contents - 1 - contents remote control buttons 2 lcd tv
TRANSCRIPT

English - 1 -
ContentsRemote Control Buttons .............................................................................................................................. 2LCD TV ....................................................................................................................................................... 2Preparation ................................................................................................................................................. 3Safety Precautions ..................................................................................................................................... 3Before Switching On Your TV .................................................................................................................... 5Switching The TV ON/OFF ......................................................................................................................... 5Navigating the Menu System ...................................................................................................................... 6Menu System .............................................................................................................................................. 6PC Mode ................................................................................................................................................... 10Other Features ......................................................................................................................................... 11Teletext ..................................................................................................................................................... 12Connect Peripheral Equipment .................................................................................................................. 13Tips .......................................................................................................................................................... 14Specifications ........................................................................................................................................... 15Appendix A: PC Input Typical Display Modes ............................................................................................ 16Appendix B: Aerial Connection ................................................................................................................. 16Appendix C: Connect Peripheral Equipment .............................................................................................. 16Peripheral Equipment Connections ........................................................................................................... 17Important Instruction ................................................................................................................................. 18
01-ENG-37783-1055UK-37 INCH 17MB22-(WO SVHS-3D PANORAMA)-C2-50117479.p65 05.10.2007, 15:581
English - 2 -
LCD TV
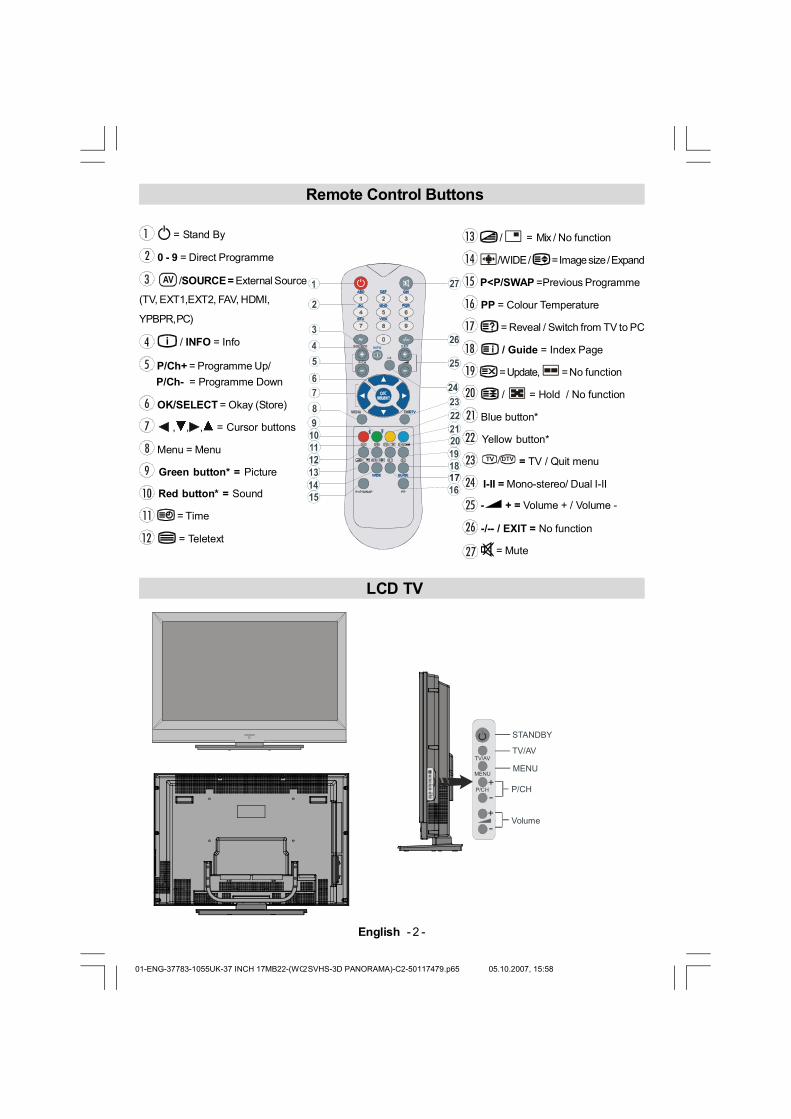
Remote Control Buttons
ABC DEF GHI
JKL MNO PQR
STU VWX YZ
1 2 3
4 5 6
7 8 9
0AV
SOURCE
P/CH
P<P/SWAP PP
I-II
INFO EXIT
-/--
MENU TV/DTV
OK
WIDE GUIDE 17
= Stand By
0 - 9 = Direct Programme
AV /SOURCE = External Source
(TV, EXT1,EXT2, FAV, HDMI,
YPBPR, PC)
/ INFO = Info
P/Ch+ = Programme Up/
P/Ch- = Programme Down
OK/SELECT = Okay (Store)
, , , = Cursor buttons
Menu = Menu
Green button* = Picture
Red button* = Sound
= Time
= Teletext
/ = Mix / No function
/WIDE / = Image size / Expand
P<P/SWAP =Previous Programme
PP = Colour Temperature
= Reveal / Switch from TV to PC
/ Guide = Index Page
= Update, = No function
/ = Hold / No function
Blue button*
Yellow button*
TV DTV = TV / Quit menu
I-II = Mono-stereo/ Dual I-II
- + = Volume + / Volume -
-/-- / EXIT = No function
= Mute
+
P/CH+
TV/AV
MENU
+
P/CH+
TV/AV
MENU
Volume
P/CH
MENU
TV/AV
STANDBY
01-ENG-37783-1055UK-37 INCH 17MB22-(WO SVHS-3D PANORAMA)-C2-50117479.p65 05.10.2007, 15:582

English - 3 -
Safety PrecautionsPlease read the following recommended safety pre-cautions carefully for your safety.
1.Power SourceThe TV set should be operated only from a 220-240 VAC, 50 Hz outlet. Ensure that you select the correctvoltage setting for your convenience.
2.Power CordDo not place the set, a piece of furniture, etc. on thepower cord (mains lead) or pinch the cord. Handle thepower cord by the plug. Do not pull out the plug bytugging the cord and never touch the power cord whenyour hands are wet as this could cause a short circuitor electric shock. Never make a knot in the cord or tie itwith other cords. The power cords should be placedin such a way that they are not likely to be stepped on.A damaged power cord can cause fire or give you anelectric shock. When it is damaged and needs to bechanged, it should be done by qualified personnel.
3.Moisture and WaterDo not use this equipment in a humid and damp place(avoid the bathroom, the sink in the kitchen, and nearthe washing machine). Do not expose this equipmentto rain or water, as this may be dangerous and do notplace objects filled with liquids, such as flower vases,on top. Avoid from dripping or splashing.
If any solid object or liquid falls into the cabinet, unplugthe TV and have it checked by qualified personnelbefore operating it any further.
4.CleaningBefore cleaning, unplug the TV set from the wall out-let. Do not use liquid or aerosol cleaners. Use soft anddry cloth.
5. VentilationThe slots and openings on the TV set are intended forventilation and to ensure reliable operation. To pre-vent overheating, these openings must not be blockedor covered in anyway.
6. Heat and FlamesThe set should not be placed near to naked flamesand sources of intense heat, such as an electricheater. Ensure that no naked flame sources, such aslighted candles, are placed on top of the TV. Batteriesshall not be exposed to excessive heat such as sun-shine, fire or the like.
7. LightningIn case of storm and lightning or when going on holi-day, disconnect the power cord from the wall outlet
PreparationFor ventilation, leave a space of at least 10 cm free allaround the set. To prevent any fault and unsafe situa-tions, please do not place any objects on top of the set.
Use this apparatus in moderate climates.
Features• Remote controlled colour LCD TV.
• 100 programmes from VHF, UHF bands or cablechannels can be preset.
• It can tune cable channels.
• Controlling the TV is very easy by its menu driven system.
• It has 2 Scart sockets for external devices (such asvideo, video games, audio set, etc.)
• Stereo sound system (3D Panorama).
• Full function Teletext (1000 pages).
Fastext, TOP text.
• Headphone connection.
• A.P.S. (Automatic Programming System).
• All programmes can be named.
• Forward or backward automatic tuning.
• Sleep timer.
• Child Lock.
• Automatic sound mute when no transmission.
• NTSC Playback.
• AV in are available.
• It has VGA connector for external devices such ascomputer.
• It has an HDMI connector for Digital Video and Audio.This connection is also designed to accept HighDefinition signals.
• AVL (Automatic Volume Limiting)
• When no valid signal is detected, after 5 minutes theTV switches itself automatically to stand-by mode.
• PLL (Frequency Search)
• PC Input
• Plug&Play for Windows 9X, ME, 2000, XP
• Audio Line Out
01-ENG-37783-1055UK-37 INCH 17MB22-(WO SVHS-3D PANORAMA)-C2-50117479.p65 05.10.2007, 15:583

English - 4 -
8. Replacement PartsWhen replacement parts are required, be sure theservice technician has used replacement parts whichare specified by the manufacturer or have the samespecifications as the original one. Unauthorized sub-stitutions may result in fire, electrical shock, or otherhazards.
9. ServicingPlease refer all servicing to qualified personnel. Donot remove the cover yourself as this may result in anelectric shock.
10. Waste DisposalInstructions for waste disposal:
• Packaging and packaging aids are recyclable andshould principally be recycled. Packaging materials,such as foil bag, must be kept away from children.
• Battery, including those which are heavy metal-free,should not be disposed of with household waste.Please dispose of used battery in an environmen-tally sound manner. Find out about the legal regula-tions which apply in your area.
• Cold cathode fluoresant lamp in LCD PANEL con-tains a small amount of mercury; please follow localordinates or regulations for disposal.
11. Disconnect DeviceThe mains plug is used to disconnect TV set from themains and therefore it shall remain readily operable.
12.Excessive sound pressure from earphones and head-phones can cause hearing loss.
13.To prevent injury, this device must be securely at-tached to the wall in accordance with the installationinstructions when mounted to the wall (if the option isavailable).
“The LCD panel is very high technology product withabout a million thin film transistors, giving you finepicture details. Occasionally, a few non-active pixelsmay appear on the screen as a fixed point of blue,green or red. Please note that this does not affect theperformance of your product.”
“DO NOT LEAVE YOUR TV AT STAND-BY OR OPER-ATING WHEN YOU LEAVE YOUR HOUSE”
01-ENG-37783-1055UK-37 INCH 17MB22-(WO SVHS-3D PANORAMA)-C2-50117479.p65 05.10.2007, 15:584

English - 5 -
Before Switching On Your TVPower ConnectionIMPORTANT: The TV set is designed to operate on230-240V AC, 50 Hz.
• After unpacking, allow the TV set to reach the ambi-ent room temperature before you connect the set tothe mains.
Connections To The Aerial Input Socket• Connect the aerial or cable TV plug to the Aerial input
socket located at the rear of the TV and connect thecable plug coming out from the TV out socket lo-cated on the devices (VCR, DVB etc.) to this socketas well.
VHF/UHF
75
REAR OF THE TV
CABLE TV
Inserting Batteries In The RemoteControl HandsetWARNING : Remote control is battery included. A plas-tic protector is used to disconnect the batteries inorder to prevent the battery life from reducing. Pleaseremove the plastic protector before the first use.
• Remove the battery cover located on the back of thehandset by gently pulling backwards from the indi-cated part.
• Insert two AAA/R03 or equivalent type batteriesinside. Place the batteries in the right directions andreplace the battery cover.
Note: Remove the battery from remote control hand-set when it is not to be used for a long period. Other-wise it can be damaged due to any leakage of bat-tery.
Switching The TV ON/OFFTo switch the TV on:Your TV will switch on in two steps:
1- Connect the power to 230-240V AC, 50Hz. Pressstand-by button.Then the TV switches itself tostand-by mode (Optional).
2- To switch on the TV from stand-by mode either:
Press a digit button on the remote control so that achannel number is selected, or Press the -P/CH or P/CH+ button on the TV or press the Ch+ or Ch- buttonon the remote control, so that last mode switched offis selected.
By either method the TV will switch on. When the TVis operated for the first time, the following screenappears:
Country
Language
Auto Program
UKOk
Cancel
PLEASE CHECK ANTENNA CABLEAUTO. PROGRAMMING SYSTEM
TXT Language
By pressing “ ” or “ ” button, adjust the Country
item and press “ ” to highlight “Language” item.
Use “ ” or “ ” button to set “Language”. Use “ ”
or “ ” buttons to select “TXT Language” and set it
by using “ ” or “ ” buttons. Press “OK” button tocontinue:
For more information on this process, see “InstallMenu” section.
To switch the TV off:Press stand-by button on the remote control or stand-by button on the TV so the TV will switch to standbymode. To power down the TV completely, unplug thepower cord from the mains socket.
01-ENG-37783-1055UK-37 INCH 17MB22-(WO SVHS-3D PANORAMA)-C2-50117479.p65 05.10.2007, 15:585

English - 6 -
Navigating the Menu System
MENU TV/DTV
OK
For Displaying Menu Options
For Navigation
To Confirm Choices
1- Press MENU to display the menu.
2- Press “” or “” button to select an icon. Press“” for more options.
3- Use “” or “” button to highlight.
4- Press “” or “” buttons to change the settings.Press OK to set as default.
5- To exit the menu or return from sub-menu screen,press MENU.
These explanations are available for the navigation
of the whole Menu System. To select options that are
explained in the following parts, refer to “Navigating
The Menu System”.
Menu SystemPicture Menu
PICTURE
Mode
Contrast
Brightness
Sharpness
Colour
In picture menu if PC, YPbPr or HDMI modes areselected, resolution information is displayed at thebottom of the menu osd.
Mode
By pressing / button, select Mode. Press / button to choose from one of these options: Cinema,Dynamic and Natural.
Hint: Hue is displayed in picture menu when the TV
receives an NTSC signal.
Contrast/Brightness/Sharpness/Colour
By pressing / button, select the desired Option.
Press / button to set the level.
Colour Temp
• By pressing / button select Colour Temp.
• Press / to choose from one of these options:Cool, Normal and Warm.
Noise Reduction
By pressing / button select Noise Reduction.Press / to choose from one of these options:Low, Medium, High or Off.
Film Mode
Films are recorded at a different number offramesper second to normal television programmes.
By pressing / button, select Film Mode.
Press / button to set this feature On or Off. Turnthis feature on when you are watchingfilms to seethe fast motion scenes clearly.
3D Comb
3D Comb is used to improve colour transitions andcolour quality of pictures.
By pressing / button, select 3D Comb. Press / button to set this feature On or Off.
Note: 3D Comb feature is not functional in NATURALpicture mode.
Picture Zoom
By pressing / button select Picture Zoom.Use / buttons, to change picture zoom to Auto,16:9, 4:3, Panaromic, 14:9 Zoom, Cinema, Sub-title, or Zoom.
Reset
By pressing / button, select Reset. Press or“OK” button to reset the picture modes to factorydefault settings.
Store
• By pressing / button select Store.
• Press or “OK” button to store the adjustments.“Stored” will be displayed on the screen.
01-ENG-37783-1055UK-37 INCH 17MB22-(WO SVHS-3D PANORAMA)-C2-50117479.p65 05.10.2007, 15:586

English - 7 -
Sound Menu
SOUND
Volume
Equalizer
Balance
Headphone
Sound Mode
Volume
By pressing / select Volume . Press / button to change the level of the Volume.
Equalizer
By pressing / select Equalizer.Press / button to change the Equalizer setting. In equalizermenu, the mode can be changed to Pop, Rock, Jazz,Flat, Classic or User. Select the desired frequencyby / button and increase or decrease the fre-quency gain by pressing / button.
Note: Equalizer menu settings can be altered onlywhen the Equalizer Mode is in User.
Balance
By pressing / select Balance.Press / buttonto change the level of the balance.Balance level canbe adjusted between -32 and 32.
Headphone
By pressing / button, select Headphone. Press
button to enter hedphone menu.
volume
By pressing / button, select Volume. Press button to increase hp volume level. Press button todecrease hp volume level. Headphone volume levelcan be adjusted between 0 and 63.
sound mode
By pressing / button, select Sound Mode. Press
/ button to change sound mode.
Sound mode is used to identify sound mode of theheadphone and can be set to mono, stereo, dual I ordual II according to the transmission.
balance
By pressing / button, select Balance. Press
button to increase balance to the right. Press button to decrease balance to the left. Balance levelcan be adjusted between -32 and +31.
Press the “M” button to return to the previous menu.
Sound Mode
By pressing / select Sound Mode. Press / button, you can select Mono, Stereo, Dual I or Dual IImode, only if the selected channel supports that mode.
AVL
By pressing / select AVLVL.Press / button toset the AVL as on or off.
Effect
By pressing / select Effect. Press / buttonto set Effect as on or off.
Dynamic Bass
Dynamic Bass is used to increase bass effect of theTV set.
By pressing / button, select Dynamic Bass. Bypressing / button set Dynamic bass to Low, Highor Off. It is not recommended to select High if listeningat high volume levels.
3D Panorama
This feature is used to create the impression thatsound is coming from around the room instead of theset speakers. Pressing the / buttons will turn thefeature on or off.
Store
• By pressing / button select Store.
• Press or “OK” button to store the adjustments.“Stored” will be displayed on the screen.
Feature Menu
FEATURE
Sleep Timer
Child Lock
Language
Ext-2 Out
PC Audio In
01-ENG-37783-1055UK-37 INCH 17MB22-(WO SVHS-3D PANORAMA)-C2-50117479.p65 05.10.2007, 15:597
English - 8 -
Sleep Timer
By pressing / select “Sleep Timer”. Press /
button to set the Sleep Timer..
The timer can be programmed between Off and 120minutes in steps of 10 minutes.
Child Lock
By pressing / select Child Lock.
Press / button to set the Child Lock on or off.When on is selected, the TV can only be controlled bythe remote control handset. In this case the controlpanel buttons will not work. Hence, if one of thesebuttons is pressed, “Child Lock On” will be displayedon the screen when the Menu screen is not visible.
Language
By pressing / button, select Language. Use / button to select the language.
EXT2 Out
By pressing / select EXT2 Output. Use / button, to set Ext-2 Out to TV, EXT1, FAV, AudioYPbPr or Audio PC.
Note: When TV Source is set to HDMI Audio settingwill be available among EXT-2 Out options.
PC Audio In
By pressing / select Pc Audio In.By pressing“ ” / “ ” button, you can change the PC Audio In to TV,,EXT-1, EXT-2, FAV, YPbPr Audio or PC Audio.
Blue Background
You can set the TV to automatically change to a bluescreen if the signal is weak or absent, or when thereis no input from an external device.
The Blue Background feature can be turned on or offby pressing “ ” / “ ” button.
Menu Background
By pressing / button, select Menu Background.Transparency level is adjusted by pressing “ ” / “ ”button.
Menu Timeout
By pressing / button, select Menu Timeout.Press ” / “ ” button to change menu timeout to 15sec, 30 sec or 60 sec.
Teletext Language
By pressing / button, select Teletext Language.Press “ ” / “ ” button to change Teletext Languageto West, East, Turk/Gre,Cyrillic or Arabic.
Default Zoom
Default zoom is a feature that provides the zoom modeof the TV set to be switched to the selected default
zoom mode (Panoramic, 4:3 ,14:9 zoom,16:9) in caseno WSS or 4:3 signal by end-user.
By pressing / button, select Default Zoom. Yououcan set Default Zoom to Panoramic, 4:3, 14:9Zoom or 16:9 by pressing / button.
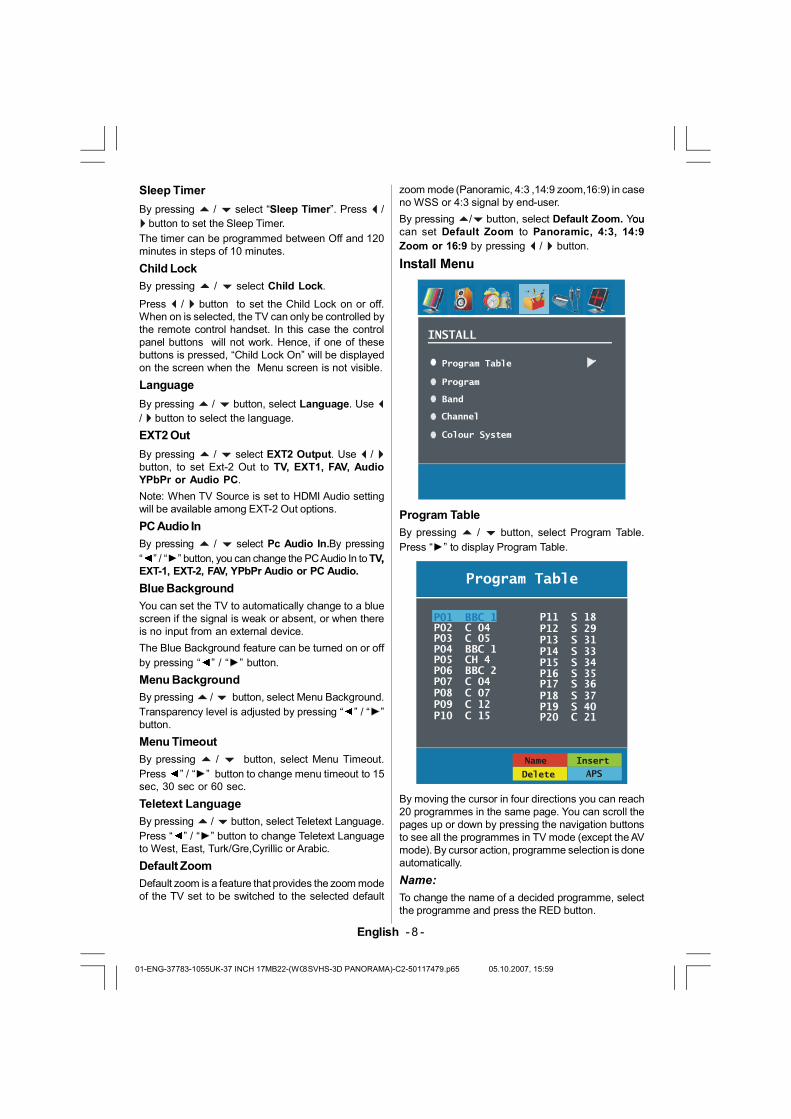
Install Menu
INSTALL
Program Table
Program
Band
Channel
Colour System
Program Table
By pressing / button, select Program Table.Press “ ” to display Program Table.
P02 C 04P03 C 05P04 BBC 1P05 CH 4P06 BBC 2P07 C 04P08 C 07P09 C 12P10 C 15
P11 S 18P12 S 29P13 S 31P14 S 33P15 S 34P16 S 35P17 S 36P18 S 37P19 S 40P20 C 21
Name
Delete
Insert
APS
P01 BBC 1
Program Table
By moving the cursor in four directions you can reach20 programmes in the same page. You can scroll thepages up or down by pressing the navigation buttonsto see all the programmes in TV mode (except the AVmode). By cursor action, programme selection is doneautomatically.
Name:
To change the name of a decided programme, selectthe programme and press the RED button.
01-ENG-37783-1055UK-37 INCH 17MB22-(WO SVHS-3D PANORAMA)-C2-50117479.p65 05.10.2007, 15:598
English - 9 -
The first letter of the selected name will be highlighted.Press / button to change that letter and “ ” /“ ” button to select the other letters. By pressingthe RED button, you can store the name.
Insert:
Select the programme which you want to insert bynavigation buttons. Press the GREEN button. By navi-gation buttons move the selected programme to thedecided programme space and press the GREEN but-ton again.
Delete:
To delete a programme, press the YELLOW button.Pressing the YELLOW button again erases the se-lected programme from the programme list, and theprogrammes below shift one up.
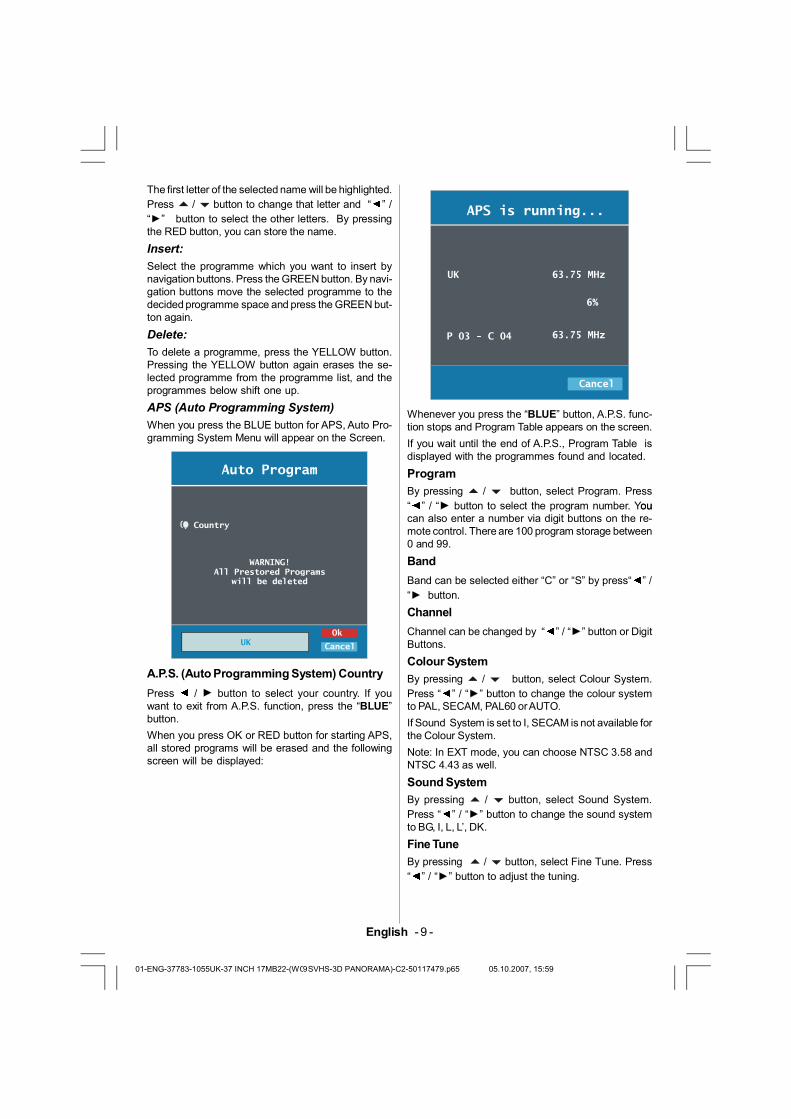
APS (Auto Programming System)
When you press the BLUE button for APS, Auto Pro-gramming System Menu will appear on the Screen.
Country
WARNING! All Prestored Programs
will be deleted
UKOk
Cancel
Auto Program
A.P.S. (Auto Programming System) Country
Press / button to select your country. If youwant to exit from A.P.S. function, press the “BLUE”button.
When you press OK or RED button for starting APS,all stored programs will be erased and the followingscreen will be displayed:
UK
P 03 - C 04
63.75 MHz
6%
63.75 MHz
Cancel
APS is running...
Whenever you press the “BLUE” button, A.P.S. func-tion stops and Program Table appears on the screen.
If you wait until the end of A.P.S., Program Table isdisplayed with the programmes found and located.
Program
By pressing / button, select Program. Press“ ” / “ button to select the program number. Yououcan also enter a number via digit buttons on the re-mote control. There are 100 program storage between0 and 99.
Band
Band can be selected either “C” or “S” by press“ ” /“ button.
Channel
Channel can be changed by “ ” / “ ” button or DigitButtons.
Colour System
By pressing / button, select Colour System.Press “ ” / “ ” button to change the colour systemto PAL, SECAM, PAL60 or AUTO.
If Sound System is set to I, SECAM is not available forthe Colour System.
Note: In EXT mode, you can choose NTSC 3.58 andNTSC 4.43 as well.
Sound System
By pressing / button, select Sound System.Press “ ” / “ ” button to change the sound systemto BG, I, L, L’, DK.
Fine Tune
By pressing / button, select Fine Tune. Press“ ” / “ ” button to adjust the tuning.
01-ENG-37783-1055UK-37 INCH 17MB22-(WO SVHS-3D PANORAMA)-C2-50117479.p65 05.10.2007, 15:599
English - 10 -
Search
By pressing / button, select Search. Press“ ” / “ ” button to start program searching.You canalso enter the desired frequency via digit buttons whensearch item is highlighted.
Store
By pressing / button, select Store. Press“ ”or “OK” button to store the adjustments. “Stored...”will be displayed on the screen.
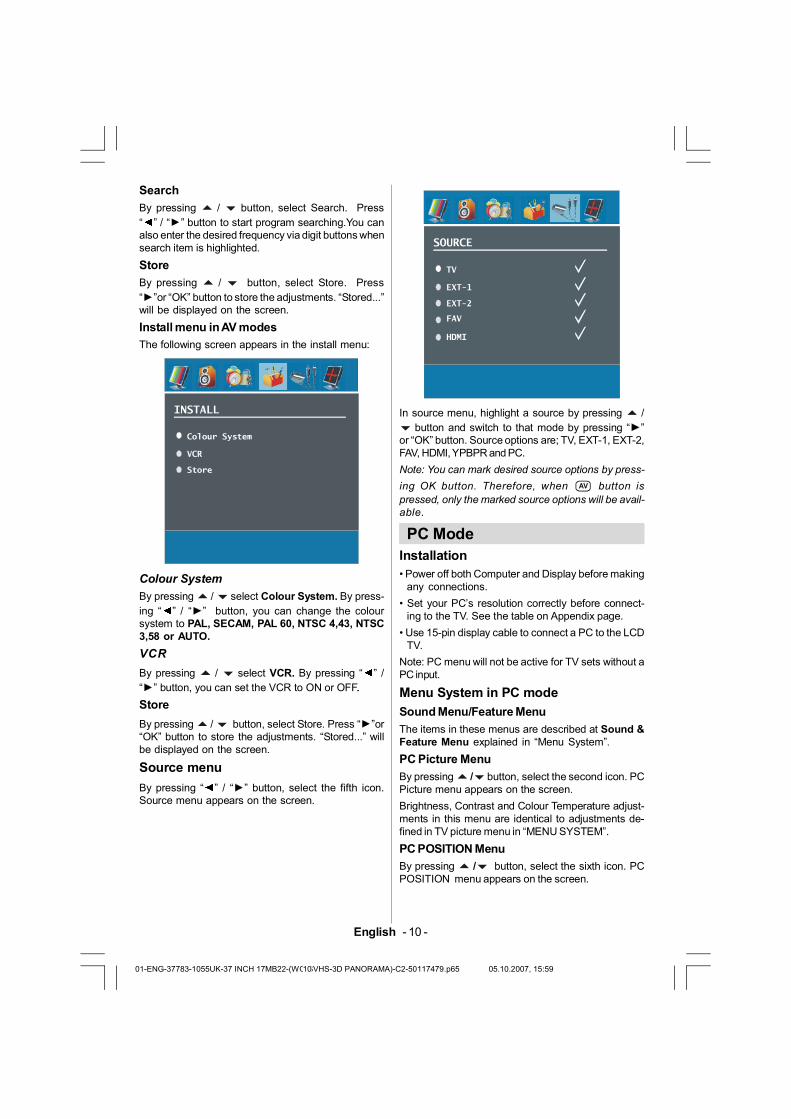
Install menu in AV modes
The following screen appears in the install menu:
INSTALL
Colour System
VCR
Store
Colour System
By pressing / select Colour System. By press-ing “ ” / “ ” button, you can change the coloursystem to PAL, SECAM, PAL 60, NTSC 4,43, NTSC3,58 or AUTO.
VCR
By pressing / select VCR. By pressing “ ” /“ ” button, you can set the VCR to ON or OFF..
Store
By pressing / button, select Store. Press “ ”or“OK” button to store the adjustments. “Stored...” willbe displayed on the screen.
Source menu
By pressing “ ” / “ ” button, select the fifth icon.Source menu appears on the screen.
SOURCE
TV
EXT-1
EXT-2
FAV
HDMI
In source menu, highlight a source by pressing / button and switch to that mode by pressing “ ”or “OK” button. Source options are; TV, EXT-1, EXT-2,FAV, HDMI, YPBPR and PC.
Note: You can mark desired source options by press-
ing OK button. Therefore, when AV button ispressed, only the marked source options will be avail-able.
PC ModeInstallation• Power off both Computer and Display before making
any connections.
• Set your PC’s resolution correctly before connect-ing to the TV. See the table on Appendix page.
• Use 15-pin display cable to connect a PC to the LCDTV.
Note: PC menu will not be active for TV sets without aPC input.
Menu System in PC mode
Sound Menu/Feature Menu
The items in these menus are described at Sound &Feature Menu explained in “Menu System”.
PC Picture Menu
By pressing / button, select the second icon. PCPicture menu appears on the screen.
Brightness, Contrast and Colour Temperature adjust-ments in this menu are identical to adjustments de-fined in TV picture menu in “MENU SYSTEM”.
PC POSITION Menu
By pressing / button, select the sixth icon. PCPOSITION menu appears on the screen.
01-ENG-37783-1055UK-37 INCH 17MB22-(WO SVHS-3D PANORAMA)-C2-50117479.p65 05.10.2007, 15:5910

English - 11 -
PC POSITION
Autoposition
H Position
V Position
Phase
Dot Clock
Autoposition
If you shift the picture horizontally or vertically to anunwanted position, use this item to put the picture intocorrect place automatically.
• Select Autoposition item by using / buttons.Press or “OK” button.
Warning: Auto position adjustment recommended tobe done with the full screen image for the properadjustment.
H (Horizontal) Position
This item shifts the image horizontally to right handside or left hand side of the screen.
• Select H Position item by using / button.
• Use “ ” / “ ” button to adjust the value.
V (Vertical) Position
This item shifts the image vertically towards the top orbottom of the screen.
• Select V Position item by using / button.
• Use “ ” / “ ” button to adjust the value.
Phase
Depending on the resolution and scan frequency thatyou input to the TV Set, you may see a hazy or noisypicture on the screen. In such a case you can usethis item to get a clear picture by trial and error method.
• Use “ ” / “ ” button to adjust the value.
Dot Clock
Dot Clock adjustments correct interference that appearas vertical banding in dot intensive presentations likespreadsheets or paragraphs or text in smaller fonts.
• Use “ ” / “ ” button to adjust the value.
Sound in PC mode
• Connect the PC’s Audio output to the TV’s PC AudioIn socket with an audio cable.
Other FeaturesTV StatusProgramme Number, Programme Name,Sound Indicator and Zoom Mode are displayedon the screen when a new programme is entered.
Mute IndicatorIt is placed in the upper side of the screen whenenabled.
MuteTo cancel mute, there are two alternatives; the first
one is pressing the button and the second one isincreasing the volume level.
AV ModesBy pressing the AV button you can switch your TV toAV modes (except being in teletext). Pressing thisbutton consecutively will switch the TV in one of theoptional AV modes: TV, EXT1, EXT2, FAV, HDMI,YPBPR or PC.
Personal PreferenceBy pressing PP button, you maychange Picture Modesettings.
Zoom ModesZoom mode can be changed by pressing the WIDEbutton. You can change the screen size according tothe picture aspect ratio. Select the optimum one fromthe following ZOOM modes.
Note:
• In YPBPR and HDMI modes, while in 720p-1080iresolutions, only FULL mode is available.
• In PC mode, only 4:3 and 16:9 modes are available.
Auto:
When a WSS (Wide Screen Signalling) signal,which shows the aspect ratio of the picture, is in-cluded in the broadcast signal or the signal from anexternal device, the TV automatically changes theZOOM mode according to the WSS signal.
• When the AUTO mode does not function correctlydue to poor WSS signal quality or when you want tochange the ZOOM mode, change to another ZOOMmode manually.
Zoom:
This uniformly stretches the left and right sides of anormal picture (4:3 aspect ratio) to fill the wide TV screen.
01-ENG-37783-1055UK-37 INCH 17MB22-(WO SVHS-3D PANORAMA)-C2-50117479.p65 05.10.2007, 15:5911

English - 12 -
• For 16:9 aspect ratio pictures that have been squeezedinto a normal picture (4:3 aspect ratio), use the Fullmode to restore the picture to its original shape.
Cinema:
This zooms up the wide picture (16:9 aspect ratio) tothe full screen.
16:9 Zoom:
This zooms up the wide picture (16:9 aspect ratio) tothe full screen.
Subtitle:
This zooms up the wide picture (16:9 aspect ratio)with subtitles to the full screen.
4:3
Use to view a normal picture (4:3 aspect ratio) as thisis its original shape.
14:9 Zoom:
This zooms up the wide picture (14:9 aspect ratio) tothe upper and lower limits of the screen.
Panoramic:
This stretches the left and right sides of a normalpicture (4:3 aspect ratio) to fill the screen, withoutmaking the picture appear unnatural.
The top and bottom of the picture are slightly cut off.
Freeze PictureYou can freeze the picture on the screen by pressingthe “OK” button.
Note: This feature will be unavailable to be used whilewatching PC, YPbPr and HDMI sources.
TeletextYou can display Teletext information on your TV. Eachchannel which broadcasts teletext, transmits a page withinformation on how to use its teletext system (usually page100). Depending on the TV channel, teletext is transmittedin different systems.The colours used in the options linecorrespond with the colour buttons of your remote control.
• Ensure that the TV is receiving a good signal, orsome text errors may occur.
• When four coloured items appear at the bottom ofthe text page,Fasttext is available.Fasttext allowsyou to access pages quickly and easily.Press thecorresponding coloured button to access the page.
Special Teletext Functions
“ ” To Display a page of text.
The view text services press “ ”. To return normalviewing press again.Programmes cannot be changeduntil text is cancelled.
• To select a page, press the number buttons or pro-gram buttons(P+, P-).
• To select index page, press “ ” button.
• To select superimposed over the programme on the
screen, press “ ”.
• Press “ ” once to enlarge top half of the page,pressagain to enlarge the bottom half of the page.Pressagain to revert normal size.
• To discover solutions on quiz and games press “ ”
• At times it is convenient to hold a page of text.Press
“ / ” to hold a page. The page will be held onscreen until the button pressed again.
• To select subcode pages press “ ”.Subcode pagesare subsections of long Teletext pages that can onlybe displayed on the screen one section at a time.
• Time information will be displayed on screen after
pressing “ ” button.If the programme does not haveteletext transmission, no information will be displayed.
• When ” ” button is pressed while in teletext mode,the screen will be splitted into two windows, onedisplaying the teletext and the other displaying the
current channel. Press the “ ” button or
“ TV DTV ” button to exit from teletext.
• To exit text press “ ”.
Note: If the signal becomes insufficient, the teletextmode will be quitted.
01-ENG-37783-1055UK-37 INCH 17MB22-(WO SVHS-3D PANORAMA)-C2-50117479.p65 05.10.2007, 15:5912
English - 13 -
FastextYour TV supports the 1000 page Teletext system.When the page number of any of the 1000 pages inmemory is entered, the system will not search for therequested page; instead it will display the page auto-matically. If the requested page is not in memory, thesystem will search for the requested page numberand save the 1000 pages including the requestedpage into memory after finding it.
• Press the button to move the Teletext screenforward one page at a time.
• Press the button to move the Teletext screenbackward one page at a time.
For Fastext
The subject-heading for the information may have aparticular colour.
• Press an appropriate RED, GREEN, YELLOW orBLUE button in order to reach the relevant pagequickly.
TOP textTOP text mode of operation will be activated automati-cally according to the transmission.
• If TOP text transmission is present, colour codedbuttons will appear in status row.
• If TOP text transmission is not present, status rowwill not appear.
The subject-heading for information may be located incolored box.
In Top mode the “-P/CH” or “P/CH+” commands willrequest the next or previous page respectively. If TOPtext transmission is not available, in case of operation ofthese commands, wraparound occurs. For example page100 appears to be one greater than page 199.
Connect Peripheral EquipmentHigh DefinitionYour LCD Television is capable of displaying HighDefinition pictures from devices such as a High Defi-nition Satellite Receiver or DVD Player. These devicesmust be connected via the HDMI socket or Compo-nent Socket. These sockets can accept either 720por 1080i signals.
Note: When it is desired to watch HDMI source with aDVI to HDMI cable; in order to enable audio, AudioInput (which is located at the left side of the antennainput) is to be used to get DVI device’s audio signals.
Via The ScartThe TV has 2 Scart sockets. If you want to connectperipherals (e.g. video, decoder, etc.) which have Scartsockets to the TV, you can use SCART socket of the TV.
Note: If an external device is connected via the Scartsockets, the TV will automatically switch to AV mode.If both sockets are employed at the sime time, SCART1 becomes the preferential.
Via Aerial InputIf the device you want to connect does not have a Scartsocket, you should connect it to the Aerial input of the TV.
If the VCR is connected via Aerial input, it issuggested to use Programme 0.
DecoderIf you are subscribed to cable TV offers, theorganisation will supply you a corresponding decoderunit to allow the programmes to be unscrambled.
For further information consult your dealer.
Connect a decoder with an aerial socket tothe TV
• Connect the aerial cable.
Connect a decoder without an aerial socketto the TV
• Connect the decoder to the EXTERNAL socket of TVwith a RCA cable. Through the SCART/RCA socket ofthe decoder, you may attain a better display resolution.
TV And Video Recorder• Connect the aerial cables.
Better picture quality can be obtained if you also con-nect a Scart cable to SCART sockets.
Playback NTSC• Connect NTSC VCR player to a Scart socket of the TV.
Then, press the “AV” button to select EXT1 or EXT2.
Copy FacilitySource selection for VCR recording.
• Select Feature menu.
• Select SCART 2 Out by pressing / button.
• For copying the picture that comes from the tuner,select SCART 1.
Camera And Camcorder
To Connect To AV Input
Connect your camera or camcorder to AV input of the TV.
• Connect your equipment to the TV via VIDEO (yellow),AUDIO R (red) and AUDIO L (white) inputs. You mustconnect the jacks into the input with the same colour.
01-ENG-37783-1055UK-37 INCH 17MB22-(WO SVHS-3D PANORAMA)-C2-50117479.p65 05.10.2007, 15:5913

English - 14 -
Connect The Decoder To The VideoRecorderSome video recorders have a special Scart socketfor decoder.
• Connect a Scart cable to the Scart socket of yourdecoder and to the special Scart socket of your videorecorder. Refer to the booklet of your video recorder.
Connecting Headphones (optional)Use the stereo headphone socket of the TV, to con-nect headphones.
Note: If you want to connect more equipment to yourTV, consult your dealer.)
Audio LineoutTo connect the external speakers to your TV, use theHeadphone Line Out of the TV. Additionally, turn “Lineout” setting on in the “Sound Menu”.
Note: While watching YPbPr, PC sources, Lineout se-lection could only be the current source.
TipsCare Of The ScreenClean the screen with a slightly damp, soft cloth. Donot use abrasive solvents as they may damage theTV screen coating layer.
Poor PictureHave you selected the correct TV system? Is your TVset or house aerial located too close to non-earthedaudio equipment or neon lights, etc.?
Mountains or high buildings can cause double picturesor ghost images. Sometimes you can improve the pic-ture quality by changing the direction of the aerial.
Is the picture or Teletext unrecognisable? Check ifyou have entered the correct frequency.
The picture quality may degrade when two peripher-als are connected to the TV at the same time. In sucha case, disconnect one of the peripherals.
No PictureIs the aerial connected properly? Are the plugs con-nected tightly to the aerial socket? Is the aerial cabledamaged? Are suitable plugs used to connect theaerial? If you are in doubt, consult your dealer.
No Picture means that your TV is not receiving atransmission. Have you selected the correct buttonon the remote control?Try once more.
SoundYou can not hear any sound. Did you perhaps inter-
rupt the sound, pressing the button?
Sound is coming from only one of the speakers.Is thebalance set to one extreme? See Sound menu.
Remote ControlYour TV no longer responds to the remote control.Perhaps the batteries are exhausted. If so you canstill use the local buttons at the bottom of the TV.
01-ENG-37783-1055UK-37 INCH 17MB22-(WO SVHS-3D PANORAMA)-C2-50117479.p65 05.10.2007, 15:5914

English - 15 -
Specifications
TV BROADCASTINGPAL/SECAM B/G D/K K' I/I' L/L'
RECEIVING CHANNELSVHF (BAND I/III)UHF (BAND U)HYPERBANDCABLE TV (S1-S20/ S21-S41)
NUMBER OF PRESET CHANNELS
100
CHANNEL INDICATOROn Screen Display
RF AERIAL INPUT75 Ohm (unbalanced)
OPERATING VOLTAGE220-240V AC 50 Hz
AUDIO
3D Panorama
AUDIO OUTPUT POWER (WRMS.
) (%10 THD)2 x 8
POWER CONSUMPTION (W)210 W1 W (Stand-by)
PANEL
16:9 display, 37” Screen Size
DIMENSIONS (mm)
244125
930930
675630
21,718,7
Poids (kg)
Avec pied
Sans pied
P L H
DIMENSIONS (mm)
01-ENG-37783-1055UK-37 INCH 17MB22-(WO SVHS-3D PANORAMA)-C2-50117479.p65 05.10.2007, 15:5915

English - 16 -
Appendix C: Connect Peripheral Equipment
ANT.IN
AUDIO IN
(R)(L)
VIDEO IN
IN OUTIN OUT
HEADPHONE
AUDIO
VIDEO
SATELLITE RECEIVER
ANTENNA
CAMCORDER
VHF/UHF
75
Round 75 ohm coaxial cable
Rear of TV
Outdoor Aerial Connection
Appendix B: Aerial Connection
Appendix A: PC Input Typical Display ModesThe display has a maximum resolution of 1360 x 768, frequency range of 56-75 Hz.
The following table is an illustration of some of the typical video display modes.
ModeHorizontal Vertical Hor.(kHz) Ver.(Hz)
1 640 480 31,5 60
2 640 480 37,9 72
3 640 480 37,5 75
4 800 600 35,2 56
5 800 600 37,9 60
6 800 600 48,1 72
7 800 600 46,9 75
8 1024 768 48,4 60
9 1024 768 56,5 70
10 1024 768 60 75
11 1280 1024 64 60
12 1280 768 47,8 60
13 1360 768 47,7 60
Resolution Frequency
01-ENG-37783-1055UK-37 INCH 17MB22-(WO SVHS-3D PANORAMA)-C2-50117479.p65 05.10.2007, 15:5916

English - 17 -
Peripheral Equipment Connections
Power Cable
Video Input
Audio Inputss
Headphone
Audio Line out
For Service Use Only
HDMI Input
SCART 2
SCART 1
Component Audio Inputss
Component Video Inputs (YPbPr)
RF
PC Audio Input
PC Input
HDMI
01-ENG-37783-1055UK-37 INCH 17MB22-(WO SVHS-3D PANORAMA)-C2-50117479.p65 05.10.2007, 15:5917
English - 18 -
CAUTIONTO PREVENT ELECTRIC SHOCK DISCONNECT FROM THE MAINS BEFORE REMOVING COVER. NOUSER SERVICEABLE PARTS INSIDE. REFER SERVICING TO QUALIFIED SERVICE PERSONNEL.
SAFETY PRECAUTIONTHIS EQUIPMENT MUST BE DISCONNECTED FROM THE MAINS WHEN NOT IN USE. DO NOT ALLOWTHIS UNIT TO BE EXPOSED TO RAIN OR MOISTURE.
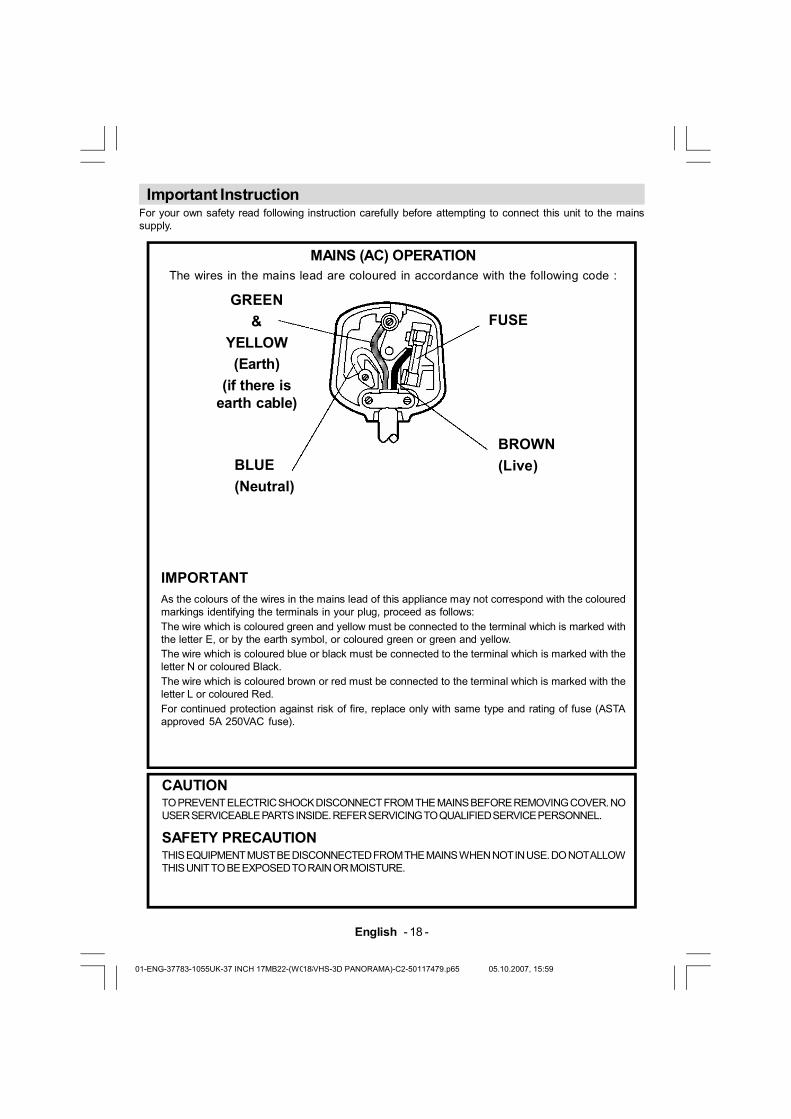
MAINS (AC) OPERATIONThe wires in the mains lead are coloured in accordance with the following code :
IMPORTANTAs the colours of the wires in the mains lead of this appliance may not correspond with the colouredmarkings identifying the terminals in your plug, proceed as follows:The wire which is coloured green and yellow must be connected to the terminal which is marked withthe letter E, or by the earth symbol, or coloured green or green and yellow.The wire which is coloured blue or black must be connected to the terminal which is marked with theletter N or coloured Black.The wire which is coloured brown or red must be connected to the terminal which is marked with theletter L or coloured Red.For continued protection against risk of fire, replace only with same type and rating of fuse (ASTAapproved 5A 250VAC fuse).
Important InstructionFor your own safety read following instruction carefully before attempting to connect this unit to the mainssupply.
BLUE
(Neutral)
BROWN
(Live)
FUSEGREEN
&
YELLOW
(Earth)
(if there isearth cable)
01-ENG-37783-1055UK-37 INCH 17MB22-(WO SVHS-3D PANORAMA)-C2-50117479.p65 05.10.2007, 15:5918