classroom · 2016-01-07 · classroom, but not every teacher can make him learn. he will not work...
TRANSCRIPT

This “Cookbook” was Provided by the Idaho Department of Education, Driver Education Program
Appreciation goes to Fred Mottola for the great activities he designed for the Drive Right textbook, 10th edition. Many of those activities have been adapted for this book, and other activities were developed by driver education teachers throughout Idaho for the 2001 Regional Workshops.
Any teacher can take a child to the classroom, but not every teacher can make him learn. He will not work joyously unless he feels that liberty is his, whether he is busy or at rest; he must feel the flush of victory and the heart-sinking of disappointment before he takes with a will the tasks distasteful to him and resolves to dance his way bravely through a dull routine of textbooks. Helen Keller
A Rabbit… or a Duck?
Is the book facing towards you… or away from you?
Classroom

INSTRUCTIONS
INGREDIENTS
Title: What Elephant? Objective: Demonstrate how optical illusions can make you believe something does or does not exist
Cookbook of Activities for Driver Education #106
Responsible Driving CH #
Drive Right CH #
Reproduce the elephant picture on an overhead transparency. Show the picture and ask students what they see. Discussion: The elephant appears to have more than 4 legs. What types of optical illusion occur when driving? (When stopped at an intersection on a downhill, the vehicle may appear to be into the intersection. Overcome the illusion with ref. Pts.
Reproduce the elephant picture on an overhead transparency

INSTRUCTIONS
INGREDIENTS
Title: The Number Game Objective: Demonstrate how repetition helps us remember
Tell students, when you say “GO” they are to point (or draw a line) to #1 and to each number in sequence, stopping when you say “STOP” Allow 10 seconds between each game. Repeat the game eight times. Discussion: Ask who improved as the game was repeated. Did everyone have success? If not, why not? (nervous, frustrated). How does this related to practicing good driving habits?
Cookbook of Activities for Driver Education #105 ResponsibleDriving CH #
Drive Right CH #
1. Distribute each participant eight copies of the number game, printed double-sided OR
2. Show the number game on an overhead projector
2
3
4
5
6
7
8
9
10
11
12
13
14
15
16
17
18
10
19
20
21
22
23
24
2526
27
28
2930
31
32
3334
35
36
37
38
39
40
41
42
43
4445
46
47
4849
50
1
Cookbook of Activities for Driver Education
Vehicle Familiarization 9. Putting on the Brakes 10. Ready, Set 11. Motion, Lotion 22. Where are my Lights? 23. Sit This Way 33. Big Turn, Little Turn 69. Simulated Shifting 86. Starting Out
Vision Control 12. Lookie - Lookie 27. The Eyes Have It 28. Your Order Please 44. Peripheral Vision 47. Curvy Driving 48. Curvy Driving II 66. Visual Searching on Two Lane Roads 70. Let’s Process It 71. Eye Ball Recovery 72. Altering Depth Perception 74. Flash Me! 79. Where Is It? 84. On the Fringe 87. Blind Areas 91. Look & See 94 Sober Guess 99. Power of your Eyes 102. Do You See Me? 103. How Observant Are You? 104. The Perceptual K 106. What Elephant?
Table of Content

Targeting 24. Target Practice 60. Targeting on Rural Roads 75. Slipping & a Sliding 76. Where am I Heading? 78. Moving on Down 88. Simon Says
Laws of Nature 1. Ruler Rules 43. Balance My Pencil 73. Put Your Left Foot Forward
LOS-POT 4. Rural LOS-POT 5. Model Cars in the City 29. Restrictions and Constrictions 46. One-Way, Two-Way, Know Way 61. Behind Door #1 67. Where Did You Come From? 68. Country Roads Take Me Home
Managing Decisions and Risks 13. Risky Business 14. Conquer the Monster 16. Riskier Business 17. Sifting out the Junk 26. Our Town 59. Don’t Be a Dummy 62. Speed Kills 65. Speeding is a Waste of Time 93. A Drop or Two Won’t Hurt
Signs and Lines 19. Signs of the Highway 20. Lines & Markings 21. Signo 51. Group Quiz 85. Red Herring Mystery
Seatbelts 3. The Doll in the Wall 25. Don’t Be An Egghead 41. Seat Belt Lotto
Basic Skills 30. Position Changes 31. Hands up 32. Turn Back
INSTRUCTIONS
INGREDIENTS
Title: The Perceptual “K” Objective: Demonstrate how the eyes see, but the mind evaluates
Show the first diagram. Ask “What do you see?” Responses will probably include “arrows”, “home plates”, “ three houses on their side”, etc. When you get the response “Two K’s” immediately highlight the two K’s and show the second diagram. Ask: “Now what do you see?” Very likely, you will get the response “Two H’s.” Ask: Would you have seen the H’s if someone had not first pointed out the K’s? Discussion: Why did you see the H’s more easily than the K’s? (You were conditioned by the first example. The eyes see, but the mind evaluates.) In what ways do your eyes see but your mind evaluate when driving?
Responsible Driving CH #
Drive Right CH #
Diagrams on a flip chart, chalkboard or overhead transparency
Cookbook of Activities for Driver Education #104

INSTRUCTIONS
INGREDIENTS
Title: How observant are you? Objective: Demonstrates how we often overlook many details in our daily lives.
Tell students you want to test their powers of observation. Ask a volunteer to let you borrow their watch (not a digital watch!). Tell students to see if they would be able to respond to the questions – without looking at their own watch. To the volunteer owner of the watch: Assume your watch was lost and someone found it but they want you to describe your watch.
1. What is the brand name of your watch? 2. What color is the face? 3. Are the numbers Roman or Arabic? 4. Does it have a second hand? 5. Is anything else printed on the face?
Ask how many could have accurately described their watch. Discussion questions:
1. Who would have flunked this test and why? 2. Why are we not more observant (time pressure, lack
of concern, taking things for granted, etc.) 3. What problems could result when driving if you don’t
carefully observe?
Cookbook of Activities for Driver Education #103
ResponsibleDriving CH #
Drive Right CH #
Non-digital watch borrowed from a student
34. Merry Go Round 38. Where Did You Learn to Park? 52. Under Control 53. Put Control in the Uncontrolled 80. Catch Me If You Can! 89. Scooting Down the road 95. Freeway Exits 98. Stomp, Stay, Steer
Time Space Management 2. Reaction to Distraction 6. Follow the Leader 7. Get in the Gap 15. Using the Mental System SIPDE 39. Conflicts and Resolutions 40. Checkers 42. I’ll Get There Sooner or Later 45. On the Right Path 49. Passing Without Crashing 50. Sharing a Narrow Road 58. Use the Best Lane to See 63. High Speed Gaps 96. Watching Cars Go By
Sharing the Road 8. Model Car Right of Way 54. Knowing Your Right of Way 55. Little Things That Get You 56. Where Am I Hiding? 57. Dangerous Places 64. Follow that Truck 77. Don’t Fence Me In! 97. Right of Way 100. Hear What I Say
Reference Points 35. Finding Reference Points 36. Let’s Demonstrate 37. Stringing Along 90. Reference Points Discovery
Road Rage 81. Rate Your Road Rage 82. It’s a Question of Road Rage 83. Diary of a Road Rager
Miscellaneous 18. The Grim Reaper 92. Family Feud 101. Wright Family 105. The Number Game

INSTRUCTIONS
INGREDIENTS
Title: Ruler Rules Objective: Demonstrate the effect of gravity
1. 2 small plastic containers such as a film canister
2. a ruler 3. a yardstick
4. tape 5. rubber bands 6. 1/24” scale model car
Part 1 Tape the ruler at the top of the desk. Place the car on the desk, with the left tires resting against the ruler.
Tilt the desk until the car rolls over the ruler. Measure and record how far the desk was lifted off the floor before the car rolled off.
Part 2 Secure an empty container to the top of the car with rubber bands and
repeat Part 1. Part 3 Secure a water-filled container to the top of the car and repeat Part 1. Have the students compare measurements and explain the differences. (Measurement for Part 1 should be the greatest, Part 2 less than Part 1, and Part 3 less than Part 2) The Center of Gravity was gradually raised with the addition of the container. Discuss how this affects car loading, and what occurs when the car is turning when the center of gravity is raised. A vehicle with a high center of gravity is more likely to roll than a vehicle with a low center of gravity.
Cookbook of Activities for Driver Education #1
ResponsibleDriving CH # 14
Drive Right CH # 5
INSTRUCTIONS
INGREDIENTS
Title: Do You See Me? Objective: People see what they want to see.
ONCE
IN A
A LIFETIME
ONCE
IN A
A LIFETIME
Cookbook of Activities for Driver Education #102
ResponsibleDriving CH #
Drive Right CH #
A diagram such as the one below on an overhead transparency or on a card.
Show the transparency, or hand out the card to a group of students. Instruct students to read and memorize the words. Allow 5 seconds then hide the diagram. Instruct students to write the phrase on a sheet of paper. Review their work. Point out that familiarity with the words caused students to read it incorrectly. Time caused pressure and the message can be misread if now looked at carefully. What implications does this have for driving? Look and look again. Be absolutely sure before you commit to an action.

INSTRUCTIONS There once was a family named the Wrights … Father Wright, Mother Wright, Johnny Wright and Mary Wright. One day during the summer, Father Wright said to Mother Wright, “The other day I realized there is only a week left of summer vacation and we have not taken our annual family vacation. Mother Wright agreed. “I will gather up the kids right away so we can leave first thing tomorrow morning right after breakfast. The next morning, Father Wright wanted to be sure they left on time right after breakfast. Everyone was anxious to leave on the family vacation. Mother Wright was hurrying about making sure everything was packed right and ready to go. Father Wright asked Mother Wright, “Did you pack some leftovers for today’s lunch?” Mother Wright replied, “We ate everything last night for dinner. There isn’t anything left. We will have stop and get lunch on the way right about 12 noon”. As Father Wright loaded the car, he hollered upstairs to Johnny Wright and Mary Wright, “Hurry up kids, or you will be left behind at home”. Father Wright, Mother Wright and Mary Wright were all into the car while Johnny Wright was rushing out of the house, slamming the door right behind him. Father Wright backed the car out of the driveway, turned left, headed down the street to the corner, made a left turn, then right to the gas station. He got out of the left side of the car and walked over to the right gas pump to pump his gas. As he reached into his back left pocket and realized he had left his wallet at home. He got right back into his car, left the gas station, turned left, right at the corner, then left into the driveway. Father Wright instructed to Johnny Wright, “Son, please go into the house and fetch my wallet. I left it on the table in the hallway, right next to the telephone.” Johnny Wright ran up to the front door, used his spare house key which he always left under the doormat and entered the house. His father’s wallet was exactly where he said he had left it, in the hallway, right next to the telephone. Johnny Wright picked up the wallet and returned to the car. The Wright family was off once again. Father Wright backed the car out of the driveway, turned left, headed down the street to the corner, made a left turn, then right to the gas station. As Father Wright was pumping gas from the right pump. Mary Wright said to Mother Wright. “I don’t feel well. I’m dizzy. I think I’m going to vomit right here”. Mother Wright replied, “Oh Mary, not in the car please. Quick! Stick your head out the left window and then do in”! Mary complied. Father Wright returned to the car. Mother Wright said, “We need to go right back home. In our haste this morning, I believe I left the stove on after breakfast”. Father Wright left the gas station, turned left, right at the corner, then left into the driveway. Mother Wright dashed into the house to check on the stove, which she believed she had left “on” that morning. When Mother Wright returned to the car, FatherWright, Johnny Wright and Mary Wright were standing outside on the driveway. Father Wright said, “I think this is not the right time for the Wright family to go on a vacation. There will be some time left later this year”.
Title: The Wright Family Objective: To demonstrate that when driving, you need to listen carefully to directions and know your right from your left!
Cookbook of Activities for Driver Education #101
INSTRUCTIONS Size of Group: Unlimited: any number can participate. Formation: Have each participant bring a pen or pencil. Stand in a circle,
shoulder-to-shoulder; comfortable (not squeezed). Directions: Facilitator: I will read a story to you. Whenever you hear the word “left”, you will pass the pen/pencil, which you are holding, to your left. Whenever you hear the word “right”, you will pass the pen/pencil, which you are holding, to your right.
INSTRUCTIONS
INGREDIENTS
Title: Reaction to Distraction Objective: Demonstrate reaction time and how distraction can add to reaction time
1. 10 Yard sticks (one for every 3 students) 2. Masking tape
Divide the class into groups of three, assign them the task of being: a Tester, a Reactor, and Evaluator For each group, place a piece of masking tape on the wall 5 feet from the floor
• Testers are to hold their yardsticks parallel to the wall with the yardstick even with the masking tape
• Reactors place one hand 12 inches to the left or right of the yardstick.
• Testers release the yardstick, Reactor attempts to stop the yardstick
from falling.
• Evaluator measures the distance the yardstick fell before the Reactor was able to stop it
• Repeat 4 times for an average, then change roles.
EXTRA MILE - Demonstration for the class.
• Use 2 yardsticks, one on either side of the hand, repeat the above.
• Don’t tell the Reactor which yardstick will drop. • Note the change in reaction time. • Add more distractions to simulate how much drivers are
distracted.
Cookbook of Activities for Driver Education#2
Responsible Driving CH # 4
Drive Right CH # 5

INSTRUCTIONS
INGREDIENTS
Title: The Doll in the Wall Objective: Demonstrates effectiveness of safety belts and air bags
1. Remote-controlled model car 2. Small doll 3. Rubber bands
4. Balloons 5. Sponge 6.Video Camera
Part 2 Place the doll in a sitting position on top of the car. Have a student drive the car into a wall at full speed. Have another student video tape the “crash” (Note how the doll “crashes”)
Part 2 Use the same starting point as in Part 1 Attach the doll to the top of the car with rubber bands Repeat the crash and videotape again.
Part 3 Inflate and tie a balloon and attach to the front of the car,
in front of the doll (simulated airbag) Repeat the “crash” from Part 2
Part 4 Attach a sponge to the wall at the “crash” site.
With the doll “belted” and “airbag” inflated, crash the car into the sponge and videotape.
Play back the videos in slow motion. Freeze frame as desired and lead a discussion on the effectiveness of safety features of a vehicle, potential for injury without these features, and why people don’t always use safety belts or proper steering control.
Cookbook of Activities for Driver Education #3
ResponsibleDriving CH # 7
Drive Right CH # 5
INSTRUCTIONS
INGREDIENTS
Title: Hear What I Say! Objective: Recognize the importance of clear communication
A diagram such as the one below. The diagram can be drawn on a white board, flip chart or Overhead transparency.
Prepare a diagram similar to this one. Ask for two volunteers: one describes the diagram, the other draws it without seeing the diagram. The drawer must not see the describer. No questions are allowed. Optional: create another diagram and permit full and free two-way communication between the two volunteers. How important is it to ensure the receiver receives our communication? How do we communicate when driving?
Responsible Driving CH #
Drive Right CH #
12
34
Cookbook of Activities for Driver Education #100

INSTRUCTIONS
INGREDIENTS
Title: Power of Your Eyes, The Objective: Demonstrate to Students the power vision has on hand control
12-16 inches of string for each student or group 1 large washer for each string
Making the tool: Tie the washer to the end of the piece of string Part 1 Demonstrate to the class: Hold the end of the string and focus on the washer (it should be dangling about eye level, and should be still). A. Now start to move your eyes side to side while focusing on the washer. (The washer should start to move side to side as your eyes move back and forth.) STOP. B. Now start to move your eyes in a circular motion while still
focusing on the washer. (The washer should move in circles now.) STOP
C. Now see if you can move the washer from side to side then in circles without stopping.
Part 2 Divide students up and have them all practice the Power of Their Eyes with the same exercises.
Cookbook of Activities for Driver Education #99
ResponsibleDriving CH #
Drive Right CH #
INSTRUCTIONS
INGREDIENTS
Title: Rural LOS-POT Objective: Identify conditions that create line of sight and/or path of travel restrictions
Tally Sheet that includes the following: Bridges Bushes close to the road Guardrails
Newly paved roads Crowned roads Gravel roads Objects close to road Potholes in road
Narrow lanes Sharp curves No shoulders Broken pavement
This activity can be used for classroom and BTW.
Divide the class into groups of five
Have students identify an example of the locations on the Tally Sheet
Answer the following questions: 1. Which locations have line-of-sight restrictions? 2. What causes the restriction? 3. Which locations require reduced speed and why?
Activity can also be used for BTW: Observer students identify the above characteristics to the instructor and/or in notebook. Note the street or road name where the characteristic appears. Check to see if the driver responds appropriately, or do they notice at all. Driver can use commentary driving to demonstrate they recognize the above and respond with appropriate driving maneuvers.
Cookbook of Activities for Driver Education #4
Responsible Driving CH # 11 Lesson 3
Drive Right CH # 10

INSTRUCTIONS
INGREDIENTS
Title: Model Cars in the City Objective: Decision making for line of sight, path of travel restrictions on one & two way streets
2 model cars per group of 3 3 wild cards (a small object) Roadway templates for 1 & 2 way streets
Use a wall traffic board set-up if you have one
Part 1 Using the two-way streets road template, have students “drive” on the roadway.
Use the wild cards to create problems with line of sight or path of travel.
What are student responses to problems? (lane position, speed control, communication)
Part 2 Use the one-way streets to see how problems are different
from two-way streets. Part 3 Groups report how their “driving”on one-way and two-
way streets are different. (Careful, this can be a fun activity just setting it up!) A wild card can be any small item such as a block of wood, small box, etc.
Cookbook of Activities for Driver Education #5
ResponsibleDriving CH # 11 Lesson 2
Drive Right CH # 9
Cookbook of Activities for Driver Education #98
Title: Stomp, Stay and Steer Objective: Develop understanding of how the anti-lock braking system affects braking.
Responsible Driving CH #
Drive Right CH #
INGREDIENTS
INSTRUCTIONS Show the video. Conduct short question and answer session covering the information given about ABS braking. Use the handout as a source for your questions. Pass out the handout and continue discussion over the areas that the students did not recall from the video. Show the video again. While watching the video have students mimic the proper steps to use when braking hard with ABS. (Sitting in their desks in a driving position, students will STOMP hard on the floor, STAY pressing on the floor, and STEER in the direction they want to go. Reinforce the steps by stopping the video and repeating the steps as needed.
Video: Stomp, Stay, Steer VCR/TV Student Desk Handout
Contributed by Benita Jaca, Meridian

INSTRUCTIONS
INGREDIENTS
Title: Right of Ways Objective: Determining Right of Way through Intersections
Masking Tape for intersection marksing
Part 1 Divide the students in groups of 4. Have the students go to each corner of the intersection. Part 2 Have # 1 and 3 go through the intersection going straight. Then have # 2 and #4 go straight through the intersection. Next have #1 go straight and #3 go right and see if the students can get through the turns alright. Now have # 4 go straight and # 2, go right and #3turn left. Change all the instructions so each student has to do something different all the time. Part 3 Add different types of intersections: uncontrolled intersection, one with 2 stop signs, 4 way stop, a light, timed and sensor lights. Keep giving them situations until they understand what to do. After you have practiced each intersection have them switch to groups of 8 and have 4 lanes. Start with a couple of people moving and then keep adding more and more people so they really have to think #1 goes right. #2 goes left, #5 goes straight, #6 goes left.
Cookbook of Activities for Driver Education #97
ResponsibleDriving CH #
Drive Right CH #7
INSTRUCTIONS
INGREDIENTS
Title: Follow the Leader Objective: Reinforce good habits for following time
Masking tape about 3 feet long
Sufficient space in the classroom for students to walk in a big circle
Put the masking tape on the floor at the front of the classroom Assign 5 students to line up behind the tapeline in single file Ask students to walk around the classroom and maintain a one-second following distance.
• Have a student count out the following time in seconds using the tape line to start the count
• Tell the students to increase following distance to 2 seconds
• Tell the students to increase to 3 second following distance
• Tell the students to pick up their “speed” and maintain following distance.
Ask the students in the activity to describe their feelings as they went from 1 to 3 seconds following time. Did they feel in control or out of control at various times? Optional: Have an “obstruction” where braking or stopping is required. What happened? Was 3 seconds enough? Have the classroom students check to see if the students are staying single file, or are they changing their lane position to increase their “line of sight?”
Cookbook of Activities for Driver Education #6
Responsible Driving CH # 11 Lesson 3
Drive Right CH # 9

INSTRUCTIONS
INGREDIENTS
Title: Get in the Gap Objective: Judge the size of a gap
• Chairs and/or desks to form a crossroads intersection or • Place tape on the floor to outline the intersection • Directional markers for North, South, East, West is
desirable S ffi i t f t d t t ti t “i t ti ”
Select a group of 5 students to represent westbound traffic, walking at various speeds through intersection. Select a group of 5 students to represent eastbound traffic, walking at various amounts of distance between each other through the intersection, continuing in a loop back to the original line Divide the remaining students into two groups, northbound and southbound groups to enter the intersection one at a time, continuing in a loop to get back in line One at a time, ask north and southbound traffic to select a gap to enter the intersection, they may choose to go straight, turn right, or turn left The “driver” counts the gap between the two cars to determine if there is an acceptable gap based on the gap selection chart on page 144, Drive Right, 10th edition. After the activity lead students in a discussion
Miles per hour
To cross Traffic 4-5 seconds
Turn Right And join traffic 6 seconds
Turn Left And join traffic 7 seconds
20mph More than ½ block away
More than ½ block away
More than 2/3 block away
30mph More than 2/3 block away
1 block away More than 1 block away
45mph More than 1 block away
More than 2 blocks away
More than 2 ½ blocks away
55mph More than 1 ½ blocks away
More than 3 blocks away
More than 3 ½ blocks away
Cookbook of Activities for Driver Education #7
ResponsibleDriving CH # 10
Drive Right CH # 7
Cookbook of Activities for Driver Education #96
INSTRUCTIONS
INGREDIENTS
Description: Watching Cars go By Objective: Identify traffic patterns, gaps and behaviors on the freeway
Record sheet to include: Day, time, location, number of vehicles grouped, amount of time between groups
Students are to observe traffic while riding in cars with friends, family members Students are to study on-coming traffic patterns on various roadways to detect gaps Complete the information on record sheet, or create a record sheet that includes the above information Record at least 10 different gap situations Divide the class into groups of four or five and have them discuss and compare information from their record sheet
Responsible Driving CH #
Drive Right CH #
Cookbook of Activities for Driver Education#95
INSTRUCTIONS
INGREDIENTS
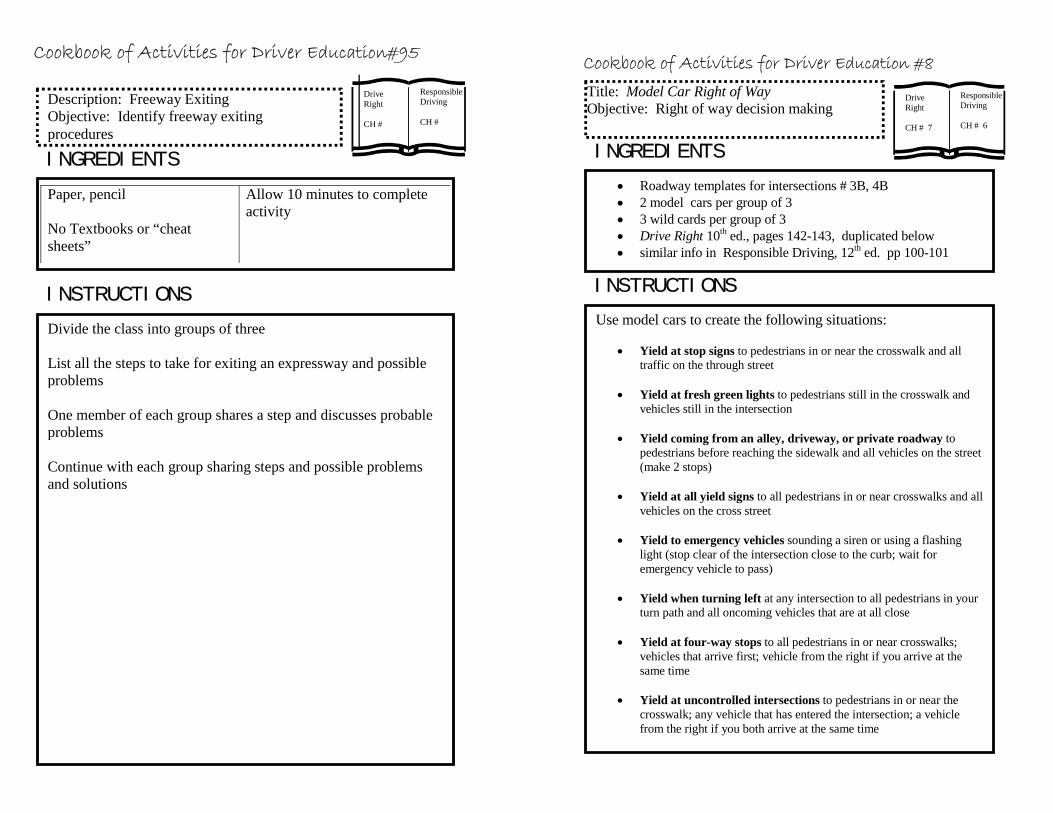
Description: Freeway Exiting Objective: Identify freeway exiting procedures
Paper, pencil No Textbooks or “cheat sheets”
Allow 10 minutes to complete activity
Divide the class into groups of three List all the steps to take for exiting an expressway and possible problems One member of each group shares a step and discusses probable problems Continue with each group sharing steps and possible problems and solutions
ResponsibleDriving CH #
Drive Right CH #
INSTRUCTIONS
INGREDIENTS
Title: Model Car Right of Way Objective: Right of way decision making
• Roadway templates for intersections # 3B, 4B • 2 model cars per group of 3 • 3 wild cards per group of 3 • Drive Right 10th ed., pages 142-143, duplicated below • similar info in Responsible Driving, 12th ed. pp 100-101
Use model cars to create the following situations:
• Yield at stop signs to pedestrians in or near the crosswalk and all traffic on the through street
• Yield at fresh green lights to pedestrians still in the crosswalk and
vehicles still in the intersection
• Yield coming from an alley, driveway, or private roadway to pedestrians before reaching the sidewalk and all vehicles on the street (make 2 stops)
• Yield at all yield signs to all pedestrians in or near crosswalks and all
vehicles on the cross street
• Yield to emergency vehicles sounding a siren or using a flashing light (stop clear of the intersection close to the curb; wait for emergency vehicle to pass)
• Yield when turning left at any intersection to all pedestrians in your
turn path and all oncoming vehicles that are at all close
• Yield at four-way stops to all pedestrians in or near crosswalks; vehicles that arrive first; vehicle from the right if you arrive at the same time
• Yield at uncontrolled intersections to pedestrians in or near the
crosswalk; any vehicle that has entered the intersection; a vehicle from the right if you both arrive at the same time
Cookbook of Activities for Driver Education #8
Responsible Driving CH # 6
Drive Right CH # 7
INSTRUCTIONS
INGREDIENTS
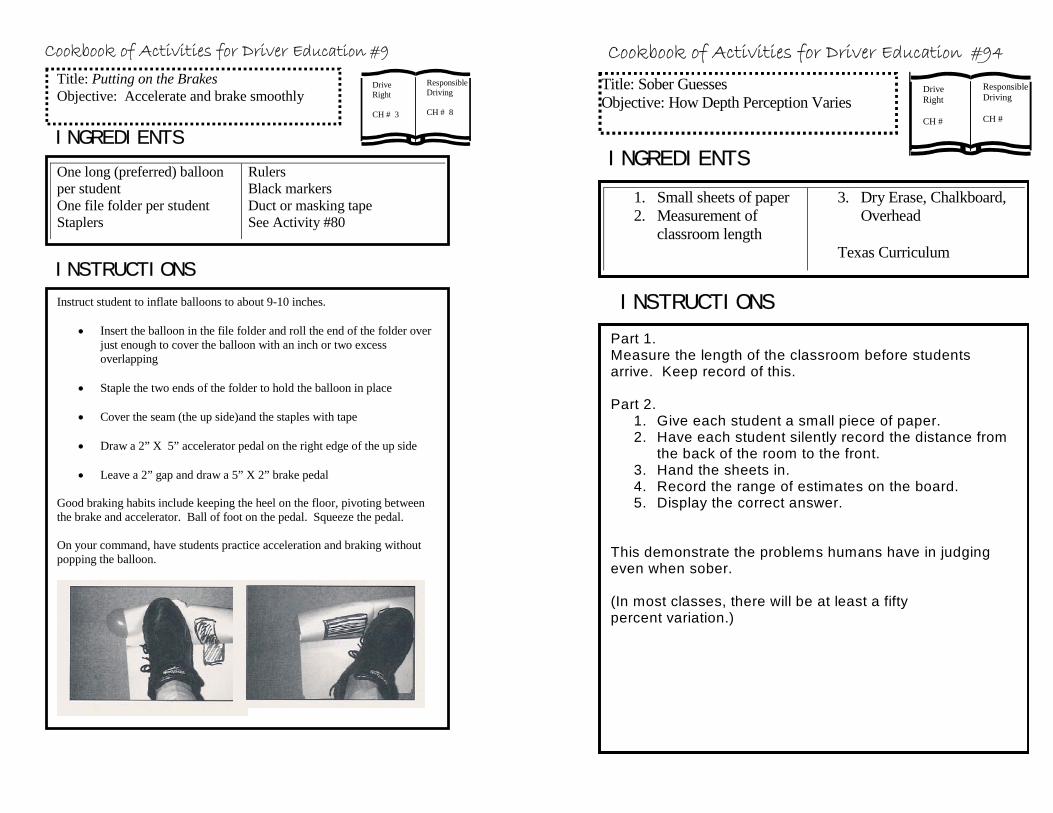
Title: Putting on the Brakes Objective: Accelerate and brake smoothly
One long (preferred) balloon per student One file folder per student Staplers
Rulers Black markers Duct or masking tape See Activity #80
Instruct student to inflate balloons to about 9-10 inches.
• Insert the balloon in the file folder and roll the end of the folder over just enough to cover the balloon with an inch or two excess overlapping
• Staple the two ends of the folder to hold the balloon in place
• Cover the seam (the up side)and the staples with tape
• Draw a 2” X 5” accelerator pedal on the right edge of the up side
• Leave a 2” gap and draw a 5” X 2” brake pedal Good braking habits include keeping the heel on the floor, pivoting between the brake and accelerator. Ball of foot on the pedal. Squeeze the pedal. On your command, have students practice acceleration and braking without popping the balloon.
Cookbook of Activities for Driver Education #9
ResponsibleDriving CH # 8
Drive Right CH # 3
Title: Sober Guesses Objective: How Depth Perception Varies
Responsible Driving CH #
Drive Right CH #
Cookbook of Activities for Driver Education #94
INGREDIENTS
1. Small sheets of paper 2. Measurement of
classroom length
3. Dry Erase, Chalkboard, Overhead
Texas Curriculum
INSTRUCTIONS
Part 1. Measure the length of the classroom before students arrive. Keep record of this. Part 2.
1. Give each student a small piece of paper. 2. Have each student silently record the distance from
the back of the room to the front. 3. Hand the sheets in. 4. Record the range of estimates on the board. 5. Display the correct answer.
This demonstrate the problems humans have in judging even when sober. (In most classes, there will be at least a fifty percent variation.)

Cookbook of Activities for Driver Education #93
ResponsibleDriving CH #
Drive Right CH #
INGREDIENTS 1. Large (1 gal.) clear
container 2. Small ( ½ gal.) clear
container
3. Red Dye or Food Color 4. Water Texas Curriculum
INSTRUCTIONS 1. Fill each container with water.
2. Place the same amount of red dye into the two
containers of water In which will the dye be most concentrated? The same concept holds true for different sized people.
Title: A Drop or Two Won’t Hurt Objective: Alcohol Concentration Demonstration
INSTRUCTIONS
INGREDIENTS
Title: Ready, Set Objective: Preparations for entering a vehicle
Divide students into groups of three Each group needs two chairs to simulate the front seats
Part 1 Student #1 performs the outside checks of the car while the other two students check performance:
• Walk around vehicle with keys in hand, look for objects in path, water, oil; check tires, direction wheels are pointed; windshield, windows, headlights and tail lights clear; check back window ledge for loose objects; look inside for unwanted passengers.
Part 2 Student #2 demonstrates proper procedure for getting
into the vehicle while two students check performance:
• Walk around the vehicle from the front toward the back to check for oncoming vehicles; wait for vehicles to pass before opening door; get in quickly, close and lock door; key in ignition
Part 3 Student #3 performs inside checks while two students
check performance: • Ensure doors are locked; adjust seat; adjust head
restraint; adjust mirrors, sun visor; fasten safety belt and ask passengers to fasten theirs.
Rotate positions until all students have completed all three parts
Cookbook of Activities for Driver Education #10
Responsible Driving CH # 7 L:esson 4
Drive Right CH # 3 46-47 in DR
INSTRUCTIONS
INGREDIENTS
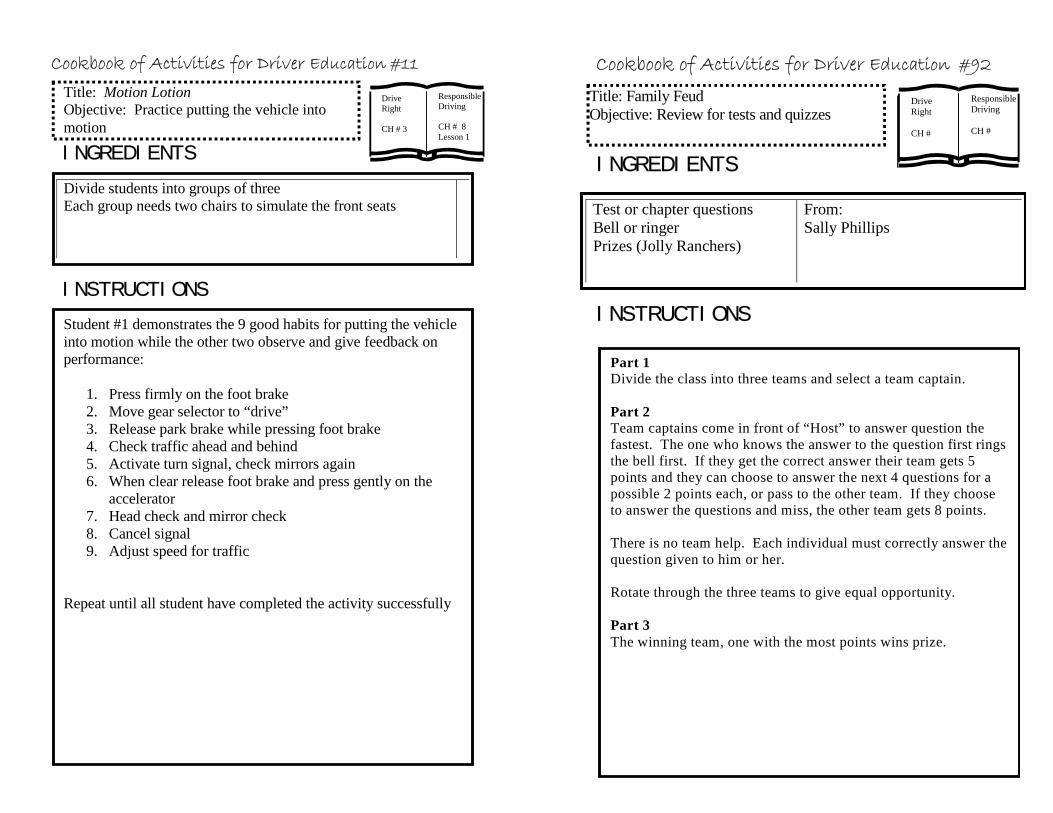
Title: Motion Lotion Objective: Practice putting the vehicle into motion
Divide students into groups of three Each group needs two chairs to simulate the front seats
Student #1 demonstrates the 9 good habits for putting the vehicle into motion while the other two observe and give feedback on performance:
1. Press firmly on the foot brake 2. Move gear selector to “drive” 3. Release park brake while pressing foot brake 4. Check traffic ahead and behind 5. Activate turn signal, check mirrors again 6. When clear release foot brake and press gently on the
accelerator 7. Head check and mirror check 8. Cancel signal 9. Adjust speed for traffic
Repeat until all student have completed the activity successfully
Cookbook of Activities for Driver Education #11
ResponsibleDriving CH # 8 Lesson 1
Drive Right CH # 3
Cookbook of Activities for Driver Education #92
Title: Family Feud Objective: Review for tests and quizzes
Responsible Driving CH #
Drive Right CH #
INGREDIENTS
INSTRUCTIONS Part 1 Divide the class into three teams and select a team captain. Part 2 Team captains come in front of “Host” to answer question the fastest. The one who knows the answer to the question first rings the bell first. If they get the correct answer their team gets 5 points and they can choose to answer the next 4 questions for a possible 2 points each, or pass to the other team. If they choose to answer the questions and miss, the other team gets 8 points. There is no team help. Each individual must correctly answer the question given to him or her. Rotate through the three teams to give equal opportunity. Part 3 The winning team, one with the most points wins prize.
Test or chapter questions Bell or ringer Prizes (Jolly Ranchers)
From: Sally Phillips

Cookbook of Activities for Driver Education #91
Part 1 Arrange the three desks to represent cars in three lanes of traffic, with the outside two cars in the blind spots of car one. Target Give several small objects to students in desks 2-3 Part 2 On the instructor’s command, have student in desk 1 look and identify what is being held by either the right (desk 3) blind spot car or left (desk 2) blind spot car Blind spot desk students hold up only one item at a time. Instructor and other students look at steering wheel for movement or use the equipment from activity #78
Desk 1 Desk 2 Desk 3
INSTRUCTIONS
INGREDIENTS
Title: Look and See Objective: Checking Blind Spots
Three desks Simulated Steering Wheel Several small objects
From: Nampa Driver Ed. Workshop
ResponsibleDriving CH #
Drive Right CH #
INSTRUCTIONS
INGREDIENTS
Title: Lookie, Lookie Objective: Practice observation skills
Any two objects placed at the front of the classroom that are unique to the classroom
• Place the two objects in plain view of the classroom (your desk, podium)
• Do NOT call attention to the objects
• After 5 minutes, block the students’ view of the objects and
• ask the students to write the names of the two objects that are at the front of the class
• Reveal the objects to the students
• Lead a discussion on why some did not see the objects
and how it relates to driving
Cookbook of Activities for Driver Education #12
Responsible Driving CH # 1
Drive Right CH # 4

INSTRUCTIONS
INGREDIENTS
Title: Risky Business Objective: Identify risk factors in our driving environment
Risk Factors Sheet handout for each student
Ask students to read all the Risk Factors in the handout Classify all the risk factors as one of the following:
People Vehicles Roadways
Ask which risks can be eliminated or minimized. • Place an “X” next to each factor that could be eliminated • Place an “M” next to each factor that could be minimized Add 5 new risk factors to each of the three components (People, Vehicles, Roadways) Have students work in groups of 3 to compare their responses
Cookbook of Activities for Driver Education #13
ResponsibleDriving CH # 1
Drive Right CH # 1
Cookbook of Activities for Driver Education #90
INSTRUCTIONS
INGREDIENTS
Title: Reference Points Discovery Objective: Identify Reference Points
Masking tape or Wood strips Student desks Student chair Red Pen (hood ornament)
Contributed by: Scott Lords
Responsible Driving CH #
Drive Right CH #
Left Right line line Place three student’s desks together. Use masking to mark reference point locations. Tape the red pen to the middle desk as a hood ornament Instructions: Divide students into groups and have them take turns sitting in the “driver’s seat” to identify reference points. NOTE: This exercise is to develop the concept of reference points and has not been tried with front limit and rear reference points
Desk Desk Desk

Cookbook of Activities for Driver Education # 89
Title: Scooting on Down the Road Objective: Lane changes, Passing, Turning
ResponsibleDriving CH #
Drive Right CH #
INGREDIENTS Scooter boards (from PE dept)
Road Signs Tape for Lane Markings Steering Wheels Instruction cards Visor (Advisor)
From: Jamie Kurtz and Deb Dehoney
INSTRUCTIONS Part 1
Mark off hallways with tape showing various lanes. (One-way, Two-way, Turn lanes) Part 2 Pair students in groups of two. Give each group 1 scooter, a steering wheel and an instruction card. Part 3 Students “drive” the scooters following all road rules. One students pushes the other drives. Some students driver slow, others drive faster. Practice lane changes, passing, etc. Part 4 Advisor (person with the Visor) issues tickets for illegal driving Part 5 Discuss experience in classroom after several minutes of the activiy
INSTRUCTIONS
INGREDIENTS
Title: Conquer the Monster Objective: Curbing road rage
Paper and pencil Honesty
• Divide the class into groups of five
• Each group develops a list of 10 driving errors that annoy or irritate other drivers
• Discuss why these actions are annoying or irritating
• Discuss and list 10 ways that a driver can be courteous and deal with these annoyances positively
Cookbook of Activities for Driver Education #14
Responsible Driving CH # 3 Lesson 1
Drive Right CH # 1

INSTRUCTIONS
INGREDIENTS
Title: Using the Mental System SIPDE Objective: Practice a mental system for managing space & time
Paper and Pencil
Divide the class into groups of five Each group list 5 examples of Search Identify Predict Decide Execute
After the activity, lead a discussion on responses. NOTE: This is a good time to reinforce the six zones around the vehicle
Cookbook of Activities for Driver Education #15
ResponsibleDriving CH # 1
Drive Right CH # 1
Responsible Driving CH # 8
Drive Right CH # 4
Cookbook of Activities for Driver Education #88
Title: Simon Says Objective: Targeting
INGREDIENTS
Simulated Steering Wheel Yard stick Crosses
INSTRUCTIONS
Part 1 Give each student a simulated steering wheel. Part 2 Give the students a direction and speed they are traveling Watch the students’ head movements Watch the students’ turning movements Part 3 If student oversteers for the commands given, they “die”. Give that student a cross and they are out How many live?

INSTRUCTIONS
INGREDIENTS
Title: Blind Areas Objective: Demonstrate the blind areas around the vheicle
Set up for Reference Points 3 desks 1 chair
Part 1 Setup the desks and chair. The desk represent the width of a car Chair Part 2 Student identifies the blind areas around the “car”. Have students rotate through “drivers” seat to see/find the blind area around the “car”. Blind Areas: Blind area to the front is about 1 car length (approx.11ft) Blind area to the driver’s side is about a car width Blind area to the passenger side is about 1-1/2 car widths Blind area to the rear is about 2 car lengths
Cookbook of Activities for Driver Education #87
ResponsibleDriving CH #
Drive Right CH #
Desk Desk Desk
INSTRUCTIONS
INGREDIENTS
Title: Riskier Business Objective: Identify risky situations in our driving environment
Partial Risk Factors handout from Drive Right Resource Book or Zone Control Partnership Book
Paper/pencil
Part 1 Divide the class into groups of five • Have the students write nine numbers between the range
of 1 –60, 61-120, 121-180 on a sheet of paper • Using the Partial Risk Factors Sheets, locate the risk
factors represented by the nine numbers • Write the risk factors next to the numbers
Part 2 Answer the following questions: 1. What is the likelihood of a collision occurring if all those risk factors were to take place at the same time?
2. How many different combinations of nine can be made from the list of partial risk factors? (446 trillion, 098 billion, 010 million, 817,800)
Part 3 Explain that multiple factors are present when a collision occurs • There are always more than one thing that
goes wrong • Have students share their nine risk factors with
each other and the likelihood that a collision could occur
Part 4 After the activity, lead a discussion on why there will always be risk factors. Ask: • What are the risks that can be eliminated? • Can collisions still occur?
Cookbook of Activities for Driver Education #16
Responsible Driving CH # 1
Drive Right CH # 1

INSTRUCTIONS
INGREDIENTS
Title: Sifting out the Junk Objective: Make good decisions that support good driving habits
Decision Making Filter Paper/pencil
Give each student a copy of the Decision Making Filter that includes the following: Decision Making Filters
1. Does it solve the problem? 2. What do I have to gain? What do I have to lose? 3. Is it right (legal, ethical, moral)? 4. How will this choice affect me, others, and/or property? 5. Am I proud of my choice? Am I willing to share my choice with
a. Family? b. Friends? c. Work profession, or school associates d. Community members or neighbors
6. Am I willing to have it as a front page headline? 7. Does it make the face in the mirror look good? 8. Will it pass the test of time? Is the solution lasting?
Have the students read the 8 steps of the filter. Ask students to describe/list situations where the filters would help in decision making process. Examples: dealing with being honest, avoiding the use of tobacco products, being kind/courteous to others, avoiding drugs and alcohol
Cookbook of Activities for Driver Education #17
ResponsibleDriving CH # 4
Drive Right CH # 4
Cookbook of Activities for Driver Education #86
Title: Starting Out Right Objective: Learn Pre-driving Checks and Procedures before entering the car.
Partnership For Driver Excellence: (Student, Parent, Teacher)
ResponsibleDriving CH # 6 Lesson 4
INGREDIENTS
Getting Ready To Drive” Partnership for Driver Excellence workbook, Guide 1 check sheet and pencil. Two desks per pair of students.
Contributed by Ken Kellum, Weiser
INSTRUCTIONS
Divide the class into groups of two: • Have each pair put their desks in line, making sure they
have enough room to get around the desks. (The desks represent a four door sedan)
• Have students practice the correct procedures, used on the check sheet.
• Each student takes their turn being the driver and the observer.
The observer should record the drivers’ actions and guide them in the correct procedures to use.
• Have the driver explain each procedure and tell why they are important for safe driving practices.
• After the first driver has successfully completed the exercise, switch roles and repeat the exercise.
• After all groups are finished, have class discussion on the importance of each procedure used.

Cookbook of Activities for Driver Education #85
Title: Driver Ed Red Herring Mystery Objective: Use critical thinking skills to solve a puzzle relating to a driver’s ed topic.
ResponsibleDriving CH #
Drive Right CH # p.20
INGREDIENTS Puzzle story for instructors Contributed by Jan Maybon,
District #131
INSTRUCTIONS The Story: If you met me 100 years ago, you wouldn’t recognize me. I grow
and change over time. Sometimes I am bossy, “If you don’t do what I say, I’ll punch your lights out.” Other times I’m just full of good information.
• Who am I? • Where did I come from? • Why am I here? •
Tell the story and ask the questions. You may ask me any questions that I can answer “Yes” or “No.” Answer: A road sign that came into being out of necessity and exists to protect you. Direct students to eliminate blocks of solutions instead of randomly guessing the answer. Red Herring mysteries are suppose to be misleading clues that are in fact true. If students are unable to answer the 1st question easily will probably have more difficulty answering the next two questions. This will be your golden opportunity to discuss the development and purpose of road signs.
• Clue #1 – 100 years ago there were no road signs. • Clue #2 – Over time there has been a need for more and more road
signs, and many signs have changed over time (speed limits for one).• Clue #3 – If you don’t stop at a stop sign, you could run into another
car and smash your headlights. Other signs are information signs.
INSTRUCTIONS
INGREDIENTS
Title: The Grim Reaper Objective: Analyze crash statistics to reinforce good driving habits
Population statistics from a town or city Facts and figures on highway safety
Calculator
Facts and Figures sheet (DR Teacher Edition , 10th Ed. p. 12) Responsible Driving pp 8-9 1/9 = accidents 1/83 = disability or death Based on the numbers provided in the book Death rates: 13 fatalities per 100,000 for males aged 16-19 6 fatalities per 100,000 for females aged 16-19 Calculator Instructions: Have the students calculate the number of students statistically that will be in a collision or killed DRIVE RIGHT EXAMPLE: 13 (males) X ____n_____ 100,000 250,000 (Population of city) n= the number of male students that may not survive the year RESPONSIBLE DRIVING EXAMPLE
91
x 30n
= n = 3.3 if you will be in a collision this year
Cookbook of Activities for Driver Education #18
Responsible Driving CH # 1
Drive Right CH # 1

INSTRUCTIONS
INGREDIENTS
Title: Signs of the Highway Objective: Identify highways by their signs
Pictures or photos of a large variety of route signs
The following web site is an excellent resourceManual of Traffic Signs at http://members.aol.com/rcmoeur/signman.html
The signs can be placed on 3 x 5 cards with the correct answers on the reverse side.
• Divide the class into groups of four or five
• Ask each group to identify the four types of route signs (Interstate, U.S., state, county)
• Formulate at least 5 characteristic features for each type of highway
• After listing the features, ask the groups to rank them as
to whether they make driving on that roadway safe or dangerous
Cookbook of Activities for Driver Education #19
ResponsibleDriving CH # 5 Lesson 2
Drive Right CH # 2
Cookbook of Activities for Driver Education #84
Title: On the Fringe Objective: Identify Fringe vision
Responsible Driving CH #
Drive Right CH #
INGREDIENTS
None
INSTRUCTIONS Have the students stand behind their desks/chairs with at least an
arms length between them. Hold index fingers together (pointing up) with arms extended in front. Separate arms until you can no longer clearly see fingers pointing up. (This is not peripheral vision you are demonstrating) This is fringe vision

Cookbook of Activities for Driver Education #83
Title: Diary of a Road Rager Objective: Examine attitudes, behaviors and traits to avoid road rage
ResponsibleDriving CH #
Drive Right CH # 14
INGREDIENTS Driving Diary Contributed by:
Ruth Hubsmith
INSTRUCTIONS Keep a Driving Diary.
Option 1 Take notes of the drive, recording how you felt, any poor behaviors you or others made. This can be done after each drive. Option 2 Record commentary driving. Listen to it later to see if you displayed any signs of road rage. Note whether you remember any and/or all of the behaviors demonstrated during the drive. Option 3 Have driving partner tell you how your driving makes them feel, comfortable or uncomfortable. This driving diary will help you assess whether you are in reality or fantasyland regarding your potential for road rage.
INSTRUCTIONS
INGREDIENTS
Title: Lines & Markings Objective: Identify and understand the meaning of roadway markings
Driver Education Textbook
Sheet of paper to record page numbers where examples are located
Part 1 Divide the class into three (3) teams • Give each team 10 minutes to find examples of different
road markings in the textbook • The team with the most examples after 10 minutes wins
Part 2 The winning team gives the page numbers for their
examples. • The other teams take turns explaining the purpose of the
pavement marking found. • Cover as many examples from all teams as time permits
Cookbook of Activities for Driver Education #20
ResponsibleDriving CH # 5 Lesson 1&3
Drive Right CH # 2
INSTRUCTIONS
INGREDIENTS
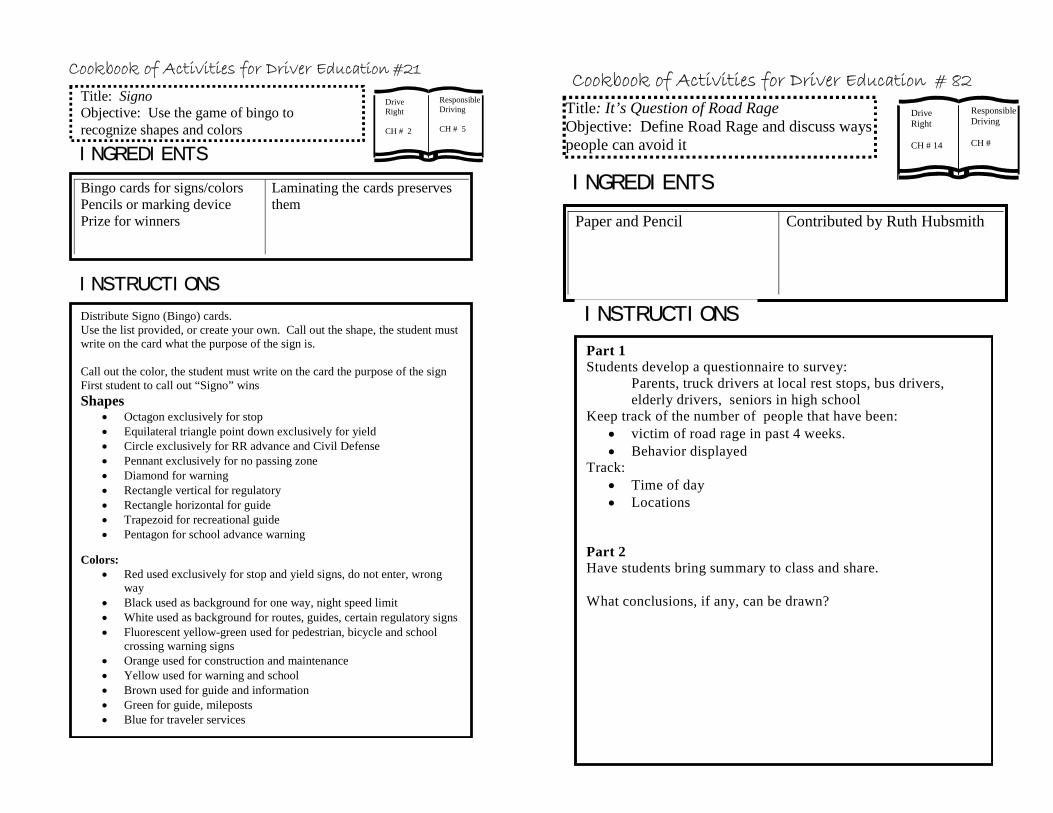
Title: Signo Objective: Use the game of bingo to recognize shapes and colors
Bingo cards for signs/colors Pencils or marking device Prize for winners
Laminating the cards preserves them
Distribute Signo (Bingo) cards. Use the list provided, or create your own. Call out the shape, the student must write on the card what the purpose of the sign is. Call out the color, the student must write on the card the purpose of the sign First student to call out “Signo” wins Shapes
• Octagon exclusively for stop • Equilateral triangle point down exclusively for yield • Circle exclusively for RR advance and Civil Defense • Pennant exclusively for no passing zone • Diamond for warning • Rectangle vertical for regulatory • Rectangle horizontal for guide • Trapezoid for recreational guide • Pentagon for school advance warning
Colors:
• Red used exclusively for stop and yield signs, do not enter, wrong way
• Black used as background for one way, night speed limit • White used as background for routes, guides, certain regulatory signs• Fluorescent yellow-green used for pedestrian, bicycle and school
crossing warning signs • Orange used for construction and maintenance • Yellow used for warning and school • Brown used for guide and information • Green for guide, mileposts • Blue for traveler services
Cookbook of Activities for Driver Education #21
ResponsibleDriving CH # 5
Drive Right CH # 2
Cookbook of Activities for Driver Education # 82
Title: It’s Question of Road Rage Objective: Define Road Rage and discuss ways people can avoid it
Paper and Pencil Contributed by Ruth Hubsmith
INGREDIENTS
INSTRUCTIONS
Part 1 Students develop a questionnaire to survey: Parents, truck drivers at local rest stops, bus drivers,
elderly drivers, seniors in high school Keep track of the number of people that have been:
• victim of road rage in past 4 weeks. • Behavior displayed
Track: • Time of day • Locations
Part 2 Have students bring summary to class and share. What conclusions, if any, can be drawn?
Responsible Driving CH #
Drive Right CH # 14
INSTRUCTIONS
INGREDIENTS
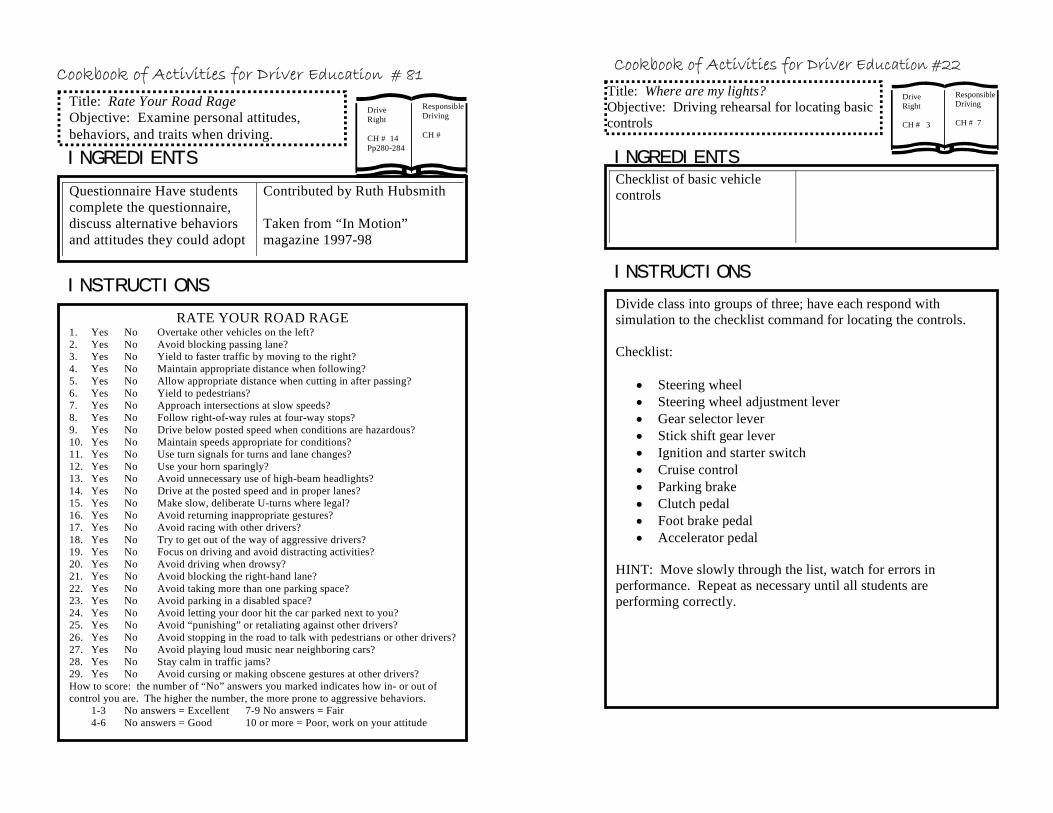
Title: Rate Your Road Rage Objective: Examine personal attitudes, behaviors, and traits when driving.
Questionnaire Have students complete the questionnaire, discuss alternative behaviors and attitudes they could adopt
Contributed by Ruth Hubsmith Taken from “In Motion” magazine 1997-98
RATE YOUR ROAD RAGE 1. Yes No Overtake other vehicles on the left? 2. Yes No Avoid blocking passing lane? 3. Yes No Yield to faster traffic by moving to the right? 4. Yes No Maintain appropriate distance when following? 5. Yes No Allow appropriate distance when cutting in after passing? 6. Yes No Yield to pedestrians? 7. Yes No Approach intersections at slow speeds? 8. Yes No Follow right-of-way rules at four-way stops? 9. Yes No Drive below posted speed when conditions are hazardous? 10. Yes No Maintain speeds appropriate for conditions? 11. Yes No Use turn signals for turns and lane changes? 12. Yes No Use your horn sparingly? 13. Yes No Avoid unnecessary use of high-beam headlights? 14. Yes No Drive at the posted speed and in proper lanes? 15. Yes No Make slow, deliberate U-turns where legal? 16. Yes No Avoid returning inappropriate gestures? 17. Yes No Avoid racing with other drivers? 18. Yes No Try to get out of the way of aggressive drivers? 19. Yes No Focus on driving and avoid distracting activities? 20. Yes No Avoid driving when drowsy? 21. Yes No Avoid blocking the right-hand lane? 22. Yes No Avoid taking more than one parking space? 23. Yes No Avoid parking in a disabled space? 24. Yes No Avoid letting your door hit the car parked next to you? 25. Yes No Avoid “punishing” or retaliating against other drivers? 26. Yes No Avoid stopping in the road to talk with pedestrians or other drivers?27. Yes No Avoid playing loud music near neighboring cars? 28. Yes No Stay calm in traffic jams? 29. Yes No Avoid cursing or making obscene gestures at other drivers? How to score: the number of “No” answers you marked indicates how in- or out of control you are. The higher the number, the more prone to aggressive behaviors. 1-3 No answers = Excellent 7-9 No answers = Fair 4-6 No answers = Good 10 or more = Poor, work on your attitude
Cookbook of Activities for Driver Education # 81
ResponsibleDriving CH #
Drive Right CH # 14 Pp280-284
INSTRUCTIONS
INGREDIENTS
Title: Where are my lights? Objective: Driving rehearsal for locating basic controls
Checklist of basic vehicle controls
Divide class into groups of three; have each respond with simulation to the checklist command for locating the controls. Checklist:
• Steering wheel • Steering wheel adjustment lever • Gear selector lever • Stick shift gear lever • Ignition and starter switch • Cruise control • Parking brake • Clutch pedal • Foot brake pedal • Accelerator pedal
HINT: Move slowly through the list, watch for errors in performance. Repeat as necessary until all students are performing correctly.
Cookbook of Activities for Driver Education #22
Responsible Driving CH # 7
Drive Right CH # 3

INSTRUCTIONS
INGREDIENTS
Title: Sit this way Objective: Practice proper posture for vehicle control and comfort
Student chairs
Have the students practice appropriate seating posture for control a and comfort:
• The chair is the driver’s seat • Lean slightly forward, slide all the way to the back of the
seat, sit up straight (Photo A) • Ask: Can you feel the support for your back? • Now slouch down in the chair now (Photo B) • Ask: Do you feel the lack of support to your back? • Repeat again for comparison • Ask: How could this affect your vision?
o Is your hand position affected?
Cookbook of Activities for Driver Education #23
ResponsibleDriving CH # 7
Drive Right CH # 3
INSTRUCTIONS
INGREDIENTS
Title: Catch me if you can! Objective: Demonstrate benefit of covering brake in a ready position
Tennis Ball
• Have two students stand next to each other facing the side of the classroom.
• Position yourself facing the two students about 3 feet away from them.
• Hold the tennis ball in your hand and raise your arm to shoulder height. Move your arm back and forth in front of the two students.
• Instruct the students to keep their arms at their sides until you drop the fall in front of one of them.
• Tell each student to try to catch the ball when you drop it in front of him. Drop the ball in front of each student several times. Point out that if they keep their arms at their sides until you drop the ball, they cannot catch it.
• Now instruct the students to hold their arms out with the palms of their hands turned up ready to catch the ball.
• Hold the tennis ball in your hand and raise your arm to shoulder height. Move your arm back and forth in front of the two students. Tell them to try to catch the ball when you drop it in front of them.
• Drop the ball in front of the students several times. • Point out how much easier it was to catch the ball when they
were in the ready position.
• Point out that this is the principle behind covering the brake.
Cookbook of Activities for Driver Education #80
Responsible Driving CH # 11
Drive Right CH # 9

INSTRUCTIONS
INGREDIENTS
Title: Where is it? Objective: Practice why two eyes are needed for depth perception
Pencil
This demonstrates how depth perception can be temporarily affected by an eye injury. Pair students up into teams of two. Assign them to try and place a finger on the tip of a pencil with one eye closed. The partner holds the pencil and moves it various distances from one to three feet from the student. Point out that you must not expect to make the same depth perception judgment if you have a problem with one eye. Increase following distance to compensate for the loss of depth perception.
Cookbook of Activities for Driver Education #79
ResponsibleDriving CH # 3
Drive Right CH # 14
INSTRUCTIONS
INGREDIENTS
Title: Target Practice Objective: The beginning of the searching process, students visualize the space their vehicle will occupy
Simulated steering wheel such as a paper plate
Place a small strip of tape at the top of the wheel and ensure a piece goes over the top and to the back of the wheel
Give each student a simulated wheel • Hold the wheel at 9:00 and 3:00 positions • The teacher represents the target • Instruct students to turn their head to look directly at you before
moving the steering wheel to get you on target • Move your position to the left and right side of the room. Instruct
student to wait for your instruction to “get on target.” Ensure students turn their head to look directly at you, and then turn the wheel to get on target.
• Walk to the back of the room, instruct students to turn their head and steering wheel to keep you in alignment with the center of their steering wheel.
Watch for students who:
• Turn their wheel while turning their head, the head turns first to look for the target, then the wheel is turned to get on target.
• Check that students are turning the wheel, then centering back up by looking for the tape at the top of the wheel.
Note: When the students are on target, it will appear that their body is in alignment to the target.
Cookbook of Activities for Driver Education #24
Responsible Driving CH # 8 Lesson 4
Drive Right CH # 4
INSTRUCTIONS
INGREDIENTS
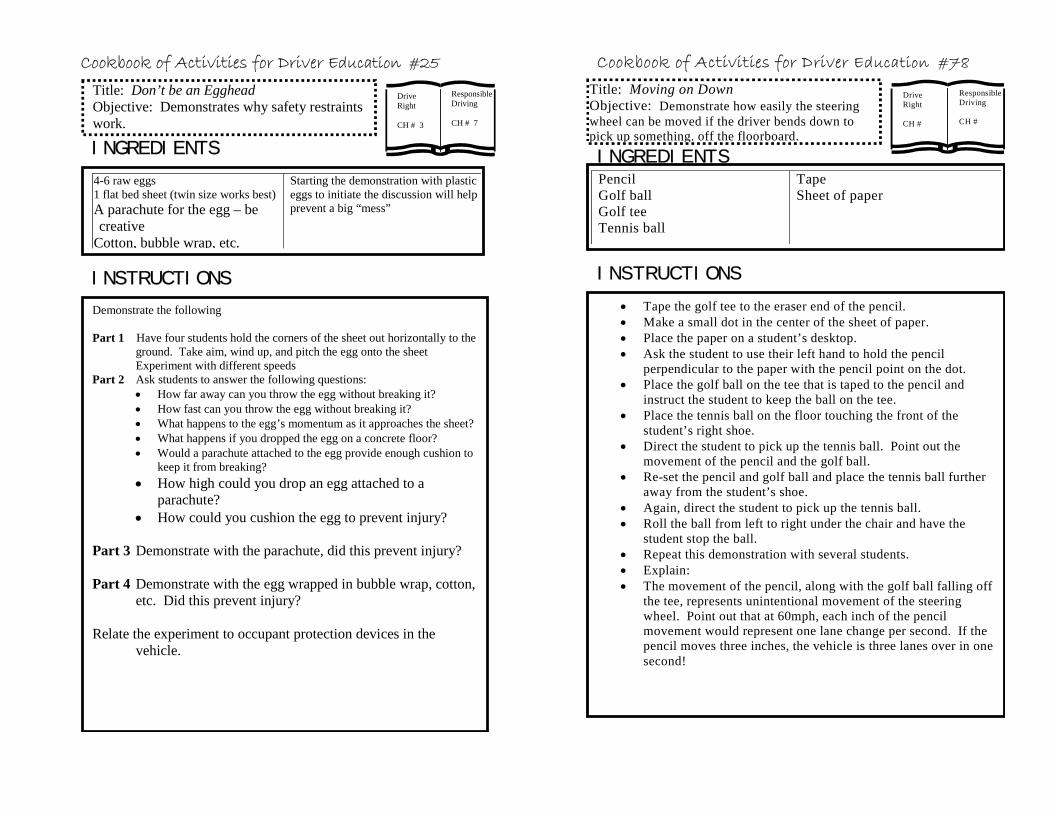
Title: Don’t be an Egghead Objective: Demonstrates why safety restraints work.
4-6 raw eggs 1 flat bed sheet (twin size works best) A parachute for the egg – be creative
Cotton, bubble wrap, etc.
Starting the demonstration with plastic eggs to initiate the discussion will help prevent a big “mess”
Demonstrate the following Part 1 Have four students hold the corners of the sheet out horizontally to the
ground. Take aim, wind up, and pitch the egg onto the sheet Experiment with different speeds
Part 2 Ask students to answer the following questions: • How far away can you throw the egg without breaking it? • How fast can you throw the egg without breaking it? • What happens to the egg’s momentum as it approaches the sheet?• What happens if you dropped the egg on a concrete floor? • Would a parachute attached to the egg provide enough cushion to
keep it from breaking? • How high could you drop an egg attached to a
parachute? • How could you cushion the egg to prevent injury?
Part 3 Demonstrate with the parachute, did this prevent injury? Part 4 Demonstrate with the egg wrapped in bubble wrap, cotton,
etc. Did this prevent injury? Relate the experiment to occupant protection devices in the
vehicle.
Cookbook of Activities for Driver Education #25
ResponsibleDriving CH # 7
Drive Right CH # 3
INSTRUCTIONS
INGREDIENTS
Title: Moving on Down Objective: Demonstrate how easily the steering wheel can be moved if the driver bends down to pick up something. off the floorboard.
Pencil Golf ball Golf tee Tennis ball
Tape Sheet of paper
• Tape the golf tee to the eraser end of the pencil. • Make a small dot in the center of the sheet of paper. • Place the paper on a student’s desktop. • Ask the student to use their left hand to hold the pencil
perpendicular to the paper with the pencil point on the dot. • Place the golf ball on the tee that is taped to the pencil and
instruct the student to keep the ball on the tee. • Place the tennis ball on the floor touching the front of the
student’s right shoe. • Direct the student to pick up the tennis ball. Point out the
movement of the pencil and the golf ball. • Re-set the pencil and golf ball and place the tennis ball further
away from the student’s shoe. • Again, direct the student to pick up the tennis ball. • Roll the ball from left to right under the chair and have the
student stop the ball. • Repeat this demonstration with several students. • Explain: • The movement of the pencil, along with the golf ball falling off
the tee, represents unintentional movement of the steering wheel. Point out that at 60mph, each inch of the pencil movement would represent one lane change per second. If the pencil moves three inches, the vehicle is three lanes over in one second!
Cookbook of Activities for Driver Education #78
Responsible Driving CH #
Drive Right CH #

INSTRUCTIONS
INGREDIENTS
Title: Don’t Fence Me In Objective: Demonstrate turbulent air to the front and rear of a passing truck
Small block of wood Shallow tray with one inch of sand
• Move the block of wood through the sand and call attention to how the sand is accumulating to the front and sides of the block of wood, while leaving a void of sand to the rear.
Explain that when a truck is approaching and getting ready to pass, there is the same type of movement of the air. The accumulation of air to the front of the truck can push a vehicle out of a travel lane away from the side of the truck. To the rear of the truck the void of air creates a vacuum that can draw a vehicle into the direction of the truck. The effects from the truck’s air turbulence will be most dominant when a vehicle is in a reduced traction situation.
Cookbook of Activities for Driver Education #77
ResponsibleDriving CH # 13, 14
Drive Right CH # 10
INSTRUCTIONS
INGREDIENTS
Title: Our Town Objective: Understand risk factors while driving
Paper and pencil
Divide the class into groups of three (3) • Give each group a blank sheet of paper • Each group member takes one of the three categories:
1. the driver, 2. the vehicle, 3. the roadway
• Instruct students to list 5 risk factors for their assigned category that are not listed in the textbook, and that are particular to your community
• Each group explains how and why the factors they selected are a risk to drivers
• After adequate time, have groups report to the whole class.
Cookbook of Activities for Driver Education #26
Responsible Driving CH # 1
Drive Right CH # 3

INSTRUCTIONS
INGREDIENTS
Title: The Eyes Have It Objective: Demonstrate the value of “pausing” while searching
Ten 3 x 5 cards per group, number the cards 0-9 4 foot measurement/distance
Divide the class into groups of 4 • Each group will have a tester, driver and 2 observers • Give the tester the 3 x 5 cards • Have the tester stand 4 feet from the driver • Select 2 cards without showing them to the driver • Have the tester hold 2 of the cards in one hand to form a 2
digit number • Have the driver move his/her head 90 degrees to the right
and left without pausing to see the numbers • Have the observers stand next to the tester to see if the
driver’s eyes pause to read the number • Have the tester hide the number • Ask the driver to state what the number was
o The group will discover that the driver can only correctly identify the number if they paused to look at it
• Repeat the exercise, this time allowing the driver to pause/fixate on the numbers.
• Repeat the exercise and change positions
Cookbook of Activities for Driver Education #27
ResponsibleDriving CH # 1
Drive Right CH # 4
INSTRUCTIONS
INGREDIENTS
Title: Where am I Heading? Objective: Handle a rear wheel skid with targeting skills
Chair that can swivel Simulated steering wheel
Directions: Assign a student to sit in the chair that can swivel, holding a simulated steering wheel.
• Tell the student to pretend they are driving. • Explain that in this simulation the intended path of travel
is toward the target (select one in the classroom, such as the door.)
• Tell the student to keep the vehicle on target, and as soon as the vehicle gets off target, turn the steering wheel to get the front of the vehicle back on target. Remind that a slight steering effort is all that is necessary. If the vehicle begins to move quickly off target, a very rapid and full turning of the wheel would be necessary to get the tires back on target.
• Stand to the rear of the chair and swing the chair slightly off target in one direction or the other. Observe how the student responds with steering and head movement toward the target.
• Swing the chair again, changing the direction and quickness.
• Ask students to provide feedback about the driver’s head position and direction, speed and the extent of the steering wheel turns.
Cookbook of Activities for Driver Education #76
Responsible Driving CH #
Drive Right CH #

INSTRUCTIONS
INGREDIENTS
Title: Slipping and a Sliding Objective: Demonstrate when it is near freezing, roads become slippery on ice & snow
Freezer Ice cubes
Directions: Demonstrate how road conditions can become slippery when ice and snow are near the freezing point (32 degrees, 0 degrees Celsius). If you have access to a freezer for the classroom, conduct the activity there, otherwise assign this as a homework project.
• Take ice cubes out of the freezer and have students hold them between two fingers for a few seconds.
• Point out that the cubes are sticky. • Have student place the cubes in a dish at room
temperature for a few minutes. • Have students pick up the ice cubes with two fingers. • Point out that the cubes are now slippery. • Ask to explain the differences and how this relates to
road conditions. • Discuss how black ice forms
When exposed to the warmer than freezing temperatures of the room, the melting ice cube becomes coated with a layer of water. When temperatures get above freezing, the ice warms up and begins to melt, placing a layer of water on top of the road surface.
Cookbook of Activities for Driver Education #75
ResponsibleDriving CH # 12
Drive Right CH # 12
INSTRUCTIONS
INGREDIENTS
Title: Your Order Please Objective: Practice the orderly visual search pattern
5 x 7 inch cards with the search pattern on it Moveable chairs or tape
Tape can be placed on the floor to outline an intersection
• Arrange rows of student chairs to simulate travel lane • Have at least one chair off to the side to represent a right-front zone
change caused by a car backing out of a driveway. • Have the students walk through the “travel lane” simulating they are
driving • Give each student one of the index cards and ask them to:
o Demonstrate how they are using that step of the orderly visual search pattern
o Verbalize how they are using that step of orderly visual search pattern
• Repeat each step several times with different students “driving” and explaining
ORDERLY VISUAL SEARCH PATTERN:
• Look ahead to your target area range. • Evaluate your left-front, front, and right-front zones in the 12-15 sec
range. Search driveways and intersections for possible changes in your line of sight and path of travel.
• Glance in rearview mirror to check rear zones • Evaluate your 4-6 second range before entering that space. • Look ahead again to evaluate another 12-15 sec range. • Check 4-6 second range. • Glance in rearview mirror. • Check speedometer and gauges. Note: Each look or glance should last only an instant as you evaluate your zones.
Cookbook of Activities for Driver Education #28
ResponsibleDriving CH # 11
Drive Right CH # 4

INSTRUCTIONS
INGREDIENTS
Title: Restrictions and Constrictions Objective: Identify line of sight and path of travel restrictions
Paper and pencil
Divide the class into groups of 3-4 students • Have one student draw three columns on a sheet of paper
placing the following at the top of the columns o Roadway Users o Roadway Features o Traffic Controls
• Ask each group to list examples of each of the above that can affect line of sight or path of travel
• After adequate time, have the groups share their information with the whole class
Cookbook of Activities for Driver Education #29
ResponsibleDriving CH # 1
Drive Right CH # 4
INSTRUCTIONS
INGREDIENTS
Title: Flash Me! Objective: Demonstrate how high beams reduce visibility
Two flashlights Very dark room
Directions:
• Ask for two volunteers: one to represent the driver and one to represent an oncoming vehicle.
• Have the volunteers stand ten feet apart facing each other and give them each a flashlight.
• Darken the room (the darker the better!) • Stand behind the student representing the oncoming
vehicle. Instruct the student in front of you to shine the flashlight directly at the other student, the driver.
• Hold up three fingers and ask the driver to tell you how many fingers you are holding up.
• When the driver cannot tell you how many fingers you are holding up, instruct the driver to shine the flashlight at the oncoming vehicle.
• Ask again how many fingers you are holding up. • The driver’s ability to see will not be improved by shining
the flashlight directly at the oncoming vehicle. • Repeat this activity with different students.
Cookbook of Activities for Driver Education #74
Responsible Driving CH # 12
Drive Right CH # 12
INSTRUCTIONS
INGREDIENTS
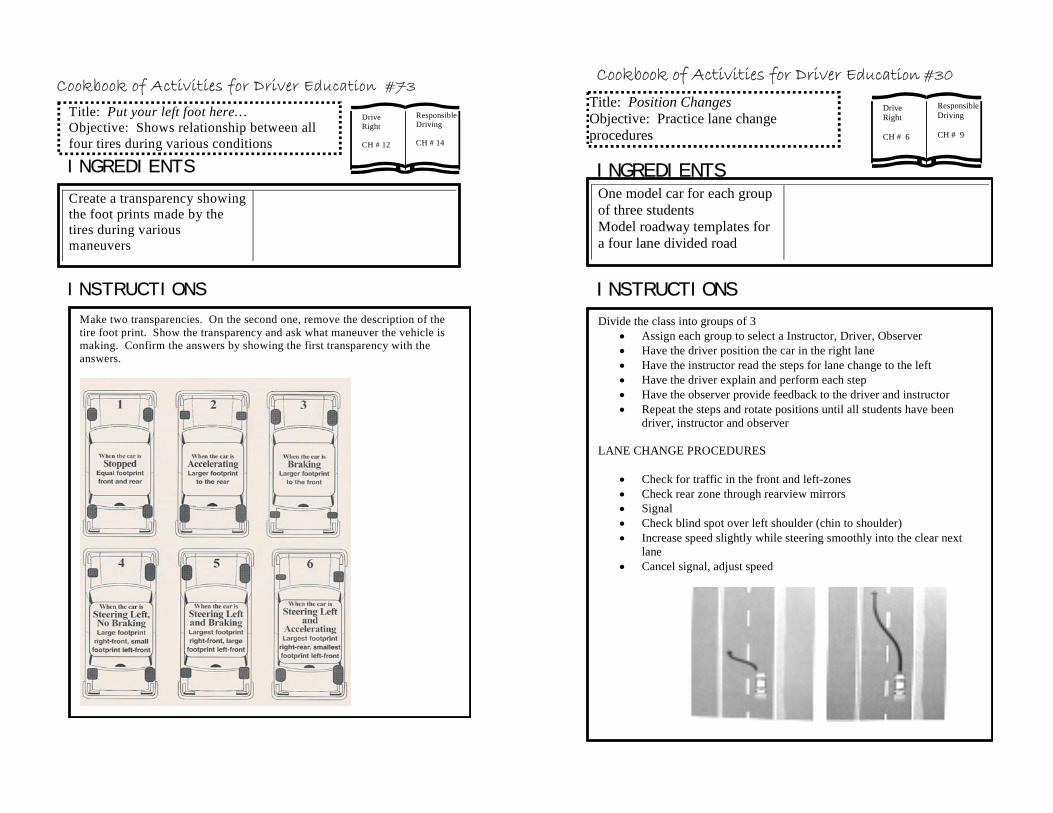
Title: Put your left foot here… Objective: Shows relationship between all four tires during various conditions
Create a transparency showing the foot prints made by the tires during various maneuvers
Make two transparencies. On the second one, remove the description of the tire foot print. Show the transparency and ask what maneuver the vehicle is making. Confirm the answers by showing the first transparency with the answers.
Cookbook of Activities for Driver Education #73
ResponsibleDriving CH # 14
Drive Right CH # 12
INSTRUCTIONS
INGREDIENTS
Title: Position Changes Objective: Practice lane change procedures
One model car for each group of three students Model roadway templates for a four lane divided road
Divide the class into groups of 3 • Assign each group to select a Instructor, Driver, Observer • Have the driver position the car in the right lane • Have the instructor read the steps for lane change to the left • Have the driver explain and perform each step • Have the observer provide feedback to the driver and instructor • Repeat the steps and rotate positions until all students have been
driver, instructor and observer LANE CHANGE PROCEDURES
• Check for traffic in the front and left-zones • Check rear zone through rearview mirrors • Signal • Check blind spot over left shoulder (chin to shoulder) • Increase speed slightly while steering smoothly into the clear next
lane • Cancel signal, adjust speed
Cookbook of Activities for Driver Education #30
ResponsibleDriving CH # 9
Drive Right CH # 6

INSTRUCTIONS
INGREDIENTS
Title: Hands Up Objective: Practice steering control while turning
Simulated steering wheel for each student
Give each student a simulated steering wheel Have the students place hands at 3-9 On command, have the students demonstrate proper hand positioning for HAND-OVER-HAND Pull the steering wheel down with one hand while your other hand crosses over to pull the wheel farther down
Left turn example: • Begin the turn with a balanced hand position • Start pulling down to the left with your left hand • Your right hand pushes the wheel toward the left about ¼ turn • Release your left hand from the wheel and cross it over your right
hand to grasp the wheel near the top. Continue pulling down PUSH-PULL This method allows you to keep both hands on the wheel at all times.
• One hand grasps the steering wheel near the 4 or 8 o’clock position. • That hand pushes the wheel up to near the 12 o’clock position. • At the same time, the other hand slides up to the 11 or 1 o’clock
position and pulls down. • As the pulling hand comes down, the pushing hand returns to the
original position to continue the procedure.
Cookbook of Activities for Driver Education #31
ResponsibleDriving CH # 8
Drive Right CH # 6
INSTRUCTIONS
INGREDIENTS
Title: Altering Depth Perception Objective: Demonstrates depth perception is altered when another vehicle is moving
2 match box cars file folder string soda can
Directions:
• Cut a 4 inch square \window in the front flap of the file folder. • The bottom edge of the window should be at the fold and the window should
be in the middle of the folder. • Tape the back of the folder to a table or desk. • Lift up the front of the folder and place a soda can on the back of the folder
to make the front stay up. • Attach a piece of string that is double the length of the table to the front of
one of the cars. • Attach a piece of string that is double the length of the table to the back of
the same car. • Place the car with the string on the file folder, one foot behind the window,
and facing away from you. • Run the front string forward , under the table and back to your side of the
table. You will use the strings to move the car forward and backward. • Place the other car next to the window. • Have a student look through the file folder window. • Have the student tell you when the two cars are aligned. • Move the car toward the window and past the stationary car. • Ask the student to close one eye and repeat the activity. • Ask students what effect this has on •
Cookbook of Activities for Driver Education #72
Responsible Driving CH # 3
Drive Right CH # 14

INSTRUCTIONS
INGREDIENTS
Title: Eye Ball Recovery Objective: Discover how eyes need time to recover after seeing headlights
Ten 4 X 6 inch cards Large flash light (two or three D-cell batteries)
Carton box about 18” long (the size box that holds reams of copy paper)
Directions: • Cut a 4 X 6 inch opening in one end of the box, which will be the
“viewer’s” opening. • Cut a 2 X 2 inch opening in the other end, which will be the “display”
end. • Cut a 4 X 6 inch opening in the middle of one side of the box, which
will provide a “natural light source.” • In the center of the index cards, print five-digit numbers ¼ inch high.
Cookbook of Activities for Driver Education #71
ResponsibleDriving CH # 12
Drive Right CH # 14
INSTRUCTIONS
INGREDIENTS
Title: Turn Back Objective: Practice backing left and right
Simulated steering wheel for each student
Have students select a target that is to their rear and 90 degrees to the right Using the steering wheel, students demonstrate backing to the right. Repeat activity backing to the left Evaluate performance for:
• Correct steering control • Visual search (correct shoulder) • Checking swing of front end of car
BACKING • Before backing, select a target to the rear at 90 degrees. • Before backing, check for traffic, pedestrians, parked vehicles, and any
stationary objects in front, around, and behind you. • Keep both hands on the wheel, ready for hand-over-hand steering. Pull the
wheel to the left to back left. • Pull the wheel to the right to back right. • The back of your vehicle will go in the direction you turn the wheel. • Look back toward the direction you want the vehicle to go. • Back slowly as you enter the turn. • Make quick glances to the front and sides to be sure no one is near. • Begin unwinding the steering wheel to finish the turn in a straight
position
Cookbook of Activities for Driver Education #32
Responsible Driving CH # 8
Drive Right CH # 6

INSTRUCTIONS
INGREDIENTS
Title: Big Turn, Little Turn Objective: Investigate turning radius of different vehicles
Owner’s Manuals Web Pages Older vehicle Newer vehicle
Take the students to the parking lot to evaluate two vehicles with different turning ratios, or Report on their findings from web pages, etc. Part 1 Start the students with an older vehicle
• With the wheels straight, count the number of turns until wheels lock to right.
• Repeat going to the left • Total the number of turns from lock to lock • Repeat above steps on newer vehicle • What are the differences?
Part 2 Use the owner’s manual and/or web pages of auto makers to compare the turning radii of various sized of vehicles.
• Compare sub-compact mid-size, and SUV or truck • How large is the turning radius? • What causes the differences?
Why is this important to know?
Cookbook of Activities for Driver Education #33
ResponsibleDriving CH # 8
Drive Right CH # 6
INSTRUCTIONS
INGREDIENTS
Title: Lets Process It Objective: Assess how much information can be processed at one time
Transparency with the numbers listed as shown Projector File Folder
Cookbook of Activities for Driver Education #70
Responsible Driving CH # 1
Drive Right CH # 4
Create a transparency with the numbers as shown below. • Make a mask out of a file folder stock to cover the
transparency • Cut an opening in the mask to allow only one number at a
time to be viewed. • Have the first number (7542) in the mask’s opening. • Tell students to look at the screen • Turn on the projector for one minute • Give 10 seconds to record what they saw after you turned
off the projector • Repeat for all the numbers
Discuss the results of the activity stressing how the mind can only process so much in a given period of time. We can train ourselves to be more aware and keying in on specific information that is critical.

INSTRUCTIONS
INGREDIENTS
Title: Simulated Shifting Objective: Practice shifting while in the classroom
Pencil or dowel Golf ball Compression spring about 1.5 to 2 inches Masking tape or duct tape
Shoe box Cardboard 1/8” plywood or masonite nut, bolt, washers (bolt head fits inside spring) Power drill
Cut a 1/8 inch plywood or masonite board to fit the inside of a shoe box. Cut another piece to fit in the inside of the box cover. Trace the shift pattern below onto the plywood for the box cover. Cut out the pattern. Cut away top of box to have shift pattern visible while leaving at least one inch border on the box cover for support. Tape the plywood to the inside of the box cover. Place cover on box with plywood on bottom. Locate the N (neutral) position centered between the 3rd and 4th gear and make a hole in the bottom plywood to receive the pencil. Place a small washer and bolt on the inside of the compression spring to hold it to the plywood. Place the pencil one inch into the spring. Wrap tape over spring. Drill a 5/16 hole one inch deep into the golf ball to receive the eraser end of the pencil. Press ball onto pencil.
Cookbook of Activities for Driver Education #69
ResponsibleDriving CH #
Drive Right CH #
INSTRUCTIONS
INGREDIENTS
Title: Merry Go Round Objective: Judge safe locations for turnabouts
Slides, pictures, videos with safe and unsafe locations for turnabout areas in your community
Divide the class into small groups Give each group several photos to look at Students evaluate:
• Which locations are safe for a turnabout • Which type of turnabout they would use and why • Which locations are poor places for a turnabout
Cookbook of Activities for Driver Education #34
Responsible Driving CH # 10
Drive Right CH # 6

INSTRUCTIONS
INGREDIENTS
Title: Finding Reference Points Objective: Understand personal reference points
Table or desk Chair 15 feet of masking/duct tape
Part 1 Place the table or desk at the front of the room to simulate the hood of vehicle
• Place a chair behind and to the left of the table to simulates driver position in the vehicle
• Place the masking/duct tape on the floor to the right of the table to simulates a curbline. The tape must extend 15 feet beyond the front of the desk.
Part 2 Have the students take turns sitting in the “driver’s seat” and explain their reference points to the curbline in relation to the desk. Move the tape or desk apart to simulate the distances for
• 3-6 inches from a line to the right. • Front bumper even with the curb line • 3 feet from a line to the right • 3-6 inches from a line to the left • 6 feet from a line to the right.
Cookbook of Activities for Driver Education #35
ResponsibleDriving CH # 7 N/a
Drive Right CH # 6
INSTRUCTIONS
INGREDIENTS
Title: Country Roads Take Me Home Objective: Define characteristics of rural roads
List of road conditions: Bridges Crowns Bushes Gravel Guardrails Narrow lanes Newly paved Potholes
No Shoulders Sharp curves In need of Repaving Objects too close to edge
Prior to this activity, ask students to list five areas where they have a line of sight restriction when in the car. 1. Provide the above examples to students 2. Divide the class into groups of five (5) 3. Each group identifies examples of each condition/situation on
local roads 4. Ask the following questions after lists are completed:
a) Which locations involve line of sight restrictions? b) What causes the restriction? c) Which locations require reduced speed and why?
After adequate time, have the groups share their findings
Cookbook of Activities for Driver Education #68
Responsible Driving CH # 11
Drive Right CH # 10
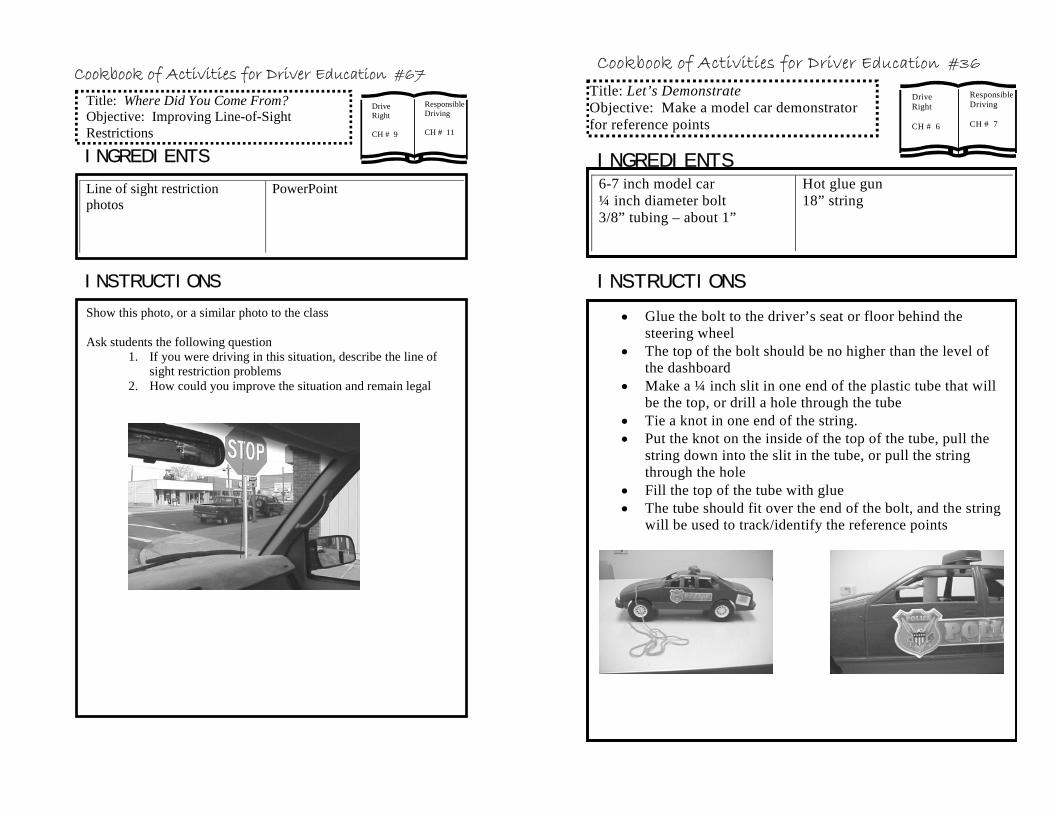
INSTRUCTIONS
INGREDIENTS
Title: Where Did You Come From? Objective: Improving Line-of-Sight Restrictions
Line of sight restriction photos
PowerPoint
Show this photo, or a similar photo to the class Ask students the following question
1. If you were driving in this situation, describe the line of sight restriction problems
2. How could you improve the situation and remain legal
Cookbook of Activities for Driver Education #67
ResponsibleDriving CH # 11
Drive Right CH # 9
INSTRUCTIONS
INGREDIENTS
Title: Let’s Demonstrate Objective: Make a model car demonstrator for reference points
6-7 inch model car ¼ inch diameter bolt 3/8” tubing – about 1”
Hot glue gun 18” string
• Glue the bolt to the driver’s seat or floor behind the steering wheel
• The top of the bolt should be no higher than the level of the dashboard
• Make a ¼ inch slit in one end of the plastic tube that will be the top, or drill a hole through the tube
• Tie a knot in one end of the string. • Put the knot on the inside of the top of the tube, pull the
string down into the slit in the tube, or pull the string through the hole
• Fill the top of the tube with glue • The tube should fit over the end of the bolt, and the string
will be used to track/identify the reference points
Cookbook of Activities for Driver Education #36
Responsible Driving CH # 7
Drive Right CH # 6
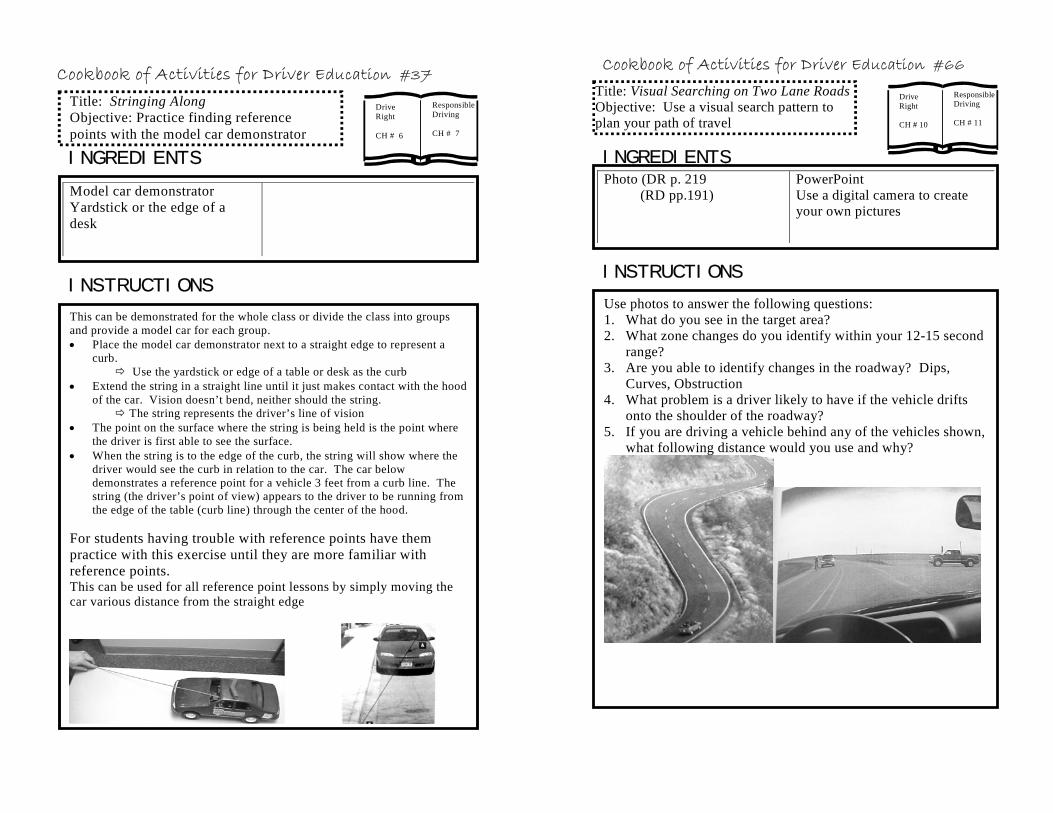
INSTRUCTIONS
INGREDIENTS
Title: Stringing Along Objective: Practice finding reference points with the model car demonstrator
Model car demonstrator Yardstick or the edge of a desk
This can be demonstrated for the whole class or divide the class into groups and provide a model car for each group. • Place the model car demonstrator next to a straight edge to represent a
curb. Use the yardstick or edge of a table or desk as the curb
• Extend the string in a straight line until it just makes contact with the hoodof the car. Vision doesn’t bend, neither should the string.
The string represents the driver’s line of vision • The point on the surface where the string is being held is the point where
the driver is first able to see the surface. • When the string is to the edge of the curb, the string will show where the
driver would see the curb in relation to the car. The car below demonstrates a reference point for a vehicle 3 feet from a curb line. The string (the driver’s point of view) appears to the driver to be running from the edge of the table (curb line) through the center of the hood.
For students having trouble with reference points have them practice with this exercise until they are more familiar with reference points. This can be used for all reference point lessons by simply moving the car various distance from the straight edge
Cookbook of Activities for Driver Education #37
ResponsibleDriving CH # 7
Drive Right CH # 6
INSTRUCTIONS
INGREDIENTS
Title: Visual Searching on Two Lane RoadsObjective: Use a visual search pattern to plan your path of travel
Photo (DR p. 219 (RD pp.191)
PowerPoint Use a digital camera to create your own pictures
Use photos to answer the following questions: 1. What do you see in the target area? 2. What zone changes do you identify within your 12-15 second
range? 3. Are you able to identify changes in the roadway? Dips,
Curves, Obstruction 4. What problem is a driver likely to have if the vehicle drifts
onto the shoulder of the roadway? 5. If you are driving a vehicle behind any of the vehicles shown,
what following distance would you use and why?
Cookbook of Activities for Driver Education #66
Responsible Driving CH # 11
Drive Right CH # 10

INSTRUCTIONS
INGREDIENTS
Title: Speeding is a Waste of Time Objective: Identifying ways to prevent speeding
Paper and Pencil
1. Divide the class into groups of 4 or 5 2. Appoint a recorder for each group 3. Have the students develop a list of reasons for:
a) Why do drivers speed? b) Why do drivers enter curves too fast?
4. Have students list ways to prevent speeding 5. Have students list ways to prevent speeding into curves 6. Identify ways to identify curves ahead of time 7. Discuss following distances in relation to curves and hazards
that may be on rural roadways
Cookbook of Activities for Driver Education #65
ResponsibleDriving CH # 11
Drive Right CH # 10
INSTRUCTIONS
INGREDIENTS
Title: Where Did You Learn to Park? Objective: Compare parking procedures
Paper/pencil
Divide the class into teams of five (5); discuss findings after this exercise • Ask each group to appoint a “recorder” • Each group lists:
o The behaviors/ steps used for each type of parking procedure o The behaviors/steps that are unique to each parking procedure
ANSWERS Procedures for all parking maneuvers:
• Check for traffic • Signal • Check blind spots • Use reference points • Move slowly • Straighten wheels when centered
Angle Parking: • Position vehicle at least 6 feet from parked cars • Creep forward until centered with space without line of sight cutting
across the parking line Perpendicular Parking:
• Position vehicle at least 8 feet from parked cars • When your front bumper passes the left rear taillight of the vehicle to the
right of the empty space, turn wheel sharply right. • Use forward reference point before striking the curb.
Parallel Parking: • Select space that is at least 5-6 feet longer than your vehicle • Stop 2-3 feet away from the front vehicle with the two rear bumpers even • Shift to reverse, look back and back slowly while turning right • When the back of your seat is even with the rear bumper of the front
vehicle, straight wheels • When your front bumper is even with the front vehicle’s back bumper,
turn wheels sharply left, back slowly • When parallel to the curb, straighten wheels and center in the space
Cookbook of Activities for Driver Education #38
ResponsibleDriving CH # 10
Drive Right CH # 6

INSTRUCTIONS
INGREDIENTS
Title: Conflicts and Resolutions Objective: Crossing intersections without conflict
Intersection template, one for each student, see DR Resource Book pg.41-43
Make transparency of template and template master
Divide class into groups of 3. Give each member of the group a copy of the intersection drawings. Ask each group to to draw the path of travel that vehicles and pedestrians can take in the intersection. See how many points of conflict they are able to illustrate. Project transparency, explain each dot represents a different conflict points in the intersection. Approaching Intersection:
• Conflict with vehicle from rear • Vehicle may hit your rear • Vehicle in process of making right turn may stop, causing you to hit it
While making a left turn: • While turning you may stop, causing others to hit you from the rear • Conflict with a vehicle:
o approaching from the west o from the east making a left turn o from the west making a left turn o from the north traveling south o from the east traveling west o from the north making a right tuirn o from the west may rear end you
While making a right turn: • Conflict with a vehicle from the north making a left turn • Conflict with a vehicle from the west traveling east, rear ending you • Your vehicle rear ending a vehicle
While traveling straight through the intersection: • Conflict with vehicle:
o From the west o from the north making a left turn o from the east o from the west making a left turn o from the east making a right turn o from the south rear ending you
Cookbook of Activities for Driver Education #39
ResponsibleDriving CH # 13
Drive Right CH # 7
INSTRUCTIONS
INGREDIENTS
Title: Follow That Truck Objective: Sharing the road with trucks
Paper Pencil
Step 1 Divide the class into groups of 4 Tell the groups they are to pretend they are on a two-lane roadway following a slow-moving truck. Ask the students to discuss and come to consensus on the following questions
• How are you likely to feel following this truck? • How closely will you follow the truck? • What will determine if you will have an opportunity to
pass? • What will you do if you do not have the opportunity to
pass? • What will it cost to not pass the truck? Time? Stress?
Accident potential? Step 2 After adequate time, have the groups share their findings
Cookbook of Activities for Driver Education #64
ResponsibleDriving CH # 11
Drive Right CH # 10

INSTRUCTIONS
INGREDIENTS
Title: High Speed Gap Objective: Entering traffic at high speed
Photo from below
1. Divide the class into groups of 5 2. Using the picture below, or one similar, have the students discuss and
come to consensus on the following questions: 1. Where do you think the truck in the median came from? 2. From all the gaps in the left lane of the northbound traffic that you
are able to see, which would be a suitable gap for the truck to enter? 3. What is the difference between a southbound and northbound vehicle
wanting to make a left turn?
ANSWERS: a) the side street b) the gap between the third and fourth cars from the bottom of the
photo c) there is no left turn lane for southbound traffic, therefore, it would
most likely be prohibited
Cookbook of Activities for Driver Education #63
ResponsibleDriving CH # 10
Drive Right CH # 10
INSTRUCTIONS
INGREDIENTS
Title: Checkers Objective: Demonstrate two objects can not occupy the same space at the same time
Checkerboard One red checker One black checker Timer
Part 1 Place the checkerboard on a table • Give a red checker to one student, who will be going north and south• Give a black checker to another student, who will be going east and
west • Set the timer for 1 minute
Part 2 Have the students gently slide their checkers back and forth as many times as possible in the one minute
• Score 1 point for each time the checker successfully crosses the board• If the checker becomes airborne, or collides, subtract 10 points
Part 3 How many points can be accumulated in 1 minute? • Record the scores • Repeat the activity with several more players
Part 4 Discuss the likelihood of both checkers clearing the point of conflict by chance verses as a result of effective searching and communication.
Cookbook of Activities for Driver Education #40
Responsible Driving CH # 13
Drive Right CH # 7

INSTRUCTIONS
INGREDIENTS
Title: Seat Belt Lotto Objective: Not using safety belts is a gamble
Small pieces of paper with students’ name Box for all the names 30 pennies, one per student
Ask students to bring their own pennies
Put all the students names in the box. • At three different times during the class, select a name
from the box. (The name goes back in the box after each drawing)
• The “winner” of the drawing pays each class member 1 penny. Ask:
• How do you like this lotto? • How long would it take to lose all your pennies? • Is this game worth it? • What lotto are people playing when they don’t wear their seatbelts? • Is this a high-risk, low-gain game? Are you willing to play?
Cookbook of Activities for Driver Education # 41
ResponsibleDriving CH # 7
Drive Right CH # 5
INSTRUCTIONS
INGREDIENTS
Title: Speed Kills Objective: Develop knowledge about the effects of speed
Paper and Pencil
Divide the class into small groups for discussions Each group answers the following questions; be prepared to share their responses. Responses should be consensus of the group. 1. Why do drivers speed? 2. What are the legal consequences of speeding? 3. When does speeding have a high collision potential? 4. What good habits can drivers develop to avoid speeding?
Cookbook of Activities for Driver Education62Responsible Driving CH # 6
Drive Right CH # 9

INSTRUCTIONS
INGREDIENTS
Title: Behind Door #1 Objective: Identify advantages for using different lane positions
DR page 184 photos of parked car with door opening into traffic; busy intersection with traffic light
Develop your own digital photo gallery
Have students look at photos and answer the following questions.
Photo 1 What are the advantages of having the car in lane position 2 before the car’s door is flung open? ANSWER: Room for the door without changing path of travel
Photo 2 What actions should a driver take to be ready for the light to change?
ANSWER: Cover the brake, turn head 45-degrees right to look for anything approaching from a line-of-sight restriction
Cookbook of Activities for Driver Education #61
ResponsibleDriving CH #
Drive Right CH # 9
INSTRUCTIONS
INGREDIENTS
Title: I’ll get there Sooner or Later Objective: Calculate distance traveled at various speeds
Calculators Paper/pencil
One mile = 5,280 feet.
)sec467.1(secsec60min60280,5
ondperfeetonpertraveledfeetfeet =÷÷
Use the following formulate to calculate the distance a vehicle travels at various speeds. Part I Assign students to calculate distance traveled for:
• 25mph (37 feet per second) • 35mph (51 feet per second • 45mph (66 feet per second) • 55mph (80 feet per second) • 65mph (95 feet per second) • 75mph (110 feet per second)
Part II Calculate the following story problems John travels to school every day averaging 30mph. (This time does not account for any stops, delays, etc., which does not typically occur!) He travels 6 miles one way. How long does it take him to get to school?
• 30mph x 1.467 = 44 feet per second traveled • 44 feet x 60 seconds in a minute = 2640 feet per minute (1/2 mile) • 6 miles x 5,280 feet (mile) = 31,680 feet in 6 miles • 31,680 feet (6 miles) ÷ 2640 feet (minute) = Takes 12 minutes for 6
miles John is late one day and speeds up to 40mph. How much time does he save?
• 40mph x 1.467 = 58.5 feet per second traveled • 58.5 x 60 seconds = 3510 feet per minute • 6 miles x 5280 = 31680 feet in 6 miles • 31680 feet ÷ 3510 = 9 minutes
He may get there 3 minutes earlier, if he doesn’t get stopped by law enforcement in which case he will really be late! He would benefit by not leaving for school late.
Cookbook of Activities for Driver Education #42
ResponsibleDriving CH # 13
Drive Right CH # 9

INSTRUCTIONS
INGREDIENTS
Title: Balance my Pencil Objective: Changing the center of gravity
Pencil Paperclip
Instruct students to balance a pencil on their index finger.
• The first time do it with the eraser end up.
• The second time do it with the eraser end down. Ask: Which position had the lower center of gravity? Instruct student to place a paper clip on the pointed end of the pencil and again balance it on their index finger. Ask: How did the center of gravity change?
Cookbook of Activities for Driver Education #43
ResponsibleDriving CH # 14
Drive Right CH # 5
INSTRUCTIONS
INGREDIENTS
Title: Targeting on Rural Roads Objective: Search for line of sight and path of travel restrictions
Photo DR p. 201 RD pp.204-207 Power Point
Use the photos to answer the following questions: 1. What do you see in the target area? 2. What zone changes do you identify within your 12-15 second
range? 3. Are you able to identify changes in the roadway?
• Dips, • Curves • Obstruction
4. What problem is a driver likely to have if the vehicle drifts onto the shoulder of the roadway?
5. If you are driving a vehicle behind any of the vehicles shown, are you following too close for the speed of that roadway?
Cookbook of Activities for Driver Education #60
ResponsibleDriving CH # 11
Drive Right CH # 10

INSTRUCTIONS
INGREDIENTS
Title: Don’t Be A Dummy Objective: Preventing excess speed on curved roads
Paper and Pencil
Divide the class into groups of 4 or 5 1. Each group selects a recorder 2. Have the students develop a list of reasons for:
• Why do drivers speed? • Why do drivers enter curves too fast?
3. Have students list ways to prevent speeding. 4. Have students list ways to prevent speeding into curves 5. Identify ways to identify curves ahead of time 6. Discuss following distances in relation to curves and hazards
that may be on rural roadways
Cookbook of Activities for Driver Education #59
ResponsibleDriving CH # 11
Drive Right CH # 10
INSTRUCTIONS
INGREDIENTS
Title: Peripheral Vision and Braking Objective: Practice using peripheral vision and braking and turning in standard trans.
Desks Simulated Steering wheels Simulator gas/brake/clutch is optional
Contributed by: Troy Shippen Rigby High School
Part 1 Select two students as “signalers”. Have each student stand at the front of the class on opposite sides of the room facing the instructor. Instructor stands at the back of the classroom. The remaining students sit in chairs, facing front with steering wheels in hands Part 2 Students hold steering wheels on top of desk and have their “cars” stopped. Left toes down (clutch), right toes down (brake). Keep heels on the floor. Part 3 Signalers mimic instructor with the following and Students “driving” are to respond appropriately to signal. 1. Hand Straight up above head means stop. (Braking in standard) 2. Dropped hand to the side means go. Must follow Straight up 3. Hand Straight out to the Right means Right Turn 4. Hand Straight out to the Left means Turn Left. 5. Straight up call together means emergency stop Part 4 Give students time to react. Gradually speed up process Give signals to different sides randomly for more peripheral vision practice Once in a while, have both signalers give an inside signal. Watch the reaction of the class. Who brakes for confusion? Part 5 Change seating in the room to give different peripheral views.
Cookbook of Activities for Driver Education # 44
Responsible Driving CH # 3
Drive Right CH # 4

INSTRUCTIONS
INGREDIENTS
Title: On the Right Path Objective: Use lane position, speed control and communication to minimize zone changes
Roadway sheets 4-19 Two cars per group Three wild cards per group
Part 1 Divide the class into groups of three
• Give each group a roadway sheet and two cars; each group having a different roadway
Part 2 Have each group formulate three problems that could affect their path of travel or line of sight while traveling on urban roadways
• Use the cars to demonstrate how to use lane positioning,
speed control and communication to minimize each zone change
Cookbook of Activities for Driver Education #45
ResponsibleDriving CH # 11
Drive Right CH # 9
INSTRUCTIONS
INGREDIENTS
Description: Use the Best Lane to See Objective: Select best lane for more time and space to see and avoid conflicts
Overhead or PowerPoint of an Intersection diagram 2” square object
2 cars of different colors Pencil
Part 1 Place a two-inch square object at the southeast corner of the intersection to represent a building
• Place car #1 in lane position 3 in the inside lane heading west
Part 2 Place car #2 three (3) car lengths south of the intersection heading
north • Begin with the car #1 in the left-hand lane, lane position 2
heading west • Place the eraser end of a pencil where the driver would be
seated and pivot the pointed end to demonstrate looking to the left (line of sight restriction by the building)
• Move car #2 into lane position 2, until the driver is able to see the car approaching from the east without being blocked by the building.
• Point out how close car #1 is to the intersection before the driver can see beyond the line-of-sight restriction.
Part 3 Repeat the activity with car #1 in the right-hand lane and place it in lane position 3 (far right side)
• Point out how much sooner the driver can see beyond the line-of-sight restriction
•
Cookbook of Activities for Driver Education #58
ResponsibleDriving CH # 11
Drive Right CH # 9

INSTRUCTIONS
INGREDIENTS
Title: Dangerous Places Objective: Identifying dangerous places where vehicles and pedestrians risk collision
Photos of alleys, driveways and parking lots
Part 1 Divide the class into groups of five (5) Appoint a recorder for each group Part 2 Using the photos, slides or familiar place, have the
students:
• Name the location of dangerous pedestrian crossing or parking lot
• List actions drivers can take to minimize risks of
hitting the pedestrians Part 3 Report findings to class
Cookbook of Activities for Driver Education #57
ResponsibleDriving CH # 13
Drive Right CH # 8
INSTRUCTIONS
INGREDIENTS
Title: One-Way, Two-Way, Know Way Objective: Identify LOS-POT on one-way and two-way streets
Roadway sheets 2,3,4 2 cars per group 3 wild cards per group
Overhead or PowerPoint of Roadway sheets
Part 1 Divide the class into groups of three (3)
• Give each group a roadway sheet, 2 cards and 3 wild cards
Part 2 Using the roadway sheets, cars, and wild cards, create
problems that could affect path of travel and/or line of sight while traveling on a two-way street
• Use the same sheets, but change it to a one-way street to
discover how the problems of a one-way street are different from a two-way street
Part 3 Have the groups report their findings to the class using the overhead or PowerPoint
Cookbook of Activities for Driver Education #46
ResponsibleDriving CH # 11
Drive Right CH # 9

INSTRUCTIONS
INGREDIENTS
Title: Curvy Driving Practice search pattern for rural roads
One Model Car per group Roadway sheets 1 and 5 List of Orderly Search Pattern (DR p.67, RD pp.11-12)
1. Divide the class into groups of three • Instructor • Driver • Observer
2. Give each group a car and roadway sheet • Point out the Roadway sheet represents rural roadways
3. Have the “Driver” position the car on an approaching curve4. Have the “Instructor” read the steps for approaching a curve
(Visual Search) 5. Ask the “Driver” to explain and perform each step 6. The “Observer” provides feedback to the “Driver” and the
“Instructor” 7. Repeat the activity until each student has played each role 8. Use transparency or PowerPoint to give the students feedback
for each step of the orderly visual search pattern
Cookbook of Activities for Driver Education #47
ResponsibleDriving CH # 11
Drive Right CH # 10
INSTRUCTIONS
INGREDIENTS
Title: Where am I Hiding? Objective: Practice searching for motorcyclists within the traffic mix
DR page 150 Paper/pencil
RD page 221
Divide the class into groups of three. Assign the group to view the picture in the textbook and discuss how motorcyclist can be easily hidden.
• Ask the groups to record the number of ways a motorcyclist can be hidden.
• Ask if you really can see a motorcyclist through another
vehicle’s windows as depicted in Drive Right. (the answer is no)
• Ask if riding between vehicles is legal or safe? In Idaho
it is illegal, in California it is not illegal but if there is a collision, the rider will probably be cited.
Emphasize the need to not share any portion of a lane with a motorcyclist. They need to have a complete lane to themselves to operate safely.
Cookbook of Activities for Driver Education #56
Responsible Driving CH # 12
Drive Right CH # 8

INSTRUCTIONS
INGREDIENTS
Title: Little Things That Get You Objective: Understanding the difficulty seeing small cars and motorcycles
Black Videocassette jacket Dark painted Pencil
Paper and pencil for students
Part 1 Hold the videocassette and the pencil together in one hand in view of the class for five (5) seconds
• Make sure the pencil is along and against the edge
of the cassette
• After 5 seconds, put both objects down where students cannot see them
Part 2 Ask students to use their paper and pencil to write down
what they saw in your hand
• After they have written down their responses, solicit feedback
• Most will have seen the cassette, but very few will have
noticed the pencil Part 3 Emphasize that small objects (motorcycles) are difficult
to see unless a systematical search is used
• Hold up the cassette and pencil again, and point out how much easier it is to see the pencil when looking for it
Cookbook of Activities for Driver Education #55
ResponsibleDriving CH # 13
Drive Right CH # 8
INSTRUCTIONS
INGREDIENTS
Title: Curvy Driving II Objective: Practice visual search pattern for curved roads
Roadway Sheets 5 and 6 Model Car for each group Orderly Visual Search Pattern List (DR p. 200, RD pp.11-12)
1. Divide the class into groups of three (3) Driver, Instructor, Observer
2. Give each group of students a car and roadway sheets 5 & 6 3. Have the “Instructor” read the steps 4. Have the “Driver” explain and demonstrate how it is
performed 5. Have the “Observer” provide feedback to the “Driver” and
“Instructor” 6. Repeat the activity until each student has played each role
Cookbook of Activities for Driver Education #48
ResponsibleDriving CH # 11
Drive Right CH # 10

INSTRUCTIONS
INGREDIENTS
Title: Passing Without Crashing Objective: Develop judgment for passing
Photos of your community. Use as PowerPoint, transparency or individual pictures
1. Divide the class into groups of five (5) 2. Ask the groups to evaluate the situations shown in the photos3. Determine if it is or is not safe to pass and explain why for
each photo 4. Discuss the findings after adequate time
Cookbook of Activities for Driver Education #49
ResponsibleDriving CH # 9
Drive Right CH # 10
INSTRUCTIONS
INGREDIENTS
Title: Knowing Your Right-of-Way Objective: Develop understanding of right-of-way
Roadway sheets 3 and 4 2 model cars per group 3 wild cards per group
DR pp 142 and 143 pictures RD pp 100-102 pictures
Divide the class into groups of three (3) Using the Roadway sheets, and the pages listed above, Have the students take one situation/picture at a time and discuss the right of way and justify their decision
Cookbook of Activities for Driver Education #54
ResponsibleDriving CH # 6
Drive Right CH # 7

INSTRUCTIONS
INGREDIENTS
Title: Put Control in the Uncontrolled Objective: Practice procedures for uncontrolled intersections
Roadway Sheets 3 and 4 2 model cars per group 1 wild card per group
Divide the class into groups of three (3) Appoint within the group an Instructor, Driver, Observer
• The “Instructor” describes each step in the procedure at uncontrolled intersections
• The “Driver” moves the model car as each step is
described by the “Instructor” on the Roadway Sheets
• The “Instructor” and “Observer” provide feedback Rotate Positions
Cookbook of Activities for Driver Education #53
ResponsibleDriving CH # 6
Drive Right CH # 7
INSTRUCTIONS
INGREDIENTS
Title: Sharing a Narrow Road Objective: Select safe places for meeting on-coming traffic on rural/narrow roads
2 Model cars per group 1 Wild Card per group Roadway Sheets 1 & 5 Representing rural roads
Part 1 Have the students demonstrate the following behaviors when meeting oncoming traffic on a narrow rural road:
• Blowout, hitting or swerving to avoid a pothole or other debris on the road
• Unexpected loss of traction due to ice, snow, rain or mud • Distractions • Impairment due to alcohol, other drugs, or medications • Impairment due to illness or fatigue • Vehicle failure
Part 2 Have students list additional situations that could cause a
head on collision.
Cookbook of Activities for Driver Education #50
Responsible Driving CH # 13
Drive Right CH # 10

INSTRUCTIONS
INGREDIENTS
Title: Group Quiz Objective: Review signals, searching, and left turns
Quiz sheet Notebook and Paper
Part 1 Divide the class into groups of three or four • Select a student “recorder” for each group • Tell the students they will be taking a group quiz • Give each team a copy of the quiz
Part 2 The group must arrive at one answer that all agree upon for each question
• Once an answer is agreed to, record the answer by writing it down
• Grades for each group are given to each member based on the group answers
Sample Questions for Quiz
1. What is a stale green light? 2. How can you identify a stale green light? 3. What searching actions should you take before
entering a fresh red light? 4. How is the point-of-no-return used when the signal
light turns yellow? 5. What is an unprotected left turn? 6. What are three different ways that you can make a
protected left turn?
Cookbook of Activities for Driver Education #51
ResponsibleDriving CH # 10
Drive Right CH # 7
INSTRUCTIONS
INGREDIENTS
Title: Under Control Objective: Practice identifying controlled and uncontrolled intersections
• Slides, overhead or digital photos of
• Controlled and uncontrolled
• Intersections from
PowerPoint can also be used
Divide the class into groups of three
• Show picture, video or slide of one intersection
• Working as a group, have students: o Classify the intersections as Controlled or
Uncontrolled o list the clues used to identify the intersection
• Repeat with additional photos, videos, or slides
Cookbook of Activities for Driver Education #52
ResponsibleDriving CH # 6
Drive Right CH # 7