nas4rm.pdf - addonics technologies · hours: 8:30 am - 6:00 pm pst phone: 408-453-6212 email: ......
TRANSCRIPT

Technical SupportIf you need any assistance to get your unit functioning properly, please have your product information ready and contact Addonics Technical Support at:
Hours: 8:30 am - 6:00 pm PSTPhone: 408-453-6212Email: http://www.addonics.com/support/query/
T E C H N O L O G I E S
www.addonics.com
Internal GigaNASAdapter
(NAS4RM)
User Guide

www.addonics.com Technical Support (M-F 8:30am - 6:00pm PST) Phone: 408-453-6212 Email: www.addonics.com/support/query/
Overview
1
23 4 5
6 7
1. Power LED2. Status LED3. Reset Button4. RJ45 Connector for LAN Connection5. USB Port for Additional USB Storage Device
6. 4P Molex Power Connector7. 2x SATA Port
Storage Ports: SATA (1.5Gbps) and two USB (2.0).Network Port: Supports 10/100/1000.
Power LED: glows when unit is on.Status LED: glows steady when unit is idle, other states are dark or dim to indicate a problem, slow or fast blinking between dark and bright or dim and bright to indicate the unit is busy.
SATA - eSATA Converter (2)

www.addonics.com Technical Support (M-F 8:30am - 6:00pm PST) Phone: 408-453-6212 Email: www.addonics.com/support/query/
Quick Install
In order to start sharing storage as soon as possible, follow these steps:Step 1. Attach the NAS 4.0 unit to a network with a DHCP server present(most home routers provide this by default).Step 2. Follow the steps described in the Initial Setup section below.Step 3. Attach one hard disk. The Status LED should begin to blink after afew moments, then settle back to a steady glow. Confirm at least onepartition was detected using the View Drive Information feature in theConfiguration Menu. If not, the drive may be formatted with ext3 or XFSusing the Format Drive feature in the Configuration Menu.Step 4. Define at least one share, granting either read-only or full accessrights to “Everyone.”
Installation
Network Connection
The NAS unit is factory configured for dynamic IP addressing (DHCP client). Connect the unit to a network (router or switch) where DHCP is supported. Static IP may be assigned later after initial setup.
Storage
The NAS unit does not support FIS switching for port multipliers, therefore any eSATA devices must be a single drive or a RAID array. Also, through the use of USB hubs, up to a total of 16 physical storage devices may be connected, also counting any eSATA drives. One SATA port multiplier in JBOD mode may be connected using USB; however, with more than one such port multiplier connected only one will function – others will not be recognized at all.
Each physical unit may be formatted with up to 4 individual partitions using a Master Boot Record (MBR), or up to 15 individual partitions using a GUID Partition Table (GPT). Supported file systems are: FAT32, ext2, ext3, ext4, XFS, and NTFS. The NAS unit will by far provide the best performance when using the XFS file system.
NOTE: Initializing a drive with MBR is limited to drives less than 2TB in capacity with up to 4 partitions total. For drives greater than 2TB in capacity or if more than 4 partitions are desired, the drive must be initialized using a GPT boot record.
The NAS Unit Boot ProcessUpon connecting power the unit, the status LED will blink at first between bright and dim, then remain dark for a few moments, then begin to blink between bright and dark for a while and finally settle down to glowing steadily. Once this pattern is complete the unit is ready to communicate.
This process normally takes about a minute or less, but may take longer depending on the complexity of the configuration, storage and LAN connections. With the 240 possible file systems, booting may take several minutes or longer.
Resetting the NAS Should a problem arise with the NAS unit or its configuration, the unit may be reset simply by turning the unit off, then back on after a few moments. If this doesn't clear the problem, the unit may be returned to its factory configuration by gently pressing and holding the reset button between the power and LAN connectors until the Status LED blinks slowly, then rapidly. After releasing the Reset button while blinking slowly there will be no changes. After releasing the button once the Status LED blinks rapidly, the Status LED will continue to blink for a while, and may possibly glow steadily for a while as well. Eventually it will begin the boot process, beginning with blinking between bright and dim. Once the boot process is complete and the LED is glowing steadily again, all settings will have been cleared and the unit is ready to communicate with all settings reset to the factory default – including the network and device name settings. If the process appears to become stuck or takes too long to complete, you can try disconnecting power, then reconnect and after the Status LED blinks bright and dark a few times, try the Reset button again.
Initial SetupWindows: All of the NAS unit's functions and features are configured using a Web Interface. Once the hardware is installed, access the Web Interface with a web browser on a computer attached to the same network by typing in “http://addnas” - this will work on most Windows systems. Be sure the computer accessing the NAS has the Workgroup name set to WORKGROUP.
MAC: Mac users may need to determine the NAS unit's IP address by opening a Terminal window and typing the following command:smbutil lookup addnas This utility should return the NAS unit's IP address. Typing this address into the web browser should open the NAS unit's Web Interface.Linux: Linux users may need to determine the NAS unit's IP address if Windows name resolution support is not fully installed and configured, by examining the DHCP server's clients table and attempting to connect to each unidentified IP address using a browser until the NAS unit's Web Interface appears.

www.addonics.com Technical Support (M-F 8:30am - 6:00pm PST) Phone: 408-453-6212 Email: www.addonics.com/support/query/
Once you have connected to the Web Interface, the Initial Setup page will appear:
Click Next, then a dialog will appear requesting the Administrator login. The default username is "admin" and the password is "123456" (without the double-quote marks). Next, set a custom password for the admin account. The admin account name may also be changed.
Next, set up the Date and Time. Choose a city nearest you in the same Time Zone and be sure the Date and Time are correct.

www.addonics.com Technical Support (M-F 8:30am - 6:00pm PST) Phone: 408-453-6212 Email: www.addonics.com/support/query/
Finally, review and confirm the settings:
After clicking on the Update settings button, Initial Setup is complete.
Sharing Files Using the NAS UnitSMB (Windows Sharing)Connecting to the NAS for direct file access through Windows Explorer is very similar to sharing files between Windows systems. Typing “\\ADDNAS” (or the NAS unit's hostname if changed from the default) or the double-backslash followed by the NAS unit's IP address is the easiest way to gain direct access quickly. After pressing Enter, the Explorer Window should show a list of the shares available. Opening any of the shares is like opening any other folder, except when accessing a share for the first time, Windows may request a username and password for access to the share (unless “Everyone” permissions have been changed from the default setting of NONE). Entering a valid username and password will open the folder with appropriate access rights to that user. If “NONE” permissions are set for that user on that share, Another username and password prompt will appear. After connecting to a share, Windows will use the same username and password for all connections until the Windows user logs off of Windows.
On Mac systems, on the Finder's Go menu choose “Connect to Server...” then in the server address box type “smb://” followed by the NAS unit's IP address. On Linux systems, use the “Connect to share...” dialog found on the Nautilus or “File Manager” menu bar, then select Windows Share for the type and complete the remaining fields for share name, username and password. Information required to complete the connection and the system's response vary from one version of Linux to another, and should be expected to work about the same way as connecting to a share on an actual Windows PC.
FTP ServerThe NAS FTP Server requires the "User Home Directory Drive" is defined under the Sharing Tab to function. Anonymous login is supported with no user home directory and access to any shares with read-only or read and write access to "Everyone" for FTP. Authenticated users will have read and write access to their home folder and any other shares defined under the Sharing tab with read-only or read and write access for the user for FTP, as well as "Everyone."
Getting Started with MLDonkey
MLDonkey is a powerful, multi-protocol Peer-to-Peer (P2P) client included with theNAS unit. The features and capabilities of this tool are beyond the scope of this user guide, the steps below will show how to get MLDonkey up and running. For more information on how to use MLDonkey, visit http://mldonkey.sourceforge.net.
MLDonkey Basic SetupThe MLDonkey client requires one partition formatted with either ext3 or XFS. The NAS unit's format utility can format one physical unit with a single partition using all space if needed
Under the P2P/MLDonkey tab, choose the drive you wish to create the file structure on and click Save. Please note: this menu will permit setting up folders on incompatible file systems. If this is done, MLDonkey will not start or may not be able to download files.
When the folder structure is set up, a page will appear stating this is done. Click the START button. NOTE: The MLDonkey setup page will create a share on the selected drive called MLDonkey. This share will be configured with “None” permissions to “Everyone” as well as all existing users.
Next, a new page will appear stating MLDonkey is running. Click the link at the bottom of the page that reads “Launch MLDonkey Control Panel.”
A new tab will appear in the browser with the MLDonkey web interface. If MLDonkey is not fully initialized yet, the browser may report a failure to connect. If this happens, wait about one minute and try again, either by refreshing the page or clicking a “try again” button – this step varies depending on the browser used.
When first setting up, a prompt appears warning there is no password for the admin account. Click the space between the “DL” and “Input” buttons, then type the command “useradd admin” as shown, then add a password after a space.
NOTE: The MLDonkey admin account is not the same account as the NAS unit's web interface admin account. It is recommended that the password matches for simplicity, but not necessary.
MLDonkey will perform most of the remaining steps automatically and connect tosome servers on the Donkey network.
To download a file using the Donkey network, begin by clicking search, then entersome criteria and click the Search button. After a query message appears, click the "Search Results" button.
To download a Torrent, on the command bar type dllink followed by a space and the full URL path to the .Torrent file and press Enter or click Input. (example: "dllinkhttp://sampletorrent.com/path/dot-torrentfile.torrent"). MLDonkey will parse thedownload and add it to the download queue automatically.
Files queued for download will appear in the MLDonkey share in the incoming/files folder when when complete.
NOTE: this folder has read-only permissions and cannot be changed.
.

www.addonics.com Technical Support (M-F 8:30am - 6:00pm PST) Phone: 408-453-6212 Email: www.addonics.com/support/query/
Sharing Files Using the NAS UnitSMB (Windows Sharing)Connecting to the NAS for direct file access through Windows Explorer is very similar to sharing files between Windows systems. Typing “\\ADDNAS” (or the NAS unit's hostname if changed from the default) or the double-backslash followed by the NAS unit's IP address is the easiest way to gain direct access quickly. After pressing Enter, the Explorer Window should show a list of the shares available. Opening any of the shares is like opening any other folder, except when accessing a share for the first time, Windows may request a username and password for access to the share (unless “Everyone” permissions have been changed from the default setting of NONE). Entering a valid username and password will open the folder with appropriate access rights to that user. If “NONE” permissions are set for that user on that share, Another username and password prompt will appear. After connecting to a share, Windows will use the same username and password for all connections until the Windows user logs off of Windows.
On Mac systems, on the Finder's Go menu choose “Connect to Server...” then in the server address box type “smb://” followed by the NAS unit's IP address. On Linux systems, use the “Connect to share...” dialog found on the Nautilus or “File Manager” menu bar, then select Windows Share for the type and complete the remaining fields for share name, username and password. Information required to complete the connection and the system's response vary from one version of Linux to another, and should be expected to work about the same way as connecting to a share on an actual Windows PC.
FTP ServerThe NAS FTP Server requires the "User Home Directory Drive" is defined under the Sharing Tab to function. Anonymous login is supported with no user home directory and access to any shares with read-only or read and write access to "Everyone" for FTP. Authenticated users will have read and write access to their home folder and any other shares defined under the Sharing tab with read-only or read and write access for the user for FTP, as well as "Everyone."
Getting Started with MLDonkey
MLDonkey is a powerful, multi-protocol Peer-to-Peer (P2P) client included with theNAS unit. The features and capabilities of this tool are beyond the scope of this user guide, the steps below will show how to get MLDonkey up and running. For more information on how to use MLDonkey, visit http://mldonkey.sourceforge.net.
MLDonkey Basic SetupThe MLDonkey client requires one partition formatted with either ext3 or XFS. The NAS unit's format utility can format one physical unit with a single partition using all space if needed
Under the P2P/MLDonkey tab, choose the drive you wish to create the file structure on and click Save. Please note: this menu will permit setting up folders on incompatible file systems. If this is done, MLDonkey will not start or may not be able to download files.
When the folder structure is set up, a page will appear stating this is done. Click the START button. NOTE: The MLDonkey setup page will create a share on the selected drive called MLDonkey. This share will be configured with “None” permissions to “Everyone” as well as all existing users.
Next, a new page will appear stating MLDonkey is running. Click the link at the bottom of the page that reads “Launch MLDonkey Control Panel.”
A new tab will appear in the browser with the MLDonkey web interface. If MLDonkey is not fully initialized yet, the browser may report a failure to connect. If this happens, wait about one minute and try again, either by refreshing the page or clicking a “try again” button – this step varies depending on the browser used.
When first setting up, a prompt appears warning there is no password for the admin account. Click the space between the “DL” and “Input” buttons, then type the command “useradd admin” as shown, then add a password after a space.
NOTE: The MLDonkey admin account is not the same account as the NAS unit's web interface admin account. It is recommended that the password matches for simplicity, but not necessary.
MLDonkey will perform most of the remaining steps automatically and connect tosome servers on the Donkey network.
To download a file using the Donkey network, begin by clicking search, then entersome criteria and click the Search button. After a query message appears, click the "Search Results" button.
To download a Torrent, on the command bar type dllink followed by a space and the full URL path to the .Torrent file and press Enter or click Input. (example: "dllinkhttp://sampletorrent.com/path/dot-torrentfile.torrent"). MLDonkey will parse thedownload and add it to the download queue automatically.
Files queued for download will appear in the MLDonkey share in the incoming/files folder when when complete.
NOTE: this folder has read-only permissions and cannot be changed.
.
The Configuration Tab
Update Admin Username and Password
Changes the web interface management login.
Configure User Home Directory Drive
Determines which drive on the system carries the HOME directory for users. Theuser's home folder is required for FTP transfers and as a network share for private files. If a home directory is already defined it will be shown. Choose a volume and click Save. If any files exist in a previous Home directory they will be moved to the new location.
Change Current Date and Time
Settings for time zone, date and time. Set time zone to a listed city nearby in thesame time zone.
Update Device/Workgroup Names
Settings for the NAS unit's network name and Windows workgroup. Default setting is ADDNAS joined to WORKGROUP. Setting the workgroup name on all devices on the same network to match is strongly recommended. The Device name is
www.addonics.com Technical Support (M-F 8:30am - 6:00pm PST) Phone: 408-453-6212 Email: www.addonics.com/support/query/
The Configuration Tab
Update Admin Username and Password
Changes the web interface management login.
Configure User Home Directory Drive
Determines which drive on the system carries the HOME directory for users. Theuser's home folder is required for FTP transfers and as a network share for private files. If a home directory is already defined it will be shown. Choose a volume and click Save. If any files exist in a previous Home directory they will be moved to the new location.
Change Current Date and Time
Settings for time zone, date and time. Set time zone to a listed city nearby in thesame time zone.
Update Device/Workgroup Names
Settings for the NAS unit's network name and Windows workgroup. Default setting is ADDNAS joined to WORKGROUP. Setting the workgroup name on all devices on the same network to match is strongly recommended. The Device name is used for accessing the Web Interface as well as browsing for the shared folders on the network.
Update FTP Port Number
Changes the TCP Port used by the FTP server. Default is port 21. Note that someFTP clients will not be able to connect on alternate ports.
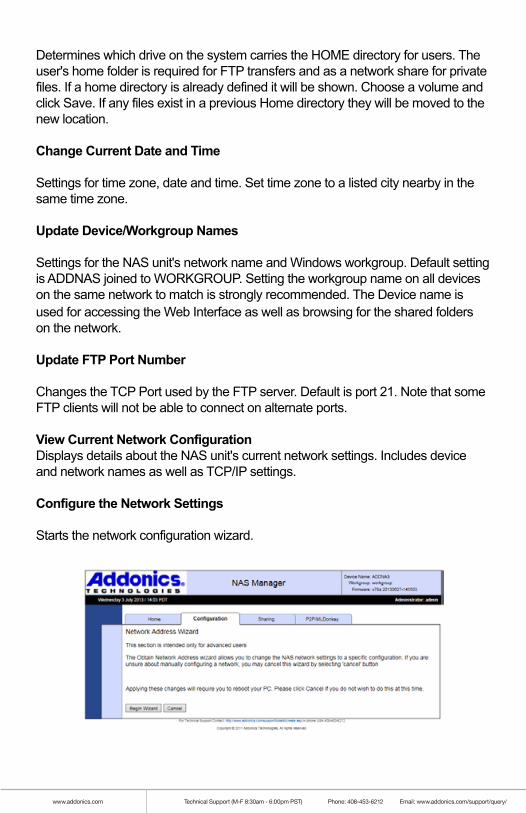
View Current Network ConfigurationDisplays details about the NAS unit's current network settings. Includes device and network names as well as TCP/IP settings.
Configure the Network Settings
Starts the network configuration wizard.

www.addonics.com Technical Support (M-F 8:30am - 6:00pm PST) Phone: 408-453-6212 Email: www.addonics.com/support/query/
Choosing Automatic will configure the NAS unit as a DHCP client and theconfiguration wizard will skip to the end. Choosing Manual configuration will proceed to Step 2.
Step 2 configures the NAS unit's static IP address and subnet mask. To choose a working static IP address, make sure you meet these criteria:1. The subnet mask must match the rest of the network exactly.2. The IP address must match the router's IP address exactly where the subnet mask is "255."3. The IP address cannot end in 0 or 255.4. The IP address must not match any other system on the network.5. The IP address should not be within the DHCP server's client pool.
The next step is to configure network connections. The gateway is usually the internal IP address for the router the NAS unit is connected to. DNS entries are usually the same as used by the router's external network configuration (determined by your ISP). Setting an NTP server will synchronize the NAS unit to a time server, usually on the Internet. This can be a name or IP address. Use the
keywords “free NTP servers” on your preferred search engine if you wish to configure this feature and don't know of a server you can use.

www.addonics.com Technical Support (M-F 8:30am - 6:00pm PST) Phone: 408-453-6212 Email: www.addonics.com/support/query/
Step 2 configures the NAS unit's static IP address and subnet mask. To choose a working static IP address, make sure you meet these criteria:1. The subnet mask must match the rest of the network exactly.2. The IP address must match the router's IP address exactly where the subnet mask is "255."3. The IP address cannot end in 0 or 255.4. The IP address must not match any other system on the network.5. The IP address should not be within the DHCP server's client pool.
The next step is to configure network connections. The gateway is usually the internal IP address for the router the NAS unit is connected to. DNS entries are usually the same as used by the router's external network configuration (determined by your ISP). Setting an NTP server will synchronize the NAS unit to a time server, usually on the Internet. This can be a name or IP address. Use the
keywords “free NTP servers” on your preferred search engine if you wish to configure this feature and don't know of a server you can use.
When the wizard is complete by either choosing Automatic in Step 1 or completingSteps 2 and 3, a confirmation page will appear. Clicking the Finish button will applythe settings.
View Drive InformationDisplays details of all connected drives. If network shares are configured fordrives that have been disconnected, those drives will also appear in this list asunavailable.
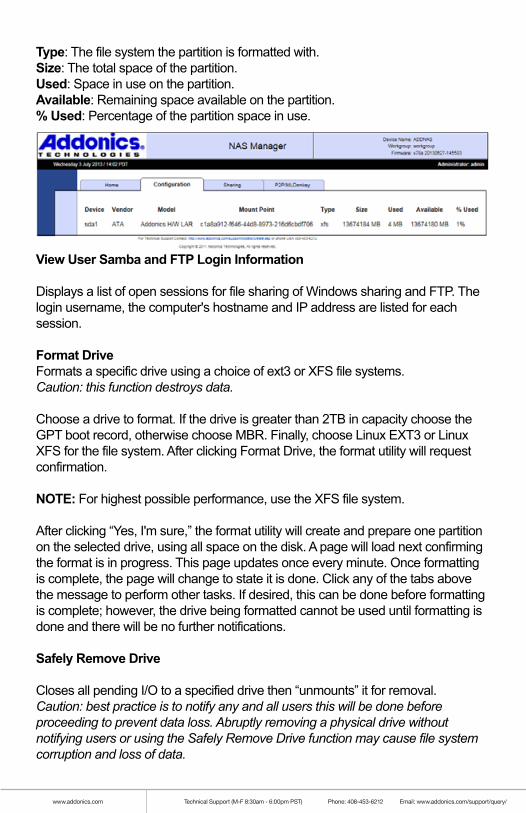
Device: The letter after “sd” is the drive's letter, in order of when the drive was firstencountered by the NAS unit. The number at the end of the device label is thepartition on the drive, in order of the drive's partition map.Vendor: The drive's manufacturer.Model: The drive's model number.Mount Point: Used by the NAS unit internally.
Type: The file system the partition is formatted with.Size: The total space of the partition.Used: Space in use on the partition.Available: Remaining space available on the partition.% Used: Percentage of the partition space in use.
View User Samba and FTP Login Information
Displays a list of open sessions for file sharing of Windows sharing and FTP. The login username, the computer's hostname and IP address are listed for each session.
Format DriveFormats a specific drive using a choice of ext3 or XFS file systems.Caution: this function destroys data.
Choose a drive to format. If the drive is greater than 2TB in capacity choose the GPT boot record, otherwise choose MBR. Finally, choose Linux EXT3 or Linux XFS for the file system. After clicking Format Drive, the format utility will request confirmation.
NOTE: For highest possible performance, use the XFS file system.
After clicking “Yes, I'm sure,” the format utility will create and prepare one partition on the selected drive, using all space on the disk. A page will load next confirming the format is in progress. This page updates once every minute. Once formatting is complete, the page will change to state it is done. Click any of the tabs above the message to perform other tasks. If desired, this can be done before formatting is complete; however, the drive being formatted cannot be used until formatting is done and there will be no further notifications.
Safely Remove Drive
Closes all pending I/O to a specified drive then “unmounts” it for removal.Caution: best practice is to notify any and all users this will be done before proceeding to prevent data loss. Abruptly removing a physical drive without notifying users or using the Safely Remove Drive function may cause file system corruption and loss of data.
Backup Internal System Configuration Information
Saves or restores all of the NAS unit's settings using a specified drive. Select the volume desired for backups. If backups exist on that volume they will be listed under Backups, with comments if present. To create a backup, add a backup comment if desired then click Create Backup. To restore an existing backup, select the desired backup and click Restore Selected. The currently selected backup may also be deleted using the Delete Selected button. All three functions will request confirmation before proceeding.
Reboot
Restarts the NAS unit.Caution: best practice is to notify any and all users this will be done before proceeding
Upgrade the System FirmwareIn the case of a firmware update release, this utility applies the update.Update will not proceed unless only one volume (one partition on one drive) is present. Instructions on updating firmware are provided with the firmwareupdate.
Caution: All of the NAS unit's settings may be lost in the process of applyingfirmware. Make sure to notify any and all users this will be done to prevent data loss and use the Backup Internal System Configuration Information utility beforeproceeding.
The Sharing Tab
User Management
Shows current list of known users on the NAS unit.
To delete a user, click the “Delete” link next to that username, then confirm.To change a user's password, select the username just above “New Password,” thenenter the new password into the “New Password” and “Confirm Password” fields andclick “Change Password.”
To create a new user account, click “New User,” then enter the new username andthe initial password in the “New Password” and “Confirm Password” fields. If sharedfolders are defined on the system, select the default permissions granted to the newuser for each share.
Add A Shared Folder
Creates a new folder and shares it on the network. This function has several steps.The first page introduces the wizard. Click “Begin Wizard” to proceed.
www.addonics.com Technical Support (M-F 8:30am - 6:00pm PST) Phone: 408-453-6212 Email: www.addonics.com/support/query/
When the wizard is complete by either choosing Automatic in Step 1 or completingSteps 2 and 3, a confirmation page will appear. Clicking the Finish button will applythe settings.
View Drive InformationDisplays details of all connected drives. If network shares are configured fordrives that have been disconnected, those drives will also appear in this list asunavailable.
Device: The letter after “sd” is the drive's letter, in order of when the drive was firstencountered by the NAS unit. The number at the end of the device label is thepartition on the drive, in order of the drive's partition map.Vendor: The drive's manufacturer.Model: The drive's model number.Mount Point: Used by the NAS unit internally.
Type: The file system the partition is formatted with.Size: The total space of the partition.Used: Space in use on the partition.Available: Remaining space available on the partition.% Used: Percentage of the partition space in use.
View User Samba and FTP Login Information
Displays a list of open sessions for file sharing of Windows sharing and FTP. The login username, the computer's hostname and IP address are listed for each session.
Format DriveFormats a specific drive using a choice of ext3 or XFS file systems.Caution: this function destroys data.
Choose a drive to format. If the drive is greater than 2TB in capacity choose the GPT boot record, otherwise choose MBR. Finally, choose Linux EXT3 or Linux XFS for the file system. After clicking Format Drive, the format utility will request confirmation.
NOTE: For highest possible performance, use the XFS file system.
After clicking “Yes, I'm sure,” the format utility will create and prepare one partition on the selected drive, using all space on the disk. A page will load next confirming the format is in progress. This page updates once every minute. Once formatting is complete, the page will change to state it is done. Click any of the tabs above the message to perform other tasks. If desired, this can be done before formatting is complete; however, the drive being formatted cannot be used until formatting is done and there will be no further notifications.
Safely Remove Drive
Closes all pending I/O to a specified drive then “unmounts” it for removal.Caution: best practice is to notify any and all users this will be done before proceeding to prevent data loss. Abruptly removing a physical drive without notifying users or using the Safely Remove Drive function may cause file system corruption and loss of data.
Backup Internal System Configuration Information
Saves or restores all of the NAS unit's settings using a specified drive. Select the volume desired for backups. If backups exist on that volume they will be listed under Backups, with comments if present. To create a backup, add a backup comment if desired then click Create Backup. To restore an existing backup, select the desired backup and click Restore Selected. The currently selected backup may also be deleted using the Delete Selected button. All three functions will request confirmation before proceeding.
Reboot
Restarts the NAS unit.Caution: best practice is to notify any and all users this will be done before proceeding
Upgrade the System FirmwareIn the case of a firmware update release, this utility applies the update.Update will not proceed unless only one volume (one partition on one drive) is present. Instructions on updating firmware are provided with the firmwareupdate.
Caution: All of the NAS unit's settings may be lost in the process of applyingfirmware. Make sure to notify any and all users this will be done to prevent data loss and use the Backup Internal System Configuration Information utility beforeproceeding.
The Sharing Tab
User Management
Shows current list of known users on the NAS unit.
To delete a user, click the “Delete” link next to that username, then confirm.To change a user's password, select the username just above “New Password,” thenenter the new password into the “New Password” and “Confirm Password” fields andclick “Change Password.”
To create a new user account, click “New User,” then enter the new username andthe initial password in the “New Password” and “Confirm Password” fields. If sharedfolders are defined on the system, select the default permissions granted to the newuser for each share.
Add A Shared Folder
Creates a new folder and shares it on the network. This function has several steps.The first page introduces the wizard. Click “Begin Wizard” to proceed.
Step 1 is to define the name of the share. The share name will become the foldername on the drive.
NOTE: The shared folder name will be written to disk using all capital letters. If an existing folder of the same name appears and is not all capital letters, the NAS considers that not a match and writes the same folder name in all capital letters anyway. This can cause unpredictable results if the drive is subsequently connected to a computer. If a folder exists of the same name with all capital letters, it will be sharedwithout harming any data.
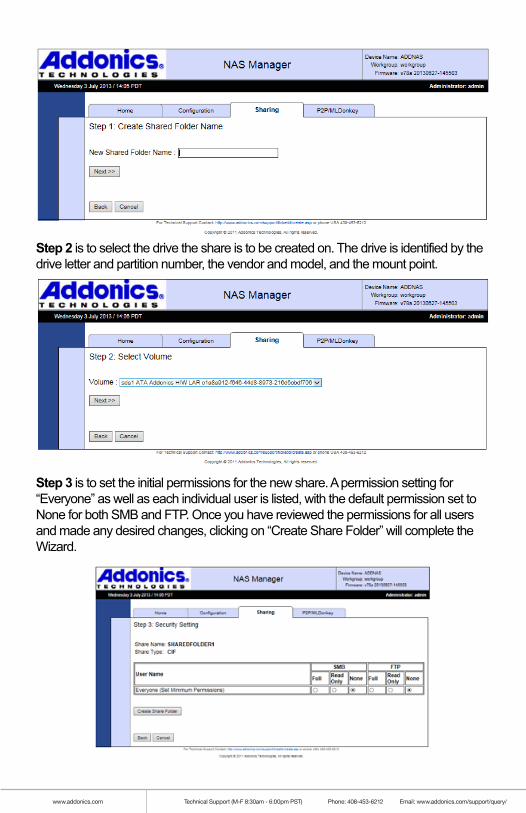
Step 2 is to select the drive the share is to be created on. The drive is identified by the drive letter and partition number, the vendor and model, and the mount point.
www.addonics.com Technical Support (M-F 8:30am - 6:00pm PST) Phone: 408-453-6212 Email: www.addonics.com/support/query/
Step 1 is to define the name of the share. The share name will become the foldername on the drive.
NOTE: The shared folder name will be written to disk using all capital letters. If an existing folder of the same name appears and is not all capital letters, the NAS considers that not a match and writes the same folder name in all capital letters anyway. This can cause unpredictable results if the drive is subsequently connected to a computer. If a folder exists of the same name with all capital letters, it will be sharedwithout harming any data.
Step 2 is to select the drive the share is to be created on. The drive is identified by the drive letter and partition number, the vendor and model, and the mount point.
Step 3 is to set the initial permissions for the new share. A permission setting for“Everyone” as well as each individual user is listed, with the default permission set toNone for both SMB and FTP. Once you have reviewed the permissions for all users and made any desired changes, clicking on “Create Share Folder” will complete the Wizard.
Rename A Shared FolderChanges the name of the directory as well as the share name for an existing sharedfolder. Select the share to change and type in a new name, then click “RenameShared Folder.”NOTE: The new shared folder name will be written to disk using all capital letters. If an existing folder of the same name appears and is not all capital letters, the NAS unit considers that not a match and writes the same folder name in all capital letters anyway. This can cause unpredictable results if the drive is subsequently connected to a computer. If a folder exists of the same name with all capital letters, it will be shared without harming any data.
Remove a Shared Folder
Deletes a share from the NAS unit. As a precaution this screen requires the word “yes” is typed in as confirmation.NOTE: Removing a shared folder also deletes the associated directory and all of its contents from the drive. It is however possible to delete the share without destroying any data: simply disconnect the drive physically from the NAS unit before proceeding. If the shared folder is on the NAS unit's RAID array, shutting down the unit, then removing all of the RAID drives and powering up again before deleting the share will preserve the data.
Update Security Settings
Changes SMB and FTP permissions for a share for each user and the general permission for “Everyone.” Select the share to change, then click next and another page will appear with current permissions. Make desired changes and click Update to apply.

www.addonics.comPhone: 408-573-8580Fax: 408-573-8588Email: http://www.addonics.com/sales/query/
CONTACT US
Step 3 is to set the initial permissions for the new share. A permission setting for“Everyone” as well as each individual user is listed, with the default permission set toNone for both SMB and FTP. Once you have reviewed the permissions for all users and made any desired changes, clicking on “Create Share Folder” will complete the Wizard.
Rename A Shared FolderChanges the name of the directory as well as the share name for an existing sharedfolder. Select the share to change and type in a new name, then click “RenameShared Folder.”NOTE: The new shared folder name will be written to disk using all capital letters. If an existing folder of the same name appears and is not all capital letters, the NAS unit considers that not a match and writes the same folder name in all capital letters anyway. This can cause unpredictable results if the drive is subsequently connected to a computer. If a folder exists of the same name with all capital letters, it will be shared without harming any data.
Remove a Shared Folder
Deletes a share from the NAS unit. As a precaution this screen requires the word “yes” is typed in as confirmation.NOTE: Removing a shared folder also deletes the associated directory and all of its contents from the drive. It is however possible to delete the share without destroying any data: simply disconnect the drive physically from the NAS unit before proceeding. If the shared folder is on the NAS unit's RAID array, shutting down the unit, then removing all of the RAID drives and powering up again before deleting the share will preserve the data.
Update Security Settings
Changes SMB and FTP permissions for a share for each user and the general permission for “Everyone.” Select the share to change, then click next and another page will appear with current permissions. Make desired changes and click Update to apply.