© cheltenham computer training 1995-2002 powerpoint 4 - the powerpoint screen - slide no. 1 the...
TRANSCRIPT

© Cheltenham Computer Training 1995-2002 PowerPoint 4 - The PowerPoint Screen - Slide No. 1
The PowerPoint Screen
PowerPoint 4 Foundation/Intermediate

© Cheltenham Computer Training 1995-2002 PowerPoint 4 - The PowerPoint Screen - Slide No. 2
Opening a Presentation
• Use the File/Open command• Or use the Open tool
Keyboard Shortcut Ctrl+O

© Cheltenham Computer Training 1995-2002 PowerPoint 4 - The PowerPoint Screen - Slide No. 3
Saving a Presentation
• Use the File/Save command• Or use the Save tool
Keyboard Shortcut Ctrl+S

© Cheltenham Computer Training 1995-2002 PowerPoint 4 - The PowerPoint Screen - Slide No. 4
Closing a Presentation
• Click on the File/Close command• Options include:
– Save changes
– Do not save changes
– Cancel the Close command

© Cheltenham Computer Training 1995-2002 PowerPoint 4 - The PowerPoint Screen - Slide No. 5
Menu Commands
• To select a menu command– Click on the menu name to open the menu
– Then click on the command you require to select it
Mouse shortcut Tip
Place the mouse pointer over the object for which you want to use a shortcut menu
Click with the right-hand mouse button to display the menu and select the command you require.
Keyboard shortcut tip
To access a particular menu item, depress the Alt key and the underlined letter in the menu
Alt+O

© Cheltenham Computer Training 1995-2002 PowerPoint 4 - The PowerPoint Screen - Slide No. 6
Dialog Boxes
• A dialog box is a pop-up window which is displayed when you choose certain menu commands– They allow you to enter additional information, or select options

© Cheltenham Computer Training 1995-2002 PowerPoint 4 - The PowerPoint Screen - Slide No. 7
The PowerPoint 4 Screen

© Cheltenham Computer Training 1995-2002 PowerPoint 4 - The PowerPoint Screen - Slide No. 8
The Status Bar• The status bar at the bottom of the screen
provides you with a description of what you are seeing on-screen
• The status bar tells you which slide you are currently working on, i.e. Slide 1, Slide 2, etc.
• When you select a command the status bar displays a short description of what that command will do

© Cheltenham Computer Training 1995-2002 PowerPoint 4 - The PowerPoint Screen - Slide No. 9
The Scroll Bar
• The vertical scroll bar on the right-hand side of the PowerPoint screen allows you to move backwards and forwards between slides
At the bottom of the scroll bar are the Previous Slide and Next Slide buttons
The elevator can be used to quickly move between slides

© Cheltenham Computer Training 1995-2002 PowerPoint 4 - The PowerPoint Screen - Slide No. 10
What Are Toolbars?
• When you open a PowerPoint presentation, the Standard, Formatting and Drawing toolbars are displayed on screen– The Standard and Formatting toolbars appear along the top
of the screen, just below the menu bar
– The Drawing toolbar appears vertically on the left-hand side of the screen

© Cheltenham Computer Training 1995-2002 PowerPoint 4 - The PowerPoint Screen - Slide No. 11
Displaying/Hiding Toolbars
• Select Toolbars from the View menu to display the Toolbars dialog box
© Cheltenham Computer Training 1995-2002 PowerPoint 4 - The PowerPoint Screen - Slide No. 12
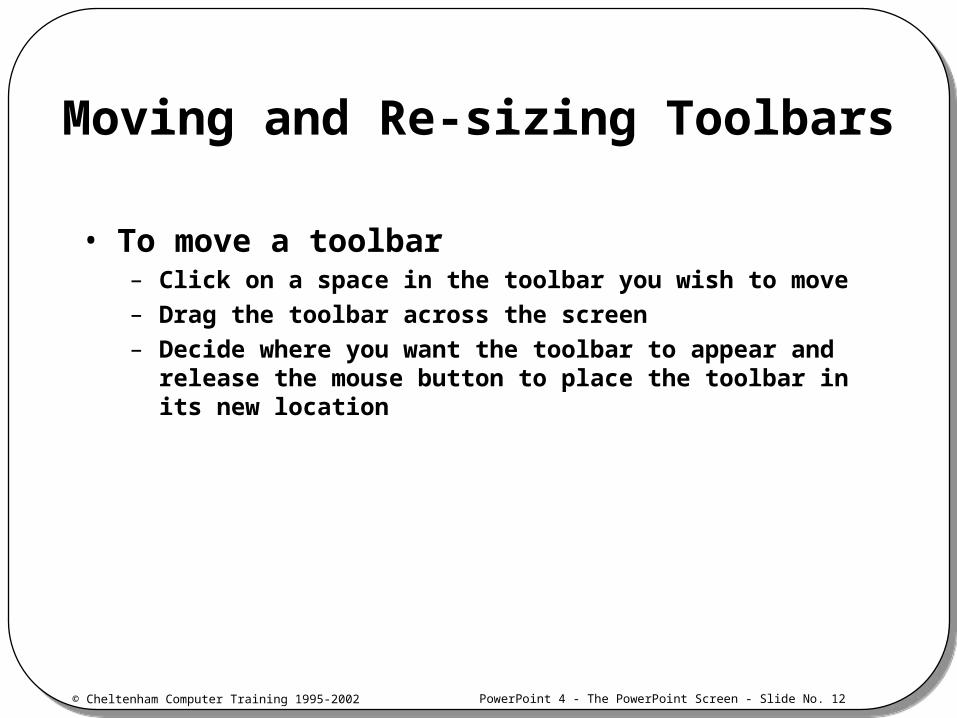
Moving and Re-sizing Toolbars
• To move a toolbar– Click on a space in the toolbar you wish to move
– Drag the toolbar across the screen
– Decide where you want the toolbar to appear and release the mouse button to place the toolbar in its new location

© Cheltenham Computer Training 1995-2002 PowerPoint 4 - The PowerPoint Screen - Slide No. 13
Hiding or Adding Buttons
• Select Customize from the Tools menu to display the Customize Toolbars dialog box

© Cheltenham Computer Training 1995-2002 PowerPoint 4 - The PowerPoint Screen - Slide No. 14
Custom Toolbars
• Select Toolbars from the View menu to display the Toolbars dialog box– Then select the Custom check box and choose
OK to display the Custom toolbar
– Select Customize from the Tools menu, to display the Customize Toolbars dialog box
– Choose the category which includes the button you require from the Categories box
– Drag the required button to the Custom toolbar and drop the button onto it. Repeat these steps as required
– When you have finished, select Close
Empty custom toolbar to which you can add selected tools

© Cheltenham Computer Training 1995-2002 PowerPoint 4 - The PowerPoint Screen - Slide No. 15
On-line Help and Cue Cards
A complete range of Help tools are available!

© Cheltenham Computer Training 1995-2002 PowerPoint 4 - The PowerPoint Screen - Slide No. 16
Tip of the Day
• Displayed by default each time you start PowerPoint
Toggles automatic startup displayDisplays additional tips

© Cheltenham Computer Training 1995-2002 PowerPoint 4 - The PowerPoint Screen - Slide No. 17
Review Questions

© Cheltenham Computer Training 1995-2002 PowerPoint 4 - The PowerPoint Screen - Slide No. 18
Views in PowerPoint
PowerPoint 4 Foundation/Intermediate

© Cheltenham Computer Training 1995-2002 PowerPoint 4 - The PowerPoint Screen - Slide No. 19
What Are PowerPoint Views?
• Five different views– Slide View
– Outline View
– Notes Page View
– Slide Sorter View
– Slide Show View
• You can switch between views by clicking the View buttons on the bottom left-hand side of the PowerPoint window
• Changes made to a presentation in one view will be reflected in all other views

© Cheltenham Computer Training 1995-2002 PowerPoint 4 - The PowerPoint Screen - Slide No. 20
Slide View
• When you first begin working on your slides, they will appear in Slide view by default
• Slides are displayed one at a time– You can enter and edit text, draw shapes, insert pictures,
add clip art, and add artwork and graphics from other applications to your presentation

© Cheltenham Computer Training 1995-2002 PowerPoint 4 - The PowerPoint Screen - Slide No. 21
Outline View
• Outline view allows you to enter and edit the text of your document
• No graphics are displayed in Outline view– Only the titles and
main body text of your presentation
• You can:– Display plain or
formatted text
– Show titles only
– Show the full text

© Cheltenham Computer Training 1995-2002 PowerPoint 4 - The PowerPoint Screen - Slide No. 22
Slide Sorter View
• Slide Sorter view allows you to see each slide in your presentation in miniature– Slide Sorter view allows
you to change the order of slides, add transitions, and set the timing for electronic presentations
To rearrange a slide, click on it and drag it to its new location. You can also copy, delete, and add new slides.

© Cheltenham Computer Training 1995-2002 PowerPoint 4 - The PowerPoint Screen - Slide No. 23
Notes Pages View
• Notes Pages view enables you to add speaker’s notes to your slides which you can use as a guide to each slide during your presentation– In Notes Pages view,
you see a reduced version of the current slide in the top half of the page with space below where you can enter text and draw shapes to accompany the slide

© Cheltenham Computer Training 1995-2002 PowerPoint 4 - The PowerPoint Screen - Slide No. 24
Slide Show View
• In Slide Show view your slides are displayed as an electronic presentation on your computer– The slides, along with their text, art, and graphics fill the whole
screen and all screen elements such as tools and menus are hidden

© Cheltenham Computer Training 1995-2002 PowerPoint 4 - The PowerPoint Screen - Slide No. 25
Review Questions

© Cheltenham Computer Training 1995-2002 PowerPoint 4 - The PowerPoint Screen - Slide No. 26
Adding Text to Slides
PowerPoint 4 Foundation/Intermediate

© Cheltenham Computer Training 1995-2002 PowerPoint 4 - The PowerPoint Screen - Slide No. 27
Text and PowerPoint
• Every new slide which you create in PowerPoint will contain placeholders– Consisting of a title placeholder where you type in the text for
the title of the slide, and a main text placeholder where you can add text and objects
• You can also add text to your slides, outside the placeholders, using the Text tool– Use the Text tool to create text labels where the text doesn’t
wrap; this is ideal for short notes and phrases
– You can also use the Text tool to create a word processing box for longer sections of text where the text will wrap inside the boundaries of the box
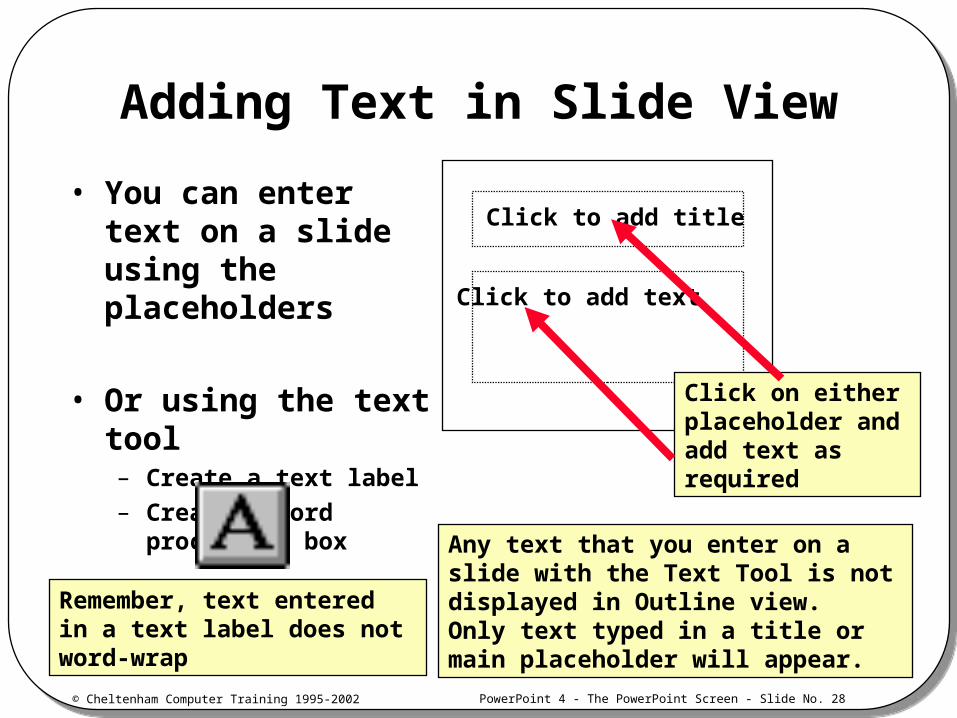
© Cheltenham Computer Training 1995-2002 PowerPoint 4 - The PowerPoint Screen - Slide No. 28
• You can enter text on a slide using the placeholders
• Or using the text tool– Create a text label
– Create a word processing box
Click to add title
Click to add text
Click on either placeholder and add text as required
Remember, text entered in a text label does not word-wrap
Any text that you enter on a slide with the Text Tool is not displayed in Outline view. Only text typed in a title or main placeholder will appear.
Adding Text in Slide View

© Cheltenham Computer Training 1995-2002 PowerPoint 4 - The PowerPoint Screen - Slide No. 29
Adding a New Slide to a Presentation
• Click on the New Slide button on the right-hand side of the status bar to display the New Slide dialog box
To select an AutoLayout, click on the layout you require

© Cheltenham Computer Training 1995-2002 PowerPoint 4 - The PowerPoint Screen - Slide No. 30
Outline View and Text
• In Outline view you work with only the titles and main text from each slide in your presentation
• There are six levels of text in an outline

© Cheltenham Computer Training 1995-2002 PowerPoint 4 - The PowerPoint Screen - Slide No. 31
Adding Text in Outline View
• Enter text and then use the Outline tools for formatting– Promote tool
– Demote tool
– Move Up tool
– Move Down tool
– Collapse Selection tool
– Expand Selection tool
– Show Titles tool
– Show All tool
– Show Formatting tool

© Cheltenham Computer Training 1995-2002 PowerPoint 4 - The PowerPoint Screen - Slide No. 32
Adding Text in Shapes
– Text can easily be added and arranged in drawing shapes selected from the Autoshape toolbar
– When you move or rotate the shape, the text moves with it
To add text to an Autoshape
Click on the Autoshape to select it
Begin typing
The text appears in the Autoshape
To make the text fit the shape, use the Text Anchor dialog box in the Format menu

© Cheltenham Computer Training 1995-2002 PowerPoint 4 - The PowerPoint Screen - Slide No. 33
Fitting Text Within Shapes
• To fit text within a shape– Select Text Anchor from the Format menu
to display the Text Anchor dialog box– Click the arrow in the Anchor Point section
of the dialog box– Select an option to determine how the text
will be positioned– Click on the Preview button to see the effect– Click the Word-wrap Text in Object check
box– Click on the Preview button to see the effect
this has– Click OK– The text wraps to fit inside the boundaries
of the shape

© Cheltenham Computer Training 1995-2002 PowerPoint 4 - The PowerPoint Screen - Slide No. 34
Adjusting Shape Size to Fit Text
• You can adjust the shape to fit around the text – From the Format menu, select Text Anchor to display the Text
Anchor dialog box
– Click the Adjust Object Size To Fit Text check box
– Click the Preview button to see the effect this has
– Choose OK
– The shape has changed to fit around the text
Note: In this case, the size of the shape is affected, not the text

© Cheltenham Computer Training 1995-2002 PowerPoint 4 - The PowerPoint Screen - Slide No. 35
Finding and Replacing Text
• Allows you to search for words or strings of characters and replace them with other words
• You can find and replace any word or phrase in a presentation– Except for those which are embedded in objects

© Cheltenham Computer Training 1995-2002 PowerPoint 4 - The PowerPoint Screen - Slide No. 36
Review Questions

© Cheltenham Computer Training 1995-2002 PowerPoint 4 - The PowerPoint Screen - Slide No. 37
Formatting and Proofing Text
PowerPoint 4 Foundation/Intermediate

© Cheltenham Computer Training 1995-2002 PowerPoint 4 - The PowerPoint Screen - Slide No. 38
Formatting Within PowerPoint
• You can format text by selecting commands from the Format menu or by using the tools on the Formatting toolbar
© Cheltenham Computer Training 1995-2002 PowerPoint 4 - The PowerPoint Screen - Slide No. 39
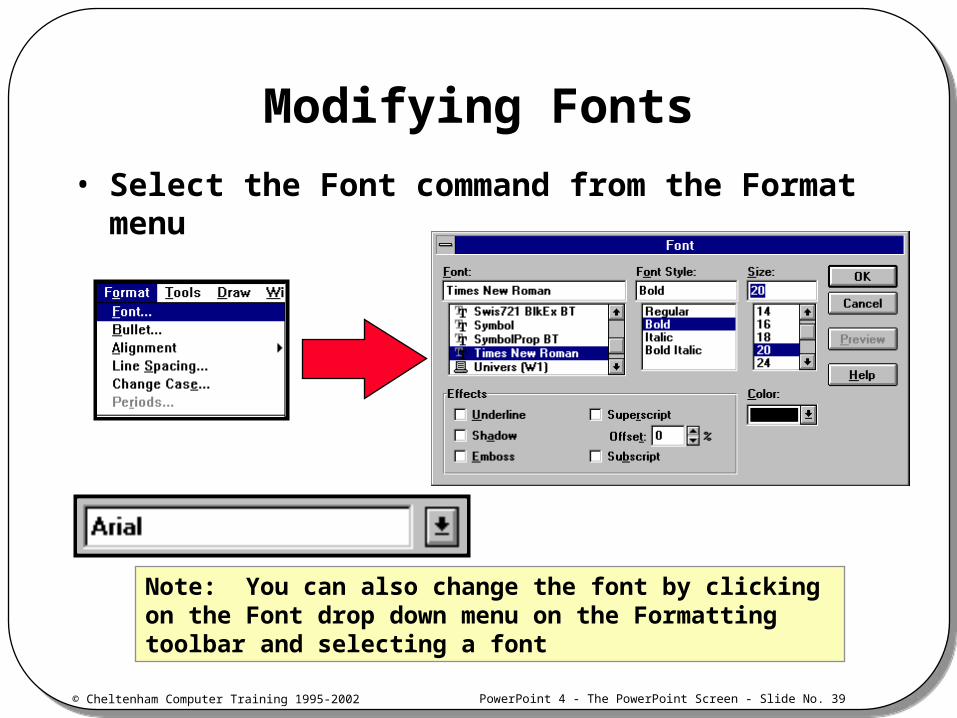
Modifying Fonts
• Select the Font command from the Format menu
Note: You can also change the font by clicking on the Font drop down menu on the Formatting toolbar and selecting a font

© Cheltenham Computer Training 1995-2002 PowerPoint 4 - The PowerPoint Screen - Slide No. 40
Note: You can also modify the font size and style using drop- down menus on the formatting toolbar
Formatting Font Styles, Sizes and Color
• Select the Font command from the Format menu

© Cheltenham Computer Training 1995-2002 PowerPoint 4 - The PowerPoint Screen - Slide No. 41
Additional Text Formatting Effects
• Select the Font command from the Format menu• Additional formatting effects include:
– Underline
– ShadowShadow
– EmbossEmboss– Superscript
– Subscript

© Cheltenham Computer Training 1995-2002 PowerPoint 4 - The PowerPoint Screen - Slide No. 42
Bullet Formatting
• Select the Bullet command from the Format menu
Or • Use the Bullet On/Off tool

© Cheltenham Computer Training 1995-2002 PowerPoint 4 - The PowerPoint Screen - Slide No. 43
Case Formatting
• Select the Change Case command from the Format menu
• Options include:– Sentence case– lowercase– UPPERCASE– Title Case– tOGGLE cASE

© Cheltenham Computer Training 1995-2002 PowerPoint 4 - The PowerPoint Screen - Slide No. 44
Full Stop (Period) Formatting
• Used to add or remove periods (fullstops) from sentences
• Select the Periods command from the Format menu

© Cheltenham Computer Training 1995-2002 PowerPoint 4 - The PowerPoint Screen - Slide No. 45
Using the Format Painter
• Select the text containing the styles you wish to transfer to another section of text
• Click on the Format Painter button on the Standard toolbar
• Select the text you want to add the style to and the style is transferred to the selected text
Note: The Format Painter button only lets you transfer a style to one other section of text. To copy the style to more than one section use the Pick Up Text Style and Apply Text Style commands in the Format menu

© Cheltenham Computer Training 1995-2002 PowerPoint 4 - The PowerPoint Screen - Slide No. 46
Transferring Styles via the Format Menu
Highlight the text containing the styles you wish to use
From the Format menu, select the Pick Up Text Style command
The style information is copied to the Clipboard
Highlight the text you want to add the style to
Select Apply Text Style from the Format menu
The style is transferred to the selected text

© Cheltenham Computer Training 1995-2002 PowerPoint 4 - The PowerPoint Screen - Slide No. 47
Remember the Undo Command!
• To undo your last action, click on the Undo button on the Standard toolbar– Or select Undo from the Edit menu
• Remember, the Undo command only undoes your last action
OR

© Cheltenham Computer Training 1995-2002 PowerPoint 4 - The PowerPoint Screen - Slide No. 48
Paragraph Alignment
• Includes:– Left
– Right
– Center
– Justify
• Select Alignment from the Format menu
Or • Use the Formatting
toolbar icons

© Cheltenham Computer Training 1995-2002 PowerPoint 4 - The PowerPoint Screen - Slide No. 49
Line and Paragraph Space Formatting
• Modifies the amount of space between lines of text or between paragraphs
• Select the Format Line Spacing command
HINT: To start a new line in a paragraph without creating a new paragraph with a separate bullet, press Shift+Enter, and begin typing the new line

© Cheltenham Computer Training 1995-2002 PowerPoint 4 - The PowerPoint Screen - Slide No. 50
Left and First Line Indents
• Drag the left-hand indent marker along the ruler to the right to adjust indents
• To adjust the margin levels, drag the margin marker to the left or right to set a new left margin for the text object

© Cheltenham Computer Training 1995-2002 PowerPoint 4 - The PowerPoint Screen - Slide No. 51
Tab Formatting
Used to align and space text horizontally in a document. All tab stops are available on the ruler. You can choose from the following types of tab stop:
Note: When you are entering text and want to move from one tab stop to the next, press Ctrl+Tab
Left Tab The left-hand edge of the text is aligned with the tab stop
Right Tab The right-hand edge of the text is aligned with thetab stop
Center Tab The text is centered over the tab stop
Decimal Tab The decimal points of numbers are aligned at the tab stop

© Cheltenham Computer Training 1995-2002 PowerPoint 4 - The PowerPoint Screen - Slide No. 52
Checking Spelling• Use the Tools/Spelling command• Or click on the Spelling icon, in the Standard Toolbar
• Options include:– Ignore– Ignore All– Change– Change All– Add– Suggest
TIP:
Press F7 to activate the Spell Checker

© Cheltenham Computer Training 1995-2002 PowerPoint 4 - The PowerPoint Screen - Slide No. 53
Review Questions

© Cheltenham Computer Training 1995-2002 PowerPoint 4 - The PowerPoint Screen - Slide No. 54
Wizards
PowerPoint 4 Foundation/Intermediate

© Cheltenham Computer Training 1995-2002 PowerPoint 4 - The PowerPoint Screen - Slide No. 55
What Are Wizards?
• PowerPoint’s Wizards enable you to create professional presentations quickly and efficiently
– Wizards guide you through the steps of creating a presentation by asking you questions, on-screen, about the style and content of your presentation
– The AutoContent Wizard helps you to come up with the basic idea for your presentation, starting with a title slide
– The Pick a Look Wizard helps you create the look, or style, of your presentation

© Cheltenham Computer Training 1995-2002 PowerPoint 4 - The PowerPoint Screen - Slide No. 56
AutoContent Wizard
– From the File menu, select New to display the PowerPoint opening screen
– Click the AutoContent Wizard button and select OK

© Cheltenham Computer Training 1995-2002 PowerPoint 4 - The PowerPoint Screen - Slide No. 57
Pick a Look Wizard
– From the File menu, select New to display the PowerPoint opening screen
– Click the Pick a Look Wizard button and select OK
– The Pick a Look Wizard - Step 1 of 9 dialog box appears
– Answers the questions in each dialog box
– Click the Next button to move to the next step This illustration shows Step
3 of the Pick a Look Wizard

© Cheltenham Computer Training 1995-2002 PowerPoint 4 - The PowerPoint Screen - Slide No. 58
Review Questions

© Cheltenham Computer Training 1995-2002 PowerPoint 4 - The PowerPoint Screen - Slide No. 59
Templates
PowerPoint 4 Foundation/Intermediate

© Cheltenham Computer Training 1995-2002 PowerPoint 4 - The PowerPoint Screen - Slide No. 60
What Are Templates?
• PowerPoint is supplied with over one-hundred pre-designed templates
– Templates are presentations where masters and colors have been designed to give a particular look, and define what your text will look like
– You can apply a template when you begin a new presentation, or when you have completed it
The default template is called DEFAULT.PPT

© Cheltenham Computer Training 1995-2002 PowerPoint 4 - The PowerPoint Screen - Slide No. 61
Using Templates in Presentations
• Either select Presentation Template from the Format menu
• Or click on the Template button on the right-hand side of the status bar– The Presentation Template
dialog box is displayed
Note: You can also select the Template option from the PowerPoint startup dialog box when you first start PowerPoint

© Cheltenham Computer Training 1995-2002 PowerPoint 4 - The PowerPoint Screen - Slide No. 62
Customized Templates
• You may wish to create your own template by changing the color scheme and slide master of an existing template
– From the File menu, select Open
– In the File Name list, double-click on the template you want to edit to open it
– Make any changes required to the template
– When you have finished• Select Save As from the File menu and give the template you have
created a new name

© Cheltenham Computer Training 1995-2002 PowerPoint 4 - The PowerPoint Screen - Slide No. 63
Review Questions

© Cheltenham Computer Training 1995-2002 PowerPoint 4 - The PowerPoint Screen - Slide No. 64
PowerPoint Objects
PowerPoint 4 Foundation/Intermediate

© Cheltenham Computer Training 1995-2002 PowerPoint 4 - The PowerPoint Screen - Slide No. 65
What Are the PowerPoint Drawing Tools?
• Objects can consist of drawings, text, lines, arcs, shapes, or graphs
• The Drawing toolbar – Enables you to draw many basic objects such as lines, arcs,
circles and boxes
• The AutoShapes toolbar– Allows you to add commonly used shapes, such as rectangles
and triangles
• The Drawing+ toolbar– Provides special tools which enable you to modify your
pictures and graphics even more

© Cheltenham Computer Training 1995-2002 PowerPoint 4 - The PowerPoint Screen - Slide No. 66
Using the Drawing Tools
• Allows you to:– Draw a line or an arc
– Give the line or arc a new style
– Draw rectangles and ellipses
– Draw a Freeform shape
– Edit a Freeform shape
Toolbar display is controlled via the View/Toolbars command

© Cheltenham Computer Training 1995-2002 PowerPoint 4 - The PowerPoint Screen - Slide No. 67
AutoShapes
• Click on the AutoShapes button on the Drawing toolbar to display the AutoShapes toolbar
To adjust the shape further, select the shape and drag the adjustment handle

© Cheltenham Computer Training 1995-2002 PowerPoint 4 - The PowerPoint Screen - Slide No. 68
Selecting Objects
• It is important to know:– How to select a single object
– How to deselect a selected object
– How to select more than one object at a time
– How to select objects using the Selection Tool
– How to select all the objects on a slide
To select all objects:
Press CTRL+
To select multiple objects:
Press the SHIFT key and click on the next object you wish to select
To select a single object:
Click on it
To deselect objects:
Click on the selected object whilst holding down the SHIFT key

© Cheltenham Computer Training 1995-2002 PowerPoint 4 - The PowerPoint Screen - Slide No. 69
Grouping and Un-grouping Objects
• Grouped objects are treated as one single object• To group objects:
– Select the objects you wish to group
– From the Draw menu, select Group
To ungroup objects
Select Ungroup from the Draw menu

© Cheltenham Computer Training 1995-2002 PowerPoint 4 - The PowerPoint Screen - Slide No. 70
Re-sizing Objects
• Select the object• From the Draw menu, select Scale to display the
Scale dialog box
Other re-sizing options include:
• Constraining objects when you re-size them
• Re-sizing a line

© Cheltenham Computer Training 1995-2002 PowerPoint 4 - The PowerPoint Screen - Slide No. 71
Aligning Objects
• Select the objects to be aligned• Select Align from the Draw menu
© Cheltenham Computer Training 1995-2002 PowerPoint 4 - The PowerPoint Screen - Slide No. 72
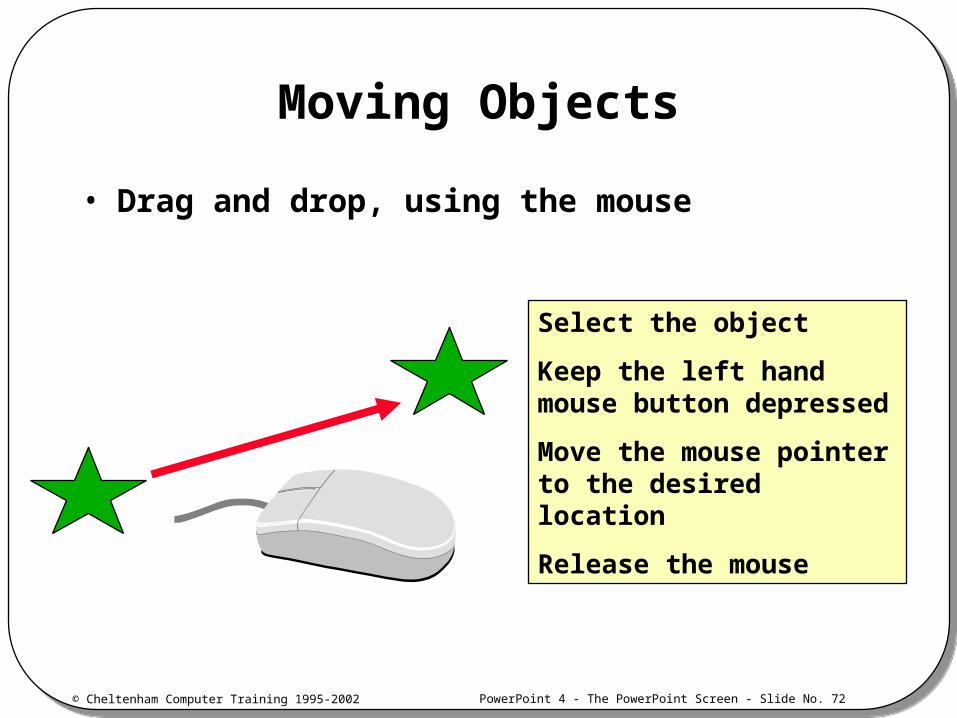
Moving Objects
• Drag and drop, using the mouse
Select the object
Keep the left hand mouse button depressed
Move the mouse pointer to the desired location
Release the mouse

© Cheltenham Computer Training 1995-2002 PowerPoint 4 - The PowerPoint Screen - Slide No. 73
Rotating Objects
• Objects can be rotated as individual objects, or as groups or multiple selections– Select the object (or group) you wish to rotate
– Click on the Free Rotate tool on the Drawing toolbar
– Place the Free Rotate pointer over one of the object’s re-size handles
– Drag the pointer and rotate the outline of the selection to the position you require
You may also use the Rotate/Flip command within the Draw drop down menu, which also allows you to Rotate Left or Rotate Right by 90 degrees

© Cheltenham Computer Training 1995-2002 PowerPoint 4 - The PowerPoint Screen - Slide No. 74
Cutting, Copying, Pasting and Duplicating
• Cut, Copy and Paste – Objects can be cut, copied and pasted using
buttons on the Standard toolbar (or Edit menu commands)
– Whenever you use the cut and copy commands, a copy of the object is placed on the Clipboard
• Duplicating– When you duplicate an object, a copy of it is not
stored on the Clipboard
– Duplicating an object means that you make a copy of it which is placed on the slide, slightly offset from the original object
Duplicate Keyboard shortcut: Ctrl+D

© Cheltenham Computer Training 1995-2002 PowerPoint 4 - The PowerPoint Screen - Slide No. 75
Moving Objects Forwards and Backwards
• The placement of objects can be modified using:– Bring to Front
– Send to Back
– Bring Forward
– Send Backward
Note: You can also use the Bring Forward or Send Backward buttons on the Drawing+ toolbar to move objects forward or backwards one level at a time

© Cheltenham Computer Training 1995-2002 PowerPoint 4 - The PowerPoint Screen - Slide No. 76
Selecting and Changing Color Schemes
• PowerPoint comes with eight sets of pre-designed color schemes
• A color scheme consists of a background color, text and lines color, shadow color, title text color, fill color and accent colors
Background color Text and lines color
Shadow color Title text color
Fill color Accent colors

© Cheltenham Computer Training 1995-2002 PowerPoint 4 - The PowerPoint Screen - Slide No. 77
Creating Color Schemes
• From the Format menu, select Slide Color Scheme

© Cheltenham Computer Training 1995-2002 PowerPoint 4 - The PowerPoint Screen - Slide No. 78
Changing Color Schemes
• Allows modification of part of your color scheme by changing individual colors
In this example, choose the Text & Lines color box, and select Change Color to modify text and line colors

© Cheltenham Computer Training 1995-2002 PowerPoint 4 - The PowerPoint Screen - Slide No. 79
Adding a Shaded Background
• Six shaded background options– The color of the shading can
be adjusted to suit your requirements
You can see the affect of the color scheme changes in Slide Sorter View
© Cheltenham Computer Training 1995-2002 PowerPoint 4 - The PowerPoint Screen - Slide No. 80
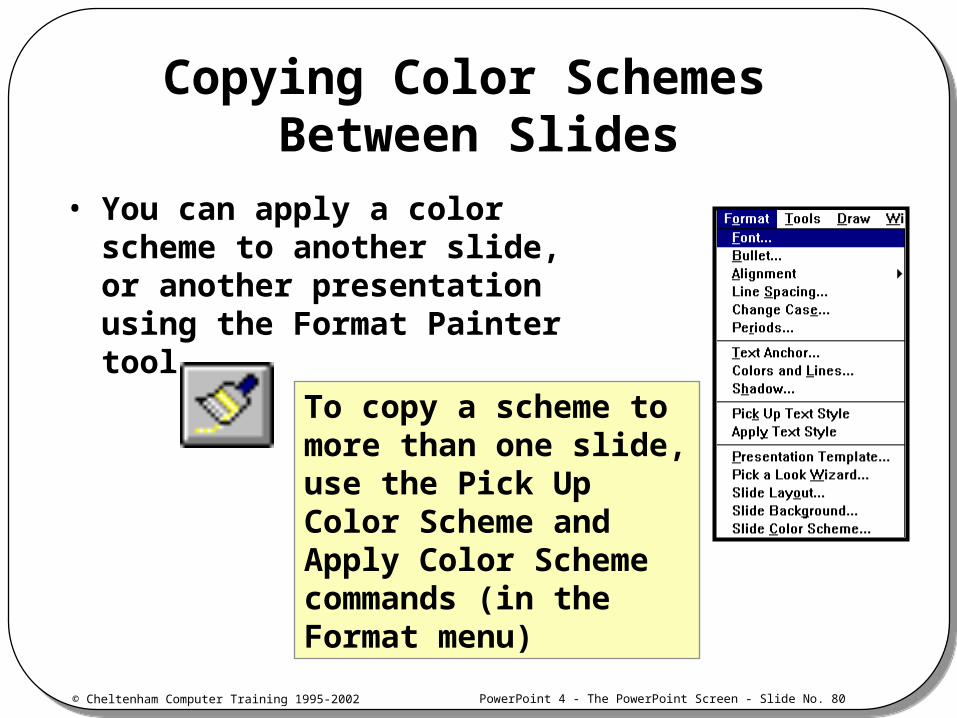
Copying Color Schemes Between Slides
• You can apply a color scheme to another slide, or another presentation using the Format Painter tool
To copy a scheme to more than one slide, use the Pick Up Color Scheme and Apply Color Scheme commands (in the Format menu)

© Cheltenham Computer Training 1995-2002 PowerPoint 4 - The PowerPoint Screen - Slide No. 81
Creating Custom Colors
• You can create your own custom colors– From the Format menu, select
Slide Color Scheme
– Select the item you wish to change from the Change Scheme Colors box
– Click on Change Color to display the Color Palette relating to the item you have selected
– Select the More Colors button to display the More Colors dialog box

© Cheltenham Computer Training 1995-2002 PowerPoint 4 - The PowerPoint Screen - Slide No. 82
Review Questions

© Cheltenham Computer Training 1995-2002 PowerPoint 4 - The PowerPoint Screen - Slide No. 83
Using Masters
PowerPoint 4 Foundation/Intermediate

© Cheltenham Computer Training 1995-2002 PowerPoint 4 - The PowerPoint Screen - Slide No. 84
What Are Slide Masters?
• Four PowerPoint masters:– Slide Master for Slide view
– Outline Master for Outline view, etc.
• Masters contain formatting information
• Items on the master appear on all slides– No need to apply the master formatting
to every slide in your presentation
• Changes to text on individual slides are retained

© Cheltenham Computer Training 1995-2002 PowerPoint 4 - The PowerPoint Screen - Slide No. 85
The Slide Master
• Contains formatted placeholders for title, text and background items
• To open, select Master from the View menu, and select Slide Master
Shortcut Tip to open the Slide Master, click on the Slide View button whilst holding down the SHIFT key
Master title (Title Area for AutoLayouts)
Master text (Object Area for AutoLayouts)

© Cheltenham Computer Training 1995-2002 PowerPoint 4 - The PowerPoint Screen - Slide No. 86
Numbering Slides Using the Slide Master and Adding the Date
• To add the date– Select Date from the Insert menu– The date is displayed as two slashes in a frame– Select and drag the date frame to position it
• To add the date outside the title and object areas– Select the Text tool from the Drawing toolbar– Click on the slide master where you want to
insert the date and type two forward slashes (//)– The time is displayed as two colons in a frame
• To add the slide number to the Slide Master– Select Page Number from the Insert menu, or select
the Text tool from the Drawing toolbar and type two number signs (##) where you want the page number to appear
Note: To begin slide numbering with a number other than 1, select Slide Setup from the File menu. Enter the number you want to start slide numbering with in the Number Slides From box

© Cheltenham Computer Training 1995-2002 PowerPoint 4 - The PowerPoint Screen - Slide No. 87
Manipulating Slide Masters• You can:
– Make a slide different from the Slide Master• By making changes to an individual slide
– Reapply the Slide Master formats to a slide• Select the slide that you want to reapply
the Slide Master formatting to• Select Slide Layout from the Format menu
to display the Slide Layout dialog box• Select Reapply
– Follow the Slide Master• Color scheme change can be reset to
follow the Slide Master• Select Slide Background from the Format
menu to display the Slide Background dialog box
• Click on the Follow Master button• Click the Apply button to apply the Slide Master
settings to the current slide
© Cheltenham Computer Training 1995-2002 PowerPoint 4 - The PowerPoint Screen - Slide No. 88
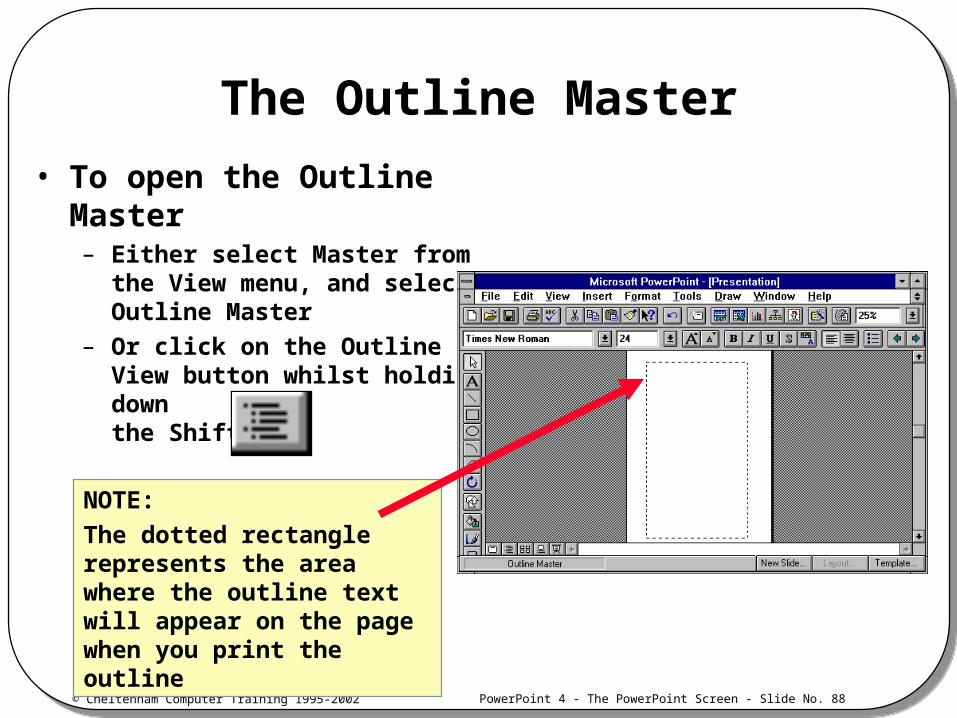
The Outline Master
• To open the Outline Master– Either select Master from the View
menu, and select Outline Master
– Or click on the Outline View button whilst holding down the Shift key
NOTE:
The dotted rectangle represents the area where the outline text will appear on the page when you print the outline

© Cheltenham Computer Training 1995-2002 PowerPoint 4 - The PowerPoint Screen - Slide No. 89
Review Questions

© Cheltenham Computer Training 1995-2002 PowerPoint 4 - The PowerPoint Screen - Slide No. 90
Inserting Graphics, Pictures and Clipart
PowerPoint 4 Foundation/Intermediate

© Cheltenham Computer Training 1995-2002 PowerPoint 4 - The PowerPoint Screen - Slide No. 91
ClipArt and File Formats
• Common file formats include:– BMP
– DIB
– EPS
– PCT
– WMF
• Two ways of storing graphics in a file:– Bitmap
– Vector

© Cheltenham Computer Training 1995-2002 PowerPoint 4 - The PowerPoint Screen - Slide No. 92
Importing From Another Application
© Cheltenham Computer Training 1995-2002 PowerPoint 4 - The PowerPoint Screen - Slide No. 93
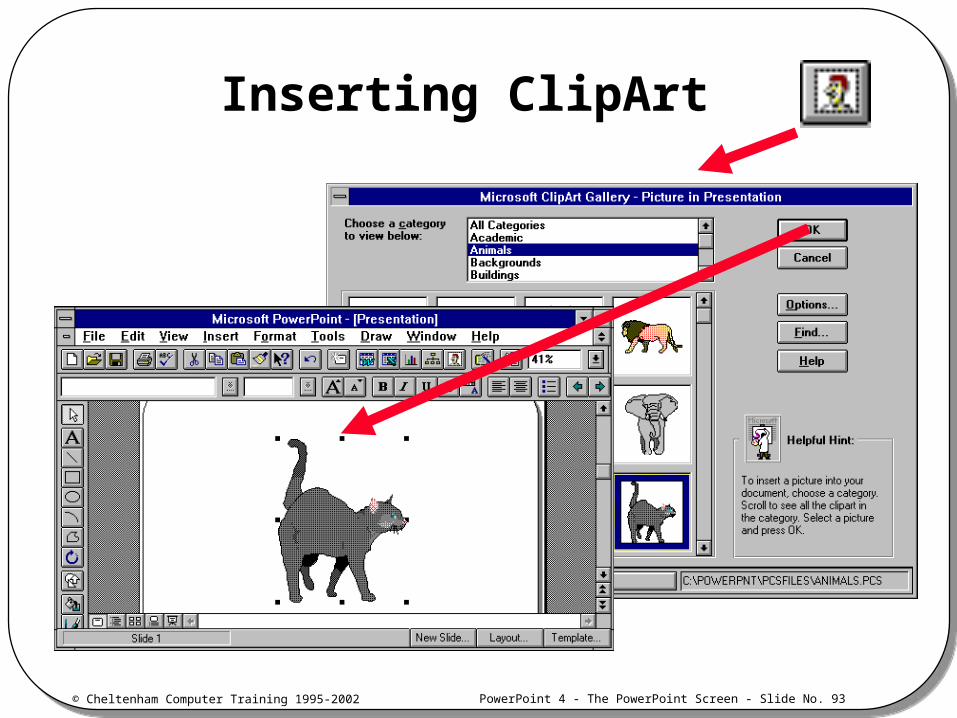
Inserting ClipArt

© Cheltenham Computer Training 1995-2002 PowerPoint 4 - The PowerPoint Screen - Slide No. 94
Modifying ClipArt Color Schemes
• Each ClipArt image has a preset color combination which may not match with the color scheme on your slides.

© Cheltenham Computer Training 1995-2002 PowerPoint 4 - The PowerPoint Screen - Slide No. 95
Adding ClipArt to the Gallery
• Select the Options button within the ClipArt Gallery
© Cheltenham Computer Training 1995-2002 PowerPoint 4 - The PowerPoint Screen - Slide No. 96
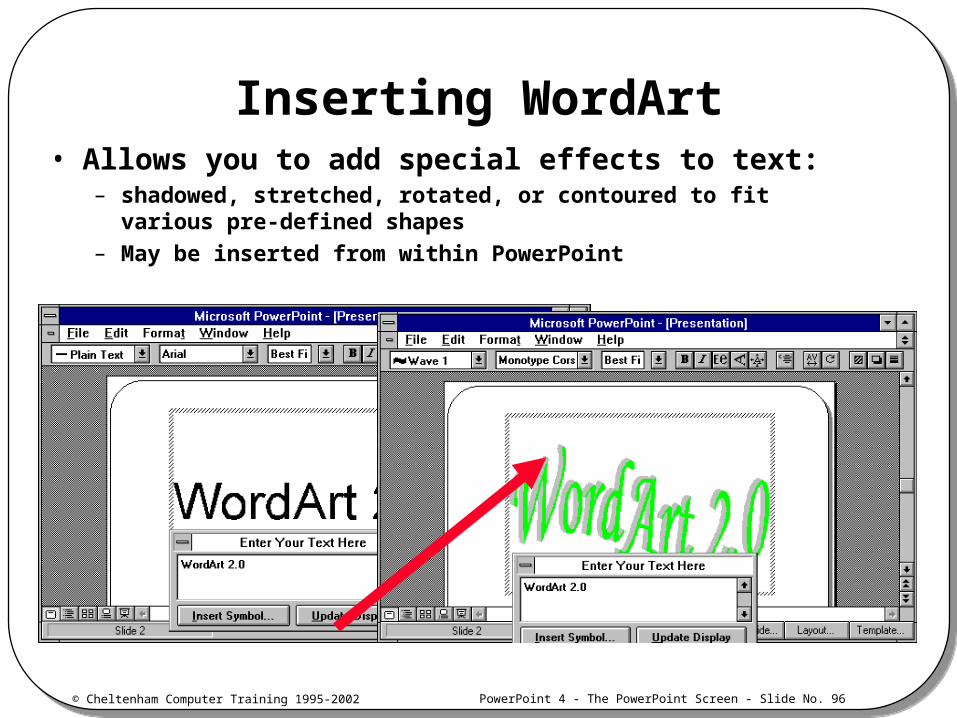
Inserting WordArt• Allows you to add special effects to text:
– shadowed, stretched, rotated, or contoured to fit various pre-defined shapes
– May be inserted from within PowerPoint

© Cheltenham Computer Training 1995-2002 PowerPoint 4 - The PowerPoint Screen - Slide No. 97
Review Questions

© Cheltenham Computer Training 1995-2002 PowerPoint 4 - The PowerPoint Screen - Slide No. 98
Creating Tables
PowerPoint 4 Foundation/Intermediate

© Cheltenham Computer Training 1995-2002 PowerPoint 4 - The PowerPoint Screen - Slide No. 99
What Are Tables?
• A better alternative to using tab stops to display paragraphs of text side by side
• Tables can contain text, numbers, or both• PowerPoint uses the Word 6 for Windows table
module to create tables– If you do not have Word 6 on your system, you will need to
create tables in another application and import them into PowerPoint as an object

© Cheltenham Computer Training 1995-2002 PowerPoint 4 - The PowerPoint Screen - Slide No. 100
Creating Slides that Contain Tables
• To create a new slide containing a table– Click on the New Slide
button on the Status Bar at the bottom of the screen to display the New Slide dialog box
– Select the Table AutoLayout and click on OK
Double click on the table placeholder to display the Insert Word Table dialog box

© Cheltenham Computer Training 1995-2002 PowerPoint 4 - The PowerPoint Screen - Slide No. 101
Inserting Tables into Existing Slides
– You can insert a table into an existing slide in two ways
– The first method is to use the Insert Microsoft Word Table button
– Click on the Insert Microsoft Word Table button on the Standard Toolbar
The second way to enter a table
From the Insert menu, select Microsoft Word Table to display the Insert Word Table dialog box

© Cheltenham Computer Training 1995-2002 PowerPoint 4 - The PowerPoint Screen - Slide No. 102
Tables and Text Manipulation
• Tab Move to the next cell• Shift+Tab Move to the previous cell• Alt+Home Move to the first cell in a row• Alt+End Move to the last cell in a row• Alt+PgUp Move to the first cell in a column• Alt+PgDn Move to the last cell in a column

© Cheltenham Computer Training 1995-2002 PowerPoint 4 - The PowerPoint Screen - Slide No. 103
Selection Techniques Within Tables• To select cells
– Place the insertion point just inside the left-hand edge of the cell you wish to select
– When the cursor changes to a right arrow, click on the cell to select it
• To select a row– Position the insertion point to the left (outside the table’s border) of
the row you wish to select– When the cursor changes to a right arrow, click to select the entire row
of cells
• To select a column– Position the insertion point on the top border of the column you wish
to select– When the cursor changes to a small down arrow click the left-hand
mouse button to select the column

© Cheltenham Computer Training 1995-2002 PowerPoint 4 - The PowerPoint Screen - Slide No. 104
Manipulating Cells, Rows and Columns Within Tables
• To add cells– Select a cell(s) and choose Insert
Cells from the Table menu
– The Insert Cells dialog box is displayed
• To change column widths and
row heights– From the Table menu, select Cell
Height and Width to display the Cell Height and Width dialog box
© Cheltenham Computer Training 1995-2002 PowerPoint 4 - The PowerPoint Screen - Slide No. 105
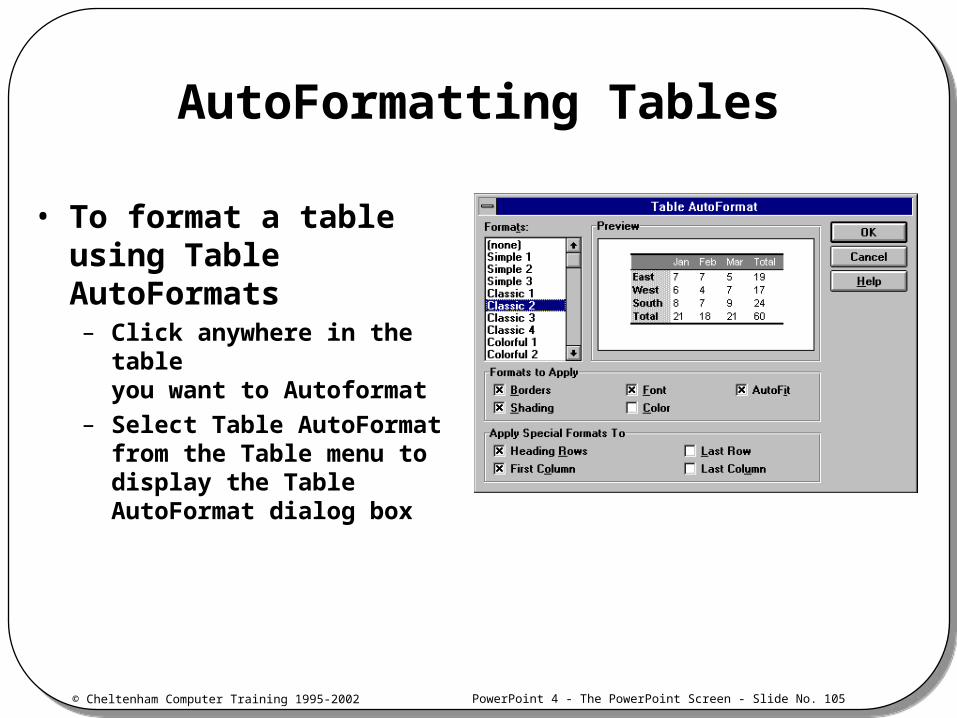
AutoFormatting Tables
• To format a table using Table AutoFormats– Click anywhere in the table
you want to Autoformat
– Select Table AutoFormat from the Table menu to display the Table AutoFormat dialog box
© Cheltenham Computer Training 1995-2002 PowerPoint 4 - The PowerPoint Screen - Slide No. 106
Review Questions

© Cheltenham Computer Training 1995-2002 PowerPoint 4 - The PowerPoint Screen - Slide No. 107
Creating Graphs
PowerPoint 4 Foundation/Intermediate

© Cheltenham Computer Training 1995-2002 PowerPoint 4 - The PowerPoint Screen - Slide No. 108
What Are Graphs?
• PowerPoint uses an embedded application called Microsoft Graph 5– Enables you to create graphs using many of the features that
are used in Microsoft Excel
Seven 2-D chart types:Area charts
Bar charts
Column charts
Doughnut charts
Line charts
Pie charts
Radar charts
XY (Scatter) charts
Six 3-D chart types:3-D Area
3-D Bar
3-D Column
3-D Line
3-D Pie
3-D Surface

© Cheltenham Computer Training 1995-2002 PowerPoint 4 - The PowerPoint Screen - Slide No. 109
1stQtr
2ndQtr
3rdQtr
4thQtr
0
10
20
30
40
50
60
70
80
90
1stQtr
2ndQtr
3rdQtr
4thQtr
East
WestNorth
Creating a Graph
• Use the Insert Graph tool

© Cheltenham Computer Training 1995-2002 PowerPoint 4 - The PowerPoint Screen - Slide No. 110
Entering Data into a Datasheet
• If the datasheet is not displayed– Select Datasheet from the View menu to display the
Presentation Datasheet
To let PowerPoint know if the numbers are to be entered in rows or columns, click on the By Column or By Row buttons on the Graph Standard Toolbar; the default setting is By Row

© Cheltenham Computer Training 1995-2002 PowerPoint 4 - The PowerPoint Screen - Slide No. 111
Shortcut Method of Entering Numbers into a Graph
– Position the mouse pointer on the first cell in the range– Drag the mouse pointer over the cells until you reach the
opposite corner of the range– Type in a number and press Enter– The mouse pointer moves, automatically, to the cell below– Continue entering numbers by column– When you reach the last cell in the range, the mouse pointer
moves back to the first cell in the range
Note: The numbers must be entered by column when using this technique, even if the data is being charted by row

© Cheltenham Computer Training 1995-2002 PowerPoint 4 - The PowerPoint Screen - Slide No. 112
Manipulating Columns
• To delete columns or rows– From the Edit menu, select Clear
• To change column width– Place the mouse pointer on the line dividing two column labels
– The mouse pointer changes to a double arrow
– Drag and drop the column line to the width required. Release the mouse button
Double clicking between two column letters will automatically alter the width of the first column so that its longest entry fits the column
To change the width of all the columns so that they accommodate their longest entry, select the columns and double click between any two columns to automatically adjust them
© Cheltenham Computer Training 1995-2002 PowerPoint 4 - The PowerPoint Screen - Slide No. 113
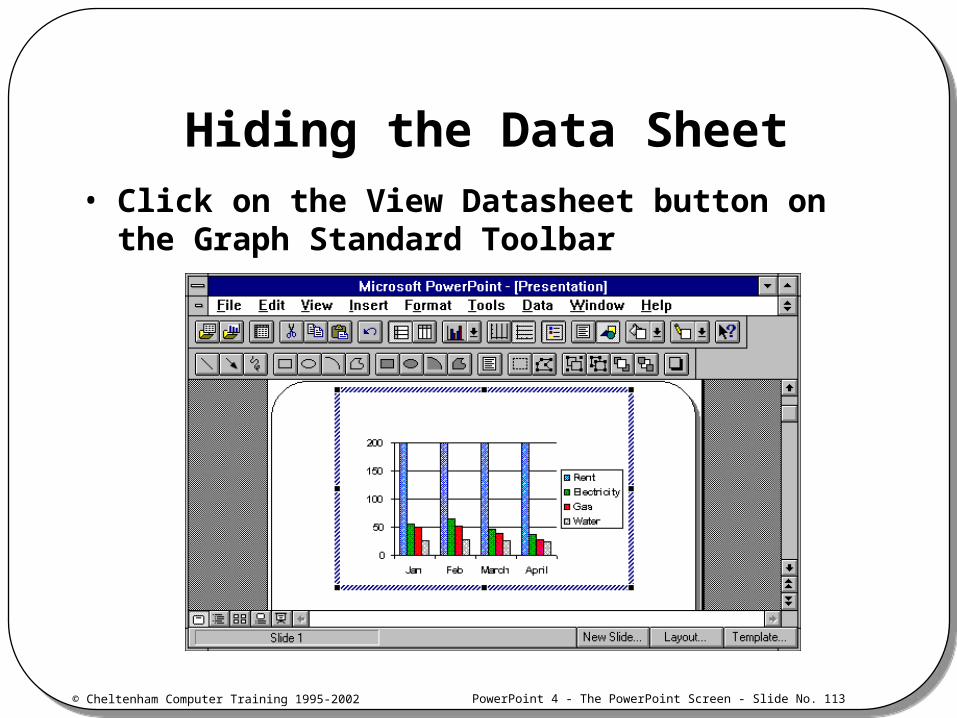
Hiding the Data Sheet• Click on the View Datasheet button on the Graph
Standard Toolbar

© Cheltenham Computer Training 1995-2002 PowerPoint 4 - The PowerPoint Screen - Slide No. 114
Formatting Graphs With AutoFormat
• Allows AutoFormatting of the chart type, font styles and legends, etc.

© Cheltenham Computer Training 1995-2002 PowerPoint 4 - The PowerPoint Screen - Slide No. 115
Formatting Graph Axes
• Double click on the graph to display the Graph toolbar and menus
• Click on the axis you wish to edit
• Choose Selected Axis from the Format menu to display the Format Axis dialog box

© Cheltenham Computer Training 1995-2002 PowerPoint 4 - The PowerPoint Screen - Slide No. 116
Graph Legends
• A legend is the key to a chart and represents the data series markers using color or patterns
• To add a legend to a graph– Click on the Legend button
on the Standard toolbar• Or select Legend from the
Insert menu
– The legend is placed on the right-hand side of the chart area by default
– The chart will be re-sized to accommodate the legend

© Cheltenham Computer Training 1995-2002 PowerPoint 4 - The PowerPoint Screen - Slide No. 117
Adding Chart Titles and ArrowsAdd chart titles, using the Titles dialog box
An example showing an arrow linking text to a data series

© Cheltenham Computer Training 1995-2002 PowerPoint 4 - The PowerPoint Screen - Slide No. 118
Adding Data Labels to a Chart
• Select Data Labels from the Insert menu, to display the Data Labels dialog box

© Cheltenham Computer Training 1995-2002 PowerPoint 4 - The PowerPoint Screen - Slide No. 119
Adding Gridlines to a Chart
• Gridlines can make a graph easier to read, particularly if you have several data series which are close together
• To add vertical and horizontal Gridlines to a chart– Select Gridlines from the Insert menu
to display the Gridlines dialog box

© Cheltenham Computer Training 1995-2002 PowerPoint 4 - The PowerPoint Screen - Slide No. 120
Formatting a 3-D Graph• A 3-D graph has far more formatting possibilities
than a 2-D graph– You can change the graphs elevation, rotation, perspective,
and position by changing the options in the Format 3-D View dialog box
TIP:
To return the graph to its original default settings, click on the Default button in the Format 3-D View dialog box

© Cheltenham Computer Training 1995-2002 PowerPoint 4 - The PowerPoint Screen - Slide No. 121
3-D Chart Floor and Wall Formatting
• Double click on the walls or floor of the graph to display the Format Walls or Format Floor dialog box respectively

© Cheltenham Computer Training 1995-2002 PowerPoint 4 - The PowerPoint Screen - Slide No. 122
Review Questions

© Cheltenham Computer Training 1995-2002 PowerPoint 4 - The PowerPoint Screen - Slide No. 123
Creating Organizational Charts
PowerPoint 4 Foundation/Intermediate

© Cheltenham Computer Training 1995-2002 PowerPoint 4 - The PowerPoint Screen - Slide No. 124
What Are Organizational Charts?
• PowerPoint has an embedded application called Microsoft Organization Chart
• Organizational charts can be added to a new slide by selecting the Org Chart AutoLayout– PowerPoint will create a new slide for you with a placeholder
inserted
T ype nam e hereT ype title here
T ype nam e hereT ype title here
T ype nam e hereT ype title here
T ype nam e hereT ype title here

© Cheltenham Computer Training 1995-2002 PowerPoint 4 - The PowerPoint Screen - Slide No. 125
Creating an Organizational Chart
• Using the New Slide Button– Select Slide View
– Click on the New Slide button on the Status Bar at the bottom of the screen. The New Slide dialog box is displayed
– Select the Org Chart AutoLayout
The Insert Org Chart button allows the insertion of a chart into an existing slide

© Cheltenham Computer Training 1995-2002 PowerPoint 4 - The PowerPoint Screen - Slide No. 126
Manipulating Data in Organizational Charts
• Ctrl+Down Arrow Moves down one box to the next subordinate
level• Ctrl+Left Arrow Moves one box to the
left• Ctrl+Right Arrow Moves one box to the right• Ctrl+Up Arrow Moves up one box to
the previous level

© Cheltenham Computer Training 1995-2002 PowerPoint 4 - The PowerPoint Screen - Slide No. 127
Adding or Removing Chart Boxes• Boxes may be added to the chart using the icon bar at
the top of the window• Click on the button which corresponds to the box you
wish to add, i.e. subordinate, co-worker, etc• Click on the box in the chart to which you want to attach
the new box• The new box is added to the chart and is selected
To remove a chart box
Click on the box you want to remove to select it
Then press the Delete key

© Cheltenham Computer Training 1995-2002 PowerPoint 4 - The PowerPoint Screen - Slide No. 128
Moving Chart Boxes
• Locate the mouse pointer within the box you wish to move
• Hold down the left-hand mouse button and drag the box to a new location
• Position the box over another box in the chart, the mouse pointer changes shape to indicate where the box will be placed when you release the mouse button

© Cheltenham Computer Training 1995-2002 PowerPoint 4 - The PowerPoint Screen - Slide No. 129
Organizational Chart Styles
• The subordinate boxes displayed under a manager box are called a group
• These subordinate boxes are displayed side-by-side by default, but this can be modified
First select the group
Then select the required style

© Cheltenham Computer Training 1995-2002 PowerPoint 4 - The PowerPoint Screen - Slide No. 130
Formatting an Organizational Chart
• To format text– Select the Format/Font
command
• To format chart boxes– Select the Edit\Select
Levels command
– Display the Select Levels dialog box

© Cheltenham Computer Training 1995-2002 PowerPoint 4 - The PowerPoint Screen - Slide No. 131
Chart Connecting Lines
First select Connecting Lines
Then select Line Thickness, from the Boxes menu

© Cheltenham Computer Training 1995-2002 PowerPoint 4 - The PowerPoint Screen - Slide No. 132
Chart Boxes and the Drawing Tools
• Any objects you draw using the Drawing Tools do not become part of the actual chart, but are displayed on the chart’s background

© Cheltenham Computer Training 1995-2002 PowerPoint 4 - The PowerPoint Screen - Slide No. 133
Chart Labels, Exiting and Updating
• To add a text label to a chart– Select the Text Tool button
– Locate the insertion point at the location where you want to add text
– Type the text you wish to add to the chart
– Click anywhere on the chart to deselect the text box
• To exit Organization Chart and update the presentation– Select Exit and Return to Presentation from the File menu
– Select Yes to update your presentation
– Select No to ignore any changes
– Select Cancel to cancel

© Cheltenham Computer Training 1995-2002 PowerPoint 4 - The PowerPoint Screen - Slide No. 134
Review Questions

© Cheltenham Computer Training 1995-2002 PowerPoint 4 - The PowerPoint Screen - Slide No. 135
Creating and Running a Slide Show
PowerPoint 4 Foundation/Intermediate

© Cheltenham Computer Training 1995-2002 PowerPoint 4 - The PowerPoint Screen - Slide No. 136
What is a Slide Show?
• You may want to run your presentation as an electronic slide show on your computer– Each slide in your
presentation, along with its text, art, and graphics, take up the whole screen
– All other screen elements are hidden

© Cheltenham Computer Training 1995-2002 PowerPoint 4 - The PowerPoint Screen - Slide No. 137
Running a Slide Show
• Select Slide Show from the View menu to display the Slide Show dialog box
OPTIONS INCLUDE:
Manual Advance
Use Slide Timings
Run Continuously Until ‘ESC’
Show

© Cheltenham Computer Training 1995-2002 PowerPoint 4 - The PowerPoint Screen - Slide No. 138
Slide Show Transitions
• Change to Slide Sorter view by clicking on the Slide Sorter button
• Select Transition from the Tools menu, to display the Transition dialog box

© Cheltenham Computer Training 1995-2002 PowerPoint 4 - The PowerPoint Screen - Slide No. 139
Slide Show Timings
• Each slide in your slide show can have a different timing applied to it
• The timings you set for each slide appear below the slide in Slide Show view

© Cheltenham Computer Training 1995-2002 PowerPoint 4 - The PowerPoint Screen - Slide No. 140
Build Slides• A Build slide is where each bullet point in the
main text of the slide appears separately– Enables the highlighting of each bullet point in turn, before
bringing the next one onto the slide
– To create a Build slide, select Build from the Tools menu, to display the Build dialog box
OPTIONS INCLUDE
Build Body Text
Dim Previous Points
Effect

© Cheltenham Computer Training 1995-2002 PowerPoint 4 - The PowerPoint Screen - Slide No. 141
Slide Show Annotations
• It is possible to add freehand annotations to draw attention to a particular part of the slide
– Begin the slide show– The Freehand annotation icon is displayed in the bottom right-hand corner of the screen– Click on the Freehand annotation icon and move the mouse to change the mouse pointer into a pencil– Hold down the mouse button to write or draw on the screen– To erase annotations during a slide show, press the E key– When you move to the next slide the annotations will disappear– Click the Freehand annotation icon again to turn the feature off

© Cheltenham Computer Training 1995-2002 PowerPoint 4 - The PowerPoint Screen - Slide No. 142
Hidden Slides
• Select the slide(s) you wish to hide– Select Hide Slide from the Tools menu, or click on the Hide
Slide button on the Slide Sorter toolbar if you are working in Slide Sorter view
– The slide will be hidden during a slide show
– In Slide Sorter view an icon appears below the slide, which contains the slide number with a line through it, to indicate that it is hidden
– During a slide show, a Hidden Slide icon is displayed in the bottom right-hand corner of the previous slide to indicate that the next slide is a hidden slide
– If you want to show the hidden slide, click on the Hidden Slide icon, or type H, or type in the slide number and press Enter

© Cheltenham Computer Training 1995-2002 PowerPoint 4 - The PowerPoint Screen - Slide No. 143
Review Questions

© Cheltenham Computer Training 1995-2002 PowerPoint 4 - The PowerPoint Screen - Slide No. 144
Using PowerPoint 4 With Other Applications
PowerPoint 4 Foundation/Intermediate

© Cheltenham Computer Training 1995-2002 PowerPoint 4 - The PowerPoint Screen - Slide No. 145
PowerPoint 4.0 and OLE
• PowerPoint uses OLE (Object Linking and Embedding)– OLE allows you to embed, or link, objects from other
applications to your PowerPoint presentations
– Embedded objects, such as a Microsoft Excel chart, become part of your presentation
– Linked objects are stored in the original document which enables others to update the object at source
• The presentation only stores a representation of the original object• Any changes made to the original document will be reflected in the
PowerPoint presentation when the link is updated

© Cheltenham Computer Training 1995-2002 PowerPoint 4 - The PowerPoint Screen - Slide No. 146
Embedding Objects from Other Applications
• To insert an Object
Use the Browse button to locate the required file

© Cheltenham Computer Training 1995-2002 PowerPoint 4 - The PowerPoint Screen - Slide No. 147
Creating an Embedded Object
• Use the Insert/Object command
Note: If the server application is not present the dialog box above is displayed

© Cheltenham Computer Training 1995-2002 PowerPoint 4 - The PowerPoint Screen - Slide No. 148
Editing an Embedded Object
• Double click on the embedded object– The application where the object was created is opened to
allow editing
– In some cases, you may need to use the Edit menu commands
– Some applications allow you to edit embedded objects using in-place editing
– In other cases, a completely separate window is opened to allow you to edit the object in its original application
© Cheltenham Computer Training 1995-2002 PowerPoint 4 - The PowerPoint Screen - Slide No. 149
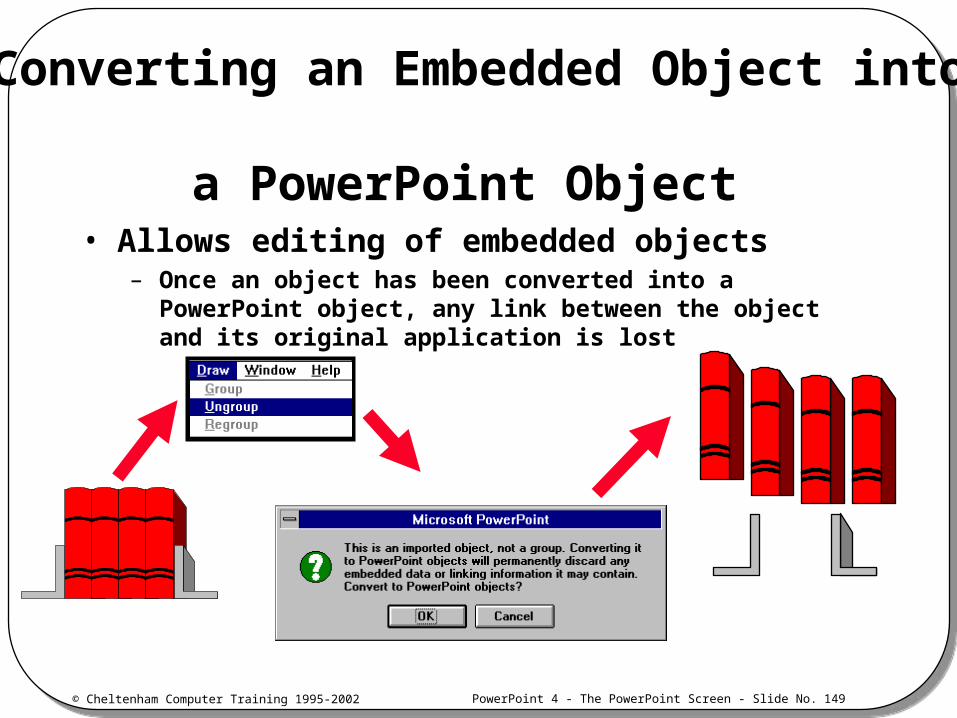
Converting an Embedded Object into a PowerPoint Object
• Allows editing of embedded objects– Once an object has been converted into a PowerPoint object,
any link between the object and its original application is lost

© Cheltenham Computer Training 1995-2002 PowerPoint 4 - The PowerPoint Screen - Slide No. 150
Linking Objects from Other Applications
• Use the Edit/Paste Special command
Note: If the format of the object does not allow a link to be created, this option will not be available
Paste Link Command

© Cheltenham Computer Training 1995-2002 PowerPoint 4 - The PowerPoint Screen - Slide No. 151
Creating Linked Objects Within PowerPoint
• The object is inserted into the presentation and is linked to its’ original application
Note: Any changes made to the object in the original application will be reflected in the PowerPoint object
Select the Link check box and click OK

© Cheltenham Computer Training 1995-2002 PowerPoint 4 - The PowerPoint Screen - Slide No. 152
The Links Command
• Options include:– Automatic
– Manual
– Update Now
– Open Source
– Change Source
– Break Link

© Cheltenham Computer Training 1995-2002 PowerPoint 4 - The PowerPoint Screen - Slide No. 153
Using PowerPoint with Microsoft Word
• You can:– Export a presentation to Microsoft Word using the ‘Report It’
button on the Standard toolbar
– Import an outline into PowerPoint using Open. In the List Files Of Type box, select Outlines
– Use the ‘Slides From Outline’ command to insert an outline into an existing presentation, using ‘Select Slides From Outline’ from the Insert menu

© Cheltenham Computer Training 1995-2002 PowerPoint 4 - The PowerPoint Screen - Slide No. 154
Using the Equation Editor
• An application which is shared between PowerPoint and other Microsoft applications– Useful for adding items such as Greek symbols, fractions,
and integrals etc
– May be edited within PowerPoint

© Cheltenham Computer Training 1995-2002 PowerPoint 4 - The PowerPoint Screen - Slide No. 155
Review Questions

© Cheltenham Computer Training 1995-2002 PowerPoint 4 - The PowerPoint Screen - Slide No. 156
Printing a Presentation
PowerPoint 4 Foundation/Intermediate

© Cheltenham Computer Training 1995-2002 PowerPoint 4 - The PowerPoint Screen - Slide No. 157
Printing Under PowerPoint
• All the elements of your presentation can be printed– Slides
– Outlines
– Speaker’s notes
– Audience handouts
• The slides can be printed onto paper or onto overhead transparencies– Before you begin, you should set up the slide format
– Setting up the slides at this stage ensures that what you see on the screen is what will appear on the printed page!

© Cheltenham Computer Training 1995-2002 PowerPoint 4 - The PowerPoint Screen - Slide No. 158
Setting Up Slides for Printing
• Select Slide Setup from the File menu to display the Slide Setup dialog box
OPTIONS INCLUDE:
On-screen Show
Letter Paper (8.5 x 11 in)
A4 Paper (210 x 297 mm)
35mm Slides
Custom
In the Orientation section, select the orientation for your slides in the Slides box. Choose either Portrait or Landscape

© Cheltenham Computer Training 1995-2002 PowerPoint 4 - The PowerPoint Screen - Slide No. 159
Printing a Presentation
• Select Print from the File menu to display the Print dialog box
OPTIONS INCLUDE:
Slides
Slides (with builds)
Slides (without builds)
Notes Pages
Handouts (2 slides per page)
Handouts (3 slides per page)
Handouts (6 slides per page)
Outline View
Select the number of copies you want to print in the Copies box.

© Cheltenham Computer Training 1995-2002 PowerPoint 4 - The PowerPoint Screen - Slide No. 160
Review Questions