- electromagnetic floater - juneau · pdf file · 2011-09-29table of contents...
TRANSCRIPT

http://www.instructables.com/id/Electromagnetic-Floater/
Food Living Outside Play Technology Workshop
Electromagnetic Floaterby J_Hodgie on June 8, 2007
Table of Contents
Electromagnetic Floater . . . . . . . . . . . . . . . . . . . . . . . . . . . . . . . . . . . . . . . . . . . . . . . . . . . . . . . . . . . . . . . . . . . . . . . . . . . . . . . . . . . . . . . . . . . . . . . . . . . . . . . . . 1
Intro: Electromagnetic Floater . . . . . . . . . . . . . . . . . . . . . . . . . . . . . . . . . . . . . . . . . . . . . . . . . . . . . . . . . . . . . . . . . . . . . . . . . . . . . . . . . . . . . . . . . . . . . . . . . 2
File Downloads . . . . . . . . . . . . . . . . . . . . . . . . . . . . . . . . . . . . . . . . . . . . . . . . . . . . . . . . . . . . . . . . . . . . . . . . . . . . . . . . . . . . . . . . . . . . . . . . . . . . . . . . . . . 3
Step 1: Materials . . . . . . . . . . . . . . . . . . . . . . . . . . . . . . . . . . . . . . . . . . . . . . . . . . . . . . . . . . . . . . . . . . . . . . . . . . . . . . . . . . . . . . . . . . . . . . . . . . . . . . . . . . . 3
Step 2: Prepare The Base . . . . . . . . . . . . . . . . . . . . . . . . . . . . . . . . . . . . . . . . . . . . . . . . . . . . . . . . . . . . . . . . . . . . . . . . . . . . . . . . . . . . . . . . . . . . . . . . . . . . 4
Step 3: Install the Magnets and Sensor . . . . . . . . . . . . . . . . . . . . . . . . . . . . . . . . . . . . . . . . . . . . . . . . . . . . . . . . . . . . . . . . . . . . . . . . . . . . . . . . . . . . . . . . . . 5
Step 4: Build the Electronics . . . . . . . . . . . . . . . . . . . . . . . . . . . . . . . . . . . . . . . . . . . . . . . . . . . . . . . . . . . . . . . . . . . . . . . . . . . . . . . . . . . . . . . . . . . . . . . . . . 6
File Downloads . . . . . . . . . . . . . . . . . . . . . . . . . . . . . . . . . . . . . . . . . . . . . . . . . . . . . . . . . . . . . . . . . . . . . . . . . . . . . . . . . . . . . . . . . . . . . . . . . . . . . . . . . . . 8
Step 5: Make Some Objects To Float . . . . . . . . . . . . . . . . . . . . . . . . . . . . . . . . . . . . . . . . . . . . . . . . . . . . . . . . . . . . . . . . . . . . . . . . . . . . . . . . . . . . . . . . . . . . 8
Step 6: Start Floating . . . . . . . . . . . . . . . . . . . . . . . . . . . . . . . . . . . . . . . . . . . . . . . . . . . . . . . . . . . . . . . . . . . . . . . . . . . . . . . . . . . . . . . . . . . . . . . . . . . . . . . . 10
Related Instructables . . . . . . . . . . . . . . . . . . . . . . . . . . . . . . . . . . . . . . . . . . . . . . . . . . . . . . . . . . . . . . . . . . . . . . . . . . . . . . . . . . . . . . . . . . . . . . . . . . . . . . . . 12
Comments . . . . . . . . . . . . . . . . . . . . . . . . . . . . . . . . . . . . . . . . . . . . . . . . . . . . . . . . . . . . . . . . . . . . . . . . . . . . . . . . . . . . . . . . . . . . . . . . . . . . . . . . . . . . . . . . 13
http://www.instructables.com/id/Electromagnetic-Floater/
Author:J_Hodgie author's websiteCurrently doing masters in Mechatronics Engineering, but still create in my spare time
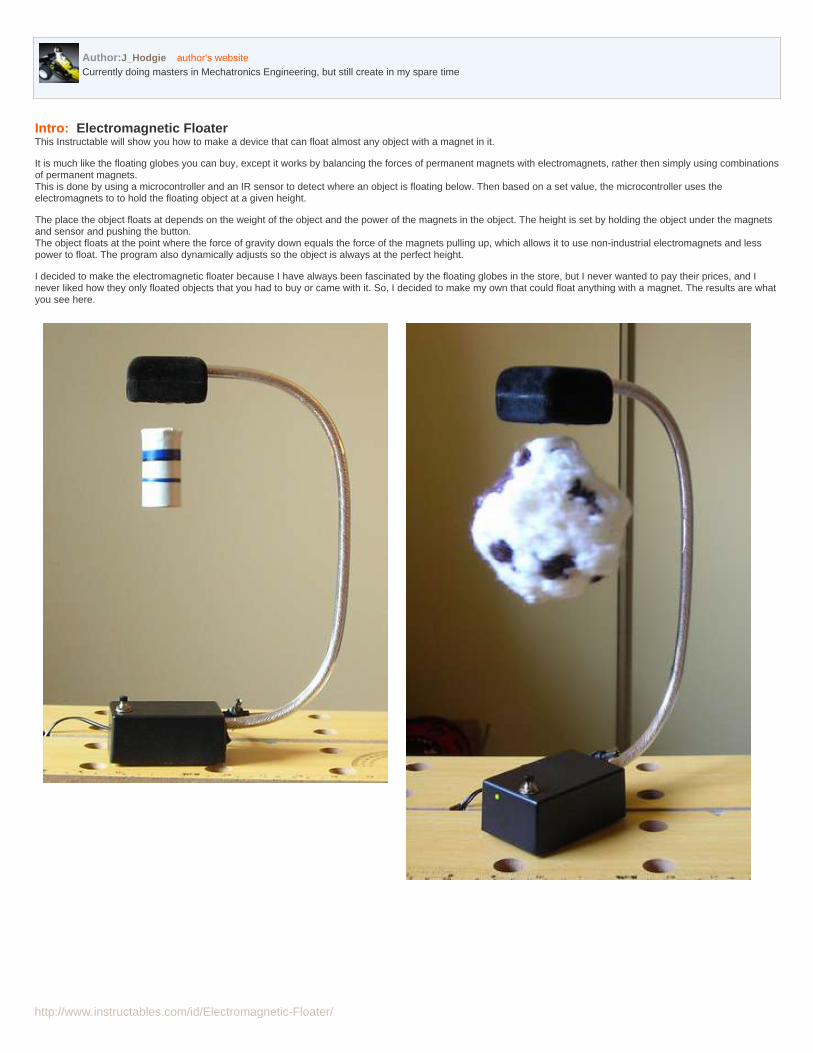
Intro: Electromagnetic FloaterThis Instructable will show you how to make a device that can float almost any object with a magnet in it.
It is much like the floating globes you can buy, except it works by balancing the forces of permanent magnets with electromagnets, rather then simply using combinationsof permanent magnets.This is done by using a microcontroller and an IR sensor to detect where an object is floating below. Then based on a set value, the microcontroller uses theelectromagnets to to hold the floating object at a given height.
The place the object floats at depends on the weight of the object and the power of the magnets in the object. The height is set by holding the object under the magnetsand sensor and pushing the button.The object floats at the point where the force of gravity down equals the force of the magnets pulling up, which allows it to use non-industrial electromagnets and lesspower to float. The program also dynamically adjusts so the object is always at the perfect height.
I decided to make the electromagnetic floater because I have always been fascinated by the floating globes in the store, but I never wanted to pay their prices, and Inever liked how they only floated objects that you had to buy or came with it. So, I decided to make my own that could float anything with a magnet. The results are whatyou see here.

http://www.instructables.com/id/Electromagnetic-Floater/
File Downloads
Electromagnetic Floater Program.zip (60 KB)[NOTE: When saving, if you see .tmp as the file ext, rename it to 'Electromagnetic Floater Program.zip']
Electromagnetic Floater.dwg (986 KB)[NOTE: When saving, if you see .tmp as the file ext, rename it to 'Electromagnetic Floater.dwg']
Step 1: MaterialsMaterials:- ATMega168 Microcontroller- 1 16-20 MHz Crystal- 28 Pin Socket- Dual Full H Bridge IC- 1 Power NPN- 2 Electromagnets- 1 Bicolour LED- 2 IR LED- 1 IR Photodiode- 1 5V Regulator- 2 Leveling Capacitors- 1 SPST Switch- 1 NO Button- 1, 470 Ohm Resistor- 1, 5 Ohm Resistor- 1 Universal Breadboard- 2 Cases- Plexiglas- Solder- Hot Glue- Steel Wire
http://www.instructables.com/id/Electromagnetic-Floater/
- Vinyl Tubing- 3 or more 1/4" diameter x 1/4" thick rare earth magnets (for the base)- 2 or more 1/2" diameter x 1/8" thick rare earth magnets (for the objects)
Tools:- Soldering Iron- Hot Glue Gun- Desoldering Pump- 3rd Hand- Plexiglas cutter
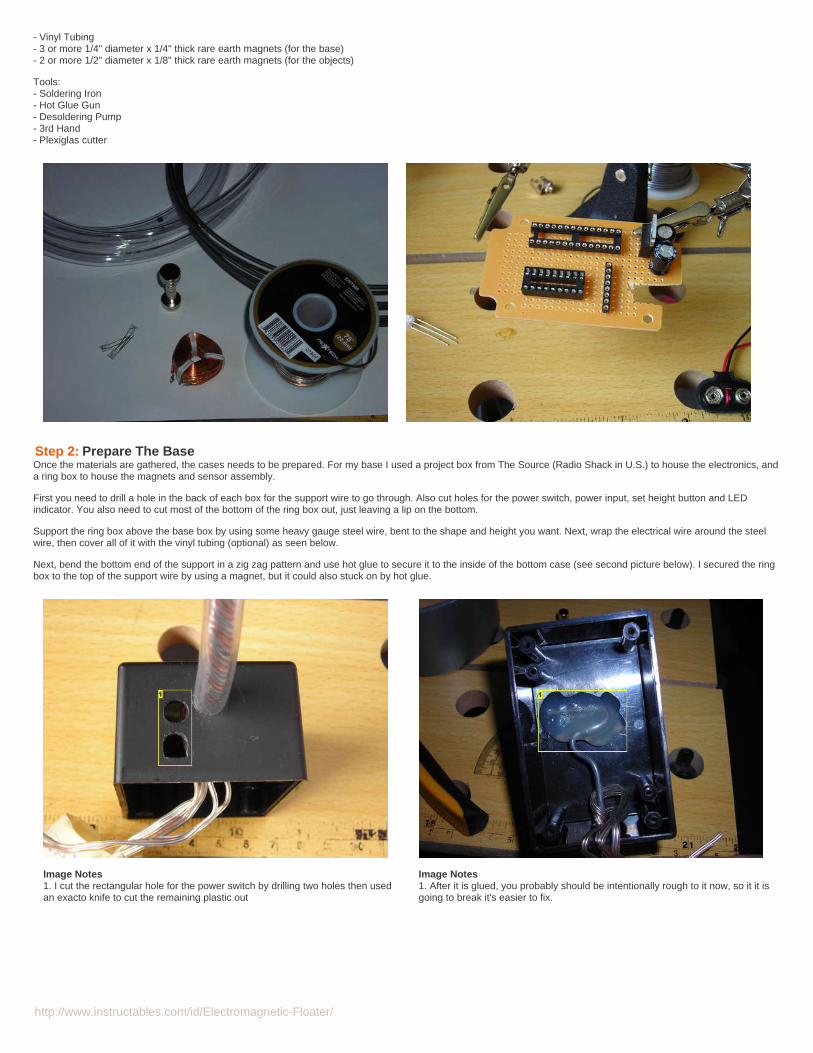
Step 2: Prepare The BaseOnce the materials are gathered, the cases needs to be prepared. For my base I used a project box from The Source (Radio Shack in U.S.) to house the electronics, anda ring box to house the magnets and sensor assembly.
First you need to drill a hole in the back of each box for the support wire to go through. Also cut holes for the power switch, power input, set height button and LEDindicator. You also need to cut most of the bottom of the ring box out, just leaving a lip on the bottom.
Support the ring box above the base box by using some heavy gauge steel wire, bent to the shape and height you want. Next, wrap the electrical wire around the steelwire, then cover all of it with the vinyl tubing (optional) as seen below.
Next, bend the bottom end of the support in a zig zag pattern and use hot glue to secure it to the inside of the bottom case (see second picture below). I secured the ringbox to the top of the support wire by using a magnet, but it could also stuck on by hot glue.
Image Notes1. I cut the rectangular hole for the power switch by drilling two holes then usedan exacto knife to cut the remaining plastic out
Image Notes1. After it is glued, you probably should be intentionally rough to it now, so it it isgoing to break it's easier to fix.
http://www.instructables.com/id/Electromagnetic-Floater/
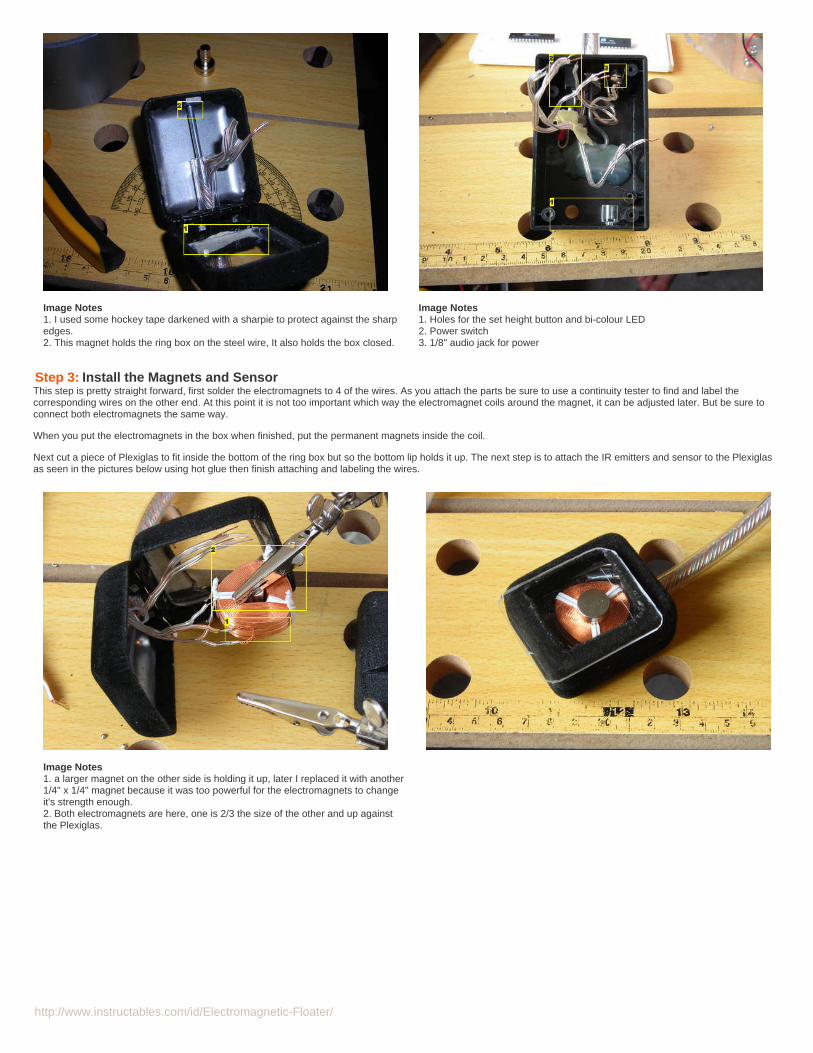
Image Notes1. I used some hockey tape darkened with a sharpie to protect against the sharpedges.2. This magnet holds the ring box on the steel wire, It also holds the box closed.
Image Notes1. Holes for the set height button and bi-colour LED2. Power switch3. 1/8" audio jack for power
Step 3: Install the Magnets and SensorThis step is pretty straight forward, first solder the electromagnets to 4 of the wires. As you attach the parts be sure to use a continuity tester to find and label thecorresponding wires on the other end. At this point it is not too important which way the electromagnet coils around the magnet, it can be adjusted later. But be sure toconnect both electromagnets the same way.
When you put the electromagnets in the box when finished, put the permanent magnets inside the coil.
Next cut a piece of Plexiglas to fit inside the bottom of the ring box but so the bottom lip holds it up. The next step is to attach the IR emitters and sensor to the Plexiglasas seen in the pictures below using hot glue then finish attaching and labeling the wires.
Image Notes1. a larger magnet on the other side is holding it up, later I replaced it with another1/4" x 1/4" magnet because it was too powerful for the electromagnets to changeit's strength enough.2. Both electromagnets are here, one is 2/3 the size of the other and up againstthe Plexiglas.
http://www.instructables.com/id/Electromagnetic-Floater/
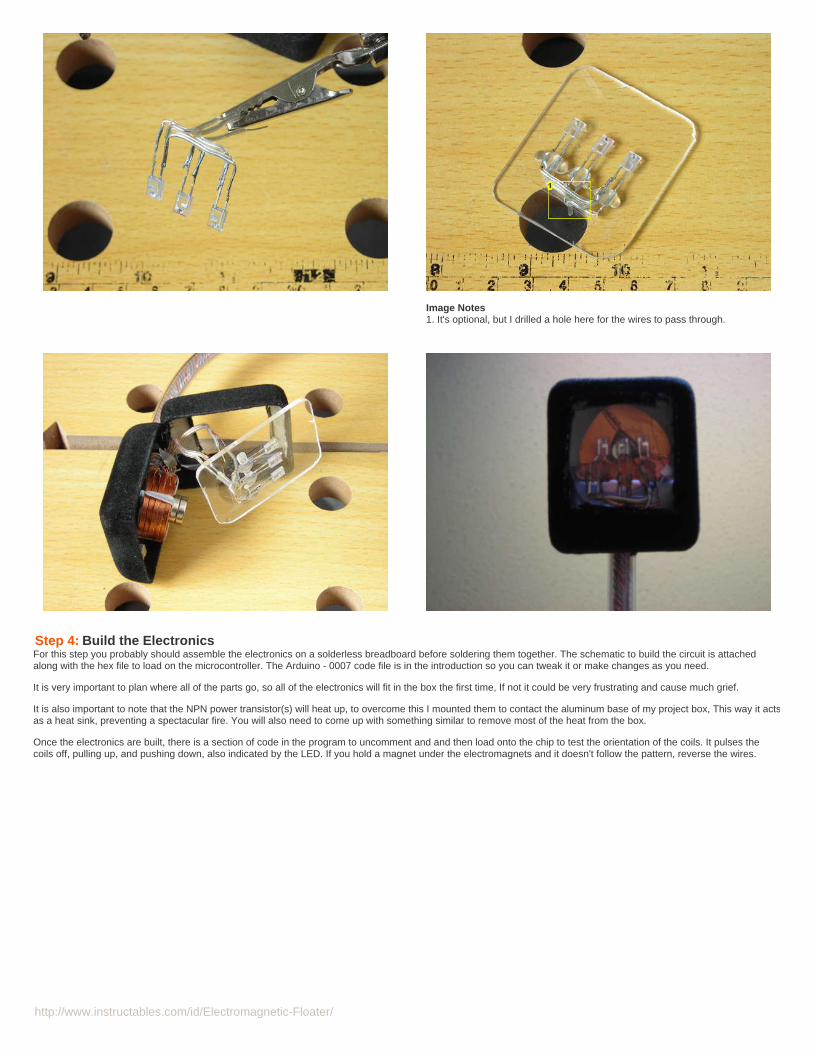
Image Notes1. It's optional, but I drilled a hole here for the wires to pass through.
Step 4: Build the ElectronicsFor this step you probably should assemble the electronics on a solderless breadboard before soldering them together. The schematic to build the circuit is attachedalong with the hex file to load on the microcontroller. The Arduino - 0007 code file is in the introduction so you can tweak it or make changes as you need.
It is very important to plan where all of the parts go, so all of the electronics will fit in the box the first time, If not it could be very frustrating and cause much grief.
It is also important to note that the NPN power transistor(s) will heat up, to overcome this I mounted them to contact the aluminum base of my project box, This way it actsas a heat sink, preventing a spectacular fire. You will also need to come up with something similar to remove most of the heat from the box.
Once the electronics are built, there is a section of code in the program to uncomment and and then load onto the chip to test the orientation of the coils. It pulses thecoils off, pulling up, and pushing down, also indicated by the LED. If you hold a magnet under the electromagnets and it doesn't follow the pattern, reverse the wires.

http://www.instructables.com/id/Electromagnetic-Floater/

http://www.instructables.com/id/Electromagnetic-Floater/
File Downloads
Floating_Magnets.hex (24 KB)[NOTE: When saving, if you see .tmp as the file ext, rename it to 'Floating_Magnets.hex']
Step 5: Make Some Objects To FloatThis part is only limited by your imagination. I have found that if the objects to float are too small, or two short relative to the width, are harder to get to float.
The object shown here is a heavy cardboard tube covered in electrical tape with 2 1/2" diameter x 1/4" thick rare earth metal magnets (from Digi-Key). I have alsosuccessfully floated a die I crocheted using a granny square pattern, and a ruby made from construction paper.

http://www.instructables.com/id/Electromagnetic-Floater/

http://www.instructables.com/id/Electromagnetic-Floater/
Step 6: Start FloatingAll that is left to do is start floating the objects.This is done by holding the object under the magnets and slowly bringing it up. When It nears the point where it wants to float up, push the button. This will set the level tofloat at to the current height.
Next, hold it just below where you set the hold height, so the LED lights up. Hold it there until it simply floats out of your hand. This happens because the microcontrollerslowly adjusts the hold height up, to where the electromagnets have enough power to control the object.
You may also notice some buzzing coming from the electromagnets. This can be easily fixed by inserting some padding around the electromagnets.
If you do make this I would love to see some photos. It would also be great to hear any comments you have.

http://www.instructables.com/id/Electromagnetic-Floater/

http://www.instructables.com/id/Electromagnetic-Floater/
Related Instructables
Laterally DrivenSpeakers byJ_Hodgie Anti-gravity
Chamber(Photos) bycypherxax
Magnetic stripecard spoofer bypowerpants
micro gaussrifle by Ark
Make a SimpleElectromagnetbyFrenchCrawler
TongueMusic(+TheSound of Kiss)(video) by hnam

http://www.instructables.com/id/Electromagnetic-Floater/
Comments
50 comments Add Comment view all 449 comments
3gfisch says: Sep 1, 2011. 5:01 AM REPLYgreat german projecthttp://www.bis0uhr.de/index.htm?http://www.bis0uhr.de/projekte/schwebekugel/index.html%99
penghars says: May 2, 2010. 1:01 AM REPLYHow about if you changed the microcontroller and LED and thar stuff with a potensiometer.... Could it still work??
bears0 says: Aug 31, 2011. 6:28 AM REPLYno it needs to compensate for height. if the object being levitated is too high it turns off the magnet and vice versa. with a potentiometer it wont be able toautomatically adjust. also it would be impossible for someone to to control it because they couldn't react to the changes fast enough.
vzdemon says: Aug 6, 2011. 11:14 AM REPLYthat's really cool, but i wonder if i can use the Arduino2009 instead of create a new MCU.
samirsky says: Apr 29, 2011. 11:16 AM REPLY1. Is it possible to get a parts list?Excuse me if this was already posted. I couldn't find it. I am too much of a newbie to know what to buy when I see "Power NPN": there are so manytransistors.
2. Is it possible to drive the electromagnet (via transistor/bridge) with the PWM output of the Arduino? Or does this higher frequency switching cause themagnetic field to not behave properly? I ask because this project has inspired me for another project I want to do (and post on instructables, of course).
lurkingdevil says: Jul 15, 2011. 4:29 PM REPLYI too would like to know the answer to question 2.
How does the arduino control the coil in this instructable?
rkr says: Sep 6, 2009. 1:07 PM REPLYHow exactly do you load a program onto a microcontroller? I am unfamiliar with this task and I think that you should have included some instructions on it.
antonad says: May 28, 2010. 11:46 AM REPLYya, me to, need to know, and also the value for capacitor and transistor?
16zzundel5 says: Jul 28, 2010. 2:39 PM REPLYYou need to program it with an arduino- I can do one and send it to you for tthe price of the microcontroller and shipping. If you have themicrocontroller already, send it to me and I can program it for you for the cost of me sending it back.
kucloth says: Nov 17, 2010. 3:55 AM REPLYWell... not exactly. Arduino is a special micro hardware/software system based around the atmega micros and is actually not nearly as useful aseveryone seems to think it is. To program a microcontroller, you need a compiler program to write the code on and actually load it into the micro.(tons of free ones like WinAVR available online, just Google it). You also need a cable to connect the port (serial, parallel, USB, etc) on yourcomputer to the micro to program. It's not that complicated, but it does take a bit of practice. I am sure there a few instructables that can teachyou how among many websites.
theexpert says: Jul 8, 2011. 1:12 PM REPLYit should be like putting music on your mp3 from lime wire and or frost wire just download it to your computer then put the file into the micro-controller after plugging it in at least with arduino you can put it into the comp idk about others
robomatt1999 says: Jun 19, 2011. 2:54 PM REPLYThis would make a nice futuristic pecil holder : P
bkrishnan1 says: May 12, 2011. 10:55 AM REPLYits very nice can you send which electromagnetic coil used

http://www.instructables.com/id/Electromagnetic-Floater/
TheIronHobo says: May 4, 2011. 6:38 PM REPLYis it strong enough to hold a pen?
tech industries says: May 3, 2011. 3:04 PM REPLYWould the math involved in the Arduino code need to be modified for every specific coil? My electromagnets are not identical to yours, so with the change insize/strength where in the code would the modification (if any was needed) take place?
thanks
pianoman2011 says: Dec 23, 2008. 10:59 PM REPLYi was thinking... since the power jack is a 1/8" audio jack, if you used a jack converter and plugged the device into a cd player/iPod, would the change in theelectrical signal when you play a song sort of move the magnet with the music? would an amplification system be needed to strengthen the signals tosufficiently power the device, if this was all possible?
J_Hodgie says: Feb 10, 2009. 1:21 PM REPLYnot really, it needs a constant power supply and more power then the audio feed could supply.
scraciun says: Apr 6, 2011. 3:44 AM REPLYhello i really need your help:) you didn t say anything about the program
pianoman2011 says: Feb 10, 2009. 4:21 PM REPLYbut if you amplified the audio feed current, or just added to it so that the slight changes in voltage would make the magent float, it still wouldnt work?
J_Hodgie says: Feb 10, 2009. 6:41 PM REPLYThat might work if the coils were stronger than what I used here. It might even act as a speaker.
pianoman2011 says: Feb 11, 2009. 6:35 AM REPLYthat would be neat. but i gues i am only dreaming lol
Aercimete says: Mar 13, 2009. 6:45 AM REPLYyou might be able to put a secondary electromagnet in(much weaker) so that the primary suspends it and the secondary just kindawiggles it lol
coleyy says: Dec 11, 2010. 5:05 AM REPLYit might be easier to do that to a smaller magnet like Aercimete said and put that next to the object
pianoman2011 says: Mar 15, 2009. 6:47 PM REPLYlol nice idea. but now that i really think about it, i don't think having it wiggle to music would be that fascinating... still worth doingthough.
richsrules says: Mar 18, 2011. 1:07 PM REPLYdoes anyone know if the object remains stationary while it is suspended or does it revolve and spin?
xXnocturnusXx says: Dec 10, 2009. 9:59 PM REPLYim thinking about making an index (from halo) replica and having it float in it the center.....i hope it's mass isn't to big!
electric_destruction says: Jan 15, 2011. 5:28 PM REPLYI would love to see that, i love both Halo and electromagnets.
nosesquid says: Jan 6, 2011. 7:01 PM REPLYThere are so many people wondering how this thing works, is the schematic right, etc... has anyone successfully built one? If so, could you please tell ushow it works?I'm about to try to tackle it, with one electromagnet and no H-bridge. I don't really understand the schematic, but looking at the code, it seems like it basicallydoes this:if ((detected height - target height) > a little bit)use smaller magnetelse if ((detected height - target height) > a lot)use big magnet

http://www.instructables.com/id/Electromagnetic-Floater/
elseleave things as they are
I could understand this if a lone electromagnet couldn't be switched quickly enough... is that the case?The full H-bridges let the electromagnets push as well as pull, which should increase the range in which something should float, but that doesn't seem strictlynecessary either. Can anyone comment?Thanks very much.
DehLeprechaun says: Jun 5, 2010. 9:58 PM REPLYwonder if you could beef it up and make floating furniture
pyrotech45 says: Oct 20, 2010. 6:06 PM REPLYthey actually do have floating beds but they are expensive
DehLeprechaun says: Oct 20, 2010. 6:13 PM REPLYsend me a link i'd like 2 luk at it
pyrotech45 says: Oct 24, 2010. 7:45 PM REPLYhttp://zedomax.com/blog/2007/02/18/magnetic-floating-bed/
Chimex14 says: Dec 5, 2010. 8:54 AM REPLYDANG!
gtyrfdrty says: Nov 17, 2010. 3:02 PM REPLYholy crap thats cool
natman3400 says: Jun 22, 2010. 8:59 AM REPLYAnd then sit in it. That would be awesome. Or a floating bed-sized ferofulid ball that you could sleep on.
monkeys98 says: Aug 22, 2011. 12:39 AM REPLYit would suck if it stopped working when you were sleeping SMACK!
DehLeprechaun says: Jul 1, 2010. 6:01 PM REPLYi think the ferofluid would be a bad idea the second you lay on it you would fall through and be soaked in it. not to mention you might drown.
natman3400 says: Jul 2, 2010. 10:01 AM REPLYFill a waterbed with it?
DehLeprechaun says: Jul 3, 2010. 10:23 PM REPLYthat would probably work better but theres no telling what shape it would be or if it would float at all
dombeef says: Oct 31, 2010. 1:56 PM REPLYIt would spike you though
natman3400 says: Nov 6, 2010. 6:51 PM REPLYmake it weak then
dombeef says: Nov 7, 2010. 5:51 AM REPLYIt would just be a regular water bed then

http://www.instructables.com/id/Electromagnetic-Floater/
killerdynamo says: Dec 30, 2010. 9:38 PM REPLYno, it'd be a really badass waterbed
natman3400 says: Dec 30, 2010. 11:02 PM REPLYIt be a really badass floating water bed. PWNT fools.
dombeef says: Dec 31, 2010. 5:45 PM REPLYIt would be a watery blob,if it was in a skin of some kind it would be a cool bean bag chair
killerdynamo says: Dec 31, 2010. 6:41 PM REPLYand if your pants were magnetic... now we're getting somewhere! haha
dombeef says: Jan 2, 2011. 1:31 PM REPLYOwww, ultra wedgy
unanonymous says: Nov 24, 2010. 12:45 PM REPLYhow much did this cost exactly?
runedevil98 says: Sep 3, 2010. 3:37 AM REPLYcan you run this thing off batteries?
crobertob says: Oct 23, 2008. 10:44 PM REPLYHello, I'm going to start building this, I hope it works. I have my first question that wasn't already answered in the 241 comments I already read. Did you usethe 7805 to get the +5 volts from the power plug? Or did you use Zener diodes. Also in one of the pictures of the PCB there are about 3 Zener diodes, whatis their use or are they necessary for the floater to work. Thanks, it's really a great project.
view all 449 comments