mtx2004.mtxaudio.eu/img/pdf/jackhammer_re-cone_kit_manual.pdf · mtx.com specifications...
TRANSCRIPT
MTX.COM
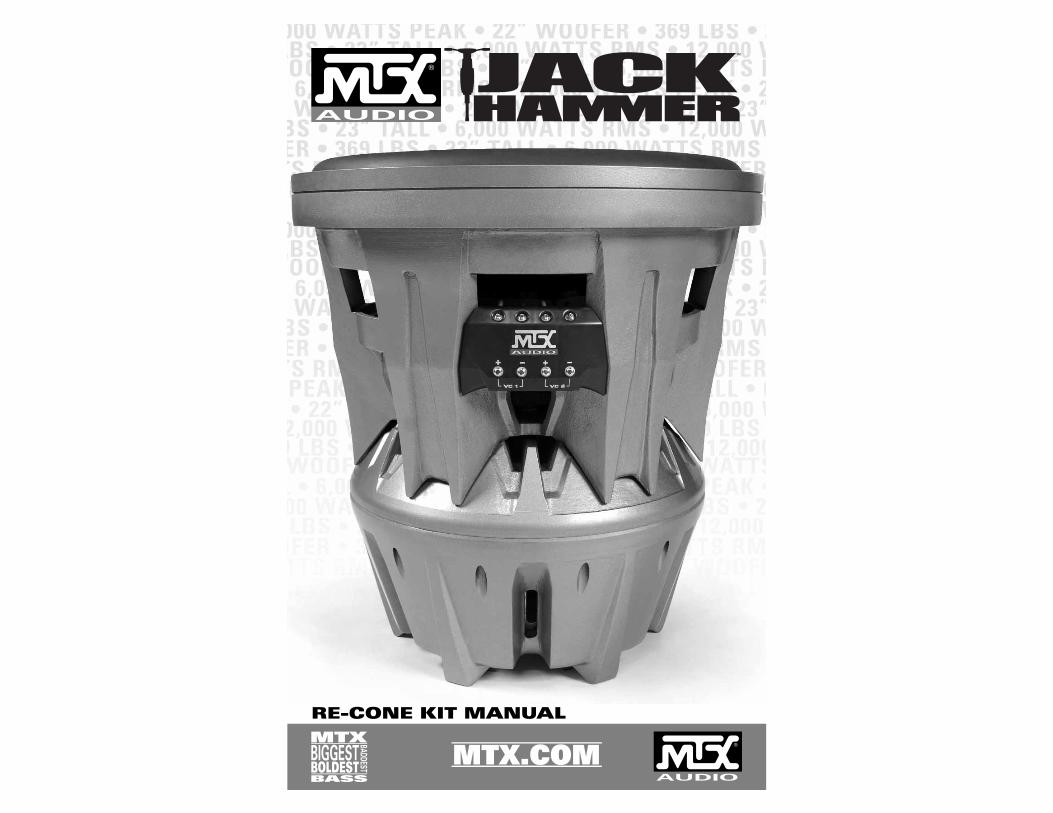
RE-CONE KIT MANUAL

MTX.COM
SP
ECIF
ICA
TIO
NS
INTRODUCTIONThank you for choosing MTX to help you reach your ultimate goal with your vehicle. The MTX JackHammer is a true 22" subwoofer with power and performance beyond anything ever attempted in the mobile audio world. This behemoth, is capable of handling 6,000 watts of RMS power. Designed for those who want to show off the biggest woofer ever made no matter the price, the JackHammer will fi t into most full-sized SUVs and some shorter models, like Escalades, with the third seat removed.
There are two versions of the JackHammer built for different applications. The SPL model (T9922-22) is perfect for excessive bass and competition use, while the SQL model (T9922-44) offers increased sound quality for “real life” listening. Both of these kits will work in the same motor for easy installation of either unit. You can order either of these models or just a re-cone replacement kit for the other and switch between the two without reinstalling the entire woofer. For more information, see the Piston Change (Re-cone Kit) section in this manual or call 1-800-CALL-MTX.
The most enormous subwoofer to date, the JackHammer is just the newest example of how MTX is the biggest, baddest, boldest car audio...ever!
BEFORE STARTINGIt is very important that you have your JackHammer installed by an authorized MTX Elite Status retailer, preferably MECP certifi ed. Before installation, make sure you have read the instructions carefully and have the following equipment:
• Fork Lift (or another means of lifting approximately 370 lbs.)• 5⁄32", 4mm, 3⁄16" hex keys • 3mm hex wrench (if re-coning) • 15⁄16" wrench or socket
Model T9922-44RCK T9922-22RCK
Description Re-cone kit for T9922-44 Re-cone kit for T9922-22
Impedance Dual 4 Ohm Dual 2 Ohm
Frequency Response 20Hz-150Hz 20Hz-150Hz
Power Handling (RMS) 6000 Watts 6000 Watts
Recommended RMS Amplifi er Power 3000-6000 Watts 3000-6000 Watts
Voice Coil Diameter 6.5” 6.5”
T9922-44Fs = 16.76 HzQms = 5.19Vas = 239.1 litersCms = 0.063 mm/NMms = 1428 gRms = 29.04 kg/sXmax = 2.5 inXmech = 3 inP-Dia = 17.95 inSd = 1642 sq.cm
P-Vd = 0.366 cu.ftQes = 0.6Re = 1.66 ohmsBL = 20.39 TmQts = 0.538no = 0.181 %2.83V SPL = 91.55 dB
T9922-22Fs = TBDQms = TBDVas = TBDCms = TBDMms = TBDRms = TBDXmax = TBDXmech = TBDP-Dia = TBDSd = TBD
P-Vd = TBDQes = TBDRe = TBDBL = TBDQts = TBDno = TBD2.83V SPL = TBD

MTX.COM
PISTON CHANGE (RE-CONE KIT)Along with the excessive SPL, MTX has created a replaceable cone assembly so the competition level of bass (done with the dual 2Ω voice coils) can be switched out with a dual 4Ω voice coil for every day listening with increased sonic quality and still be the same speaker with excessive high SPL. But since the installation of the JackHammer is a large investment in time and resources, the cone can be removed without removing the entire sub.
Re-coning the woofer is surprisingly easy. No glue is needed, just bolts, and if you followed the enclosure design it can be done without taking the woofer out of the enclosure. Directions for either procedure follow.
To Re-cone the Woofer when Removed from the EnclosureTo remove the cone, unscrew the twelve 3⁄16" hex screws from the front gasket of the woofer and remove the gasket. Next remove the six 5⁄32" hex screws from the back of the spider plateau and loosen the tinsel leads at the terminal. The tinsel leads are the four 3mm hex screws at the top of the terminal that hold the voice coil wires. Gently pull on the cone under the surround and the cone assembly should pull away from the woofer motor. Be sure and pull evenly to prevent the assembly from binding in the basket. Spinning the cone as you pull will help remove the assembly. You are now ready to put in the new re-cone kit.
Place the new cone assembly into the woofer motor. Make sure to align the tinsel leads from the re-cone kit with the terminals and line up the large notches in the surround with the largest holes in the basket. Insert the tinsel leads into the terminal ensuring the red lead is going into the positive (+) position and the black lead is going into the negative (–) position. Tighten the four set screws and then slightly tug on the tinsel leads to make sure they are tight in the terminal.
Next, insert the six 5⁄32” hex screws back into the spider plateau and tighten. Replace the top gasket over the surround on the top of the woofer. The counter-bore holes in the gasket need to align with the smaller threaded holes in the basket. Insert the twelve 3⁄16" hex gasket screws into the counter-bored holes and tighten. Your new cone is now installed and you are ready to once again experience the JackHammer’s extreme bass!
To Re-cone the Woofer when Installed in the EnclosureIf you have made the back removable, as suggested earlier in this manual, you can remove the cone without removing the woofer from the enclosure. To remove the cone, unscrew the twelve 3⁄16" hex screws from the front gasket of the woofer and then remove the top gasket. DO NOT remove the T-30 wood screws because the gasket can be removed with these still in place. Next, remove the six 5⁄8" bolts from the back with a 15⁄16" wrench and pull off the back of the enclosure. Then, remove the six 5⁄32" hex screws from the back of the spider plateau and loosen the tinsel leads at the terminal. The tinsel leads are the four 3mm hex screws at the top of the terminal that hold the voice coil wires. Gently pull on the cone under the surround and the cone assembly should pull away from the woofer motor. Be sure and pull evenly to prevent the assembly from binding in the basket. Spinning the cone as you pull will help remove the assembly. You are now ready to put in the new re-cone kit.
Place the new cone assembly into the woofer motor. Make sure to align the tinsel leads from the re-cone kit with the terminals and line up the large notches in the surround with the largest holes in the basket. Insert the tinsel leads into the terminal ensuring the red lead is going into the positive (+) position and the black lead is going into the negative (–) position. Tighten the four set screws, and then slightly tug in the tinsel leads to make sure they are tight in the terminal.
Next, insert the six 5⁄32" hex screws back into the spider plateau and tighten. Replace the top gasket over the surround on the top of the woofer. The counter-bore holes in the gasket need to align with the smaller threaded holes in the basket. Insert the twelve 3⁄16" hex gasket screws into the counter-bored holes and tighten. Finally, replace the back of the enclosure and re-attach the 5⁄8" bolts to support the back of the woofer. Your new cone is now installed and you are ready to once again experience the JackHammer’s extreme bass!

MTX.COM
NOTES: NOTES:

© 2005 MTX. All rights reserved. MTX, Thunder, JackHammer and StreetWires are trademarks of Mitek. Designed and Engineered in the U.S.A.
Due to continual product development, all specifi cations are subject to change without notice.
MTX Audio, 1 Mitek Plaza, Winslow, IL 61089 U.S.A.
MTX002240 RevA 10/05 21A8383
MTX.COM