safety instructions owner’s manual and
TRANSCRIPT

Safety Instructions . . . . . . . . . . . . . 2, 3
Operating InstructionsCare and Cleaning . . . . . . . . . . . . . . . . . .6, 7Control Settings . . . . . . . . . . . . . . . . . . . . . . .4Ice Service . . . . . . . . . . . . . . . . . . . . . . . . . . . . . .5Storage Drawers . . . . . . . . . . . . . . . . . . . . . . .4
Installation InstructionsPreparing to Install the Refrigerator . . . . . . . . . . . . . . . . . . . . . . 8Reversing the Door Swing . . . . . . . . . . 9–12
Troubleshooting Tips . . . . . . . . 13–15Normal Operating Sounds . . . . . . . . . . . 13
Consumer SupportConsumer Support . . . . . . . . . . . . . . . . . . 18Warranty (U.S.) . . . . . . . . . . . . . . . . . . . . . . 17
GEAppliances.com
Refr
iger
ator
sTo
p Fr
eeze
r
197D8071P003 49-60673 02-12 GE
Write the model and serial numbers here:
Model # ____________________
Serial # ____________________
You can find them on a label insidethe refrigerator.
GTL12
GTR10
GTR12
Owner’s Manual andInstallation Instructions

IMPORTANT SAFETY INFORMATION.READ ALL INSTRUCTIONS BEFORE USING.
WARNING!Use this appliance only for its intended purpose as described in this Owner’s Manual.
SAFETY PRECAUTIONSWhen using electrical appliances, basic safety precautions should be followed, including the following:
This refrigerator must be properly installed and located in accordance with the InstallationInstructions before it is used.
Do not allow children to climb, stand or hang on the shelves in the refrigerator. They coulddamage the refrigerator and seriously injurethemselves.
Do not touch the cold surfaces in the freezercompartment, particularly when hands are damp or wet. Skin may stick to these extremelycold surfaces.
Do not store or use gasoline or other flammablevapors and liquids in the vicinity of this or any otherappliance.
In refrigerators with automatic icemakers, avoid contact with the moving parts of the ejector mechanism, or with the heating elementthat releases the cubes. Do not place fingers orhands on the automatic icemaking mechanismwhile the refrigerator is plugged in.
Keep fingers out of the “pinch point” areas;clearances between the doors and between the doors and cabinet are necessarily small. Be careful closing doors when children are in the area.
Unplug the refrigerator before cleaning and makingrepairs.
NOTE: We strongly recommend that any servicingbe performed by a qualified individual.
Turning the control to the COLD position does not remove power to the light circuit.
Do not refreeze frozen foods which have thawed completely.
Before replacing a burned-out light bulb, therefrigerator should be unplugged in order to avoidcontact with a live wire filament. (A burned-outlight bulb may break when being replaced.)
PROPER DISPOSAL OF THE REFRIGERATORChild entrapment and suffocation are not problems of the past. Junked or abandoned refrigerators arestill dangerous…even if they will sit for “just a fewdays.” If you are getting rid of your old refrigerator,please follow the instructions below to help preventaccidents.
Before You Throw Away Your OldRefrigerator or Freezer:
Take off the doors.
Leave the shelves in place so that children may noteasily climb inside.
RefrigerantsAll refrigeration products contain refrigerants, which must be removed prior to product disposal. If you are getting rid of an old refrigeration product,check with the company handling the disposal aboutwhat to do.
USE OF EXTENSION CORDSBecause of potential safety hazards under certain conditions, we strongly recommend against the use of an extension cord.
However, if you must use an extension cord, it is absolutely necessary that it be a UL-listed, 3-wire, grounding-type appliance extension cord having a grounding-type plug and outlet and that the electrical rating of thecord be 15 amperes (minimum) and 120 volts.
DANGER! RISK OF CHILD ENTRAPMENT
2

3
GEAppliances.com
WARNING!HOW TO CONNECT ELECTRICITYDo not, under any circumstances, cut or remove the third (ground) prong from the power cord. For personal safety, this appliance must be properly grounded.
The power cord of this appliance is equipped with a 3-prong (grounding) plug which mates with a standard 3-prong (grounding) wall outlet to minimize the possibility of electric shock hazardfrom this appliance.
Have the wall outlet and circuit checked by a qualified electrician to make sure the outlet is properly grounded.
Where a standard 2-prong wall outlet is encountered,it is your personal responsibility and obligation tohave it replaced with a properly grounded 3-prongwall outlet.
The refrigerator should always be plugged into itsown individual electrical outlet which has a voltagerating that matches the rating plate.
This provides the best performance and also preventsoverloading house wiring circuits which could cause a fire hazard from overheated wires.
Never unplug your refrigerator by pulling on thepower cord. Always grip plug firmly and pull straightout from the outlet.
Repair or replace immediately all power cords thathave become frayed or otherwise damaged. Do notuse a cord that shows cracks or abrasion damagealong its length or at either end.
When moving the refrigerator away from the wall, be careful not to roll over or damage the power cord.
READ AND FOLLOW THIS SAFETY INFORMATION CAREFULLY.SAVE THESE INSTRUCTIONS

About the control on the refrigerator.
Control SettingsAdjust the fresh food control one increment at a time. Allow 12 hours after each adjustment for the refrigerator to reach the temperature youhave set.
Adjust the freezer control one increment at a time.Allow 12 hours after each adjustment for the freezerto reach the temperature you have set.
After each adjustment, check both the freezer and the fresh food compartments. Changing the freshfood control will affect the temperature of the freezercompartment. Likewise, changing the freezer controlcan affect the temperature of the fresh foodcompartment.
Control settings will vary based on personalpreferences, usage and operating conditions and may require more than one adjustment. Factors that affect temperature include the amount of food in the fresh food and freezer compartments,frequency of door opening, and temperature of foodwhen placed in either compartment.
There is a temperature control in the fresh food compartment as well as the freezer compartment. Initially set the control to Normal in the fresh food and freezer compartments. Allow 24 hours for the temperature to stabilize.
4
Fruit and Vegetable Drawers
These storage drawers provide space to store fruits,vegetables and meats.
To replace the drawers and the cover above them, the door must be fully opened. In some installations, the refrigerator may have to be moved away from thewall for the door to be fully opened.
About the storage drawers.

5
Ice Trays
To release ice cubes, turn the tray upsidedown, hold it over a container and twist both ends.
For only one or two ice cubes, leave the trayright-side up, twist both ends slightly andremove as many cubes as you want.
Wash ice trays in lukewarm water only—do not put them in an automatic dishwasher.
About ice service. GEAppliances.com
Icemaker Accessory Kit (Models GTR12 and GTL12 only)
An icemaker accessory kit is available from your dealer. The IM-4A, IM-6 orequivalent accessory kit will work with yourrefrigerator.
The water valve cover that came with theOwner’s Manual must be installed wheninstalling the optional icemaker kit.
Water Supply Kits (Models GTR12 and GTL12 only)
Kits containing copper tubing, shutoff valve,fittings and instructions needed to connectthe icemaker to your cold water line areavailable at extra cost from your dealer or from Parts and Accessories. In the U.S., call 800.626.2002.

6
Care and cleaning of the refrigerator.
Behind the Refrigerator
Once a year, move the refrigerator out and vacuum the back coils. Be careful whenmoving the refrigerator away from the wall.All types of floor coverings can be damaged,particularly cushioned coverings and thosewith embossed surfaces.
Pull the refrigerator straight out and return it to position by pushing it straight in. Moving the refrigerator in a side directionmay result in damage to the floor covering or refrigerator.
When pushing the refrigerator back, makesure you don’t roll over the power cord. Alsobe sure to leave a minimum of 3" between the wall and the condenser coils
Cleaning the Outside
Keep the outside clean. Wipe with a cleancloth lightly dampened with mild liquid dishdetergent. Dry with a clean, soft cloth.
Do not wipe the refrigerator with a soiled dishcloth or wet towel. These may leave a residuethat can erode the paint. Do not use scouringpads, powdered cleaners, bleach or cleanerscontaining bleach because these products can scratch and weaken the paint finish.
Protect the paint finish. The finish on theoutside of the refrigerator is a high quality,baked-on paint finish. With proper care, it will stay new-looking and rust free for years.Apply a coat of kitchen/appliance wax when the refrigerator is new, and then at least twice a year.
Cleaning the Inside
To help prevent odors, leave an open box of baking soda in the fresh food and freezercompartments.
Unplug the refrigerator before cleaning. If this is not practical, wring excess moistureout of sponge or cloth when cleaning aroundswitches, lights or controls.
Use warm water and baking soda solution—about a tablespoon (15 ml) of baking soda toa quart (1 liter) of water. This both cleans andneutralizes odors. Rinse and wipe dry.
Other parts of the refrigerator—including doorgaskets, fruit and vegetable drawers, and allplastic parts—can be cleaned the same way.
After cleaning the door gaskets, apply a thinlayer of petroleum jelly to the door gaskets at the hinge side. This helps keep the gasketsfrom sticking and bending out of shape. Donot use cleansing powders or other abrasivecleaners.
Do not wash any plastic refrigerator parts in the dishwasher.
Avoid cleaning cold glass shelves (on some models) with hot water because the extreme temperature difference maycause them to break. Handle glass shelvescarefully. Bumping tempered glass can causeit to shatter.

Preparing for Vacation
For long vacations or absences, remove foodand unplug the refrigerator. Clean the interiorwith a baking soda solution of onetablespoon (15 ml) of baking soda to onequart (1 liter) of water. Leave the doors open.
Preparing to Move
Secure all loose items such as shelves anddrawers by taping them securely in place to prevent damage.
Be sure the refrigerator stays in an uprightposition during moving.
7
GEAppliances.com
Replacing the Light Bulb
Moving the control to COLD does not removepower to the light circuit.
The bulb is located behind the shield in the back wall.
Unplug the refrigerator.
Remove the shelves (if necessary).
Remove the screw.
Gently remove the light shield byinserting a flat head screwdriver into the slot at the top of the shieldand pop it off.
Replace the bulb with a 25W appliancebulb with an E12 candelabra base.
NOTE: If the bulb is not available at your localhardware store, contact GE customer service.
Insert the tab at the bottom of the lightshield into the light bulb housing andsnap into place.
Replace the screw.
Replace the shelves if removed.
Plug in the refrigerator.Bulb
Cover
ScrewHole

Models GTL12, GTR10, GTR12
LEVELING LEGSAdjustable legs at the front corners of the refrigeratorshould be set so the refrigerator is firmly positioned on the floor, and the front is raised just enough that the door closes easily when opened about halfway.
To adjust the leveling legs, turn the legs clockwise to raise the refrigerator, counterclockwise to lower it.
If you have questions, call 1.800.GE.CARES or visit our Website at: GEAppliances.com
To raise the refrigerator
Installation RefrigeratorInstructions
BEFORE YOU BEGINRead these instructions completely and carefully.
• IMPORTANT – Save these instructions forlocal inspector’s use.
• IMPORTANT – Observe all governing codesand ordinances.
• Note to Installer – Be sure to leave theseinstructions with the Consumer.
• Note to Consumer – Keep these instructions for future reference.
• Skill level – Installation of this appliance requires basicmechanical skills.
• Completion time – Refrigerator Installation15 minutesReversing the Door Swing1 hour
• Proper installation is the responsibility of the installer.
• Product failure due to improper installation is not coveredunder the Warranty.
REFRIGERATOR LOCATION• Do not install the refrigerator where the temperature will
go below 55°F (13°C) because it will not run often enoughto maintain proper temperatures.
• Install it on a floor strong enough to support it fullyloaded.
• Do not install it closer than 5” (13 cm) next to a range.
CLEARANCESFree-standing installation only.Minimum Clearances:
Back – 3” from the condenser coils
8

9
Installation Instructions
REVERSING THE DOOR SWING
REMOVE THE FREEZER DOORRemove the hinge cover screws (some models havelock washers with each screw), top hinge and shim.
Set the door on a non-scratching surface with the outside up.
NOTE: When removing the door, watch for washer(s)between the center hinge and the bottom of thefreezer door that may stick to the door. Do not lose.
CAUTION: Do not let door drop to the floor. To do so could damage the door stop.
1IMPORTANT NOTESWhen reversing the door swing:
• Read the instructions all the way through before starting.
• Handle parts carefully to avoid scratching paint.
• Set screws down by their related parts to avoid usingthem in the wrong places.
• Provide a non-scratching work surface for the doors.
IMPORTANT: Once you begin, do not move the cabinet untildoor-swing reversal is completed.
These instructions are for changing the hinges from theright side to the left side—if you ever want to change thehinges back to the right side, follow these sameinstructions and reverse all references to left and right.
Unplug the refrigerator from its electrical outlet.
Empty all door shelves.
TOOLS YOU WILL NEED
8 mm Socket driver
Phillips screwdriver
Putty knife or thin-blade screwdriver
Masking tape

TRANSFER TOP HINGE TO THE LEFTUsing a putty knife with the edge covered withmasking tape, remove the plug buttons. Be careful of the paint finish.
Reinstall the plug button on the right side by inserting it into the holes vacated by the top hinge screws.
Reassemble the top hinge and shim on the left side,turning the screws just enough to hold the hinge in place.
3
Installation Instructions
REVERSING THE DOOR SWING (CONT.)
REMOVE THE FRESH FOOD DOORTape the door shut with masking tape.
Remove the center hinge and shim by removing the screws (some models have lock washers with each screw). Lift up the hinge to remove it.
NOTE: Some models have a washer between the center hinge and the top of the fresh food door. Do not lose.
Remove the tape holding the door shut.
Lift the fresh food door up and off the bottom hinge.
Set the door outside-up on a non-scratching surface.
NOTE: When removing the door, watch for washer(s)between the bottom hinge and the bottom of the freshfood door that may stick to the door. Do not lose.
CAUTION: Do not let door drop to the floor. To do so could damage the door stop.
2
10

Installation Instructions
TRANSFER BOTTOM HINGE TO THE LEFTTo access the bottom hinge, move the refrigerator so it is 30� from a wall. Then carefully tip therefrigerator back until it rests against the wall.
CAUTION: Be sure that the coils on the back of the refrigerator do not rest against the wall. Doing so could damage the coils.
Remove the screws (some models have washers with each screw), leveling leg and bottom hinge fromthe right side. Remove the leveling leg from the left sideof the cabinet and install it in the right side.
Reassemble the bottom hinge on the left side.
NOTE: The leveling legs are not interchangeable.
4
11
30”
TRANSFER FRESH FOOD DOOR STOPTO THE LEFTRemove the door stop from the bottom of the rightside of the door. Transfer the plug buttons from the bottom left side to the right side.
Install the door stop on the left side.
5
REHANG THE FRESH FOOD DOORMake sure the washer(s) are in place on the bottomhinge pin. Place the fresh food door on the bottomhinge, close the door and tape it in place with masking tape.
Remove the plug button from the left edge of the doorand insert it into the hole on the opposite side.
6
INSTALL CENTER HINGE ON THE LEFTRemove the three plug buttons on the left side and install them on the right.
Install the center hinge designed for the left side that came with the refrigerator, with the screws, spacerand washer(s) (on some models) that you removedin Step 2.
Remove the tape holding the door shut.
CAUTION: When assembled correctly,the hinge is tight against the cabinet.
ATTENTION: The screws must be properly tightened.Turn the screws until snug. Then tighten the screws a minimum of 1/2 turn using both hands.
7
Plug button

ALIGN THE DOORSAlign the freezer door with the fresh food door so thatthe gap between the doors is even.
Tighten the top hinge screws by turning them untilsnug. Then turn the screws a minimum of 1/2 turnusing both hands.
Install the hinge cover over the top hinge.
10
Plug button
Installation Instructions
REVERSING THE DOOR SWING (CONT.)
REHANG THE FREEZER DOORPlace the freezer door on the center hinge over the pin.
Raise the top hinge by hand and insert the top hinge pin into the hole in the door. Then swing the door shut.
Transfer the plug button on top of the door to the opposite side.
9
12
TRANSFER FREEZER DOOR STOP TO THE LEFTRemove the door stop from the bottom of the rightside of the door. Transfer the plug buttons from the bottom left side to the right side.
Install the door stop on the left side.
8

HUMMM...WHOOSH...
The new high efficiency compressor may run faster andlonger than your old refrigerator and you may hear ahigh-pitched hum or pulsating sound while it is operating.
You may hear a whooshing sound when the doors close.This is due to pressure equalizing within the refrigerator.
Newer refrigerators sound different from older refrigerators. Modern refrigeratorshave more features and use newer technology.
You may hear the fans spinning at high speeds. This happens when the refrigerator is first plugged in,when the doors are opened frequently or when a largeamount of food is added to the refrigerator or freezercompartments. The fans are helping to maintain the correct temperatures.
CLICKS, POPS,CRACKS and CHIRPS
You may hear cracking or popping sounds when the refrigerator is first plugged in. This happens as the refrigerator cools to the correct temperature.
The compressor may cause a clicking or chirping soundwhen attempting to restart (this could take up to 5 minutes).
Expansion and contraction of cooling coils during andafter defrost can cause a cracking or popping sound.
On models with an icemaker, after an icemaking cycle,you may hear the ice cubes dropping into the icebucket.
WATER SOUNDS
The flow of refrigerant through the freezer cooling coilsmay make a gurgling noise like boiling water.
Water dropping on the defrost heater can cause asizzling, popping or buzzing sound during the defrostcycle.
A water dripping noise may occur during the defrostcycle as ice melts from the evaporator and flows intothe drain pan.
Closing the door may cause a gurgling sound due to pressure equalization.
Do you hear what I hear? These sounds are normal.
Normal operating sounds. GEAppliances.com
13

14
Problem Possible Causes What To Do
Refrigerator does not Refrigerator in defrost cycle. • Wait about 30 minutes for defrost cycle to end.operate Refrigerator is unplugged. • Push the plug completely into the outlet.
The fuse is blown/circuit • Replace fuse or reset the breaker.breaker is tripped.
Vibration or rattling Front leveling legs need • See Leveling Legs.(slight vibration adjusting.is normal)
Motor operates for Normal when refrigerator • Wait 24 hours for the refrigerator to completely is first plugged in. cool down.
Often occurs when large • This is normal.amounts of food areplaced in refrigerator.
Door left open. • Check to see if package is holding door open.
Hot weather or frequent • This is normal.door openings.
Temperature control •See About the control.set at the coldest setting.
Fresh food or freezer Temperature control not • See About the control.compartment too warm set cold enough.
Warm weather or frequent • Set the temperature control one step colder. door openings. See About the control.
Door left open. • Check to see if package is holding door open.
Frost or ice crystals Door left open. • Check to see if package is holding door open.on frozen food Too frequent or too long (frost within package door openings.is normal)
Ice cubes have Food transmitting odor/taste • Wrap foods well.odor/taste to ice cubes.
Interior of refrigerator •See Care and cleaning.needs cleaning.
Slow ice cube freezing Door left open. • Check to see if package is holding door open.
Temperature control not • See About the control.set cold enough.
Before you call for service…Troubleshooting Tips Save time and money! Review the charts on the followingpages first and you may not need to call for service.
long periods orcycles on and offfrequently. (Modernrefrigerators withmore storage spaceand a larger freezerrequire moreoperating time. Theystart and stop often to maintain eventemperatures.)

15
Problem Possible Causes What To Do
Refrigerator has odor Foods transmitting odor • Foods with strong odors should be tightly wrapped.to refrigerator. • Keep an open box of baking soda in the refrigerator;
replace every three months.
Interior needs cleaning. • See Care and cleaning.
Moisture forms on Not unusual during periods • Wipe surface dry. outside of refrigerator of high humidity.
Moisture collects inside Too frequent or too long(in humid weather, air door openings.carries moisture intorefrigerator when doors are opened)
Interior light does No power at outlet. • Replace fuse or reset the breaker.not work Light bulb burned out. • See Replacing the light bulb.
Food is freezing Food too close to the air vent • Move the food away from the air vent.in the refrigerator at the back of the refrigerator.
Refrigerator control is set • Move the refrigerator control to a warmer temperature too cold. setting one increment at a time.
GEAppliances.com

16
Notes.

Refrigerator Warranty.All warranty service provided by our Factory Service Centers, or an authorized Customer Care® technician. To schedule service on-line, visit us at GEAppliances.com, or call 800.GE.CARES(800.432.2737). Please have serial number and model numberavailable when calling for service.
Service trips to your home to teach you how to use the product.
Improper installation, delivery or maintenance.
Failure of the product if it is abused, misused, or used forother than the intended purpose or used commercially.
Loss of food due to spoilage.
Replacement of house fuses or resetting of circuitbreakers.
Damage caused after delivery.
Replacement of the water filter cartridge, if included, dueto water pressure that is outside the specified operatingrange or due to excessive sediment in the water supply.
Replacement of the light bulbs, if included, or water filtercartridge, if included, other than as noted above.
Damage to the product caused by accident, fire, floods or acts of God.
Incidental or consequential damage caused by possibledefects with this appliance.
Product not accessible to provide required service.
What GE Will Not Cover:
This warranty is extended to the original purchaser and any succeeding owner for products purchased for home use within the USA. If the product is located in an area where service by a GE Authorized Servicer is not available, you may be responsible for a trip charge or you may be required to bring the product to anAuthorized GE Service location for service. In Alaska, the warranty excludes the cost of shipping or service callsto your home.
Some states do not allow the exclusion or limitation of incidental or consequential damages. This warrantygives you specif ic legal rights, and you may also have other rights which vary from state to state. To knowwhat your legal rights are, consult your local or state consumer affairs off ice or your state’s Attorney General.
Warrantor: General Electric Company. Louisville, KY 40225
Staple your receipt here. Proof of the original purchase
date is needed to obtain serviceunder the warranty.
EXCLUSION OF IMPLIED WARRANTIES—Your sole and exclusive remedy is product repair as provided inthis Limited Warranty. Any implied warranties, including the implied warranties of merchantability orfitness for a particular purpose, are limited to one year or the shortest period allowed by law.
For The Period Of: GE Will Replace:One Year Any part of the refrigerator which fails due to a defect in materials or workmanship.From the date of During this limited one-year warranty, GE will also provide, free of charge, all labor and the original purchase related service to replace the defective part.
17

18
Consumer Support.
GE Appliances Website GEAppliances.comHave a question or need assistance with your appliance? Try the GE Appliances Website, 24 hours a day, any day of the year! For greater convenience and faster service, you can now download Owner’s Manuals, order parts or even schedule service on-line.
Schedule Service GEAppliances.comExpert GE repair service is only one step away from your door. Get on-line and schedule your service at yourconvenience any day of the year! Or call 800.GE.CARES (800.432.2737) during normal business hours.
Real Life Design Studio GEAppliances.comGE supports the Universal Design concept—products, services and environments that can be used by people of allages, sizes and capabilities. We recognize the need to design for a wide range of physical and mental abilities andimpairments. For details of GE’s Universal Design applications, including kitchen design ideas for people with disabilities,check out our Website today. For the hearing impaired, please call 800.TDD.GEAC (800.833.4322).
Extended Warranties GEAppliances.comPurchase a GE extended warranty and learn about special discounts that are available while your warranty is still in effect. You can purchase it on-line anytime, or call 800.626.2224 during normal business hours. GE Consumer HomeServices will still be there after your warranty expires.
Parts and Accessories GEAppliances.comIndividuals qualified to service their own appliances can have parts or accessories sent directly to their homes (VISA, MasterCard and Discover cards are accepted). Order on-line today, 24 hours every day or by phone at 800.626.2002 during normal business hours.Instructions contained in this manual cover procedures to be performed by any user. Other servicing generallyshould be referred to qualified service personnel. Caution must be exercised, since improper servicing may causeunsafe operation.
Contact Us GEAppliances.comIf you are not satisfied with the service you receive from GE, contact us on our Website with all the details including yourphone number, or write to: General Manager, Customer Relations
GE Appliances, Appliance ParkLouisville, KY 40225
Register Your Appliance GEAppliances.comRegister your new appliance on-line—at your convenience! Timely product registration will allow for enhancedcommunication and prompt service under the terms of your warranty, should the need arise. You may also mail in the pre-printed registration card included in the packing material.
Printed in China

Instrucciones de seguridad . . . . . 2, 3
Instrucciones de operaciónCajónes de almacenamiento . . . . . . . . . .4Configuraciones de control . . . . . . . . . . .4Cuidado y limpieza . . . . . . . . . . . . . . . . .6, 7Servicio de hielo . . . . . . . . . . . . . . . . . . . . . . . .5
Instrucciones de instalaciónCómo invertir el vaivén de la puerta . . . . . . . . . . . . . . . . . . . . . . 9–12Preparación para instalar el refrigerador . . . . . . . . . . . . . . . . . . . . . . . 8
Consejos para la identificación y solución de problemas . . . 13–15Sonidos normales de la operación . . . 13
Apoyo al clienteApoyo al cliente . . . . . . . . . . . . . . . . . . . . . 18Garantía . . . . . . . . . . . . . . . . . . . . . . . . . . . . 16
Escriba los números de modelo y de serie aquí:
Modelo # ______________________
Serie # ________________________
Usted puede encontrarlos en una etiqueta dentrodel refrigerador.
GEAppliances.com
Refr
iger
ador
esCo
ngel
ador
sup
erio
r
197D8071P003 49-60673 02-12 GE
GTL12GTR10GTR12
Manual del propietario e instalación

INFORMACIONES IMPORTANTES DE SEGURIDAD. LEA PRIMERO TODAS LAS INSTRUCCIONES.
¡ADVERTENCIA!Use este aparato sólo para los fines que se describen en este Manual del propietario.
PRECAUCIONES DE SEGURIDADCuando use electrodomésticos, siga las precauciones básicas de seguridad, incluyendo las siguientes:
Antes de usarse, este refrigerador deberá estarinstalado y ubicado de acuerdo con lasinstrucciones de instalación.
No permita que los niños se suban, se paren o secuelguen de las charolas del refrigerador. Podríadañarse el refrigerador y causarles serias lesiones.
No toque las superficies frías del congeladorcuando tenga las manos húmedas o mojadas. La piel se podría adherir a las superficiesextremadamente frías.
No guarde ni use gasolina u otros vapores o líquidosinflamables cerca de este o cualquier otro aparato.
Si su refrigerador tiene un dispositivo automáticopara hacer hielo, evite el contacto con las partesmóviles del mecanismo de expulsión, o con el elemento calefactor localizado en la parteinferior del dispositivo para hacer hielo. No pongalos dedos ni las manos en el mecanismoautomático para hacer hielo mientras elrefrigerador esté conectado.
Aleje los dedos fuera de las áreas donde se puedepinchar los dedos; los espacios entre las puertas y entre las puertas y los gabinetes sonnecesariamente estrechos. Cierre las puertas con cuidado en la presencia de los niños.
Desconecte el refrigerador antes de limpiarlo o efectuar reparaciones.
NOTA: Recomendamos enfáticamente encargarcualquier servicio a un personal calificado.
El torneado del control a la posición COLD no quita energía al circuito ligero.
Do not refreeze frozen foods which have thawedcompletely.
Antes de substituir una bombilla quemada, el refrigerador debe ser desenchufado para evitar el contacto con un filamento del alambre vivo. (La bombilla quemada de A puede romperse al ser substituido.)
DESHACERSE DEBIDAMENTE DE SU REFRIGERADOREl atrapamiento y la sofocación de los niños no son un problema del pasado. Los refrigeradoresabandonados son un peligro…aunque sea sólo por“pocos días.” Si se deshace de su viejo refrigerador,por favor siga las instrucciones abajo para ayudarnosa prevenir algún accidente.
Antes de deshacerse de su viejorefrigerador o congelador:
Quite las puertas.
Deje los entrepaños en su sitio para que los niñosno se suban.
RefrigerantesTodos los aparatos de refrigeración contienenrefrigerantes, los cuales se deben retirar antes de la eliminación del producto de acuerdo con la leyfederal. Si va a desechar algún aparato antiguo de refrigeración, consulte con la compañía a cargo de desechar el aparato para saber qué hacer.
USO DE CABLES DE EXTENSIONDebido a los accidentes potenciales que pudieran ocurrir bajo determinadas condiciones, se recomienda estrictamente no usar cables de extensión.
Sin embargo, si decidiera usarlos, es absolutamente necesario que sea del tipo UL trifilar para aparatos y cuente con una clavija con conexión a tierra y que el cable eléctrico sea de 15 amperios (mínimo) y 120 voltios.
¡PELIGRO! RIESGO DE QUE UN NIÑO PUEDA QUEDAR ATRAPADO
2

3
GEAppliances.com
¡ADVERTENCIA!COMO CONECTAR LA ELECTRICIDADBajo ninguna circunstancia debe cortar o quitar la tercera punta (tierra) de la clavija. Para su seguridadpersonal, este aparato deberá conectarse debidamente a tierra.
El cable eléctrico de este aparato está equipado con una clavija de tres puntas (tierra) que enchufa enun contacto estándar de pared de tres salidas (tierra)para reducir al mínimo la posibilidad de daños por un choque eléctrico con este aparato.
Haga que un electricista calificado verifique el enchufe de la pared y el circuito para asegurarseque la salida esté conectada debidamente a tierra.
Donde se disponga sólo de un contacto de pared consalida para dos puntas, es su responsabilidad personaly su obligación reemplazarlo por un contacto adecuadopara tres puntas con conexión a tierra.
El refrigerador deberá conectarse siempre en su propio contacto eléctrico individual que tenga un voltaje que vaya de acuerdo con la tabla de clasificación.
Esto garantiza la mejor ejecución y evita la sobrecarga del circuito eléctrico de la casa y losdaños a causa del sobrecalentamiento de los cables.
Nunca desconecte el refrigerador jalando el cable.Tome siempre firmemente la clavija y sáquela del contacto sin doblarla.
Repare o reemplace inmediatamente todos los cableseléctricos de servicio que se hayan desgastado o dañado en alguna otra forma. No utilice cables que muestren roturas o daños por abrasión a lo largode éste ni en la clavija o en alguno de sus extremos.
Al alejar su refrigerador de la pared, cuide que no pase sobre el cable o lo dañe.
FAVOR DE LEER Y SEGUIR CUIDADOSAMENTE LAS PRECAUCIONES DE SEGURIDAD.GUARDE ESTAS INSTRUCCIONES

Sobre el control del refrigerador.
Configuraciones de controlAjuste el control de alimentos frescos subiendo unaunidad por vez. Permita que transcurran 12 horasdespués de cada ajuste para que el refrigeradoralcance la nueva temperatura configurada.
Ajuste el control del congelador un incremento por vez.Permita que transcurran 12 horas después de cadaajuste para que el refrigerador alcance la nuevatemperatura configurada.
Después de cada ajuste, controle los compartimentosdel congelador y de alimentos frescos. Cambiar elcontrol de alimentos frescos afectará la temperaturadel compartimento del congelador. Del mismo modo,cambiar el control del congelador afectará latemperatura del compartimento de alimentos frescos.
Las configuraciones de control varían en base a las preferencias personales, uso y condiciones de operación y pueden requerir más de un ajuste. Los factores que afectan la temperatura incluyen la cantidad de alimentos en los compartimentos de alimentos frescos y del congelador, la frecuencia deapertura de la puerta y la temperatura de los alimentos cuando se los coloca en cualquiera delos dos compartimentos.
Hay un control de temperatura en el compartimento dealimentos frescos y en el compartimento del congelador.Inicialmente configure el control en Normal de loscompartimentos de alimentos frescos y del congelador. Deje pasar 24 horas hasta que la temperatura se estabilice.
4
Cajones de frutas y vegetales
Estos cajones de almacenamiento ofrecen espaciopara almacenar frutas, vegetales y carnes.
Para reemplazar los cajones y la tapa que los cubre,la puerta debe estar completamente abierta. En algunas instalaciones, el refrigerador puede tenerque alejarse de la pared para que la puerta puedaabrirse por completo.
Sobre los cajones de almacenamiento.

5
Bandejas para cubitos de hielo
Para liberar los cubitos de hielo, dé vuelta la bandeja, sosténgala sobre un recipiente y retuerza ambos extremos.
Para sólo uno o dos cubitos de hielo, deje la bandeja hacia arriba, retuerza ambosextremos ligeramente y quite todos loscubitos que desee.
Lave las bandejas para cubitos de hielo sóloen agua tibia—no las coloque en el lavaplatos.
Sobre el servicio de hielo. GEAppliances.com
Kit de accesorios para la máquina de hielo (Sólo modelos GTR12 y GTL12)
Su vendedor tiene disponible un kit de accesorios para la máquina de hielo. El IM-4A, IM-6 o kit de accesoriosequivalente funcionará con surefrigerador.
La tapa de la válvula de agua provistajunto con el manual del usuario se debeinstalar al realizar la instalación del kitopciona de la máquina de hacer hielo.
Kits de suministro de agua (Sólo modelos GTR12 y GTL12)
Su vendedor o Piezas y Accesorios ponen a su alcance, a un costo extra, kits quecontienen tuberías de cobre, una válvula de cierre, accesorios e instruccionesnecesarias para conectar la máquina de hieloa su línea de agua fría. En los EE.UU., llame al 800.626.2002.

6
Cuidado y limpieza del refrigerador.
Detrás del refrigerador
Una vez al año, quite el refrigerador y aspirelas serpentinas traseras. Tenga cuidado alalejar el refrigerador de la pared. Todos lostipos de pisos pueden dañarse, en especiallos recubrimientos acolchados y los quetienen superficies en relieve.
Tire del refrigerador hacia afuera en formarecta y devuélvala a su posición también en forma recta. Mover el refrigerador de costado puede provocar daños al recubrimiento del piso o al refrigerador.
Cuando empuje el refrigerador hacia atrás,asegúrese de no aplastar el cable de energía.Además asegúrese de dejar un mínimo de 3� entre la pared y las serpentinas delcondensador.
Limpieza de la parte exterior
Mantenga la parte exterior limpia. Límpielacon un paño ligeramente humedecido con un detergente líquido para platos noagresivo. Seque con un paño suave y limpio.
No limpie el refrigerador con un repasadorsucio o con una toalla mojada. Estos puedendejar un residuo que puede desgastar lapintura. No utilice esponjillas abrasivas,limpiadores en polvo, blanqueadores olimpiadores que contengan blanqueadoresporque estos productos pueden rayar y dañarel acabado de la pintura.
Proteja el acabado de la pintura. El acabadode la parte exterior del refrigerador es de unapintura cocida de alta calidad. Con loscuidados adecuados, permanecerá comonueva y libre de herrumbre durante años.Aplique una mano de cera para cocinas/aparatos al refrigerador nuevo, y luego por lo menos dos veces por año.
Limpieza de la parte interior
Para ayudar a prevenir olores, deje una caja abierta de bicarbonato de sodio en loscompartimentos de alimentos frescos y delcongelador.
Desenchufe el refrigerador antes delimpiarlo. Si esto no resulta práctico, seque lahumedad excesiva con una esponja o pañocuando limpie alrededor de los interruptores,luces o controles.
Utilice una solución de agua tibia conbicarbonato de sodio—alrededor de unacucharada (15 ml) de bicarbonato de sodio y un cuarto de galón (1 litro) de agua. Estasolución limpia y neutraliza los olores.Enjuague y seque con un paño.
Otras piezas del refrigerador—incluyendojuntas de las puertas, cajones para frutas y vegetales y todas las piezas plásticas—pueden limpiarse de la misma manera.
Después de limpiar las juntas de la puerta,aplique una fina capa de vaselina a las juntassobre el lado de la bisagra. Esto ayuda a quelas juntas no se peguen y que no sedeformen. No utilice polvos limpiadores u otros limpiadores abrasivos.
No lave ninguna pieza plástica del refrigeradoren el lavaplatos.
No limpie los estantes de vidrio fríos (en algunos modelos) con agua calienteporque pueden quebrarse debido a la extremadiferencia de temperatura. Maneje losestantes de vidrio con cuidado. Golpear el vidrio templado puede hacerlo quebrar.

Preparación para vacacionesDurante largas vacaciones o ausencias, quitelos alimentos y desenchufe el refrigerador.Limpie la parte interior con una solucióncompuesta por una cucharada bicarbonatode sodio (15 ml) y un cuarto (1 litro) de agua.Deje las puertas abiertas.
Preparación para una mudanzaFije todos los elementos sueltos comoestantes o cajones asegurándolos bien con cinta adhesiva para evitar daños.
Asegúrese de que el refrigerador quede en posición vertical durante la mudanza.
7
GEAppliances.com
Cómo reemplazar las bombillas de luz
Desplazar el control a la posición COLD (fría)no elimina la corriente de electricidad dirigidaal circuito de la luz.
La bombilla se encuentra ubicada detrás de la protección en la pared trasera.
Desenchufe el refrigerador.
Retire los estantes (si fuera necesario).
Quite el tornillo.
Con cuidado quite la protección de la luz introduciendo un destornilladorplano dentro de la ranura en la partesuperior de la protección y ejerciendopresión.
Reemplácela con una bombilla paraelectrodomésticos de 25W con unabase de candelabro E12.
NOTA: Si la bombilla no está disponible ensu tienda local, comuníquese con elservicio al cliente de GE.
Introduzca la lengüeta en la parteinferior de la protección de la luzdentro de la carcasa de la bombilla de luz y trábela en su lugar.
Coloque el tornillo.
Vuelva a colocar los estantes si los ha quitado.
Enchufe el refrigerador.
Bombilla
Tapa
Orificiopara
tornillo

Modelos GTL12, GTR10, GTR12
PATAS DE NIVELACIÓNDeben instalarse patas ajustables en las esquinasfrontales del refrigerador para que éste se encuentre bien asentado en el piso, y el frente debe estar elevado lo suficiente para que la puerta cierre fácilmente cuando se abre hasta alrededor de la mitad.
Para ajustar las patas de nivelación, gire las patas patas en sentido de las agujas del reloj para levantarel refrigerador o en sentido contrario a las agujas delreloj para bajarlo.
¿Preguntas? Llame al 800.GE.CARES (800.432.2737) o bien Visite nuestra página Web: GEAppliances.com
Para elevar el refrigerador
Instrucciones RefrigeradordeInstalación
ANTES DE COMENZARLea estas instrucciones por completo y con detenimiento.
• IMPORTANTE – Guarde estas instruccionespara el uso de inspectores locales.
• IMPORTANTE – Cumpla con todos loscódigos y ordenanzas vigentes.
• Nota al instalador – Asegúrese de dejar estasinstrucciones con el Consumidor.
• Nota al consumidor – Conserve estasinstrucciones para referencia futura.
• Nivel de capacidad – La instalación de este aparatorequiere capacidades mecánicas básicas.
• Tiempo de finalización – Instalación del refrigerador15 minutosInvertir el vaivén de la puerta1 hora
• El instalador tiene la responsabilidad de efectuar una instalación adecuada.
• La Garantía no cubre las fallas del producto debido a una instalación incorrecta.
UBICACIÓN DEL REFRIGERADOR• No instale el refrigerador donde la temperatura pueda
ser menor a los 55°F (13°C) porque no funcionará con la regularidad suficiente para mantener las temperaturasadecuadas.
• Instálelo sobre un piso lo suficientemente resistente parasoportarlo completamente cargado.
• No lo instale a menos 5” (13 cm) de una cocina.
DISTANCIASSólo instalación independiente.Despeje Mínimo:
Parte trasera – 3” desde las serpentinas del condensador
8
9
Instrucciones de instalación
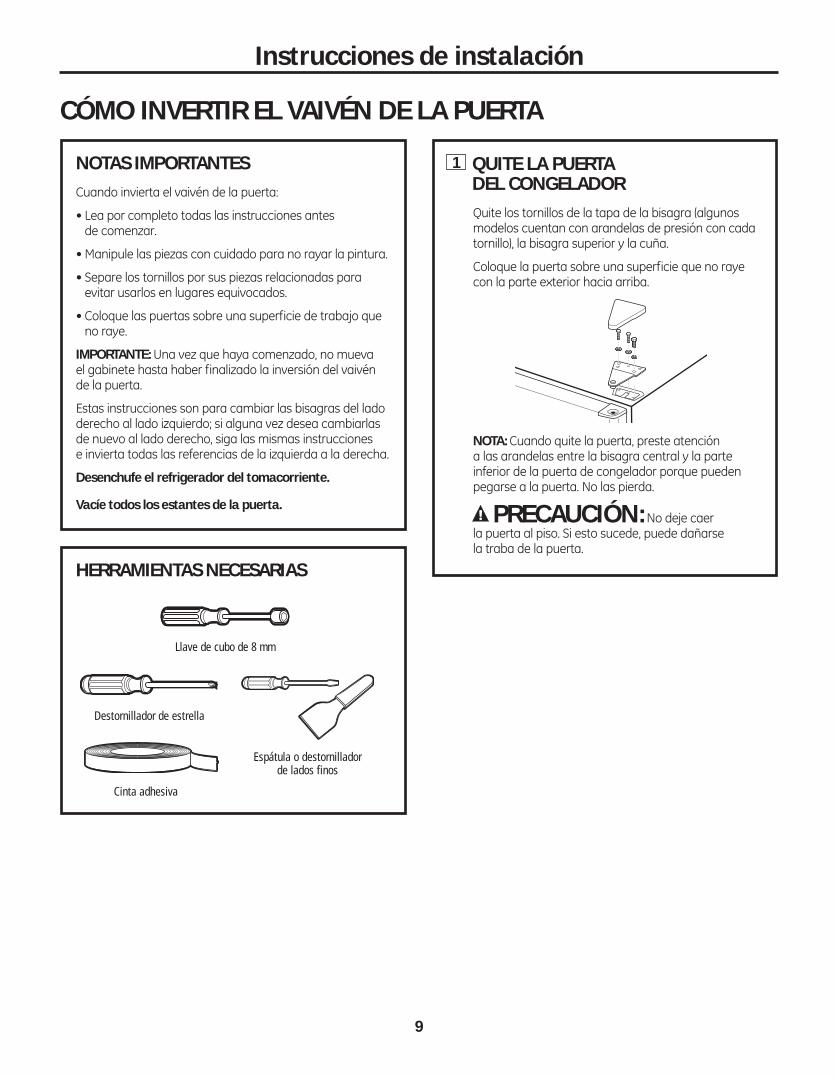
CÓMO INVERTIR EL VAIVÉN DE LA PUERTA
QUITE LA PUERTA DEL CONGELADORQuite los tornillos de la tapa de la bisagra (algunosmodelos cuentan con arandelas de presión con cadatornillo), la bisagra superior y la cuña.
Coloque la puerta sobre una superficie que no rayecon la parte exterior hacia arriba.
NOTA: Cuando quite la puerta, preste atención a las arandelas entre la bisagra central y la parteinferior de la puerta de congelador porque puedenpegarse a la puerta. No las pierda.
PRECAUCIÓN: No deje caer la puerta al piso. Si esto sucede, puede dañarse la traba de la puerta.
1NOTAS IMPORTANTESCuando invierta el vaivén de la puerta:
• Lea por completo todas las instrucciones antes de comenzar.
• Manipule las piezas con cuidado para no rayar la pintura.
• Separe los tornillos por sus piezas relacionadas paraevitar usarlos en lugares equivocados.
• Coloque las puertas sobre una superficie de trabajo queno raye.
IMPORTANTE: Una vez que haya comenzado, no mueva el gabinete hasta haber finalizado la inversión del vaivén de la puerta.
Estas instrucciones son para cambiar las bisagras del ladoderecho al lado izquierdo; si alguna vez desea cambiarlasde nuevo al lado derecho, siga las mismas instrucciones e invierta todas las referencias de la izquierda a la derecha.
Desenchufe el refrigerador del tomacorriente.
Vacíe todos los estantes de la puerta.
HERRAMIENTAS NECESARIAS
Llave de cubo de 8 mm
Destornillador de estrella
Espátula o destornillador de lados finos
Cinta adhesiva

TRANSFIERA LA BISAGRA SUPERIORA LA IZQUIERDAUtilizando una espátula con los bordes recubiertos con cinta adhesiva, quite los botones obturadores.Tenga cuidado con el acabado de pintura.
Vuelva a instalar el botón obturador en el lado derechointroduciéndolo en los orificios dejados por los tornillosde la bisagra superior.
Vuelva a armar la bisagra superior y la cuña sobre ellado izquierdo, girando los tornillos lo suficiente paramantener la bisagra en su lugar.
3
Instrucciones de instalación
CÓMO INVERTIR EL VAIVÉN DE LA PUERTA (CONT.)
QUITE LA PUERTA DE ALIMENTOSFRESCOSCierre la puerta con cinta adhesiva.
Quite la bisagra central y cuña sacando los tornillos(algunos modelos cuentan con arandelas de presióncon cada tornillo). Levante la bisagra para quitarla.
NOTA: Algunos modelos cuentan con una arandelaentre la bisagra central y la parte superior de la puertade alimentos frescos. No la pierda.
Quite la cinta que sostiene la puerta cerrada.
Levante la puerta de alimentos frescos y quítela de la bisagra inferior.
Coloque la puerta con la parte exterior hacia arribasobre una superficie que no raye.
NOTA: Cuando quite la puerta, preste atención a las arandelas entre la bisagra central y la parteinferior de la puerta de congelador porque puedenpegarse a la puerta. No las pierda.
PRECAUCIÓN: No deje caer la puerta al piso. Si esto sucede, puede dañarse la traba de la puerta.
2
10

Instrucciones de instalación
TRANSFIERA LA BISAGRA INFERIORA LA IZQUIERDAPara acceder a la bisagra inferior, mueva el refrigerador a 30� de la pared. Luego incline con cuidado el refrigerador hacia atrás hasta que descanse sobre la pared.
PRECAUCIÓN: Asegúrese de que las serpentinas ubicadas en la parte trasera del refrigerador no descansen contra la pared. Al hacerlo podrían dañarse las serpentinas.
Quite los tornillos (algunos modelos cuentan conarandelas en cada tornillo), la pata de nivelación y la bisagra inferior del lado derecho. Quite la pata de nivelación del lado izquierdo del gabinete e instálelaen el lado derecho.
Vuelva a armar la bisagra inferior en el lado izquierdo.
NOTA: Las patas de nivelación no son intercambiables.
4
11
30” (76.2cm)
TRANSFIERA LA TRABA DE LAPUERTA DE ALIMENTOS FRESCOS A LA IZQUIERDAQuite la traba de la puerta de la parte inferior del lado derecho de la puerta. Transfiera los botonesobturadores del lado inferior izquierdo al lado derecho.
Instale la traba de la puerta sobre el lado izquierdo.
5
VUELVA A COLGAR LA PUERTA DE ALIMENTOS FRESCOSAsegúrese que las arandelas estén en su lugar en el perno inferior de la bisagra. Coloque la puerta de alimentos frescos en la bisagra inferior, cierre la puerta y ciérrela con cinta adhesiva.
Quite el botón obturador del lado izquierdo de lapuerta e introdúzcalo dentro del orificio del ladoopuesto.
6
INSTALE LA BISAGRA CENTRAL EN LA IZQUIERDAQuite los tres botones obturadores sobre el ladoizquierdo e instálelos sobre el derecho.
Instale la bisagra central diseñada para el ladoizquierdo que vino con el refrigerador, con los tornillosespaciador y arandelas (en algunos modelos) que se quitaron en el Paso 2.
Quite la cinta que sostiene la puerta cerrada.
PRECAUCIÓN: Cuando se armacorrectamente, la bisagra queda firme contra elgabinete.
ATENCIÓN: Los tornillos deben estar bien ajustados.Gire los tornillos hasta que queden firmes. Luegoajuste los tornillos con 1/2 vuelta como mínimoutilizando ambas manos.
7
Botón obturador

ALINEE LAS PUERTASAlinee la puerta del congelador con la puerta de alimentos frescos para que el espacio entre ellas se encuentre equilibrado.
Ajuste los tornillos de la bisagra inferior girándoloshasta que queden firmes. Luego gire los tornillos 1/2 vuelta como mínimo utilizando ambas manos.
Instale la tapa de la bisagra sobre la bisagra superior.
10
Instrucciones de instalación
CÓMO INVERTIR EL VAIVÉN DE LA PUERTA (CONT.)
VUELVA A COLGAR LA PUERTA DEL CONGELADORColoque la puerta del congelador en la bisagra centralsobre el perno.
Levante la bisagra superior a mano e introduzca el perno de la bisagra superior dentro del orificio de la puerta. Luego cierre la puerta.
Transfiera el botón obturador de la parte superior de la puerta al lado opuesto.
9
12
TRANSFIERA LA TRABA DE LA PUERTA DEL CONGELADOR A LA IZQUIERDAQuite la traba de la puerta de la parte inferior del lado derecho de la puerta. Transfiera los botonesobturadores del lado inferior izquierdo al lado derecho.
Instale la traba de la puerta sobre el lado izquierdo.
8
Botón obturador

HUMMM...WHOOSH...
El nuevo compresor de alta eficiencia puede funcionar más rápido y durar más que el de su refrigeradoranterior y puede escuchar un zumbido de tono alto o un sonido pulsante mientras opera.
Puede escuchar un sonido de soplido cuando las puertas se cierran. Esto se debe a que la presión se está estabilizando dentro del refrigerador.
Los refrigeradores más nuevos producen sonidos diferentes a los modelos más antiguos. Los refrigeradores modernos tienen más funciones y usan tecnología más reciente.
Puede escuchar los ventiladores moviéndose a granvelocidad. Esto pasa cuando el refrigerador se conectapor primera vez, cuando las puertas se abrenfrecuentemente o cuando se guarda gran cantidad de alimentos en el refrigerador o en loscompartimientos del congelador. Los ventiladores estánayudando a mantener las temperaturas correctas.
CHASQUIDOS, ESTALLIDOS,CRUJIDO
Puede escuchar sonidos como de crujido o estallidoscuando el refrigerador se conecta por primera vez. Estopasa a medida que el refrigerador se enfría hasta latemperatura correcta.
El compresor puede causar un chasquido o un gorjeocuando intenta volver a arrancar (esto puede tomarhasta 5 minutos).
Expansión y contracción de las bobinas durante o después del ciclo de descongelación puede causarsonidos como de crujido o estallidos.
En modelos con máquina de hielos, después decompletar un ciclo de hacer hielo, se pueden escucharlos cubos de hielo cuando caen a la bandeja de hielos.
SONIDOS DE AGUA
El fluido del refrigerante a través de las bobinas puedeproducir un sonido de borboteo como de aguahirviendo.
El agua que cae en el calentador de descongelaciónpuede causar un chisporroteo, estallido o zumbidodurante el ciclo de descongelación.
Un ruido de agua cayendo se puede escuchar durante el ciclo de descongelación a medida que el hielo se derrite del evaporador y fluye hacia la bandeja de drenaje.
El cierre de las puertas puede producir un sonido de gorgoteo debido a la estabilización de la presión.
¿Usted escucha lo que yo escucho? Estos sonidos son normales.
Sonidos normales de la operación. GEAppliances.com
13

14
Problema Causas Posibles Qué hacer
El refrigerador El refrigerador está en el ciclo • Espere alrededor de 30 minutos para que termine no funciona de descongelado. el ciclo de descongelado.
El refrigerador está desenchufado. • Presione el enchufe completamente dentrodel tomacorriente.
Fusible quemado/interruptor • Cambie el fusible o reconfigure el interruptor. de circuitos accionado.
Vibración o golpeteo Las patas de nivelación frontales • Ver Patas de nivelación. (una leve vibración deben ajustarse. es normal)
Normal cuando el refrigerador • Espere 24 horas para que el refrigerador se enfríese enchufa por primera vez. por completo.
Esto ocurre a menudo cuando • Esto es normal.se colocan grandes cantidades de alimentos en el refrigerador.
Se dejó la puerta abierta. • Constate que un paquete no esté manteniendola puerta abierta.
Clima caluroso o aperturas • Esto es normal.frecuentes de la puerta.
Control de temperatura •Ver Sobre el control.configurado en el nivel más frío.
El compartimento de El control de temperatura no • Ver Sobre el control.alimentos frescos o del se ha configurado lo congelador están muy suficientemente frío. calientes Clima caluroso o aperturas • Configure el control de temperatura un paso más frío.
frecuentes de la puerta. Ver Sobre el control.
Se dejó la puerta abierta. • Constate que un paquete no esté manteniendola puerta abierta.
Escarcha o cristales de Se dejó la puerta abierta. • Constate que un paquete no esté manteniendo hielo sobre los alimentos la puerta abierta. congelados (la escarcha Aperturas de la puerta muy dentro del paquete frecuentes o muy prolongadas es normal)
Los cubitos de hielo Los alimentos transmiten • Envuelva bien los alimentos. tienen olor/sabor olor/sabor a los cubitos de hielo
Debe limpiarse la parte •Ver Cuidado y limpieza. interior del refrigerador.
Los cubitos de hielo Se dejó la puerta abierta. • Constate que un paquete no esté manteniendotardan en hacerse la puerta abierta.
El control de temperatura no • Ver Sobre el control.se ha configurado lo suficientemente frío.
Antes de solicitar un servicio…Solucionar problemas¡Ahorre tiempo y dinero! Revise las tablas en las siguientespáginas y tal vez no necesitará de solicitar un servicio.
El motor funciona porperíodos prolongados o se enciende y apagafrecuentemente (Los refrigeradoresmodernos con másespacio dealmacenamiento y uncongelador más granderequieren más tiempode operación. Seencienden y apagan amenudo para mantenertemperaturas parejas)

15
Problema Causas Posibles Qué hacer
El refrigerador tiene olor Los alimentos transmiten olor • Los alimentos con olores fuertes deben envolverse bien. al refrigerador. • Mantenga una caja abierta de bicarbonato de sodio
en el refrigerador; cámbiela casa tres meses.
Debe limpiarse la parte interna. • Ver Cuidado y limpieza.
Se forma humedad en Resulta común durante períodos • Seque la superficie con un paño. la parte exterior del de humedad elevada. refrigerador
Se acumula humedad Aperturas de la puerta muy en el interior (en climas frecuentes o muy prolongadas.húmedos, el aire transporta humedad dentro del refrigerador cuando se abren las puertas)
La luz interior no El tomacorriente no recibe energía. • Cambie el fusible o reconfigure el interruptor. funciona La bombilla de luz se ha quemado. • Ver Cómo cambiar la bombilla de luz.
Los alimentos se Los alimentos se encuentran • Aleje los alimentos de la ventilación de aire.congelan en el muy cerca de la ventilación de refrigerador aire en la parte trasera del
refrigerador.
El control del refrigerador está • Mueva el control del refrigerador a una configuración configurado en una temperatura más elevada subiendo una unidad por vez. muy baja.
GEAppliances.com

Esta garantía se extiende al comprador original y cualquier comprador posterior de productos comprados para usoresidencial dentro de Estados Unidos. Si el producto está situado en un área que no dispone de servicio por parte de un proveedor de servicio autorizado de GE, podría tener que hacerse cargo de los costes de envío o bienpodría solicitársele que lleve el producto a una centro de servicio de GE autorizado para realizar la reparación.En Alaska, la garantía excluye el costo de envío o las visitas de servicio a su casa.
Algunos estados no permiten la exclusión o las limitaciones de daños incidentales o consecuenciales. Esta garantía da derechos legales específicos, y usted podría tener otros derechos que variarán de estado a estado. Para sabercuáles son sus derechos legales, consulte a la oficina de asuntos del consumidor local o la oficina del Attorney Generalen su localidad.
Garante: General Electric Company. Louisville, KY 40225
Garantía del Refrigerador. (Para consumidores en los EE.UU.)
Todos los servicios de garantía los proporcionan nuestros Centros de Reparación de Fábrica o nuestros técnicos Customer Care®
autorizados. Para concertar una cita de reparación, en línea, visíte nos al GEAppliances.com, o llame al 800.GE.CARES(800.432.2737). Cuando llame para solicitar servicio, por favor tenga a mano el número de serie y el número de modelo.
Viajes de servicio a su hogar para enseñarle cómo usar el producto.
Instalación o entrega inapropiada, o mantenimientoimpropio.
Fallas del producto si hay abuso, mal uso, o uso para otros propósitos que los propuestos, o uso para finescomerciales.
Pérdida de alimentos por averías.
Causar daños después de la entrega.
Reemplazo de fusibles de su hogar o reajuste de interruptores de circuito.
Reemplazo del cartucho del filtro para agua, si incluidos,debido a presión de agua afuera de las limites deoperación especificados o sedimento excesivo en el suministro de agua.
Reemplazo de las bombillas, si incluidos, o los filtros de agua, si incluidos otro entonces según lo observadoarriba.
Daño al producto causado por accidente, fuego,inundaciones, o actos de Dios.
Daño incidental o consecuencial causado por posiblesdefectos con el aparato.
Producto no accesible para facilitar el servicio requerido.
Lo que GE no cubrirá:
Grape aquí su recibo. Se requiere facilitar prueba
de la fecha de compraoriginal para obtener unservicio bajo la garantía.
EXCLUSIÓN DE GARANTÍAS IMPLÍCITAS—Su único y exclusivo derecho es la reparación del producto, tal y como se indica en esta Garantía limitada. Cualquier garantía implícita, incluyendo las garantíasimplícitas de comerciabilidad o adecuación para un fin determinado, están limitadas a un año o el período de tiempo más breve permitido por la ley.
Por el período de: GE reemplazará:
Un año Cualquier parte del refrigerador que falle debido a defectos en los materiales o en A partir de la fecha la fabricación. Durante esta garantía limitada de un año, GE también proporcionará, sin costo de la compra original alguno, toda la mano de obra y el servicio relacionado—para reemplazar partes defectuosas.
16

17
Notas. GEAppliances.com

Servicio al consumidor.
Página Web de GE Appliances GEAppliances.com¿Tiene alguna pregunta sobre su electrodoméstico? ¡Pruebe la página Web de GE Appliances, 24 horas al día,cualquier día del año! Para mayor conveniencia y servicio más rápido, ya puede descargar los Manuales de losPropietarios, pedir piezas o incluso hacer una cita en línea para que vengan a realizar una reparación.
Solicite una reparación GEAppliances.comEl servicio de expertos GE está a tan sólo un paso de su puerta. ¡Entre en línea y solicite su reparación cuando le venga cualquier día del año! O llame al 800.GE.CARES (800.432.2737) durante horas normales de oficina.
Real Life Design Studio (Estudio de diseño para la vida real) GEAppliances.comGE apoya el concepto de Diseño Universal—productos, servicios y ambientes que pueden usar gente de todaslas edades, tamaños y capacidades. Reconocemos la necesidad de diseñar para una gran gama de habilidadesy dificultades físicas y mentales. Para más detalles cobre las aplicaciones de GE Diseño Universal, incluyendoideas de diseño para la cocina para personas con discapacidades, mire nuestra página Web hoy mismo. Para personas con dificultades auditivas, favor de llamar al 800.TDD.GEAC (800.833.4322).
Garantías ampliadas GEAppliances.comCompre una garantía ampliada y obtenga detalles sobre descuentos especiales disponibles mientras su garantíaestá aún activa. Puede comprarla en línea en cualquier momento, o llamar al (800.626.2224) durante horasnormales de oficina. GE Consumer Home Services estará aún ahí cuando su garantía termine.
Piezas y accesorios GEAppliances.comAquellos individuos con la calificación necesaria para reparar sus propios electrodomésticos pueden pedir que se les manden las piezas o accesorios directamente a sus hogares (aceptamos las tarjetas VISA, MasterCard y Discover). Haga su pedido en línea hoy, 24 horas cada día o llamar por teléfono al 800.626.2002 durante horas normales de oficina.
Las instrucciones descritas en este manual cubren los procedimientos a seguir por cualquier usuario.Cualquier otra reparación debería, por regla general, referirse a personal calificado autorizado. Debeejercerse precaución ya que las reparaciones incorrectas pueden causar condiciones de funcionamientoinseguras.
Póngase en contacto con nosotros GEAppliances.comSi no está satisfecho con el servicio que recibe de GE, póngase en contacto con nosotros en nuestra página Web indicando todos los detalles así como su número de teléfono o escríbanos a:
General Manager, Customer RelationsGE Appliances, Appliance ParkLouisville, KY 40225
Registre su electrodoméstico GEAppliances.com¡Registre su nuevo electrodoméstico en línea —cuando usted prefiera! El registrar su producto a tiempo le proporcionará, si surgiera la necesidad, una mejor comunicación y un servicio más rápido bajo los términosde su garantía. También puede enviar su tarjeta de registro pre-impresa que se incluye en el material deembalaje.
18 Impreso en China