showers - kohler co.resources.kohler.com/plumbing/mira/pdf/p2383-5-mira-7… · ·...
TRANSCRIPT

." "SHOWERS
723MIXER SI-IOWER
GUIDE
Opi!3r~tiqn &;-
Maintenance

1. Turn flow control knob until thedesired force of water is obtained.
2. Turn the temperature knob in thedirection of the red mark (No.9) forwarmer wa ter and in the direction ofthe blue mark (No. 0) for coolerwater, until the desired temperatureof water is obtained.
If difficulties are experienced pleasecontact our service office.
finisllSovereign golden finish is softer thanchrome and its abrasive resistance
much less, when cleaning or using toolsduring maintenance extra care must betaken.
Clea~ningSovereign golden finish should becleaned with a soft cloth and if
necessary, a mild washing up detergentor soap solution and then rinsed andrubbed dry.
Many household cleaners contain mildabrasives or chemicals and should
never be used for cleaning chromeplated, sovereign finish or plasticfittings.
1.
Temperature knob
If a new Mira 723 mixer shower fails
to operate satisfactorily it is usuallythe result of incorrect installationand the installer should beconsulted. Refer to Installation
notes on page 13.
If the mixer has operated for a timeand no longer performs acceptablyor if it is leaking the mixer may needservIcIng.
The dismantling procedure whichfollows will assist you withmaintenance. Our experience hasshown that, due to the simplicity ofdesign, the average user is capableof renewing '0' seals and cleaningor replacing internal parts whennecessary.
You may if you wish, choose to
engage the services of a suitablequalified person locally.
You will need
A screwdriver
A spanner or wrenchKettle descalent
Service pack (if valve is leaking)Silicone lubricant
The service pack (part No 936 59)
contains all seals and silicone greasenecessary to service the valve. Tocheck the complete contents of thepack see illustration on page 12.
Spare parts are available fromCaradon Mira, when ordering pleasequote model of mixer shower, partnumber and description of itemsrequired.
Isolate water supplies toshower.
Open flow control torelease pressure in system.
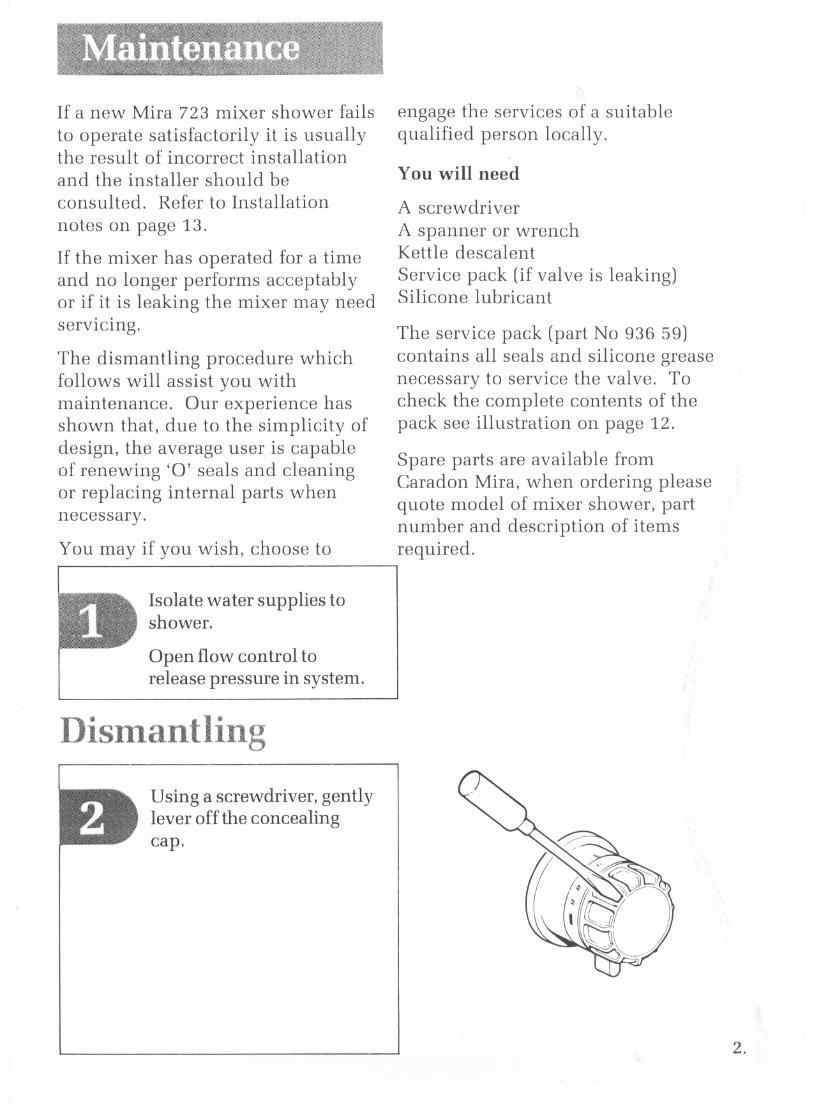
iSlllantlillg
Using a screwdriver, gentlylever off the concealingcap.
2.

Control knob
Screw
Circlip
3.
Remove flow control knob
screw, pull off flow knob.
Gently prise off circlip, removeflat washer and wavy washer,pull off temperature knob.
Recessed models only - gentlylever off concealing plate.

Remove 3 gears and gear carrier.
Undo 2 screws and pull off thegear housing, remove the covershroud.
Undo 4 cover screws andremove cover.Note! Recessed modelsWhen cover is removed some
water will run from body.Channel water away or soak itup with absorbent material.
Pull the temperature spindle,this action will remove the
temperature spindle, thethermostat coil and the portsleeve as a complete assembly.Note! In hard water areas scale
build up may cause moreresistance when removing thisassembly.
Gear carrier
Cover shroud
Gear housing
Sleeve
Temperaturespindle 4.

HeadNut
Use a spanner to loosen theheadnut on the port assembly.
Deflector
Pull the port assembly from thevalve body (it may be easier toloosely fit the flow knob andscrew, to provide extra leverage).Remove deflector from valve
body.
~)~ .."",-/, ~"''''
~: .. :.
: 0°..'
~'.. /C:
Fl. /'1®1 "Pis ~
5. Flow ~spindle
Unscrew the headnut and
dismantle the port assembly intoit's individual components.
Clean all metal components in aproprietory inhibited scalesolvent, ie Kettle descaler.Follow manufacturersinstructions. Do not useabrasives or acid solutions.
Port
Assembly
wvton

SiliconeLubricant
Note!! Do not allow the solventto come into contact with
bathroom fittings and surfaces.
Ifnecessary replace the seals, theinstruction leaflet in the service
pack indentifies individual seals(Service pack 936 59).
To assist re-assembly, lightlysmear all '0' seals and
piston/spindle threads with asilicone based lubricant
(supplied with service pack).
Screw the flow spindle fully intothe flow piston.Fit the small thrust washer on to
the spindle.
Push the piston/ spindleassembly into the headnut.Engage the hexagon fully.
000000
Flow spindle
oo
oo
Small thrustwasher
Head nut
6.

Deflector
Thrustwasher
7.
Screw the headnut looselyinto the port assembly.
Fit the deflector into the valvebody. Locate it's cut-out overthe pin.
Push the port assembly fullyinto the body. Locate cut-outover the pin.
Fit the larger thrust washerover the port assemblyspindle.
Use a spanner to tighten theheadnut. Do not overtighten!as this may damage thelocating pin.

Fit the temperature spindleinto one end of the thermostatcoil. Locate the coil tab into
the slot in the spindle.
Fit the port sleeve into theother end of the thern10statcoil. Locate the coil tab intothe slot in the sleeve.
Push the sleeve/coil/spindleassen1bly over the portassembly. Ensure that thelarge cut-out on the end of the
sleeve is located over the bodypIn.
Turn the temperature spindleto check that the pin islin1iting the free rotation of thesleeve.
Fi t the cover seal over the boss
on the valve body.
Fi t the largest thrust washerover the temperature spindle.
Temperaturespinel Ie
8.

Temperatureindicator
Refit the cover and secure itwith 4 cover screws. Ensurethat the 2 holes in the frontface of the cover are
horizontal. Tighten coverscrHWSfully. Turn on thewater supplies and check forleaks.
Refit the cover shroud, ensurethat the temperature indicator isat the top. Fit the gear housingonto the end of the cover, Locatethe 2 lugs into the cut-outs in thecover shroud. Secure the gearhousing with 2 screws.
On recessed models refit the
concealing plate over the covershroud. Ensure that it is located
over the j retaining clips.
Fit the gear carrier onto thesplines of the temperaturespindle, then fit the 3 gears ontothe gear carrier.

Maxill1llJIl
tell1p el~atllr'(~Ensure that there is an
adequate supply of hot wateravailable.
Fit the temperature knob tothe valve with No 5 adjacentto the indicator on the covershroud. (Do not fit thewashers and circli p at thisstage.)
Fit the flow knob and secure itwith the screw.
Note! for correct operation ofthe flow control and toprevent leakage the screwMUST be fitted.
Turn the shower on and checkthe temperature at thesprayhead. Toincrease thetemperature turn thetemperature knob towards No 9,to reduce temperature turn ittowards No O.
Note! If the required Maximumtemperature cannot be achieved,remove the flow knob and screw,pull off the temperature knob,and refit it at No 5 so that further
movement in the requireddirection is possible.
10.

Fit concealing cap to flow knob.
Fit the wavy washer, the flatwasher and the circlip to securethe temperature knob.
Refit flow knob and secure itwi th the screw.
Remove the temperature knoband refit it so that No 9 is
adjacent to the indicator on thecover shroud.
When the required maximumtemperature is reached, turnthe shower off and removeflu\v knob and screw.
Indica tor

Parts List
Item No
DescriptionPart No19 Cartridge assembly -723L902 701
Concealing Cap -723 107 0720 Deflector 282 112
Concealing Cap - 723L 1071921 Pillar and sleeve assembly -723900663
Flow Knob 9168122 Pillar and sleeve assembly3A 'H' Knob (white)
931 33-723L 90067
(chrome)
931 3423 Flow piston/spindle assembly927204
Temperature knob 0329724 Thermostat coil 019 805
Gear Control Set 8002225 Support bracket assembly6
Cover shroud 07965('B' models) 805 387
Cover assembly 9205026 Backplate assembly8
Inlet connector assembly 55541('B' 'models) 807 119
Trim pack 9371327 Seal ('B' models) i641 56I10 Inlet elbow grubscrew 6182228: Clip (3) ('B' models) 579 55
11 Inlet elbow assembly802 7329, Mounting bracket assembly
12 Compression fitting28007('B' models) 805 36
13 Body assembly801 2030 Concealing plate ('B' models) :076 66
14 Outlet nipple assembly553 3531 Building in shroud '.
15 Backplate assembly807 17('B' models) 079 63
16 Body shroud079 6432 Pipe concealing plate 090 95
17 Drain plug assembly089 69(f)Screw pack933 98
18 Cartridge assembly -723902 65*
Service pack 936 5912
11 ,
32 uvI
I\f
30 3129 t Part number 3A is only available from your local stockist 12.

1
1
Layout and sizing of pipework exists or a more forceful showermust be such that when other
is required a booster pump mayservices are used, pressures at
be installed. The type of pumpthe valve inlets are maintained
used will depend on the siteapproximately equal and do not
conditions, the type and numberfall below the recommended
of sprayheads required. Forminimum. Hot and cold water
further information see Datasupplies must orginate from
Sheet P2181, and Pump Guidestorage tanks as shown in
P2310.schematic plumbing layout except when used with gas water
Schematic plumbing layoutheaters (see vi below).
11
Supply pipes must be flushed to Cold cistern
clear debris before connecting to the Mira 723.111
Conveniently situated isolating
Tvalves should be fitted for
' ,
II Other coldservicing purposes.draw offsIIsolating *
val ves 1IV
No form of flow control should~#11I~be fitted in outlet pipework.
v
Installations must comply with
Local Water Authority or WaterUndertakers Bye-Laws.II
IHotI
II 723/723bI cylindervi
GAS WATER HEATERS II
The Mira 723 can be used in conjunction with fully
II"
modulating gas water heaters.
Other hot
Consult our Customer Advice
draw offs
Department for ad vice if it is intended to use any form of
*Minimum head
instantaneous heater to supply
0.9 metre = 5.7litre/min
the hot water. For further
Absolute minimum
information see Data Sheet P579.
0.6 metre = 4.6litre/min
The figures quoted for each situationV11 PUMPSare based on pipe runs not exceeding 5
Where insufficient pressuremetres of 15mm pipe on each supply.
13.

Mira 723Dimensions
Mira 723bDimensions
I 153 I
723723b
Valve type
ThermostaticThermostatic
Configuration
Surface mountedRecessed mixer showermixer shower
Controls Knob
Flow control knobFlow control knobLever
Temperature control knobTemperature control knob
Maximum temperature
YesYesStop
Temperature
Full cold to presetFull cold to presetSelection
maximum temperaturemaximum temperature
Pressures - must be nominally equal. See Installation notes (Page 4)Minimum pressure
0.06 bar0.06 bar
Maximum pressure loss
3 bar3 bar
MaximUll1 static pressure
10 bar10 bar
Connections inlets
15mm compression1/:/' BSP femaleou tlet
15mm compression/1/z"1/:/' BSP femaleBSP male
Standards
BS 1415 part 2BS 1415 part 2UK "WFBS" Listed
UK "WFBS" Listed(IRN 103,104 and 111)
(IRN 103, 104 and 111)
14.

Guarantee of QualityMira Showers guarantee products against any defect ofmaterials or workmanship for one year from the date ofpurchase (2 years for Mira Select and 3 years for Mira Excelranges).
To validate the guarantee, please return your completedregistration card.Within the guarantee period we will resolve defects, free ofcharge, by repairing or replacing parts or modules as we maychoose.
To be free of charge, service work must only be undertakenby Mira Showers or our approved agents in Northern Irelandand Republic of Ireland.
Service under this guarantee does not affect the expirydate. The guarantee on any exchanged parts or productends when the normal product guarantee period expires.
Not covered by this guarantee:
Damage or defects arising from incorrect installation, improperuse or lack of maintenance, including build-up of limescale.
Damage or defects if the product is taken apart, repaired ormodified by any person not authorised by Mira Showers or ourapproved agents.
This guarantee is in addition to your statutory and otherlegal rights.
Before using your shower
Please take the time to read and understand the operating
and safety instructions detailed in this manual.
What to do if something goes wrong
If when you first use your shower it doesn't function correctly,first contact your installer to check that installation andcommissioning are satisfactory and in accordance with theinstructions in this manual. We are on-hand to offer you or yourinstaller any advice you may need.
Should this not resolve the difficulty, simply contact ourCustomer Services who will give every assistance, and ifnecessary arrange for our service engineer to visit.
If later the performance of your shower declines, consult thismanual to see whether simple home maintenance is required.Please call our Customer Services to talk the difficultythrough, request service under guarantee if applicable, ortake advantage of our comprehensive After-Sales service.
As part of our quality and training programme callsmay be recorded or monitored
After Sales ServiceOur Customer Services Team is comprehensively trainedto provide every assistance you may need: help andadvice, spare parts or a service visit.
Spare PartsWe maintain an extensive stock of spares, and aim to havefunctional parts available for ten years from the date offinal manufacture of the product.
Spares can be purchased from approved stockists ormerchants (locations on request) or direct from CustomerServices.
Spares direct will normally be despatched within twoworking days. Payment can be made by Visa or Mastercardat the time of ordering. Should payment by cheque bepreferred a pro-forma invoice will be sent.
Note! In the interests of safety, spares requiring exposureto mains voltages can only be sent to competent persons.ServiceOur Service Force is available to provide a quality service ata reasonable cost. You will have the assurance of a Miratrained engineer/agent, genuine Mira spares - and a 12 monthguarantee on the repair.
Payment should be made directly to the Service Engineer/Agent, using Visa, Mastercard or a cheque supported by abanker's card.
To contact us:
England, Scotland & Wales
Mira Showers Customer Services
Telephone: 0870241 08888.30am to 5pm Working days (4.30pm Fri)8.30 am to 12.30pm SaturdayE-mail: [email protected]: 01242282595
By Post: Cromwell RoadCheltenhamGloucester GL52 5EP
For Customers in Northern IrelandWm H Leech & Son LtdTelephone: 028 90449257 - Mon to Fri 9 am-5pmFax: 02890449234 - 24 hours
Post: Maryland Industrial EstateBallygowan RoadMoneyreagh, Co DownBT236BL
For Customers in Republic of IrelandModern Plant LtdTelephone: Dublin 01 4591344 - Mon to Fri 9am to 5pmFax: Dublin 01 4592329 - 24 hoursPost: Otter House
Naas RoadClondalkinDublin 22
Mira ShowersKohler Mira Ltd
Cromwell Road,Cheltenham GL52 5EP.
Mira is a registered trade mark ofKohler Mira Limited.The company reserves the right toalter product specifications withoutnotice.
OSII'.fi~,...003
FM 14648
P2383/5 (H) © Kohler Mira Limited, December 2002