accesspatrol · the currentware server is the central hub for the currentware consoles and the...
TRANSCRIPT

User Guide Revised in March, 2018
AccessPatrol Version 5.2.7
Endpoint Security Tool
www.CurrentWare.com 2
AccessPatrol User Guide - Table of Contents 1.0 Introduction to AccessPatrol......................................................................................................... 4
1.1 CurrentWare Components ........................................................................................................... 5
1.2 System Requirements .................................................................................................................. 6
1.3 Installing the CurrentWare Server, Console and Solutions ......................................................... 7
1.4 Installing the CurrentWare Clients ............................................................................................... 8
1.4.1 Local CurrentWare Client Install ............................................................................................ 8
1.4.2 Remote Client Install ............................................................................................................. 9
1.4.3 Deploy CurrentWare Client by Command Line ................................................................... 11
1.4.4 Deploy CurrentWare Client with a Third-Party Software Delivery Tool or Active Directory 11
1.5 Configuring the CurrentWare Client to Connect to the CurrentWare Server over the Internet (Port Forwarding) ............................................................................................................................. 12
1.5.1 Preparing your CurrentWare Server .................................................................................... 12
1.5.2 Installing the CurrentWare Client ........................................................................................ 12
1.6 Upgrading the CurrentWare Clients ........................................................................................... 13
1.6.1 Automatic Upgrade of the CurrentWare Clients .................................................................. 13
1.6.2 Manual Upgrade of the CurrentWare Clients ...................................................................... 13
1.7 Standalone Installation ............................................................................................................... 13
1.7.1 Installing the CurrentWare Console, Server and Solution .................................................. 13
1.7.2 Installing the CurrentWare Client ........................................................................................ 14
1.7.3 Password Protect the CurrentWare Console ...................................................................... 14
2.0 CurrentWare Console Overview .................................................................................................. 15
2.1 Client and Group Management .................................................................................................. 16
2.2 Redirect Clients .......................................................................................................................... 17
2.3 Client Settings ............................................................................................................................ 18
2.4 Troubleshooting .......................................................................................................................... 22
2.5 Operators .................................................................................................................................... 23
2.5.1 Operator Permissions .......................................................................................................... 25
2.6 Import Users ............................................................................................................................... 26
2.7 Database Backup Scheduler ...................................................................................................... 27
2.8 Auto Delete Scheduler ............................................................................................................... 29
2.9 Options ....................................................................................................................................... 30
2.10 Server Settings ......................................................................................................................... 32
2.11 Log Out ..................................................................................................................................... 33
3.0 Overview of AccessPatrol Functions .......................................................................................... 34
4.0 Controlling Device Access ........................................................................................................... 35
www.CurrentWare.com 3
4.1 Access Permissions ................................................................................................................... 35
4.2 Device Scheduler ....................................................................................................................... 37
4.3 Allowed List ................................................................................................................................ 38
5.0 Device Reports .............................................................................................................................. 41
5.1 Device Report Options ............................................................................................................... 41
5.1.1 Reporting Type .................................................................................................................... 41
5.1.2 Select Mode ......................................................................................................................... 41
5.1.3 Reporting Period .................................................................................................................. 41
5.1.4 Output .................................................................................................................................. 42
6.0 Email Reports ................................................................................................................................ 43
6.1 Email Settings ............................................................................................................................ 44
7.0 AccessPatrol Client Settings ........................................................................................................ 45
8.0 Copy Group Settings .................................................................................................................... 46
9.0 CurrentWare Server Manager ..................................................................................................... 47
9.1 Changing the CurrentWare Client and Console Port ................................................................. 47
9.2 Stopping the CurrentWare Server Service................................................................................. 48
9.3 Compress the CurrentWare Database ....................................................................................... 49
9.4 Archive and Restore the CurrentWare Database ...................................................................... 49
9.5 Advanced .................................................................................................................................... 51
10.0 Licensing ..................................................................................................................................... 52
10.1 Register your Permanent License key ..................................................................................... 52
10.2 License Management ............................................................................................................... 53
11.0 Uninstall CurrentWare Server, Console and Solutions ........................................................... 54
11.1 Uninstalling the CurrentWare Solutions ................................................................................... 54
11.2 Uninstalling the CurrentWare Server and Console .................................................................. 54
12.0 Uninstall CurrentWare Client .................................................................................................... 55
12.1 Uninstall CurrentWare Client from the Console ....................................................................... 55
12.2 Uninstall CurrentWare Client on the workstation by command line ........................................ 56
12.3 Uninstall CurrentWare Client on the workstation from the Client Configuration Window........ 56
13.0 Technical Support ...................................................................................................................... 57
14.0 Contacts ...................................................................................................................................... 58

www.CurrentWare.com 4
1.0 Introduction to AccessPatrol AccessPatrol is endpoint security software used for controlling the access of external devices on your network computers AccessPatrol Device Security With the influx of portable storage devices and removable media, data theft is becoming an increasing threat to organizations. Devices such as USB sticks, mobile phones, tablets, media players and external hard drives connect seamlessly to company networks, without IT administrators having any knowledge that that their company data is being exposed. Portable devices also provide an easy entryway for infecting systems with viruses or malicious software, thus compromising an organization’s network. Banning these devices in the workplace/schools is becoming increasingly difficult to monitor. As a result, more and more companies are resorting to tools that can prevent users from implementing these devices to their workstations. CurrentWare’s endpoint security solution, AccessPatrol, provides a comprehensive solution for securing company devices to minimize unauthorized access to proprietary information.
www.CurrentWare.com 5
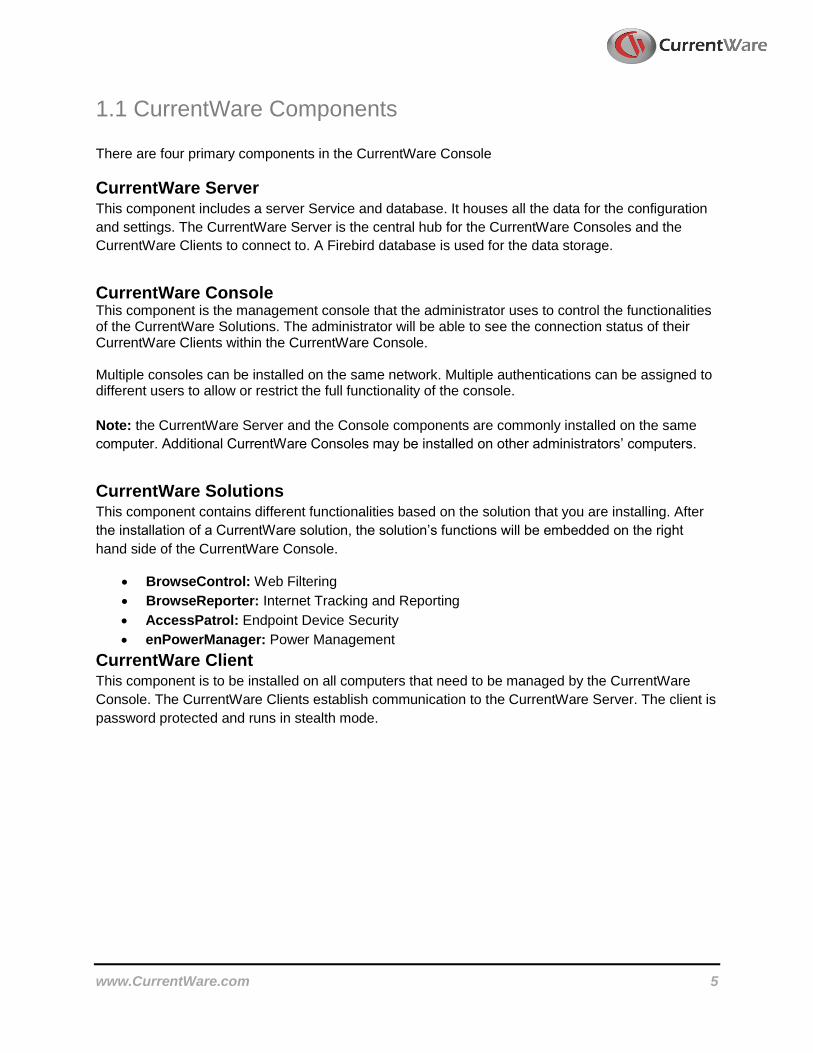
1.1 CurrentWare Components There are four primary components in the CurrentWare Console
CurrentWare Server
This component includes a server Service and database. It houses all the data for the configuration
and settings. The CurrentWare Server is the central hub for the CurrentWare Consoles and the
CurrentWare Clients to connect to. A Firebird database is used for the data storage.
CurrentWare Console
This component is the management console that the administrator uses to control the functionalities of the CurrentWare Solutions. The administrator will be able to see the connection status of their CurrentWare Clients within the CurrentWare Console. Multiple consoles can be installed on the same network. Multiple authentications can be assigned to different users to allow or restrict the full functionality of the console.
Note: the CurrentWare Server and the Console components are commonly installed on the same
computer. Additional CurrentWare Consoles may be installed on other administrators’ computers.
CurrentWare Solutions
This component contains different functionalities based on the solution that you are installing. After
the installation of a CurrentWare solution, the solution’s functions will be embedded on the right
hand side of the CurrentWare Console.
BrowseControl: Web Filtering
BrowseReporter: Internet Tracking and Reporting
AccessPatrol: Endpoint Device Security
enPowerManager: Power Management
CurrentWare Client This component is to be installed on all computers that need to be managed by the CurrentWare
Console. The CurrentWare Clients establish communication to the CurrentWare Server. The client is
password protected and runs in stealth mode.
www.CurrentWare.com 6
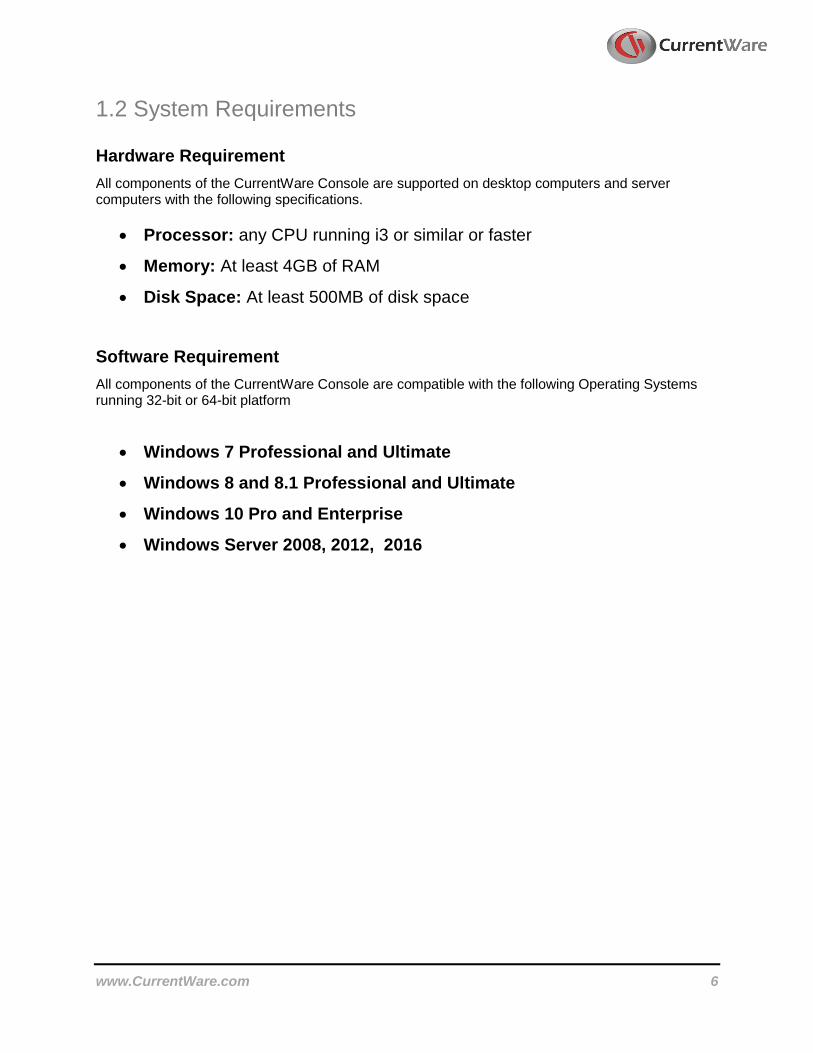
1.2 System Requirements
Hardware Requirement
All components of the CurrentWare Console are supported on desktop computers and server computers with the following specifications.
Processor: any CPU running i3 or similar or faster
Memory: At least 4GB of RAM
Disk Space: At least 500MB of disk space
Software Requirement
All components of the CurrentWare Console are compatible with the following Operating Systems running 32-bit or 64-bit platform
Windows 7 Professional and Ultimate
Windows 8 and 8.1 Professional and Ultimate
Windows 10 Pro and Enterprise
Windows Server 2008, 2012, 2016
www.CurrentWare.com 7
1.3 Installing the CurrentWare Server, Console and Solutions Follow the instructions below to install the CurrentWare Server, Console and Solutions.
Before you begin your installation:
Installation of all components must be done with an admin user account.
The Server and Console components may be installed on the same computer.
1. Download the Setup Files
Download the CurrentWare setup files from our website:
http://www.currentware.com/download/
2. Select a Computer to install the CurrentWare Server and Console
3. Install the CurrentWare Server and Console
1. Unzip the setup file that you downloaded from our website and run the currentware.exe to initiate the CurrentWare Console Installation Wizard.
2. Proceed to accept the License Agreement.
3. Put in your User Information (Full Name and Organization name) and select the software usage for “Anyone who uses this computer” or “Only for me”
4. Now, select the CurrentWare Components that you want to install. For first time installation, click next. The install wizard will automatically select the CurrentWare Console and Server to be installed on your computer.
5. Select the Solutions that you want to install.
6. Type in the computer name (or IP address) of your CurrentWare Server. For first time installation, click next. The install wizard will automatically type in your Computer name.
7. The Installer will now proceed to install the CurrentWare Server, Console and the solution(s) on your computer.

www.CurrentWare.com 8
1.4 Installing the CurrentWare Clients Follow the instructions below to install the CurrentWare clients on the computers you want to manage. After a successful installation of the CurrentWare Clients, they will connect to your CurrentWare Server and automatically show up on your CurrentWare Console.
Before you begin your installation:
Installation of all components must be done with an admin user account.
To successfully deploy the CurrentWare Client using the Remote Client Install utility, please temporarily disable the Windows Firewall on the client computers and disable Window’s Simple File Sharing.
There are four ways to deploy the CurrentWare Clients to your workstations.
1. Local CurrentWare Client Install: run the cwClientSetup.exe file on all
the computers you want to manage.
2. Remote Client Install: use the built-in Remote Client Install tool on the
CurrentWare Console to push the CurrentWare Client install to the
computers.
3. Deploy the CurrentWare Client by Command Line: create a batch file
that will install the CurrentWare Client. Run the batch file through Active
Directory or Login Script.
4. Deploy the CurrentWare Client with a Third-Party Software Delivery
Tools: use third-party software to deploy the cwClientSetup.exe file.
1.4.1 Local CurrentWare Client Install This is the most standard method of installing the CurrentWare Client. Run the cwClientSetup.exe file on each computer you want to manage. The cwClientSetup.exe file can be found on the computer that you have installed the CurrentWare Server. This set up file is stored under: CurrentWare Client Setup File:
C:\Program Files (x86)\CurrentWare\cwClientSetup\cwClientSetup.exe
When you run the cwClientSetup.exe on your managed computers, you will need to fill in the following information.
www.CurrentWare.com 9
1. Computer Name or IP Address of the CurrentWare Server
Put in the Computer Name or IP address of the CurrentWare Server that
you want the client to connect to. Ensure that the managed workstations
can establish connections to the CurrentWare Server.
2. CurrentWare Client Password (Optional)
The CurrentWare Client password is used to configure the CurrentWare
Client settings. If you do not put in a custom CurrentWare Client password,
then the default password is “Admin” (without the quote; case sensitive).
Upon the completion of your CurrentWare Client installation, it will automatically connect to your
CurrentWare Console.
1.4.2 Remote Client Install
Before you begin your installation:
Disable UAC (User Account Control) and Windows Firewall on the client computers CurrentWare Clients can be remotely installed from the Console. The remote installer can be found on the console under the menu Install > Remote Client Install.
1. Browse for the path of the CurrentWare Client setup file, cwClientSetup.exe, on your computer. By default this file is located in the following folder on the server computer:
C:\Program
Files(x86)\CurrentWare\cwClientSetup\cwClientSetup.exe
2. Enter the Computer name or IP address of the CurrentWare Server.
3. (Optional): Change the CurrentWare Client password .
4. Select the option to enable or disable reboot after the installation (the recommended option is to enable reboot).
5. Select the computers you want to install the CurrentWare Client on:
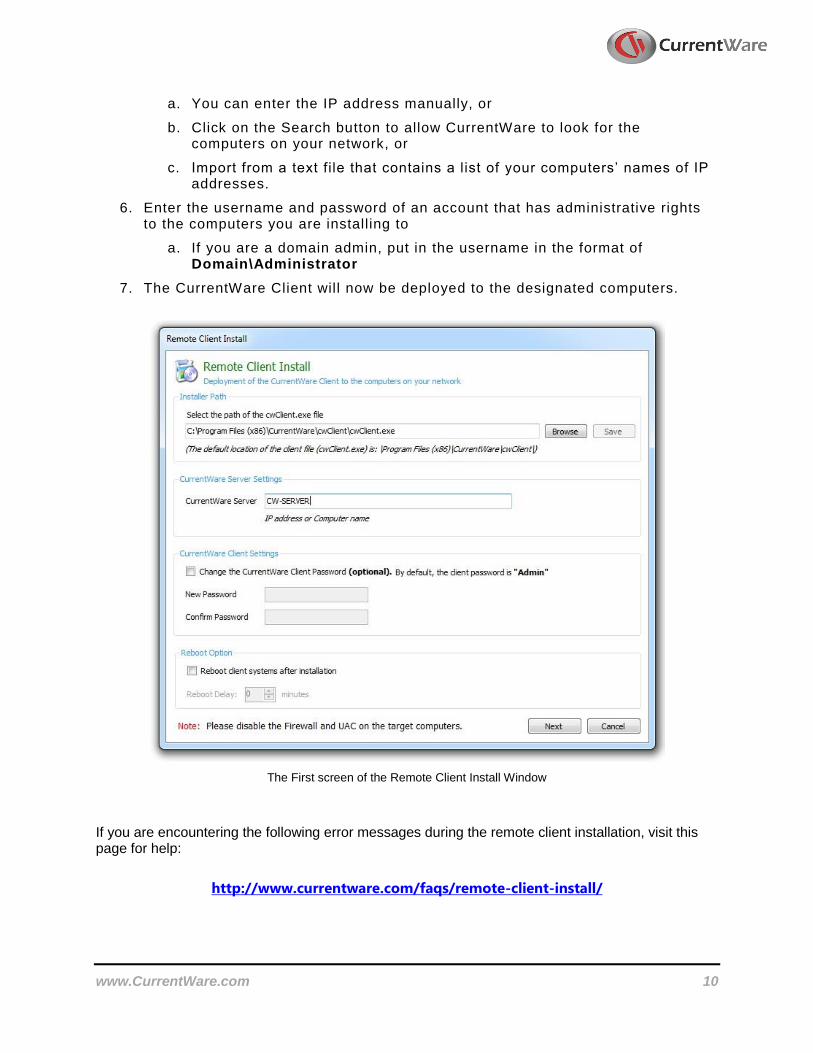
www.CurrentWare.com 10
a. You can enter the IP address manually, or
b. Click on the Search button to allow CurrentWare to look for the computers on your network, or
c. Import from a text file that contains a list of your computers’ names of IP addresses.
6. Enter the username and password of an account that has administrative rights to the computers you are installing to
a. If you are a domain admin, put in the username in the format of Domain\Administrator
7. The CurrentWare Client will now be deployed to the designated computers.
The First screen of the Remote Client Install Window
If you are encountering the following error messages during the remote client installation, visit this page for help:
http://www.currentware.com/faqs/remote-client-install/
www.CurrentWare.com 11
1.4.3 Deploy CurrentWare Client by Command Line The CurrentWare client file can be deployed through a single command line. Below is a list of switches you can along with the command line to deploy the CurrentWare client with the configurations of your choice.
e:\cwClientSetup.exe /qn USERPARAMS="-p Admin -ds 192.168.1.100
-rp password -sp password" /l e:\install.log /norestart
Switches: -p Required parameter (password is Admin) -ds CurrentWare Server IP address or Computer name -rp New Password (Optional) -sp Confirm Password (Optional) /qn Quiet Install /l Create a log file during the install. Specify the location and name of the log file. /norestart Prevents the installer to restart the client computer
In the above example, the network drive is assigned with the letter e:\. The CurrentWare Client set up file is stored on the network drive and the install log file will be created on the network drive after the installation.
1.4.4 Deploy CurrentWare Client with a Third-Party Software Delivery Tool or Active Directory The CurrentWare Client is packaged as an .exe file and a .msi file. You can find the .msi file as a separate download link from our download page. You can use your company’s system deployment tools to deploy the CurrentWare client to your workstations.
Deploy by customizing the cwClientSetup.msi file
You can take the existing cwClientSetup.msi file and customize it with the proper CurrentWare Server Computer name and other parameters before you deploy the file. Use a MSI editor (for example, the Orca MSI editor) and modify the following table within the cwClientSetup.msi file:
Table Property Value
Property USERPARAMS "-p Admin -ds 192.168.1.100"
Change the IP address in the value field to the IP address of your CurrentWare Server.
Deploy the .msi file using a Software Delivery Tool or through Active Directory.
www.CurrentWare.com 12
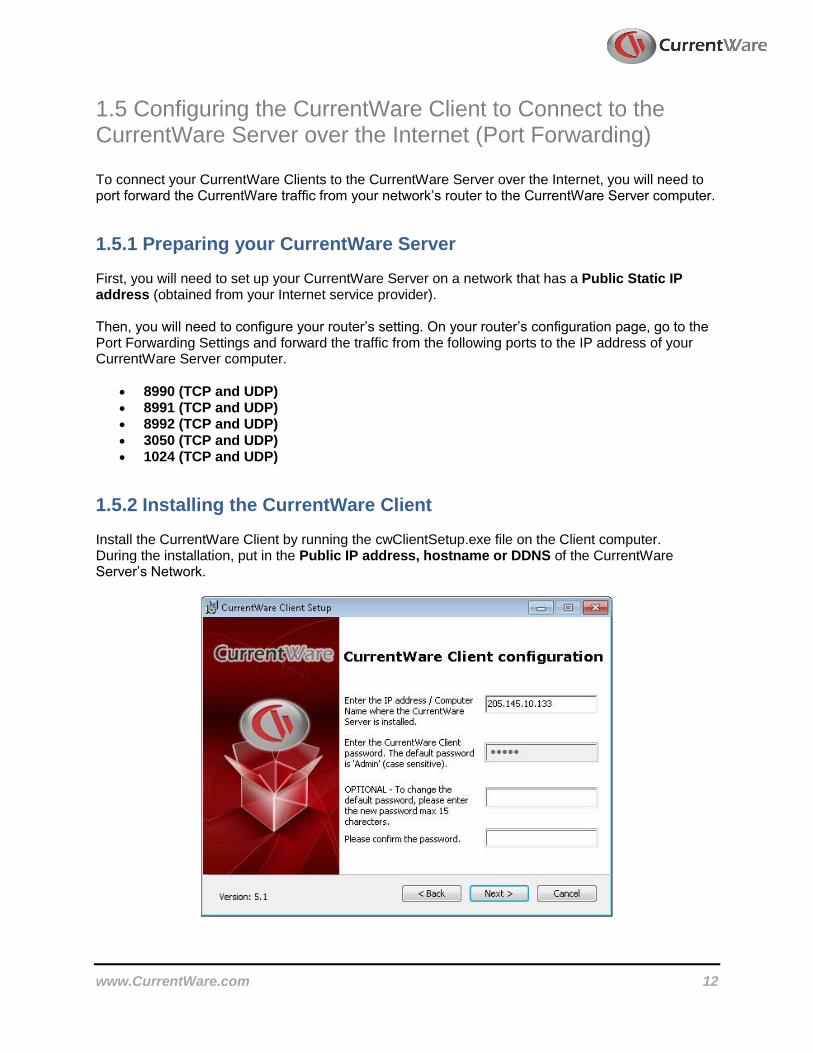
1.5 Configuring the CurrentWare Client to Connect to the CurrentWare Server over the Internet (Port Forwarding) To connect your CurrentWare Clients to the CurrentWare Server over the Internet, you will need to port forward the CurrentWare traffic from your network’s router to the CurrentWare Server computer.
1.5.1 Preparing your CurrentWare Server First, you will need to set up your CurrentWare Server on a network that has a Public Static IP address (obtained from your Internet service provider). Then, you will need to configure your router’s setting. On your router’s configuration page, go to the Port Forwarding Settings and forward the traffic from the following ports to the IP address of your CurrentWare Server computer.
8990 (TCP and UDP) 8991 (TCP and UDP) 8992 (TCP and UDP) 3050 (TCP and UDP) 1024 (TCP and UDP)
1.5.2 Installing the CurrentWare Client Install the CurrentWare Client by running the cwClientSetup.exe file on the Client computer. During the installation, put in the Public IP address, hostname or DDNS of the CurrentWare Server’s Network.

www.CurrentWare.com 13
1.6 Upgrading the CurrentWare Clients There are two ways to upgrade the CurrentWare clients in version 4 – Automatic upgrade or Manual
upgrade.
1.6.1 Automatic Upgrade of the CurrentWare Clients The client upgrade process can be automated when you upgrade any version of the CurrentWare client to the latest version.
1. On the CurrentWare Console, go to Install > Auto Upgrade Clients
2. Click on the “Automatically upgrade the CurrentWare Clients on your network…” checkbox and the CurrentWare Server will push the update to the clients.
The Client upgrade is automatic when this option is enabled.
1.6.2 Manual Upgrade of the CurrentWare Clients The client upgrade method can be done manually by running the cwClientSetup.exe file on each
computer that has a CurrentWare client installed.
1.7 Standalone Installation
Standalone: Installing the CurrentWare Server, Console and Client on the same computer.
1.7.1 Installing the CurrentWare Console, Server and Solution
www.CurrentWare.com 14
1. Run the CurrentWare.exe setup file
2. Accept the terms in the License Agreement
3. Select the Security Solutions you want to install.
a. AccessPatrol: Block USB and external devices
b. BrowseControl: Web Filter and Application Blocking
c. BrowseReporter: Internet Activity Tracking
d. enPowerManager: Remote Power Management
4. The Installer will proceed to install the CurrentWare Server, Console and Solutions onto your computer
1.7.2 Installing the CurrentWare Client
1. Run the cwClientSetup.exe setup file
2. When prompted for the CurrentWare Server, put in the word loopback. This will make the Client connect to itself
3. Finish the installation
1.7.3 Password Protect the CurrentWare Console
1. Launch the CurrentWare Console
2. Go to Tools > Operators
3. Click on Add and add an operator with administrator role
4. Once an administrator has been added, check the option “Enable Password Security”.
5. The next time you launch the CurrentWare Console, it will ask you to enter the operator name and password.
www.CurrentWare.com 15
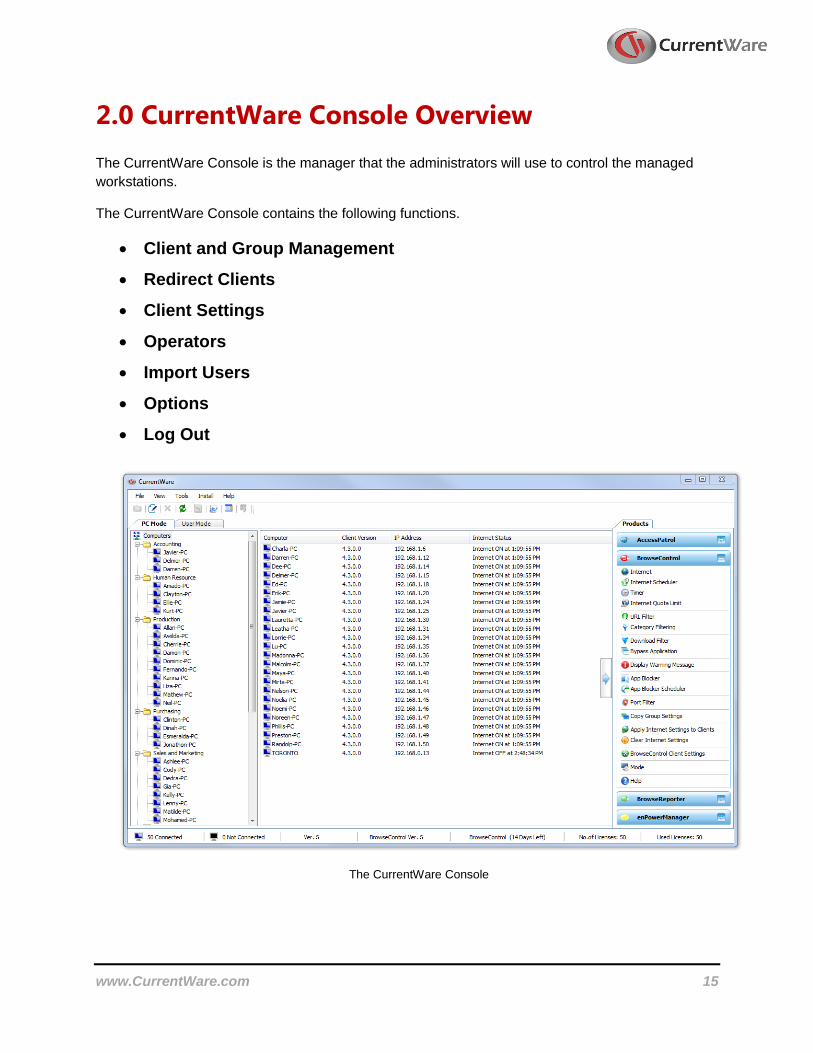
2.0 CurrentWare Console Overview The CurrentWare Console is the manager that the administrators will use to control the managed
workstations.
The CurrentWare Console contains the following functions.
Client and Group Management
Redirect Clients
Client Settings
Operators
Import Users
Options
Log Out
The CurrentWare Console

www.CurrentWare.com 16
2.1 Client and Group Management In computer mode, a connected client is represented by a blue computer icon, while an unconnected client is represented by a grey computer icon. In user mode, an active user is represented by a green user icon, while an inactive user is represented by an orange user icon. For ease of management, the workstations and users can be organized into groups.
Create a New Group
To create a new group, from the menu, select File > Add New Group. Or, right click on the computer pane in the CurrentWare console and select Add New Group.
Rename a Group
To rename a group, from the menu, select File > Rename Or, right click on the computer pane in the CurrentWare console and select Rename.
Delete a Group
To delete a group, from the menu, select File > Delete Or, right click on the computer pane in the CurrentWare console and select Delete.
Move Computers/Users
On the CurrentWare Console, organization of the computers, users and groups can be accomplished by dragging and dropping the selected computer/user into the group. To facilitate the organization of a large number of computers, users or groups, you can use the Move Computers/Users function. On the CurrentWare Console menu, select File > Move Computer/Users. The left hand side contains the source folder and the right hand side contains the destination folder. Select the computer(s) you want to move from the source folder, and then select the destination folder. Click on the >> button to move the computers.

www.CurrentWare.com 17
2.2 Redirect Clients Redirect Clients is usually used when there are more than one CurrentWare Servers installed on
your network. It is used to connect the CurrentWare Clients from another CurrentWare Server to the
current CurrentWare server. Essentially, the redirect clients tool, transfers the CurrentWare Clients
from one server to another.
Scenario: I need to transfer all of my CurrentWare Clients from my old server to the new server.
1. On the new CurrentWare Server, launch the CurrentWare Console and access the menu Tools > Redirect Clients .
2. Enter the CurrentWare Client password. The default password is Admin
3. Select Redirect All CurrentWare Clients.
4. Enable the option Redirect connected Client(s)
5. Click on OK
6. After a brief moment, the CurrentWare Clients will start connecting to the new Server.
Redirect CurrentWare Clients that are connected to one CurrentWare Server
to another CurrentWare Server

www.CurrentWare.com 18
2.3 Client Settings The CurrentWare Client settings can be modified in the CurrentWare Console under Tools > Client
Settings. You can also right click on a group to find the Client Settings.
Change Password
Put in the new CurrentWare Client password to replace the existing CurrentWare Client password.
You will need to use the CurrentWare client password if you want to change the client settings, such
as IP address or computer name of the CurrentWare Server or the port that the client use to connect
to the CurrentWare Server. By default the case sensitive Client password is Admin.
General
Run at Windows Startup: toggle the option to allow the CurrentWare client service to start
every time the workstation boots up.
Show in System Tray: toggle the option to display the CurrentWare icon in the system tray.
When this option is enabled, the administrator can double click on the icon, put in the
password, to access the CurrentWare Client configuration window.
Block admin users from stopping the client: toggle the option to prevent the users of the
workstation to stop the CurrentWare Client service or end the CurrentWare Client process.
www.CurrentWare.com 19
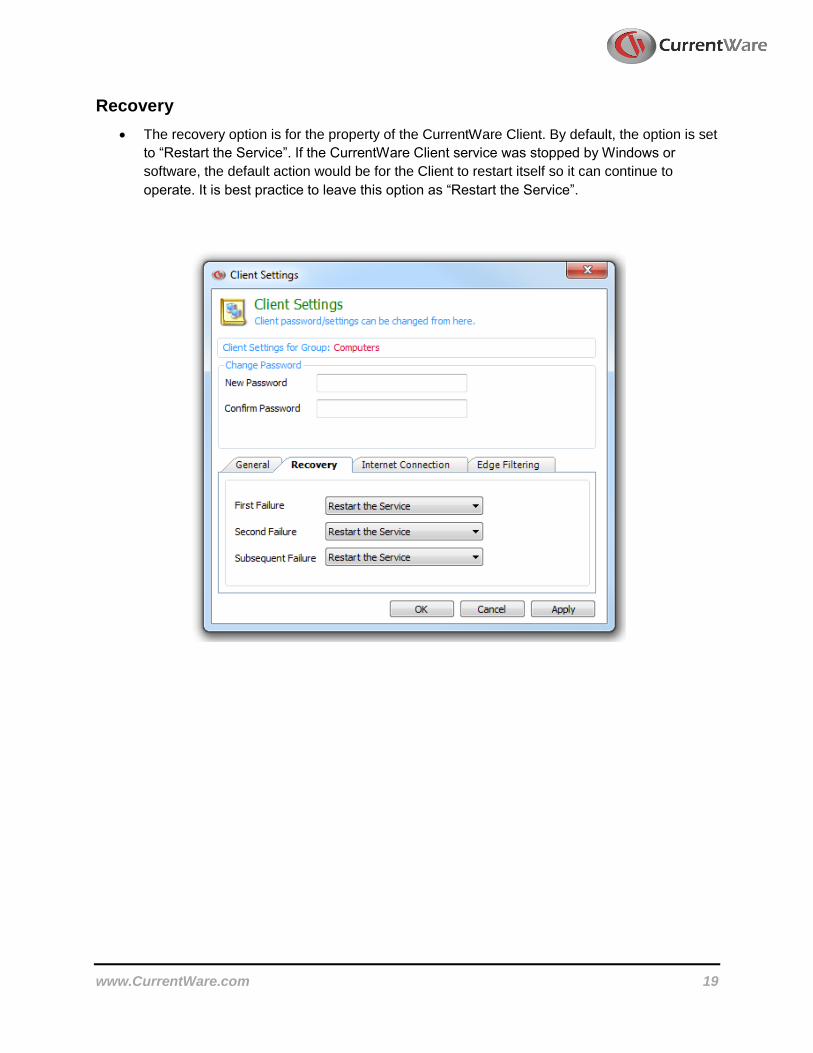
Recovery
The recovery option is for the property of the CurrentWare Client. By default, the option is set
to “Restart the Service”. If the CurrentWare Client service was stopped by Windows or
software, the default action would be for the Client to restart itself so it can continue to
operate. It is best practice to leave this option as “Restart the Service”.
www.CurrentWare.com 20
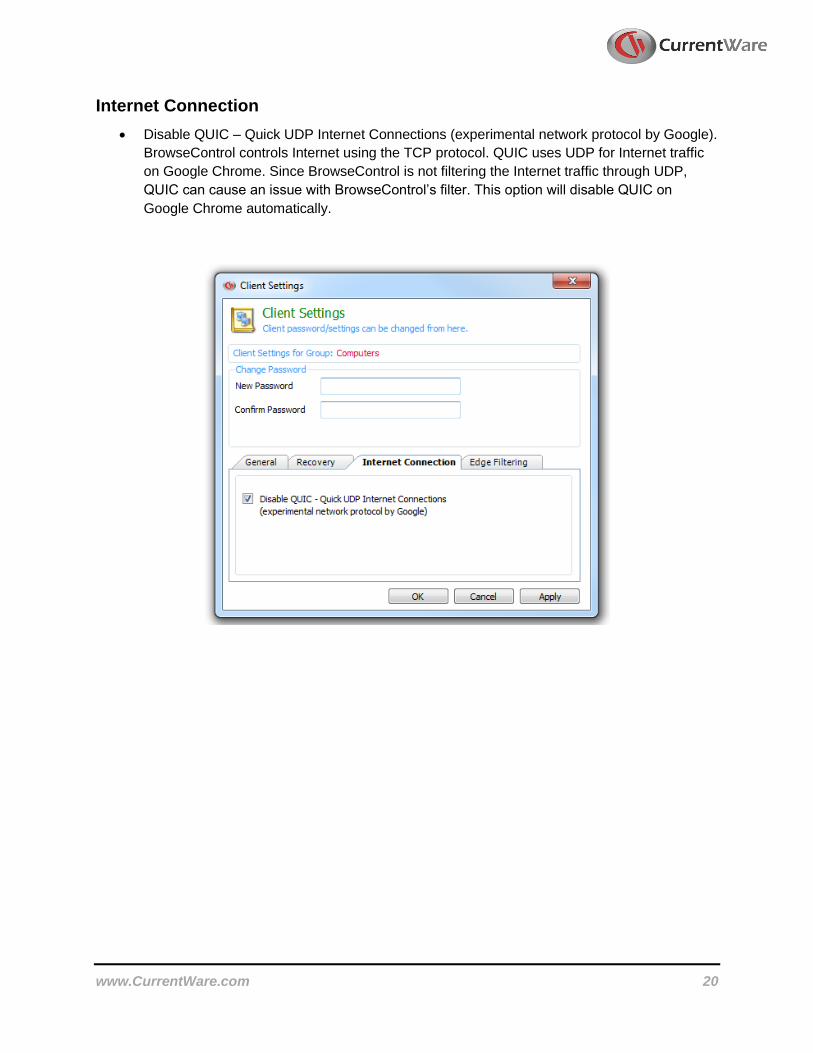
Internet Connection
Disable QUIC – Quick UDP Internet Connections (experimental network protocol by Google).
BrowseControl controls Internet using the TCP protocol. QUIC uses UDP for Internet traffic
on Google Chrome. Since BrowseControl is not filtering the Internet traffic through UDP,
QUIC can cause an issue with BrowseControl’s filter. This option will disable QUIC on
Google Chrome automatically.

www.CurrentWare.com 21
Edge Filtering
This setting applies to Windows 10 computers only.
When this option is enabled, BrowseControl uses the cwMetroClient service to filter Internet access.
This is a new process applicable to Windows 10 and Windows 2016. It can filter Internet access for
all of the Internet browsers including Microsoft Edge.
When this option is disabled, BrowseControl uses the legacy cwClient service to filter Internet
access. This process is applicable to Windows operating systems older than Windows 10 (i.e.
Windows 7, 8, 2003, 2008 and 2012). It can filter Internet access to all of the Internet browsers
except for Microsoft Edge.
When Edge Filtering is disabled, we highly recommend adding Microsoft Edge to the Application
Blocked list in order to prevent your end users from launching the Edge browser.

www.CurrentWare.com 22
2.4 Troubleshooting The troubleshooting option allows administrator to perform troubleshooting tasks to resolve errors that are related to the CurrentWare Client.
Client Restart Schedule
Restarting the CurrentWare Client will resolve unexpected issues that can occur on the CurrentWare Client. This option will help the administrator restart the CurrentWare Client automatically during scheduled time.
Use the Client Restart Schedule to automatically restart the CurrentWare Clients
Viewing Log files
You can use the CurrentWare Console to remotely connect to a client computer to open the CurrentWare Client log files. The following CurrentWare Client log files are available to view remotely:
CurrentWare Client Log
Upload Log
Category Log
Blocked URL Log
Advanced Logs
www.CurrentWare.com 23
CurrentWare Client Log
The CurrentWare Client log indicates the status of the Client. This log file can help identify connection issues and version conflicts.
Upload Log
The upload log records the data, tracked by BrowseReporter, which is uploaded to the CurrentWare Server. This log file can help identify issues with BrowseReporter data upload.
Category Log
The category log records the communication between the CurrentWare Client and the Category Filtering Server used by BrowseControl. If the Category Filtering restriction is not working properly, use this log to identify if the client is connected to the server.
Blocked URL Log
The blocked URL log will show you the blocked websites that your end users attempted to access. You can use this log to identify additional websites (such as CDN, image server, CSS, etc.) to add to BrowseControl’s Allowed list.
Advanced Logs
Use the CurrentWare advanced log to troubleshoot specific issues that you are having with CurrentWare
CWSEmail.log
CWSAPEmail.log
CWSBRAlertEmail.log
CWUserActivity.log
Advanced client and port connection logs (CltCommand.log, TSTLog8991.log, TSTLog8992.log)
NOTE: Enable advanced logs may cause your system to slow down. After collecting
the log files for the technical support team, remember to disable the logging.
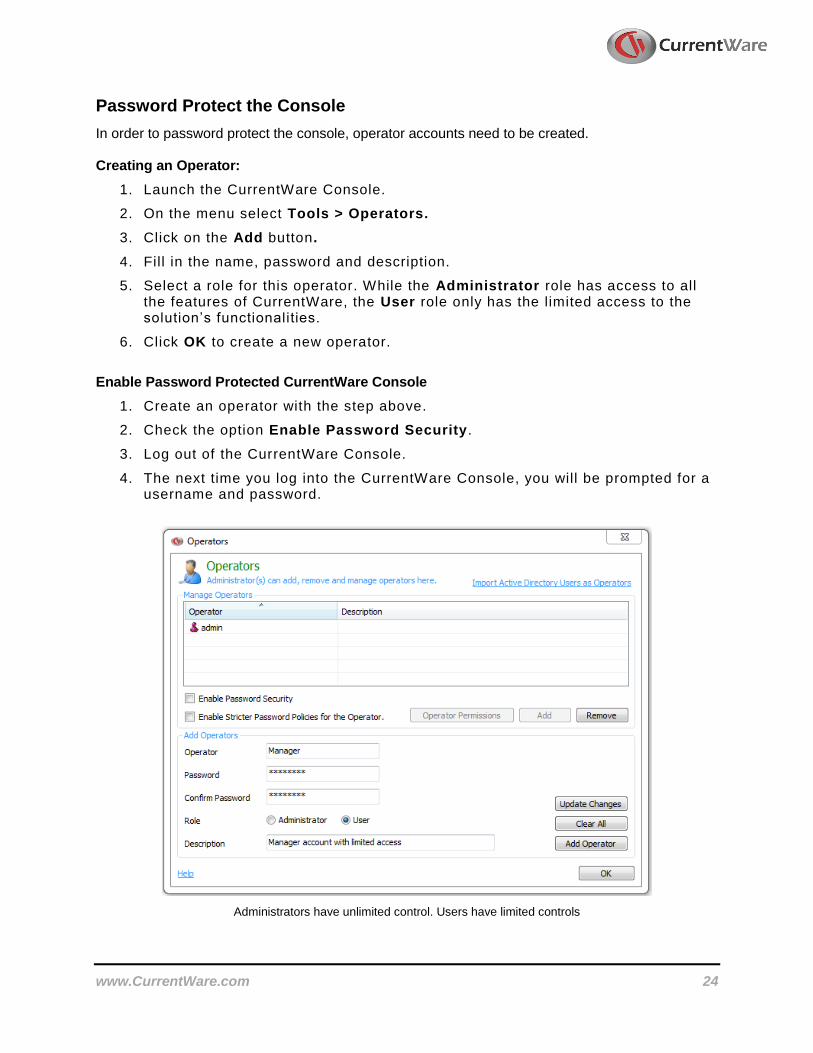
2.5 Operators Operators are used in the CurrentWare Console to assign console permissions to different users. The Operators utility is available on the CurrentWare Console under Tools > Operators. There are two types of operators in CurrentWare Console: Administrator and User.
Administrator type has complete control over every computer, group and the solution’s functionalities.
User type has limitations defined by the administrator. These limitations include the solution’s functionalities and group accesses.
www.CurrentWare.com 24
Password Protect the Console
In order to password protect the console, operator accounts need to be created. Creating an Operator:
1. Launch the CurrentWare Console.
2. On the menu select Tools > Operators.
3. Click on the Add button.
4. Fill in the name, password and description.
5. Select a role for this operator. While the Administrator role has access to all the features of CurrentWare, the User role only has the limited access to the solution’s functionalities.
6. Click OK to create a new operator.
Enable Password Protected CurrentWare Console
1. Create an operator with the step above.
2. Check the option Enable Password Security.
3. Log out of the CurrentWare Console.
4. The next time you log into the CurrentWare Console, you will be prompted for a username and password.
Administrators have unlimited control. Users have limited controls
www.CurrentWare.com 25
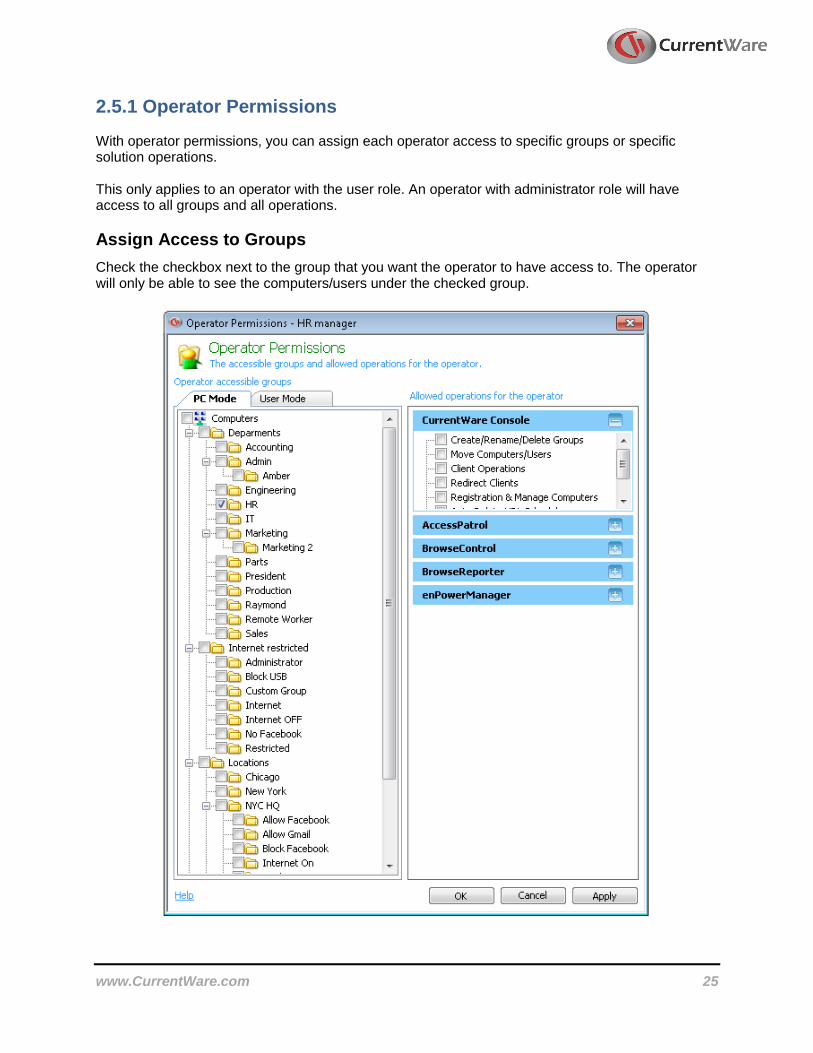
2.5.1 Operator Permissions With operator permissions, you can assign each operator access to specific groups or specific solution operations. This only applies to an operator with the user role. An operator with administrator role will have access to all groups and all operations.
Assign Access to Groups
Check the checkbox next to the group that you want the operator to have access to. The operator will only be able to see the computers/users under the checked group.
www.CurrentWare.com 26
Assign Operations
Each solution along with the CurrentWare Console has specific operations you can assign to a user operator:
CurrentWare Console Operations
Create/Rename/Delete Groups
Move Computers/Users
Client Operations
Redirect Clients
Registration & Manage Computers
Auto Delete URL Scheduler
Track Assets
AccessPatrol Operations
Device Permissions
Device Scheduler
Allowed List
Device Reports
Profile Save and Delete
Email Reports
AccessPatrol Client Settings
Copy Group Settings
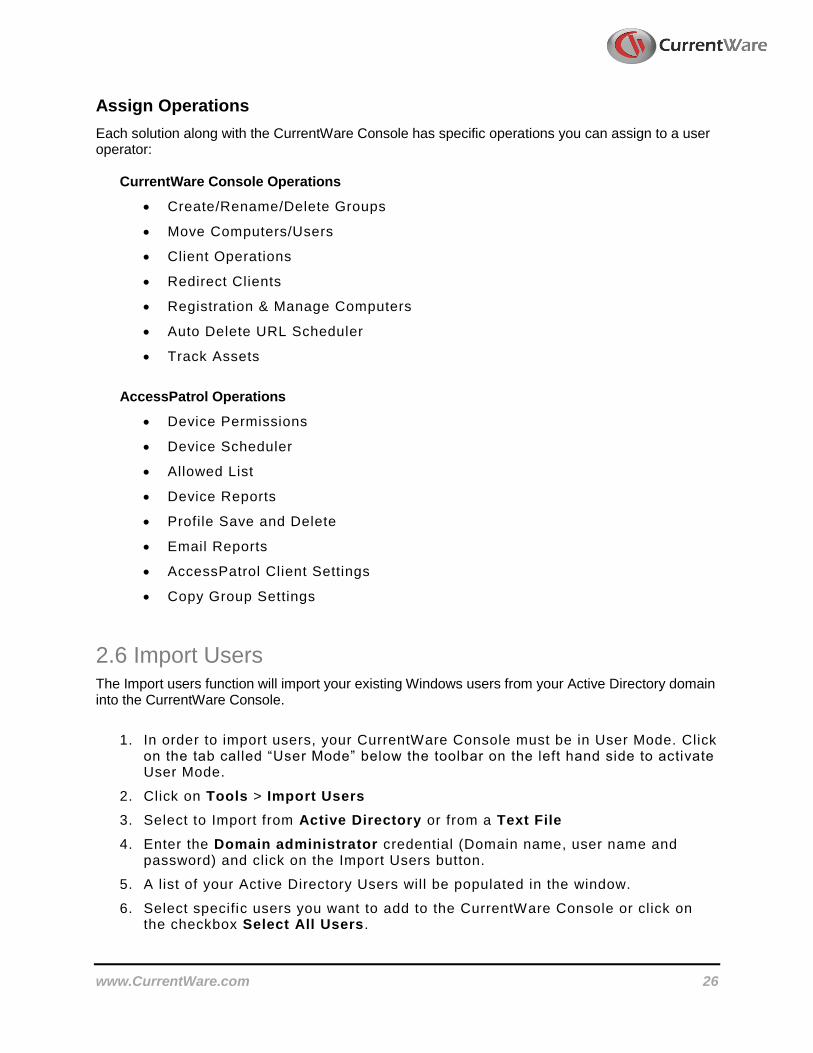
2.6 Import Users The Import users function will import your existing Windows users from your Active Directory domain into the CurrentWare Console.
1. In order to import users, your CurrentWare Console must be in User Mode. Click on the tab called “User Mode” below the toolbar on the left hand side to activate User Mode.
2. Click on Tools > Import Users
3. Select to Import from Active Directory or from a Text File
4. Enter the Domain administrator credential (Domain name, user name and password) and click on the Import Users button.
5. A list of your Active Directory Users will be populated in the window.
6. Select specific users you want to add to the CurrentWare Console or click on the checkbox Select All Users .
www.CurrentWare.com 27
7. Click Add Users to add the selected users to the Console.
Import Windows Users from Active Directory
NOTE: When you import users from Active Directory to the CurrentWare Console as
operators, the operator name will be the same as the username on active directory. However, the passwords cannot be retrieved directly from the Microsoft Active Directory for security purposes. The new password for each operator is the username in lowercases. For example, if your Active Directory username is John, your CurrentWare operator password will be john.
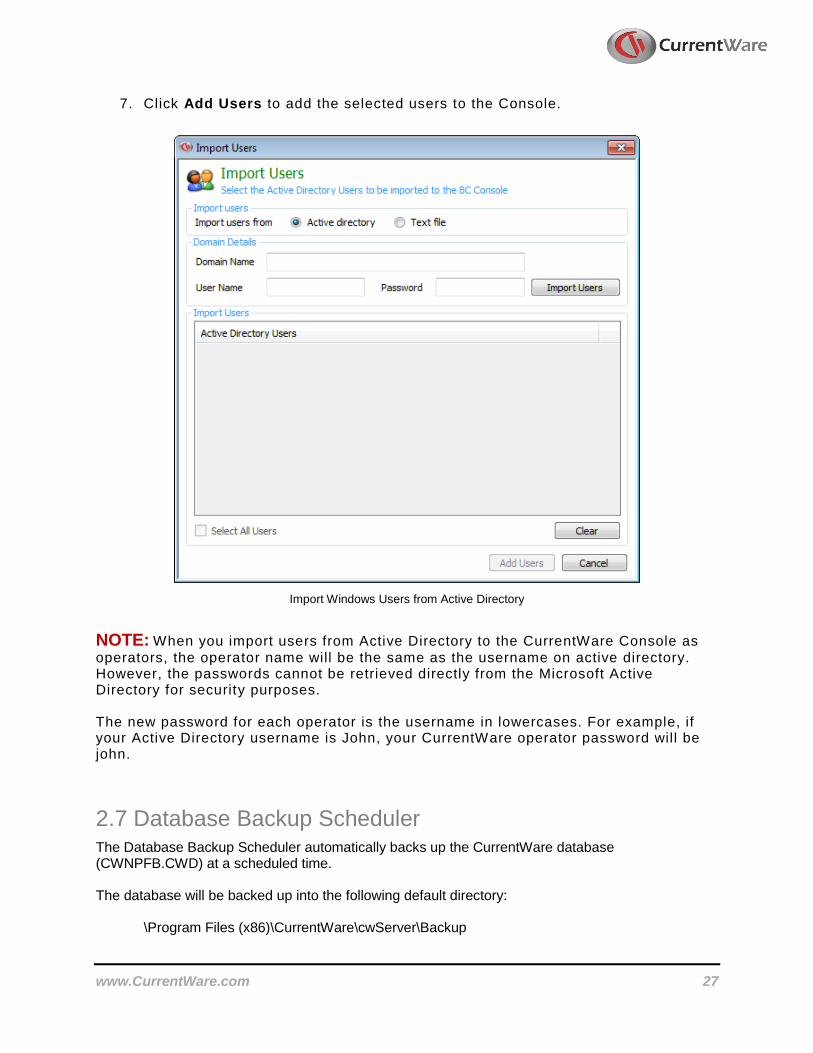
2.7 Database Backup Scheduler The Database Backup Scheduler automatically backs up the CurrentWare database (CWNPFB.CWD) at a scheduled time. The database will be backed up into the following default directory:
\Program Files (x86)\CurrentWare\cwServer\Backup

www.CurrentWare.com 28
Up to a maximum of 10 of the newest databases will be backed up into the folder. You can perform a one-time back up by clicking on the “Run Backup Now” button.
Automatically back up your database at a scheduled time
www.CurrentWare.com 29
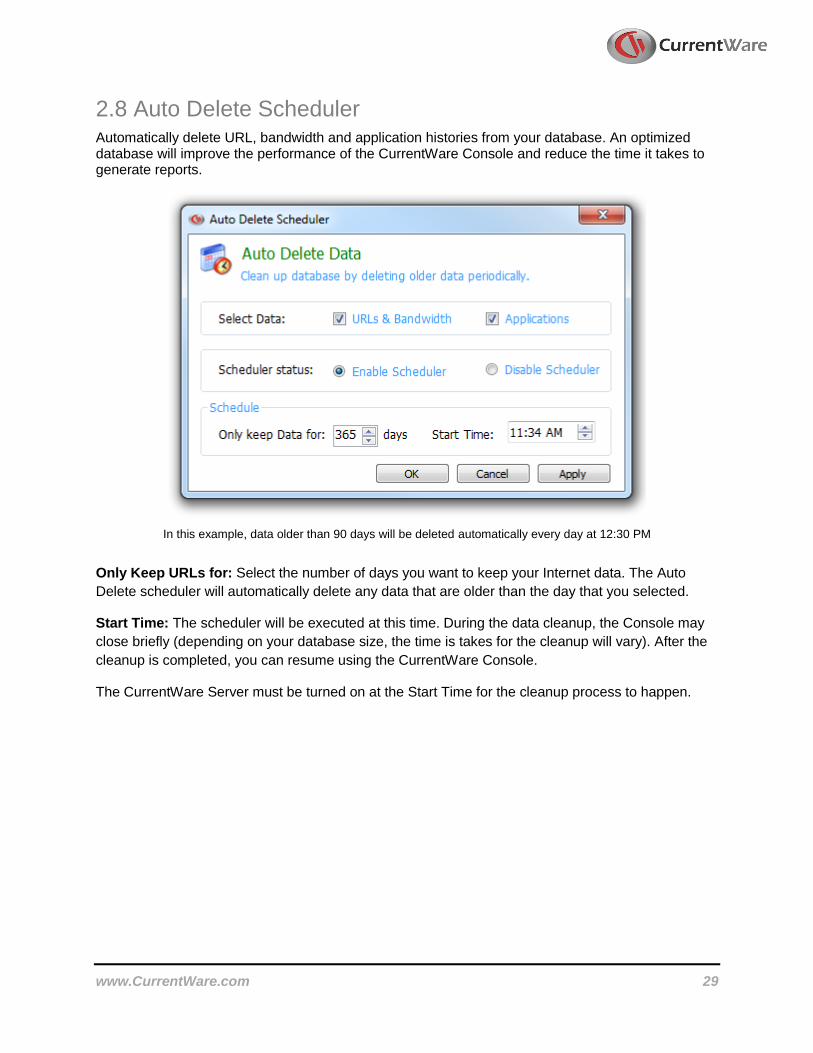
2.8 Auto Delete Scheduler Automatically delete URL, bandwidth and application histories from your database. An optimized database will improve the performance of the CurrentWare Console and reduce the time it takes to generate reports.
In this example, data older than 90 days will be deleted automatically every day at 12:30 PM
Only Keep URLs for: Select the number of days you want to keep your Internet data. The Auto
Delete scheduler will automatically delete any data that are older than the day that you selected.
Start Time: The scheduler will be executed at this time. During the data cleanup, the Console may
close briefly (depending on your database size, the time is takes for the cleanup will vary). After the
cleanup is completed, you can resume using the CurrentWare Console.
The CurrentWare Server must be turned on at the Start Time for the cleanup process to happen.

www.CurrentWare.com 30
2.9 Options Details of the Console port and newly connected client management are available on the
CurrentWare Console under Tools > Options
General
Add new Computers to the group: define the group that a new computer will automatically be
assigned to once it connects to the CurrentWare Server for the first time.
Add new Users to the group: define the group that a new user will automatically be assigned to
once it is populated to the CurrentWare Server for the first time.
Connection
CurrentWare Server: the computer name or the IP address of the CurrentWare Server that the CurrentWare Console is connected to. Console Port: The port that CurrentWare Console uses to connect to the CurrentWare Server. The default Console port is 8990.

www.CurrentWare.com 31
Notification
Enable/disable the following notifications:
Show welcome screen during start up
Show maintenance reminder after expiry
Check for updates

www.CurrentWare.com 32
2.10 Server Settings Use the Server Settings to change the CurrentWare Server service start up type and recovery mode.
Service Startup Type
Toggle the option “Automatic (Delayed Start)” to change the CurrentWare Server service start up type. Enable this option if your CurrentWare Server service is not starting up automatically during system boot up.
www.CurrentWare.com 33
Recovery
The CurrentWare Server service is set to “Restart the Service” if it runs into any failures. This will prevent the CurrentWare Server service from stopping unexpectedly.
2.11 Log Out Log Out can be used to re-log into the Console with a different user name and password. This feature can be found under the menu File Logout.
www.CurrentWare.com 34
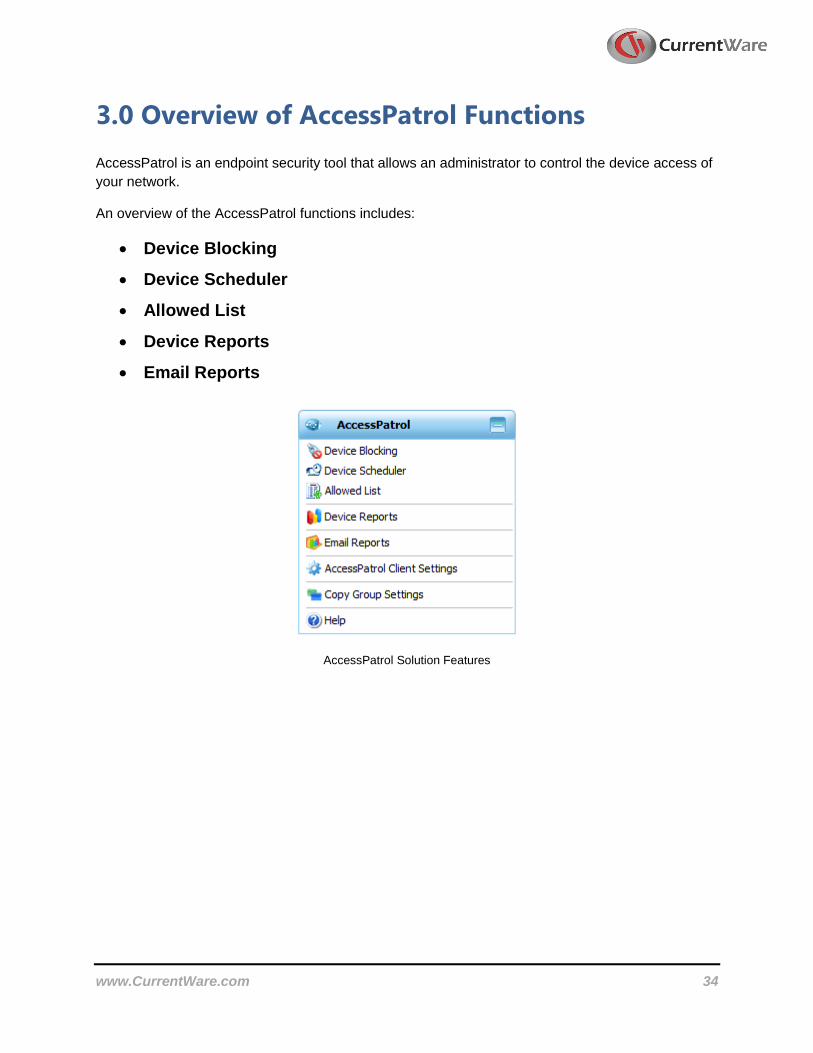
3.0 Overview of AccessPatrol Functions AccessPatrol is an endpoint security tool that allows an administrator to control the device access of
your network.
An overview of the AccessPatrol functions includes:
Device Blocking
Device Scheduler
Allowed List
Device Reports
Email Reports
AccessPatrol Solution Features

www.CurrentWare.com 35
4.0 Controlling Device Access AccessPatrol is a device security tool. It allows administrators to control the access of external devices of the users on the network. Below are the main features of AccessPatrol on the CurrentWare Console.
Access Permissions
Device Scheduler
Allowed List
4.1 Access Permissions AccessPatrol allow the administrator to control the device access privileges for a group of clients or an individual computer.
Full Access: the computer with this access permission can read and write to the specified external devices that are connected to the computer. Read Only: the computer with this access permission can only read the information from the specified external device that is connected to the computer. The user will not be able to copy any information to the specified external device. This option is only available to storage devices. No Access: the computer with this access permission cannot read or write to the specified external devices that are connected to the computer.
In the CurrentWare console, groups do not inherit settings from their parent groups. The groups stores the CurrentWare settings independently. Here is a list of devices that are supported by AccessPatrol: Storage Devices:
USB (Removable disk, iPod)
CD/DVD
Floppy
Tape
External Hard Drive
FireWire
SD Card
MM Card
Communication Ports:
Serial
Parallel
Wireless Devices:
Bluetooth
Infrared
Wi-Fi
Other:
Imaging Devices (Digital camera, Webcam)
Portable Devices (iPhone, Mobiles)
Sound Cards
USB Ethernet Adapter
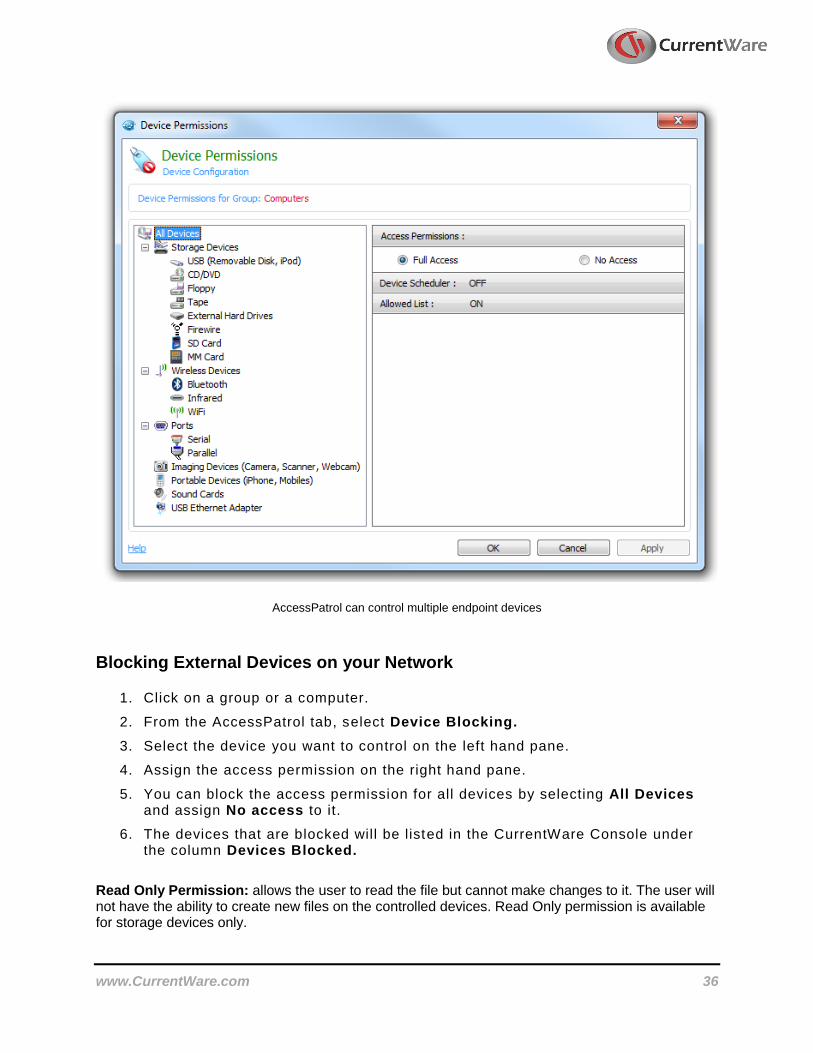
www.CurrentWare.com 36
AccessPatrol can control multiple endpoint devices
Blocking External Devices on your Network
1. Click on a group or a computer.
2. From the AccessPatrol tab, select Device Blocking.
3. Select the device you want to control on the left hand pane.
4. Assign the access permission on the right hand pane.
5. You can block the access permission for all devices by selecting All Devices and assign No access to it.
6. The devices that are blocked will be listed in the CurrentWare Console under the column Devices Blocked.
Read Only Permission: allows the user to read the file but cannot make changes to it. The user will not have the ability to create new files on the controlled devices. Read Only permission is available for storage devices only.

www.CurrentWare.com 37
Note for Bluetooth Device blocking: in order to block some Bluetooth devices and its associated services, a reboot may be required on the client’s computer.
4.2 Device Scheduler The device scheduler allows the administrator to assign when the device permissions will be enforced by assigning the start time and stop time for particular devices on the network. Only storage devices are available for the device scheduler. This is a Group specific setting. Groups can be assigned to three levels of device accesses:
Full Access: the computer with this access permission can read and write to the specified external devices that are connected to the computer. Read Only: the computer with this access permission can only read the information from the specified external device that is connected to the computer. The user will not be able to copy any information to the specified external device. This option is only available to storage devices. No Access: the computer with this access permission cannot read or write to the specified external devices that are connected to the computer.
Creating a Device Schedule
1. Highlight the group you want to assign a scheduler to and select Device Scheduler under the AccessPatrol tab on the right hand side of the CurrentWare Console.
2. Click on the Add button to create a new schedule.
3. Select the Device type.
4. Select the access permission.
5. Select the Schedule type.
6. Select the Schedule reoccurrence: Daily, Weekly or Monthly
7. Select the Schedule Start and Stop Times.
8. Click on the Add Schedule button to create the Device Schedule.
Up to 20 different device schedules can be set per Group.
9. Click on Enable Scheduler
10. Click on Apply to Clients

www.CurrentWare.com 38
The Device Scheduler sets the time for the device access to go on and off
4.3 Allowed List Administrators can utilize the Allowed List to specify devices that will have permanent access on the network. By adding a device to the Allowed List, any user on the network will be able to access it even if the device permission is set to No Access. You can choose to add a single device with a specific serial number or add devices from the same vendor and model. The allowed list is folder specific. It applies to any computers that are in the specified folder. The following devices are supported by the allowed list: USB and External Hard drive.

www.CurrentWare.com 39
The devices listed on the Allowed list have permanent access by the users.
Adding a device to the Allowed list
1. A device must be physically connected to a computer where the CurrentWare client is installed at one point in time.
2. Click on a group and select Allowed List under the AccessPatrol tab
3. Click on Add from Available Devices
4. Check the device you want to allow.
5. Choose the option “Allow all devices from the same vendor and model” or “Allow specific device(s) b serial number.
6. Click on Add to Allowed List
7. Click Ok.
8. Ensure the “Enable Allowed list” option is checked.
9. The selected devices will be added to the Allowed list
Note: Allow a device by serial number is fully compatible with Windows 10. For Windows 7 or 8, some newer model of USB devices may not support this feature. Instead of allowing by serial number, it will allow all devices from the same vendor and model.

www.CurrentWare.com 41
5.0 Device Reports The AccessPatrol reporting utility addresses an organization’s security compliance of mobile and storage devices. It serves as an effective tool for analyzing removable device usage and policy enforcement. Effectively identify employees that frequently abuse the endpoint device policies. Through the intuitive reporting tool, generate comprehensive reports highlighting device usage by computer or by user.
5.1 Device Report Options In the device report option, you can select the types of device access report that you would like to generate. You can also define the computer and the reporting period for which the report data will reflect on.
5.1.1 Reporting Type The AccessPatrol reports are clear and easy to understand, ranging from executive level summaries to drill down detailed reports for administrators. The reports include:
All Devices Accessed
Allowed Devices
Blocked Devices
Allowed vs. Denied Access
Top N Active Machines
USB File Transfer History*
*Note: On the USB File Transfer History report, you may occasionally see a special character in the filename being replaced by a question mark. This is an indication that the special character is not supported by the character encoding of our database.
5.1.2 Select Mode Select the computers or users to generate a device report on. You can select an individual computer, multiple computers and a group of computers. The same selection applies for the users.
5.1.3 Reporting Period Select the time and date period for the report. The reporting period options are as follow:
All

www.CurrentWare.com 42
Today
Yesterday
Last 7 Days
Last Month
Custom Range: day and time range.
5.1.4 Output You can choose to output some reports in .CSV format for easy access on your spreadsheet program such as Microsoft Excel. The reports that are compatible with this option are:
USB File Transfer History
All Devices Accessed
www.CurrentWare.com 43
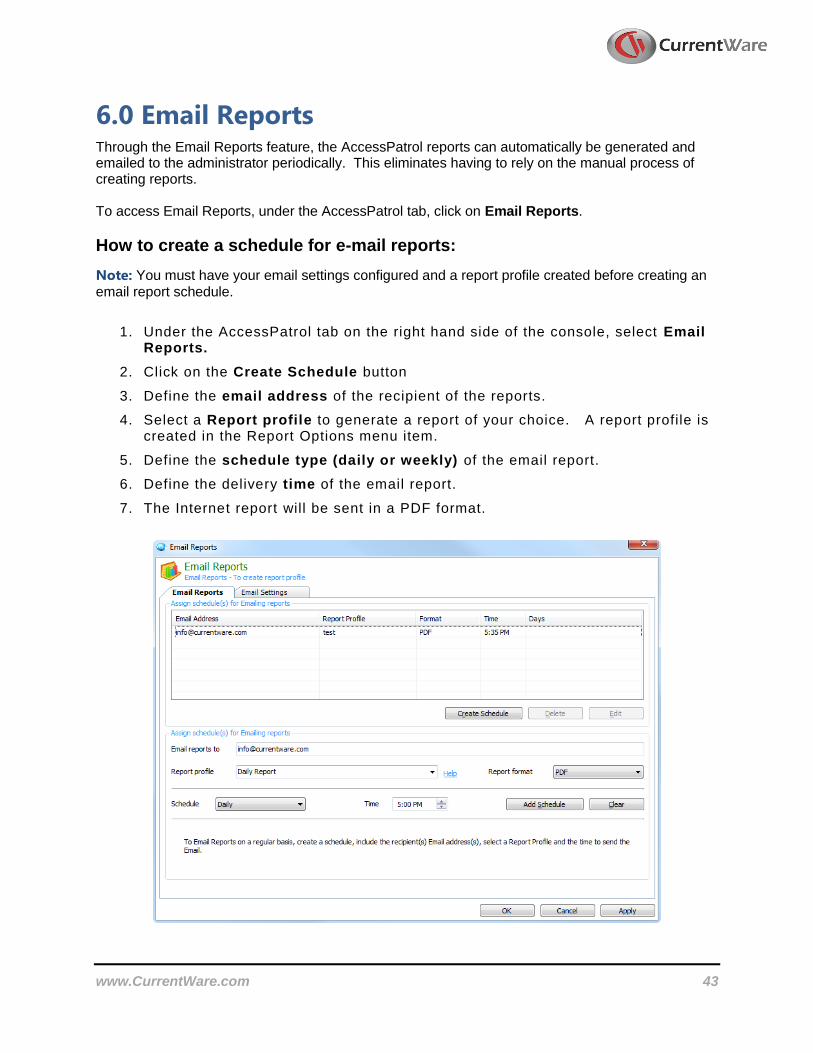
6.0 Email Reports Through the Email Reports feature, the AccessPatrol reports can automatically be generated and emailed to the administrator periodically. This eliminates having to rely on the manual process of creating reports. To access Email Reports, under the AccessPatrol tab, click on Email Reports.
How to create a schedule for e-mail reports:
Note: You must have your email settings configured and a report profile created before creating an email report schedule.
1. Under the AccessPatrol tab on the right hand side of the console, select Email Reports.
2. Click on the Create Schedule button
3. Define the email address of the recipient of the reports.
4. Select a Report profile to generate a report of your choice. A report profile is created in the Report Options menu item.
5. Define the schedule type (daily or weekly) of the email report.
6. Define the delivery time of the email report.
7. The Internet report will be sent in a PDF format.
www.CurrentWare.com 44
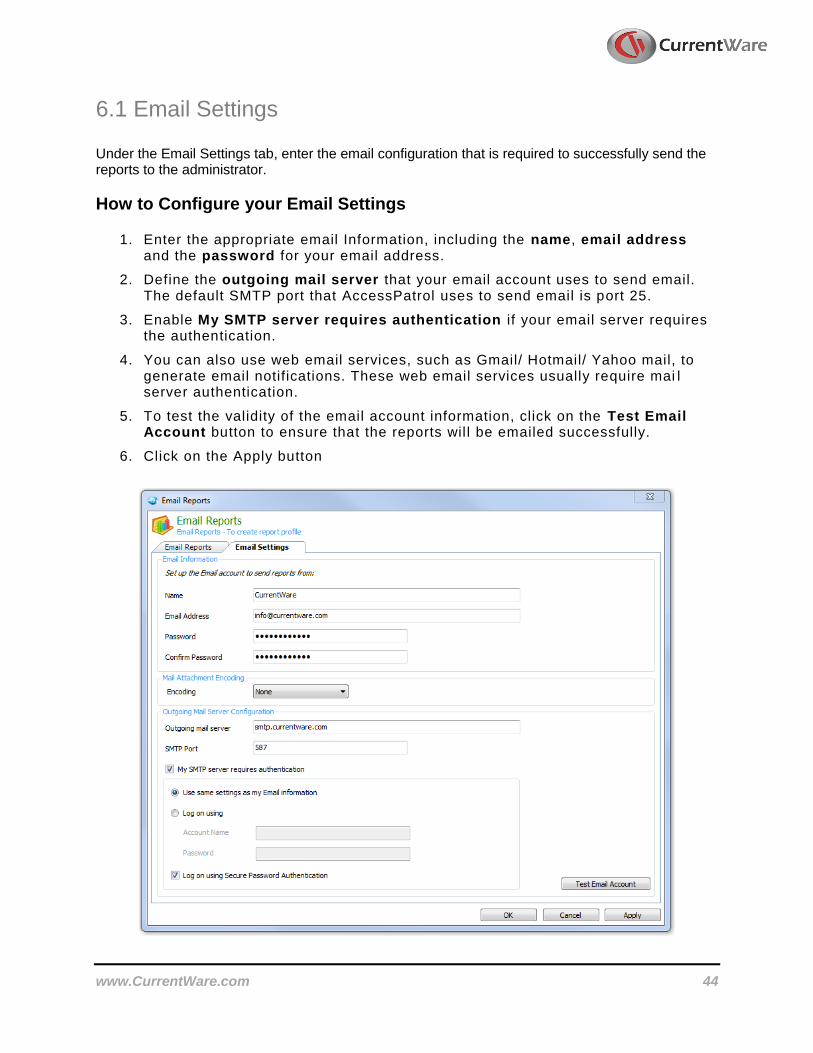
6.1 Email Settings Under the Email Settings tab, enter the email configuration that is required to successfully send the reports to the administrator.
How to Configure your Email Settings
1. Enter the appropriate email Information, including the name, email address and the password for your email address.
2. Define the outgoing mail server that your email account uses to send email. The default SMTP port that AccessPatrol uses to send email is port 25.
3. Enable My SMTP server requires authentication if your email server requires the authentication.
4. You can also use web email services, such as Gmail/ Hotmail/ Yahoo mail, to generate email notifications. These web email services usually require mai l server authentication.
5. To test the validity of the email account information, click on the Test Email Account button to ensure that the reports wil l be emailed successfully.
6. Click on the Apply button
www.CurrentWare.com 45
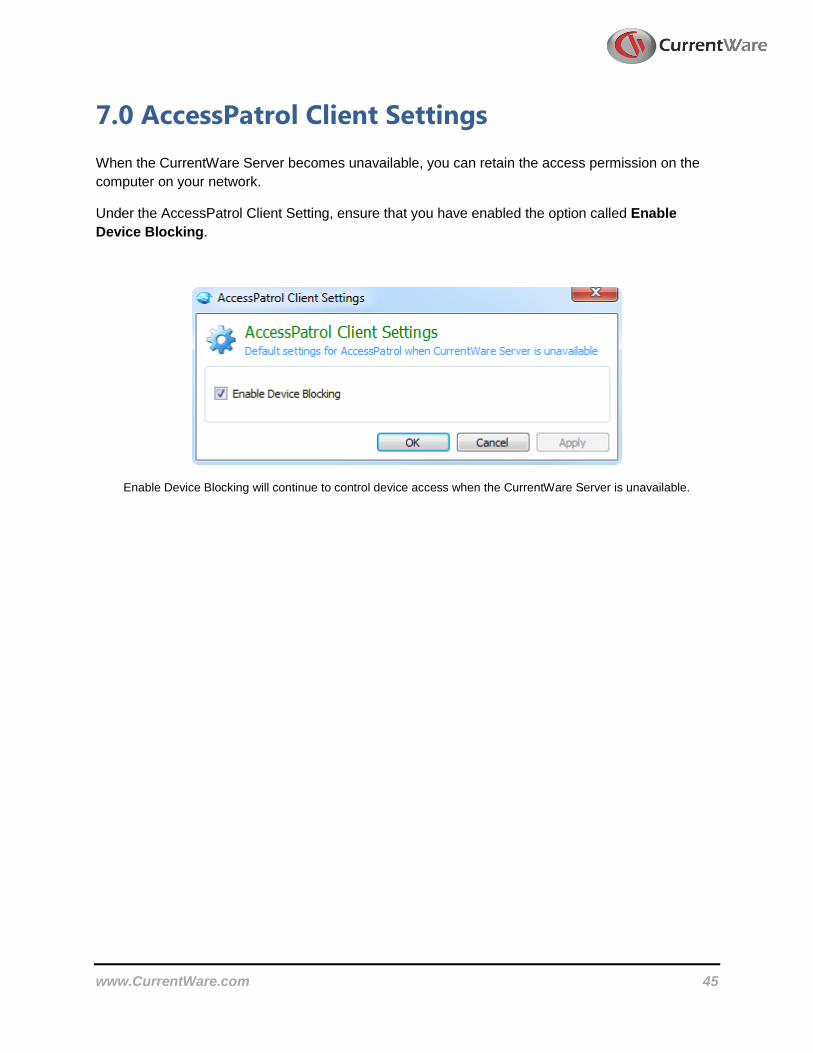
7.0 AccessPatrol Client Settings When the CurrentWare Server becomes unavailable, you can retain the access permission on the
computer on your network.
Under the AccessPatrol Client Setting, ensure that you have enabled the option called Enable
Device Blocking.
Enable Device Blocking will continue to control device access when the CurrentWare Server is unavailable.
www.CurrentWare.com 46
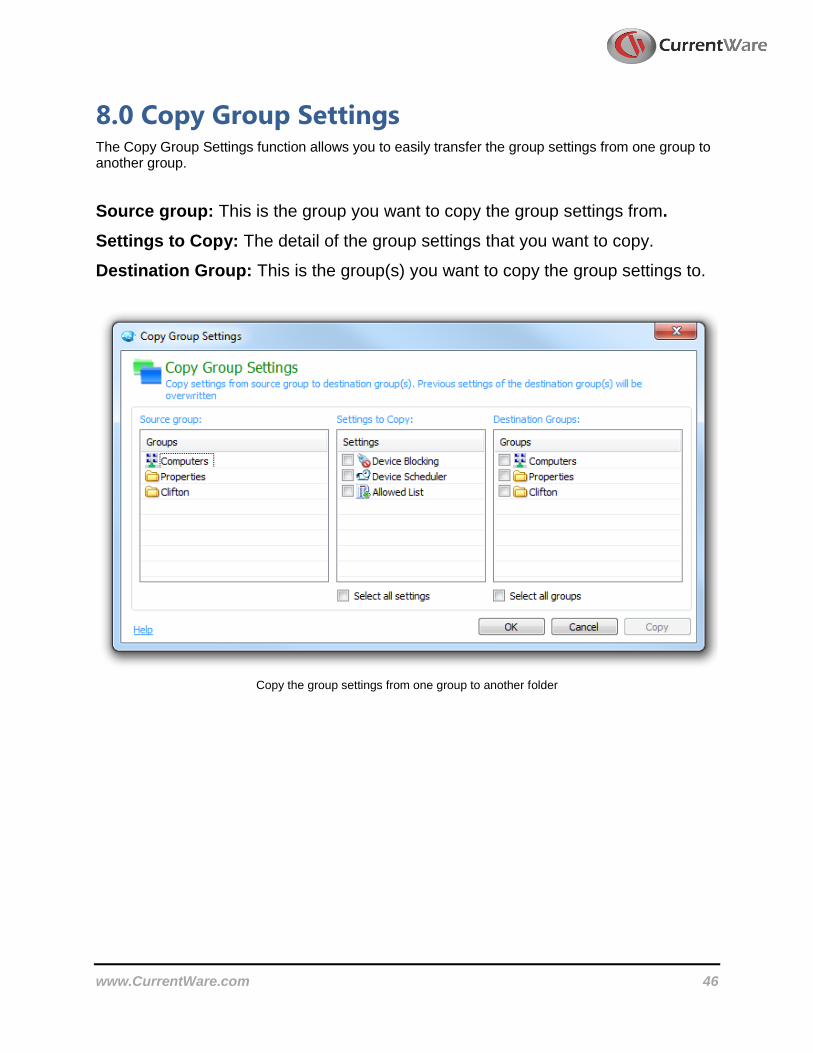
8.0 Copy Group Settings The Copy Group Settings function allows you to easily transfer the group settings from one group to another group.
Source group: This is the group you want to copy the group settings from.
Settings to Copy: The detail of the group settings that you want to copy.
Destination Group: This is the group(s) you want to copy the group settings to.
Copy the group settings from one group to another folder
www.CurrentWare.com 47
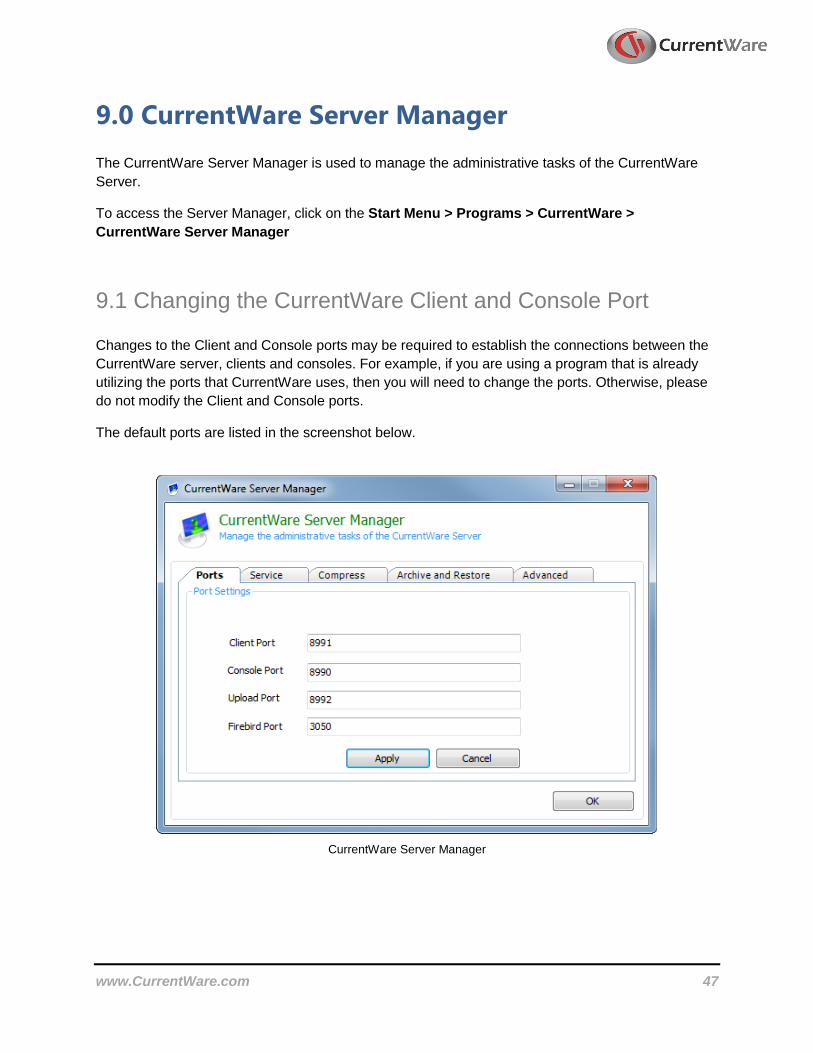
9.0 CurrentWare Server Manager The CurrentWare Server Manager is used to manage the administrative tasks of the CurrentWare
Server.
To access the Server Manager, click on the Start Menu > Programs > CurrentWare >
CurrentWare Server Manager
9.1 Changing the CurrentWare Client and Console Port Changes to the Client and Console ports may be required to establish the connections between the
CurrentWare server, clients and consoles. For example, if you are using a program that is already
utilizing the ports that CurrentWare uses, then you will need to change the ports. Otherwise, please
do not modify the Client and Console ports.
The default ports are listed in the screenshot below.
CurrentWare Server Manager
www.CurrentWare.com 48
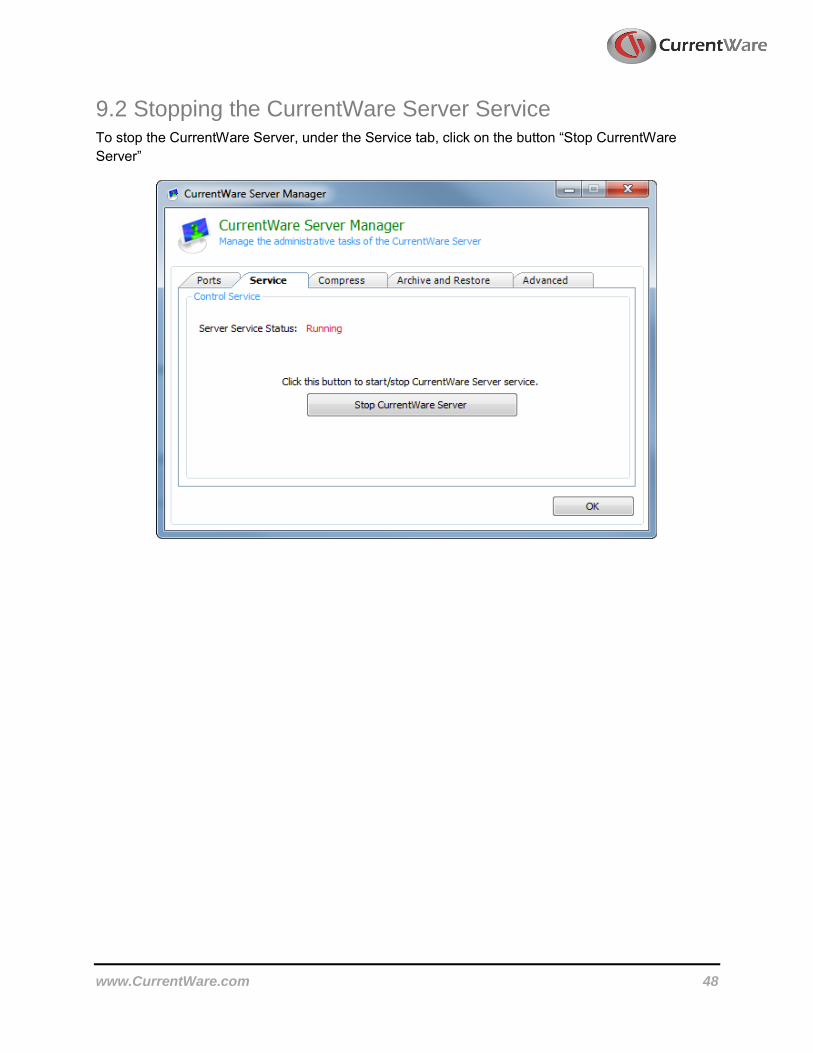
9.2 Stopping the CurrentWare Server Service To stop the CurrentWare Server, under the Service tab, click on the button “Stop CurrentWare
Server”

www.CurrentWare.com 49
9.3 Compress the CurrentWare Database It is recommended that database compression be performed on a regular basis. To compress your CurrentWare database:
1. Make sure you have closed the CurrentWare Console.
2. Go to the Start menu > Programs > CurrentWare > CurrentWare Server Manager
3. Under the Compress tab, click on the browse button and search for your CurrentWare database. By default, the database is located under C:\Program Files\CurrentWare\cwServer\CWNPFB.CWD
4. Click on the Compress button to begin compressing your database.
9.4 Archive and Restore the CurrentWare Database Archiving the CurrentWare database will create a copy of your existing database. However, all tracking data from the existing live database will be deleted.
Note: archiving will create a copy of the current database. After the archiving process is completed, the Internet tracking data for BrowseReporter will be deleted. All Computer and User data will be maintained but the corresponding monitoring data will be removed.

www.CurrentWare.com 50
To Archive your CurrentWare Database:
1. Under the Archive and Restore tab, click on the Archive button.
2. A copy of your database will be created under C:\ Program Files\CurrentWare\cwServer\Archive\
Restoring the database will put your current database back to the state it was prior to archiving. The current database will be replaced with the archived database. It is advised that you archive your current database before restoring to a previous database, should you need to retrieve the original data. Restoring an Archived Database:
1. Under the Archive and Restore tab, select the database that you want to restore from the drop-down menu
2. Click on the Restore button to begin the process of restoring your archived database.

www.CurrentWare.com 51
9.5 Advanced Enable Stricter client connection handshake will add another layer of validation to the client
connection process.
When this option is enabled, CurrentWare will use the MAC address and a registry key to identify a
client computer. It will ensure that CurrentWare will identify a computer even when the end user
renames it to something else.
When this option is disabled, CurrentWare will only use MAC address to identify the client
computers.
This option is disabled by default.
www.CurrentWare.com 52
10.0 Licensing CurrentWare Solutions are licensed on a per-computer basis for client management. The evaluation copy of BrowseControl is functional on a maximum of 10 computers for 14 days.
10.1 Register your Permanent License key After you have purchased BrowseControl, BrowseReporter, enPowerManager or AccessPatrol from CurrentWare, you will receive an email from our licensing department containing your license key information, which includes the following fields:
1. Organization’s Name
2. Number of Licenses
3. License key
To register your license key, follow the steps below
1. Launch the CurrentWare Console
2. Go to Help > Licensing
3. From the Solutions drop down box, select the Solution
4. Copy your Organization’s name, number of licenses and Activation Code from the licensing email sent to you
5. Click on the Register Button
6. Your CurrentWare Console has now been registered.
7. Click on Next to manage the computers you want to apply the license keys to.
www.CurrentWare.com 53
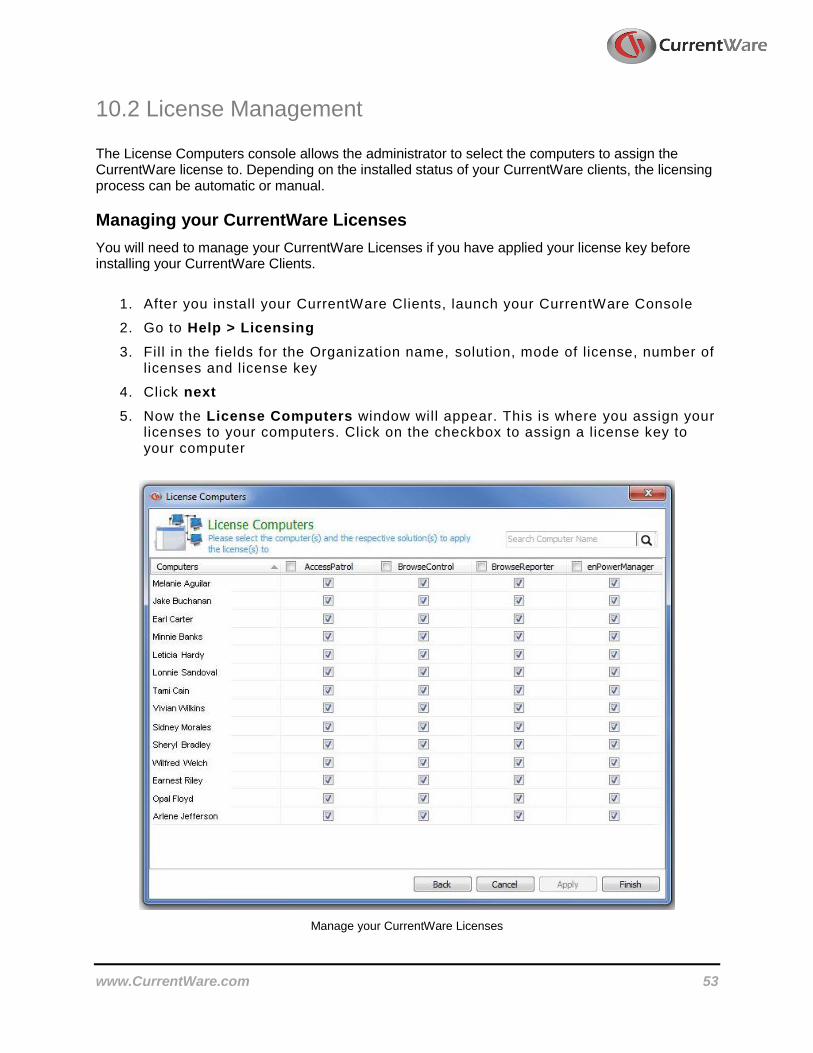
10.2 License Management The License Computers console allows the administrator to select the computers to assign the CurrentWare license to. Depending on the installed status of your CurrentWare clients, the licensing process can be automatic or manual.
Managing your CurrentWare Licenses
You will need to manage your CurrentWare Licenses if you have applied your license key before installing your CurrentWare Clients.
1. After you install your CurrentWare Clients, launch your CurrentWare Console
2. Go to Help > Licensing
3. Fill in the fields for the Organization name, solution, mode of license, number of licenses and license key
4. Click next
5. Now the License Computers window will appear. This is where you assign your licenses to your computers. Click on the checkbox to assign a license key to your computer
Manage your CurrentWare Licenses

www.CurrentWare.com 54
11.0 Uninstall CurrentWare Server, Console and
Solutions
11.1 Uninstalling the CurrentWare Solutions
1. On the CurrentWare Console, go to Help > Licensing.
2. Select the solution you want to remove and click the “Remove button”
3. The CurrentWare Console will restart and the selected solution will be removed.
11.2 Uninstalling the CurrentWare Server and Console The CurrentWare Console and Server can be removed from the Control Panel.
1. Go to Control Panel > Programs > Uninstall a Program
2. Select CurrentWare and click “Uninstall”.
3. The CurrentWare Server and Console will be uninstalled.
www.CurrentWare.com 55
12.0 Uninstall CurrentWare Client The CurrentWare Client can be uninstalled by three different methods:
Uninstall CurrentWare Client from the Console
Uninstall CurrentWare Client on the workstation by command line
Uninstall CurrentWare Client on the workstation from the Client
Configuration Window
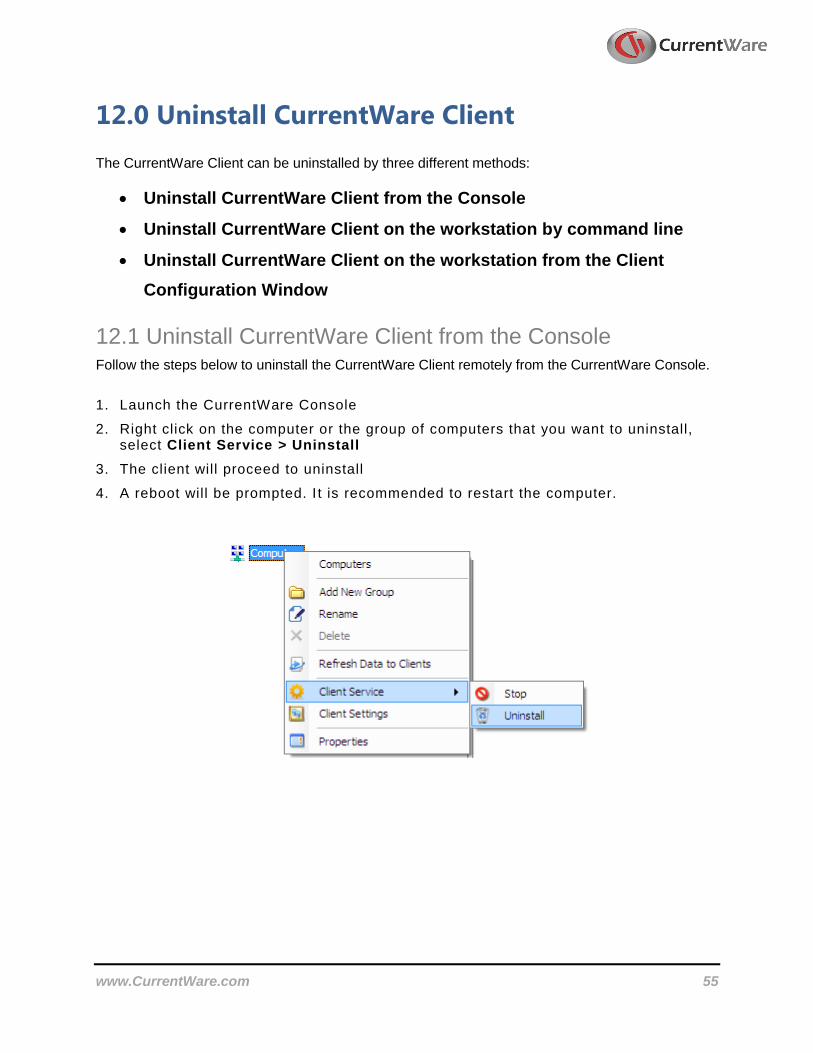
12.1 Uninstall CurrentWare Client from the Console Follow the steps below to uninstall the CurrentWare Client remotely from the CurrentWare Console.
1. Launch the CurrentWare Console
2. Right click on the computer or the group of computers that you want to uninstall, select Client Service > Uninstall
3. The client will proceed to uninstall
4. A reboot will be prompted. I t is recommended to restart the computer.
www.CurrentWare.com 56
12.2 Uninstall CurrentWare Client on the workstation by command line Follow the steps below to uninstall the CurrentWare Client locally on the workstation by running a command line. You need to have your CurrentWare Client password in order to uninstall the CurrentWare Client by Command line.
On your CurrentWare Client computer, go to start menu > run > type in the following (for Windows 7,
go to the run command box):
For 32-bit Windows PC
C:\Windows\System32\CwClient.exe –p Admin –u
For 64-bit Windows PC C:\Windows\SysWOW64\CwClient.exe –p Admin –u
The word “Admin” in the command is the password field. Admin is the default CurrentWare Client
password. If you changed the CurrentWare Client password during the installation, please replace
Admin with your CurrentWare Client password.
12.3 Uninstall CurrentWare Client on the workstation from the Client Configuration Window Follow the steps below to uninstall the CurrentWare Client locally on the workstation from the CurrentWare client configuration Window.
1. On the Client computer, go to C:\Windows\System32 (for 32-bit computers) or C:\Windows\SysWOW64 (for 64-bit computers).
2. Double click on cwagent.exe.
3. When prompted for the CurrentWare Client password, type it in (Admin is the default
CurrentWare Client password. If you changed the CurrentWare Client password during the installation, please replace Admin with your CurrentWare Client password).
4. In the CurrentWare Client Configuration Window, click on the Uninstall button to uninstall the
CurrentWare client from your workstation.

www.CurrentWare.com 57
13.0 Technical Support For technical support of CurrentWare, please contact us at [email protected].

www.CurrentWare.com 58
14.0 Contacts
USA
CurrentWare (a division of Codework Inc.)
1623, Military Rd #556, Niagara Falls, NY 14304-1745, United States of America
Tel: 613-368-4300
Fax: 866-929-9808
Email: [email protected]
CANADA
CurrentWare (a division of Codework Inc.)
55 Hawktree Ridge, Ottawa, K2J 5N7, Canada
Tel: 613-368-4300
Fax: 866-929-9808
Email: [email protected]
EUROPE
CurrentWare (a division of Codework Inc.)
55 Hawktree Ridge, Ottawa, K2J 5N7, Canada
Tel: 613-368-4300
Fax: 866-929-9808
Email: [email protected]
ASIA
Codework Solutions Pvt Ltd,
‘Thapasya’, Infopark, Kakkanad, Kochi, Kerala, India – 682030
Tel: +91-484-4055678
Fax: +91-484-4061003
Email: [email protected]
OTHER COUNTRIES
Please email [email protected] for the name of a local reseller in your country.