viewplus.com · web viewa. preface. v. p . embraille. desktop embosser. owner's manual....
TRANSCRIPT

VP EmBraille User ManualRevision: 20150420
1

Table of ContentsI. Introduction..............................................................................................................................................4
A. Preface................................................................................................................................................4
B. FCC Compliance Statement.................................................................................................................5
C. Safety Instructions...............................................................................................................................7
II. General Information................................................................................................................................8
A. Specifications.......................................................................................................................................8
B. Software Driver....................................................................................................................................9
III. Printer Setup...........................................................................................................................................9
A. Unpacking............................................................................................................................................9
B. Rear Paper Path Extension and Lid......................................................................................................9
C. Insert Output Tray...............................................................................................................................9
D. Cable Attachment..............................................................................................................................10
E. Ink Cartridges.....................................................................................................................................12
F. Alignment..........................................................................................................................................12
G. Software Installation.........................................................................................................................12
IV. Printer Properties.................................................................................................................................13
A. Introduction......................................................................................................................................13
B. Printer Properties..............................................................................................................................13
C. Printing Preferences..........................................................................................................................17
V. Operator Panel......................................................................................................................................24
A. Functions...........................................................................................................................................24
B. Status Lights......................................................................................................................................25
C. Audio Alerts.......................................................................................................................................25
VI. Paper Handling.....................................................................................................................................26
A. Paper Loading....................................................................................................................................26
B. Paper Jams.........................................................................................................................................27
VII. Braille, Translation and Printing..........................................................................................................28
A. ViewPlus Tiger Software Suite...........................................................................................................28
B. Fonts..................................................................................................................................................28
2

C. Magic Colors......................................................................................................................................28
D. Printing..............................................................................................................................................28
VIII. Accessories and Software Packages...................................................................................................29
A. Accessories........................................................................................................................................29
B. Software Packages.............................................................................................................................29
IX. Training, Warranty, Maintenance and Support....................................................................................30
A. Training.............................................................................................................................................30
B. Maintenance.....................................................................................................................................30
C. Support..............................................................................................................................................31
D. Warranty...........................................................................................................................................31
3

I. Introduction
A. PrefaceVP EmBraille Desktop Embosser
Owner's Manual
Congratulations on owning a ViewPlus EmBraille desktop embosser! The VP SpotDot Powered by Tiger adds color ink print to a tactile output using a user-friendly USB interface. Print on many different types of media, from lightweight copy paper to heavy cardstock, up to 9 inches wide. Patented roller-die technology means ViewPlus embossers print at a 20 dots-per-inch graphic resolution and automatically convert colors and gray scale into variable dot heights. The sound-absorbing roller die makes Powered by Tiger embossers much quieter than other Braille printers. ViewPlus embossers use the standard Windows printer driver to mix text and graphics in mainstream Windows software like Word and Excel. Use the computer to adjust settings and preferences. Print documents exactly how they appear on the screen. Use the Tiger Software Suite to take braille translation and tactile graphics to a new level. The Tiger Formatter is a Microsoft add-in that gives you advanced tools for translation and embossing. Tiger Designer enables basic editing of documents for quick drawing and braille needs. Translator serves as a basic translation tool for almost any Windows software- including PowerPoint and Corel Draw. Keep up to date by checking the ViewPlus Technologies, Inc. webpage at:http://www.ViewPlus.com
VP EmBraille Model Number:
4

VPTT0508-01USER MANUAL
5

B. FCC Compliance StatementFCC Compliance Statement (USA)This equipment has been tested and found to comply with the limits for a Class B digital device, pursuant to Part 15 of the FCC Rules. Operation is subject to the following two conditions: (1) this device may not cause harmful interference, and (2) this device must accept any interference received, including interference that may cause undesired operation. If this equipment does cause harmful interference to radio or television reception, which can be determined by turning the equipment off and on, the user is encouraged to try to correct the interference by one or more of the following measures:
Reorient or relocate the receiving antenna.
Increase the separation between the equipment and receiver.
Connect the equipment to an outlet on a circuit different from that to which the receiver is connected.
Consult the dealer or an experienced radio/TV technician for help.
FCC Warning: Changes or modifications not expressly approved by the party responsible for compliance could void the user's authority to operate the equipment.Note the following:
The use of a non-shielded interface cable with the referenced device is prohibited.
The length of the power cord must be 3 meters (10 feet) or less.
Compliance Statement (Canada)This digital apparatus is in conformity with standard NMB-003 of Canada.Cet appareil num?rique est conforme à la norme NMB-003 du Canada.
Compliance Statement (Germany)Bescheinigung des Herstellers/Importeurs:Hiermit wird bescheinigt, dass der Drucker der Maschinenlärminformationsverordnung 3. GSGV, 18.01.1991 entspricht: Der höchste Schalldruckpegel beträgt 70 dB(A) oder weniger gemäß EN27779-1991.
6
Compliance Statement (Europe)Warning: This product meets the interference requirements of EN55022. In a domestic environment, this product may cause radio interference in which case, the user may be required to take adequate measures.
Compliance Statement (Korea)This apparatus complies with CISPR22 requirements.
International Compliance
EN55022 ClassB:1998 Emissions seriesEN55024:1998 Immunity characteristicsEN61000-3-2:2000 Power line harmonicsEN61000-3-3:2001 Power line flickerEN61000-4-2:2001-04 Electrostatic dischargeEN61000-4-3:2002-09 Radiated susceptibilityEN61000-4-4:2004 Electrical fast transient/burstEN61000-4-5:2005-11 SurgeEN61000-4-6:2004-11 Conducted immunityEN61000-4-8:2001-03 Magnetic Field Immunity EN61000-4-11:2004 Input voltage interruptions/DIPS
7

C. Safety InstructionsRead all of these safety instructions before using the embossing printer. In addition, follow all warnings and instructions marked on the embossing printer itself.
Do not place embossing printer on an unstable surface.
Do not place embossing printer near a radiator or heat source.
Do not block or cover slots and openings in the embossing printer's cabinet; do not insert objects through slots.
Use only the type of power source indicated on embossing printer's label.
Connect all equipment to properly grounded electrical outlets.
Do not use frayed or damaged power cord.
The use of an extension cord with the embossing printer is not recommended.
Unplug embossing printer before cleaning it; always clean it with a piece of damp cloth only.
Do not spill liquid into embossing printer.
Except as specifically explained in the user's manual, do not attempt to service the embossing printer by yourself.
Detach the embossing printer from power source and refer to qualified service personnel under the following conditions:
o If the power cord or plug is damaged.o If liquid has entered the embossing printer.o If the embossing printer has been dropped or the cabinet is
damaged.o If the embossing printer does not operate properly or exhibits a
distinct change in performance.
Only adjust those controls that are covered by the operating instructions.
8
II. General Information
A. Specifications
VP SpotDotCharacter Sets DotsPlus
Braille - free programmable character setsPaper Feed Method single sheet
150 sheet input tray (copy paper) or 60 sheet for braille paper or card stock or up to 20 envelopes, labels or banners.
Paper Size A4, US Letter (8.5 x 11in.), Legal (8.5 x 14in.), envelopes
Paper Weight Letter 20-28 lb (75 to 105 g/m2)Envelopes 20 to 24 lb (75 to 90 g/m2)Banner 15 to 24 lb (60 to 90 g/m2)Card Stock up to 110 lbs (200 g/m2)Photo paper up to 130 lbs (230 g/m2)
Power Supply
100 - 240 VAR (± 10%)Frequency: 50/60 Hz (± 3%)
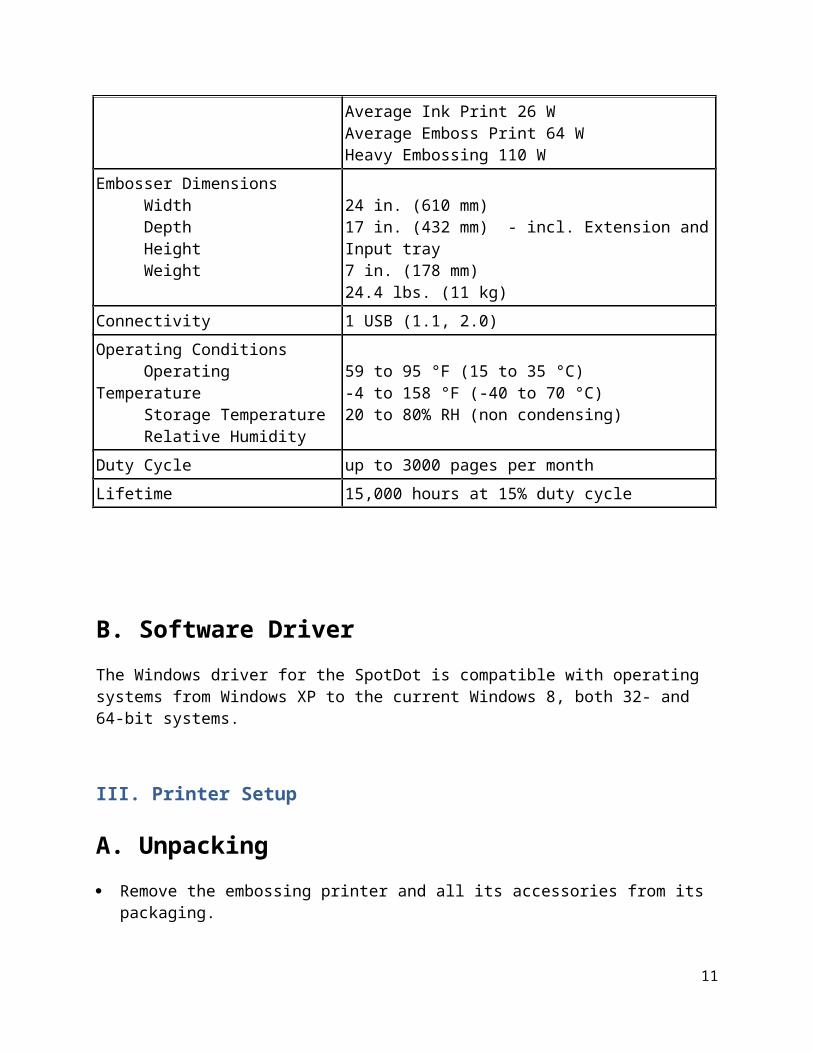
Power Consumption Standby 12 WAverage Ink Print 26 WAverage Emboss Print 64 WHeavy Embossing 110 W
Embosser Dimensions Width Depth Height Weight
24 in. (610 mm)17 in. (432 mm) - incl. Extension and Input tray7 in. (178 mm)24.4 lbs. (11 kg)
Connectivity 1 USB (1.1, 2.0)Operating Conditions Operating Temperature Storage Temperature Relative Humidity
59 to 95 °F (15 to 35 °C) -4 to 158 °F (-40 to 70 °C) 20 to 80% RH (non condensing)
Duty Cycle up to 3000 pages per monthLifetime 15,000 hours at 15% duty cycle
9

B. Software DriverThe Windows driver for the SpotDot is compatible with operating systems from Windows XP to the current Windows 8, both 32- and 64-bit systems.
III. Printer Setup
A. Unpacking Remove the embossing printer and all its accessories from its packaging. Inspect the ViewPlus embossing printer and its packaging for any damage. Save the packing material and box. If any damage occurred during shipping, most
shipping companies require the box and the packing material in order to settle the insurance claim. The packing material must also be used to ship the ViewPlus embosser for warranty maintenance service.
Follow the VP SpotDot Setup Instructions included with your other materials.
B. Rear Paper Path Extension and Lid An HP duplexer (rear paper path extension) is mounted in the back of the VP SpotDot. It is
mounted with snap locks which can be released by pressing the two buttons on either side of the extension. Make sure the duplexer is firmly attached before operating the embossing printer.
The lid on top of the embossing printer lifts up and can easily be taken off without any hooks or snaps. During operation of the VP SpotDot make sure the lid is in place and is closed.
C. Insert Output TrayThe paper output tray has been removed prior to shipment in order to prevent damage. The tray has a pull out extension which is lighter grey colored. The extension slides out and then the upper portion folds out to extend the tray to its full length. There are metal brackets with pins on either side of the front opening of the case above the paper input tray. Line up the slots on the side of the tray over the pins and slide the tray in until it drops into place. For convenience the output tray can be removed to load new media on the input tray. An optional stack paper tray is available for larger stacks of paper. This can be purchased separately.
10
D. Cable AttachmentPower cable
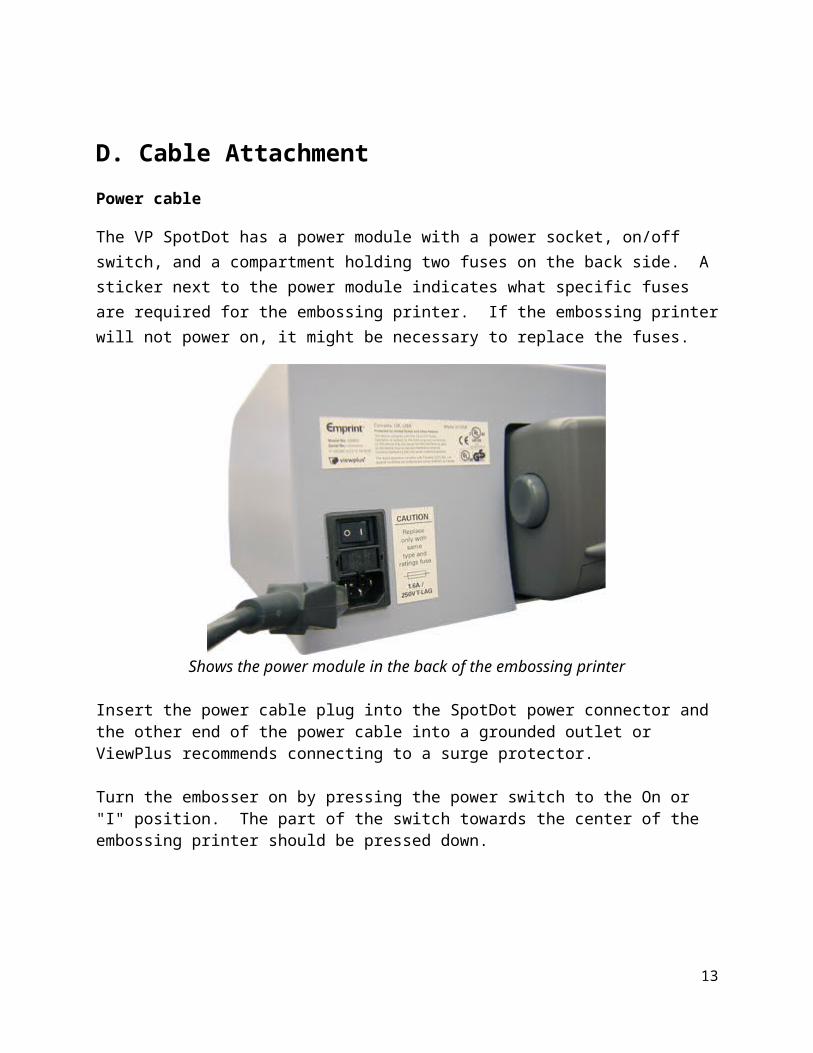
The VP SpotDot has a power module with a power socket, on/off switch, and a compartment holding two fuses on the back side. A sticker next to the power module indicates what specific fuses are required for the embossing printer. If the embossing printer will not power on, it might be necessary to replace the fuses.
Shows the power module in the back of the embossing printer
Insert the power cable plug into the SpotDot power connector and the other end of the power cable into a grounded outlet or ViewPlus recommends connecting to a surge protector.
Turn the embosser on by pressing the power switch to the On or "I" position. The part of the switch towards the center of the embossing printer should be pressed down.
11

Shows the power switch in the back of the embossing printer
Data cable
A USB printer cable was included in your box.
Attach the flat end of the USB data cable to the USB port of the host computer, and then attach the other end to the embossing printer. The USB connection is located on the back side of the embossing printer.
Shows the USB connector in the back of the embossing printer
12
E. Ink CartridgesIncluded with your SpotDot are starter cartridges. HP27 – black , and HP28 – tri color. Your embossing printer should be turned on so that the cartridge holder will move to the correct position for the installation of the cartridges. The standard replacement cartridges are VPT05-BLACK-HP56 (or HP56) for black and VPT05-TRI-HP57 (or HP57) for Tri Color.
F. AlignmentThe VP SpotDot automatically checks alignment for the tactile dots at the beginning of each print job. If the embossed output of your SpotDot seems to be incorrectly aligned, please ensure that the embossing printer is on a flat, even surface. It is possible to bend the body of the embossing printer and cause the ViewPlus embosser to be out of alignment. After a paper jam, it is also possible for the embosser to be incorrectly aligned if you simply continue to print. Start a new print job, allow the VP SpotDot to automatically align, and check the new document to see if the alignment is good. If the embossed dots do not seem to be aligned, or there is a problem with the alignment of the embossed image with respect to the printed image refer to service section of the manual.
G. Software InstallationThe Windows printer driver is included with your SpotDot on CD, as well as the Tiger Software Suite (TSS).
Do not connect your SpotDot to the computer during installation of the Windows printer driver, or turn it off during this process. Run the driver setup from the CD, or download the current SpotDot driver from the ViewPlus website, www.viewplus.com. Follow the instructions from the installation program.
After installation of the driver, connect the SpotDot to the computer and turn it on. The system should automatically detect the printer and add it to the system control panel under 'Devices and Printers'.It is possible that it does not detect correctly at first try on one USB port. In this case, please try again to connect to the same or another USB port of your computer.
For installation of the Tiger Software Suite please also follow the instructions from the setup program. For use of the Tiger Software Suite (TSS) please refer to the TSS manual.
13

IV. Printer Properties
A. IntroductionThe ViewPlus printer driver uses a standard Windows printer driver interface to provide user access to setting options on the ViewPlus embosser from a local or networked computer. The printer properties are accessible through the Windows control panel for devices and printers. Select the VP SpotDot in the list of printers and get to the printer properties through the context menu. The printer properties contain general device settings such as for connectivity, sharing, and security, but also ViewPlus specific settings for legacy mode operation and service procedures on the ViewPlus printer. Note, that these options are only activated when your SpotDot device is locally connected through an USB port and switched on.
Always click on the 'Apply' button to activate changes.
B. Printer PropertiesDevice settings tab
The device settings are properties that are stored within the internal memory of the printer. Therefore the printer needs to be locally connected and turned on. To activate any changes, always click on the 'Apply' button when done with the settings. The printer will beep once to confirm the receiving of the changed settings.
14
Shows Device Settings Tab Form To Try Assignment
Lower Paper Tray – The first section of the Device Settings tab controls the SpotDot's "tray assignment", allowing you to set what paper size is loaded into the embosser.
Legacy Settings
The second section of the Device Settings controls the embosser's legacy settings. These settings are used when you print to the SpotDot from programs that do not use the Windows printer driver, including some braille programs. Use the descriptions below to make your selections.
Form Size – Select a standard page size, or select Custom to set the page size manually.
15

Form Width – This field shows the page width. For standard page sizes, this field is informational only. If the Form Size is set to Custom, this field is editable.
Form Length – This field shows the page length. For standard page sizes, this field is informational only. If the Form Size is set to Custom, this field is editable.
Top Margin – Set the top margin to be used when printing in legacy mode. Note: If you are printing from an application that sends margin information with the print job, set the top margin to 0.
Left Margin – Set the left margin to be used when printing in legacy mode. Note: If you are printing from an application that sends margin information with the print job, set the left margin to 0.
Dry Time – This option sets the time that the SpotDot allows the ink to dry before embossing. This slider bar can be adjusted between 1 and 16 seconds.
Text/Graphics Mode – Select Text mode if your legacy document contains text. If the document is a graphic, select Graphics mode to remove the space between braille lines so that dots may be printed in an even grid.
Dots Per Character – Select 6 or 8 dots.
Automatic Text Wrapping – Select 'On' if lines in the document are longer than will fit on one printed line and you do not wish the lines to be truncated. If the document is formatted correctly for the page size and margins you are using, or if you do not wish to have long lines wrapped to the next line, select 'Off'.
Extra Line Spacing – Set the amount of extra space desired between braille lines. This setting can only be set in multiples of 0.05 inches.
Media Type – Select a default media type from the list, or choose Custom to set the punch forces manually for non-standard media.
Custom Media Lowest Force – Enter the punch force value to be used for the lowest dots on a custom media type.
Custom Media Highest Force – Enter the punch force value to be used for the highest dots on a custom media type.
Braille Table… – The VP SpotDot can store up to seven braille tables. Click on 'Properties' to open a dialog which allows you to load the tables to the SpotDot internal memory.
Braille Table – Select which braille table to use when printing.
Braille Dot Height – Select 'Low', 'Normal', or 'High' to control how tall the braille dots print.
16

Service tab
The Service tab of the printer properties dialog window provides information about the connected VP SpotDot at the bottom left. When contacting ViewPlus Support, please have the driver version, printer serial number, and firmware version available.Furthermore it provides several servicing functions for your VP SpotDot.
Shows Service Tab
Pen Calibration – Performs a calibration of the black and color ink cartridge. This procedure needs at least two sheets of plain paper in the input tray.
Print Test Page – Prints a test page to exercise the SpotDot's ink and embossing mechanism. This procedure needs at least one sheet of plain paper in the input tray.
17

Ink/Emboss Alignment Calibration – The function should be used if the ink image does not line up with the emboss output. After the test page has been printed, an input dialog box opens. The print out shows an array of boxes marked with numbers. Please enter the number of the box that best matches the ink and emboss output.
Emboss Head Calibration – Please do not adjust these settings unless directed to do so by ViewPlus Support. This option prints the alignment page for the embossing head. In order to produce perfect dots on the special Tiger platen, the embossing head needs to be aligned with the grooves. This procedure prints out a 10 by 10 pattern of dots of which only one dot should look perfectly aligned, meaning it appears the biggest, ideally with a little 'x' mark at the center. After the test page has been printed, select the row, and the column that the best dot appears in, and enter their values in the "Vertical" and "Horizontal" boxes, respectively. The columns and rows are numbered from left to right, and top to bottom respectively, starting with 1.
Emboss Skew Calibration – Please do not adjust this setting unless directed to do so by ViewPlus Support. This option prints the skew calibration pattern. The pattern is 10 vertical rows of dots of which one should be perfectly straight from top to bottom. Please count the rows from left to right, starting with 1, and enter the number of the best vertical line.
Ink Cartridge Levels – This dialog box shows the status of the ink cartridges. It shows how much of ink is left in the cartridges (in percent).
C. Printing PreferencesThe Printing Preferences contain settings for printing from Windows programs to your VP SpotDot, that will affect the output of individual print jobs. To open the printing preferences dialog, right click on the SpotDot within the Devices and Printers control panel under Windows, and choose the 'Printing Preferences...' option from the context menu. The printing preferences dialog is also accessible within the 'Printer properties' dialog window, when clicking the 'Preferences …' button on the General tab. In addition, the printing preferences are accessible next to the printer selection box on the standard Windows print dialog when printing from most programs. Layout tab
The printing preferences options are organized onto three tabs. The Layout tab contains options pertaining to the page layout of the document to be printed. Use the descriptions of the options on the Layout tab to help make the appropriate selections for the document.
18

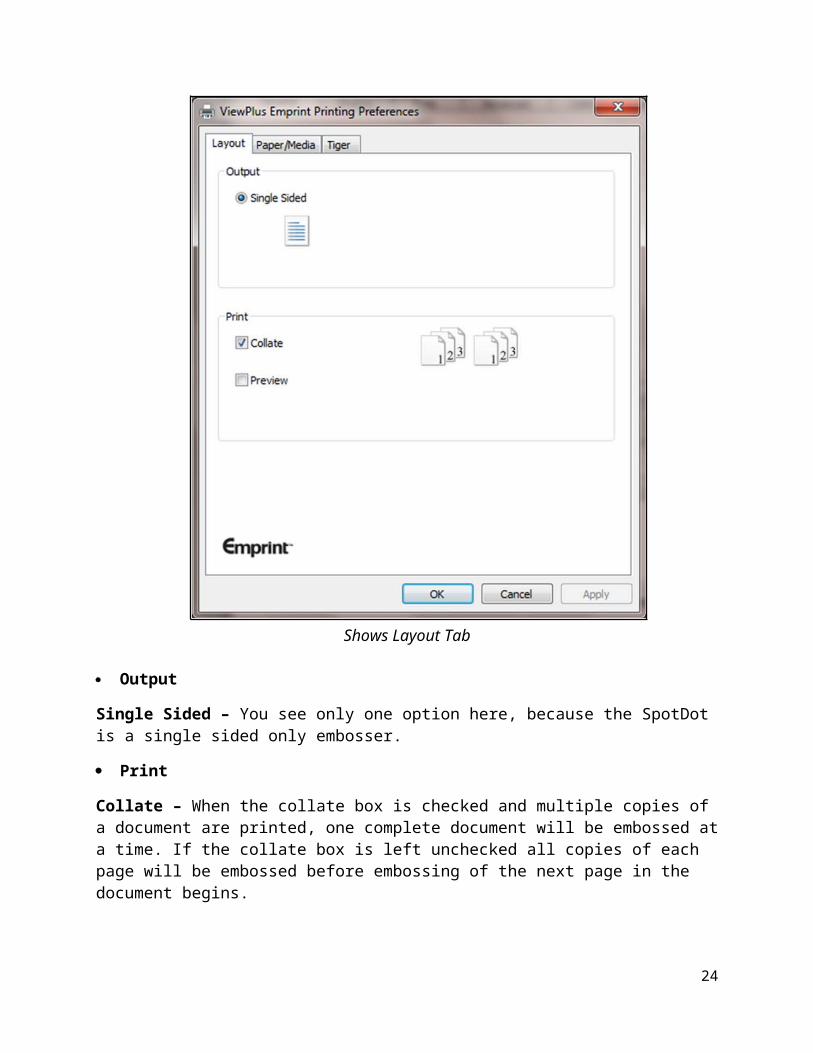
Shows Layout Tab
Output
Single Sided – You see only one option here, because the SpotDot is a single sided only embosser.
Collate – When the collate box is checked and multiple copies of a document are printed, one complete document will be embossed at a time. If the collate box is left unchecked all copies of each page will be embossed before embossing of the next page in the document begins.
Preview – If this option is checked, a preview of how the document will print and emboss will be shown in Tiger Viewer instead of printing.
19

Paper/Media tab
The Paper/Media tab contains options related to the type of paper or media being used for printing. Select the desired options for your media.
Shows Paper/Media Tab
Paper and Media
Select the options that apply to your media.
Paper size – Select the paper size you are using from the list, or leave the setting at 'Automatic Select' to allow the application you are printing from to choose the correct paper size for you.
Media Type – Select the type of media you are using.
Media Surface – Select the surface type that most closely matches that of the media you are using.
20

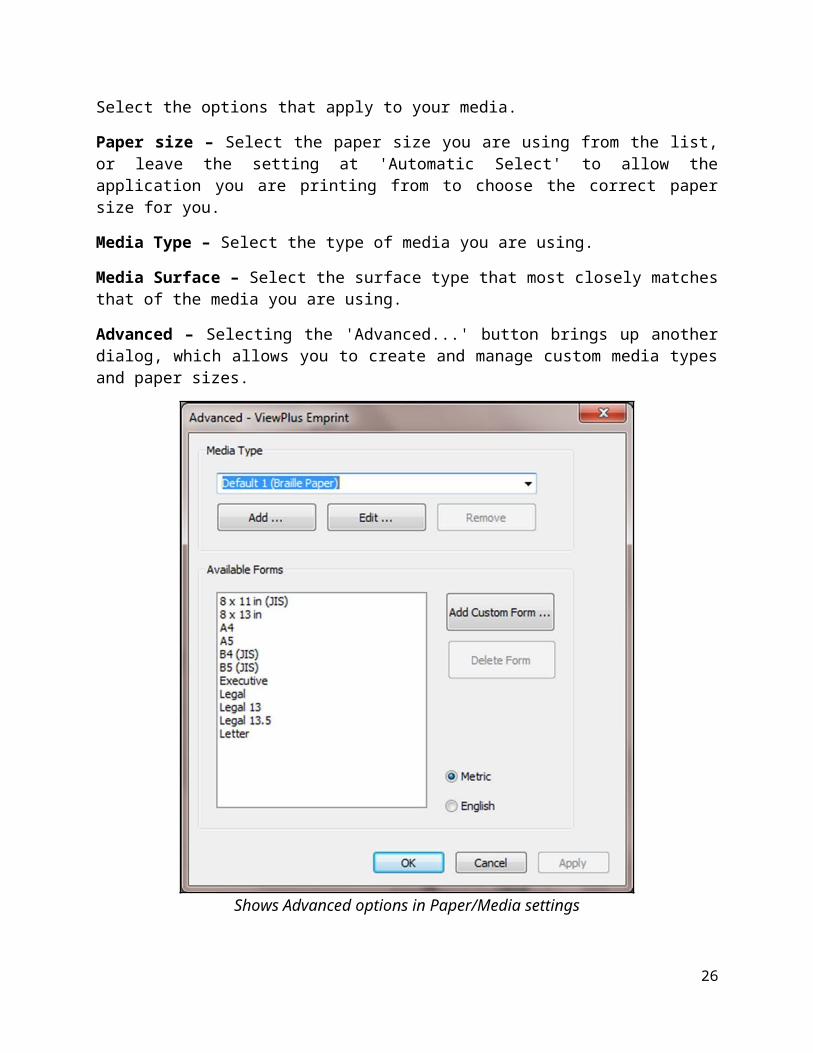
Advanced – Selecting the 'Advanced...' button brings up another dialog, which allows you to create and manage custom media types and paper sizes.
Shows Advanced options in Paper/Media settings
o Media Type
Add – Choosing this button will allow you to define a new custom media type. The 'Print Media Type Test Pattern' button will print a selection of punch forces from which you can choose to set the highest and lowest punch force values that work for your media.
Edit – Selecting a media type from the drop-down list and choosing 'Edit...' will allow you to edit that media type. Note: Default media types can not be edited.
Remove – Selecting a media type from the drop-down list and choosing 'Remove' will delete that media type from the list. Note: Default media types can not be removed.
21

o Available Forms
Selecting a paper size in the list will show the paper dimensions in the selected units of measure.
Add Custom Form… – This button will allow you to define a new paper size. Note: Paper sizes wider than 9 inches may not be added.
Delete Form – If the selected form from the list is a custom size, this button will remove the selected form.
Tiger tab
The Tiger tab allows you to control braille and print options for printing. Use the descriptions below to help you make your selections.
Shows Tiger Tab
22

How to Print
Select the print and braille options appropriate for your document.
Emboss – When this option is checked, the SpotDot will create embossed output.
o Braille Height – Select 'Low', 'Normal' or 'High' braille dot height. Normal dot height sets the braille dots to the same height as the highest graphics dots. Adjust the braille dot height higher or lower to suit the reader.
o Emboss Standard Text – When checked, standard text that is not translated to braille will be embossed. This is helpful when used with a large font to print raised letters.
Print – When this option is checked, the SpotDot will create color printed output.
o Print Quality – Select 'Draft', 'Normal' or 'Best'. Draft is the fastest option, Normal is standard and Best produces the nicest-looking print output. Please note, that higher quality print option consumes more ink and takes longer to print.
Advanced
Select the advanced printing options appropriate for your document.
2 in 1 – When this option is checked, the SpotDot will generate embossed output from every odd page and print output from every even page of the document, so on the output two pages of the document are being combined on one sheet of paper. This is helpful when you wish to have the embossed page differ from the print page (for example, if you wish to simplify a complex image on the embossed page but retain the original detail on the print page).
More Options – Selecting the 'More Options...' button brings up a new dialog with the following options.
23
Shows the More Options dialog window
o Images
Invert Colors – When checked, this option embosses light colors as high dots and dark colors as low dots.
Contrast – The default setting is 0. The range is from -100 to 100. Increasing the contrast increases the dot height difference of two colors that have intensities that are nearly the same. By increasing the contrast, light colors get lighter and dark colors get darker.
Brightness – The default setting is 0. The range is from -100 to 100. Increasing the brightness can be useful to increase the intensity of all the colors. This option is most often used with images in which lines are thin and light.
Apply Chessboard Pattern – When this is checked, the printer will emboss graphics with every second dot only, resulting in 10 dpi resolution instead of 20 dpi. With every new line, dots are being placed underneath the spaces of the previous line, which will show like a chessboard pattern. To separate the dots like this will help determine tactile differences in dot heights between filled areas.
24

Thin Line Intensity – If lines in graphics are too thin to emboss correctly, slide the indicator to the right.
o Dry Time
This option sets the time that the SpotDot allows the ink to dry before embossing. This slider bar can be adjusted between 1 and 16 seconds. If dry time is too short you will likely notice some ink smearing in vertical lines at the bottom of the page.
o Defaults
- The 'Defaults...' button will restore all settings on the Advanced dialog to their default values.
V. Operator Panel
A. Functions
Illustration of the operator panel
(The buttons are described from left to right order.) Cancel – This button is square with a raised red X on it. Pressing this button during printing
will stop the print job or clear error status.
Resume – This button is triangular with one point oriented up, like an up arrow, and has a "play" symbol (a triangle pointing right) screen-printed on it. Pressing this button will resume a paused print job.
Pause – This button is triangular with one point oriented down, like a down arrow, and has a pause symbol (two vertical bars) screen-printed on it. Pressing this button during the embossing phase of the print job will interrupt the embossing. Continue the embossing action by pressing the resume button, or press cancel to abort the print job. Holding down this button during power up of the printer will initiate the printing and embossing of a system information page. It will load paper, print and emboss information such as the serial number,
25
the firmware version plus some adjustment values for the embossing and ink modes. If this function completes without error, the embossing printer is functioning properly.
B. Status Lights Green light (power symbol) – This light is on when the embossing printer is powered and
ready to receive data. It is blinking if the embossing printer is busy receiving data or servicing the ink cartridges.
Red light (warning symbol) – This light is blinking when an error occurs during printing. The specific errors are: out of paper, paper jam, embosser head position error, or if the print job data is corrupted. To clear the error status warning light, press the cancel button.
Orange light (ink cartridge symbol) – This light is blinking if the embossing printer has no ink cartridges installed, or if the housing lid is open.
Light cycle through all three lights – During start up the embossing printer automatically checks the three lights by cycling through them once. If an unidentified error occurs during operation, the embossing printer indicates this by cycling through the three lights continuously. If this happens, please contact ViewPlus support.
Sequence 2x orange light, 1x red light – If this blinking sequence occurs, the embossing printer is detecting a non volatile ram error. If this happens, please contact ViewPlus support.
C. Audio AlertsComputer screen error alerts
During printing the printer driver is monitoring the status of the print job. If problems occur during printing, the embossing printer will inform the user of the error by showing a dialog box on the screen. This will only happen if the embossing printer is connected locally to the computer via the USB interface. This will not happen with network or BlueTooth connections.
Paper Out – (High-Low) Load new print media to the input tray and press the cancel button to clear the error status warning. Now any print job which was sent but not printed before the error occurred should be resent.
Paper Jam – (High-Low-High) Remove the jammed paper and press cancel to clear the error status warning. Now any print job which was not printed before the error occurred should be resent.
26

Alignment error / Emboss head stalled – (High-High-Low) Press cancel to clear the error status warning. Try printing again. If the problem persists, contact ViewPlus support.
Print data error – (Low-High) Press cancel to clear the error status warning.
Ink Carriage stalled – (High-Low-Very Low) A paper jam might cause the ink carriage to stall. Please clear the paper from the paper path and free up the ink carriage inside of the embossing printer. See B in the Paper Handling section also.
Rear Paper Path Extension – The rear paper path extension of the embossing printer is not properly installed. Please firmly attach the rear paper path extension to fix the problem.
No ink cartridges – (High-High-High) Open the lid of the embossing printer and insert at least one ink cartridge (see the installation instructions supplied with your ink cartridges). The embossing printer will not emboss if there are no ink cartridges installed because the HP system will not load paper. Close lid and continue operation.
Housing open – (Low) Close the lid of the embossing printer and continue operation. If error status warning does not clear, make sure the lid is not crooked and verify that the black plastic lever to the right of the ink cartridges is being hit by the pin protruding from the inside of the lid. An error message will be displayed if you try to print with the lid open.
VI. Paper Handling
A. Paper LoadingThe VP SpotDot takes stacks of single sheet print media. Insert the paper from the front into the input tray.
27

Shows the input tray in the front of the embossing printer
B. Paper JamsPaper jams can occur in the main body of the embossing printer or in the rear paper path extender. To check and clear paper jams please follow the steps below.Note: Always pull the paper from the center of the visible side or with one hand on each edge of the paper so the pulling force is distributed. This way it is less likely that the sheet will be torn into pieces which might be harder to remove.
If the embossing printer is indicating a paper jam, turn the embossing printer off. Open the housing lid and check for paper inside. If there is paper present, in most cases it can
be removed from the area where the ink cartridges would move over the paper. (If the ink cartridges are stuck on jammed paper, move them manually over to the right side).
First try to free the paper from underneath the flat metal part towards the front of the embossing printer by pulling the paper towards the back of the embossing printer.
Then try to free the paper from underneath the small metal rollers towards the back of the embossing printer by pulling the paper towards the front of the embossing printer.
If you cannot remove the paper using the methods described in the previous steps or if the area underneath the lid is free of paper, check for paper within the rear paper path extender.
To remove the rear paper path extender press the buttons on the left and right sides of the accessory and pull it away from the embossing printer. Remove any paper jam inside the embossing printer.
To check the inside of the rear paper path extender, press the button on top of the accessory and lower the access door. Remove any paper jam from inside the rear paper path extender and close the door again.
Reinsert the rear paper path extender into the embossing printer until both sides snap into place.
Turn on the embossing printer, and then reprint the document.
28

VII. Braille, Translation and Printing
A. ViewPlus Tiger Software SuiteTo create abbreviated braille code it is necessary to translate text into braille using the Tiger Software Suite, which provides a direct add-in menu in MS Word and Excel for document translation. The Tiger Software Suite is part of your embosser package. Instructions for installation and use come with the software package.
B. FontsBraille and Tiger screen fonts are braille fonts that install with the installation of the ViewPlus embosser driver. They can be chosen from any Windows program that includes Windows font selection. Braille and Tiger screen fonts appear as standard text characters on the screen and print as braille dot patterns. When applying these fonts, each print character is converted to one braille character that corresponds to the ASCII code of that print character. There will be no contractions, or translation of symbols in the braille output.
It is very important to use the correct font size for the correct dot spacing to be printed for braille fonts. For 8 dot braille fonts, like 'Computer' Braille, the point size needs to be set to 43. Other braille fonts, indicated through a '29' in their font name, need to be set to point size 29. The corresponding text in ink will be printed in that same point size on top of the braille if option 'Print' is checked within the Tiger tab of the printing preferences.
Characters, or text not translated to braille will emboss as graphic images of the visual character if 'Emboss Standard Text' option is checked within the Tiger tab of the printing preferences. It will be overprinted with color if also option 'Print' is checked within the Tiger tab of the printing preferences.
C. Magic ColorsThe printer driver includes a feature to manipulate the embossed, or the printed output of text. If black text is set to color values Red 6, Green 7, and Blue 8, then this text will only be embossed, but not printed in ink, disregarding the 'Emboss Standard Text' check box option in the printing preferences. If black text is set to color values Red 5, Green 6, and Blue 7, then this text will only be printed in ink (black color), but not embossed, disregarding the 'Emboss Standard Text' option check box.
D. PrintingOnce the printer driver is installed and the printer properties are accessible, the next step would be to print a document. These are the steps that you should follow to print:
29

Open the document to be printed for example in MS Word. Open the program's File menu and choose Print. On the Print dialog, make sure the VP SpotDot is selected. Click on the printer properties
button and ensure that the correct paper size and Tiger printing options are selected. Click OK on the printer properties dialog when you are finished. Then click OK on the Print dialog to start the print job.
In general ViewPlus printers follow the principle "What you see is what you get" with a 20 dpi resolution of the embossed representation, and colors converted to dot heights where darker colors are embossed with higher dots (black = highest dot), and lighter colors are embossed with lower dots (white = no dot).
There are example documents and tips for using various Windows applications at: http://www.viewplus.com/support/examples/
VIII. Accessories and Software Packages
For pricing, ordering, and additional information on any of the following products consult the ViewPlus website www.viewplus.com or your ViewPlus representative.
A. Accessories SpotDot Ink Cartridges (VPT05-BLACK-HP56, and VPT05-TRI-HP57)
Expanded Output Paper Tray (VPT05-TRAY-FIRE)
This replacement tray is designed for larger print jobs. .
B. Software Packages Audio Graphing Calculator (VSW03AGC-CD, or VSW03AGC-DL)
The ViewPlus Audio Graphing Calculator (AGC) is a self-voicing Windows application that provides access to scientific calculation and graphing for people who are blind or dyslexic. It includes a standard on-screen calculator and a powerful function evaluator as well as the capability of computing and viewing functions visually and as an audio plot. The audio tone plot gives AGC users access on a time scale comparable to access by people without print disabilities to visual plots on standard graphing calculators.
30

Tiger Software Suite (VSW05TSS-CD, or VSW05TSS-DL)
The ViewPlus Tiger Software Suite (TSS) is the complete solution for producing Braille and tactile graphics by harnessing the full power of MS Word and Excel. The press of a button automatically converts and formats documents that were originally created for an ink printer. One complementary license of TSS will be included with the purchase of any ViewPlus embosser.
Tiger Software Suite Upgrade from version 4 to version 5 (VSW05TSS-CDU, or VSW05TSS-DLU)
MathType by Design Science (VSW01MT-CD, or VSW01MT-DL)
MathType is an Add-in editor in MS Word for math equations. Equations can be entered using MathType editor and directly translated to LaTeX, Nemeth, or other Braille math using the ViewPlus Tiger Software Suite.
IX. Training, Warranty, Maintenance and Support
For additional information about any of the below, please don't hesitate to consult the ViewPlus website www.viewplus.com or contact your ViewPlus sales representative.
A. TrainingViewPlus provides two training methods
1) Video tutorials/documentation downloadable from our website, and2) Live on-line training sessions with a ViewPlus Support Specialist.
B. MaintenanceIt is important to choose a suitable location for the ViewPlus embossing printer. The cable length between the embossing printer and the host computer should not exceed ten feet (three meters). The location should be sturdy and flat. The embossing printer should not be exposed to direct sunlight, extreme heat, cold, dust or humidity. The AC power outlet must be compatible with the plug of the embossing printer's power cord.
Dot quality should be monitored; poor alignment can cause permanent damage to the platen of the ViewPlus embosser.
31

Software updates can be downloaded from the ViewPlus Technologies website. You should occasionally check the website for the latest developments.
C. SupportIn addition to support material on our website please do not hesitate to contact us for your technical support questions: Contact your ViewPlus embosser sales representative if you did not purchase directly from
ViewPlus Technologies E-mail to [email protected], or Call the ViewPlus Technologies office at +1 541 754 4002 (Pacific Standard Time Zone), or
the European office at +49 5404 9596 414 (Central European Time Zone).
D. WarrantyFor information on your product warranty, please visit our website. Select the appropriate link to your warranty information based on your region from the choices below. For Europe, please see your manufacturer's warranty information at
www.viewplus.eu/support/warranty For all other regions, please see your manufacturer's warranty information at
www.viewplus.com/support/warranty
Extended Warranty
For extended warranty options please contact your ViewPlus representative, or the dealer the embosser was purchased from.
32