· web viewuse the “hardware” drop-down menu to choose the correct hardware. for this lesson,...
TRANSCRIPT

Unit 7: Programming (Electronic Music)Lesson 2: Programming in Minibloq U07_L02_03-Teaching_ Demo_Minibloq
To lead your students through this activity, you will need your computer, attached to a projector, for projecting your code for students to see. You will also need a speaker circuit connected to your computer.
INSTALL THE SOFTWARE
Download and install the miniBloq integrated development environment (IDE). As of June 2014, this software is only compatible with Windows OS. If you are using the Mac OS, skip this lesson and proceed to Lesson 3. The software is available here:
miniBloq, standard build: http://blog.minibloq.org/p/download.html
In order to upload programs to the Arduino board, you also need to install the drivers (which are in the Arduino IDE download). Download the Arduino software here:
Arduino, standard build: https://www.arduino.cc/en/Main/Software
STEP 1: PREPARE TO PROGRAM (See U07_L02_05-V1-Minibloq1_Set_up_IDE.mp4)
1. Launch the IDE by clicking on the miniBloq icon in the Start Menu.
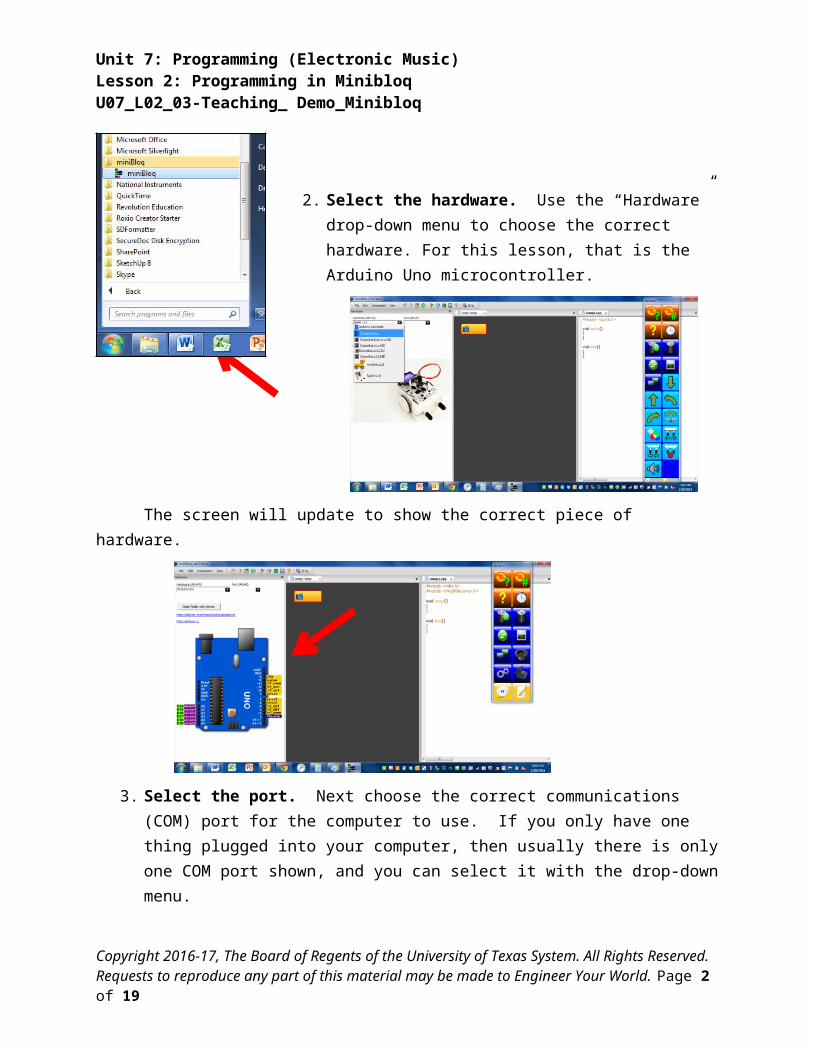
2. Select the hardware. Use the “Hardware” drop-down menu to choose the correct hardware. For this lesson, that is the Arduino Uno microcontroller.
Copyright 2016-17, The Board of Regents of the University of Texas System. All Rights Reserved.Requests to reproduce any part of this material may be made to Engineer Your World. Page 1 of 15
Unit 7: Programming (Electronic Music)Lesson 2: Programming in Minibloq U07_L02_03-Teaching_ Demo_Minibloq
The screen will update to show the correct piece of hardware.
3. Select the port. Next choose the correct communications (COM) port for the computer to use. If you only have one thing plugged into your computer, then usually there is only one COM port shown, and you can select it with the drop-down menu.
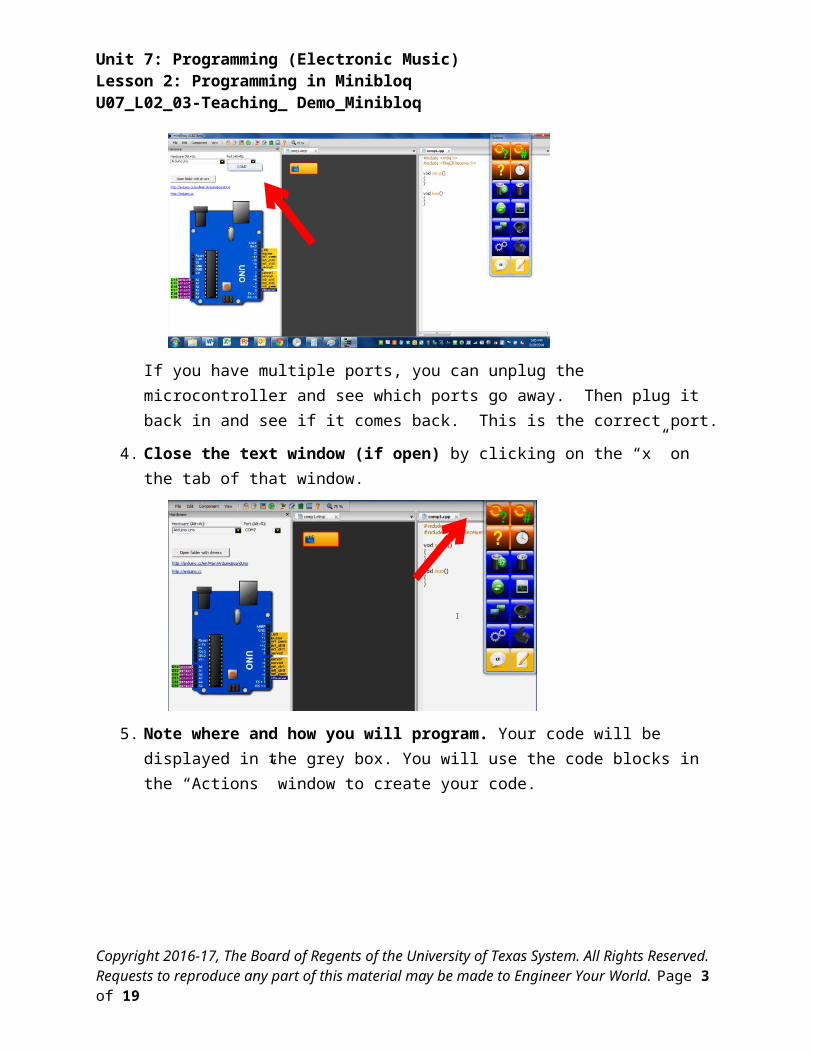
If you have multiple ports, you can unplug the microcontroller and see which ports go away. Then plug it back in and see if it comes back. This is the correct port.
4. Close the text window (if open) by clicking on the “x” on the tab of that window.
Copyright 2016-17, The Board of Regents of the University of Texas System. All Rights Reserved.Requests to reproduce any part of this material may be made to Engineer Your World. Page 2 of 15
Unit 7: Programming (Electronic Music)Lesson 2: Programming in Minibloq U07_L02_03-Teaching_ Demo_Minibloq
5. Note where and how you will program. Your code will be displayed in the grey box. You will use the code blocks in the “Actions” window to create your code.
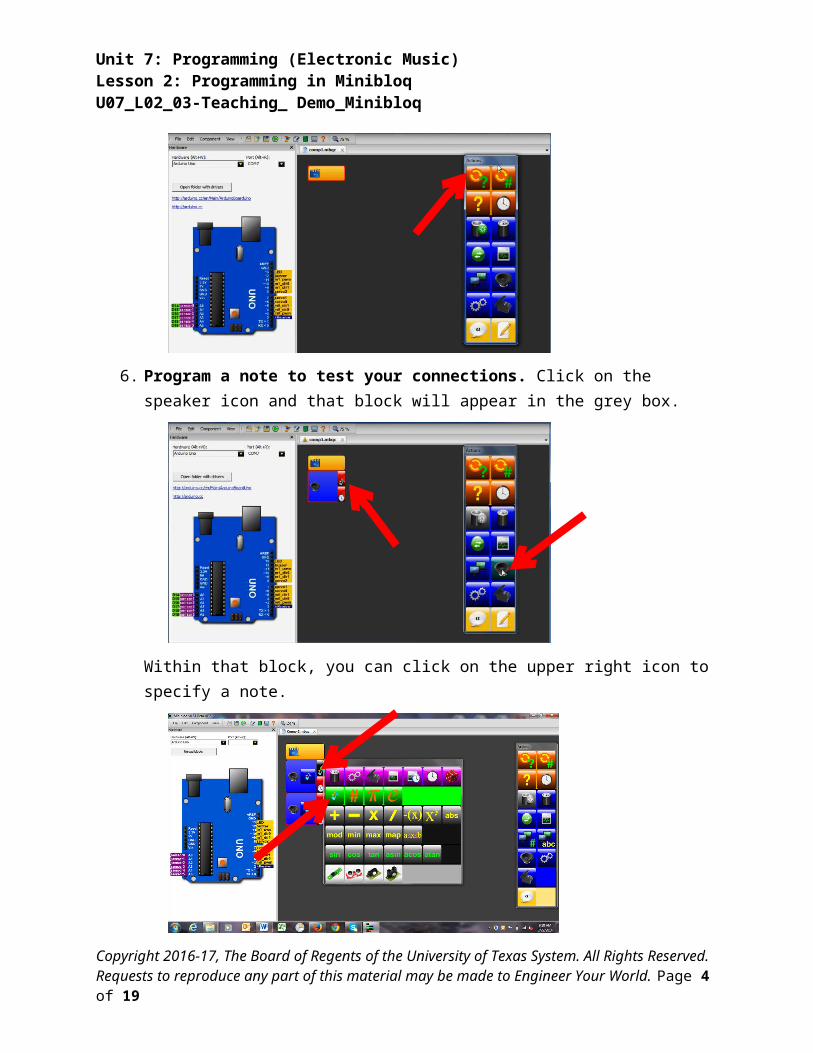
6. Program a note to test your connections. Click on the speaker icon and that block will appear in the grey box.
Within that block, you can click on the upper right icon to specify a note.
Copyright 2016-17, The Board of Regents of the University of Texas System. All Rights Reserved.Requests to reproduce any part of this material may be made to Engineer Your World. Page 3 of 15
Unit 7: Programming (Electronic Music)Lesson 2: Programming in Minibloq U07_L02_03-Teaching_ Demo_Minibloq
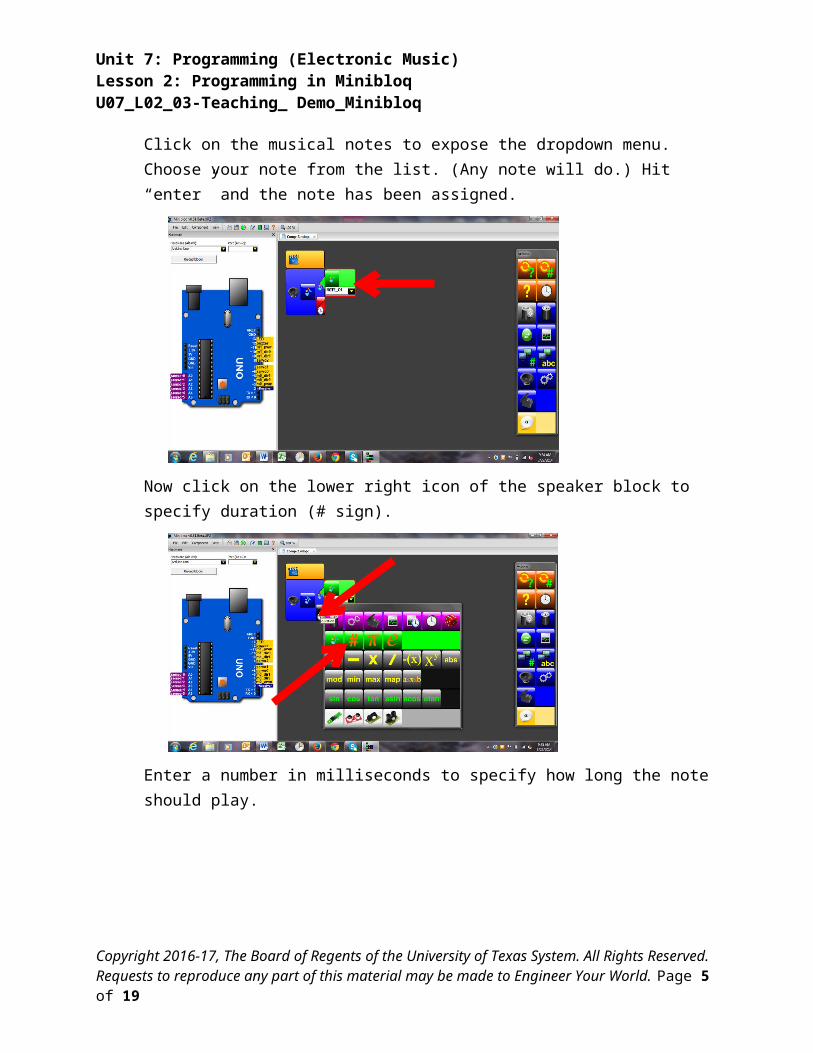
Click on the musical notes to expose the dropdown menu. Choose your note from the list. (Any note will do.) Hit “enter” and the note has been assigned.
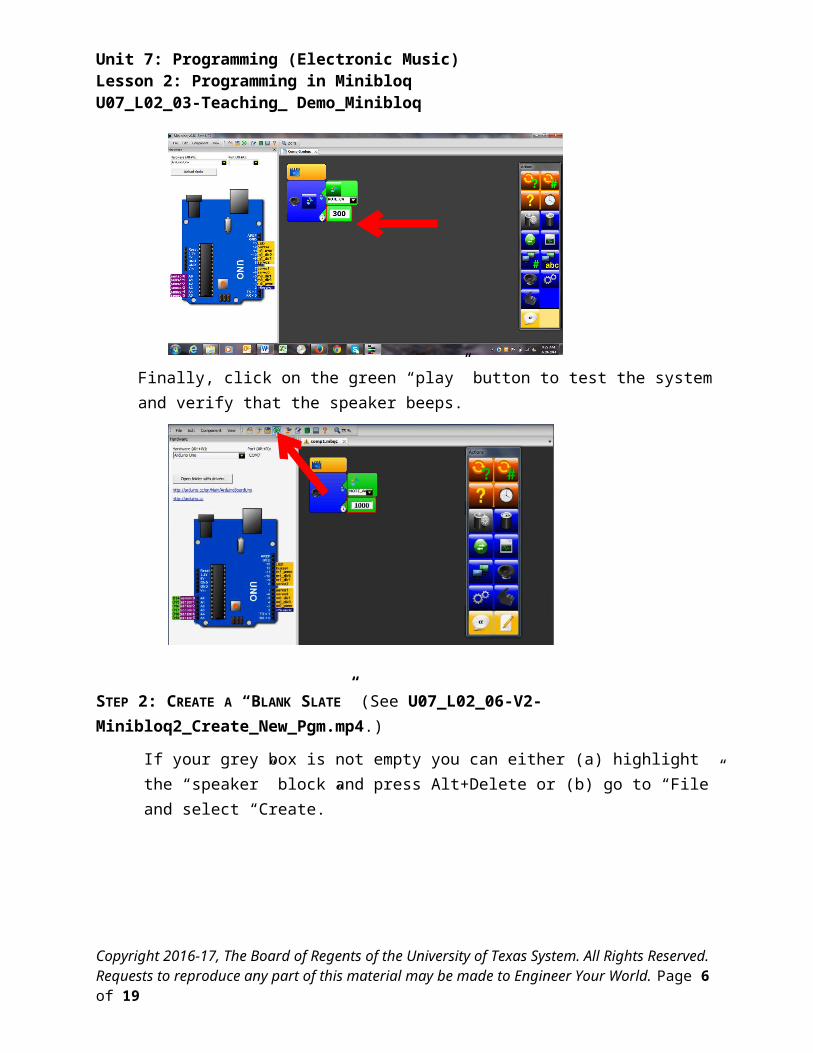
Now click on the lower right icon of the speaker block to specify duration (# sign).
Enter a number in milliseconds to specify how long the note should play.
Copyright 2016-17, The Board of Regents of the University of Texas System. All Rights Reserved.Requests to reproduce any part of this material may be made to Engineer Your World. Page 4 of 15
Unit 7: Programming (Electronic Music)Lesson 2: Programming in Minibloq U07_L02_03-Teaching_ Demo_Minibloq
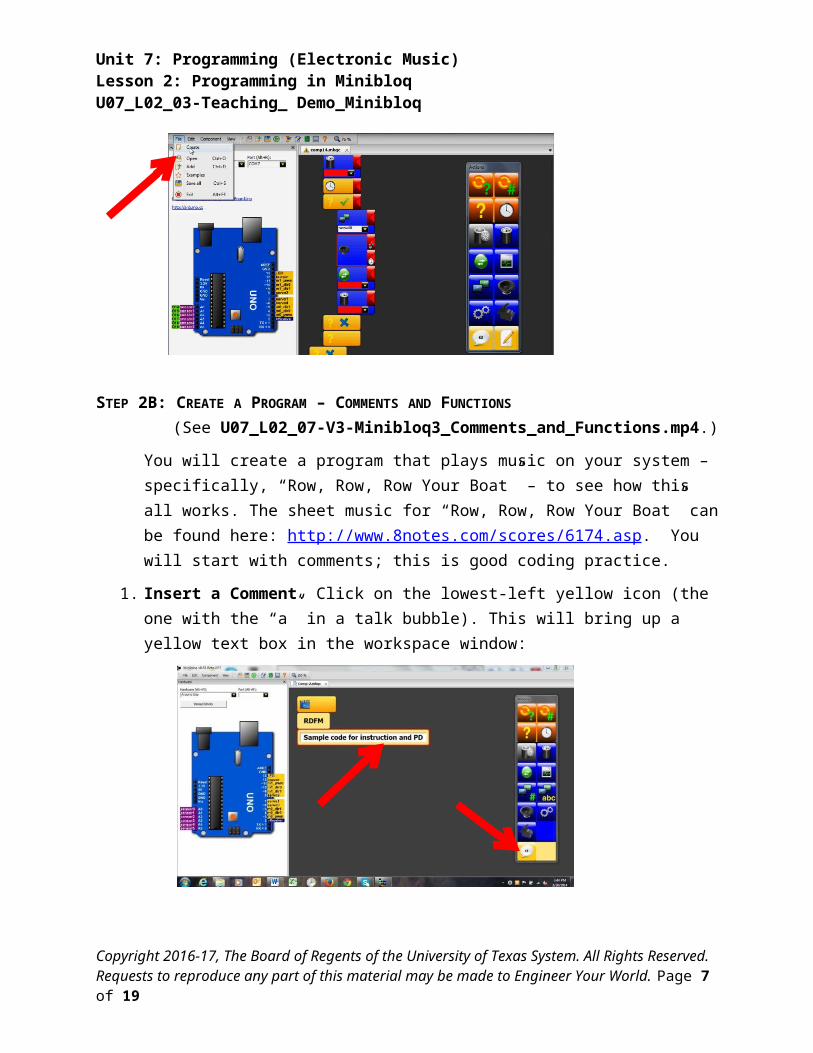
Finally, click on the green “play” button to test the system and verify that the speaker beeps.
STEP 2: CREATE A “BLANK SLATE” (See U07_L02_06-V2-Minibloq2_Create_New_Pgm.mp4.)
If your grey box is not empty you can either (a) highlight the “speaker” block and press Alt+Delete or (b) go to “File” and select “Create.”
Copyright 2016-17, The Board of Regents of the University of Texas System. All Rights Reserved.Requests to reproduce any part of this material may be made to Engineer Your World. Page 5 of 15
Unit 7: Programming (Electronic Music)Lesson 2: Programming in Minibloq U07_L02_03-Teaching_ Demo_Minibloq
STEP 2B: CREATE A PROGRAM – COMMENTS AND FUNCTIONS
(See U07_L02_07-V3-Minibloq3_Comments_and_Functions.mp4.)
You will create a program that plays music on your system – specifically, “Row, Row, Row Your Boat” – to see how this all works. The sheet music for “Row, Row, Row Your Boat” can be found here: http://www.8notes.com/scores/6174.asp. You will start with comments; this is good coding practice.
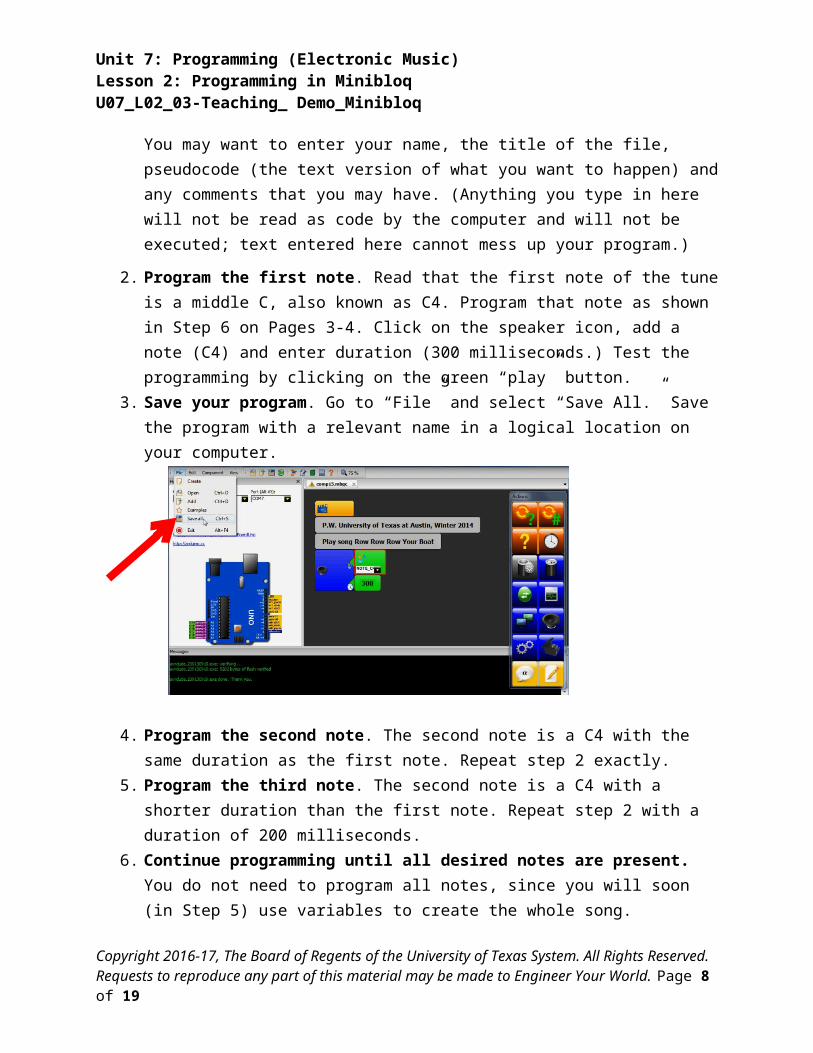
1. Insert a Comment. Click on the lowest-left yellow icon (the one with the “a” in a talk bubble). This will bring up a yellow text box in the workspace window:
You may want to enter your name, the title of the file, pseudocode (the text version of what you want to happen) and any comments that you may have. (Anything you type in here will not be read as code by the computer and will not be executed; text entered here cannot mess up your program.)
2. Program the first note. Read that the first note of the tune is a middle C, also known as C4. Program that note as shown in Step 6 on Pages 3-4. Click on the speaker icon, add a note (C4) and enter duration (300 milliseconds.) Test the programming by clicking on the green “play” button.
3. Save your program. Go to “File” and select “Save All.” Save the program with a relevant name in a logical location on your computer.
Copyright 2016-17, The Board of Regents of the University of Texas System. All Rights Reserved.Requests to reproduce any part of this material may be made to Engineer Your World. Page 6 of 15
Unit 7: Programming (Electronic Music)Lesson 2: Programming in Minibloq U07_L02_03-Teaching_ Demo_Minibloq
4. Program the second note. The second note is a C4 with the same duration as the first note. Repeat step 2 exactly.
5. Program the third note. The second note is a C4 with a shorter duration than the first note. Repeat step 2 with a duration of 200 milliseconds.
6. Continue programming until all desired notes are present. You do not need to program all notes, since you will soon (in Step 5) use variables to create the whole song.
STEP 4: DEBUG (See U07_L02_08-V4-Minibloq4_Debugging.mp4.)
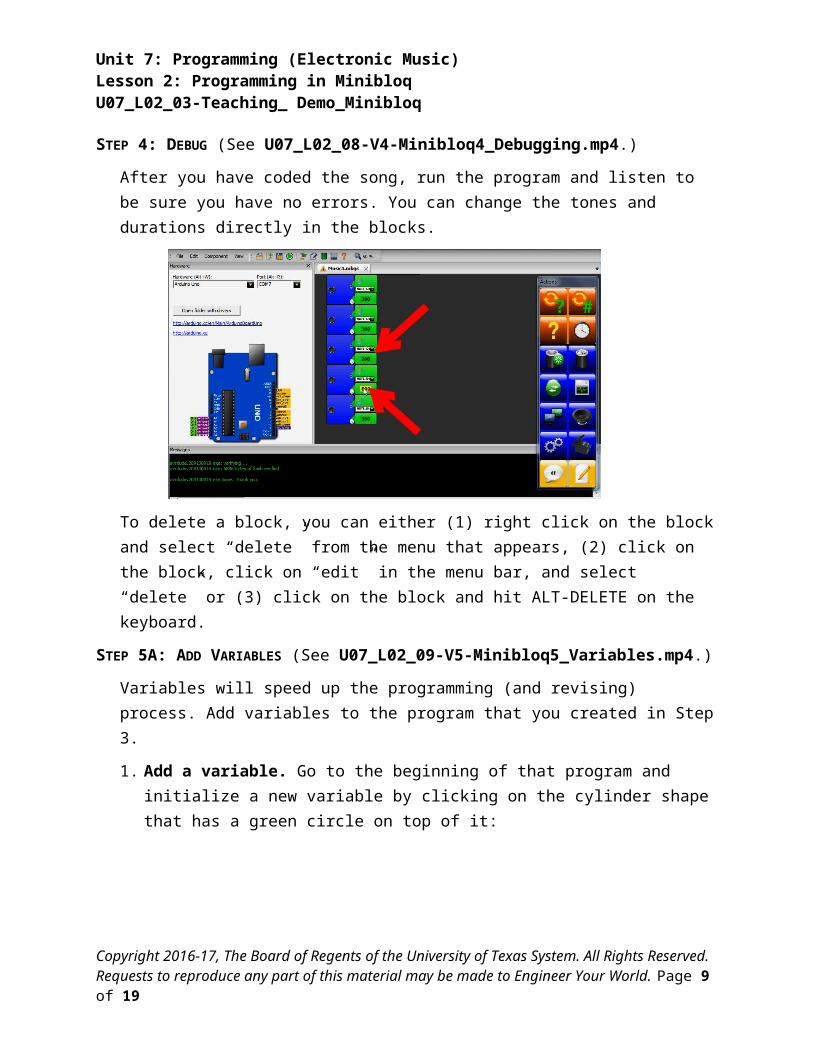
After you have coded the song, run the program and listen to be sure you have no errors. You can change the tones and durations directly in the blocks.
To delete a block, you can either (1) right click on the block and select “delete” from the menu that appears, (2) click on the block, click on “edit” in the menu bar, and select “delete” or (3) click on the block and hit ALT-DELETE on the keyboard.
STEP 5A: ADD VARIABLES (See U07_L02_09-V5-Minibloq5_Variables.mp4.)
Copyright 2016-17, The Board of Regents of the University of Texas System. All Rights Reserved.Requests to reproduce any part of this material may be made to Engineer Your World. Page 7 of 15
Unit 7: Programming (Electronic Music)Lesson 2: Programming in Minibloq U07_L02_03-Teaching_ Demo_Minibloq
Variables will speed up the programming (and revising) process. Add variables to the program that you created in Step 3.
1. Add a variable. Go to the beginning of that program and initialize a new variable by clicking on the cylinder shape that has a green circle on top of it:
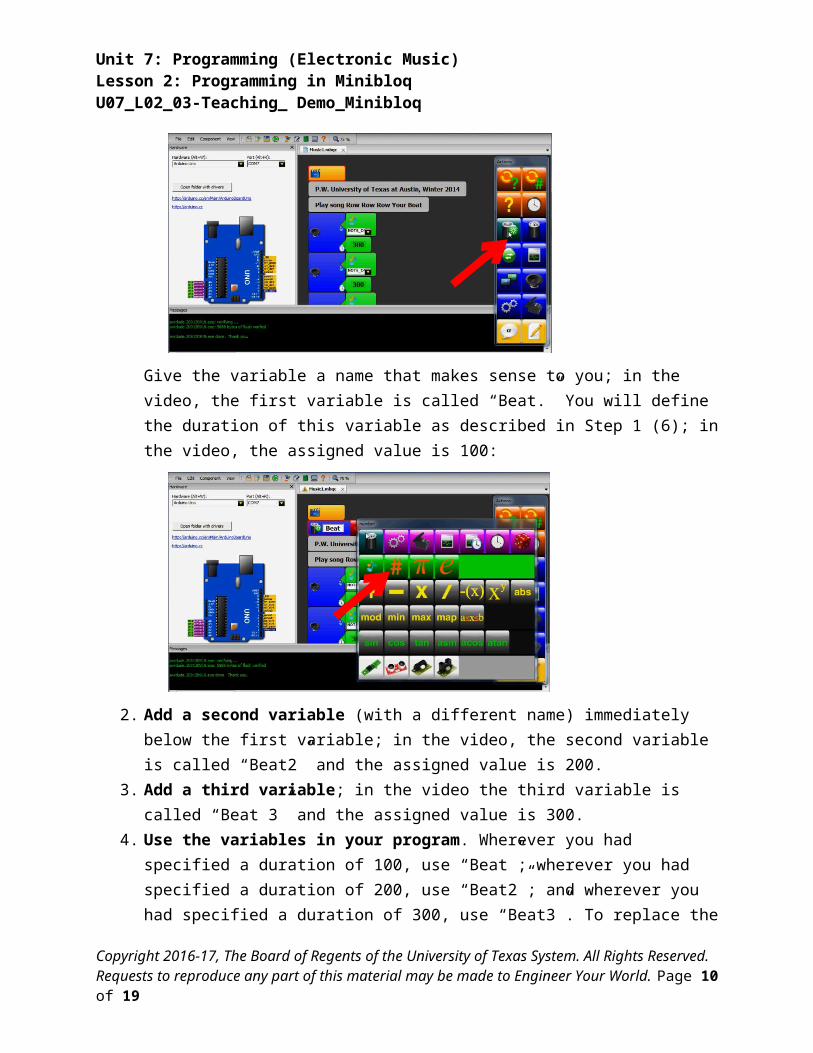
Give the variable a name that makes sense to you; in the video, the first variable is called “Beat.” You will define the duration of this variable as described in Step 1 (6); in the video, the assigned value is 100:
2. Add a second variable (with a different name) immediately below the first variable; in the video, the second variable is called “Beat2” and the assigned value is 200.
3. Add a third variable; in the video the third variable is called “Beat 3” and the assigned value is 300.
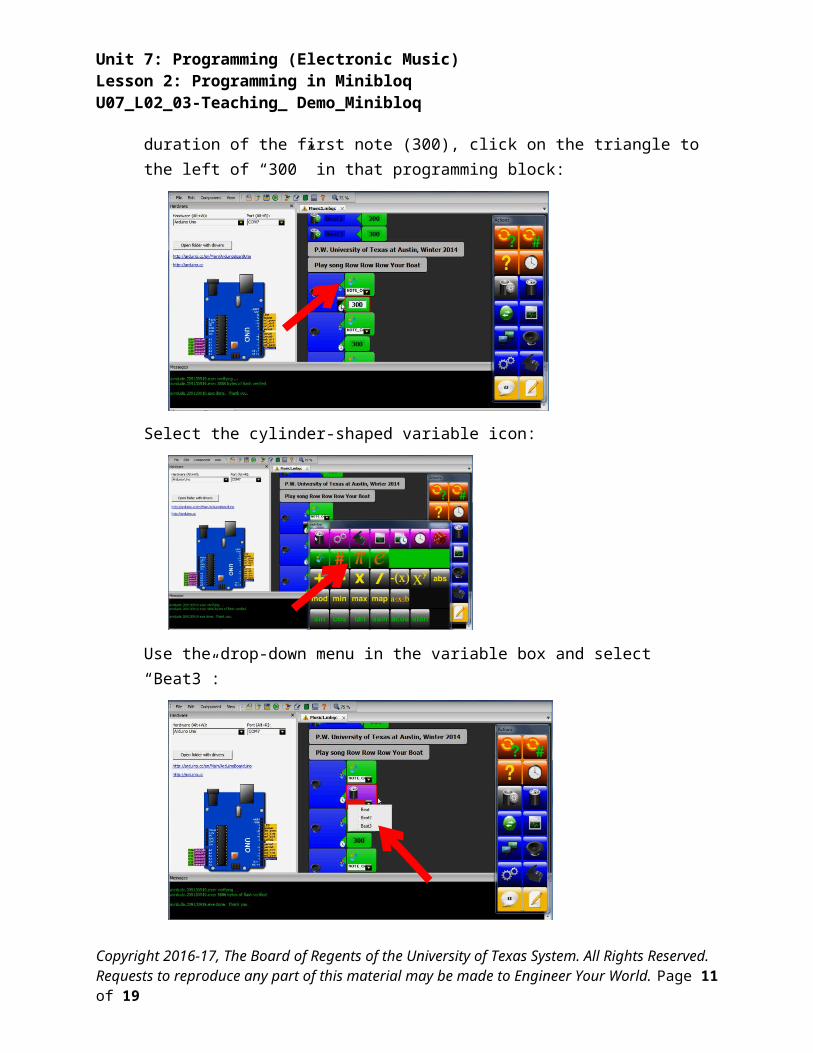
4. Use the variables in your program. Wherever you had specified a duration of 100, use “Beat”; wherever you had specified a duration of 200, use “Beat2”; and wherever you had specified a duration of 300, use “Beat3”. To replace the duration of the first note (300), click on the triangle to the left of “300” in that programming block:
Copyright 2016-17, The Board of Regents of the University of Texas System. All Rights Reserved.Requests to reproduce any part of this material may be made to Engineer Your World. Page 8 of 15
Unit 7: Programming (Electronic Music)Lesson 2: Programming in Minibloq U07_L02_03-Teaching_ Demo_Minibloq
Select the cylinder-shaped variable icon:
Use the drop-down menu in the variable box and select “Beat3”:
5. Repeat the previous step with each programming block to replace all of the numbers with the appropriate variables. (Save the program.) Now you can change all of the values in all of the programming blocks by simply changing the values of the variables.
STEP 5B: PROGRAM LINE 2 (See U07_L02_09-V5-Minibloq5_Variables.mp4.)
Copyright 2016-17, The Board of Regents of the University of Texas System. All Rights Reserved.Requests to reproduce any part of this material may be made to Engineer Your World. Page 9 of 15
Unit 7: Programming (Electronic Music)Lesson 2: Programming in Minibloq U07_L02_03-Teaching_ Demo_Minibloq
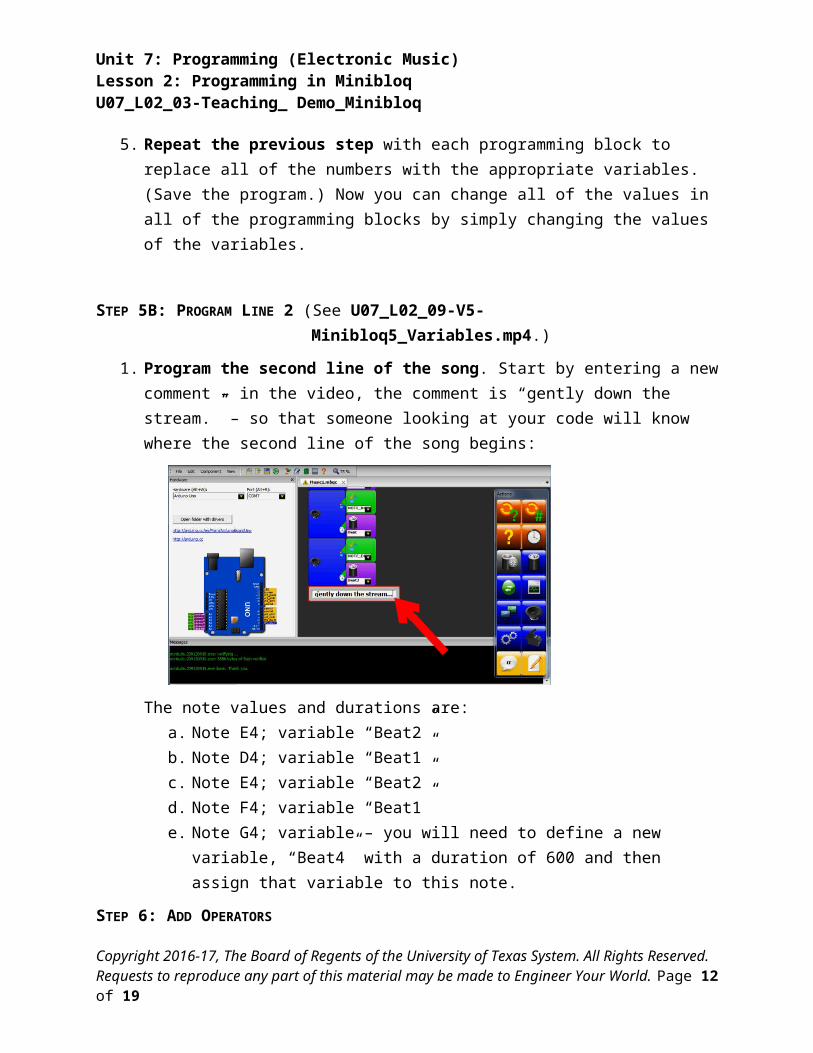
1. Program the second line of the song. Start by entering a new comment – in the video, the comment is “gently down the stream.” – so that someone looking at your code will know where the second line of the song begins:
The note values and durations are:a. Note E4; variable “Beat2”b. Note D4; variable “Beat1”c. Note E4; variable “Beat2”d. Note F4; variable “Beat1”e. Note G4; variable – you will need to define a new variable, “Beat4” with a
duration of 600 and then assign that variable to this note.
STEP 6: ADD OPERATORS (See U07_L02_10-V6-Minibloq6_Mathematical_Operators.mp4.)
1. To prepare for the need for operators, change all of your variable values to half of their current values. In other words, change the values so that
a. “Beat” = 50b. “Beat2” = 100c. “Beat3” = 150d. “Beat4” = 300
Play the song and notice that it is too fast. (Later, rather than retyping all of the variable values again, we will simply change the value of the first variable, “Beat”, and then use operators to make all other variable values dependent on the value of “Beat”. For now, leave “Beat” at a value of 50.)
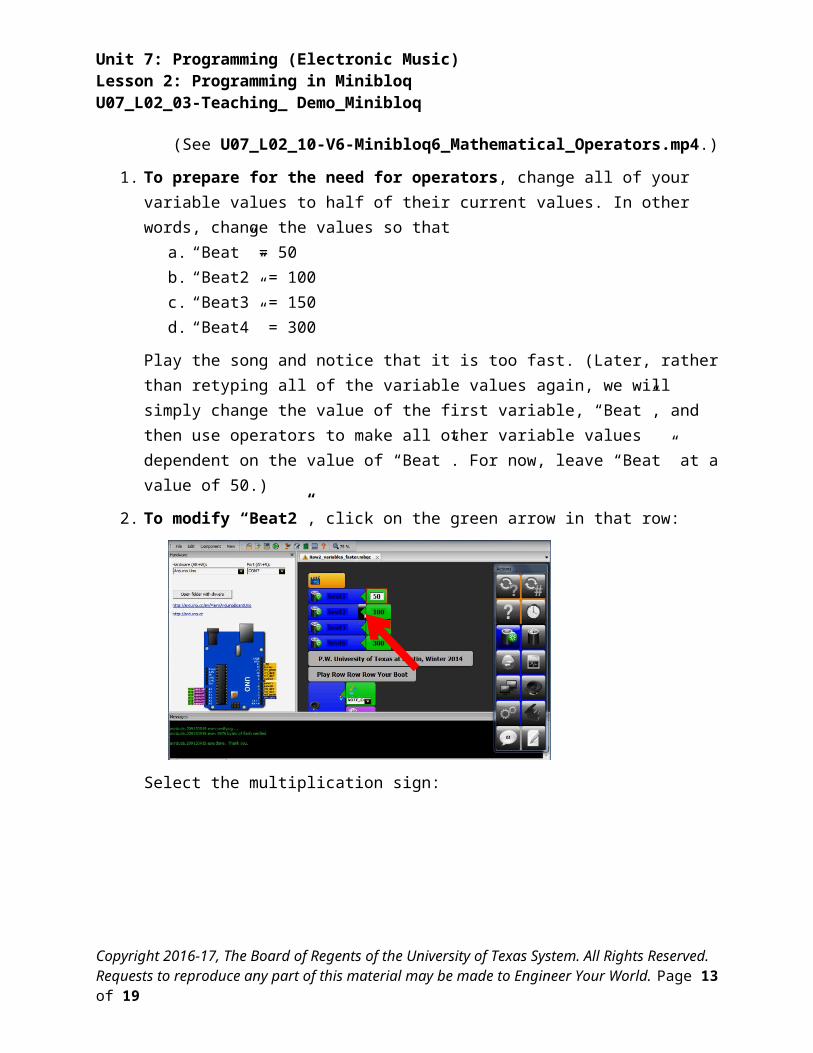
2. To modify “Beat2”, click on the green arrow in that row:
Copyright 2016-17, The Board of Regents of the University of Texas System. All Rights Reserved.Requests to reproduce any part of this material may be made to Engineer Your World. Page 10 of 15
Unit 7: Programming (Electronic Music)Lesson 2: Programming in Minibloq U07_L02_03-Teaching_ Demo_Minibloq
Select the multiplication sign:
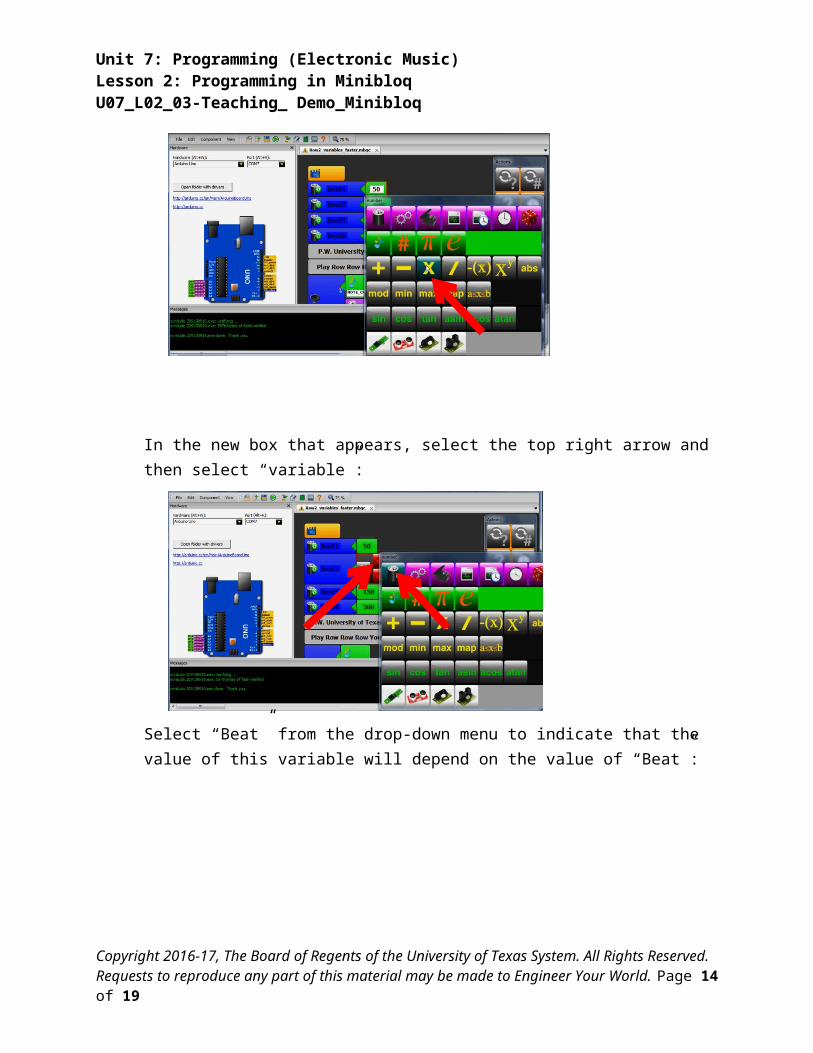
In the new box that appears, select the top right arrow and then select “variable”:
Select “Beat” from the drop-down menu to indicate that the value of this variable will depend on the value of “Beat”:
Copyright 2016-17, The Board of Regents of the University of Texas System. All Rights Reserved.Requests to reproduce any part of this material may be made to Engineer Your World. Page 11 of 15
Unit 7: Programming (Electronic Music)Lesson 2: Programming in Minibloq U07_L02_03-Teaching_ Demo_Minibloq
To indicate that the duration of “Beat2” should be twice that of “Beat”, click on the lower right arrow and select the #:
Then enter the number “2” in the box that appears.
3. Repeat this process for “Beat3”, using the value “3”.
4. Repeat this process for “Beat4”, using the value “6”. (Save your program.)
5. Now play the song and notice that it is too fast. Adjust the tempo as follows:
a. Change “Beat” to 120; notice that the song is too slow.
b. Change “Beat” to 80; notice that the tempo is about right.
By using operators, you have made it easy to adjust the tempo of all notes simply by adjusting the value of a single variable.
6. Use variables and operators to code the rest of the song.
STEP 7: USE LOOPS FOR REPEATED PHRASES
(See U07_L02_11-V7-Minibloq7_Loops.mp4.)
Copyright 2016-17, The Board of Regents of the University of Texas System. All Rights Reserved.Requests to reproduce any part of this material may be made to Engineer Your World. Page 12 of 15
Unit 7: Programming (Electronic Music)Lesson 2: Programming in Minibloq U07_L02_03-Teaching_ Demo_Minibloq
Loops will enable you to repeat sections of code quickly and easily. For this demonstration, you will be programming the song Frere Jacques. As shown in the video, measures 1 and 2 are identical. Rather than create the code block for measure 1 twice, you can simply use a loop to repeat the code block for measure 1.
1. Program the first measure. Code measure 1 using the steps outlined above. The values – use a variable! – are:
C4; duration 300 D4; duration 300
E4; duration 300 C4; duration 300
2. Save and verify that the tune sounds correct.
3. Use a loop to program the second measure. Since measure 2 is a repeat of measure 1, click on the first block in your code for measure 1 and insert a loop. You want the loop button with the # so that you can specify the number of times to repeat the code:
You will see the loop appear in the code as two rectangular blocks:
Now drag the bits of code that you want to repeat and drop them in between the two loop blocks:
Copyright 2016-17, The Board of Regents of the University of Texas System. All Rights Reserved.Requests to reproduce any part of this material may be made to Engineer Your World. Page 13 of 15
Unit 7: Programming (Electronic Music)Lesson 2: Programming in Minibloq U07_L02_03-Teaching_ Demo_Minibloq
The four notes are now inside the loop. Specify that you want the loop to run twice by entering a “2” in the first loop block:
4. Use a loop to program the third and fourth measures. First add the loop, then insert three sound blocks into the loop (using variables and operators as appropriate):
E4; duration 300 F4; duration 300 G4; duration 600 (product of basic beat times two)
Tell the loop to run twice. (Save and run to test.) You are using loops to speed up coding.
5. Don’t forget to add comments.
6. You might look at the text view to see what the code looks like in a text-based IDE.
NOTE: In Minibloq, you cannot name new variables “D0” to “D12” (i.e. D0, D1, D2, … D12). These are already used by the internal Minibloq library, so using them for your own variable names will cause errors. You may want to use “camel case” when naming variables. This is a convention of starting variable names with a lowercase letter, continuing with all lowercase letters, and only using capital letters at the start of new words within a variable name.
Copyright 2016-17, The Board of Regents of the University of Texas System. All Rights Reserved.Requests to reproduce any part of this material may be made to Engineer Your World. Page 14 of 15

Unit 7: Programming (Electronic Music)Lesson 2: Programming in Minibloq U07_L02_03-Teaching_ Demo_Minibloq
Examples: “miniBloq” “camelCase” “sensorVoltage” “aFlat7” “melodyFastVersion”
Copyright 2016-17, The Board of Regents of the University of Texas System. All Rights Reserved.Requests to reproduce any part of this material may be made to Engineer Your World. Page 15 of 15