· web viewwith a “punchout” site, you are able to shop at external websites and bring back...
TRANSCRIPT

eiNetwork Order Portal - Coupa Training Manual
Logging In to Coupa Website
1. Point your browser to: https://einetwork.coupahost.com2. Login with your username and password provided to you by eiNetwork.
3. When the system logs you in, you will see the following Welcome Screen:
4. You will see 4 Sections of the welcome page: Toolbar – allows for easy access to main functions (home, search, My Account, logout, etc..) To Do – will find the latest notifications here – this is where buyers will find all outstanding orders. Quick Access – allows you to go directly to the Supplier catalogs and any other ordering sites. Portlets – here you will find your Shopping Cart and popular “tags” assigned to catalog items.
Services/Products Available
April 2009 Page 1
To Do
Quick Access
Portlets
Toolbar
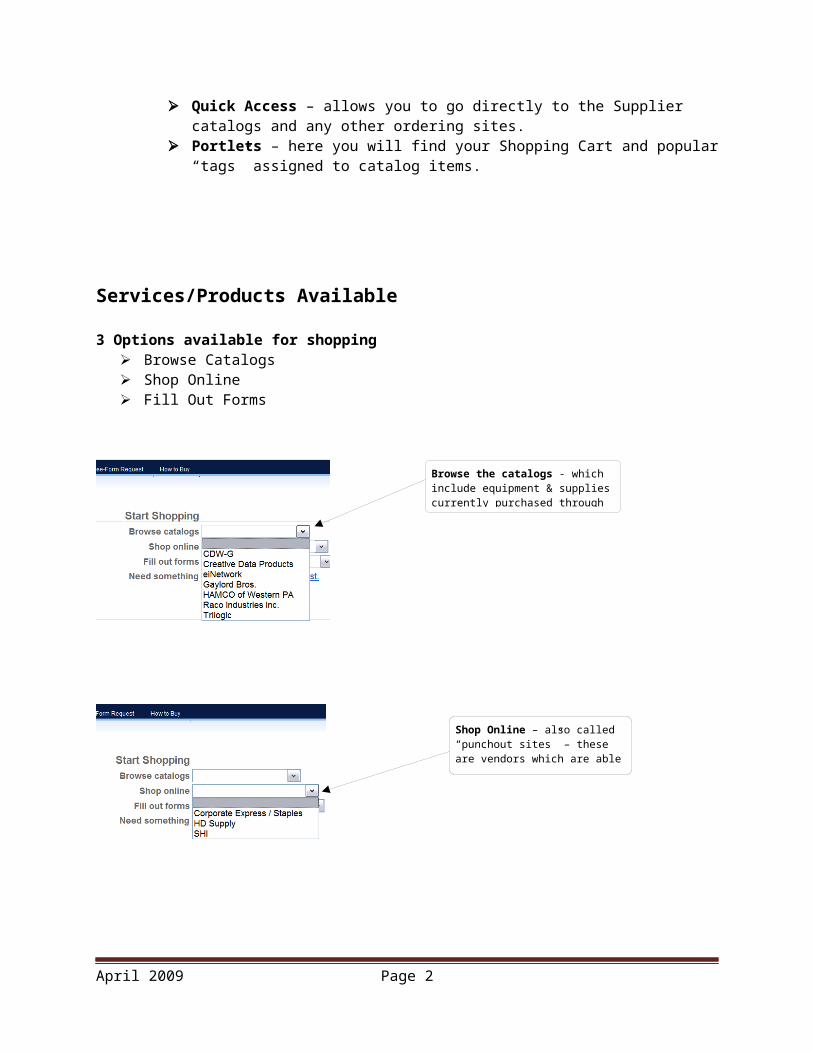
3 Options available for shopping Browse Catalogs Shop Online Fill Out Forms
Creating Requisitions (Orders)
1. Purchasing through the Catalogs
April 2009 Page 2
Browse the catalogs - which include equipment & supplies currently purchased through the support center.
Shop Online – also called “punchout sites” – these are vendors which are able to support e-commerce.
Fill Out Forms – AMCOM printer maintenance orders, toner orders and enrollment requests.

You can browse the catalogs from the Quick Access menu – or – you can browse the catalogs from the drop down menu on the Toolbar.
Once a vendor is selected – you will see a list of all available items. You can also sort the list of available items by different categories.
You can select an item and click on the button for Add to Cart – you may also change the quantity at this point as well.
Once you have added an item to your cart – you will see it appear in your Shopping Cart.
When you are ready to Checkout – click on the Checkout button in your Shopping Cart. You will see the Checkout Screen with your Requisition (Order)#
You now must select a Shipping Address and a Billing Code. **PLEASE NOTE** - if you do not select both a Shipping Address and a Billing Code – your order will be considered Incomplete and will bypass the Approver and will be sent directly to eiNetwork. The requisition will be returned so that corrections can be made. When the User logs back into their account, a message will
April 2009 Page 3

be waiting in the To Do Section and will say: “Requisition #XX Returned from Buyer.” Click the link to edit the Shipping Address and/or Billing Information.
By clicking on the box next to “Specify by Individual Line” – this will allow you to identify a different account for each item being purchased (Optional).
For libraries with only 1 location (ship to address) – the default should already be set for you. If your library has more than 1 location, you will need to select from the list of library locations. You must click on the Magnifying Glass icon to select from the list.
For libraries with only 1 billing code – the default should already be set for you. If your library has a more complicated billing structure (more than 1 billing code) – you will need to select from the list of billing codes for your library. You must click on the Magnifying Glass icon to select from the list.
Prior to placing the order – you also have the option at this point to make changes to your order by clicking on Edit or Delete Items.
You can make changes to the quantity, you can delete the line item, clear your entire cart, etc…. When you are done making changes and wish to Checkout – you can do that from this screen as well.
April 2009 Page 4

2. Making purchases by Shopping Online.
With a “punchout” site, you are able to shop at external websites and bring back their external shopping cart into your Coupa Shopping Cart. Once this is done, you complete the checkout process in Coupa as identified above.
i. You will find a list of punchout sites in the Quick Access section of your homepage.ii. Click on a punchout site and you are taken to the website of the supplier.iii. Shop as you normally would and add items to your shopping cart.iv. When all items have been added, click on Checkout and you will be directed back to the
Coupa website.v. All items that were in the Shopping Cart of the punchout site will now appear in your
Coupa shopping cart.vi. Continue to shop or Checkout of the Coupa website.
3. Purchasing with Fill Out Forms
AMCOM Printer Maintenance, AMCOM Toner Orders and request for adding a new printer to the AMCOM Printer Maintenance Program can be ordered through these forms.
4. Adding a Justification note to your requisition (order). You can add an internal note to your order (such as a PO#) in this field if you need to.
April 2009 Page 5
Delete a line item.

5. Making Purchases with a Credit Card If your library has a credit card used for purchasing equipment/supplies, eiNetwork will need to set
this up ahead of time so that it will be an available option when making purchases. If your library has a credit card setup in the user/buyer profile, you will “Use P-Card” as an
available option when selecting the Billing Code information. By placing a check in the box next to this option – the supplier will know NOT to send an invoice to
the library and will use the credit card information to place the order.
6. Approval Chain Below the list of items you are ordering, the system provides the appropriate approval chain for the
requisition. Accounts designated as “buyer” accounts (approvers) will receive an email notification to let them know to approve or reject the requisition (order).
7. Submitting a Requisition for Approval Once you have completed your order and have verified that the requisition is complete, you will
need to submit the order for approval.
April 2009 Page 6

If you are using the general “user” account and the order is less than $50.00 – the order will be sent directly to the supplier.
If you are using the general “user” account and the order is more than $50.00 – the order will be sent directly to the person designated as the “buyer” (approver) so that they can either approve or reject the order.
If you are using the “buyer” account to place the order, there will be no approval chain and the order will be sent directly to the supplier (regardless of the dollar amount of the order).
Click on the box that says “Submit for Approval”
Setting a Tag Once you have a specific item on the screen – if you click on the Item Title Link (in blue) – this will bring up
a more detailed description of the item.
You will then see a box that says “Tag It” – if you click on the option to tag the item – it will then appear in the Tags section of your home screen.
You now need to give the tag a name – type a description of the tag in the box provided. If you wish to make this a “Private” tag for yourself – put a check in the box marked Private next to your tag
description. The Private Tags that you create will appear in My Account – Manage My Tags.
April 2009 Page 7

Approval Process
Most requisitions require one or more approvals. The system automatically generates the appropriate approval chain. Approvers are notified that their approval is required via an email notification and a message is sent to the Inbox of the “buyer” email account. All notifications that are sent to the “buyer” email account also display in the Coupa “To Do” area of the homepage.
1. Approving Via Email The email will show the requisition information so that the “buyer” (approver) can decide to approve
or reject the requisition. At the bottom of the email are links to allow the “buyer” to quickly act upon the “user” request.
April 2009 Page 8

You can simply approve or reject at the bottom of the email. A new email will open which contains a special code. Click Send and the system will receive the email.
2. Approving Via Coupa Login to your Coupa account. You can see line items waiting for “buyer” approval in the “To Do” section of the homepage.
Click on the link to view the requisition (order).o Click on See More Detail at the bottom of the page to view additional informationo Click on Approve to approve the order.o Click on Reject to reject the order.
You can print out this screen to have a record of your order. It includes the items purchased, the billing account used and the Purchase Order number. You can also view the PO through My Account (see section below).
April 2009 Page 9

Once the “buyer” has approved the order, a Purchase Order is created and sent to the vendor via email submission.
You can follow the progress of the approval in the My Account area.
My Account
The My Account area provides you with the ability to check order status, review past order, receive goods and services, review your tags, change your password and delegate approvals.
Click on View to access different views: Open Requisitions: these are in draft form not yet sent. A user can withdraw the requisition and it will no
longer be in the approvers queue. You can edit and resubmit for approval. Requisitions pending approval: these are waiting for the approver to approve the order. Requisitions pending Receipt: these orders have been sent and are waiting delivery.
April 2009 Page 10
Account number designated
Click here to Approve

Ordered Requisitions: a list of what you’ve already ordered. All Requisitions: lists all requisitions in every status.
Purchase Order Statuses
Draft - Purchase orders will only be in draft status if a valid PO could not be automatically created from an approved requisition.
Buyer Hold - A PO will have a buyer hold placed on it if the option "Hold POs for buyer review" is selected for the PO's supplier. It will not be issued without manual intervention.
Currency Hold - A PO will have a currency hold placed on it if there is no exchange rate defined between the PO's transactional currency and the chart of accounts' accounting currency. To release the hold, ensure that the appropriate exchange rates are defined, and then click on the "Attempt to release POs on currency hold" button at the bottom of the "Exchange Rates" page. That will start a background process that will attempt to further progress the affected purchase orders.
Supplier Hold - A PO will have a supplier hold placed on it if the supplier is marked as "On Hold". When the "On Hold" option is unchecked on the supplier record, a background process will attempt to issue any POs that were affected.
Issued - The purchase order has been issued to the supplier.
Cancelled - The purchase order has been cancelled. POs can only be cancelled if it has not been received or invoiced against.
Closed - The purchase order has been closed. Only issued POs can be closed.
Actions Users may resend the requisition using the mail icon. Users may withdraw a requisition if it is in the “Pending Approval” status by clicking on the green return
arrow icon. Users may copy the requisition to be used again by clicking on the two pages icon.
Export Order into Excel You can also export your order history into Excel by clicking on the button to “Export to Excel”.
To View the Purchase Order You can view a more detailed Purchase Order by clicking on the number on the left
April 2009 Page 11

Changing Passwords:You may change your password by clicking on Change Password on the right under Settings.
My Address Book You can set a default address. Find your address and on the far right, click on Choose. This should display
when you go to your shopping cart.
My Default Account You can set one account as your default if this works in your process. If you have more than 1 account,
then this is not recommended
Manage My Tags You may also manage your Private tags here. You can use this for quick access to the items you purchase
most often. You can also delete your personal tags as well from this section of your account.
ReceivingThere is functionality that allows you to indicate if you have received the goods or services that you ordered.
When you are in My Account looking at all of your orders – if an order has a status of ORDERED – and you know you have received the items, you can click on the Truck Icon to receive against the order.
April 2009 Page 12

Once you click on the Truck Icon – it will bring up a list of the items on that order to be received. You can receive the entire order by clicking Receive All, or receive line by line.
Partial receipts are allowed by entering a number in the white box under Receive, and you can view what has been received to date for each requisition line.
Click Save to save the receipt in the system.
April 2009 Page 13
Click on Truck Icon to Receive.