0872e3 goodrich ice detector - campbell sci · 0872e3 goodrich ice detector 2 figure 1. model...
TRANSCRIPT

0872E3 Goodrich
Ice Detector
User Manual
Issued 31.3.09
Copyright © 2006-2007 Campbell Scientific (Canada) Corp. Printed under Licence by Campbell Scientific Ltd.
CSL 741


Guarantee This equipment is guaranteed against defects in materials and workmanship. This guarantee applies for twelve months from date of delivery. We will repair or replace products which prove to be defective during the guarantee period provided they are returned to us prepaid. The guarantee will not apply to:
• Equipment which has been modified or altered in any way without the written permission of Campbell Scientific
• Batteries
• Any product which has been subjected to misuse, neglect, acts of God or damage in transit.
Campbell Scientific will return guaranteed equipment by surface carrier prepaid. Campbell Scientific will not reimburse the claimant for costs incurred in removing and/or reinstalling equipment. This guarantee and the Company’s obligation thereunder is in lieu of all other guarantees, expressed or implied, including those of suitability and fitness for a particular purpose. Campbell Scientific is not liable for consequential damage.
Please inform us before returning equipment and obtain a Repair Reference Number whether the repair is under guarantee or not. Please state the faults as clearly as possible, and if the product is out of the guarantee period it should be accompanied by a purchase order. Quotations for repairs can be given on request.
When returning equipment, the Repair Reference Number must be clearly marked on the outside of the package.
Note that goods sent air freight are subject to Customs clearance fees which Campbell Scientific will charge to customers. In many cases, these charges are greater than the cost of the repair.
Campbell Scientific Ltd, Campbell Park, 80 Hathern Road,
Shepshed, Loughborough, LE12 9GX, UK Tel: +44 (0) 1509 601141 Fax: +44 (0) 1509 601091
Email: [email protected] www.campbellsci.co.uk

PLEASE READ FIRST About this manual
Please note that this manual was originally produced by Campbell Scientific Inc. primarily for the North American market. Some spellings, weights and measures may reflect this origin.
Some useful conversion factors:
Area: 1 in2 (square inch) = 645 mm2 Length: 1 in. (inch) = 25.4 mm
1 ft (foot) = 304.8 mm 1 yard = 0.914 m 1 mile = 1.609 km
Mass: 1 oz. (ounce) = 28.35 g 1 lb (pound weight) = 0.454 kg Pressure: 1 psi (lb/in2) = 68.95 mb Volume: 1 UK pint = 568.3 ml 1 UK gallon = 4.546 litres 1 US gallon = 3.785 litres
In addition, while most of the information in the manual is correct for all countries, certain information is specific to the North American market and so may not be applicable to European users.
Differences include the U.S standard external power supply details where some information (for example the AC transformer input voltage) will not be applicable for British/European use. Please note, however, that when a power supply adapter is ordered it will be suitable for use in your country.
Some brackets, shields and enclosure options, including wiring, are not sold as standard items in the European market; in some cases alternatives are offered. Details of the alternatives will be covered in separate manuals.
Recycling information At the end of this product’s life it should not be put in commercial or domestic refuse but sent for recycling. Any batteries contained within the product or used during the products life should be removed from the product and also be sent to an appropriate recycling facility.
Campbell Scientific Ltd can advise on the recycling of the equipment and in some cases arrange collection and the correct disposal of it, although charges may apply for some items or territories.
For further advice or support, please contact Campbell Scientific Ltd, or your local agent.
Campbell Scientific Ltd, Campbell Park, 80 Hathern Road, Shepshed, Loughborough, LE12 9GX, UK Tel: +44 (0) 1509 601141 Fax: +44 (0) 1509 601091
Email: [email protected] www.campbellsci.co.uk


i
Contents PDF viewers note: These page numbers refer to the printed version of this document. Use the Adobe Acrobat® bookmarks tab for links to specific sections.
1. Introduction .................................................................. 1
2. Installation .................................................................... 2 2.1 Location .................................................................................................... 2 2.2 Mounting .................................................................................................. 3 2.3 Wiring....................................................................................................... 3
3. Operational Check Using Datalogger ........................ 4
4. Programming Example for CR1000 ............................ 5
Appendices
A. Operation of the 0872E3 ......................................... A-1 A1.1 Operation ........................................................................................... A-1 A1.2 System Operation .............................................................................. A-1 A1.3 Data Link ........................................................................................... A-1 A1.4 System Commands ............................................................................ A-2 A1.5 Failure Detection ............................................................................... A-3 A1.6 Probe Frequency Variation ................................................................ A-3 A1.7 Electrical Design ............................................................................... A-3 A1.8 Maintenance ...................................................................................... A-5
B. FCC Compliancy ...................................................... B-1
C. Specification Drawings ........................................... C-1
Figures 1. Model 0872E3 Goodrich Ice Detector ....................................................... 2 2. Mounting .................................................................................................... 3 3. Electrical Block Diagram ....................................................................... A-4 4. Assembly Drawing ............................................................................... A-12 5. Detail Assembly Drawing .................................................................... A-13 6. FCC Compliancy Statement ................................................................... B-1

This is a blank page.
1
0872E3 Goodrich Ice Detector
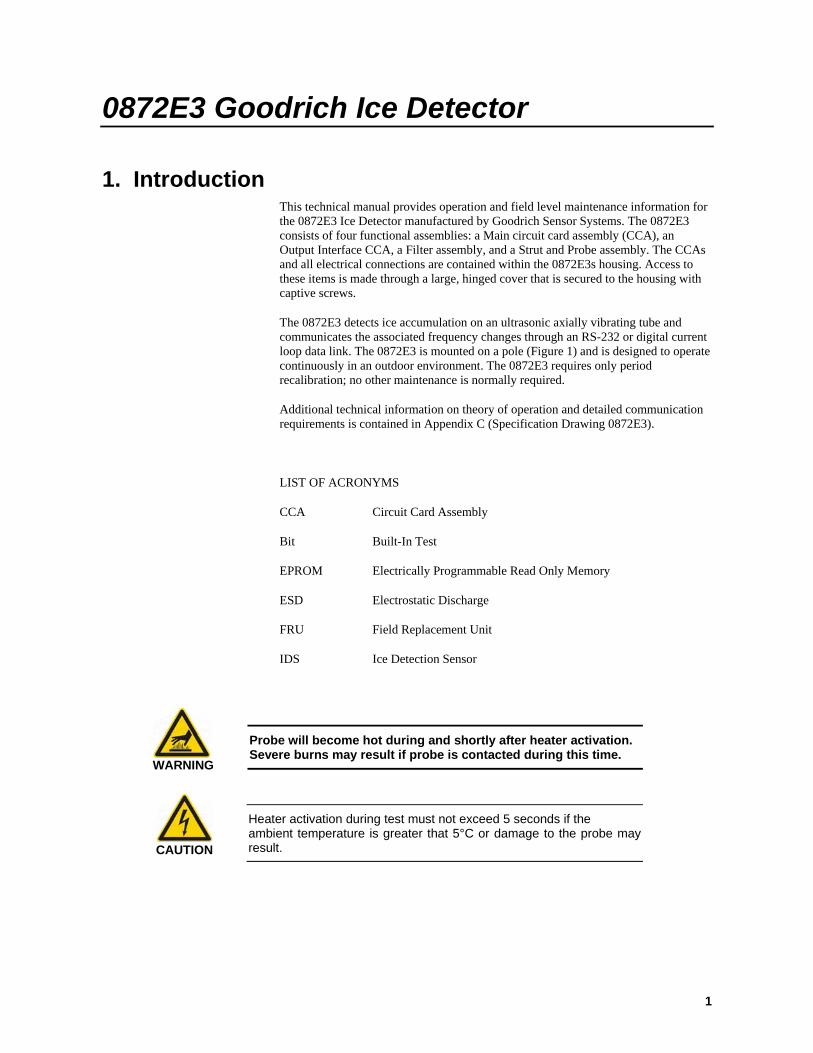
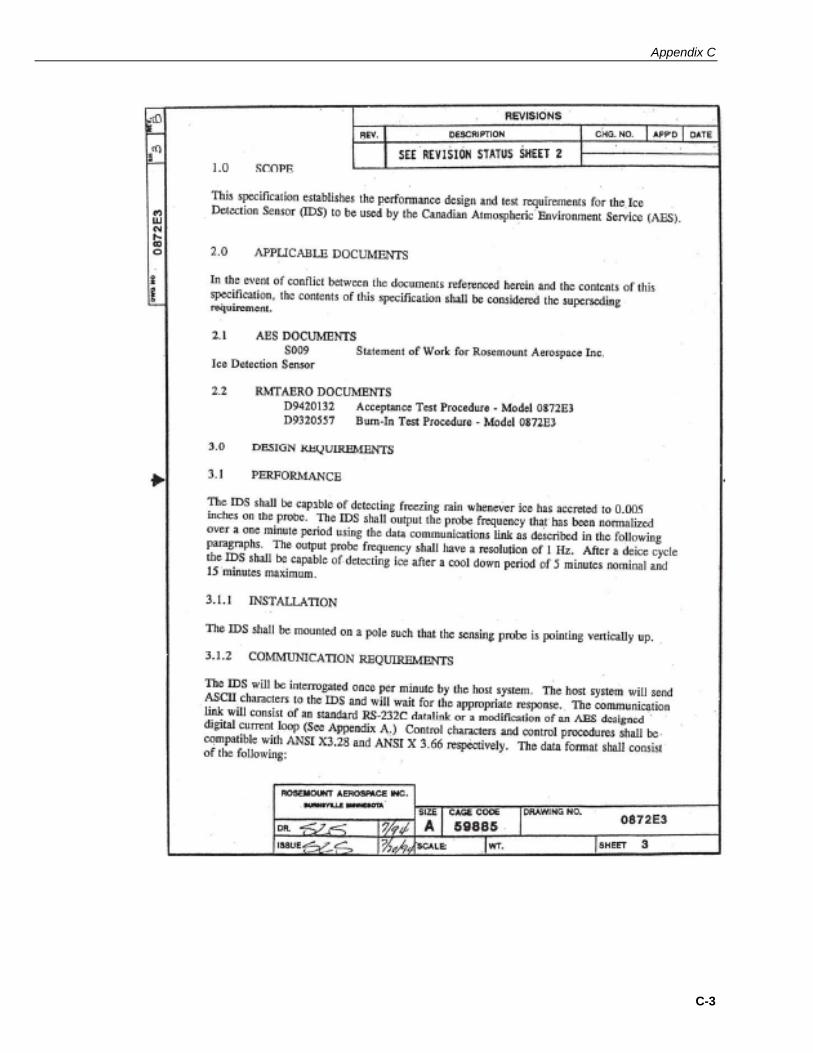
1. Introduction This technical manual provides operation and field level maintenance information for the 0872E3 Ice Detector manufactured by Goodrich Sensor Systems. The 0872E3 consists of four functional assemblies: a Main circuit card assembly (CCA), an Output Interface CCA, a Filter assembly, and a Strut and Probe assembly. The CCAs and all electrical connections are contained within the 0872E3s housing. Access to these items is made through a large, hinged cover that is secured to the housing with captive screws.
The 0872E3 detects ice accumulation on an ultrasonic axially vibrating tube and communicates the associated frequency changes through an RS-232 or digital current loop data link. The 0872E3 is mounted on a pole (Figure 1) and is designed to operate continuously in an outdoor environment. The 0872E3 requires only period recalibration; no other maintenance is normally required.
Additional technical information on theory of operation and detailed communication requirements is contained in Appendix C (Specification Drawing 0872E3).
LIST OF ACRONYMS
CCA Circuit Card Assembly
Bit Built-In Test
EPROM Electrically Programmable Read Only Memory
ESD Electrostatic Discharge
FRU Field Replacement Unit
IDS Ice Detection Sensor
Probe will become hot during and shortly after heater activation. Severe burns may result if probe is contacted during this time.
Heater activation during test must not exceed 5 seconds if the ambient temperature is greater that 5°C or damage to the probe may result.
WARNING
CAUTION
0872E3 Goodrich Ice Detector
2
Figure 1. Model 0872E3 Goodrich Ice Detector
2. Installation 2.1 Location
The 0872E3 should be mounted to a sturdy pole located away from buildings or other obstacles that could shadow the sensing element from freezing rain. The 0872E3 should be installed so that the sensing probe is a minimum 36 inches above the ground. The attached mounting bracket is ideal for mounting the 0872E3 to the pole.
User Manual
3
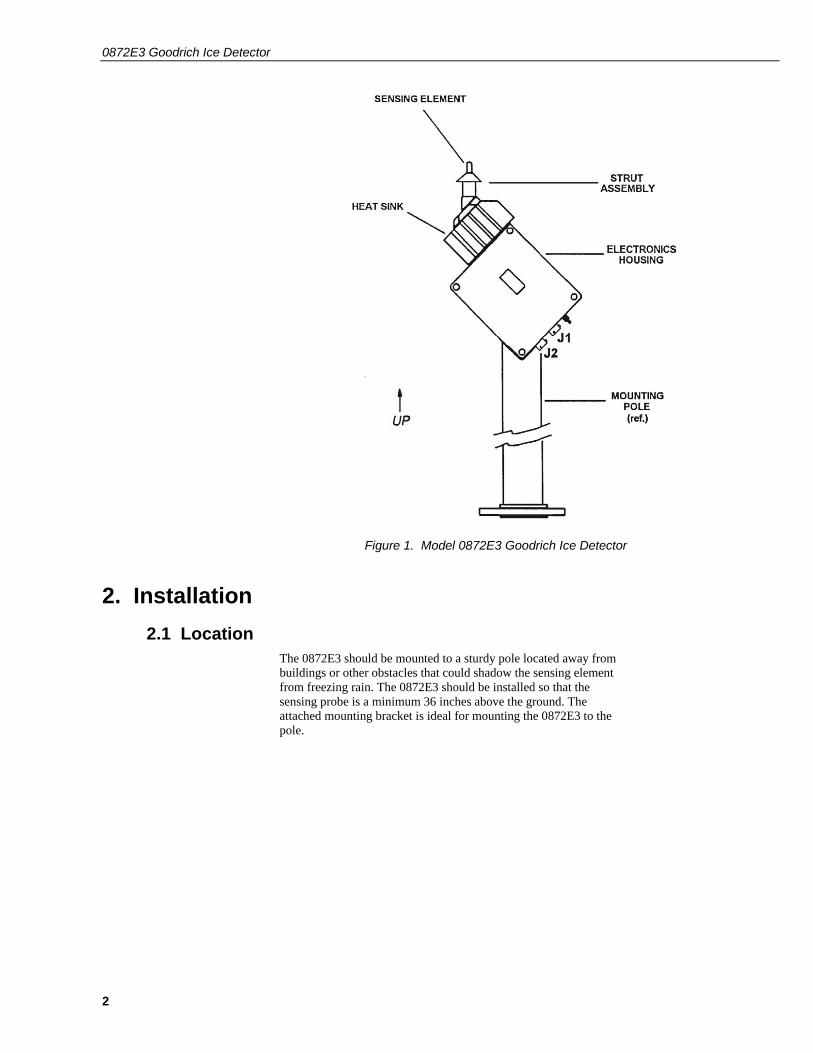
2.2 Mounting 1. Position the 0872E3 on mounting pole with the sensing probe
pointing upward. Tighten band clamps (shown in photo below).
Figure 2. Mounting
2. Remove one ground stud nut.
3. Position ground wire on ground stud.
4. Replace and tighten ground stud nut.
5. Connect cables to connectors J1(IDS) and J2(IDS).
6. Remove protective tube from strut and probe.
2.3 Wiring Ice Detector Connections
Wire colour Description 120 VAC Supply
J1 Black 120 VAC Line Line J1 White 120 VAC Neutral Neutral J1 Green 120 VAC Ground Ground
Ground Stud Green Ground Earth Ground
Datalogger
Connections J2 Green RS-232 Rx C1 J2 White RS-232 Tx C2 J2 Black RS-232 Signal Gnd G J2 Clear Shield G
J2 Signal Cable
Band Clamps
J1 Power Cable
Ground Stud
0872E3 Goodrich Ice Detector
4
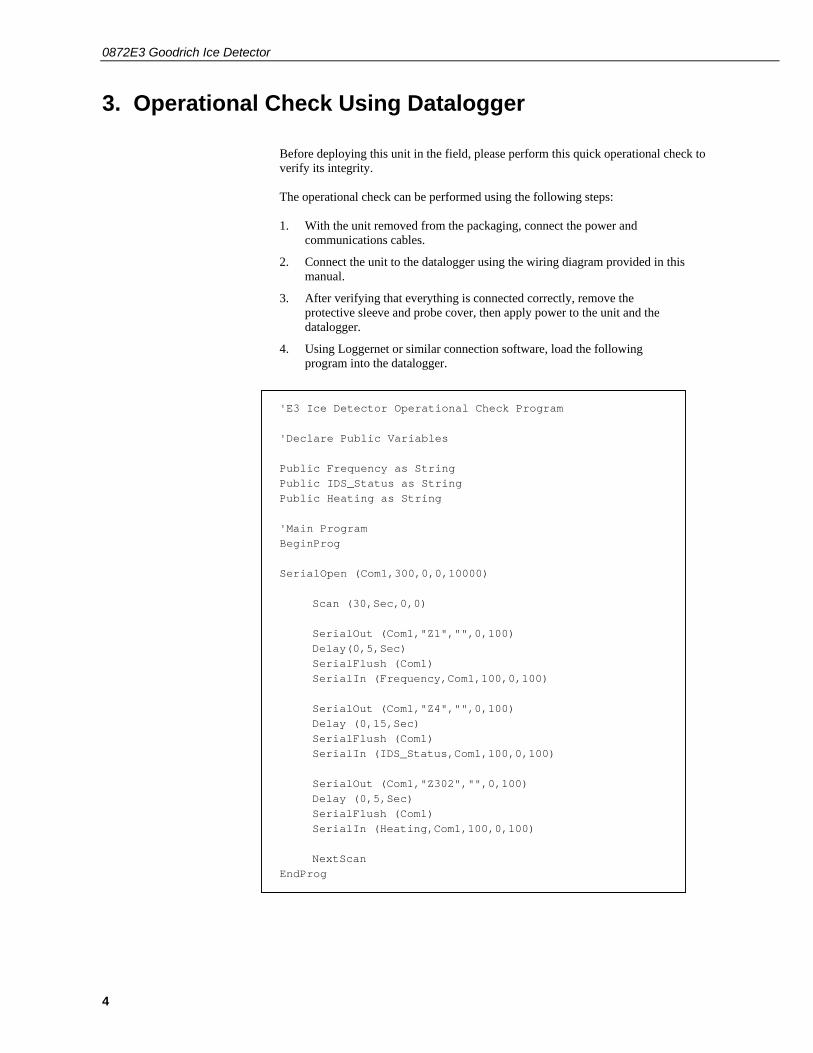
3. Operational Check Using Datalogger
Before deploying this unit in the field, please perform this quick operational check to verify its integrity. The operational check can be performed using the following steps: 1. With the unit removed from the packaging, connect the power and
communications cables.
2. Connect the unit to the datalogger using the wiring diagram provided in this manual.
3. After verifying that everything is connected correctly, remove the protective sleeve and probe cover, then apply power to the unit and the datalogger.
4. Using Loggernet or similar connection software, load the following program into the datalogger.
'E3 Ice Detector Operational Check Program 'Declare Public Variables Public Frequency as String Public IDS_Status as String Public Heating as String 'Main Program BeginProg SerialOpen (Com1,300,0,0,10000) Scan (30,Sec,0,0) SerialOut (Com1,"Z1","",0,100) Delay(0,5,Sec) SerialFlush (Com1) SerialIn (Frequency,Com1,100,0,100)
SerialOut (Com1,"Z4","",0,100) Delay (0,15,Sec) SerialFlush (Com1) SerialIn (IDS_Status,Com1,100,0,100)
SerialOut (Com1,"Z302","",0,100) Delay (0,5,Sec) SerialFlush (Com1) SerialIn (Heating,Com1,100,0,100) NextScan
EndProg
User Manual
5
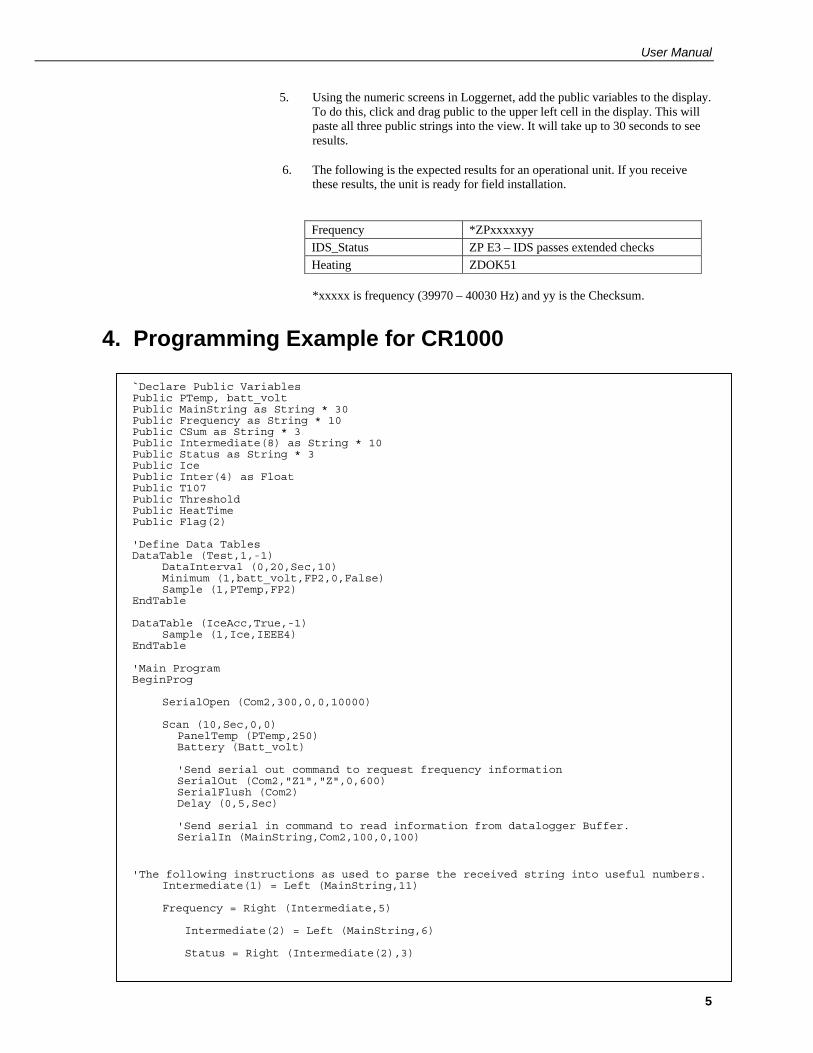
5. Using the numeric screens in Loggernet, add the public variables to the display. To do this, click and drag public to the upper left cell in the display. This will paste all three public strings into the view. It will take up to 30 seconds to see results.
6. The following is the expected results for an operational unit. If you receive these results, the unit is ready for field installation.
Frequency *ZPxxxxxyy IDS_Status ZP E3 – IDS passes extended checks Heating ZDOK51
*xxxxx is frequency (39970 – 40030 Hz) and yy is the Checksum.
4. Programming Example for CR1000
`Declare Public Variables Public PTemp, batt_volt Public MainString as String * 30 Public Frequency as String * 10 Public CSum as String * 3 Public Intermediate(8) as String * 10 Public Status as String * 3 Public Ice Public Inter(4) as Float Public T107 Public Threshold Public HeatTime Public Flag(2) 'Define Data Tables DataTable (Test,1,-1)
DataInterval (0,20,Sec,10) Minimum (1,batt_volt,FP2,0,False) Sample (1,PTemp,FP2)
EndTable DataTable (IceAcc,True,-1)
Sample (1,Ice,IEEE4) EndTable 'Main Program BeginProg
SerialOpen (Com2,300,0,0,10000)
Scan (10,Sec,0,0) PanelTemp (PTemp,250) Battery (Batt_volt)
'Send serial out command to request frequency information SerialOut (Com2,"Z1","Z",0,600) SerialFlush (Com2) Delay (0,5,Sec)
'Send serial in command to read information from datalogger Buffer. SerialIn (MainString,Com2,100,0,100)
'The following instructions as used to parse the received string into useful numbers.
Intermediate(1) = Left (MainString,11)
Frequency = Right (Intermediate,5)
Intermediate(2) = Left (MainString,6) Status = Right (Intermediate(2),3)
0872E3 Goodrich Ice Detector
6
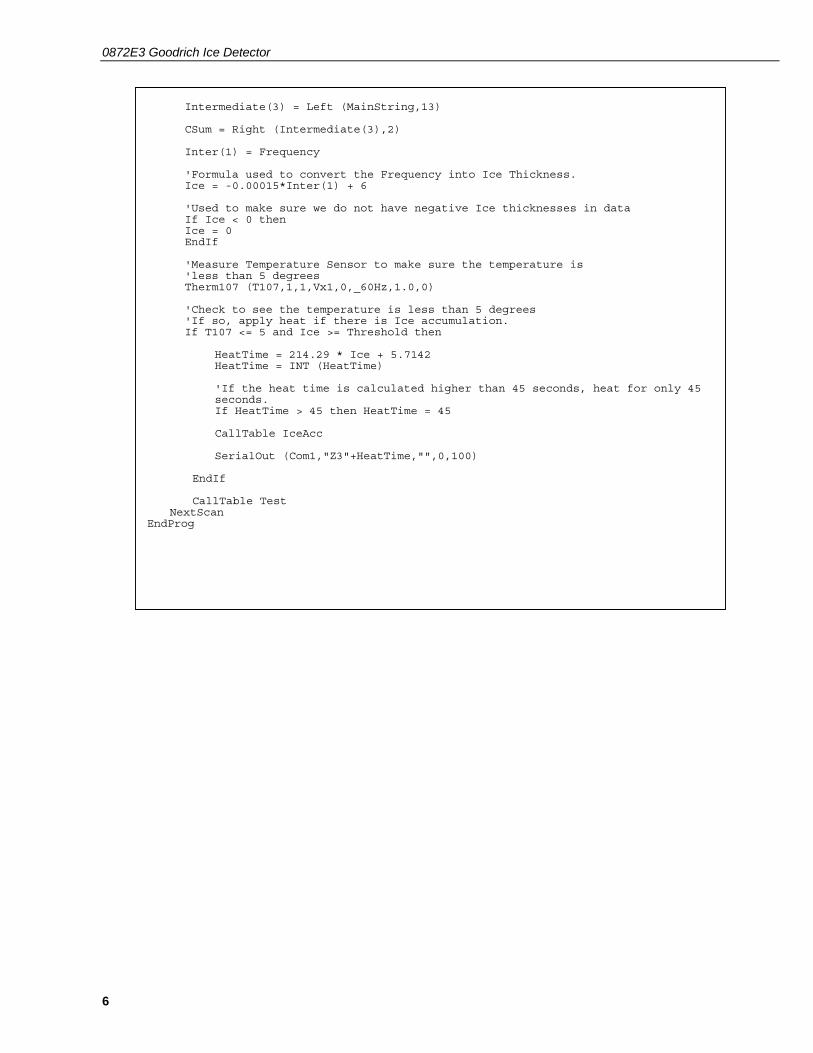
Intermediate(3) = Left (MainString,13)
CSum = Right (Intermediate(3),2)
Inter(1) = Frequency
'Formula used to convert the Frequency into Ice Thickness. Ice = -0.00015*Inter(1) + 6
'Used to make sure we do not have negative Ice thicknesses in data If Ice < 0 then Ice = 0 EndIf
'Measure Temperature Sensor to make sure the temperature is 'less than 5 degrees Therm107 (T107,1,1,Vx1,0,_60Hz,1.0,0)
'Check to see the temperature is less than 5 degrees 'If so, apply heat if there is Ice accumulation. If T107 <= 5 and Ice >= Threshold then
HeatTime = 214.29 * Ice + 5.7142 HeatTime = INT (HeatTime)
'If the heat time is calculated higher than 45 seconds, heat for only 45 seconds. If HeatTime > 45 then HeatTime = 45
CallTable IceAcc
SerialOut (Com1,"Z3"+HeatTime,"",0,100)
EndIf
CallTable Test
NextScan EndProg

A-1
Appendix A. Operation of the 0872E3
A1.1 Operation Apply power to the 0872E3. Wait 30 seconds minimum, then perform the following sequence of commands to ensure proper operation of the unit.
Command Response Wait (minimum)
Z1 Xpxxxxxyy 5 sec Z4 ZP E3 15 sec
Z302 ZDOK51 5 sec
*xxxxx is frequency (39970-40030 Hz) and yy is the checksum
A1.2 System Operation Ice is sensed due to the effect of mass loading on the probe. As ice bonds to the probe the probe mass increases and its natural frequency decreases. The sensor outputs a normalized frequency (corresponding to the ice accretion level) that has been averaged over one minute. The 0872E3 will respond when interrogated by the host system with one of the four different requests described below:
Z1 – SEND FREQUENCY DATA
Z3 – DE-ICE STRUT AND PROBE
Z4 – PERFORM EXTENDED DIAGNOSTICS
F5 – PERFORM FIELD CALIBRATION
A1.3 Data Link The 0872E3 is interrogated once per minute by the host system. The host system sends ASCII characters to the 0872E3 and awaits the appropriate response. Control characters and control procedures are compatible with ANSI X3.28 and ANSI X3.66, respectively. The data format consists of the following:
• 1 Start Bit • 8 Data Bits • 1 Stop Bit • No Parity • 300 Baud • Full Duplex • Serial Asynchronous • Configured as Data Terminal Equipment (DTE)
Either RS-232 or digital current loop interface can be used to communicate with the 0872E3.

0872E3 Goodrich Ice Detector
A-2
A1.4 System Commands
All system commands must be in upper case.
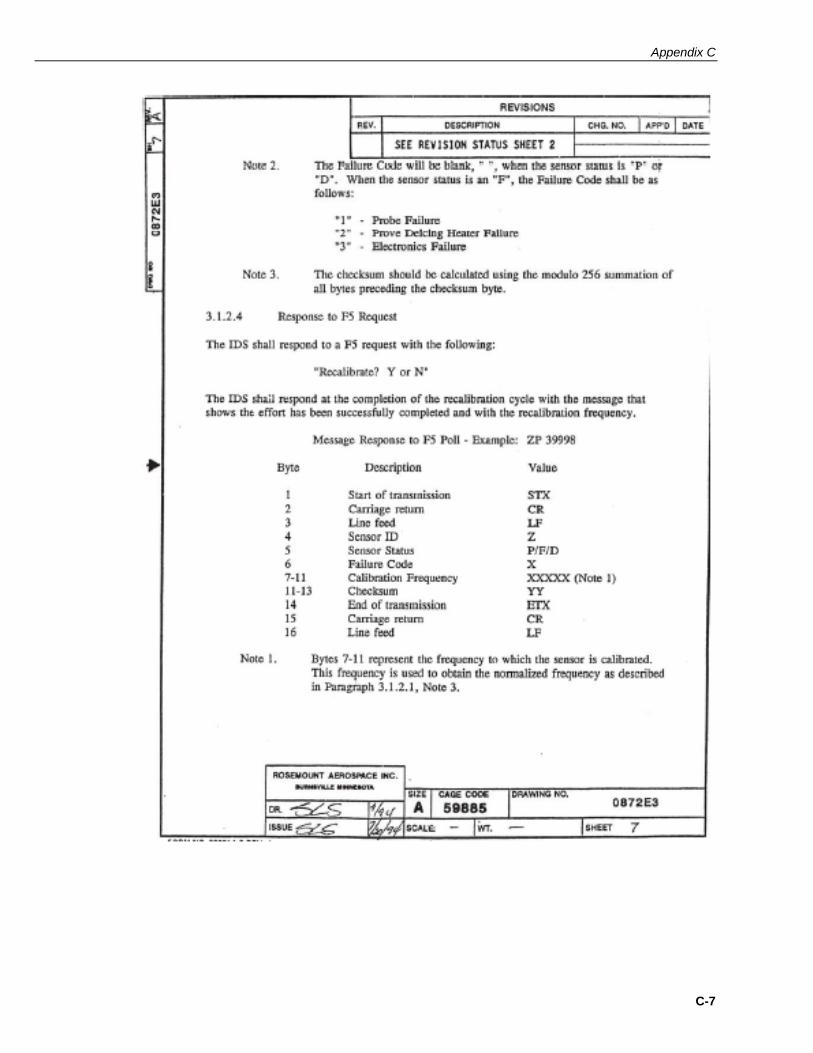
Z1 – Typing Z1 commands the 0872E3 to “Send Routine Data”. The expected output from the 0872E3 is: ZPXXXXXCC Normal Operation ZDXXXXXCC De-icing Cycle “XXXXX” is the probe frequency (averaged over one minute) and “CC” is the checksum. The probe frequency must be between 38,400 and 41,500 Hz. Three failure response outputs are also possible after a Z1 command: ZF1XXXXXCC Probe Failure ZF2XXXXXCC Heater Failure ZF3XXXXXCC Electronics Failure Z3 – Typing “Z3XX” Commands the 0872E3 to turn the strut and probe heaters on for “XX” seconds, where “XX” is a two digit number between 01 and 60. The expected output for the 0872E3 is: ZDOK51 Confirmation of Heater Activation If a heater failure is detected of if “XX” is not a valid input, the 0872E3 will not acknowledge the “Z3” request.
Probe will become hot during and shortly after heater activation. Severe burns may result if probe is contacted during this time.
Heater activation during test must not exceed 5 seconds if the ambient temperature is greater that 5°C or damage to the probe may result.
Z4 – Typing “Z4” commands the 0872E3 to perform extended diagnostics. The possible outputs from the 0872E3 are: ZP E3 0872E3 Passes ZD D7 0872E3 in De-ice Mode ZF1 EA Probe Failure ZF2 EB Heater Failure ZF3 EC Electronics Failure F5 – Typing “F5” commands the 0872E3 to re-calibrate the probe frequency. The 0872E3 responds with:
NOTE
WARNING
CAUTION
Appendix A
A-3
Recalibrate? Y or N Responding with “Y” will recalibrate the nominal probe frequency to 40,000 Hz. Responding with “N” or no response within 10 seconds will cancel the F5 request.
Probe calibration should only be done under the conditions specified in Paragraph 6.7 (Field Calibration).
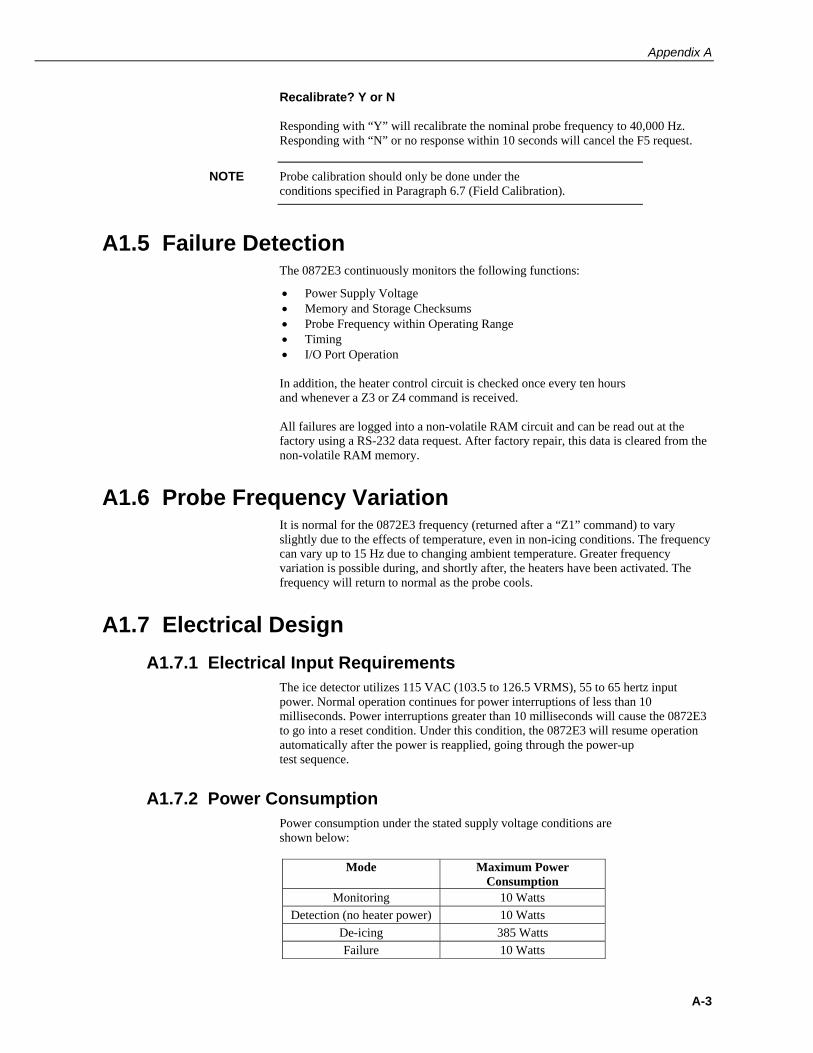
A1.5 Failure Detection The 0872E3 continuously monitors the following functions:
• Power Supply Voltage • Memory and Storage Checksums • Probe Frequency within Operating Range • Timing • I/O Port Operation In addition, the heater control circuit is checked once every ten hours and whenever a Z3 or Z4 command is received. All failures are logged into a non-volatile RAM circuit and can be read out at the factory using a RS-232 data request. After factory repair, this data is cleared from the non-volatile RAM memory.
A1.6 Probe Frequency Variation It is normal for the 0872E3 frequency (returned after a “Z1” command) to vary slightly due to the effects of temperature, even in non-icing conditions. The frequency can vary up to 15 Hz due to changing ambient temperature. Greater frequency variation is possible during, and shortly after, the heaters have been activated. The frequency will return to normal as the probe cools.
A1.7 Electrical Design A1.7.1 Electrical Input Requirements
The ice detector utilizes 115 VAC (103.5 to 126.5 VRMS), 55 to 65 hertz input power. Normal operation continues for power interruptions of less than 10 milliseconds. Power interruptions greater than 10 milliseconds will cause the 0872E3 to go into a reset condition. Under this condition, the 0872E3 will resume operation automatically after the power is reapplied, going through the power-up test sequence.
A1.7.2 Power Consumption Power consumption under the stated supply voltage conditions are shown below:
Mode Maximum Power Consumption
Monitoring 10 Watts Detection (no heater power) 10 Watts
De-icing 385 Watts Failure 10 Watts
NOTE
0872E3 Goodrich Ice Detector
A-4
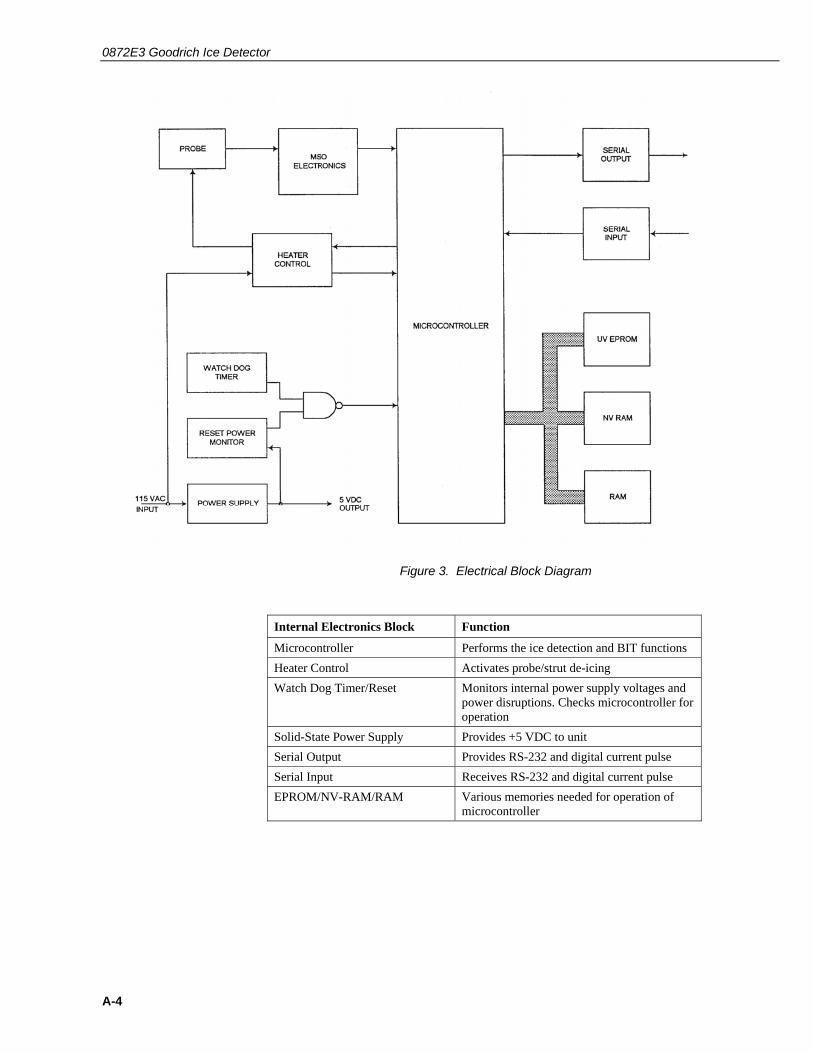
Figure 3. Electrical Block Diagram
Internal Electronics Block Function
Microcontroller Performs the ice detection and BIT functions Heater Control Activates probe/strut de-icing Watch Dog Timer/Reset Monitors internal power supply voltages and
power disruptions. Checks microcontroller for operation
Solid-State Power Supply Provides +5 VDC to unit Serial Output Provides RS-232 and digital current pulse Serial Input Receives RS-232 and digital current pulse EPROM/NV-RAM/RAM Various memories needed for operation of
microcontroller
Appendix A
A-5
A1.8 Maintenance A1.8.1 Maintenance Concept
The maintenance concept for the 0872E3 consists of:
• BIT detecting and isolating a 0872E3 fault to one of three subassemblies. • Replacement of the faulty subassembly (with 0872E3 attached to the
mounting pole). • Return failed subassembly to Campbell Scientific for repair
A1.8.2 Calibration and Preventative Maintenance The sensor is designed to require no adjustments, alignments, scheduled maintenance, or preventative maintenance. A field calibration feature is included in the design, but the calibration is not performed on a scheduled basis.
Probe calibration should only be done under the conditions specified in Paragraph 6.7 (Field Calibration).
A1.8.3 Fault Isolation Failures can be broken into two categories: BIT detected failures, and those that BIT does not detect (non BIT failures).
A1.8.3.1 BIT Detected Failures ZF1 Probe Failure If a ZF1 failure is indicated in response to the Z1 or Z4 command, proceed as follows: 1. Perform steps 1-6 of paragraph 6.5.3 (removal of strut and probe assembly) to
electrically disconnect probe from Main CCA. 2. Connect a functional strut and probe assembly to J3(MAIN) and J4(MAIN) on
the Main CCA. Install select capacitor (for the functional strut at C7. The test strut and probe assembly can be temporarily placed on top of the 0872E3 housing.
3. Turn power to the 0872E3 “On” and wait for 30 seconds. Issue the Z4 command. If the ZF1 failure code is still indicated, replace the Main CCA. If the failure is no longer indicated, replace the strut and probe assembly.
ZF2 Heater Failure If a ZF2 failure is indicated in response to the Z1 or Z4 command, or if a “no response” condition occurs after issuing the Z3 command, proceed as follows:
1. Perform steps 1-6 of paragraph 6.5.3 (removal of strut and probe assembly) to electrically disconnect probe from Main CCA.
2. Check resistance between J4(S/P)-1 and J4(S/P)-2 using an ohmmeter. Resistance must be 42 ± 5 ohms. If resistance is within range, replace Main CCA. If resistance is out of range, replace strut and probe assembly.
NOTE

0872E3 Goodrich Ice Detector
A-6
ZF3 Electronic Failure If a Zf3 failure is indicated in response to the Z1 or Z4 command, replace the Main CCA. No further troubleshooting is required.
A1.8.3.2 Non BIT Failures If the sensor fails to respond to commands, proceed as follows:
1. Verify AC power is on and main J1(IDS) and J2(IDS) connectors are connected to the IDS.
2. Switch to RS-232 mode. If the 0872E3 communicates in RS-232 mode, but not is current loop mode, replace the Output Interface CCA. If the 0872E3 fails to communicate in either mode, continue with step 3.
3. Switch AC power off. Disconnect connector J1(IDS). Using an ohmmeter, measure the resistance between connector J1(IDS)-A and J1(IDS)-B. If resistance is less than 200 ohms, replace Main CCA. If not, loosen four cover screws and open cover. Remove plastic guard covering J1(MAIN) terminal block by depressing three white clips on each side of guard. Measure resistance between J12(MAIN) pins 1 and 2. If resistance is less than 200 ohms, replace Filter Assembly. If greater than 200 ohms, replace Main CCA.
A1.8.4 Removal of 0872E3 Most repairs can be accomplished without removing the 0872E3 from the mounting pole. If removal is required, proceed as follows:
1. Switch 115 VAC power to 0872E3 off. 2. Place protective tube over strut and probe. 3. Disconnect connectors J1(IDS) and J2(IDS). Place ESD protective caps over
connectors. 4. Remove ground nut and wire from ground stud. Put nut back on finger tight. 5. Loosen mounting bolts and remove unit from mounting pole.
A1.8.5 Disassembly
A1.8.5.1 Removal of Output Interface CCA Refer to Figure 3 for removal of Output Interface CCA.
Remove power to unit prior to opening sensor cover or injuries could result from electrical shock.
This is a Class 1 ESDS item. ESD precautions must be taken prior to opening sensor cover or equipment damage could result.
WARNING
CAUTION

Appendix A
A-7
1. Switch 115 VDC power to the 0872E3 off. Disconnect J1(IDS). 2. Loosen captive screws on sensor cover. 3. Open sensor cover. Cover is hinged to housing. (Pull cover up, then back to
open.) 4. Carefully disconnect J1(I/O) and J2(I/O) plugs from Output Interface CCA. 5. Remove green ground wire from case. 6. Remove Output Interface CCA by gently pulling off from Main CCA.
A1.8.5.2 Removal of Main CCA Refer to Figures 3 and 4 for removal of Main CCA.
Remove power to unit prior to opening sensor cover or injuries could result from electrical shock.
This is a Class 1 ESDS item. ESD precautions must be taken prior to opening sensor cover or equipment damage could result.
1. Switch 115 VAC power to 0872E3 off. Disconnect J1(IDS). 2. Loosen captive screws on sensor cover. 3. Open sensor cover. Cover is hinged to housing (pull cover up, then back to
open.) 4. Remove Output Interface CCA per paragraph 6.5.1. 5. Remove plastic terminal block cover mounted on snap-on standoffs. 6. Remove terminal screws #1, #2, and #3 with a flat-tip screwdriver. The lugs on
these wires are closed-ended. 7. Carefully remove select capacitor C7. Depress latch and pull capacitor straight
upward. (This capacitor will be reinstalled on the replacement CCA.) 8. Carefully disconnect J2(MAIN), J3(MAIN), and J4(MAIN) plugs from main
CCA. 9. Remove two remaining wires from terminal block (see Figures 3 and 4). 10. Remove Main CCA mounting screws. 11. Remove Main CCA from sensor housing.
A1.8.5.3 Removal of Strut and Probe Assembly from Heat Sink Refer to Figure 3 for removal of strut and probe assembly from heat sink.
Remove power to unit prior to opening sensor cover or injuries could result from electrical shock.
This is a Class 1 ESDS item. ESD precautions must be taken prior to opening sensor cover or equipment damage could result.
WARNING
CAUTION
WARNING
CAUTION
0872E3 Goodrich Ice Detector
A-8
Strut and probe replacement can be done at any ambient temperature, however, the unit should be field calibrated only when the ambient temperature is between -10°C and +10°C (see paragraph 6.7).
1. Switch 115VAC power to 0872E3 off. Disconnect J1(IDS).
2. Place protective tube over strut and probe. 3. Loosen captive bolts on sensor cover. 4. Open sensor cover. Cover is hinged to housing (pull cover up, then back to
open). 5. Carefully remove select capacitor C7. Depress latch and pull capacitor straight
out. 6. Carefully disconnect connectors P3(I/O) and P4(I/O) from J3(MAIN) and
J4(MAIN). Remove black grommet from hole in top of housing.
Some early units have a small amount of silicone RTV sealing the hole in the housing in place of the grommet. The RTV should be carefully removed prior to strut removal so that the connectors can be routed through the housing and heat sink.
7. Remove four strut mounting screws securing strut to heat sink. 8. Remove strut and probe assembly from heat sink. Carefully feed connectors
through the housing and heat sink as the strut is removed. 9. Remove and examine strut and probe O-ring.
A1.8.5.4 Removal of Programmed EPROM
Remove power to unit prior to opening sensor cover or injuries could result from electrical shock.
This is a Class 1 ESDS item. ESD precautions must be taken prior to opening sensor cover or equipment damage could result.
1. Switch 115VAC power to 0872E3 off. Disconnect J1(IDS).
2. Loosen captive bolts on sensor cover. 3. Open sensor cover. Cover is hinged to housing (pull cover up, then back to
open.) 4. Remove Output Interface CCA per paragraph 5.5.1. 5. The EEPROM is located in the lower left corner of the Main CCA. It is
distinguished from other components by the socket eject levers used to secure and remove the component from the socket. Push tabs on socket eject levers outward to lift and remove EPROM from Main CCA.
NOTE
NOTE
WARNING
CAUTION

Appendix A
A-9
A1.8.5.5 Removal of Filter Assembly Refer to Figures 3 and 4 for removal of Filter Assembly.
Remove power to unit prior to opening sensor cover or injuries could result from electrical shock.
This is a Class 1 ESDS item. ESD precautions must be taken prior to opening sensor cover or equipment damage could result.
1. Switch 115VAC power to 0872E3 off. Disconnect J1(IDS) and J2(IDS). 2. Loosen captive bolts on sensor cover. 3. Open sensor cover. Cover is hinged to housing (pull cover up, then back to
open). 4. Remove jam nut securing J1(IDS) connector to housing. 5. Disconnect wires from line filter at terminal block J1(MAIN), terminals 1 and 2. 6. Disconnect green/yellow wire (originating at line filter) from ground stud. 7. Remove two shoulder nuts securing line filter to housing. 8. Remove J1(IDS) connector and line filter from housing.
A1.8.6 Assembly Refer to Figures 3 and 4 for installation of FRUs.
A1.8.6.1 Installation of Main CCA 1. Ensure that 115VAC power to 0872E3 is off and J1(IDS) is disconnected. 2. Install Select Capacitor C7 into replacement Main CCA. 3. Position Main CCA into housing with terminal block to the bottom side (ground
lug side) of the housing. 4. Install Main CCA mounting screws. 5. Install latching electrical connectors J2(MAIN), J3(MAIN) and J4(MAIN). 6. Position wires on terminal block and tighten terminal screws.
• Blue wire to terminal #1 • White wire from terminal #1 to terminal #4 • Brown wire to terminal #2 • Black wire from terminal #2 to terminal #5 • Green wire (from ground stud) to terminal #3
7. Torque terminal block screws to 9 in-lbs. 8. Snap plastic terminal block cover in place. 9. Install Output Interface CCA per paragraph 5.6.2. 10. Position cover on housing. 11. Torque cover mounting screws to 28 in-lbs. 12. Perform “System Verification” (paragraph 6.8).
WARNING
CAUTION
Appendix A
A-11
A1.8.6.2 Installation of Output Interface CCA
1. Ensure that 115VAC power to 0872E3 is off. 2. Align four plastic standoffs with corresponding holes on Main CCA and snap in
place. 3. Install green ground wire to internal ground stud. 4. Install plugs J1(I/O) and J2(I/O) in receptacles on Output Interface CCA. 5. Perform “System Verification” (paragraph 5.8).
A1.8.6.3 Installation of Strut and Probe Assembly 1. Ensure that 115VAC power to 0872E3 is off and J1(IDS) is disconnected. 2. Replacement select capacitor is provided with the spare strut and probe
assembly. Install select capacitor into Main CCA location C7. 3. Install O-ring in channel in strut. Feed probe and heater wires through heat sink
into housing. 4. Carefully position strut and probe assembly on heat sink taking care not to pinch
any wires. 5. Secure strut and probe assembly to heat sink with four screws. Torque to 12 in-
lbs. 6. Connect probe electrical connectors P3(I/O) and P4(I/O) at J3(MAIN) and
J4(MAIN). 7. Route wires through grommet and press grommet into hole in top of hole (about
two-thirds of grommet should be inside hole). 8. Position cover on housing. 9. Torque cover mounting screws to 28 in-lbs. 10. Remove protective tube from strut and probe. 11. Perform “System Verification” (paragraph 6.8).
A1.8.6.4 Installation of Programmed EPROM 1. Ensure that 115VAC power to 0872E3 is off and J1(IDS) is disconnected. 2. Orient replacement EPROM so that the notch faces the same direction as other
integrated circuits on the CCA. Push EPROM evenly into socket until it is fully seated and eject levers clamp into place.
It may be necessary to squeeze the eject levers together slightly to fully seat the EPROM.
3. Install Output Interface CCA per paragraph 5.6.2 4. Perform steps 10 and 11 of paragraph 5.6.1 (Installation of Main CCA). 5. Perform “System Verification” (paragraph 5.8).
NOTE

0872E3 Goodrich Ice Detector
A-12
A1.8.6.5 Installation of Filter Assembly Refer to Figures 3 and 4 for installation of filter assembly. 1. Install line filter onto housing studs so that side of filter with two leads face
down 2. Secure line filter to housing using lockwasher and shoulder nut (two places).
Torque to 8 in-lbs. 3. Remove jam nut from connector. Insert connector through D-hole in housing and
secure with jam nut.
Ensure connector O-ring remains in the groove. Torque jam nut to 80 in-lbs.
4. Perform “System Verification” (paragraph 6.8).
A1.8.7 Field Calibration
Field Calibration of the 0872E3 may be required after replacement of the Strut and Probe Assembly or Main CCA. Field calibration should be invoked if the “Z1” frequency of a clean and dry probe at 0 ± 10°C is less than 39970 Hz or greater than 40030 Hz. Calibration should not be performed under any of the following conditions: • Temperature is greater than 10°C or less than -10°C. • Freezing rain or snow has accreted on the sensing probe. • Liquid water or other contaminants are visible on the probe. • Within 20 minutes of a “Z3” (de-ice) command. • Z1 or Z4 commands indicate a fail condition
A1.8.7.1 Calibration Procedure 1. Insure temperature is 0 ± 10°C and the probe is clean and dry. 2. Type “F5”. 3. Type “Y” when prompted. 4. Wait one minute. 5. Type “Z1”. The 0872E3 should respond with “ZPXXXXXYY”. “XXXXX”
represents the probe frequency and should be between 39995 and 40005.
A1.8.8 System Verification
1. Ensure connectors J1(IDS) and J2(IDS) are attached to the 0872E3 and 115VAC power to the 0872E3 is on.
2. Type “Z1”. The 0872E3 should respond with “ZPXXXXXYY”. “XXXXX” represents the probe frequency. If probe is clean and dry and the ambient temperature is 0° ± 10°C, the probe frequency should be between 39970 and 40030.
3. Type “Z4”. The 0872E3 should respond with “ZP E3”. 4. Type “Z302”. The 0872E3 should respond with “ZDOK51”.
NOTE

Appendix A
A-13
Item Name Manufacturer’s Part Number CAGE Code
Main CCA 00872-0150-0003 59885
Output Interface CCA 00872-0149-0002 59885
Strut and Probe Assembly 00872-0286-0002 59885
Filter Assembly 00872-0325-0001 59885
Programmed EPROM 00872-0151-0003 59885
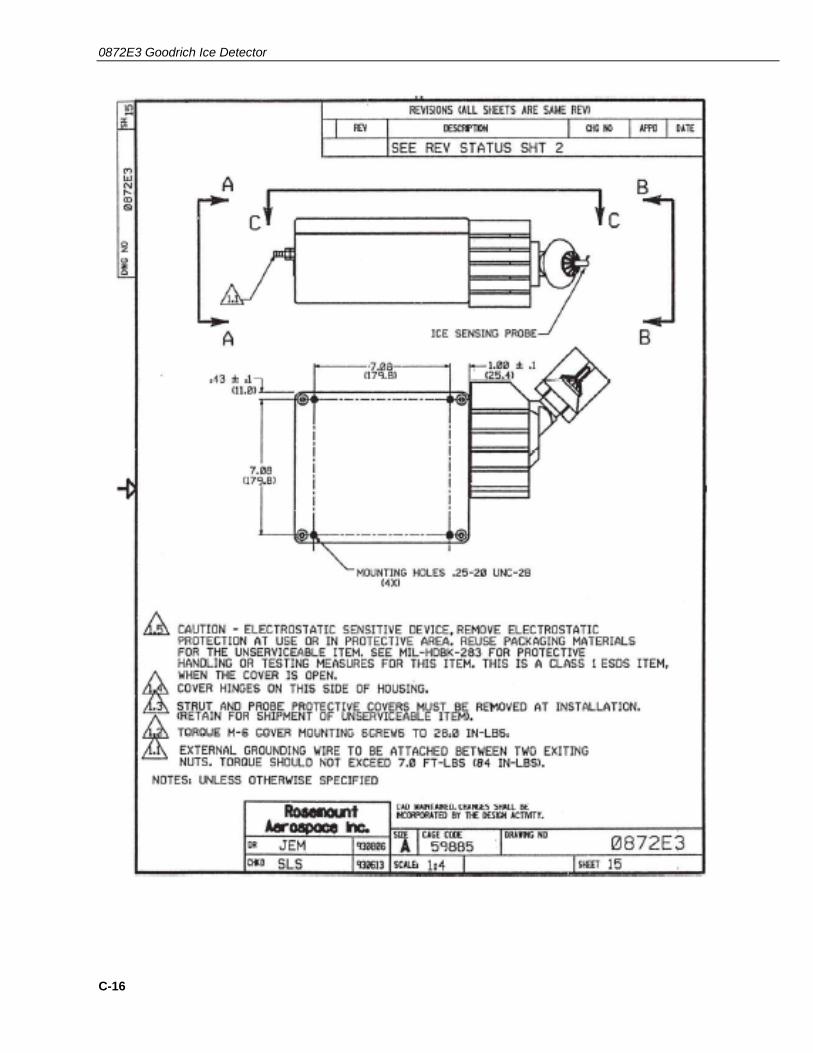
Figure 4. Assembly Drawing
0872E3 Goodrich Ice Detector
A-14
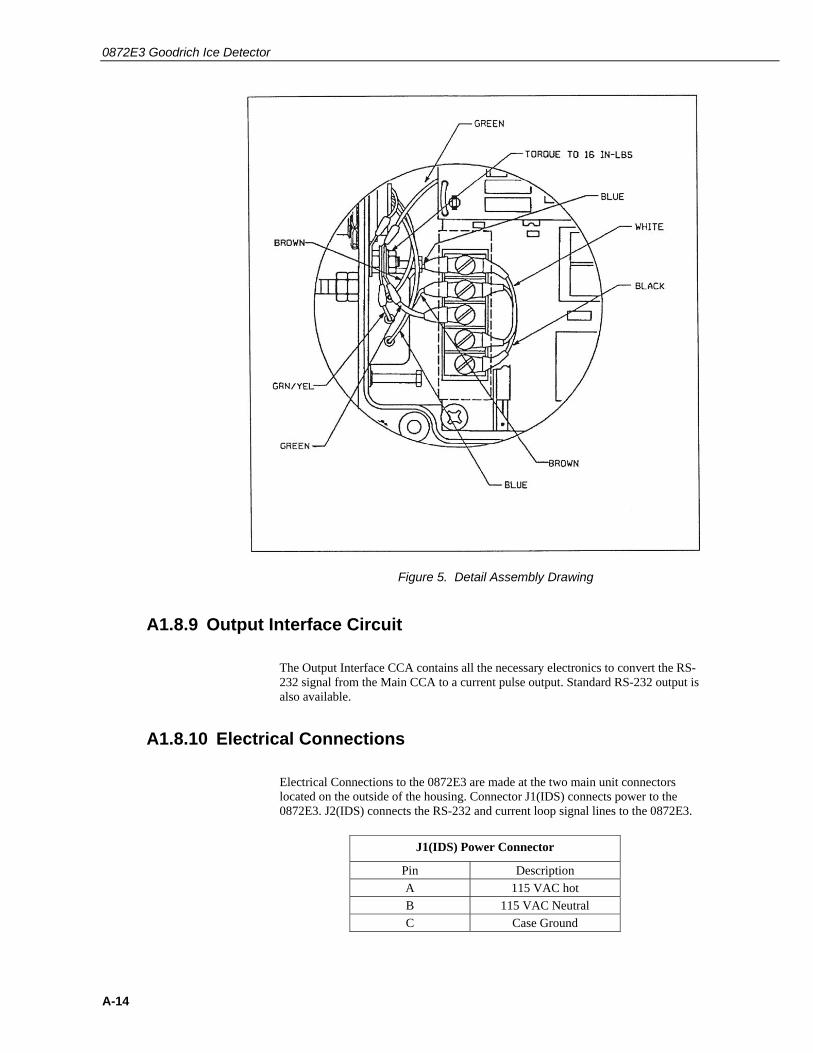
Figure 5. Detail Assembly Drawing
A1.8.9 Output Interface Circuit
The Output Interface CCA contains all the necessary electronics to convert the RS-232 signal from the Main CCA to a current pulse output. Standard RS-232 output is also available.
A1.8.10 Electrical Connections
Electrical Connections to the 0872E3 are made at the two main unit connectors located on the outside of the housing. Connector J1(IDS) connects power to the 0872E3. J2(IDS) connects the RS-232 and current loop signal lines to the 0872E3.
J1(IDS) Power Connector
Pin Description A 115 VAC hot B 115 VAC Neutral C Case Ground

Appendix A
A-15
J2(IDS) Power Connector
Pin Description A RS-232Tx B RS-232Rx C RS-232 Signal Gnd. D Unused E Unused F Current Loop Rx+ G Current Loop Rx- H Current Loop Tx+ J Current Loop Tx- K Unused
B-1
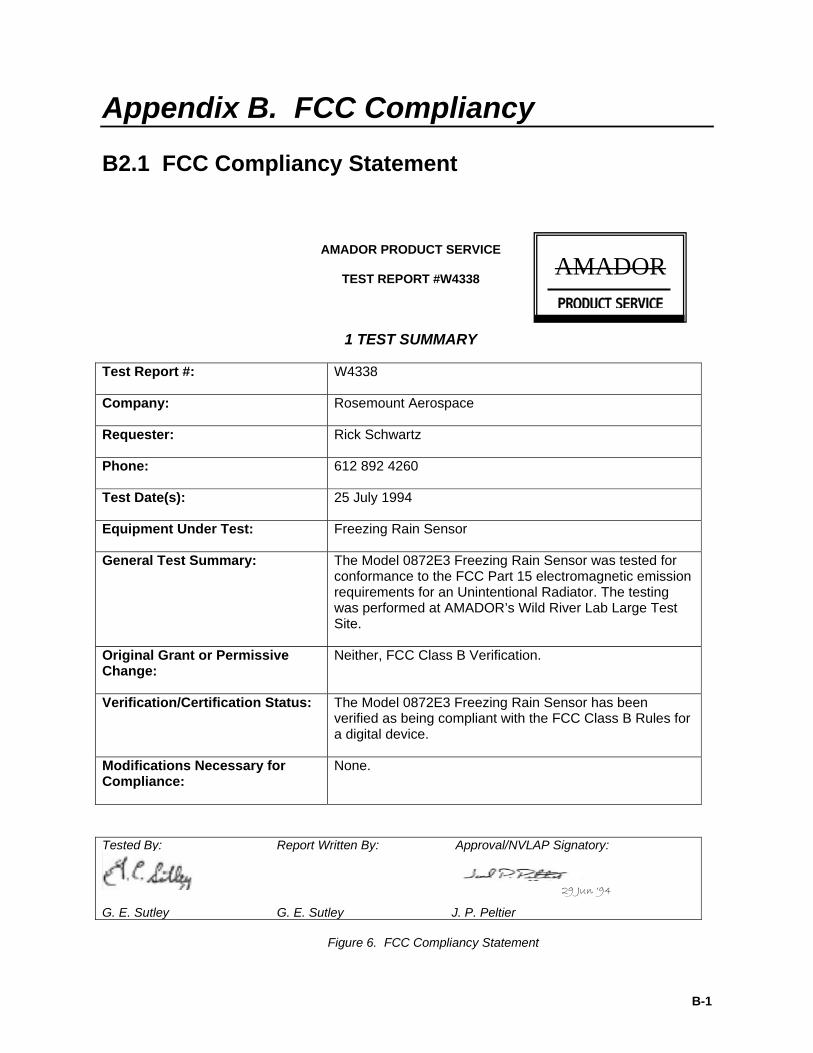
Appendix B. FCC Compliancy
B2.1 FCC Compliancy Statement
AMADOR PRODUCT SERVICE
TEST REPORT #W4338
1 TEST SUMMARY
Test Report #: W4338
Company: Rosemount Aerospace
Requester: Rick Schwartz
Phone: 612 892 4260
Test Date(s): 25 July 1994
Equipment Under Test: Freezing Rain Sensor
General Test Summary: The Model 0872E3 Freezing Rain Sensor was tested for conformance to the FCC Part 15 electromagnetic emission requirements for an Unintentional Radiator. The testing was performed at AMADOR’s Wild River Lab Large Test Site.
Original Grant or Permissive Change:
Neither, FCC Class B Verification.
Verification/Certification Status: The Model 0872E3 Freezing Rain Sensor has been verified as being compliant with the FCC Class B Rules for a digital device.
Modifications Necessary for Compliance:
None.
Tested By: Report Written By: Approval/NVLAP Signatory:
G. E. Sutley G. E. Sutley J. P. Peltier
Figure 6. FCC Compliancy Statement
29 Jun ‘94
AMADORPRODUCT SERVICE

0872E3 Goodrich Ice Detector
B-2
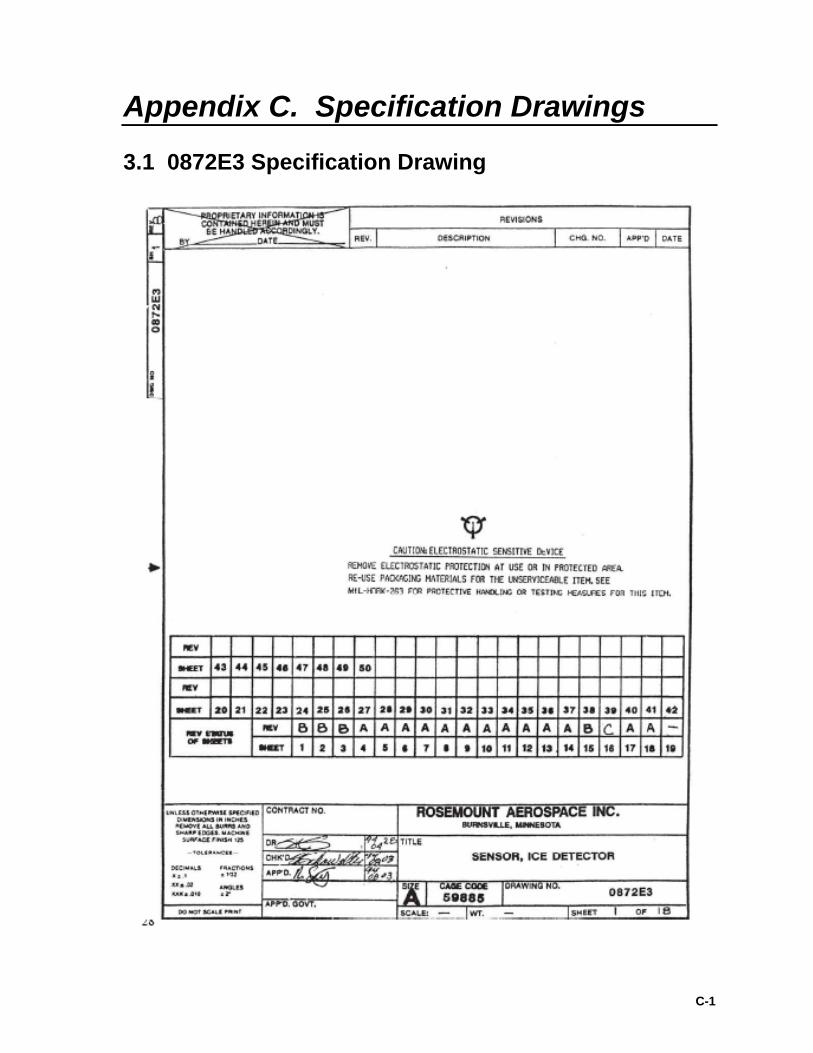
C-1
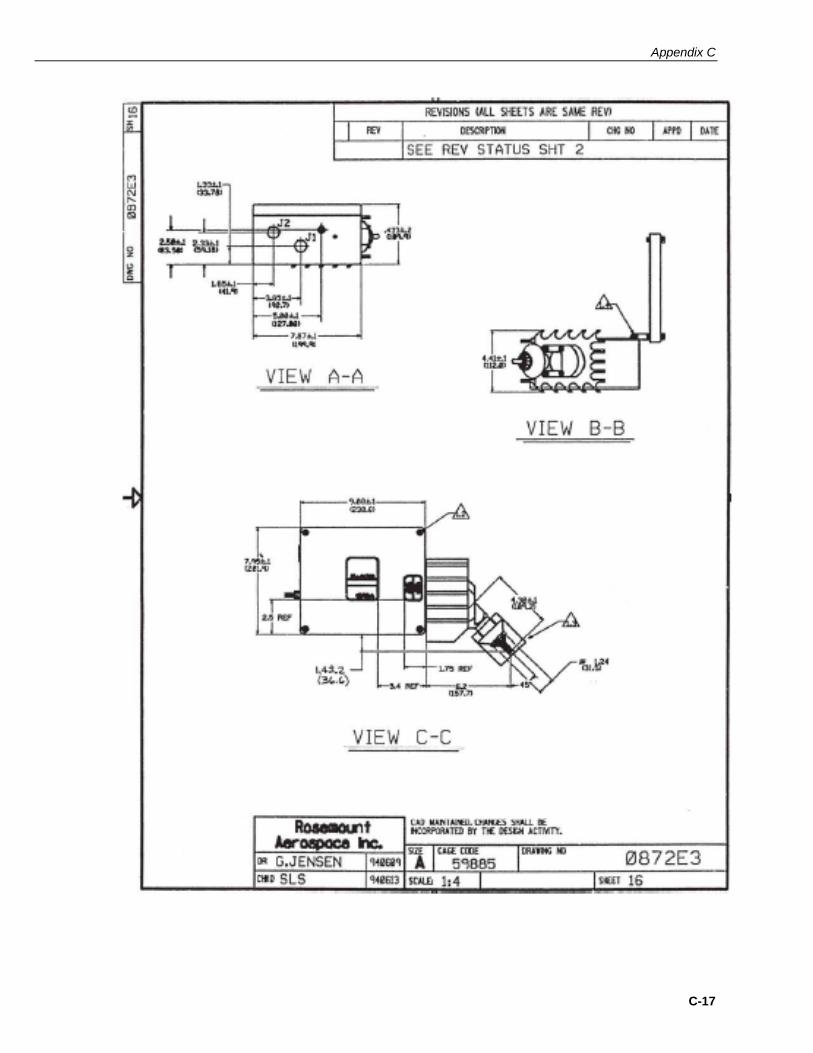
Appendix C. Specification Drawings
3.1 0872E3 Specification Drawing
0872E3 Goodrich Ice Detector
C-2
Appendix C
C-3

0872E3 Goodrich Ice Detector
C-4

Appendix C
C-5

0872E3 Goodrich Ice Detector
C-6
Appendix C
C-7

0872E3 Goodrich Ice Detector
C-8

Appendix C
C-9

0872E3 Goodrich Ice Detector
C-10

Appendix C
C-11
0872E3 Goodrich Ice Detector
C-12

Appendix C
C-13

0872E3 Goodrich Ice Detector
C-14

Appendix C
C-15
0872E3 Goodrich Ice Detector
C-16
Appendix C
C-17

0872E3 Goodrich Ice Detector
C-18

Appendix C
C-19


CAMPBELL SCIENTIFIC COMPANIES
Campbell Scientific, Inc. (CSI) 815 West 1800 North Logan, Utah 84321 UNITED STATES
www.campbellsci.com [email protected]
Campbell Scientific Africa Pty. Ltd. (CSAf)
PO Box 2450 Somerset West 7129
SOUTH AFRICA www.csafrica.co.za [email protected]
Campbell Scientific Australia Pty. Ltd. (CSA)
PO Box 444 Thuringowa Central
QLD 4812 AUSTRALIA www.campbellsci.com.au [email protected]
Campbell Scientific do Brazil Ltda. (CSB)
Rua Luisa Crapsi Orsi, 15 Butantã CEP: 005543-000 São Paulo SP BRAZIL
www.campbellsci.com.br [email protected]
Campbell Scientific Canada Corp. (CSC)
11564 - 149th Street NW Edmonton, Alberta T5M 1W7
CANADA www.campbellsci.ca
Campbell Scientific Ltd. (CSL) Campbell Park
80 Hathern Road Shepshed, Loughborough LE12 9GX
UNITED KINGDOM www.campbellsci.co.uk [email protected]
Campbell Scientific Ltd. (France)
Miniparc du Verger - Bat. H 1, rue de Terre Neuve - Les Ulis
91967 COURTABOEUF CEDEX FRANCE
www.campbellsci.fr [email protected]
Campbell Scientific Spain, S. L.
Psg. Font 14, local 8 08013 Barcelona
SPAIN www.campbellsci.es [email protected]
Campbell Scientific Ltd. (Germany) Fahrenheitstrasse13, D-28359 Bremen
GERMANY [email protected]
Please visit www.campbellsci.com to obtain contact information for your local US or International representative.