0—i- c’) c - c’) c 0—i-o o. fold out this page some safety rules a) take...
TRANSCRIPT
— C’)
C 0—I- o o
Fold out this page
Some safety rules
a) Take care to avoid injury to yourfingers by the needle during sewing.
b) Make sure you unplug the powercord whenever you have to leavethe machine or want to clean it, oilit or change mechanical andaccessory parts.
c) Be sure to use only a 15-watt lightbulb in the sewing lamp.
d) The drive belt must never beadjusted by anyone but an authorized Pfaff agent.
“ome safety rulesvalid for United Kingdom only
The wires in the mains lead are coloured according to the following code:Blue: NeutralBrown: LiveAs the colours of the wires in themains lead of this appliance may notcorrespond with the colour coding ofthe terminals in your plug, proceed asfollows: the wire which is colouredblue must be connected to the terminal which is marked with the letter Nor coloured black.The wire which is coloured brown mustbe connected to the terminal which ismarked with the letter L or colouredred.
Please note:When a 13-ampere plug is used, a3-ampere fuse has to be fitted
Contents on pages 165 to 167.
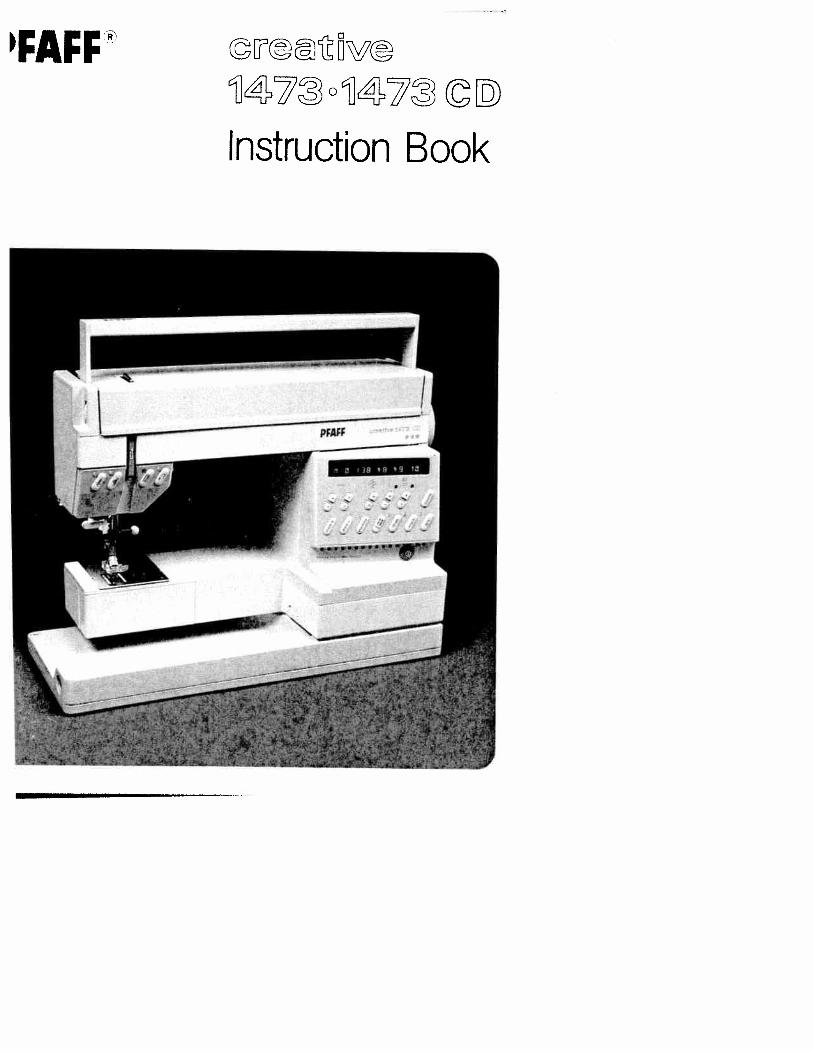
More than just a sewing machine: 29
Your new -
PFAFF Creative 1473The right machine for creative sewing,
embroidery as if by hand, and textile
design.This means you have bought a quality
product, one of the best sewing ax.width
machines in the world. Compared with mm
other makes it has a multitude of
superb sewing features. From this vast 6range of features we have compiled a
number of tips and ideas for you and
divided them into three groups: 61. Straight-stitch, zigzag and utility
stitch programs and buttonhole pro
gram. 0
2. Embroidery stitch program.
3. Programming of embroidery and
hand-sewn stitches, and alphabet 35
programs.
As a creative fashion designer you
will no doubt have further questions C
regarding sewing problems now and
then. If so, simply contact your PFAFF
dealer. They will be pleased to help / )
you whenever you wish.To make full use of the numerous tea
tures of the machine, please read this 7,5instruction book carefully.When using this book, fold out the
front and back cover pages. 6We wish you great pleasure and suc- -—
cess with your creative sewing.7!
S
$1
7
1
4
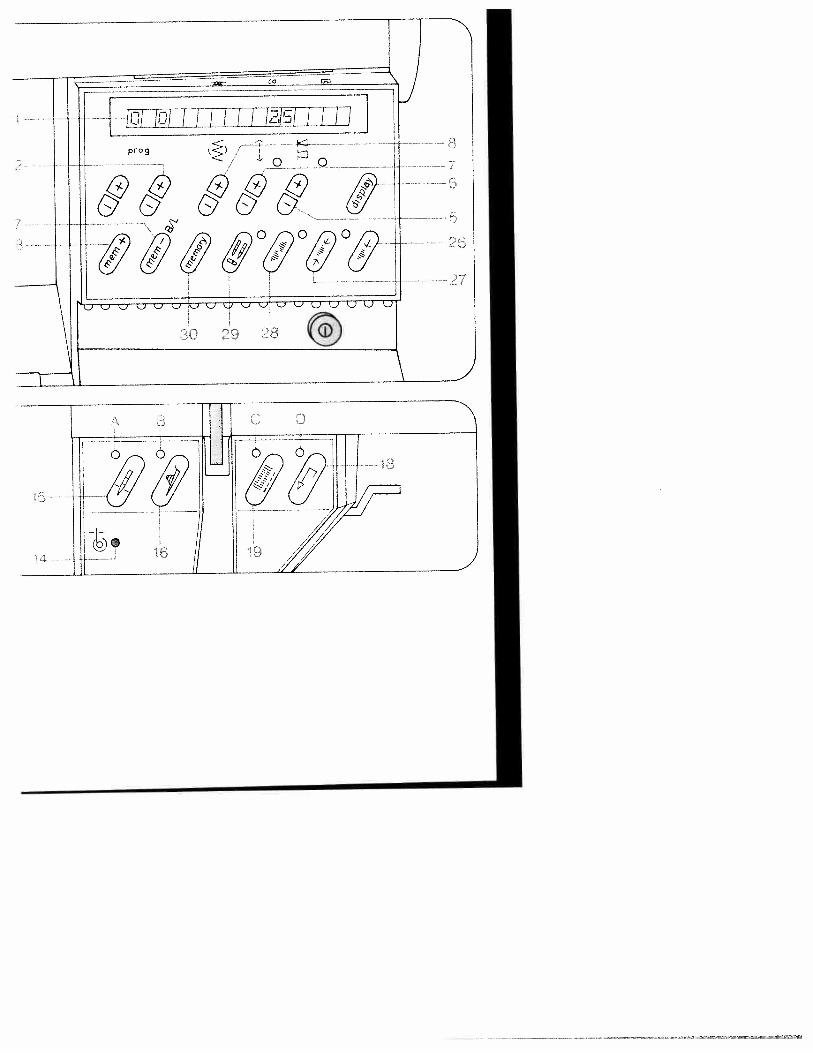
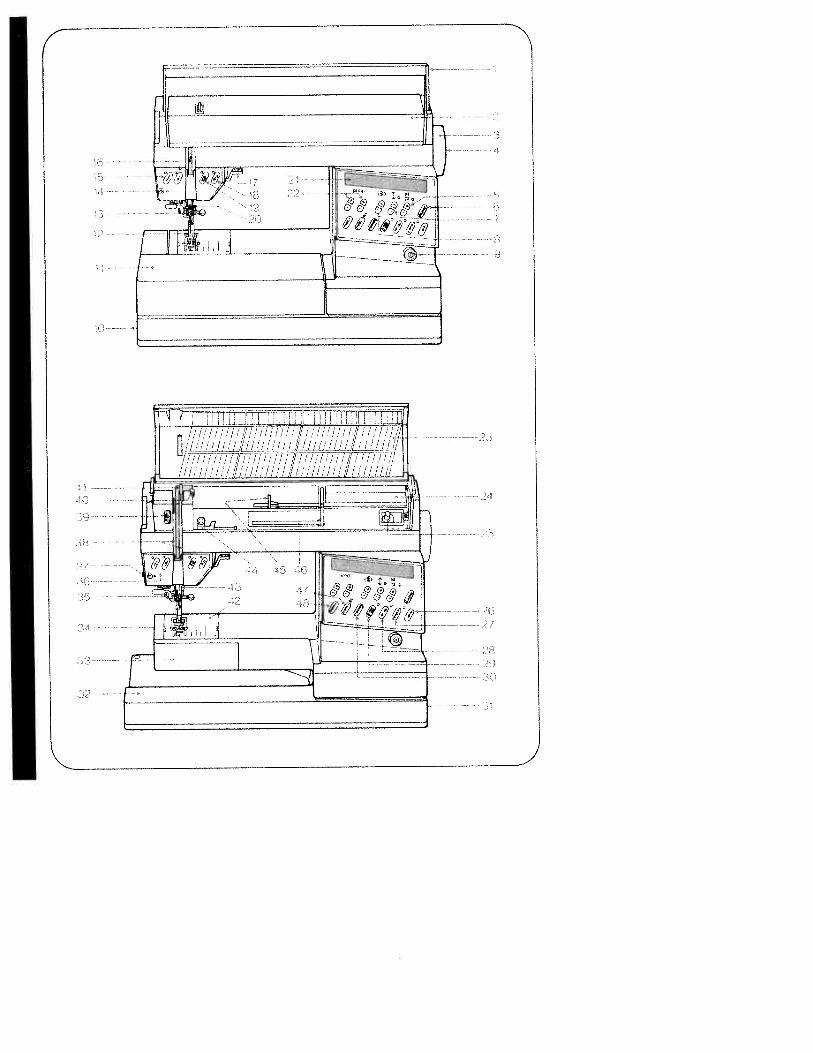
Parts of the sewing machine1 Carrying handle2 Folding cover3 Hand wheel4 Release disc5 Keys for balance and pattern
length6 Key for program sequence and
recommended sewing modes7 Key for stitch length and pattern
length8 Stitch width keys9 Main switch
10 Connection socket for the CreativeDesigner 1473 CD
11 Work support with accessory boxand accessory compartment
12 Sewing foot holder with sewingfoot
13 Needle holder with retaining screw14 Bobbin thread monitor15 “Needle down” key16 “Sew-slow” key17 Presser bar lifter18 “Reverse” key19 “Tie-off”/buttonhole key20 Presser bar21 Display22 Four program selection keys23 Program chart24 Storing compartment25 Bobbin winder26 Pattern start key27 Single pattern key28 Pattern mirror key29 Twin neddle key30 Memory recall key31 Connection socket for foot control32 Baseplate33 Cover, sewing hook area34 Free arm35 Threader36 Sewing lamp37 Thread trimmer38 Threading slots39 Needle thread tension40 Bobbin winder thread guide41 Take-up lever42 Needle plate43 Dual feed44 Bobbin winder thread guide
(swing-out)45 Spool holder with unwinding disc46 Second spool holder (swing-up)47 Correction key48 Program entry key
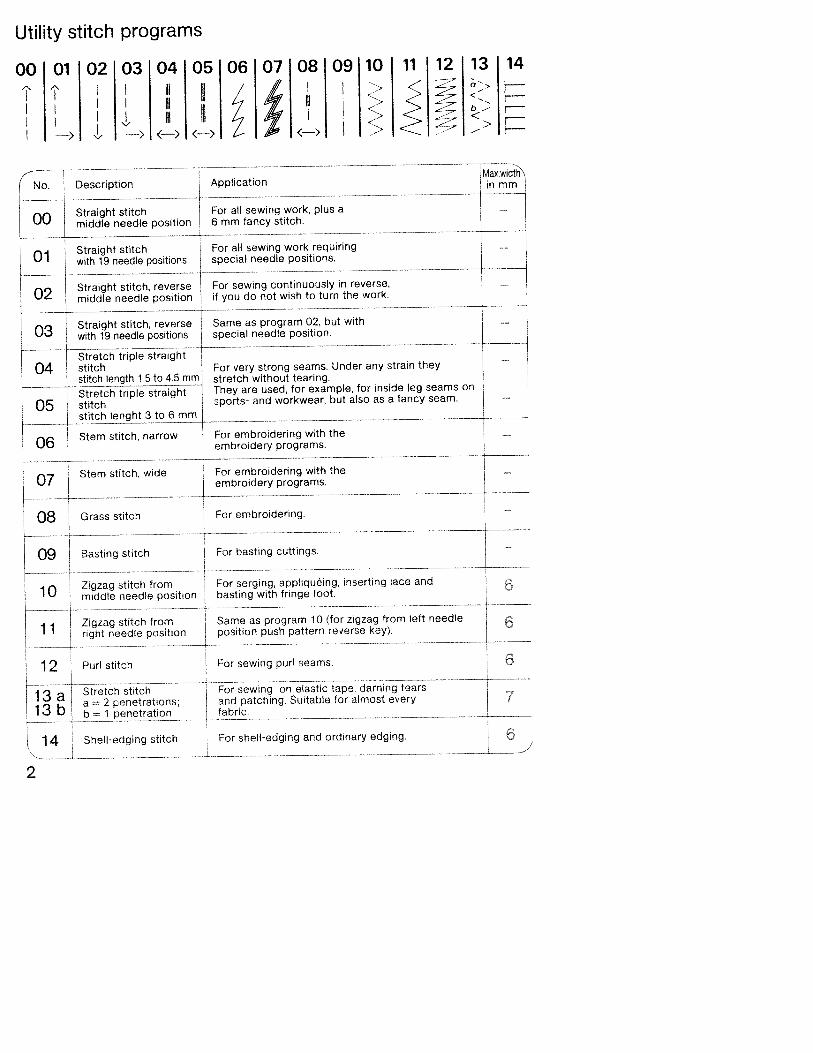
Utility stitch programs
0OI0H020304I0506O7I08fO9I
III‘i” I I II Ill
I I NI
I —j ‘1, —> <—> <—)I I ‘,.,
Ill I
10 11 12 13 14
<__;, <-> <
.>
Straight stitch For all sewing work, plus a —
‘-“-‘ middle needle position 6 mm fancy stitch.
O1Straight stitch For all sewing work requiring
‘ with 19 needle positions special needle positions.
r- Straight stitch, reverse For sewing continuously in reverse,
“- middle needle position if you do not wish to turn the work.
Straight stitch, reverse Same as program 02, but with‘-“-‘ with 19 needle positions special needle position.
Stretch triple straight04 stitch For very strong seams. Under any strain they
stitch length l5to 4.5 mm stretch without tearing.
Stretch triple straight They are used, for example, for inside leg seams on
05 stitch sports- and workwear, but also as a fancy seam. —
stitch Ienght 3 to 6 mm
r Stem stitch, narrow For embroidering with the“-“-‘ embroidery programs.
Stem stitch, wide For embroidering with the‘-“ embroidery programs.
08 Grass stitch For embroidering.
09 Basting stitch For basting cuttings. —
I O Zigzag stitch from For serging, appliquéing, inserting lace and
‘ middle needle position basting with fringe foot.C
i i Zigzag stitch from Same as program 10 (for zigzag from left needle‘ ‘ right needle position position push pattern reverse key),
1 2 Purl stitch For sewing purl seams. 6
1 3 a Stretch stitch For sewing on elastic tape, darning tears —
b ‘ a = 2 penetrations; and patching. Suitable for almost every II) b = 1 penetration fabric.
14
(No. Description ApplicationMax.widtt,in mm
Shell-edging stitch For shell-edging and ordinary edging.
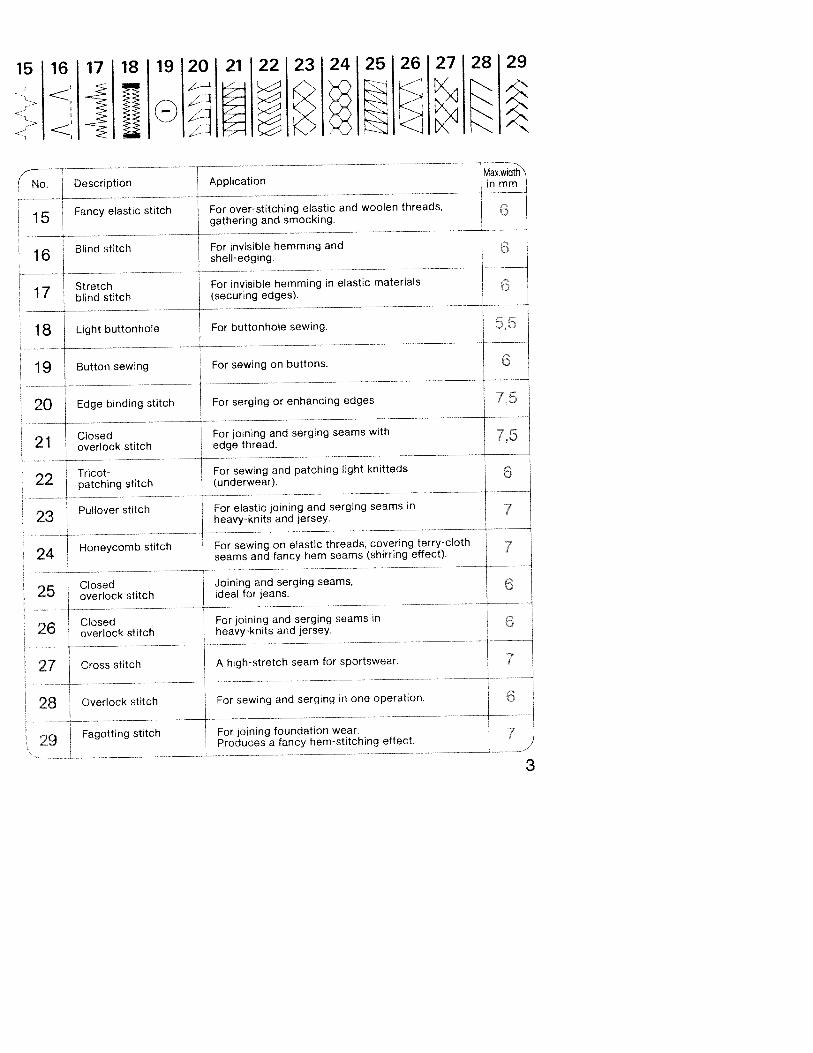
15 16 17 18 19 20 21 22 23 24 25 26 27 28 29
ej
3
No. Description ApplicationMax.wkin mm
5 Fancy elastic stitch For over-stitching elastic and woolen threads, SI gathering and smocking.
6 Blind stitch For invisible hemming and S‘ shell-edging.
--.-------.-
--.---—
----.
7 Stretch For invisible hemming in elastic materials 6‘ blind stitch (securing edges).
18 Light buttonhole For buttonhole sewing. 5,5
1 9 Button sewing For sewing on buttons. 6
20 Edge binding stitch For serging or enhancing edges 7,5
Closed For joining and serging seams with‘
‘ overlock stitch edge thread,
2 Tricot- For sewing and patching light knitteds
‘- patching stitch (underwear).
Pullover stitch For elastic joining and serging seams in 7
‘-‘-‘ heavy-knits and jersey.
‘)A Honeycomb stitch For sewing on elastic threads, covering terry-clothseams and fancy hem seams (shirring effect).
,5 Closed Joining and serging seams,
‘- overlock stitch ideal for jeans.
6 Closed For joining and serging seams in
‘— overlock stitch heavy-knits and jersey.
Cross stitch A high-stretch seam for sportswear. 7
Overlock stitch For sewing and serging in one operation. 6
27
28
29 Fagotting stitch For joining foundation wear.Produces a fancy hem-stitching effect.
18 150 151 152 153 153 153 154 154 154
DescriptionMax.wldthNin mm
1 53 Round buttonhole
c with crosswise tackFor outerwear buttonholes inheavier materials.
Application
8 Light buttonhole For sewing buttonholes in blouses, shirts
‘ 7.0 to 16 mm and linen.
---.
-
i 5(-\ Light buttonhole For sewing buttonholes in bed linen.I J 7.Oto44mm
1 51Stretch buttonhole, For buttonholes in open-weave fabrics.
‘ reinforced
1 52 Stretch buttonhole For buttonholes in stretch fabrics (jersey, etc.)
[ 1 53 Round buttonhole For buttonholes in trousers 7 r
a with wedge tack and casual garments.
1 53 Round buttonhole For outerwear buttonholes in
b with lengthwise tack light materials.
1 54 Eyelet buttonhole For buttonholes in jeans, trousersI and sportswear.
147 157 158 159 160 161
Description Application Max.wthNin mm
1 54 Eyelet buttonhole For buttonholes in outerwear, costumes,
b with lengthwise tack coats, etc.
1 54 Eyelet buttonhole For buttonholes in heavy-duty —
c with crosswise tack outerwear,
Covering stitch For joining terry cloth, jersey and1 47 inserting patches (flat seam with double
edge reinforcement).
1 57Bartack For sewing bartacks on pocket openings, belt loops,
‘ hanger tabs and zipper ends.
58 Darning program For darning thin damaged areas.‘ lengthwise I
Darning program For darning holes.1 59 lengthwise and crosswis&
Stretch triple- For sewing elastic tapes in sportswear and
1 60 zigzag stitch ‘ bathing wear (high-stretch seam for lightknitted fabrics).
Stretch triple stitchelastic stitch
For sewing elastic tapes in sportswear andbathing wear (high-stretch seam for heavyknitted fabrics).
5
888°
w1e
AA
%oo
oç
•JfJo
M2
888
-w LM
Ck
•O
OO
Oo
000
0000oo
QQ-Q
Q
S2c*
k%
Sl5
1
UrU
3 (D Gb)
>o)c
C
Ni
(D
‘I
C.’0
____
I.
—
0-
II
Wa)
N>
I’
‘a
_
*00
x*xi
___
____—
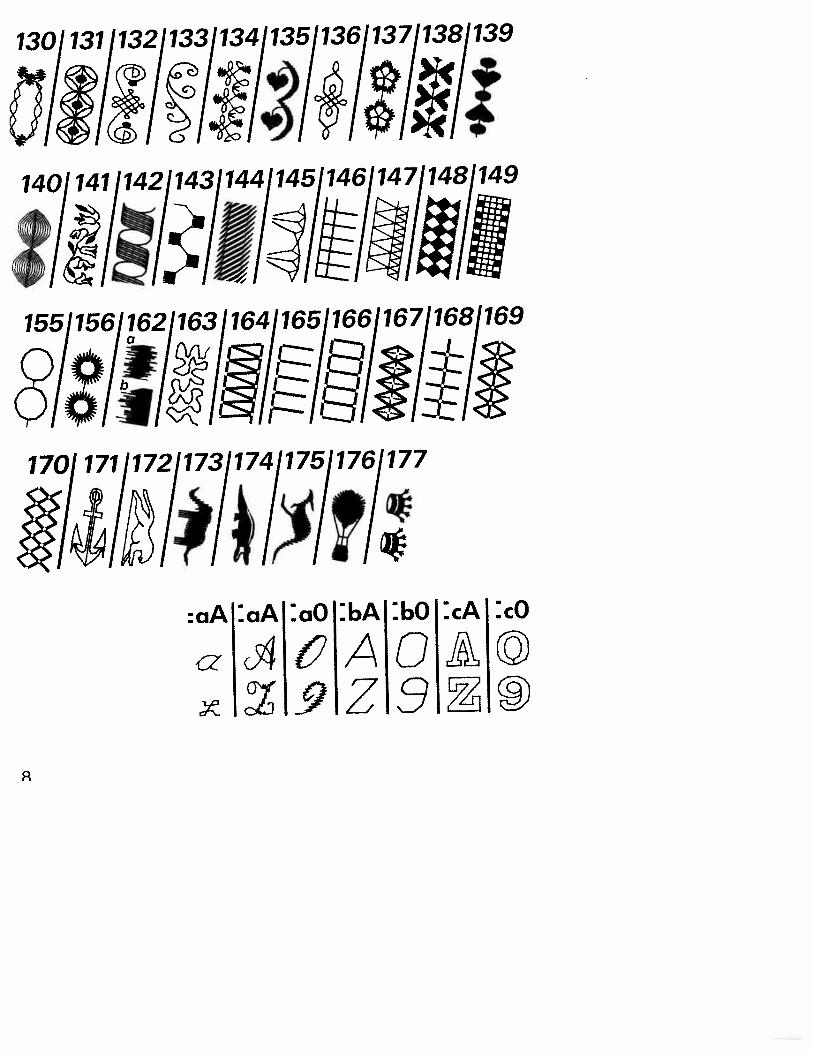
dthDescription Application in mm
30-6990-1 63
Embroidery stitch For fancy seams, ornaments, borders and
programs embroideries. Programs 162 a, 162 b and 163
1 71-1 77 are filling-out stitches for large areas.
5053 Scalloping For table linen, serviettes, bed linen, etc.
60,61,63 edge decoration
70-89 Cross stitch For cross-stitch embroidery in children’s wear,
programs blouses, covers, etc.
-—
,
1 64-1 70 Hem-stitching For hem stitching in table linen bed linen
programs blouses, cloths, etc. ‘‘‘ -
- ———— — -—————. ————
Alphabets with special For monograms and texts
letters for languages-. -
- 1-—---- —--—-. -
Script letters and Upper and lower case letters, numbers
:aA,a0 numerals — - andpuflctuahonmarks.
— hA, — bO Block letters and Capital letters, numbers and— — numerals punctuation marks.
—-—- ——-f —
__
cA,co Outline letters and Capital letters, numbers and— — numerals punctuation marks
9

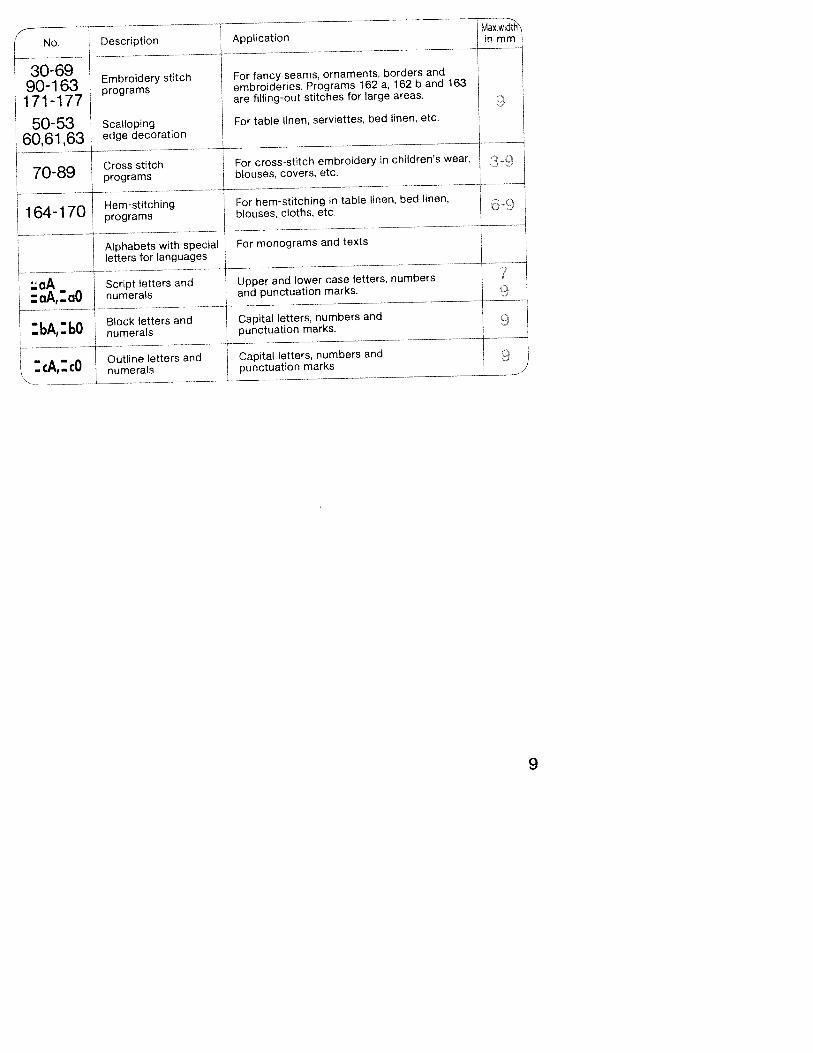
NElectrical connectionLift off the cover and fold down thecarrying handle. Compartment A is forstoring the foot control, mains leadand instruction book.
Open cover 2.
11io°
______________
Connect the mains lead.
10

Pull the power lead out of the footcontrol.
Plug the foot control lead into connection socket 31 and place the foot control on the ground.
4Press main switch 9, the sewing lampthen goes on.
•11
4O
CD CD C
) > CD a CD CD C CD
C)
rC
/)
D
CD3 C
Da t
CO
CC
)C CD c3
-C 0
0 CD D CD CD CD 3 C) 0 CD c)
CO
CC
D
;0
Z
a
CD CD
<D
0 CO C V V 0 CD a
CD CDC
D0 0
V•0
00
0 0.
CD 0.
C 0.
CD
CD
CJ)
CD 3C
D<
0
0C)
Fo 0
.0 V 0 0 0 0.
CD V CD 0.
92
CD
CD
0
5.0
z.
r.
CD 0D
CD
O
0) 01
0)0 0
.
.‘C
D CD
V9:
>g
CD 0) co CD
-,
00)
—
0.
c13
44

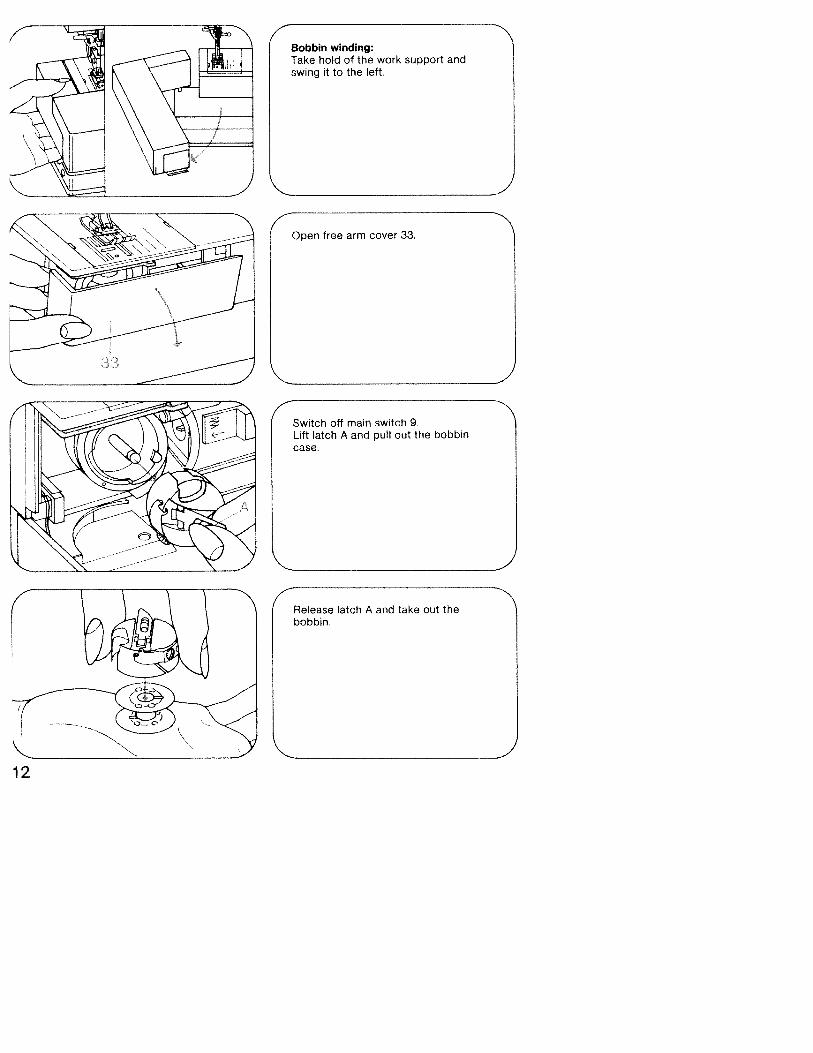
Winding from a second spool:Swing bobbin winder thread guide 44to the front. Pull the thread into guide40, into bobbin winder tension A andaround finger B. Now pass the threadto bobbin winder 25 and wind it a fewtimes clockwise around the bobbin.Press the bobbin to the right. Thenturn on the main switch, press the footcontrol and wind the bobbin. Press thefull bobbin to the left and cut thethread using thread cutter 37.Bobbins are wound n the same wayfrom reel holder 45.
14
Important: If an empty M- or P-memoryis selected, it is not possible to windthe bobbin, A program between 00and 177 must be selected.If the spool has a thread slot, the slotmust face to the right when the spoolis placed on.
Engaging the sewing action: hold thehand wheel firmly and turn disc 4 tothe rear. Then turn the hand wheel tothe front until it engages.
4 N
D
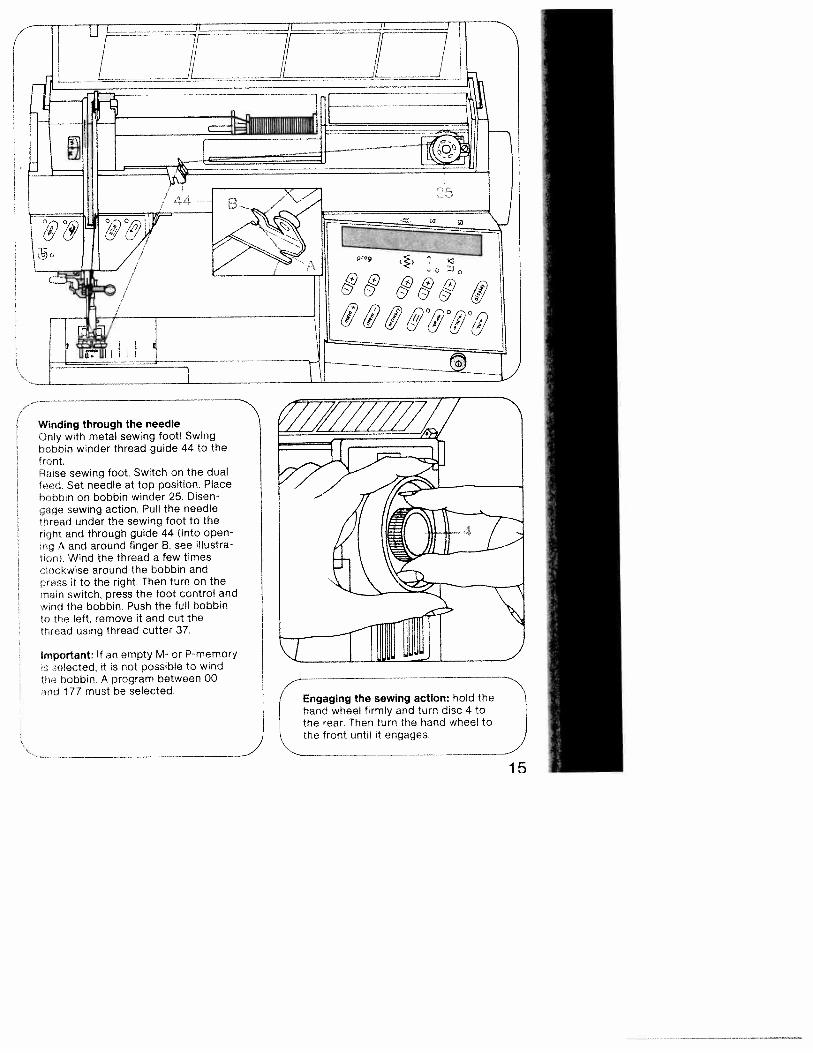
Winding through the needleOnly with metal sewing foot! Swingbobbin winder thread guide 44 to thefront.Raise sewing foot Switch on the dualfeed. Set needle at top position. Placebobbin on bobbin winder 25. Disengage sewing action. Pull the needlethread under the sewing foot to therght and through guide 44 (into openng A and around finger B. see IlustraliOn) Wind the thread a few times‘lockwise around the bobbin and
r ross it to the right. Then turn on themain switch, press the foot control andwind the bobbin. Push the full bobbino the left, remove it and cut thethread using thread cutter 37.
Important: If an empty M- or P-memoryis selected, it is not possible to windthe bobbin A program between 00md 177 must be selected.
Engaging the sewing action: hold thehand wheel firmly and turn disc 4 tothe rear. Then turn the hand wheel tothe front until it engages.
15
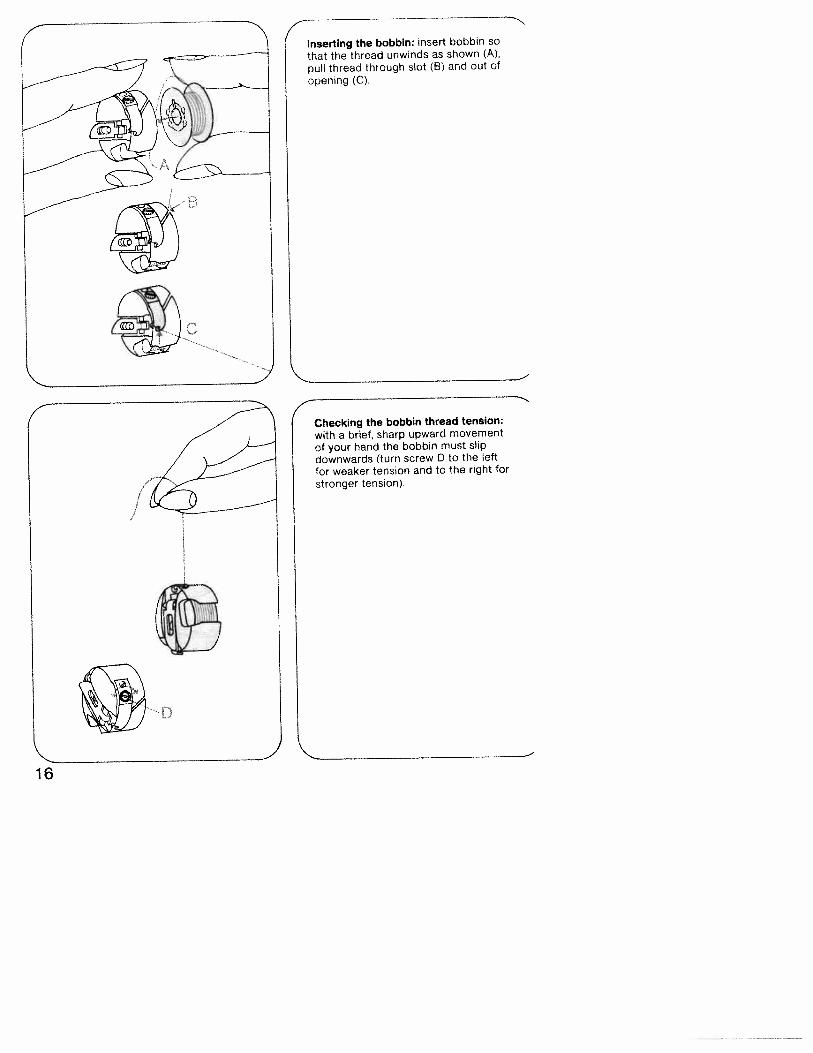
N
Inserting the bobbin: insert bobbin sothat the thread unwinds as shown (A),pull thread through slot (B) and Out of
opening (C).
Checking the bobbin thread tension:with a brief, sharp upward movementof your hand the bobbin must slipdownwards (turn screw D to the leftfor weaker tension and to the right forstronger tension).
I
16
4
17
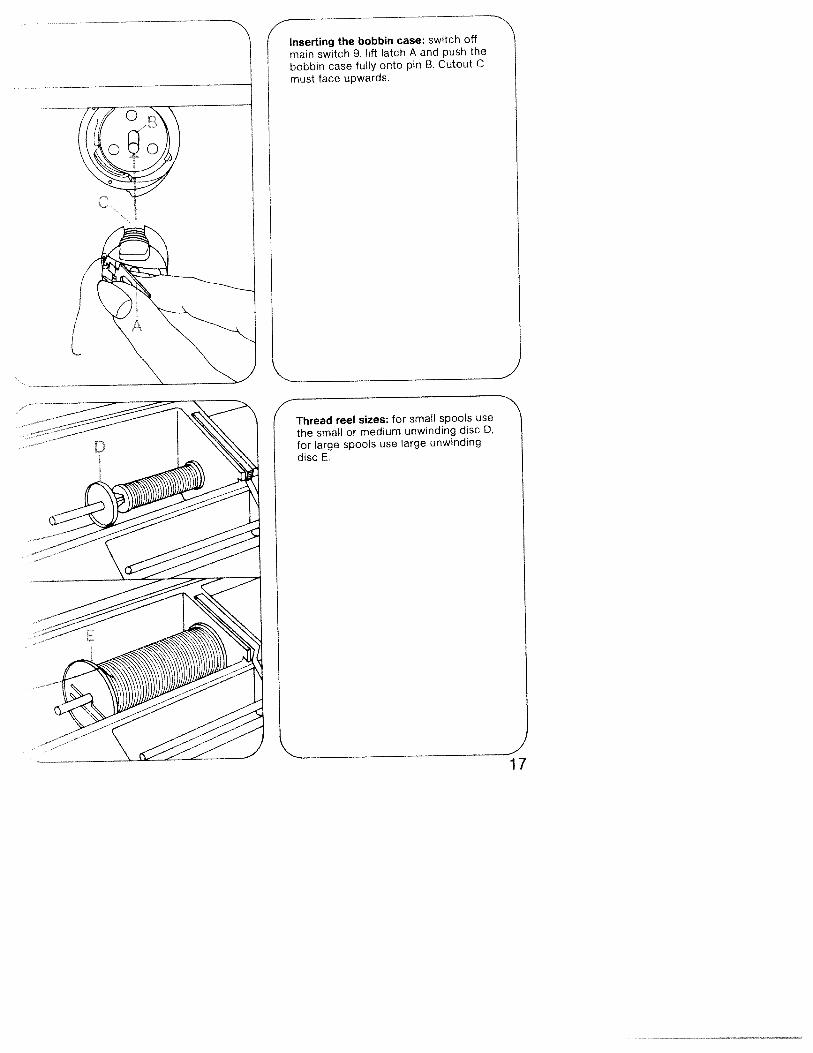
Inserting the bobbin case: switch offmain switch 9, lift latch A and push the
bobbin case fully onto pin 8. Cutout Cmust face upwards.
4Thread reel sizes: for small spools use
the small or medium unwinding disc D,
for large spools use large unwindingdisc E.
\
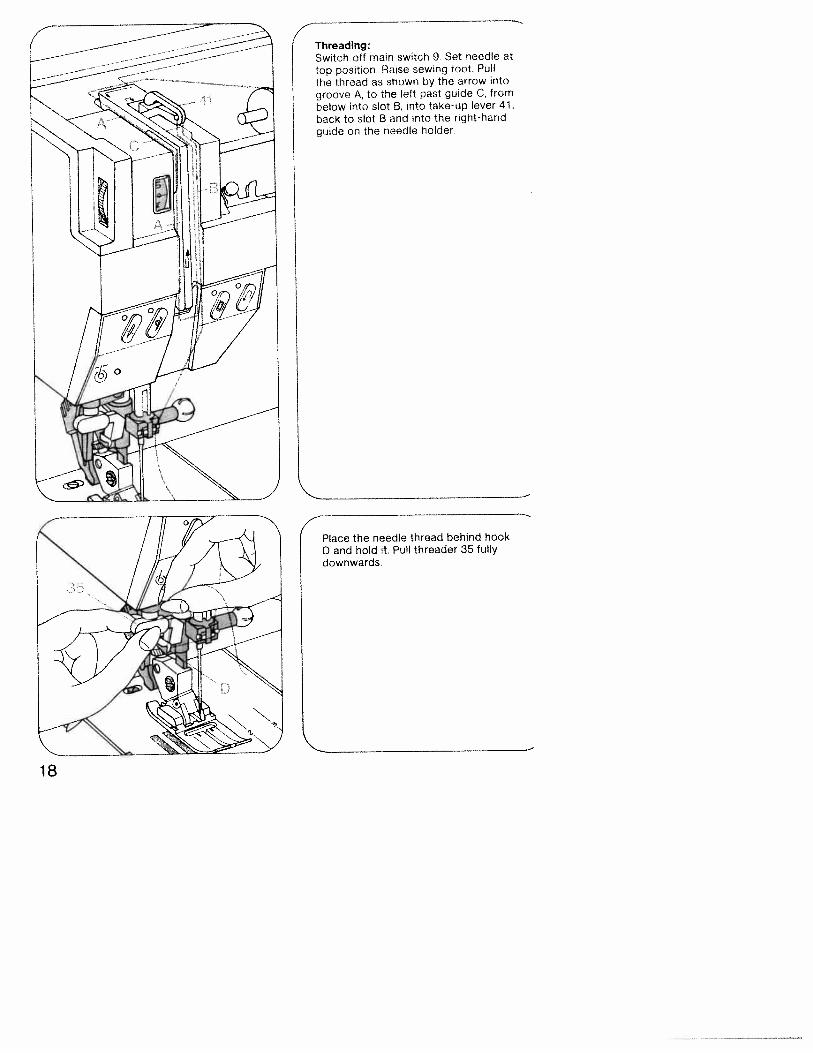
Threading:Switch off main switch 9. Set needle attop position. Raise sewing foot. Pullthe thread as shown by the arrow intogroove A, to the left past guide C, frombelow into slot B, into take-up lever 41.back to slot B and into the right-handguide on the needle holder.
Place the needle thread behind hookD and hold it. Pull threader 35 fullydownwards.
4
4
18
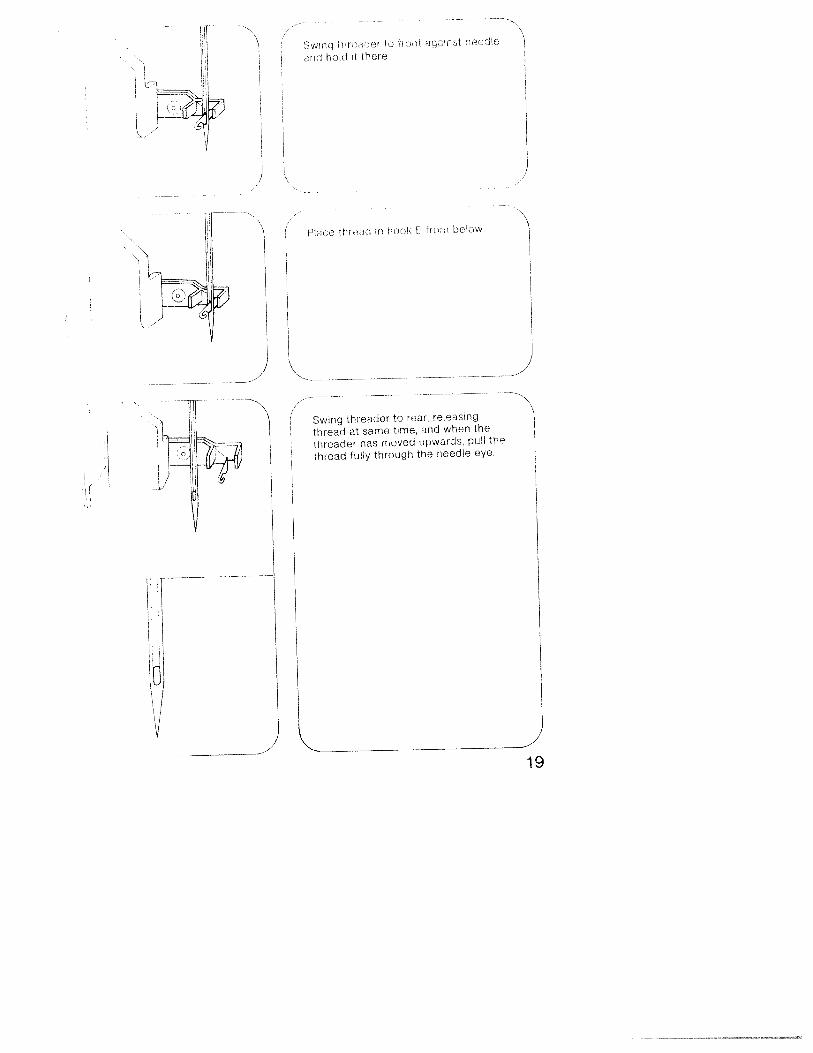
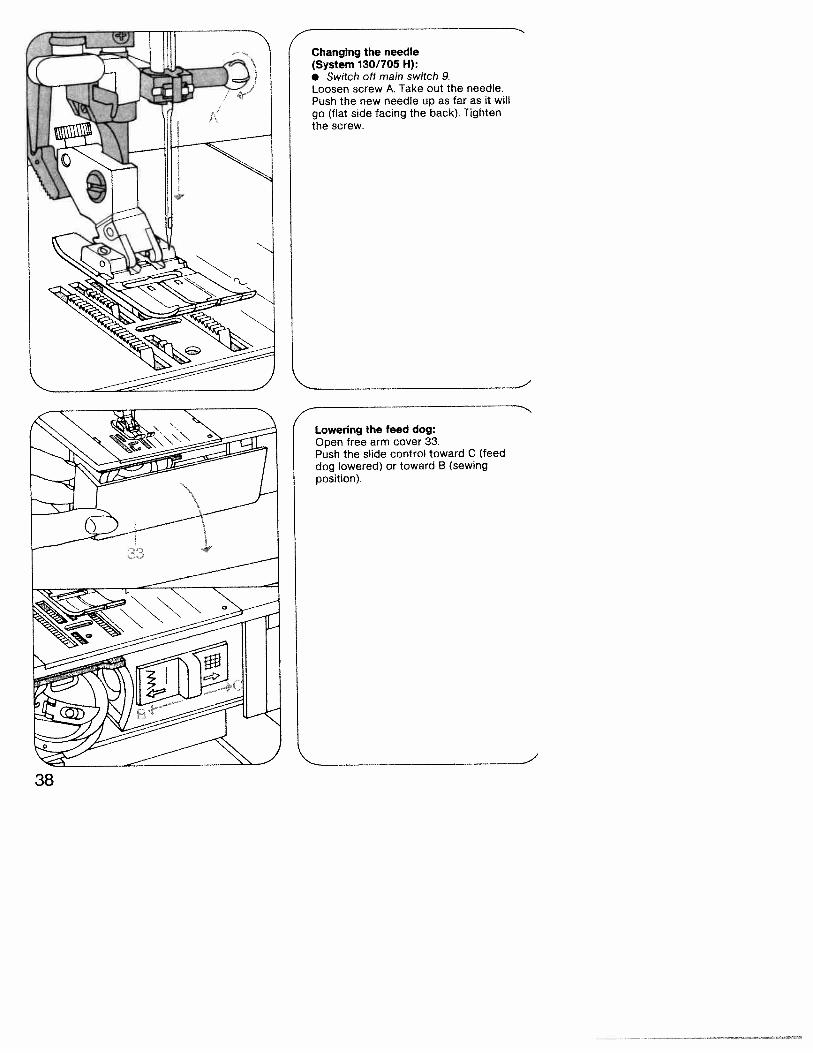
Swir q hr oor ji r aquost needle
inn hoid ii there
P1 ;c thre 1(1 iii hook t n blow
Swing threader to rear, releasing
thread at same time, and when the
threader has moved upwards. pull tb
thread fully through the needle eye
19
zt
C0CD
DO
ac)
CD
.D
——
CD
CC
D
—c
:7
zr5ciD
)
rCD
CD
t) C
4C) 0 0 CD CD CD 0 0 CD c)
JI
I
)21
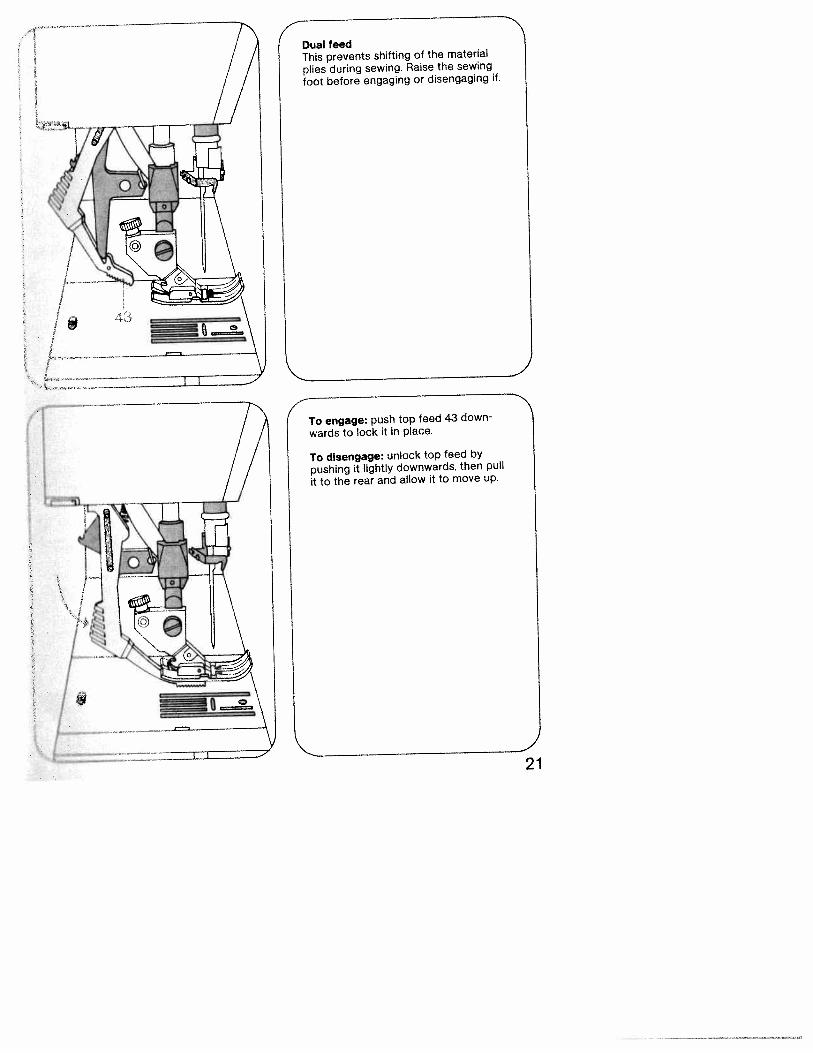
Dual feedThis prevents shifting of the material
plies during sewing. Raise the sewing
foot before engaging or disengaging if.
I
To engage: push top feed 43 down
wards to lock it in place.
To disengage: unlock top feed by
pushing it lightly downwards, then pull
it to the rear and allow it to move up.

4
*
Exclusive built-in dual feed lets youdo things even experts find difficult.
Even experts find it difficult to matchpatterns and plaids when sewing slippery silks and synthetics. But easymatching is automatic with Pfaff’sexclusive built-in dual feed.When two or more fabric layers arefed simultaneously through conventional sewing machines, there isalways the possibility of slippage.The exclusive Pfaff solution ist built-indual feed, a walking foot that simultaneously feeds the fabric from aboveas the feed dog moves it from below.You can sew up to 12 fabric layerswithout fear of slippage.
I22
£
-T’
—.
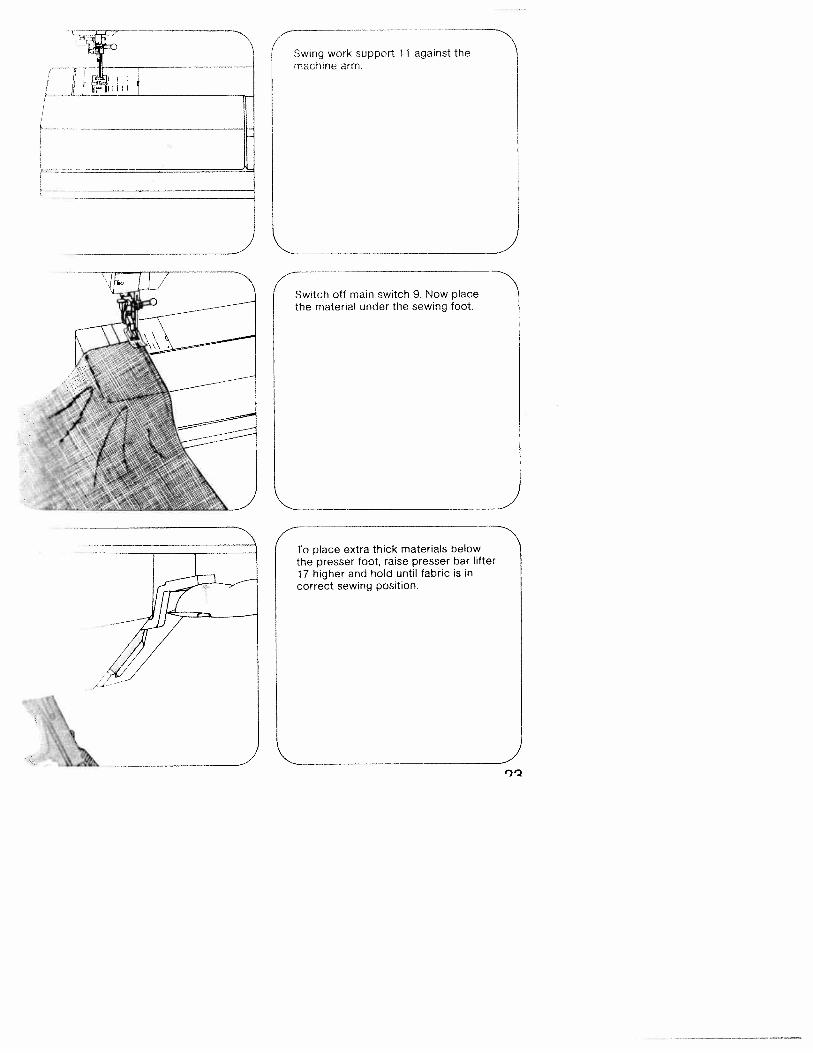
4Swing work support 11 against themachine arm.
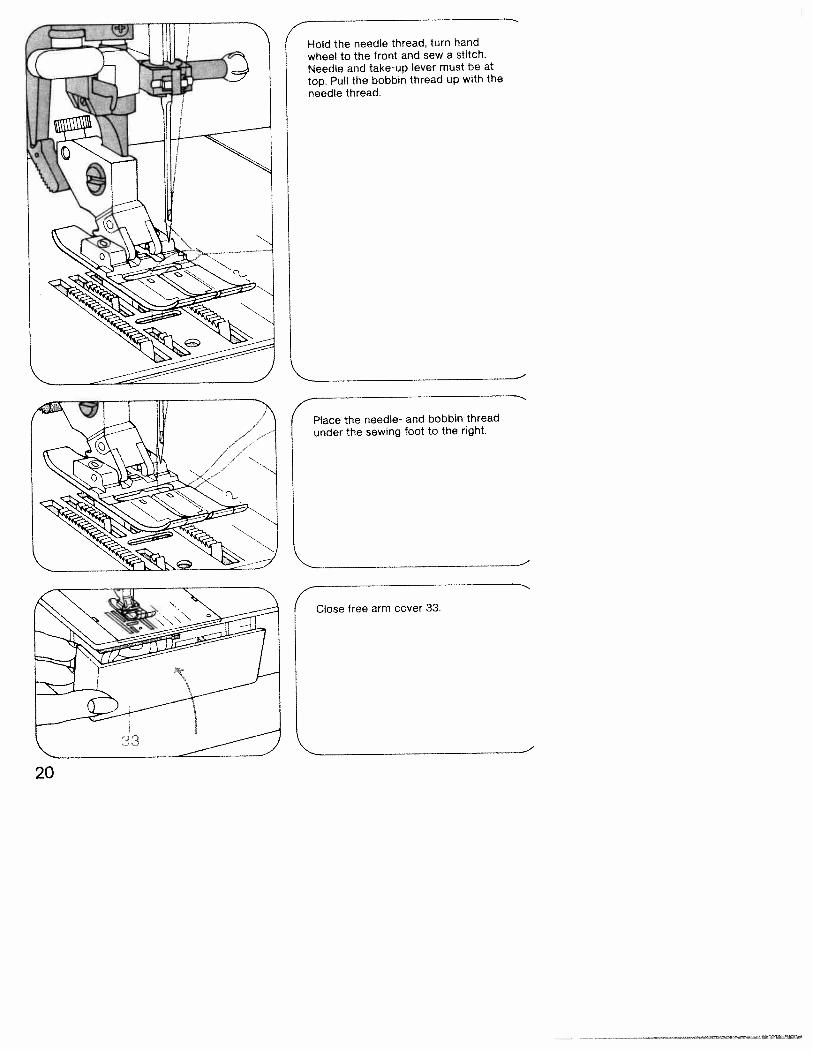
Switch off main switch 9. Now placethe material under the sewing foot.
)
FTo place extra thick materials belowthe presser foot, raise presser bar lifter17 higher and hold until fabric is incorrect sewing position.
()1)
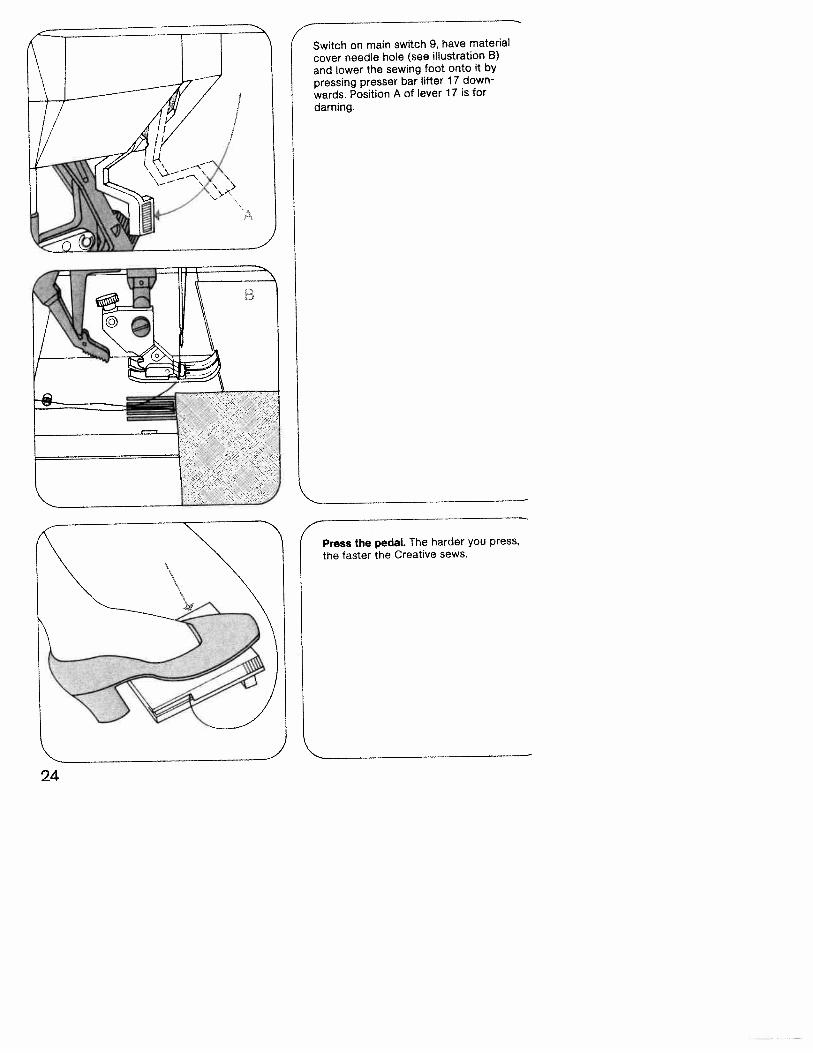
4Switch on main switch 9, have materialcover needle hole (see illustration B)
and lower the sewing foot onto it bypressing presser bar lifter 17 downwards. Position A of lever 17 is for
darning.
Press the pedal. The harder you press,the faster the Creative sews.
4
24
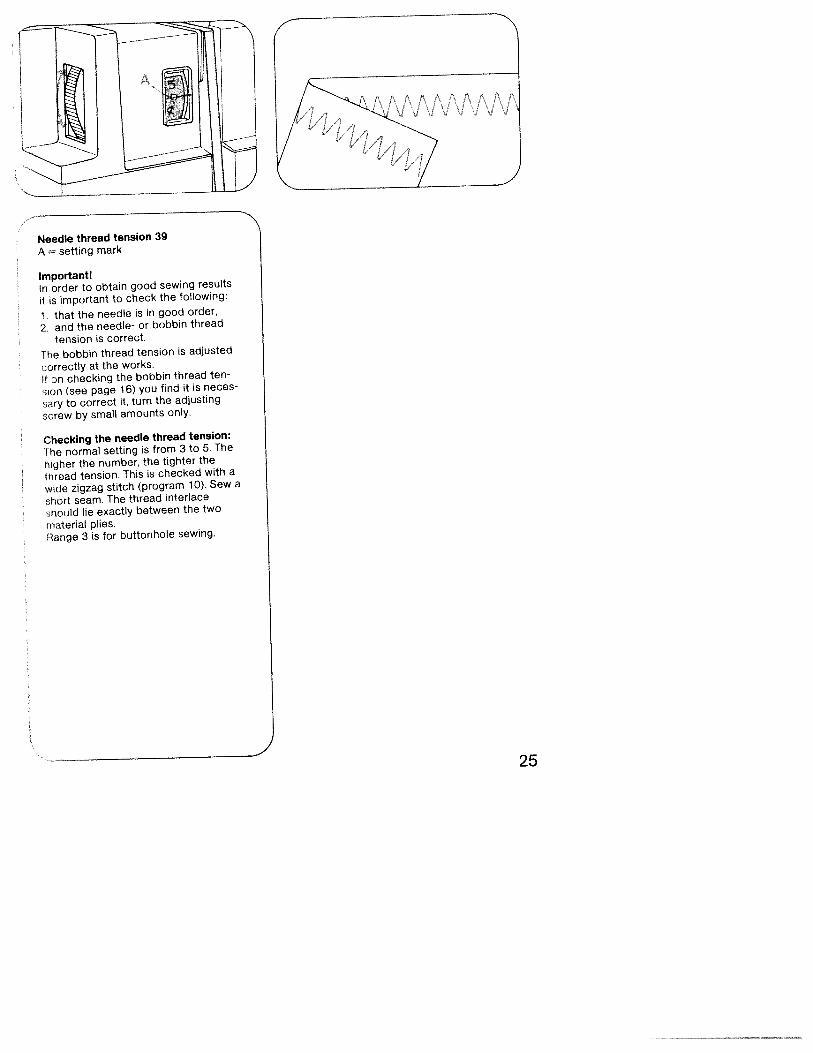
Needle thread tension 39
A = setting mark
Important!In order to obtain good sewing results
it is important to check the following:
1. that the needle is in good order,
2. and the needle- or bobbin thread
tension is correct.
The bobbin thread tension is adjusted
correctly at the works.If on checking the bobbin thread ten
sion (see page 16) you find it is neces
sary to correct it, turn the adjusting
screw by small amounts only.
Checking the needle thread tension:
The normal setting is from 3 to 5. The
higher the number, the tighter the
thread tension. This is checked with a
wide zigzag stitch (program 10). Sew a
short seam. The thread interlace
,,hould lie exactly between the two
material plies.Range 3 is for buttonhole sewing.
N
25

Raising the presser bar lifter:When you have finished a seam the
needle must be fully raised. Then raise
presser bar lifter 17.
Removing the work from the machine
and cutting the threads:Remove the material to the rear andpull the threads in sewing directioninto thread cutter 37 in order to cut
them.
26
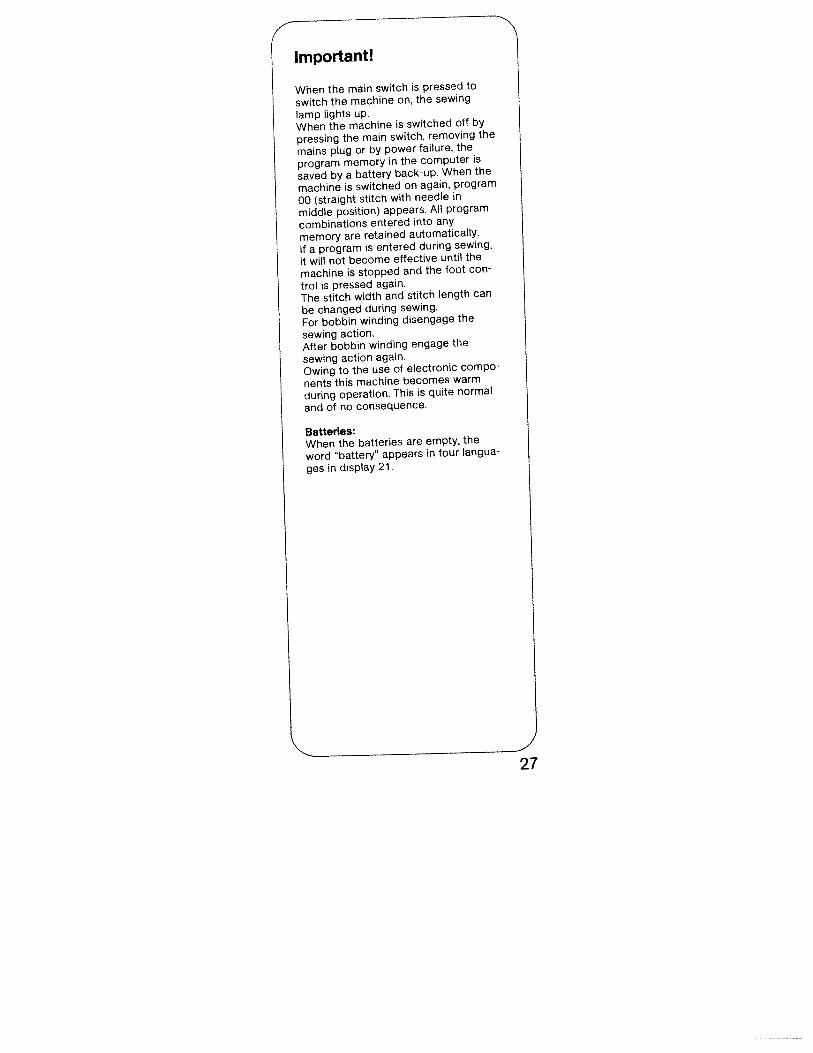
4Important!
When the main switch is pressed to
switch the machine on, the sewing
lamp lights up.When the machine is switched off by
pressing the main switch, removing the
mains plug or by power failure, the
program memory in the computer is
saved by a battery back-up. When the
machine is switched on again, program
00 (straight stitch with needle in
middle position) appears. All program
combinations entered into any
memory are retained automatically.
If a program is entered during sewing,
it will not become effective until the
machine is stopped and the foot con
trol is pressed again.The stitch width and stitch length can
be changed during sewing,
For bobbin winding disengage the
sewing action.After bobbin winding engage the
sewing action again.
Owing to the use of electronic compo
nents this machine becomes warm
during operation. This is quite normal
and of no consequence.
Batteries:When the batteries are empty, the
word “battery” appears in four langua
ges in display 21.
27
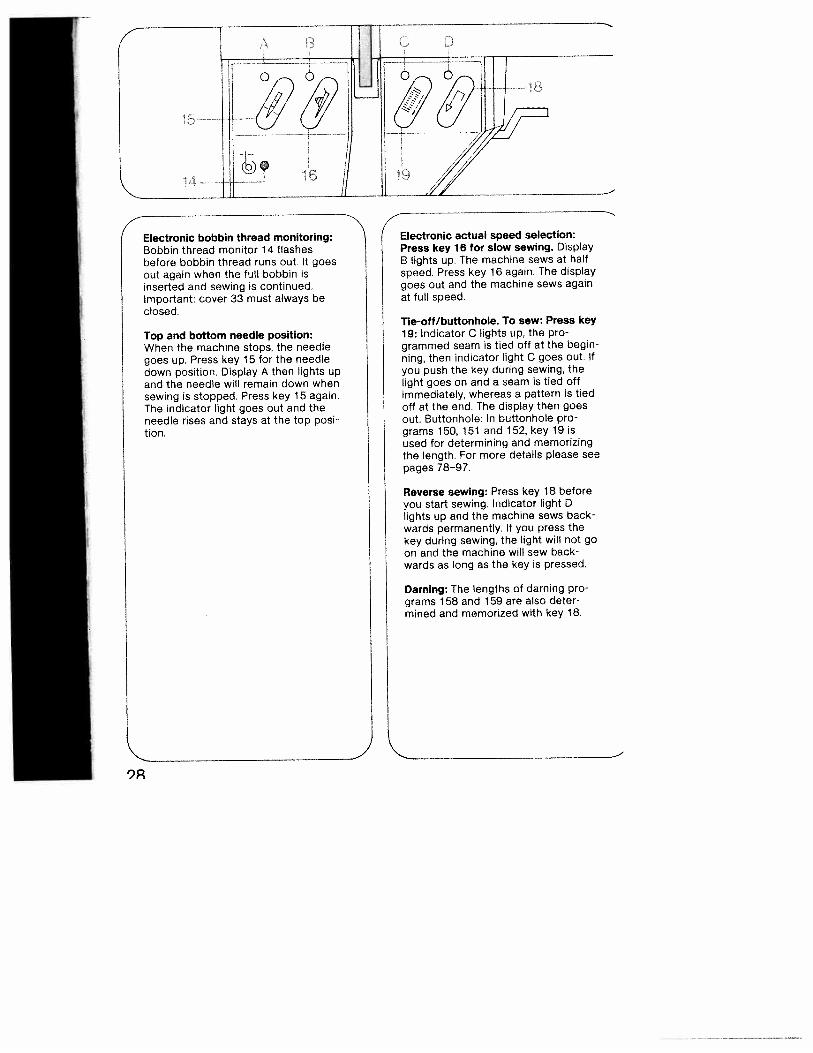
Top and bottom needle position:When the machine stops, the needlegoes up. Press key 15 for the needledown position. Display A then lights upand the needle will remain down whensewing is stopped. Press key 15 again.The indicator light goes out and theneedle rises and stays at the top position.
Tie-off/buttonhole. To sew: Press key19: Indicator C lights up, the programmed seam is tied off at the beginning, then indicator light C goes out. Ifyou push the key during sewing, thelight goes on and a seam is tied offimmediately, whereas a pattern is tiedoff at the end, The display then goesout. Buttonhole: In buttonhole programs 150, 151 and 152. key 19 isused for determining and memorizingthe length. For more details please seepages 78—97.
Reverse sewing: Press key 18 beforeyou start sewing. Indicator light Dlights up and the machine sews backwards permanently. If you press thekey during sewing, the light will not goon and the machine will sew backwards as long as the key is pressed.
Darning: The lengths of darning programs 158 and 159 are also determined and memorized with key 18.
Electronic bobbin thread monitoring:Bobbin thread monitor 14 flashesbefore bobbin thread runs out It goesout again when the full bobbin isinserted and sewing is continued.Important: cover 33 must always beclosed.
Electronic actual speed selection:Press key 16 for slow sewing. DisplayB lights up. The machine sews at halfspeed. Press key 16 again. The displaygoes out and the machine sews againat full speed.
9R
The controls of the Creative comput
er:5 Keys for balance and pattern
length6 Key for program sequence and
recommended sewing modes
7 Stitch length and pattern length
keys8 Stitch width keys
21 Display22 Four program keys
26 Pattern start key27 Single pattern key
28 Pattern mirror key
29 Twin needle key30 Repetition key47 Memory correction key
48 Program entry key for memories
J
The computer of the Creative contains
four different alphabets and three sets
of numerals, punctuation marks and
178 programs. The programs are illus
trated in the table with their seam
types and setting numbers or symbols
in the folding cover,The optimum width and length is indi
cated for every program. When you
push and hold key 6 the computer
also makes recommendations as to
the use of dual feed, needle thread
tensions and sewing feet for each pro
gram.These settings are indicated in display
21 above the keys. The programs can
only be changed with keys which have
an indicator above them.
The computer also contains 16 M
memories for program combinations
and 16 P memories for free program
ming. During free programming lets
you design your own patterns and
store them in the Creative computer.
F—prog c) —
- 0
&& &
§• •• U U U
\
29
EJflLprog
a
_____
-
,10 , 0 , 0
__
4Program selection:When the Creative is switched on, program -00- appears in display 21. Enterthe required number in program display 22 using programming keys 21,The alphabet and number symbols areselected with the left keys, while letters and numbers are selected withthe right keys.
Stitch width setting:The stitch width ranges from 0 to9 mm.Keys 8 have three functions:1. Selection of width for the program.2. Selection of the size of letters and
numbers.3. Selection of 19 needle positions for
straight stitch programs 01,03 and04, and 17 needle positions for program 05,
EEz -—------ 7 3
LJJJIIIIIELLIprog I
2
&&
30
Stitch length and pattern lengthsetting:Keys 7 have two functions:1 Selection of stitch length for pro
grams in which display A does notlight up The stitch length rangesfrom 0 to 6 mm For some of theprograms the stitch length is limi
ted.2. Selection of pattern length for pro
grams with illuminated display AThe pattern length is indicated inmm and is limited in different ways.
—-.,-J -
- I Li
orog I
?I&&&&
-----
JLLTZHH1Lfl
4
og (<.>) c—,
4
Balancing out and pattern lengthsetting:Keys 5 have three functions:1 Adjusting the reverse stitch length
in a pattern (for balancing out, see
page 32) for programs in which dis
play B does not light up.2. Selecting the pattern length in mm
while the stitch density remains the
same in programs in which display
B lights up.The set stitch length determines the
maximum pattern length.3. Checking and altering the stitch
counter in free programming.
2
31
Balance, or correction of reversestitchesThe balance control is used for correcting pattern- or program combinationswhich are sewn with a slight shiftowing to influences by the type ofmaterial or working method used.The stitch length of the reverse stitches of a pattern is corrected from — 7to + 7; the normal position is 0”. Theminus ‘-“ settings shorten the reversestitches and the patterns or programsbecome longer, and the plus “+“ settings lengthen the reverse stitches;patterns or programs become shorter.
Examples:1. Correction of individual patterns
(also in the P-memory)
Pattern too long
Prog. 159
pCorrected by: ÷3 +3
Rule: if the pattern is too long, correction has to be made by “+“ (from+ 1 to + 7),
2. Correction of pattern- and programcombinations(in the M-memory)
/F +
Combination LiJ .. .‘V.,, ,5’ ,,
Corrected by: +3: LzRi
Rule: If the pattern or program lastentered is corrected with —“ or +“
and entered, this applies to theentire program combination.
(rNI I 1! I.I I I 111 Ifl jprog ‘r
urr progr.:
9936
430000
129129
1360000
118
32
4Storing program combinations:
The creative computer contains 16 Mmemories, MO to M 15. A maximum of484 programs can be stored in the16 M memories.One M memory holds up to 84 entriesof programs 00 to 99 or letters andnumerals, and up to 63 entries of programs 100 to 177.
Programs 00 to 177 can also be combined with letters and numbers.Storing: first select a free M memorywith left key 22 M Oand right key 22.The M memory is empty when no indication appears in display 21.If no M memory from M 1 to M 15 isselected, all programs will go intomemory MO.Afterwards press key 48 for programentry. The memory is now ready forinput.Select programs, letters, punctuationmarks or numbers individually withprogram keys 22 and enter them inthe memory by pressing key 48. Theprogram numbers, letters, punctuation-marks or numbers appear in display21. The programs can be changed inlength and width before input.If the computer will not take furtherinputs, this means the memory capacity is exhausted, and a memory youno longer need must be emptied.
Checking a program combination byrunning it through the display:When more than 4 programs or morethan 11 letters or numbers are stored,the program can be run through display 21 from right to left by pressingkey 6. To stop the display press key 6again.Press memory key 30 to sew the programs entered from the beginning.By pressing the foot control themachine sews the combination fromthe beginning as well.
Cancelling a program combination:
By pressing key 47 “correct”, the lastprogram of the stored combination iscancelled. Continue pressing key 47until the entire combination is cancelled.If the combination consists of severalM memories, each individual memoryhas to be selected and cancelled. Thememories are then free for new combinations.
)33
fRepeatingprogram combinations:
Key 30 “memory/repeat” has three
functions:1. Returning a program combination
to the starting position.2. Repeating selected program combi
nations after other programs have
been sewn in the meantime.
3. Initiating sewing after free program
ming.
[ ri i i i i i i i riiiprog I
-o 0
&& &&.&
h
-
\
Twin-needle sewing:
Key 29 “twIn needle” must bepressed. Indicator C lights up and the
stitch width is reduced by 2 mm. Press
key 29 again and both function andindicator are switched oft.
Key 29 has a second function for
straight stitch sewing with a round-hole needle plate and straight stitch
foot (special accessories). If themachine is in program 00 and youpress key 29, indicator C lights up and
the computer programming function is
switched off.
I I 11 i ! i I I I I ill
&
prog () 1 fri
4-Q
10f
1360000
118
4
34
______
N
Lrn ill till 1111111 Patternmirroñng
P109 I Press “pattern mirror key 28.” Display
0 0 D lights up. The selected program is
4 4sewn in reverse. Programs can also be
o o entered mirror-imaged into a combina
L tion, as well as whole combinations
can be sewn mirror-imaged by pres0 ó sing key 30 first, then key 28, display
and function are now switched off.
Progr.
14557 ‘,
39373737
11111111111 11111 I I Single pattern setting:
p109 I Push “single pattern” key 27.
“ 0 0 Display E lights up. The machine sews
/9 a program or a program combination
and ties off beginning and end of the
seam.If the key 27 is pressed while sewing is
in progress, the machine completes
the program and ties off the seam.
99 93
35
4Setting the pattern start:
Key 26 “pattern start” has three func
tions:1 Push “pattern start” key 26. A pat
tern in progress is returned to the
starting point.2. The last program in a combination
appears in the display.
3. Length programming in buttonhole-
and darning programs is cancelled.
Recommended sewing modes:
For every program from 00 to 1 77. and
for letters and figures the machine will
indicate recommended sewing modes
with regard to dual feed, needle thread
tension and sewing feet.
Press key 6 and hold it. The recom
mendations appear in the display
beneath the three symbols on the
computer:
- A: dual feed
engaged
disengaged E
B: needle thread tension
C: number of sewing foot
(standard accessories)
Recommendations made in this book
may differ from those in the machine
display. In that case both recommen
dations can be used.
4 ‘, o o
&// ,c/
0 g20
-u0
0C
0
0<
j
a..
—0
)O
(00
(0
(0
I\
NN
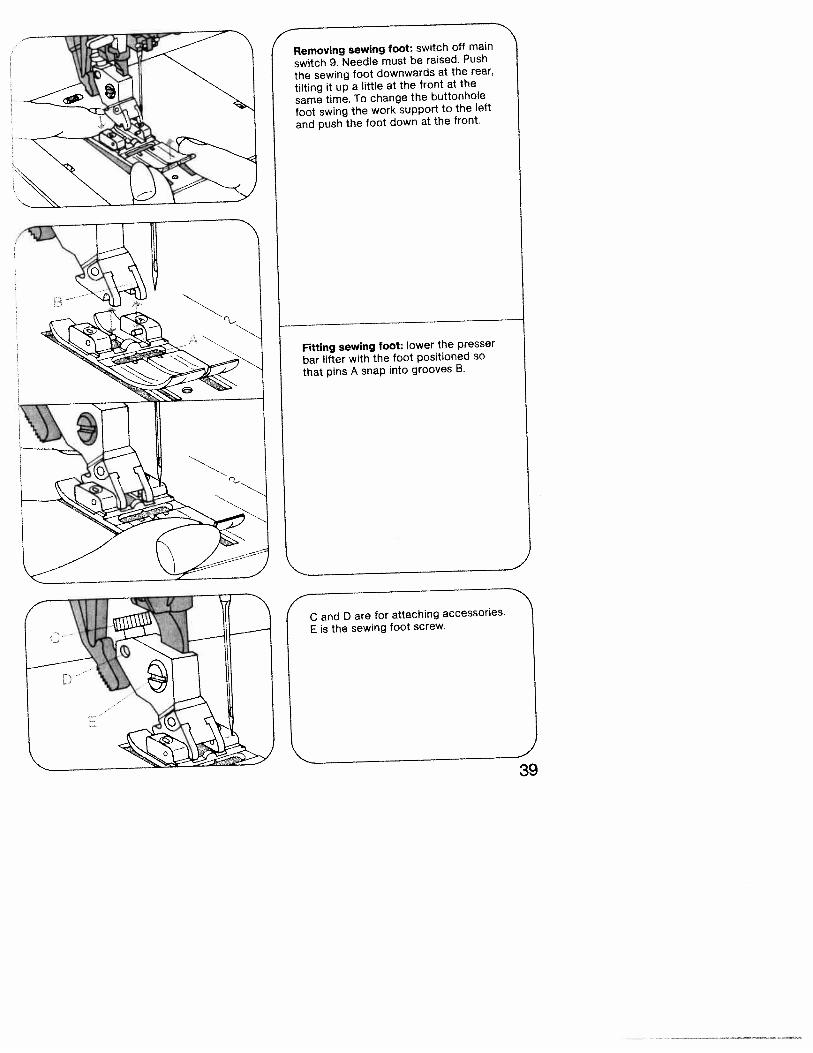
Removing sewing foot: switch off main
switch 9. Needle must be raised. Push
the sewing foot downwards at the rear,
tilting it up a little at the front at the
same time. To change the buttonhole
foot swing the work support to the left
and push the foot down at the front.
Fitting sewing foot: lower the presser
bar lifter with the foot positioned so
that pins A snap into grooves B.
NC and D are for attaching accessories.
E is the sewing foot screw.
-I
39
D
4- C
D
—o
(T
0 -o -o 0 0
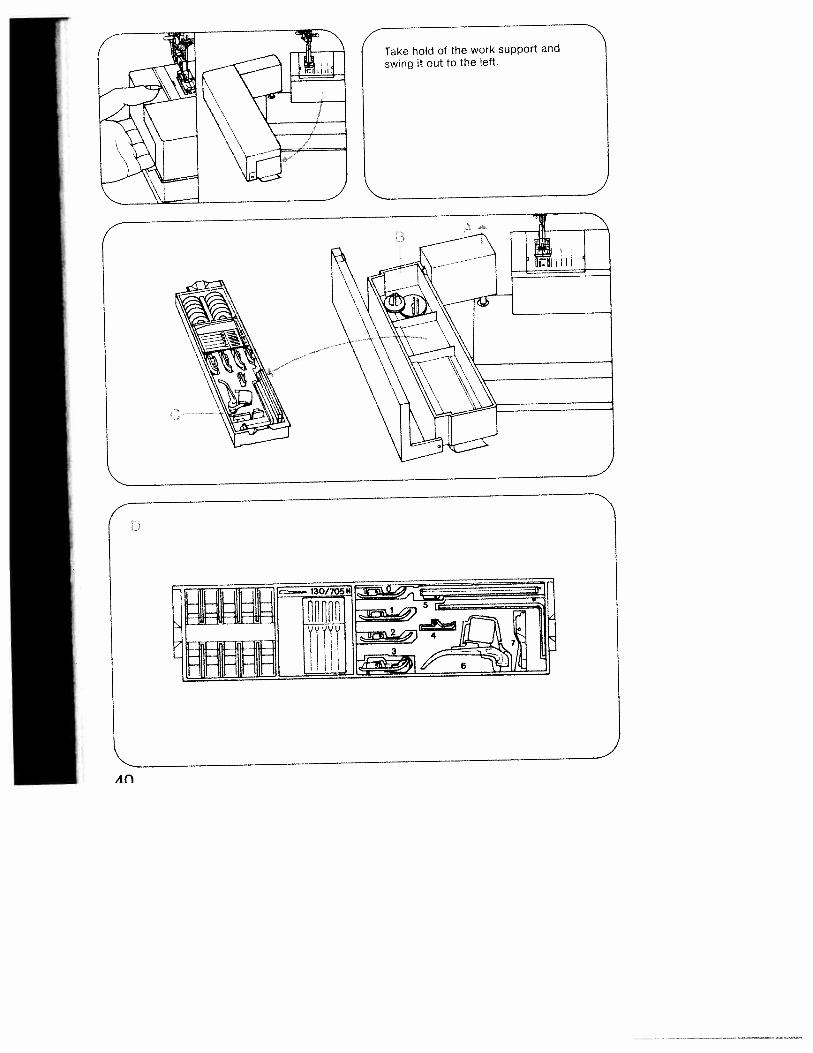
Detachable work support andaccessories:The work support can be lifted out (A).
Open its lid and take out accessory
box C. Underneath the box is an
accessory compartment B. Illustration
D shows how to arrange sewing feet,
needles and bobbins in the accessory
box.
Sewing feet (normal accessories)
OA Normal sewing toot
1A Fancy stitch foot for dual feed
2A Fancy stitch foot (not for dual
feed)3 Blind stitch and overlook foot
4 Zipper and edge sewing foot
5A Buttonhole foot6 Darning foot7 Hemming foot8 Edge guide
I41

4Cleaning and oiling• Pull out the mains plug.Tilt the needle plate up at the back (A)and remove it (B). Clean the feed dogand the parts in the sewing hook areawith a soft brush. Clean the bobbinthread monitor as instructed on page163. Apply a drop of oil in the hookraceway, as shown in the illustration,every 15 to 20 hours of operation.Other than that, the machine is maintenance-free and must not be oiled.
\
Changing the light bulb:• Disconnect the mains plug.Close the hinged top cover and swingup the carrying handle. Insert the edgeguide into cutout D, push down thelamp housing and hold it there, Turnthe light bulb towards A and take itout. Insert the new bulb so that its pinsenter slots C. Push it up and turn ittowards B. Pull out the edge guide.Be sure to use only a 15-watt lightbulb in the sewing lamp.
42
NChanging the fuseDisconnect the mains plug. Turn fuse
holder A left by a quarter turn with a
screwdriver, release it and take it out.
Pull out fuse B. Insert a new fuse in the
holder, replace the holder, push it in
with the screwdriver, then turn it right
by a quarter turn. (The fuse type is
F2A.) 110-volt machines have no fuse.
4Changing the bafteriesSwitch on the machine, so that the
memories are not lost when the batte
ries are changed, and tilt the machine
over backwards. A battery compart
ment is installed in the base. Lift cover
B at the catches in recesses A and
remove cover. Take out the batteries.
Insert the new batteries with the plus
side (+) facing upwards:Place cover B in so that hinges C
engage in recesses D and press cover
until it snaps in place.After changing the batteries, check the
contents of the memories.Replacement batteries:2 Mignon cells, 1.5 V, type LR 6
Only use leak-proof batteries!
43
Special accessoriesThe special accessories listed below are intended for special sewing work. They can be obtained from
your dealer at an extra charge.
P’ease note!Special accessories must be employed for the intended purpose only. They can only be used at
stitch widths up to 6 mm.
Accessory Part No. Sewing Operation
---
-- - --
Appliqué toot 93 042 941-91 For appliqué work
Binder 98 053 484-91 For binding edges
(remove sewing foot holder) with tape
—h—-—. --——-—
Cording toot, 5 groovesI
(twin needle with 1 8-2.5 mm needle gaugell 93-042 950-91 Forcordingwork
Cording foot, 7 grooves(twin needle with 1.4-1 8 mm needle gauge)I 93-042 953-91
Cding blade (2 ea -3-035 9525
__
-
Fringe sewing toot 93-042 943-9 1 JStraight stitch foot with round needle hole 98-694 82 1-00
Needle plate with round needle hole 98-694 827-00
Felling foot 4.5 mm 93-042 946-91 1Felling toot 6.5 mm 93-042 948-9 1
Shirring foot 93-036 998-91
—
Single-needle cording foot 93-036 915-91
—- -
Eyeletting plate 93-036 977-91
fee ——
—98-694 823-00
Knit edge sewing foot 98-042 957 91 J-
4
(needle size 80,for fine cordingneedle size 70)
For sewing fringes and for basting
Important! Only for straightstitches, needle position center.For topstitching and sewing verydelicate and soft fabrics(silk jersey, etc) — —
Teflon sewing foot
For felled seams
For shirring valances
—
For single-needle cording
For eyeletting
For hemming edges
For sewing knitted fabrics
For sewing plastic,synthetic materials and leatherI 93-036917-91
AA
r1
ji ‘/
\*i
I
,
j
(
C,’
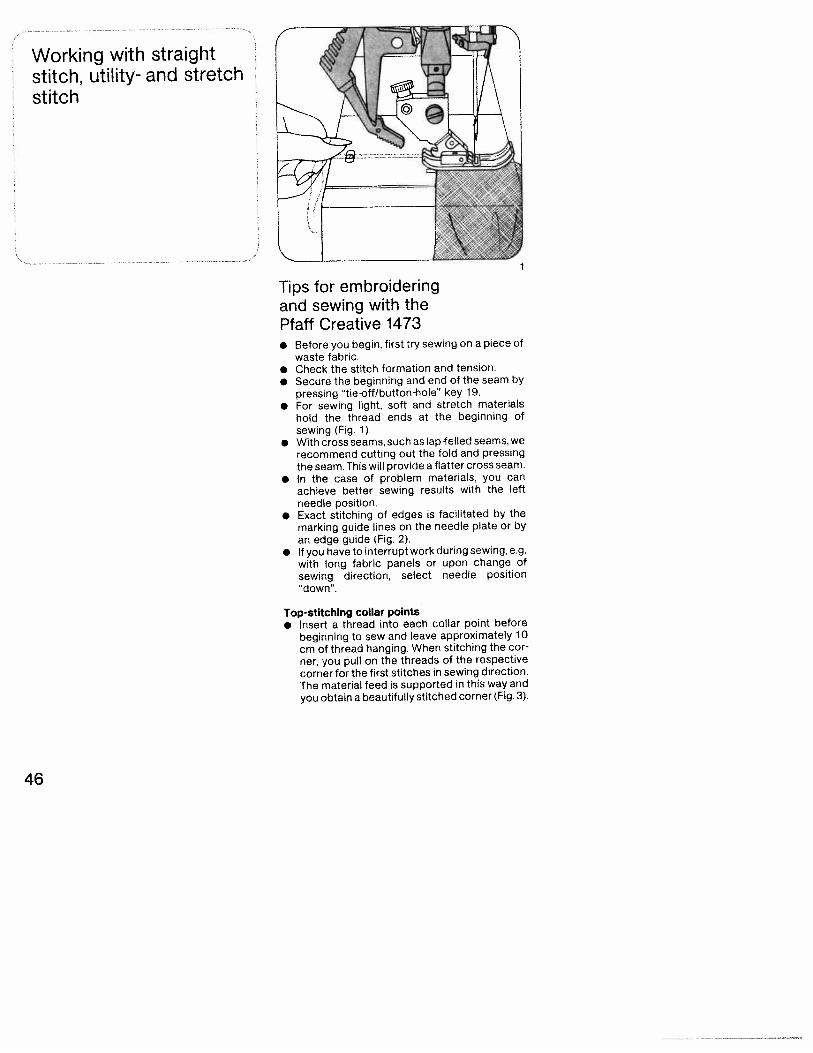
Working with straightstitch, utility- and stretchstitch
and sewing with thePfaff Creative 1473• Before you begin, first try sewing on a piece of
waste fabric.• Check the stitch formation and tension.• Secure the beginning and end of the seam by
pressing “tie-off/button-toIe” key 19.• For sewing light, soft and stretch materials
hold the thread ends at the beginning ofsewing (Fig. 1).
• With cross seams, such as lap-felled seams, werecommend cutting out the fold and pressingthe seam. This will provide a flatter cross seam.
• In the case of problem materials, you canachieve better sewing results with the leftneedle position.
• Exact stitching of edges is facilitated by themarking guide lines on the needle plate or byan edge guide (Fig. 2).
• If you have to interrupt work during sewing, e.g.with long fabric panels or upon change ofsewing direction, select needle position“down”.
Top-stitching collar points• Insert a thread into each collar point before
beginning to sew and leave approximately 10cm of thread hanging. When stitching the corner, you pull on the threads of the respectivecorner for the first stitches in sewing direction.The material feed is supported in this way andyou obtain a beautifully stitched corner (Fig. 3).
Tips for embroidering
46
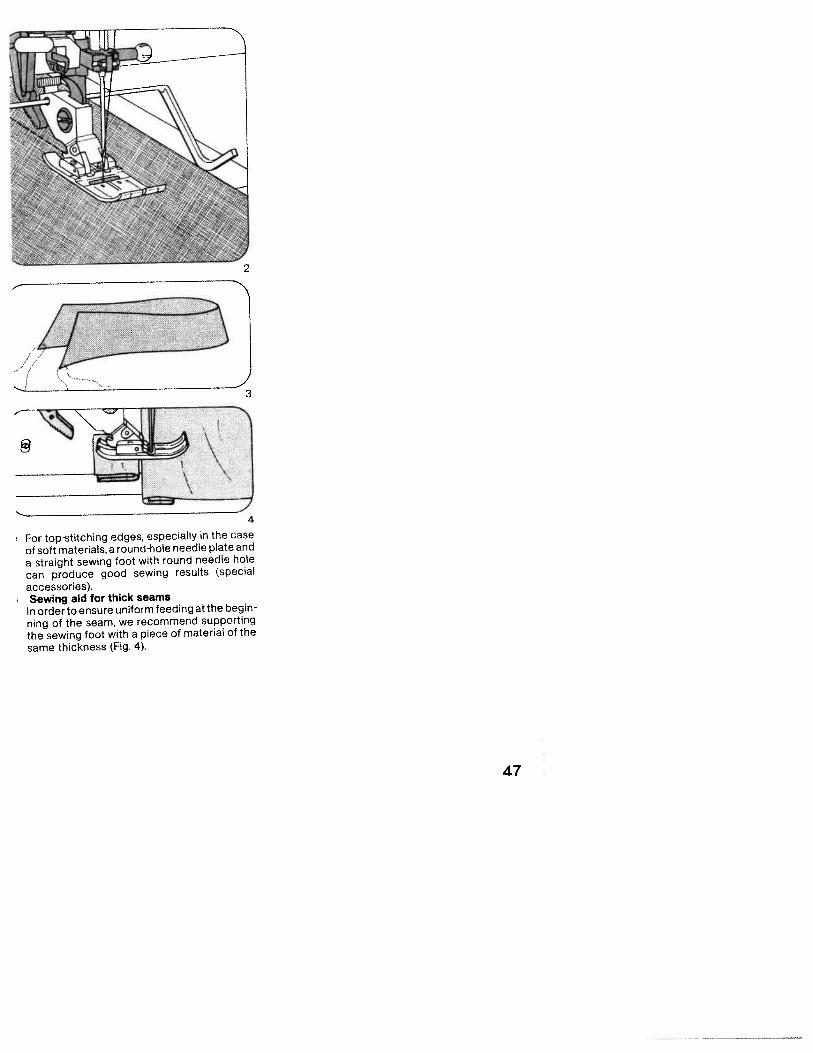
For top-stitching edges, especially in the case
of soft materials, a round-hole needle plate and
a straight sewing foot with round needle hole
can produce good sewing results (special
accessories).Sewing aid for thick seams
In order to ensure uniform feeding at the begin
ning of the seam, we recommend supporting
the sewing foot with a piece of material of the
same thickness (Fig. 4).
2
3
4
47
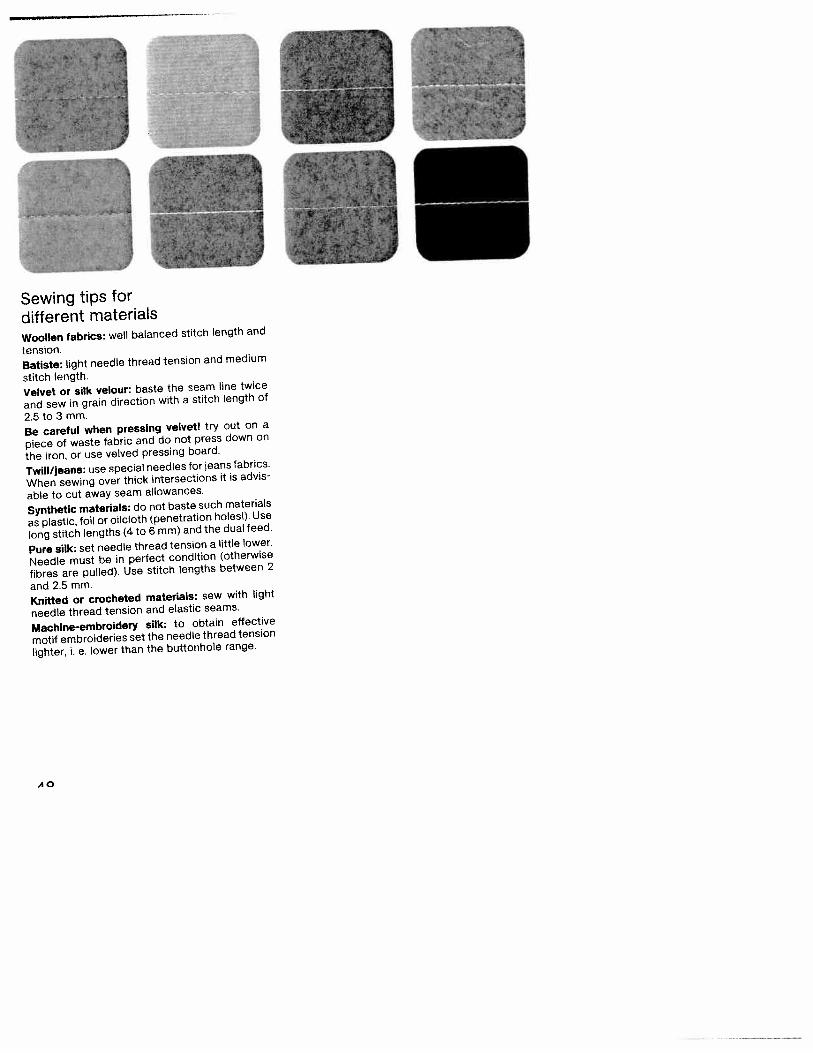
wISewing tips fordifferent materialsWoollen fabrics: well balanced stitch length and
tension.
Batiste: light needle thread tension and medium
stitch length.
Velvet or silk velour: baste the seam line twice
and sew in grain direction with a stitch length of
2.5 to 3 mm.
Be careful when pressing velvet! try out on a
piece of waste fabric and do not press down on
the iron, or use velved pressing board.
Twill/jeans: use special needles for jeans fabrics.
When sewing over thick intersections it is advis
able to cut away seam allowances.
Synthetic materials: do not baste such materials
as plastic, foil or oilcloth (penetration holes!). Use
long stitch lengths (4 to 6 mm) and the dual feed.
Pure silk: set needle thread tension a little lower.
Needle must be in perfect condition (otherwise
fibres are pulled). Use stitch lengths between 2
and 2.5 mm.
Knitted or crocheted materials: sew with light
needle thread tension and elastic seams.
Machine-embroidery silk: to obtain effective
motif embroideries set the needle thread tension
lighter, i. e. lower than the buttonhole range.
AO
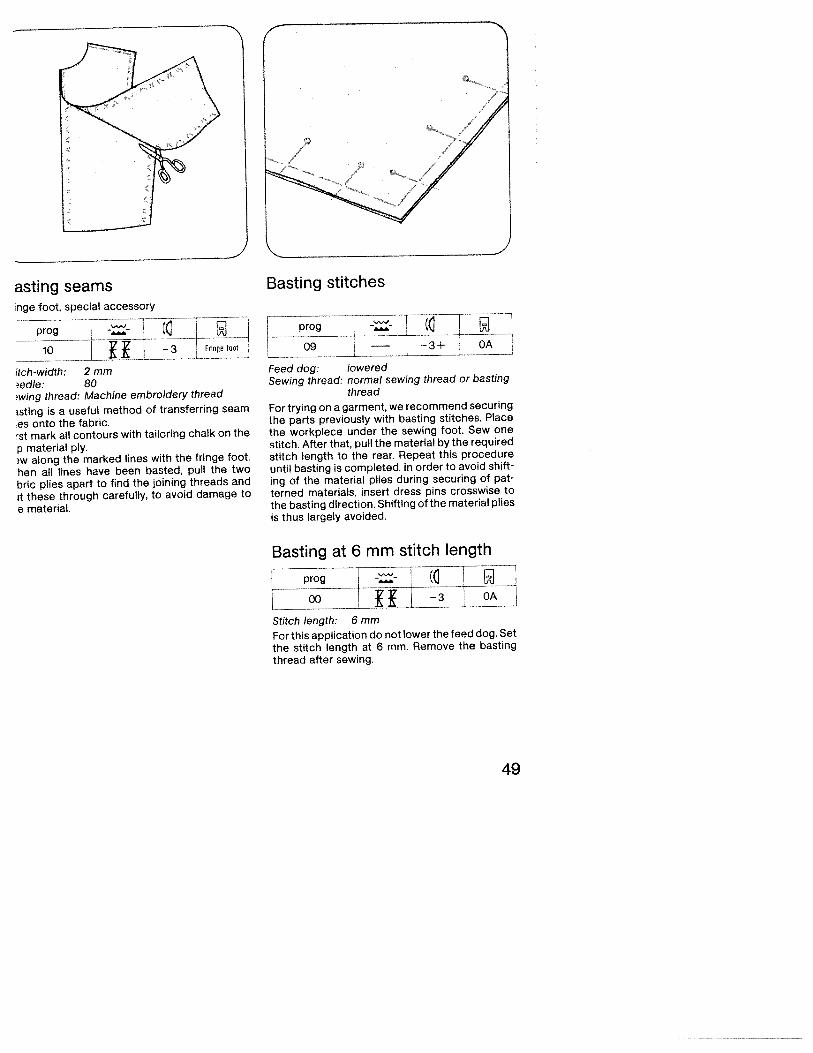
asting seamsnge foot, special accessory
10 i_iL_L_z iitch-width: 2 mm9edle: 80wing thread: Machine embroidery thread
sting a a useful method of transferring seam
es onto the fabric.st mark all contours with tailoring chalk on the
p material ply.w along the marked lines with the fringe foot.
hen all lines have been basted, pull the two
bric plies apart to find the joining threads and
it these through carefully, to avoid damage to
e material.
1prog
L_9iFeed dog: loweredSewing thread: normal sewing thread or basting
thread
For trying on a garment, we recommend securingthe parts previously with basting stitches. Place
the workpiece under the sewing foot. Sew onestitch. After that, pull the material by the requiredstitch length to the rear. Repeat this procedure
until basting is completed. In order to avoid shift
ing of the material plies during securing of pat
terned materials, insert dress pins crosswise tothe basting direction. Shifting of the material pliesis thus largely avoided.
Basting at 6 mm stitch length
progL___________
— (00 KKI-3
Stitch length: 6 mm
For this application do not lower the feed dog. Setthe stitch length at 6 mm. Remove the bastingthread after sewing.
)
Basting stitches
.LoJ
49
Straight stitch
ro
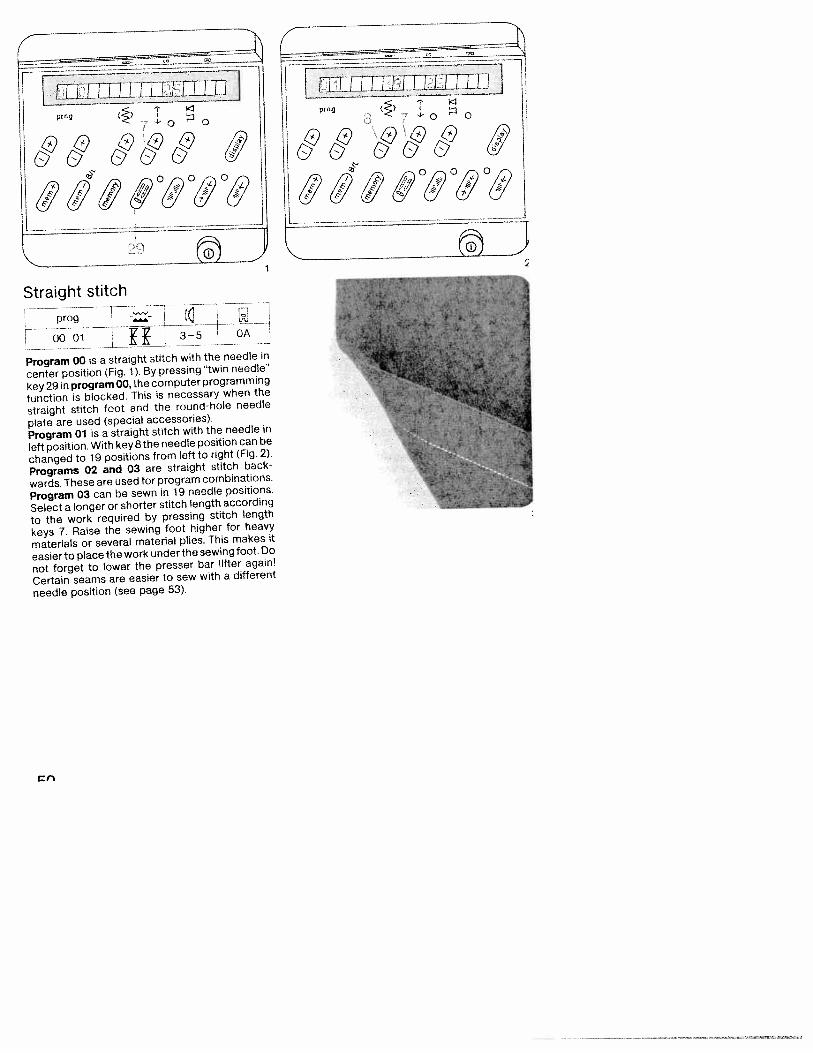
hñProgram 00 s a straight stitch with the needle in
center position (Fig. 1). By pressing ‘twin needle’
key 29 in program 00, the computer programming
function is blocked. This is necessary when the
straight stitch foot and the round-hole needle
plate are used (special accessories).
Program 01 is a straight stitch with the needle in
left position. With key 8 the needle position can be
changed to 19 positions from left to right (Fig. 2).
Programs 02 and 03 are straight stitch back
wards. These are used for program combinations.
Program 03 can be sewn in 19 needle positions.
Select a longer or shorter stitch length according
to the work required by pressing stitch length
keys 7. Raise the sewing foot higher for heavy
materials or several material plies, This makes it
easier to place the work under the sewing foot. Do
not forget to lower the presser bar lifter again!
Certain seams are easier to sew with a different
needle position (see page 53).
4
L— 11grog T
L-0
&&
LuffinpíOg
iii
o
h
3-5 L OA
‘Zr’
12?2
___
1oo
/;) 4 /) I
ro&
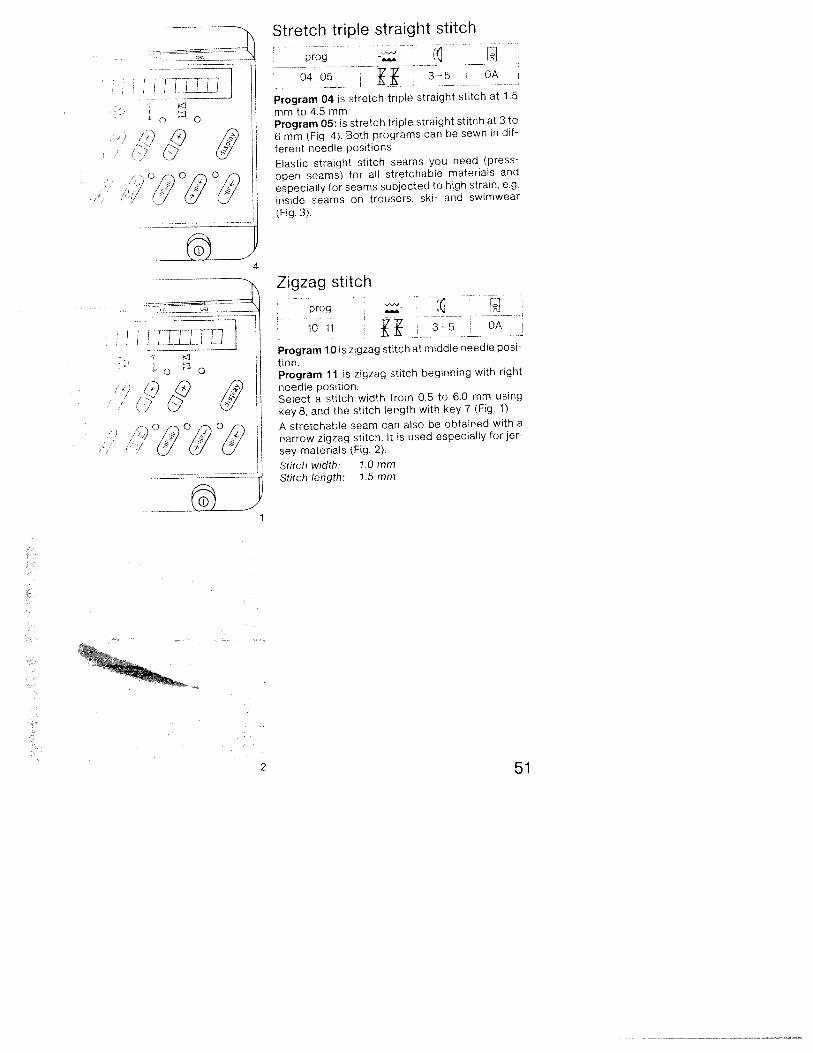
Stretch triple straight stitch
HProgram 04 is stretch triple straight stitch at 1.5
mm to 4.5 mm.Program 05: is stretch triple straight stitch at 3 to
6 mm (Fig. 4). Both programs can be sewn in dif
ferent needle positions.
Elastic straight stitch seams you need (press-
open seams) for all stretchable materials and
especially for seams subjected to high strain, e.g.
inside seams on trousers, ski- and swimwear
(Fig. 3)
Zigzag stitch
--
H 3-
Program lOis zigzag stitch at middle needle posi
tionProgram 11 is zigzag stitch beginning with right
needle position.Select a stitch width from 0.5 to 6.0 mm using
key 8, and the stitch length with key 7 (Fig. 1).
A stretchable seam can also be obtained with a
narrow zigzag stitch. It is used especially for jer
sey materials (Fig. 2).
Stitch width 1.0 mmStitch length: 1.5 mm
prog
04 05 3—5 OA
prog
10 11
2 51
Tprog
__
- f I
00 5-6 OAJ
Needle: 100 or 130 H-N
Needle thread. buttonhole thread
Stitch length: longest stitch
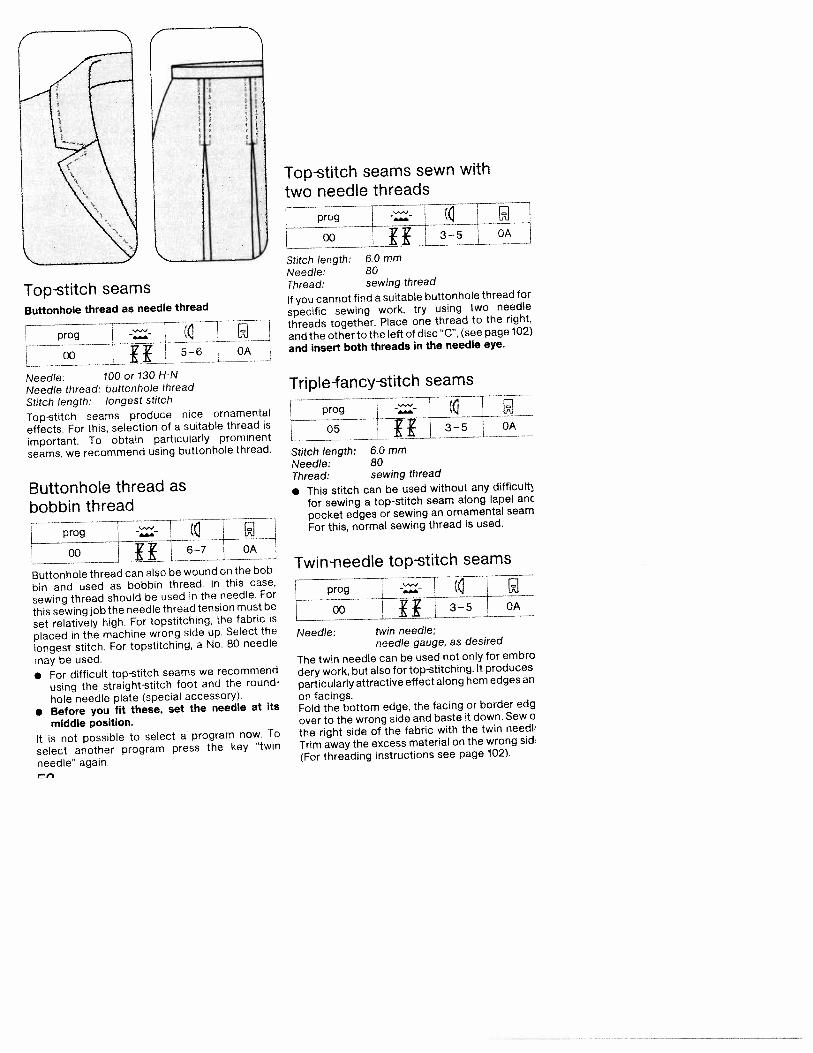
Top-stitch seams produce nice ornamental
effects. For this, selection of a suitable thread is
important. To obtain particularly prominent
seams, we recommend using buttonhole thread.
Buttonhole thread asbobbin threadn——— ——-—
prog j
00 H 16-7 OA
Buttonhole thread can also be wound on the bob
bin and used as bobbin thread. In this case,
sewing thread should be used in the needle. For
this sewing job the needle thread tension must be
set relatively high. For topstitching, the fabric is
placed in the machine wrong side up. Select the
longest stitch. For topstitching. a No. 80 needle
may be used.
• For difficult top-stitch seams we recommend
using the straight-stitch foot and the round-
hole needle plate (special accessory).
• Before you fit these, set the needle at its
middle position.
It is not possible to select a program now. To
select another program press the key “twin
needle” again.
Top-stitch seams sewn with
two needle threads
prog
___
JStitch length: 6,0 mmNeedle: 80Thread: sewing thread
If you cannot find a suitable buttonhole thread for
specific sewing work, try using two needle
threads together. Place one thread to the right,
and the other to the left of disc “C”, (see page 102)
and insert both threads in the needle eye.
Triple-fancy-stitch seams
pg I
__05-5
°
Stitch length: 6.0 mmNeedle: 80Thread: sewing thread
• This stitch can be used without any difficult
for sewing a top-stitch seam along lapel anc
pocket edges or sewing an ornamental seam
For this, normal sewing thread is used.
Twin-needle top-stitch seams
.Z4TL00 KK 1 3-5 OA
L
___________
—____1
Needle: twin needle;needle gauge, as desired
The twin needle can be used not only for embro
dery work, but also for top-stitching. It produces
particularly attractive effect along hem edges an
on facings,Fold the bottom edge, the facing or border edg
over to the wrong side and baste it down. Sew o
the right side of the fabric with the twin needl
Trim away the excess material on the wrong sid’
(For threading instructions see page 102).
Top-stitch seamsButtonhole thread as needle thread
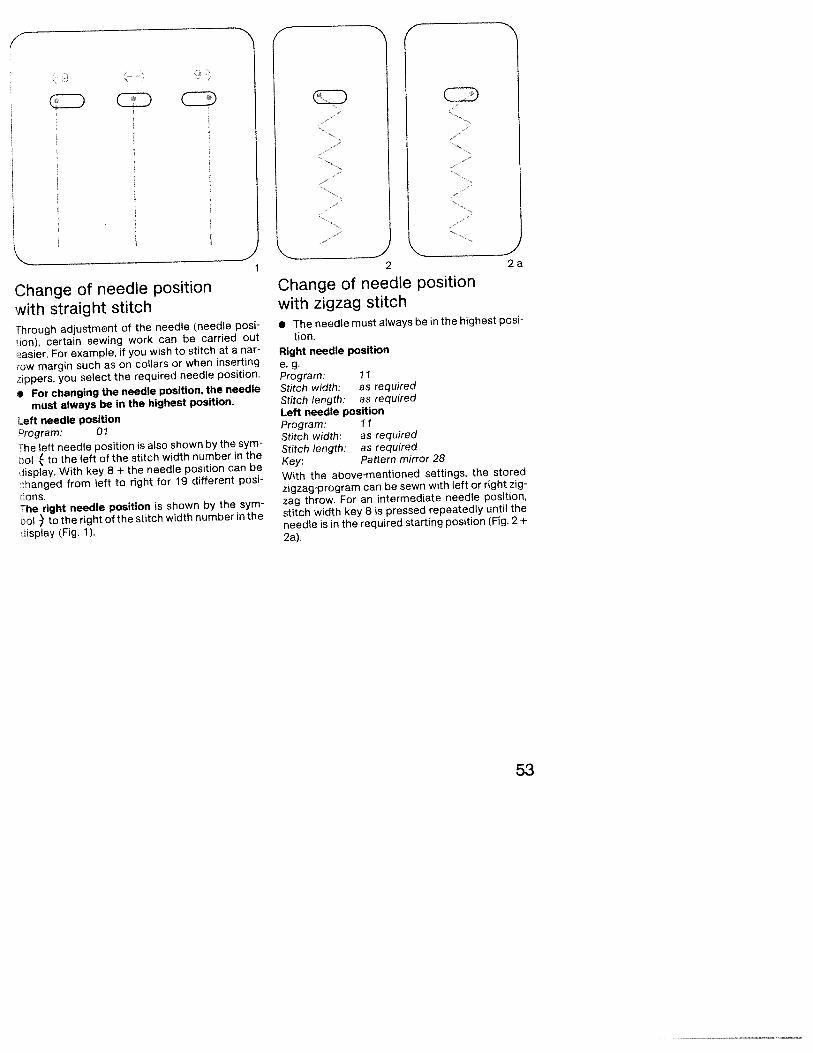
Change of needle positionwith straight stitchThrough adjustment of the needle (needle posi
tion), certain sewing work can be carried out
easier. For example, if you wish to stitch at a nar
row margin such as on collars or when inserting
zippers, you select the required needle position.
• For changing the needle position, the needle
must always be in the highest position.
Left needle positionProgram: 01
The left needle position is also shown by the sym
ol to the left of the stitch width number in the
iisplay. With key 8 + the needle position can be
hanged from left to right for 19 different posi
ions.The right needle position is shown by the sym
ol to the right of the stitch width number in the
iisplay (Fig. 1).
2 2a
Change of needle positionwith zigzag stitch• The needle must always be in the highest posi
tion.
Right needle positione.g.Program: 11Stitch width: as requiredStitch length: as requiredLeft needle positionProgram: 11Stitch width: as requiredStitch length: as requiredKey: Pattern mirror 28
With the above-mentioned settings, the stored
zigzag-program can be sewn with left or right zig
zag throw. For an intermediate needle position,
stitch width key 8 is pressed repeatedly until the
needle is in the required starting position (Fig. 2 +
2a).
cz cD
53

**
7s) c;D
(Th
4
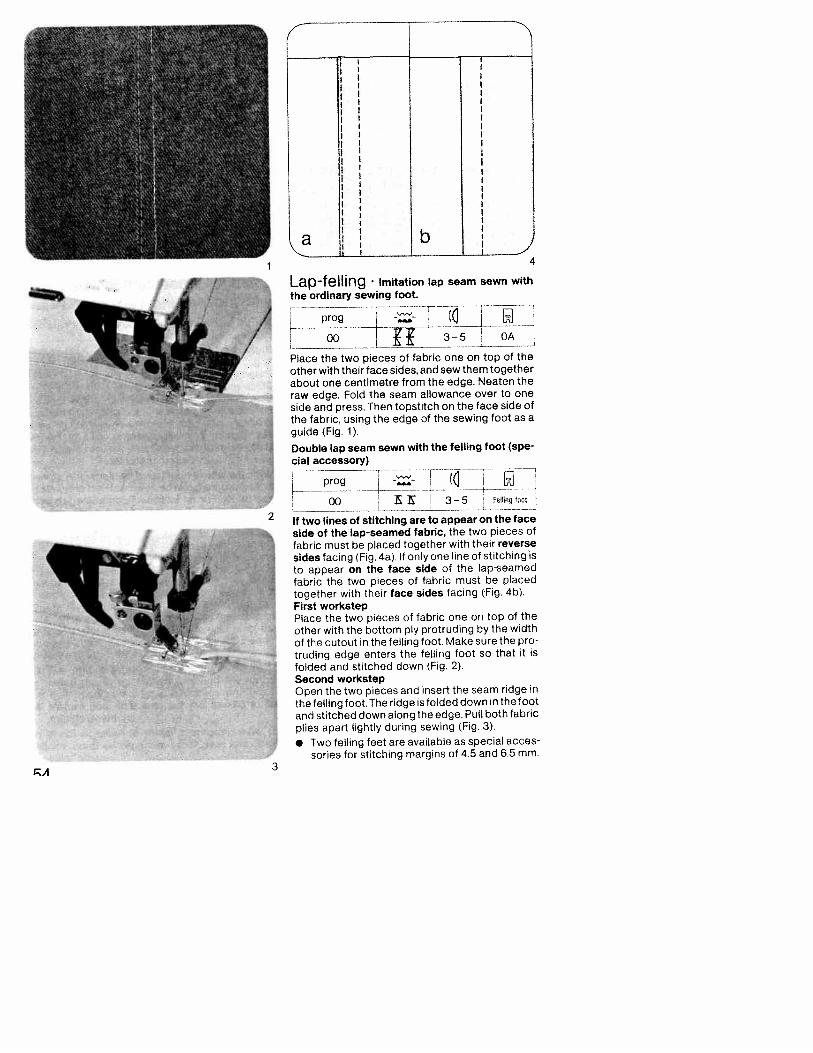
Lap-felling imitation lap seam sewn withthe ordinary sewing foot.
Lprog ccj L
J°ZZII[’TPlace the two pieces of fabric one on top of theother with their face sides, and sew them togetherabout one centimetre from the edge. Neaten theraw edge. Fold the seam allowance over to oneside and press. Then topstitch on the face side ofthe fabric, using the edge of the sewing foot as aguide (Fig, 1).
Double lap seam sewn with the felling foot (special accessory)
If two lines of Stitching are to appear on the faceside of the lap-seamed fabric, the two pieces offabric must be placed together with their reversesides facing (Fig. 4a). If only one line of stitching isto appear on the face side of the lap-seamedfabric the two pieces of fabric must be placedtogether with their face sides facing (Fig. 4b).First workstepPlace the two pieces of fabric one on top of theother with the bottom ply protruding by the widthof the cutout in the felling foot. Make sure the protruding edge enters the felling foot so that it isfolded and stitched down (Fig. 2).Second workstepOpen the two pieces and insert the seam ridge inthe felling foot. The ridge is folded down in the footand stitched down along the edge. Pull both fabricplies apart lightly during sewing (Fig. 3).
• Two felling feet are available as special accessories for stitching margins of 4.5 and 6.5 mm.
ba\-
•..
•1 -
2
3

01 01
———-————
L__P_-00 I 3—5 7
-I
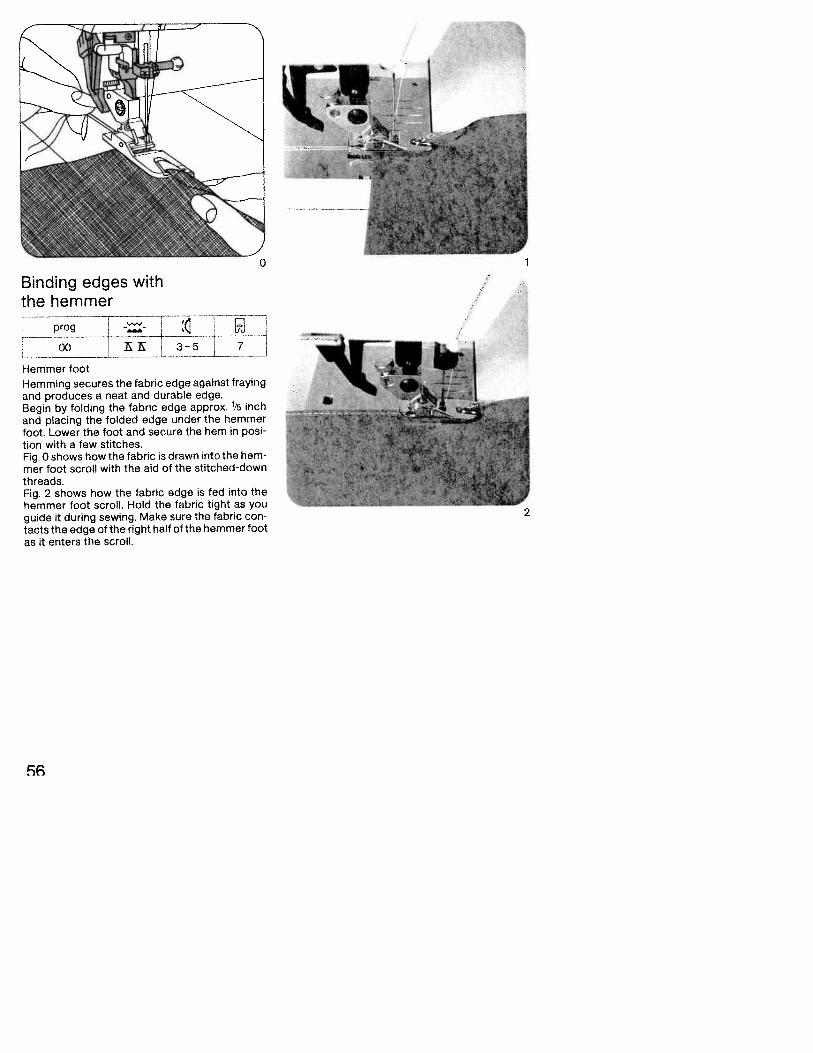
Hemmer foot
Hemming secures the fabric edge against frayingand produces a neat and durable edge.Begin by folding the fabric edge approx. ‘/s inchand placing the folded edge under the hemmerfoot. Lower the foot and secure the hem in position with a few stitches.Fig. 0 shows how the fabric is drawn into the hemmer foot scroll with the aid of the stitched-downthreads.Fig. 2 shows how the fabric edge is fed into thehemmer foot scroll. Hold the fabric tight as youguide it during sewing. Make sure the fabric contacts the edge of the right half of the hemmer footas it enters the scroll.
Binding edges withthe hemmer
0
2
3
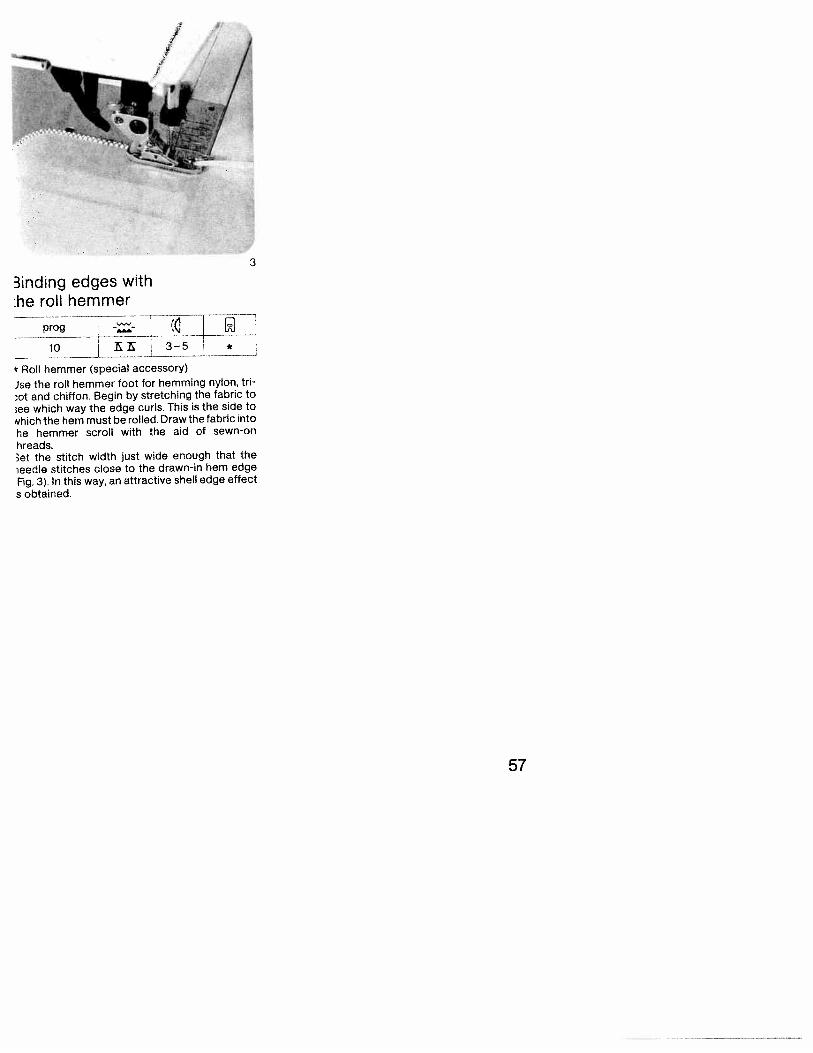
3inding edges with:he roll hemmer
Jz_j w_—---
Roll hemmer (special accessory)
ise the roll hemmer foot for hemming nylon, tn
ot and chiffon, Begin by stretching the fabric toee which way the edge curls. This is the side to,hich the hem must be rolled. Draw the fabric into
he hemmer scroll with the aid of sewn-onhreads.3et the stitch width just wide enough that the‘,eedle stitches close to the drawn-in hem edgeFig. 3). In this way, an attractive shell edge effects obtained.
//
F
57
ooHf3 OA
Stitch length: 4 mm
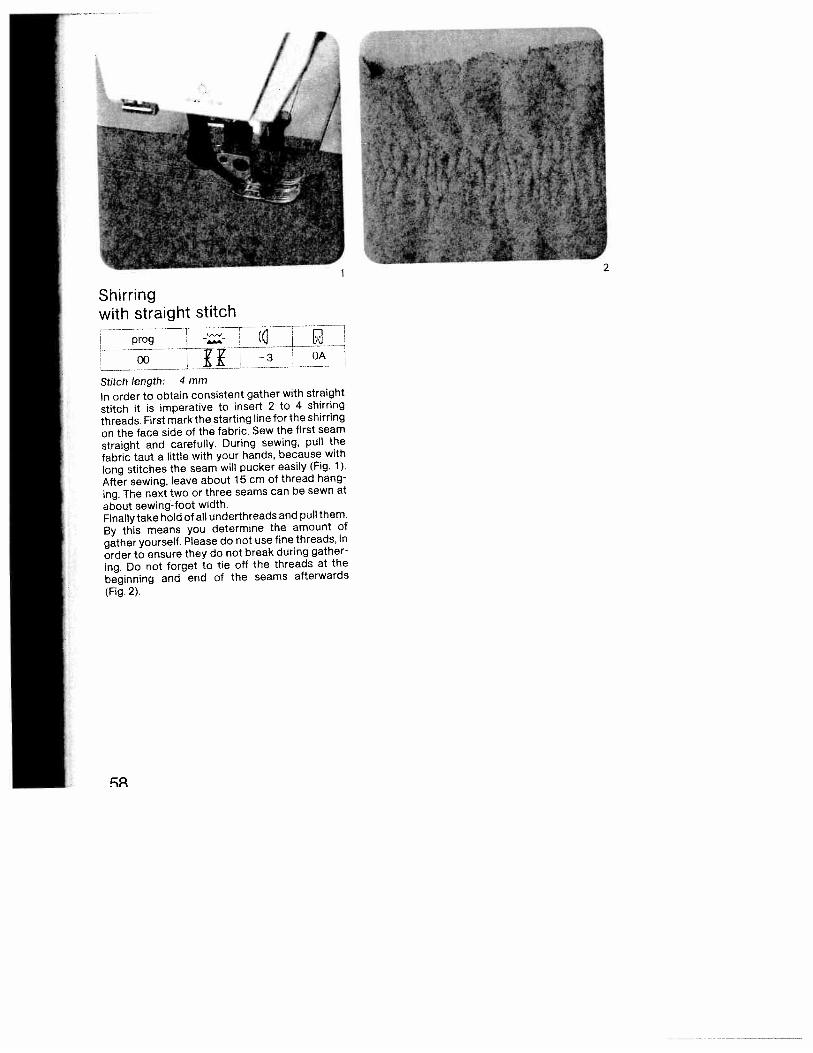
In order to obtain consistent gather with straight
stitch it is imperative to insert 2 to 4 shirring
threads. First mark the starting line for the shirring
on the face side of the fabric, Sew the first seam
straight and carefully. During sewing, pull the
fabric taut a little with your hands, because with
long stitches the seam will pucker easily (Fig. 1).
After sewing, leave about 15 cm of thread hang
ing. The next two or three seams can be sewn at
about sewing-foot width.Finally take hold of all underthreads and pull them.
By this means you determine the amount of
gather yourself. Please do not use fine threads, inorder to ensure they do not break during gather
ing. Do not forget to tie off the threads at the
beginning and end of the seams afterwards
(Fig. 2).
Shirrngwith straight stitch
Shirring withelastic threads
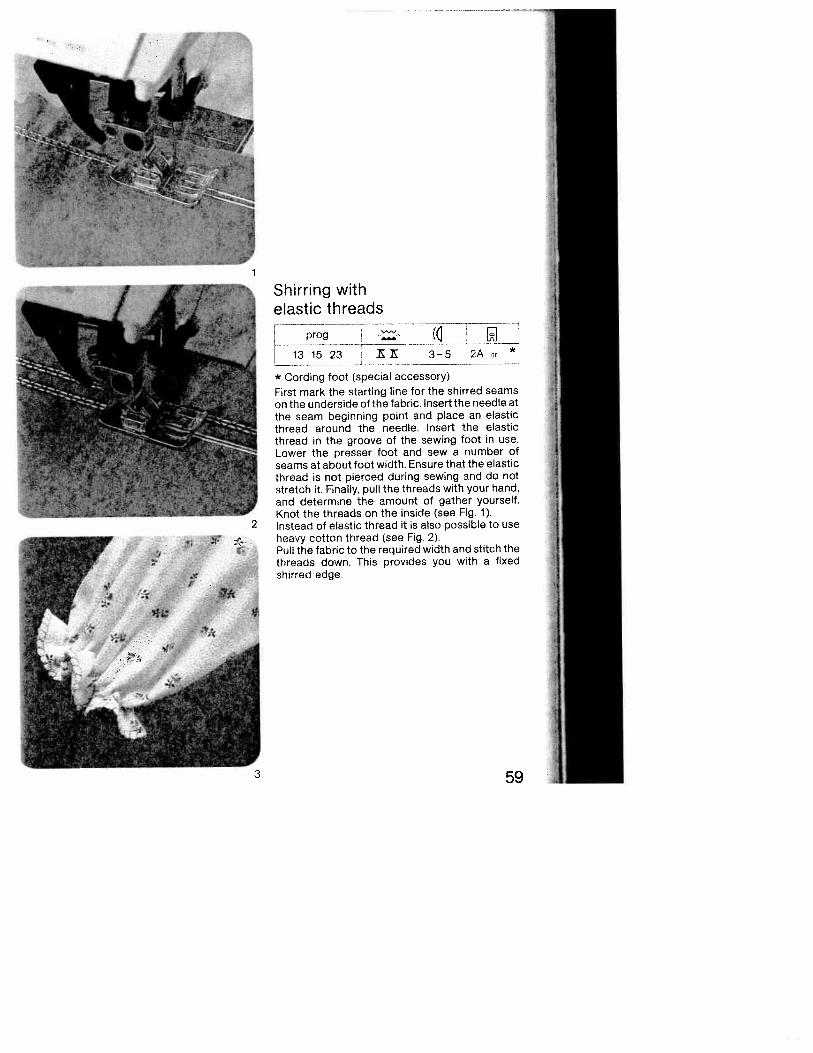
2:Jz2* Cording foot (special accessory)
First mark the starting line for the shirred seamson the underside of the fabric. Insert the needle atthe seam beginning point and place an elasticthread around the needle. Insert the elasticthread in the groove of the sewing foot in use.Lower the presser foot and sew a number ofseams at about foot width. Ensure that the elasticthread is not pierced during sewing and do notstretch it. Finally, pull the threads with your hand,and determine the amount of gather yourself.Knot the threads on the inside (see Fig. 1).Instead of elastic thread it is also possible to useheavy cotton thread (see Fig. 2).Pull the fabric to the required width and stitch thethreads down. This provides you with a fixedshirred edge.
(special accessory)
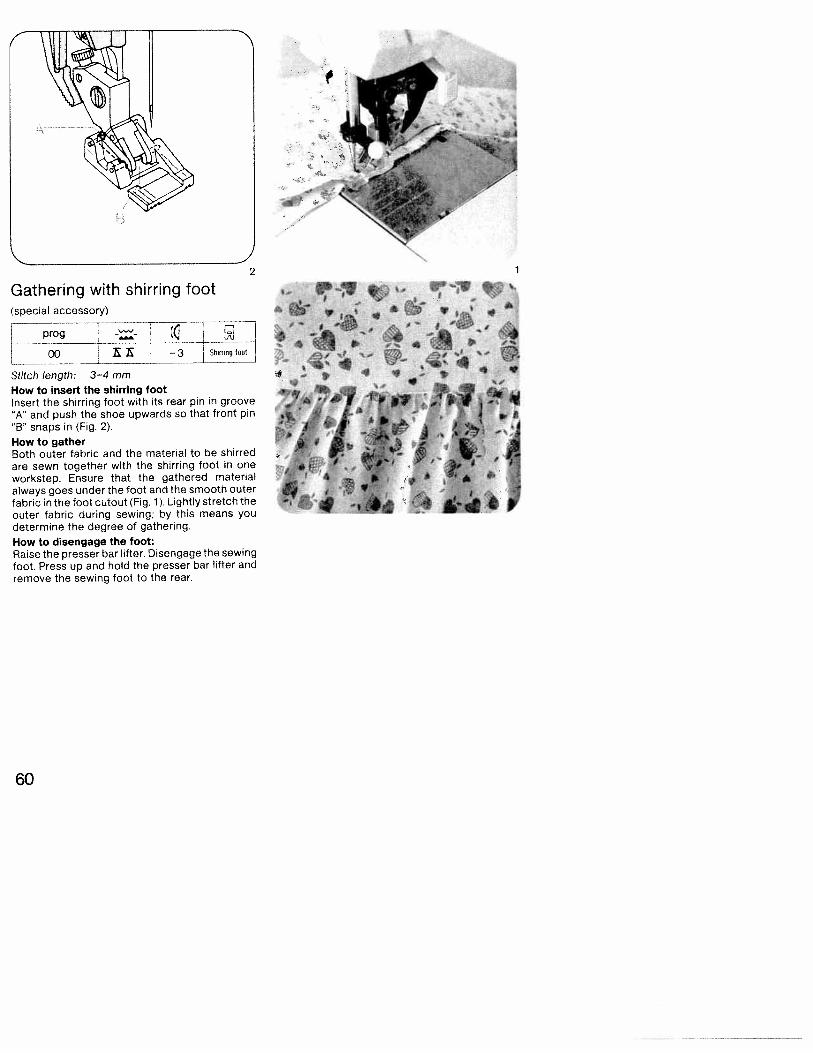
EJZZ00 E — 3 Shirnnq hot
Stitch length: 3—4 mm
How to insert the shirring tootInsert the shirring foot with its rear pin in groove“A’ and push the shoe upwards so that front pinB’ snaps in (Fig. 2).
How to gatherBoth outer fabric and the material to be shirredare sewn together with the shirring foot in oneworkstep. Ensure that the gathered materialalways goes under the foot and the smooth outerfabric in the foot cutout (Fig. 1). Lightly stretch theouter fabric during sewing; by this means youdetermine the degree of gathering.
How to disengage the foot:Raise the presser bar lifter. Disengage the sewingfoot. Press up and hold the presser bar lifter andremove the sewing foot to the rear.
2
Gathering with shirring foot
60
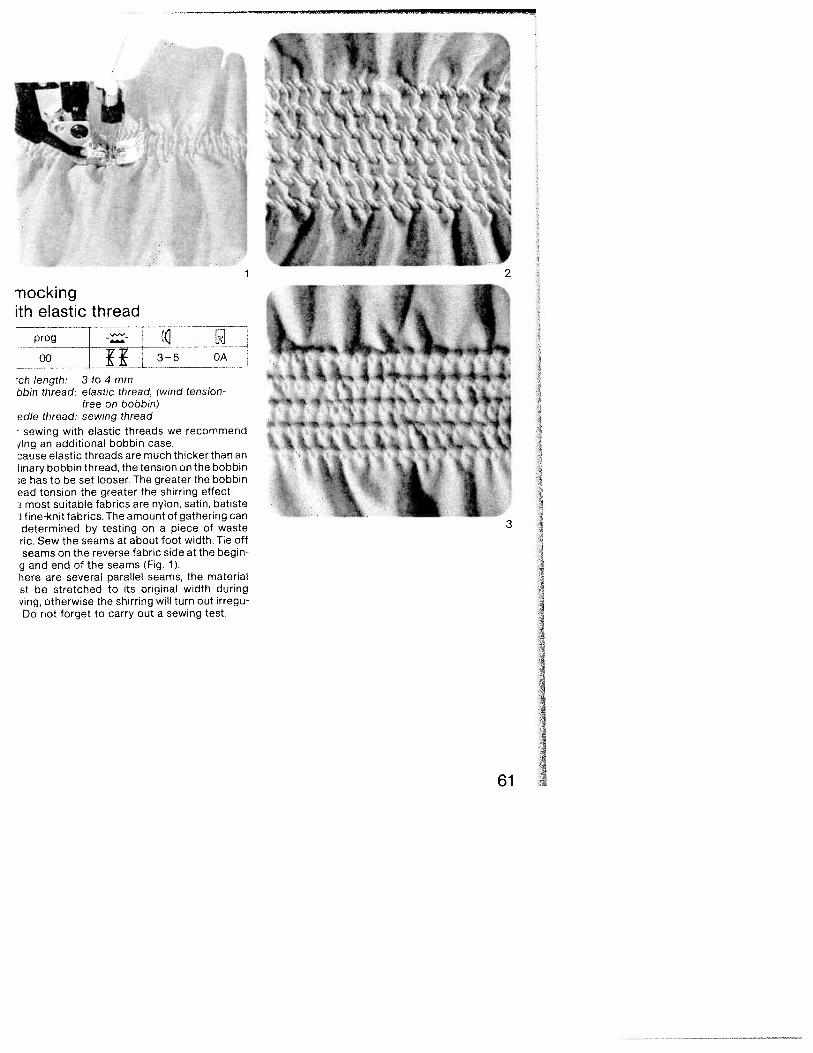
‘nockingith elastic thread
pg
5__DA
ch length: 3 to 4 mmbbin thread: elastic thread, (wind tension-
free on bobbin)edle thread: sewing thread
sewing with elastic threads we recommendwing an additional bobbin case.Dause elastic threads are much thicker than anmary bobbin thread, the tension on the bobbine has to be set looser. The greater the bobbinead tension the greater the shirring effect.
most suitable fabrics are nylon, satin, batisteJ fine-knit fabrics. The amount of gathering candetermined by testing on a piece of waste 3
nc. Sew the seams at about foot width. Tie offseams on the reverse fabric side at the begin
g and end of the seams (Fig. 1).here are several parallel seams, the materialst be stretched to its original width duringving, otherwise the shirring will turn out irreguDo not forget to carry out a sewing test.
II
II
61
2
(J -r
Stitch-width: as requiredSewing thread: embroidery, darning,
or sewing thread
The stored zigzag-stitch is suitable for serging of
light materials. The more difficult the material, the
wider the stitch width must be selected for the zig
zag stitch. Ensure that the needle passes outside
the outer edge during sewing. In this way the
material edge is properly serged and well covered
(Fig. 1).For heavy or easily fraying materials, use:
• Program: 13, 21, or 22 (Fig. 3).
For materials which contract during serging us
the overlock foot.
[ prog zzzrzii L1[_-L
Stitch-width: as required
Serge the raw edge with the required zigz
stitch. The material enters at the red marking c
the sewing foot (Fig. 2).• Preparation of the sewing foot (overlock foi
No. 3)Turn screw “A” fully to the front. The red mark “I
is then on the right sewing foot side. Allow t[
edge of the material to be sewn to enter clo
against the red mark. During sewing, the thret
places itself over the wire “C”. By this means y
will receive a beautiful smooth seam (Fig. 2).For change of needle position for zigzag stit
see page 53,
Overcasting raw edges with the Sergingzigzag-stitch with overlock foot
3
623

35 OA
130/705 H 80 or130/705 H SKF 80
titch width: as requwed
Vith the above-mentioned programs it is possible
a repair elastic tapes, or join them on underwear.;athing wear and high-stretch materials such asycra and difficult synthetic fabrics.
3elect the appropriate stitch width for the appli,ation. For this work it is recommended to use fineewing threads (Figs. 1 and 2).
:aggotting stitchor corsetry
prog -- (29 H 3-5 OA
qeedle: 130/705 H 80 or130/705 H SKF 80
AJith faggotting stitch it is possible to sew a highly
lastic seam with hem-stitching effect. Tack over
he edges to be sewn and place them under theewing foot with a clearance of 3 mm (Fig. 3).)ver-stitch using program 29. The needle mustenetrate the material to the right and to the left
Fig. 4).
63
Ij j \ \f \i’/;
tJ j1\/
1
3tretch tnple zigzag-stitchycrastitch
prog
160 161
leedle
2
3
f
Change of bartack widthand length
prog
13a 3-5 OA
Cut off the stretched elastic tape close to theedge. Gather the fabric to the waist size usingstraight stitch. Push the part prepared in this waybetween the elastic tape and pin it firmly. Stitch iton using elastic stitches. Finally over-stitch theclosed and rounded tape elastic stitches (Fig. 1>.
prog -- (1 11[ 13a 3-5
On skirts or trousers sew the strap onto the prepared edge with elastic stitches (Fig. 2>.
Bartacks
prog-- (J 11
157 3-5 OA
Belt loops, flies or pockets can be very easilytacked down with automatic bartacks (Fig. 3).
Elastic stitch (for underwear)
The bartacks can be changed to different widthor lengths, or only in width or length (Fig. 4 + 4b)
prog
157 1 KK 3—5OA
Elastic straps (outerwear)
Pattern length: as requiredStitch-width: as required
In order to ensure correct feeding of protrudinçcrosswise seams, belt-loops and similar thingswe recommend supporting the sewing foot withcorrespondingly thick piece of material (sepage 47).
64
a) 01
Closing- andserging seams
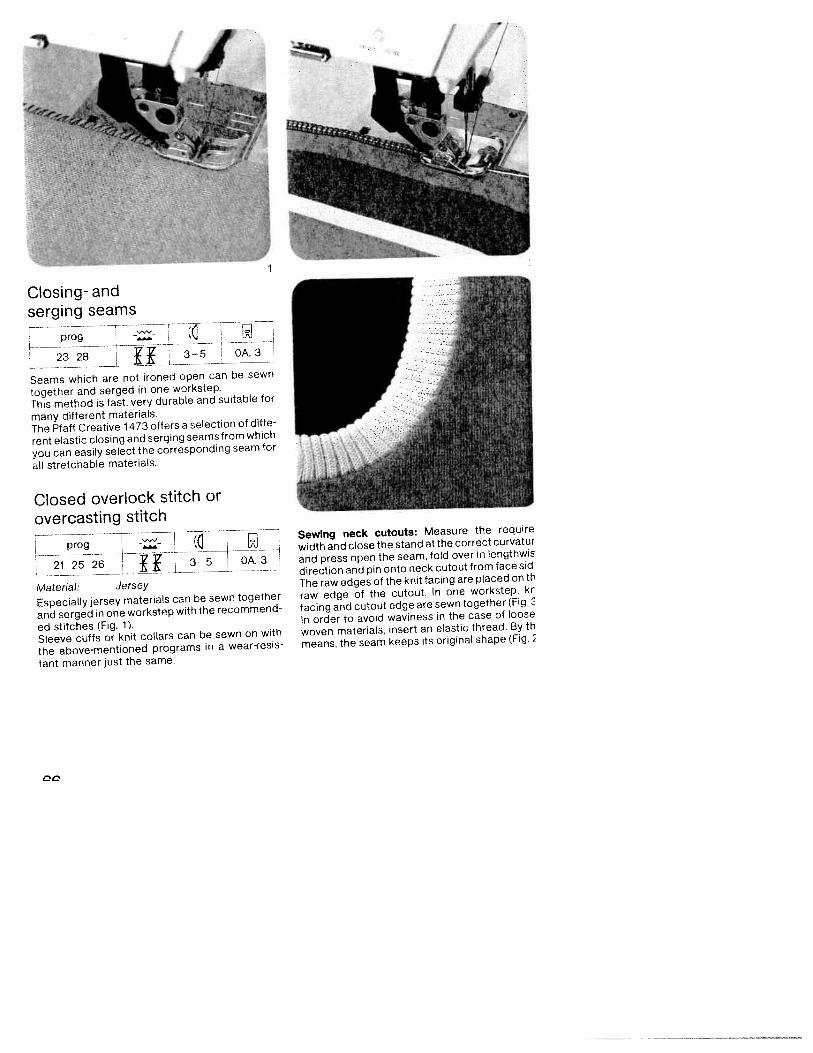
— prog — E1 -
L 2328— H 3-5 OA,3
Seams which are not ironed open can be sewn
together and serged in one workstep.
This method is fast, very durable and suitable for
many different materials.
The Pfaff Creative 1473 offers a selection of diffe
rent elastic closing and serging seams from which
you can easily select the corresponding seam for
all stretchable materials.
Closed overlock stitch or
overcasting stitch
prog-
21 2526 i
Material: Jersey
Especially jersey materials can be sewn together
and serged in one workstep with the recommend
ed stitches (Fig. 1).Sleeve cuffs or knit collars can be sewn on with
the above-mentioned programs in a wear-resis
tant manner just the same.
Sewing neck cutouts: Measure the require
width and close the stand at the correct curvatur
and press open the seam, fold over in lengthwis
direction and pin onto neck cutout from face sid
The raw edges of the knit facing are placed on tI’
raw edge of the cutout. In one workstep, kr
facing and cutout edge are sewn together (Fig.
In order to avoid waviness in the case of loose
woven materials, insert an elastic thread. By th
means, the seam keeps its original shape (Fig.
1i3-5 OA,3
prog--
23
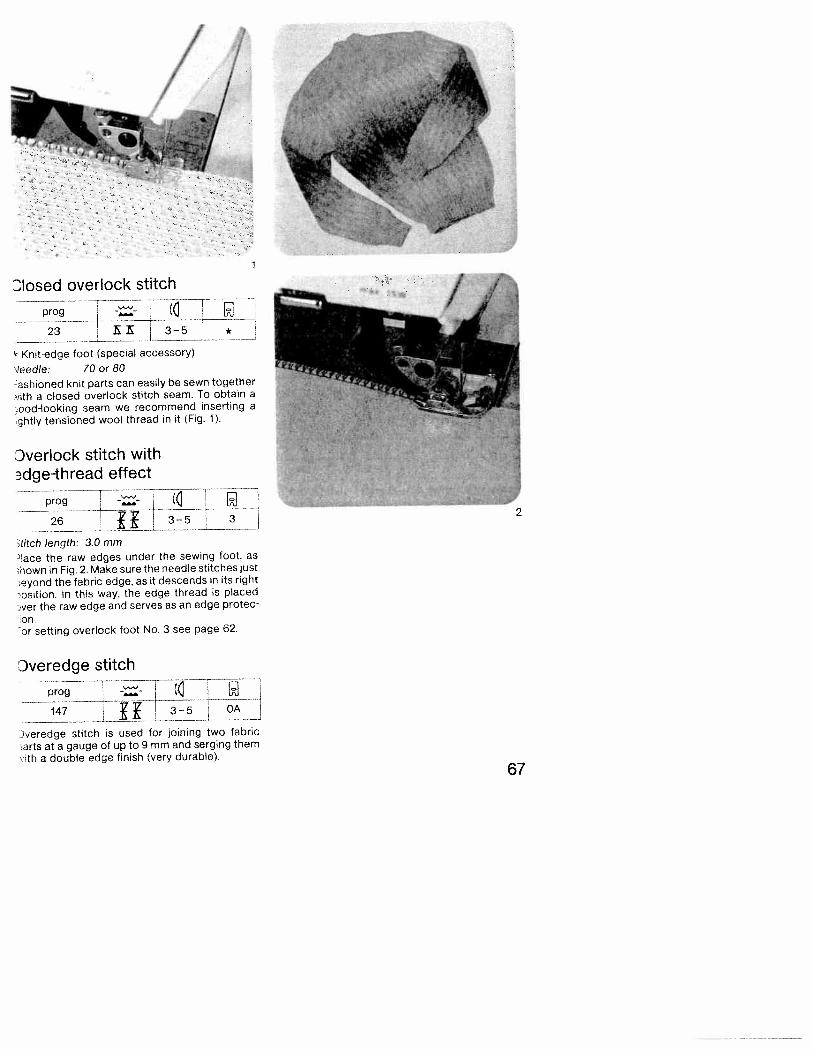
k Knit-edge foot (special accessory)
Jeedle: 70 or 80
ashioned knit parts can easily be sewn together
vith a closed overlock stitch seam. To obtain aood-looking seam we recommend inserting aghtly tensioned wool thread in it (Fig. 1).
Dverlock stitch withdge-th read effect
;g --i;—
26 3—5 3- -
ititch length 3.0 mm
lace the raw edges under the sewing foot, as
hown in Fig. 2. Make sure the needle stitches just
eyond the fabric edge, as it descends in its right
osition. In this way, the edge thread is placedver the raw edge and serves as an edge protec
on.or setting overlock foot No. 3 see page 62.
Dveredge stitch
prog - : L Ji147 3—5 OA
Jveredge stitch is used for joining two fabricarts at a gauge of up to9 mm and serging themth a double edge finish (very durable).
Diosed overlock stitch
67
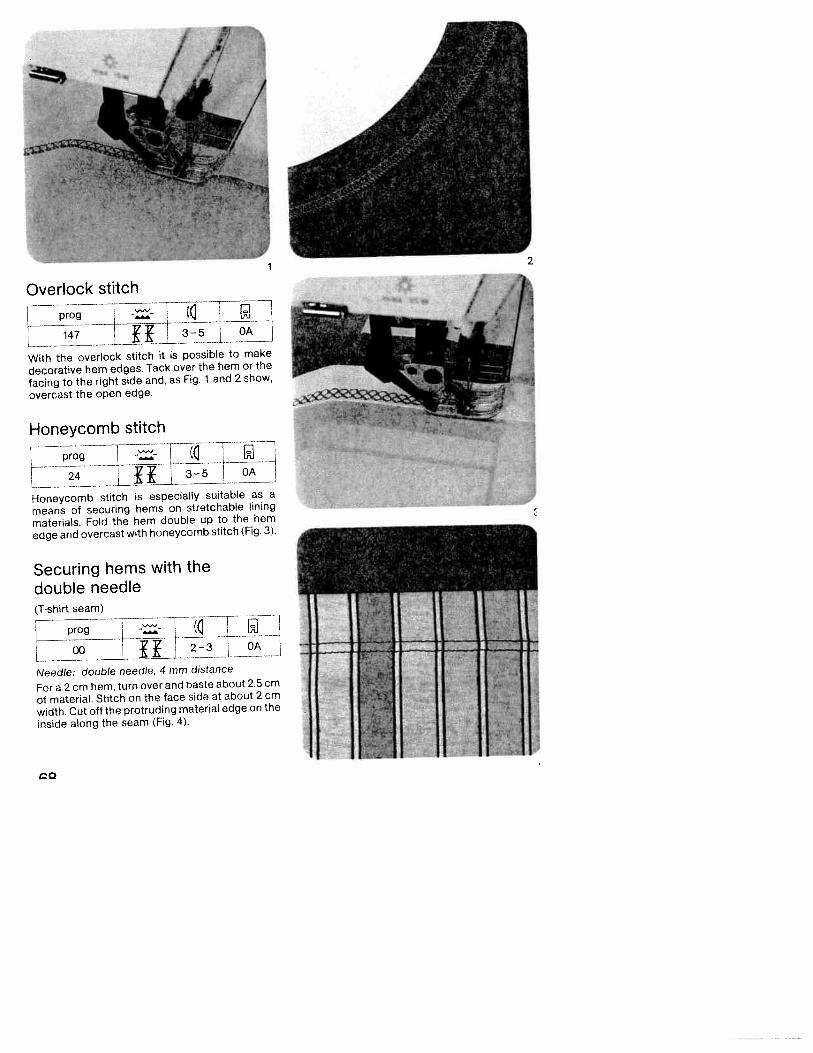
----
--
prog I ((1
With the overlock stitch it is possible to make
decorative hem edges. Tack over the hem or the
facing to the right side and, as Fig. 1 and 2 show,
overcast the open edge.
Honeycomb stitch
—jzrT ___i
Honeycomb stitch is especially suitable as a
means of securing hems on stretchable lining
materials. Fold the hem double up to the hem
edge and overcast with honeycomb stitch (Fig. 3).
Securing hems with thedouble needle(Tshirt seam)
_4Z_ - -
00
___Hll-3i0A
Needle: double needle, 4 mm distance
For a 2 cm hem, turn over and baste about 2.5cm
of material. Stitch on the face side at about 2 cm
width. Cut off the protruding material edge on the
inside along the seam (Fig. 4).
1
Overlock stitch
2
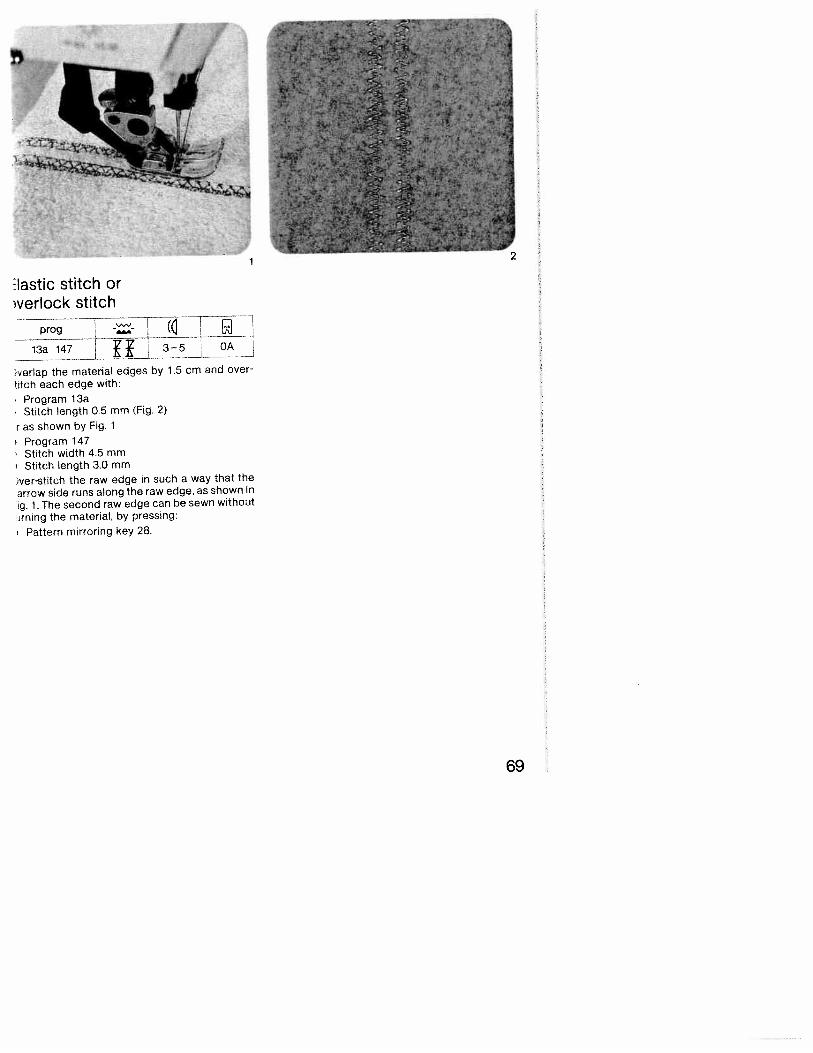
13a 147. KK3-50A
‘verlap the material edges by 1.5 cm and over
titch each edge with:
Program 13aStitch length 0.5 mm (Fig. 2)
as shown by Fig. 1
Program 147Stitch width 4.5 mmStitch length 3.0 mm
)ver-stitch the raw edge in such a way that the
arrow side runs along the raw edge, as shown in
ig. 1. The second raw edge can be sewn without
rnng the material, by pressing:
Pattern mirroring key 28.
Iastic stitch orverlock stitch
2
69
Binding edges with
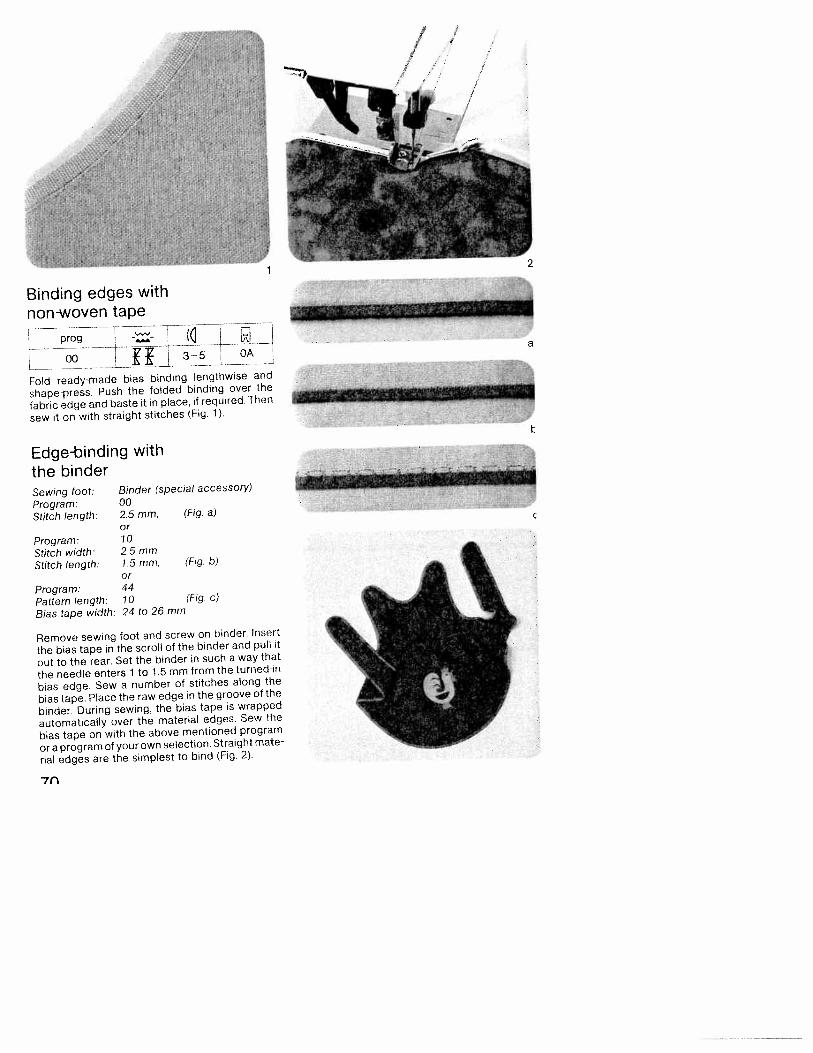
-
00 HFold ready-made bias binding lengthwise and
shape-press. Push the folded binding over the
fabric edge and baste it in place, if required. Then
sew it on with straight stitches (Fig. 1).
-a
—Edge-binding withthe binder
Binder (special accessory)
002.5 mm, (Fig. a)or
Remove sewing foot and screw on binder, Insert
the bias tape in the scroll of the binder and pull it
out to the rear. Set the binder ri such a way that
the needle enters 1 to 1.5 mm from the turned-in
bias edge. Sew a number of stitches along the
bias tape. Place the raw edge in the groove of the
binder During sewing, the bias tape is wrapped
automatically over the material edges. Sew the
bias tape on with the above mentioned program
or a program of your own selection. Straight mate
rial edges are the simplest to bind (Fig. 2).
y;;;‘; ? -A
;;
non-woven tape
Sewing foot:Program:Stitch length:
Program:Stitch width:Stitch length:
102.5 mm1.5 mm,or44Program:
Pattern length: 10Bias tape width: 24 to 26 mm
(Fig. b)
(Fig. c)
7n
‘-,
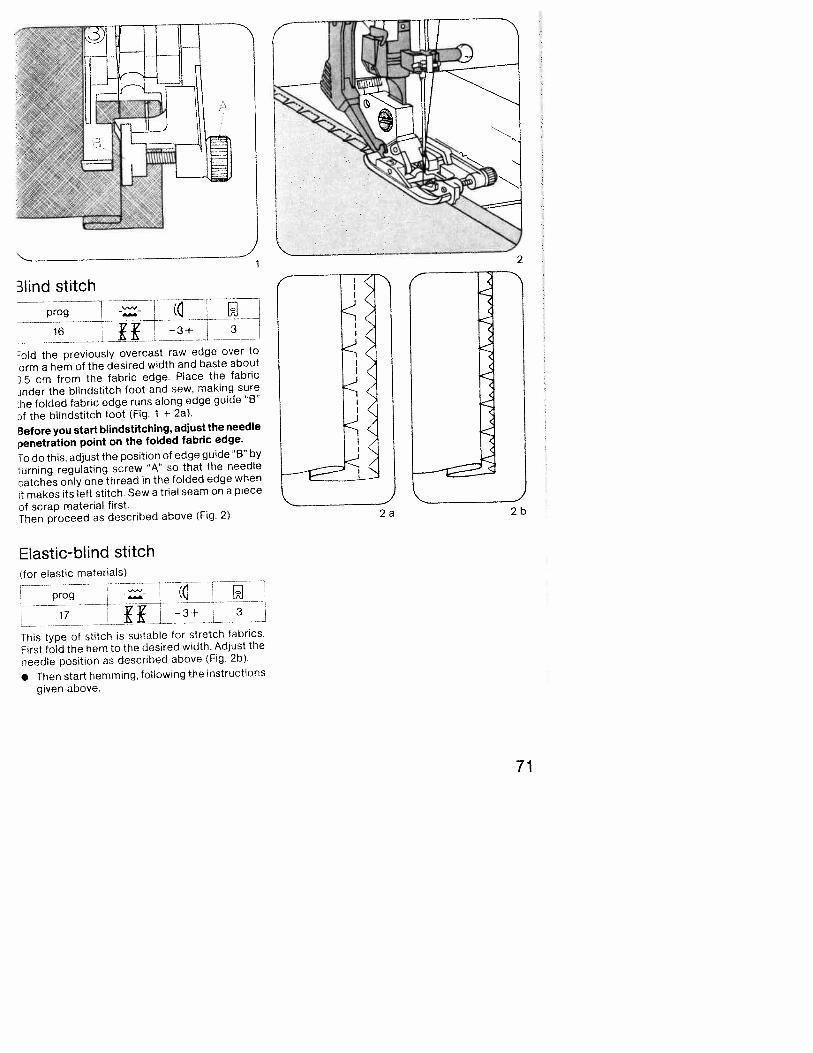
3lind stitch(ii
-1K -3fJ
:old the previously overcast raw edge over to
orm a hem of the desired width and baste about
D.5 cm from the fabric edge. Place the fabric
inder the blindstitch foot and sew, making sure
.he folded fabric edge runs along edge guide ‘B’
of the blindstitch foot (Fig. 1 t 2a).
3efore you start blindstitching, adjust the needle
penetration point on the folded fabric edge.
To do this, adjust the position of edge guide “B” by
wrning regulating screw “A” so that the needle
catches only one thread in the folded edge when
.t makes its left stitch. Sew a trial seam on a piece
of scrap material first.Then proceed as described above (Fig, 2).
Elastic-blind stitchfor elastic materials)
-
prog - --
4
17 KK -3+ 3
This type of stitch is suitable for stretch fabrics.
First fold the hem to the desired width. Adjust the
needle position as described above (Fig. 2b).
• Then start hemming, following the instructions
given above.
0
2
I,
-J
1<-J
2a 2b
71
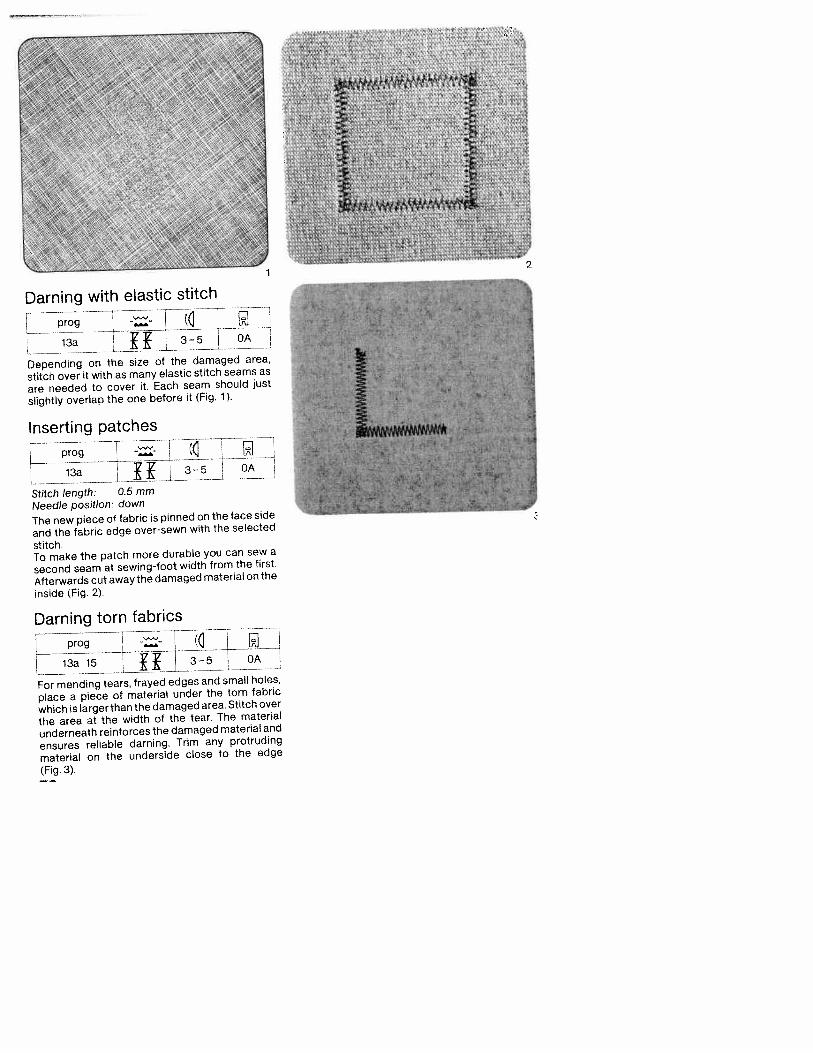
Darning with elastic stitch
ron a
__—
-
13a 3—5 OA—
Depending on the size of the damaged area,
stitch over it with as many elastic stitch seams as
are needed to cover it. Each seam should just
slightly overlap the one before it (Fig. 1).
Inserting patches
-‘
13a KK3-5 OA
Stitch length: 0.5 mm
Needle position: down
The new piece of fabric is pinned on the face side
and the fabric edge over-sewn with the selected
stitch.To make the patch more durable you can sew a
second seam at sewing-foot width from the first.
Afterwards cut away the damaged material on the
inside (Fig. 2).
Darning torn fabrics
13a 15 I 3—5 OA
For mending tears, frayed edges and small holes,
place a piece of material under the torn fabric
which is larger than the damaged area. Stitch over
the area at the width of the tear, The material
underneath reinforces the damaged material and
ensures reliable darning. Trim any protruding
material on the underside close to the edge
(Fig. 3).
12
utomatic darning
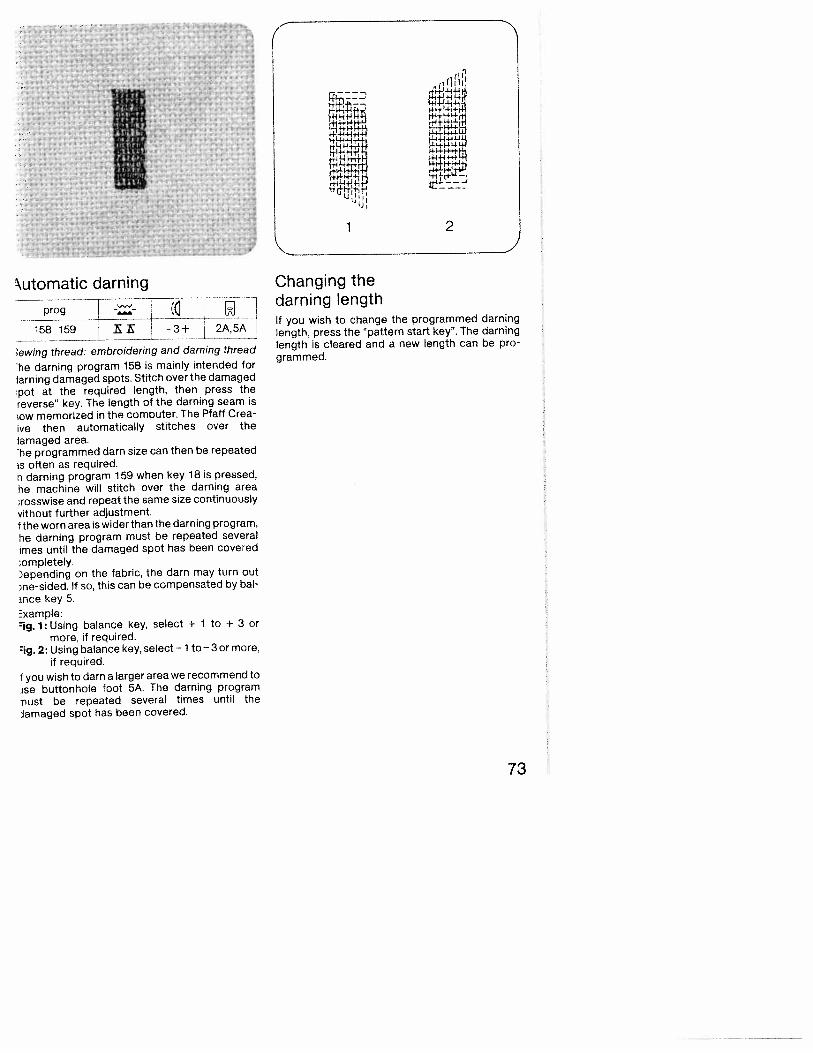
prog--
ewing thread: embroidering and darning thread
The darning program 158 is mainly intended for
laming damaged spots. Stitch over the damagedpot at the required length, then press thereverse” key. The length of the darning seam isow memorized in the computer. The Pfaff Creaive then automatically stitches over the
lamaged area.The programmed darn size can then be repeateds often as required.n darning program 159 when key 18 is pressed,he machine will stitch over the darning area:rosswise and repeat the same size continuouslythout further adjustment.the worn area is wider than the darning program,
he darning program must be repeated several
imes until the damaged spot has been coveredompletely,)epending on the fabric, the darn may turn outme-sided. If so, this can be compensated by bal
mce key 5.
Example:1g.1:Using balance key, select + 1 to + 3 or
more, if required.rig. 2: Using balance key, select — 1 to —3 or more,
if required.
you wish to darn a larger area we recommend toise buttonhole foot 5A. The darning program
iust be repeated several times until theJamaged spot has been covered.
Changing thedarning lengthIf you wish to change the programmed darninglength, press the “pattern start key”. The darninglength is cleared and a new length can be programmed.
rli4
ffiIi+frf..
44+4+’+4,
1 2I
73
prog — -
00 2-3
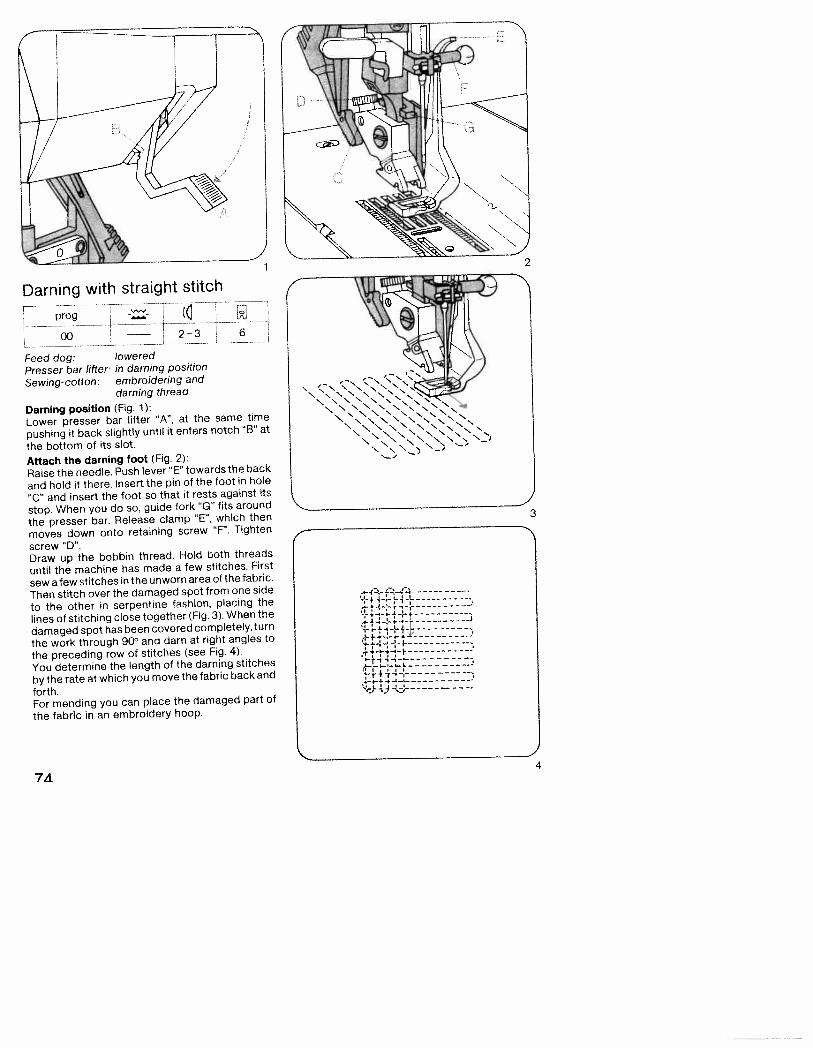
Feed dog: loweredPresser bar lifter: in darning position
Sewing-cotton: embroidering anddarning thread
Darning position (Fig. 1>:Lower presser bar lifter “A’, at the same time
pushing it back slightly until it enters notch “B” at
the bottom of its slot.
Attach the darning foot (Fig. 2):
Raise the needle. Push lever ‘E” towards the back
and hold it there. Insert the pin of the foot in hole
“C” and insert the foot so that it rests against its
stop. When you do so, guide fork “G” fits around
the presser bar. Release clamp “E”, which then
moves down onto retaining screw “F”. Tighten
screw “D”.Draw up the bobbin thread. Hold both threads
until the machine has made a few stitches. First
sew a few stitches in the unworn area of the fabric.
Then stitch over the damaged spot from one side
to the other in serpentine fashion, placing the
lines of stitching close together (Fig. 3). When the
damaged spot has been covered completely, turn
the work through 90° and darn at right angles to
the preceding row of stitches (see Fig. 4).
You determine the length of the darning stitches
by the rate at which you move the fabric back and
forth.For mending you can place the damaged part of
the fabric in an embroidery hoop.
Darning with straight stitch
2
{j6
3
J
I4
)arning with wool
prog
10 13a 2-3 6
eed dog: loweredresser bar lifter: in darning position
(see page 74)ewing thread: Embroidery and darning thread
)raw the wool thread through the needle hole of
he darning foot and into the thread guide (Fig. 1).
lace the wool thread under the darning foot.
tart at the top left and place the wool thread
ack and forth across the damaged area (Fig. 2).
hen cut the wool thread and sew over the rows of
iool thread with zigzag stitches or an elastic
titch seam (Fig. 3).)o not place the lines of stitching too close toge
her as this would make the darn too hard.ll darning work described above is carried out on
he reverse side of the fabric, so that the darn
oks neater on the face side.
2
3 75
_1I
VL
?&i ,,t
• sew4 C*0-U ‘O
76B
—
prog-
0001 . 3—5 4---
-
Stitch length: 25—3.0 mmKey: needle down
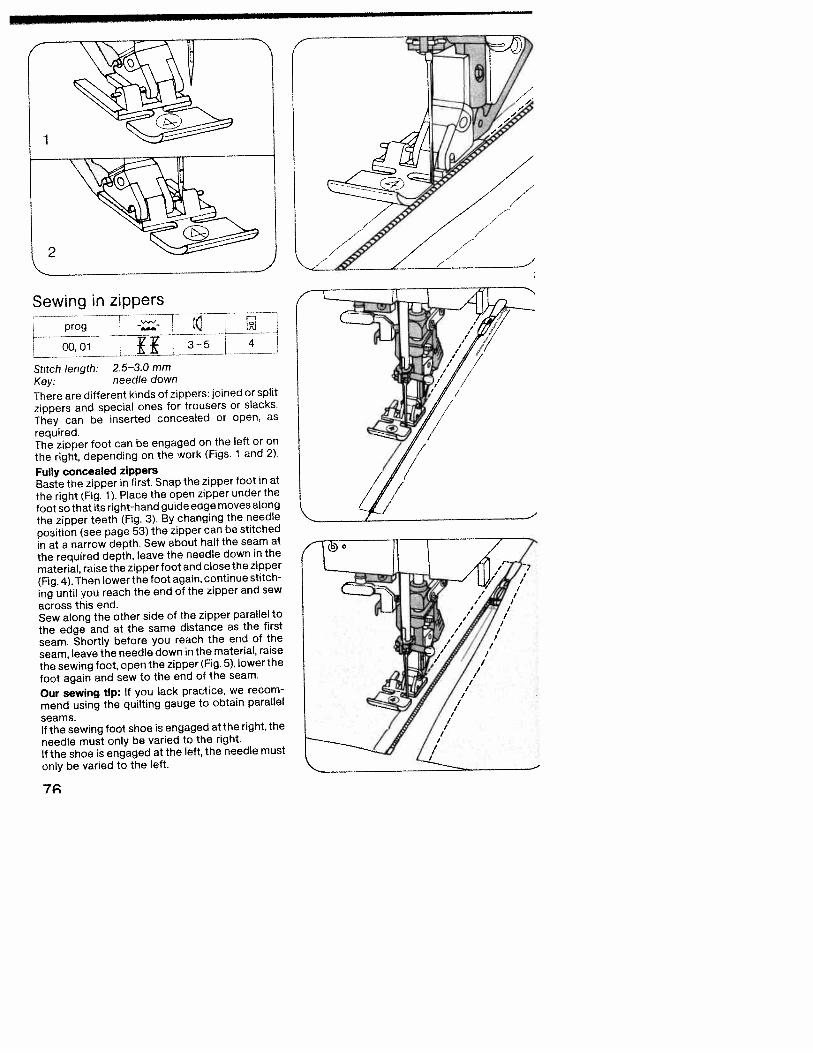
There are different kinds of zippers: joined or split
zippers and special ones for trousers or slacks.
They can be inserted concealed or open, as
required.The zipper foot can be engaged on the left or on
the right, depending on the work (Figs. 1 and 2).
Fully concealed zippersBaste the zipper in first. Snap the zipper foot in atthe right (Fig. 1). Place the open zipper under the
foot so that its right-hand guide edge moves along
the zipper teeth (Fig. 3). By changing the needle
position (see page 53) the zipper can be stitched
in at a narrow depth. Sew about half the seam at
the required depth, leave the needle down in the
material, raise the zipper foot and close the zipper
(Fig. 4). Then lower the foot again, continue stitch
ing until you reach the end of the zipper and sew
across this end.Sew along the other side of the zipper parallel to
the edge and at the same distance as the first
seam. Shortly before you reach the end of the
seam, leave the needle down in the material, raise
the sewing foot, open the zipper (Fig. 5), lower the
foot again and sew to the end of the seam.
Our sewing tip: If you lack practice, we recom
mend using the quilting gauge to obtain parallel
seams.If the sewing foot shoe is engaged at the right, the
needle must only be varied to the right.
If the shoe is engaged at the left, the needle must
only be varied to the left.
Sewing in zippers
7A
ippers for ladies’ slacks
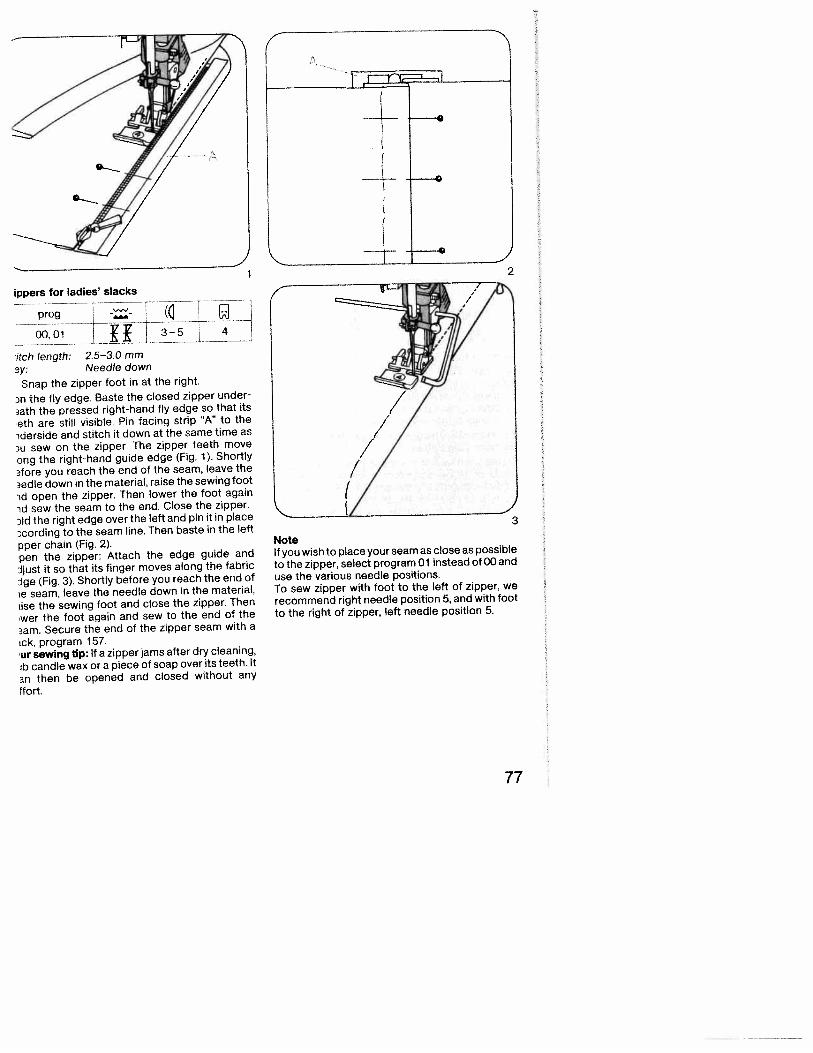
prog
_.29.9_L K[iitch length: 25—3.0 mm
Needle down
Snap the zipper foot in at the right.
n the fly edge. Baste the closed zipper under
ath the pressed right-hand fly edge so that its
‘eth are still visible. Pin facing strip “A” to the
derside and stitch it down at the same time as
)U sew on the zipper. The zipper teeth move
ong the right-hand guide edge (Fig. 1). Shortly
afore you reach the end of the seam, leave the
aedle down in the material, raise the sewing foot
id open the zipper. Then lower the foot again
id sew the seam to the end. Close the zipper.
ld the right edge over the left and pin it in place
Dcording to the seam line. Then baste in the left
pper chain (Fig. 2).pen the zipper: Attach the edge guide and
ijust it so that its finger moves along the fabric
cige (Fig. 3). Shortly before you reach the end of
e seam, leave the needle down in the material,
use the sewing foot and close the zipper. Then
wer the foot again and sew to the end of the
am. Secure the end of the zipper seam with a
uck, program 157.ur sewing tip: If a zipper jams after dry cleaning.
ub candle wax or a piece of soap over its teeth, It
an then be opened and closed without any
fort.
NoteIf you wish to place your seam as close as possible
to the zipper, select program 01 instead of 00 anduse the various needle positions.To sew zipper with foot to the left of zipper, we
recommend right needle position 5, and with foot
to the right of zipper, left needle position 5.
—-14J
—.
2
3
77

—prog — L-3+ J_5A
Sewing thread: Embroidery and darning thread
Generally buttonholes are sewn onto double
material. In spite of this, a piece of paper shouldbe placed underneath during sewing. First drawthe spacings and the distance from the edge. This
point always marks the beginning of sewing.
Ten buttonhole lengths are stored in the compu
ter, from 7,0 to 16 mm.
On program selection a programmed buttonhole
length of 14 mm and a buttonhole width of 4 mm
appear in the display. Select the length of the buttonhole using stitch-length keys 7 (Fig. 1). Themachine will automatically sew the selected buttonhole.
Before beginning the buttonhole pull the runner
of the buttonhole foot fully to the front.
For the following buttonholes it is best to lift thefabric a little in order not to affect feeding. Thesewing speed should always be the same.
Correcting a buttonholeIf a buttonhole does not turn out well, cancel it bypressing “pattern start” key 26 and sew it again.
Jprog (1)
- •‘-_-o 0
&
L
\-
Adapting the buttonhole seamlengths with the balance keysWith “balance” keys 5 the left buttonhole seanlength can be adapted to the right one.Sew a sample buttonhole first.
Example:If the left seam is too short(Fig. 4a)Select balance +1 to +3 withrequired.
If the left seam is too long(Fig. 4b)
Select balance —1 to —2 with key, or more irequired.• Sew the first buttonhole seam at the require
length and• the first bartack.• Press balance keys 5, “+“ or”—”, and adjust thi
second buttonhole seam length to the first oni(Figs. 4a, 4b).
• Sew last bartack.The change made in this way will be maintamed for the following buttonholes.
Changing the buttonhole widthFor every type of fabric, the corresponding but
tonhole width can be determined up to 5,5 mm.
For heavy materials select a wide buttonhole and
for light materials a narrow one. With stitch width
keys 8, you determine the required buttonhole
width. The length of the cut changes automati
cally (Fig. 5).A buttonhole width of 4 mm is stored.
78
Linen buttonholes (fully automatic>
18
key, or more i
2
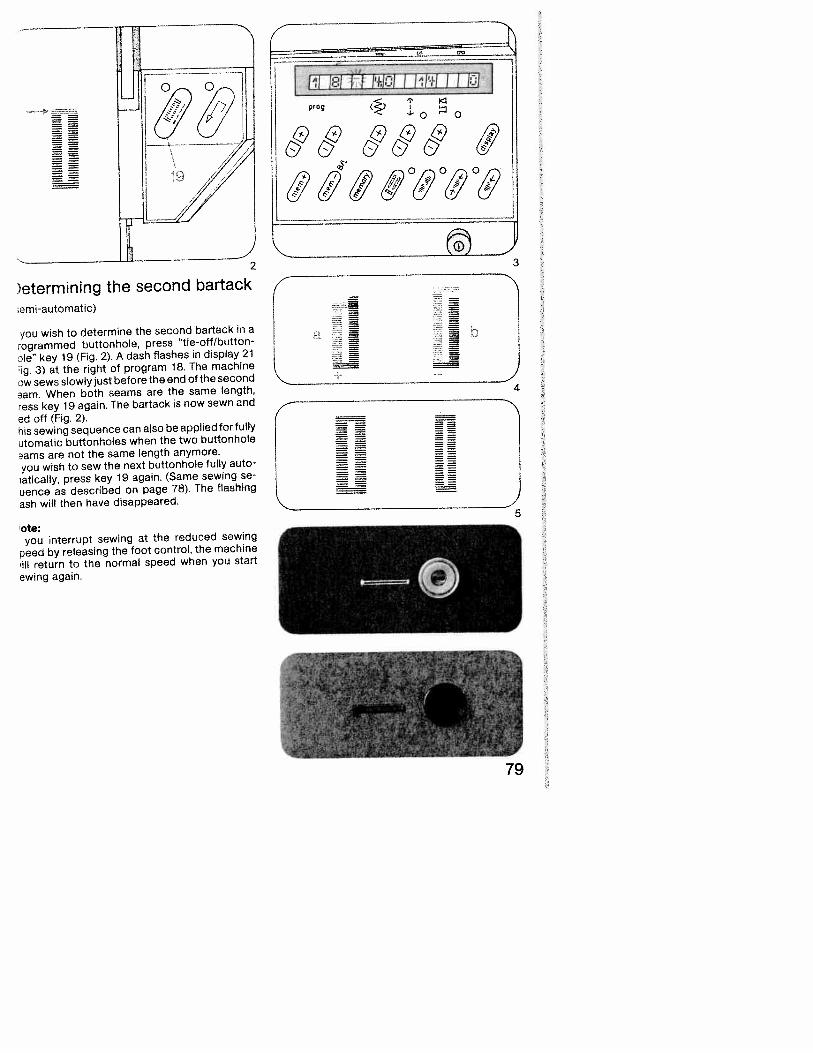
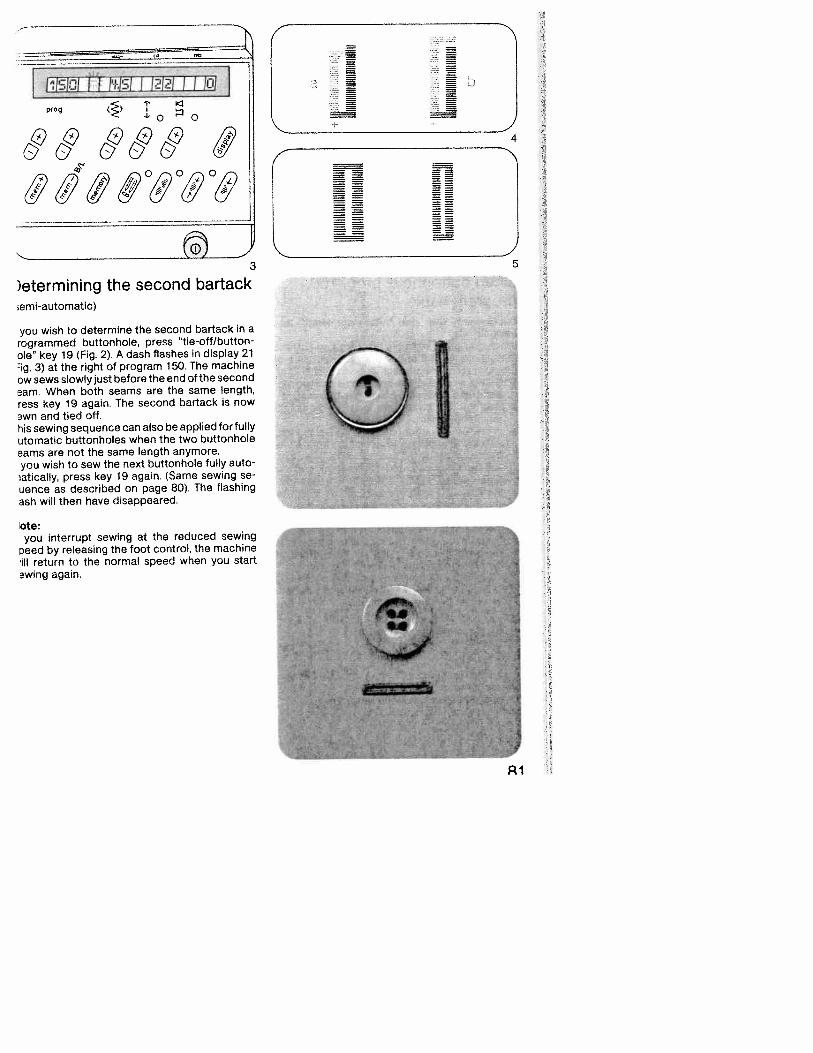
)etermining the second bartack
.emi-automatic)
you wish to determine the second bartack in a
“ogrammed buttonhole, press ‘tie-off/button-
ole” key 19 (Fig. 2). A dash flashes in display 21
1g. 3) at the right of program 18. The machine
ow sews slowly just before the end of the second
9am. When both seams are the same length,
ress key 19 again. The bartack is now sewn and
ad off (Fig. 2).his sewing sequence can also be applied for fully
utomatic buttonholes when the two buttonhole
cams are not the same length anymore.
you wish to sew the next buttonhole fully auto
iatically, press key 19 again. (Same sewing Se
uence as described on page 78). The flashing
ash will then have disappeared.
ote:you interrupt sewing at the reduced sewing
peed by releasing the foot control, the machine
‘ill return to the normal speed when you start
ewing again.
4
-=—.
:—
r IRI H iin, I HII I Iprog T
k0 Q
/)&&&&&
h._\-
ji
5
79
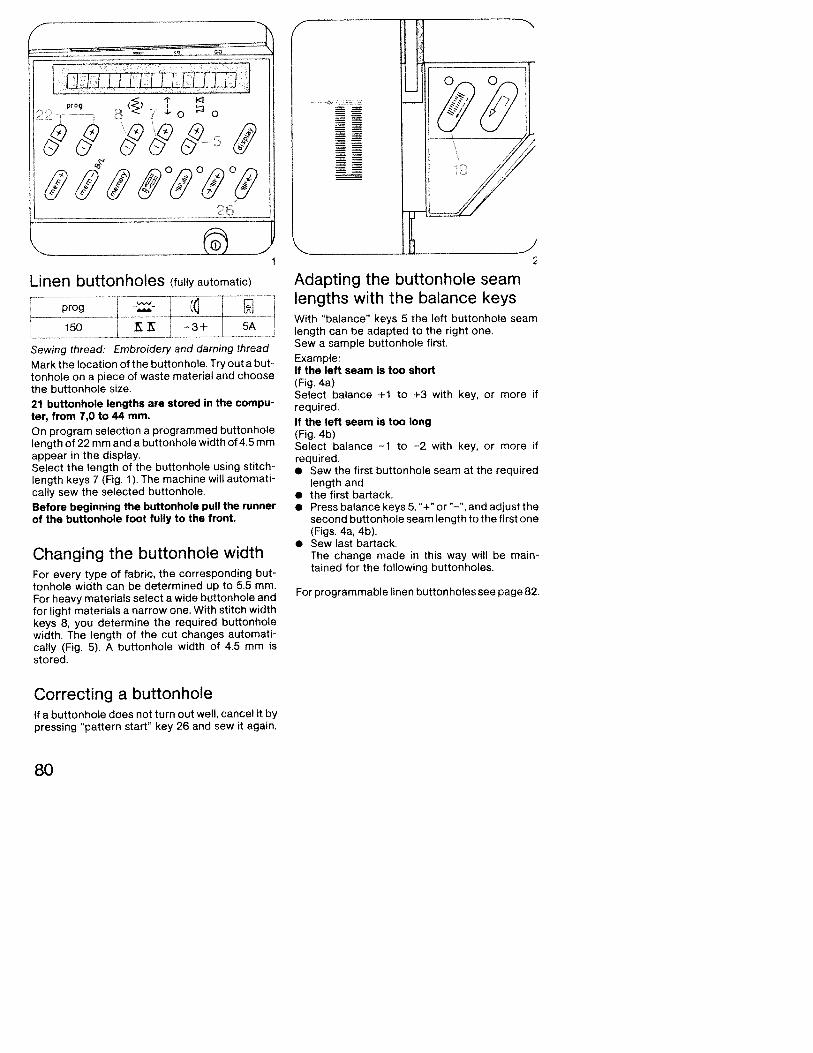
prog-- (150 E
Sewing thread: Embroidery and darning thread
Mark the location of the buttonhole. Try out a buttonhole on a piece of waste material and choosethe buttonhole size.
21 buttonhole lengths are stored in the computer, from 7,0 to 44 mm.
On program selection a programmed buttonholelength of 22mm and a buttonhole width of 4 5mmappear in the display.Select the length of the buttonhole using stitch-length keys 7 (Fig. 1). The machine will automatically sew the selected buttonhole.
Before beginning the buttonhole pull the runnerof the buttonhole toot fully to the front.
Changing the buttonhole widthFor every type of fabric, the corresponding buttonhole width can be determined up to 5.5 mm.For heavy materials select a wide buttonhole andfor light materials a narrow one. With stitch widthkeys 8, you determine the required buttonholewidth. The length of the cut changes automatically (Fig. 5). A buttonhole width of 4.5 mm isstored.
With ‘balance” keys 5 the left buttonhole seamlength can be adapted to the right one.Sew a sample buttonhole first.
Example:If the left seam Is too short(Fig, 4a)Select balance +1 to +3 withrequired.If the left seam is too long(Fig. 4b)Select balance —1 to —2 with key, or more ifrequired.• Sew the first buttonhole seam at the required
length and• the first bartack.• Press balance keys 5, “+“ or”—”, and adjust the
second buttonhole seam length to the first one(Figs. 4a, 4b).
• Sew last bartack.The change made in this way will be maintained for the following buttonholes.
For programmable linen buttonholes see page 82.
Correcting a buttonholeIf a buttonhole does not turn out well, cancel it bypressing “pattern start” key 26 and sew it again.
I—1-
p109 ()_i_o o
&/,o/
non3
Linen buttonholes (fully automatic) Adapting the buttonhole seamlengths with the balance keys
key, or more if
80
/4v
)etermining the second bartack;erni-automatic)
you wish to determine the second bartack in arogrammed buttonhole, press “tie-off/buttonole” key 19 (Fig. 2). A dash flashes in display 21:jg 3) at the right of program 150. The machineow sews slowly just before the end of the secondearn. When both seams are the same length,ress key 19 again. The second bartack is nowawn and tied off.his sewing sequence can also be applied for fullyutomatic buttonholes when the two buttonholeearns are not the same length anymore.you wish to sew the next buttonhole fully autoatically, press key 19 again. (Same sewing seuence as described on page 80). The flashingash will then have disappeared.
ote:you interrupt sewing at the reduced sewing
Deed by releasing the foot control, the machine‘ill return to the normal speed when you startewing again.
Lti!or1’ i:i;I I 1D(D1 I I IflJprog T
-o -o
1
RI
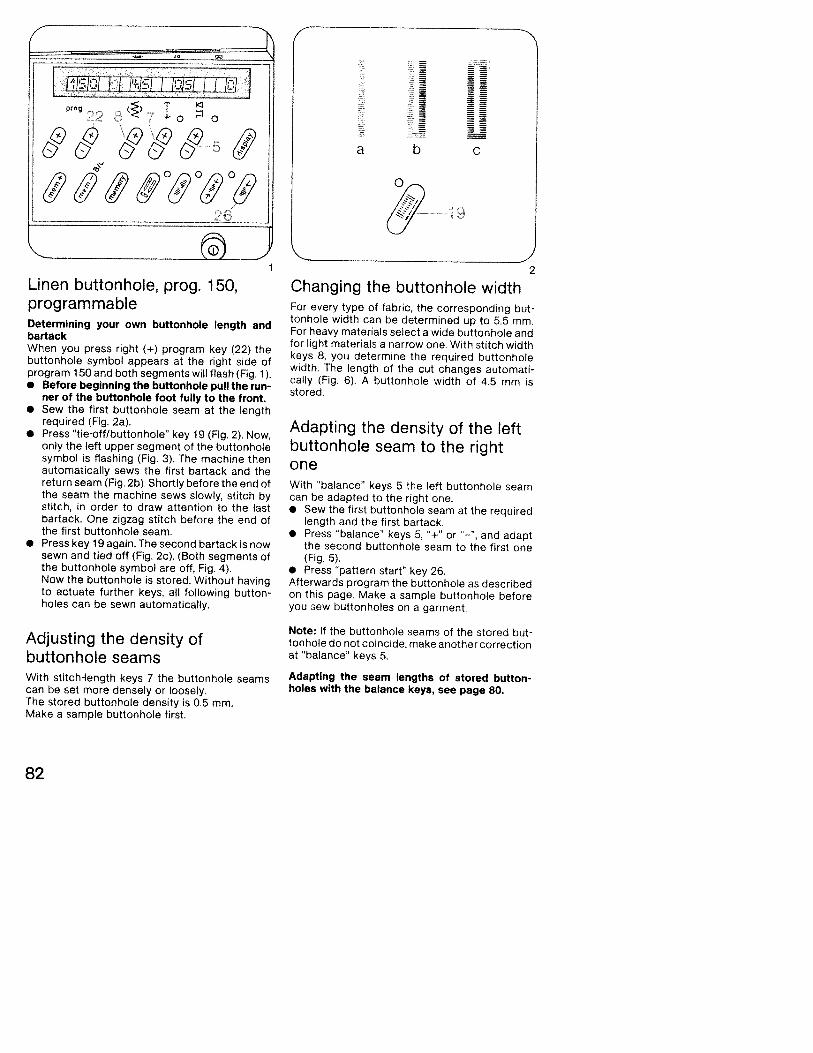
Linen buttonhole, prog. 150,programmable
1
Determining your own buttonhole length andbartackWhen you press right (+) program key (22) thebuttonhole symbol appears at the right side ofprogram 150 and both segments will flash (Fig. 1>.• Before beginning the buttonhole pull the run
ner of the buttonhole toot fully to the front.• Sew the first buttonhole seam at the length
required (Fig. 2a).• Press “tie’ofl/buttonhole” key 19 (Fig. 2). Now,
only the left upper segment of the buttonholesymbol is flashing (Fig. 3). The machine thenautomatically sews the first bartack and thereturn seam (Fig 2b). Shortly before the end ofthe seam the machine sews slowly, stitch bystitch, in order to draw attention to the lastbartack. One zigzag stitch before the end ofthe first buttonhole seam.
• Press key 19 again. The second bartack is nowsewn and tied off (Fig. 2c). (Both segments ofthe buttonhole symbol are off, Fig. 4).Now the buttonhole is stored. Without havingto actuate further keys, all following buttonholes can be sewn automatically.
Adjusting the density ofbuttonhole seamsWith stitchlength keys 7 the buttonhole seamscan be set more densely or loosely.The stored buttonhole density is 0.5 mm.Make a sample buttonhole first.
Changing the buttonhole width2
For every type of fabric, the corresponding buttonhole width can be determined up to 5.5 mm.For heavy materials select a wide buttonhole andfor light materials a narrow one. With stitch widthkeys 8, you determine the required buttonholewidth, The length of the cut changes automatically (Fig. 6). A buttonhole width of 4.5 mm isstored.
Adapting the density of the leftbuttonhole seam to the rightoneWith “balance” keys 5 the left buttonhole seamcan be adapted to the right one.• Sew the first buttonhole seam at the required
length and the first bartack.• Press ‘balance” keys 5, ‘-i-” or “—“, and adapt
the second buttonhole seam to the first one(Fig, 5).
• Press “pattern start” key 26,Afterwards program the buttonhole as describedon this page. Make a sample buttonhole beforeyou sew buttonholes on a garment.
Note: If the buttonhole seams of the stored buttonhole do not coincide, make another correctionat “balance” keys 5.
Adapting the seam lengths of stored buttonholes with the balance keys, see page 80.
!sGI I E I’riII I JciJsl Iprog 1
/&&
1f6-&a b c
6”
82
prog
44
3
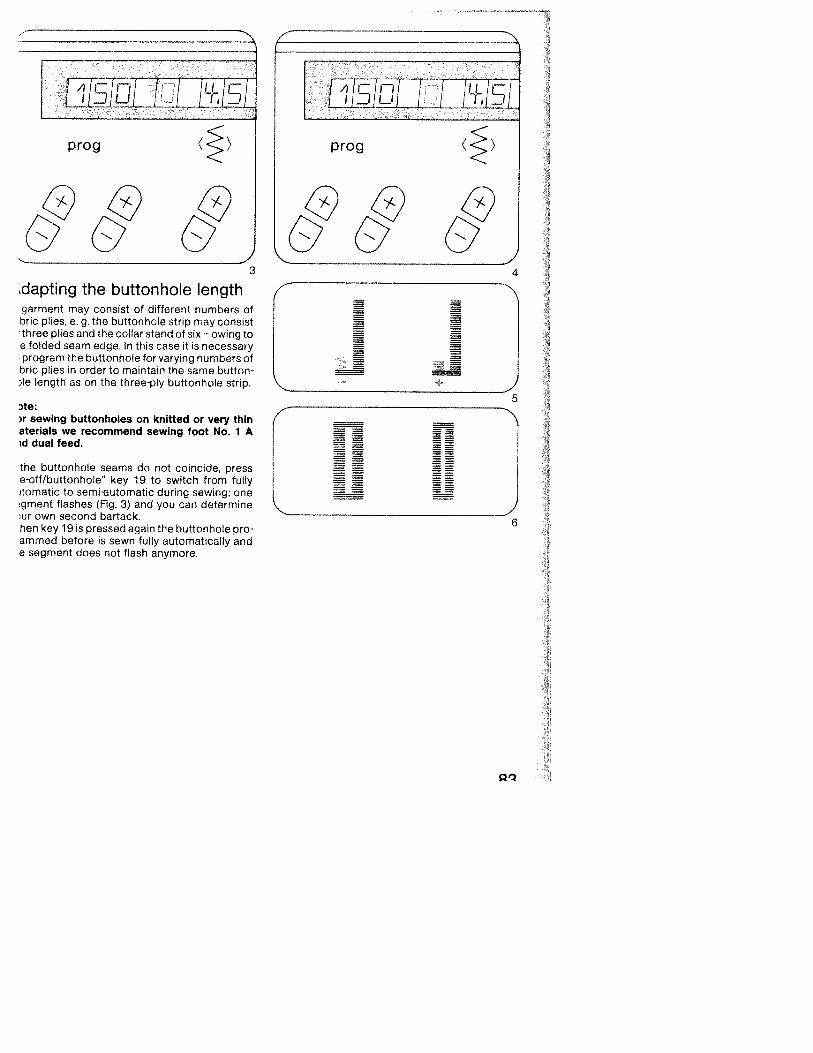
dapting the buttonhole lengthgarment may consist of different numbers ofbric plies. e. g. the buttonhole strip may consistthree plies and the collar stand of six — owing toe folded seam edge. In this case it is necessaryprogram the buttonhole for varying numbers of
bric plies in order to maintain the same button)le length as on the three-ply buttonhole strip.
ate:r sewing buttonholes on knitted or very thin
aterials we recommend sewing foot No. 1 Aid dual feed.
the buttonhole seams do not coincide, presse-otf/buttonhole” key 19 to switch from fullyitomatic to semi-automatic during sewing; onegment flashes (Fig. 3) and you can determineur own second bartack.hen key 19 is pressed again the buttonhole proammed before is sewn fully automatically ande segment does not flash anymore.
4
6
1’
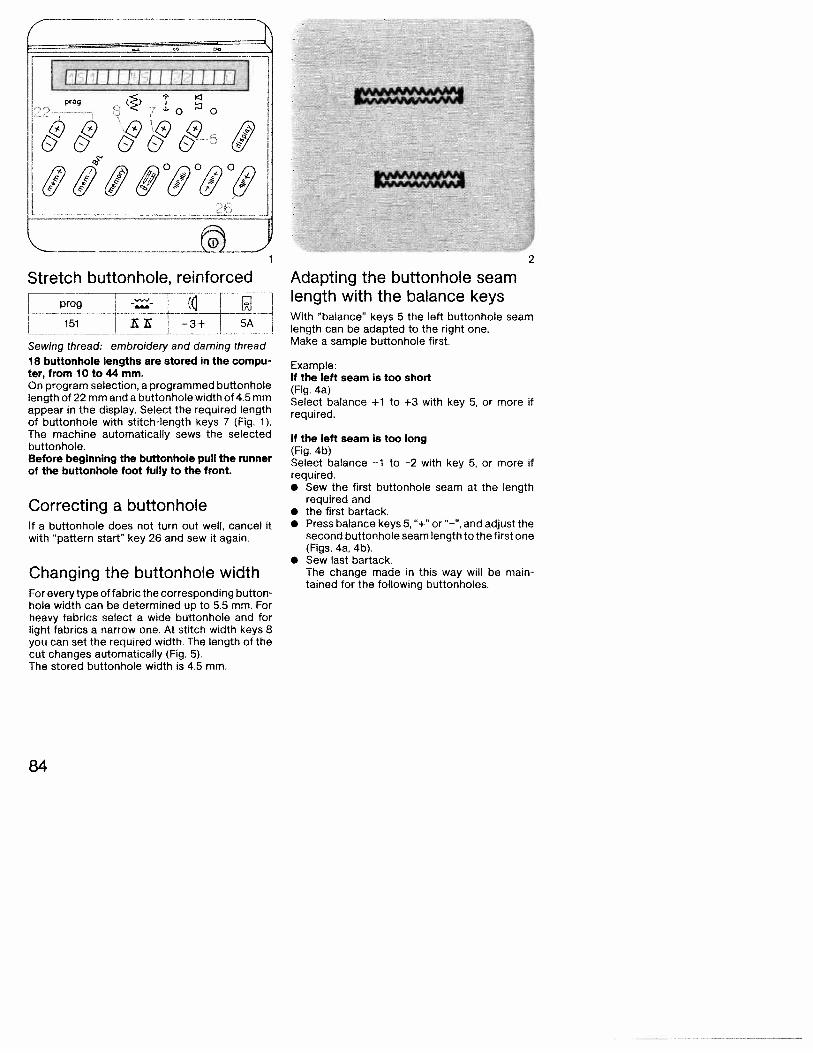
Stretch buttonhole, reinforced
prog--
151 —3+ 5A
Sewing thread: embroidery and darning thread
18 buttonhole lengths are stored In the computer, from 10 to 44mm.On program selection, a programmed buttonholelength of 22mm and a buttonhole width of 4.5mmappear in the display. Select the required lengthof buttonhole with stitch-length keys 7 (Fig. 1).The machine automatically sews the selectedbuttonhole.Before beginning the buttonhole pull the runnerof the buttonhole toot fully to the front.
Correcting a buttonholeIf a buttonhole does not turn out well, cancel itwith ‘pattern start’ key 26 and sew it again.
Changing the buttonhole widthFor every type of fabric the corresponding buttonhole width can be determined up to 5.5 mm. Forheavy fabrics select a wide buttonhole and forlight fabrics a narrow one. At stitch width keys 8you can set the required width. The length of thecut changes automatically (Fig. 5).The stored buttonhole width is 4.5 mm.
Adapting the buttonhole seamlength with the balance keys
2
With “balance” keys 5 the left buttonhole seamlength can be adapted to the right one.Make a sample buttonhole first.
Example:If the left seam is too short(Fig. 4a)Select balance +1 to +3 with key 5, or more ifrequired.
If the left seam is too long(Fig. 4b)Select balance —1 to —2 with key 5. or more ifrequired.• Sew the first buttonhole seam at the length
required and• the first bartack.• Press balance keys 5, “+“ or”—”, and adjust the
second buttonhole seam length to the first one(Figs. 4a, 4b).
• Sew last bartack.The change made in this way will be maintained for the following buttonholes.
I1prog I
r-Q
1
84

J i
iietermining the second bartackemi-automatic)
you wish to determine the second bartack in aogrammed buttonhole, press “tie-off/button)le” key 19 (Fig. 7). A dash then flashes in display
(Fig. 6) at the right side of program 151. Theachine now sews slowly just before the end ofe second seam. When both seams are the samegth, press key 19 again. The bartack is nowwn and tied off (Fig. 7).is sewing sequence can also be applied for fullytomatic buttonholes when the buttonholeams are not the same length anymore.jou wish to sew the next buttonhole fully autoatically again, press key 19. (Sewing sequencedescribed on page 84). The flashing dash has
en disappeared.
you interrupt sewing at the reduced sewingeed by releasing the foot control, the machineII return to the normal speed when you startwing again.e next page for programmable stretch buttonles.
prog () I it1
-‘“O
6
7
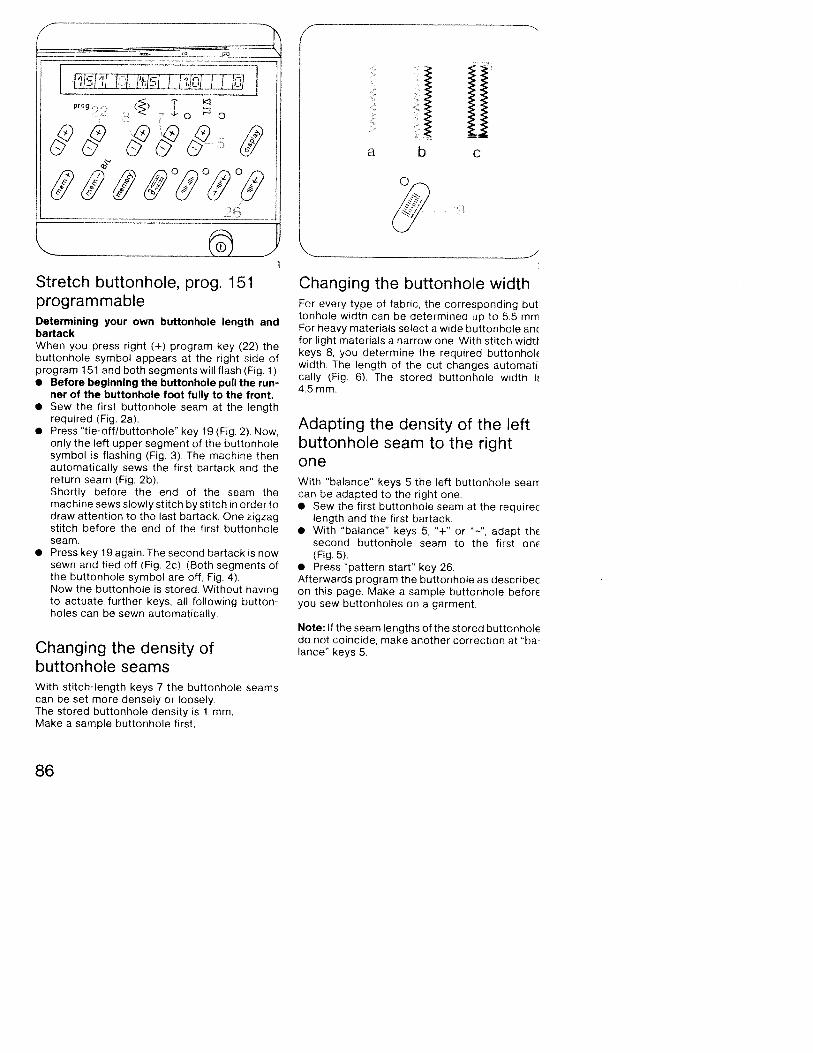
\
a J iiStretch buttonhole, prog. 151programmableDetermining your own buttonhole length andbartackWhen you press right (+) program key (22) thebuttonhole symbol appears at the right side ofprogram 151 and both segments will flash (Fig 1).• Before beginning the buttonhole pull the run
ner of the buttonhole foot fully to the front.• Sew the first buttonhole seam at the length
required (Fig. 2a).• Press “tie-off/buttonhole” key 19 (Fig. 2). Now,
only the left upper segment of the buttonholesymbol is flashing (Fig 3). The machine thenautomatically sews the first bartack and thereturn seam (Fig. 2b).Shortly before the end of the seam themachine sews slowly stitch by stitch in order todraw attention to the last bartack. One zigzagstitch before the end of the first buttonholeseam.
• Press key 19 again. The second bartack is nowsewn and tied off (Fig. 2c) (Both segments ofthe buttonhole symbol are off, Fig. 4).Now the buttonhole is stored Without havingto actuate further keys, all following buttonholes can be sewn automatically.
Changing the density ofbuttonhole seamsWith stitch-length keys 7 the buttonhole seamscan be set more densely or loosely.The stored buttonhole density is 1 mm.Make a sample buttonhole first.
Changing the buttonhole widthFor every type of fabric, the corresponding buttonhole width can be determined up to 5.5 mmFor heavy materials select a wide buttonhole amfor light materials a narrow one. With stitch widttkeys 8. you determine the required buttonholEwidth. The length of the cut changes automatically (Fig. 6) The stored buttonhole width i45mm.
Adapting the density of the leftbuttonhole seam to the rightoneWith “balance” keys 5 the left buttonhole seancan be adapted to the right one.• Sew the first buttonhole seam at the requirec
length and the first bartack.• With “balance” keys 5, ‘+“ or “—“, adapt the
second buttonhole seam to the first one(Fig. 5).
• Press “pattern start” key 26.Afterwards program the buttonhole as describecon this page Make a sample buttonhole beforeyou sew buttonholes on a garment.
Note: If the seam lengths of the stored buttonholedo not coincide, make another correction at ‘balance” keys 5.
1Is11I LJ_JsI ii_jjjçqprog I
“-o
h
86
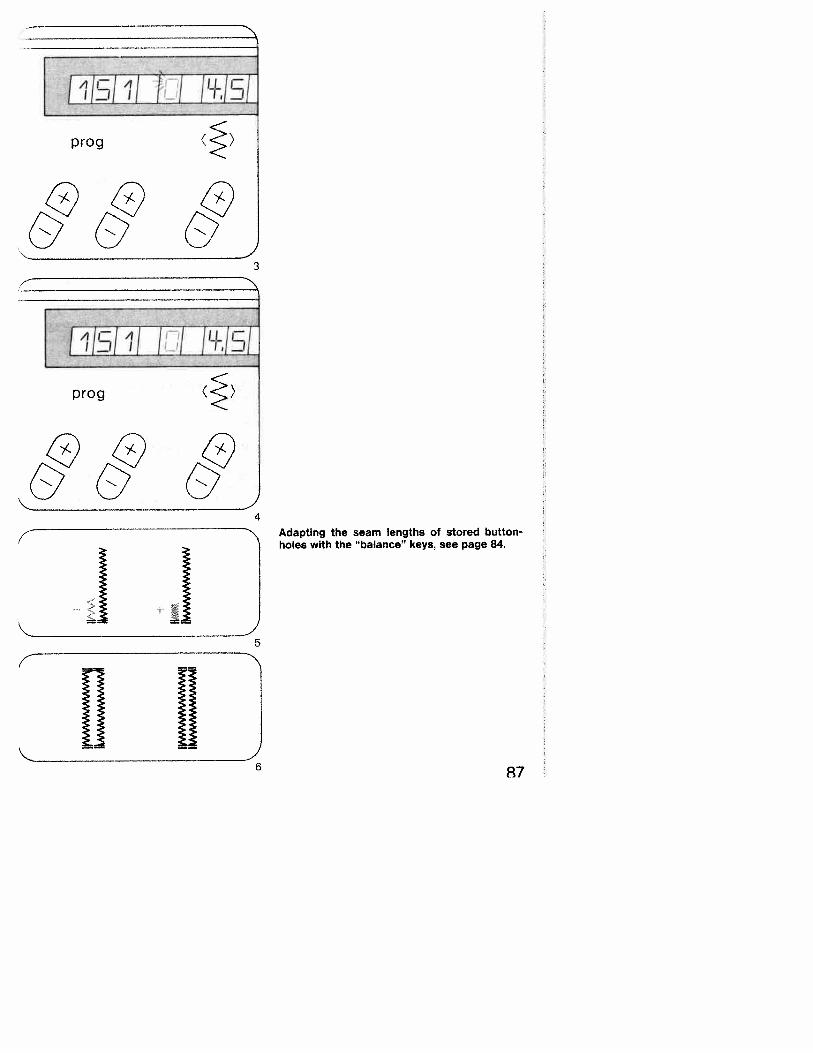
I-fl
0)
—
ao
0
—— 0
-
(DO C 0 z
—4
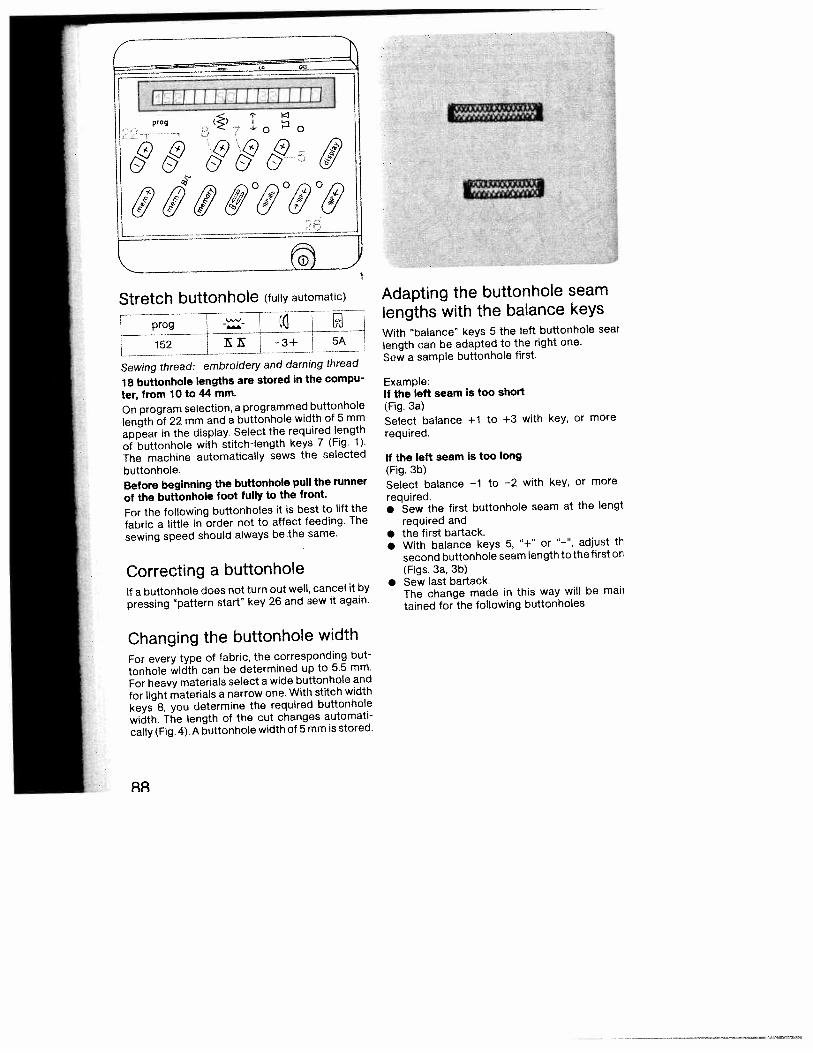
4
‘o
I tiiiiiiiiiiiiiii1prog () I
o
&7&
h____
_--
--
ro -“-
I
zJzLzLzSewing thread: embroidery and darning thread
18 buttonhole lengths are stored in the compu
ter, from 10 to 44 mm.
On program selection, a programmed buttonhole
length of 22 mm and a buttonhole width of 5 mm
appear in the display. Select the required length
of buttonhole with stitch-length keys 7 (Fig. 1).
The machine automatically sews the selected
buttonhole.
Before beginning the buttonhole pull the runner
of the buttonhole foot fully to the front.
For the following buttonholes it is best to lift the
fabric a little in order not to affect feeding. The
sewing speed should always be the same.
Correcting a buttonholeIf a buttonhole does not turn out well, cancel it by
pressing “pattern start” key 26 and sew it again.
Changing the buttonhole widthFor every type of fabric, the corresponding but
tonhole width can be determined up to 5.5 mm.
For heavy materials select a wide buttonhole and
for light materials a narrow one. With stitch width
keys 8, you determine the required buttonhole
width. The length of the cut changes automati
cally (Fig. 4). A buttonhole width of 5mm is stored.
Adapting the buttonhole seamlengths with the balance keysWith “balance” keys 5 the left buttonhole sear
length can be adapted to the right one.
Sew a sample buttonhole first.
Example:If the left seam is too short(Fig. 3a)
Select balance +1 to +3 withrequired.
If the left seam is too long(Fig. 3b)
Select balance —t to —2 with key, or more
required.• Sew the first buttonhole seam at the lengt
required and• the first bartack.• With balance keys 5, “+“ or “—“, adjust tl’
second buttonhole seam length to the first or
(Figs. 3a, 3b)• Sew last bartack.
The change made in this way will be mai,
tamed for the following buttonholes.
Stretch buttonhole (fully automatic)
key, or more
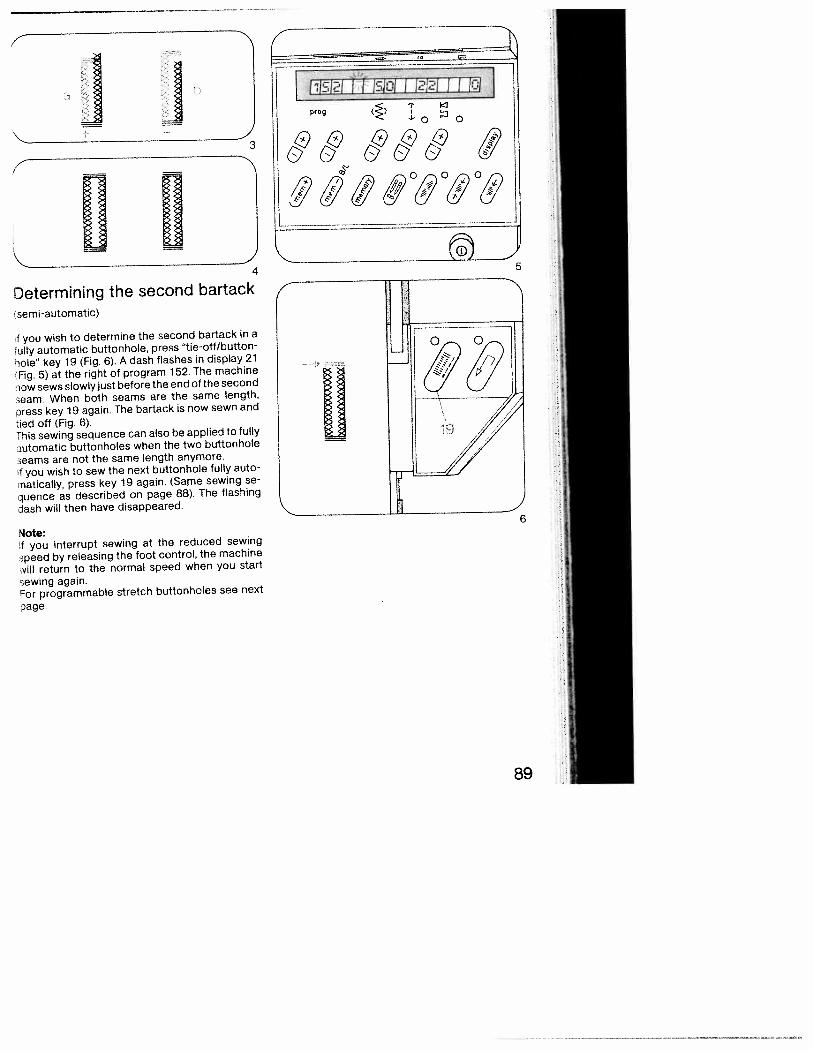
;:4
Determining the second bartack
semi-automatic)
you wish to determine the second bartack in a
ully automatic buttonhole, press tie-off/button
qole” key 19 (Fig. 6). A dash flashes in display 21
Fig. 5) at the right of program 152. The machine
iow sews slowly just before the end of the second
seam. When both seams are the same length,
Dress key 19 again. The bartack is now sewn and
ied off (Fig. 6).This sewing sequence can also be applied to fully
sutomatic buttonholes when the two buttonhole
3eams are not the same length anymore,
you wish to sew the next buttonhole fully auto
i’atically, press key 19 again. (Same sewing se
quence as described on page 88). The flashing
dash will then have disappeared.
Note:if you interrupt sewing at the reduced sewing
speed by releasing the foot control, the machine
Nill return to the normal speed when you start
sewing again.or programmable stretch buttonholes see next
page.
4
3.&& && (c1f6-0g20&
L5
6
89
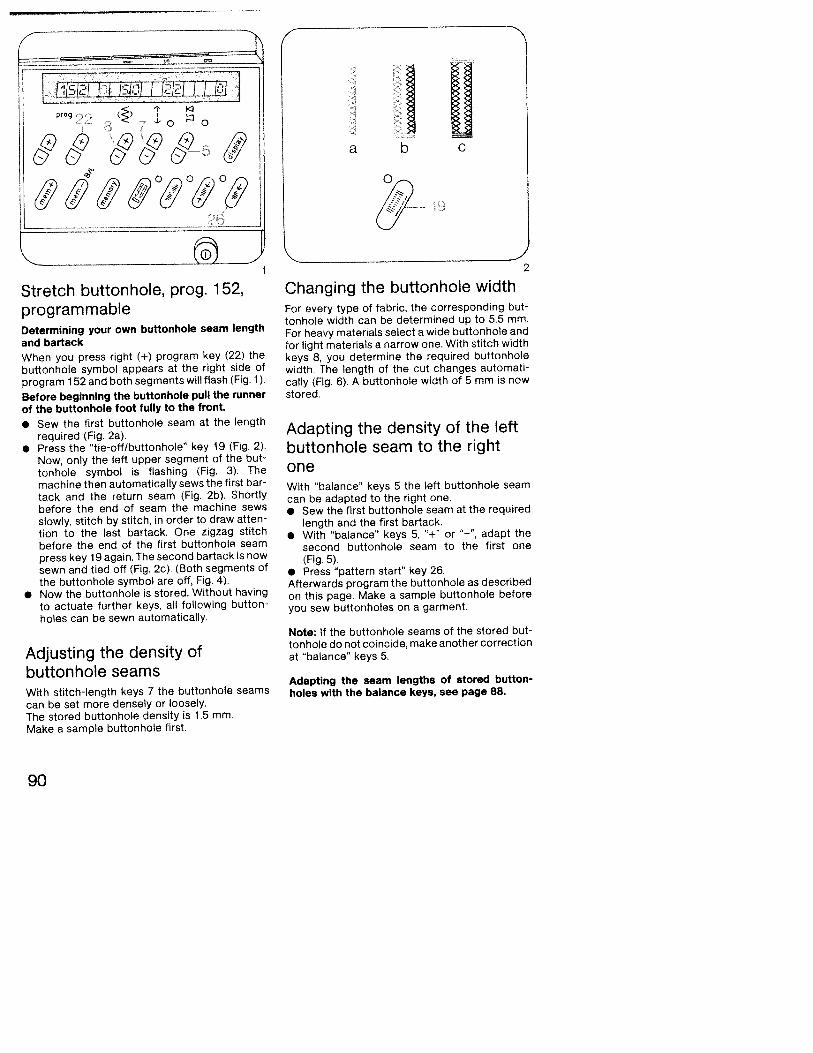
JI2iUJSJ!II212IJZLJJ
Stretch buttonhole, prog. 152,programmable
j
Determining your own buttonhole seam length
and bartack
When you press right (+) program key (22) thebuttonhole symbol appears at the right side ofprogram 152 and both segments will flash (Fig. 1).
Before beginning the buttonhole pull the runner
of the buttonhole foot fully to the front.
• Sew the first buttonhole seam at the lengthrequired (Fig. 2a).
• Press the “tie-off/buttonhole” key 19 (Fig. 2).Now, only the left upper segment of the buttonhole symbol is flashing (Fig. 3). Themachine then automatically sews the first bar-tack and the return seam (Fig. 2b). Shortlybefore the end of seam the machine sewsslowly, stitch by stitch, in order to draw attention to the last bartack. One zigzag stitchbefore the end of the first buttonhole seampress key 19 again. The second bartack is nowsewn and tied off (Fig. 2c). (Both segments ofthe buttonhole symbol are off, Fig. 4).
• Now the buttonhole is stored. Without havingto actuate further keys, all following buttonholes can be sewn automatically.
Adjusting the density ofbuttonhole seamsWith stitch-length keys 7 the buttonhole seamscan be set more densely or loosely.The stored buttonhole density is 1.5 mm.Make a sample buttonhole first.
éV
Changing the buttonhole width2
For every type of fabric, the corresponding buttonhole width can be determined up to 5.5 mm.For heavy materials select a wide buttonhole andfor light materials a narrow one. With stitch widthkeys 8, you determine the required buttonholewidth. The length of the cut changes automatically (Fig. 6). A buttonhole width of 5 mm is nowstored.
Adapting the density of the leftbuttonhole seam to the rightoneWith “balance” keys 5 the left buttonhole seamcan be adapted to the right one.• Sew the first buttonhole seam at the required
length and the first bartack.• With “balance” keys 5, “+“ or —“, adapt the
second buttonhole seam to the first one(Fig. 5).
• Press “pattern start” key 26,Afterwards program the buttonhole as describedon this page. Make a sample buttonhole beforeyou sew buttonholes on a garment.
Note: If the buttonhole seams of the stored buttonhole do not coincide, make another correctionat “balance” keys 5.
Adapting the seam lengths of stored buttonholes with the balance keys, see page 88.
prog ()
& &
I/4Vs. ab
1
90
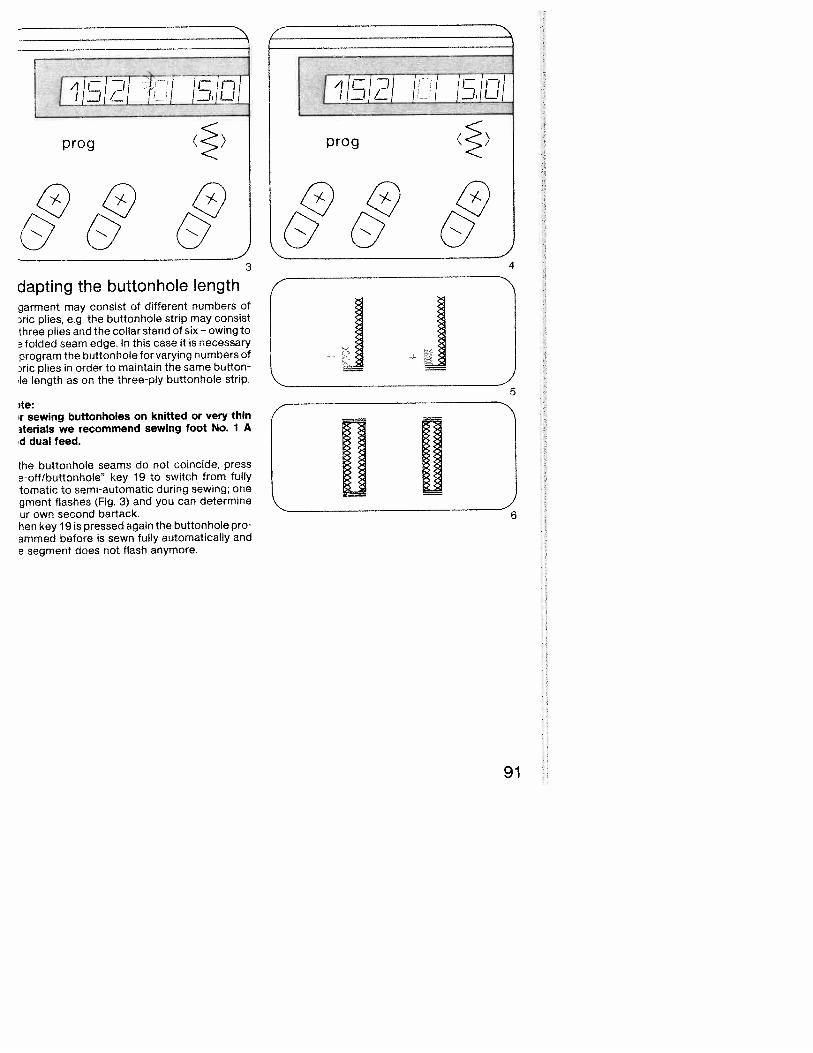
I5II
prog
3
dapting the buttonhole lengthgarment may consist of different numbers ofric plies, e.g. the buttonhole strip may consist
three plies and the collar stand of six — owing tofolded seam edge. In this case it is necessary
program the buttonhole for varying numbers ofJric plies in order to maintain the same buttonle length as on the three-ply buttonhole strip,
ite:ir sewing buttonholes on knitted or very thinaterials we recommend sewing toot No. 1 Ad dual feed.
the buttonhole seams do not coincide, pressa-off/buttonhole’ key 19 to switch from fullytomatic to semi-automatic during sewing; onegment flashes (Fig. 3) and you can determineur own second bartack.hen key 19 is pressed again the buttonhole proammed before is sewn fully automatically ande segment does not flash anymore.
71/%J2/ / r/5JIprog
44&4
JooD
91
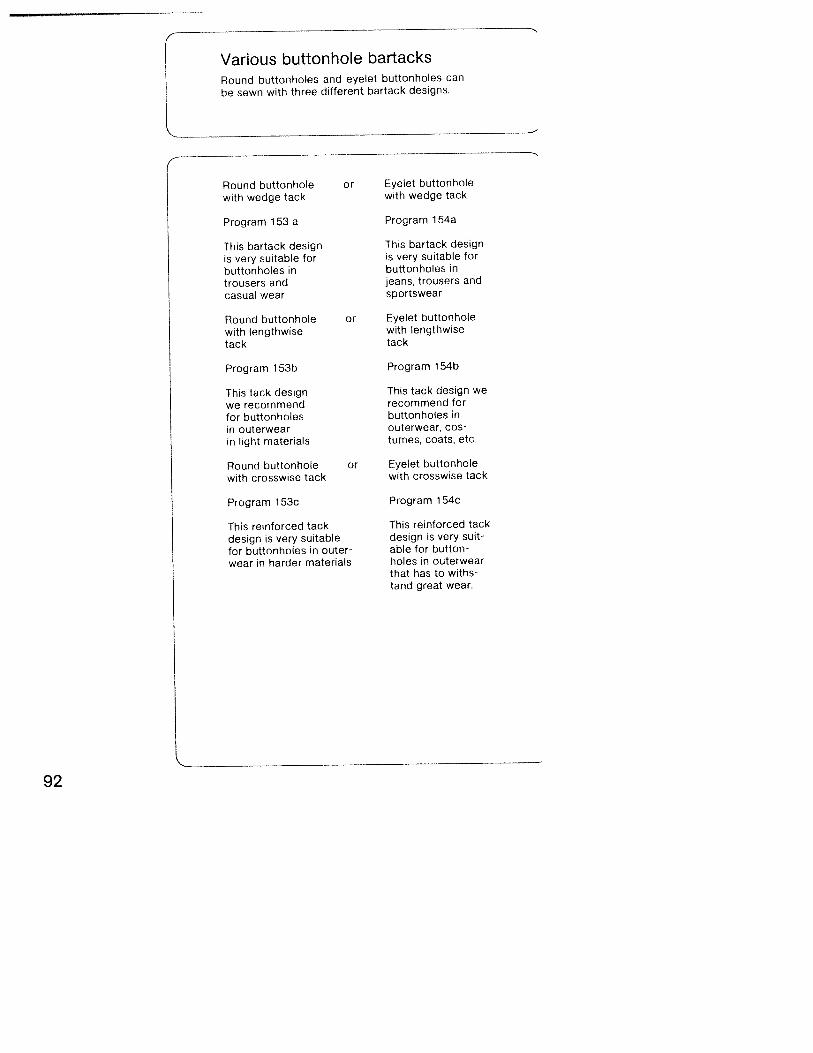
Various buttonhole bartacksRound buttonholes and eyelet buttonholes can
be sewn with three different bartack designs.
Round buttonholewith wedge tack
Program 153 a
This bartack designis very suitable forbuttonholes introusers andcasual wear
Round buttonholewith lengthwisetack
Program 153b
This tack designwe recommendfor buttonholesin outerwearin light materials
Round buttonholewith crosswise tack
Program 1 53c
This reinforced tackdesign is very suitablefor buttonholes in outerwear in harder materials
or Eyelet buttonholewith wedge tack
Program 1 54a
This bartack designis very suitable forbuttonholes injeans, trousers andsportswear
or Eyelet buttonholewith lengthwisetack
Program 154b
This tack design werecommend forbuttonholes inouterwear, costumes, coats, etc.
or Eyelet buttonholewith crosswise tack
Program 1 54c
This reinforced tackdesign is very suitable for buttonholes in outerwearthat has to withstand great wear.
L
92
$
)P
tt ‘4
1
thi
4
(0
4-
‘9 &?,
0 0 0
&ftö’
prog
153a, b, C 5A
Sewing thread: embroidery and darning thread
Key: press “slow sewing”
For round buttonholes with different bartackdesigns please see table on page 92.
1 53a = buttonhole with wedge tack1 53b = buttonhole with lengthwise tack1 53c = buttonhole with crosswise tack
The buttonhole must be 3mm longer than the diameter plus height of the button. The distance fromthe edge should be as wide as the button.First mark the spacings and the distance from theedge, then mark the buttonhole towards theinside from this point. Sewing is always begunfrom the inside outwards.
19 buttonhole lengths are stored In the computer, from 7.0 to 40 mm.
On program selection a programmed buttonholelength of 22mm and a buttonhole width of 4.5mmappear in the display.Select the length of the buttonhole using stitch-length keys 7 (Fig. 1). The machine will automatically sew the selected buttonhole.
Before beginning the buttonhole pull the runnerof the buttonhole foot fully to the front.
Correcting a buttonholeIf a buttonhole does not turn out well, cancel it bypressing “pattern start” key 26 and sew it again.
Changing the buttonhole widthFor every type of fabric, the corresponding buttonhole width can be determined up to 5.5 mmFor heavy materials select a wide buttonhole ancfor light materials a narrow one. With stitch widttkeys 8, you determine the required buttonhokwidth. The length of the cut changes automatically (Fig. 7). A buttonhole width of 4,5 mm is novstored.
Adapting the buttonhole seamlengths with the balance keysWith “balance” keys 5 the left buttonhole seanlength can be adapted to the right one.Sew a sample buttonhole first.
Example:If the left seam Is too short(Fig. 8d)
Select balance +1 to +3 with key, or more irequired.
If the left seam Is too long(Fig. 8e)
Select balance —1 to —2 with key, or morerequired.
I j:L 1 ‘:I 1 JJ Liprog () I
-o 0
Lilililprog
TiIIIIIprog
2
4=____zf1JirJ I•prog
Round buttonhole (fully automatic)
4
alt
a
.
)etermining the bartack3emi-automatic)
Sc
you wish to determine the bartack in a pro-
rammed buttonhole, press “tie-off/buttonhole”
ey 19 (Fig. 5). A dash flashes in display 21 (Fig. 4)
the right of program 1 53a, b, or c. The machine
ow sews slowly just before the end of the second
eam. When both seams are the same length,
ress key 19 again. The bartack is now sewn and
ed off.you wish to sew the next buttonhole fully auto
iatically, press key 19 again. (Same sewing se
uence as described on page 94), The flashing
ash will then have disappeared.
A garment may consist of different numbers of
fabric plies, e. g. the buttonhole strip may consist
of three plies and the collar stand of six — owing to
the folded seam edge. In this case it is necessary
to program the buttonhole for varying numbers of
fabric plies in order to maintain the same button
hole length as on the three-ply buttonhole strip.
Note:For sewing buttonholes on knitted or very thin
materials we recommend sewing foot No 1 A
and dual feed.
lote:you interrupt sewing at the reduced sewing
peed by releasing the foot control, the machine
,ill return to the normal speed when you start
ewing again.Vhen you are working in the bartack determining
node and have selected bartack design “a”, you
ave to press the “tie-off/buttonhole” key when
he second buttonhole seam has reached the
econd to last mark of the buttonhole foot. Obser
‘ance of this always ensures correct finishing of
he bartack.
b NI
Adapting the buttonhole seam
lengths
8
95
Eyelet buttonhole (fully automatic)
3prog --
______
154a, b. c T E 3± 5A
Sewing thread: embroidery and darning threadKey: press “slow sewing”
Eyelet buttonholes with different tack designs:(see table on page 92).
1 54a = buttonhole with wedge tack1 54b = buttonhole with lengthwise tack1 54c = buttonhole with crosswise tack
Eyelet buttonholes are often sewn in outerwear,such as jackets, coats or casual wear. They shouldalways be sewn with backing material underneath. In spite of this, a piece of paper should beplaced underneath during sewing.The buttonhole must be 3mm longer than the diameter of the button, plus its height. The distancefrom the front edge should be equal to the buttonhole width. First mark the spacings and the distance from the edge. Mark the buttonhole lengthfrom this point to the inside. Sewing is then alwaysbegun from the inside to the outside towards theedge.16 buttonholes are stored in the computer, from10 to 40mmOn program selection a programmed buttonholelength of 22 mm and a buttonhole width of 6 mmappear in the display Select the length of the buttonhole using stitch-length keys 7 (Fig. 1). Themachine will automatically sew the selected buttonhole.Before beginning the buttonhole pull the runnerof the buttonhole foot fully to the front.
/
,,
7Correcting a buttonholeIf a buttonhole does not turn out well, cancel it bpressing “pattern start” key 26 and sew it again.
Changing the buttonhole widthFor every type of fabric, the corresponding buttonhole width can be determined from 5.5 to 8.Emm, For heavy materials select a wide buttonholeand for light materials a narrow one. With stitchwidth keys 8, you determine the required buttonhole width. The length of the cut changes automatically (Fig. 7).A buttonhole width of 6 mm is now stored.
Adapting the buttonhole seamlengths with the balance keysWith “balance” keys 5 the left buttonhole sean’length can be adapted to the right one.Sew a sample buttonhole first.
Example:If the left seam is too short(Fig. 8d)
Select balance +1 to +3 with key, or more iirequired.
If the left seam is too long(Fig. 8e)
Select balance —1 to —2 with key, or more iirequired.
liii?!’I iIiiiiiiii±i I
prog •1 prog
2
prog
prog
4
96
a
6c
)etermining the bartacksemi-automatic)
you wish to determine the bartack in a pro
irammed buttonhole, press “tie-off/buttonhole”.ey 19 (Fig. 5). A dash flashes in display 21 at theight side of program 154a, b, or c (Fig. 4). Thenachine now sews slowly just before the end ofhe second seam. When both seams are the samesngth, press key 19 again. The bartack is nowewn and tied off.you wish to sew the next buttonhole fully auto
natically, press key 19 again. (Sewing sequence
s described on page 96). The flashing dash willhen have disappeared.
Iote:you interrupt sewing at the reduced sewing
peed by releasing the foot control, the machinevill return to the normal speed when you startewing again.When you are working in the bartack determiningnode and have selected bartack design “a”, youave to press the “tie-off/buttonhole” key whenhe second buttonhole seam has reached theecond to last mark of the buttonhole foot. Obser‘ance of this always ensures correct finishing ofhe bartack.
1111111111111h11111111li1111111
clIlIIIIHIItHllUl!llhlIIllhlllfIllIlIlIIIHhIlHIHhlIlllllll
Adapting the buttonhole seamlengthA garment may consist of different numbers offabric plies, e.g. the buttonhole strip may consistof three plies and the collar stand of six — owing tothe folded seam edge. In this case it is necessaryto program the buttonhole for varying numbers offabric plies in order to maintain the same buttonhole length as on the three-ply buttonhole strip.
Note:For sewing buttonholes on knitted or very thinmaterials we recommend sewing foot No. 1 Aand dual feed.
8
97

/
Buttonhole with gimp threadIn the case of elastic materials, it is possible thatthe buttonholes extend. Therefore, the buttonhole strip should be reinforced with interliningmaterial. In order to retain the shape of the buttonhole, use gimp thread if possible. Place the gimpthread over the back ridge “A’, pull taut and jam itinto front ridge ‘B” to the left and right (Fig. 1).(Pull runner fully to the front).The buttonhole sequence is the same as withoutgimp thread. After completing the buttonhole pullon the left gimp thread (Fig. 2) until the loop iscovered up by the bar. This is where the button willbe located later.On elastic materials pull the gimp threads throughto the reverse side with a needle and tie them off.On normal fabrics the gimp threads can betrimmed immediately behind the last bartack.
Suitable threads: bead yarn No. 8, or thicksewing thread
• Move runner slightly to the rear.• Jam the gimp thread into the left of ridge “A’
(Fig. 3) and pull to the front under the buttonhole runner.
• Place it over the front ridge ‘B’ and jam it to th€right and left (Fig. 4).
• Pull it to the rear again and jam it into the righiof ridge “A” (Fig. 5).
• Place the fabric underneath the sewing foot,• pull the buttonhole runner fully to the froni
and lower the sewing foot.• Before you start sewing press “slow sewing’
key 16 (Fig, 6).• Sew the first buttonhole seam.• When the machine starts sewing slowly (at the
beginning of the curve), take the gimp threadfrom the left of ridge “A”,
• pull down the thread from ridge “B” by meansof a needle and pull it to the rear until a loopappears in needle plate cutout “C” of the buttonhole runner (Fig. 7).
• Sew the curve and — when the machine hasagain reached its normal speed —
• pull the thread taut and finish sewing the buttonhole. To prevent the gimp threads fromshowing at the end of the bartack, pull themtaut and cut them off.
Round buttonholes with gimp threads are sewnin exactly the same way.
Note:The thicker the gimp thread you use, the wider thebuttonhole seams must be selected to correspond with the thread.
F B
threadEyelet buttonhole with gimp
98
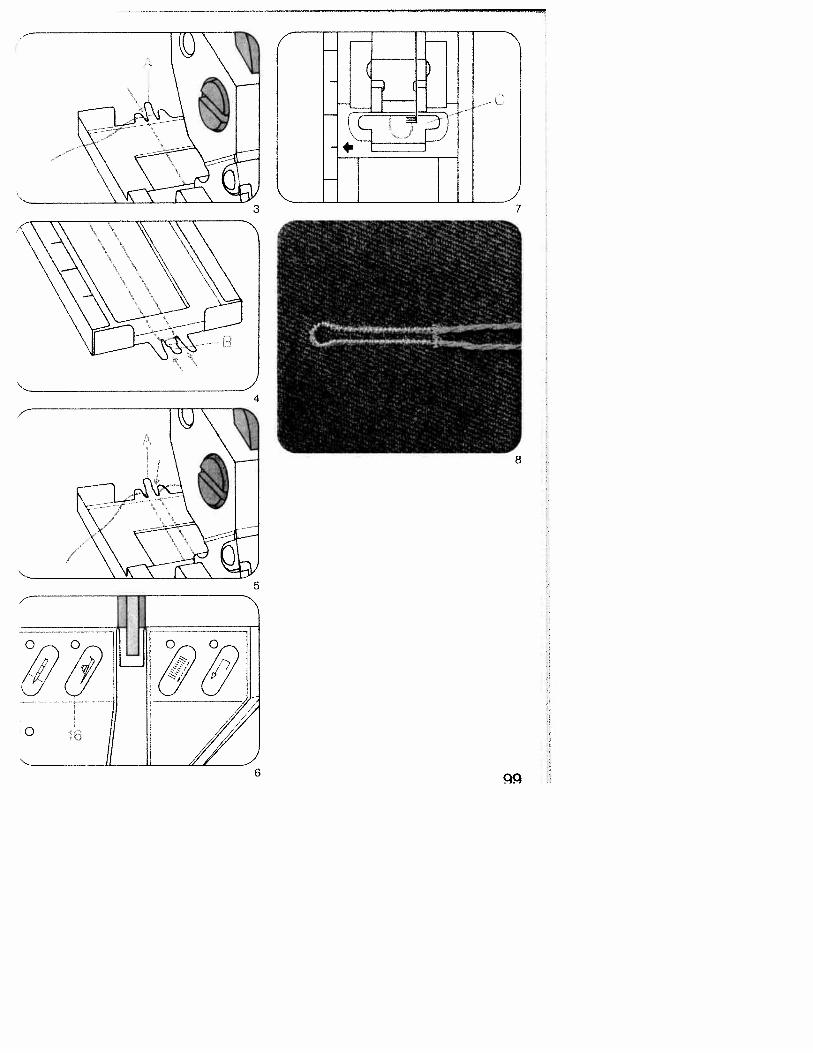
0)
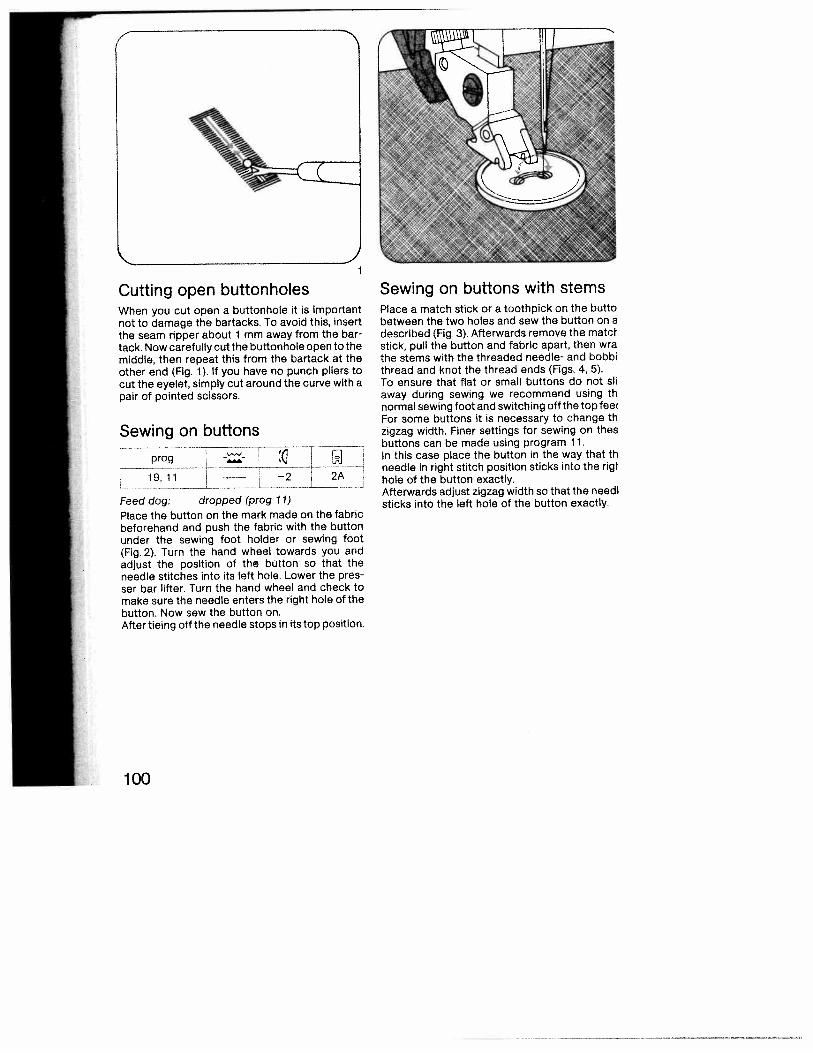
When you cut open a buttonhole it is importantnot to damage the bartacks. To avoid this, insertthe seam ripper about 1 mm away from the bar-tack. Now carefully cut the buttonhole open to themiddle, then repeat this from the bartack at theother end (Fig. 1). If you have no punch pliers tocut the eyelet, simply cut around the curve with apair of pointed scissors.
-- c—2 2A
Feed dog: dropped (prog 11)
Place the button on the mark made on the fabricbeforehand and push the fabric with the buttonunder the sewing foot holder or sewing foot(Fig. 2). Turn the hand wheel towards you andadjust the position of the button so that theneedle stitches into its left hole. Lower the presser bar lifter. Turn the hand wheel and check tomake sure the needle enters the right hole of thebutton. Now sew the button on.After tieing off the needle stops in its top position.
Place a match stick or a toothpick on the buttobetween the two holes and sew the button on adescribed (Fig. 3). Afterwards remove the matcstick, pull the button and fabric apart, then wrathe stems with the threaded needle- and bobbithread and knot the thread ends (Figs. 4, 5).To ensure that flat or small buttons do not sliaway during sewing we recommend using thnormal sewing foot and switching off the top feeFor some buttons it is necessary to change thzigzag width. Finer settings for sewing on thesbuttons can be made using program 11.In this case place the button in the way that thneedle in right stitch position sticks into the righole of the button exactly.
— Afterwards adjust zigzag width so that the needlsticks into the left hole of the button exactly.
Cutting open buttonholes Sewing on buttons with stems
Sewing on buttons
prog
19,11
100
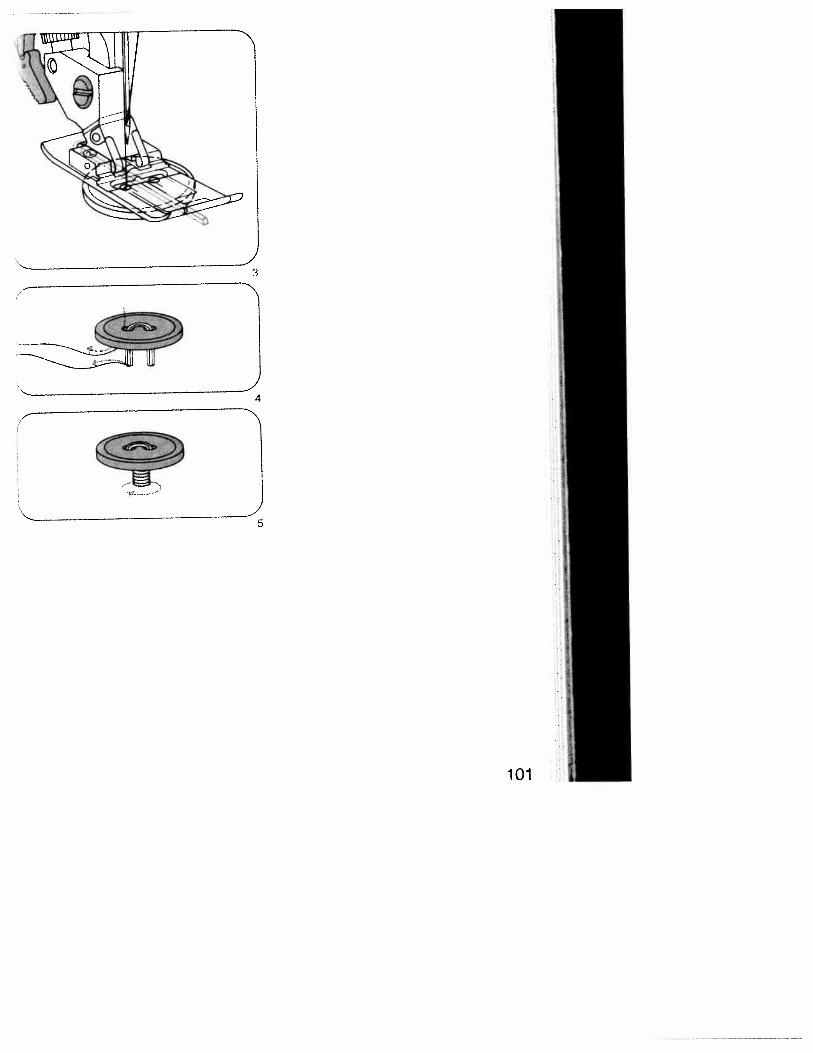
1.0I.
9
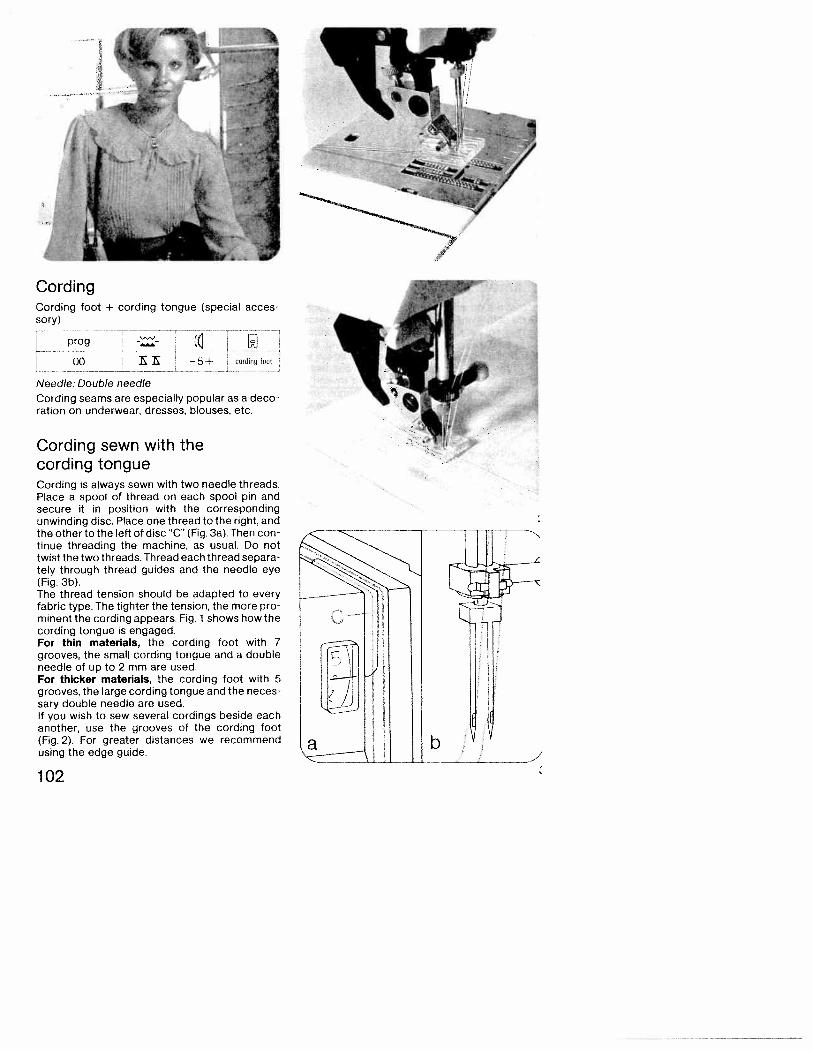
CordingCording foot + cordingsOry)
prog
E —5+ uldng toot
Needle: Double needleCording seams are especially popular as a decoration on underwear, dresses, blouses, etc.
Cording sewn with thecording tongueCording is always sewn with two needle threads.Place a spool of thread on each spool pin andsecure it in position with the correspondingunwinding disc. Place one thread to the right, andthe other to the left of disc “C” (Fig. 3a). Then continue threading the machine, as usual. Do nottwist the two threads. Thread each thread separately through thread guides and the needle eye(Fig. 3b).The thread tension should be adapted to everyfabric type. The tighter the tension, the more prominent the cording appears. Fig. 1 shows how thecording tongue is engaged.For thin materials, the cording foot with 7grooves, the small cording tongue and a doubleneedle of up to 2 mm are used.For thicker materials, the cording foot with 5grooves, the large cording tongue and the necessary double needle are used.If you wish to sew several cordings beside eachanother, use the grooves of the cording foot(Fig. 2). For greater distances we recommendusing the edge guide.
tongue (special acces
00
a b
102
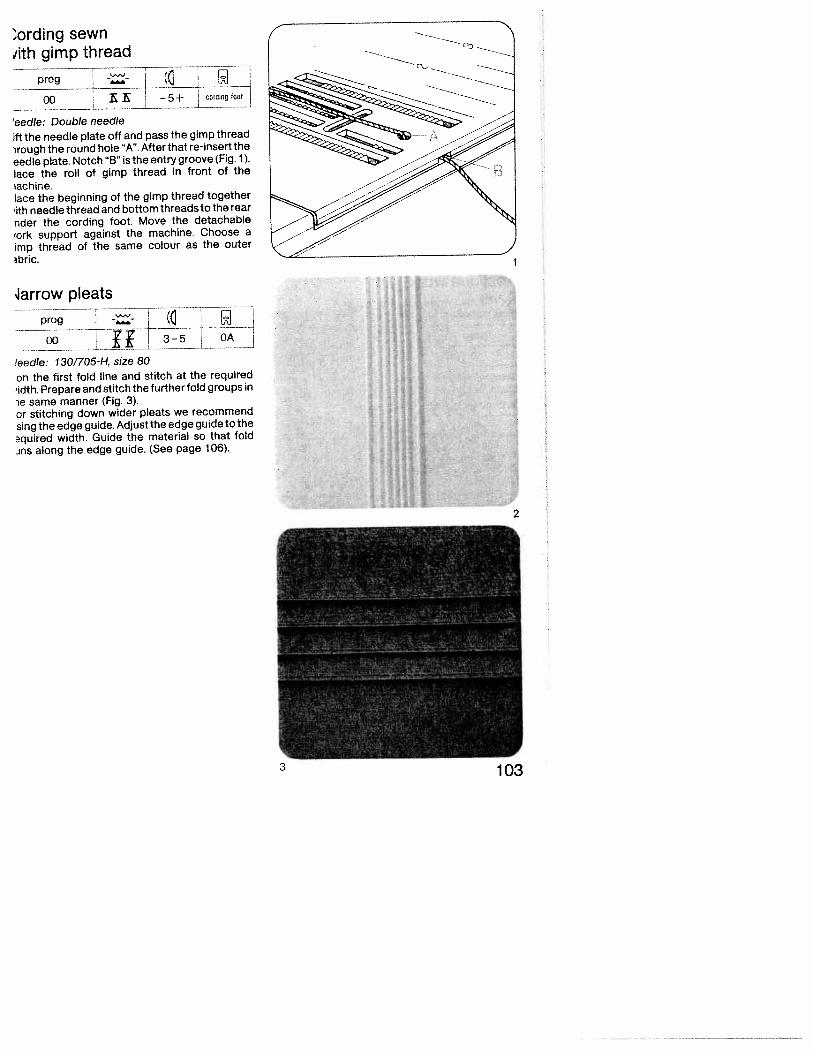
)ording sewnwith gimp thread
eedle: Double needle
ft the needle plate off and pass the gimp thread
wough the round hole “A”. After that re-insert the
eedle plate. Notch “B” is the entry groove (Fig. 1).
lace the roll of gimp thread in front of the
achine.lace the beginning of the gimp thread together
‘ith needle thread and bottom threads to the rear
nder the cording foot. Move the detachable
‘ork support against the machine. Choose a
imp thread of the same colour as the outer
thric.
arrow pleats
1E i
_JiLtLZLofeedle: 130/705-H, size 80
on the first fold line and stitch at the required
‘idth, Prepare and stitch the further fold groups in
e same manner (Fig. 3).or stitching down wider pleats we recommend
sing the edge guide. Adjust the edge guide to the
quired width. Guide the material so that fold.jns along the edge guide. (See page 106).
prog -_-
oo carding
2
103
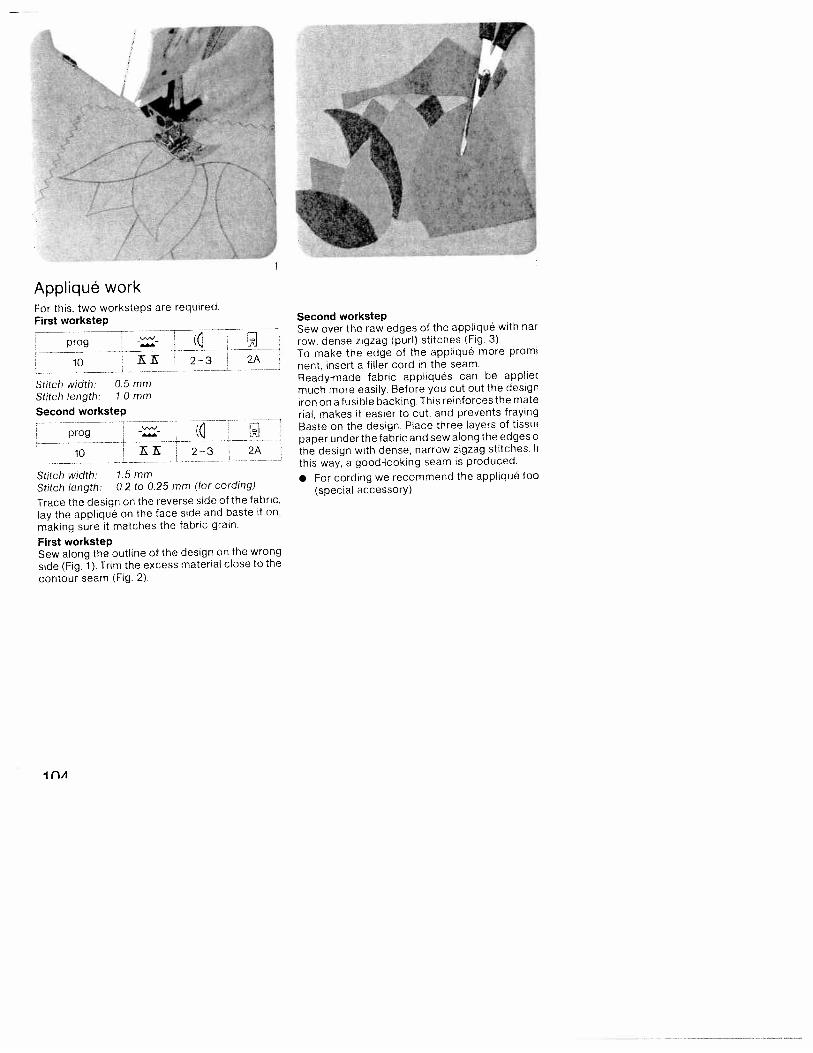
Appliqué work
Second workstepSew over the raw edges of the appliqué with nar
row, dense zigzag (purl) stitches (Fig 3).To make the edge of the appliqué more promi
nent. insert a filler cord in the seam.Ready-made fabric appliqués can be appliec
much more easily. Before you cut out the desigr
iron on a fusible backing. This reinforces the mate
rial. makes it easier to cut, and prevents fraying
Baste on the design. Place three layers of tissuE
paper under the fabric and sew along the edges a2A the design with dense, narrow zigzag stitches Ii
this way, a good-400king seam is produced.
• For cording we recommend the appliqué foo(special accessory)
For this, two worksteps are required.First workstep
prog
10 : 2-3 2A
Stitch width: 0.5 mmStitch length: 1.0 mm
Second workstep
prog
2—31
Stitch width: 1 5 mmStitch length: 0.2 to 0.25 mm (for cording)
Trace the design on the reverse side of the fabric,
lay the appliqué on the face side and baste it on,
making sure it matches the fabric grain.
First workstepSew along the outline of the design on the wrong
side (Fig. 1). Trim the excess material close to the
contour seam (Fig. 2).
I flA
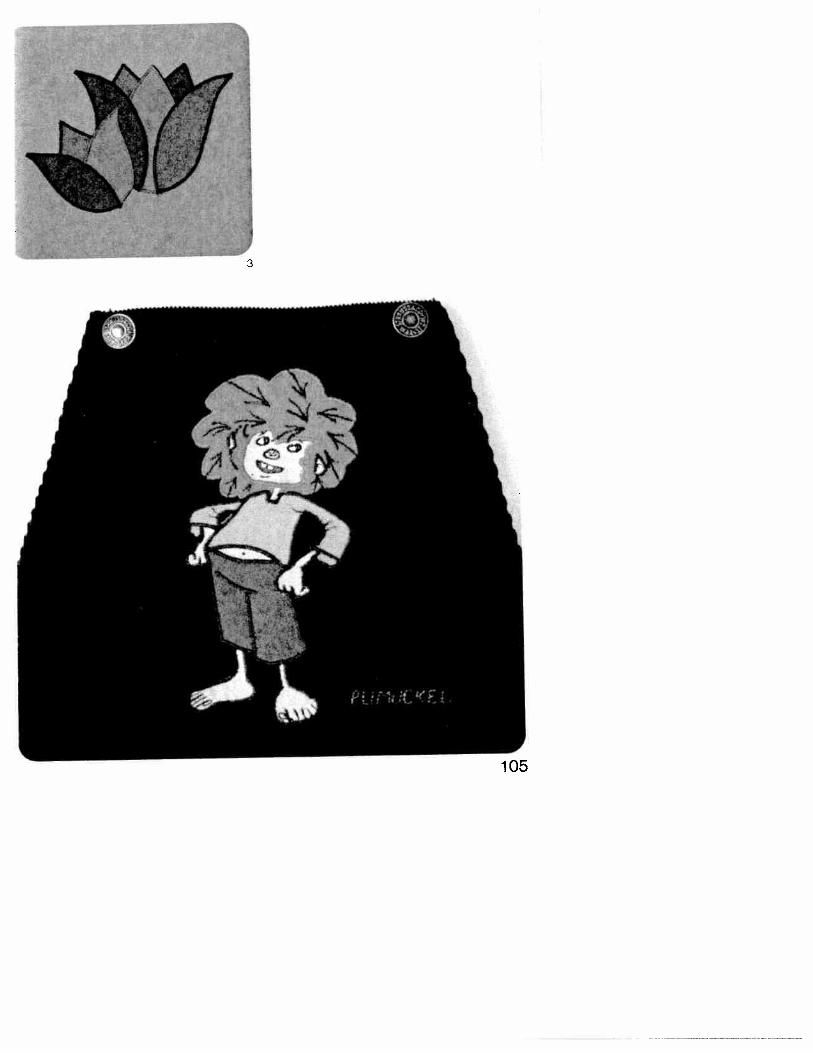
goi
£
Quilting
prog
______
00 KK 3—5 OA,4
• Edge guideSeams stitched on articles filled with cotton woolor some other soft padding have a very prominenteffect. For this purpose, batting, foam plastic orflannel is placed between the top ply and a lightweight bottom ply (Fig. 3).To keep the fabric plies and the padding in place.baste them together with rows of long bastingstitches spread over the whole area.Squares and diamonds can be sewn on thestraight or on the bias of the material. On fabricswith regular patterns stitch between the patternsor around them.The spacing between seams can be set as required by adjusting the guide accordingly.Trace the seam line for the first seam on the fabricor guide the quilting gauge along the straight-cutfabric edge.When you have completed the first seam movethe work sideways so that the quilting gauge runsalong the first seam or the traced seam line. Foreach subsequent seam, guide the gauge fingeralong the preceding line of stitching (Fig. 1).Quilting can also be done advantageously on patterned materials.Preparation of the material is the same as described above, Just sew around the contours and youhave a very beautiful piece of embroidery (Fig. 2).
2
106
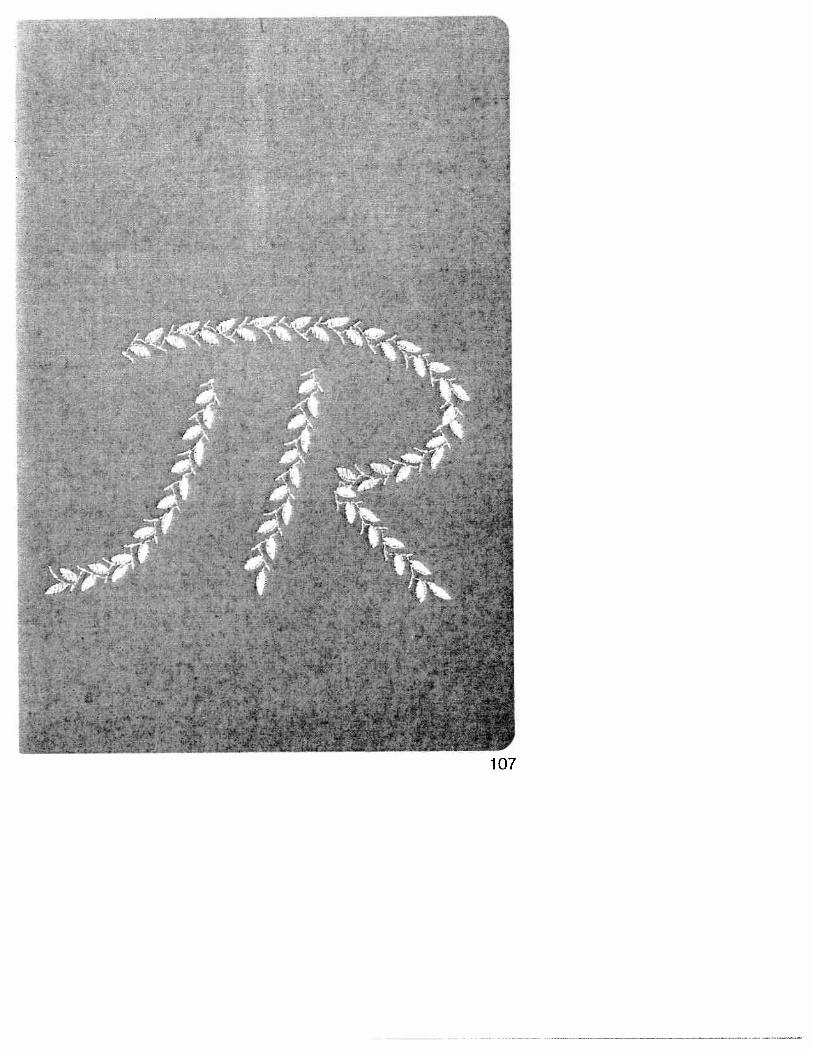
v
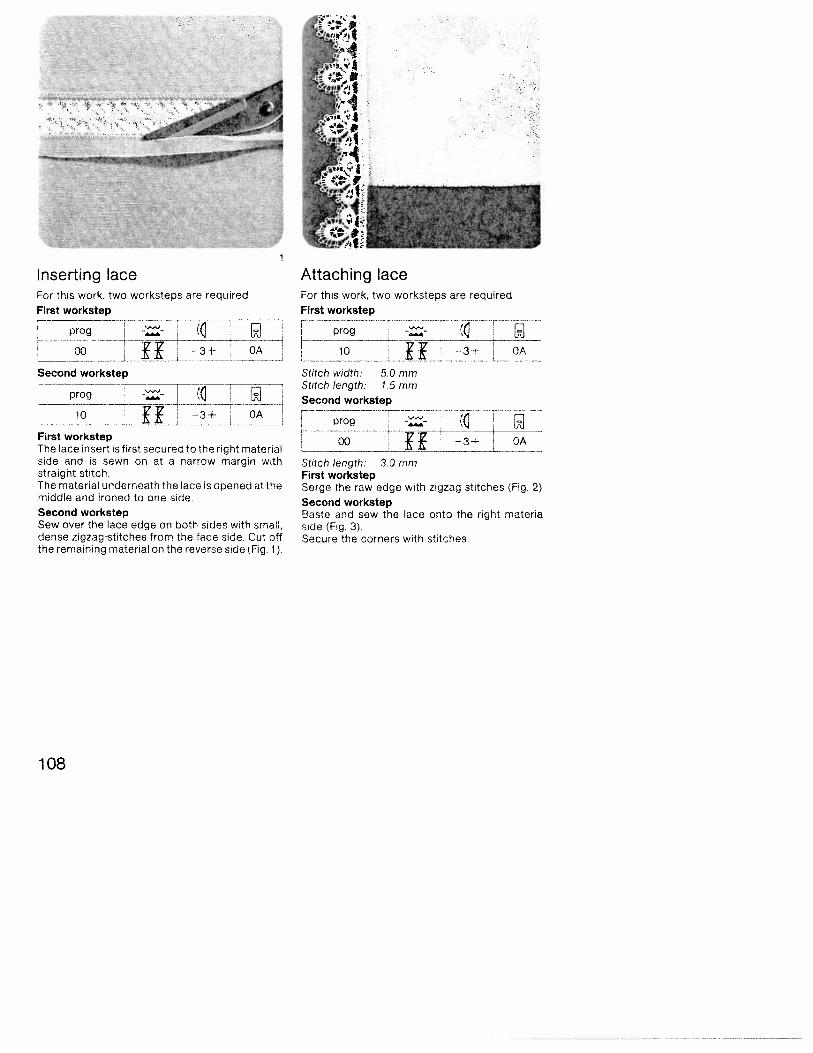
Inserting laceFor this work, two worksteps are required
Ffrst workstep
prog-- (
—_______
00
Second workstep
10
First workstepThe lace insert is first secured to the right materialside and is sewn on at a narrow margin withstraight stitch.The material underneath the lace is opened at themiddle and ironed to one side.Second workstepSew over the lace edge on both sides with small,dense zigzagstitches from the face side, Cut offthe remaining material on the reverse side (Fig. 1).
Stitch width: 5.0 mmStitch length: 1 5 mmSecond workstep
prog—
00
____H
-3+ OA
Stitch length: 3 0 mmFirst workstepSerge the raw edge with zigzag stitches (Fig. 2)
Second workstepBaste and sew the lace onto the right materiaside (Fig. 3).Secure the corners with stitches,
Attaching laceFor this work, two worksteps are requiredFirst workstep
prog
OA 10 -3+OA
OA
108
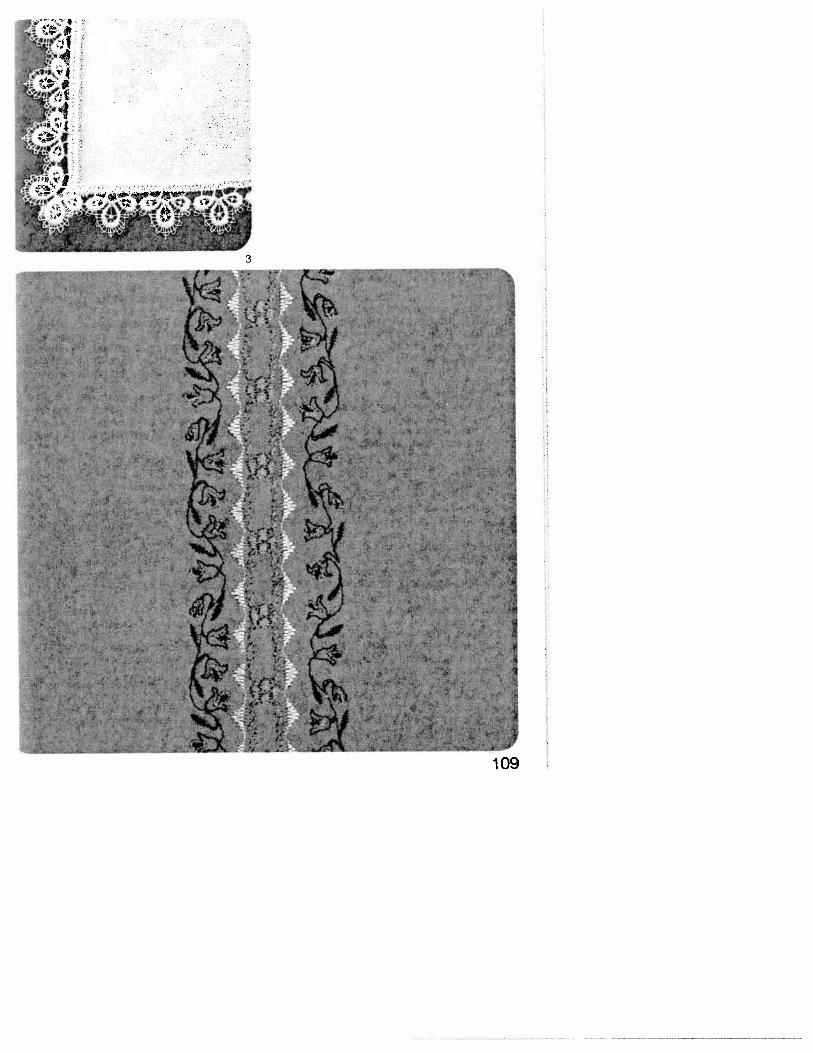
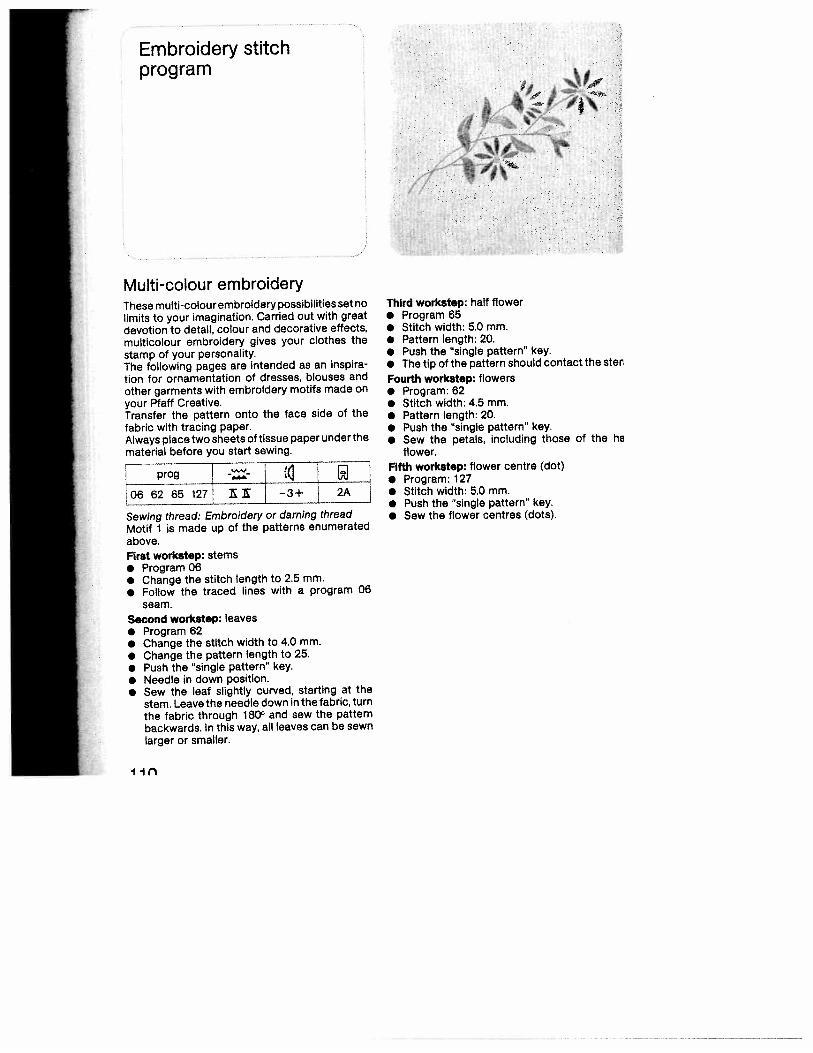
Embroidery stitchprogram
Multi-colour embroidery
:
These multi-colour embroidery possibilities set nolimits to your imagination. Carried out with greatdevotion to detail, colour and decorative effects,multicolour embroidery gives your clothes thestamp of your personality.The following pages are intended as an inspiration for ornamentation of dresses, blouses andother garments with embroidery motifs made onyour Pfaff Creative.Transfer the pattern onto the face side of thefabric with tracing paper.Always place two sheets of tissue paper under thematerial before you start sewing.
prog-- (
06 62 65 127 KE —3+ 2A_,j
Sewing thread: Embroidery or darning threadMotif 1 is made up of the patterns enumeratedabove.First workstep: stems• Program 06• Change the stitch length to 2,5 mm.• Follow the traced lines with a program 08
seam.Second workstep: leaves• Program 62• Change the stitch width to 4.0 mm.• Change the pattern length to 25.• Push the “single pattern” key.• Needle in down position.• Sew the leaf slightly curved, starting at the
stem. Leave the needle down in the fabric, turnthe fabric through 180° and sew the patternbackwards. In this way, all leaves can be sewnlarger or smaller.
Third workstep: half flower• Program 65• Stitch width: 5.0 mm.• Pattern length: 20.• Push the “single pattern” key.• The tip of the pattern should contact the ster
Fourth workstep: flowers• Program: 62• Stitch width: 4.5 mm.• Pattern length: 20.• Push the “single pattern’ key.• Sew the petals, including those of the ha
flower.Fifth workstep: flower centre (dot)• Program: 127• Stitch width: 5.0 mm.• Push the “single pattern” key.• Sew the flower centres (dots).
I jf

-order 1 consists of the following programs:
Centre motif: 104Side motif: 53
irst workstep: centre motifSelect program 104.
t Sew the programmed stitch pattern.
3econd workstep: side motifs, Select program 53,
Sew the programmed stitch pattern along
both sides of the centre motif. The second side
motif can be sewn without turning the fabric by
pushing the “pattern mirror” key.
3order 2 consists of the following programs13065 141
irst workstep: centre motif• Select program 130.• Sew the programmed stitch pattern.
Second workstep:• Select program 65 and change zigzag width to
4—5 mm.• Sew the programmed stitch pattern along
both sides of the centre motif.
Third workstep: side motifs• Enter program 141.• Sew the programmed stitch pattern on both
sides along the previously sewn motif.
1+4i
2
rThy
1ijjj’ ‘jjit)’ i ii t, ‘11j.L ijji1i’4&ijjiJ
Border 3 consists of the followingprograms:Centre motif: 39Side motif: 92Single motif: 62
3
First workstep: centre motif• Select program 39.• Needle in down position.• Sew the programmed stitch pattern. Shortly
before you reach the end of the seam, press
the “tie-off/buttonhole” key. At the end of the
pattern the needle remains down in the mate
rial. Turn the fabric through 180• Sew the opposite half back in the other direc
tion, making sure the patterns match.
Second workstep: side motifs• Select program 92.• Sew the programmed stitch pattern along
both sides of the centre motif. The second side
motif can be sewn without turning the fabric by
pushing the pattern mirror” key.
Third workstep: centre dots• Select program 62,• Change the stitch width to 6 mm.• Change the pattern length to 10 mm.
• Push the “single pattern” key.
• Sew the selected program (single pattern) in
the centre motifs
Heart motif (Fig. 4)• Select program 119.• Change stitch length to 0.25 mm• Reduce pattern length to 9.0 mm.• Press key 27 single pattern’.• Press key 15 “needle down”.• Sewtheheartmotifand,withtheneedledown
turn the material so that the tip of the heart iexactley in line with the red mark on the letside of the sewing foot.
Repeat this process until the motif is closed.
112
jgzrzzOptional L E
Thread: embroidering/darning thread
Needle: 130/705 H-LR, size 80
Since leather is a pliable material, an underlay of
double-folded paper or light non-woven material
(e. g. vylerie) should always be used. Do not set
the stitches too close, because leather splits
easily and cracks in leather show up on the fini
shed work.
Flat leather seamsOverlap the raw edges by about 1/2 cm. Top-
stitch both sides at a narrow margin using straight
stitch. Instead of straight stitch it is also possible
to use zigzag stitch or some other program to
over-stitch the double seam. This method of
sewing is commonly used for joining parts of diffe
rent colours (e. g. patchwork>.
Fancy seams in leather
113

n
\J\i
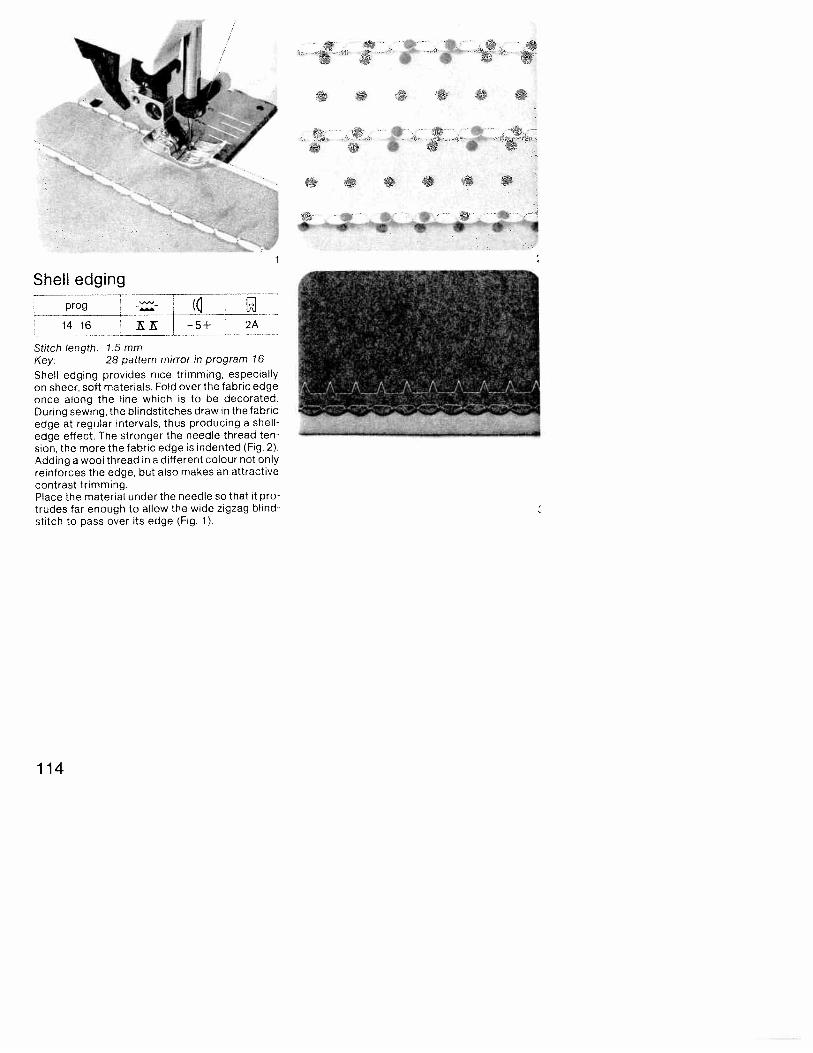
Shell edging
prog
______
1416 -5+ 2A
Stitch length; 1.5 mmf(ey; 28 pattern mirror in program 16
Shell edging provides nice trimming, especiallyon sheer, soft materials. Fold over the fabric edgeonce along the line which is to be decorated.During sewing the blindstitches draw inthefabricedge at regular intervals, thus producing a shell-edge effect. The stronger the needle thread tension, the more the fabric edge is indented (Fig. 2).Adding a wool thread in a different colour not onlyreinforces the edge, but also makes an attractivecontrast trimming.Place the material under the needle so that it protrudes far enough to allow the wide zigzag blind-stitch to pass over its edge (Fig. 1).
x
4£ I
114
ButterflyTwo worksteps are required for this:
First workstep (wings)
prog
10 2-3 jFdn9eftoLJStitch width: 1.5Stitch length: 0.5Fringe foot: (special accessory)
Second workstep (body)
biztz-3 F_Pattern length: as requiredKey: single pattern
First workstep (wings)• First sew a fringe seam as a trial, using a piece
of scrap material. During sewing, try differentstitch lengths until you find the one most suitable. The wings are best sewn in circularseams, working from the outside inwards.
Second workstep (body)• Sew the body as shown in the illustration
(Fig. 1).
Flower
prog-- 1]
066263 EE -3+ 2A
Mark out the pattern of the flower on the fabric.Sew the petals, stem and leaves as shown in theillustration, Now fill in the seed capsule using afringe seam, working spirally from the outsideinwards (Fig. 2).
Fringe seams2
Suggestions:(not described)
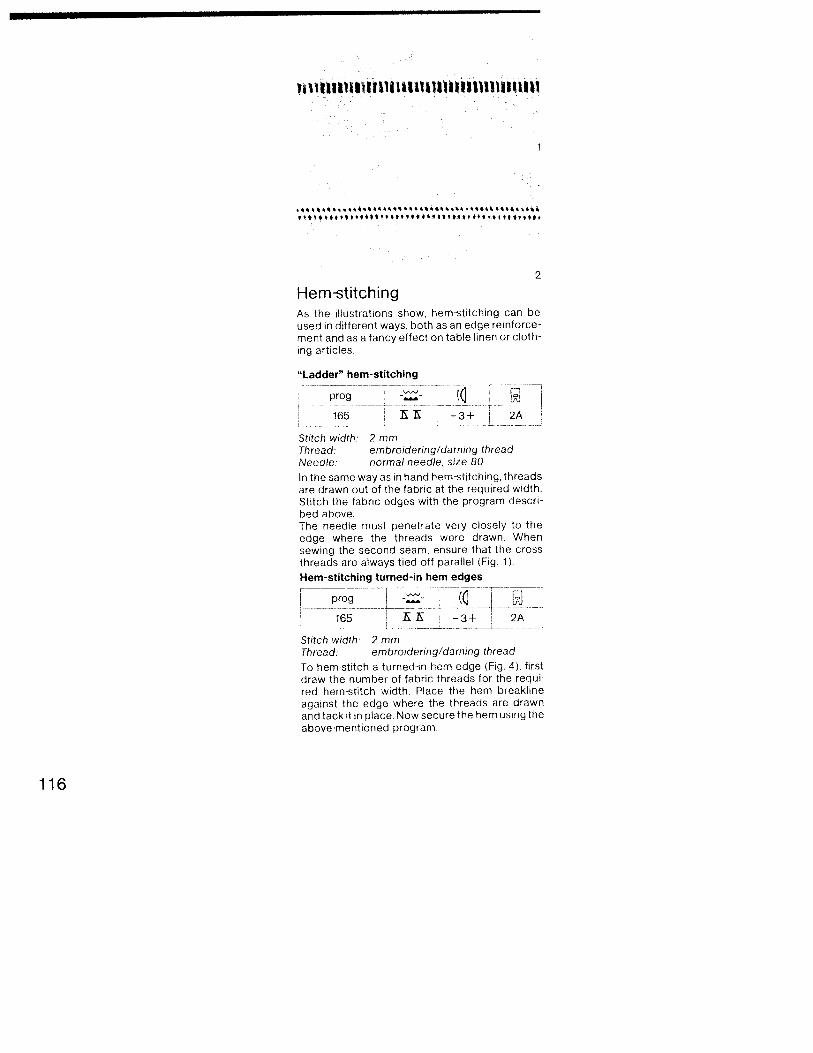
imIflIflh1 lltflUflhJi*flflhliiliII
4*$
2
Hem-stitchingAs the illustrations show, hem-stitching can beused in different ways, both as an edge reinforcement and as a fancy effect on table linen or clothing articles.
“Ladder” hem-stitching
‘11 flprog -
165 E —3+ 2A
Stitch width 2 mmThread: embroidering/darning threadNeedle: normal needle, size 80
In the same way as in hand hem-stitching, threadsare drawn out of the fabric at the required width.Stitch the fabric edges with the program described aboveThe needle must penetrate very closely to theedge where the threads were drawn. Whensewing the second seam, ensure that the crossthreads are always tied off parallel (Fig. 1).
Hem-stitching turned-in hem edges
prog-- -
165 -3+ - 2A
Stitch width 2 mmThread: embroidering/darning thread
To hem-stitch a turned-in hem edge (Fig 4), firstdraw the number of fabric threads for the required hem-stitch width. Place the hem breaklineagainst the edge where the threads are drawnand tack it in place. Now secure the hem using theabove-mentioned program.
116

,,_•,...,,,.,,te
-
-
3
em-stitching with wing needle
164 166 -3+ 2AIhread: embroidering/darning threadfeedle: wing needle
or this work, four threads are drawn, five threadsre left in, then a further four threads drawn. Overew the five threads left in the fabric using pro-ram 164 or 166 (Figs. 2 and 3).lem-stitching as an edge finish made with the,ing needle
_
-n--.---j
OA
bread: embroidering/darning threadJeedle: wing needle
his edge finish is used on very light and thinabrics. It is particularly well suited for valances,ounces and frills or for finishing edges. For thisowing job no threads must be drawn out of theabric. Sew at sewing-foot width along the fabricdge, using the edge of the sewing foot as a guide.Then carefully trim the excess material along theiemstitching with a small scissors (Fig. 5).
4
117
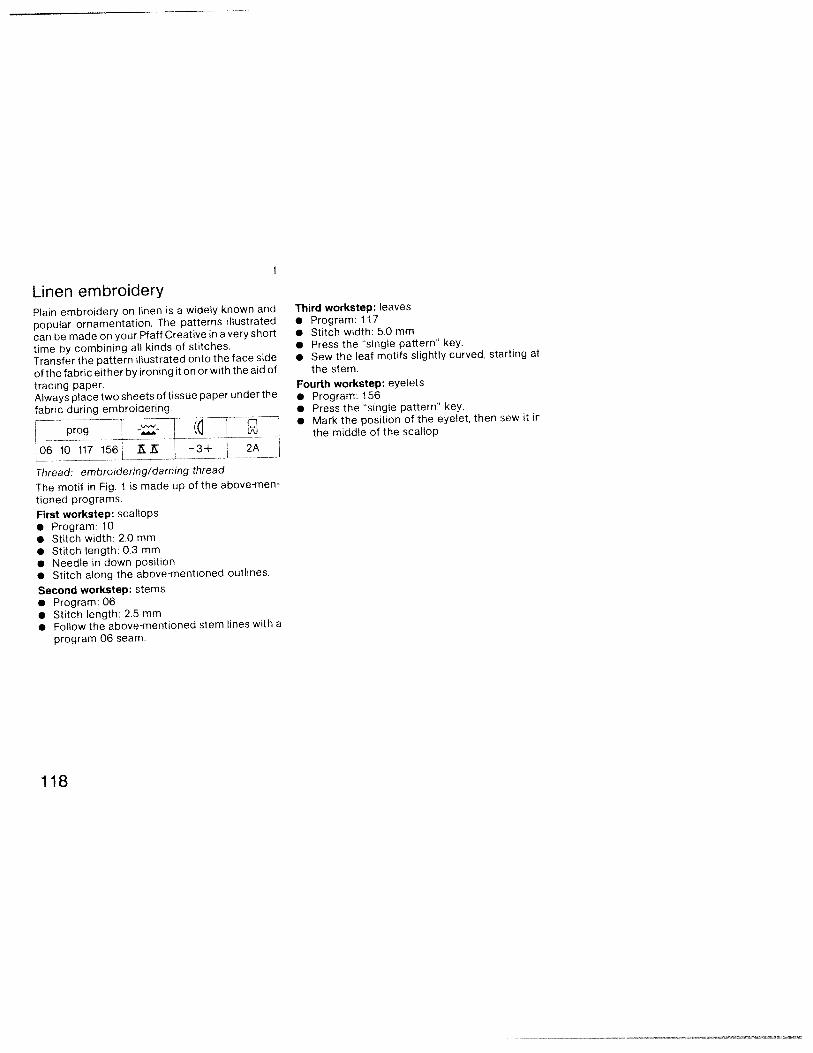
Linen embroideryPlain embroidery on linen is a widely known and
popular ornamentation. The patterns illustrated
can be made on your Pfaff Creative in a very short
time by combining all kinds of stitches.
Transfer the pattern illustrated onto the face side
of the fabric either by ironing it on or with the aid of
tracing paper.Always place two sheets of tissue paper under the
fabric during embroidering.r..—.—.-—
F Wprog -
06 10 117 156; E. —3+ 2AL_.
Thread: embroidering/darning thread
The motif in Fig. 1 is made up of the above-men
tioned programs.
First workstep: scallops• Program: 10• Stitch width: 2,0 mm• Stitch length: 0.3 mm• Needle in down position• Stitch along the above-mentioned outlines.
Second workstep: stems• Program: 06• Stitch length: 2.5 mm• Follow the above-mentioned stem lines with a
program 06 seam.
Third workstep: leaves• Program: 117• Stitch width: 5.0 mm• Press the “single pattern” key.
• Sew the leaf motifs slightly curved, starting at
the stem.
Fourth workstep: eyelets• Program: 156• Press the “single pattern key.
• Mark the position of the eyelet, then sew it ir
the middle of the scallop.
118
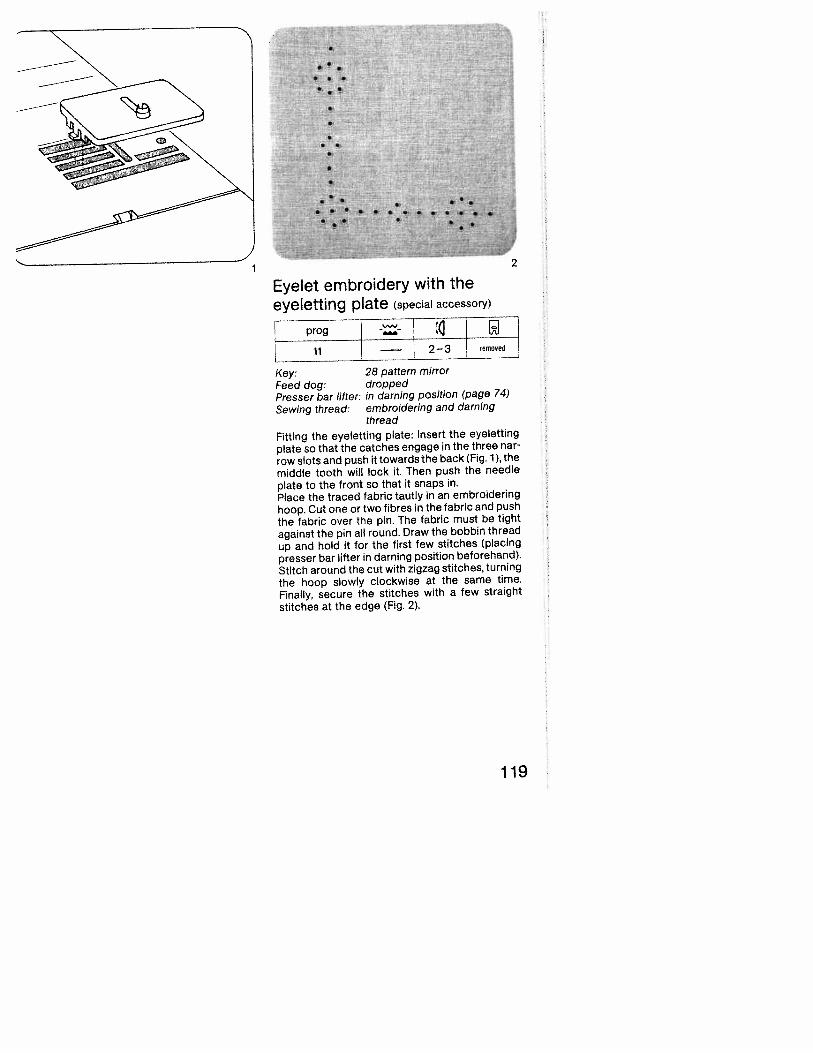
• aI
• •.
I I •,I. •
2
Eyelet embroidery with theeyeletting plate (special accessory)
prog --I
L —
2-3 removed
Key: 28 pattern mirrorFeed dog: droppedPresser bar lifter: in darning position (page 74)
Sewing thread: embroidering and darningthread
Fitting the eyeletting plate: Insert the eyeletting
plate so that the catches engage in the three nar
row slots and push it towards the back (Fig. 1), the
middle tooth will lock it. Then push the needle
plate to the front so that it snaps in.Place the traced fabric tautly in an embroidering
hoop. Cut one or two fibres in the fabric and push
the fabric over the pin. The fabric must be tight
against the pin all round. Draw the bobbin thread
up and hold it for the first few stitches (placing
presser bar lifter in darning position beforehand).
Stitch around the cut with zigzag stitches, turning
the hoop slowly clockwise at the same time.
Finally, secure the stitches with a few straight
stitches at the edge (Fig. 2).
1
119
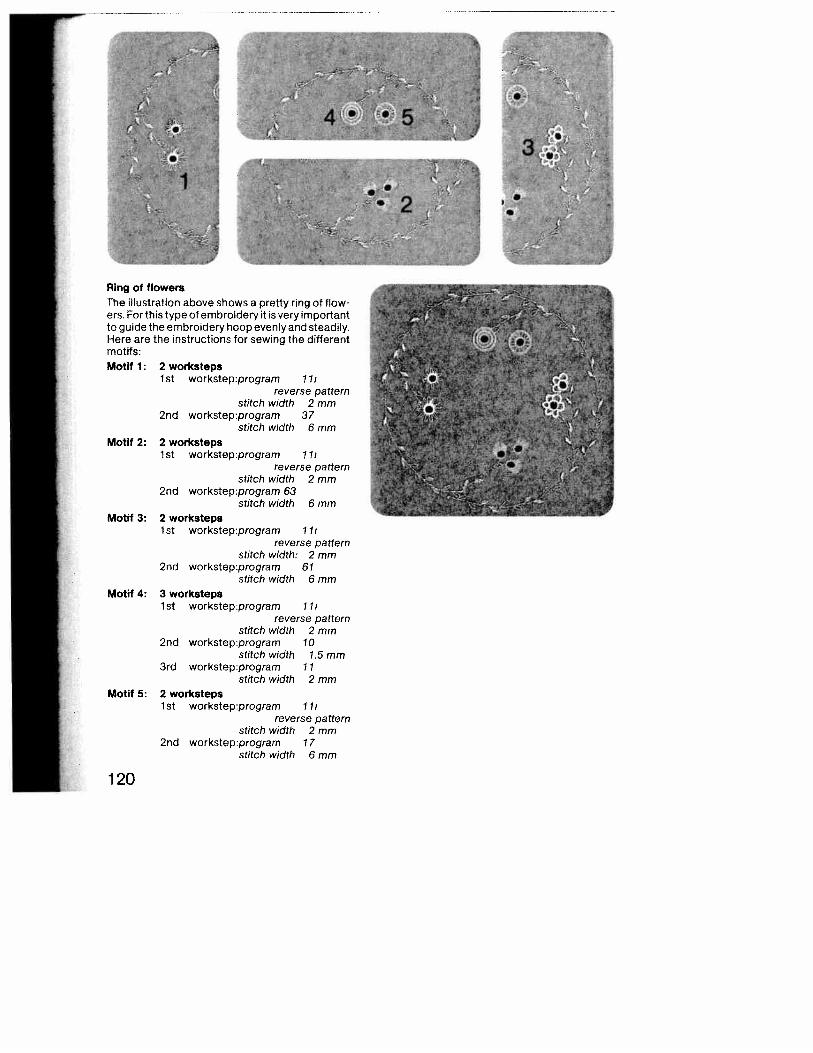
The illustration above shows a pretty ring of flowers. For this type of embroidery it is very importantto guide the embroidery hoop evenly and steadily.Here are the instructions for sewing the differentmotifs:Motif 1: 2 worksteps
1st workstep:program liireverse pattern
stitch width 2 mm2nd workstep:program 37
stitch width 6 mmMotif 2: 2 worksteps
1st workstep:program liireverse pattern
stitch width 2 mm2nd workstep:program 63
stitch width 6 mmMotif 3: 2 worksteps
1st workstep:program liireverse pattern
stitch width: 2 mm2nd workstep:program 61
stitch width 6 mmMotif 4: 3 worksteps
1st workstep:program liireverse pattern
stitch width 2 mm2nd workstep:program 10
stitch width 1.5 mm3rd workstep:program 11
stitch width 2 mmMotif 5: 2 worksteps
1st workstep:program lii
Ring of flowers
reverse patternstitch width 2 mm
2nd workstep:program 17stitch width 6 mm
120
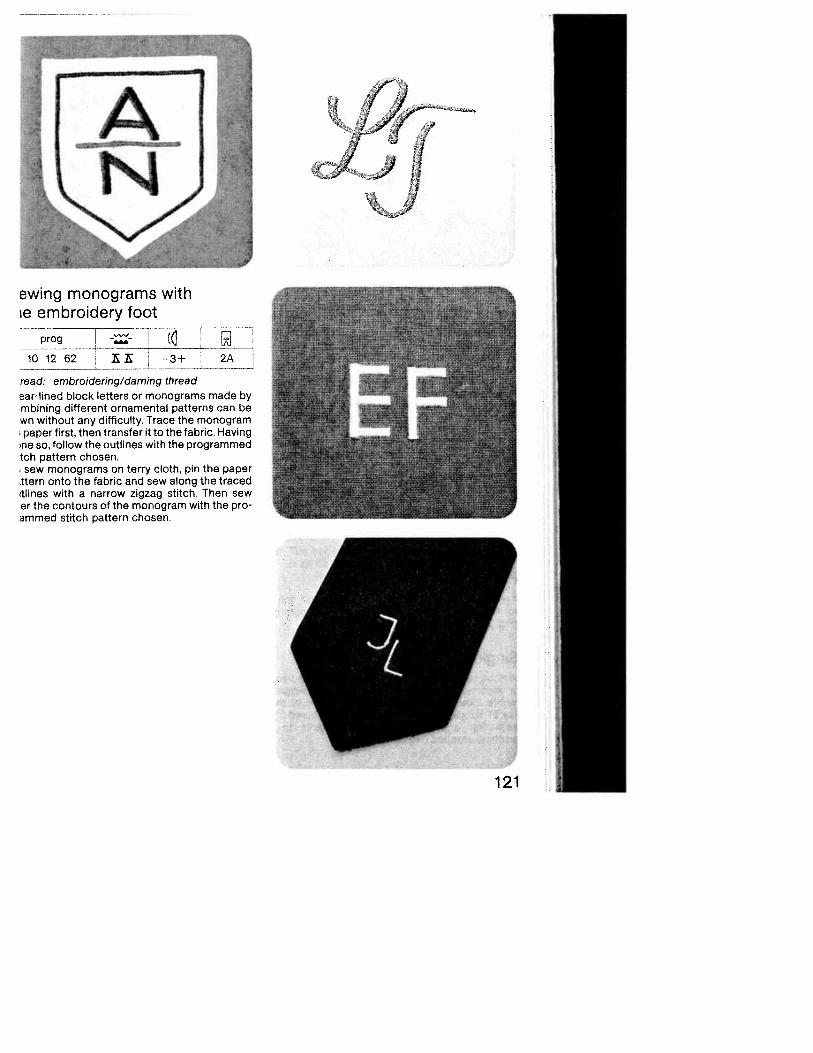
ewing monograms withie embroidery foot
prog
___--
101262
read: embroidering/darning thread
ear-lined block letters or monograms made bymbining different ornamental patterns can bewn without any difficulty. Trace the monogrampaper first, then transfer it to the fabric. Havingne so, follow the outlines with the programmedtch pattern chosen.sew monograms on terry cloth, pin the paper
.ttern onto the fabric and sew along the tracedtimes with a narrow zigzag stitch. Then sewer the contours of the monogram with the proammed stitch pattern chosen.
I
121
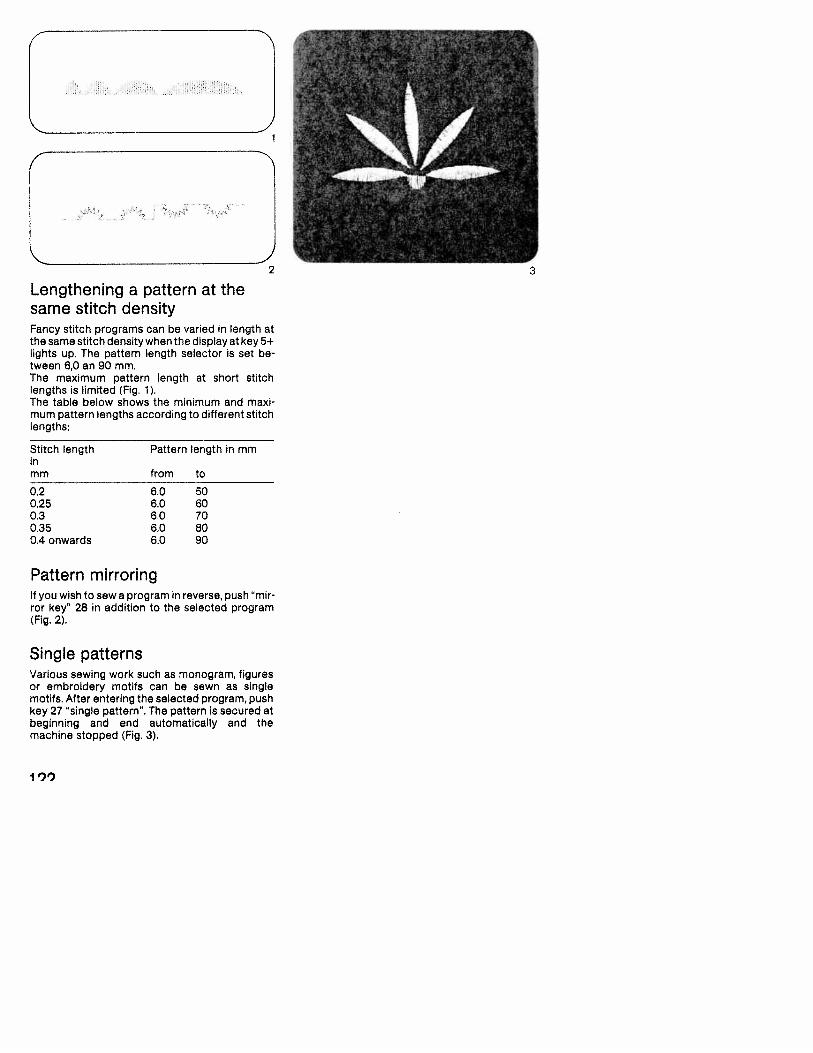
Fancy stitch programs can be varied in length atthe same stitch density when the display at key 5+lights up. The pattern length selector is set between 6,0 an 90 mm.The maximum pattern length at short stitchlengths is limited (Fig. 1).The table below shows the minimum and maximum pattern lengths according to different stitchlengths:
Stitch length Pattern length in mminmm from to
0.2 6.0 500.25 6.0 600.3 6.0 700.35 6.0 800.4 onwards 6.0 90
Pattern mirroringIf you wish to sew a program in reverse, push “mirror key” 28 in addition to the selected program(Fig. 2).
Single patternsVarious sewing work such as monogram, figuresor embroidery motifs can be sewn as singlemotifs. After entering the selected program, pushkey 27 “single pattern”. The pattern is secured atbeginning and end automatically and themachine stopped (Fig. 3).
Lengthening a pattern at thesame stitch density
2
I ‘‘)
Programming thecomputer withembroidery stitchesand monograms
Compiling various programsfrom 00 to 177• The Creative computer has 16 M-memories,
from M 0 to M 15.
• Per one pattern sequence — M — up to 84 programs can be entered in one M-memory.
• Distributed over 16 M-memories, up to 484programs can be stored.
• If no M-memory is pre-selected, all programsare stored in memory M 0.
• When the machine is switched off, the storedprograms are maintained.
• When the capacity of the memories is used up,no further programs are accepted.
• The M-combinations no longer required canthan be cancelled with the “correct” key.
123

prog IL-0
How to select anM -memory:Fig. 1• Select the M-memory
(with the left prog key 22).
Fig. 2• Select the number of a tree M-memory
(using the right button prog 22).• The M-memory is free when the display (21) to
the right of the memory number is empty.• Pushkeymem+48.
The memory is now ready to accept a program.
Fig. 3• Select the programs (00 to 177) with the keys
(prog 22) and enter them one after the other inthe computer by pressing the key me m + 48for program entry.The program numbers appear in display 21.
• When you have entered all program combinations, the machine is ready to sew.
Single patternsIf you wish to sew only one pattern sequence orjust one pattern, press the key• “Single pattern” 27.
The machine then sews until the program isconcluded, secures the stitches, and stopsautomatically.
Mirroring a patternIf you wish to sew a pattern in reverse, press thefollowing keys in addition to the selected program:• “Pattern mirror’ key 28• ‘mem+” key 48The pattern mirroring function is indicated by thesymbol following the number in the computer. Ifyou wish to mirror an entire pattern combination,press the following keys after programming:• “memory” key 30 and• “pattern mirror’ key 28 (Fig. 4),
UI 111/1111 ri Iiii Iprog ()
-
h
To enter the programs from 00 to 177 first select afree M-memory.
I4)
/4v
J
124
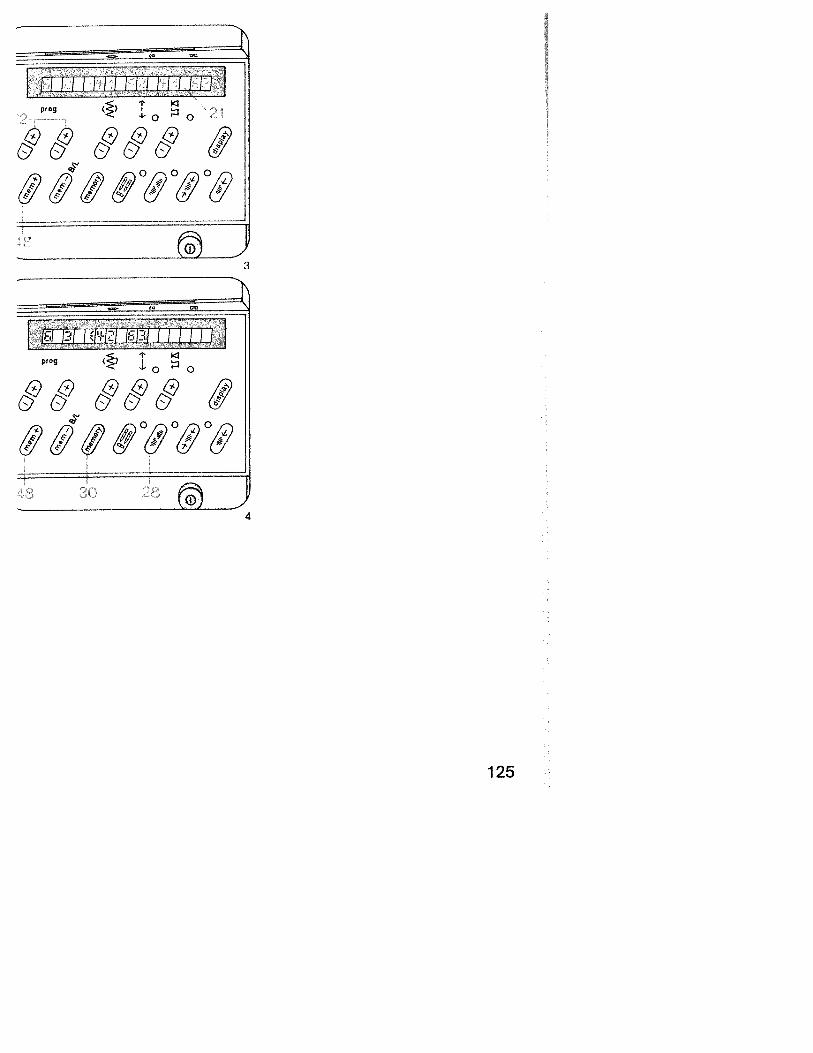
AM
QO
AM
,
QO
F..)
(71
4 4
I I I I I I I I I I I I I I I mprog I
3
&&&
1n°&LAll programs and program combinations can bealtered to any length or width and entered in thecomputer.
Changing thestitch lengthBefore the last program entry for a fancy patternthe stitch length has to be determined (usingkey 7) (Fig. 2).This change of stitch length also determines thelength of stitches in the programs entered before(Fig. 1).
Example:• Select a free M-memory• Push “mem+’ key 48• Select program 41• Push “mem+” key 48• Select program 62• Push ‘mem+” key 48• Select program 41• Push “mem+” key 48• Select program 62 and change the stitch
length to 0.25 (using key 7), Fig. 2.• Push “mem+” key48• Now the whole program with the altered stitch
length is inside the computer.
r± I I I 1 1 11181]prog () I
o
ftfl°fl\-
4
126
itii
a
‘1 I
‘4
‘
4
&4
itit
’
4,,
HI
batI
aIi
S
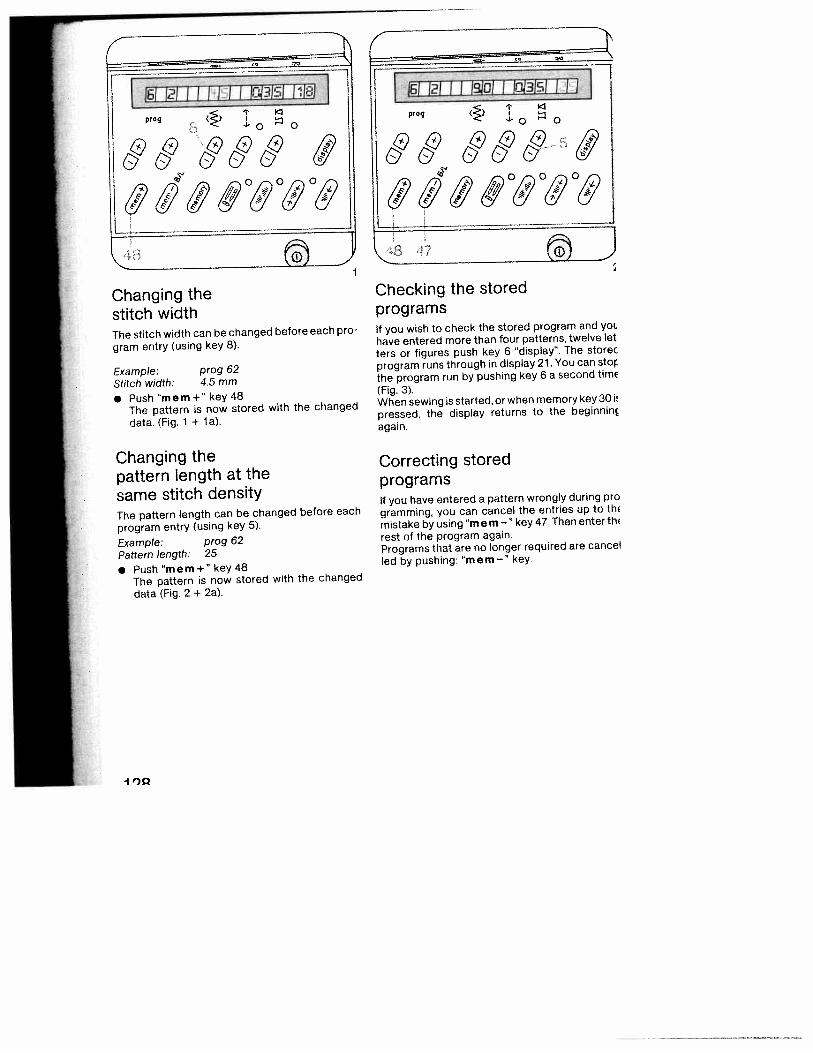
1’ -I’,
Changing thestitch widthThe stitch width can be changed before each pro
gram entry (using key 8).
Example: prog 62Stitch width: 4.5 mm
• Push “mem+” key 48
The pattern is now stored with the changed
data. (Fig. 1 + la).
Changing thepattern length at thesame stitch densityThe pattern length can be changed before each
program entry (using key 5).
Example: prog 62Pattern length: 25
• Push “mem+”key 48The pattern is now stored with the changed
data (Fig. 2 + 2a).
Lcr2I i i i i III I IIprog ()
4
f,)
Ii f9°f&
Checking the storedprograms
J
If you wish to check the stored program and yo
have entered more than four patterns, twelve let
ters or figures push key 6 “display”. The storec
program runs through in display 21. You can stop
the program run by pushing key 6 a second timE
(Fig, 3).When sewing is started, or when memory key 30 i
pressed, the display returns to the beginninç
again.
Correcting storedprogramsIf you have entered a pattern wrongly during pro
gramming, you can cancel the entries up to thE
mistake by using ‘rn em —“ key 47. Then enter thE
rest of the program again.Programs that are no longer required are cancel
led by pushing: “mern—” key.
[15! 121 II I II I Icq3IsI hIE:!pog I
0
f”°F4
I “)Q
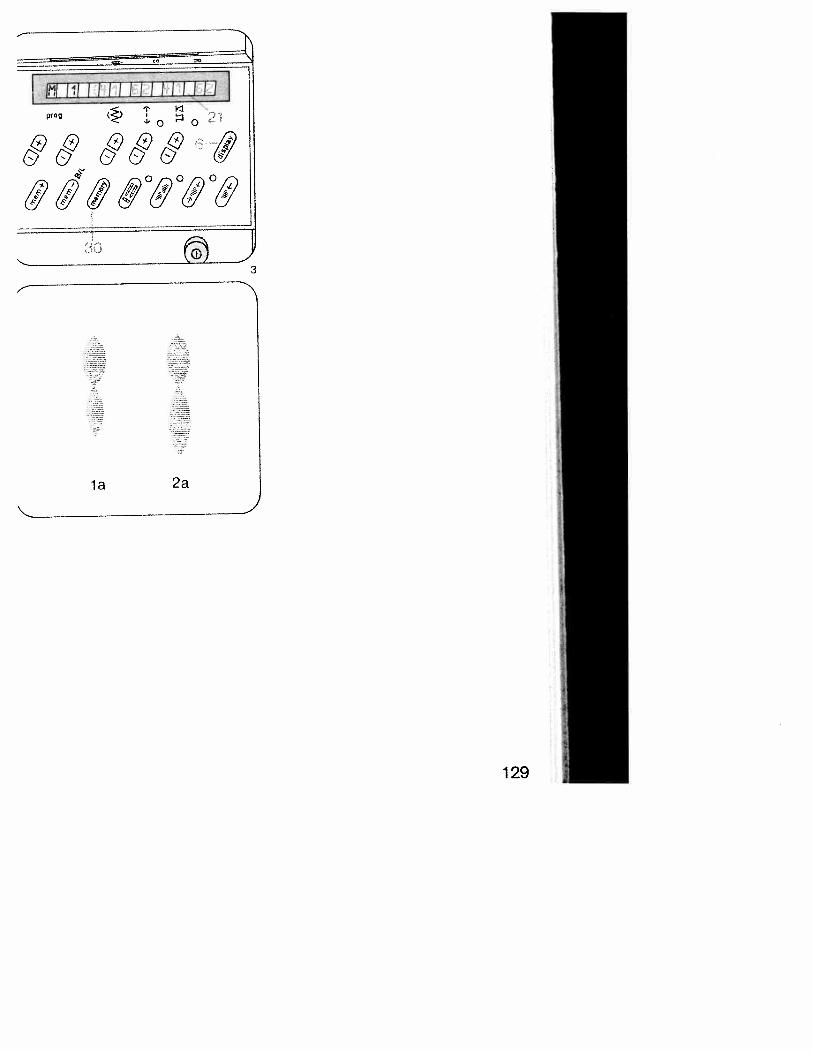
1\)
0
F’)
CD
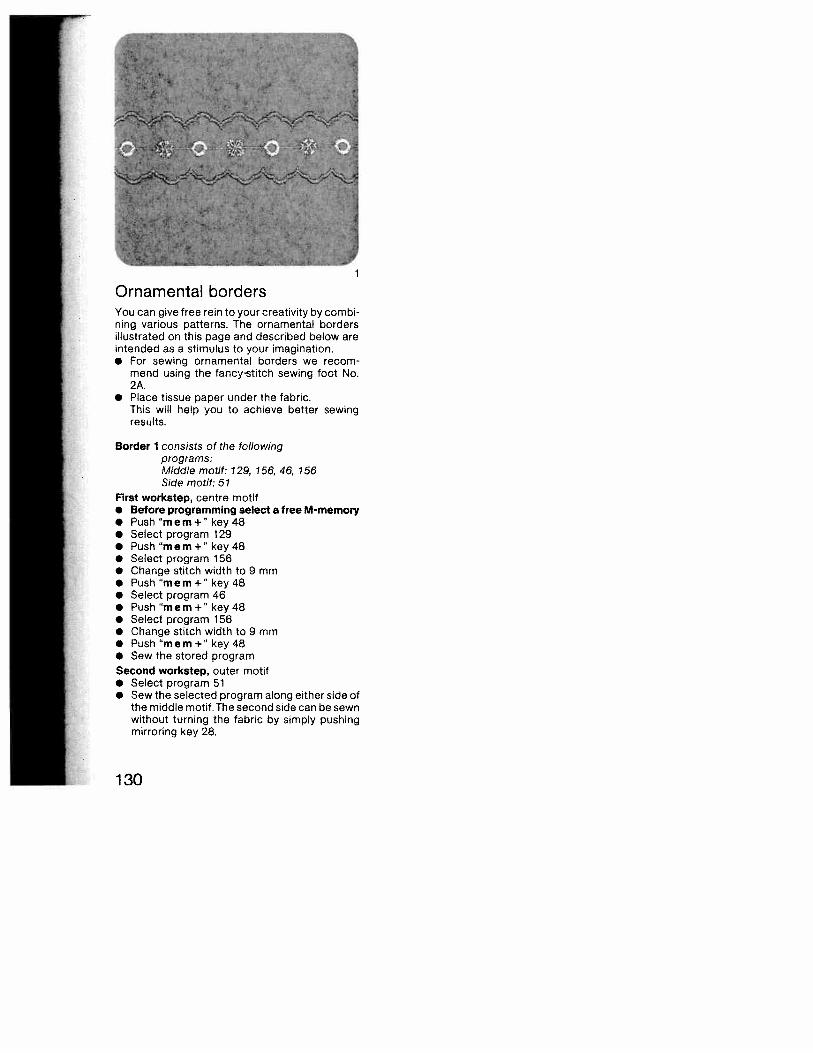
You can give free rein to your creativity by combining various patterns. The ornamental bordersillustrated on this page and described below areintended as a stimulus to your imagination.• For sewing ornamental borders we recom
mend using the fancy-stitch sewing foot No.2A.
• Place tissue paper under the fabric.This will help you to achieve better sewingresults.
Border 1 consists of the followingprograms:Middle motif: 129, 156, 46, 156Side motif: 51
First workstep, centre motif• Before programming select a free M-memory• Push “mem+” key 48• Select program 129• Push “mem+” key 48• Select program 156• Change stitch width to 9 mm• Push “mem+” key48• Select program 46• Push “mem-i-” key48• Select program 156• Change stitch width to 9 mm• Push “mem+’ key 48• Sew the stored programSecond workstep, outer motif• Select program 51• Sew the selected program along either side of
the middle motif, The second side can be sewnwithout turning the fabric by simply pushingmirroring key 28.
Ornamental borders
130
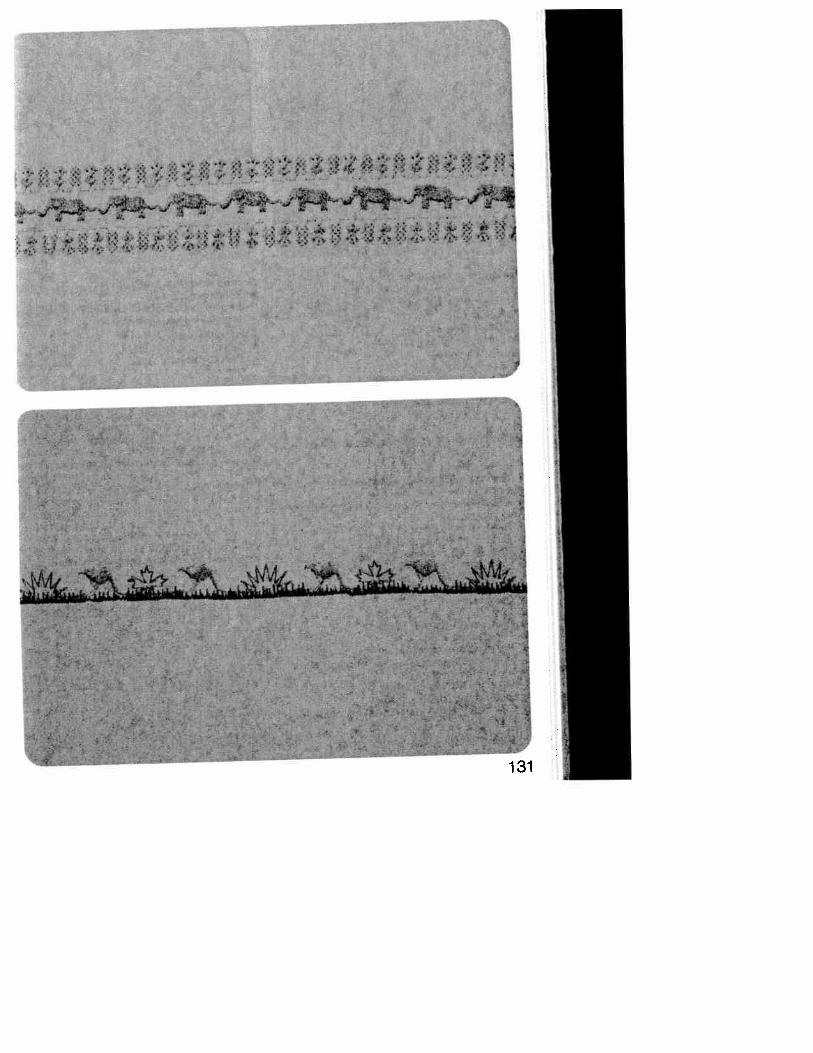
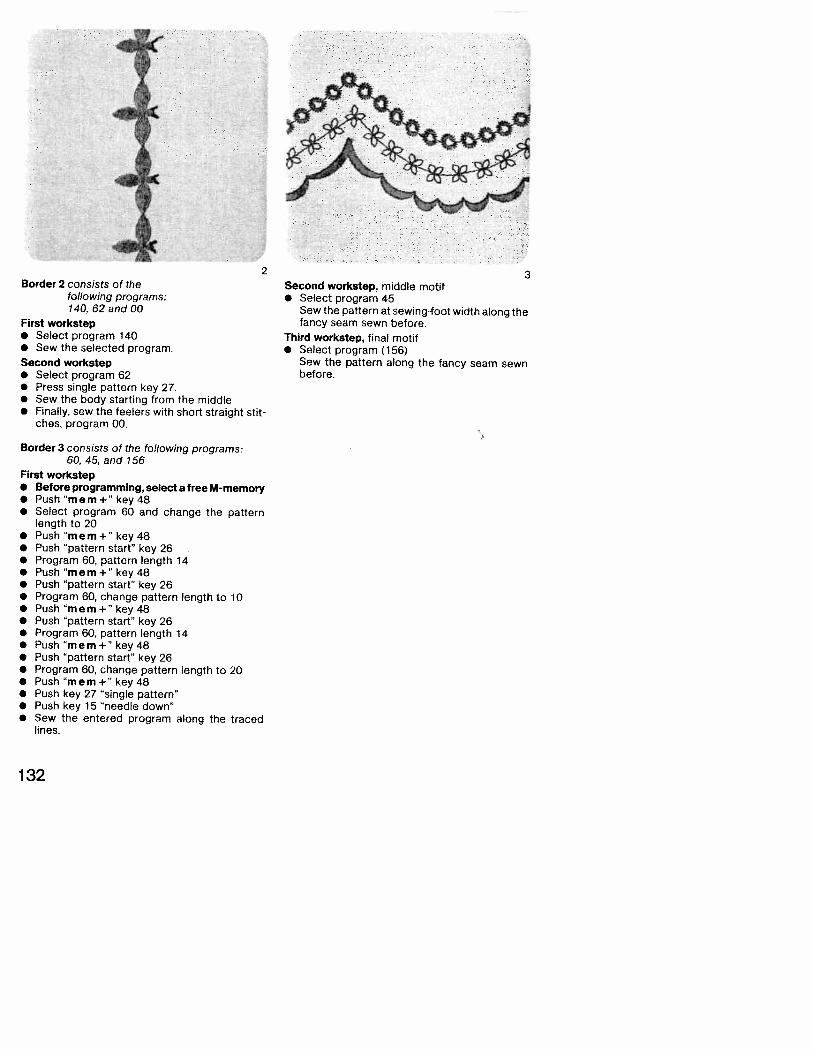
Border 2 consists of thefollowing programs:140, 62 and 00
First workstep• Select program 140• Sew the selected program.Second workstep• Select program 62• Press single pattern key 27.• Sew the body starting from the middle• Finally, sew the feelers with short straight stit
ches, program 00.
Border 3 consists of the following programs:60, 45, and 156
First workstep• Before programming, select a free M-memory• Push “mem+” key 48• Select program 60 and change the pattern
length to 20• Push “mem+” key48• Push “pattern start” key 26• Program 60, pattern length 14• Push “mem+” key 48• Push “pattern start” key 26• Program 60, change pattern length to 10• Push “mem+” key 48• Push “pattern start” key 26• Program 60, pattern length 14• Push “mem+” key48• Push “pattern start” key 26• Program 60, change pattern length to 20• Push “mem+” key48• Push key 27 “single pattern”• Push key 15 “needle down”• Sew the entered program along the traced
lines.
3Second workstep, middle motif• Select program 45
Sew the pattern at sewing-foot width along thefancy seam sewn before.
Third workstep, final motif• Select program (156)
Sew the pattern along the fancy seam sewnbefore.
(
2
132
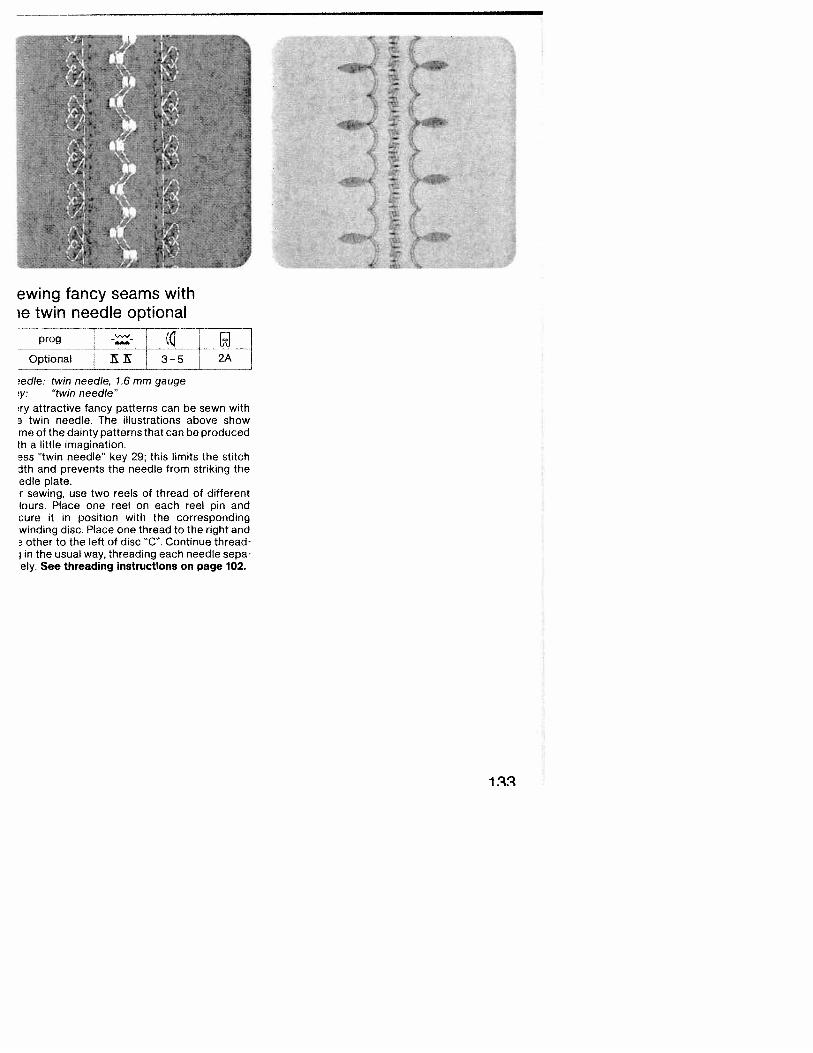
ewing fancy seams withe twin needle optional
zTOptional Ej
edle: twin needle, 1.6 mm gaugey: “twin needle”ry attractive fancy patterns can be sewn with
a twin needle. The illustrations above showme of the dainty patterns that can be producedth a little imagination.ass “twin needle” key 29; this limits the stitchith and prevents the needle from striking theedle plate.
sewing, use two reels of thread of differentlours. Place one reel on each reel pin andcure it in position with the correspondingwinding disc. Place one thread to the right and
other to the left of disc C”. Continue threadin the usual way, threading each needle sepa
ely. See threading instructions on page 102.
2A
I .q
the programmed reversestraight stitchesYou will find numerous ways of expressing your
creative talent by varying or rearranging the
reverse straight-stitch patterns in programs 02
and 03 or the pattern combinations derived from
them.The pattern variations illustrated and explained
below are intended as an inspiration.
see below
Stitch combination 1 consists of the followingprograms: 102,02 (Fig. 2)• Before programming, select a free M-memory• Push “mem+” key 48• Select the programs:
1 x 10², 2 x 02and enter them in the computer by pressing“mem-t-” key 48 each time
• Sew the stored program.
Stitch combination 2 consists of the followingprograms: 38, 03 (Fig. 2)• Before programming, select a free M-memory
• Push mem+” key48• Select the programs:
1 x 38, 6 x 03and enter them in the computer by pushing‘mem+” key 48 each time
• Sew the stored program.
Pattern variations made with
14
(31
9C[
, F L_,J
zi
>V
-‘
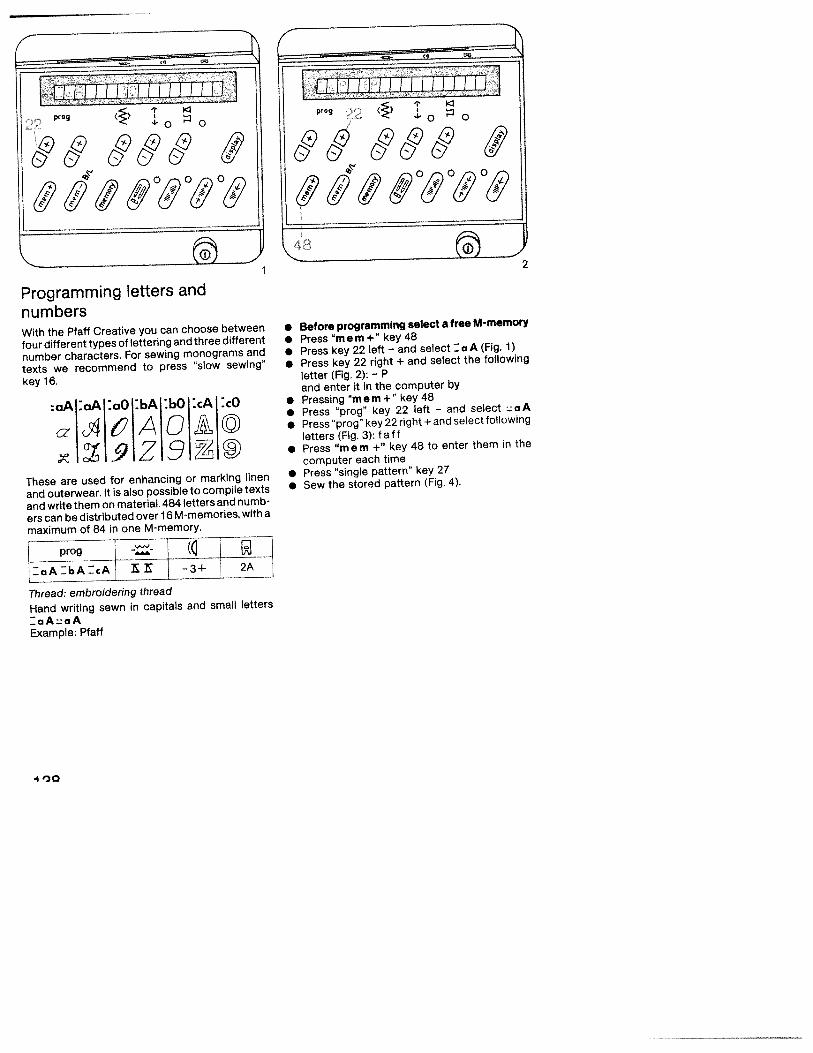
Programming letters and
numbersWith the Pfaff Creative you can choose between
four different types of lettering and three different
number characters. For sewing monograms and
texts we recommend to press “slow sewing”
key 16.
:ciA :aA :o :bA :bO :A :o
These are used for enhancing or marking linen
and outerwear. It is also possible to compile texts
and write them on material. 484 letters and numb
ers can be distributed over 16 M-memories, with a
maximum of 84 in one M-memory.
prog I( ——
:aA:bA:cAI E -3+ 2A
Thread: embroidering thread
Hand writing sewn in capitals and small letters
:aAaAExample: Pfaff
j1l II Jri i iiiptog 1
/)“I
I
2
• Before programming select a free M-memory• Press “mem+” key 48• Press key 22 left — and select :A (Fig. 1)
• Press key 22 right + and select the following
letter (Fig. 2): — Pand enter it in the computer by
• Pressing “mem+” key 48
• Press “prog” key 22 left — and select aA
• Press “prog” key 22 right + and select following
letters (Fig. 3): faff• Press “mem +“ key 48 to enter them in the
computer each time• Press single pattern” key 27
• Sew the stored pattern (Fig. 4).
I WiiIiiliiiiiiiljprug
.4 a)Q
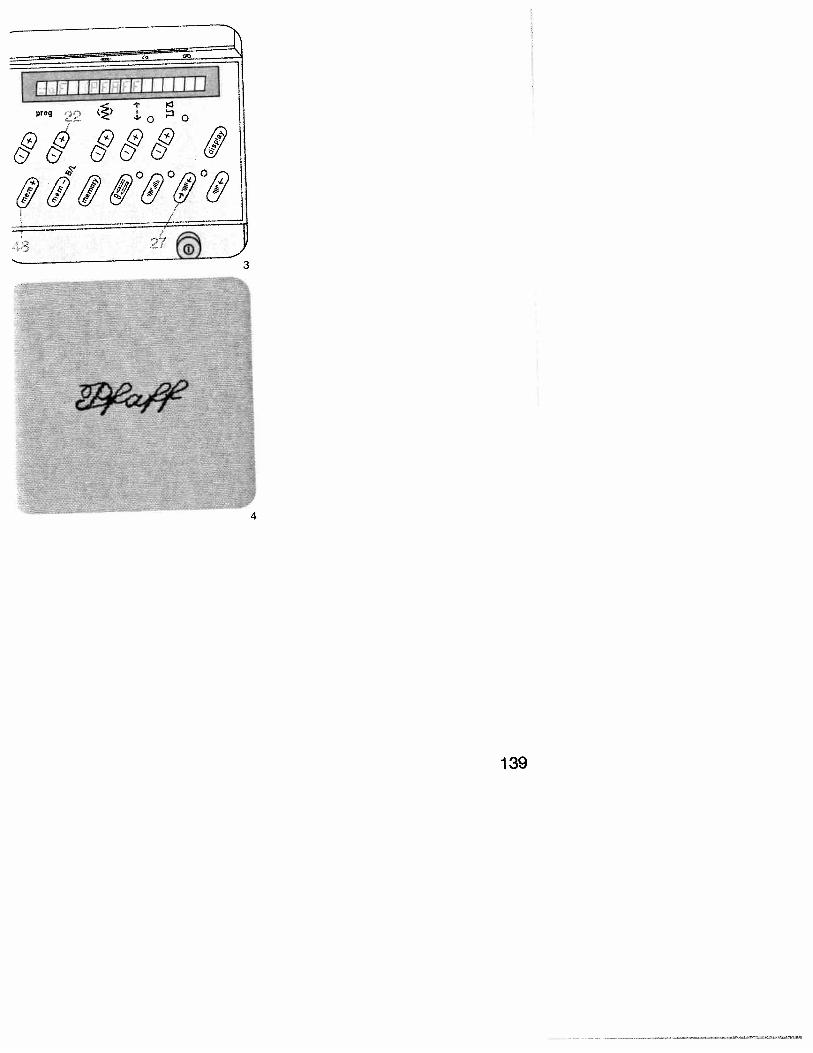
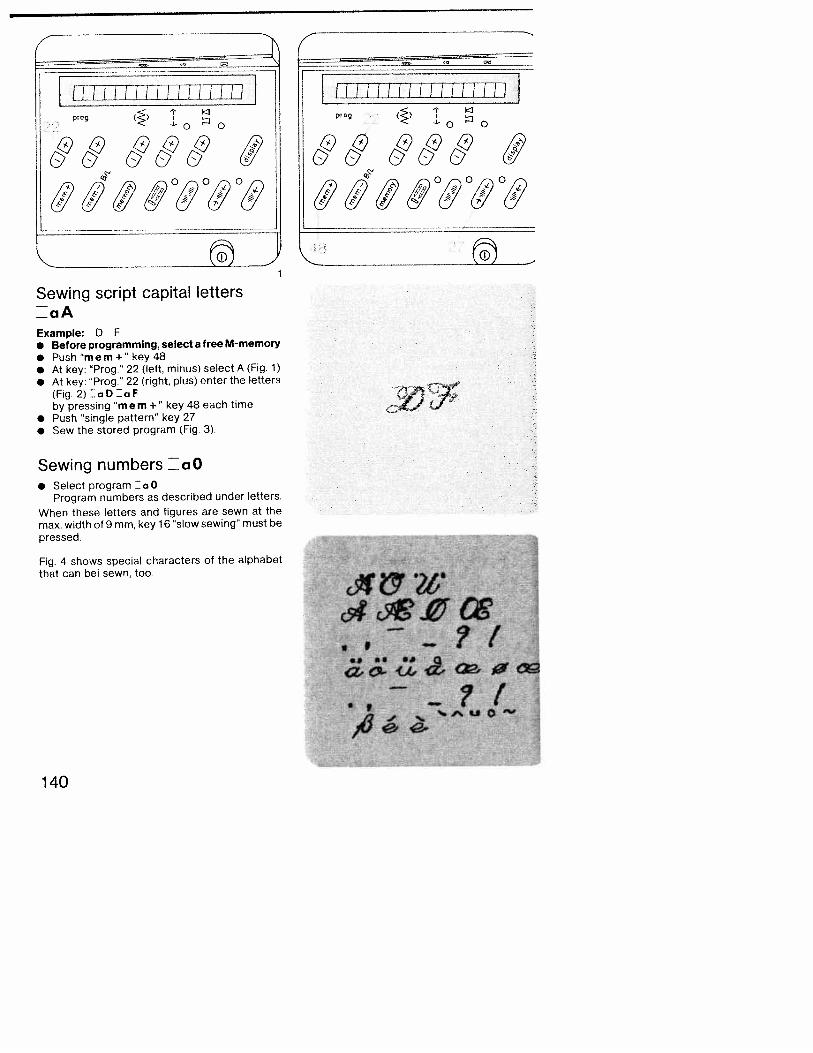
1 ii!ii!iiiii 1 / ii /
prog ( > 1’ I’:l
“O 0
&&&&&
h
Sewing script capital lettersaAExampIe D F• Before programming, select a free M-mernory• Push “mern+” key 48• At key: “Prog.” 22 (left, minus) select A (Fig. 1)• At key: “Prog” 22 (right, plus) enter the letters
(Fig. 2):D:Fby pressing “rn em +“ key 48 each time
• Push ‘single pattern” key 27• Sew the stored program (Fig. 3).
Sewing numbers aO• Select program :ao
Program numbers as described under letters.
When these letters and figures are sewn at themax, width of 9mm, key 16 “slow sewing” must bepressed.
Fig. 4 shows special characters of the alphabetthat can bei sewn, too.
L iiiiiiiiiiiiiijprog () I
0
94&&&&&
4a
140
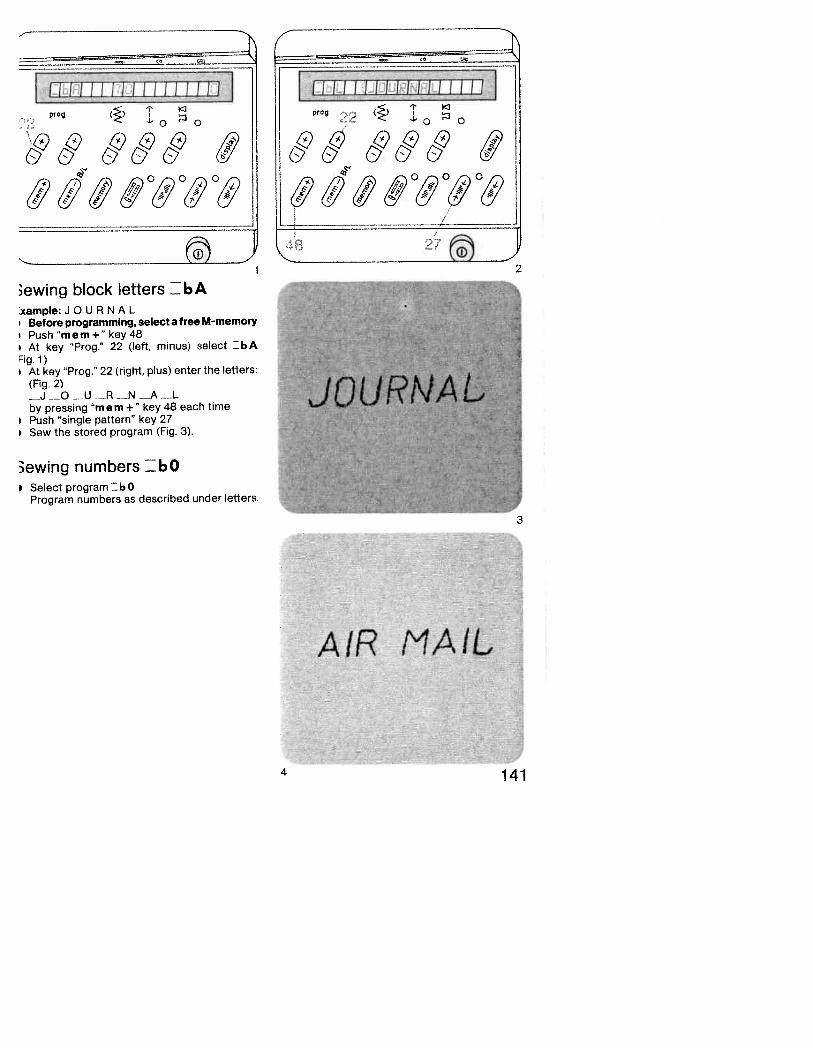
I tiiiiiiiiiiiiiiiijprog ()
/;)
oo4o&
3ewing block letters EbA:xample: J 0 U R N A L
Before programming, select a free M-memoryPush “mem+” key48At key “Prog.” 22 (left, minus> select :bA
Fig. 1)At key “Prog” 22 (right, plus) enter the letters:(Fig. 2)
J_0 UR_NALby pressing “m em +“ key 48 each timePush ‘single pattern” key 27Sew the stored program (Fig. 3).
Sewing numbers EbOSelect program = b 0Program numbers as described under letters.
AIR 11AIL,
Th4
11111111111 I 111111 jprog ()
-0 0
I’)
/4v
1
3
4 141

7-
Outline alphabet,sewing outlined letters ZcA
Example: P A R I S• Before programming, select a free M-memory
• Push “mem+” key 48• At key “prog.” 22 (left, minus) select :cA
(Fig. 1)• At key “Prog.” 22 (right, plus) enter the letters:
(Fig. 2)_P A _R _l _Sby pressing “m em +“ key 48 each time
• Push “single pattern” key 27
• Sew the stored program (Fig, 3).
Sewing numbers EcO• Select program :co
Program numbers as described under letters.
111 iiJ iii iruilprog () I
“o/)
1
==-
[ L:II Il II iLIjprog () I
/
III
Iui2U
—1
4 AW
k
$‘$
t 4, 4i
I 14 1‘
I3
$
Lii
14E N’
S $1’
I
I
I
‘I
1•’4’
4$
4
I
t
I
I
0)
tI
4
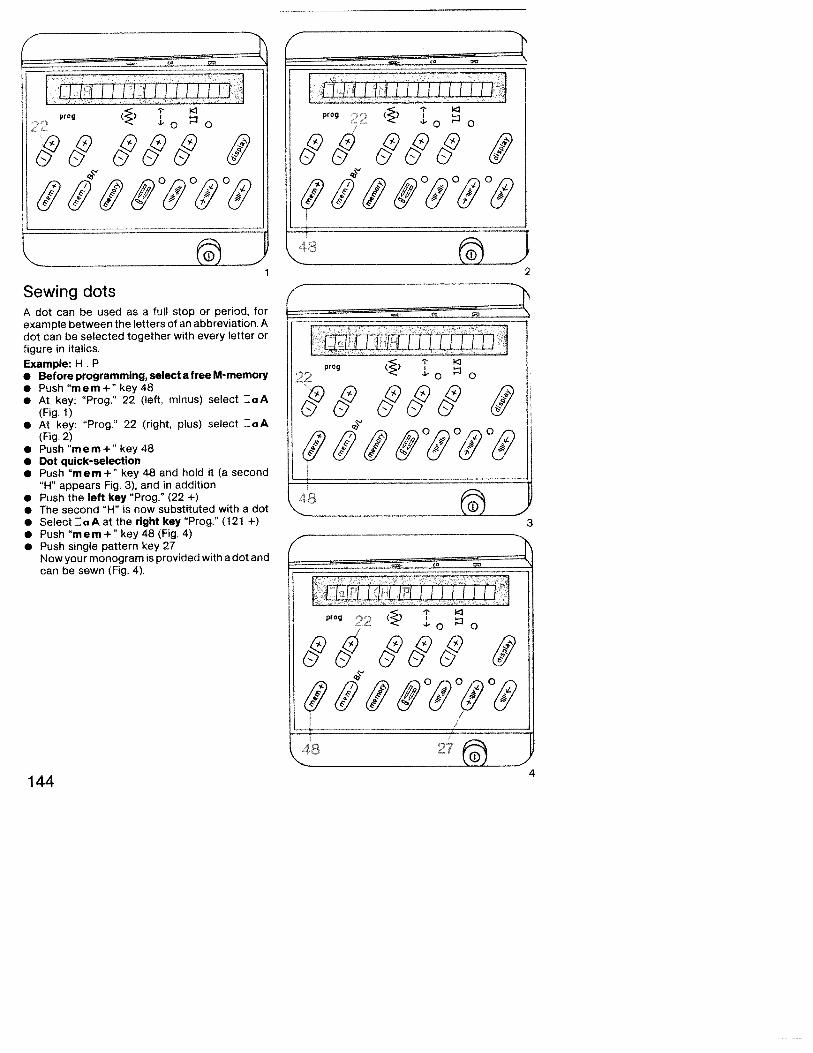
Sewing dotsA dot can be used as a full stop or period, forexample between the letters of an abbreviation. Adot can be selected together with every letter orfigure in italics.
Example: H P• Before programming, select a free M-memory• Push “mem+’ key 48• At key: “Prog.” 22 (left, minus) select :aA
(Fig. 1)• At key: “Prog.” 22 (right, plus) select :aA
(Fig. 2)• Push “mem+” key 48• Dot quick-selection• Push “mem+” key 48 and hold it (a second
“H” appears Fig. 3), and in addition• Push the left key “Prog,” (22 +)• The second “H” is now substituted with a dot• Select :aA at the right key “Prog.” (121 +)• Push “mem+” key 48 (Fig. 4)• Push single pattern key 27
Now your monogram is provided with a dot andcan be sewn (Fig. 4).
I rniiiiiiiiiiiijProc ()
[u I I .1111111111117 1proc - . <)
ki
1
*__-““;-
[ i i i i i i i i iprog ( >
..2 o C
&&&&
[ rii ii Ill’ ‘ iprog () ‘1
-. -o 0
/
&&&&&
3
1444
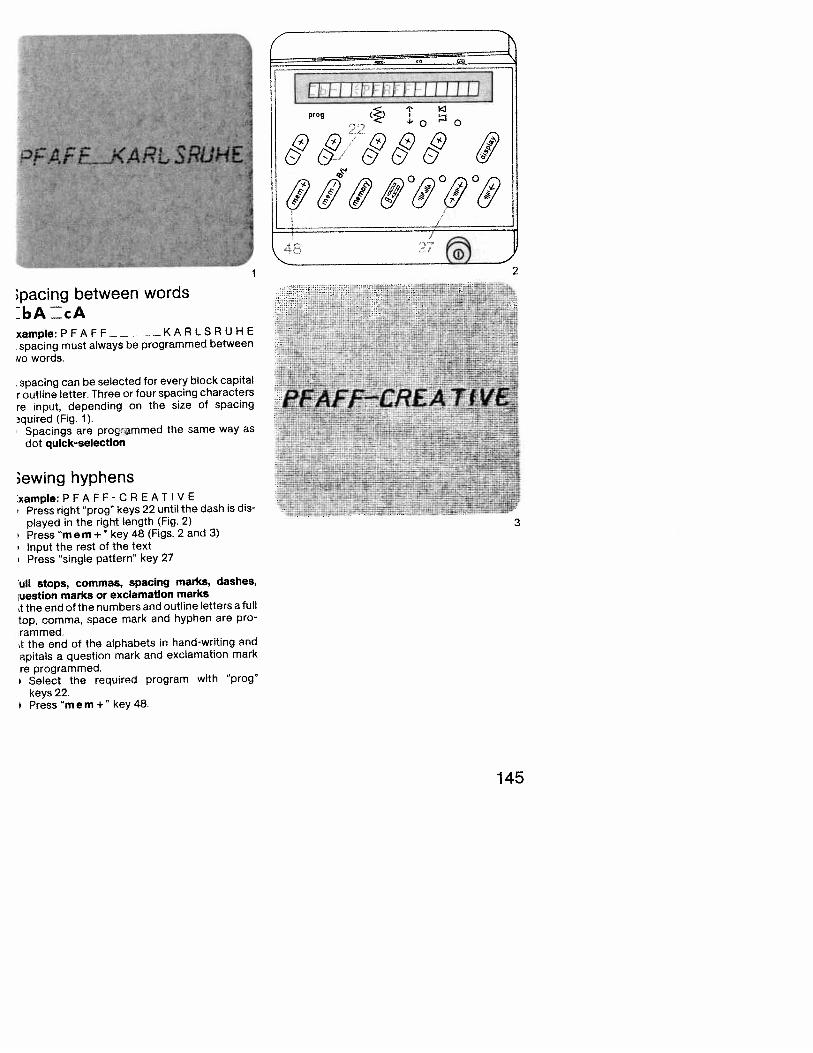
uN stops, commas, spacing marks, dashes,uestion marks or exclamation markst the end of the numbers and outline letters a full
top, comma, space mark and hyphen are pro-rammed.t the end of the alphabets in hand-writing andapitals a question mark and exclamation markre programmed.
Select the required program with “prog”keys 22.Press “mem+” key 48.
2
3
I rnuiiiiiiiiiiiijprog () I
-o
&& &&&
I10 ,00&
pacing between wordsEbAEcAxample: P F A F F KA R LS RU HEspacing must always be programmed between
‘o words.
spacing can be selected for every block capitaloutline letter. Three or four spacing characters
re input, depending on the size of spacingquired (Fig. 1).
Spacings are proç-ammed the same way asdot quick-selection
ewing hyphensxample:PFAFF-CREATIVE
Press right “prog” keys 22 until the dash is displayed in the right length (Fig. 2)Press’mem-i-”key48(Figs.2and3)Input the rest of the textPress “single pattern” key 27
145
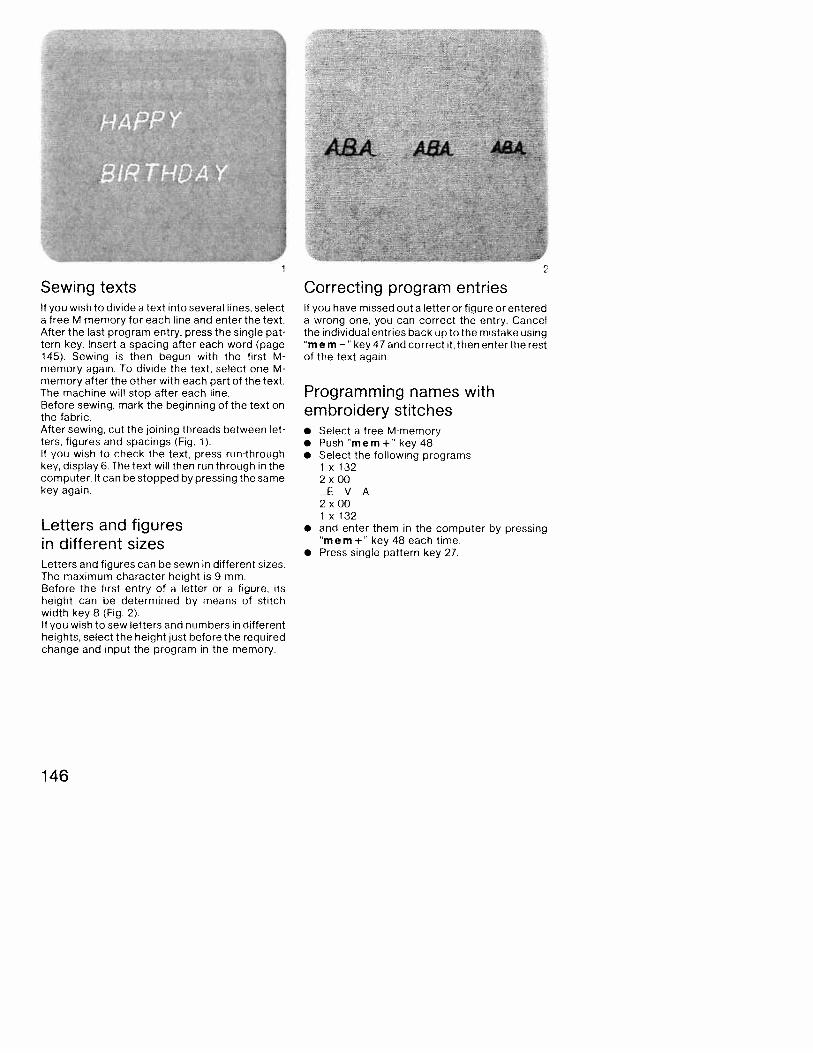
Sewing textsIf you wish to divide a text into several lines, selecta free M-memory for each line and enter the text.After the last program entry, press the single pattern key. Insert a spacing after each word (page145). Sewing is then begun with the first Mmemory again. To divide the text, select one Mmemory after the other with each part of the text.The machine will stop after each line.Before sewing, mark the beginning of the text onthe fabric.After sewing, cut the joining threads between letters, figures and spacings (Fig. 1).If you wish to check the text, press run-throughkey, display 6. The text will then run through in thecomputer. It can be stopped by pressing the samekey again.
Letters and figuresin different sizesLetters and figures can be sewn in different sizes.The maximum character height is 9 mm.Before the first entry of a letter or a figure, itsheight can be determined by means of stitchwidth key 8 (Fig. 2).If you wish to sew letters and numbers in differentheights, select the height just before the requiredchange and input the program in the memory.
If you have missed out a letter or figure or entereda wrong one, you can correct the entry. Cancelthe individual entries back up to the mistake usingrn em — key 47 and correct it, then enter the rest
of the text again.
Programming names withembroidery stitches• Select a free M-memory• Push “mem+’ key 48• Select the following programs
1 x 1322 x 00EVA
2 x 001 x 132
• and enter them in the computer by pressingrnern+” key 48 each time
• Press single pattern key 27.
.- j V7
--
Correcting program entries
146
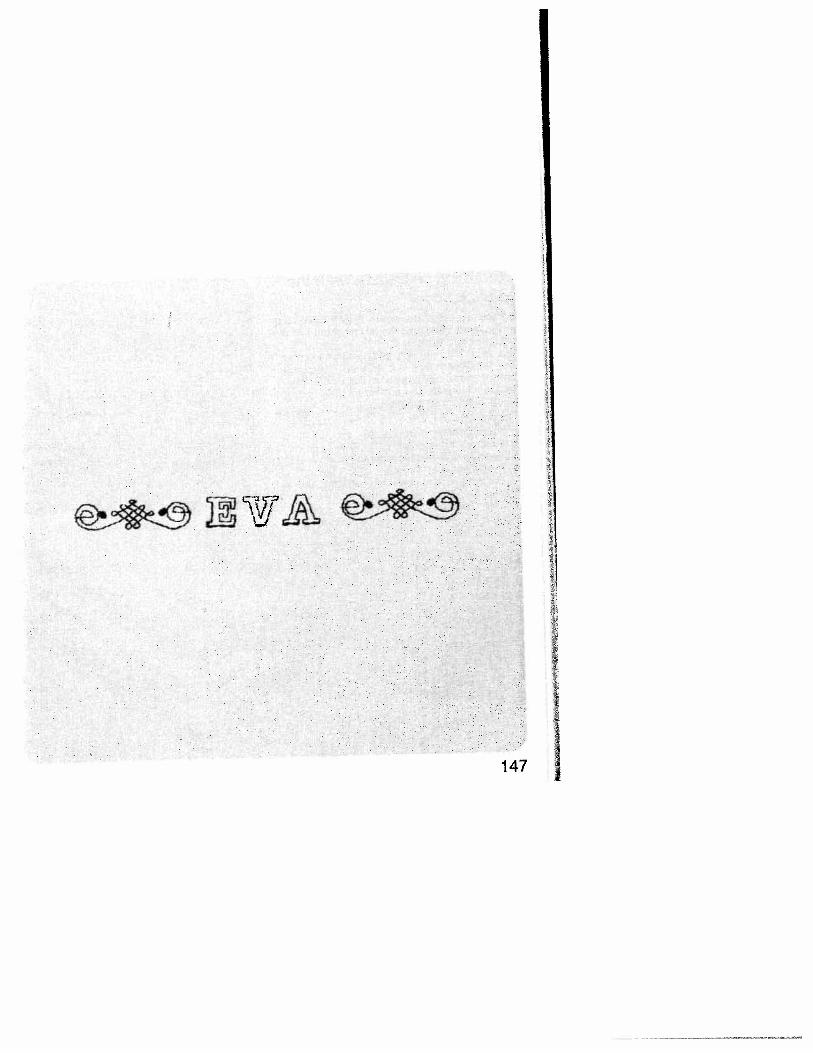
I
II!IIIIIIIIIII!Iijprog I
9 $74
__
ooo&
1 2
Correcting characters with thebalance keySometimes, letters or words may shift, dependingon the fabric used. This can be corrected with thebalance key (Fig. 2).Words or texts can only be corrected together.The letter or figure last entered is correctedtowards plus or minus with key Sand entered with“memt-” key 48. The correction applies to thewhole memorized program.
Example: S U R F E N
• Press “pattern start” key 26• Program N” appears• Select + 3 on balance key 5 (Fig. 1)• Press ‘rn em +“ key 48
the program has now been corrected with + 3(Fig.3)
• Press “single pattern” key 27. 3
148
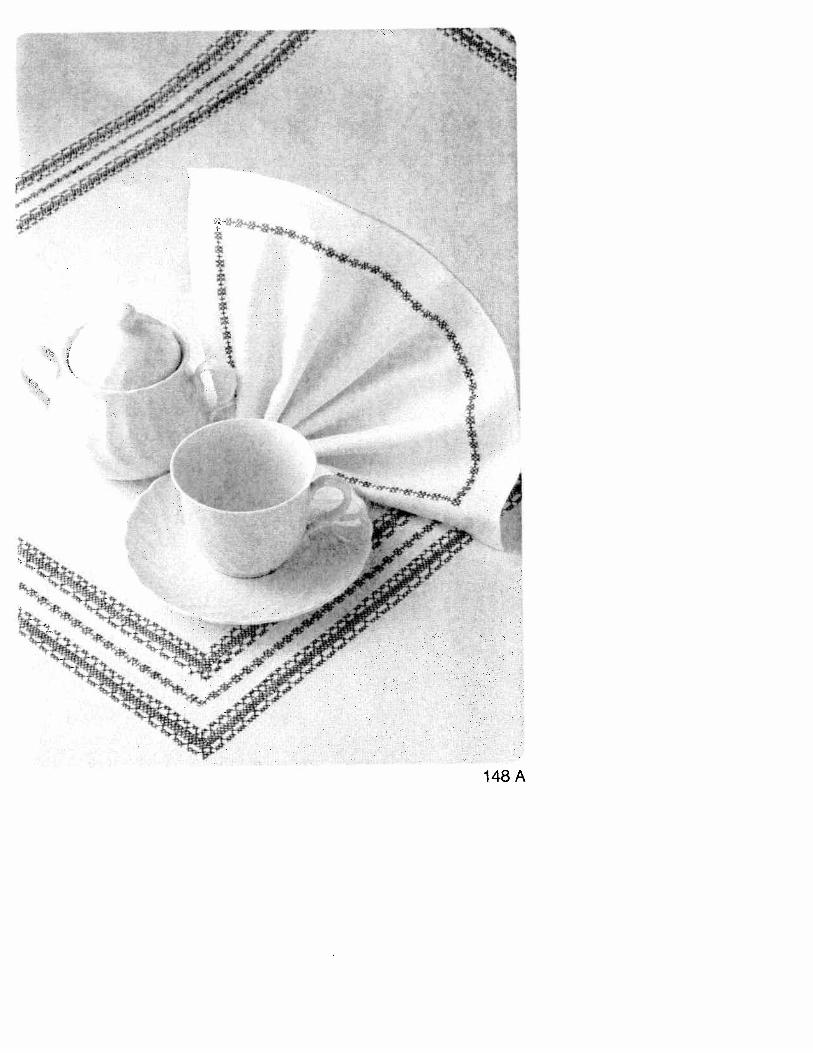
AI
+
I
)‘A4
4
148 A
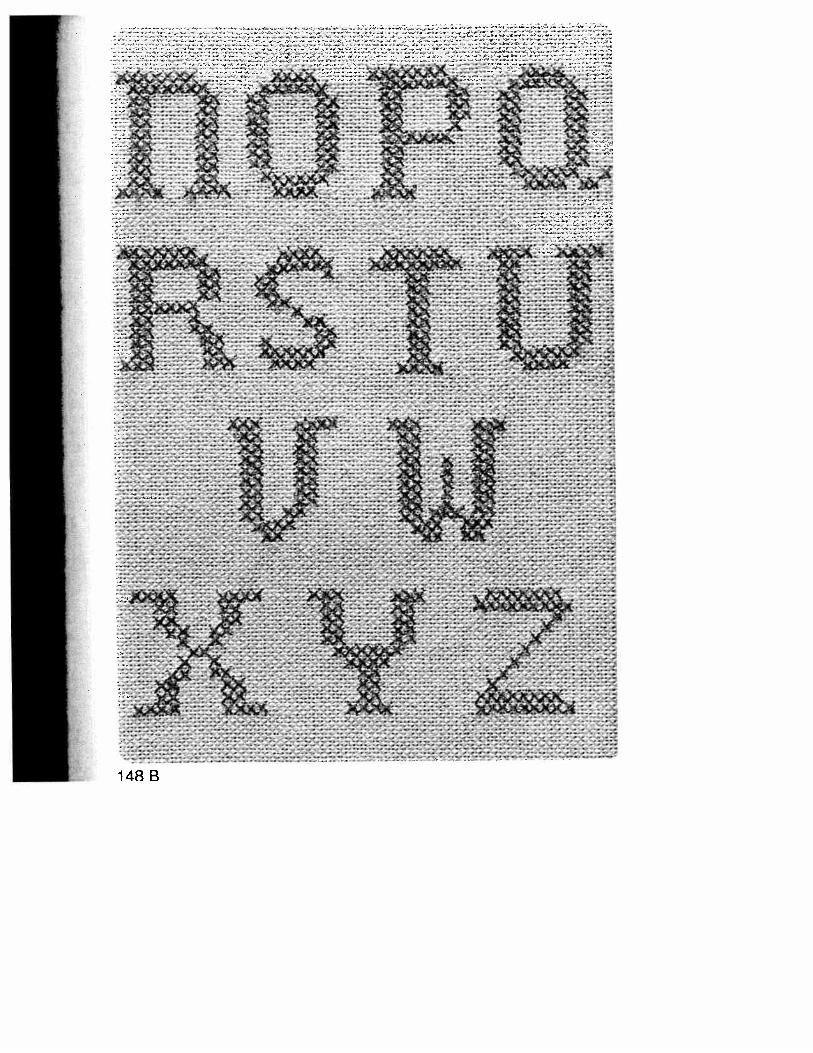
4;
44‘4
6
.4.1
It
71’
‘4
4,,
,44
‘.*
44
4
.7’
‘44
flt
1h
44
1’I.
14
44 ‘4.,
’..
.It,.
n.4
....
,4
*4
•a%
*4
4*.,i*.fl,*4’
44t44
i4
44
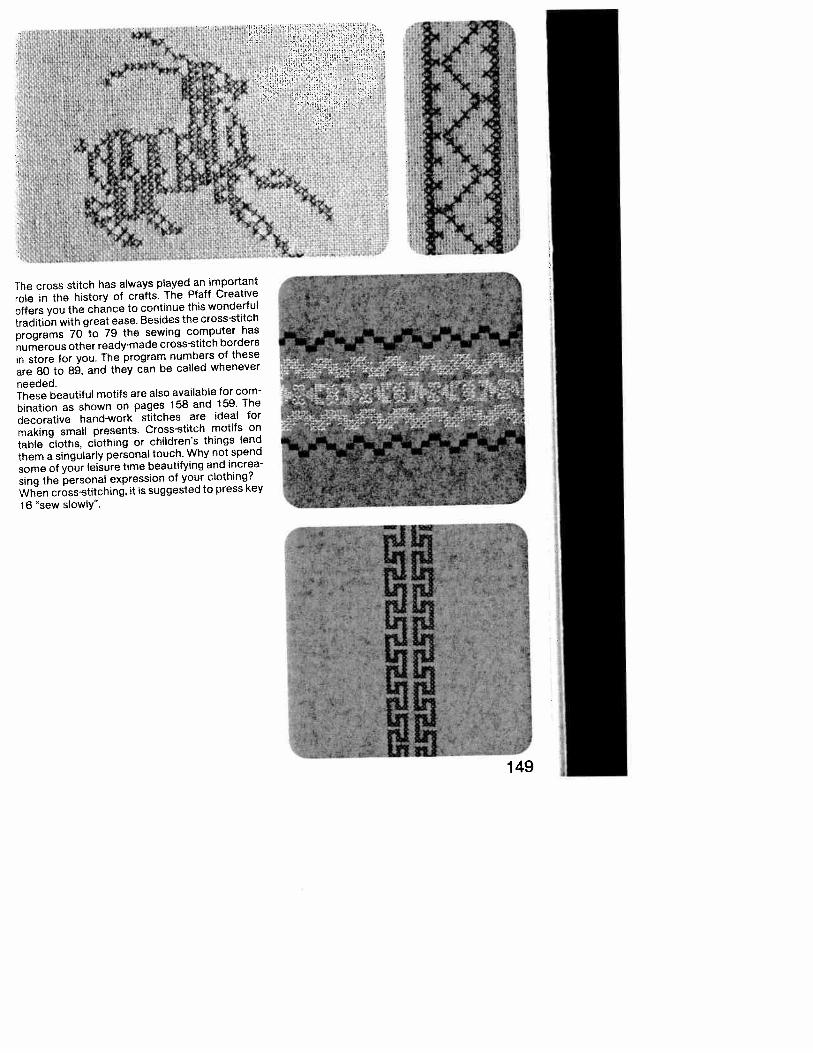
, •.. .: ‘: :..-.
:
.
the cross stitch has always played an important
role ri the history of crafts. The Pfaff Creative
offers you the chance to continue this wonderful
tradition with great ease. Besides the cross-stitch
programs 70 to 79 the sewing computer has
numerous other ready-made cross-stitch borders
n store for you. The program numbers of these
are 80 to 89, and they can be called whenever
needed.These beautiful motifs are also available for com
bination as shown on pages 158 and 159. The
decorative hand-work stitches are ideal for
making small presents. Cross-stitch motifs on
table cloths, clothing or children’s things lend
them a singularly personal touch. Why not spend
some of your leisure time beautifying and increa
sing the personal expression of your clothing?
When cross-stitching, it is suggested to press key
16 ‘sew slowly”.
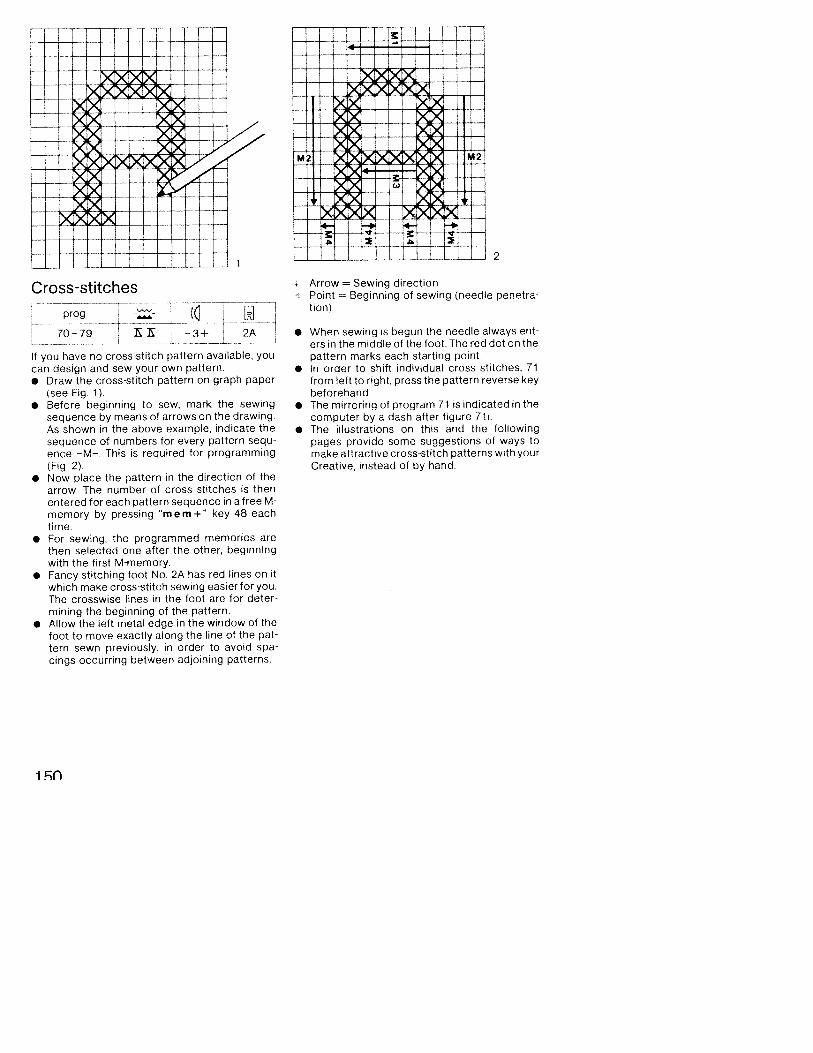
: z :[: :[:
<x><<)<<
-- 0<(x
---
—
- Xx)<x X
zzEj
EjEEHECross-stitches
70-79 E -3+ 2A
If you have no cross-stitch pattern available, youcan design and sew your own pattern.• Draw the cross-stitch pattern on graph paper
(see Fig. 1).• Before beginning to sew, mark the sewing
sequence by means of arrows on the drawing.As shown in the above example, indicate thesequence of numbers for every pattern sequence —M—. This is required for programming(Fig. 2).
• Now place the pattern in the direction of thearrow. The number of cross stitches is thenentered for each pattern sequence in a free Mmemory by pressing ‘rn em +“ key 48 eachtime.
• For sewing, the programmed memories arethen selected one after the other, beginningwith the first M-memory.
• Fancy stitching foot No. 2A has red lines on itwhich make cross-stitch sewing easier for you.The crosswise lines in the foot are for determining the beginning of the pattern.
• Allow the left metal edge in the window of thefoot to move exactly along the line of the pattern sewn previously, in order to avoid spacings occurring between adjoining patterns.
(XX<)4 (XX
x.K>x)x
M2 xX> CXX( M2
X)c)0< C.)
-
Arrow = Sewing directionPoint = Beginning of sewing (needle penetration)
• When sewing is begun the needle always enters in the middle of the foot. The red dot on thepattern marks each starting point.
• In order to shift individual cross stitches, 71from left to right, press the pattern reverse keybeforehand.
• The mirroring of program 71 is indicated in thecomputer by a dash after figure 71i,
• The illustrations on this and the followingpages provide some suggestions of ways tomake attractive cross-stitch patterns with yourCreative, instead of by hand.
2
1;n
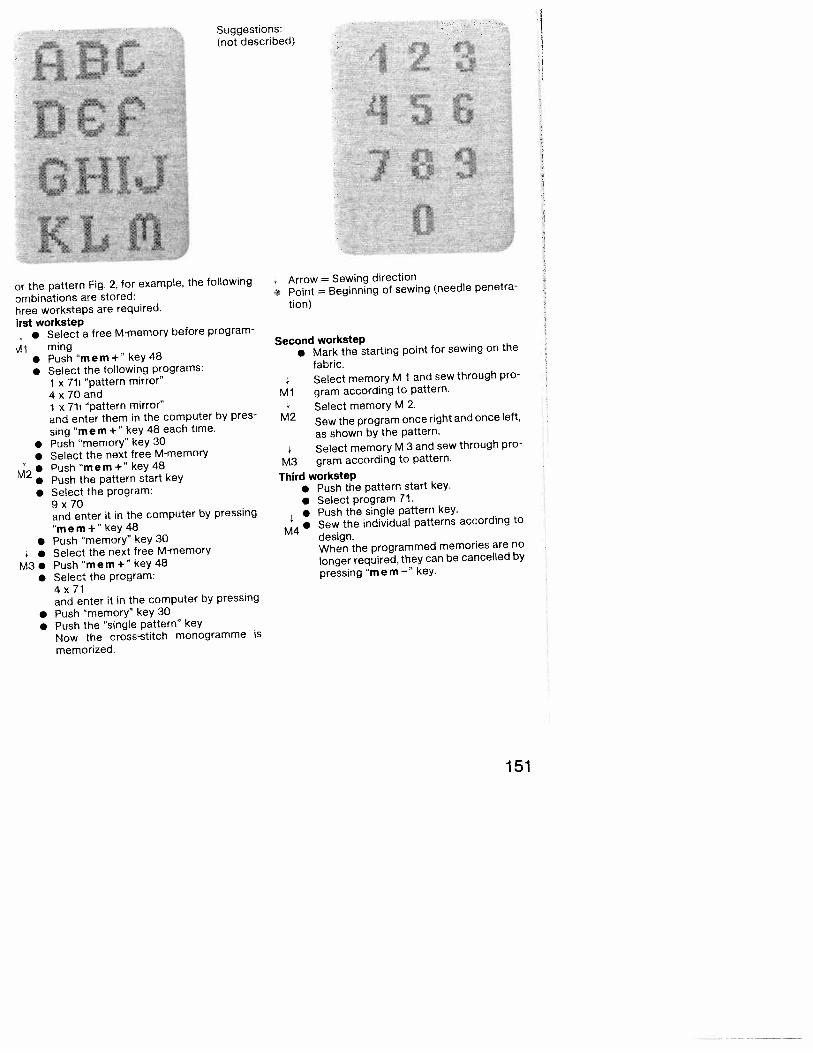
L £t b?
Suggestions:(not described)
p
i r b
GH1JKLf
or the pattern Fig. 2, for example, the following
ombinations are stored:hree worksteps are required.
irst workstep• • Select a free M-memory before program
ming• Push “rnem+” key48
• Select the following programs:
1 x 71i “pattern mirror”4 x 70 and1 x 71i “pattern mirror”and enter them in the computer by pres
sing ‘rn em +“ key 48 each time.
• Push “memory” key 30• Select the next free M-memory
Push “mem+” key48• Push the pattern start key
• Select the program:9 x 70and enter it in the computer by pressing
“mem+” key 48Push “memory” key 30Select the next free M-niemory
Push “mern+” key 48Select the program:4 x 71and enter it in the computer by pressing
• Push “memory” key 30• Push the “single pattern” key
Now the crossstitch monogramme is
memorized.
f flitI 0$
0Arrow = Sewing direction
• Point = Beginning of sewing (needle penetra
tion)
Second workstep• Mark the starting point for sewing on the
fabric.
Select memory M 1 and sew through pro-
Ml gram according to pattern.
Select memory M 2.M2 Sew the program once right and once left,
as shown by the pattern.
Select memory M 3 and sew through pro
M3 gram according to pattern.
Third workstep• Push the pattern start key.
• Select program 71.• Push the single pattern key.
M4Sew the individual patterns according to
design.When the programmed memories are no
longer required, they can be cancelled by
pressing “mem—” key.
•
M3.•
151
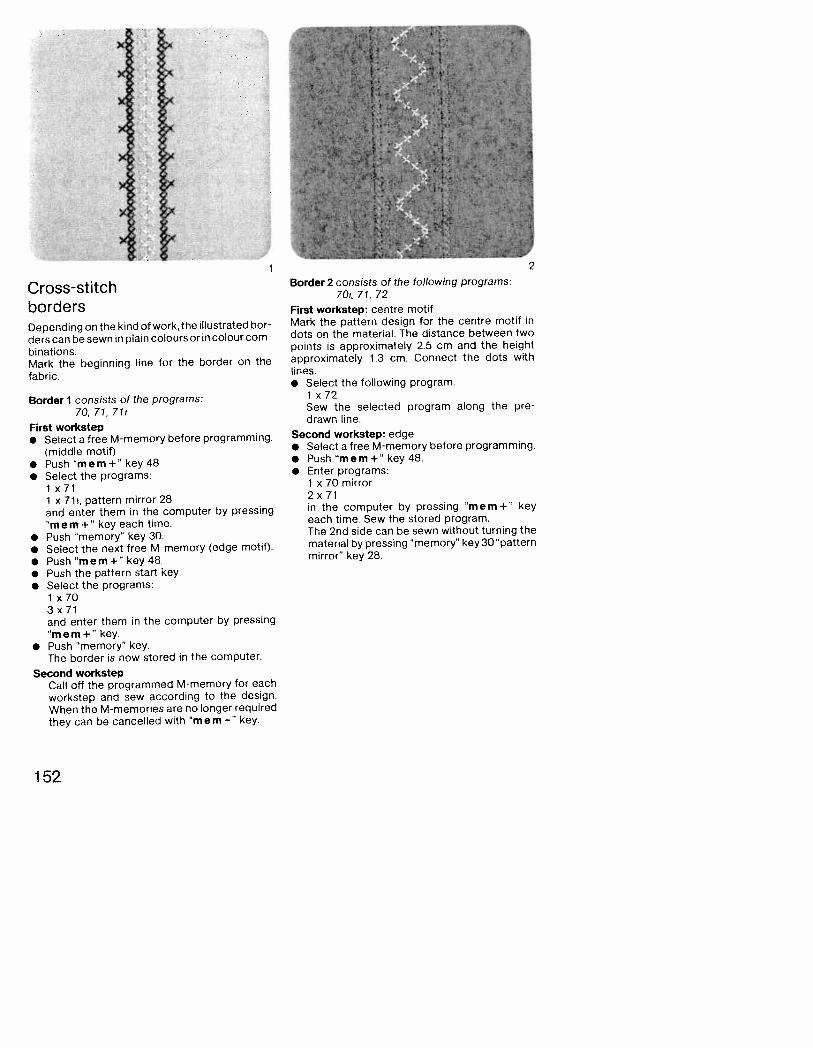
Cross-stitchbordersDepending on the kind of work, the illustrated borders can be sewn in plain colours or in colourcombinations.Mark the beginning line for the border on thefabric.
Border 1 consists of the programs:70, 71, 71i
First workstep• Select a free M-memory before programming.
(middle motif)• Push”mem+”key48• Select the programs:
1 x 711 x 71i, pattern mirror 28and enter them in the computer by pressing“mem+” key each time.
• Push “memory” key 30.• Select the next free M-memory (edge motif).
• Push “mem+” key48.• Push the pattern start key• Select the programs:
1 x 703 x 71and enter them in the computer by pressing“mem+” key.
• Push “memory” key.The border is now stored in the computer.
Second workstepCall off the programmed M-memory for eachworkstep and sew according to the design.When the M-memories are no longer requiredthey can be cancelled with ‘rn em —“ key.
First workstep: centre motifMark the pattern design for the centre motif indots on the material. The distance between twopoints is approximately 2.5 cm and the heightapproximately 1.3 cm. Connect the dots withlines.• Select the following program.
1 x 72Sew the selected program along the predrawn line.
Second workstep: edge• Select a free M-memory before programming.• Push “mem+” key48.• Enter programs:
1 x 70 mirror2 x 71in the computer by pressing “mem+” keyeach time. Sew the stored program.The 2nd side can be sewn without turning thematerial by pressing “memory” key 30 “patternmirror” key 28.
Border 2 consists of the following programs:70,, 71, 72
152
li-st wo,icstep: centre motifSelect the following program.1 x 70Sew the selected program.
econd workstep: centre rowsSelect the following program1 x 72Sew the selected program at both sides alongthe centre motif.
bird wo,icstep: edgeSelect a free M-memory.Push “mem+” key48.Enter programs2 x 704 x 71in the computer by pressing “mem+” keyeach time.Sew the stored program at both sides.By pressing“memory” key 30 and “pattern mirror” keyyou will save yourself the trouble of turning thematerial. The programmed memory can becleared again after the work is finished bypressing “rn em —“ key.
Suggestions:(not described)
3
order 3 consists of the following programs:70, 71, 72
*4
Second workstep• Select a free M-rnemory.• Push “mem+” key 48.• Enter programs
2 x 701 x 71in the computer by pressing key “mem÷’each time.
• Sew the stored program at both sides alongthe centre-line.
Third workstep• Select a free M-memory.• Push “rnem+” key48.• Push beginning-of-pattern key• Enter programs
1 x 711 x 71i pattern mirrorin the computer by pressing ‘mem+’ keyeach time
• Sew the stored program at both sides alongthe previously sewn pattern.
Border 4 consists of the following programs:70. 71, 71i
First workstep (centre motif)• Mark the centre-line on the material.• Select program 71
and sew along the marked line.
Fourth workstep (edge)• Select a free M-memory,• Push “mem+” key48.• Enter programs
1 x 703 x 71in the computer by pressing rn em +‘ keyeach time.
• Sew the stored program at both sides alongthe previously sewn pattern as shown on thedrawing.The reserved M-memories can be cleared bypressing “mem—” key after the work is finished.
154
I
cn C),
•
A
E!1I I 9Vd OLW::
LLL E1E Etf E E1Et: H:Motifs with cross stitchesSwanFor the pattern shown above 11 free Mmemoriesare required. As the following example shows,they are stored in sequence (for preparation seepage 150).For M-memory programs M 3 to M 10 the arrowindicating the sewing direction is replaced bysymbol U = sewing direction.
First workstep• Select a free M-memory.
Ml Ml• Press “mem+” key48• Enter programs
1 x 71, mirrorI x 701 x 711 x 701 x 712 x 701 x 71
2 x 71i mirror in the computer by pressing“mem+” key each time.
• Press “memory” key.M2• Select the next free M-memory.
M2• Press “mem+” key• Press “pattern start” key.• Enter programs;
2 x 701 x 71in the computer by pressing ‘rn em + “keyeach time.
L_JI Press “memory” key.
M3• Select the next free M-rnemory.M3
• Press “mem+” key.• Press “pattern start” key• Enter programs
3 x 71I x 71, mirror1 x 703 x 71I x 71, mirror1 x 701 x 71in the computer by pressing ‘rn em +“keyeach time.Press “memory” key.Select the next free Mmemory.M4Press “mem+” key.Press “pattern start” key.Enter programs1 x 711 x 702 x 71i mirror1 x 703 x 711 x 701 x 71t mirrorin the computer by pressing ‘rn em + “keyeach time.
LJ• Press “memory” key.M5• Select the next free M-memory.
M5• Press “mem+” key• Press “pattern start” key.• Enter programs
3 x 71, mirror1 x 71in the computer by pressing m em +“keyeach time.
L__J• Press “memory” key.
Arrow = Sewing direction= Sewing direction (M3 to M10)
Dot = Beginning of seam (needlepenetration)
L_JM4•
•••
2 x 70I x 71
156
A6• Select the next free M-memory,
MG• Push “mem+” key.• Push “pattern start” key.
• Enter programsI x 704 x 71, mirror1 x 70in the computer by pressing “m em +“
key each time.._J• Push ‘memory” key.
v17• Select the next free M-memory,
M7• Push”mem+”key,• Push “pattern start” key.
• Enter programsI x 712 x 702 x 71i mirror1 x 711 x 71i mirror1 x 71in the computer by pressing ‘rn em +“
key each time.J• Push “memory” key.
M8• Select the next free M-memory.
M8• Push “mem+” key• Push “pattern start” key.• Enter programs
1 x 702 x 712 x 70I x 711 x 701 x 711 x 70in the computer by pressing ‘rn em +“
key each time._J• Push “memory” key.
M9 Select the next free M-memory.
M9• Push”mern+” key.• Push “pattern start” key.
• Enter programs1 x 71i mirror3 x 711 x 701 x 71in the computer by pressing “mern+”
key each time.LJ• Push “memory” key.
M1O• Select the next free M-rnemory.
M 10• Push”mem+” key.• Push “pattern start’ key.
• Enter programs5 x 71in the computer by pressing ‘rn em +“
key each time.LJ• Push “memory” key.Mu. Select the next free M-memory,
M 11• Push “rnem+” key.• Push “pattern start” key.
• Enter programs1 x 71I x 70in the computer by pressing ‘rn em +“
key each time.L_J Push “memory” key.
• Push “single pattern” key.Now your pattern is stored.
Second workstep: sewing a pattern
• Mark the beginning point on the material.
Select an M 1 memory and recall the follo
wing M-rnemories in sequence and sew
according to pattern.When the programmed memories are no
longer required, they can be cleared with
the correction key.
157
U’
I

Needle chartUsing the adequate needle guarantees betterprocessing of the material.
Fabric weight: Fabric weight: Fabric weight:
light medium heavy
Needle size: I Needle size: Needle size:60, 70, 75 80,90 100,110,120
Needle points
System & No. Profile Point & eye Suitable for
130/705 H -— Light ball point Universal needle for fine-meshed70, 80 ___— synthetics, fine linen, chiffon, batiste,
organdy, woolens, velvet, fancy seamsand embroidery work.
130/705 H-SUK Medium Coarse knitted fabrics, Lastex, double-70,110 ball point jersey fabrics, Quiana and Simplex.
130/70511-PS Medium Stretch-fabric needle developed75, 90 —zE ball point especially for Pfaff. Particularly suitable
—.-— for delicate stretch and knitted fabrics.
130/705 H-SKF Heavy Wide-meshed corsetry, Lycra, Simplex70, 110 ball point and Lastex.
130/705 H-J Acute Twill, workwear, heavy linen, blue jeans90—110 round point and light canvas.
130/705 H-LR Narrow Leather, suede, calf and goatskin70—1 20 twist point leathers.
130/705 H-PCI.. Narrow wedge Imitation leathers, plastic materials,80—110 point with plastic sheeting and oilcloth.
left-twist groove
130 H-N Light ball point, Seams topstitched with buttonhole silk70—110 long eye or No. 30/3 synthetic thread.
130/705 H-WING _— Hemstitching Attractive hemstitching on heavily100 C point dressed materials, organdy and
— glass cambric.
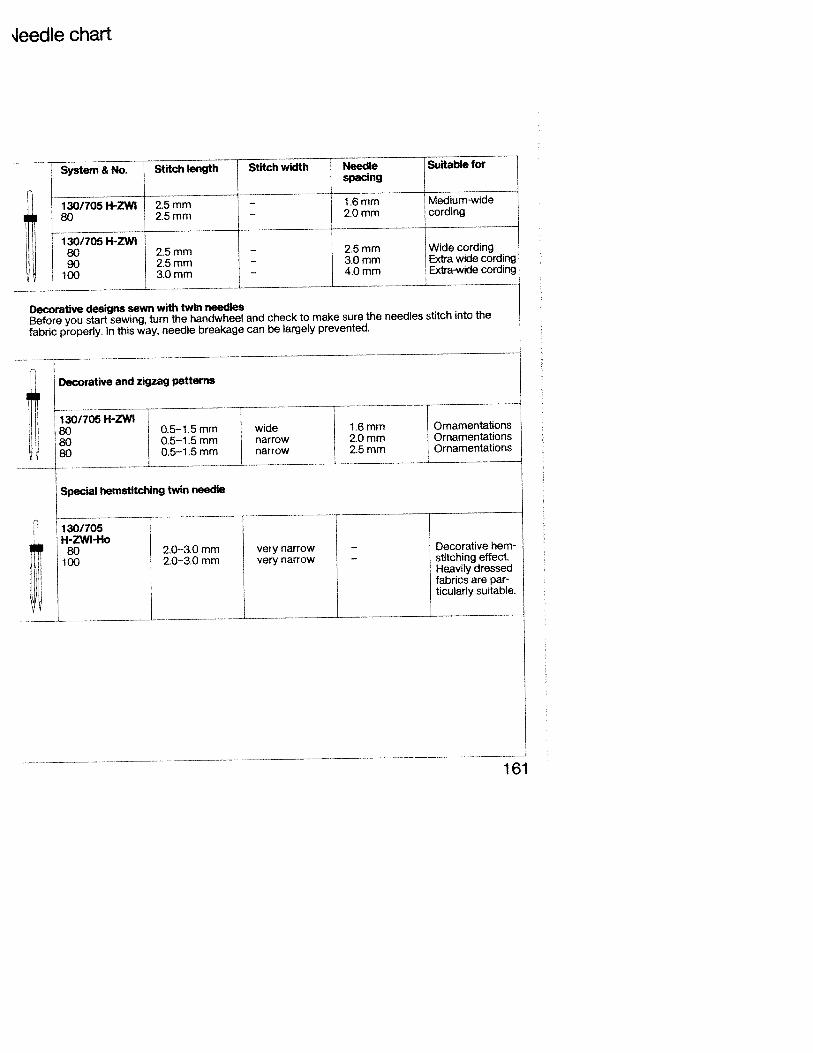
Jeedle chart
System & No. Stitch length — Stitch width Needle Suitable forspacing
h 130/705H-ZWI 2.5mm -1.6mm Medium-wide
80 2.5 mm —2.0 mm cording
130/705H-ZWJ 180 2.5mm I —
2.5mm Wide cording
90 2.5mm -3.0mm Extra wide cording
100 3.0mm —4.0mm Extra-wide cording
Decorative designs sewn with twin needlesBefore you start sewing, turn the handwheel and check to make sure the needles stitch into the
fabric properly. In this way, needle breakage can be largely prevented.
Decorative and zigzag patterns
II i3W7O5H-ZV T80 0.5—1.5mm wide 1.6mm Ornamentations
80 0.5—1.5mm narrow 2.0 mm Ornamentations
80 L.Sl.5mmnarrow 2.5 mm Ornamentations
Special hemstitching twin needle
---
i_____ —______
H-ZWI-Ho I80 2.0—3.0mm very narrow — Decorative hem
100 2.0—3.0mm very narrow — stitching effectHeavily dressedfabrics are par
y j ticularly suitable.
161
4Fault finding
Cause:
1. Machine skips stitches
Needle not inserted correctly.
Wrong needle used.
Needle bent or blunt.
Machine threaded improperly.
Needle too thin for thread used.
2. Needle thread breaks
For any of the above reasons.
Thread tension too strong.
Poor-quality or knotty thread used, orthread that has become too dry byexcessive storage.
3. Needle breaks
Needle not pushed up as far as it willgo.
Needle bent.
Needle too thin or too thick.
Needle bent and strikes needle platebecause fabric is pushed or pulled.
Bobbin case improperly inserted.
4. Seam is not uniform
Tension out of adjustment.
Tread too thick, knotty or hard.
Bobbin thread wound unevenly.
Remedy:
Push needle up as far as it will go, its flatshank side facing rear.
Insert system 130/705 H needle.
Insert new needle.
Check threading.
Insert thicker needle.
See par. 1 above.
Regulate thread tensions.
Use only goocFquality thread.
Insert new needle and push it up as far asit will go.
Insert new needle.
Refer to needle table.
Let machine feed the fabric. Only guide thematerial lightly.
When inserting the bobbin case, push it inas far as it will go.
Check upper and lower tensions.
Use firstclass thread only.
During bobbin winding, do not hold threadin hand, but pass it through the winder tension stud.
Thread machine properly and check bothtensions.
Kinks appear on top and bottom ofmaterial.
162
Cause: Remedy:
5. Machine feeds irregularly or not at all
Lint has accumulated between tooth
rows of feed dog.
Feed dog lowered. (Slide control is at
right).
6. Machine runs with difficulty
Thread ends in hook raceway.
Thread ends and dirt have collected in
the free arm cover over the sensor, in
the hook raceway, in the bobbin case,
behind the hook and on the second sen
sor to the right behind the hook.
Remove needle plate and remove lint with
a soft brush.
Push slide control to the left.
Remove thread ends and put one drop of
oil into hook raceway.
Remove thread ends and dirt. Special care
should be taken in the area round the
second sensor.
8. Machine does not sew the program entered
Switch the machine off, wait about 30 seconds, then switch it on again. Again enter the
desired program.
9. Machine can no longer be programmed
If you find that it is not possible to program the computer although it is not filled
up, the machine must be switched off. Press key 47 “Correction GIL” after about 30
seconds, hold it down and switch the machine on again by actuating main switch
9. Release button 47.By means of this procedure the contents of both the M- and P-memory has been fully
erased. Required program sequences and patterns must be entered once more.
10. The sewing lamp lights up, but the machine does not run
Fuse is defective. Insert new fuse,
Important:
Before exchanging either sewing foot or needle, switch off master switch 9.
Never run a threaded machine unless there is a piece of fabric under the sewing foot.
If you have to leave the machine, even for a short while, be sure to switch off the master
switch. This is particularly important when children are around.
7. Electronic bobbin thread monitor does not work
163
164
ntentshnical section
N
habets, numbers 8, 9 Needle changing 38
Needle thread tension, checking 25
ance and pattern length setting 31, 32 p
:tery changing 43 Pattern mirroring 35
Dbin case, inserting 17 Pattern start, setting 36
Dbin thread tension, checking 16 Presser bar litter 23, 24
obin thread, drawing up 20 Program combination, cancelling 33
bbin winding 12, 13 Program combination, checking 33
bbin winding from a second spool 14 Program combination, repeating 34
bbin winding through the needle 15 Program combination, storing 33
bbin, inserting 16 Program selection 30
ttonhole programs 4 Program table 2—9
R
aning and oiling 42 Recommended sewing modes 36
sative computer keys 29SSafety notes 37
opping the feed dog 38 Sewing feet 41
al feed 21, 22 Sewing foot changing 39
Single pattern setting 35
Special accessories 44
3ctrical connection o, ii Spool fitting 17
3ctronic controls and keys 28 Stitch length and pattern length setting 31
ibroidery stitch programs 6—9 Stitch width setting 30
T
ot control 24 Thread trimmer 26
se, changing 43 Twin-needle sewing 34
U
portant notes 27 Upper threading 18, 19
Utility stitch programs 2—5
wmp bulb, changing 42
Work support and accessories box 40, 41
165
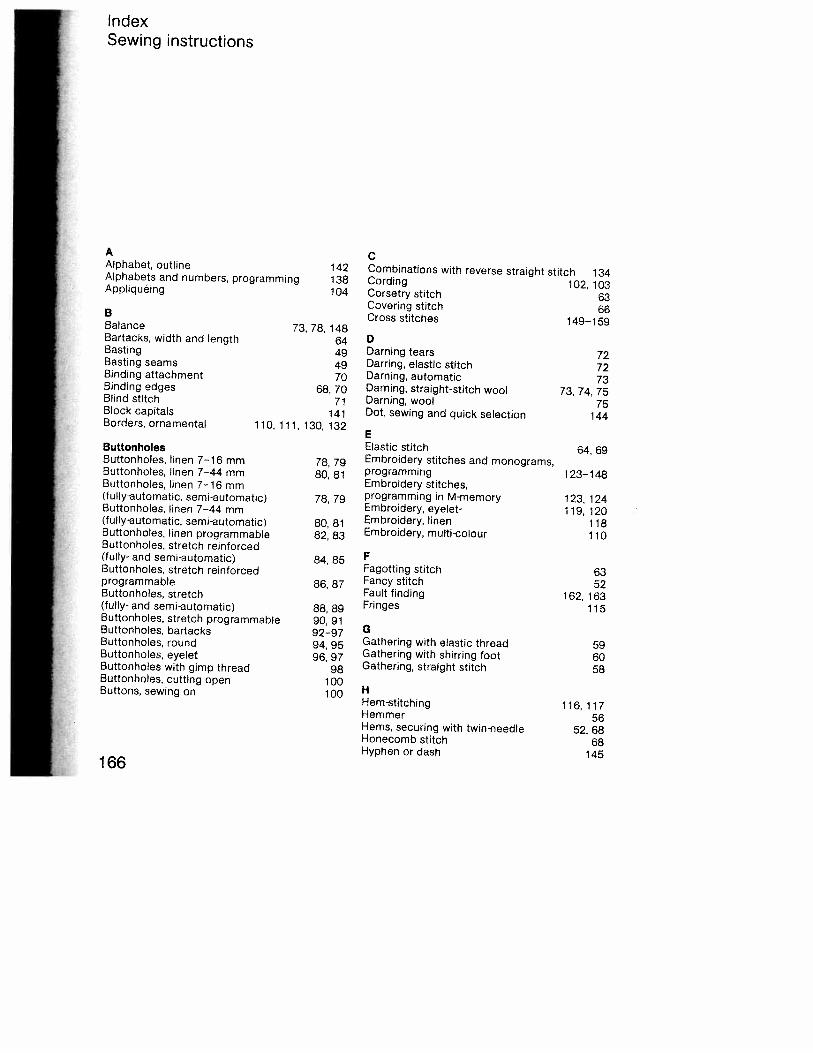
IndexSewing instructions
A CAlphabet, outline 142 Combinations with reverse straight stitch 134Alphabets and numbers, programming 138 Cording 102, 103Appliqueing 104 Corsetry stitch 63
Covering stitch 66B Cross stitches 149—1 59Balance 73, 78, 148Bartacks, width and length 64 DBasting 49 Darning tears 72Basting seams 49 Darring, elastic stitch 72Binding attachment 70 Darning, automatic 73Binding edges 68, 70 Darning, straight-stitch wool 73, 74, 75Blind stitch 71 Darning, wool 75Block capitals 141 Dot, sewing and quick selection 144Borders, ornamental 110, 111, 130, 132
EButtonholes Elastic stitch 64, 69Buttonholes, linen 7—16 mm 78, 79 Embroiders, stitches and monograms,Buttonholes, linen 7—44 mm 80, 81 programming 123—148Buttonholes, linen 7—16 mm Embroidery stitches,(fully-automatic, semi-automatic) 78, 79 programming in M-memory 123, 124Buttonholes, linen 7—44mm Embroidery, eyelet- 119,120(fully-automatic, semi-automatic) 80, 81 Embroidery, linen 118Buttonholes, linen programmable 82, 83 Embroidery, multi-colour 110Buttonholes, stretch reinforced(fully- and semi-automatic) 84, 85 FButtonholes, stretch reinforced Fagotting stitch 63programmable 86, 87 Fancy stitch 52Buttonholes, stretch Fault finding 162, 163(fully- and semi-automatic) 88, 89 Fringes 115Buttonholes, stretch programmable 90, 91Buttonholes, bartacks 92—97 GButtonholes, round g 95 Gathering with elastic thread 59Buttonholes, eyelet 96, 97 Gathering with shirring foot 60Buttonholes with gimp thread 98 Gathering, straight stitch 58Buttonholes, cutting open 100Buttons, sewing on 100 H
Hem-stitching 116, 117Hemmer 56Hems, securing with twin-needle 52, 68Honecomb stitch 68Hyphen or dash 145
166
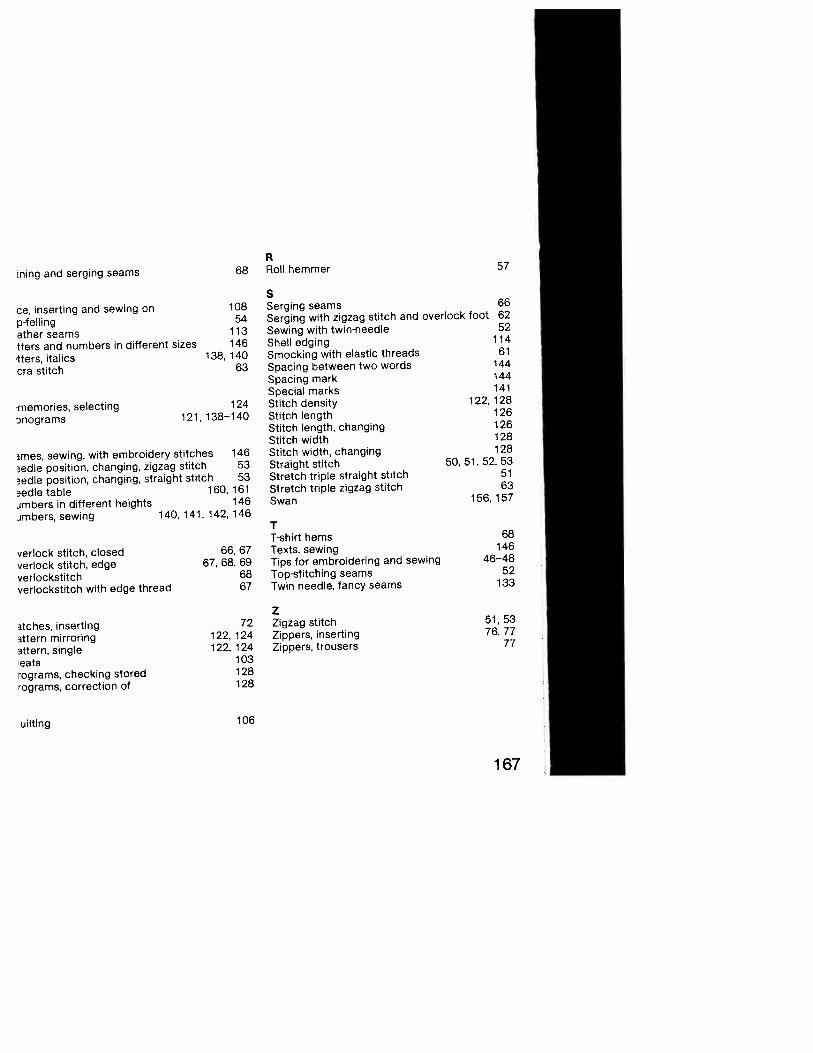
ining and serging seams
ce, inserting and sewing onp-fellingather seamstters and numbers in different sizestters, italicscra stitch
-memories, selectingnograms
verlock stitch, closedverlock stitch, edgeverlockstitchverlockstitch with edge thread
10854
113146
138, 14063
TT-shirt hemsTexts, sewingTips for embroidering and sewingTop-stitching seamsTwin needle, fancy seams
141122, 128
126126128128
51,52,535163
156, 157
68146
46—4852
133
stches, insertingsttern mirroringsttern, singleeatsrograms, checking storedrograms, correction of
:uilting
72122, 124122, 124
103128128
R68 Roll hemmer
S
57
Serging seams 66
Serging with zigzag stitch and overlock foot 62
Sewing with twin-needle 52
Shell edging 114
Smocking with elastic threads 61
Spacing between two words 144
Spacing mark 144
Special marks124 Stitch density
121, 138—140 Stitch lengthStitch length, changingStitch widthStitch width, changingStraight stitch 50,Stretch triple straight stitchStretch triple zigzag stitchSwan
ames, sewing, with embroidery stitches 146
edle position, changing, zigzag stitch 53
?edle position, changing, straight stitch 53
3edle table 160, 161
mbers in different heights 146
jmbers, sewing 140, 141, 142, 146
66, 6767, 68, 69
6867
zZigzag stitchZippers, insertingZippers, trousers
51, 5376, 77
77
106
167