1 before you start 2 hard disk installation - foscam · shenzhen foscam intelligent technology co.,...
TRANSCRIPT
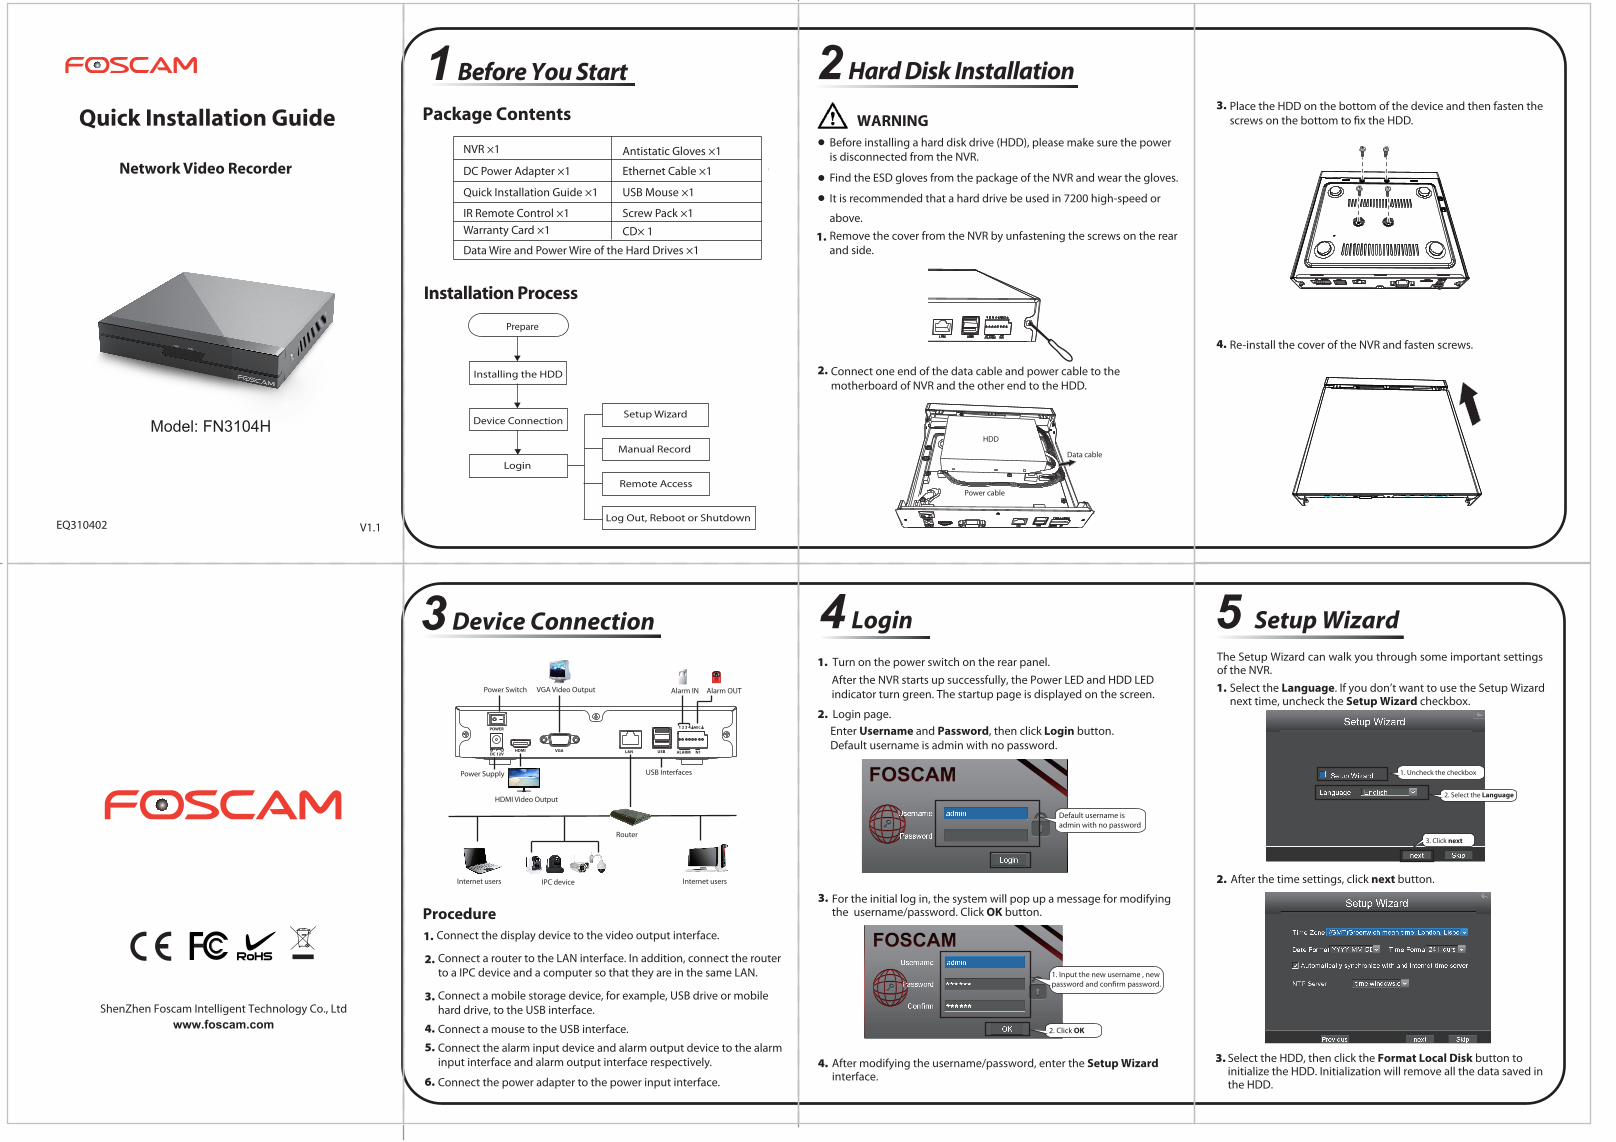
Quick Installation Guide
Network Video Recorder
Model: FN3104H
V1.1
NVR ×1
IR Remote Control ×1
USB Mouse ×1
DC Power Adapter ×1
Screw Pack ×1
Antistatic Gloves ×1
Data Wire and Power Wire of the Hard Drives ×1
Quick Installation Guide ×1
CD× 1Warranty Card ×1
Ethernet Cable ×1
WARNINGBefore installing a hard disk drive (HDD), please make sure the power is disconnected from the NVR.
Find the ESD gloves from the package of the NVR and wear the gloves.
It is recommended that a hard drive be used in 7200 high-speed or
above.
Power cable
HDD
Data cable
Remove the cover from the NVR by unfastening the screws on the rear and side.
1.
Connect one end of the data cable and power cable to the motherboard of NVR and the other end to the HDD.
2.
Place the HDD on the bottom of the device and then fasten the screws on the bottom to fix the HDD.
3.
Re-install the cover of the NVR and fasten screws.4.
Internet users IPC device
Power Switch
Power Supply
HDMI Video Output
VGA Video Output
USB Interfaces
DC 12V
POWER
HDMI VGA LAN USB ALARM N1
1 2 3 4 NO C
Alarm IN Alarm OUT
Router
Internet users
ProcedureConnect the display device to the video output interface. 1.
Connect a router to the LAN interface. In addition, connect the router to a IPC device and a computer so that they are in the same LAN.
2.
Connect a mobile storage device, for example, USB drive or mobile hard drive, to the USB interface.
3.
Connect a mouse to the USB interface. 4.
Connect the power adapter to the power input interface.6.
Connect the alarm input device and alarm output device to the alarm input interface and alarm output interface respectively.
5.
EQ310402
Prepare
Installing the HDD
Device Connection
Login
Setup Wizard
Manual Record
Remote Access
Log Out, Reboot or Shutdown
After the NVR starts up successfully, the Power LED and HDD LED indicator turn green. The startup page is displayed on the screen.
1. Turn on the power switch on the rear panel.
2. Login page.Enter Username and Password, then click Login button.Default username is admin with no password.
Default username is admin with no password
Package Contents
2 Hard Disk Installation
Installation Process
1 Before You Start
3 Device Connection 4 Login 5 Setup Wizard
For the initial log in, the system will pop up a message for modifying the username/password. Click OK button.
3.
After modifying the username/password, enter the Setup Wizard interface.
4.
After the time settings, click next button.2.
Select the HDD, then click the Format Local Disk button to initialize the HDD. Initialization will remove all the data saved in the HDD.
3.
Select the Language. If you don’t want to use the Setup Wizard next time, uncheck the Setup Wizard checkbox.
1.
ShenZhen Foscam Intelligent Technology Co., Ltd www.foscam.com
The Setup Wizard can walk you through some important settings of the NVR.
1. Uncheck the checkbox
2. Select the Language
3. Click next
1. Input the new username , new password and confirm password.
2. Click OK

To disable recording, uncheck the channel checkbox on the Manual Record interface.
Note
NoteThis product supports 32-bit IE8 or later versions and does not support 64-bit browsers.
Shutdown
Reboot
Log Out
② Turn off the power switch on the rear panel.
7.1 Network Configuration
7.3 Access to the NVR in WAN
Now you can access to your NVR by http://domain name:HTTP port via the browser. eg, http://a6747.myfoscam.org:88
Click Add New...
172.16.0.127
Here you have finished the Port Forwarding setup.
Input the port and IP address of your NVR and click Save.
Select Reboot and the note message box will pop up. Click OK button to reboot the NVR system.
If there is a UPnP function in your router. Choose “Forwarding > UPnP”, make sure that the Current UPnP Status is Enabled.
If there is a UPnP function in your router. Choose “Forwarding > Virtual Servers”, configure the following information.
If the UPnP of the router has been enable, you do not need to perform following steps. Configure HTTP port forwarding on your router. We will be using the TP-LINK brand wireless router as an example.
1. Select the IPC2.Click Add
6. Click OK
3. Select the Channel
5. Select the Protocol
4. Input the Username and Password of the IPC
After the IPC device is added successfully to the NVR, you can enable the manual recording function in the live view mode.
Assume you need to log in to your NVR from LAN or WAN via the browser. You need to perform following configurations:
Click Save
a6747.myfoscam.org
Check DDNS
Check Enable DDNS
2. Click Format Local Disk
3. Click next
1. Select the HDD
6 Manual Record
8 Log Out, Reboot or Shutdown
7 Remote AccessFind the IP Camera in the IP Camera List, then click Finish button to complete the setup wizard.
5.
Configure the DDNS.2.
You can add the online IPC device for your NVR.4.
You can configure the following information of the IP Camera. Click OK button which to go back to the Setup Wizard page.
① Select Shutdown and the note message box will pop up. Click OK button to shut down the NVR system.
Configure network information.1.
Right click the mouse in the live view mode, and the shortcut menu will pop up.
1.
Select the Manual Record to enter the Manual Record page.2.
Check the channel which you want to enable recording. Click OK button.
3.
Then click icon to exit the interface.4.
In the live view mode, the icon is at the right bottom of the screen for the channel, indicating recording is on going.
NoteYou can also shut down the NVR by pressing the On/Off key on the remote control.
Please try to avoid shutting down the unit by turning off the power switch on the rear panel especially during recording.
Right click the mouse in the live view mode, and the shortcut menu will pop up. Then select Shutdown to enter the Shutdown interface.
Select Log Out and the note message box will pop up. Click OK button to log out the NVR system.
Right click the mouse in the live view mode, choose “Menu > Settings > Network”. Check the Network checkbox, configure the network information of the NVR.
It is highly recommended to set the HTTP Port range from 5000 to 65535, and the value of the HTTP Port No. for each device should be unique.
Right click the mouse in the live view mode, choose “Menu > Settings > Network”. Check the DDNS checkbox. Enable DDNS of the NVR. We recommend you to use the DDNS by factory default.
The live view interface will display as shown in the figure below. Live view shows you the video image getting from each IP Camera in real time.
9Technical SupportIf you have problems with your Foscam device, please contact the Foscam reseller you purchased from, or you can e-mail the Foscam headquarter technical support team: [email protected].
Your valuable comments and suggestions on improving Foscam products are welcomed!
Select the Type
Check Network
Set the HTTP Port or HTTPS Port
IP Address: Set it to an IP address of NVR in the range of the router address pool, or keep it as default.Subnet Mask: Keep it as default.Gateway and DNS Server: Set it to the IP address of your router.
Check UPNP
Click Save
7.2 Access to the NVR in LAN
You can also access to your NVR by http://IP address:HTTP port via the browser. eg, http://172.16.0.127:88
Open the IP Camera Tool program in the resource CD. It will display the NVR’s IP address and port in your LAN. Double click the NVR list here, and your default brower will open up to the login page.
There are two ways to access to the NVR via the browser in LAN.
Click Finish