1 curing light 2500multimedia.3m.com/mws/media/46318o/curing-light-2500-technical... · operation...
TRANSCRIPT
13Curing Light 2500
Technical Product Profile
A Technical Service Publication

2

3Table of Contents
Product Description ................................................................................................... 5
Operation of the 3M Curing Light 2500.................................................................. 6
Features of the 3M Curing Light 2500 .................................................................... 7
High Intensity ....................................................................................................... 7
Rotating Nose Cone and Light Guide .................................................................. 7
Optical Filter and Bulb ........................................................................................ 7
Fan ........................................................................................................................ 8
Voltage Regulation ............................................................................................... 8
Continuous Duty .................................................................................................. 9
Ergonomic Design ................................................................................................ 9
Wall Mounting Kit ............................................................................................... 9
Light Guides ......................................................................................................... 9
Disinfecting and Cleaning ....................................................................................... 10
Cleaning of Base and Handpiece ....................................................................... 10
Light Guide ........................................................................................................ 10
Eyeshield ............................................................................................................ 10
Light Testers ............................................................................................................. 11
Light Meter Use ................................................................................................. 11
Light Meter Contraindications ........................................................................... 11
Curing Performance Test ........................................................................................ 12
Curing Light Maintenance ..................................................................................... 12
Bulb .................................................................................................................... 12
Lamp Reflector .................................................................................................. 12
Fan ...................................................................................................................... 12
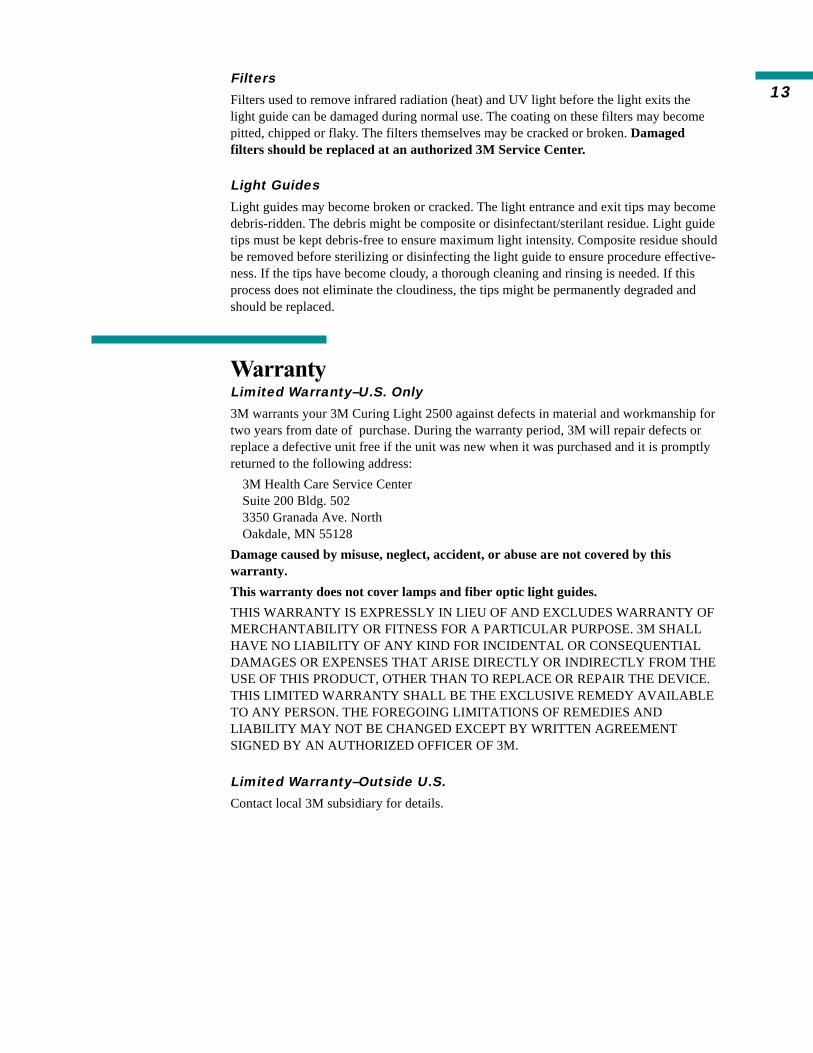
Filter ................................................................................................................... 13
Light Guides ....................................................................................................... 13
Warranty .................................................................................................................. 13
Precautionary Statement ............................................................................................ 14
Safety and Efficacy .................................................................................................. 14
Specifications............................................................................................................ 15
5560 Kit Contents .................................................................................................... 16
Competitive Comparisons....................................................................................... 16
Questions and Answers ........................................................................................... 17
Instructions for Use ................................................................................................. 18

4

5Product DescriptionThe 3M Curing Light 2500 produces high intensity visible blue light in the 400 to 500nm waveband.
The 3M light will cure all dental restoratives activated by light around the 470 nano-meter wavelength. The radiation from the tungsten halogen bulb (75 watt) is selectivelyreflected and filtered within the light to reduce the ultraviolet, infrared radiation andunneeded visible light. Therefore, only the blue light band is available to be absorbed.
The rotating nose cone and continuous cure capability offer flexibility to the dentalpractitioner. The high intensity curing light also has the benefit of a quiet and efficientfan which keeps the handpiece comfortably cool, even during extended light curing.
The two light guides available are the 8 mm and 13 mm outer diameters. The innerdiameters are 7mm and 12 mm. These light guides are interchangeable with the 3MCuring Light XL3000.
1
2
3
6
7
5
4
8
1. Handpiece
2. Handpiece Push Button
3. Rotating Nose Cone
4. Light Guide
5. Eyeshield
6. Power Module
7. Main Switch andIndicator Light
8. Power Cord
Photo ofCuring Light 2500
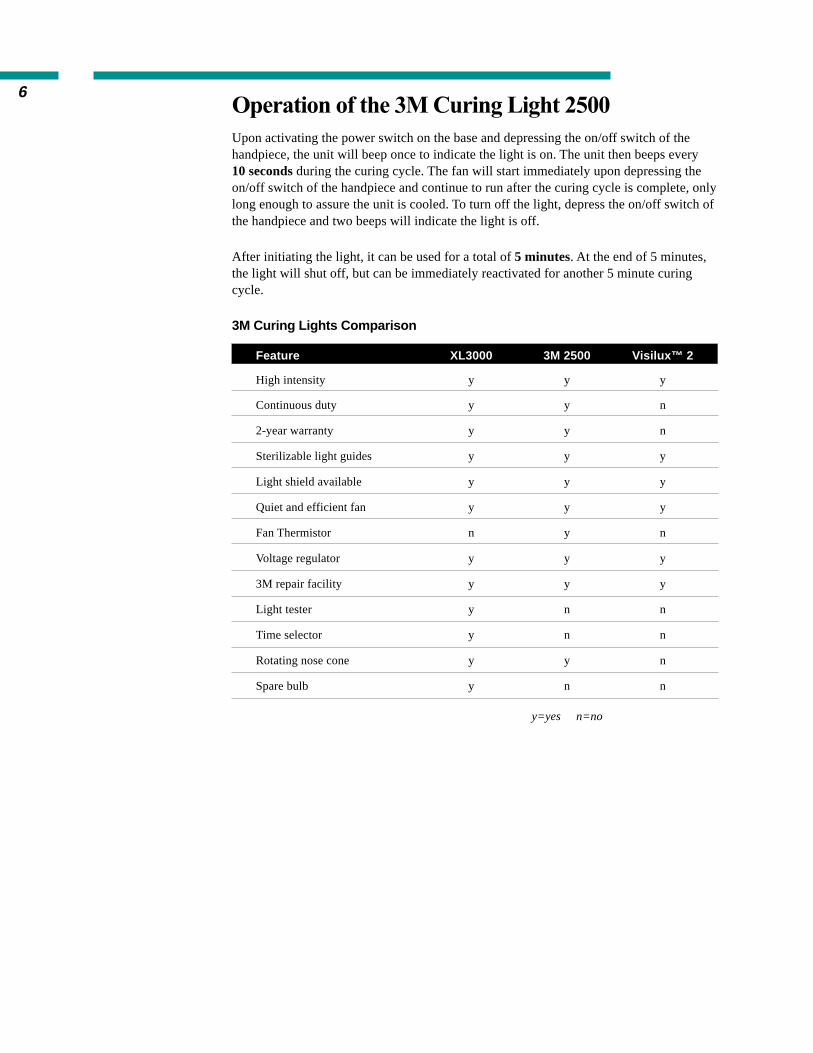
6Operation of the 3M Curing Light 2500Upon activating the power switch on the base and depressing the on/off switch of thehandpiece, the unit will beep once to indicate the light is on. The unit then beeps every10 seconds during the curing cycle. The fan will start immediately upon depressing theon/off switch of the handpiece and continue to run after the curing cycle is complete, onlylong enough to assure the unit is cooled. To turn off the light, depress the on/off switch ofthe handpiece and two beeps will indicate the light is off.
After initiating the light, it can be used for a total of 5 minutes. At the end of 5 minutes,the light will shut off, but can be immediately reactivated for another 5 minute curingcycle.
3M Curing Lights Comparison
Feature XL3000 3M 2500 Visilux™ 2
High intensity y y y
Continuous duty y y n
2-year warranty y y n
Sterilizable light guides y y y
Light shield available y y y
Quiet and efficient fan y y y
Fan Thermistor n y n
Voltage regulator y y y
3M repair facility y y y
Light tester y n n
Time selector y n n
Rotating nose cone y y n
Spare bulb y n n
y=yes n=no

7Features of the 3M Curing Light 2500High Intensity
The 3M light is a high intensity curing light. There are two important factors associatedwith dental curing lights: the intensity and the shape/location of the peak on the curve.
Since most dental materials contain a photoinitiator that absorbs light in the 400-500nanometer range, it is important that the radiation from the tungsten halogen lamp isselectively reflected and filtered to leave the blue light band to be absorbed. Thereforethe wavelength output of the curing light matches the absorbance of the photoinitiator.
A number of curing lights were evaluated by spectrophotometry between 360-520nanometers and are graphed below. Note that the peak (mW/cm2) for the Coltolux 3is considerably lower than the other units. Furthermore, the Coltolux 3 peak is alsooutside the optimum 470-480 nanometer range which is optimal for most photoinitiatorchemistries.
Spectrum™ is a trademark of Dentsply Caulk
Coltolux 3™ is a trademark of Coltene®
Rotating Nose Cone and Light Guide
Both the nose cone and light guide rotate through 360° independently of each other. Thisallows for very easy positioning of the light guide. The light guide housing is designed togive positive retention and secure positioning of the light guide in its socket, coupled withease of removal and reseating.
Optical Filter and Bulb
The 3M 2500 light has an optical filter which reduces radiation above 520 nm. A 75 wattbulb is supplied with the unit. The bulb has a minimum average life of 4000 cycles at 20seconds each cycle, (average lifetime of approximately 23 hours).
The bulb has a dichroic reflector which consists of a concave surface built up ofmultiple coatings. It is a technologically exacting process to produce a high quality
3 3 33
3
3 3
3
3
3
33
3
3
3 3 3JJJJ
JJ J
J
JJ J
J
JJ J J JH H
H
H
H
H H
H
H
H
H
H
H
H
H
H HG G GG
G
GG
G
G
G
G
G
G
G
GG G0
2
4
6
8
10
12
14
16
350 370 390 410 430 450 470 490 510 530
Sp
ectr
al Ir
rad
ian
ce (
mW
/cm
^2n
m)
Nanometers
3 XL3000
J Coltolux 3
H Heliolux DLX
Spectrum
G 3M 2500
Figure 1.High IntensityCuring Light

8
J J J
H HH
EE
E
108V 120V 132V0
200
400
600
800
1000
1200
Lig
ht
Inte
nsi
ty (
mW
/cm
2)
Voltage
3M 2500
J XL3000
H Spectrum
Heliolux DLX
E Coltolux 3
Figure 2.Voltage Regulation
reflector, as a precise angle of curvature must be achieved so that as much light aspossible can be reflected and focused onto the filter and through the light guide. Thebulb itself produces light in the entire visible light spectrum as well as some non-visibleradiation. Two optical filters, a blue pass filter and a heat (IR) filter, are included in thelight path to substantially block unwanted non-visible radiation and visible light otherthan that in the range of 400-500 nm.
Each bulb is subjected to a quality assurance check before it is released for sale. Purchaseof a competitive bulb may give reduced light intensity when used in the light.
Fan
The cooling fan is quiet in operation and comes on with activation of the light. After 1.5minutes it slowly increases in speed to maintain effective cooling of all external areas ofthe handpiece. Additionally, a built-in thermistor in the handpiece allows the fan to shutoff as soon as the handpiece has cooled. This results in a benefit to the patient and dentistof less noise.
Voltage Regulation
The electronics of the 3M 2500 light provide voltage regulation so that if the supplyvoltage should vary, even as much as +/-10% from the nominal, at a 75 watt load, thebulb voltage will be automatically regulated to within 95 to 100% of its intended designvoltage. The bulb voltage regulation is virtually instantaneous.
Because line voltage can fluctuate, voltage regulation is considered an advantageousfeature. It will sense peaks and valleys and will adjust the voltage to the bulb accordingly,so the output remains fairly constant. The 3M light regulates the bulb voltage for eachversion’s rated supply voltage +/-10%.
Intensity readings of the light (model M5560AA) were run at a nominal 120 volts and+/-10%. (Readings were performed at 108V, 120V, and 132V.) The intensity was mea-sured using the CureRite Model 8000 hand held radiometer. Notice that the bulb outputof the 3M lights remains steady throughout the voltage ranges.
Spectrum™ is a trademark of Dentsply Caulk
Coltolux 3™ is a trademark of Coltene®

9Continuous Duty
The light cycle will run continuously for a total of 5 minutes. For safety purposes wehave built in an automatic shut off after 5 minutes. It can be reactivated to run additional5 minute cycles by depressing the handpiece button.
Ergonomic Design
The pistol grip handpiece has been designed to be cool and comfortable in use. Thethermoplastic casing has a smooth, glossy surface and the efficient cooling fan keepsthe handpiece comfortably cool for the operator, both for short term and extended curingprocedures.
Wall Mounting Kit
The light can be fixed to a wall or equipment panel with the wall mounting kit. The kitwill adapt to various surfaces and the mounting hole pattern is compatible with the 3MCuring Light XL3000 bracket hole pattern.
Light Guides
The light guide is sheathed in a thin coating of amber-colored glass that has a very specialcharacteristic. The refractive index of the amber glass is such that light trying to escapethe light guide is reflected internally back into the light guide. Therefore, loss of lightintensity through the sides of the light guide is minimal.
The light guide should be handled with care to avoid damaging the polished ends, andthe tips kept clear of debris to ensure maximum light transmission. Any composite orresin adhering to the light guide should always be removed, e.g. with the thumbnail orblunt instrument, taking care not to scratch the fiber-optic surface. Cracks or scratcheson the ends of the light guide will diminish light transmission.
The light guide is very efficient in the transmission of light because it is virtually all glassfibers. The light guide bundle consists of fibers fused very tightly together. In fact, theyare packed so tightly that they may not be perfectly round, thus the honeycomb effect. Noresin is used to glue the fibers together as some other manufacturers may do. TheXL3000, 2500 and Visilux™ 2 have this honeycomb design.
The light guides can be autoclaved or cold sterilized. Refer to the Disinfecting andCleaning section.
The 3M light has 2 light guides available. The outer diameters of the light guides are 8and 13 mm. The inner diameters or the actual diameter of light transmission is 7 and 12mm respectively.

10Disinfecting and CleaningCleaning of Base and Handpiece
Turn off the main power (green) switch and unplug the unit before cleaning. Thebase unit and handpiece may be cleaned by wiping with a soft cloth moistened slightlywith alcohol or disinfectant. Be careful to prevent entry of liquid into the components.Remove nose cone and carefully wipe any excess alcohol or disinfectant from matingsurfaces of the nose cone and handpiece. Alcohol should be less than 30% concentra-tion. Avoid using any disinfectant with basic glutaraldehyde as the active ingredient.
Light Guide
Remove debris from the light guide using a thumbnail or a blunt instrument. Take carenot to scratch the light guides. Periodically examine both ends of the light guide. If theyare dull or white, check the cure performance by following the Curing Performance Testinstructions described on page 12.
AutoclaveFollow manufacturer’s instructions regarding exposure times. Generally speaking, aminimum of 15 minutes at 121°C (250°F), 1000 hPa/15psi is recommended. Do notautoclave the light guide at temperatures above 136°C. Allow the lightguide to coolto room temperature before reinserting it into the handpiece receptacle.
Cold SterilizationSoak the light guide in an alkaline glutaraldehyde type of cold sterilizing solution. Followmanufacturer’s instructions regarding dilution and recommended exposure times. Use ofother types of solutions (e.g., phenolics) may cause decreased output intensity.
Eyeshield
Dissemble the rubber O-ring from the shield. Clean any debris off the surface with a dullinstrument. Soak the shield in an alkaline glutaraldehyde type of cold sterilizing solutionfor the minimum amount of time recommended per manufacturer.

11Light TestersLight Meter Use
Light meters should be used to monitor output of each light in a dental office. A base lineis established with a new light curing unit, a reconditioned unit or one with a new bulb.Meter readings should also be taken with clean, clear light guide tips and light filtersshould be in good condition. Weekly tests, utilizing the same diameter light guide as thebase line can indicate intensity loss before it affects the curing ability of the light.
Light Meter Contraindications
Light meters should not be used to select a curing light for purchase. The commerciallyavailable curing light meters do not have the capability to adequately distinguish betweenoutputs from lights of different manufacturers. These meters have fixed apertures whichmay not be able to detect difference in outputs from lights of different manufacturers.Some lights emit more power in the center of the light guide than around the periphery.Radiometers (light meters) with more sophisticated electronics to monitor not only theintensity but the shape of the light output curve and spectral location are used by research-ers to properly characterize light output. This characterization is essential to determineand understand curing light effectiveness. Studies comparing meter readings to depth ofcure and Knoop hardness have documented this shortfall of currently available dentallight meters.1 Light meters should not be solely relied upon to determine curing lightoutput as the long term reliability has not been documented.
Curing Light Requirements for 3M Composite Cure
Model Interpretation Reading
Demetron Model 100 Acceptable light output >400Curing Radiometer Double cure time 200-400
Unacceptable light output <200
Caulk/Dentsply Acceptable light output >300Cure Rite Visible Light Meter Double cure time 150-300
Unacceptable light output <150
1 Reality Now, March 1991, No. 22.

12
2 Friedman, J: Care and Maintenance of Dental Curing Lights, Dentistry Today, 1991:10(1).3 Shortall, A. and E. Harrington: Guidelines for the Selection, Use, and Maintenance of Visible Light Activation Units, British Dental Journal, 1996:180(10): 383-7.4 Instructions from dental light meters.
Curing Performance TestLay a clean polyester matrix band on white paper and place a clear or white plastic formon the band. The form should be a cylindrical hole 3-6 mm in diameter through material2.0-2.5 mm thick. Pack restorative material into the form, cover with polyester strip andpress flat. Direct the curing light at the top surface (from less than 2 mm) of the sampleand cure for the recommended time. Remove the polyester strips and examine thecondition of cure. The bottom surface should appear glassy and resist scratching by asharp explorer, indicating adequate cure. (Consult manufacturer’s instructions for othercriteria relating to correct cure).
If the surface is soft or dull, repeat the test procedure using incrementally longer curingtimes until adequate cure is attained and adjust curing time accordingly. If the adjustedtime exceeds 200% of normal, verify that the restorative material has not degenerated, orcorrect curing light problems as directed in the Troubleshooting table located in the userinstructions.
Curing Light MaintenanceCuring lights are not a maintenance-free item.2,3,4 In order to ensure maximum light outputand efficiency, a few regular maintenance steps must be done.
Bulb
It was initially thought that a bulb stayed at a maximum output then died suddenly. It hasnow been established that a bulb actually fades slightly over the course of its lifetime. Thespeed with which this occurs depends on the number of uses and length of use time. Manylights are overpowered, i.e., a low wattage bulb is supplied with too much power, forcingit to emit more light than intended. This overpowering will substantially shorten bulb life.The glass bulb may collect white or black deposits on the surface which can reduce lightoutput.
Lamp Reflector
The lamp reflector may lose its reflective properties due to loss of the reflective materialor deposition of an impurity on the surface. Loss of these properties may result indecreased light intensity. If the reflector has been damaged, the bulb should be replaced.
Fan
Curing light fans were designed to keep the internal electronics cool. Fans coated withdust and other debris, or blockage of the air input areas may cause a unit to overheat,severely damaging the electronics. However, the 3M Curing Light 2500 has a built-insafety feature which prevents the unit from over heating. The light unit will beep 5times and then shut off if blockage of air or debris is present. If the fan is preventedfrom rotating, either mechanically or electrically, the unit will attempt to turn on, butimmediately shut off again. Have unit serviced by an authorized 3M Service Center.
13Filters
Filters used to remove infrared radiation (heat) and UV light before the light exits thelight guide can be damaged during normal use. The coating on these filters may becomepitted, chipped or flaky. The filters themselves may be cracked or broken. Damagedfilters should be replaced at an authorized 3M Service Center.
Light Guides
Light guides may become broken or cracked. The light entrance and exit tips may becomedebris-ridden. The debris might be composite or disinfectant/sterilant residue. Light guidetips must be kept debris-free to ensure maximum light intensity. Composite residue shouldbe removed before sterilizing or disinfecting the light guide to ensure procedure effective-ness. If the tips have become cloudy, a thorough cleaning and rinsing is needed. If thisprocess does not eliminate the cloudiness, the tips might be permanently degraded andshould be replaced.
WarrantyLimited Warranty–U.S. Only
3M warrants your 3M Curing Light 2500 against defects in material and workmanship fortwo years from date of purchase. During the warranty period, 3M will repair defects orreplace a defective unit free if the unit was new when it was purchased and it is promptlyreturned to the following address:
3M Health Care Service CenterSuite 200 Bldg. 5023350 Granada Ave. NorthOakdale, MN 55128
Damage caused by misuse, neglect, accident, or abuse are not covered by thiswarranty.
This warranty does not cover lamps and fiber optic light guides.
THIS WARRANTY IS EXPRESSLY IN LIEU OF AND EXCLUDES WARRANTY OFMERCHANTABILITY OR FITNESS FOR A PARTICULAR PURPOSE. 3M SHALLHAVE NO LIABILITY OF ANY KIND FOR INCIDENTAL OR CONSEQUENTIALDAMAGES OR EXPENSES THAT ARISE DIRECTLY OR INDIRECTLY FROM THEUSE OF THIS PRODUCT, OTHER THAN TO REPLACE OR REPAIR THE DEVICE.THIS LIMITED WARRANTY SHALL BE THE EXCLUSIVE REMEDY AVAILABLETO ANY PERSON. THE FOREGOING LIMITATIONS OF REMEDIES ANDLIABILITY MAY NOT BE CHANGED EXCEPT BY WRITTEN AGREEMENTSIGNED BY AN AUTHORIZED OFFICER OF 3M.
Limited Warranty–Outside U.S.
Contact local 3M subsidiary for details.
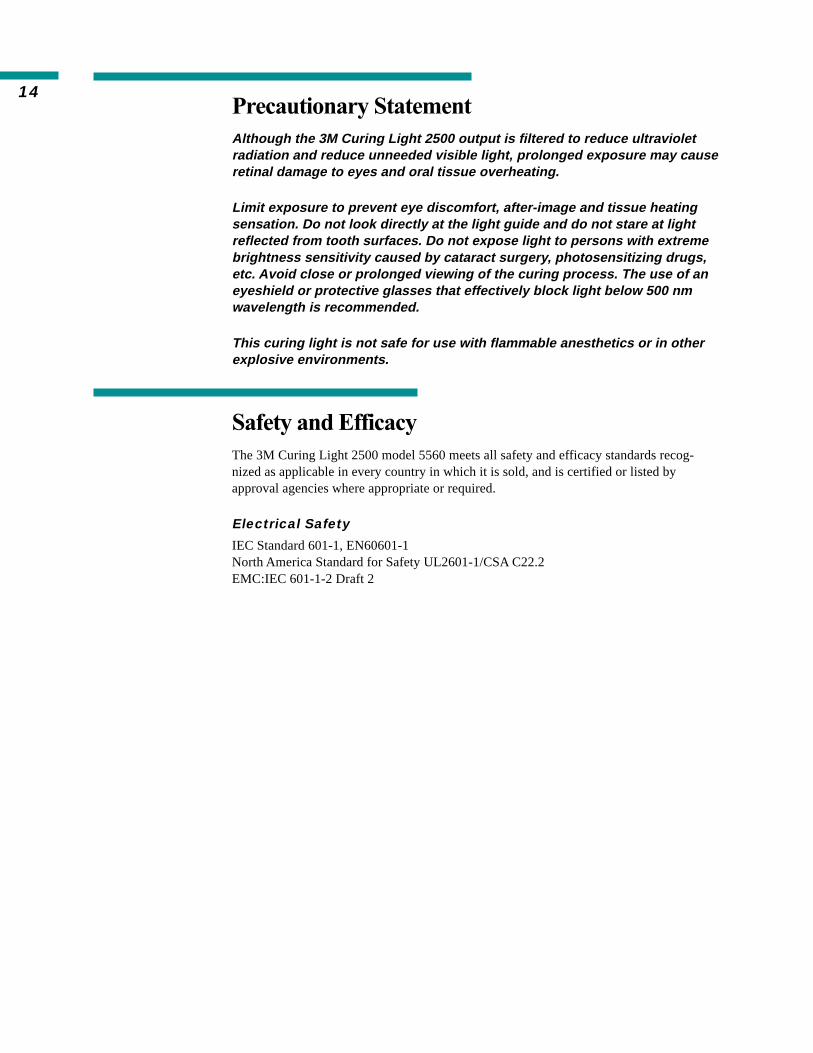
14Precautionary StatementAlthough the 3M Curing Light 2500 output is filtered to reduce ultravioletradiation and reduce unneeded visible light, prolonged exposure may causeretinal damage to eyes and oral tissue overheating.
Limit exposure to prevent eye discomfort, after-image and tissue heatingsensation. Do not look directly at the light guide and do not stare at lightreflected from tooth surfaces. Do not expose light to persons with extremebrightness sensitivity caused by cataract surgery, photosensitizing drugs,etc. Avoid close or prolonged viewing of the curing process. The use of aneyeshield or protective glasses that effectively block light below 500 nmwavelength is recommended.
This curing light is not safe for use with flammable anesthetics or in otherexplosive environments.
Safety and EfficacyThe 3M Curing Light 2500 model 5560 meets all safety and efficacy standards recog-nized as applicable in every country in which it is sold, and is certified or listed byapproval agencies where appropriate or required.
Electrical Safety
IEC Standard 601-1, EN60601-1North America Standard for Safety UL2601-1/CSA C22.2EMC:IEC 601-1-2 Draft 2

15Specifications
3M Curing Light 2500 3M Curing Light XL3000
Light Source Light Source
75 Watt tungsten/halogen lamp 75 Watt tungsten/halogen lamp
Average lamp life 4000 cycles Average lamp life 4000 cycles(20 seconds/cycle) (20 second/cycle)
Optical filter passes 420-500nm band Optical filter passes 420-500nm band
Lightguide Lightguide
8mm illuminated diameter 8mm illuminated diameter3" long (from nosecone) 3" long (from nosecone)
13mm illuminated diameter 13mm illuminated diameter3" long (from nosecone) 3" long (from nosecone)
Dimensions Dimensions
Handpiece: Handpiece:167 mm × 53 mm × 139 mm 167mm × 53mm × 139mm
(0.30kg) (0.30kg)
6.6 in. × 2.1 in. × 5.5 in. 6.6 in. × 2.1 in. × 5.5 in.(0.7 lb.) (0.7 lb.)
Base Unit: Base Unit:69 mm × 173 mm × 141 mm 115 mm × 170 mm × 120 mm
(2.7kg) (2.14kg)
2.7 in. × 6.8 in. × 5.5 in. 4.5 in. × 6.7 in. × 4.7 in.(6.0 lb.) (4.7 lb.)
Electrical Electrical
100 volts 50/60Hz 100 volts 50/60Hz
110 volts 50/60Hz 115 volts 50/60Hz
120 volts 50/60Hz 230 volts 50/60Hz
220 volts 50/60Hz 240 volts 50/60Hz
230 volts 50/60Hz
240 volts 50/60Hz

165560 Kit Contents
• Power module with handpiece
• Light Guide
• Eyeshield
• User Instructions
Competitive Comparisons
Caulk Heliolux3M 2500 3M XL3000 Coltolux 3™ Spectrum™ DLX
Bulb Wattage 75 75 75 49 75
Voltage Regulation y y y y n
Light Guides 2 2 4 5 4
Warranty 2 Year 2 Year 1 Year 1 Year 1 Year
Shield Provided y y cones y y
UL/CSA/VDE UL/CSA UL/CSA UL/CSA CSA VDE
Fan (dBa) 53 52 61 49 57
Rotating Nose Cone y y n n n
Spare Bulb n y n n n
Battery Operated n n n n n
Light Intensity Tester n y n y y
Continuous Run 5 min. 3 min. 10 min. 15 min. 10 min.
y=yes n=no
Spectrum™ is a trademark of Dentsply CaulkColtolux 3™ is a trademark of Coltene®

17Questions and AnswersQ. The old fiber-optic units are still in some offices. How can I check for fiber-optic
cable damage in a dentist’s office?
A. Hold the end that connects to the unit so a bright light (desk lamp) shines in the end.Look at the other end. Damage of fibers results in dark spots when you look at the tip end.
Q. Which bulbs are interchangeable?
A. The Visilux™ 2, 3M Curing Light XL3000, and 3M Curing Light 2500 all use a75 watt bulb. Therefore, the bulbs are interchangeable between units. However, theXL1500 uses a 52 watt bulb.
Replacement of bulbs should be with 3M replacement parts only. In the past, wehave experienced inexpensive bulbs causing low intensity, and thus inadequatelycured restorations.
Q. Why is voltage regulation important?
A. It compensates for the peaks and valleys in the supply voltage so the light will giveoff a constant intensity, thus assuring the operator of properly cured restorations.
Q. Why is the light guide an amber, or dark color?
A. The glass sheath has a special characteristic of internally reflecting any stray lightback into the fiber bundle.
Q. What does the honeycomb effect in the light guide mean?
A. The honeycomb effect means the fiber-optic fibers are not attached to each other witha resin. Instead there are only fiber-optic fibers packed as tightly as possible together.
Q. Under the caution section of the instructions, it mentions that the unit is not safe tobe used with flammable anesthetics or in other explosive environments. Could youexplain this?
A. Curing lights, like most other electronic devices, do not have hermetically sealed electri-cal circuitry. Any electrical fault could be dangerous in a flammable environment.
Q. Can the light guides of the 3M Curing Light XL3000 and the 3M Curing Light2500 be interchanged?
A. Yes
Q. Will the Visilux™ 2 light guide fit the 3M Curing Light 2500 and/or the3M Curing Light XL3000?
A. No
Q. Why is high intensity in a curing light important?
A. Light curing materials cure exclusively by a reaction with the blue light from adental curing unit. High intensity light is needed to cure deeper areas. Inadequatelight intensity will result in an inadequate cure which can lead to clinical problemssuch as a reduction in compressive and bond strengths, poor color stability, and otherundesirable results. Light curing materials cure only during light activation.
Q. Are the eye shields interchangeable?
A. The eyeshields of the XL3000 and the 2500 are interchangeable.

18Instructions for Use
Glossary of Symbols
Read and understand all safety information before operating
~Attention, Consult Accompanying Documents
Alternating Current.
OFF (Power: Disconnection from the Mains).
ON (Power: Connection to the Mains. Greenindicator light for ON position).
Type BF Equipment
Class II Equipment - double insulated
Fuse
Intended Use:The 3M™ Curing Light 2500 is a high intensity source of blue light (400-500 nm) designed and testedfor polymerizing visible light-cure dental materials such as 3M™ Z100™ Restorative, 3M™ SingleBond and 3M™ Vitremer Core Buildup/Restorative. It consists of a power module with handpieceholder, a handpiece that contains the light source, and a fused glass fiber optic light guide. It hasbeen designed for table top use or wall mount. Consult any restorative manufacturer’s instructions forproper technique and curing times. If not using 3M products, perform a curing performance test asoutlined on page 13 of this product profile and also in these instructions.(Note: For mounting, follow the instructions included with the mounting kit).
2. Handpiece2. pushbutton
1. Handpiece
3. Nose Cone
4. Light Guide
5. Eyeshield
6. Power Module
7. Power Cord
8. Main Switch and8. Indicator Light

19CAUTION
• The fiber optic light guide is provided in a nonsterile condition and must be sterilizedprior to use. Refer to Cleaning Instructions.
• Do not immerse unit in water. Refer to Cleaning Instructions.
• Prolonged exposure may cause retinal damage.
• Prolonged exposure to an area may cause oral tissue trauma.
• The use of an eyeshield or protective glasses that effectively block light below 500 nmwavelength is recommended for dental staff.
• Do not look directly at the light guide and do not stare at light reflected from toothsurface.
• Do not expose light to persons with extreme brightness sensitivity caused by cataractsurgery or photosensitizing drugs.
• Avoid close or prolonged viewing of the curing process.
• This product has not been designed for use with flammable anesthetics or in otherexplosive environments.
• If it is necessary to change the line plug to fit your outlet type, contact a qualifiedservice person in your area.
• Handpiece bulb, fuse, light guide and eyeshield are the only user serviceablecomponents.
• The power module has dangerous internal voltage. It can only be serviced by anauthorized service center.
• Do not turn off the main power switch until the fan has stopped in order to allow theunit to cool down.
• Allow the light guide to cool to room temperature before handling to avoid riskof burn.
• Before attempting bulb replacement, make sure the cooling fan has completed thecooling cycle and has stopped rotating to avoid risk of burn from bulb. Turn off themain switch. Disconnect the power cord from the wall outlet.
• Do not attempt to replace any cracked or scratched optical filter or heat filter.It is important that the heat filter be properly placed to avoid any tissue trauma. Sendcuring light to a qualified service center.
• Do not operate the unit without the optical filter and heat filter.
Assembly1. Slide the eyeshield onto the light guide.
2. Insert the straight end of the light guide into the chuck mechanism in the front cover of thehandpiece until it stops solidly. The light guide may be rotated to any convenient position byrotating the nosecone.
3. Connect the power cord into the correct supply outlet; refer to the specification label on thepower module.
4. Place the handpiece in the handpiece holder.

20Operating Instructions
CAUTION
Consult the restorative manufacturer’s instructions for proper technique and curing times.
Operation:
1. Press the power (green) switch on the side of the base unit to the “I” position. The green indicatorlight will glow, and the unit is now ready for use.
2. Rotate the nose cone to optimize the position of the light guide and hold the light guide no furtherthan 2 mm from the dental material.
NOTE: When a colorless transparent matrix is used to provide anatomical form, the light guidemay be placed directly against the matrix a few seconds after polymerization has begun toavoid movement of material.
3. Depress the handpiece push-button to activate the bulb. A single audible tone will be heard every10 seconds. Depressing the handpiece push-button a second time will immediately deactivate thebulb.
NOTE: The handpiece cooling fan will automatically start at the beginning of, and continuethroughout, the curing time cycle. It will continue running until the unit has cooledsufficiently.
4. When the curing operation is complete, return the handpiece to the holder.
5. To turn the base unit off, depress the power (green) switch on the side of the base unit to the “0”position. The green indicator light will turn off.
CAUTION
Allow the light guide to cool to room temperature before handling to avoid risk of burn.
Plastic
Cleaning/Disinfecting - Turn off the main power (green) switch and unplug the unit before cleaning.The base unit and handpiece may be cleaned by wiping with a soft cloth moistened slightly withalcohol or disinfectant. Be careful to prevent entry of liquid into components. Always wipe off anyexcess alcohol or disinfectant.
NOTE: Disinfectants with basic glutaraldehyde as an active ingredient are not recommended.
Alcohol should be less than 30% concentration.
Light Guide
1. Carefully handle the light guide to avoid damaging the polished ends.
2. Periodically examine both ends of the light guide. If they are dull or white, check the cureperformance using the Curing Performance Test described in this manual.
3. Do not contaminate the light guide with unpolymerized restorative material to avoid diminishedlight transmision.
4. The light guide and eyeshield should be disinfected after each use to prevent transfer ofmicroorganisms between patients.
Cold Sterilization - Soak the light guide in an alkaline glutaraldehyde type of cold sterilizing solution.Follow manufacturer’s instructions regarding dilution and recommended exposure times. Use of theother types of solutions (e.g., phenolics) may cause decreased output intensity.
Autoclave - Follow manufacturer’s instructions regarding exposure times. Generally a minimum of 15minutes at 121° C (252° F). 15 psi (1000hPa) is recommended. Do not autoclave the light guide attemperatures above 136° C.
Eyeshield - Dissemble the rubber O-ring from the shield. Clean any debris off the surface with a dullinstrument. Soak shield in an alkaline glutaraldehyde type of cold sterilizing solution for the minimumamount of time recommended per manufacturer.

21
Note: Inspect the optical filter in the nose cone.Remove dust or other other contaminants with asoft cotton swab. A chipped or cracked filter shouldbe replaced immediately by an authorized servicecenter.
3. Hold the new bulb/reflector unit by the reflector rim.Align the bulb pins and push the unit securely into thesocket. To ensure expected performance and safety,replace bulb with 3M part number 78-8045-4571-9 only.
Note: Fingerprints on the inside of the reflector orthe bulb can adversely affect performance. Removefingerprints with a cotton swab moistened slightlywith alcohol.
4. Replace the nose cone by holding it at a slight angle tothe handpiece. Insert the side opposite the snap-in tabsinto the groove of the handpiece. While gentlysqueezing the tabs, rotate the nose cone to align it intothe handpiece until it is fully seated and snaps intoposition.
5. Release the snap-in tabs and rotate the nose cone onthe handpiece to assure it is correctly positioned and rotates freely.
Light Guide Replacement:
Caution
Allow unit to cool sufficiently before replacing the light guide. The metal sleeve oflight guide could still be very hot.
1. Hold the handpiece by placing one hand firmly around the nose cone area.
2. Grasp the light guide firmly with the other hand.
3. Pull light guide straight out of nose cone receptacle.
4. Push replacement light guide firmly into nose cone receptacle.
Troubleshooting:Condition Remedy
Main indicator light inoperative 1. Check electrical supply.2. Send unit to an authorized service center.
Curing bulb inoperative 1. Replace bulb.2. Send unit to an authorized service center.
No time signal tone 1. Send unit to an authorized service center.
3
4
Bulb Replacement
Caution
To avoid risk of burn, make sure the cooling fanhas completed the cooling cycle and has stoppedrotating. Turn off the main switch. Disconnect thepower cord from the wall outlet.
Do not attempt to replace any filters. Improperplacement or missing a heat filter could lead totissue burn. Send curing light to an authorizedservice center.
1. Remove the nose cone by placing the thumb on atextured snap-in tab located between two slits and theforefinger on the other textured snap-in tab locatedbetween two slits. Gently squeeze the tabs while pullingdownward at an angle to separate the nose cone fromthe handpiece.
2. Grasp the outside rim of the reflector and pull it forward,separating the bulb pins from the socket. The bulb andintegral reflector are changed as a unit.
1
2

22Reduced curing performance 1. Check intensity with hand held radiometer.
2. Clean light guide exit tip. Consult cleaninginstructions.
3. Clean optical filter in nose cone with a soft cottonswab.
4. Check intensity output.5. Check optical filter in nose cone for chips or cracks. If
chips or cracks are present on optical filter, send unitto an authorized service center.
6. Replace light guide.7. Replace bulb.8. Check intensity output.9. Send unit to an authorized service center.
Handpiece turns on, immediately hear 1. Fan possibly blocked, therefore send unit5 beeps and handpiece shuts off to an authorized service center.
Unit overheats. Five consecutive beeps, 1. Let unit cool down for 10 minutes.bulb shuts off during curing cycle Restart bulb. If, after a few minutes the bulb shuts
off again after 5-beep signal, or if the bulb will notrestart, send the unit to an authorized servicecenter.
Curing Performance TestLay a clean polyester matrix band on white paper and place a clear or white plastic form on the band.The form should be a cylindrical hole 3-6 mm diameter through material 2.0-2.5 mm thick. Packrestorative material into the form, cover with polyester and press flat. Direct the curing light at the topsurface (from less than 2 mm) of the sample and cure for the recommended time, remove thepolyester strips and examine the condition of cure. The bottom surface should appear glassy andresist scratching by a sharp explorer, indicating adequate cure. (Consult manufacturer’s instructionsfor the other criteria for correct cure).
If the surface is soft or dull, repeat the test procedure using incrementally longer curing times untiladequate cure is attained, and adjust curing time accordingly. If the adjusted time exceeds 200% ofnormal, verify that the restorative material has not degenerated, or correct curing light problems asdirected in the Troubleshooting table.
RepairObtain qualified repair service only from 3M Dental Products authorized service facilities.
Contact:
for U.K.
3M Health Care Service Centre,Wharncliffe RoadLoughborough, Leicestershire,LE11 1SL,Tel: 01509 613051 (01509 613249 24 hr. Answer Phone).FAX: 01509 613079
for U.S.
3M Health Care Service CenterSuite 200 Bldg. 5023350 Granada Ave. NorthOakdale, MN 55128(800) 292-6298
Replacement Parts and Accessories - Can be purchased from authorized dealer
Item 3M Stock Number
Bulb/12V, 75W 78-8045-4571-9
Light guide - 8 mm diameter 78-8060-9551-5
Light guide - 13 mm diameter 78-8060-9552-3
Mounting Kit 12-2716-0339-6
Eyeshield - 8 mm 78-8055-7567-3
Eyeshield - 13mm 78-8060-9550-7
SpecificationsNote: This manual is used for all versions of the 3M Curing Light 2500, M5560.
Operation of equipment - Continuous Duty
— Unit will operate continuously for 5 minutes before automatic shutoff, at which time the unit may berestarted immediately

23Light Source:
— 75 watt tungsten/halogen bulb. Average life 4000 cycles at 20 seconds each.
— Optically filtered light output for peak power in 400-500 nm band.
— Fused fiber-optic light guide.
—13 mm and 8 mm diameter optional light guide aperture
Electrical:
— Electronically regulated bulb voltage
—106 VA input power
— Fuse: See product name plate for correct rating.
— Model versions for worldwide electrical supply characteristics. See product nameplate for correctsupply voltage.
Electrical versions available: 50/60 Hz240V; 230V; 220V; 120V; 110V; 100V
Note: Be sure your unit is correctly rated for your specific electrical supply
— Unit is double insulated and uses plug configurations according to individual primary countryspecifications.
Protective Features:
— Thermal overload protector in handpiece.
— Optical filter blocks light outside peak curing band.
— Protection against electrical shock (Type BF)
— Double insulated power supply
— Low voltage handpiece circuit.
— Protection against ingress of water: ordinary
Transport and Storage Conditions:
— Ambient temperature range -40° C to +70° C
— Relative humidity range of 10% to 80%, excluding condensation
— Atmospheric pressure of 500 hPa to 1060 hPa
Dimensions:
— Power module: 2.7 in. x 6.8 in. x 5.5 in. (69 mm x 173 mm x 141 mm) 6.0 lb. (2.7 kg)
— Handpiece: 6.6 in. x 2.1 in. x 5.5 in. (167 mm x 53 mm x 139 mm) 0.7lb. (0.3kg)
Safety Regulations:
M5560 fulfills the following standards:
— UL Standard 2601-1 /CSA C22.2 No. 601.1/EN60601-1
— Other country specific deviations to IEC601-1 through CB certification.
Electro Magnetical Compatibility:
M5560 complies with IEC 601-1-2 Draft 2
Limited Warranty - U.S. Only
3M warrants your 3M Curing Light 2500 against defects in material and workmanship for two years from date of purchase. Duringthe warranty period, 3M will repair defects or replace a defective unit free if the unit was new when it was purchased and it ispromptly returned to the following address:
3M Health Care Service CenterSuite 200 Bldg. 5023350 Granada Ave. NorthOakdale, MN 55128
Damage caused by misuse, neglect, accident, or abuse are not covered by this warranty.
This warranty does not cover lamps and fiber optic light guides.
THIS WARRANTY IS EXPRESSLY IN LIEU OF AND EXCLUDES WARRANTY OF MERCHANTABILITY OR FITNESS FOR APARTICULAR PURPOSE. 3M SHALL HAVE NO LIABILITY OF ANY KIND FOR INCIDENTAL OR CONSEQUENTIAL DAMAGESOR EXPENSES THAT ARISE DIRECTLY OR INDIRECTLY FROM THE USE OF THIS PRODUCT, OTHER THAN TO REPLACE ORREPAIR THE DEVICE. THIS LIMITED WARRANTY SHALL BE THE EXCLUSIVE REMEDY AVAILABLE TO ANY PERSON. THEFOREGOING LIMITATIONS OF REMEDIES AND LIABILITY MAY NOT BE CHANGED EXCEPT BY WRITTEN AGREEMENTSIGNED BY AN AUTHORIZED OFFICER OF 3M.
Limited Warranty - Outside U.S.Contact local 3M subsidiary for details

24
33333
Dental Products Laboratory
3M Center, Building 260-2B-13St. Paul, MN 55144-1000
Printed in U. S. A.
©1997 3M 70-2008-7959-4