1 dritz 1 center release buckle #475 cutting - happy …thehappyzombie.com/pdf/dragonslayer.pdf ·...
TRANSCRIPT

Dragon slaying just got more fun with this handyslayer satchel. Perfect for all your tools - sticks, twigs, rubber bands, sling-shots... Plenty of roomfor the arsenal needed to protect the castle.
When not slaying dragons, the satchel is perfectfor hunting and gathering berries, rocks, stuff kids find interesting that tend to be goopy, stickyand stink. Recycle your old milk jugs to use as aliner. Foraging in the forrest just got more fun.
Omit the tail point step... and voila - you have ahorse riding Knight In Shining Armor Knapsack!
Dragon Slayer Satchel featuring Lizzy House's Castle Peeps by Andoverlizzyhouse.typepad.com/lizzyhouse/castle-peeps-summer-camp
MATERIALS: (note: ample yardage given for directional fabric) ! yard "Village" fabric (bag) ! yard "Peeps" fabric (pockets)
! yard "Flags" fabric (liner, strap)
" yard "Circles" fabric (tail, bag scales, pocket scales) 1 Plastic gallon milk jug 1 Dritz 1" Center Release Buckle #475 www.dritz.com/brands/showcase/details.php?ITEM_NUM=475
CUTTING:
"Village" fabric 2) 12!" x 15!" (bag)
"Flags" fabric 2) 12!" x 15!" (liner) 1) 4" x 32" (strap A) 1) 4" x 10" (strap B)
© 2010 Monica Solorio-Snow + thehappyzombie.com
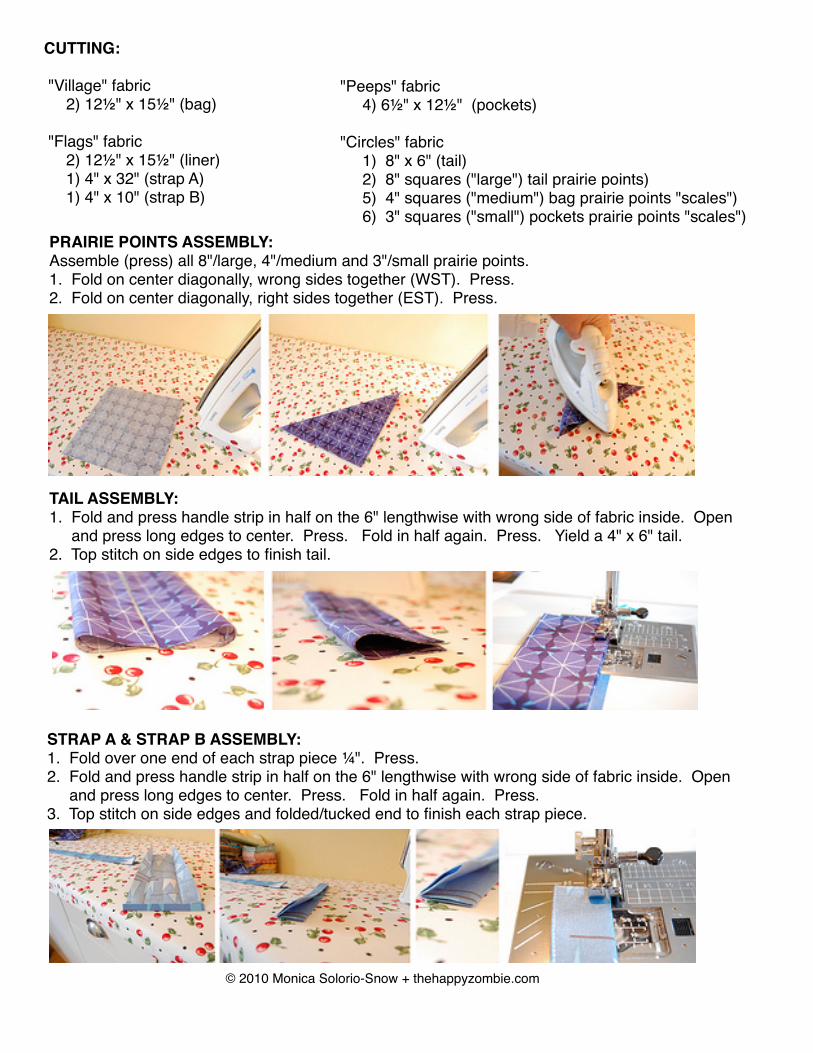
CUTTING:
"Village" fabric 2) 12!" x 15!" (bag)
"Flags" fabric 2) 12!" x 15!" (liner) 1) 4" x 32" (strap A) 1) 4" x 10" (strap B)
"Peeps" fabric 4) 6!" x 12!" (pockets)
"Circles" fabric 1) 8" x 6" (tail) 2) 8" squares ("large") tail prairie points) 5) 4" squares ("medium") bag prairie points "scales") 6) 3" squares ("small") pockets prairie points "scales")
PRAIRIE POINTS ASSEMBLY: Assemble (press) all 8"/large, 4"/medium and 3"/small prairie points. 1. Fold on center diagonally, wrong sides together (WST). Press.2. Fold on center diagonally, right sides together (EST). Press.
TAIL ASSEMBLY: 1. Fold and press handle strip in half on the 6" lengthwise with wrong side of fabric inside. Open and press long edges to center. Press. Fold in half again. Press. Yield a 4" x 6" tail.2. Top stitch on side edges to finish tail.
STRAP A & STRAP B ASSEMBLY: 1. Fold over one end of each strap piece "". Press. 2. Fold and press handle strip in half on the 6" lengthwise with wrong side of fabric inside. Open and press long edges to center. Press. Fold in half again. Press. 3. Top stitch on side edges and folded/tucked end to finish each strap piece.
© 2010 Monica Solorio-Snow + thehappyzombie.com
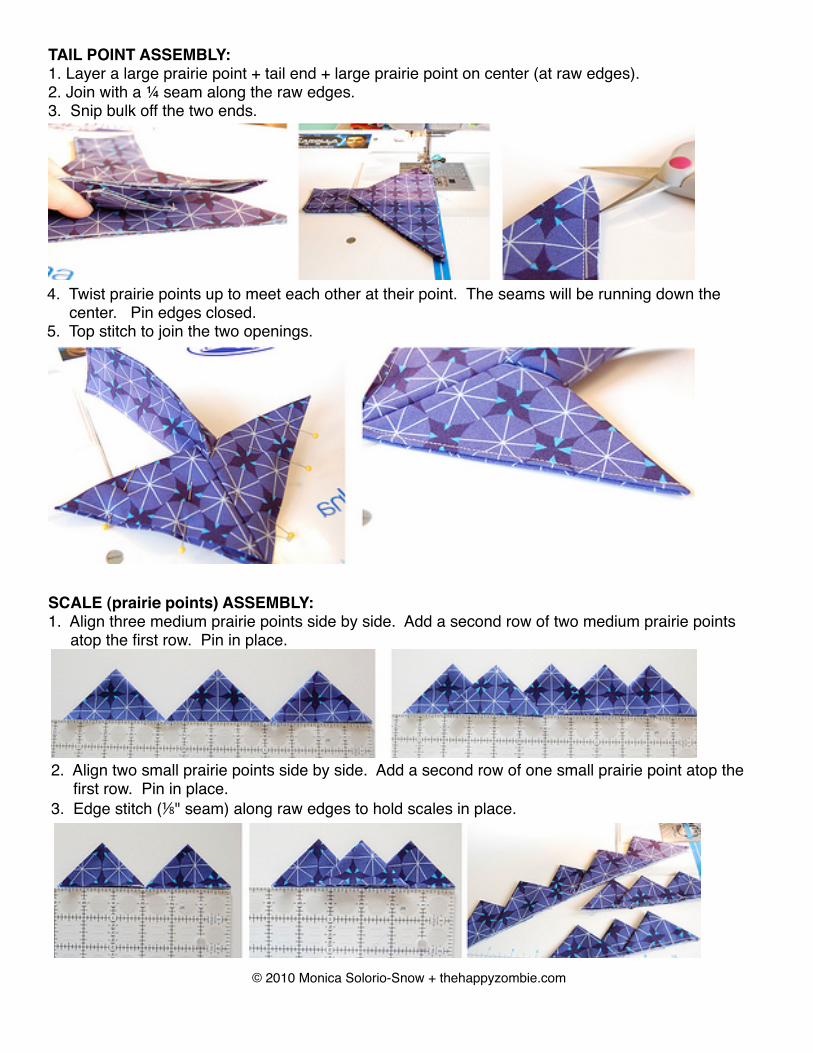
TAIL POINT ASSEMBLY: 1. Layer a large prairie point + tail end + large prairie point on center (at raw edges). 2. Join with a " seam along the raw edges.3. Snip bulk off the two ends.
4. Twist prairie points up to meet each other at their point. The seams will be running down the center. Pin edges closed. 5. Top stitch to join the two openings.
SCALE (prairie points) ASSEMBLY: 1. Align three medium prairie points side by side. Add a second row of two medium prairie points atop the first row. Pin in place.
2. Align two small prairie points side by side. Add a second row of one small prairie point atop the first row. Pin in place.
3. Edge stitch (#" seam) along raw edges to hold scales in place.
© 2010 Monica Solorio-Snow + thehappyzombie.com

POCKETS: 1. Layer a strip of small prairie points at the top end, sandwiched between two RST pocket pieces.2. Pin and join with a "" seam around sides and stop. Leave bottom open for turning. 3. Snip corners to reduce bulk. Make two pocket units.
4. Turn pocket unit inside out and press.5. Center pocket unit on bag fabric. Raw edges meeting at bottom. Pin in place.6. Mark a link across bottom of bottom pocket, 3"" above the pocket's bottom edge. 7. Join pocket unit to bag piece by top-stitching in a continuous "H" formation. Starting and ending at the bottom. Make two units.
ASSEMBLE BAG: 1. On the top left of each bag piece, !" from the left side place the raw edge end of strap A to bag unit. Pin. Repeat for strap B on second bag piece.2. Pin straps away from edges to prevent sewing them into the side seams.3. Layer RST bag piece with liner piece. Pin. Join with a "" seam across the top.
4. Press unit open towards the liner fabric, press second unit open towards the bag fabric.5. Using the 3"" stitched line on the bottom of your pocket as a guide, pin the raw edge of the medium prairie point strip and the raw edge of the tail just a hair above the 3"" line on the edge of the bag piece. Pin.6. Pin layer and pin bag/liner units to each other, RST. Bag fabric atop bag fabric, liner fabric atop liner fabric. 7. Join units with a "" seam around all four sides, leaving a 4!" opening at the center bottom of liner end for turning.
© 2010 Monica Solorio-Snow + thehappyzombie.com

Please do not reproduce, copy, distribute or sell this free pattern. This pattern is intended for your sole personal use
and not to be used for personal profit or gain. Please be cool, please be kind... or Karma's gonna get you in the behind.
Castle Peeps Summer Camp Dragon Slayer Satchel is free for download at: thehappyzombie.com/dragonslayer © 2010 Monica Solorio-Snow + thehappyzombie.com
4. Press unit open towards the liner fabric, press second unit open towards the bag fabric.5. Using the 3"" stitched line on the bottom of your pocket as a guide, pin the raw edge of the medium prairie point strip and the raw edge of the tail just a hair above the 3"" line on the edge of the bag piece. Pin.6. Pin layer and pin bag/liner units to each other, RST. Bag fabric atop bag fabric, liner fabric atop liner fabric. 7. Join units with a "" seam around all four sides, leaving a 4!" opening at the center bottom of liner end for turning.
5. Pinch each corner into a triangle to make a "poochie" or "milk carton corner". Use the seams as your guide to center your triangle. Pin. Draw 6" line across - which is 3" below the point.6. Stitch along the line. Trim excess fabric. Repeat for all corners.
7. Turn bag inside out. Pin the turning opening shut, and edge-sticth to close it.8. Attach the Dritz 1" Center Release Buckle to strap ends according to package instructions.8. Carefully cut the top off a milk jug to make a liner.9. Slay a dragon. But not the nice ones.