1 es1050 cad assignment due the week of january 25 th, 2010
TRANSCRIPT

1
ES1050 CAD Assignment
Due the week of January 25th, 2010

2
PART 1
3 points
3
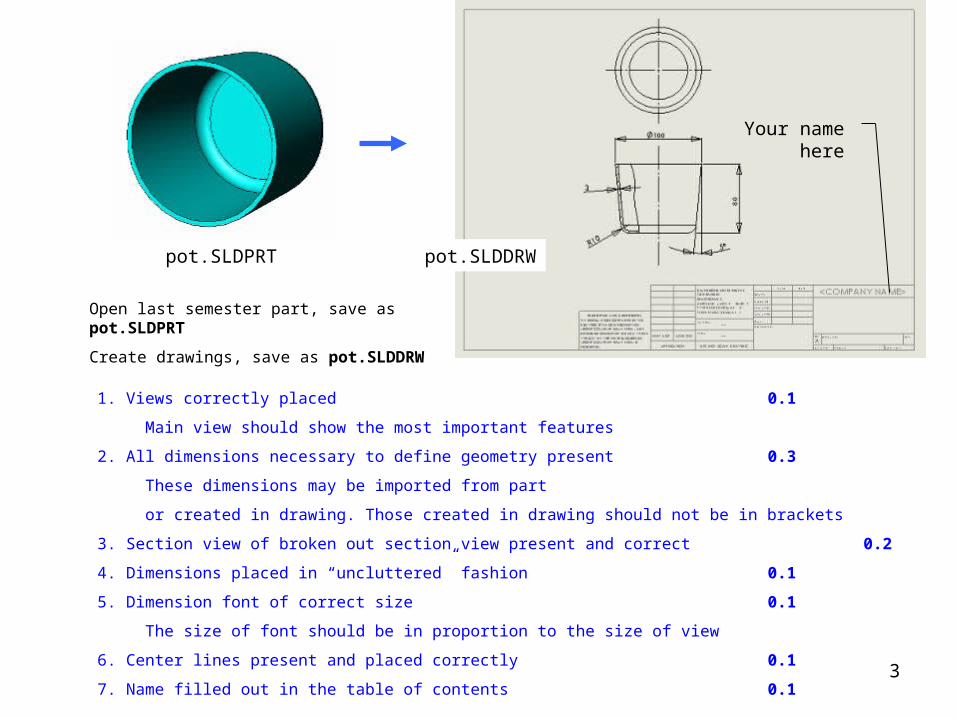
Open last semester part, save as pot.SLDPRT
Create drawings, save as pot.SLDDRW
pot.SLDPRT pot.SLDDRW
Your name here
1. Views correctly placed 0.1
Main view should show the most important features
2. All dimensions necessary to define geometry present 0.3
These dimensions may be imported from part
or created in drawing. Those created in drawing should not be in brackets
3. Section view of broken out section view present and correct 0.2
4. Dimensions placed in “uncluttered” fashion 0.1
5. Dimension font of correct size 0.1
The size of font should be in proportion to the size of view
6. Center lines present and placed correctly 0.1
7. Name filled out in the table of contents 0.1

4
Open last semester part, save as bracket.SLDPRT
Create drawings, save as bracket.SLDDRW
bracket.SLDPRT
Your name here
bracket.SLDDRW
1. Views correctly placed 0.1
Main view should show the most important features
2. All dimensions necessary to define geometry present 0.3
These dimensions may be imported from part
or created in drawing. Those created in drawing should not be in brackets
3. Section view of broken out section view present and correct 0.2
4. Dimensions placed in “uncluttered” fashion 0.1
5. Dimension font of correct size 0.1
The size of font should be in proportion to the size of view
6. Center lines present and placed correctly 0.1
7. Name filled out in the table of contents 0.1

5
Open last semester part, save as hanger.SLDPRT
Create drawings, save as hanger.SLDDRW
hanger.SLDPRT
Your name herehanger.SLDDRW
1. Views correctly placed 0.1
Main view should show the most important features
2. All dimensions necessary to define geometry present 0.3
These dimensions may be imported from part
or created in drawing. Those created in drawing should not be in brackets
3. Section view of broken out section view present and correct 0.2
4. Dimensions placed in “uncluttered” fashion 0.1
5. Dimension font of correct size 0.1
The size of font should be in proportion to the size of view
6. Center lines present and placed correctly 0.1
7. Name filled out in the table of contents 0.1

6
PART 2
4 points

7
Step 01
Extend bracket.SLDPRT as shown,
save as bracket long.SLDPRT
0.5

8
Step 02
Create part as shown, save as wall.SLDPRT
0.5

9
Step 03 Create part as shown, save as bar.SLDPRT
Sketches fully defined 0.6
Geometry correctly defined (geometry has correct dimensions) 0.4

10
Step 04
Assemble wall.SLDPRT and two parts bracket long.SLDPRT as shown. Save as grab bar.SLDASM
Brackets correctly placed on wall 0.4
Brackets fully placed (mates fully define bracket position) 0.6

11
Step 05
Add bar.SLDPRT make sure all assembly components are fully constrained.
Bar placed correctly placed on wall 0.4
Bar fully placed (reference plane must be used to restrain rotation) 0.6

12
PART 3
3 points

13
Open housing.x_t and save it as housing.SLDPRT
Create drawings, save as housing.SLDDRW
next slide
housing.x_t housing.SLDPRT housing.SLDDRW
1. Views correctly placed 0.5
Main view should show the most important features
2. All dimensions necessary to define geometry present 1.0
These dimensions may be imported from part
or created in drawing. Those created in drawing should not be in brackets
3. Section view of broken out section view present and correct 0.6
4. Dimensions placed in “uncluttered” fashion 0.3
5. Dimension font of correct size 0.2
The size of font should be in proportion to the size of view
6. Center lines present and placed correctly 0.3
7. Name filled out in the table of contents 0.1

14 housing.SLDDRW
Your name here
Some dimensions are missing in this drawing!

15
Submitting assignment:
Save the following files to a CD:
Part 01
pot.SLDPRT pot.SLDDRW
bracket.SLDPRT bracket.SLDDRW
hanger.SLDPRT hanger.SLDDRW
Part 02
grab bar.SLDASM use “Pack and go” to make sure you save all assembly components
Give 0 for part 02 if not all components have been saved to CD
Part 03
housing.SLDPRT housing.SLDDRW
Sign CD with your name and studio number
Place CD in a signed envelope and drop of in your studio locker
Deduct one point if CD is not signed or envelope is not signed