1. install ink - disc makers
TRANSCRIPT

Installing Ink Cartridges
1. Install Ink
Open the front cover, and press the ink button circled in the picture below. This will move the Disc Transport Robot to the left, and move the cartridge holders to an accessible position. The red "Status" light will blink.
Remove the ink cartridges from their packaging. Also remove the tape covering the print heads as shown, taking care not to touch the heads or the gold contacts on the back.
June 20, 2007 Page 1 of 18

Installing Ink Cartridges
Install Ink (continued)
Following the illustration below:
1. Place your fingers behind the tabs on the front of each ink holder.
2. Lift the covers upward to open.
3. Place the ink cartridges into their holders taking note to use the correct color-coded holder.
4. Close the covers until they latch into the lower holders as before.
Note: you should never have to force the ink cartridges into their holders. If excessive force is necessary, remove and reinsert the cartridges, or check for any obstructions within the holders.
5. Close the printer cover. This will return the cartridges to their parking position and prevent the print heads from drying out.
June 20, 2007 Page 2 of 18

Installing Ink Cartridges
2. Start Disc Direct
Click on Start, Programs, Disc Works, Disc Direct (or, simply click on the desktop shortcut to Disc Direct.
The first time you run Disc Direct you may see the following:
1. A window may open saying that it is Updating Printer Firmware. This process should not be interrupted. The process modifies the printer's internal firmware so it will have all the features needed for current versions of Disc Direct software.
2. A window may open asking to "Disable AIN on Drive X1", with Yes or No choices. AIN (automatic insert notification) is not required for Disc Direct, and we recommend disabling it.
1 – Where X is the drive letter assigned to your Disc Makers Medley unit.
Now, Disc Direct will proceed with ink alignment.
June 20, 2007 Page 3 of 18

Installing Ink Cartridges
3. Ink Alignment
You should now see the following message on your screen. If you do not see this, with DiscDirect running, raise the lid, and press the Control Button on the Disc Makers Medley unit. Confirm that the ink cartridges are installed, and close the lid. Do NOT click anything at this point:
The Ink Cartridge alignment must be set up to ensure the most trouble free operation of your Disc Makers Medley. A blank Ink-jet Printable disc needs to be loaded into the printer. Lift the front cover as shown.
June 20, 2007 Page 4 of 18

Installing Ink Cartridges
4. Printable Disc
Place two blank Ink-jet Printable discs into the Input Disc Basket as shown. When finished, close the front cover.
June 20, 2007 Page 5 of 18
Installing Ink Cartridges
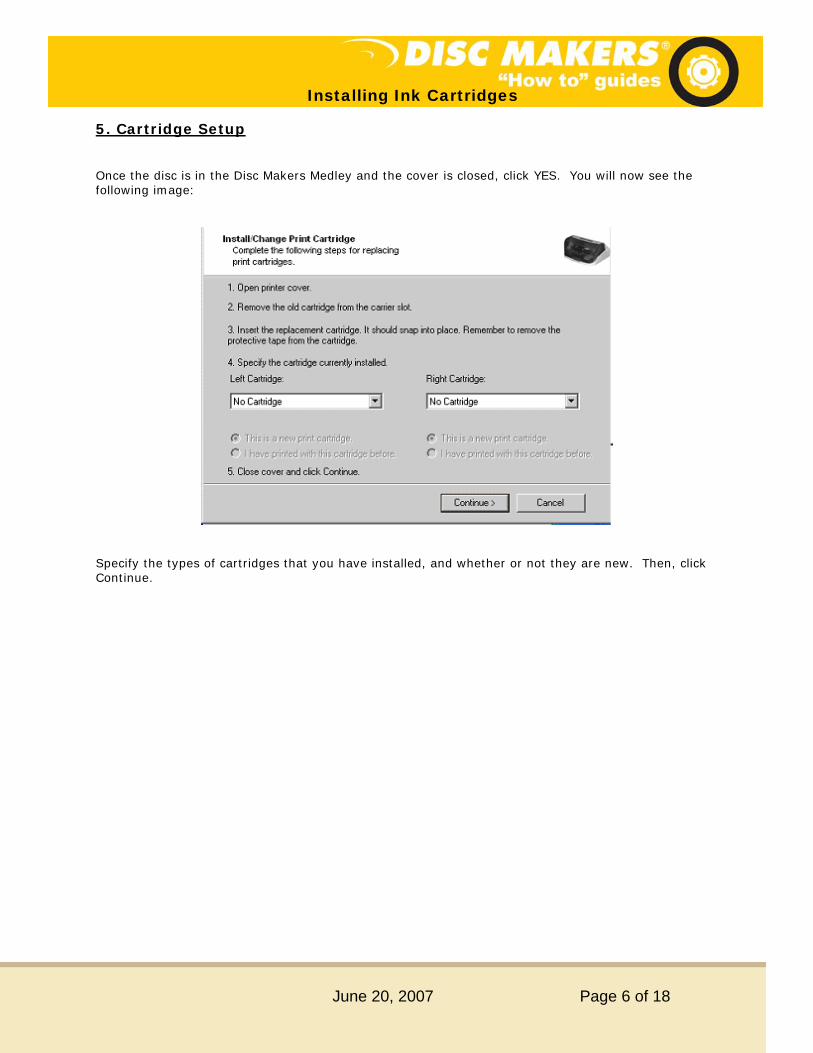
5. Cartridge Setup
Once the disc is in the Disc Makers Medley and the cover is closed, click YES. You will now see the following image:
Specify the types of cartridges that you have installed, and whether or not they are new. Then, click Continue.
June 20, 2007 Page 6 of 18

Installing Ink Cartridges
Cartridge Setup (continued)
On the next screen “Prepare for Alignment,” simply click Continue. The Disc Makers Medley unit will pick one disc, print an alignment image on it, and release it in the output basket.
June 20, 2007 Page 7 of 18
Installing Ink Cartridges
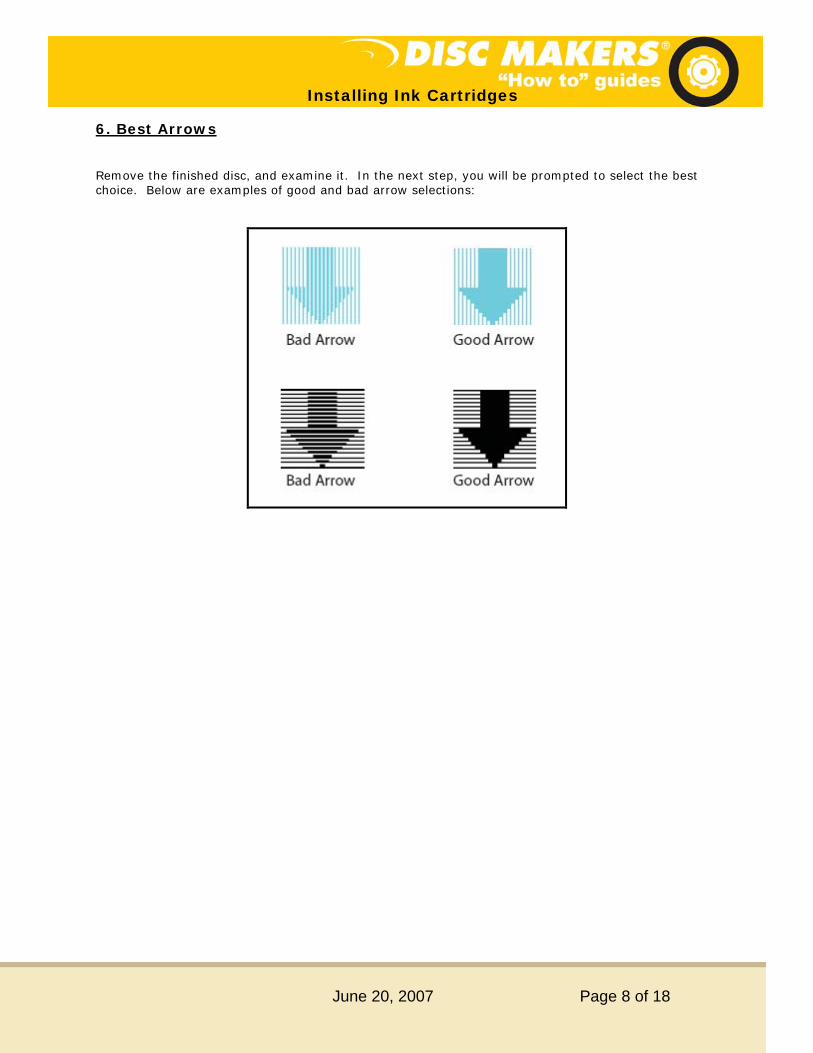
6. Best Arrows
Remove the finished disc, and examine it. In the next step, you will be prompted to select the best choice. Below are examples of good and bad arrow selections:
June 20, 2007 Page 8 of 18

Installing Ink Cartridges
7. Alignment Numbers
Using your best judgment, pick the arrow that stands out the most. If two arrows stand out equally, choose the number in between (i.e., if 8 and 10 look the same, choose 9). Take note of the letter (A, B, C or D) next to each arrow. Enter the value into the correct box. When you are finished, click the “OK” button to close this window (see image below).
June 20, 2007 Page 9 of 18

Installing Ink Cartridges
Alignment Numbers (continued)
After this, a window may be present on your desktop (see following image). If it does not close automatically, click cancel. The main Disc Direct window will now come up. At this point, please close Disc Direct.
June 20, 2007 Page 10 of 18

Installing Ink Cartridges
8. Print Alignment
The first time you run DiscStudio, it will prompt you to set up the printer. Please select the Disc Makers Medley.
DiscStudio must be aligned with your printer before you can print CDs or DVDs accurately. This procedure is only done once unless you change printers. Alignment will be remembered from session to session.
Note: This procedure must be done with at least one blank CD or DVD in the "in" basket. If basket is empty, place a disc into it as described earlier.
Open DiscStudio, click on “File,” then “Printer Alignment.”
June 20, 2007 Page 11 of 18

Installing Ink Cartridges
Print Alignment (continued)
The following window will appear:
This window provides adjustment for the X and Y positions of the printed image. Don't try to set them manually at this point.
Click the Print Alignment Image button and WAIT for the printer to finish. DO NOT CLICK OK. Please wait for the printing to complete, then proceed to Step 17.
June 20, 2007 Page 12 of 18

Installing Ink Cartridges
9. Final Print
The printed disc will look like the following image:
June 20, 2007 Page 13 of 18
Installing Ink Cartridges
Final Print (continued)
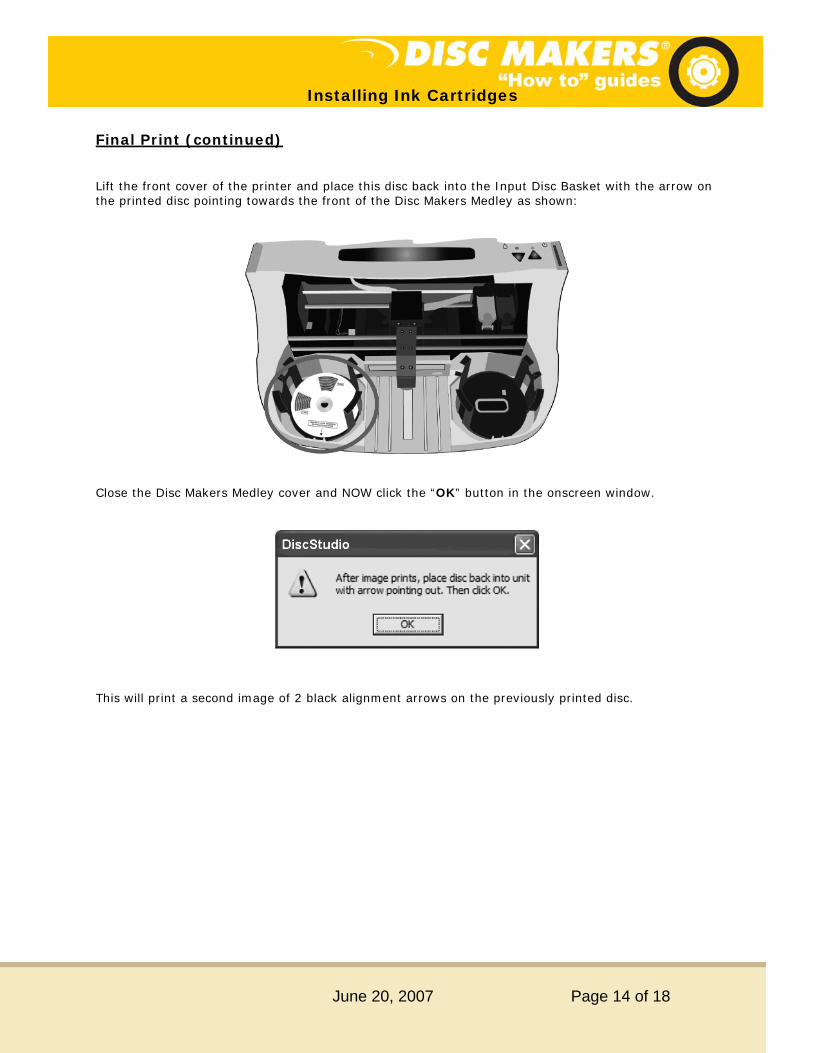
Lift the front cover of the printer and place this disc back into the Input Disc Basket with the arrow on the printed disc pointing towards the front of the Disc Makers Medley as shown:
Close the Disc Makers Medley cover and NOW click the “OK” button in the onscreen window.
This will print a second image of 2 black alignment arrows on the previously printed disc.
June 20, 2007 Page 14 of 18

Installing Ink Cartridges
Final Print (continued)
X alignment
Examine the printed CD carefully, looking first at the area marked X Axis.
Note that (in this example) the tip of the arrow points to the right edge of the blue line under the letter G.
June 20, 2007 Page 15 of 18

Installing Ink Cartridges
Final Print (continued)
To adjust the X Axis alignment, use the pulldown arrow to the right to select the letter G.
Next, use the slider to move the black arrow so that it just touches the right edge of the blue band under the letter G.
You will see that the X Offset has now been set to a new value.
Note: The values for your printer will almost certainly differ from those shown here, which are examples only.
June 20, 2007 Page 16 of 18

Installing Ink Cartridges
Final Print (continued)
Y alignment
Now examine the area of the CD marked Y Axis.
June 20, 2007 Page 17 of 18

Installing Ink Cartridges
Final Print (continued)
The tip of the black arrow is at the beginning of the green band under the letter G.
First, use the pulldown arrow to the right to select the letter G.
Next, use the slider at the left to move the black arrow to the correct position (to match the image above).
You will see that the Y offset has now been set to a new value.
Note: The values for your printer will almost certainly differ from those shown here, which are examples only.
Both X and Y values will be remembered from session to session and need only be set once for each printer that you use.
Congratulations! You have successfully setup your Disc Makers Medley for optimum printing!
June 20, 2007 Page 18 of 18