1 lieap opus index introtable 12-2007 - oregon.gov · project team project managers: bill...
TRANSCRIPT

i OPUS LIEAP-OEAP User Manual, Table of Contents Revised: 02/29/2008
Users Manual Updated February 29, 2008
Presented by: Oregon Housing & Community Services
725 Summer St. NE, Suite B Salem, OR 97301
[email protected] 800.453.5511, Option 6
Victor Merced, Director

ii OPUS LIEAP-OEAP User Manual, Table of Contents Revised: 02/29/2008
OPUS User Manual For Windows
For OPUS System v2.3 and above
Acknowledgments: Project Team Project Managers: Bill Carpenter, Brent Holmes Help Desk: Sharon Bowser, Lori Openshaw, John Rutledge, Sheila Parkins
Developers: Ronald Toub, Brandon Stonier, Kerri Haworth Interface Designer: Suzanne Harris Technical Writer: Sharon Bowser Intern Tester: Kris Kody Program Coordinators: Cecilia Gonzales-Lyons, Energy Program Coordinator
David Kaufman, OEA/E2C2 Program Coordinator Vacant , LIEAP Program Coordinator Notices: OPUS User Manual for Windows For OPUS System v2.3 and above. DISCLAIMER: While Oregon Housing and Community Services takes great care to ensure the accuracy and quality of this manual, all materials are provided without any warranty whatsoever, including, but not limited to, the fitness for a particular purpose. TRADEMARK NOTICES: OPUS system content, operations and corresponding logos are service marks of Oregon Housing and Community Services. All other product names and services used throughout this book are trademarks or registered trademarks of their respective companies. The product names and services are used throughout this book in editorial fashion only and for the benefit of such companies. No such use, or the use of any trade name, is intended to convey endorsement or other affiliation with the manual. Help Us Improve this Manual Your comments are important to us. Please contact us at:
Oregon Housing and Community Services ATTN: OPUS HelpDesk 725 Summer St NE Suite B Salem OR 97309-0409 1-800-453-5511 (press Option #6) E-mail: [email protected]

iii OPUS LIEAP-OEAP User Manual, Table of Contents Revised: 02/29/2008
Table of Contents Introduction Acknowledgments ii Table of Contents iii Frequently Asked Questions Section One - Basic Operations Basic Operations Internet Explorer (IE) Settings 2 Login to OPUS 3
Message of the Day 5 HOME and Log Out screen 5 Log Out / ‘Log Off’ screen 6 Types of Screens and Buttons 6 Screen Navigation 7 Maun Menu / Left Navigation Bar (Left Nav Bar) 8 Section Two - Client Intake - New Client Search 10 Client ‘New’ Search 11 Client New 12 Client View 14 Residence Search 15 Residence New 15 Income & Employer 18 Verifying Data on Views 20 Add Clients to Household 20 What are the Red Icons for? 24 Client Vendor New 25 Household View, Programs- Vendor- Summary 26 Household New Payment, Confirms qualification 27 NEW RELEASE – Update 29 Payment Links 31 Denying a Payment 31

iv OPUS LIEAP-OEAP User Manual, Table of Contents Revised: 02/29/2008
Section Three - Client Intake - Existing Client Search 34 The Household View screen – “The Most Useful Screen” 35 Residence Search 37 Verifying Data on Views 40 Residence Edit 40 Add Client(s) to Existing Household 41 Client(s) Edit 46 Income Edit/Employer or Delete Income/Employer 47 Moves 50 Move Client(s) Household to Unknown 50 Move Household to New Residence 52 Move/Adding Existing Client(s) to Existing Household 54 Move/Merge Household to Existing Residence 56 Merge Household with Another Household 57 Client Vendor Edit, Remove, New Vendor 58 Payment – Edit, Void or Deny 60 Payment Edit 61 Payment Void 63 MANAGEMENT
Note: Sections Four and Five below cover Management 'Permission Only' areas of the OPUS system. Therefore, these screens are only available to assigned fiscal and management personnel to work within.
Section Four - Agency Fiscal - Management Functions Authorizing Pending Payments 67 Batch Payments and Summary Reports 69 Agency Paid and Paid Summary Reports 72 Paid Summary and Reports 74 Section Five - Agency Management Functions Agency* 77 Search 77 View 78 Edit 78 New 79

v OPUS LIEAP-OEAP User Manual, Table of Contents Revised: 02/29/2008
Program* 80 Search/View 81 Edit 81 New 82 Section Five - Agency Management Functions (cont) APC* 85 Search 85 View 87 Edit 87 New 87 88 User 88 Search 89 Possible Disabled User-Reactivating Inactive User 91 New 92 View 93 User Role Edit 93 User Action Edit 94 Delete User 96 Vendor 98 Search 98 View 100 Edit 101 New 102 Section Six – Management - How to Setup a Local Program Creating a Local Program, Tree Structure 105 Create an Agency 106 Create a Program 107 Counties in the OPUS System 109 Create a Grant 110 Creating an APC 111 APC Tree Structure 112 Creating an APC, Parent and Child 113 Verifying the APC Tree Structure 115 Grant Allocation 116

vi OPUS LIEAP-OEAP User Manual, Table of Contents Revised: 02/29/2008
New Grant Allocation 118 Moe Grant/APC 122 Program Funds Available for Payment Assistance 126

1 OPUS LIEAP-OEA Manual, Section 1-Basic Operations Revised 02/29/2008
Section One Basic Operations
Internet Explorer Settings 2
Login to OPUS 3
Message of the Day screen 5
HOME / Log Out 5
Log Out / ‘Log Off’ screen 6
Screen Types and Buttons 6
Screen Navigation 7
Main Menu / Left Navigation Bar (Left Nav Bar) 8

2 OPUS LIEAP-OEA Manual, Section 1-Basic Operations Revised 02/29/2008
Internet Explorer Settings
Internet Explorer (IE) Settings It is likely that internet browser software was installed with the default settings. The default settings need to be adjusted for web-based data entry operations. Making the following adjustments allows the application and database to communicate in ‘real-time’ as information is entered and saved to the database. Setup: 1. Open Internet Explorer (IE). Using the Main Tool Bar, Click Tools, point to Internet Options
(reference figure 1-1). 2. In the Internet Options Panel (middle section of the window under ‘Temporary Internet
Files’, click the Settings button (reference figure 1-1A).
Figure 1-1: internet Options screen. Figure 1-1A: Internet Options Advanced Settings
3. On the Internet Options Panel, in middle section of window under Temporary Internet
Settings, click the Settings button (reference figure 1-1).

3 OPUS LIEAP-OEA Manual, Section 1-Basic Operations Revised 02/29/2008
4. In ‘Settings’ screen, click the option "Every Visit to the Page", then click “OK” button (reference figure 1-2). You are ready to login using OPUS.
Figure 1-2: Settings Panel Logging into OPUS Setup: 1. Start Internet Explorer (IE). 2. Type the address: http://opusprod.hcs.state.or.us/ 3. A popup window will ask you to accept a security certificate, Click the ‘OK’ button. This is the security certificate to protect the database. Note: Check the box next to the phrase, "In the future, do not show this warning", so that you
will not repeatedly see the message popup on each visit to OPUS. 4. On the OPUS screen, click the ‘Login to OPUS’ link (reference figure 1-3A).
Figure 1-3A: Client View - Employer and Income Updated

4 OPUS LIEAP-OEA Manual, Section 1-Basic Operations Revised 02/29/2008
5. On the ‘Login’ screen, type the ‘User Name’ and the password (reference figure 1-3B). For new users, a temporary password issued to by the manager. The user will be prompted to change it on the next screen. The ‘User Name’ is not case sensitive. The ‘Password’ is case sensitive.
Figure 1-3B: Login screen 6. Click the ‘Login’ button. 7. The ‘Change Password’ screen will appear. For the ‘Old Password’; type the temporary
(default) password again (reference figure 1-4).
Figure 1-4: Password change screen. 8. Type a new password (this will be the permanent one to use on a regular basis unless there is
a password reset). Permanent passwords need to be at least eight (8) characters, at least one upper-case letter, at least one lower-case letter, and at least one number or special character in the middle somewhere (characters such as #, *, -, @, $). A password can not begin with a number.
9. In the next box, re-type your new password, to confirm.
Default Password is the ‘Old Password’

5 OPUS LIEAP-OEA Manual, Section 1-Basic Operations Revised 02/29/2008
10. Click the ‘Change’ button. The ‘Agency & Module Select’ screen will appear. Some OPUS users have more than one module to work in, if so, the user has the opportunity to select the module they are approved to work in. Users with one module won’t need to do anything except click ‘submit’. If a user has multiple modules, use the dropdown button in ‘OPUS Module’ to select the required module then click ‘Submit’ (reference figure 1-5).
Figure 1-5: Agency & Module Select screen. After clicking on the ‘Submit’ button, the ‘Message of the Day’ screen will appear. Message of the Day The ‘Message of the Day’ screen is known as the OPUS Home Page. Users will be alerted to notices of upcoming system-upgrades, program updates, and OPUS helpdesk procedures. To initiate a client search, click the ‘Search Client’ link or use the Main Menu, scroll over ‘Client’ to ‘Search’.
HOME and the Log Out Screen The ‘HOME’ and ‘Log Out’ links are located on the Main Menu (reference figure 1-6). The ‘HOME’ link goes to the "Message of the Day" screen.
Figure 1-6: Main Menu - Links for HOME and Log Out screen.

6 OPUS LIEAP-OEA Manual, Section 1-Basic Operations Revised 02/29/2008
To end a session, click the ‘Log Out’ link. The ‘Log Off’ screen will appear. To continue logging off, click the “Yes” button. To cancel from logging off, and return to the last screen visited, click the “No, Go Back” button (reference figure 1-7). The ‘Log Off’ screen has a five minute timer before logging the user totally out. All other OPUS screens have a 20 minute timer. If there isn’t activity in a screen, the system will go to ‘log out’.
Figure 1-7: Log Off screen Types of Screens and Buttons There are four types of screens: ‘Search’, ‘View’, ‘Edit’ and ‘New’. Search Screen The ‘Search’ screen is used to search for existing database records. View Screen A ‘View’ screen provides a view and/or review of information entered. This screen usually appears after saving data from a ‘New’ or ‘Edit’ screen. Edit Screen An ‘Edit’ screen displays existing database records so a user can edit regions/fields requiring updating and to be saved. New Screen A ‘New’ screen creates new records, a new client, a new residence, or a new payment. The Save Button On ‘New’ screens, the “Save” button is used to save information to the database. On ‘Edit’ screens, the “Save Changes” button is available.

7 OPUS LIEAP-OEA Manual, Section 1-Basic Operations Revised 02/29/2008
Screen Timer Each OPUS screen is programmed with a 20 minute timer (reference figure 1-8). If a screen is inactive for more than 20 minutes, the ‘Log Off’ screen will appear. The ‘Log Off’ screen has a five (5) minute timer. You will need to click either “No” or “Yes” within 5 minutes. If a response is not completed within five minutes, the session will end and the user will be logged off. To continue using OPUS, the user must re-log into OPUS. This process is a security measure programmed into the system to protect client and agency information.
Figure 1-8: Screen Timer Note: Log out of the system if leaving your desk for any amount of time. If you have saved each screen you have completed beforehand, you can log-in and go back to where you left off.
Screen Navigation Main Menu, Left Navigation Bar (Left Nav Bar), and Drop-Down Menus OPUS screens have two navigational sections: Main Menu and Left Navigation Bar. Main Menu The ‘Main Menu’ is the horizontal section located on the top area of the screen (reference figure 1-9). The active ‘Agency’ is displayed in the ‘Main Menu’. The main menu provides top level drop-down menus. Drop-down menus appear under: Client, Program, Fiscal, Management, Reports and Help.
Figure 1-9: Main Menu and Left Nav Bar

8 OPUS LIEAP-OEA Manual, Section 1-Basic Operations Revised 02/29/2008
A drop-down menu may include sub-menus when the mouse scrolls over a topic. For each menu item, you may see a black arrow pointing towards the right. When the mouse is scrolled over a menu, the arrow will display additional sub-menu items. In the example above, the ‘Program’ menu has a drop-down menu with a ”Go To” item menu, which has a sub-level menu listing other modules. The menu includes an “Agency” item which leads the user to the Agency- Module Select screen. Left Navigation (Nav) Bar The Left Nav Bar is bar area has text links (reference figure 1-9). Text links change on the ‘Left Nav Bar’, from screen to screen, depending on what screens have been accessed, or need to be completed through the client intake process.

9 OPUS LIEAP-OEA Manual, Section 2 - Client Intake-New Revised 02/29/2008
Section Two Client Intake - New New household records are created in this section. From there, a household (HH) can be enrolled in agency programs, services and household transactions.
Client Search 10
Client “New” Search 11
Client New 12
Client View 14
Residence Search 15
Residence New 15
Income & Employer 18
Verifying Data on Views 20
Add Clients to Household 20
What are the red Icons for? 24
Client Vendor New 25
Household View, Programs- Vendor- Summary 26
Household New Payment, Confirms Qualification 27 NEW RELEASE-Update 29
Payment Links 31
Denying a Payment 31 All SSNs throughout this manual have be covered for confidentiality purposes even though the test database was used.
10 OPUS LIEAP-OEA Manual, Section 2 - Client Intake-New Revised 02/29/2008
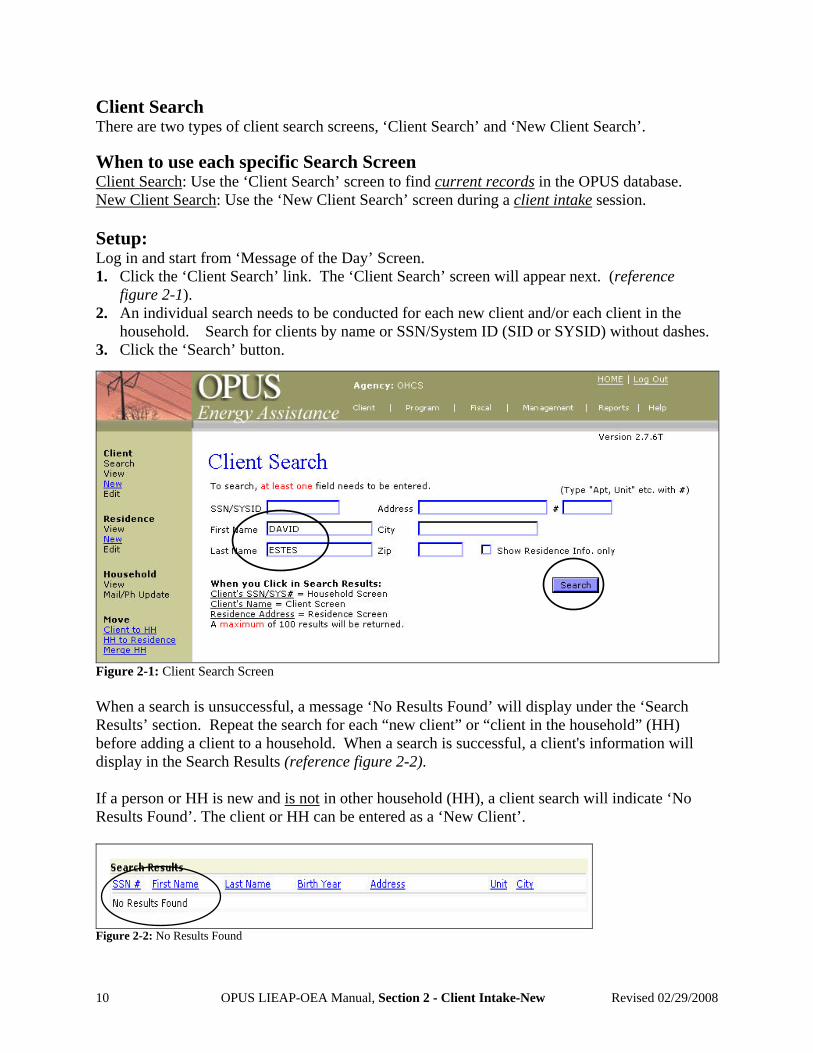
Client Search There are two types of client search screens, ‘Client Search’ and ‘New Client Search’. When to use each specific Search Screen Client Search: Use the ‘Client Search’ screen to find current records in the OPUS database. New Client Search: Use the ‘New Client Search’ screen during a client intake session. Setup: Log in and start from ‘Message of the Day’ Screen. 1. Click the ‘Client Search’ link. The ‘Client Search’ screen will appear next. (reference figure 2-1). 2. An individual search needs to be conducted for each new client and/or each client in the
household. Search for clients by name or SSN/System ID (SID or SYSID) without dashes. 3. Click the ‘Search’ button.
Figure 2-1: Client Search Screen When a search is unsuccessful, a message ‘No Results Found’ will display under the ‘Search Results’ section. Repeat the search for each “new client” or “client in the household” (HH) before adding a client to a household. When a search is successful, a client's information will display in the Search Results (reference figure 2-2). If a person or HH is new and is not in other household (HH), a client search will indicate ‘No Results Found’. The client or HH can be entered as a ‘New Client’.
Figure 2-2: No Results Found

11 OPUS LIEAP-OEA Manual, Section 2 - Client Intake-New Revised 02/29/2008
A search can be completed by any of the fields provided: SSN, first name, last name, birth year, address or system ID. When a client has a system ID (SYSID or SID) different from their social security number, it might be beneficial to remove the SID from the search box, and search only by the first and last name. Client New Search: The ‘Client New Search’ screen finds possible matches using the required search fields. (reference figure 2-3). Setup: On the ‘Client Search New’ screen. 1. Enter required fields: first name, last name, SSN/SID, and date of birth (DOB) (reference
figure 2-3). The “Create ID” button will automatically create an SID to search for a client who may be assigned a system ID versus a SSN. System ID is created by OPUS (or can be manually done): SYSID sequence is as follows: "S" + first 5 letters of the clients first name + month, day, year (MMDDYY) of client's birth date.
2. Click the “Search” button. The search button becomes activated when information is typed into any of the boxes. If “No Results found” is displayed, the client can be added as a new client to the OPUS database (reference figure 2-3).
Note: ‘Search Results’ are displayed for the first 100 records randomly matching the criteria you enter in a given ‘search’. A list resulting up to 100 individual result records are generated randomly (as of the published date of this manual). Specific search criteria entered will result in a more defined search result and will narrow down in the list generated.
Figure 2-3: Client New Search, no match

12 OPUS LIEAP-OEA Manual, Section 2 - Client Intake-New Revised 02/29/2008
Client New This step is only used after determining the client is not in the system and all search attempts have been exhausted. Setup: On the ‘Client Search New’ screen. 1. Click the ‘Add New Member’ button (reference Figure 2-3). The ‘Client New’ screen
appears (reference figure 2-4).
Figure 2-3: Client Search New 2. Client name, birth date, SYSID/SSN is already filled in from being entered on the ‘Client
New Search’ screen. Complete the rest of the new client information. Fields marked * are required. There are several buttons with dropdown arrows for different choices. Title; salutation if necessary. First name, middle name (if necessary), last name. The SSN/SYSID. Use ‘Create ID’ button if SSN is not available. Note: a System ID
is created by OPUS: OPUS creates a SYSID as follows: "S" + first 5 letters of the clients first name + month, day and two digit year of client's birth date. This can be completed manually if desired.
SSN Quality Code. This is to describe if the SSN is full, ‘don’t know’, ‘refuse’ to give one.
Phone number, extension, and type. E-mail address. Gender. Language.
No Results Found

13 OPUS LIEAP-OEA Manual, Section 2 - Client Intake-New Revised 02/29/2008
Education. Ethnicity. Race. Nationality options (up to three). Tribes options (up to three). Mailing Address: The first client created for a household, type their mailing address in
provided boxes. For subsequent clients, the select from drop-down menu will display previous mailing addresses.
Street number, Street direction: S, N, NE, NW, etc. Street name. Street type: Ave, Lane, etc. Unit type: Apt, Unit, PO Box, etc. Enter an apt number or PO Box number. Select the services and benefits client receives. Click the ‘Save’ button.
Figure 2-4: Client New screen.

14 OPUS LIEAP-OEA Manual, Section 2 - Client Intake-New Revised 02/29/2008
Client View The ‘Client View’ screen will appear after a new client record is created or edited (reference figure 2-5). Use this screen to review the accuracy of information entered from the ‘New’ or ‘Edit’ screens. If the client hasn’t been assessed for a program, then you can follow the steps in the following section titled, “Assessment New”. Viewing the HH View screen to verify information will be covered several times throughout this manual.
Figure 2-5: Client View with Income/Employer info screen

15 OPUS LIEAP-OEA Manual, Section 2 - Client Intake-New Revised 02/29/2008
Residence Search A residence may exist in the database but may be linked to an old household record. If a client is located at an old address or linked to another household, go to Section 3 - Move Client(s) to Unknown and follow the steps. This process moves clients from an old residence record in order for you to use it for processing a new intake.
Note: If a client is “Active” in another program enrollment, possibly in another OPUS module for services, the client can not be moved from the HH without being exited from the ‘other’ open enrollment. The OPUS user can search other modules he/she has access to or contact their agency’s OPUS Administrator for assistance. If the agency does not have access to another module and receives an error message “The client can not be moved due to another open enrollment, contact OPUS Helpdesk [email protected]”.
Residence New
Setup: While in the ‘Client Search’ screen. 1. In the address box, type a street number and street name (with spaces between as needed). If a street number isn’t available, use a "%" in front of the street name, such as % Stevens St. 2. If there is an apartment or unit number, use one of these formats: Apt #, Unit #, or Space #. 3. Type a city and zip code to narrow the results to this region of the state (reference figure 2-6). Note: At any time, searching for a client by address, the percent symbol (%) is considered a ‘wild card’. Enter the percent sign followed by the street name then click ‘Search’, the system will search for any addresses close to matching what you entered.
Figure 2-6: Client Search, Residence New Search – no results found. 4. When a residence is found in the database, the address, city and zip code will be displayed in
the ‘Search Results’.

17 OPUS LIEAP-OEA Manual, Section 2 - Client Intake-New Revised 02/29/2008
5. If the residence is not in the result list, you’ll see ‘No Results Found’. A new household and new residence can be created (reference figure 2-6). When household members have not been found in the database, click the ‘New’ link under ‘Client’ on the ‘Left Nav Bar’. The goal is to find any records from the client’s application first, and find out which household members already exist in the database before creating new records (reference figure 2-6).
Figure 2-7: Client Search New, add new member.
No results found

18 OPUS LIEAP-OEA Manual, Section 2 - Client Intake-New Revised 02/29/2008
Income & Employer
Setup: Using the ‘Client View’, click on the individual household member ‘SSN/SYSID’ to open ‘Client View’ screen. 1. Click the button “New Income/Employer” (reference figure 2-8). The ‘Income & Employer
New’ screen will appear next.
Figure 2-8: Income/Employer 2. On the Income and Employer screen, (reference figure 2-9). Type or Select:
* Source (such as employer's name) * Verified how, verified by who * Type of the income: ie. SSI * Verified Date, who verified * Start Date * Enter Comments as needed * Frequency * Employer Information & address * Asset Value (follow steps as required)
Click the ‘Save’ button, the ‘Client View’ screen will re-appear with the income displayed. If the client has an employer, you can enter this information by following the same steps done for income (reference figure 2-9). If the client has another employer or source of income, click the ‘Add Another’ button, or if done, click ‘Done’.

19 OPUS LIEAP-OEA Manual, Section 2 - Client Intake-New Revised 02/29/2008
Figure 2-9: Income & Employer Click the ‘Save’ button and the ‘Client View’ screen will appear next with the income added and displayed in the Income section (reference figure 2-9).
Figure 2-10: Income & Employer screen.

20 OPUS LIEAP-OEA Manual, Section 2 - Client Intake-New Revised 02/29/2008
Verifying Data on Views In general, for all view screens, you should review to verify data entered. If information needs to be edited, the ‘Edit’ links or buttons are available to update or correct information. Most "View Screens" are for viewing purposes, the one exception is the ‘Household View’ screen. Intake workers would use this screen to add new vendors. When the household composition is complete, proceed to the next section titled Vendor New. Add Clients to Household Adding clients to an existing household is easiest when at least one client and the residence have been created initially (reference figure 2-11).
Figure 2-11: Adding new client to HH Setup: On the ‘Household View’ screen: 1. On the Left Nav Bar, under ‘Client’, click the ‘New’ link. The ‘Client New’ screen will
appear. If the client’s HH member is not listed, click ‘Add New Member’ (reference figure 2-12).

21 OPUS LIEAP-OEA Manual, Section 2 - Client Intake-New Revised 02/29/2008
Some household information will be previously entered due to the first client enrolled such as: address, home phone number. Drop-down menus are available to select from for subsequent household member(s) entered or you can manually enter new mailing addresses or phone numbers for each individual.
Figure 2-12: Add new HH member search

22 OPUS LIEAP-OEA Manual, Section 2 - Client Intake-New Revised 02/29/2008
Adding Clients to Household (cont).
Figure 2-13: HH member new 2. For each household member, enter or select from the following:
Salutation, if needed, First Name, and Last Name. Date of birth and SSN or click the ‘Create System ID’ button. As stated in creating a
new client, a System ID is created by OPUS: OPUS creates a SYSID as follows: "S" + first 5 letters of the clients first name + month, day and two digit year of client's birth date.
Phone number. Note: If the client's phone number is the same as another client in the household, use the drop-down menu to select an existing home number.

23 OPUS LIEAP-OEA Manual, Section 2 - Client Intake-New Revised 02/29/2008
PH Extension, PH Type. Select gender, language, ethnicity, race, nationality, and education level. Mailing Address. Select an address from the drop-down menu if the mailing address
has been entered previously for another member in household, or enter a new address. Enter an E-mail address, if needed. Select the Services and Benefits for this person. Click ‘Save’ Button.
Figure 2-14: HH member added view The ‘Client View’ screen will appear (reference figure 2-14). If changes need to be made, click the ‘Client Edit’ link in the left Nav Bar, or the ‘Edit Client’ button. Make the necessary changes, and click ‘Save Changes’ button. More clients can be added to the household as necessary by repeating the same steps. If all the clients have been added to the household, proceed to the ‘Household View’ screen to finish the client intake process, see next section for this process. Note: There are two sections on the Household View screen that need to be completed before a client or household can qualify for LIEAP/OEA program assistance:
Client-Vendor Section Household Summary Section

24 OPUS LIEAP-OEA Manual, Section 2 - Client Intake-New Revised 02/29/2008
What are the RED ICONS for? There are two red icons that are displayed at the top of client screens (reference figure 2-15). The red "person" icon represents an active client record added, and the red "house" icon represents an active physical residence created for this household. Scrolling the mouse over the red person icon shows the name of the client that is being worked on and the red house icon will display the physical address for the current household.
Figure 2-15: Household view Red Icons
Household View Household view provides an overview of the household view screen and instructions for completing the final steps for a household to receive program assistance.
Setup: On the ‘Client View’ screen: Use the ‘Left Nav’ bar, click the ‘Household View’ Link, the ‘Household View’ screen will appear or scroll over ‘Client’ in the top navigational bar and HH view will appear. (reference figure 2-16). This screen is organized as follows:
HH Members information - top section Programs - below client section Vendors - left side under program Household Summary - right-side under program section Addresses - left side under vendor section Phone numbers - left side under address section
Figure 2-16: HH View, Programs, Vendor, Summary screen.

25 OPUS LIEAP-OEA Manual, Section 2 - Client Intake-New Revised 02/29/2008
In the ‘Programs’ section, under ‘HH Members’, program assistance records the household received are listed by year. This screen is mainly a "view only" screen, except for two sections in the middle of the screen: ‘Client-Vendor’ and ‘Household Summary’ sections. Both sections need to be completed to qualify household for assistance.
Client Vendor New
Setup: On the ‘Household View’ screen, click the ‘New Vendor’ button in the Client-Vendor section.
The ‘Client Vendor New’ screen will appear (reference figure 2-17). Type or Select (fields marked * are required): Select the Applicant's name. Enter the Name on the Account (this may/may not be the Applicant). Client's Account number. Vendor Name. Verify by Intake Worker initials. Intake Date. Verification Type. Comments for Vendor, if needed. Click the Save button to save.
Figure 2-17: Client Vendor New

26 OPUS LIEAP-OEA Manual, Section 2 - Client Intake-New Revised 02/29/2008
The ‘Household View’ screen will re-appear with the vendor information entered in the Client Vendor section (reference figure 2-18, next page). To add another vendor, click the ‘New Vendor’ button and repeat the setup steps listed above.
Figure 2-18: New Vendor section on the Household View screen. If all the vendor information is complete, proceed to the next section ‘Household Summary’.
Household Summary This section provides steps to complete the household summary section on the ‘Household View’ screen. Setup: There are two areas on the ‘Household View’ screen (reference figure 2-17) is the ‘Household Summary’ section has two sections to be completed.
Household Type - drop-down list. This describes the composition of the household. Subsidized Status Boxes: This id for when the household receives a housing voucher to
live in an approved subsidized housing development. Always check the box when a residence is subsidized for the LIEAP program. If the ‘Household Subsidized’ box is checked when the residence information is initially entered (reference ‘Add Residence’ screen). The ‘Residence Subsidized’ box should be checked when working on the household summary. ‘HH Comments’ should be used for any documentation related to household.

27 OPUS LIEAP-OEA Manual, Section 2 - Client Intake-New Revised 02/29/2008
Note: All users with "view-only" access will be able to view the comments entered within the energy module only. It is strongly suggested to enter the ‘Date’ followed by comments and completed by intake worker initials. This will allow future agency OPUS users to follow the record(s) when staff turn-over takes place. Click the ‘Save’ button. The Household View screen will "blink" while the database is saving the information, then the screen will remain steady. Household - New Payment, Confirms Qualification This process is to initiate a new payment. This step is only completed once ALL household and vendor information has been verified and/or updated. The OPUS database calculates the income sources compared with formulas under the ‘Payment New’ screen and confirms that a household qualifies for program assistance.
While in the ‘Household View’, using the top ‘Main Menu’; scroll the mouse over ‘Program’ and down to ‘New Payment’ (reference figure 2-18). The ‘Payment New’ screen will appear.
Select an APC for your agency = Agency/Program/County. APC Example: ACCESS-LP08-JAC-LIEAP 2008
Click the ‘Load’ button (reference figure 2-19). OPUS will load the agency’s APC information with a program formula to calculate and match all household data with the program requirements. If a household qualifies or does not qualify for program requirements, an ‘Accepted’ or ‘Denied’ message will be displayed next to the ‘Payment Eligibility Status’ area (reference figure 2-20).
Figure 2-19: Main menu - drop down options.
Figure 2-20: Payment New - APC Select and Load.

28 OPUS LIEAP-OEA Manual, Section 2 - Client Intake-New Revised 02/29/2008
Once the household is accepted and can receive services (payment), complete a ‘Payment New’ by selecting or entering the following fields: (fields marked * are required):
Applicant Intake Date Your initials will be displayed in the Intake Worker’s box Weatherization check box: check the box “if the household is recommended” Payment Type (Refer to program requirements) Authorization numbers can be taken from the application, or if desired, OPUS
will generate the authorization number automatically when the ‘Save’ button is activated (reference figure 2-20). The authorization number will be generated and it will be displayed on the ‘Payment View’ screen.
Select Service Code Enter Dollar amount of assistance for each vendor (refer to program requirements
for details on limitations). Click the ‘Save’ button to save payment information.
Figure 2-21: Payment New (before the new release) screen. IMPORTANT: On the ‘Payment New’ or ‘Payment Edit’ screen if the APC has changed or been selected to create a new payment, be sure to re-click the “Load” button in order to re-qualify under the new APC chosen. Work through the New/Edit screen and save (reference figure 2-21).

29 OPUS LIEAP-OEA Manual, Section 2 - Client Intake-New Revised 02/29/2008
Note: New Release. On the ‘Payment New’ screen, if there is an adjustment in the ‘Applicant Information or in ‘Payment Information’ without loading a New APC or issuing a new payment, one of the two sections will disable (reference figure 2-21A).
Figure 2-21A: Payment New – Any adjustments made, one section will disable. Example: The “Applicant Information”, ‘Eligible in HH information was changed from “3” to “2” followed by using the tab key. At that time, the “Payment Information” In order to complete a payment with new information, a new APC needs to be selected and loaded.
In this example; the ‘Eligible in HH’ number was changed to ‘2’. By making this change, the ‘Payment Information became inactive. The drop-down arrows, comments section and the ‘Deny’ ‘Save’ buttons are deactivated.

30 OPUS LIEAP-OEA Manual, Section 2 - Client Intake-New Revised 02/29/2008
The ‘Payment View’ screen will appear next. Verify all information entered is correct. This step is considered to be a final review step for intake workers. The ‘Payment View’ screen displays the OPUS generated authorization number or the authorization number from the application.
Figure 2-22: Payment View The payment is now to be in "Pending Status", until management performs the payment authorization function. If edits need to be done on a payment, this can be done only when the payment is in "Pending Status". To edit, click the ‘Edit Payment’ button on the ‘Payment View’ screen. The payment detail section (at the bottom of screen) displays the batch number, check number and payment authorization number (reference figure 2-21). You can access the Payment View screen from the Household View Screen or Main Menu [Program > Search > Payment] as often as needed to track the payment status dates from ‘pending’, ‘authorized’, ‘batched’, to the final ‘agency paid’ status.

31 OPUS LIEAP-OEA Manual, Section 2 - Client Intake-New Revised 02/29/2008
Payment Links The ‘Household View’ screen displays under the ‘Programs’ which the household receives assistance. A household may receive assistance from several programs or different time periods. For each program there is an associated payment link that displays a ‘Payment View’ screen. This concludes issuing a payment" to a qualified household who is eligible for program assistance in the LIEAP/OEA program (reference figure 2-24). The next section describes how to “Deny a Payment.”
Payment Link Authorization # Payment Status
Figure 2-24: Household View Programs Denying a Payment There may be times when an agency needs to "manually" deny a payment to a household, and process a denied payment. Note: All ‘denied’ payments need to have comments recorded in the comments section of the screen. The details as to “why the payment was denied should be recorded”, (reference figure 2-25). It is strongly suggested to enter the ‘Date’ followed by comments and completed by intake worker initials. This will allow future agency OPUS users to follow the record(s) when staff-turn over takes place.
Figure 2-25: Deny a Payment with comments.

32 OPUS LIEAP-OEA Manual, Section 2 - Client Intake-New Revised 02/29/2008
Setup: 1. Start on ‘Payment New’ screen and complete the steps in the topic “Household - New
Payment, Confirms Qualification”. 2. Enter an authorization number, or allow OPUS to generate one by leaving it blank. 3. Enter comments about why a household is denied a payment. 4. At the end of the screen (Payment New), notice the "Deny" button next to the Save button Note: On the Payment Edit screen, the ‘Deny’ button is located at the bottom-right side of the screen next to the ‘Save’ button. Click the ‘Deny’ button. Once the Deny button is clicked, the Payment View screen will appear, (reference figure 2-26). If needed, a payment in "Deny" status can be edited on the ‘Payment Edit’ screen and the household re-qualified for program assistance.
Figure 2-26: Payment View with Status as ‘Deny’.

33 OPUS LIEAP-OEA Manual, Section Two - Existing Clients Revised 02/29/2008
Section Three Client Intake – Existing The user will learn how to update and edit existing household records in the OPUS database in this section. These records include client, residence, income, employer, vendor and household summary. Using data-entry screens, all records updated and edited prepare the database to assimilate required information to qualify a household for program assistance.
Client Search 34
The Household View screen - “The Most Useful Screen” 35
Residence Search 37
Verifying Data on Views 40
Residence Edit 40
Add Client(s) to Existing Household 41
Client(s) Edit 46
Income Edit/Employer or Delete Income/Employer 47
Moves 50
Move Client(s) Household to Unknown 50
Move Household to New Residence 52
Move/Adding Existing Client(s) to Existing Household 54
Move/Merge Household to Existing Residence 56
Merge Household with Another Household 57
Client Vendor Edit, Remove, New Vendor 58
Payment - Edit, Void or Deny 60
Payment Edit 61
Payment Void 63 All SSNs throughout this manual have be covered for confidentiality purposes even though the test database was used.

34 OPUS LIEAP-OEA Manual, Section Two - Existing Clients Revised 02/29/2008
Client Search Search the OPUS database for existing client information before creating new records and to prevent duplicate records. Setup: On the ‘Message of the Day’ Screen. 1. Click the ‘Search Client’ link on the ‘Left Nav Bar’ or from the ’Main Menu’ under ‘Client’. 2. For each client in the household, and with one search at a time, type a person’s first, last
name OR SSN/SYSID - without dashes (reference figure 3-1). Note: The search results will display only 100 records results at random that match the criteria you entered. It’s important to provide as much search criteria as possible, so that your results will narrow down to a reasonable number returned records. Or the search results will indicate ‘No Results Found’. 3. Click the ‘Search’ Button. The search button becomes activated when information is typed
into any of the boxes.
Figure 3-1: Client Search Screen When the search is successful, the client's information will show in the ‘Search Results’ section (reference figure 3-1). Repeat a search for each client in household. In the ‘Search Results’, client's system ID, first name, last name, address, city and zip code will display.

35 OPUS LIEAP-OEA Manual, Section Two - Existing Clients Revised 02/29/2008
Figure 3-2: Client search with results When a search is unsuccessful, a message ‘No Results Found’ will display under the ‘Search Results’. Be sure to repeat a search for each client in the household before adding a client to a household. Note: Searching by other fields on the search screen, such as first name or last name can be attempted. Be sure to remove the SYSID/SSN when searching by first and last name. This allows the system to find a person if they have a different ID number. 4. Estes was found in the database. The blue and underlined links in the columns signify links
to other screens. After a link has been used, it turns to a dark pink color for a period of time (reference figure 3-2).
The following linked columns take you to respective view screens:
Click on SSN/SYSID to view ‘Household View’ screen. Click on the first or last name links to view the ‘Client View’ screen. Click on the address, unit or zip to view the ‘Residence View’ screen.
The ‘Household View’ Screen "The Most Useful Screen" It is recommended that following a client search, to view a client’s household View Screen by clicking the client’s social security number or system ID number. From the Household View screen, the user will be able to see if there are other client(s) associated with the household (HH). If a user finds household members in a specific HH, the user won't have to search each client individually, since the client was found within the HH and the user will know they have a record in the database. Click Estes’ SYSID to bring up the HH view.
The link has been left in for an example SSN which in not real.

36 OPUS LIEAP-OEA Manual, Section Two - Existing Clients Revised 02/29/2008
Household View: (cont.)
Figure 3-3: HH view The ‘Household View’ screen will appear (reference figure 3-3). On Estes’ HH View screen, it displays the following: 1. Estes’ household includes other members. 2. The Estes’ address. If the address on the application is different from what is displayed on
the HH view screen, the address will need to be updated. To update the address and/or phone number, click on ‘Residence View’ from the ‘Left Nav Bar’. The ‘Residence View’ will appear (reference figure 3-4).
Figure 3-4: Residence View and Edit

37 OPUS LIEAP-OEA Manual, Section Two - Existing Clients Revised 02/29/2008
3. The HH includes a third person who meets the definition of a HH member. If a new application was to include a fourth person not yet in the system, the HH information would require an update to add another person. A review of the ‘Household View’ screen from the initial client search makes it easy and quick to discover any information that would require to be updated. When updating residence information, always search for the new address first. From a residence search, you can determine how to proceed from one of the following scenarios:
If the residence address is found in the database without a household living in it, the
address can be used for the household. Use guidelines in topic Move Household to Residence.
If the address is found in the database with a household in it and the HH is not active in a
program, then the “old HH” can be moved into “Unknown” and the new HH can use the address. Use the guidelines in topic Move Household to Unknown, and Move Household to Residence.
If a HH is in the system with an old address and the new residence does not exist, it can
be added then moved to the HH from the old residence to the new one, using steps in topic Move Household to a new Residence. Remember to complete a “Residence Search” before adding a new one.
Residence Search A residence may exist in the database but may be linked to an old household record. If a client is located at an old address or linked to another household, go to Section 3 - Move Client (s) to Unknown and follow the steps. This process moves clients from an old residence record in order for you to use it for processing a new intake. Note: If a client is “Active” in another program enrollment, possibly in another OPUS module for services, the client can not be moved from the HH without being exited from the ‘other’ open enrollment. The OPUS user can search other modules he/she has access to or contact their agency’s OPUS Administrator for assistance. If the agency does not have access to another module and receives the message that the client can not be moved due to another open enrollment, contact OPUS Helpdesk [email protected]. Setup: On the ‘Client Search’ screen. 1. In the address box, type a street number and street name (with spaces between as needed).
If you don't have a street number, use a "%" in front of the street name, such as % Stevens St. 2. If there is an apartment or unit number, use one of these formats: Apt #, Unit #, or Space #. 3. Type a city and zip code to narrow the results to this region of the state. Note: At any time, searching for a client by address, the percent symbol (%) is considered a ‘wild card’. Enter the percent sign followed by the street name then click ‘Search’, the system will search for any addresses close to matching what you entered (reference figure 3-5).

38 OPUS LIEAP-OEA Manual, Section Two - Existing Clients Revised 02/29/2008
Figure 3-5: Client Search
When a residence is found in the database, the address, city and zip code will be displayed in the ‘Search Results’.
If the residence is not in the result list, you’ll see ‘No Results Found’. You can begin
creating a new household and a new residence (reference figure 3-7). When household members have not been found in the database, click the ‘New’ link under “Client” on the Left Nav Bar. The goal is to find any records from the client’s application first, and find out which household members already exist in the database before creating new records.
Figure 3-6: HH View with address

39 OPUS LIEAP-OEA Manual, Section Two - Existing Clients Revised 02/29/2008
If the residence address is found in the system: the address, city and zip code will be displayed in the results (reference figure 3-6). If this address isn’t correct, update the residence information in the following order:
• Create a New Residence • Move a Household to New Residence
To complete the ‘Move a Household to New Residence’, follow the steps in the ‘Moves’ section titled ‘Move household to a New Residence’. On the Left Nav Bar, click the Residence ‘New’ link. The ‘Residence New’ screen will appear (reference figure 3-8). Reference “Section Two; Client Intake, Residence New” for additional information to create new residences.
Figure 3-7: Client Search for residence
Figure 3-8: Residence New

40 OPUS LIEAP-OEA Manual, Section Two - Existing Clients Revised 02/29/2008
Verifying Data on Views In general, for all view screens, you should review to verify data entered. If information requires to be updated or revised, the ‘Edit’ link or button is available to update or correct information. Most "View Screens" are for viewing purposes, the one exception is the ‘Household View’ screen. Intake workers would use this screen to add new vendors. Residence Edit
Setup: On ‘Client View’ screen. 1. On the ‘Left Nav Bar’, click the ‘Residence View’ link and the ‘Residence View’ screen will
appear next. On the Left Nav bar under ‘Residence’, click the ‘Edit’ link. The ‘Residence Edit’ screen will open. Edit the required information then click ‘Save’. Everything else stays the same as detailed on the client’s application (reference figure 3-9A).
Figure 3-9: in the Figure 3-9A: Residence View, Edit Client View
Figure 3-9B: Residence Edit screen

41 OPUS LIEAP-OEA Manual, Section Two - Existing Clients Revised 02/29/2008
Add Client(s) to Existing Household Adding clients to an existing household is easiest when at least one client and the residence have been initially created.
Setup: On the ‘Search Client’ screen, as mentioned in the previous topics, searching for a client who needs to be added to an existing household prevents creating duplicate records. If a search locates clients living in a different household, follow steps in topic Merge Household with another Household (reference figure 3-10).
Search Household to Add Client(s) to: 1. Search for the household member that needs to be added to the HH. On the ‘Search Client’
screen, type in the client’s name or SSN/SYSID. Click ‘Search’ button.
Figure 3-10: Client Search
2. In the results, click the client’s SSN number link to access ‘Household View’ screen (reference figure 3-11).
Figure 3-11: Client Search New with results

42 OPUS LIEAP-OEA Manual, Section Two - Existing Clients Revised 02/29/2008
3. Under the ‘HH Members’ section, click the ‘New Client’ button (reference figure 3-12). The ‘Client Search New’ screen will appear next.
Figure 3-12: HH view, New Client button
Figure 3-13: Add new HH member Search

43 OPUS LIEAP-OEA Manual, Section Two - Existing Clients Revised 02/29/2008
On the Client Search New screen, under ‘Possible Matches’, clients will appear if the name and or SSN/SYSID number is close to the search criteria entered. If the ‘Possible Matches’ do not match the client in question, click on the ‘Add New Member’ button. The ‘Client New’ screen will appear. Fields marked with * are required. 4. Type or select the following:
Salutation, as needed. First Name, Middle Name, (if required), Last Name. Date of Birth. SSN or choose SYSID instead. Phone number is the same as the others in HH, should not have to re-enter. Gender. Language. Ethnicity. Education. Mailing Address.
In the example above (reference figure 3-13), the mailing address will be the same as the others in the household. Address selections can be made from the drop-down menu previously entered for other clients in household and skip the steps below.
Street Number, Street Name, Street Direction such as: S, N, NE, NW, etc. Street Type such as: Ave, Lane, etc. Unit Type such as: Apt, Unit, Bldg, PO Box, etc., # - for an apt number or PO Box #. Select City. E-mail address, not needed. Services and Benefits the client currently receives. Click the ‘Save' Button to save the client information (reference figure 3-14, next page).
The ‘Client New’ screen is on the next page alone to capture all the details.

44 OPUS LIEAP-OEA Manual, Section Two - Existing Clients Revised 02/29/2008
Figure 3-14: HH Client New Click the ‘Save’ button.

45 OPUS LIEAP-OEA Manual, Section Two - Existing Clients Revised 02/29/2008
Figure 3-15: HH member view selection Double-check the information to ensure it is correct. On the ‘Client View’ screen, a user can select another household member from the top right drop-down menu called ‘Select Another Client in HH’. This is an easy way to get to another HH member ‘Client View’ screen if information requires to be updated, (reference figure 3-15). The figure below shows in detail the HH selection (reference figure 3-15A).
Figure 3-15A: HH member view selection

46 OPUS LIEAP-OEA Manual, Section Two - Existing Clients Revised 02/29/2008
Client Edit Setup: On the ‘Client View’ screen, working with the dropdown box ‘Select Another Client in HH’.
Figure 3-16: Client view to edit information 1. Once the correct name is selected, click the ‘Go’ button. The ‘Client View’ screen will
appear next. On the Left Nav Bar, click the ‘Client Edit’ link, or click the ‘Edit Client’ button under the ‘Client Information’ section. The ‘Client Edit’ screen will appear next (reference figure 3-16, above).
Figure 3-16A: Client Edit screen 2. On the ‘Client Edit’ screen, all fields will be in edit mode for information to be corrected or
changed. Certain drop-down boxes contain information that was entered for the other HH members. If this information is correct, it can be chosen or the information can be manually added (reference figure 3-16A).

47 OPUS LIEAP-OEA Manual, Section Two - Existing Clients Revised 02/29/2008
If the phone number needs to be updated, dashes do not need to be typed in. As the tab button is used to exit a cell, OPUS will automatically insert the dashes, (reference figure 3-16A, previous page).
When the information has been verified and correct, click the ‘Save Changes’ button at the bottom of the screen (reference figure 3-16B). The ‘Client View’ screen will appear with the most current changes.
Figure 3-16B: Client edit ‘Save Changes’
Income Edit/Employer or Delete Income/Employer Setup: 1. On the ‘Client View’ screen, use "Select Another Client in HH" to select the required HH
member whose information requires to be updated. The ‘Client View’ screen will appear next (reference figure 3-17).
Figure 3-17: Client View Edit income/employer

48 OPUS LIEAP-OEA Manual, Section Two - Existing Clients Revised 02/29/2008
2. To edit income or an employer, click the ‘Edit’ button on the ‘Client View’ screen. The ‘Income & Employer Edit’ screen will appear. Some cells require manual input and some cells have drop-down boxes to choose information from. Make appropriate changes or updates as needed. Click the ‘Save’ button (reference figure 3-18). The ‘Client View’ screen will re-appear. Note: Fields marked with * are required for an income source to be saved.
Figure 3-18: Income & Employer Edit screen Click the ‘Save’ button when complete.

49 OPUS LIEAP-OEA Manual, Section Two - Existing Clients Revised 02/29/2008
3. To delete an income, click on the ‘Delete’ button. A “Windows Internet Explorer” confirmation will appear with the question “Are you sure you want to delete the selected income?” If the income is to be deleted, click the ‘OK’ button. If the income is not to be deleted, click ‘Cancel’ (reference figure 3-19, deleting income).
Figure 3-19: Income & Employer delete 4. If a new income needs to be added, click the ‘New Income’ button. Note: Complete all
required information using the same steps used to edit client information. Click the ‘Save’ button when complete (reference figure 3-18).

50 OPUS LIEAP-OEA Manual, Section Two - Existing Clients Revised 02/29/2008
Moves There are six different ways to process moves in OPUS:
1. Move Client(s)/Household to Unknown 2. Move Client (s) to Household 3. Move/Adding Client(s) to Existing Residence 4. Move/Merge Household to New Residence 5. Move/Merge Household to Existing Residence 6. Merge Household with another Household
The following examples demonstrate move scenarios. Move Client(s)/Household to Unknown Paul Morgan submitted his application for assistance. Searching the database using the client’s SSN, Paul Morgan was not in the database. A search for the client’s current address: 7114 SE Terrace Trails Dr., Portland OR 97266 was completed and found the address in the database with a different client identified as Lisa and Steven Adams. Setup: 1. On the ‘Client Search’ screen, enter Paul Morgan’s address and click the ‘Search’ button.
The ‘Search Results’ indicates Lisa and Steven Adams affiliated with the address. Click on Lisa’s SSN to get to the ‘Household View’ screen (reference figure 3-20).
Figure 3-20: Client Search by address

51 OPUS LIEAP-OEA Manual, Section Two - Existing Clients Revised 02/29/2008
2. This HH needs to be moved from the existing address which is being occupied by Paul Morgan. To move the family from the residence, click on ‘Move Entire Household to Unknown’ (reference figure 3-21).
Figure 3-21: HH view. Move Entire Household to Unknown. The HH view screen stands alone to show where the ‘Move’ buttons are located.

52 OPUS LIEAP-OEA Manual, Section Two - Existing Clients Revised 02/29/2008
3. The database will require the user to confirm they want to move the HH to unknown. Click the ‘OK’ button to complete the move to unknown. When the HH has been moved out of the residence, the HH address will appear as ‘unknown’ (reference figure 3-22).
Figure 3-22: HH View. Move HH to unknown. Address shows ‘unknown’. Move Household to New Residence 1. To move a new client to a household, use ‘Client Search New. If the client does not appear
in ‘Possible Matches’, click on ‘Add New Member’ (reference figure 3-23).
Figure 3-23: Client Search New, Add New Member

53 OPUS LIEAP-OEA Manual, Section Two - Existing Clients Revised 02/29/2008
2. The ‘Client New’ screen will appear. Some information will already be filled in (reference figure 3-24). Complete the balance of the client information, then click ‘Save’.
Figure 3-24: Client New screen.

54 OPUS LIEAP-OEA Manual, Section Two - Existing Clients Revised 02/29/2008
Moving-Adding Existing Client(s) to Existing Residence 1. To move an existing client to an existing residence, locate the designated client who is being
moved. Click on SSN to open up ‘Client View’ (reference figure 3-25). Click on ‘Client to HH’ link in the ‘Left Nav Bar’. The ‘Move Client’ screen will appear (reference figure 3-25A).
Figure 3-25: Move existing client to existing residence
Figure 3-25A: Move Client Enter the ‘Client(s) FROM’ - SSN and/or name and enter ‘TO Household’ SSN and/or name, click ‘Search’ (reference figure 3-25A).

55 OPUS LIEAP-OEA Manual, Section Two - Existing Clients Revised 02/29/2008
2. The client(s) to be moved ‘FROM’ and the ‘TO Household’ information will appear. Check the appropriate box(es) to complete the move. Click on ‘Move Client(s) to Household’ button (reference figure 3-26). Windows Internet Explorer comment will appear asking for a confirmation of the move ‘Are you sure you want to move the selected clients?
Figure 3-26: Move Client(s) to Household 3. Click ‘OK’ if the client(s) are correct to complete the merge (reference figure 3-26A).
Figure 3-26A: Confirmation to move client(s) to HH

56 OPUS LIEAP-OEA Manual, Section Two - Existing Clients Revised 02/29/2008
4. The ‘Household View’ screen will appear with the clients merged (reference figure 3-26B).
Figure 3-26B: Household view, clients merged. Move/Merge Household to Existing Residence In ‘Household View’, in the Left Nav Bar, #1, click ‘Mail/Ph Update’ link. Check the appropriate information to be updated in ‘Household Info Update’ screen then #2, click ‘Update Changes’. “Windows Internet Explorer” will request confirmation ‘Are you sure you want to Update Household information? Click #3, ‘OK’. The clients in the HH will be updated at the same time with the same address and phone number (reference figure 3-27).
Figure 3-27: Merge HH to Residence
#1
#2
#3

57 OPUS LIEAP-OEA Manual, Section Two - Existing Clients Revised 02/29/2008
Merge Household with Another Household 1. In ‘Household View’ locate the household you want to merge with another household. On
the Left Nav Bar, click ‘Merge HH’ link (reference figure 3-28).
Figure 3-28: HH View after merge. 2. #1, fill in the ‘Move FROM’ ‘Merge TO’ then: #2, click “Search’. Check the appropriate
circle(s) to be updated, #3, click ‘Merge Households’. “Windows Internet Explorer” will request confirmation ‘Are you sure you want to Update Household information? #4, click ‘OK’. The clients in the HH will be updated at the same time with the same address and phone number (reference figure 3-28A).
Figure 3-28A: HH View processing merge.
#1 #2
#3
#4
AND

58 OPUS LIEAP-OEA Manual, Section Two - Existing Clients Revised 02/29/2008
3. The Household View screen appears. The move is completed (reference figure 3-28B).
Figure 3-28B: HH merge completed. Client Vendor Edit, Remove, New Vendor Periodically, client vendor records need to be updated with new account numbers, or a household may be serviced through a different vendor. Setup: On the Household View screen. Find the ‘Client-Vendor’ section, under the ‘Programs’ section. To edit, remove or add a new vendor, click the appropriate button and the desired screen will appear.
Figure 3-29: Vendor Edit/Remove/New Vendor screen.

59 OPUS LIEAP-OEA Manual, Section Two - Existing Clients Revised 02/29/2008
The ‘Client Vendor Edit’ screen allows household information to be updated. The ‘Client’ drop-down box will allow different names to be chosen within the specific household.
Figure 3-29A: Client Vendor Edit screen. The ‘Client Vendor New’ screen allows a new vendor to be used for a specific client (reference figure 3-30).
Figure 3-30A: Client Vendor New screen

60 OPUS LIEAP-OEA Manual, Section Two - Existing Clients Revised 02/29/2008
The ‘New Vendor’ button will allow the vendor to be removed from the client’s records. Notice: This button initiates a double check asking ‘Are you sure you want to Remove Vendor’ (reference figure 3-30B).
Figure 3-30B: Client Vendor Remove screen. Payment Edit, Void and Deny At times, a client’s payment assistance record needs to be edited to change something about a payment. At other times, a payment may need to be voided or denied due to program limitations, or depleted program funds. On the ‘Household View’ screen, find the ‘Programs’ section, under the client information section. Programs that a household has received assistance from will be listed as a link (blue and underlined text) to the associated payment view screen (reference figure 3-30). If the link has been used within a short period of time the color would be a dark pink. The household view screen offers a "quick" view of information about a payment such as the: amount, check number, date, authorization number, payment type and payment status. Only a payment in "Pending Status" can be edited, if needed. Once the payment has been authorized by a manager and labeled "Authorized" under the Payment Status column, the payment can not be edited.
Figure 3-31: HH view, Program Payment view screen

61 OPUS LIEAP-OEA Manual, Section Two - Existing Clients Revised 02/29/2008
Payment Edit Setup: On the Household View screen. 1. Find the Programs section, under the household information section.
Figure 3-32: HH View Program, Payment view screen. 2. Click the ‘Payment’ link you want to edit “blue and underlined link”. The Payment View
screen will appear (reference figure 3-32). When a link has been used previous within a short period of time the link can be a different color (dark pink). This can be used as a quickly located tool to find a link previously reviewed.
Figure 3-32A: Payment View – to Edit screen. 3. The ‘Payment View’ screen provides details about a specific payment. At the bottom of the
screen, is a section called ‘Payment Information by Vendor’. This section provides a tracking system, by vendor, for each stage of a payment cycle from "Pending" to "Agency Paid".
4. Click the ‘Payment Edit’ button. The Payment Edit screen will appear (reference
figure 3-32A). Payments can only be edited in ‘Pending’ status.
62 OPUS LIEAP-OEA Manual, Section Two - Existing Clients Revised 02/29/2008
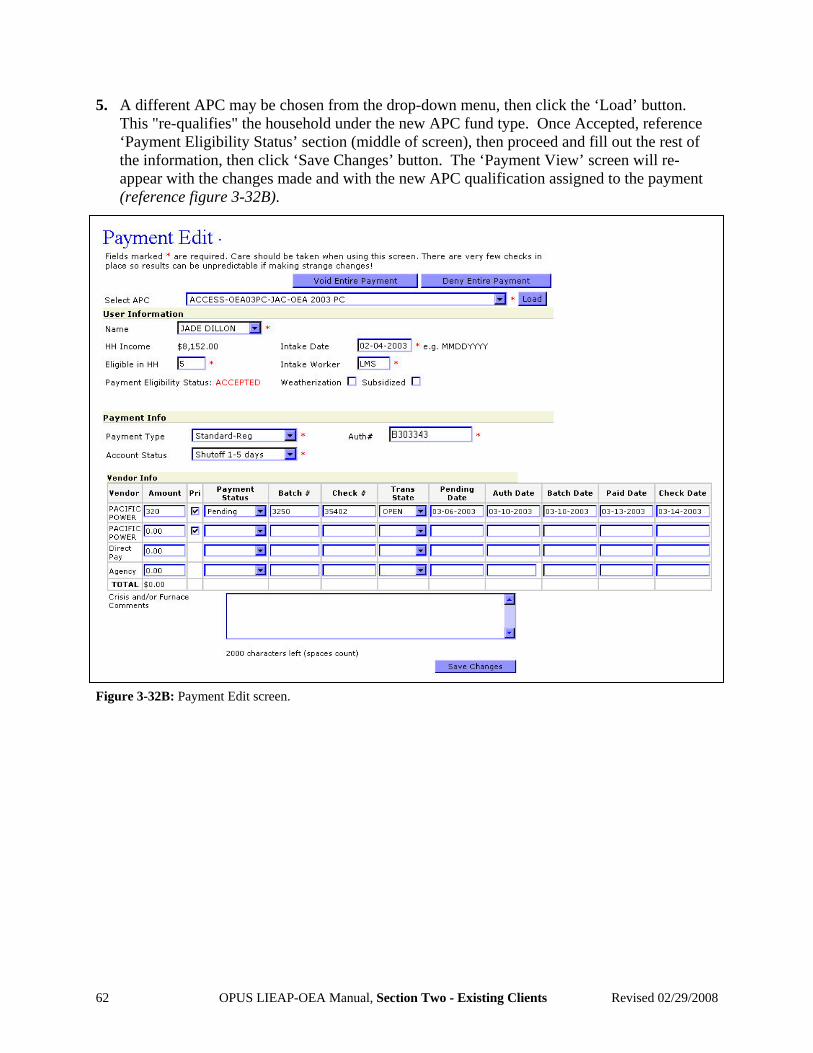
5. A different APC may be chosen from the drop-down menu, then click the ‘Load’ button. This "re-qualifies" the household under the new APC fund type. Once Accepted, reference ‘Payment Eligibility Status’ section (middle of screen), then proceed and fill out the rest of the information, then click ‘Save Changes’ button. The ‘Payment View’ screen will re-appear with the changes made and with the new APC qualification assigned to the payment (reference figure 3-32B).
Figure 3-32B: Payment Edit screen.

63 OPUS LIEAP-OEA Manual, Section Two - Existing Clients Revised 02/29/2008
Pending Status
Payment Void A Payment can only be voided if it is in a ‘Pending Status’. In a similar way, a user can edit a payment or deny it, as long as the payment is in ‘Pending’ status. In general, it will be a rare occasion to void payments in OPUS, unless there is a specific reason such as a depletion of grant funds, or some other reason. Therefore, the ‘Payment View’ and ‘Payment Edit’ screens may be used frequently to change a pending payment’s information. Setup: 1. On the Household View screen, locate the ‘Programs’ section located under the household
information section (reference figure 3-33).
Figure 3-33: Household View – Program links 2. Under ‘Programs’, click the payment link that is in the ‘Pending’ status needing to be voided.
The ‘Payment View’ screen will appear.

64 OPUS LIEAP-OEA Manual, Section Two - Existing Clients Revised 02/29/2008
3. Click on the ‘Edit Payment’ button (reference figure 3-33B).
Figure 3-33B: Payment Edit – Agency – to void screen. 4. The ‘Payment Edit – Agency’ screen will appear. In the comments box, enter the reason why
the payment is being voided. It should be a standard operating procedure to enter ‘Date’, ‘Comment(s) and the ‘intake worker’s initials’ (reference figure 3-33C).
Figure 3-33C: Payment Edit – Agency to Void Payment screen

65 OPUS LIEAP-OEA Manual, Section Two - Existing Clients Revised 02/29/2008
4. Click the ‘Void Payment’ button at top (reference figure 3-33D). The ‘Payment View’ screen will re-appear with the payment labeled ‘Voided’ in the Payment Detail Section in the lower part of the Payment View screen.
Figure 3-33B: Payment View – Voided screen.

66 OPUS LIEAP-OEA Manual, Revised 02/29/2008 Section 4 M1: Agency Fiscal Functions
M1 Section Four Agency Fiscal Functions This section covers how to authorize payments, batch payments by specific vendors, and complete the final paid functions.
Authorize Pending Payments 67
Batch Payments and Summary Reports 69
Agency Paid and Paid Summary Reports 72
Paid Summary & Reports 74

67 OPUS LIEAP-OEA Manual, Revised 02/29/2008 Section 4 M1: Agency Fiscal Functions
Authorize Pending Payments
Setup: ‘Management authorizes client assistance payments in OPUS. 1. Using the ‘Household View’ screen, on the ‘Main Menu, scroll the mouse over ‘Fiscal’. A
drop-down menu will appear. Scroll down to ‘Authorize’ and click. The ‘Authorize Payment’ screen will appear (reference figure 4-1).
Figure 4-1: Fiscal-Authorize drop-down screen. 2. In the top portion of ‘Authorize Payment’, select agency's APC (Agency, Program, County)
from the drop-down menu and click the ‘Search’ button (reference figure 4-2).
Figure 4-2, Part 1: Authorize payment APC – Search screen.
Figure 4-2, Part 2: APC Authorize Payment Search Results - Totals screen.

68 OPUS LIEAP-OEA Manual, Revised 02/29/2008 Section 4 M1: Agency Fiscal Functions
On the right side, above the ‘Amount’ column, the ‘Total Pending’ amount is displayed. In the ‘Search Results’ area, payments waiting to be verified and authorized by a manager is located (reference figure 4-2). Note: The button with a blue diamond shape labeled ‘Print Pending Payments’ is a feature used to print out all the pending payments. This allows the user to view all the pending payments and verify information instead of trying to scroll through 50-100 pending payments on the computer. If an individual payment needs to be edited, click the ‘Search Payment’ link on the ‘Left Nav’ bar. On the ‘Payment Search’ screen, search for the payment by the authorization number (reference figure 4-2). In the ‘Client’ column, the ‘Client’ name is a link; underlined and blue. Clicking on the client's name, the client’s ‘Payment View’ screen will appear in a new internet browser window and display the individual payment. The client ‘Payment View’ screen allows you to verify and check for payment accuracy. Close this window when you’re done verifying the payment’s details (reference figure 4-3).
Figure 4-3: Payment View. Note: Any payment with a ‘Pending Status’ can be edited. The ‘Payment View’ window will not allow a payment to be edited. Editing a payment must be done in the client's ‘HH View’ screen. In the ‘Programs’ section, click the appropriate ‘Program’ link and edit the payment the following the steps in ‘Section 3, Client(s) Edit’. Once the payment has been edited, you can return to the ‘Authorize Payment’ screen to finish the authorization process.

69 OPUS LIEAP-OEA Manual, Revised 02/29/2008 Section 4 M1: Agency Fiscal Functions
3. Select the appropriate payment(s) under the “A” column or click the ‘Check All’ button at bottom of screen and every payment will be automatically checked for payment (reference figure 4-4).
Figure 4-4: Authorize Payment screen. The ‘Authorize Payment’ screen has a table with a right-side column which has the following information with balances (reference figure 4-2):
Total = the total of payments selected to be authorized. Available = the total funds available for pending payments. Remaining = the remaining funds available after payments on this screen have been
authorized. The ‘Remaining” row may show a negative balance if pending payments exceed the available amount to spend.
4. Once payments have been verified and selected, click the ‘Authorize’ button at the bottom
(reference figure 4.2). The ‘Authorize Payment’ screen will “blink”, and re-display any remaining unauthorized payments that were not previously selected. The ‘Available’ funds section will show a balance for future for payments for the specific agency APC on the right-side under the ‘Amount’ column (reference figure 4-2).
If more payments need to be authorized, repeat steps 1-4; above until the authorized payments process phase has been completed. If payments from another APC need to be paid, select the required APC from the drop-down menu, click ‘Search’ and repeat the same steps (1-4) listed above. After completing these steps, managers can proceed to ‘Batch Payments and Reports’. Batch Payments and Reports. This section provides an overview of the batch payment process. Batch payments can be viewed by APC, Payment or Vendor. In most cases, it is recommended to view batches by Vendor.
Column ‘A’ Reference step 3 or use ‘Check All’ button.

70 OPUS LIEAP-OEA Manual, Revised 02/29/2008 Section 4 M1: Agency Fiscal Functions
Setup: On the ‘Authorize Payment’ screen. 1. Using the main menu, scroll the mouse over ‘Fiscal’, scroll down to ‘Batch’, to ‘Vendor’.
The Batch by Vendor screen will appear next.
Figure 4-4: View Batched Payments by Vendor. 2. On the ‘Batch Vendor Payments’ screen, use the drop-down to select the appropriate
‘Program’, then click ‘Search’ (reference figure 4-5).
Figure 4-5: Batch Vendor Payments – Search. In the example, Central Lincoln PUD (Newport) is listed for the Program – CSSEULIEAP2, which was selected from the drop down menu. In most cases, there will be several vendors listed with a number of transactions, and the total payment amounts for each vendor displayed (reference figure 4-6).
Figure 4-6: Batch Vendor Payments view.

71 OPUS LIEAP-OEA Manual, Revised 02/29/2008 Section 4 M1: Agency Fiscal Functions
3. To batch payments for vendors, select the appropriate vendors required for the batch under column "B", and click the ‘Batch’ button. The ‘Batch Summary Reports’ search screen will appear (reference figure 4-7).
Figure 4-7: Batch Summary Reports – Load. ‘Batch Summary Reports’ provide the total batch figures of transactions and payments associated with a batch number. There are five buttons total. Three report buttons are provided: Payment Detail, Payment Register, and Fiscal Reimbursement Register. One button is for ‘Fiscal Reimburse Register’. One button is for ‘Mail List by Batch Number’ (reference figure 4-8).
Figure 4-8: Batch Summary Reports. The next step shows how to complete the ‘Agency Paid’ functions and generate the ‘Paid Summary Reports’. This step instructs how to designate batched payments with a ‘Paid’ status.

72 OPUS LIEAP-OEA Manual, Revised 02/29/2008 Section 4 M1: Agency Fiscal Functions
Agency Paid and Paid Summary Reports The ‘Agency Paid’ screen is used to enter check numbers and check dates for vendor payments. When this step is completed, this information is displayed on a client’s ‘Household View’ screen and allows an agency to track payment status (reference figure 4-9).
Setup: On the Authorize Payment screen. 1. Using the ‘Main Menu’, scroll the mouse over ‘Fiscal’, down to ‘Paid’ and click ‘Agency’.
The "Agency Paid" screen will appear.
Figure 4-9: Agency Paid Search screen. 2. Select a ‘Batch #’ from the drop-down menu and click the ‘Load’ button (reference
figure 4-10).
Figure 4-10: Agency Paid load screen.

73 OPUS LIEAP-OEA Manual, Revised 02/29/2008 Section 4 M1: Agency Fiscal Functions
3. Each row in the table has a ‘Check Date’ column, and a ‘Check number’ column to enter
check information. The check date can be entered without a check number (not required). Select individual payments or click the ‘Check All’ button, under the "P" column. Click the ‘Mark Paid’ button located at bottom of the screen (reference figure 4-11).
Figure 4-11: Agency Paid with check # and date displayed. 4. The Batch Summary & Reports screen will appear next. The "Agency Paid" screen will re-
appear without data so you may select another batch to load and enter check information. When data entry is complete, verify the information then proceed to the next Topic - Paid Summary Reports.

74 OPUS LIEAP-OEA Manual, Revised 02/29/2008 Section 4 M1: Agency Fiscal Functions
Paid Summary and Reports Setup: On the ‘Batch Summary’ screen. 1. Use the ‘Main Menu’, scroll the mouse over ‘Fiscal’, down to ‘Paid’ and click on ‘Summary’
(reference figure 4-12).
Figure 4-12: Main Menu Paid Summary Search screen. 2. Select the batch number from the drop-down menu and click the ‘Load’ button. The ‘Paid
Summary Reports’ screen will appear the total transactions in the batch and the total dollar amount of a batch (reference figure 4-12A).
Figure 4-12A: Paid Summary Reports Load – Search screen.

75 OPUS LIEAP-OEA Manual, Revised 02/29/2008 Section 4 M1: Agency Fiscal Functions
Paid Summary Reports entail: ‘Payment Detail’, ‘Payment Register’ and ‘Fiscal Reimbursement Register’ and are available to view and download to keep on file or submit to OHCS for fiscal reimbursement purposes. These reports are similar to the ‘Batch Summary Reports’ except these are documented with "Mark Paid" status (Reference figure 4-13).
Figure 4-13: Paid Summary Reports This step completes the manager role of processing client and vendor payments through the fiscal payment cycle; from the ‘Pending Status’ phase to the ‘Paid’ phase.

76 OPUS LIEAP-OEA Manual, Revised 02/29/2008 Section 5 M2: Agency Management Functions
M2 Section Five Agency Management Functions Program coordinators and managers will learn how to use the management screens: Agency, Program, Grant, APC, User and Vendor. Most screens are processes that involve setting up programs funded thru OHCS, local programs which are temporary local programs, or agency match funds that are used to assist low income families to pay energy bills. Agency * 77 Search 77 View 78 Edit 78 New 79Program * 80 Search/View 81 Edit 81 New 82APC * Agency Program County 85 Search 85 View 87 Edit 87 New 87User 88 Search 89 Possible Disabled User-Reactivating Inactive User 91 New 92 View 93 User Role Edit 93 User Action Edit 94 Delete User 96Vendor 98 Search 98 View 100 Edit 101 New 102
Topics marked with an * above are fully explained in detail in the “How to Setup a Local Program” section of the manager’s manual. All SSNs throughout this manual have be covered for confidentiality purposes even though the test database was used.

77 OPUS LIEAP-OEA Manual, Revised 02/29/2008 Section 5 M2: Agency Management Functions
Agency Screens The ‘Agency’ screen allows information to be updated or to add new records for an agency such as address, phone, etc. There are four Agency screen types: Search, Edit, View and New. Agency Search The ‘Agency Search’ screen has fields to search by agency name, address, abbreviation, city and phone. Click the ‘Search’ button. The ‘Search Results’ section will display any agency matching the search criteria entered (reference figure 5-1).
Figure 5-1: Main Menu, Management – Agency screen.
Figure 5-1A: Agency Search screen
Setup: On the Message of the Day screen. 1. Using the ‘Main Menu’, scroll the mouse over ‘Management’. The drop-down menu will
appear, click on ‘Agency’ (reference figure 5-1). The ‘Agency Search’ screen will appear next (see Figure 5-1A).
2. Enter the required agency abbreviation or name. Example: ABBR: ‘OHCS’, click the ‘Search’ button.
3. The agency entered will be displayed in the results. Click on the ‘Agency Name’ to open the ‘Agency View’ screen.

78 OPUS LIEAP-OEA Manual, Revised 02/29/2008 Section 5 M2: Agency Management Functions
Note: If the agency name doesn’t appear in the ‘Search Results’, a new agency can be created by following steps in section titled Agency New (reference figure 5-2).
Figure 5-2: Agency View Agency View The ‘Agency View’ screen (reference figure 5-2) provides a view only screen with the agency information. To edit an agency’s information, click the ‘Edit Agency’ button on right-side of screen, or on the ‘Left Nav Bar’. The ‘Agency Edit’ screen will appear next. Agency Edit The ‘Agency Edit’ screen provides editing capability to enter or update information.
Figure 5-3: Agency Edit screen.

79 OPUS LIEAP-OEA Manual, Revised 02/29/2008 Section 5 M2: Agency Management Functions
Setup: On the ‘Agency Edit’ screen (reference figure 5-3). The following fields can be updated. Note:
All fields marked * are required before saving. Agency Name Agency Abbreviation Agency tax payer ID Contact Phone and Fax numbers Physical address Mailing address
Click the ‘Save Changes’ button. The ‘Agency View’ screen will appear next with the updated information. Agency New Setup: Using the ‘Agency Search’ screen, the agency in question did not appear. The ‘Search Results’ displays ‘No matches’. To create a new agency follow the steps listed: 1. On the ‘Left Nav Bar’, under ‘Agency, click the ’New’ link or click on ‘Add Agency’
(reference figure 5-4). The ‘Agency New’ screen will appear next (reference figure 5-5).
Figure 5-4: Agency Search, No match – New screen. 2. Enter or Select (all fields marked * are required).
Agency Name Agency Abbreviation Tax Payer ID Contact Phone and Fax numbers Physical address Mailing address

80 OPUS LIEAP-OEA Manual, Revised 02/29/2008 Section 5 M2: Agency Management Functions
3. Click ‘Save’ button. The ‘Agency New’ screen will appear next (reference figure 5-5).
Figure 5-5: Agency New screen. Program Screens Program screens allow an agency to update or create local programs in OPUS. There are four program screen types: ‘Search’, ‘View’, ‘Edit’ and ‘New’. In most cases, programs have already been created in OPUS for agencies by OHCS so that an agency can utilize it in the system. OPUS has been developed specifically for OHCS managed programs. At the agency level, if additional third party grant funds become available, the OPUS system can be utilized for local grant programs. Agencies must use the LIEAP-OEA module business rules and reports. To learn more on how to setup a local program in OPUS, reference the section titled ‘Setting up a Local Program’ of this management manual.
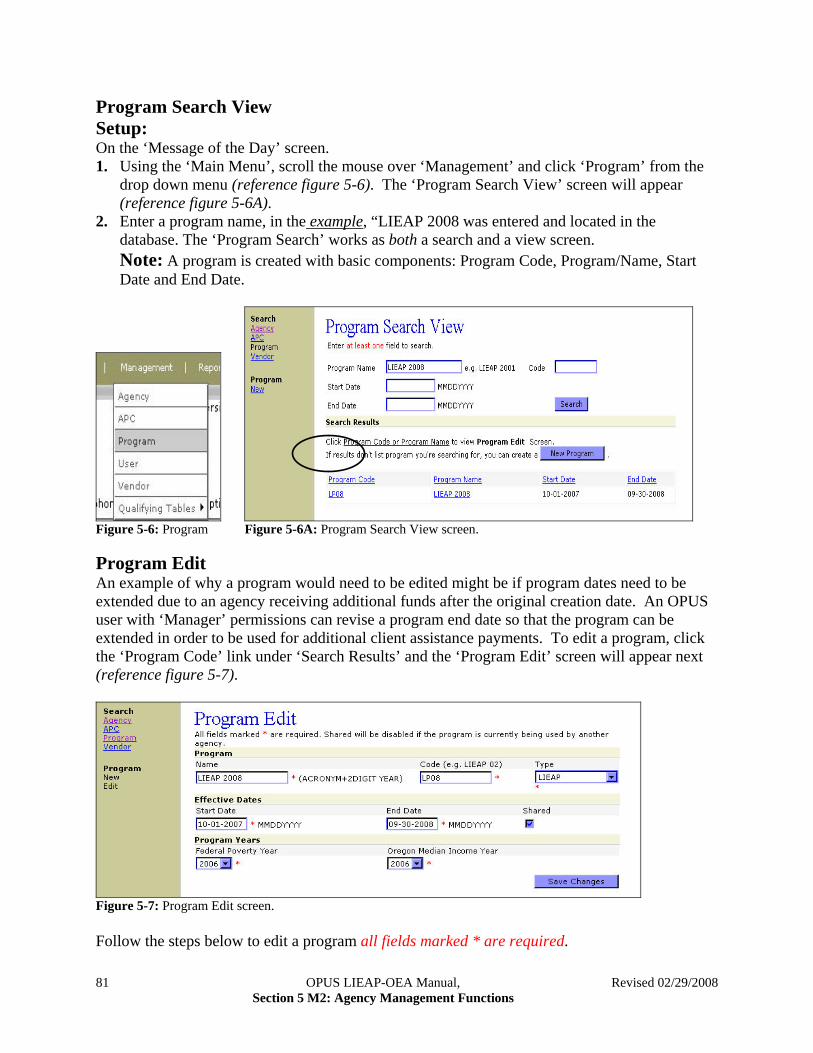
81 OPUS LIEAP-OEA Manual, Revised 02/29/2008 Section 5 M2: Agency Management Functions
Program Search View Setup: On the ‘Message of the Day’ screen. 1. Using the ‘Main Menu’, scroll the mouse over ‘Management’ and click ‘Program’ from the
drop down menu (reference figure 5-6). The ‘Program Search View’ screen will appear (reference figure 5-6A).
2. Enter a program name, in the example, “LIEAP 2008 was entered and located in the database. The ‘Program Search’ works as both a search and a view screen. Note: A program is created with basic components: Program Code, Program/Name, Start Date and End Date.
Figure 5-6: Program Figure 5-6A: Program Search View screen. Program Edit An example of why a program would need to be edited might be if program dates need to be extended due to an agency receiving additional funds after the original creation date. An OPUS user with ‘Manager’ permissions can revise a program end date so that the program can be extended in order to be used for additional client assistance payments. To edit a program, click the ‘Program Code’ link under ‘Search Results’ and the ‘Program Edit’ screen will appear next (reference figure 5-7).
Figure 5-7: Program Edit screen. Follow the steps below to edit a program all fields marked * are required.

82 OPUS LIEAP-OEA Manual, Revised 02/29/2008 Section 5 M2: Agency Management Functions
1. Enter or Select (reference 5-7). Program Name Program Code Effective Program Start Date Effective Program End Date Program Federal Poverty Year Program Oregon Median Income Year
2. Click ‘Save Changes’ button to save The ‘Program View’ screen will appear next with the
changes completed.
Program New An OPUS user with manager permissions can create new programs. Always search for the program prior to creating new programs to prevent creating duplicate programs. The following steps are instruction to create a new program in OPUS.
Setup: On the ‘Message of the Day’ screen. Use the same steps in section “Program Search View” (reference figure 5-6 and 5-6A), Page 76. 1. Using the ‘Main Menu’, scroll the mouse over ‘Management’ and click ‘Program’ from the
dropdown menu. The ‘Program Search View’ screen will appear (reference figure 5-8). 2. Search for the desired program name to see if it exists in the OPUS database.
Figure 5-8: Program Search View – New screen.

83 OPUS LIEAP-OEA Manual, Revised 02/29/2008 Section 5 M2: Agency Management Functions
3. Click the ‘New Program’ button or click the “New” link under ‘Program’ on the ‘Left Nav Bar’. The ‘Program New’ screen will appear next (reference figure 5-9).
Figure 5-9: Program New screen. 4. Enter or Select the following: all fields marked * are required (reference figure 5-9).
Program Name Program Code Program Type Start Date and End Date Program Year for calculations Oregon Median Income Year
5. Click the ‘Save’ button (reference figure 5-9). The ‘Program Search View’ screen will
appear next. Search for the new program created. Note: Enter at least one field to search. Example: enter the ‘Code’ “LIEAP” and “Start and End date”. Click the ‘Search’ button. The ‘Program Edit’ screen will appear with ‘Search Results’ listed (reference figure 5-10).
Figure 5-10: Program Search View with results screen.

84 OPUS LIEAP-OEA Manual, Revised 02/29/2008 Section 5 M2: Agency Management Functions
6. Click on the Program “New” link or click on ‘New Program’ button (reference figure 5-10, page 78) and the ‘Program New’ screen will open. Complete the required fields, then click ‘Save’ (reference figure 5-10A).
Figure 5-10A: Program New screen After clicking on the ‘Save’ button, The ‘Program View’ screen will appear. Use this screen to verify the program information (reference figure 5-10B).
Figure 5:10B: Program View New completed screen If the program information requires editing, click on ‘Edit Program’ button. The ‘Program Edit’ screen will open. Make corrections and click ‘Save Changes’ (reference figure 5-11).
Figure 5-11: Program Edit screen.

85 OPUS LIEAP-OEA Manual, Revised 02/29/2008 Section 5 M2: Agency Management Functions
APC Screens The acronym APC stands for ‘Agency, Program, County’. The ‘APC’ screens allow a manager to update information about an agency’s program details such as: which grant a program is affiliated with, which agencies utilize a specific program, and whether to change the start and end dates of an APC in order to be used for specific time periods, such as a program operation year. There are four APC screen types: ‘Search’, ‘Edit’, ‘View’ and ‘New’. The APC tree structure is best explained in the section ‘Setting up a Local Program in OPUS’ in the user manual, Management Section. APC Search The ‘APC Search’ screen searches by the following criteria: ‘Agency’, ‘County’, ‘Program’, ‘Grant’, ‘Start date and End date’. Setup: On the Message of the Day screen. 1. Using the ‘Main Menu’, scroll the mouse over ‘Management’ and click on the APC item
(reference figure 5-12). The ‘APC Search’ screen will appear.
Figure 5-12: APC Search screen.

86 OPUS LIEAP-OEA Manual, Revised 02/29/2008 Section 5 M2: Agency Management Functions
2. Enter specified information in one of the cells to initiate a search.
Figure 5-13: APC Search with Results screen. Agencies with and without Counties. 3. Example above: The “Program” ’07 OR HEAT’ was entered. Click on the ‘Search’ link and
the APC View screen appears. At this time, an APC can be viewed, edited or deleted (reference figure 5-13).
Figure 5-14: APC View with County screen. An APC without a county denotes a ‘Parent level’ APC. An APC with a county denotes the APC is a ‘Child level’ APC. Both are displayed with a start date and end date for the program. To edit an APC, click the ‘Agency’ name and the ‘APC View’ screen will display (reference figure 5-14).
APC with County, “Jackson”

87 OPUS LIEAP-OEA Manual, Revised 02/29/2008 Section 5 M2: Agency Management Functions
APC View The ‘APC View’ screen provides a brief overview of a ‘Parent APC’ selected from the search screen (reference figure 5-14). To “View an ‘APC’, follow the step listed in ‘APC Search’. APC Edit An ‘APC’ can be edited if an ‘APC’ start or end date requires revised or extended. To edit an ‘APC’, follow the steps below:
Figure 5-15: APC View to Edit screen.
Setup: 1. Using the ‘APC View’ screen, click the ‘Edit APC’ button or click the ‘Edit’ link on the
‘Left Nav Bar’, under APC (reference figure 5-15). The ‘APC Edit’ screen will display (reference figure 5-15A). In most cases, program end dates are extended so an ‘APC’ is functional and allows clients to receive future program assistance.
Figure 5-15A: APC Edit in process screen. 2. Click the ‘Save Changes’ button. The ‘APC View’ screen will appear with the changes.

88 OPUS LIEAP-OEA Manual, Revised 02/29/2008 Section 5 M2: Agency Management Functions
APC New In most cases, OHCS will have set up most agencies ‘APC’ tree structures in OPUS. The OPUS system can be used by agency managers to set up local programs using the built-in LIEAP-OEA business rules and reports. For local program guidelines, use the specific instructions in the manual’s section titled, “Setting Up a Local Program in OPUS”.
Setup: On the ‘APC Search’ screen. 1. Using the ‘Left Nav Bar’, click the ‘New’ link under APC. The ‘APC New’ screen will
appear (referenced figure 5-16).
Figure 5-16: APC Search – New screen.
2. Select the following: Agency name. Sub Agency to. Note: If a “Child Level APC” is being created, select “Sub Agency to”
and select the “Parent APC” which is the main agency receiving the funds to hand down to a sub-agency.
County. Note: If a “Parent Level APC” is being created, leave the ‘County’ option blank.
Program. Grant. Start and end date.
3. Click the ‘Save’ button. The ‘APC View’ screen will appear (reference figure 5-16A).
Figure 5-16A: APC New (filled in) screen.
CAP: Parent Sub-agency: Child APC

89 OPUS LIEAP-OEA Manual, Revised 02/29/2008 Section 5 M2: Agency Management Functions
User Screens A manager sets up user accounts and roles (permissions) in the OPUS system for the agency staff. Staff roles and actions depend on what job functions are to be performed by individual working in OPUS. Some users will have minimum; view only access. Some users will need additional roles to process client intakes and/or reports. Some users will have additional roles for management functions. There are six types of ‘User’ screens: ‘Search’, ‘New’, ‘View’, ‘Edit’, ‘User Role Edit’ and ‘User Action Edit’. User Search The ‘User Search’ screen allows a manager and/or another user to search for a person who is registered in OPUS. Setup: On the ‘Message of the Day’ screen. 1. Using the ‘Main Menu’, scroll the mouse over ‘Management’, down to and click ‘User’ (reference figure 5-17). The ‘User Search’ screen will appear next (reference figure 5-217A).
Figure 5-17: User Menu
Figure 5-17A: User Search by agency screen.

90 OPUS LIEAP-OEA Manual, Revised 02/29/2008 Section 5 M2: Agency Management Functions
2. Enter a users name or search by ‘Agency’. Note: Parent agencies have access to sub-agency staff within their structure. To search by ‘Agency’, use the drop-down arrow and select the appropriate agency and click ‘Search’. To search by user name, type in the first and/or last name then click ‘Search’. A list of staff members will appear in the ‘Search Results’. In the ‘Search Results’, user names can be placed in alphabetical order by first name, last name or login name by clicking on the link(s) (reference figure 5-17B).
Figure 5-17B: User Search with Search Results screen. 3. Click on a name to see ‘User View’ screen. The ‘User View’ screen allows a manger to view
an individual user’s roles (reference figure 5-17C).
Figure 5-17C: User View screen.
Login names have been blocked

91 OPUS LIEAP-OEA Manual, Revised 02/29/2008 Section 5 M2: Agency Management Functions
Possible Disabled User IMPORTANT NOTE: If there is a possibility that a user might have been enrolled before in OPUS but a search results indicates no match, follow these steps: 1. Reference the procedure ‘User Search’. In ‘Search Results’, if a specific user’s name does
not appear, click the boxes “Show Active Users Only” and “w/Rights to This Module”, removing the ‘Checkmark’ then click ‘Search (reference figure 5-17).
These steps will allow an agency’s users to appear regardless what module the user has permission to work in and it will show all users who have been disabled. To reactivate a disabled user, reference the ‘Reactivate a User’ section listed below.
Figure 5-17: Searching for users, Active users and rights to the module screen. 2. If there are no matches found in the database, a manager can create a new user.
Login names blocked.

92 OPUS LIEAP-OEA Manual, Revised 02/29/2008 Section 5 M2: Agency Management Functions
User New The User New Screen allows a manager to create a new user in the OPUS System.
Setup: On the ‘User Search’ screen. 1. Using the left Nav Bar, under ‘User’, click ‘New’ (reference figure 5-18). The ‘User New’
screen will appear next (reference figure 5-18B).
Figure 5-18: User Search – New User screen.
Type or select (all fields marked * are required). User name. Note: Refer to the User name and password requirements link. First name. Last name. Middle name or initial (optional). Initials. Title. Role - includes the "Permission Levels" by screen. E-mail. This is optional but Note: OHCS communicates regularly via e-mail. OPUS
Broadcasts are via e-mail along with announcements. Make sure the e-mail address is correct. **OPUS Broadcasts are announcements from OHCS stating something is wrong or something is being worked on, updated or fixed. OPUS Broadcasts are done on ‘URGENT’ basis only. Read all OPUS Broadcast.
Phone and Extension if applicable. Agency.
Click the ‘Save’ button to save The User View screen will appear next.
Figure 5-18B: User New screen.

93 OPUS LIEAP-OEA Manual, Revised 02/29/2008 Section 5 M2: Agency Management Functions
User View The ‘User View’ screen allows a manager to view or edit information on an individual user and to view ‘Roles’ (permission) level a user has been assigned (reference figure 5-19). To edit roles, follow the instructions listed below.
Figure 5-19: User View – to Edit screen. User Role Edit The ‘User Role Edit’ screen allows a manager to grant or adjust the roles and actions a user has access to on a as needed basis, per screen or assigned task. To edit user roles and actions, follow the steps below. Note: There are two steps issuing roles. The first step is establishing permissions for a user. For each role there is a default set of actions, which initially allows permissions to all the actions associated within the specific role. Setup: 1. On the ‘User View’ screen, click the ‘Edit Roles’ button or click on the ‘Edit Roles’ link in
the Left Nav Bar (reference figure 5-19, above). The ‘User Role Edit’ screen will appear. 2. On the ‘User Role Edit’ screen, select the role(s) the user will have access to (reference
figure 5-19A, below) then click the ‘Update’ button to apply the roles. The ‘User View’ screen will appear again. The ‘Roles’ are now listed in the ‘User View’ screen (reference figure 5-19C). This completes Step One.
If the user needs all the default permissions associated with a given role, there is no need to do any further steps. There may be times when a user needs additional permissions within a role so they can do specific actions within a specific role. At the same time, there might be permissions within a specific role that a user does not need access to perform. To customize permissions within a role, follow the instructions below.

94 OPUS LIEAP-OEA Manual, Revised 02/29/2008 Section 5 M2: Agency Management Functions
User Action Edit Setup: On the ‘User Role Edit’ screen.
1. Click on ‘Edit Actions’ (reference figure 5-19A above). The ‘User Role Action Edit’ screen will appear (reference figure 5-19C, below).
Figure 5-19A: User Role Edit screen.

95 OPUS LIEAP-OEA Manual, Revised 02/29/2008 Section 5 M2: Agency Management Functions
2. On the ‘User Role Action Edit’ screen, a manager can ‘Allow’ or ‘Deny’ permissions within any specific role. The permissions are decided by the OPUS Administrator and Manager(s) of the agencies. Once permissions have been assigned, click the ‘Save’ button. The ‘User View’ screen will appear. This step needs to be repeated for each specific role that requires permission within it to be edited (reference figure 5-19B).
Figure 5-19B: User Role Edit screen.

96 OPUS LIEAP-OEA Manual, Revised 02/29/2008 Section 5 M2: Agency Management Functions
Delete User When users are deleted, the user’s name is basically cancelled. The user’s name stays in the database in an inactive list and never really deleted. To locate a user that could have been deleted, refer to ‘Possible Deleted User’ previously discussed. To cancel a user account, a manager will click the ‘Disable User’ or ‘Disable User/All Modules’ button (reference figure 5-19C). For user(s) who have access to multiple modules, it’s best to use ‘Disable User/All Modules’.
Figure 5-19C: User View Delete User screen.
Reset User Password Setup: 1. Using the ‘User View’, click the ‘Edit User’ button or the ‘Edit User’ link in the Left Nav
Bar. The ‘User Edit’ screen will appear (reference figure 5-21).
Figure 5-20: User View screen.

97 OPUS LIEAP-OEA Manual, Revised 02/29/2008 Section 5 M2: Agency Management Functions
2. On the ‘User Edit’ screen, check box "Reset password". A manager would use this feature if a current user forgot the password or if an agency has a policy to reset passwords for routine reasons (reference figure 5-21).
Figure 5-21: User Edit – Reset Password screen. 3. Click the ‘Save Changes’ button. The User View screen will display. The user will need to
log in the next time with a temporary password (reference Section One - Basic Operations).

98 OPUS LIEAP-OEA Manual, Revised 02/29/2008 Section 5 M2: Agency Management Functions
Vendor Screens The vendor screens allow a manager to setup and/or update information for program vendors; such as address, phone, etc. There are four vendor screen types: ‘Search’, ‘Edit’, ‘View’ and ‘New’.
Vendor Search The LIEAP-OEA module has many vendor records in the database. Always search for a vendor to see if it exists before creating a new one.
Setup: One the ‘Message of the Day’ screen. 1. Using the ‘Main Menu’, scroll the mouse over ‘Management’ down and click on ‘Vendor’
(reference figure 5-22). The ‘Vendor Search’ screen will appear (reference figure 5-22A).
Figure 5-22: Vendor Search
Figure 5-22A: Vendor Search screen. 2. Enter at least one of the following:
Vendor Name Type of service

99 OPUS LIEAP-OEA Manual, Revised 02/29/2008 Section 5 M2: Agency Management Functions
3. If the vendor exists, it will display in the ‘Search Results’. Click on the required ‘Vendor
Name’ in the ‘Search Results’(reference figure 5-23), the ‘Vendor View’ screen will appear .
Figure 5-23: Vendor View screen. If the vendor does not exist in the system, ‘Search Results’ will appear with ‘No matches’. A new vendor can be created (reference figure 5-24). At that time a ‘New’ vendor can be created.
Figure 5-24: Vendor View – No Match screen.

100 OPUS LIEAP-OEA Manual, Revised 02/29/2008 Section 5 M2: Agency Management Functions
Vendor View The ‘Vendor View’ screen provides an overview of a vendor and contact information (reference figure 5-25). From this screen, a vendor can be ‘Edited’ or a ‘New’ vendor created. If vendor information needs to be updated or corrected, click the ‘Edit Vendor’ button or the ‘Edit’ link located in the Left Nav Bar. The ‘Vendor Edit’ screen will appear.
Figure 5-25: Vendor View

101 OPUS LIEAP-OEA Manual, Revised 02/29/2008 Section 5 M2: Agency Management Functions
Vendor Edit The ‘Vendor Edit’ screen allows information to be updated on a vendor. Updates could involve any of the vendor sections, which are ‘Vendor Info’, ‘Crisis Info’, ‘Physical Address’ and ‘Mailing Address’. All fields marked with “*” are required (reference figure 5-26). IMPORTANT NOTE: Each agency has their specific set of vendors. Each vendor in the LIEAP-OEA business rules need to have an operating contract, which has effective start and end dates that are renewed on a yearly basis. Once changes are made, click ‘Save Changes’.
Figure 5-26: Vendor Edit screen.

102 OPUS LIEAP-OEA Manual, Revised 02/29/2008 Section 5 M2: Agency Management Functions
Vendor New When a Vendor has been searched and not found in the database, you will need to create a new Vendor in OPUS. The following steps will instruct you on how to create a new Vendor.
Setup: On the ‘Message of the Day’ screen. 1. Using the ‘Main Menu’, scroll the mouse over ‘Management’ down and click on ‘Vendor’
(reference figure 5-27). The ‘Vendor Search’ screen will appear (reference figure 5-27A).
Figure 5-27: Vendor Search
Figure 5-27A: Vendor Search – No Match – New Vendor screen 2. Using the Left Nav bar under Vendor, click the ‘New’ link. The ‘Vendor New’ screen will
appear (reference figure 5-28).

103 OPUS LIEAP-OEA Manual, Revised 02/29/2008 Section 5 M2: Agency Management Functions
3. On the ‘Vendor New’ screen, enter or select the following: (fields marked * are required).
Figure 5-28: Vendor New screen.
Vendor Name Using the drop-down menu, select the Agency affiliated with this Vendor Select the Heat Type provided by the Vendor clients Crisis Phone and Fax numbers Contract Phone and Fax Effective Start and End dates of the vendor contract Vendor’s Physical address Vendor’s Mailing address. If the vendor’s mailing address is the same as the physical
address, check the ‘Same as Physical Address’ box. Click the ‘Save’ button. The Vendor View screen will appear next.

104 OPUS LIEAP-OEA Manual, Revised 02/29/2008 Section 6 M3: Local Program Tree Structure Creating an APC
M3 Section Six
Local Program Tree Structure – Creating the APC
Setting Up a Local Program The Local Program tree structure is created with an ‘Agency’, ‘Program’, ‘County’, and ‘Grant’ developing the “APC”. After the ‘tree structure’ is created, then the manager can create a grant and allocate the grant funds to the APC branches which include the ‘Parent-Level’ agency and the ‘County-Level’ agencies (or sub-agencies). Note: For all agencies and/or programs created; LIEAP-OEA ‘Energy’ programs can be viewed by all agencies delivering LIEAP-OEA ‘Energy’ services.
Creating a Local Program, Tree Structure 105
Create an Agency 106
Create a Program 107
Counties in the OPUS System 109
Create a Grant 110
Creating an APC 111
APC Tree Structure 112
Creating an APC, Parent and Child 113
Verifying the APC Tree Structure 115
Grant Allocation 116
New Grant Allocation 118
Move Grant/APC 122
Program Funds Available for Payment Assistance 126

105 OPUS LIEAP-OEA Manual, Revised 02/29/2008 Section 6 M3: Local Program Tree Structure Creating an APC
Creating a Local Program A Local Program tree structure is created with 1-Agency, 2-Program, 3-County, and 4-Grant. The tree structure includes the necessary components to be able to allocate funds from the grant level to the agency level and to make funds available for client assistance. The structure produces objects called an APC. After the tree structure is created, a manager can allocate grant funds from a ‘Parent-Level’ APC to a ‘Child-Level’ agency or sub-agencies to be used for energy assistance payments. Local Program Tree Structure
Note: A Grant must be created before the APC can be completed.
The first step to “Creating a Local Program” is to create the ‘Agency’ branch of the tree. Reference “Create an Agency.”
Grant
Program
County
APC
Agency
APC Allocations
Grant Allocations
3
4
1 5
7
6
Scenario 1 Parent Agency withoutSub-agencies
Scenario 2 Parent Agency with Sub-agencies
2

106 OPUS LIEAP-OEA Manual, Revised 02/29/2008 Section 6 M3: Local Program Tree Structure Creating an APC
Create an Agency Agencies using OPUS will most likely have their agency initially built by OHCS. The agency “Manager” role has the ability to edit and update agency information, i.e.; address and phone numbers, as needed. If an agency needs to create another agency (sub-agency) it can be built by the main agency (CAP) who receives the initial funding. When an agency creates a sub-agency in OPUS, it is viewed by other Community Action Agencies (CAA) within the same module(s). Before creating a new agency or sub-agency; standard operating procedure (SOP) is to conduct a search for a specific ‘APC’. A search for an agency is done by using the ‘Main Menu’ > ‘Management’ > ‘Agency’ (reference figure 6-1). Using the ‘Agency Search’ screen, enter the acronym of the agency or the agency name and click the ‘Search’ button (reference figure 6-1A).
Figure 6-1: Agency Search Figure 6-1A: Agency Search with Results If the agency is active, the agency name will appear in ‘Search Results’. Click on the Agency Name under the link.
Grant (the leaf)
Program (the branch)
Agency (the root) CAA
County (the branch)
4
5
3
2
1
1
APC

107 OPUS LIEAP-OEA Manual, Revised 02/29/2008 Section 6 M3: Local Program Tree Structure Creating an APC
The ‘Agency View’ screen will appear (reference figure 6-1B).
Figure 6-1B: Agency View screen. To edit an agency’s information use the ‘Edit Agency’ button or go to the ‘Left Nav Bar’ and click on the Agency ‘Edit’ link. To create a new agency, use the ‘Left Nav Bar’, under ‘Agency’ and click on the ‘New’ link (reference figure 6-1B). If the ‘Program’ hasn’t been created yet, the next step is creating the program, reference “Creating a Local Program”. Create a Program Once an agency has been created, the ‘Program’ branch of the tree is ready to be completed. From the ‘Main Menu’, scroll the mouse over ‘Management’ and click ‘Program’ (reference figure 6-2). The 'Program Search View' screen appears (referenced figure 6-2A). Note: Search for the program name before creating a new program to ensure the program is not duplicated. As shown below, there was a search for the program ‘First Steps’, which ‘Search Results’ indicates ‘No Matches’.
Figure 6-2: Program Figure 6-2A: Program Search View screen with “No Match”.
2

108 OPUS LIEAP-OEA Manual, Revised 02/29/2008 Section 6 M3: Local Program Tree Structure Creating an APC
Using the ‘Left Nav Bar’ under ‘Program’ click the ‘New’ link. The 'Program Search New' screen appears. Enter the program name, program code, start date and end date. Click the ‘Save ‘button. The ‘Program Search View’ screen appears. You can verify that the program you entered is in the database by searching for it again and seeing it displayed in the search results section of the screen. If a program is not in the database, click on the ‘New Program’ button (reference figure 6-4). The ‘Program New’ screen will appear (reference figure 6-4A).
Figure 6-4: Program New Link and New Program button screen Enter the program name, program code, start date and end date. Click the Save button. The Program Search/View screen will appear.
Figure 6-4A: Program New screen.

109 OPUS LIEAP-OEA Manual, Revised 02/29/2008 Section 6 M3: Local Program Tree Structure Creating an APC
Verify that the program you entered is in the database by searching for it again and seeing it displayed in the search results section of the screen.
Figure 6-4B: Program View screen Working with the ‘County’ branch of the APC is next. Counties in the OPUS System Since all counties have been initially created in the OPUS database, agencies don’t need to complete this step. A County drop-down list is provided on all screens as you need to access them.
The next step is to create the Grant that the APC(s) will use for the program assistance funds.
APC
Agency
Program
County
3

110 OPUS LIEAP-OEA Manual, Revised 02/29/2008 Section 6 M3: Local Program Tree Structure Creating an APC
Create a Grant A grant (funding source) must be created in OPUS in order to draw down funds for a ‘Parent’ agency level or for the ‘Child’ agency level to complete client assistance payments.
1. Using the ‘Main Menu’, scroll the mouse over ‘Fiscal’ down to ‘Search’, and in the menu,
click Grant. The 'Grant Search' screen will appear.
Figure 6-5: Grant Search Note: Complete a search for the grant name prior to creating a new grant to ensure the grant is not duplicated. 2. Enter the ‘Grant Name’ and click ‘Search’. Once it has been determined the grant does not exist in the database (reference figure 6-5B), click the ‘New Grant’ button or in the Left Nav Bar, under ‘Grant’, click the “New” link. The “Grant New” screen will appear.
Figure 6-5B: Grant Allocation Search New screen.
APC
Agency
Program
County
4
Grant

111 OPUS LIEAP-OEA Manual, Revised 02/29/2008 Section 6 M3: Local Program Tree Structure Creating an APC
3. Enter all the information. Fields with a red * Asterisk are required (reference figure 6-5C). Click the ‘Save’ button and the ‘Grant View’ screen will appear.
Figure 6-5C: Grant New screen. Creating an APC Notice: Before a grant can be used, the APC tree structure needs to be completed by bringing the branches together for the overall tree structure. **Complete a search for any APC combination with the agency and/or program name created to ensure the grant is not duplicated. Agencies can or will have ‘Local Programs’. ‘Local Programs’ are programs not funded through OHCS. A ‘Parent’ APC is required to be created first to be the starting point to draw grant funds. Every Community Action Agency (CAA) is the ‘Parent’ agency. The subgrantee(s) or known as sub-agency. Sub-agencies are the ‘Child’ agency or agencies. A ‘Parent’ agency can have one sub-agency or multiple sub-agencies. Agencies can, within itself, be the only agency who can be the ‘Parent’ and ‘Child’ with a county. Note: Agencies who receive funding from OHCS will not build an APC. The APC will be created by OHCS Staff. To better understand a ‘Parent’ APC versus a ‘Child’ agency, see the diagram below.

112 OPUS LIEAP-OEA Manual, Revised 02/29/2008 Section 6 M3: Local Program Tree Structure Creating an APC
APC Tree Structure
The Agency is considered the “Parent’ (root) of the tree and must exist to receive a ‘Program’ and can be the only agency to receive the ‘Program’; in turn the agency can be the ‘Child’ branch from the ‘Parent’ agency. The Parent agency delivering a program with a specific county will list the appropriate ‘County’ in the tree structure. The ‘Grant’, a funding stream is created (received) in order to draw down funds to the ‘Parent’ and/or ‘Child’ agency for client assistance.
Building the Agency, Program, County (if applicable) and the Grant together, the APC is completed. Below, the screen shots show how the structure is completed.

113 OPUS LIEAP-OEA Manual, Revised 02/29/2008 Section 6 M3: Local Program Tree Structure Creating an APC
Creating an APC, Parent and Child 1. Using the ‘Main Menu’, scroll the mouse over ‘Management’ and click the item ‘APC’
(reference figure 6-6). The APC Search screen will appear (reference figure 6-6A).
Figure 6-6: APC Search Figure 6-6A: APC Search, No Match screen.
If the ‘Search Results’ indicates ‘No Matches’, a new APC can be created (reference figure 6-6A).
2. Using the Left Nav Bar, under ‘APC’, click the ‘New’ link. The ‘APC New’ screen will
appear (reference figure 6-6B).
Figure 6-6B: APC New ‘Parent’ screen. 3. Complete all required information:
Agency Name Program Grant Start and End Date
Leave blank for Parent APC
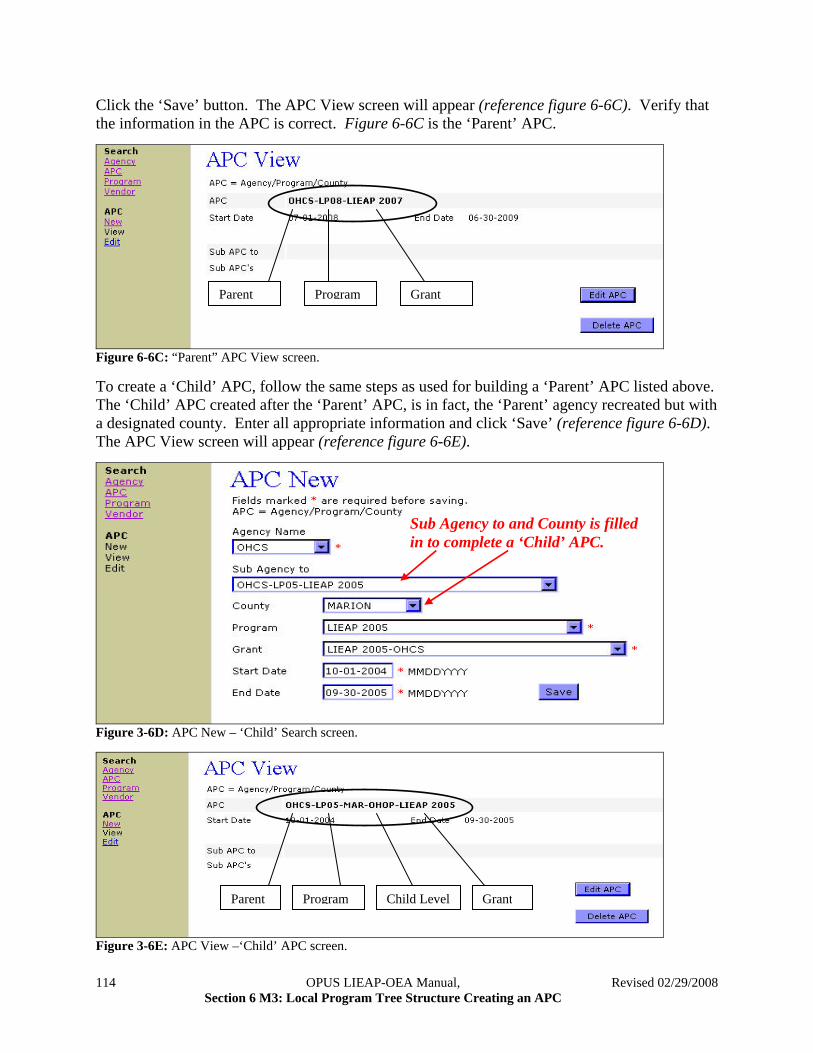
114 OPUS LIEAP-OEA Manual, Revised 02/29/2008 Section 6 M3: Local Program Tree Structure Creating an APC
Click the ‘Save’ button. The APC View screen will appear (reference figure 6-6C). Verify that the information in the APC is correct. Figure 6-6C is the ‘Parent’ APC.
Figure 6-6C: “Parent” APC View screen. To create a ‘Child’ APC, follow the same steps as used for building a ‘Parent’ APC listed above. The ‘Child’ APC created after the ‘Parent’ APC, is in fact, the ‘Parent’ agency recreated but with a designated county. Enter all appropriate information and click ‘Save’ (reference figure 6-6D). The APC View screen will appear (reference figure 6-6E).
Figure 3-6D: APC New – ‘Child’ Search screen.
Figure 3-6E: APC View –‘Child’ APC screen.
Parent Program Grant
Sub Agency to and County is filled in to complete a ‘Child’ APC.
Parent Program Child Level Grant

115 OPUS LIEAP-OEA Manual, Revised 02/29/2008 Section 6 M3: Local Program Tree Structure Creating an APC
Verifying the APC Tree Structure Verifying an APC tree structure can be done by using the ‘APC Search’ screen. 1. On the ‘Main Menu’, scroll the mouse over ‘Management’ and click ‘APC’. The APC Search
screen will appear (reference figure 6-7).
Figure 6-7: APC Search Figure 6-7A: APC Agency Search screen 2. Using only the drop-down menus, select the ‘Agency’ and ‘Program’ (reference figure 6-7A).
These options will display an APC or multiple APCs using the specifications chosen (reference figure 6-7B).
Figure 6-7B: APC Search with Search Results screen The agency ‘ACCESS’ and the Program ‘LIEAP 08’ was selected for a search. In the ‘Search Results’ section, the ‘Parent’ APC with no county, and two ‘Child’ APCs are displayed. Note: “Child APCs” display a ‘County’. This process distinguishes the difference from a ‘Parent’ and ‘Child APC. Grant allocations are ready for this program and issued to the ‘Child Level’ APC(s).
Child APC shown with County
Parent APC No County

116 OPUS LIEAP-OEA Manual, Revised 02/29/2008 Section 6 M3: Local Program Tree Structure Creating an APC
Grant Allocation Grant Allocations to agencies are funds assigned to a ‘Parent APC’ and then are allocated the ‘Child APC(s)’ or County level agencies. 1. From the ‘Main Menu’ to ‘Fiscal’ to ‘Search’, click on ‘Grant’. The 'Grant Search' screen
will appear (reference figure 6-8). Enter the ‘Grant’ name and click ‘Search’ (reference figure 6-8A). The grant should appear in ‘Search Results’.
Figure 6-8: Grant Search screen
Figure 6-8A: Grant Allocation Search screen 2. The ‘Grant Allocation Search’ screen will display with ‘Search Results’. There are times
when agencies can have more than one grant. The desired grant will need to be selected. To view the appropriate grant, click on the ‘Grant’ link under ‘Search Results’ (reference
figure 6-8A).

117 OPUS LIEAP-OEA Manual, Revised 02/29/2008 Section 6 M3: Local Program Tree Structure Creating an APC
The ‘Grant Allocation View’ screen will display. The view screen allows verification of the designated amount of a grant allocated funds down to the associated APC agencies. The ‘Total Grant’, ‘Transferred Total’, ‘Total Remaining’ and dates are displayed (reference figure 6-8B).
Figure 6-8B: Grant Allocation View screen The button labeled ‘Grant to/from APC Transfer’ allows funds to be transferred down to ‘Parent’ and ‘Child’ APC levels. In some cases, the ‘Grant to/from APC Transfer’, allows transferring funds back up to the grant-level. The button labeled ‘New Allocation’ allows a deposit to the top grant level, aka the ‘Parent’ (Reference figure 6-8B). As funds are transferred down to the ‘Parent’ and ‘Child’ APC levels, the section labeled ‘Grant APC Transfers’ will display a history of transfers as they occur.

118 OPUS LIEAP-OEA Manual, Revised 02/29/2008 Section 6 M3: Local Program Tree Structure Creating an APC
New Grant Allocation The purpose of the ‘New Grant Allocation is to set-up grant funds to be distributed to sub-agencies ‘Child APCs’. On the ‘Grant Allocation View’ screen, under the ‘Allocations’ section the funding amount is displayed. The ‘Allocations’ section will display a list of current and future allocations given to, or subtracted from, a grant. 1. On the ‘Grant View’ screen, click the button ‘New Allocation’ (reference figure 6-9).
Figure 6-9: Grant Allocation View ‘New Allocation’ screen. 2. The ‘Grant Allocation New’ screen will appear (reference figure 6-9A). The ‘New Grant
Allocation New’ screen allows funds to be added (+) or subtracted (-) from a grant and the allocation date. When complete, click ‘Save Allocation’.
Figure 6-9A: Grant Allocation New screen.

119 OPUS LIEAP-OEA Manual, Revised 02/29/2008 Section 6 M3: Local Program Tree Structure Creating an APC
The ‘Grant Allocation View New’ screen will appear (reference figure 6-9B). Confirmation of the allocation will be displayed under ‘Allocations’ section.
Figure 6-9B: Grant Allocation View with New Allocation added screen. Note: the initials of the user completing the allocation adjustment will appear with the new entry (reference figure 6-9C).
Figure 6-9C: Grant Allocation View screen The ‘Amount’ is a “link” indicated in blue and underlined (reference figure 6-9C).

120 OPUS LIEAP-OEA Manual, Revised 02/29/2008 Section 6 M3: Local Program Tree Structure Creating an APC
If the amount needs to be edited, click the actual dollar amount and the ‘Grant Allocation Edit’ screen will appear (reference figure 3-10). The funding a can be edited to be added (+) or subtracted (-) from a grant and the allocation date can be edited. When complete, click ‘Save Changes’.
Figure 6-9C: Grant Allocation Edit screen. If the grant information needs to be edited complete the following steps. Click on the ‘Edit Grant’ button or use the Left Nav Bar, under ‘Grant’ and click on ‘Edit’ (reference figure 6-10). The grant name, contract number, start and end date, and agency can be edited.
Figure 6-10: Grant Edit screen. Click ‘Save Changes’, the ‘Grant Allocation View’ screen will appear (reference figure 6-10A, next page). Note: Funding amounts can not be edited in this field.

121 OPUS LIEAP-OEA Manual, Revised 02/29/2008 Section 6 M3: Local Program Tree Structure Creating an APC
Figure 6-10A: Grant Allocation View screen.

122 OPUS LIEAP-OEA Manual, Revised 02/29/2008 Section 6 M3: Local Program Tree Structure Creating an APC
Move Grant/APC To allocate grant funds down to the ‘Parent’ APC level (no county), so specific amounts can be drawn down to the ‘Child’ APC(s) level for client assistance payments, funds must be moved. Using the ‘Grant Allocation View’, click on ‘Grant to/from APC Transfer’ button (reference figure 6-11).
Figure 6-11: Grant Allocation View – Grant to/from APC Transfer screen. To allocate to the ‘Parent’ APC, click the button labeled ‘Grant to/from APC Transfer’. The ‘Move Grant/APC’ screen will appear. Select the appropriate APC from the drop-down menu, then click ‘Load’ (reference figure 6-11).
Figure 6-11: Grant Allocation. Grant to/from APC Transfer screen.

123 OPUS LIEAP-OEA Manual, Revised 02/29/2008 Section 6 M3: Local Program Tree Structure Creating an APC
The ‘Move Grant APC’ screen will appear. In the ‘Move Grant/APC’ section, enter the following:
Select the appropriate APC, using the drop-down menu Enter the funding amount that will be moved Enter the date Select the appropriate ‘Transfer Type’
Click on ‘Move’ to complete the transfer. The ‘APC Allocation View’ screen will appear. Transfers should be reviewed and verified and can be done using the APC Allocation View screen.
Figure 6-11C: APC Allocation View ‘Parent’
Grant Owner
Parent APC

124 OPUS LIEAP-OEA Manual, Revised 02/29/2008 Section 6 M3: Local Program Tree Structure Creating an APC
Figure 6-11D: APC Allocation View New ‘Child’ screen. On the ‘APC Allocation View New’ screen, above the “Grant Name” the ‘Parent’ APC is displayed showing the allocation that was just completed. If the initial APC family was built correctly, the following information: the Parent APC listed at top: ACCESS-LP08-LIEAP 2008 (no county), and it’s associated ‘Child’ APC: ACCESS-LP08-JAC-LIEAP 2008 is listed. To complete an APC move, enter the ‘Allocation Date’, the ‘New Allocation Amount’, and click the ‘S’ (Save) button. Click on ‘View History’ and the ‘APC Allocation History View’ screen will appear. The history view screen is used for historical purposes (reference figure 6-12).
Figure 6-12: APC Allocation History View After allocating from the Parent APC-level (no county) to the Child (with County), notice that the total available in the Parent ‘APC’ is $0.00, because the Parent’s available funds have been allocated down to the Child-County level, and the ‘Total Allocated’ is $10,000.
Child APC
Grant Name
Parent APC

125 OPUS LIEAP-OEA Manual, Revised 02/29/2008 Section 6 M3: Local Program Tree Structure Creating an APC
Click on ‘View Parent APC’ and the ‘APC Allocation View New’ screen will appear. Select the appropriate ‘Parent APC’ by clicking on the Sub APC Agency link (reference figure 6-13).
Figure 6-13: APC Allocation View New – View History The ‘APC Allocation View New’ screen will appear. In the upper portion of the screen is the information on the ‘Parent APC. This view screen is used for historical purposes (reference figure 6-14).
Figure 6-14: APC Allocation View New – View Parent APC

126 OPUS LIEAP-OEA Manual, Revised 02/29/2008 Section 6 M3: Local Program Tree Structure Creating an APC
Program Funds Available for Payment Assistance Once the Grant and APC tree structure is completed and grant funds allocated down to the Child APC level, the funds will be able to be used on the ‘OPUS New Payment’ screen for client payment assistance. After an intake worker has processed a household through the OPUS system, the intake worker will be able to select the Child-APC from a drop down menu on the ‘New Payment’ screen as shown in the example below. Reference Section 2; Client Intake New. Steps have been completed for creating a Local Program.