1 outlook w eb access tutorial - forest.k12.ms.us · pdf file1 outlook w eb access tutorial...
TRANSCRIPT

1
Outlook Web Access TutorialOutlook Web Access 2010 allows you to gain access to your messages, calendars, contacts, tasks and public folders from any computer with internetaccess.
How to access your email
There are two ways you can access your email via the web.
1. Open your browser and go to the Forest homepage (http://www.forest.k12.ms.us/) and click on the District Email ink located at the bottom of thewebpage
2. Open your browser and type in the following address: http://www.forest.k12.ms.us/
The OWA 2010 toolbar
After successfully logging on, your Inbox will be displayed. Use the toolbar along the top of your Inbox to manage your email messages. ImportantNote: It is recommended you change two settings. Click on the “View” link near the top of your Inbox and uncheck “Use Conversations”. Alsoselect either Right or Bottom Reading Pane depending on your preference.
Sign out
View
Help
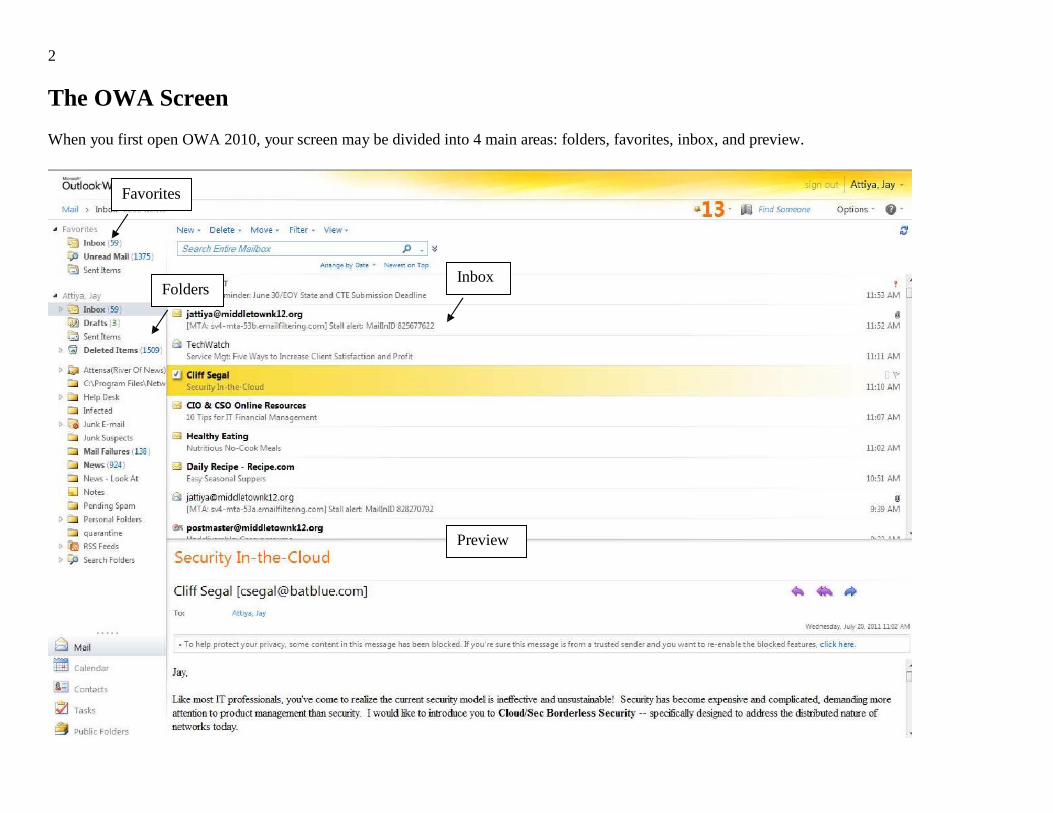
2
The OWA Screen
When you first open OWA 2010, your screen may be divided into 4 main areas: folders, favorites, inbox, and preview.
Favorites
FoldersInbox
Preview

3
Folders: in your folders list you will find such items as your calendar, contacts, deleted items, drafts, inbox, notes, and sent items.
Favorites: Shortcuts to your inbox, unread mail and sent items. You can add folders to the shortcut list by right-clicking on the folder and selectingAdd to Favorites. You can access any of these shortcuts by simply clicking them.
Preview Pane: This section can be made larger or smaller by clicking on and dragging the line separating the Preview and Inbox areas
If you wish to open one of the mail messages full screen (as opposed to only the preview pane) simply double-click the email in question.
In the “Arrange by” drop-down you will find various ways to organize the messages in your inbox.

4
How to create a new message
To create a new message, click the downward arrow located next to the word New. A drop-down list with various options will appear. SelectMessage. Or simply click on the word New. An untitled message dialog box will appear on your screen.
Begin typing the first or last name of the person within our system in the To: field andclick on the Check Names button. You can enter multiple names each separated by a semicolon.
This will give you a list of all names in our address book that fit the criteria. For example, type in Help then click the Check Names button and theComputer Help Desk address will auto-complete. You do not have to enter the entire name. Entering the first few letters of the name and clickingthe Check Names button will bring up a list of all matches.
Compose your message and click the Send button located at the upper left-hand corner of the window.

5
Using the To button to find other users
If you don't want to go through the trouble of entering long, complicated email addresses, or if you know someone else is a user within Forest, butyou are unsure as to what their email address is, the Exchange server will help you find it. Start by creating a new email message. Click the Tobutton.
The Find names dialogue box will appear.

6
On the left under Address Book: Click Default Address List.
Global address book: think of this as the Forest yellow pages. Every person or group with a Forest email account can be found in theGlobal address book.
My Contacts: think of this as your personal little phone book. Only addresses you personally enter into your contacts will appear here. Thesecontacts are your personal list and not available to anyone else at Forest.
If you wish to email someone but are unsure of how to spell their name, type the beginning of a name in the search box. For example type "Ho" andclick the Find button (magnifying glass). A list of names that meet the search criteria will appear.
Simply click the appropriate one to select it. Under the Add recipient to...section, select either To, Cc or Bcc to put the recipients name in thecorrect box. You can follow these steps again to add additional people. Once you have found all the recipients you would like, select OK at thebottom of the window and you will return to your new message with all the recipients in place.
Attachments
With OWA 2010 you can attach a document, picture or other file to the message you are sending. To add an attachment to a new message, simplyselect the paperclip located at the top of the window. This will take you to the Attachments web dialog box.
Once the dialog box is open, select Browse to find the file you would like to attach. Double-click the file to insert the file name. To insert more filesclick “Choose more files”. Once you have found the correct files, select Attach. You can also repeat this process if you would like to attach morefiles to the same email message. The file/s you selected will now be attached to your message ready to be sent.
Deleting a message
To delete any message that appears on your list, simply select it by clicking it once, then hit the Delete key on your keyboard. Hitting the X symbolat the top of your page will do the same thing.
Note: when you delete a message it is actually moved to your deleted items folder. This still takes up space so it is good practice to periodically go toyour deleted items folder and delete the messages from there. This will permanently delete the messages and free up the space.

7
Click here Then click here How to create a contact
The Contacts section is your personal email addressbook. Select the Contacts icon either in your folder list or your shortcuts to access it. Your Contacts window will appear with a list of your personalcontacts. To create a new contact, click the downward arrow located next to the word New. A drop-down list with various options will appear. SelectContact.
The New contact dialog box will open on your screen. Enter whatever information you require for this contact into the necessary fields. When youare finished, select the Save and close button. Next time you select your Contacts shortcut or folder, you will see your new contact listed.
How to create a personal Group “distribution” list
A personal distribution list (also known as a Group) is one email address given to a group of individuals. This comes in very handy when you have agroup of individuals you email the same message to on a frequent basis (ie a special team or class group). This will help you to avoid entering eachindividual's email separately.
Then click here and select “Group”

8
To create a new personal distribution list, select the downward arrow located next to the word New. A drop-down list with various options willappear. Select Group.
An untitled group will appear on your screen. Add email addresses either by manually typing them into the Add to Group field or using the Findnames button to locate them in the global address book or your personal contact list.
Make sure to type in the name of the group under List name. You can name the group whatever you like. Select Save and close. The personaldistribution list will now be a part of your personal contacts list.
Options
Through the Options section, you have the ability to personalize your OWA 2010 client. Be sure to Save and close when you are finished, otherwiseyour changes will not take effect. To access your options, simply select Options and then See All Options in the top right-hand side of the window.
Adding a signature: There are many areas you can personalize in the Options section. Under Settings you will see areas to create an E-Mailsignature, default font and other message options.

9
FAQsWHY DOES MY OWA LOOK DIFFERENT THAN SOMEONE ELSE'S?Outlook Web Access will look and function differently depending on the Internet browser you use to access it. Browsers other than Internet Explorer5.5 and above may not provide all the features, options and functionality of OWA. For instance the Firefox browser does not have the Spell Checkfeature in the Options section.
HOW DO I SET UP AN ALERT FOR NEW MAIL MESSAGES?
To set an alert when you receive new email, go to Options Settings Scroll down to Messaging Options then choose either:
Display a notification message when new mail arrives orPlay a sound when new mail arrives orboth
IS THERE A WAY TO FLAG EMAIL MESSAGES FOR FOLLOW-UP?
You can use flags to remind yourself to follow up on an issue or to categorize messages in your Inbox. For example, you can flag all personalmessages in blue, all messages that must be followed up on within 24 hours in red, and so on. Message flags are displayed in the last column of theInbox view.
You can use message flags to do the following:
To flag a message with a particular color, right-click the flag that corresponds to the message, and then select the flag color.Tip: To change a message's flag to red, click the flag that corresponds to the message.To flag a message as complete, right-click the message, and click Flag Complete.To sort your messages by color, click the flag column heading.To clear a flag from a message, right-click the message, and then click Clear Flag.
HOW DO I CREATE A NEW CONTACT?
To add a person’s contact information in your Wilson personal Contacts area:
In Contacts, on the toolbar, click New.In the new contact window, in the profile tab, type the information you want to include for the contact.

10
Tip: Use the drop-down lists to record multiple entries in some boxes. For example, the drop-down list next to the Email icon allows you tostore up to three different email addresses for a contact (Email, Email 2, and Email 3). You can also store multiple addresses and phonenumbers.If you have multiple addresses stored for a contact, you can designate one as the contact's mailing address. Select the address in the list, andthen select the Mailing address check box.On the Details tab, you can fill in additional information about a contact.Click Save and Close, and then refresh your browser window to see the new contact.
Note: Use the File As list on the Profile to determine how the contact will appear in Contacts. You can display each person by first and last name,by last name first, or by company name.
HOW DO I INVITE OTHERS TO AN APPOINTMENT OR MEETING?
In planning a meeting with other Wilson users, you can check their schedules (“free-busy search”) to assure they are free before you invite them witha message.
Click the New button on the Calendar standard toolbarAdd users as you would a standard email message.Insert any other appropriate information in the fields provided.Click Send to send a message request to the attendees named.
HOW DO I SET UP A REMINDER?
You can set reminder messages with or without an “alarm” sound to remind you of appointments, meetings or tasks. Like an alarm clock, you caneither turn off or dismiss the reminders or “snooze” to be reminded again.
Click the Options section button.Under Settings Calendar check the Show Reminder Alerts to turn on your reminder feature.(Optional) Check the Play a sound when reminder is due box to add an audible “alarm” to your reminders.Click Save and Close.When you set a new meeting, appointment or task, check the Reminder box to add a reminder OR click the Reminder button on the toolbar.In Meetings and Appointments click on the pull down menu next to the Reminder check box to select the number of minutes before themeeting or appointment the reminder will sound. (The default is 15 minutes.)In Tasks, click on the pull down menu to select a day and a time for the reminder. (The default is 8:00 am of the day the task is set.)
HOW DO I SET UP THE SPELL CHECKER?

11
Use the following procedures to customize your spelling options. (This features does not appear if using Mozilla Firefox)
To automatically check spelling before a message is sent:
Under Spelling Options, select the Always check spelling before sending check box.
To prevent the spelling checker from checking words in UPPERCASE letters:
Under Spelling Options, select the Ignore words in UPPERCASE check box.
To prevent the spelling checker from checking words that contain numbers:
Under Spelling Options, select the Ignore words with numbers check box.
Outlook Web Access also allows you to spell-check messages in several languages using language-specific dictionaries.
To select a dictionary:
Under Spelling Options, select a language from the drop-down list.