1 tracs manual
TRANSCRIPT

1
TRACS Manual
1

2
Table of Content Chapter 1: Entering Tracs Page 5 Through Construction tools website Page 8 Through Webportal 2 Chapter 2: Project Set up Page 10 Assigning PM & CM Page 12 Assigning Materials Control Letter Page 14 Assigning Users Page 16 Set up Email teams Page 19 FieldOps Download Page 20 Enter Request to Sublet Page 23 Project Field Ops Set Up Page 24 Mark Plan Quantities Page 25 Enter Engineers Information Page 26 Enter Contractor Information Page 27 Add FieldOps User Page 31 Set up Fuel Escalation Chapter 3: Document Management Page 35 Entering Documents into TRACS Page 35 Adding Document Page 40 Adding Action Page 41 Adding submittal Page 42 Adding Transmittal Page 43 Searching for Documents Page 44 Search by Key Words Page 45 Search by Document Type Page 46 Search by File Number Page 47 Search by Logs Page 48 Search by Submittals, Construction Documents & Transmittals
2

3
Chapter 4: Daily Diary Page 49 Field ops Construction Time & Change of Construction Status Page 54 Tracs Diary Setup Page 55 Adding Equipment Page 57 Adding Labor Page 59 Adding Contractors Page 60 Adding new diary Page 62 Adding Activity & Notes Page 64 Adding Equipment & Labor Page 67 Use Const. Docs for notes Page 70 Weekly Reports Chapter 5: Punch list Management Page 73 Adding Punch list in Diary Page 76 Punch list Resolution
Chapter 6: Quantity Payment Page 79 Entering Quantity through Daily Const. Rpt. Page 79 Quantity Comps in Diary Notes Page 83 Quantity Comps in a Template Spread Sheet Page 89 Quantity Comps in Field Ops Page 94 Adding Inspection templates into project Page 99 Adding S.A., C.O., W.O. & Back Sheet Items Page 100 Adding & paying Supplemental Agreements Page 105 Adding & Paying Change Orders Page 111 Adding & Paying Work Orders Page 118 Adding & Paying Back Sheet Items Page 123 Material on Hand Page 123 Adding Material on Hand Page 128 Subtracting Material on Hand Page 133 Quantity Payment Verification Page 133 Quantity Check Page 141 Certifying Quantity in Field Ops for Finals
3

4
Material Management For instructions on Material Certification Management through Tracs see TRACS Material Manual Chapter 7: Collaboration Page 144 Adding and Editing Template Page 148 Tossing & Catching the Ball Page 151 Finalizing template Page 152 Collaboration & Daily Diary Chapter 8: Photo Manager Page 155 Adding Photo’s through Photo manager Page 158 Adding Photo’s through Daily Diary’s Chapter 9: Finalizing Project Gather Material Certification paper work as shown in TRACS Material Manual Page 161 PROJECT FINAL PROCEDURES
4

5
Chapter 1: Entering TRACS Entering through Construction Tools website: Open IHUB / MN/DOT A to Z
Click on C
5

6
Select Construction Tools
Select Computer Applications
6
7
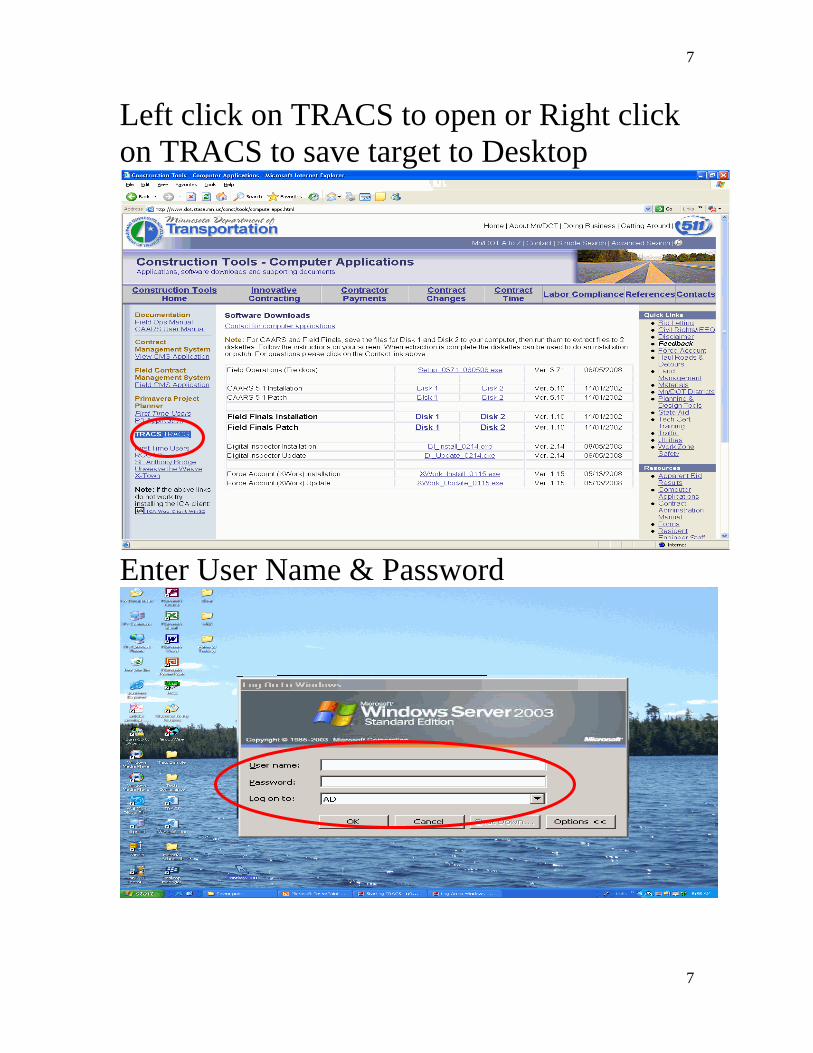
Left click on TRACS to open or Right click on TRACS to save target to Desktop
Enter User Name & Password
7

8
Entering through WebPortal 2 website: From Internet Browser enter (webportal2.dot.state.mn.us)
Enter User Name & Password Select Construction Office Applications
Will only see this screen the first time in.
8

9
Select TRACS
When in TRACS SELECT Project When Tracs is first opened the top project is highlighted but not selected. Double click desired project to select.
Chapter 2: Project Set up
9

10
Chapter 2: Project Set up Assigning Project Manager (PM) & Contract Manager (CM) (PM & CM will have the rights to add Users to projects) Select Project Double click desired project to select.
Click on Proj Info
Select Edit
10

11
Click on PM or CM
Choose person to be PM & CM If desired person isn’t in the list contact your TRACS Addmin.
Click Save
11
12
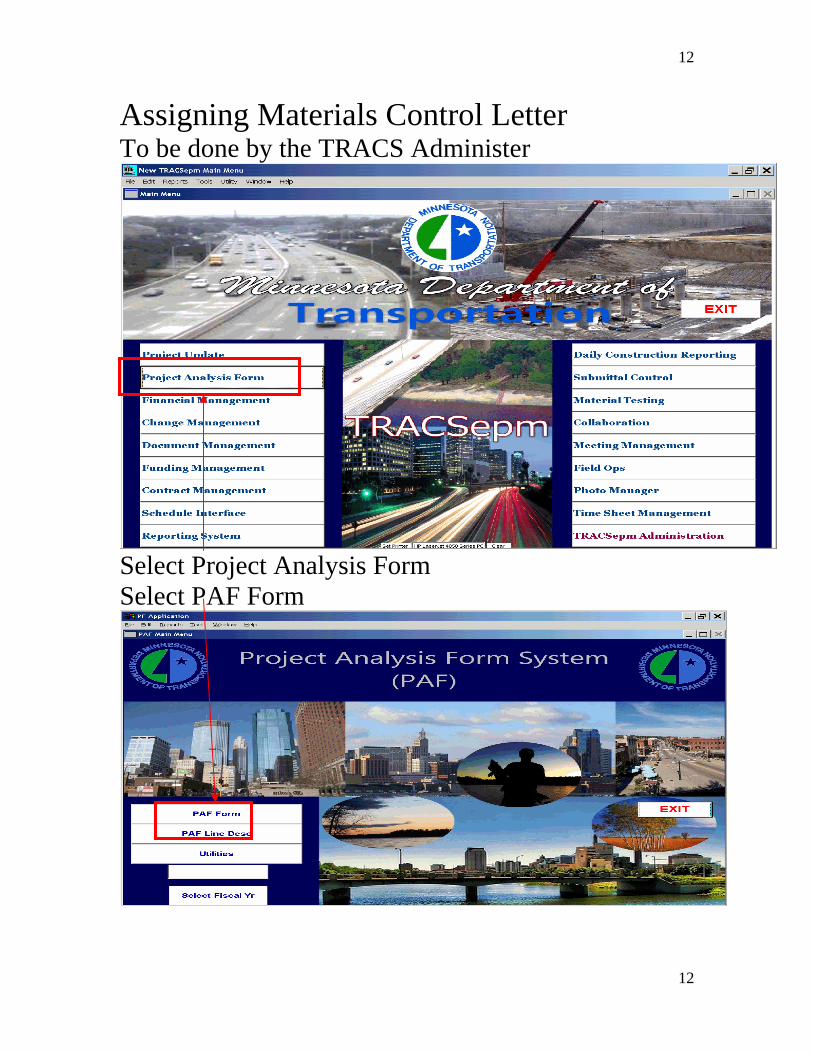
Assigning Materials Control Letter To be done by the TRACS Administer
Select Project Analysis Form Select PAF Form
12

13
Select Project Double click desired project to select.
Choose Material Control Schedule
If schedule is not in list Contact your TRACS Administer Click Save
13

14
Assigning Users Users wont see this job in there list unless they are added to this page and can only be added by the PM & CM Make sure you’re in the desired Project
Select Users Add User
14

15
Select User from list Highlight User / Hit Add / hit OK
If desired user isn’t in list contact your TRACS Addimistrator Edit users Project Level Security
No Access = Module is inactive Read Only = Module active but can’t Edit R/W = Module Active and can Add notes Supervisor = Module Active and can add notes and Edit & delete other peoples Notes
15

16
Set up Email Teams To set up email teams to automatically E-Mail report and notifications Select E-MAIL Set Up Select Edit Choose report
Select Add TRACS User Select Desired E-Mail recipient Highlight User / Hit Add / hit OK
16

17
To create E-Mail Teams Select Teams Select Add
Choose E-MAIL Teams name
Click Save then Details
17

18
Click Add TRACS User to add E-Mail Recipients to the Team Highlight User / Hit Add / hit OK
Click Save
18

19
Field Ops Setup Down load Field Ops from CMS to TRACS This will be done by the Office manager Select Field Ops
Select Resident Office & New Download from Network
19

20
Select District hit OK
Select Project and hit Download
If project is not in list and has not been already downloaded Project might not be in CMS yet If it is in CMS but not on this list Contact your Field Ops Addmin. Enter Request to sublet (To be done By Office Manager) Select Field Ops
20

21
Select Resident Office & Request to Sublet
If subcontractor not listed Select Add First Tier Sub If they are a sub of a sub then Highlight First Tier Sub then hit Add Second Tier Sub
21

22
Click Add
Highlight Desired subcontractor then Hit Select
Enter Info from Request to sublet Form
Click Save
22

23
Project Field Ops Set Up Make sure you’re in the desired Project Select Field Ops
Select Project
23

24
Select Project Setup
Select Mark (P) Quantities
24

25
Highlight Item & Click Mark Plan Items marked as Plan Qty in the Plan should be marked as Plan here.
Select Exit when done To enter Engineers, Chief Inspectors & Contractors name Select Engineer – Contractor Info This is what will show on the Estimate
25

26
Select Engineer Enter Project Engineer/Supervisor & Chief Inspectors Information – Then Click Save
Select Contractor Enter Contractors Information – Then Click Save then Exit
26

27
Select Project Level Security This will add users to the field ops project
Select Add or Edit User
27

28
Select User from List then Click Select
Mark Items that user can have access to - click Save
28

29
Select Group Description
View or Edit Group Descriptions
29

30
Enter Contact Information
Enter any Contractor’s information that you may want to communicate throughout the life of the project. The E-Mail addresses entered here will be used for sending vouchers or Fieldops generated reports Click Save & Exit when done.
30

31
Set up Fuel Escalation Select Modify Fuel Index Percentage
Enter Percentage as Specified in project special provisions. This will be used by FieldOps to calculate fuel escalation. After entering Percentage Click OK
31

32
Mark Fuel Escalation Items
Fuel Escalation eligible items should already be identified and marked. If
m
your project download has errors, or if the special provisions change, you may need to mark additional items as eligible Do not mark items that are not specifically listed in the Special Provisions
Select Desired Item and Click mark fuel esc. IteVerify the Conversion Factor with the Special Provisions
32

33
To Enter Monthly Fuel Index Select Utilities
Select Monthly Fuel index
33

34
Add Base fuel Index (BFI) from the date of Letting for the project. To get the Fuel Index click fuel index on web
Add Current Fuel Index (CFI) To Be Done Monthly Select Add CFI and enter Information then Click Save To get the Fuel Index click fuel index on web
34

35
Chapter 3: Document Management Entering Documents into TRACS Select Project Double click desired project to select.
Select Documents Then select go to Doc Mgmt System
35

36
Select Add
Enter information into Details Tab
Click Save
36

37
Information Box Descriptions
DocNo: Document Number Received Date: Date document was sent over to Document Control Logged By: Person who loaded document (pick-list) Distr. Date: Automatically generated by TRACS for date document was loaded in system Type: Document type (pick-list) Subject: Title used to describe the document DocDate: Date shown on document Key Words: Free-form field used to enter additional words used to search for document -Note: when searching for documents via keyword, TRACS looks at Subject and Key Words field File No: Code used in filing system. You can use pick-list or Tree to search for file number. Attention: Person who is receiving document To Agency: Agency who is receiving document From: Person who is sending document From Agency: Agency who is sending document Ref ID: Transmittal code used in contractor’s document management system Distr. To: Free-form field used to enter who received copies of document Copy From Another Document: Used when loading new documents that are similar to another document Project: Tells you what project you are in the Document Management System of. Change History No: Used if there is any coding necessary for document (Change Orders, RFI’s, NDC, etc.)
37

38
Select Attachments Click Add Item
-You are able to View and Download attachments on this tab. -Additional information can be displayed in “Desc.” column. -“Type” refers to document type if it is viewable in another system in TRACS, i.e. Change Management or Submittal Control. These document types are: Change Document and Drawings. Note: TRACS automatically assigns these document types for you if enter data in the Change History No. field or make the document a Submittal.
38

39
Chose File Path/ select File & click OK
ose File Path/ select File & click OK
Chose File Type- Chose File Type- Needs to be Drawing it to be used as a con Doc. Needs to be Drawing it to be used as a con Doc.
39

40
Adding Action Select Action Tab -This tab is used if there are any “Actions” associated with the document that need to be tracked by the system. The person who loads the document selects the Action Required check-box, enters a Due Date, selects an Actionee, and enters the action to be taken in Action By field. -A report for actions can be generated in the Reports section of Document Management System. -When the Actionee responds to the action, they do so here by listing the steps they took in the Action Taken field and selecting the Action Closed check-box.
40

41
Adding Submittal Select Submittals -When you “Add Sub”, you add the document to the Submittal Control System, where official comments are tracked for the Owner and Contractor. -When you click the “Const Doc” button, the document will be flagged as a Construction Document. Typically, this button is clicked for Released for Construction (RFC) documents or finalized As-Builts. -If you wish to track a submittal by an Activity ID in the project schedule, you would enter that ID here.
41

42
Adding Transmittal Select Transmittal -You can create a Transmittal Cover Sheet for a document on this tab using the “New” button. -See below sample when you “Print” transmittal from this page.
Add Notes -This is an open text field where any additional information on a document can be put and associated with the document
42

43
Searching for Documents Select List
-This is the “List” tab where you can search for documents. Document Number is typically the easiest way to find a document, but if you wish to sort by any of the other columns to find a document, simply double-click on the column heading to sort by that column. This technique is common throughout all of the modules in TRACS if you need to sort by different columns. -The “Look For” box will search the column sorted to the left. In the above example, you can type in a Document Number and it will take you to the line of that document. -To return to the original sort order on this list (Document Number first), select the “Reset” button. -After selecting a document on the list, every tab (circled above) will correspond to the selection. You can tell if there is data contained within any of these tabs based on their shading. In the example above, the selected document has an Attachment (note the bold text on the tab).
43

44
Select Filter To search for documents by filtering the documents in the list view,
See items highlighted below for Keyword Filters.
44

45
Searching by Document Type You can filter the list by Document Type by using highlighted button below.
45

46
Searching by File Number You can filter the list by File Number by using highlighted button below.
Enter file number in this field to show all of the documents linked to it.
46
47
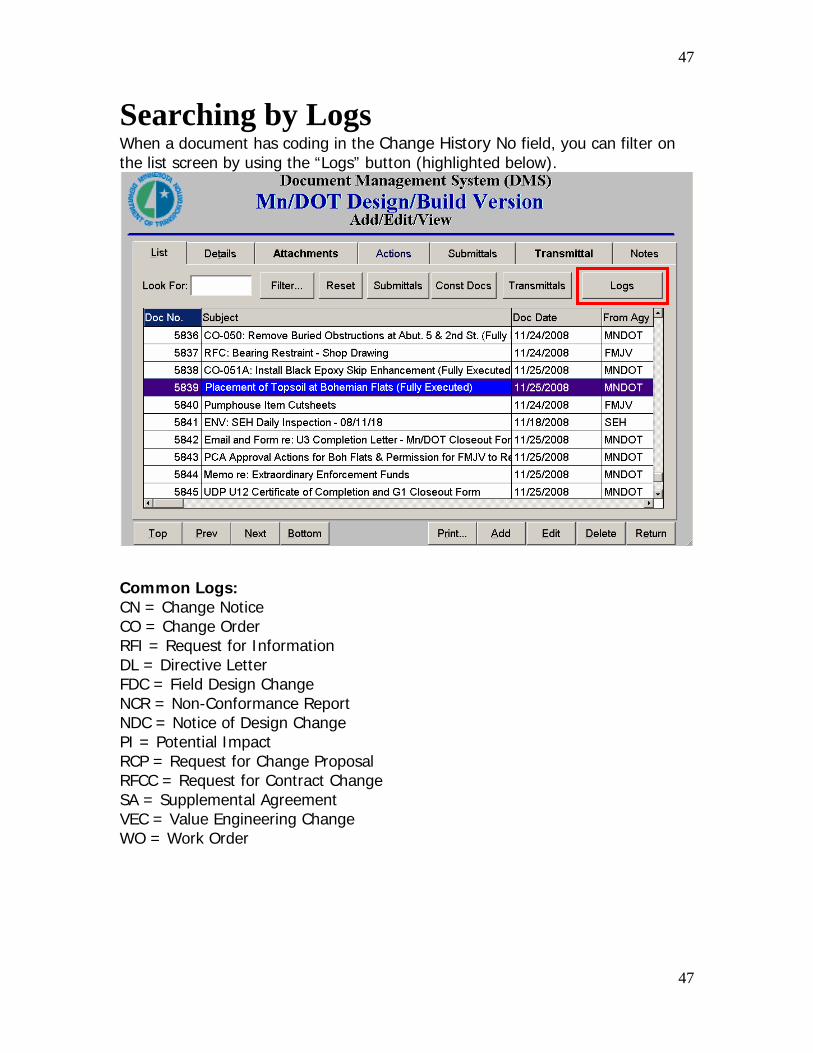
Searching by Logs When a document has coding in the Change History No field, you can filter on the list screen by using the “Logs” button (highlighted below).
Common Logs: CN = Change Notice CO = Change Order RFI = Request for Information DL = Directive Letter FDC = Field Design Change NCR = Non-Conformance Report NDC = Notice of Design Change PI = Potential Impact RCP = Request for Change Proposal RFCC = Request for Contract Change SA = Supplemental Agreement VEC = Value Engineering Change WO = Work Order
47

48
Searching by Submittal, Transmittals & Construction Documents You can filter the list on this screen to show Submittals, Construction Documents, and Transmittals by selecting any of the three buttons highlighted above.
48

49
Chapter 4: Daily Diary Select Project Double click desired project to select. Select FieldOps
Open project
49

50
Select Contract Time Select Contract Time Setup
Select Add/Edit Contract – Intermediates Enter or Edit Information / click Save then Exit
50

51
Select Construction Status
Select Add New
51

52
Highlight Status Click Select
Enter Status Date & Reason/ Click Save
Print If Desired / Click Exit when Done
52

53
Print Change in Construction Status for Engineers Signature
53

54
Tracs Diary Setup Select Daily Const Rpt Click on Go to daily const report System
Select Data Maintenance Module
54

55
Add Equipment Select Equipment
Select Add ( Can Import list from contractor)
55

56
Enter description then click Save
After adding all desired Equipment Click Return
56

57
Adding Labor Select Labor Classification
General list already exists in system
57

58
If the Labor Classification needed is not on the List the Select Add
Enter description then click save
58

59
Adding Contractors Contractors to be added in the Request to Sublet as shown on Page 21 After Request to Sublet is complete it FieldOps Select Vendors Select Import Vendors from CMS
59

60
Adding New Daily Project diary’s Select Daily Const. Rpt There are 2 way to enter Diary system, 1st way is to select Add daily Const. Report next step page 61
The 2nd way is to select Go to Daily Const. Report System.
If Selected Go to Daily const. Report System. Select Daily Reports
60

61
Select Add
If you selected Add daily Const. Report or Go to Daily Const. Report System you will be at this point. Enter Diary Detail Information Verify Employee – Enter Contractor – Enter weather – Enter Shift
Click Save
61

62
Add Activity (Click Add activity)
Select Activity Id (Highlight Activity then Click Select Activity) Activity Id is set by Spec # unless there is a CPM then the CPM Activity Id is imported from P3/P6
62

63
Select Notes Click Add Item / Enter Note /Click OK
Enter Contractor the Note applies to Toggle if note is to be put in weekly Diary Toggle if note is to be put into Punch list Resolution Toggle if Note is related to project delay
Click Save
63

64
Adding Equipment & Labor Select Equip / Then Add item
Highlight Desired Equipment Click Add then Ok
64

65
Enter Contractor / Quantity / Hours
Click Save Select Labor / Click Add Item
65

66
Highlight Desired Labor/ click Add then Ok
Enter Contractor/ # of Workers / Hours
Click Save
66

67
Use Const. Docs for notes To be able to use a Construction Document you would first have to place the document in Document Management (See Page 36) Then Make sure you set it to Drawing (See Page 40) Then Toggle on the Con Doc (See page 42) After you have Entered Notes / Equipment & Labor Select Con Docs / Select View
PDF version of Document will come up. Left Click Mouse and drag to capture area then Click Control C to Copy shaded area
Exit out of Page by Clicking x
67

68
Click on Ref Docs Select Inspections
Toggle on Blank Word Doc. Click Select
68

69
Right Click and Select Paste Shaded area from other document will appear Write notes associated with picture
Click x to exit Click Yes to Save
69

70
Weekly Diary Report Select Weekly Rpt
Select desired Week Notes that were Toggled on Construction Highlights (See Page 64) will show up here
Notes Toggled Punch list (see page 64) will be here Notes Toggled Delay (see page 64) will be here
70

71
To add Notes directly into Weekly Diary and not go through the Daily diary System Click Add Item Under Weekly Summary
Click on notes and enter note / Click OK If Diary Complete Click Save To print Select Print Weekly Report
71

72
Choose Print Preview / Click OK
View Weekly Diary if satisfactory Click on printer
72

73
Chapter 5: Punch list Management Start a new diary or add to an existing on See page 61 to 63 Select Activity Code that best represents the Punch list item
Add note to explain the Punch List Item / Click OK
73

74
Select Contractor
Toggle Punch List to send note to Punch list Resolution
Click Save
74

75
View Punch list in Weekly Report Click Weekly Report / Click Notes
View actual Note/ Click Ok
Punch List Item will stay on report until Resolved in Punch List Resolution Section.
75

76
To Go to Punch List Resolution Select Daily Const. Rpt / Go to Const Report System
Select Punch List Resolution
76

77
Select user Type (this is who has the action of the Punch list)
Change Status of Punch List Item When contractor open this box they will fill out the Contractors Recommended Resolution
Can dispute if the contractors work is unsatisfactory
77

78
Enter Notes & Dates when Punch List is Complete Click Save
Punch List Item will go into the Resolved area and the only way to see it would be to select Resolved
This Punch List Item is no longed on the Weekly Report.
78

79
Chapter 6: Quantity Payment Entering Quantities through Daily Construction Report System You will first have to start a Daily Diary (See Page 60 to 64) Entering Quantity Comps in Daily Notes Enter Notes with Quantity Equations / Click OK
Add Contractor and Click Save
79

80
Click on Cost Items / Select Add Item
Field Ops will open to Items with the same Spec # Select Item and Click Edit/Add Line
80

81
Select Add Item
Enter Station and Quantity (should match Quantity in TRACS Notes)
Document Location is the Tracs Diary Number Click Save
81

82
Choose month of work was done for Fuel Escalation Click OK
Documentation/Verification Note is the Tracs Diary number which will be as good as using Source Documentation
82

83
Entering Quantity Comps in a Template Spread sheet You will first have to start a Daily Diary (See Page 60 to 64) Enter Notes without Quantity Equations / Click OK
Add Contractor / Click Save
83

84
Select Ref Docs Click on Inspections
Toggle Desired Template / Click Select
84

85
Spread sheet will open Enter needed Information to complete computations Click X
Click Yes
Can Edit Spread sheet if needed
85

86
Click on Cost Items / Select Add Item
Field Ops will open to Items with the same Spec # Select Item and Click Edit/Add Line
86

87
Select Add Item
Enter Station and Quantity (should match Quantity on Spread sheet)
Document Location is the Tracs Diary Number Click Save
87

88
Choose month of work was done for Fuel Escalation Click OK
Documentation/Verification Note is the Tracs Diary number which will be as good as using Source Documentation
88

89
Entering Quantity Comps in Field Ops You will first have to start a Daily Diary (See Page 60 to 64) Select Item
Select Notes and Add Item
89

90
Write note then click OK
Click on Cost Items / Select Add Item
90

91
Field Ops will open to Items with the same Spec # Select Item and Click Edit/Add Line
Select Add Item
91

92
Enter Location/ Select Calculator Symbol
Enter Dimensions / Click OK
92

93
Quantity will be placed from Calculator
Considered Source Documentation
93

94
Adding Inspection templates into project When in the project Select Daily Const Rpt Then Go to Const Report System
Select Project Template Selection
94

95
Select Inspection Templates
Click Add Template
95

96
Toggle desired Templates / Click OK
Toggled Templates will show here
Click Save
96

97
To enter project Information Click Edit
Spread sheet will open/ Enter Information that will be used on spread sheet every time it is used on this project / Click X to exit spread sheet
97

98
Click Yes to save changes to spread sheet
When Editing of spread sheets is complete click Return
98

99
Adding S.A., C.O., W.O. & Back Sheet Items When in Project Select Field Ops
Click Select project
99

100
Adding & paying Supplemental Agreements Add Supplemental Agreement when download is ready in CMS Click on Supplemental Agreements
Select Download S.A./Encumbrance
100

101
Select Download new S.A.
Select File Location then click OK
If Other was chosen then show path and click OK
101

102
Choose OK
Select Return / If you cant see return use scroll bar to go down
102

103
To Pay on a S.A. Select Update
Select Supplemental Agreements then Edit/Add Line
103

104
Enter Payment information
Click Save Click Exit
104

105
Adding & Paying Change Orders Entering Field Ops (See page 99) Select Backsheets
Select Change Orders then Click on Add/Edit C.O. Descriptions
105

106
Enter Change order # and if it affect project days
Enter C.O. Description and Click save
106

107
Select Add Items Click Add Item
Add change Order Information then Click save
107

108
Click Exit
To Pay Change Order Select Update
108

109
Select Change Orders Select Edit/Add Line Select Add Line
Enter payment information
Click Save
109

110
Click Exit when done
110

111
Adding & Paying Work Orders Entering Field Ops (See page 99) Select Backsheet
Select Work Orders
111

112
Select Add/Edit W.O. Descriptions Click Add
Enter Work order # and Cost
Click on Category and Type of work
112
113
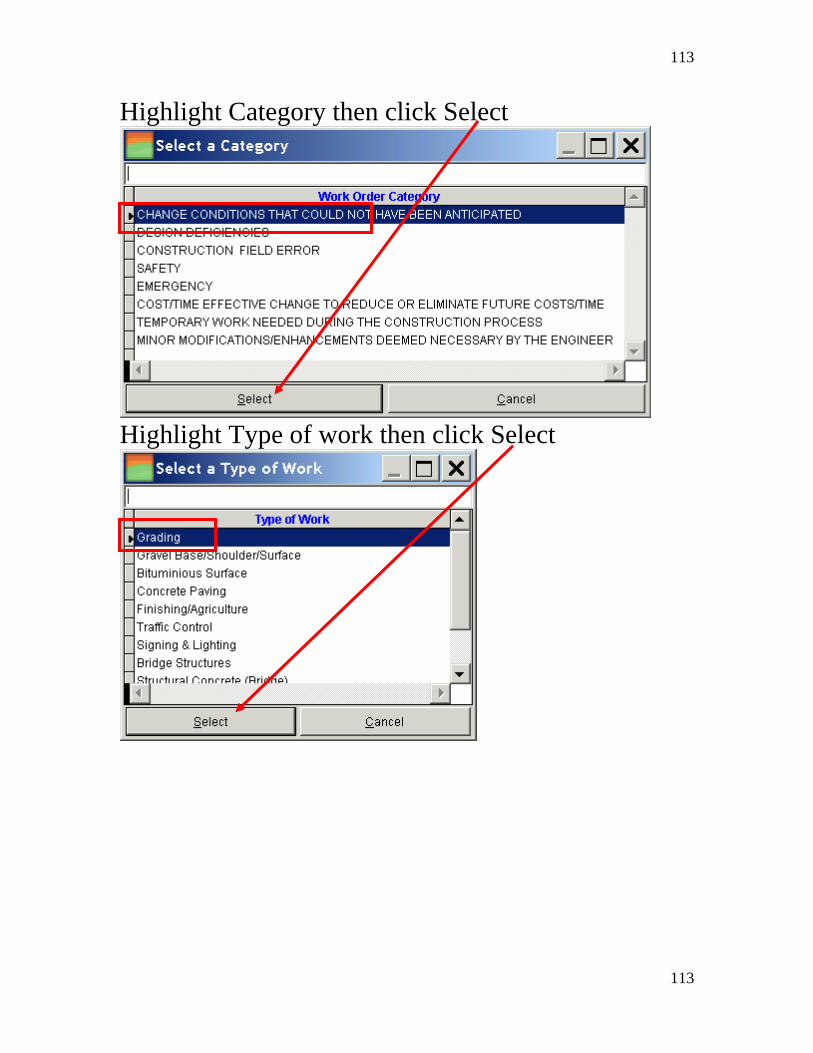
Highlight Category then click Select
Highlight Type of work then click Select
113

114
Enter Description then Click Save
Select Add Item
114

115
Enter work order Item information / Click Save
Click Exit To Pay W.O. Select Update
115

116
Select Work Order then Click edit/Add Line
Click Add Line
116

117
Add Payment information the Click save
Click Exit
117

118
Adding & Paying Back Sheets s (See page 99)
Select Backsheet Entering Field Op
Select Add Back sheet
Click on Add Item
118
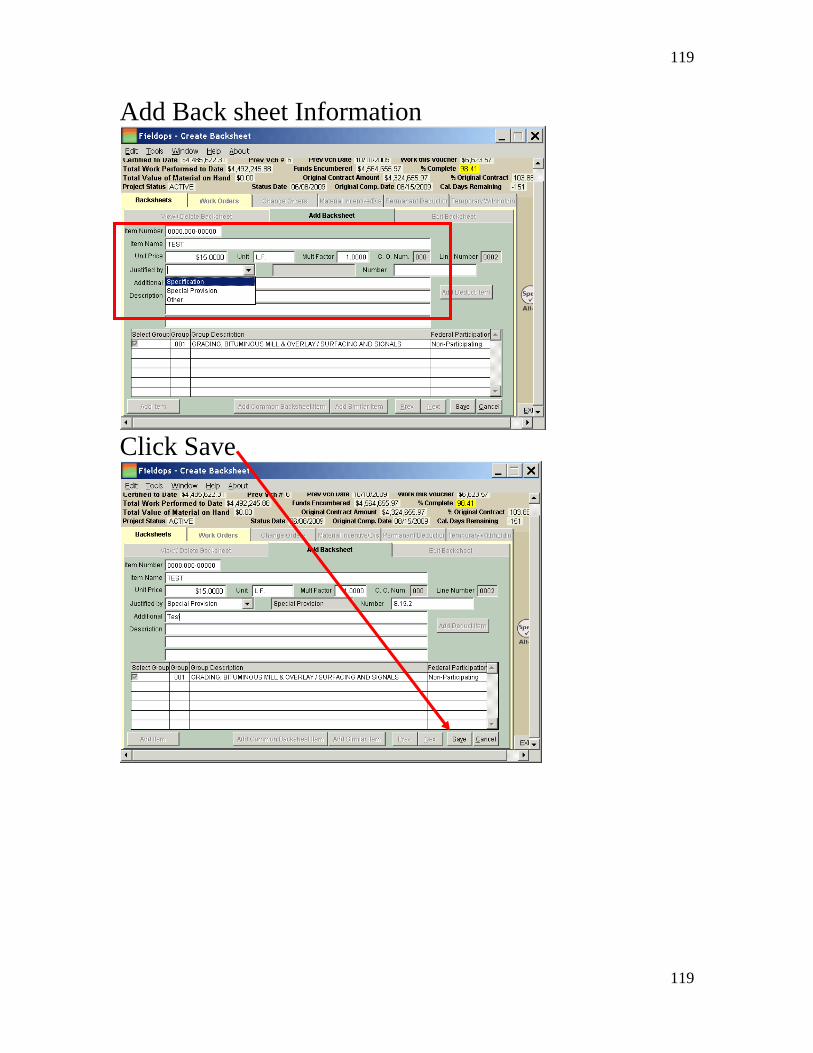
119
Add Back sheet Information
Click Save
119

120
Click Exit
To Pay Back sheet Select Update
120

121
Select Backsheet
Select Edit/Add Line
Click on Add Line
121

122
Enter Payment information Click Save
Click Exit
122

123
Material on Hand Adding Material on Hand
inistration MaFor Additional guidance see Contract Adm nual Section .370
age 99) Select Material on Hand Entering Field Ops (See p
Standard MOH – Add by Unit price – when you have an assignment letter, or
quest for material produced by contractor, you may not have an “invoice” with a price
tandard MOH – Add by Invoice – when you have an invoice for material for
ump Sum/MOH – when you get an invoice for a LS or Each item which may consist f many components, e.g. signal system.
rebreakdown, so you want to pay a percentage of the unit price.
Sspecific items. This option is handy when multiple items are on one invoice.
Lo
123

124
Select Item then Click on Mark Standard MOH or Mark Lump Sum/Each MOH
Select Mark Standard MOH Select Add by Unit Price or Add by Invoice
124

125
If selected Add by Unit Price Click on Add
Enter Information from MOH and Click Save
Click Exit
125

126
If selected Add by Invoice Click on Add
Enter Information from MOH and Click Save
Click Exit
126

127
If selected Mark Lump Sum/Each MOH
Click Add / Enter MOH Information
Click Save then Exit
127

128
Subtracting Material on Hand When Paying material placed on project.
Ops (See page 99) Select Update Entering Field
Select Item Line click Edit/Add Items
128

129
Click Add Line
Enter Payment Information Click Save
129

130
Click Yes
Enter amount of MOH to be removed then Click OK
Click Exit
130

131
Removing Material from Material on Hand List Needs to be done before project final. Select Material on Hand
Select Item to be removed Click View detail/delete MOH items
131

132
Click on Delete
Click Yes
Click Ok
Item no longer on MOH List Click Exit
132

133
Quantity Payment Verification
Click on Go to daily const report System
Quantity Check Select Daily Const Rpt
Select Daily Reports
133

134
Select Daily Diary then click Activity
Select Module where Payment Quantity is located
Quantity could be on a spread sheet in Ref Doc (see page 83) Quantity could be in Notes (see page 78)
134

135
When spread sheets were used Click Ref Docs Click Edit
Editing a Finalized report will create a copy over the original. Click Yes
135

136
Verify entered data and computations
Click X to exit spread sheet Click Yes to save changes
136

137
To check Quantity on spread sheet matches Field Ops Click Edit Item
Click Yes
137

138
Select Item /Select View IRA Entry Detail
Verify Quantity matches TRACS Report Should make sure Contractor agrees with quantity.
Click Exit
138

139
Click Details then toggle Computations Checked (Onl omputatio e correct and matched in Field Ops) y if all C ns wer
Daily Diary Report must be Finalized before Comp
If report is Finalized you won’t get this message Check can be recorded.
To continue click Yes
139

140
Person Checking Comps will need to placed there password here for Electronic Signature then hit OK
Checked by will show on Daily Report
The Employee that Initiated the report can NOT bethe Employee that does the Computation Check.
RACS will allow it but Contract Administration oes not. (See Contract Administration Manual Section 5-591.500)
Td
140

141
Certifying Quantity in Field Ops for Finals Select Field Ops
Select Project
141

142
Select Certify
Select Item then Click Edit/Add Final Qty
142

143
Click Add Final Quantity
Verify Quantity Should make sure Contractor agrees with quantity.
Add Final Document Location / Click Save If the quantity computations are in the Tracs system then that is as good as it being source documentation.
143

144
Chapter 7: Collaboration emplate
Select Collaboration Adding and Editing T
Select Collaboration
144

145
Select Add
Select Template Type
145

146
To have Templates in this area See Page 94 Toggle desired Spread sheet to be placed into Collaboration Click Select
Name spread sheet and click save
146

147
Enter desired information into spread sheet then click X
Click Yes
147

148
To give the control of Spread Sheet to someone else Click Toss Ball
Choose person to receive spread sheet click OK
148

149
After Spread sheet has been sent to desired recipient but need to change it then Select Take Back / Edit then resend
TRACS will send E-Mail to recipient that they have action in Collaboration System
149

150
List will show action required
To Retrieve spread sheet sent to you highlight then click details Click Catch Ball
150

151
Finalizing Spread sheet in Collaboration System List of people who had control of spread sheet and record of changes. If changes complete, to finalize (click Finalize)
Select Yes if ready to Finalize
Select People to receive notice of spread sheet finalization. Highlight people or team click ADD then OK
151

152
Received E-Mail from TRACS/ to view spread sheet click link
Collaboration & Daily Diary You will first have to start a Daily Diary (See Page 60 to 64) Select Ref Docs Select Collaboration
152

153
Select Spread sheet to enter into Collaboration Click Select
Item in Collaboration – Can View
153

154
Open Collaboration System to work with Spread sheet See page 144 & 145 Click Edit to work on spread sheet
154

155
Chapter 8: Photo Manager Adding Photo’s through Photo manager This will take a folder of pictures from your computer and place them in TRACS
Click Photos
Click Daily Photo Upload
Click Yes
155

156
Choose Path C$ on ‘Client’( C: ) is your Local PC
Choose Folder with photo’s then Click OK
Click User Photo Tree to Add comments to photo’s
156

157
Choose path to Picture then Highlight picture Click Display Information
Add Title or Notes by Clicking Edit
Add Note or Title then Click OK Click Return When Complete.
157
158
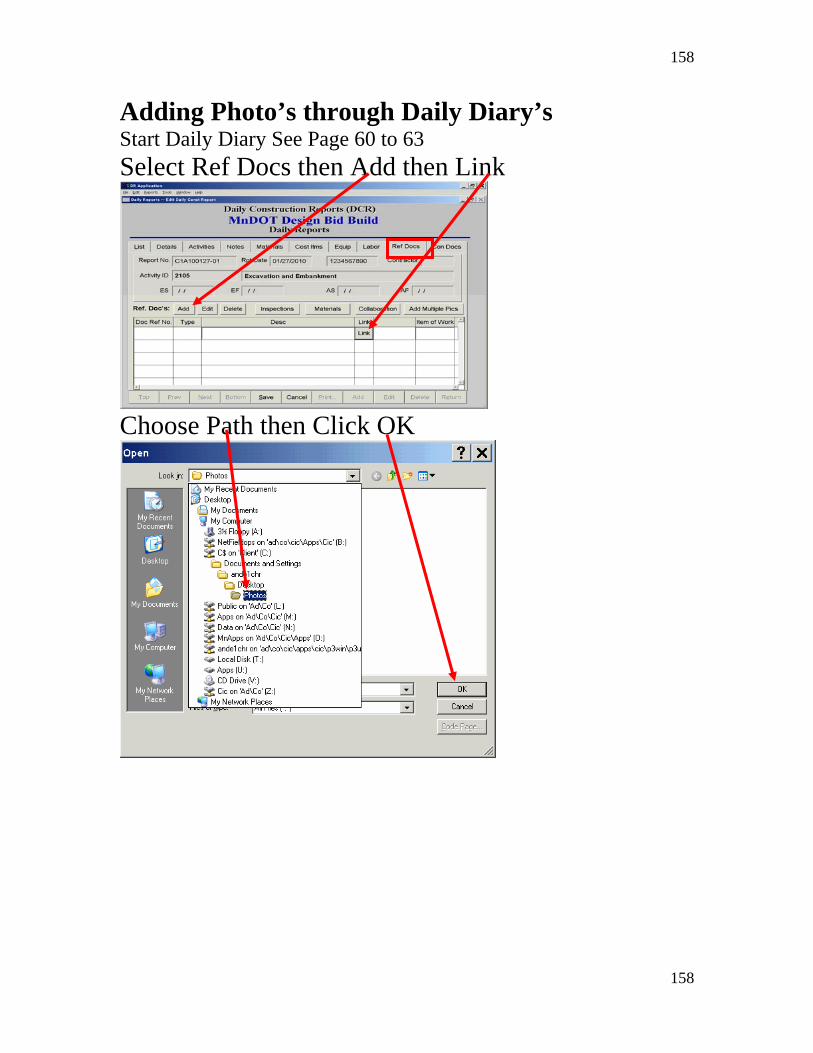
Adding Photo’s through Daily Diary’s Start Daily Diary See Page 60 to 63 Select Ref Docs then Add then Link
Choose Path then Click OK
158

159
Click Save then View
Picture attached to Daily Diary
159

160
To View Picture and Comments in Photo Manager Click Field Staff (DCR) Tree
Choose Photo Path
Click Display Information View Picture & Comments click Return when Done
160

161
Chapter 9: Finalizing Project Gather Material Certification paper work as shown in TRACS Material Manual Project Final Procedures 1 through 6 – See Tracs Material Manual Project Final Procedure 7 See Chapter 6 / Page 133 Project Final Procedure 8 See Chapter 6 / Page 128 Project Final Procedure 9 See Chapter 2 / Page 25
PROJECT FINAL PROCEDURES STEP #
1 Gather all failing material reports from file 2 List instances on Metro Inspection Form 3 Fill out Project Certification Roster 4 Fill out Material Certification Exception Sheet 5 Send Material Certification Exception Sheet & Project Certification Roster & all supporting
documentation to Materials Engineer 6 Create a Material audit packet (optional)
Need: Summary of testing requirement & test taken, Copy of info sent to Materials Engineer 7 Final Project Line Items (Certify Field Documentation) 8 Delete all zeroed out Back sheet & Material on Hand Items 9 Make sure all overhead personnel info is correct
(Engineer, Contractor & Address, ADE & Contract Administration Engineer 10 Write Overrun & under run Letters 11 Print out Draft Final Voucher go over Final quantities with Contractor 12 Send Draft Final Voucher to Contractor to start 90 day Clock - Note the Date in Field ops 13 Print out Overrun & under run Letter & send to ADE 14 Print out Required letters from Field Ops 15 Gather all Diary's & Change of Construction Status Reports 16 Get Project Letting Date & Award Date 17 Fill out Contract Date Log make sure all provisions of 1806 have been addressed 18 Get signature from Engineer on Contract Date Log & Final Contract Time Certification 19 Create Final Envelope's 20 Make appropriate Copies check newest directions for total number of copies 21 Place Info in required Envelopes 22 Fill out Documentation Submittal Sheet 23 Give to Office Manager
161

162
Project Final Procedure 10 & 13 Over-run / Under-run Letters Enter Field Ops See page 23 Click on Final
Click Edit Over-run / Under-run Letter
162

163
Highlight Item needing Over-run Under-run Description
Click Edit Choose Category
Write Over-run / Under-run reason Click Save
Click Exit when Done
163

164
To print Over-run / Under-run Letter Click
Print out letter and send to ADE
164

165
Project Final Procedure 11 & 12 Draft Final Voucher Click Final Reports Select Draft Final Voucher
If not all Items are Finaled you will get this notification
Printed out Draft Final Voucher
Have Office manager start 90 day Clock when given to Contractor
165

166
Project Final Procedure 17 Print out Contract Time Summary Data or Fill out Time Date Log Click Print Contract Time Summary Data
166

167
Click Time Date Log
Fill out Required Information This form does not need to be filled out if you use Print Contract Time Summary Data
167

168
Click Time Certification
Enter $ amount Click OK
168

169
169
Print Out Final Contract Time Certification Report
Project Final Procedure 18 Give Contract Time Certification Report, Print Contract Time Summary Data or Time Date Log All Diary Reports (Page 70) All Change of Construction Status Reports (Page 53) And Copy of Special Provisions Section 1806 Engineer will sign Contract Time Certification Report