1 unit 1 - pnw boces · as citizens or future technicians, scientists, technologists, engineers,...
TRANSCRIPT
Science 21 Curriculum © PNW BOCES G1 U1 Revised January 2019 | P a g e 1
Grade 1 Unit 1
Unit 1
Science 21 Curriculum © PNW BOCES G1 U1 Revised January 2019 | P a g e 2
Science 21 Curriculum © PNW BOCES G1 U1 Revised January 2019 | P a g e 3
SCIENCE 21©
Grade 1 Unit 1
Space Systems: Patterns and Cycles
The Sun, Moon, and Stars
A K-5 INTEGRATED SCIENCE CURRICULUM
DEVELOPED AT
PUTNAM/NORTHERN WESTCHESTER BOCES CURRICULUM & INSTRUCTIONAL SERVICES
Marla Gardner
Director, Curriculum and Instructional Services
David Jacob Regional Science Coordinator
For further information regarding this curriculum and staff development program, please contact the Science 21 Coordinator at 914-248-2336.
© 2006 by Putnam/Northern Westchester BOCES, 200 BOCES Drive, Yorktown Heights, NY 10598-4399.
All rights reserved. No portion of this document may be reproduced or transmitted in any form by any means (electronic, mechanical, photocopying, recording, or otherwise) without the prior
written permission of the Putnam/Northern Westchester BOCES Curriculum Center.

Science 21 Curriculum © PNW BOCES G1 U1 Revised January 2019 | P a g e 4
Science 21 Curriculum © PNW BOCES G1 U1 Revised January 2019 | P a g e 5
SCIENCE 21 VISION STATEMENT
The Science 21 Elementary Science Curriculum Project envisions that science classrooms in member districts will
foster a learning environment where all students learn the practices, the core idea, and crosscutting concepts of
science and engineering to become independent and collaborative, problem-solvers, and self-directed learners
in their present and future lives. In such an environment students will:
Engage in the active construction of essential core ideas in science and engineering that is
developmentally appropriate and relevant to their lives in the life sciences, earth/space sciences,
physical science, and engineering.
Be encouraged to evaluate phenomena and then construct meaning through hands-on activities
using appropriate materials and skills.
Be encouraged to identify real-world human problems, designing solutions, evaluating solutions and
communicating this information in a variety of ways including spoken, written, pictorial, graphical, and
mathematical forms.
Engage in a variety of child-centered learning experiences where they must apply science and
engineering practices and crosscutting concepts to other disciplines and in areas beyond the
classroom.
Be assessed in a variety of ways, including performance tasks, exhibitions, written and oral tests and
portfolios, to demonstrate what they know and can do in science.
Science 21 Curriculum © PNW BOCES G1 U1 Revised January 2019 | P a g e 6
Grade 1 Science Curriculum
We are pleased to announce the release of the Grade 1 Science Curriculum manual. This manual was originally
written in July 2016 and piloted in the 2016-2017 school year. The Grade 1 curriculum continues a robust planned
revision of Science 21. The team that wrote these lessons included grade level teachers and science instructional
consultants.
By using this curriculum, your instruction will have the following support:
The Science and Engineering Practices, the Disciplinary Core Ideas and the Crosscutting Concepts are
integrated into each lesson
Robust interdisciplinary, hands-on science lessons
Delineated expected run time for each lesson so you can plan for science instruction more efficiently
Formative and summative assessments (some lessons integrate the assessment into the activity)
Differentiated instruction built directly into the lesson format (more will be added based on teacher
suggestions)
This manual is part of a curriculum continuous improvement model; please be aware that you may find some flaws
in the lessons. As you use this new manual, please provide any feedback to us about the lessons or materials so
we can continue to improve the Science 21 service. Thank you so much for your continued support!
Sincerely,
David Jacob
Regional Science Coordinator BOARD OF COOPERATIVE EDUCATIONAL
SERVICES
200 BOCES Drive
Yorktown Heights, NY 10598
914.248.2336 FAX: 914.248.2390
http://www.pnwboces.org/Science21/index.html
Science 21 Curriculum © PNW BOCES G1 U1 Revised January 2019 | P a g e 7
Foreword
Science 21 and the Standards
The Science 21 curriculum is aligned with the draft New
York State P-12 Science Learning Standards, (NYSSLS).
This document is our state’s version of the Next
Generation Science Standards (NGSS). The new
standards were written with extensive input from New
York teachers of all grade levels, and evolved from
previous national standards such as Project 2061 -
Benchmarks for Science Literacy from the AAAS,
http://www.project2061.org/publications/bsl/online/inde
x.php and the 2011 National Research Council’s A
Framework for K-12 Science Education: Practices,
Crosscutting Concepts, and Core Ideas.
http://www.nap.edu/read/13165/chapter/1
Change is Necessary
Since our MST Standards are now 20 years old, updates
are necessary to match the changing nature of science
education and the fields of science and engineering.
Our scientific knowledge and recent discoveries in
astronomy, genetics, and technology have dramatically
changed our world. The NYSSLS are firmly based on
research into the best science and engineering
practices, the brain and learning, and lay a
developmentally appropriate, solid foundation in
physical, life and earth and space sciences.
The goals of these changes are simple: first to help all
graduating students gain a concept of science and
engineering as an endeavor and a way of thinking
about the world, not just a collection of facts. Secondly,
to master the practices needed to succeed and thrive in
an ever-changing 21st-century global economy, either
as citizens or future technicians, scientists, technologists,
engineers, and entrepreneurs.
Achieving these goals necessitates an inquiry approach
using hands-on, student-driven investigations which
reflect the authentic nature of science. Professional
scientists and engineers rarely use one method to solve
problems or conduct research. Therefore, the path to a
student’s ability to fully understand and explain a
phenomenon may well include failure, exploration,
identification of errors, perseverance, ingenuity, and
creativity.
Students will no longer view science as a single, discrete
subject, but take opportunities to connect and apply
their understanding in many other areas of the
curriculum as they learn. For the first time, connections to
the NYS Common Core Learning Standards for English
Language Arts and Math are deliberately included. They
are tools for the work that scientists do every day. The
architecture of NGSS is retained in the NYSSLS. It is
Science 21 Curriculum © PNW BOCES G1 U1 Revised January 2019 | P a g e 8
important to note that the performance expectations –
how students demonstrate their understanding – are key.
Meeting them will require a fundamental rethinking of
the way we approach teaching in our classrooms.
Three Dimensional Thinking
The NYSSLS have three dimensions. Background readings
explaining the reasoning behind these dimensions can
be accessed at http://www.nextgenscience.org/get-to-
know.
1. The first dimension, Science and Engineering
Practices, (Appendix F from the Framework) are
what students should DO as they engage in
science and engineering in the classroom. As you
read Appendix F, you will discover that students
should become increasingly sophisticated in
using each practice as they move up the grade
level bands. The implication is that, as educators,
we must “Take off the training wheels” and allow
students to experience science and engineering
as scientists and engineers.
2. The second dimension is the Disciplinary Core
Ideas (Appendix E from the Framework) which
was considered “the content.” The NYSSLS focus
on core ideas across the disciplines and can be
studied at many levels rather than a broad but
shallow coverage of facts.
3. The third dimension is the Crosscutting Concepts,
(Appendix G from the Framework) which can be
considered both as the big ideas of science and
thinking tools to explain unique phenomena.
All three dimensions must be explicitly stated and woven
together in lessons and units if students are to master the
new expectations. All are equally important for the
thorough understanding of Science and Engineering
phenomena. Students who can meet the new
performance expectations will be taking more
responsibility for their learning throughout a unit.
Inquiry Model
The teaching strategy used in the development of this
curriculum which encourages this increased student role
in learning is Roger Bybee’s 5E model. It has been
embraced by educators planning instruction for new
science standards. Students are first Engaged with an
interesting prompt or phenomenon, they then Explore
other examples and related materials to gain
understanding. Their developing understanding is
expanded by sharing their ideas with the teacher and
peers during the Explain portion of the instruction. They
then Elaborate on their knowledge by applying it to a
new example or situation. The lesson or unit culminates
with Evaluation through summative or formative
assessments.
Trying Something New
As educators, these changes will require a leap of faith,
since trying something unfamiliar may cause us some
Science 21 Curriculum © PNW BOCES G1 U1 Revised January 2019 | P a g e 9
trepidation. The new standards will require us (the
teachers) to accept the role of “learner.” We cannot
know immediately the answers to questions that will arise
as we investigate. This situation is OK since science in the
“real world” follows just such a path.
What we must do is share with our students our curiosity
about the world, our willingness to question further, and
our intention to remain life-long learners. We must also
commit unequivocally to addressing the needs of ALL
students in our classrooms, giving ENL, struggling and
gifted students the support and encouragement to
“jump in” and do science.
The rewards will be exciting – increased engagement
which touches students fundamentally, who may now
see science as part of their lives and may reveal skills
and insights from children that are not easily measured
by traditional testing.
Engineering for Everyone
Another aspect of the NYSSLS standards (which you may
have already experienced in the Science 21 curriculum)
will now be more formally taught in your classroom.
Engineering is integrated into some performance
expectations and units. An asterisk (*) indicates this at
the end of the performance expectation. They are also
included in “stand-alone” standards for grades K-2 and
3-5. Students will experience the engineering design
cycle, learn the vocabulary of technology and
innovation, and apply their understanding of science
concepts to solve problems. Children love these hands-
on, creative challenges which tap into many other
talents! However, given the complexity of this design
thinking, students will also fail. As teachers, we will help
them (and their families) to realize that failure the first
time you try a task not a disaster, but merely a “First
Attempt In Learning!”(F.A.I.L)
Time for Teaching
This curriculum can be completed with a commitment of
2 periods of science a week for about 30 weeks. A single
science lesson can range from 15-40 minutes. Almost
everything you need is in the Science 21 kits with
external material requirements explicitly stated in the
lesson. The packing list indicates what is necessary lesson
by lesson.
Good luck on this new and exciting road to science
learning for you and your student!
Dr. Helen Pashley
Science 21 Curriculum © PNW BOCES G1 U1 Revised January 2019 | P a g e 10
Acknowledgments and Credits
Science 21 has been a highly effective curriculum program due to the efforts and dedication of teachers that have served
as curriculum developers on grade-level design teams. Using feedback based on classroom teacher experiences, each
design team continually develops, pilots, and revises the Science 21 curriculum to improve and strengthen it.
We gratefully acknowledge the contributions made by the teachers and consultants who have served on the Science 21
design team for this manual. The following designers are to be recognized for infusing their enthusiasm, creativity, talent, and
team spirit into the Science 21 curriculum.
July 2016
Dr. Helen Pashley Glen Cochrane
Rafael Bencosme* Lisa Kenny*
Deirdre Cardona* Todd Leonardo
Kathleen Catlin* Nancy Longenberger*
Danielle Colasante* Nicole Marty*
Megan Delo* Jill Moore*
Jessica Elliott* Brian Mullan*
Pamela Farsetta* Barbara Rink
Heather Fidler* Betty Rivera*
Elizabeth Hamboussi* Jennifer Sullivan*
Denise Hayes Jen Teichmann
Leesa Hernandez* Linda Whitney
Janet Ho* Katy Morley
* Teachers that agreed to pilot the curriculum in the 2016-2017 school year.
Science 21 Curriculum © PNW BOCES G1 U1 Revised January 2019 | P a g e 11
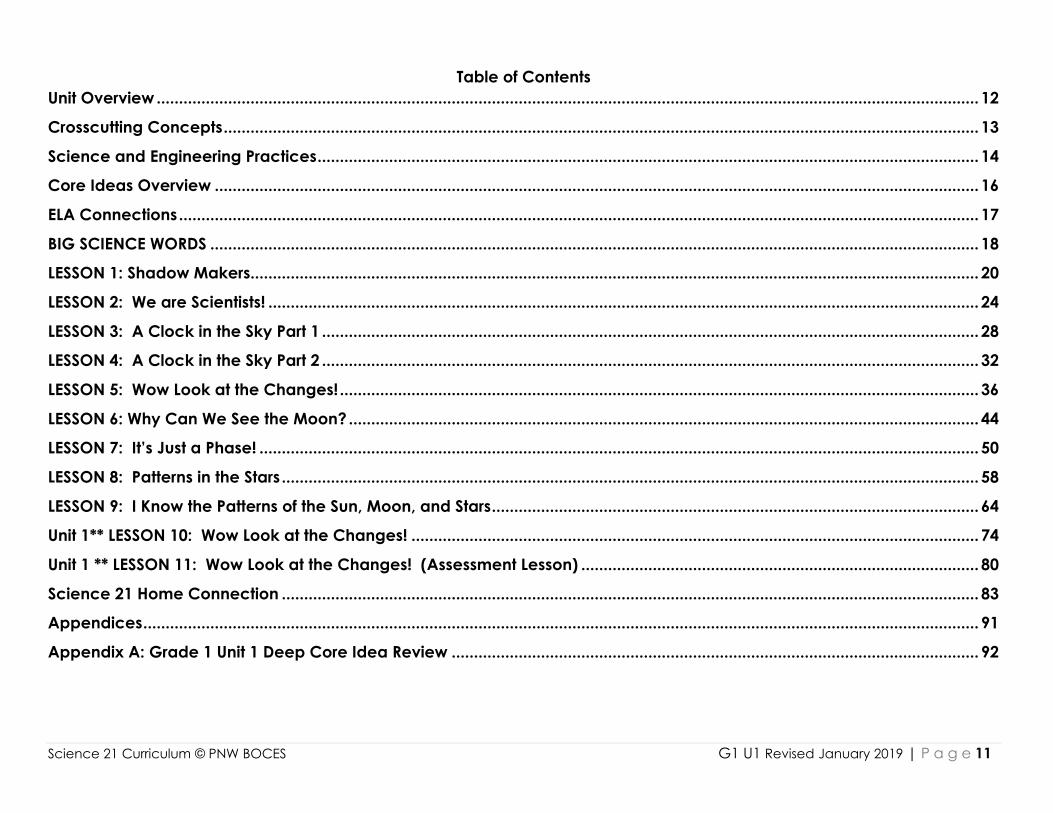
Table of Contents
Unit Overview ........................................................................................................................................................................................ 12
Crosscutting Concepts ......................................................................................................................................................................... 13
Science and Engineering Practices .................................................................................................................................................... 14
Core Ideas Overview ........................................................................................................................................................................... 16
ELA Connections ................................................................................................................................................................................... 17
BIG SCIENCE WORDS ............................................................................................................................................................................ 18
LESSON 1: Shadow Makers................................................................................................................................................................... 20
LESSON 2: We are Scientists! ............................................................................................................................................................... 24
LESSON 3: A Clock in the Sky Part 1 ................................................................................................................................................... 28
LESSON 4: A Clock in the Sky Part 2 ................................................................................................................................................... 32
LESSON 5: Wow Look at the Changes! ............................................................................................................................................... 36
LESSON 6: Why Can We See the Moon? ............................................................................................................................................. 44
LESSON 7: It’s Just a Phase! ................................................................................................................................................................. 50
LESSON 8: Patterns in the Stars ............................................................................................................................................................ 58
LESSON 9: I Know the Patterns of the Sun, Moon, and Stars ............................................................................................................. 64
Unit 1** LESSON 10: Wow Look at the Changes! ............................................................................................................................... 74
Unit 1 ** LESSON 11: Wow Look at the Changes! (Assessment Lesson) ......................................................................................... 80
Science 21 Home Connection ............................................................................................................................................................ 83
Appendices ........................................................................................................................................................................................... 91
Appendix A: Grade 1 Unit 1 Deep Core Idea Review ...................................................................................................................... 92
Science 21 Curriculum © PNW BOCES G1 U1 Revised January 2019 | P a g e 12
Unit Overview
In this unit, students will be making observations of the
Sun, moon, and stars. The way we are approaching this
unit may be different than how you may have approached
this topic in the past. We will not be doing direct instruction
about where the sun rises or sets, the names of the phases
of the moon or memorizing star patterns.
Instead, we want students to have firsthand
experience observing these astronomical objects and
“describe patterns that can be predicted” (as the
performance expectation states). We are focusing on the
scientific skill of observing, describing and then using those
observations to predict future movement.
As with all the Science 21 curriculum, we want
students to construct meaning through student inquiry.
One way that we attempt to attain student inquiry is:
OBSERVE A PHENOMENON
DESCRIBE WHAT THEY SEE
REPRESENT WHAT THEY SEE USING WORDS AND
MODELS (sketches)
PREDICT FUTURE PHENOMENON
This process is how students can develop a mindset for
taking the time to observe the natural and designed world
around them and start to make meaning out of what they
see.
Conveying this process is not an easy task, but a
worthwhile instructional goal. The ability for a student to
slow down and OBSERVE CAREFULLY can be utilized in all
subject areas. When a student practices the “art of
observation” they are using a skill that will serve them a
lifetime. When we learn something new, we may need to
read a passage many times before it makes sense to us.
When we encounter any new information, this skill of
observation is the first step.
In this unit, we have constructed lessons where we
have students observe and record the changes in the sun
over the day, how the moon illumination changes each
day, how the stars can be seen and the amount of daylight
changes over the course of a year. We could have
provided students with this information succinctly, but the
intent of this unit is for students to observe, describe and
predict these changes. Although this will take longer for
students to construct these explanations the intent is that
they will have some foundational understanding about
planetary movement as these core ideas progress across
the grade level.
WARNING: Some of our pilot teachers reported that
their students became MOON obsessed. Young children
can be fascinated by what they see in the night sky.
Another pilot teacher shared an experience with us: one
day during snack time a student made the pattern of the
big dipper using blueberries. She then reported that a
spontaneous outbreak of “big dippering” of snacks starting
happening around her classroom (fish crackers, cheerios,
etc.). This story demonstrates the natural curiosity students
have for the natural phenomenon around them.
In this unit, we are using shadows as a measurement
tool for the sun. Although “playing with shadows” is a fun
activity for students, we want to connect students to the
source of the light that makes the shadows, the Sun. Your
students will be surprised to see how much the Sun appears
to move across the sky in just 10 minutes! With the moon,
we want students to observe and record the changes that
they see in the moon over several days and then predict
what the moon will look like next. These activities will help
students achieve the performance expectations
Science 21 Curriculum © PNW BOCES G1 U1 Revised January 2019 | P a g e 13
Crosscutting Concepts
Below you will find the description of the Crosscutting Concepts (CC), which is reprinted with permission from the
source document, A Framework for K-12 Science Education: Practices, Crosscutting Concepts and Core Ideas
(National Research Council, (2012). Washington D.C.: National Academies Press. Retrieved from
http://www.nap.edu/catalog.php?record_id=13165).
This overview is intended for teacher background knowledge. Each lesson has a quick reference for each CC
to help guide the teaching.
1. Patterns. Observed patterns of forms and events guide organization and classification, and they
prompt questions about relationships and the factors that influence them.
2. Cause and effect: Mechanism and explanation. Events have causes, sometimes simple, sometimes
multifaceted. A significant activity of science is investigating and explaining causal relationships
and the mechanisms by which they are mediated. Such mechanisms can then be tested across
given contexts and used to predict and explain events in new contexts.
3. Scale, proportion, and quantity. In considering phenomena, it is critical to recognize what is
relevant at different measures of size, time, and energy and to recognize how changes in scale,
proportion, or quantity affect a system’s structure or performance.
4. Systems and system models. Defining the system under study—specifying its boundaries and
making explicit a model of that system—provides tools for understanding and testing ideas that are
applicable throughout science and engineering.
5. Energy and matter: Flows, cycles, and conservation. Tracking fluxes of energy and matter into,
out of, and within systems helps one understand the systems’ possibilities and limitations.
6. Structure and function. The way in which an object or living thing is shaped and its substructure
determine many of its properties and functions.
7. Stability and change. For natural and built systems alike, conditions of stability and determinants
of rates of change or evolution of a system are critical elements of study.
Science 21 Curriculum © PNW BOCES G1 U1 Revised January 2019 | P a g e 14
Science and Engineering Practices
Below you will find the description of the Science and Engineering
Practices (SEP), which is reprinted with permission from the source
document, A Framework for K-12 Science Education: Practices,
Crosscutting Concepts and Core Ideas (National Research Council,
(2012). Washington D.C.: National Academies Press. Retrieved from
http://www.nap.edu/catalog.php?record_id=13165).
This overview is intended for teacher background knowledge. Each
lesson has a quick reference SEP overview to help guide the lesson.
1. Asking Questions and Defining Problems
Science begins with a question about a phenomenon, such as “Why is the sky blue?” or “What causes cancer?” and seeks to develop theories that can provide explanatory answers to such questions. A basic practice of the scientist is formulating empirically answerable questions about phenomena, establishing what is already known, and determining what questions have yet to be satisfactorily answered. Engineering begins with a problem, need, or desire that suggests an engineering problem that needs to be solved. A societal problem such as reducing the nation’s dependence on fossil fuels may engender a variety of engineering problems, such as designing more efficient transportation systems, or alternative power generation devices such as improved solar cells. Engineers ask questions to define the engineering problem, determine criteria for a successful solution, and identify constraints.
2. Developing and Using Models Science often involves the construction and use of a wide variety of models and simulations to help develop explanations about natural phenomena. Models make it possible to go beyond observables and imagine a world not yet seen. Models enable predictions of the form “if…then…therefore” to be made to test hypothetical explanations. Engineering makes use of models and simulations to analyze existing systems so as to see where flaws might occur or to test possible solutions to a new problem. Engineers also call on models of various sorts to test proposed systems and to recognize the strengths and limitations of their designs.
3. Planning and Carrying Out Investigations Scientific investigation may be conducted in the field or the laboratory. A major practice of scientists is planning and carrying out a systematic investigation, which requires the identification of what is to be recorded and, if applicable, what are to be treated as the dependent and independent variables (control of variables). Observations and data collected from such work are used to test existing theories and explanations or to revise and develop new ones. Engineers use investigation both to gain data essential for specifying design criteria or parameters and to test their designs. Like scientists, engineers must identify relevant variables, decide how they will be measured, and collect data for analysis. Their investigations help them to identify how effective, efficient, and durable their designs may be under a range of conditions. Analyzing and Interpreting Data.
4. Analyzing and Interpreting Data Scientific investigations produce data that must be analyzed in order to derive meaning. Because data usually do not speak for them- selves, scientists use a range of tools—including tabulation, graphical interpretation, visualization, and statistical analysis—to identify the significant features and patterns in the data. Sources of error are identified and the degree of certainty calculated. Modern technology makes the collection of large data sets much easier, thus providing many secondary sources for analysis. Engineers analyze data collected in the tests of their designs and investigations; this allows them to compare different solutions and determine how well each one meets specific design criteria—that is, which design best solves the problem within the given constraints. Like scientists, engineers require a range of tools to identify the major patterns and interpret the results.
5. Using Mathematics and Computational Thinking In science, mathematics and computation are fundamental tools for representing physical variables and their relationships. They are used for a range of tasks, such as constructing simulations, statistically analyzing data, and recognizing, expressing, and applying quantitative relationships. Mathematical and computational approaches enable
Science 21 Curriculum © PNW BOCES G1 U1 Revised January 2019 | P a g e 15
predictions of the behavior of physical systems, along with the testing of such predictions. Moreover, statistical techniques are invaluable for assessing the significance of pat- terns or correlations. In engineering, mathematical and computational representations of established relationships and principles are an integral part of design. For example, structural engineers create mathematically based analyses of designs to calculate whether they can stand up to the expected stresses of use and if they can be completed within acceptable budgets. Moreover, simulations of designs provide an effective test bed for the development of designs and their improvement.
6. Constructing Explanations and Designing Solutions The goal of science is the construction of theories that can provide explanatory accounts of features of the world. A theory becomes accepted when it has been shown to be superior to other explanations in the breadth of phenomena it accounts for and in its explanatory coherence and parsimony. Scientific explanations are explicit applications of theory to a specific situation or phenomenon, perhaps with the intermediary of a theory-based model for the system under study. The goal for students is to construct logically coherent explanations of phenomena that incorporate their current understanding of science, or a model that represents it and are consistent with the available evidence. Engineering design, a systematic process for solving engineering problems, is based on scientific knowledge and models of the material world. Each proposed solution results from a process of balancing competing criteria of desired functions, technological feasibility, cost, safety, esthetics, and compliance with legal requirements. There is usually no single best solution but rather a range of solutions. Which one is the optimal choice depends on the criteria used for making evaluations.
7. Engaging in Argument from Evidence In science, reasoning and argument are essential for identifying the strengths and weak- nesses of a line of reasoning and for finding the
best explanation for a natural phenomenon. Scientists must defend their explanations, formulate evidence based on a solid foundation of data, examine their own understanding in light of the evidence and comments offered by others, and collaborate with peers in searching for the best explanation for the phenomenon being investigated. In engineering, reasoning and argument are essential for finding the best possible solution to a problem. Engineers collaborate with their peers throughout the design process, with a critical stage being the selection of the most promising solution among a field of competing ideas. Engineers use systematic methods to compare alternatives, formulate evidence based on test data, make arguments from evidence to defend their conclusions, evaluate the ideas of others critically, and revise their designs in order to achieve the best solution to the problem at hand.
8. Obtaining, Evaluating, and Communicating Information
Science cannot advance if scientists are unable to communicate their findings clearly and persuasively or to learn about the findings of others. A major practice of science is thus the communication of ideas and the results of inquiry—orally, in writing, with the use of tables, diagrams, graphs, and equations, and by engaging in extended discussions with scientific peers. Science requires the ability to derive meaning from scientific texts (such as papers, the Internet, symposia, and lectures), to evaluate the scientific validity of the information thus acquired, and to integrate that information. Engineers cannot produce new or improved technologies if the advantages of their designs are not communicated clearly and persuasively. Engineers need to be able to express their ideas, orally and in writing, with the use of tables, graphs, drawings, or models and by engaging in extended discussions with peers. Moreover, as with scientists, they need to be able to derive meaning from colleagues’ texts, evaluate the information, and apply it usefully. In engineering and science alike, new technologies are now routinely available that extend the possibilities for collaboration and communication.
Science 21 Curriculum © PNW BOCES G1 U1 Revised January 2019 | P a g e 16
Core Ideas Overview
Grade 1 Unit 1
For this unit in Grade 1, we will be working with one overarching disciplinary core idea in science. Below you will find the
content summary adapted reprinted with permission from the source document, A Framework for K-12 Science Education:
Practices, Crosscutting Concepts and Core Ideas (National Research Council. (2012). Washington D.C.: National
Academies Press. Retrieved from http://www.nap.edu/catalog.php?record_id=13165).
This content overview is intended for teacher background knowledge, not as a primer for students. Each lesson has lesson
specific content overview to help guide the lesson.
Core Idea ESS1 Earth’s Place in the Universe
What is the universe, and what is Earth’s place in it?
The planet Earth is a tiny part of a vast universe that has
developed over a huge expanse of time. The history of
the universe, and of the structures and objects within it,
can be deciphered using observations of their present
condition together with knowledge of physics and
chemistry. Similarly, the patterns of motion of the objects in
the solar system can be described and predicted on the
basis of observations and an understanding of gravity.
Comprehension of these patterns can be used to explain
many Earth phenomena, such as day and night, seasons,
tides, and phases of the Moon. Observations of other solar
system objects and of Earth itself can be used to
determine Earth’s age and the history of large-scale
changes in its surface.
**You can find more content background in appendix A
of this Unit.
Science 21 Curriculum © PNW BOCES G1 U1 Revised January 2019 | P a g e 17
ELA Connections
Grade 1 Unit 1
This bibliography is a list of suggested texts that would support reading in the content area for the Disciplinary Core Ideas, the Science
and Engineering Practices or the Crosscutting Concepts of this unit. All of these books were available at the time of writing this unit, but
as with all published documents, they may go out of print. If you notice a book is out of print or have a suggestion to add to this list,
please let Science 21 know via the email on the website and we will update these lists. We will sometimes leave an out of print book on
the list (with an annotation) if the book is of particular interest and may be found in current libraries.
Suggested Texts (Author. Year. Title. Publisher)
Branley, F. (1994). Daylight, Nightlight: Where Light Comes From, Harper Collins
Branley, F. (1987). The Moon Seems to Change, Harper Collins
Branley, F. (2002). The Sun Our Nearest Star, Harper Collins
Fowler, A. (1992). So That’s How the Moon Changes Shape!, Childrens Press Chicago
Fulco, C. & Jacob, D. (2016). The Clocks in the Sky
Gibbons, G. (1998). The Moon Book, Holiday House
Gibbons, G. (1987). Sun Up, Sun Down, HMH Books for Young Readers
Otto, C. (2001). Shadows, Scholastic
Science 21 Curriculum © PNW BOCES G1 U1 Revised January 2019 | P a g e 18
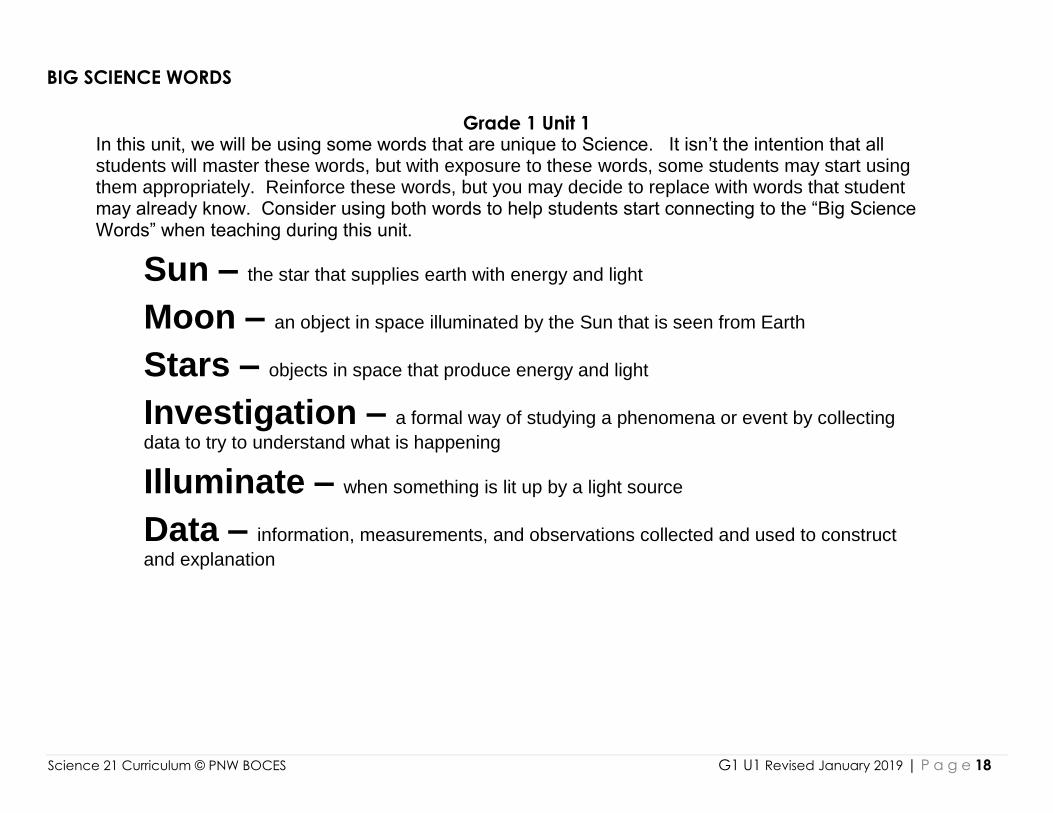
BIG SCIENCE WORDS
Grade 1 Unit 1 In this unit, we will be using some words that are unique to Science. It isn’t the intention that all students will master these words, but with exposure to these words, some students may start using them appropriately. Reinforce these words, but you may decide to replace with words that student may already know. Consider using both words to help students start connecting to the “Big Science Words” when teaching during this unit.
Sun – the star that supplies earth with energy and light
Moon – an object in space illuminated by the Sun that is seen from Earth
Stars – objects in space that produce energy and light
Investigation – a formal way of studying a phenomena or event by collecting
data to try to understand what is happening
Illuminate – when something is lit up by a light source
Data – information, measurements, and observations collected and used to construct
and explanation
Science 21 Curriculum © PNW BOCES G1 U1 Revised January 2019 | P a g e 19
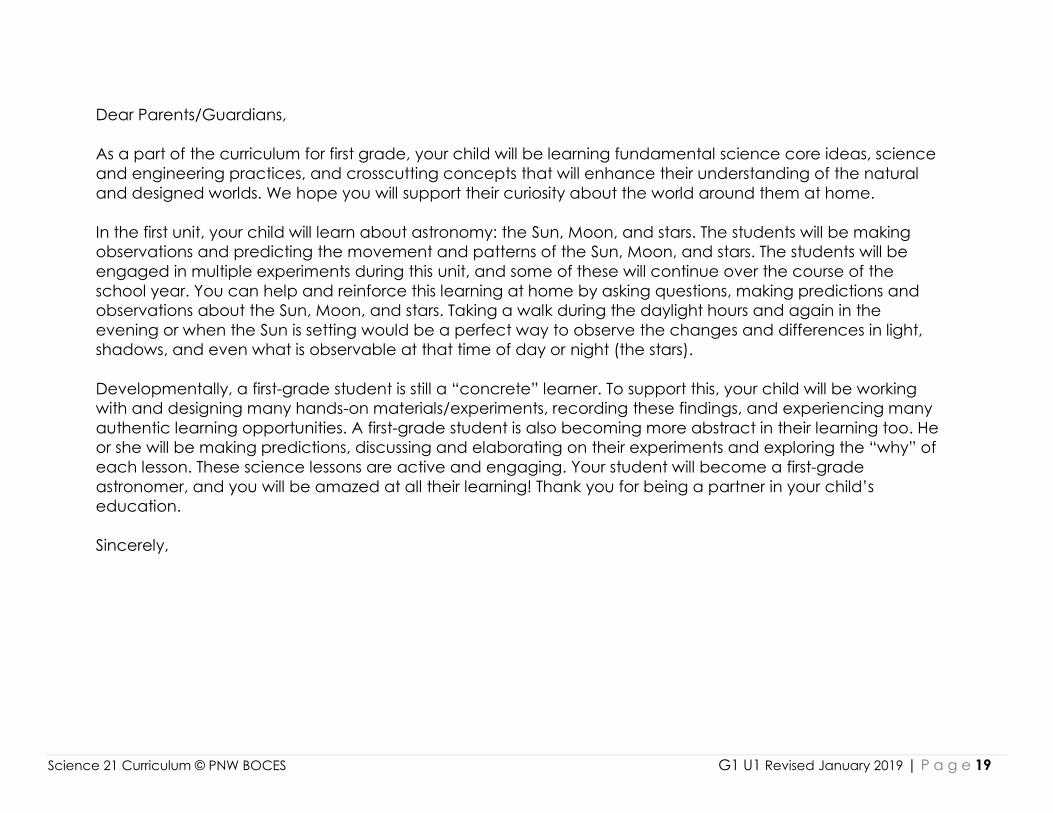
Dear Parents/Guardians,
As a part of the curriculum for first grade, your child will be learning fundamental science core ideas, science
and engineering practices, and crosscutting concepts that will enhance their understanding of the natural
and designed worlds. We hope you will support their curiosity about the world around them at home.
In the first unit, your child will learn about astronomy: the Sun, Moon, and stars. The students will be making
observations and predicting the movement and patterns of the Sun, Moon, and stars. The students will be
engaged in multiple experiments during this unit, and some of these will continue over the course of the
school year. You can help and reinforce this learning at home by asking questions, making predictions and
observations about the Sun, Moon, and stars. Taking a walk during the daylight hours and again in the
evening or when the Sun is setting would be a perfect way to observe the changes and differences in light,
shadows, and even what is observable at that time of day or night (the stars).
Developmentally, a first-grade student is still a “concrete” learner. To support this, your child will be working
with and designing many hands-on materials/experiments, recording these findings, and experiencing many
authentic learning opportunities. A first-grade student is also becoming more abstract in their learning too. He
or she will be making predictions, discussing and elaborating on their experiments and exploring the “why” of
each lesson. These science lessons are active and engaging. Your student will become a first-grade
astronomer, and you will be amazed at all their learning! Thank you for being a partner in your child’s
education.
Sincerely,
Science 21 Curriculum © PNW BOCES G1 U1 Revised January 2019 | P a g e 20
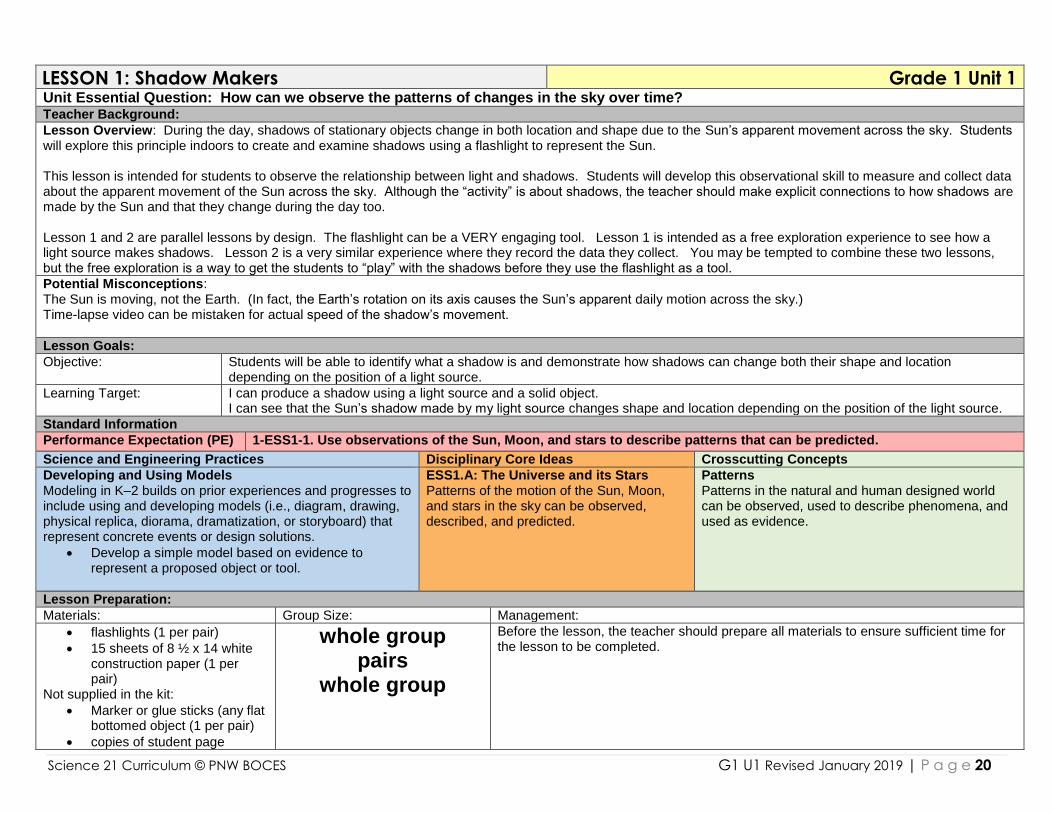
LESSON 1: Shadow Makers Grade 1 Unit 1 Unit Essential Question: How can we observe the patterns of changes in the sky over time? Teacher Background:
Lesson Overview: During the day, shadows of stationary objects change in both location and shape due to the Sun’s apparent movement across the sky. Students will explore this principle indoors to create and examine shadows using a flashlight to represent the Sun. This lesson is intended for students to observe the relationship between light and shadows. Students will develop this observational skill to measure and collect data about the apparent movement of the Sun across the sky. Although the “activity” is about shadows, the teacher should make explicit connections to how shadows are made by the Sun and that they change during the day too. Lesson 1 and 2 are parallel lessons by design. The flashlight can be a VERY engaging tool. Lesson 1 is intended as a free exploration experience to see how a light source makes shadows. Lesson 2 is a very similar experience where they record the data they collect. You may be tempted to combine these two lessons, but the free exploration is a way to get the students to “play” with the shadows before they use the flashlight as a tool.
Potential Misconceptions: The Sun is moving, not the Earth. (In fact, the Earth’s rotation on its axis causes the Sun’s apparent daily motion across the sky.) Time-lapse video can be mistaken for actual speed of the shadow’s movement.
Lesson Goals:
Objective: Students will be able to identify what a shadow is and demonstrate how shadows can change both their shape and location depending on the position of a light source.
Learning Target: I can produce a shadow using a light source and a solid object. I can see that the Sun’s shadow made by my light source changes shape and location depending on the position of the light source.
Standard Information
Performance Expectation (PE) 1-ESS1-1. Use observations of the Sun, Moon, and stars to describe patterns that can be predicted.
Science and Engineering Practices Disciplinary Core Ideas Crosscutting Concepts
Developing and Using Models Modeling in K–2 builds on prior experiences and progresses to include using and developing models (i.e., diagram, drawing, physical replica, diorama, dramatization, or storyboard) that represent concrete events or design solutions.
Develop a simple model based on evidence to represent a proposed object or tool.
ESS1.A: The Universe and its Stars Patterns of the motion of the Sun, Moon, and stars in the sky can be observed, described, and predicted.
Patterns Patterns in the natural and human designed world can be observed, used to describe phenomena, and used as evidence.
Lesson Preparation:
Materials: Group Size: Management:
flashlights (1 per pair)
15 sheets of 8 ½ x 14 white construction paper (1 per pair)
Not supplied in the kit:
Marker or glue sticks (any flat bottomed object (1 per pair)
copies of student page
whole group pairs
whole group
Before the lesson, the teacher should prepare all materials to ensure sufficient time for the lesson to be completed.
Science 21 Curriculum © PNW BOCES G1 U1 Revised January 2019 | P a g e 21
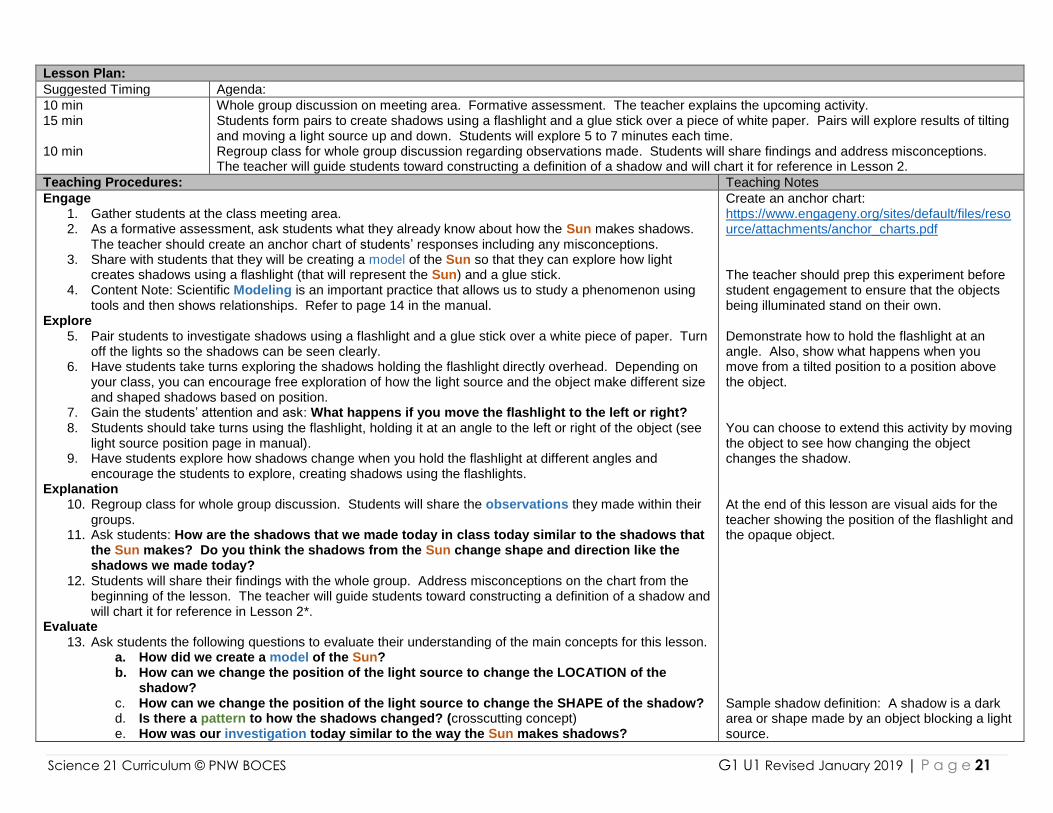
Lesson Plan:
Suggested Timing Agenda:
10 min 15 min 10 min
Whole group discussion on meeting area. Formative assessment. The teacher explains the upcoming activity. Students form pairs to create shadows using a flashlight and a glue stick over a piece of white paper. Pairs will explore results of tilting and moving a light source up and down. Students will explore 5 to 7 minutes each time. Regroup class for whole group discussion regarding observations made. Students will share findings and address misconceptions. The teacher will guide students toward constructing a definition of a shadow and will chart it for reference in Lesson 2.
Teaching Procedures: Teaching Notes
Engage 1. Gather students at the class meeting area. 2. As a formative assessment, ask students what they already know about how the Sun makes shadows.
The teacher should create an anchor chart of students’ responses including any misconceptions. 3. Share with students that they will be creating a model of the Sun so that they can explore how light
creates shadows using a flashlight (that will represent the Sun) and a glue stick. 4. Content Note: Scientific Modeling is an important practice that allows us to study a phenomenon using
tools and then shows relationships. Refer to page 14 in the manual. Explore
5. Pair students to investigate shadows using a flashlight and a glue stick over a white piece of paper. Turn off the lights so the shadows can be seen clearly.
6. Have students take turns exploring the shadows holding the flashlight directly overhead. Depending on your class, you can encourage free exploration of how the light source and the object make different size and shaped shadows based on position.
7. Gain the students’ attention and ask: What happens if you move the flashlight to the left or right? 8. Students should take turns using the flashlight, holding it at an angle to the left or right of the object (see
light source position page in manual). 9. Have students explore how shadows change when you hold the flashlight at different angles and
encourage the students to explore, creating shadows using the flashlights. Explanation
10. Regroup class for whole group discussion. Students will share the observations they made within their groups.
11. Ask students: How are the shadows that we made today in class today similar to the shadows that the Sun makes? Do you think the shadows from the Sun change shape and direction like the shadows we made today?
12. Students will share their findings with the whole group. Address misconceptions on the chart from the beginning of the lesson. The teacher will guide students toward constructing a definition of a shadow and will chart it for reference in Lesson 2*.
Evaluate 13. Ask students the following questions to evaluate their understanding of the main concepts for this lesson.
a. How did we create a model of the Sun? b. How can we change the position of the light source to change the LOCATION of the
shadow? c. How can we change the position of the light source to change the SHAPE of the shadow? d. Is there a pattern to how the shadows changed? (crosscutting concept) e. How was our investigation today similar to the way the Sun makes shadows?
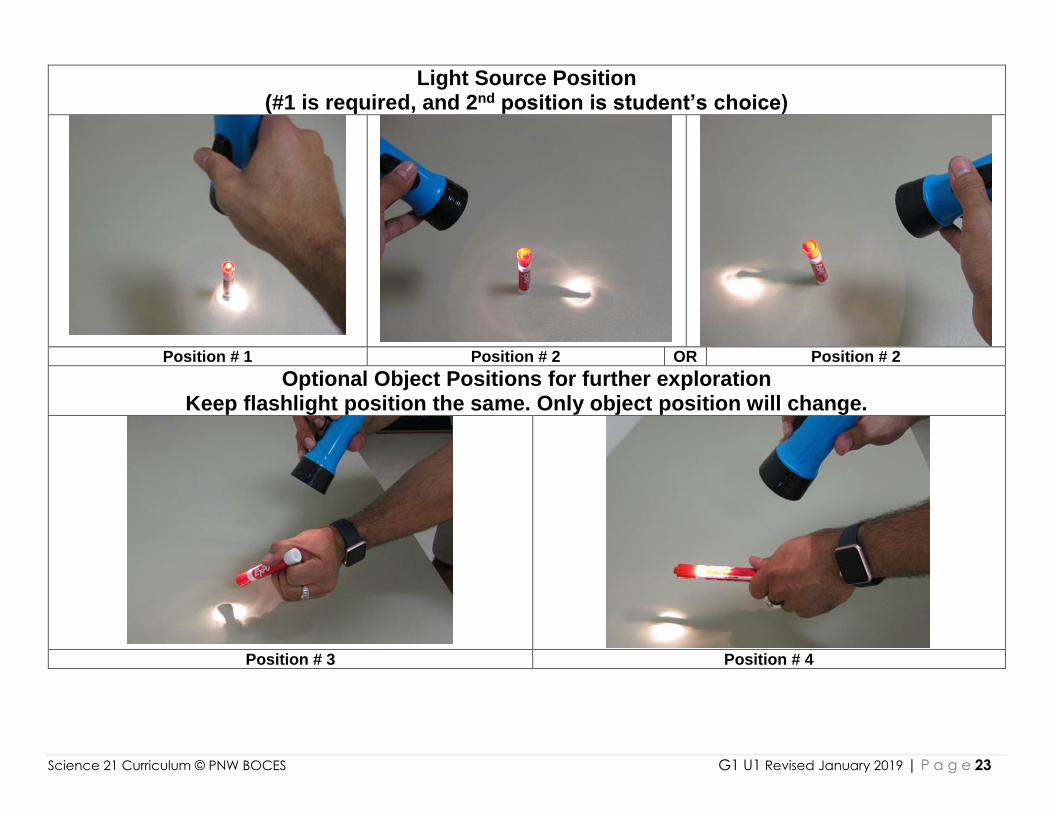
Create an anchor chart: https://www.engageny.org/sites/default/files/resource/attachments/anchor_charts.pdf The teacher should prep this experiment before student engagement to ensure that the objects being illuminated stand on their own. Demonstrate how to hold the flashlight at an angle. Also, show what happens when you move from a tilted position to a position above the object. You can choose to extend this activity by moving the object to see how changing the object changes the shadow. At the end of this lesson are visual aids for the teacher showing the position of the flashlight and the opaque object. Sample shadow definition: A shadow is a dark area or shape made by an object blocking a light source.
Science 21 Curriculum © PNW BOCES G1 U1 Revised January 2019 | P a g e 22
Science Notebook: Keeping dated records of thoughts, observations and sketches are a practice employed by scientists. It is also a good way to keep an ongoing record of student understanding and can be used as a formative assessment tool for student learning.
Make sure students DATE each page of their notebook. Students will be introduced to Science Notebooks in Lesson 2.
Assessment:
Formative Assessment: Teacher will evaluate the students’ ability to recognize that shadows change their shape and location based on the position of a light source. The teacher will ask students:
a. Can someone tell me how we can create a shadow? b. How can we change the position of the light source to change the LOCATION of the shadow? c. How can we change the position of the light source to change the SHAPE of the shadow? d. Is there a pattern to how the shadows changed? (crosscutting concept) e. How was our investigation today similar to the way the Sun makes shadows?
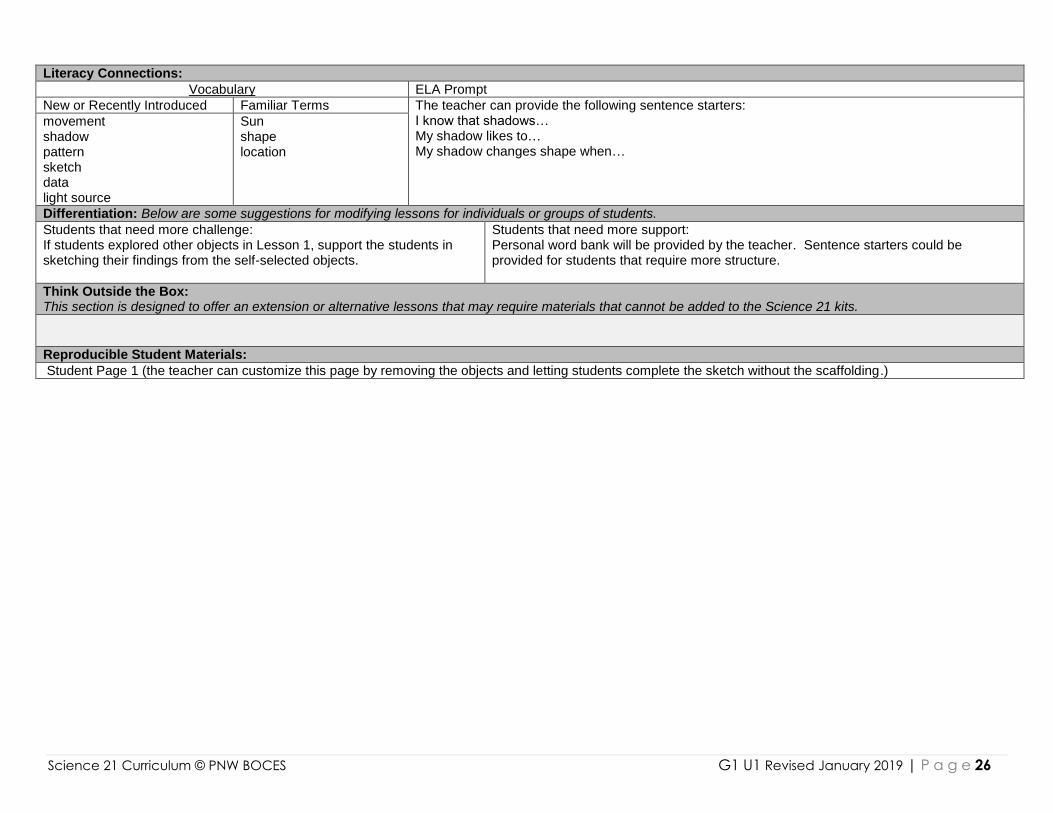
Literacy Connections:
Vocabulary ELA Prompt
New or Recently Introduced Familiar Terms One day I lost my shadow, because… The shadow of the tree looks like… My shadow followed me to… A shadow is made by…
model movement illuminate position casts location
Sun shadow shape pattern
Differentiation: Below are some suggestions for modifying lessons for individuals or groups of students.
Students that need more challenge: students can also study the effects of using self-selected objects to create shadows. You can encourage students to observe the shadows that are cast from various angles and note the changes in the shadows.
Students that need more support: pair students with peers if skills (fine motor, observational, recording, etc.) require assistance. Have students work in teams to check for peers’ understanding.
Think Outside the Box: This section is designed to offer an extension or alternative lessons that may require materials that cannot be added to the Science 21 kits.
Video: “What Causes a Shadow?” https://www.youtube.com/watch?v=bI6k7rLFVfs
Reproducible Student Materials:
Science Notebooks will be introduced in Lesson 2
Science 21 Curriculum © PNW BOCES G1 U1 Revised January 2019 | P a g e 23
Light Source Position (#1 is required, and 2nd position is student’s choice)
Position # 1 Position # 2 OR Position # 2
Optional Object Positions for further exploration Keep flashlight position the same. Only object position will change.
Position # 3 Position # 4
Science 21 Curriculum © PNW BOCES G1 U1 Revised January 2019 | P a g e 24
LESSON 2: We are Scientists! Grade 1 Unit 1 Unit Essential Question: How can we observe the patterns of changes in the sky over time? Teacher Background:
Lesson Overview: Students will be introduced to the use of a Science Notebook, in which they will record data and observations about patterns in the natural world. In today’s entry, the students will record their findings from Lesson 1 (Shadow Makers). This lesson is intended to be VERY similar to Lesson 1. This way the students have been exposed to the task and can focus their attention on sketching the results of their investigation. The intent of this lesson is to focus on how scientists record their data so that they can explain how their investigation turned out.
Potential Misconceptions:
Lesson Goals:
Objective: Students will be able to record observations and data from the previous explorations of Lesson 1.
Learning Target: I can demonstrate how shadows change shape and location depending on the position of a light source.
Standard Information
Performance Expectation (PE) 1-ESS1-1. Use observations of the Sun, Moon, and stars to describe patterns that can be predicted.
Science and Engineering Practices Disciplinary Core Ideas Crosscutting Concepts
Analyzing and Interpreting Data Analyzing data in K–2 builds on prior experiences and progresses to collecting, recording, and sharing observations.
Use observations (firsthand or from media) to describe patterns and/or relationships in the natural and designed world(s) in order to answer scientific questions and solve problems.
ESS1.A: The Universe and its Stars Patterns of the motion of the Sun, Moon, and stars in the sky can be observed, described, and predicted.
Patterns Patterns in the natural and human designed world can be observed, used to describe phenomena, and used as evidence.
Lesson Preparation:
Materials: Group Size: Management:
Science Notebook
flashlight Not in kit:
markers or glue sticks
writing tools
Anchor charts created from Lesson 1
whole group pairs solo
whole group
1-2 days before the lesson: The teacher should prepare for this lesson by creating a Word Bank for students, including the words: marker, glue stick, flashlight, and shadow. This vocabulary will be used for labeling in their Science Notebook entries. Students may be directed to fold the student page in half to keep their focus on one section of the activity at a time.
Lesson Plan:
Suggested Timing Agenda:
10 min 15 min 5 min
Whole group review of Lesson 1 and exploration. Students will sketch and label diagrams on their student pages. Share drawings with class. Have several students explain their work.
Teaching Procedures: Teaching Notes
Explanation 1. Begin with a class discussion in the meeting area and review how a shadow is made. Have students
explain what they saw and the direction of the shadow in relation to the light source. * Remember to link this shadow work to how can Sun is a light source that makes shadows like the flashlight.
Sample shadow definition: A shadow is a dark area or shape made by an object blocking a light source.
Science 21 Curriculum © PNW BOCES G1 U1 Revised January 2019 | P a g e 25
2. Reinforce and review what was learned in Lesson 1, that a shadow’s shape and location could change based on the position of the light source or the object, or both.
3. Explain to students that scientists record investigation and experiment results in a special way. Today they will review their previous investigation, but this time, they will record their results in a “Science Notebook” by creating a sketch of the light source, the object, and the shadow on the Student Pages.
Explore 4. Have students form pairs to create shadows using a flashlight (which represents the Sun), and a marker
or a glue stick over a white piece of paper. Turn off the lights so the shadows can be clearly seen. 5. Help direct the students to take turns using the flashlight and hold the flashlight directly above the object
(position 1). What happens to the shadow if you hold the flashlight directly over the object? 6. Have students make observations and record what they see by sketching their results on the student
page. When they are done sketching, encourage students to explore, creating shadows using the flashlights until all students are done with sketches.
7. Gain the students’ attention and ask: What happens if you tilt the flashlight? 8. Help direct the students to take turns using the flashlight and hold the flashlight either left or right of the
object at an angle above the object (position 2). 9. Have students make observations and record what they see by sketching their results on the student
page. Explain
9. In pairs or small groups, have students analyze their observations and describe what they noticed. They could describe the relationship between the light source and the shadow patterns.
Evaluation 10. Have students sketch their results on the student page OR directly into the Science Notebook using the
student page as a guide. First, they will sketch the shadow with the flashlight positioned directly over the object. Then they will sketch it showing the flashlight in a tilted position.
11. When they are done sketching, encourage the students to explore, creating shadows using the flashlights until all students are done with their sketches.
12. Encourage the students to label their sketches and reference the posted Word Bank. 13. Students will share and explain their drawings to the class reinforce the Crosscutting Concept of patterns.
“Can we describe a pattern in the location and length of the shadow when the light source (which represents the Sun) changes?”
The teacher should explain that the Science Notebook will be used for recording students’ work all year. Remind students to take good care of it – don’t pull out pages or rip it. Expected results: Overhead light source: little to no shadow (similar to noon Sun). Angled light source: longer shadow depending on how low and angled the light source (similar to early or late day Sun). Crosscutting Concept alert: One pattern that you may reinforce is that the object’s shadow is always in line with the light source and that the shadow is longer when the light source is low on the object.
Science Notebook: Keeping dated records of thoughts, observations and sketches is a practice employed by scientists. It is also a good way to keep an ongoing record of student understanding and can be used as a formative assessment tool for student learning.
Make sure students DATE each page of their notebook. Have students diagram the data from each observation on the shadow’s shape and location, based on the position of the light source and the position of the object. They can write directly in the notebook or paste the student page into their Science Notebook.
Assessment:
Formative Assessment: Teacher will consult/confer with the students during today’s exploration. Summative Assessment: Student Notebook entry.
Science 21 Curriculum © PNW BOCES G1 U1 Revised January 2019 | P a g e 26
Literacy Connections:
Vocabulary ELA Prompt
New or Recently Introduced Familiar Terms The teacher can provide the following sentence starters: I know that shadows… My shadow likes to… My shadow changes shape when…
movement shadow pattern sketch data light source
Sun shape location
Differentiation: Below are some suggestions for modifying lessons for individuals or groups of students.
Students that need more challenge: If students explored other objects in Lesson 1, support the students in sketching their findings from the self-selected objects.
Students that need more support: Personal word bank will be provided by the teacher. Sentence starters could be provided for students that require more structure.
Think Outside the Box: This section is designed to offer an extension or alternative lessons that may require materials that cannot be added to the Science 21 kits.
Reproducible Student Materials:
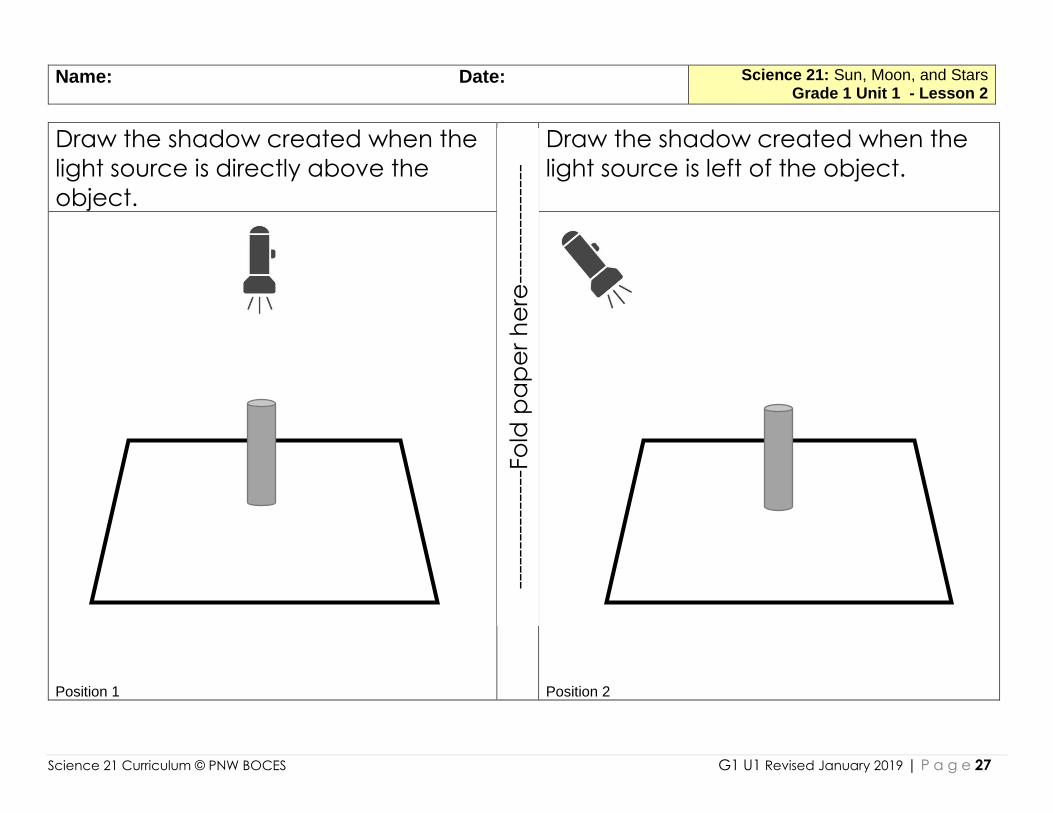
Student Page 1 (the teacher can customize this page by removing the objects and letting students complete the sketch without the scaffolding.)
Science 21 Curriculum © PNW BOCES G1 U1 Revised January 2019 | P a g e 27
Name: Date:
Science 21: Sun, Moon, and Stars Grade 1 Unit 1 - Lesson 2
Draw the shadow created when the
light source is directly above the
object.
Draw the shadow created when the
light source is left of the object.
Position 1
Position 2
----
----
----
---F
old
pa
pe
r h
ere
----
----
----
---
Science 21 Curriculum © PNW BOCES G1 U1 Revised January 2019 | P a g e 28
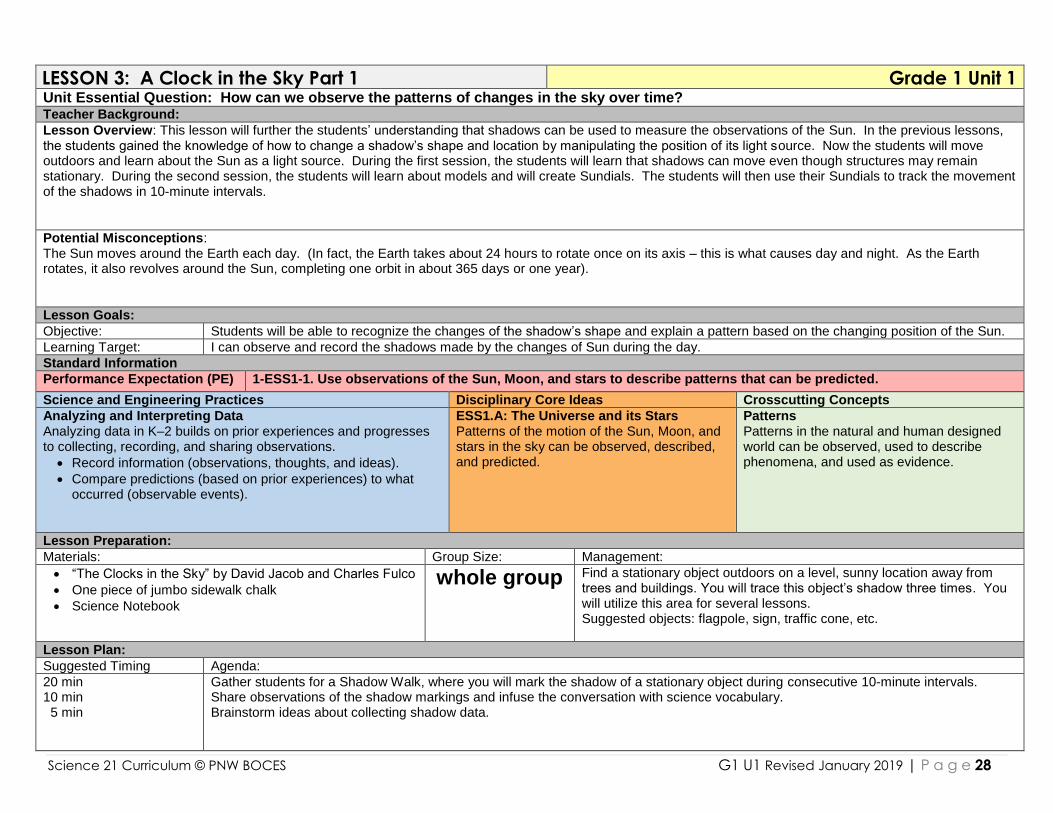
LESSON 3: A Clock in the Sky Part 1 Grade 1 Unit 1 Unit Essential Question: How can we observe the patterns of changes in the sky over time? Teacher Background:
Lesson Overview: This lesson will further the students’ understanding that shadows can be used to measure the observations of the Sun. In the previous lessons, the students gained the knowledge of how to change a shadow’s shape and location by manipulating the position of its light source. Now the students will move outdoors and learn about the Sun as a light source. During the first session, the students will learn that shadows can move even though structures may remain stationary. During the second session, the students will learn about models and will create Sundials. The students will then use their Sundials to track the movement of the shadows in 10-minute intervals.
Potential Misconceptions: The Sun moves around the Earth each day. (In fact, the Earth takes about 24 hours to rotate once on its axis – this is what causes day and night. As the Earth rotates, it also revolves around the Sun, completing one orbit in about 365 days or one year).
Lesson Goals:
Objective: Students will be able to recognize the changes of the shadow’s shape and explain a pattern based on the changing position of the Sun.
Learning Target: I can observe and record the shadows made by the changes of Sun during the day.
Standard Information
Performance Expectation (PE) 1-ESS1-1. Use observations of the Sun, Moon, and stars to describe patterns that can be predicted.
Science and Engineering Practices Disciplinary Core Ideas Crosscutting Concepts
Analyzing and Interpreting Data Analyzing data in K–2 builds on prior experiences and progresses to collecting, recording, and sharing observations.
Record information (observations, thoughts, and ideas).
Compare predictions (based on prior experiences) to what occurred (observable events).
ESS1.A: The Universe and its Stars Patterns of the motion of the Sun, Moon, and stars in the sky can be observed, described, and predicted.
Patterns Patterns in the natural and human designed world can be observed, used to describe phenomena, and used as evidence.
Lesson Preparation:
Materials: Group Size: Management:
“The Clocks in the Sky” by David Jacob and Charles Fulco
One piece of jumbo sidewalk chalk
Science Notebook
whole group
Find a stationary object outdoors on a level, sunny location away from trees and buildings. You will trace this object’s shadow three times. You will utilize this area for several lessons. Suggested objects: flagpole, sign, traffic cone, etc.
Lesson Plan:
Suggested Timing Agenda:
20 min 10 min 5 min
Gather students for a Shadow Walk, where you will mark the shadow of a stationary object during consecutive 10-minute intervals. Share observations of the shadow markings and infuse the conversation with science vocabulary. Brainstorm ideas about collecting shadow data.
Science 21 Curriculum © PNW BOCES G1 U1 Revised January 2019 | P a g e 29
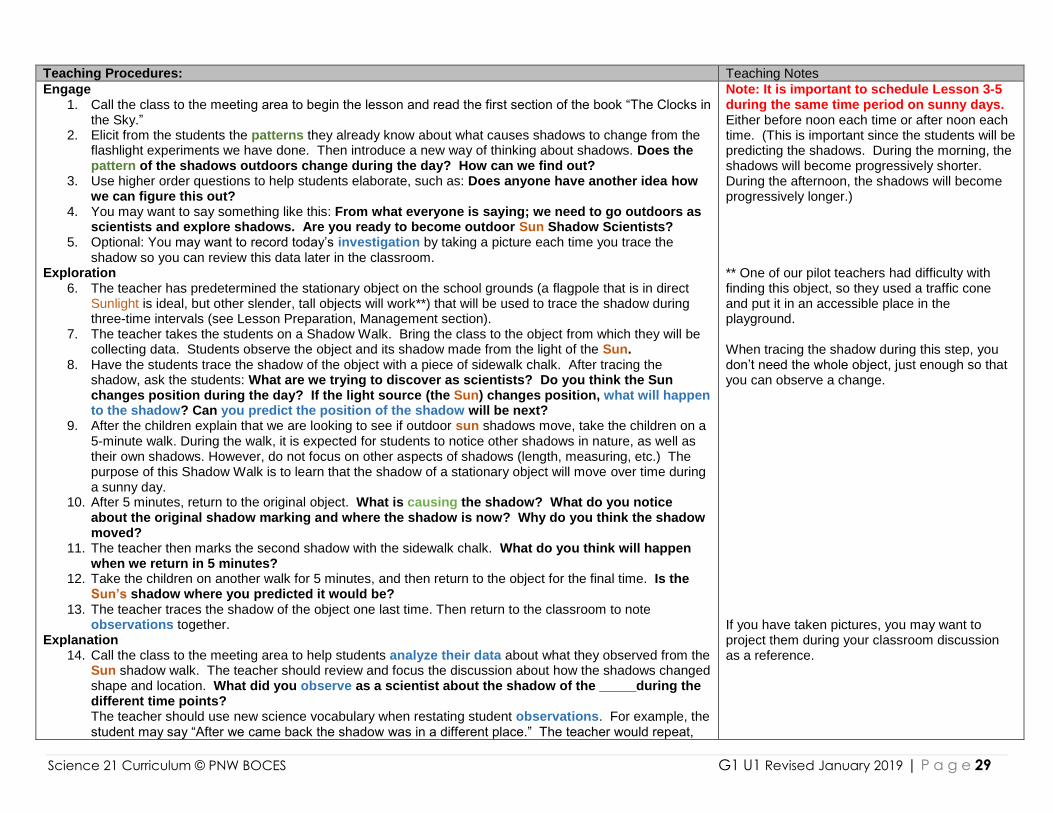
Teaching Procedures: Teaching Notes
Engage 1. Call the class to the meeting area to begin the lesson and read the first section of the book “The Clocks in
the Sky.” 2. Elicit from the students the patterns they already know about what causes shadows to change from the
flashlight experiments we have done. Then introduce a new way of thinking about shadows. Does the pattern of the shadows outdoors change during the day? How can we find out?
3. Use higher order questions to help students elaborate, such as: Does anyone have another idea how we can figure this out?
4. You may want to say something like this: From what everyone is saying; we need to go outdoors as scientists and explore shadows. Are you ready to become outdoor Sun Shadow Scientists?
5. Optional: You may want to record today’s investigation by taking a picture each time you trace the shadow so you can review this data later in the classroom.
Exploration 6. The teacher has predetermined the stationary object on the school grounds (a flagpole that is in direct
Sunlight is ideal, but other slender, tall objects will work**) that will be used to trace the shadow during three-time intervals (see Lesson Preparation, Management section).
7. The teacher takes the students on a Shadow Walk. Bring the class to the object from which they will be collecting data. Students observe the object and its shadow made from the light of the Sun.
8. Have the students trace the shadow of the object with a piece of sidewalk chalk. After tracing the shadow, ask the students: What are we trying to discover as scientists? Do you think the Sun changes position during the day? If the light source (the Sun) changes position, what will happen to the shadow? Can you predict the position of the shadow will be next?
9. After the children explain that we are looking to see if outdoor sun shadows move, take the children on a 5-minute walk. During the walk, it is expected for students to notice other shadows in nature, as well as their own shadows. However, do not focus on other aspects of shadows (length, measuring, etc.) The purpose of this Shadow Walk is to learn that the shadow of a stationary object will move over time during a sunny day.
10. After 5 minutes, return to the original object. What is causing the shadow? What do you notice about the original shadow marking and where the shadow is now? Why do you think the shadow moved?
11. The teacher then marks the second shadow with the sidewalk chalk. What do you think will happen when we return in 5 minutes?
12. Take the children on another walk for 5 minutes, and then return to the object for the final time. Is the Sun’s shadow where you predicted it would be?
13. The teacher traces the shadow of the object one last time. Then return to the classroom to note observations together.
Explanation 14. Call the class to the meeting area to help students analyze their data about what they observed from the
Sun shadow walk. The teacher should review and focus the discussion about how the shadows changed shape and location. What did you observe as a scientist about the shadow of the _____during the different time points? The teacher should use new science vocabulary when restating student observations. For example, the student may say “After we came back the shadow was in a different place.” The teacher would repeat,
Note: It is important to schedule Lesson 3-5 during the same time period on sunny days. Either before noon each time or after noon each time. (This is important since the students will be predicting the shadows. During the morning, the shadows will become progressively shorter. During the afternoon, the shadows will become progressively longer.) ** One of our pilot teachers had difficulty with finding this object, so they used a traffic cone and put it in an accessible place in the playground. When tracing the shadow during this step, you don’t need the whole object, just enough so that you can observe a change. If you have taken pictures, you may want to project them during your classroom discussion as a reference.
Science 21 Curriculum © PNW BOCES G1 U1 Revised January 2019 | P a g e 30
“Yes, so the location changed” (see vocabulary section below). You may want to note their responses using scientific vocabulary as appropriate.
15. Ask students “What patterns did you notice about how the Sun changes during the day?” The students may also notice that the shadow became shorter (if measurements took place in the morning), or longer (if measurements took place in the afternoon).
Elaboration 16. Brainstorm several ideas with the students on how to collect shadow data as a class. Save the list to
refer to during the next lesson and have students record a sample version in their Science Notebook. Evaluation
17. Have students sketch a picture of the object and then sketch the three shadows they observed in their Science Notebooks. Label each shadow 1, 2 and 3 or use a different color to represent each shadow.
Science Notebook: Keeping dated records of thoughts, observations and sketches is a practice employed by scientists. It is also a good way to keep an ongoing record of student understanding and can be used as a formative assessment tool for student learning.
Make sure students DATE each page of their notebook. The students should sketch a picture of the stationary object the class used to measure the Sun’s shadow. The students can also sketch the three shadows, labeling the shadows “1’, “2’, and “3” or use a different color to represent each shadow and the changing pattern.
Assessment:
The teacher should use the Science Notebook records and in-class prompts to determine if students are making a relationship between the changing patterns of the shadows and the changing position of the Sun. The students should be able to observe and describe this pattern.
Literacy Connections:
Vocabulary ELA Prompt
New or Recently Introduced Familiar Terms movement
pattern length
Sun shadow shape location observe explain
Differentiation: Below is some suggestions for modifying lessons for individuals or groups of students.
Students that need more challenge:
Students that need more support: Pair students with other students if skills (fine motor, observational, recording, etc.) require. Have students work in teams to check for peer understanding. When students are writing their observations in the Science Notebook, an alternative assessment is to have students write 3-5 words that are connected to the changes they observed.
Think Outside the Box: This section is designed to offer an extension or alternative lessons that may require materials that cannot be added to the Science 21 kits.
A great extension for this lesson would be to compare several tall objects to see if they have different measurements. Because tall objects are “closer to the Sun” will that affect the shadow changes? (It does not). Having the students choose objects to measure and then compare is a great science practice.
Reproducible Student Materials:
Children will be utilizing their Science Notebooks for this lesson.
Science 21 Curriculum © PNW BOCES G1 U1 Revised January 2019 | P a g e 31

Science 21 Curriculum © PNW BOCES G1 U1 Revised January 2019 | P a g e 32
LESSON 4: A Clock in the Sky Part 2 Grade 1 Unit 1 Unit Essential Question: How can we observe the patterns of changes in the sky over time? Teacher Background:
Lesson Overview: This lesson is a continuation of Lesson 3 and will further the student’s understanding that shadows can be used to measure the observations of the changing position of the Sun. In this lesson, students will construct a model of a rudimentary Sundial as a tool to measure the changing position of the Sun. The students will then use their Sun tool to track the movement of the shadows in 10-minute intervals.
Potential Misconceptions: Sundials can tell the exact time. (In fact, the trajectory across the sky changes very slightly during from day to day. Although the time is not accurate, older civilizations used the Sundial as a means of calculating relative changes in time. You can find more information about Sundials in the “think outside the box” section of this lesson!)
Lesson Goals:
Objective: Students will be able to observe, record and analyze the movement of the Sun’s shadow.
Learning Target: I can tell that the Sun’s shadow changes shape and location in a regular pattern during the day.
Standard Information
Performance Expectation (PE) 1-ESS1-1. Use observations of the Sun, Moon, and stars to describe patterns that can be predicted.
Science and Engineering Practices Disciplinary Core Ideas Crosscutting Concepts
Developing and Using Models Modeling in K–2 builds on prior experiences and progresses to include using and developing models (i.e., diagram, drawing, physical replica, diorama, dramatization, or storyboard) that represent concrete events or design solutions.
Develop a simple model based on evidence to represent a proposed object or tool.
ESS1.A: The Universe and its Stars Patterns of the motion of the Sun, Moon, and stars in the sky can be observed, described, and predicted.
Patterns Patterns in the natural and human designed world can be observed, used to describe phenomena, and used as evidence.
Lesson Preparation:
Materials: Group Size: Management:
30 flatwood coffee stirrers
1cm x 1 cm cube of clay (or Play-Doh)
Science Notebook Not in kit:
green, blue and red colored pencils or markers
Medium tip permanent marker
whole group individual
1-2 days before the lesson: The teacher should prepare for this lesson by preparing materials for constructing the Sundials. This preparation will allow enough time for the lesson without unnecessary time spent on same-day prep. Create a sample Sundial to share with the children during Part 2 of the lesson.
Lesson Plan:
Suggested Timing Agenda:
5 min 5 min 25 min 10 min
Review “shadow collection” brainstorming ideas. Introduce the Sun shadow tool and have children create one individually. Children use the tool to collect data. Share observations.

Science 21 Curriculum © PNW BOCES G1 U1 Revised January 2019 | P a g e 33
Teaching Procedures: Teaching Notes
Engage 1. Have students join you in the meeting area. Review the previous lesson’s observations and a list of
brainstorming ideas. Incorporate the students’ ideas into today’s conversation. Remind students of the Science and Engineering Practice (SEP) of Developing and Using Models by saying something like, “Scientists use models to explain how things work or to represent tools. Today, you are going to create a model to show the changing pattern of the Sun by using a Sundial to record the changing pattern of shadows that the Sun makes.”
2. Show them an example of what they will be creating. Exploration
3. Students will work independently to construct a Sundial**. Teachers can either explain full instructions or do step-by-step instructions to build the tool (see directions in “Teaching Notes”).
4. When all students have completed their Sundials, the teacher will gather the children together to demonstrate the procedure for the tool that they will be using in the investigation. Note the area where the investigation will happen today.
a. Students should place their Sundial stick side up on a blank page in their Science Notebook. (NOTE: depending on the time of day, the tool may need to be moved to another section of the paper, so the shadow of the stick falls across the paper).
b. If the students are dexterous enough, they can trace around the outside of the clay. Alternatively, the teacher could trace the outside of the clay for each Sundial. (This placement keeps it in the same place each time so that their measurements are accurate. The measurements in 10 min intervals are not large, so accuracy is important. You could choose to wait a longer time between measurements, but that may be impractical with the rest of the scheduled instruction.)
5. The teacher will bring the class to the predetermined location outdoors, where they will not be disturbed by others (see Management, in Lesson Preparation). Have all students bring their Science Notebooks, as well as blue, red, and green colored pencils.
6. As you visit with students, ensure their Sun tools are positioned on the bottom, middle of their pages. Note: depending on the time of day, the paper may need to be turned, so the shadow of the stick falls across the paper.
7. Have each student sketch the first shadow (in green) and label this first data recording with a number “1” at the top of the tracing.
8. Have the students take a shadow walk for at least 10 minutes. After the walk, have the students do another tracing, this time with a blue pencil to help students clearly see the difference between tracings. Have each student in the pair of students sketch the Sun shadow and label this second data recording (in blue) with a number “2” at the top of the tracing.
9. Have the student predict the length and shape of the shadow for the final shadow tracing and record it on their page with black marker.
10. Take the class on a final 10-minute walk. 11. Repeat the observation for a third time, trace the shadow with a red marker, and mark it with a “3.”
Explanation 12. After the last observation, have the students return to the classroom to analyze their data. 13. Students should work in pairs to explain and discuss how the three tracings were different and what
caused the difference between the shadow tracings.
Note: It is important to schedule Lesson 3-5 during the same time period on Sunny days. Either before noon each time or after noon each time. (This is important since the students will be predicting the shadows. During the morning, the shadows will become progressively shorter. During the afternoon, the shadows will become progressively longer.) **Instructions: How to create a Sundial: Students creating the tool:
Students work individually to make a Sun tool.
Have the students roll the clay into a ball.
Flatten the clay on the bottom
Gently press the coffee stirrer into the middle of the clay.
Tracing the shadows: When the students are tracing the shadow of the coffee stirrer, it would be easiest to have the students use a particular color (either colored pencils or markers) ex., the first tracing for everyone is green, the second tracing is done in blue, and the third tracings done in red.

Science 21 Curriculum © PNW BOCES G1 U1 Revised January 2019 | P a g e 34
Evaluation 14. Have students review their tracings in their Science Notebook and write a sentence describing the
pattern showing the way that the shadow changed over time. Cue students to think of the pattern they see between the position of the Sun and the position of the shadow.
15. The teacher may choose to ask for student explanation as a formative assessment. What is the student understanding of the patterns of the Sun during a day?
Science Notebook: Keeping dated records of thoughts, observations and sketches is a practice employed by scientists. It is also a good way to keep an ongoing record of student understanding and can be used as a formative assessment tool for student learning.
Make sure students DATE each page of their notebook. The students will have traced the data from into their Science Journals, noting the order of each observation. The teacher can write the amount of time between the shadow tracings for the students to copy into their Science Notebooks, or the teacher may opt to write the actual time that each shadow was traced, and then the children can copy the times into their Notebooks.
Assessment:
The teacher should use the Science Notebook records and in-class prompts to determine if students are making a relationship between the changing patterns of the shadows and the changing position of the Sun. The students should be able to observe and describe this pattern.
Literacy Connections:
Vocabulary ELA Prompt
New or Recently Introduced Familiar Terms Sundial
movement pattern length model
Sun shadow shape location observe explain
Differentiation: Below are some suggestions for modifying lessons for individuals or groups of students.
Students that need more challenge: Have students observe and record the data for an entire day, hourly, at home, on the weekend if possible from sunrise to sunset, to see the full daily motion of the Sun’s shadow. Students can mark the times above the shadows. Have students try to tell approximate time of day by observing the Sundial’s shadow at regular intervals, and have them predict the time when shown, the shadow at a particular location on the Sundial’s face.
Students that need more support: Pair students with other students if skills (fine motor, observational, recording, etc.) require. Have students work in teams to check for peer understanding. When students are writing their observations in the Science Notebook, an alternative assessment is to have students write 3-5 words that are connected to the changes they observed.
Think Outside the Box: This section is designed to offer an extension or alternative lessons that may require materials that cannot be added to the Science 21 kits.
If your class has record the shadows in this lesson during the morning hours, have them predict what would happen if they went outdoors to collect during the afternoon hours. Write down predictions. Then bring the class out to collect data in the afternoon, using the same format as Part 2. Discuss the results. Within the discussion, be sure to bring into the conversation that the longest shadows of the day are at Sunrise and Sunset. In the morning, the shadows will change from longer to shorter. During the afternoon, the shadows will change from shorter to longer. At noontime, the shadow will be the shortest, and the shadow will also point due North. Creating an accurate sundial maybe an activity you would like to do in your class as an extension. Here is a web link about installing and calibrating a sundial for accuracy. http://www.ehow.com/how_5686952_position-sundial-use-home.html
Reproducible Student Materials:
Children will be utilizing their Science Notebooks for this lesson.

Science 21 Curriculum © PNW BOCES G1 U1 Revised January 2019 | P a g e 35

Science 21 Curriculum © PNW BOCES G1 U1 Revised January 2019 | P a g e 36
LESSON 5: Wow Look at the Changes! Grade 1 Unit 1 Unit Essential Question: How can we observe the patterns of changes in the sky over time? Teacher Background:
Lesson Overview: This lesson is repeated three times over the course of the school year, with students venturing collecting and recording data during
the months of October, December and May. This lesson is embedded into the other units, and this section will be colored yellow to remind you and
your students that it is connected to Unit 1.
Potential Misconceptions: The Sun always shines the same amount. (The shortest day of the year is in December the longest day is in June) The Sun is in the same position at the same time every day. (It changes each day.)
Lesson Goals:
Objective: Students will be able to use a data collection tool identify that differing amounts of daylight are seen at different times of the year.
Learning Target: I can gather information about the changing amounts of daylight throughout the year and describe the pattern I see.
Standard Information
Performance Expectation (PE) 1-ESS1-2. Make observations at different times of year to relate the amount of daylight to the time of year.
Science and Engineering Practices Disciplinary Core Ideas Crosscutting Concepts
Planning and Carrying Out Investigations Planning and carrying out investigations to answer questions or test solutions to problems in K–2 builds on prior experiences and progresses to simple investigations, based on fair tests, which provide data to support explanations or design solutions.
Plan and conduct investigations collaboratively to produce data to serve as the basis for evidence to answer a question.
ESS1.B: Earth and the Solar System Seasonal patterns of sunrise and sunset can be observed, described, and predicted.
Cause and Effect Simple tests can be designed to gather evidence to support or refute student ideas about causes. Events have causes that generate observable patterns.
Lesson Preparation:
Materials: Group Size: Management:
“The Clocks in the Sky” by David Jacob and Charles Fulco
Data collection sheet
Science notebooks
Class data table
Teacher Reference annual sunrise/sunset times Not supplied in kit:
pencils
markers/crayons
Student Page
whole group pairs
whole group
This lesson is done over two days. You introduce the activity on one day. Send the students to record data at home. Students will collect the sunset data the same day and then the sunrise data the next morning. Then reconvene to review the results. Although there may be a difference between the sunrise/sunset between two days, we are only looking a relative amounts once during a season.
Lesson Plan:
Suggested Timing Agenda:
10 min 15 min 10 min 10 min (next day)
Anchor chart about amount of daylight in the summer and winter Have students discuss what you would need to do to plan an investigation about measuring daylight Show students the collection tool that will be sent home and filled out with parent/guardian Review data and determine a consensus of sunrise and sunset.
Science 21 Curriculum © PNW BOCES G1 U1 Revised January 2019 | P a g e 37
Teaching Procedures: Teaching Notes
This lesson must be done during the curriculum sequence of Unit 1 and redone in both of the other two units for this grade level. We do this to collect the data necessary for students to understand the Performance Expectation connected to this lesson. Some instructions may seem redundant in the fall but will be a reminder for the teacher in the winter and spring. We have created this investigation as a way to realizing the goal of the PE. If you students come up with an alternate way of measuring the differences in daylight at different times of the year, you may consider that investigation instead. If you plan an alternative task, please make sure that you are helping students achieve this foundational core idea of Earth/Space Science. Day 1: Engage:
1. Start by asking the students questions like “Do you think there is the same amount of daylight in the winter as there is in the summer?”
2. Create an anchor chart with the words “Daylight in a Day” at the center and assess students’ current understanding of the about changing daylight. Try to tap into the students’ evidence of what they know (ex. “I can play outside longer in the summer time because the sun is out.” “In September it is light when I wake up for school, but it is dark in December when I get up for school.”)
3. Save the anchor chart for the next recording (approximately December) to give students a visual cue of what they were thinking at the start of the year.
Explore: 4. Pose the question to the students “Let’s think like a scientist: How can we measure the different amounts
of sunlight during the year? What ways could we do that? What are the different times of the year we should measure? What problems do you see and how can we solve them?“’
5. Have students work in pairs to discuss how they may approach this investigation. Explain:
6. Have student then share their strategies to investigate the amount of day with the whole group. 7. Write the classes investigation procedures on chart paper.
Elaborate: 8. Introduce the parent letter with daylight recording table to students and have the student complete the
information with the parent/guardian this evening and the next morning and return to you. Day 2: Evaluate
9. On the next day, review the data that the students collected. (Check the “Rise and Set of the Sun” chart at the end of this unit for actual sunrise and sunset to check if the student data makes sense).
10. Tally the student data by :15 minute intervals. You are looking for an approximate sunrise and sunset time.. 11. Have the students come to a consensus about the approximate time that it gets light out (sunrise) and the
approximate time that it gets dark (sunset) for the FALL and record on this information on your class data chart. 12. Have students paste their personal sunrise/sunset collection tool in their science notebook or save their data to
review the next time they do this lesson.
Pre-set the initial Anchor Chart phrase “Daylight in a day?” Anchor chart Reference: https://www.engageny.org/sites/default/files/reso urce/attachments/anchor_charts.pdf
Science Notebook: Keeping dated records of thoughts, observations and sketches is a practice employed by scientists. It is also a good way to keep an ongoing record of student understanding and can be used as a formative assessment tool for student learning.
Make sure students DATE each page of their notebook. Students will paste recorded data sheet in their science notebook.
Science 21 Curriculum © PNW BOCES G1 U1 Revised January 2019 | P a g e 38
Assessment:
Formative Assessment: Teacher observations throughout the investigation.
Literacy Connections:
Vocabulary ELA Prompt
New or Recently Introduced Familiar Terms What are some activities you can only do when it is daylight outside?
Daylight consensus
Sun Shape data location pattern
Differentiation: Below are some suggestions for modifying lessons for individuals or groups of students.
Students that need more challenge:
Students that need more support:
Think Outside the Box: This section is designed to offer an extension or alternative lessons that may require materials that cannot be added to the Science 21 kits.
Reproducible Student Materials:
List Student Journal Pages and Copied Manipulatives Student work page to record observations.
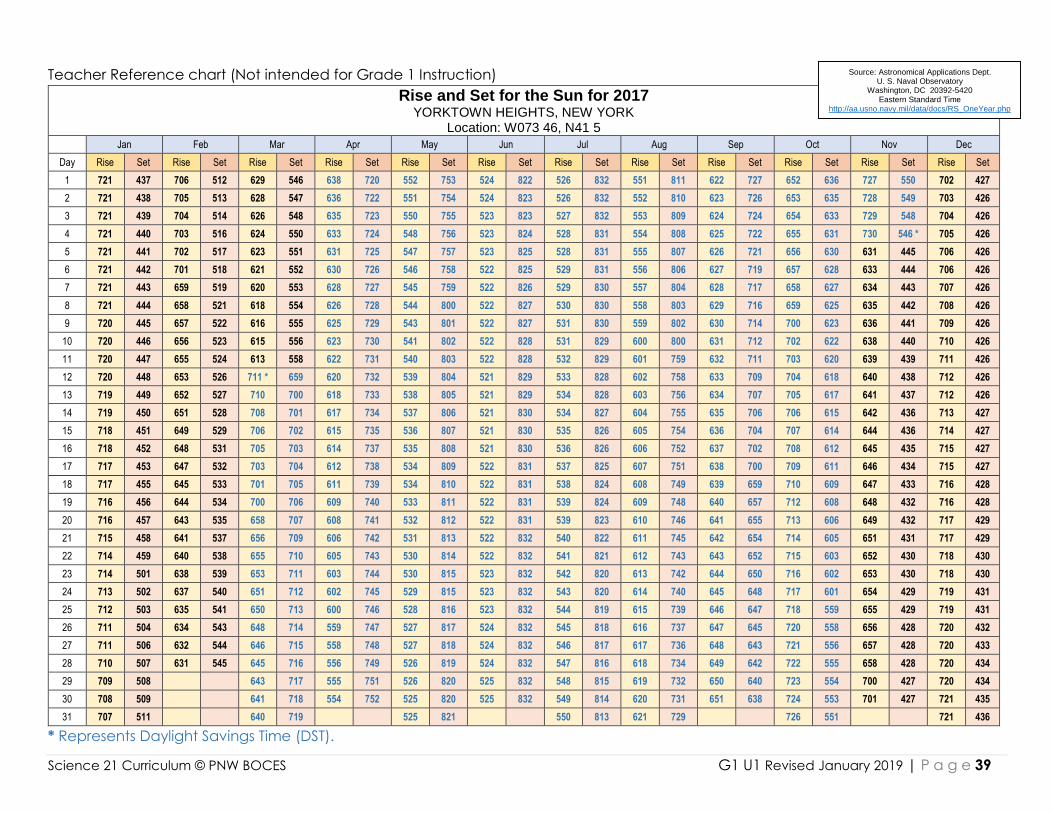
Science 21 Curriculum © PNW BOCES G1 U1 Revised January 2019 | P a g e 39
Teacher Reference chart (Not intended for Grade 1 Instruction)
Rise and Set for the Sun for 2017 YORKTOWN HEIGHTS, NEW YORK
Location: W073 46, N41 5
Jan Feb Mar Apr May Jun Jul Aug Sep Oct Nov Dec
Day Rise Set Rise Set Rise Set Rise Set Rise Set Rise Set Rise Set Rise Set Rise Set Rise Set Rise Set Rise Set
1 721 437 706 512 629 546 638 720 552 753 524 822 526 832 551 811 622 727 652 636 727 550 702 427
2 721 438 705 513 628 547 636 722 551 754 524 823 526 832 552 810 623 726 653 635 728 549 703 426
3 721 439 704 514 626 548 635 723 550 755 523 823 527 832 553 809 624 724 654 633 729 548 704 426
4 721 440 703 516 624 550 633 724 548 756 523 824 528 831 554 808 625 722 655 631 730 546 * 705 426
5 721 441 702 517 623 551 631 725 547 757 523 825 528 831 555 807 626 721 656 630 631 445 706 426
6 721 442 701 518 621 552 630 726 546 758 522 825 529 831 556 806 627 719 657 628 633 444 706 426
7 721 443 659 519 620 553 628 727 545 759 522 826 529 830 557 804 628 717 658 627 634 443 707 426
8 721 444 658 521 618 554 626 728 544 800 522 827 530 830 558 803 629 716 659 625 635 442 708 426
9 720 445 657 522 616 555 625 729 543 801 522 827 531 830 559 802 630 714 700 623 636 441 709 426
10 720 446 656 523 615 556 623 730 541 802 522 828 531 829 600 800 631 712 702 622 638 440 710 426
11 720 447 655 524 613 558 622 731 540 803 522 828 532 829 601 759 632 711 703 620 639 439 711 426
12 720 448 653 526 711 * 659 620 732 539 804 521 829 533 828 602 758 633 709 704 618 640 438 712 426
13 719 449 652 527 710 700 618 733 538 805 521 829 534 828 603 756 634 707 705 617 641 437 712 426
14 719 450 651 528 708 701 617 734 537 806 521 830 534 827 604 755 635 706 706 615 642 436 713 427
15 718 451 649 529 706 702 615 735 536 807 521 830 535 826 605 754 636 704 707 614 644 436 714 427
16 718 452 648 531 705 703 614 737 535 808 521 830 536 826 606 752 637 702 708 612 645 435 715 427
17 717 453 647 532 703 704 612 738 534 809 522 831 537 825 607 751 638 700 709 611 646 434 715 427
18 717 455 645 533 701 705 611 739 534 810 522 831 538 824 608 749 639 659 710 609 647 433 716 428
19 716 456 644 534 700 706 609 740 533 811 522 831 539 824 609 748 640 657 712 608 648 432 716 428
20 716 457 643 535 658 707 608 741 532 812 522 831 539 823 610 746 641 655 713 606 649 432 717 429
21 715 458 641 537 656 709 606 742 531 813 522 832 540 822 611 745 642 654 714 605 651 431 717 429
22 714 459 640 538 655 710 605 743 530 814 522 832 541 821 612 743 643 652 715 603 652 430 718 430
23 714 501 638 539 653 711 603 744 530 815 523 832 542 820 613 742 644 650 716 602 653 430 718 430
24 713 502 637 540 651 712 602 745 529 815 523 832 543 820 614 740 645 648 717 601 654 429 719 431
25 712 503 635 541 650 713 600 746 528 816 523 832 544 819 615 739 646 647 718 559 655 429 719 431
26 711 504 634 543 648 714 559 747 527 817 524 832 545 818 616 737 647 645 720 558 656 428 720 432
27 711 506 632 544 646 715 558 748 527 818 524 832 546 817 617 736 648 643 721 556 657 428 720 433
28 710 507 631 545 645 716 556 749 526 819 524 832 547 816 618 734 649 642 722 555 658 428 720 434
29 709 508 643 717 555 751 526 820 525 832 548 815 619 732 650 640 723 554 700 427 720 434
30 708 509 641 718 554 752 525 820 525 832 549 814 620 731 651 638 724 553 701 427 721 435
31 707 511 640 719 525 821 550 813 621 729 726 551 721 436
* Represents Daylight Savings Time (DST).
Source: Astronomical Applications Dept. U. S. Naval Observatory
Washington, DC 20392-5420 Eastern Standard Time
http://aa.usno.navy.mil/data/docs/RS_OneYear.php
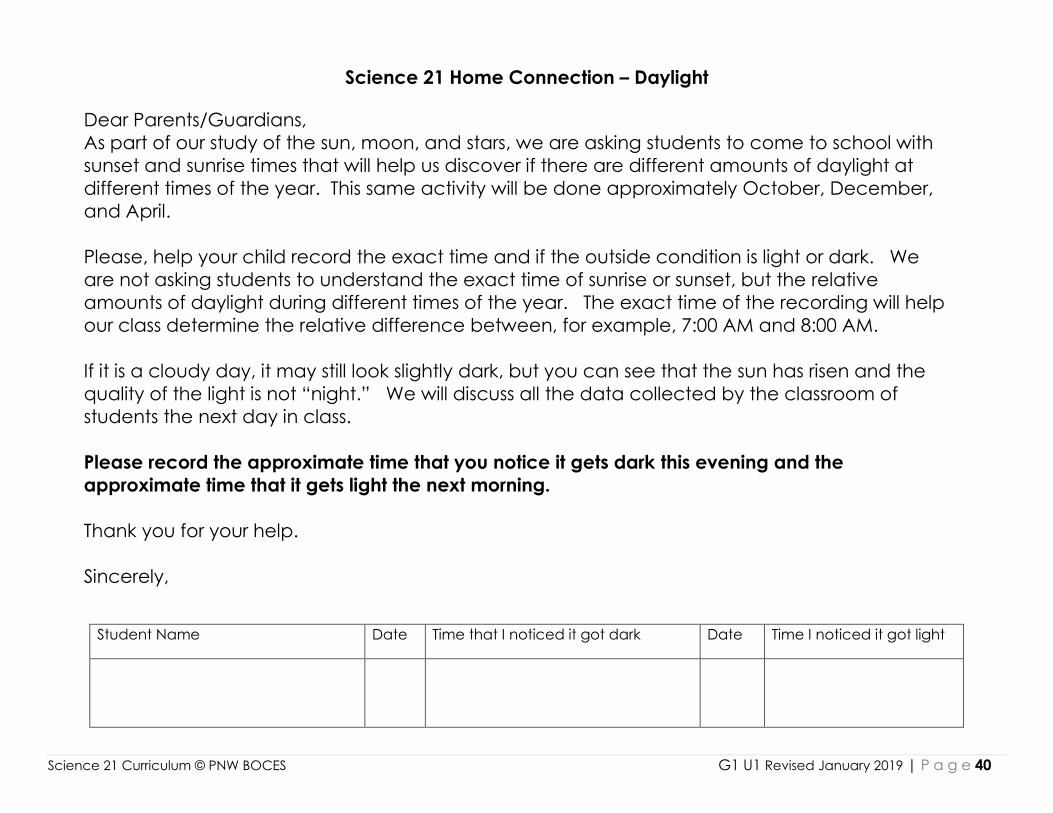
Science 21 Curriculum © PNW BOCES G1 U1 Revised January 2019 | P a g e 40
Science 21 Home Connection – Daylight
Dear Parents/Guardians,
As part of our study of the sun, moon, and stars, we are asking students to come to school with
sunset and sunrise times that will help us discover if there are different amounts of daylight at
different times of the year. This same activity will be done approximately October, December,
and April.
Please, help your child record the exact time and if the outside condition is light or dark. We
are not asking students to understand the exact time of sunrise or sunset, but the relative
amounts of daylight during different times of the year. The exact time of the recording will help
our class determine the relative difference between, for example, 7:00 AM and 8:00 AM.
If it is a cloudy day, it may still look slightly dark, but you can see that the sun has risen and the
quality of the light is not “night.” We will discuss all the data collected by the classroom of
students the next day in class.
Please record the approximate time that you notice it gets dark this evening and the
approximate time that it gets light the next morning.
Thank you for your help.
Sincerely,
Student Name Date Time that I noticed it got dark Date Time I noticed it got light
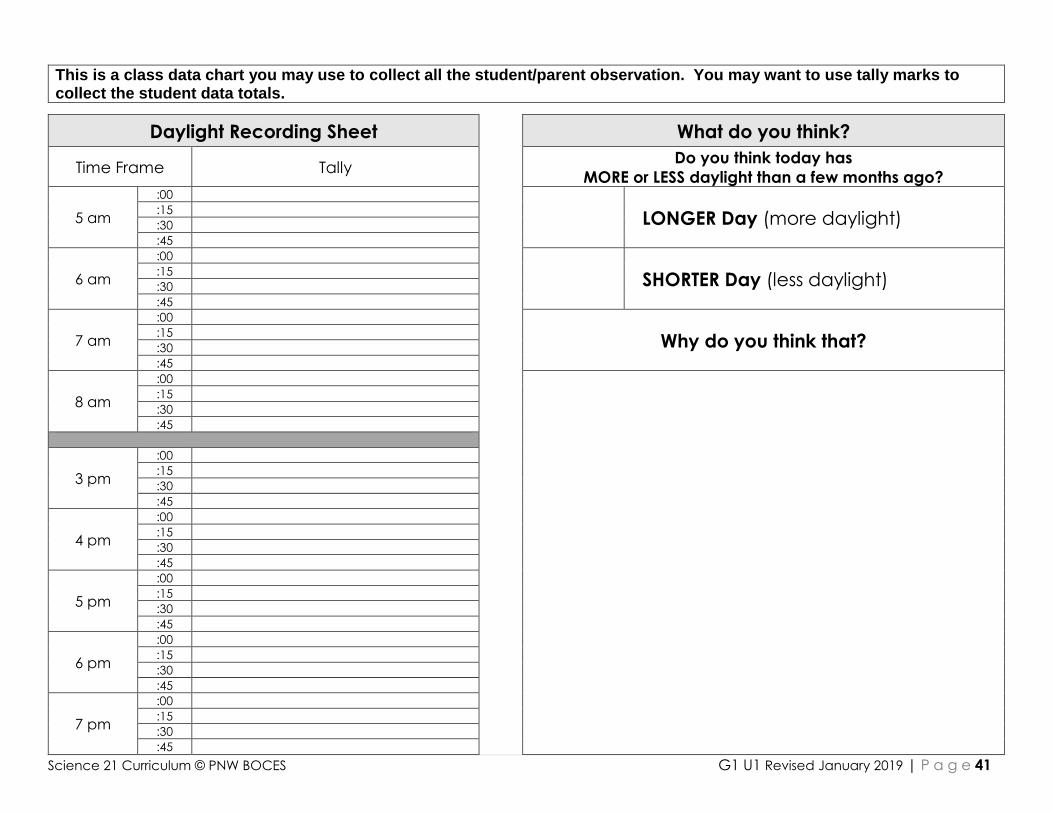
Science 21 Curriculum © PNW BOCES G1 U1 Revised January 2019 | P a g e 41
This is a class data chart you may use to collect all the student/parent observation. You may want to use tally marks to collect the student data totals.
Daylight Recording Sheet
What do you think?
Time Frame Tally Do you think today has
MORE or LESS daylight than a few months ago?
5 am
:00
LONGER Day (more daylight) :15
:30
:45
6 am
:00
SHORTER Day (less daylight) :15
:30
:45
7 am
:00
Why do you think that? :15
:30
:45
8 am
:00 :15
:30
:45
3 pm
:00
:15
:30
:45
4 pm
:00
:15
:30
:45
5 pm
:00
:15
:30
:45
6 pm
:00
:15
:30
:45
7 pm
:00
:15
:30
:45
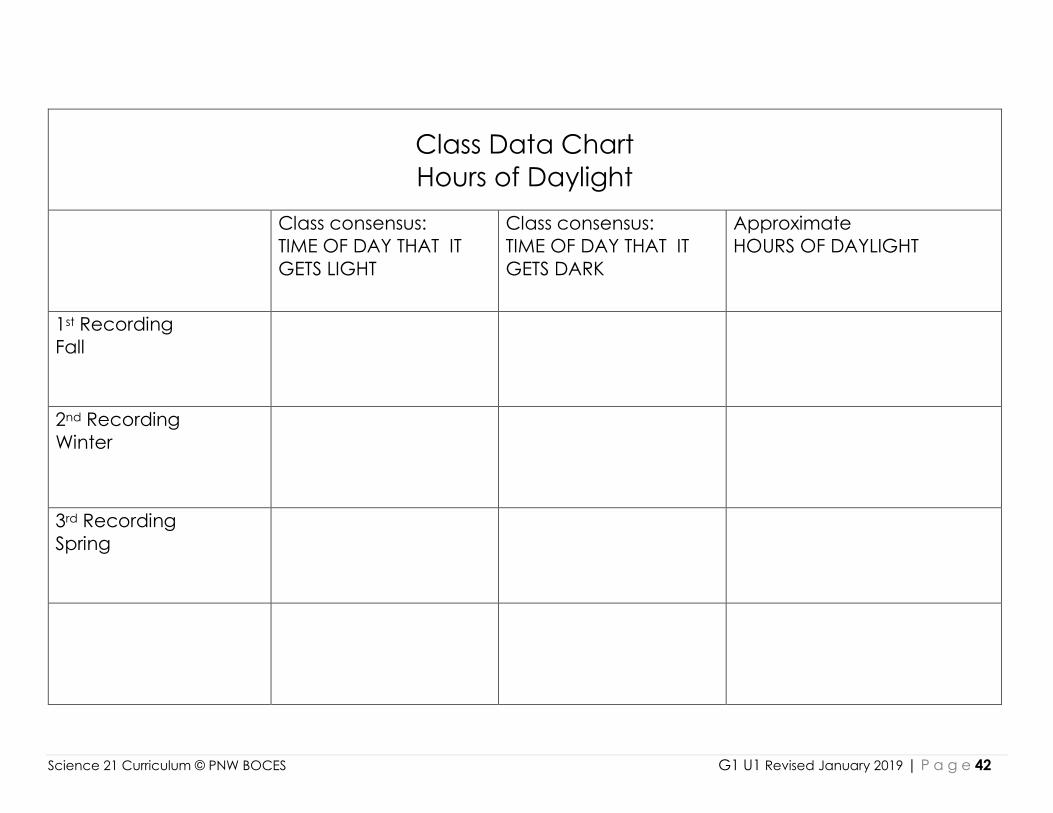
Science 21 Curriculum © PNW BOCES G1 U1 Revised January 2019 | P a g e 42
Class Data Chart
Hours of Daylight
Class consensus:
TIME OF DAY THAT IT
GETS LIGHT
Class consensus:
TIME OF DAY THAT IT
GETS DARK
Approximate
HOURS OF DAYLIGHT
1st Recording
Fall
2nd Recording
Winter
3rd Recording
Spring
Science 21 Curriculum © PNW BOCES G1 U1 Revised January 2019 | P a g e 43
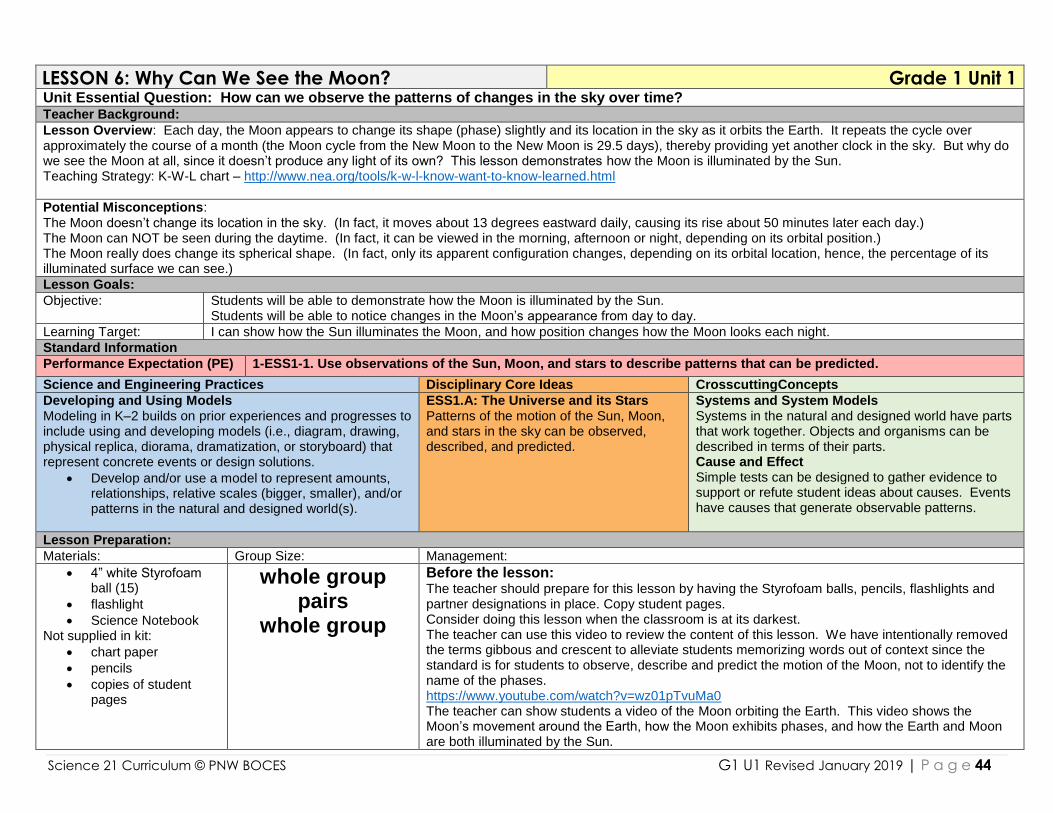
Science 21 Curriculum © PNW BOCES G1 U1 Revised January 2019 | P a g e 44
LESSON 6: Why Can We See the Moon? Grade 1 Unit 1 Unit Essential Question: How can we observe the patterns of changes in the sky over time? Teacher Background:
Lesson Overview: Each day, the Moon appears to change its shape (phase) slightly and its location in the sky as it orbits the Earth. It repeats the cycle over approximately the course of a month (the Moon cycle from the New Moon to the New Moon is 29.5 days), thereby providing yet another clock in the sky. But why do we see the Moon at all, since it doesn’t produce any light of its own? This lesson demonstrates how the Moon is illuminated by the Sun. Teaching Strategy: K-W-L chart – http://www.nea.org/tools/k-w-l-know-want-to-know-learned.html
Potential Misconceptions: The Moon doesn’t change its location in the sky. (In fact, it moves about 13 degrees eastward daily, causing its rise about 50 minutes later each day.) The Moon can NOT be seen during the daytime. (In fact, it can be viewed in the morning, afternoon or night, depending on its orbital position.) The Moon really does change its spherical shape. (In fact, only its apparent configuration changes, depending on its orbital location, hence, the percentage of its illuminated surface we can see.)
Lesson Goals:
Objective: Students will be able to demonstrate how the Moon is illuminated by the Sun. Students will be able to notice changes in the Moon’s appearance from day to day.
Learning Target: I can show how the Sun illuminates the Moon, and how position changes how the Moon looks each night.
Standard Information
Performance Expectation (PE) 1-ESS1-1. Use observations of the Sun, Moon, and stars to describe patterns that can be predicted.
Science and Engineering Practices Disciplinary Core Ideas CrosscuttingConcepts
Developing and Using Models Modeling in K–2 builds on prior experiences and progresses to include using and developing models (i.e., diagram, drawing, physical replica, diorama, dramatization, or storyboard) that represent concrete events or design solutions.
Develop and/or use a model to represent amounts, relationships, relative scales (bigger, smaller), and/or patterns in the natural and designed world(s).
ESS1.A: The Universe and its Stars Patterns of the motion of the Sun, Moon, and stars in the sky can be observed, described, and predicted.
Systems and System Models Systems in the natural and designed world have parts that work together. Objects and organisms can be described in terms of their parts. Cause and Effect Simple tests can be designed to gather evidence to support or refute student ideas about causes. Events have causes that generate observable patterns.
Lesson Preparation:
Materials: Group Size: Management:
4” white Styrofoam ball (15)
flashlight
Science Notebook Not supplied in kit:
chart paper
pencils
copies of student pages
whole group pairs
whole group
Before the lesson: The teacher should prepare for this lesson by having the Styrofoam balls, pencils, flashlights and partner designations in place. Copy student pages. Consider doing this lesson when the classroom is at its darkest. The teacher can use this video to review the content of this lesson. We have intentionally removed the terms gibbous and crescent to alleviate students memorizing words out of context since the standard is for students to observe, describe and predict the motion of the Moon, not to identify the name of the phases. https://www.youtube.com/watch?v=wz01pTvuMa0 The teacher can show students a video of the Moon orbiting the Earth. This video shows the Moon’s movement around the Earth, how the Moon exhibits phases, and how the Earth and Moon are both illuminated by the Sun.
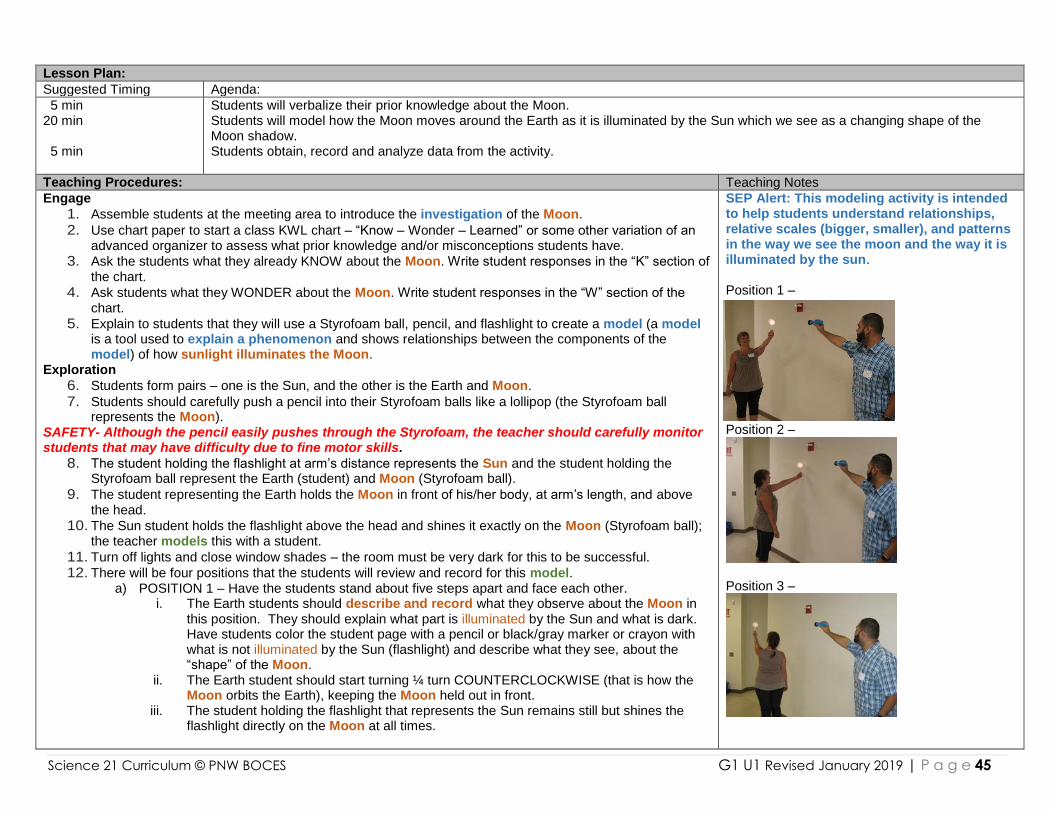
Science 21 Curriculum © PNW BOCES G1 U1 Revised January 2019 | P a g e 45
Lesson Plan:
Suggested Timing Agenda:
5 min 20 min 5 min
Students will verbalize their prior knowledge about the Moon. Students will model how the Moon moves around the Earth as it is illuminated by the Sun which we see as a changing shape of the Moon shadow. Students obtain, record and analyze data from the activity.
Teaching Procedures: Teaching Notes
Engage
1. Assemble students at the meeting area to introduce the investigation of the Moon.
2. Use chart paper to start a class KWL chart – “Know – Wonder – Learned” or some other variation of an advanced organizer to assess what prior knowledge and/or misconceptions students have.
3. Ask the students what they already KNOW about the Moon. Write student responses in the “K” section of the chart.
4. Ask students what they WONDER about the Moon. Write student responses in the “W” section of the chart.
5. Explain to students that they will use a Styrofoam ball, pencil, and flashlight to create a model (a model is a tool used to explain a phenomenon and shows relationships between the components of the model) of how sunlight illuminates the Moon.
Exploration
6. Students form pairs – one is the Sun, and the other is the Earth and Moon.
7. Students should carefully push a pencil into their Styrofoam balls like a lollipop (the Styrofoam ball represents the Moon).
SAFETY- Although the pencil easily pushes through the Styrofoam, the teacher should carefully monitor students that may have difficulty due to fine motor skills.
8. The student holding the flashlight at arm’s distance represents the Sun and the student holding the Styrofoam ball represent the Earth (student) and Moon (Styrofoam ball).
9. The student representing the Earth holds the Moon in front of his/her body, at arm’s length, and above the head.
10. The Sun student holds the flashlight above the head and shines it exactly on the Moon (Styrofoam ball); the teacher models this with a student.
11. Turn off lights and close window shades – the room must be very dark for this to be successful.
12. There will be four positions that the students will review and record for this model. a) POSITION 1 – Have the students stand about five steps apart and face each other.
i. The Earth students should describe and record what they observe about the Moon in this position. They should explain what part is illuminated by the Sun and what is dark. Have students color the student page with a pencil or black/gray marker or crayon with what is not illuminated by the Sun (flashlight) and describe what they see, about the “shape” of the Moon.
ii. The Earth student should start turning ¼ turn COUNTERCLOCKWISE (that is how the Moon orbits the Earth), keeping the Moon held out in front.
iii. The student holding the flashlight that represents the Sun remains still but shines the flashlight directly on the Moon at all times.
SEP Alert: This modeling activity is intended to help students understand relationships, relative scales (bigger, smaller), and patterns in the way we see the moon and the way it is illuminated by the sun. Position 1 –
Position 2 –
Position 3 –
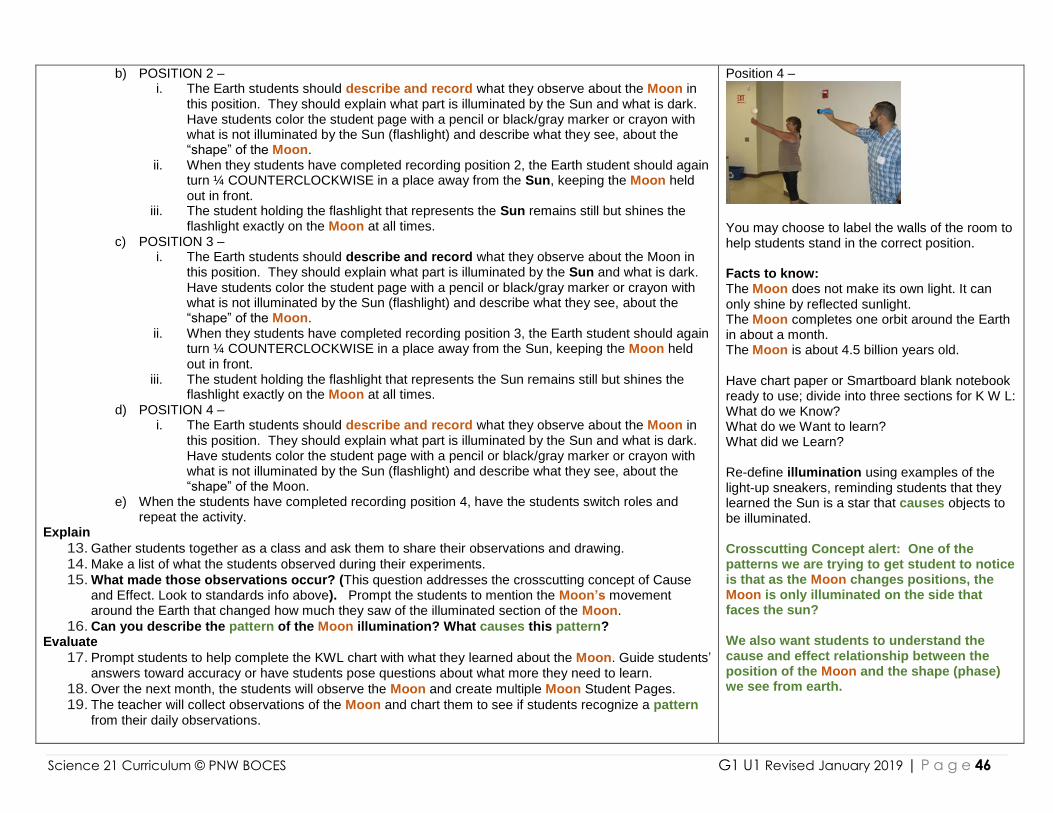
Science 21 Curriculum © PNW BOCES G1 U1 Revised January 2019 | P a g e 46
b) POSITION 2 – i. The Earth students should describe and record what they observe about the Moon in
this position. They should explain what part is illuminated by the Sun and what is dark. Have students color the student page with a pencil or black/gray marker or crayon with what is not illuminated by the Sun (flashlight) and describe what they see, about the “shape” of the Moon.
ii. When they students have completed recording position 2, the Earth student should again turn ¼ COUNTERCLOCKWISE in a place away from the Sun, keeping the Moon held out in front.
iii. The student holding the flashlight that represents the Sun remains still but shines the flashlight exactly on the Moon at all times.
c) POSITION 3 – i. The Earth students should describe and record what they observe about the Moon in
this position. They should explain what part is illuminated by the Sun and what is dark. Have students color the student page with a pencil or black/gray marker or crayon with what is not illuminated by the Sun (flashlight) and describe what they see, about the “shape” of the Moon.
ii. When they students have completed recording position 3, the Earth student should again turn ¼ COUNTERCLOCKWISE in a place away from the Sun, keeping the Moon held out in front.
iii. The student holding the flashlight that represents the Sun remains still but shines the flashlight exactly on the Moon at all times.
d) POSITION 4 – i. The Earth students should describe and record what they observe about the Moon in
this position. They should explain what part is illuminated by the Sun and what is dark. Have students color the student page with a pencil or black/gray marker or crayon with what is not illuminated by the Sun (flashlight) and describe what they see, about the “shape” of the Moon.
e) When the students have completed recording position 4, have the students switch roles and repeat the activity.
Explain
13. Gather students together as a class and ask them to share their observations and drawing.
14. Make a list of what the students observed during their experiments.
15. What made those observations occur? (This question addresses the crosscutting concept of Cause and Effect. Look to standards info above). Prompt the students to mention the Moon’s movement around the Earth that changed how much they saw of the illuminated section of the Moon.
16. Can you describe the pattern of the Moon illumination? What causes this pattern? Evaluate
17. Prompt students to help complete the KWL chart with what they learned about the Moon. Guide students’ answers toward accuracy or have students pose questions about what more they need to learn.
18. Over the next month, the students will observe the Moon and create multiple Moon Student Pages.
19. The teacher will collect observations of the Moon and chart them to see if students recognize a pattern from their daily observations.
Position 4 –
You may choose to label the walls of the room to help students stand in the correct position. Facts to know: The Moon does not make its own light. It can only shine by reflected sunlight. The Moon completes one orbit around the Earth in about a month. The Moon is about 4.5 billion years old. Have chart paper or Smartboard blank notebook ready to use; divide into three sections for K W L: What do we Know? What do we Want to learn? What did we Learn? Re-define illumination using examples of the light-up sneakers, reminding students that they learned the Sun is a star that causes objects to be illuminated. Crosscutting Concept alert: One of the patterns we are trying to get student to notice is that as the Moon changes positions, the Moon is only illuminated on the side that faces the sun? We also want students to understand the cause and effect relationship between the position of the Moon and the shape (phase) we see from earth.
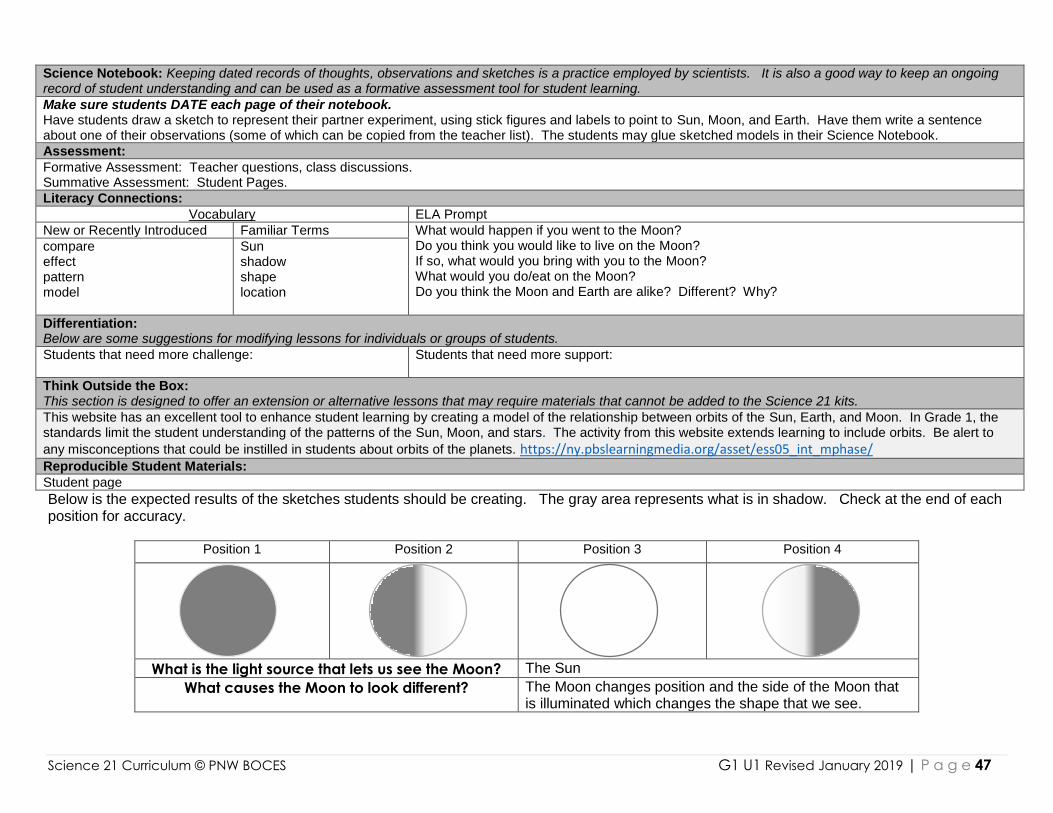
Science 21 Curriculum © PNW BOCES G1 U1 Revised January 2019 | P a g e 47
Science Notebook: Keeping dated records of thoughts, observations and sketches is a practice employed by scientists. It is also a good way to keep an ongoing record of student understanding and can be used as a formative assessment tool for student learning.
Make sure students DATE each page of their notebook. Have students draw a sketch to represent their partner experiment, using stick figures and labels to point to Sun, Moon, and Earth. Have them write a sentence about one of their observations (some of which can be copied from the teacher list). The students may glue sketched models in their Science Notebook.
Assessment:
Formative Assessment: Teacher questions, class discussions. Summative Assessment: Student Pages.
Literacy Connections:
Vocabulary ELA Prompt
New or Recently Introduced Familiar Terms What would happen if you went to the Moon? Do you think you would like to live on the Moon? If so, what would you bring with you to the Moon? What would you do/eat on the Moon? Do you think the Moon and Earth are alike? Different? Why?
compare effect pattern model
Sun shadow shape location
Differentiation: Below are some suggestions for modifying lessons for individuals or groups of students.
Students that need more challenge:
Students that need more support:
Think Outside the Box: This section is designed to offer an extension or alternative lessons that may require materials that cannot be added to the Science 21 kits.
This website has an excellent tool to enhance student learning by creating a model of the relationship between orbits of the Sun, Earth, and Moon. In Grade 1, the standards limit the student understanding of the patterns of the Sun, Moon, and stars. The activity from this website extends learning to include orbits. Be alert to
any misconceptions that could be instilled in students about orbits of the planets. https://ny.pbslearningmedia.org/asset/ess05_int_mphase/
Reproducible Student Materials:
Student page
Below is the expected results of the sketches students should be creating. The gray area represents what is in shadow. Check at the end of each position for accuracy. Position 1 Position 2 Position 3 Position 4
What is the light source that lets us see the Moon? The Sun
What causes the Moon to look different? The Moon changes position and the side of the Moon that is illuminated which changes the shape that we see.

Science 21 Curriculum © PNW BOCES G1 U1 Revised January 2019 | P a g e 48
For each model position color the side of the Moon that is in shadow.
Position 1 Position 2 Position 3 Position 4
What is the light source that lets us see
the Moon?
What causes the Moon to look
different?
Name: Date:
Science 21: Sun, Moon, and Stars Grade 1 Unit 1 - Lesson 6

Science 21 Curriculum © PNW BOCES G1 U1 Revised January 2019 | P a g e 49
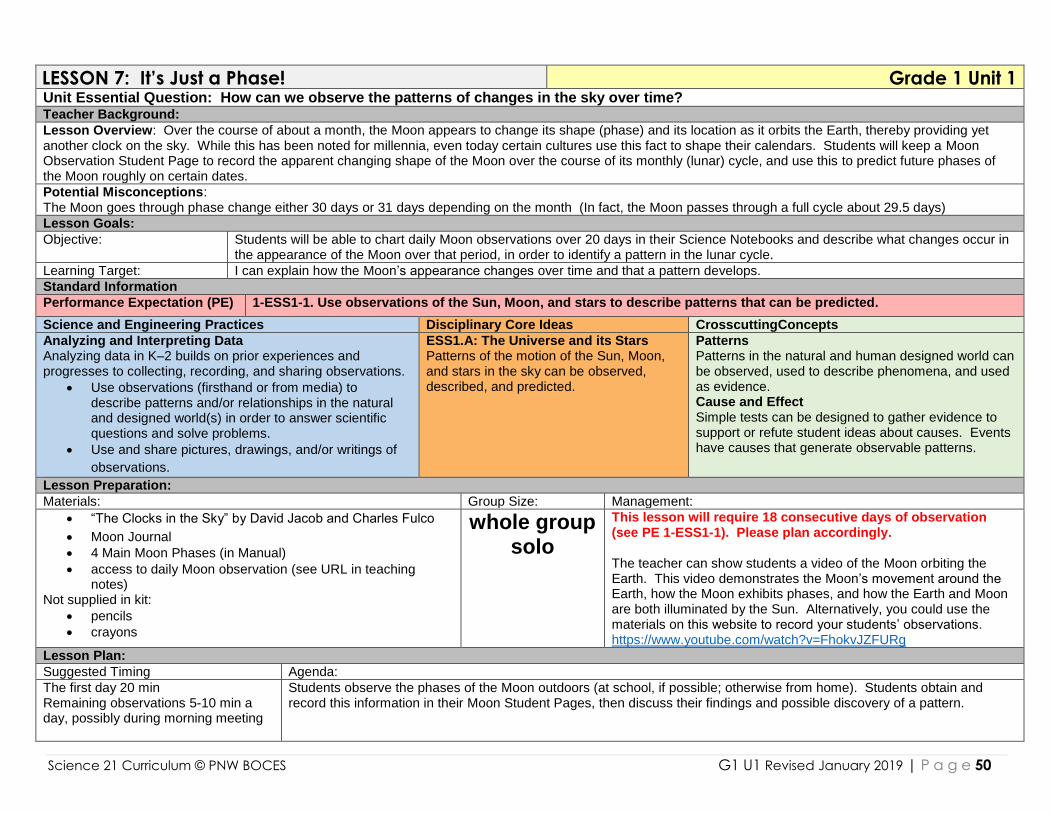
Science 21 Curriculum © PNW BOCES G1 U1 Revised January 2019 | P a g e 50
LESSON 7: It’s Just a Phase! Grade 1 Unit 1 Unit Essential Question: How can we observe the patterns of changes in the sky over time? Teacher Background:
Lesson Overview: Over the course of about a month, the Moon appears to change its shape (phase) and its location as it orbits the Earth, thereby providing yet another clock on the sky. While this has been noted for millennia, even today certain cultures use this fact to shape their calendars. Students will keep a Moon Observation Student Page to record the apparent changing shape of the Moon over the course of its monthly (lunar) cycle, and use this to predict future phases of the Moon roughly on certain dates.
Potential Misconceptions: The Moon goes through phase change either 30 days or 31 days depending on the month (In fact, the Moon passes through a full cycle about 29.5 days)
Lesson Goals:
Objective: Students will be able to chart daily Moon observations over 20 days in their Science Notebooks and describe what changes occur in the appearance of the Moon over that period, in order to identify a pattern in the lunar cycle.
Learning Target: I can explain how the Moon’s appearance changes over time and that a pattern develops.
Standard Information
Performance Expectation (PE) 1-ESS1-1. Use observations of the Sun, Moon, and stars to describe patterns that can be predicted.
Science and Engineering Practices Disciplinary Core Ideas CrosscuttingConcepts
Analyzing and Interpreting Data Analyzing data in K–2 builds on prior experiences and progresses to collecting, recording, and sharing observations.
Use observations (firsthand or from media) to describe patterns and/or relationships in the natural and designed world(s) in order to answer scientific questions and solve problems.
Use and share pictures, drawings, and/or writings of
observations.
ESS1.A: The Universe and its Stars Patterns of the motion of the Sun, Moon, and stars in the sky can be observed, described, and predicted.
Patterns Patterns in the natural and human designed world can be observed, used to describe phenomena, and used as evidence. Cause and Effect Simple tests can be designed to gather evidence to support or refute student ideas about causes. Events have causes that generate observable patterns.
Lesson Preparation:
Materials: Group Size: Management:
“The Clocks in the Sky” by David Jacob and Charles Fulco
Moon Journal
4 Main Moon Phases (in Manual)
access to daily Moon observation (see URL in teaching notes)
Not supplied in kit:
pencils
crayons
whole group solo
This lesson will require 18 consecutive days of observation (see PE 1-ESS1-1). Please plan accordingly. The teacher can show students a video of the Moon orbiting the Earth. This video demonstrates the Moon’s movement around the Earth, how the Moon exhibits phases, and how the Earth and Moon are both illuminated by the Sun. Alternatively, you could use the materials on this website to record your students’ observations. https://www.youtube.com/watch?v=FhokvJZFURg
Lesson Plan:
Suggested Timing Agenda:
The first day 20 min Remaining observations 5-10 min a day, possibly during morning meeting
Students observe the phases of the Moon outdoors (at school, if possible; otherwise from home). Students obtain and record this information in their Moon Student Pages, then discuss their findings and possible discovery of a pattern.
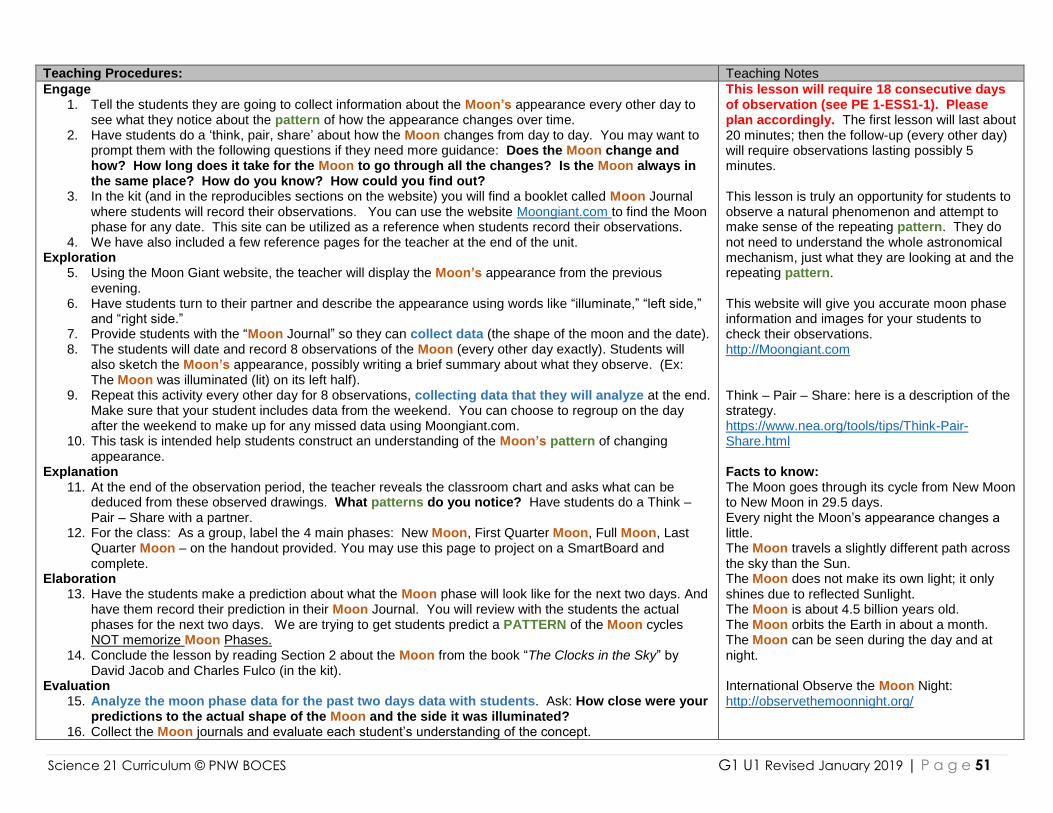
Science 21 Curriculum © PNW BOCES G1 U1 Revised January 2019 | P a g e 51
Teaching Procedures: Teaching Notes
Engage 1. Tell the students they are going to collect information about the Moon’s appearance every other day to
see what they notice about the pattern of how the appearance changes over time. 2. Have students do a ‘think, pair, share’ about how the Moon changes from day to day. You may want to
prompt them with the following questions if they need more guidance: Does the Moon change and how? How long does it take for the Moon to go through all the changes? Is the Moon always in the same place? How do you know? How could you find out?
3. In the kit (and in the reproducibles sections on the website) you will find a booklet called Moon Journal where students will record their observations. You can use the website Moongiant.com to find the Moon phase for any date. This site can be utilized as a reference when students record their observations.
4. We have also included a few reference pages for the teacher at the end of the unit. Exploration
5. Using the Moon Giant website, the teacher will display the Moon’s appearance from the previous evening.
6. Have students turn to their partner and describe the appearance using words like “illuminate,” “left side,” and “right side.”
7. Provide students with the “Moon Journal” so they can collect data (the shape of the moon and the date). 8. The students will date and record 8 observations of the Moon (every other day exactly). Students will
also sketch the Moon’s appearance, possibly writing a brief summary about what they observe. (Ex: The Moon was illuminated (lit) on its left half).
9. Repeat this activity every other day for 8 observations, collecting data that they will analyze at the end. Make sure that your student includes data from the weekend. You can choose to regroup on the day after the weekend to make up for any missed data using Moongiant.com.
10. This task is intended help students construct an understanding of the Moon’s pattern of changing appearance.
Explanation 11. At the end of the observation period, the teacher reveals the classroom chart and asks what can be
deduced from these observed drawings. What patterns do you notice? Have students do a Think – Pair – Share with a partner.
12. For the class: As a group, label the 4 main phases: New Moon, First Quarter Moon, Full Moon, Last Quarter Moon – on the handout provided. You may use this page to project on a SmartBoard and complete.
Elaboration 13. Have the students make a prediction about what the Moon phase will look like for the next two days. And
have them record their prediction in their Moon Journal. You will review with the students the actual phases for the next two days. We are trying to get students predict a PATTERN of the Moon cycles NOT memorize Moon Phases.
14. Conclude the lesson by reading Section 2 about the Moon from the book “The Clocks in the Sky” by David Jacob and Charles Fulco (in the kit).
Evaluation 15. Analyze the moon phase data for the past two days data with students. Ask: How close were your
predictions to the actual shape of the Moon and the side it was illuminated? 16. Collect the Moon journals and evaluate each student’s understanding of the concept.
This lesson will require 18 consecutive days of observation (see PE 1-ESS1-1). Please plan accordingly. The first lesson will last about 20 minutes; then the follow-up (every other day) will require observations lasting possibly 5 minutes. This lesson is truly an opportunity for students to observe a natural phenomenon and attempt to make sense of the repeating pattern. They do not need to understand the whole astronomical mechanism, just what they are looking at and the repeating pattern. This website will give you accurate moon phase information and images for your students to check their observations. http://Moongiant.com Think – Pair – Share: here is a description of the strategy. https://www.nea.org/tools/tips/Think-Pair-Share.html Facts to know: The Moon goes through its cycle from New Moon to New Moon in 29.5 days. Every night the Moon’s appearance changes a little. The Moon travels a slightly different path across the sky than the Sun. The Moon does not make its own light; it only shines due to reflected Sunlight. The Moon is about 4.5 billion years old. The Moon orbits the Earth in about a month. The Moon can be seen during the day and at night. International Observe the Moon Night: http://observethemoonnight.org/
Science 21 Curriculum © PNW BOCES G1 U1 Revised January 2019 | P a g e 52
Science Notebook: Keeping dated records of thoughts, observations and sketches is a practice employed by scientists. It is also a good way to keep an ongoing record of student understanding and can be used as a formative assessment tool for student learning.
Make sure students DATE each page of their notebook. Let students know that sometimes scientists have a special notebook just for a particular task. Have the students date each entry of their Moon Journal and shade in the dark areas of the Moon’s appearance with the side of a pencil and possibly write a brief sentence about what they see each time (ex: the Moon has a dark area on half of it). See reproducible student materials.
Assessment:
Formative Assessment: Teacher questioning; class discussions; peer discussions. Summative Assessment: Moon Journal entries.
Literacy Connections:
Vocabulary ELA Prompt
New or Recently Introduced Familiar Terms Would you like to live on the Moon? Why? How would you cook on the Moon? Do you think you could grow anything on the Moon?
pattern illuminate shadows left right
Sun shadow shape location
Differentiation: Below are some suggestions for modifying lessons for individuals or groups of students.
Students that need more challenge: A student can access International Observe the Moon night for extended activities and investigations, including the annual Moon Observation Night in early October. http://observethemoonnight.org/
Students that need more support:
Think Outside the Box: This section is designed to offer an extension or alternative lessons that may require materials that cannot be added to the Science 21 kits.
In September each year, there is an “International Observe the Moon Night” events around the planet. You can learn more from this website http://www.lpi.usra.edu/ Below are two links for planetarium software that may extend your students understanding of both developing and using models and an introduction to other celestial bodies. This task is a far extension from the Performance Expectations, but students this age may be interested in space science. http://www.stellarium.org/ to explore other planets and stars. http://celestiaproject.net/
Reproducible Student Materials:
Student Moon Journal can be found in kit and online with the unit reproducibles. Teacher reference pages
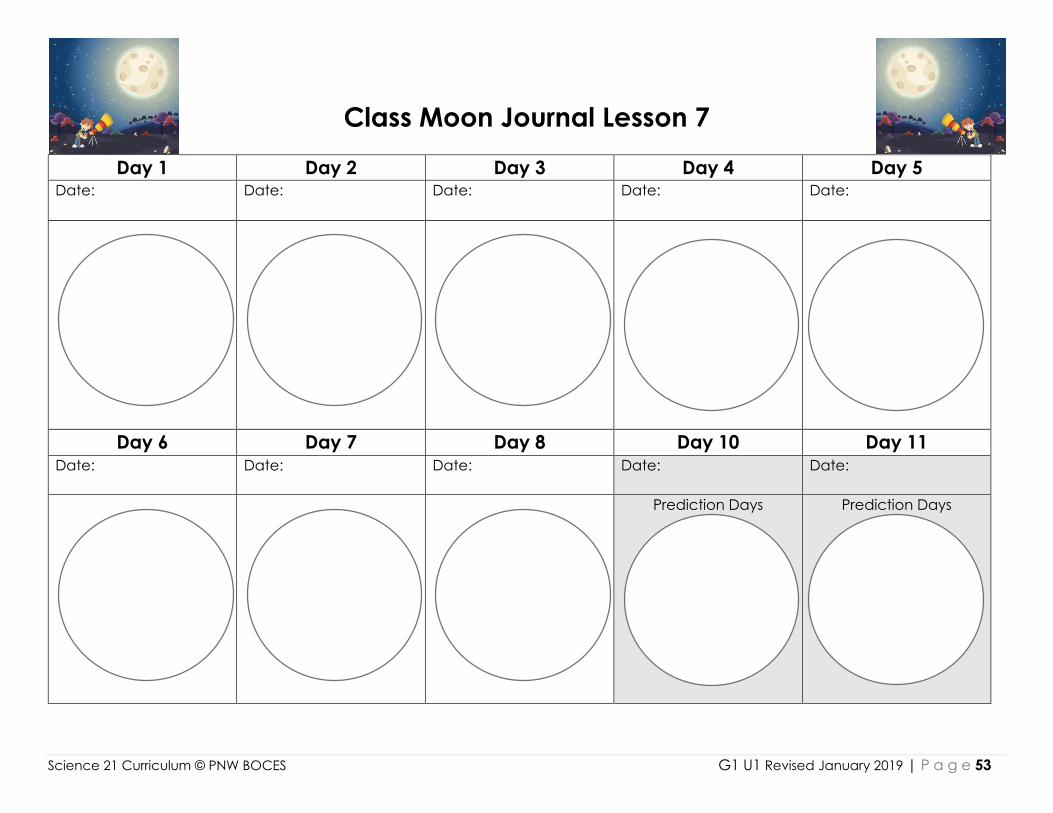
Science 21 Curriculum © PNW BOCES G1 U1 Revised January 2019 | P a g e 53
Class Moon Journal Lesson 7
Day 1 Day 2 Day 3 Day 4 Day 5 Date:
Date: Date: Date: Date:
Day 6 Day 7 Day 8 Day 10 Day 11 Date:
Date: Date: Date: Date:
Prediction Days Prediction Days
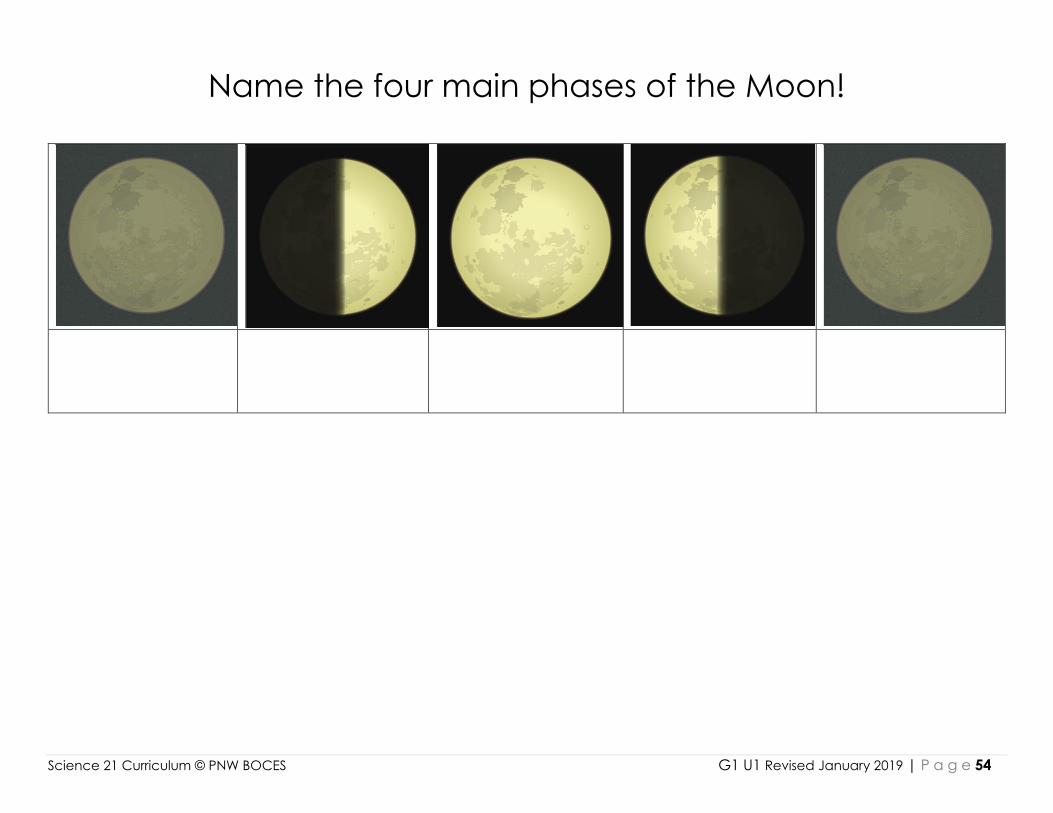
Science 21 Curriculum © PNW BOCES G1 U1 Revised January 2019 | P a g e 54
Name the four main phases of the Moon!
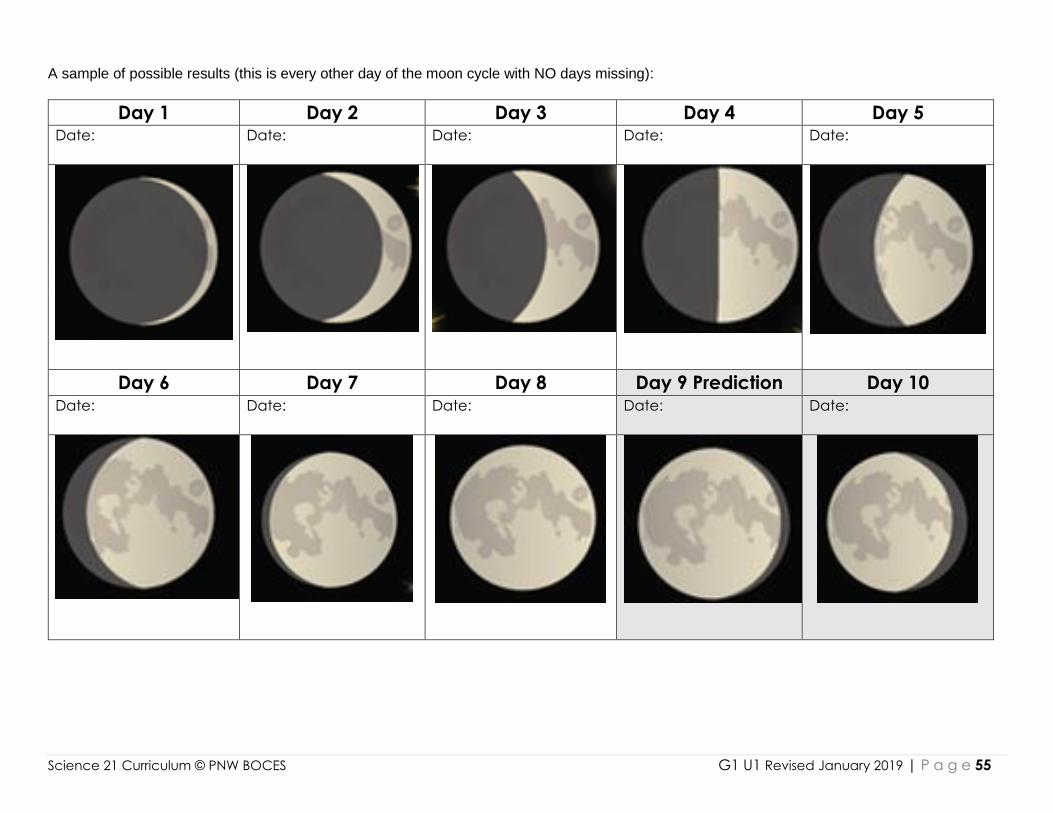
Science 21 Curriculum © PNW BOCES G1 U1 Revised January 2019 | P a g e 55
A sample of possible results (this is every other day of the moon cycle with NO days missing):
Day 1 Day 2 Day 3 Day 4 Day 5 Date:
Date: Date: Date: Date:
Day 6 Day 7 Day 8 Day 9 Prediction Day 10 Date:
Date: Date: Date: Date:
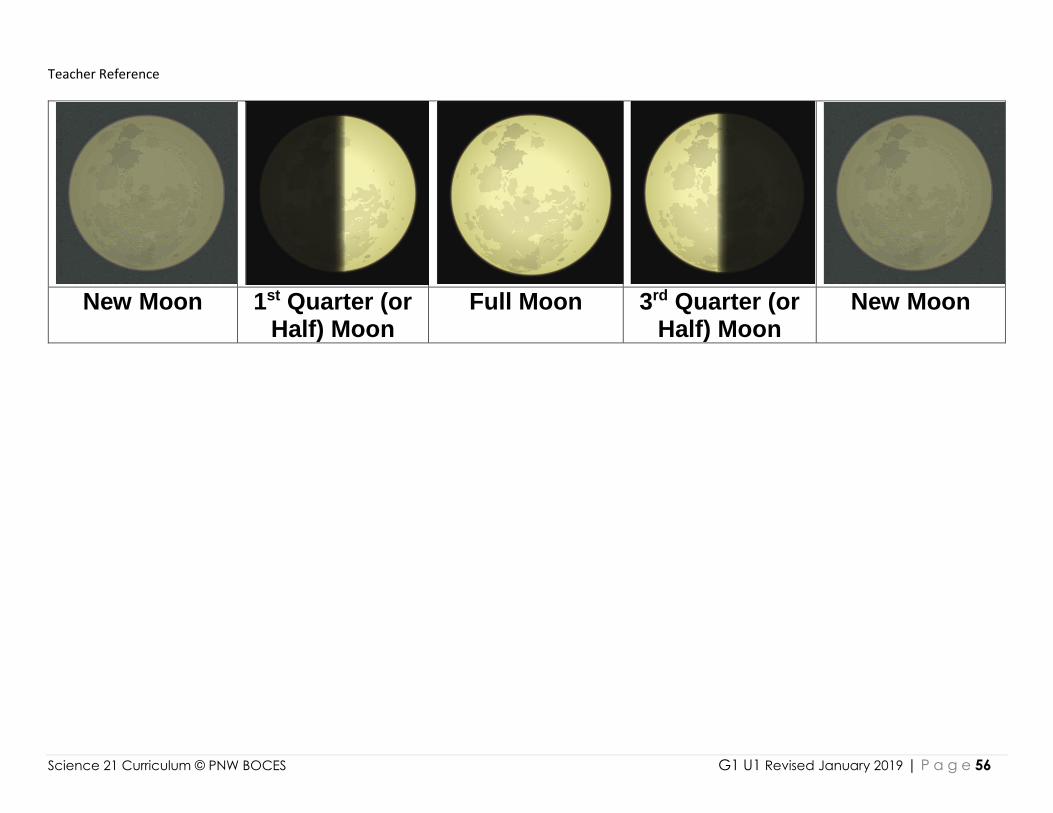
Science 21 Curriculum © PNW BOCES G1 U1 Revised January 2019 | P a g e 56
Teacher Reference
New Moon 1st Quarter (or Half) Moon
Full Moon 3rd Quarter (or Half) Moon
New Moon
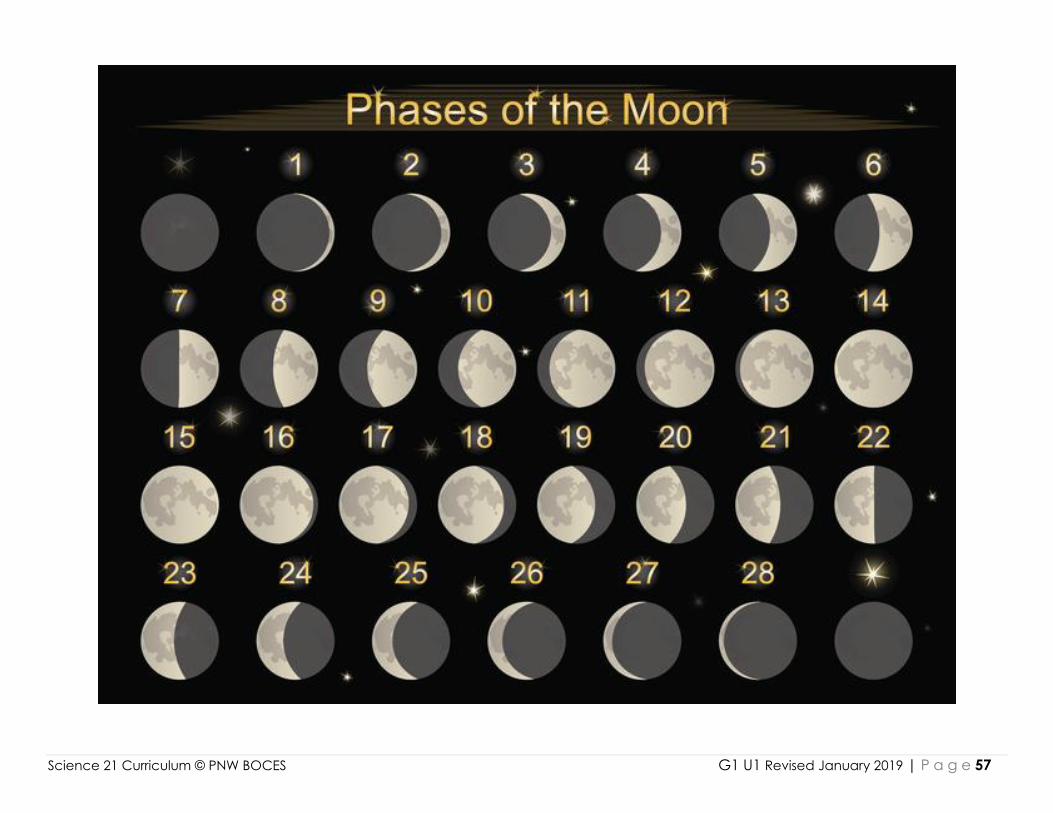
Science 21 Curriculum © PNW BOCES G1 U1 Revised January 2019 | P a g e 57
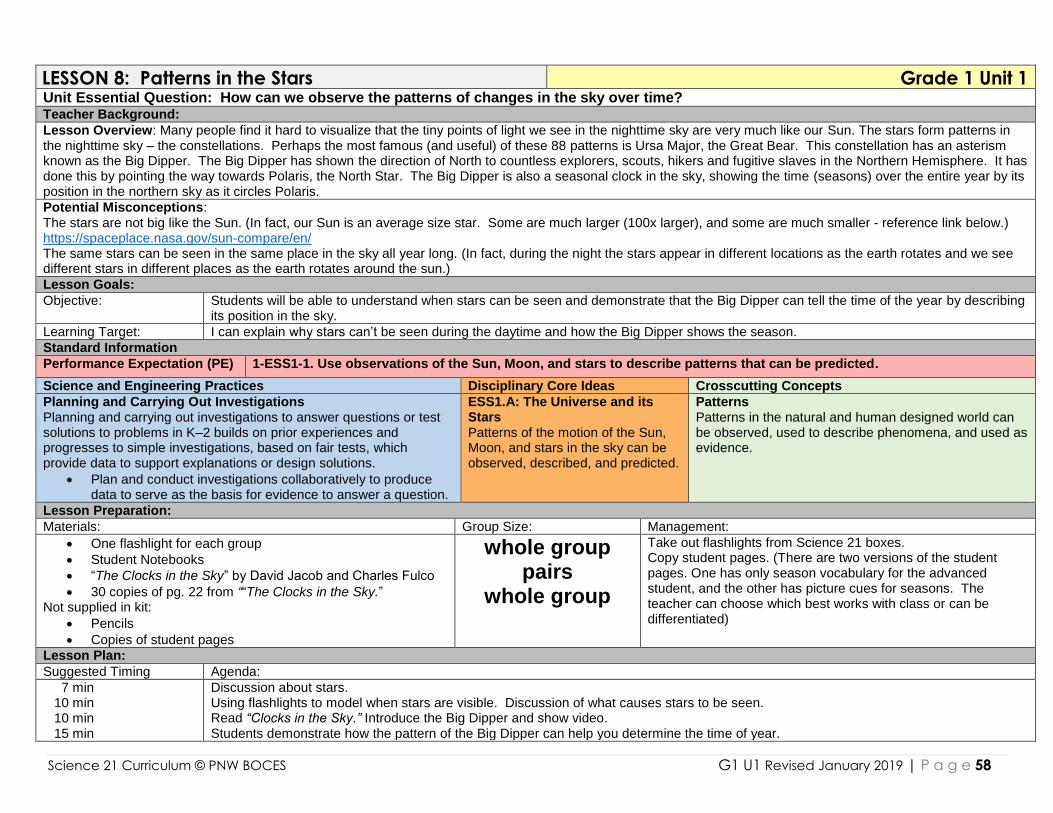
Science 21 Curriculum © PNW BOCES G1 U1 Revised January 2019 | P a g e 58
LESSON 8: Patterns in the Stars Grade 1 Unit 1 Unit Essential Question: How can we observe the patterns of changes in the sky over time? Teacher Background:
Lesson Overview: Many people find it hard to visualize that the tiny points of light we see in the nighttime sky are very much like our Sun. The stars form patterns in the nighttime sky – the constellations. Perhaps the most famous (and useful) of these 88 patterns is Ursa Major, the Great Bear. This constellation has an asterism known as the Big Dipper. The Big Dipper has shown the direction of North to countless explorers, scouts, hikers and fugitive slaves in the Northern Hemisphere. It has done this by pointing the way towards Polaris, the North Star. The Big Dipper is also a seasonal clock in the sky, showing the time (seasons) over the entire year by its position in the northern sky as it circles Polaris.
Potential Misconceptions: The stars are not big like the Sun. (In fact, our Sun is an average size star. Some are much larger (100x larger), and some are much smaller - reference link below.) https://spaceplace.nasa.gov/sun-compare/en/ The same stars can be seen in the same place in the sky all year long. (In fact, during the night the stars appear in different locations as the earth rotates and we see different stars in different places as the earth rotates around the sun.)
Lesson Goals:
Objective: Students will be able to understand when stars can be seen and demonstrate that the Big Dipper can tell the time of the year by describing its position in the sky.
Learning Target: I can explain why stars can’t be seen during the daytime and how the Big Dipper shows the season.
Standard Information
Performance Expectation (PE) 1-ESS1-1. Use observations of the Sun, Moon, and stars to describe patterns that can be predicted.
Science and Engineering Practices Disciplinary Core Ideas Crosscutting Concepts
Planning and Carrying Out Investigations Planning and carrying out investigations to answer questions or test solutions to problems in K–2 builds on prior experiences and progresses to simple investigations, based on fair tests, which provide data to support explanations or design solutions.
Plan and conduct investigations collaboratively to produce data to serve as the basis for evidence to answer a question.
ESS1.A: The Universe and its Stars Patterns of the motion of the Sun, Moon, and stars in the sky can be observed, described, and predicted.
Patterns Patterns in the natural and human designed world can be observed, used to describe phenomena, and used as evidence.
Lesson Preparation:
Materials: Group Size: Management:
One flashlight for each group
Student Notebooks
“The Clocks in the Sky” by David Jacob and Charles Fulco
30 copies of pg. 22 from ““The Clocks in the Sky.” Not supplied in kit:
Pencils
Copies of student pages
whole group pairs
whole group
Take out flashlights from Science 21 boxes. Copy student pages. (There are two versions of the student pages. One has only season vocabulary for the advanced student, and the other has picture cues for seasons. The teacher can choose which best works with class or can be differentiated)
Lesson Plan:
Suggested Timing Agenda:
7 min 10 min 10 min 15 min
Discussion about stars. Using flashlights to model when stars are visible. Discussion of what causes stars to be seen. Read “Clocks in the Sky.” Introduce the Big Dipper and show video. Students demonstrate how the pattern of the Big Dipper can help you determine the time of year.
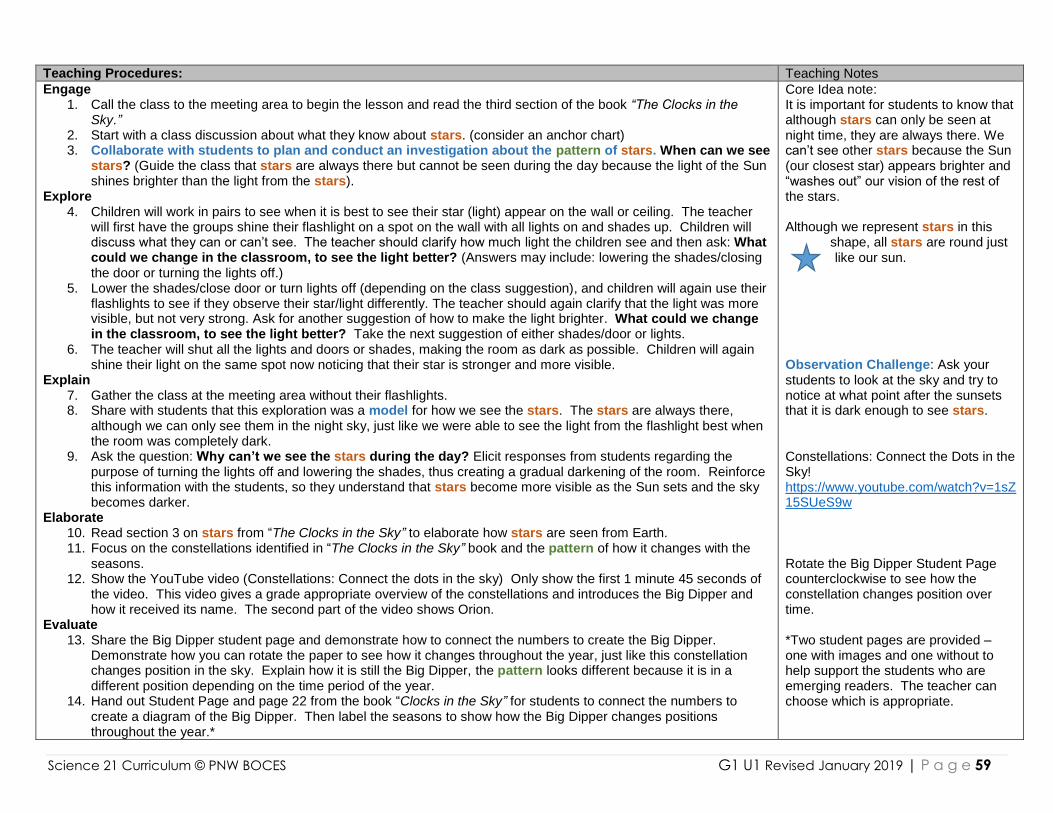
Science 21 Curriculum © PNW BOCES G1 U1 Revised January 2019 | P a g e 59
Teaching Procedures: Teaching Notes
Engage 1. Call the class to the meeting area to begin the lesson and read the third section of the book “The Clocks in the
Sky.” 2. Start with a class discussion about what they know about stars. (consider an anchor chart) 3. Collaborate with students to plan and conduct an investigation about the pattern of stars. When can we see
stars? (Guide the class that stars are always there but cannot be seen during the day because the light of the Sun shines brighter than the light from the stars).
Explore 4. Children will work in pairs to see when it is best to see their star (light) appear on the wall or ceiling. The teacher
will first have the groups shine their flashlight on a spot on the wall with all lights on and shades up. Children will discuss what they can or can’t see. The teacher should clarify how much light the children see and then ask: What could we change in the classroom, to see the light better? (Answers may include: lowering the shades/closing the door or turning the lights off.)
5. Lower the shades/close door or turn lights off (depending on the class suggestion), and children will again use their flashlights to see if they observe their star/light differently. The teacher should again clarify that the light was more visible, but not very strong. Ask for another suggestion of how to make the light brighter. What could we change in the classroom, to see the light better? Take the next suggestion of either shades/door or lights.
6. The teacher will shut all the lights and doors or shades, making the room as dark as possible. Children will again shine their light on the same spot now noticing that their star is stronger and more visible.
Explain 7. Gather the class at the meeting area without their flashlights. 8. Share with students that this exploration was a model for how we see the stars. The stars are always there,
although we can only see them in the night sky, just like we were able to see the light from the flashlight best when the room was completely dark.
9. Ask the question: Why can’t we see the stars during the day? Elicit responses from students regarding the purpose of turning the lights off and lowering the shades, thus creating a gradual darkening of the room. Reinforce this information with the students, so they understand that stars become more visible as the Sun sets and the sky becomes darker.
Elaborate 10. Read section 3 on stars from “The Clocks in the Sky” to elaborate how stars are seen from Earth. 11. Focus on the constellations identified in “The Clocks in the Sky” book and the pattern of how it changes with the
seasons. 12. Show the YouTube video (Constellations: Connect the dots in the sky) Only show the first 1 minute 45 seconds of
the video. This video gives a grade appropriate overview of the constellations and introduces the Big Dipper and how it received its name. The second part of the video shows Orion.
Evaluate 13. Share the Big Dipper student page and demonstrate how to connect the numbers to create the Big Dipper.
Demonstrate how you can rotate the paper to see how it changes throughout the year, just like this constellation changes position in the sky. Explain how it is still the Big Dipper, the pattern looks different because it is in a different position depending on the time period of the year.
14. Hand out Student Page and page 22 from the book “Clocks in the Sky” for students to connect the numbers to create a diagram of the Big Dipper. Then label the seasons to show how the Big Dipper changes positions throughout the year.*
Core Idea note: It is important for students to know that although stars can only be seen at night time, they are always there. We can’t see other stars because the Sun (our closest star) appears brighter and “washes out” our vision of the rest of the stars. Although we represent stars in this
shape, all stars are round just like our sun.
Observation Challenge: Ask your students to look at the sky and try to notice at what point after the sunsets that it is dark enough to see stars. Constellations: Connect the Dots in the Sky! https://www.youtube.com/watch?v=1sZ15SUeS9w Rotate the Big Dipper Student Page counterclockwise to see how the constellation changes position over time. *Two student pages are provided – one with images and one without to help support the students who are emerging readers. The teacher can choose which is appropriate.
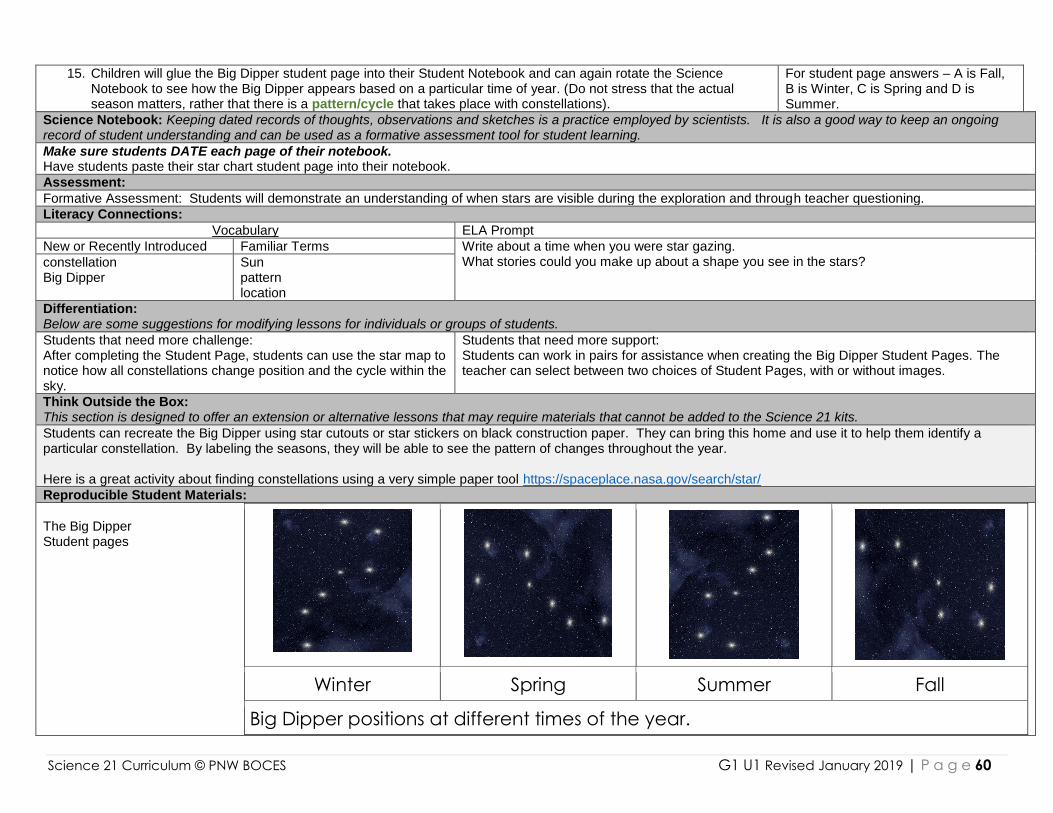
Science 21 Curriculum © PNW BOCES G1 U1 Revised January 2019 | P a g e 60
15. Children will glue the Big Dipper student page into their Student Notebook and can again rotate the Science Notebook to see how the Big Dipper appears based on a particular time of year. (Do not stress that the actual season matters, rather that there is a pattern/cycle that takes place with constellations).
For student page answers – A is Fall, B is Winter, C is Spring and D is Summer.
Science Notebook: Keeping dated records of thoughts, observations and sketches is a practice employed by scientists. It is also a good way to keep an ongoing record of student understanding and can be used as a formative assessment tool for student learning.
Make sure students DATE each page of their notebook. Have students paste their star chart student page into their notebook.
Assessment:
Formative Assessment: Students will demonstrate an understanding of when stars are visible during the exploration and through teacher questioning.
Literacy Connections:
Vocabulary ELA Prompt
New or Recently Introduced Familiar Terms Write about a time when you were star gazing. What stories could you make up about a shape you see in the stars?
constellation Big Dipper
Sun pattern location
Differentiation: Below are some suggestions for modifying lessons for individuals or groups of students.
Students that need more challenge: After completing the Student Page, students can use the star map to notice how all constellations change position and the cycle within the sky.
Students that need more support: Students can work in pairs for assistance when creating the Big Dipper Student Pages. The teacher can select between two choices of Student Pages, with or without images.
Think Outside the Box: This section is designed to offer an extension or alternative lessons that may require materials that cannot be added to the Science 21 kits.
Students can recreate the Big Dipper using star cutouts or star stickers on black construction paper. They can bring this home and use it to help them identify a particular constellation. By labeling the seasons, they will be able to see the pattern of changes throughout the year. Here is a great activity about finding constellations using a very simple paper tool https://spaceplace.nasa.gov/search/star/
Reproducible Student Materials:
The Big Dipper Student pages
Winter Spring Summer Fall
Big Dipper positions at different times of the year.
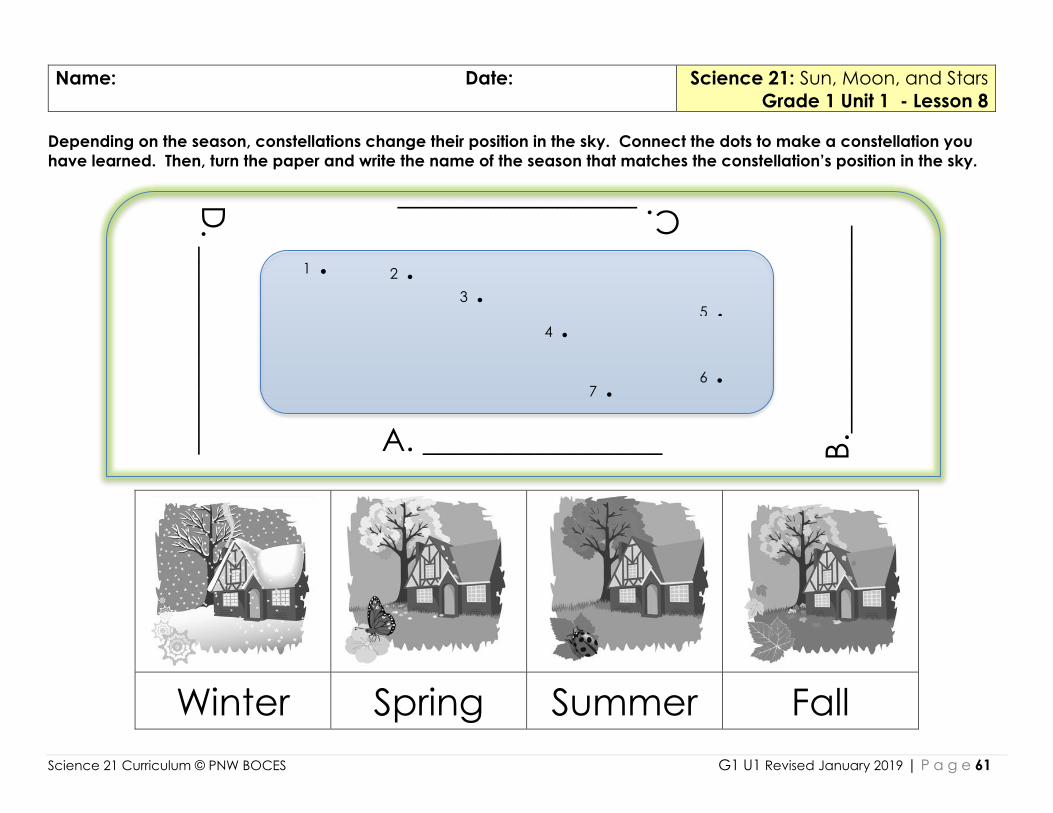
Science 21 Curriculum © PNW BOCES G1 U1 Revised January 2019 | P a g e 61
Name: Date:
Science 21: Sun, Moon, and Stars
Grade 1 Unit 1 - Lesson 8 Depending on the season, constellations change their position in the sky. Connect the dots to make a constellation you
have learned. Then, turn the paper and write the name of the season that matches the constellation’s position in the sky.
Winter Spring Summer Fall
1 . 2 .
3 .
4 .
5 .
6 . 7 .
D. _
____________ B
._____________ C. _______________
A. _______________
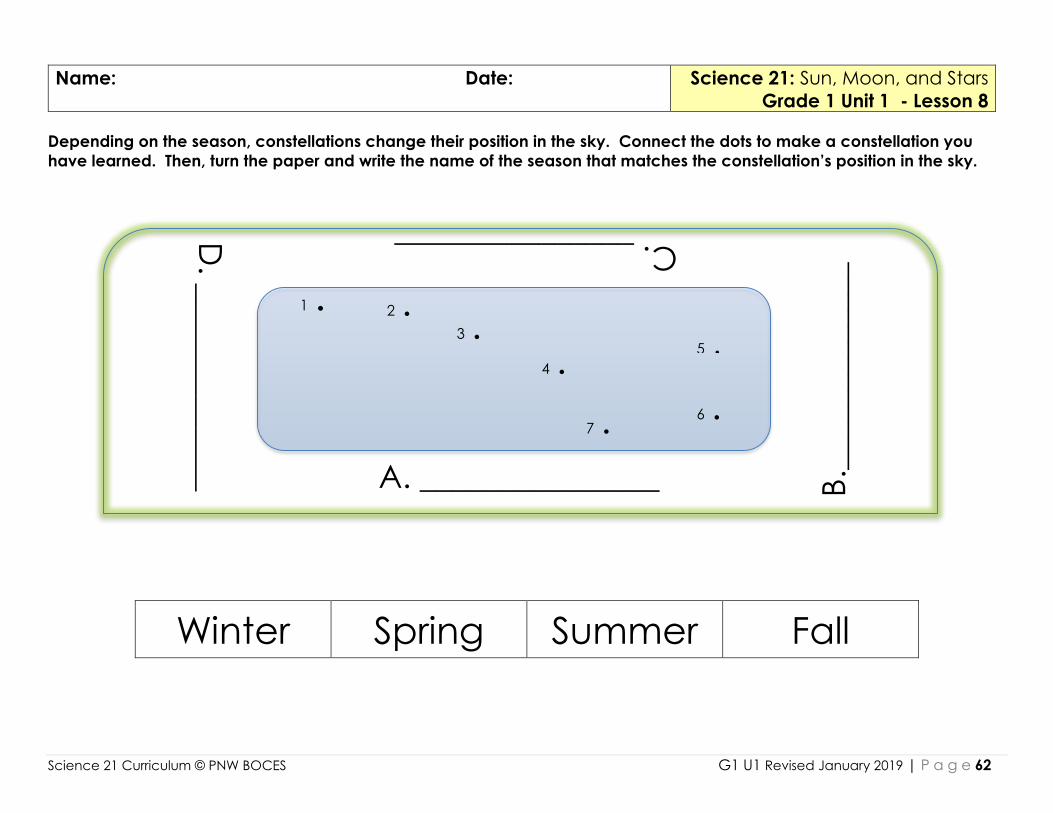
Science 21 Curriculum © PNW BOCES G1 U1 Revised January 2019 | P a g e 62
Name: Date:
Science 21: Sun, Moon, and Stars
Grade 1 Unit 1 - Lesson 8 Depending on the season, constellations change their position in the sky. Connect the dots to make a constellation you
have learned. Then, turn the paper and write the name of the season that matches the constellation’s position in the sky.
Winter Spring Summer Fall
1 . 2 .
3 .
4 .
5 .
6 . 7 .
D. _
____________ B
._____________ C. _______________
A. _______________
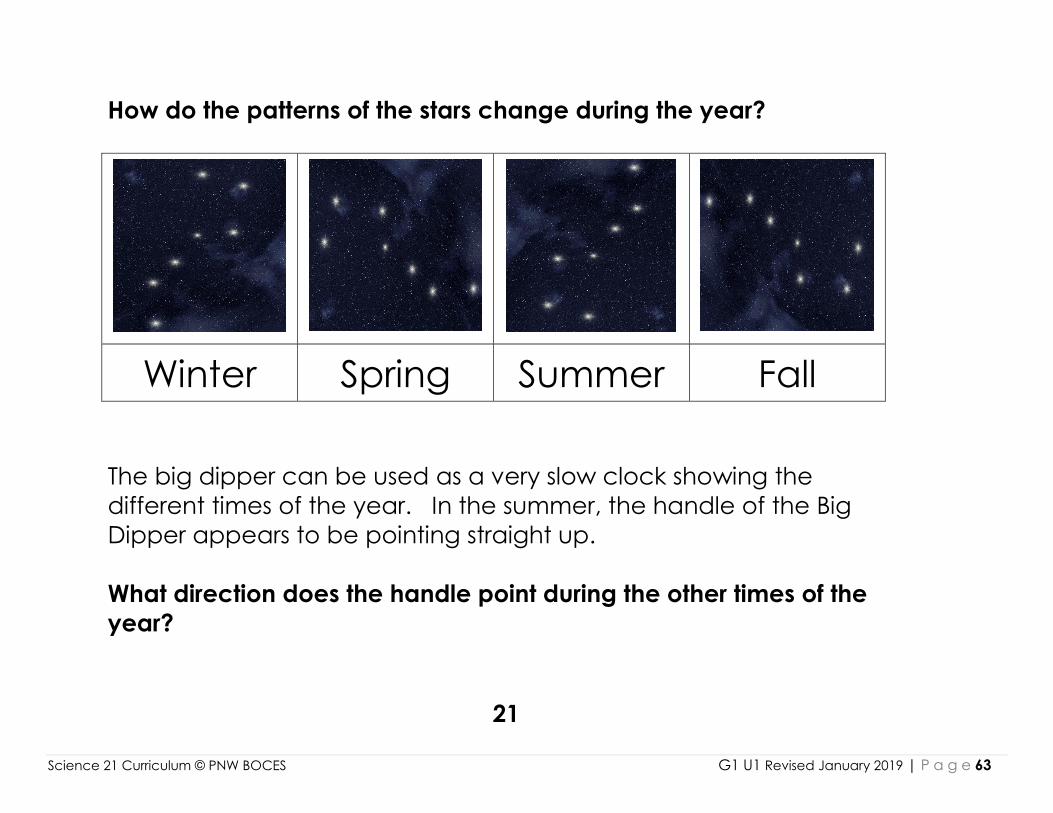
Science 21 Curriculum © PNW BOCES G1 U1 Revised January 2019 | P a g e 63
How do the patterns of the stars change during the year?
Winter Spring Summer Fall
The big dipper can be used as a very slow clock showing the
different times of the year. In the summer, the handle of the Big
Dipper appears to be pointing straight up.
What direction does the handle point during the other times of the
year?
21
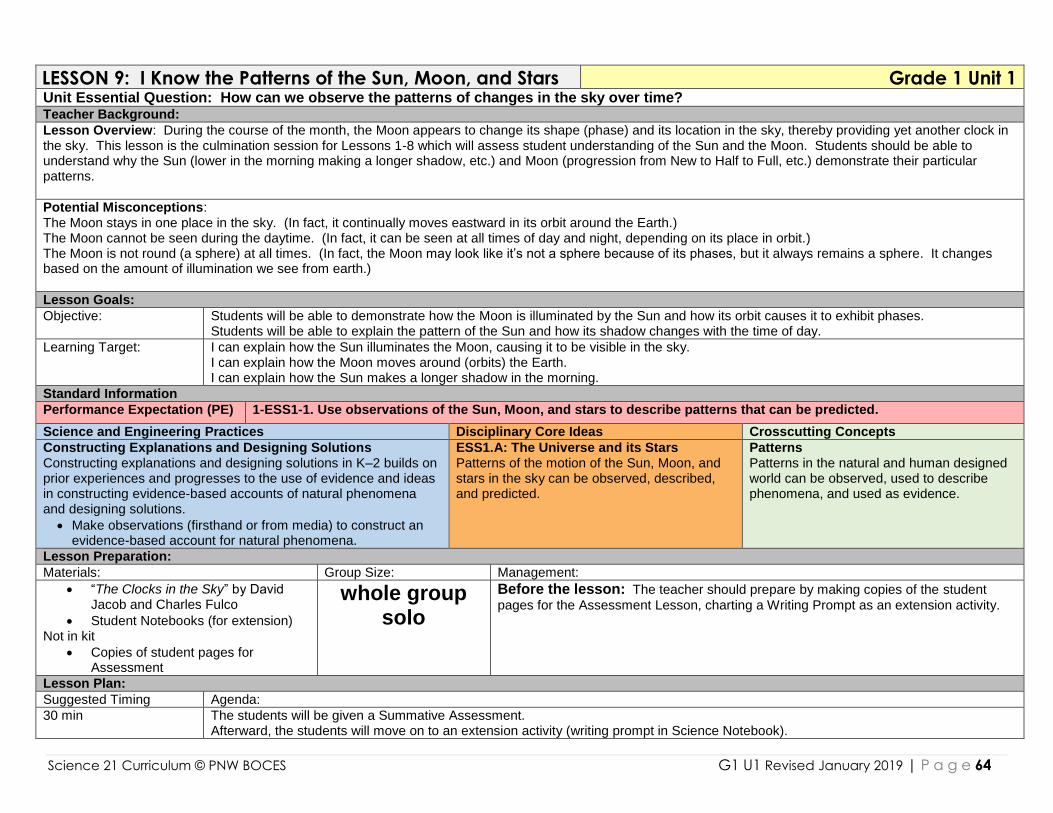
Science 21 Curriculum © PNW BOCES G1 U1 Revised January 2019 | P a g e 64
LESSON 9: I Know the Patterns of the Sun, Moon, and Stars Grade 1 Unit 1 Unit Essential Question: How can we observe the patterns of changes in the sky over time? Teacher Background:
Lesson Overview: During the course of the month, the Moon appears to change its shape (phase) and its location in the sky, thereby providing yet another clock in the sky. This lesson is the culmination session for Lessons 1-8 which will assess student understanding of the Sun and the Moon. Students should be able to understand why the Sun (lower in the morning making a longer shadow, etc.) and Moon (progression from New to Half to Full, etc.) demonstrate their particular patterns.
Potential Misconceptions: The Moon stays in one place in the sky. (In fact, it continually moves eastward in its orbit around the Earth.) The Moon cannot be seen during the daytime. (In fact, it can be seen at all times of day and night, depending on its place in orbit.) The Moon is not round (a sphere) at all times. (In fact, the Moon may look like it’s not a sphere because of its phases, but it always remains a sphere. It changes based on the amount of illumination we see from earth.)
Lesson Goals:
Objective: Students will be able to demonstrate how the Moon is illuminated by the Sun and how its orbit causes it to exhibit phases. Students will be able to explain the pattern of the Sun and how its shadow changes with the time of day.
Learning Target: I can explain how the Sun illuminates the Moon, causing it to be visible in the sky. I can explain how the Moon moves around (orbits) the Earth. I can explain how the Sun makes a longer shadow in the morning.
Standard Information
Performance Expectation (PE) 1-ESS1-1. Use observations of the Sun, Moon, and stars to describe patterns that can be predicted.
Science and Engineering Practices Disciplinary Core Ideas Crosscutting Concepts
Constructing Explanations and Designing Solutions Constructing explanations and designing solutions in K–2 builds on prior experiences and progresses to the use of evidence and ideas in constructing evidence-based accounts of natural phenomena and designing solutions.
Make observations (firsthand or from media) to construct an evidence-based account for natural phenomena.
ESS1.A: The Universe and its Stars Patterns of the motion of the Sun, Moon, and stars in the sky can be observed, described, and predicted.
Patterns Patterns in the natural and human designed world can be observed, used to describe phenomena, and used as evidence.
Lesson Preparation:
Materials: Group Size: Management:
“The Clocks in the Sky” by David Jacob and Charles Fulco
Student Notebooks (for extension) Not in kit
Copies of student pages for Assessment
whole group solo
Before the lesson: The teacher should prepare by making copies of the student
pages for the Assessment Lesson, charting a Writing Prompt as an extension activity.
Lesson Plan:
Suggested Timing Agenda:
30 min The students will be given a Summative Assessment. Afterward, the students will move on to an extension activity (writing prompt in Science Notebook).

Science 21 Curriculum © PNW BOCES G1 U1 Revised January 2019 | P a g e 65
Teaching Procedures: Teaching Notes
Engage
1. Have students gather in the meeting area.
2. Revisit the book “The Clocks in the Sky” and read all three sections of the book. Explain
3. Have student construct and explanation from evidence about what they know about the motion of the Sun, Moon, and stars in the sky can be observed, described, and predicted.
4. Prompt students with the questions: Who can explain what they know about the patterns of the Sun that we studied? Who can explain what they know about the patterns of the Moon that we studied? Who can explain what they know about the patterns of the stars that we studied?
5. Elicit some writing prompt ideas from the students (see suggested Writing Prompts in Teacher Notes) and write them on a chart for student use.
6. For today’s lesson, explain to the students they will now use what they know to answer scientific questions about the Sun, Moon, and stars on the Student Page.
Evaluate
7. Distribute copies of the student pages, and have them complete this task. (At the end of this lesson there is a version in color and black/white. Depending on your school resources, you can choose which page to copy and distribute.) Students may use their notebooks as a reference for this assessment.
8. Optional: at teacher’s discretion, explain to students that after their completion of the Student Page, they will complete a writing activity in their Science Notebooks.
9. Tell the students that they should also illustrate or diagram their thoughts when writing for the writing prompts.
10. Clarify to the students that now construct an explanation independently to show what they know as a Scientist; afterward, they will work in their Science Notebooks independently.
You may choose to wait and give this assessment after you have done Lesson 11 in May. Or consider giving this assessment both times to see if students retain this information. Summative Assessment/Lessons 1-8: The Sun creates a shorter shadow when… I know this because… My shadow looks like… because… During recess, I saw the shadow of a/an… The Moon has a dark area on half of it when…
Science Notebook: Keeping dated records of thoughts, observations and sketches is a practice employed by scientists.
Make sure students DATE each page of their notebook. Students will write and illustrate based on the Writing Prompt they have chosen.
Assessment:
Summative Assessment: Lesson 9 student Assessment Page and Science Notebook entry.
Literacy Connections:
Vocabulary ELA Prompt
New or Recently Introduced Familiar Terms height (altitude)
pattern noon
Sun shadow shape location
Differentiation: Below are some suggestions for modifying lessons for individuals or groups of students.
Students that need more challenge: Have students come up with different Writing Prompts and illustrate their thinking. Students can draw and label their thinking.
Students that need more support:
Think Outside the Box: This section is designed to offer an extension or alternative lessons that may require materials that cannot be added to the Science 21 kits.
Reproducible Student Materials:
List Student Journal Pages and Copied Manipulatives
Science 21 Curriculum © PNW BOCES G1 U1 Revised January 2019 | P a g e 66
Student Assessment.
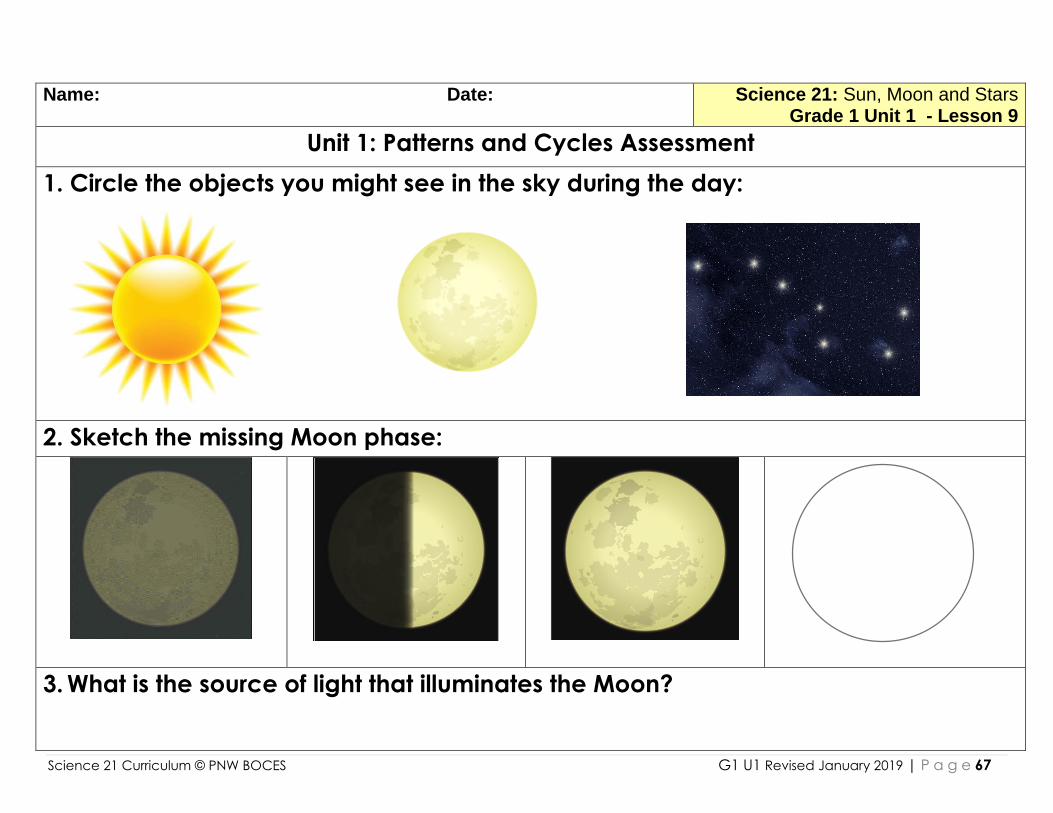
Science 21 Curriculum © PNW BOCES G1 U1 Revised January 2019 | P a g e 67
Name: Date:
Science 21: Sun, Moon and Stars Grade 1 Unit 1 - Lesson 9
Unit 1: Patterns and Cycles Assessment
1. Circle the objects you might see in the sky during the day:
2. Sketch the missing Moon phase:
3. What is the source of light that illuminates the Moon?
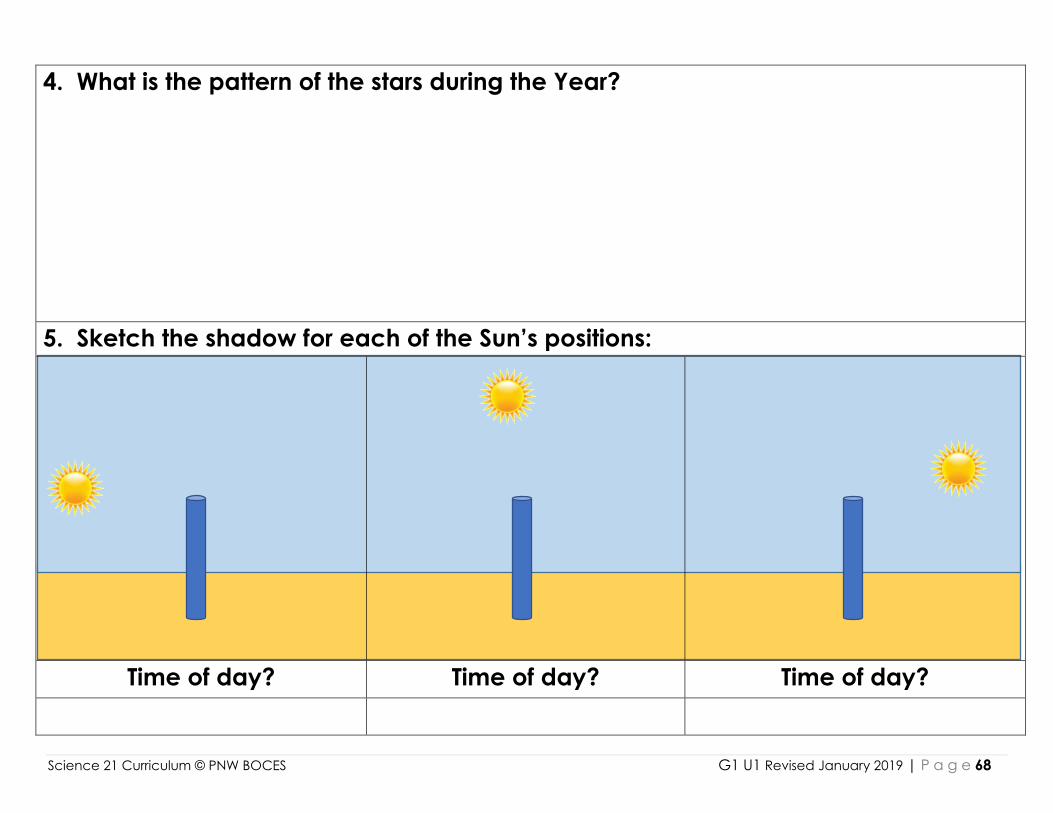
Science 21 Curriculum © PNW BOCES G1 U1 Revised January 2019 | P a g e 68
4. What is the pattern of the stars during the Year?
5. Sketch the shadow for each of the Sun’s positions:
Time of day? Time of day? Time of day?

Science 21 Curriculum © PNW BOCES G1 U1 Revised January 2019 | P a g e 69
6. What is the pattern of the Sun during the day?
7. What is the pattern of the Sun during the year?

Science 21 Curriculum © PNW BOCES G1 U1 Revised January 2019 | P a g e 70

Science 21 Curriculum © PNW BOCES G1 U1 Revised January 2019 | P a g e 71
Name: Date:
Science 21: Sun, Moon, and Stars Grade 1 Unit 1 - Lesson 9
Unit 1: Patterns and Cycles Assessment
1. Circle the objects you might see in the sky during the day:
2. Sketch the missing Moon phases:
3. What is the source of light that illuminates the Moon?
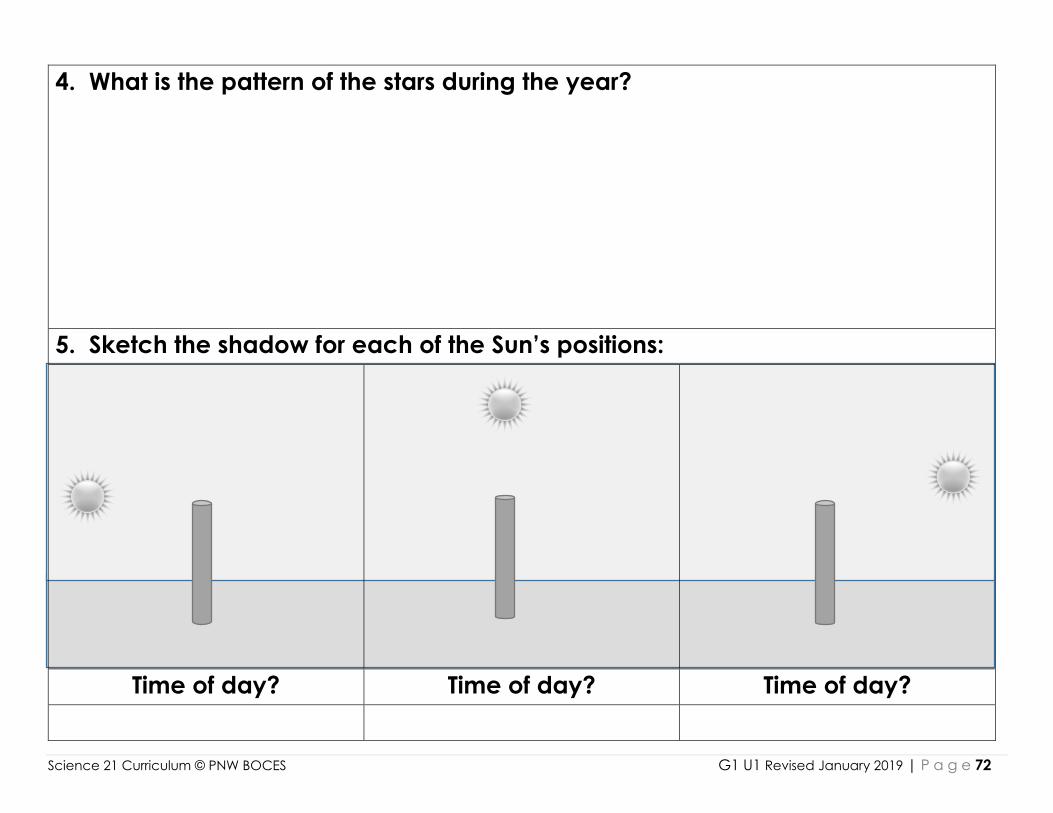
Science 21 Curriculum © PNW BOCES G1 U1 Revised January 2019 | P a g e 72
4. What is the pattern of the stars during the year?
5. Sketch the shadow for each of the Sun’s positions:
Time of day? Time of day? Time of day?
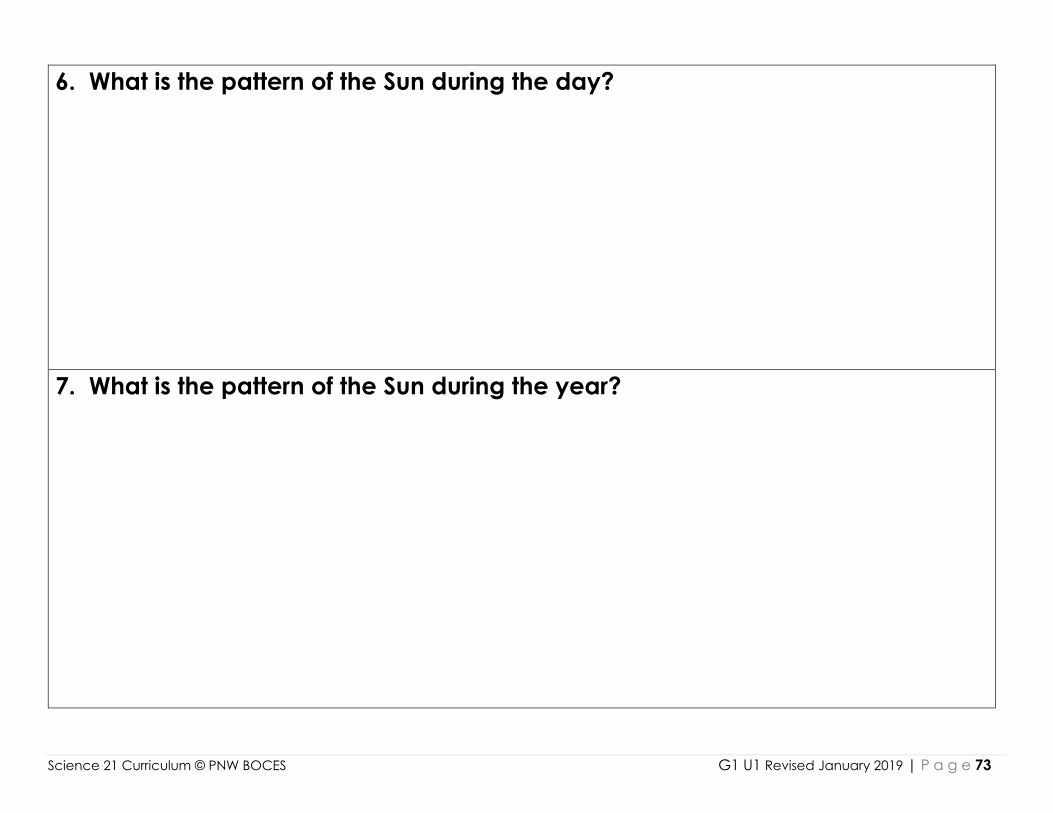
Science 21 Curriculum © PNW BOCES G1 U1 Revised January 2019 | P a g e 73
6. What is the pattern of the Sun during the day?
7. What is the pattern of the Sun during the year?
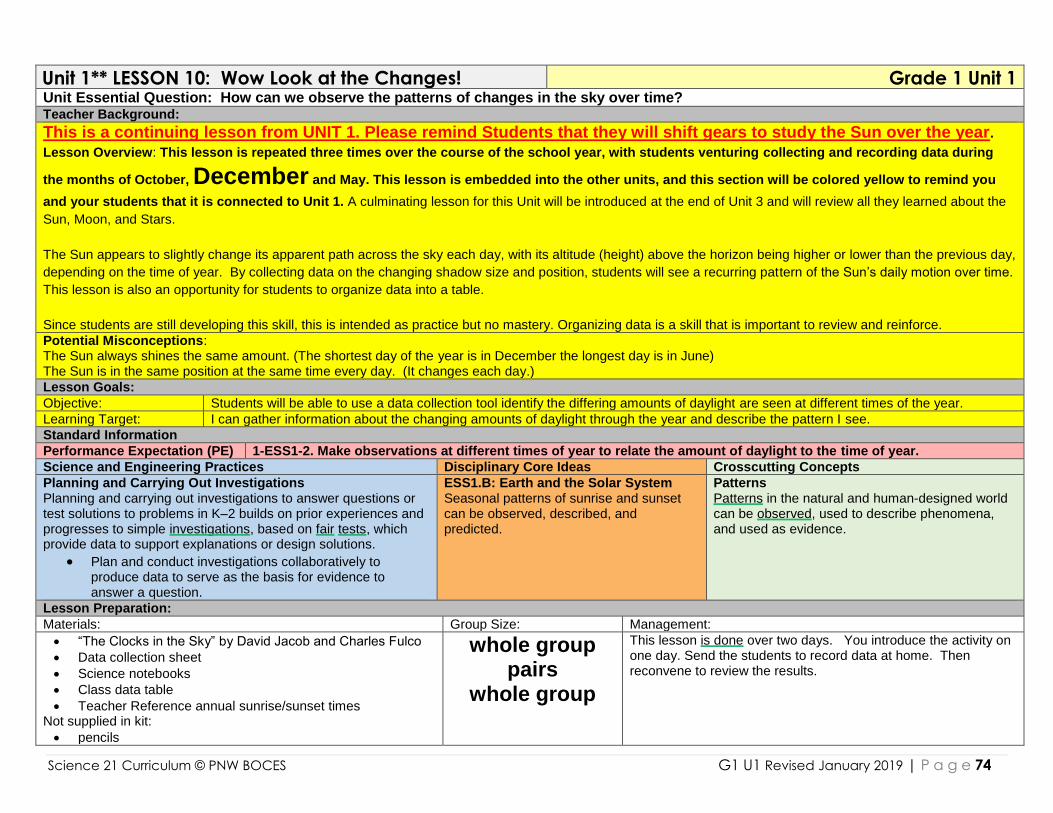
Science 21 Curriculum © PNW BOCES G1 U1 Revised January 2019 | P a g e 74
Unit 1** LESSON 10: Wow Look at the Changes! Grade 1 Unit 1 Unit Essential Question: How can we observe the patterns of changes in the sky over time? Teacher Background:
This is a continuing lesson from UNIT 1. Please remind Students that they will shift gears to study the Sun over the year.
Lesson Overview: This lesson is repeated three times over the course of the school year, with students venturing collecting and recording data during
the months of October, December and May. This lesson is embedded into the other units, and this section will be colored yellow to remind you
and your students that it is connected to Unit 1. A culminating lesson for this Unit will be introduced at the end of Unit 3 and will review all they learned about the
Sun, Moon, and Stars.
The Sun appears to slightly change its apparent path across the sky each day, with its altitude (height) above the horizon being higher or lower than the previous day,
depending on the time of year. By collecting data on the changing shadow size and position, students will see a recurring pattern of the Sun’s daily motion over time.
This lesson is also an opportunity for students to organize data into a table.
Since students are still developing this skill, this is intended as practice but no mastery. Organizing data is a skill that is important to review and reinforce.
Potential Misconceptions: The Sun always shines the same amount. (The shortest day of the year is in December the longest day is in June) The Sun is in the same position at the same time every day. (It changes each day.)
Lesson Goals:
Objective: Students will be able to use a data collection tool identify the differing amounts of daylight are seen at different times of the year.
Learning Target: I can gather information about the changing amounts of daylight through the year and describe the pattern I see.
Standard Information
Performance Expectation (PE) 1-ESS1-2. Make observations at different times of year to relate the amount of daylight to the time of year.
Science and Engineering Practices Disciplinary Core Ideas Crosscutting Concepts
Planning and Carrying Out Investigations Planning and carrying out investigations to answer questions or test solutions to problems in K–2 builds on prior experiences and progresses to simple investigations, based on fair tests, which provide data to support explanations or design solutions.
Plan and conduct investigations collaboratively to produce data to serve as the basis for evidence to answer a question.
ESS1.B: Earth and the Solar System Seasonal patterns of sunrise and sunset can be observed, described, and predicted.
Patterns Patterns in the natural and human-designed world can be observed, used to describe phenomena, and used as evidence.
Lesson Preparation:
Materials: Group Size: Management:
“The Clocks in the Sky” by David Jacob and Charles Fulco
Data collection sheet
Science notebooks
Class data table
Teacher Reference annual sunrise/sunset times Not supplied in kit:
pencils
whole group pairs
whole group
This lesson is done over two days. You introduce the activity on one day. Send the students to record data at home. Then reconvene to review the results.
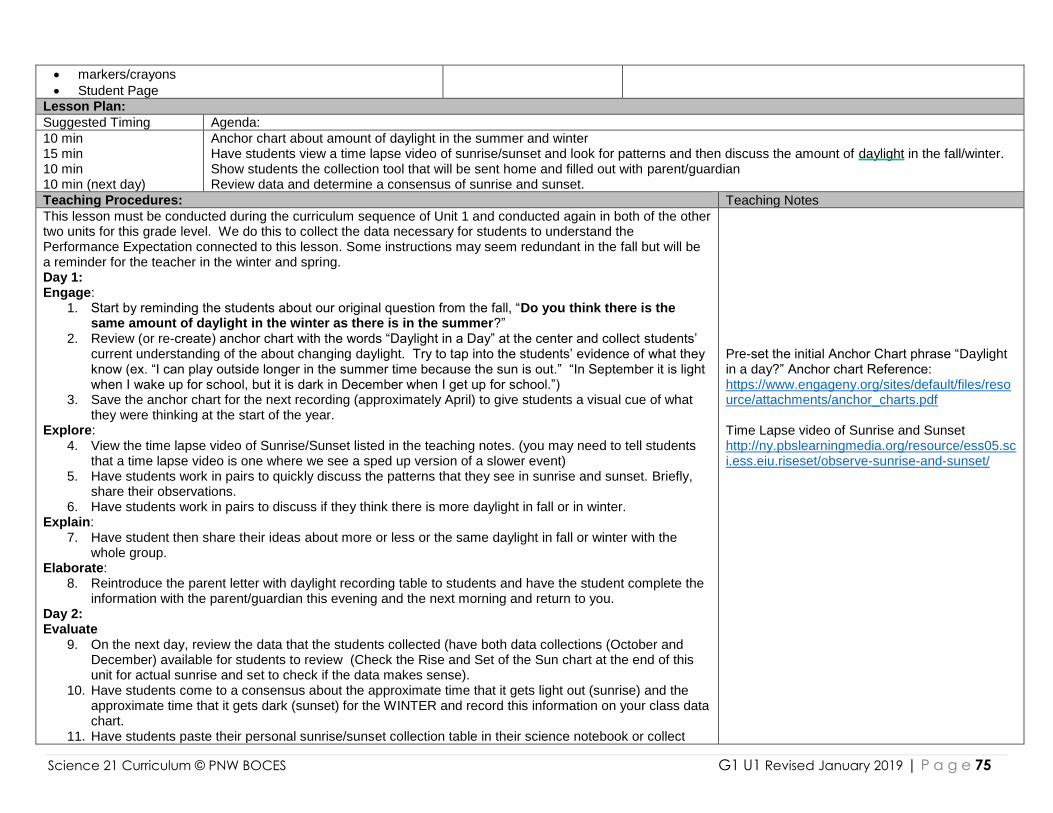
Science 21 Curriculum © PNW BOCES G1 U1 Revised January 2019 | P a g e 75
markers/crayons
Student Page
Lesson Plan:
Suggested Timing Agenda:
10 min 15 min 10 min 10 min (next day)
Anchor chart about amount of daylight in the summer and winter Have students view a time lapse video of sunrise/sunset and look for patterns and then discuss the amount of daylight in the fall/winter. Show students the collection tool that will be sent home and filled out with parent/guardian Review data and determine a consensus of sunrise and sunset.
Teaching Procedures: Teaching Notes
This lesson must be conducted during the curriculum sequence of Unit 1 and conducted again in both of the other two units for this grade level. We do this to collect the data necessary for students to understand the Performance Expectation connected to this lesson. Some instructions may seem redundant in the fall but will be a reminder for the teacher in the winter and spring. Day 1: Engage:
1. Start by reminding the students about our original question from the fall, “Do you think there is the same amount of daylight in the winter as there is in the summer?”
2. Review (or re-create) anchor chart with the words “Daylight in a Day” at the center and collect students’ current understanding of the about changing daylight. Try to tap into the students’ evidence of what they know (ex. “I can play outside longer in the summer time because the sun is out.” “In September it is light when I wake up for school, but it is dark in December when I get up for school.”)
3. Save the anchor chart for the next recording (approximately April) to give students a visual cue of what they were thinking at the start of the year.
Explore: 4. View the time lapse video of Sunrise/Sunset listed in the teaching notes. (you may need to tell students
that a time lapse video is one where we see a sped up version of a slower event) 5. Have students work in pairs to quickly discuss the patterns that they see in sunrise and sunset. Briefly,
share their observations. 6. Have students work in pairs to discuss if they think there is more daylight in fall or in winter.
Explain: 7. Have student then share their ideas about more or less or the same daylight in fall or winter with the
whole group. Elaborate:
8. Reintroduce the parent letter with daylight recording table to students and have the student complete the information with the parent/guardian this evening and the next morning and return to you.
Day 2: Evaluate
9. On the next day, review the data that the students collected (have both data collections (October and December) available for students to review (Check the Rise and Set of the Sun chart at the end of this unit for actual sunrise and set to check if the data makes sense).
10. Have students come to a consensus about the approximate time that it gets light out (sunrise) and the approximate time that it gets dark (sunset) for the WINTER and record this information on your class data chart.
11. Have students paste their personal sunrise/sunset collection table in their science notebook or collect
Pre-set the initial Anchor Chart phrase “Daylight in a day?” Anchor chart Reference: https://www.engageny.org/sites/default/files/reso urce/attachments/anchor_charts.pdf Time Lapse video of Sunrise and Sunset http://ny.pbslearningmedia.org/resource/ess05.sci.ess.eiu.riseset/observe-sunrise-and-sunset/
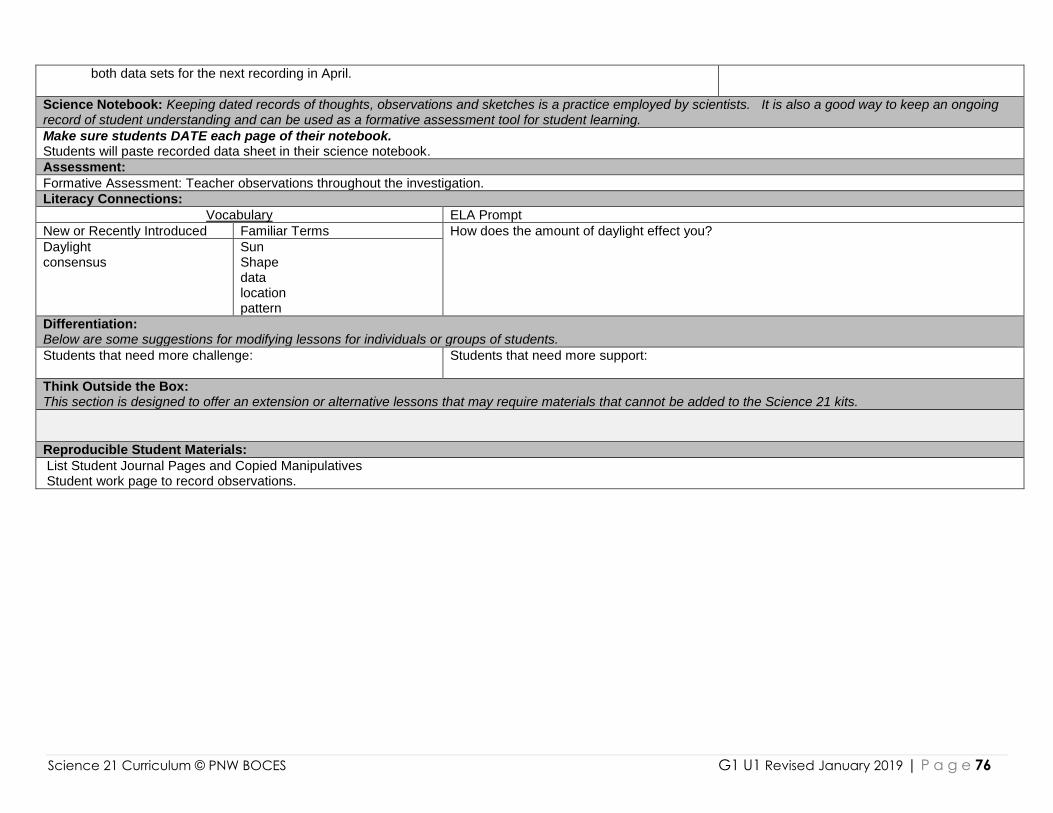
Science 21 Curriculum © PNW BOCES G1 U1 Revised January 2019 | P a g e 76
both data sets for the next recording in April.
Science Notebook: Keeping dated records of thoughts, observations and sketches is a practice employed by scientists. It is also a good way to keep an ongoing record of student understanding and can be used as a formative assessment tool for student learning.
Make sure students DATE each page of their notebook. Students will paste recorded data sheet in their science notebook.
Assessment:
Formative Assessment: Teacher observations throughout the investigation.
Literacy Connections:
Vocabulary ELA Prompt
New or Recently Introduced Familiar Terms How does the amount of daylight effect you?
Daylight consensus
Sun Shape data location pattern
Differentiation: Below are some suggestions for modifying lessons for individuals or groups of students.
Students that need more challenge:
Students that need more support:
Think Outside the Box: This section is designed to offer an extension or alternative lessons that may require materials that cannot be added to the Science 21 kits.
Reproducible Student Materials:
List Student Journal Pages and Copied Manipulatives Student work page to record observations.

Science 21 Curriculum © PNW BOCES G1 U1 Revised January 2019 | P a g e 77
This is a class data chart you may use to collect all the student/parent observation. You may want to use tally marks to collect the student data totals.
Daylight Recording Sheet
What do you think?
Time Frame Tally Do you think today has
MORE or LESS daylight than a few months ago?
5 am
:00
LONGER Day (more daylight) :15
:30
:45
6 am
:00
SHORTER Day (less daylight) :15
:30
:45
7 am
:00
Why do you think that? :15
:30
:45
8 am
:00 :15
:30
:45
3 pm
:00
:15
:30
:45
4 pm
:00
:15
:30
:45
5 pm
:00
:15
:30
:45
6 pm
:00
:15
:30
:45
7 pm
:00
:15
:30
:45

Science 21 Curriculum © PNW BOCES G1 U1 Revised January 2019 | P a g e 78
Class Data Chart
Hours of Daylight
Class consensus:
TIME OF DAY THAT IT
GETS LIGHT
Class consensus:
TIME OF DAY THAT IT
GETS DARK
Approximate
HOURS OF DAYLIGHT
1st Recording
Fall
2nd Recording
Winter
3rd Recording
Spring
Science 21 Curriculum © PNW BOCES G1 U1 Revised January 2019 | P a g e 79
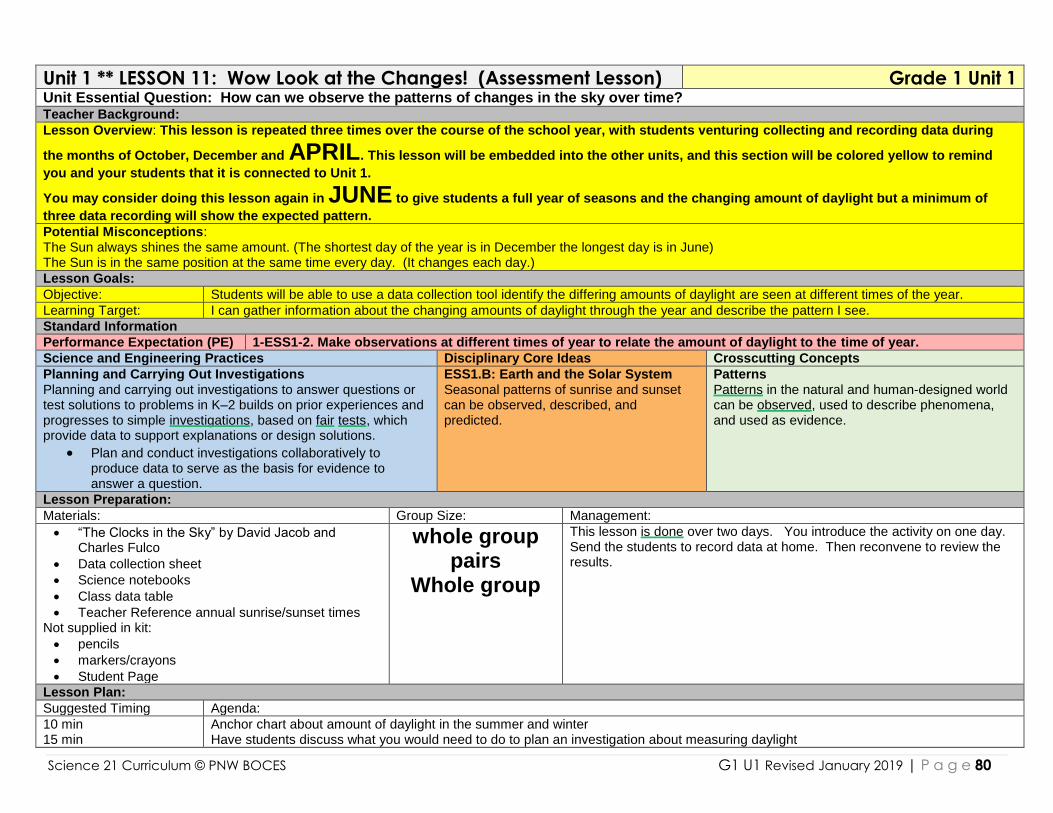
Science 21 Curriculum © PNW BOCES G1 U1 Revised January 2019 | P a g e 80
Unit 1 ** LESSON 11: Wow Look at the Changes! (Assessment Lesson) Grade 1 Unit 1 Unit Essential Question: How can we observe the patterns of changes in the sky over time? Teacher Background:
Lesson Overview: This lesson is repeated three times over the course of the school year, with students venturing collecting and recording data during
the months of October, December and APRIL. This lesson will be embedded into the other units, and this section will be colored yellow to remind
you and your students that it is connected to Unit 1.
You may consider doing this lesson again in JUNE to give students a full year of seasons and the changing amount of daylight but a minimum of
three data recording will show the expected pattern.
Potential Misconceptions: The Sun always shines the same amount. (The shortest day of the year is in December the longest day is in June) The Sun is in the same position at the same time every day. (It changes each day.)
Lesson Goals:
Objective: Students will be able to use a data collection tool identify the differing amounts of daylight are seen at different times of the year.
Learning Target: I can gather information about the changing amounts of daylight through the year and describe the pattern I see.
Standard Information
Performance Expectation (PE) 1-ESS1-2. Make observations at different times of year to relate the amount of daylight to the time of year.
Science and Engineering Practices Disciplinary Core Ideas Crosscutting Concepts
Planning and Carrying Out Investigations Planning and carrying out investigations to answer questions or test solutions to problems in K–2 builds on prior experiences and progresses to simple investigations, based on fair tests, which provide data to support explanations or design solutions.
Plan and conduct investigations collaboratively to produce data to serve as the basis for evidence to answer a question.
ESS1.B: Earth and the Solar System Seasonal patterns of sunrise and sunset can be observed, described, and predicted.
Patterns Patterns in the natural and human-designed world can be observed, used to describe phenomena, and used as evidence.
Lesson Preparation:
Materials: Group Size: Management:
“The Clocks in the Sky” by David Jacob and Charles Fulco
Data collection sheet
Science notebooks
Class data table
Teacher Reference annual sunrise/sunset times Not supplied in kit:
pencils
markers/crayons
Student Page
whole group pairs
Whole group
This lesson is done over two days. You introduce the activity on one day. Send the students to record data at home. Then reconvene to review the results.
Lesson Plan:
Suggested Timing Agenda:
10 min 15 min
Anchor chart about amount of daylight in the summer and winter Have students discuss what you would need to do to plan an investigation about measuring daylight
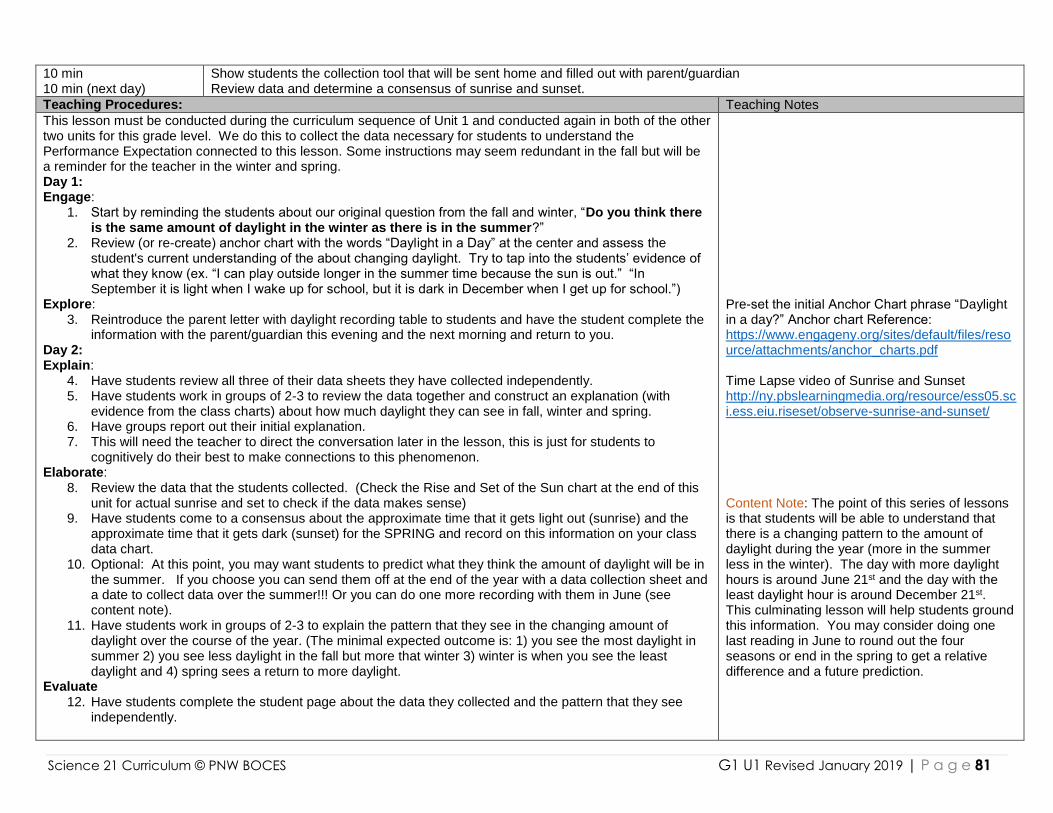
Science 21 Curriculum © PNW BOCES G1 U1 Revised January 2019 | P a g e 81
10 min 10 min (next day)
Show students the collection tool that will be sent home and filled out with parent/guardian Review data and determine a consensus of sunrise and sunset.
Teaching Procedures: Teaching Notes
This lesson must be conducted during the curriculum sequence of Unit 1 and conducted again in both of the other two units for this grade level. We do this to collect the data necessary for students to understand the Performance Expectation connected to this lesson. Some instructions may seem redundant in the fall but will be a reminder for the teacher in the winter and spring. Day 1: Engage:
1. Start by reminding the students about our original question from the fall and winter, “Do you think there is the same amount of daylight in the winter as there is in the summer?”
2. Review (or re-create) anchor chart with the words “Daylight in a Day” at the center and assess the student's current understanding of the about changing daylight. Try to tap into the students’ evidence of what they know (ex. “I can play outside longer in the summer time because the sun is out.” “In September it is light when I wake up for school, but it is dark in December when I get up for school.”)
Explore: 3. Reintroduce the parent letter with daylight recording table to students and have the student complete the
information with the parent/guardian this evening and the next morning and return to you. Day 2: Explain:
4. Have students review all three of their data sheets they have collected independently. 5. Have students work in groups of 2-3 to review the data together and construct an explanation (with
evidence from the class charts) about how much daylight they can see in fall, winter and spring. 6. Have groups report out their initial explanation. 7. This will need the teacher to direct the conversation later in the lesson, this is just for students to
cognitively do their best to make connections to this phenomenon. Elaborate:
8. Review the data that the students collected. (Check the Rise and Set of the Sun chart at the end of this unit for actual sunrise and set to check if the data makes sense)
9. Have students come to a consensus about the approximate time that it gets light out (sunrise) and the approximate time that it gets dark (sunset) for the SPRING and record on this information on your class data chart.
10. Optional: At this point, you may want students to predict what they think the amount of daylight will be in the summer. If you choose you can send them off at the end of the year with a data collection sheet and a date to collect data over the summer!!! Or you can do one more recording with them in June (see content note).
11. Have students work in groups of 2-3 to explain the pattern that they see in the changing amount of daylight over the course of the year. (The minimal expected outcome is: 1) you see the most daylight in summer 2) you see less daylight in the fall but more that winter 3) winter is when you see the least daylight and 4) spring sees a return to more daylight.
Evaluate 12. Have students complete the student page about the data they collected and the pattern that they see
independently.
Pre-set the initial Anchor Chart phrase “Daylight in a day?” Anchor chart Reference: https://www.engageny.org/sites/default/files/reso urce/attachments/anchor_charts.pdf Time Lapse video of Sunrise and Sunset http://ny.pbslearningmedia.org/resource/ess05.sci.ess.eiu.riseset/observe-sunrise-and-sunset/ Content Note: The point of this series of lessons is that students will be able to understand that there is a changing pattern to the amount of daylight during the year (more in the summer less in the winter). The day with more daylight hours is around June 21st and the day with the least daylight hour is around December 21st. This culminating lesson will help students ground this information. You may consider doing one last reading in June to round out the four seasons or end in the spring to get a relative difference and a future prediction.
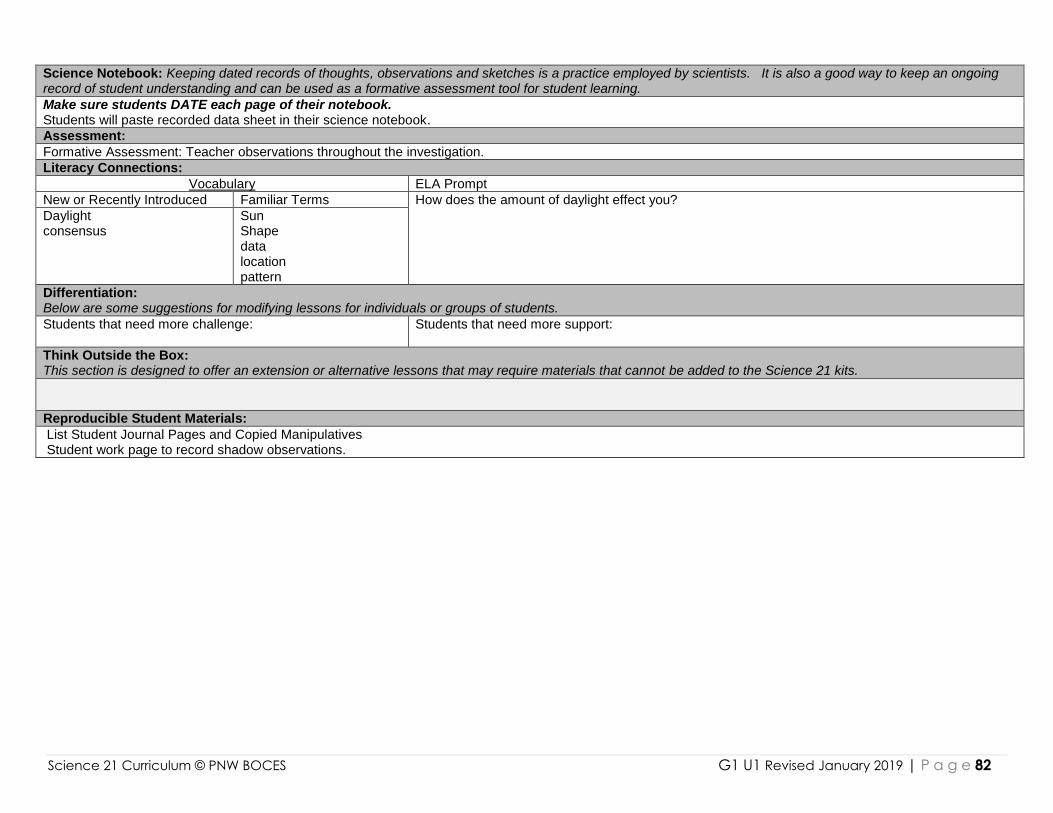
Science 21 Curriculum © PNW BOCES G1 U1 Revised January 2019 | P a g e 82
Science Notebook: Keeping dated records of thoughts, observations and sketches is a practice employed by scientists. It is also a good way to keep an ongoing record of student understanding and can be used as a formative assessment tool for student learning.
Make sure students DATE each page of their notebook. Students will paste recorded data sheet in their science notebook.
Assessment:
Formative Assessment: Teacher observations throughout the investigation.
Literacy Connections:
Vocabulary ELA Prompt
New or Recently Introduced Familiar Terms How does the amount of daylight effect you?
Daylight consensus
Sun Shape data location pattern
Differentiation: Below are some suggestions for modifying lessons for individuals or groups of students.
Students that need more challenge:
Students that need more support:
Think Outside the Box: This section is designed to offer an extension or alternative lessons that may require materials that cannot be added to the Science 21 kits.
Reproducible Student Materials:
List Student Journal Pages and Copied Manipulatives Student work page to record shadow observations.
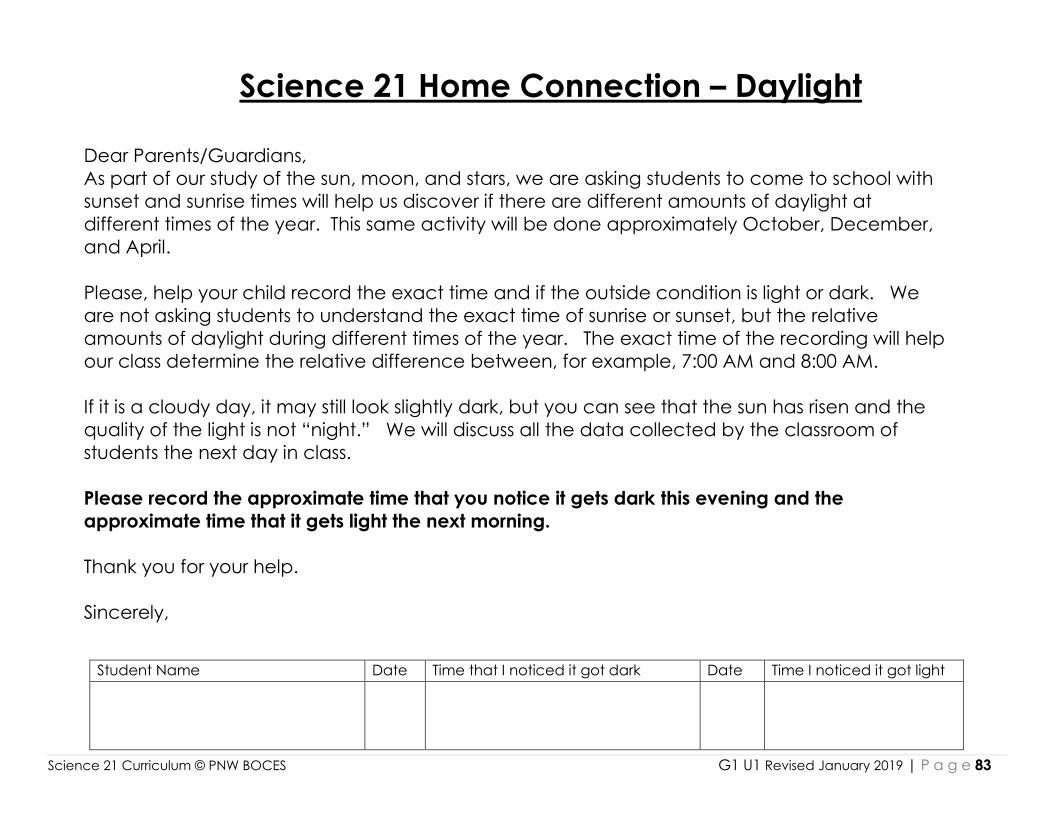
Science 21 Curriculum © PNW BOCES G1 U1 Revised January 2019 | P a g e 83
Science 21 Home Connection – Daylight
Dear Parents/Guardians,
As part of our study of the sun, moon, and stars, we are asking students to come to school with
sunset and sunrise times will help us discover if there are different amounts of daylight at
different times of the year. This same activity will be done approximately October, December,
and April.
Please, help your child record the exact time and if the outside condition is light or dark. We
are not asking students to understand the exact time of sunrise or sunset, but the relative
amounts of daylight during different times of the year. The exact time of the recording will help
our class determine the relative difference between, for example, 7:00 AM and 8:00 AM.
If it is a cloudy day, it may still look slightly dark, but you can see that the sun has risen and the
quality of the light is not “night.” We will discuss all the data collected by the classroom of
students the next day in class.
Please record the approximate time that you notice it gets dark this evening and the
approximate time that it gets light the next morning.
Thank you for your help.
Sincerely,
Student Name Date Time that I noticed it got dark Date Time I noticed it got light

Science 21 Curriculum © PNW BOCES G1 U1 Revised January 2019 | P a g e 84
This is a class data chart you may use to collect all the student/parent observation. You may want to use tally marks to collect the student data totals.
Daylight Recording Sheet
What do you think?
Time Frame Tally Do you think today has
MORE or LESS daylight than a few months ago?
5 am
:00
LONGER Day (more daylight) :15
:30
:45
6 am
:00
SHORTER Day (less daylight) :15
:30
:45
7 am
:00
Why do you think that? :15
:30
:45
8 am
:00 :15
:30
:45
3 pm
:00
:15
:30
:45
4 pm
:00
:15
:30
:45
5 pm
:00
:15
:30
:45
6 pm
:00
:15
:30
:45
7 pm
:00
:15
:30
:45
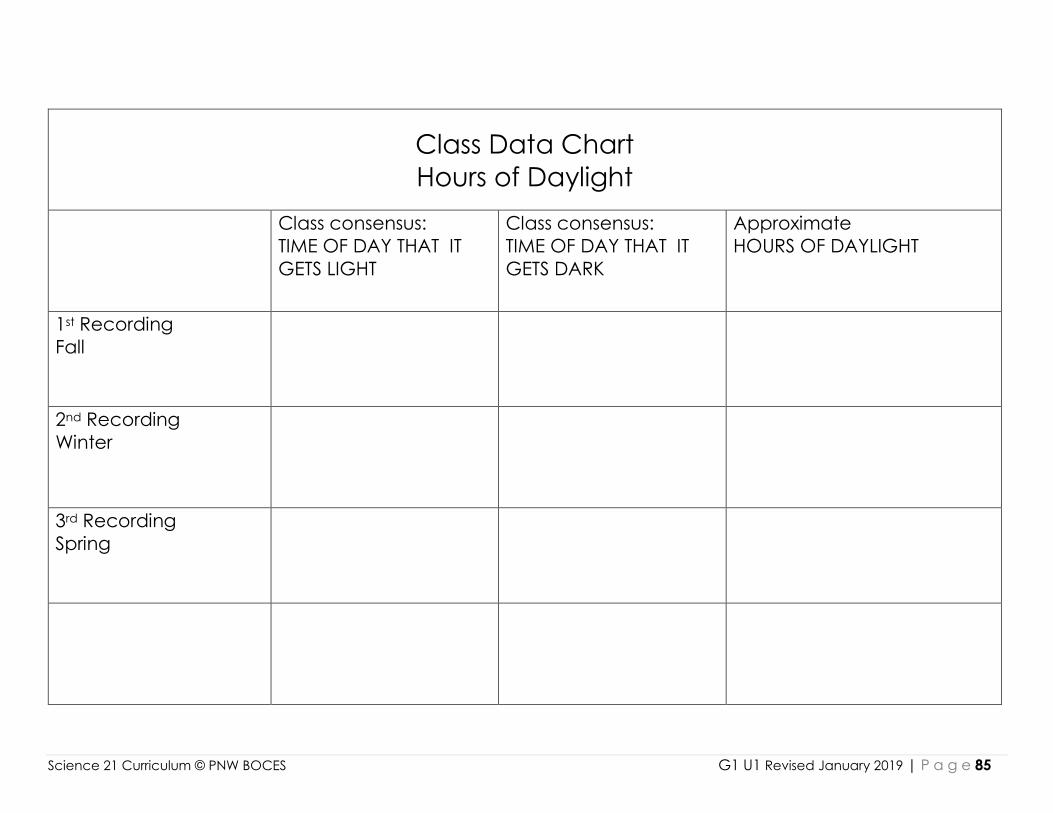
Science 21 Curriculum © PNW BOCES G1 U1 Revised January 2019 | P a g e 85
Class Data Chart
Hours of Daylight
Class consensus:
TIME OF DAY THAT IT
GETS LIGHT
Class consensus:
TIME OF DAY THAT IT
GETS DARK
Approximate
HOURS OF DAYLIGHT
1st Recording
Fall
2nd Recording
Winter
3rd Recording
Spring
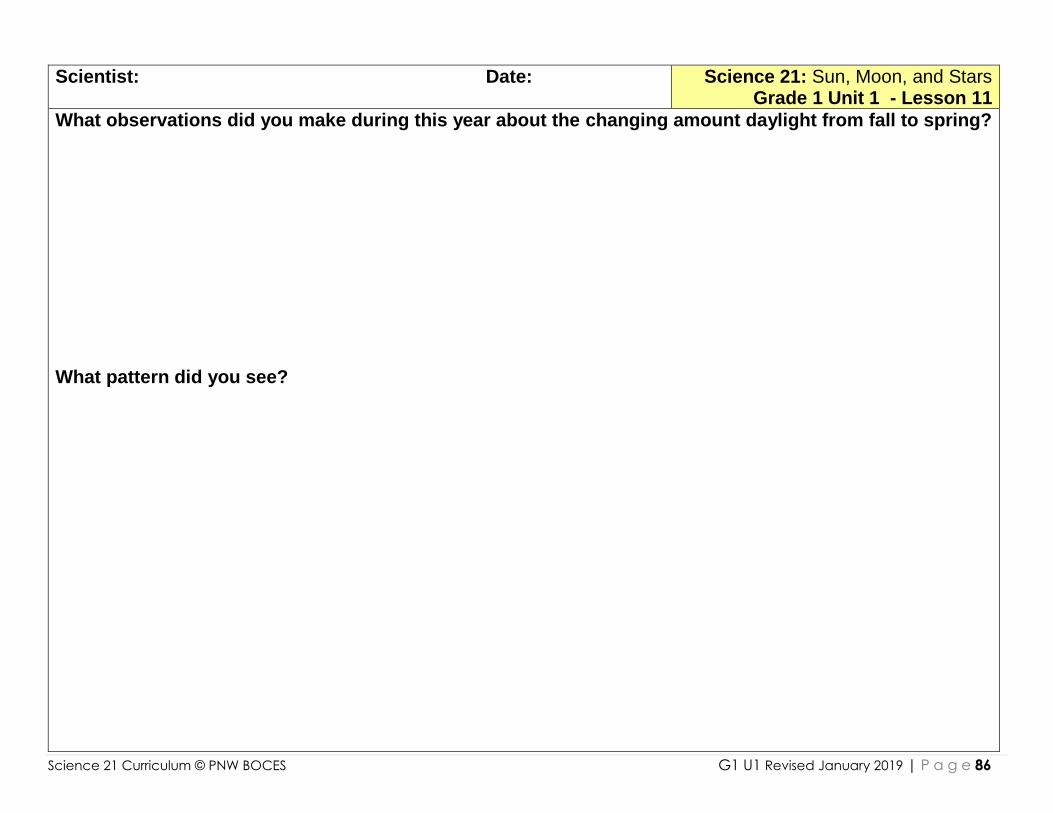
Science 21 Curriculum © PNW BOCES G1 U1 Revised January 2019 | P a g e 86
Scientist: Date:
Science 21: Sun, Moon, and Stars Grade 1 Unit 1 - Lesson 11
What observations did you make during this year about the changing amount daylight from fall to spring? What pattern did you see?
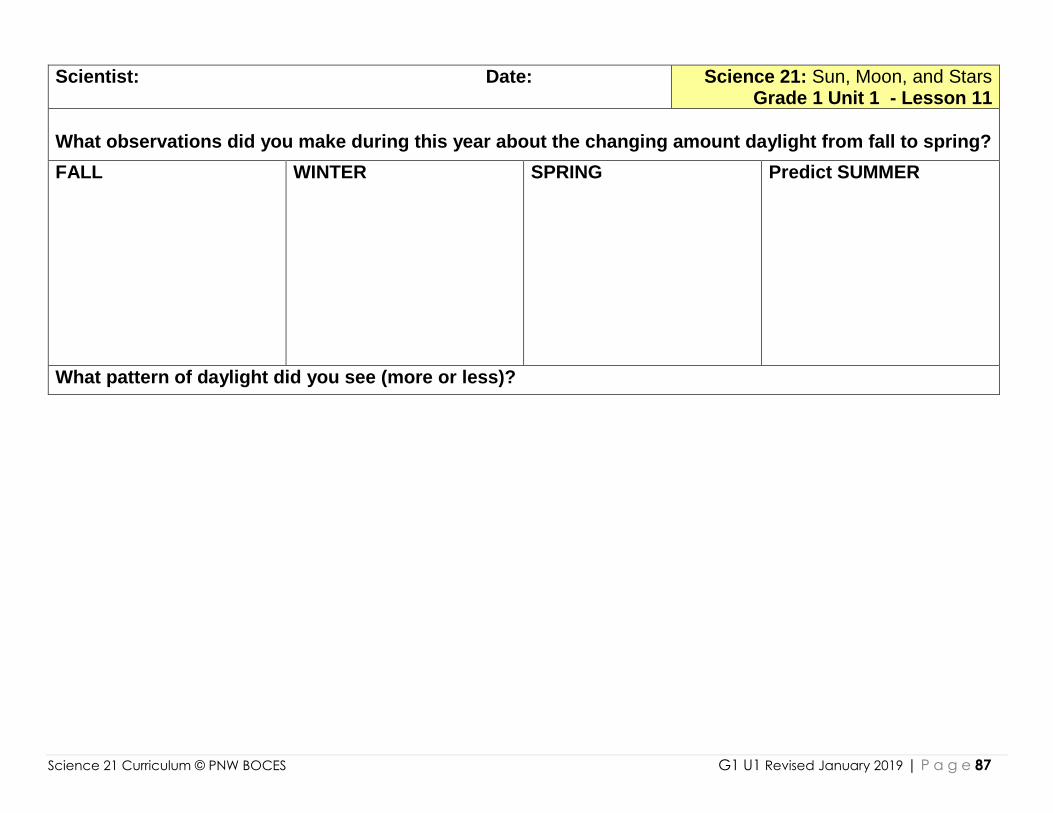
Science 21 Curriculum © PNW BOCES G1 U1 Revised January 2019 | P a g e 87
Scientist: Date:
Science 21: Sun, Moon, and Stars Grade 1 Unit 1 - Lesson 11
What observations did you make during this year about the changing amount daylight from fall to spring?
FALL WINTER SPRING Predict SUMMER
What pattern of daylight did you see (more or less)?
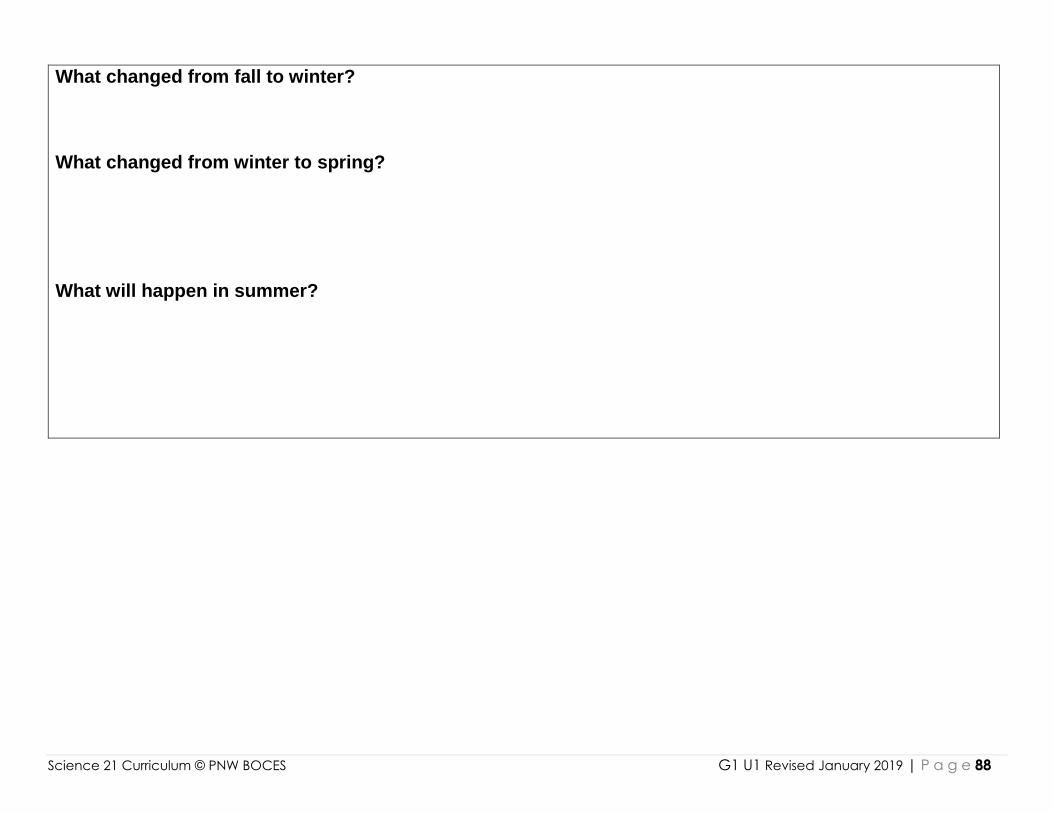
Science 21 Curriculum © PNW BOCES G1 U1 Revised January 2019 | P a g e 88
What changed from fall to winter? What changed from winter to spring? What will happen in summer?
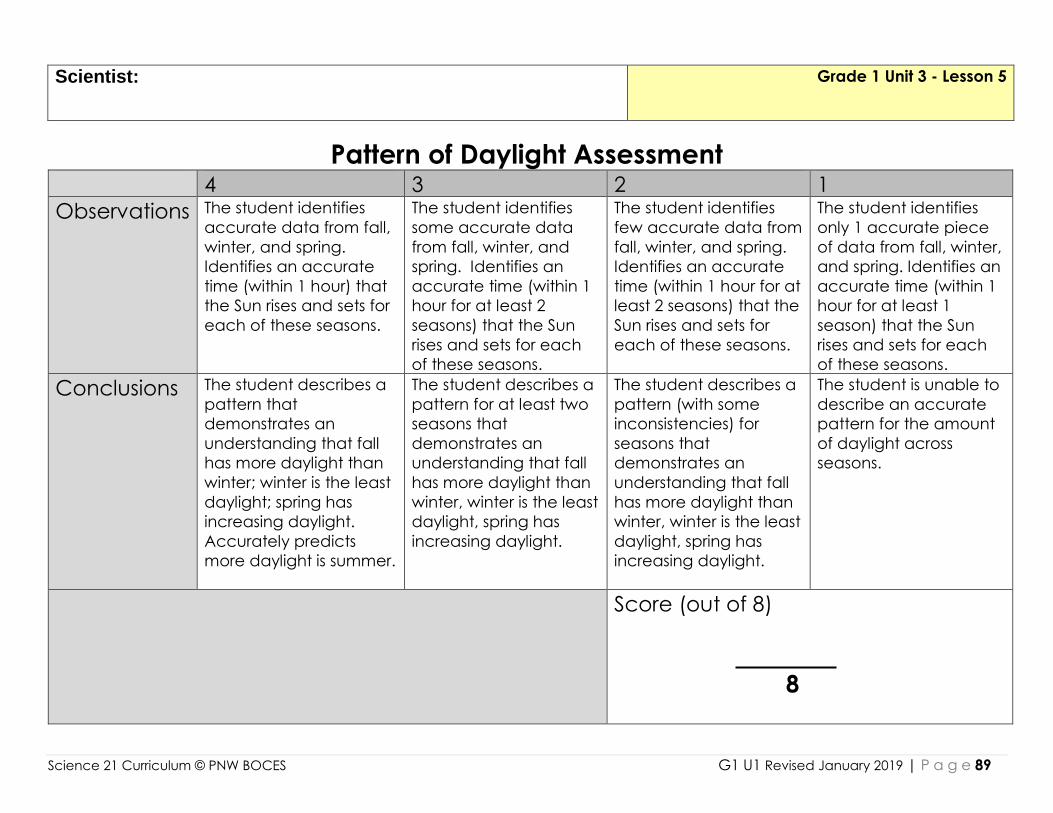
Science 21 Curriculum © PNW BOCES G1 U1 Revised January 2019 | P a g e 89
Scientist:
Grade 1 Unit 3 - Lesson 5
Pattern of Daylight Assessment 4 3 2 1
Observations The student identifies
accurate data from fall,
winter, and spring.
Identifies an accurate
time (within 1 hour) that
the Sun rises and sets for
each of these seasons.
The student identifies
some accurate data
from fall, winter, and
spring. Identifies an
accurate time (within 1
hour for at least 2
seasons) that the Sun
rises and sets for each
of these seasons.
The student identifies
few accurate data from
fall, winter, and spring.
Identifies an accurate
time (within 1 hour for at
least 2 seasons) that the
Sun rises and sets for
each of these seasons.
The student identifies
only 1 accurate piece
of data from fall, winter,
and spring. Identifies an
accurate time (within 1
hour for at least 1
season) that the Sun
rises and sets for each
of these seasons.
Conclusions The student describes a
pattern that
demonstrates an
understanding that fall
has more daylight than
winter; winter is the least
daylight; spring has
increasing daylight.
Accurately predicts
more daylight is summer.
The student describes a
pattern for at least two
seasons that
demonstrates an
understanding that fall
has more daylight than
winter, winter is the least
daylight, spring has
increasing daylight.
The student describes a
pattern (with some
inconsistencies) for
seasons that
demonstrates an
understanding that fall
has more daylight than
winter, winter is the least
daylight, spring has
increasing daylight.
The student is unable to
describe an accurate
pattern for the amount
of daylight across
seasons.
Score (out of 8)
8

Science 21 Curriculum © PNW BOCES G1 U1 Revised January 2019 | P a g e 90
Science 21 Curriculum © PNW BOCES G1 U1 Revised January 2019 | P a g e 91
Appendices
Science 21 Curriculum © PNW BOCES G1 U1 Revised January 2019 | P a g e 92
Appendix A: Grade 1 Unit 1 Deep Core Idea Review
Below you will find the content details reprinted with permission
from the source document, A Framework for K-12 Science
Education: Practices, Crosscutting Concepts and Core Ideas
(National Research Council. (2012). Washington D.C.: National
Academies Press. Retrieved from
http://www.nap.edu/catalog.php?record_id=13165).
**Not all disciplinary core ideas are addressed at each grade
level. The expectation that the all of the core ideas are
addressed in the progressions across the K-12 continuum.
ESS1.A: THE UNIVERSE AND ITS STARS
What is the universe, and what goes on in stars?
The Sun is but one of a vast number of stars in the Milky Way
galaxy, which is one of a vast number of galaxies in the
universe.
The universe began with a period of extreme and rapid
expansion known as the Big Bang, which occurred about 13.7
billion years ago. This theory is sup- ported by the fact that it
provides an explanation of observations of distant galaxies
receding from our own, of the measured composition of stars
and nonstellar gasses, and of the maps and spectra of the
primordial radiation (cosmic microwave back- ground) that still
fills the universe.
Nearly all observable matter in the universe is hydrogen or
helium, which formed in the first minutes after the Big Bang.
Elements other than these remnants of the Big Bang continue to
form within the cores of stars. Nuclear fusion within stars
produces all atomic nuclei lighter than and including iron, and
the process releases the energy seen as starlight. Heavier
elements are produced when certain massive stars achieve a
supernova stage and explode.
Stars’ radiation of visible light and other forms of energy can be
measured and studied to develop explanations about the
formation, age, and composition of the universe. Stars go
through a sequence of developmental stages—they are
formed; evolve in size, mass, and brightness; and eventually
burn out.
Material from earlier stars that exploded as supernovas is
recycled to form younger stars and their planetary systems. The
Sun is a medium-sized star about halfway through its predicted
lifespan of about 10 billion years.
Grade Band Endpoints for ESS1.A
By the end of grade 2. Patterns of the motion of the Sun, Moon,
and stars in the sky can be observed, described, and predicted.
At night one can see the light coming from many stars with the
naked eye, but telescopes make it possible to see many more
and to observe them and the Moon and planets in greater
detail.
ESS1.B: EARTH AND THE SOLAR SYSTEM
What are the predictable patterns caused by Earth’s movement
in the solar system?
The solar system consists of the Sun and a collection of objects
of varying sizes and conditions—including planets and their
Moons—that are held in orbit around the Sun by its gravitational
pull on them. This system appears to have formed from a disk of
dust and gas, drawn together by gravity.
Earth and the Moon, Sun, and planets have predictable
patterns of movement. These patterns, which are explainable
by gravitational forces and conservation laws, in turn, explain
many large-scale phenomena observed on Earth.
Science 21 Curriculum © PNW BOCES G1 U1 Revised January 2019 | P a g e 93
Planetary motions around the Sun can be predicted using
Kepler’s three empirical laws, which can be explained based
on Newton’s theory of gravity. These orbits may also change
somewhat due to the gravitational effects from, or collisions
with, other bodies. Gradual changes in the shape of Earth’s
orbit around the Sun (over hundreds of thousands of years),
together with the tilt of the planet’s spin axis (or axis of rotation),
have altered the intensity and distribution of Sunlight falling on
Earth. These phenomena cause cycles of climate change,
including the relatively recent cycles of ice ages.
Gravity holds Earth in orbit around the Sun, and it holds the
Moon in orbit around Earth. The pulls of gravity from the Sun and
the Moon cause the patterns of ocean tides. The Moon’s and
Sun’s positions relative to Earth cause lunar and solar eclipses to
occur. The Moon’s monthly orbit around Earth, the relative
positions of the Sun, the Moon, and the observer and the fact
that it shines by reflected Sunlight explain the observed phases
of the Moon.
Even though Earth’s orbit is very nearly circular, the intensity of
Sunlight falling on a given location on the planet’s surface
changes as it orbits around the Sun. Earth’s spin axis is tilted
relative to the plane of its orbit, and the seasons are a result of
that tilt. The intensity of Sunlight striking Earth’s surface is greatest
at the equator. Seasonal variations in that intensity are greatest
at the poles.
Grade Band Endpoints for ESS1.B
By the end of grade 2. Seasonal patterns of Sunrise and Sunset
can be observed, described, and predicted.
Science 21 Curriculum © PNW BOCES G1 U1 Revised January 2019 | P a g e 94