10 tutorials for obiee power users - us-analytics
TRANSCRIPT

10 Tutorials for OBIEE Power Users Tips for RPD Development, Connecting DVD to OBIEE, and More

1
TABLE OF CONTENTS
Source Control and Automated Code Deployment Options for OBIEE………………………………………………………………………………….2 OBIEE 12c Configuration with sysdig……………………………………….20 Web-Based RPD Upload and Download for OBIEE 12c………..23
Enabling Concurrent OBIEE RPD Development………………….32
OBIEE 12c - Repository Password Corruption Issue…………..46
OBIEE 12c Catalog Validation: Command Line……………………50
OBIEE Time Dimension: Logical Sequence Number…………60
OBIEE Server Cache Management Strategies…………………..…..71
Managing the OBIEE BI Server Cache from ODI 12c…………86
Connecting Oracle Data Visualization Desktop to OBIEE……98

2
Source Control and Automated Code Deployment Options for OBIEE
Managing OBIEE code in source control, and automating code deployments, is not straightforward. But, it is necessary — so why you should be doing it? And how should it be done?
Why Source Control? Do we really need source control for OBIEE? After all, what's wrong with the tried-and-tested method of sticking it all in a folder? (shown below)
There are several reasons why this shouldn’t be your go-to method, including:
• No audit trail of who changed something • No audit of what was changed, and when • No enforceable naming standards for versions • No secure way of identifying deployment candidates • No distributed method for sharing code • No way of reliably identifying the latest version of code

3
These range from the immediately practical to the slightly more abstract, but all are necessary in a mature deployment.
The immediate impact is the simple ability to identify the latest version of code on which to make new changes. But, you can download the copy from the live server, right? No. If you're tracking your versions accurately and reliably then you simply pull the latest version of code from there, with the knowledge that it is the version that is live. No monkeying around trying to figure out if it really is (just because it's called "PROD-011818.rpd" how do you know that's what got released to Production?).
Which Source Control? As long as you are using source control, it shouldn’t matter which one.
Some of our experts advocate for git. It is a modern platform, with strong support from many desktop clients (SourceTree, along with the commandline too, natch). Git is decentralized, meaning that you can commit and branch code locally on your own machine without having to be connected to a server. It supports a powerful fork and pull process too, which is part of the reason it has almost universal usage within the open source world. The most well-known of git platforms is github, which provides git as a Platform-as-a-service (PaaS), in a similar fashion to Bitbucket. You can also run git on its own locally, or more pragmatically, with gitlab.
But if you're using Subversion (SVN), Perforce, or anything else — that's fine. The key is that you understand how to use it, and that it is supported within your organization. For simple source control, all the common platforms work just fine. If you get onto more advanced use, such as feature-branches and concurrent development, you may find it worth ensuring that your chosen platform supports the workflow that you adopt.
What Goes into Source Control? There really isn’t any excuse to not use source control. But, what do you put into it? The RPD? The OBIEE 12c BAR file? What if you're still on OBIEE 11g? The answer here depends partially on how you’re planning to manage code deployment in your environment. For a fully automated solution, you may opt to store code in a more granular fashion than if you are simply migrating full BAR files each time. Read on to understand about code deployment, and then we'll revisit this question again.

4
How Do You Deploy Code Changes in OBIEE? The core code artefacts are the same between OBIEE 11g and OBIEE 12c, so we’ll cover both in this, pointing out differences as well go.
The biggest difference with OBIEE 12c is the concept of the "Service Instance", in which the pieces for the "analytical application" are clearly defined and made portable. These components are:
• Metadata model (RPD) • Presentation Catalog ("WebCat"), holding all analysis and dashboard
definitions • Security - Application Roles and Policy grants, as well as OBIEE front-end
privilege grants
Part of this is laying the foundations for what has been termed, "Pluggable BI", in which 'applications' can be deployed with customizations layered on top of them. In 12.2.1.0.0 version of OBIEE 12c, we have just the Single Service Instance (ssi). Service Instances can be exported and imported to BI Archive files, known as BAR files.
The documentation for OBIEE environment migrations (known as "T2P" - Test to Production) in 12c can be found here. The following will help clarify a few points made in the documentation:
PROD Service Instance metadata will be replaced with TEST metadata.
Occasionally, we miss things in the documentation before using our products. However, it’s important that you read carefully so as not to destroy your Production presentation catalog after importing a service instance…
Let's walk through the three main code artefacts, and how to manage each one, starting with the RPD.
The RPD The complication of deployments of the RPD is that the RPD differs between environments because of different connection pool details, and, occasionally, repository variable values too.
If you are not changing connection pool passwords between environments, or if you are changing anything else in your RPD (e.g. making actual model changes) between environments, then you probably shouldn't be. It's a security risk to not have different passwords, and a bad software development practice to make code changes other than in your development environment. Perhaps you have valid

5
reasons for doing it. But bear in mind that many test processes and validations are based on the premise that code will not change after being moved out of dev.
With OBIEE 12c, there are two options for managing deployment of the RPD:
• BAR file deploy and then connection pool update • Offline RPD patch with connection pool updates, and then deploy
This approach is valid for OBIEE 11g too:
• RPD Deployment in OBIEE 12c - Option 1
This is based on the service instance / BAR concept. It is therefore only valid for OBIEE 12c.
One-off setup: Using listconnectionpool to create a JSON connection pool
configuration file per target environment. Store each of these files in source control.
Once code is ready for promotion from Development, run exportServiceInstance to
create a BAR file. Commit this BAR file to source control:
/app/oracle/biee/oracle_common/common/bin/wlst.sh <<EOF
exportServiceInstance('/app/oracle/biee/user_projects/domains/bi/','ssi','/home/oracle','/home/oracle')
EOF
To deploy the updated code to the target environment:
1. Checkout the BAR from source control

6
2. Deploy it with importServiceInstance , ensuring that the importRPD flag is set.
/app/oracle/biee/oracle_common/common/bin/wlst.sh <<EOF
importServiceInstance('/app/oracle/biee/user_projects/domains/bi','ssi','/home/oracle/ssi.bar',true,false,false)
EOF
3. Run updateConnectionPool using the configuration file from source control for
the target environment to set the connection pool credentials.
/app/oracle/biee/user_projects/domains/bi/bitools/bin/datamodel.sh updateconnectionpool -C ~/prod_cp.json -U weblogic -P Admin123 -SI ssi
Note: Your OBIEE system will not be able to connect to source databases to retrieve data until you update the connection pools.
4. The BI Server should pick up the new RPD after a few minutes. You can force this by restarting the BI Server, or using "Reload Metadata" from OBIEE front end.
You can also create the BAR file with includeCredentials , you wouldn't use this for
migration of code between environments, because you don't have the same connection pool database passwords in each environment. If you do have the same passwords, then change it now, because it is a big security risk.
The above BAR approach works fine, but be aware that if the deployed RPD is activated on the BI Server before you have updated the connection pools (step 3 above) then the BI Server will not be able to connect to the data sources and your end users will see an error. This approach is also based on storing the BAR file as whole in source control, when, for preference, we'd store the RPD as a standalone

7
binary if we want to be able to do concurrent development with it.
RPD Deployment in OBIEE 12c - Option 2 (also valid for OBIEE 11g) This approach takes the RPD on its own, and takes advantage of OBIEE's patching capabilities to prepare RPDs for the target environment prior to deployment.
1. One-off setup: create a XUDML patch file for each target environment.
To do this…
1. Take your development RPD (e.g. "DEV.rpd"), and clone it (e.g. "PROD.rpd")
2. Open the cloned RPD (e.g. "PROD.rpd") offline in the Administration Tool. Update it only for the target environment — nothing else. This should be all connection pool passwords, and could also include connection pool DSNs and/or users, depending on how your data sources are configured. Save the RPD.
3. Using comparerpd , create a XUDML patch file for your target environment:
/app/oracle/biee/user_projects/domains/bi/bitools/bin/comparerpd.sh \ -P Admin123 \ -W Admin123 \ -G ~/DEV.rpd \ -C ~/PROD.rpd \ -D ~/prod_cp.xudml
4. Repeat the above process for each target environment
2. Once code is ready for promotion from Development: 1. Extract the RPD
o In OBIEE 12c use downloadrpd to obtain the RPD file
• /app/oracle/biee/user_projects/domains/bi/bitools/bin/datamodel.sh \ • downloadrpd \ • -O /home/oracle/obiee.rpd \ • -W Admin123 \ • -U weblogic \ • -P Admin123 \ • -SI ssi

8
o In OBIEE 11g copy the file from the server filesystem. Commit the RPD to source control.
2. Commit the RPD to source control
3. To deploy the updated code to the target environment: 1. Checkout the RPD from source control. 2. Prepare it for the target environment by applying the patch created
above. 1. Check out the XUDML patch file for the appropriate environment
from source control. 2. Apply the patch file using biserverxmlexec :
/app/oracle/biee/user_projects/domains/bi/bitools/bin/biserverxmlexec.sh \ -P Admin123 \ -S Admin123 \ -I prod_cp.xudml \ -B obiee.rpd \ -O /tmp/prod.rpd
3. Deploy the patched RPD file. • In OBIEE 12c use uploadrpd
/app/oracle/biee/user_projects/domains/bi/bitools/bin/datamodel.sh \ uploadrpd \ -I /tmp/prod.rpd \ -W Admin123 \ -U weblogic \ -P Admin123 \ -SI ssi \ -D
The RPD is available straightaway. No BI Server restart is needed.

9
• In OBIEE 11g use WLST's uploadRepository to programmatically do this, or manually from EM. After deploying the RPD in OBIEE 11g, you need to restart the BI Server.
This approach is the best and only option for OBIEE 11g. For OBIEE 12c, it’s also preferable because it is 'lighter' than a full BAR, more solid in terms of connection pools (since they're set prior to deployment, not after), and it enables greater flexibility in terms of RPD changes during migration since any RPD change can be encompassed in the patch file.
Note that the OBIEE 12c product manual states that uploadrpd / downloadrpd are for:
"...repository diagnostic and development purposes such as testing, only ... all other repository development and maintenance situations, you should use BAR to utilize BAR's repository upgrade and patching capabilities and benefits.".
Maybe in the future the BAR capabilities will extend beyond what they currently do, but as of now, there’s not a definitive reason to use them and not uploadrpd / downloadrpd .
The Presentation Catalog ("WebCat") The Presentation Catalog stores the definition of all analyses and dashboards in OBIEE, along with supporting objects including Filters, Conditions, and Agents. It differs significantly from the RPD when it comes to environment migrations. The RPD can be seen in more traditional software development lifecycle terms, since it is built in Development, and when deployed in subsequent environment overwrites in entirety what is currently there. However, the Presentation Catalog is not so simple.
Commonly, content in the Presentation Catalog is created by developers as part of 'pre-canned' reporting and dashboard packs, to be released along with the RPD to end-users. Things get difficult because the Presentation Catalog is also written in Production. This can include:
• User-developed content saved in one (or both) of:

10
o My Folders o Shared, e.g. special subfolders per department for sharing common
reports outside of "gold standard" ones • User's profile data, including time zone and language settings, saved
dashboard customizations, preferred delivery devices, and more • System configuration data, such as default formatting for specific columns,
bookmarks, etc.
In your environment, you might now permit some of these (for example, disabling access to My Folders is not uncommon). But almost certainly, you'll want your users to be able to persist their environment settings between sessions.
The impact of this is that the Presentation Catalog becomes complex to manage. We can't just overwrite the whole catalog when we come to deployment in Production, because if we do so all the above listed content will get deleted.
So, how do we bring any kind of mature software development practice to the Presentation Catalog, if we have report development being done in non-Production environments?
There are two possible approaches:
1. Deploy the full catalog into Production each time, but backup first existing content that we don't want to lose, and restore it after the deploy.
a. Fiddly, but means that we don't have to worry about which bits of the catalog go in source control - all of it does. This has consequences for if we want to do branch-based development with source control, in that we can't. This is because the catalog will exist as a single binary

11
(whether BAR or 7ZIP ), so there'll be no merging with the source
control tool possible. b. Risky, if we forget to back up the user content first, or something goes
wrong in the process c. A 'heavier' operation involving the whole catalog and therefore almost
certainly requiring the catalog to be in maintenance-mode (read only). 2. Deploy the whole catalog once, and then do all subsequent deploys as deltas
(i.e. only what has changed in the source environment)
a. Less risky, since not overwriting whole target environment catalog b. More flexible, and more granular so easier to track in source control
(and optionally do branch-based development). c. Requires more complex automated deployment process.
Both methods can be used with OBIEE 11g and 12c.
Presentation Catalog Migration in OBIEE - Option 1
In this option, the entire Catalog is deployed, but content that we want to retain is backed up first, and then re-instated after the full catalog deploy.
First, you’ll take the entire catalog from the source environment and store it in source control. With OBIEE 12c, this is done using the exportServiceInstance WLST
command (see the example with the RPD above) to create a BAR file. With OBIEE 11g, you would create an archive of the catalog at its root using 7-zip/tar/gzip (but not winzip).
When ready to deploy to the target environment, we first backup the folders that we want to preserve. Which folders might you want to preserve?

12
1. /users - this holds both objects that users have created and saved in My
Folders , as well as user profile information (including time zone preferences,
delivery profiles, dashboard customizations, and more) 2. /system - this hold system internal settings, which include things such as
authorisations for the OBIEE front end ( /system/privs ), as well as column
formatting defaults ( /system/metadata ), global variables
( /system/globalvariables ), and bookmarks ( /system/bookmarks ).
• See note below regarding the /system/privs folder:
3. /shared/<…>/<…> — If users are permitted to create content directly in the
Shared area of the catalog, you will want to preserve this. A valid use of this is for teams to share content developed internally, instead of (or prior to) it being released to the wider user community through a more formal process (the latter being often called “gold standard” reports).
Regardless of whether we are using OBIEE 11g or 12c, we create a backup of the folders identified by using the Archive functionality of OBIEE. This is not just creating a .zip file of the file system folders (which is completely unsupported and a bad idea for catalog management, except at the very root level). Instead, the Archive functionality creates a .catalog file which can be stored in source control,
and unarchived back into OBIEE to restore content.
You can create OBIEE catalog archives in one of four ways, which are also valid for importing the content back into OBIEE too:
1. Manually, through OBIEE front-end 2. Manually, through Catalog Manager GUI

13
3. Automatically, through Catalog Manager CLI ( runcat.sh ) a. Archive:
runcat.sh \
-cmd archive \
-online http://demo.us.oracle.com:7780/analytics/saw.dll \
-credentials /tmp/creds.txt \
-folder "/shared/HR" \
-outputFile /home/oracle/hr.catalog
b. Unarchive:
runcat.sh \
-cmd unarchive \
-inputFile hr.catalog \
-folder /shared \
-online http://demo.us.oracle.com:7780/analytics/saw.dll \
-credentials /tmp/creds.txt \
-overwrite all
4. Automatically, using the WebCatalogService API ( copyItem2 / pasteItem2 ).
Having taken a copy of the necessary folders, we then deploy the entire catalog (with the changes from the development) taken from source control. Deployment is done in OBIEE 12c using importServiceInstance . In OBIEE 11g, it's done by taking the
server offline, and replacing the catalog with the filesystem archive to 7zip of the entire catalog.

14
Finally, we then restore the folders previously saved, using the Unarchive function to import the .catalog files:
Presentation Catalog Migration in OBIEE - Option 2
In this option, we take a more granular approach to catalog migration. The entire catalog from development is only deployed once, and after that only .catalog files from development are put into source control and then deployed to
the target environment.
As before, the entire catalog is initially taken from the development environment, and stored in source control. With OBIEE 12c, this is done using the exportServiceInstance WLST command (see the example with the RPD above) to

15
create a BAR file. With OBIEE 11g, you would create an archive of the catalog at its root using 7zip.
Note that this is only done once, as the initial 'baseline'.
The first time an environment is commissioned, the baseline is used to populate the catalog, using the same process as in option 1 above (in 12c, importServiceInstance / in 11g unzip of full catalog filesystem copy).
After this, any work that is done in the catalog in the development environment is migrated by using OBIEE's archive function against just the necessary /shared subfolder to a .catalog file, storing this in source control.

16
This is then imported to target environment with unarchive capability. See above in option 1 for details of using archive/unarchive — just remember that this is archiving with OBIEE, not using 7zip.
You will need to determine at what level you take this folder:
• If you archive the whole of /shared each time you'll never be able to do
branch-based development with the catalog in which you want to merge branches (because the .catalog file is binary).
• If you instead work at, say, department level ( /shared/HR , /shared/sales , etc) then the highest grain for concurrent catalog development would be the department. The lower down the tree you go the greater the scope for independent concurrent development, but the greater the complexity to manage. This is because you want to be automating the unarchivable of these .catalog files to the target environment — so having to deal with
multiple levels of folder hierarchy becomes hard work.
It's a tradeoff between the number of developers, breadth of development scope, and how simple you want to make the release process.
The benefit of this approach is that content created in Production remains completely untouched. Users can continue to create their content, save their profile settings, and so on.

17
Presentation Catalog Migration - OBIEE Privilege Grants
Permissions set in the OBIEE front end are stored in the Presentation Catalog's /system/privs folder.

18
Therefore, how this folder is treated during migration dictates where you must apply your security grants (or conversely, where you set your security grants dictates how you should treat the folder in migrations). For some the "correct" approach would be to define the full set of privileges in the development environment and then migrate these along with pre-built objects in /shared through
to Production. If you have a less formal approach to environments, or reason permissions are granted directly in Production, you will need to ensure that the /system/privs folder isn't overwritten during catalog deployments.
When you create a BAR file in OBIEE 12c, it does include /system/privs and /system/metadata . Therefore, if you are happy for
these to be overwritten from the source environment, you would not need to backup/restore these folders. If you set includeCatalogRuntimeInfo in the OBIEE 12c
export to BAR, it will also include the complete /system folder as well as /users .
Agents
Regardless of how you move Catalog content between environments, if you have Agents you need to look after them too. When you move Agents between environments, they are not automatically registered with the BI Scheduler in the target environment. You either have to do this manually, or with the web service API: WebCatalogService.readObjects to get the XML for the agent, and then submit it
to iBotService.writeIBot which will register it with the BI Scheduler.
Security In terms of the Policy store (Application Roles and Policy grants), these are managed by the Security element of the BAR and migration through the environments. You can deploy the policy store alone in OBIEE 12c using the importJazn flag
of importServiceInstance . In OBIEE 11g it's not so simple - you have to use
the migrateSecurityStore WLST command.
Data/Object security defined in the RPD gets migrated automatically through the RPD, by definition
See above for a discussion of OBIEE front-end privilege grants.

19
What Goes into Source Control? Part 2 So, suddenly this question looks a bit less simple than when originally posed at the beginning of this section. In summary, you need to store:
1. RPD a. BAR + JSON configuration for each environment's connection pools -- 12c
only, simpler, but less flexible and won't support concurrent development easily
b. RPD ( .rpd ) + XUDML patch file for each environment's connection pools --
works in 11g too, supports concurrent development 2. Presentation Catalog
a. Entire catalog (BAR in 12c / 7zip in 11g) -- simpler, but impossible to manage branch-based concurrent development
b. Catalog baseline (BAR in 12c / 7zip in 11g) plus delta .catalog files -- More
complex, but more flexible, and support concurrent development 3. Security
a. BAR file (OBIEE 12c) b. System-jazn-data.xml (OBIEE 11g)
4. Any other files that are changed for your deployment.
It's important that when you provision a new environment you can set it up the same as the others. It is also invaluable to have previous versions of these files to be able to rollback changes if needed, and to track what settings have changed over time.
This could include:
• Configuration files ( nqsconfig.ini , instanceconfig.xml , tnsnames.ora , etc)
• Custom skins & styles • Writeback templates

20
OBIEE 12c Configuration with sysdig
OBIEE 12c has changed a lot in how it manages configuration. OBIEE 11g configuration was based around system MBeans and the biee-domain.xml as the
master copy of settings — and if you updated a configuration directly that was centrally managed, it would get reverted back. Now, OBIEE 12c configuration can be managed directly in text files again but also through EM still (not to mention WLST). Confused? You’re not the only one.
In the configuration files such as NQSConfig.INI there are settings still marked with the ominous comment:
# This Configuration setting is managed by Oracle Enterprise Manager Fusion Middleware Control
In 11g this meant — turn back unless you want your configuration settings wiped next time the stack boots.
Now in 12c, you can make a configuration change (such as enabling BI Server caching), restart the affected component, and the change will take affect -- and persist through a restart of the whole OBIEE stack.
But, if I only restart the affected component (for example, BI Server for an NQSConfig.INI change), since you don't want to waste time bouncing the whole
stack if you don't need to, then Enterprise Manager will continue to show the old setting:

21
So, even though the cache is enabled (and you can see entries being populated in it), Enterprise Manager suggests that it's not. It’s confusing.
If we're going to edit configuration files by hand (a personal preference, since it saves firing up a web browser), we need to know how to make sure Enterprise Manager will reflect the change too. Does EM poll the file while running, or something direct to each component to request the configuration? Or maybe it just reads the file on startup only?
Enter sysdig. The next part is kind of trivial (and could probably be done with other standard *nix tools), but is still a useful example. What we want to know is which process reads NQSConfig.INI , and from there, isolate the particular component that
we need to restart to trigger a re-read of the file, thus correctly showing the value in Enterprise Manager.
You can run sysdig with a filter for filename and custom output format to include the process PID:
sudo sysdig -A -p "%evt.num %evt.time %evt.cpu %proc.name (%proc.pid) %evt.dir %evt.info" "fd.filename=NQSConfig.INI and evt.type=open"

22
Nothing was written (i.e. nothing was polling the file), until I bounced the full OBIEE stack ( $DOMAINHOME/bitools/bin/stop.sh && $DOMAINHOME/bitools/bin/start.sh ).
During the startup of the AdminServer, sysdig showed:
32222110 12:00:49.912132008 3 java (10409) < fd=874(/app/oracle/biee/user_projects/domains/bi/config/fmwconfig/biconfig/OBIS/NQSConfig.INI) name=/app/oracle/biee/user_projects/domains/bi/config/fmwconfig/biconfig/OBIS/NQSConfig.INI flags=1(O_RDONLY) mode=0
So, it's the java process that reads it, PID 10409. Which is that?
$ ps -ef|grep 10409
oracle 10409 10358 99 11:59 ? 00:03:54 /usr/java/jdk1.8.0_51/bin/java -server -Xms512m -Xmx1024m -Dweblogic.Name=AdminServer [...]
It's AdminServer, which makes sense, because Enterprise Manager is a java deployment hosted in AdminServer.
So, if you want to hack the config files by hand, restart either the whole OBIEE stack, or the affected component plus AdminServer for Enterprise Manager to pick up the change.

23
Web-Based RPD Upload and Download for OBIEE 12c
One of the greatest new features of OBIEE 12c is the scripted deploy of an RPD file from a developer’s computer. In 11g, you had to make dozens of clicks for every deploy of an RPD. You may object and say that there is WLST in 11g which can do the same and even more. Well, you’re right. Except for one thing: WLST is on the server side. Information security folks don’t like to give direct access to a server to OBIEE developers. And not every developer can use it.
In OBIEE 12c, the only way to upload and download RPDs from a developer’s local machine to the OBIEE server is through the command line. We’re big fans of the command-line approach because it enables automation, reduces the risk of error, and more. But not everyone likes the script approach. Many OBIEE developers don’t like to use a command line to do what they used to do with their mouse for years. But now we have a solution for them.
Disclaimer. Everything below is a result of RMA’s investigation. It’s not a supported functionality or Oracle’s recommendation. It makes use of undocumented web services that Oracle may remove or change at any time.
The Simplest Sample Modern computer technologies offer us a lot of tools to build GUIs, but we wanted to keep it as simple as possible and because OBIEE’s front end is web-based, use of HTML for our RPD tool was the obvious choice too.
Download Let's start with RPD download. Here is the curl script to call OBIEE web service and get RPD file.
curl -X "POST" "http://192.168.0.66:7780/bi-lcm/v1/si/ssi/rpd/downloadrpd" \
--data-urlencode "target-password=Admin123" \
--basic --user weblogic:Admin123 \
> downloadrpd.rpd

24
As you can see it's pretty simple. We send a message to http://<host>:<port>/bi-
lcm/v1/si/ssi/rpd/downloadrpd using POST method. As a parameter, we send a
password to set to the downloaded RPD file ( target-password=Admin123 ) and
authentication information ( weblogic:Admin123 ). As a result, we get bytes of the
RPD which we redirect to the downloadrpd.rpd file. And now we want a GUI for this
script.
<html>
<body>
<FORM action="http://192.168.0.66:7780/bi-lcm/v1/si/ssi/rpd/downloadrpd"
method="post" target=_blank>
<P>
New password for downloaded RPD file? <INPUT type="password" name="target-password"><BR>
<INPUT type="submit" value="Send"> <INPUT type="reset">
</FORM>
</body>
</html>

25
This is not a snippet of code you somehow should incorporate into your system. No. That's almost complete GUI for RPD download! The only thing you need to do is to change hostname and port to match your system. That's it. Simply create an HTML file, put this code into it, change host and port, and then open with a browser.
This form has no field for authentication because OBIEE server will ask us for login and password at the first call and will maintain this session later.
Upload The upload was a little bit trickier from the curl side. Let's look at the script:
curl -X POST \
"http://192.168.0.66:7780/bi-lcm/v1/si/ssi/rpd/uploadrpd" \
--form "[email protected];type=application/vnd.oracle.rpd" \
--form "rpd-password=Admin123" \
--basic --user weblogic:Admin123
Here we call another service to upload our file. Our parameters are:
1. sample.rpd - the RPD file to upload
2. type=application/vnd.oracle.rpd - MIME type of this file (that was the main trick).
3. rpd-password=Admin123 - the password of sample.rpd
4. weblogic:Admin123 - information for authentication.
But the GUI for this task is surprisingly simple. I expected it to be monstrous with lots of JS but in fact, it is small and easy. The minimum viable version is almost as simple as the upload one.
<html>
<body>
<FORM action="http://192.168.0.66:9502/bi-lcm/v1/si/ssi/rpd/uploadrpd"
method="post" enctype="multipart/form-data" target=_blank>
File to upload <INPUT type=file name="file"><BR>
Password for uploaded RPD file? <INPUT type="password" name="rpd-password"><BR>
<INPUT type="submit" value="Send"> <INPUT type="reset">
</FORM>

26
</body>
</html>
The use of this piece of code is the same as for download. Simply put it into an HTML file, change host and port.
Keep in mind that, for the both forms, field names are fixed and shouldn't be changed. For example, the field for a file to upload should have name "file" and for a password - "rpd-password." Without it, it won’t work.
But there is a thing about this part that could still be improved. Depending on the browser you use, it shows the response message either in the same window or downloads it as a text file. This message is a JSON file.
In real life, this message is a one-line JSON, but here it is a more human-readable formatted with jq .
{
"clazz": ["rpd-response"],
"links": [
{
"href": "http://192.168.0.66:7780/bi-lcm/v1/si/ssi/rpd/uploadrpd",
"rel": ["self"]
}
],
"properties": {
"entry": [
{
"key": "si",
"value": {
"type": "string",
"value": "ssi"
}
},
{
"key": "description",

27
"value": {
"type": "string",
"value": "RPD upload completed successfully."
}
},
{
"key": "desc_code",
"value": {
"type": "string",
"value": "DESC_CODE_RPD_UPLOAD_SUCCESSFUL"
}
},
{
"key": "status",
"value": {
"type": "string",
"value": "SUCCESS"
}
}
]
},
"title": "RPD-LCM response, SI=ssi, action=Upload RPD"
}
As you can see here, there’s a "description" field which holds a more readable message. The "desc_code" field is the same but more suitable for automated processing, and the "status" field is the first candidate to be used in automatic procedures.
It's easy to read this file but most of the time you'd prefer a simple "Success" message, right?

28
Going Further These HTML forms do the trick. A developer can now download and upload RPD file easily with a minimum of clicks and without a need to learn a command-line interface. Security is managed by Weblogic server. Sounds good, right? But we can do it even better. Some absolutely necessary improvements include:
1. Adding some JS to make diagnostics more user-friendly. 2. Putting these forms to a server so every developer in an organization can use
them.
Adding Some JavaScript Magic We’re trying to keep things as simple as possible. The JavaScript library (JQuery) might not be the simplest for this task, but the code you’ll have to write is very small.
<html>
<head>
<script src="./jquery-3.1.1.min.js"></script>
</head>
<body>
<script>
$(document).ready(function(){
$("#upload").on('submit', function( e ) {
e.preventDefault();
$.ajax( {
url: $(this).attr('action'),
type: 'POST',
data: new FormData( this ),
processData: false,
contentType: false,
dataFilter: function (data, type){$("#response").html(JSON.parse(data).properties.entry[1].value.value);$("#response").append('<details>'+data+'</details>');}
});
});
});

29
</script>
<FORM id=upload action="http://192.168.0.136:9502/bi-lcm/v1/si/ssi/rpd/uploadrpd"
method="post" enctype="multipart/form-data">
File to upload <INPUT type=file name="file"><BR>
Password for uploaded RPD file? <INPUT type="password" name="rpd-password"><BR>
<INPUT type="submit" value="Send"> <INPUT type="reset">
</FORM>
<div id=response></div>
</body>
</html>
The script reads the form and sends content to the server, then it reads the answer, parses it and shows it in a user-friendly way. Note that it does need the Jquery library to work. The problem with this code is that it won't work locally. If you try to use it in the same way as previous samples, it won't do anything. But if we look at the developer console of the browser we immediately find the answer. OBIEE blocks your cross-domain JavaScript call.
Deploying It to a Server
Now, you’re going to put want to put forms to some place accessible with a browser from a server where OBIEE works. To achieve that I should do a few steps.
1. Create a directory on the server. 2. Put my files to that directory. 3. Expose the directory with a web server.
There are no special requirements for the location for the directory you need to create. It just should be accessible by a web server (Weblogic). For this example, we’ll place it place it somewhere inside $ORACLEHOME/userprojects.

30
But there is one special requirement for the directory content. It should have a subdirectory WEB-INF with web.xml file inside.
For this example, almost empty web.xml is just fine. That may be not the best option for the real life, but we’re trying to keep things simple
<?xml version="1.0" encoding="UTF-8"?>
<web-app xmlns="http://java.sun.com/xml/ns/javaee"
xmlns:xsi="http://www.w3.org/2001/XMLSchema-instance"
xsi:schemaLocation="http://java.sun.com/xml/ns/javaee/web-app_2_5.xsd"
version="2.5"/>
You can combine download and upload forms into one rpdtools.html file and add some styling for a nicer look. From the functional point of view, these forms and script were not changed. You can then combine file and Jquery library into your "static" directory.
Now everything is ready for the final step. Deploy this directory to Weblogic server so the users can access it with a browser.
Login to Weblogic console and deploy static folder as an application.
For more details on deploying folders to WLS, see the Official documentation on web.xml and Deploying Using Shared Folders.

31
Summary
We showed here a very simple way of adding a web-based GUI for uploading and downloading RPD to any OBIEE 12c system. You can take it and adjust to suit your needs and be a useful day-to-day tool. Deploying this code to a server allows you to give an access to it to all OBIEE developers in your organization and add some cool JavaScript effects. But keep in mind that it uses non-documented services and is not supported by Oracle in any way. This means that it can stop working after an upgrade.

32
Enabling Concurrent OBIEE RPD Development
One of the most common and long-standing problems with developing in OBIEE is the problem of multiple developers working on the RPD at the same time. In this section, we’ll explain the problem and explore the solution that we’ve developed and have been successfully using for the last couple of years.
Why Concurrent Development The benefits of concurrent development are obvious: scalability and flexibility. It enables you to scale your development team to meet the delivery demands of the business. The challenge is to manage all the concurrent work and enable releases in a flexible manner, which is where source control comes in.
We couldn't possibly attempt to manage concurrent development on something as complex as the RPD without good version control in place. Source control (A.K.A. version control/revision control) systems like Git and Apache Subversion (SVN) are designed to track and retain all of the changes made to a code base so that you can easily backtrack to points in time where the code was behaving as expected. It tracks what people changed, who changed it, when they changed it, and even why they made that change (via commit messages). They also possess merge algorithms that can automatically combine changes made to text files, as long as there are no direct conflicts on the same lines. Then there's added benefits with code branching and tagging for releases. All of this leads to quicker and more reliable development cycles, no matter what the project.
All these techniques are about reducing the risk during the development process, and saving time. Time spent developing, time spent fixing bugs, spent communicating, testing, migrating, deploying, and just about every IT activity under the sun. Time that could be better spent elsewhere.
Out of the Box Oracle provide two ways to tackle this problem in the software:
• Online Check in/out • Multi-User Development (MUD)

33
However, neither of these are sufficient for high standards of reliable development and releases. We’ll explore that reasoning below. Additionally, it is not possible to natively and fully integrate with version control for the RPD, which presents a significant problem for reliable development cycles.
First, the online check-in and check-out system does, by design, force all development to be conducted online. This is not an issue for a single developer, and is a practice that we advocate for ‘sandbox’ development in isolation. However, as soon as there is more than one developer on the same server it reduces development flexibility. Two developers cannot develop their solutions in isolation and can be made to wait for assets they want to modify to be unlocked by other developers. This may be workable for a small amount of developers but does not scale well. Furthermore, the risk of losing work is much higher when working online; we've all seen the infamous "Transaction Update Failed" message when saving online. This is usually because of an inconsistency in the RPD, but it can be caused by less obvious reasons and usually leads to repeating some work. Lastly, very large RPDs like those from BI Apps or mature enterprise deployments pose a problem when working online. They cause the Admin Tool to work very slowly because of the calls it has to make to the server, which can be frustrating for developers. To be clear, we’re not advocating developing without testing your code, but given the speed of uploading an RPD to the server and the fact that it can be automated, it is far more efficient to develop offline and upload frequently for testing.
The MUD system is much better and is quite close in methodology to what we recommend in this guide. The premise works on having a production quality master RPD and then having many other individual developers with their own RPDs. The check-in and check-out system will automatically handle three-way merges to and from the master RPD when development changes are made. This is good in theory but has been maligned for years when used in practice. The version control system in MUD is not as robust as Git or SVN and the conflict resolution relies on developers managing their own issues — without the ability for a source master to intervene. Ultimately, there is little flexibility in this method, which makes it difficult to use in the real world.
Source Controlling the RPD Source control is another problem as the RPD is a binary file which cannot be merged or analyzed by text-based comparison tools like SVN or Git. A potential solution at one point seemed to be MDS XML, a structured, textual representation of the RPD. However, this also seemed to have some drawbacks when put into practice. Whilst some use MDS XML with great success and there are tools on the market that rely on this system, we’ve found that there are significant risks and

34
issues with it. We’ve come up with what we believe is a robust, scalable, and flexible approach, based around the binary RPD.
Our Solution to Concurrent OBIEE RPD Development Successful development lifecycles come down to implementation of the correct process and ensuring it is as quick and reliable as possible. Tools, like the ones described in this eBook, can be used to help in both of those areas but are not a substitute for detailed knowledge of the processes and the product. A key feature of this approach is the Source Master who owns and is responsible for the overall development process. They will have a detailed understanding of the method and tools, as well as the specifics of the current and future work being done on the RPD. Things will go wrong — the key is to minimize the impact and frequency of these events.
The solution is based on the Gitflow method, which is one of the most established development models. The model is based on a few major concepts:
Features: Specific items of development, these begun from the development branch and then merged back into development when complete.
Develop/Master Branches: Two branches of code, one representing the development stream, the other the production code.
Releases: A branch taken from development that is then eventually merged into production. This is the mechanism for getting the development stream into production.
Scenario This section shows a simple example of how you might use this methodology for multiple developers to work on the RPD in a reliable way. Many of the screenshots below show SourceTree, a GUI for Git.
In this example, we have two developers in our team, Dan and Manuel, who both want to work on the RPD and add in their own changes. They already have an RPD they've made and are using with OBIEE, named base.rpd . First, they initialize a Git
repository, committing a copy of their RPD ( base.rpd ).
35
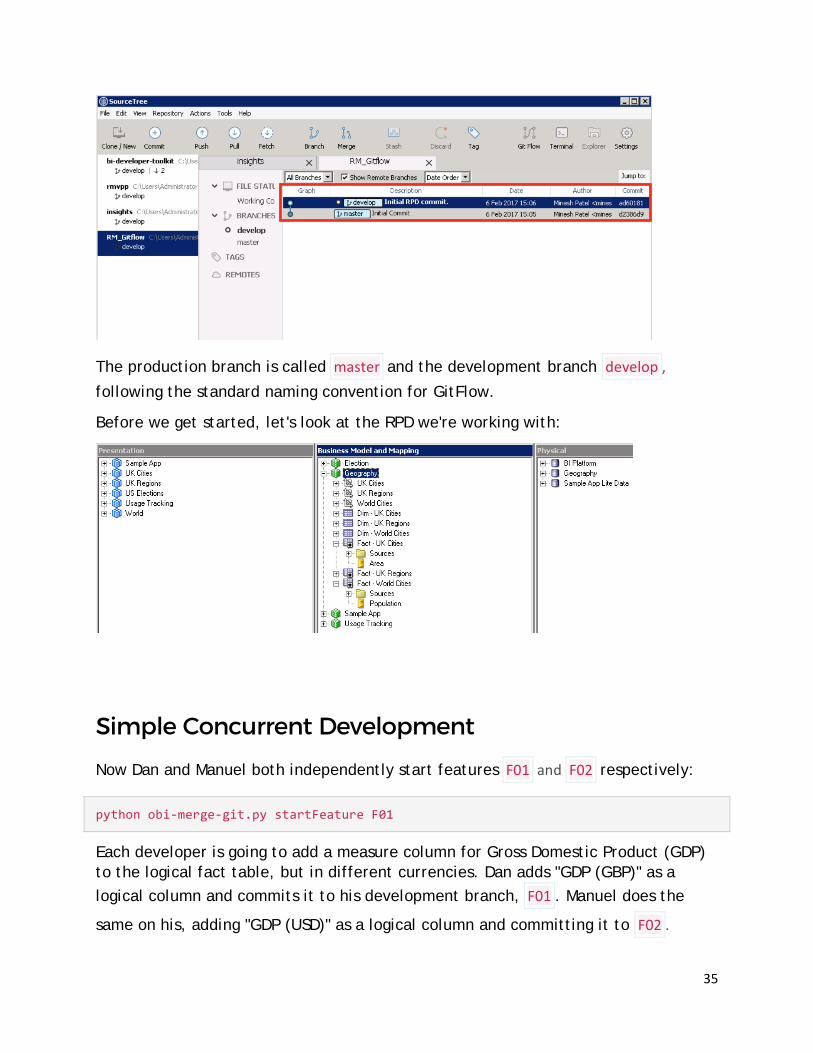
The production branch is called master and the development branch develop , following the standard naming convention for GitFlow.
Before we get started, let's look at the RPD we're working with:
Simple Concurrent Development
Now Dan and Manuel both independently start features F01 and F02 respectively:
python obi-merge-git.py startFeature F01
Each developer is going to add a measure column for Gross Domestic Product (GDP) to the logical fact table, but in different currencies. Dan adds "GDP (GBP)" as a logical column and commits it to his development branch, F01 . Manuel does the
same on his, adding "GDP (USD)" as a logical column and committing it to F02 .

36
Now Dan finishes his feature, which merges his work back into the develop branch.
This doesn't require any work, as it's the first change to development to occur.
python obi-merge-git.py finishFeature F01
Checking out develop...
Already on 'develop'
Merging feature/F01 into develop...
Successfully merged feature/F01 to the develop branch.
When Manuel does the same, there is some extra work to do. To explain what's happening we need to look at the three merge candidates in play, using the terminology of OBIEE’s 3-way merge functionality:

37
• Original: This is the state of the development repository from when the feature was created.
• Modified: This is your repository at the time of finishing the feature. • Current: This is the state of the development repository at the time
of finishing the feature.
When Dan completed F01, the original and current RPDs were the same, so it could just be overridden with the new RPD. However now, the Original and Current RPDs are different, so we need to resolve the changes. Our RPDs are binary files and so we need to use the 3-way merge from the Admin Tool. The python script wrapped around this process uses Git’s metadata to determine the appropriate merge candidates for invoking the OBIEE 3-way merge.
Since these changes do not conflict, this can happen automatically without user intervention. This is one of the critical differences from doing the same process in MDS XML, which would have thrown a git merge conflict (two changes to the same Logical Table, and thus same MDS XML file) requiring user intervention.
python obi-merge-git.py finishFeature F02
Checking out develop...
Already on 'develop'
Merging feature/F02 into develop...
warning: Cannot merge binary files: base.rpd (HEAD vs. feature/F02)
Creating patch...
Patch created successfully.
Patching RPD...
RPD patched successfully.
RPD Merge complete.

38
Successfully merged feature/F02 to the develop branch.
In the background the script uses the comparerpd and patchrpd OBIEE commands.
Release Now our development branch has both features in, which we can see using the Admin Tool:
To get this into production we can start a release process:
python obi-merge-git.py startRelease v1.00
This creates a new branch from develop that we can use to apply bug fixes if we need to. Any changes made to the release now will be applied back into development when the release is complete as well as being merged into the production branch. The developers realize they have forgotten to put the new columns in the presentation layer, so they do it now in the release branch as a bug fix. In GitFlow, bug fixes are last minute changes that need to be made for a release but do not interfere with the next development cycle, which may have already

39
begun (in the develop branch) by the time the bug was spotted. The changes are
merged back to develop as well as master so the fix isn't lost in the next cycle.
This is committed to the repo and then the release is finished:
python obi-merge-git.py finishRelease v1.00
After the release we can see that the master and develop branches at the same
commit point, with a tag of the release name added in too. Additionally, we can switch to the develop and master branches and see all the changes, including the

40
columns in the presentation layer. The full commit history, of course, remains if we want to roll back to other RPDs.
Conflicted Development Dan and Manuel start their new features, F03 and F04 respectively. This time they’re working on the same existing column — something that a “Source Master” should have helped avoid, but missed this time. Dan edits the column formula of the "Area" column and renames it to "Area (sqm)"" and Manuel does the same, naming his column "Area (sqFt)".
They both commit the changes to their own feature branches and Manuel merges his back to development with no problem.
python obi-merge-git.py finishFeature F04

41
However, when Dan tries to finish his feature the obvious conflict occurs, as the automatic merge cannot resolve without some human intervention since it is the same object in the RPD affected by both changes. At this point, the script will open the current RPD in the Admin Tool and tell Dan to merge his changes manually in the tool, going through the usual conflict resolution process. The script provides 3 RPDs to make the RPD choosing step unambiguous:
• original.rpd
• modified.rpd
• current.rpd (Opened)
python obi-merge-git.py finishFeature F03
Checking out develop...
Already on 'develop'
Merging feature/F03 into develop...
warning: Cannot merge binary files: base.rpd (HEAD vs. feature/F03)
Creating patch...
Patch created successfully.
Patching RPD...
Failed to patch RPD. See C:\Users\Administrator\Documents\obi-concurrent-develop\patch_rpd.log for details.
Conflicts detected. Can resolve manually using the Admin Tool.
Original RPD: C:\\Users\\Administrator\\Documents\\rpd-test\a.rpd (original.rpd)
Current RPD: C:\\Users\\Administrator\\Documents\\rpd-test\c.rpd (Opened)
Modified RPD: C:\\Users\\Administrator\\Documents\\rpd-test\b.rpd (modified.rpd)
Perform a full repository merge using the Admin Tool and keep the output name as the default or C:\\Users\\Administrator\\Documents\\rpd-test\base.rpd
Will open RPD using the Admin Tool.
Press Enter key to continue.
You must close the AdminTool after completing the merge manually in order for this script to continue.

42
When Dan hits a key, the Admin Tool opens up, and from here he needs to manually initiate the merge and specify the merge candidates. This is made easy by the script which automatically names them appropriately:
Note that the a , b and c RPDs are part of the merge logic with Git and can be ignored here.
Dan assigns the original and modified RPDs to the correct parts of the wizard and
then resolves the conflict (choosing his change) in the next step of the wizard.

43
Upon closing the Admin Tool, the Git merge to the develop branch is automatically
completed.
Now when they look in the development RPD they can see the column named as "Area (sqm)", having accepted Dan’s change. Of course, this is a trivial example, but because the method relies on using the Admin Tool, it will be just as reliable as a manual 3-way merge you would perform in OBIEE.
Most of the problems with 3-way merging is that developers get confused as to which candidates to choose or they lose track of a true original point from when both developers started working. Using this method eliminates both of those problems, with the added benefit of tight integration into source control. Even with an easier interface to the 3-way merge process, developers and/or the Source Master should be aware of some of the ‘features’ of OBIEE’s 3-way merge. For example, if a change has occurred on the physical layer that does not have any representations in the business or presentation layers, it may be lost during a 3-way merge. Another is that the merge rules are not guaranteed to stay the same between OBIEE versions, which means that we cannot be certain our development lifecycle is stable after patching or upgrading OBIEE.
Given this, and as a general core tenet of good software development practice, you should be automatically testing your RPDs after the merge and before release.

44
Testing the RPD There are still issues with OBIEE RPD merging that aren't rectified by the 3-way merge and must be handled manually when they occur. One such example is that if a change has occurred on the physical layer which does not have any representations at all in the business or presentation layers, it may be lost during a 3-way merge.
Another problem is that the merge rules are not guaranteed to stay the same between OBIEE versions, which means that we cannot be certain our development lifecycle is stable after patching or upgrading OBIEE. Another thing is the inherent bias the merge process has toward the modified RPD, instead of treating the modified and current RPDs equally. The merge candidates in the tool have been selected in such a way as to mitigate this problem, but it may have unforeseen consequences for some in untested scenarios. There may be other inconsistencies, but it is difficult to pin down all of the scenarios precisely and that's one of the main stumbling blocks when managing a file as complex as the RPD. Even if we didn't receive any conflicts, it is vital that RPDs are checked and tested (preferably automatically) before release.
The first step to testing is to create a representative test suite, which will encompass as much of the functionality of your system in as few reports as possible. The reason for this is that it is often impractical and sometimes invalid to check the entire catalogue at once. Furthermore, the faster the testing phase occurs, the quicker the overall release process will be. The purpose of a test suite is that we can take a baseline of the data of each report from which we can validate consistency after making changes. This means your test suite should contain reports that are expected not to change after making changes to RPD. You also need to be careful that the underlying data of the report does not change between the baseline capture and the regression validation phases, otherwise you will invalidate your test.
In terms of tooling, Oracle provides BVT which can be used outside of upgrades to perform automated regression tests. This is good as it provides both data checks as well as visual validation. Furthermore, it can be run on a specific Web/Presentation Catalog folder directly, as opposed to the whole system.
As well as Oracle’s BVT, we also have an in-house Regression Testing tool that was written prior to BVT’s availability, and is still used to satisfy specific test scenarios. Built in Python, it is part of a larger toolset that we use for automating the full development lifecycle for OBIEE, including migrating RPDs and cataloging artefacts between environments.
This brings us onto the last piece in the DevOps puzzle is continuous integration (CI). This is the concept of automatically testing and deploying code to a higher

45
environment as soon as the work is complete. This is something not explicitly covered by the tools in this section, however, would work nicely used with the testing and migration scripts described above. This could all be made seamless by invoking the processes via script calls or better using Git hooks.
Summary The success of an OBIEE concurrent development approach comes down to two things:
• The tooling, and • The rigorous implementation of the process
It is the latter that is key. In this section, we’ve demonstrated the tooling that we’ve developed, along with the process required for a successful development method. The real world is messy and developers don't all work in the same way. A single tool in isolation is not going to succeed in making OBIEE — designed from the outset as a single-developer tool — scale to multiple developers. Instead of insisting that you change to accommodate our tool, we instead bring our tool and process so you can adapt them to suit you.

46
OBIEE 12c - Repository Password Corruption Issue
This issue breaks one of the newer features of OBIEE 12c—the way in which the RPD is stored on disk and accessed by the BI Server.
Summary If you open the RPD in online mode (use File –> Copy As and then use the Save option), the password on the server gets corrupted.
[nQSError: 43113] Message returned from OBIS
[nQSError: 13042] Repository password is wrong
From this point on you cannot check-in any changes, and when you restart the BI Server it will fail to start up.

47
Details In OBIEE (12c, and before) it is possible to open the RPD as a straight binary file on disk (“Offline” mode), or by connecting directly to the BI Server and opening the copy that it is currently running (“Online mode”). Offline mode suits larger changes and development, with the RPD then being deployed onto the server once the development work is ready to be tested. Online mode is a good way for making changes on a dedicated dev server, minor changes on a shared server, or indeed just for viewing the RPD that’s currently being run.
Here’s where the problem occurs:
1. Open RPD in online mode 2. File -> Copy As 3. Enter a password with which to protect the RPD being saved on disk. 4. Do one of:
a. File -> Close, and then when prompted to save changes click Yes b. File -> Save c. Click the Save icon on the toolbar d. Ctrl-S
What happens now is two-fold:
1. You cannot check in any changes made online—the check in fails with an error from the Administration Tool:
[nQSError: 43113] Message returned from OBIS
[nQSError: 13042] Repository password is wrong
2. The BI Server will fail on restart with the same error:
Opening latest versioned cached RPD for : /app/oracle/biee/bi/bifoundation/server/empty.rpd which is /app/oracle/biee/user_projects/domains/bi/bidata/service_instances/ssi/metadata/datamodel/customizations/liverpd.rpd_5
[nQSError: 13042] Repository password is wrong. [[
We saw this on SampleApp v511, as well as on vanilla installations of OBIEE. Versions on both were 12.2.1.0.0.

48
Workaround
If you open the RPD online and use File -> Copy As, don’t hit save or check in, even if prompted by the Admin Tool. Close the RPD straightaway.
Often people will use File -> Copy As to take a copy of the current live RPD before doing some changes to it. Using source control such as git to store all code including the RPD, and using this approach you obviate the need to open the RPD online simply to get the latest copy (because the latest copy is in source control).
You can also use the data-model-cmd downloadrpd option to download the actual live RPD—that’s exactly what this option is provided for.
Solution - if BI Server (OBIS) has not yet been restarted If you’ve hit this bug and are hitting “Repository password is wrong” when you try to check-in, and if the BI Server is still running, then redeploy the RPD using the data-
model-cmd uploadrpdm tool. By redeploying the RPD the password appears to get
sorted out.
If the BI Server is down, then this is not an option because it has to be running in order for data-model-cmd uploadrpd to work.
Solution - if BI Server (OBIS) has been restarted and failed
At this point using data-model-cmd uploadrpd is not possible because OBIS is not
running and so the data-model-cmd uploadrpd will fail with the error:
[oracle@demo ~]$ /app/oracle/biee/user_projects/domains/bi/bitools/bin/data-model-cmd.sh uploadrpd -I /home/oracle/rmoff.rpd -W Password01 -U weblogic -P Admin123 -SI ssi
Service Instance: ssi
Operation failed.
An exception occurred during execution, please check server logs.

49
The only option from this point is to use importServiceInstance to reset the service
instance, either to an empty, SampleAppLite, or an existing .bar export of your
environment. For example:
/app/oracle/biee/oracle_common/common/bin/wlst.sh
importServiceInstance('/app/oracle/biee/user_projects/domains/bi','ssi','/app/oracle/biee/bi/bifoundation/samples/sampleapplite/SampleAppLite.bar')
This will enable OBIS to start up correctly, from which point the desired RPD can then be re-uploaded if required using data-model-cmd uploadrpd .
Conclusion The easiest thing is to simply not use File -> Copy As in online mode. While this on its own is fine, the UI means it's easy to accidentally use the Save option, which then triggers this problem. Instead, use data-model-cmd downloadrpd , and/or use source
control so that you can easily identify the latest RPD that you want to develop against.
If you do hit this repository password corruption problem, then keep calm and don’t restart the BI Server—just re-upload the RPD using data-model-cmd uploadrpd . If you
have already uploaded the RPD, then you need to use importServiceInstance to restore
things to a working state.

50
OBIEE 12c Catalog Validation: Command Line
The original startup procedure for catalog validation noted in Oracle's support Doc ID 2199938.1 stated that it’s not supported.
So, how do we run the catalog validation since the known procedure is unsupported? The answer is in catalog manager and the related command line call runcat.sh which, in the server installations (like the SampleApp v607p), can be found under $DOMAIN_HOME/bitools/bin .
How Does it Work? As for most of command line tools, when you don't have a clue on how it works, the best approach is to run with the -help option which provides the list of parameters
to pass.
Catalog Manager understands commands in the following areas:
Development To Production
createFolder Creates folder in the catalog
delete Deletes the given path from the catalog
maintenanceMode Puts the catalog into or out of Maintenance Mode (aka ReadOnly)
...
Multi-Tenancy
provisionTenant Provisions tenants into a web catalog
...
Patch Management
tag Tags all XML documents in a catalog with a unique id and common version string
diff Compares two catalogs
inject Injects a single item to a diff file
...

51
Subject Area Management
clearQueryCache Clears the query cache
Unfortunately none of the options in the list seems to be relevant for catalog validation, but with a close look at the recently updated Doc ID 2199938.1 you can find the parameter to pass: validate . The full command then looks like
./runcat.sh -cmd validate
There are different types of validation. What type of validation is the default command going to implement? How can you change the behavior? Again, the -
help option provides the list of instructions.
# Command : -cmd validate -help
validate Validates the catalog
Description
Validates the catalog
For more information, please see the Oracle Business Intelligence Suite
Enterprise Edition's Presentation Services Administration Guide.
Syntax
runcat.cmd/runcat.sh -cmd validate
[ -items (None | Report | Clean) [ -links (None | Report | Clean) ] [-folder <path{:path}>] [-folderFromFile <path of inclusion list file>] ]
[ -accounts (None | Report | Clean) [ -homes (None | Report | Clean) ] ]
-offline <path of catalog>
Basic Arguments
None
Optional Arguments

52
-items (None | Report | Clean) Default is 'Report'
-links (None | Report | Clean) Default is 'Clean'. Also, '-items' cannot be 'None'.
-accounts (None | Report | Clean) Default is 'Clean'
-homes (None | Report | Clean) Default is 'Report'. Also, '-accounts' cannot be 'None'.
-folder <path{:path}> Which folders in the catalog to validate
-folderFromFile <path of inclusion list file> File containing folders in the catalog to validate
Common Arguments
-offline <path of catalog>
-folderFromFile <folder from file> ----- Sample Folder From File ------
/shared/groups/misc
/shared/groups/_filters
------------------------------------
Example
runcat.cmd/runcat.sh -cmd validate -offline c:\oraclebi\data\web\catalog\paint
Few bits to notice:
• -offline: the catalog validation needs to happen offline. Either with services down or on a copy of the live catalog. Running catalog validation on an online catalog is dangerous especially with "Clean" options since could delete content in use.
• -folder: the catalog validation can be run only for a subset of the catalog • None | Report | Clean: each validation can be skipped (None), logged
(Report) or solved via removal of the inconsistent object (Clean) • Also, '-accounts' cannot be 'None'.: some validations are a prerequisite for
others to happen • Default is 'Clean': some validations have a "Clean" as default value, meaning
that will solve the issue by removing the inconsistent object, this may be inappropriate in some cases.

53
As written before, the initial catalog validation should be done with all options set on Report since this will give a log file of all inconsistencies without deleting pieces of the catalog that could still be valuable. To do so the command to execute is:
./runcat.sh -cmd validate -items Report -links Report -accounts Report -homes Report -offline <path_to_catalog> > cat_validation.log
runcat.sh output is displayed direcly in the console, I'm redirecting it to a file
called cat_validation.log for further analysis.
If, after the initial run with all options to Report you want the catalog validation utility to "fix" the inconsistent objects, just change the desired options to Clean. Make sure to take a backup of the catalog before since the automatic fix is done by removing the related objects. Additionally, ensure that catalog validation is working on an offline catalog. The command itself can work on top on an online catalog but is never a good idea checking a catalog that could potentially be changed while the tool is running.
The output Let's see a few examples of how Catalog Validation spots inconsistent objects. For this test we'll work with Oracle's Sampleapp.
Abandoned and inaccessible homes
Running the validation against the Sampleapp catalog provides some "interesting" results: some homes are declared "abandoned": this could be due to the related user not existing anymore in WebLogic console, but that's not the case.
E10 saw.security.validate.homes Abandoned home /users/weblogic
Looking deeper in the logs, we can see that the same user folders are flagged as…
User facing object '/users/weblogic' has no user permissions and is inaccessible
Logging in with the user weblogic doesn't allow me to check the "My Folders" in the

54
catalog. When switching to "Admin View" and trying to open "My Folder" I get the following error…
As written in the logs, it looks like the user folder has permission problems. How can we solve this? One option is to use again the runcat.sh command with
the forgetAccounts option to remove the inconsistent homes. However, this solution
deletes all the content related to the user that was stored under the "My Folders."
To keep the content, we need to overwrite the folder's permission with an administrator account. Unfortunately, when right-clicking on the folder, the "Permission" option is not available.
As a workaround, you can click on Properties and then on Set Ownership of this item
and all subitems allows you to grant full access to the administrator which is then
able to reset the proper user the relevant access privilege.

55
Once the workaround is implemented the users can check their "My Folder" content, however, the errors are still present in catalog validation. The solution is storing the relevant artifacts in another part of the catalog, run runcat.sh with forgetAccounts option and then reimport the objects if needed.
Inconsistent Objects The main two reasons generating inconsistent objects are:
• Invalid XML: The object (analysis or dashboard) XML code is not valid. This can be caused by errors during the write to disk or problems during migrations.
• Broken Links: Analysis contained in a dashboard or linked from other analysis have been renamed or deleted.
Let's see how catalog validation shows the errors.

56
Invalid XML
To test this case, we can create a simple analysis with two columns and then went to the Advanced tab and deliberately removed an > to make the XML invalid.
When trying to apply the change, you got the following error which will deny you the possibility to save.
If you really wanted to ruin your analysis, you can go directly to the file system under $BI_HOME/bidata/service_instances/ssi/metadata/content/catalog/root/shared/$RE
QUEST_PATH and change the XML directly there.
After, you run the catalog validation with only the flag items equal to Report and the
rest set to None since you’re looking only at invalid XMLs.
The result as expected is:

57
Message: Unterminated start tag, 'saw:column', Entity publicId: /app/oracle/biee/user_projects/domains/bi/bidata/service_instances/ssi/metadata/content/catalog/root/shared/rm+demo/notworkinanalysis, Entity systemId: , Line number: 9, Column number: 13
This tell you that your analysis notworkinganalysis is invalid with an unterminated
start tag, exactly the error we were expecting. Now, you have two choices: either fix the analysis XML manually or rerunning the catalog validation with option Clean which will delete the analysis since it's invalid. As said before there is no automated fix.
For a further example on this, instead of removing the > , you can remove a
quotation mark " to make the analysis invalid
After clicking Apply, OBIEE already tells you that there is something wrong in the analysis. But since it allows you to save, you saved the analysis.
But... when running the catalog validation as before, you end up seeing 0 errors related to your notworkinganalysis .
How is that possible? Since you received 0 errors in this second case, the XML is still valid. Removing a " doesn't make the XML syntax invalid! In order to, find and solve

58
that error we would need to use Oracle's Baseline Validation Tool.
Broken Links
To test the broken links case, you can create the following scenario:
• Analysis SourceAnalysis which has navigation action to TargetAnalysis
• Dashboard TestDashboard which contains the TargetAnalysis object.
To break things, you then delete the TargetAnalysis .
Running catalog validation with the option links to Report . As expected you get a
line

59
N1 saw.catalog.impl.scour.validateDeadLink Referenced path /shared/RM Demo/TargetAnalysis in file /shared/RM Demo/_portal/TestDashboard/page 1 is inaccessible.
But you don't get anything on the SourceRequest object, for which navigation is
failing.
But if instead of an action link, you use TargetAnalysis to filter the results
of SourceAnalysis
And then delete TargetAnalysis , you’ll get this expected error:
N1 saw.catalog.impl.scour.validateDeadLink Referenced path /shared/RM Demo/TargetAnalysis in file /shared/RM Demo/SourceAnalysis is inaccessible
Summarizing the broken link validation reports if missing objects are included in the main definition of other objects (as filters or as parts of dashboards), but it doesn't seem to report if the missing object is only linked via an action

60
OBIEE 12c Time Dimension: Logical Sequence Number
The key component of any successful OBIEE implementation is the RPD. Doing it right is sometimes considered "black magic", and small mistakes in the RPD can impact all the exposed Subject Areas, resulting in poor performances or, even worse, wrong results.
If you ever worked on RPD modelling, one of the settings you surely encountered is the Time dimension. This process didn't have any major modifications until recently when, in 12.2.1, Logical Sequence Numbers were introduced. As per Oracle's documentation this new feature "optimizes time series functions and in some cases improves query time," and in this section we'll see how to configure it and its impact on the time-series calculations. The examples shown below are based on Oracle Sampleapp v607, a really good source of modelling and front-end examples.
Usual Time-series Query Behavior Time-series functions like Ago,ToDate, and more recently PeriodRolling, allow end users to compare results coming from different moments just by specifying the level in the time dimension hierarchy and the number of periods to look backwards or forwards. An example is if you needed to compare current month sales revenue with the previous month figure, you'll end up writing a formula like…
AGO("F0 Sales Base Measures"."1- Revenue","H0 Time"."Month", 1
Where:
• AGO: is the Time-series function being called • "F0 Sales Base Measures"."1- Revenue": is the metric • "H0 Time"."Month": is the time hierarchy level • 1: is the amount of periods (months in our case) to look back in history
Once the time-series metric has been created, it can be used in an analysis like the following to compare Revenue of 2015-04 with the one of the previous month.

61
The analysis generates the following Logical SQL which basically lists the columns retrieved and the filters applied.
SELECT
0 s_0,
"A - Sample Sales"."Time"."T02 Per Name Month" s_1,
"A - Sample Sales"."Base Facts"."1- Revenue" s_2,
"A - Sample Sales"."Time Series"."127 Mth Ago Rev (Fix Time Lvl)" s_3
FROM "A - Sample Sales"
WHERE
("Time"."T02 Per Name Month" = '2015 / 04')
ORDER BY 2 ASC NULLS LAST
FETCH FIRST 5000001 ROWS ONLY
The translation to source SQL, very much depends on the data model created in the RPD and on the data source type. In our example, an Oracle SQL gets generated containing the following steps:
• Sequence Generation: a RANK function is used to created a dense sequence based on Per_Name_Month, the chronological key defined in the time-hierarchy for the month level. Mth_Key is also part of the query since it's used in the join between dimension and fact table.
WITH
OBICOMMON0 AS (select DENSE_RANK() OVER ( ORDER BY T653.Per_Name_Month) as c1,
T653.Mth_Key as c2,

62
T653.Per_Name_Month as c3
from
BISAMPLE.SAMP_TIME_MTH_D T653 /* D02 Time Month Grain */ ),
• Period Shifting: The sequence generated above is now shifted by the number of periods defined in the column formula ( D1.c1 + 1 ), in our example 1.
SAWITH0 AS (select D1.c1 + 1 as c1,
D1.c2 as c2,
D1.c3 as c3
from
OBICOMMON0 D1),
Ago Period Query: Using the period shifted query the historical record (or set of records) is retrieved.
SAWITH1 AS (select distinct D1.c1 as c1,
D1.c3 as c2
from
OBICOMMON0 D1),
SAWITH2 AS (select sum(T418.Revenue) as c1,
D3.c2 as c2
from
BISAMPLE.SAMP_REVENUE_F T418 /* F10 Billed Rev */ ,
SAWITH0 D4,
SAWITH1 D3
where ( T418.Bill_Mth_Key = D4.c2 and D3.c1 = D4.c1 and D3.c2 = '2015 / 04' )
group by D3.c2, D4.c3),
The period shifted query usage is explained visually by the image below

63
• Selected Period Query: the query for the selected period, in our case 2015-04, is executed using standard time dimension
SAWITH3 AS (select sum(T418.Revenue) as c1,
T653.Per_Name_Month as c2
from
BISAMPLE.SAMP_TIME_MTH_D T653 /* D02 Time Month Grain */ ,
BISAMPLE.SAMP_REVENUE_F T418 /* F10 Billed Rev */
where ( T418.Bill_Mth_Key = T653.Mth_Key and T653.Per_Name_Month = '2015 / 04' )
group by T653.Per_Name_Month)
• Resultsets joining: Results coming from Ago Period and Selected Period queries are then joined with an outer join.
select D1.c1 as c1, D1.c2 as c2, D1.c3 as c3, D1.c4 as c4 from ( select D1.c1 as c1,
D1.c2 as c2,
D1.c3 as c3,
D1.c4 as c4
from
(select 0 as c1,
coalesce( D1.c2, D2.c2) as c2,
D2.c1 as c3,
D1.c1 as c4,
ROW_NUMBER() OVER (PARTITION BY coalesce( D1.c2, D2.c2) ORDER BY coalesce( D1.c2, D2.c2) ASC) as c5
from
SAWITH2 D1 full outer join SAWITH3 D2 On D1.c2 = D2.c2
) D1
where ( D1.c5 = 1 )
order by c2 ) D1 where rownum <= 5000001
As you can see, it's a rather complex set of instructions that involves several steps

64
including analytical functions like the DENSE_RANK() in the sequence generation. In
our case, we have been lucky that the source system provided the DENSE_RANK() function; with other sources the sequence generation needs to be
calculated directly by the BI Server (OBIS) with a possible degradation of performances.
What is Logical Sequence Number? The Sequence Generation step mentioned above can sometimes be the bottleneck of the whole query, especially when the time dimension is complex or huge in volume since DENSE_RANK() is a costly analytical function.
All that OBIEE's Time-series needs to work is a pure sequence, or in Oracle's words:
Sequence numbers are enumerations of time dimensional members at a certain level. The enumeration must be dense (no gaps) and must correspond to a real-time order. For example, months in a year can be enumerated from 1 to 12.
So what if we can find a way of pre-calculating them and storing in the table, calculating them on the fly but using functions less expensive than a DENSE_RANK() ?
This is the idea behind the Logical Sequence Number (LSN): a way of avoiding the BI Server (OBIS) needing to execute the DENSE_RANK() , by passing either a pre-
calculated sequence column in the source table or a cheaper-cost function to calculate it on the fly based on existing columns.
The formula behind a Logical Sequence Number must resolve in a number (no varchar, or dates are allowed) and can either be:
• Absolute: When the sequence is consistent and doesn't need any external reference, e.g. calendar years are a self-defined sequence
• Relative: When the sequence is relative to a parent level, e.g. creating a sequence for months between 1 and 12 would need the calendar year as parent level to provide correct cross-years references
As the word already says, "Sequence Numbers" must be sequential, no gaps can be included. Year and month numbers are good examples of this.
But, what if we wanted to provide an absolute sequence number at month level? We could think about using a month key in the YYYYMM format, but this is not a
sequence: 201701 <> 201612+1 . The best way of generating the sequence number
would be to add it as a column in the database table.

65
As an example, the SAMP_TIME_MTH_D table that can be found in Sampleapp v607
containing MONTH_KEY column in the YYYYMM format.
We’ll add to SAMP_TIME_MTH_D a column MONTH_ABS_SEQ containing the absolute
sequence number. The formula behind the column is exactly what Oracle was doing under the covers using a DENSE_RANK .
SELECT MTH_KEY, DENSE_RANK() OVER (ORDER BY MTH_KEY) MONTH_ABS_SEQ FROM SAMP_TIME_MTH_D
And the result is..

66
How are Logical Sequence Number Used? There are two types of Logical Sequence Numbers: Absolute and Relative, each one has its use case:
• PERIODROLLING : This function uses absolute LSN to calculate the starting
Sequence Number based on the selected one: e.g. looking at the previous image a 6-month rolling starting from 2009-02 will include data from sequences in the range [9-14].
• TO_DATE : Uses relative LSN, e.g A YearToDate Measure shown by month will
use the month relative LSN to calculate the previous months in the same year. • AGO : Ago function uses both absolute and relative. Absolute numbers are
used if the grain of the query and the one of the AGO are at the same level, e.g. Yearly analysis of Actual vs Previous Year. However, when the grain of the shift in the ago is higher than the grain of the query Relative LSN are used, e.g. Monthly analysis of Actual vs. Previous Year.
How to Configure Logical Sequence Numbers Logical Sequence Number is a new feature requires additional settings in the time dimension hierarchy to be working. In our case, we'll add two sequences, an absolute at calendar year level and a relative at calendar month level. We'll add the sequences directly as formulas in the repository however those formulas should be pushed down as columns in the database table if optimal performances are sought.
In order to set the Logical Sequence Numbers we need to open the RPD (the SampleApp one in this test), and select the Time dimension we want to change.

67
After selecting any level apart from the Grand Total (top of the hierarchy) a new tab called "Sequence Numbers" should be visible. However, if like in our case, none of the columns at that level are integer or doubles, the sequence number selector is disabled.
To enable the selector, we first need to create a sequence column in our dimension and bring it at the correct level in the hierarchy. For the Year Level, there is already an integer column named "T35 Cal Year" which can be used as sequence. We need simply to drag the column at Year level in the Time hierarchy and set it as Absolute Sequence.

68
You can do the same with the Month level in the hierarchy and the "T32 Cal Month" column. Note: The column contains only the months enumeration from 1 till 12 so we need to set the sequence number as Relative to the level Year.
Please note that both absolute and relative LSN can be (and should be) entered since each have a different use cases. In addition, relative LSN should be set for all logical parents level in the hierarchy since they will be used only if the grain of the time shift matches the one of the parent level. For example, a Monthly LSN based on Year logical level will only be used in AGO functions having a year shift and not in case of Quarterly shift.

69
For an optimal usage, every level of the time hierarchy should have one absolute and a relative LSN for each of the parents level in the hierarchy.
Impact on SQL Now it’s time to review the SQL generated by our analysis and check the differences with the old-school time-series query.
When creating an analysis at year level like the following
As Expected the BI Server (OBIS) uses the CAL_YEAR column as sequence instead of
the DENSE_RANK() function over the PER_NAME_YEAR column.
WITH
OBICOMMON0 AS (select T795.CAL_YEAR as c1,
T795.QTR_KEY as c2,
T795.PER_NAME_YEAR as c3
from
BISAMPLE.SAMP_TIME_QTR_D T795 /* D03 Time Quarter Grain */ )
While when using the TO_DATE both the relative sequence is used, like in the
following example where the measure "166 Revenue Year To Date" is defined by the formula:
TODATE("01 - Sample App"."F0 Sales Base Measures"."1- Revenue", "01 - Sample App"."H0 Time"."Year" )

70
The following query gets generated, note the usage of Cal_Year and Cal_Month in
the sequence generation query instead of the DENSE_RANK() function as per RPD
settings mentioned above.
WITH
OBICOMMON0 AS (select T653.Cal_Year as c1,
T653.Cal_Month as c2,
T653.Per_Name_Month as c3,
T653.Per_Name_Year as c4
from
BISAMPLE.SAMP_TIME_MTH_D T653 /* D02 Time Month Grain */ )
...
Are Logical Sequence Numbers Useful? Most of the time, the bottleneck that occurs when using Time Series is not in the sequence generation — since the time dimension cardinality is rarely big enough to produce a noticeable delay in the query time — but rather in the poorly managed calculations made on query time on top of massive fact tables.
Don't expect LSN to solve all your performance problems with Time Series. However, the usage of Logical Sequence Numbers provides OBIEE a way of pre-cooking part of the calculation and, in theory, should help performance. The small effort required to set them up centrally in the time hierarchy is covered by the benefits during query time, without having to touch any pre-defined time-series calculation.

71
OBIEE Server Cache Management Strategies
The OBIEE BI Server cache can be one of the most effective ways of improving response times of OBIEE dashboards. By using data already in the cache, it reduces load on the database, the network, and the BI Server.
Should you be using it? Well, it’s not a fix for a badly-designed OBIEE system, but it does make a lot of sense to use once you’re happy that the foundations for the system are in place. But if your foundation isn’t in place, then you’re just papering over the cracks and at some point, it’s probably going to come back to bite you. BI Server caching should be used after your performance review and optimization rather than instead of.
If you’ve decided to use the BI Server cache, and simply went over to Enterprise Manager to enable it, restarted the BI Server — you’d think your work is done, right? Not exactly. Because the BI Server cache will start to store data from all the queries that you run and use it to satisfy subsequent queries. Not only will it match on a direct hit for the same query, it will use a subset of an existing cache entry where appropriate and can even aggregate up from what’s in the cache to satisfy a query at a higher level.
But, what happens when you load new data into your data warehouse? Well, the BI Server continues to serve requests out of the cache, because why shouldn’t it? And herein lies the problem with “just turn caching on.” You have to have a cache management strategy.
A cache management strategy sounds grand doesn’t it? But it boils down to two things:
• Accuracy – Flush any data from the cache that is now stale. • Speed – Prime the cache so that as many queries get a hit on it — the first
time.
Maintaining an Accurate Cache Every query that is run through the BI Server, whether from a Dashboard, Answers, or more funky routes such as custom ODBC clients or JDBC, will end up in cache. It’s possible to “seed” (“prime”/“warmup”) the cache explicitly — we’ll discuss this later. The only time you won’t see data in the cache is if…

72
A. You have BI Server caching disabled, or B. You’ve disabled the Cacheable option for a physical table that is involved in
providing the data for the query being run.
You can see metadata for the current contents of the cache in the Administration Tool when connected online to the BI Server — through the Manage -> Cache menu option. This gives you a lot of useful information (particularly when you come to optimizing cache usage) including the size of each entry, when it was created, when it was last used, and more.

73
Purging Options So, we have a spread of queries running that hit various dimensions, fact tables, and created a lot of cache entries. Now, we’ve loaded data into our underlying database, so we need to make sure that the next time a user runs an OBIEE query that uses the new data, they can see it. Otherwise, we commit the cardinal sin of any analytical system and show the user incorrect data which is obviously a bad thing.
We can purge the whole cache, but that’s a pretty brutal approach. The cache is persisted to disk and can hold lots of data stretching back months. To get rid of all that just because one table has some new data is overkill. A more targeted approach is to purge by physical database, physical table, or even logical query. When would you use these?
• Purge entire cache: This is the nuclear option, but also the simplest. If your data model is small and a large proportion of the underlying physical tables may have changed data, then go for this
• Purge by Physical Database: This is less brutal that clearing the whole cache. If you have various data sources that are loaded at different points in the batch schedule, then targeting a physical database makes sense.
• Purge by Physical Table: If many tables within your database have remained unchanged, while a large proportion of tables have changed (or it’s a small table), then this is a sensible option to run for each affected table
• Purge by Query: If you add a few thousand rows to a billion-row fact table, purging all references to that table from the cache would be a waste. Imagine you have a table with sales by day. You load new sales figures daily, so purging the cache by query for recent data is obviously necessary, but data from previous weeks and months may remain untouched, so it makes sense to leave queries against those in the cache. The specifics of this choice are down to you and your ETL process and business rules inherent in the data. This option is the most complex to maintain because you risk leaving behind in the cache data that may be stale but doesn’t match the precise set of queries that you purge against.
Which one is correct depends on
1. Your data load and how many tables you’ve changed 2. Your level of reliance on the cache (can you afford low cache hit ratio until it
warms up again?) 3. Time to reseed new content
If you are heavily dependent on the cache and have large amounts of data in it, you are probably going to need to invest time in a precise and potentially complex cache

74
purge strategy. Conversely, if you use caching as the ‘icing on the cake’ or it’s quick to seed new content, then the simplest option is to purge the entire cache. Simple is good; OBIEE has enough moving parts without adding to its complexity unnecessarily.
Note: OBIEE itself will perform cache purges in some situations including if a dynamic repository variable used by a Business Model (e.g. in a Logical Column) gets a new value through a scheduled initialization block.
Performing the Purge There are several ways in which we can purge the cache. First I’ll discuss the ones that I would not recommend except for manual testing:
1. Administration Tool -> Manage -> Cache -> Purge. Doing this every time your ETL runs is not a sensible idea unless you enjoy watching paint dry (or need to manually purge it as part of a deployment of a new RPD etc).
2. In the Physical table, setting Cache persistence time. Why not? Because this time period starts from when the data was loaded into the cache, not when the data was loaded into your database.
An easy mistake to make would be to think that with a daily ETL run, setting the Cache persistence time to 1 day might be a good idea. It’s not, because if your ETL runs at 06:00 and someone runs a report at 05:00, there is a going to be a stale cache entry present for another 23 hours. Even if you use cache seeding, you’re still relinquishing control of the data accuracy in your cache. What happens if the ETL batch overruns or underruns? The only scenario in which you should use this option is if you’re querying directly against a transactional system and wanted to minimize the number of hits OBIEE made against it. The trade-off being users would deliberately be seeing stale data (but sometimes this is an acceptable compromise, so long as it’s made clear in the presentation of the data).
So, the two viable options for cache purging are:
1. BI Server Cache Purge Procedures 2. Event Polling Table

75
BI Server Cache Purge Procedures
These are often called “ODBC” Procedures but technically ODBC is just one of several ways that the commands can be sent to the BI Server to invoke.
As well as supporting queries for data from clients, (such as Presentation Services) sent as Logical SQL, the BI Server also has its own set of procedures. Many of these are internal and mostly undocumented, but there are some cache management ones that are fully supported and documented. They are:
• SAPurgeCacheByQuery
• SAPurgeCacheByTable
• SAPurgeCacheByDatabase
• SAPurgeAllCache
• SAPurgeCacheBySubjectArea (>= 11.1.1.9)
• SAPurgeCacheEntryByIDVector (>= 11.1.1.9)
The names of these match up to the purge processes described above. The syntax is in the documentation, but we’re interested in how you can invoke them. They are a preferred method for managing the BI Server cache because they enable you to tightly couple our data load (ETL) to your cache purge. Setting the cache to purge based on a drop-dead timer (whether crontab, tivoli, Agent/iBot, whatever) gives you a huge margin of error if your ETL runtime does not remain consistent. Whether it organically increases in runtime as data volumes increase, or it fails and must be fixed and restarted, ETL does not always finish bang-on when it is ‘supposed’ to.
You can call these procedures in the several ways, including:
1. nqcmd - one of the most common ways, repeated on many a blog, but requires nqcmd/OBIEE to be installed on the machine running it. nqcmd is a command-line ODBC client for connecting to the BI Server
2. ODBC - requires BI to be installed on the machine running it to make the OBIEE ODBC driver available
3. JDBC - just requires the OBIEE JDBC driver, which is a single .jar file and thus portable
4. Web Service - the OBIEE BI Server Web Service can be used to invoke these procedures from any machine with no dependencies other than some WSM configuration on the OBIEE server side.
It’s preferable to use JDBC or Web Service, because they can be called from anywhere. In larger organizations, the team building the ETL may have very little to

76
do with OBIEE, and so asking them to install OBIEE components on their server in order to trigger cache purging can be quite an ask. Using JDBC only a single .jar needs copying onto the server, and using the web service not even that:
curl --silent --header "Content-Type: text/xml;charset=UTF-8"
--user weblogic:Admin123
--data @purge_cache_soap.xml
http://192.168.56.102:7780/AdminService/AdminService
[...]
[59118] Operation SAPurgeAllCache succeeded!
[...]
Event Polling Tables (EPT)
NB Not Event “Pooling” Tables as you may have seen this called
The second viable approach to automated cache purging is EPT, which is a decoupled approach to managing the cache purge, with two components:
1. An application (your ETL) inserts a row into the table S_NQ_EPT (which is
created at installation time by the RCU in the BIPLATFORM schema) with the name of the physical table in which data has been changed
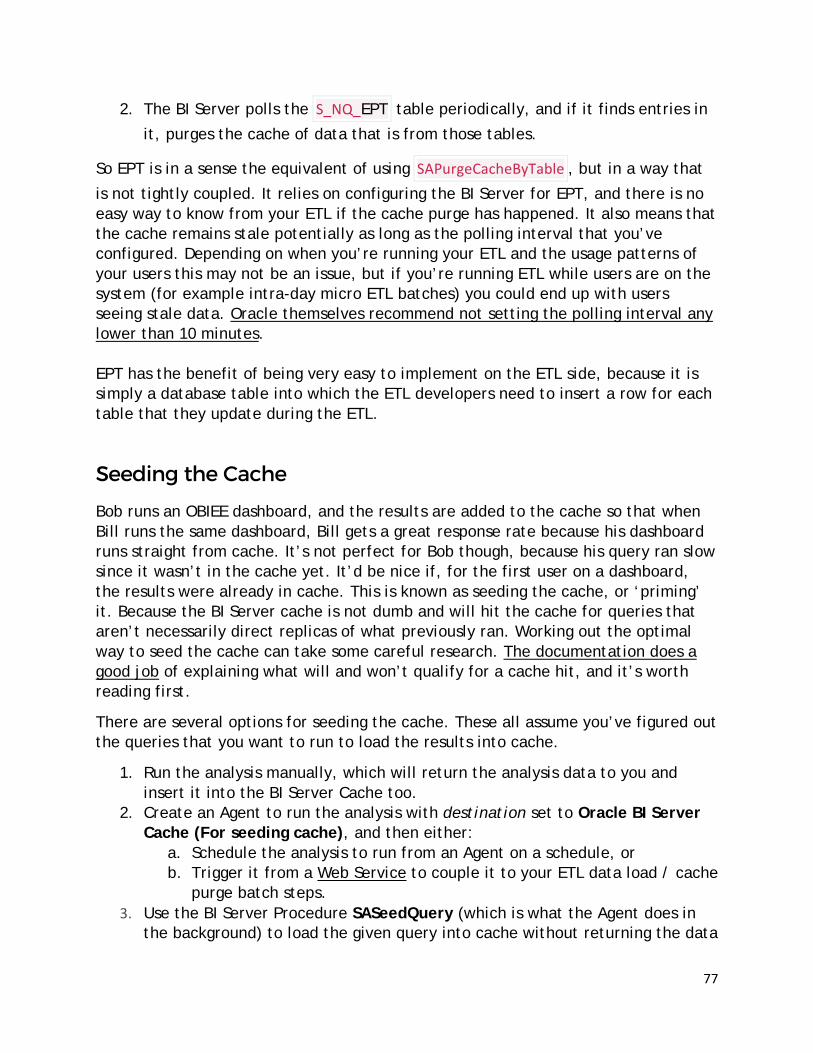
77
2. The BI Server polls the S_NQ_EPT table periodically, and if it finds entries in
it, purges the cache of data that is from those tables.
So EPT is in a sense the equivalent of using SAPurgeCacheByTable , but in a way that
is not tightly coupled. It relies on configuring the BI Server for EPT, and there is no easy way to know from your ETL if the cache purge has happened. It also means that the cache remains stale potentially as long as the polling interval that you’ve configured. Depending on when you’re running your ETL and the usage patterns of your users this may not be an issue, but if you’re running ETL while users are on the system (for example intra-day micro ETL batches) you could end up with users seeing stale data. Oracle themselves recommend not setting the polling interval any lower than 10 minutes. EPT has the benefit of being very easy to implement on the ETL side, because it is simply a database table into which the ETL developers need to insert a row for each table that they update during the ETL.
Seeding the Cache Bob runs an OBIEE dashboard, and the results are added to the cache so that when Bill runs the same dashboard, Bill gets a great response rate because his dashboard runs straight from cache. It’s not perfect for Bob though, because his query ran slow since it wasn’t in the cache yet. It’d be nice if, for the first user on a dashboard, the results were already in cache. This is known as seeding the cache, or ‘priming’ it. Because the BI Server cache is not dumb and will hit the cache for queries that aren’t necessarily direct replicas of what previously ran. Working out the optimal way to seed the cache can take some careful research. The documentation does a good job of explaining what will and won’t qualify for a cache hit, and it’s worth reading first.
There are several options for seeding the cache. These all assume you’ve figured out the queries that you want to run to load the results into cache.
1. Run the analysis manually, which will return the analysis data to you and insert it into the BI Server Cache too.
2. Create an Agent to run the analysis with destination set to Oracle BI Server Cache (For seeding cache), and then either:
a. Schedule the analysis to run from an Agent on a schedule, or b. Trigger it from a Web Service to couple it to your ETL data load / cache
purge batch steps. 3. Use the BI Server Procedure SASeedQuery (which is what the Agent does in
the background) to load the given query into cache without returning the data

78
to the client. This is useful for doing over JDBC/ODBC/Web Service. You could also just run the Logical SQL itself, but you probably don’t want to pull the actual data back to the client, hence using the procedure call instead.
Sidenote - Checking the RPD for Cacheable Tables
The RPD Query Tool is great for finding objects matching certain criteria. However, it seems to invert results when looking for Cacheable Physical tables. If you add a filter of Cacheable = false you get physical tables where Cacheable is enabled. And the same in reverse (Cacheable = true -> shows Physical tables where Cacheable is disabled).

79

80
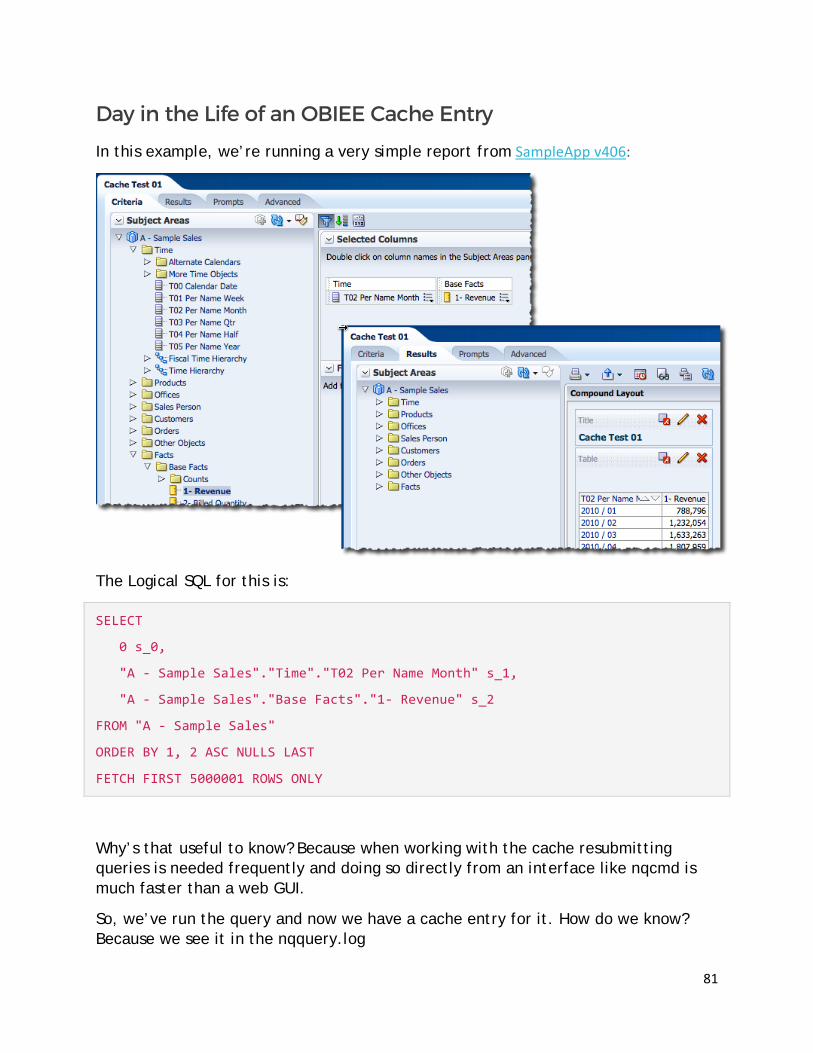
81
Day in the Life of an OBIEE Cache Entry In this example, we’re running a very simple report from SampleApp v406:
The Logical SQL for this is:
SELECT
0 s_0,
"A - Sample Sales"."Time"."T02 Per Name Month" s_1,
"A - Sample Sales"."Base Facts"."1- Revenue" s_2
FROM "A - Sample Sales"
ORDER BY 1, 2 ASC NULLS LAST
FETCH FIRST 5000001 ROWS ONLY
Why’s that useful to know? Because when working with the cache resubmitting queries is needed frequently and doing so directly from an interface like nqcmd is much faster than a web GUI.
So, we’ve run the query and now we have a cache entry for it. How do we know? Because we see it in the nqquery.log

82
[2015-09-23T15:58:18.000+01:00] [OracleBIServerComponent] [TRACE:3] [USER-42]
[] [ecid: 00586hFR07mFw000jzwkno0005Qx00007U,0] [tid: 84a35700]
[requestid: a9730015] [sessionid: a9730000] [username: weblogic]
--------------------
Query Result Cache: [59124] The query for user 'weblogic' was inserted into
the query result cache.
The filename is '/app/oracle/biee/instances/instance1/bifoundation/OracleBIServerComponent/coreapplication_obis1/cache/NQS__735866_57498_0.TBL'.
We see it in Usage Tracking (again, if you don’t have this enabled, go and enable it now):
SELECT TO_CHAR(L.START_TS, 'YYYY-MM-DD HH24:Mi:SS') LOGICAL_START_TS,
SAW_SRC_PATH,
NUM_CACHE_INSERTED,
NUM_CACHE_HITS,
NUM_DB_QUERY
FROM BIEE_BIPLATFORM.S_NQ_ACCT L
ORDER BY START_TS DESC;
We can also see it in the Administration Tool (when connected online to the BI Server):
We can even see it and touch it (figuratively) on disk:

83
So, we have the data in the cache. The same query run again will now use the cache entry, as seen in nqquery.log:
[2015-09-23T16:09:24.000+01:00] [OracleBIServerComponent] [TRACE:3] [USER-21]
[] [ecid: 11d1def534ea1be0:6066a19d:14f636f1dea:-8000-000000000000b948,0:1:1:5]
[tid: 87455700]
[requestid: a9730017] [sessionid: a9730000] [username: weblogic]
--------------------
Cache Hit on query: [[
Matching Query: SET VARIABLE QUERY_SRC_CD='Report',SAW_SRC_PATH='/users/weblogic/Cache Test 01',PREFERRED_CURRENCY='USD';SELECT
0 s_0,
"A - Sample Sales"."Time"."T02 Per Name Month" s_1,
"A - Sample Sales"."Base Facts"."1- Revenue" s_2
FROM "A - Sample Sales"
ORDER BY 1, 2 ASC NULLS LAST
FETCH FIRST 5000001 ROWS ONLY
Created by: weblogic
and in Usage Tracking:
Usage Tracking shows a count of 1 for number of DB queries run, which we would not expect for a cache hit. The nqquery.log shows the same, but no query logged as being sent to the database.
Now, what about if we want to run a query but not use the BI Server Cache? This is an easy one — use the Request Variable DISABLECACHEHIT=1. This overrides the built-in system session variable of the same name. Here we’re running it directly against the BI Server, prefixed onto my Logical SQL. If you want to run it from within OBIEE, you need the Advanced tab in the Answers editor.

84
SET VARIABLE SAW_SRC_PATH='/users/weblogic/Cache Test 01',
DISABLE\_CACHE\_HIT=1:SELECT
0 s_0,
"A - Sample Sales"."Time"."T02 Per Name Month" s_1,
"A - Sample Sales"."Base Facts"."1- Revenue" s_2
FROM "A - Sample Sales"
ORDER BY 1, 2 ASC NULLS LAST
FETCH FIRST 5000001 ROWS ONLY
Now we get a cache “miss,” because we’ve specifically told the BI Server to not use the cache. As you’d expect, Usage Tracking shows no cache hit, but it does show a cache insert.
If you want to run a query without seeding the cache either, you can use DISABLECACHESEED=1:
SET VARIABLE SAW_SRC_PATH='/users/weblogic/Cache Test 01',
DISABLE\_CACHE\_HIT=1,DISABLE_CACHE_SEED=1:SELECT
0 s_0,
"A - Sample Sales"."Time"."T02 Per Name Month" s_1,
"A - Sample Sales"."Base Facts"."1- Revenue" s_2
FROM "A - Sample Sales"
ORDER BY 1, 2 ASC NULLS LAST
FETCH FIRST 5000001 ROWS ONLY
These request variables can be set per analysis, or per user by creating a session initialization block to assign the required values to the respective variables.

85
Cache Location The BI Server cache is held on disk, so it goes without saying that storing it on fast (eg SSD) disk is a Good Idea. There's no harm in giving it its own filesystem on *nix to isolate it from other work (in terms of filesystems filling up) and to make monitoring it super easy.
Use the DATASTORAGEPATHS configuration element in NQSConfig.ini to change the location of the BI Server cache.

86
Managing the OBIEE BI Server Cache from ODI 12c
We talked about how important it is to manage BI Server Cache properly, both in the purging of stale data and seeding of new. In this section, we’ll show you how to manage the BI Server cache from within your ODI batch. By purging and reseeding the cache directly after the data has been loaded into the database, we can achieve optimal cache usage with no risk of stale data.
There are two options for cleanly hooking into OBIEE from ODI 12c with minimal fuss: JDBC, and Web Services. JDBC requires the OBIEE JDBC driver to be present on the ODI Agent machine, while Web Services has zero requirement on the ODI side, but a bit of config on the OBIEE side.
Setting up the BI Server JDBC Driver and Topology Here, we’ll demonstrate using JDBC to connect to OBIEE from ODI. We take the OBIEE JDBC driver bijdbc.jar from $FMWHOME/OracleBI1/bifoundation/jdbc and copy
it to our ODI machine. If you use a local agent for your testing, you can put it in ~/.odi/oracledi/userlib/ . For a standalone agent it should go
in $AGENT_HOME/odi/agent/lib .
[oracle@ip-10-103-196-207 ~]$ cd /home/oracle/.odi/oracledi/userlib/
[oracle@ip-10-103-196-207 userlib]$ ls -l
total 200
-rw-r----- 1 oracle oinstall 332 Feb 17 2014 additional_path.txt
-rwxr-xr-x 1 oracle oinstall 199941 Sep 22 14:50 bijdbc.jar

87
Now fire up ODI Studio, sign in to your repository, and head to the Topology pane. Under Physical Architecture -> Technologies and you’ll see Oracle BI
Right click and select New Data Server. Give it a sensible name and put your standard OBIEE credentials (eg. weblogic ) under the Connection section. Click
the JDBC tab and click the search icon to the right of the JDBC Driver text box. Select the default, oracle.bi.jdbc.AnaJdbcDriver , and then in the JDBC Url box put
your server and port (9703, unless you’ve changed the listen port of OBIEE BI Server).

88
Now click Test Connection (save the data server when prompted, and click OK at the message about creating a physical schema), and select the Local Agent with which to run it. If you get an error, then click Details to find out the problem.
One common problem can be the connection through to the OBIEE server port, so to cut ODI out of the equation try this from the command prompt on your ODI machine (assuming it’s *nix):
nc -vz my-obiee-server.foo.com 9703
If the host resolves correctly and the port is open then you should get:
Connection to my-obiee-server.foo.com 9703 port [tcp/*] succeeded!
If not, you’ll get something like:
nc: my-obiee-server.foo.com port 9703 (tcp) failed: Connection refused
Check the usual suspects: firewall (eg iptables) on the OBIEE server, firewalls on the network between the ODI and OBIEE servers, etc.
Assuming you’ve got a working connection, you now need to create a Physical Schema. Right click on the new data server and select New Physical Schema.

89
OBIEE’s BI Server acts as a “database” to clients, within which there are “schemas” (Subject Areas) and “tables” (Presentation Tables). On the New Physical Schema dialog, you just need to set Catalog (Catalog), and when you click the drop-down, you should see a list of the Subject Areas within your RPD. Pick one - it doesn’t matter which.
Save the physical schema (ignore the context message). At this point your Physical Architecture for Oracle BI should look like this:
Now under Logical Architecture locate the Oracle BI technology, right click on it and select New Logical Schema. From the Physical Schemas dropdown, select the one that you’ve just created. Give a name to the Logical Schema.

90
Your Logical Architecture for Oracle BI should look like this:
Building the Cache Management Routine
Full Cache Purge
Over in the Designer tab go to your ODI project into which you want to integrate the OBIEE cache management functions. Right click on Procedures and select Create New Procedure. Give it a name such as OBIEE Cache - Purge All and set the Target Technology to Oracle BI.
Switch to the Tasks tab and add a new Task. Give it a name, and set the Schema to the logical schema that you defined above. Under Target Command enter the call you want to make to the BI Server, which in this case is…

91
call SAPurgeAllCache();
Save the procedure and then from the toolbar menu click on Run. Over in the Operator tab, you should see the session appear and soon after completing successfully.
You can go and check your BI Server Cache from the OBIEE Administration Tool to confirm that it is now empty:

92
And confirm it through Usage Tracking:
From what’s seen at the default log levels, nothing gets written to either nqquery.log or nqserver.log for this action, unless there is an error in your syntax in which case it is logged in nqserver.log:
Partial Cache Purge
This is the same pattern as above — create an ODI Procedure to call the relevant OBIEE command, which for purging by table is SAPurgeCacheByTable. We’re going to get a little more fancy now, and add a variable that we can pass in so that the Procedure is reusable multiple times over throughout the ODI execution for different tables.
First off, create a new ODI Variable that will hold the name of the table to purge. If you’re working with multiple RPD Physical Database/Catalog/Schema objects, you’ll want variables for those too:
Now, to create a Procedure as before, with the same settings as above, but a different Target Command, it will be based on SAPurgeCacheByTable and pass in the

93
four parameters as single quoted, comma separated values. Note that these are the Database/Catalog/Schema/Table as defined in the RPD. So, “Database” is not your TNS or anything like that, it’s whatever it’s called in the RPD Physical layer. Same for the other three identifiers. If there’s no Catalog (and often there isn’t) just leave it blank.
When including ODI Variable(s), make sure you still single-quote them. The command should look something like this:
Now let’s seed the OBIEE cache with a couple of queries, one of which uses the physical table and one of which doesn’t. When we run our ODI Procedure, we should see one cache entry go and the other remain. Here’s the seeded cache:

94
And now after executing the procedure:
And confirmation through Usage Tracking of the command run:
Cache Seeding As before, we use an ODI Procedure to call the relevant OBIEE command. To seed the cache, we can use SASeedQuery which strictly speaking isn’t documented but a quick perusal of the nqquery.log when you run a cache-seeding OBIEE Agent shows that it is what is called in the background, so we’re going to use it here (and it’s mentioned in support documents on My Oracle Support, so it’s not a state secret). The documentation here gives some useful advice on what you should be

95
seeding the cache with -- not necessarily just exact copies of the dashboard queries that you want to get a cache hit for.
Since this is a cookie-cutter of what we just did, you can use the Duplicate Selection option in ODI Designer to clone one of the other OBIEE Cache procedures that you’ve already created. Amend the Target Command to:
When you run this, you should see a positive confirmation in the nqserver.log of the cache seed:
[2015-09-23T23:23:10.000+01:00] [OracleBIServerComponent] [TRACE:3]
[USER-42] [] [ecid: 005874imI9nFw000jzwkno0007q700008K,0] [tid: 9057d700]
[requestid: 477a0002] [sessionid: 477a0000] [username: weblogic]
--------------------
Query Result Cache: [59124]
The query for user 'weblogic' was inserted into the query result cache.
The filename is '/app/oracle/biee/instances/instance1/bifoundation/OracleBIServerComponent/coreapplication_obis1/cache/NQS__735866_84190_2.TBL'. [[
A very valid alternative to calling SASeedQuery would be to call the OBIEE SOA Web Service to trigger an OBIEE Agent that populated the cache (by setting 'Destination' to 'Oracle BI Server Cache (For seeding cache)'). OBIEE Agents can also be 'daisy chained' so that one Agent calls another on completion, meaning that ODI could kick off a single 'master' OBIEE Agent which then triggered multiple 'secondary' OBIEE Agents. The advantage of this approach over SASeedQuery is that cache seeding is more likely to change as OBIEE usage patterns do, and it is easier for OBIEE developers to maintain all the cache seeding code within 'their' area (OBIEE Presentation Catalog) than put in a change request to the ODI developers each time to change a procedure.

96
Integrating it in the ODI batch You have two options here, using Packages or Load Plans. Load Plans were introduced in ODI 11.1.1.5 and are a clearer and more flexible of orchestrating the batch.
To use it in a load plan, create a serial step that will call a mapping followed by the procedure to purge the affected table. In the procedure step in the load plan, set the value for the variable. At the end of the load plan, call the OBIEE cache seed step:
Alternatively, to integrate the above procedures into a Package instead of a load plan, you need to add two steps per mapping. First, the variable is updated to hold the name of the table just loaded, and then the OBIEE cache is purged for the affected table. At the end of the flow a call is made to reseed the cache:

97
These are some very simple examples, but hopefully illustrate the concept and the powerful nature of integrating OBIEE calls directly from ODI.

98
Connecting Oracle Data Visualization Desktop to OBIEE Recently, we have been asked a lot of questions surrounding Oracle’s new Data Visualization Desktop tool and how it integrates with OBIEE. Rather than referring people to the Oracle docs on DVD, I decided to share with you my experience connecting to an OBIEE 12c instance and take you through some of the things I learned through the process.
Connecting to DVD to OBIEE is like database connection with DVD, but allows the user to pull in data at pre-existing report level. In this tutorial, we’ll use the CollaborateBI (previously called ChitChat) demo server as the OBIEE source and created some sample reports in answers to test out with DVD.
From the DVD Data Sources page, clicking "Create New Data Source" brings up a selection pane with the option to select “From Oracle Applications.”
Clicking this option brings up a connection screen with options to enter a connection name, URL (location of the reports you want to pull in as a source), username, and

99
password respectively. This seems like a pretty straightforward process. Reading the Oracle docs on connectivity to OBIEE with DVD say to navigate to the web catalog, select the folder containing the analysis you want to use as a source, and then copy and paste the URL from your browser into the URL connection in DVD. However, using this method will cause the connection to fail.
To get Data Visualization Desktop to connect properly, you must use the URL that you would normally use to log into OBIEE analytics with the proper username and password.

100
Once connected, the web catalog folders are displayed.

101
From here, you can navigate to the analyses you want to use for data sources.

102
Selecting the analysis that you want to use as your data source is the same process as selecting schemas and tables from a database source. Once the selection is made, a new screen is displayed with all the tables and columns that were used for the analysis within OBIEE.

103
From here you can specify each column as an attribute or measure column and change the aggregation for your measures to something other than what was imported with the analysis.
Clicking "Add to Project" loads all the data into DVD under Data Elements and is displayed on the right-hand side just like subject area contents in OBIEE.
The objective of pulling data in from existing analyses is described by Oracle as revisualization. Keep in mind that Data Visualization Desktop is meant to be a discovery tool and not so much a day-to-day report generator.
The original report was a pivot table with Revenue and Order information for geographical, product and time series dimensions. Let’s say James just wanted to look at the revenue for all cities located in the Americas by a specific brand for the year 2012.
Dragging in the appropriate columns and adding filters took seconds and the data loaded almost instantaneously. James changed the view to horizontal bar and added a desc sort to Revenue and this was my result:

104
Notice how the revenue for San Francisco is much higher than any of the other states. Let’s say James wants to get a closer look at all the other states without seeing the revenue data for San Francisco. James could create a new filter for City and exclude San Francisco from the list or he could just create a filter range for Revenue. Choosing the latter gave him the option of moving a slider to change his revenue value distribution and shows him the results in real time. Pretty cool, right?

105
Taking one report and loading it in can open a wide range of data discovery opportunities, but what if there are multiple reports you want to pull data from? You can do this and combine the data together in DVD if the two reports contain columns to join the two together.
Going back to the OBIEE connection, there are two reports created on the demo server that both contain customer data.

106
By pulling in both the Customer Information and Number of Customer Orders Per Year report, Data Visualization Desktop creates two separate data sources which show up under Data Elements.

107
Inspecting one of the data sources shows the match between the two is made on both Customer Number and Customer Name columns.
Note: It is possible to make your own column matches manually using the Add Another Match feature.
By using two data sets from two different reports, you can blend the data together to discover trends, show outliers, and view the data together without touching the database or having to create new reports within OBIEE.

108
The ability to connect directly to OBIEE with Data Visualization Desktop and pull in data from individual analyses is a very powerful feature that makes DVD’s that much greater. Combining data from multiple analyses blend them together internally creates some exciting data discovery possibilities for users with existing OBIEE implementations.