1.0game components - compass games homepagecompassgames.com/downloads/bop rules 02 nov 2014.docx ·...
TRANSCRIPT
Balance of Powers
Table of Contents
1.0 Game Components....................................................................................................................................................4
1.1 Rules......................................................................................................................................................................4
1.2 Maps and the Sea Chart........................................................................................................................................4
1.3 Pieces....................................................................................................................................................................7
1.31 Markers.............................................................................................................................................................7
1.32 Units..................................................................................................................................................................8
1.33 Fortresses..........................................................................................................................................................9
1.34 Unit Counter Samples Chart............................................................................................................................10
1.35 Unit Colors.......................................................................................................................................................11
1.36 Acronyms and Abbreviations...........................................................................................................................11
1.4 Dice......................................................................................................................................................................12
2.0 Fundamental Concepts............................................................................................................................................12
2.1 Glossary...............................................................................................................................................................12
2.2 Sides, Nations and Players...................................................................................................................................13
2.3 Scenarios.............................................................................................................................................................14
2.4 Resource Points (RP) & Africa Points (AP)...........................................................................................................14
2.5 Locations, Adjacency & Control...........................................................................................................................15
2.6 Stacking & Forces................................................................................................................................................15
2.7 Major & Minor Battles.........................................................................................................................................16
2.8 Tactical Innovation (TI)........................................................................................................................................16
2.9 Demoralization, Crisis, and Conquest..................................................................................................................17
3.0 Supply......................................................................................................................................................................18
3.1 Demonstrate Supply.............................................................................................................................................19
3.2 Consequences to Unsupplied Units.....................................................................................................................20
3.3 Supply Example...................................................................................................................................................20
4.0 The Sequence of Play..............................................................................................................................................22
5.0 Seasonal Turn Sequence..........................................................................................................................................23
5.1 Force Pools Additions..........................................................................................................................................23
1
5.2 Resource Tabulation............................................................................................................................................23
5.21 Posting.............................................................................................................................................................23
5.22 Conversion.......................................................................................................................................................24
5.23 Transfer...........................................................................................................................................................24
5.24 Requisitioning..................................................................................................................................................24
5.3 Resource Reductions...........................................................................................................................................24
5.31 Air Raids...........................................................................................................................................................25
5.32 Submarine Warfare.........................................................................................................................................25
5.33 Surface Raiders................................................................................................................................................27
5.34 Blockade..........................................................................................................................................................27
5.35 Stockholm........................................................................................................................................................28
5.36 Demoralization................................................................................................................................................28
6.0 Monthly Turn Sequence..........................................................................................................................................28
6.1 Diplomacy Phase.................................................................................................................................................28
6.2 Construction Phase..............................................................................................................................................32
6.21 Muster.............................................................................................................................................................32
6.22 Procurement & Repair.....................................................................................................................................33
6.3 Aviation Phase.....................................................................................................................................................34
6.31 Patrols.............................................................................................................................................................34
6.32 Dogfights.........................................................................................................................................................35
6.33 Air Superiority..................................................................................................................................................36
6.4 Admiralty Phase...................................................................................................................................................36
6.41 At Sea vs. In Port..............................................................................................................................................36
6.42 Naval Zone of Patrol (NZOP)............................................................................................................................36
6.43 General Quarters (GQ) sub-phases..................................................................................................................36
6.44 Voluntary Return to Port.................................................................................................................................37
6.45 Mines...............................................................................................................................................................37
6.46 Optional Admiralty Rule..............................................................................................................................38
6.5 Campaign Phase..................................................................................................................................................39
6.51 Weather...........................................................................................................................................................39
6.52 Fortnights........................................................................................................................................................39
6.6 Aerodrome Phase................................................................................................................................................39
6.7 Commissariat Phase............................................................................................................................................40
6.8 Revolution Phase.................................................................................................................................................40
2
7.0 Naval Movement.....................................................................................................................................................40
7.1 Radius, Range and Overage.................................................................................................................................41
7.2 General Movement Rules....................................................................................................................................41
7.3 Map Movement...................................................................................................................................................42
7.4 Interrupt..............................................................................................................................................................42
7.5 Sea Chart Movement...........................................................................................................................................42
7.6 Naval Transport...................................................................................................................................................43
7.7 Amphibious Assault.............................................................................................................................................44
8.0 Naval Combat..........................................................................................................................................................44
8.1 Contact................................................................................................................................................................45
8.2 Search..................................................................................................................................................................45
8.3 Surface Combat...................................................................................................................................................46
8.4 Submarine Combat..............................................................................................................................................47
8.5 Mandatory Return to Port...................................................................................................................................47
8.6 Naval Combat Example, the Battle of Jutland......................................................................................................48
9.0 Land Movement......................................................................................................................................................54
9.1 Marching.............................................................................................................................................................54
9.2 Railroad movement.............................................................................................................................................55
9.3 Combining Rail and March Movement................................................................................................................55
9.4 Land Movement to/from Port Boxes...................................................................................................................55
9.5 Fresh Water Movement & Flotillas......................................................................................................................56
9.6 Over Extended (Over X).......................................................................................................................................56
9.7 Entrenching and Trenches...................................................................................................................................56
10.0 Land Combat...........................................................................................................................................................57
10.1 Check Supply.......................................................................................................................................................58
10.2 Bombard Fortifications........................................................................................................................................58
10.3 Spend RP or AP....................................................................................................................................................58
10.4 Defender Commit Reserves.................................................................................................................................58
10.5 Modifiers.............................................................................................................................................................59
10.51 Air Superiority..............................................................................................................................................59
10.52 Artillery........................................................................................................................................................59
10.53 Effectiveness................................................................................................................................................59
10.54 Leadership...................................................................................................................................................60
10.55 Odds............................................................................................................................................................60
3

10.56 Over X..........................................................................................................................................................60
10.57 Terrain.........................................................................................................................................................60
10.58 Entrenchment and Reserves........................................................................................................................61
10.59 Breaches......................................................................................................................................................61
10.6 Land Combat Dice Roll.........................................................................................................................................62
10.7 Implement Results...............................................................................................................................................63
10.71 Loss Points and Attrition..............................................................................................................................63
10.72 Give Ground (GG)........................................................................................................................................64
10.73 Breakthrough (Bthru)..................................................................................................................................65
10.74 Demoralization Die Roll (DDR).....................................................................................................................65
10.8 Further Movement and Combat..........................................................................................................................65
10.9 Land Combat Example, Dawn of Verdun.............................................................................................................66
Balance of Powers (BoP) is a strategic level, table top simulation of the First World War in which players maneuver air, land and naval forces across maps in monthly turns to win battles, reduce economies and capture key objectives to “win” WWI.
1.0 Game Components
1.1 Rules
The rules are divided into numbered sections for ease of reading and reference. The parenthetical references sprinkled throughout the text, such as (6.21), refer readers to rules sections related to the matter at hand.
1.2 Maps and the Sea Chart
1.21 BoP has three map sheets: 1) North Europe, 2) South Europe, and 3) the Ottoman Empire, each scaled at about 33 miles per hex. The Sea Chart, an abstract diagram of the world’s oceans and key ports, and the Africa map, scaled at about 200 miles per hex, are both imbedded on the eastern side of the Ottoman map sheet. The map sheets do NOT need to be physically joined to play the game; they can be kept separate. However, maps can be connected to form a contiguous surface if desired.
4

1.22 The maps consist of hexes displaying a variety of features. Broadly speaking, there are three types of hexes, all-land, all-water and coast which is both land and water. Coast and all-water hexes are water hexes; they display either lake or ocean. Any amount of a terrain depiction in a land hex grants that hex the properties of that terrain. Land hexes display various types of terrain which affects combat, movement and stacking as summarized in the terrain effects chart below. ARMP = All Remaining Movement PointsNE = No EffectMP = Movement PointsNMP = Naval Movement Points
5

6

Design Note: With respect to Russian territory, in contrast to many other WWI games, BoP portrays the area up to the December, 1917, armistice line plus a 100 mile “buffer,” but no more. The Russian Civil War, and Germany’s final offensive in the East, the Faustschlag of February/March 1918, both extended beyond the board edge, but occurred after Russia’s meaningful involvement in WWI had ended so they are not portrayed. Also, across the map some ports lack names because they are just the “port” of the nearby city/town which is named or they represent a convenient natural anchorage.
1.23 The Sea Chart, or “chart” for short, consists of three kinds of spaces. The light blue rectangles (sometimes with rounded corners) with white printed names of bodies of water such as “South Atlantic” are called ocean boxes and represent bodies of water that do not appear on any map. The dark grey, elongated or truncated hexes with black print such as “Gulf of Guinea” are called grey spaces and represent bodies of water that do appear on a map and are therefore windows to a corresponding cluster of hexes on a map. As explained later, there will never actually be any naval unit “on” a grey space. Instead, naval units on a hex of a map are considered to be “in” the corresponding grey space of the chart. The four-sided boxes (sometimes with rounded corners) of various colors that contain the names of land masses or cities are called port boxes and represent areas of land and water which do not appear on any map. Port boxes framed in bold such as U.S.A. and Japan are “Home Country” ports (2.24). The Sea Chart and maps connect as indicated on map edge notes.
1.24 The Africa map has additional restrictions. Naval units must pay THREE movement points to enter a hex on the Africa map; even when they enter from a connecting ocean box. Only Africa-designated (AF) land units can be used in Africa and they cannot leave. AF units show only an effectiveness score; they have no printed movement score. AF units that start outside of Africa (British IEF and WIR units) can move across the Sea Chart via naval transport to reach Africa, but cannot enter the European or Ottoman maps. Non-AF land units can only enter the Africa map as passengers on naval transport, and are eliminated if they debark on the Africa map.
1.3 Pieces
The playing pieces are called counters; there are two types: markers and units.
1.31 Markers
Markers represent conditions that affect units and also serve to track certain quantities. Some markers are placed on units during play as needed. Other markers are placed on the General Records Track (GRT) or other specific tracks to track time and certain values.
7

1.32 Units
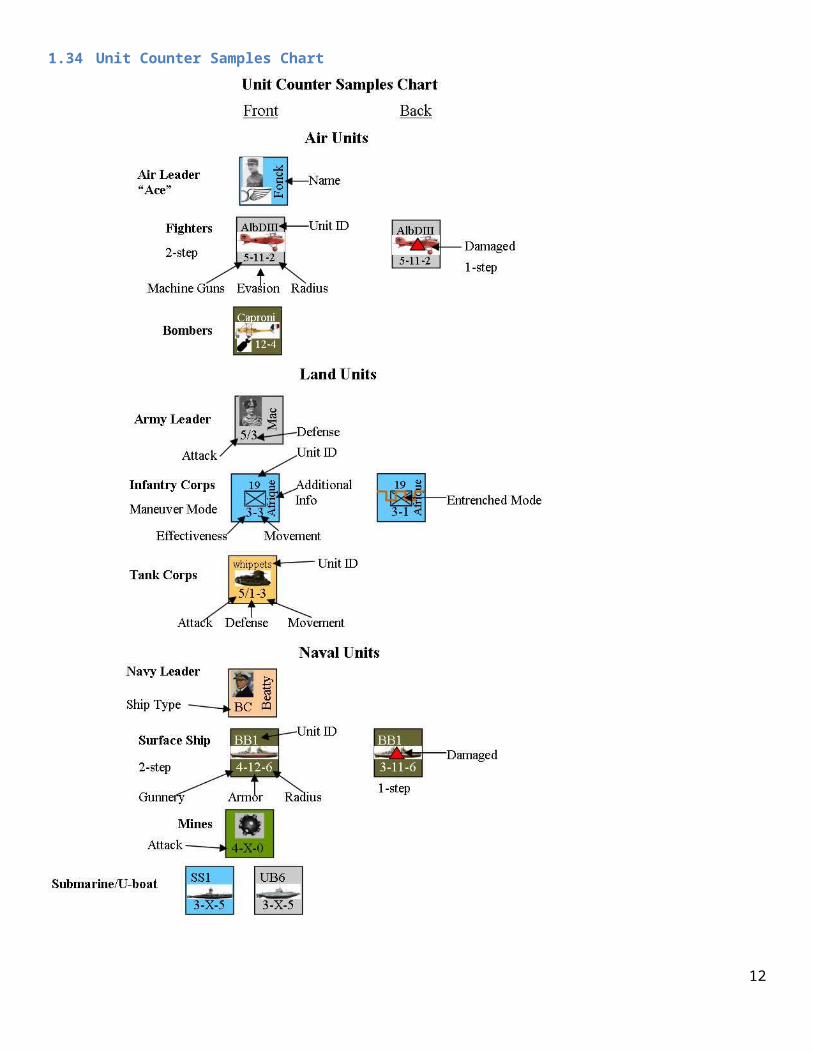
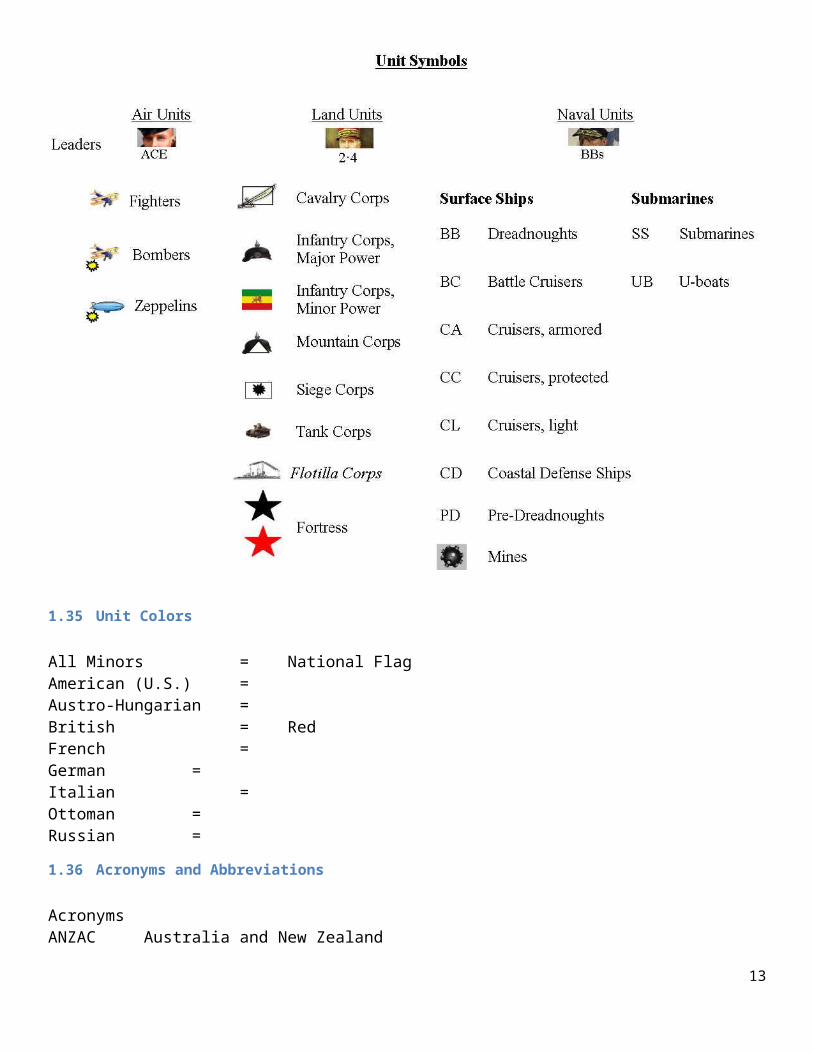
Units are sub divided into three main groups: air, land and naval. Air units include aces, fighters and bombers (British brigade-equivalents). Land units included famous (or infamous) army leaders, corps, and fortresses. Naval units include famous navy leaders, different types of surface ship/mine and submarine/U-boat squadrons, and fortresses. Note that fortresses can be both land and naval units. Unit counters display game information with symbols, statistics, and color as indicated on the Unit Counter Samples chart (1.34). Except for leaders and mines, each of a unit’s two sides has a different meaning. Always apply the mode and scores based on the side that is facing up for view. With one exception, units eliminated during play always return to their respective force pools (5.1) where they can be (re)procured (6.22) in order to reenter play via the usual muster (6.21) process. The exception is for fortresses (1.33), once ruined a fortress is permanently eliminated and cannot be repaired.
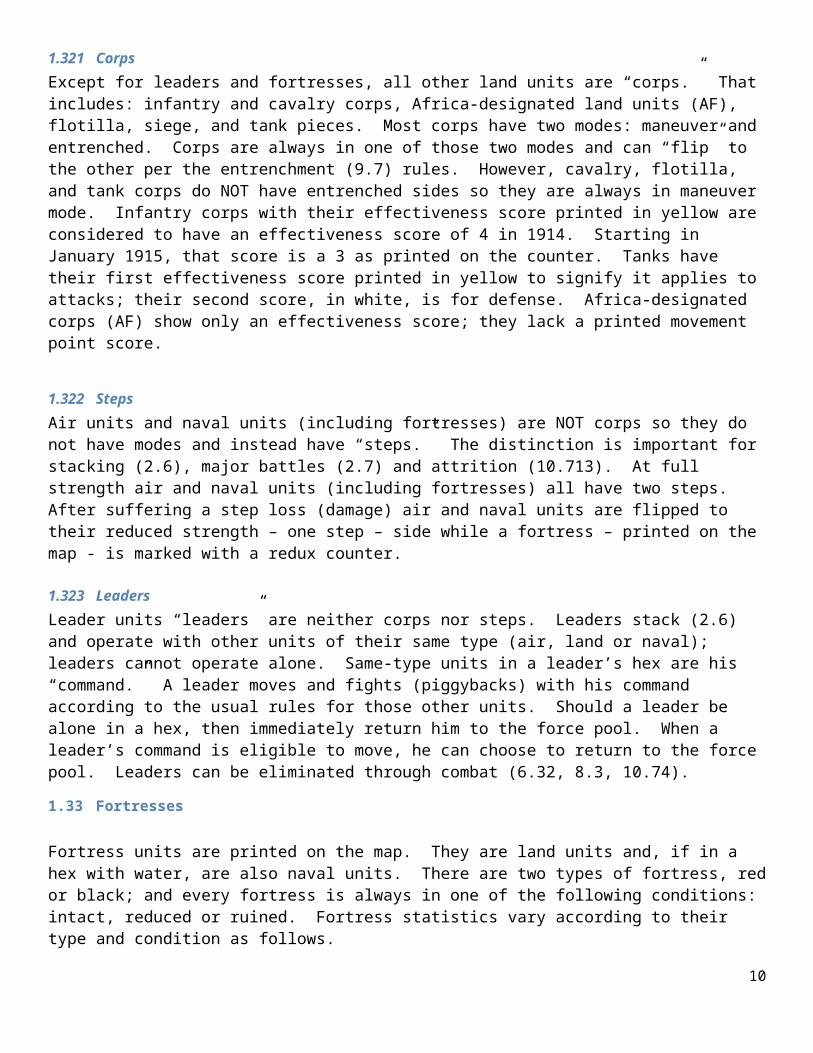
1.321 Corps Except for leaders and fortresses, all other land units are “corps.” That includes: infantry and cavalry corps, Africa-designated land units (AF), flotilla, siege, and tank pieces. Most corps have two modes: maneuver and entrenched. Corps are always in one of those two modes and can “flip” to the other per the entrenchment (9.7) rules. However, cavalry, flotilla, and tank corps do NOT have entrenched sides so they are always in maneuver mode. Infantry corps with their effectiveness score printed in yellow are considered to have an effectiveness score of 4 in 1914. Starting in January 1915, that score is a 3 as printed on the counter. Tanks have their first effectiveness score printed in yellow to signify it applies to attacks; their second score, in white, is for defense. Africa-designated corps (AF) show only an effectiveness score; they lack a printed movement point score.
1.322 StepsAir units and naval units (including fortresses) are NOT corps so they do not have modes and instead have “steps.” The distinction is important for stacking (2.6), major battles (2.7) and attrition (10.713). At full strength air and naval units (including fortresses) all have two steps. After suffering a step loss (damage) air and naval units are flipped to their reduced strength – one step – side while a fortress – printed on the map - is marked with a redux counter.
1.323 LeadersLeader units “leaders” are neither corps nor steps. Leaders stack (2.6) and operate with other units of their same type (air, land or naval); leaders cannot operate alone. Same-type units in a leader’s hex are his “command.” A leader moves and fights (piggybacks) with his command according to the usual rules for those other units. Should a leader be alone in a hex, then immediately return him to the force pool. When a leader’s command is
8

eligible to move, he can choose to return to the force pool. Leaders can be eliminated through combat (6.32, 8.3, 10.74).
1.33 Fortresses
Fortress units are printed on the map. They are land units and, if in a hex with water, are also naval units. There are two types of fortress, red or black; and every fortress is always in one of the following conditions: intact, reduced or ruined. Fortress statistics vary according to their type and condition as follows.
Fortress Table
Red Fortress Effectiveness Movement Gunnery Armor Step StrengthIntact 4 0 4 10 2Reduced 3 0 NA NA 1Ruined NA NA NA NA NA
Black FortressIntact 3 0 3 9 2Reduced 2 0 NA NA 1Ruined NA NA NA NA NA
1.331 NA means not applicable and indicates that the fortress has completely lost that characteristic. Therefore, a reduced fortress cannot participate in naval combat and a ruined fortress has no effect whatsoever on combat, movement, or supply.
1.332 Each fortress step is the equivalent of a land corps for combat odds and losses.
1.333 A fortress (intact or reduced) belongs to its original owner until it is ruined at which point it no longer exists as a unit. Use “REDUX” counters to show that a fortress has been reduced. When a fortress is destroyed, mark it with a “RUIN” counter.
1.334 A home country, interior fortress hex is one located in a home country (2.24) that does NOT have an international border along at least one of its hex sides. For example, in France, Verdun (hex 0922) is an interior fortress while Belfort (hex 1127) is not. The fate of these fortresses can affect demoralization (2.92) and victory.
1.334 Every national capital is also automatically considered a black fortress.
Design Note: Unit sizes vary based on type and theater. While referred to as “corps” for all game purposes, AF, tank, and siege units are actually battalions of 500-1,000 men with 50-250 machines. True corps have 25,000 troops (infantry) or 8,000 mounted troopers (cavalry). Fortresses include about 12,000 men. Naval units represent squadrons of 4-12 vessels per unit (vessels per piece are: BB-4, CC-6, SS-12) with again as many “built-in” destroyers for surface ships. Air units include about 50 fighters or 12 bombers per step.
9
1.34 Unit Counter Samples Chart
10

1.35 Unit Colors
All Minors = National FlagAmerican (U.S.) =Austro-Hungarian =British = RedFrench =German =Italian =Ottoman =Russian =
1.36 Acronyms and Abbreviations
AcronymsANZAC Australia and New ZealandBEF British Expeditionary Force (the original “Old Contemptibles”)EEF Egyptian Expeditionary ForceGEA German East AfricaGSW German Southwest Africa
11
IEF Indian Expeditionary Force (Indian units)JG Jagdgeschwader (Hunting Group, German fighters)KAM KamerunKAR Kings African RiflesLoA Lawrence of ArabiaMEF Mediterranean Expeditionary ForceRCTC Royal Corps of Colonial Troops (Italian Imperial Forces)RG Reserve GroupSAFH South African Frontier HorseSAH South African HorseSAI South African InfantrySAMR South African Mounted RiflesSAS South African Siege ArtilleryTC Colonial Troops (French Imperial Forces)WAFF West Africa Field ForceWDF Western Desert ForceWIR West Indies Regiment
AbbreviationsAbys AbyssiniaArm ArmenianBav BavarianCol ColonialCauc CaucasusF Pub Force PubliqueGd GuardGrndr GrenadierLstrum LandstrumLwhr Landwehr (W=West, O=Ost, R=Reserve)Roman RomanianRs ReserveSax SaxonSib SiberianTerr TerritorialsTrkstn Turkestan
1.4 Dice
The term dice roll is abbreviated as 2d6 and means roll two six-sided dice to sum the dots normally. The term die roll is abbreviated 1d6 and means roll one die to read the dots. 3d6 means roll and sum three dice. A raw roll is what the dice show while a final roll is one that includes all modifiers.
2.0 Fundamental Concepts
2.1 Glossary
Adjacent: Locations directly connected to each other (2.52).12
Africa-Designated Land Unit (AF): Only these land units can be used on the Africa map; they have no printed movement point score (1.24, 1.321).Africa Point: A measure of imperial resources in Africa (2.43).All Remaining Movement Points (ARMP or ARNMP): The cost of entering difficult or vast locations.Bargaining Chip: A population center hex framed in grey (1.22). Box: A four-sided shape on the Sea Chart (1.23) that represents a body of water or port NOT portrayed on a map.Breakthrough: A decisive (and elusive) combat result (10.73).Chronological Order of Battle (COB): A comprehensive list of which units arrive to the game and when (13.0).Conquest: A devastating consequence of losing your national capital (2.93).Control: Refers to which side “owns” a location (2.53).Corps: A land unit which is neither a leader nor a fortress (1.321).Crisis: A nation’s demoralization limit at which it suffer adverse consequences (2.92).Demoralization: A measure of declining national morale (2.9).Demoralization Die Roll (DDR): A 1d6 die roll to determine if demoralization occurs (10.74).Force: A single unit or stack of units (2.61).Grey Space: An elongated or truncated hex on the Sea Chart (1.23) that represents a body of water portrayed on a map.Home Country: A location in a unit’s country of origin (2.24).Location: A map hex or Sea Chart box (2.51).Major Power: Austria-Hungary, Britain, France, Germany, Italy, Ottoman Empire, Russia and U.S.A. (2.23)Marker: A game piece that represents a condition affecting units (1.31).Minor Power: Any nation that is not a major power (2.23).Mode: A condition affecting a corps, either entrenched on one side or maneuver on the other (1.321).Ocean Box: A light blue rectangle (possibly with rounded corners) on the Sea Chart (1.23) that represent a body of water which does not appear on any map.Population Center: A capital, city, port or fortress on a map or the Sea Chart (1.22).Port Box: A square or rectangle (possibly with rounded corners) on the Sea Chart (1.23) that contains the name of a body of land or city and represents a port that does not appear on a map. Radius: A naval unit’s “printed” radius score (7.1).Range: Twice a naval unit’s “printed” radius score (7.1).Resource Point: A measure of national resources used in Europe and the Ottoman Empire (2.4).Revolution: A collapse of national authority which can follow a crisis (6.8).Scenario: A specific game to be played (12.0).Sickness: A condition that can destroy British-colored land units in Africa (6.513).Side: Either the Central Powers or the Entente Powers (2.21).Step: A fraction of an air, naval or fortress unit (1.322)Tactical Innovation (TI): A measure of a side’s progress toward military modernization (2.8).Trench Battle: An attack against an entrenched defender without benefits of TI or a breakthrough (9.73)Unit: A game piece that represents a real world combat formation (1.32).
2.2 Sides, Nations and Players
2.21 A game of BoP includes two sides, the Central Powers (CP) and the Entente Powers (EP), as well as a Neutral Camp (NC). Each side and the NC consist of nations. The two sides, CP and EP, and all of their respective pieces are at war and “enemy” to each other. Nations on the same side, and their pieces, are “friendly” to each other. Nations in the NC are neutral and not at war. Each nation always belongs to one side or is in the NC.
13
2.22 Nations in the NC are neither friend nor enemy to either side. A Neutral’s units are NOT set up and a major power neutral does not collect Resource Points until it joins a side. However, neutrals do add units as per the order of battle so that when they do join a side they will have all units accumulated to date in their force pool for set up as appropriate.
2.23 There are two kinds of nations in BoP, major powers and minor powers. The major powers include: Austria-Hungary, Britain, France, Germany, Italy, The Ottoman Empire, Russia and the United States. All other nations are minor powers including: Abyssinia, Albania, Arabia, Belgium, Bulgaria, Greece, Japan, Montenegro, Norway, Persia, Portugal, Romania, Serbia, Sweden, and Switzerland.
2.24 Home Country: On the European and Ottoman maps, hexes within a major or minor power are “home country” hexes of that power. On the Sea Chart, port boxes titled Australia, Canada, India, Japan and USA are Home Country port boxes which function as Home Country hexes for units of their nationality. Home country port boxes can NOT be subject to amphibious assault (7.7).
2.25 Colonies on the maps are controlled by the following nations, but are NOT home country hexes for those nations.
Nation ColoniesBelgium Belgian KongoBritain Abidan, Aden, British East Africa, Cyprus, Egypt, Malta, Nigeria, North
Rhodesia, Sudan, South AfricaFrance Dahomey, French Equatorial Africa (FEA), Jibouti, SaharaGermany German East Africa, Southwest Africa, KamerunItaly Eritrea, Italian Somaliland, LibyaOttoman Empire HejazPortugal Angola, Mozambique
2.26 Australia, Canada and India are treated as “British” for all purposes except that their units can also draw supply (3.0) from and must muster (6.21) in their respective Home Country boxes except as modified by scenario special rules
2.27 PLAYERS: Although solitaire play is easy, BoP was designed for two players and can accommodate as many as seven. When two people play, one controls the Central Powers and the other the Entente Powers. When more than two people play, simply assign each player one or more major powers as desired and play as the CP team versus the EP team. The nations on a side always take their turn together at the same time.
2.3 Scenarios
Scenarios are the “matches” one plays in BoP. To actually play the game, the players must select a scenario (12.0) from the scenario book and then follow the instructions on starting alliances, duration, special rules, the order of battle (OB), and victory conditions.
2.4 Resource Points (RP) & Africa Points (AP)
14
2.41 Major Powers (2.23) collect and spend Resource Points (RP) to make diplomacy die rolls (6.124), procure/repair (6.22) air, land and naval units, fund dreadnought (7.25) and rail moves (9.2), make land attacks (10.3), absorb certain losses in combat (10.711), and sustain attrition (10.713).
2.42 Minor powers (2.23) have military and naval forces but do not collect RPs. Instead, a major power can spend its RPs to support attacks and procurement for any minor on its side if it can trace a supply line to that minor power’s capital. However, each minor is allowed one free land attack per year.
2.43 In Africa, nations use Africa Points (AP) to fund attacks, construct/repair AF land (not air/naval) units, make rail moves, absorb certain combat losses, and make diplomacy die rolls for Abyssinia or Portugal.
2.44 RP and AP are always expressed as a positive number or zero which can be tracked on the appropriate scale. When spending RP or AP, nations may not go below zero. Deficit spending is NOT possible. Once a nation reaches zero RP or AP, it cannot avail those actions which require RP/AP until it acquires more RP/AP.
2.5 Locations, Adjacency & Control
2.51 The term “location” refers equally to a map hex, Sea Chart box or Sea Chart grey space. When there is a need to distinguish between these, the rules will use the more specific terms, hex, box or grey space.
2.52 Two locations are “adjacent” if physically touching (connected) or labeled on the map edge as transit points. For example, in France hex 0720 (Maubeuge) is adjacent to hex 0621 (St. Quentin) because they are physically touching as are the North Atlantic and Mid Atlantic Ocean boxes. In Russia, hexes 4201 through 5001 are all “adjacent” to the Petrograd port box because, per the map edge instructions, they lead to the Petrograd port box. Note: certain boxes and grey spaces on the Sea Chart (1.23) have their corners rounded so that they do NOT touch; such locations are NOT adjacent.
2.53 At the start of a scenario, a nation controls all locations within its set up area. During play, a nation gains control of an enemy location if and when it solely occupies that location with at least one infantry or mountain corps. Should opposing sides occupy the same port box – only possible during amphibious assault – then the side that was there first actually “controls” that port box. Should two or more nations on the same side simultaneously capture an enemy location then they must decide which one of them actually gains control. A location is considered friendly to all nations on the same side as the nation that controls it.
2.531 Corps cannot change control of friendly/same-side locations. For example, if Britain and France are both EP powers then a British corps in a French-controlled hex of France does NOT change control of that hex to Britain. But, the British can treat that hex as friendly since it is controlled by a same-side power.
2.532 If and when a side regains control of a formerly enemy controlled location within the boundaries of a friendly/same-side nation then that location reverts to the original owner. For example, if a British force liberates Lille from German control then Lille returns to French control.
2.533 BoP provides control markers for each side with which to mark control when necessary to alleviate confusion. However, players do not need to meticulously mark every location.
2.6 Stacking & Forces
2.61 Players can place more than one unit per location. A “stack” exists where more than one unit from the same side is present in the same location. The term “force” applies equally to either a single unit or a stack of units. A stacking limit is the maximum number of units allowed per location.
15

2.62 At no time can a single location simultaneously contain more than one army leader, six corps, and any number of steps (air/naval and fortress) and any number of air/navy leaders. In desert or marsh hexes which lack an infrastructure marker, rail road, or population center (1.22), the corps limit falls to one vice the usual six while all other elements of the limit remain the same. Once these limits are reached, additional friendly units cannot enter that full location, even just to move through it. However, these limits do NOT prevent enemy units from indicating that they “intend” to enter a location to attack the current occupants (9.15).
2.63 When opposing land units are in the same port box – only possible during amphibious assault – they should be kept in separate stacks. In that case, each stack is treated as a separate “location” within that port box.
2.64 Surface ships and submarine units cannot comingle into a single stack. When surface units and submarines appear in the same location then they are considered to be separate forces.
2.65 Units of different nationalities on the same side can stack together freely unless prohibited by scenario special rules.
2.66 To alleviate the problem of tall stacks, players can place land units in the concentration box and naval units in their fleet box and then have a corresponding concentration or fleet marker represent those units on the map/chart. The concentration and fleet markers are freely interchangeable with the units they represent; there are no additional transition/representation rules.
2.67 Whenever a stack contains reduced strength, same nationality air units with the same machine gun, evasion and radius scores or reduced strength, same nationality naval units with the same gunnery, armor and radius scores those reduced units can, at the owning player’s discretion, immediately combine into a single, full strength unit. The “other” unit would then go back to the force pool. If performed during combat, such (re)combination must be done at the start of dog fights (6.32) or deployment (8.3). Breakdown of full strength units (de-combination) is NOT permitted.
2.68 Players can freely inspect each other’s stacks at any time.
2.7 Major & Minor Battles
A major battle is a land battle outside of the Africa map in which at least three corps attack at least two corps (not steps). Of course, fortress steps can participate in the battle, but their presence is not counted toward the minimum corps amount necessary to qualify for a major battle. Any other arrangement is a “minor battle.” Major battles drive the progress of Tactical Innovation (TI) (2.8) and Demoralization (2.9).
2.8 Tactical Innovation (TI)
2.81 The CP and EP each have a Tactical Innovation (TI) rating ranging from 0 to 40+ which measures how far along each alliance is in solving the riddle of trench warfare and implementing modern tactics. Each scenario defines the at-start value for each side. Track that value with each side’s TI counter on the general records track.
2.82 During play, a side’s TI value increases by one point immediately after it attacks in a major battle (2.7). One must ATTACK (rather than defend) to gain a point of TI.
2.83 Starting with TI level 36, a side may gain TI benefits by rolling less than the target number for its current TI level. Make the TI roll each time a side gains a point of TI at level 36 or higher and stop only when
16
that side succeeds. Once TI benefits (2.84) are achieved, they apply to all nations on the side which achieved them. Sides which fail to obtain TI benefits by TI level 40 can roll again each time they gain a level after TI 40 with a roll of < 6; it’s never automatic.
TI Level Roll < # To Achieve TI Benefits36 237 338 439 540 6>40 6
2.84 TI benefits include:
Exemption from having to entrench after attacking an entrenched defender (9.72), No limit on the number of moves/attacks per fortnight against the same entrenched location (9.73), Exemption from the usual penalty for attacking from a breach (10.591), Prohibition against the defender committing reserves (10.4), Prohibition against the defender invoking attrition (10.713).
Design Note: TI benefits represent the effective coordination and implementation of all those tactical innovations developed during the war such as: creeping barrage, shock bombardments, storm trooper/infiltration tactics, trench radios, aerial artillery spotting, etc. The designer contends that those various tactics developed piecemeal during the war and “congealed” into a new doctrine sometime between late 1917 and early 1918.
2.9 Demoralization, Crisis, and Conquest
Design Note: Demoralization measures declining national morale as the war progresses. Basically, as casualties mount, and news of defeats spreads, domestic unrest inspires labor strikes and anti-war demonstrations which reduce war time production and eventually lead to political crisis. Some nations (the autocratic empires) can descend even further into revolution.
Major Powers (2.23) track their demoralization with national demoralization markers on the General Records Track (GRT). See scenario instructions to determine where demoralization markers begin. As play proceeds, move the marker along the track as appropriate to record the current demoralization level.
2.91 DEMORALIZATION: Certain events trigger demoralization. During the resource reductions (5.36) portion of each seasonal turn, a major power must reduce its RP total by one for every point of demoralization it has tracked. AP are NOT affected by demoralization.
A major power may, depending on a DDR (10.74), incur one point of demoralization each time any one of the following events happens to that major power.
It suffers an adverse results in the Crisis of July (11.5) One of its forces involved in a major battle (2.7) suffers a land combat table result which calls for a
demoralization die roll (10.74). One of its land combat losses (even in a minor battle) is accounted for with attrition (10.713).
17
A major power will, no dice roll required, automatically incur one point of demoralization each time any one of the following events happens to that major power.
One of its dreadnought units is destroyed by any means. One of its home-country (2.24), interior fortresses hexes (1.334) comes under enemy control.
2.92 CRISIS: Once a nation’s demoralization marker has advanced to its national limit as marked on its demoralization counter and noted on the General Records Track, flip the marker over to its crisis side and place it on the calendar month. That nation is in “crisis” for the remainder of the game unless and until it goes even further into “revolution.”
2.921 A nation in crisis continues to suffer seasonal RP losses for demoralization equal to its national limit as marked on the demoralization/crisis marker and noted on the General Records Track. But, no further demoralization is possible.
2.922 The land units of a nation in crisis cannot chose attrition (10.713) when defending, and they cannot make a land attack unless that attack includes at least one tank and/or they have air superiority over the defending location.
2.923 Naval units of a nation in crisis must pass a check to move. Each time a naval unit declares that it will move, roll 1d6. If the result is greater than (yes, greater than) the unit’s gunnery score then it can move; otherwise it cannot move this GQ sub-phase. Check only once per unit per GQ sub-phase.
2.924 Austria-Hungary, Germany and Russia can each suffer a revolution (6.8) starting with the second month after going into crisis.
2.93 CONQUEST: When a nation’s capital location, or Budapest and Vienna for Austria-Hungary, is controlled by the enemy that nation is conquered. Conquest has no effect on a nation in revolution (6.8). Nations not in revolution suffer the following consequences when conquered. The nation immediately advances its demoralization marker to its national limit and is thereby in crisis (2.92). The conquered nation then designates the capital of any single same-side major power as the host of its “shadow government.” Conquered nations treat this new capital as their own for all purposes; they can use it for supply (3.0) and muster (6.212) as if it were their own. Double the usual procurement costs (6.222) and delays (6.223) when procuring units of a conquered nation. Thus, nations never switch sides in BoP and remain on a side even when completely overrun/conquered by the enemy side. Retaking a lost capital will NOT undo any of these adverse consequences.
3.0 Supply
Design Note: Corps-sized land units consume tons of food and ammunition each fortnight. The supply rules simulate the need for a steady flow of material to keep these units in good order.
Players may have to check supply at various times in order to: transfer RP (5.23), muster (6.21), start an air raid, patrol or change of base with air units (6.3), start a move (9.1, 9.2) or combat (10.1) with land units, and during the commissariat sub-phase (6.7). Certain units are always in supply as follows.
Always in supply: All naval units, including mines All units being carried by naval transport (7.6)
18
All Fortresses All minor power units stacked with a fortress in their home country All Rebels (Lawrence, Dinar, Senussi, Sherif) anywhere within the nation or colony where they
mustered (6.21).
All other air units and land corps must demonstrate supply.
3.1 Demonstrate Supply
3.11 Units must meet at least one of the following three conditions to demonstrate supply.1) The unit is on or adjacent to a supply source.2) The unit can trace a supply path over land and/or water locations back to a supply source.3) Any one Ottoman corps can be “unconditionally” in supply.
3.12 There are numerous supply sources. National capitals, including those in Africa, are supply sources for their nationality and any shadow governments which they host unless and until they are conquered (2.93). That includes London for all British-color (Commonwealth) units and the Portuguese. Russian and Swedish units can trace supply to their respective capitals (over the north edge of the North Europe map) along friendly controlled rail lines that exit the north edge within their respective countries. In addition to unconquered national capitals, units can draw supply from other sources as follows. AF units can draw supply from any bargaining chip (1.22) hex which their side controls in Africa. Russians can draw supply from any friendly-controlled rail hex in Russia along the east map edge as well as Russian-controlled Baku (9448) on the Ottoman map. Ottoman units can draw supply from Baghdad (8464), Damascus (6762), and Erzerum (7849) as long as those population centers are under Ottoman control.
3.13 Supply paths can be traced over land and/or water from a unit back to a source (condition 2) to demonstrate supply as follows.
3.131 Overland, a supply path must begin with a rail hex or infrastructure marker either in or adjacent to the tracing unit’s location. The path then traverses a contiguous chain of friendly controlled rail hexes and/or infrastructure markers back to a qualifying supply source without passing through an enemy land unit. Note, for supply purposes, it’s the hexes – not the artwork in them – that must be contiguous. So, rail line art work in adjacent hexes does not need to “connect” to support a supply path as it must to support rail movement.
3.132 Rivers and Canals: On the South Europe, Ottoman, and Africa maps, river and canal hex sides can be treated as rail lines for purposes of tracing supply. However, to use a given river hex side, the tracing side must control both hexes which form that hex side; in other words, one must control both sides of the river to trace supply along it. And, in order for a tracing unit to use a river hex side as its initial “rail” hex, that unit must be in a hex which has that river along one of its hex sides.
3.133 A supply path can enter or exit water at a friendly controlled port box, port hex, landing, or anchorage marker. In all cases, the location where a supply path enters the water must contain at least one friendly surface ship unit. The path is then traced over water locations (hexes or boxes). Hexes traversed by a water supply line cannot contain enemy fortresses or surface naval units; that includes mines. Boxes in the path can contain enemy land and surface naval units and still support the supply path IF the tracing side has more naval gunnery factors in each contested box than the sum of enemy gunnery and mine factors there. Additionally, each box – ocean or port – of a waterborne supply path, including the final destination box, must also contain at least one friendly surface ship unit. A supply path could be traced overland (3.131) and then enter the water and then back onto land as needed.
19

3.14 One Ottoman corps can be “unconditionally” in supply (condition 3) as follows. At the start of each fortnight and the commissariat phase, the Ottomans can each designate any one of their corps which is on the Ottoman map as automatically in supply. A new, or the same, corps can be designated each fortnight and during the commissariat phase.
3.2 Consequences to Unsupplied Units
3.21 An unsupplied corps has its effectiveness and movement scores each reduced by 1. Unsupplied corps cannot use railroad movement (9.2). During the commissariat phase (6.7), unsupplied corps must roll less than their effectiveness score on 1d6 to avoid elimination. If a leader’s command (1.323) is out of supply, then he has the option to immediately return to the force pool.
3.22 An unsupplied air unit cannot conduct an air raid or go on patrol. However, it can still return to base and dogfight (within its own hex) normally.
3.3 Supply Example
IEF D traces a supply line along the river as shown. Note how the EP controls hexes on either side of each river hex side so used. (The control markers are not required, but used here to illustrate the point). At the port of Fao, CC4 takes the supply line to sea. The line then leaves the southern edge of the Ottoman map and, per the map edge instructions, travels to the Persian Gulf hex on the Africa map where no additional surface ship is required because intermediate hexes of a sea supply line do not need surface ships. From there, CC5 carries the supply line through the Indian Ocean box. Finally, the line reaches its source, the India port box, where CC6’s presence is required.
20

21
4.0 The Sequence of Play
Game play proceeds in monthly turns with a seasonal turn conducted between every three monthly turns. So, a calendar year would proceed like this: January, February, SPRING, March, April, May, SUMMER, June, July, August, FALL, September, October, November, WINTER, December.
SEASONAL TURNS: Each seasonal turn (season) has the following phases and sub-phases.Force Pool AdditionsResource Tabulation
PostingConversionTransferRequisition
Resource ReductionsAir RaidsSubmarine WarfareSurface RaidersBlockadeStockholmDemoralization
MONTHLY TURNS: Each monthly turn (month) has the following phases and sub-phases.Diplomacy Construction
Muster Procurement
Aviation PatrolDogfights
Admiralty General Quarters (GQ) IGeneral Quarters (GQ) IIVoluntary Return to Port
Campaign Weather First Fortnight Second Fortnight
AerodromeCommissariat Revolution
Except for the Patrol (6.31) and GQ II (6.43) sub-phases, all other sub-phases consist of a CP half followed by an EP half. The CP conducts all of its actions for the sub-phase; then the EP conducts all of its actions for that same sub-phase. The side currently conducting its half of a sub-phase is “phasing” while the other side is “non-phasing.” Once both sides have completed their respective halves of a sub-phase then play proceeds to the next sub-phase or phase as applicable. Once all the phases within a turn (monthly or seasonal) are complete, that turn is over and play proceeds to the next turn.
22

5.0 Seasonal Turn Sequence
5.1 Force Pools Additions
5.11 Each major power has a force pool of units awaiting procurement. Units enter the force pool in either of three ways: 1) per the instructions from the Order of Battle (OB) for the scenario in progress; or 2) after they are removed from the map/Sea Chart via destruction in combat, combination (2.67), or conversion (5.22); or 3) if they are a leader returned to the force pool voluntarily (1.323). The “force pool” is any convenient location in which to store these units.
5.12 When setting up the game and as play proceeds use the calendar printed on the maps to show when and where units arrive. Units placed on a seasonal turn arrive to the force pool during the force pool additions phase of that seasonal turn. Units placed on a month arrive to the map during the muster sub-phase of that month.
5.13 Neutral powers do accrue units form the OB as planned, but they do not set them up on the map, or place them in their force pool, until they enter the war. When a neutral enters the war, set up its at-start units as well as any that have arrived via a monthly turn since the game began. Those that arrived via a seasonal turn would start in the force pool.
5.2 Resource Tabulation
Record a running tally of RP totals on the GRT with the corresponding markers for each nation. AP can be tracked on the Africa Track or on the GRT per player preference.
5.21 Posting
5.211 Each major power on a side (but not those in the Neutral Camp) posts its nominal RP to the GRT. Use the “1st Season” column for each nation’s first full seasonal turn at war. Use the “Other Seasons” column for all other seasons. Do not post for major powers that are neutral. Add new RPs to any remaining from previous turns. In this way, the RP tracks will always show cumulative totals.
Nominal Resource Points
Nation Resource Points 1st Season Other Seasons
Austria-Hungary 6 12Britain 11 22France 8 16Germany 17 34Italy 5 10Ottoman Empire 4 8Russia* 9 18United States+ 12 24
*Russia posts an additional 2 RP (for 1st and Other Seasons) while the Ottoman Empire is neutral or if the EP control both Gallipoli (4946) and Constantinople (5444). +The United States posts 48 RP per season starting on the 8th season after it joins the EP.
5.212 For Africa, Germany collects three AP and Britain six AP automatically each season from local sources. Britain, France, Italy, and the Ottoman Empire (But NOT Germany) may convert RP into AP for use in Africa.
23
5.22 Conversion
5.221 Major powers can voluntarily convert fortresses and naval units, except BB, into RP and convert RP into AP at this time. In all cases, the RP or AP generated are immediately added to the relevant nation’s track. This conversion process is the only way to voluntarily reduce or eliminate units.
5.222 Each season, any major power except Russia can voluntarily reduce one of its fortresses by one step to generate one RP.
5.223 Each season, any major power can voluntarily reduce one of its non-BB naval units by one step (dreadnoughts cannot be voluntarily reduced) to generate the number of RP it would cost to procure that step.
5.224 Britain, France, Italy and the Ottoman Empire can each convert up to two RP into AP at a 1 to 3 ratio. That is, each RP converts into three AP. Simply adjust the tracks as appropriate after the declaration.
5.23 Transfer
Each major power may transfer RPs to other major power recipients on its side according to the following constraints. To transfer RPs, a donor must be able to trace a supply line (3.0) from its unconquered (2.93) capital to the recipient’s unconquered capital or shadow capital. Note that the White Sea ocean box is off limits from November through February inclusive (7.55) and therefore cannot be part of a supply line to Russia during that time frame. In any given seasonal turn, a single donor can transfer no more than SIX RPs and a single recipient can receive no more than SIX RPs. In all cases, simply reduce the donor’s RP track by the amount transferred to the recipient(s) and then immediately increase the recipient track(s) by that same amount.
5.24 Requisitioning
At this time, a major power receives additional RP as follows.
a) +1 RP for every enemy minor power (2.23) capital that it controls;b) +1 RP for every three population centers (1.22) (drop and ignore any remainder) it controls in the
territory of an enemy major power on the North Europe or South Europe map sheet provided it also has at least one infantry corps in the major power’s boundaries per point so extracted;
c) +1 RP for every six population centers (drop and ignore any remainder) it controls in the territory of an enemy major power on the Ottoman map sheet provided it also has at least one infantry corps in the major power’s boundaries per point so extracted.
For example: If Germany controlled nine population centers inside Russia then Germany could gain 3 RP provided it also had at least three infantry corps inside of Russia.
5.3 Resource Reductions
A major power’s RP, but not its AP, are subject to reduction for: air raids, submarine warfare, surface raiders, blockade, conquest of Stockholm, demoralization, and revolution. Record losses on the RP track as they occur in order to keep a running tally throughout the game. Losses can never reduce an RP track to less than 0; ignore losses beyond that point.
Design Note: Each RP represents about 100,000 tons of merchant shipping or railway cargo.
24

5.31 Air Raids
Design Note: Italy and Russia pioneered strategic bombing during WWI. The Germans got off to a clumsy start with their Zeppelins, but later their Gotha’s proved a real threat. Britain’s newly formed Independent Air Force finished the war by dropping more tonnage in three months than the Germans had in the previous three years.
5.311 In-supply bombers can raid strategic targets at this time. A “strategic target” is any enemy controlled hex which contains both a population center (1.22) and a river hex side or rail line.
5.312 The CP does all of its raids first. Conduct air raids one bomber unit at a time. To conduct an air raid, a bomber selects a strategic target to which it can trace a hex path no longer than its radius without entering a neutral hex. Note that there is no need to actually move the bomber counter, just illustrate the required path. Then roll 2d6 and modify as follows.
+1 If the targeted hex is within the radius of an enemy fighter+1 If the bomber is a Zeppelin+1 If bomber has only one step
5.313 If the final dice roll result is less than the last digit of the current year, then the bomber inflicts ONE RP loss on the targeted nation.
5.314 After the raid, any one enemy fighter unit that has the just-raided strategic target in its radius can make one attack dice roll against the bomber. As usual, add the fighter’s machine guns score to 2d6, if the final result exceeds the bomber’s evasion score, then it suffers a hit.
5.32 Submarine Warfare
Submarine warfare enables Austria-Hungary and Germany to reduce Britain’s RP and enables Britain to reduce Germany’s RP. Submarine warfare is NOT the same as submarine combat (8.4).
5.321 CP submarine warfare
(A) First, the CP must declare if Unrestricted Submarine Warfare (USW) applies this season. If it does, place a USW marker on the calendar in the box for the current season. Once the year passes, move all USW markers from their seasonal slots to that year’s box as a reminder that they were incurred during that year. USW increases the damage caused by U-boats, but also drives U.S. entry (6.125). Apply a -1 to the submarine warfare die roll when USW applies. For the 5th season of USW, that modifier doubles to -2; but reverts back to -1 for the 6th and all later seasons of USW.
(B) CP U-boats can conduct submarine warfare in three locations: 1) Mid Atlantic Ocean Box, 2) North Atlantic Ocean Box, and 3) the Mediterranean grey space. As a reminder, a U-boat image marks each of those three locations. No more than six U-boat steps per location can participate in submarine warfare, ignore all those over six. Furthermore, U-boats in the Mediterranean grey space (i.e. at sea on the South Europe map), must be south of a line drawn through Bari (3246) and Athens (4452) to participate in submarine warfare. Units north of that line cannot participate.
(C) For each eligible location on the chart that contains at least one CP U-boat unit roll 1d6. Modify the die roll for each of the following which apply; however, never reduce the final roll to less than 0.
25
-1 For the location that contains Lothar (Lothar von Arnauld de la Periere). -1* If USW is in effect (5.321A). *Double to -2 for 5th (only) USW chit.+1 If convoys are in effect.
In the Mid and North Atlantic Ocean Boxes only…-1 If Antwerp is a port (6.121) controlled by the CP.+1 if Germany does NOT control at least one port in Belgium, France or Netherlands.
(D) If the final result is less than the number of U-boat steps (limit 6) in that box or grey space then Britain must immediately lose A NUMBER OF RP EQUAL TO THE DIFFERENCE between the final die roll result and the number of U-boats steps in that box or grey space.
Examples: Germany has two U-boat steps in the Mid Atlantic ocean box, controls Ostend, Belgium, and has declared USW, but there are not yet convoys. Germany rolls a 2 on 1d6 and then applies -1 for USW to get a final roll of 1 which is one less than the number of U-boat steps present (two), and therefore inflicts one RP loss on Britain. Austria-Hungary (AH) has three, full strength U-boat units in hex 3348 - just south of the heel of Italy’s boot. Therefore, AH has six U-boats steps south of the Bari-Athens line and so can make a submarine warfare die roll for the Mediterranean grey space. USW is NOT in effect. AH rolls a 3 which is 3 less than 6 (the number of U-boat steps present) and therefore inflicts a 3RP loss on Britain.
5.322 EP submarine warfare
The EP can attack shipments of iron ore sailing from Sweden to Germany, without violating Swedish neutrality (6.11). Roll 1d6. If the results is less than the number of EP submarine steps on or within one hex of Swedish Gotland (the landmass around hex 3405) in the Baltic Sea then Germany losses TWO RP. There are no modifiers to this roll; however, EP submarine warfare is not possible if the EP occupy the Stockholm port box (5.35). 5.323 Anti-Submarine Warfare (ASW)
(A) After each submarine warfare (5.321/322) or torpedo dice roll (8.41), the targeted side rolls 3d6 for Anti-Submarine Warfare (ASW), even if the ASW number (see C below) is too low to permit success.
(B) If the 3d6 roll result is less than the current ASW number on the ASW track, then inflict step losses on the phasing submarine/U-boat force that just triggered the ASW roll as follows. If the roll succeeded with “triples” (all three dice show the same number), then inflict THREE step losses on the submarine force. If the roll succeeded with “doubles” (two dice show the same number), then inflict TWO step losses on the submarine force. If the roll was simply less than the ASW number, then inflict ONE step loss on the submarine force.
(C) The ASW number used by both sides is a function of how many ASW rolls have been made by the EP. The track starts at 0 and goes up to 12. Immediately AFTER each ASW roll made by the EP (not the CP), increase the ASW track by one point.
5.324 Endurance
After submarine warfare (5.32), there is NO requirement for submarines/U-boats to return to port as they must after submarine combat (8.53).
5.325 Convoys
26

The seasonal turn AFTER the CP play the 5th USW chit, the convoys rule takes effect. From that moment forward, add +1 to all CP submarine warfare die rolls because of convoys. The EP must also eliminate a total of three CC steps from any EP nationalities (to serve as convoy escorts). The CC elimination is a onetime event that does NOT need to be repeated. Those eliminated CC go back to the force pool and can be procured with no adverse impact on the convoy modifier.
5.33 Surface Raiders
For each German surface ship in an ocean box (not gray space) that is adjacent to (touching) at least one British port box the CP player rolls 2D6. If the result is less than the rolling ship’s printed radius score Britain losses ONE RP up to a limit of six per Sea Chart box. Surface raiders do NOT need to return to port after raiding (they subsist on their prizes). For example, a German Light Cruiser (CL) with a radius score of 9 in the South Atlantic Box could inflict an RP loss on Britain by rolling less than 9 since that box is adjacent to British Gibraltar. That same CL in the Terra del Fuego box could not make a roll since Terra del Fuego is not adjacent to a British port box – note that Australia is adjacent to the South Pacific box only. Similarly, for lack of an adjacent British port box, North Pacific and Mid Pacific are also immune to surface raiders.
5.34 Blockade
5.341 The EP can possibly blockade any or all of: Germany, Austria-Hungary, Italy and the Ottoman Empire. Each of those nations is subject to a “close” blockade. Alternatively, Germany and Austria-Hungary (only) are subject to a “distant” blockade.
5.342 Close Blockade: The EP can demonstrate a close blockade against a given country by having at least one EP surface naval unit on or adjacent to each of that nation’s home country port hexes during the seasonal turn. The same unit can cover more than one port so long as it is adjacent to each.
5.343 Distant Blockade: The EP can demonstrate a distant blockade of Austria-Hungary by having a contiguous, uninterrupted chain of surface ship units and/or mines from any hex of Italy to any hex of Albania during the seasonal turn. The EP can demonstrate a distant blockade of Germany by having at least two steps of surface ship units in each of the Mid Atlantic, Norwegian Sea, and Scapa Flow boxes on the Sea Chart during the seasonal turn.
5.344 A blockade, whether close or distant, has the same affect. There is NO additional penalty to a nation that simultaneously suffers both types of blockade. A blockaded nation suffers the following RP losses each season. Year RP reduction per season
Germany* or Austria-Hungary Italy or Ottoman Empire1914 1 01915 2 11916 4 21917 8 41918 16 81919 32 16
*Increases losses for Germany by +2 if the Netherlands has been violated (6.11).
27
Design Note: Before the war began, the Germans anticipated that a neutral Netherlands could serve as a “windpipe” against the strangulation of a British blockade owing to smuggling. This may have been true. Later in the war, most of the gravel used to construct the Hindenburg Line came from Holland. 5.35 Stockholm
If an EP infantry corps occupies the Stockholm port box (a violation of Swedish neutrality 6.11) then Germany losses THREE RP, and EP submarine warfare (5.322) is not possible.
5.36 Demoralization
During the resource reductions portion of each seasonal turn, a major power must reduce its RP by ONE, to a minimum of 0, for every point of demoralization (2.9) it has tracked. AP are NOT affected by demoralization.
6.0 Monthly Turn Sequence
6.1 Diplomacy Phase
Players adjudicate the fate of neutrals during the diplomacy phase. Neutral units are NOT set up at the start of play. Instead, during the game when a neutral joins a side, the gaining side immediately sets up the former neutral’s units in the former neutral’s home country population centers, or population centers in its African possession for “AF” units, unless otherwise directed by scenario special rules. Neutrals always set up when violated (6.11). Otherwise, they set up according to the standard diplomacy rules (6.12) which allow players to simulate Great War diplomacy OR they set up according to the Optional Neutral Random Entry rule (6.13) which facilitates solitaire play; players must select which rules apply before play begins.
6.11 Violations: If a side intends during this month to move any unit into a land location or port of a neutral country or colony of a neutral country then it must declare that intent now unless said neutral is permissive (6.122) with respect to the side that intends to enter the land location/port. CP declares first. Without this declaration, a side cannot enter the subject neutral’s land locations/ports. Upon the declaration, the declaring power has “violated” the neutral which immediately joins the side opposed to its violator and immediately sets up its units. A nation and/or side can declare any number of violations per month.
6.12 The Standard Diplomacy Rules
6.121 True Neutrals: Arabia, Belgium, Denmark, Luxembourg, Norway, the Netherlands, Sinai, Sweden, and Switzerland are “true neutrals” because they will enter the game only if violated. If both Belgium and the Netherlands are violated then Antwerp, Belgium (0917) becomes a port.
Design Note: The complex territorial claims around the waters with access to Antwerp meant that full scale employment of that port by invaders would have violated Dutch neutrality as well as Belgian. Thus, if only one of those neutrals has been drawn into the war then the “port” of Antwerp is not available in game terms.
6.122 Permissive Neutrals: Albania, Batavia, Greece, the Ottoman Empire, Persia, and South America are “permissive neutrals” because certain nationalities can enter their land locations without violating them. EP land movement (9.1-9.2) or port use by naval units in Albania, Greece and Persia is NOT a violation (6.11) and therefore does not require a declaration during the diplomacy phase and does not automatically push any of them into the CP; instead they remain neutral and their forces are not set up. Similarly, land movement (9.1-9.2) or port use by naval units in the Ottoman Empire by CP units is not a violation (6.11) and therefore does
28

not require a declaration during the diplomacy phase and does NOT automatically push the Ottoman Empire into the EP; instead it remains neutral and its forces are not set up. Similarly, either side may freely enter the Batavia and South America port boxes; in fact, the British AF WIR infantry unit musters (6.215) in the South American port box (simulating the British Caribbean). With the exception of the Batavia and South American port boxes, infantry/mountain corps that enter land locations of a permissive neutral gain control (2.53) of those locations. However, if a side wishes to actually take control of a permissive neutral’s capital or attack one of its fortresses then it must declare a violation (6.11) of that neutral during the diplomacy phase and thereby forsake the benefits of permissiveness.
6.123 Imperial Neutrals: Britain, Japan and the Ottoman Empire are the “imperial neutrals” who, in addition to the usual rules for violations (6.11), will enter the war under the following circumstances.
Britain begins August, 1914, as a neutral, but joins the EP immediately when at least one of the following occurs:
Germany declares a violation of Belgium and/or the Netherlands; A German land unit enters a hex within three hexes of Paris; Germany gains control (2.53) of at least two ports in France; Germany has more than three naval units simultaneously at sea (6.41) in locations more than five hexes
away from a German home country (2.24) coastal hex; Russia goes into crisis (2.92); Italy joins the CP.
Japan joins the EP one month after Britain does. The Ottoman Empire joins the CP one month after Japan joins the EP.
Design Note: This seemingly unusual chain of events derives from history. Britain saw Antwerp as the linchpin of commerce and security in Northwest Europe. So a substantial German military presence anywhere near there would have unsettled the balance of power that Britain needed to preserve its own security. Japan eagerly awaited an opportunity to snatch Germany’s sparsely defended Pacific possessions. The Ottoman Empire had no choice but Germany to try and preserve its crumbling empire which Britain had been nibbling since taking over Egypt in the 1870s. In return, the Ottomans gave Germany reach into Britain’s Middle East sphere of influence.
6.124 Opportunistic Neutrals: Abyssinia, Bulgaria, Greece, Italy, Romania, and Portugal, can be enticed to join either side for the right price in Bargaining Chips – population centers (1.22) framed in grey.
A) Starting in the March, 1915, diplomacy phase, each side has one chance per diplomacy phase to bring one opportunistic neutral onto its side with a diplomacy die roll via the following procedure.
1. If the phasing side elects to court an opportunistic neutral this turn then it must pay 1 RP (or 1 AP for a neutral in Africa) and then identify that neutral from among the opportunistic group.
2. The phasing side then reveals how many qualifying Bargaining Chip hexes it will offer to the subject neutral. See Bargaining Chip (BC) Offer Criteria below.
3. The non-phasing side then reveals how many qualifying Bargaining Chip hexes it will counter-offer the subject neutral. See Bargaining Chip (BC) Offer Criteria below.
4. Roll 1d6 and modify per the Diplomacy Die Roll Modifiers. 5. Read the final modified die roll as follows.
>5 The targeted neutral joins the CP2-5 No effect
29
<2 The targeted neutral joins the EP
Bargaining Chip (BC) Offer Criteria: To offer a BC, it must meet the following criteria. It must be outside of, but within three hexes of (1 hex in Africa), the targeted neutral’s border. It must be in a nation or colony that is an enemy of the side making the offer, i.e. from the other side. It cannot already be marked with a “spoils” counter – from either side.
Diplomacy Die Roll Modifiers+1 When rolling for Greece, Italy or Portugal if at least one British and/or French land unit has NOT moved
(9.1-9.2) into or made a land attack (10.0) (including amphibious assault) against at least one home country hex (2.23) of a CP nation on the South Europe map.
-1 When rolling for Greece, Italy or Portugal if at least one British and/or French land unit has moved into or made a land attack (including amphibious assault) against at least one home country hex of a CP nation on the South Europe map.
+1* per BC offered by the CP -1* per BC offered by the EP* Double these to +2 or -2 respectively if the offering side actually controls the BC hex or its capital.
B) If the diplomacy die roll actually pushes the targeted neutral onto a side, rather than getting a “No effect” result, then the gaining side must mark each of the Bargaining Chip hexes which it just offered to that former neutral with a “spoils” counter. The only effect of a spoils counter is to prevent a bargaining chip from being offered again, by either side, to any other opportunistic neutral in the future. A spoils counter does NOT affect control (2.53) or victory calculations in scenarios (12.0).
Design Note: It’s useful to understand that many Bargaining Chip hexes represent larger regions since those regions were in fact the focus of these swaps. For example, around Romania, Czernowitz represents Bukovina, Hermannstadt represents Transylvania, Kishinev represents Moldova, and South Dobruja represents itself. Also, one might ask, why can’t the EP re-gift a spoil successfully offered by the CP? The reason is that the EP would want to return that spoil back to its original owner – an EP power – and so would not give it to someone else.
For example, during the October 1915 alliance phase, the CP pays one RP and declares an attempt to bring Bulgaria on side. The CP offers Nish (3939) and Skopje (3942), both in EP-controlled Serbia. The EP counters by offering Adrianople (5043) in CP-controlled Ottoman Empire. The “gift” of Adrianople (which the EP does not actually possess) affords a -1 modifier to the die roll. Since there is a German unit in Belgrade, the capital of Serbia, Nish and Skopje each provide a +2 to the roll for a total CP modifier of +4. Hence, the net modifier to the roll is +3. Note that neither side can offer up Bargaining Chip hexes in Greece or Romania since they are still neutral. If the CP does succeed in rolling a 3 or more – to get a final modified result over 5 – then Bulgaria will immediately join the CP and the CP must then mark Nish and Skopje with spoils counters. From that moment forward, neither side could ever again offer Nish or Skopje to another opportunistic neutral.
6.125 United States: The United States joins the EP during the season in which the FIFTH unrestricted submarine warfare (USW) marker is placed by the German (CP) player. After the German places his 5th chit, the EP player rolls 1d6 to determine the exact month of U.S. entry: 1-2 = 1st month of the season, 3-4 = 2nd month of the season, 5-6 = 3rd month of the season. The U.S. then joins the EP during the diplomacy phase of the indicated month. Note that the U.S. will enter the war with 0 RP since it was still neutral during the resource tabulation phase of the seasonal turn in which it entered. For example, suppose the German plays his 5th USW chit during the Spring, 1917, seasonal turn. The EP rolls 1d6 and gets a 3. Therefore, the U.S. will join the EP during the diplomacy phase of April, 1917. When the U.S. joins, it will have 0 RP. During the
30
resource tabulation phase of the summer seasonal turn, the U.S. will collect its 1st season income of 12 RP. The following fall, the U.S. will be “all in” with an income of 24 RP.
Design Note: “Yes,” officially, the U.S. was an “associated power,” but we label them EP to acknowledge the truth (regardless of semantics) and facilitate game play. Why would the Germans play the 5th USW counter if they know it will bring U.S. entry? Because playing that counter effectively deprives Britain of six RP right away - three corps equivalents; and an equal number of U.S. corps will not be available until five seasons later.
6.13 Optional Neutral Random Entry Rule
For solitaire play, or just an easier game, employ this optional rule instead of 6.12 to adjudicate the fate of neutrals. Under this rule, violated neutrals (6.11) still join the side opposed to their invader. But, other neutrals join according to the Neutrals Random Entry Table. Simply roll 1d6 during the indicated year and month to determine the indicated neutral’s fate. For months that have no entry (for example December, 1914) make no roll.
Neutrals Random Entry Table
1914 Die Roll Result
August1-5 Britain joins the EP6 Britain becomes a true neutral (6.121)
September1-5 Japan joins the EP6 Japan becomes a true neutral
November1-5 Ottoman Empire joins the CP6 Ottoman Empire becomes a true neutral
1915May
1 Italy joins CP2-5 Italy joins the EP6 Italy becomes a true neutral
October1 Bulgaria joins the EP2-5 Bulgaria joins the CP6 Bulgaria becomes a true neutral
November1 Sweden joins the CP2-6 Sweden remains a true neutral
1916March
1 Portugal joins the CP2-5 Portugal joins the EP6 Portugal becomes a true neutral
August1 Romania joins the CP2-5 Romania joins the EP6 Romania becomes a true neutral
September31
1 Abyssinia joins the CP2-5 Abyssinia becomes a true neutral 6 Abyssinia joins the EP
1917April
1-5 United States joins the EP6 United States becomes a true neutral
June1 Greece joins the CP2-5 Greece joins the EP6 Greece becomes a true neutral
6.2 Construction Phase
6.21 Muster
6.211 During the muster sub phase, each side places new units due to arrive on the map from the current month of the calendar. This process is called muster. All corps muster in maneuver mode. Units due to muster but unable to meet their muster requirements (i.e. placement in friendly or enemy hexes or in population centers, etc.) cannot arrive and are instead returned to the force pool. Place new arrivals according to the following protocols.
6.212 Most units arrive to the Europe or Ottoman maps to a friendly-controlled (2.53), in-supply (3.0), population center (1.22) in their unconquered (2.93) home country (2.24) or the capital of their major power host for units of shadow governments. There are exceptions for: leaders, ANZ, Canadian, IEF (Indian), Japanese, U.S., WIR, Portuguese, AF units, rebels, and the British Tigris flotilla
6.213 Leaders arrive in any land hex or port box which contains corps or steps of the placing power.
6.214 ANZAC, Canadian, IEF (Indian), Japanese, and U.S. units arrive to their Home Country Port Box (2.24) where they are assumed to be in friendly, supplied population centers, in port and/or on land as needed. However, U.S. air and tank units can muster in an unconquered France or Britain (since it’s Allied equipment) and Portuguese non-AF units can muster in an unconquered Britain.
6.215 AF corps arrive to friendly-controlled boxes or population centers per the AF Muster Chart below.
AF Muster ChartAbyssinian AbyssiniaBelgian Belgian KongoBritish
Arab AdenEAMR British East AfricaKAR British East Africa or Nyasaland SAFH, SAH, SAI, SAMR, SAS British South AfricaWDF British EgyptWAFF British NigeriaWIR South America Port Box (as the British Caribbean)IEF India port box
32
Sherif* Ottoman HejazFrench French Equatorial Africa (FEA), or French Dahomey,
or the Dakar Port BoxGerman
GEA German East AfricaGSW German South West AfricaGKAM German Kamerun
ItalianRCTC Eritrea or Libya
OttomanHejaz (7th) Corps Ottoman HejazDinar* British SudanSenussi* Italian Libya
PortugueseAfriq Portuguese Angola or Mozambique
*Rebels, see 6.216
6.216 Rebels: The Lawrence cavalry corps as well as the Sherif, Dinar, and Senussi AF corps are all rebels. These rebel corps can only muster in an ENEMY controlled hex that does not contain an enemy land unit. AF units arrive per their muster chart (6.215). The Lawrence cavalry corps arrives on or adjacent to Aqaba (6271).
6.217 The British Tigris Flotilla can only muster in British-controlled Abidan (9270).
6.22 Procurement & Repair
6.221 Major Powers (2.23) at war can now use their RP and AP to procure units from their own force pools, repair damaged air units, naval units, and fortresses, and buy infrastructure markers. Air and naval units procured from the force pool must be bought at full strength which is two steps. A major power’s RP and AP can only be spent on units of its own nationality, units of same side minors who can trace a supply line from their capital to the major power’s capital, or units of a shadow government the major power hosts. AP can only be spent on land units in Africa.
6.222 Nations procure units at the following costs. Pay double the listed amount if procuring units of a conquered nation (2.93).
Units Cost Leaders 0Infrastructure 1 per counterMines 1 per counterTanks 1 per corpsCavalry, Infantry, Mountain, Siege, Flotilla 2 per corpsFortress Repair 1 per stepAir Unit 1 per stepSubmarines/U-boats 1 per stepSurface ships except BB 2 per stepBB naval units 3 per step
33

6.223 Procured units muster (arrive to the map) after some delay. Surface ship units muster one year after procurement. Submarines muster six months after procurement. All other units muster the month after they are procured. Units of a conquered nation (2.93) double these delays.
For example: In March, the German player (unconquered) procures two infantry corps, two full strength U-boat units, and one full-strength CL (light cruiser) unit from his force pool. The cost will be: four RP for the infantry corps, four RP for the U-boats, and four RP for the CL for a total of 12 RP. He then places the infantry corps on the April box of the calendar, the U-boats on the September box and the CL on the March box (to arrive the following year).
6.224 A major power (2.23) can repair reduced fortresses and damaged air or naval units at the usual procurement costs. A ruined fortress cannot be repaired. To repair a fortress under a redux counter, pay the required RP cost and then immediately remove the redux counter. To repair an air unit, pay the required RP cost and then immediately flip the air to its full strength side. Naval units of all types can only be repaired if in one of their unconquered (2.93) home country (2.24) or shadow government port locations. To repair a naval unit in a home country port location, pay the required RP cost and then roll 1d6. Place the naval unit at full strength on the turn track a number of months in the future equal to the die roll result; that’s when it reenters play via the usual muster process.
6.225 When procuring infantry corps for use on the Europe and Ottoman maps (AF are exempt), a major power that procures more than one infantry corps in a month must spread its purchases across available effectiveness scores as evenly as possible. Therefore, a major power cannot purchase two corps with the same effectiveness score unless and until it has purchased one corps from each available effectiveness score. A major power cannot purchase three corps with the same effectiveness score unless and until it has purchased two corps from each available effectiveness score, so forth and so on. Lack of corps at certain effectiveness levels alleviates the need to meet this requirement at that level, i.e. if there are no “2s” then you can’t buy them and you can therefore buy another 0, 1 or a 3 in its place. There is no requirement to start procurement at the lowest level. So, you can start with a 3, but must procure a 2 and a 1 and a 0, if they are available, before buying another 3.
6.226 When procuring/repairing fighter air units, a nation is restricted to those with the single highest machine gun score available in its force pool unless that score is 7. When that score is 7, a nation can also freely procure/repair 6s, but at no other time can a nation procure/repair lower than the highest score available to it. For example, at some point, the British force pool will include fighters with a machine gun score of 2 and others with a machine gun score of 4. At that point, Britain can only procure/repair those with a score of 4. When fighters with a score of 6 enter the British force pool, the British can no longer procure/repair 4s, but must procure/repair 6s. Throughout, the fighters with lower scores can remain in play, but if damaged or destroyed they cannot be “bought back.”
6.227 Infrastructure: Each side may build one infrastructure marker per month to a limit of 12 per side. A side may NOT build infrastructure in two consecutive months. It costs one RP (or AP in Africa) to build an infrastructure marker. Infrastructure musters one month after procurement in any friendly, controlled land hex.
6.3 Aviation Phase
During the aviation phase, players move and fight with fighters only; bombers play no role.
6.31 Patrols
34
6.311 Each side, CP first, alternates moving one, in-supply fighter unit at a time to any location (hex or box) within its radius or passing on that option. A fighter has one movement point per point of radius and pays one movement point to enter any hex, regardless of terrain and/or the presence of enemy units, but cannot enter neutral hexes. Fighters can enter port boxes from an adjacent map edge hex by spending all remaining movement points to do so. Fighters cannot patrol over ocean boxes. Fighters patrolling out from a port box would pay the cost of the on-map hexes they enter as usual.
6.312 There are four movement restrictions during the patrols sub-phase: 1) a fighter must demonstrate supply (3.1) before it starts its move, 2) no fighter can leave a location which contains an enemy fighter, 3) no fighter can pass through a neutral hex, and 4) each fighter can move only once. Other than that, a fighter can traverse any hex and/or conclude its patrol in any location regardless of terrain or the presence of enemy units.
6.313 The Patrols sub-phase comes to an end when at least one of the following two events occurs: 1) Both sides pass in succession, or 2) Both sides have moved all available fighter units
6.32 Dogfights
Players must resolve dogfights for locations that contain fighters of both sides. Resolve dogfights until at least one side has no fighters present in the location.
6.321 Begin by making any desired (re)combinations of eligible, reduced-strength fighters (2.67). Then pair each air leader (ace) present with a single fighter. The ace shares that fighter’s fate in the coming combat, i.e. if that fighter is destroyed then so is the ace.
6.322 A dog fight is resolved in “tiers” based on machine guns scores. The highest machine gun scores fire in the first tier, the next highest fire in the 2nd tier, so fourth and so on until all tiers have fired. Identical scores fire simultaneously in the same tier. Units that refuse to fire at their place in the hierarchy forfeit their shot, i.e. you cannot wait to fire until after lower machine gun scores have completed their shots. So all 7s fire, then all 6s fire, then all 5s fire, etc.
6.323 To fire, a fighter selects any enemy fighter as its target, even one that cannot fire in the current tier. However, unless directed by an air leader “ace” (6.328) no fighter can target an already targeted unit for a second shot until all enemy units have been targeted at least once. The firing fighter rolls 2d6. Modify the sum by adding the firing fighter’s machine gun score and subtract one if the firing fighter is damaged. If the final result of a fire dice roll exceeds the target’s evasion score then the target is hit. 6.324 Implement all results after every unit in a tier has fired. A hit flips an air unit over to its damaged side, or destroys it if already damaged, and forces it to abort. Aborted units must return (at the end of the current tier) to any friendly aerodrome by spending a number of movement points up to their radius score or be destroyed. Aborted units are not subject to additional dogfight attacks after the tier in which they were hit.
6.325 After implementing all the results generated within a tier, proceed to the next tier in sequence. Note, that it is possible for units with higher scores to damage, destroy and/or abort units with lower scores before those lower scores get their chance to fire.
6.326 After all fighters of both sides have fired and/or been aborted a dog fight is complete. If opposing fighters still occupy the same location, then they must start and complete another dog fight. Repeat this process until only one side, or neither side, has fighters in the location.
6.327 When only one side has fighters remaining then that side has “air superiority” over that location.
35
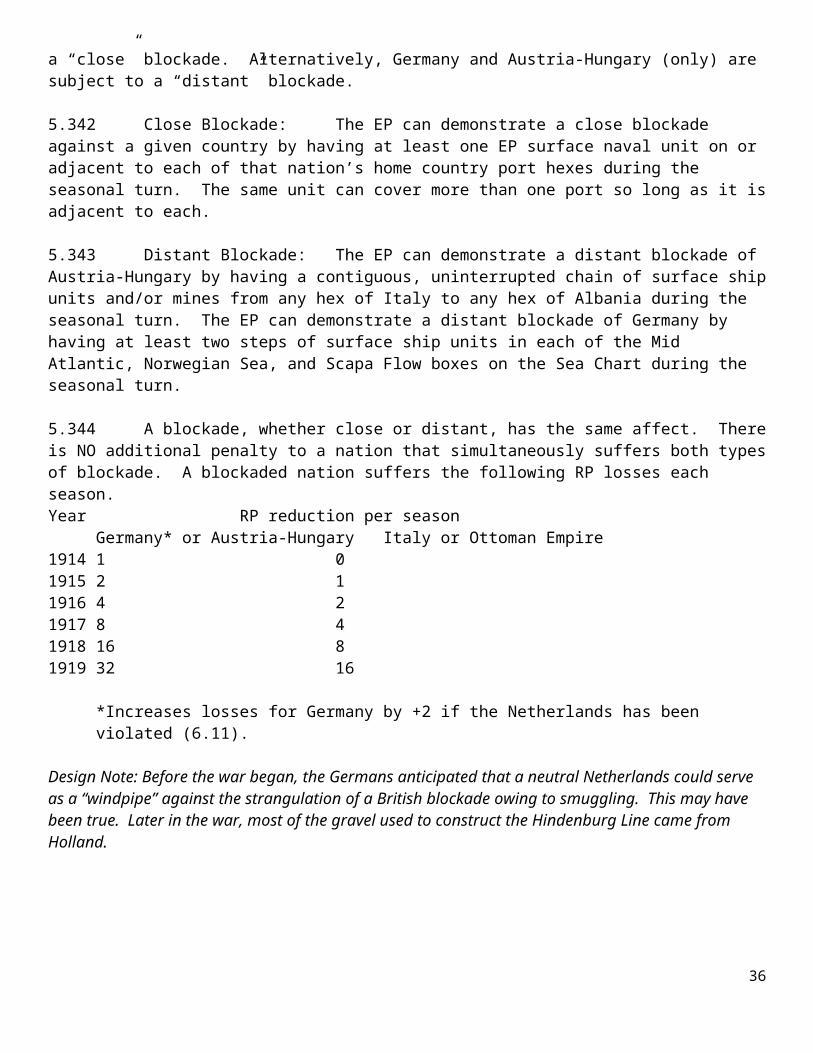
6.328 A fighter stacked with an ace gets a second shot immediately after the first at any eligible target of its choice. The second shot can be directed at the same target as the first.
6.33 Air Superiority
Fighters on patrol that won (or never faced) dog fights remain in their destination location to assert air superiority (10.51) until the Aerodrome Phase and have no other effect on play. Fighters asserting air superiority do NOT interfere in any way with enemy supply or movement, however they can modify a reserves die roll (10.4), and are not themselves displaced by the subsequent movement of enemy land units into their location.
6.4 Admiralty Phase
Design Note: The presence of naval counters in a hex or box represents sustained activity at the designated point, but not necessarily the continuous presence of all the ships in those units at that point. Most of the time, one can assume that about 1/3rd of the all the ships in a given unit are actually coming or going from their duty station and therefore not actually present on station. The standard admiralty rules (6.41-6.45) allow players to simulate naval operations. However, players who wish to curtail the naval simulation may instead use the Option Admiralty Rule (6.46) which abbreviates all the detail.
6.41 At Sea vs. In Port
Naval units sometimes need to distinguish between being “at sea” or “in port.” Naval units in all-sea hexes, coastal hexes, ocean boxes, or enemy port boxes are at sea. Naval units in friendly controlled port hexes or boxes, or permissive neutral port boxes, can declare themselves in port or at sea as desired when challenged to do so by the opposing side. A side can require enemy units to declare their at sea or in port status each time contact (8.1) occurs. Once a status is declared, it cannot be altered until another separate instance of contact occurs.
6.42 Naval Zone of Patrol (NZOP)
Each stack of surface ships or submarines on the North Europe, South Europe or Ottoman map radiates a Naval Zone of Patrol (NZOP) into the water portion of the six adjacent hexes that surround the stack. Fortresses, mines, and lone naval units do not radiate NZOP. NZOP never applies on the Africa map or Sea Chart.
6.43 General Quarters (GQ) sub-phases
6.431 Each Admiralty Phase has two GQ sub-phases, I and II. Each GQ sub-phase has a CP half followed by an EP half – except when the British exercise rule 6.432 to go first during GQ II. A side is phasing during its half. The phasing side conducts all of its naval movement (7.0) and any resulting naval combat (8.0) one force (2.61) at a time. Conduct all actions for a single phasing force, to include an interwoven series of moves and or combats, before conducting actions for any other phasing force. After a side has finished all desired moves
36
and/or combats for all of its forces its sub-phase half ends and the other side’s half begins. After both sides complete their respective halves of GQ I, proceed to GQ II where the process repeats.
6.432 At the beginning of GQ sub-phase II, the British (or EP) player can decide that he will move first, reversing the usual CP-EP order for a sub-phase.
Design Note: Britain’s ability to control the initiative in GQ II stems from cryptologists in Admiralty Room 40 who consistently read Germany’s coded message traffic.
6.44 Voluntary Return to Port
6.441 After GQ II, naval units still at sea MAY return to port, but are not required to do so. The CP makes all of its returns first. Units returning to port may spend a number of naval movement points equal to their range (7.11) one time. Surface units returning to port cannot enter a location containing enemy naval units (including surface, submarine, mines and intact fortresses) or enemy NZOP. All units returning to port must end their move in a friendly or permissive port or anchorage. Return-to-port moves are not possible unless these conditions are met.
6.442 Units returning to port are NOT subject to interruption.
6.443 Naval units do NOT need to return to the port from which they came. They are free to return to any friendly or permissive port/anchorage which they can reach.
6.45 Mines
Mines are one-step, immobile surface naval units that fight via mine attacks instead of naval combat. No more than one mine counter from each side can occupy the same map hex or port box, but any number of mine counters from the same side can occupy the same ocean box.
6.451 Naval units can enter a location that contains mines from their own side at no penalty.
6.452 A mine automatically attacks EACH enemy Surface ship and/or U-boat/submarine in a force that meets at least one of the following conditions. Note that this means the non-phasing player will be “attacking” the phasing player with mines.
The enemy force enters a location that contains at least one friendly mine counter; NZOP overlapping an enemy mine hex will NOT by itself trigger mine attacks.
The enemy force places a landing counter pointing at a location that contains at least one friendly mine counter.
6.453 Mine attacks vary depending on location. Mines attacking from a hex or port box roll 1d6; if the die roll result is less than the mine’s attack score then inflict a hit on the target naval unit. Mines attacking from an ocean box roll 2d6; if the result is less than the sum total of mine attack scores in that box then inflict a hit on the target unit. Note that certain ocean boxes modify mine scores as follows: double all mine scores in the Gulf of Finland and half all mine scores in the Mid Atlantic, Mid Pacific and Indian Ocean boxes. In all cases, mines do NOT need “doubles” to kill an already damaged BB. Mines themselves are unharmed by their own attacks.
6.454 Mines available at the start of a scenario are set up according to the instructions in the order of battle. Mines procured during play are stored in any convenient out-of-the-way space until placed.
37

6.455 PLACEMENT: A surface ship or submarine/U-boat that spends a number of naval movement points equal to its radius score in a single location can place one mine counter there after surviving any combat triggered by its movement. The owner simply selects any same nationality stored mine counter, or a same nationality mine counter already placed elsewhere, and repositions it to the location where the placing unit just spent its naval movement points. A single unit could, in theory, place two mines per GQ sub-phase.
6.456 CLEARANCE: A surface ship (submarines cannot clear mines) that spends a number of naval movement points equal to its radius score in the location where it began the current GQ sub-phase can make one attempt to clear one mine counter from that location OR any one adjacent location during the current GQ sub-phase. Roll one die on the clearance table and implement the result immediately. “Mine cleared” means move that mine back to the force pool. Should the clearance attempt fail, other surface ships can attempt to clear the same mine counter in the same GQ sub-phase via the same procedure. Resolve mine clearance attempts before adjudicating contact with enemy naval units when both apply.
Clearance TableRoll Result1 Mine cleared and clearing unit suffers one step loss.2 Mine cleared 3-6 No Effect, Mine Remains
6.46 Optional Admiralty Rule
6.461 To simplify the game at the expense of naval detail, by mutual consent, player may wish to invoke the Optional Admiralty Rule before beginning a scenario. When using this rule, players can omit rules sections 6.41-6.45 as well as sections 7.0 and 8.0. There is no need to set up naval units. Instead, during an abbreviated, monthly Admiralty phase, the EP – only - has the following capabilities.
6.462 Each month, the EP can move up to five corps and any number of air units over water anywhere except German coastal hexes and the Sea of Marmara (defined as any coastal/water hex within two hexes of 5245). Each corps or air unit so moved can make three moves of up to 14 movement points each. Each water hex entered on a European or Ottoman map costs one movement point while each one entered on the Africa map costs three. Entering an ocean box costs all remaining movement points for the current move. Entering a port box from an adjacent ocean box costs 0 movement points; however entering a port box form a map hex costs all remaining movement points for the current move. Since each unit has three moves, each could possibly enter three ocean boxes. These units can remain “at sea” indefinitely. However, units that move by sea can only return to land at a friendly port (2.5), permissive neutral port (6.122), or via a landing counter. During the admiralty phase, the EP can place one landing counter per calendar year in any port box or ocean/coastal hex except those adjacent to hexes of Germany or in the Sea of Marmara. The landing counter serves as EP-controlled, “land” in the subject location which is connected to an adjacent coastal hex to which it points.
6.463 The EP can freely trace supply over water hexes/boxes without the usual need for a friendly surface ship (3.133) except in the Sea of Marmara. Assume that the British can trace an off-map sea supply line in order to transfer RPs to Russia.
6.464 When making a land combat dice roll against any coastal hex except those of Germany and the Sea of Marmara, the EP can always apply a +1 for siege artillery provided by naval gunfire.
6.465 CP units have no naval capabilities. They cannot enter or trace supply through all-water hexes or ocean boxes.
38
6.5 Campaign Phase
6.51 Weather
6.511 There are two types of weather in Balance of Powers, good or bad. Good weather is the default that applies unless otherwise noted and has no effect on play. Bad weather varies by month and location as marked on the on-map calendar and does affect play.
6.512 Bad weather occurs as follows. From March through May inclusive the entire Africa map suffers bad weather due to rain. From June through August inclusive Ottoman map hexes numbered XX60 and higher suffer bad weather due to the heat. From November through February inclusive, the North & South Europe maps and Ottoman map hexes numbered XX59 and lower suffer bad weather due to snow.
6.513 Locations affected by bad weather suffer several penalties as follows. They have only one fortnight (6.52). They require double the usual RP/AP expenditure when selected as the target of a land attack (10.3). And during the weather sub phase of each bad weather month in Africa (March through May), the CP (or German) player can select any one British-colored AF corps on the Africa map for possible elimination due to sickness. After selecting a British-colored corps, the CP player rolls one die. If the result is LESS than the selected unit’s printed effectiveness score then that unit is immediately eliminated; otherwise no effect. Note that only British units - including British colonial units such as IEF, SA, etc, - can be selected. Belgian, French and Italian units are immune. And, only one unit can be selected as the target of sickness each month.
Design Note: Britain had a higher percentage of white and non-native troops (from India) in its various units so they suffered more black water, dysentery, malaria, and other ailments than the other powers fighting in Africa. The sickness casualties suffered by other powers were not numerous enough to decimate their units.
6.52 Fortnights
6.521 A month usually consists of TWO fortnights; however, when “bad” weather applies, play only ONE (the 1st) fortnight for that month in the affected location. Corps that begin their 2nd fortnight in a hex affected by bad weather forfeit that fortnight – they can neither move nor attack. Corps that begin their 2nd fortnight in a good weather location cannot move into a bad weather location during that fortnight.
6.522 Each fortnight is a sub-phase with a CP half followed by an EP half. A side is phasing during its half. The phasing side conducts all of its land movement (9.0) and any resulting land combat (10.0) one force (2.61) at a time. Conduct all actions for a single phasing force, to include an interwoven series of moves and/or combats, before conducting actions for any other phasing force. After a side has finished all desired moves and/or combats for all of its forces its fortnight half ends; remove all trench battle (9.73) and breakthrough (10.73) counters. Then the other side performs its fortnight half.
6.523 Once both sides have completed their halves, a fortnight is complete.
6.6 Aerodrome Phase
6.61 Return to Base: Each air unit not in friendly controlled location (i.e. a fighter still on patrol over an enemy hex/box or a bomber or fighter unit whose hex/box has been overrun by enemy land units) must now move to a friendly controlled location. Air units do NOT need to demonstrate supply to return to base. Air units returning to base have a number of movement points equal to their radius score.
39

6.62 Change of Base: Any in-supply air unit, including those which just returned to base, may now move by spending a number of movement points equal to twice its printed radius score (it’s range).
6.63 During base returns and changes, the following movement rules apply. The CP makes all of its returns and changes first followed by the EP. Air units pay one movement point per hex entered, regardless of terrain and/or the presence of enemy land or naval units, or all remaining movement points to enter an adjacent box. Air units cannot enter neutral locations or those which contain enemy air units. Their move must end in a friendly-controlled location; if not then the air unit in question is completely eliminated.
6.7 Commissariat Phase
At this time, check each corps (1.321) of both sides for supply (3.1). Make these checks in order of printed effectiveness scores from lowest to highest. All scores of the same value check “simultaneously.” Any corps found to be out of supply must roll 1d6 and compare the result to its printed effectiveness score. If the result is LESS than the checking corps’ printed effectiveness score then it survives; otherwise destroy it.
6.8 Revolution Phase
6.81 Austria-Hungary, Germany and Russia can each suffer a revolution. Starting with the second month after it went into crisis, an affected nation from this group must roll 1d6 during the revolution phase. If the result of that roll is less than the number of months since its crisis started (as marked on the calendar), but not 6, then that nation immediately goes into revolution. A roll of 6 never causes revolution. For example, if Russia goes into crisis in July 1917, then it would need the following die rolls in the months that followed to go into revolution: August 0 (impossible), September 1, October 2 or less, November 3 or less, December 4 or less, January, 1918 through the end of the game 5 or less each month.
6.82 A nation in revolution suffers the following consequences.1) Immediately reduce its RP track to 0 permanently; it never again posts RP from any source and cannot
receive transfers or RP income of any kind.2) For Austria-Hungary and Russia (NOT Germany) immediately remove all of its units from play except
mines, ruin all fortresses, and then return six infantry corps, each with an effectiveness score of 2, to the nation’s capital location unless that capital is enemy controlled. Austria-Hungary returns three infantry corps to Vienna and three to Budapest. Germany’s units and fortresses remain intact, but given clause 1 they cannot be replaced when damaged or destroyed.
6.83 A nation in revolution remains on its original side (CP or EP). Germany (only) can conduct one land attack per season at no cost in RP.
Design Note: In game terms, we keep the nation in revolution on a side for simplicity. It could revert to neutrality, but that would require additional rules to handle multiple transitions since the original enemy will likely occupy its territory anyway.
7.0 Naval Movement
In general, during the GQ (6.43) and voluntary return to port (6.44) sub-phases of the admiralty phase, phasing naval units can move individually or in stacks across water hexes on the maps as well as port and ocean boxes on the Sea Chart. The distance moved is a function of a naval unit’s radius score. Non-phasing naval units can
40

attempt to interrupt the movement of phasing naval units. A successful interrupt curtails the movement of an enemy force. At any point, either side can attempt a search to trigger naval combat. The presence of enemy air units or land corps (except at canals) does not affect naval unit movement, but enemy fortresses might. Complete the movement for one phasing force, including any combat triggered by that movement, before starting the movement of another phasing force.
7.1 Radius, Range and Overage
7.11 Each naval unit has a printed radius score. The radius score is the number of map hexes out to which a non-phasing naval unit could interrupt the movement of a phasing surface naval force which has run an overage. Note, on the Africa map each hex counts as three. The radius score X 2, also called “range,” is the number of naval movement points a phasing naval unit has available to spend on its own movement during a GQ sub-phase. When moving, the amount by which a phasing naval unit exceeds its printed radius score is called an “overage.” The extent of a force’s overage is determined by the slowest unit in that force.
7.12 SummaryRadius = score printed on unitRange = two times the radiusOverage =number of movement points spent beyond the radius score during a single move
7.2 General Movement Rules
7.21 Naval units can move individually or in stacks. Surface ships and submarines can never be a part of the same stack; they are always separate forces.
7.22 Each naval unit begins its half of a GQ sub-phase with a number of naval movement points equal to its range. Naval units spend naval movement points to enter locations. Once a naval unit has spent a number of naval movement points equal to its range, or declined to do so, its move is complete with the possible exception of moving from an ocean box to an adjacent port box at a cost of 0 movement points (7.52). Some moves cost All Remaining Naval Movement Points (ARNMP) and so can be conducted even if the moving unit has already spent some naval movement points on previous movement.
7.23 When moving, players must pay careful attention to the distinctions between maps and the Sea Chart. Naval units move across maps one hex at a time and across the Sea Chart one box at a time. Naval units can transfer from maps to boxes on the Sea Chart and vice versa as indicated at map edges and on the Sea Chart. In such cases, units pay the cost of the location they are entering.
7.24 Coastal Defense (CD) ships can only enter coastal hexes, all water hexes adjacent to coastal hexes, and port boxes. CD units can never enter an all water hex which is surrounded by six other all water hexes or an ocean box.
7.25 A nation must pay one RP per month in which it moves at least one dreadnought (BB). Make this payment immediately before moving the first dreadnought. Pay only one RP regardless of how many dreadnoughts that nation moves this month. If a nation does not have an RP available then it cannot move any dreadnoughts.
7.3 Map Movement
41
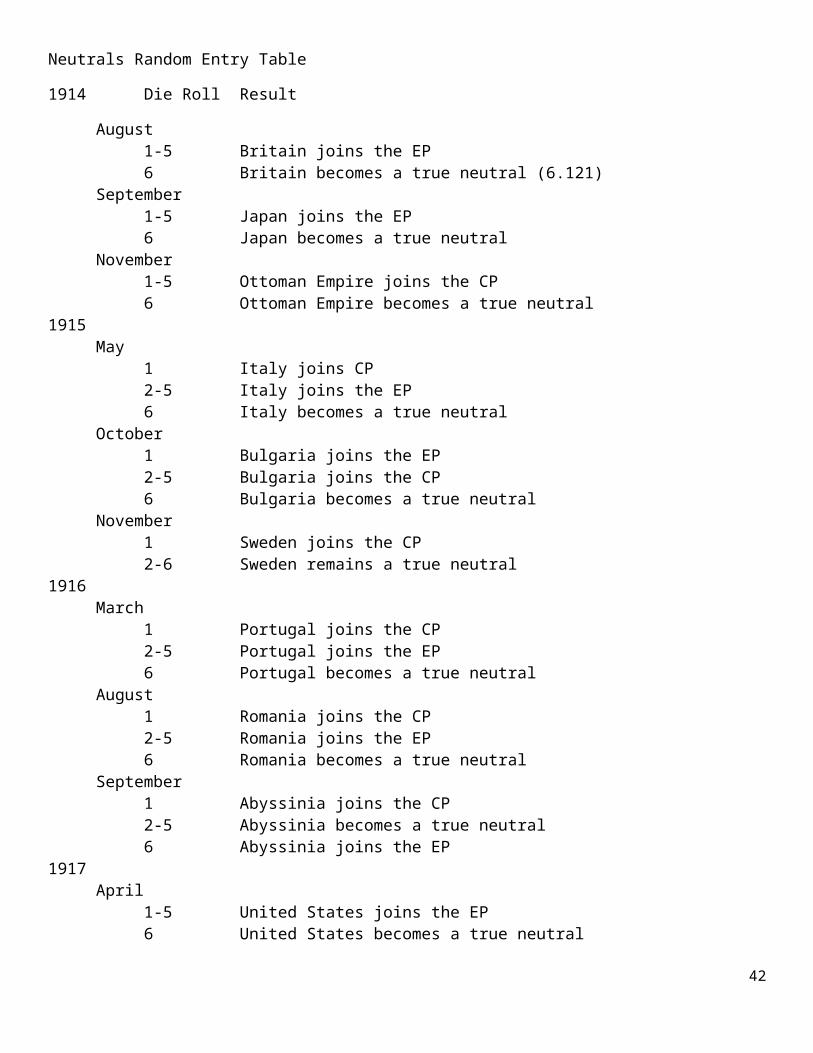
7.31 Naval units spend their movement points as they enter new hexes or cross map edges. Entering a hex on the North Europe, South Europe, or Ottoman map costs ONE naval movement point. Moving into a hex on the Africa map costs, THREE, naval movement points. Naval units moving onto a map hex from a Sea Chart box would pay either one or three naval movement points depending on which map they enter.
7.32 Naval units can move only into hexes that contain at least some ocean or a canal and they cannot cross an all-land hex side in the process. Therefore, naval units can enter hexes that are all ocean, coastal hexes that show some combination of ocean and land, and the Kiel and Suez Canal hexes.
7.33 Moving naval stacks can pick up new units and drop off elements of the stack in hexes that they enter. However, upon joining, each new unit in a stack is considered to have spent as many movement points as the stack spent to reach it. Each unit dropped off can move no further. But, individual units retain their individual movement point scores for all purposes; therefore, some units in a stack may run out of movement points before others.
7.34 Naval units can move into hexes occupied by enemy units. However, naval units cannot enter canal hexes when either side of a canal hex is enemy controlled.
7.4 Interrupt
7.41 The non-phasing side can interrupt phasing surface naval movement on the maps (North Europe, South Europe, Africa and Ottoman), but not on the Sea Chart. If a phasing surface force runs an overage (moves further than its radius score) in a hex that is within the radius of a non-phasing force then that non-phasing force can attempt to interrupt the phasing surface force in that overage hex. Note that submarine and U-boat movement cannot be interrupted; but submarines and U-boats can perform interrupts as usual. The extent of a force’s overage is determined by the unit with the lowest radius score in that force. A non-phasing force can attempt any number of interrupts; but a phasing force is subject to only one interrupt attempt per hex it enters. Pause the phasing side’s movement while the non-phasing side considers and/or attempts an interrupt.
7.42 To attempt an interrupt, roll 1d6. If the final result is LESS than the overage amount spent up to that point by the currently moving force then the non-phasing side has successfully interrupted the phasing side. When this happens, the phasing side must immediately end the move of the entire interrupted force in the target hex, even if some units in that force had not yet run an overage. However, the phasing side can still move other remaining so-far-unmoved naval forces. But, none of those so-far-unmoved surface forces can accumulate an overage GREATER than the amount which was just interrupted. In all cases, resolve contact, search and combat as normal (8.0) should it occur.
7.43 Subsequent interrupts can occur after the first in the same GQ sub-phase. They could stop the movement of other naval forces and even further reduce the allowable surface force overage for the currently phasing player.
7.44 When the phasing side changes (it’s the other guy’s GQ half) or play moves to the next GQ sub-phase, then the current overage limit is erased and the process begins anew with the first possible interrupt against the newly phasing side.
7.5 Sea Chart Movement
42

7.51 Phasing naval units can enter ocean boxes from adjacent port or ocean boxes or map edges by spending ARNMP. A naval unit can enter an enemy occupied ocean box. In effect, phasing naval units can move one ocean box per GQ or return-to-port sub phase.
7.52 Units that begin their move in a Sea Chart box can move to an adjacent map edge hex for ONE (Europe) or THREE (Africa) naval movement points depending on the which map they are entering. 7.53 Phasing naval units can enter port boxes from adjacent ocean boxes at a cost of ZERO naval movement points. Therefore, a unit which had spent ARNMP to enter an ocean box could then enter a port box connected to that ocean box for “free” and end its move there. Units can enter enemy controlled, or even enemy occupied, port boxes but are considered “at sea (6.41)” in that port box. Moving from one port box to an adjacent port box (such as from South America to U.S.A. costs ARNMP.
7.54 Naval units can enter two neutral port boxes, Batavia and South America, even if enemy naval units are present there. If opposing sides both occupy a neutral port box; each can avail the port to decline contact. A CP naval unit that begins its GQ sub-phase in a neutral port box MUST leave or be eliminated that GQ sub-phase.
7.55 NO GO ZONES: CP U-boats can never enter the U.S.A. port box or the South Atlantic and Indian Ocean boxes (those waters were beyond their operational range). No naval units cannot enter or remain in the White Sea box from November through February inclusive (it’s frozen). Naval units that start November GQ I in the White Sea box must leave or be destroyed.
7.56 Naval units never move onto a grey space on the Sea Chart since each such grey space is in fact a “window” to a corresponding map area. Therefore, when a naval unit on the Sea Chart has cause to enter a grey space on the Sea Chart it should instead be immediately placed in a hex of a connected map edge at a cost of one naval movement point for a European edge or three naval movement points for an African edge. So, naval units will never be “on” a grey space of the Sea Chart. However, units on a map are simultaneously “in” the corresponding grey space of the Sea Chart which accounts for (covers) their map area.
7.6 Naval Transport
7.61 Surface ship units of any kind can transport air units and land corps as “passengers” with them as they move. Each surface ship step can carry one corps of land units or one step of air units. Passengers are temporarily incorporated into the surface ship transport, must abide by all naval movement rules, and lose all of their own functionality until they debark – i.e. air units cannot patrol from ships. Surface ships carrying units are referred to as “transports” regardless of their actual type.
Design Note: In most cases, the surface ships aren’t actually carrying the troops rather they are escorting the transports which are not represented by pieces in this game.
7.62 Transports retain all their usual functionality.
7.63 Nations are limited in the total number of land corps that their entire fleet can carry on the Sea Chart and any and all maps according to the following transport limits table. For purposes of this rule, every Six AF “corps” counts as one corps. Transports can carry any number of air steps.
Britain 5 corps per monthUSA 5 corps per monthEvery other major power 1 corps every other month
43
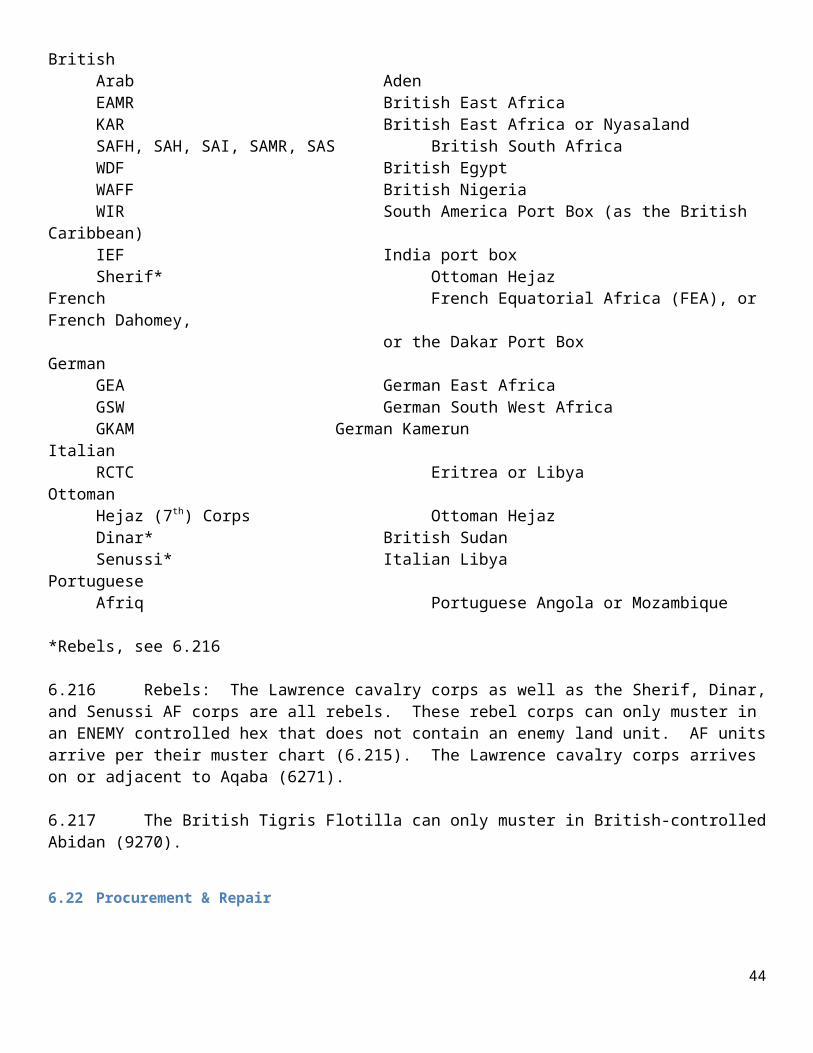
7.64 Transport Procedure: A surface ship that begins its move for a given GQ sub-phase stacked with a friendly air/land unit in a location (hex or box) containing a port or landing can transport that unit. The unit stacks on top of the surface ship as it moves across the water. If losses reduce the number of transporting steps to a number less than the number required to transport their passengers then excess passenger corps/steps of the transporting side’s choice must be eliminated. Given enough transport, passengers can remain embarked and at sea indefinitely where they are always considered to be in supply (3.0).
7.65 Disembarkation Procedure: Passengers can offload in either GQ sub phase or the campaign phase. Air and land unit passengers can offload into a friendly controlled (2.5) or permissive neutral (6.122) port hex/box during the GQ sub phase; and the transport could then continue moving elsewhere. Units disembarked into a port move normally thereafter, in the aviation or campaign phases as appropriate. Corps (only) can offload into any non-port coastal hex or an enemy controlled port hex/box during the campaign phase as amphibious assault (7.7). In this case, the transports must actually stop adjacent to the target hex, or in the target port box, which their passengers intend to enter and stay there through the end of the current month.
7.7 Amphibious Assault
7.71 Corps stacked with surface naval units – an amphibious force - may conduct a land attack via amphibious assault against any enemy controlled location except a Home Country Port box (2.24) during the campaign phase. But first, the attacker must place a landing counter during the admiralty phase. If the amphibious force is in a port box, then the amphibious force places the landing counter in that port box pointing at the enemy stack if there is one. If the amphibious force is in a map hex, then the amphibious force places the landing counter in its own hex pointing at the adjacent coastal hex which it intends to assault during the campaign phase. In either case, placement is automatic.
7.72 Once placed, the landing counter functions as land connected to the hex to which it points or in the port box where it sits. A landing counter remains so long as the placing side has at least one corps and one surface ship stacked together with the landing counter. If either half of the amphibious force is completely absent or eliminated then the landing counter is removed. If the landing counter is removed from a location for lack of a surface ship, then all same-side corps in that location are eliminated.
7.73 Placing a landing counter pointed at Antwerp, Belgium is a violation (6.11) of Dutch (as well as Belgian) neutrality! This would require declaring a violation of the Netherlands (and Belgium if it were neutral) during the diplomacy phase and then putting the Netherlands on the side opposed to the violator.
7.74 The side which placed a landing counter can voluntarily remove it at any time. It must be removed, and may be flipped to its “anchorage” side, when the amphibious force captures the target location at which the landing counter was pointed. The anchorage side of a landing counter can only be placed via a successful amphibious assault. An anchorage functions as a port for supply purposes (3.0) only! Therefore, naval units in an anchorage cannot decline enemy contact.
8.0 Naval Combat
Naval combat MAY occur as naval forces move. Proceed through the following sequence to determine if naval combat occurs and how it plays out.
44

8.1 Contact
As the phasing player moves his naval units, both sides should keep careful watch for contact. Contact occurs when opposing naval forces and/or their NZOPs occupy the same location. However, naval units in a friendly port hex, or neutral or friendly port box, can always decline contact and thereby avoid a search that might trigger sea combat. When contact occurs, either player can immediately pause movement to resolve searches.
Therefore, assuming neither side avails a port, contact can occur in four different ways.
If two opposing naval units occupy the same hex.
If two opposing naval units and/or stacks occupy the same box.
If a naval unit from one side and a naval stack from the other side occupy adjacent hexes.
If two opposing naval stacks, each of which radiates NZOP, are within two hexes of each other.
8.2 Search
8.21 When contact occurs, opposing surface or submarine forces may search for opposing surface (only) forces that are not evading (8.26). Note that no force, not even a submarine force, can search for an enemy submarine force – they cannot be found. Nonetheless, a submarine force can search for an enemy surface force.
8.22 Separation of Surface and Submarine actions: Since it is possible for a single hex or box to contain surface and submarine units from the same side, each of these “separate” forces could search for the same enemy surface force separately. In that case, there could be two naval combats, one surface and one submarine, against the same enemy force. Resolve each combat separately.
8.23 The phasing side gets to search first. To search, a naval force in contact with an enemy surface naval force declares that surface naval force to be its target (chose if more than one target force is available). Searches by or against a fortress (1.33) always succeed. In all other cases, the searching side rolls 1d6. Subtract the number of naval units in the searching force. If the final result of a search die roll is less than the total number of surface naval units in the target force, then the search succeeds and the target force has been found. Otherwise, the search fails. If both sides fail or decline their searches then proceed with naval movement as usual.
8.24 A given pairing of opposing forces can search for each other only once per GQ sub phase. Either force in the pair could conduct further searches, and be the target of additional searches, but not against each other. This restriction applies even if the composition of a given force changes through the loss or gain of units; it’s still the “same” for purposes of once-per-GQ-sub phase limit on pairings of opposing forces.
8.25 When the phasing player declares an end to his half of a given GQ sub-phase, the non-phasing player may delay that end to conduct searches against those phasing units that did not enter new locations that sub-phase and with whom he has contact. The non-phasing player is allowed to search each location with which he has contact one time in this manner and cannot search any location that contains enemy units which moved.
Design Note: This end-of-phase search round is designed to prevent a clever phasing player from avoiding combat by just sitting still.
45
8.26 EVASION: When a search succeeds, non-phasing units that were found may try to evade unless it was a submarine that found them. Phasing units cannot evade. Only those non-phasing units whose movement score exceeds the movement score of every unit in the phasing force that found them can try to evade. Roll 2d6 once for all units attempting to evade. If the final result is less than an evading unit’s radius score then that unit avoids any combat triggered by the search it just evaded and can immediately (out of the usual order) spend a number of movement points equal to its radius score to move. During this “evasion move,” evading units can neither initiate nor be the target of a search (8.2) regardless of what contact occurs.
8.27 After searching, the naval combat sequence that follows varies depending on the presence of submarines. If submarines successfully found an opposing surface force then use the “Submarine Combat” sequence. In all other cases, use the “Surface Combat” sequence.
Naval Combat SequenceContactSearch
Submarine Combat Surface CombatTorpedoes Deploy
SurpriseSalvos
Return to Port
8.3 Surface Combat
8.31 Deploy: Surface ships and fortresses which have been found by other surface ships and fortresses and refuse or fail to evade must deploy for naval combat. To deploy, each side - phasing player first - immediately and publicly allocates its surface ships and fortresses between a van and a main force on the Sea Combat Chart. The van can have any number of BC, CA, and CL. If none of those are present, then there can be no van. All BB, CC, CD, PD and fortresses must be in the main force. If none of those are present, then there is no main force. BC, CA, and CL not assigned to the van can join the main force, if there is one. Navy leaders must also deploy by being placed atop a particular ship of their type. They share that ship’s fate; if it is destroyed, so are they.
8.32 Surprise: When a fortress is involved, neither side is surprised. In all other cases, each side rolls 1d6. A side whose die roll result is greater than the number of units in its van is surprised. Units include surface ships and leaders with a van-eligible ship type (BC, CA, and CL). If both sides are surprised, ignore the results and assume neither is surprised. When only one side is surprised, then that surprised side must apply a -1 to all gunnery dice rolls made by its main force.
8.33 Salvos: Opposing surface naval units fire at each other in two salvos, van and fleet in that order. During the van salvo, only surface ships of the two opposing vans fire at each other. During the fleet salvo, all opposing surface ships may fire at each other, however, surface ships in the enemy van cannot be targeted unless and until all surface ships in the enemy main force have been targeted at least once.
8.331 Surface ships and fortresses fire in tiers defined by gunnery scores arranged in descending order. Units with the highest gunnery score occupy the top tier. The next highest score then makes the 2nd tier and so on. Units with identical gunnery scores fire simultaneously in the same tier so implement the hits inflicted during a tier at the end of that tier. Between tiers, however, firing is sequential so implement all results inflicted by a tier before proceeding to the next tier in sequence. Therefore, units with lower gunnery scores can be damaged or
46

destroyed by units with higher gunnery scores before the lower scores have a chance to fire. Units that refuse to fire at their place in the hierarchy forfeit their shot, i.e. you cannot wait to fire until after lower gunnery scores have completed their shots. So, all 4s fire and implement their results, then all 3s fire and implement their results, etc.
8.332 To fire, a surface ship or fortress selects any enemy surface ship or fortress engaged in the current salvo, even one in a lower tier, as its target. The firing surface ship or fortress rolls 2d6. Modify the sum by adding the firing unit’s gunnery score and subtracting one for surprise if applicable. If the final, modified result of a fire dice roll exceeds the target’s armor score then the target is hit. However, unless directed by a naval leader (8.334) no ship or fortress can target an already targeted unit for a second shot until all enemy units have been targeted at least once. 8.333 A hit flips a full strength surface ship over to its damaged side or reduces a full strength fortress. Except for BB (dreadnoughts), an already damaged naval unit (including a fortress) that is hit is destroyed. A damaged BB that is hit a second or subsequent time is destroyed if and only if that most recent fire dice roll was also doubles before any modification; otherwise that would-have-been hit is negated.
8.334 If a side has a navy leader present who is paired with a ship of his type then that ship gets a second shot immediately after its first in each salvo. The second shot can be directed at the same target as the first.
8.4 Submarine Combat
If submarines are attacking a surface force (the only way submarines could be involved) then they fire torpedoes at enemy surface ships, but NOT fortresses, and suffer ASW attacks in return.
8.41 Each submarine unit in a force attacks the surface ship of its choice with its torpedo score. Simply roll 2d6 for each attacking submarine, add the shooter’s torpedo score, and compare that sum to the target’s armor score. If the final dice roll result exceeds the target’s armor score then inflict a hit on the target unit. As usual, damaged BBs are hit if and only if the dice were doubles in addition to exceeding the armor score. Submarines cannot target fortresses.
8.42 After each torpedo attack, each surface ship unit so attacked makes one ASW (5.323) roll even if the torpedo attack damaged or destroyed it.
8.5 Mandatory Return to Port
8.51 At the end of a surface combat, each side – CP first - must check for mandatory return to port by rolling 1d6. If the result is less than the number of surface ship steps which that side lost in the just-finished combat then all of that side’s surviving surface ships must immediately conduct a mandatory return to port.
8.52 Surface ships which do NOT roll less than the number of steps they lost may – at their option - conduct a mandatory return to port or they may, after all mandatory returns to port are complete, continue with regular movement if phasing or stay where they are if non-phasing. Such ships could even participate in additional naval combat in the same GQ sub-phase.
8.53 At the end of a submarine combat, any submarines/U-boats that participated and survived must immediately conduct a mandatory return to port.
47

8.54 To conduct a mandatory return to port, simply move the affected naval units to the nearest friendly port as measured in NMP from their current location regardless of their radius/range scores. For this rule, the Batavia and South America boxes (7.54) count as “friendly” ports. When calculating distances, each ocean box counts as 24 NMP, hostile port boxes count as 6 NMP, friendly port boxes are 0 NMP. Returning units are not subject to interrupt (7.4) or search (8.2), nor can they initiate a search. Indeed, they pass directly through locations containing enemy surface ships and submarines without incident. However, returning units must suffer any mine attacks they may trigger as usual (6.45) and each returning unit must also endure a single attack (one dice roll) from any hostile fortress locations they enter without being able to fire back. Finally, units that perform a mandatory return to port can NOT leave that port until the following month; if forced to exit before then they are destroyed.
8.6 Naval Combat Example, the Battle of Jutland
The following example replays a Jutland-like battle (May 31-June 1, 1916) in game terms. In “Illustration Jutland 1,” the German “Hoch See” fleet marker moves north out of Cuxhaven, passing freely through the German mine belt, spending movement points as indicated on the map. The Hoch See counter represents all those units depicted in the lower left of the illustration. The British CL keeps careful watch for the two conditions that will enable him to interrupt the German move: 1) Hoch See enters his radius of eight, and 2) Hoch See spends more than the printed movement point allowance of its slowest member (5 for pre-dreadnoughts). Both conditions first apply simultaneously at movement point 6 in hex 1607. The British try to interrupt by rolling LESS than the amount of the overage in each hex thereafter and finally succeed by rolling less than four when Hoch See spends its 9th movement point in 1504. So, Hoch See’s move is interrupted (stopped) in that hex. Note that interrupt attempts are one per hex, not one per opposing pair like search attempts. With no one else to move, the Germans declare their half of GQ I complete.
48

49

During the British half of the GQ I (Illustration Jutland 2), the British CL (yellow movement point numbers) sails to 1003. Since the CL did not exceed its printed radius of 8, the Germans cannot interrupt. Then Beatty and the Battle Cruisers leave Rosyth to join the CL in 1003 following the path indicated by the black numbers. Beatty’s force runs an overage on its 9th movement point. The Germans announce an interrupt attempt from Hoch See when Beatty’s force spends its 10th movement point. They need to roll less than 2 (10-8=2) but fail. Beatty’s force stops anyway. Grand Fleet then exits the Scapa Flow box to enter the map edge at 0601 and follows the trail of red movement points to rendezvous with Beatty’s force before stopping on its 5th movement point. That concludes the British portion of GQ I.
50

At the start of GQ II, the British player exercises his ability to manipulate the initiative and moves first.
Contact occurs when Grand Fleet’s Naval Zone of Patrol (NZOP), shown with the khaki circle, overlaps Hoch See’s NZOP, shown with a grey circle. At that point, Grand Fleet searches for Hoch See. With 1d6, Grand Fleet needs to roll less than the number of ships in Hoch See (9) and gets to subtract its own ship total (13) from the die roll so success is automatic. Naval units of both sides then deploy on the Sea Combat chart as follows.
Once deployed, opposing forces check for surprise by each rolling 1d6. If the result is greater than the number of naval units (surface ships and van-eligible leaders) which a side has in its van (triangle) then that side is surprised. The German rolls a 4 and the British roll a 5 so neither side is surprised.
Play proceeds to the van salvo in which the opposing forces fire at each other in the order indicated as determined by their gunnery scores.
51

First German BC 1Second British BC 1Third British BC 2Fourth German CL1, CL2 and British CL1, CL2
German BC 1 fires at British BC 1 by rolling 2d6 to get a 7 and then adds 4 for gunnery. The final result of 11 exceeds the British ship’s armor of 9 and so inflicts a step loss – flip the British BC. Thanks to Hipper (a BC leader) the Germans take a second shot with BC 1 at the same target getting a final score of 11 to sink British BC 1 – remove it. The surviving British BC 2 returns fire at German BC 1 by rolling 2d6 to get 8 and then adds 3 for gunnery. The final result of 11 damages German BC 1. Beatty enables that same British BC to take a second shot, which it directs at the German BC, but misses with a roll of 5. The opposing CLs then fire at each other. One German and one British CL are damaged in the process.
Next comes the fleet salvo in which all units can fire, but all units in the opposing main body must be targeted at least once before any unit in the van can be targeted. The dreadnoughts, with gunnery scores of 4, will all fire simultaneously in the first tier before any other ships. Subsequent tiers and their fires occur in descending order of gunnery scores. The breakdown of shots appears below.
52

So, after both salvos, each side sums its step losses. The Germans lost BC1 and CL1 while PD1, PD2 and CL2 suffered damage for a total of seven step losses. The British lost BC 1 while BB3, BB4, CA1, and CL1 all suffered damage for a total of six step losses. Each side, CP first, then rolls one die to see if it must return to port. The rolls are 3 and 4, each less than six, so each side MUST return to port. Referring back to Illustration Jutland 1, the Germans just retrace their steps to Cuxhaven while the entire British force sails north across the map edge into the Norwegian Sea box for “all remaining” movement points and then enters the adjacent Scapa Flow port box at a costs of 0 movement points.
If the British had surrounded the Germans with naval units and thereby prevented the return to port, then the Germans could have remained in place and used their GQ II to move and fight to perhaps punch a hole through which they could then return to port.
53

9.0 Land Movement
In general, phasing corps can move individually or in stacks across land hexes on the maps as well as into port boxes on the Sea Chart. The distance moved is a function of a corps movement point score. The presence of enemy air units or naval units does not affect corps movement. Complete the movement for one phasing force (2.61), including any combat triggered by that movement, before starting the movement of another phasing force.
9.1 Marching
9.11 Corps march by indicating which adjacent location (hex or port box) they wish to enter, and then each corps in the force (2.61) pays the required number of movement points to enter that location from its printed allowance. This process continues until a corps has spent all available movement points, or does not wish to go further, or does not have enough movement points left to enter the next intended location.
9.12 Marching forces can pick up new corps which have not yet moved in hexes that they enter. New additions to a moving stack are assumed to have already spent as many movement points as the stack they join. Stacks can drop off corps at any point while corps with sufficient movement points remaining can continue onward. Corps dropped off from a stack immediately cease movement.
9.13 Corps must pay the following movement point costs and observe the following restrictions to enter the indicated terrain types.
All-Ocean Hex Side: Prohibited except to passengers of naval transport. Solid Red Bar: Prohibited except to mountain corps at an Alpine pass. Alpine Pass: Mountain corps (only) can cross for All Remaining Movement Points (ARMP). Mountain Pass Hex Side: Any corps can cross for ONE MP. Marsh, Forest/Jungle, and Mountain: Any corps can enter for ARMP. Desert: No effect on movement. All-Lake hex side: Prohibited except to flotillas. Any other hex: Any corps can enter for ONE MP. Port Box: Any corps can enter from an adjacent land hex for ARMP.
Note that the presence of a water obstacle within a hex (rather than the hex side) has no effect on corps. Thus, corps can occupy the Dardanelles, 4946 and 5046, and move and fight through these hexes without penalty because these are not “hex side” water obstacles.
9.14 Assume that AF corps have only one movement point in maneuver mode, and zero when entrenched.
9.15 Phasing corps can indicate that they intend to march into a location occupied by enemy land unit(s) in order to initiate land combat (10.0) against those units. In this case, stacking limits (2.62) apply per side based on the location the marching units intend to enter. Marching corps simply pay the usual movement point cost for the location they intend to enter; there is no additional cost for the enemy presence. But, the marching corps do not actually enter the intended location until after they resolve land combat against the occupants. In the meantime, the marching corps pause in the location which they intend to leave pending the outcome of the land combat.
9.16 Cavalry corps cannot declare a move into a location which contains an entrenched enemy corps and therefore cannot participate in land combat against a location which contains an entrenched enemy corps.
54
9.2 Railroad movement
9.21 Railroad movement allows corps to move up to 18 hexes (3 in Africa) along friendly controlled rail line and/or infrastructure hexes per movement point spent. However, railroad movement is subject to the following restrictions.
9.22 No corps can declare railroad movement during the first fortnight of August 1914.
9.23 To declare railroad movement, corps must: 1) be on a rail or infrastructure hex, 2) be able to demonstrate a valid supply path at the time of its declaration i.e. in its own hex before it actually moves, and 3) spend one RP per railroading force (2.61). Pay the RP cost per force, not per corps in the force, from any nation with at least one corps in that force. A railroading force can pick up new units without having to pay an additional RP. New arrivals are assumed to have already spent as many movement points as the force that picked them up spent to reach them.
9.24 Corps using railroad movement must move through friendly, controlled, railroad or infrastructure hexes along the path of the railroad artwork. Corps on rails can only traverse those hex sides crossed by the rail road art work. Infrastructure markers are assumed to connect directly to all rail road artwork in adjacent hexes. Corps using railroad movement are NOT required to spend ARMP upon entering forest/jungle, mountain or marsh.
9.25 No corps can spend more than 3 movement points on railroad movement. Hence, the maximum distance one can move along rails in one fortnight is 54 hexes in Europe or 9 hexes in Africa.
9.26 An entrenched corps in a rail or infrastructure hex can declare railroad movement. It spends its one movement point to move up to 18 hexes along rail lines, ends its move, and remains entrenched.
Design Note: This is a simplified way of representing the quick transfer of forces from one area of the line to the other. The troops aren’t digging fresh trenches when they arrive; they are occupying old ones. And, their “kit” comes several days after they do since they rushed out of their first position to catch the train.
9.27 Corps cannot rail across the north edge of the Ottoman Empire Map.
Design Note: Although the rail line running along the Caspian did connect to Ukraine, in game terms the best way to account for that arduous trek – that strained Russia’s rail resources – is to forbid it and instead have the Russian player muster units in the Caucuses.
9.3 Combining Rail and March Movement
9.31 Corps can alternate between marching and railroad movement in the same fortnight in so far as their movement allowance permits. However, each time a force begins a railroad move, it must meet all requirements of 9.23 including spending (another) RP.
9.32 It is possible for corps to rail adjacent to any enemy force and then spend its next available movement point to declare that it is marching into the enemy occupied hex to initiate combat (Tannenberg).
9.4 Land Movement to/from Port Boxes
Corps can march and/or rail into a box from an adjacent map edge hex or landing counter by spending “all remaining movement points.” If the port box is enemy occupied, then such a move initiates combat as usual
55

except that the defending location will be the port box. To exit a box, corps must pay the usual movement point cost for the board edge hex it enters.
9.5 Fresh Water Movement & Flotillas
Flotillas are corps (1.321) that “march” (9.1), but must always be in a hex which has one of the Danube, Tigris or Euphrates rivers along one of its hex sides, or for AF flotillas, be in a hex which contains an African lake. Flotillas can never cross all land hex sides unless following the path of a river.
Design Note: To keep the game simple, we treat these river boats as “corps.”
9.6 Over Extended (Over X)
9.61 As the phasing player moves his corps, the non-phasing player should keep careful watch. If a maneuver mode, phasing corps spends its entire movement point allowance then the non-phasing player can immediately mark that phasing corps with an Over X counter. Use the Over X counter that corresponds to the marked corps’ side. For example, if the German side detects a maneuver mode Russian corps that spends its third movement point then the German player could mark that Russian corps with an “EP Over X” counter.
9.62 The non-phasing player can place only one Over X counter per fortnight half. The non-phasing player can ask the phasing player to pause while the non-phasing player considers whether or not to place an Over X. Once placed, an Over X cannot be repositioned in that same fortnight.
9.63 Remove “Over X” counters at the start of the marked side’s next fortnight half. For example, when the EP is phasing, the CP could mark an EP corps “EP Over X.” That counter would then remain in place from that moment, on through the next CP fortnight half, and finally be removed at the start of the next EP fortnight half. Once removed, the counter is again available for the enemy to place it per 9.61.
9.64 Over X has two combat-related effects. Phasing corps attacking a force that contains an over X counter add +1 to the combat dice roll. A force marked over X cannot avail an RP combat result (10.711).
Design Note: The Over X mechanism accounts for the attenuated supply lines and faulty reconnaissance that afflicted WWI armies on the move such as at the Marne (German) and Tannenberg (Russian) in 1914. In plain English, they work like this. He moves. You mark him. When you are phasing, you attack him. The marker comes off as soon as he becomes the phasing side again.
9.7 Entrenching and Trenches 9.71 A corps can entrench or un-entrench by spending all of its movement points in its starting location. Flip the corps over to the appropriate side and consider its move complete. Entrenched AF corps, with an assumed move of 0, and out-of-supply corps whose movement score of 1 would reduce to 0, are allowed to flip back to maneuver mode as their “move.”
9.72 A corps in maneuver mode that attacks a hex which contains at least one entrenched defender will automatically and immediately entrench after that attack UNLESS the attacker’s side has TI (2.8) benefits, and/or it achieves a breakthrough combat result (10.73). A corps in maneuver mode which successfully commits as reserves (10.4) will automatically and immediately entrench before the land combat dice roll. Corps that cannot entrench, such as tanks, remain in maneuver mode and retain all the usual maneuver mode options.
56

9.73 Immediately after an attack against a location containing at least one entrenched corps, mark that location with a trench battle counter unless the attacker started that attack with TI (2.8) benefits or achieves a breakthrough during said attack (10.73). A location marked with a trench battle counter cannot be entered or attacked again during the current fortnight half even if it contains no units or only friendly units. At the end of each fortnight half, remove all trench battle counters. In effect, this rule means that an entrenched location can be attacked or entered only once per fortnight unless the attacker has TI or achieves a breakthrough.
Design Note: The once-per-fortnight half attack limit against entrenched locations reflects the set piece nature of WWI trench battles. For example, Britain’s attack on the Somme in July, 1916, covered a 21-mile front (about one hex), required one week of preliminary bombardment, followed by one day of actual fighting, and then a few more days to interpret the situation (disaster) before making subsequent decisions about further action. Hence, adjacent, friendly forces had to stand clear for about 10 days before understanding what happened in the initial attack. This slow, methodical pace adjusted gradually as the war progressed. In March 1918, the initial German assault sprang forward after only a few hours of artillery preparation and yielded verifiable results within a few days. So, once TI is achieved, adjacent forces can react within the time span of a single fortnight half.
10.0 Land Combat
10.01 Land combat occurs during a fortnight when a phasing force (2.61) pays at least one movement point to march into an enemy-occupied land location (hex or port box) (9.15) which does not already contain a trench battle (9.73) counter. When this happens, the phasing force does not actually enter the enemy location, although the required movement point(s) are expended, but instead stays in its current location pending resolution of land combat.
10.02 Land combat always occurs between one phasing force in a single “attacking location,” against one non-phasing force, in a single “defending location.” The phasing force is attacking while the non-phasing force is defending.
10.03 Resolve land combat in the following order.
1) Check Supply2) Bombard Fortifications3) Spend a Resource Point (RP) or Africa Point (AP)4) Defender commit reserves5) Determine modifiers for:
a. Air Superiority,b. Artillery,c. Effectiveness,d. Leadership,e. Odds, f. Over X, g. Terrain, h. Entrenchment and Reserves, i. Breaches.
6) Land Combat Dice Roll7) Implement Result
57

10.1 Check Supply
To begin the land combat process, check supply for each corps involved. Corps check supply from the location they currently occupy. So, an attacking force checks supply from the location it intends to leave (the attacking location), not from the location it intends to enter (the defending location). Unsupplied corps lower their printed effectiveness and movement scores by one point each for the duration of the current combat.
10.2 Bombard Fortifications
10.21 If the attacking force includes at least one siege artillery corps, and the defending force includes a fortress (1.33) then adjudicate bombardment as follows. If the defending force includes a black fortress then that fortress is immediately ruined (destroyed). If the defending force includes a red fortress then roll 1d6. If that die roll result is LESS than the total number of siege artillery corps in the attacking force then inflict a step loss on the red fortress; otherwise there is no effect on a red fortress.
10.22 If this bombardment ruins a fortress and there are no other non-phasing corps in the hex then the attacker must immediately move into the hex – he already paid the required MP when he declared the attack – and can continue moving from there.
10.23 Surface naval units and naval gunnery scores play no role in this portion of land combat.
Design Note: Red fortifications represent the more modern constructions (Verdun) that withstood bombardment well while black fortifications are older structures that literally cracked/collapsed under fire (Liege).
10.3 Spend RP or AP
At this point, if the attacker wishes to proceed he must spend RP (or AP in Africa) as follows. The usual cost to make a land attack dice roll is one RP or one AP; but that cost doubles to two RP or two AP when attacking locations affected by bad weather (6.513). However, each minor nation can make one attack per year free of charge (2.42) while a revolutionary Germany (6.83) can make one attack per season free of charge. Any RP or AP must come from a major power with at least one corps in the phasing force. If the attacker spends the necessary RP or AP, then he must continue the attack (cannot abort) even if the dice later fail to yield a hoped-for modifier and/or defender reserves (10.4) arrive unexpectedly
10.4 Defender Commit Reserves
10.41 At this point, an entrenched defender (9.7) may attempt to bring an additional corps from an adjacent location into the defending location. This additional corps can be in either maneuver or entrenched mode. Committing reserves is NOT possible if the attacker is counter attacking a breach (10.592) or if the attacker has TI benefits (2.84).
10.42 To commit a reserve, the defending side may make one “reserve” die roll (1d6) for each of his corps which is not already under a trench battle (9.73) counter and is adjacent to the entrenched defending location. Modify per the reserve die roll modifiers listed below. If the final result is less than the rolling corps’ effectiveness score, than it can immediately move (free of any movement point charge) into the defending location to join the defense where it automatically entrenches if in maneuver mode. Once a single corps has succeeded at a reserve die roll, no additional corps may try to enter that battle this fortnight half. Even though only one corps can reinforce a given defending hex each fortnight half, qualifying defending corps can make a
58
reserve die roll each time an attack is declared even if they failed on past rolls for previous attacks in that same fortnight half.
Reserve Die Roll Modifiers-1 if rolling for a corps in maneuver mode -1 if rolling for a corps which is not adjacent to any enemy corps at the time of the roll+1 if the attacker has air superiority (6.33, 10.51) over the defending location
10.43 Reserves will better the defender’s odds (10.55), and enhance his entrenchment modifier (10.583).
Design Note: This rule simulates WWI’s most enduring theme. In the trench-scape, defenders almost always managed to feed reserves into the cauldron faster than the attacker. Prolonged opening bombardments invariably alerted defenders to the “point of main effort,”and broke the ground over which the attacker had to advance. Taken together, those factors enabled defenders to react faster than attackers; hence the out of sequence movement allowed by reserves. The defender lost these advantages only when he was trying to hold freshly captured ground (i.e. defending a breach against a counter attack) or when the attacker made good use of rapid, shock bombardments and combined arms (i.e. tactical innovation).
10.5 Modifiers
Calculate modifiers for: air superiority, artillery, effectiveness, leadership, odds, over X, terrain, entrenchment and reserves as well as breaches and then sum them into a final net modifier which cannot exceed six points either up or down. Positive modifiers are added to the combat dice roll (favoring the attacker/phasing side) while negative modifiers are subtracted from the combat dice roll (favoring the defender/non-phasing side).
10.51 Air Superiority
If one side has at least one air unit on patrol (6.31) in the defending location then that side modifies the dice roll by one point in its favor, i.e. +1 for the attacker or -1 for the defender.
10.52 Artillery
For each attacking (not defending) siege artillery corps, add +1 to the combat dice roll. A surface naval force (regardless of the number of units in that force) friendly to the attacker and in the defending location counts as one siege artillery corps for this rule.
10.53 Effectiveness
10.531 Each side, attacker first, must now designate a single point unit whose effectiveness score will be used as the standard for that side in this combat. A unit committed to the battle as reserve (10.4) cannot be chosen as a point unit unless it is the only unit present for the defender. Subtract the effectiveness score of the defending point unit (a fortress or a corps) from the effectiveness score of the attacking point corps. The result is the effectiveness modifier for the coming combat.
For example, if an attacking force with effectiveness 3 initiates combat against a defending force with effectiveness 1 then the effectiveness modifier for the coming combat is 3-1 = +2. If those score were reversed, attacking side 1 and defending 3, then the effectiveness modifier would be 1-3 = -2.
59

10.532 Tanks have two effectiveness scores listed on their counter as attack/defense. Tanks use the number on the left of the slash only when they are the point corps in an attack. At all other times, tanks use the number (1) on the right of the slash.
10.533 Siege Artillery corps can never serve as an attacker’s point unit and therefore cannot attack alone.
10.54 Leadership
Each side now makes a command check for its leader by rolling one die. If a side’s command check result is LESS than its leader’s applicable value (attack or defense depending on the case) then modify the die roll by one point in that side’s favor, +1 for attacker or -1 for defender. Both can apply and be mutually negating.
10.55 Odds
Compare the total number of corps in the attacking force to the total number of corps and fortress steps in the defending force to obtain an odds ratio of attacking corps to defending corps/fortress steps and reduce that ratio to its simplest form. As long as the ratio is in its simplest form, and both sides of the ratio are whole numbers, any ratio is possible. For example, from least to greatest, 1 to 3, 1 to 2, 2 to 3, 4 to 5, 1 to 1, 5 to 4, 3 to 2, 2 to 1, 3 to 1, etc, are all valid odds ratios. After determining the ratio, select the corresponding land combat dice roll modifier as follows.
Odds Ratio = Land Combat Dice Roll Modifier1 to 2 or less = - 2 >1 to 2 thru < 3 to 1 = 03 to 1 thru < 5 to 1 = +15 to 1 or more = +2
Notice that unlike in many other war games, the attacker can be outnumbered and not suffer a penalty until the odds are at least 1 to 2 against him. So an attack of two corps against three defending corps would fall into the range of “>1 to 2 thru < 3 to 1” and therefore have a modifier of 0.
10.56 Over X
If any defending corps is marked Over X (9.6), then add a +1 to the combat dice roll.
10.57 Terrain
10.571 Amphibious Assaults (7.7): suffer a base penalty of -3, but the attacker can reduce that penalty by one point for every point of naval gunnery stacked with the landing counter to a minimum of 0. Hence, three gunnery factors will completely negate the amphibious assault penalty, but a fourth would not yield a positive modifier.
10.572 Mountains: If the defender occupies a mountain hex, then apply a -2 terrain modifier to the dice roll except on the Africa map where it is just -1. Alpine corps have their effectiveness score increased by one point when attacking into a mountain hex. These modifiers apply even if attacking along a pass hex side.
10.573 Marsh: If the defender occupies a marsh hex, then apply a -1 terrain modifier to the dice roll.
10.574 Rivers: Rivers do not affect combat when the attacker is attacking from a breach (10.591) or counter attacking a breach (10.592). In all other cases, when attacking across a river hex side, roll one die. If the final
60

result is LESS than the effectiveness score of the defender’s point unit then apply a -1 to the combat dice roll; otherwise no effect.
10.575 Inherent Defense: An otherwise empty coastal hex or port box subject to amphibious assault (7.7) or an otherwise empty hex subject to enemy movement/attack across a canal hex side is assumed to contain a virtual 1-0 (effectiveness-movement) land unit belonging to the side which controls the hex. This virtual unit is always in supply and never entrenched. This virtual unit must be defeated in land combat in order for phasing corps to enter the hex. If a real unit is present, then this virtual unit does NOT exist. The one exception is the Carolines port box which does NOT have a virtual unit and is therefore defenseless when vacant.
10.58 Entrenchment and Reserves
10.581 If at least one defending corps is in entrenched mode, then apply an entrenchment modifier based on the entrenched defender’s nationality. A force of mixed entrenched defenders could choose the most advantageous modifier.
Entrenchment ModifiersAmerican, British, Bulgarian, French, German or Ottoman -2All others -1
10.582 RESERVES: If the defender succeeded in committing reserves (10.4) then apply an additional -1 to the land combat dice roll.
10.59 Breaches
Design Note: Breach counters and their modifiers account for the fundamental paradox of trench warfare; that is, as one penetrates an enemy position progress becomes harder and the vulnerability to counterattack increases. Breaches are created by a Give Ground (10.72) combat result. The seemingly odd persistence of breach markers after the departure of entrenched units accounts for the “permanence” of trenches in a game where that status is depicted on the unit counters themselves rather than by a separate piece, i.e. the trenches remain even if the original digger has moved on.
10.591 Attacking from a Breach
Phasing corps are “attacking from a breach” if attacking from a location containing a breach counter which points at the defending location, i.e. attacking along the arrow. When attacking from a breach, the phasing side must subtract the current breach number from its land combat dice roll (unfavorable to the attacker) UNLESS the attacker as TI benefits (2.84). An attacker with TI benefits does not suffer this penalty.
10.592 Counter Attacking a Breach
Phasing corps are “counter attacking a breach” when attacking a location containing a breach counter that points at them, i.e. attacking head-on into the arrow. When counter attacking a breach, the phasing side adds TWICE the current breach number to its combat dice roll (favorable to the attacker).
10.593 Other Angles
Attacks which are not in alignment with a breach arrow (10.591) or directly opposed to it (10.592) are not affected by it.
10.594 Voluntary Removal
61
Corps stacked with a breach counter can voluntarily remove that breach counter by spending all of their movement points in their starting location, i.e. instead of moving to a new location. Entrenched AF corps, with an assumed move of 0, also have the option to remove a breach in this fashion. This is an all or nothing option; each corps in the force must pay the cost to remove the breach instead of moving to a new location.
10.595 Mandatory Removal
A breach must be removed under either of the following conditions.
1) (absorbed) When one side simultaneously controls the location containing the breach counter and the location to which it points, remove the breach.
2) (diminished to < 1 or expanded to > 2) When a breach is diminished to less than factor 1 or expanded to greater than factor 2 (10.723) remove the breach counter.
In all other cases, breaches remain in place. Hence, a breach is not removed simply because the units in its hex were destroyed.
10.596 Example
If the German force attacks the French force then the German force is attacking from a breach. If the French force attacks the German force then the French force is counterattacking a breach. A French corps in Longwy that attacked the German force would NOT be counterattacking a breach since that attack would not be head-on into the arrow point. Similarly, if the German force attacked Longwy, it would not be attacking from a breach because it is not attacking in the direction that the arrow points.
10.6 Land Combat Dice Roll
10.61 Sum all the modifiers for each category and then combine them to get a final net modifier anywhere between -6 to +6. Roll 2d6 and apply the net modifier to the roll. Dice roll results of less than 2 are treated as 2 and results of greater than 12 are treated as 12. On the Land Combat Table, read across from that final modified dice roll to get a combat result expressed as attacker loss points/defender loss points or “RP” possibly followed by: Give Ground (GG), Breakthrough (Bthru), and a Demoralization Die Roll (DDR). Each loss point is equivalent to one corps or one fortress step. 10.62 Land Combat Table
Dice Result Demoralization Die Roll
2 3/0 if <5 then attacker demoralized3 2/0 if <4 then attacker demoralized4 1/0 if <3 then attacker demoralized 5 2/1 if <2 then attacker demoralized6 1/RP NA
62

7 1/1 NA8 RP/1 NA9 1/2 GG if <3 then defender demoralized10 1/2 GG if <4 then defender demoralized11 1/3 GG if <5 then defender demoralized12 1/3 Breakthrough if <6 then defender demoralized
10.7 Implement Results
10.71 Loss Points and Attrition
10.711 RP indicates that the affected force can claim 0 loss points IF its parent nation immediately spends one Resource Point or one Africa Point if the force is in Africa. However, a force cannot avail this option if it is marked Over X (9.6), or is out of supply (3.0), or is unwilling/unable to spend the one RP/AP. Forces of mixed nationality must draw their RP/AP from the nation with the most units in the stack; owning side resolves ties. If a force cannot or will not avail the RP option, then it suffers 1 loss point.
10.712 Inflict loss points as follows. Each side inflicts its first loss against its point unit: remove that corps or reduce that fortress. Losses after the first can be fulfilled by removing any other corps/fortress step in the force, or under certain circumstances, the defender can choose attrition (10.713). However, if one side cannot fulfill its second loss point – because it lacks a unit to take the loss or permit attrition – then the other side’s losses are reduced to 0. There is not additional penalty for failure to fulfill a third loss point. For example, if the attacker rolls a final 9 to yield a 1/2 GG result, but the defender has only one unit in the defending location and so cannot fulfill the requirement for a second loss, then the attacker’s total loss would be reduced by zero! Similarly, if an attacker rolls a final 5 to generate a 2/1 result, but has only one unit in the attack and so cannot fulfill the second loss, then the defender’s loss of 1 would reduce to 0. Finally, if an attack generated a 1/3 GG result and the defending location contained only two corps then the attacker would still suffer a loss point because there is no penalty for defender’s failure to fulfill the third loss point.
10.713 ATTRITION: Rather than actually removing a corps from the map, a defender who meets the below attrition conditions may choose to fulfill his second loss point (only) by immediately expending one RP (2.4) and making a DDR (10.74) against <4. If the DDR result is LESS than 4 then the defender also suffers one point of demoralization (2.9) in addition to the RP already expended and must check for associated leader loss.
Attrition Conditionsa) The defender started the combat with at least two corps (not steps) (1.321).b) The defender is entrenched and has an entrenchment modifier of -2 (10.581).c) The defender is in supply (3.0).d) The defender has NOT suffered a crisis (2.92).e) The attacker does NOT have TI benefits (2.84).
When the defender consists of more than one nationality, he can use this rule if at least one of those nationalities has not gone into a political crisis and that nation would incur the demoralization. The attrition option is NOT available in Africa; one can NOT spend AP to facilitate this process. Note that attrition can be chosen in major AND minor (2.7) battles.
63

Design Note: Attrition accounts for the ability of densely deployed defenders (two or more corps per hex) to feed new recruits into combat rather than risk the loss of more experienced soldiers. However, national morale (and productivity) wanes as parents see their young marching off into a meat grinder even if they are holding their ground. Since victory conditions are based on possession of terrain and demoralization from attrition is not certain (i.e 50% chance), players do have incentive to endure attrition. Note that the application of attrition can prevent a breakthrough (10.73) by allowing the defender to keep a corps in the defending location by “charging” his 2nd loss. The challenge is to stagger the incidence of attrition so that the crisis which will eventually follow occurs late in the game.
10.72 Give Ground (GG)
After inflicting losses, players MUST implement GG results; they are not optional
Design Note: GG means that the phasing (attacker) pushed the non-phasing (defender) back.
10.721 If the defender was completely destroyed, then continue the attacker’s movement and combat options as befits his remaining movement points (10.8) unless restricted by trench battle (9.73). If any defending units survived, what happens to them is a function of their mode even if all attacking units perished in the just finished combat.
10.722 All surviving, defending corps in maneuver mode must retreat 1-3 hexes if on the European/Ottoman maps, one hex on the Africa map, or remain in place if in a box. The defending side retreats its own corps up to the limit of the allowable distance according to the following priorities. Retreating corps cannot enter enemy occupied hexes, cannot enter a hex adjacent to the force that attacked them, cannot cross all ocean/lake hex sides (unless they are flotillas). Retreating corps are not required to stop upon entering forest, mountain or marsh. Corps blocked from retreating by terrain, enemy units, or stacking limits are eliminated.
10.723 If at least one surviving, defending unit is an entrenched corps or a fortress then the GG result either: diminishes, expands or creates a breach. Players cannot decline to place or modify a breach. Check for diminish, expand or create in that order (DEC) and apply only the first one that qualifies as follows.
a) Diminish: If the defending location already contains a breach counter pointing at the phasing corps that just attacked them then diminish that breach by replacing the existing breach counter with one of lesser degree. A breach 2 would demote to a breach 1 while a breach 1 would be removed with no breach remaining.
b) Expand: If the attacking location already contains a breach counter pointing at the defending location, then expand the breach as follows. Replace an existing breach 1 counter with a breach 2 counter. Expand an already existing breach 2 counter by: eliminating all remaining defending units, removing the breach 2, and implementing a breakthrough (10.73).
c) Create: If neither the defending nor attacking location already contains a breach counter which is pointing at the other location then create one. Place a breach 1 counter on the attacking location with its arrow pointing to the defending location. Note, either location could already contain a breach counter, but if it is not positioned such that it is pointing at the other location then it is not diminished or expanded, rather a new breach is created. A single hex can contain up to six breach counters, one per hex side, while a box could contain one breach per connection to another location.
Example: Refer to illustration 10.596, if a French force in Longwy attacked the German force and obtained a GG result it would NOT diminish the already existing breach 1 in the German hex, but would instead place a new breach 1 counter in Longwy pointing at the German force which would retain its breach 1 pointing at
64
Verdun. A subsequent attack out of the Longwy hex in another direction could result in the placement of another breach counter (two in the same hex) pointing in another direction.
10.73 Breakthrough (Bthru)
10.731 A final dice roll result of 12 or more (or the expansion of a 2 breach counter (10.723b)) achieves a breakthrough if the following conditions are met:
All defending units were removed from the defending location (by elimination and/or retreat); The attacker was NOT counter attacking a breach (10.592).
A final dice roll of 12 that fails to meet the above criteria achieves a GG (10.72) result instead of a breakthrough.
10.732 A breakthrough result allows surviving, maneuver-mode, attacking corps to ignore the usual requirement to immediately entrench after attacking an entrenched defender (9.72), and it allows other phasing units to ignore the usual once-per-fortnight-half move/attack limit against entrenched defenders (9.73) in the breakthrough location and thereby move into and through the location where the breakthrough occurred. Players should mark break through locations with breakthrough counters rather than trench battle counters. Breakthrough counters are removed at the end of the current fortnight half.
Design Note: The breakthrough result basically enables a side to employ TI benefits in specific instances before that side has actually achieves TI. This allows recreations of the German breakthrough at Gorlice-Tarnow (1915) while also giving the British and French that glimmer of hope to get through to “the green fields beyond” that motivated so many fruitless assaults on the western front.
10.74 Demoralization Die Roll (DDR)
Final dice roll results of less than 6 or greater than 8 for a major battle (2.7) require another 1d6 die roll to adjudicate demoralization. If this 1d6 Demoralization Die Roll (DDR) result is LESS than the number shown then the indicated side suffers one point of demoralization (2.9). Additionally, the leader (if any) of a force so demoralized must roll a 1d6 survival die roll; if the result is GREATER than his lower leadership score then he is permanently removed from the game, otherwise he is unharmed.
10.8 Further Movement and Combat
10.81 If the just-finished combat cleared the defending location of all defending units then the attacker must complete the move he already paid for and occupy the defending location unless he was attacking a landing counter (7.7) in which case he does not have to enter the defender’s former location – the now defunct landing. After that, the attacker can continue moving and attacking with any remaining movement points.
10.82 If the defender was (or still is) entrenched and the attacked did not have TI benefits (2.8) at the time of the attack or achieve a breakthrough (10.73) then mark the battle hex with a “trench battle” counter which will prevent further movement and/or attacks into the hex for the remainder of this fortnight half (9.73).
10.83 If the defender was not forced out of the defending location, then the attacker remains in the attacking location. The movement point(s) which the attacker expended to initiate the just finished combat are gone. But if the attacker has any movement points remaining he can spend them for further movement or attacks not
65

prohibited by the restrictions of trench battle (9.73). Note that an attacker does NOT need a GG result (10.72) to continue movement and combat.
10.84 In all cases, since the movement point cost to march into forest/jungle, mountain, marsh, or port box is ARMP a given force can conduct only one attack per fortnight half against one of those locations. After concluding that attack as usual, that force is then done moving and fighting for that fortnight half.
10.9 Land Combat Example, Dawn of Verdun
The following example approximates (in game terms) the situation at Verdun starting in February, 1916. The first graphic “Verdun I” illustrates the distribution of forces around Verdun during the Campaign Phase at the start of the German half of February’s only fortnight. Below the first picture, the horizontal line of corps next to the German concentration marker is considered stacked with that marker on the map. The empty map below that shows the area in question for ease of reference.
The German force in 0921 declares a move into 0922 (Verdun) and so each corps in the German force pays one movement point – which is all they have in entrenched mode – for that move. But, the German force pauses in 0921 pending resolution of the land combat just triggered by its proposed move into 0922.
Events proceed according to the standard land combat sequence.
66
1) Check SupplyAll corps are on or adjacent to rail lines which lead back to their national capitals so they are all in supply.
2) Bombard FortificationsNote that the yellow marker beneath the French 30 and 7 corps is a “REDUX” counter on the Verdun “red” fortress. Since the German force includes three siege artillery corps, they need to roll two or less on one die to destroy that already reduced red fortress. If the fortress were black, destruction would be automatic. Anyway, the Germans roll a 4 so Verdun’s fortifications withstand the initial bombardment.
3) Spend a Resource Point (RP) or Africa Point (AP)The Germans pay one RP to fund the attack.
4) Defender Commit Reserves
The French 1,2 and 20 corps each try to roll less than their effectiveness score on one die in order to slide into 0921 to join the defense. The following modifiers apply.
Reserve Die Roll Modifiers-1 if rolling for a corps in maneuver mode -1 if rolling for a corps which is not adjacent to any enemy corps at the time of the roll+1 if the attacker has air superiority (6.33, 10.51) over the defending location
The French units are not in maneuver mode, they are adjacent to the enemy, and the attacker has air superiority over the hex. Given the modifiers (10.42), each corps needs to roll a 0; so they all fail.
5) Determine modifiers for:
a. Air Superiority = +1The German fighter over Verdun defeated its French opponent in a dog fight during the previous aviation phase and so extends a +1 modifier to the coming land battle.
b. Artillery = +3Since the Germans have three siege artillery corps, they will add 3 to the combat dice roll.
c. Effectiveness = 0The Germans declare that 3rd Corps, with an effectiveness of 3, is their point unit. The French declare that their reduced, red fortress is their point unit so, per the fortress table, they too have an effectiveness of 3 for the coming battle. Hence, there is no modifier for effectiveness this time.
d. Leadership = +1Falkenhayn rolls a 1 (which is less than his attack score of 2) and so passes his command check to add +1 to the land combat dice roll.
e. Odds = 0Six German Corps are attacking two French corps plus a French fortress step so the odds of 6:3 reduce to 2:1, not extreme enough to grant either side a modifier.
f. Over X = 067

The defender is not over extended.
g. Terrain = 0The French roll one die to see if their force can make good use of the river. Their roll of 5 is not less than their point unit’s (the fortress) effectiveness so there is no terrain modifier to this battle.
h. Entrenchment and Reserves = -2Because the French are entrenched the will apply a -2 modifier to the land combat dice roll. Since no adjacent French corps succeeded in joining the defense as a reserve, the French do NOT apply the -1 for reserves.
i. Breaches = 0There is no breach – yet.
Therefore, the total net modifier to the coming land combat dice roll will be +3.
6) Land Combat Dice Roll
The Germans roll an 8 and then add 3 to get a final 11.
7) Implement Result
From the Land Combat Table we see that a final 11 yields a 1/3GG result with a DDR of <5. So, the Germans lose their point unit (the 3rd corps) and the French account for three loss points as follows. The French must inflict their first loss point on their point unit (the reduced fortress) by marking it with a ruin counter. To avoid losing the hex, the French player elects to fill his second loss with attrition (10.713) by burning one RP and incurring another DDR roll, this time at <4. Note, that’s exactly what Falkenhayn intended. The third loss point takes the 30th corps. The French then resolve two DDR rolls one at <5 and the other at <4. Rolls of 5 and 3 indicate that France passed the first one, but failed the second, so the French suffer a point of demoralization (2.9). Finally, the GG portion of the result enables the German player to place a “Breach 1” counter on hex 0921 pointing at hex 0922.
It’s important to note that the attack is over because the German does not yet have TI benefits (2.84) and attacked an entrenched defender (9.73). Also, in this case, even if the German had rolled a 12 to get a break through (10.73) the attack would still be over with the same result because the French still have a corps in the defending location hence the breakthrough would demote to GG.
Illustration “Verdun II” shows the situation after the German attack.
68
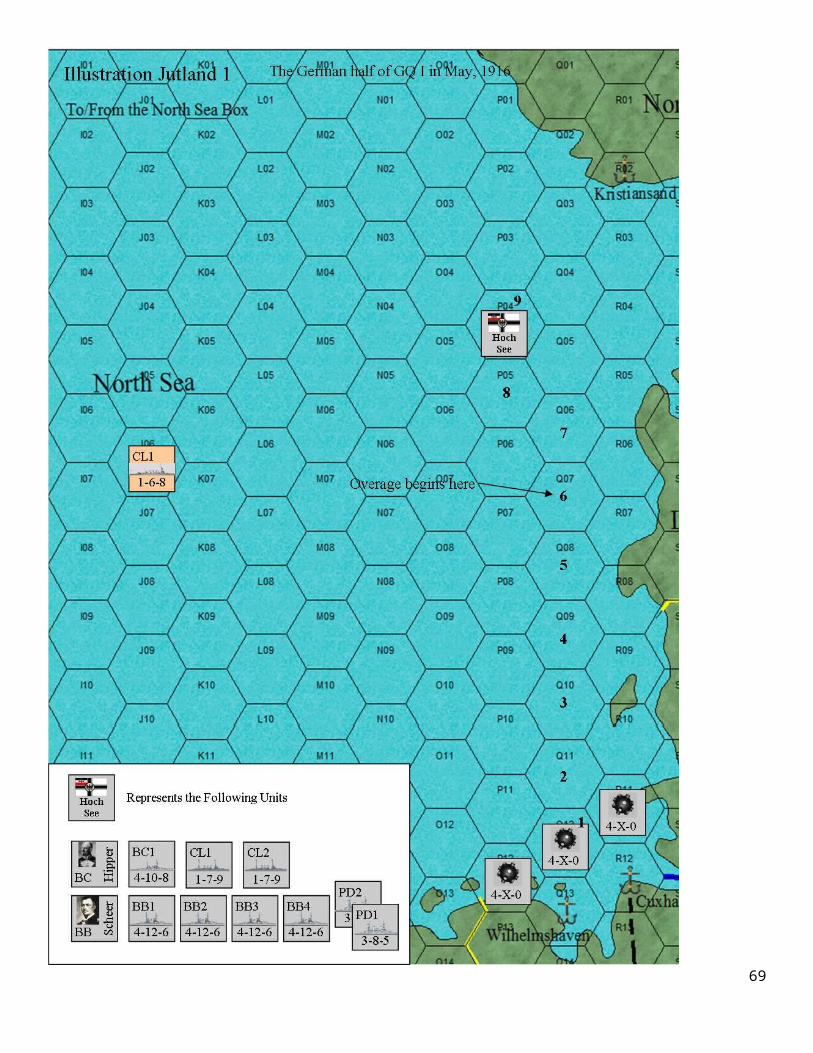
Play then moves to the EP (French) half of the February fortnight. Anxious to avoid the loss of Verdun and still more demoralization, the French move their 1, 2 and 20 corps into Verdun (along the Voie Sacrée) to bolster their defenses. They make no attack. Other French units, not depicted, then backfill hexes 0823 and 0923.
Play then moves to March. During the construction phase, muster sub-phase, the French player places the newly arrived Petain Leader on Verdun. In the aviation phase, the CP fighter asserts air superiority. The German 5th Reserve and 18th corps, along with their three siege artillery corps, do attack from 0921 into Verdun. So on the eve of the 2nd German attack, the scene looks like this.
The Germans declare their attack by paying one MP to enter the Verdun hex, but then pause to resolve combat. The Germans pay one RP. The French decline to commit reserves from adjacent hexes (they are spread too thin). So Five German corps attack four French corps. The Germans have a +1 for air superiority. The Germans also add +3 to the combat dice roll for their three siege artillery corps. Falkenhayn fails his leadership die roll, but Petain makes his so the French get a -1 modifier to the combat dice roll for leadership. Since the opposing point units, German 18th and French 20th, are evenly matched neither side gets an advantage for quality. Since the Germans are attacking from a breach the river will not be a factor. Because the French are entrenched (-2) and the Germans are attacking from a breach (-1) apply another -3 to the combat dice roll for entrenchments and breaches. Hence, the net land combat dice roll modifier will be 0.
The Germans roll a 5 and that yields a 2/1 result. After applying losses, the new line up looks like this.
69

During the French half of the first fortnight, Petain considers a counterattack. The French would apply a +2 to the combat dice roll for counter attacking a breach. In their favor, the Germans have air superiority (-1) and entrenchment (-2); and the Germans could possibly commit reserves from an adjacent hex. As is, the odds are 3 to 4, not extreme enough to cause a modifier for the slight French shortfall. Both sides would get to roll for leadership. So Petain decides to keep his powder dry for now and hold until his siege artillery and new aircraft arrive in April.
70