11 expressions - university of california,...
TRANSCRIPT
Getting Started with Maya
597
11 Expressions
Expressions are instructions you type to control keyable attributes over time. Expressions can be comprised of mathematical equations, conditional statements, or MEL commands.
Expressions offer an alternative to difficult keyframing tasks similar to Set Driven Key. With Set Driven Key, attribute relationships can be set up and are defined using animation curves. Unlike Set Driven Key, an expression does not use an animation curve to define the animation of the attribute but calculates the attribute values over time from the formula defined in the expression.
Although you can create an expression to animate attributes for any purpose, they’re ideal for attributes that you want to change incrementally, randomly, or rhythmically over time.
It is possible to create custom attributes for objects and control them in conjunction with expressions. It is not possible to mix expressions with other animation techniques for the same attribute on an object (keyframing, path animation, set driven key).
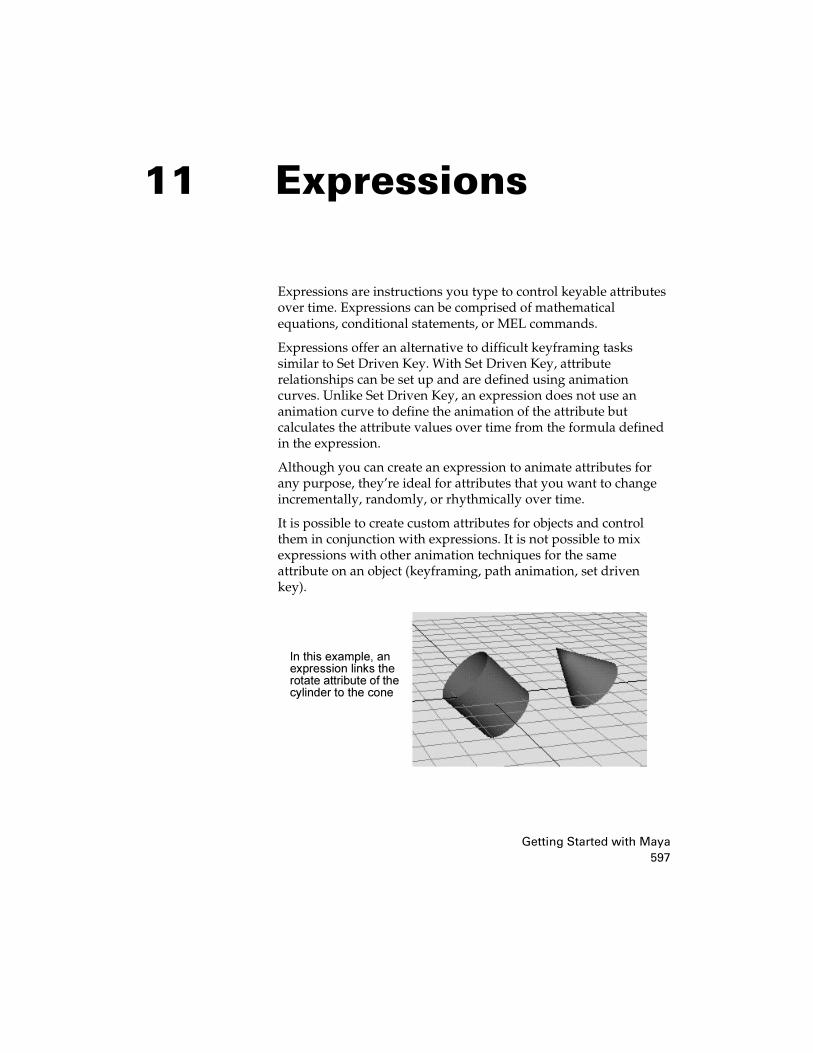
In this example, an expression links the rotate attribute of the cylinder to the cone

Getting Started with Maya
598
11 | Expressions > Preparing for the lessons
This chapter contains the following lessons:
• “Lesson 1: Creating a simple expression” on page 599
• “Lesson 2: Controlling attributes conditionally” on page 609
• “Lesson 3: Controlling particle attributes” on page 622
Preparing for the lessonsTo ensure the lessons work as described, do these steps before beginning:
1 Select File > New Scene to create a new scene.
2 Select Window > Settings/Preferences > Preferences. Click the Settings category and set the Time option to Film (24 fps) so your animation plays at the default rate of 24 frames per second. Click the Timeline category and enter 0 and 300 for the Playback Start/End values. (Press the Enter (Windows, IRIX, and Linux) or Return (Mac OS X) as necessary.) Set the Playback Speed to Play every frame. Click the Save button in the Preferences window.
At this playback speed and frame range, the animation results of the expressions you’ll create in the lessons will be easier to examine and understand.
3 With the pointer in the perspective view, press 5 (for Shading > Smooth Shade All). It’s easier to see the expression effects on shaded objects than wireframe objects in the following lessons.

Getting Started with Maya
599
11 | ExpressionsLesson 1 > Creating a simple expression
Lesson 1 Creating a simple expressionThis lesson introduces you to some basic concepts regarding the creation and editing of expressions. You learn how to:
• Use the expression editor to create and edit expressions.
• Control both single and multiple attributes of objects in your scene.
Creating expressions to control a single attributeIn the following steps, you create a default sphere and write an expression to increase its Scale Y attribute as the animation time increases during playback.
To create an expression
1 Make sure you’ve done the steps in ”Preparing for the lessons” on page 598.
2 Create a NURBS or polygonal sphere with an X scale, Y scale, and Z scale of 1. Name the sphere Ball.
3 With Ball selected, choose Window > Animation Editors > Expression Editor.
4 In the Expression Name box, you can optionally enter an expression name, for instance, ScaleBallHeight.

Getting Started with Maya
600
11 | Expressions Lesson 1 > Creating expressions to control a single attribute
If you write several expressions in the same scene, giving each a name might make it easier to find the desired expression if you decide to alter it later. If you don’t provide a name, the expression receives a default name, for instance, expression1.
Note that the Attributes list displays Ball’s keyable, unlocked attributes—the attributes you’ll most likely want to animate with an expression. Use the scroll bar to see the entire list.
5 Enter this expression in the expression text area:
Type all characters exactly as shown above. Entries are case sensitive. The semicolon (;) signifies the end of the expression statement. End each statement in an expression with a semicolon.
An error message appears in the Script Editor and Command Line’s response area if the expression has incorrect syntax or typing mistakes.
6 Click Create to create the expression.
Creating the expression checks it for syntax errors and converts it to a form Maya can execute when you return to the start time or play the animation. Clicking this button also executes the expression for the current frame.
The expression sets Ball’s scaleY attribute to the value of time + 1. Ball.scaleY is the full name of the attribute. A period separates the name of the object and attribute. Note that you

Getting Started with Maya
601
11 | ExpressionsLesson 1 > Creating expressions to control a single attribute
must spell the object and attribute with uppercase and lowercase letters as they appear in the Expression Editor’s Objects and Attributes lists.
The word time is a commonly used predefined variable that updates as an animation plays. It contains the elapsed number of seconds from the first frame to the current frame. The value increases with the increasing frame number.
At the default animation playback rate of 24 frames per second, time has these values (rounded to four decimal places):
You can find the time elapsed in the animation at any frame by calculating this formula with a desktop calculator:
Frame Time (secs)
0 0
1 0.0417
2 0.0833
3 0.125
24 1.0
240 10.0
timeframe
rate---------------=

Getting Started with Maya
602
11 | Expressions Lesson 1 > Creating expressions to control a single attribute
For example, if the frame rate is 24 frames/second and the animation is at frame 1, the elapsed time is 1 divided by 24, or 0.0417. At frame 6, the elapsed time is 6 divided by 24, which equals 0.25. Note that if your frame rate was 30 frames/second the calculated values would be different.
7 Go to the start time and play the animation. Ball’s scaleY attribute increases as the time increases:
Maya executes the expression each frame. This causes the object size to scale along its Y-axis, stretching its height during playback.
Frame Time (seconds) Ball.scaleY (time + 1)
0 0 1
1 0.0417 1.0417
2 0.0833 1.0833
3 0.125 1.125
24 1.0 2.0
240 10.0 11.0

Getting Started with Maya
603
11 | ExpressionsLesson 1 > Editing expressions
To see the value of Ball’s scaleY attribute at any particular frame, select Ball, display the Channel Box, and stop the animation at the desired frame. The Channel Box updates its values after you stop the animation.
The scaling is smooth because the geometry stretches in synch with the small time increments of the animation playback.
8 Close the Expression Editor window.
Editing expressionsTo edit an expression after you’ve created it and closed the window, you must know how to find the expression in the Expression Editor. The next steps show how to find and edit the expression. Specifically, you’ll change the expression to alter how quickly the scaleY value changes.
To edit the expression
1 To display the Expression Editor again, select Window > Animation Editors > Expression Editor.

Getting Started with Maya
604
11 | Expressions Lesson 1 > Editing expressions
2 To find the expression, make sure the Ball is selected. In the Attributes list of the Expression Editor, select scaleY, the attribute controlled by the expression.
If you don’t see the scaleY attribute, scroll through the Attributes list as necessary. You can also use the Select Filter menu option to customize how you search for your expressions within the Expression Editor.
The expression you created previously appears in the expression text field:
Ball.scaleY = time + 1;
3 Change the expression to this:
Ball.scaleY = time/5 + 1;
By dividing time by 5, you’ll make the Y scaling increase one-fifth as fast as with the previous version of the expression.
Note that you can use the keyboard commands Ctrl-c (Windows, IRIX, and Linux) or Control-c (Mac OS X), Ctrl-x or Control-x, and Ctrl-v or Control-v to copy, cut, and paste text in the Expression Editor and elsewhere in Maya.
4 Click Edit to update the modified expression.
Clicking the Edit button does the same action as clicking the Create button. The Create button exists only for new expressions. The Edit button replaces the Create button when you display an existing expression.
5 Play the animation to see the results of the new expression.
The sphere scales at a slower rate than before.
6 Stop the animation and go to the start time.
7 At this point and in subsequent steps, save the scene if you think you’ll want to examine it at a later date.

Getting Started with Maya
605
11 | ExpressionsLesson 1 > Using expressions to control multiple attributes
Using expressions to control multiple attributesYou can change the expression to control two or more attributes of Ball as in this example:
Ball.scaleX = time + 1;
Ball.scaleY = time + 2;
Ball.scaleZ = time + 5;
Maya scales the Ball at different rates for the X, Y, and Z dimensions.
Linking multiple attributes on the same objectYou can change the expression to link the value of one attribute to another as in this example:
Ball.scaleX = time + 1;
Ball.scaleY = Ball.scaleX;
Ball.scaleZ = Ball.scaleX;
The second statement sets Ball.scaleY to the value of Ball.scaleX. Because you’ve set Ball.scaleX to the value of time + 1, Ball.scaleY also has the value of time + 1. You’re linking one attribute’s value to another. The third statement also sets Ball.scaleZ to the value of the attribute Ball.scaleX.
The advantage of this expression is that if you assign a different value to Ball.scaleX in the first statement, the second and third statements automatically receive the new value.
Controlling attributes in two objectsYou can add an object to the scene and use the expression to control any of its attributes also. For example, suppose you added a default NURBS or polygonal cylinder named Drum to the scene. You could control attributes of Ball and Drum with the same expression as in this example:

Getting Started with Maya
606
11 | Expressions Lesson 1 > Beyond the lesson
Ball.scaleY = time/2 + 1;
Drum.scaleX = time + 1;
Drum.scaleY = time + 1;
You can link attributes in different objects—so a change in one attribute alters the behavior of the other. For example, you could cause Drum’s scaleY value to always equal two times Ball’s scaleY value as in this example:
Ball.scaleY = time + 1;
Drum.scaleY = Ball.scaleY * 2;
If you decide to control attributes in two (or more) objects, you can select either object to write the expression. In fact, any object or node in a scene can be selected when you write an expression to control an object other than a particle object.
Alternatively, you can write two (or more) expressions, for instance, one that controls Ball.scaleY and one that controls Drum.scaleX and Drum.scaleY.
The advantage of creating separate expressions is that you’ll have two expression names, each presumably named after the object and attribute you’re controlling. Having two expression names makes it easier to find the expression that controls the desired attribute.
The advantage of using a single expression to control the attributes is that all statements are in a single expression. You don’t need to edit two expressions.
Beyond the lessonIn this lesson you learned how to:
• Create and edit simple expressions using the Expression Editor.
• Use variables, for example time, to control the specific attributes within expressions.

Getting Started with Maya
607
11 | ExpressionsLesson 1 > Beyond the lesson
When you write expressions, it is common to assign the built-in time variable to an attribute so the attribute value predictably increases as the animation plays. It’s also useful to link an attribute’s value to the value of another, such as setting the ball’s scale Y and Z attributes to equal the scale X value.
• Control multiple attributes with a single expression.
Your expressions can control multiple attributes of the same object or of multiple objects. Alternatively, you can write a single expression for each attribute or object.
For more information on the various mathematical operators that are possible with expressions, refer to the Maya Help.
Behind the lesson
Although not shown in the lessons, you can decrease an attribute value during playback by subtracting time from some number. Example:
Ball.scaleY = 3 - time;
This decreases the value of Ball’s scaleY attribute for the first three seconds of playback.
When you use the predefined time variable, note the animation start frame value. The lessons in this chapter use a start time of 0. In your work, you might create an animation with a start time of 1. With Maya’s default frame rate of 24 frames per second, time is 0.0417 at frame 1.
Because of this small time offset from 0, the prior lesson would have required more steps and instructions to work with frame 1 as the start time. For instance, suppose you use following expression with the start time at 1.
Ball.scaleY = time + 1;

Getting Started with Maya
608
11 | Expressions Lesson 1 > Beyond the lesson
If you go to the start time, the expression sets the initial value of Ball’s scaleY attribute to time + 1, which equals 0.0417 + 1, or 1.0417. Because Ball’s scaleY attribute was 1 when you created it, going to the start time sets scaleY to a value 0.0417 larger than its initial value.
This discrepancy means the Ball scaleY is larger than its scaleX and scaleZ attributes in the first frame of the animation. Although the difference is minor in this example, other cases might be more significant.
To start your animation at frame 1 and get the same result as the example, you can subtract 0.0417 from the attribute:
Ball.scaleY = (time - 0.0417) + 1;
When you go to the start time, the expression sets Ball’s scaleY value to (0.0417 - 0.0417) + 1. This equals 1, its original scaleY value.

Getting Started with Maya
609
11 | ExpressionsLesson 2 > Controlling attributes conditionally
Lesson 2 Controlling attributes conditionallyConditional statements set one attribute or variable for an expression based on the condition of another attribute or variable. This means that when a particular defined condition exists for one attribute then another attribute is changed based on how the expression defines it to do so.
In this lesson you learn how to:
• Use conditional statements to control an expression.
• Refine the conditional statements using if and else statements.
Creating a conditional expressionIn the following steps, you create a default sphere and write an expression to increase its Scale Y attribute based on the animation playback time. In the first two seconds of the animation time, Scale Y increases with the value of the time. At two seconds and thereafter, Scale Y no longer increases.
To create an expression using conditional statements
1 Make sure you’ve done the steps in ”Preparing for the lessons” on page 598.
2 Create a NURBS or polygonal sphere at the origin with an X scale, Y scale, and Z scale of 1.
3 Name the sphere Balloon.
4 Go to the start time.
5 With Balloon selected, choose Window > Animation Editors > Expression Editor.
6 Enter this expression:
if (time < 2)
Balloon.scaleY = time;

Getting Started with Maya
610
11 | Expressions Lesson 2 > Creating a conditional expression
This expression is an if statement. The if keyword causes the expression to make a decision based on a comparison of two or more items. In this case, the expression compares the value of time to the value 2.
The expression checks whether the value of time is less than two seconds. If so, it does the assignment Balloon.scaleY = time. If time is not less than two seconds, the assignment doesn’t occur.
Notice how the assignment Balloon.scaleY = time has been formatted so it appears indented under if (time < 2). Maya ignores all indentation, extra spaces, and blank lines between statements. We used the indentation to make the expression easier to read. You could have also written the expression as follows:
if (time < 2) Balloon.scaleY = time;
This isn’t as easy to read. Consistent, organized spacing is a good habit to develop. This book attempts to show examples of good spacing style whenever possible.
7 Click Create to compile the expression.
The ball flattens.
Note When you compare the value of time to a number in an expression, Maya interprets time as seconds rather than milliseconds, minutes, or any other unit of time. In the example, Maya interprets 2 as two seconds.

Getting Started with Maya
611
11 | ExpressionsLesson 2 > Creating a conditional expression
The expression executes when you click the Create button. Because the animation is at frame 0, animation time is 0. Because time is less than 2, Maya sets Balloon.scaleY equal to the value of time, which equals 0.
A scaleY value of 0 flattens the object in the Y dimension.
8 Playback the animation.
The flattened Balloon’s scale increases along its Y-axis. It inflates as the animation plays.
At 2 seconds and thereafter, Balloon no longer inflates.
When time equals 2 or more, the if condition is no longer true. The statement that follows it, Balloon.scaleY = time, no longer executes. The value of the scaleY attribute stays at the last value it had before time became 2, specifically, 1.9583.
Recall that this example uses a frame rate of 24 frames per second. The time and Balloon.scaleY have these values at various frames:
Frame Time (seconds)
Balloon.scaleY (time)
0 0 0
1 0.0417 0.0417

Getting Started with Maya
612
11 | Expressions Lesson 2 > Other conditional statement options
The if statement’s condition, (time < 2), is a comparison. The condition must be surrounded by parentheses to isolate it from assignment that follows it.
The < in the condition is a relational operator. A relational operator tests how one value relates to another. In the example, the < tested whether time is less than 2.
Besides the < operator shown in this example, there are several other relational operators such as >, >=, ==, and so on. See the Maya Help for more details.
9 Stop the animation and go to the start time. Balloon flattens again because the scaleY attribute becomes 0 when you go to the start time. Time is 0, so scaleY is 0.
Other conditional statement optionsYou can make Balloon rise after it inflates by adding another if statement to the expression.
2 0.0833 0.0833
3 0.125 0.125
24 1.0 1.0
47 1.96 1.9583
48 2.0 1.9583
49 2.04 1.9583
Frame Time (seconds)
Balloon.scaleY (time)

Getting Started with Maya
613
11 | ExpressionsLesson 2 > Other conditional statement options
To add an if statement to the expression
1 Change the expression to this:
if (time < 2)
Balloon.scaleY = time;
if (time >= 2)
Balloon.translateY = time;
2 Click Edit to compile the expression.
3 Play the animation.
Balloon inflates for two seconds. After two seconds, Balloon stops inflating and its position skips from a Y-axis position of 0 to 2. You’ll eliminate the motion skip in a later step.
The new if statement increases the translateY position of Balloon after the animation time rises above two seconds. The >= symbols mean greater than or equal to. Whenever time is greater than or equal to 2, the expression assigns Balloon’s translateY the value of time. The translateY value therefore increases for the rest of your animation’s playback range.
Notice that a semicolon ends each statement for a particular condition. Forgetting a semicolon after each statement causes a syntax error, and the changes you’ve made to the expression won’t take effect.
Note Always examine the Script Editor for error messages after you edit an expression and click the Create button. If you alter a previously successful expression and a syntax error occurs, Maya executes the previous successful expression when you play the animation. This might make you believe your changes took effect. Error messages are preceded by the text // Error:.

Getting Started with Maya
614
11 | Expressions Lesson 2 > Other conditional statement options
4 Stop the animation and go to the start time. Balloon flattens but doesn’t return to the origin. (If Balloon has risen out of view, adjust your camera to see it.)
Balloon doesn’t return to the origin because the expression doesn’t assign Balloon a starting point for the beginning of the animation.
5 To make Balloon return to the origin, change the expression to this:
if (time < 2)
Balloon.translateY = 0;
if (time < 2)
Balloon.scaleY = time;
if (time >= 2)
Balloon.translateY = time;
The new first statement sets Balloon.translateY to 0 whenever time is less than 2.
Note that you can put the three statements in any order in this example. When Maya plays each frame, it executes each statement in the expression in the order listed. In this example, the statements work independently, so their order doesn’t matter.

Getting Started with Maya
615
11 | ExpressionsLesson 2 > Fixing a problem in an expression
We put the statements in the order of time execution because it’s easier to see the logic of the expression. If you ever need to change the expression, you’ll be able to grasp the expression’s actions more quickly.
6 Click Edit.
7 Stop the animation and go to the start time.
The flattened Balloon returns to its correct position at the origin.
8 Play the animation.
Balloon inflates for two seconds, then rises. As it rises, it jumps slightly higher at approximately frame 48.
Fixing a problem in an expressionAs mentioned before, Balloon skips from Y-axis position 0 to 2 after two seconds of animation play. You can eliminate the skipping and make Balloon rise smoothly from the origin.
To fix the skipping in the animation
1 Stop the animation and go to the start time.
2 Change the expression as follows. (Changes are displayed in bold print.)
if (time < 2)
Balloon.translateY = 0;
if (time < 2)
Balloon.scaleY = time;
if (time >= 2)
Balloon.translateY = time - 2;

Getting Started with Maya
616
11 | Expressions Lesson 2 > Using else statements
3 Click Edit.
Playback the animation. Balloon inflates for 2 seconds, then rises slowly and smoothly with time, from its position at the origin.
When time is greater than or equal to 2, the translateY position of Balloon becomes 2 minus 2, which is 0. As time increases beyond 2 seconds, the translateY position increases in the same increments that time increases.
4 Stop the animation and go to the start time.
Using else statementsThe expression achieved the desired result, but with unnecessary complexity. You can use an if-else statement to make the statement more compact and easier to read.
1 Change the expression to this:
if (time < 2)
Balloon.translateY = 0;
if (time < 2)
Balloon.scaleY = time;
else
Balloon.translateY = time - 2;
2 Click Edit.
3 Play the animation.

Getting Started with Maya
617
11 | ExpressionsLesson 2 > Simplifying expressions
The animation plays back exactly as before.
This additional variation on the if conditional statement includes the else statement. It is used as an option when the if statement condition is not true. The else keyword sets Balloon.translateY to time - 2 when (time < 2) is false. In English terms, the combination of the if and else statements means: If time is less than two seconds, set Balloon.scaleY to the value of time. Otherwise (when time is greater than or equal to two seconds), set Balloon.translateY to time minus two.
At any instant in the animation’s playback, either Balloon.scaleY = time executes or Balloon.translateY = time - 2 executes. Under no circumstances can they both execute. The else statement executes only when the if condition that precedes it is false.
The first if statement executes whenever time equals 0. It is unrelated to the if-else statements.
Using else statements instead of multiple if statements makes an expression simpler to read. If you use an if-else construction instead of a lengthy list of if statements, you’ll also improve the execution speed of the expression. This improves your animation’s playback and rendering speed.
Either expression is valid. If using the if-else construction seems confusing, stick with multiple if statements.
You can accomplish most expression animation tasks with several if statements strung after one another.
4 Stop the animation and go to the start time.
Simplifying expressionsYou can simplifying the expression to make it easier to read.
1 Change the expression to this:
if (time < 2)

Getting Started with Maya
618
11 | Expressions Lesson 2 > Editing expressions to refine an animation
{
Balloon.translateY = 0;
Balloon.scaleY = time;
}
else
Balloon.translateY = time - 2;
We removed the second if statement:
if (time < 2)
In its place, we enclosed the remaining statements with braces { and }. Maya evaluates both the statements between the braces if the condition (time < 2) is true. Setting Ball.translateY to 0 here instead of in a separate if statement makes the expression easier to read and comprehend. Reducing the statement in this way also makes it more efficient for Maya to process and easier to troubleshoot if you encounter a problem.
Note that you can put multiple statements between braces for an else statement, just as you do for an if statement.
2 Click Edit.
3 Play the animation.
The animation plays exactly as before with the new expression.
4 Stop the animation and go to the start time.
Editing expressions to refine an animationYou can further refine the animation by expanding Balloon more slowly.
To edit the expression to scale the balloon more slowly
1 Change the expression to this:
if (time < 2)
{
Balloon.translateY = 0;

Getting Started with Maya
619
11 | ExpressionsLesson 2 > Editing expressions to refine an animation
Balloon.scaleY = time * 0.6;
}
else
Balloon.translateY = time - 2;
(The asterisk (*) multiplies time by 0.6.)
2 Click Edit.
3 Play the animation.
The scaleY attribute increases at 60% of the value of time, so Balloon expands slower during playback. (The number 0.6 equals 60%.) By the time Balloon starts to rise, it has expanded to the size of a typical balloon.
To know whether to multiply time by 0.6 or some other number, you need to experiment.
For example, you might multiply by various percentages such as 0.2, 0.5, 0.75, and finally 0.6. The 0.6 creates a life-like balloon shape at two seconds.
4 Stop the animation and go to the start time.
You can further refine Balloon’s appearance by eliminating the flattened Balloon that appears at the origin when you go to the start time. You can also scale Balloon at different rates along each of its three axes.

Getting Started with Maya
620
11 | Expressions Lesson 2 > Editing expressions to refine an animation
To edit the expression to change the balloon’s initial scale
1 Change the expression to this:
if (time < 2)
{
Balloon.translateY = 0;
Balloon.scaleY = time * 0.6;
Balloon.scaleX = time * 0.5;
Balloon.scaleZ = time * 0.5;
}
else
Balloon.translateY = time - 2;
2 Click Edit.
At frame 0, Balloon disappears from view because its scale attributes are 0.
The scaleX, scaleY, and scaleZ attributes are 0 at frame 0 because time is 0. Any number multiplied by 0 is 0.
3 Play the animation.
As time increases, the value of Balloon’s scale attributes increase.

Getting Started with Maya
621
11 | ExpressionsLesson 2 > Beyond the lesson
Because the expression sets scaleX and scaleZ to 50% of the value of time, these dimensions scale slower than scaleY, which is set to 60% of the value of time. Balloon scales faster in height than in width or depth. This is true for many real balloons.
4 Stop the animation and go to the start time.
5 Save the scene if you plan to examine it later.
Beyond the lessonIn this lesson you learned how to:
• Use conditional statements to control an expression.
You can accomplish many expression tasks with several if statements strung after one another. However, using else statements instead of multiple if statements makes an expression simpler to read.
If statements and else statements are two of the most common programming features available in expressions. If you’re familiar with programming, you can write expressions with an extensive syntax similar to the C language.
For further information and related techniques, refer to the Maya Help.

Getting Started with Maya
622
11 | Expressions Lesson 3 > Controlling particle attributes
Lesson 3 Controlling particle attributesYou can use an expression to control attributes of particle objects. Particle expressions can be more complex than other types of expressions. For example, you can write an expression to control all particles in an object the same way, or you can control each particle differently.
In this lesson you learn how to:
• Create a particle object
• Create a creation expression to set the initial color of the particles.
• Create a runtime expression to control the color during playback.
• Use a random function to randomize how the color changes
• Control the timing of an expression.
Creating particle objectsIn the following steps, you’ll create a particle object made of 100 randomly positioned particles displayed as tiny spheres. You’ll also dynamically add an attribute to the particles. To color particles with an expression, Maya requires you to dynamically add the appropriate attribute.
To create a particle object
1 Make sure you’ve done the steps in ”Preparing for the lessons” on page 598.
2 From the Dynamics menu set, select Particles > Particle Tool > �.
3 In the Tool Settings window, click Reset Tool, and set the following options:
• Particle Name: Bubbles

Getting Started with Maya
623
11 | ExpressionsLesson 3 > Creating particle objects
• Number of Particles: 100
• Maximum Radius: 5
• Click in the scene view (roughly in the center) to create the 100-particle object.
4 From the Toolbox, select the Selection Tool so that particles become selected.
5 With Bubbles selected, display the Attribute Editor.
6 In the Attribute Editor, select the BubblesShape tab, and then open the Render Attributes section and set the following:
• Particle Render Type: Spheres
• Add Attributes For: Click the Current Render Type button.
• Radius: 2
7 In the Add Dynamic Attributes section of the Attribute Editor, click the Color button. A window appears that prompts you to choose whether to add the attribute per object, per particle, or connected to a shader.
8 Turn on Add Per Particle Attribute, then click the Add Attribute button.

Getting Started with Maya
624
11 | Expressions Lesson 3 > Using creation expressions to set a constant color
This adds an rgbPP attribute to the particle shape node for Bubbles. Because you’re adding this attribute as a per particle attribute, you can give each particle a different color.
Using creation expressions to set a constant colorTo set an attribute that doesn’t change during the animation (the particle color), you’ll use a creation expression. A creation expression executes when you go to the start time. It doesn’t execute while the animation plays. (For emitted particles, a creation expression executes for a particular particle when it is emitted.)
To create a creation expression
1 In the Per Particle (Array) Attributes section of the Attribute Editor, right-click the rgbPP box and select Creation Expression from the pop-up menu. Note that the shape node of Bubbles (BubblesShape) is displayed in the Expression Editor.
When you use an expression to control particle attributes, make sure the selected object in the Expression Editor is a particle shape node, not the transform node of the particle object. If a particle object’s transform node is selected, move the mouse pointer to the scene view and press the down arrow key to select the particle shape node.
2 Enter this expression and then click the Create button:
BubblesShape.rgbPP = <<1,0,0>>;
When you click the Create button in the Expression Editor, Maya checks the syntax of the expression. Assuming you made no typing errors, the expression executes once for each of the 100 particles.

Getting Started with Maya
625
11 | ExpressionsLesson 3 > Using runtime expressions
The expression colors all particles in the object red. The double angle brackets << and >> enclose a vector that sets the red, green, and blue components of the rgbPP attribute to 1, 0, and 0. In the RGB color scheme, this gives the object a red color.
If the particles are uncolored, check that you’ve turned on Shading > Smooth Shade All. This shading mode is necessary for particles to show the color assigned in an expression.
3 Play the animation. The particles remain red.
Using runtime expressionsThere is one other type of expression you can create for a particle object (shape node)—a runtime expression. By default, a runtime expression executes each frame during playback. A runtime expression does not execute when you go to the start time (or at the time in which a particle is emitted).
You’ll often create both types of expressions for a particle object—a creation expression that initializes an attribute value in the first frame, and a runtime expression that controls the attribute value in subsequent frames.
The following steps show how to create a runtime expression to change particle color during playback.

Getting Started with Maya
626
11 | Expressions Lesson 3 > Using runtime expressions
To create a runtime expression
1 In the Per Particle (Array) Attributes section of the Attribute Editor, right-click the rgbPP box and select Runtime Before Dynamics Expression from the pop-up menu.
2 Enter this runtime expression:
BubblesShape.rgbPP = sphrand(1);
3 Click the Create button to compile the expression.
4 Play the animation.
The particles flicker in random colors as the animation plays back. The runtime expression controls the rgbPP attribute during playback. Because rgbPP is a per particle attribute, the runtime expression executes for each particle in the object each frame. For each particle, the expression assigns the rgbPP attribute the output from the execution of the sphrand function with an argument of 1. The sphrand function is one of Maya’s many built-in mathematical functions that are useful in expressions.
The sphrand function with an argument of 1 assigns each particle’s rgbPP color a random vector. The vector represents a random point in a spherical region of radius 1. The left, middle, and right rgbPP color components get a value no less than -1 and no greater than 1. (R, G, and B values less than 0 are treated as 0—a black color).

Getting Started with Maya
627
11 | ExpressionsLesson 3 > Modifying runtime expressions
The sphrand function returns a different random vector each execution, so each particle receives a different random rgbPP value, and therefore, a different color. The color changes each frame.
5 Rewind and play the animation again.
The particles become red when you go to the start time, and random colors during playback.
Modifying runtime expressionsYou might have trouble seeing the color of a particle in any instant because the color changes so quickly. You can slow the change of colors to create a flashing Christmas light effect. The following steps make the particles change colors every second of animation.
To adjust the timing of the change of color
1 Change the runtime expression to this:
if ((frame % 24) == 0)
BubblesShape.rgbPP = sphrand(1);
This expression uses the modulus operator (%) to control when the rgbPP attribute of the particles receives a random color. The modulus operator returns the remainder after
Note You can use only one creation and one runtime expression per particle object (shape node) in your scene. To control multiple attributes of a single particle object, you must do so within one creation expression and one runtime expression. You can’t create a separate expression for each attribute as you can for other types of objects. You therefore don’t need to select an attribute from the Expression Editor’s Attributes list.

Getting Started with Maya
628
11 | Expressions Lesson 3 > Modifying runtime expressions
division. For example, 24 divided by 24 returns 0, but 25 divided by 24 returns 1. (Dividing 25 by 24 equals 1 with a remainder of 1.)
If the value of frame divided by 24 is equal to any number with a remainder of 0, the assignment to BubblesShape.rgbPP occurs. In other words, the assignment occurs when frame equals 24, 48, 72, and so on. At an animation rate of 24 frames/second, the assignment happens once each second.
The == symbols mean is equal to. In conditional statements, be careful to type == rather than =. The = symbol means assign the value to.
2 Rewind and play the animation again.
When you go to the start time, the particles turn red because the creation expression executes. When the animation plays, the particles receive a random color once each second.
Note that you can change the beginning red color to random colors by changing the creation expression to this:
BubblesShape.rgbPP = sphrand(1);
This is the same expression as the runtime expression.
3 Save the scene if you plan to examine it later. This concludes the lesson.
1 second 3 seconds2 seconds

Getting Started with Maya
629
11 | ExpressionsLesson 3 > Beyond the lesson
Beyond the lessonIn this lesson you learned how to:
• Control particles using creation and runtime expressions.
• Apply a random function to your expression.
For a particle object, you typically create two expressions—a creation expression that initializes an attribute value in the first frame, and a runtime expression that controls the attribute value in subsequent frames. (Creation and runtime expressions exist only for particle objects, not for other types of objects.)
This lesson described how to color stationary particles as a simple way to describe creation and runtime expressions. However, it’s more typical to use particle expressions to:
• Create sophisticated particle motion and life span; for example, the movement and fading of exploding fireworks.
• Create complex colors for emitted particles, for example, rocket exhaust flames.
• Create complex colors and movement of particles following collision with geometry, for example, sparks resulting from fired bullets.
Creating such effects requires experience and experimentation. Expression writing can be as complex as computer programming. A detailed understanding of expression execution and syntax is essential. You also need to become familiar with the built-in mathematical functions such as the sphrand function introduced in this lesson.
For further information and related techniques, refer to the Maya Help.

Getting Started with Maya
630
11 | Expressions Lesson 3 > Beyond the lesson