1.5 blocklaying - nzcma€¦ · new zealand concrete masonry association inc. 1.5 blocklaying...
TRANSCRIPT

New Zealand
Concrete Masonry
Association Inc.
1.5 Blocklaying
General The purpose of this section is to give the specifier a background to the procedures used to construct a concrete masonry wall. Design drawings and structural details should clearly establish the types of blocks to be used, their bonding patterns, reinforcing and grouting details and the relationship between the concrete masonry and other elements of the structure in hand. Examples of this are shown in Section 3 Construction Details of this manual. Block units should be ordered well ahead of required delivery times to allow for manufacture and strength gain. Construction/Specification details including tolerances are contained in the Construction Section. These details follow the requirements of NZS 4210 Masonry Construction: Materials and Workmanship.
Units It is recommended practice that concrete masonry units be kept and laid dry in order to minimise shrinkage. Dirt on a mortar bedding face will reduce bond and, if on an outer face, could mar the appearance of the unit. Concrete masonry units should be kept clean and reasonably dry before laying by stacking and storing them on planks, pallets or similar supports to keep them clear of the ground. In particular climatic circumstances concrete blocks may be lightly dampened immediately before mortaring. Special units should be used at corners, windows, doors, bond beams, lintels, pilasters, etc., with little or no cutting. If cutting is necessary, such should be carried out with a concrete-cutting table saw or similar equipment to produce neat and true fashioning of the required unit.
Extreme Weather Conditions As mentioned above it is preferable that concrete blocks be dry when laid. However, variations to recommended procedures for normal conditions may be adapted in extreme weather conditions.
When air temperatures are above 27°C or when there is a drying wind at lower temperatures the following practice is applicable. 1. Masonry units may be lightly dampened before
laying, such as by brushing on water using a soft paint brush.
2. Mortar should be kept moist and should not be
spread on the wall so far ahead of the units being placed as to cause a loss of plasticity.
3. Mortar should be prevented from drying so
rapidly that it cannot cure properly; this may be done by applying a very light fog spray several times during the first 24 hours after laying or by other protective measures over the same period.
4. Grout should also be protected from too rapid
drying. When air temperatures are below 5°C the following practice is applicable. 1. Water used for mixing mortar should be heated. 2. Masonry should be protected for not less than 24
hours after laying by covers, blankets, heated enclosures, or the like to ensure that the mortar can gain strength without freezing or harmful effects from cold winds.
3. Frozen materials and materials containing ice
should not be used.
Laying the First Course The foundation face on which the blockwork is to be laid shall be clean and free of laitance, loose aggregate and any other material that would reduce the bonding if the mortar to the foundation. The bedding face of the foundation should be checked for horizontal and vertical alignment. Any variance that would cause the base mortar joint to be less than 7 mm or more than 20 mm thick should be corrected before the blocklaying is commenced. If a moisture barrier/coating is required it should be applied at this stage. It is recommended that profile lines be placed in two directions to ensure precise location of the corners. After locating the corners it would be prudent to check the layout by using a rod marked at 400 mm modules or by stringing out the blocks for the first

New Zealand
Concrete Masonry
Association Inc.
course without mortar (Figures 1 and 2). A chalked snap-line is sometimes used to mark the footing, thus helping to align the blocks accurately. Except for partially grouted hollow unit masonry walls a mortar bed is then spread under the lines of the face shells and furrowed with a trowel to ensure plenty of mortar along the bottom edges of the face
shells of the blocks for the first course (Figure 3). For partially grouted walls mortar should be under the face shells and those cross webs that separate grouted cells from hollow cells (Figure 4). The corner block should be laid first (Figure 5) and carefully positioned (Figure 6).
Figure 1 Figure 2 Figure 3
Layout with marked rod Check layout with dry blocks Mortar bed for first course
Figure 4 Figure 5 Figure 6
Web mortar for partial grouting Lay corner block first Position carefully
Figure 7 Figure 8 Figure 9
Mortar vertical face shells Place block against previous one Check alignment
New Zealand
Concrete Masonry
Association Inc.
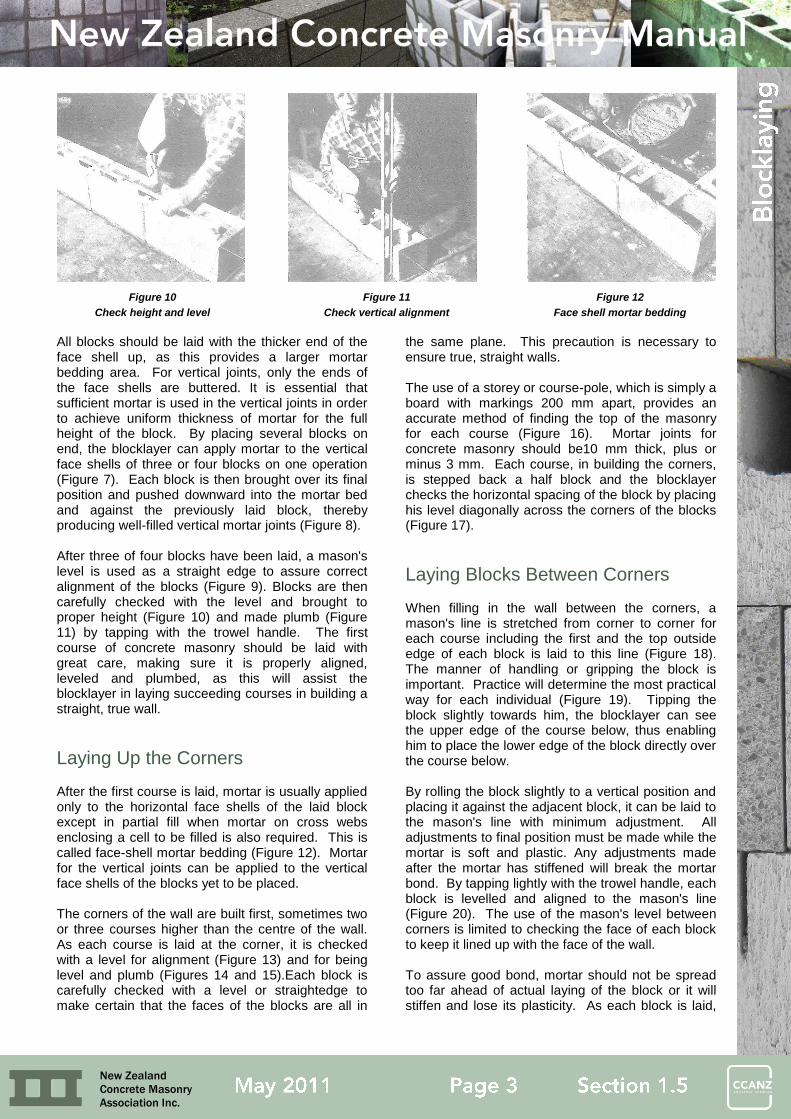
Figure 10 Figure 11 Figure 12
Check height and level Check vertical alignment Face shell mortar bedding
All blocks should be laid with the thicker end of the face shell up, as this provides a larger mortar bedding area. For vertical joints, only the ends of the face shells are buttered. It is essential that sufficient mortar is used in the vertical joints in order to achieve uniform thickness of mortar for the full height of the block. By placing several blocks on end, the blocklayer can apply mortar to the vertical face shells of three or four blocks on one operation (Figure 7). Each block is then brought over its final position and pushed downward into the mortar bed and against the previously laid block, thereby producing well-filled vertical mortar joints (Figure 8). After three of four blocks have been laid, a mason's level is used as a straight edge to assure correct alignment of the blocks (Figure 9). Blocks are then carefully checked with the level and brought to proper height (Figure 10) and made plumb (Figure 11) by tapping with the trowel handle. The first course of concrete masonry should be laid with great care, making sure it is properly aligned, leveled and plumbed, as this will assist the blocklayer in laying succeeding courses in building a straight, true wall.
Laying Up the Corners After the first course is laid, mortar is usually applied only to the horizontal face shells of the laid block except in partial fill when mortar on cross webs enclosing a cell to be filled is also required. This is called face-shell mortar bedding (Figure 12). Mortar for the vertical joints can be applied to the vertical face shells of the blocks yet to be placed. The corners of the wall are built first, sometimes two or three courses higher than the centre of the wall. As each course is laid at the corner, it is checked with a level for alignment (Figure 13) and for being level and plumb (Figures 14 and 15).Each block is carefully checked with a level or straightedge to make certain that the faces of the blocks are all in
the same plane. This precaution is necessary to ensure true, straight walls. The use of a storey or course-pole, which is simply a board with markings 200 mm apart, provides an accurate method of finding the top of the masonry for each course (Figure 16). Mortar joints for concrete masonry should be10 mm thick, plus or minus 3 mm. Each course, in building the corners, is stepped back a half block and the blocklayer checks the horizontal spacing of the block by placing his level diagonally across the corners of the blocks (Figure 17).
Laying Blocks Between Corners When filling in the wall between the corners, a mason's line is stretched from corner to corner for each course including the first and the top outside edge of each block is laid to this line (Figure 18). The manner of handling or gripping the block is important. Practice will determine the most practical way for each individual (Figure 19). Tipping the block slightly towards him, the blocklayer can see the upper edge of the course below, thus enabling him to place the lower edge of the block directly over the course below. By rolling the block slightly to a vertical position and placing it against the adjacent block, it can be laid to the mason's line with minimum adjustment. All adjustments to final position must be made while the mortar is soft and plastic. Any adjustments made after the mortar has stiffened will break the mortar bond. By tapping lightly with the trowel handle, each block is levelled and aligned to the mason's line (Figure 20). The use of the mason's level between corners is limited to checking the face of each block to keep it lined up with the face of the wall. To assure good bond, mortar should not be spread too far ahead of actual laying of the block or it will stiffen and lose its plasticity. As each block is laid,

New Zealand
Concrete Masonry
Association Inc.
excess mortar extruding from the joints is cut off with the trowel (Figure 21) and is usually thrown into and reworked with the fresh mortar. If the work is progressing rapidly, some blocklayers apply the extruded mortar out from the joints to the vertical face shells of the block just laid (Figure 22). Should there be any delay long enough for the mortar to stiffen on the block, the mortar should be removed
and reworked. Dead mortar that has been picked up from the scaffold or from the floor should not be used. In some instances, a full mortar bed maybe specified on all concrete block construction. This requires mortar on the cross webs as well as on the face shells (Figure 23).
Figure 13 Figure 14 Figure 15
Check alignment Check level Check plumb
Figure 16 Figure 17 Figure 18
Check course heights Check spacing Mason’s line at each course
Figure 19 Figure 20 Figure 21
Lay to line Tap into position Remove excess mortar

New Zealand
Concrete Masonry
Association Inc.
Figure 22 Figure 23 Figure 24
Vertical joint mortaring Full mortar bedding Mortar for closing block
Closure Block When installing the closure block, the vertical mortar beds of one end of the closure block and the vertical mortar beds of the enclosure block of the other end are buttered with mortar (Figure 24). The closure block should be carefully lowered into place (Figure 25). If any of the mortar falls out, leaving an open joint, the joint should be packed with mortar using a trowel and jointing tool (Figure 26).
Tooling Weathertight joints and neat appearance of concrete block walls are dependent on proper tooling. After a section of the wall has been laid and the mortar has become hard enough to resist the pressure of a thumb, the mortar joints should be tooled. The tooling operation compacts the mortar and forces it tightly against the masonry on each side of the joint. Proper tooling also produces joints of uniform appearance with sharp, clean lines. Unless otherwise specified, all joints should be tooled either concave or V-shaped. The jointer for tooling horizontal joints should be upturned on both ends to prevent gouging the mortar. A suitable handle should be located approximately in the centre for ease of handling. Concave joints are preferable and are formed by a tool made from a 15 mm round bar (Figure 27). For V-shaped joints, a tool made from a 12 mm square bar is generally used. Tooling of the horizontal joints should be done first, followed by striking the vertical joints (Figure 28). Raked joints are formed by a rollered gouge (Figure 29). After the joints have been tooled any mortar burrs should be trimmed off flush with the face of the wall with a trowel (Figure 30) or removed by rubbing with a piece of concrete block of the same colour as those in the wall (Figure 31). Do not move or straighten the blocks in any manner once the mortar has stiffened or even partly
stiffened. Final positioning of blocks must be done while the mortar is soft and plastic. Any attempt to move or shift the blocks after the mortar has stiffened will break the mortar bond (Figure 32) and allow the penetration of water. After the mortar has firmed a second tooling of joints will enhance the physical properties and appearance of the joints.
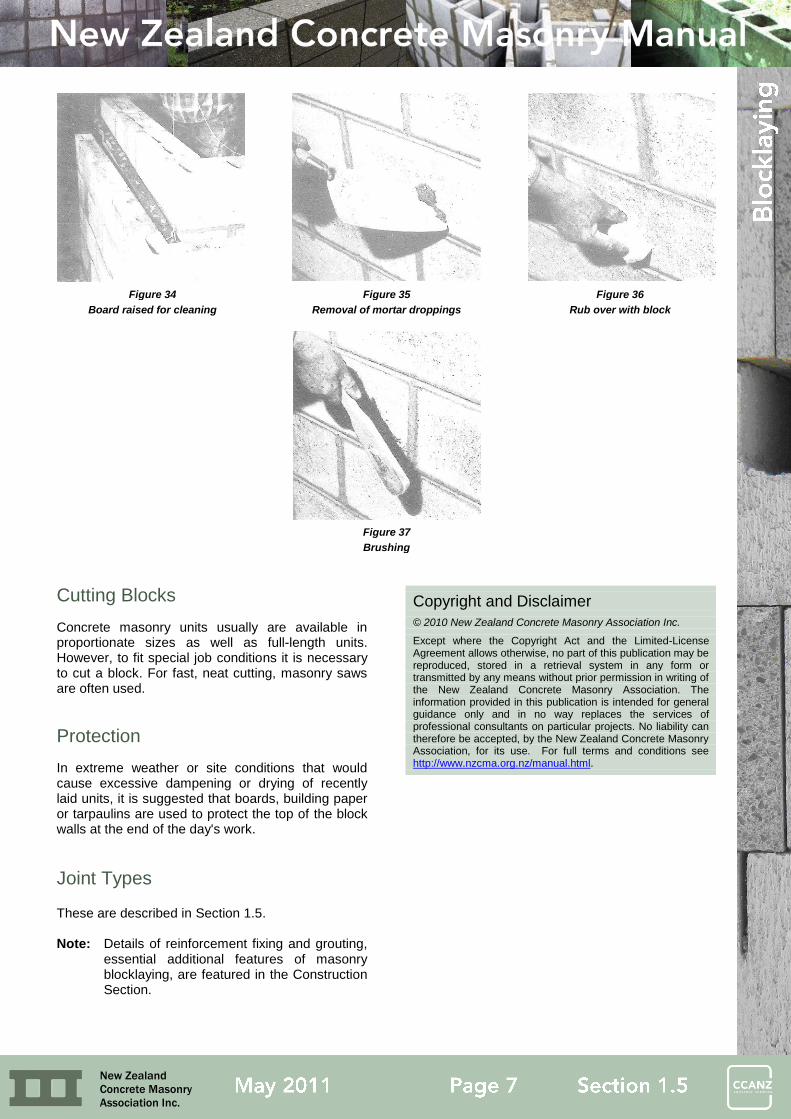
Cavity Walls A cavity wall consists of two walls or wythes separated by a continuous air space and securely tied together with strong non-corroding metal ties embedded in the mortar joints. Ties are usually laced about 400 mm vertically and 600 mm horizontally. Weep holes are required at the bottom of cavity walls spaced at approximately 800 mm centres. The base of the cavity should be such as to drain away moisture which might collect in the cavity and build up against the inner wall. To keep the cavity clean, a 25 mm board of almost the same width as the cavity is laid across a level of wall ties to catch mortar droppings (Figure 33). The board can then be raised, cleaned and laid in the wall at the next level (Figure 34). Expanded polystyrene is often used in sheet form within the cavity to improve insulation values. In some cases it might not be practical to use a cleaning board, when it would be necessary to temporarily leave out every third or fourth block of the first course to facilitate cleaning of the cavity. These blocks would be mortared in after such cleaning.
Patching and Cleaning Block Walls Any patching of the mortar joints or filling of holes left by nails or line pins should be done with fresh mortar.

New Zealand
Concrete Masonry
Association Inc.
Particular care should be taken to prevent smearing mortar into the surface of the block. Once hardened, embedded mortar smears can never be removed and they detract from the neat appearance of the finished wall. Paint cannot hide mortar smears. As concrete block walls should not be cleaned with an acid wash to remove mortar smears or mortar droppings, care must be taken to keep the wall surface clean during construction.
Any mortar droppings that stick to the block wall should be allowed to dry before removal with a trowel (Figure 35). The mortar may smear into the surface of the block if it is removed while soft. When dry and hard, most of the remaining mortar can be removed by rubbing with a small piece of block (Figure 36). Brushing the rubbed spots removes practically all of the mortar (Figure 37).
Figure 25 Figure 26 Figure 27
Laying closure block Packing vertical joint Jointing tool
Figure 28 Figure 29 Figure 30
Tooled joints Raked joints Trim off burrs
Figure 31 Figure 32 Figure 33
Rub with concrete block Moved blocks will crack joints Cavity board
New Zealand
Concrete Masonry
Association Inc.
Figure 34 Figure 35 Figure 36
Board raised for cleaning Removal of mortar droppings Rub over with block
Figure 37
Brushing
Cutting Blocks
Concrete masonry units usually are available in proportionate sizes as well as full-length units. However, to fit special job conditions it is necessary to cut a block. For fast, neat cutting, masonry saws are often used.
Protection
In extreme weather or site conditions that would cause excessive dampening or drying of recently laid units, it is suggested that boards, building paper or tarpaulins are used to protect the top of the block walls at the end of the day's work.
Joint Types These are described in Section 1.5. Note: Details of reinforcement fixing and grouting,
essential additional features of masonry blocklaying, are featured in the Construction Section.
Copyright and Disclaimer
© 2010 New Zealand Concrete Masonry Association Inc.
Except where the Copyright Act and the Limited-License Agreement allows otherwise, no part of this publication may be reproduced, stored in a retrieval system in any form or transmitted by any means without prior permission in writing of the New Zealand Concrete Masonry Association. The information provided in this publication is intended for general guidance only and in no way replaces the services of professional consultants on particular projects. No liability can therefore be accepted, by the New Zealand Concrete Masonry Association, for its use. For full terms and conditions see http://www.nzcma.org.nz/manual.html.