15 internet when you tap stop - mike channon
TRANSCRIPT
15� Internet
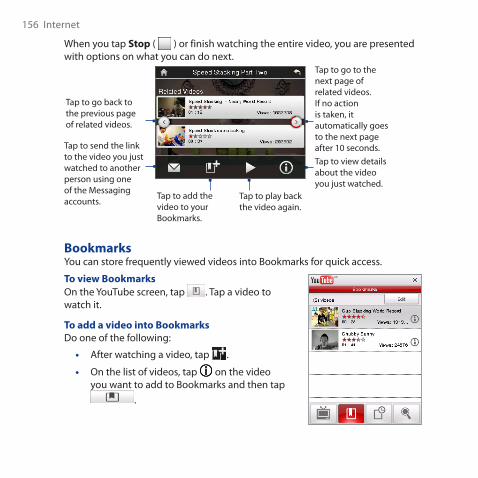
When you tap Stop ( ) or finish watching the entire video, you are presented with options on what you can do next.
Tap to send the link to the video you just watched to another person using one of the Messaging accounts.
Tap to add the video to your Bookmarks.
Tap to play back the video again.
Tap to view details about the video you just watched.
Tap to go to the next page of related videos. If no action is taken, it automatically goes to the next page after 10 seconds.
Tap to go back to the previous page of related videos.
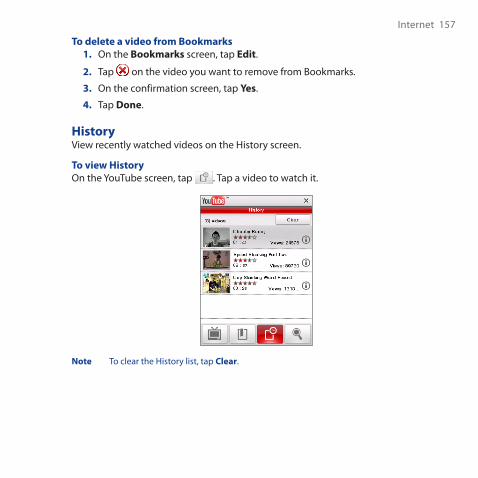
BookmarksYou can store frequently viewed videos into Bookmarks for quick access.
To view BookmarksOn the YouTube screen, tap . Tap a video to watch it.
To add a video into BookmarksDo one of the following:
• After watching a video, tap .
• On the list of videos, tap on the video you want to add to Bookmarks and then tap
.
Internet 15�
To delete a video from Bookmarks1. On the Bookmarks screen, tap Edit.
2. Tap on the video you want to remove from Bookmarks.
3. On the confirmation screen, tap Yes.
4. Tap Done.
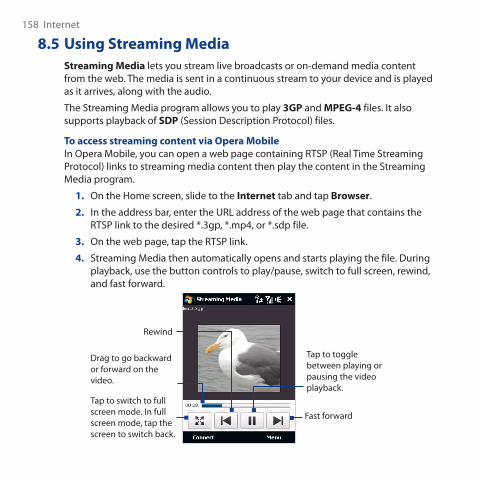
HistoryView recently watched videos on the History screen.
To view HistoryOn the YouTube screen, tap . Tap a video to watch it.
Note To clear the History list, tap Clear.
158 Internet
8.5 Using Streaming MediaStreaming Media lets you stream live broadcasts or on-demand media content from the web. The media is sent in a continuous stream to your device and is played as it arrives, along with the audio.
The Streaming Media program allows you to play 3GP and MPEG-4 files. It also supports playback of SDP (Session Description Protocol) files.
To access streaming content via Opera MobileIn Opera Mobile, you can open a web page containing RTSP (Real Time Streaming Protocol) links to streaming media content then play the content in the Streaming Media program.
1. On the Home screen, slide to the Internet tab and tap Browser.
2. In the address bar, enter the URL address of the web page that contains the RTSP link to the desired *.�gp, *.mp4, or *.sdp file.
3. On the web page, tap the RTSP link.
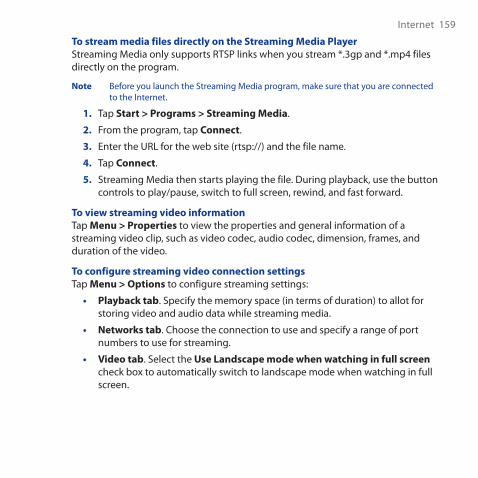
4. Streaming Media then automatically opens and starts playing the file. During playback, use the button controls to play/pause, switch to full screen, rewind, and fast forward.
Tap to switch to full screen mode. In full screen mode, tap the screen to switch back.
Tap to toggle between playing or pausing the video playback.
Fast forward
Drag to go backward or forward on the video.
Rewind
Internet 159
To stream media files directly on the Streaming Media PlayerStreaming Media only supports RTSP links when you stream *.�gp and *.mp4 files directly on the program.
Note Before you launch the Streaming Media program, make sure that you are connected to the Internet.
1. Tap Start > Programs > Streaming Media.
2. From the program, tap Connect.
3. Enter the URL for the web site (rtsp://) and the file name.
4. Tap Connect.
5. Streaming Media then starts playing the file. During playback, use the button controls to play/pause, switch to full screen, rewind, and fast forward.
To view streaming video informationTap Menu > Properties to view the properties and general information of a streaming video clip, such as video codec, audio codec, dimension, frames, and duration of the video.
To configure streaming video connection settingsTap Menu > Options to configure streaming settings:
• Playback tab. Specify the memory space (in terms of duration) to allot for storing video and audio data while streaming media.
• Networks tab. Choose the connection to use and specify a range of port numbers to use for streaming.
• Video tab. Select the Use Landscape mode when watching in full screen check box to automatically switch to landscape mode when watching in full screen.
1�0 Internet
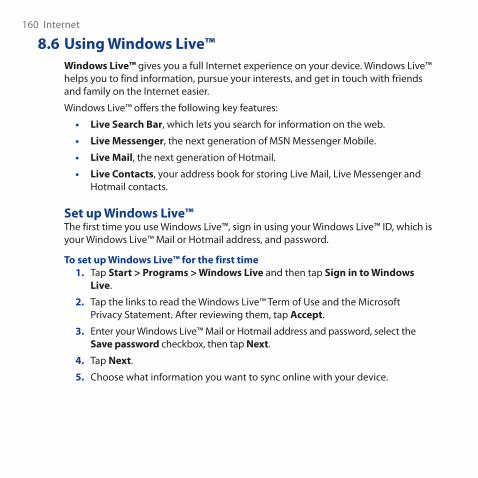
8.6 Using Windows Live™Windows Live™ gives you a full Internet experience on your device. Windows Live™ helps you to find information, pursue your interests, and get in touch with friends and family on the Internet easier.
Windows Live™ offers the following key features:
• Live Search Bar, which lets you search for information on the web.
• Live Messenger, the next generation of MSN Messenger Mobile.
• Live Mail, the next generation of Hotmail.
• Live Contacts, your address book for storing Live Mail, Live Messenger and Hotmail contacts.
Set up Windows Live™The first time you use Windows Live™, sign in using your Windows Live™ ID, which is your Windows Live™ Mail or Hotmail address, and password.
To set up Windows Live™ for the first time1. Tap Start > Programs > Windows Live and then tap Sign in to Windows
Live.
2. Tap the links to read the Windows Live™ Term of Use and the Microsoft Privacy Statement. After reviewing them, tap Accept.
3. Enter your Windows Live™ Mail or Hotmail address and password, select the Save password checkbox, then tap Next.
4. Tap Next.
5. Choose what information you want to sync online with your device.
Internet 1�1
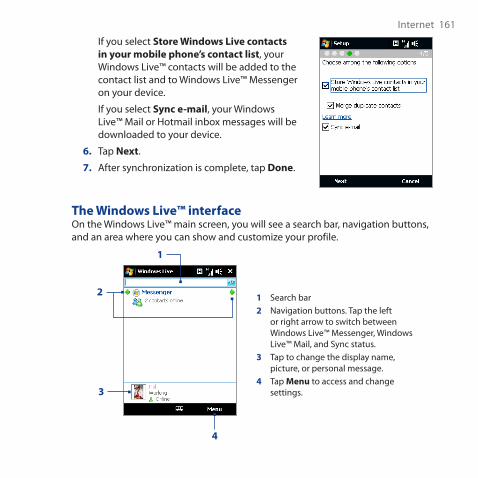
If you select Store Windows Live contacts in your mobile phone’s contact list, your Windows Live™ contacts will be added to the contact list and to Windows Live™ Messenger on your device.
If you select Sync e-mail, your Windows Live™ Mail or Hotmail inbox messages will be downloaded to your device.
6. Tap Next.
7. After synchronization is complete, tap Done.
The Windows Live™ interfaceOn the Windows Live™ main screen, you will see a search bar, navigation buttons, and an area where you can show and customize your profile.
1 Search bar2 Navigation buttons. Tap the left
or right arrow to switch between Windows Live™ Messenger, Windows Live™ Mail, and Sync status.
3 Tap to change the display name, picture, or personal message.
4 Tap Menu to access and change settings.
1
2
3
4
1�� Internet
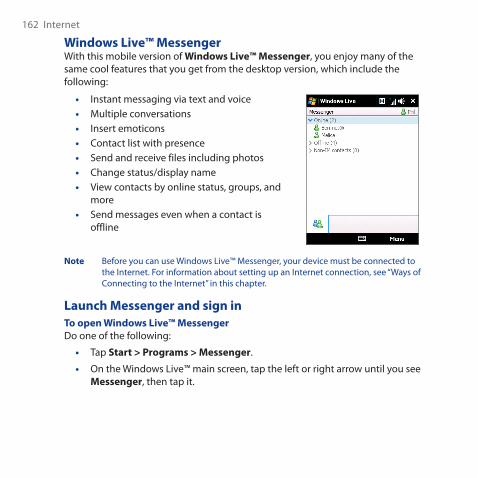
Windows Live™ MessengerWith this mobile version of Windows Live™ Messenger, you enjoy many of the same cool features that you get from the desktop version, which include the following:
• Instant messaging via text and voice• Multiple conversations• Insert emoticons• Contact list with presence• Send and receive files including photos• Change status/display name• View contacts by online status, groups, and
more• Send messages even when a contact is
offline
Note Before you can use Windows Live™ Messenger, your device must be connected to the Internet. For information about setting up an Internet connection, see “Ways of Connecting to the Internet” in this chapter.
Launch Messenger and sign inTo open Windows Live™ MessengerDo one of the following:
• Tap Start > Programs > Messenger.
• On the Windows Live™ main screen, tap the left or right arrow until you see Messenger, then tap it.
Internet 1��
To sign in and out1. Tap Sign in on the Messenger screen.
2. If this is your first time to sign in, a message appears to inform you that your messenger contacts will be added to the contact list on your device. Tap OK to add them.
Signing in may take several minutes, depending on your connection speed.
3. To sign out, tap Menu > Sign Out.
To start and end conversations1. In the contact list, select a contact, then tap Send IM to open a message
screen.
2. Enter your text message in the text entry area of the message screen.
3. To add an emoticon, tap Menu > Add emoticon then tap an icon from the list.
4. Tap Send.
5. To end a conversation with the current contact, tap Menu > End conversation.
Tips • To send a file, tap Menu > Send. You can choose to send a picture, voice clip or any file.
• To invite one or more contacts to the conversation, tap Menu > Options > Add participant.
• To send a voice message, tap Voice Clip on a message screen then start talking. After you have recorded a message, tap Send.
1�4 Internet
Add Windows Live™ contactsYou can add new Windows Live™ contacts in Windows Live™ Messenger or in Contacts.
To add a Windows Live™ contact in Live Messenger1. Tap Menu > Add new contact.
2. Enter the e-mail address of the contact, then tap OK.
To add a Windows Live™ contact in Contacts1. On the Home screen, slide to the People tab and then tap All People.
2. Tap New, then tap Windows Live.
3. In the IM box, enter the e-mail address of the contact, which can be a Windows Live ID or any other e-mail address.Tip You can fill in other information about the contact, if desired. This is not
necessary if you will communicate with the contact only through Windows Live™ Messenger or Live Mail.
4. Tap OK.
5. Follow the remaining instructions to add the new contact to your Windows Live™ contact list.
Internet 1�5
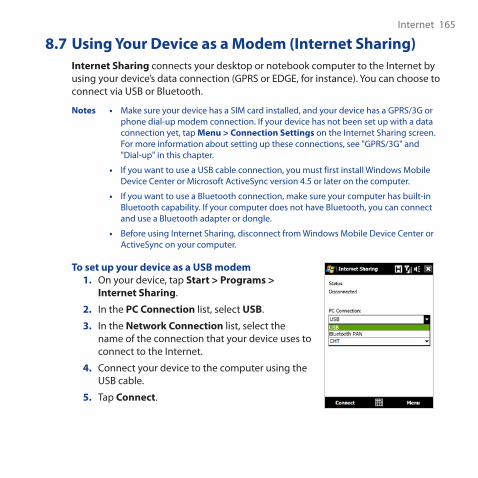
8.7 Using Your Device as a Modem (Internet Sharing)Internet Sharing connects your desktop or notebook computer to the Internet by using your device’s data connection (GPRS or EDGE, for instance). You can choose to connect via USB or Bluetooth.
Notes • Make sure your device has a SIM card installed, and your device has a GPRS/�G or phone dial-up modem connection. If your device has not been set up with a data connection yet, tap Menu > Connection Settings on the Internet Sharing screen. For more information about setting up these connections, see "GPRS/�G" and "Dial-up" in this chapter.
• If you want to use a USB cable connection, you must first install Windows Mobile Device Center or Microsoft ActiveSync version 4.5 or later on the computer.
• If you want to use a Bluetooth connection, make sure your computer has built-in Bluetooth capability. If your computer does not have Bluetooth, you can connect and use a Bluetooth adapter or dongle.
• Before using Internet Sharing, disconnect from Windows Mobile Device Center or ActiveSync on your computer.
To set up your device as a USB modem1. On your device, tap Start > Programs >
Internet Sharing.
2. In the PC Connection list, select USB.
3. In the Network Connection list, select the name of the connection that your device uses to connect to the Internet.
4. Connect your device to the computer using the USB cable.
5. Tap Connect.
1�� Internet
To use your device as a Bluetooth modemFor the computer to use the Internet connection of your device, activate Internet Sharing on your device, then set up a Bluetooth Personal Area Network (PAN) between the computer and your device.
1. On your device, turn on Bluetooth and set it to visible mode by following the steps in “To turn Bluetooth on and make your device visible” section in Chapter 9.
2. Initiate a Bluetooth partnership from your device by following the steps in “To create a Bluetooth partnership”
3. Tap Start > Programs > Internet Sharing.
4. Select Bluetooth PAN as the PC Connection.
5. From the Network Connection list, select the name of the connection that your device uses to connect to the Internet.
6. Tap Connect.
7. On your computer, set up a Bluetooth Personal Area Network (PAN) with your device:For Windows Vista:
a. Click Start > Control Panel > Network and Internet > Network and Sharing Center.
b. Click Manage network connections and then under Personal Area Network, double-click Bluetooth Network Connection.
c. In the Bluetooth Personal Area Network Devices dialog box, select your device, then click Connect.
For Windows XP:
a. Tap Start > Control Panel > Network Connections.
b. Under Personal Area Network, click the Bluetooth Network Connection icon.
Internet 1��
c. Under Network Tasks, click View Bluetooth network devices.
d. In the Bluetooth Personal Area Network Devices dialog box, select your device, then click Connect.
Note If the Bluetooth adapter or dongle on your computer was installed using a third-party provided driver, open the Bluetooth software that came with the Bluetooth adapter/dongle to connect your computer and device via Bluetooth. Refer to the Bluetooth adapter/dongle documentation for more information.
8. On the Internet Sharing screen on your device, check if a connected status message is displayed, which indicates that your computer has been successfully connected to the Internet using your device as a Bluetooth modem.
To end the Internet connectionOn the Internet Sharing screen, tap Disconnect.
1�8 Internet
8.8 Using RSS HubRSS Hub is an RSS reader that keeps you up-to-date with the latest news from the Internet. It monitors Internet news channels and downloads the most current news updates and podcasts so you are instantly informed of breaking news and events.
For more information and tips on using RSS Hub, see Help on your device.
Note Make sure you have an active Internet connection (such as EDGE or GPRS) before using RSS Hub.
Subscribe to and organize news channelsYou must subscribe to news channels before you can receive RSS feeds.
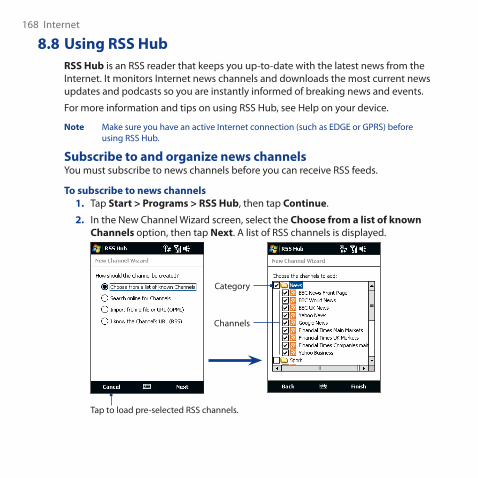
To subscribe to news channels1. Tap Start > Programs > RSS Hub, then tap Continue.
2. In the New Channel Wizard screen, select the Choose from a list of known Channels option, then tap Next. A list of RSS channels is displayed.
Channels
Category
Tap to load pre-selected RSS channels.

Internet 1�9Note If the RSS channel you want to subscribe to is not in the list of known channels,
tap Back, then select another option on the New Channel Wizard screen. For more information on these other options, see the Help on your device.
3. Select the check boxes of the RSS channels you want to subscribe to, then tap Finish.Tip Channels are grouped by categories. If you want to select all channels in a
category, select the category check box.
4. The channel list appears. Tap Refresh to update the channels.
Tap to cancel channel updating
Channel is updated. Tap it to view the headlines.
Tap to select the channel category to display
Headline count
Tap to update the channels
Channel list
1�0 Internet
To add new channels1. In the channel list, tap Menu > Channel > New to open the New Channel
Wizard screen.
2. Select an option, then follow screen instructions to add new channels. For more information on New Channel Wizard options, see Help on your device.
To filter the channels in the displayIn the channel list, tap Menu > View, then select:
• Updated to display only those channels with unread headlines.
• All to display all subscribed channels.
Manage channel categoriesTo view all the channels in a particular category, tap All Categories in the upper left area of the channel list, then tap the category you want to display.
To add a new category, tap Menu > Categories in the channel list to display all categories, then tap Menu > New.
To rename or delete a category, tap Menu > Categories in the channel list to display all categories, select a category, then tap Menu > Rename or Menu > Delete.
If you want to change the channel category, tap and hold the channel in the channel list, then tap Change Category. Select a new category and tap OK.
Internet 1�1
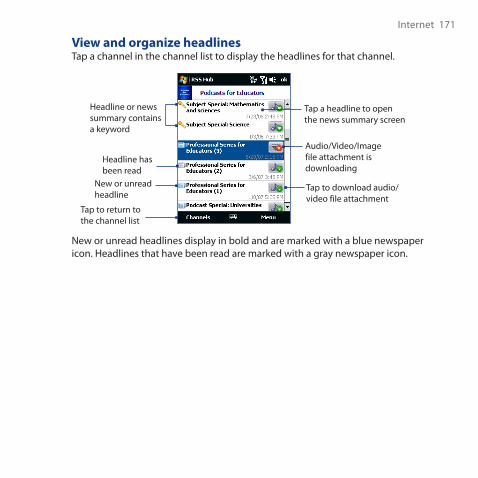
View and organize headlinesTap a channel in the channel list to display the headlines for that channel.
Tap a headline to open the news summary screen
Headline or news summary contains a keyword
Tap to download audio/video file attachment
Audio/Video/Image file attachment is downloading
New or unread headline
Headline has been read
Tap to return to the channel list
New or unread headlines display in bold and are marked with a blue newspaper icon. Headlines that have been read are marked with a gray newspaper icon.
1�� Internet
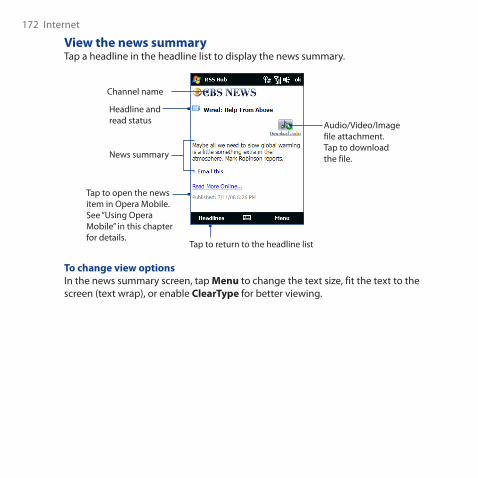
View the news summaryTap a headline in the headline list to display the news summary.
Headline and read status Audio/Video/Image
file attachment. Tap to download the file.News summary
Tap to open the news item in Opera Mobile. See “Using Opera Mobile” in this chapter for details.
Channel name
Tap to return to the headline list
To change view optionsIn the news summary screen, tap Menu to change the text size, fit the text to the screen (text wrap), or enable ClearType for better viewing.
Internet 1��
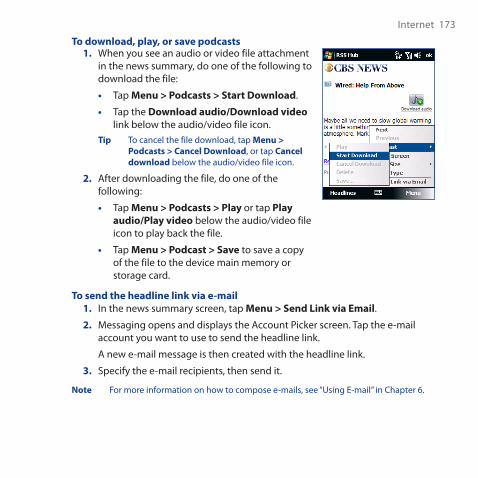
To download, play, or save podcasts1. When you see an audio or video file attachment
in the news summary, do one of the following to download the file:
• Tap Menu > Podcasts > Start Download.
• Tap the Download audio/Download video link below the audio/video file icon.
Tip To cancel the file download, tap Menu > Podcasts > Cancel Download, or tap Cancel download below the audio/video file icon.
2. After downloading the file, do one of the following:
• Tap Menu > Podcasts > Play or tap Play audio/Play video below the audio/video file icon to play back the file.
• Tap Menu > Podcast > Save to save a copy of the file to the device main memory or storage card.
To send the headline link via e-mail1. In the news summary screen, tap Menu > Send Link via Email.
2. Messaging opens and displays the Account Picker screen. Tap the e-mail account you want to use to send the headline link.
A new e-mail message is then created with the headline link.
3. Specify the e-mail recipients, then send it.
Note For more information on how to compose e-mails, see “Using E-mail” in Chapter �.
1�4 Internet
To view the next or previous news summaryIn the news summary screen, tap Menu > Next or Menu > Previous, or press NAVIGATION left or right.
For more information about the features and configuring RSS Hub, refer to the online help. To open the online help, tap Start > Help while in RSS Hub.
Chapter 9 Bluetooth
9.1 Bluetooth Modes9.2 Bluetooth Partnerships
9.3 Connecting a Bluetooth Hands-free or Stereo Headset
9.4 Beaming Information Using Bluetooth9.5 Bluetooth Explorer and Bluetooth
File Sharing9.6 Printing Files via Bluetooth
1�� Bluetooth
9.1 Bluetooth ModesBluetooth is a short-range wireless communications technology. Devices with Bluetooth capabilities can exchange information over a distance of about eight meters without requiring a physical connection.
Bluetooth on your device operates in three different modes:• On. Bluetooth is turned on. Your device can detect other Bluetooth-enabled
devices, but not vice versa.• Visible. Bluetooth is turned on, and all other Bluetooth-enabled devices can
detect your device.• Off. Bluetooth is turned off. In this mode, you can neither send nor receive
information using Bluetooth.
Notes • By default, Bluetooth is turned off. If you turn it on, then turn off your device, Bluetooth also turns off. When you turn on your device again, Bluetooth automatically turns on.
• Turn off Bluetooth when not in use to conserve battery power, or in places where using a wireless device is prohibited, such as on board an aircraft and in hospitals.
To turn Bluetooth on and make your device visible1. On the Home screen, slide to the Settings tab and then tap Menu >
Bluetooth Devices > Mode tab.
2. Select the Turn on Bluetooth and Make this device visible to other devices check boxes.
3. Tap OK. The Title bar will show to indicate that the device is in Visible mode.
To turn off Bluetooth visibility after a certain period of timeYou can automatically turn off Bluetooth visibility after a specified period of time.
1. On the Home screen, slide to the Settings tab and then tap Menu > Bluetooth Devices > Timeout tab.
2. In Turn off Visible mode, select the time before your device’s Bluetooth visibility turns off. Tap OK.
Bluetooth 1��
9.2 Bluetooth PartnershipsA Bluetooth partnership is a relationship that you create between your device and another Bluetooth-enabled device in order to exchange information in a secure manner.
To create a Bluetooth partnership1. On the Home screen, slide to the Settings tab and then tap Menu >
Bluetooth Devices > Devices tab.
2. Tap Add new device. Your device displays the names of other Bluetooth devices within range.
3. Tap the device name in the box, then tap Next.
4. Specify a passcode to establish a secure connection. The passcode can be 1 up to 1� characters.
5. Tap Next.
6. Wait for the paired device to accept the partnership. The receiving party needs to enter the same passcode that you specified.
7. After the receiving party enters the passcode, a message box appears on your device confirming the partnership.Tip Tap Advanced to change the paired device name and to set the services you
want to use for the paired device. After setting the name and options, tap Save.
8. Tap Done.
Note Creating a Bluetooth partnership between two devices is a one-time process. Once a partnership is created, the devices can recognize the partnership and exchange information without entering a passcode again.
1�8 Bluetooth
To accept a Bluetooth partnership1. Ensure that Bluetooth is turned on and in visible mode.
2. Tap Yes when prompted to establish a partnership with the other device.
3. Enter a passcode (the same passcode that is entered on the device requesting the partnership) to establish a secure connection. The passcode must be between 1 and 1� characters.
4. Tap Next.
5. Tap Done. You can now exchange information with the paired device.
Tips • To rename a Bluetooth partnership, tap and hold the partnership’s name on the Devices tab of the Bluetooth screen, then tap Edit.
• To delete a Bluetooth partnership, tap and hold the partnership’s name on the Devices tab, then tap Delete.
9.3 Connecting a Bluetooth Hands-free or Stereo HeadsetFor hands-free phone conversations, you can use a Bluetooth hands-free headset such as a car kit with your device. Your device also supports A�DP (Advanced Audio Distribution Profile) which allows you to use a Bluetooth stereo headset for hands-free phone conversations and for listening to stereo music.
To connect a Bluetooth hands-free or stereo headset1. Make sure that both your device and the Bluetooth headset are turned
on and within close range, and that the headset is visible. Refer to the manufacturer’s documentation to find out how to set the headset in visible mode.
2. On the Home screen, slide to the Settings tab and then tap Menu > Bluetooth Devices > Devices tab > Add new device.
Bluetooth 1�9
3. Tap the name of the Bluetooth headset, then tap Next. The device will automatically pair the device with the Bluetooth headset.
Windows Mobile will automatically try one of the preconfigured passcodes (0000, 1111, 8888, 1��4) to pair the Bluetooth headset with the device. If this fails, you have to enter the passcode delivered with your headset manually.
Note If the Bluetooth stereo headset becomes disconnected, turn the headset on and repeat step 1 to � above. Tap and hold the name of the Bluetooth stereo headset and tap Set as Wireless Stereo.
9.4 Beaming Information Using BluetoothYou can beam information, such as contacts, calendar items, tasks, and files from your device to your computer or to another Bluetooth-enabled device.
Note If your computer does not have built-in Bluetooth capability, you need to connect and use a Bluetooth adapter or dongle on your computer.
To beam information from your device to a computer1. Turn on Bluetooth on your device, and make your device visible. For
information about this, see “To turn Bluetooth on and make your device visible”.
2. Set Bluetooth on your computer to visible mode, create a Bluetooth partnership, then enable your computer to receive Bluetooth beams.Note If the Bluetooth adapter or dongle on your computer was installed using a third-
party provided driver, open the Bluetooth software that came with the Bluetooth adapter/dongle and enable the adapter/dongle to be discovered by other devices. Refer to the Bluetooth adapter’s documentation for more information.
If your computer has Windows Vista or Windows XP SP2 and your computer’s Bluetooth adapter is supported by your Windows version, do the following steps:
180 Bluetooth
a. On your computer, open Bluetooth Devices from the Control Panel, then click the Options tab on the Bluetooth Devices window.
b. For Windows Vista, select Allow Bluetooth devices to find this computer.
For Windows XP, select Turn discovery on and Allow Bluetooth devices to connect to this computer.
c. Create a Bluetooth partnership between your device and computer. For information about creating a partnership, see “Bluetooth partnerships”.
d. In the Options tab of Bluetooth Devices, select Show the Bluetooth icon in the notification area.
e. To enable your computer to receive Bluetooth beams, right-click the Bluetooth icon in the notification area at the bottom-right corner of your computer screen and select Receive a File. You are now ready to beam.
3. On your device, select an item to beam. The item can be an appointment in your calendar, a task, a contact card, or a file.
4. To beam a contact, tap Menu > Send Contact > Beam.
To beam other types of information, tap Menu > Beam [type of item].
5. Tap the device name to which you want to send the item.
6. If you beamed a calendar, task, or contact item to your computer and it is not automatically added to Outlook, select File > Import and Export in Outlook to import it.
To beam information to a Bluetooth-enabled device such as another Windows Mobile-powered device, follow steps 1 to 5 in the above procedure.
Tips • The default folder on your computer where beamed items are stored may be C:\Documents and Settings\your_username\My Documents in Windows XP or C:\Users\your_username\My Documents in Windows Vista.
• For your device to receive Bluetooth beams, tap Start > Settings > Connections tab > Beam and make sure the Receive all incoming beams check box is selected.
Bluetooth 181
9.5 Bluetooth Explorer and Bluetooth File SharingBluetooth Explorer searches for other Bluetooth devices that have file sharing enabled and lets you access their Bluetooth shared folder. You can copy files from and to their shared folder, and create subfolders in it. When you enable Bluetooth file sharing on your device, other Bluetooth-enabled devices will also be able to access your Bluetooth shared folder.
To enable Bluetooth Explorer and Bluetooth file sharing on your device1. On the Home screen, slide to the Settings tab and then tap Menu >
Bluetooth Devices > FTP tab.
2. Select the Enable Bluetooth Explorer check box. This makes the Bluetooth device folder visible in File Explorer.
3. Select the Enable File Sharing check box.
You can use the default Bluetooth shared folder, or tap Browse to use another folder as your shared folder.
4. Tap OK.
To use Bluetooth Explorer1. Bluetooth Explorer is integrated with the File Explorer program. You can
open it by tapping Start > Programs > Bluetooth Explorer or by tapping the down arrow ( ) on the upper left of File Explorer screen then tapping Bluetooth.

18� Bluetooth
2. Bluetooth Explorer then scans for other Bluetooth devices that have file sharing enabled. From the list, tap to select a Bluetooth device you want to connect to. You may need to enter a passcode in order for you to connect to the selected device.
If there are files contained in the Bluetooth shared folder on the other device, you will be able to see them on the Bluetooth Explorer screen.
3. Select one or more files, then tap Menu > Edit and choose to cut or copy the files.
4. Tap Up twice.
5. Navigate to the folder where you want to paste the files on your device, then tap Menu > Edit > Paste.
9.6 Printing Files via BluetoothConnect your device to a Bluetooth printer to print contact information, appointment details, images, and other file types.
Note You can print files in the .txt, .jpg, .xhtml, .vcf, .vcs file formats.
Before you start printing, make sure to turn on the Bluetooth printer and to turn on Bluetooth on your device. To turn on Bluetooth, tap Start > Programs > Comm Manager, then tap the Bluetooth button.
Bluetooth 18�
To print contact information1. On the Home screen, slide to the People tab and then tap All People.
2. Select the contact whose information you want to print.
3. Tap Menu > Print via Bluetooth > Menu > Search Devices. Your device starts to search for Bluetooth devices.
4. Select the Bluetooth printer and tap Menu > Send File.
5. Set the printing options you want, then tap Print.
To print a calendar appointment1. Tap Start > Calendar, then select (highlight) the appointment whose details
you want to print.
2. Follow steps � to 5 in the “To print contact information” procedure.
To print a JPEG file1. In Pictures & Videos, locate the JPEG file you want to print.
2. Tap and hold the JPEG image file and then on the menu, tap Print via Bluetooth.
3. Follow steps � to 5 in the “To print contact information” procedure:
To print a text file1. In File Explorer, locate the text file you want to print.
2. Tap and hold the txt file and then on the menu, tap Print via Bluetooth.
3. Follow steps � to 5 in the “To print contact information” procedure:

184 Bluetooth
Chapter 10 Navigating on the Road
10.1 Google™ Maps (Available by Country)10.2 Guidelines and Preparation for Using GPS10.3 Downloading Satellite Data via QuickGPS
18� Navigating on the Road
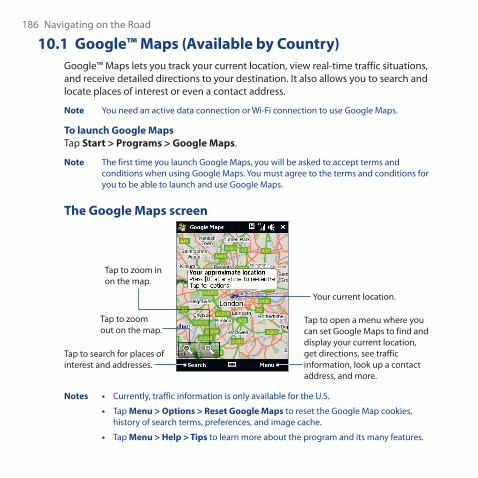
10.1 Google™ Maps (Available by Country)Google™ Maps lets you track your current location, view real-time traffic situations, and receive detailed directions to your destination. It also allows you to search and locate places of interest or even a contact address.
Note You need an active data connection or Wi-Fi connection to use Google Maps.
To launch Google MapsTap Start > Programs > Google Maps.
Note The first time you launch Google Maps, you will be asked to accept terms and conditions when using Google Maps. You must agree to the terms and conditions for you to be able to launch and use Google Maps.
The Google Maps screen
Tap to zoom out on the map.
Tap to zoom in on the map.
Tap to search for places of interest and addresses.
Tap to open a menu where you can set Google Maps to find and display your current location, get directions, see traffic information, look up a contact address, and more.
Your current location.
Notes • Currently, traffic information is only available for the U.S.
• Tap Menu > Options > Reset Google Maps to reset the Google Map cookies, history of search terms, preferences, and image cache.
• Tap Menu > Help > Tips to learn more about the program and its many features.
Navigating on the Road 18�
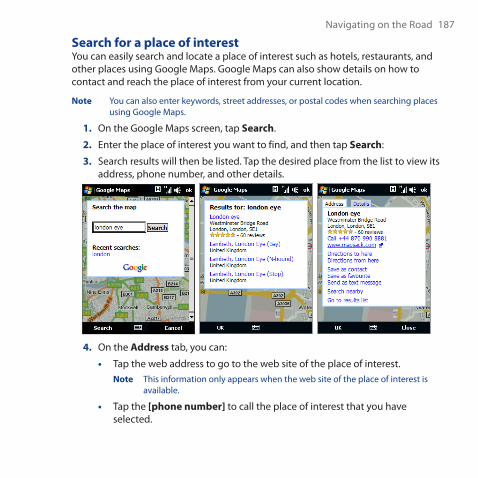
Search for a place of interestYou can easily search and locate a place of interest such as hotels, restaurants, and other places using Google Maps. Google Maps can also show details on how to contact and reach the place of interest from your current location.
Note You can also enter keywords, street addresses, or postal codes when searching places using Google Maps.
1. On the Google Maps screen, tap Search.
2. Enter the place of interest you want to find, and then tap Search:
3. Search results will then be listed. Tap the desired place from the list to view its address, phone number, and other details.
4. On the Address tab, you can:
• Tap the web address to go to the web site of the place of interest.Note This information only appears when the web site of the place of interest is
available.
• Tap the [phone number] to call the place of interest that you have selected.
188 Navigating on the Road
• Tap Directions to here or Directions from here to get directions on how to get to the place of interest from your current location or vice versa.
• Tap Search nearby to search for other places of interest near your current location.
• Tap Send as text message to send the contact information of the place of interest via SMS.
For more information about Google Maps, you can visit the following web site: http://www.google.com/gmm/index.html.
10.2 Guidelines and Preparation for Using GPSIf you install a GPS software on your device, please follow these guidelines before and when using your device as a GPS device.
• Do not operate the GPS system while driving. The plotted GPS route is only for driving reference. It should not interfere with actual driving behavior.
• Do not leave your device in a vehicle or expose the device to direct sunlight to avoid overheating the battery, which could pose damage to the device or risk to the vehicle.
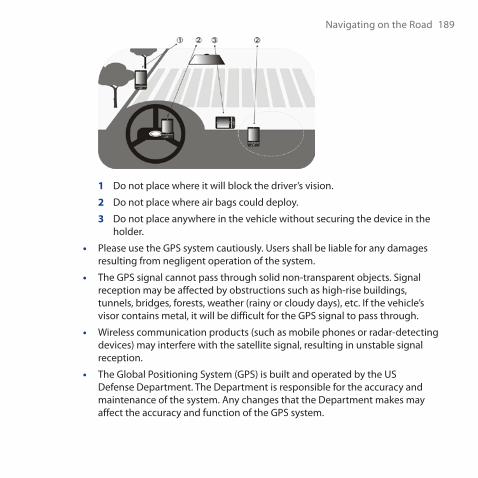
• When using the device inside a vehicle, use the car holder to mount the device securely in place. Avoid placing the device in the areas shown in the following diagram:
Navigating on the Road 189
1 Do not place where it will block the driver’s vision.
2 Do not place where air bags could deploy.
3 Do not place anywhere in the vehicle without securing the device in the holder.
• Please use the GPS system cautiously. Users shall be liable for any damages resulting from negligent operation of the system.
• The GPS signal cannot pass through solid non-transparent objects. Signal reception may be affected by obstructions such as high-rise buildings, tunnels, bridges, forests, weather (rainy or cloudy days), etc. If the vehicle’s visor contains metal, it will be difficult for the GPS signal to pass through.
• Wireless communication products (such as mobile phones or radar-detecting devices) may interfere with the satellite signal, resulting in unstable signal reception.
• The Global Positioning System (GPS) is built and operated by the US Defense Department. The Department is responsible for the accuracy and maintenance of the system. Any changes that the Department makes may affect the accuracy and function of the GPS system.
190 Navigating on the Road
10.3 Downloading Satellite Data via QuickGPSBefore you start using your device for GPS navigation, open the QuickGPS program first to download ephemeris data (current satellite position and timing information) onto your device. This data is needed to determine the GPS position of your current location.
QuickGPS downloads ephemeris data from a web server, instead of from the satellites, using the Internet connection on your device, which can be via Wi-Fi, ActiveSync or GPRS/�G. This significantly speeds up the time for determining your GPS position.
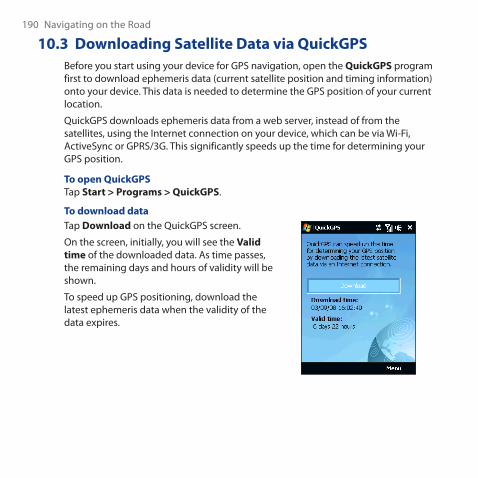
To open QuickGPSTap Start > Programs > QuickGPS.
To download dataTap Download on the QuickGPS screen.
On the screen, initially, you will see the Valid time of the downloaded data. As time passes, the remaining days and hours of validity will be shown.
To speed up GPS positioning, download the latest ephemeris data when the validity of the data expires.
Navigating on the Road 191
Download optionsTo configure download times, tap Menu > Options and choose from the available options:
• Remind me when data expires. Enables your device to display a reminder message when the validity of the ephemeris data has expired.
When you see the reminder message, tap Menu to dismiss the reminder or to set the snooze time so that you will be reminded again. Tap OK to open the QuickGPS program and download the latest data.
• Auto download when data expires. Allows ephemeris data to be automatically updated onto your device when the data has expired.
• Auto download when connected to PC via ActiveSync. Allows ephemeris data to be automatically downloaded via ActiveSync to your device when your device is connected to your computer. Your computer must be connected to the Internet in order to download data.Note The ephemeris data is stored on HTC web servers. QuickGPS is preconfigured to
connect to these servers.

19� Navigating on the Road
Chapter 11 Experiencing Multimedia
11.1 Taking Photos and Videos11.2 Viewing Photos and Videos Using Album
11.3 Using Windows Media® Player Mobile11.4 Using Audio Manager
11.5 Using Audio Booster
194 Experiencing Multimedia
11.1 Taking Photos and VideosUse Camera to take photos and record video clips.
To open the Camera screen1. On the Home screen, slide to the Photos and Videos tab.
2. Tap the Camera icon ( ) or the Video Camera icon ( ).
The screen orientation automatically switches to landscape mode when you open Camera.
Tip You can also tap Start > Programs > Camera to open the Camera program.
To exit the CameraTap the screen first to display the Camera screen icons, and then tap the Exit icon ( ).
Capture modesThe camera on your device allows you to capture pictures and video clips by using various built-in modes that provide you flexibility in taking your shots.
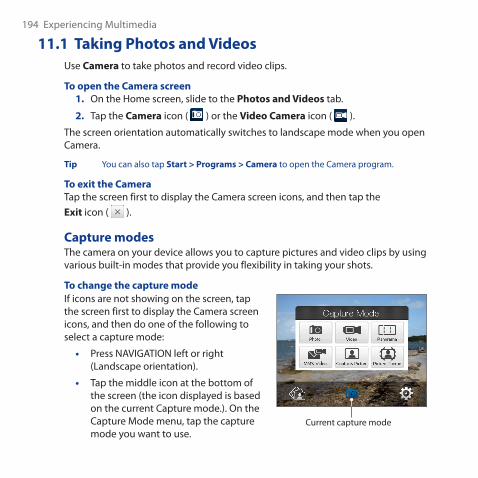
To change the capture modeIf icons are not showing on the screen, tap the screen first to display the Camera screen icons, and then do one of the following to select a capture mode:
• Press NAVIGATION left or right (Landscape orientation).
• Tap the middle icon at the bottom of the screen (the icon displayed is based on the current Capture mode.). On the Capture Mode menu, tap the capture mode you want to use.
Current capture mode
Experiencing Multimedia 195
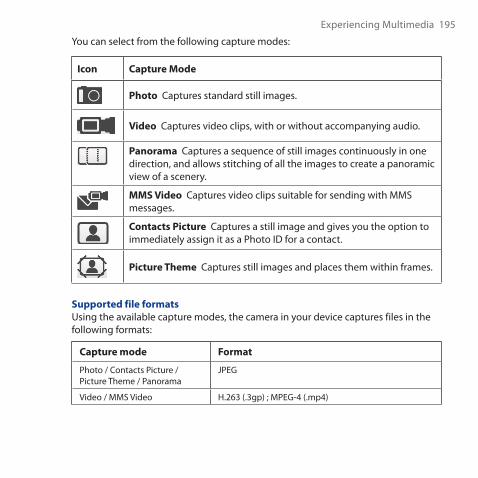
You can select from the following capture modes:
Icon Capture Mode
Photo Captures standard still images.
Video Captures video clips, with or without accompanying audio.
Panorama Captures a sequence of still images continuously in one direction, and allows stitching of all the images to create a panoramic view of a scenery.
MMS Video Captures video clips suitable for sending with MMS messages.
Contacts Picture Captures a still image and gives you the option to immediately assign it as a Photo ID for a contact.
Picture Theme Captures still images and places them within frames.
Supported file formatsUsing the available capture modes, the camera in your device captures files in the following formats:
Capture mode Format
Photo / Contacts Picture / Picture Theme / Panorama
JPEG
Video / MMS Video H.��� (.�gp) ; MPEG-4 (.mp4)
19� Experiencing Multimedia
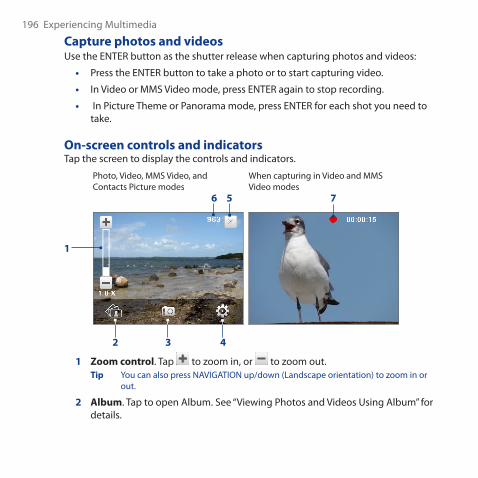
Capture photos and videosUse the ENTER button as the shutter release when capturing photos and videos:
Press the ENTER button to take a photo or to start capturing video.
In Video or MMS Video mode, press ENTER again to stop recording.
In Picture Theme or Panorama mode, press ENTER for each shot you need to take.
On-screen controls and indicatorsTap the screen to display the controls and indicators.
When capturing in Video and MMS Video modes
Photo, Video, MMS Video, and Contacts Picture modes
6 7
42
1
3
5
1 Zoom control. Tap to zoom in, or to zoom out.Tip You can also press NAVIGATION up/down (Landscape orientation) to zoom in or
out.
2 Album. Tap to open Album. See “Viewing Photos and Videos Using Album” for details.
•
•
•
Experiencing Multimedia 19�
3 Capture mode. Displays the current capture mode. Tap to open the Capture Mode menu where you can choose from available capture modes.
4 Menu. Tap to display the Menu Panel. See “Menu Panel” for details.5 Exit. Tap to exit the Camera program.6 Remaining information indicator. In Photo, Contacts Picture, Picture Theme,
and Panorama modes, this shows the remaining/available shots of pictures based on the current settings.In Video and MMS Video modes, this shows the remaining duration that can be recorded. While recording video, this shows the recorded duration.
7 Recording indicator. Flashes when recording a video.
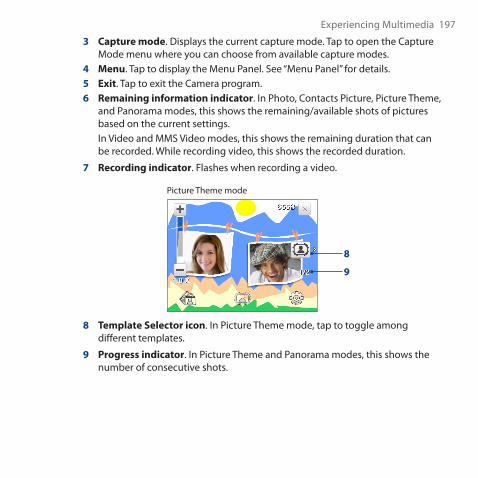
Picture Theme mode
8
9
8 Template Selector icon. In Picture Theme mode, tap to toggle among different templates.
9 Progress indicator. In Picture Theme and Panorama modes, this shows the number of consecutive shots.
198 Experiencing Multimedia
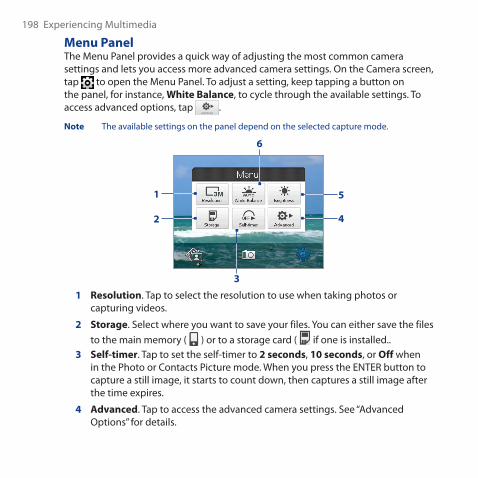
Menu PanelThe Menu Panel provides a quick way of adjusting the most common camera settings and lets you access more advanced camera settings. On the Camera screen, tap to open the Menu Panel. To adjust a setting, keep tapping a button on the panel, for instance, White Balance, to cycle through the available settings. To access advanced options, tap .
Note The available settings on the panel depend on the selected capture mode.
2
1 5
4
3
6
1 Resolution. Tap to select the resolution to use when taking photos or capturing videos.
2 Storage. Select where you want to save your files. You can either save the files to the main memory ( ) or to a storage card ( if one is installed..
3 Self-timer. Tap to set the self-timer to 2 seconds, 10 seconds, or Off when in the Photo or Contacts Picture mode. When you press the ENTER button to capture a still image, it starts to count down, then captures a still image after the time expires.
4 Advanced. Tap to access the advanced camera settings. See “Advanced Options” for details.
Experiencing Multimedia 199
5 Brightness. Tap to open the Brightness bar at the bottom of the screen. On the Brightness bar, tap to decrease, or to increase the brightness level. Tap outside the Brightness bar to apply the change.
6 White Balance. White balance enables the camera to capture colors more accurately by adjusting to different lighting conditions. White balance settings include: Auto ( ), Daylight ( ), Night ( ), Incandescent ( ), and Fluorescent ( ).
ZoomingBefore capturing a photo or a video clip, you can zoom in to make the object in focus move closer, or zoom out to make the object move farther away.
To zoom inPress NAVIGATION up (Landscape orientation), or tap .
To zoom outPress NAVIGATION down (Landscape orientation), or tap .
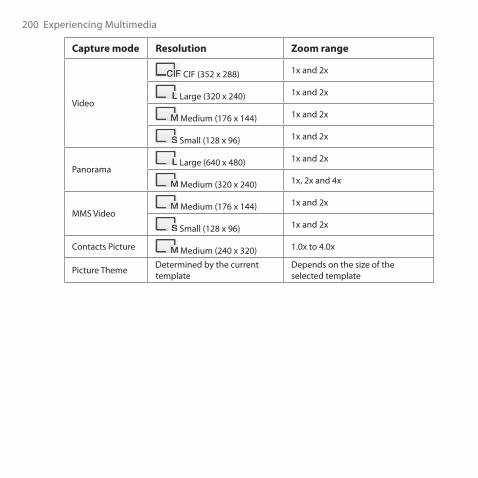
The camera zoom range for a photo or a video clip depends on the capture mode and resolution. Refer to the table for more information.
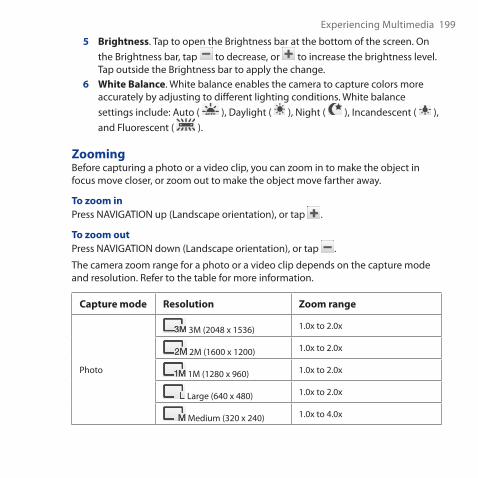
Capture mode Resolution Zoom range
Photo
�M (�048 x 15��) 1.0x to �.0x
�M (1�00 x 1�00) 1.0x to �.0x
1M (1�80 x 9�0) 1.0x to �.0x
Large (�40 x 480) 1.0x to �.0x
Medium (��0 x �40) 1.0x to 4.0x
�00 Experiencing Multimedia
Capture mode Resolution Zoom range
Video
CIF (�5� x �88) 1x and �x
Large (��0 x �40) 1x and �x
Medium (1�� x 144) 1x and �x
Small (1�8 x 9�) 1x and �x
Panorama Large (�40 x 480) 1x and �x
Medium (��0 x �40) 1x, �x and 4x
MMS Video Medium (1�� x 144) 1x and �x
Small (1�8 x 9�) 1x and �x
Contacts Picture Medium (�40 x ��0) 1.0x to 4.0x
Picture Theme Determined by the current template
Depends on the size of the selected template
Experiencing Multimedia �01
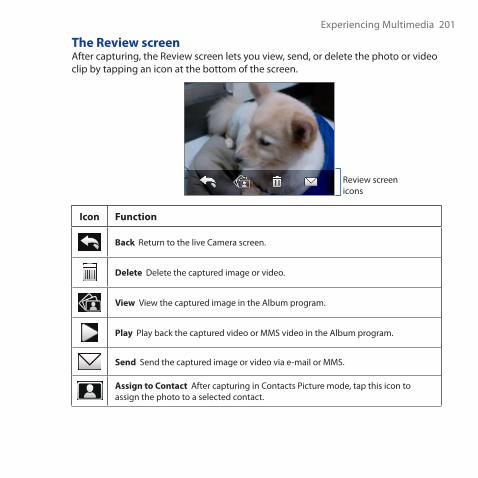
The Review screenAfter capturing, the Review screen lets you view, send, or delete the photo or video clip by tapping an icon at the bottom of the screen.
Review screen icons
Icon Function
Back Return to the live Camera screen.
Delete Delete the captured image or video.
View View the captured image in the Album program.
Play Play back the captured video or MMS video in the Album program.
Send Send the captured image or video via e-mail or MMS.
Assign to Contact After capturing in Contacts Picture mode, tap this icon to assign the photo to a selected contact.
�0� Experiencing Multimedia
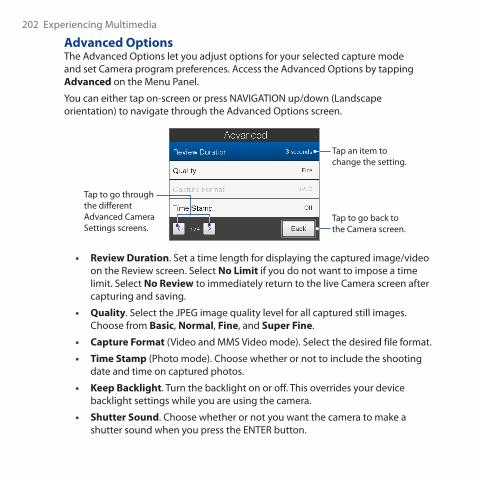
Advanced OptionsThe Advanced Options let you adjust options for your selected capture mode and set Camera program preferences. Access the Advanced Options by tapping Advanced on the Menu Panel.
You can either tap on-screen or press NAVIGATION up/down (Landscape orientation) to navigate through the Advanced Options screen.
Tap to go through the different Advanced Camera Settings screens.
Tap to go back to the Camera screen.
Tap an item to change the setting.
• Review Duration. Set a time length for displaying the captured image/video on the Review screen. Select No Limit if you do not want to impose a time limit. Select No Review to immediately return to the live Camera screen after capturing and saving.
• Quality. Select the JPEG image quality level for all captured still images. Choose from Basic, Normal, Fine, and Super Fine.
• Capture Format (Video and MMS Video mode). Select the desired file format.
• Time Stamp (Photo mode). Choose whether or not to include the shooting date and time on captured photos.
• Keep Backlight. Turn the backlight on or off. This overrides your device backlight settings while you are using the camera.
• Shutter Sound. Choose whether or not you want the camera to make a shutter sound when you press the ENTER button.
Experiencing Multimedia �0�
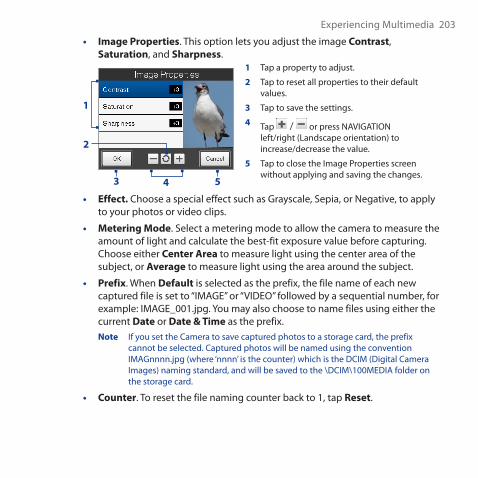
• Image Properties. This option lets you adjust the image Contrast, Saturation, and Sharpness.
1 Tap a property to adjust.
2 Tap to reset all properties to their default values.
3 Tap to save the settings.
4 Tap / or press NAVIGATION left/right (Landscape orientation) to increase/decrease the value.
5 Tap to close the Image Properties screen without applying and saving the changes.
2
3 4
1
5
• Effect. Choose a special effect such as Grayscale, Sepia, or Negative, to apply to your photos or video clips.
• Metering Mode. Select a metering mode to allow the camera to measure the amount of light and calculate the best-fit exposure value before capturing. Choose either Center Area to measure light using the center area of the subject, or Average to measure light using the area around the subject.
• Prefix. When Default is selected as the prefix, the file name of each new captured file is set to “IMAGE” or “VIDEO” followed by a sequential number, for example: IMAGE_001.jpg. You may also choose to name files using either the current Date or Date & Time as the prefix.Note If you set the Camera to save captured photos to a storage card, the prefix
cannot be selected. Captured photos will be named using the convention IMAGnnnn.jpg (where ‘nnnn’ is the counter) which is the DCIM (Digital Camera Images) naming standard, and will be saved to the \DCIM\100MEDIA folder on the storage card.
• Counter. To reset the file naming counter back to 1, tap Reset.
�04 Experiencing Multimedia
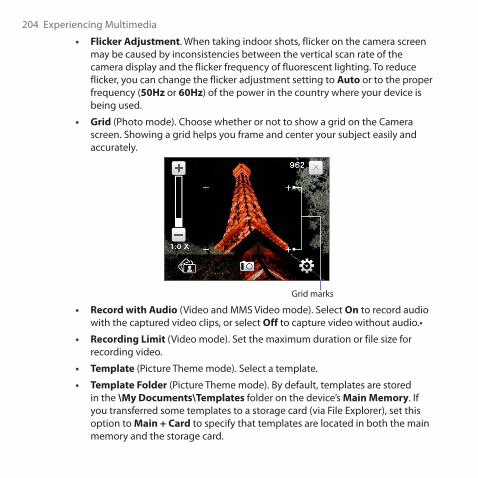
• Flicker Adjustment. When taking indoor shots, flicker on the camera screen may be caused by inconsistencies between the vertical scan rate of the camera display and the flicker frequency of fluorescent lighting. To reduce flicker, you can change the flicker adjustment setting to Auto or to the proper frequency (50Hz or 60Hz) of the power in the country where your device is being used.
• Grid (Photo mode). Choose whether or not to show a grid on the Camera screen. Showing a grid helps you frame and center your subject easily and accurately.
Grid marks
• Record with Audio (Video and MMS Video mode). Select On to record audio with the captured video clips, or select Off to capture video without audio.•
• Recording Limit (Video mode). Set the maximum duration or file size for recording video.
• Template (Picture Theme mode). Select a template.
• Template Folder (Picture Theme mode). By default, templates are stored in the \My Documents\Templates folder on the device’s Main Memory. If you transferred some templates to a storage card (via File Explorer), set this option to Main + Card to specify that templates are located in both the main memory and the storage card.
Experiencing Multimedia �05
• Show Reminder (Contacts Picture mode). Select On if you want the Camera to always display a message that confirms whether or not to assign the captured picture to a contact.
• Direction (Panorama mode). Choose in what direction images will be stitched in a panorama.
• Stitch Count (Panorama mode). Select the desired number of images to be captured and stitched into a panorama.
• Help. Tap to open the Camera program help file.
• About. Tap to display version and copyright information.
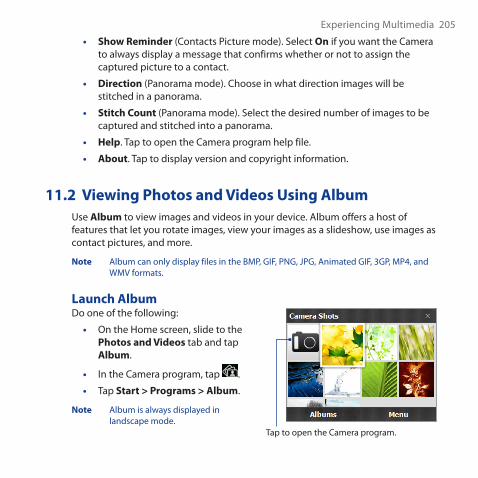
11.2 Viewing Photos and Videos Using AlbumUse Album to view images and videos in your device. Album offers a host of features that let you rotate images, view your images as a slideshow, use images as contact pictures, and more.
Note Album can only display files in the BMP, GIF, PNG, JPG, Animated GIF, �GP, MP4, and WMV formats.
Launch AlbumDo one of the following:
• On the Home screen, slide to the Photos and Videos tab and tap Album.
• In the Camera program, tap .
• Tap Start > Programs > Album.
Note Album is always displayed in landscape mode.
Tap to open the Camera program.
�0� Experiencing Multimedia
Select a photo or video to view1. On the main Album screen, tap Albums and then select the album to view.
The contents of the album are then displayed on the main Album screen.
2. Browse through the files by sliding your finger upward or downward.
3. Do one of the following:
• Tap an image to view it in full screen mode. See “View an image” for details.
• Tap a video file (files with the icon) to play back the video file. See “Play back video” in this chapter for details.
• Select a still image and then tap Menu > Slideshow to view the images in the album as a slideshow. Animated GIF and video files will not be played back in the slideshow. See “To view still images as a slideshow” in this chapter for details.
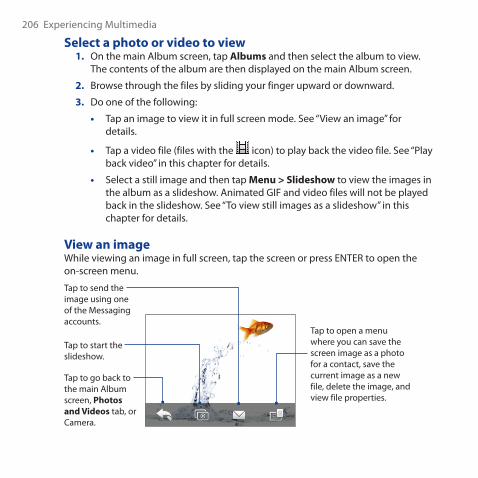
View an imageWhile viewing an image in full screen, tap the screen or press ENTER to open the on-screen menu.
Tap to go back to the main Album screen, Photos and Videos tab, or Camera.
Tap to start the slideshow.
Tap to send the image using one of the Messaging accounts.
Tap to open a menu where you can save the screen image as a photo for a contact, save the current image as a new file, delete the image, and view file properties.
Experiencing Multimedia �0�Tip You can delete multiple files at once by selecting Menu > Delete Items on the main
Album screen and then selecting the files to delete.
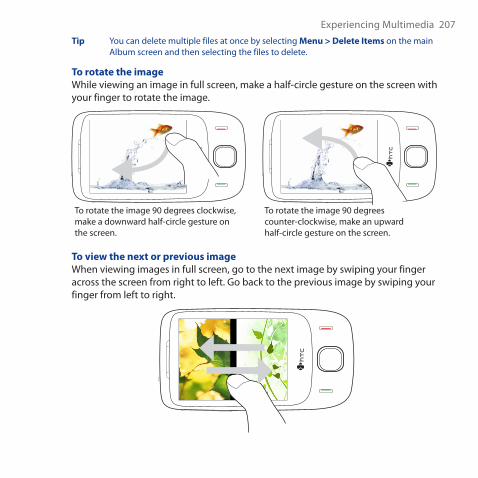
To rotate the imageWhile viewing an image in full screen, make a half-circle gesture on the screen with your finger to rotate the image.
To rotate the image 90 degrees counter-clockwise, make an upward half-circle gesture on the screen.
To rotate the image 90 degrees clockwise, make a downward half-circle gesture on the screen.
To view the next or previous imageWhen viewing images in full screen, go to the next image by swiping your finger across the screen from right to left. Go back to the previous image by swiping your finger from left to right.
�08 Experiencing Multimedia
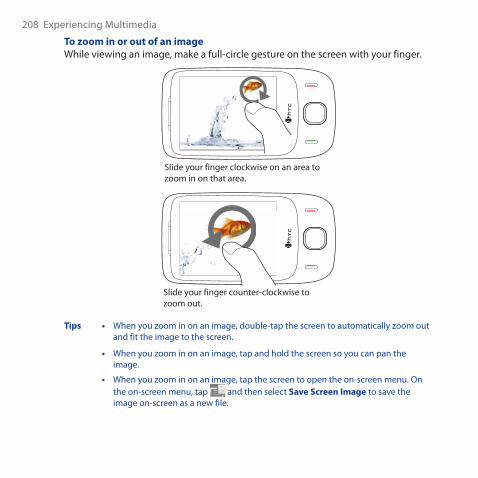
To zoom in or out of an imageWhile viewing an image, make a full-circle gesture on the screen with your finger.
Slide your finger clockwise on an area to zoom in on that area.
Slide your finger counter-clockwise to zoom out.
Tips • When you zoom in on an image, double-tap the screen to automatically zoom out and fit the image to the screen.
• When you zoom in on an image, tap and hold the screen so you can pan the image.
• When you zoom in on an image, tap the screen to open the on-screen menu. On the on-screen menu, tap and then select Save Screen Image to save the image on-screen as a new file.
Experiencing Multimedia �09
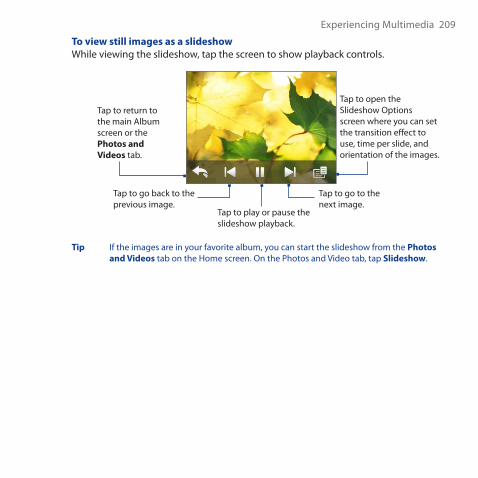
To view still images as a slideshowWhile viewing the slideshow, tap the screen to show playback controls.
Tap to go back to the previous image.
Tap to open the Slideshow Options screen where you can set the transition effect to use, time per slide, and orientation of the images.
Tap to return to the main Album screen or the Photos and Videos tab.
Tap to play or pause the slideshow playback.
Tap to go to the next image.
Tip If the images are in your favorite album, you can start the slideshow from the Photos and Videos tab on the Home screen. On the Photos and Video tab, tap Slideshow.
�10 Experiencing Multimedia
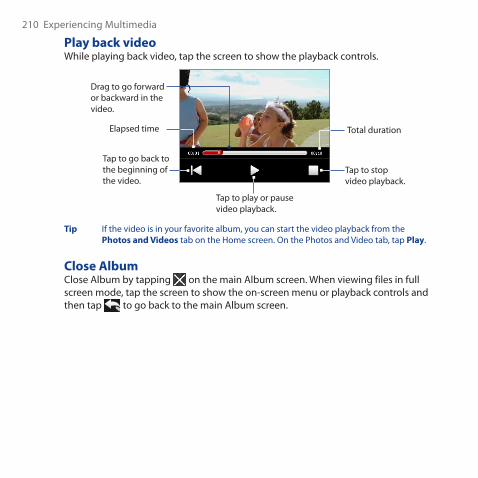
Play back videoWhile playing back video, tap the screen to show the playback controls.
Tap to go back to the beginning of the video.
Tap to play or pause video playback.
Tap to stop video playback.
Drag to go forward or backward in the video.
Elapsed time Total duration
Tip If the video is in your favorite album, you can start the video playback from the Photos and Videos tab on the Home screen. On the Photos and Video tab, tap Play.
Close AlbumClose Album by tapping on the main Album screen. When viewing files in full screen mode, tap the screen to show the on-screen menu or playback controls and then tap to go back to the main Album screen.
Experiencing Multimedia �11
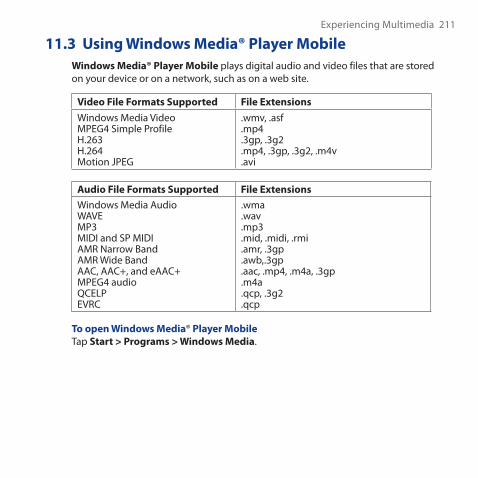
11.3 Using Windows Media® Player MobileWindows Media® Player Mobile plays digital audio and video files that are stored on your device or on a network, such as on a web site.
Video File Formats Supported File ExtensionsWindows Media VideoMPEG4 Simple ProfileH.���H.��4Motion JPEG
.wmv, .asf
.mp4
.�gp, .�g�
.mp4, .�gp, .�g�, .m4v
.avi
Audio File Formats Supported File ExtensionsWindows Media AudioWAVEMP�MIDI and SP MIDIAMR Narrow BandAMR Wide BandAAC, AAC+, and eAAC+MPEG4 audioQCELPEVRC
.wma
.wav
.mp�
.mid, .midi, .rmi
.amr, .�gp
.awb,.�gp
.aac, .mp4, .m4a, .�gp
.m4a
.qcp, .�g�
.qcp
To open Windows Media® Player MobileTap Start > Programs > Windows Media.
�1� Experiencing Multimedia
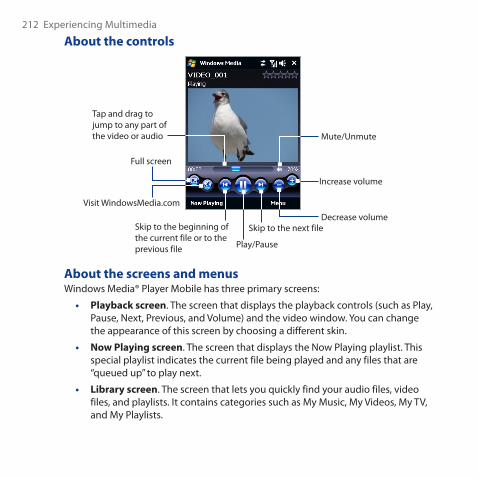
About the controls
Play/Pause
Full screen
Visit WindowsMedia.com
Tap and drag to jump to any part of the video or audio
Skip to the beginning of the current file or to the previous file
Skip to the next file
Mute/Unmute
Increase volume
Decrease volume
About the screens and menusWindows Media® Player Mobile has three primary screens:
• Playback screen. The screen that displays the playback controls (such as Play, Pause, Next, Previous, and Volume) and the video window. You can change the appearance of this screen by choosing a different skin.
• Now Playing screen. The screen that displays the Now Playing playlist. This special playlist indicates the current file being played and any files that are “queued up” to play next.
• Library screen. The screen that lets you quickly find your audio files, video files, and playlists. It contains categories such as My Music, My Videos, My TV, and My Playlists.
Experiencing Multimedia �1�
At the bottom of each screen, you can open a Menu. The commands on this menu vary, depending on which screen you are viewing. For more information about the commands in these menus, see Help on your device.
Synchronize video and audio filesUse the latest version of Windows Media® Player on your computer to synchronize digital media files from your computer to your device. This ensures that protected files and album art (for skins) are copied to your device correctly.
To synchronize content to your device automatically1. On your computer, open Windows Media® Player, then connect your device to
your computer.
2. In the Device Setup Wizard, select Yes, search my computer now.Note If you have previously opened Windows Media® Player and searched for media
on your computer, you will not be prompted to search your computer in Step �.
3. On the Device Setup dialog box, enter a name for your device and click Finish.Note If you installed a storage card that has a capacity of more than 4GB and
your entire library can fit into the storage card, Windows Media Player will automatically synchorize your music files. The device also needs to be set to Disk Drive mode for Windows Media Player to automatically synchronize.
4. On the left panel of Windows Media® Player, right-click the name of your device and click Set Up Sync.Note To set up media synchronization on a storage card, right-click Storage Card in the
left panel of Windows Media® Player, then click Set Up Sync.
5. Select the playlist(s) that you want to sync between your computer and device, then click Add.Note On the Device Setup dialog box, make sure that the Sync this device
automatically check box is selected.
6. Click Finish.
�14 Experiencing Multimedia
The files will begin synchronizing to your device. The next time you connect your device to your computer while Windows Media® Player is running, synchronization will start automatically.
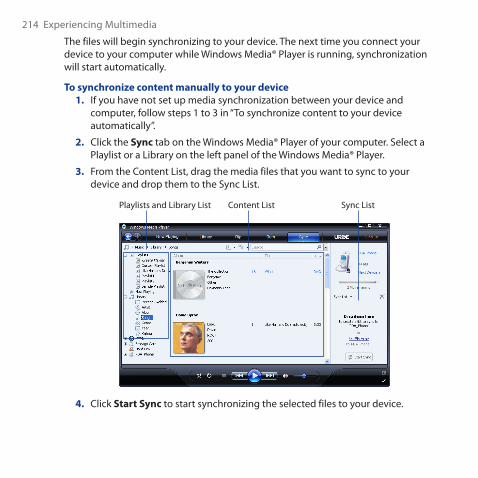
To synchronize content manually to your device1. If you have not set up media synchronization between your device and
computer, follow steps 1 to � in “To synchronize content to your device automatically”.
2. Click the Sync tab on the Windows Media® Player of your computer. Select a Playlist or a Library on the left panel of the Windows Media® Player.
3. From the Content List, drag the media files that you want to sync to your device and drop them to the Sync List.
Playlists and Library List Sync ListContent List
4. Click Start Sync to start synchronizing the selected files to your device.
Experiencing Multimedia �15
Notes • Use Windows Media® Player 11 or higher on your computer to synchronize media files to your device.
• Audio files copy faster if Windows Media® Player is configured to automatically set the quality level for audio files copied to your device. For more information, see the Windows Media® Player Help.
Play mediaUse the Library to find and play songs, videos, and playlists that are stored on your device or an installed storage card.
To update the Library1. If you are not on the Library screen, tap Menu > Library.
2. On the Library screen, tap the Library arrow (near the top of the screen), then tap the media storage that you want use, for example, Storage Card.
3. In most cases, Windows Media® Player Mobile automatically updates the library. However, you can manually update the library to ensure that it contains new files that you recently copied to your device or storage card. Tap Menu > Update Library to manually update the library list.
To play video and audio files on your device1. Select a category (for example, My Music or My Playlists).
2. Tap and hold the item that you want to play (such as a song, album, or artist name), then tap Play.
Tips • To play a media file that is stored on your device but is not in a library, on the Library screen, tap Menu > Open File. Tap and hold the item that you want to play (such as a file or a folder), then tap Play.
• To play a media file from the Internet or a network server, tap Menu > Library then tap Menu > Open URL.
�1� Experiencing Multimedia
PlaylistsIn Windows Media® Player Mobile, you can create a new playlist by saving the current Now Playing playlist and giving it a new name.
To save a new playlist1. If you are not on the Library screen, tap Menu > Library.
2. Tap to select a category (for example, My Music or My Playlists).
3. Select a media file that you want, then tap Menu > Queue Up. This adds the file to the Now Playing list.
Repeat this step until you have added all desired media files to the Now Playing list.Note You cannot select multiple files simultaneously.
4. After adding the media files, tap Menu > Now Playing.
5. On the Now Playing screen, tap Menu > Save Playlist.
6. Enter the playlist name, then tap Done.
7. To play back the playlist you created, tap My Playlists in the Library, select your playlist, then tap Play.
TroubleshootingIf you encounter a problem while using the Windows Media® Player Mobile, see the Troubleshooting Windows Media® Player Mobile page at the Microsoft web site : http://www.microsoft.com/windows/windowsmedia/player/windowsmobile/troubleshooting.aspx.
Experiencing Multimedia �1�
11.4 Using Audio ManagerAudio Manager is a music browser and player in one. It gives you access to all the music files on your device, and allows you to easily browse for the music that you want to play by organizing music into categories such as title, artist, album, and more. You can also create playlists of your favorite songs and use the integrated Music Player to play them back.
To launch Audio ManagerTap Start > Programs > Audio Manager.
Notes • Audio Manager searches for all music files stored on your device memory and memory card that have the following audio formats: MP�, WMA, AAC, and AAC+. It will search in the following locations:
Device: My Music (including all subfolders) \My Documents (including all subfolders) Memory card: \Storage Card (including all subfolders)
• Music files are categorized under Artists, Album, Genre, and more, if such metadata is found in the files.
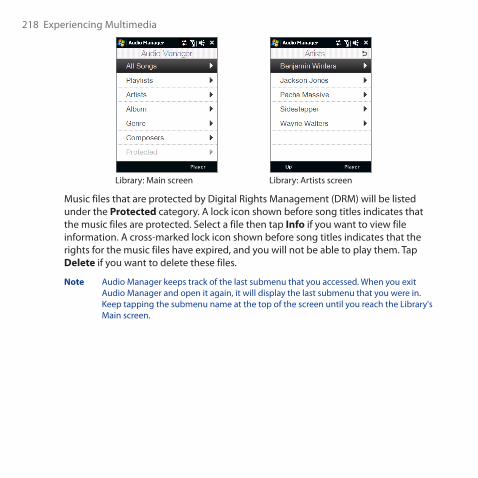
LibraryWhen you launch the Audio Manager, the Library screen opens and displays categories such as All Songs, Artists, Genre, and more. An arrow that appears to the right of a category indicates that it has submenus.
When you tap a category on the Library’s Main screen, you will see more submenus which may have deeper levels of menus. For example, when you tap Artists, another level of submenus will be listed showing artist names. When you tap an artist name, more submenus showing album names will be displayed. Just keep opening the submenus until you reach the level where song titles can be selected for playback.
�18 Experiencing Multimedia
Library: Main screen Library: Artists screen
Music files that are protected by Digital Rights Management (DRM) will be listed under the Protected category. A lock icon shown before song titles indicates that the music files are protected. Select a file then tap Info if you want to view file information. A cross-marked lock icon shown before song titles indicates that the rights for the music files have expired, and you will not be able to play them. Tap Delete if you want to delete these files.
Note Audio Manager keeps track of the last submenu that you accessed. When you exit Audio Manager and open it again, it will display the last submenu that you were in. Keep tapping the submenu name at the top of the screen until you reach the Library's Main screen.
Experiencing Multimedia �19
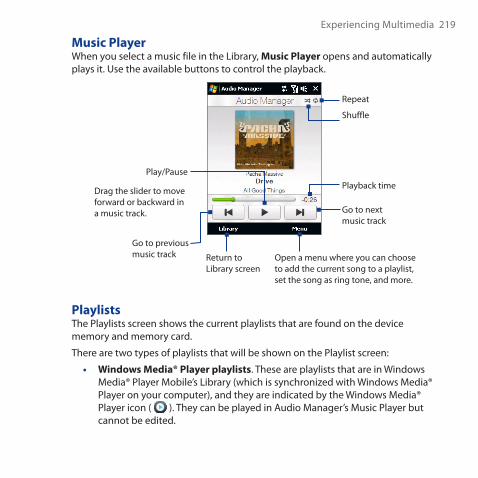
Music PlayerWhen you select a music file in the Library, Music Player opens and automatically plays it. Use the available buttons to control the playback.
Repeat
Shuffle
Playback timePlay/Pause
Go to previous music track Return to
Library screen
Go to next music track
Open a menu where you can choose to add the current song to a playlist, set the song as ring tone, and more.
Drag the slider to move forward or backward in a music track.
PlaylistsThe Playlists screen shows the current playlists that are found on the device memory and memory card.
There are two types of playlists that will be shown on the Playlist screen:
• Windows Media® Player playlists. These are playlists that are in Windows Media® Player Mobile’s Library (which is synchronized with Windows Media® Player on your computer), and they are indicated by the Windows Media® Player icon ( ). They can be played in Audio Manager’s Music Player but cannot be edited.
��0 Experiencing Multimedia
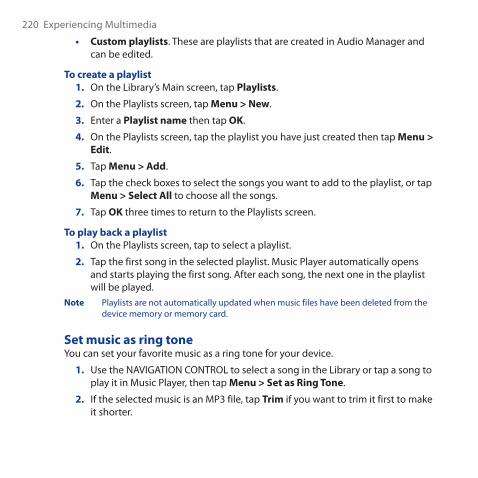
• Custom playlists. These are playlists that are created in Audio Manager and can be edited.
To create a playlist1. On the Library’s Main screen, tap Playlists.
2. On the Playlists screen, tap Menu > New.
3. Enter a Playlist name then tap OK.
4. On the Playlists screen, tap the playlist you have just created then tap Menu > Edit.
5. Tap Menu > Add.
6. Tap the check boxes to select the songs you want to add to the playlist, or tap Menu > Select All to choose all the songs.
7. Tap OK three times to return to the Playlists screen.
To play back a playlist1. On the Playlists screen, tap to select a playlist.
2. Tap the first song in the selected playlist. Music Player automatically opens and starts playing the first song. After each song, the next one in the playlist will be played.
Note Playlists are not automatically updated when music files have been deleted from the device memory or memory card.
Set music as ring toneYou can set your favorite music as a ring tone for your device.
1. Use the NAVIGATION CONTROL to select a song in the Library or tap a song to play it in Music Player, then tap Menu > Set as Ring Tone.
2. If the selected music is an MP� file, tap Trim if you want to trim it first to make it shorter.
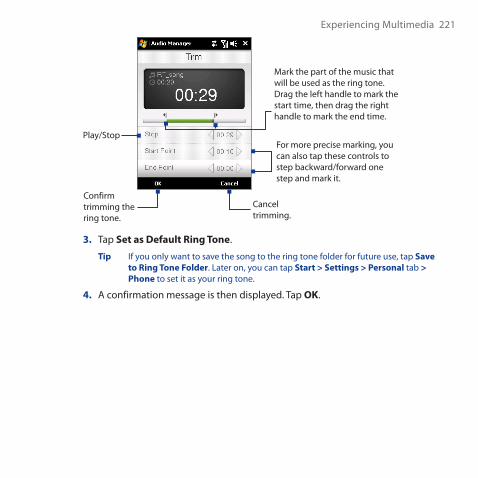
Experiencing Multimedia ��1
Play/Stop
Mark the part of the music that will be used as the ring tone. Drag the left handle to mark the start time, then drag the right handle to mark the end time.
For more precise marking, you can also tap these controls to step backward/forward one step and mark it.
Confirm trimming the ring tone.
Cancel trimming.
3. Tap Set as Default Ring Tone.
Tip If you only want to save the song to the ring tone folder for future use, tap Save to Ring Tone Folder. Later on, you can tap Start > Settings > Personal tab > Phone to set it as your ring tone.
4. A confirmation message is then displayed. Tap OK.
��� Experiencing Multimedia
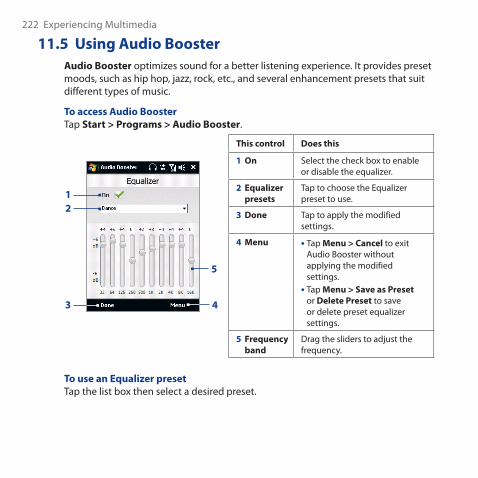
11.5 Using Audio BoosterAudio Booster optimizes sound for a better listening experience. It provides preset moods, such as hip hop, jazz, rock, etc., and several enhancement presets that suit different types of music.
To access Audio BoosterTap Start > Programs > Audio Booster.
5
43
This control Does this
1 On Select the check box to enable or disable the equalizer.
2 Equalizer presets
Tap to choose the Equalizer preset to use.
3 Done Tap to apply the modified settings.
4 Menu • Tap Menu > Cancel to exit Audio Booster without applying the modified settings.
• Tap Menu > Save as Preset or Delete Preset to save or delete preset equalizer settings.
5 Frequency band
Drag the sliders to adjust the frequency.
12
To use an Equalizer presetTap the list box then select a desired preset.
Experiencing Multimedia ���
To create a custom equalizer preset1. Adjust the frequency bands to your desired values by dragging the equalizer
controls. The selected values are indicated on top of the sliders.
2. Save your equalizer settings as a preset by tapping Menu > Save as Preset.
3. Enter a preset name and then tap Done. The preset you created will be added to the list box.
To delete a custom equalizer preset1. Tap the list box then select the Equalizer preset you want to delete.
2. Tap Menu > Delete Preset.
Note You can only delete custom equalizer presets. Equalizer presets that are pre-installed cannot be deleted.

��4 Experiencing Multimedia
Chapter 12 Programs
12.1 Accessing Programs on Your Device12.2 Adding and Removing Programs
12.3 Adobe® Reader® LE12.4 Calendar12.5 Contacts
12.6 Comm Manager12.7 Microsoft® Office Mobile
12.8 Notes12.9 Java
12.10 SIM Manager12.11 Spb GPRS Monitor (Available by Country)
12.12 Sprite Backup12.13 Tasks
12.14 Voice Recorder12.15 Voice Speed Dial
��� Programs
12.1 Accessing Programs on Your DeviceYou will find preinstalled programs in the Start menu and on the Programs screen of your device.
To launch and use a programDo one of the following:
Tap Start to open the Start menu and then tap a desired program.
To access more programs, tap Start > Programs, or slide to the Programs tab on the Home screen and then tap All Programs.
12.2 Adding and Removing ProgramsAdditional programs, such as the programs in the Application disc or other programs that you purchase, can be installed and uninstalled on your device. Your device does not allow you to uninstall most of the preinstalled programs.
Note Before you purchase additional programs for your device, make sure that they are compatible with your device.
To install a program1. Download the program to your computer (or insert the CD or disk that
contains the program into your computer).
You may see a single *.exe file, a *.zip file, a Setup.exe file, or several versions of files for different device types and processors. Be sure to select only the programs designed for your device.
2. Read any installation instructions or documentation that comes with the program. Many programs provide special installation instructions.
3. Connect your device to the computer.
4. Double-click the installation setup file.
•
•
Programs ���
To uninstall a program1. Tap Start > Settings > System tab > Remove Programs.
2. In the Programs in storage memory list, select the program you want to remove, then tap Remove.
12.3 Adobe® Reader® LEAdobe® Reader® LE is an application for viewing PDF (Portable Document Format) documents on your device. It supports a subset of the features found in the PC versions of Adobe Reader.
To open Adobe Reader LETap Start > Programs > Adobe Reader LE.
To open a PDF file on your device• Open a PDF file in Adobe Reader LE; or
• Open File Explorer, find the PDF file, then tap the file to open it.
To navigate through a PDF documentYou can use the controls in the program and finger gestures to navigate a PDF document.
• Tap Tools > View > Continuous and then slide your finger up or down the screen to scroll through the pages in the document.Tip You can also drag the scroll bars to scroll through the pages.
• Tap to zoom in or to zoom out. After zooming in, slide your finger on the screen to pan the current page.
• Press NAVIGATION up/down/right/left to move to the desired direction of the page.
• Tap to return to the previous page; tap to move to the next page. Tap to jump to the first page; tap to jump to the last page.
• Tap Tools > Go To > Page Number to enter a page number that you want to view.
��8 Programs
To search for text in the document1. Tap Tools > Find > Text or tap in the toolbar.
2. Type in the text to be searched, then tap Find.
The matched text in the document will be highlighted.
3. To view the next occurrence of the text, tap Tools > Find > Next.
Tips • Adobe Reader LE displays a bookmark pane for the PDF files that contain bookmarks. Tap the bookmarks to go to a specific section/page within the file.
• Adobe Reader LE supports password-protected PDF files with up to 1�8-bit encryption. When you open a password-protected PDF file, you will be prompted to enter the password before opening it.
12.4 CalendarUse Calendar to create appointments, including meetings and other events. You can also synchronize Calendar appointments between your device and computer.
To open the Calendar screenOn the TouchFLO Home screen, tap Calendar or a displayed appointment; or
Tap Start > Calendar.
Create appointmentsTo schedule an appointment
1. Open the Calendar screen and then tap Menu > New Appointment.
2. Enter a name for the appointment.
3. Do one of the following:
• If it is a special occasion such as a birthday or a whole-day event, set the All Day option to Yes.
• If there is a time frame for the appointment, set the start and end dates and times.
•
•
Programs ��9
4. Specify the type of category for your appointment, so that it can be grouped with other related appointments. Tap Categories, then select a preset category (Business, Holiday, Personal, or Seasonal), or tap New to create your own category.
5. When finished, tap OK to return to the calendar.
Notes • All-day events do not occupy blocks of time in Calendar; instead, they appear in banners at the top of the calendar.
• To remove an appointment, tap Menu > Delete Appointment.
Tip To have the time entered automatically in Day view, tap and drag to select a time slot for the new appointment, and tap Menu > New Appointment.
To set the reminder time for new appointmentsBy default, Calendar has been set to display a reminder alert when you have new upcoming appointments. You can change the reminder time.
1. Open the Calendar screen.
2. Tap Menu > Tools > Options > Appointments tab.
3. Make sure the Set reminders for new items check box is selected.
4. Set the time when you want the reminder to alert you.
5. Tap OK to return to the Calendar screen.
��0 Programs
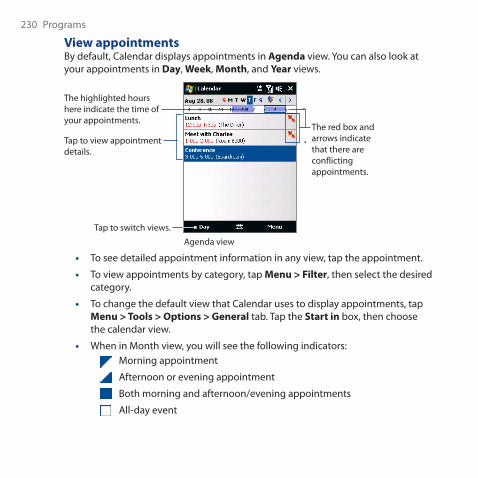
View appointmentsBy default, Calendar displays appointments in Agenda view. You can also look at your appointments in Day, Week, Month, and Year views.
The highlighted hours here indicate the time of your appointments.
Tap to view appointment details.
Agenda view
Tap to switch views.
The red box and arrows indicate that there are conflicting appointments.
• To see detailed appointment information in any view, tap the appointment.
• To view appointments by category, tap Menu > Filter, then select the desired category.
• To change the default view that Calendar uses to display appointments, tap Menu > Tools > Options > General tab. Tap the Start in box, then choose the calendar view.
• When in Month view, you will see the following indicators: Morning appointment
Afternoon or evening appointment
Both morning and afternoon/evening appointments
All-day event
Programs ��1
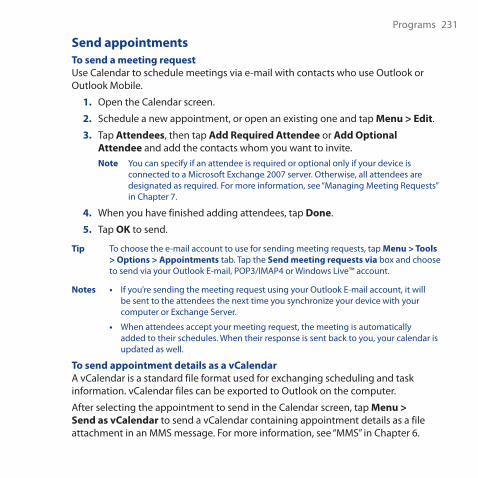
Send appointmentsTo send a meeting requestUse Calendar to schedule meetings via e-mail with contacts who use Outlook or Outlook Mobile.
1. Open the Calendar screen.
2. Schedule a new appointment, or open an existing one and tap Menu > Edit.
3. Tap Attendees, then tap Add Required Attendee or Add Optional Attendee and add the contacts whom you want to invite.Note You can specify if an attendee is required or optional only if your device is
connected to a Microsoft Exchange �00� server. Otherwise, all attendees are designated as required. For more information, see “Managing Meeting Requests” in Chapter �.
4. When you have finished adding attendees, tap Done.
5. Tap OK to send.
Tip To choose the e-mail account to use for sending meeting requests, tap Menu > Tools > Options > Appointments tab. Tap the Send meeting requests via box and choose to send via your Outlook E-mail, POP�/IMAP4 or Windows Live™ account.
Notes • If you’re sending the meeting request using your Outlook E-mail account, it will be sent to the attendees the next time you synchronize your device with your computer or Exchange Server.
• When attendees accept your meeting request, the meeting is automatically added to their schedules. When their response is sent back to you, your calendar is updated as well.
To send appointment details as a vCalendarA vCalendar is a standard file format used for exchanging scheduling and task information. vCalendar files can be exported to Outlook on the computer.
After selecting the appointment to send in the Calendar screen, tap Menu > Send as vCalendar to send a vCalendar containing appointment details as a file attachment in an MMS message. For more information, see “MMS” in Chapter �.
��� Programs
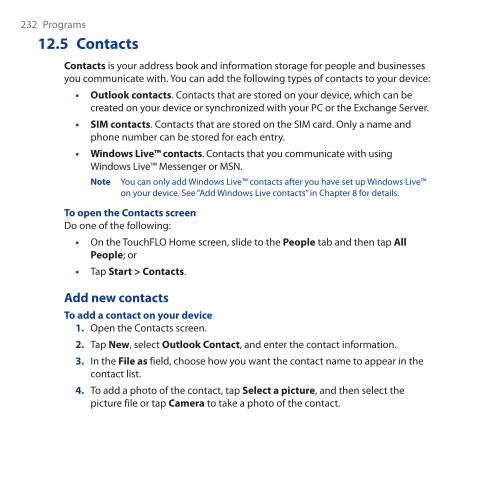
12.5 ContactsContacts is your address book and information storage for people and businesses you communicate with. You can add the following types of contacts to your device:
• Outlook contacts. Contacts that are stored on your device, which can be created on your device or synchronized with your PC or the Exchange Server.
• SIM contacts. Contacts that are stored on the SIM card. Only a name and phone number can be stored for each entry.
• Windows Live™ contacts. Contacts that you communicate with using Windows Live™ Messenger or MSN.Note You can only add Windows Live™ contacts after you have set up Windows Live™
on your device. See “Add Windows Live contacts” in Chapter 8 for details.
To open the Contacts screenDo one of the following:
On the TouchFLO Home screen, slide to the People tab and then tap All People; or
Tap Start > Contacts.
Add new contactsTo add a contact on your device
1. Open the Contacts screen.
2. Tap New, select Outlook Contact, and enter the contact information.
3. In the File as field, choose how you want the contact name to appear in the contact list.
4. To add a photo of the contact, tap Select a picture, and then select the picture file or tap Camera to take a photo of the contact.
•
•
Programs ���
5. To assign a ring tone to the contact, tap the Ring tone field, scroll through the list of tones, then select a desired tone.
6. When finished, tap OK.
Tips • If a person who is not in your list of contacts called you and you want to save that person’s phone number, tap and hold the phone number in the Call History and then tap Save to Contacts from the shortcut menu.
• To save a phone number that is contained in a message, open the message, tap the underlined phone number, and then tap Menu > Save to Contacts.
• To edit contact information, tap the contact name and then tap Menu > Edit.
To add a contact to your SIM card1. Open the Contacts screen.
2. Tap New, then select SIM Contact.
3. Enter a contact name and phone number.
4. Tap OK.
Tip You can also use the SIM Manager to add and edit contacts on your SIM card. For more information, see "SIM Manager" in this chapter.
Organize and search contactsTo group similar contactsFor easier management, you can group similar contacts by assigning them to categories.
1. Create a new Outlook contact or edit an existing Outlook contact.
2. Tap Categories.
3. Select a preset category such as Business or Personal, or tap New to create your own category.
4. When finished, tap OK.
��4 Programs
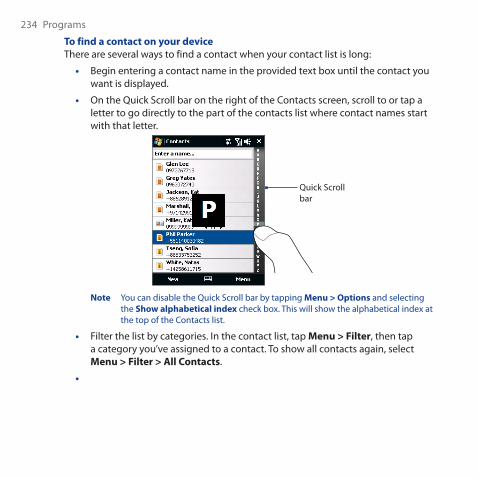
To find a contact on your deviceThere are several ways to find a contact when your contact list is long:
Begin entering a contact name in the provided text box until the contact you want is displayed.
On the Quick Scroll bar on the right of the Contacts screen, scroll to or tap a letter to go directly to the part of the contacts list where contact names start with that letter.
Quick Scroll bar
Note You can disable the Quick Scroll bar by tapping Menu > Options and selecting the Show alphabetical index check box. This will show the alphabetical index at the top of the Contacts list.
Filter the list by categories. In the contact list, tap Menu > Filter, then tap a category you’ve assigned to a contact. To show all contacts again, select Menu > Filter > All Contacts.
•
•
•
•
Programs ��5
Share contact informationTo beam a contact’s detailsYou can quickly send contact information to another mobile phone or device through Bluetooth beaming.
1. On the Contacts screen, select a contact.
2. Tap Menu > Send Contact > Beam, then select a device where to beam the contact to.
Note Before beaming, make sure Bluetooth is turned on and set to visible mode on your device and the target mobile device. You can also beam contact information to your computer. See Chapter 9 for details.
To send contact information via text messaging1. On the Contacts screen, select a contact.
2. Tap Menu > Send Contact > SMS \ MMS.
3. Select the contact information you want to send, then tap Done.
4. In the new text message, enter the mobile phone number of the recipient, then tap Send.
To send contact information as a vCardA vCard (virtual business card) is a standard file format used for exchanging contact information. vCard files can be exported to Outlook on the computer. From your device, you can send a vCard containing contact information as file attachment in an MMS message.
1. On the Contacts screen, select a contact.
2. Tap Menu > Send as vCard.
3. A new MMS message is created with the vCard file attached. Enter the mobile phone number or e-mail address of the recipient, then tap Send.
For more information, see “MMS” in Chapter �.
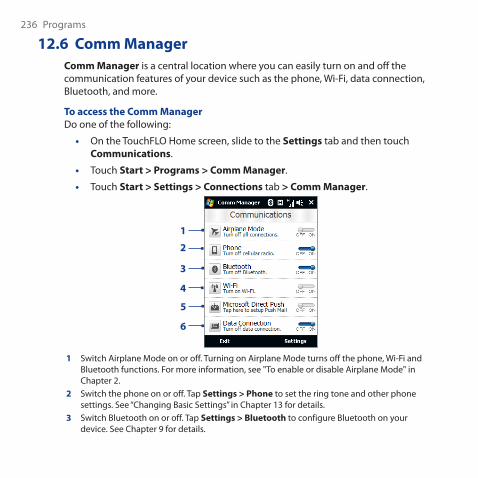
��� Programs
12.6 Comm ManagerComm Manager is a central location where you can easily turn on and off the communication features of your device such as the phone, Wi-Fi, data connection, Bluetooth, and more.
To access the Comm ManagerDo one of the following:
On the TouchFLO Home screen, slide to the Settings tab and then touch Communications.
Touch Start > Programs > Comm Manager.
Touch Start > Settings > Connections tab > Comm Manager.
1
3
2
4
5
6
1 Switch Airplane Mode on or off. Turning on Airplane Mode turns off the phone, Wi-Fi and Bluetooth functions. For more information, see "To enable or disable Airplane Mode" in Chapter �.
2 Switch the phone on or off. Tap Settings > Phone to set the ring tone and other phone settings. See “Changing Basic Settings” in Chapter 1� for details.
3 Switch Bluetooth on or off. Tap Settings > Bluetooth to configure Bluetooth on your device. See Chapter 9 for details.
•
•
•
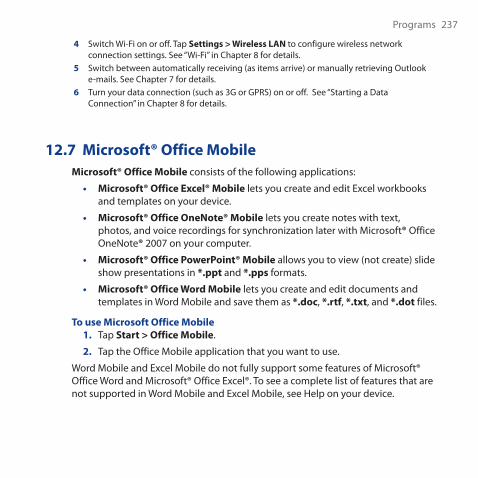
Programs ���
4 Switch Wi-Fi on or off. Tap Settings > Wireless LAN to configure wireless network connection settings. See “Wi-Fi” in Chapter 8 for details.
5 Switch between automatically receiving (as items arrive) or manually retrieving Outlook e-mails. See Chapter � for details.
6 Turn your data connection (such as �G or GPRS) on or off. See “Starting a Data Connection” in Chapter 8 for details.
12.7 Microsoft® Office MobileMicrosoft® Office Mobile consists of the following applications:
• Microsoft® Office Excel® Mobile lets you create and edit Excel workbooks and templates on your device.
• Microsoft® Office OneNote® Mobile lets you create notes with text, photos, and voice recordings for synchronization later with Microsoft® Office OneNote® �00� on your computer.
• Microsoft® Office PowerPoint® Mobile allows you to view (not create) slide show presentations in *.ppt and *.pps formats.
• Microsoft® Office Word Mobile lets you create and edit documents and templates in Word Mobile and save them as *.doc, *.rtf, *.txt, and *.dot files.
To use Microsoft Office Mobile1. Tap Start > Office Mobile.
2. Tap the Office Mobile application that you want to use.
Word Mobile and Excel Mobile do not fully support some features of Microsoft® Office Word and Microsoft® Office Excel®. To see a complete list of features that are not supported in Word Mobile and Excel Mobile, see Help on your device.
��8 ProgramsTips • By default, Word Mobile saves documents in .docx format, while Excel Mobile
saves workbooks in .xlsx format. If you want to open these types of files on a computer that uses Microsoft Office �000, Office XP, or Office �00�, you need to download and install the File Format Converter in your computer. You can find this converter at http://www.microsoft.com/downloads/details.aspx?FamilyId=941B�4�0-�AE9-4AEE-8F4�-C�BB�4CD14��&displaylang=en.
• If you want Word Mobile to save documents in .doc format, tap Menu > Tools > Options (or Menu > Options when no document is opened), then change the Default template to Word 97-2003 Document (.doc).
• If you want Excel Mobile to save workbooks in a format that is compatible with Microsoft Office �000, Office XP, or Office �00�, tap Menu > Options (with no workbook opened), then change the Template for new workbook to Blank 97-2003 Workbook.
12.8 NotesUsing Notes, you can create handwritten and typed notes, record voice notes, convert handwritten notes to text for easy readability, and more.
To create a note1. Tap Start > Programs > Notes. In the note list, tap New.
2. Choose an input method and then enter your text.Tip For more information about input methods and entering text, see Chapter 4.
3. When finished, tap OK to save and return to the note list.
Notes • To select handwritten text, tap and hold next to the writing. As soon as dots appear, and before they form a complete circle, quickly drag across the writing.
• If a letter crosses three ruled lines, it is treated as a drawing rather than text.
To draw in a note1. Create or open a note file.
2. Use the stylus to draw on the screen. A selection box then appears around your drawing.
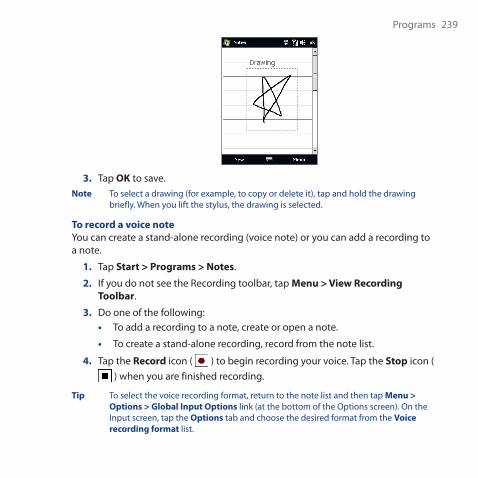
Programs ��9
3. Tap OK to save.Note To select a drawing (for example, to copy or delete it), tap and hold the drawing
briefly. When you lift the stylus, the drawing is selected.
To record a voice noteYou can create a stand-alone recording (voice note) or you can add a recording to a note.
1. Tap Start > Programs > Notes.
2. If you do not see the Recording toolbar, tap Menu > View Recording Toolbar.
3. Do one of the following:• To add a recording to a note, create or open a note.
• To create a stand-alone recording, record from the note list.
4. Tap the Record icon ( ) to begin recording your voice. Tap the Stop icon ( ) when you are finished recording.
Tip To select the voice recording format, return to the note list and then tap Menu > Options > Global Input Options link (at the bottom of the Options screen). On the Input screen, tap the Options tab and choose the desired format from the Voice recording format list.
�40 Programs
12.9 JavaMIDlets are Java applications such as games and tools that can run on mobile devices, while a MIDlet suite is a collection of one or more MIDlets. The Java program lets you download, install and manage MIDlets or MIDlet suites on your device. Your device supports Java � Micro Edition, J�ME.
To open the Java programTap Start > Programs > Java.
Install and launch MIDlets/MIDlet suitesThere are several ways to install a MIDlet/MIDlet suite.
To download and install via Internet Explorer Mobile1. Tap Menu > Install > Browser to open Internet Explorer Mobile.
2. Locate the MIDlet/MIDlet suite while connected to the Internet.
3. Select the MIDlet/MIDlet suite to download.
4. Information about the MIDlet/MIDlet suite is then displayed. Tap Continue.
5. Confirm to start downloading.
6. Select <root> or a folder where to install the MIDlet suite to, then tap OK.
To install from your deviceYou can copy MIDlets/MIDlet suites from the computer to your device using the USB sync cable or Bluetooth connection. Copy them to the root folder or any subfolder on your device.
1. Tap Menu > Install > Local Files. The program then searches for MIDlets/MIDlet suites on your device and displays them in a list.
2. From the list, tap the MIDlet/MIDlet suite that you want to install.
3. Confirm to start the installation.
4. Select <root> or a folder where to install the MIDlet suite to, then tap OK.
Programs �41
To run a MIDlet/MIDlet suiteDo one of the following:
• After installation of the MIDlet/MIDlet suite is complete, tap Yes.
• On the Java screen, open the folder that contains the MIDlet/MIDlet suite. Select the MIDlet/MIDlet suite, then tap Launch.
Manage MIDlets/MIDlet suitesYou can organize MIDlets/MIDlet suites into folders for easy identification, renaming, updating, and more. If the device memory is full, uninstall some MIDlets/MIDlet suites to free up memory space.
To create folders1. On the Java screen, tap Menu > New Folder.
2. Enter a folder name, then tap Create.
To update a MIDlet/MIDlet suiteTap and hold a MIDlet/MIDlet suite, then tap Update. Alternatively, you can tap Menu > Actions > Update.
Java will search for updates for the selected MIDlet/MIDlet suite where it was installed from before.
To uninstall MIDletsBefore you uninstall a MIDlet, make sure that it is not running.
1. Tap and hold the MIDlet, then tap Uninstall.
2. Tap OK to confirm.
Note To uninstall all MIDlets and folders from the current folder, tap Menu > Uninstall All.
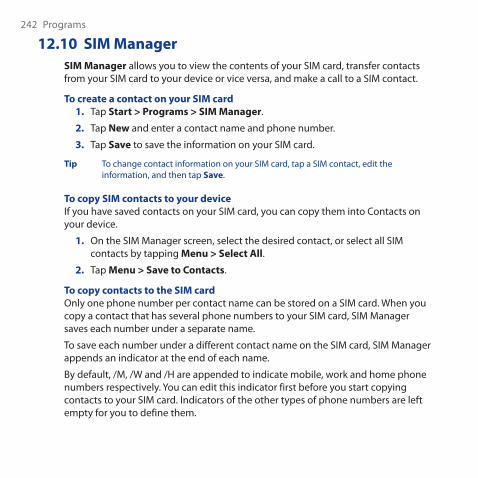
�4� Programs
12.10 SIM ManagerSIM Manager allows you to view the contents of your SIM card, transfer contacts from your SIM card to your device or vice versa, and make a call to a SIM contact.
To create a contact on your SIM card1. Tap Start > Programs > SIM Manager.
2. Tap New and enter a contact name and phone number.
3. Tap Save to save the information on your SIM card.
Tip To change contact information on your SIM card, tap a SIM contact, edit the information, and then tap Save.
To copy SIM contacts to your deviceIf you have saved contacts on your SIM card, you can copy them into Contacts on your device.
1. On the SIM Manager screen, select the desired contact, or select all SIM contacts by tapping Menu > Select All.
2. Tap Menu > Save to Contacts.
To copy contacts to the SIM cardOnly one phone number per contact name can be stored on a SIM card. When you copy a contact that has several phone numbers to your SIM card, SIM Manager saves each number under a separate name.
To save each number under a different contact name on the SIM card, SIM Manager appends an indicator at the end of each name.
By default, /M, /W and /H are appended to indicate mobile, work and home phone numbers respectively. You can edit this indicator first before you start copying contacts to your SIM card. Indicators of the other types of phone numbers are left empty for you to define them.
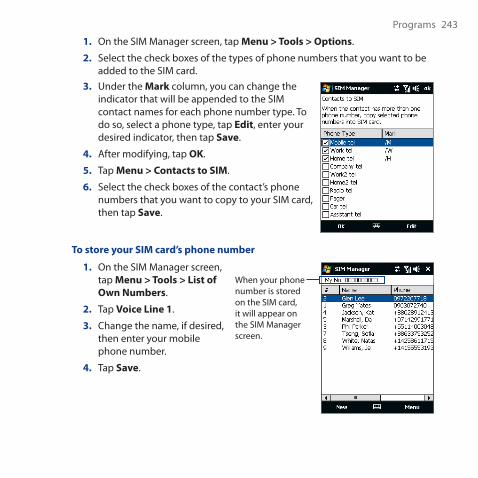
Programs �4�
1. On the SIM Manager screen, tap Menu > Tools > Options.
2. Select the check boxes of the types of phone numbers that you want to be added to the SIM card.
3. Under the Mark column, you can change the indicator that will be appended to the SIM contact names for each phone number type. To do so, select a phone type, tap Edit, enter your desired indicator, then tap Save.
4. After modifying, tap OK.
5. Tap Menu > Contacts to SIM.
6. Select the check boxes of the contact’s phone numbers that you want to copy to your SIM card, then tap Save.
To store your SIM card’s phone number
1. On the SIM Manager screen, tap Menu > Tools > List of Own Numbers.
2. Tap Voice Line 1.
3. Change the name, if desired, then enter your mobile phone number.
4. Tap Save.
When your phone number is stored on the SIM card, it will appear on the SIM Manager screen.
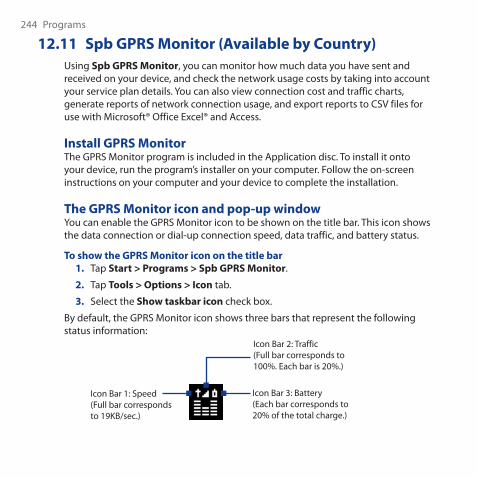
�44 Programs
12.11 Spb GPRS Monitor (Available by Country)Using Spb GPRS Monitor, you can monitor how much data you have sent and received on your device, and check the network usage costs by taking into account your service plan details. You can also view connection cost and traffic charts, generate reports of network connection usage, and export reports to CSV files for use with Microsoft® Office Excel® and Access.
Install GPRS MonitorThe GPRS Monitor program is included in the Application disc. To install it onto your device, run the program’s installer on your computer. Follow the on-screen instructions on your computer and your device to complete the installation.
The GPRS Monitor icon and pop-up windowYou can enable the GPRS Monitor icon to be shown on the title bar. This icon shows the data connection or dial-up connection speed, data traffic, and battery status.
To show the GPRS Monitor icon on the title bar1. Tap Start > Programs > Spb GPRS Monitor.
2. Tap Tools > Options > Icon tab.
3. Select the Show taskbar icon check box.
By default, the GPRS Monitor icon shows three bars that represent the following status information:
Icon Bar �: Traffic(Full bar corresponds to 100%. Each bar is �0%.)
Icon Bar �: Battery(Each bar corresponds to �0% of the total charge.)
Icon Bar 1: Speed(Full bar corresponds to 19KB/sec.)
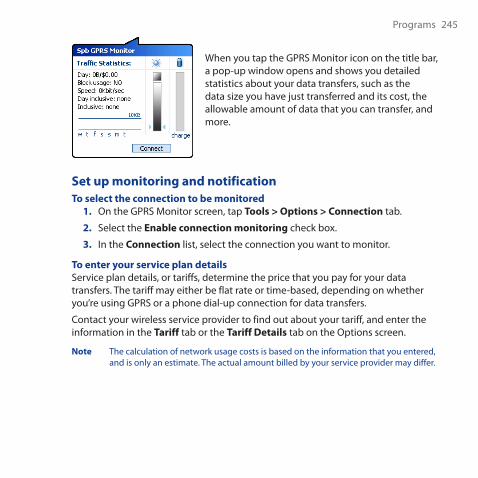
Programs �45
When you tap the GPRS Monitor icon on the title bar, a pop-up window opens and shows you detailed statistics about your data transfers, such as the data size you have just transferred and its cost, the allowable amount of data that you can transfer, and more.
Set up monitoring and notificationTo select the connection to be monitored
1. On the GPRS Monitor screen, tap Tools > Options > Connection tab.
2. Select the Enable connection monitoring check box.
3. In the Connection list, select the connection you want to monitor.
To enter your service plan detailsService plan details, or tariffs, determine the price that you pay for your data transfers. The tariff may either be flat rate or time-based, depending on whether you’re using GPRS or a phone dial-up connection for data transfers.
Contact your wireless service provider to find out about your tariff, and enter the information in the Tariff tab or the Tariff Details tab on the Options screen.
Note The calculation of network usage costs is based on the information that you entered, and is only an estimate. The actual amount billed by your service provider may differ.
�4� Programs
To set up traffic limit notificationsYou can set up traffic limit notifications if you want to be notified when a traffic limit is reached.
1. On the GPRS Monitor screen, tap Tools > Options.
2. Enable the notifications on the Day Warn and Month Warn tabs. You can specify up to three daily and three monthly limits.
Once traffic reaches one of these limits, you will receive a notification.
View charts and reportsOn the GPRS Monitor, you can view network connection cost charts and traffic charts, as well as generate detailed reports of network connection usage during a given period of time. These reports can be exported to CSV files that you can open using Excel, Access, or other similar spreadsheet and database software applications.
To view charts and generate reportsOn the GPRS Monitor screen:
• Tap the Chart tab to view the network connection cost charts and traffic charts.
• Tap the Report tab to generate reports on network traffic and tariff.
For more information about using Spb GPRS Monitor, see Help on your device.
Programs �4�
12.12 Sprite BackupUse Sprite Backup to back up data, which includes settings, files, contacts, and all other information, to the device memory, storage card or a computer.
Note If you are sending your device for repair or performing a hard reset, data from your device will be lost. It is recommended that you use Sprite Backup to back up your files including settings, contacts and other information to your computer or a storage card.
To install Sprite Backup1. Make sure your device is connected to your computer via a USB cable.
2. Insert the Application disc on your computer’s disc drive and start the Sprite Backup installation.
3. Follow the on-screen instructions to install the Sprite Backup PC Manager to your computer and the Sprite Backup program onto your device.
To open Sprite BackupOn your device, tap Start > Programs > Sprite Backup.
Before you start to back up or restore files, please check the following:
Make sure that the device storage memory has at least 15MB of free space. To check, tap Start > Settings > System tab > Memory > Main tab.
If you have a storage card installed, make sure that it has at least 100MB of free space. To check, tap Start > Settings > System tab > Memory > Storage Card tab.
To back up data1. To back up data remotely to a computer, enable the PC backup feature first.
See “To enable remote backup to a computer” for instructions.
2. On the Sprite Backup main screen, tap Backup.
3. On the Backup Data Selection screen, you will see a tree view of the data and files on your device. Tap “+” on the left of an item to view its sub-items.
•
•
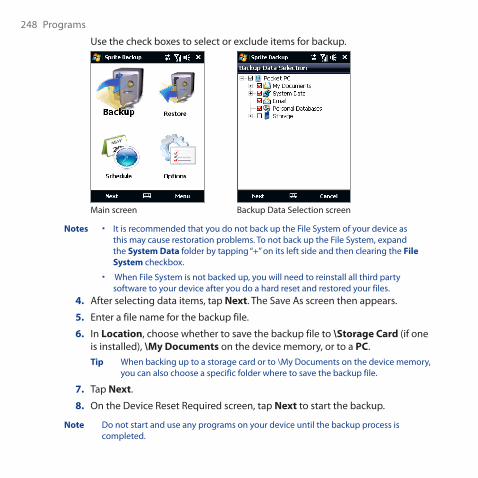
�48 Programs
Use the check boxes to select or exclude items for backup.
Main screen Backup Data Selection screen
Notes It is recommended that you do not back up the File System of your device as this may cause restoration problems. To not back up the File System, expand the System Data folder by tapping “+” on its left side and then clearing the File System checkbox.
When File System is not backed up, you will need to reinstall all third party software to your device after you do a hard reset and restored your files.
4. After selecting data items, tap Next. The Save As screen then appears.
5. Enter a file name for the backup file.
6. In Location, choose whether to save the backup file to \Storage Card (if one is installed), \My Documents on the device memory, or to a PC.Tip When backing up to a storage card or to \My Documents on the device memory,
you can also choose a specific folder where to save the backup file.
7. Tap Next.
8. On the Device Reset Required screen, tap Next to start the backup.
Note Do not start and use any programs on your device until the backup process is completed.

Programs �49
To restore data1. On the Sprite Backup main screen, tap Restore. Sprite Backup then searches
for all available backup files from the device memory and storage card and then displays them on the Open File screen.Tip To search for backup files created on your computer, connect your device to
your computer and run Sprite Backup PC Manager on your computer. In Sprite Backup’s Open File screen on your device, set Location to PC.
2. Select the backup file you want to restore and then tap Next.
3. In the tree view, select the items you want to be restored to your device and then tap Next.Note If your phone has SIM PIN lock enabled, a screen will appear asking you to set up
Sprite Backup SIM Unlock feature. It is recommended that you set up this feature to avoid file restoration errors. To set up, tap Setup Phone SIM Lock.
4. On the Device Reset Required screen, tap Next to begin restoring data.
Note Sprite Backup soft resets your device first before it begins the backup or restoration process. It soft resets again after the operation is completed.
To enable remote backup to a computer1. On the Sprite Backup main screen, tap Options > Networking > PC.
2. Select the Enable PC Backup check box and choose whether to do the remote backup to your computer via ActiveSync or network.
For more information about using Sprite Backup, see the Sprite Backup Help or download the Sprite Backup User Manual from http://www.spritesoftware.com/.
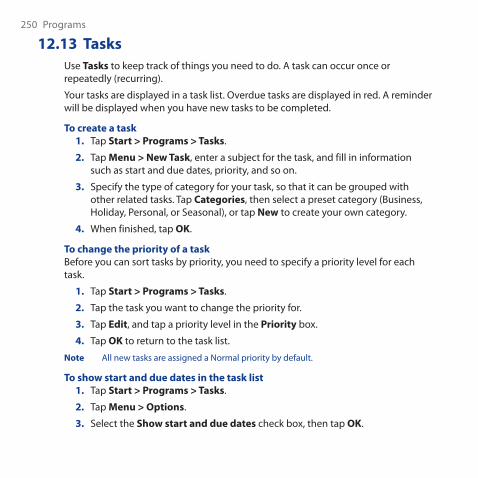
�50 Programs
12.13 TasksUse Tasks to keep track of things you need to do. A task can occur once or repeatedly (recurring).
Your tasks are displayed in a task list. Overdue tasks are displayed in red. A reminder will be displayed when you have new tasks to be completed.
To create a task1. Tap Start > Programs > Tasks.
2. Tap Menu > New Task, enter a subject for the task, and fill in information such as start and due dates, priority, and so on.
3. Specify the type of category for your task, so that it can be grouped with other related tasks. Tap Categories, then select a preset category (Business, Holiday, Personal, or Seasonal), or tap New to create your own category.
4. When finished, tap OK.
To change the priority of a taskBefore you can sort tasks by priority, you need to specify a priority level for each task.
1. Tap Start > Programs > Tasks.
2. Tap the task you want to change the priority for.
3. Tap Edit, and tap a priority level in the Priority box.
4. Tap OK to return to the task list.
Note All new tasks are assigned a Normal priority by default.
To show start and due dates in the task list1. Tap Start > Programs > Tasks.
2. Tap Menu > Options.
3. Select the Show start and due dates check box, then tap OK.
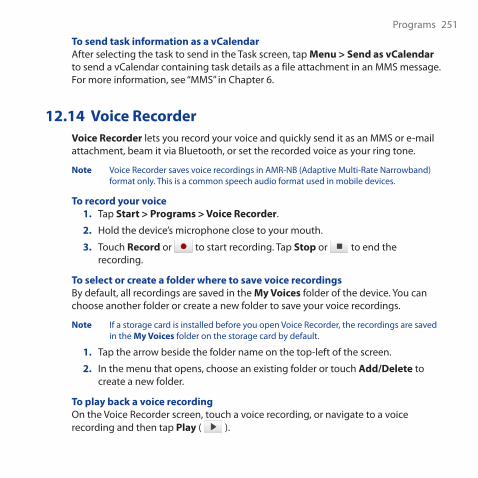
Programs �51
To send task information as a vCalendarAfter selecting the task to send in the Task screen, tap Menu > Send as vCalendar to send a vCalendar containing task details as a file attachment in an MMS message. For more information, see “MMS” in Chapter �.
12.14 Voice RecorderVoice Recorder lets you record your voice and quickly send it as an MMS or e-mail attachment, beam it via Bluetooth, or set the recorded voice as your ring tone.
Note Voice Recorder saves voice recordings in AMR-NB (Adaptive Multi-Rate Narrowband) format only. This is a common speech audio format used in mobile devices.
To record your voice1. Tap Start > Programs > Voice Recorder.
2. Hold the device’s microphone close to your mouth.
3. Touch Record or to start recording. Tap Stop or to end the recording.
To select or create a folder where to save voice recordingsBy default, all recordings are saved in the My Voices folder of the device. You can choose another folder or create a new folder to save your voice recordings.
Note If a storage card is installed before you open Voice Recorder, the recordings are saved in the My Voices folder on the storage card by default.
1. Tap the arrow beside the folder name on the top-left of the screen.
2. In the menu that opens, choose an existing folder or touch Add/Delete to create a new folder.
To play back a voice recordingOn the Voice Recorder screen, touch a voice recording, or navigate to a voice recording and then tap Play ( ).

�5� Programs
Tip If you need to adjust the sound volume, touch any of the status icons on the title bar and then touch the Volume icon ( ) to open the System Volume screen where you can adjust the volume.
To send a voice recording through MMSSelect a voice recording, then tap Menu > Send via MMS. A new MMS message is then created with the voice recording automatically inserted as an audio clip.
See “MMS” in Chapter � to learn how to compose and send MMS messages.
To send a voice recording via e-mailSelect a voice recording, tap Menu > Send, and then select an e-mail account. This creates a new e-mail message with the voice recording inserted as a file attachment.
See “Using E-mail” in Chapter � to learn how to send e-mails.
To beam a voice recording via Bluetooth1. Select the voice recording you want to beam, then tap Menu > Beam File.
Tip To select multiple recordings, tap and drag over the desired recordings or tap Menu > Select All.
2. Tap the device you want to send the voice recording to.3. On the other device, accept the file transfer to receive the file.
To set a voice recording as ring toneSelect the voice recording, then tap Menu > Set as Ringtone.
To rename or move a recording1. Select the voice recording, then tap Menu > Rename/Move.
Tip To select multiple recordings, tap and drag over the desired recordings or tap Menu > Select All. Note that you can move multiple files, but you cannot rename multiple files simultaneously.
2. In Name, enter the new voice recording name.3. To move the voice recording, select the new destination Folder and
Location. Tap OK.
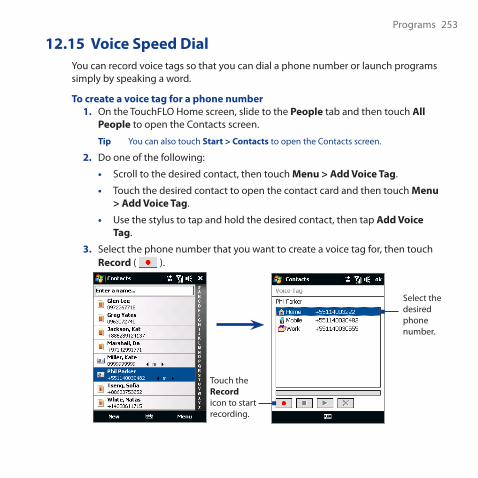
Programs �5�
12.15 Voice Speed DialYou can record voice tags so that you can dial a phone number or launch programs simply by speaking a word.
To create a voice tag for a phone number1. On the TouchFLO Home screen, slide to the People tab and then touch All
People to open the Contacts screen.
Tip You can also touch Start > Contacts to open the Contacts screen.
2. Do one of the following:
• Scroll to the desired contact, then touch Menu > Add Voice Tag.
• Touch the desired contact to open the contact card and then touch Menu > Add Voice Tag.
• Use the stylus to tap and hold the desired contact, then tap Add Voice Tag.
3. Select the phone number that you want to create a voice tag for, then touch Record ( ).
Select the desired phone number.
Touch the Record icon to start recording.
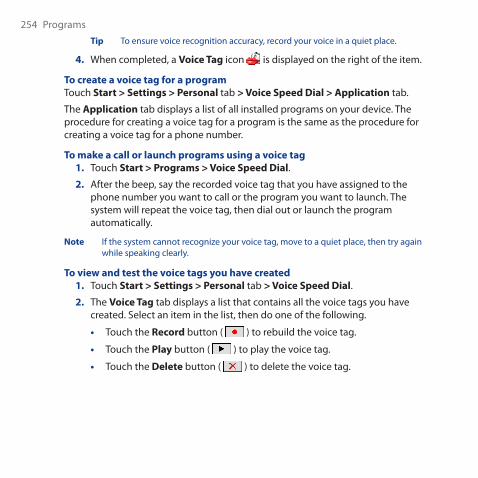
�54 ProgramsTip To ensure voice recognition accuracy, record your voice in a quiet place.
4. When completed, a Voice Tag icon is displayed on the right of the item.
To create a voice tag for a programTouch Start > Settings > Personal tab > Voice Speed Dial > Application tab.
The Application tab displays a list of all installed programs on your device. The procedure for creating a voice tag for a program is the same as the procedure for creating a voice tag for a phone number.
To make a call or launch programs using a voice tag1. Touch Start > Programs > Voice Speed Dial.
2. After the beep, say the recorded voice tag that you have assigned to the phone number you want to call or the program you want to launch. The system will repeat the voice tag, then dial out or launch the program automatically.
Note If the system cannot recognize your voice tag, move to a quiet place, then try again while speaking clearly.
To view and test the voice tags you have created1. Touch Start > Settings > Personal tab > Voice Speed Dial.
2. The Voice Tag tab displays a list that contains all the voice tags you have created. Select an item in the list, then do one of the following.
• Touch the Record button ( ) to rebuild the voice tag.
• Touch the Play button ( ) to play the voice tag.
• Touch the Delete button ( ) to delete the voice tag.
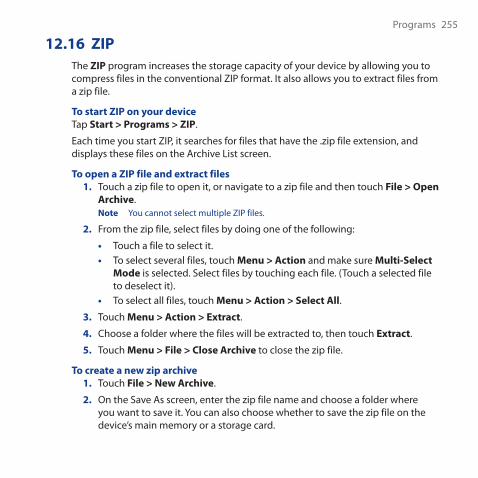
Programs �55
12.16 ZIPThe ZIP program increases the storage capacity of your device by allowing you to compress files in the conventional ZIP format. It also allows you to extract files from a zip file.
To start ZIP on your deviceTap Start > Programs > ZIP.
Each time you start ZIP, it searches for files that have the .zip file extension, and displays these files on the Archive List screen.
To open a ZIP file and extract files1. Touch a zip file to open it, or navigate to a zip file and then touch File > Open
Archive.Note You cannot select multiple ZIP files.
2. From the zip file, select files by doing one of the following:
• Touch a file to select it.• To select several files, touch Menu > Action and make sure Multi-Select
Mode is selected. Select files by touching each file. (Touch a selected file to deselect it).
• To select all files, touch Menu > Action > Select All.
3. Touch Menu > Action > Extract.
4. Choose a folder where the files will be extracted to, then touch Extract.
5. Touch Menu > File > Close Archive to close the zip file.
To create a new zip archive1. Touch File > New Archive.
2. On the Save As screen, enter the zip file name and choose a folder where you want to save it. You can also choose whether to save the zip file on the device’s main memory or a storage card.
�5� Programs
3. Touch Save.
4. Touch Menu > Action > Add.
5. Navigate to the folder that contains the files you want to archive.
6. Select files to add by doing one of the following:• Touch a file to select it.• To select several consecutive files, drag over the files.• To select several non-contiguous files, use the stylus to tap and hold on
the screen and then select Multi-Select Mode. Select files by tapping each file. (Tap a selected file to deselect it).
• To select all files, use the stylus to tap and hold on the screen and then tap Select All.
7. Touch Add.
8. Touch Menu > File > Close Archive to save and close the zip file.

Chapter 13 Managing Your Device
13.1 Copying and Managing Files13.2 Settings on your Device
13.3 Changing Basic Settings13.4 Using Connection Setup
13.5 Using Task Manager13.6 Protecting Your Device
13.7 Managing Memory13.8 Resetting Your Device
13.9 Windows Update13.10 Battery Saving Tips
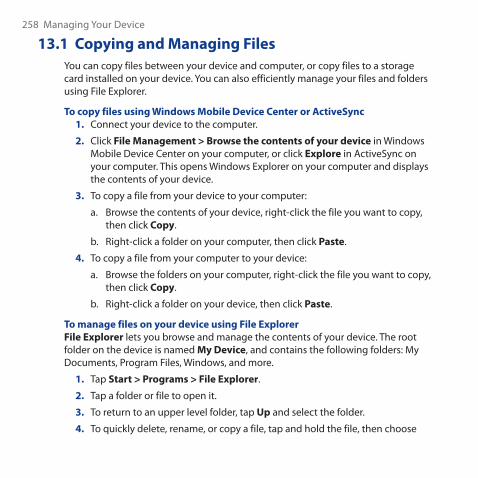
�58 Managing Your Device
13.1 Copying and Managing FilesYou can copy files between your device and computer, or copy files to a storage card installed on your device. You can also efficiently manage your files and folders using File Explorer.
To copy files using Windows Mobile Device Center or ActiveSync1. Connect your device to the computer.
2. Click File Management > Browse the contents of your device in Windows Mobile Device Center on your computer, or click Explore in ActiveSync on your computer. This opens Windows Explorer on your computer and displays the contents of your device.
3. To copy a file from your device to your computer:
a. Browse the contents of your device, right-click the file you want to copy, then click Copy.
b. Right-click a folder on your computer, then click Paste.
4. To copy a file from your computer to your device:
a. Browse the folders on your computer, right-click the file you want to copy, then click Copy.
b. Right-click a folder on your device, then click Paste.
To manage files on your device using File ExplorerFile Explorer lets you browse and manage the contents of your device. The root folder on the device is named My Device, and contains the following folders: My Documents, Program Files, Windows, and more.
1. Tap Start > Programs > File Explorer.
2. Tap a folder or file to open it.
3. To return to an upper level folder, tap Up and select the folder.
4. To quickly delete, rename, or copy a file, tap and hold the file, then choose
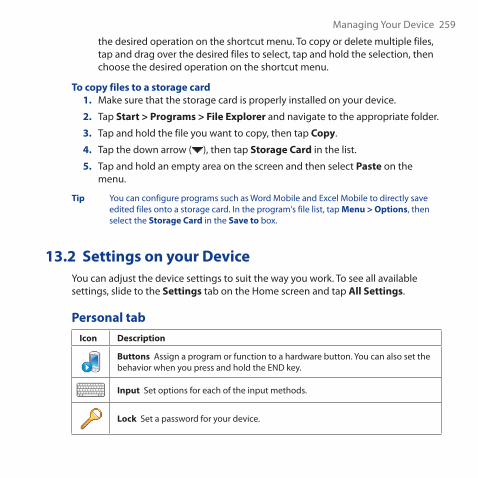
Managing Your Device �59
the desired operation on the shortcut menu. To copy or delete multiple files, tap and drag over the desired files to select, tap and hold the selection, then choose the desired operation on the shortcut menu.
To copy files to a storage card1. Make sure that the storage card is properly installed on your device.
2. Tap Start > Programs > File Explorer and navigate to the appropriate folder.
3. Tap and hold the file you want to copy, then tap Copy.
4. Tap the down arrow ( ), then tap Storage Card in the list.
5. Tap and hold an empty area on the screen and then select Paste on the menu.
Tip You can configure programs such as Word Mobile and Excel Mobile to directly save edited files onto a storage card. In the program's file list, tap Menu > Options, then select the Storage Card in the Save to box.
13.2 Settings on your DeviceYou can adjust the device settings to suit the way you work. To see all available settings, slide to the Settings tab on the Home screen and tap All Settings.
Personal tabIcon Description
Buttons Assign a program or function to a hardware button. You can also set the behavior when you press and hold the END key.
Input Set options for each of the input methods.
Lock Set a password for your device.
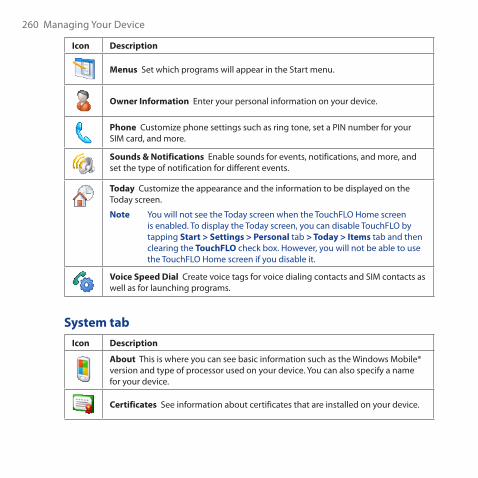
��0 Managing Your Device
Icon Description
Menus Set which programs will appear in the Start menu.
Owner Information Enter your personal information on your device.
Phone Customize phone settings such as ring tone, set a PIN number for your SIM card, and more.
Sounds & Notifications Enable sounds for events, notifications, and more, and set the type of notification for different events.
Today Customize the appearance and the information to be displayed on the Today screen.
Note You will not see the Today screen when the TouchFLO Home screen is enabled. To display the Today screen, you can disable TouchFLO by tapping Start > Settings > Personal tab > Today > Items tab and then clearing the TouchFLO check box. However, you will not be able to use the TouchFLO Home screen if you disable it.
Voice Speed Dial Create voice tags for voice dialing contacts and SIM contacts as well as for launching programs.
System tabIcon Description
About This is where you can see basic information such as the Windows Mobile® version and type of processor used on your device. You can also specify a name for your device.
Certificates See information about certificates that are installed on your device.
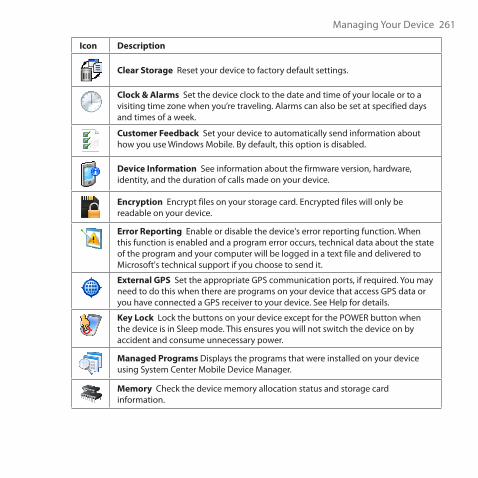
Managing Your Device ��1
Icon Description
Clear Storage Reset your device to factory default settings.
Clock & Alarms Set the device clock to the date and time of your locale or to a visiting time zone when you’re traveling. Alarms can also be set at specified days and times of a week.
Customer Feedback Set your device to automatically send information about how you use Windows Mobile. By default, this option is disabled.
Device Information See information about the firmware version, hardware, identity, and the duration of calls made on your device.
Encryption Encrypt files on your storage card. Encrypted files will only be readable on your device.
Error Reporting Enable or disable the device's error reporting function. When this function is enabled and a program error occurs, technical data about the state of the program and your computer will be logged in a text file and delivered to Microsoft's technical support if you choose to send it.
External GPS Set the appropriate GPS communication ports, if required. You may need to do this when there are programs on your device that access GPS data or you have connected a GPS receiver to your device. See Help for details.
Key Lock Lock the buttons on your device except for the POWER button when the device is in Sleep mode. This ensures you will not switch the device on by accident and consume unnecessary power.
Managed Programs Displays the programs that were installed on your device using System Center Mobile Device Manager.
Memory Check the device memory allocation status and storage card information.

��� Managing Your Device
Icon Description
Microphone AGC Adjust the volume of your voice automatically when you are recording.
Power Check the remaining battery power. You can also set the brightness of the backlight and timeout for turning off the display (switching device to Sleep mode) to conserve battery power.
Regional Settings Set the regional configuration to use, including the format for displaying numbers, currency, date, and time on your device.
Remove Programs Remove programs that you installed on your device.
Screen Recalibrate the screen, apply ClearType, and change the screen text size.
Task Manager Stop running programs and set the ( ) button to end programs immediately when you tap the button. For more information, see "Using Task Manager" in this chapter.
TouchFLO You can enable or mute the finger scrolling and panning sound. You can also enable or disable the large Start menu, and choose to show or hide the System Status screen when title bar icons are tapped.
Windows Update Link to Microsoft's web site and update Windows Mobile® on your device with the latest security patches or fixes, if they are available.
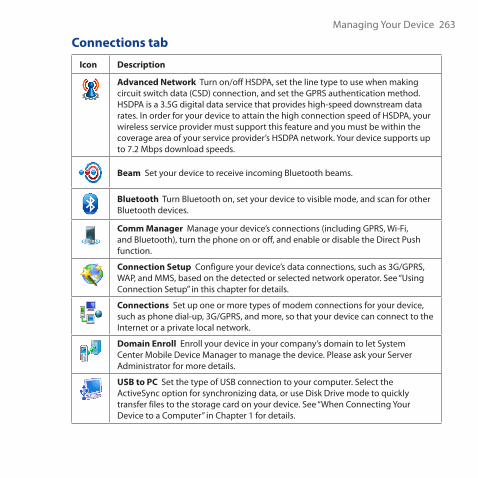
Managing Your Device ���
Connections tab
Icon Description
Advanced Network Turn on/off HSDPA, set the line type to use when making circuit switch data (CSD) connection, and set the GPRS authentication method. HSDPA is a �.5G digital data service that provides high-speed downstream data rates. In order for your device to attain the high connection speed of HSDPA, your wireless service provider must support this feature and you must be within the coverage area of your service provider’s HSDPA network. Your device supports up to �.� Mbps download speeds.
Beam Set your device to receive incoming Bluetooth beams.
Bluetooth Turn Bluetooth on, set your device to visible mode, and scan for other Bluetooth devices.
Comm Manager Manage your device’s connections (including GPRS, Wi-Fi, and Bluetooth), turn the phone on or off, and enable or disable the Direct Push function.
Connection Setup Configure your device’s data connections, such as �G/GPRS, WAP, and MMS, based on the detected or selected network operator. See “Using Connection Setup” in this chapter for details.
Connections Set up one or more types of modem connections for your device, such as phone dial-up, �G/GPRS, and more, so that your device can connect to the Internet or a private local network.
Domain Enroll Enroll your device in your company’s domain to let System Center Mobile Device Manager to manage the device. Please ask your Server Administrator for more details.
USB to PC Set the type of USB connection to your computer. Select the ActiveSync option for synchronizing data, or use Disk Drive mode to quickly transfer files to the storage card on your device. See “When Connecting Your Device to a Computer” in Chapter 1 for details.
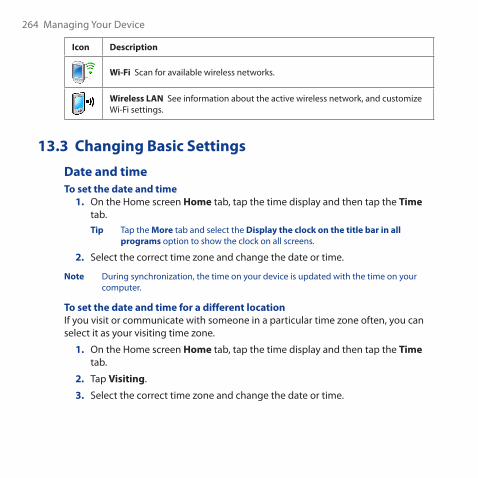
��4 Managing Your Device
Icon Description
Wi-Fi Scan for available wireless networks.
Wireless LAN See information about the active wireless network, and customize Wi-Fi settings.
13.3 Changing Basic Settings
Date and timeTo set the date and time
1. On the Home screen Home tab, tap the time display and then tap the Time tab.Tip Tap the More tab and select the Display the clock on the title bar in all
programs option to show the clock on all screens.
2. Select the correct time zone and change the date or time.
Note During synchronization, the time on your device is updated with the time on your computer.
To set the date and time for a different locationIf you visit or communicate with someone in a particular time zone often, you can select it as your visiting time zone.
1. On the Home screen Home tab, tap the time display and then tap the Time tab.
2. Tap Visiting.
3. Select the correct time zone and change the date or time.
Managing Your Device ��5
Regional settingsThe style in which numbers, currency, dates, and times are displayed is specified in regional settings.
1. On the Home screen, slide to the Settings tab and then tap All Settings.
2. On the System tab, tap Regional Settings > Region tab and then select your region from the list.
Note This does not change the language of your device’s operating system.
The region you select determines which options will be available on the other tabs.
3. To customize regional settings further, tap the appropriate tabs and set the desired options.
Display settingsTo adjust the screen brightness
1. On the Home screen, slide to the Settings tab and then tap All Settings.
2. On the System tab, tap Power > Backlight tab.
3. Clear the Auto adjust backlight check box to display the sliders for adjusting brightness.
4. Adjust the brightness by dragging the slider under On battery power and On external power.
To set the backlight to dim after a time delay1. On the Home screen, slide to the Settings tab and then tap All Settings.
2. On the System tab, tap Power > Advanced tab.
3. In On battery power and On external power, select the Turn off backlight if device is not used for check box, then specify the time delay.
��� Managing Your Device
To increase or decrease the size of text on the screen1. On the Home screen, slide to the Settings tab and then tap All Settings.
2. On the System tab, tap Screen > Text Size tab.
3. Move the slider to increase or decrease the text size.
Device nameThe device name is used to identify your device in the following situations:
• Synchronizing with a computer
• Connecting to a network
• Restoring information from a backup
Note If you synchronize multiple devices with the same computer, each device must have a unique name.
To change the device name1. On the Home screen, slide to the Settings tab and then tap All Settings.
2. On the System tab, tap About > Device ID tab.
3. Enter the device name.
Notes • The device name must begin with a letter, consist of letters from A to Z, numbers from 0 to 9, and cannot contain spaces. Use the underscore character to separate words.
• If you enroll your device to your company’s domain, the device name will be changed to be the same as the one used to enroll the device.
Ringer settingsTo change the ring type and ring tone
1. Press the TALK/SEND button to open the Phone screen and then tap Menu > Options.
2. On the Phone tab, select the desired Ring type and Ring tone from the provided lists and then tap OK.

Managing Your Device ���
Tips • You can use *.wav, *.mid, *.mp3, *.wma, or other types of sound files that you downloaded from the Internet or copied from your computer as ring tones. To quickly set the music file as a ring tone, tap and hold the music file and then select Set As Ringtone. For a complete list of supported audio file formats for ring tones, see "Specifications" in the Appendix.
• To use your sound files as ring tones, copy them first to the /My Documents/My Ringtones folder on your device, then select the sound from the Ring tone list of your device. For more information about copying files, see “Copying and Managing Files” in this chapter.
Alarms and notificationsTo set an alarm
1. On the Home screen Home tab, tap the time display and then tap the Alarms tab.
2. Tap <Description> and enter a name for the alarm.
3. Tap the day of the week for the alarm. Select multiple days by tapping each desired day. Tap again to deselect the day.
4. Tap the time to open a clock and set the time for the alarm.Tip You can drag the hour and minute hands of the clock to set the time.
5. Tap the alarm icon ( ) to specify the type of alarm you want. You can choose a flashing light, a single sound, a repeating sound, or vibration.
6. If you choose to play a sound, tap the list next to the Play sound check box and tap the sound you want.
To choose how to be notified about events or actions1. On the Home screen, slide to the Settings tab and then tap Sounds >
Advanced.
2. On the Sounds tab, choose how you want to be notified by selecting the appropriate check boxes.
��8 Managing Your Device
3. On the Notifications tab, in Event, tap an event name and choose how you want to be notified by selecting the appropriate check boxes. You can choose from several options, such as a special sound, a message, a flashing light, or vibrate.
Tip Turning off sounds and flashing light notifications helps conserve battery power.
Phone servicesYour device can directly link to the mobile phone network, and enable you to access and change the settings of various phone services for your device. Phone services may include Call Forwarding, Call Waiting, Voicemail, and more. Contact your wireless service provider to find out about the availability of phone services for your device.
To access and change settings of phone services1. On the Home screen, slide to the Settings tab and then tap All Settings.
2. On the Personal tab, tap Phone > Services tab.
3. Select the service you want to use, then tap Get Settings.
4. Choose your desired options, then tap OK.
For more information about customizing settings of phone services, see Help on your device.
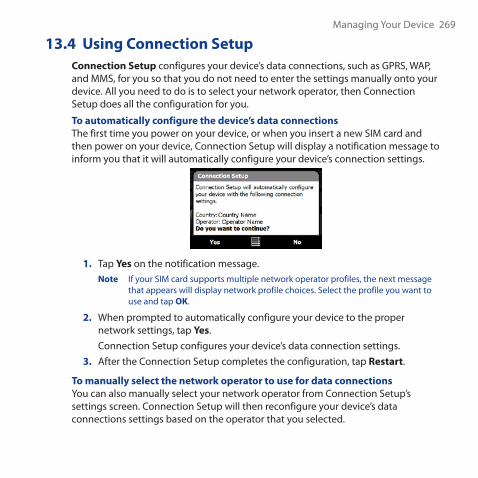
Managing Your Device ��9
13.4 Using Connection SetupConnection Setup configures your device’s data connections, such as GPRS, WAP, and MMS, for you so that you do not need to enter the settings manually onto your device. All you need to do is to select your network operator, then Connection Setup does all the configuration for you.
To automatically configure the device’s data connectionsThe first time you power on your device, or when you insert a new SIM card and then power on your device, Connection Setup will display a notification message to inform you that it will automatically configure your device’s connection settings.
1. Tap Yes on the notification message.Note If your SIM card supports multiple network operator profiles, the next message
that appears will display network profile choices. Select the profile you want to use and tap OK.
2. When prompted to automatically configure your device to the proper network settings, tap Yes.Connection Setup configures your device’s data connection settings.
3. After the Connection Setup completes the configuration, tap Restart.
To manually select the network operator to use for data connectionsYou can also manually select your network operator from Connection Setup’s settings screen. Connection Setup will then reconfigure your device’s data connections settings based on the operator that you selected.
��0 Managing Your Device
1. On the Home screen, slide to the Settings tab and then tap All Settings.2. On the Connections tab, tap Connection Setup.3. Select the network Country and Operator you want to use, then tap OK.
Note If you choose a Country and/or Operator that is different from the installed SIM card network operator, you may not be able to access network services.
4. When prompted to confirm whether you want to configure the data connection settings based on the selected network, tap Yes.
Connection Setup configures the data connection settings.
5. After the Connection Setup completes the configuration, tap Restart.
13.5 Using Task ManagerTask Manager lets you view and stop running programs, configure the button, and enable the Quick Menu on the Home screen.
To open Task Manager• Tap the Quick Menu button on the top right corner of the Home screen to
open the Quick Menu, then tap ; or
• On the Home screen, slide to the Settings tab and then tap All Settings. On the System tab, tap Task Manager.
To switch back to a running program• Tap the program name in the Quick Menu; or
• On the Task Manager screen, tap and hold the program name on the Running tab, then tap Activate.
To configure the Exit ( ) buttonYou can configure the Exit button to shut down running programs when the button is tapped, or to just temporarily close the program screen but keep the program running.
Managing Your Device ��1
1. On the Task Manager screen, tap the Button tab.
2. Select the Enable the “X” button to end running programs check box.
Note When the Enable the “X” button to end running programs check box is not selected, tapping the Exit button will only close a program screen. The program is not ended and continues to run in the background.
3. Choose the action for shutting down programs (by tapping the button, or by tapping and holding the button).
4. Tap OK.
To close running programs from the Task Manager1. On the Task Manager screen, tap the Running tab.
2. Do one of the following:
• Select the check box of the programs that you want to close, then tap Stop Selected.
• Tap Stop All to close all programs in the list.
• Tap Menu > Stop All but Selected to close all programs except those which check boxes are selected.
Tip You can also close running programs from the Quick Menu on the Home screen. See “Quick Menu” in Chapter 1 for details.
To add a running program to the exclusive listIf you add a running program to the Exclusive Programs List, it will not be closed when you tap Stop Selected or Stop All and will not be listed in the Quick Menu on the Home Screen.
1. On the Task Manager screen, tap the Running tab.
2. Tap and hold the program name, then tap Add Exclusive.
Tip To remove a program from the exclusive list, tap the Exclusive tab, select the check box of the program, then tap Remove.

��� Managing Your Device
To set the sorting preference and program icon size in the Quick Menu1. On the Task Manager screen, tap the Others tab.
2. In Sort programs in Quick Menu by, choose whether to sort according to Program name or Memory usage. The list will be sorted in ascending order.
3. In Program icon size in Quick Menu, choose whether to use Small size or Large size.
13.6 Protecting Your DeviceProtect your SIM card with a PINYou can protect your SIM card from unauthorized use by assigning a PIN (personal identification number). The default SIM card PIN is provided by your wireless service provider.
To enable the SIM card PIN1. On the Home screen, slide to the Settings tab and then tap All Settings.
2. On the Personal tab, tap Phone > PIN/PIN2 tab.
3. Select the Require PIN when phone is used check box.
4. Enter the PIN number and then tap OK. To change the PIN at any time, tap Change PIN.
Tip Emergency calls can be placed at any time, without requiring a PIN.
Protect your device with a passwordYou can help keep your data more secure by requiring a password every time the device is turned on.
To set a device password1. On the Home screen, slide to the Settings tab and then tap All Settings.
2. On the Personal tab, tap Lock.

Managing Your Device ���
3. Select the Prompt if device unused for check box, then specify the idle time before the device requires a password.
4. In the Password type box, select the type of password you would like to use.Tip If your device is configured to connect to a network, use an alphanumeric
password for increased security.
5. Enter the password in both the Password and Confirm boxes.
6. Tap OK. The next time the device is turned on, you will be prompted to enter your password.
Notes • To ensure that you can always make emergency calls, do not begin your password with the digits of your local emergency number.
• If you entered a hint, the hint will be displayed after the wrong password is entered five times.
• Each time a wrong password is entered, the device response time gets longer until the device appears to be not responding.
• If you forget your password, you can hard reset or clear the device memory. Before you do this, make sure you back up your data and files so that you can restore them back to your device. For more information about hard resetting the device and clearing the memory, see “Resetting Your Device” in this chapter.
Encrypt files on your storage cardYou can set your device to encrypt files as they are saved on the storage card.
1. On the Home screen, slide to the Settings tab and then tap All Settings.
2. On the System tab, tap Encryption.
3. Select Encrypt files when placed on a storage card.
Notes • Encrypted files can only be read on the device that encrypted them.
• Encrypted files are opened just like other files, provided you are using the device that encrypted them. There is no separate step for you to take to read these files.
��4 Managing Your DeviceImportant If Encrypt files when placed on a storage card is enabled, backup all files from
the storage card before using Clear Storage, hard reset, or updating the ROM system software. Otherwise you will no longer be able to access the encrypted files on the storage card. Use ActiveSync or Windows Mobile Device Center to transfer files between your storage card and computer. After the procedure, copy your files back to the storage card.
13.7 Managing MemoryTo see how much memory is available for use
1. On the Home screen, slide to the Settings tab and then tap All Settings.
2. On the System tab, tap Memory > Main tab. The amount of memory allocated to data storage versus program storage is displayed, as well as the amount of memory in use versus the available memory.
To see the available space of the storage card 1. On the Home screen, slide to the Settings tab and then tap All Settings.
2. On the System tab, tap Memory > Storage Card tab.
If your device is running low on memory, try the following to free memory on your device:
• Close programs which are not in use.
• Install a storage card and then move files and e-mail attachments to the storage card.
• Delete unnecessary files. Tap Start > Programs > File Explorer. Tap and hold the file, and tap Delete.
• Delete large files. To find large files on your device, tap Start > Programs > Search. In the Type list, tap Larger than 64 KB, and tap Search.
• In Opera Mobile or Internet Explorer Mobile, delete temporary Internet files and clear history information.
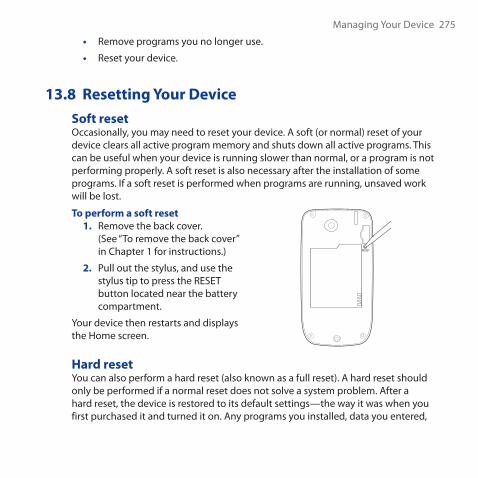
Managing Your Device ��5
• Remove programs you no longer use.
• Reset your device.
13.8 Resetting Your DeviceSoft resetOccasionally, you may need to reset your device. A soft (or normal) reset of your device clears all active program memory and shuts down all active programs. This can be useful when your device is running slower than normal, or a program is not performing properly. A soft reset is also necessary after the installation of some programs. If a soft reset is performed when programs are running, unsaved work will be lost.
To perform a soft reset1. Remove the back cover.
(See “To remove the back cover” in Chapter 1 for instructions.)
2. Pull out the stylus, and use the stylus tip to press the RESET button located near the battery compartment.
Your device then restarts and displays the Home screen.
RESET
Hard resetYou can also perform a hard reset (also known as a full reset). A hard reset should only be performed if a normal reset does not solve a system problem. After a hard reset, the device is restored to its default settings—the way it was when you first purchased it and turned it on. Any programs you installed, data you entered,
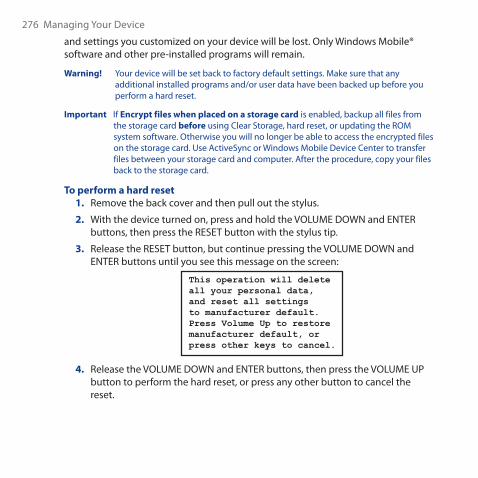
��� Managing Your Device
and settings you customized on your device will be lost. Only Windows Mobile® software and other pre-installed programs will remain.
Warning! Your device will be set back to factory default settings. Make sure that any additional installed programs and/or user data have been backed up before you perform a hard reset.
Important If Encrypt files when placed on a storage card is enabled, backup all files from the storage card before using Clear Storage, hard reset, or updating the ROM system software. Otherwise you will no longer be able to access the encrypted files on the storage card. Use ActiveSync or Windows Mobile Device Center to transfer files between your storage card and computer. After the procedure, copy your files back to the storage card.
To perform a hard reset1. Remove the back cover and then pull out the stylus.
2. With the device turned on, press and hold the VOLUME DOWN and ENTER buttons, then press the RESET button with the stylus tip.
3. Release the RESET button, but continue pressing the VOLUME DOWN and ENTER buttons until you see this message on the screen:
This operation will delete all your personal data, and reset all settings to manufacturer default. Press Volume Up to restore manufacturer default, or press other keys to cancel.
4. Release the VOLUME DOWN and ENTER buttons, then press the VOLUME UP button to perform the hard reset, or press any other button to cancel the reset.
Managing Your Device ���
Clear StorageYou can also use Clear Storage to reset your device back to factory default settings.
1. On the Home screen, slide to the Settings tab and then tap All Settings.
2. On the System tab, tap Clear Storage.
3. Enter “1234” and then tap Yes.
13.9 Windows UpdateYou can update Windows Mobile® on your device with the latest updates, security patches or fixes, if these are available.
To set up Windows UpdateThe first time you run Windows Update, you need to set up how you want Windows Update to check for patches on the Microsoft web site.
1. On the Home screen, slide to the Settings tab and then tap All Settings.
2. On the System tab, tap Windows Update.
3. On the Update Setup screen, tap Next.
4. Choose how you want to check for updates, Manual or Automatic, then tap Next. Note If you select Automatic, you will be asked if you want to use your current data
plan to check for updates. Select or clear the Use my data plan to check for and download updates check box and tap Next.
5. Tap Finish.
To check for updates1. On the Home screen, slide to the Settings tab and then tap All Settings.
2. On the System tab, tap Windows Update.
3. Tap Check Now.
��8 Managing Your DeviceNote Windows Mobile® updates may not be available at all times. Check the Windows
Mobile® web site for update information.
To change Windows Update options1. On the Home screen, slide to the Settings tab and then tap All Settings.
2. On the System tab, tap Windows Update.
3. Tap Menu and select the option you want to change.
• Tap Connections to change how the device connects to the Internet when checking for updates.
• Tap Change Schedule to change how Windows Update checks for Windows Mobile® updates.
Managing Your Device ��9
13.10 Battery Saving TipsHow long your battery power lasts depends on the battery type and how you use your device. Try the following to help conserve battery life:
• When the device is not in use, press POWER to switch off the display.
• On the Home screen, slide to the Settings tab and then tap All Settings. On the System tab, tap Power > Advanced tab of the Power settings screen. Here, you can specify the time before your device automatically turns off the display and backlight to conserve battery power. For optimum conservation, specify � minutes or less.
• On the Home screen, slide to the Settings tab and then tap All Settings. On the System tab, tap Power > Backlight tab. Clear the Auto adjust backlight check box to be able to adjust the backlight brightness settings.
• Use the AC adapter to plug your device into an external power outlet whenever possible, especially when using a storage card or when using a modem or other peripherals.
• Turn Bluetooth off when you are not using it. Make your device visible to other devices only when you are trying to establish a Bluetooth partnership. For more information about Bluetooth, see Chapter 9.
• On the Home screen, slide to the Settings tab and then tap Communications. On the Comm Manager screen, turn off Wi-Fi or your active data connection when not in use.
• Tap Start > Settings > Connections tab > Wi-Fi and then tap Menu > Advanced. From the Turn off Wi-Fi if not connected in list, select a timeout period so that Wi-Fi can be automatically turned off when your device is not connected to any wireless network for some time.
�80 Managing Your Device
• Lower the volume.
• Close battery-intensive programs, such as the Camera, when you are done using them. Make sure the programs are ended and are not continuously running in the background. Refer to “Using Task Manager” in this chapter for information on closing programs.

Appendix
A.1 SpecificationsA.2 Regulatory Notices
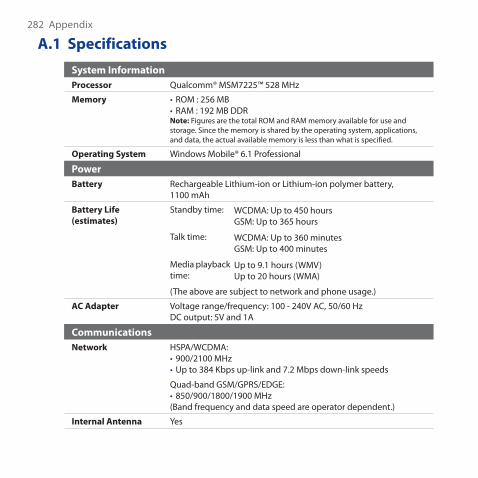
�8� Appendix
A.1 SpecificationsSystem InformationProcessor Qualcomm® MSM���5™ 5�8 MHz
Memory ROM : �5� MBRAM : 19� MB DDR
Note: Figures are the total ROM and RAM memory available for use and storage. Since the memory is shared by the operating system, applications, and data, the actual available memory is less than what is specified.
••
Operating System Windows Mobile® �.1 Professional
PowerBattery Rechargeable Lithium-ion or Lithium-ion polymer battery,
1100 mAh
Battery Life (estimates)
Standby time: WCDMA: Up to 450 hoursGSM: Up to ��5 hours
Talk time: WCDMA: Up to ��0 minutesGSM: Up to 400 minutes
Media playback time:
Up to 9.1 hours (WMV)Up to �0 hours (WMA)
(The above are subject to network and phone usage.)
AC Adapter Voltage range/frequency: 100 - �40V AC, 50/�0 HzDC output: 5V and 1A
CommunicationsNetwork HSPA/WCDMA:
900/�100 MHzUp to �84 Kbps up-link and �.� Mbps down-link speeds
Quad-band GSM/GPRS/EDGE:850/900/1800/1900 MHz
(Band frequency and data speed are operator dependent.)
••
•
Internal Antenna Yes
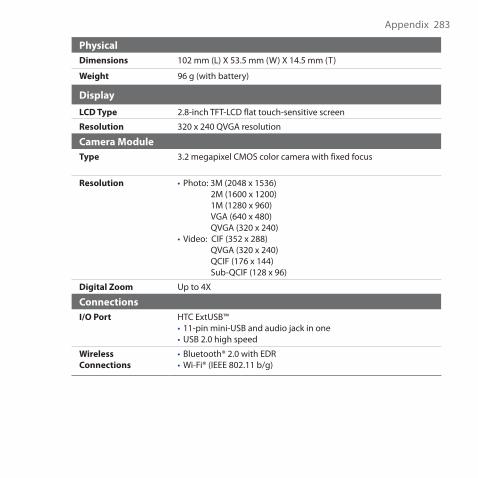
Appendix �8�
PhysicalDimensions 10� mm (L) X 5�.5 mm (W) X 14.5 mm (T)
Weight 9� g (with battery)
Display
LCD Type �.8-inch TFT-LCD flat touch-sensitive screen
Resolution ��0 x �40 QVGA resolution
Camera ModuleType �.� megapixel CMOS color camera with fixed focus
Resolution Photo: �M (�048 x 15��) �M (1�00 x 1�00) 1M (1�80 x 9�0) VGA (�40 x 480) QVGA (��0 x �40)
Video: CIF (�5� x �88) QVGA (��0 x �40) QCIF (1�� x 144) Sub-QCIF (1�8 x 9�)
•
•
Digital Zoom Up to 4X
ConnectionsI/O Port HTC ExtUSB™
11-pin mini-USB and audio jack in oneUSB �.0 high speed
••
Wireless Connections
Bluetooth® �.0 with EDRWi-Fi® (IEEE 80�.11 b/g)
••
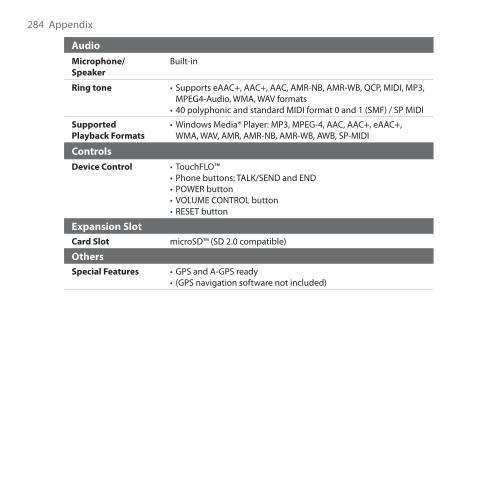
�84 Appendix
AudioMicrophone/Speaker
Built-in
Ring tone Supports eAAC+, AAC+, AAC, AMR-NB, AMR-WB, QCP, MIDI, MP�, MPEG4-Audio, WMA, WAV formats40 polyphonic and standard MIDI format 0 and 1 (SMF) / SP MIDI
•
•
Supported Playback Formats
Windows Media® Player: MP�, MPEG-4, AAC, AAC+, eAAC+, WMA, WAV, AMR, AMR-NB, AMR-WB, AWB, SP-MIDI
•
ControlsDevice Control TouchFLO™
Phone buttons: TALK/SEND and ENDPOWER buttonVOLUME CONTROL buttonRESET button
•••••
Expansion SlotCard Slot microSD™ (SD �.0 compatible)
OthersSpecial Features GPS and A-GPS ready
(GPS navigation software not included)••
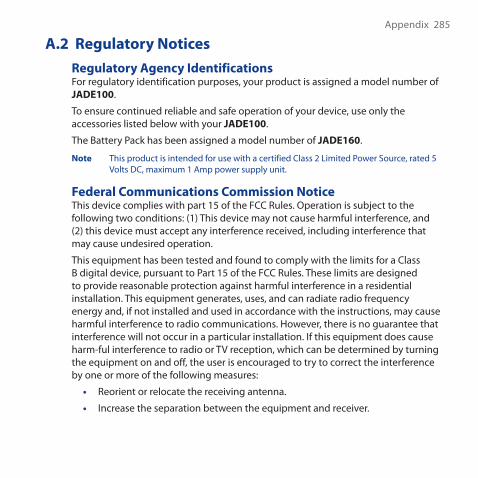
Appendix �85
A.2 Regulatory NoticesRegulatory Agency IdentificationsFor regulatory identification purposes, your product is assigned a model number of JADE100.
To ensure continued reliable and safe operation of your device, use only the accessories listed below with your JADE100.
The Battery Pack has been assigned a model number of JADE160.
Note This product is intended for use with a certified Class � Limited Power Source, rated 5 Volts DC, maximum 1 Amp power supply unit.
Federal Communications Commission NoticeThis device complies with part 15 of the FCC Rules. Operation is subject to the following two conditions: (1) This device may not cause harmful interference, and (�) this device must accept any interference received, including interference that may cause undesired operation.
This equipment has been tested and found to comply with the limits for a Class B digital device, pursuant to Part 15 of the FCC Rules. These limits are designed to provide reasonable protection against harmful interference in a residential installation. This equipment generates, uses, and can radiate radio frequency energy and, if not installed and used in accordance with the instructions, may cause harmful interference to radio communications. However, there is no guarantee that interference will not occur in a particular installation. If this equipment does cause harm-ful interference to radio or TV reception, which can be determined by turning the equipment on and off, the user is encouraged to try to correct the interference by one or more of the following measures:
• Reorient or relocate the receiving antenna.
• Increase the separation between the equipment and receiver.
286 Appendix
• Connect the equipment into an outlet on a circuit different from that to which the receiver is connected.
• Consult the dealer or an experienced radio or television technician for help.
ModificationsThe FCC requires the user to be notified that any changes or modifications made to the device that are not expressly approved by High Tech Computer Corporation may void the user’s authority to operate the equipment.
Body-worn operationThis device was tested for typical body-worn operations with the back of the phone kept 1.5cm from the body. To maintain compliance with FCC RF exposure requirements, use only belt-clips, holsters or similar accessories that maintain a 1.5cm separation distance between the user’s body and the back of the phone, including the antenna. The use of belt-clips, holsters and similar accessories should not contain metallic components in its assembly. The use of accessories that do not satisfy these requirements may not comply with FCC RF exposure requirements, and should be avoided.
Safety Precautions for RF ExposureUse only original manufacturer-approved accessories, or accessories that do not contain any metal.
Use of non-original manufacturer-approved accessories may violate your local RF exposure guidelines and should be avoided.
FCC RF Radiation Exposure Statement• This Transmitter has been demonstrated co-location compliance
requirements with Bluetooth / QDID:B014495 and WLAN / CID:WFA6450.This transmitter must not be co-located or operating in conjunction with any other antenna or transmitter.
• This equipment complies with FCC RF radiation exposure limits set forth for an uncontrolled environment.
Appendix 287
Exposure to Radio Frequency (RF) SignalsYour device contains a radio transmitter and receiver. The radiated output power is far below the international radio frequency exposure limits. These limits are part of comprehensive guidelines and establish permitted levels of RF energy for the general population. The guidelines are based on the safety standards previously set by international standards bodies:
• American National Standards Institute (ANSI) IEEE. C95.1-1992• National Council on Radiation Protection and Measurement (NCRP). Report
86. 1986• International Commission on Non-Ionizing Radiation Protection (ICNIRP) 1996• Ministry of Health (Canada), Safety Code 6. The standards include a
substantial safety margin designed to assure the safety of all persons, regardless of age and health.
The exposure standard for wireless mobile phones employs a unit of measurement known as the Specific Absorption Rate, or SAR. The standard incorporates a substantial margin of safety to give additional protection for the public and to account for any variations in usage.
As with other mobile radio transmitting equipment, users are advised that for satisfactory operation of the equipment and for the safety of personnel, it is recommended that no part of the human body be allowed to come too close to the antenna during operation of the equipment.
Your device has an internal antenna. Use only the supplied integral antenna. Use of unauthorized or modified antennas may impair call quality and damage the phone, causing loss of performance and SAR levels exceeding the recommended limits as well as result in non-compliance with local regulatory requirements in your country.
To assure optimal phone performance and ensure human exposure to RF energy is within the guidelines set forth in the relevant standards; always use your device only in its normal-use position. Do not touch or hold the antenna area unnecessarily when placing or receiving a phone call. Contact with the antenna

288 Appendix
area may impair call quality and cause your device to operate at a higher power level than needed. Avoiding contact with the antenna area when the phone is IN USE optimizes the antenna performance and the battery life.
Tests for SAR are conducted using standard operating positions specified by the FCC with the phone transmitting at its highest certified power level in all tested frequency bands. Although the SAR is determined at the highest certified power level, the actual SAR level of the phone while operation can be well below the maximum value. This is because the phone is designed to operate at multiple power levels so as to use only the power required to reach the network. In general, the closer you are to a wireless base station antenna, the lower the power output. Before a phone model is available for sale to the public, it must be tested and certified to the FCC that it does not exceed the limit established by the government-adopted requirement for safe exposure. The tests are performed in positions and locations (for example, at the ear and worn on the body) as required by the FCC for each model. (Bodyworn measurements may differ among phone models, depending upon available accessories and FCC requirements). For body worn operation, to maintain compliance with FCC RF exposure guidelines, use only original manufacturer approved accessories. When carrying the phone while it is on, use the specific original manufacturer supplied or approved carrying case, holster, or other body-worn accessory
SAR Information1.33 W/kg @ 1g
Telecommunications & Internet Association (TIA) Safety InformationPacemakers The Health Industry Manufacturers Association recommends that a minimum separation of six inches be maintained between a handheld wireless phone and a pacemaker to avoid potential interference with the pacemaker. These
Appendix 289
recommendations are consistent with the independent research by and recommendations of Wireless Technology Research. Persons with pacemakers:
• Should ALWAYS keep the phone more than six inches from their pacemaker when the phone is turned ON.
• Should not carry the phone in a breast pocket. • Should use the ear opposite the pacemaker to minimize the potential for
interference. If you have any reason to suspect that interference is taking place, turn the phone OFF immediately.
Hearing Aids Some digital wireless phones may interfere with some hearing aids. In the event of such interference, you may want to consult your service provider, or call the customer service line to discuss alternatives.
Other Medical Devices If you use any other personal medical device, consult the manufacturer of your device to determine if they are adequately shielded from external RF energy. Your physician may be able to assist you in obtaining this information.
Turn the phone OFF in health care facilities when any regulations posted in these areas instruct you to do so. Hospitals or health care facilities may be using equipment that could be sensitive to external RF energy.
WEEE NoticeThe Directive on Waste Electrical and Electronic Equipment (WEEE), which entered into force as European law on 13th February 2003, resulted in a major change in the treatment of electrical equipment at end-of-life.
The purpose of this Directive is, as a first priority, the prevention of WEEE, and in addition, to promote the reuse, recycling and other forms of recovery of such wastes so as to reduce disposal.
290 Appendix
The WEEE logo (shown at the left) on the product or on its box indicates that this product must not be disposed of or dumped with your other household waste. You are liable to dispose of all your electronic or electrical waste equipment by relocating over to the specified collection point for recycling of such hazardous waste. Isolated collection and proper recovery of your electronic and electrical waste equipment at the time of disposal will allow us to help conserving natural resources. Moreover, proper recycling of the electronic and electrical waste equipment will ensure safety of human health and environment. For more information about electronic and electrical waste equipment disposal, recovery, and collection points, please contact your local city center, household waste disposal service, shop from where you purchased the equipment, or manufacturer of the equipment.
RoHS ComplianceThis product is in compliance with Directive 2002/95/EC of the European Parliament and of the Council of 27 January 2003, on the restriction of the use of certain hazardous substances in electrical and electronic equipment (RoHS) and its amendments.
Index AA�DP 1�8ActiveSync
- ActiveSync mode 4�- set up 100- synchronize with computer 101- synchronize with Exchange Server 1�0
Add and remove programs ���Adobe Reader LE ���Airplane Mode �0, ���Alarm ���Album
- about �05- close Album �10- play back video �10- select a photo or video to view �0�- view an image �0�
Answering calls 54Attachment
- add to e-mail 1��- download 1�5- set IMAP4 to automatically receive
attachments 1��- set Outlook to automatically receive
attachments 1��Audio Booster ���Audio Manager �1�
BBack cover
- remove �8Backlight
- adjust brightness ��5- set backlight timeout ��5
Back up data �4�Basic settings ��4Battery
- battery information �0- charge battery ��- install �1- remove �1- save battery power 145, ��9
Beam via Bluetooth 1�9Block Recognizer 91Bluetooth
- about 1��- Bluetooth Explorer 181- Bluetooth file sharing 181- Bluetooth shared folder 181- hands-free headset 1�8- modem 1��- modes 1��- partnership (pairing) 1��- printing 18�- SIM Access Profile (SAP) �1- stereo headset 1�8
�9� Index
- synchronize 10�- turn on and off ���- visible 1��
CCalendar
- create appointment ��8- send appointment ��1- view appointment ��0
Call History 59Calling
- from Contacts 5�- from Home screen 5�- from Phone screen 51
Camera- about 194- Advanced Options �0�- capture modes 194- capture photos and videos 19�- file formats 195- icons 19�- Menu Panel 198- resolution 198- specifications �8�- zooming 199
Capture photos and videos 19�Car kit phones �1Clear Storage ���Clock & Alarms ��1, ��4, ���Comm Manager ���, ���Compact QWERTY 8�Company Directory 1�8Conference call 5�
Configure data connection settings �5, 14�, ��9
Connect device to Internet- Dial-up 14�- GPRS/�G 14�- start a connection 148- ways of connecting 14�- Wi-Fi 14�
Connection Setup �5, 41, ��9Contacts ���Contacts Picture capture mode 195Copy
- contacts to SIM card �4�- copy and manage files �58- media files from PC to device �1�- SIM contacts to device �4�
DData connection 14�, 148, ���Device name ���Dial-up 14�Dimensions and weight �8�Direct Push 1��, ���Disk Drive mode 4�Download
- download complete e-mail 1�4- e-mail download settings 1�0, 1��- file attachments 1�5- Java applications �40- satellite data 190- synchronize e-mails 1��- web feeds 1�8
Draw ��8
Index �9�
EE-mail
- Internet e-mail account (POP�/IMAP4) 118
- mail server settings 119- Mail tab (Home screen) �0- send 1��- settings (POP�/IMAP4) 1�0- setup wizard 118- synchronize 9�, 1��, 1�0- types of e-mail accounts 11�
EDGE 14�Emergency call 5�Emoticon
- MMS 114- Windows Live Messenger 1��
Ending calls 54Equalizer ���Excel Mobile ���Exchange Server 1�0
FFavorite contacts ��File Explorer �58Find contact
- Company Directory 1�8- on device ��4
Finger gestures 81Finger panning 8�Finger scrolling 81Forward e-mail 1�5Full QWERTY 85
GGoogle Maps ��, 18�GPRS 14�GPRS Monitor �44GPS 188, 190
HHard reset ��5, ���Home screen �9, �4Home tab (Home screen) ��
IIMAP4 118Input methods
- Block Recognizer 91- Compact QWERTY 8�- Full QWERTY 85- Letter Recognizer 9�- Phone Keypad 8�- Transcriber 9�
Input Panel 84Input Selector arrow 84International call 54Internet 14�Internet e-mail 118Internet Sharing 1�5Internet tab (Home screen) �1
JJava
- create folders �41- install MIDlets/MIDlet suites from
device �40
�94 Index
- install MIDlets/MIDlet suites from Internet �40
- manage MIDlets/MIDlet suites �41- uninstall MIDlets �41- update a MIDlet/MIDlet suite �41
KKey Lock ��1
LLetter Recognizer 9�Library
- Audio Manager �1�- Music tab (Home screen) �4- Windows Media Player Mobile �1�
Live Messenger 1��
MMail tab (Home screen) �0Making calls 51Maps Search tab (Home screen) ��Meeting request 1��, ��1Memory 45, ��4, �8�Messages tab (Home screen) �9Messaging
- about 10�- e-mail 11�, 118, 1��- multimedia (MMS) 111- text (SMS) 10�
Messenger 1��microSD card
- install ��Microsoft Office Mobile ���
MIDlet/MIDlet suite �40MMS
- about 111- add audio clip 114- add photo/video 11�- add text 114- blacklist 11�- create MMS message 11�- MMS settings 111- reply message 115- view message 115
MMS Video capture mode 195Modem
- Bluetooth 1��- USB 1�5
Multimedia 111, 19�Multitap 88Music tab (Home screen) ��
NNews channels (web feeds) 1�8Notes ��8Numeric and Symbol Mode 90
OOffice Mobile ���OneNote Mobile ���Open PDF file ���Opera Mobile 149
PPanorama capture mode 195Password ���
Index �95
People tab (Home screen) ��Phone 50Phone Keypad 8�Phone services ��8Photo capture mode 195Photos and Videos tab (Home screen) �1Picture Theme capture mode 195PIN 50, ���Playlists
- Audio Manager �19- Windows Media Player Mobile �1�
Play media �15Play music
- Audio Manager �1�- Music tab (Home screen) ��- Windows Media Player Mobile �15
Podcasts 1��POP� 118PowerPoint Mobile ���Profile �8Programs ���Programs tab (Home screen) 80Put call on hold 5�
QQuickGPS 190Quick menu 45, ��0
RRecord
- voice note ��9- voice recording �51
Regional Settings ���, ��5
Regulatory notices �85Reply
- e-mail 1�5- MMS 115- text (SMS) �9, 109
Reset- clear storage ���- hard reset ��5- soft reset ��5
Resolution 198Review screen (Camera) �01Ring tone ��0, ���Ring type ���RSS Hub
- about 1�8- headline list 1�1- news channels 1�8- podcasts 1��- summary view 1��
SSafety information 5Screen text size ���Send
- e-mail 1��- MMS message 11�- text message (SMS) 10�
Set music as ring tone ��0Settings (Connections tab)
- Advanced Network ���- Beam ���- Bluetooth ���- Connections 14�, 14�, ���

�9� Index
- Connection Setup ���, ��9- Domain Enroll ���- USB to PC 10�, ���- Wi-Fi 145, ��4- Wireless LAN 144, ��4
Settings (Personal tab)- Buttons �59- Input �59- Lock �59, ���- Menus ��0- Owner Information ��0- Phone ��0, ���, ��8- Sounds & Notifications ��0, ���- Today ��0- Voice Speed Dial �54, ��0
Settings (System tab)- About ��0, ���- Certificates ��0- Clear Storage ��1, ���- Clock & Alarms ��1, ��4, ���- Customer Feedback ��1- Device Information ��1- Encryption ��1, ���- Error Reporting ��1- External GPS ��1- Managed Programs ��1- Memory ��1- Microphone AGC ���- Power ���- Regional Settings ���, ��5- Remove Programs ���, ���- Screen ���, ���- Task Manager ���, ��0- TouchFLO 44, 8�, ���
- Windows Update ���, ���Settings tab (Connections)
- Comm Manager ���Settings tab (Home screen) �8Settings tab (System)
- Key Lock ��1SIM Access Profile (SAP) �1SIM card
- install �8- PIN ���- remove �9
SIM Manager- about �4�- copy contacts to SIM card �4�- copy SIM contacts to device �4�- create SIM contact �4�
Sleep mode ��Smart Dial 51SMS �9, 10�, 1��Soft reset ��5Sounds & Notifications ��0, ���Sound settings �8Spb GPRS Monitor �44Speakerphone 5�Specifications �8�Speed Dial 59Sprite Backup �4�Start menu 44Status icons 40Storage card
- encrypt ���- install ��
Strap holder �4Streaming Media 158

Index �9�
Swap/switch calls 5�Synchronize
- ActiveSync 101- change information types 10�- music and videos 104- via Bluetooth 10�- Windows Media Player �1�- Windows Mobile Device Center 9�- with computer �8, 101- with Exchange Server �8, 1�0
TT9 88Task Manager ���, ��0Tasks �50Text messages
- copy from SIM card 110- copy to SIM card 109- create new message 10�- Messages tab (Home screen) �9- send 108
Text size (screen) ���TouchFLO ��, ���Transcriber 9�Troubleshoot
- sync connection 10�- Windows Media Player Mobile �1�
Turn device on and off �5Turn phone function on and off �0, ���
UUSB modem 1�5USB to PC 10�, ���
VVibrate 4�, 4�, 5�, ���Video capture mode 195Voice call 51Voicemail 54Voice Recorder �51Voice Speed Dial
- about �5�, ��0- create
- voice tag for phone number �5�- voice tag for program �54
- make call or launch program �54Voice tag
- create- for phone number �5�- for program �54
- make call or launch program �54
WWeather tab (Home screen) �5Wi-Fi 14�, ���Windows Live 1�0Windows Live Messenger 1��Windows Media Player Mobile
- file formats �11- menus �1�- playlists �1�- troubleshoot �1�
Windows Mobile Device Center 9�Windows Update ���, ���Word Mobile ���
�98 Index
YYouTube 15�
ZZIP
- about �55- create archive �55- open zip file and extract files �55
Zooming- Camera 199- finger gestures 8�- Opera Mobile 151