15 marvel crescent ice machine - ferguson
TRANSCRIPT
marvelrefrigeration.com | 800.223.3900
Storage Capabilities
• Stores 15 lbs of crescent ice
Aesthetics
• Easy-to-install panel overlay option
• Finish options: stainless steel, black or overlay (panel ready)
Additional Convenience
• No pump or drain required
• Close Door Assist System™ gently and automatically draws door to a close, ensuring door is never accidentally left ajar
• Black toe kick adjustable to 4” with leveling legs
• Filler kit available for 18” wide opening
• 1-year parts and labor warranty, 5-year sealed system parts warranty
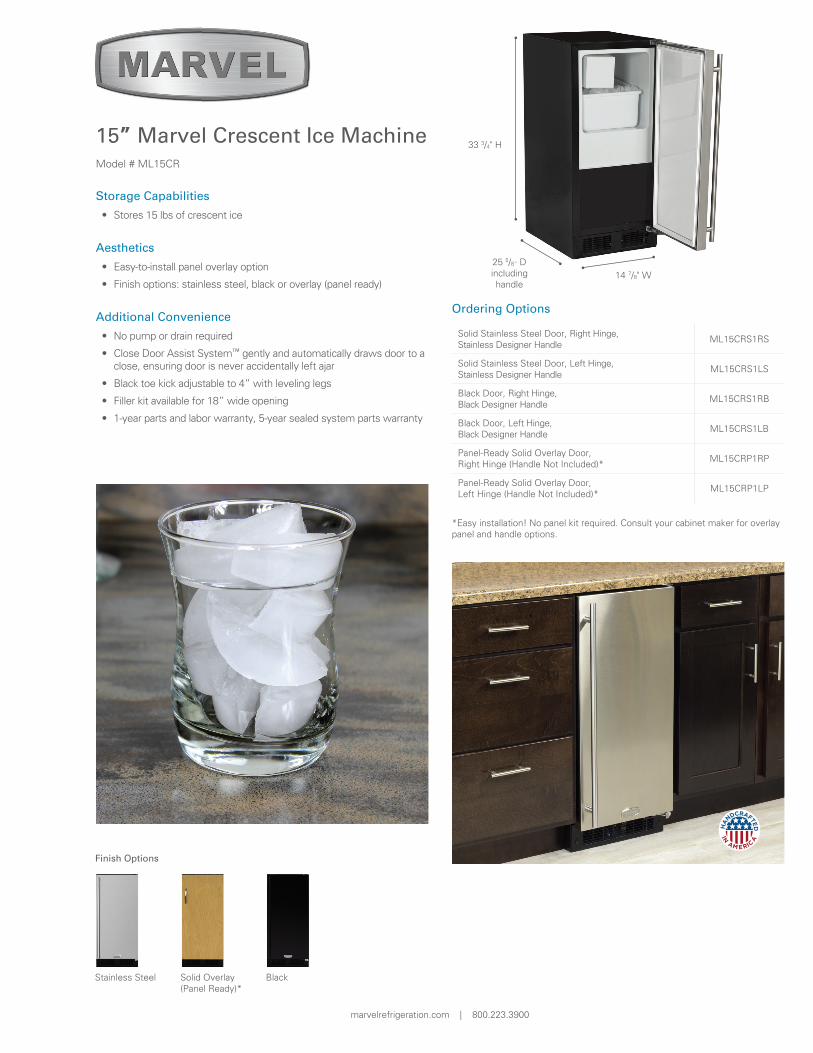
15” Marvel Crescent Ice MachineModel # ML15CR
” Marvel Crescent Ice Machine
Ordering Options
Solid Stainless Steel Door, Right Hinge, Stainless Designer Handle
ML15CRS1RS
Solid Stainless Steel Door, Left Hinge, Stainless Designer Handle
ML15CRS1LS
Black Door, Right Hinge, Black Designer Handle
ML15CRS1RB
Black Door, Left Hinge, Black Designer Handle
ML15CRS1LB
Panel-Ready Solid Overlay Door, Right Hinge (Handle Not Included)*
ML15CRP1RP
Panel-Ready Solid Overlay Door, Left Hinge (Handle Not Included)*
ML15CRP1LP
*Easy installation! No panel kit required. Consult your cabinet maker for overlay panel and handle options.
14 7/8" W
33 3/4" H
25 5/8” Dincluding handle
Solid Overlay(Panel Ready)*
BlackStainless Steel
Finish Options

marvelrefrigeration.com | 800.223.3900
Panel Overlay Dimensions
Rough-In Dimensions
A. Rough-In Width 15”
B. Rough-In Height 34” to 35”
C. Rough-In Depth 24”
Product Dimensions
D. Width 14 7/8”
E. Height 33 3/4” to 34 3/4”
F. Depth 19 23/32”
G. Depth to Front of DoorSolid Door 21 25/32”
Overlay Door 21 1/32
H. Depth to Handle 25 7/32” (Stainless Steel)
I. Depth with door at 90˚Solid Door 35 5/8”
Overlay Door 35 5/8”
Product Features
Interior Cabinet Finish White
Capacity 15 lbs of Ice Storage
Shelving System NA
Shelf Fronts NA
Other Storage Ice Bin
Interior Lighting NA
Toe Grill Finish Black
Hinge Classic Hinge
HandleSlim Designer Handle(Panel Overlay Does Not Include Handle)
Control Type NA
Temperature Range NA
Lock No
Electrical Requirements 120V / 60Hz / 15A
Length of Power Cord 6’
Shipping Weight 127 lbs
Finishes Stainless Steel, Overlay, Black
Vacation Mode No
Agency Approvals CSA
"A"
"B"
"C"
"D"
"E"
"A"
"B"
"C"
"D"
"E"
"G"
"H"
"I""G"
"H"
"I"
"A"
"B"
"C"
"D"
"E"
"A"
"B"
"C"
"D"
"E"
"G"
"H"
"I""G"
"H"
"I"
Product Dimensions
For comprehensive installation instructions, please visit www.marvelrefrigeration.com to access the owner’s guide.
NOTE
NOTE
Step 1: Verify door alignmentVerify that the door is aligned correctly with the cabinet prior to fabricating the custom panel. Failure to do so may result in mis-alignment of the custom panel with the hinge bracket. The door should be parallel to the sides and top of the refrigerator. If alignment is necessary the door may be adjusted by loosen-ing the 2 screws which secure the top and/or bottom hinge adapter brackets, located on the top and bottom of the door and adjusting the door side to side. Use a 5/32” allen wrench, for this procedure. (See Figure 9 below). When finished aligning the door, tighten the screws securely.
Hinge adapter bracket lo-cated on the top and bottom of the door.
Remove top hinge pin to re-move the door.
9/32”(7mm)
Figure 9
Door should be parallel to top and sides of ice machine.
Step 2: Remove doorRemove the top hinge pin from the hinge with an 1/8” allen wrench. Remove the door by angling the top of the door out-ward and lifting the door off the bottom hinge.(See detail in Figure 9).
Step 3: Remove gasketLay the door on its front being careful not to scratch it. To gain access to the screw holes remove the door gasket by peeling up and out of the channel.
Step 4: Cut overlay panelDepending on the ice machine model cut the overlay panel to the dimensions shown in Figure 10.
305/16”(77.0cm)
145/8”(37.1cm)
Front ofoverlaypanel
Figure 10
For model 25iM
Step 5: Drill hinge clearance holes in overlay panelSet the overlay panel on the door front, align the edges, and clamp together. Clamp the panel firmly but be careful not to damage the door or the panel. Mark center of hinge adapter hole on wood panel, top and bottom. (See Figure 11.) Remove wood panel from door and drill 5/16” (8mm) diameter clearance holes into the overlay panels 3/4” (20mm) deep. These will be clearance holes for the top and bottom hinge pins.
This is also a convenient time to locate and drill the holes for your handle. Most often the handle is to match that of the sur-rounding cabinetry. If your handle attaches from the back-side of the custom panel, locate the mounting holes while the panel is attached to the door and cabinet. After the panel is removed from the door, drill the mounting holes from the front, to the recommended diameter of the handle manufacturer. Counter bore the back-side of the panel so the screw heads do not inter-fere with the surface of the door.
For overlay with lock option panel thickness to be 3/4” (19mm) maximum to 5/8” (16mm) minimum.
Weight of the overlay panel should not exceed 20 pounds (9.1 kilograms).
For the door to close properly, it is necessary to maintain a mini-mum space of 9/32” (7mm) between the door and cabinet flange (See Figure 9). This space can be adjusted by adjusting the top and bottom hinge adapter brackets.
FULL OVERLAY PANEL INSTALLATION INSTRUCTIONS
12