16sig1867 716g2 … instruction manual should always accompany this fi rearm and be transferred...
TRANSCRIPT

OWNERS MANUAL: HANDLING & SAFETY INSTRUCTIONS
SIG716®G2READ THE INSTRUCTIONS AND WARNINGS IN THIS MANUAL CAREFULLY
BEFORE USING THIS FIREARM; DO NOT DISCARD THIS MANUAL.This instruction manual should always accompany this fi rearm and be transferred with it upon
ownership, or when the fi rearm is loaned or presented to another person.

2 www.sigsauer.com
State-By-State WarningsCertain states require, by law, that their own specified warning notices, in larger-than-normal type be conspicuously included by the manufacturer, distributor, or retail dealer with firearms sold in that state. SIG SAUER sells its products in compliance with applicable laws and regulations. Because our products may be sold in these states, we include the following:
CALIFORNIA:
WARNING“Children are attracted to and can operate firearms that can cause severe injuries or death. Prevent child access by always keeping guns locked away and unloaded when not in use. If you keep a loaded firearm where a child obtains and improperly uses it, you may be fined or sent to prison.”
ADVERTENCIA“A los niños atraen las amas de fuego y las pueden hacer funcionar. Ellos pueden causarse lesions graves y la muerte. Evite que los niños tengan accesso a las armas de fuego guardándolas siepre con llave y descargadas cuando no las esté utilizando. Si usted tiene una arma de fuego cargada en un lugar en que un niño tiene accesso a ella y la usa indebidamente, le pueden dar una multa o enviarlo a la carcel.”CONNECTICUT:
“UNLAWFUL STORAGE OF A LOADED FIREARM MAY RESULT IN IMPRISONMENT OR FINE.”
FLORIDA:“IT IS UNLAWFUL, AND PUNISHABLE BY IMPRISONMENT AND FINE, FOR ANY ADULT TO STORE OR LEAVE A FIREARM IN ANY PLACE WITHIN THE REACH OR EASY ACCESS OF A MINOR UNDER 18 YEARS OF AGE OR TO KNOWINGLY SELL OR OTHERWISE TRANSFER OWNERSHIP OR POSSESSION OF A FIREARM TO A MINOR OR A PERSON OF UNSOUND MIND.”

www.sigsauer.com 3
MAINE:“ENDANGERING THE WELFARE OF A CHILD IS A CRIME. IF YOU LEAVE A FIREARM AND AMMUNITION WITHIN EASY ACCESS OF A CHILD, YOU MAY BE SUBJECT TO FINE, IMPRISONMENT OR BOTH. KEEP FIREARMS AND AMMUNITION SEPARATE. KEEP FIREARMS AND AMMUNITION LOCKED UP. USE TRIGGER LOCKS.”
MARYLAND:“WARNING: Children can operate firearms which may cause death or serious injury. It is a crime to store or leave a loaded firearm in any location where an individual knew or should have known that an unsupervised minor would gain access to the firearm. Store your firearm responsibly!”
MASSACHUSETTS:“WARNING FROM THE MASSACHUSETTS ATTORNEY GENERAL: This handgun is not equipped with a device that fully blocks use by unauthorized users. More than 200,000 firearms like this one are stolen from their owners every year in the United States. In addition, there are more than a thousand suicides each year by younger children and teenagers who get access to firearms. Hundreds more die from accidental discharge. It is likely that many more children sustain serious wounds, or inflict such wounds accidentally on others. In order to limit the chance of such misuse, it is imperative that you keep this weapon locked in a secure place and take other steps necessary to limit the possibility of theft or accident. Failure to take reasonable preventative steps may result in innocent lives being lost, and in some circumstances may result in your liability for these deaths.”
“IT IS UNLAWFUL TO STORE OR KEEP A FIREARM, RIFLE, SHOTGUN OR MACHINE GUN IN ANY PLACE UNLESS THAT WEAPON IS EQUIPPED WITH A TAMPER RESISTANT SAFETY DEVICE OR IS STORED OR KEPT IN A SECURELY LOCKED CONTAINER.”
NEW JERSEY:“IT IS A CRIMINAL OFFENSE TO LEAVE A LOADED FIREARM WITHIN EASY ACCESS OF A MINOR.”

4 www.sigsauer.com
NEW YORK CITY, NY:“THE USE OF A LOCKING DEVICE OR SAFETY LOCK IS ONLY ONE ASPECT OF RESPONSIBLE FIREARMS STORAGE. FOR INCREASED SAFETY, FIREARMS SHOULD BE STORED UNLOADED AND LOCKED IN A LOCATION THAT IS BOTH SEPARATE FROM THEIR AMMUNITION AND INACCESSIBLE TO CHILDREN AND OTHER UNAUTHORIZED PERSONS.”
NORTH CAROLINA:Any person who resides in the same premises as a minor, owns or possesses a firearm, and stores or leaves the firearm (i) in a condition that the firearm can be discharged and (ii) in a manner that the person knew or should have known that an unsupervised minor would be able to gain access to the firearm, is guilty of a Class 1 misdemeanor if a minor gains access to the firearm without the lawful permission of the minor’s parents or a person having charge of the minor and the minor:
(1) Possesses it in violation of G.S. 14-269.2(b)(2) Exhibits it in a public place in a careless, angry, or threatening manner;(3) Causes personal injury or death with it not in self defense; or(4) Uses it in the commission of a crime.
TEXAS:“IT IS UNLAWFUL TO STORE, TRANSPORT, OR ABANDON AN UNSECURED FIREARM IN A PLACE WHERE CHILDREN ARE LIKELY TO BE AND CAN OBTAIN ACCESS TO THE FIREARM.”
WISCONSIN:“IF YOU LEAVE A LOADED FIREARM WITHIN THE REACH OR EASY ACCESS OF A CHILD YOU MAY BE FINED OR IMPRISONED OR BOTH IF THE CHILD IMPROPERLY DISCHARGES, POSSESSES, OR EXHIBITS THE FIREARM.”
Please check with your licensed retailer, state police, or local police for additional warnings, which may be required by local law or regulation. Such regulations change constantly, and local authorities are in the best position to advise you on such legal matters.

www.sigsauer.com 5
THE BASIC RULES OF SAFE FIREARMS HANDLING
1. ALWAYS treat every firearm as if it were loaded.
2. ALWAYS be sure the barrel is clear of any obstruction.
3. ALWAYS be sure of your backstop, what lies beyond, and the safety of bystanders before you shoot.
4. ALWAYS use clean, dry, original factory-made ammunition of the proper type and caliber for your firearm.
5. ALWAYS wear ear protection and safety glasses when shooting.
6. ALWAYS carry your firearm so that you can control the direction of the muzzle if you fall or stumble.
7. NEVER shoot at a flat surface or water.
8. DO NOT leave an unattended firearm loaded. Firearms and ammunition should be stored separately, locked if possible, beyond the reach of children, careless adults, and unauthorized users.
9. NEVER allow your firearm to be used by anyone who has not read and understood this operator’s manual.
10. DO NOT point any firearm, loaded or unloaded, at any undesired target.
11. NEVER fire your rifle near an animal unless it is trained to accept the noise; an animal’s startled reaction could injure it or cause an accident.
12. NEVER drink alcoholic beverages or take drugs before or during shooting, as your vision and judgment could be seriously impaired, making your firearm handling unsafe.

6 www.sigsauer.com
This firearm was originally sold with a key- operated locking device. While it can help provide secure storage for your unloaded firearm, any locking device can fail. All firearms are designed to fire if they are loaded and the trigger is pulled. Therefore, never install the locking device inside the trigger guard or in any way that makes it possible to pull the trigger! Do not leave the keys in the lock.
The ultimate responsibility for secure storage of any firearm must depend upon its owner and his or her individual circumstances. Firearms should be stored unloaded, in a secure location, separate from their ammunition.
NEVER INSTALL THE LOCKING DEVICE INSIDE THE TRIGGER GUARD
To maximize effectiveness and reduce the chances of malfunction or damage to a firearm, ALWAYS refer to the locking device’s manufacturer directions for installation and removal of the device.
W WARNING – LOCKING DEVICES

www.sigsauer.com 7
FIREARMS SAFETY IS YOUR RESPONSIBILITYThis owner’s manual is designed to assist you in learning how to use and care for your SIG SAUER® pistol properly.
Only when you are certain that you fully understand this manual and can properly carry out its instructions, should you practice loading and firing your firearm with live ammunition. Having a firearm in your possession is a full-time job; you cannot guess and you cannot forget. You must know how to use your firearm safely.
If you have any doubts about your ability to handle or use this firearm safely, you should seek supervised instruction. The Sig Sauer AcademySM provides all levels of firearms safety and skill training, from beginner to expert. For more information contact:
www.sigsaueracademy.com • (603) 610-3400 • Epping, New Hampshire
SAFETY MUST BE THE FIRST AND CONSTANT CONSIDERATION OFEVERY PERSON WHO HANDLES FIREARMS AND AMMUNITION.
For more information about safety, responsible firearms ownership, and shooting sports, contact:National Rifle Association (NRA) of America, 11250 Waples Mill Road, Fairfax, VA 22030-7400 1-800-672-3888 • www.nra.com

8 www.sigsauer.com
This manual contains the information necessary to safely operate and perform authorized preventative maintenance at the user level on the SIG716 G2 DMR rifle. Read this manual in its entirety prior to handling or operating the firearm.
USING OR HANDLING THE SIG716 G2 DMR WITHOUT FIRST READING AND UNDERSTANDING THE ENTIRE OPERATOR’S MANUAL CAN RESULT IN UNSAFE CONDITIONS WITH THE POTENTIAL TO CAUSE DEATH OR SERIOUS BODILY HARM.
• ALWAYS HANDLE AND OPERATE THE FIREARM IN ACCORDANCE WITH THE INSTRUCTIONS CONTAINED IN THIS MANUAL.
• NEVER ALLOW UNAUTHORIZED PERSONS TO HAVE ACCESS TO ANY FIREARM AND NEVER LEAVE A FIREARM UNSECURED.
• BEFORE BEGINNING ANY MAINTENANCE BE SURE TO CLEAR THE FIREARM.
• INSPECT THE CHAMBER VISUALLY AND PHYSICALLY TO ENSURE IT IS CLEAR OF ANY AMMUNITION.
• IF THE 716 DMR IS DROPPED WITH THE BOLT ASSEMBLY LOCKED TO THE REAR AND A LOADED MAGAZINE INSTALLED, IT COULD CHAMBER A ROUND.
• DO NOT LOAD WITH A HOT CHAMBER.
• IF THE 716 DMR STOPS FIRING WITH A LIVE ROUND IN THE CHAMBER OF A HOT BARREL, REMOVE IT WITHIN 10 SECONDS. IF THAT CANNOT BE ACCOMPLISHED KEEP THE MUZZLE POINTED IN A SAFE DIRECTION AND QUICKLY REMOVE THE MAGAZINE. THEN WAIT 15 MINUTES BEFORE HANDLING THE FIREARM.
• DO NOT OVER HEAT THE BARREL.
W WARNING

www.sigsauer.com 9
• DO NOT INTERCHANGE BOLTS BETWEEN FIREARMS.
• ENSURE THE CAM PIN IS PROPERLY INSTALLED IN THE BOLT CARRIER ASSEMBLY. SEVERE DAMAGE TO THE FIREARM AND INJURY OR DEATH TO THE OPERATOR COULD OCCUR.
• DO NOT KEEP LIVE AMMUNITION IN THE WORK AREA.
• ONLY OPERATE THE 716 DMR WITH AMMUNITION OF THE CORRECT CALIBER THAT HAS BEEN PROFESSIONALLY MANUFACTURED TO U.S. MILITARY, SAAMI, OR NATO STANAG SPECIFICATION.
• DO NOT FIRE SERIOUSLY CORRODED AMMUNITION.
• DO NOT FIRE DENTED CARTRIDGES.
• DO NOT FIRE CARTRIDGES WITH LOOSE BULLETS.
• DO NOT FIRE CARTRIDGES WITH THE BULLET COMPRESSED (PUSHED IN).
• ALWAYS CHECK TO ENSURE THE SILENCER, IF UTILIZED, IS PROPERLY ATTACHED TO THE BARREL.
• A HOT SILENCER CAN CAUSE SEVERE BURNS AS A RESULT FROM DIRECT CONTACT WITH UNPROTECTED SKIN OR PROLONGED CONTACT WITH PROTECTED SKIN.
• ALWAYS CHECK TO ENSURE THAT THE SILENCER IS THE CORRECT CALIBER FOR THE AMMUNITION BEING FIRED.
• DO NOT FIRE THE FIREARM AFTER A KNOWN BAFFLE STRIKE OCCURS AS THIS CAN CAUSE CATASTROPHIC FAILURE TO THE SILENCER AND INJURY TO THE SHOOTER OR A BYSTANDER.
W WARNING

10 www.sigsauer.com
Table Of Contents
State-by-State Warnings . . . . . . . . . . . . . . . . . . . . . . . . . . . . . . . . . . . .2
The Basic Rules of Safe Firearms Handling . . . . . . . . . . . . . . . . . . . . . . . . . .5
Firearms Safety, Warnings . . . . . . . . . . . . . . . . . . . . . . . . . . . . . . . . . . .7
Introduction and Warnings . . . . . . . . . . . . . . . . . . . . . . . . . . . . . . . . . . .2
1.0 General Information . . . . . . . . . . . . . . . . . . . . . . . . . . . . . . . . . . . 1311 Description . . . . . . . . . . . . . . . . . . . . . . . . . . . . . . . . . . . . . . . . . . . 131.2 Controls & Features . . . . . . . . . . . . . . . . . . . . . . . . . . . . . . . . . . . . . . 151.3 Specifications . . . . . . . . . . . . . . . . . . . . . . . . . . . . . . . . . . . . . . . . . 161.4 Groups & Assemblies . . . . . . . . . . . . . . . . . . . . . . . . . . . . . . . . . . . . . 181.5 Cycle of Operation . . . . . . . . . . . . . . . . . . . . . . . . . . . . . . . . . . . . . . . 25
2.0 Operating . . . . . . . . . . . . . . . . . . . . . . . . . . . . . . . . . . . . . . . . 282.1 Safety Rules & Procedures . . . . . . . . . . . . . . . . . . . . . . . . . . . . . . . . . . 282.2 Selecting Modes of Fire . . . . . . . . . . . . . . . . . . . . . . . . . . . . . . . . . . . . 302.3 Clearing . . . . . . . . . . . . . . . . . . . . . . . . . . . . . . . . . . . . . . . . . . . 312.4 Loading/Reloading . . . . . . . . . . . . . . . . . . . . . . . . . . . . . . . . . . . . . . 342.5 Firing . . . . . . . . . . . . . . . . . . . . . . . . . . . . . . . . . . . . . . . . . . . . . . 362.6 Operating Under Adverse/Special Conditions . . . . . . . . . . . . . . . . . . . . . . . . . 382.7 Immediate/Remedial Action . . . . . . . . . . . . . . . . . . . . . . . . . . . . . . . . . . 40

www.sigsauer.com 11
3.0 User Level Authorized Preventative Maintenance . . . . . . . . . . . . . . . . . . . 413.1 Field Strip the SIG716 G2 DMR . . . . . . . . . . . . . . . . . . . . . . . . . . . . . . . . 413.2 Cleaning and Lubrication . . . . . . . . . . . . . . . . . . . . . . . . . . . . . . . . . . . 483.3 Reassembly . . . . . . . . . . . . . . . . . . . . . . . . . . . . . . . . . . . . . . . . . . 523.4 SIG Silencer Devices & Muzzle Brake Assembly . . . . . . . . . . . . . . . . . . . . . . . 563.5 Magazine Maintenance . . . . . . . . . . . . . . . . . . . . . . . . . . . . . . . . . . . . 613.6 Function Check . . . . . . . . . . . . . . . . . . . . . . . . . . . . . . . . . . . . . . . . 643.7 Troubleshooting . . . . . . . . . . . . . . . . . . . . . . . . . . . . . . . . . . . . . . . . 66
4.0 Exploded View/Parts Lists . . . . . . . . . . . . . . . . . . . . . . . . . . . . . . . . 684.1 Bolt Carrier Assembly Group and Upper Receiver Group #100 . . . . . . . . . . . . . . . . 684.2 Lower Receiver Group #200 . . . . . . . . . . . . . . . . . . . . . . . . . . . . . . . . . . 704.3 Silencer Group #300 . . . . . . . . . . . . . . . . . . . . . . . . . . . . . . . . . . . . . . 714.4 Rail Adapter Group #400 . . . . . . . . . . . . . . . . . . . . . . . . . . . . . . . . . . . 72
5.0 Transportation and Storage . . . . . . . . . . . . . . . . . . . . . . . . . . . . . . . 68
7.0 Service and Replacement Parts Policy . . . . . . . . . . . . . . . . . . . . . . . . . 74
8.0 Shipping Firearms for Service . . . . . . . . . . . . . . . . . . . . . . . . . . . . . . 76
SIG SAUER® Limited Lifetime Firearms Warranty . . . . . . . . . . . . . . . . . . . . . . 78

12 www.sigsauer.com
WARNINGS OF GREAT IMPORTANCEARE FOUND WITHIN THIS MANUAL
OTHER CAUTIONS AND WARNINGS APPEAR THROUGHOUT THE MANUAL
FIREARMS ARE DANGEROUS FIREARMS
READ THE INSTRUCTIONS AND WARNINGS IN THIS MANUAL THOROUGHLY AND CAREFULLY BEFORE USING.
Locking Devices 6Alterations 14Silencer Devices 56, 60
Magazine Spring 61Storage 73Parts Purchase 75

www.sigsauer.com 13
1.0 General Information about the SIG716 G2 DMR
1.1 Description
The SIG716 G2 DMR is a medium range, magazine fed, gas operated, precision rifle chambered in 7.62x51mm NATO. The SIG716 G2 DMR fires from the closed bolt position. The 716 DMR is available in semi-automatic only versions. The operating system is a short stroke pushrod system enabling optimum function under adverse conditions. The SIG716 G2 DMR is designed to be fired with or without the SIG silencer attached.
The upper KeyMod rail adapter provides a full length MIL-STD 1913 rail. The KeyMod rail adapter has interfaces for mounting of MIL-STD 1913 rail segments at the 3-6 and 9 o’clock positions. The firearm features several sling mounting points enabling the use of multiple sling configurations.

14 www.sigsauer.com
This product was designed to function properly in its original condition. Alterations can make it unsafe. Do not alter any part or add or substitute any parts or accessories not manufactured by SIG SAUER Inc.
DO NOT ALTER ANY FIREARM
W WARNING – ALTERATIONS

www.sigsauer.com 15
1.2 Controls & Features
Charging Handle Forward Assist Ejection Port Cover Gas Block Gas Valve Muzzle Brake/Adapter
Takedown Pin Trigger Magazine Release Button
Pivot Pin
Gas Valve Lever MIL-STD 1913 Upper Rail Adapter Bolt Catch QD Sling Attachment
Lower Rail Adapter Fire Control Selector Grip Release Lever
Friction Lock
Ambidextrous Magazine Catch

16 www.sigsauer.com
CALIBER 7.62 x 51mm NATO
OVERALL LENGTH W/TELESCOPIC STOCK 44.05” MAX/40.5” MIN
OVERALL LENGTH W/O SUPPRESSOR 37.0” MAX/33.45” MIN
BARREL LENGTH W/O SUPPRESSOR 16.0”
LANDS & GROOVES 6 RH
RATE OF TWIST 1:10
WEIGHT (W/ SIGHTS & EMPTY MAG) 9.278 LBS
MAGAZINE 20RD METAL
BARREL THREAD PITCH 5/8 X 24 UNEF-2A
SIGHT RADIUS 21.0”
HEIGHT (Measured at highest point of top rail) 8.0”
TOP MIL-STD 1913 RAIL MOUNTING SURFACE LENGTH 21.250”
BOTTOM MOUNTING SURFACE LENGTH 10.250”/14 KEYMOD HOLES
1.3 Specifications

www.sigsauer.com 17
SIDE MOUNTING SURFACE LENGTH 10.250”/14 KEY MOD HOLES
GRIP MAGPUL MIAD
TRIGGER TYPE GEISSELE SSA 2 STAGE
TRIGGER 4.5 LBS (2.5 1ST-2.0 2ND)
FORWARD ASSIST YES
CHARGING HANDLE AMBIDEXTROUS
HANDGUARD TYPE SIG RAIL ADAPTER/KEYMOD
SELECTOR 2 POS AMBIDEXTROUS
FIRE CONTROL SAFE/SEMI
BOLT CATCH STANDARD M4 TYPE
MAG CATCH SIG SAUER AMBIDEXTROUS
SLING ATTACHMENT POINTS MULTIPLE QD TYPE
BUTTSTOCK CTR TELESCOPIC

18 www.sigsauer.com
1.4 Groups & Assemblies
1.4.1 Upper Receiver Group
The Upper Receiver Group consists of the charging handle assembly, bolt/bolt carrier assembly, barrel assembly, rail adapter assembly, and the operating system.

www.sigsauer.com 19
a) Charging Handle Assembly
b) Bolt Carrier/Bolt Assembly
The bolt carrier assembly is removed as a single unit during field stripping by the operator. It consists of the bolt carrier, the complete bolt, firing pin, and firing pin retaining pin.

20 www.sigsauer.com
c) Barrel Assembly
The SIG716 G2 DMR barrel assembly is comprised of the barrel extension, barrel, gas block, barrel nut, and muzzle brake assembly.
Muzzle Brake Assembly Gas Block Assembly Barrel Barrel Nut Barrel Extension

www.sigsauer.com 21
d) Rail Adapter Assembly
The SIG 716 DMR rail adapter assembly is comprised of the upper and lower rail adapter. The upper rail adapter has 20 minutes of angle (MOA) forward cant, built into the rail. This allows for a minimal amount of elevation adjustment when zeroing the day optic. The top MIL-STD 1913 rail is full length and affixes to the top of the 716 DMR upper receiver providing a continuous, rigid mounting platform.
The rail assembly is fitted with KeyMod attachment points at the 12, 3, 9, and 6 o’clock positions, for mounting of accessories. The rail assembly also allows for access to the gas valve lever for adjustments.

22 www.sigsauer.com
e) Operating/Gas System
The SIG716 G2 DMR operating/gas system is a short stroke pushrod system. Shown below with the barrel assembly, it includes the gas valve, with an extended gas valve lever, the stop pin, and the op rod assembly.
Gas Valve Lever Gas Valve Gas Block Op Rod Assembly
Stop Pin

www.sigsauer.com 23
1.4.2 Lower Receiver Group
The Lower Receiver Group consists of the lower receiver assembly with its related parts, and the buttstock.
Pivot Pin Bolt Catch Hammer Takedown Pin QD Sling Cup
Ambi Magazine Catch Trigger Grip Fire Control Selector Stock Latch Web Sling Slots
Friction Lock

24 www.sigsauer.com
a) Buttstock, Telescopic The 716 DMR is fitted with a 6 position telescopic buttstock. To adjust the length of pull, press upward on the stock latch and hold. This will release the friction lock and allow you to move the stock front to rear for the proper length of pull. The stock will feel slightly loose on the receiver extension until you press upward on the friction lock, which will lock the stock in place.
Stock Latch Friction Lock

www.sigsauer.com 25
1.5 Cycle of Operation
There are eight steps in the cycle of operation of the SIG716 G2 DMR which begin after a loaded magazine is inserted into the firearm.
FEEDINGAs the bolt carrier is released from its rearward position, the carrier group moves forward allowing the lower lugs of the bolt to make contact with the rear of the cartridge as it sits in the magazine.
The cartridge is stripped from the magazine and begins its forward movement toward the chamber.
CHAMBERINGAs the bolt moves forward the bolt locking lugs move forward into the barrel extension. The ejector is then compressed against the left side of the cartridge head.
The last action that occurs is the ejector snapping over the rim of the cartridge case.

26 www.sigsauer.com
LOCKINGThe forward movement of the bolt and the cartridge is stopped by the chamber.
The bolt carrier continues to move forward until it is stopped by contact with the rear face of the barrel extension.
As the carrier goes through the last portion of movement, the bolt is rotated to the left, through the action of the cam slot in the carrier and the cam pin through the bolt.
This engages the bolt lugs with the barrel extension lugs to lock the bolt into the barrel extension.
FIRINGThe selector is rotated to the Semi position.
The trigger is pressed and the hammer is released. The hammer spring drives the hammer forward against the firing pin, which in turn, strikes the primer in the cartridge causing detonation.
UNLOCKINGAs the bullet passes the gas port in the barrel, a small amount of gas is bled off travelling up though the gas port and into the gas block. The gas then enters the gas valve and is regulated by gas ports in the valve. This gas acts upon the piston to move the operating rod to the rear. The operating rod transfers its energy to the carrier assembly setting it in motion.
The rearward movement of the carrier caused the bolt cam pin to rotate the bolt to the unlocked position.

www.sigsauer.com 27
EXTRACTIONAs the bolt carrier assembly moves rearward the spent case is pulled free from the chamber by the extractor. The twisting motion of the bolt aids in the extraction from the chamber.
EJECTIONThe extractor continues to grip the rim of the spent case on the right side. The ejector plunger is applying forward pressure to the left side of the case. As the expended case clears the chamber, then the barrel extension, it is flipped out through the ejector port on the right side of the receiver.
COCKINGThe rearward movement of the bolt carrier overrides the hammer, forcing it down into the receiver and compressing the hammer spring, cocking the hammer in the firing position.

28 www.sigsauer.com
2.0 Operating the SIG716 G2 DMR
2.1 Safety Rules & Procedures
Always follow the safety rules and procedures noted in this manual in addition to the safety rules, regulations, procedures or guidelines of your organization.
2.1.1 Safety Rulesa. Treat every firearm as if it were loaded.
b. Never point a firearm at anything you do not intend to shoot.
c. Keep your trigger finger off the trigger and out of the trigger guard until you are ready to shoot.
d. Keep the firearm on safe until you are ready to shoot.
e. Be sure of your intended target and know what lays beyond.
2.1.2 Safety Proceduresa. When handing a firearm to someone else or prior to accepting a firearm from another person, always physically and visually check the chamber so both people can ensure the firearm is unloaded (see paragraph 2.3).
b. Every SIG SAUER firearm is shipped with a chamber safety flag. The chamber safety flag prevents the chambering of a round when installed and provides a readily visible indication that the firearm’s chamber is empty. The chamber safety flag is to be installed in the firearm’s chamber at all times when not actually on the firing range.

www.sigsauer.com 29
c. Ensure that unauthorized people never have access to a firearm. Never operate or handle a firearm when you are under the influence of alcohol or drugs.
d. Be aware of where the muzzle of the firearm is pointed at all times while handling or operating the firearm. Never allow the muzzle to be inadvertently pointed at another person.
e. Always perform a functions check prior to shooting the firearm (see paragraph 3.5). Do not fire the firearm if it is damaged or it fails functions check.
f. Always use serviceable, clean ammunition that has been professionally manufactured to U.S. military, SAAMI, or NATO STANAG specification of the proper caliber for the firearm. Never oil or otherwise lubricate ammunition. Do not use damaged or dented ammunition.
g. Do not fire the firearm if you had a known baffle strike within the SIG silencer device, as this can cause a catastrophic failure to the silencer, and injury to the shooter or bystander should another baffle strike occur.
h. Live fire firearm’s training should always be conducted on an approved firing range conforming to the minimum safety requirements for the caliber and ammunition utilized and under the supervision of qualified range safety personnel.
i. Always ensure firearms are unloaded prior to storage, maintenance or otherwise not in use.
j. Any maintenance beyond the user level described in this manual, is to be performed by qualified personnel specifically trained on the maintenance of the SIG716 G2 DMR in accordance with the SIG SAUER armorer’s manual for this specific firearm.

30 www.sigsauer.com
2.2 Selecting Modes of Fire
2.2.1 The SIG716 G2 DMR has two fire control selector positions; SAFE and SEMI. The SAFE position prevents the firearm from firing by mechanically blocking the movement of the trigger. The selector can only be rotated to the SAFE position when the hammer is in the cocked position. The SEMI position is for semi-automatic mode and allows the firing of one round each time the trigger is depressed. The fire control selector is ambidextrous and allows for operation by both right and left handed shooters. Each position of the selector is clearly marked by pictographs.
SAFE SEMI

www.sigsauer.com 31
2.3 Clearing the SIG716 G2 DMR
There are 5 steps required to properly clear the SIG716 G2 DMR. The steps are to be followed in order.
1. Ensure the muzzle of the firearm is pointed in a safe direction at all times while clearing the firearm.
2. Remove the magazine from the firearm by depressing the magazine catch with the index finger of the firing hand and simultaneously pulling the magazine free with the support hand.

32 www.sigsauer.com
3. With the support hand depress and hold the bottom portion of the bolt catch, while pulling the charging handle briskly, and fully to the rear with the firing hand. Engage the bolt catch ensuring that the bolt carrier assembly remains locked to the rear, and return the charging handle to its forward and locked position. Ensure the firearm is on safe.

www.sigsauer.com 33
4. Inspect the chamber to ensure that there are no live rounds or spent cartridges present. In periods of darkness or reduced visibility it will be necessary to physically inspect the chamber.
W CAUTION
THE BOLT CARRIER ASSEMBLY IS UNDER SPRING TENSION AND WILL SPRING FORWARD IF THE BOLT CATCH IS INADVERTENTLY DEPRESSED, POSSIBLY CAUSING INJURY. DO NOT TO ALLOW THE BOLT CATCH TO BE DEPRESSED. THE CHAMBER OF THE FIREARM COULD POTENTIALLY BE HOT CAUSING BURNS. WHEN PHYSICALLY INSPECTING THE CHAMBER, USE A PEN OR SIMILAR IMPLEMENT IF YOU ARE NOT SURE THE CHAMBER IS COLD.

34 www.sigsauer.com
2.4 Loading / Reloading
2.4.1 Loading /Bolt carrier assembly locked to the rear
1. Grasp and retract the charging handle locking the bolt carrier to the rear by pressing the bolt catch inward (see page 24).
2. Return the charging handle to the forward locked position.
3. Rotate the fire control selector to the SAFE position.
4. Visually and physically inspect the chamber to ensure it is clear.
5. Insert a loaded magazine until it engages and is held by the magazine catch. Always pull down to ensure the magazine is seated properly.
6. Press the top of the bolt catch inward releasing the bolt carrier. If the firearm is not to be fired immediately, close the ejection port cover.
2.4.2 Loading (Bolt carrier forward)
1. Insert a loaded magazine until it engages and is held by the magazine catch. Always pull down to ensure the magazine is seated properly.
2. Grasp the charging handle and pull it completely to the rear.
3. Release the charging handle allowing it to go forward under full spring pressure (DO NOT RIDE IT FORWARD).
4. Rotate the fire control selector to SAFE.

www.sigsauer.com 35
2.4.3 Reloading an expended magazine (Bolt locked to rear)
1. Rotate the fire control selector to SAFE.
2. Depress the magazine catch from either the left or right side. The magazine should fall free from the mag well.
3. Insert a loaded magazine until it engages and is held in place by the magazine catch. Pull down to ensure proper seating of the magazine.
4. Depress the top of the bolt catch releasing the bolt carrier forward chambering a live cartridge.
2.4.4 Reloading a partially expended magazine (bolt forward, live round chambered)
1. Rotate the fire control selector to SAFE.
2. Grasp the magazine with the support hand and depress the magazine catch from either the left or right side.
3. Remove the partially loaded magazine and secure it.
4. Insert a loaded magazine until it engages and is held in place by the magazine catch. Pull down to ensure proper seating of the magazine.
5. Press bolt catch to release the bolt carrier and chamber a live round.

36 www.sigsauer.com
2.5 Firing
When the fire control selector is rotated to the Semi-Auto position one press of the trigger will result in a single round being fired.
To fire the SIG716 G2 DMR:
1. Insert a loaded magazine into the SIG716 G2 DMR.
2. Fully retract the charging handle and release it to chamber a round.
3. Rotate the fire control selector from SAFE to SEMI.
4. Pressing the trigger releases the hammer causing the cartridge to be fired.
5. Be conscious when firing the SIG716 G2 DMR with the silencer affixed. The silencer generates heat that can cause burns if unprotected skin comes into contact during extended firing.

www.sigsauer.com 37
Valve Positions
The SIG716 G2 DMR has two valve positions.(–) (Unsuppressed) and (+) (Suppressed) or adverse conditions with the silencer removed. Access to the gas valve is via two ports in the upper rail adapter. Pushing the lever downward engages the valve in that specified position.
Valve shown above in (+) Suppressed Position Valve shown above in (–) Unsuppressed Position

38 www.sigsauer.com
2.6 Adverse/Special Conditions
DESERT• Apply light lubrication to internal metal on metal moving parts only. If available use dry graphite lubricant.
• Increase frequency of inspection and cleaning of firearm due to blowing dust and sand. Use muzzle covers if available.
• Unload and clean ammunition and inside of magazines daily. Do not lube magazines.
• Cover firearms when not in use.
• Close the ejection port cover when not in use.
ARCTIC• When operating is sub-freezing temperatures lubricate with LAW. Do not use CLP as it can prevent the firearm from firing.
• Avoid bringing firearm into heated shelters and buildings to prevent condensation from forming on moving parts which will freeze when the firearm is brought back outdoors.
• If necessary to bring firearm indoors allow it to warm to room temperature then disassemble and clean thoroughly ensuring all moisture is removed from firearm and re-lubricate with LAW.
• When operating is snowy environments conduct frequent inspection of the firearm to ensure snow has not gotten into operating parts. Work the action to ensure it is not frozen. Use muzzle covers if available.
• If the bolt carrier becomes frozen with snow/moisture DO NOT fire firearm to free the bolt carrier. Warm firearm with body heat or bring indoors until free movement is restored then clean & re-lubricate firearm.

www.sigsauer.com 39
JUNGLE
• Increase frequency of inspection and cleaning of the firearm for rust/ corrosion.
• Apply thin coat of lubricant on steel parts frequently.
• Inspect hidden surfaces of the bolt and carrier assembly, upper receiver and chamber/barrel extension (locking lugs)
• Inspect the lower receiver for corrosion.
• Inspect and lubricate the spring-loaded detents on the firearm.
• Unload magazine, clean ammunition, and inspect inside of magazines daily for corrosion.
• Wipe ammunition dry before reloading.

40 www.sigsauer.com
2.7 Immediate/Remedial Action
If the SIG716 G2 DMR stops firing:
1. Slap up on the bottom of the magazine.
2. Pull charging completely rearward.
3. Observe the ejection of the case/cartridge and check the chamber for any obstruction.
4. Release the charging handle to feed a new cartridge.
5. Tap the forward assist to ensure the round is chambered and the bolt is locked.
6. Press the trigger and attempt to fire the firearm.
If the SIG716 G2 DMR still fails to fire upon completion of above steps:
1. Check the chamber for a stuck case.
2. If a case is present separate the receivers and remove the bolt carrier and op rod assembly.
3. Attempt to tap out the case with a cleaning rod from the muzzle end of the barrel.
If the firearm still fails to fire refer to the troubleshooting section of this manual.

www.sigsauer.com 41
3.0 User Level Authorized Preventive Maintenance
3.1 Field Strip the SIG716 G2 DMR
1. Clear the firearm and rotate the selector to SAFE.
2. Remove the sling if it is attached.
3. Push the takedown pin from left to right until stopped by the detent.
4. Swing apart the receivers.

42 www.sigsauer.com
5. Partially draw back the charging handle to expose the bolt carrier assembly. Grasp the bolt carrier assembly and pull it straight out from the rear of the upper receiver.
6. Remove the charging handle by pulling it rearward until the two guide tabs are aligned with the slots in the upper receiver track. The charging handle will then drop out of the track and can be removed from the rear of the upper receiver.

www.sigsauer.com 43
7. Remove the firing pin retaining pin from the left side of the bolt carrier.
8. Remove the firing pin from the rear of the bolt carrier.
9. Remove the cam pin by lifting it up and out of the bolt carrier.
10. Pull the bolt assembly from the front of the bolt carrier.

44 www.sigsauer.com
11. Push the extractor pin (2) out of the bolt body (slight pressure on the rear of the extractor will relieve spring tension making this step easier).
12. Remove the extractor (3) (Do not remove the spring 4).

www.sigsauer.com 45
13. With the hammer in the cocked position, depress the buffer retainer then remove the buffer and action spring. The spring can be removed from the buffer by pushing the spring against the buffer with a right hand twisting motion as you pull it rearward off of the buffer.
46 www.sigsauer.com
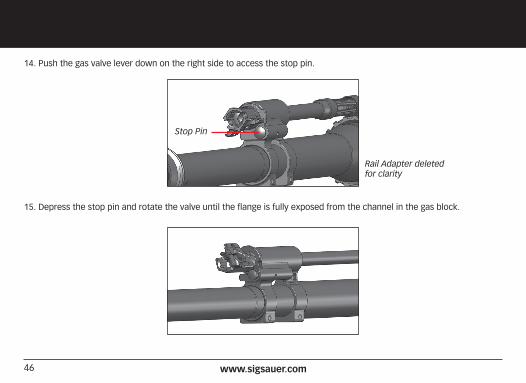
14. Push the gas valve lever down on the right side to access the stop pin.
15. Depress the stop pin and rotate the valve until the flange is fully exposed from the channel in the gas block.
Rail Adapter deleted for clarity
Stop Pin

www.sigsauer.com 47
16. Withdraw the gas valve and op rod from the front of the rail adapter.
17. Separate the gas valve from the op rod.
3.1.2 Upper/Lower Rail Adapter Assembly Removal The removal of the SIG716 G2 rail adapter assembly is not authorized at the user level.

48 www.sigsauer.com
3.2 Cleaning and Lubrication• USE ONLY CLEANING AND LUBRICATION PRODUCTS SPECIFICALLY DESIGNED FOR USE ON FIREARMS.
• DO NOT USE WIRE BRUSHES ON ALUMINUM SURFACES SUCH AS THE UPPER/LOWER RECEIVERS AS THIS CAN SCRATCH THE FINISH.
• FOLLOW ALL MANUFACTURERS INSTRUCTIONS AND CAUTIONS WHEN USING CLEANING AND LUBRICATION PRODUCTS.
• WHEREVER THE TERM CLP (CLEANER-LUBRICANT-PROTECTANT) OR THE WORDS LUBE OR LUBRICANT ARE USED IN THIS MANUAL IT IS INTERPRETED TO MEAN THAT CLP, LAS, OR LAW CAN BE UTILIZED AS APPLICABLE.
• THE SIG 716 DMR SILENCER DOES NOT REQUIRE CLEANING.
• DO NOT LUBRICATE THE SILENCER MOUNTING THREADS ON THE BARREL.
• DO NOT CLEAN THE SIG 716 DMR BORE WITH THE SILENCER ATTACHED AS CLEANING PATCHES COULD BE PULLED FROM THE JAG AND GET LODGED IN THE SILENCER CAUSING A POSSIBLE FIRE HAZARD IF THE RIFLE IS FIRED.
• INCREASE FREQUENCY OF CLEANING IF A SILENCER IS UTILIZED.
3.2.1 Cleaning the Gas SystemUse CLP, rifle bore cleaner, or carbon cleaner.
1. Clean the interior /exterior surfaces of the gas valve of all carbon residue.
2. Clean the piston/op rod of all carbon residue paying particular attention to the piston end.
3. Clean the interior of the gas block.

www.sigsauer.com 49
3.2.2 Cleaning the Bore and ChamberMilitary metal sectional rods should be avoided if at all possible as they can damage the barrel and have an adverse effect on accuracy. Use a quality 1 piece coated or graphite rod with a good bearing.
1. Attach the .30 caliber jag to the rod.
2. Attach a clean patch to the jag.
3. Apply a coat of rifle bore solvent to the patch and slowly push it through the bore toward the muzzle end.
4. Allow the solvent to sit in the barrel to loosen any fouling.
5. Clean all residue from the bolt, bolt carrier, cam pin, and firing pin.
6. Attach a new clean patch to the cleaning rod.
7. Coat the patch as before and push it through the bore.
8. Remove the patch jag and attach the bore brush to the cleaning rod end.
9. Brush through the bore several times to loosen any remaining residue.
10. Push another patch through the bore with bore cleaner to remove any heavy residue loosened by the bore brush.
11. Push new patches through the bore until they come out clean.
12. Coat the chamber brush with bore cleaner.
13. Keep the muzzle elevated so the solvent does not run into your freshly cleaned bore.
14. Make several plunging strokes followed by several 360 degree rotations in the barrel extension to clean the locking lug area.

50 www.sigsauer.com
3.2.3 Lubrication • Bolt body, rear of bolt lugs, bolt rings• Cam pin• Contact surfaces (rails) of the bolt carrier• Anti-tilt surface at the rear of the bolt carrier
Do not introduce oil or grease into the tail shaft of the bolt.
• Charging handle• Ejection port cover spring and latch• Forward assist

www.sigsauer.com 51
• Fire control selector• Pivot & takedown pins • All internal moving parts
• Action spring• Receiver extension

52 www.sigsauer.com
3.3 Reassembly
1. Assemble the extractor to the bolt body.
2. Insert the bolt into the bolt carrier with the extractor positioned as shown below.

www.sigsauer.com 53
3. Install the cam pin.
4. Pull the bolt out to the unlocked position and insert the firing pin through the rear of the bolt.
5. Insert the firing pin retaining pin from the left side of the bolt carrier. Make sure the retaining pin is between the firing pin head (red) and the large flange as shown below.
6. Partially install the charging handle into the upper receiver.
7. Pull the bolt forward to the unlocked position and slide the bolt carrier assembly into the channel of the upper receiver.
Retaining Pin

54 www.sigsauer.com
8. Push the bolt carrier assembly and charging handle completely forward until the bolt locks into the barrel extension.
9. Close the receivers and press in the takedown pin to detent.
10. Assemble the gas valve to the op rod.
11. Guide the op rod through the upper rail adapter.
12. Insert the end of the op rod through the bushing in the upper receiver.

www.sigsauer.com 55
13. Position the gas valve flange to allow the gas valve to be inserted completely into the gas block.
14. Push in on the stop pin and rotate the valve to the suppressed position.
15. Release the stop pin and check to see that the valve rotates and stops at both positions.

56 www.sigsauer.com
3.4 SIG Silencer Devices and Muzzle Brake Assembly
• PRIOR TO ATTACHING OR REMOVING THE SIG SILENCER, MAKE SURE THE FIREARM IS CLEAR (REVIEW SECTION 2.3 PAGE 31).
• ALWAYS WEAR WRAP AROUND EYE PROTECTION WHEN FIRING THE FIREARM WHEN THE SILENCER IS AFFIXED OR REMOVED.
• PERIODICALLY CHECK TO MAKE SURE THE SILENCER REMAINS TIGHT TO THE MUZZLE OR MUZZLE DEVICE.
• WEAR HEAT RESISTANCE GLOVES WHILE TIGHTENING OR REMOVING THE SILENCER AFTER FIRING THE FIREARM.
• DO NOT FIRE CARTRIDGES WITH DAMAGED OR LOOSE BULLETS.
• DO NOT FIRE FRANGIBLE AMMUNITION THROUGH THE SIG SILENCER.
W WARNING

www.sigsauer.com 57
3.4.1 Attachment
The SIG Silencer muzzle brake assembly is comprised of three individual components, the Micro Brake, crush washer, and the Taper-Lok™ Mount. These components are properly installed at the factory and should not be removed. The SIG silencer fits over this entire assembly.
Taper-Lok™ Mount
Micro Brake
Taper Washer

58 www.sigsauer.com
3.4.2 Installing the SIG Silencer to the Muzzle Brake Assembly
1. Ensure all threads and bearing surfaces are clean and undamaged (Do not lubricate threads).
2. Start threading the silencer (clockwise) to the muzzle brake base by hand until the silencer stops on the taper.
3. Turn the silencer an additional 1/8 turn until snug.

www.sigsauer.com 59
3.4.3 Removing the SIG Silencer
SIG SAUER recommends removal of the silencer every 100-200 rounds, to ensure the build-up of carbon does not seize the silencer to the barrel threads or Taper-Lok™ Mount.
1. Rotate the silencer counterclockwise just enough to break the friction seal with the Taper-Lok™ Mount.
2. Depress the latch, then continue rotating the silencer counterclockwise until completely free from the Taper-Lok™ Mount.

60 www.sigsauer.com
W WARNING
3.4.3 Removing the SIG Silencer
Removal if stuck after extended shooting
1. Brace the 716 DMR.
2. Place a 1.5” wrench across the latch engaging the flats of the suppressor flange (this will depress and unlock the latch).
IF THE DIRECTIONS IN STEP 2 DO NOT RESULT IN THE SILENCER LOOSENING, UTILIZE AN ADDITIONAL WRENCH ON THE SILENCER BASE. FAILURE TO DO SO MAY RESULT IN DAMAGE TO THE UPPER/LOWER RECEIVER OR THE POSSIBILITY OF THE BARREL UNTHREADING FROM THE BARREL EXTENSION.
3. Rotate the wrench counterclockwise.
Cleaning the SIG Silencer Device
SIG Silencers do not require internal cleaning. Cleaning of the threads and mating surfaces is suggested and can be accomplished with a carbon removing solvent. Do not run cleaning patches through the silencer as they can become dislodged and pose a potential risk of fire.

www.sigsauer.com 61
3.5 Magazine Maintenance
The SIG716 G2 DMR is supplied with a metal 20 round magazine.
W WARNING
USE CAUTION AS THE MAGAZINE SPRING IS COMPRESSED AND WILL EJECT OUT OF THE BOTTOM OF THE MAGAZINE BODY ONCE THE FLOORPLATE IS REMOVED. WEAR EYE PROTECTION DURING THIS PROCEDURE.
To disassemble the magazine:
1. Push up on the rear of the base plate with one thumb while covering the bottom of the magazine with the other hand in order to maintain control of the compressed spring.

62 www.sigsauer.com
3. Gently remove the spring and follower from the magazine body without stretching it.
4. Do not separate the follower from the spring.
2. Slide the base plate off of the bottom of the magazine body.

www.sigsauer.com 63
Cleaning/Lubricating
a. Wipe the magazine body down with a damp cloth to remove any debris and then dry.
b. Wipe the spring down and apply a very light coat of CLP.
c. Wipe down the follower, base plate, and spring inspecting each item for damage.
Re-Assembly
1. Orient the follower to the magazine body and carefully insert it through the bottom of the magazine.
2. Carefully guide the remainder of the spring up into the magazine body.
3. Position the raised surface of the base plate outward and slide the base plate under the rear tabs.
4. Finish the installation by sliding the base plate under the remaining tabs until the rear of the base plate catches on the magazine body.

64 www.sigsauer.com
3.6 Function Check
1. Ensure the firearm is clear.
2. Insert an unloaded magazine into mag well.
3. Fully retract the charging handle until bolt locks to the rear, then press the charging handle forward to lock.
4. Rotate the fire control selector to SAFE.
5. Depress the magazine catch. The magazine should fall free of magazine well.
6. Depress the bolt catch. The bolt should go forward.
7. Press the trigger to the rear. The hammer should not fall.
8. Rotate the fire selector to SEMI.
9. Press the trigger and hold to the rear. The hammer should fall.
10. Fully retract the charging handle, cocking the firearm.
11. Slowly release the trigger. You should hear an audible click.
12. Press the trigger to the rear. The hammer should fall.

www.sigsauer.com 65
W CAUTION
CONTINUOUSLY RELEASING THE BOLT CARRIER, AND ALLOWING IT TO SLAM FORWARD WITHOUT A CARTRIDGE BEING CHAMBERED CAN CAUSE UNDUE WEAR ON THE BOLT. USE OF AN INERT/DUMMY ROUND DURING FUNCTION CHECK IS RECOMMENDED.

66 www.sigsauer.com
3.7 Troubleshooting
STOPPAGE TEST/INSPECTION CORRECTIVE ACTION
Fails to Fire Selector on SAFE. Rotate to a fire position.
Improper installation of firing pin. Assemble correctly.
Excessive oil in firing pin recess of bolt. Clean out with pipe cleaner.
Defective ammo. Remove / Discard.
Bolt Fails to Unlock Dirty bolt. Clean and replace.
Burred Bolt Lugs. Evacuate to Armorer.
Failure to Feed Dirty/Corroded ammo. Clean and replace.
Dirty magazine. Clean and replace.
Defective magazine. Replace.
Overloaded magazine. Remove excess rounds.
Magazine not seated. Check mag catch adjustment.
Under function. Evacuate to Armorer.
Double Feed Defective magazine. Replace.

www.sigsauer.com 67
STOPPAGE TEST/INSPECTION CORRECTIVE ACTION
Fails to Chamber Dirty/Corroded ammo. Clean/Replace.
Damaged ammo. Discard/Replace.
Dirty chamber. Clean.
Bolt Fails to Lock Dirty bolt lugs. Clean lugs.
Fails to Extract Frozen extractor. Remove/Clean.
Broken extractor spring. Evacuate to Armorer.
Restricted movement of bolt carrier group. Remove, clean, lube.
Dirty/Corroded ammo. Remove/Clean.
Dirty chamber. Clean.
Fails to Lock Bolt to Rear after Last Round.
Faulty magazine. Replace.
Broken bolt catch Evacuate to Armorer.
Frozen Selector Lever Needs oil. Lubricate.
Dirt/Residue under trigger. Clean.

68 www.sigsauer.com
4.0 Exploded View/Parts Lists 4.1 Bolt Carrier Assembly Group and Upper Receiver Group #100

www.sigsauer.com 69
DIAGRAM # DESCRIPTION
101 UPPER RECEIVER GROUP
102 GAS VALVE
103 OP ROD ASSEMBLY
104 CHARGING HANDLE ASSEMBLY, AMBIDEXTROUS
105 BOLT CARRIER
106 FIRING PIN
107 PIN, FIRING PIN RETAINING
108 CAM PIN
109 PIN, EXTRACTOR
110 EXTRACTOR
111 BOLT

70 www.sigsauer.com
4.2 Lower Receiver Group #200
DIAGRAM # DESCRIPTION
201 LOWER RECEIVER GROUP
202 BUFFER ASSEMBLY
203 STOCK, MAGPUL CTR, MIL-STD
204 RECOIL SPRING
201
204
203
202

www.sigsauer.com 71
302
303
304
301
4.3 Silencer Group #300 (If so equipped)
DIAGRAM # DESCRIPTION
301 SILENCER, SRD762TI-QD
302 MICRO BRAKE
303 TAPER WASHER
304 TAPER-LOK™ MOUNT

72 www.sigsauer.com
4.4 Rail Adapter Group #400
DIAGRAM # DESCRIPTION
401 UPPER RAIL ADAPTER
402 LOWER RAIL ADAPTER
403 SCREW, FLATHEAD 7 EACH
404 SCREW, SOCKET HEAD 4 EACH

www.sigsauer.com 73
5.0 Transportation and Storage
When transporting your firearm to and from shooting activities, keep it unloaded for your safety and for the safetyof others. When storing your firearm, keep it separated from ammunition, under lock and key if possible, and out of the reach of children and other inexperienced or unauthorized persons.
W WARNING – STORAGE
Never place or store any firearm in such a manner that it may be dislodged. Firearms should always be stored securely and unloaded, away from children and other unauthorized users. Use the locking device originally supplied with this firearm for storage. The use of a locking device or safety lock is only one aspect of responsible firearms storage. For increased safety, firearms should be stored unloaded and locked in a location that is both separate from their ammunition and inaccessible to children and any other unauthorized person.
STORE SECURELY & UNLOADED

74 www.sigsauer.com
6.0. Service and Replacement Parts Policy
Parts Policy
Our Service Department maintains a full complement of replacement parts. Even though most gunsmiths have theknowledge, training, and the ability to make necessary repairs to your firearm, the skill and workmanship of anyparticular 3rd party gunsmith is totally beyond our control.
Should your firearm ever require service, we strongly recommend that you return it to SIG SAUER Inc. A firearm is a precision instrument and some replacement parts will require individual fitting to ensure correct operation. A wrong part, improper fitting, or incorrect mechanical adjustment may result in an unsafe condition or dangerous malfunction, damage to the firearm, or cause possible serious injury to the shooter or others.
IF ANY PART IS ORDERED WITHOUT RETURNING THE FIREARM TO SIG SAUER Inc., the customer bears full responsibility for ensuring that the part supplied is correct for their particular firearm and is properly installed and fitted by a qualified gunsmith.
SIG SAUER Inc. IS NOT RESPONSIBLE FOR THE FUNCTIONING OF ANY FIREARM IN WHICH REPLACEMENT PARTS ARE INSTALLED BY OTHERS.

www.sigsauer.com 75
W WARNING – PARTS PURCHASE
It is the purchaser’s responsibility to be absolutely certain that any parts ordered from the factory are correctly fitted and installed. Firearms are complicated mechanisms and IMPROPER FITTING OF PARTS MAY RESULT IN A DANGEROUS MALFUNCTION, DAMAGE TO THE FIREARM, AND SERIOUS INJURY TO THE SHOOTER AND OTHER PERSONS. The purchaser and installer of parts must accept full responsibility for the correct adjustment and functioning of the rifle after such installation.
PARTS MUST FIT CORRECTLY
Service PolicyIf you have questions concerning the performance or servicing of your rifle, please write or call:
SIG SAUER Inc. Attention: Customer Service 72 Pease Boulevard, Newington, NH 03801 Phone: (603) 610-3000 ext. 1 Fax: (603) 766-7002
IF YOU DO NOT UNDERSTAND THE INSTRUCTIONS FOR OPERATING YOUR RIFLE, IT IS YOUR RESPONSIBILITY TO CALL OUR CUSTOMER SERVICE DEPARTMENT AT (603) 610-3000 EXT. 1 BEFORE USING YOUR RIFLE.

76 www.sigsauer.com
7.0. Shipping Firearms for Repair
Returning Your Firearm For ServiceIn the event you need to return your rifle to the SIG SAUER Service Department, here’s what to do:
1. The first step is to contact Customer Service at (603) 610-3000 ext. 1 for an RMA number. This number allows SIG SAUER to track the status of your return from its receipt at SIG SAUER through its return to you. Please do not send your firearm until you obtain an RMA number.
2. Make sure that the chamber and magazine(s) are unloaded and that no ammunition is included with your returned firearm.
3. Package the firearm securely to prevent damage. Enclose a letter which includes your name, street address, daytime phone number, model and serial number, and a detailed description of the problem you have experienced or the work you want performed. With the exception of extra magazines, do not include scopes, mounts, or other accessories.
4. An individual’s ability to legally ship firearms to the manufacturer for repair or service varies according to state and local law. Some jurisdictions require that firearms be shipped and returned by a Federally Licensed Firearms Dealer. Consult applicable law to determine how your firearm should be returned.
5. Federal law prohibits persons who do not possess a Federal Firearms License from shipping a firearm via the U.S. Postal Service. (Note: any shipment of firearms outside U.S. borders is subject to the export laws of the United States and to the valid laws of the specific country, which you must strictly follow; prior to exporting any firearm you should seek legal counsel.)
6. SIG SAUER is not responsible for any firearm until it is received, nor for damage incurred during shipment.

www.sigsauer.com 77
7. Ship your firearms insured and prepaid (we do not accept collect shipments) to:
SIG SAUER Inc.Attention: Service Department18 Industrial Drive Exeter, NH 03833
This instruction manual should always accompany this rifle and be transferred with it upon change of ownership.
ORDER PARTS
In the event you want to order parts for your SIG716 G2 DMR, contact Customer Service at (603) 610-3000 ext. 1. Have available the serial number of your rifle and the part diagram number for the part(s) you wish to order. A parts list and diagram of the rifle is provided in this manual.

78 www.sigsauer.com
SIG SAUER® Limited Lifetime Firearms Warranty
SIG SAUER warrants that the enclosed firearm was originally manufactured free of defects in material, workmanship and mechanical function. For the lifetime of the original purchaser, SIG SAUER agrees to correct any defect in the firearm for the original purchaser by repair, adjustment or replacement, at SIG SAUER’s option, with the same or comparable quality components (or by replacing the firearms at SIG SAUER’s option); provided, however, that the firearm is returned unloaded and freight prepaid to SIG SAUER at 18 Industrial Drive, Exeter, NH 03833.
This limited warranty is null and void if the firearm has been misused, damaged (by accident or otherwise), fired with handloaded, reloaded or improper ammunition, fired with an obstruction in the barrel, damaged through failure to provide reasonable and necessary maintenance as described in the manual accompanying the firearm, or if unauthorized repair or any alteration, including of a cosmetic nature, has been performed on the firearm. This limited warranty does not apply to normal wear and tear of any parts.
Subject to the foregoing, this limited warranty confers the right to have the covered firearm or its parts repaired, adjusted or replaced exclusively upon the original purchaser, which right is not transferable to any other person. No implied warranties of any kind are made herein and this warranty does not apply to any accessory items attached or appurtenant to the firearm. In no event shall SIG SAUER be liable for any incidental or consequential damages arising from or in connection with this limited warranty.

www.sigsauer.com 79
Notes:

72 Pease Boulevard, Newington, NH 03801 USA
P/N 1800846-01 REV00
FOR PRODUCT SERVICE ON THIS MODEL, PLEASE CALL (603) 610-3000, EXT. 1
www.sigsauer.com