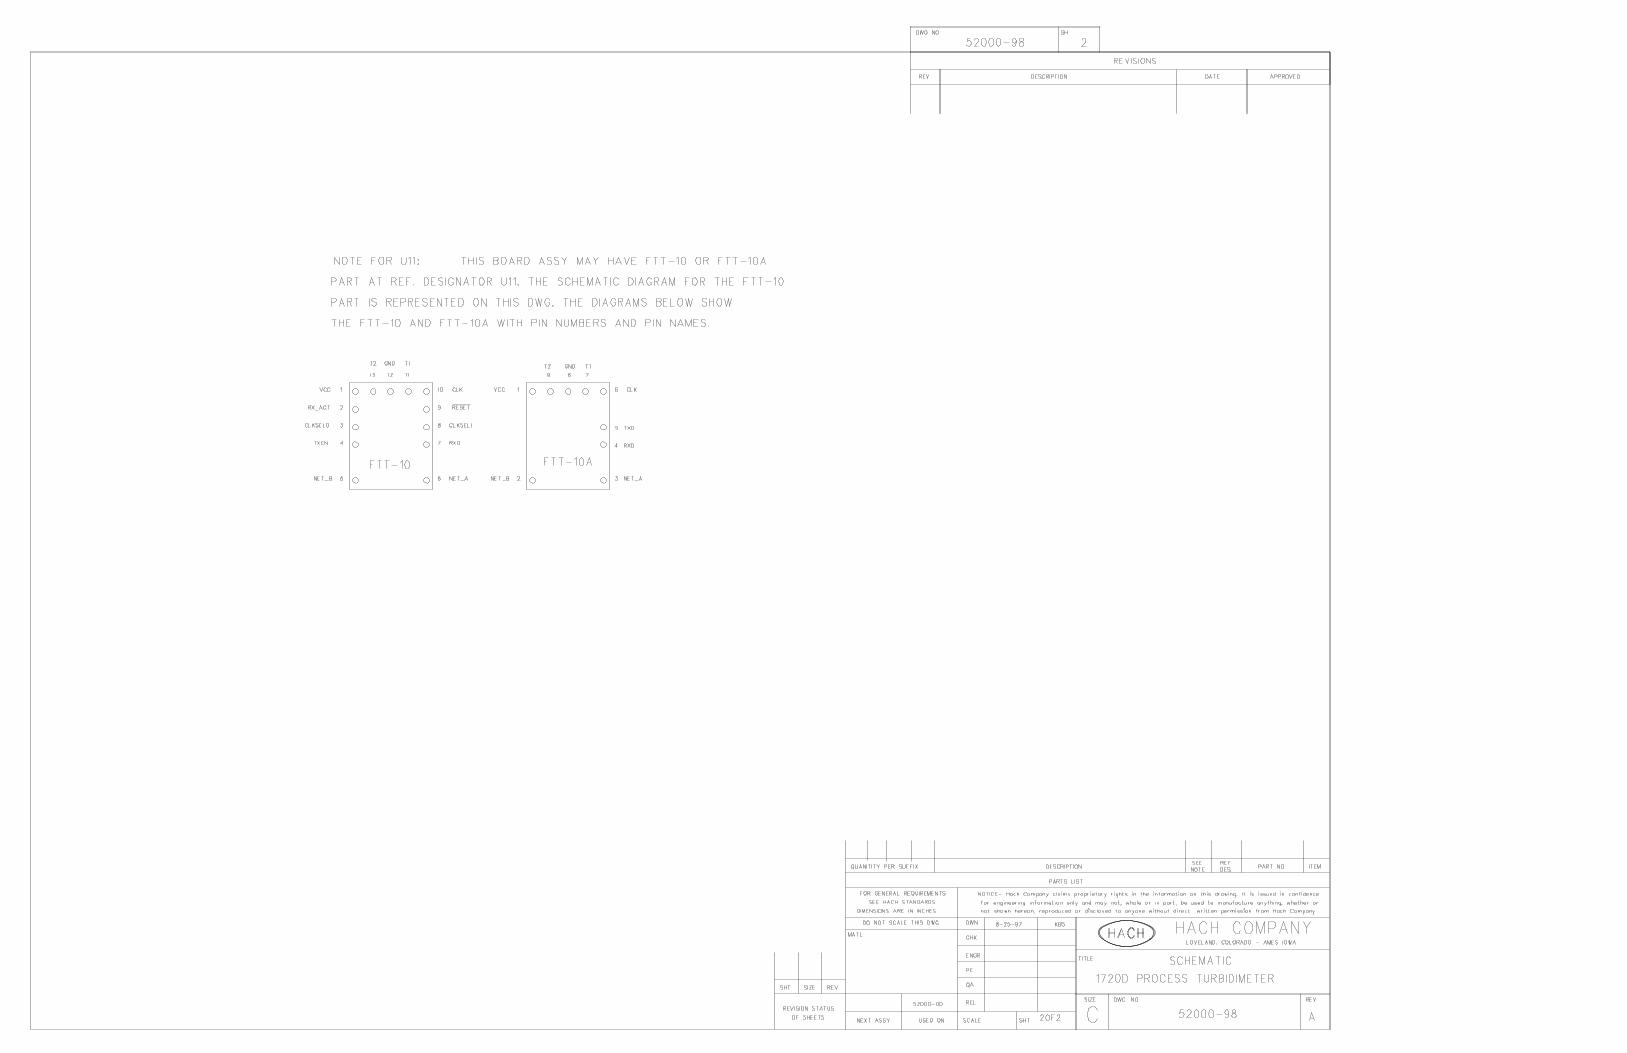
1720d low range process turbidimeter service manual · 1.1 how to use this manual ... the 1720d low...
TRANSCRIPT

52000-04
1720D Low RangeProcess Turbidimeter
SERVICE MANUAL
© Hach Company, 1999. All rights reserved. Printed in the U.S.A. dd/dp 12/99 1ed

2

3
199
TABLE OF CONTENTS
SERVICE ......................................................................................................................................................................... 5
SECTION 1 INTRODUCTION ............................................................................................................................... 71.1 How to Use This Manual ........................................................................................................................................... 71.2 Serial Number History .............................................................................................................................................. 71.3 Software Version History ........................................................................................................................................... 7
1.3.1 Version 2.0 – November 28, 1997 .................................................................................................................... 71.3.2 Version 2.2 – January 27, 1999......................................................................................................................... 7
1.4 General Service Information ...................................................................................................................................... 81.5 Theory of Operation................................................................................................................................................... 8
1.5.1 Principle of Operation....................................................................................................................................... 81.5.2 Electronics ........................................................................................................................................................ 8
1.5.2.1 Amplifier.............................................................................................................................................. 91.5.2.2 System Voltage Divider..................................................................................................................... 101.5.2.3 A/D Converter.................................................................................................................................... 111.5.2.4 Microprocessor and Memory............................................................................................................. 11
1.6 Network Interface..................................................................................................................................................... 111.6.1 -5 Volt Generator ............................................................................................................................................ 121.6.2 Lamp Driver.................................................................................................................................................... 121.6.3 Configure Button ............................................................................................................................................ 121.6.4 Portable AquaTrend Interface......................................................................................................................... 121.6.5 LED Indicators................................................................................................................................................ 12
1.6.5.1 Power LED ........................................................................................................................................ 121.6.5.2 Configure LED .................................................................................................................................. 131.6.5.3 Status LED......................................................................................................................................... 13
1.7 Software ................................................................................................................................................................... 11.7.1 Power Up ........................................................................................................................................................ 131.7.2 Idle Loop......................................................................................................................................................... 141.7.3 Menu Mode..................................................................................................................................................... 141.7.4 Calibration ...................................................................................................................................................... 14
1.7.4.1 Zero Electronics................................................................................................................................. 151.7.4.2 Normal Calibration ............................................................................................................................ 151.7.4.3 Comparative Calibration.................................................................................................................... 161.7.4.4 Calibration History ............................................................................................................................ 16
1.7.5 LonWorks® Technology................................................................................................................................. 171.8 Required Tools and Equipment ................................................................................................................................ 18
SECTION 2 INSTRUMENT INSPECTION AND CHECKOUT ................................................................. 2.1 Test Method.............................................................................................................................................................. 12.2 Checkout Sheet Procedure ....................................................................................................................................... 19
2.2.1 Visual Inspection ............................................................................................................................................ 192.2.2 Add Device Test.............................................................................................................................................. 202.2.3 Cold Start Test ................................................................................................................................................ 202.2.4 Portable AquaTrend Test ................................................................................................................................ 212.2.5 Sensor Startup Values: .................................................................................................................................... 212.2.6 Calibration DI Water Test ............................................................................................................................... 222.2.7 Calibration Gain Factor .................................................................................................................................. 222.2.8 One (1.0) NTU Test ........................................................................................................................................ 232.2.9 Remove Device Test ....................................................................................................................................... 23
3
TABLE OF CONTENTS, continued
SECTION 3 TROUBLESHOOTING.................................................................................................................... 253.1 Introduction............................................................................................................................................................... 253.2 Troubleshooting Tables............................................................................................................................................. 25
3.2.1 Underrange/Overrange .................................................................................................................................... 253.2.2 Zero or Erratic Readings ................................................................................................................................. 263.2.3 Questionable Cal ............................................................................................................................................. 273.2.4 Power Indicator ............................................................................................................................................... 273.2.5 Configure LED................................................................................................................................................ 283.2.6 Status Indicator................................................................................................................................................ 283.2.7 Alarm Log Sensor Warnings ........................................................................................................................... 283.2.8 Voltage Measurements .................................................................................................................................... 29
3.3 Troubleshooting Procedures ..................................................................................................................................... 303.3.1 Cold Start......................................................................................................................................................... 303.3.2 Manually Unconfiguring the 1720D ............................................................................................................... 31
SECTION 4 DIAGNOSTICS .................................................................................................................................. 334.1 Neuron Chip Diagnostics.......................................................................................................................................... 334.2 Sensor Alarm Log..................................................................................................................................................... 33
4.2.1 Reviewing the Sensor Alarm Log ................................................................................................................... 334.2.2 Alarm Begin .................................................................................................................................................... 344.2.3 Alarm End ....................................................................................................................................................... 344.2.4 Power Up......................................................................................................................................................... 344.2.5 Sensor Warning ............................................................................................................................................... 34
4.2.5.1 A/D Timeout....................................................................................................................................... 344.2.5.2 Light Leak .......................................................................................................................................... 354.2.5.3 Bad Lamp ........................................................................................................................................... 354.2.5.4 System Volts....................................................................................................................................... 364.2.5.5 Low Signal ......................................................................................................................................... 36
4.2.6 Clearing the Sensor Alarm Log....................................................................................................................... 364.3 Service Menu Access................................................................................................................................................ 374.4 Display Startup Values.............................................................................................................................................. 384.5 Test Mode Menu ....................................................................................................................................................... 38
4.5.1 Mux Channel ................................................................................................................................................... 394.5.2 Amplifier Setting............................................................................................................................................. 394.5.3 Lamp Setting ................................................................................................................................................... 404.5.4 Millivolt Display ............................................................................................................................................. 40
SECTION 5 REPAIR AND UPGRADES ........................................................................................................... 415.1 Introduction............................................................................................................................................................... 415.2 Software Upgrade ..................................................................................................................................................... 41
5.2.1 Determining the Software Version .................................................................................................................. 415.2.2 Replacing the Flash Memory Chip.................................................................................................................. 41
5.3 Circuit Board Replacement....................................................................................................................................... 445.3.1 Circuit Board Removal.................................................................................................................................... 445.3.2 Circuit Board Installation ................................................................................................................................ 46
5.4 Lamp Replacement ................................................................................................................................................... 475.5 Photocell Cleaning.................................................................................................................................................... 495.6 Photocell Assembly Replacement ............................................................................................................................ 50
SECTION 6 REPLACEMENT PARTS................................................................................................................ 55
4

SERVICE
5

6

us e n
(i.e. ach
he
for
f
SECTION 1 INTRODUCTION
1.1 How to Use This ManualRead this introduction thoroughly to become familiar with the 1720D Low Range Process Turbidimeter pre-repair information.
Photocopy and fill out the checkout sheet (found on the last page of this manual) for each instrument repaired. The checkout sheet provides important information for the customer when shipped with the repaired instrument.
Begin repair procedures by performing the tests listed in the Checkout Sheet Procedure. After identifying the instrument’s symptoms, refer to SECTION 3 on page 25 to help identify the possible causes(s) and to locate related repair procedures. Use SECTION 4 on page 33 as a guide to pinpointing specific problems before repair, and to determine if the instrument is working properlyafter repair. Repair procedures are found in SECTION 5 on page41.
1.2 Serial Number HistoryThe 1720D Low Range Process Turbidimeter is found in the Hach Products for Analysis (PFA) as Cat. No. 52000-00. This number refers to the instrument plall standard accessories. A label affixed to the back of the instrument gives thinstrument only Cat. No. 52000-60. The 12-digit serial number is also listed othis label. The serial number begins with the year and month of manufactureJune of 1997 is 9706), followed by an 8 digit number that is incremented for einstrument produced.
1.3 Software Version HistoryUpgrade all 1720D instruments to the most recent version of software beforereturning the instrument to the customer. The customer should also receive tmost recent instrument manual version available. Upgrade components are included in the 1720D Software Upgrade Kit (Cat. No. 52183-00). Instructionsupgrading 1720D software versions are found in Section 5.2 on page 41.
The following sections describe the new features contained in each release o1720D software. See the 1720D Instrument Manual (Cat. No. 52000-18) for detailed information on each topic.
1.3.1 Version 2.0 – November 28, 1997Initial production release of 52146-79 (1720D software).
1.3.2 Version 2.2 – January 27, 1999Production release with extensive feature improvements and additions.
Table 1 Instrument Version History
S/N Date Description Software
971000000101 10/28/97 Initial production release. Potential for wrong resistor on circuit board (R23) causes “A/D Timeout” error log entry.
2.0
980100000500 1/20/98 Reworked units from 971000000101 to 980100000499. These reworked units have 500 added to the original serial number.
2.0
980100001000 1/20/98 Standard production with correct R23 value. 2.0
990100004456 1/27/99 Production release with extensive feature improvements and additions. 2.2
7
SECTION 1, continued
es
1.4 General Service InformationImportant Note: Use only current revision parts and components. Use of improper
components may void compliance approval.
Repairing the 1720D Turbidimeter may involve replacing damaged optical components, labels, the turbidimeter head bottom and top, and the circuit board. Replacement parts and part numbers can be found in REPLACEMENT PARTS on page 55 of this manual.
The 1720D was designed for hand assembly and disassembly. Wear cotton gloves or finger cots to avoid contaminating the printed circuit boards and optical components. Always assemble and disassemble the instrument in a static-free environment while wearing a grounded static-discharge wrist strap.
1.5 Theory of OperationA brief overview of each functional section of the 1720D Low Range Process Turbidimeter follows.
1.5.1 Principle of OperationThe 1720D Low Range Process Turbidimeter operates on the principle that the amount of light scattered from a sample is proportional to the quantity of particulate material in that sample.
Light from a tungsten lamp is collected by a glass lens and directed through a smooth, upflowing water surface in the turbidimeter body. This design eliminates a glass window between the light source and the sample, which would require regular cleaning, cause stray light scattering, and limit sensitivity at low turbidity levels. Problems with condensation and filming on the exterior of a window also are eliminated by this design. Light scattered by particles in the sample is detected by the submerged photocell at an angle of 90° to the light beam.
A filter in front of the photocell causes the detector response to peak at a wavelength between 400 nm and 600 nm in compliance with USEPA guidelin(USEPA Method 180.1).
Turbidity is calculated by the microprocessor inside the 1720D head, and readings are sent, via the network, to the AquaTrend® Interface where the data is displayed and stored for trending purposes. Readings are sent to peripheral devices as well. These peripheral devices include: Signal Output Modules (SOM) which provide two relay and recorder outputs; Serial I/O Modules (SIO) which provide two way communication with a personal computer or printer; and a Digital Display Module (DDM) which provides an eight character LED local display. A Portable AquaTrend can also be plugged directly into the 1720D head, allowing local calibrations and other setup functions to be performed.
1.5.2 ElectronicsThe 1720D electronics consist of 10 major sections. These are: the amplifier, system voltage divider, A/D converter, microprocessor and memory, network interface, -5V generator, lamp driver, configure button, portable AquaTrend interface and LEDs.
8

SECTION 1, continued
are t
Figure 1 1720D Turbidimeter Components
1.5.2.1 AmplifierThe amplifier section consists of an ICL7650 chopper stabilized op-amp in a“T-Network” transimpedance configuration. In addition, the contacts of a relayconnected across one of the resistors in the T-Network. With the relay contacopen the gain of this amplifier is given by:
Similarly, with the relay contact closed, the gain of this amplifier is:
The difference in gain is approximately 32 times. The software automatically selects the appropriate gain setting depending on the photocell current. See Section 4.5 on page38 for information on manually setting the amplifier gain.
CONFIGURESTATUSPOWER
REMOTE
LOW RANGE1720D Turbidimeter
Turbidimeter Head
Turbidimeter Body
vopenii
---------------- 475k– 1 30.9K1K
----------------+ 15 152 500, ,–
VA----= =
vclosedii
-------------------- 475k 1 0K1K-------+
475,000VA----= =
9

SECTION 1, continued
value e the
Figure 2 1720T Turbidimeter Head Components
1.5.2.2 System Voltage DividerA voltage divider is used to scale the +5 system volts so it can be measured by the A/D converter. The equation describing the output voltage is given by:
With a system voltage of 5.0 volts, the resulting output voltage is 2.01 volts. This is within the –2.5 to +2.5 volt measurable range of the A/D converter.
The +5 system voltage (orange wire from the PS1201) is measured and the is stored (with the lamp off) at startup. This value is periodically re-measured(with the lamp on) and compared to the lamp off value. If the two are the sam(i.e. no voltage drop) there is a problem with the lamp or lamp drive circuit and“BAD LAMP” alarm is stored in the alarm log. See the Display Startup Values section for more information on viewing the +5 system volts.
CONFIGURESTATUSPOWER
REMOTE
LOW RANGE1720D Turbidimeter
Power LED(Green)
Status LED(Yellow)
Remote DeviceConnector
Photocell Wiring
Photocell Assembly
Photocell Shade
LampLamp Wiring
Configure LED(Yellow)
Configure Button
vout1k
1k 1.49k+---------------------------
vin 0.402vin= =
10
SECTION 1, continued
n, 5504
s nd
”)
,
se r-on
nd
h as p to ters.
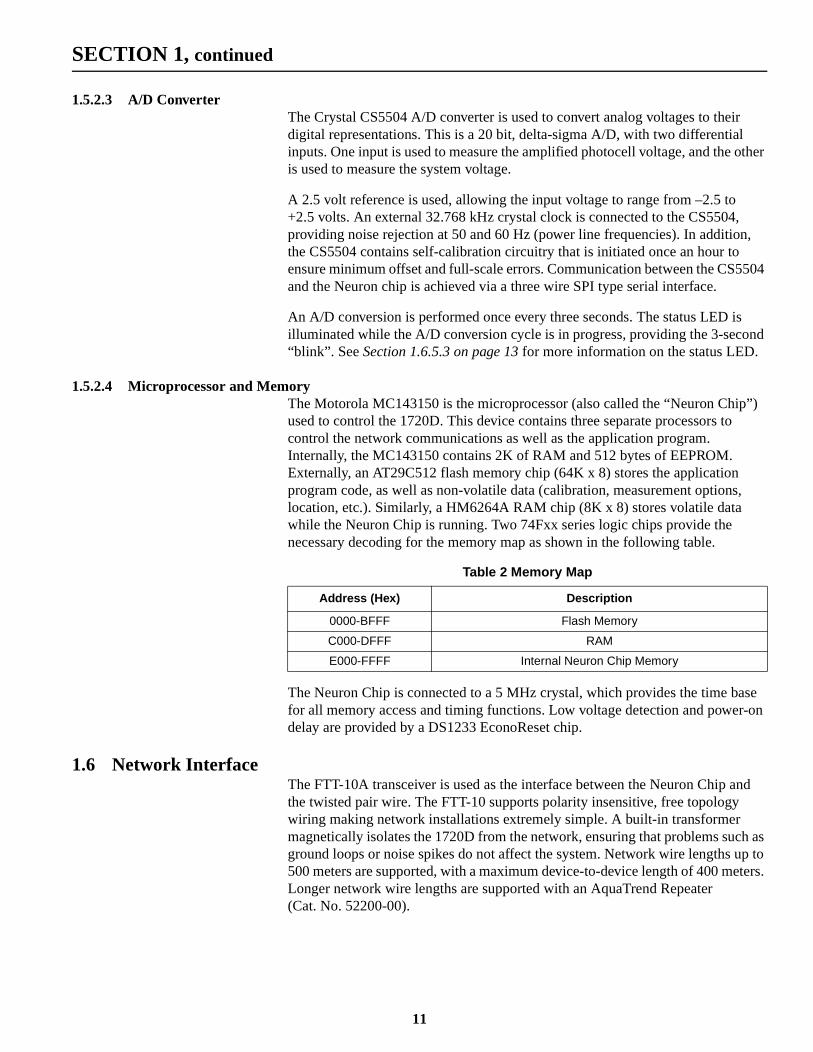
1.5.2.3 A/D ConverterThe Crystal CS5504 A/D converter is used to convert analog voltages to their digital representations. This is a 20 bit, delta-sigma A/D, with two differential inputs. One input is used to measure the amplified photocell voltage, and the other is used to measure the system voltage.
A 2.5 volt reference is used, allowing the input voltage to range from –2.5 to +2.5 volts. An external 32.768 kHz crystal clock is connected to the CS5504,providing noise rejection at 50 and 60 Hz (power line frequencies). In additiothe CS5504 contains self-calibration circuitry that is initiated once an hour toensure minimum offset and full-scale errors. Communication between the CSand the Neuron chip is achieved via a three wire SPI type serial interface.
An A/D conversion is performed once every three seconds. The status LED iilluminated while the A/D conversion cycle is in progress, providing the 3-seco“blink”. See Section 1.6.5.3 on page 13 for more information on the status LED.
1.5.2.4 Microprocessor and MemoryThe Motorola MC143150 is the microprocessor (also called the “Neuron Chipused to control the 1720D. This device contains three separate processors tocontrol the network communications as well as the application program. Internally, the MC143150 contains 2K of RAM and 512 bytes of EEPROM. Externally, an AT29C512 flash memory chip (64K x 8) stores the application program code, as well as non-volatile data (calibration, measurement optionslocation, etc.). Similarly, a HM6264A RAM chip (8K x 8) stores volatile data while the Neuron Chip is running. Two 74Fxx series logic chips provide the necessary decoding for the memory map as shown in the following table.
The Neuron Chip is connected to a 5 MHz crystal, which provides the time bafor all memory access and timing functions. Low voltage detection and powedelay are provided by a DS1233 EconoReset chip.
1.6 Network InterfaceThe FTT-10A transceiver is used as the interface between the Neuron Chip athe twisted pair wire. The FTT-10 supports polarity insensitive, free topology wiring making network installations extremely simple. A built-in transformer magnetically isolates the 1720D from the network, ensuring that problems sucground loops or noise spikes do not affect the system. Network wire lengths u500 meters are supported, with a maximum device-to-device length of 400 meLonger network wire lengths are supported with an AquaTrend Repeater (Cat. No. 52200-00).
Table 2 Memory Map
Address (Hex) Description
0000-BFFF Flash Memory
C000-DFFF RAM
E000-FFFF Internal Neuron Chip Memory
11

SECTION 1, continued
) is ICE ue
ion
red”
nt
able A ip to is ng the
0D
e.
, or
1.6.1 -5 Volt GeneratorSystem +5 volts is converted to approximately -5 volts by an ICL7660, and associated components. This voltage is used by the ICL7650 op-amp as well as the CS5504 A/D converter.
1.6.2 Lamp DriverThe lamp driver circuitry consists of an IRF541 power MOSFET transistor, an LM358 dual op-amp, and several discrete components. The IRF541 regulates the lamp voltage to approximately 4.2 volts at 2 amps. A slow turn-on is inherent in the design and protects the lamp from high inrush currents that would cause premature lamp failure. The lamp is operated in constant voltage mode.
1.6.3 Configure ButtonThe configure button (also know as the “service pin” in LonWorks terminologyused during installation of the 1720D. When this button is pressed, the SERVinput to the Neuron chip is grounded, causing the Neuron chip to send a uniq6 byte ID out on the network. This ID is used by the AquaTrend for identificatand configuration purposes. The configure LED is illuminated to full intensity while the configure button is pressed.
A second use for the configure button is to return the 1720D to the “unconfigustate (configure LED flashing). See Section 3.3.2 on page 31 for more information on this topic.
1.6.4 Portable AquaTrend InterfaceThe Portable AquaTrend is connected via a 5-pin sealed connector on the froface of the 1720D. This connector contains two network connections, +12V, circuit ground, and “remote service”. Remote service is grounded by the PortAquaTrend to indicate it is ready for the 6 byte ID message from the 1720D. 4N38 opto-isolator is used as a buffer between the connector and Neuron chensure transients or noise do not damage the Neuron chip. The opto-isolatorconnected to the same pin as the configure button, so either can trigger sendiconfigure message.
1.6.5 LED Indicators Three LED indicators display information about the operating state of the 172as described below in Section 1.6.5.1 through Section 1.6.5.3.
1.6.5.1 Power LEDThe green power LED is lit during normal operation, indicating power is beingsupplied to the 1720D. This LED is powered directly off the +5 system voltagNo indication is given for the +12V system voltage.
If the power LED is off, no +5 system voltage is being supplied to the 1720Dthe wiring is not properly connected. Refer to the PS1201 Power Supply Manual (Cat. No. 52010-18) for detailed wiring information.
12

SECTION 1, continued
er d,
ates
en a en
g for .
1.6.5.2 Configure LEDThe yellow configure LED provides information about the state of the Neuron chip. The configure LED is always lighted for ½ second immediately after powup. A continuously flashing configure LED indicates the 1720D is unconfigureand is ready to be added by the AquaTrend. A steady off configure LED indicthe 1720D is configured, and is running its application program. A steady on configure LED indicates a problem with the Neuron chip. See the Configure LED Troubleshooting Table for more information on the configure LED.
1.6.5.3 Status LEDThe yellow status LED blinks once every three seconds (corresponding to whmeasurement is taken) in normal operation. The status LED lights steady whthe 1720D is in an alarm condition (high or low setpoint alarm, or sensor warning). Alarms associated with a specific sensor are shown in the alarm lothat sensor, as indicated by a number at the bottom of the AquaTrend display
1.7 SoftwareThe 1720D software was developed in Neuron C®, a derivative of ANSI C written specifically for the Neuron Chip. This allows standard “C” code and data structures to be used with very few modifications.
1.7.1 Power Up
At power up, the 1720D performs the following steps:
• Initializes all variables (both internal variables and SNVTs)
• Initializes all hardware (LEDs, A/D converter, etc.)
• Reads system volts and high/low gain detector values with the lamp off (dark values)
• Broadcasts a “power up” message to the master AquaTrend
• Turns the lamp on
• Reads system volts (to determine if the lamp is functional)
• Reports any startup errors in the alarm log
13

SECTION 1, continued
1.7.2 Idle LoopAfter power up, the 1720D enters the “idle loop”. This loop executes indefinitely until power is removed from the 1720D.
The following steps occur in the idle loop:
• Reads detector value
• If necessary, switches gain and re-reads detector value
• Computes turbidity
• Sends turbidity values to the following devices (if installed on the network)
• Master AquaTrend (1)
• Remote AquaTrends (up to 8)
• Portable AquaTrend
• Digital Display Module (1)
• Signal Output Modules (up to 4; two alarms and two recorders)
• Serial I/O Modules (up to 2)
• Once per hour, reads the system voltage (lamp test) and autocalibrates the A/D converter
• If a menu is requested, sends a string back to the appropriate AquaTrend
1.7.3 Menu ModeWhen the user selects the 1720D from an AquaTrend SENSOR MENU, the 1720D begins transmitting menu strings in response to each ENTER key press on the AquaTrend. These menus contain information on calibration, alarms, relays, measurement options, sensor location, etc. The 1720D continues to run its idle loop during menu display, so that readings continue as normal.
1.7.4 CalibrationFive calibration procedures are presented in the instrument manual supplied with the instrument. Table 3 summarizes each method. (“A” denotes the least time and/or the lowest cost in each category.)
Table 3 Calibration Procedures Compared
Calibration Type
TimeEPA
ReportingStandards Required
Reagent Cost
Accessory Cost
Accessories Required
User-prepared C Yes 2 B B Cal Cylinder, TenSette® Pipet, 4000 NTU Formazin
StablCal® Standards
B Yes 1 C BCal Cylinder, StablCal standard
Comparative C Yes 1 A A None
ICE-PIC™ Module
A No 1 A CICE-PIC Fixture
Multi-turb B Yes 1 C B Cal Cylinder, StablCal standard
14

SECTION 1, continued
e for cs is ally
the
is e es
dard
The zero electronics procedure and calibration history are described in the following sections.
1.7.4.1 Zero ElectronicsBefore starting a calibration, the electronics should be “zeroed” to compensatany optical or electrical offsets. A detailed procedure for zeroing the electronipresented in the 1720D instruction manual and Zero Electronics is automaticperformed each time power is applied to the 1720D.
When zeroing the electronics, ensure the 1720D head is properly seated on calibration cylinder or turbidimeter body and select ZERO ELECTRONICS from the sensor calibration menu. This step establishes a “zero light” offset, whichsubtracted from all future readings. During the zero electronics procedure, thlamp is turned off, and the system volts as well as high/low gain detector valu(dark values) are read.
Once this procedure is complete, the lamp is turned back on and the PLEASE WAIT message is removed from the AquaTrend display. Do not remove the 1720D head during this procedure, or incorrect offset values will be read. (Performing Zero Electronics is equivalent to pressing the SYS RESET key on the 1720C turbidimeter.)
1.7.4.2 Normal CalibrationNormal calibration is performed with the standard Formazin based calibrationsequence. During this procedure, both a DI water and a known Formazin stanvalue (typically 20 NTU) are read in a calibration cylinder. Signal averaging isautomatically set to 6 seconds during this procedure, and restored to its pre-calibration setting when calibration is complete. See Calibration in the 1720D Instrument Manual (Cat. No. 52000-18) for detailed information on performingthe normal calibration procedure.
15

SECTION 1, continued
on tion .5 to .
1.7.4.3 Comparative CalibrationComparative calibration is an alternate calibration method. In this method, the 1720D is forced to read the same value as a grab sample from a laboratory turbidimeter. As in normal calibration, signal averaging is automatically set to 6 seconds during this procedure, and restored to its pre-calibration setting after calibration. See Calibration in the 1720D Instrument Manual (Cat No. 52000-18) for detailed information on performing a comparative calibration procedure.
1.7.4.4 Calibration HistoryA history of either calibration type is displayed by selecting CAL HISTORY from the calibration menu. A sample screen of each type is shown below.
• The first line indicates the type of calibration, either NORMAL CAL or COMPARATIVE CAL.
• The second line indicates the date and time the calibration was performed.
• For a normal calibration, lines 3 and 4 display the value of the DI water and the second standard (typically 20 NTU). For a comparative calibration, line 3 displays the value of the lab instrument comparative reading.
• The gain line denotes how close the calibration is to the “default” calibrati(pre-programmed into the software). A gain value of 1.0 denotes a calibrathat exactly matches the default calibration. Values outside the range of 02.0 trigger QUESTIONABLE CAL at the end of either calibration procedureThis value can be overridden and accepted by selecting Accept Calibration, however the error field will be set to BAD GAIN. The gain value varies basedon lamp age, electronic drift, and cleanliness of the lens and detector.
• The error line displays an error that may have occurred during the last calibration. NONE is displayed if no error was encountered during calibration. The following table lists each calibration error type.
Table 4 Calibration Errors
NONE No error
BAD GAIN Gain outside 0.5 to 2.0 limits
NOT ASCENDING DI water standard read higher NTU value than second standard
SAME STANDARD DI water standard read the same as the second standard
DI WATER > 0.5 DI water computed to be greater than 0.5 NTU
DIV ZERO Divide by zero encountered
16

SECTION 1, continued
er, e ns
rk™
rm
The same information displayed in CAL HISTORY can be sent to a computer or printer via a Serial Input/Output Module (SIO) by selecting PRINT CAL HISTORY.
1.7.5 LonWorks® TechnologyThe 1720D utilizes LonWorks® technology, a complete platform for implementing control network systems. These networks consist of intelligent devices that interact with their environment, and communicate with one another using a common, message-based control protocol. This protocol, commonly referred to as the LonTalk® protocol, is an open standard developed by Echelon® to promote interoperable (or inter-vendor compatible) network products.
The Hach AquaTrend system uses the LonTalk protocol to communicate between AquaTrend network devices. Unlike a “pure” LonWorks based system, howevthe AquaTrend utilizes a string based messaging scheme. This allows menustrings to be stored locally in each device, eliminating the need to upgrade thAquaTrend whenever a new device is developed. Multiple language translatioare also possible with this scheme.
In addition to the AquaTrend messaging scheme, the 1720D includes LonManetwork variables to allow interoperability with other LonWorks systems. Twonumeric turbidity output SNVTs (Standard Network Variable Types) allow the1720D to communicate with virtually any SCADA system that provides a LonWorks driver. In addition, all setup parameters (measurement options, alasetpoints, recorder min/max, etc.) can be accessed via SNVTs.
17

SECTION 1, continued
1.8 Required Tools and Equipment
A list of common tasks and associated tools for repairing the 1720D is shown below.
Checkout Sheet
• PS1201 Power Supply
• AquaTrend
• Calibration Cylinder
• StablCal Standards (<0.1, 1, 20 NTU)
1720D Head Disassembly
• #2 Phillips Screwdriver
Circuit Board Replacement
• #2 Phillips Screwdriver
• 1/8” Tip Slotted Screwdriver
Software Upgrade
• #2 Phillips Screwdriver
• PLCC Extraction Tool (Cat. No. 30484-00)
Photocell Replacement
• #2 Phillips Screwdriver
• 1/8 inch Tip Slotted Screwdriver
• Crimping Tool
• 7/16 inch Open End Wrench
• Heat Gun
Lamp Replacement
• Cotton gloves
Circuit Board Voltage Test
• #2 Phillips Screwdriver
• Digital Volt Meter (DVM)
• Digital Oscilloscope (optional)
18

en
da e ue a a
culo
ente
une uf
que
SECTION 2 INSTRUMENT INSPECTION AND CHECKOUT
2.1 Test MethodDo not use any test equipment that is overdue for calibration. Observe all electrostatic discharge (E.S.D.) requirements. Pay attention to all warnings in this section; failure to do so could result in serious personal injury or damage to the instrument.
In this section the term “instrument” refers to Cat. No. 52000-60 Model 1720D Low Range Process Turbidimeter. Follow the 1720D check-out sheet (found on the last page of this manual) when repairing each instrument. Completed check-out sheets provide the customer with useful information whreturned with the repaired instrument.
2.2 Checkout Sheet Procedure
WARNINGDo not use damaged or defective test equipment. Use only a power receptacle and power cord with earth ground for all test equipment, unless the procedure specifies differently. Only trained personnel should perform these tests.
ADVERTÊNCIA Não use equipamento de teste defeituoso ou que ofereça perigo. Use somente tomacabo de energia com ligação terra para todos os equipamentos de teste, a menos qinstrução do procedimento seja diferente. Somente pessoal treinado está autorizadoexecutar os testes.
ADVERTENCIANo emplee equipo de probar dañado o defectuoso. Conecte solamente a un receptáy use un cable con polo a tierra para todos los aparatos de prueba, a menos que el procedimiento especifique algo diferente. Estas pruebas deben ser ejecutadas solampor personal debidamente adiestrado.
ATTENTIONNe pas utiliser d’équipement d’essai endommagé ou défectueux. Utiliser seulement prise de courant et un câble d’alimentation avec torre pour tout le matériel d’essai, sainstruction contraire dans la procédure d’essai. Ces essais ne doivent être effectuéspar du porsonnel qualifié.
WARNUNGArbeiten Sie nicht mit beschädigter order defekter Testausrüstung. Benutzen Sie ausschießlich geerdete Steckdosen und Stromkabel, es sei denn, im Verfahren sindandere Angaben gemacht. Diese sollten nur von augebildeten Personen durchgefürhrt werden.
2.2.1 Visual Inspection
1. Remove the instrument from the packing carton.
2. Ensure there are no cracks or other defects that can be detected visually in the instrument housing. Also ensure the lamp and photocell are free of cracks, pits, or other abrasions. If defects are found, replace the items as described in Section 5, Repair and Upgrades.
3. Record Pass or Fail for Step 1 of the checkout sheet, depending on the condition of the instrument.
19

SECTION 2, continued
2.2.2 Add Device Test
1. Place the 1720D head on an empty calibration cylinder. Connect the 1720D head to a PS1201 Power Supply and an AquaTrend.
2. Supply AC input power to the PS1201. Verify that the green Power LED illuminates on the 1720D head and that the AquaTrend display is functional.
3. Ensure the configure LED is flashing once per second. If it is not, see Section 3.3.2 Manually Unconfiguring the 1720D on page 31.
4. Press MENU on the AquaTrend. Select NETWORK MENU, followed by SINGLE SENSOR SYSTEM.
5. Press ENTER to continue when the list of devices is shown.
6. If the OPERATION COMPLETE screen appears, the Add Device Test was successful.
7. Record Pass or Fail for Step 2 of the checkout sheet.
2.2.3 Cold Start Test
1. Press MENU on the AquaTrend. Select SENSOR MENU.
2. Press ENTER to select the 1720D.
3. Select SENSOR DIAGNOSTICS, followed by SENSOR COLD START.
4. Select Yes when the display shows: WARNING! RESTORE DEFAULT SETTINGS?.
5. After approximately 30 seconds, the PLEASE WAIT message will clear from the AquaTrend screen.
6. Press EXIT to return to the SENSOR MENU.
20

SECTION 2, continued
7. Select CALIBRATION, followed by CAL HISTORY.
8. If the calibration date/time is 01/01/00 00:00 and the gain is 1.000, the Cold Start Test was successful.
9. Press DISPLAY to return to the display mode.
10. Record Pass or Fail for Step 3 of the checkout sheet.
2.2.4 Portable AquaTrend Test
1. Plug the Portable AquaTrend into the remote connector of the 1720D.
2. After approximately 30 seconds, a reading will appear on Channel A of the Portable AquaTrend if the Portable AquaTrend Test was successful.
3. Remove the Portable AquaTrend from the remote connector.
4. Record Pass or Fail for Step 4 of the checkout sheet.
2.2.5 Sensor Startup Values:
Note: The AquaTrend SERVICE MENU must be enabled to perform steps 5–8.
1. Enable the Service Menu using the instructions in Section 4.3 on page 37.
2. Press MENU on the AquaTrend. Select SENSOR MENU.
3. Press ENTER to select the 1720D.
4. Select SENSOR DIAGNOSTICS.
5. Select DISPLAY STARTUP VALUES.
21

SECTION 2, continued
e
er er
e
X32 Amplifier Gain Dark Millivolts Test
1. Note the value displayed next to “X32 AMP DARK”. If the number is -0.1 to 0.1, the X32 Amplifier Gain Dark Millivolts Test was successful.
2. Record Pass or Fail for Step 5 of the checkout sheet.
X1 Amplifier Gain Dark Millivolts Test
1. Note the value displayed next to “X1 AMP DARK”. If the number is -0.1 to 0.1, the X1 Amplifier Gain Dark Millivolts Test was successful.
2. Record Pass or Fail for Step 6 of the checkout sheet.
Lamp Off +5V Millivolts Test
1. Note the value displayed next to “LAMP OFF +5V”. If the number is 4700 to 5700, the Lamp Off +5V Millivolts Test was successful.
2. Record Pass or Fail for Step 7 of the checkout sheet.
Lamp On +5V Millivolts Test
1. Note the value displayed next to “LAMP ON +5V”. If the number is 225 to 275 lower than lamp off, the Lamp On +5V Millivolts Test was successful.
2. Record Pass or Fail for Step 8 of the checkout sheet.
2.2.6 Calibration DI Water Test
1. Perform a user-prepared calibration (called Normal Calibration in softwarversion 2.0) as described in the Calibration section of the 1720D Low Range Process Turbidimeter Instrument Manual.
Note: Be sure to use low-turbidity, filtered, deionized water.
2. View the first CAL HISTORY screen.
3. Record the value of the DI water. In software version 2.0 this is the numbnext to DI WATER. In software version 2.2 and higher, this is the first numbon the CAL STD line. If the value of the DI water is less than 0.25 NTU, thetest was successful. Perform a normal calibration as described in the Calibration section of the 1720D Low Range Process Turbidimeter Instrument Manual.
2.2.7 Calibration Gain Factor
1. Perform a user-prepared calibration (called Normal Calibration in softwarversion 2.0) as described in the Calibration section of the 1720D Low Range Process Turbidimeter Instrument Manual.
2. Record the value next to “GAIN” in the first CAL HISTORY screen for Step 10 of the checkout sheet. If the number is between 0.750 to 1.50, the test was successful.
22

SECTION 2, continued
2.2.8 One (1.0) NTU Test
1. Perform the Calibration Curve Verification procedure described in the Calibration section of the 1720D Low Range Process Turbidimeter Instrument Manual. This verification may be performed in a calibration cylinder if a 1720D body is not available. Because of the large dilution factor, use only 1.0 NTU StablCal standard (Cat. No. 26598-53) for this test. Do not attempt to make 1 NTU formazin from a 4000 NTU standard.
2. Record the value from the test for Step 11 of the checkout sheet. If the number is between 0.95 and 1.05 NTU, the test was successful.
2.2.9 Remove Device Test
1. Press MENU on the AquaTrend. Select NETWORK MENU, followed by REMOVE DEVICE.
2. Select SENSOR. Press ENTER to confirm removal of the 1720D.
3. Wait approximately 10 seconds. If the OPERATION COMPLETE screen appears and the configure LED begins flashing once per second, the Remove Device Test was successful.
4. Record Pass or Fail for Step 12 of the checkout sheet.
5. Unhook the 1720D from the PS1201/AquaTrend. Place a copy of the 1720D checkout sheet into the packing carton with the instrument.
23

24

SECTION 3 TROUBLESHOOTING
3.1 IntroductionThe 1720D Turbidimeter incorporates a number of self-diagnostic functions to monitor key performance parameters. Continuous diagnostic functions are used to detect system failures and to actuate sensor warnings. The Alarm Log stores pertinent information about alarms and sensor warnings, and in many cases, indicates the nature of the failure.
This instrument is certified to UL/CSA/EU safety standards as well as RF emissions and EMC immunity standards. To assure continued compliance, replace components with current version parts.
3.2 Troubleshooting TablesThe following sections provide troubleshooting tables for a variety of topics. Each table lists symptoms, possible causes, and corrective actions. See SECTION 5 on page 41 for specific repair procedures.
3.2.1 Underrange/OverrangeIf the sample being measured is outside the instrument range (0-100 NTU) or malfunction occurs with the instrument, an underrange or overrange condition may occur. These are defined as follows:
• Underrange is indicated by a negative reading, and typically indicates an improper calibration, failure to zero electronics properly, or a burned-out lamp.
• Overrange is indicated by a continuous reading of 100 NTU, and typically indicates an improper calibration or that the sample being measured is more turbid than 100 NTU.
Table 5 Underrange Troubleshooting Table
Symptom Possible Cause Corrective Action
Low readings
Continuous underrange
Negative readings
Light leak – 1720D head not on body or calibration cylinder during Power Up or Zero Electronics
Ensure the 1720D head is on the body and properly aligned. Repower instrument or perform ZERO ELECTRONICS in the calibration menu.
Lamp burned out, aged lamp, or corroded lamp terminals.
Check lamp connector. Replace lamp.
Check lamp connection at circuit board.
Improper calibration
Check CAL HISTORY menu for bad gain. Check calibration standards.
Recalibrate instrument.
Dirty optics Clean optical components (photocell, lamp, lens).
Photocell cracked / disconnectedCheck photocell wiring at circuit board.
Replace photocell.
Bad lamp driver circuit
Check lamp voltage. Check +12V and +5V voltages (red and orange wires).
Replace circuit board.
25
SECTION 3, continued
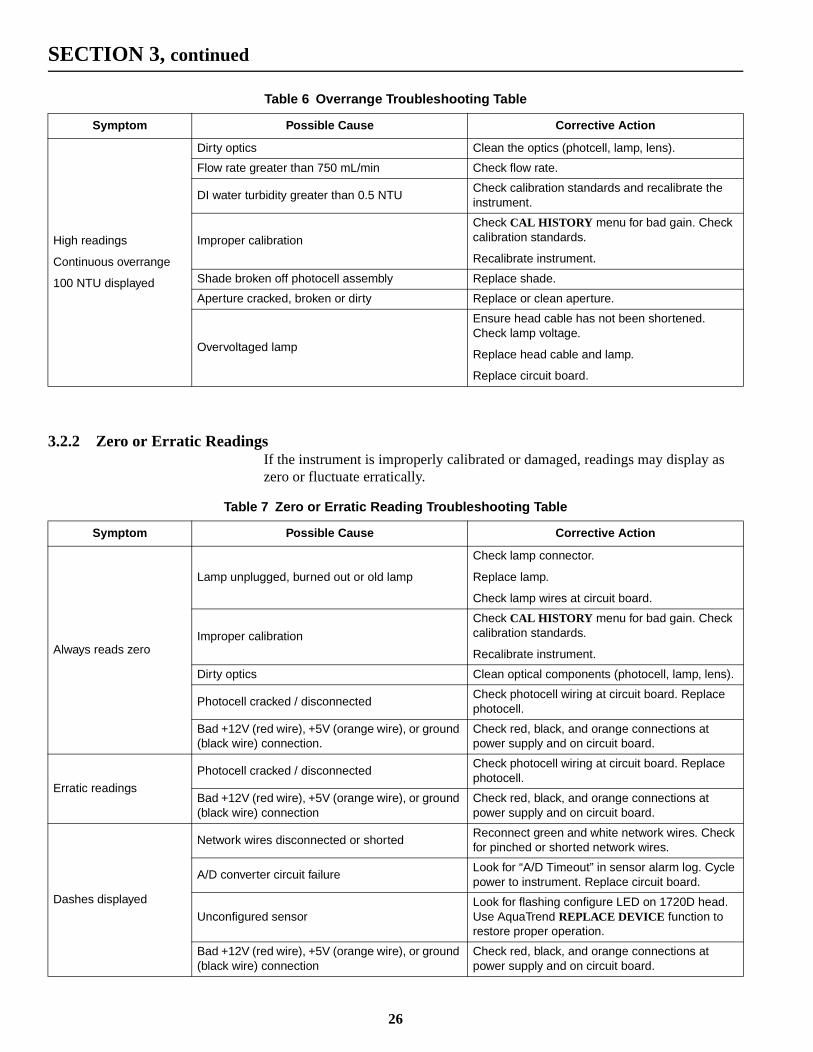
3.2.2 Zero or Erratic ReadingsIf the instrument is improperly calibrated or damaged, readings may display as zero or fluctuate erratically.
Table 6 Overrange Troubleshooting Table
Symptom Possible Cause Corrective Action
High readings
Continuous overrange
100 NTU displayed
Dirty optics Clean the optics (photcell, lamp, lens).
Flow rate greater than 750 mL/min Check flow rate.
DI water turbidity greater than 0.5 NTUCheck calibration standards and recalibrate the instrument.
Improper calibration
Check CAL HISTORY menu for bad gain. Check calibration standards.
Recalibrate instrument.
Shade broken off photocell assembly Replace shade.
Aperture cracked, broken or dirty Replace or clean aperture.
Overvoltaged lamp
Ensure head cable has not been shortened. Check lamp voltage.
Replace head cable and lamp.
Replace circuit board.
Table 7 Zero or Erratic Reading Troubleshooting Table
Symptom Possible Cause Corrective Action
Always reads zero
Lamp unplugged, burned out or old lamp
Check lamp connector.
Replace lamp.
Check lamp wires at circuit board.
Improper calibration
Check CAL HISTORY menu for bad gain. Check calibration standards.
Recalibrate instrument.
Dirty optics Clean optical components (photocell, lamp, lens).
Photocell cracked / disconnectedCheck photocell wiring at circuit board. Replace photocell.
Bad +12V (red wire), +5V (orange wire), or ground (black wire) connection.
Check red, black, and orange connections at power supply and on circuit board.
Erratic readings
Photocell cracked / disconnectedCheck photocell wiring at circuit board. Replace photocell.
Bad +12V (red wire), +5V (orange wire), or ground (black wire) connection
Check red, black, and orange connections at power supply and on circuit board.
Dashes displayed
Network wires disconnected or shortedReconnect green and white network wires. Check for pinched or shorted network wires.
A/D converter circuit failureLook for “A/D Timeout” in sensor alarm log. Cycle power to instrument. Replace circuit board.
Unconfigured sensorLook for flashing configure LED on 1720D head. Use AquaTrend REPLACE DEVICE function to restore proper operation.
Bad +12V (red wire), +5V (orange wire), or ground (black wire) connection
Check red, black, and orange connections at power supply and on circuit board.
26

SECTION 3, continued
nly red.
ted, is .
3.2.3 Questionable CalIf the 1720D detects a potential problem during the calibration procedure, the message “QUESTIONABLE CAL” is displayed during the last step of the calibration procedure.
If the calibration is accepted at this point, the error entry in the CAL HISTORY screen will display one of the errors shown in Table 8.
These errors can only be cleared by recalibrating the instrument. Note that oone error is displayed, even though multiple error conditions may have occur
3.2.4 Power IndicatorDuring normal operation, the green power LED on the 1720D head is illuminaindicating power is being supplied to the 1720D. If the power LED is off, thereno power being supplied to the 1720D or the wiring is not properly connectedRefer to the PS1201 Power Supply manual (Cat. No. 52010-18) for detailed wiring information.
Table 8 Questionable Cal Troubleshooting Table
Symptom (Error) Possible Cause Corrective Action
None No calibration error detected. None
Bad Gain Gain is out of recommended limits.Valid gain values are 0.5 to 2.0. Check the calibration standards and repeat the procedure. If the problem persists, replace the lamp.
Not AscendingCalibration standards were read backwards (highest value standard first).
Repeat the calibration procedure with the standards in the proper order.
Same StandardCalibration standards (Deionized Water, 20 NTU) read the same turbidity value.
Repeat the calibration procedure with the proper standards.
Deionized Water > 0.5The calculated NTU value of the deionized water is greater than 0.5 NTU.
Use filtered water if necessary and re-mix standards. Clean the calibration cylinder and repeat the calibration procedure.
Table 9 Power LED Troubleshooting Table
Symptom Possible Cause Corrective Action
Power LED always OFFPower supply problem
Check red, black, and orange connections at power supply and on circuit board.
Measure +12V and +5V system voltages.
Power not being supplied Check 110/220 volt connections in power supply.
Bad circuit board Replace circuit board.
27
SECTION 3, continued
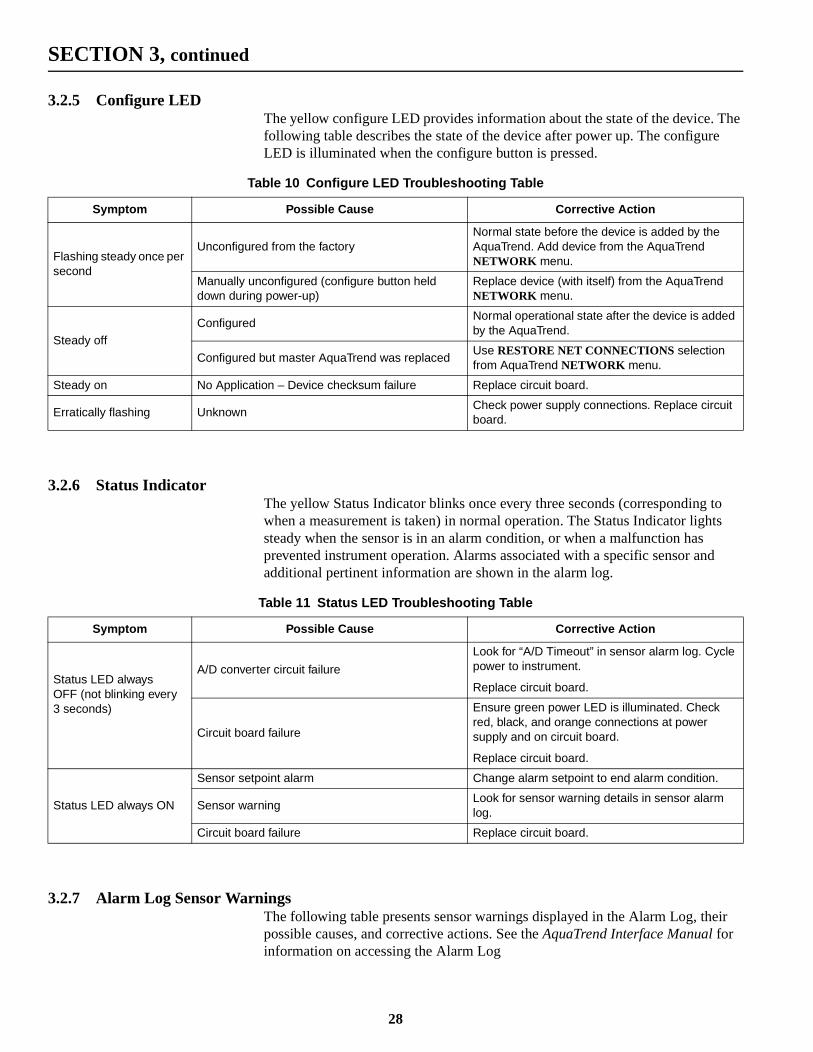
3.2.5 Configure LEDThe yellow configure LED provides information about the state of the device. The following table describes the state of the device after power up. The configure LED is illuminated when the configure button is pressed.
3.2.6 Status IndicatorThe yellow Status Indicator blinks once every three seconds (corresponding to when a measurement is taken) in normal operation. The Status Indicator lights steady when the sensor is in an alarm condition, or when a malfunction has prevented instrument operation. Alarms associated with a specific sensor and additional pertinent information are shown in the alarm log.
3.2.7 Alarm Log Sensor WarningsThe following table presents sensor warnings displayed in the Alarm Log, their possible causes, and corrective actions. See the AquaTrend Interface Manual for information on accessing the Alarm Log
Table 10 Configure LED Troubleshooting Table
Symptom Possible Cause Corrective Action
Flashing steady once per second
Unconfigured from the factoryNormal state before the device is added by the AquaTrend. Add device from the AquaTrend NETWORK menu.
Manually unconfigured (configure button held down during power-up)
Replace device (with itself) from the AquaTrend NETWORK menu.
Steady offConfigured
Normal operational state after the device is added by the AquaTrend.
Configured but master AquaTrend was replacedUse RESTORE NET CONNECTIONS selection from AquaTrend NETWORK menu.
Steady on No Application – Device checksum failure Replace circuit board.
Erratically flashing UnknownCheck power supply connections. Replace circuit board.
Table 11 Status LED Troubleshooting Table
Symptom Possible Cause Corrective Action
Status LED always OFF (not blinking every 3 seconds)
A/D converter circuit failure
Look for “A/D Timeout” in sensor alarm log. Cycle power to instrument.
Replace circuit board.
Circuit board failure
Ensure green power LED is illuminated. Check red, black, and orange connections at power supply and on circuit board.
Replace circuit board.
Status LED always ON
Sensor setpoint alarm Change alarm setpoint to end alarm condition.
Sensor warningLook for sensor warning details in sensor alarm log.
Circuit board failure Replace circuit board.
28

SECTION 3, continued
3.2.8 Voltage MeasurementsMeasure the following voltages directly on the 1720D circuit board, using a Digital Volt Meter (DVM). For all measurements, connect the black ground lead of the DVM to TP1.
.
Table 12 Sensor Alarm Log Troubleshooting Table
Sensor Warning Possible Cause Corrective Action
Bad Lamp
Lamp burned out Replace lamp.
Lamp unplugged Restore connection.
Red wire (+12 V) disconnected Restore connection.
Dislodged lamp Reinstall lamp.
Bad circuit board Replace circuit board.
Low Signal
Photocell coated/dirty Clean the photocell window.
Photocell wires disconnected Reconnect wires.
Photocell broken/crackedReplace photocell.
Contact the Hach Service Department.
Lens coated/dirtyClean the lens using isopropyl alcohol and a cotton swab.
Obstructed light path Remove obstruction.
Sample turbidity >100 NTU
See Bad Lamp causes above
Switch to a high range turbidimeter (such as the Hach SS6).
See Bad Lamp corrective actions above.
Bad System Voltage
A/D Converter Timeout
Improper wiring at power supply See the PS1201 Power Supply Manual (Cat. No. 52010-18).
Turbidimeter head cable shortened to improper length
Contact Hach Service Department.
Fluctuation in power supply voltage Turn power to the instrument off and back on.
Bad circuit board in turbidimeter head Contact the Hach Service Department.
Light Leak (High Dark Counts in Software Version 2.0)
Light Leak—Turbidimeter head not properly aligned on the turbidimeter body or calibration cylinder during Power Up or Zero Electronics
Make sure the turbidimeter head is properly aligned and repower instrument or perform ZERO ELECTRONICS in the Calibration Menu.
Photocell broken/cracked Contact the Hach Service Department.
Table 13 Voltage Measurements
Name Reference Designator Typical Voltage
+5 V dc J1-115.0 V dc with lamp on 5.25 V dc with lamp off
+12 V dc J1-9 12.0 V dc
A/D Reference TP2 2.5 V dc
Lamp Driver J3-1 4.2 V dc
Photcell A/D Input U3-8 -5 to +5 V dc
Voltage Divider A/D Input U3-92 V dc with lamp on 2.1 V dc with lamp off
29

SECTION 3, continued
Figure 3 Voltage Measurements
3.3 Troubleshooting ProceduresThe following procedures describe techniques used in the troubleshooting tables.
3.3.1 Cold StartDuring the Cold Start procedure, the instrument erases and reprograms appropriate memory. The following device settings are replaced with the instrument default settings:
• Calibrations and calibration standard values
• Settings for measurement options
• Alarm levels, recorder min/max
• Sensor name
Network connections are NOT affected by the cold start procedure.
Perform a cold start as follows:
1. Press the MENU key to access the MAIN MENU.
2. Select SENSOR MENU and press the ENTER key.
3. Select the sensor to be cold started and press the ENTER key.
4. Select SENSOR DIAGNOSTICS from the Sensor Menu and press the ENTER key.
TP1(Black)
TP2(Red)
30

SECTION 3, continued
5. Move the pointer to SENSOR COLD START and press the ENTER key.
6. The display will show: WARNING! RESTORE DEFAULT SETTINGS? Select YES and press ENTER to accept.
7. Press the DISPLAY key to return to display mode.
At this point, the instrument will display turbidity readings based on a pre-programmed calibration curve. However, the instrument must be recalibrated to meet the accuracy specifications. A cal history date and time of 00/00/00, 00:00 and gain setting of 1.0 indicates the pre-programmed calibration is in effect.
3.3.2 Manually Unconfiguring the 1720DUse this procedure only if the AquaTrend will not remove the 1720D using REMOVE DEVICE from the NETWORK menu, or if the AquaTrend that installed the 1720D is not available.
The manual unconfigure procedure does NOT change the following settings:
• Calibrations and calibration standard values
• Settings for Measurement Options
• Alarm levels, recorder min/max
• Sensor name
Warning!Network connections between the 1720D and the AquaTrend, DDM, SOM, and SIO are removed by this procedure.
The 1720D network can be manually removed from the AquaTrend (and all network-applied parameters erased) with the following procedure:
1. Remove power from the 1720D and ensure the green Power LED is off.
2. Press and hold the configure button on the 1720D head.
3. While holding the configure button down, restore power to the 1720D.
4. Release the configure button after 10 seconds.
The configure LED will begin to flash, indicating the 1720D is ready to be added to the AquaTrend network.
If the 1720D was inadvertently manually unconfigured, it can easily be re-added to the AquaTrend by using REPLACE DEVICE from the NETWORK menu. See the AquaTrend Interface Manual (Cat. No. 51350-18) for more information.
31

32

the
Log, ice
r from along
e
cent west ved yed.
SECTION 4 DIAGNOSTICS
The 1720D contains built-in diagnostics that are run at power-up and in the background. In addition, service menus that allow additional diagnostics to be examined can be enabled via the AquaTrend.
4.1 Neuron Chip DiagnosticsAfter reset, the Neuron chip automatically performs the following tasks:
• Application Checksum Verification
• System Checksum Verification
• RAM Test
If any of these tests fail, the node will automatically go “applicationless”, and Configure LED will light steady. When this occurs, the Neuron will not run its application program. The result of these tests are stored in the Neuron Error which is accessed via the Device Status command. See the AquaTrend ServManual (Cat. No. 51350-04) for more information on device status.
4.2 Sensor Alarm LogThe alarm log is used to show sensor warnings and alarm conditions for the AquaTrend and each attached sensor. An alarm indicator, shown as a numbe1-8 (denoting sensor alarms) or as an N (denoting network alarms), appears the lower portion of the AquaTrend display during an alarm condition.
4.2.1 Reviewing the Sensor Alarm Log
To review the entries in the 1720D alarm log, perform the following steps:
1. Press the MENU key to access the MAIN MENU. Move the pointer to ALARM LOG and press the ENTER key.
2. Select the appropriate sensor (1-8) and press the ENTER key.
3. A list of the 1720D alarm log entries is displayed. For more information about a particular alarm log entry, select the entry of interest and press thENTER key.
Up to 14 entries can be stored in each 1720D sensor alarm log. The most reentry is shown at the top of the list. If more than 14 entries are stored, the neentry will appear at the top of the list and the oldest entry will be deleted. Anyactive sensor warnings are automatically acknowledged (the number is remofrom the lower portion of the screen) when the sensor alarm log is first displa
33

SECTION 4, continued
The 1720D alarm log is maintained across power outages, so alarm events before a power outage can be viewed after power is restored.
4.2.2 Alarm BeginThe begin alarm condition is displayed as AL1 BEGIN or AL2 BEGIN, depending on the alarm number. This entry indicates a set point alarm started, and shows the time, date, type, set point, and turbidity value that triggered the alarm.
4.2.3 Alarm EndThe end alarm condition is displayed as AL1 END or AL2 END, depending on the alarm number. This entry indicates that a set point alarm completed, and shows the time, date, type, set point, and turbidity value that ended the alarm.
4.2.4 Power UpPower up is always the first entry in the alarm log. The date and time the instrument powered up is displayed along with the POWER UP message. A date/time of 01/01/00 00:00 indicates the 1720D has not received date and time from the Master AquaTrend. In software version 2.0, multiple power up entries were recorded in the alarm log.
4.2.5 Sensor WarningIf the microprocessor detects a problem within the sensor electronics, the alarm log displays SENS WARN. The type of sensor warning, and the time and date the warning occurred are displayed.
Sensor warnings are automatically acknowledged (the number is removed from the lower portion of the screen) when the sensor alarm log is first displayed. The 1720D sensor warnings that may be displayed are described in Section 4.2.5.1 through Section 4.2.5.5.
4.2.5.1 A/D TimeoutWhen power is first applied to the 1720D, a 60 second timeout timer is started to ensure the A/D converter is functioning properly. Every three seconds, the a/d converter is started and, under normal operation, completes its conversion cycle in 50 milliseconds. When the a/d converter completes its conversion cycle, the timeout timer is reset to 60 seconds. If the timeout timer expires (indicating
34

SECTION 4, continued
s the and e, bient
to
the
ses of ad
iffer
with mp
out.
amp
20 consecutive a/d conversion cycles did not complete) the sensor warning A/D TIMEOUT is added to the alarm log.
Since the 1720D cannot compute turbidity readings after an A/D TIMEOUT, dashes are displayed instead of turbidity values. In addition, the AquaTrend sensor alarm indicator is set (denoted by a small box with a number in it at the bottom of the AquaTrend display).
Even after an A/D TIMEOUT, the 1720D continues to attempt to restart the a/d every 3 seconds, so that readings may be restored if the a/d begins to work normally. After an A/D TIMEOUT, cycle power to the instrument to ensure the a/d converter is cleared.
4.2.5.2 Light LeakWhen the 1720D starts, the “dark counts” are read. Dark counts are defined aa/d count values read at the photodetector with the lamp turned off. Both lowhigh gain settings of the amplifier are read. Later, during normal reading modthe dark count values are subtracted from each reading to compensate for amlight reaching the detector. If the a/d converter reads “overrange” (full scale out of the amplifier) for high gain dark, LIGHT LEAK is recorded in the alarm log and the AquaTrend sensor alarm indicator is set (denoted by a small box with a number in it at the bottom of the AquaTrend display). The 1720D attempts continue reading turbidity even after LIGHT LEAK is stored in the alarm log.
Typically, LIGHT LEAK indicates the head was not seated on the body while 1720D was powered up. Selecting ZERO ELECTRONICS from the CALIBRATION menu re-reads the dark counts. Alternatively, power can be cycled to the 1720D which also re-reads the dark counts. Other possible cauLIGHT LEAK are a light leak in the 1720D body, reversed detector leads, or bamplifier circuit.
In software version 2.0, LIGHT LEAK was called HI DARK COUNTS.
4.2.5.3 Bad LampAfter the dark counts are read (see LIGHT LEAK above), the 1720D reads the +5system voltage with the lamp off and the lamp on. If the two readings do not dby more than 3000 a/d counts (14.3 millivolts), BAD LAMP is stored in the alarm log and the AquaTrend sensor alarm indicator is set (denoted by a small boxa number in it at the bottom of the AquaTrend display). After power up, the laon +5 system voltage is read once per hour to ensure the lamp is not burnedThe 1720D attempts to continue reading turbidity even after BAD LAMP is stored in the alarm log.
The typical voltage drop on the +5 system voltage with a “good” lamp is 15000 a/d counts (71.5 millivolts).
Besides a burned out lamp, BAD LAMP may indicate the lamp is unplugged (either at the connector outside the 1720D head or at the circuit board), the lcircuit failed or overheated on the circuit board, or there is a problem with thepower supply.
35

SECTION 4, continued
ed e
ble
the lue,
e
the
ses of a bad
4.2.5.4 System VoltsThe same “lamp-on” volts (+5 system voltage with lamp on) that are used to check for a bad lamp are checked absolutely against 65535 a/d counts (5.469 volts). If the voltage is greater than 5.469 volts, the supply is considerout of range and SYSTEM VOLTS is stored in the alarm log and the AquaTrendsensor alarm indicator is set (denoted by a small box with a number in it at thbottom of the AquaTrend display). The 1720D attempts to continue reading turbidity even after SYSTEM VOLTS is stored in the alarm log.
A SYSTEM VOLTS error may indicate a problem with power supply, a head cathat has been cut too short, or a problem with the 1720D circuit board.
4.2.5.5 Low Signal When the amplifier is set to high gain (x32), each A/D reading is compared tohigh gain dark value. If the reading is less (darker) than the high gain dark vaLOW SIGNAL is stored in the alarm log, and the AquaTrend sensor alarm indicator is set (denoted by a small box with a number in it at the bottom of thAquaTrend display).
Typically, LOW SIGNAL indicates the head was not seated on the body while 1720D was powered up. Selecting ZERO ELECTRONICS from the CALIBRATION menu re-reads the dark counts. Alternatively, power can be cycled to the 1720D which also re-reads the dark counts. Other possible cauLOW SIGNAL are disconnected photodetector leads, a bad photodetector, or amplifier circuit.
4.2.6 Clearing the Sensor Alarm Log
To clear the contents of the 1720D alarm log, perform the following steps:1. Press the MENU key to access the main menu. Move the pointer to SENSOR
MENU and press the ENTER key.
2. Select the appropriate sensor and press the ENTER key.
3. Select SENSOR DIAGNOSTICS and press the ENTER key.
4. Select CLEAR ALARM LOG and press the ENTER key.
5. Move the pointer to YES, and press ENTER. Reviewing the alarm log will show NO ALARM ENTRIES until an alarm, power up, or sensor warning occurs.
36

SECTION 4, continued
359),
4.3 Service Menu AccessService menu access allows service personnel to access menu options not normally available to users. To enable service menus, a password must be entered as shown in the following screens.
1. Press the MENU key.
2. Select AQUATREND MENU.
3. Select AQUATREND DIAGNOSTICS.
4. Select SERVICE MENU.
5. Use the arrow keys to enter the password AMES, then press the ENTER key.
When the service menu is enabled, an “S” is displayed in the lower right corner of the AquaTrend display, indicating service mode is active. The time field alternates between time (00:00) and the minutes remaining in service mode (as shown below.
Service access is turned off by again accessing SERVICE MENU from the AQUATREND DIAGNOSTICS menu.
Alternatively, service access is automatically turned off after 360 minutes (6 hours).
Once service access has been granted via the AquaTrend, the following changes occur to the 1720D:
• Visible display of the DISPLAY STARTUP VALUES menu selection in SENSOR DIAGNOSTICS
• Visible display of test mode menu selection in SENSOR DIAGNOSTICS
37
SECTION 4, continued
r, eful
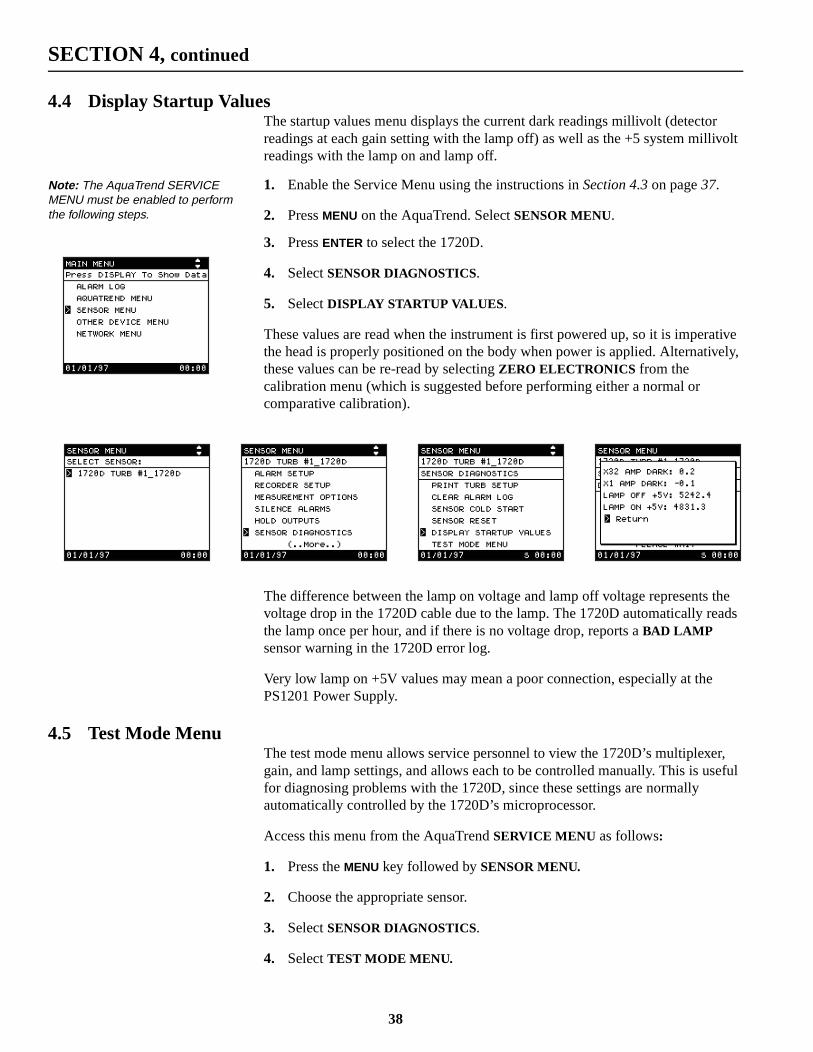
4.4 Display Startup ValuesThe startup values menu displays the current dark readings millivolt (detector readings at each gain setting with the lamp off) as well as the +5 system millivolt readings with the lamp on and lamp off.
Note: The AquaTrend SERVICE MENU must be enabled to perform the following steps.
1. Enable the Service Menu using the instructions in Section 4.3 on page 37.
2. Press MENU on the AquaTrend. Select SENSOR MENU.
3. Press ENTER to select the 1720D.
4. Select SENSOR DIAGNOSTICS.
5. Select DISPLAY STARTUP VALUES.
These values are read when the instrument is first powered up, so it is imperative the head is properly positioned on the body when power is applied. Alternatively, these values can be re-read by selecting ZERO ELECTRONICS from the calibration menu (which is suggested before performing either a normal or comparative calibration).
The difference between the lamp on voltage and lamp off voltage represents the voltage drop in the 1720D cable due to the lamp. The 1720D automatically reads the lamp once per hour, and if there is no voltage drop, reports a BAD LAMP sensor warning in the 1720D error log.
Very low lamp on +5V values may mean a poor connection, especially at the PS1201 Power Supply.
4.5 Test Mode MenuThe test mode menu allows service personnel to view the 1720D’s multiplexegain, and lamp settings, and allows each to be controlled manually. This is usfor diagnosing problems with the 1720D, since these settings are normally automatically controlled by the 1720D’s microprocessor.
Access this menu from the AquaTrend SERVICE MENU as follows:
1. Press the MENU key followed by SENSOR MENU.
2. Choose the appropriate sensor.
3. Select SENSOR DIAGNOSTICS.
4. Select TEST MODE MENU.
38

SECTION 4, continued
From this menu, the current state of the instrument is displayed without affecting any of the settings. This is useful, for example, for determining if the gain is switching properly (high gain should be selected at approximately 10 NTU and below).
The status of Test Mode is shown in this menu. To change test mode, select TEST MODE, then press ENTER. The automatic updates of Mux channel, gain setting, and lamp state are disabled when test mode is set to ON. When mux channel, gain, or lamp state are manually set (see sections below), test mode is automatically set to ON. Test mode is automatically set to OFF when power is cycled to the instrument.
4.5.1 Mux ChannelThe second line of the test mode menu displays the current multiplexer (mux) setting. To change the mux setting, select MUX CHANNEL, then press ENTER. Test mode is automatically set to ON.
Note: Changing to system volts may cause an alarm(s) to trigger.
Under normal operation, the multiplexer is set to the detector channel. In this mode, the A/D measures the voltage from the photocell amplifier circuit. Alternatively, when the multiplexer is set to +5 volts, the A/D measures the voltage from the +5 volt voltage divider. See Section 1.5 on page 8 for more information on the multiplexer.
4.5.2 Amplifier SettingThe third line of the test mode menu displays the current amplifier setting. To change the amplifier setting, select AMP SETTING, then press ENTER. Test mode is automatically set to ON when either option is selected.
Under normal operation, the microprocessor automatically selects the appropriate amplifier gain setting depending on the turbidity of the sample. The amplifier gain switches from high to low at approximately 10 NTU. In X1 mode, the relay in the photocell amplifier circuit is opened, causing the lower gain. In X32 mode, the relay in the photocell amplifier circuit is closed, raising the gain by a factor of 32. See Section 1.5 on page 8, for more information on the photocell amplifier circuit.
39

SECTION 4, continued
4.5.3 Lamp SettingThe fourth line of the test mode menu displays the current lamp setting. To change the lamp setting, select LAMP SETTING, then press ENTER. Test mode is automatically set to ON when either option is selected.
Under normal operation, the lamp is switched on approximately 20 seconds after power is applied to the instrument (dark values are read during this time). The lamp is always left on after the initial power up period, unless ZERO ELECTRONICS is selected, which repeats the 20 second dark value reading period. See Section 1.5 on page 8 for more information on the lamp circuit.
4.5.4 Millivolt Display
WARNINGThe 1720D automatically switches units from NTU to mV (millivolts) when millivolt display is selected. The AquaTrend data log for this channel is erased when the switch occurs. Do not select millivolt dis-play if the data log contains impor-tant data! In addition, alarms may be triggered.
The last line of the test mode menu displays the current status of the millivolt display selection. To change the millivolt display setting, select MILLIVOLT DISPLAY, then press ENTER. Test mode is automatically set to ON when either option is selected.
When the millivolt display is set ON, the units are changed from NTU to mV, and the millivolts at the A/D converter are displayed on the AquaTrend and Digital Display Module. When the millivolt display is set to OFF, the units are returned to NTU, and turbidity is displayed.
When the multiplexer is set to the detector channel, the millivolt range displayed is -2500 to 2500 mV. This voltage can be directly measured with a volt meter at the input to the A/D converter. See the Voltage Measurements section for more information.
40
SECTION 5 REPAIR AND UPGRADES
5.1 IntroductionThis section contains information on common repair and upgrade procedures.
Important Note: Wear a grounding strap when touching any of the circuit board components.
5.2 Software UpgradeThe 1720D software resides in Flash memory, a rewritable memory type similar to EEPROM (Electrical Erasable Programmable Read Only Memory). Because the memory is rewritable, the software can be updated in one of two ways: by replacing the chip or by downloading over the LonWorks network. Currently, only chip replacement is supported.
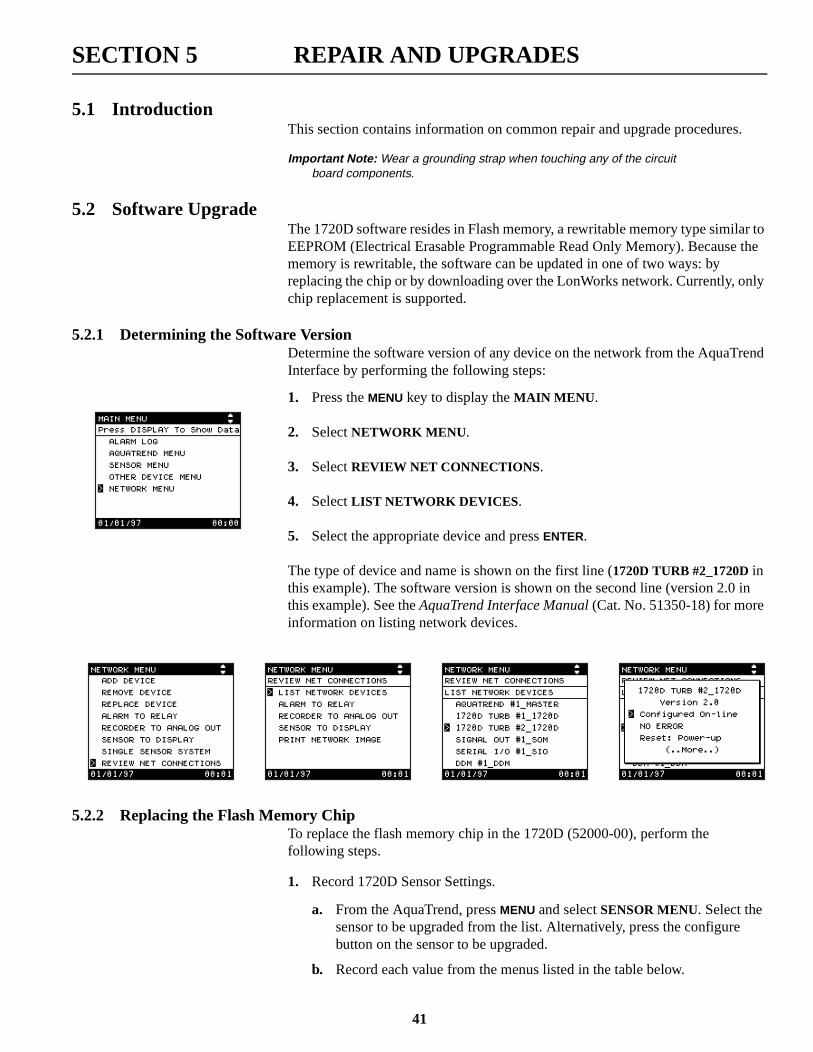
5.2.1 Determining the Software VersionDetermine the software version of any device on the network from the AquaTrend Interface by performing the following steps:
1. Press the MENU key to display the MAIN MENU.
2. Select NETWORK MENU.
3. Select REVIEW NET CONNECTIONS.
4. Select LIST NETWORK DEVICES.
5. Select the appropriate device and press ENTER.
The type of device and name is shown on the first line (1720D TURB #2_1720D in this example). The software version is shown on the second line (version 2.0 in this example). See the AquaTrend Interface Manual (Cat. No. 51350-18) for more information on listing network devices.
5.2.2 Replacing the Flash Memory ChipTo replace the flash memory chip in the 1720D (52000-00), perform the following steps.
1. Record 1720D Sensor Settings.
a. From the AquaTrend, press MENU and select SENSOR MENU. Select the sensor to be upgraded from the list. Alternatively, press the configure button on the sensor to be upgraded.
b. Record each value from the menus listed in the table below.
41

SECTION 5, continued
2. Change the 1720D Flash Memory Chip.
Important Note: This procedure sets calibration and measurement option information to their default values!
a. Remove power to the 1720D. Ensure the green power LED is not illuminated.
b. Remove the 1720D head from the body.
c. Remove the 5 Phillips screws from the underside of the 1720D head.
d. Separate the top half from the bottom half of the 1720D head, exposing the circuit board.
e. Locate socket U1 on the 1720D circuit board. Remove the flash memory chip from the socket by placing the metal teeth of the PLCC extraction tool in the slotted corners of the socket. Gently squeeze the extraction tool to close around the memory chip. As you squeeze, the teeth of the extraction tool will pull the memory chip from the socket.
Table 14 1720D Sensor Settings
Menu Sensor Setting Value
ALARM SETUP ALARM 1 TYPE
ALARM SETUP ALARM 1 HYSTERESIS
ALARM SETUP ALARM 1 SET POINT
ALARM SETUP ALARM 2 TYPE
ALARM SETUP ALARM 2 HYSTERESIS
ALARM SETUP ALARM 2 SET POINT
RECORDER SETUP RECORDER 1 MIN
RECORDER SETUP RECORDER 1 MAX
RECORDER SETUP RECORDER 2 MIN
RECORDER SETUP RECORDER 2 MAX
MEASUREMENT OPTIONS BUBBLE REJECT
MEASUREMENT OPTIONS SIGNAL AVG
MEASUREMENT OPTIONS PRINT INTERVAL
MEASUREMENT OPTIONS TIME STAMP
EDIT NAME SENSOR NAME
42

SECTION 5, continued
Figure 4 Flash Memory Chip Location
f. Obtain the latest 1720D software upgrade kit (Cat. No. 52183-00). Carefully install the new flash memory in socket U1 with the proper orientation. Orient the memory chip so the angled corner of the chip aligns with the angled corner in the socket. Press the memory chip firmly in place until it is seated in the socket.
g. If necessary, press the gasket back into the groove in the top of the 1720D head. Place the top half of the 1720D cap back on the bottom half of the cap, ensuring the gasket is properly seated and no wires are pinched.
h. Apply Locktight (Cat No. 41437-00) to the threaded screw holes and reinstall the five Phillips screws on the underside of the 1720D head.
i. Place the 1720D head back on the body.
j. Restore power to the 1720D head. Ensure the green power LED is illuminated.
Note: The 1720D is unconfigured at this point (configure LED flashing), and must be replaced using the AquaTrend Network menu before it will communicate with the AquaTrend or other network devices.
3. Replace the 1720D from the AquaTrend Network Menu.
a. Press the MENU key on the AquaTrend. Select NETWORK MENU followed by REPLACE DEVICE.
b. Select CONTINUE.
U1(Flash Memory Chip)
Socket
43
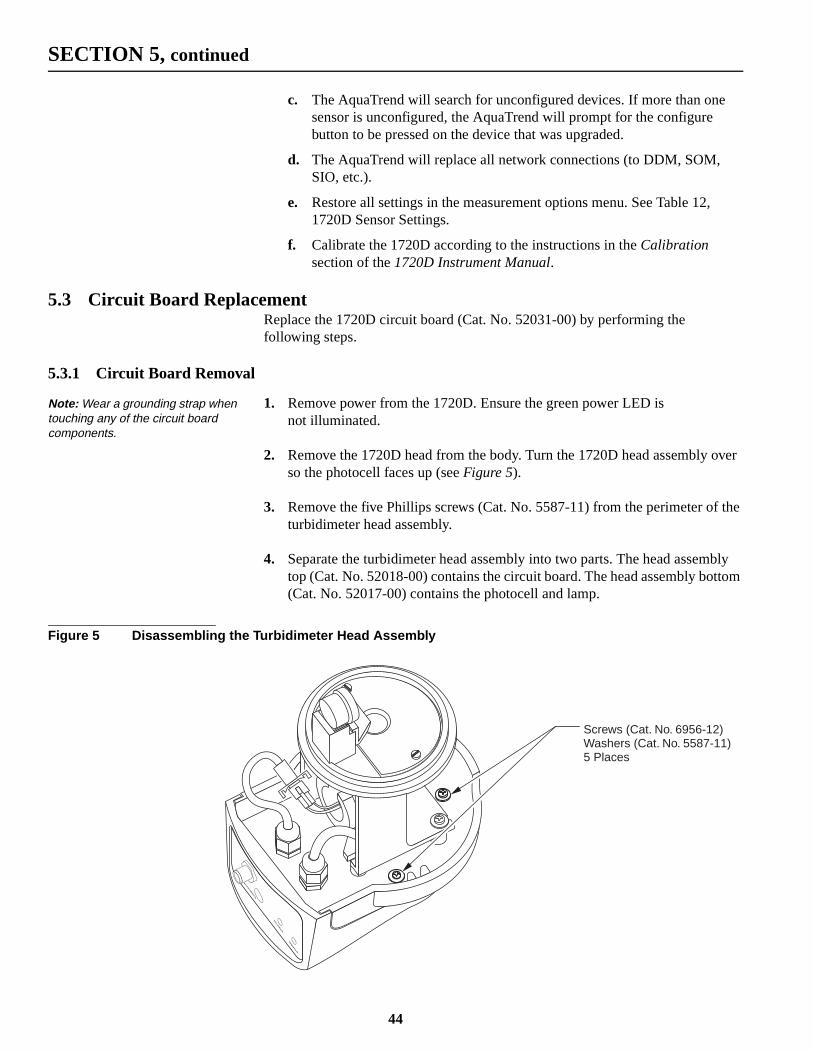
SECTION 5, continued
c. The AquaTrend will search for unconfigured devices. If more than one sensor is unconfigured, the AquaTrend will prompt for the configure button to be pressed on the device that was upgraded.
d. The AquaTrend will replace all network connections (to DDM, SOM, SIO, etc.).
e. Restore all settings in the measurement options menu. See Table 12, 1720D Sensor Settings.
f. Calibrate the 1720D according to the instructions in the Calibration section of the 1720D Instrument Manual.
5.3 Circuit Board ReplacementReplace the 1720D circuit board (Cat. No. 52031-00) by performing the following steps.
5.3.1 Circuit Board Removal
Note: Wear a grounding strap when touching any of the circuit board components.
1. Remove power from the 1720D. Ensure the green power LED is not illuminated.
2. Remove the 1720D head from the body. Turn the 1720D head assembly over so the photocell faces up (see Figure 5).
3. Remove the five Phillips screws (Cat. No. 5587-11) from the perimeter of the turbidimeter head assembly.
4. Separate the turbidimeter head assembly into two parts. The head assembly top (Cat. No. 52018-00) contains the circuit board. The head assembly bottom (Cat. No. 52017-00) contains the photocell and lamp.
Figure 5 Disassembling the Turbidimeter Head Assembly
Screws (Cat. No. 6956-12)Washers (Cat. No. 5587-11)5 Places
CO
NF
IGU
RE
ST
AT
US
PO
WE
R
44

SECTION 5, continued
5. Refer to Figure 6 and disconnect the wires from connectors J1, J2, and J3 as follows:
• Loosen the 3 screws holding each wire in J2, and remove each wire.
• Loosen the 2 screws holding each wire in J3, and remove each wire.
• Loosen the 12 screws holding each wire in J1, and remove each wire.
6. Remove the two Phillips screws (Cat. No.7511-11) from the circuit board (Cat. No. 52031-00)s See Figure 7.
7. Lift the circuit board (Cat. No. 52031-00) out of the head assembly top (Cat. No. 52018-00).
Figure 6 Removing Wires
Figure 7 Removing Screws from Circuit Board
12
34
56
78
910
1112
J3
J1
12
1 2 3
To Lamp
To Photocell
Disconnect each wirefrom connectorsJ1, J2, and J3
12
34
56
78
910
1112
J3
J1
12
1 2 3
Remove screws(Cat. No. 7511-11)2 Places
Circuit Board(Cat. No. 52031-00)
45

SECTION 5, continued
46
5.3.2 Circuit Board Installation1. Feed the head cable wires (Cat. No. 52019-00) through the large hole in the
52031-00 circuit board, and place the board in the head assembly top so that circuit board components face the open end of the head assembly, and the flat end of circuit board faces the flat end of the head assembly. To ensure proper push button operation, hold the circuit board tight against the flat end of the head assembly. Make sure the wires to the remote connector are not trapped beneath the circuit board.
2. Place two Phillips screws (Cat. No.7511-11) in holes and tighten.
Figure 8 Head Cap Top and Bottom
3. Install the wires in terminal block J1 according to the following table.
POWER
STATUS
CONFIGURE
REMOTE
Low Range1720D Turbidim
eter
1720D Turbidimeter
Head Cap - Top(Cat. No. 52018-00)
Screw5 Places
(Cat. No. 5587-11)
Washer5 Places
(Cat. No. 6956-12)
Head Cap - Bottom(Cat. No. 52017-00)
Gasket(Cat. No. 52028-00)
Table 15 Terminal Block J1 Wire Colors
Position Wire Color Wire Source
1 Brown Remote Connector
2 Black Remote Connector
3 Blue Remote Connector
4 Gray Remote Connector
5 White Remote Connector
6 Green/Yellow Remote Connector Ground Lug
7 White 52019-00 Head Cable
8 Green 52019-00 Head Cable

SECTION 5, continued
4. Position the head assembly bottom (Cat. No. 52017-00) next to the head assembly top (Cat. No. 52018-00).
5. Thread the black and red wire from the photocell through the ferrite bead (Cat. No. 52620-00) before installing the wires in the connector.
6. Install photocell wires into connector J2 in the head assembly top according to the following table.
7. Install the lamp wires into connector J3 in the head assembly top according to the following table.
8. Place five washers (Cat. No. 6956-12) on five Phillips screws(Cat. No. 5587-11).
9. Route all wires so they do not touch the heatsink and place the head assembly top on the head assembly bottom. Make sure the gasket (Cat. No. 52028-00) is in place and no wires are pinched between the two halves.
10. Use locktight (Cat. No. 41437-00) in the screw holes in the head assembly bottom, place five screws in the holes and tighten.
5.4 Lamp ReplacementTo change the lamp (Cat. No. 18950-00), perform the following steps. When handling the bulb, wear cotton gloves to protect your hands and to avoid fingerprints on the glass.
1. Remove power from the 1720D. Ensure the green power LED is not illuminated.
2. Remove the 1720D head from the body. Turn the 1720D head over so the photocell faces up.
9 Red 52019-00 Head Cable
10 Black 52019-00 Head Cable
11 Orange 52019-00 Head Cable
12 Shield 52019-00 Head Cable
Table 15 Terminal Block J1 Wire Colors (Continued)
Table 16 Terminal Block J2 Wire Colors
Position Wire Color Wire Source
1 Black Photocell
2 Red Photocell
3 Shield Photocell
Table 17 Terminal Block J3 Wire Colors
Position Wire Color Wire Source
1 Black Lamp
2 Red Lamp
47

SECTION 5, continued
3. Disconnect the lamp leads by unplugging the connector.
4. After the bulb has cooled, grasp the bulb with the fingers of one hand. Twist the bulb in a counterclockwise direction, pulling out slightly, until the bulb is released from the housing.
Figure 9 Replacing the Lamp Assembly
5. Pull the lamp leads and connector through the hole in the lamp housing.
6. Pull the lamp leads and connector of the new lamp through the hole in the opposite direction of step 5.
7. Rotate the new lamp so that the three alignment pins line up.
8. Pressing slightly, twist the lamp in a clockwise direction until the alignment pins are fully seated.
9. Plug the lamp lead connector into the mating connector on the 1720D head.
10. Place the 1720D head on the body and restore power to 1720D. After approximately 30 seconds, remove the head and ensure the lamp is on.
LAMPStrain Relief ( 46696-00)Lock Nut ( 52060-00)
Cat. No.Cat. No.
Optical HeadAssembly
(Cat. No. 52179-00)
Lamp Assembly(Cat. No.18950-00)
Screw3 Places
(Cat. No.52086-00)
Head AssemblyBottom
(Cat. No. 52017-00)
Gasket( 52028-00)Cat. No.
Lamp Cable(Cat. No. 52069-00)
DETECTORStrain Relief ( 52020-00)Lock Nut ( 52060-00)
Cat. No.Cat. No.
Lamp Socket ( )Cat. No. 4404-26
48

SECTION 5, continued
le res
ny
h as
11. The lamp has been “burned-in” at the factory before being shipped and isready for use.
12. Calibrate the 1720D per the instrument manual.
Figure 10 Lamp Assembly
5.5 Photocell CleaningOccasional clearing of the photocell window is required. The frequency of the cleaning will depend on the nature and concentration of dissolved and suspended solids in the sample. Biological activity contributes to mineral scadeposit on the window. In general, more growth will occur in warm temperatuand less in cold.
Note: Do not scratch the photocell window.
Inspect the photocell windows often to determine cleaning needs. Remove aorganic growth or film on the photocell window before standardization or calibration. Use a cotton swab and isopropyl alcohol or a mild detergent (sucLiqui-nox®) to remove most sediment and dirt. Mineral scale buildup may require cleaning with a mild acid applied with a cotton swab, followed by a detergent wash. Do not use abrasive cleaners.
Lamp Housing
Lamp Assembly
Photo Detector
49

SECTION 5, continued
ad
d
ter
the p.
5.6 Photocell Assembly ReplacementTo replace the photocell assembly (Cat. No. 52180-00), perform the following steps.
1. Remove power from the PS1201 Power Supply that is connected to the 1720D Turbidimeter head assembly. Ensure the “POWER” LED on the 1720D heis not lit.
Note: Perform all assembly and disassembly at an EDS work station while wearing a grounding strap to avoid damage to the circuit board.
2. Remove the 1720D head from the turbidimeter body. Turn the 1720D heaover so the photocell faces up.
3. Remove the five Phillips-head screws (Cat. No. 5587-11) from the perimeof the turbidimeter head assembly.
4. Separate the turbidimeter head assembly into two parts. The top (Cat. No. 52018-00) contains the circuit board and the cable connected toPS1201. The bottom (Cat. No. 52017-00) contains the photocell and lam
5. Loosen the three screws holding each wire in J2, and remove each wire. Retain the ferrite bead for use in reassembly. See Figure 11.
6. Loosen the two screws holding each wire in J3, and remove each wire.
Figure 11 Head Assembly Top
12
34
56
78
910
1112
J3
J1
1 2
123
To Lamp
J2
J1
J3
To Photocell Assembly
50

SECTION 5, continued
the
lding
rom
7. Hold the bottom of the head assembly so the photocell is facing up. Loosen the strain relief marked DETECTOR. See Figure 12.
8. Cut the photocell cable ½ in. back from the spade lug and ½ in. back fromDETECTOR strain relief.
Figure 12 Head Assembly Bottom
9. Pull the photocell wire out of the strain relief.
10. Remove the heat shrink tubing on the photocell stem to expose the nut hothe photocell onto the assembly.
11. Using a 7/16 in. wrench, turn the nut counterclockwise several turns.
12. Remove the spade lug from the stem, and cut the wire attached to the photocell.
13. Remove the nut, flat washer, and lock washer from the photocell stem.
14. Pull the photocell assembly away from the lamp, removing the assembly fthe cap bottom.
LAMPStrain Relief ( 46696-00)Lock Nut ( 52060-00)
Cat. No.Cat. No.
Optical HeadAssembly
(Cat. No. 52179-00)
Lamp Assembly(Cat. No.18950-00)
Screw3 Places
(Cat. No.52086-00)
Head AssemblyBottom
(Cat. No. 52017-00)
Gasket( 52028-00)Cat. No.
Lamp Cable(Cat. No. 52069-00)
DETECTORStrain Relief ( 52020-00)Lock Nut ( 52060-00)
Cat. No.Cat. No.
Lamp Socket ( )Cat. No. 4404-26
51

SECTION 5, continued
th of ts
lamp -00).
OR,
d the
ing
15. Feed the wires and stem of the replacement photocell assembly (Cat. No. 52005-00) through bottom hole of optical head. Make sure the outer shield drain wire of the cable is free from the hole.
16. Remove the red insulation sleeve from the spade lug (Cat. No. 52073-00) and crimp it onto the shield wire.
17. Place spade lug between the flat washer and plastic, and tighten the nut until just snug with a 7/16 in. wrench. Do not over tighten!
18. On photocell stem, place a flat washer (Cat. No. 6959-12), a split washer (Cat. No. 16185-00) and a hex nut (Cat. No. 15585-00).
19. Bend the spade lug 90° so it lays flat against the nut. Place a 2.0 in. lengheat shrink tubing (Cat. No. 40707-00) over the photocell cable until it resagainst the detector head.
20. Shrink the tubing with a heat gun. Dress the cable so it lays between the base mold feature and the inside edge of the optical head (Cat. No. 52179
21. Pass the photocell assembly cable through strain relief marked DETECTleaving about 5 in. protruding. Tighten the strain relief.
22. Position the head assembly bottom next to the head assembly top. Threablack and red wire through the ferrite bead (Cat. No. 52620-00) before installing the wires in the connector.
23. Install photocell wires into connector J2 in the head assembly top accordto Table 18.
24. Install the lamp wires into connector J3 according to Table 19.
Table 18 Terminal Block J2 Wire Colors
Position Wire Color Wire Source
1 Black Photocell
2 Red Photocell
3 Shield Photocell
Table 19 Terminal Block J3 Wire Colors
Position Wire Color Wire Source
1 Black Lamp
2 Red Lamp
52

SECTION 5, continued
When wiring is complete, reassemble the turbidimeter head assembly as follows:
1. Place five washers (Cat. No. 6956-12) on five Phillips-head screws (Cat. No. 5587-11).
2. Make sure the gasket (Cat. No. 52028-00) between the two components is in place and route all wires so they do not touch the lamp heatsink.
3. Position the head assembly top on the head assembly bottom. Before tightening the screws, make sure no wires are pinched between the two halves.
4. Place the five screws and washers assembled in step 1 into the holes in the cap bottom and tighten.
5. Place the 1720D head on the body. Restore power to the PS1201 that is supplying power to the 1720D, and ensure the power LED is on.
Recalibrate the 1720D turbidimeter per the user manual.
53

54

30
00
000
0
0
0
52122221
000
SECTION 6 REPLACEMENT PARTS
1720D Standard AccessoriesDescription Unit Part Number1720D Sensor Head Assembly.................................................................................................... each.................52008-00Formazin Primary Standard ...................................................................................................500 mL...................2461-49Filter, 0.45 µm, to produce ultra-filtered water for cleaning and calibration .............................. each.................26705-00Filter, 0.2 µm, to produce ultra-filtered water for calibration standard preparation.................... each.................2238-10Lamp Assembly........................................................................................................................... each.................18950-0PS1201 Power Supply ................................................................................................................. each.................52010-00Lid, Bubble Trap, 1720D ............................................................................................................ each.................52012-00
1720D Service Only Replacement PartsAperture for 1720C/1720D ......................................................................................................... each.................44117-00Barb fitting, ½” ID x ½” NPT ..................................................................................................... each.................51414-00Body and bubble trap assembly ..................................................................................................each.................52006-00Bubble Trap................................................................................................................................. each.................52007-0Bubble Trap Lid .......................................................................................................................... each.................52012-0Cable assembly, lamp to 1720D circuit board............................................................................. each.................52069-00Cap bottom .................................................................................................................................. each.................52017-0Cap top ........................................................................................................................................ each.................52018-0Circuit board................................................................................................................................ each.................52031-0Connector receptacle, 5 circuit female sealed............................................................................. each.................52032-00Gasket for 1720D cap.................................................................................................................. each.................52028-0Label for front of 1720D cap....................................................................................................... each.................52051-00Lens for 1720C/1720D................................................................................................................ each.................44114-00Shade for 1720C/1720D.............................................................................................................. each.................44365-00Software upgrade kit ................................................................................................................... each.................52183-0Tube fitting, ¼” OD male............................................................................................................ each.................45667-00
1720D Optional AccessoriesCalibration Cylinder.................................................................................................................... each.................44153-0Cap, Connector Receptacle ......................................................................................................... each.................52100-00Communication Cable, 22 gauge, 2-conductor, shielded.......................................................per foot.................52157-00Communication Cable, 22 gauge, 2-conductor, shielded......................................................... 100 ft..................52157-10Communication Cable, 22 gauge, 2-conductor, shielded......................................................... 250 ft..................52157-25Communication Cable, 22 gauge, 2-conductor, shielded......................................................... 500 ft..................52157-50Communication Cable, 22 gauge, 2-conductor, shielded.......................................................1000 ft..................52157-51Communication and Power Cable, 20 gauge, 4-conductor, shielded.....................................per foot.................58-00Communication and Power Cable, 20 gauge, 4-conductor, shielded....................................... 100 ft..................5158-10Communication and Power Cable, 20 gauge, 4-conductor, shielded....................................... 250 ft..................5158-25Communication and Power Cable, 20 gauge, 4-conductor, shielded....................................... 500 ft..................5158-50Communication and Power Cable, 20 gauge, 4-conductor, shielded.....................................1000 ft..................558-51Digital Display Module (DDM).................................................................................................. each.................52400-00Drain plug for the 1720D body ................................................................................................... each.................44116-00ICE-PIC™ Module for Calibration and Calibration Verification
20 NTU ................................................................................................................................. each.................52250-01 NTU ................................................................................................................................... each.................52215-00.5 NTU ................................................................................................................................ each.................52225-0
Deionized water..............................................................................................................................1L.....................272-56
55

SECTION 6, continued
Formazin Calibration Kit includes:Description Unit Part NumberCalibration Cylinder, TenSette® Pipet, 4000 NTU Formazin Primary Standard (500 mL) ........each ................ 44156-00Floor Stand for 1720D/PS1201....................................................................................................each ................ 52160-00Mounting Kit, pole/wall for Portable AquaTrend® .....................................................................each ................ 51413-00Photocell Replacement Kit for the 1720D...................................................................................each ................ 52100-00Pipet tips for 19700-01 TenSette® Pipet..................................................................................50/pkg ................ 21856-96Pipet tips for 19700-10 TenSette® Pipet..................................................................................50/pkg ................ 21997-96Portable AquaTrend® Interface ...................................................................................................each ................ 51400-00Power Cord Kit, 10A-125V, 1.8 m (6 feet), UL/CSA listed........................................................each ................ 46306-00Power Cord Kit, 10A-230V, 1.8 m (6 feet), European-style plug, VDE approved .....................each ................ 46308-00Signal Output Module (SOM) .....................................................................................................each ................ 51250-00Serial Input/Output Module (SIO), 115 V 50/60 Hz with 120 V power supply..........................each ................ 52074-00Serial Input/Output Module (SIO), 230 V 50/60 Hz with 230 V power supply..........................each ................ 52074-02
StablCal Calibration Kit for the 1720C/1720D Turbidimeter includes: StablCal® Standards, < 0.1 NTU, 20.0 NTU........................................................................ 1 L/each ................ 26596-00StablCal® Standard, 1.0 NTU....................................................................................................... 1 L ................ 26598-53Swabs, Cotton, presterilized for photocell cleaning ..............................................................100/pkg ................ 25543-00TenSette® Pipet, 0.1 to 1.0 mL ....................................................................................................each ................ 19700-01TenSette® Pipet Tips, 0.1 to 1.0 mL ......................................................................................200/pkg ................ 25588-00TenSette® Pipet, 1.0 to 10.0 mL ..................................................................................................each ................ 19700-10TenSette® Pipet Tips, 0.1 to 1.0 mL ........................................................................................50/pkg ................ 25589-00U-Bolts for PS1201/AquaTrend® pole mounting......................................................................2/pkg .............. 251410-00
56