1946 aircraft guide
TRANSCRIPT

IL-2 Series of Flight Simulations Il-2 Sturmovik
Forgotten Battles Ace Expansion Pack
Pacific Fighters Pe-2 Peshka
Sturmoviks over Manchuria 46
FLYABLE AIRCRAFT GUIDE
© 2001 – 2006 1C:Maddox Games, RRG Studios and Ubisoft. All rights reserved.

INDEX
Allied Aircraft (some aircraft served on both sides, but appear only in one of the lists)
A-20C Il-2 Type 3 P-39N Spitfire LF Mk Vc4 A-20G Il-2 Type 3M P-39N-1 Spitfire Mk IX 25 lbs B-25J-1NA Il-2I P-39Q-1 Spitfire Mk IXc Beaufighter Mk 21 Il-2M 1942 1 Series P-39Q-10 Spitfire Mk IXe BI-1 Il-2M 1942 Later Series P-400 Spitfire Mk Vb BI-6 Il-2T P-40B Spitfire Mk Vb CW Buffalo Mk I La-5 P-40C Spitfire Mk VIII Corsair Mk I La-5F P-40E Spitfire Mk VIII CW Corsair Mk II La-5FN P-40E M-105 field mod TB-3 4M-17 F2A-2 La-7 3xB-20 P-40M TB-3 4M-34R F4F-3 La-7 P-47D TB-3 4M-34R SPB F4F-4 La-7R P-47D-10 Tempest Mk V F4U-1A LaGG-3, 1941 4 Series P-47D-22 Tomahawk IIb F4U-1C LaGG-3, 1942 29 Series P-47D-27 Tomahawk IIc F4U-1D LaGG-3, 1942 35 Series P-51B-NA Tomahawk Mk IIa F6F-3 Late Ext LaGG-3, 1943 66 Series P-51C-NT Tomahawk Mk IIb F6F-5 LaGG-3IT P-51D-20NA Yak-1 FM-2 LaGG-3RD P-51D-5NT Yak-15 Hawk 81A-2 MiG-3 2xShVAK P-63C-5 Yak-1B Hurricane Mk II field mod MiG-3 2xUB Pe-2 1 series Yak-3 Hurricane Mk IIb MiG-3 AM-38 Pe-2 110 series Yak-3 VK-107 Hurricane Mk IIc MiG-3 Pe-2 359 series Yak-3P I-153 M-62 MiG-3U Pe-2 84 series Yak-3R I-153P MiG-3UD Pe-3 Yak-7A I-16 Tip 18 MiG-9 I-300 Pe-3bis Yak-7B 1941 I-16 Type 24 MiG-9FS SBD-3 Yak-7B 1942 I-16 Type 24 SPB Mosquito SBD-5 Yak-9 I-185 M-71 Mosquito FB MK VI Seafire F MK III Yak-9B I-185 M-82A Mustang Mk III Seafire L MK III Yak-9D I-250 P.11C Spitfire HF Mk IXe Yak-9K IL-10 P-38J Spitfire LF Mk IXc CW Yak-9M Il-2 1941 1 Series P-38L Spitfire LF Mk IXe CW Yak-9T Il-2 1941 2 Series P-38L Late Spitfire LF Mk Vb Yak-9U Il-2 1941 3 Series P-39D-1 Spitfire LF MK Vb CW Yak-9UT Il-2 1941 field mod P-39D-2 Spitfire LF Mk Vc2 YP-80

Axis Aircraft (some aircraft served on both sides, but appear only in one of the lists)
A6M2 Bf-109G-6AS He-162A-2 Ki-43-II Kai A6M2-21 Bf-109K-4 He-162B Ki-61-I Hei A6M2-N Bf-109K-4 C3 He-162C Ki-61-I Ko A6M3 Bf-109Z Lerche III B-2 Ki-61-I Otsu A6M5 Bf-110G-2 Hurricane Mk I Ki-84-Ia A6M5a D3A1 I.A.R. 80 Ki-84-Ib A6M5b Do-335A-0 I.A.R. 81a Ki-84-Ic A6M5c Do-335V-13 I.A.R. 81c MC.200 Serie 3 A6M7-62 Fiat CR.42 J2M3 MC.202 Serie III A6M7-63 Fiat G.50 J2M5 MC.202 Serie VII Ar-234B-2 FW-190 A-4 J8A (Gladiator) MC.202 Serie XII B-239 FW-190 A-5 Ju-87B-2 MC.205 V Serie I Bf-109E-4 FW-190 A-5 1.65 ATA Ju-87D-3 MC.205 V Serie III Bf-109E-4B FW-190 A-6 Ju-87D-5 Me-163B-1a Bf-109E-7Z FW-190 A-8 Ju-87G-1 Me-262A-1a Bf-109eE-7B FW-190 A-9 Ju-88A-4 Me-262A-1a U4 Bf-109F-2 FW-190 D-9 1944 Ki-100-I Ko Me-262A-2a Bf-109F-4 FW-190 D-9 1945 Ki-27 Ko Me-262HG-II Bf-109G-10 FW-190 F-8 Ki-27 Otsu N1K2-Ja Bf-109G-14 G4M1-11 Ki-43-Ia Ta-152C Bf-109G-2 Go-229A-1 Ki-43-Ib Ta-152H-1 Bf-109G-6 He-111H-2 Ki-43-Ic Ta-183 Bf-109G-6 Late He-111H-6 Ki-43-II
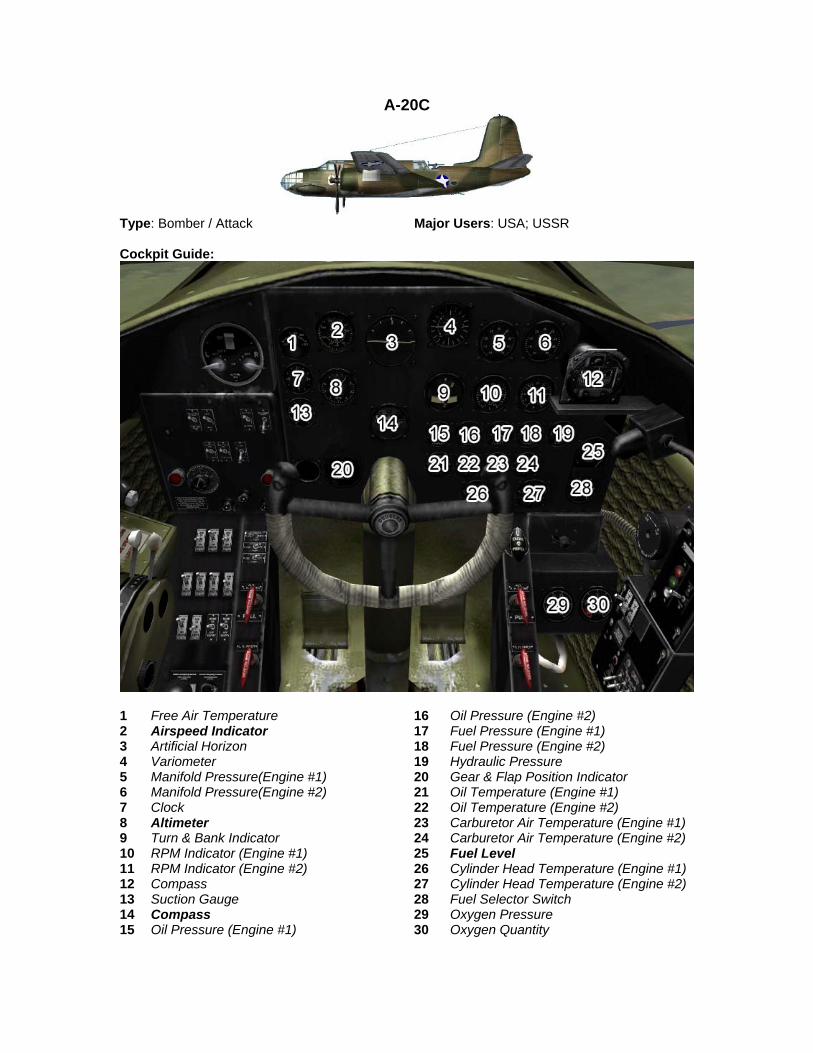
A-20C
Type: Bomber / Attack Major Users: USA; USSR Cockpit Guide:
1 Free Air Temperature 16 Oil Pressure (Engine #2) 2 Airspeed Indicator 17 Fuel Pressure (Engine #1) 3 Artificial Horizon 18 Fuel Pressure (Engine #2) 4 Variometer 19 Hydraulic Pressure 5 Manifold Pressure(Engine #1) 20 Gear & Flap Position Indicator 6 Manifold Pressure(Engine #2) 21 Oil Temperature (Engine #1) 7 Clock 22 Oil Temperature (Engine #2) 8 Altimeter 23 Carburetor Air Temperature (Engine #1) 9 Turn & Bank Indicator 24 Carburetor Air Temperature (Engine #2) 10 RPM Indicator (Engine #1) 25 Fuel Level 11 RPM Indicator (Engine #2) 26 Cylinder Head Temperature (Engine #1) 12 Compass 27 Cylinder Head Temperature (Engine #2) 13 Suction Gauge 28 Fuel Selector Switch 14 Compass 29 Oxygen Pressure 15 Oil Pressure (Engine #1) 30 Oxygen Quantity

(A-20C continued) Other Playable Crew Positions:
Bombardier Bottom Gunner Top Gunner At a Glance: Engine:
2 x R-2600-A5B Power: 2 x 1,600 HP
Armament: • 6 x .50 cal machine guns (forward-firing) • 3 x .50 cal machine guns (defensive) • Up to 1,800 kg of bombs
Advantages: • Long range; • Powerful armament by early-war
standards.
Disadvantages: • Poor defensive gun coverage.
Pilot Notes: • The aircraft is equipped with a two-stage supercharger. • Supercharger Stage 1 (default) should be used between 0 and 2,200 meters • Supercharger Stage 2 should be used above 2,200 meters • Mixture adjustment is automatic. Using the Level Sight: • The level bomb sight will automatically calculate the bomb trajectory and impact point based
on the aircraft’s current airspeed and altitude. The bombardier must enter these parameters into the sight manually, and point it at the target. Then the sight will automatically track the target, and drop the bombs automatically at the right time.
• As the first step, bombing altitude and aircraft speed must be entered into the bombsight. The actual altitude above target (not above sea level) can be entered using the Increase Bombsight Altitude and Decrease Bombsight Altitude keys. The plane speed is entered using the Increase Bombsight Velocity and Decrease Bombsight Velocity keys. Note that the true (not indicated) airspeed must be set. It can be obtained from the speed gauge when in No-Cockpit View mode.
• After the initial parameters are entered, the bombardier has to acquire the target with the bombsight crosshair. Tap the Toggle Gunsight key (Shift-F1 by default) to look through the optics. Use Increase Bombsight Distance and Decrease Bombsight Distance to adjust the bombsight viewing angle up, and scan the horizon for the mission target.
• If the target does not appear along the centerline of the bomb sight optics, make minute changes to your plane’s course. Then using the Increase Bombsight Distance and Decrease Bombsight Distance keys place the crosshair on target. With the target dead center, turn on the targeting computer using the Toggle Bombsight Automation key. The bombsight will begin tracking the target. Correct the crosshair movement with the Increase Bombsight Velocity and Decrease Bombsight Velocity keys if necessary.
• The bombs will drop automatically when the plane reaches the proper position for a bomb drop, based on the input parameters and the optics angle.
• Note that after starting the bomb run, a plane may not be banked more than 4.5 degrees or the bombsight will lose stability. Only slight adjustments in direction are allowed. After more substantial maneuvers the bomb sight may take up to 30 seconds to stabilize. During the stabilization phase, the bomb sight crosshairs are turned off.

A-20G
Type: Ground Attack Major Users: USA; USSR Cockpit Guide:
1 Airspeed Indicator 15 Fuel Pressure (Engine #2) 2 Artificial Horizon 16 Hydraulic Pressure 3 Variometer 17 Gear & Flap Position Indicator 4 Manifold Pressure(Engine #1) 18 Oil Temperature (Engine #1) 5 Manifold Pressure(Engine #2) 19 Oil Temperature (Engine #2) 6 Altimeter 20 Carburetor Air Temperature (Engine #1) 7 Turn & Bank Indicator 21 Carburetor Air Temperature (Engine #2) 8 RPM Indicator (Engine #1) 22 Fuel Level 9 RPM Indicator (Engine #2) 23 Cylinder Head Temperature (Engine #1) 10 Compass 24 Cylinder Head Temperature (Engine #2) 11 Compass 25 Fuel Selector Switch 12 Oil Pressure (Engine #1) 26 Oxygen Pressure 13 Oil Pressure (Engine #2) 27 Oxygen Quantity 14 Fuel Pressure (Engine #1)

(A-20G continued)
Other Playable Crew Positions:
Bottom Gunner Top Gunner At a Glance: Engine:
2 x R-2600-23 Power: 2 x 1,600 HP
Armament: • 6 x .50-cal machine guns (nose) • 3 x .50-cal machine guns (defensive) • Up to 4,000 lbs of bombs
Advantages: • Packs a powerful punch; • Good armor protection and range.
Disadvantages: • Heavy, not very maneuverable.
Pilot Notes: • The aircraft is equipped with a two-stage supercharger. • Supercharger Stage 1 (default) should be used between 0 and 2,200 meters • Supercharger Stage 2 should be used above 2,200 meters • Maximum traverse speed for the electric top turret is 60 deg / sec Using the Level Sight: • The level bomb sight will automatically calculate the bomb trajectory and impact point based
on the aircraft’s current airspeed and altitude. The bombardier must enter these parameters into the sight manually, and point it at the target. Then the sight will automatically track the target, and drop the bombs automatically at the right time.
• As the first step, bombing altitude and aircraft speed must be entered into the bombsight. The actual altitude above target (not above sea level) can be entered using the Increase Bombsight Altitude and Decrease Bombsight Altitude keys. The plane speed is entered using the Increase Bombsight Velocity and Decrease Bombsight Velocity keys. Note that the true (not indicated) airspeed must be set. It can be obtained from the speed gauge when in No-Cockpit View mode.
• After the initial parameters are entered, the bombardier has to acquire the target with the bombsight crosshair. Tap the Toggle Gunsight key (Shift-F1 by default) to look through the optics. Use Increase Bombsight Distance and Decrease Bombsight Distance to adjust the bombsight viewing angle up, and scan the horizon for the mission target.
• If the target does not appear along the centerline of the bomb sight optics, make minute changes to your plane’s course. Then using the Increase Bombsight Distance and Decrease Bombsight Distance keys place the crosshair on target. With the target dead center, turn on the targeting computer using the Toggle Bombsight Automation key. The bombsight will begin tracking the target. Correct the crosshair movement with the Increase Bombsight Velocity and Decrease Bombsight Velocity keys if necessary.
• The bombs will drop automatically when the plane reaches the proper position for a bomb drop, based on the input parameters and the optics angle.
• Note that after starting the bomb run, a plane may not be banked more than 4.5 degrees or the bombsight will lose stability. Only slight adjustments in direction are allowed. After more substantial maneuvers the bomb sight may take up to 30 seconds to stabilize. During the stabilization phase, the bomb sight crosshairs are turned off.

B-25J-1NA
Type: Medium Bomber Major Users: USA; USSR Cockpit Guide:
1 Compass (not visible in screenshot) 16 Carburetor Air Temperature (Engine #1 &
#2) 2 Pilot’s Direction Indicator 17 Oil Temperature (Engine #1 & #2) 3 Radio Compass 18 Fuel Level (Front) 4 Compass 19 Flap Position Indicator 5 Manifold Pressure (Engine #1 & #2) 20 Hydraulic Pressure 6 RPM Indicator (Engine #1 & #2) 21 Altimeter 7 Suction Gauge 22 Turn & Bank Indicator 8 Fuel Pressure (Engine #1 & #2) 23 Variometer 9 Oil Pressure(Engine #1 & #2) 24 Pilot’s Direction Indicator 10 Fuel Level (Auxiliary) 25 Cylinder Head Temperature (Engine #1 &
#2) 11 Landing Gear Position Indicator 26 Free Air Temperature 12 Airspeed Indicator 27 Fuel Level (Rear) 13 Compass 28 Landing & Nav Light Switch 14 Artificial Horizon 29 Brake Pressure 15 Clock

(B-25J continued) Other Playable Crew Positions:
Bombardier Nose Gunner Top Turret Gunner Waist Gunner (L – R)
Tail Gunner At a Glance: Engine:
2 x R-2600-29 Power: 2 x 1,700 HP
Armament: • 12 x .50-cal machine guns • Up to 1,814 kg of bombs
Advantages: • Fast, maneuverable, durable.
Disadvantages: • Relatively light bombload.
Pilot Notes: • Switch supercharger speeds at 2,700 meters (8,850 feet) • Maximum traverse speed for the electric top turret is 60 deg / sec Using the Level Sight: • The level bomb sight will automatically calculate the bomb trajectory and impact point based
on airspeed and altitude. The bombardier must enter these parameters into the sight manually, and point it at the target. Then the sight will automatically track the target, and drop the bombs automatically at the right time.
• As the first step, bombing altitude and airspeed must be entered. The actual altitude above target (not above sea level) can be entered using the Increase Bombsight Altitude and Decrease Bombsight Altitude keys. The plane speed is entered using the Increase Bombsight Velocity and Decrease Bombsight Velocity keys. Note that the true (not indicated) airspeed must be set. It can be obtained from the speed gauge when in No-Cockpit View mode.
• After the initial parameters are entered, the bombardier has to acquire the target with the bombsight crosshair. Tap the Toggle Gunsight key (Shift-F1 by default) to look through the optics. Use Increase Bombsight Distance and Decrease Bombsight Distance to adjust the bombsight viewing angle up, and scan the horizon for the mission target.
• If the target does not appear along the centerline of the bomb sight optics, make minute changes to your plane’s course. Then using the Increase Bombsight Distance and Decrease Bombsight Distance keys place the crosshair on target. With the target dead center, turn on the targeting computer using the Toggle Bombsight Automation key. The bombsight will begin tracking the target. Correct the crosshair movement with the Increase Bombsight Velocity and Decrease Bombsight Velocity keys if necessary.
• The bombs will drop automatically when the plane reaches the proper position for a bomb drop, based on the input parameters and the optics angle.
• Note that after starting the bomb run, a plane may not be banked more than 4.5 degrees or the bombsight will lose stability. Only slight adjustments in direction are allowed. After more substantial maneuvers the bomb sight may take up to 30 seconds to stabilize. During the stabilization phase, the bomb sight crosshairs are turned off.

Beaufighter Mk 21
Type: Fighter-Bomber Major Users: RAF; RAAF; RNZAF Cockpit Guide:
1 Clock 14 RPM Indicator (Engine #2) 2 Airspeed Indicator 15 Fuel Pressure (Engine #1) 3 Artificial Horizon 16 Fuel Pressure (Engine #2) 4 Compass 17 Suction Gauge 5 Variometer 18 Coolant Temperature (Engine #1) 6 Altimeter 19 Coolant Temperature (Engine #2) 7 Turn & Bank Indicator 20 Oil Pressure (Engine #1) 8 Radio Altimeter 21 Oil Pressure (Engine #2) 9 Free Air Temperature 22 Oil Temperature (Engine #1) 10 Compass 23 Oil Temperature (Engine #2) 11 Manifold Pressure(Engine #1) 24 Hydraulic Systems Indicator 12 Manifold Pressure(Engine #2) 25 Fuel Level (Left) 13 RPM Indicator (Engine #1) 26 Fuel Level (Right) Other Crew Positions: <not modeled> Rear Observer

(Beaufighter continued) At a Glance: Engine:
2 x Hercules XVIII Power: 2 x 1,725 HP
Armament: • 4 x 20 mm cannon • 4 x .50-cal machine guns • Up to 2,000 lbs of bombs • 8 x 90-lb rockets
Advantages: • Very adaptable; • Very powerful armament.
Disadvantages: • Not maneuverable enough to evade enemy
fighter; • No defensive armament for the rear
crewman. Pilot Notes: The Beafighter Mk 21 is an Australian license-built version of the Beaufighter Mk X. The plane is mostly intended as a ground attack aircraft or a torpedo bomber, however the very brave can also use it as a heavy fighter. Unfortunately it does not carry defensive armament, and the unarmed rear observer position is not modeled in the aircraft, so shaking off an enemy on one’s tail is quite difficult. The Beaufighter is very fast at low altitudes, and keeping that speed up is the key to survival.

BI-1
Type: Rocket Fighter Major Users: USSR Cockpit Guide:
1 Airspeed Indicator 6 Engine Status 1 2 Ammeter 7 Engine Status 2 3 Altimeter 8 Landing Gear Position Indicator 4 Turn & Bank Indicator 9 Fuel Level 5 Oil & Air Pressure At a Glance: Engine:
1 x LPR D-1-A-1100 Thrust: 1 x 1,100 kg/s
Armament: 2 x 20 mm guns ShVAK (45 shells each)
Advantages: • High speed and excellent climb rate; • Easy controls; • Strong armor against bomber defensive
fire.
Disadvantages: • Insufficient maneuverability for horizontal
fights against maneuverable fighters; • Limited time of flight due to quick fuel
consumption; • Low ammo load.

(BI-1 continued) Pilot Notes:
• BI-1 is a rocket interceptor which can carry very little fuel. Its range is therefore very limited. In most situations you will climb on full power to meet the enemy, make one or two firing passes, and glide back to base with empty tanks.
• The throttle lever also works as an engine on/off switch. Moving the throttle to idle switches the engine off, opening the throttle turns the engine back on.
• BI-1 is not a turn fighter and almost any plane in the sim will outturn it. However it has good low-speed characteristics, and at full power it can outclimb and outdive anything;
• Bombers are your primary target, and fighters are usually too nimble for the BI-1. • The two ShVAK cannon on the BI-1 have only 45 shells each which allows for less than
one second of continuous fire. Open fire only at point-blank range. • Best performance altitude is between 0 and 5,000 meters. Performance begins to
deteriorate above 5,000 meters
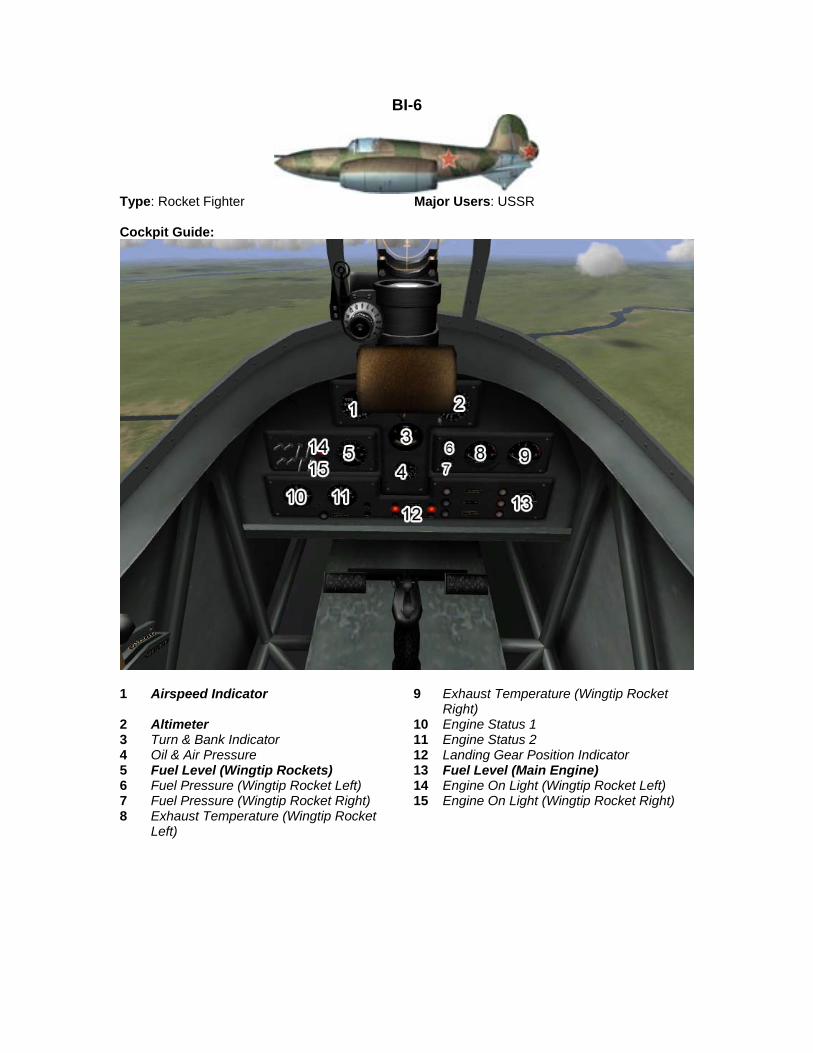
BI-6
Type: Rocket Fighter Major Users: USSR Cockpit Guide:
1 Airspeed Indicator 9 Exhaust Temperature (Wingtip Rocket
Right) 2 Altimeter 10 Engine Status 1 3 Turn & Bank Indicator 11 Engine Status 2 4 Oil & Air Pressure 12 Landing Gear Position Indicator 5 Fuel Level (Wingtip Rockets) 13 Fuel Level (Main Engine) 6 Fuel Pressure (Wingtip Rocket Left) 14 Engine On Light (Wingtip Rocket Left) 7 Fuel Pressure (Wingtip Rocket Right) 15 Engine On Light (Wingtip Rocket Right) 8 Exhaust Temperature (Wingtip Rocket
Left)
(BI-6 continued) At a Glance: Engine: 1 X LPR D-1-A-1100 2 x Glushkov RD-1 Power: 1 x 1,100 kg/s
2 x 300 kg/s
Armament: • 2 x 20mm ShVAK cannon (45 shells each)
Advantages: • Incredible climb rate; • Small size makes for a difficult target; • Easy to fly.
Disadvantages: • Insufficient maneuverability for dogfights; • Insufficient flight time; • Short range.
Pilot Notes:
• This plane is powered by three engines: D-1-A-1100 rocket engine in the fuselage (engine #1), and two DM-4-S ramjets on the wingtips (engines #2 and #3).
• The wingtip ramjets have independent fuel source stored in the wings. They are effective at speeds above 320 km/h and have limited throttle control. Ramjets offer better fuel economy than the rocket engine, and are used to achieve better range at cruise speed. The main engine is to be used for take-off, acceleration, and maneuvering.
• The ramjet engines are engaged / disengaged with the throttle lever. With the throttle at 100%, an engine cannot be shut down; with the throttle at 0% it cannot be turned on. Correspondingly, to control the use of the ramjets, use the engine selection keys to select / deselect the throttle input.
• Having the same basic airframe as the BI-1, the aircraft is prone to enter uncontrollable dives at speeds in excess of 800 km/h.
We’re not modeling the historical thrust difference between the two wingtip units, as this would make the plane virtually impossible to control with rudder trim. A simple decision historically would have been to place the ramjets closer to the fuselage; however we decided not to make such changes, as this would alter the aerodynamically pure original design. We’re also not modeling the historical unreliability of starting the ramjets in-flight.
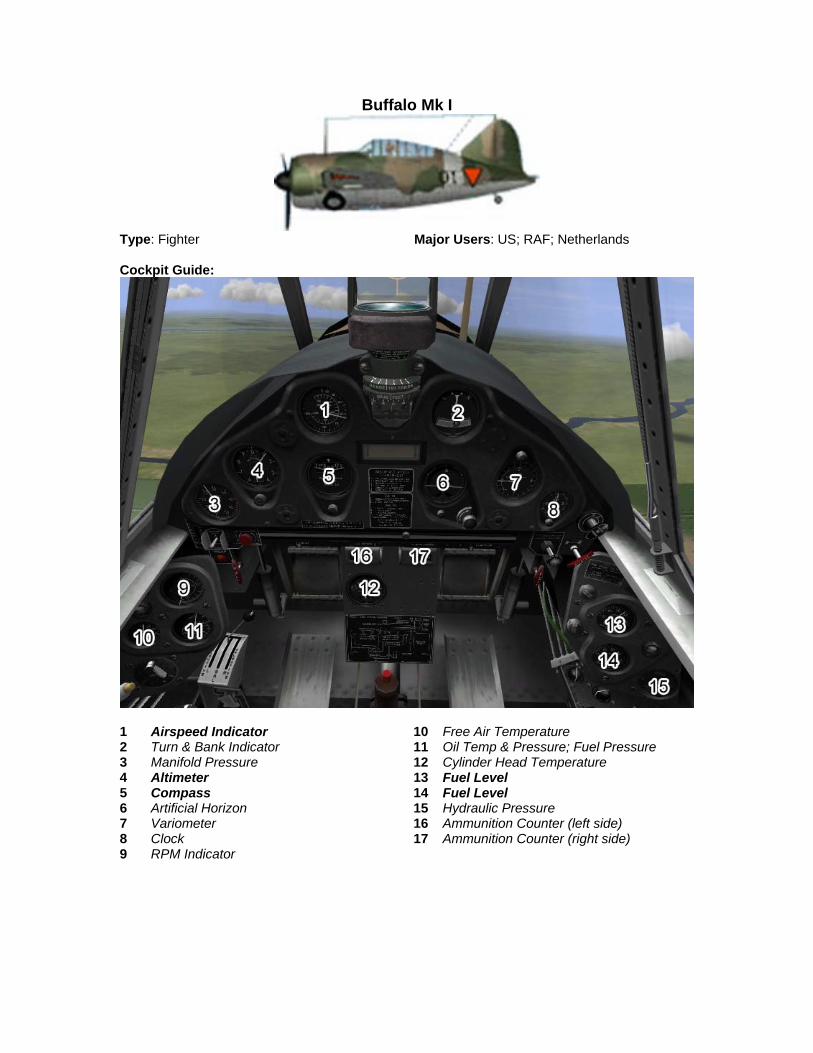
Buffalo Mk I
Type: Fighter Major Users: US; RAF; Netherlands Cockpit Guide:
1 Airspeed Indicator 10 Free Air Temperature 2 Turn & Bank Indicator 11 Oil Temp & Pressure; Fuel Pressure 3 Manifold Pressure 12 Cylinder Head Temperature 4 Altimeter 13 Fuel Level 5 Compass 14 Fuel Level 6 Artificial Horizon 15 Hydraulic Pressure 7 Variometer 16 Ammunition Counter (left side) 8 Clock 17 Ammunition Counter (right side) 9 RPM Indicator

(Buffalo continued) At a Glance: Engine: R-1820-G5 Power:
Continuous: 850 HP Take-off : 950 HP Combat (WEP) max 5min: 1,000 HP
Armament: • 3 x .50cal + 1 x .30cal • Later 4 x .50cal (12.7mm)
Advantages: • Good maneuverability and handling; • Spacious and well-organized cockpit; • Good visibility.
Disadvantages: • Obsolete compared to contemporary Axis
planes; • Inadequate speed and armament
compared to late war planes. Pilot Notes:
Take-Off Speed: 140 km/h Landing Speed: 135 km/h Combat Engine Setting: No RPM gauge Best Cruise: No RPM gauge Economy Cruise: No RPM gauge Prop Pitch Control: Manual Mixture Control: Manual Boost: No Supercharger: Two-Speed
• Buffalo is a decent dogfighter against most pre-1943 fighters, with the exception of the
Zero. It will outturn almost any plane in a high-G instantaneous turn, however it will bleed off excessive amounts of speed in sustained turns. Your best bet against enemy fighters is to stay fast and not get involved in prolonged turning engagements, especially at low altitudes.
• Buffalo’s armament is not particularly strong but it is adequate against most planes, with the possible exception of the Il-2. You will usually need at least a one-second burst at a vulnerable area to bring your target down. Just like with all machine-gun only planes, the best spot to aim for is the pilot.
• Brewster can stall rather easily if handled roughly, however when it is handled with care it can be a very tough opponent.
• Supercharger speeds need to be switched at around 3,000 meters. Best performance altitude is between 500 and 2,800 meters.
• Worst performance above 4,500 meters

F2A-2
Type: Carrier-Borne Fighter Major Users: US Navy Cockpit Guide:
1 Airspeed Indicator 10 Free Air Temperature 2 Turn & Bank Indicator 11 Oil Temp & Pressure; Fuel Pressure 3 Manifold Pressure 12 Cylinder Head Temperature 4 Altimeter 13 Fuel Level 5 Compass 14 Fuel Level 6 Artificial Horizon 15 Hydraulic Pressure 7 Variometer 16 Ammunition Counter (left side) 8 Clock 17 Ammunition Counter (right side) 9 RPM Indicator

(F2A continued) At a Glance: Engine: Cyclone R-1820-G5 Power:
Continuous: 850 HP Take-off : 950 HP Combat (WEP) max 5min: 1,000 HP
Armament: • 3 x .50cal + 1 x .30cal • Later 4 x .50cal (12.7mm)
Advantages: • Good maneuverability and handling; • Spacious and well-organized cockpit; • Good visibility.
Disadvantages: • Obsolete compared to contemporary Axis
planes; • Inadequate speed and armament
compared to late war planes. Pilot Notes:
Take-Off Speed: 140 km/h Landing Speed: 135 km/h Combat Engine Setting: No RPM gauge Best Cruise: No RPM gauge Economy Cruise: No RPM gauge Prop Pitch Control: Manual Mixture Control: Manual Boost: No Supercharger: Two-Speed
• Buffalo is a decent dogfighter against most pre-1943 fighters, with the exception of the
Zero. It will outturn almost any plane in a high-G instantaneous turn, however it will bleed off excessive amounts of speed in sustained turns. Your best bet against enemy fighters is to stay fast and not get involved in prolonged turning engagements, especially at low altitudes.
• Buffalo’s armament is not particularly strong but it is adequate against most planes, with the possible exception of the IL-2. You will usually need at least a one-second burst at a vulnerable area to bring your target down. Just like with all machine-gun only planes, the best spot to aim for is the pilot.
• Brewster can stall rather easily if handled roughly, however when it is handled with care it can be a very tough opponent.
• Supercharger speeds need to be switched at around 3,000 meters. Best performance altitude is between 500 and 2,800 meters.
• Worst performance above 4,500 meters
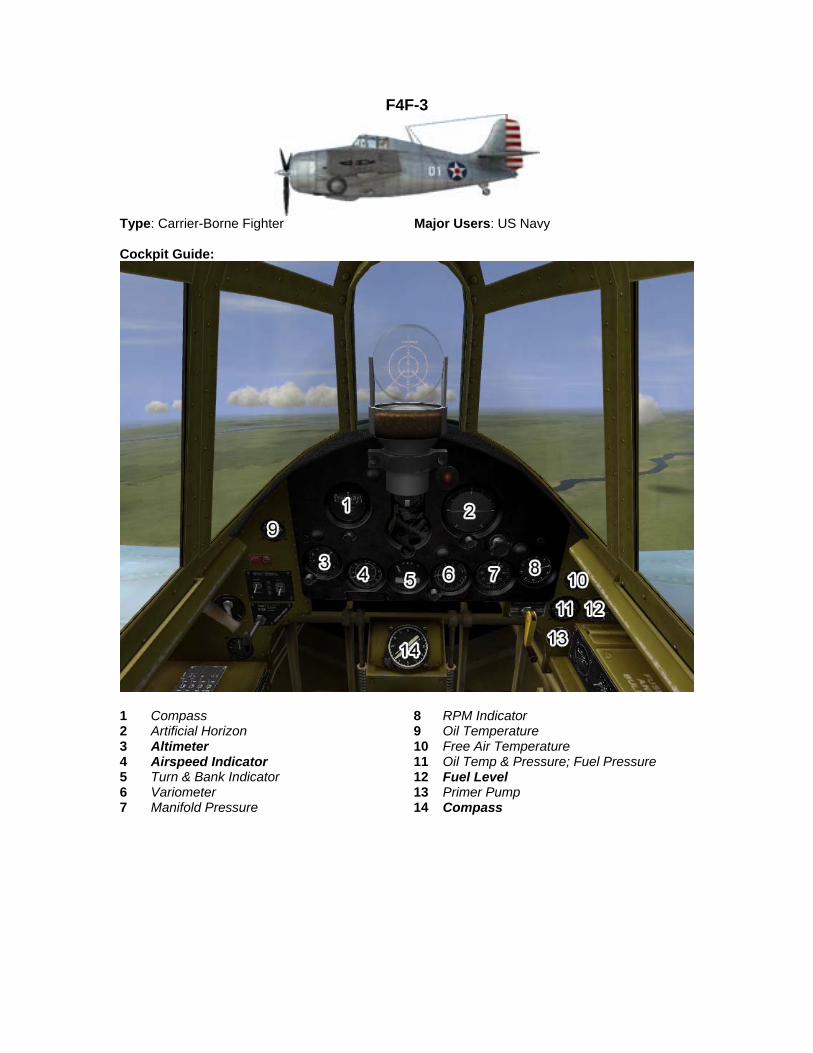
F4F-3
Type: Carrier-Borne Fighter Major Users: US Navy Cockpit Guide:
1 Compass 8 RPM Indicator 2 Artificial Horizon 9 Oil Temperature 3 Altimeter 10 Free Air Temperature 4 Airspeed Indicator 11 Oil Temp & Pressure; Fuel Pressure 5 Turn & Bank Indicator 12 Fuel Level 6 Variometer 13 Primer Pump 7 Manifold Pressure 14 Compass

(F4F-3 continued) At a Glance: Engine: 1x R-1830-90. Power: 1,200 HP.
Armament: • 4 x .50 cal MG
Advantages: • Good durability; • Adequately armed.
Disadvantages: • Poor maneuverability; • Lack of performance.
Pilot Notes:
• Switch supercharger speeds at 2,500 meters (8,200 feet) and 4,800 meters (15,750 feet) • Flaps are automatically retracted at 250 km/h (155 mph) • Gear can only be operated manually; you have to manually assign keys for it in the
Controls section.

F4F-4
Type: Carrier-Borne Fighter Major Users: US Navy Cockpit Guide:
1 Compass 8 RPM Indicator 2 Artificial Horizon 9 Oil Temperature 3 Altimeter 10 Free Air Temperature 4 Airspeed Indicator 11 Oil Temp & Pressure; Fuel Pressure 5 Turn & Bank Indicator 12 Fuel Level 6 Variometer 13 Primer Pump 7 Manifold Pressure 14 Compass
(F4F-4 continued) At a Glance: Engine: 1 x R-1830. Power: 1,200 HP.
Armament: • 6 x .50 cal MG
Advantages: • Good durability; • Adequately armed.
Disadvantages: • Poor maneuverability; • Lack of performance.
Pilot Notes:
• Switch supercharger speeds at 2,500 meters (8,200 feet) and 4,800 meters (15,750 feet) • Flaps are automatically retracted at 250 km/h (155 mph) • Gear can only be operated manually; you have to manually assign keys for it in the
Controls section.
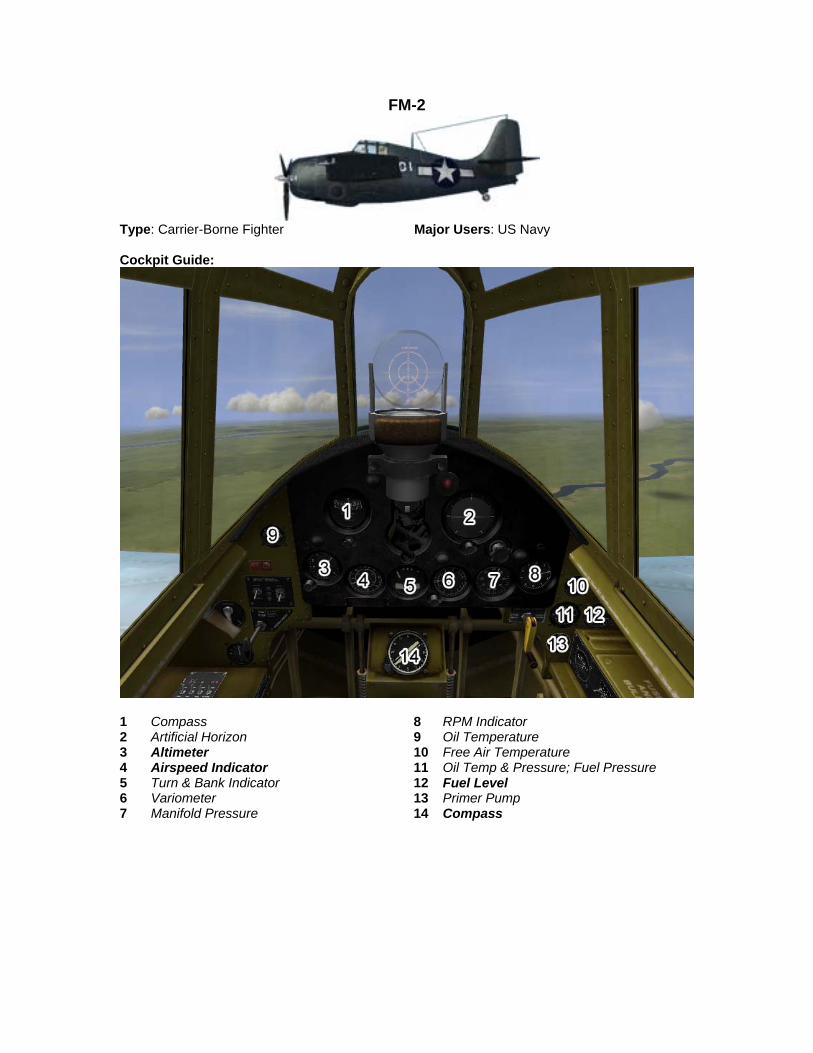
FM-2
Type: Carrier-Borne Fighter Major Users: US Navy Cockpit Guide:
1 Compass 8 RPM Indicator 2 Artificial Horizon 9 Oil Temperature 3 Altimeter 10 Free Air Temperature 4 Airspeed Indicator 11 Oil Temp & Pressure; Fuel Pressure 5 Turn & Bank Indicator 12 Fuel Level 6 Variometer 13 Primer Pump 7 Manifold Pressure 14 Compass

(FM-2 continued)
At a Glance: Engine: 1x R-1820-56. Power: 1,350 HP.
Armament: • 6 x .50 cal MG • 2 x 113-kg bombs • 6 x 5-inch HVAR rockets
Advantages: • Good durability; • Adequately armed.
Disadvantages: • Poor maneuverability; • Lack of performance.
Pilot Notes:
• Switch supercharger speeds at 2,500 meters (8,200 feet) and 4,800 meters (15,750 feet) • Flaps are automatically retracted at 250 km/h (155 mph) • Gear can only be operated manually; you have to manually assign keys for it in the
Controls section.
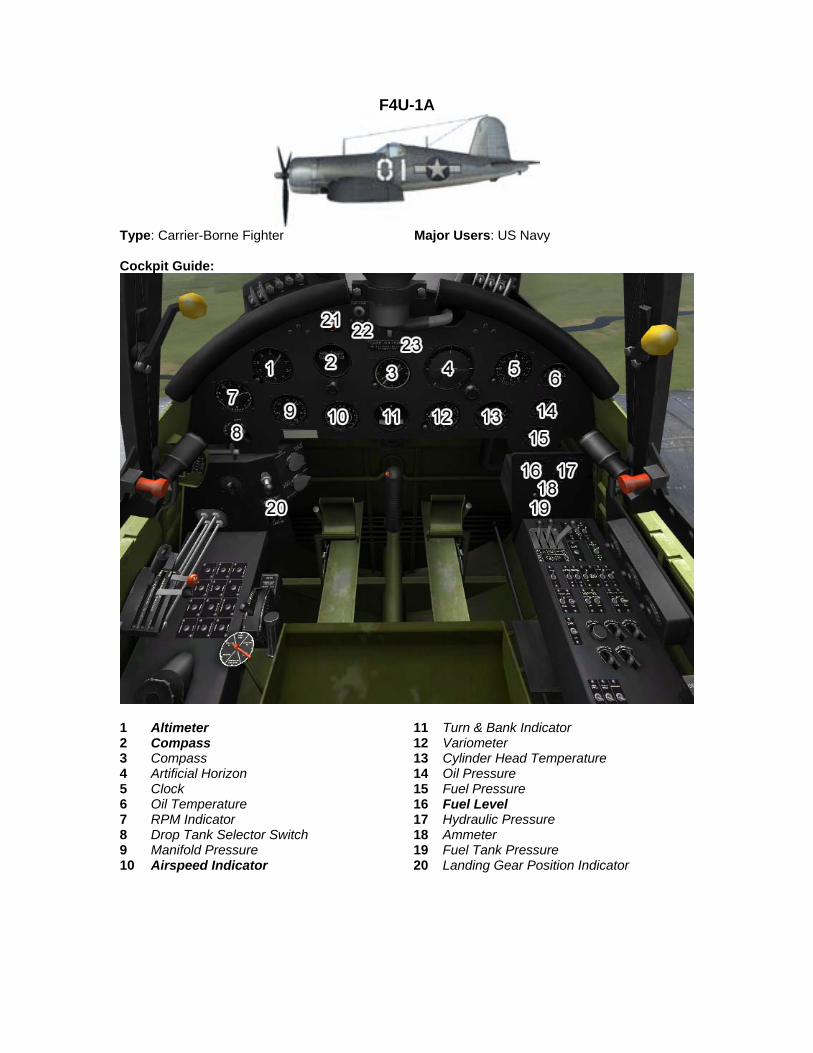
F4U-1A
Type: Carrier-Borne Fighter Major Users: US Navy Cockpit Guide:
1 Altimeter 11 Turn & Bank Indicator 2 Compass 12 Variometer 3 Compass 13 Cylinder Head Temperature 4 Artificial Horizon 14 Oil Pressure 5 Clock 15 Fuel Pressure 6 Oil Temperature 16 Fuel Level 7 RPM Indicator 17 Hydraulic Pressure 8 Drop Tank Selector Switch 18 Ammeter 9 Manifold Pressure 19 Fuel Tank Pressure 10 Airspeed Indicator 20 Landing Gear Position Indicator
(F4U-1A continued) At a Glance: Engine:
1 x R-2800-8W Power: 2,250 HP
Armament: • 6 x .50 cal MG (400 rounds per gun)
Advantages: • Excellent performance; • Good maneuverability; • Excellent range; • Adaptable to other roles; • Well armed.
Disadvantages: • Difficult handling; • Poor forward visibility during landing and
take-off.
Pilot Notes:
• Switch supercharger speeds at 2,600 meters (8,500 feet) and 8,200 meters (26,900 feet) • The aircraft are also equipped with speed brakes that utilize a part of the gear
mechanism. Please do not use this function during take-offs and landing, as in this way the gear isn’t supported by additional hydraulic pump and may very well break off under the stress.

F4U-1C
Type: Carrier-Borne Fighter Major Users: US Navy Cockpit Guide:
1 Altimeter 11 Turn & Bank Indicator 2 Compass 12 Variometer 3 Compass 13 Cylinder Head Temperature 4 Artificial Horizon 14 Oil Pressure 5 Clock 15 Fuel Pressure 6 Oil Temperature 16 Fuel Level 7 RPM Indicator 17 Hydraulic Pressure 8 Drop Tank Selector Switch 18 Ammeter 9 Manifold Pressure 19 Fuel Tank Pressure 10 Airspeed Indicator 20 Landing Gear Position Indicator

(F4U-1C continued) At a Glance: Engine:
1 x R-2800-8W Power: 2,250 HP
Armament: • 4 x 20 mm cannon
Advantages: • Excellent performance; • Good maneuverability; • Excellent range; • Adaptable to other roles; • Well armed.
Disadvantages: • Difficult handling; • Poor forward visibility during landing and
take-off.
Pilot Notes:
• Switch supercharger speeds at 2,600 meters (8,500 feet) and 8,200 meters (26,900 feet) • The aircraft are also equipped with speed brakes that utilize a part of the gear
mechanism. Please do not use this function during take-offs and landing, as in this way the gear isn’t supported by additional hydraulic pump and may very well break off under the stress.

F4U-1D
Type: Carrier-Borne Fighter Major Users: US Navy Cockpit Guide:
1 Altimeter 11 Turn & Bank Indicator 2 Compass 12 Variometer 3 Compass 13 Cylinder Head Temperature 4 Artificial Horizon 14 Oil Pressure 5 Clock 15 Fuel Pressure 6 Oil Temperature 16 Fuel Level 7 RPM Indicator 17 Hydraulic Pressure 8 Drop Tank Selector Switch 18 Ammeter 9 Manifold Pressure 19 Fuel Tank Pressure 10 Airspeed Indicator 20 Landing Gear Position Indicator

(F4U-1D continued) At a Glance: Engine:
1 x R-2800-8W Power: 2,250 HP
Armament: • 6 x .50 cal MG (400 rounds per gun) • 2 x 1,000 lb bombs or 2 x 606-l fuel tanks • 8x 5-inch HVAR rockets
Advantages: • Excellent performance; • Good maneuverability; • Excellent range; • Adaptable to other roles; • Well armed.
Disadvantages: • Difficult handling; • Poor forward visibility during landing and
take-off.
Pilot Notes:
• Switch supercharger speeds at 2,600 meters (8,500 feet) and 8,200 meters (26,900 feet) • The aircraft are also equipped with speed brakes that utilize a part of the gear
mechanism. Please do not use this function during take-offs and landing, as in this way the gear isn’t supported by additional hydraulic pump and may very well break off under the stress.

Corsair Mk I
Type: Carrier-Borne Fighter Major Users: Royal Navy Cockpit Guide:
1 Altimeter 11 Turn & Bank Indicator 2 Compass 12 Variometer 3 Compass 13 Cylinder Head Temperature 4 Artificial Horizon 14 Oil Pressure 5 Clock 15 Fuel Pressure 6 Oil Temperature 16 Fuel Level 7 RPM Indicator 17 Hydraulic Pressure 8 Drop Tank Selector Switch 18 Ammeter 9 Manifold Pressure 19 Fuel Tank Pressure 10 Airspeed Indicator 20 Landing Gear Position Indicator

(Corsair Mk I continued) At a Glance: Engine:
1 x R-2800-8W Power: 2,250 HP
Armament: • 6 x .50 cal MG (400 rounds per gun)
Advantages: • Excellent performance; • Good maneuverability; • Excellent range; • Adaptable to other roles; • Well armed.
Disadvantages: • Difficult handling; • Poor forward visibility during landing and
take-off.
Pilot Notes:
• Switch supercharger speeds at 2,600 meters (8,500 feet) and 8,200 meters (26,900 feet) • The aircraft are also equipped with speed brakes that utilize a part of the gear
mechanism. Please do not use this function during take-offs and landing, as in this way the gear isn’t supported by additional hydraulic pump and may very well break off under the stress.

Corsair Mk II
Type: Carrier-Borne Fighter Major Users: Royal Navy Cockpit Guide:
1 Altimeter 11 Turn & Bank Indicator 2 Compass 12 Variometer 3 Compass 13 Cylinder Head Temperature 4 Artificial Horizon 14 Oil Pressure 5 Clock 15 Fuel Pressure 6 Oil Temperature 16 Fuel Level 7 RPM Indicator 17 Hydraulic Pressure 8 Drop Tank Selector Switch 18 Ammeter 9 Manifold Pressure 19 Fuel Tank Pressure 10 Airspeed Indicator 20 Landing Gear Position Indicator

(Corsair Mk II continued) At a Glance: Engine:
1 x R-2800-8W Power: 2,250 HP
Armament: • 6 x .50 cal MG (400 rounds per gun)
Advantages: • Excellent performance; • Good maneuverability; • Excellent range; • Adaptable to other roles; • Well armed.
Disadvantages: • Difficult handling; • Poor forward visibility during landing and
take-off.
Pilot Notes:
• Switch supercharger speeds at 2,600 meters (8,500 feet) and 8,200 meters (26,900 feet) • The aircraft are also equipped with speed brakes that utilize a part of the gear
mechanism. Please do not use this function during take-offs and landing, as in this way the gear isn’t supported by additional hydraulic pump and may very well break off under the stress.

F6F-3 Late
Type: Carrier-Borne Fighter Major Users: US Navy Cockpit Guide:
1 Clock 10 Manifold Pressure 2 Compass 11 Ammunition Counter 3 Compass 12 Gear & Flap Position Indicator 4 Artificial Horizon 13 Fuel Level 5 RPM Indicator 14 Coolant Temperature 6 Altimeter 15 Oxygen Pressure 7 Airspeed Indicator 16 Oil Pressure 8 Turn & Bank Indicator 17 Coolant Temperature 9 Variometer

(F6F-3 continued) At a Glance: Engine: 1 x R-2800-10W Power: 2,000 HP
Armament: • 6 x .50 cal MG • 2 x 1,000 lb • 2 x 500 lb • 6 x rockets.
Advantages: • Structurally well built; • Well armed; • Can take a lot of punishment.
Disadvantages: • Not maneuverable enough compared to
late-war Japanese fighters. • Poor rearward visibility
Pilot Notes:
• Switch supercharger speeds at 2,500 meters (8,200 feet) and 8,100 meters (26,570 feet)

F6F-5
Type: Carrier-Borne Fighter Major Users: US Navy Cockpit Guide:
1 Clock 10 Manifold Pressure 2 Compass 11 Ammunition Counter 3 Compass 12 Gear & Flap Position Indicator 4 Artificial Horizon 13 Fuel Level 5 RPM Indicator 14 Coolant Temperature 6 Altimeter 15 Oxygen Pressure 7 Airspeed Indicator 16 Oil Pressure 8 Turn & Bank Indicator 17 Coolant Temperature 9 Variometer
(F6F-5 continued)
At a Glance: Engine: 1 x R-2800-10W Power: 2,000 HP
Armament: • 6x.50 cal MG • 2 x 1,000 lb • 2 x 500 lb • 2 x Tiny Tim rockets • 6 x HVAR rockets.
Advantages: • Structurally well built; • Well armed; • Can take a lot of punishment.
Disadvantages: • Not maneuverable enough compared to
late-war Japanese fighters. • Poor rearward visibility
Pilot Notes:
• Switch supercharger speeds at 2,500 meters (8,200 feet) and 8,100 meters (26,570 feet)
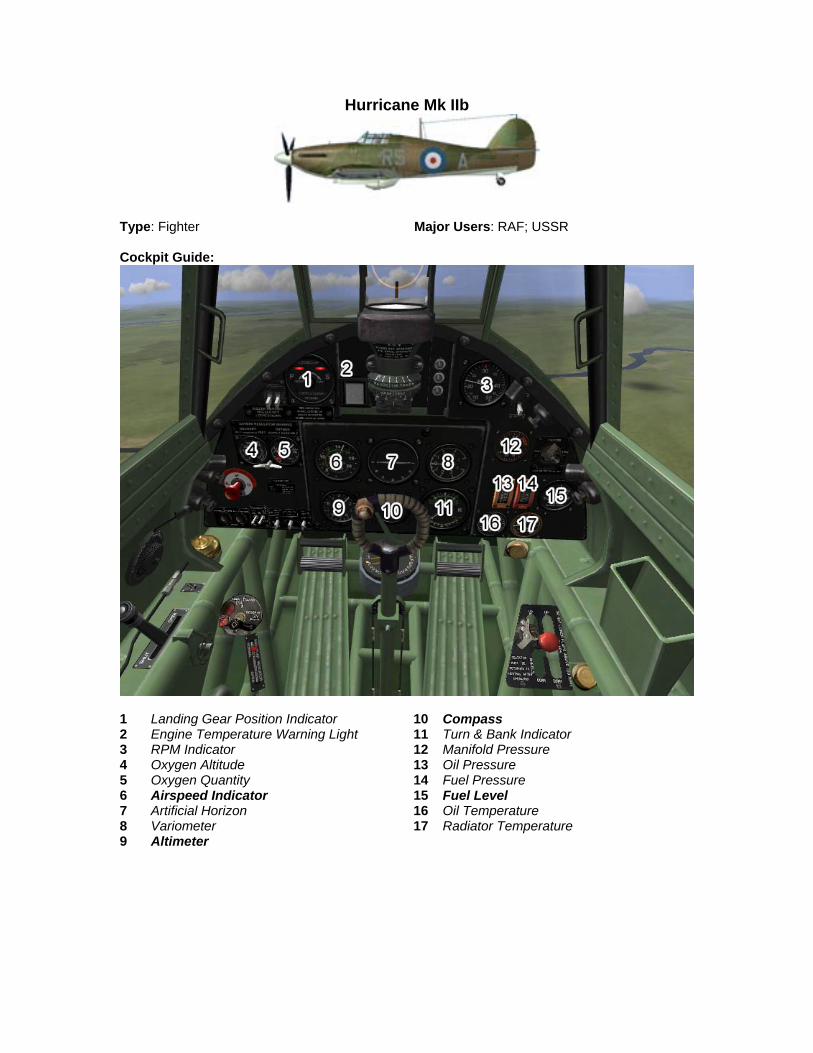
Hurricane Mk IIb
Type: Fighter Major Users: RAF; USSR Cockpit Guide:
1 Landing Gear Position Indicator 10 Compass 2 Engine Temperature Warning Light 11 Turn & Bank Indicator 3 RPM Indicator 12 Manifold Pressure 4 Oxygen Altitude 13 Oil Pressure 5 Oxygen Quantity 14 Fuel Pressure 6 Airspeed Indicator 15 Fuel Level 7 Artificial Horizon 16 Oil Temperature 8 Variometer 17 Radiator Temperature 9 Altimeter

(Hurricane IIb continued)
At a Glance: Engine: Merlin XX Power:
Indicated: 950 HP Take-off: 1,280 HP
Armament: • 12 x .303 machine guns
Advantages: • Simple to control; • Easy to maintain in field conditions; • Reliable and stable in flight.
Disadvantages: • Insufficient cockpit visibility; • Inferior to contemporary enemy fighters.
Pilot Notes:
Take-Off Speed: 150 km/h / 85 kts Landing Speed: 145 km/h / 80 kts Combat Engine Setting: 3,000 RPM Best Cruise: 2,650 RPM Economy Cruise: 2,500 RPM Prop Pitch Control: Manual Mixture Control: Manual Boost: No Supercharger: Two-Speed
• Hurricane is generally inferior to all 1941 fighters, and inadequate against all 1942 and later fighters. It is mostly effective against bombers or as a ground attack plane.
• Hurricane has regretful acceleration and dive characteristics, therefore should generally be used in horizontal combat.
• Be aware that all instrumentation in the Hurricane is not metric but imperial, therefore you will need to learn to convert feet to meters and mile to kilometers when flying on instruments. Hurricane is a rather stable gunnery platform with armament sufficient to bring down any target at ranges under 300 meters.
• Supercharger speeds should be set to speed 2 in combat or in climb if boost is 2-5 psi below max; otherwise use speed 1.
• Best performance altitude is between 1,500 and 2,800 meters for speed 1 and 4,500 and 6,500 for speed 2.
• Worst performance between 3,000 and 4,500 meters

Hurricane Mk IIc
Type: Fighter/Bomber Major Users: RAF; USSR Cockpit Guide:
1 Landing Gear Position Indicator 10 Compass 2 Engine Temperature Warning Light 11 Turn & Bank Indicator 3 RPM Indicator 12 Manifold Pressure 4 Oxygen Altitude 13 Oil Pressure 5 Oxygen Quantity 14 Fuel Pressure 6 Airspeed Indicator 15 Fuel Level 7 Artificial Horizon 16 Oil Temperature 8 Variometer 17 Radiator Temperature 9 Altimeter
(Hurricane IIc continued)
At a Glance: Engine:
Merlin XX Power:
Indicated: 950 HP Take-off: 1,280 HP
Armament: • 4 x 20mm cannon
Advantages: • Simple to control; • Easy to maintain in field conditions; • Reliable and stable in flight; • Strong armament.
Disadvantages: • Insufficient cockpit visibility; • Inferior to contemporary enemy fighters.
Pilot Notes:
Take-Off Speed: 150 km/h / 85 kts Landing Speed: 145 km/h / 80 kts Combat Engine Setting: 3,000 RPM Best Cruise: 2,650 RPM Economy Cruise: 2,500 RPM Prop Pitch Control: Manual Mixture Control: Manual Boost: No Supercharger: Two-Speed
• Hurricane is generally inferior to all 1941 fighters, and inadequate against all 1942 and later fighters. It is mostly effective against bombers or as a ground attack plane.
• Hurricane has regretful acceleration and dive characteristics, therefore should generally be used in horizontal combat.
• Be aware that all instrumentation in the Hurricane is not metric but imperial, therefore you will need to learn to convert feet to meters and mile to kilometers when flying on instruments. Hurricane is a rather stable gunnery platform with armament sufficient to bring down any target at ranges under 300 meters.
• Supercharger speeds should be set to speed 2 in combat or in climb if boost is 2-5 psi below max; otherwise use speed 1.
• Best performance altitude is between 1,500 and 2,800 meters for speed 1 and 4,500 and 6,500 for speed 2.
• Worst performance between 3,000 and 4,500 meters
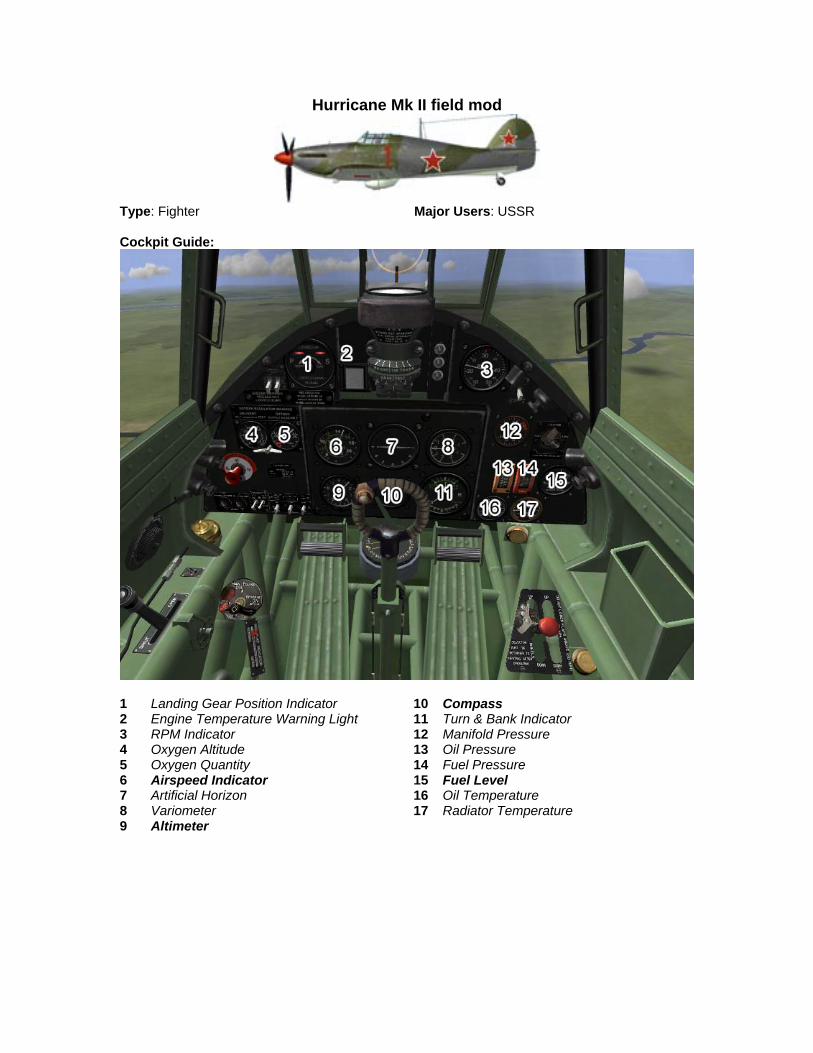
Hurricane Mk II field mod
Type: Fighter Major Users: USSR Cockpit Guide:
1 Landing Gear Position Indicator 10 Compass 2 Engine Temperature Warning Light 11 Turn & Bank Indicator 3 RPM Indicator 12 Manifold Pressure 4 Oxygen Altitude 13 Oil Pressure 5 Oxygen Quantity 14 Fuel Pressure 6 Airspeed Indicator 15 Fuel Level 7 Artificial Horizon 16 Oil Temperature 8 Variometer 17 Radiator Temperature 9 Altimeter

(Hurricane Field mod. continued) At a Glance: Engine: Merlin XX Power:
Indicated: 950 HP Take-off: 1,280 HP
Armament: • 2 x 12,7 mm UBS • 2 x 20mm ShVAK cannon
Advantages: • Simple to control; • Easy to maintain in field conditions; • Reliable and stable in flight.
Disadvantages: • Insufficient cockpit visibility; • Inferior to contemporary enemy fighters.
Pilot Notes:
Take-Off Speed: 150 km/h / 85 kts Landing Speed: 145 km/h / 80 kts Combat Engine Setting: 3,000 RPM Best Cruise: 2,650 RPM Economy Cruise: 2,500 RPM Prop Pitch Control: Manual Mixture Control: Manual Boost: No Supercharger: Two-Speed
• Hurricane is generally inferior to all 1941 fighters, and inadequate against all 1942 and later fighters. It is mostly effective against bombers or as a ground attack plane.
• Hurricane has regretful acceleration and dive characteristics, therefore should generally be used in horizontal combat.
• Be aware that all instrumentation in the Hurricane is not metric but imperial, therefore you will need to learn to convert feet to meters and mile to kilometers when flying on instruments. Hurricane is a rather stable gunnery platform with armament sufficient to bring down any target at ranges under 300 meters.
• Supercharger speeds should be set to speed 2 in combat or in climb if boost is 2-5 psi below max; otherwise use speed 1.
• Best performance altitude is between 1,500 and 2,800 meters for speed 1 and 4,500 and 6,500 for speed 2.
• Worst performance between 3,000 and 4,500 meters
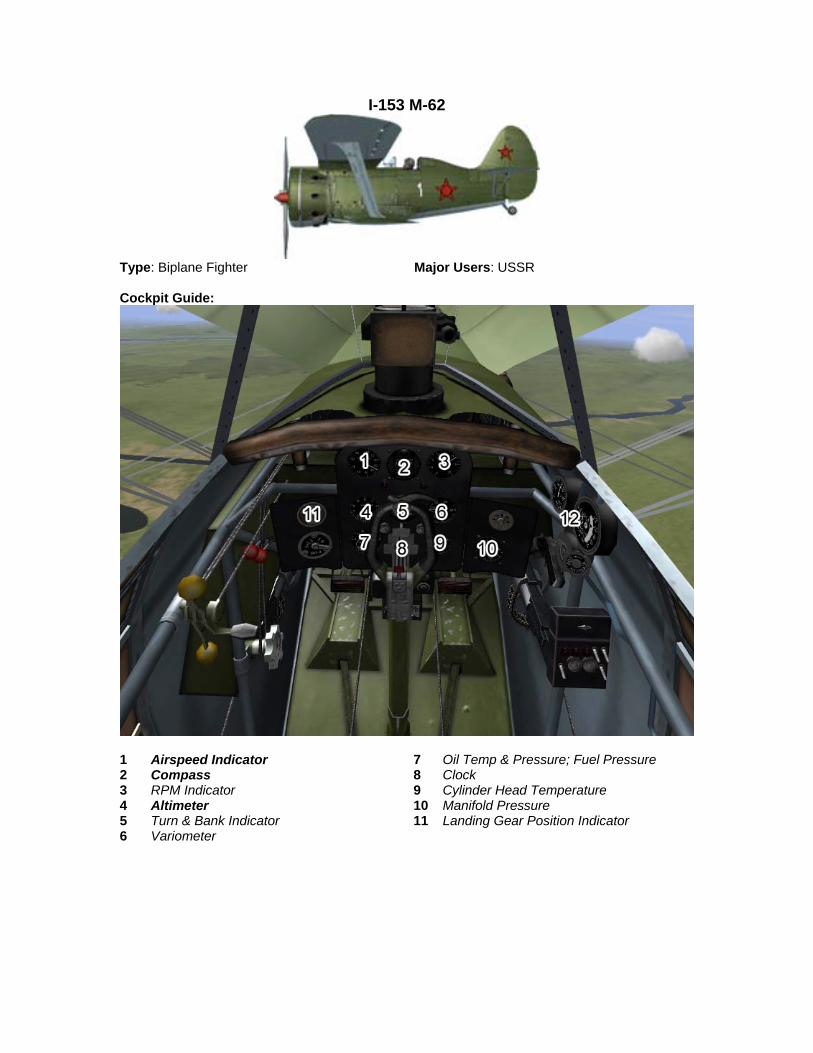
I-153 M-62
Type: Biplane Fighter Major Users: USSR Cockpit Guide:
1 Airspeed Indicator 7 Oil Temp & Pressure; Fuel Pressure 2 Compass 8 Clock 3 RPM Indicator 9 Cylinder Head Temperature 4 Altimeter 10 Manifold Pressure 5 Turn & Bank Indicator 11 Landing Gear Position Indicator 6 Variometer
(I-153 continued)
At a Glance: Engine: 1 x Shvetsov M-62. Power: 1,000 HP
Armament: • 4 x 7.62mm MG (ShKAS)
Advantages: • The best mass-produced biplane fighter; • Good maneuverability; • Strong armament.
Disadvantages: • Insufficient speed by the year 1941.
Pilot Notes:
Take-Off Speed: 145 km/h Landing Speed: 130 km/h Combat Engine Setting: 2,200 RPM Best Cruise: 1,600 RPM Economy Cruise: 1,400 RPM Prop Pitch Control: Manual Mixture Control: Manual Boost: No Supercharger: Two-Speed
• I-153 is an exceptional turn fighter which can literally fly circles around faster German planes. It can turn on a dime at almost any speed; unfortunately it has a very low top speed of only 366 km/h at sea level.
• The best tactic against enemy fighters is to stay horizontal, and attack the enemy with passes from his frontal quarter, denying him the opportunity to fire by coming in slightly from the side.
• Against bombers, I-153 is not very effective as many bombers can simply outrun the Chaika. For slow flying bombers, don’t waste airspeed on maneuver and hang back in the bombers rear quarter. I-153 presents a very small profile for a bomber gunner so staying at respectable distance should keep you safe.
• When used as ground attack, bombs and rockets should be fired in 15-45 degree dives. • I-153 is a rather stable gunnery platform with armament sufficient to bring down any target at
ranges under 300 meters. • Supercharger speeds need to be switched at around 1,500 meters. Best performance altitude
is between 0 and 2,500 meters. Performance begins to deteriorate above 2,500 meters

I-153P
Type: Biplane Fighter Major Users: USSR Cockpit Guide:
1 Airspeed Indicator 7 Oil Temp & Pressure; Fuel Pressure 2 Compass 8 Clock 3 RPM Indicator 9 Cylinder Head Temperature 4 Altimeter 10 Manifold Pressure 5 Turn & Bank Indicator 11 Landing Gear Position Indicator 6 Variometer

(I-153P continued)
At a Glance: Engine: 1 x Shvetsov M-62. Power: 1,000 HP
Armament: • 2 x 20mm cannon (ShVAK).
Advantages: • The best mass-produced biplane fighter; • Good maneuverability; • Powerful armament.
Disadvantages: • Insufficient speed by the year 1941.
Pilot Notes:
Take-Off Speed: 145 km/h Landing Speed: 130 km/h Combat Engine Setting: 2,200 RPM Best Cruise: 1,600 RPM Economy Cruise: 1,400 RPM Prop Pitch Control: Manual Mixture Control: Manual Boost: No Supercharger: Two-Speed
• I-153 is an exceptional turn fighter which can literally fly circles around faster German planes. It can turn on a dime at almost any speed; unfortunately it has a very low top speed of only 366 km/h at sea level.
• The best tactic against enemy fighters is to stay horizontal, and attack the enemy with passes from his frontal quarter, denying him the opportunity to fire by coming in slightly from the side.
• Against bombers, I-153 is not very effective as many bombers can simply outrun the Chaika. For slow flying bombers, don’t waste airspeed on maneuver and hang back in the bombers rear quarter. I-153 presents a very small profile for a bomber gunner so staying at respectable distance should keep you safe.
• When used as ground attack, bombs and rockets should be fired in 15-45 degree dives. • I-153 is a rather stable gunnery platform with armament sufficient to bring down any target at
ranges under 300 meters. • Supercharger speeds need to be switched at around 1,500 meters. Best performance altitude
is between 0 and 2,500 meters. Performance begins to deteriorate above 2,500 meters

I-16 Type 18
Type: Fighter Major Users: USSR Cockpit Guide:
1 Clock 10 Oil Pressure 2 Radio 11 Manifold Pressure 3 Left Landing Gear Light 12 Turn & Bank Indicator 4 Right Landing Gear Light 13 Variometer 5 RPM Indicator 14 Cylinder Head Temperature 6 Airspeed Indicator 15 Oil Temperature (IN) 7 Compass 16 Oil Temperature (OUT) 8 Altimeter 17 Fuel Level 9 Air Pressure
(I-16 18 continued)
At a Glance: Engine:
1 x M-62 Power: 1 x 800 HP
Armament: • 4 x 7.62mm MG (ShKAS)
Advantages: • Excellent performance characteristics; • Excellent maneuverability.
Disadvantages: • Excessive control sensitivity. • Slow and underpowered by 1941
standards. Pilot Notes:
Take-Off Speed: 150 km/h Landing Speed: 145 km/h Combat Engine Setting: 2,500 RPM Best Cruise: 1,850 RPM Economy Cruise: 1,600 RPM Prop Pitch Control: Manual Mixture Control: Manual Boost: No Supercharger: Two-Speed
• Excellent turn fighter with adequate performance for 1941. In capable hands can fight Bf-109E on equal terms, and Bf-109F with slight disadvantage. Both energy and angles tactics can be used against these planes at altitudes up to 3,500 meters.
• Inferior to later German fighters; I-153 tactics should be used against those. • I-16 Tip 24 has very strong armament, while I-16 Tip 18 has a rather weak armament
which may be ineffective against well-armored targets. • Supercharger speeds need to be switched at around 1,500 meters. Best performance
altitude is between 0 and 3,500 meters. Performance begins to deteriorate above 3,500 meters
• I-16 gear can only be operated manually. In order to raise or lower it, you will need to bind the corresponding keys in the Controls section and then keep pressing them until the gear lights on the dashboard come on (red = down, green = up)

I-16 Type 24
Type: Fighter Major Users: USSR Cockpit Guide:
1 Clock 10 Oil Pressure 2 Radio 11 Manifold Pressure 3 Left Landing Gear Light 12 Turn & Bank Indicator 4 Right Landing Gear Light 13 Variometer 5 RPM Indicator 14 Cylinder Head Temperature 6 Airspeed Indicator 15 Oil Temperature (IN) 7 Compass 16 Oil Temperature (OUT) 8 Altimeter 17 Fuel Level 9 Air Pressure
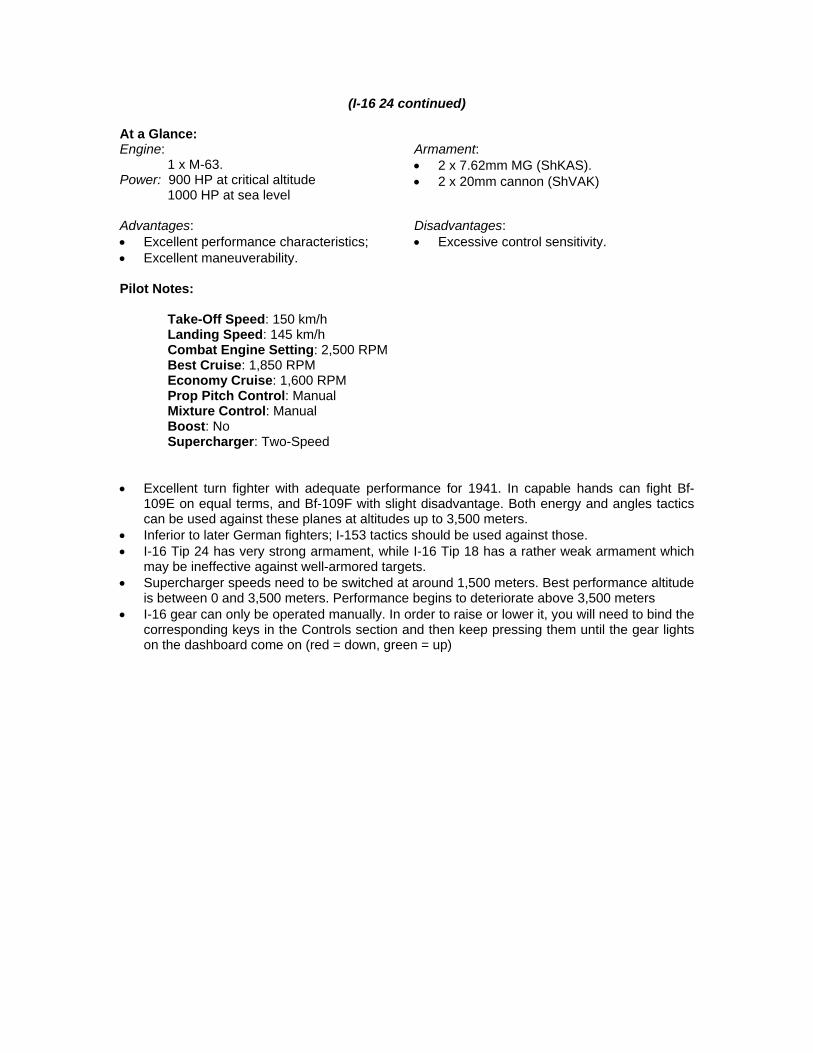
(I-16 24 continued)
At a Glance: Engine:
1 x M-63. Power: 900 HP at critical altitude
1000 HP at sea level
Armament: • 2 x 7.62mm MG (ShKAS). • 2 x 20mm cannon (ShVAK)
Advantages: • Excellent performance characteristics; • Excellent maneuverability.
Disadvantages: • Excessive control sensitivity.
Pilot Notes:
Take-Off Speed: 150 km/h Landing Speed: 145 km/h Combat Engine Setting: 2,500 RPM Best Cruise: 1,850 RPM Economy Cruise: 1,600 RPM Prop Pitch Control: Manual Mixture Control: Manual Boost: No Supercharger: Two-Speed
• Excellent turn fighter with adequate performance for 1941. In capable hands can fight Bf-109E on equal terms, and Bf-109F with slight disadvantage. Both energy and angles tactics can be used against these planes at altitudes up to 3,500 meters.
• Inferior to later German fighters; I-153 tactics should be used against those. • I-16 Tip 24 has very strong armament, while I-16 Tip 18 has a rather weak armament which
may be ineffective against well-armored targets. • Supercharger speeds need to be switched at around 1,500 meters. Best performance altitude
is between 0 and 3,500 meters. Performance begins to deteriorate above 3,500 meters • I-16 gear can only be operated manually. In order to raise or lower it, you will need to bind the
corresponding keys in the Controls section and then keep pressing them until the gear lights on the dashboard come on (red = down, green = up)

I-16 Type 24 SPB
Type: Fighter Major Users: USSR Cockpit Guide:
1 Clock 10 Oil Pressure 2 Radio 11 Manifold Pressure 3 Left Landing Gear Light 12 Turn & Bank Indicator 4 Right Landing Gear Light 13 Variometer 5 RPM Indicator 14 Cylinder Head Temperature 6 Airspeed Indicator 15 Oil Temperature (IN) 7 Compass 16 Oil Temperature (OUT) 8 Altimeter 17 Fuel Level 9 Air Pressure
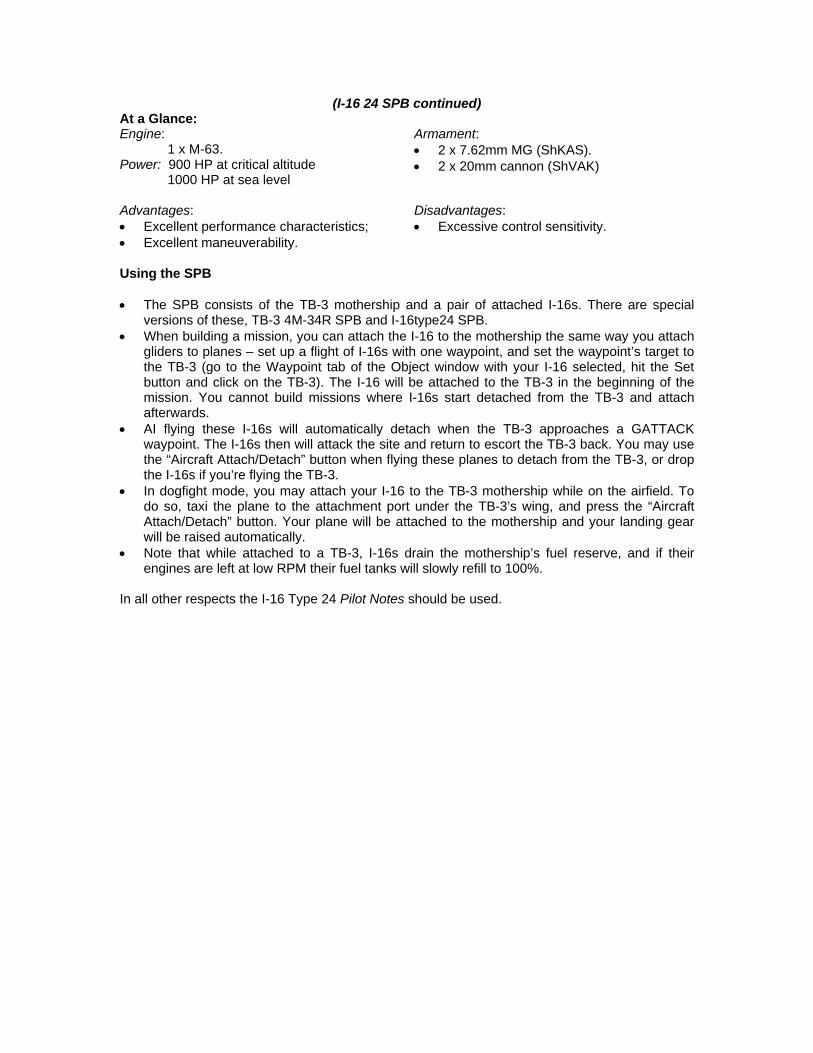
(I-16 24 SPB continued) At a Glance: Engine:
1 x M-63. Power: 900 HP at critical altitude
1000 HP at sea level
Armament: • 2 x 7.62mm MG (ShKAS). • 2 x 20mm cannon (ShVAK)
Advantages: • Excellent performance characteristics; • Excellent maneuverability.
Disadvantages: • Excessive control sensitivity.
Using the SPB • The SPB consists of the TB-3 mothership and a pair of attached I-16s. There are special
versions of these, TB-3 4M-34R SPB and I-16type24 SPB. • When building a mission, you can attach the I-16 to the mothership the same way you attach
gliders to planes – set up a flight of I-16s with one waypoint, and set the waypoint’s target to the TB-3 (go to the Waypoint tab of the Object window with your I-16 selected, hit the Set button and click on the TB-3). The I-16 will be attached to the TB-3 in the beginning of the mission. You cannot build missions where I-16s start detached from the TB-3 and attach afterwards.
• AI flying these I-16s will automatically detach when the TB-3 approaches a GATTACK waypoint. The I-16s then will attack the site and return to escort the TB-3 back. You may use the “Aircraft Attach/Detach” button when flying these planes to detach from the TB-3, or drop the I-16s if you’re flying the TB-3.
• In dogfight mode, you may attach your I-16 to the TB-3 mothership while on the airfield. To do so, taxi the plane to the attachment port under the TB-3’s wing, and press the “Aircraft Attach/Detach” button. Your plane will be attached to the mothership and your landing gear will be raised automatically.
• Note that while attached to a TB-3, I-16s drain the mothership’s fuel reserve, and if their engines are left at low RPM their fuel tanks will slowly refill to 100%.
In all other respects the I-16 Type 24 Pilot Notes should be used.

I-185 M-71
Type: Fighter Major Users: USSR Cockpit Guide:
1 Ammeter 9 Oil Temp & Pressure; Fuel Pressure 2 Compass 10 Altimeter 3 Clock 11 Compass 4 Fuel Level 12 Artificial Horizon 5 Airspeed Indicator 13 RPM Indicator 6 Turn & Bank Indicator 14 Cylinder Head Temperature 7 Variometer 15 Oxygen Apparatus 8 Manifold Pressure 16 Landing Gear Indicator Lights

(I-185 continued)
At a Glance: Engine:
1 x M-71 Power: 2,000 HP
Armament: • 3 x 20mm cannon (ShVAK)
Advantages: • Excellent flying characteristics.
Disadvantages: • Never entered serial production
Pilot Notes: • Supercharger speeds need to be switched at 2,000 meters, and then at 4,200 meters. • Mixture adjustment is requires at altitudes above 5,000 meters.

I-185 M-82A
Type: Fighter Major Users: USSR Cockpit Guide:
1 10Ammeter Altimeter 2 11 Compass Compass 3 Clock 12 Artificial Horizon 4 Fuel Level 13 RPM Indicator 5 Airspeed Indicator 14 Cylinder Head Temperature 6 Turn & Bank Indicator 15 Oxygen Apparatus 7 Variometer 16 Carburetor Pressure 8 Manifold Pressure 17 Oil Pressure 9 Oil Temp & Pressure; Fuel Pressure 18 Landing Gear Indicator Lights

(I-185 M-82 continued)
At a Glance: Engine:
1 x M-82A Power: 1,800 HP
Armament: • 3 x 20mm cannon (ShVAK)
Advantages: • Excellent flying characteristics.
Disadvantages: • Never entered serial production
Pilot Notes: • Supercharger speeds need to be switched at 2,000 meters, and then at 4,200 meters. • Mixture adjustment is requires at altitudes above 5,000 meters.

I-250
Type: Mixed Power Fighter Major Users: USSR Cockpit Guide:
1 Altimeter 12 Oxygen Indicator 2 Compass 13 Oil Temperature 3 Clock 14 Coolant Temperature 4 Airspeed Indicator 15 Exhaust Temperature 5 Artificial Horizon 16 Manifold Pressure (Jet Engine) 6 Variometer 17 Landing Gear Indicator Lights 7 Manifold Pressure (Piston Engine) 18 Exhaust Pressure 8 RPM Indicator 19 Fuel Pressure (Jet Engine) 9 Oil Temp & Pressure; Fuel Pressure 20 Ammeter 10 Gun Arm Indicator Lights 21 Voltmeter 11 Oxygen Quantity 22 Fuel Level

(I-250 continued)
At a Glance: Engine: 1 x Klimov VK-107R V-12,
1 x VDRK Compressor Jet Power: 2,560 HP at sea level
Armament: • 3 x 20mm B-20 cannon (100 shells each) • Up to 230 kg of bombs
Advantages: • Good speed characteristics; • Powerful armament; • Good pilot protection.
Disadvantages: • Low reliability of the jet engine; • Insufficient flight time at high speeds.
Pilot Notes:
• The tail unit of the aircraft contains a turbojet engine, driven by an extension shaft connected to the main piston engine. The tail engine is used as a regular jet, and has no specific limitations; however it should be used sparingly as it burns through fuel very quickly (about 10 minutes at cruise power). As such, the jet engine should only be used in combat and other non-routine conditions.
• The engine starting procedure is as follows: first start and get the piston engine to low RPM. The jet engine cannot be started otherwise, as it requires the crankshaft to rotate, which is powered by the piston engine. After successfully starting the piston engine, you may engage the jet. If you lose the piston engine due to battle damage or other failures, the jet engine will not operate even if it is completely intact.
Low reliability of the jet engine is not modeled.
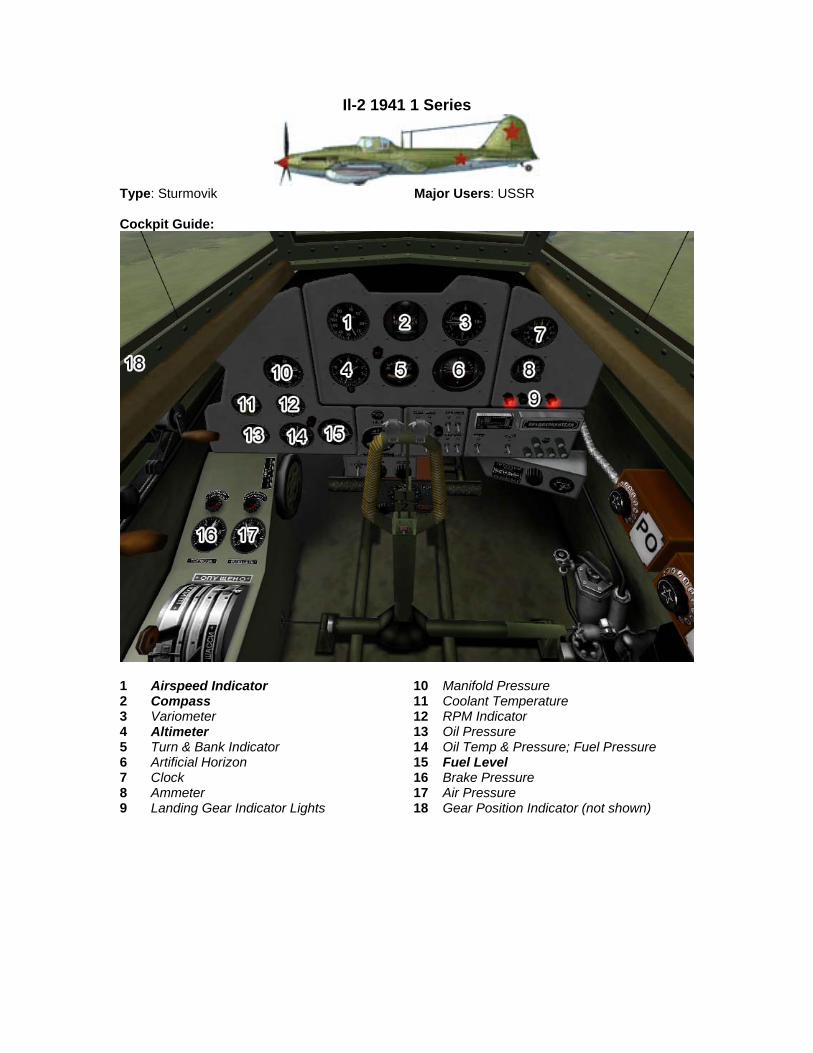
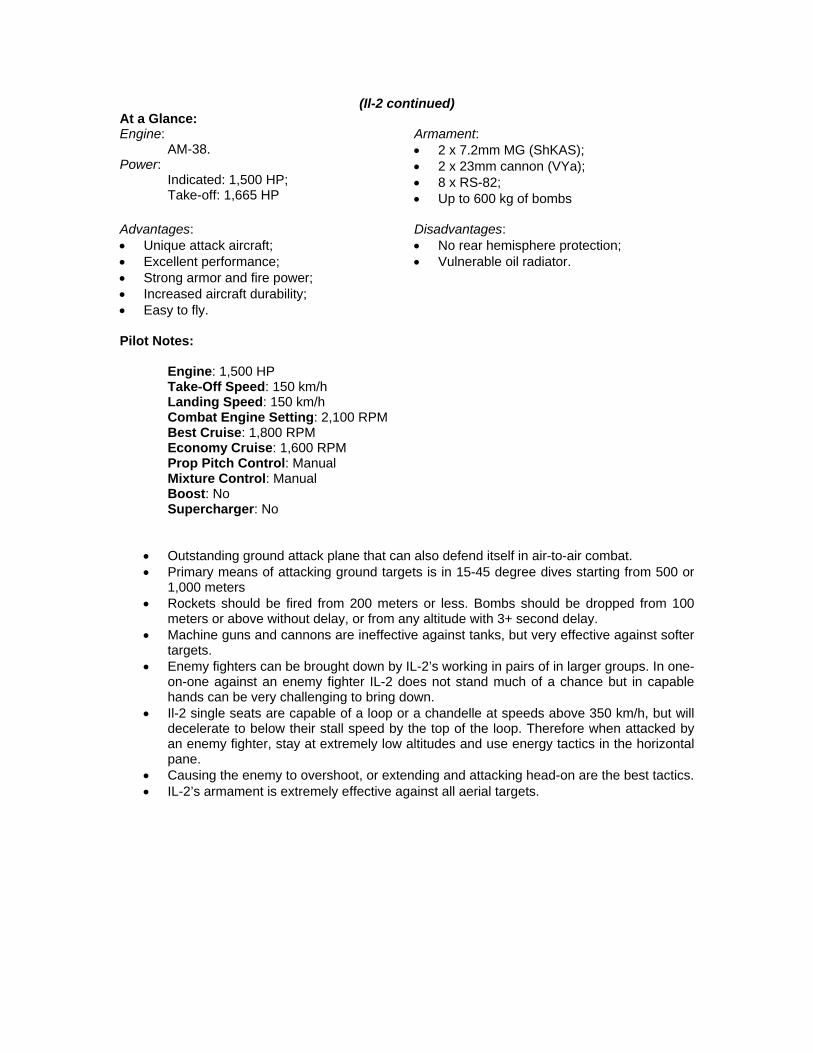
Il-2 1941 1 Series
Type: Sturmovik Major Users: USSR Cockpit Guide:
1 Airspeed Indicator 10 Manifold Pressure 2 Compass 11 Coolant Temperature 3 Variometer 12 RPM Indicator 4 Altimeter 13 Oil Pressure 5 Turn & Bank Indicator 14 Oil Temp & Pressure; Fuel Pressure 6 Artificial Horizon 15 Fuel Level 7 Clock 16 Brake Pressure 8 Ammeter 17 Air Pressure 9 Landing Gear Indicator Lights 18 Gear Position Indicator (not shown)

(Il-2 continued)
At a Glance: Engine:
AM-38. Power:
Indicated: 1,500 HP; Take-off: 1,665 HP
Armament: • 2 x 7.62mm MG (ShKAS); • 2 x 20mm cannon (ShVAK); • 16 x RS-82; • Up to 600 kg of bombs.
Advantages: • Unique attack aircraft. • Excellent performance; • Strong armor and fire power; • Increased aircraft durability; • Easy to fly.
Disadvantages: • No rear hemisphere protection; • Vulnerable oil radiator.
Pilot Notes:
Take-Off Speed: 150 km/h Landing Speed: 150 km/h Combat Engine Setting: 2,100 RPM Best Cruise: 1,800 RPM Economy Cruise: 1,600 RPM Prop Pitch Control: Manual Mixture Control: Manual Boost: No Supercharger: No
• Outstanding ground attack plane that can also defend itself in air-to-air combat. • Primary means of attacking ground targets is in 15-45 degree dives starting from 500 or
1,000 meters • Rockets should be fired from 200 meters or less. Bombs should be dropped from 100
meters or above without delay, or from any altitude with 3+ second delay. • Machine guns and cannons are ineffective against tanks, but very effective against softer
targets. • Enemy fighters can be brought down by IL-2’s working in pairs of in larger groups. In one-
on-one against an enemy fighter IL-2 does not stand much of a chance but in capable hands can be very challenging to bring down.
• Il-2 single seats are capable of a loop or a chandelle at speeds above 350 km/h, but will decelerate to below their stall speed by the top of the loop. Therefore when attacked by an enemy fighter, stay at extremely low altitudes and use energy tactics in the horizontal pane.
• Causing the enemy to overshoot, or extending and attacking head-on are the best tactics. • IL-2’s armament is extremely effective against all aerial targets.

Il-2 1941 2 Series
Type: Sturmovik Major Users: USSR Cockpit Guide:
1 Airspeed Indicator 10 Manifold Pressure 2 Compass 11 Coolant Temperature 3 Variometer 12 RPM Indicator 4 Altimeter 13 Oil Pressure 5 Turn & Bank Indicator 14 Oil Temp & Pressure; Fuel Pressure 6 Artificial Horizon 15 Fuel Level 7 Clock 16 Brake Pressure 8 Ammeter 17 Air Pressure 9 Landing Gear Indicator Lights 18 Gear Position Indicator (not shown)

(Il-2 continued) At a Glance: Engine: AM-38. Power:
Indicated: 1,500 HP; Take-off: 1,665 HP
Armament: • 2 x 7.62mm MG (ShKAS); • 2 x 20mm cannon (ShVAK); • 8 x RS-82; • Up to 600 kg of bombs.
Advantages: • Unique attack aircraft; • Excellent performance; • Strong armor and fire power; • Increased aircraft durability; • Easy to fly.
Disadvantages: • No rear hemisphere protection; • Vulnerable oil radiator.
Pilot Notes:
Take-Off Speed: 150 km/h Landing Speed: 150 km/h Combat Engine Setting: 2,100 RPM Best Cruise: 1,800 RPM Economy Cruise: 1,600 RPM Prop Pitch Control: Manual Mixture Control: Manual Boost: No Supercharger: No
• Outstanding ground attack plane that can also defend itself in air-to-air combat. • Primary means of attacking ground targets is in 15-45 degree dives starting from 500 or
1,000 meters • Rockets should be fired from 200 meters or less. Bombs should be dropped from 100
meters or above without delay, or from any altitude with 3+ second delay. • Machine guns and cannons are ineffective against tanks, but very effective against softer
targets. • Enemy fighters can be brought down by IL-2’s working in pairs of in larger groups. In one-
on-one against an enemy fighter IL-2 does not stand much of a chance but in capable hands can be very challenging to bring down.
• Il-2 single seats are capable of a loop or a chandelle at speeds above 350 km/h, but will decelerate to below their stall speed by the top of the loop. Therefore when attacked by an enemy fighter, stay at extremely low altitudes and use energy tactics in the horizontal pane.
• Causing the enemy to overshoot, or extending and attacking head-on are the best tactics. • IL-2’s armament is extremely effective against all aerial targets.

Il-2 1941 3 Series
Type: Sturmovik Major Users: USSR Cockpit Guide:
1 Airspeed Indicator 10 Manifold Pressure 2 Compass 11 Coolant Temperature 3 Variometer 12 RPM Indicator 4 Altimeter 13 Oil Pressure 5 Turn & Bank Indicator 14 Oil Temp & Pressure; Fuel Pressure 6 Artificial Horizon 15 Fuel Level 7 Clock 16 Brake Pressure 8 Ammeter 17 Air Pressure 9 Landing Gear Indicator Lights 18 Gear Position Indicator (not shown)
(Il-2 continued) At a Glance: Engine:
AM-38. Power:
Indicated: 1,500 HP; Take-off: 1,665 HP
Armament: • 2 x 7.2mm MG (ShKAS); • 2 x 23mm cannon (VYa); • 8 x RS-82; • Up to 600 kg of bombs
Advantages: • Unique attack aircraft; • Excellent performance; • Strong armor and fire power; • Increased aircraft durability; • Easy to fly.
Disadvantages: • No rear hemisphere protection; • Vulnerable oil radiator.
Pilot Notes:
Engine: 1,500 HP Take-Off Speed: 150 km/h Landing Speed: 150 km/h Combat Engine Setting: 2,100 RPM Best Cruise: 1,800 RPM Economy Cruise: 1,600 RPM Prop Pitch Control: Manual Mixture Control: Manual Boost: No Supercharger: No
• Outstanding ground attack plane that can also defend itself in air-to-air combat. • Primary means of attacking ground targets is in 15-45 degree dives starting from 500 or
1,000 meters • Rockets should be fired from 200 meters or less. Bombs should be dropped from 100
meters or above without delay, or from any altitude with 3+ second delay. • Machine guns and cannons are ineffective against tanks, but very effective against softer
targets. • Enemy fighters can be brought down by IL-2’s working in pairs of in larger groups. In one-
on-one against an enemy fighter IL-2 does not stand much of a chance but in capable hands can be very challenging to bring down.
• Il-2 single seats are capable of a loop or a chandelle at speeds above 350 km/h, but will decelerate to below their stall speed by the top of the loop. Therefore when attacked by an enemy fighter, stay at extremely low altitudes and use energy tactics in the horizontal pane.
• Causing the enemy to overshoot, or extending and attacking head-on are the best tactics. • IL-2’s armament is extremely effective against all aerial targets.

Il-2 1941 field mod
Type: Sturmovik Major Users: USSR Cockpit Guide:
1 Airspeed Indicator 10 Manifold Pressure 2 Compass 11 Coolant Temperature 3 Variometer 12 RPM Indicator 4 Altimeter 13 Oil Pressure 5 Turn & Bank Indicator 14 Oil Temp & Pressure; Fuel Pressure 6 Artificial Horizon 15 Fuel Level 7 Clock 16 Brake Pressure 8 Ammeter 17 Air Pressure 9 Landing Gear Indicator Lights 18 Gear Position Indicator (not shown) Other Playable Crew Positions: [AI Only] Rear Gunner

(Il-2 continued)
At a Glance: Engine: AM-38. Power:
Indicated: 1,500 HP; Take-off: 1,665 HP
Armament: • 2 x 7.62mm MG (ShKAS); • 2 x 7.62mm MG (DA) or 1 x 7.62mm MG
(ShKAS); • 2 x 23mm cannon (VYa); • 8 x RS-82; • Up to 500 kg of bombs.
Advantages: • Good overall flying characteristics; • Strong armor and fire power; • Increased aircraft durability; • Unsurpassed aircraft protection; • Easy to fly.
Disadvantages: • Unprotected rear gunner; • Vulnerable oil radiator.
Pilot Notes:
Take-Off Speed: 160 km/h Landing Speed: 150 km/h Combat Engine Setting: 2,000 RPM Best Cruise: 1,800 RPM Economy Cruise: 1,700 RPM Prop Pitch Control: Manual Mixture Control: Manual Boost: No Supercharger: No
• Two-seater IL-2s are heavier, slower and less maneuverable than the single-seat variants. Most maneuvers should be restricted to the horizontal pane. All two-seaters except 1941 Field Mod bleed off excessive speed in hard turns, especially with external ordnance. In most conditions no more than 1.5-2 G turns should be used. All two-seaters are incapable of a loop or a chandelle at speeds below 360 km/h, and will decelerate to below their stall speed by the top of the loop.
• Primary means of attacking ground targets is in 15-45 degree dives starting from 500 or 1,000 meters
• Rockets should be fired from 200 meters or less. Bombs should be dropped from 100 meters or above without delay, or from any altitude with 3+ second delay.
• Machine guns and cannons of all Il-2 two-seaters except IL-2M3 are marginally effective against tanks and very effective against softer targets.
• IL-2M3’s 37mm cannon are very effective against all enemy tanks. Tanks are best attacked from the rear where their armor is the weakest.
• When attacked by enemy fighters the rear gunner is the best defense. Dive to ground level and maneuver to keep the enemy fighter within the rear gunner’s defensive arc. Causing the enemy to overshoot, or extending and attacking head-on will work if the enemy allows you to do that.

Il-2M 1942 1 Series
Type: Sturmovik Major Users: USSR Cockpit Guide:
1 Airspeed Indicator 10 Manifold Pressure 2 Compass 11 Coolant Temperature 3 Variometer 12 RPM Indicator 4 Altimeter 13 Oil Pressure 5 Turn & Bank Indicator 14 Oil Temp & Pressure; Fuel Pressure 6 Artificial Horizon 15 Fuel Level 7 Clock 16 Brake Pressure 8 Ammeter 17 Air Pressure 9 Landing Gear Indicator Lights 18 Gear Position Indicator (not shown) Other Playable Crew Positions:
Rear Gunner

(Il-2 continued)
At a Glance: Engine: AM-38. Power:
Indicated: 1,500 HP; Take-off: 1,665 HP
Armament: • 2 x 7.62mm (ShKAS); • 1 x 12.7mm (UBT); • 2 x 23mm (VYa); • 4 x RS-82 or 4 x RS-132; • Up to 600 kg of bombs.
Advantages: • Good overall flying characteristics; • Strong armor and fire power; • Increased aircraft durability; • Unsurpassed aircraft protection; • Easy to fly.
Disadvantages: • Reduction of aircraft speed; • Vulnerable oil radiator.
Pilot Notes:
Take-Off Speed: 160 km/h Landing Speed: 150 km/h Combat Engine Setting: 2,000 RPM Best Cruise: 1,800 RPM Economy Cruise: 1,700 RPM Prop Pitch Control: Manual Mixture Control: Manual Boost: No Supercharger: No
• Two-seater IL-2s are heavier, slower and less maneuverable than the single-seat variants. Most maneuvers should be restricted to the horizontal pane. All two-seaters except 1941 Field Mod bleed off excessive speed in hard turns, especially with external ordnance. In most conditions no more than 1.5-2 G turns should be used. All two-seaters are incapable of a loop or a chandelle at speeds below 360 km/h, and will decelerate to below their stall speed by the top of the loop.
• Primary means of attacking ground targets is in 15-45 degree dives starting from 500 or 1,000 meters
• Rockets should be fired from 200 meters or less. Bombs should be dropped from 100 meters or above without delay, or from any altitude with 3+ second delay.
• Machine guns and cannons of all Il-2 two-seaters except IL-2M3 are marginally effective against tanks and very effective against softer targets.
• IL-2M3’s 37mm cannon are very effective against all enemy tanks. Tanks are best attacked from the rear where their armor is the weakest.
• When attacked by enemy fighters the rear gunner is the best defense. Dive to ground level and maneuver to keep the enemy fighter within the rear gunner’s defensive arc. Causing the enemy to overshoot, or extending and attacking head-on will work if the enemy allows you to do that.

Il-2M 1942 Later Series
Type: Sturmovik Major Users: USSR Cockpit Guide:
1 Airspeed Indicator 10 Manifold Pressure 2 Compass 11 Coolant Temperature 3 Variometer 12 RPM Indicator 4 Altimeter 13 Oil Pressure 5 Turn & Bank Indicator 14 Oil Temp & Pressure; Fuel Pressure 6 Artificial Horizon 15 Fuel Level 7 Clock 16 Brake Pressure 8 Ammeter 17 Air Pressure 9 Landing Gear Indicator Lights 18 Gear Position Indicator (not shown) Other Playable Crew Positions:
Rear Gunner

(Il-2 continued)
At a Glance: Engine: AM-38. Power:
Indicated: 1,500 HP; Take-off: 1,665 HP
Armament: • 2 x 7.62mm MG (ShKAS); • 1 x 12.7mm MG (UBT); • 2 x 23mm cannon (VYa); • 4 x RS-82 or 4 x RS-132; • Up to 600 kg of bombs.
Advantages: • Good overall flying characteristics; • Strong armor and fire power; • Increased aircraft durability; • Unsurpassed aircraft protection; • Easy to fly.
Disadvantages: • Reduction of diving speed and
maneuverability; • Reduced flight performance; • Mixed metal/wooden wing type; • Vulnerable oil radiator.
Pilot Notes:
Take-Off Speed: 160 km/h Landing Speed: 150 km/h Combat Engine Setting: 2,000 RPM Best Cruise: 1,800 RPM Economy Cruise: 1,700 RPM Prop Pitch Control: Manual Mixture Control: Manual Boost: No Supercharger: No
• Two-seater IL-2s are heavier, slower and less maneuverable than the single-seat variants. Most maneuvers should be restricted to the horizontal pane. All two-seaters except 1941 Field Mod bleed off excessive speed in hard turns, especially with external ordnance. In most conditions no more than 1.5-2 G turns should be used. All two-seaters are incapable of a loop or a chandelle at speeds below 360 km/h, and will decelerate to below their stall speed by the top of the loop.
• Primary means of attacking ground targets is in 15-45 degree dives starting from 500 or 1,000 meters
• Rockets should be fired from 200 meters or less. Bombs should be dropped from 100 meters or above without delay, or from any altitude with 3+ second delay.
• Machine guns and cannons of all Il-2 two-seaters except IL-2M3 are marginally effective against tanks and very effective against softer targets.
• IL-2M3’s 37mm cannon are very effective against all enemy tanks. Tanks are best attacked from the rear where their armor is the weakest.
• When attacked by enemy fighters the rear gunner is the best defense. Dive to ground level and maneuver to keep the enemy fighter within the rear gunner’s defensive arc. Causing the enemy to overshoot, or extending and attacking head-on will work if the enemy allows you to do that.

Il-2 Type 3
Type: Sturmovik Major Users: USSR Cockpit Guide:
1 Airspeed Indicator 10 Manifold Pressure 2 Compass 11 Coolant Temperature 3 Variometer 12 RPM Indicator 4 Altimeter 13 Oil Pressure 5 Turn & Bank Indicator 14 Oil Temp & Pressure; Fuel Pressure 6 Artificial Horizon 15 Fuel Level 7 Clock 16 Brake Pressure 8 Ammeter 17 Air Pressure 9 Landing Gear Indicator Lights 18 Gear Position Indicator (not shown) Other Playable Crew Positions:
Rear Gunner

(Il-2 continued)
At a Glance: Engine: AM-38F. Power:
Indicated: 1,575 HP; Take-off: 1,720 HP
Armament: • 2 x 7.62mm MG (ShKAS); • 1 x 12.7mm MG (UBT); • 2 x 23mm cannon (VYa); • 4 x RS-82 or 4 x RS-132; • Up to 600 kg of bombs.
Advantages: • Good overall flying characteristics; • Strong armor and fire power; • Increased aircraft durability; • Unsurpassed aircraft protection; • Easy to fly.
Disadvantages: • Vulnerable oil radiator.
Pilot Notes:
Take-Off Speed: 160 km/h Landing Speed: 150 km/h Combat Engine Setting: 2,000 RPM Best Cruise: 1,800 RPM Economy Cruise: 1,700 RPM Prop Pitch Control: Manual Mixture Control: Manual Boost: No Supercharger: No
• Two-seater IL-2s are heavier, slower and less maneuverable than the single-seat variants. Most maneuvers should be restricted to the horizontal pane. All two-seaters except 1941 Field Mod bleed off excessive speed in hard turns, especially with external ordnance. In most conditions no more than 1.5-2 G turns should be used. All two-seaters are incapable of a loop or a chandelle at speeds below 360 km/h, and will decelerate to below their stall speed by the top of the loop.
• Primary means of attacking ground targets is in 15-45 degree dives starting from 500 or 1,000 meters
• Rockets should be fired from 200 meters or less. Bombs should be dropped from 100 meters or above without delay, or from any altitude with 3+ second delay.
• Machine guns and cannons of all Il-2 two-seaters except IL-2M3 are marginally effective against tanks and very effective against softer targets.
• IL-2M3’s 37mm cannon are very effective against all enemy tanks. Tanks are best attacked from the rear where their armor is the weakest.
• When attacked by enemy fighters the rear gunner is the best defense. Dive to ground level and maneuver to keep the enemy fighter within the rear gunner’s defensive arc. Causing the enemy to overshoot, or extending and attacking head-on will work if the enemy allows you to do that.
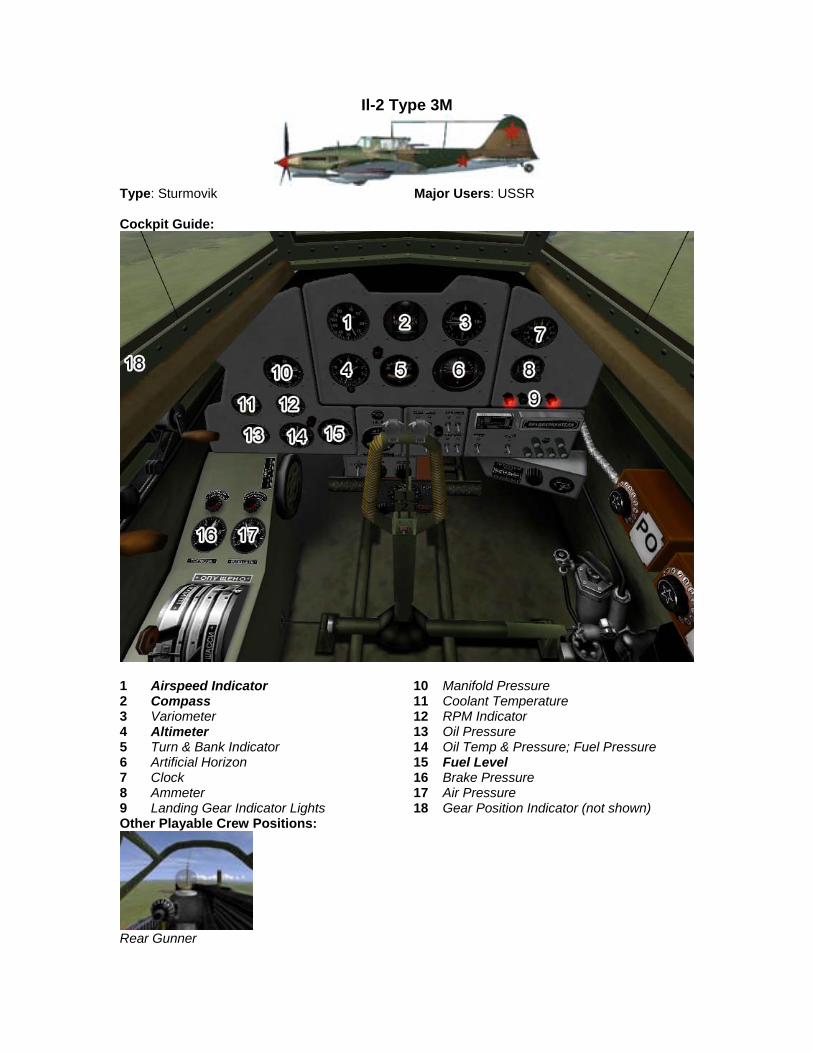
Il-2 Type 3M
Type: Sturmovik Major Users: USSR Cockpit Guide:
1 Airspeed Indicator 10 Manifold Pressure 2 Compass 11 Coolant Temperature 3 Variometer 12 RPM Indicator 4 Altimeter 13 Oil Pressure 5 Turn & Bank Indicator 14 Oil Temp & Pressure; Fuel Pressure 6 Artificial Horizon 15 Fuel Level 7 Clock 16 Brake Pressure 8 Ammeter 17 Air Pressure 9 Landing Gear Indicator Lights 18 Gear Position Indicator (not shown) Other Playable Crew Positions:
Rear Gunner
(Il-2 continued)
At a Glance: Engine: AM-38F. Power:
Indicated: 1,575 HP; Take-off: 1,720 HP
Armament: • 2 x 7.2mm MG (ShKAS); • 1 x 12.7mm MG (UBT); • 2 x 37mm cannon (NS-37); • 4 x RS-82 or 4 x RS-132; • Up to 200 kg of bombs.
Advantages: • Good overall flying characteristics; • Strong armor and fire power; • Increased aircraft durability; • Unsurpassed aircraft protection; • Easy to fly.
Disadvantages: • Strong recoil; • Lower bomb load; • Vulnerable oil radiator.
Pilot Notes:
Take-Off Speed: 160 km/h Landing Speed: 150 km/h Combat Engine Setting: 2,000 RPM Best Cruise: 1,800 RPM Economy Cruise: 1,700 RPM Prop Pitch Control: Manual Mixture Control: Manual Boost: No Supercharger: No
• Two-seater IL-2s are heavier, slower and less maneuverable than the single-seat variants. Most maneuvers should be restricted to the horizontal pane. All two-seaters except 1941 Field Mod bleed off excessive speed in hard turns, especially with external ordnance. In most conditions no more than 1.5-2 G turns should be used. All two-seaters are incapable of a loop or a chandelle at speeds below 360 km/h, and will decelerate to below their stall speed by the top of the loop.
• Primary means of attacking ground targets is in 15-45 degree dives starting from 500 or 1,000 meters
• Rockets should be fired from 200 meters or less. Bombs should be dropped from 100 meters or above without delay, or from any altitude with 3+ second delay.
• Machine guns and cannons of all Il-2 two-seaters except IL-2M3 are marginally effective against tanks and very effective against softer targets.
• IL-2M3’s 37mm cannon are very effective against all enemy tanks. Tanks are best attacked from the rear where their armor is the weakest.
• When attacked by enemy fighters the rear gunner is the best defense. Dive to ground level and maneuver to keep the enemy fighter within the rear gunner’s defensive arc. Causing the enemy to overshoot, or extending and attacking head-on will work if the enemy allows you to do that.
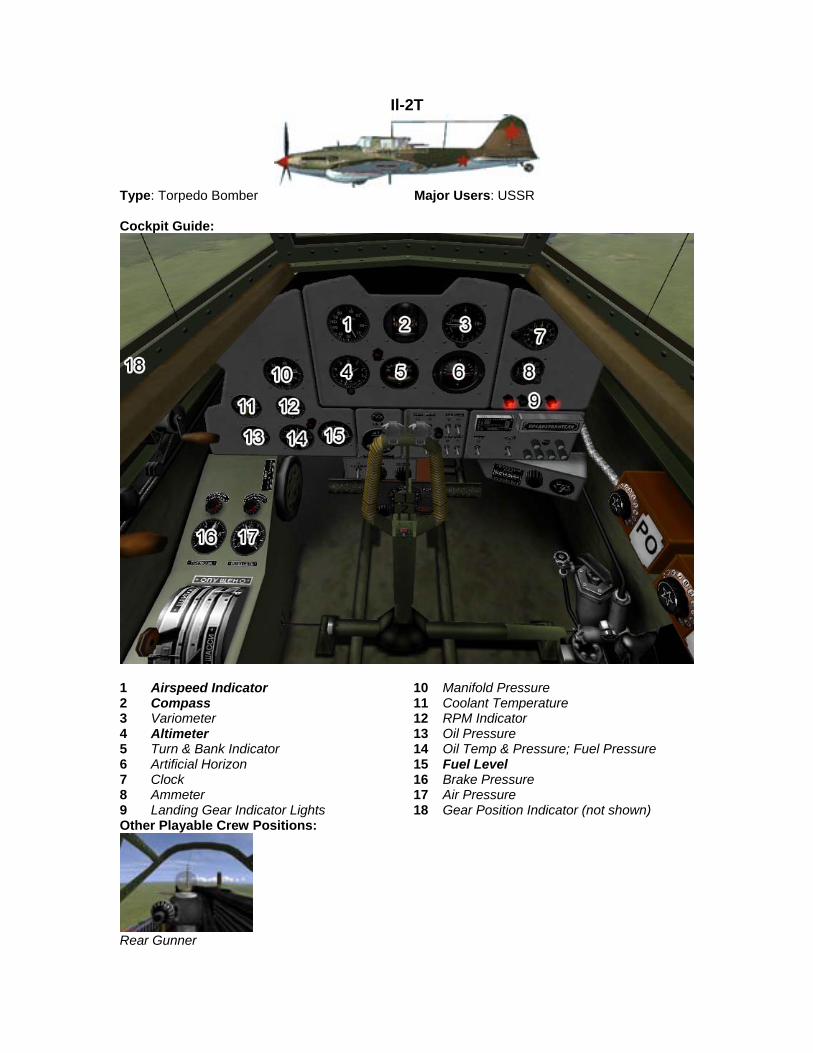
Il-2T
Type: Torpedo Bomber Major Users: USSR Cockpit Guide:
1 Airspeed Indicator 10 Manifold Pressure 2 Compass 11 Coolant Temperature 3 Variometer 12 RPM Indicator 4 Altimeter 13 Oil Pressure 5 Turn & Bank Indicator 14 Oil Temp & Pressure; Fuel Pressure 6 Artificial Horizon 15 Fuel Level 7 Clock 16 Brake Pressure 8 Ammeter 17 Air Pressure 9 Landing Gear Indicator Lights 18 Gear Position Indicator (not shown) Other Playable Crew Positions:
Rear Gunner

(Il-2 continued)
At a Glance: Engine: AM-38F. Power:
Indicated: 1,575 HP; Take-off: 1,720 HP
Armament: • 2 x 7.,62mm MG (SHKAS); • 1 x 12.7mm MG (UBT); • 4 x RS-82 or 4 x RS-132; • 1 45-12-AN torpedo.
Advantages: • Effective as torpedo bomber; • Great crew protection.
Disadvantages: • Vulnerable oil radiator; • Decreased speed performance.
Pilot Notes:
Take-Off Speed: 160 km/h Landing Speed: 150 km/h Combat Engine Setting: 2,000 RPM Best Cruise: 1,800 RPM Economy Cruise: 1,700 RPM Prop Pitch Control: Manual Mixture Control: Manual Boost: No Supercharger: No
• Il-2T is the torpedo version of the IL-2. All guns except two 7.62 machine guns are removed, therefore the only effective means of destroying enemy targets is the single torpedo carried under the fuselage.
• All torpedo runs should be performed at speeds below 350 km/h and altitudes under 100 meters. Torpedoes are best dropped from 500 meters or more away from flak-equipped ships.
• After attack immediately turn back and fly home at low level.

Il-2I
Type: Heavy Fighter Major Users: USSR Cockpit Guide:
1 Airspeed Indicator 10 Manifold Pressure 2 Compass 11 Coolant Temperature 3 Variometer 12 RPM Indicator 4 Altimeter 13 Oil Pressure 5 Turn & Bank Indicator 14 Oil Temp & Pressure; Fuel Pressure 6 Artificial Horizon 15 Fuel Level 7 Clock 16 Brake Pressure 8 Ammeter 17 Air Pressure 9 Landing Gear Indicator Lights 18 Gear Position Indicator (not shown)

(Il-2 continued)
At a Glance: Engine: AM-38F. Power:
Indicated: 1,575 HP; Take-off: 1,720 HP
Armament: • 2 x 7.62mm MG (ShKAS); • 2 x 23mm cannon (VYa).
Advantages: • Strong armor and firepower; • Increased aircraft durability; • Easy to fly; • Excellent against enemy bombers.
Disadvantages: • Insufficient maneuverability and speed for
opposing high-speed fighters; • No rear gunner; • Vulnerable oil radiator.
Pilot Notes:
Take-Off Speed: 150 km/h Landing Speed: 150 km/h Combat Engine Setting: 2,100 RPM Best Cruise: 1,800 RPM Economy Cruise: 1,600 RPM Prop Pitch Control: Manual Mixture Control: Manual Boost: No Supercharger: No
• IL-2I is the heavy interceptor version of the IL-2 ground attack. • The onboard armament is brutally effective against all air targets. IL-2’s armor is also
very effective at stopping small-caliber rounds of bomber defensive gunners. • The only problems with Il-2 as a fighter is its weight, speed and maneuverability. It’s
significantly inferior in those aspects to all dedicated fighters, and therefore regular anti-bomber tactics cannot generally be used.
• A good tactic is to set convergence to 400-500 meters and fire at bombers from beyond their effective defensive fire range. Otherwise IL-2I can attack bombers directly from behind at speeds at least 50 km/h greater than the bombers’, then extend ahead of the formation, turn around and attack head-on. During such attacks airspeed should be watched constantly: IL-2I does not accelerate that well and therefore if you let yourself get too slow you may never catch up to the enemy’s fast bombers.
• In combat against enemy fighters IL-2I is generally at a disadvantage. Use energy tactics in the horizontal pane. Causing the enemy to overshoot, or extending and attacking head-on are the best tactics.

IL-10
Type: Sturmovik Major Users: USSR Cockpit Guide:
1 Airspeed Indicator 11 RPM Indicator 2 Compass 12 Oil Temperature 3 Altimeter 13 Coolant Temperature 4 Variometer 14 Oil Radiator Indicator 5 Artificial Horizon 15 Water Radiator Indicator 6 Ammeter 16 Manifold Pressure 7 Ammunition Counters & Warning Lights 17 Oil Temp & Pressure; Fuel Pressure 8 Landing Gear Indicator Lights 18 Fuel Level 9 Pilot’s Direction Indicator 19 Brake Pressure 10 Clock 20 Air Pressure Other Playable Crew Positions:
Rear Gunner
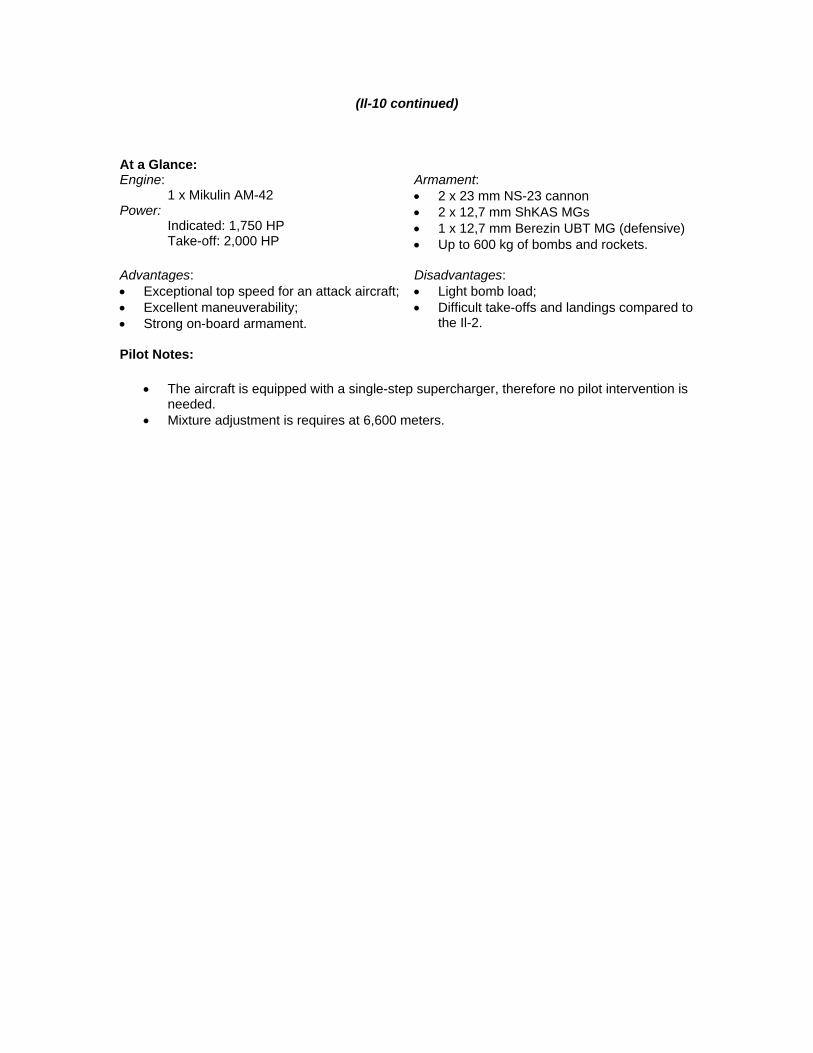
(Il-10 continued)
At a Glance: Engine: 1 x Mikulin AM-42 Power:
Indicated: 1,750 HP Take-off: 2,000 HP
Armament: • 2 x 23 mm NS-23 cannon • 2 x 12,7 mm ShKAS MGs • 1 x 12,7 mm Berezin UBT MG (defensive) • Up to 600 kg of bombs and rockets.
Advantages: • Exceptional top speed for an attack aircraft; • Excellent maneuverability; • Strong on-board armament.
Disadvantages: • Light bomb load; • Difficult take-offs and landings compared to
the Il-2. Pilot Notes:
• The aircraft is equipped with a single-step supercharger, therefore no pilot intervention is needed.
• Mixture adjustment is requires at 6,600 meters.

LaGG-3, 1941 4 Series
Type: Fighter Major Users: USSR Cockpit Guide:
1 Clock 13 Pilot’s Direction Indicator 2 Brake Pressure 14 Oil Temperature 3 Air Pressure 15 RPM Indicator 4 Altimeter 16 Fuel Level 5 Compass 17 Magneto 6 Radio 18 Internal System Indicator 7 Manifold Pressure 19 Landing Gear Indicator Lights 8 Oil Temp & Pressure; Fuel Pressure 20 Ammeter 9 Voltmeter 21 Oxygen Apparatus 10 Airspeed Indicator 22 Air Pressure 11 Turn & Bank Indicator 23 Brake Pressure 12 Variometer 24 Engine Temperature Warning Light
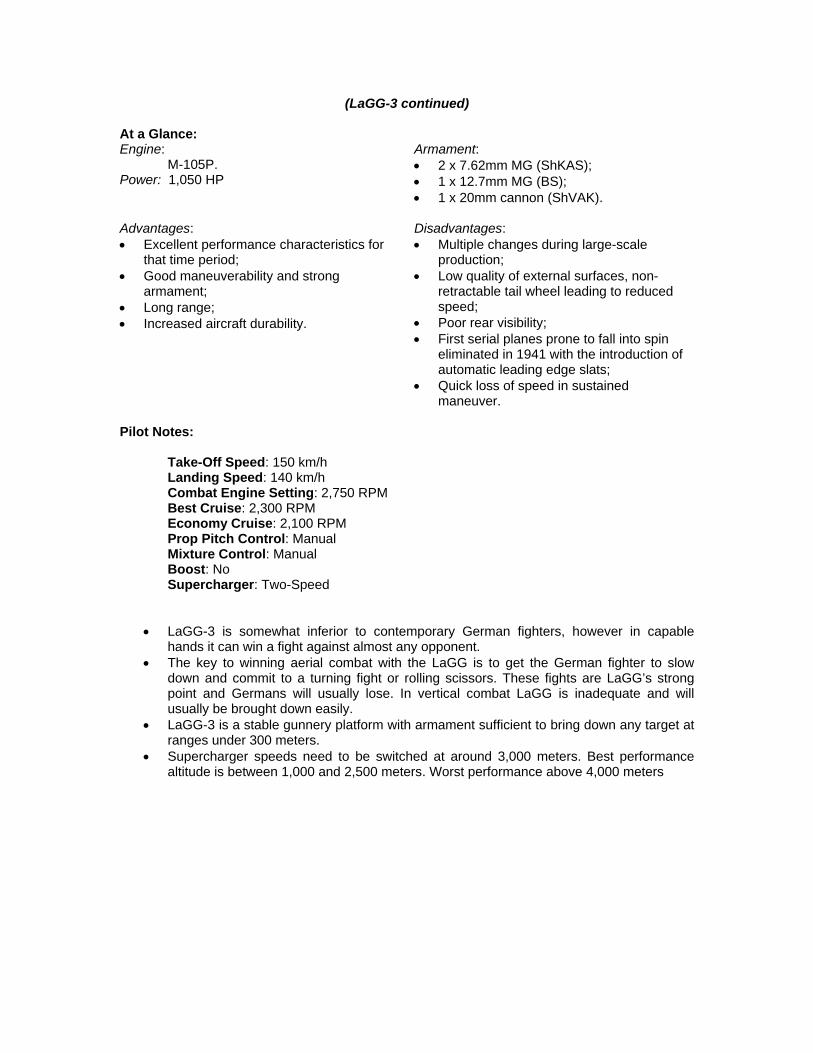
(LaGG-3 continued)
At a Glance: Engine: M-105P. Power: 1,050 HP
Armament: • 2 x 7.62mm MG (ShKAS); • 1 x 12.7mm MG (BS); • 1 x 20mm cannon (ShVAK).
Advantages: • Excellent performance characteristics for
that time period; • Good maneuverability and strong
armament; • Long range; • Increased aircraft durability.
Disadvantages: • Multiple changes during large-scale
production; • Low quality of external surfaces, non-
retractable tail wheel leading to reduced speed;
• Poor rear visibility; • First serial planes prone to fall into spin
eliminated in 1941 with the introduction of automatic leading edge slats;
• Quick loss of speed in sustained maneuver.
Pilot Notes:
Take-Off Speed: 150 km/h Landing Speed: 140 km/h Combat Engine Setting: 2,750 RPM Best Cruise: 2,300 RPM Economy Cruise: 2,100 RPM Prop Pitch Control: Manual Mixture Control: Manual Boost: No Supercharger: Two-Speed
• LaGG-3 is somewhat inferior to contemporary German fighters, however in capable hands it can win a fight against almost any opponent.
• The key to winning aerial combat with the LaGG is to get the German fighter to slow down and commit to a turning fight or rolling scissors. These fights are LaGG’s strong point and Germans will usually lose. In vertical combat LaGG is inadequate and will usually be brought down easily.
• LaGG-3 is a stable gunnery platform with armament sufficient to bring down any target at ranges under 300 meters.
• Supercharger speeds need to be switched at around 3,000 meters. Best performance altitude is between 1,000 and 2,500 meters. Worst performance above 4,000 meters
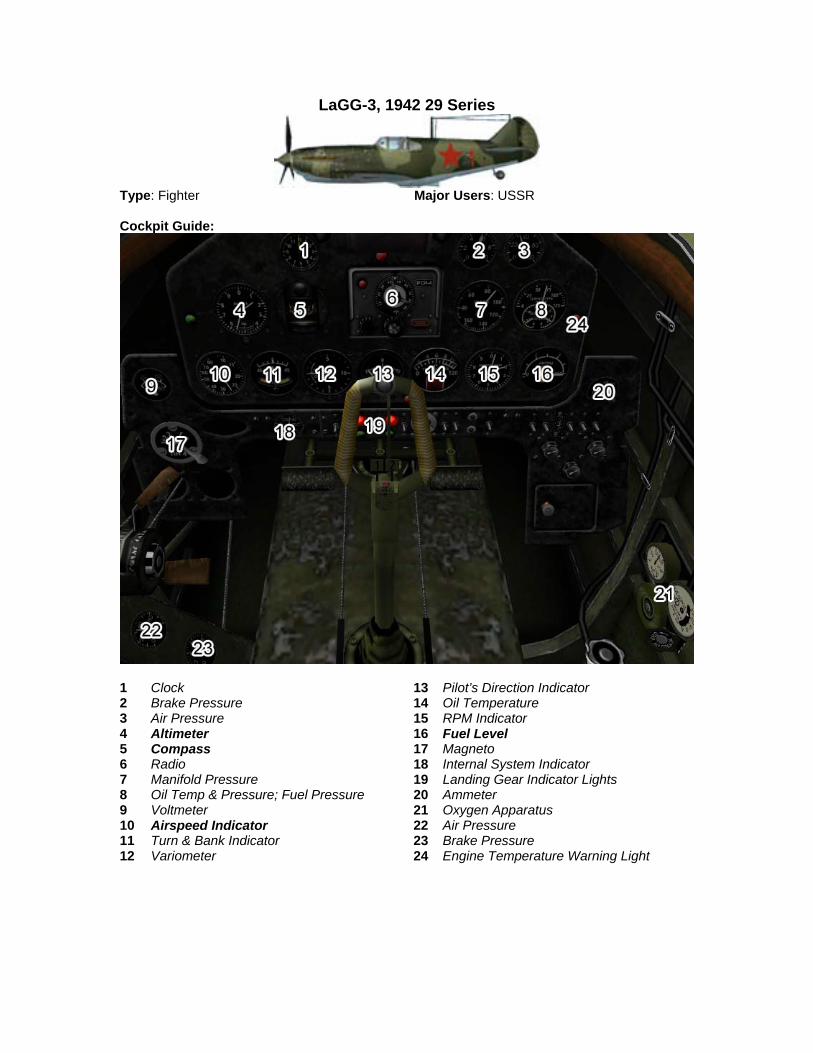
LaGG-3, 1942 29 Series
Type: Fighter Major Users: USSR Cockpit Guide:
1 Clock 13 Pilot’s Direction Indicator 2 Brake Pressure 14 Oil Temperature 3 Air Pressure 15 RPM Indicator 4 Altimeter 16 Fuel Level 5 Compass 17 Magneto 6 Radio 18 Internal System Indicator 7 Manifold Pressure 19 Landing Gear Indicator Lights 8 Oil Temp & Pressure; Fuel Pressure 20 Ammeter 9 Voltmeter 21 Oxygen Apparatus 10 Airspeed Indicator 22 Air Pressure 11 Turn & Bank Indicator 23 Brake Pressure 12 Variometer 24 Engine Temperature Warning Light

(LaGG-3 continued)
At a Glance: Engine: M-105P. Power: 1,050 HP
Armament: • 2 x 7.62mm MG (ShKAS); • 1 x 12.7mm MG (BS); • 1 x 20mm cannon (ShVAK).
Advantages: • Excellent performance characteristics for
that time period; • Good maneuverability and strong
armament; • Long range; • Increased aircraft durability.
Disadvantages: • Multiple changes during large-scale
production; • Low quality of external surfaces, non-
retractable tail wheel leading to reduced speed;
• Poor rear visibility; • First serial planes prone to fall into spin
eliminated in 1941 with the introduction of automatic leading edge slats;
• Quick loss of speed in sustained maneuver.
Pilot Notes:
Take-Off Speed: 150 km/h Landing Speed: 140 km/h Combat Engine Setting: 2,750 RPM Best Cruise: 2,300 RPM Economy Cruise: 2,100 RPM Prop Pitch Control: Manual Mixture Control: Manual Boost: No Supercharger: Two-Speed
• LaGG-3 is somewhat inferior to contemporary German fighters, however in capable hands it can win a fight against almost any opponent.
• The key to winning aerial combat with the LaGG is to get the German fighter to slow down and commit to a turning fight or rolling scissors. These fights are LaGG’s strong point and Germans will usually lose. In vertical combat LaGG is inadequate and will usually be brought down easily.
• LaGG-3 is a stable gunnery platform with armament sufficient to bring down any target at ranges under 300 meters.
• Supercharger speeds need to be switched at around 3,000 meters. Best performance altitude is between 1,000 and 2,500 meters. Worst performance above 4,000 meters
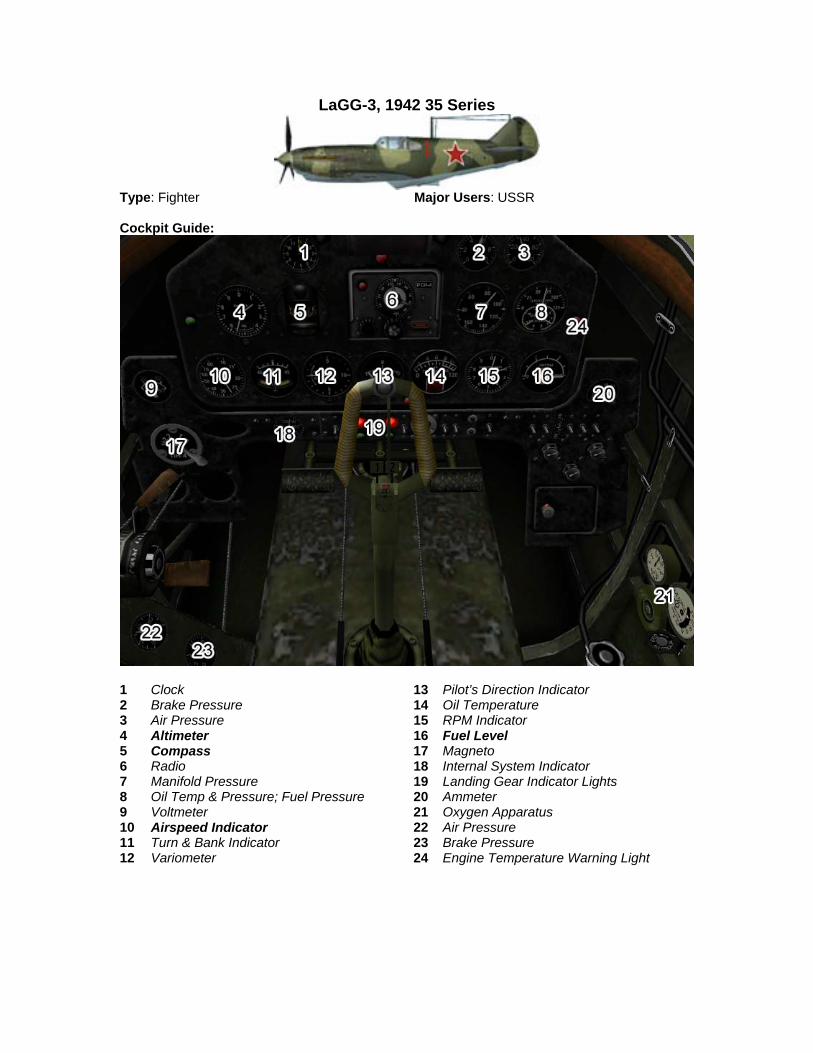
LaGG-3, 1942 35 Series
Type: Fighter Major Users: USSR Cockpit Guide:
1 Clock 13 Pilot’s Direction Indicator 2 Brake Pressure 14 Oil Temperature 3 Air Pressure 15 RPM Indicator 4 Altimeter 16 Fuel Level 5 Compass 17 Magneto 6 Radio 18 Internal System Indicator 7 Manifold Pressure 19 Landing Gear Indicator Lights 8 Oil Temp & Pressure; Fuel Pressure 20 Ammeter 9 Voltmeter 21 Oxygen Apparatus 10 Airspeed Indicator 22 Air Pressure 11 Turn & Bank Indicator 23 Brake Pressure 12 Variometer 24 Engine Temperature Warning Light

(LaGG-3 continued)
At a Glance: Engine: M-105P. Power: 1,050 HP
Armament: • 2 x 7.62mm MG (ShKAS); • 1 x 12.7mm MG (BS); • 1 x 20mm cannon (ShVAK).
Advantages: • Excellent performance characteristics for
that time period; • Good maneuverability and strong
armament; • Long range; • Increased aircraft durability.
Disadvantages: • Multiple changes during large-scale
production; • Low quality of external surfaces, non-
retractable tail wheel leading to reduced speed;
• Poor rear visibility; • First serial planes prone to fall into spin
eliminated in 1941 with the introduction of automatic leading edge slats;
• Quick loss of speed in sustained maneuver.
Pilot Notes:
Take-Off Speed: 150 km/h Landing Speed: 140 km/h Combat Engine Setting: 2,750 RPM Best Cruise: 2,300 RPM Economy Cruise: 2,100 RPM Prop Pitch Control: Manual Mixture Control: Manual Boost: No Supercharger: Two-Speed
• LaGG-3 is somewhat inferior to contemporary German fighters, however in capable hands it can win a fight against almost any opponent.
• The key to winning aerial combat with the LaGG is to get the German fighter to slow down and commit to a turning fight or rolling scissors. These fights are LaGG’s strong point and Germans will usually lose. In vertical combat LaGG is inadequate and will usually be brought down easily.
• LaGG-3 is a stable gunnery platform with armament sufficient to bring down any target at ranges under 300 meters.
• Supercharger speeds need to be switched at around 3,000 meters. Best performance altitude is between 1,000 and 2,500 meters. Worst performance above 4,000 meters

LaGG-3, 1943 66 Series
Type: Fighter Major Users: USSR Cockpit Guide:
1 Clock 12 Turn & Bank Indicator 2 Airspeed Indicator 13 Variometer 3 RPM Indicator 14 Oil Temperature 4 Fuel Level 15 Ammeter 5 Altimeter 16 Oxygen Apparatus 6 Compass 17 Magneto 7 Manifold Pressure 18 Internal System Indicator 8 Oil Temp & Pressure; Fuel Pressure 19 Landing Gear Indicator Lights 9 Voltmeter 20 Air Pressure 10 Radio 21 Brake Pressure 11 Pilot’s Direction Indicator 22 Engine Temperature Warning Light
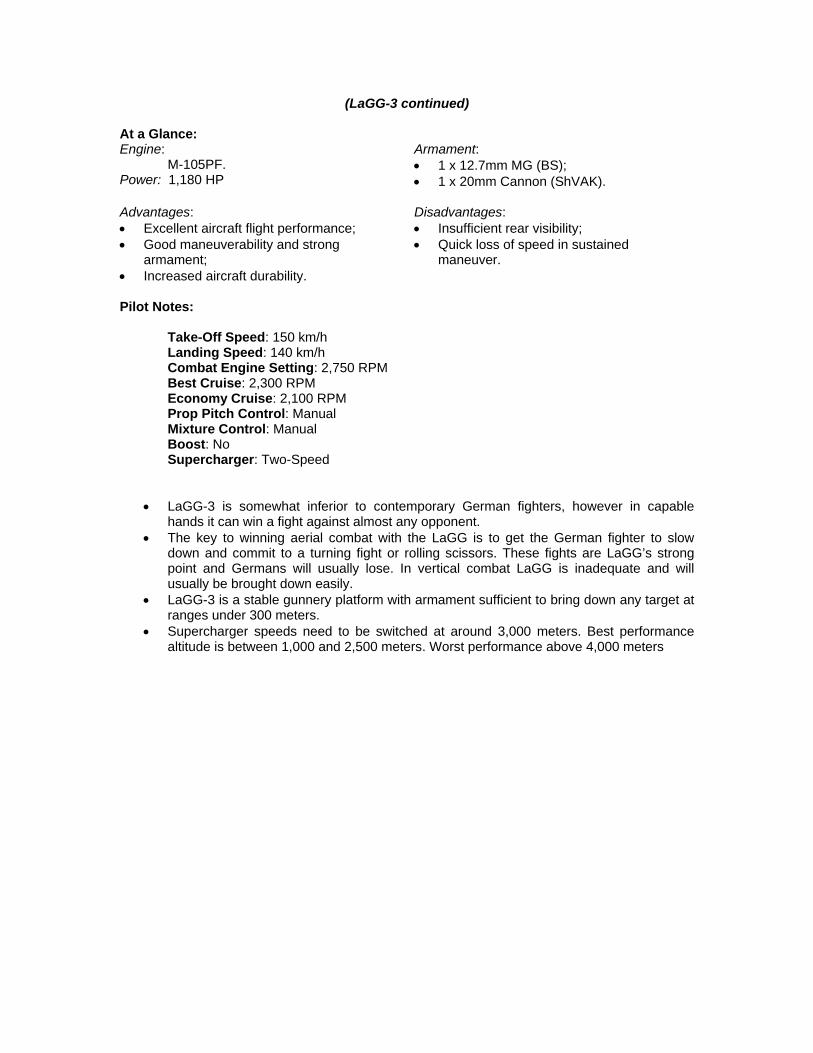
(LaGG-3 continued)
At a Glance: Engine: M-105PF. Power: 1,180 HP
Armament: • 1 x 12.7mm MG (BS); • 1 x 20mm Cannon (ShVAK).
Advantages: • Excellent aircraft flight performance; • Good maneuverability and strong
armament; • Increased aircraft durability.
Disadvantages: • Insufficient rear visibility; • Quick loss of speed in sustained
maneuver.
Pilot Notes:
Take-Off Speed: 150 km/h Landing Speed: 140 km/h Combat Engine Setting: 2,750 RPM Best Cruise: 2,300 RPM Economy Cruise: 2,100 RPM Prop Pitch Control: Manual Mixture Control: Manual Boost: No Supercharger: Two-Speed
• LaGG-3 is somewhat inferior to contemporary German fighters, however in capable hands it can win a fight against almost any opponent.
• The key to winning aerial combat with the LaGG is to get the German fighter to slow down and commit to a turning fight or rolling scissors. These fights are LaGG’s strong point and Germans will usually lose. In vertical combat LaGG is inadequate and will usually be brought down easily.
• LaGG-3 is a stable gunnery platform with armament sufficient to bring down any target at ranges under 300 meters.
• Supercharger speeds need to be switched at around 3,000 meters. Best performance altitude is between 1,000 and 2,500 meters. Worst performance above 4,000 meters

LaGG-3IT
Type: Fighter Major Users: USSR Cockpit Guide:
1 Clock 12 Turn & Bank Indicator 2 Airspeed Indicator 13 Variometer 3 RPM Indicator 14 Oil Temperature 4 Fuel Level 15 Ammeter 5 Altimeter 16 Oxygen Apparatus 6 Compass 17 Magneto 7 Manifold Pressure 18 Internal System Indicator 8 Oil Temp & Pressure; Fuel Pressure 19 Landing Gear Indicator Lights 9 Voltmeter 20 Air Pressure 10 Radio 21 Brake Pressure 11 Pilot’s Direction Indicator 22 Engine Temperature Warning Light

(LaGG-3IT continued)
At a Glance: Engine: M-105PF. Power: 1,180 HP
Armament: • 1 x 12.7mm (BS); • 1 x 37mm (NS-37).
Advantages: • Excellent performance characteristics; • Good maneuverability; • Strong armament; • Increased aircraft durability.
Disadvantages: • Insufficient rear cockpit visibility; • Quick loss of speed in long-drawn
maneuvers; • Insufficient maximum speed for the year
1943. Pilot Notes:
Take-Off Speed: 150 km/h Landing Speed: 140 km/h Combat Engine Setting: 2,750 RPM Best Cruise: 2,300 RPM Economy Cruise: 2,100 RPM Prop Pitch Control: Manual Mixture Control: Manual Boost: No Supercharger: Two-Speed
• LaGG-3 is somewhat inferior to contemporary German fighters, however in capable hands it can win a fight against almost any opponent.
• The key to winning aerial combat with the LaGG is to get the German fighter to slow down and commit to a turning fight or rolling scissors. These fights are LaGG’s strong point and Germans will usually lose. In vertical combat LaGG is inadequate and will usually be brought down easily.
• LaGG-3 is a stable gunnery platform with armament sufficient to bring down any target at ranges under 300 meters. LaGG-3IT is equipped with a rapid firing 37mm cannon which can be absolutely brutal against both air and ground targets.
• Supercharger speeds need to be switched at around 3,000 meters. Best performance altitude is between 1,000 and 2,500 meters. Worst performance above 4,000 meters
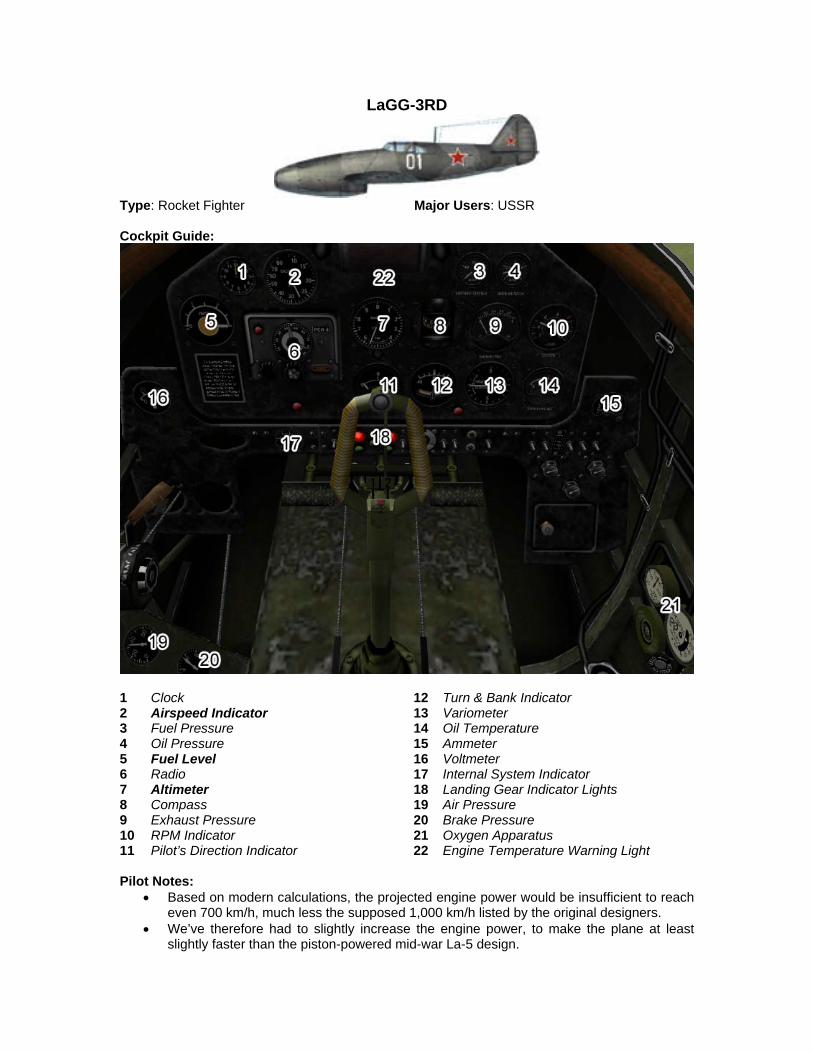
LaGG-3RD
Type: Rocket Fighter Major Users: USSR Cockpit Guide:
1 Clock 12 Turn & Bank Indicator 2 Airspeed Indicator 13 Variometer 3 Fuel Pressure 14 Oil Temperature 4 Oil Pressure 15 Ammeter 5 Fuel Level 16 Voltmeter 6 Radio 17 Internal System Indicator 7 Altimeter 18 Landing Gear Indicator Lights 8 Compass 19 Air Pressure 9 Exhaust Pressure 20 Brake Pressure 10 RPM Indicator 21 Oxygen Apparatus 11 Pilot’s Direction Indicator 22 Engine Temperature Warning Light Pilot Notes:
• Based on modern calculations, the projected engine power would be insufficient to reach even 700 km/h, much less the supposed 1,000 km/h listed by the original designers.
• We’ve therefore had to slightly increase the engine power, to make the plane at least slightly faster than the piston-powered mid-war La-5 design.
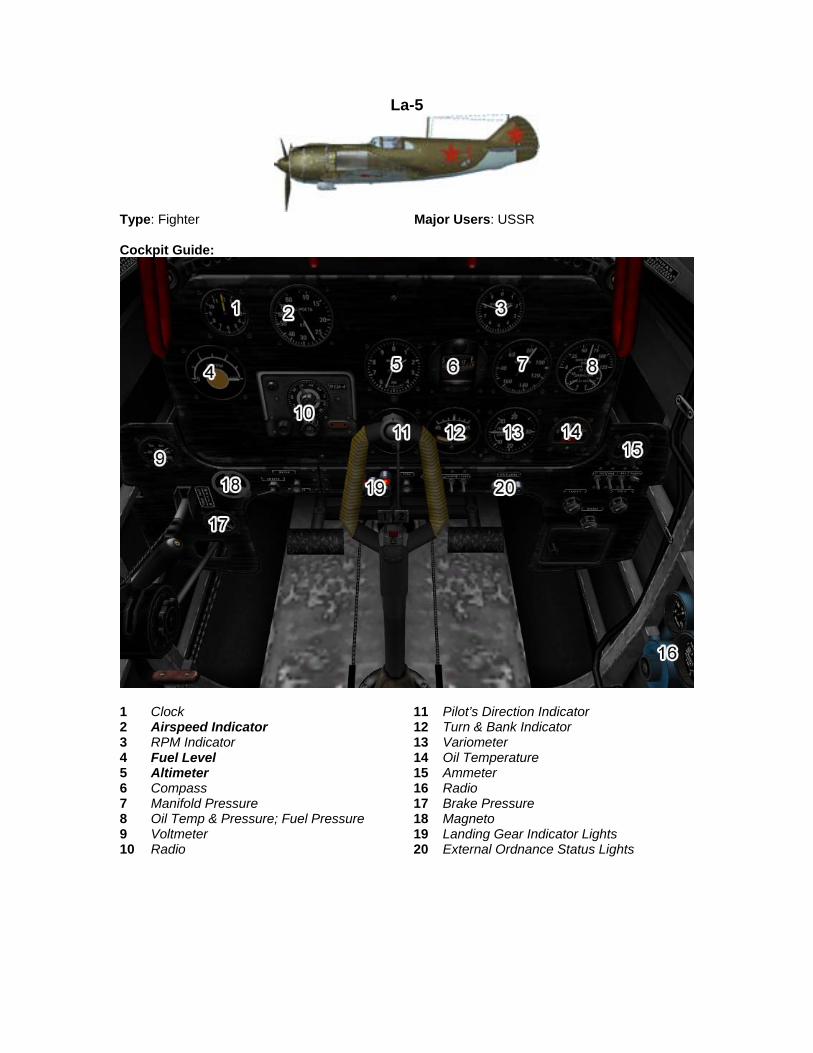
La-5
Type: Fighter Major Users: USSR Cockpit Guide:
1 Clock 11 Pilot’s Direction Indicator 2 Airspeed Indicator 12 Turn & Bank Indicator 3 RPM Indicator 13 Variometer 4 Fuel Level 14 Oil Temperature 5 Altimeter 15 Ammeter 6 Compass 16 Radio 7 Manifold Pressure 17 Brake Pressure 8 Oil Temp & Pressure; Fuel Pressure 18 Magneto 9 Voltmeter 19 Landing Gear Indicator Lights 10 Radio 20 External Ordnance Status Lights
(La-5 continued)
At a Glance: Engine: M-82 Power: 1,700 HP
Armament: • 2 x 20mm cannons (ShVAK)
Advantages: • Good performance characteristics; • Good maneuverability and strong
armament; • Good cockpit visibility.
Disadvantages: • Heavy weight; • Wooden construction of the first serial
aircraft.
Pilot Notes:
Take-Off Speed: 170 km/h Landing Speed: 165 km/h Combat Engine Setting: 2,500 RPM Best Cruise: 2,100 RPM Economy Cruise: 1,950 RPM Prop Pitch Control: Manual Mixture Control: Manual Boost: No Supercharger: Two-Speed
• La-5 is somewhat inferior to contemporary German fighters, however in capable hands it can win a fight against almost any opponent. In general these radial versions of the LaGG-3 are less capable than the 1943 version of the LaGG.
• LaGG-3 tactics and considerations to aerial combat apply to the La-5 as well. La-5 is an excellent gunnery platform as its twin ShVAK cannon are installed in the nose and therefore are effective at any range regardless of convergence at distances up to 300 meters for fighters, and 500 meters for bombers.
• Supercharger speeds need to be switched at around 3,500 meters. Second speed can be used on take-off, however needs to be switched off at 100-150 meters.
• Best performance altitude is between 1,000 and 2,500 meters. Worst performance above 4,000 meters
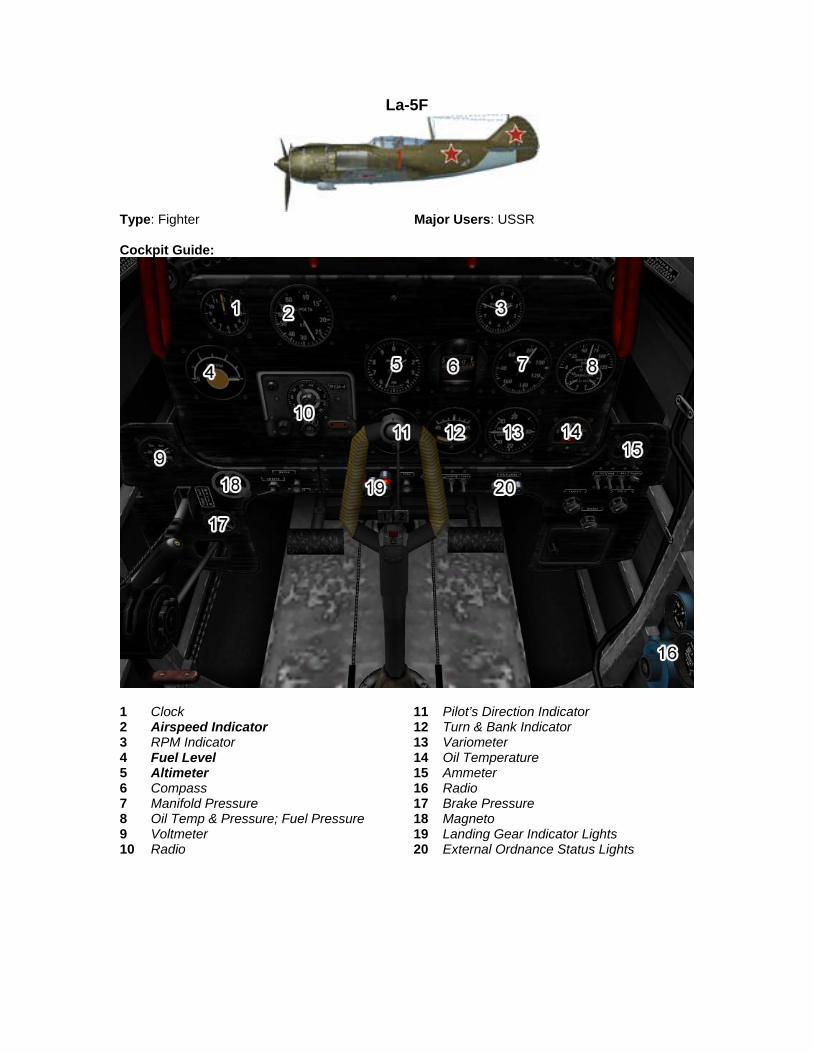
La-5F
Type: Fighter Major Users: USSR Cockpit Guide:
1 Clock 11 Pilot’s Direction Indicator 2 Airspeed Indicator 12 Turn & Bank Indicator 3 RPM Indicator 13 Variometer 4 Fuel Level 14 Oil Temperature 5 Altimeter 15 Ammeter 6 Compass 16 Radio 7 Manifold Pressure 17 Brake Pressure 8 Oil Temp & Pressure; Fuel Pressure 18 Magneto 9 Voltmeter 19 Landing Gear Indicator Lights 10 Radio 20 External Ordnance Status Lights
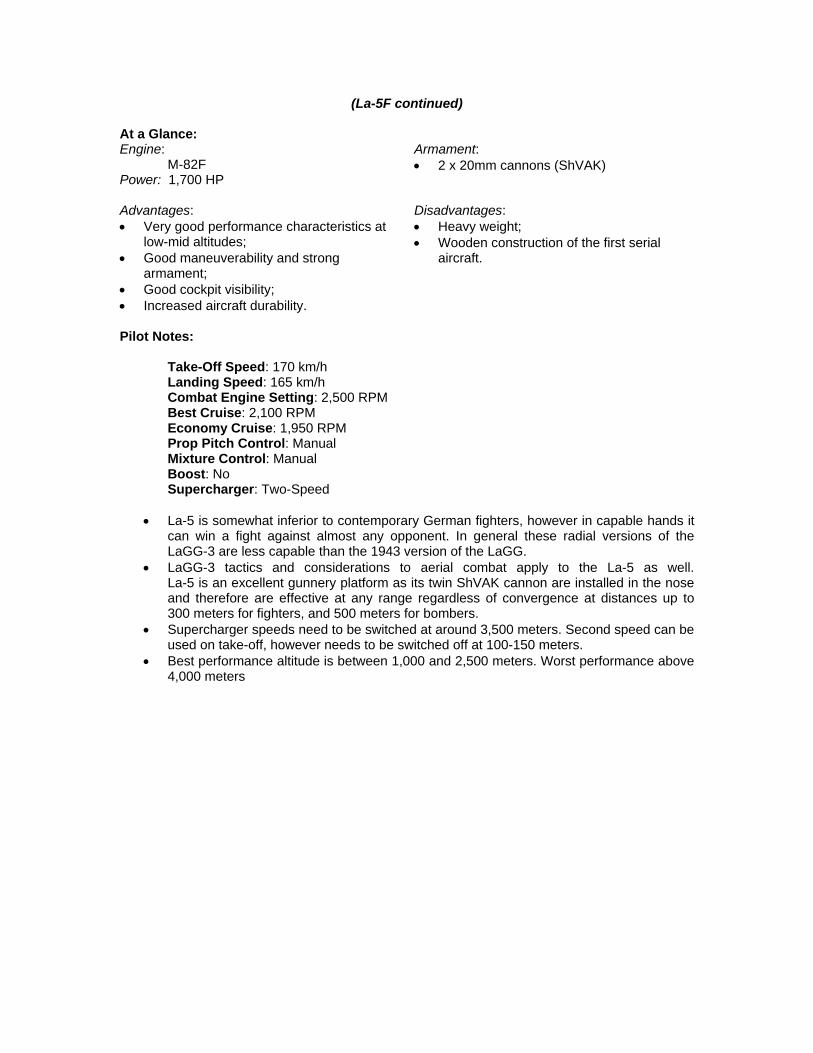
(La-5F continued)
At a Glance: Engine: M-82F Power: 1,700 HP
Armament: • 2 x 20mm cannons (ShVAK)
Advantages: • Very good performance characteristics at
low-mid altitudes; • Good maneuverability and strong
armament; • Good cockpit visibility; • Increased aircraft durability.
Disadvantages: • Heavy weight; • Wooden construction of the first serial
aircraft.
Pilot Notes:
Take-Off Speed: 170 km/h Landing Speed: 165 km/h Combat Engine Setting: 2,500 RPM Best Cruise: 2,100 RPM Economy Cruise: 1,950 RPM Prop Pitch Control: Manual Mixture Control: Manual Boost: No Supercharger: Two-Speed
• La-5 is somewhat inferior to contemporary German fighters, however in capable hands it can win a fight against almost any opponent. In general these radial versions of the LaGG-3 are less capable than the 1943 version of the LaGG.
• LaGG-3 tactics and considerations to aerial combat apply to the La-5 as well. La-5 is an excellent gunnery platform as its twin ShVAK cannon are installed in the nose and therefore are effective at any range regardless of convergence at distances up to 300 meters for fighters, and 500 meters for bombers.
• Supercharger speeds need to be switched at around 3,500 meters. Second speed can be used on take-off, however needs to be switched off at 100-150 meters.
• Best performance altitude is between 1,000 and 2,500 meters. Worst performance above 4,000 meters

La-5FN
Type: Fighter Major Users: USSR Cockpit Guide:
1 Clock 11 Pilot’s Direction Indicator 2 Airspeed Indicator 12 Turn & Bank Indicator 3 RPM Indicator 13 Variometer 4 Fuel Level 14 Oil Temperature 5 Altimeter 15 Ammeter 6 Compass 16 Radio 7 Manifold Pressure 17 Brake Pressure 8 Oil Temp & Pressure; Fuel Pressure 18 Magneto 9 Voltmeter 19 Landing Gear Indicator Lights 10 Radio 20 External Ordnance Status Lights

(La-5FN continued)
At a Glance: Engine: M-82FN. Power: 1,850 HP
Armament: • 2 x 20mm cannon (ShVAK).
Advantages: • Excellent performance characteristics; • Good maneuverability; • Strong armament; • Good cockpit visibility; • Increased aircraft durability.
Disadvantages: • Heavy weight; • Wooden construction of the first serial
aircraft.
Pilot Notes:
Take-Off Speed: 160 km/h Landing Speed: 155 km/h Combat Engine Setting: 2,500 RPM Best Cruise: 2,100 RPM Economy Cruise: 2,000 RPM Prop Pitch Control: Manual Mixture Control: Manual Boost: Yes, 10 minute maximum Supercharger: Two-Speed
• Excellent dogfighter with good all-around performance. Can be used both as an energy or angles fighter against BF-109s up to G6, and all FW-190A and F. Best used as angles fighter against later 109s, FW-190D and Me-262.
• Very stable gun platform. Best results can be achieved at ranges under 200 meters by aiming at enemy engine and/or cockpit area.
• Even though equipped with radial engine, the La-5FN can easily overheat in combat especially when using boost. Make sure to fully open the radiator as soon as you can afford losing speed.
• La-5FN will not easily stall at slow speeds due to the leading edge slats, however you can enter a vicious high-speed spin if you yank the sick too hard at speeds above 400 km/h.
• Supercharger speeds need to be switched at 4,500 meters. La-5FN will not perform well at all at higher altitudes and speed 1; at lower altitudes and speed 2 engine damage will occur.
• Best performance altitude is between 1,500 and 2,800 meters for speed 1 and 4,500 and 6,500 for speed 2.
• Worst performance between 3,000 and 4,500 meters/

La-7
Type: Fighter Major Users: USSR Cockpit Guide:
1 Clock 11 Fuel Level 2 Altimeter 12 Oil Temperature 3 Compass 13 Air Pressure 4 Pilot’s Direction Indicator 14 Brake Pressure 5 Airspeed Indicator 15 Oxygen Flow Indicator 6 Turn & Bank Indicator 16 Oxygen Pressure 7 Variometer 17 Landing Gear Indicator Lights 8 Manifold Pressure 18 Ammeter 9 RPM Indicator 19 External Ordnance Status Lights 10 Oil Temp & Pressure; Fuel Pressure 20 Voltmeter

(La-7 continued)
At a Glance: Engine: ASh-82FN. Power: 1,850 HP
Armament: • 2 x 20mm cannon (ShVAK)
Advantages: • One of the best late-war fighters; • Improved aerodynamics; • Good maneuverability and strong
armament. Increased aircraft durability; • Easy to fly.
Disadvantages: • The quality of manufacture slightly inferior
to late-war Yak fighters.
Pilot Notes:
Take-Off Speed: 165 km/h Landing Speed: 160 km/h Combat Engine Setting: 2,500 RPM Best Cruise: 2,100 RPM Economy Cruise: 2,000 RPM Prop Pitch Control: Manual Mixture Control: Manual Boost: No Supercharger: Two-Speed
• Excellent fighter with great all-around performance. Clearly superior in one-on-one dogfights to most pre-1944 fighters of the world in both energy and angles tactics. Outstanding climb, acceleration and diving characteristics.
• Very stable gun platform. Best results can be achieved at ranges under 200 meters by aiming at enemy engine and/or cockpit area.
• Even though equipped with radial engine, the La-7 can easily overheat in combat especially when using boost. Make sure to fully open the radiator as soon as you can afford losing speed.
• La-7 will not easily stall at slow speeds due to the leading edge slats, however you can enter a vicious high-speed spin if you yank the sick too hard at speeds above 400 km/h.
• Supercharger speeds need to be switched at 4,500 meters. La-7 will not perform well at all at higher altitudes and speed 1; at lower altitudes and speed 2 engine damage will occur.
• Best performance altitude is between 1,500 and 2,800 meters for speed 1 and 4,500 and 6,500 for speed 2.
• Worst performance between 3,000 and 4,500 meters.

La-7 3xB-20
Type: Fighter Major Users: USSR Cockpit Guide:
1 Clock 12 Ammeter 2 Altimeter 13 Fuel Level 3 Compass 14 Oil Temperature 4 Pilot’s Direction Indicator 15 Landing Gear Indicator Lights 5 Airspeed Indicator 16 Magneto 6 Turn & Bank Indicator 17 Voltmeter 7 Variometer 18 Oxygen Flow Indicator 8 Manifold Pressure 19 Oxygen Pressure 9 RPM Indicator 20 Air Pressure 10 Oil Temp & Pressure; Fuel Pressure 21 Brake Pressure 11 Pilot’s Direction Indicator 22 External Ordnance Status Lights
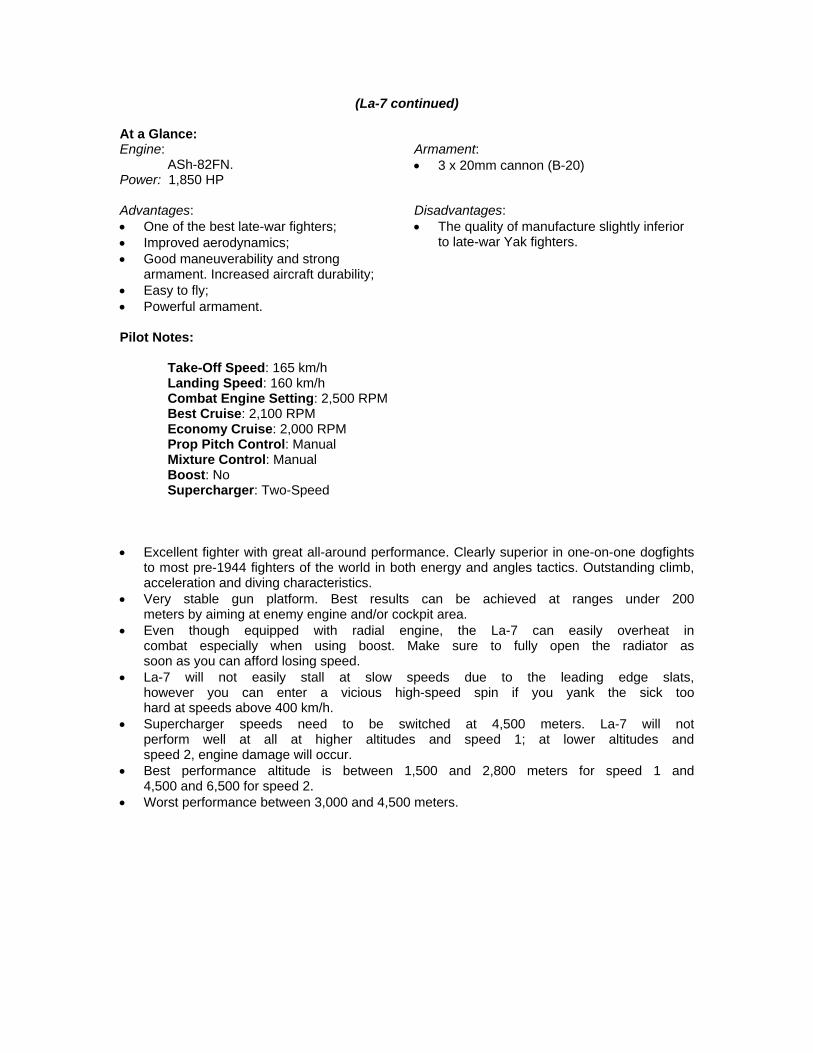
(La-7 continued)
At a Glance: Engine: ASh-82FN. Power: 1,850 HP
Armament: • 3 x 20mm cannon (B-20)
Advantages: • One of the best late-war fighters; • Improved aerodynamics; • Good maneuverability and strong
armament. Increased aircraft durability; • Easy to fly; • Powerful armament.
Disadvantages: • The quality of manufacture slightly inferior
to late-war Yak fighters.
Pilot Notes:
Take-Off Speed: 165 km/h Landing Speed: 160 km/h Combat Engine Setting: 2,500 RPM Best Cruise: 2,100 RPM Economy Cruise: 2,000 RPM Prop Pitch Control: Manual Mixture Control: Manual Boost: No Supercharger: Two-Speed
• Excellent fighter with great all-around performance. Clearly superior in one-on-one dogfights to most pre-1944 fighters of the world in both energy and angles tactics. Outstanding climb, acceleration and diving characteristics.
• Very stable gun platform. Best results can be achieved at ranges under 200 meters by aiming at enemy engine and/or cockpit area.
• Even though equipped with radial engine, the La-7 can easily overheat in combat especially when using boost. Make sure to fully open the radiator as soon as you can afford losing speed.
• La-7 will not easily stall at slow speeds due to the leading edge slats, however you can enter a vicious high-speed spin if you yank the sick too hard at speeds above 400 km/h.
• Supercharger speeds need to be switched at 4,500 meters. La-7 will not perform well at all at higher altitudes and speed 1; at lower altitudes and speed 2, engine damage will occur.
• Best performance altitude is between 1,500 and 2,800 meters for speed 1 and 4,500 and 6,500 for speed 2.
• Worst performance between 3,000 and 4,500 meters.
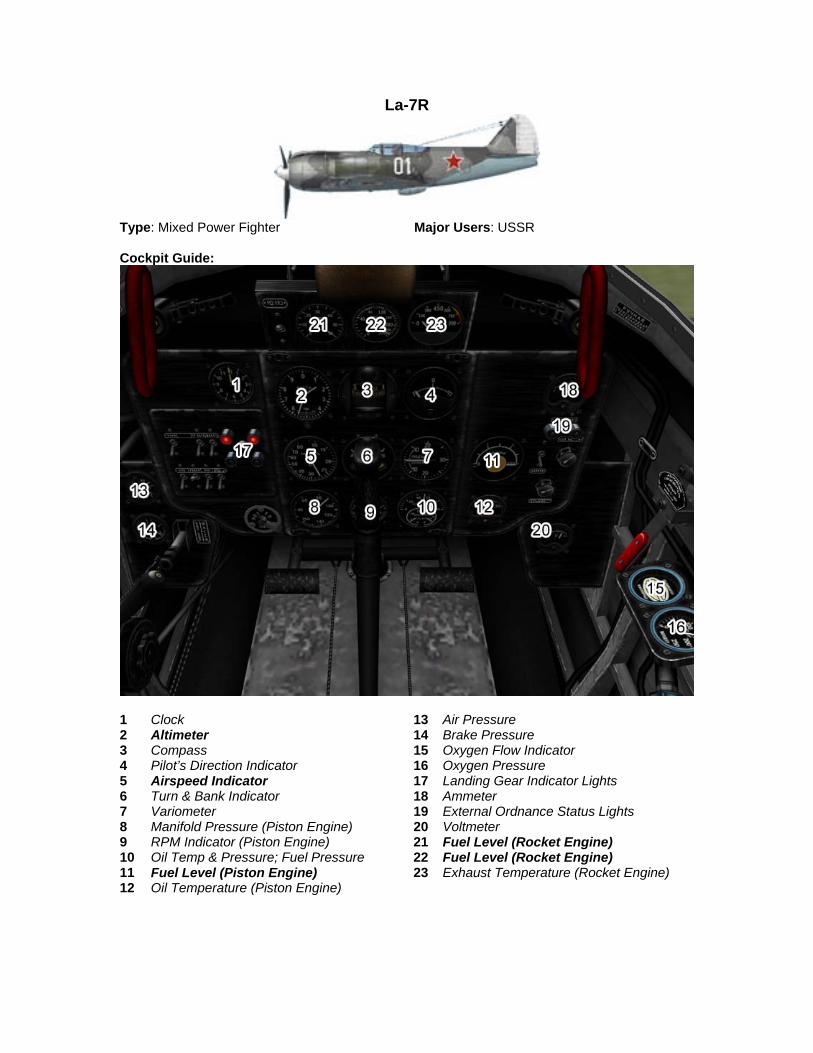
La-7R
Type: Mixed Power Fighter Major Users: USSR Cockpit Guide:
1 Clock 13 Air Pressure 2 Altimeter 14 Brake Pressure 3 Compass 15 Oxygen Flow Indicator 4 Pilot’s Direction Indicator 16 Oxygen Pressure 5 Airspeed Indicator 17 Landing Gear Indicator Lights 6 Turn & Bank Indicator 18 Ammeter 7 Variometer 19 External Ordnance Status Lights 8 Manifold Pressure (Piston Engine) 20 Voltmeter 9 RPM Indicator (Piston Engine) 21 Fuel Level (Rocket Engine) 10 Oil Temp & Pressure; Fuel Pressure 22 Fuel Level (Rocket Engine) 11 Fuel Level (Piston Engine) 23 Exhaust Temperature (Rocket Engine) 12 Oil Temperature (Piston Engine)
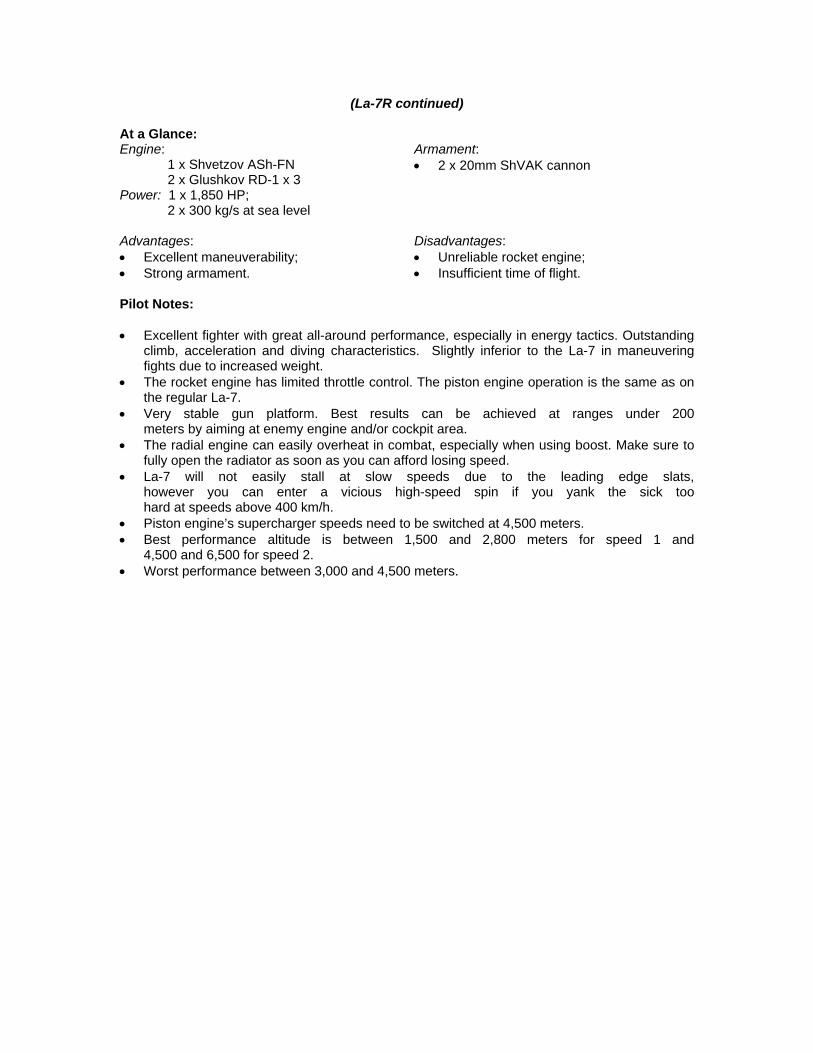
(La-7R continued)
At a Glance: Engine: 1 x Shvetzov ASh-FN 2 x Glushkov RD-1 x 3 Power: 1 x 1,850 HP;
2 x 300 kg/s at sea level
Armament: • 2 x 20mm ShVAK cannon
Advantages: • Excellent maneuverability; • Strong armament.
Disadvantages: • Unreliable rocket engine; • Insufficient time of flight.
Pilot Notes: • Excellent fighter with great all-around performance, especially in energy tactics. Outstanding
climb, acceleration and diving characteristics. Slightly inferior to the La-7 in maneuvering fights due to increased weight.
• The rocket engine has limited throttle control. The piston engine operation is the same as on the regular La-7.
• Very stable gun platform. Best results can be achieved at ranges under 200 meters by aiming at enemy engine and/or cockpit area.
• The radial engine can easily overheat in combat, especially when using boost. Make sure to fully open the radiator as soon as you can afford losing speed.
• La-7 will not easily stall at slow speeds due to the leading edge slats, however you can enter a vicious high-speed spin if you yank the sick too hard at speeds above 400 km/h.
• Piston engine’s supercharger speeds need to be switched at 4,500 meters. • Best performance altitude is between 1,500 and 2,800 meters for speed 1 and
4,500 and 6,500 for speed 2. • Worst performance between 3,000 and 4,500 meters.

MiG-3
Type: Fighter Major Users: USSR Cockpit Guide:
1 Altimeter 10 Voltmeter 2 Compass 11 Air Pressure 3 Manifold Pressure 12 Brake Pressure 4 Fuel Level 13 Coolant Temperature 5 Airspeed Indicator 14 Oil Temperature 6 Turn & Bank Indicator 15 Landing Gear Indicator Lights 7 Variometer 16 Clock 8 RPM Indicator 17 Ammeter 9 Oil Temp & Pressure; Fuel Pressure

(MiG-3 continued)
At a Glance: Engine: AM-35A Power:
Indicated: 1,200 HP Take-off: 1,350 HP
Armament: • 2 x 12.7mm MG (BS)
Advantages: • Fastest high-altitude interceptor of 1941; • Stable gun platform; • Excellent maneuverability at high angles of
attack; • Good maneuverability at high altitudes; • Practical easy-to-build, easy-to-maintain
construction.
Disadvantages: • Weakly armored; • High landing speed; • Insufficient maneuverability at low altitudes.
Pilot Notes:
Take-Off Speed: 165 km/h Landing Speed: 160 km/h Combat Engine Setting: 2,200 RPM Best Cruise: 1,850 RPM Economy Cruise: 1,750 RPM Prop Pitch Control: Manual Mixture Control: Manual Boost: No Supercharger: No
• MiG-3 1941 versions are generally inferior to all 1941 and 1942 fighters, and inadequate against all 1943 and later fighters.
• MiG-3’s low altitude performance is ferocious and it should never be used as an angles fighter below 5,000 meters.
• MiG-3 will easily stall at lower altitudes from rough maneuvers. It should be flown very gently.
• Most MiG-3 variants have very weak armament and usually need a two-three second burst at a vulnerable area to bring down a target.
• Best performance altitude is above 4,500 meters. Worst performance under 1,000 meters
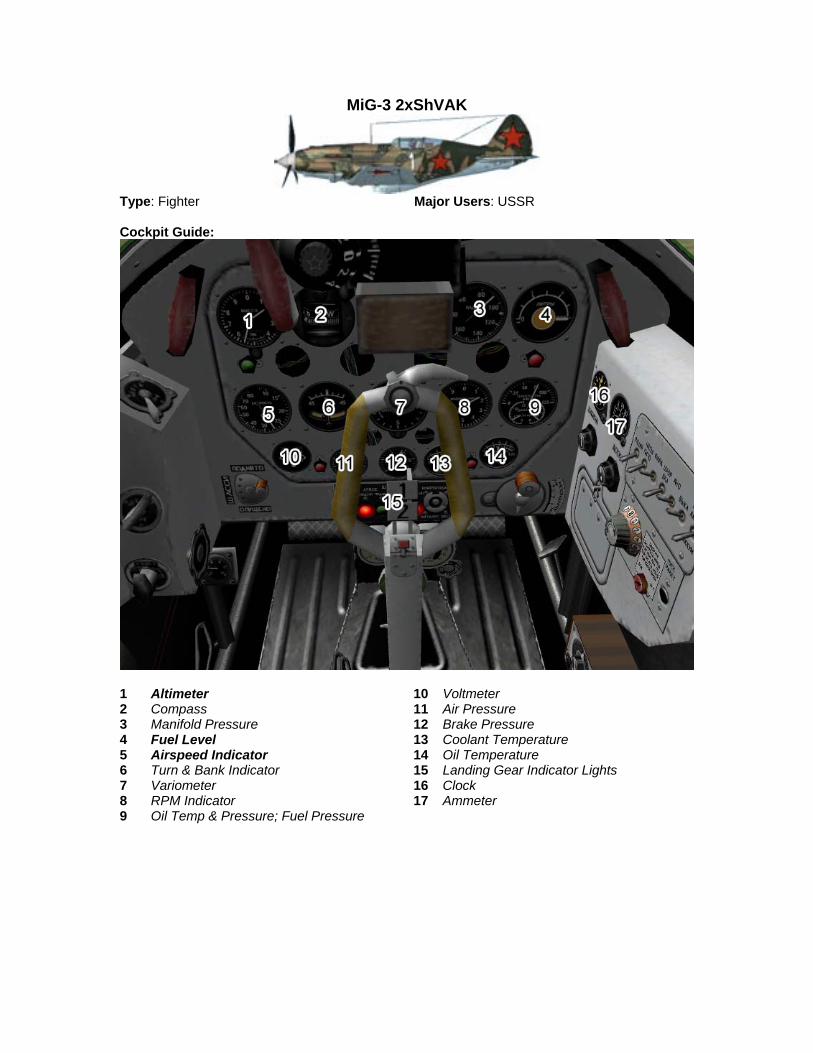
MiG-3 2xShVAK
Type: Fighter Major Users: USSR Cockpit Guide:
1 Altimeter 10 Voltmeter 2 Compass 11 Air Pressure 3 Manifold Pressure 12 Brake Pressure 4 Fuel Level 13 Coolant Temperature 5 Airspeed Indicator 14 Oil Temperature 6 Turn & Bank Indicator 15 Landing Gear Indicator Lights 7 Variometer 16 Clock 8 RPM Indicator 17 Ammeter 9 Oil Temp & Pressure; Fuel Pressure

(MiG-3 continued)
At a Glance: Engine: AM-35A Power:
Indicated: 1,200 HP Take-off: 1,350 HP
Armament: • 2 x 20mm (ShVAK)
Advantages: • Fastest high-altitude interceptor of 1941; • Stable gun platform; • Excellent maneuverability at high angles of
attack; • Good maneuverability at high altitudes; • Practical easy-to-build, easy-to-maintain
construction.
Disadvantages: • Weakly armored; • High landing speed; • Insufficient maneuverability at low altitudes.
Pilot Notes:
Take-Off Speed: 165 km/h Landing Speed: 160 km/h Combat Engine Setting: 2,200 RPM Best Cruise: 1,850 RPM Economy Cruise: 1,750 RPM Prop Pitch Control: Manual Mixture Control: Manual Boost: No Supercharger: No
• MiG-3 1941 versions are generally inferior to all 1941 and 1942 fighters, and inadequate against all 1943 and later fighters.
• MiG-3’s low altitude performance is ferocious and it should never be used as an angles fighter below 5,000 meters.
• MiG-3 will easily stall at lower altitudes from rough maneuvers. It should be flown very gently.
• Most MiG-3 variants have very weak armament and usually need a two-three second burst at a vulnerable area to bring down a target.
• Best performance altitude is above 4,500 meters. Worst performance under 1,000 meters

MiG-3 2xUB
Type: Fighter Major Users: USSR Cockpit Guide:
1 Altimeter 10 Voltmeter 2 Compass 11 Air Pressure 3 Manifold Pressure 12 Brake Pressure 4 Fuel Level 13 Coolant Temperature 5 Airspeed Indicator 14 Oil Temperature 6 Turn & Bank Indicator 15 Landing Gear Indicator Lights 7 Variometer 16 Clock 8 RPM Indicator 17 Ammeter 9 Oil Temp & Pressure; Fuel Pressure

(MiG-3 continued)
At a Glance: Engine: AM-35A Power:
Indicated: 1,200 HP Take-off: 1,350 HP
Armament: • 2 x 12.7 UB MG
Advantages: • Fastest high-altitude interceptor of 1941; • Stable gun platform; • Excellent maneuverability at high angles of
attack; • Good maneuverability at high altitudes; • Practical, easy-to-build, easy-to-maintain
construction.
Disadvantages: • Weakly armored; • High landing speed; • Insufficient maneuverability at low altitudes.
Pilot Notes:
Take-Off Speed: 165 km/h Landing Speed: 160 km/h Combat Engine Setting: 2,200 RPM Best Cruise: 1,850 RPM Economy Cruise: 1,750 RPM Prop Pitch Control: Manual Mixture Control: Manual Boost: No Supercharger: No
• MiG-3 1941 versions are generally inferior to all 1941 and 1942 fighters, and inadequate against all 1943 and later fighters.
• MiG-3’s low altitude performance is ferocious and it should never be used as an angles fighter below 5,000 meters.
• MiG-3 will easily stall at lower altitudes from rough maneuvers. It should be flown very gently.
• Most MiG-3 variants have very weak armament and usually need a two-three second burst at a vulnerable area to bring down a target.
• Best performance altitude is above 4,500 meters. Worst performance under 1,000 meters

MiG-3 AM-38
Type: Fighter Major Users: USSR Cockpit Guide:
1 Altimeter 10 Voltmeter 2 Compass 11 Air Pressure 3 Manifold Pressure 12 Brake Pressure 4 Fuel Level 13 Coolant Temperature 5 Airspeed Indicator 14 Oil Temperature 6 Turn & Bank Indicator 15 Landing Gear Indicator Lights 7 Variometer 16 Clock 8 RPM Indicator 17 Ammeter 9 Oil Temp & Pressure; Fuel Pressure

(MiG-3 continued)
At a Glance: Engine: AM-38 Power:
Indicated: 1,500 HP Take-off: 1,665HP
Armament: • 2 x 12.7mm MG (BS) • 2 x 7.62mm MG (ShKAS)
Advantages: • Fastest high-altitude interceptor of 1941; • Stable gun platform; • Excellent maneuverability at high angles of
attack; • Good maneuverability at high altitudes; • Practical, easy-to-build, easy-to-maintain
construction.
Disadvantages: • High landing speed; • Insufficient maneuverability at low altitudes.
Pilot Notes:
Take-Off Speed: 165 km/h Landing Speed: 160 km/h Combat Engine Setting: 2,200 RPM Best Cruise: 1,850 RPM Economy Cruise: 1,750 RPM Prop Pitch Control: Manual Mixture Control: Manual Boost: No Supercharger: No
• MiG-3 1941 versions are generally inferior to all 1941 and 1942 fighters, and inadequate against all 1943 and later fighters.
• MiG-3’s low altitude performance is ferocious and it should never be used as an angles fighter below 5,000 meters.
• MiG-3 will easily stall at lower altitudes from rough maneuvers. It should be flown very gently.
• Most MiG-3 variants have very weak armament and usually need a two-three second burst at a vulnerable area to bring down a target.
• Best performance altitude is above 4,500 meters. Worst performance under 1,000 meters
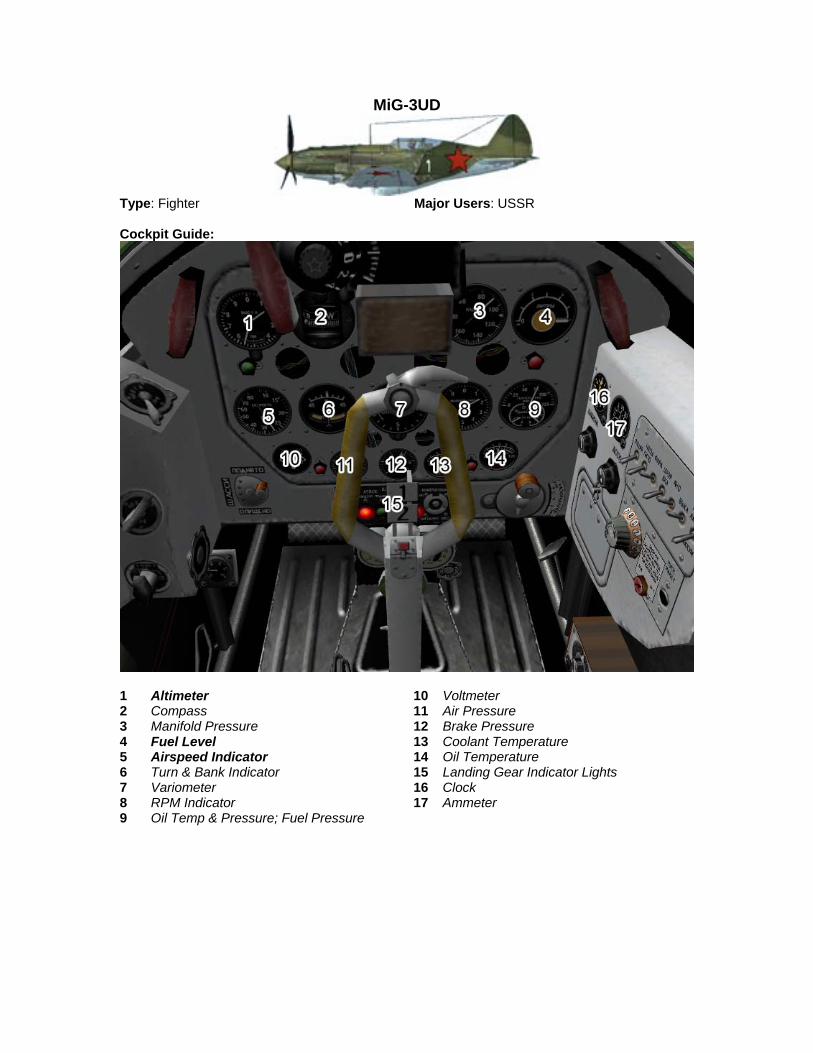
MiG-3UD
Type: Fighter Major Users: USSR Cockpit Guide:
1 Altimeter 10 Voltmeter 2 Compass 11 Air Pressure 3 Manifold Pressure 12 Brake Pressure 4 Fuel Level 13 Coolant Temperature 5 Airspeed Indicator 14 Oil Temperature 6 Turn & Bank Indicator 15 Landing Gear Indicator Lights 7 Variometer 16 Clock 8 RPM Indicator 17 Ammeter 9 Oil Temp & Pressure; Fuel Pressure

(MiG-3 continued)
At a Glance: Engine: AM-35A Power:
Indicated: 1,200 HP Take-off: 1,350 HP
Armament: • 1 x 12.7mm MG (BS) • 2 x 7.62mm MG (ShKAS)
Advantages: • Fastest high-altitude interceptor of 1941; • Stable gun platform; • Excellent maneuverability at high angles of
attack; • Good maneuverability at high altitudes; • Practical, easy-to-build, easy-to-maintain
construction.
Disadvantages: • High landing speed; • Insufficient maneuverability at low altitudes.
Pilot Notes:
Take-Off Speed: 165 km/h Landing Speed: 160 km/h Combat Engine Setting: 2,200 RPM Best Cruise: 1,850 RPM Economy Cruise: 1,750 RPM Prop Pitch Control: Manual Mixture Control: Manual Boost: No Supercharger: No
• MiG-3 1941 versions are generally inferior to all 1941 and 1942 fighters, and inadequate against all 1943 and later fighters.
• MiG-3’s low altitude performance is ferocious and it should never be used as an angles fighter below 5,000 meters.
• MiG-3 will easily stall at lower altitudes from rough maneuvers. It should be flown very gently.
• Most MiG-3 variants have very weak armament and usually need a two-three second burst at a vulnerable area to bring down a target.
• Best performance altitude is above 4,500 meters. Worst performance under 1,000 meters

MiG-3U
Type: Fighter Major Users: USSR Cockpit Guide:
1 Altimeter 10 Voltmeter 2 Compass 11 Air Pressure 3 Manifold Pressure 12 Brake Pressure 4 Fuel Level 13 Coolant Temperature 5 Airspeed Indicator 14 Oil Temperature 6 Turn & Bank Indicator 15 Landing Gear Indicator Lights 7 Variometer 16 Clock 8 RPM Indicator 17 Ammeter 9 Oil Temp & Pressure; Fuel Pressure

(MiG-3 continued)
At a Glance: Engine: AM-35A Power:
Indicated: 1,200 HP Take-off: 1,350 HP
Armament: • 2 x 20 mm cannons (ShVAK).
Advantages: • Stable gun platform; • Excellent maneuverability at high angles of
attack; • Good maneuverability at high altitudes; • Practical, easy-to-build, easy-to-maintain
construction.
Disadvantages: • High landing speed; • Insufficient maneuverability at low altitudes.
Pilot Notes:
Take-Off Speed: 165 km/h Landing Speed: 160 km/h Combat Engine Setting: 2,200 RPM Best Cruise: 1,850 RPM Economy Cruise: 1,750 RPM Prop Pitch Control: Manual Mixture Control: Manual Boost: No Supercharger: No
• MiG-3’s low altitude performance is ferocious and it should never be used as an angles fighter below 5,000 meters.
• MiG-3 will easily stall at lower altitudes from rough maneuvers. It should be flown very gently.
• Most MiG-3 variants have very weak armament and usually need a two-three second burst at a vulnerable area to bring down a target.
• Best performance altitude is above 4,500 meters. Worst performance under 1,000 meters

MiG-9 I-300
Type: Jet Fighter Major Users: USSR Cockpit Guide:
1 Airspeed Indicator 16 Exhaust Temperature (Engine #2) 2 Artificial Horizon 17 Fuel Level (Right) 3 Variometer 18 Oxygen Flow Indicator 4 Altimeter 19 Oxygen Quantity 5 Compass 20 Landing Gear Indicator Lights 6 Pilot’s Direction Indicator 21 Fuel Selector Switch 7 Clock 22 Fuel Selector Switch 8 RPM Indicator (Engine #1) 23 Fuel Pressure (Engine #1) 9 RPM Indicator (Engine #2) 24 Fuel Pressure (Engine #2) 10 Exhaust Pressure (Engine #1) 25 Brake Pressure 11 Oil Pressure (Engine #1) 26 Air Pressure 12 Oil Pressure (Engine #2) 27 Hydraulic Pressure 13 Exhaust Pressure (Engine #2) 28 Ammeter 14 Fuel Level (Left) 29 Gun Camera Status Light 15 Exhaust Temperature (Engine #1)
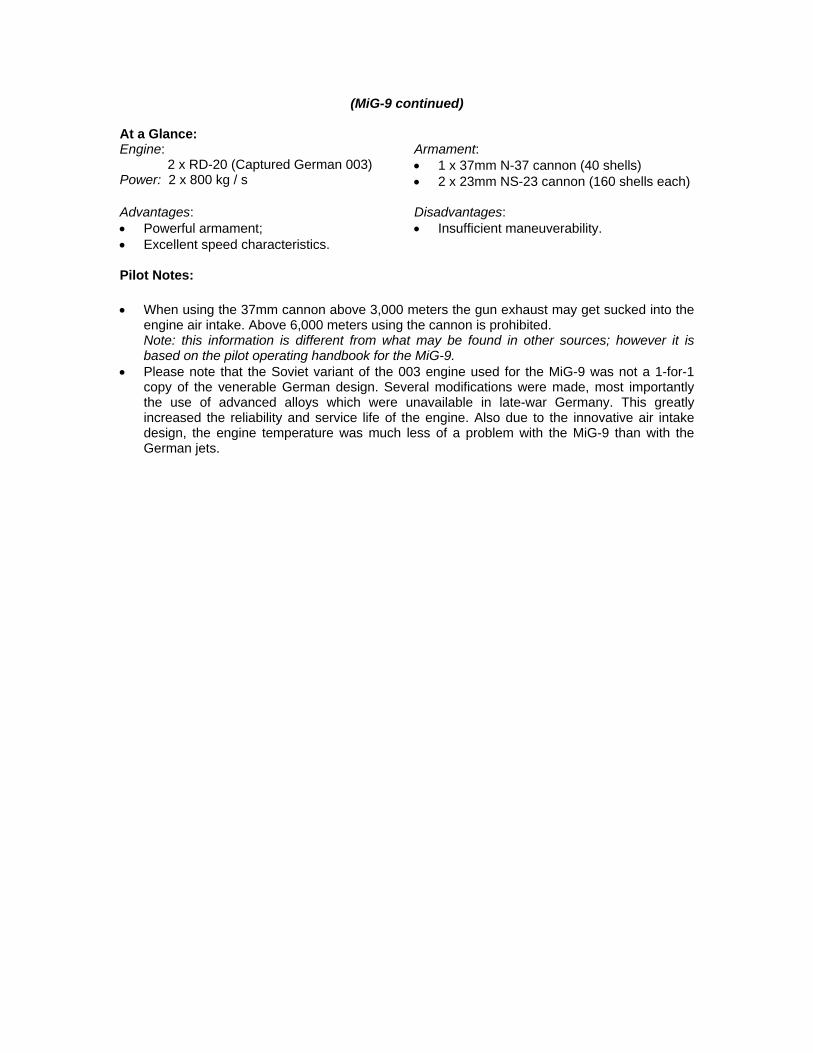
(MiG-9 continued)
At a Glance: Engine: 2 x RD-20 (Captured German 003) Power: 2 x 800 kg / s
Armament: • 1 x 37mm N-37 cannon (40 shells) • 2 x 23mm NS-23 cannon (160 shells each)
Advantages: • Powerful armament; • Excellent speed characteristics.
Disadvantages: • Insufficient maneuverability.
Pilot Notes: • When using the 37mm cannon above 3,000 meters the gun exhaust may get sucked into the
engine air intake. Above 6,000 meters using the cannon is prohibited. Note: this information is different from what may be found in other sources; however it is based on the pilot operating handbook for the MiG-9.
• Please note that the Soviet variant of the 003 engine used for the MiG-9 was not a 1-for-1 copy of the venerable German design. Several modifications were made, most importantly the use of advanced alloys which were unavailable in late-war Germany. This greatly increased the reliability and service life of the engine. Also due to the innovative air intake design, the engine temperature was much less of a problem with the MiG-9 than with the German jets.

MiG-9FS
Type: Jet Fighter Major Users: USSR Cockpit Guide:
1 Airspeed Indicator 16 Exhaust Temperature (Engine #2) 2 Artificial Horizon 17 Fuel Level (Right) 3 Variometer 18 Oxygen Flow Indicator 4 Altimeter 19 Oxygen Quantity 5 Compass 20 Landing Gear Indicator Lights 6 Pilot’s Direction Indicator 21 Fuel Selector Switch 7 Clock 22 Fuel Selector Switch 8 RPM Indicator (Engine #1) 23 Fuel Pressure (Engine #1) 9 RPM Indicator (Engine #2) 24 Fuel Pressure (Engine #2) 10 Exhaust Pressure (Engine #1) 25 Brake Pressure 11 Oil Pressure (Engine #1) 26 Air Pressure 12 Oil Pressure (Engine #2) 27 Hydraulic Pressure 13 Exhaust Pressure (Engine #2) 28 Ammeter 14 Fuel Level (Left) 29 Gun Camera Status Light 15 Exhaust Temperature (Engine #1)

(MiG-9 continued)
At a Glance: Engine: 2 x RD-20 (Captured German 003) Power: 2 x 800 kg / s
Armament: • 1 x 37mm N-37 cannon (40 shells) • 2 x 23mm NS-23 cannon (160 shells each)
Advantages: • Powerful armament; • Excellent speed characteristics.
Disadvantages: • Insufficient maneuverability.
Pilot Notes: • When using the 37mm cannon above 3,000 meters the gun exhaust may get sucked into the
engine air intake. Above 6,000 meters using the cannon is prohibited. Note: this information is different from what may be found in other sources; however it is based on the pilot operating handbook for the MiG-9.
• Please note that the Soviet variant of the 003 engine used for the MiG-9 was not a 1-for-1 copy of the venerable German design. Several modifications were made, most importantly the use of advanced alloys which were unavailable in late-war Germany. This greatly increased the reliability and service life of the engine. Also due to the innovative air intake design, the engine temperature was much less of a problem with the MiG-9 than with the German jets.

Mosquito FB MK VI
Type: Fighter-Bomber Major Users: RAF Cockpit Guide:
1 Airspeed Indicator 15 Coolant Temperature (Engine #1) 2 Artificial Horizon 16 Coolant Temperature (Engine #2) 3 Variometer 17 Landing Gear Indicator Lights 4 Altimeter 18 Flap Position Indicator 5 Turn & Bank Indicator 19 Oxygen Apparatus 6 Pilot’s Direction Indicator 20 Bomb Door Position Indicator 7 Boost Cut-Out Switch 21 Fuel Level (Inner) 8 Compass 22 Fuel Level (Center) 9 RPM Indicator (Engine #1) 23 Fuel Level (Drop) 10 RPM Indicator (Engine #2) 24 Free Air Temperature 11 Manifold Pressure(Engine #1) 25 Fuel Level (Outer) 12 Manifold Pressure(Engine #2) 26 Oil Pressure (Engine #1) 13 Oil Temperature (Engine #1) 27 Oil Pressure (Engine #2) 14 Oil Temperature (Engine #2) 28 Compass

P.11C
Type: Fighter Major Users: Poland Cockpit Guide:
1 Compass 7 Airspeed Indicator 2 Manifold Pressure 8 Turn & Bank Indicator 3 Oil Temperature (IN) 9 Variometer 4 Oil Pressure 10 RPM Indicator 5 Oil Temperature (OUT) 11 Altimeter 6 Fuel Pressure 12 Clock At a Glance: Engine:
PZL VS2 Power: 560 HP
Armament: • 4 x 7.9 mm PWU wz.33 MGs • 2 x 12.5 kg bombs.
Advantages: • Good maneuverability.
Disadvantages: • Low speed; • Weak armament.

P-38J
Type: Fighter Major Users: USA Cockpit Guide:
1 Clock 11 Landing Gear Indicator Lights 2 Compass 12 Manifold Pressure (Engine #1 & #2) 3 Compass 13 RPM Indicator (Engine #1 & #2) 4 Artificial Horizon 14 Oil Temp & Pressure; Fuel Pressure (#1) 5 Fuel Level (Front) 15 Oil Temp & Pressure; Fuel Pressure (#2) 6 Altimeter 16 Ammeter (Engine #1) 7 Airspeed Indicator 17 Ammeter (Engine #2) 8 Turn & Bank Indicator 18 Coolant Temperature (Engine #1 & #2) 9 Variometer 19 Carburetor Air Temp (Engine #1 & #2) 10 Fuel Level (Rear) 20 Oxygen Flow Indicator
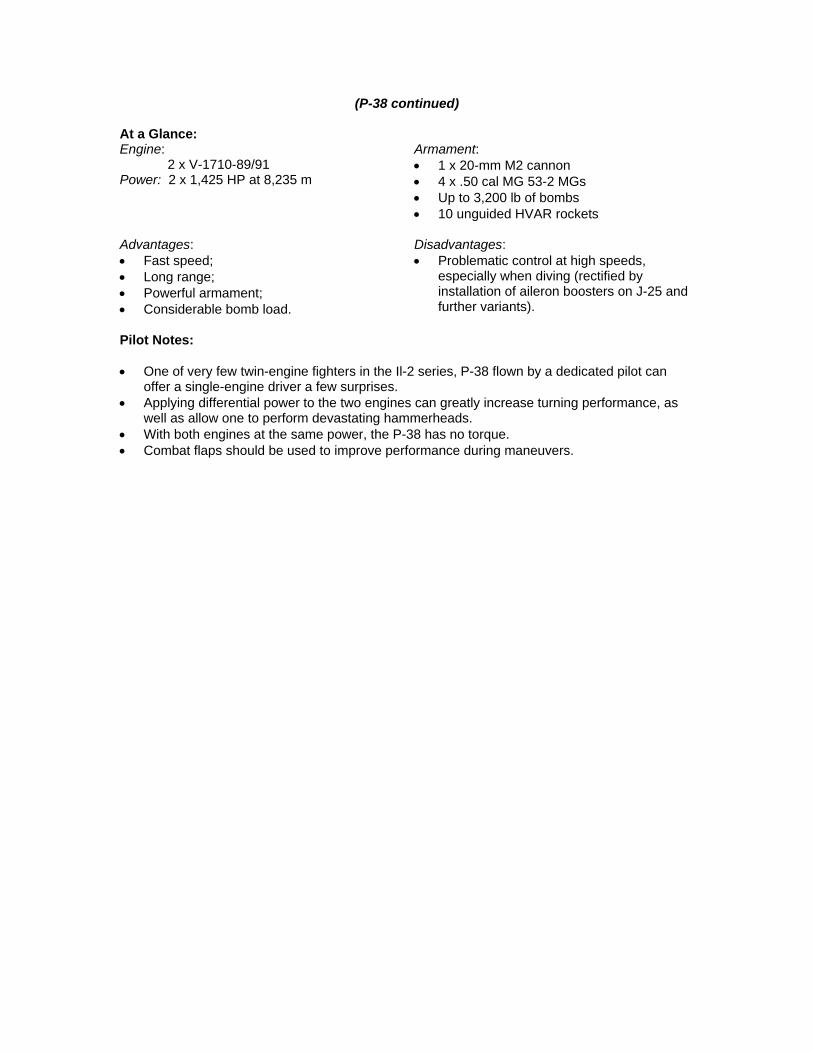
(P-38 continued)
At a Glance: Engine: 2 x V-1710-89/91 Power: 2 x 1,425 HP at 8,235 m
Armament: • 1 x 20-mm M2 cannon • 4 x .50 cal MG 53-2 MGs • Up to 3,200 lb of bombs • 10 unguided HVAR rockets
Advantages: • Fast speed; • Long range; • Powerful armament; • Considerable bomb load.
Disadvantages: • Problematic control at high speeds,
especially when diving (rectified by installation of aileron boosters on J-25 and further variants).
Pilot Notes: • One of very few twin-engine fighters in the Il-2 series, P-38 flown by a dedicated pilot can
offer a single-engine driver a few surprises. • Applying differential power to the two engines can greatly increase turning performance, as
well as allow one to perform devastating hammerheads. • With both engines at the same power, the P-38 has no torque. • Combat flaps should be used to improve performance during maneuvers.

P-38L
Type: Fighter-Bomber Major Users: USA Cockpit Guide:
1 Clock 11 Landing Gear Indicator Lights 2 Compass 12 Manifold Pressure (Engine #1 & #2) 3 Compass 13 RPM Indicator (Engine #1 & #2) 4 Artificial Horizon 14 Oil Temp & Pressure; Fuel Pressure (#1) 5 Fuel Level (Front) 15 Oil Temp & Pressure; Fuel Pressure (#2) 6 Altimeter 16 Ammeter (Engine #1) 7 Airspeed Indicator 17 Ammeter (Engine #2) 8 Turn & Bank Indicator 18 Coolant Temperature (Engine #1 & #2) 9 Variometer 19 Carburetor Air Temp (Engine #1 & #2) 10 Fuel Level (Rear) 20 Oxygen Flow Indicator
(P-38 continued)
At a Glance: Engine: 2 x V-1710-111/113 Power: 2 x 1,475 HP at 9,150 m
Armament: • 1 x 20-mm M2 cannon • 4 x .50 cal MG 53-2 MGs • Up to 3,200 lb of bombs • 10 unguided HVAR rockets
Advantages: • Fast speed; • Increased maneuverability; • Long range; • Powerful armament; • Considerable bomb load.
Disadvantages: • Somewhat slower than P-38J.
Pilot Notes: • One of very few twin-engine fighters in the Il-2 series, P-38 flown by a dedicated pilot can
offer a single-engine driver a few surprises. • Applying differential power to the two engines can greatly increase turning performance, as
well as allow one to perform devastating hammerheads. • With both engines at the same power, the P-38 has no torque. • Combat flaps should be used to improve performance during maneuvers.
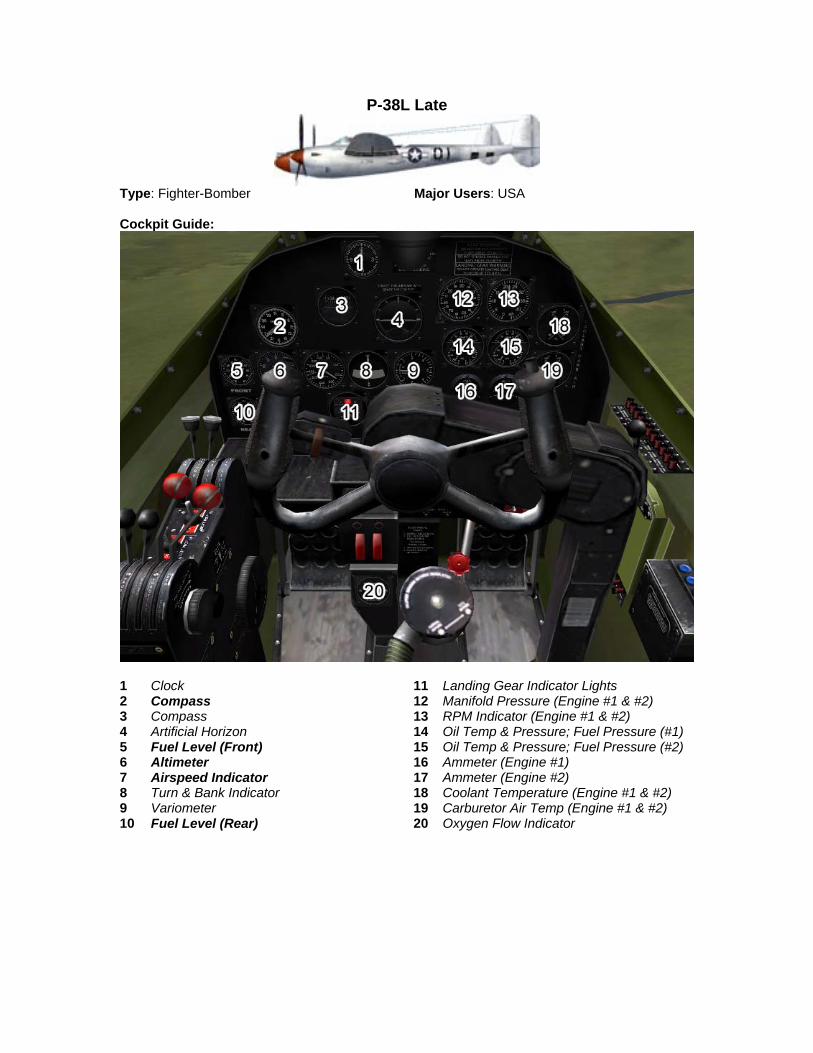
P-38L Late
Type: Fighter-Bomber Major Users: USA Cockpit Guide:
1 Clock 11 Landing Gear Indicator Lights 2 Compass 12 Manifold Pressure (Engine #1 & #2) 3 Compass 13 RPM Indicator (Engine #1 & #2) 4 Artificial Horizon 14 Oil Temp & Pressure; Fuel Pressure (#1) 5 Fuel Level (Front) 15 Oil Temp & Pressure; Fuel Pressure (#2) 6 Altimeter 16 Ammeter (Engine #1) 7 Airspeed Indicator 17 Ammeter (Engine #2) 8 Turn & Bank Indicator 18 Coolant Temperature (Engine #1 & #2) 9 Variometer 19 Carburetor Air Temp (Engine #1 & #2) 10 Fuel Level (Rear) 20 Oxygen Flow Indicator

(P-38 continued)
At a Glance: Engine: 2 x V-1710-111/113 Power: 2 x 1,720 HP
Armament: • 1 x 20-mm M2 cannon • 4 x .50 cal MG 53-2 MGs • Up to 3,200 lb of bombs • 10 unguided HVAR rockets
Advantages: • Fast speed; • Increased maneuverability; • Long range; • Powerful armament; • Considerable bomb load.
Disadvantages: • Somewhat slower than P-38J.
Pilot Notes: • One of very few twin-engine fighters in the Il-2 series, P-38 flown by a dedicated pilot can
offer a single-engine driver a few surprises. • Applying differential power to the two engines can greatly increase turning performance, as
well as allow one to perform devastating hammerheads. • With both engines at the same power, the P-38 has no torque. • Combat flaps should be used to improve performance during maneuvers.
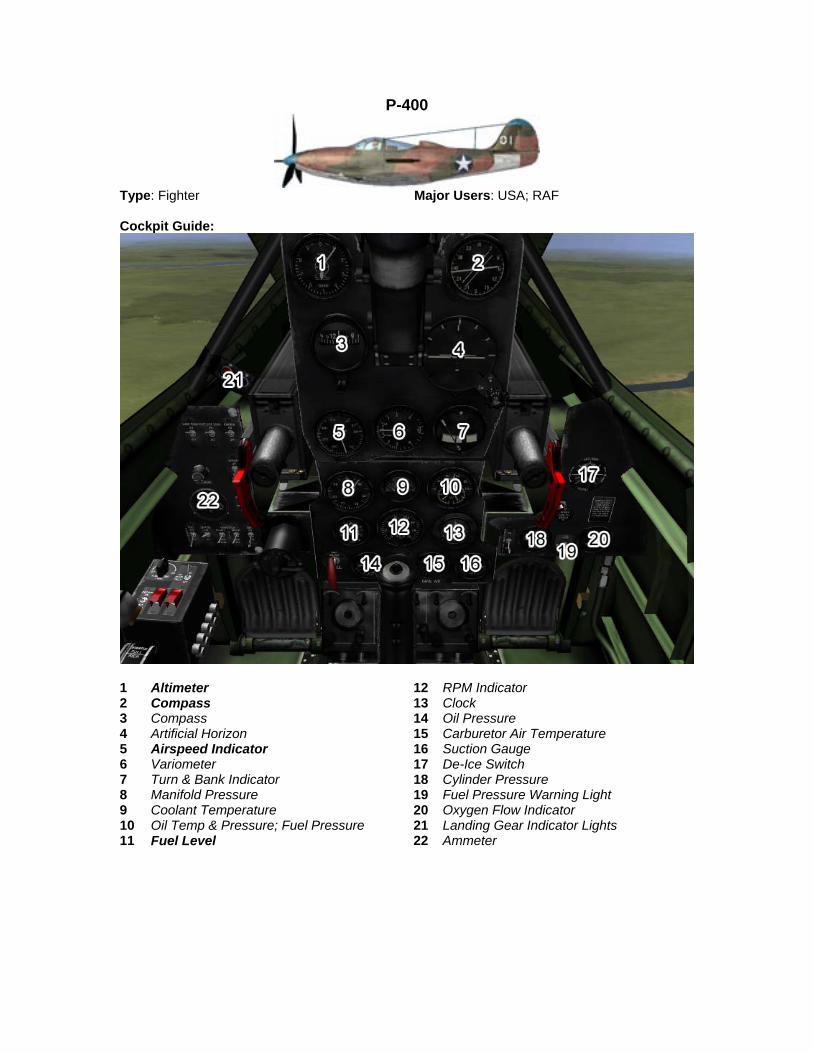
P-400
Type: Fighter Major Users: USA; RAF Cockpit Guide:
1 Altimeter 12 RPM Indicator 2 Compass 13 Clock 3 Compass 14 Oil Pressure 4 Artificial Horizon 15 Carburetor Air Temperature 5 Airspeed Indicator 16 Suction Gauge 6 Variometer 17 De-Ice Switch 7 Turn & Bank Indicator 18 Cylinder Pressure 8 Manifold Pressure 19 Fuel Pressure Warning Light 9 Coolant Temperature 20 Oxygen Flow Indicator 10 Oil Temp & Pressure; Fuel Pressure 21 Landing Gear Indicator Lights 11 Fuel Level 22 Ammeter

(P-400 continued)
At a Glance: Engine: 1 x V-1710-35 Power: 1,200 HP
Armament: • 1 x 20mm cannon (nose) • 2 x .50 cal machine gun (nose) • 4 x .30 cal (wings) • 500 lb bomb
Advantages: • Reasonably maneuverable at lower
altitudes; • Adequate armament
Disadvantages: • Performance drop-off at high altitude; • Poor low-speed handling.
Pilot Notes: • Adequate dogfighter with good all-around performance. • The P-39 will easily stall from rough handling, and therefore should be flown very gently
especially in horizontal maneuvers. • It will hold its own against many early fighters, however the Zero and its Japanese
counterparts will run circles around the Cobra, while it stalls all over the sky. Avoid turning dogfights with the Japanese planes at all costs.
• P-39 is an very stable gunnery platform. While the wing .50-caliber machine guns are not very effective, the nose 20mm cannon is quite powerful and can bring down most targets in a few hits.
• Best performance altitude is between 1,500 and 3,000 meters. Performance begins to deteriorate above 5,000 meters

P-39D-1
Type: Fighter Major Users: USA; RAF Cockpit Guide:
1 Altimeter 12 RPM Indicator 2 Compass 13 Clock 3 Compass 14 Oil Pressure 4 Artificial Horizon 15 Carburetor Air Temperature 5 Airspeed Indicator 16 Suction Gauge 6 Variometer 17 De-Ice Switch 7 Turn & Bank Indicator 18 Cylinder Pressure 8 Manifold Pressure 19 Fuel Pressure Warning Light 9 Coolant Temperature 20 Oxygen Flow Indicator 10 Oil Temp & Pressure; Fuel Pressure 21 Landing Gear Indicator Lights 11 Fuel Level 22 Ammeter

(P-39D-1 continued)
At a Glance: Engine: 1 x V-1710-35 Power: 1,200 HP
Armament: • 1 x 37mm cannon (nose) • 2 x .50 cal machine gun (nose) • 4 x .30 cal machine gun (wings) • 500 lb bomb
Advantages: • Reasonably maneuverable at lower
altitudes; • Powerful armament
Disadvantages: • Performance drop-off at high altitude; • Poor low-speed handling.
Pilot Notes: • Adequate dogfighter with good all-around performance. • The P-39 will easily stall from rough handling, and therefore should be flown very gently
especially in horizontal maneuvers. • It will hold its own against many early fighters, however the Zero and its Japanese
counterparts will run circles around the Cobra, while it stalls all over the sky. Avoid turning dogfights with the Japanese planes at all costs.
• P-39 is an very stable gunnery platform. While the wing .50-caliber machine guns are not very effective, the nose 20mm cannon is quite powerful and can bring down most targets in a few hits.
• Best performance altitude is between 1,500 and 3,000 meters. Performance begins to deteriorate above 5,000 meters
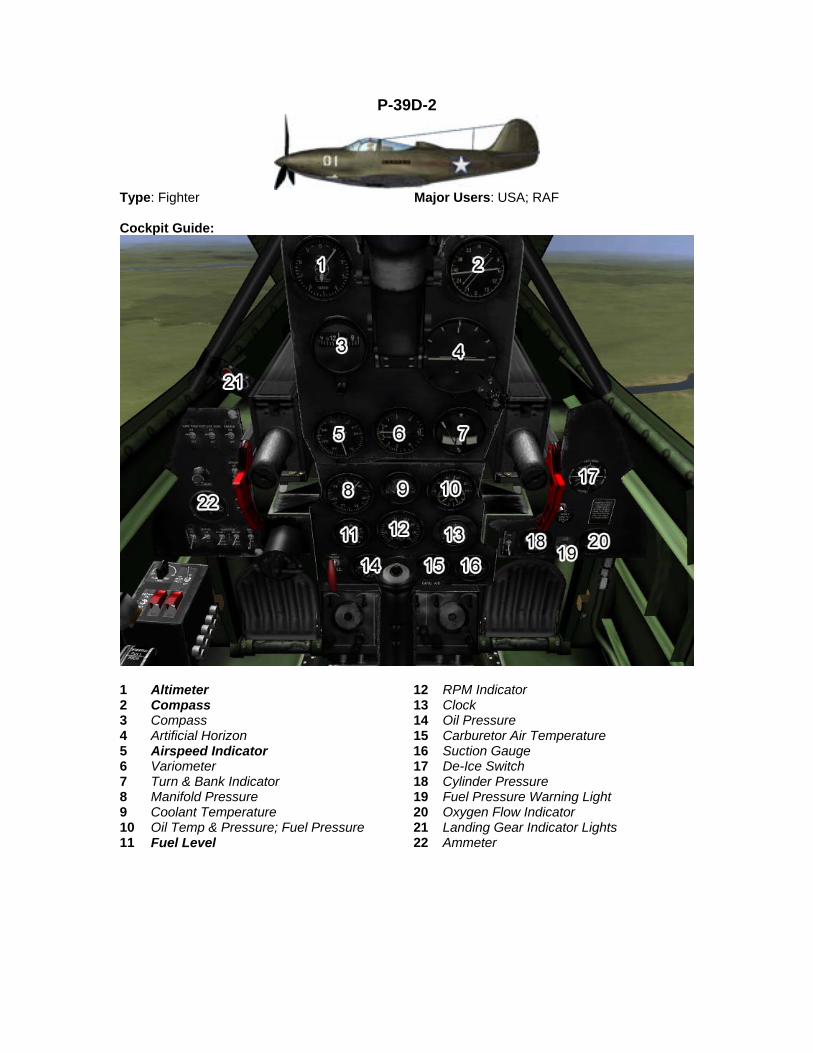
P-39D-2
Type: Fighter Major Users: USA; RAF Cockpit Guide:
1 Altimeter 12 RPM Indicator 2 Compass 13 Clock 3 Compass 14 Oil Pressure 4 Artificial Horizon 15 Carburetor Air Temperature 5 Airspeed Indicator 16 Suction Gauge 6 Variometer 17 De-Ice Switch 7 Turn & Bank Indicator 18 Cylinder Pressure 8 Manifold Pressure 19 Fuel Pressure Warning Light 9 Coolant Temperature 20 Oxygen Flow Indicator 10 Oil Temp & Pressure; Fuel Pressure 21 Landing Gear Indicator Lights 11 Fuel Level 22 Ammeter

(P-39D-2 continued)
At a Glance: Engine: 1 x V-1710-35 Power: 1,200 HP
Armament: • 1 x 20mm cannon (nose) • 2 x .50 cal machine gun (nose) • 4 x .30 cal (wings) • 500 lb bomb
Advantages: • Reasonably maneuverable at lower
altitudes; • Adequate armament
Disadvantages: • Performance drop-off at high altitude; • Poor low-speed handling.
Pilot Notes: • Adequate dogfighter with good all-around performance. • The P-39 will easily stall from rough handling, and therefore should be flown very gently
especially in horizontal maneuvers. • It will hold its own against many early fighters, however the Zero and its Japanese
counterparts will run circles around the Cobra, while it stalls all over the sky. Avoid turning dogfights with the Japanese planes at all costs.
• P-39 is an very stable gunnery platform. While the wing .50-caliber machine guns are not very effective, the nose 20mm cannon is quite powerful and can bring down most targets in a few hits.
• Best performance altitude is between 1,500 and 3,000 meters. Performance begins to deteriorate above 5,000 meters

P-39N-1
Type: Fighter Major Users: USA; USSR Cockpit Guide:
1 Altimeter 12 RPM Indicator 2 Compass 13 Clock 3 Compass 14 Oil Pressure 4 Artificial Horizon 15 Carburetor Air Temperature 5 Airspeed Indicator 16 Suction Gauge 6 Variometer 17 De-Ice Switch 7 Turn & Bank Indicator 18 Cylinder Pressure 8 Manifold Pressure 19 Fuel Pressure Warning Light 9 Coolant Temperature 20 Oxygen Flow Indicator 10 Oil Temp & Pressure; Fuel Pressure 21 Landing Gear Indicator Lights 11 Fuel Level 22 Ammeter
(P-39N continued)
At a Glance: Engine: V-1710-85. Power:
Indicated: 1,200 HP; Take-off: 1,420 HP
Armament: • 1 x 37mm cannon (T9); • 2 x 12.7mm MG (.50 cal). • 4 x 7.62mm MG (.303 cal).
Advantages: • Excellent low altitude performance; • Good maneuverability; • Powerful armament; • Increased aircraft durability; • Easy to fly.
Disadvantages: • Tendency to spin.
Pilot Notes:
Take-Off Speed: 160 km/h / 95 kts Landing Speed: 155 km/h / 85 kts Combat Engine Setting: 3,000 RPM Best Cruise: 2,600 RPM Economy Cruise: 2,500 RPM Prop Pitch Control: Manual Mixture Control: Manual Boost: No Supercharger: No
• An adequate dogfighter with good all-around performance. • The P-39 will easily stall from rough handling, and therefore should be flown very gently
especially in horizontal maneuvers. • P-39 is an excellent gunnery platform. While the wing .50-caliber machine guns are not very
effective, the nose 37mm cannon is very powerful and can bring down most targets in a few hits.
• Best performance altitude is between 1,500 and 3,000 meters. Performance begins to deteriorate above 5,000 meters

P-39Q-1
Type: Fighter Major Users: USA; USSR Cockpit Guide:
1 Altimeter 12 RPM Indicator 2 Compass 13 Clock 3 Compass 14 Oil Pressure 4 Artificial Horizon 15 Carburetor Air Temperature 5 Airspeed Indicator 16 Suction Gauge 6 Variometer 17 De-Ice Switch 7 Turn & Bank Indicator 18 Cylinder Pressure 8 Manifold Pressure 19 Fuel Pressure Warning Light 9 Coolant Temperature 20 Oxygen Flow Indicator 10 Oil Temp & Pressure; Fuel Pressure 21 Landing Gear Indicator Lights 11 Fuel Level 22 Ammeter

(P-39Q continued)
At a Glance: Engine: V-1710-85. Power:
Indicated: 1,200 HP; Take-off: 1,420 HP
Armament: • 1 x 37mm cannon (T9); • 2 x 12.7mm MG (.50 cal). • 2 x 7.62mm MG (.303 cal)
Advantages: • Good low altitude flying characteristics; • Improved aerodynamics; • Good maneuverability; • Powerful armament; • Increased aircraft durability; • Easy to fly.
Disadvantages: • While reduced, the tendency to spin
remained.
Pilot Notes:
Take-Off Speed: 160 km/h / 95 kts Landing Speed: 155 km/h / 85 kts Combat Engine Setting: 3,000 RPM Best Cruise: 2,600 RPM Economy Cruise: 2,500 RPM Prop Pitch Control: Manual Mixture Control: Manual Boost: No Supercharger: No
• An adequate dogfighter with good all-around performance. • The P-39 will easily stall from rough handling, and therefore should be flown very gently
especially in horizontal maneuvers. • P-39 is an excellent gunnery platform. While the wing .50-caliber machine guns are not very
effective, the nose 37mm cannon is very powerful and can bring down most targets in a few hits.
• Best performance altitude is between 1,500 and 3,000 meters. Performance begins to deteriorate above 5,000 meters

P-39Q-10
Type: Fighter Major Users: USA; USSR Cockpit Guide:
1 Altimeter 12 RPM Indicator 2 Compass 13 Clock 3 Compass 14 Oil Pressure 4 Artificial Horizon 15 Carburetor Air Temperature 5 Airspeed Indicator 16 Suction Gauge 6 Variometer 17 De-Ice Switch 7 Turn & Bank Indicator 18 Cylinder Pressure 8 Manifold Pressure 19 Fuel Pressure Warning Light 9 Coolant Temperature 20 Oxygen Flow Indicator 10 Oil Temp & Pressure; Fuel Pressure 21 Landing Gear Indicator Lights 11 Fuel Level 22 Ammeter

(P-39Q continued)
At a Glance: Engine: V-1710-85. Power:
Indicated: 1,200 HP; Take-off: 1,420 HP
Armament: • 1 x 37mm cannon (T9). • 2 x 12.7mm MG (.50 cal).
Advantages: • Good overall flying characteristics; • Improved aerodynamics; • Good maneuverability; • The tendency to spin at low speed was
considerably reduced; • Increased durability; • Easy to fly.
Disadvantages: • Reduced armament.
Pilot Notes:
Take-Off Speed: 160 km/h / 95 kts Landing Speed: 155 km/h / 85 kts Combat Engine Setting: 3,000 RPM Best Cruise: 2,600 RPM Economy Cruise: 2,500 RPM Prop Pitch Control: Manual Mixture Control: Manual Boost: No Supercharger: No
• An adequate dogfighter with good all-around performance. • The P-39 will easily stall from rough handling, and therefore should be flown very gently
especially in horizontal maneuvers. • P-39 is an excellent gunnery platform. While the wing .50-caliber machine guns are not very
effective, the nose 37mm cannon is very powerful and can bring down most targets in a few hits.
• Best performance altitude is between 1,500 and 3,000 meters. Performance begins to deteriorate above 5,000 meters

Hawk 81A-2
Type: Fighter Major Users: USA Cockpit Guide:
1 Compass 10 RPM Indicator 2 Artificial Horizon 11 Gear & Flap Position Indicator 3 Airspeed Indicator 12 Suction Gauge 4 Variometer 13 Carburetor Air Temperature 5 Turn & Bank Indicator 14 Compass 6 Fuel Level 15 Ammeter 7 Clock 16 Coolant Temperature 8 Altimeter 17 Oil Temp & Pressure; Fuel Pressure 9 Manifold Pressure 18 Engine Temperature Warning Light

(Hawk-81 continued)
At a Glance: Engine: 1 x V-1710-33 Power: 1,150 HP
Armament: • 2 x .50-cal machine guns • 4 x .30-cal machine guns • 500 lb bomb
Advantages: • Sturdy aircraft that can endure a great deal
of punishment; • More maneuverable than any other US
aircraft at the time of Pearl Harbor; • Easy to fly.
Disadvantages: • Largely obsolescent by any standards even
before it was ordered into production; • Too slow; • Low climb rate; • Easily outmaneuvered by the Zero.
Pilot Notes:
• P-40 is inferior to most contemporary enemy fighters; however in capable hands it can win a fight against almost any opponent.
• Against the Japanese, the P-40 does not fare very well. Against the early Japanese fighters superior speed, especially in a dive, can be used; however against more capable Japanese planes, the best strategy is to have a good wingman.
• P-40 is a stable gunnery platform. The wing machine guns are best used at the convergence range, and usually take a 2-3 second burst to bring down a target
• Best performance altitude is between 1,000 and 3,500 meters. Worst performance above 6,000 meters

P-40B
Type: Fighter Major Users: USA Cockpit Guide:
1 Compass 10 RPM Indicator 2 Artificial Horizon 11 Gear & Flap Position Indicator 3 Airspeed Indicator 12 Suction Gauge 4 Variometer 13 Carburetor Air Temperature 5 Turn & Bank Indicator 14 Compass 6 Fuel Level 15 Ammeter 7 Clock 16 Coolant Temperature 8 Altimeter 17 Oil Temp & Pressure; Fuel Pressure 9 Manifold Pressure 18 Engine Temperature Warning Light

(P-40 continued)
At a Glance: Engine: 1 x V-1710-33 Power: 1,150 HP
Armament: • 2 x .50-cal machine guns • 4 x .30-cal machine guns
Advantages: • Sturdy aircraft that can endure a great deal
of punishment; • More maneuverable than any other US
aircraft at the time of Pearl Harbor; • Easy to fly.
Disadvantages: • Largely obsolescent by any standards even
before it was ordered into production; • Too slow; • Low climb rate; • Easily outmaneuvered by the Zero.
Pilot Notes:
• P-40 is somewhat inferior to contemporary enemy fighters, however in capable hands it can win a fight against almost any opponent.
• Against the Japanese, the P-40 does not fare very well. Against the early Japanese fighters superior speed, especially in a dive, can be used; however against more capable Japanese planes, the best strategy is to have a good wingman.
• P-40 is a stable gunnery platform. The wing machine guns are best used at the convergence range, and usually take a 2-3 second burst to bring down a target
• Best performance altitude is between 1,000 and 3,500 meters. Worst performance above 6,000 meters

P-40C
Type: Fighter-Bomber Major Users: USA Cockpit Guide:
1 Compass 10 RPM Indicator 2 Artificial Horizon 11 Gear & Flap Position Indicator 3 Airspeed Indicator 12 Suction Gauge 4 Variometer 13 Carburetor Air Temperature 5 Turn & Bank Indicator 14 Compass 6 Fuel Level 15 Ammeter 7 Clock 16 Coolant Temperature 8 Altimeter 17 Oil Temp & Pressure; Fuel Pressure 9 Manifold Pressure 18 Engine Temperature Warning Light

(P-40 continued)
At a Glance: Engine: 1 x V-1710-33 Power: 1,150 HP
Armament: • 2 x .50-cal machine guns • 4 x .30-cal machine guns • 500 lb bomb
Advantages: • Sturdy aircraft that can endure a great deal
of punishment; • More maneuverable than any other US
aircraft at the time of Pearl Harbor; • Easy to fly.
Disadvantages: • Largely obsolescent by any standards even
before it was ordered into production; • Too slow; • Low climb rate; • Easily outmaneuvered by the Zero.
Pilot Notes:
• P-40 is somewhat inferior to contemporary enemy fighters, however in capable hands it can win a fight against almost any opponent.
• Against the Luftwaffe, the key to winning aerial combat with the P-40 is to get the enemy to slow down and commit to a turning fight or rolling scissors. These fights are P-40’s strong point and Germans will usually lose. In vertical combat P-40 can still defeat a FW-190, but a Bf-109G and above is greatly superior to the P-40 in the vertical.
• Against the Japanese, the P-40 does not fare quite as well. Against the early Japanese fighters superior speed, especially in a dive, can be used; however against more capable Japanese planes, the best strategy is to have a good wingman.
• P-40 is a stable gunnery platform. The wing machine guns are best used at the convergence range, and usually take a 2-3 second burst to bring down a target
• Best performance altitude is between 1,000 and 3,500 meters. Worst performance above 6,000 meters
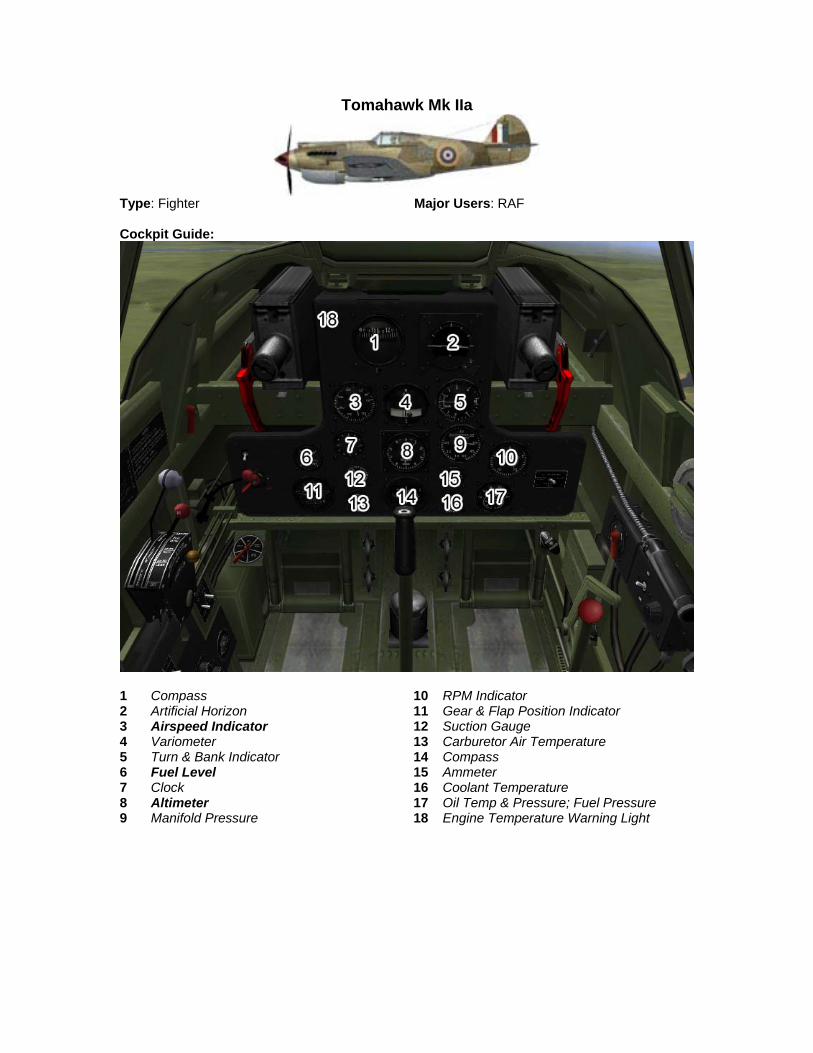
Tomahawk Mk IIa
Type: Fighter Major Users: RAF Cockpit Guide:
1 Compass 10 RPM Indicator 2 Artificial Horizon 11 Gear & Flap Position Indicator 3 Airspeed Indicator 12 Suction Gauge 4 Variometer 13 Carburetor Air Temperature 5 Turn & Bank Indicator 14 Compass 6 Fuel Level 15 Ammeter 7 Clock 16 Coolant Temperature 8 Altimeter 17 Oil Temp & Pressure; Fuel Pressure 9 Manifold Pressure 18 Engine Temperature Warning Light

(P-40 continued)
At a Glance: Engine: 1 x V-1710-33 Power: 1,150 HP
Armament: • 2 x .50-cal machine guns • 4 x .303 machine guns
Advantages: • Sturdy aircraft that can endure a great deal
of punishment; • More maneuverable than any other US
aircraft at the time of Pearl Harbor; • Easy to fly.
Disadvantages: • Largely obsolescent by any standards even
before it was ordered into production; • Too slow; • Low climb rate; • Easily outmaneuvered by the Zero.
Pilot Notes:
• British version of the P-40B. • P-40 is somewhat inferior to contemporary fighters, however in capable hands it can win
a fight against almost any opponent. • Against the Luftwaffe, the key to winning aerial combat with the P-40 is to get the enemy
to slow down and commit to a turning fight or rolling scissors. These fights are P-40’s strong point and Germans will usually lose. In vertical combat P-40 can still defeat a FW-190, but a Bf-109G and above is greatly superior to the P-40 in the vertical.
• Against the Japanese, the P-40 does not fare quite as well. Against the early Japanese fighters superior speed, especially in a dive, can be used; however against more capable Japanese planes, the best strategy is to have a good wingman.
• P-40 is a stable gunnery platform. The wing machine guns are best used at the convergence range, and usually take a 2-3 second burst to bring down a target
• Best performance altitude is between 1,000 and 3,500 meters. Worst performance above 6,000 meters

Tomahawk Mk IIb
Type: Fighter-Bomber Major Users: RAF Cockpit Guide:
1 Compass 10 RPM Indicator 2 Artificial Horizon 11 Gear & Flap Position Indicator 3 Airspeed Indicator 12 Suction Gauge 4 Variometer 13 Carburetor Air Temperature 5 Turn & Bank Indicator 14 Compass 6 Fuel Level 15 Ammeter 7 Clock 16 Coolant Temperature 8 Altimeter 17 Oil Temp & Pressure; Fuel Pressure 9 Manifold Pressure 18 Engine Temperature Warning Light

(P-40 continued)
At a Glance: Engine: 1 x V-1710-33 Power: 1,150 HP
Armament: • 2 x .50-cal machine guns • 4 x .303 machine guns • 500 lb bomb
Advantages: • Sturdy aircraft that can endure a great deal
of punishment; • More maneuverable than any other US
aircraft at the time of Pearl Harbor; • Easy to fly.
Disadvantages: • Largely obsolescent by any standards even
before it was ordered into production; • Too slow; • Low climb rate; • Easily outmaneuvered by the Zero.
Pilot Notes:
• British version of the P-40C. • P-40 is somewhat inferior to contemporary fighters; however in capable hands it can win
a fight against almost any opponent. • Against the Luftwaffe, the key to winning aerial combat with the P-40 is to get the enemy
to slow down and commit to a turning fight or rolling scissors. These fights are P-40’s strong point and Germans will usually lose. In vertical combat P-40 can still defeat a FW-190, but a Bf-109G and above is greatly superior to the P-40 in the vertical.
• Against the Japanese, the P-40 does not fare quite as well. Against the early Japanese fighters superior speed, especially in a dive, can be used; however against more capable Japanese planes, the best strategy is to have a good wingman.
• P-40 is a stable gunnery platform. The wing machine guns are best used at the convergence range, and usually take a 2-3 second burst to bring down a target
• Best performance altitude is between 1,000 and 3,500 meters. Worst performance above 6,000 meters
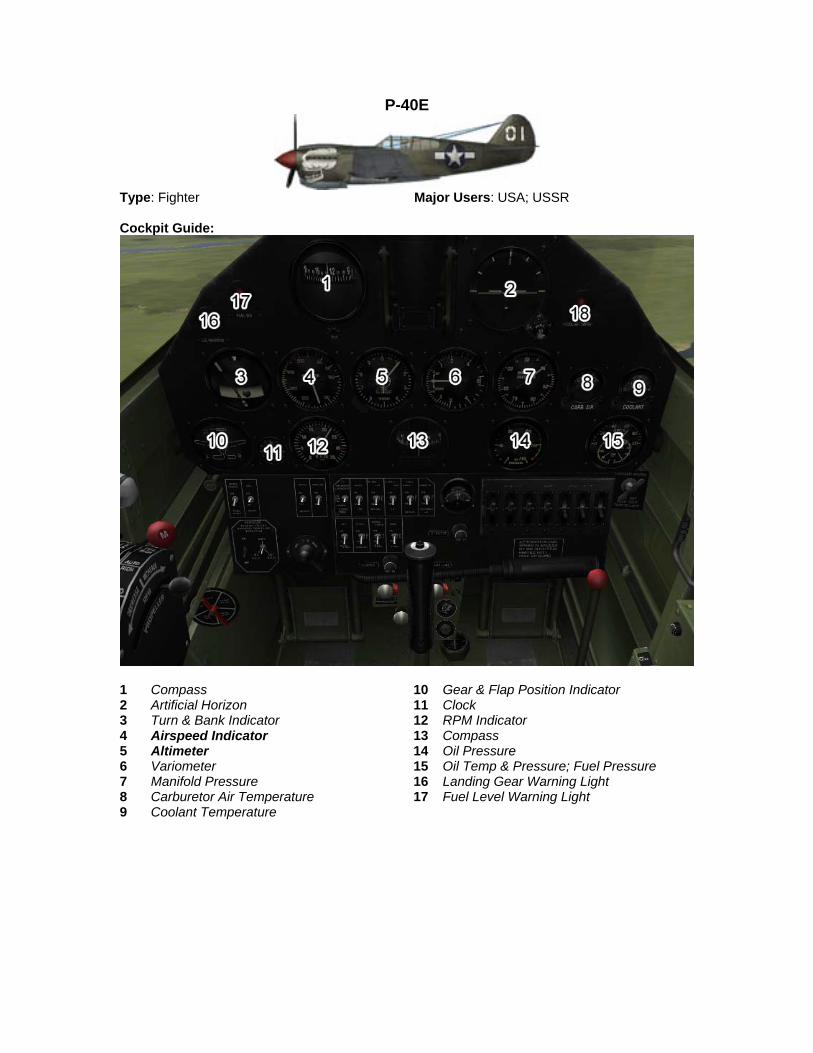
P-40E
Type: Fighter Major Users: USA; USSR Cockpit Guide:
1 Compass 10 Gear & Flap Position Indicator 2 Artificial Horizon 11 Clock 3 Turn & Bank Indicator 12 RPM Indicator 4 Airspeed Indicator 13 Compass 5 Altimeter 14 Oil Pressure 6 Variometer 15 Oil Temp & Pressure; Fuel Pressure 7 Manifold Pressure 16 Landing Gear Warning Light 8 Carburetor Air Temperature 17 Fuel Level Warning Light 9 Coolant Temperature
(P-40 continued)
At a Glance: Engine: V-1710-39 Power: 1,150 HP
Armament: • 6 x 12.7 mm MG • 1 x 227 kg (500 lb) bomb • 2 x 45 kg bombs
Advantages: • Increased firepower over earlier P-40s; • Sturdy aircraft that can endure a great deal
of punishment.
Disadvantages: • Slow; • Lacks maneuverability; • Low climb rate; • Largely obsolescent by any standards
before it even entered production. Pilot Notes:
Take-Off Speed: 160 km/h / 95 kts Landing Speed: 155 km/h / 85 kts Combat Engine Setting: 3,000 RPM Best Cruise: 2,600 RPM Economy Cruise: 2,500 RPM Prop Pitch Control: Manual Mixture Control: Manual Boost: No Supercharger: No
• P-40 is somewhat inferior to contemporary enemy fighters, however in capable hands it can win a fight against almost any opponent.
• Against the Luftwaffe, the key to winning aerial combat with the P-40 is to get the enemy to slow down and commit to a turning fight or rolling scissors. These fights are P-40’s strong point and Germans will usually lose. In vertical combat P-40 can still defeat a FW-190, but a Bf-109G and above is greatly superior to the P-40 in the vertical.
• Against the Japanese, the P-40 does not fare quite as well. Against the early Japanese fighters superior speed, especially in a dive, can be used; however against more capable Japanese planes, the best strategy is to have a good wingman.
• P-40 is a stable gunnery platform. The wing machine guns are best used at the convergence range, and usually take a 2-3 second burst to bring down a target
• Best performance altitude is between 1,000 and 3,500 meters. Worst performance above 6,000 meters

P-40E M-105 field mod
Type: Fighter Major Users: USSR Cockpit Guide:
1 Compass 10 Gear & Flap Position Indicator 2 Artificial Horizon 11 Clock 3 Turn & Bank Indicator 12 RPM Indicator 4 Airspeed Indicator 13 Compass 5 Altimeter 14 Oil Pressure 6 Variometer 15 Oil Temp & Pressure; Fuel Pressure 7 Manifold Pressure 16 Landing Gear Warning Light 8 Carburetor Air Temperature 17 Fuel Level Warning Light 9 Coolant Temperature

(P-40 continued)
At a Glance: Engine: Klimov M-105P Power: 1,100 HP
Armament: • 6 x 12.7 mm MG • Up to 6 x RS-82 Rockets • 1 x 250 kg bomb • 2 x 50 kg bombs
Advantages: • Increased firepower over earlier P-40s; • Sturdy aircraft that can endure a great deal
of punishment.
Disadvantages: • Slow; • Lacks maneuverability; • Low climb rate; • Largely obsolescent by any standards
before it even entered production. Pilot Notes:
Take-Off Speed: 160 km/h / 95 kts Landing Speed: 155 km/h / 85 kts Combat Engine Setting: 3,000 RPM Best Cruise: 2,600 RPM Economy Cruise: 2,500 RPM Prop Pitch Control: Manual Mixture Control: Manual Boost: No Supercharger: No
• P-40 is somewhat inferior to contemporary enemy fighters, however in capable hands it
can win a fight against almost any opponent. • Against the Luftwaffe, the key to winning aerial combat with the P-40 is to get the enemy
to slow down and commit to a turning fight or rolling scissors. These fights are P-40’s strong point and Germans will usually lose. In vertical combat P-40 can still defeat a FW-190, but a Bf-109G and above is greatly superior to the P-40 in the vertical.
• Against the Japanese, the P-40 does not fare quite as well. Against the early Japanese fighters superior speed, especially in a dive, can be used; however against more capable Japanese planes, the best strategy is to have a good wingman.
• P-40 is a stable gunnery platform. The wing machine guns are best used at the convergence range, and usually take a 2-3 second burst to bring down a target
• Best performance altitude is between 1,000 and 3,500 meters. Worst performance above 6,000 meters
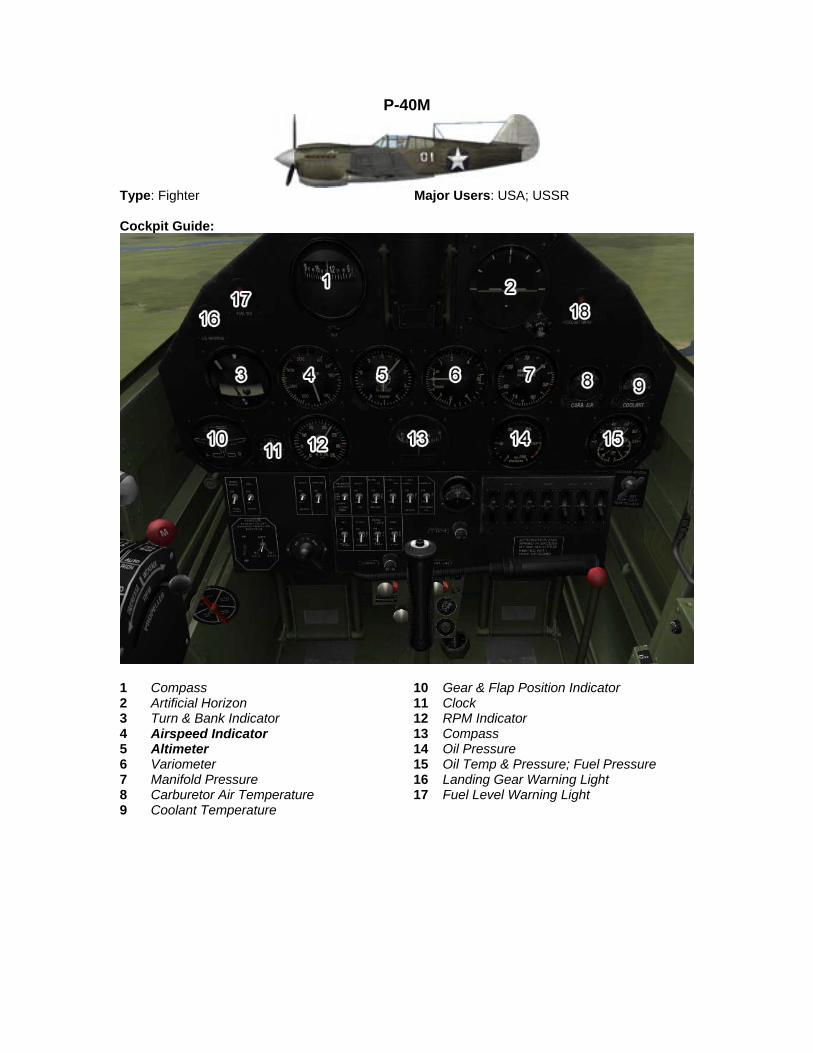
P-40M
Type: Fighter Major Users: USA; USSR Cockpit Guide:
1 Compass 10 Gear & Flap Position Indicator 2 Artificial Horizon 11 Clock 3 Turn & Bank Indicator 12 RPM Indicator 4 Airspeed Indicator 13 Compass 5 Altimeter 14 Oil Pressure 6 Variometer 15 Oil Temp & Pressure; Fuel Pressure 7 Manifold Pressure 16 Landing Gear Warning Light 8 Carburetor Air Temperature 17 Fuel Level Warning Light 9 Coolant Temperature
(P-40 continued)
At a Glance: Engine: V-1710-81 Power: At 17,300 ft: 1,125 HP Take-off: 1,200 HP
Armament: • 6 x 12,7mm MG
Advantages: • Increased performance over earlier P-40s; • Good durability.
Disadvantages: • Weak armament; • Poor roll performance.
Pilot Notes:
Take-Off Speed: 160 km/h / 95 kts Landing Speed: 155 km/h / 85 kts Combat Engine Setting: 3,000 RPM Best Cruise: 2,600 RPM Economy Cruise: 2,500 RPM Prop Pitch Control: Manual Mixture Control: Manual Boost: No Supercharger: No
• P-40 is somewhat inferior to contemporary enemy fighters, however in capable hands it can win a fight against almost any opponent.
• Against the Luftwaffe, the key to winning aerial combat with the P-40 is to get the enemy to slow down and commit to a turning fight or rolling scissors. These fights are P-40’s strong point and Germans will usually lose. In vertical combat P-40 can still defeat a FW-190, but a Bf-109G and above is greatly superior to the P-40 in the vertical.
• Against the Japanese, the P-40 does not fare quite as well. Against the early Japanese fighters superior speed, especially in a dive, can be used; however against more capable Japanese planes, the best strategy is to have a good wingman.
• P-40 is a stable gunnery platform. The wing machine guns are best used at the convergence range, and usually take a 2-3 second burst to bring down a target
• Best performance altitude is between 1,000 and 3,500 meters. Worst performance above 6,000 meters

P-47D-10
Type: Fighter Major Users: USA Cockpit Guide:
1 Clock 13 Accelerometer 2 Compass 14 Engine Temperature 3 Artificial Horizon 15 Water Pressure 4 Turbo RPM Indicator 16 Compass 5 Ammeter 17 Manifold Pressure 6 Fuel Level 18 RPM Indicator 7 Suction Gauge 19 Oil Temperature 8 Airspeed Indicator 20 F.A.S. Pressure 9 Turn & Bank Indicator 21 Oxygen Flow Indicator 10 Variometer 22 Oxygen Pressure 11 Altimeter 23 Landing Gear Indicator Lights 12 Oil Temp & Pressure; Fuel Pressure 24 Fuel Level Warning Light

(P-47 continued)
At a Glance: Engine: R-2800-59 Power: 2,300 HP
Armament: • 8 x .50 Cal (12.7 mm) MG
Advantages: • Powerful, rugged, reliable R-2800 Engine; • Great high altitude performance; • Outstanding range; • Fast dive speed; • Tremendous firepower.
Disadvantages: • Poor turn performance, particularly at lower
altitudes; • Sub-par climb rate.
Pilot Notes:
Take-Off Speed: 175 km/h Landing Speed: 150 km/h Combat Engine Setting: 3,000 RPM Best Cruise: 2,550 RPM Economy Cruise: 2,400 RPM Prop Pitch Control: Manual Mixture Control: Manual Boost: Yes, 5 minute maximum Supercharger: Two-Speed
• P-47 is best used as an energy fighter against most fighters with the possible exception of the Me-262. It is second to none in power dives and will lose any opponent in a dive with enough altitude. When starting a high-speed dive with a 109 at same altitude and airspeed, a P-47 can actually outclimb most 109s in a subsequent zoom climb and end up at higher altitudes.
• Primary means of attacking ground targets is in 15-45 degree dives. • Rockets should be fired from 200 meters or less. Bombs should be dropped from 100
meters or above without delay, or from any altitude with 3+ second delay. • Machine guns are ineffective against tanks but very effective against softer ground
targets. • P-47 is a very stable gunnery platform. The wing machine guns are best used at the
convergence range, and usually take a 2-3 second burst to bring down a target. • Supercharger speeds need to be switched at 4,500 meters. • Best performance altitude is between 3,500 and 4,800 meters for speed 1 and
6,500 and 7,500 for speed 2. • Worst performance between 0 and 2,000 meters

P-47D-22
Type: Fighter-Bomber Major Users: USA Cockpit Guide:
1 Clock 13 Accelerometer 2 Compass 14 Engine Temperature 3 Artificial Horizon 15 Water Pressure 4 Turbo RPM Indicator 16 Compass 5 Ammeter 17 Manifold Pressure 6 Fuel Level 18 RPM Indicator 7 Suction Gauge 19 Oil Temperature 8 Airspeed Indicator 20 F.A.S. Pressure 9 Turn & Bank Indicator 21 Oxygen Flow Indicator 10 Variometer 22 Oxygen Pressure 11 Altimeter 23 Landing Gear Indicator Lights 12 Oil Temp & Pressure; Fuel Pressure 24 Fuel Level Warning Light

(P-47 continued)
At a Glance: Engine: R-2800-59 Power: 2,300 HP
Armament: • 8 x .50 Cal (12.7 mm) MG
Advantages: • Powerful, rugged, reliable R-2800 Engine; • Great high altitude performance; • Outstanding range; • Fast dive speed; • Tremendous firepower.
Disadvantages: • Poor turn performance, particularly at lower
altitudes; • Sub-par climb rate.
Pilot Notes:
Take-Off Speed: 175 km/h Landing Speed: 150 km/h Combat Engine Setting: 3,000 RPM Best Cruise: 2,550 RPM Economy Cruise: 2,400 RPM Prop Pitch Control: Manual Mixture Control: Manual Boost: Yes, 5 minute maximum Supercharger: Two-Speed
• P-47 is best used as an energy fighter against most fighters with the possible exception of the Me-262. It is second to none in power dives and will lose any opponent in a dive with enough altitude. When starting a high-speed dive with a 109 at same altitude and airspeed, a P-47 can actually outclimb most 109s in a subsequent zoom climb and end up at higher altitudes.
• Primary means of attacking ground targets is in 15-45 degree dives. • Rockets should be fired from 200 meters or less. Bombs should be dropped from 100
meters or above without delay, or from any altitude with 3+ second delay. • Machine guns are ineffective against tanks but very effective against softer ground
targets. • P-47 is a very stable gunnery platform. The wing machine guns are best used at the
convergence range, and usually take a 2-3 second burst to bring down a target. • Supercharger speeds need to be switched at 4,500 meters. • Best performance altitude is between 3,500 and 4,800 meters for speed 1 and
6,500 and 7,500 for speed 2. • Worst performance between 0 and 2,000 meters

P-47D-27
Type: Fighter-Bomber Major Users: USA Cockpit Guide:
1 Clock 13 Oil Temp & Pressure; Fuel Pressure 2 Compass 14 Turbo RPM Indicator 3 Artificial Horizon 15 Accelerometer 4 Engine Temperature 16 Suction Gauge 5 Airspeed Indicator 17 Water Pressure 6 Ammeter 18 Fuel Level 7 Altimeter 19 Oil Temperature 8 Turn & Bank Indicator 20 F.A.S. Pressure 9 Variometer 21 Oxygen Flow Indicator 10 Compass 22 Oxygen Pressure 11 Manifold Pressure 23 Landing Gear Indicator Lights 12 RPM Indicator 24 Fuel Level Warning Light

(P-47 continued)
At a Glance: Engine: R-2800-59 Power: 2,300 HP
Armament: • 8 x 12.7 mm MG
Advantages: • Powerful, rugged, reliable R-2800 Engine; • Great high altitude performance; • Outstanding range; • Fast dive speed; • Tremendous firepower.
Disadvantages: • Poor turn performance, particularly at lower
altitudes; • Sub-par climb rate.
Pilot Notes:
Take-Off Speed: 175 km/h Landing Speed: 150 km/h Combat Engine Setting: 3,000 RPM Best Cruise: 2,550 RPM Economy Cruise: 2,400 RPM Prop Pitch Control: Manual Mixture Control: Manual Boost: Yes, 5 minute maximum Supercharger: Two-Speed
• P-47 is best used as an energy fighter against most fighters with the possible exception of the Me-262. It is second to none in power dives and will lose any opponent in a dive with enough altitude. When starting a high-speed dive with a 109 at same altitude and airspeed, a P-47 can actually outclimb most 109s in a subsequent zoom climb and end up at higher altitudes.
• Primary means of attacking ground targets is in 15-45 degree dives. • Rockets should be fired from 200 meters or less. Bombs should be dropped from 100
meters or above without delay, or from any altitude with 3+ second delay. • Machine guns are ineffective against tanks but very effective against softer ground
targets. • P-47 is a very stable gunnery platform. The wing machine guns are best used at the
convergence range, and usually take a 2-3 second burst to bring down a target. • Supercharger speeds need to be switched at 4,500 meters. • Best performance altitude is between 3,500 and 4,800 meters for speed 1 and
6,500 and 7,500 for speed 2. • Worst performance between 0 and 2,000 meters
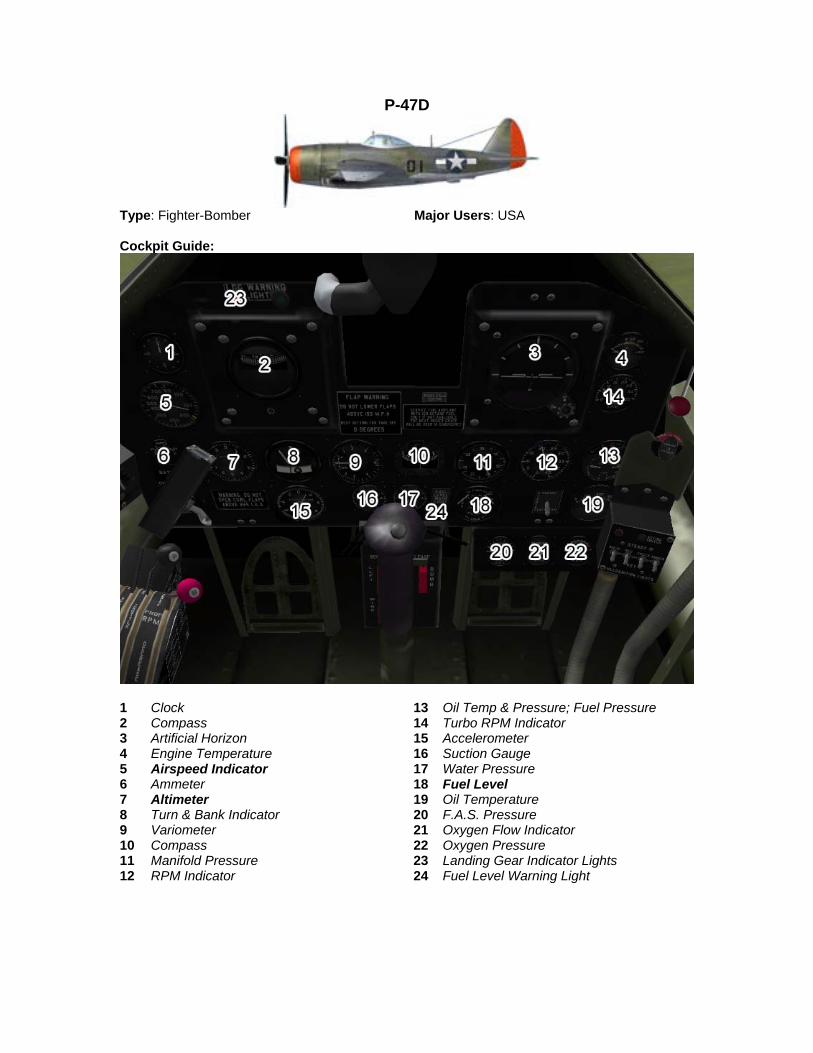
P-47D
Type: Fighter-Bomber Major Users: USA Cockpit Guide:
1 Clock 13 Oil Temp & Pressure; Fuel Pressure 2 Compass 14 Turbo RPM Indicator 3 Artificial Horizon 15 Accelerometer 4 Engine Temperature 16 Suction Gauge 5 Airspeed Indicator 17 Water Pressure 6 Ammeter 18 Fuel Level 7 Altimeter 19 Oil Temperature 8 Turn & Bank Indicator 20 F.A.S. Pressure 9 Variometer 21 Oxygen Flow Indicator 10 Compass 22 Oxygen Pressure 11 Manifold Pressure 23 Landing Gear Indicator Lights 12 RPM Indicator 24 Fuel Level Warning Light

(P-47 continued)
At a Glance: Engine: R-2800-59 Power: 2,300 HP
Armament: • 8 x 12.7 mm MG
Advantages: • Powerful, rugged, reliable R-2800 Engine; • Great high altitude performance; • Outstanding range; • Fast dive speed; • Tremendous firepower.
Disadvantages: • Poor turn performance, particularly at lower
altitudes; • Sub-par climb rate.
Pilot Notes:
Take-Off Speed: 175 km/h Landing Speed: 150 km/h Combat Engine Setting: 3,000 RPM Best Cruise: 2,550 RPM Economy Cruise: 2,400 RPM Prop Pitch Control: Manual Mixture Control: Manual Boost: Yes, 5 minute maximum Supercharger: Two-Speed
• This is the late 150 octane version and increased boost pressure. Its performance almost approaches the P-47M.
• P-47 is best used as an energy fighter against most fighters with the possible exception of the Me-262. It is second to none in power dives and will lose any opponent in a dive with enough altitude. When starting a high-speed dive with a 109 at same altitude and airspeed, a P-47 can actually outclimb most 109s in a subsequent zoom climb and end up at higher altitudes.
• Primary means of attacking ground targets is in 15-45 degree dives. • Rockets should be fired from 200 meters or less. Bombs should be dropped from 100
meters or above without delay, or from any altitude with 3+ second delay. • Machine guns are ineffective against tanks but very effective against softer ground
targets. • P-47 is a very stable gunnery platform. The wing machine guns are best used at the
convergence range, and usually take a 2-3 second burst to bring down a target. • Supercharger speeds need to be switched at 4,500 meters. • Best performance altitude is between 3,500 and 4,800 meters for speed 1 and
6,500 and 7,500 for speed 2. • Worst performance between 0 and 2,000 meters

P-51B-NA
Type: Fighter Major Users: USA Cockpit Guide:
1 Compass 11 Turn & Bank Indicator 2 Clock 12 Variometer 3 Suction Gauge 13 Coolant Temperature 4 Manifold Pressure 14 Oil Temp & Pressure; Fuel Pressure 5 Altimeter 15 Engine Primer 6 Compass 16 Oxygen Cylinder Pressure 7 Artificial Horizon 17 Fuel Level (Left) 8 RPM Indicator 18 Fuel Level (Right) 9 Landing Gear Indicator Lights 19 Oil Pressure 10 Airspeed Indicator 20 Fuel Level (Fuselage) – not shown
(P-51 continued)
At a Glance: Engine: 1 x V-1650-3 Power:
Take-off: 1,400 HP Indicated: 1,450 HP At 6040 m
Armament: • 4 x .50 caliber machine guns
Advantages: • Great range for a fighter; • High top speed.
Disadvantages: • Mediocre maneuverability; • Poor rearwards visibility.
Pilot Notes:
• The Mustang is best used at high altitudes. Below 20,000 feet its superiority over the enemy deteriorates and finally completely disappears as it approaches the ground.
• The P-51 should not be used as a turn-and-burn fighter. The key to victory is having advantage in both the airspeed and altitude.

P-51C-NT
Type: Fighter Major Users: USA Cockpit Guide:
1 Compass 11 Turn & Bank Indicator 2 Clock 12 Variometer 3 Suction Gauge 13 Coolant Temperature 4 Manifold Pressure 14 Oil Temp & Pressure; Fuel Pressure 5 Altimeter 15 Engine Primer 6 Compass 16 Oxygen Cylinder Pressure 7 Artificial Horizon 17 Fuel Level (Left) 8 RPM Indicator 18 Fuel Level (Right) 9 Landing Gear Indicator Lights 19 Oil Pressure 10 Airspeed Indicator 20 Fuel Level (Fuselage) – not shown
(P-51 continued)
At a Glance: Engine: 1 x V-1650-7 Power:
Take-off: 1,450 HP Indicated: 1,695 HP At 3,140 m
Armament: • 4 x .50 cal machine guns
Advantages: • Great range for a fighter; • High top speed.
Disadvantages: • Mediocre maneuverability; • Poor rearwards visibility.
Pilot Notes:
• The Mustang is best used at high altitudes. Below 20,000 feet its superiority over the enemy deteriorates and finally completely disappears as it approaches the ground.
• The P-51 should not be used as a turn-and-burn fighter. The key to victory is having advantage in both the airspeed and altitude.

P-51D-5NT
Type: Fighter Major Users: USA Cockpit Guide:
1 Compass 13 Variometer 2 Clock 14 Oil Temp & Pressure; Fuel Pressure 3 Suction Gauge 15 Oxygen Flow Indicator 4 Manifold Pressure 16 Oxygen Pressure 5 Airspeed Indicator 17 Fuel Level (Left) 6 Compass 18 Fuel Level (Right) 7 Artificial Horizon 19 Landing Gear Indicator Lights 8 Coolant Temperature 20 Supercharger Warning Light 9 Carburetor Air Temperature 21 Oil Pressure 10 RPM Indicator 22 Fuel Level (Fuselage) – not shown 11 Altimeter 23 Slip Ball 12 Turn & Bank Indicator

(P-51 continued)
At a Glance: Engine: V-1650-7 Power:
Take off: 1,490 HP WEP: 1,720 HP
Armament: • 6 x 12.7 mm MG
Advantages: • Excellent long-range, high speed, high
altitude performance; • Outstanding in the long-range bomber
escort role.
Disadvantages: • Low-altitude performance not as
impressive. • Can be destroyed by damage that would
not affect other aircraft seriously; • Liquid-cooled engine that could be disabled
by a single shot. Pilot Notes:
• The Mustang is best used at high altitudes. Below 20,000 feet its superiority over the enemy deteriorates and finally completely disappears as it approaches the ground.
• The P-51 should not be used as a turn-and-burn fighter. The key to victory is having advantage in both the airspeed and altitude.
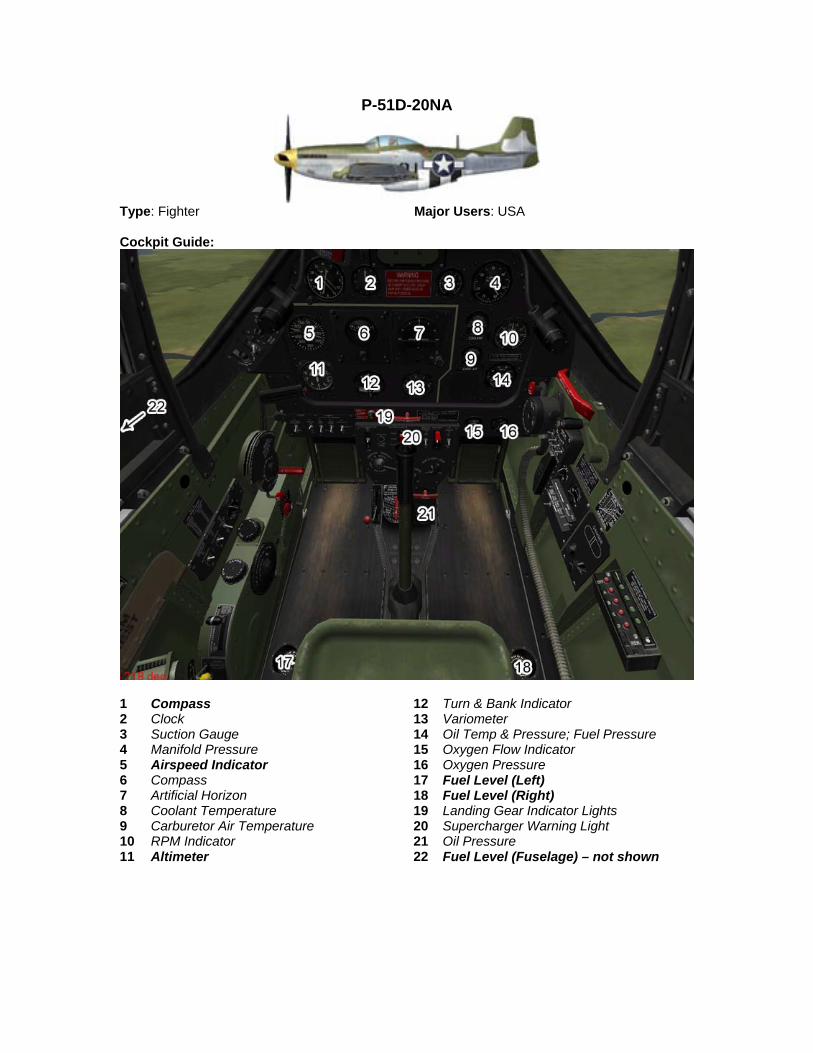
P-51D-20NA
Type: Fighter Major Users: USA Cockpit Guide:
1 Compass 12 Turn & Bank Indicator 2 Clock 13 Variometer 3 Suction Gauge 14 Oil Temp & Pressure; Fuel Pressure 4 Manifold Pressure 15 Oxygen Flow Indicator 5 Airspeed Indicator 16 Oxygen Pressure 6 Compass 17 Fuel Level (Left) 7 Artificial Horizon 18 Fuel Level (Right) 8 Coolant Temperature 19 Landing Gear Indicator Lights 9 Carburetor Air Temperature 20 Supercharger Warning Light 10 RPM Indicator 21 Oil Pressure 11 Altimeter 22 Fuel Level (Fuselage) – not shown
(P-51 continued)
At a Glance: Engine: V-1650-7 Power:
Take off: 1,490 HP WEP: 1,720 HP
Armament: • 6 x 12.7 mm MG
Advantages: • Excellent long-range, high speed, high
altitude performance; • Outstanding in the long-range bomber
escort role.
Disadvantages: • Low-altitude performance not as
impressive; • Can be destroyed by damage that would
not affect other aircraft seriously; • Liquid-cooled engine that could be disabled
by a single shot. Pilot Notes:
• The Mustang is best used at high altitudes. Below 20,000 feet its superiority over the enemy deteriorates and finally completely disappears as it approaches the ground.
• The P-51 should not be used as a turn-and-burn fighter. The key to victory is having advantage in both the airspeed and altitude.
• To use the K-14 gunsight, use the ‘Toggle Sight Mode (Auto)’ button to switch gunsight mode. Use the ‘Adjust Sight Control to Right’ and ‘Adjust Sight Control to Left’ buttons to select the target aircraft type. Use the ‘Increase Sight Distance’ and ‘Decrease Sight Distance’ buttons to adjust the sight circle for the target aircraft to fit in it. Track the target aircraft for at least 2 seconds to maintain correct lead.

Mustang Mk III
Type: Fighter Major Users: RAF Cockpit Guide:
1 Compass 11 Turn & Bank Indicator 2 Clock 12 Variometer 3 Suction Gauge 13 Coolant Temperature 4 Manifold Pressure 14 Oil Temp & Pressure; Fuel Pressure 5 Altimeter 15 Engine Primer 6 Compass 16 Oxygen Cylinder Pressure 7 Artificial Horizon 17 Fuel Level (Left) 8 RPM Indicator 18 Fuel Level (Right) 9 Landing Gear Indicator Lights 19 Oil Pressure 10 Airspeed Indicator 20 Fuel Level (Fuselage) – not shown

(P-51 continued)
At a Glance: Engine: 1 x V-1650-7 Power:
Take-off: 1,450 HP Indicated: 1,695 HP At 3,140 m
Armament: • 4 x .50 cal machine guns
Advantages: • Great range for a fighter; • High top speed.
Disadvantages: • Mediocre maneuverability.
Pilot Notes:
• The Mustang is best used at high altitudes. Below 20,000 feet its superiority over the enemy deteriorates and finally completely disappears as it approaches the ground.
• The P-51 should not be used as a turn-and-burn fighter. The key to victory is having advantage in both the airspeed and altitude.

P-63C-5
Type: Fighter Major Users: USA; USSR Cockpit Guide:
1 Slip Ball 12 Fuel Level 2 Altimeter 13 Clock 3 Compass 14 Oil Pressure 4 Compass 15 Coolant Temperature 5 Artificial Horizon 16 Suction Gauge 6 Airspeed Indicator 17 De-Ice Switch 7 Variometer 18 Oxygen Flow Indicator 8 Turn & Bank Indicator 19 Cylinder Pressure 9 Manifold Pressure 20 Carburetor Air Temperature 10 RPM Indicator 21 Oil Pressure 11 Oil Temp & Pressure; Fuel Pressure 22 Landing Gear Indicator Lights
(P-63 continued)
At a Glance: Engine: 1 x V-1710-117 Power:
Sea level: 1,500 HP in WEP mode With water injection: 1,800 HP.
Armament: • 1 x 37-mm M10 cannon • 4 x 12,7-mm MG 53-2 MG
Advantages: • High top speed; • Powerful armament; • Good maneuverability.
Disadvantages: • Slower climb rate than many contemporary
planes; • Still somewhat spin and stall-prone; • Lower fuel capacity than the P-39.
Pilot Notes: • Adequate dogfighter with good all-around performance at lower altitudes. • The P-63 will easily stall from rough handling, and therefore should be flown very gently
especially in horizontal maneuvers. • Avoid turning dogfights with the Japanese planes at all costs. • The climb rate is rather poor, so chasing a climbing plane is almost always futile. • P-63 is a very stable gunnery platform. While the wing .50-caliber machine guns are not very
effective, the nose 37mm cannon is quite powerful and can bring down most targets in a few hits.
• Best performance altitude is between 1,500 and 3,000 meters. Performance begins to deteriorate above 5,000 meters
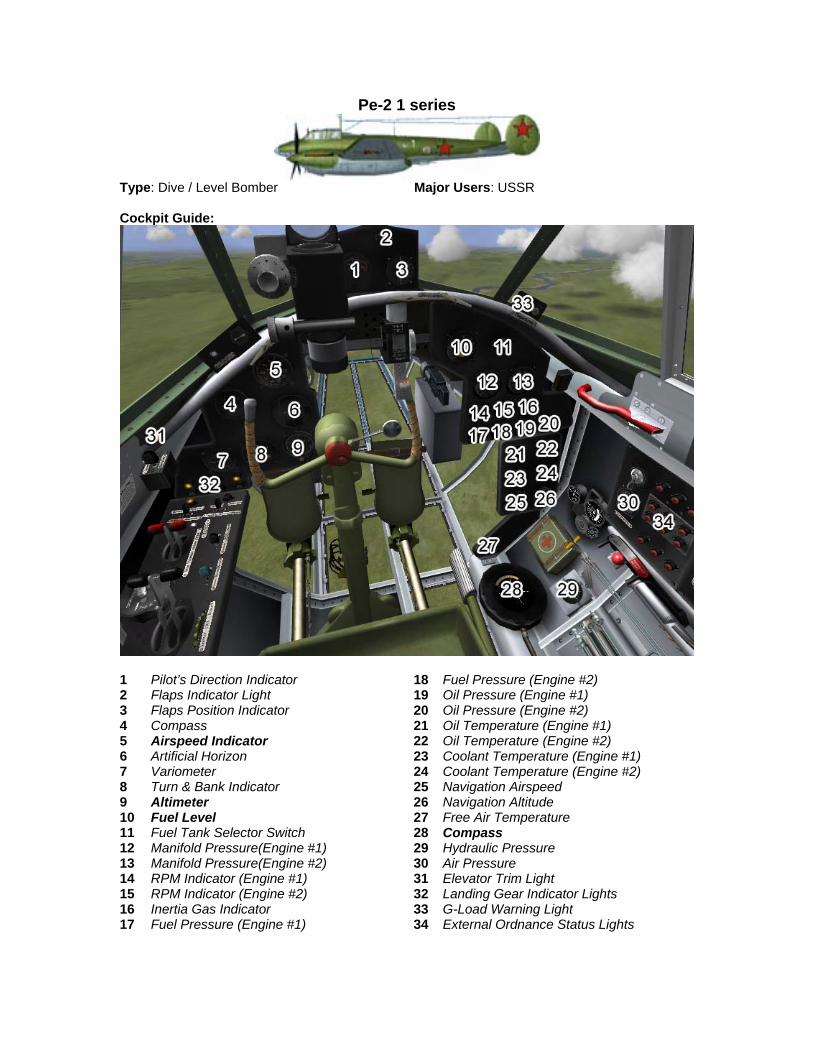
Pe-2 1 series
Type: Dive / Level Bomber Major Users: USSR Cockpit Guide:
1 Pilot’s Direction Indicator 18 Fuel Pressure (Engine #2) 2 Flaps Indicator Light 19 Oil Pressure (Engine #1) 3 Flaps Position Indicator 20 Oil Pressure (Engine #2) 4 Compass 21 Oil Temperature (Engine #1) 5 Airspeed Indicator 22 Oil Temperature (Engine #2) 6 Artificial Horizon 23 Coolant Temperature (Engine #1) 7 Variometer 24 Coolant Temperature (Engine #2) 8 Turn & Bank Indicator 25 Navigation Airspeed 9 Altimeter 26 Navigation Altitude 10 Fuel Level 27 Free Air Temperature 11 Fuel Tank Selector Switch 28 Compass 12 Manifold Pressure(Engine #1) 29 Hydraulic Pressure 13 Manifold Pressure(Engine #2) 30 Air Pressure 14 RPM Indicator (Engine #1) 31 Elevator Trim Light 15 RPM Indicator (Engine #2) 32 Landing Gear Indicator Lights 16 Inertia Gas Indicator 33 G-Load Warning Light 17 Fuel Pressure (Engine #1) 34 External Ordnance Status Lights

(Pe-2 continued)
Other Playable Crew Positions:
Level Bombsight Rear Gunner At a Glance: Engine: 2 x M-105R. Power: 2 x 1,100 HP
Armament: • 2 x 7.62mm (ShKAS); • 2 x 12.7mm (BK); • Up to 1,000 kg of bombs.
Advantages: • Excellent flight performance; • High speed and range; • Fully electric controls; • Easy to fly.
Disadvantages: • Weak on-board armament; • Some unreliable electric devices.
Pilot Notes:
• Supercharger speeds need to be switched at 3,100 meters. • Mixture adjustment is as follows: 100% at 3,200 m; 80% at 4,600 m; 60% at 6,300 m; and
40% at 8,400 m. • While ostensibly a dive bomber, the Pe-2 is excellent in almost every ground attack
mode. It can dive-bomb, level bomb, and strafe. • The biggest weakness of the Pe-2 is its vulnerability to enemy fire. It can’t take
punishment nearly as well as its famous counterpart, the Il-2. Therefore, it should only be used as a dive bomber, or as a low-level attack aircraft, when enemy opposition is expected to be low.
• For well defended areas, the Pe-2 is best used as a medium-altitude level bomber. • Do not forget to lock the tailwheel (use the Lock Tailwheel key) prior to starting a take-off
run, in order to stay straight. Attempting to take off with the tailwheel unlocked will lead to your aircraft veering uncontrollably to the side.

(Pe-2 continued)
Using the Level Sight:
• The level bomb sight will automatically calculate the bomb trajectory and impact point based on the aircraft’s current airspeed and altitude. The bombardier must enter these parameters into the sight manually, and point it at the target. Once the target passes under the crosshairs, the bombardier must drop the bombs manually.
• As the first step, bombing altitude and aircraft speed must be entered into the bombsight. The actual altitude above target (not above sea level) can be entered using the Increase Bombsight Altitude and Decrease Bombsight Altitude keys. The plane speed is entered using the Increase Bombsight Velocity and Decrease Bombsight Velocity keys. Note that the true (not indicated) airspeed must be set. It can be obtained from the speed gauge when in No-Cockpit View mode.
• After the initial parameters are entered, the bombardier has to point the bombsight towards the projected impact point. Tap the Toggle Gunsight key (Shift-F1 by default) to look through the optics. The bead symbol along the outer ring of numbers shows the combined Altitude / Airspeed input. Use Increase Bombsight Distance and Decrease Bombsight Distance to adjust the bombsight viewing angle. As the sight angle changes, note the ring symbol moving along the outer ring of symbols.
• Align the ring with the bead. With them aligned, the bomb sight is pointing at the projected impact point for the currently entered altitude / airspeed parameters.
• If the target does not appear along the centerline of the bomb sight optics, make minute changes to your plane’s course.
• Once you see your target pass through the sight center bubble, press the Weapon 4 button to drop your bombs.

Pe-2 84 series
Type: Dive / Level Bomber Major Users: USSR Cockpit Guide:
1 Pilot’s Direction Indicator 18 Fuel Pressure (Engine #2) 2 Flaps Indicator Light 19 Oil Pressure (Engine #1) 3 Flaps Position Indicator 20 Oil Pressure (Engine #2) 4 Compass 21 Oil Temperature (Engine #1) 5 Airspeed Indicator 22 Oil Temperature (Engine #2) 6 Artificial Horizon 23 Coolant Temperature (Engine #1) 7 Variometer 24 Coolant Temperature (Engine #2) 8 Turn & Bank Indicator 25 Navigation Airspeed 9 Altimeter 26 Navigation Altitude 10 Fuel Level 27 Compass 11 Fuel Tank Selector Switch 28 Oxygen Apparatus 12 Manifold Pressure(Engine #1) 29 Hydraulic Pressure 13 Manifold Pressure(Engine #2) 30 Air Pressure 14 RPM Indicator (Engine #1) 31 Elevator Trim Light 15 RPM Indicator (Engine #2) 32 Landing Gear Indicator Lights 16 Inertia Gas Indicator 33 G-Load Warning Light 17 Fuel Pressure (Engine #1) 34 External Ordnance Status Lights
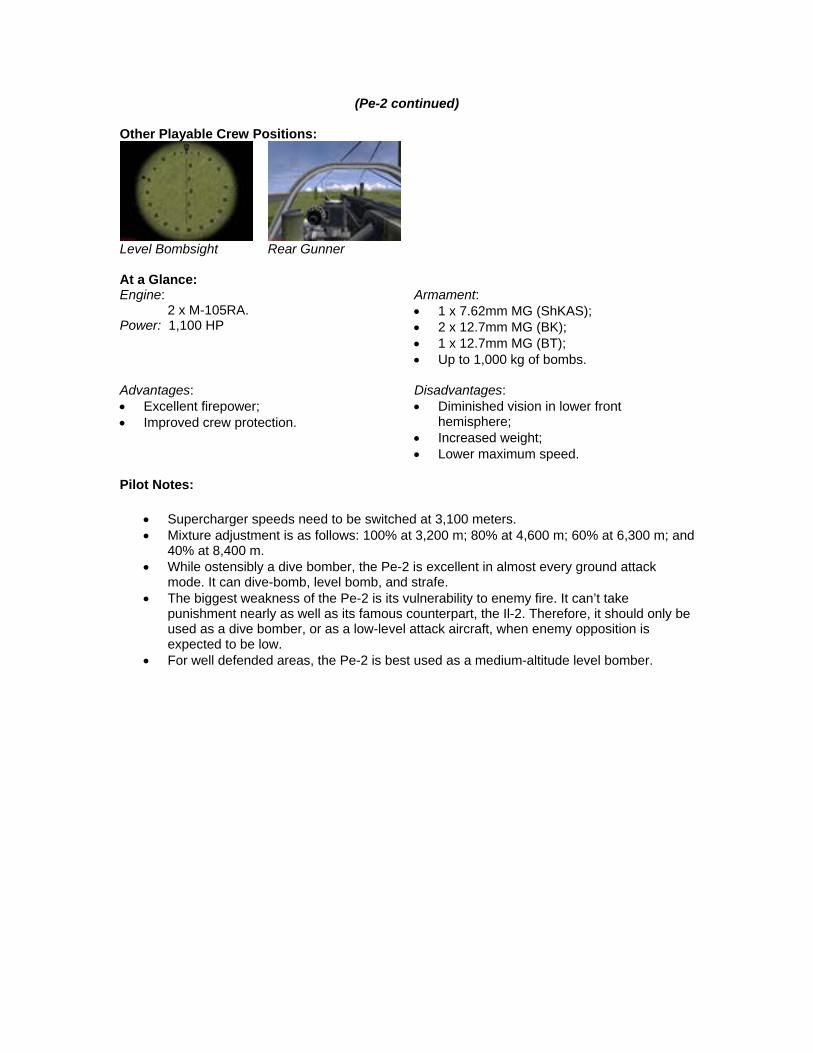
(Pe-2 continued)
Other Playable Crew Positions:
Level Bombsight Rear Gunner At a Glance: Engine: 2 x M-105RA. Power: 1,100 HP
Armament: • 1 x 7.62mm MG (ShKAS); • 2 x 12.7mm MG (BK); • 1 x 12.7mm MG (BT); • Up to 1,000 kg of bombs.
Advantages: • Excellent firepower; • Improved crew protection.
Disadvantages: • Diminished vision in lower front
hemisphere; • Increased weight; • Lower maximum speed.
Pilot Notes:
• Supercharger speeds need to be switched at 3,100 meters. • Mixture adjustment is as follows: 100% at 3,200 m; 80% at 4,600 m; 60% at 6,300 m; and
40% at 8,400 m. • While ostensibly a dive bomber, the Pe-2 is excellent in almost every ground attack
mode. It can dive-bomb, level bomb, and strafe. • The biggest weakness of the Pe-2 is its vulnerability to enemy fire. It can’t take
punishment nearly as well as its famous counterpart, the Il-2. Therefore, it should only be used as a dive bomber, or as a low-level attack aircraft, when enemy opposition is expected to be low.
• For well defended areas, the Pe-2 is best used as a medium-altitude level bomber.
(Pe-2 continued)
Using the Level Sight:
• The level bomb sight will automatically calculate the bomb trajectory and impact point based on the aircraft’s current airspeed and altitude. The bombardier must enter these parameters into the sight manually, and point it at the target. Once the target passes under the crosshairs, the bombardier must drop the bombs manually.
• As the first step, bombing altitude and aircraft speed must be entered into the bombsight. The actual altitude above target (not above sea level) can be entered using the Increase Bombsight Altitude and Decrease Bombsight Altitude keys. The plane speed is entered using the Increase Bombsight Velocity and Decrease Bombsight Velocity keys. Note that the true (not indicated) airspeed must be set. It can be obtained from the speed gauge when in No-Cockpit View mode.
• After the initial parameters are entered, the bombardier has to point the bombsight towards the projected impact point. Tap the Toggle Gunsight key (Shift-F1 by default) to look through the optics. The bead symbol along the outer ring of numbers shows the combined Altitude / Airspeed input. Use Increase Bombsight Distance and Decrease Bombsight Distance to adjust the bombsight viewing angle. As the sight angle changes, note the ring symbol moving along the outer ring of symbols.
• Align the ring with the bead. With them aligned, the bomb sight is pointing at the projected impact point for the currently entered altitude / airspeed parameters.
• If the target does not appear along the centerline of the bomb sight optics, make minute changes to your plane’s course.
• Once you see your target pass through the sight center bubble, press the Weapon 4 button to drop your bombs.

Pe-2 110 series
Type: Dive / Level Bomber Major Users: USSR Cockpit Guide:
1 Pilot’s Direction Indicator 18 Fuel Pressure (Engine #2) 2 Flaps Indicator Light 19 Oil Pressure (Engine #1) 3 Flaps Position Indicator 20 Oil Pressure (Engine #2) 4 Compass 21 Oil Temperature (Engine #1) 5 Airspeed Indicator 22 Oil Temperature (Engine #2) 6 Artificial Horizon 23 Coolant Temperature (Engine #1) 7 Variometer 24 Coolant Temperature (Engine #2) 8 Turn & Bank Indicator 25 Navigation Airspeed 9 Altimeter 26 Navigation Altitude 10 Fuel Level 27 Compass 11 Fuel Tank Selector Switch 28 Oxygen Systems 12 Manifold Pressure(Engine #1) 29 Hydraulic Pressure 13 Manifold Pressure(Engine #2) 30 Air Pressure 14 RPM Indicator (Engine #1) 31 Elevator Trim Light 15 RPM Indicator (Engine #2) 32 Landing Gear Indicator Lights 16 Inertia Gas Indicator 33 G-Load Warning Light 17 Fuel Pressure (Engine #1) 34 External Ordnance Status Lights

(Pe-2 continued)
Other Playable Crew Positions:
Level Bombsight Rear Gunner At a Glance: Engine: 2 x M-105PA Power: 1,100 HP
Armament: • 2 x 7.62mm MG (ShKAS); • 2 x 12.7mm MG (BK); • 1 x 12.7mm MG (UBT or UBK); • Up to 1,000 kg of bombs.
Advantages: • Strong armament; • Improved armor protection.
Disadvantages: • Insufficient field of vision in lower front
hemisphere; • Increased weight; • Lower speed.
Pilot Notes:
• Supercharger speeds need to be switched at 3,100 meters. • Mixture adjustment is as follows: 100% at 3,200 m; 80% at 4,600 m; 60% at 6,300 m; and
40% at 8,400 m. • While ostensibly a dive bomber, the Pe-2 is excellent in almost every ground attack
mode. It can dive-bomb, level bomb, and strafe. • The biggest weakness of the Pe-2 is its vulnerability to enemy fire. It can’t take
punishment nearly as well as its famous counterpart, the Il-2. Therefore, it should only be used as a dive bomber, or as a low-level attack aircraft, when enemy opposition is expected to be low.
• For well defended areas, the Pe-2 is best used as a medium-altitude level bomber.

(Pe-2 continued)
Using the Level Sight:
• The level bomb sight will automatically calculate the bomb trajectory and impact point based on the aircraft’s current airspeed and altitude. The bombardier must enter these parameters into the sight manually, and point it at the target. Once the target passes under the crosshairs, the bombardier must drop the bombs manually.
• As the first step, bombing altitude and aircraft speed must be entered into the bombsight. The actual altitude above target (not above sea level) can be entered using the Increase Bombsight Altitude and Decrease Bombsight Altitude keys. The plane speed is entered using the Increase Bombsight Velocity and Decrease Bombsight Velocity keys. Note that the true (not indicated) airspeed must be set. It can be obtained from the speed gauge when in No-Cockpit View mode.
• After the initial parameters are entered, the bombardier has to point the bombsight towards the projected impact point. Tap the Toggle Gunsight key (Shift-F1 by default) to look through the optics. The bead symbol along the outer ring of numbers shows the combined Altitude / Airspeed input. Use Increase Bombsight Distance and Decrease Bombsight Distance to adjust the bombsight viewing angle. As the sight angle changes, note the ring symbol moving along the outer ring of symbols.
• Align the ring with the bead. With them aligned, the bomb sight is pointing at the projected impact point for the currently entered altitude / airspeed parameters.
• If the target does not appear along the centerline of the bomb sight optics, make minute changes to your plane’s course.
• Once you see your target pass through the sight center bubble, press the Weapon 4 button to drop your bombs.

Pe-2 359 series
Type: Dive / Level Bomber Major Users: USSR Cockpit Guide:
1 Pilot’s Direction Indicator 18 Fuel Pressure (Engine #2) 2 Flaps Indicator Light 19 Oil Pressure (Engine #1) 3 Flaps Position Indicator 20 Oil Pressure (Engine #2) 4 Compass 21 Oil Temperature (Engine #1) 5 Airspeed Indicator 22 Oil Temperature (Engine #2) 6 Artificial Horizon 23 Coolant Temperature (Engine #1) 7 Variometer 24 Coolant Temperature (Engine #2) 8 Turn & Bank Indicator 25 Navigation Airspeed 9 Altimeter 26 Navigation Altitude 10 Fuel Level 27 Compass 11 Fuel Tank Selector Switch 28 Oxygen Systems 12 Manifold Pressure(Engine #1) 29 Hydraulic Pressure 13 Manifold Pressure(Engine #2) 30 Air Pressure 14 RPM Indicator (Engine #1) 31 Elevator Trim Light 15 RPM Indicator (Engine #2) 32 Landing Gear Indicator Lights 16 Inertia Gas Indicator 33 G-Load Warning Light 17 Fuel Pressure (Engine #1) 34 External Ordnance Status Lights

(Pe-2 continued)
Other Playable Crew Positions:
Level Bombsight Rear Gunner At a Glance: Engine: 2 x M-105PF. Power: 1,210 HP
Armament: • 2 x 7.62mm MG (ShKAS); • 2 x 12.7mm MG (BK); • 1 x 12.7mm MG (UBT or UBK); • Up to 1,000 kg of bombs.
Advantages: • Strong armament; • Improved aerodynamics; • Excellent performance at altitudes up to
4,000m.
Disadvantages: • Increased weight; • Reduced range and service ceiling.
Pilot Notes:
• Supercharger speeds need to be switched at 2,800 meters. • Mixture adjustment is as follows: 100% at 1,650 m; 80% at 3,150 m; 60% at 4,850 m;
40% at 7,000 m; and 20% at 9,800 m. • While ostensibly a dive bomber, the Pe-2 is excellent in almost every ground attack
mode. It can dive-bomb, level bomb, and strafe. • The biggest weakness of the Pe-2 is its vulnerability to enemy fire. It can’t take
punishment nearly as well as its famous counterpart, the Il-2. Therefore, it should only be used as a dive bomber, or as a low-level attack aircraft, when enemy opposition is expected to be low.
• For well defended areas, the Pe-2 is best used as a medium-altitude level bomber.

(Pe-2 continued)
Using the Level Sight:
• The level bomb sight will automatically calculate the bomb trajectory and impact point based on the aircraft’s current airspeed and altitude. The bombardier must enter these parameters into the sight manually, and point it at the target. Once the target passes under the crosshairs, the bombardier must drop the bombs manually.
• As the first step, bombing altitude and aircraft speed must be entered into the bombsight. The actual altitude above target (not above sea level) can be entered using the Increase Bombsight Altitude and Decrease Bombsight Altitude keys. The plane speed is entered using the Increase Bombsight Velocity and Decrease Bombsight Velocity keys. Note that the true (not indicated) airspeed must be set. It can be obtained from the speed gauge when in No-Cockpit View mode.
• After the initial parameters are entered, the bombardier has to point the bombsight towards the projected impact point. Tap the Toggle Gunsight key (Shift-F1 by default) to look through the optics. The bead symbol along the outer ring of numbers shows the combined Altitude / Airspeed input. Use Increase Bombsight Distance and Decrease Bombsight Distance to adjust the bombsight viewing angle. As the sight angle changes, note the ring symbol moving along the outer ring of symbols.
• Align the ring with the bead. With them aligned, the bomb sight is pointing at the projected impact point for the currently entered altitude / airspeed parameters.
• If the target does not appear along the centerline of the bomb sight optics, make minute changes to your plane’s course.
• Once you see your target pass through the sight center bubble, press the Weapon 4 button to drop your bombs.

Pe-3
Type: Heavy Fighter Major Users: USSR Cockpit Guide:
1 Flaps Indicator Light 18 Fuel Pressure (Engine #2) 2 Flaps Position Indicator 19 Oil Pressure (Engine #1) 3 Gunsight Dial 20 Oil Pressure (Engine #2) 4 Compass 21 Oil Temperature (Engine #1) 5 Airspeed Indicator 22 Oil Temperature (Engine #2) 6 Artificial Horizon 23 Coolant Temperature (Engine #1) 7 Variometer 24 Coolant Temperature (Engine #2) 8 Turn & Bank Indicator 25 Navigation Airspeed 9 Altimeter 26 Navigation Altitude 10 Fuel Level 27 Free Air Temperature 11 Fuel Tank Selector Switch 28 Compass 12 Manifold Pressure(Engine #1) 29 Hydraulic Pressure 13 Manifold Pressure(Engine #2) 30 Air Pressure 14 RPM Indicator (Engine #1) 31 Elevator Trim Light 15 RPM Indicator (Engine #2) 32 Landing Gear Indicator Lights 16 Inertia Gas Indicator 33 G-Load Warning Light 17 Fuel Pressure (Engine #1)
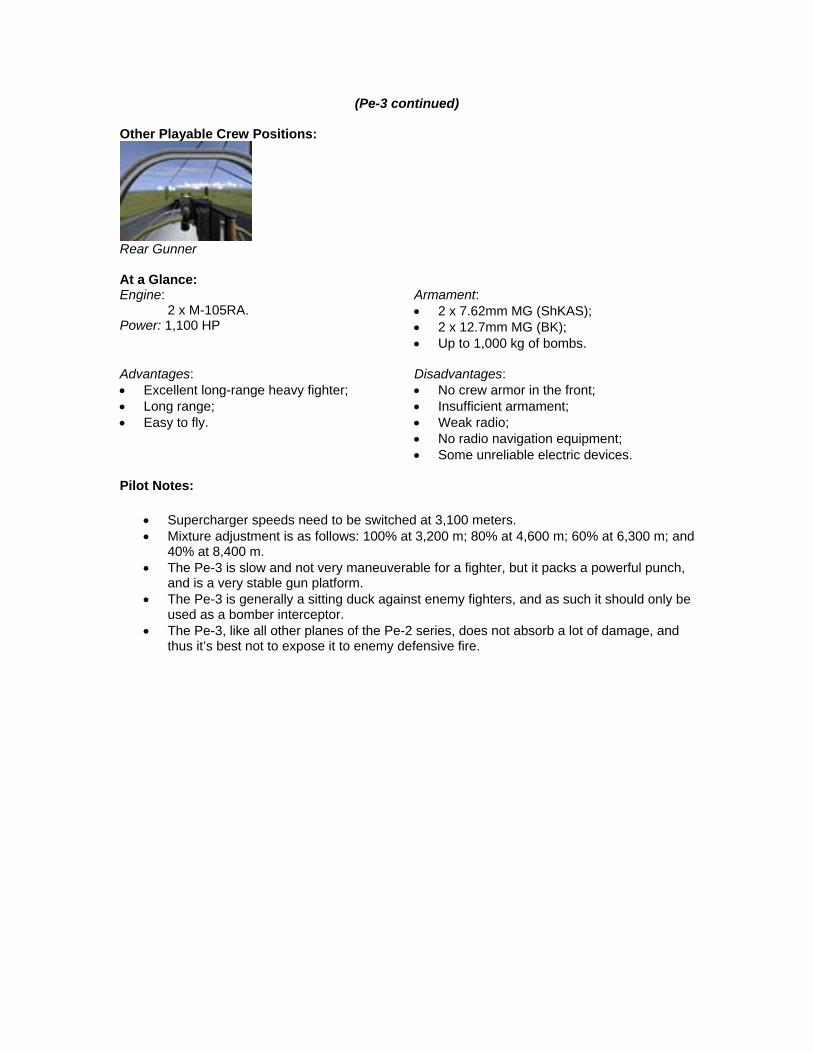
(Pe-3 continued)
Other Playable Crew Positions:
Rear Gunner At a Glance: Engine: 2 x M-105RA. Power: 1,100 HP
Armament: • 2 x 7.62mm MG (ShKAS); • 2 x 12.7mm MG (BK); • Up to 1,000 kg of bombs.
Advantages: • Excellent long-range heavy fighter; • Long range; • Easy to fly.
Disadvantages: • No crew armor in the front; • Insufficient armament; • Weak radio; • No radio navigation equipment; • Some unreliable electric devices.
Pilot Notes:
• Supercharger speeds need to be switched at 3,100 meters. • Mixture adjustment is as follows: 100% at 3,200 m; 80% at 4,600 m; 60% at 6,300 m; and
40% at 8,400 m. • The Pe-3 is slow and not very maneuverable for a fighter, but it packs a powerful punch,
and is a very stable gun platform. • The Pe-3 is generally a sitting duck against enemy fighters, and as such it should only be
used as a bomber interceptor. • The Pe-3, like all other planes of the Pe-2 series, does not absorb a lot of damage, and
thus it’s best not to expose it to enemy defensive fire.

Pe-3bis
Type: Heavy Fighter Major Users: USSR Cockpit Guide:
1 Flaps Indicator Light 18 Fuel Pressure (Engine #2) 2 Flaps Position Indicator 19 Oil Pressure (Engine #1) 3 Gunsight Dial 20 Oil Pressure (Engine #2) 4 Compass 21 Oil Temperature (Engine #1) 5 Airspeed Indicator 22 Oil Temperature (Engine #2) 6 Artificial Horizon 23 Coolant Temperature (Engine #1) 7 Variometer 24 Coolant Temperature (Engine #2) 8 Turn & Bank Indicator 25 Navigation Airspeed 9 Altimeter 26 Navigation Altitude 10 Fuel Level 27 Compass 11 Fuel Tank Selector Switch 28 Oxygen Systems 12 Manifold Pressure(Engine #1) 29 Hydraulic Pressure 13 Manifold Pressure(Engine #2) 30 Air Pressure 14 RPM Indicator (Engine #1) 31 Elevator Trim Light 15 RPM Indicator (Engine #2) 32 Landing Gear Indicator Lights 16 Inertia Gas Indicator 33 G-Load Warning Light 17 Fuel Pressure (Engine #1)
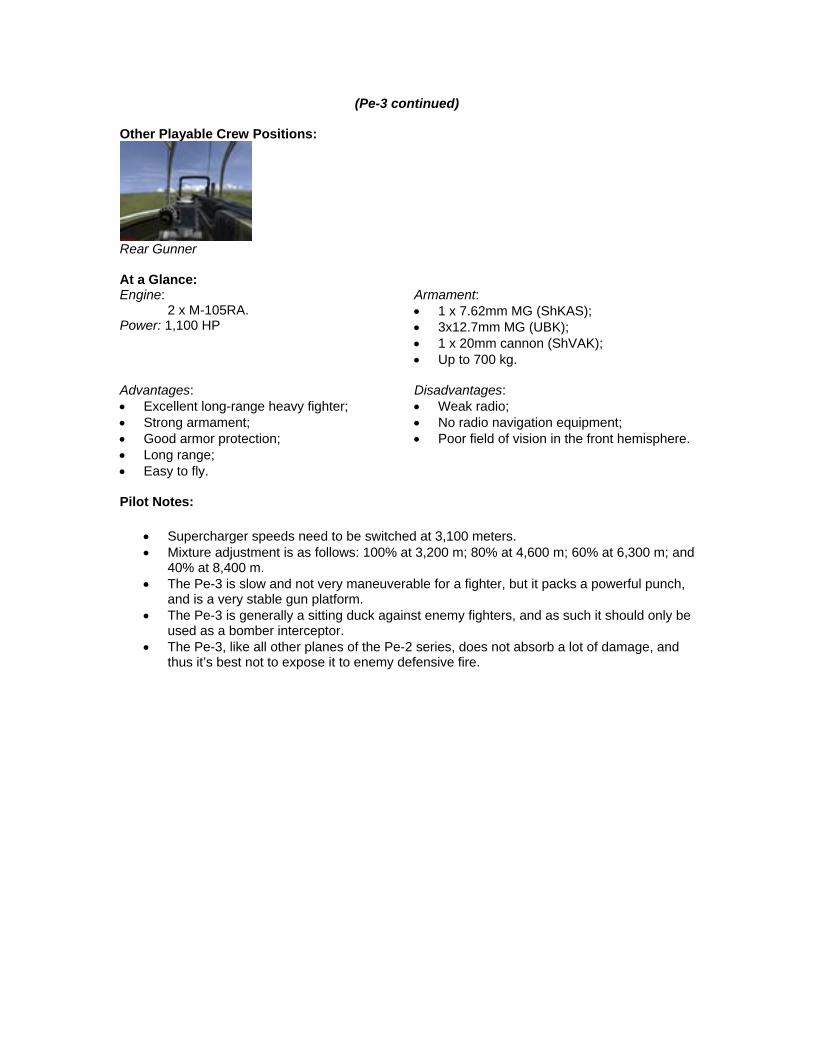
(Pe-3 continued)
Other Playable Crew Positions:
Rear Gunner At a Glance: Engine: 2 x M-105RA. Power: 1,100 HP
Armament: • 1 x 7.62mm MG (ShKAS); • 3x12.7mm MG (UBK); • 1 x 20mm cannon (ShVAK); • Up to 700 kg.
Advantages: • Excellent long-range heavy fighter; • Strong armament; • Good armor protection; • Long range; • Easy to fly.
Disadvantages: • Weak radio; • No radio navigation equipment; • Poor field of vision in the front hemisphere.
Pilot Notes:
• Supercharger speeds need to be switched at 3,100 meters. • Mixture adjustment is as follows: 100% at 3,200 m; 80% at 4,600 m; 60% at 6,300 m; and
40% at 8,400 m. • The Pe-3 is slow and not very maneuverable for a fighter, but it packs a powerful punch,
and is a very stable gun platform. • The Pe-3 is generally a sitting duck against enemy fighters, and as such it should only be
used as a bomber interceptor. • The Pe-3, like all other planes of the Pe-2 series, does not absorb a lot of damage, and
thus it’s best not to expose it to enemy defensive fire.

SBD-3
Type: Carrier-Borne Dive Bomber Major Users: USA Cockpit Guide:
1 RPM Indicator 9 Variometer 2 Manifold Pressure 10 Clock 3 Altimeter 11 Cylinder Head Temperature 4 Compass 12 Suction Gauge 5 Artificial Horizon 13 Oil Temperature 6 Oil Temp & Pressure; Fuel Pressure 14 Fuel Level 7 Airspeed Indicator 15 Compass (not shown) 8 Turn & Bank Indicator Other Playable Crew Positions:
Rear Gunner
(SBD continued)
At a Glance: Engine: 1 x R-1820-52 Power: 1,000 HP
Armament: • 2 x .50 cal MG; • 2 x .30 cal MG rear cockpit; • Bombs: 1 x 1,600 lb or 2 x 147 kg. • External Fuel: 2 x 220 L.
Advantages: • Stable gun platform; • Good defensive field of fire.
Disadvantages: • Mediocre performance; • Insufficient armor protection; • Unstable in dive (partially solved by
perforated flaps).
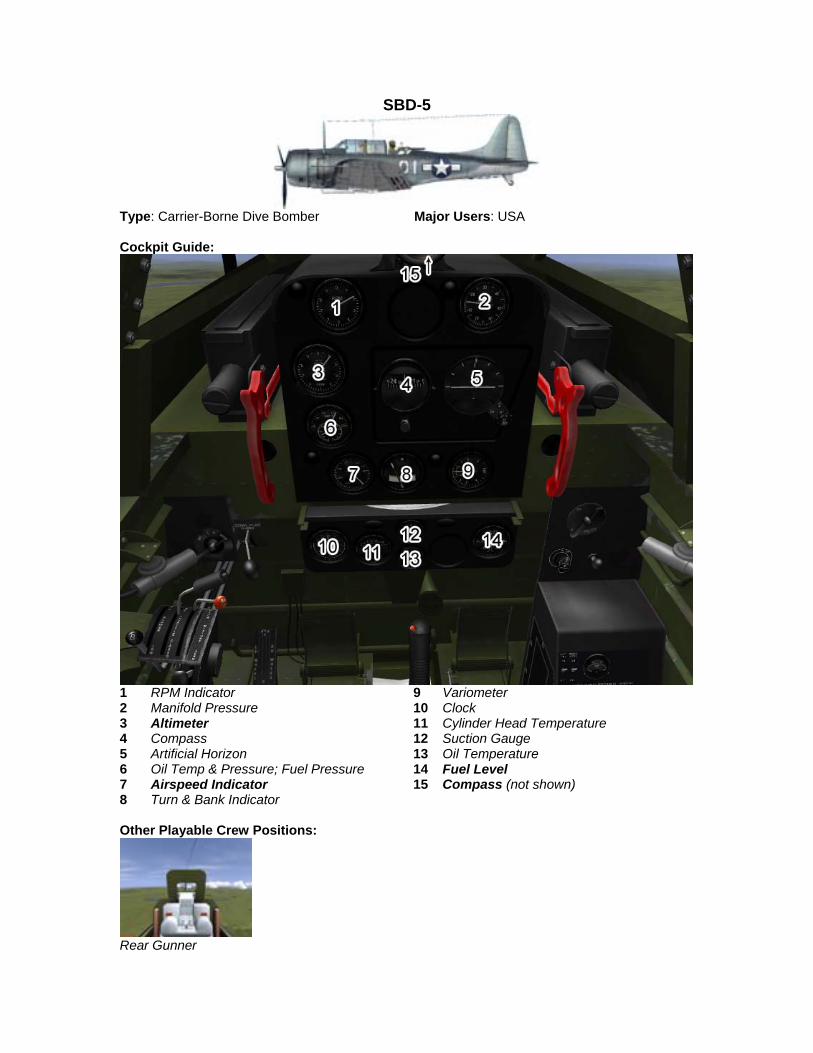
SBD-5
Type: Carrier-Borne Dive Bomber Major Users: USA Cockpit Guide:
1 RPM Indicator 9 Variometer 2 Manifold Pressure 10 Clock 3 Altimeter 11 Cylinder Head Temperature 4 Compass 12 Suction Gauge 5 Artificial Horizon 13 Oil Temperature 6 Oil Temp & Pressure; Fuel Pressure 14 Fuel Level 7 Airspeed Indicator 15 Compass (not shown) 8 Turn & Bank Indicator Other Playable Crew Positions:
Rear Gunner

(SBD continued)
At a Glance: Engine: 1 x R-1820-60 Power: 1,200 HP
Armament: • 2 x .50 cal MG; • 2 x .30 cal MG rear cockpit; • Bombs: 1 x 1,600 lb or 2 x 147 kg. • External Fuel: 2 x 220 L.
Advantages: • Stable gun platform; • Good defensive field of fire.
Disadvantages: • Mediocre performance; • Insufficient armor protection; • Unstable in dive (partially solved by
perforated flaps).

Spitfire Mk Vb
Type: Fighter Major Users: RAF Cockpit Guide:
1 Airspeed Indicator 11 Oil Temperature 2 Artificial Horizon 12 Coolant Temperature 3 Variometer 13 Fuel Level 4 Altimeter 14 Compass 5 Compass 15 Oxygen Altitude 6 Turn & Bank Indicator 16 Oxygen Supply 7 RPM Indicator 17 Clock 8 Fuel Level Warning Light 18 Landing Gear Indicator Lights 9 Manifold Pressure 19 Elevator Trim Indicator 10 Oil Pressure 20 Internal System Indicator

(Spitfire continued)
At a Glance: Engine:
1 x 45 Power: 1,470 HP
Armament: • 2 x 20mm HS.404 cannons • 4 x .303 machine guns • 500 lb of bombs
Advantages: • Excellent maneuverability; • Good speed characteristics compared to
mid-war adversaries; • Adequate firepower
Disadvantages: • Short range.
Pilot Notes:
• Supercharger speeds are changed automatically, and no player intervention is required. • Mixture adjustment is also automatic and requires no player input.

Spitfire Mk Vb CW
Type: Fighter Major Users: RAF Cockpit Guide:
1 Airspeed Indicator 11 Oil Temperature 2 Artificial Horizon 12 Coolant Temperature 3 Variometer 13 Fuel Level 4 Altimeter 14 Compass 5 Compass 15 Oxygen Altitude 6 Turn & Bank Indicator 16 Oxygen Supply 7 RPM Indicator 17 Clock 8 Fuel Level Warning Light 18 Landing Gear Indicator Lights 9 Manifold Pressure 19 Elevator Trim Indicator 10 Oil Pressure 20 Internal System Indicator

(Spitfire continued)
At a Glance: Engine:
1 x 45 Power: 1,470 HP
Armament: • 2 x 20mm HS.404 cannons • 4 x .303 machine guns • 500 lb of bombs
Advantages: • Excellent maneuverability; • Good speed characteristics compared to
mid-war adversaries; • Adequate firepower.
Disadvantages: • Short range.
Pilot Notes:
• Supercharger speeds are changed automatically, and no player intervention is required. • Mixture adjustment is also automatic and requires no player input.
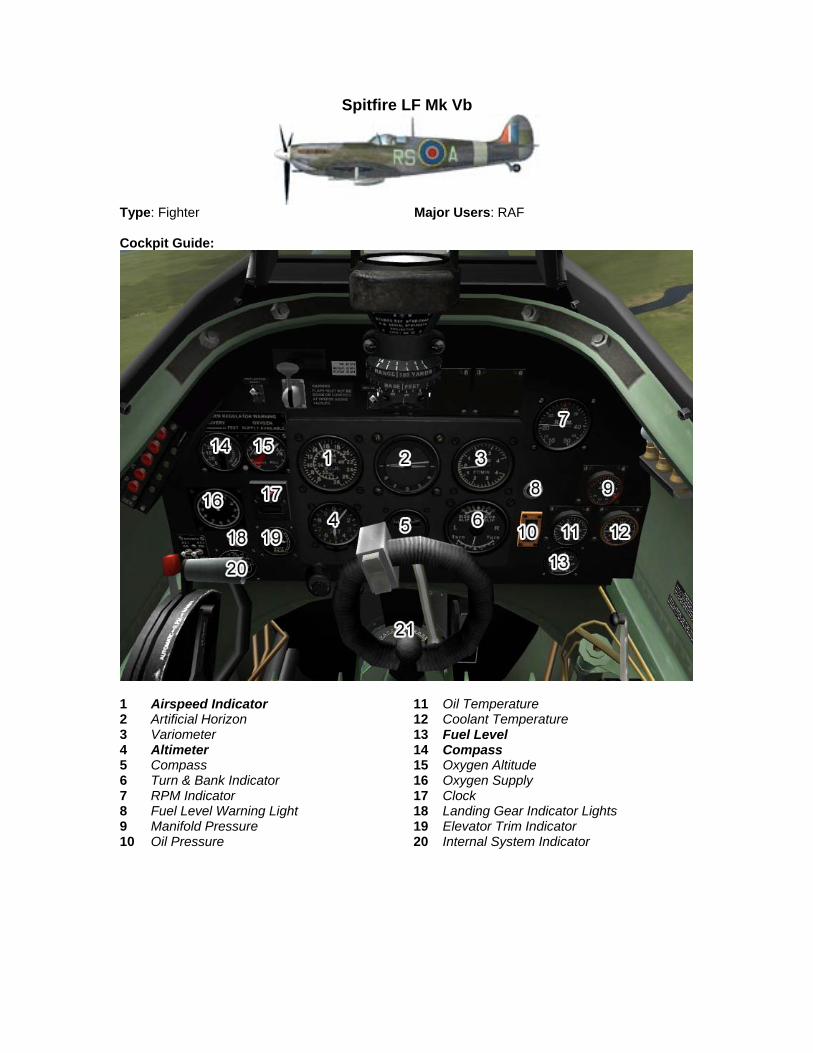
Spitfire LF Mk Vb
Type: Fighter Major Users: RAF Cockpit Guide:
1 Airspeed Indicator 11 Oil Temperature 2 Artificial Horizon 12 Coolant Temperature 3 Variometer 13 Fuel Level 4 Altimeter 14 Compass 5 Compass 15 Oxygen Altitude 6 Turn & Bank Indicator 16 Oxygen Supply 7 RPM Indicator 17 Clock 8 Fuel Level Warning Light 18 Landing Gear Indicator Lights 9 Manifold Pressure 19 Elevator Trim Indicator 10 Oil Pressure 20 Internal System Indicator
(Spitfire continued)
At a Glance: Engine:
1 x 45 Power: 1,470 HP
Armament: • 2 x 20mm HS.404 cannons • 4 x .303 machine guns • 500 lb of bombs
Advantages: • Excellent maneuverability; • Good speed characteristics compared to
mid-war adversaries; • Adequate firepower.
Disadvantages: • Short range.
Pilot Notes:
• Supercharger speeds are changed automatically, and no player intervention is required. • Mixture adjustment is also automatic and requires no player input.

Spitfire LF MK Vb CW
Type: Fighter Major Users: RAF Cockpit Guide:
1 Airspeed Indicator 11 Oil Temperature 2 Artificial Horizon 12 Coolant Temperature 3 Variometer 13 Fuel Level 4 Altimeter 14 Compass 5 Compass 15 Oxygen Altitude 6 Turn & Bank Indicator 16 Oxygen Supply 7 RPM Indicator 17 Clock 8 Fuel Level Warning Light 18 Landing Gear Indicator Lights 9 Manifold Pressure 19 Elevator Trim Indicator 10 Oil Pressure 20 Internal System Indicator

(Spitfire continued)
At a Glance: Engine:
1 x 45 Power: 1,470 HP
Armament: • 2 x 20mm HS.404 cannons • 4 x .303 machine guns • 500 lb of bombs
Advantages: • Excellent maneuverability; • Good speed characteristics compared to
mid-war adversaries; • Adequate firepower.
Disadvantages: • Short range.
Pilot Notes:
• Supercharger speeds are changed automatically, and no player intervention is required. • Mixture adjustment is also automatic and requires no player input.

Spitfire LF Mk Vc (2)
Type: Fighter Major Users: RAF Cockpit Guide:
1 Airspeed Indicator 11 Oil Temperature 2 Artificial Horizon 12 Coolant Temperature 3 Variometer 13 Fuel Level 4 Altimeter 14 Compass 5 Compass 15 Oxygen Altitude 6 Turn & Bank Indicator 16 Oxygen Supply 7 RPM Indicator 17 Clock 8 Fuel Level Warning Light 18 Landing Gear Indicator Lights 9 Manifold Pressure 19 Elevator Trim Indicator 10 Oil Pressure 20 Internal System Indicator
(Spitfire continued)
At a Glance: Engine:
1 x 45 Power: 1,470 HP
Armament: • 2 x 20mm HS.404 cannons • 500 lb of bombs
Advantages: • Excellent maneuverability; • Good speed characteristics compared to
mid-war adversaries; • Tremendous firepower.
Disadvantages: • Short range.
Pilot Notes:
• Supercharger speeds are changed automatically, and no player intervention is required. • Mixture adjustment is also automatic and requires no player input.

Spitfire LF Mk Vc (4)
Type: Fighter Major Users: RAF Cockpit Guide:
1 Airspeed Indicator 11 Oil Temperature 2 Artificial Horizon 12 Coolant Temperature 3 Variometer 13 Fuel Level 4 Altimeter 14 Compass 5 Compass 15 Oxygen Altitude 6 Turn & Bank Indicator 16 Oxygen Supply 7 RPM Indicator 17 Clock 8 Fuel Level Warning Light 18 Landing Gear Indicator Lights 9 Manifold Pressure 19 Elevator Trim Indicator 10 Oil Pressure 20 Internal System Indicator

(Spitfire continued)
At a Glance: Engine:
1 x 45 Power: 1,470 HP
Armament: • 4 x 20mm HS.404 cannons • 500 lb of bombs
Advantages: • Excellent maneuverability; • Good speed characteristics compared to
mid-war adversaries; • Tremendous firepower.
Disadvantages: • Short range.
Pilot Notes:
• Supercharger speeds are changed automatically, and no player intervention is required. • Mixture adjustment is also automatic and requires no player input.

Spitfire Mk VIII
Type: Fighter Major Users: RAF Cockpit Guide:
1 Airspeed Indicator 11 Oil Temperature 2 Artificial Horizon 12 Coolant Temperature 3 Variometer 13 Fuel Level 4 Altimeter 14 Compass 5 Compass 15 Oxygen Altitude 6 Turn & Bank Indicator 16 Oxygen Supply 7 RPM Indicator 17 Landing Gear Indicator Lights 8 Supercharger Warning Light 18 Elevator Trim Indicator 9 Manifold Pressure 19 Internal System Indicator 10 Oil Pressure

(Spitfire continued)
At a Glance: Engine:
1 x 66 Power: 1,720 HP
Armament: • 2 x 20mm HS.404 cannons • 4 x .303 machine guns
Advantages: • Excellent maneuverability; • Good speed characteristics; • Adequate firepower.
Disadvantages: • Short range.
Pilot Notes:
• Supercharger speeds are changed automatically, and no player intervention is required. • Mixture adjustment is also automatic and requires no player input.

Spitfire Mk VIII CW
Type: Fighter Major Users: RAF Cockpit Guide:
1 Airspeed Indicator 11 Oil Temperature 2 Artificial Horizon 12 Coolant Temperature 3 Variometer 13 Fuel Level 4 Altimeter 14 Compass 5 Compass 15 Oxygen Altitude 6 Turn & Bank Indicator 16 Oxygen Supply 7 RPM Indicator 17 Landing Gear Indicator Lights 8 Supercharger Warning Light 18 Elevator Trim Indicator 9 Manifold Pressure 19 Internal System Indicator 10 Oil Pressure

(Spitfire continued)
At a Glance: Engine:
1 x 66 Power: 1,720 HP
Armament: • 2 x 20mm HS.404 cannons • 4 x .303 machine guns
Advantages: • Excellent maneuverability; • Good speed characteristics; • Adequate firepower.
Disadvantages: • Short range.
Pilot Notes:
• Supercharger speeds are changed automatically, and no player intervention is required. • Mixture adjustment is also automatic and requires no player input.

Spitfire Mk IXc
Type: Fighter Major Users: RAF Cockpit Guide:
1 Airspeed Indicator 12 Coolant Temperature 2 Artificial Horizon 13 Fuel Level Warning Light 3 Variometer 14 Fuel Level 4 Altimeter 15 Oxygen Altitude 5 Compass 16 Oxygen Supply 6 Turn & Bank Indicator 17 Clock 7 RPM Indicator 18 Landing Gear Indicator Lights 8 Supercharger Warning Light 19 Elevator Trim Indicator 9 Manifold Pressure 20 Internal System Indicator 10 Oil Pressure 21 Compass 11 Oil Temperature
(Spitfire continued)
At a Glance: Engine:
1 x 61 Power: 1,660 HP
Armament: • 2 x 20mm HS.404 cannons • 4 x .50-cal machine guns
Advantages: • Excellent maneuverability; • Excellent speed characteristics; • Adequate firepower.
Disadvantages: • Short range.
Pilot Notes:
• Supercharger speeds are changed automatically, and no player intervention is required. • Mixture adjustment is also automatic and requires no player input.

Spitfire LF Mk IXc CW
Type: Fighter Major Users: RAF Cockpit Guide:
1 Airspeed Indicator 12 Coolant Temperature 2 Artificial Horizon 13 Fuel Level Warning Light 3 Variometer 14 Fuel Level 4 Altimeter 15 Oxygen Altitude 5 Compass 16 Oxygen Supply 6 Turn & Bank Indicator 17 Clock 7 RPM Indicator 18 Landing Gear Indicator Lights 8 Supercharger Warning Light 19 Elevator Trim Indicator 9 Manifold Pressure 20 Internal System Indicator 10 Oil Pressure 21 Compass 11 Oil Temperature

(Spitfire continued)
At a Glance: Engine:
1 x 61 Power: 1,660 HP
Armament: • 2 x 20mm HS.404 cannons • 4 x .50-cal machine guns
Advantages: • Excellent maneuverability; • Excellent speed characteristics; • Adequate firepower.
Disadvantages: • Short range.
Pilot Notes:
• Supercharger speeds are changed automatically, and no player intervention is required. • Mixture adjustment is also automatic and requires no player input.

Spitfire Mk IXe
Type: Fighter Major Users: RAF Cockpit Guide:
1 Airspeed Indicator 12 Coolant Temperature 2 Artificial Horizon 13 Fuel Level Warning Light 3 Variometer 14 Fuel Level 4 Altimeter 15 Oxygen Altitude 5 Compass 16 Oxygen Supply 6 Turn & Bank Indicator 17 Clock 7 RPM Indicator 18 Landing Gear Indicator Lights 8 Supercharger Warning Light 19 Elevator Trim Indicator 9 Manifold Pressure 20 Internal System Indicator 10 Oil Pressure 21 Compass 11 Oil Temperature

(Spitfire continued)
At a Glance: Engine:
1 x 70 Power: 1,650 HP
Armament: • 2 x 20mm HS.404 cannons • 2 x .50-cal machine guns
Advantages: • Excellent maneuverability; • Excellent speed characteristics.
Disadvantages: • Short range.
Pilot Notes:
• Supercharger speeds are changed automatically, and no player intervention is required. • Mixture adjustment is also automatic and requires no player input.
Spitfire HF Mk IXe
Type: Fighter Major Users: RAF Cockpit Guide:
1 Airspeed Indicator 12 Coolant Temperature 2 Artificial Horizon 13 Fuel Level Warning Light 3 Variometer 14 Fuel Level 4 Altimeter 15 Oxygen Altitude 5 Compass 16 Oxygen Supply 6 Turn & Bank Indicator 17 Clock 7 RPM Indicator 18 Landing Gear Indicator Lights 8 Supercharger Warning Light 19 Elevator Trim Indicator 9 Manifold Pressure 20 Internal System Indicator 10 Oil Pressure 21 Compass 11 Oil Temperature

(Spitfire continued)
At a Glance: Engine:
1 x 70 Power: 1,650 HP
Armament: • 2 x 20mm HS.404 cannons • 2 x .50-cal machine guns
Advantages: • Excellent maneuverability; • Excellent speed characteristics.
Disadvantages: • Short range.
Pilot Notes:
• Supercharger speeds are changed automatically, and no player intervention is required. • Mixture adjustment is also automatic and requires no player input.

Spitfire LF Mk IXe CW
Type: Fighter Major Users: RAF Cockpit Guide:
1 Airspeed Indicator 12 Coolant Temperature 2 Artificial Horizon 13 Fuel Level Warning Light 3 Variometer 14 Fuel Level 4 Altimeter 15 Oxygen Altitude 5 Compass 16 Oxygen Supply 6 Turn & Bank Indicator 17 Clock 7 RPM Indicator 18 Landing Gear Indicator Lights 8 Supercharger Warning Light 19 Elevator Trim Indicator 9 Manifold Pressure 20 Internal System Indicator 10 Oil Pressure 21 Compass 11 Oil Temperature

(Spitfire continued)
At a Glance: Engine:
1 x 70 Power: 1,650 HP
Armament: • 2 x 20mm HS.404 cannons • 2 x .50-cal machine guns
Advantages: • Excellent maneuverability; • Excellent speed characteristics.
Disadvantages: • Short range.
Pilot Notes:
• Supercharger speeds are changed automatically, and no player intervention is required. • Mixture adjustment is also automatic and requires no player input.
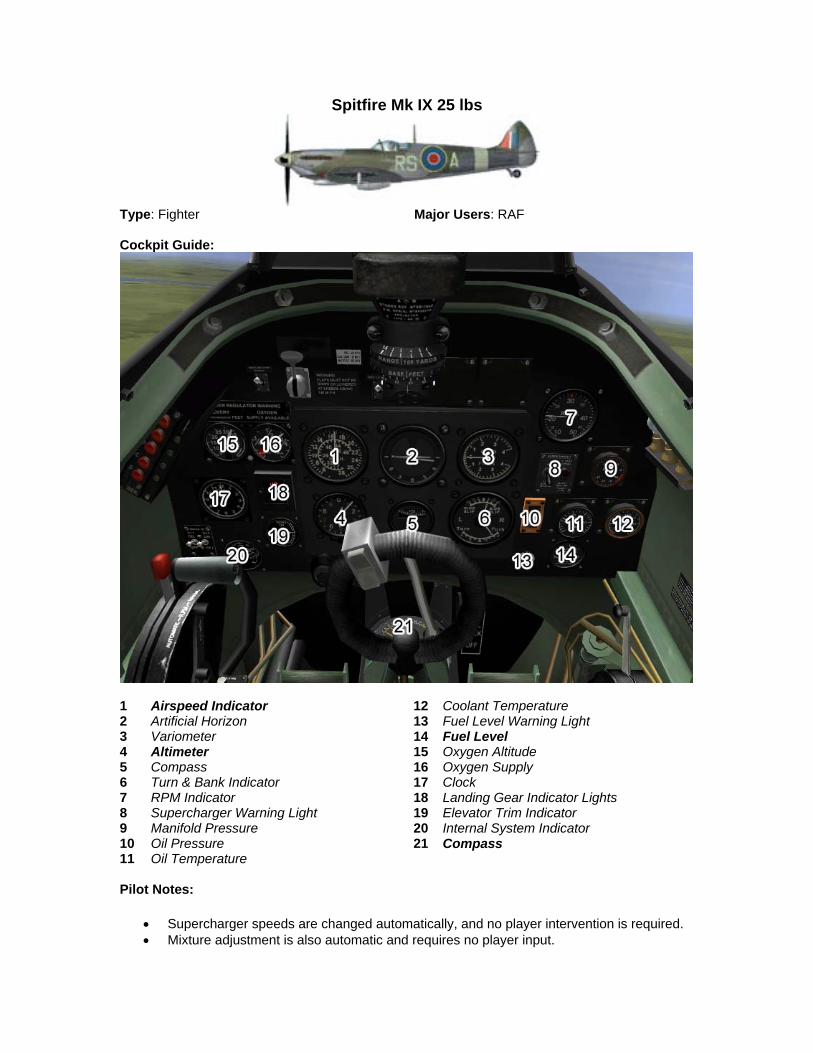
Spitfire Mk IX 25 lbs
Type: Fighter Major Users: RAF Cockpit Guide:
1 Airspeed Indicator 12 Coolant Temperature 2 Artificial Horizon 13 Fuel Level Warning Light 3 Variometer 14 Fuel Level 4 Altimeter 15 Oxygen Altitude 5 Compass 16 Oxygen Supply 6 Turn & Bank Indicator 17 Clock 7 RPM Indicator 18 Landing Gear Indicator Lights 8 Supercharger Warning Light 19 Elevator Trim Indicator 9 Manifold Pressure 20 Internal System Indicator 10 Oil Pressure 21 Compass 11 Oil Temperature Pilot Notes:
• Supercharger speeds are changed automatically, and no player intervention is required. • Mixture adjustment is also automatic and requires no player input.

Seafire F MK III
Type: Carrier-Borne Fighter Major Users: Royal Navy Cockpit Guide:
1 Airspeed Indicator 12 Coolant Temperature 2 Artificial Horizon 13 Fuel Level 3 Variometer 14 Oxygen Altitude 4 Altimeter 15 Oxygen Supply 5 Compass 16 Clock 6 Turn & Bank Indicator 17 Landing Gear Indicator Lights 7 RPM Indicator 18 Arresting Hook Indicator Light 8 Fuel Level Warning Light 19 Elevator Trim Indicator 9 Manifold Pressure 20 Internal System Indicator 10 Oil Pressure 21 Compass 11 Oil Temperature
(Seafire continued)
At a Glance: Engine: 1 x 55 Power: 1,470 HP
Armament: • 2 x 20mm cannon • 4 x .30 cal MG
Advantages: • Excellent maneuverability; • Well-armed.
Disadvantages: • Poor ground handling • Inadequate visibility while taxiing; • Short range.
Pilot Notes:
• Supercharger speeds are changed automatically, and no player intervention is required. • Mixture adjustment is also automatic and requires no player input.
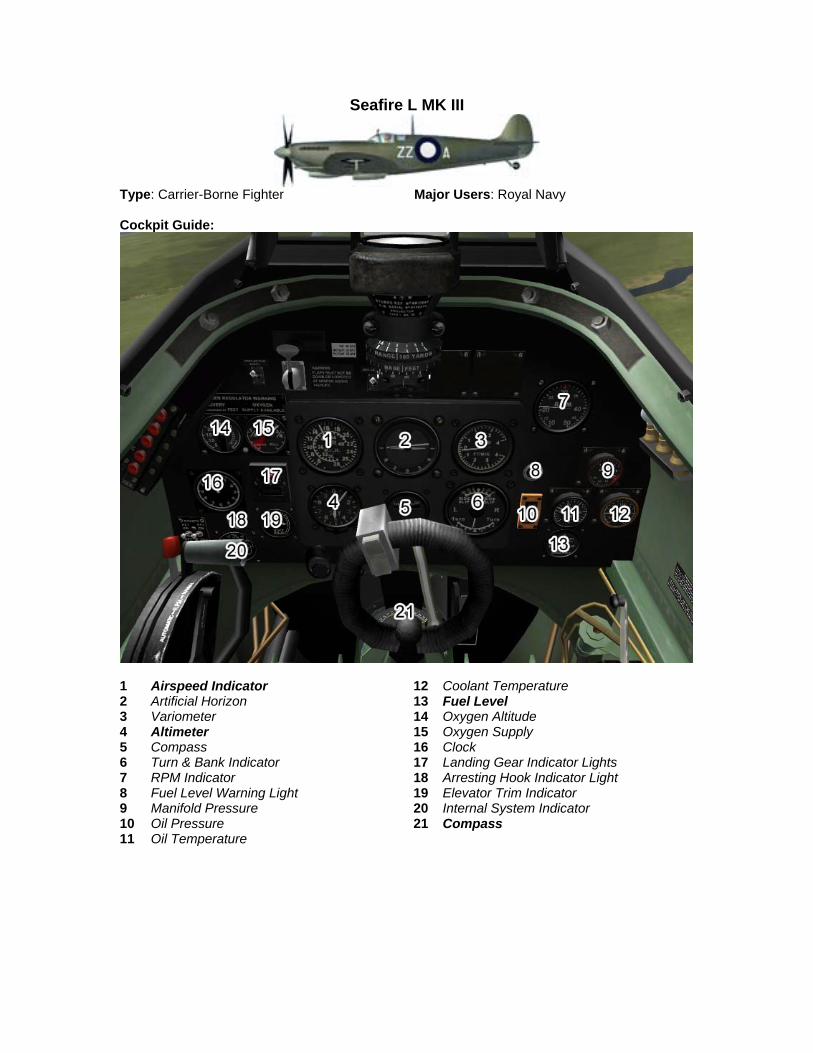
Seafire L MK III
Type: Carrier-Borne Fighter Major Users: Royal Navy Cockpit Guide:
1 Airspeed Indicator 12 Coolant Temperature 2 Artificial Horizon 13 Fuel Level 3 Variometer 14 Oxygen Altitude 4 Altimeter 15 Oxygen Supply 5 Compass 16 Clock 6 Turn & Bank Indicator 17 Landing Gear Indicator Lights 7 RPM Indicator 18 Arresting Hook Indicator Light 8 Fuel Level Warning Light 19 Elevator Trim Indicator 9 Manifold Pressure 20 Internal System Indicator 10 Oil Pressure 21 Compass 11 Oil Temperature

(Seafire continued)
At a Glance: Engine: 1 x 55 Power: 1,470 HP
Armament: • 2 x 20mm cannon • 4 x .30 cal MG
Advantages: • Excellent maneuverability; • Well-armed.
Disadvantages: • Poor ground handling • Inadequate visibility while taxiing; • Short range.
Pilot Notes:
• Supercharger speeds are changed automatically, and no player intervention is required. • Mixture adjustment is also automatic and requires no player input.

TB-3 4M-17
Type: Heavy Bomber Major Users: USSR Cockpit Guide:
1 Pilot’s Direction Indicator 12 RPM Indicator (Engine #4) 2 Artificial Horizon 13 Artificial Horizon 3 Airspeed Indicator 14 Pilot’s Direction Indicator 4 Turn & Bank Indicator 15 Altimeter 5 Variometer 16 Turn & Bank Indicator 6 Altimeter 17 Airspeed Indicator 7 Clock 18 Compass 8 Compass 19 Oxygen Gauges 9 RPM Indicator (Engine #1) 20 Oxygen Apparatus 10 RPM Indicator (Engine #2) 21 Oxygen Apparatus 11 RPM Indicator (Engine #3)
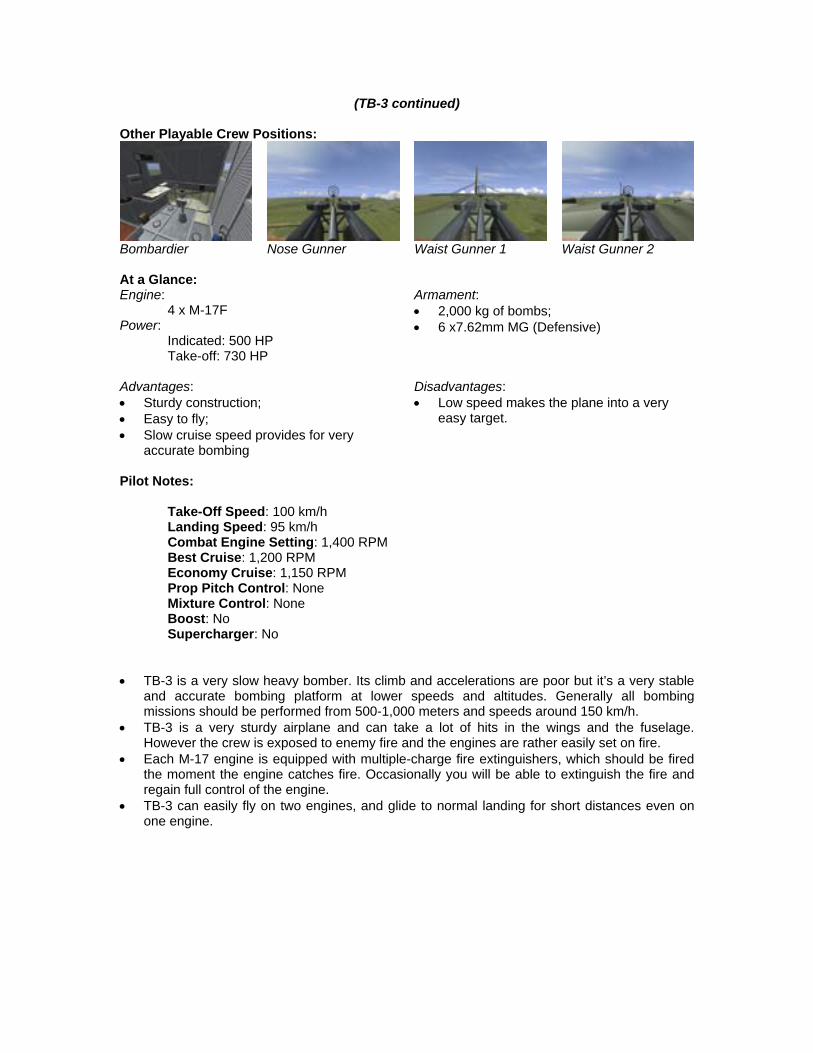
(TB-3 continued)
Other Playable Crew Positions:
Bombardier Nose Gunner Waist Gunner 1 Waist Gunner 2 At a Glance: Engine: 4 x M-17F Power:
Indicated: 500 HP Take-off: 730 HP
Armament: • 2,000 kg of bombs; • 6 x7.62mm MG (Defensive)
Advantages: • Sturdy construction; • Easy to fly; • Slow cruise speed provides for very
accurate bombing
Disadvantages: • Low speed makes the plane into a very
easy target.
Pilot Notes:
Take-Off Speed: 100 km/h Landing Speed: 95 km/h Combat Engine Setting: 1,400 RPM Best Cruise: 1,200 RPM Economy Cruise: 1,150 RPM Prop Pitch Control: None Mixture Control: None Boost: No Supercharger: No
• TB-3 is a very slow heavy bomber. Its climb and accelerations are poor but it’s a very stable and accurate bombing platform at lower speeds and altitudes. Generally all bombing missions should be performed from 500-1,000 meters and speeds around 150 km/h.
• TB-3 is a very sturdy airplane and can take a lot of hits in the wings and the fuselage. However the crew is exposed to enemy fire and the engines are rather easily set on fire.
• Each M-17 engine is equipped with multiple-charge fire extinguishers, which should be fired the moment the engine catches fire. Occasionally you will be able to extinguish the fire and regain full control of the engine.
• TB-3 can easily fly on two engines, and glide to normal landing for short distances even on one engine.

(TB-3 continued)
Using the Level Sight:
• The level bomb sight will automatically calculate the bomb trajectory and impact point based on the aircraft’s current airspeed and altitude. The bombardier must enter these parameters into the sight manually, and point it at the target. Once the target passes under the crosshairs, the bombardier must drop the bombs manually.
• As the first step, bombing altitude and aircraft speed must be entered into the bombsight. The actual altitude above target (not above sea level) can be entered using the Increase Bombsight Altitude and Decrease Bombsight Altitude keys. The plane speed is entered using the Increase Bombsight Velocity and Decrease Bombsight Velocity keys. Note that the true (not indicated) airspeed must be set. It can be obtained from the speed gauge when in No-Cockpit View mode.
• After the initial parameters are entered, the bomb sight will point towards the projected impact point for the currently entered altitude / airspeed parameters. Tap the Toggle Gunsight key (Shift-F1 by default) to look through the optics.
• The intersection of the central vertical line and the horizontal curved line form a crosshair. The bombardier must release the bombs manually when the target is under this intersection.
• Once you see your target pass under the intersecting lines, press the Weapon 4 button to drop your bombs.

TB-3 4M-34R
Type: Heavy Bomber Major Users: USSR Cockpit Guide:
1 Pilot’s Direction Indicator 12 RPM Indicator (Engine #4) 2 Artificial Horizon 13 Artificial Horizon 3 Airspeed Indicator 14 Pilot’s Direction Indicator 4 Turn & Bank Indicator 15 Altimeter 5 Variometer 16 Turn & Bank Indicator 6 Altimeter 17 Airspeed Indicator 7 Clock 18 Compass 8 Compass 19 Oxygen Gauges 9 RPM Indicator (Engine #1) 20 Oxygen Apparatus 10 RPM Indicator (Engine #2) 21 Oxygen Apparatus 11 RPM Indicator (Engine #3)
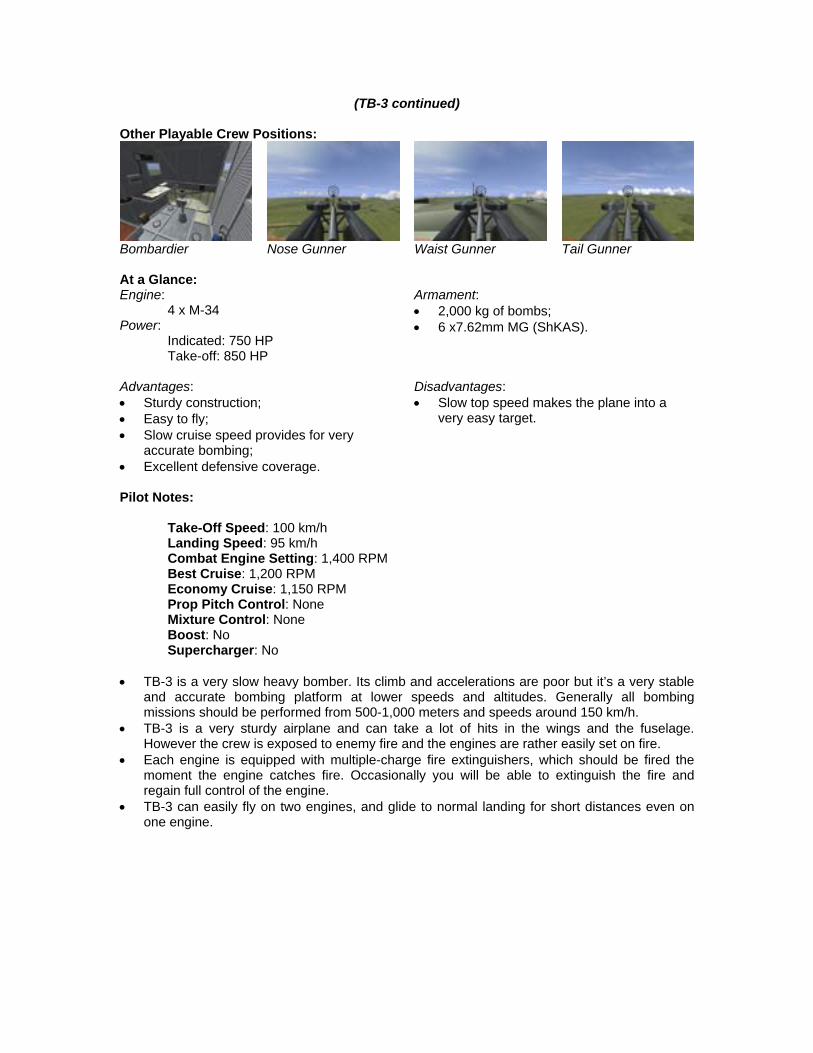
(TB-3 continued)
Other Playable Crew Positions:
Bombardier Nose Gunner Waist Gunner Tail Gunner At a Glance: Engine: 4 x M-34 Power:
Indicated: 750 HP Take-off: 850 HP
Armament: • 2,000 kg of bombs; • 6 x7.62mm MG (ShKAS).
Advantages: • Sturdy construction; • Easy to fly; • Slow cruise speed provides for very
accurate bombing; • Excellent defensive coverage.
Disadvantages: • Slow top speed makes the plane into a
very easy target.
Pilot Notes:
Take-Off Speed: 100 km/h Landing Speed: 95 km/h Combat Engine Setting: 1,400 RPM Best Cruise: 1,200 RPM Economy Cruise: 1,150 RPM Prop Pitch Control: None Mixture Control: None Boost: No Supercharger: No
• TB-3 is a very slow heavy bomber. Its climb and accelerations are poor but it’s a very stable and accurate bombing platform at lower speeds and altitudes. Generally all bombing missions should be performed from 500-1,000 meters and speeds around 150 km/h.
• TB-3 is a very sturdy airplane and can take a lot of hits in the wings and the fuselage. However the crew is exposed to enemy fire and the engines are rather easily set on fire.
• Each engine is equipped with multiple-charge fire extinguishers, which should be fired the moment the engine catches fire. Occasionally you will be able to extinguish the fire and regain full control of the engine.
• TB-3 can easily fly on two engines, and glide to normal landing for short distances even on one engine.

(TB-3 continued)
Using the Level Sight:
• The level bomb sight will automatically calculate the bomb trajectory and impact point based on the aircraft’s current airspeed and altitude. The bombardier must enter these parameters into the sight manually, and point it at the target. Once the target passes under the crosshairs, the bombardier must drop the bombs manually.
• As the first step, bombing altitude and aircraft speed must be entered into the bombsight. The actual altitude above target (not above sea level) can be entered using the Increase Bombsight Altitude and Decrease Bombsight Altitude keys. The plane speed is entered using the Increase Bombsight Velocity and Decrease Bombsight Velocity keys. Note that the true (not indicated) airspeed must be set. It can be obtained from the speed gauge when in No-Cockpit View mode.
• After the initial parameters are entered, the bomb sight will point towards the projected impact point for the currently entered altitude / airspeed parameters. Tap the Toggle Gunsight key (Shift-F1 by default) to look through the optics.
• The intersection of the central vertical line and the horizontal curved line form a crosshair. The bombardier must release the bombs manually when the target is under this intersection.
• Once you see your target pass under the intersecting lines, press the Weapon 4 button to drop your bombs.
•
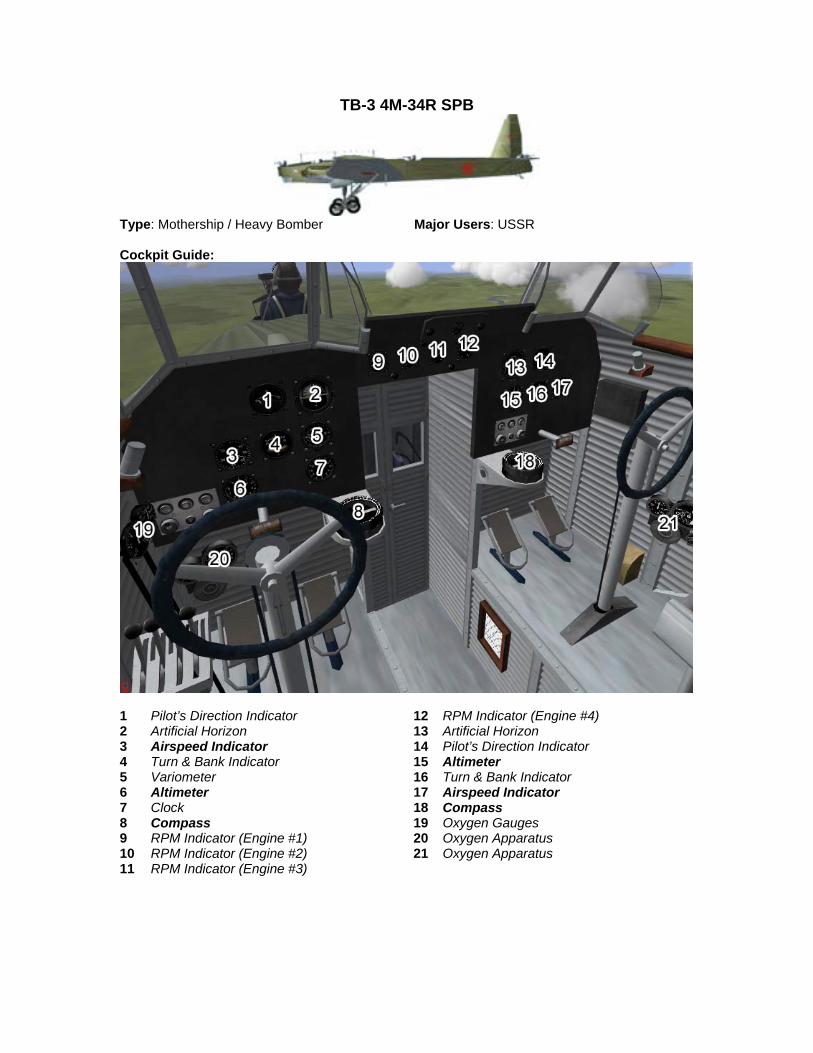
TB-3 4M-34R SPB
Type: Mothership / Heavy Bomber Major Users: USSR Cockpit Guide:
1 Pilot’s Direction Indicator 12 RPM Indicator (Engine #4) 2 Artificial Horizon 13 Artificial Horizon 3 Airspeed Indicator 14 Pilot’s Direction Indicator 4 Turn & Bank Indicator 15 Altimeter 5 Variometer 16 Turn & Bank Indicator 6 Altimeter 17 Airspeed Indicator 7 Clock 18 Compass 8 Compass 19 Oxygen Gauges 9 RPM Indicator (Engine #1) 20 Oxygen Apparatus 10 RPM Indicator (Engine #2) 21 Oxygen Apparatus 11 RPM Indicator (Engine #3)

(TB-3 continued)
Other Playable Crew Positions:
Bombardier Nose Gunner Waist Gunner Tail Gunner At a Glance: Engine: 4 x M-34 Power:
Indicated: 750 HP Take-off: 850 HP
Armament: • 2,000 kg of bombs; • 6 x7.62mm MG (ShKAS).
Advantages: • Sturdy construction; • Easy to fly; • Slow cruise speed provides for very
accurate bombing; • Excellent defensive coverage.
Disadvantages: • Slow top speed makes the plane into a
very easy target.
Using the SPB • The SPB consists of the TB-3 mothership and a pair of attached I-16s. There are special
versions of these, TB-3 4M-34R SPB and I-16type24 SPB. • When building a mission, you can attach the I-16 to the mothership the same way you attach
gliders to planes – set up a flight of I-16s with one waypoint, and set the waypoint’s target to the TB-3 (go to the Waypoint tab of the Object window with your I-16 selected, hit the Set button and click on the TB-3). The I-16 will be attached to the TB-3 in the beginning of the mission. You cannot build missions where I-16s start detached from the TB-3 and attach afterwards.
• AI flying these I-16s will automatically detach when the TB-3 approaches a GATTACK waypoint. The I-16s then will attack the site and return to escort the TB-3 back. You may use the “Aircraft Attach/Detach” button when flying these planes to detach from the TB-3, or drop the I-16s if you’re flying the TB-3.
• In dogfight mode, you may attach your I-16 to the TB-3 mothership while on the airfield. To do so, taxi the plane to the attachment port under the TB-3’s wing, and press the “Aircraft Attach/Detach” button. Your plane will be attached to the mothership and your landing gear will be raised automatically.
• Note that while attached to a TB-3, I-16s drain the mothership’s fuel reserve, and if their engines are left at low RPM their fuel tanks will slowly refill to 100%.
In all other respects the TB-3 4M-34R Pilot Notes should be used.

Tempest Mk V
Type: Fighter Major Users: RAF Cockpit Guide:
1 Airspeed Indicator 11 Brake Pressure 2 Artificial Horizon 12 RPM Indicator 3 Variometer 13 Manifold Pressure 4 Altimeter 14 Fuel Level (Nose) 5 Compass 15 Fuel Level (Main) 6 Turn & Bank Indicator 16 Fuel Level (Wings) 7 Landing Gear Indicator Lights 17 Oil Pressure 8 Clock 18 Oil Temperature 9 Oxygen Altitude 19 Coolant Temperature 10 Oxygen Supply 20 Compass
At a Glance: Engine:
1 x IIB Power: 2,400 HP
Armament: • 4 x 20mm Mark II cannons • 1,000 lb of bombs • 8 x 3 in rockets

Yak-1
Type: Fighter Major Users: USSR Cockpit Guide:
1 Altimeter 9 Coolant Temperature 2 Compass 10 Voltmeter 3 Manifold Pressure 11 Magneto 4 Airspeed Indicator 12 Landing Gear Lever 5 Turn & Bank Indicator 13 Gun Heat Indicator 6 RPM Indicator 14 Ammeter 7 Clock 15 Landing Gear Indicator Lights 8 Oil Temp & Pressure; Fuel Pressure

(Yak-1 continued)
At a Glance: Engine: M-105P Power: 1,050 HP
Armament: • 1 x 7.62mm MG (ShKAS) • 1 x 20mm cannon (ShVAK) • 6 x RS-82 rockets
Advantages: • Excellent flight performance for 1940; • Good maneuverability; • Good armament; • Easy to fly.
Disadvantages: • Defects and imperfections during large-
scale production.
Pilot Notes:
Take-Off Speed: 165 km/h Landing Speed: 155 km/h Combat Engine Setting: 2,800 RPM Best Cruise: 2,300 RPM Economy Cruise: 2,150 RPM Prop Pitch Control: Manual Mixture Control: Manual Boost: No Supercharger: Two-Speed
• Yak-1 is inferior to contemporary German fighters in the vertical and superior in horizontal combat. In capable hands it can win a fight against almost any opponent.
• The key to winning aerial combat with the Yak is to get the German fighter to slow down and commit to a turning fight or rolling scissors. These fights are Yak’s strong point and Germans will usually lose. In vertical combat Yak can still fend for itself but a victory is much easier achieved in the horizontal. Yak is a stable gunnery platform with armament sufficient to bring down any target at ranges under 300 meters.
• Supercharger speeds need to be switched at around 2,000 meters. Best performance altitude is between 500 and 3,000 meters. Worst performance above 4,000 meters

Yak-1B
Type: Fighter Major Users: USSR Cockpit Guide:
1 Altimeter 9 Coolant Temperature 2 Compass 10 Voltmeter 3 Manifold Pressure 11 Magneto 4 Airspeed Indicator 12 Landing Gear Lever 5 Turn & Bank Indicator 13 Gun Heat Indicator 6 RPM Indicator 14 Ammeter 7 Clock 15 Landing Gear Indicator Lights 8 Oil Temp & Pressure; Fuel Pressure

(Yak-1 continued)
At a Glance: Engine: M-105PF Power: 1,180 HP
Armament: • 1 x 12.7mm MG (UBS) • 1 x 20mm cannon (ShVAK)
Advantages: • Excellent flight performance; • Good cockpit visibility; • Night flying possible without specialized
equipment; • Good maneuverability; • Strong armament; • Easy to fly.
Disadvantages: • Defects and imperfections during large-
scale production.
Pilot Notes:
Take-Off Speed: 165 km/h Landing Speed: 155 km/h Combat Engine Setting: 2,800 RPM Best Cruise: 2,300 RPM Economy Cruise: 2,150 RPM Prop Pitch Control: Manual Mixture Control: Manual Boost: No Supercharger: Two-Speed
• Yak-1 is inferior to contemporary German fighters in the vertical and superior in horizontal combat. In capable hands it can win a fight against almost any opponent.
• The key to winning aerial combat with the Yak is to get the German fighter to slow down and commit to a turning fight or rolling scissors. These fights are Yak’s strong point and Germans will usually lose. In vertical combat Yak can still fend for itself but a victory is much easier achieved in the horizontal. Yak is a stable gunnery platform with armament sufficient to bring down any target at ranges under 300 meters.
• Supercharger speeds need to be switched at around 2,000 meters. Best performance altitude is between 500 and 3,000 meters. Worst performance above 4,000 meters
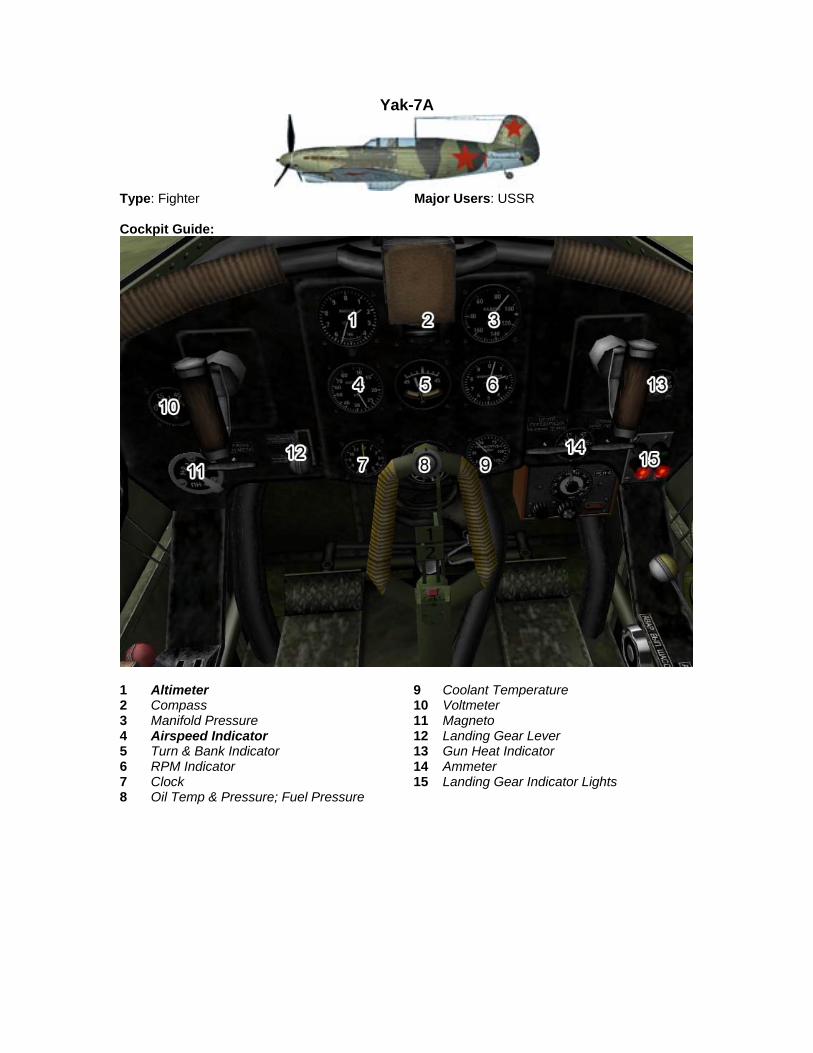
Yak-7A
Type: Fighter Major Users: USSR Cockpit Guide:
1 Altimeter 9 Coolant Temperature 2 Compass 10 Voltmeter 3 Manifold Pressure 11 Magneto 4 Airspeed Indicator 12 Landing Gear Lever 5 Turn & Bank Indicator 13 Gun Heat Indicator 6 RPM Indicator 14 Ammeter 7 Clock 15 Landing Gear Indicator Lights 8 Oil Temp & Pressure; Fuel Pressure

(Yak-7 continued)
At a Glance: Engine: M-105P. Power: 1,050 HP
Armament: • 2 x 7.62 mm MG (ShKAS); • 1 x 20 mm cannon (ShVAK).
Advantages: • Excellent performance characteristics; • Good maneuverability; • Strong armament; • Increased aircraft durability; • Easy to fly.
Disadvantages: • Defects and imperfections during large-
scale production.
Pilot Notes:
Take-Off Speed: 165 km/h Landing Speed: 155 km/h Combat Engine Setting: 2,800 RPM Best Cruise: 2,300 RPM Economy Cruise: 2,150 RPM Prop Pitch Control: Manual Mixture Control: Manual Boost: No Supercharger: Two-Speed
• Yak-7 is inferior to contemporary German fighters in the vertical and superior in horizontal combat. In capable hands it can win a fight against almost any opponent.
• The key to winning aerial combat with the Yak is to get the German fighter to slow down and commit to a turning fight or rolling scissors. These fights are Yak’s strong point and Germans will usually lose. In vertical combat Yak can still fend for itself but a victory is much easier achieved in the horizontal. Yak is a stable gunnery platform with armament sufficient to bring down any target at ranges under 300 meters.
• Supercharger speeds need to be switched at around 2,000 meters. Best performance altitude is between 500 and 3,000 meters. Worst performance above 4,000 meters

Yak-7B 1941
Type: Fighter Major Users: USSR Cockpit Guide:
1 Altimeter 9 Coolant Temperature 2 Compass 10 Voltmeter 3 Manifold Pressure 11 Magneto 4 Airspeed Indicator 12 Landing Gear Lever 5 Turn & Bank Indicator 13 Gun Heat Indicator 6 RPM Indicator 14 Ammeter 7 Clock 15 Landing Gear Indicator Lights 8 Oil Temp & Pressure; Fuel Pressure

(Yak-7 continued)
At a Glance: Engine: M-105P. Power: 1,050 HP
Armament: • 2 x 7.62 mm MG (ShKAS); • 1 x 20 mm cannon (ShVAK).
Advantages: • Excellent performance characteristics; • Good maneuverability; • Strong armament; • Increased aircraft durability; • Easy to fly.
Disadvantages: • Defects and imperfections during large-
scale production.
Pilot Notes:
Take-Off Speed: 165 km/h Landing Speed: 155 km/h Combat Engine Setting: 2,800 RPM Best Cruise: 2,300 RPM Economy Cruise: 2,150 RPM Prop Pitch Control: Manual Mixture Control: Manual Boost: No Supercharger: Two-Speed
• Yak-7 is inferior to contemporary German fighters in the vertical and superior in horizontal combat. In capable hands it can win a fight against almost any opponent.
• The key to winning aerial combat with the Yak is to get the German fighter to slow down and commit to a turning fight or rolling scissors. These fights are Yak’s strong point and Germans will usually lose. In vertical combat Yak can still fend for itself but a victory is much easier achieved in the horizontal. Yak is a stable gunnery platform with armament sufficient to bring down any target at ranges under 300 meters.
• Supercharger speeds need to be switched at around 2,000 meters. Best performance altitude is between 500 and 3,000 meters. Worst performance above 4,000 meters

Yak-7B 1942
Type: Fighter Major Users: USSR Cockpit Guide:
1 Altimeter 9 Coolant Temperature 2 Compass 10 Voltmeter 3 Manifold Pressure 11 Magneto 4 Airspeed Indicator 12 Landing Gear Lever 5 Turn & Bank Indicator 13 Gun Heat Indicator 6 RPM Indicator 14 Ammeter 7 Clock 15 Landing Gear Indicator Lights 8 Oil Temp & Pressure; Fuel Pressure

(Yak-7 continued)
At a Glance: Engine: M-105P. Power: 1,050 HP
Armament: • 2 x 7.62 mm MG (ShKAS); • 1 x 20 mm cannon (ShVAK).
Advantages: • Excellent performance characteristics; • Good maneuverability; • Strong armament; • Increased aircraft durability; • Easy to fly.
Disadvantages: • Defects and imperfections during large-
scale production.
Pilot Notes:
Take-Off Speed: 165 km/h Landing Speed: 155 km/h Combat Engine Setting: 2,800 RPM Best Cruise: 2,300 RPM Economy Cruise: 2,150 RPM Prop Pitch Control: Manual Mixture Control: Manual Boost: No Supercharger: Two-Speed
• Yak-7 is inferior to contemporary German fighters in the vertical and superior in horizontal combat. In capable hands it can win a fight against almost any opponent.
• The key to winning aerial combat with the Yak is to get the German fighter to slow down and commit to a turning fight or rolling scissors. These fights are Yak’s strong point and Germans will usually lose. In vertical combat Yak can still fend for itself but a victory is much easier achieved in the horizontal. Yak is a stable gunnery platform with armament sufficient to bring down any target at ranges under 300 meters.
• Supercharger speeds need to be switched at around 2,000 meters. Best performance altitude is between 500 and 3,000 meters. Worst performance above 4,000 meters

Yak-9
Type: Fighter Major Users: USSR Cockpit Guide:
1 Altimeter 9 Oil Temp & Pressure; Fuel Pressure 2 Compass 10 Oxygen Apparatus 3 Clock 11 Armament Status Lights 4 Airspeed Indicator 12 Landing Gear Indicator Lights 5 Turn & Bank Indicator 13 Coolant Temperature 6 Variometer 14 Voltmeter 7 Manifold Pressure 15 Radio 8 RPM Indicator

(Yak-9 continued)
At a Glance: Engine: M-105PF Power: 1,180 HP
Armament: • 1 x 7.62mm MG (ShKAS) • 1 x 20mm cannon (ShVAK)
Advantages: • Excellent performance characteristics; • Good maneuverability; • Strong armament; • Increased aircraft durability; • Easy to fly.
Disadvantages: • Defects and imperfections during large-
scale production.
Pilot Notes:
Take-Off Speed: 165 km/h Landing Speed: 155 km/h Combat Engine Setting: 2,800 RPM Best Cruise: 2,300 RPM Economy Cruise: 2,150 RPM Prop Pitch Control: Manual Mixture Control: Manual Boost: No Supercharger: Two-Speed
• 1943 and later Yak fighters are excellent dogfighters with great all-around performance. Can be used both as an energy or angles fighter against BF-109s up to G6, and all FW-190A and F. Best used as angles fighter against later 109s, FW-190D and Me-262.
• Very stable gun platform. Best results can be achieved at ranges under 200 meters by aiming at enemy engine and/or cockpit area.
• Yak will not easily stall at slow speeds and will usually not enter a high-speed stall unless flown improperly.
• Supercharger speeds need to be switched at around 2,000 meters. Best performance altitude is between 500 and 2,800 meters.
• Worst performance above 4,500 meters

Yak-9B
Type: Fighter-Bomber Major Users: USSR Cockpit Guide:
1 Altimeter 9 Oil Temp & Pressure; Fuel Pressure 2 Compass 10 Oxygen Apparatus 3 Clock 11 Armament Status Lights 4 Airspeed Indicator 12 Landing Gear Indicator Lights 5 Turn & Bank Indicator 13 Coolant Temperature 6 Variometer 14 Voltmeter 7 Manifold Pressure 15 Radio 8 RPM Indicator

(Yak-9 continued)
At a Glance: Engine: VK-105PF Power: 1,180 HP
Armament: • 1 x 12.7mm MG (UBS) • 1 x 20mm cannon (ShVAK) • Up to 400 kg of bombs
Advantages: • Excellent performance characteristics; • Good maneuverability; • Strong armament; • Increased aircraft durability; • Easy to fly.
Disadvantages: • Defects and imperfections during large-
scale production.
Pilot Notes:
Take-Off Speed: 165 km/h Landing Speed: 155 km/h Combat Engine Setting: 2,800 RPM Best Cruise: 2,300 RPM Economy Cruise: 2,150 RPM Prop Pitch Control: Manual Mixture Control: Manual Boost: No Supercharger: Two-Speed
• 1943 and later Yak fighters are excellent dogfighters with great all-around performance. Can be used both as an energy or angles fighter against BF-109s up to G6, and all FW-190A and F. Best used as angles fighter against later 109s, FW-190D and Me-262.
• Very stable gun platform. Best results can be achieved at ranges under 200 meters by aiming at enemy engine and/or cockpit area.
• Yak will not easily stall at slow speeds and will usually not enter a high-speed stall unless flown improperly.
• Supercharger speeds need to be switched at around 2,000 meters. Best performance altitude is between 500 and 2,800 meters.
• Worst performance above 4,500 meters

Yak-9D
Type: Fighter Major Users: USSR Cockpit Guide:
1 Altimeter 9 Oil Temp & Pressure; Fuel Pressure 2 Compass 10 Oxygen Apparatus 3 Clock 11 Armament Status Lights 4 Airspeed Indicator 12 Landing Gear Indicator Lights 5 Turn & Bank Indicator 13 Coolant Temperature 6 Variometer 14 Voltmeter 7 Manifold Pressure 15 Radio 8 RPM Indicator
(Yak-9 continued)
At a Glance: Engine: M-105PF Power: 1,180 HP
Armament: • 1 x 12.7mm MG (UBS) • 1 x 20mm cannon (ShVAK)
Advantages: • Excellent performance characteristics; • Good maneuverability; • Strong armament; • Increased aircraft durability; • Easy to fly.
Disadvantages: • Defects and imperfections during large-
scale production.
Pilot Notes:
Take-Off Speed: 165 km/h Landing Speed: 155 km/h Combat Engine Setting: 2,800 RPM Best Cruise: 2,300 RPM Economy Cruise: 2,150 RPM Prop Pitch Control: Manual Mixture Control: Manual Boost: No Supercharger: Two-Speed
• 1943 and later Yak fighters are excellent dogfighters with great all-around performance. Can be used both as an energy or angles fighter against BF-109s up to G6, and all FW-190A and F. Best used as angles fighter against later 109s, FW-190D and Me-262.
• Very stable gun platform. Best results can be achieved at ranges under 200 meters by aiming at enemy engine and/or cockpit area.
• Yak will not easily stall at slow speeds and will usually not enter a high-speed stall unless flown improperly.
• Supercharger speeds need to be switched at around 2,000 meters. Best performance altitude is between 500 and 2,800 meters.
• Worst performance above 4,500 meters

Yak-9K
Type: Fighter Major Users: USSR Cockpit Guide:
1 Altimeter 9 Oil Temp & Pressure; Fuel Pressure 2 Compass 10 Oxygen Apparatus 3 Clock 11 Armament Status Lights 4 Airspeed Indicator 12 Landing Gear Indicator Lights 5 Turn & Bank Indicator 13 Coolant Temperature 6 Variometer 14 Voltmeter 7 Manifold Pressure 15 Radio 8 RPM Indicator

(Yak-9 continued)
At a Glance: Engine:
VK-105PF. Power: 1,180 HP
Armament: • 1 x 12.7 mm MG (UBS); • 1 x 45 mm cannon (NS).
Advantages: • Excellent performance characteristics; • Good maneuverability. • Devastating armament; • Very durable; • Easy to fly.
Disadvantages: • Heavy recoil makes for a very unstable gun
platform.
Pilot Notes:
Take-Off Speed: 165 km/h Landing Speed: 155 km/h Combat Engine Setting: 2,800 RPM Best Cruise: 2,300 RPM Economy Cruise: 2,150 RPM Prop Pitch Control: Manual Mixture Control: Manual Boost: No Supercharger: Two-Speed
• This is an experimental anti-tank version of the Yak-9. The 45mm cannon was mostly intended to pierce the thin top armor of enemy tanks. However it can be more than adequate against enemy aircraft, as long as the first round fired is sure to hit its target.
• For aerial hawk-eyes, the 45mm cannon is effective at ranges over 1 km. • Yak will not easily stall at slow speeds and will usually not enter a high-speed stall unless
flown improperly. • Supercharger speeds need to be switched at around 2,000 meters. Best performance altitude
is between 500 and 2,800 meters. • Worst performance above 4,500 meters

Yak-9M
Type: Fighter Major Users: USSR Cockpit Guide:
1 Altimeter 9 Oil Temp & Pressure; Fuel Pressure 2 Compass 10 Oxygen Apparatus 3 Clock 11 Armament Status Lights 4 Airspeed Indicator 12 Landing Gear Indicator Lights 5 Turn & Bank Indicator 13 Coolant Temperature 6 Variometer 14 Voltmeter 7 Manifold Pressure 15 Radio 8 RPM Indicator

(Yak-9 continued)
At a Glance: Engine: VK-105PF Power: 1,180 HP
Armament: • 1 x 12.7mm MG (UBS) • 1 x 20mm cannon (ShVAK)
Advantages: • Excellent performance characteristics; • Good maneuverability; • Strong armament; • Increased aircraft durability; • Easy to fly.
Disadvantages: • Defects and imperfections during large-
scale production.
Pilot Notes:
Take-Off Speed: 165 km/h Landing Speed: 155 km/h Combat Engine Setting: 2,800 RPM Best Cruise: 2,300 RPM Economy Cruise: 2,150 RPM Prop Pitch Control: Manual Mixture Control: Manual Boost: No Supercharger: Two-Speed
• 1943 and later Yak fighters are excellent dogfighters with great all-around performance. Can be used both as an energy or angles fighter against BF-109s up to G6, and all FW-190A and F. Best used as angles fighter against later 109s, FW-190D and Me-262.
• Very stable gun platform. Best results can be achieved at ranges under 200 meters by aiming at enemy engine and/or cockpit area.
• Yak will not easily stall at slow speeds and will usually not enter a high-speed stall unless flown improperly.
• Supercharger speeds need to be switched at around 2,000 meters. Best performance altitude is between 500 and 2,800 meters.
• Worst performance above 4,500 meters

Yak-9T
Type: Fighter-Bomber Major Users: USSR Cockpit Guide:
1 Altimeter 9 Oil Temp & Pressure; Fuel Pressure 2 Compass 10 Oxygen Apparatus 3 Clock 11 Armament Status Lights 4 Airspeed Indicator 12 Landing Gear Indicator Lights 5 Turn & Bank Indicator 13 Coolant Temperature 6 Variometer 14 Voltmeter 7 Manifold Pressure 15 Radio 8 RPM Indicator

(Yak-9 continued)
At a Glance: Engine: VK-105PF Power: 1,180 HP
Armament: • 1 x 12.7mm MG (UBS) • 1 x 37mm cannon (NS-37)
Advantages: • Excellent performance characteristics; • Good maneuverability; • Strong armament; • Increased aircraft durability; • Easy to fly.
Disadvantages: • Defects and imperfections during large-
scale production.
Pilot Notes:
Take-Off Speed: 165 km/h Landing Speed: 155 km/h Combat Engine Setting: 2,800 RPM Best Cruise: 2,300 RPM Economy Cruise: 2,150 RPM Prop Pitch Control: Manual Mixture Control: Manual Boost: No Supercharger: Two-Speed
• The heavy 37mm cannon was mostly intended to be used against ground targets. However it can also be used against enemy aircraft.
• For aerial hawk-eyes, the 37mm cannon is effective at ranges up to 1 km. • Very stable gun platform. Best results can be achieved at ranges under 200 meters by aiming
at enemy engine and/or cockpit area. • Yak will not easily stall at slow speeds and will usually not enter a high-speed stall unless
flown improperly. • Supercharger speeds need to be switched at around 2,000 meters. Best performance altitude
is between 500 and 2,800 meters. • Worst performance above 4,500 meters

Yak-9U
Type: Fighter Major Users: USSR Cockpit Guide:
1 Altimeter 9 Oil Temp & Pressure; Fuel Pressure 2 Compass 10 Oxygen Apparatus 3 Clock 11 Magneto 4 Airspeed Indicator 12 Landing Gear Lever 5 Turn & Bank Indicator 13 Coolant Temperature 6 Variometer 14 Internal System Indicator 7 Manifold Pressure 15 Coolant Temperature 8 RPM Indicator

(Yak-9 continued)
At a Glance: Engine: VK-107A. Power: 1,500 HP
Armament: • 2 x 12.7 mm MG (UBS); • 1 x 20 mm cannon (ShVAK).
Advantages: • Excellent performance characteristics; • Good maneuverability; • Strong armament; • Increased aircraft durability; • Easy to fly.
Disadvantages: • Defects and imperfections during large-
scale production.
Pilot Notes:
Take-Off Speed: 165 km/h Landing Speed: 155 km/h Combat Engine Setting: 2,800 RPM Best Cruise: 2,300 RPM Economy Cruise: 2,150 RPM Prop Pitch Control: Manual Mixture Control: Manual Boost: No Supercharger: Two-Speed
• 1943 and later Yak fighters are excellent dogfighters with great all-around performance. Can be used both as an energy or angles fighter against BF-109s up to G6, and all FW-190A and F. Best used as angles fighter against later 109s, FW-190D and Me-262.
• Very stable gun platform. Best results can be achieved at ranges under 200 meters by aiming at enemy engine and/or cockpit area.
• Yak will not easily stall at slow speeds and will usually not enter a high-speed stall unless flown improperly.
• Supercharger speeds need to be switched at around 2,000 meters. Best performance altitude is between 500 and 2,800 meters.
• Worst performance above 4,500 meters

Yak-9UT
Type: Fighter-Bomber Major Users: USSR Cockpit Guide:
1 Altimeter 9 Oil Temp & Pressure; Fuel Pressure 2 Compass 10 Oxygen Apparatus 3 Clock 11 Magneto 4 Airspeed Indicator 12 Landing Gear Lever 5 Turn & Bank Indicator 13 Coolant Temperature 6 Variometer 14 Internal System Indicator 7 Manifold Pressure 15 Coolant Temperature 8 RPM Indicator

(Yak-9 continued)
At a Glance: Engine: VK-107A Power: 1,180 HP
Armament: • 2 x 20mm cannon (B-20S) • 1 x 37mm cannon (NS-37)
Advantages: • Excellent performance characteristics; • Good maneuverability; • Strong armament; • Increased aircraft durability; • Easy to fly.
Disadvantages: • Defects and imperfections during large-
scale production.
Pilot Notes:
Take-Off Speed: 165 km/h Landing Speed: 155 km/h Combat Engine Setting: 2,800 RPM Best Cruise: 2,300 RPM Economy Cruise: 2,150 RPM Prop Pitch Control: Manual Mixture Control: Manual Boost: No Supercharger: Two-Speed
• The heavy 20mm and 37mm armament was mostly intended to be used against ground targets. However it can also be used against enemy aircraft.
• Very stable gun platform. Best results can be achieved at ranges under 200 meters by aiming at enemy engine and/or cockpit area.
• Yak will not easily stall at slow speeds and will usually not enter a high-speed stall unless flown improperly.
• Supercharger speeds need to be switched at around 2,000 meters. Best performance altitude is between 500 and 2,800 meters.
• Worst performance above 4,500 meters
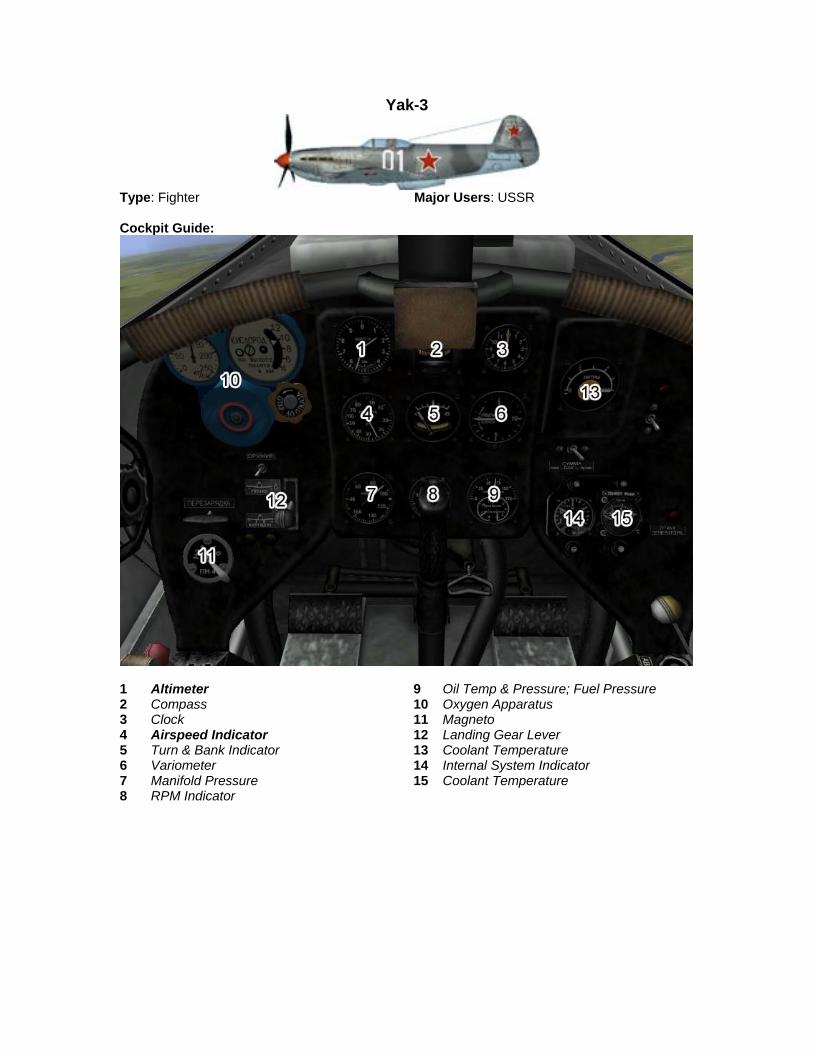
Yak-3
Type: Fighter Major Users: USSR Cockpit Guide:
1 Altimeter 9 Oil Temp & Pressure; Fuel Pressure 2 Compass 10 Oxygen Apparatus 3 Clock 11 Magneto 4 Airspeed Indicator 12 Landing Gear Lever 5 Turn & Bank Indicator 13 Coolant Temperature 6 Variometer 14 Internal System Indicator 7 Manifold Pressure 15 Coolant Temperature 8 RPM Indicator

(Yak-3 continued)
At a Glance: Engine: VK-105PF2 Power: 1,240 HP
Armament: • 2 x 12.7 mm MG (UBS); • 1 x 20 mm cannon (ShVAK).
Advantages: • Excellent performance characteristics; • Good maneuverability; • Strong armament; • Increased aircraft durability; • Easy to fly.
Disadvantages: • Defects and imperfections during large-
scale production.
Pilot Notes:
Take-Off Speed: 165 km/h Landing Speed: 155 km/h Combat Engine Setting: 2,800 RPM Best Cruise: 2,300 RPM Economy Cruise: 2,150 RPM Prop Pitch Control: Manual Mixture Control: Manual Boost: No Supercharger: Two-Speed
• Excellent all-around dogfighter. • Very stable gun platform. Best results can be achieved at ranges under 200 meters by aiming
at enemy engine and/or cockpit area. • Yak will not easily stall at slow speeds and will usually not enter a high-speed stall unless
flown improperly. • Supercharger speeds need to be switched at around 2,000 meters. Best performance altitude
is between 500 and 2,800 meters. • Worst performance above 4,500 meters
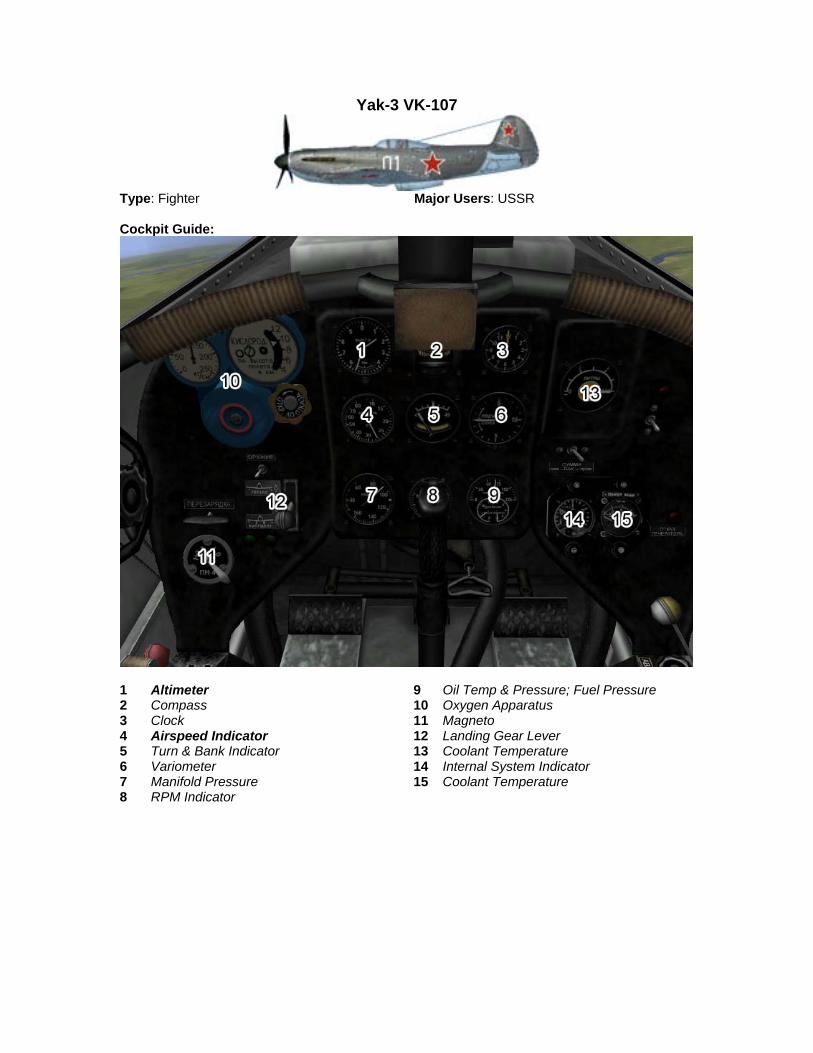
Yak-3 VK-107
Type: Fighter Major Users: USSR Cockpit Guide:
1 Altimeter 9 Oil Temp & Pressure; Fuel Pressure 2 Compass 10 Oxygen Apparatus 3 Clock 11 Magneto 4 Airspeed Indicator 12 Landing Gear Lever 5 Turn & Bank Indicator 13 Coolant Temperature 6 Variometer 14 Internal System Indicator 7 Manifold Pressure 15 Coolant Temperature 8 RPM Indicator

(Yak-3 continued)
At a Glance: Engine: 1 x VK-107A Power: 1,500 at sea level
Armament: • 2 x 20mm B-20S cannon (120 shells each)
Advantages: • Excellent maneuverability; • Small size; • Strong armament.
Disadvantages: • Light-weight construction buckling under
high Gs.
Pilot Notes:
Take-Off Speed: 165 km/h Landing Speed: 155 km/h Combat Engine Setting: 2,800 RPM Best Cruise: 2,300 RPM Economy Cruise: 2,150 RPM Prop Pitch Control: Manual Mixture Control: Manual Boost: No Supercharger: Two-Speed
• Excellent all-around dogfighter. • Very stable gun platform. Best results can be achieved at ranges under 200 meters by aiming
at enemy engine and/or cockpit area. • Yak will not easily stall at slow speeds and will usually not enter a high-speed stall unless
flown improperly. • Supercharger speeds need to be switched at around 2,000 meters. Best performance altitude
is between 500 and 2,800 meters. • Worst performance above 4,500 meters

Yak-3P
Type: Fighter Major Users: USSR Cockpit Guide:
1 Altimeter 9 Oil Temp & Pressure; Fuel Pressure 2 Compass 10 Oxygen Apparatus 3 Clock 11 Magneto 4 Airspeed Indicator 12 Landing Gear Lever 5 Turn & Bank Indicator 13 Coolant Temperature 6 Variometer 14 Internal System Indicator 7 Manifold Pressure 15 Coolant Temperature 8 RPM Indicator

(Yak-3 continued)
At a Glance: Engine: 1 x VK-105PF Power: 1,240 HP
Armament: • 2 x 20mm cannon (B-20S) • 1 x 20mm cannon (B-20M)
Advantages: • Excellent maneuverability; • Small size; • Strong armament.
Disadvantages: • Defects and imperfections during large-
scale production.
Pilot Notes:
Take-Off Speed: 165 km/h Landing Speed: 155 km/h Combat Engine Setting: 2,800 RPM Best Cruise: 2,300 RPM Economy Cruise: 2,150 RPM Prop Pitch Control: Manual Mixture Control: Manual Boost: No Supercharger: Two-Speed
• Excellent all-around dogfighter. • Very stable gun platform. Best results can be achieved at ranges under 200 meters by aiming
at enemy engine and/or cockpit area. • Yak will not easily stall at slow speeds and will usually not enter a high-speed stall unless
flown improperly. • Supercharger speeds need to be switched at around 2,000 meters. Best performance altitude
is between 500 and 2,800 meters. • Worst performance above 4,500 meters
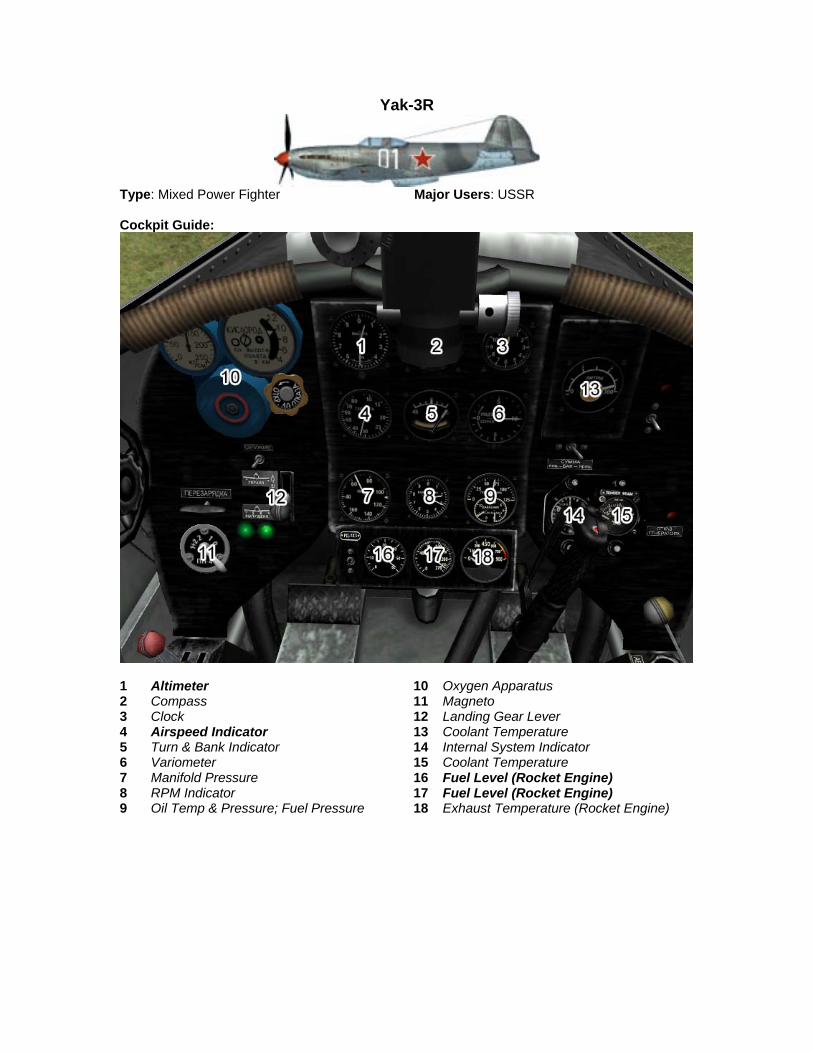
Yak-3R
Type: Mixed Power Fighter Major Users: USSR Cockpit Guide:
1 Altimeter 10 Oxygen Apparatus 2 Compass 11 Magneto 3 Clock 12 Landing Gear Lever 4 Airspeed Indicator 13 Coolant Temperature 5 Turn & Bank Indicator 14 Internal System Indicator 6 Variometer 15 Coolant Temperature 7 Manifold Pressure 16 Fuel Level (Rocket Engine) 8 RPM Indicator 17 Fuel Level (Rocket Engine) 9 Oil Temp & Pressure; Fuel Pressure 18 Exhaust Temperature (Rocket Engine)

(Yak-3R continued)
At a Glance: Engine: 1 x VK-105PD
1 X GlushkoRD-1 Power: 1,240 HP
300 kg/s at sea level
Armament: • 1 x 23mm NS-23 cannon
Advantages: • Excellent maneuverability; • Excellent top speed.
Disadvantages: • Insufficient time of flight with the rocket
engine; • Loss of speed under piston power alone; • Weak armament.
Pilot Notes:
• Excellent fighter with great all-around performance, especially in energy tactics. Outstanding
climb, acceleration and diving characteristics. Slightly inferior to the Yak-3 in maneuvering fights due to increased weight.
• The rocket engine has limited throttle control. The piston engine operation is the same as on the regular Yak-3.
• Very stable gun platform. Best results can be achieved at ranges under 200 meters by aiming at enemy engine and/or cockpit area.
• Yak will not easily stall at slow speeds and will usually not enter a high-speed stall unless flown improperly.
• Supercharger speeds need to be switched at around 2,000 meters. Best performance altitude is between 500 and 2,800 meters.
• Worst performance above 4,500 meters

Yak-15
Type: Jet Fighter Major Users: USSR Cockpit Guide:
1 Altimeter 10 Air Pressure 2 Compass 11 Exhaust Pressure 3 Clock 12 RPM Indicator 4 Airspeed Indicator 13 Fuel Level 5 Turn & Bank Indicator 14 Fuel Pressure 6 Variometer 15 Oil Pressure 7 Oxygen Supply 16 Exhaust Temperature 8 Oxygen Flow Indicator 17 Emergency Air Pressure 9 Ammeter 18 Landing Gear Indicator Lights

(Yak-15 continued)
At a Glance: Engine: 1 x RD-10 turbojet Power: 900 kg / s
Armament: • 2 x 23mm NS-23 cannon
Advantages: • Ease of conversion from piston to jet
engines; • Good maneuverability.
Disadvantages: • Manufacturing defects; • Extremely short range.
Pilot Notes:
• The Yak is the lightest production jet fighter in entire history of aerial warfare. Corresondingly, it’s maneuverable and can climb and accelerate very well, but its dive performance is poor.
• Please note that the Soviet variant of the German engine used for the Yak-15 was not a 1-for-1 copy of the venerable German design. Several modifications were made, most importantly the use of advanced alloys which were unavailable in late-war Germany. This greatly increased the reliability and service life of the engine. Therefore, engine temperature was much less of a problem with the Yak-15 than with the comparable jets.

YP-80
Type: Jet Fighter Major Users: USA Cockpit Guide:
1 Airspeed Indicator 13 Oxygen Cylinder Pressure 2 Compass 14 Clock 3 Artificial Horizon 15 Fuel Level 4 RPM Indicator 16 Bearing Temperature 5 Altimeter 17 Oil Pressure 6 Turn & Bank Indicator 18 Accelerometer 7 Variometer 19 Gauge Pressure 8 Compass 20 Landing Gear Indicator Lights 9 Fuel Pressure 21 Fuel Level Warning Light 10 Exhaust Temperature 22 Stall Warning Light 11 Ammeter 23 Engine Fire Warning Light 12 Oxygen Flow Indicator

(YP-80 continued)
At a Glance: Engine: 1 x J-33-GE-11 Thrust: 1,748 kgx
Armament: • 6 x .50 cal M2 machine guns
Advantages: • High speed for its time; • More maneuverable than most comparable
jet fighters of the time.
Disadvantages: • Unreliable engine
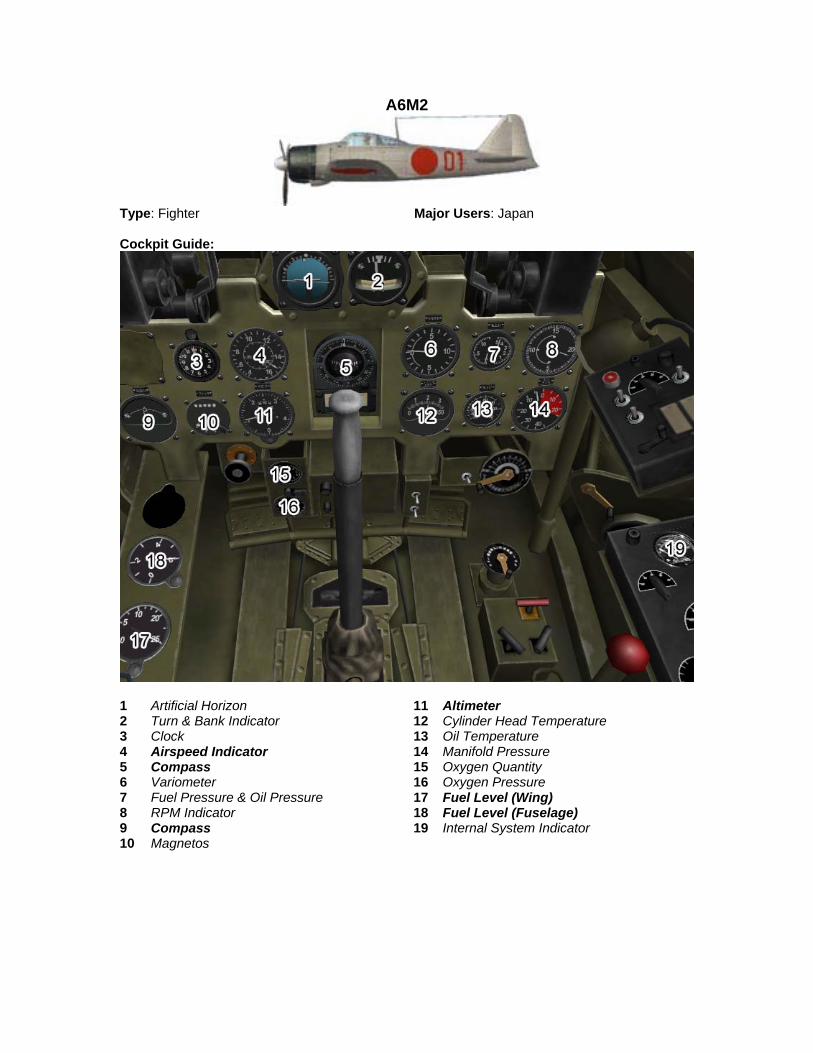
A6M2
Type: Fighter Major Users: Japan Cockpit Guide:
1 Artificial Horizon 11 Altimeter 2 Turn & Bank Indicator 12 Cylinder Head Temperature 3 Clock 13 Oil Temperature 4 Airspeed Indicator 14 Manifold Pressure 5 Compass 15 Oxygen Quantity 6 Variometer 16 Oxygen Pressure 7 Fuel Pressure & Oil Pressure 17 Fuel Level (Wing) 8 RPM Indicator 18 Fuel Level (Fuselage) 9 Compass 19 Internal System Indicator 10 Magnetos

(A6M continued)
At a Glance: Engine:
NK1C Sakae-12 Power:
Take-off: 940 HP Indicated: 950 HP at 5,000 m
Armament: • 2 x 7,7-mm Type 97 machine guns • 2 x 20-mm Type 99 wing cannons • 2 x 60 kg bombs
Advantages: • Speed, maneuverability and range
undreamed of by other contemporary carrier borne fighters;
• Good cockpit visibility.
Disadvantages: • Poor pilot protection; • No self-sealing fuel tanks
Pilot Notes:
• Switch supercharger speeds at 3,300 meters (10,800 feet) • Wing Fold: This key will toggle your carrier-borne aircraft’s wings between the up and
down position. Not all aircraft are so equipped. None of the land-based aircraft have this feature, and many carrier-borne planes, such as the SBD Dauntless or the F4F-3 were also not historically equipped with folding wings. We do not recommend using this feature while airborne. That doesn’t mean you shouldn’t try it once. Or twice.
• Change seat position: this key toggles the pilot’s seat height between two presets: high and low. This feature is intended for use during take-offs and landing to help look over the aircraft’s nose. High position should not be used in combat as it prevents you from using your gunsight. You must open your canopy first before raising your seat. This function ONLY works on the A6M Zero, F4U Corsairs and F4F/FM Wildcat series of planes. All other planes did not have seat systems that could be controlled by pilot in-flight.
• Arrestor Hook: toggles your aircraft arresting hook between the up and down positions. Used to land on an aircraft carrier. NOTE: not all planes are equipped with the arrestor hook.
• Chocks: These are used to fix your aircraft on the carrier deck, and to reach full throttle before beginning to move. Otherwise a heavy aircraft, especially carrying extra fuel or ordnance, may not be able to reach sufficient speed if it begins moving before reaching max RPM. This is especially true for slow moving or stationary carriers, as their speed is added to your plane’s speed during take-off. In other words, an aircraft carrier moving at 20 miles per hour adds 20 mph to your airspeed even when you remain stationary with your engine off. If the carrier however is not moving, it means you need to reach an even higher speed before you run out of deck. You’re not required to use chocks, and can release them at any time and simply use wheel brakes, however chocks provide much better control over your aircraft’s speed when you increase RPM. After landing on a carrier, if you wish to watch other AI or human-controlled planes land, move to the front of the ship and engage chocks. Otherwise the motion of the ocean may cause your plane to slide and fall overboard.

A6M2-21
Type: Carrier-Borne Fighter Major Users: Japan Cockpit Guide:
1 Artificial Horizon 11 Altimeter 2 Turn & Bank Indicator 12 Cylinder Head Temperature 3 Clock 13 Oil Temperature 4 Airspeed Indicator 14 Manifold Pressure 5 Compass 15 Oxygen Quantity 6 Variometer 16 Oxygen Pressure 7 Fuel Pressure & Oil Pressure 17 Fuel Level (Wing) 8 RPM Indicator 18 Fuel Level (Fuselage) 9 Compass 19 Internal System Indicator 10 Magnetos
(A6M continued)
At a Glance: Engine:
NK1C Sakae-12 Power:
Take-off: 940 HP Indicated: 950 HP at 5,000 m
Armament: • 2 x 7,7-mm Type 97 machine guns • 2 x 20-mm Type 99 wing cannons • 2 x 60 kg bombs
Advantages: • Speed, maneuverability and range
undreamed of by other contemporary carrier borne fighters;
• Good cockpit visibility.
Disadvantages: • Poor pilot protection; • No self-sealing fuel tanks
Pilot Notes:
• Switch supercharger speeds at 3,300 meters (10,800 feet) • Wing Fold: This key will toggle your carrier-borne aircraft’s wings between the up and
down position. Not all aircraft are so equipped. None of the land-based aircraft have this feature, and many carrier-borne planes, such as the SBD Dauntless or the F4F-3 were also not historically equipped with folding wings. We do not recommend using this feature while airborne. That doesn’t mean you shouldn’t try it once. Or twice.
• Change seat position: this key toggles the pilot’s seat height between two presets: high and low. This feature is intended for use during take-offs and landing to help look over the aircraft’s nose. High position should not be used in combat as it prevents you from using your gunsight. You must open your canopy first before raising your seat. This function ONLY works on the A6M Zero, F4U Corsairs and F4F/FM Wildcat series of planes. All other planes did not have seat systems that could be controlled by pilot in-flight.
• Arrestor Hook: toggles your aircraft arresting hook between the up and down positions. Used to land on an aircraft carrier. NOTE: not all planes are equipped with the arrestor hook.
• Chocks: These are used to fix your aircraft on the carrier deck, and to reach full throttle before beginning to move. Otherwise a heavy aircraft, especially carrying extra fuel or ordnance, may not be able to reach sufficient speed if it begins moving before reaching max RPM. This is especially true for slow moving or stationary carriers, as their speed is added to your plane’s speed during take-off. In other words, an aircraft carrier moving at 20 miles per hour adds 20 mph to your airspeed even when you remain stationary with your engine off. If the carrier however is not moving, it means you need to reach an even higher speed before you run out of deck. You’re not required to use chocks, and can release them at any time and simply use wheel brakes, however chocks provide much better control over your aircraft’s speed when you increase RPM. After landing on a carrier, if you wish to watch other AI or human-controlled planes land, move to the front of the ship and engage chocks. Otherwise the motion of the ocean may cause your plane to slide and fall overboard.
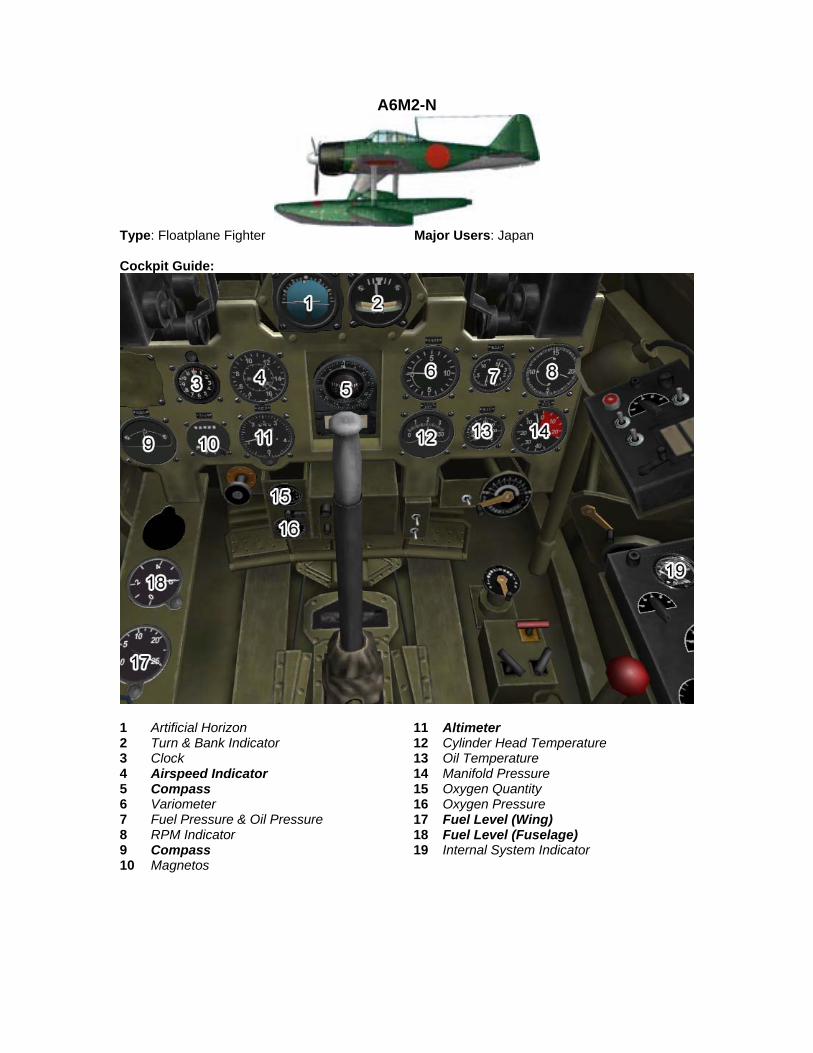
A6M2-N
Type: Floatplane Fighter Major Users: Japan Cockpit Guide:
1 Artificial Horizon 11 Altimeter 2 Turn & Bank Indicator 12 Cylinder Head Temperature 3 Clock 13 Oil Temperature 4 Airspeed Indicator 14 Manifold Pressure 5 Compass 15 Oxygen Quantity 6 Variometer 16 Oxygen Pressure 7 Fuel Pressure & Oil Pressure 17 Fuel Level (Wing) 8 RPM Indicator 18 Fuel Level (Fuselage) 9 Compass 19 Internal System Indicator 10 Magnetos

(A6M continued)
At a Glance: Engine:
1 x Sakae 12 Power: 940 HP
Armament: • 2 x Type 87 7.7mm machine guns
(fuselage) • 2 x Type 99 20mm cannon (wing) • 2 x 60kg bombs
Advantages: • Speed, maneuverability and range
undreamed of by other contemporary floatplane fighters;
• Good cockpit visibility.
Disadvantages: • Poor pilot protection; • No self-sealing fuel tanks; • Performance inferior to that of the
retractable wing A6M2. Pilot Notes: • A6M2-N is one of the very few floatplanes modeled in our sim, and it is unique in being the
only flyable one. • The A6M2-N cannot safely operate on land-based runways. • Many Pacific maps, and a few European ones, have water runways created specifically for
floatplanes. • Landing and taking off on water is not much different from landing on a runway, as we do not
model waves and water swells. You must mainly ensure to do a shallow flare and land on the entire surface of the float.
• Switch supercharger speeds at 3,300 meters (10,800 feet)

A6M3
Type: Fighter Major Users: Japan Cockpit Guide:
1 Artificial Horizon 11 Altimeter 2 Turn & Bank Indicator 12 Cylinder Head Temperature 3 Clock 13 Oil Temperature 4 Airspeed Indicator 14 Manifold Pressure 5 Compass 15 Oxygen Quantity 6 Variometer 16 Oxygen Pressure 7 Fuel Pressure & Oil Pressure 17 Fuel Level (Wing) 8 RPM Indicator 18 Fuel Level (Fuselage) 9 Compass 19 Internal System Indicator 10 Magnetos
(A6M continued)
At a Glance: Engine:
NK1C Sakae-12 Power: 1,130 HP
Armament: • 2 x 7,7-mm Type 97 machine guns • 2 x 20-mm Type 99 wing cannons • 2 x 60 kg bombs
Advantages: • Speed, maneuverability and range
undreamed of by other contemporary carrier borne fighters;
• Good cockpit visibility.
Disadvantages: • Poor pilot protection; • No self-sealing fuel tanks
Pilot Notes:
• Switch supercharger speeds at 3,300 meters (10,800 feet) • Wing Fold: This key will toggle your carrier-borne aircraft’s wings between the up and
down position. Not all aircraft are so equipped. None of the land-based aircraft have this feature, and many carrier-borne planes, such as the SBD Dauntless or the F4F-3 were also not historically equipped with folding wings. We do not recommend using this feature while airborne. That doesn’t mean you shouldn’t try it once. Or twice.
• Change seat position: this key toggles the pilot’s seat height between two presets: high and low. This feature is intended for use during take-offs and landing to help look over the aircraft’s nose. High position should not be used in combat as it prevents you from using your gunsight. You must open your canopy first before raising your seat. This function ONLY works on the A6M Zero, F4U Corsairs and F4F/FM Wildcat series of planes. All other planes did not have seat systems that could be controlled by pilot in-flight.
• Arrestor Hook: toggles your aircraft arresting hook between the up and down positions. Used to land on an aircraft carrier. NOTE: not all planes are equipped with the arrestor hook.
• Chocks: These are used to fix your aircraft on the carrier deck, and to reach full throttle before beginning to move. Otherwise a heavy aircraft, especially carrying extra fuel or ordnance, may not be able to reach sufficient speed if it begins moving before reaching max RPM. This is especially true for slow moving or stationary carriers, as their speed is added to your plane’s speed during take-off. In other words, an aircraft carrier moving at 20 miles per hour adds 20 mph to your airspeed even when you remain stationary with your engine off. If the carrier however is not moving, it means you need to reach an even higher speed before you run out of deck. You’re not required to use chocks, and can release them at any time and simply use wheel brakes, however chocks provide much better control over your aircraft’s speed when you increase RPM. After landing on a carrier, if you wish to watch other AI or human-controlled planes land, move to the front of the ship and engage chocks. Otherwise the motion of the ocean may cause your plane to slide and fall overboard.
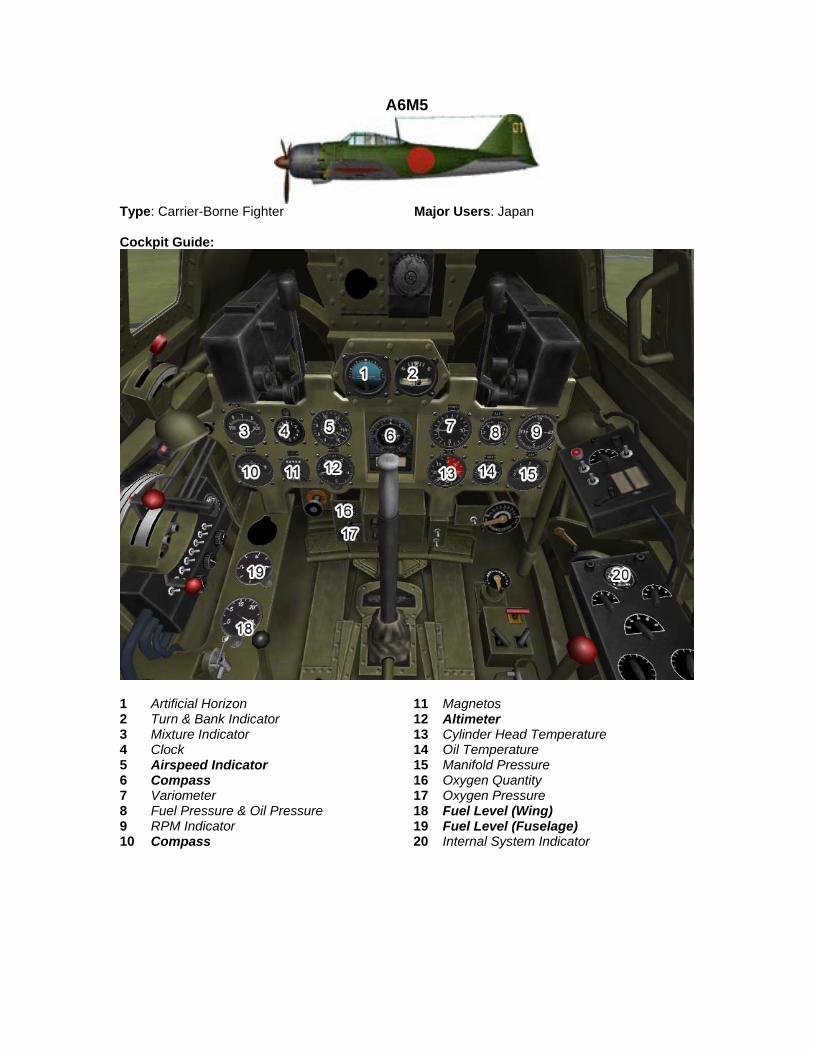
A6M5
Type: Carrier-Borne Fighter Major Users: Japan Cockpit Guide:
1 Artificial Horizon 11 Magnetos 2 Turn & Bank Indicator 12 Altimeter 3 Mixture Indicator 13 Cylinder Head Temperature 4 Clock 14 Oil Temperature 5 Airspeed Indicator 15 Manifold Pressure 6 Compass 16 Oxygen Quantity 7 Variometer 17 Oxygen Pressure 8 Fuel Pressure & Oil Pressure 18 Fuel Level (Wing) 9 RPM Indicator 19 Fuel Level (Fuselage) 10 Compass 20 Internal System Indicator

(A6M continued)
At a Glance: Engine:
1 x NK1F Sakae-21 Power:
Take-off: 1,130 HP Indicated: 1,100 HP at 3,500 m
Armament: • 2 x 7,7-mm Type 97 machine guns • 2 x 20-mm Type 99 wing cannons • 2 x 60 kg bombs
Advantages: • Good maneuverability; • Good pilot visibility.
Disadvantages: • Weak armor; • No self-sealing tanks; • Low top speed.
Pilot Notes:
• Switch supercharger speeds at 3,300 meters (10,800 feet) • Wing Fold: This key will toggle your carrier-borne aircraft’s wings between the up and
down position. Not all aircraft are so equipped. None of the land-based aircraft have this feature, and many carrier-borne planes, such as the SBD Dauntless or the F4F-3 were also not historically equipped with folding wings. We do not recommend using this feature while airborne. That doesn’t mean you shouldn’t try it once. Or twice.
• Change seat position: this key toggles the pilot’s seat height between two presets: high and low. This feature is intended for use during take-offs and landing to help look over the aircraft’s nose. High position should not be used in combat as it prevents you from using your gunsight. You must open your canopy first before raising your seat. This function ONLY works on the A6M Zero, F4U Corsairs and F4F/FM Wildcat series of planes. All other planes did not have seat systems that could be controlled by pilot in-flight.
• Arrestor Hook: toggles your aircraft arresting hook between the up and down positions. Used to land on an aircraft carrier. NOTE: not all planes are equipped with the arrestor hook.
• Chocks: These are used to fix your aircraft on the carrier deck, and to reach full throttle before beginning to move. Otherwise a heavy aircraft, especially carrying extra fuel or ordnance, may not be able to reach sufficient speed if it begins moving before reaching max RPM. This is especially true for slow moving or stationary carriers, as their speed is added to your plane’s speed during take-off. In other words, an aircraft carrier moving at 20 miles per hour adds 20 mph to your airspeed even when you remain stationary with your engine off. If the carrier however is not moving, it means you need to reach an even higher speed before you run out of deck. You’re not required to use chocks, and can release them at any time and simply use wheel brakes, however chocks provide much better control over your aircraft’s speed when you increase RPM. After landing on a carrier, if you wish to watch other AI or human-controlled planes land, move to the front of the ship and engage chocks. Otherwise the motion of the ocean may cause your plane to slide and fall overboard.

A6M5a
Type: Carrier-Borne Fighter Major Users: Japan Cockpit Guide:
1 Artificial Horizon 11 Magnetos 2 Turn & Bank Indicator 12 Altimeter 3 Mixture Indicator 13 Cylinder Head Temperature 4 Clock 14 Oil Temperature 5 Airspeed Indicator 15 Manifold Pressure 6 Compass 16 Oxygen Quantity 7 Variometer 17 Oxygen Pressure 8 Fuel Pressure & Oil Pressure 18 Fuel Level (Wing) 9 RPM Indicator 19 Fuel Level (Fuselage) 10 Compass 20 Internal System Indicator
(A6M continued)
At a Glance: Engine:
1 x NK1F Sakae-21 Power:
Take-off: 1,130 HP Indicated: 1,100 HP at 3,500 m
Armament: • 1 x 13,2-mm machine gun • 2 x 20-mm Type 99 wing cannons • 2 x 60 kg bombs
Advantages: • Good maneuverability; • Good pilot visibility.
Disadvantages: • Weak armor; • Weak armament; • No self-sealing tanks; • Low top speed.
Pilot Notes:
• Switch supercharger speeds at 3,300 meters (10,800 feet) • Wing Fold: This key will toggle your carrier-borne aircraft’s wings between the up and
down position. Not all aircraft are so equipped. None of the land-based aircraft have this feature, and many carrier-borne planes, such as the SBD Dauntless or the F4F-3 were also not historically equipped with folding wings. We do not recommend using this feature while airborne. That doesn’t mean you shouldn’t try it once. Or twice.
• Change seat position: this key toggles the pilot’s seat height between two presets: high and low. This feature is intended for use during take-offs and landing to help look over the aircraft’s nose. High position should not be used in combat as it prevents you from using your gunsight. You must open your canopy first before raising your seat. This function ONLY works on the A6M Zero, F4U Corsairs and F4F/FM Wildcat series of planes. All other planes did not have seat systems that could be controlled by pilot in-flight.
• Arrestor Hook: toggles your aircraft arresting hook between the up and down positions. Used to land on an aircraft carrier. NOTE: not all planes are equipped with the arrestor hook.
• Chocks: These are used to fix your aircraft on the carrier deck, and to reach full throttle before beginning to move. Otherwise a heavy aircraft, especially carrying extra fuel or ordnance, may not be able to reach sufficient speed if it begins moving before reaching max RPM. This is especially true for slow moving or stationary carriers, as their speed is added to your plane’s speed during take-off. In other words, an aircraft carrier moving at 20 miles per hour adds 20 mph to your airspeed even when you remain stationary with your engine off. If the carrier however is not moving, it means you need to reach an even higher speed before you run out of deck. You’re not required to use chocks, and can release them at any time and simply use wheel brakes, however chocks provide much better control over your aircraft’s speed when you increase RPM. After landing on a carrier, if you wish to watch other AI or human-controlled planes land, move to the front of the ship and engage chocks. Otherwise the motion of the ocean may cause your plane to slide and fall overboard.
A6M5b
Type: Carrier-Borne Fighter Major Users: Japan Cockpit Guide:
1 Artificial Horizon 11 Magnetos 2 Turn & Bank Indicator 12 Altimeter 3 Mixture Indicator 13 Cylinder Head Temperature 4 Clock 14 Oil Temperature 5 Airspeed Indicator 15 Manifold Pressure 6 Compass 16 Oxygen Quantity 7 Variometer 17 Oxygen Pressure 8 Fuel Pressure & Oil Pressure 18 Fuel Level (Wing) 9 RPM Indicator 19 Fuel Level (Fuselage) 10 Compass 20 Internal System Indicator
(A6M continued)
At a Glance: Engine:
1 x NK1F Sakae-21 Power:
Take-off: 1,130 HP Indicated: 1,100 HP at 3,500 m
Armament: • 1 x 13,2-mm machine gun • 2 x 20-mm Type 99 wing cannons • 2 x 60 kg bombs
Advantages: • Good maneuverability; • Good pilot visibility.
Disadvantages: • Low damage threshold; • Weak armament; • Low top speed.
Pilot Notes:
• Switch supercharger speeds at 3,300 meters (10,800 feet) • Wing Fold: This key will toggle your carrier-borne aircraft’s wings between the up and
down position. Not all aircraft are so equipped. None of the land-based aircraft have this feature, and many carrier-borne planes, such as the SBD Dauntless or the F4F-3 were also not historically equipped with folding wings. We do not recommend using this feature while airborne. That doesn’t mean you shouldn’t try it once. Or twice.
• Change seat position: this key toggles the pilot’s seat height between two presets: high and low. This feature is intended for use during take-offs and landing to help look over the aircraft’s nose. High position should not be used in combat as it prevents you from using your gunsight. You must open your canopy first before raising your seat. This function ONLY works on the A6M Zero, F4U Corsairs and F4F/FM Wildcat series of planes. All other planes did not have seat systems that could be controlled by pilot in-flight.
• Arrestor Hook: toggles your aircraft arresting hook between the up and down positions. Used to land on an aircraft carrier. NOTE: not all planes are equipped with the arrestor hook.
• Chocks: These are used to fix your aircraft on the carrier deck, and to reach full throttle before beginning to move. Otherwise a heavy aircraft, especially carrying extra fuel or ordnance, may not be able to reach sufficient speed if it begins moving before reaching max RPM. This is especially true for slow moving or stationary carriers, as their speed is added to your plane’s speed during take-off. In other words, an aircraft carrier moving at 20 miles per hour adds 20 mph to your airspeed even when you remain stationary with your engine off. If the carrier however is not moving, it means you need to reach an even higher speed before you run out of deck. You’re not required to use chocks, and can release them at any time and simply use wheel brakes, however chocks provide much better control over your aircraft’s speed when you increase RPM. After landing on a carrier, if you wish to watch other AI or human-controlled planes land, move to the front of the ship and engage chocks. Otherwise the motion of the ocean may cause your plane to slide and fall overboard.

A6M5c
Type: Fighter Major Users: Japan Cockpit Guide:
1 Artificial Horizon 12 Altimeter 2 Turn & Bank Indicator 13 Cylinder Head Temperature 3 Mixture Indicator 14 Oil Temperature 4 Clock 15 Manifold Pressure 5 Airspeed Indicator 16 Oxygen Quantity 6 Compass 17 Oxygen Pressure 7 Variometer 18 Fuel Level (Wing) 8 Fuel Pressure & Oil Pressure 19 Fuel Level (Fuselage) 9 RPM Indicator 20 Internal System Indicator 10 Compass 21 Mixture Indicator 11 Magnetos

(A6M continued)
At a Glance: Engine:
1 x NK1F Sakae-21 Power:
Take-off: 1,130 HP Indicated: 1,100 HP at 3,500 m
Armament: • 1 x 13,2-mm machine gun • 2 x 20-mm Type 99 wing cannons • 2 x 60 kg bombs
Advantages: • Good maneuverability; • Good pilot visibility.
Disadvantages: • Low damage threshold; • Weak armament; • Low top speed.
Pilot Notes:
• Switch supercharger speeds at 3,300 meters (10,800 feet) • A6M5c is modeled with the Sakae 31a engine with methanol injection, instead of the
Sakae 21. The cockpit has a gauge showing the quantity of the methanol mix. Unfortunately we were not able to find any detailed photos showing this gauge, and it is based on a diagram that may not adequately represent the historical gauge.

A6M7-62
Type: Fighter Major Users: Japan Cockpit Guide:
1 Artificial Horizon 12 Altimeter 2 Turn & Bank Indicator 13 Cylinder Head Temperature 3 Mixture Indicator 14 Oil Temperature 4 Clock 15 Manifold Pressure 5 Airspeed Indicator 16 Oxygen Quantity 6 Compass 17 Oxygen Pressure 7 Variometer 18 Fuel Level (Wing) 8 Fuel Pressure & Oil Pressure 19 Fuel Level (Fuselage) 9 RPM Indicator 20 Internal System Indicator 10 Compass 21 Mixture Indicator 11 Magnetos

(A6M continued)
At a Glance: Engine:
1 x NK1F Sakae-21 Power:
Take-off: 1,130 HP Indicated: 1,100 HP at 3,500 m
Armament: • 1 x 13,2-mm machine gun • 2 x 20-mm Type 99 wing cannons • 2 x 60 kg bombs
Advantages: • Good maneuverability; • Good pilot visibility.
Disadvantages: • Low damage threshold; • Weak armament; • Low top speed.
Pilot Notes:
• Switch supercharger speeds at 3,300 meters (10,800 feet) • A6M7 model 62 uses the Sakae 31a, however A6M7 model 63 reverts to Sakae 21
because of historical shortage of newer engines. • The Sakae 31a engine is modeled with methanol injection. The cockpit has a gauge
showing the quantity of the methanol mix. Unfortunately we were not able to find any detailed photos showing this gauge, and it is based on a diagram that may not adequately represent the historical gauge.

A6M7-63
Type: Fighter Major Users: Japan Cockpit Guide:
1 Artificial Horizon 11 Magnetos 2 Turn & Bank Indicator 12 Altimeter 3 Mixture Indicator 13 Cylinder Head Temperature 4 Clock 14 Oil Temperature 5 Airspeed Indicator 15 Manifold Pressure 6 Compass 16 Oxygen Quantity 7 Variometer 17 Oxygen Pressure 8 Fuel Pressure & Oil Pressure 18 Fuel Level (Wing) 9 RPM Indicator 19 Fuel Level (Fuselage) 10 Compass 20 Internal System Indicator

(A6M continued)
At a Glance: Engine:
1 x NK1F Sakae-21 Power:
Take-off: 1,130 HP Indicated: 1,100 HP at 3,500 m
Armament: • 1 x 13,2-mm machine gun • 2 x 20-mm Type 99 wing cannons • 2 x 60 kg bombs
Advantages: • Good maneuverability; • Good pilot visibility.
Disadvantages: • Low damage threshold; • Weak armament; • Low top speed.
Pilot Notes:
• Switch supercharger speeds at 3,300 meters (10,800 feet) • A6M7 model 62 uses the Sakae 31a, however A6M7 model 63 reverts to Sakae 21
because of historical shortage of newer engines. • The Sakae 31a engine is modeled with methanol injection. The cockpit has a gauge
showing the quantity of the methanol mix. Unfortunately we were not able to find any detailed photos showing this gauge, and it is based on a diagram that may not adequately represent the historical gauge.
Ar-234B-2
Type: Jet Bomber Major Users: Germany Cockpit Guide:
1 Compass 15 Oil Pressure (Engine #2) 2 Airspeed Indicator 16 Fuel Pressure (Engine #1) 3 Turn & Bank Indicator 17 Fuel Pressure (Engine #2) 4 Variometer 18 Exhaust Temperature (Engine #1) 5 Altimeter 19 Exhaust Temperature (Engine #2) 6 Compass 20 Fuel Level (Front) 7 Pilot’s Direction Indicator 21 Fuel Level (Rear) 8 Pitot Pressure (L / R) 22 Oxygen Pressure 9 RPM Indicator (Engine #1) 23 Oxygen Flow Indicator 10 RPM Indicator (Engine #2) 24 Landing Gear Indicator Lights 11 Clock 25 Hydraulic Pressure 12 Exhaust Pressure (Engine #1) 26 Overspeed Warning Light 13 Exhaust Pressure (Engine #2) 27 Fuel Level Warning Light (Front) 14 Oil Pressure (Engine #1) 28 Fuel Level Warning Light (Rear)

(Ar-234 continued) Other Playable Crew Positions:
Rear Stinger Level Bombsight Dive Sight At a Glance: Engine:
2 x Jumo-004B Power: 2 x 900 kg/s
Armament: • 2 x 20mm MG-151 cannon (defensive) • Up to 1,700 kg of bombs
Advantages: • Excellent Speed
Disadvantages: • Difficult to handle • Poor maneuverability • Extremely short range at lower altitudes
Pilot Notes: • The aircraft has no forward-firing armament. The trigger fires the twin MG-151/20 cannons
situated in a stationary tail stinger. They can be fired at any time by pressing the trigger, and can be aimed by pressing the “Toggle Gunsight” button (Shift-F1 by default) when seated in the pilot’s seat. This will switch your view to the telescopic sight located in the cockpit.
• The bomb-aiming equipment consists of the Lofte 7K level bombing sight, and the BZA-1 dive-bombing sight. In order to switch to the bombing mode, press the “Pilot or Gunner Position” button (C by default), and use the “Toggle Gunsight” button (Shift-F1 by default) to switch between the dive and level bombing sight optics.
• The BZA-1 modeled in the game is simpler than the actual sight used in the Blitz; the details cannot be modeled at this time due to inherent game engine restrictions. In the game, it’s a simple point-and-shoot periscope that requires no parameter input. The horizontal “bone” shows the projected impact point of your bombs. The dive procedure is standard.
• The aircraft is also equipped with rocket-assisted-take-off (RATO) packs, which give it extra boost when taking-off, and are especially needed at heavy combat loads. The RATO packs are fully automated, and cannot be interacted with by the player. They will be automatically engaged should there be the need for it, and automatically jettisoned once they are expended. The lack of player’s control is due to inherent game engine limitations.
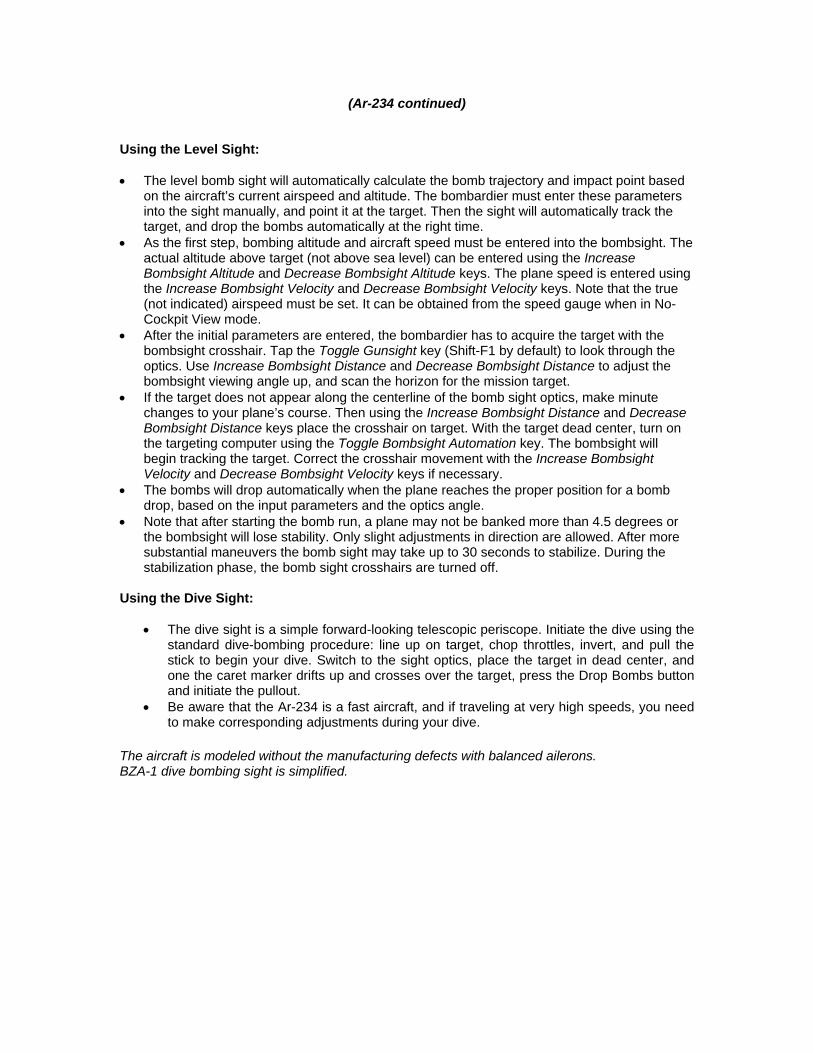
(Ar-234 continued) Using the Level Sight: • The level bomb sight will automatically calculate the bomb trajectory and impact point based
on the aircraft’s current airspeed and altitude. The bombardier must enter these parameters into the sight manually, and point it at the target. Then the sight will automatically track the target, and drop the bombs automatically at the right time.
• As the first step, bombing altitude and aircraft speed must be entered into the bombsight. The actual altitude above target (not above sea level) can be entered using the Increase Bombsight Altitude and Decrease Bombsight Altitude keys. The plane speed is entered using the Increase Bombsight Velocity and Decrease Bombsight Velocity keys. Note that the true (not indicated) airspeed must be set. It can be obtained from the speed gauge when in No-Cockpit View mode.
• After the initial parameters are entered, the bombardier has to acquire the target with the bombsight crosshair. Tap the Toggle Gunsight key (Shift-F1 by default) to look through the optics. Use Increase Bombsight Distance and Decrease Bombsight Distance to adjust the bombsight viewing angle up, and scan the horizon for the mission target.
• If the target does not appear along the centerline of the bomb sight optics, make minute changes to your plane’s course. Then using the Increase Bombsight Distance and Decrease Bombsight Distance keys place the crosshair on target. With the target dead center, turn on the targeting computer using the Toggle Bombsight Automation key. The bombsight will begin tracking the target. Correct the crosshair movement with the Increase Bombsight Velocity and Decrease Bombsight Velocity keys if necessary.
• The bombs will drop automatically when the plane reaches the proper position for a bomb drop, based on the input parameters and the optics angle.
• Note that after starting the bomb run, a plane may not be banked more than 4.5 degrees or the bombsight will lose stability. Only slight adjustments in direction are allowed. After more substantial maneuvers the bomb sight may take up to 30 seconds to stabilize. During the stabilization phase, the bomb sight crosshairs are turned off.
Using the Dive Sight:
• The dive sight is a simple forward-looking telescopic periscope. Initiate the dive using the standard dive-bombing procedure: line up on target, chop throttles, invert, and pull the stick to begin your dive. Switch to the sight optics, place the target in dead center, and one the caret marker drifts up and crosses over the target, press the Drop Bombs button and initiate the pullout.
• Be aware that the Ar-234 is a fast aircraft, and if traveling at very high speeds, you need to make corresponding adjustments during your dive.
The aircraft is modeled without the manufacturing defects with balanced ailerons. BZA-1 dive bombing sight is simplified.

B-239
Type: Fighter Major Users: Finland Cockpit Guide:
1 Airspeed Indicator 10 Free Air Temperature 2 Turn & Bank Indicator 11 Oil Temp & Pressure; Fuel Pressure 3 Manifold Pressure 12 Cylinder Head Temperature 4 Altimeter 13 Fuel Level 5 Compass 14 Fuel Level 6 Artificial Horizon 15 Hydraulic Pressure 7 Variometer 16 Ammunition Counter (left side) 8 Clock 17 Ammunition Counter (right side) 9 RPM Indicator (Engine #1)

(Brewster continued)
At a Glance: Engine: R-1820-G5 Power:
Continuous: 850 HP Take-off : 950 HP Combat (WEP) max 5min: 1,000 HP
Armament: • 3 x .50cal + 1 x .30cal • Later 4 x .50cal (12.7mm)
Advantages: • Good maneuverability and handling; • Spacious and well-organized cockpit; • Good visibility.
Disadvantages: • Obsolete compared to contemporary Axis
planes; • Inadequate speed and armament
compared to late war planes. Pilot Notes:
Take-Off Speed: 140 km/h Landing Speed: 135 km/h Combat Engine Setting: No RPM gauge Best Cruise: No RPM gauge Economy Cruise: No RPM gauge Prop Pitch Control: Manual Mixture Control: Manual Boost: No Supercharger: Two-Speed
• Buffalo is a decent dogfighter against most pre-1943 fighters, with the exception of the
Zero. Brewster will outturn almost any plane in a high-G instantaneous turn, however it will bleed off excessive amounts of speed in sustained turns. Your best bet against enemy fighters is to stay fast and not get involved in prolonged turning engagements, especially at low altitudes.
• Buffalo’s armament is not particularly strong but it is adequate against most planes, with the possible exception of the IL-2. You will usually need at least a one-second burst at a vulnerable area to bring your target down. Just like with all machine-gun only planes, the best spot to aim for is the pilot.
• Brewster can stall rather easily if handled roughly, however when it is handled with care it can be a very tough opponent.
• Supercharger speeds need to be switched at around 3,000 meters. Best performance altitude is between 500 and 2,800 meters.
• Worst performance above 4,500 meters
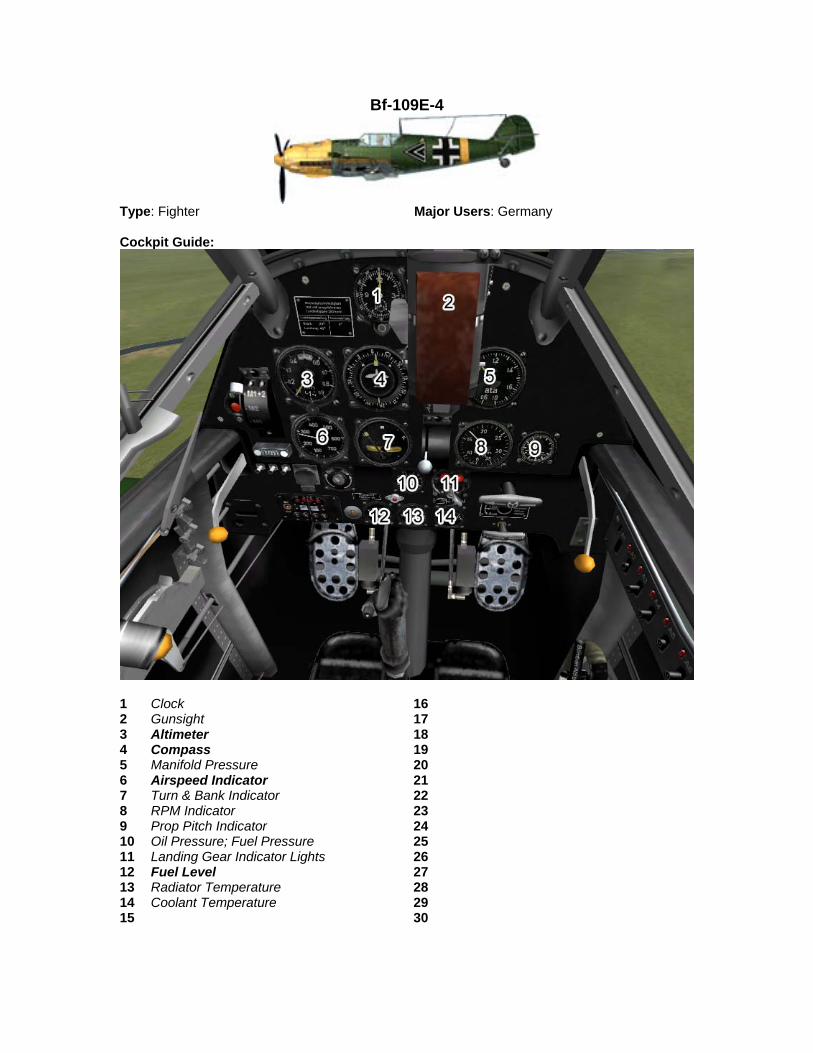
Bf-109E-4
Type: Fighter Major Users: Germany Cockpit Guide:
1 Clock 16 2 Gunsight 17 3 Altimeter 18 4 Compass 19 5 Manifold Pressure 20 6 Airspeed Indicator 21 7 Turn & Bank Indicator 22 8 RPM Indicator 23 9 Prop Pitch Indicator 24 10 Oil Pressure; Fuel Pressure 25 11 Landing Gear Indicator Lights 26 12 Fuel Level 27 13 Radiator Temperature 28 14 Coolant Temperature 29 15 30
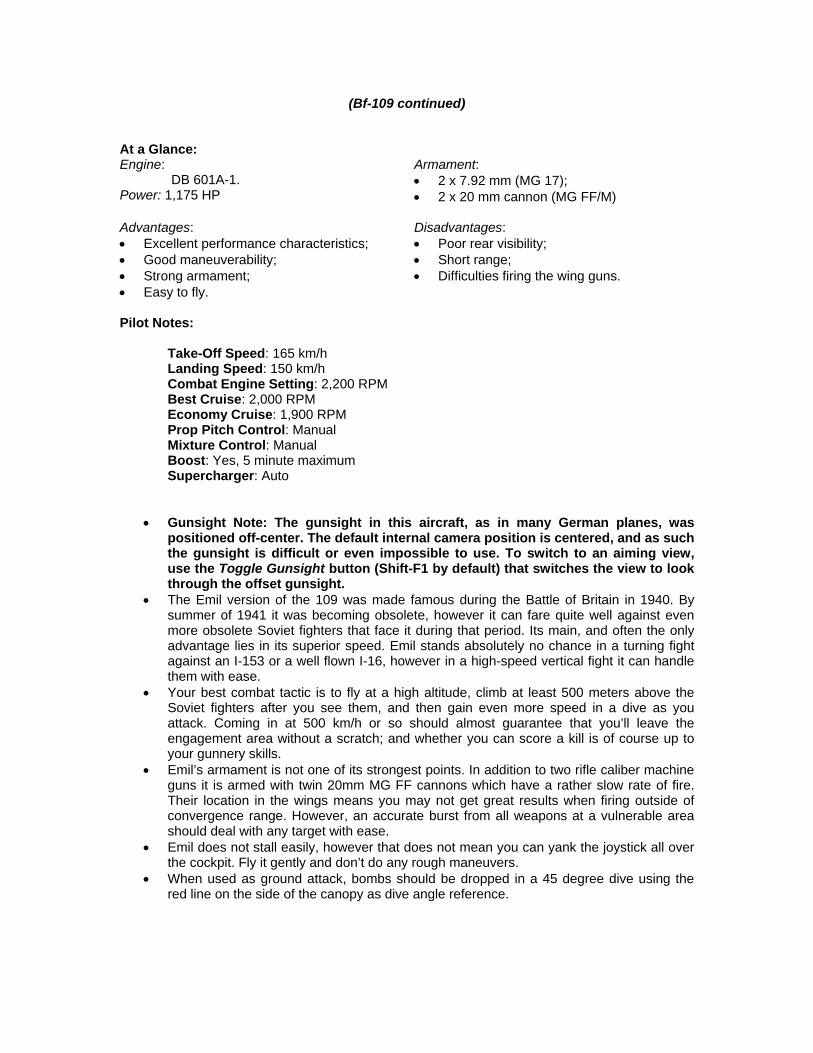
(Bf-109 continued)
At a Glance: Engine:
DB 601A-1. Power: 1,175 HP
Armament: • 2 x 7.92 mm (MG 17); • 2 x 20 mm cannon (MG FF/M)
Advantages: • Excellent performance characteristics; • Good maneuverability; • Strong armament; • Easy to fly.
Disadvantages: • Poor rear visibility; • Short range; • Difficulties firing the wing guns.
Pilot Notes:
Take-Off Speed: 165 km/h Landing Speed: 150 km/h Combat Engine Setting: 2,200 RPM Best Cruise: 2,000 RPM Economy Cruise: 1,900 RPM Prop Pitch Control: Manual Mixture Control: Manual Boost: Yes, 5 minute maximum Supercharger: Auto
• Gunsight Note: The gunsight in this aircraft, as in many German planes, was positioned off-center. The default internal camera position is centered, and as such the gunsight is difficult or even impossible to use. To switch to an aiming view, use the Toggle Gunsight button (Shift-F1 by default) that switches the view to look through the offset gunsight.
• The Emil version of the 109 was made famous during the Battle of Britain in 1940. By summer of 1941 it was becoming obsolete, however it can fare quite well against even more obsolete Soviet fighters that face it during that period. Its main, and often the only advantage lies in its superior speed. Emil stands absolutely no chance in a turning fight against an I-153 or a well flown I-16, however in a high-speed vertical fight it can handle them with ease.
• Your best combat tactic is to fly at a high altitude, climb at least 500 meters above the Soviet fighters after you see them, and then gain even more speed in a dive as you attack. Coming in at 500 km/h or so should almost guarantee that you’ll leave the engagement area without a scratch; and whether you can score a kill is of course up to your gunnery skills.
• Emil’s armament is not one of its strongest points. In addition to two rifle caliber machine guns it is armed with twin 20mm MG FF cannons which have a rather slow rate of fire. Their location in the wings means you may not get great results when firing outside of convergence range. However, an accurate burst from all weapons at a vulnerable area should deal with any target with ease.
• Emil does not stall easily, however that does not mean you can yank the joystick all over the cockpit. Fly it gently and don’t do any rough maneuvers.
• When used as ground attack, bombs should be dropped in a 45 degree dive using the red line on the side of the canopy as dive angle reference.

Bf-109E-4/B
Type: Fighter-Bomber Major Users: Germany Cockpit Guide:
1 Clock 8 RPM Indicator 2 Gunsight 9 Prop Pitch Indicator 3 Altimeter 10 Fuel Pressure; Oil Pressure 4 Compass 11 Landing Gear Indicator Lights 5 Manifold Pressure 12 Fuel Level 6 Airspeed Indicator 13 Radiator Temperature 7 Turn & Bank Indicator 14 Coolant Temperature

(Bf-109 continued)
At a Glance: Engine:
DB 601A-1. Power: 1,175 HP
Armament: • 2 x 7.92 mm (MG 17); • 2 x 20 mm cannon (MG FF/M) • Up to 250 kg of bombs.
Advantages: • Excellent performance characteristics; • Good maneuverability; • Strong armament; • Easy to fly.
Disadvantages: • Poor rear visibility; • Short range; • Difficulties firing the wing guns.
Pilot Notes:
Take-Off Speed: 165 km/h Landing Speed: 150 km/h Combat Engine Setting: 2,200 RPM Best Cruise: 2,000 RPM Economy Cruise: 1,900 RPM Prop Pitch Control: Manual Mixture Control: Manual Boost: Yes, 5 minute maximum Supercharger: Auto
• Gunsight Note: The gunsight in this aircraft, as in many German planes, was positioned off-center. The default internal camera position is centered, and as such the gunsight is difficult or even impossible to use. To switch to an aiming view, use the Toggle Gunsight button (Shift-F1 by default) that switches the view to look through the offset gunsight.
• The Emil version of the 109 was made famous during the Battle of Britain in 1940. By summer of 1941 it was becoming obsolete, however it can fare quite well against even more obsolete Soviet fighters that face it during that period. Its main, and often the only advantage lies in its superior speed. Emil stands absolutely no chance in a turning fight against an I-153 or a well flown I-16, however in a high-speed vertical fight it can handle them with ease.
• Your best combat tactic is to fly at a high altitude, climb at least 500 meters above the Soviet fighters after you see them, and then gain even more speed in a dive as you attack. Coming in at 500 km/h or so should almost guarantee that you’ll leave the engagement area without a scratch; and whether you can score a kill is of course up to your gunnery skills.
• Emil’s armament is not one of its strongest points. In addition to two rifle caliber machine guns it is armed with twin 20mm MG FF cannons which have a rather slow rate of fire. Their location in the wings means you may not get great results when firing outside of convergence range. However, an accurate burst from all weapons at a vulnerable area should deal with any target with ease.
• Emil does not stall easily, however that does not mean you can yank the joystick all over the cockpit. Fly it gently and don’t do any rough maneuvers.
• When used as ground attack, bombs should be dropped in a 45 degree dive using the red line on the side of the canopy as dive angle reference.
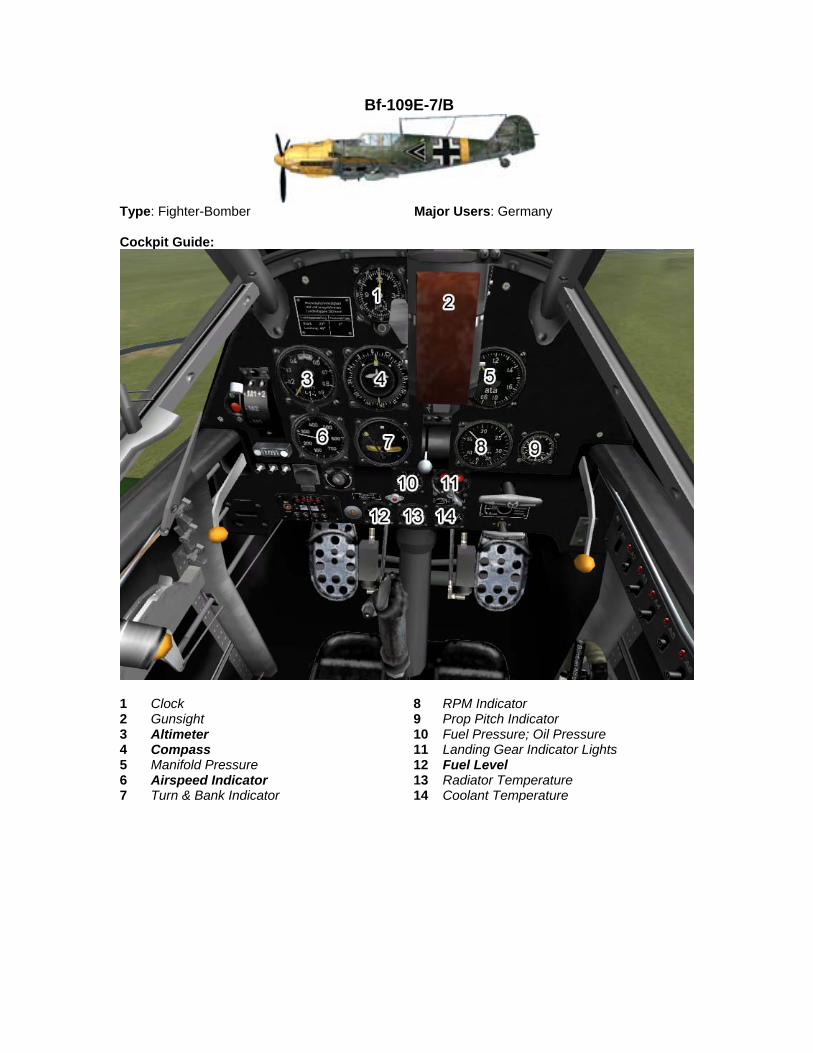
Bf-109E-7/B
Type: Fighter-Bomber Major Users: Germany Cockpit Guide:
1 Clock 8 RPM Indicator 2 Gunsight 9 Prop Pitch Indicator 3 Altimeter 10 Fuel Pressure; Oil Pressure 4 Compass 11 Landing Gear Indicator Lights 5 Manifold Pressure 12 Fuel Level 6 Airspeed Indicator 13 Radiator Temperature 7 Turn & Bank Indicator 14 Coolant Temperature
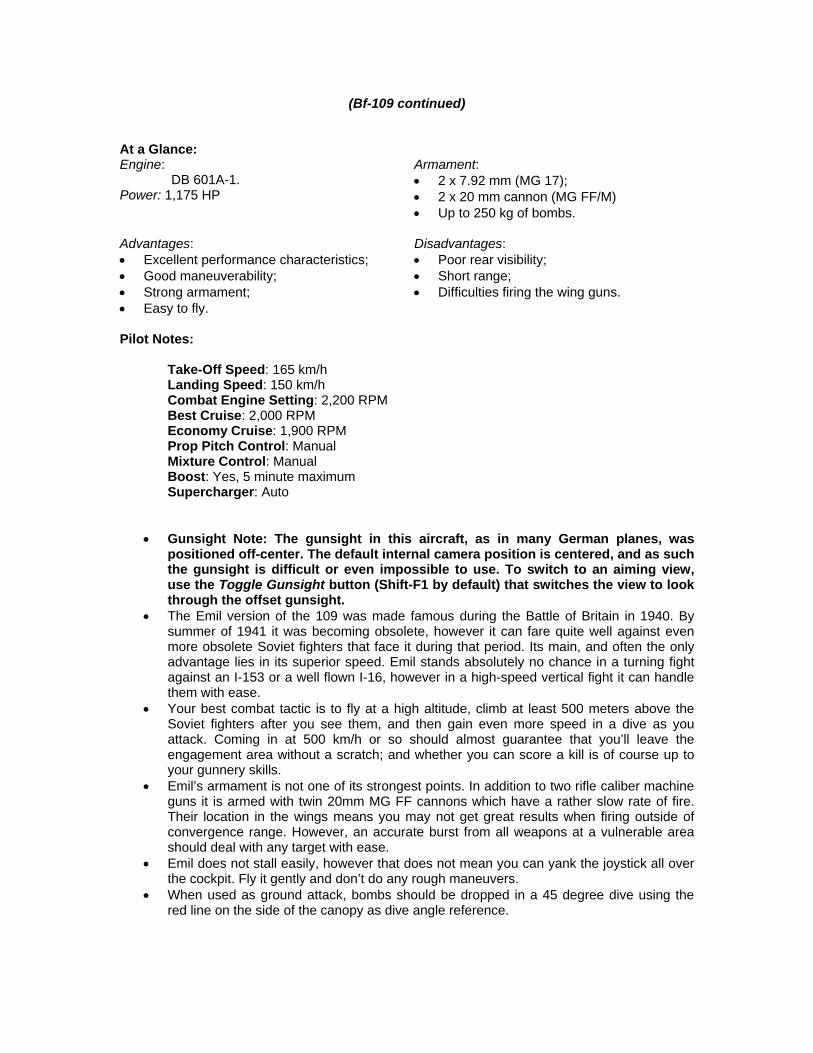
(Bf-109 continued)
At a Glance: Engine:
DB 601A-1. Power: 1,175 HP
Armament: • 2 x 7.92 mm (MG 17); • 2 x 20 mm cannon (MG FF/M) • Up to 250 kg of bombs.
Advantages: • Excellent performance characteristics; • Good maneuverability; • Strong armament; • Easy to fly.
Disadvantages: • Poor rear visibility; • Short range; • Difficulties firing the wing guns.
Pilot Notes:
Take-Off Speed: 165 km/h Landing Speed: 150 km/h Combat Engine Setting: 2,200 RPM Best Cruise: 2,000 RPM Economy Cruise: 1,900 RPM Prop Pitch Control: Manual Mixture Control: Manual Boost: Yes, 5 minute maximum Supercharger: Auto
• Gunsight Note: The gunsight in this aircraft, as in many German planes, was positioned off-center. The default internal camera position is centered, and as such the gunsight is difficult or even impossible to use. To switch to an aiming view, use the Toggle Gunsight button (Shift-F1 by default) that switches the view to look through the offset gunsight.
• The Emil version of the 109 was made famous during the Battle of Britain in 1940. By summer of 1941 it was becoming obsolete, however it can fare quite well against even more obsolete Soviet fighters that face it during that period. Its main, and often the only advantage lies in its superior speed. Emil stands absolutely no chance in a turning fight against an I-153 or a well flown I-16, however in a high-speed vertical fight it can handle them with ease.
• Your best combat tactic is to fly at a high altitude, climb at least 500 meters above the Soviet fighters after you see them, and then gain even more speed in a dive as you attack. Coming in at 500 km/h or so should almost guarantee that you’ll leave the engagement area without a scratch; and whether you can score a kill is of course up to your gunnery skills.
• Emil’s armament is not one of its strongest points. In addition to two rifle caliber machine guns it is armed with twin 20mm MG FF cannons which have a rather slow rate of fire. Their location in the wings means you may not get great results when firing outside of convergence range. However, an accurate burst from all weapons at a vulnerable area should deal with any target with ease.
• Emil does not stall easily, however that does not mean you can yank the joystick all over the cockpit. Fly it gently and don’t do any rough maneuvers.
• When used as ground attack, bombs should be dropped in a 45 degree dive using the red line on the side of the canopy as dive angle reference.
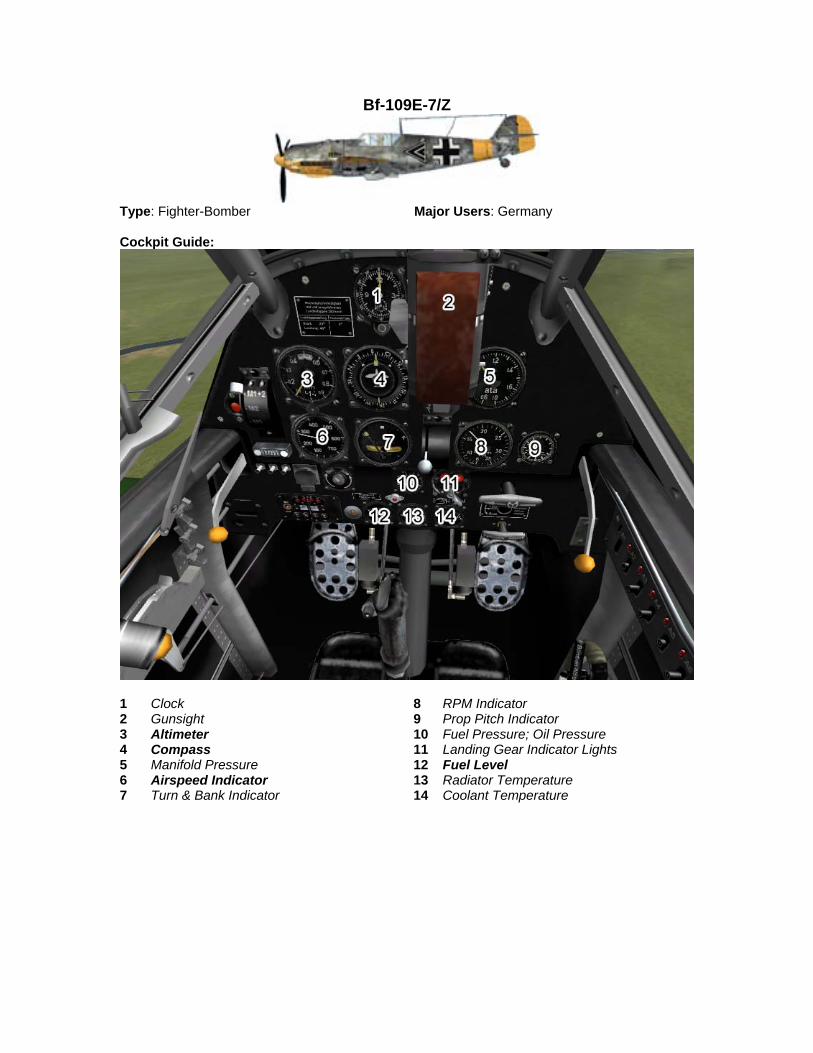
Bf-109E-7/Z
Type: Fighter-Bomber Major Users: Germany Cockpit Guide:
1 Clock 8 RPM Indicator 2 Gunsight 9 Prop Pitch Indicator 3 Altimeter 10 Fuel Pressure; Oil Pressure 4 Compass 11 Landing Gear Indicator Lights 5 Manifold Pressure 12 Fuel Level 6 Airspeed Indicator 13 Radiator Temperature 7 Turn & Bank Indicator 14 Coolant Temperature

(Bf-109 continued)
At a Glance: Engine:
DB 601A-1. Power: 1,175 HP
Armament: • 2 x 7.92 mm (MG 17); • 2 x 20 mm cannon (MG FF/M) • Up to 250 kg of bombs.
Advantages: • Excellent performance characteristics; • Good maneuverability; • Strong armament; • Easy to fly.
Disadvantages: • Poor rear visibility; • Short range; • Difficulties firing the wing guns.
Pilot Notes:
Take-Off Speed: 165 km/h Landing Speed: 150 km/h Combat Engine Setting: 2,200 RPM Best Cruise: 2,000 RPM Economy Cruise: 1,900 RPM Prop Pitch Control: Manual Mixture Control: Manual Boost: Yes, 5 minute maximum Supercharger: Auto
• Gunsight Note: The gunsight in this aircraft, as in many German planes, was positioned off-center. The default internal camera position is centered, and as such the gunsight is difficult or even impossible to use. To switch to an aiming view, use the Toggle Gunsight button (Shift-F1 by default) that switches the view to look through the offset gunsight.
• The Emil version of the 109 was made famous during the Battle of Britain in 1940. By summer of 1941 it was becoming obsolete, however it can fare quite well against even more obsolete Soviet fighters that face it during that period. Its main, and often the only advantage lies in its superior speed. Emil stands absolutely no chance in a turning fight against an I-153 or a well flown I-16, however in a high-speed vertical fight it can handle them with ease.
• Your best combat tactic is to fly at a high altitude, climb at least 500 meters above the Soviet fighters after you see them, and then gain even more speed in a dive as you attack. Coming in at 500 km/h or so should almost guarantee that you’ll leave the engagement area without a scratch; and whether you can score a kill is of course up to your gunnery skills.
• Emil’s armament is not one of its strongest points. In addition to two rifle caliber machine guns it is armed with twin 20mm MG FF cannons which have a rather slow rate of fire. Their location in the wings means you may not get great results when firing outside of convergence range. However, an accurate burst from all weapons at a vulnerable area should deal with any target with ease.
• Emil does not stall easily, however that does not mean you can yank the joystick all over the cockpit. Fly it gently and don’t do any rough maneuvers.
• When used as ground attack, bombs should be dropped in a 45 degree dive using the red line on the side of the canopy as dive angle reference.

Bf-109F-2
Type: Fighter Major Users: Germany Cockpit Guide:
1 Ammunition Counters 9 Magnetos 2 Clock 10 Landing Gear Indicator Lights 3 Altitimeter 11 Prop Pitch Indicator 4 Compass 12 Coolant Temperature 5 Manifold Pressure 13 Fuel Level Warning Light 6 Airspeed Indicator 14 Fuel Level 7 Turn & Bank Indicator 15 Fuel Pressure; Oil Pressure 8 RPM Indicator

(Bf-109 continued)
At a Glance: Engine:
DB 601H. Power: 1,200 HP
Armament: • 2 x 7.92mm (MG 17) • 1 x 15 mm (MG 151/15)
Advantages: • Excellent performance characteristics; • Good maneuverability; • Adequate armament; • Easy to fly.
Disadvantages: • Poor rear visibility; • Short range; • Weaker armament compared to the 109E.
Pilot Notes:
Take-Off Speed: 170 km/h Landing Speed: 155 km/h Combat Engine Setting: 2,500 RPM Best Cruise: 2,100 RPM Economy Cruise: 2,000 RPM Prop Pitch Control: Auto/Manual Mixture Control: Manual Boost: No Supercharger: Auto
• Gunsight Note: The gunsight in this aircraft, as in many German planes, was positioned off-center. The default internal camera position is centered, and as such the gunsight is difficult or even impossible to use. To switch to an aiming view, use the Toggle Gunsight button (Shift-F1 by default) that switches the view to look through the offset gunsight.
• Bf-109F is a highly improved version of the Emil. You can really feel the added power and reduced drag; Franz is almost 100 km/h faster. Capable pilots can dogfight most Soviet planes even in high-G turning fights, however the easiest way to win is still by keeping your airspeed up. Few 1941 and 1942 Soviet planes can achieve 500 km/h in level flight, and their acceleration above 400 km/h is really inferior to that of your 109F. So keep your airspeed up, fly higher than the Soviets and you can come down on them time after time with almost absolute impunity.
• The armament on the Franz however is not very good. F-2 is armed with a single 15mm, and F-4 with a single 20mm nose cannon. While its location in the nose makes aiming from any distance very easy, its slow rate of fire and rather small caliber often make their effects less than perfect. Much more so than with any other plane you should take care to aim at a vulnerable spot – cockpit, engine, fuel tank – to bring down your target in one burst.
• 109 is not a very stable gunnery platform under 350 km/h and you may find your aim getting thrown off and your rounds scattering too much when firing at slow speeds. Accelerate to 350 km/h or more and your bursts should be much more accurate.
• It’s very hard to stall or spin the Franz but that certainly has been done by some less capable pilots who were too rough with their crate.

Bf-109F-4
Type: Fighter Major Users: Germany Cockpit Guide:
1 Ammunition Counters 9 Magnetos 2 Clock 10 Landing Gear Indicator Lights 3 Altitimeter 11 Prop Pitch Indicator 4 Compass 12 Coolant Temperature 5 Manifold Pressure 13 Fuel Level Warning Light 6 Airspeed Indicator 14 Fuel Level 7 Turn & Bank Indicator 15 Fuel Pressure; Oil Pressure 8 RPM Indicator

(Bf-109 continued)
At a Glance: Engine:
DB 601H. Power: 1,200 HP
Armament: • 2 x 7.92mm (MG 17) • 1 x 20 mm (MG 151/20)
Advantages: • Excellent performance characteristics; • Good maneuverability; • Adequate armament; • Easy to fly.
Disadvantages: • Poor rear visibility; • Short range.
Pilot Notes:
Take-Off Speed: 170 km/h Landing Speed: 155 km/h Combat Engine Setting: 2,500 RPM Best Cruise: 2,100 RPM Economy Cruise: 2,000 RPM Prop Pitch Control: Auto/Manual Mixture Control: Manual Boost: No Supercharger: Auto
• Gunsight Note: The gunsight in this aircraft, as in many German planes, was positioned off-center. The default internal camera position is centered, and as such the gunsight is difficult or even impossible to use. To switch to an aiming view, use the Toggle Gunsight button (Shift-F1 by default) that switches the view to look through the offset gunsight.
• Bf-109F is a highly improved version of the Emil. You can really feel the added power and reduced drag; Franz is almost 100 km/h faster. Capable pilots can dogfight most Soviet planes even in high-G turning fights, however the easiest way to win is still by keeping your airspeed up. Few 1941 and 1942 Soviet planes can achieve 500 km/h in level flight, and their acceleration above 400 km/h is really inferior to that of your 109F. So keep your airspeed up, fly higher than the Soviets and you can come down on them time after time with almost absolute impunity.
• The armament on the Franz however is not very good. F-2 is armed with a single 15mm, and F-4 with a single 20mm nose cannon. While its location in the nose makes aiming from any distance very easy, its slow rate of fire and rather small caliber often make their effects less than perfect. Much more so than with any other plane you should take care to aim at a vulnerable spot – cockpit, engine, fuel tank – to bring down your target in one burst.
• 109 is not a very stable gunnery platform under 350 km/h and you may find your aim getting thrown off and your rounds scattering too much when firing at slow speeds. Accelerate to 350 km/h or more and your bursts should be much more accurate.
• It’s very hard to stall or spin the Franz but that certainly has been done by some less capable pilots who were too rough with their crate.
Bf-109G-2
Type: Fighter Major Users: Germany Cockpit Guide:
1 Ammunition Counters 9 Magnetos 2 Clock 10 Landing Gear Indicator Lights 3 Compass 11 Prop Pitch Indicator 4 Turn & Bank Indicator 12 Coolant Temperature 5 Manifold Pressure 13 Fuel Level Warning Light 6 Altimeter 14 Fuel Level 7 Airspeed Indicator 15 Fuel Pressure; Oil Pressure 8 RPM Indicator
(Bf-109 continued)
At a Glance: Engine:
DB 605A-1. Power:
Indicated: 1,355 HP Take-off: 1,475 HP
Armament: • 2 x 7.92 mm (MG 17) • 1 x 20 mm (MG 151/20)
Advantages: • Excellent maneuverability and acceleration; • Excellent overall performance; • Strong armament; • Easy to fly.
Disadvantages: • Poor rear visibility; • Heavier construction; • Short range.
Pilot Notes:
Take-Off Speed: 170 km/h Landing Speed: 155 km/h Combat Engine Setting: 2,500 RPM Best Cruise: 2,100 RPM Economy Cruise: 2,000 RPM Prop Pitch Control: Auto/ Manual Mixture Control: Manual Boost: No Supercharger: Auto
• Gunsight Note: The gunsight in this aircraft, as in many German planes, was positioned off-center. The default internal camera position is centered, and as such the gunsight is difficult or even impossible to use. To switch to an aiming view, use the Toggle Gunsight button (Shift-F1 by default) that switches the view to look through the offset gunsight.
• The Gustav model of the 109 shows an incredible ability to keep the fighter’s design a step ahead of most contemporary enemy planes. With the possible exception of the 1943 G-6, you will never feel inferior to any contemporary enemy fighter in your new 109 model. The same engagement strategies apply here as to the Franz and Emil. Feel free to enter an angles fight with the enemy if you feel confident enough. If you’re looking for an easy victory, stay above 450 km/h in a fight and attack the enemy in 500 km/h+ dives and you should be able to defeat almost any opponent.
• 109’s armament is always enough to bring down a fighter, but can sometimes be a bit insufficient against better armored bombers like the IL-2. When you know you’ll have to face targets like that make sure to grab underwing gun pods, or a 30mm MK-108 cannon in the nose. With the gunpods or the MK-108 you will bring down any target with a single accurate burst.
• 109 is not a very stable gunnery platform under 350 km/h and you may find your aim getting thrown off and your rounds scattering too much when firing at slow speeds. Accelerate to 350 km/h or more and your bursts should be much more accurate.
• It’s very hard to stall or spin the 109 but that certainly has been done by some less capable pilots who were too rough with their crate.
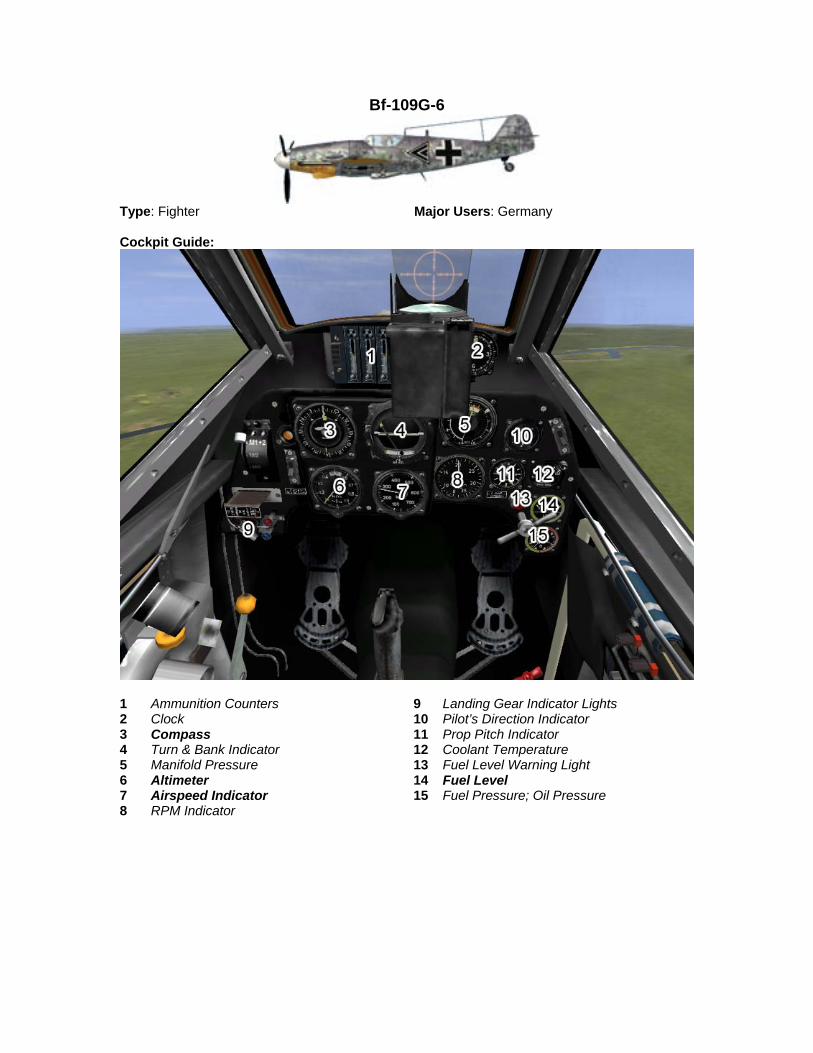
Bf-109G-6
Type: Fighter Major Users: Germany Cockpit Guide:
1 Ammunition Counters 9 Landing Gear Indicator Lights 2 Clock 10 Pilot’s Direction Indicator 3 Compass 11 Prop Pitch Indicator 4 Turn & Bank Indicator 12 Coolant Temperature 5 Manifold Pressure 13 Fuel Level Warning Light 6 Altimeter 14 Fuel Level 7 Airspeed Indicator 15 Fuel Pressure; Oil Pressure 8 RPM Indicator
(Bf-109 continued)
At a Glance: Engine:
DB 605A-1. Power:
Indicated: 1,300 HP Take-off : 1,550 HP
Armament: • 2 x 13 mm (MG 131). • 1 x 20 mm (MG 151/20)
or • 1 x 30 mm (MG 108).
Advantages: • Strong armament; • Good cockpit visibility; • Easy to fly.
Disadvantages: • Poor speed characteristics; • Heavier construction; • Short range.
Pilot Notes:
Take-Off Speed: 170 km/h Landing Speed: 155 km/h Combat Engine Setting: 2,500 RPM Best Cruise: 2,100 RPM Economy Cruise: 2,000 RPM Prop Pitch Control: Auto/ Manual Mixture Control: Manual Boost: No Supercharger: Auto
• Gunsight Note: The gunsight in this aircraft, as in many German planes, was positioned off-center. The default internal camera position is centered, and as such the gunsight is difficult or even impossible to use. To switch to an aiming view, use the Toggle Gunsight button (Shift-F1 by default) that switches the view to look through the offset gunsight.
• The Gustav model of the 109 shows an incredible ability to keep the fighter’s design a step ahead of most contemporary enemy planes. With the possible exception of the 1943 G-6, you will never feel inferior to any contemporary enemy fighter in your new 109 model. The same engagement strategies apply here as to the Franz and Emil. Feel free to enter an angles fight with the enemy if you feel confident enough. If you’re looking for an easy victory, stay above 450 km/h in a fight and attack the enemy in 500 km/h+ dives and you should be able to defeat almost any opponent.
• 109’s armament is always enough to bring down a fighter, but can sometimes be a bit insufficient against better armored bombers like the IL-2. When you know you’ll have to face targets like that make sure to grab underwing gun pods, or a 30mm MK-108 cannon in the nose. With the gunpods or the MK-108 you will bring down any target with a single accurate burst.
• 109 is not a very stable gunnery platform under 350 km/h and you may find your aim getting thrown off and your rounds scattering too much when firing at slow speeds. Accelerate to 350 km/h or more and your bursts should be much more accurate.
• It’s very hard to stall or spin the 109 but that certainly has been done by some less capable pilots who were too rough with their crate.

Bf-109G-6 Late
Type: Fighter Major Users: Germany Cockpit Guide:
1 Ammunition Counters 9 Landing Gear Indicator Lights 2 Clock 10 Pilot’s Direction Indicator 3 Compass 11 Prop Pitch Indicator 4 Turn & Bank Indicator 12 Coolant Temperature 5 Manifold Pressure 13 Fuel Level Warning Light 6 Altimeter 14 Fuel Level 7 Airspeed Indicator 15 Fuel Pressure; Oil Pressure 8 RPM Indicator

(Bf-109 continued)
At a Glance: Engine:
DB 605A-1. Power:
Indicated: 1,300 HP; Take-off : 1,550 HP
Armament: • 2 x 13 mm (MG 131). • 1 x 20 mm (MG 151/20)
or • 1 x 30 mm (MG 108).
Advantages: • Strong armament; • Good cockpit visibility; • Easy to fly.
Disadvantages: • Poor speed characteristics; • Wooden tail unit; • Short range.
Pilot Notes:
Take-Off Speed: 170 km/h Landing Speed: 155 km/h Combat Engine Setting: 2,500 RPM Best Cruise: 2,100 RPM Economy Cruise: 2,000 RPM Prop Pitch Control: Auto/ Manual Mixture Control: Manual Boost: No Supercharger: Auto
• Gunsight Note: The gunsight in this aircraft, as in many German planes, was positioned off-center. The default internal camera position is centered, and as such the gunsight is difficult or even impossible to use. To switch to an aiming view, use the Toggle Gunsight button (Shift-F1 by default) that switches the view to look through the offset gunsight.
• The Gustav model of the 109 shows an incredible ability to keep the fighter’s design a step ahead of most contemporary enemy planes. With the possible exception of the 1943 G-6, you will never feel inferior to any contemporary enemy fighter in your new 109 model. The same engagement strategies apply here as to the Franz and Emil. Feel free to enter an angles fight with the enemy if you feel confident enough. If you’re looking for an easy victory, stay above 450 km/h in a fight and attack the enemy in 500 km/h+ dives and you should be able to defeat almost any opponent.
• 109’s armament is always enough to bring down a fighter, but can sometimes be a bit insufficient against better armored bombers like the IL-2. When you know you’ll have to face targets like that make sure to grab underwing gun pods, or a 30mm MK-108 cannon in the nose. With the gunpods or the MK-108 you will bring down any target with a single accurate burst.
• 109 is not a very stable gunnery platform under 350 km/h and you may find your aim getting thrown off and your rounds scattering too much when firing at slow speeds. Accelerate to 350 km/h or more and your bursts should be much more accurate.
• It’s very hard to stall or spin the 109 but that certainly has been done by some less capable pilots who were too rough with their crate.

Bf-109G-6AS
Type: Fighter Major Users: Germany Cockpit Guide:
1 Ammunition Counters 9 Landing Gear Indicator Lights 2 Clock 10 Pilot’s Direction Indicator 3 Compass 11 Prop Pitch Indicator 4 Turn & Bank Indicator 12 Coolant Temperature 5 Manifold Pressure 13 Fuel Level Warning Light 6 Altimeter 14 Fuel Level 7 Airspeed Indicator 15 Fuel Pressure; Oil Pressure 8 RPM Indicator

(Bf-109 continued)
At a Glance: Engine:
DB 605ASM. Power:
Indicated: 1,300 HP; Take-off : 2,000 HP
Armament: • 2 x 13 mm (MG 131). • 1 x 20 mm (MG 151/20)
or • 1 x 30 mm (MG 108).
Advantages: • Excellent performance characteristics; • Strong armament; • Good cockpit visibility; • Easy to fly.
Disadvantages: • Poor engine durability; • Short range.
Pilot Notes:
Take-Off Speed: 170 km/h Landing Speed: 155 km/h Combat Engine Setting: 2,500 RPM Best Cruise: 2,100 RPM Economy Cruise: 2,000 RPM Prop Pitch Control: Auto/ Manual Mixture Control: Manual Boost: No Supercharger: Auto
• Gunsight Note: The gunsight in this aircraft, as in many German planes, was positioned off-center. The default internal camera position is centered, and as such the gunsight is difficult or even impossible to use. To switch to an aiming view, use the Toggle Gunsight button (Shift-F1 by default) that switches the view to look through the offset gunsight.
• The Gustav model of the 109 shows an incredible ability to keep the fighter’s design a step ahead of most contemporary enemy planes. With the possible exception of the 1943 G-6, you will never feel inferior to any contemporary enemy fighter in your new 109 model. The same engagement strategies apply here as to the Franz and Emil. Feel free to enter an angles fight with the enemy if you feel confident enough. If you’re looking for an easy victory, stay above 450 km/h in a fight and attack the enemy in 500 km/h+ dives and you should be able to defeat almost any opponent.
• 109’s armament is always enough to bring down a fighter, but can sometimes be a bit insufficient against better armored bombers like the IL-2. When you know you’ll have to face targets like that make sure to grab underwing gun pods, or a 30mm MK-108 cannon in the nose. With the gunpods or the MK-108 you will bring down any target with a single accurate burst.
• 109 is not a very stable gunnery platform under 350 km/h and you may find your aim getting thrown off and your rounds scattering too much when firing at slow speeds. Accelerate to 350 km/h or more and your bursts should be much more accurate.
• It’s very hard to stall or spin the 109 but that certainly has been done by some less capable pilots who were too rough with their crate.
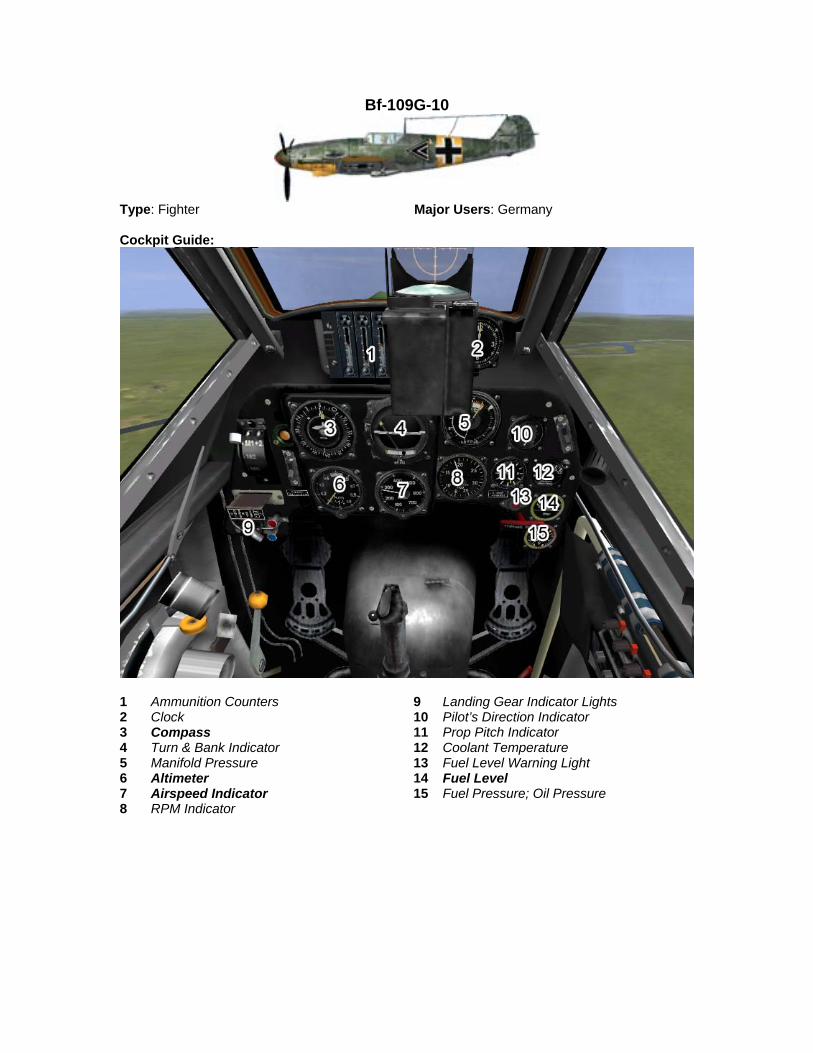
Bf-109G-10
Type: Fighter Major Users: Germany Cockpit Guide:
1 Ammunition Counters 9 Landing Gear Indicator Lights 2 Clock 10 Pilot’s Direction Indicator 3 Compass 11 Prop Pitch Indicator 4 Turn & Bank Indicator 12 Coolant Temperature 5 Manifold Pressure 13 Fuel Level Warning Light 6 Altimeter 14 Fuel Level 7 Airspeed Indicator 15 Fuel Pressure; Oil Pressure 8 RPM Indicator

(Bf-109 continued)
At a Glance: Engine:
DB 605 D. Power:
Take-off : 1,800 HP
Armament: • 2 x 13 mm (MG 131). • 1 x 30 mm cannon (MK 108).
Advantages: • Excellent performance characteristics; • Strong armament; • Good cockpit visibility; • Easy to fly.
Disadvantages: • Poor engine durability; • Short range; • Deteriorating war conditions leading to
poor manufacturing quality. Pilot Notes:
Take-Off Speed: 170 km/h Landing Speed: 155 km/h Combat Engine Setting: 2,500 RPM Best Cruise: 2,100 RPM Economy Cruise: 2,000 RPM Prop Pitch Control: Auto/ Manual Mixture Control: Manual Boost: No Supercharger: Auto
• Gunsight Note: The gunsight in this aircraft, as in many German planes, was positioned off-center. The default internal camera position is centered, and as such the gunsight is difficult or even impossible to use. To switch to an aiming view, use the Toggle Gunsight button (Shift-F1 by default) that switches the view to look through the offset gunsight.
• The Gustav model of the 109 shows an incredible ability to keep the fighter’s design a step ahead of most contemporary enemy planes. With the possible exception of the 1943 G-6, you will never feel inferior to any contemporary enemy fighter in your new 109 model. The same engagement strategies apply here as to the Franz and Emil. Feel free to enter an angles fight with the enemy if you feel confident enough. If you’re looking for an easy victory, stay above 450 km/h in a fight and attack the enemy in 500 km/h+ dives and you should be able to defeat almost any opponent.
• 109’s armament is always enough to bring down a fighter, but can sometimes be a bit insufficient against better armored bombers like the IL-2. When you know you’ll have to face targets like that make sure to grab underwing gun pods, or a 30mm MK-108 cannon in the nose. With the gunpods or the MK-108 you will bring down any target with a single accurate burst.
• 109 is not a very stable gunnery platform under 350 km/h and you may find your aim getting thrown off and your rounds scattering too much when firing at slow speeds. Accelerate to 350 km/h or more and your bursts should be much more accurate.
• It’s very hard to stall or spin the 109 but that certainly has been done by some less capable pilots who were too rough with their crate.

Bf-109G-14
Type: Fighter Major Users: Germany Cockpit Guide:
1 Ammunition Counters 11 Pilot’s Direction Indicator 2 Clock 12 Prop Pitch Indicator 3 Compass 13 Coolant Temperature 4 Turn & Bank Indicator 14 Fuel Level Warning Light 5 Manifold Pressure 15 Fuel Level 6 Altimeter 16 Fuel Pressure; Oil Pressure 7 Airspeed Indicator 17 MW-50 Indicator 8 RPM Indicator 18 Oxygen Pressure 9 Magnetos 19 Oxygen Quantity 10 Landing Gear Indicator Lights
(Bf-109 continued)
At a Glance: Engine:
DB 605AM or
DB 605ASM Power:
Indicated: 1,425 HP Take-off: 1,800 HP
Armament: • 2 x 13mm (MG 131) • 1 x 30mm (MK 108)
Advantages: • Excellent performance characteristics; • Strong armament; • Good cockpit visibility; • Easy to fly.
Disadvantages: • Poor engine durability; • Short range; • Deteriorating war conditions leading to
poor manufacturing quality. Pilot Notes:
Take-Off Speed: 170 km/h Landing Speed: 155 km/h Combat Engine Setting: 2,500 RPM Best Cruise: 2,100 RPM Economy Cruise: 2,000 RPM Prop Pitch Control: Auto/ Manual Mixture Control: Manual Boost: No Supercharger: Auto
• Gunsight Note: The gunsight in this aircraft, as in many German planes, was positioned off-center. The default internal camera position is centered, and as such the gunsight is difficult or even impossible to use. To switch to an aiming view, use the Toggle Gunsight button (Shift-F1 by default) that switches the view to look through the offset gunsight.
• The Gustav model of the 109 shows an incredible ability to keep the fighter’s design a step ahead of most contemporary enemy planes. With the possible exception of the 1943 G-6, you will never feel inferior to any contemporary enemy fighter in your new 109 model. The same engagement strategies apply here as to the Franz and Emil. Feel free to enter an angles fight with the enemy if you feel confident enough. If you’re looking for an easy victory, stay above 450 km/h in a fight and attack the enemy in 500 km/h+ dives and you should be able to defeat almost any opponent.
• 109’s armament is always enough to bring down a fighter, but can sometimes be a bit insufficient against better armored bombers like the IL-2. When you know you’ll have to face targets like that make sure to grab underwing gun pods, or a 30mm MK-108 cannon in the nose. With the gunpods or the MK-108 you will bring down any target with a single accurate burst.
• 109 is not a very stable gunnery platform under 350 km/h and you may find your aim getting thrown off and your rounds scattering too much when firing at slow speeds. Accelerate to 350 km/h or more and your bursts should be much more accurate.
• It’s very hard to stall or spin the 109 but that certainly has been done by some less capable pilots who were too rough with their crate.

Bf-109K-4
Type: Fighter Major Users: Germany Cockpit Guide:
1 Ammunition Counters 12 RPM Indicator 2 MW-50 Pressure 13 Manifold Pressure 3 Airspeed Indicator 14 Coolant Temperature 4 Turn & Bank Indicator 15 Oil Temperature 5 Variometer 16 Prop Pitch Indicator 6 Altimeter 17 Fuel Level 7 Compass 18 MW-50 Indicator 8 Pilot’s Direction Indicator 19 Oxygen Flow Indicator 9 Clock 20 Oxygen Quantity 10 Landing Gear Indicator Lights 21 Fuel Level Warning Light 11 Fuel Pressure; Oil Pressure

(Bf-109 continued)
At a Glance: Engine:
DB 605 D. Power:
Take-off : 1,800 HP
Armament: • 2 x 13 mm (MG 131). • 1 x 30 mm cannon (MK 108).
Advantages: • Excellent performance characteristics; • Strong armament; • Good cockpit visibility; • Easy to fly.
Disadvantages: • Poor engine durability; • Short range; • Deteriorating war conditions leading to
poor manufacturing quality. Pilot Notes:
Take-Off Speed: 170 km/h Landing Speed: 155 km/h Combat Engine Setting: 2,500 RPM Best Cruise: 2,100 RPM Economy Cruise: 2,000 RPM Prop Pitch Control: Auto/ Manual Mixture Control: Manual Boost: No Supercharger: Auto
• Gunsight Note: The gunsight in this aircraft, as in many German planes, was positioned off-center. The default internal camera position is centered, and as such the gunsight is difficult or even impossible to use. To switch to an aiming view, use the Toggle Gunsight button (Shift-F1 by default) that switches the view to look through the offset gunsight.
• The Gustav model of the 109 shows an incredible ability to keep the fighter’s design a step ahead of most contemporary enemy planes. With the possible exception of the 1943 G-6, you will never feel inferior to any contemporary enemy fighter in your new 109 model. The same engagement strategies apply here as to the Franz and Emil. Feel free to enter an angles fight with the enemy if you feel confident enough. If you’re looking for an easy victory, stay above 450 km/h in a fight and attack the enemy in 500 km/h+ dives and you should be able to defeat almost any opponent.
• 109’s armament is always enough to bring down a fighter, but can sometimes be a bit insufficient against better armored bombers like the IL-2. When you know you’ll have to face targets like that make sure to grab underwing gun pods, or a 30mm MK-108 cannon in the nose. With the gunpods or the MK-108 you will bring down any target with a single accurate burst.
• 109 is not a very stable gunnery platform under 350 km/h and you may find your aim getting thrown off and your rounds scattering too much when firing at slow speeds. Accelerate to 350 km/h or more and your bursts should be much more accurate.
• It’s very hard to stall or spin the 109 but that certainly has been done by some less capable pilots who were too rough with their crate.
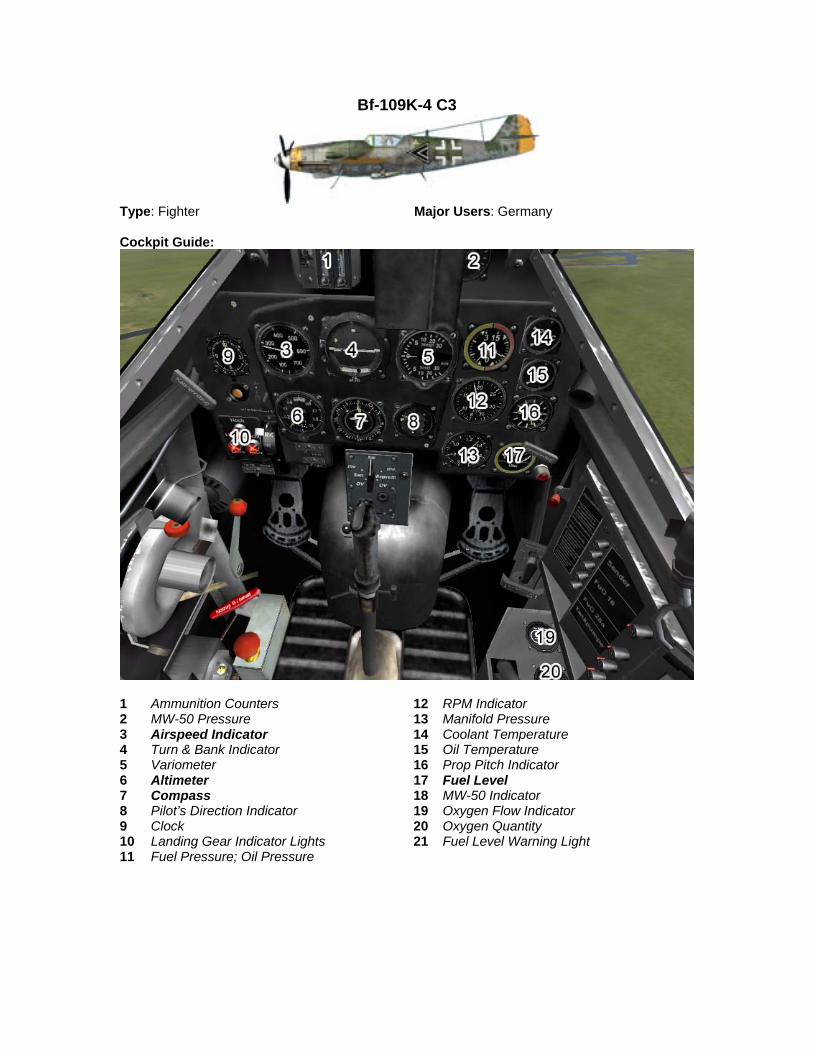
Bf-109K-4 C3
Type: Fighter Major Users: Germany Cockpit Guide:
1 Ammunition Counters 12 RPM Indicator 2 MW-50 Pressure 13 Manifold Pressure 3 Airspeed Indicator 14 Coolant Temperature 4 Turn & Bank Indicator 15 Oil Temperature 5 Variometer 16 Prop Pitch Indicator 6 Altimeter 17 Fuel Level 7 Compass 18 MW-50 Indicator 8 Pilot’s Direction Indicator 19 Oxygen Flow Indicator 9 Clock 20 Oxygen Quantity 10 Landing Gear Indicator Lights 21 Fuel Level Warning Light 11 Fuel Pressure; Oil Pressure

(Bf-109 continued)
At a Glance: Engine:
DB 605 D. Power:
Take-off : 1,800 HP
Armament: • 2 x 13 mm (MG 131). • 1 x 30 mm cannon (MK 108).
Advantages: • Excellent performance characteristics; • Strong armament; • Good cockpit visibility; • Easy to fly.
Disadvantages: • Poor engine durability; • Short range; • Deteriorating war conditions leading to
poor manufacturing quality. Pilot Notes:
Take-Off Speed: 170 km/h Landing Speed: 155 km/h Combat Engine Setting: 2,500 RPM Best Cruise: 2,100 RPM Economy Cruise: 2,000 RPM Prop Pitch Control: Auto/ Manual Mixture Control: Manual Boost: No Supercharger: Auto
• Gunsight Note: The gunsight in this aircraft, as in many German planes, was positioned off-center. The default internal camera position is centered, and as such the gunsight is difficult or even impossible to use. To switch to an aiming view, use the Toggle Gunsight button (Shift-F1 by default) that switches the view to look through the offset gunsight.
• The Gustav model of the 109 shows an incredible ability to keep the fighter’s design a step ahead of most contemporary enemy planes. With the possible exception of the 1943 G-6, you will never feel inferior to any contemporary enemy fighter in your new 109 model. The same engagement strategies apply here as to the Franz and Emil. Feel free to enter an angles fight with the enemy if you feel confident enough. If you’re looking for an easy victory, stay above 450 km/h in a fight and attack the enemy in 500 km/h+ dives and you should be able to defeat almost any opponent.
• 109’s armament is always enough to bring down a fighter, but can sometimes be a bit insufficient against better armored bombers like the IL-2. When you know you’ll have to face targets like that make sure to grab underwing gun pods, or a 30mm MK-108 cannon in the nose. With the gunpods or the MK-108 you will bring down any target with a single accurate burst.
• 109 is not a very stable gunnery platform under 350 km/h and you may find your aim getting thrown off and your rounds scattering too much when firing at slow speeds. Accelerate to 350 km/h or more and your bursts should be much more accurate.
• It’s very hard to stall or spin the 109 but that certainly has been done by some less capable pilots who were too rough with their crate.
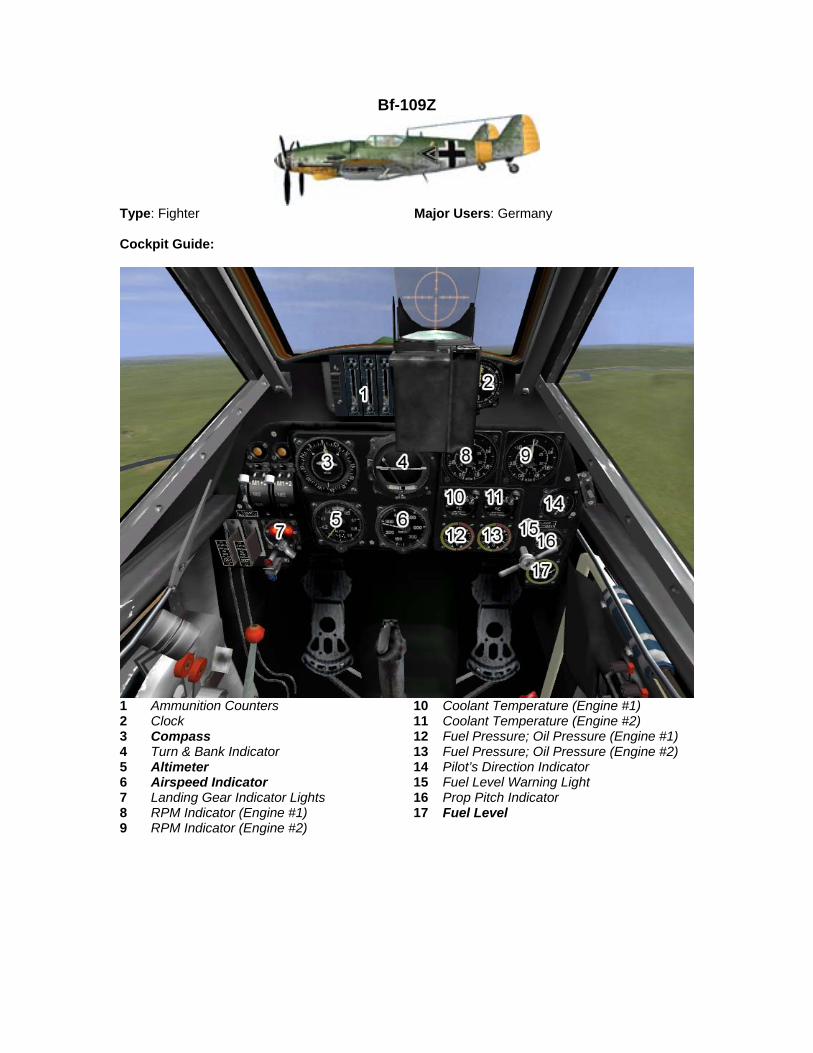
Bf-109Z
Type: Fighter Major Users: Germany Cockpit Guide:
1 Ammunition Counters 10 Coolant Temperature (Engine #1) 2 Clock 11 Coolant Temperature (Engine #2) 3 Compass 12 Fuel Pressure; Oil Pressure (Engine #1) 4 Turn & Bank Indicator 13 Fuel Pressure; Oil Pressure (Engine #2) 5 Altimeter 14 Pilot’s Direction Indicator 6 Airspeed Indicator 15 Fuel Level Warning Light 7 Landing Gear Indicator Lights 16 Prop Pitch Indicator 8 RPM Indicator (Engine #1) 17 Fuel Level 9 RPM Indicator (Engine #2)

(Bf-109 continued)
At a Glance: Engine:
2 x DB 605A-1. Power:
Indicated: 2 x 1,355 HP; Take-off : 2 x 1,475 HP
Armament: • 4 x 30 mm (Mk 108). • 1 x 30 mm (Mk 103).
Advantages: • Strong armament; • Good cockpit visibility;
Disadvantages: • Poor speed characteristics; • Short range. • Sub-standard maneuvrability

Bf-110G-2
Type: Fighter-Bomber Major Users: Germany Cockpit Guide:
1 Clock 17 Altimeter 2 Pilot’s Direction Indicator 18 RPM Indicator (Engine #1) 3 Ammunition Counters 19 RPM Indicator (Engine #2) 4 Ammunition Warning Light (Right) 20 Coolant Temperature (Engine #1) 5 Ammunition Warning Light (Left) 21 Fuel Level 6 Landing Gear Indicator Lights 22 Coolant Temperature (Engine #2) 7 Compass 23 Manifold Pressure (Engine #1) 8 Internal System Indicator 24 Manifold Pressure (Engine #2) 9 Turn & Bank Indicator 25 Air Pressure 10 Variometer 26 Oxygen Flow Indicator 11 Altitude above Ground 27 Oxygen Pressure 12 System Switch 28 Fuel Level Warning Light (Left Front) 13 Free Air Temperature 29 Fuel Level Warning Light (Left Rear) 14 Compass 30 Fuel Level Warning Light (Right Front) 15 Artificial Horizon 30 Fuel Level Warning Light (Right Rear) 16 Airspeed Indicator
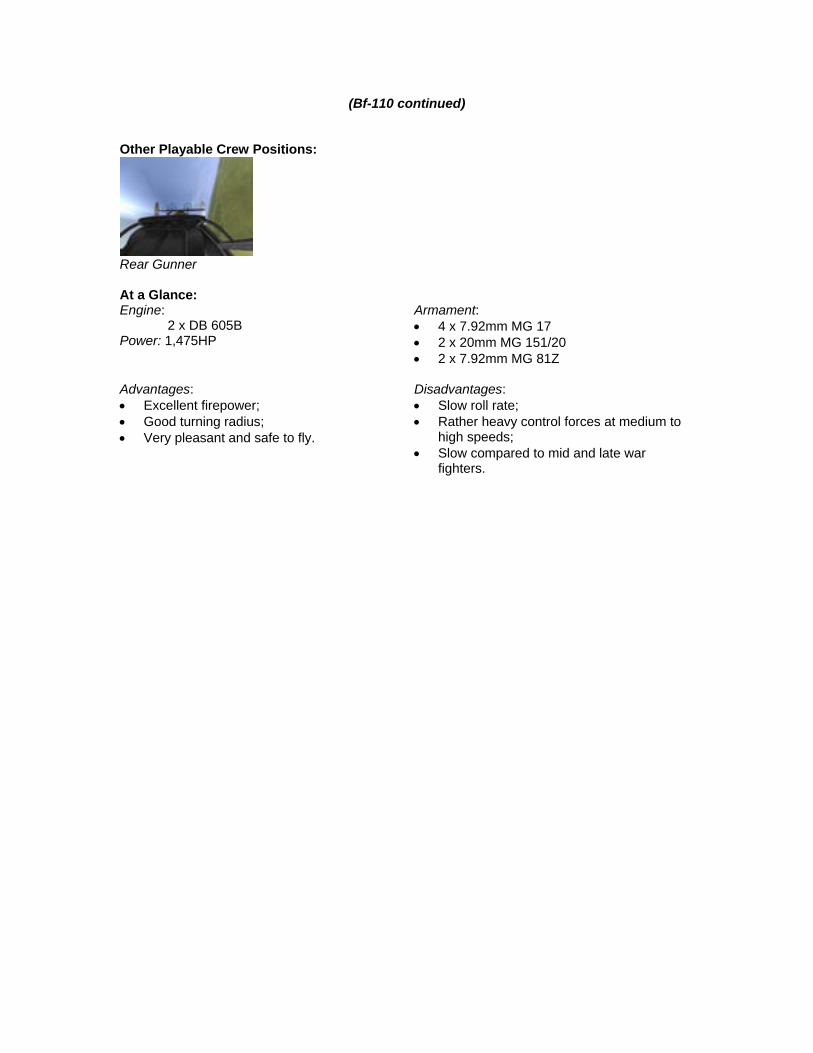
(Bf-110 continued)
Other Playable Crew Positions:
Rear Gunner At a Glance: Engine:
2 x DB 605B Power: 1,475HP
Armament: • 4 x 7.92mm MG 17 • 2 x 20mm MG 151/20 • 2 x 7.92mm MG 81Z
Advantages: • Excellent firepower; • Good turning radius; • Very pleasant and safe to fly.
Disadvantages: • Slow roll rate; • Rather heavy control forces at medium to
high speeds; • Slow compared to mid and late war
fighters.
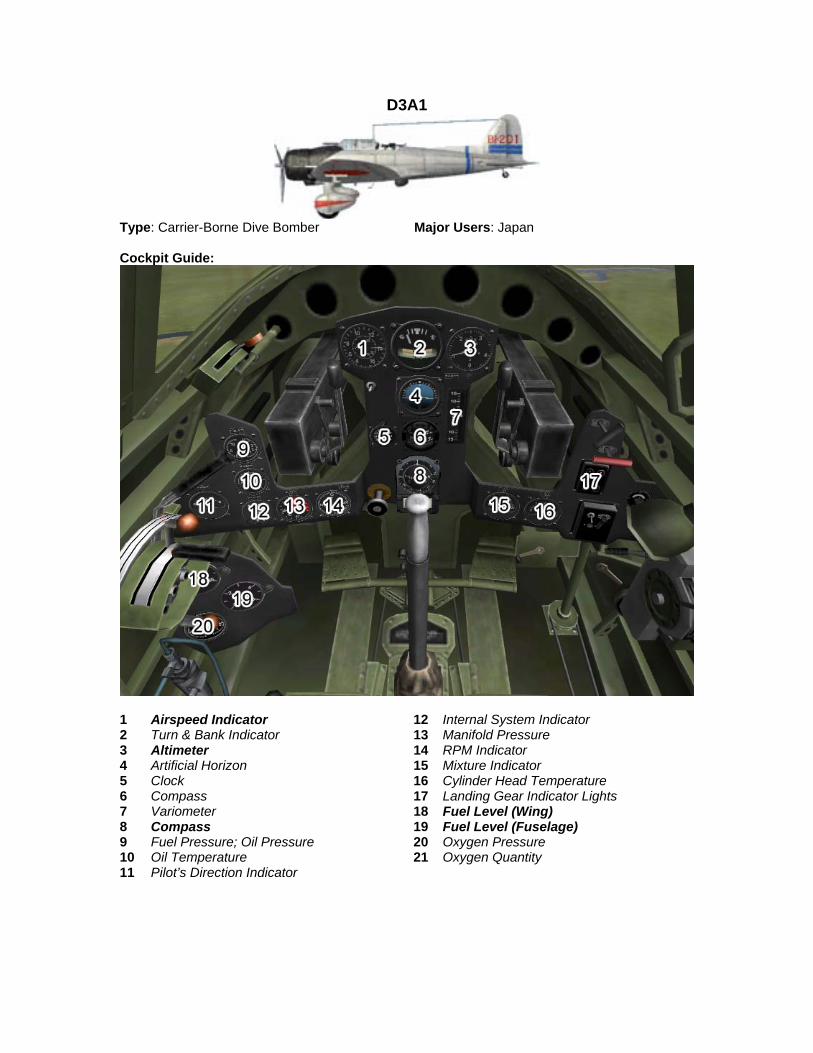
D3A1
Type: Carrier-Borne Dive Bomber Major Users: Japan Cockpit Guide:
1 Airspeed Indicator 12 Internal System Indicator 2 Turn & Bank Indicator 13 Manifold Pressure 3 Altimeter 14 RPM Indicator 4 Artificial Horizon 15 Mixture Indicator 5 Clock 16 Cylinder Head Temperature 6 Compass 17 Landing Gear Indicator Lights 7 Variometer 18 Fuel Level (Wing) 8 Compass 19 Fuel Level (Fuselage) 9 Fuel Pressure; Oil Pressure 20 Oxygen Pressure 10 Oil Temperature 21 Oxygen Quantity 11 Pilot’s Direction Indicator

(D3A1 continued)
Other Playable Crew Positions:
Rear Gunner At a Glance: Engine:
1 x Kinsei-44 Power: 1,075 HP
Armament: • 2 x Type 97 7.7mm machine guns
(forward) • 1 x Type 92 7.77 machine gun (rear) • Up to 370 kg of bombs
Advantages: • Stable gun platform; • Allows for precise dive bombing; • Long range.
Disadvantages: • Poor crew protection; • Low durability; • Low speed.
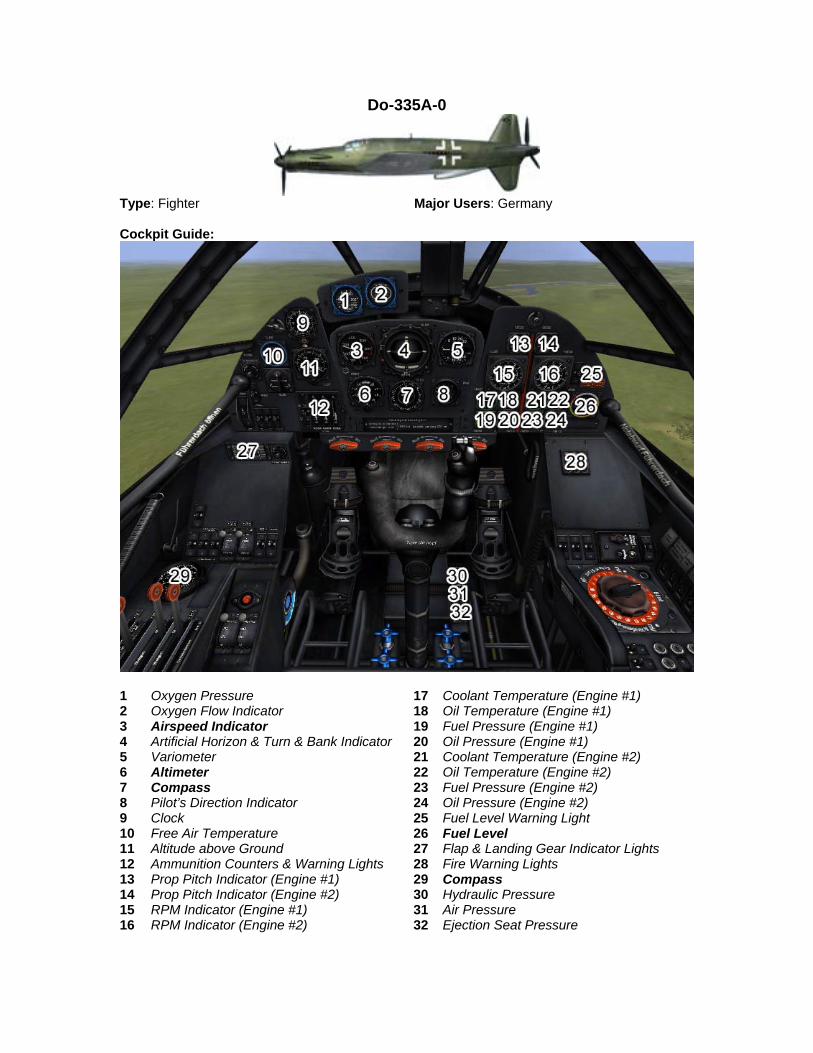
Do-335A-0
Type: Fighter Major Users: Germany Cockpit Guide:
1 Oxygen Pressure 17 Coolant Temperature (Engine #1) 2 Oxygen Flow Indicator 18 Oil Temperature (Engine #1) 3 Airspeed Indicator 19 Fuel Pressure (Engine #1) 4 Artificial Horizon & Turn & Bank Indicator 20 Oil Pressure (Engine #1) 5 Variometer 21 Coolant Temperature (Engine #2) 6 Altimeter 22 Oil Temperature (Engine #2) 7 Compass 23 Fuel Pressure (Engine #2) 8 Pilot’s Direction Indicator 24 Oil Pressure (Engine #2) 9 Clock 25 Fuel Level Warning Light 10 Free Air Temperature 26 Fuel Level 11 Altitude above Ground 27 Flap & Landing Gear Indicator Lights 12 Ammunition Counters & Warning Lights 28 Fire Warning Lights 13 Prop Pitch Indicator (Engine #1) 29 Compass 14 Prop Pitch Indicator (Engine #2) 30 Hydraulic Pressure 15 RPM Indicator (Engine #1) 31 Air Pressure 16 RPM Indicator (Engine #2) 32 Ejection Seat Pressure

Do-335V-13
Type: Ground Attack Major Users: Germany Cockpit Guide:
1 Oxygen Pressure 17 Coolant Temperature (Engine #1) 2 Oxygen Flow Indicator 18 Oil Temperature (Engine #1) 3 Airspeed Indicator 19 Fuel Pressure (Engine #1) 4 Artificial Horizon & Turn & Bank Indicator 20 Oil Pressure (Engine #1) 5 Variometer 21 Coolant Temperature (Engine #2) 6 Altimeter 22 Oil Temperature (Engine #2) 7 Compass 23 Fuel Pressure (Engine #2) 8 Pilot’s Direction Indicator 24 Oil Pressure (Engine #2) 9 Clock 25 Fuel Level Warning Light 10 Free Air Temperature 26 Fuel Level 11 Altitude above Ground 27 Flap & Landing Gear Indicator Lights 12 Ammunition Counters & Warning Lights 28 Fire Warning Lights 13 Prop Pitch Indicator (Engine #1) 29 Compass 14 Prop Pitch Indicator (Engine #2) 30 Hydraulic Pressure 15 RPM Indicator (Engine #1) 31 Air Pressure 16 RPM Indicator (Engine #2) 32 Ejection Seat Pressure

CR.42
Type: Fighter Major Users: Italy Cockpit Guide:
1 Ammunition Counter (Left) 10 Altimeter 2 Manifold Pressure 11 Airspeed Indicator 3 Fuel Pressure 12 Variometer 4 Cylinder Head Temperature 13 Ammunition Counter (Right) 5 Magnetos 14 Fuel Level 6 Oil Temperature 15 Clock 7 RPM Indicator 16 Ammeter 8 Compass 17 Brake Pressure 9 Turn & Bank Indicator 18 Air Pressure At a Glance: Engine:
A.74 RIC38 Power: 840 HP
Armament: • 2 x 12,7-mm machine guns • Up to 200 kg of bombs
Advantages: • Highly maneuverable; • Strong rugged design,
Disadvantages: • Low top speed; • Weak armament.

G.50
Type: Fighter Major Users: Italy Cockpit Guide:
1 Fuel Pressure 13 Cylinder Head Temperature 2 Oil Pressure 14 Ammunition Counter (Left) 3 RPM Indicator 15 Compass 4 Altimeter 16 Ammunition Counter (Right) 5 Airspeed Indicator 17 Brake Pressure 6 Barometric Pressure 18 Air Pressure 7 Airspeed Indicator 19 Clock 8 Turn & Bank Indicator 20 Landing Gear Indicator Lights 9 Variometer 21 Internal System Indicator 10 Oil Temperature 22 Internal System Indicator 11 Ammeter 23 Magneto 12 Fire Prevention Gauge

(G.50 continued)
At a Glance: Engine:
A 74 RC 38 Power:
At sea level: 740 HP At 3,800m: 840 HP
Armament: • 2 x 12.7mm
Advantages: • Good structural strength; • Excellent handling; • Excellent maneuverability.
Disadvantages: • Inadequate speed; • Insufficient armament; • Short range; • Not designed for winter conditions.

FW-190 A-4
Type: Fighter Major Users: Germany Cockpit Guide:
1 Ammunition Warning Light (Left) 12 RPM Indicator 2 Ammunition Warning Light (Right) 13 Fuel Pressure; Oil Pressure 3 Ammunition Counters (Left) 14 Oil Temperature 4 Ammunition Counters (Right) 15 Fuel Level 5 Pilot’s Direction Indicator 16 Prop Pitch Indicator 6 Airspeed Indicator 17 Fuel Level Warning Light 7 Artificial Horizon & Turn & Bank Indicator 18 Oxygen Flow Indicator 8 Variometer 19 Oxygen Pressure 9 Compass 20 Clock 10 Manifold Pressure 21 Flap & Landing Gear Indicator Lights 11 Altimeter 22 Elevator Trim Indicator
(FW-190 continued)
At a Glance: Engine:
801D-2. Power:
Take-off: 1,780 HP
Armament: • 2 x 20 mm (MG FF) • 2 x 20 mm (MG 151) • 2 x 7.9 mm (MG 17).
Advantages: • Good flight characteristics; • Powerful armament; • Good cockpit visibility; • Comfortable cockpit; • Easy to fly; • Good armor for the crew and power plant.
Disadvantages: • Insufficient field of vision from the cockpit
at taxiing.
Pilot Notes:
Take-Off Speed: 175 km/h Landing Speed: 160 km/h Combat Engine Setting: 2,500 RPM Best Cruise: 2,100 RPM Economy Cruise: 2,000 RPM Prop Pitch Control: Auto Mixture Control: Auto Boost: No Supercharger: No
• Gunsight Note: The gunsight in this aircraft, as in many German planes, was
positioned off-center. The default internal camera position is centered, and as such the gunsight is difficult or even impossible to use. To switch to an aiming view, use the Toggle Gunsight button (Shift-F1 by default) that switches the view to look through the offset gunsight.
• While on the Western Front the famous 190 showed itself superior to pretty much everything in the sky, on the Eastern Front it does not enjoy such a clear advantage. Most of the dogfights occur at lower altitudes where the 190 does not yet begin to shine. It should use energy tactics against most Soviet fighters, as they’ll usually outturn the 190 rather easily. Its main advantage however is its phenomenal roll rate. High-speed rolling scissors rarely end in anything but a clear victory for the 190.
• 190’s armament is again phenomenal. It packs a tremendous amount of firepower in its wings and any plane unlucky enough to get caught in the 190’s gunsight will really feel the results. Even the Il-2’s armor cannot stop the awesome power of the 190’s salvo, and when firing all guns you don’t even have to aim at a vulnerable spot. 190 will do its victim in no matter where it hits it.
• 190’s slow speed stall characteristics can be vicious; however a gentle handling of the stick and a good eye on the airspeed indicator should keep you out of trouble.

FW-190 A-5
Type: Fighter Major Users: Germany Cockpit Guide:
1 Ammunition Warning Light (Left) 12 RPM Indicator 2 Ammunition Warning Light (Right) 13 Fuel Pressure; Oil Pressure 3 Ammunition Counters (Left) 14 Oil Temperature 4 Ammunition Counters (Right) 15 Fuel Level 5 Pilot’s Direction Indicator 16 Prop Pitch Indicator 6 Airspeed Indicator 17 Fuel Level Warning Light 7 Artificial Horizon & Turn & Bank Indicator 18 Oxygen Flow Indicator 8 Variometer 19 Oxygen Pressure 9 Compass 20 Clock 10 Manifold Pressure 21 Flap & Landing Gear Indicator Lights 11 Altimeter 22 Elevator Trim Indicator

(FW-190 continued)
At a Glance: Engine:
801D-2. Power:
Take-off : 1,800 HP
Armament: • 2 x 20 mm (MG 151/20). • 2 x 7.9 mm (MG 17).
Advantages: • Good flight characteristics; • Powerful armament; • Multifunctional; • Good cockpit visibility; • Comfortable cockpit; • Easy to fly; • Good armor for the crew and power plant.
Disadvantages: • Heavier construction leading to lower
speed and reduced maneuverability; • Insufficient field of vision from the cockpit
at taxiing.
Pilot Notes:
Take-Off Speed: 175 km/h Landing Speed: 160 km/h Combat Engine Setting: 2,500 RPM Best Cruise: 2,100 RPM Economy Cruise: 2,000 RPM Prop Pitch Control: Auto Mixture Control: Auto Boost: No Supercharger: No
• Gunsight Note: The gunsight in this aircraft, as in many German planes, was
positioned off-center. The default internal camera position is centered, and as such the gunsight is difficult or even impossible to use. To switch to an aiming view, use the Toggle Gunsight button (Shift-F1 by default) that switches the view to look through the offset gunsight.
• While on the Western Front the famous 190 showed itself superior to pretty much everything in the sky, on the Eastern Front it does not enjoy such a clear advantage. Most of the dogfights occur at lower altitudes where the 190 does not yet begin to shine. It should use energy tactics against most Soviet fighters, as they’ll usually outturn the 190 rather easily. Its main advantage however is its phenomenal roll rate. High-speed rolling scissors rarely end in anything but a clear victory for the 190.
• 190’s armament is again phenomenal. It packs a tremendous amount of firepower in its wings and any plane unlucky enough to get caught in the 190’s gunsight will really feel the results. Even the Il-2’s armor cannot stop the awesome power of the 190’s salvo, and when firing all guns you don’t even have to aim at a vulnerable spot. 190 will do its victim in no matter where it hits it.
• 190’s slow speed stall characteristics can be vicious; however a gentle handling of the stick and a good eye on the airspeed indicator should keep you out of trouble.
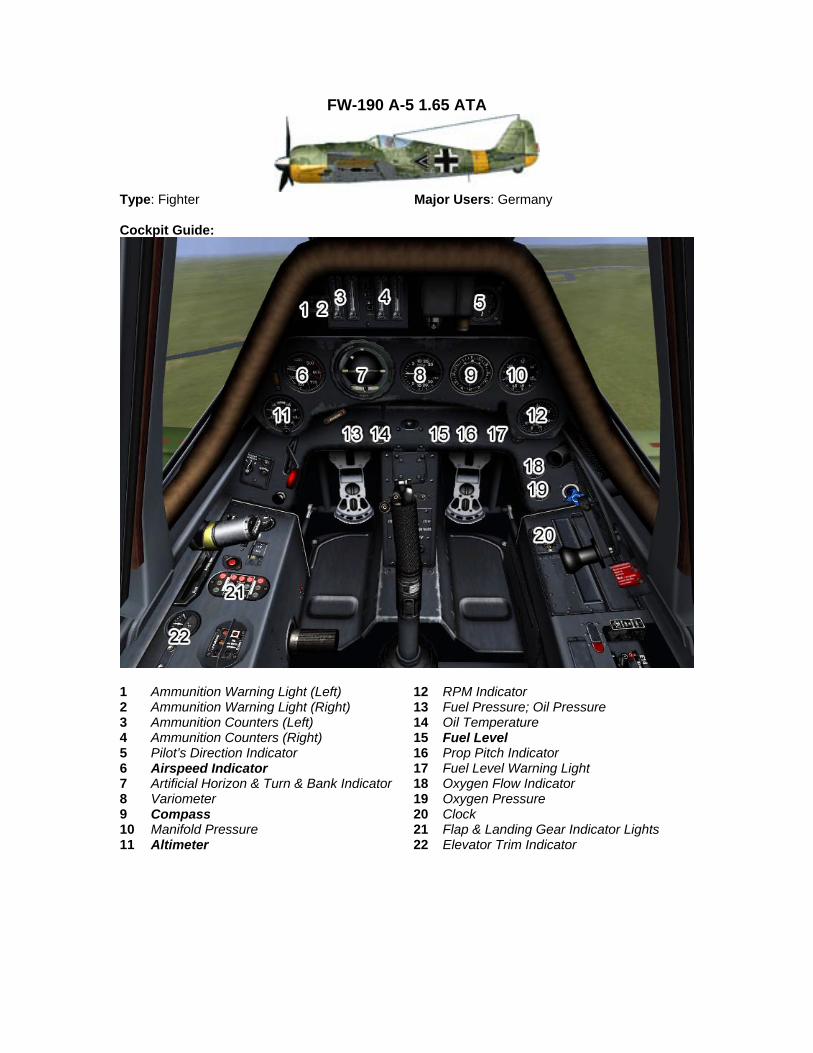
FW-190 A-5 1.65 ATA
Type: Fighter Major Users: Germany Cockpit Guide:
1 Ammunition Warning Light (Left) 12 RPM Indicator 2 Ammunition Warning Light (Right) 13 Fuel Pressure; Oil Pressure 3 Ammunition Counters (Left) 14 Oil Temperature 4 Ammunition Counters (Right) 15 Fuel Level 5 Pilot’s Direction Indicator 16 Prop Pitch Indicator 6 Airspeed Indicator 17 Fuel Level Warning Light 7 Artificial Horizon & Turn & Bank Indicator 18 Oxygen Flow Indicator 8 Variometer 19 Oxygen Pressure 9 Compass 20 Clock 10 Manifold Pressure 21 Flap & Landing Gear Indicator Lights 11 Altimeter 22 Elevator Trim Indicator

(FW-190 continued)
At a Glance: Engine:
801D-2. Power:
Take-off : 1,800 HP
Armament: • 2 x 20 mm (MG 151/20). • 2 x 7.9 mm (MG 17).
Advantages: • Good flight characteristics; • Powerful armament; • Multifunctional; • Good cockpit visibility; • Comfortable cockpit; • Easy to fly; • Good armor for the crew and power plant.
Disadvantages: • Heavier construction leading to lower
speed and reduced maneuverability; • Insufficient field of vision from the cockpit
at taxiing.
Pilot Notes:
Take-Off Speed: 175 km/h Landing Speed: 160 km/h Combat Engine Setting: 2,500 RPM Best Cruise: 2,100 RPM Economy Cruise: 2,000 RPM Prop Pitch Control: Auto Mixture Control: Auto Boost: No Supercharger: No
• Gunsight Note: The gunsight in this aircraft, as in many German planes, was
positioned off-center. The default internal camera position is centered, and as such the gunsight is difficult or even impossible to use. To switch to an aiming view, use the Toggle Gunsight button (Shift-F1 by default) that switches the view to look through the offset gunsight.
• While on the Western Front the famous 190 showed itself superior to pretty much everything in the sky, on the Eastern Front it does not enjoy such a clear advantage. Most of the dogfights occur at lower altitudes where the 190 does not yet begin to shine. It should use energy tactics against most Soviet fighters, as they’ll usually outturn the 190 rather easily. Its main advantage however is its phenomenal roll rate. High-speed rolling scissors rarely end in anything but a clear victory for the 190.
• 190’s armament is again phenomenal. It packs a tremendous amount of firepower in its wings and any plane unlucky enough to get caught in the 190’s gunsight will really feel the results. Even the Il-2’s armor cannot stop the awesome power of the 190’s salvo, and when firing all guns you don’t even have to aim at a vulnerable spot. 190 will do its victim in no matter where it hits it.
• 190’s slow speed stall characteristics can be vicious; however a gentle handling of the stick and a good eye on the airspeed indicator should keep you out of trouble.

FW-190 A-6
Type: Fighter Major Users: Germany Cockpit Guide:
1 Ammunition Warning Light (Left) 12 RPM Indicator 2 Ammunition Warning Light (Right) 13 Fuel Pressure; Oil Pressure 3 Ammunition Counters (Left) 14 Oil Temperature 4 Ammunition Counters (Right) 15 Fuel Level 5 Pilot’s Direction Indicator 16 Prop Pitch Indicator 6 Airspeed Indicator 17 Fuel Level Warning Light 7 Artificial Horizon & Turn & Bank Indicator 18 Oxygen Flow Indicator 8 Variometer 19 Oxygen Pressure 9 Compass 20 Clock 10 Manifold Pressure 21 Flap & Landing Gear Indicator Lights 11 Altimeter 22 Elevator Trim Indicator
(FW-190 continued)
At a Glance: Engine:
801D-2. Power:
Take-off : 1,800 HP
Armament: • 4 x 20 mm (MG 151/20). • 2 x 7.9 mm (MG 17).
Advantages: • Good flight characteristics; • Powerful armament; • Multifunctional; • Good cockpit visibility; • Comfortable cockpit; • Easy to fly; • Good armor for the crew and power plant.
Disadvantages: • Heavier construction leading to lower
speed and reduced maneuverability; • Insufficient field of vision from the cockpit
at taxiing.
Pilot Notes:
Take-Off Speed: 175 km/h Landing Speed: 160 km/h Combat Engine Setting: 2,500 RPM Best Cruise: 2,100 RPM Economy Cruise: 2,000 RPM Prop Pitch Control: Auto Mixture Control: Auto Boost: No Supercharger: No
• Gunsight Note: The gunsight in this aircraft, as in many German planes, was
positioned off-center. The default internal camera position is centered, and as such the gunsight is difficult or even impossible to use. To switch to an aiming view, use the Toggle Gunsight button (Shift-F1 by default) that switches the view to look through the offset gunsight.
• While on the Western Front the famous 190 showed itself superior to pretty much everything in the sky, on the Eastern Front it does not enjoy such a clear advantage. Most of the dogfights occur at lower altitudes where the 190 does not yet begin to shine. It should use energy tactics against most Soviet fighters, as they’ll usually outturn the 190 rather easily. Its main advantage however is its phenomenal roll rate. High-speed rolling scissors rarely end in anything but a clear victory for the 190.
• 190’s armament is again phenomenal. It packs a tremendous amount of firepower in its wings and any plane unlucky enough to get caught in the 190’s gunsight will really feel the results. Even the Il-2’s armor cannot stop the awesome power of the 190’s salvo, and when firing all guns you don’t even have to aim at a vulnerable spot. 190 will do its victim in no matter where it hits it.
• 190’s slow speed stall characteristics can be vicious; however a gentle handling of the stick and a good eye on the airspeed indicator should keep you out of trouble.
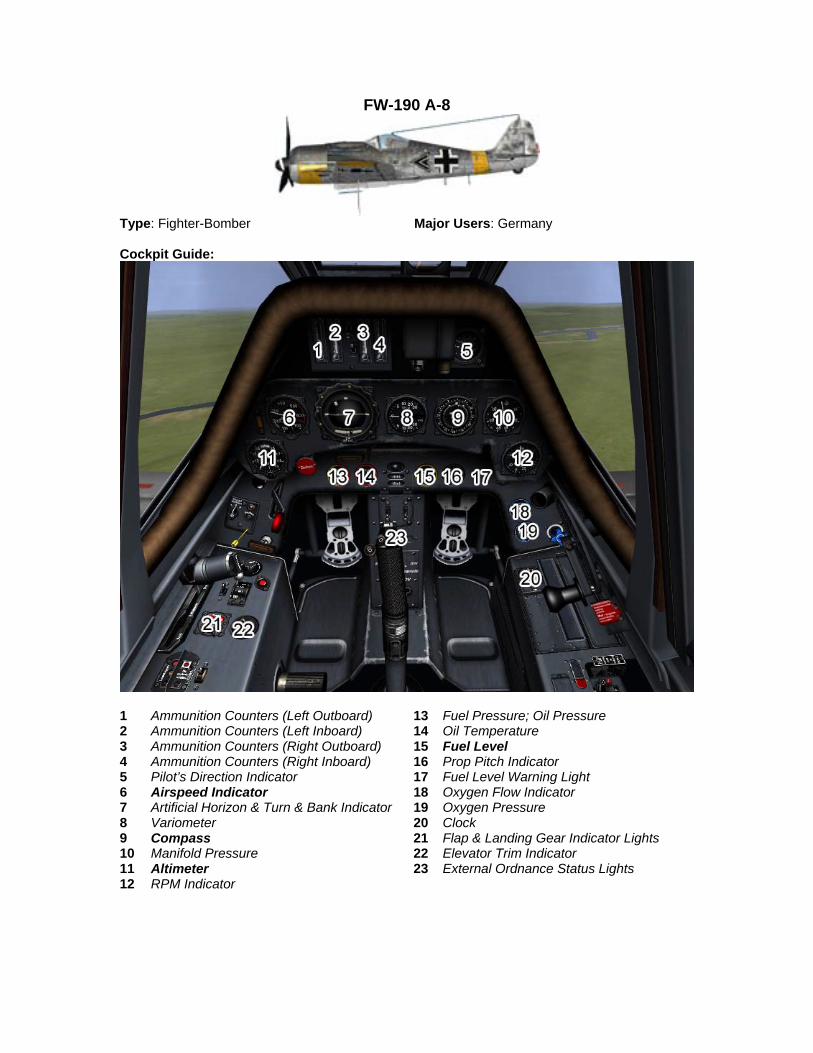
FW-190 A-8
Type: Fighter-Bomber Major Users: Germany Cockpit Guide:
1 Ammunition Counters (Left Outboard) 13 Fuel Pressure; Oil Pressure 2 Ammunition Counters (Left Inboard) 14 Oil Temperature 3 Ammunition Counters (Right Outboard) 15 Fuel Level 4 Ammunition Counters (Right Inboard) 16 Prop Pitch Indicator 5 Pilot’s Direction Indicator 17 Fuel Level Warning Light 6 Airspeed Indicator 18 Oxygen Flow Indicator 7 Artificial Horizon & Turn & Bank Indicator 19 Oxygen Pressure 8 Variometer 20 Clock 9 Compass 21 Flap & Landing Gear Indicator Lights 10 Manifold Pressure 22 Elevator Trim Indicator 11 Altimeter 23 External Ordnance Status Lights 12 RPM Indicator

(FW-190 continued)
At a Glance: Engine:
801D-2 + MW 50. Power:
Take-off : 1,800 HP
Armament: • 4 x 20 mm (MG 151/20). • 2 x 13 mm (MG 131).
Advantages: • Good flight characteristics; • Powerful armament; • Multifunctional; • Good cockpit visibility; • Comfortable cockpit; • Easy to fly; • Good armor for the crew and power plant.
Disadvantages: • Insufficient field of vision from the cockpit
at taxiing.
Pilot Notes:
Take-Off Speed: 175 km/h Landing Speed: 160 km/h Combat Engine Setting: 2,500 RPM Best Cruise: 2,100 RPM Economy Cruise: 2,000 RPM Prop Pitch Control: Auto Mixture Control: Auto Boost: No Supercharger: No
• Gunsight Note: The gunsight in this aircraft, as in many German planes, was
positioned off-center. The default internal camera position is centered, and as such the gunsight is difficult or even impossible to use. To switch to an aiming view, use the Toggle Gunsight button (Shift-F1 by default) that switches the view to look through the offset gunsight.
• While on the Western Front the famous 190 showed itself superior to pretty much everything in the sky, on the Eastern Front it does not enjoy such a clear advantage. Most of the dogfights occur at lower altitudes where the 190 does not yet begin to shine. It should use energy tactics against most Soviet fighters, as they’ll usually outturn the 190 rather easily. Its main advantage however is its phenomenal roll rate. High-speed rolling scissors rarely end in anything but a clear victory for the 190.
• 190’s armament is again phenomenal. It packs a tremendous amount of firepower in its wings and any plane unlucky enough to get caught in the 190’s gunsight will really feel the results. Even the Il-2’s armor cannot stop the awesome power of the 190’s salvo, and when firing all guns you don’t even have to aim at a vulnerable spot. 190 will do its victim in no matter where it hits it.
• 190’s slow speed stall characteristics can be vicious; however a gentle handling of the stick and a good eye on the airspeed indicator should keep you out of trouble.
• When used in ground attack role, 190 again is an excellent performer. It can drop bombs from level flight or in a dive; it can destroy most armored vehicles with strafing passes. 190’s armor will usually protect you against enemy flak. Just keep in mind that you’re not flying an IL-2, you’re flying a fighter bomber – don’t let yourself hang over the battlefield at 250 km/h. Speed up and stay fast during your attacks, you’ll live longer.

FW-190 A-9
Type: Fighter-Bomber Major Users: Germany Cockpit Guide:
1 Ammunition Counters (Left Outboard) 13 Fuel Pressure; Oil Pressure 2 Ammunition Counters (Left Inboard) 14 Oil Temperature 3 Ammunition Counters (Right Outboard) 15 Fuel Level 4 Ammunition Counters (Right Inboard) 16 Prop Pitch Indicator 5 Pilot’s Direction Indicator 17 Fuel Level Warning Light 6 Airspeed Indicator 18 Oxygen Flow Indicator 7 Artificial Horizon & Turn & Bank Indicator 19 Oxygen Pressure 8 Variometer 20 Clock 9 Compass 21 Flap & Landing Gear Indicator Lights 10 Manifold Pressure 22 Elevator Trim Indicator 11 Altimeter 23 External Ordnance Status Lights 12 RPM Indicator
(FW-190 continued)
At a Glance: Engine:
801 S (TS) or
801 E (TH)
Armament: • 2 x 20mm (MG 151/20) • 2 x 13mm (MG 131) • 2 x 20mm (MG 151/20)
Advantages: • Good flight characteristics; • Powerful armament; • Multifunctional; • Good cockpit visibility; • Comfortable cockpit; • Easy to fly; • Good armor for the crew and power plant; • Improved climb rate.
Disadvantages: • Insufficient field of vision from the cockpit
at taxiing; • Unpredictable high-G stalls.
Pilot Notes:
Take-Off Speed: 175 km/h Landing Speed: 160 km/h Combat Engine Setting: 2,500 RPM Best Cruise: 2,100 RPM Economy Cruise: 2,000 RPM Prop Pitch Control: Auto Mixture Control: Auto Boost: No Supercharger: No
• Gunsight Note: The gunsight in this aircraft, as in many German planes, was
positioned off-center. The default internal camera position is centered, and as such the gunsight is difficult or even impossible to use. To switch to an aiming view, use the Toggle Gunsight button (Shift-F1 by default) that switches the view to look through the offset gunsight.
• While on the Western Front the famous 190 showed itself superior to pretty much everything in the sky, on the Eastern Front it does not enjoy such a clear advantage. Most of the dogfights occur at lower altitudes where the 190 does not yet begin to shine. It should use energy tactics against most Soviet fighters, as they’ll usually outturn the 190 rather easily. Its main advantage however is its phenomenal roll rate. High-speed rolling scissors rarely end in anything but a clear victory for the 190.
• 190’s armament is again phenomenal. It packs a tremendous amount of firepower in its wings and any plane unlucky enough to get caught in the 190’s gunsight will really feel the results. Even the Il-2’s armor cannot stop the awesome power of the 190’s salvo, and when firing all guns you don’t even have to aim at a vulnerable spot. 190 will do its victim in no matter where it hits it.
• 190’s slow speed stall characteristics can be vicious; however a gentle handling of the stick and a good eye on the airspeed indicator should keep you out of trouble.
• When used in ground attack role, 190 again is an excellent performer. It can drop bombs from level flight or in a dive; it can destroy most armored vehicles with strafing passes. 190’s armor will usually protect you against enemy flak. Just keep in mind that you’re not flying an IL-2, you’re flying a fighter bomber – don’t let yourself hang over the battlefield at 250 km/h. Speed up and stay fast during your attacks, you’ll live longer.

FW-190 F-8
Type: Fighter-Bomber Major Users: Germany Cockpit Guide:
1 Ammunition Counters (Left Outboard) 13 Fuel Pressure; Oil Pressure 2 Ammunition Counters (Left Inboard) 14 Oil Temperature 3 Ammunition Counters (Right Outboard) 15 Fuel Level 4 Ammunition Counters (Right Inboard) 16 Prop Pitch Indicator 5 Pilot’s Direction Indicator 17 Fuel Level Warning Light 6 Airspeed Indicator 18 Oxygen Flow Indicator 7 Artificial Horizon & Turn & Bank Indicator 19 Oxygen Pressure 8 Variometer 20 Clock 9 Compass 21 Flap & Landing Gear Indicator Lights 10 Manifold Pressure 22 Elevator Trim Indicator 11 Altimeter 23 External Ordnance Status Lights 12 RPM Indicator

(FW-190 continued)
At a Glance: Engine:
801D-2 or
801 Q ( 801 TU)
Armament: • 2 x 20mm (MG 151/20) • 2 x 13mm (MG 131)
Advantages: • Good flight characteristics; • Powerful armament; • Multifunctional; • Good cockpit visibility; • Comfortable cockpit; • Easy to fly; • Good armor for the crew and power plant; • Improved climb rate.
Disadvantages: • Insufficient field of vision from the cockpit
at taxiing; • Unpredictable high-G stalls.
Pilot Notes:
Take-Off Speed: 175 km/h Landing Speed: 160 km/h Combat Engine Setting: 2,500 RPM Best Cruise: 2,100 RPM Economy Cruise: 2,000 RPM Prop Pitch Control: Auto Mixture Control: Auto Boost: No Supercharger: No
• Gunsight Note: The gunsight in this aircraft, as in many German planes, was
positioned off-center. The default internal camera position is centered, and as such the gunsight is difficult or even impossible to use. To switch to an aiming view, use the Toggle Gunsight button (Shift-F1 by default) that switches the view to look through the offset gunsight.
• While on the Western Front the famous 190 showed itself superior to pretty much everything in the sky, on the Eastern Front it does not enjoy such a clear advantage. Most of the dogfights occur at lower altitudes where the 190 does not yet begin to shine. It should use energy tactics against most Soviet fighters, as they’ll usually outturn the 190 rather easily. Its main advantage however is its phenomenal roll rate. High-speed rolling scissors rarely end in anything but a clear victory for the 190.
• 190’s armament is again phenomenal. It packs a tremendous amount of firepower in its wings and any plane unlucky enough to get caught in the 190’s gunsight will really feel the results. Even the Il-2’s armor cannot stop the awesome power of the 190’s salvo, and when firing all guns you don’t even have to aim at a vulnerable spot. 190 will do its victim in no matter where it hits it.
• 190’s slow speed stall characteristics can be vicious; however a gentle handling of the stick and a good eye on the airspeed indicator should keep you out of trouble.
• When used in ground attack role, 190 again is an excellent performer. It can drop bombs from level flight or in a dive; it can destroy most armored vehicles with strafing passes. 190’s armor will usually protect you against enemy flak. Just keep in mind that you’re not flying an IL-2, you’re flying a fighter bomber – don’t let yourself hang over the battlefield at 250 km/h. Speed up and stay fast during your attacks, you’ll live longer.

FW-190 A-8 Mistel
Type: Mothership Major Users: Germany Cockpit Guide:
1 Ammunition Counters (Left Outboard) 14 Oil Temperature 2 Ammunition Counters (Left Inboard) 15 Fuel Level 3 Ammunition Counters (Right Outboard) 16 Prop Pitch Indicator 4 Ammunition Counters (Right Inboard) 17 Fuel Level Warning Light 5 Pilot’s Direction Indicator 18 Oxygen Flow Indicator 6 Airspeed Indicator 19 Oxygen Pressure 7 Artificial Horizon & Turn & Bank Indicator 20 Clock 8 Variometer 21 Flap & Landing Gear Indicator Lights 9 Compass 22 Elevator Trim Indicator 10 Manifold Pressure 23 Ju-88 Propeller Pitch Indicator (L & R) 11 Altimeter 24 Ju-88 RPM Indicator (Left) 12 RPM Indicator 25 Ju-88 RPM Indicator (Right) 13 Fuel Pressure; Oil Pressure
(FW-190 continued)
At a Glance: Engine:
1 x 801D-2 + MW 50. 2 x Jumo 211B-1 (converted Ju-88)
Armament: • 4 x 20 mm (MG 151/20). • 2 x 13 mm (MG 131). • 3,156 kg warhead (converted Ju-88)
Advantages: • Potential to convert obsolete medium
bombers into strategic bombers; • Large destructive power
Disadvantages: • Insufficient field of vision from the cockpit
at taxiing. • Single-use weapon. • Completely defenseless against enemy
aircraft. Pilot Notes:
• Gunsight Note: The gunsight in this aircraft, as in many German planes, was positioned off-center. The default internal camera position is centered, and as such the gunsight is difficult or even impossible to use. To switch to an aiming view, use the Toggle Gunsight button (Shift-F1 by default) that switches the view to look through the offset gunsight.
• The Mistel aircraft is a very peculiar bird which presented our team with some unique challenges. The modified Ju-88 strapped to the flyable FW-190 is really a one of a kind object in the game. As such, our AI routine would need a complete overwrite to allow for complete realistic Mistel operations. Unfortunately we could not afford to spend another year doing that, so our AI Mistels cannot take-off, land or attack targets. The most an AI Mistel can do is follow a set of waypoints in the air, basically serving as a large target for other flights.
• Another important limitation is that Mistels cannot be flown in online dogfight games; however they can be flown in co-op missions.
• Player-controlled Mistels however do work like other planes. You can start on the ground and take-off in them, land with or without the attached Ju-88 bomb, and detach the Ju-88 bomb in the air and launch it at targets. You must launch the Mistel at least from 1 km away from the target; historically they were launched from even farther away. Just lower your engine power to about 33% of throttle, hold your target in the crosshairs for a few seconds and press the “Attach/Detach Aircraft” button to separate from the Ju-88. It will follow on your current course, while you should try to get away from the target area. The Mistel's blast is pretty big, and it will damage or destroy objects on the ground and in the air in a very large radius.
• Creating a mission with a Mistel is easy: just create two waypoints for the Ju-88 (Mistel), then place waypoints for the FW-190A-8 (Mistel). With the FW-190 selected, go to the Waypoint tab of the Object window, click the Set button and click on the Mistel. This will link the two in the beginning of the mission.
• You can set the first waypoint of the pair to be Take-Off, but AI flown Mistels will not be able to take-off.
• When releasing the Mistel from low altitudes and at a shallow angle, it may hit the ground without exploding. Its detonator was located in the tip of its long nose, so if the Mistel hits the ground with its fuselage without an impact on the nose it will not detonate.
• Combat/take off/landing flaps will only work on the Fw-190 and not extend on the Ju-88. • When the Mistel hits the ground you may sometimes hear the "I’m hit, I am going down"
radio call.
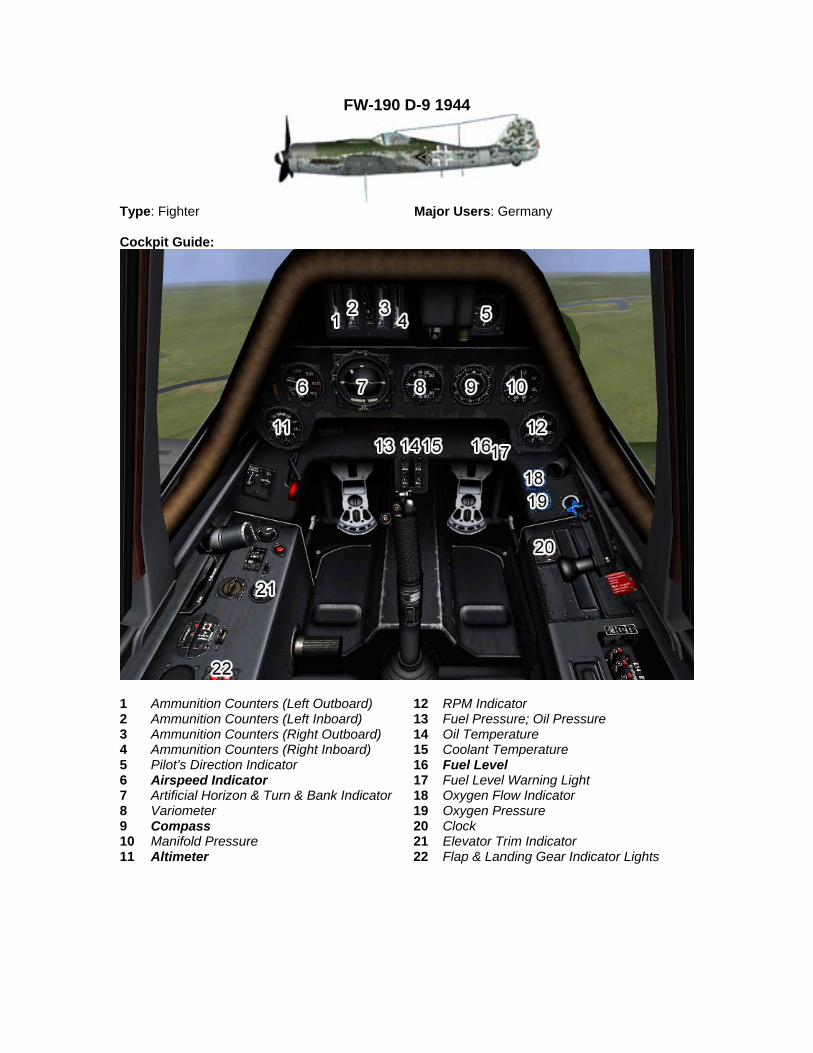
FW-190 D-9 1944
Type: Fighter Major Users: Germany Cockpit Guide:
1 Ammunition Counters (Left Outboard) 12 RPM Indicator 2 Ammunition Counters (Left Inboard) 13 Fuel Pressure; Oil Pressure 3 Ammunition Counters (Right Outboard) 14 Oil Temperature 4 Ammunition Counters (Right Inboard) 15 Coolant Temperature 5 Pilot’s Direction Indicator 16 Fuel Level 6 Airspeed Indicator 17 Fuel Level Warning Light 7 Artificial Horizon & Turn & Bank Indicator 18 Oxygen Flow Indicator 8 Variometer 19 Oxygen Pressure 9 Compass 20 Clock 10 Manifold Pressure 21 Elevator Trim Indicator 11 Altimeter 22 Flap & Landing Gear Indicator Lights

(FW-190 continued)
At a Glance: Engine:
Ju 213A-1 + MW 50. Power:
Indicated: 1,200 HP Take-off : 1,776 HP With MW 50: 2,240 HP
Armament: • 2 x 20 mm (MG 151/20). • 2 x 13 mm (MG 131).
Advantages: • Excellent flight characteristics; • Powerful armament; • Multifunctional; • Good cockpit visibility; • Comfortable cockpit; • Easy to fly; • Good armor for the crew and power plant.
Disadvantages: • Low maneuvrability
Pilot Notes:
Take-Off Speed: 170 km/h Landing Speed: 155 km/h Combat Engine Setting: 3,000 RPM Best Cruise: 2,600 RPM Economy Cruise: 2,500 RPM Prop Pitch Control: Auto/Manual Mixture Control: Auto Boost: No Supercharger: Auto
• Gunsight Note: The gunsight in this aircraft, as in many German planes, was
positioned off-center. The default internal camera position is centered, and as such the gunsight is difficult or even impossible to use. To switch to an aiming view, use the Toggle Gunsight button (Shift-F1 by default) that switches the view to look through the offset gunsight.
• The FW-190D-9, the long-nosed 190, is the ultimate version of what many consider to be the best fighter of WWII. It really is an excellent all-around fighter with great performance characteristics and easy handling. In capable hands it will defeat any other fighter of the war. The only planes that can give it trouble are the La-7 and Yak-3 or 9, which can gain an upper hand in low-altitude turning engagements. However at higher altitudes and higher airspeeds FW-190D-9 is any fighter pilot’s dream.
• Its four cannon armament is brutal against all enemy planes. Be aware that your 20mms are located in the wings; therefore convergence should become a concern. An accurate burst at a convergence distance will cause pretty much anything to instantly go down.
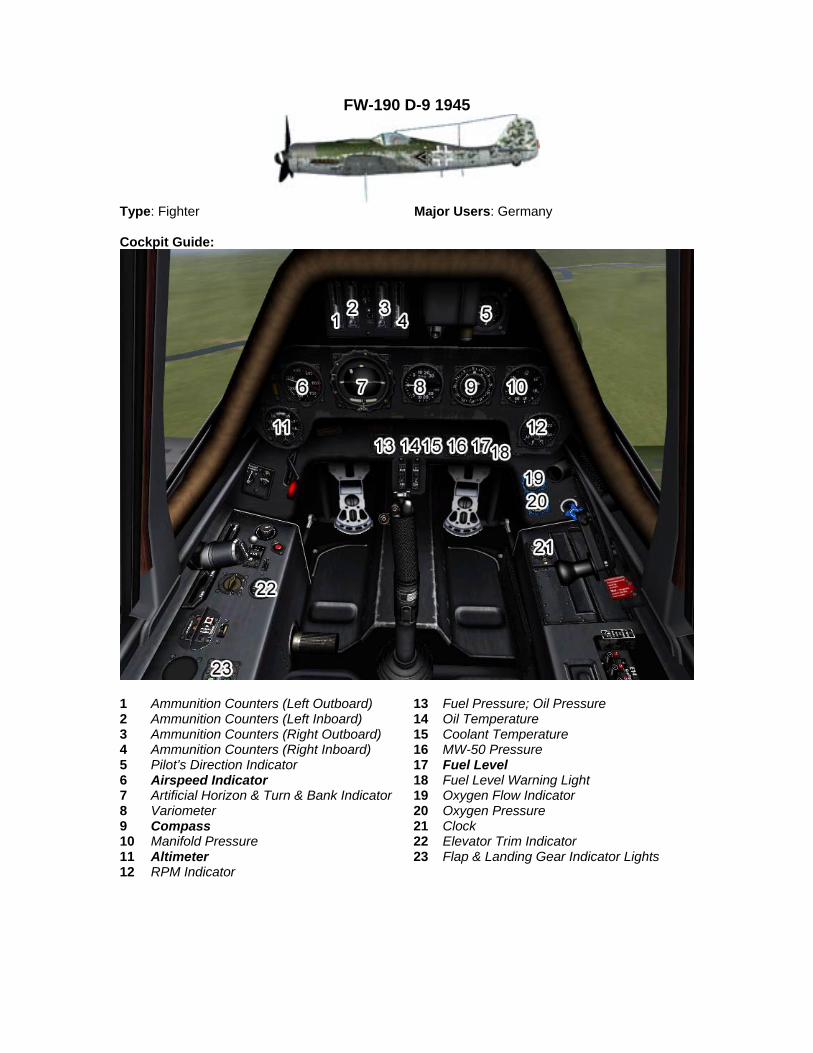
FW-190 D-9 1945
Type: Fighter Major Users: Germany Cockpit Guide:
1 Ammunition Counters (Left Outboard) 13 Fuel Pressure; Oil Pressure 2 Ammunition Counters (Left Inboard) 14 Oil Temperature 3 Ammunition Counters (Right Outboard) 15 Coolant Temperature 4 Ammunition Counters (Right Inboard) 16 MW-50 Pressure 5 Pilot’s Direction Indicator 17 Fuel Level 6 Airspeed Indicator 18 Fuel Level Warning Light 7 Artificial Horizon & Turn & Bank Indicator 19 Oxygen Flow Indicator 8 Variometer 20 Oxygen Pressure 9 Compass 21 Clock 10 Manifold Pressure 22 Elevator Trim Indicator 11 Altimeter 23 Flap & Landing Gear Indicator Lights 12 RPM Indicator

(FW-190 continued)
At a Glance: Engine:
Ju 213A-1 + MW 50. Power:
Indicated: 1,200 HP Take-off : 1,776 HP With MW 50: 2,240 HP
Armament: • 2 x 20 mm (MG 151/20). • 2 x 13 mm (MG 131).
Advantages: • Excellent flight characteristics; • Powerful armament; • Multifunctional; • Good cockpit visibility; • Comfortable cockpit; • Easy to fly; • Good armor for the crew and power plant.
Disadvantages: • Low maneuverability
Pilot Notes:
Take-Off Speed: 170 km/h Landing Speed: 155 km/h Combat Engine Setting: 3,000 RPM Best Cruise: 2,600 RPM Economy Cruise: 2,500 RPM Prop Pitch Control: Auto/Manual Mixture Control: Auto Boost: No Supercharger: Auto
• Gunsight Note: The gunsight in this aircraft, as in many German planes, was
positioned off-center. The default internal camera position is centered, and as such the gunsight is difficult or even impossible to use. To switch to an aiming view, use the Toggle Gunsight button (Shift-F1 by default) that switches the view to look through the offset gunsight.
• The FW-190D-9, the long-nosed 190, is the ultimate version of what many consider to be the best fighter of WWII. It really is an excellent all-around fighter with great performance characteristics and easy handling. In capable hands it will defeat any other fighter of the war. The only planes that can give it trouble are the La-7 and Yak-3 or 9, which can gain an upper hand in low-altitude turning engagements. However at higher altitudes and higher airspeeds FW-190D-9 is any fighter pilot’s dream.
• Its four cannon armament is brutal against all enemy planes. Be aware that your 20mms are located in the wings; therefore convergence should become a concern. An accurate burst at a convergence distance will cause pretty much anything to instantly go down.

Ta-152H-1
Type: Fighter Major Users: Germany Cockpit Guide:
1 Ammunition Counters (Left Outboard) 13 Fuel Pressure; Oil Pressure 2 Ammunition Counters (Left Inboard) 14 Oil Temperature 3 Ammunition Counters (Right Outboard) 15 Coolant Temperature 4 Ammunition Counters (Right Inboard) 16 MW-50 Pressure 5 Pilot’s Direction Indicator 17 Fuel Level 6 Airspeed Indicator 18 Fuel Level Warning Light 7 Artificial Horizon & Turn & Bank Indicator 19 Oxygen Flow Indicator 8 Variometer 20 Oxygen Pressure 9 Compass 21 Clock 10 Manifold Pressure 22 Elevator Trim Indicator 11 Altimeter 23 Flap & Landing Gear Indicator Lights 12 RPM Indicator
(Ta-152 continued)
At a Glance: Engine:
1 x Jumo-213 x -1 Power:
Take-off: 2,050 HP Indicated: 1,870 HP
Armament: • 2 x 20-mm MG-151/20 cannon • 1 x 30-mm MK 108 cannon
Advantages: • Excellent speed for a piston engine fighter; • Good climb rate; • Powerful armament.
Disadvantages: • As the plane was designed for high altitude
combat, its low altitude performance was less that stellar.
Pilot Notes: • Gunsight Note: The gunsight in this aircraft, as in many German planes, was
positioned off-center. The default internal camera position is centered, and as such the gunsight is difficult or even impossible to use. To switch to an aiming view, use the Toggle Gunsight button (Shift-F1 by default) that switches the view to look through the offset gunsight.
• This plane has two systems of engine boost: GM-1 for high altitudes and MW-50 for low altitudes.
• GM-1 should be used at altitudes above 9,000 m • If you reach that altitude with the MW-50 Off, you can turn on the GM-1 by hitting W button
(default). • If you reach that altitude with the MW-50 enabled, then you need to switch it off by hitting W
and then press W again to engage the GM-1. • Bellow 9,000 m the W key operated only the MW-50 as normal. • If the GM-1 was engaged at a high altitude and was not disengaged below 9,000 meters,
then the engine will not be damaged as on DB-605s; however no extra power will be gained from the device. This is historically correct.

Ta-152C
Type: Fighter Major Users: Germany Cockpit Guide:
1 Ammunition Counters (Left Outboard) 13 Fuel Pressure; Oil Pressure 2 Ammunition Counters (Left Inboard) 14 Oil Temperature 3 Ammunition Counters (Right Outboard) 15 Coolant Temperature 4 Ammunition Counters (Right Inboard) 16 MW-50 Pressure 5 Pilot’s Direction Indicator 17 Fuel Level 6 Airspeed Indicator 18 Fuel Level Warning Light 7 Artificial Horizon & Turn & Bank Indicator 19 Oxygen Flow Indicator 8 Variometer 20 Oxygen Pressure 9 Compass 21 Clock 10 Manifold Pressure 22 Elevator Trim Indicator 11 Altimeter 23 Flap & Landing Gear Indicator Lights 12 RPM Indicator
(Ta-152 continued)
At a Glance: Engine:
1 x DB-603L
Armament: • 2 x 20-mm MG-151/20 cannon • 1 x 30-mm MK 108 cannon
Advantages: • Excellent speed for a piston engine fighter; • Good climb rate; • Powerful armament.
Disadvantages: • As the plane was designed for high altitude
combat, its low altitude performance was less that stellar.
Pilot Notes: • Gunsight Note: The gunsight in this aircraft, as in many German planes, was
positioned off-center. The default internal camera position is centered, and as such the gunsight is difficult or even impossible to use. To switch to an aiming view, use the Toggle Gunsight button (Shift-F1 by default) that switches the view to look through the offset gunsight.
• This plane has two systems of engine boost: GM-1 for high altitudes and MW-50 for low altitudes.
• GM-1 should be used at altitudes above 9,000 m • If you reach that altitude with the MW-50 Off, you can turn on the GM-1 by hitting W button
(default). • If you reach that altitude with the MW-50 enabled, then you need to switch it off by hitting W
and then press W again to engage the GM-1. • Bellow 9,000 m the W key operated only the MW-50 as normal. • If the GM-1 was engaged at a high altitude and was not disengaged below 9,000 meters,
then the engine will not be damaged as on DB-605s; however no extra power will be gained from the device. This is historically correct.
• Ta-152C, and potentially some other Luft’46 planes modeled in our sim were projected to use the EZ42 gyro sight, similar to the K-14 “ace-maker” used in late-war American planes. However no detailed information about the features of the EZ42 exist, and we were forced to “install” regular sights on these planes. Even in the cockpits with 3D models visually based on the EZ42 design, they function as simple reflector sights.

G4M1-11
Type: Bomber Major Users: Japan Cockpit Guide:
1 Variometer 21 Airspeed Indicator 2 Turn & Bank Indicator 22 Turn & Bank Indicator 3 Airspeed Indicator 23 Altimeter 4 Artificial Horizon 24 Manifold Pressure (Engine #1) 5 Compass 25 Manifold Pressure (Engine #2) 6 Altimeter 26 RPM Indicator (Engine #1) 7 Inclinometer 27 RPM Indicator (Engine #2) 8 Flap Position Indicator 28 Exhaust Temperature (Engine #1) 9 Internal System Indicator 29 Exhaust Temperature (Engine #2) 10 Free Air Temperature (Left) 30 Fuel Pressure; Oil Pressure (Engine #1) 11 Free Air Temperature (Right) 31 Fuel Pressure; Oil Pressure (Engine #2) 12 Flap Ind. & Landing Gear Indicator Lights 32 Cylinder Head Temperature (Engine #1) 13 Pilot’s Direction Indicator 33 Cylinder Head Temperature (Engine #2) 14 Compass 34 Oil Temperature (Engine #1) 15 Compass 35 Oil Temperature (Engine #2) 16 Artificial Horizon 36 Fuel Level (Right Outboard) 17 Compass & Bank Indicator 37 Fuel Level (Right Inboard) 18 Autopilot Status Indicator 38 Fuel Level (Fuselage) 19 Voltmeter 39 Fuel Level (Left Inboard) 20 Clock 40 Fuel Level (Left Outboard)
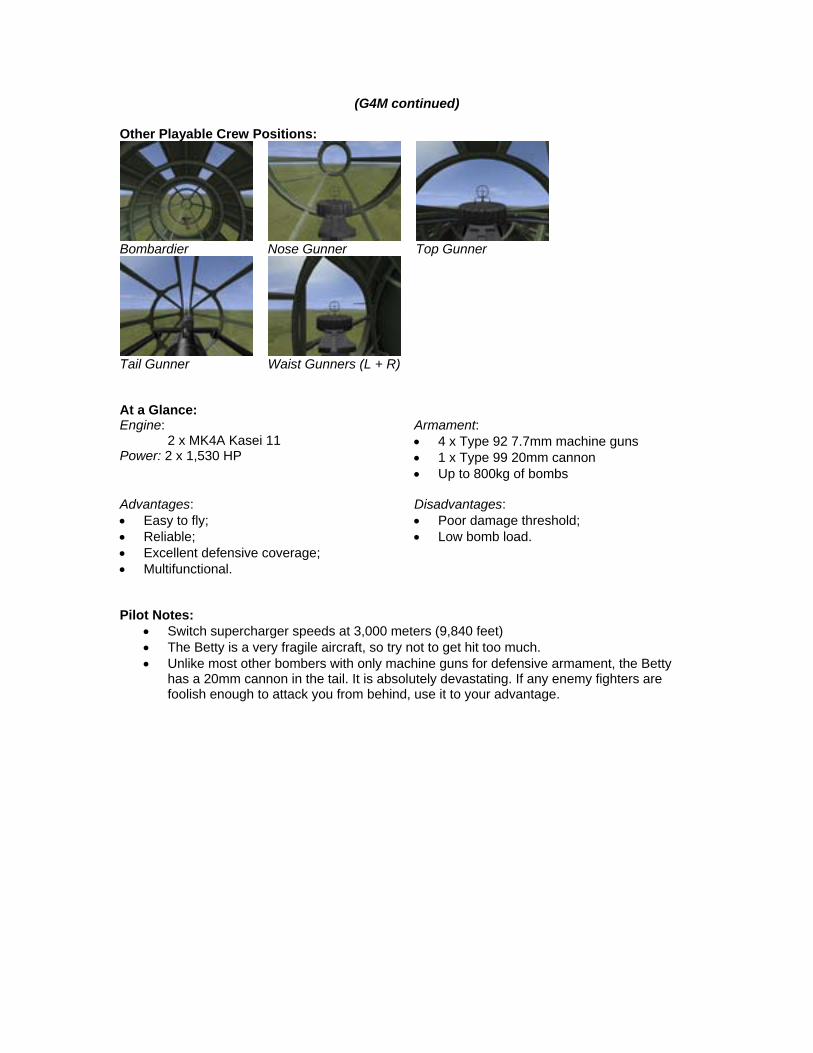
(G4M continued)
Other Playable Crew Positions:
Bombardier Nose Gunner Top Gunner
Tail Gunner Waist Gunners (L + R) At a Glance: Engine:
2 x MK4A Kasei 11 Power: 2 x 1,530 HP
Armament: • 4 x Type 92 7.7mm machine guns • 1 x Type 99 20mm cannon • Up to 800kg of bombs
Advantages: • Easy to fly; • Reliable; • Excellent defensive coverage; • Multifunctional.
Disadvantages: • Poor damage threshold; • Low bomb load.
Pilot Notes:
• Switch supercharger speeds at 3,000 meters (9,840 feet) • The Betty is a very fragile aircraft, so try not to get hit too much. • Unlike most other bombers with only machine guns for defensive armament, the Betty
has a 20mm cannon in the tail. It is absolutely devastating. If any enemy fighters are foolish enough to attack you from behind, use it to your advantage.

(G4M continued)
Using the Level Sight: • The level bomb sight will automatically calculate the bomb trajectory and impact point based
on the aircraft’s current airspeed and altitude. The bombardier must enter these parameters into the sight manually, and point it at the target. Then the sight will automatically track the target, and drop the bombs automatically at the right time.
• As the first step, bombing altitude and aircraft speed must be entered into the bombsight. The actual altitude above target (not above sea level) can be entered using the Increase Bombsight Altitude and Decrease Bombsight Altitude keys. The plane speed is entered using the Increase Bombsight Velocity and Decrease Bombsight Velocity keys. Note that the true (not indicated) airspeed must be set. It can be obtained from the speed gauge when in No-Cockpit View mode.
• After the initial parameters are entered, the bombardier has to acquire the target with the bombsight crosshair. Tap the Toggle Gunsight key (Shift-F1 by default) to look through the optics. Use Increase Bombsight Distance and Decrease Bombsight Distance to adjust the bombsight viewing angle up, and scan the horizon for the mission target.
• If the target does not appear along the centerline of the bomb sight optics, make minute changes to your plane’s course. Then using the Increase Bombsight Distance and Decrease Bombsight Distance keys place the crosshair on target. With the target dead center, turn on the targeting computer using the Toggle Bombsight Automation key. The bombsight will begin tracking the target. Correct the crosshair movement with the Increase Bombsight Velocity and Decrease Bombsight Velocity keys if necessary.
• The bombs will drop automatically when the plane reaches the proper position for a bomb drop, based on the input parameters and the optics angle.
• Note that after starting the bomb run, a plane may not be banked more than 4.5 degrees or the bombsight will lose stability. Only slight adjustments in direction are allowed. After more substantial maneuvers the bomb sight may take up to 30 seconds to stabilize. During the stabilization phase, the bomb sight crosshairs are turned off.

Go-229A-1
Type: Jet Fighter - Bomber Major Users: Germany Cockpit Guide:
1 Variometer 10 RPM Indicator (Engine #2) 2 Artificial Horizon & Turn & Bank Indicator 11 Oil Pressure (Engine #1) 3 Airspeed Indicator 12 Exhaust Temperature (Engine #1) 4 Altimeter 13 Exhaust Temperature (Engine #2) 5 Compass 14 Oil Pressure (Engine #2) 6 Pilot’s Direction Indicator 15 Free Air Temperature 7 Fuel Level (Left) 16 Oxygen Pressure 8 Fuel Level (Right) 17 Oxygen Flow Indicator 9 RPM Indicator (Engine #1)
(Go-229 continued)
At a Glance: Engine:
2 x Jumo 109-004B Thrust: 890 kgc
Armament: • 4 x 30-mm MK 108 cannon • 1,000 kg of bombs
Advantages: • High ceiling; • High airspeed and climb rate; • Powerful armament.
Disadvantages: • Low stability; • Poor maneuverability; • Poor cockpit visibility; • Difficult to land; • Large for a fighter.
Pilot Notes:
• Gunsight Note: The gunsight in this aircraft, as in many German planes, was positioned off-center. The default internal camera position is centered, and as such the gunsight is difficult or even impossible to use. To switch to an aiming view, use the Toggle Gunsight button (Shift-F1 by default) that switches the view to look through the offset gunsight.
• The Go-229 is equipped with an ejection seat. However these are not modern 0-0 ejection seats, and you have a very low chance of survival punching out below 500 meters of altitude or stationary on the ground.
• Go-229 is modeled without the historically optional drag chute; you must brake with only wheel brakes as on other planes.
• We have also modeled small air brakes on this aircraft used for low speed stability and for spin recovery.

He-111H-2
Type: Bomber Major Users: Germany Cockpit Guide:
1 Artificial Horizon 19 Oil Pressure; Fuel Pressure (Engine #1) 2 Homing Beacon Indicator 20 Oil Pressure; Fuel Pressure (Engine #2) 3 Pilot’s Direction Indicator 21 Clock 4 Airspeed Indicator 22 Prop Pitch Indicator (Engine #1) 5 Compass 23 Prop Pitch Indicator (Engine #2) 6 RPM Indicator (Engine #1) 24 Flap Position Indicator 7 RPM Indicator (Engine #2) 25 Landing Gear Indicator Lights 8 Turn & Bank Indicator 26 Patin compass 9 Variometer 27 Fuel Selector Switch (Left) 10 Altimeter 28 Fuel Level Warning Light (Left) 11 Compass 29 Fuel Level (Left) 12 Bank Indicator 30 Fuel Level (Right) 13 Manifold Pressure (Engine #1) 31 Fuel Level Warning Light (Right) 14 Manifold Pressure (Engine #2) 32 Fuel Selector Switch (Right) 15 Oil Temperature (Engine #1) 33 Oil Pressure; Fuel Pressure (Engine #1) 16 Oil Temperature (Engine #2) 34 Free Air Temperature 17 Coolant Temperature (Engine #1) 35 Oil Pressure; Fuel Pressure (Engine #2) 18 Coolant Temperature (Engine #2) 36 Instrument Dimmer Switch

(He-111 continued) Other Playable Crew Positions:
Bombardier Nose Gunner Top Gunner
Bottom Gunner Waist Gunners (L + R) At a Glance: Engine:
2 x Jumo211A-3. Power:
Take-off : 1,100 HP
Armament: • 5 x 7.92 mm (MG 15). • Up to 2,000 kg of bombs.
Advantages: • High flight characteristics; • Good field of vision from the cockpit; • Multifunctional; • Good range.
Disadvantages: • Low speed; • Low service ceiling.
Pilot Notes:
Take-Off Speed: 160 km/h Landing Speed: 150 km/h Combat Engine Setting: 2,600 RPM Best Cruise: 2,200 RPM Economy Cruise: 2,100 RPM Prop Pitch Control: Manual Mixture Control: No Boost: No Supercharger: Two Speed
• He-111 is a good German bomber that however started to become obsolete by mid-1943. By 1944 it really becomes very vulnerable to enemy fighters and should not be used in high-threat environments.
• He-111’s excellent bombsight gives you a wide window of opportunity in choosing your target altitude and airspeed. You can attack at 50 meters above ground and 450 km/h, or 4,000 meters and 250 km/h. It’s best however to fly faster in the areas protected with flak as He-111 is not very well armored.
• The engines are not equipped with fire extinguishers, so once an engine catches fire you should immediately turn it off and feather the prop. If one of the fuel tank catches fire an explosion is imminent and you should bail out immediately.
• He-111 can fly on land normally even on one engine, so if you successfully shut one down after receiving battle damage you should jettison your bombload and proceed back home.
Please refer to the in-game training missions for information on flying and fighting in the He-111.

(He-111 continued) Using the Level Sight:
• The level bomb sight will automatically calculate the bomb trajectory and impact point based on the aircraft’s current airspeed and altitude. The bombardier must enter these parameters into the sight manually, and point it at the target. Then the sight will automatically track the target, and drop the bombs automatically at the right time.
• As the first step, bombing altitude and aircraft speed must be entered into the bombsight. The actual altitude above target (not above sea level) can be entered using the Increase Bombsight Altitude and Decrease Bombsight Altitude keys. The plane speed is entered using the Increase Bombsight Velocity and Decrease Bombsight Velocity keys. Note that the true (not indicated) airspeed must be set. It can be obtained from the speed gauge when in No-Cockpit View mode.
• After the initial parameters are entered, the bombardier has to acquire the target with the bombsight crosshair. Tap the Toggle Gunsight key (Shift-F1 by default) to look through the optics. Use Increase Bombsight Distance and Decrease Bombsight Distance to adjust the bombsight viewing angle up, and scan the horizon for the mission target.
• If the target does not appear along the centerline of the bomb sight optics, make minute changes to your plane’s course. Then using the Increase Bombsight Distance and Decrease Bombsight Distance keys place the crosshair on target. With the target dead center, turn on the targeting computer using the Toggle Bombsight Automation key. The bombsight will begin tracking the target. Correct the crosshair movement with the Increase Bombsight Velocity and Decrease Bombsight Velocity keys if necessary.
• The bombs will drop automatically when the plane reaches the proper position for a bomb drop, based on the input parameters and the optics angle.
• Note that after starting the bomb run, a plane may not be banked more than 4.5 degrees or the bombsight will lose stability. Only slight adjustments in direction are allowed. After more substantial maneuvers the bomb sight may take up to 30 seconds to stabilize. During the stabilization phase, the bomb sight crosshairs are turned off.
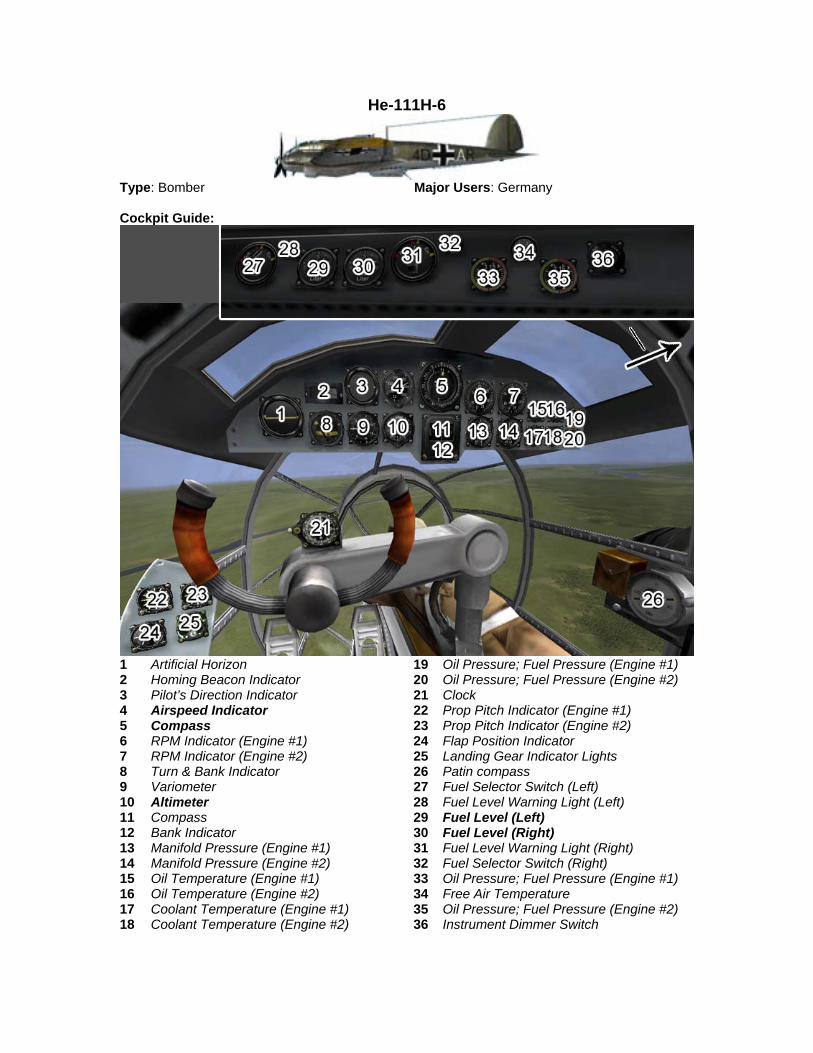
He-111H-6
Type: Bomber Major Users: Germany Cockpit Guide:
1 Artificial Horizon 19 Oil Pressure; Fuel Pressure (Engine #1) 2 Homing Beacon Indicator 20 Oil Pressure; Fuel Pressure (Engine #2) 3 Pilot’s Direction Indicator 21 Clock 4 Airspeed Indicator 22 Prop Pitch Indicator (Engine #1) 5 Compass 23 Prop Pitch Indicator (Engine #2) 6 RPM Indicator (Engine #1) 24 Flap Position Indicator 7 RPM Indicator (Engine #2) 25 Landing Gear Indicator Lights 8 Turn & Bank Indicator 26 Patin compass 9 Variometer 27 Fuel Selector Switch (Left) 10 Altimeter 28 Fuel Level Warning Light (Left) 11 Compass 29 Fuel Level (Left) 12 Bank Indicator 30 Fuel Level (Right) 13 Manifold Pressure (Engine #1) 31 Fuel Level Warning Light (Right) 14 Manifold Pressure (Engine #2) 32 Fuel Selector Switch (Right) 15 Oil Temperature (Engine #1) 33 Oil Pressure; Fuel Pressure (Engine #1) 16 Oil Temperature (Engine #2) 34 Free Air Temperature 17 Coolant Temperature (Engine #1) 35 Oil Pressure; Fuel Pressure (Engine #2) 18 Coolant Temperature (Engine #2) 36 Instrument Dimmer Switch
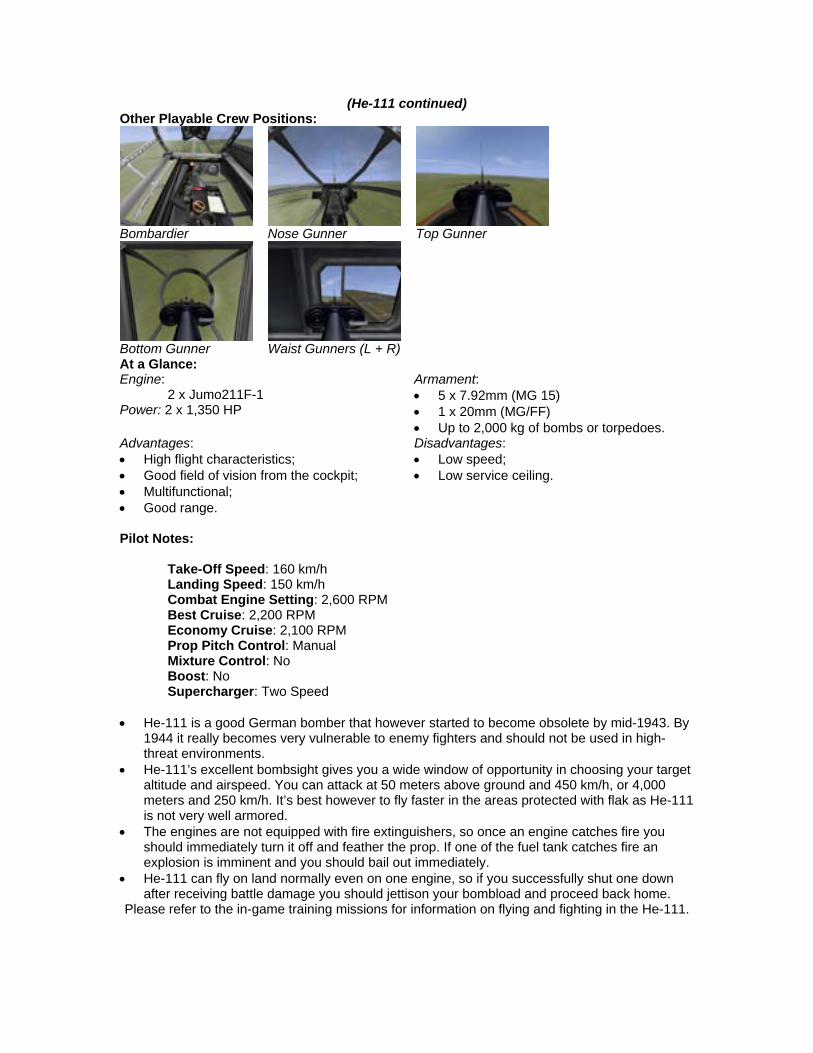
(He-111 continued) Other Playable Crew Positions:
Bombardier Nose Gunner Top Gunner
Bottom Gunner Waist Gunners (L + R) At a Glance: Engine:
2 x Jumo211F-1 Power: 2 x 1,350 HP
Armament: • 5 x 7.92mm (MG 15) • 1 x 20mm (MG/FF) • Up to 2,000 kg of bombs or torpedoes.
Advantages: • High flight characteristics; • Good field of vision from the cockpit; • Multifunctional; • Good range.
Disadvantages: • Low speed; • Low service ceiling.
Pilot Notes:
Take-Off Speed: 160 km/h Landing Speed: 150 km/h Combat Engine Setting: 2,600 RPM Best Cruise: 2,200 RPM Economy Cruise: 2,100 RPM Prop Pitch Control: Manual Mixture Control: No Boost: No Supercharger: Two Speed
• He-111 is a good German bomber that however started to become obsolete by mid-1943. By 1944 it really becomes very vulnerable to enemy fighters and should not be used in high-threat environments.
• He-111’s excellent bombsight gives you a wide window of opportunity in choosing your target altitude and airspeed. You can attack at 50 meters above ground and 450 km/h, or 4,000 meters and 250 km/h. It’s best however to fly faster in the areas protected with flak as He-111 is not very well armored.
• The engines are not equipped with fire extinguishers, so once an engine catches fire you should immediately turn it off and feather the prop. If one of the fuel tank catches fire an explosion is imminent and you should bail out immediately.
• He-111 can fly on land normally even on one engine, so if you successfully shut one down after receiving battle damage you should jettison your bombload and proceed back home.
Please refer to the in-game training missions for information on flying and fighting in the He-111.

(He-111 continued) Using the Level Sight: • The level bomb sight will automatically calculate the bomb trajectory and impact point based
on the aircraft’s current airspeed and altitude. The bombardier must enter these parameters into the sight manually, and point it at the target. Then the sight will automatically track the target, and drop the bombs automatically at the right time.
• As the first step, bombing altitude and aircraft speed must be entered into the bombsight. The actual altitude above target (not above sea level) can be entered using the Increase Bombsight Altitude and Decrease Bombsight Altitude keys. The plane speed is entered using the Increase Bombsight Velocity and Decrease Bombsight Velocity keys. Note that the true (not indicated) airspeed must be set. It can be obtained from the speed gauge when in No-Cockpit View mode.
• After the initial parameters are entered, the bombardier has to acquire the target with the bombsight crosshair. Tap the Toggle Gunsight key (Shift-F1 by default) to look through the optics. Use Increase Bombsight Distance and Decrease Bombsight Distance to adjust the bombsight viewing angle up, and scan the horizon for the mission target.
• If the target does not appear along the centerline of the bomb sight optics, make minute changes to your plane’s course. Then using the Increase Bombsight Distance and Decrease Bombsight Distance keys place the crosshair on target. With the target dead center, turn on the targeting computer using the Toggle Bombsight Automation key. The bombsight will begin tracking the target. Correct the crosshair movement with the Increase Bombsight Velocity and Decrease Bombsight Velocity keys if necessary.
• The bombs will drop automatically when the plane reaches the proper position for a bomb drop, based on the input parameters and the optics angle.
• Note that after starting the bomb run, a plane may not be banked more than 4.5 degrees or the bombsight will lose stability. Only slight adjustments in direction are allowed. After more substantial maneuvers the bomb sight may take up to 30 seconds to stabilize. During the stabilization phase, the bomb sight crosshairs are turned off.
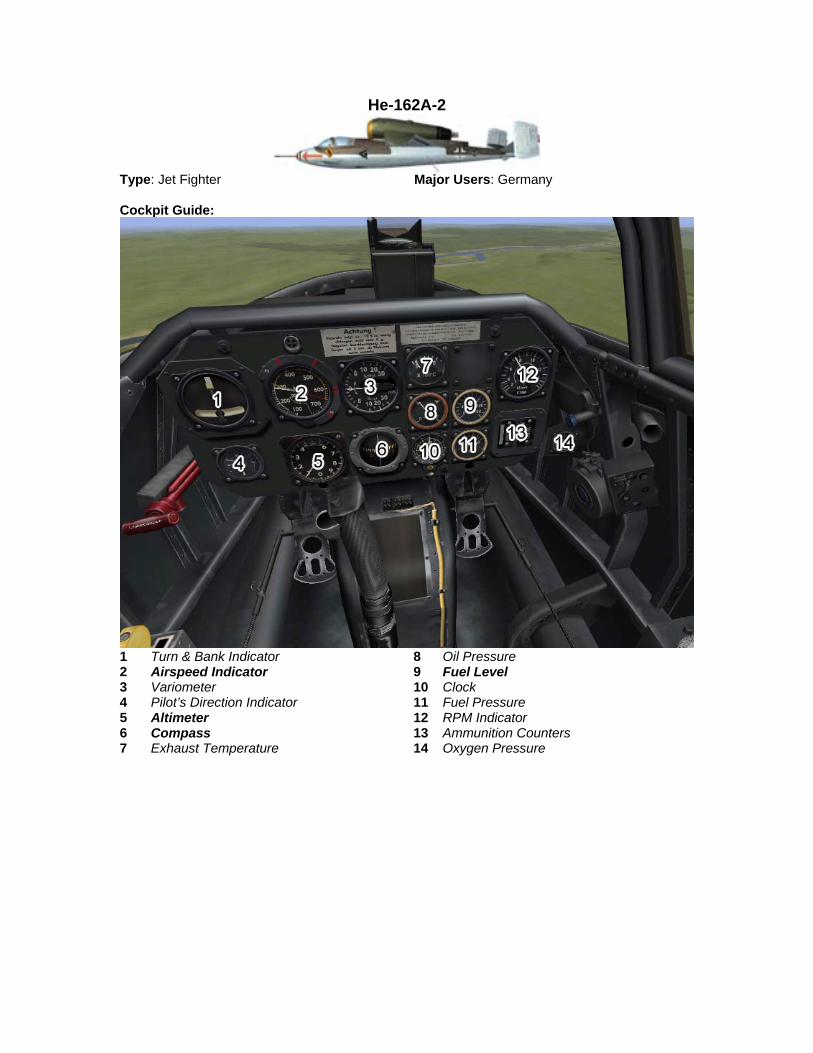
He-162A-2
Type: Jet Fighter Major Users: Germany Cockpit Guide:
1 Turn & Bank Indicator 8 Oil Pressure 2 Airspeed Indicator 9 Fuel Level 3 Variometer 10 Clock 4 Pilot’s Direction Indicator 11 Fuel Pressure 5 Altimeter 12 RPM Indicator 6 Compass 13 Ammunition Counters 7 Exhaust Temperature 14 Oxygen Pressure

(He-162 continued)
At a Glance: Engine:
1 x 003 Armament: • 2 x 20mm (MG 151) cannon
Advantages: • Fastest operational fighter of WWII; • Excellent performance characteristics; • Good maneuverability; • Strong armament; • Good cockpit visibility.
Disadvantages: • Manufacturing defects; • High control sensitivity.
Pilot Notes:
• Gunsight Note: The gunsight in this aircraft, as in many German planes, was positioned off-center. The default internal camera position is centered, and as such the gunsight is difficult or even impossible to use. To switch to an aiming view, use the Toggle Gunsight button (Shift-F1 by default) that switches the view to look through the offset gunsight.
• The He-162 is equipped with an ejection seat. However these are not modern 0-0 ejection seats, and you have a very low chance of survival punching out below 500 meters of altitude or stationary on the ground.

He-162C
Type: Jet Fighter Major Users: Germany Cockpit Guide:
1 Turn & Bank Indicator 8 Oil Pressure 2 Airspeed Indicator 9 Fuel Level 3 Variometer 10 Clock 4 Pilot’s Direction Indicator 11 Fuel Pressure 5 Altimeter 12 RPM Indicator 6 Compass 13 Ammunition Counters 7 Exhaust Temperature 14 Oxygen Pressure At a Glance: Engine:
1 x 011A turbojet Power: 1,300 kg/s
Armament: • 2 x 30mm MK-108 cannon
Advantages: • Excellent performance; • Strong armament; • Cheap and easy to produce.
Disadvantages: • Never entered production.
(He-162 continued)
Pilot Notes:
• Gunsight Note: The gunsight in this aircraft, as in many German planes, was positioned off-center. The default internal camera position is centered, and as such the gunsight is difficult or even impossible to use. To switch to an aiming view, use the Toggle Gunsight button (Shift-F1 by default) that switches the view to look through the offset gunsight.
• The He-162 is equipped with an ejection seat. However these are not modern 0-0 ejection seats, and you have a very low chance of survival punching out below 500 meters of altitude or stationary on the ground.

He-162D
Type: Jet Fighter Major Users: Germany Cockpit Guide:
1 Turn & Bank Indicator 8 Oil Pressure 2 Airspeed Indicator 9 Fuel Level 3 Variometer 10 Clock 4 Pilot’s Direction Indicator 11 Fuel Pressure 5 Altimeter 12 RPM Indicator 6 Compass 13 Ammunition Counters 7 Exhaust Temperature 14 Oxygen Pressure At a Glance: Engine:
1 x 011A turbojet Power: 1,300 kg/s
Armament: • 2 x 30mm MK-108 cannon
Advantages: • Excellent performance; • Strong armament; • Cheap and easy to produce.
Disadvantages: • Questionable forward-swept wing; • Never entered production.

(He-162 continued)
Pilot Notes: • Gunsight Note: The gunsight in this aircraft, as in many German planes, was
positioned off-center. The default internal camera position is centered, and as such the gunsight is difficult or even impossible to use. To switch to an aiming view, use the Toggle Gunsight button (Shift-F1 by default) that switches the view to look through the offset gunsight.
• A forward-swept wing is well known to hold several advantages over a straight wing, such as better laminar flow, better maneuverability, etc. However not a single forward-swept wing project has entered serial production. The reason is simple: wing flutter begins much earlier with this wing than with other types. No counter-balances can solve this problem; even the common design decision of placing the engine gondolas forward can fully solve this. The decision only became possible with introduction of super-strong composite materials in the aviation industry.
• Therefore, we’ve made a concession that the He-162D’s wing is also made of such composite materials, which would have historically been unavailable in 1945-46.
• The He-162 is equipped with an ejection seat. However these are not modern 0-0 ejection seats, and you have a very low chance of survival punching out below 500 meters of altitude or stationary on the ground.
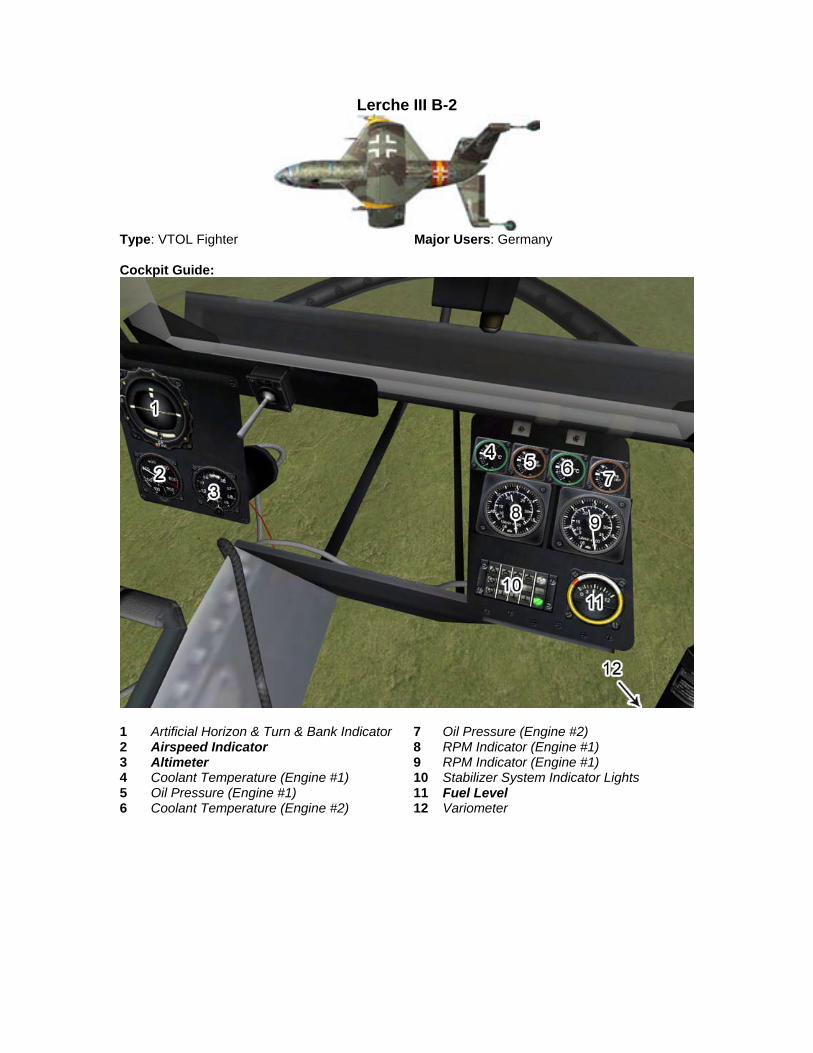
Lerche III B-2
Type: VTOL Fighter Major Users: Germany Cockpit Guide:
1 Artificial Horizon & Turn & Bank Indicator 7 Oil Pressure (Engine #2) 2 Airspeed Indicator 8 RPM Indicator (Engine #1) 3 Altimeter 9 RPM Indicator (Engine #1) 4 Coolant Temperature (Engine #1) 10 Stabilizer System Indicator Lights 5 Oil Pressure (Engine #1) 11 Fuel Level 6 Coolant Temperature (Engine #2) 12 Variometer

(Lerche continued)
Pilot Notes: • The aircraft is quipped with automatic stabilization auto-pilot that keeps the aircraft vertical
during take-off and landing. The system is toggled with the “Airbrake” key. The white indicator lights on the instrument panel illuminate when the system is switched on.
• Unlike most other fighters, the “Toggle Gunsight” button (Shift-F1 by default) switches the view to point downwards, at the instrument panel and the ground below.
• Take-off procedure in the aircraft is simple. Toggle the stabilization auto-pilot on and slowly increase engine power. Reaching 200-300 meters of altitude push the nose down slowly to convert to horizontal flight, and disengage the stabilization auto-pilot.
• The landing procedure is more involved. Firstly, select suitable area for landing. Landing approach is standard, with speeds of around 250-300 km/h, with the stabilization auto-pilot turned on (one white indicator light). At 25-30 meters of altitude begin a flare at 10 to 20 degrees nose-up attitude. The active stabilization auto-pilot will engage (second white indicator light). Level the elevators at that time. The stabilization auto-pilot will attempt to keep the aircraft vertical. Do not increase engine power at this time, as this may cause too much altitude to be gained. Do not chop the throttle below 25%, as this may lead to a stall or loss of effectiveness of the gas-powered stabilization mechanism.
• After the aircraft is stabilized vertically, slowly decrease power to descent. Aircraft with expanded ammunition and low fuel will hover at approximately 35 to 40% of throttle. When descending, vertical speed of no more than 5 m/s is recommended. The aircraft is also equipped with ultra-sound altimeter, which should be used alongside the vertical speed indicator during descent.
• Before touch-down decrease the vertical speed, momentarily opening the throttle. When the aircraft touches down, three green lights will illuminate on the dashboard. Immediately decrease power to avoid bunny-hopping.
• When using auto-pilot, or performed by AI planes, the landing may not look smooth due to inherent game engine limitations.
• The X-4 air-to-air rocket is wire guided. All rocket-carrying aircraft have a single rocket control module, and as such can guide only one rocket at a time. When launching multiple rockets simultaneously, only the last rocket fired can be guided.
• To guide the rocket, use the “Increase Sight Attitude”, “Decrease Sight Attitude”, “Adjust Sight Control to Right” and “Adjust Sight Control to Left” keys. We recommend assigning them to the Up, Down, Right, and Left arrow keys correspondingly.
• The easiest way to guide the rocket to target is to fire from the target’s six-o-clock level while flying on the same course. Guide the rocket to keep the lights on top of the target with no visible lateral movement until the moment of impact. Use gentle taps to provide last-minute guidance. The rockets detonate remotely, so no direct impact is required.
• This method should be used to attack non-maneuvering heavy bombers from 3,000 to 3,500 meters away.
• NOTE: The guiding wire is not visually modeled.
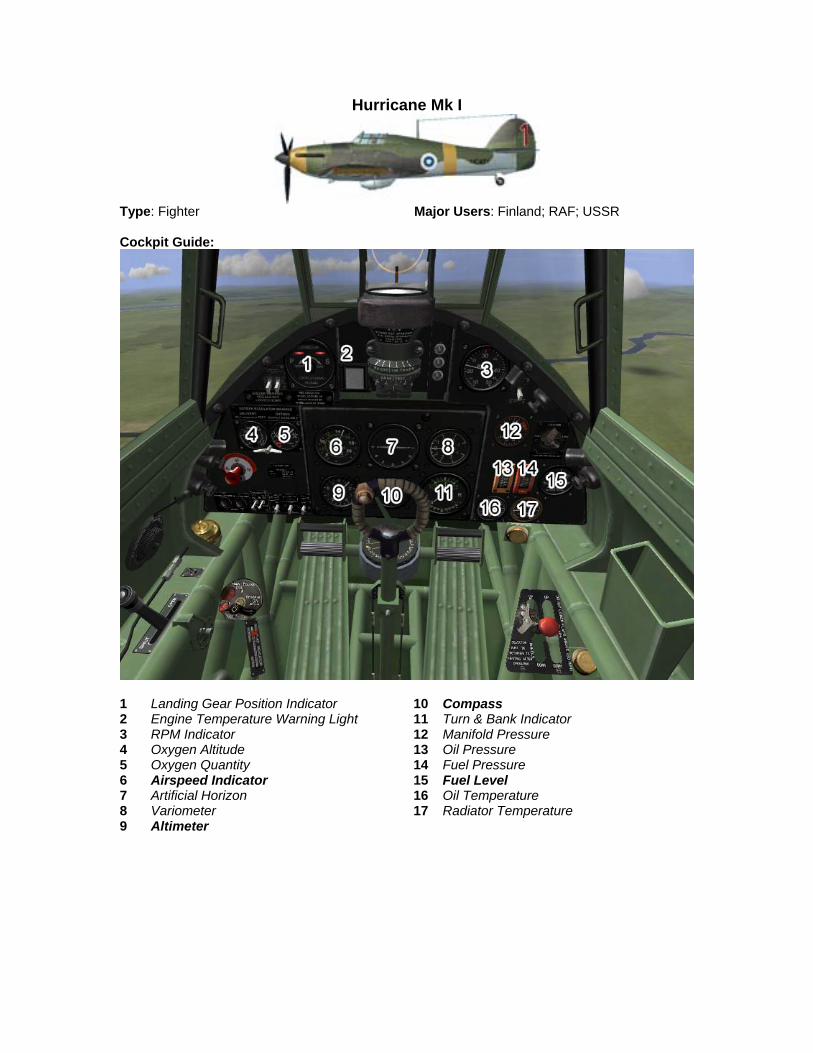
Hurricane Mk I
Type: Fighter Major Users: Finland; RAF; USSR Cockpit Guide:
1 Landing Gear Position Indicator 10 Compass 2 Engine Temperature Warning Light 11 Turn & Bank Indicator 3 RPM Indicator 12 Manifold Pressure 4 Oxygen Altitude 13 Oil Pressure 5 Oxygen Quantity 14 Fuel Pressure 6 Airspeed Indicator 15 Fuel Level 7 Artificial Horizon 16 Oil Temperature 8 Variometer 17 Radiator Temperature 9 Altimeter

(Hurricane continued)
At a Glance: Engine: 1 x XX Power:
Indicated: 950 HP Take-off: 1,280 HP
Armament: • 12 x.303 machine guns
Advantages: • Simple to control; • Easy to maintain in field conditions; • Reliable and stable in flight.
Disadvantages: • Insufficient cockpit visibility; • Inferior to contemporary enemy fighters.
Pilot Notes:
Take-Off Speed: 150 km/h / 85 kts Landing Speed: 145 km/h / 80 kts Combat Engine Setting: 3,000 RPM Best Cruise: 2,650 RPM Economy Cruise: 2,500 RPM Prop Pitch Control: Manual Mixture Control: Manual Boost: No Supercharger: Two-Speed
• The Hurricane Mk I as modeled in the sim is the version used by the Finnish Air Force, mainly against the Soviet Union; which is why it appears in the Blue / Axis list.
• Hurricane is generally inferior to all 1941 fighters, and inadequate against all 1942 and later fighters. It is mostly effective against bombers or as a ground attack plane.
• Hurricane has regretful acceleration and dive characteristics, therefore should generally be used in horizontal combat.
• Be aware that all instrumentation in the Hurricane is not metric but imperial, therefore you will need to learn to convert feet to meters and mile to kilometers when flying on instruments. Hurricane is a rather stable gunnery platform with armament sufficient to bring down any target at ranges under 300 meters.
• Supercharger speeds should be set to speed 2 in combat or in climb if boost is 2-5 psi below max; otherwise use speed 1.
• Best performance altitude is between 1,500 and 2,800 meters for speed 1 and 4,500 and 6,500 for speed 2.
• Worst performance between 3,000 and 4,500 meters

I.A.R. 80
Type: Fighter Major Users: Romania Cockpit Guide:
1 Altimeter 11 Manifold Pressure 2 Directional Gyro 12 RPM Indicator 3 Clock 13 Fire Extinguisher Status 4 Airspeed Indicator 14 Ammeter 5 Turn & Bank Indicator 15 Fuel Level 6 Variometer 16 Internal System Indicator 7 Landing Gear Indicator Lights 17 Internal System Indicator 8 Prop Pitch Indicator 18 Pump Pressure 9 Oil Pressure; Fuel Pressure 19 Air Pressure 10 Oil Temperature 20 Brake Pressure
(IAR 80 continued)
At a Glance: Engine:
I.A.R. K.14-1000A. Power: 1,025 HP
Armament: • 4 x 7.62 mm (FN).
Advantages: • Excellent performance characteristics; • Excellent maneuverability; • Strong armament; • Good cockpit visibility; • Easy to fly.
Disadvantages: • Low speed.
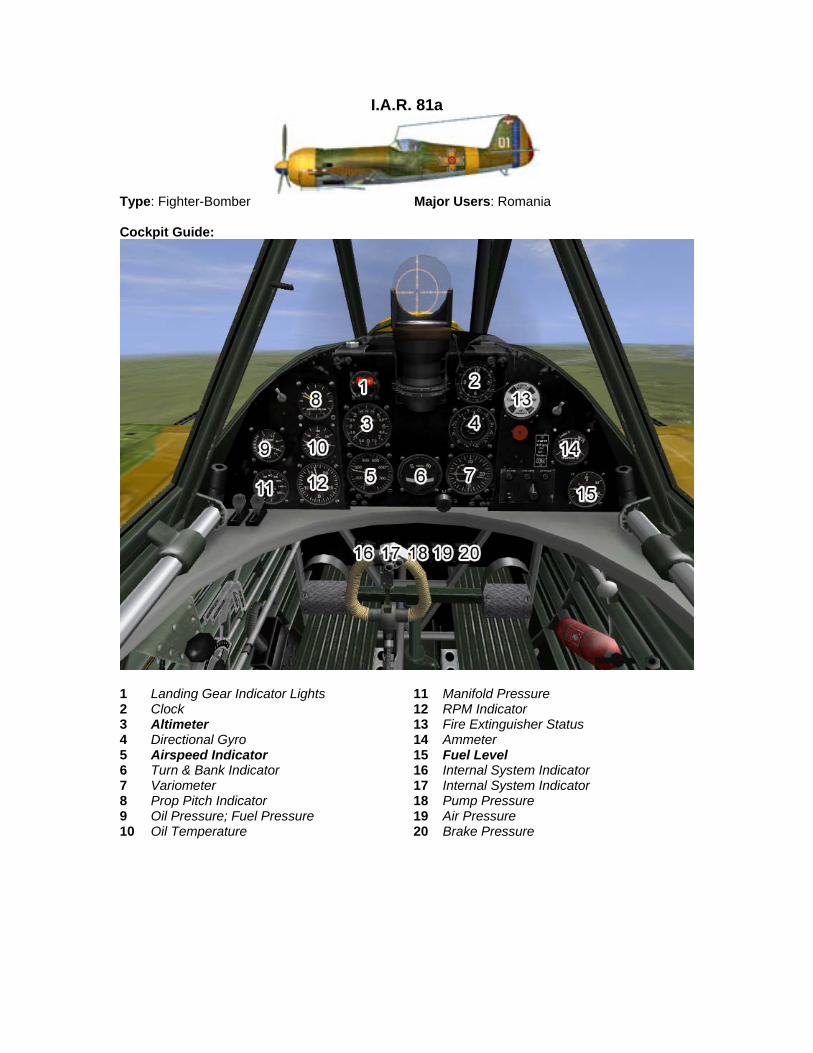
I.A.R. 81a
Type: Fighter-Bomber Major Users: Romania Cockpit Guide:
1 Landing Gear Indicator Lights 11 Manifold Pressure 2 Clock 12 RPM Indicator 3 Altimeter 13 Fire Extinguisher Status 4 Directional Gyro 14 Ammeter 5 Airspeed Indicator 15 Fuel Level 6 Turn & Bank Indicator 16 Internal System Indicator 7 Variometer 17 Internal System Indicator 8 Prop Pitch Indicator 18 Pump Pressure 9 Oil Pressure; Fuel Pressure 19 Air Pressure 10 Oil Temperature 20 Brake Pressure

(IAR 80 continued)
At a Glance: Engine:
I.A.R. K.14-1000A. Power: 1,025 HP
Armament: • 4 x 7.62 mm (FN). • 2 x 13 mm (MG 131). • Up to 250 kg of bombs.
Advantages: • Excellent performance characteristics; • Excellent maneuverability; • Strong armament; • Good cockpit visibility; • Easy to fly.
Disadvantages: • Low speed.

I.A.R. 81c
Type: Fighter-Bomber Major Users: Romania Cockpit Guide:
1 Landing Gear Indicator Lights 11 Manifold Pressure 2 Clock 12 RPM Indicator 3 Altimeter 13 Fire Extinguisher Status 4 Directional Gyro 14 Ammeter 5 Airspeed Indicator 15 Fuel Level 6 Turn & Bank Indicator 16 Internal System Indicator 7 Variometer 17 Internal System Indicator 8 Prop Pitch Indicator 18 Pump Pressure 9 Oil Pressure; Fuel Pressure 19 Air Pressure 10 Oil Temperature 20 Brake Pressure

(IAR 80 continued)
At a Glance: Engine:
I.A.R. K.14-1000A. Power: 1,025 HP
Armament: • 4 x 7.62 mm (FN). • 2 x 20 mm (MG 151). • Up to 250 kg of bombs.
Advantages: • Excellent performance characteristics; • Excellent maneuverability; • Strong armament; • Good cockpit visibility; • Easy to fly.
Disadvantages: • Low speed.

J2M3
Type: Fighter Major Users: Japan Cockpit Guide:
1 Turn & Bank Indicator 14 RPM Indicator 2 Artificial Horizon 15 Fuel Level 3 Variometer 16 Cylinder Head Temperature 4 Flap Position Indicator 17 Manifold Pressure 5 Compass 18 ADI Quantity 6 Airspeed Indicator 19 Oil Temperature 7 Altimeter 20 Oil Pressure 8 Landing Gear Indicator Lights 21 Fuel Level 9 Fire Extinguisher Level 22 ADI Pressure 10 Oxygen Pressure; Oxygen Quantity 23 Magneto Switch 11 Hydraulic Pressure 24 Fuel Pressure 12 Free Air Temperature 25 Clock 13 Exhaust Temperature 26 Voltmeter / Ammeter
(J2M continued)
At a Glance: Engine:
MK4R-A Kasei 23a Power: 1,800 HP (take-off)
Armament: • 2 x Type 99 model 1 20mm cannon • 2 x Type 99 model 2 20mm cannon • 2 x 60kg bombs
Advantages: • High Speed; • Good performance at all altitudes; • Powerful Armament.
Disadvantages: • Poor rearward visibility; • Low ammo load.
Pilot Notes:
• The aircraft is equipped with a three-stage supercharger. • Supercharger Stage 1 (default) should be used between 0 and 3,000 meters • Supercharger Stage 2 should be used between 3,000 and 5,500 meters • Supercharger Stage 3 should be used above 5,500 meters • Mixture adjustment is requires at 6,000 meters.

J2M5
Type: Fighter Major Users: Japan Cockpit Guide:
1 Turn & Bank Indicator 14 RPM Indicator 2 Artificial Horizon 15 Fuel Level 3 Variometer 16 Cylinder Head Temperature 4 Flap Position Indicator 17 Manifold Pressure 5 Compass 18 ADI Quantity 6 Airspeed Indicator 19 Oil Temperature 7 Altimeter 20 Oil Pressure 8 Landing Gear Indicator Lights 21 Fuel Level 9 Fire Extinguisher Level 22 ADI Pressure 10 Oxygen Pressure; Oxygen Quantity 23 Magneto Switch 11 Hydraulic Pressure 24 Fuel Pressure 12 Free Air Temperature 25 Clock 13 Exhaust Temperature 26 Voltmeter / Ammeter

(J2M continued)
At a Glance: Engine:
1 x MK4U-4 Kasei 26a Power: 1,820 HP for take-off
1,510 HP at 2,800 m
Armament: • 4 x 20 mm Type 99 Model 2 cannon • Up to 60 kg of bombs • 2 x 200 l drop tanks
Advantages: • High Speed; • Good performance at all altitudes; • Powerful Armament.
Disadvantages: • Poor rearward visibility; • Low ammo load.
Pilot Notes:
• The aircraft is equipped with a three-stage supercharger. • Supercharger Stage 1 (default) should be used between 0 and 3,000 meters • Supercharger Stage 2 should be used between 3,000 and 5,500 meters • Supercharger Stage 3 should be used above 5,500 meters • Mixture adjustment is requires at 6,000 meters.

J8A (Gladiator)
Type: Fighter Major Users: Finland; RAF Cockpit Guide:
1 Variometer 10 Altimeter 2 Vacuum Regulator 11 Oil Temperature 3 Oxygen Altitude 12 Oil Pressure 4 Oxygen Quantity 13 Manifold Pressure 5 RPM Indicator 14 Fuel Level 6 Variometer 15 Oil Temp & Pressure; Fuel Pressure 7 Airspeed Indicator 16 Clock 8 System Switch 17 Compass 9 Turn & Bank Indicator

(J8A continued)
At a Glance: Engine:
1 x Mercury I Power: 840 HP
Armament: • 4 x.303 machine guns
Advantages: • Good maneuverability; • Adequate early-war armament; • Enclosed cockpit.
Disadvantages: • Obsolete biplane design; • Low speed.

Ju-87B-2
Type: Dive Bomber Major Users: Germany Cockpit Guide:
1 Altimeter 9 Clock 2 Directional Gyro 10 Compass 3 Airspeed Indicator 11 RPM Indicator 4 Altimeter 12 Manifold Pressure 5 Turn & Bank Indicator 13 Fuel Level 6 Variometer 14 Fuel Pressure; Oil Pressure 7 Ammeter 15 Coolant Temperature 8 Instrument Dimmer Switch 16 Oil Temperature
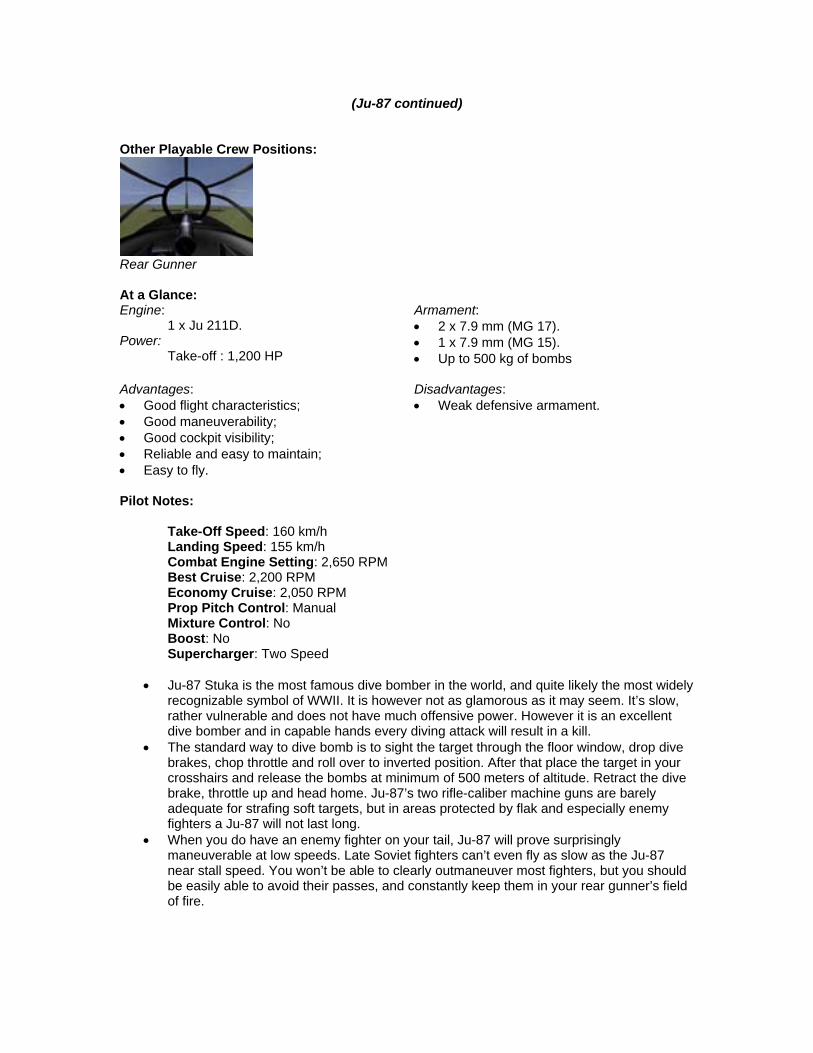
(Ju-87 continued)
Other Playable Crew Positions:
Rear Gunner At a Glance: Engine:
1 x Ju 211D. Power:
Take-off : 1,200 HP
Armament: • 2 x 7.9 mm (MG 17). • 1 x 7.9 mm (MG 15). • Up to 500 kg of bombs
Advantages: • Good flight characteristics; • Good maneuverability; • Good cockpit visibility; • Reliable and easy to maintain; • Easy to fly.
Disadvantages: • Weak defensive armament.
Pilot Notes:
Take-Off Speed: 160 km/h Landing Speed: 155 km/h Combat Engine Setting: 2,650 RPM Best Cruise: 2,200 RPM Economy Cruise: 2,050 RPM Prop Pitch Control: Manual Mixture Control: No Boost: No Supercharger: Two Speed
• Ju-87 Stuka is the most famous dive bomber in the world, and quite likely the most widely
recognizable symbol of WWII. It is however not as glamorous as it may seem. It’s slow, rather vulnerable and does not have much offensive power. However it is an excellent dive bomber and in capable hands every diving attack will result in a kill.
• The standard way to dive bomb is to sight the target through the floor window, drop dive brakes, chop throttle and roll over to inverted position. After that place the target in your crosshairs and release the bombs at minimum of 500 meters of altitude. Retract the dive brake, throttle up and head home. Ju-87’s two rifle-caliber machine guns are barely adequate for strafing soft targets, but in areas protected by flak and especially enemy fighters a Ju-87 will not last long.
• When you do have an enemy fighter on your tail, Ju-87 will prove surprisingly maneuverable at low speeds. Late Soviet fighters can’t even fly as slow as the Ju-87 near stall speed. You won’t be able to clearly outmaneuver most fighters, but you should be easily able to avoid their passes, and constantly keep them in your rear gunner’s field of fire.
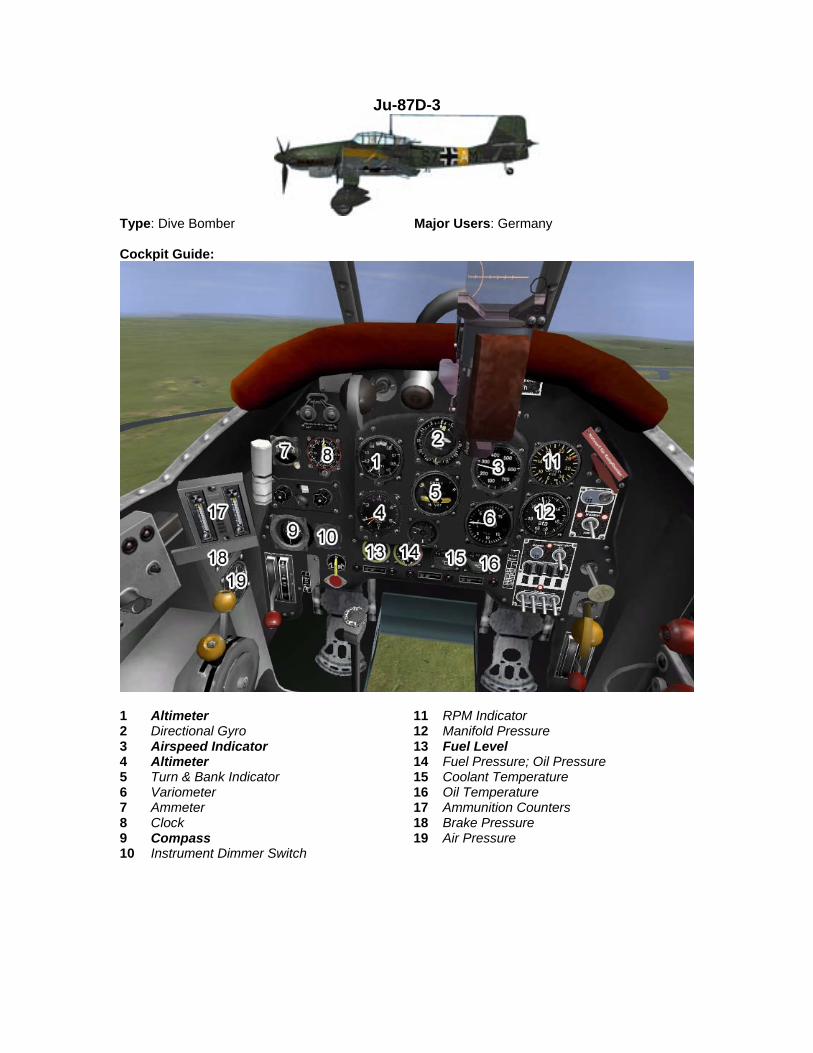
Ju-87D-3
Type: Dive Bomber Major Users: Germany Cockpit Guide:
1 Altimeter 11 RPM Indicator 2 Directional Gyro 12 Manifold Pressure 3 Airspeed Indicator 13 Fuel Level 4 Altimeter 14 Fuel Pressure; Oil Pressure 5 Turn & Bank Indicator 15 Coolant Temperature 6 Variometer 16 Oil Temperature 7 Ammeter 17 Ammunition Counters 8 Clock 18 Brake Pressure 9 Compass 19 Air Pressure 10 Instrument Dimmer Switch

(Ju-87 continued)
Other Playable Crew Positions:
Rear Gunner At a Glance: Engine:
1 x Ju 211J. Power:
Take-off : 1,400 HP
Armament: • 2 x 7.9 mm (MG 17). • 1 x 7.9 mm (MG 15). • Up to 1,000 kg of bombs
Advantages: • Good flight characteristics; • Good maneuverability; • Good cockpit visibility; • Reliable and easy to maintain; • Easy to fly.
Disadvantages: • Weak defensive armament.
Pilot Notes:
Take-Off Speed: 160 km/h Landing Speed: 155 km/h Combat Engine Setting: 2,650 RPM Best Cruise: 2,200 RPM Economy Cruise: 2,050 RPM Prop Pitch Control: Manual Mixture Control: No Boost: No Supercharger: Two Speed
• Ju-87 Stuka is the most famous dive bomber in the world, and quite likely the most widely
recognizable symbol of WWII. It is however not as glamorous as it may seem. It’s slow, rather vulnerable and does not have much offensive power. However it is an excellent dive bomber and in capable hands every diving attack will result in a kill.
• The standard way to dive bomb is to sight the target through the floor window, drop dive brakes, chop throttle and roll over to inverted position. After that place the target in your crosshairs and release the bombs at minimum of 500 meters of altitude. Retract the dive brake, throttle up and head home. Ju-87’s two rifle-caliber machine guns are barely adequate for strafing soft targets, but in areas protected by flak and especially enemy fighters a Ju-87 will not last long.
• When you do have an enemy fighter on your tail, Ju-87 will prove surprisingly maneuverable at low speeds. Late Soviet fighters can’t even fly as slow as the Ju-87 near stall speed. You won’t be able to clearly outmaneuver most fighters, but you should be easily able to avoid their passes, and constantly keep them in your rear gunner’s field of fire.

Ju-87D-5
Type: Dive Bomber Major Users: Germany Cockpit Guide:
1 Altimeter 11 RPM Indicator 2 Directional Gyro 12 Manifold Pressure 3 Airspeed Indicator 13 Fuel Level 4 Altimeter 14 Fuel Pressure; Oil Pressure 5 Turn & Bank Indicator 15 Coolant Temperature 6 Variometer 16 Oil Temperature 7 Ammeter 17 Ammunition Counters 8 Clock 18 Brake Pressure 9 Compass 19 Air Pressure 10 Instrument Dimmer Switch

(Ju-87 continued) Other Playable Crew Positions:
Rear Gunner At a Glance: Engine:
1 x Ju 211J. Power:
Take-off : 1,400 HP
Armament: • 2 x 20 mm (MG 151/20). • 2 x 7.9 mm (MG 15). • Up to 1,000 kg of bombs
Advantages: • Good flight characteristics; • Good maneuverability; • Good cockpit visibility; • Reliable and easy to maintain; • Easy to fly.
Disadvantages: • Weak defensive armament.
Pilot Notes:
Take-Off Speed: 160 km/h Landing Speed: 155 km/h Combat Engine Setting: 2,650 RPM Best Cruise: 2,200 RPM Economy Cruise: 2,050 RPM Prop Pitch Control: Manual Mixture Control: No Boost: No Supercharger: Two Speed
• Ju-87 Stuka is the most famous dive bomber in the world, and quite likely the most widely recognizable symbol of WWII. It is however not as glamorous as it may seem. It’s slow, rather vulnerable and does not have much offensive power. However it is an excellent dive bomber and in capable hands every diving attack will result in a kill.
• The standard way to dive bomb is to sight the target through the floor window, drop dive brakes, chop throttle and roll over to inverted position. After that place the target in your crosshairs and release the bombs at minimum of 500 meters of altitude. Retract the dive brake, throttle up and head home. Ju-87’s two rifle-caliber machine guns are barely adequate for strafing soft targets, but in areas protected by flak and especially enemy fighters a Ju-87 will not last long.
• When you do have an enemy fighter on your tail, Ju-87 will prove surprisingly maneuverable at low speeds. Late Soviet fighters can’t even fly as slow as the Ju-87 near stall speed. You won’t be able to outmaneuver most fighters, but you should be able to avoid their passes, and constantly keep them in your rear gunner’s field of fire.
• The Stuka D-5 is equipped with the Stuvi dive sight. Before the dive in your Ju-87D-5 you must set your dive airspeed (true) by buttons “Increase Sight Velocity” and “Decrease Sight Velocity” and bomb drop altitude by buttons “Increase Sight Altitude” and “Decrease Sight Altitude”. When the plane enters the dive you must place the crosshairs onto your target and keep it there. When the plane reaches the preset altitude the warning horn will sound. The pilot should drop the bombs at this point, after which point the plane will be automatically leveled off.

Ju-87G-1
Type: Dive Bomber / Ground Attack Major Users: Germany Cockpit Guide:
1 Altimeter 11 RPM Indicator 2 Directional Gyro 12 Manifold Pressure 3 Airspeed Indicator 13 Fuel Level 4 Altimeter 14 Fuel Pressure; Oil Pressure 5 Turn & Bank Indicator 15 Coolant Temperature 6 Variometer 16 Oil Temperature 7 Ammeter 17 Ammunition Counters 8 Clock 18 Brake Pressure 9 Compass 19 Air Pressure 10 Instrument Dimmer Switch

(Ju-87 continued)
Other Playable Crew Positions:
Rear Gunner At a Glance: Engine:
1 x Ju 211J. Power:
Take-off : 1,400 HP
Armament: • 2 x 37 mm (VK 3.7). • 2 x 7.9 mm (MG 15). • Up to 1,000 kg of bombs
Advantages: • Good flight characteristics; • Good cockpit visibility; • Reliable and easy to maintain; • Easy to fly.
Disadvantages: • Poor maneuverability; • Low speed; • Weak defensive armament.
Pilot Notes:
Take-Off Speed: 170 km/h Landing Speed: 160 km/h Combat Engine Setting: 2,650 RPM Best Cruise: 2,200 RPM Economy Cruise: 2,050 RPM Prop Pitch Control: Manual Mixture Control: No Boost: No Supercharger: Two Speed
• Ju-87G looks like a Stuka, sounds like a Stuka and flies like a Stuka – however it’s
anything but. Instead of bombs the Ju-87 G is equipped with two 37mm gunpods under the wings specifically designed to destroy enemy tanks. A single shot at the enemy tank’s rear will crack it open. Ju-87G is slower and much less maneuverable that a regular Stuka, therefore you should try to stay at low levels to avoid enemy flak and fighters.
• Attacks are best initiated from 500 meters or so, in 15-45 degree dives. Remember that the cannons are located under your wings, therefore convergence becomes very important when firing at small targets like tanks. When firing outside convergence range your rounds are very likely to impact near the tank on both sides without hitting it.
• When attacked by enemy fighters the rear gunner is the best defense. Dive to ground level and maneuver to keep the enemy fighter within the rear gunner’s defensive arc.
• If you can cause the enemy to overshoot, or extend and attacking head-on your 37mms should bring an end to any Soviet fighter.
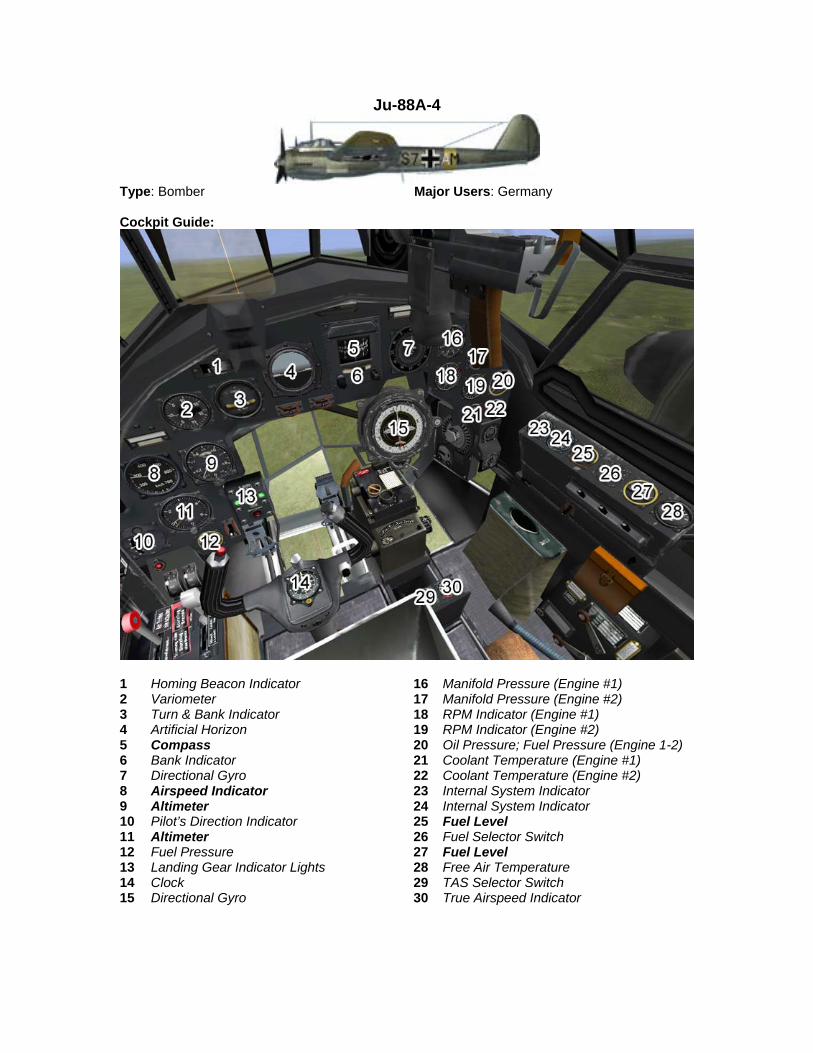
Ju-88A-4
Type: Bomber Major Users: Germany Cockpit Guide:
1 Homing Beacon Indicator 16 Manifold Pressure (Engine #1) 2 Variometer 17 Manifold Pressure (Engine #2) 3 Turn & Bank Indicator 18 RPM Indicator (Engine #1) 4 Artificial Horizon 19 RPM Indicator (Engine #2) 5 Compass 20 Oil Pressure; Fuel Pressure (Engine 1-2) 6 Bank Indicator 21 Coolant Temperature (Engine #1) 7 Directional Gyro 22 Coolant Temperature (Engine #2) 8 Airspeed Indicator 23 Internal System Indicator 9 Altimeter 24 Internal System Indicator 10 Pilot’s Direction Indicator 25 Fuel Level 11 Altimeter 26 Fuel Selector Switch 12 Fuel Pressure 27 Fuel Level 13 Landing Gear Indicator Lights 28 Free Air Temperature 14 Clock 29 TAS Selector Switch 15 Directional Gyro 30 True Airspeed Indicator

(Ju-88 continued) Other Playable Crew Positions:
Bombardier Nose Gunner Top Gunner
Bottom Gunner At a Glance: Engine:
2 x Jumo 211B-1. Power: 1,200 HP
Armament: • 1 x 7.9 mm (MG 81): front. • 1 x 7.9 mm (MG 81Z): bottom. • 2 x 7.9 mm (MG 81): top. • Up to 1,000 kg of bombs.
Advantages: • Good flight performance; • High maneuverability and good armament; • Multifunctional; • Excellent cockpit visibility; • Dive autopilot.
Disadvantages: • Insufficient defensive armament; • Entire crew sharing small quarters makes
them easy to disable.

(Ju-88 continued) Using the Dive Sight:
• The Ju-88 is equipped with the Stuvi dive sight. Before the dive you must set your dive airspeed (true) with the “Increase Sight Velocity” and “Decrease Sight Velocity” keys, and bomb drop altitude with the “Increase Sight Altitude” and “Decrease Sight Altitude” keys.
• These are the actual instructions from the historical Fl Üb 8-179/4 manual. (Traditional method with "Dive Automation") • 1. Close radiator. • 2. Set propeller pitch to 100% (Auto). • 3. Set bombsight speed to estimated drop speed (can be adjusted during dive). • 4. Set bombsight altitude (for example 1000m). • 5. Center trim (on Ju88 red marks). • 6. Extend the dive brake (this will also trim plane to dive). • 7. Set power to idle (0%). • 8. Take aim with ring in top part of the sight. Also take note of the dive
bombing marker ("Krawatte") below the ring on the vertical line. • 9. Hold target in the ring until you hear the drop altitude warning buzzer. • 10. Pull up so that the dive bombing marker becomes superimposed on the
target. Hold steady for a moment. • 11. Press the bomb release button (this will also initiate the pull-out by centering
the trim again). • 12. Press the dive-brake button again to raise the brakes up. • 13. Apply power slowly to avoid overspeeding the engines. • 14. Open the radiator and adjust prop pitch for cruise, if necessary.
Using the Level Sight: • The level bomb sight will automatically calculate the bomb trajectory and impact point based
on the aircraft’s current airspeed and altitude. The bombardier must enter these parameters into the sight manually, and point it at the target. Then the sight will automatically track the target, and drop the bombs automatically at the right time.
• As the first step, bombing altitude and aircraft speed must be entered into the bombsight. The actual altitude above target (not above sea level) can be entered using the Increase Bombsight Altitude and Decrease Bombsight Altitude keys. The plane speed is entered using the Increase Bombsight Velocity and Decrease Bombsight Velocity keys. Note that the true (not indicated) airspeed must be set. It can be obtained from the speed gauge when in No-Cockpit View mode.
• After the initial parameters are entered, the bombardier has to acquire the target with the bombsight crosshair. Tap the Toggle Gunsight key (Shift-F1 by default) to look through the optics. Use Increase Bombsight Distance and Decrease Bombsight Distance to adjust the bombsight viewing angle up, and scan the horizon for the mission target.
• If the target does not appear along the centerline of the bomb sight optics, make minute changes to your plane’s course. Then using the Increase Bombsight Distance and Decrease Bombsight Distance keys place the crosshair on target. With the target dead center, turn on the targeting computer using the Toggle Bombsight Automation key. The bombsight will begin tracking the target. Correct the crosshair movement with the Increase Bombsight Velocity and Decrease Bombsight Velocity keys if necessary.
• The bombs will drop automatically when the plane reaches the proper position for a bomb drop, based on the input parameters and the optics angle.
• Note that after starting the bomb run, a plane may not be banked more than 4.5 degrees or the bombsight will lose stability. Only slight adjustments in direction are allowed. After more substantial maneuvers the bomb sight may take up to 30 seconds to stabilize. During the stabilization phase, the bomb sight crosshairs are turned off.

Ki-27 Ko
Type: Fighter Major Users: Japan Cockpit Guide:
1 Airspeed Indicator 8 Oil Pressure 2 Turn & Bank Indicator 9 Oil Temperature 3 Variometer 10 Fuel Pressure 4 RPM Indicator 11 Coolant Temperature 5 Manifold Pressure 12 Clock 6 Compass 13 Fuel Level 7 Altimeter
(Ki-27 continued)
At a Glance: Engine:
Army Type 97 (Ha-1b) Power: 780 HP at 2,900 m
Armament: • 2 x 7.7mm Type 89 • Up to 100 kg of bombs • 2 x 130 k drop tanks
Advantages: • Excellent maneuverability.
Disadvantages: • Light armament; • Low top speed; • Poor pilot protection.
Pilot Notes:
• The aircraft is equipped with a single-step supercharger, therefore no pilot intervention is needed.
• Mixture adjustment is requires at 6,000 meters.

Ki-27 Otsu
Type: Fighter Major Users: Japan Cockpit Guide:
1 Airspeed Indicator 8 Oil Pressure 2 Turn & Bank Indicator 9 Oil Temperature 3 Variometer 10 Fuel Pressure 4 RPM Indicator 11 Coolant Temperature 5 Manifold Pressure 12 Clock 6 Compass 13 Fuel Level 7 Altimeter

(Ki-27 continued)
At a Glance: Engine:
Army Type 97 (Ha-1b) Power: 780 HP at 2,900 m
Armament: • 2 x 7.7mm Type 89 • Up to 100 kg of bombs • 2 x 130 k drop tanks
Advantages: • Excellent maneuverability.
Disadvantages: • Light armament; • Low top speed; • Poor pilot protection.
Pilot Notes:
• The aircraft is equipped with a single-step supercharger, therefore no pilot intervention is needed.
• Mixture adjustment is requires at 6,000 meters.
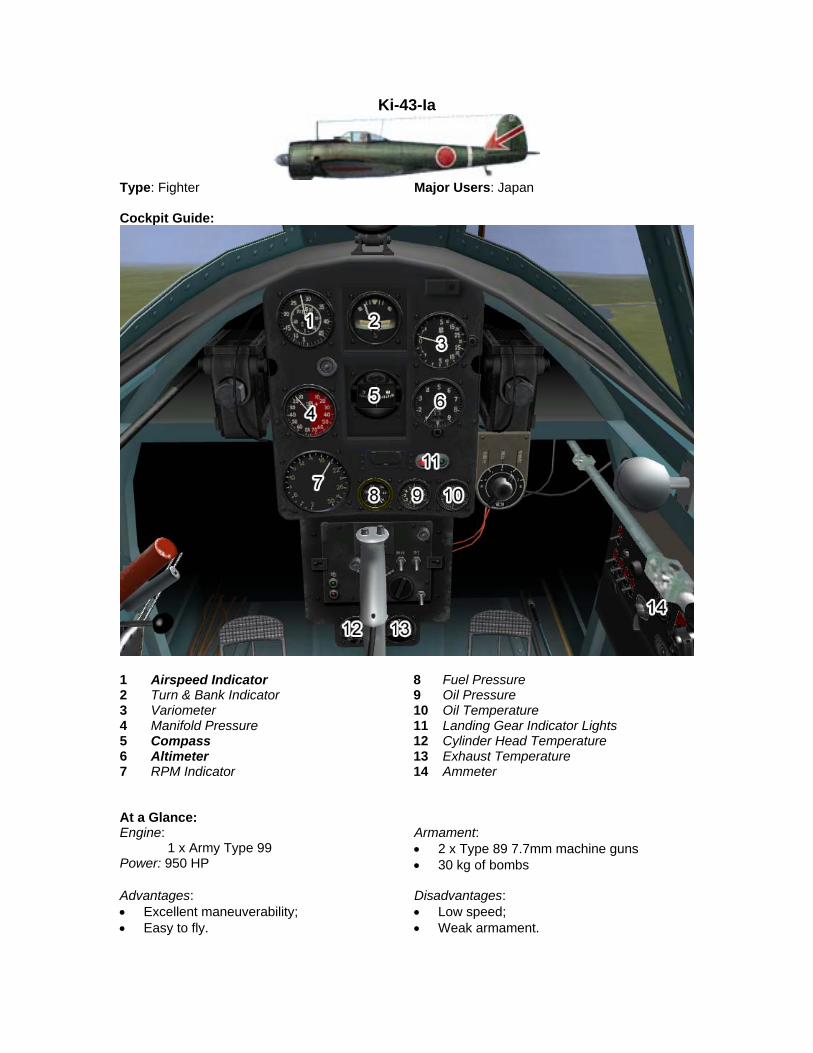
Ki-43-Ia
Type: Fighter Major Users: Japan Cockpit Guide:
1 Airspeed Indicator 8 Fuel Pressure 2 Turn & Bank Indicator 9 Oil Pressure 3 Variometer 10 Oil Temperature 4 Manifold Pressure 11 Landing Gear Indicator Lights 5 Compass 12 Cylinder Head Temperature 6 Altimeter 13 Exhaust Temperature 7 RPM Indicator 14 Ammeter At a Glance: Engine:
1 x Army Type 99 Power: 950 HP
Armament: • 2 x Type 89 7.7mm machine guns • 30 kg of bombs
Advantages: • Excellent maneuverability; • Easy to fly.
Disadvantages: • Low speed; • Weak armament.
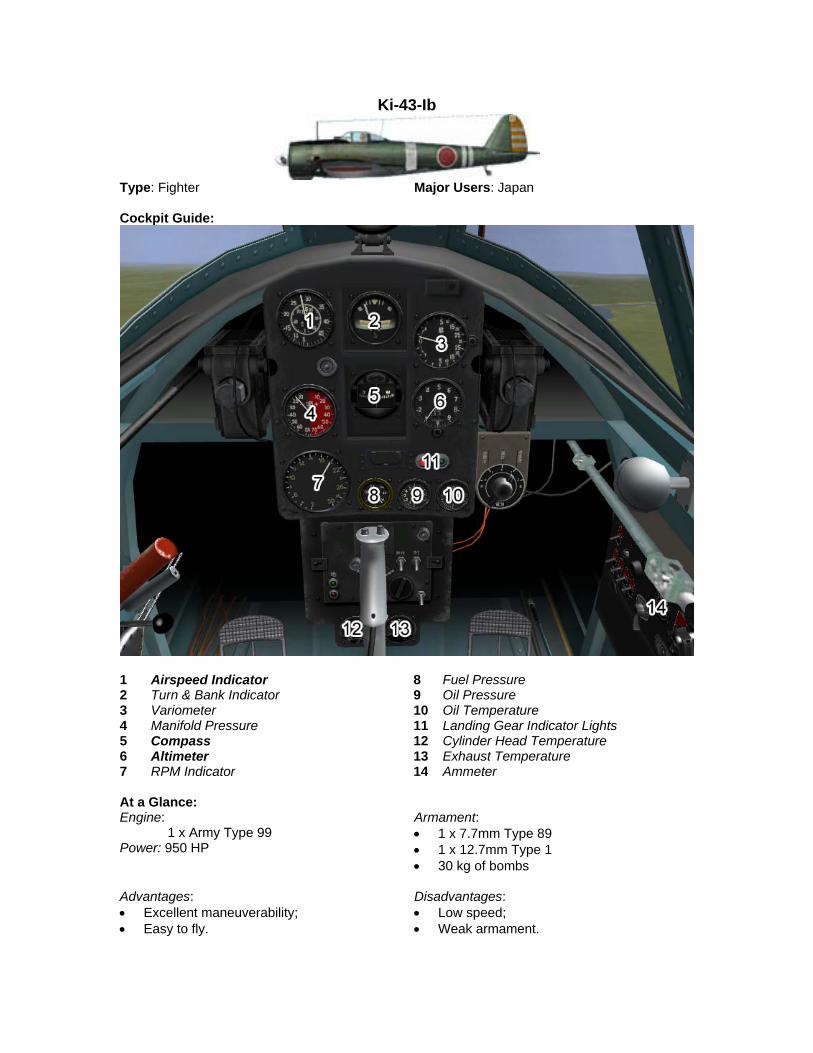
Ki-43-Ib
Type: Fighter Major Users: Japan Cockpit Guide:
1 Airspeed Indicator 8 Fuel Pressure 2 Turn & Bank Indicator 9 Oil Pressure 3 Variometer 10 Oil Temperature 4 Manifold Pressure 11 Landing Gear Indicator Lights 5 Compass 12 Cylinder Head Temperature 6 Altimeter 13 Exhaust Temperature 7 RPM Indicator 14 Ammeter At a Glance: Engine:
1 x Army Type 99 Power: 950 HP
Armament: • 1 x 7.7mm Type 89 • 1 x 12.7mm Type 1 • 30 kg of bombs
Advantages: • Excellent maneuverability; • Easy to fly.
Disadvantages: • Low speed; • Weak armament.

Ki-43-Ic
Type: Fighter Major Users: Japan Cockpit Guide:
1 Airspeed Indicator 8 Fuel Pressure 2 Turn & Bank Indicator 9 Oil Pressure 3 Variometer 10 Oil Temperature 4 Manifold Pressure 11 Landing Gear Indicator Lights 5 Compass 12 Cylinder Head Temperature 6 Altimeter 13 Exhaust Temperature 7 RPM Indicator 14 Ammeter At a Glance: Engine:
1 x Army Type 99 Power: 950 HP
Armament: • 2 x 12.7mm Type 1 • 30 kg of bombs
Advantages: • Excellent maneuverability; • Easy to fly.
Disadvantages: • Low speed; • Weak armament.

Ki-43-II
Type: Fighter Major Users: Japan Cockpit Guide:
1 Airspeed Indicator 12 Oxygen Indicator 2 Turn & Bank Indicator 13 Cylinder Head Temperature 3 Variometer 14 Exhaust Temperature 4 Manifold Pressure 15 Gun Pressure 5 Compass 16 Landing Gear Indicator Lights 6 Altimeter 17 Oxygen Flow Indicator 7 RPM Indicator 18 Oxygen Pressure 8 Oil Pressure 19 Hydraulic Pressure 9 Fuel Pressure 20 Radio 10 Oil Temperature 21 Fuel Level (Front) 11 Clock 22 Fuel Level (Rear)

(Ki-43 continued)
At a Glance: Engine:
1 x Ha-115 Power: 1,150 HP
Armament: • 2 x 12.7mm Type 1 • Up to 500 kg of bombs
Advantages: • Excellent maneuverability; • Easy to fly.
Disadvantages: • Low speed; • Weak armament.
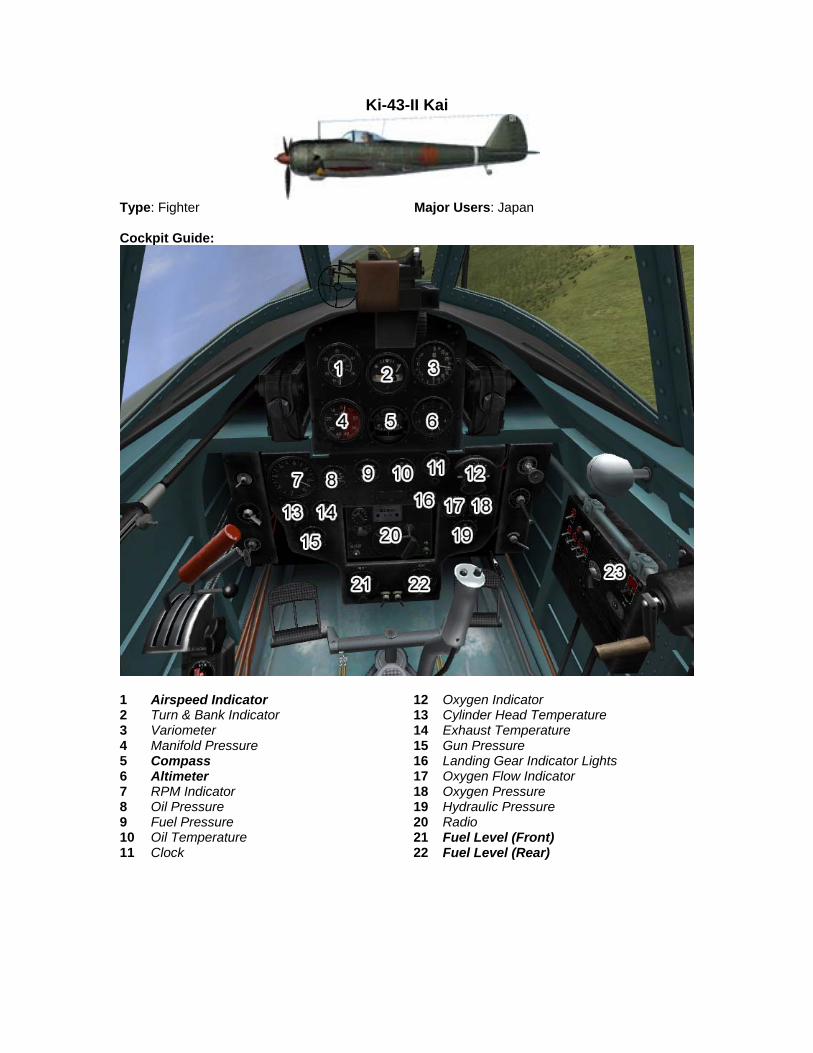
Ki-43-II Kai
Type: Fighter Major Users: Japan Cockpit Guide:
1 Airspeed Indicator 12 Oxygen Indicator 2 Turn & Bank Indicator 13 Cylinder Head Temperature 3 Variometer 14 Exhaust Temperature 4 Manifold Pressure 15 Gun Pressure 5 Compass 16 Landing Gear Indicator Lights 6 Altimeter 17 Oxygen Flow Indicator 7 RPM Indicator 18 Oxygen Pressure 8 Oil Pressure 19 Hydraulic Pressure 9 Fuel Pressure 20 Radio 10 Oil Temperature 21 Fuel Level (Front) 11 Clock 22 Fuel Level (Rear)

(Ki-43 continued)
At a Glance: Engine:
1 x Ha-115 Power: 1,150 HP
Armament: • 2 x 12.7mm Type 1 • Up to 500 kg of bombs
Advantages: • Excellent maneuverability; • Easy to fly.
Disadvantages: • Low speed; • Weak armament.
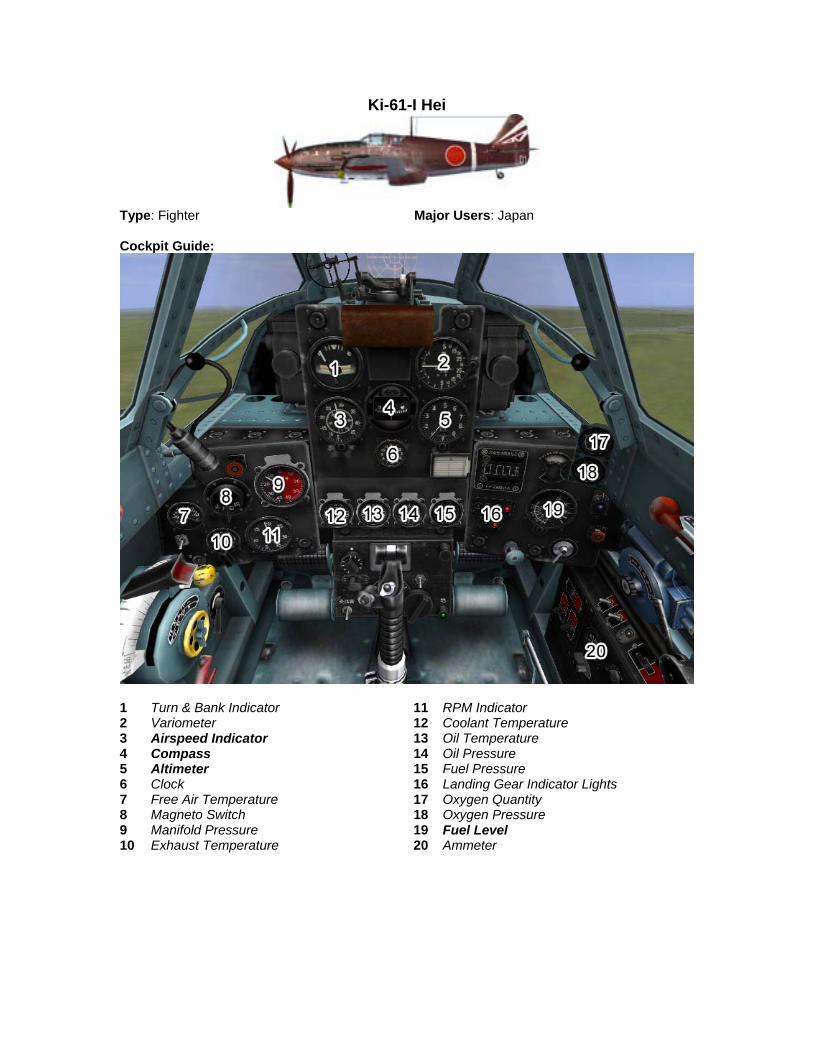
Ki-61-I Hei
Type: Fighter Major Users: Japan Cockpit Guide:
1 Turn & Bank Indicator 11 RPM Indicator 2 Variometer 12 Coolant Temperature 3 Airspeed Indicator 13 Oil Temperature 4 Compass 14 Oil Pressure 5 Altimeter 15 Fuel Pressure 6 Clock 16 Landing Gear Indicator Lights 7 Free Air Temperature 17 Oxygen Quantity 8 Magneto Switch 18 Oxygen Pressure 9 Manifold Pressure 19 Fuel Level 10 Exhaust Temperature 20 Ammeter

(Ki-61 continued)
At a Glance: Engine:
1 x Ha-40 Power: 1,175 HP (take-off)
1,080 HP (at 4,200 m – 13,780 ft)
Armament: • 2 x Type 1 12.7mm machine guns • 2 x Type 89 7.7mm machine guns
Advantages: • Good performance compared to early to
mid-war aircraft; • Adequate armament.
Disadvantages: • Outclassed by late war Allied fighters.
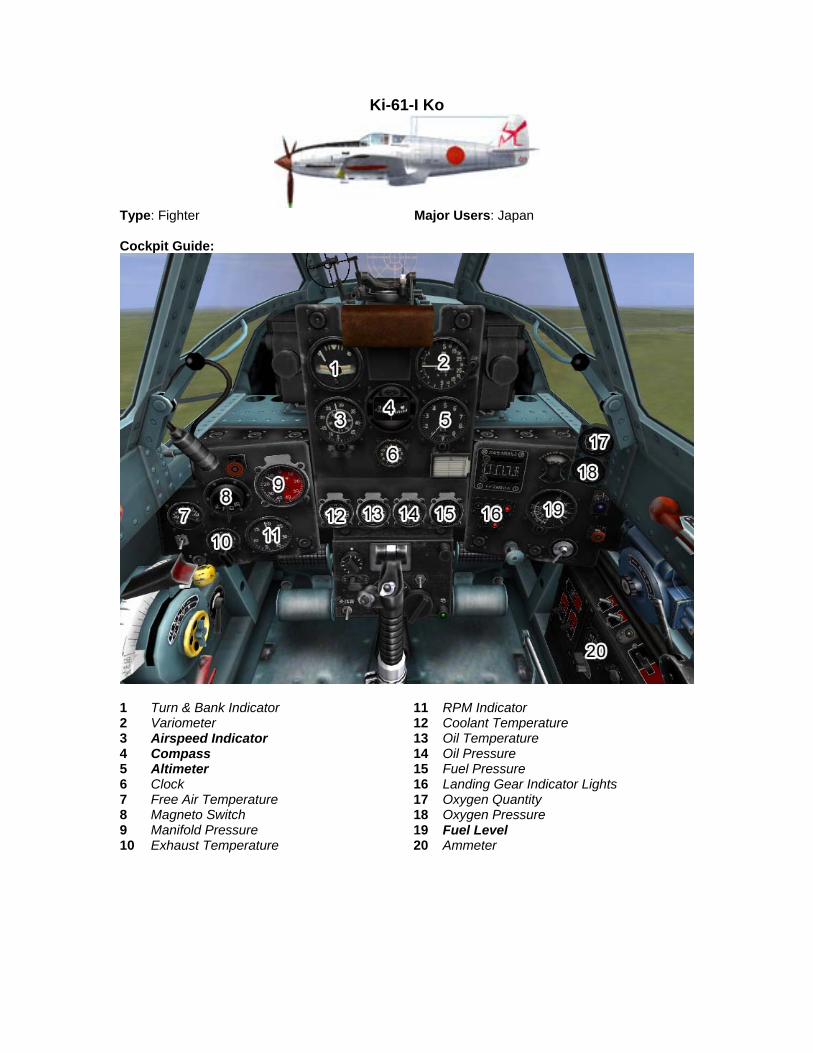
Ki-61-I Ko
Type: Fighter Major Users: Japan Cockpit Guide:
1 Turn & Bank Indicator 11 RPM Indicator 2 Variometer 12 Coolant Temperature 3 Airspeed Indicator 13 Oil Temperature 4 Compass 14 Oil Pressure 5 Altimeter 15 Fuel Pressure 6 Clock 16 Landing Gear Indicator Lights 7 Free Air Temperature 17 Oxygen Quantity 8 Magneto Switch 18 Oxygen Pressure 9 Manifold Pressure 19 Fuel Level 10 Exhaust Temperature 20 Ammeter

(Ki-61 continued)
At a Glance: Engine:
1 x Ha-40 Power: 1,175 HP (take-off)
1,080 HP (at 4,200 m – 13,780 ft)
Armament: • 4 x Type 1 12.7mm machine guns
Advantages: • Good performance compared to early to
mid-war aircraft; • Adequate armament.
Disadvantages: • Outclassed by late war Allied fighters.

Ki-61-I Otsu
Type: Fighter Major Users: Japan Cockpit Guide:
1 Turn & Bank Indicator 11 RPM Indicator 2 Variometer 12 Coolant Temperature 3 Airspeed Indicator 13 Oil Temperature 4 Compass 14 Oil Pressure 5 Altimeter 15 Fuel Pressure 6 Clock 16 Landing Gear Indicator Lights 7 Free Air Temperature 17 Oxygen Quantity 8 Magneto Switch 18 Oxygen Pressure 9 Manifold Pressure 19 Fuel Level 10 Exhaust Temperature 20 Ammeter

(Ki-61 continued)
At a Glance: Engine:
1 x Ha-40 Power: 1,175 HP (take-off)
1,080 HP (at 4,200 m – 13,780 ft)
Armament: • 4 x Type 1 12.7mm machine guns
Advantages: • Good performance compared to early to
mid-war aircraft; • Adequate armament.
Disadvantages: • Outclassed by late war Allied fighters.

Ki-84-Ia
Type: Fighter Major Users: Japan Cockpit Guide:
1 Turn & Bank Indicator 11 Ignition Switch 2 Artificial Horizon 12 Landing Gear Indicator Lights 3 Variometer 13 Cylinder Head Temperature 4 Airspeed Indicator 14 Exhaust Temperature 5 Compass 15 Oil Temperature 6 Altimeter 16 Oil Pressure 7 RPM Indicator 17 Fuel Pressure 8 Manifold Pressure 18 Methanol Injection Pressure 9 Clock 19 Fuel Level & Warning Light 10 Prop Speed Selector Switch 20 Ammeter
(Ki-84 continued)
At a Glance: Engine:
1 x Ha-45-21 Power:
Take-off: 1,970 HP
Armament: • 2 x 12.7-mm Ho 103 machine guns • 2 x 20-mm Ho 5 cannon • 2 x 250 kg bombs
Advantages: • Excellent armament for a Japanese fighter; • Excellent climb rate and maneuverability.
Disadvantages: • Poor control on taxiing; • Lack of fire extinguisher or emergency
canopy jettison. Pilot Notes:
• Switch supercharger speeds at 2,500 meters (8,200 feet)

Ki-84-Ib
Type: Fighter-Bomber Major Users: Japan Cockpit Guide:
1 Turn & Bank Indicator 11 Exhaust Temperature 2 Artificial Horizon 12 Oil Temperature 3 Variometer 13 Fuel Pressure 4 Airspeed Indicator 14 Methanol Injection Pressure 5 Compass 15 Oil Pressure 6 Altimeter 16 Prop Speed Selector Switch 7 RPM Indicator 17 Ignition Switch 8 Clock 18 Landing Gear Indicator Lights 9 Manifold Pressure 19 Fuel Level & Warning Light 10 Cylinder Head Temperature 20 Ammeter
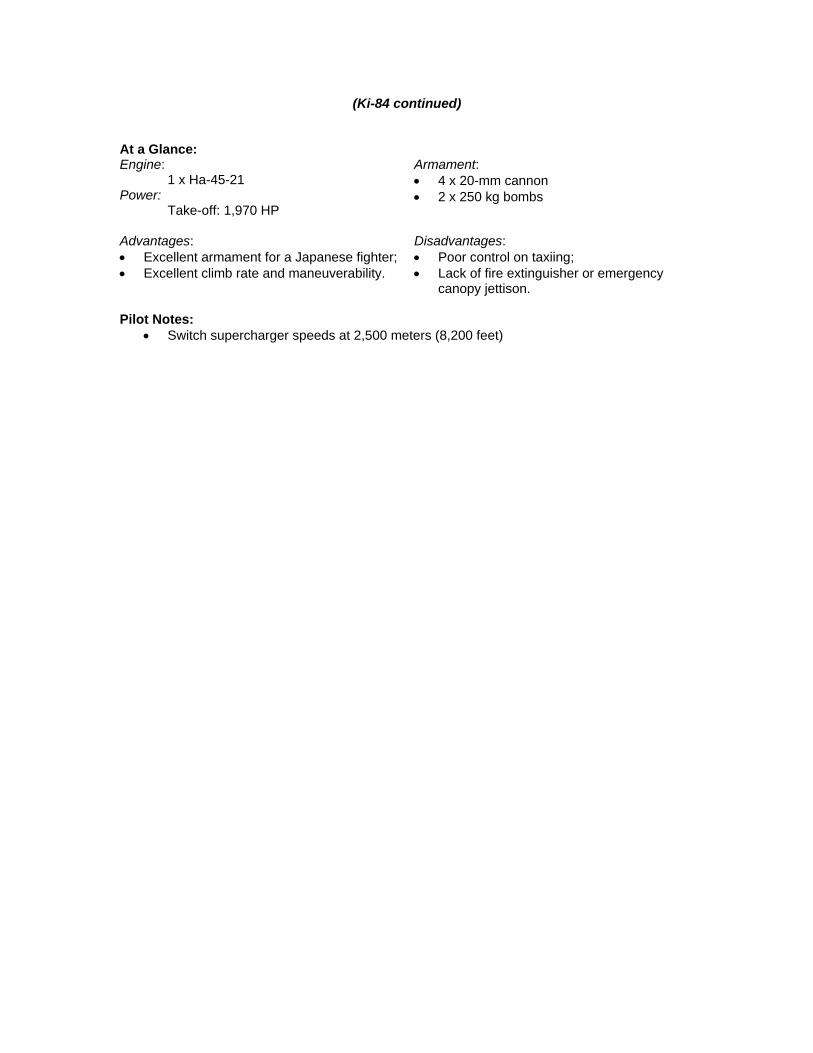
(Ki-84 continued)
At a Glance: Engine:
1 x Ha-45-21 Power:
Take-off: 1,970 HP
Armament: • 4 x 20-mm cannon • 2 x 250 kg bombs
Advantages: • Excellent armament for a Japanese fighter; • Excellent climb rate and maneuverability.
Disadvantages: • Poor control on taxiing; • Lack of fire extinguisher or emergency
canopy jettison. Pilot Notes:
• Switch supercharger speeds at 2,500 meters (8,200 feet)
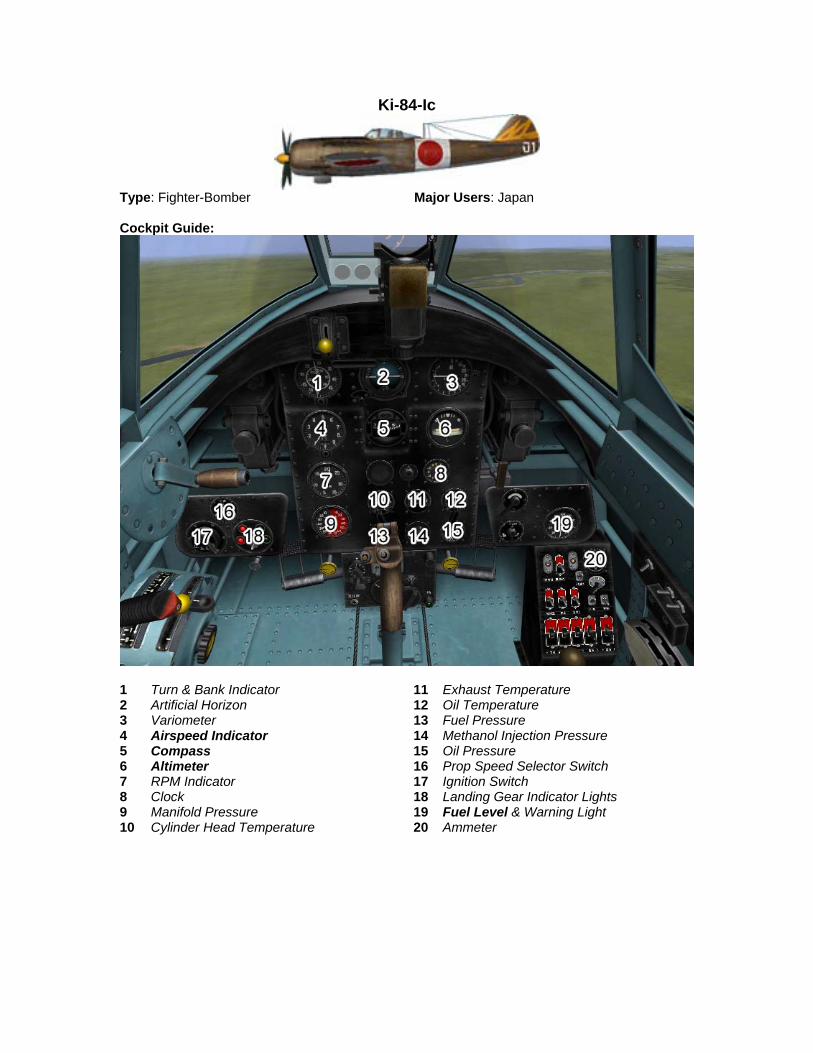
Ki-84-Ic
Type: Fighter-Bomber Major Users: Japan Cockpit Guide:
1 Turn & Bank Indicator 11 Exhaust Temperature 2 Artificial Horizon 12 Oil Temperature 3 Variometer 13 Fuel Pressure 4 Airspeed Indicator 14 Methanol Injection Pressure 5 Compass 15 Oil Pressure 6 Altimeter 16 Prop Speed Selector Switch 7 RPM Indicator 17 Ignition Switch 8 Clock 18 Landing Gear Indicator Lights 9 Manifold Pressure 19 Fuel Level & Warning Light 10 Cylinder Head Temperature 20 Ammeter
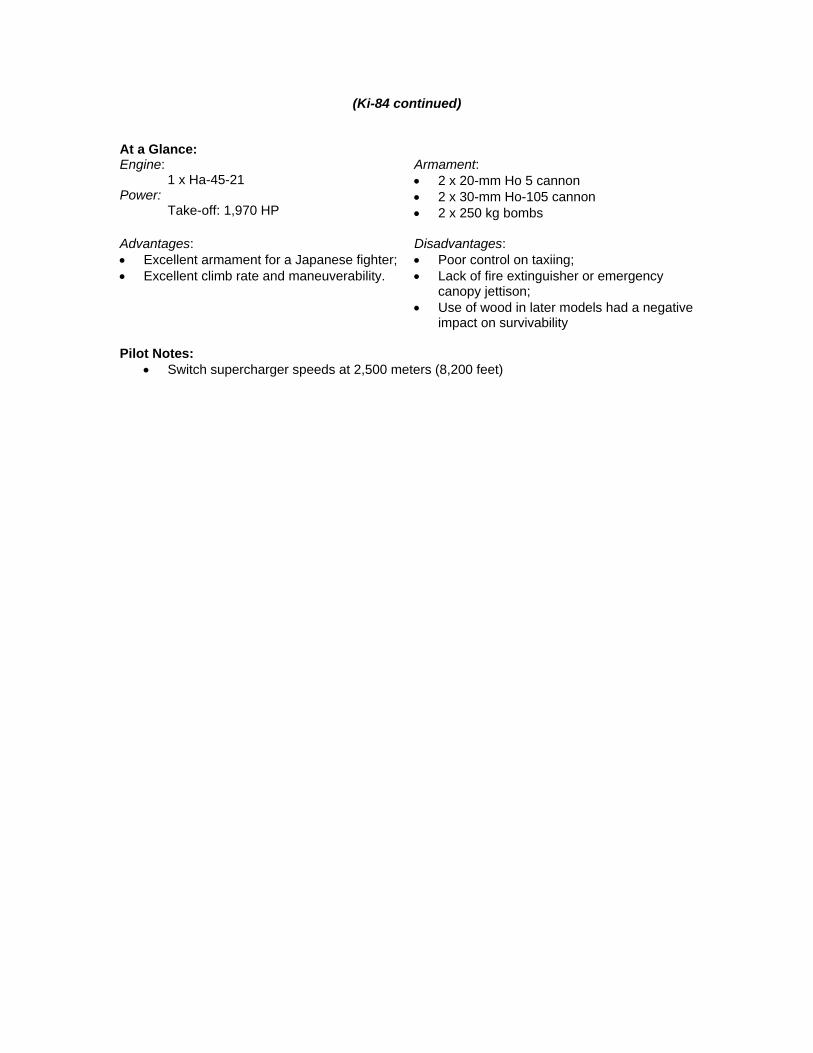
(Ki-84 continued)
At a Glance: Engine:
1 x Ha-45-21 Power:
Take-off: 1,970 HP
Armament: • 2 x 20-mm Ho 5 cannon • 2 x 30-mm Ho-105 cannon • 2 x 250 kg bombs
Advantages: • Excellent armament for a Japanese fighter; • Excellent climb rate and maneuverability.
Disadvantages: • Poor control on taxiing; • Lack of fire extinguisher or emergency
canopy jettison; • Use of wood in later models had a negative
impact on survivability Pilot Notes:
• Switch supercharger speeds at 2,500 meters (8,200 feet)
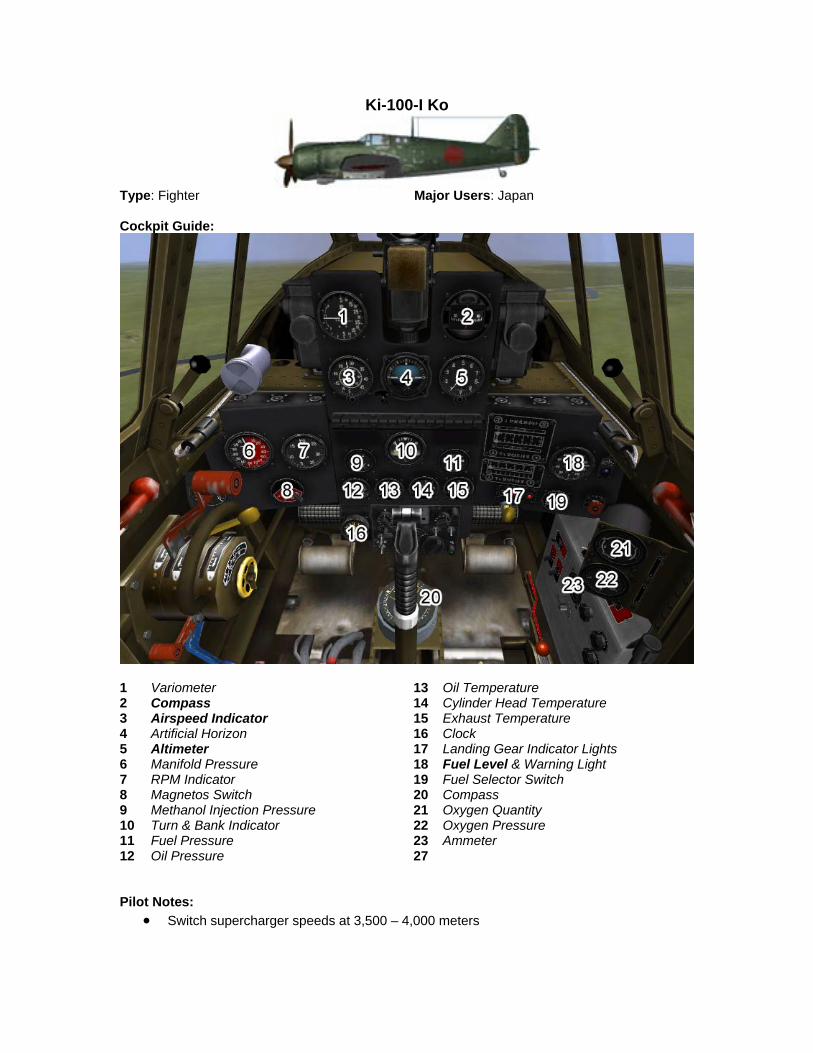
Ki-100-I Ko
Type: Fighter Major Users: Japan Cockpit Guide:
1 Variometer 13 Oil Temperature 2 Compass 14 Cylinder Head Temperature 3 Airspeed Indicator 15 Exhaust Temperature 4 Artificial Horizon 16 Clock 5 Altimeter 17 Landing Gear Indicator Lights 6 Manifold Pressure 18 Fuel Level & Warning Light 7 RPM Indicator 19 Fuel Selector Switch 8 Magnetos Switch 20 Compass 9 Methanol Injection Pressure 21 Oxygen Quantity 10 Turn & Bank Indicator 22 Oxygen Pressure 11 Fuel Pressure 23 Ammeter 12 Oil Pressure 27 Pilot Notes:
• Switch supercharger speeds at 3,500 – 4,000 meters

MC.200 Serie 3
Type: Fighter Major Users: Italy Cockpit Guide:
1 Turn & Bank Indicator 11 Flap Position Indicator 2 Airspeed Indicator 12 Cylinder Head Temperature 3 Compass 13 Oil Pressure 4 Altimeter 14 Oil Pressure 5 Variometer 15 Brake Pressure 6 Airspeed Indicator 17 Air Pressure 7 Manifold Pressure 18 Hydraulic Pressure 8 RPM Indicator 19 Fuel Level 9 Fuel Pressure

(MC.200 continued)
At a Glance: Engine:
1 x A.74 RC.38 Power:
Take-off: 870 HP.
Armament: • 2 x 12,7-mm 310 machine guns • Up to 300 kg of bombs
Advantages: • Good climb rate and maneuverability.
Disadvantages: • Low speed due to weak engine; • Weak Armament.
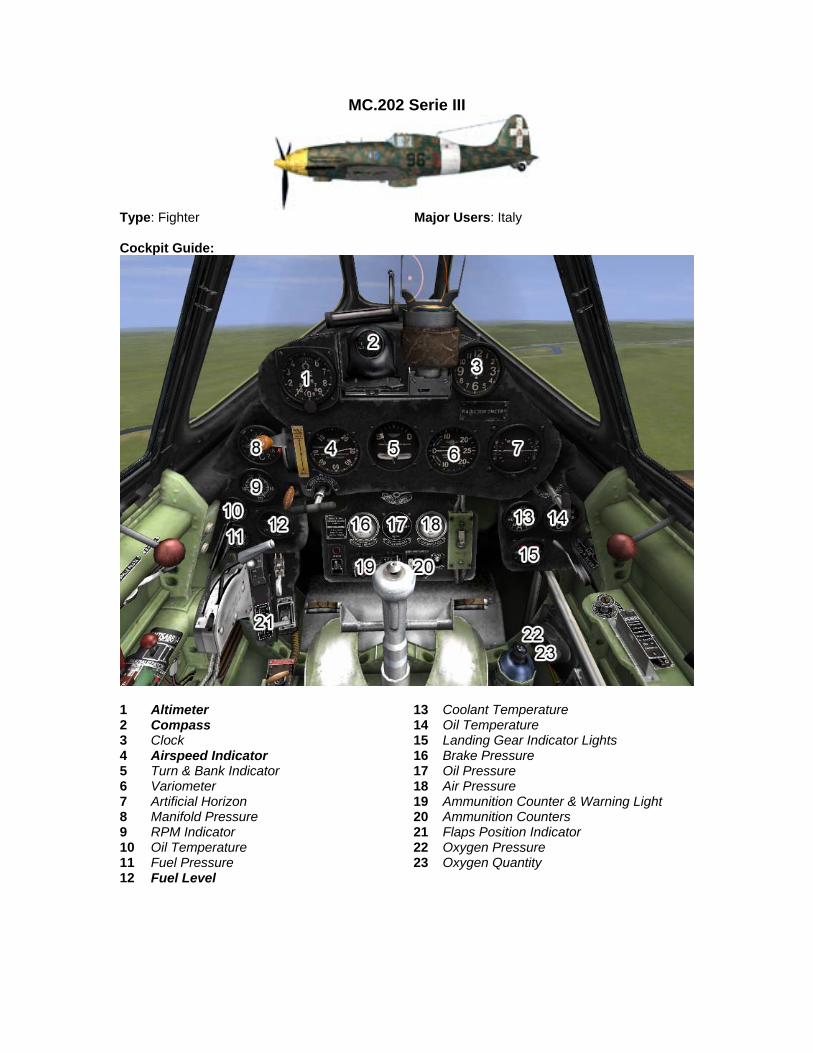
MC.202 Serie III
Type: Fighter Major Users: Italy Cockpit Guide:
1 Altimeter 13 Coolant Temperature 2 Compass 14 Oil Temperature 3 Clock 15 Landing Gear Indicator Lights 4 Airspeed Indicator 16 Brake Pressure 5 Turn & Bank Indicator 17 Oil Pressure 6 Variometer 18 Air Pressure 7 Artificial Horizon 19 Ammunition Counter & Warning Light 8 Manifold Pressure 20 Ammunition Counters 9 RPM Indicator 21 Flaps Position Indicator 10 Oil Temperature 22 Oxygen Pressure 11 Fuel Pressure 23 Oxygen Quantity 12 Fuel Level

(MC.202 continued)
At a Glance: Engine:
RA 1000 RC41-1. Power:
Indicated: 1,175 HP;
Armament: • 2 x 12.7 mm.
Advantages: • Good flight characteristics. • High maneuverability. • Good cockpit visibility. • Easy to fly.
Disadvantages: • Weak Armament.

MC.202 Serie VII
Type: Fighter Major Users: Italy Cockpit Guide:
1 Altimeter 13 Coolant Temperature 2 Compass 14 Oil Temperature 3 Clock 15 Landing Gear Indicator Lights 4 Airspeed Indicator 16 Brake Pressure 5 Turn & Bank Indicator 17 Oil Pressure 6 Variometer 18 Air Pressure 7 Artificial Horizon 19 Ammunition Counter & Warning Light 8 Manifold Pressure 20 Ammunition Counters 9 RPM Indicator 21 Flaps Position Indicator 10 Oil Temperature 22 Oxygen Pressure 11 Fuel Pressure 23 Oxygen Quantity 12 Fuel Level

(MC.202 continued)
At a Glance: Engine:
RA 1000 RC41-1. Power:
Indicated: 1,175 HP;
Armament: • 2 x 12.7 mm. • 2 x 7.7 mm.
Advantages: • Good flight characteristics. • High maneuverability. • Good cockpit visibility. • Easy to fly.
Disadvantages: • Weak Armament.

MC.202 Serie XII
Type: Fighter Major Users: Italy Cockpit Guide:
1 Altimeter 13 Coolant Temperature 2 Compass 14 Oil Temperature 3 Clock 15 Landing Gear Indicator Lights 4 Airspeed Indicator 16 Brake Pressure 5 Turn & Bank Indicator 17 Oil Pressure 6 Variometer 18 Air Pressure 7 Artificial Horizon 19 Ammunition Counter & Warning Light 8 Manifold Pressure 20 Ammunition Counters 9 RPM Indicator 21 Flaps Position Indicator 10 Oil Temperature 22 Oxygen Pressure 11 Fuel Pressure 23 Oxygen Quantity 12 Fuel Level

(MC.202 continued)
At a Glance: Engine:
RA 1000 RC41-1. Power:
Indicated: 1,175 HP;
Armament: • 2 x 12.7 mm. • 2 x 7.7 mm.
Advantages: • Good flight characteristics. • High maneuverability. • Good cockpit visibility. • Easy to fly.
Disadvantages: • Weak Armament.

MC.205 V Serie I
Type: Fighter Major Users: Italy Cockpit Guide:
1 Altimeter 12 Coolant Temperature 2 Compass 13 Oil Temperature 3 Clock 14 Fuel Level 4 Airspeed Indicator 15 Landing Gear Indicator Lights 5 Turn & Bank Indicator 16 Brake Pressure 6 Variometer 17 Oil Pressure 7 Artificial Horizon 18 Air Pressure 8 Manifold Pressure 19 Ammunition Counters 9 RPM Indicator 20 Oxygen Pressure 10 Oil Temperature 21 Oxygen Quantity 11 Fuel Pressure 22 Flaps Position Indicator
(MC.205 continued)
At a Glance: Engine:
RA1050 RC 58 Tifone Power:
Indicated: 1,475 HP;
Armament: • 2 x 12.7 mm MG • 2 x 20 mm cannons • Up to 320 kg of bombs
Advantages: • Excellent flight characteristics at medium
altitudes. • Powerful armament • High maneuverability. • Good cockpit visibility. • Easy to fly.
Disadvantages: • Inferior performance at low and high
altitudes.

MC.205 V Serie III
Type: Fighter Major Users: Italy Cockpit Guide:
1 Altimeter 12 Coolant Temperature 2 Compass 13 Oil Temperature 3 Clock 14 Fuel Level 4 Airspeed Indicator 15 Landing Gear Indicator Lights 5 Turn & Bank Indicator 16 Brake Pressure 6 Variometer 17 Oil Pressure 7 Artificial Horizon 18 Air Pressure 8 Manifold Pressure 19 Ammunition Counters 9 RPM Indicator 20 Oxygen Pressure 10 Oil Temperature 21 Oxygen Quantity 11 Fuel Pressure 22 Flaps Position Indicator

(MC.205 continued)
At a Glance: Engine:
RA1050 RC 58 Tifone Power:
Indicated: 1,475 HP;
Armament: • 2 x 12.7 mm MG • 2 x 20 mm cannons • Up to 320 kg of bombs
Advantages: • Excellent flight characteristics at medium
altitudes. • Powerful armament • High maneuverability. • Good cockpit visibility. • Easy to fly.
Disadvantages: • Inferior performance at low and high
altitudes.

Me-163B-1a
Type: Rocket Fighter Major Users: Germany Cockpit Guide:
1 Artificial Horizon 10 Clock 2 Ammunition Counters & Warning Lights 11 Thrust Indicator 3 Airspeed Indicator 12 Thrust Indicator 4 Artificial Horizon & Turn & Bank Indicator 13 Exhaust Temperature 5 Variometer 14 Compressor Pressure 6 Altimeter 15 Gear Pressure 7 RPM Indicator 16 Oxygen Flow Indicator 8 Fuel Level 17 Oxygen Pressure 9 Landing Gear Indicator Lights 24

(Me-163 continued)
At a Glance: Engine:
1 x HWK 509A-2 Thrust: 1,700 kgc
Armament: • 2 x 30-mm MK 108 cannons
Advantages: • Unmatched climb rate and top speed; • Powerful armament.
Disadvantages: • Extremely high maintenance; • Short range and low fuel capacity; • Complicated aiming due to difference
between own and target speeds; • Complicated take-off and landing.
Pilot Notes:
• Gunsight Note: The gunsight in this aircraft, as in many German planes, was positioned off-center. The default internal camera position is centered, and as such the gunsight is difficult or even impossible to use. To switch to an aiming view, use the Toggle Gunsight button (Shift-F1 by default) that switches the view to look through the offset gunsight.

Me-262A-1a
Type: Jet Fighter Major Users: Germany Cockpit Guide:
1 Airspeed Indicator 15 Oil Pressure (Engine #2) 2 Artificial Horizon & Turn & Bank Indicator 16 Exhaust Temperature (Engine #2) 3 Variometer 17 Fuel Level Warning Light (Front) 4 Altimeter 18 Fuel Level (Front) 5 Directional Gyro 19 Fuel Level (Rear) 6 Pilot’s Direction Indicator 20 Fuel Level Warning Light (Rear)t 7 RPM Indicator (Engine #1) 21 Overspeed Warning Light 8 RPM Indicator (Engine #2) 22 Clock 9 Exhaust Pressure (Engine #1) 23 Cabin Pressure Warning Light 10 Injection Pressure (Engine #1) 24 Ammunition Counters & Warning Lights 11 Injection Pressure (Engine #2) 25 Air Pressure 12 Exhaust Pressure (Engine #2) 26 Landing Gear Indicator Lights 13 Exhaust Temperature (Engine #1) 27 Oxygen Pressure 14 Oil Pressure (Engine #1) 28 Oxygen Flow Indicator

(Me-262 continued)
At a Glance: Engine:
2 x Jumo 109-004 Thrust: 8.8 kN
Armament: • 4 x 30 mm (MK 108) cannon
Advantages: • Excellent performance characteristics; • Unmatched top speed; • Strong armament; • Good field of vision from the cockpit; • Multifunctional.
Disadvantages: • Low reliability of jet engines.
Pilot Notes:
Take-Off Speed: 195 km/h Landing Speed: 180 km/h Prop Pitch Control: N/A Mixture Control: No Boost: No Supercharger: No
• Gunsight Note: The gunsight in this aircraft, as in many German planes, was
positioned off-center. The default internal camera position is centered, and as such the gunsight is difficult or even impossible to use. To switch to an aiming view, use the Toggle Gunsight button (Shift-F1 by default) that switches the view to look through the offset gunsight.
• Me-262 is one of the faster planes in the sim; however it’s probably one of the most difficult to fly. Me-262’s weakest point is its engines. A single rough movement of the throttle can cause your engine to cease or flame out. Be extremely gentle with the throttles and move them very slowly, constantly monitoring the RPM and engine temperature.
• Me-262 is not very maneuverable and it will loose a lot of speed in a turn. Your only advantage in combat is speed, so keep it up. Stay at least above 550 km/h when attacking enemy fighters and you should be all right.
• Me-262’s armament is absolutely the most effective combination in the skies. Four 30mm MK-108s located in the nose require no convergence, and will destroy any target with a single hit. The cannons’ power is enough to allow you to take pot shots at bombers beyond their defensive gunners’ range. Remember that you only have 100 shells in the upper, and 80 in the lower pair of the guns. So don’t waste your ammo.

Me-262A-1a U4
Type: Jet Fighter Major Users: Germany Cockpit Guide:
1 Airspeed Indicator 15 Oil Pressure (Engine #2) 2 Artificial Horizon & Turn & Bank Indicator 16 Exhaust Temperature (Engine #2) 3 Variometer 17 Fuel Level Warning Light (Front) 4 Altimeter 18 Fuel Level (Front) 5 Directional Gyro 19 Fuel Level (Rear) 6 Pilot’s Direction Indicator 20 Fuel Level Warning Light (Rear)t 7 RPM Indicator (Engine #1) 21 Overspeed Warning Light 8 RPM Indicator (Engine #2) 22 Clock 9 Exhaust Pressure (Engine #1) 23 Cabin Pressure Warning Light 10 Injection Pressure (Engine #1) 24 Ammunition Counters & Warning Lights 11 Injection Pressure (Engine #2) 25 Air Pressure 12 Exhaust Pressure (Engine #2) 26 Landing Gear Indicator Lights 13 Exhaust Temperature (Engine #1) 27 Oxygen Pressure 14 Oil Pressure (Engine #1) 28 Oxygen Flow Indicator

(Me-262 continued)
At a Glance: Engine:
2 x Jumo 109-004 Thrust: 8.8 kN
Armament: • 1 x 50 mm cannon
Advantages: • Excellent performance characteristics; • Unmatched top speed; • Devastating armament; • Good field of vision from the cockpit; • Multifunctional.
Disadvantages: • Low reliability of jet engines.
Pilot Notes:
Take-Off Speed: 195 km/h Landing Speed: 180 km/h Prop Pitch Control: N/A Mixture Control: No Boost: No Supercharger: No
• Gunsight Note: The gunsight in this aircraft, as in many German planes, was
positioned off-center. The default internal camera position is centered, and as such the gunsight is difficult or even impossible to use. To switch to an aiming view, use the Toggle Gunsight button (Shift-F1 by default) that switches the view to look through the offset gunsight.
• Me-262 is one of the faster planes in the sim; however it’s probably one of the most difficult to fly. Me-262’s weakest point is its engines. A single rough movement of the throttle can cause your engine to cease or flame out. Be extremely gentle with the throttles and move them very slowly, constantly monitoring the RPM and engine temperature.
• Me-262 is not very maneuverable and it will loose a lot of speed in a turn. Your only advantage in combat is speed, so keep it up. Stay at least above 550 km/h when attacking enemy fighters and you should be all right.
• Me-262’s armament is absolutely the most effective combination in the skies. Four 30mm MK-108s located in the nose require no convergence, and will destroy any target with a single hit. The cannons’ power is enough to allow you to take pot shots at bombers beyond their defensive gunners’ range. Remember that you only have 100 shells in the upper, and 80 in the lower pair of the guns. So don’t waste your ammo.

Me-262A-2a
Type: Jet Fighter-Bomber Major Users: Germany Cockpit Guide:
1 Airspeed Indicator 15 Oil Pressure (Engine #2) 2 Artificial Horizon & Turn & Bank Indicator 16 Exhaust Temperature (Engine #2) 3 Variometer 17 Fuel Level Warning Light (Front) 4 Altimeter 18 Fuel Level (Front) 5 Directional Gyro 19 Fuel Level (Rear) 6 Pilot’s Direction Indicator 20 Fuel Level Warning Light (Rear)t 7 RPM Indicator (Engine #1) 21 Overspeed Warning Light 8 RPM Indicator (Engine #2) 22 Clock 9 Exhaust Pressure (Engine #1) 23 Cabin Pressure Warning Light 10 Injection Pressure (Engine #1) 24 Ammunition Counters & Warning Lights 11 Injection Pressure (Engine #2) 25 Air Pressure 12 Exhaust Pressure (Engine #2) 26 Landing Gear Indicator Lights 13 Exhaust Temperature (Engine #1) 27 Oxygen Pressure 14 Oil Pressure (Engine #1) 28 Oxygen Flow Indicator

(Me-262 continued)
At a Glance: Engine:
2 x Jumo 109-004 Thrust: 8.8 kN
Armament: • 2 x 30 mm (MK 108) cannon • Up to 1,000 kg of bombs
Advantages: • Excellent performance characteristics; • Unmatched top speed; • Strong armament; • Good field of vision from the cockpit; • Multifunctional.
Disadvantages: • Low reliability of jet engines.
Pilot Notes:
Take-Off Speed: 195 km/h Landing Speed: 180 km/h Prop Pitch Control: N/A Mixture Control: No Boost: No Supercharger: No
• Me-262 is one of the faster planes in the sim; however it’s probably one of the most
difficult to fly. Me-262’s weakest point is its engines. A single rough movement of the throttle can cause your engine to cease or flame out. Be extremely gentle with the throttles and move them very slowly, constantly monitoring the RPM and engine temperature.
• Me-262 is not very maneuverable and it will loose a lot of speed in a turn. Your only advantage in combat is speed, so keep it up. Stay at least above 550 km/h when attacking enemy fighters and you should be all right.
• Me-262’s armament is absolutely the most effective combination in the skies. Four 30mm MK-108s located in the nose require no convergence, and will destroy any target with a single hit. The cannons’ power is enough to allow you to take pot shots at bombers beyond their defensive gunners’ range. Remember that you only have 100 shells in the upper, and 80 in the lower pair of the guns. So don’t waste your ammo.

Me-262HG-II
Type: Jet Fighter Major Users: Germany Cockpit Guide:
1 Airspeed Indicator 15 Oil Pressure (Engine #2) 2 Artificial Horizon & Turn & Bank Indicator 16 Exhaust Temperature (Engine #2) 3 Variometer 17 Fuel Level Warning Light (Front) 4 Altimeter 18 Fuel Level (Front) 5 Directional Gyro 19 Fuel Level (Rear) 6 Pilot’s Direction Indicator 20 Fuel Level Warning Light (Rear)t 7 RPM Indicator (Engine #1) 21 Overspeed Warning Light 8 RPM Indicator (Engine #2) 22 Clock 9 Exhaust Pressure (Engine #1) 23 Cabin Pressure Warning Light 10 Injection Pressure (Engine #1) 24 Ammunition Counters & Warning Lights 11 Injection Pressure (Engine #2) 25 Air Pressure 12 Exhaust Pressure (Engine #2) 26 Landing Gear Indicator Lights 13 Exhaust Temperature (Engine #1) 27 Oxygen Pressure 14 Oil Pressure (Engine #1) 28 Oxygen Flow Indicator

(Me-262 continued)
At a Glance: Engine:
2 x Jumo 004B Power: 2 x 900 kg/s
Armament: • 4 x 30 mm (MK 108) cannon
Advantages: • Capable of sub-sonic speeds • Powerful armament
Disadvantages: • Low maneuverability • Unreliable engines
Pilot Notes:
• Gunsight Note: The gunsight in this aircraft, as in many German planes, was positioned off-center. The default internal camera position is centered, and as such the gunsight is difficult or even impossible to use. To switch to an aiming view, use the Toggle Gunsight button (Shift-F1 by default) that switches the view to look through the offset gunsight.

N1K2-Ja
Type: Fighter Major Users: Japan Cockpit Guide:
1 RPM Indicator 13 Altimeter 2 Pilot’s Direction Indicator 14 Clock 3 Exhaust Temperature 15 Variometer 4 Manifold Pressure 16 Methanol Injection Pressure 5 Cylinder Head Temperature 17 Oxygen System indicator 6 Oil Pressure; Fuel Pressure 18 Fuel Level (Fuselage) 7 Oil Temperature 19 Fuel Level (Wings) 8 Turn & Bank Indicator 20 Methanol Injection Indicator Lights 9 Artificial Horizon 21 Landing Gear Indicator Lights 10 Compass 22 Hydraulic Pressure 11 Airspeed Indicator 23 Ammeter 12 Free Air Temperature
(N1K2 continued)
At a Glance: Engine:
1 x NK9H Homare 21 Power: 1,990 HP for take-off
1,825 HP at 1,750 m
Armament: • 4 x 20mm Type 99 Model 2 cannon • 4 x machine guns • Up to 500 kg of bombs
Advantages: • Good forward visibility; • Powerful armament; • Excellent low- and medium-altitude
performance.
Disadvantages: • High wing loading; • Inferior high-altitude performance; • Poor rate of climb.
Pilot Notes: • The aircraft is equipped with a two-stage supercharger. • Supercharger Stage 1 (default) should be used between 0 and 4,000 meters • Supercharger Stage 2 should be used above 4,000 meters • Mixture adjustment is requires at 6,000 meters. • The N1K2 has an advanced Auto Combat Flap system. When the system was armed
(Always armed in this Simulation) the Flaps will deploy to the Combat (High Lift Setting) automatically as a function of G. To prevent nuisance cycling two different G thresholds are used. Auto extension will occur at 3.5G. Auto retraction will occur when the G is relaxed to less than 2.5G. Auto flap deflection beyond Combat is not possible.
• Below the Combat Flap threshold G, Flap operation is manual.

Ta-183
Type: Jet Fighter Major Users: Germany Cockpit Guide:
1 Clock 10 Exhaust Pressure 2 Variometer 11 Oil Pressure 3 Airspeed Indicator 12 Fuel Level 4 Artificial Horizon & Turn & Bank Indicator 13 Ammunition Counters 5 Pilot’s Direction Indicator 14 Free Air Temperature 6 Altimeter 15 Air Pressure 7 Directional Gyro 16 Trim Position Indicator 8 RPM Indicator 17 Oxygen Flow Indicator 9 Exhaust Temperature 18 Oxygen Pressure
(Ta-183 continued)
At a Glance: Engine:
1 x HeS 011 Power: 1,300 kg/s
Armament: • 4 x MK 108 cannon
Advantages: • High speed; • Ease of production.
Disadvantages: • Low-speed control problems due to wing
configuration Pilot Notes: • A captured model of the Ta-183 was tested in the TsAGI wind tunnel post war, and
immediately uncovered a fatal mistake in the design. Flutter and subsequent structural failure of the tail unit began at only 700 km/h. Therefore we’ve had to artificially strengthen the tail unit by a great amount, in order to allow for the design to reach specified speeds while still keeping the famous original shape.
• In reality such a redesign would have been near impossible, and most likely the tail unit would have been radically redesigned instead (such as was the case with the historical Pulqui II fighter built by Kurt Tank after the war).
• In general, the plane is modeled with several concessions that were possible to make only using the knowledge gained post the 1950s.
• The X-4 air-to-air rocket is wire guided. All rocket-carrying aircraft have a single rocket control module, and as such can guide only one rocket at a time. When launching multiple rockets simultaneously, only the last rocket fired can be guided.
• To guide the rocket, use the “Increase Sight Attitude”, “Decrease Sight Attitude”, “Adjust Sight Control to Right” and “Adjust Sight Control to Left” keys. We recommend assigning them to the Up, Down, Right, and Left arrow keys correspondingly.
• The easiest way to guide the rocket to target is to fire from the target’s six-o-clock level while flying on the same course. Guide the rocket to keep the lights on top of the target with no visible lateral movement until the moment of impact. Use gentle taps to provide last-minute guidance. The rockets detonate remotely, so no direct impact is required.
• This method should be used to attack non-maneuvering heavy bombers from 3,000 to 3,500 meters away.
• NOTE: The guiding wire is not visually modeled. • Ta-183, Ta-152C, and potentially some other Luft’46 planes modeled in our sim were
projected to use the EZ42 gyro sight, similar to the K-14 “ace-maker” used in late-war American planes.
• However no detailed information about the features of the EZ42 exist, and we were forced to “install” regular sights on these planes. Even in the cockpits with 3D models visually based on the EZ42 design, they function as simple reflector sights.
Acknowledgements This document is partially based on Ilya Shevchenko's Plane Guide for Forgotten Battles, from which the comprehensive texts for some Soviet and Japanese planes are taken. We reused those texts here; however we were unable to go into the same kind of detail for all our other planes. The Pilot Notes sections of this document also uses information from previous manuals and readmes. Some texts taken from the FB guide or older version readmes may not have been updated to reflect most recent developments. Thanks Oleg Maddox Natalia Barannikova Christina Shevchenko Vladimir Kochmarskiy Dani Santos Thomas Le Grand Olivier Blin Dmitriy Goryainov
Nikolay Baryshnikov Yuri Miroshnikov Alex Porozov Yuriy Shoubin Roman Deniskin Igor Egorov Dima Soldatenkov
And the hundreds of fans whose years of dedication combined into all the aircraft described in this guide! Note to People who Like to Complain The level of detail in this document is clearly uneven. Some of the planes have more info; some have less. This is a glass-half-full situation. The document started as a cockpit guide. Its contents were to be a diagram of each cockpit, and a name of each gauge in it. However, as we began working on the document, it became clear that it could become much more. So we’ve gathered all previously compiled information on the planes contained herein, and included it with the guide. We’ve gathered as much information as possible, and tried to make this guide as encompassing as we could. We didn’t have texts and data already available, we were often able to research and gather it specifically for this guide; however in some cases we were not. So, the At a Glance and Pilot’s Notes section are a bonus. Please think of them that way.