1999 cr-v online reference owner's manual
TRANSCRIPT

1999 CR-V Online Reference Owner's Manual Use these links (and links throughout this manual) to navigate through this reference. For a printed owner's manual, click on authorized manuals or go to www.helminc.com. Contents
Introduction ......................................................................................................................................... i A Few Words About Safety ................................................................................................................. ii
Important Handling Information ..................................................................................................... iii
Your Vehicle at a Glance ..................................................................................................................... 2 Driver and Passenger Safety .............................................................................................................. 5 Proper use and care of your vehicle's seat belts, and Supplemental Restraint System. Instruments and Controls ................................................................................................................. 51 Instrument panel indicator and gauge, and how to use dashboard and steering column controls. Comfort and Convenience Features .............................................................................................. 97How to operate the climate control system, the audio system, and other convenience features. Before Driving.................................................................................................................................. 139What gasoline to use, how to break-in your new vehicle, and how to load luggage and other cargo. Driving .............................................................................................................................................. 151The proper way to start the engine, shift the transmission, and park, plus towing a trailer. Maintenance ..................................................................................................................................... 183 The Maintenance Schedule shows you when you need to take your vehicle to the dealer. Appearance Care.............................................................................................................................. 241 Tips on cleaning and protecting your vehicle. Things to look for if your vehicle ever needs body repairs. Taking Care of the Unexpected ...................................................................................................... 249 This section covers several problems motorists sometimes experience, and how to handle them. Technical Information..................................................................................................................... 275 ID numbers, dimensions, capacities, and technical information. Warranty and Customer Relations (U.S. and Canada) ................................................................ 289A summary of the warranties covering your new Acura, and how to contact us. Authorized Manuals (U.S. only)...................................................................................................... 295How to order manuals and other technical literature. Index...................................................................................................................................................... I
Service Information Summary A summary of information you need when you pull up to the fuel pump.
Accord Value Package Audio System
Owner's Identification Form

Introduction
Congratulations ! Your selection of a 1999 Honda CR-V was a wiseinvestment. It will give you years of driving pleasure.
One of the best ways to enhance the enjoyment of your new Honda is toread this manual. In it, you will learn how to operate its driving controls andconvenience items. Afterwards, keep this owner's manual in your vehicle soyou can refer to it at any time.
Several warranties protect your new Honda. Read the warranty bookletthoroughly so you understand the coverages and are aware of your rightsand responsibilities.
Maintaining your vehicle according to the schedules given in this manualhelps to keep your driving trouble-free while it preserves your investment.When your vehicle needs maintenance, keep in mind that your Hondadealer's staff is specially trained in servicing the many systems unique toyour Honda. Your Honda dealer is dedicated to your satisfaction and will bepleased to answer any questions and concerns.
As you read this manual, you willfind information that is preceded by
symbol. Thisinformation is intended to help youavoid damage to your Honda, otherproperty, or the environment.
31S10620
NOTICEa

A Few Words About Safety
Your safety, and the safety of others,is very important. And operating thisvehicle safely is an importantresponsibility.
To help you make informeddecisions about safety, we haveprovided operating procedures andother information on labels and inthis manual. This information alertsyou to potential hazards that couldhurt you or others.
Of course, it is not practical orpossible to warn you about all thehazards associated with operating ormaintaining your vehicle. You mustuse your own good judgement.
You will find this important safety information in a variety of forms,including:
Safety Labels — on the vehicle.Safety Messages — preceded by a safety alert symbol and one of
three signal words: DANGER, WARNING, or CAUTION.These signal words mean:
You WILL be KILLED or SERIOUSLYHURT if you don't follow instructions.
You CAN be KILLED or SERIOUSLYHURT if you don't follow instructions.
You CAN be HURT if you don't followinstructions.
Safety Headings — such as Important Safety Reminders or ImportantSafety Precautions.
Safety Section — such as Driver and Passenger Safety.Instructions — how to use this vehicle correctly and safely.
This entire book is filled with important safety information — please read itcarefully.
Important Handling Information
Your CR-V has higher ground clearance than a passenger vehicle designed for use only on pavement. Higher groundclearance has many advantages for off-highway driving. It allows you to travel over bumps, obstacles, and roughterrain. It also provides good visibility so you can anticipate problems earlier.
These advantages come at some cost. Because your vehicle is taller and rides higher off the ground, it has a highcenter of gravity. This means your vehicle can tip or rollover if you make abrupt turns. Utility vehicles have asignificantly higher rollover rate than other types of vehicles. In a rollover crash, an unbelted person is significantlymore likely to die than a person wearing a seat belt. As a reminder, make sure you and your passengers always wearseat belts.
For information on how to reduce the risk of rollover, read "Driving Guidelines" on page 152 of this manual and theOff-Highway Driving Guidelines section on page 177. Failure to operate this vehicle correctly may result in loss of controlor an accident.

Your Vehicle at a Glance
POWER WINDOWSWITCHES(P.84)
TAILGATE RELEASE(P.75)
HOOD RELEASEHANDLE(P.142)
MIRROR CONTROLS(P. 86)
AUDIO SYSTEM(P. 106)
FUEL FILL DOOR RELEASE(P.141)
HEATING/COOLING CONTROL(P.98)
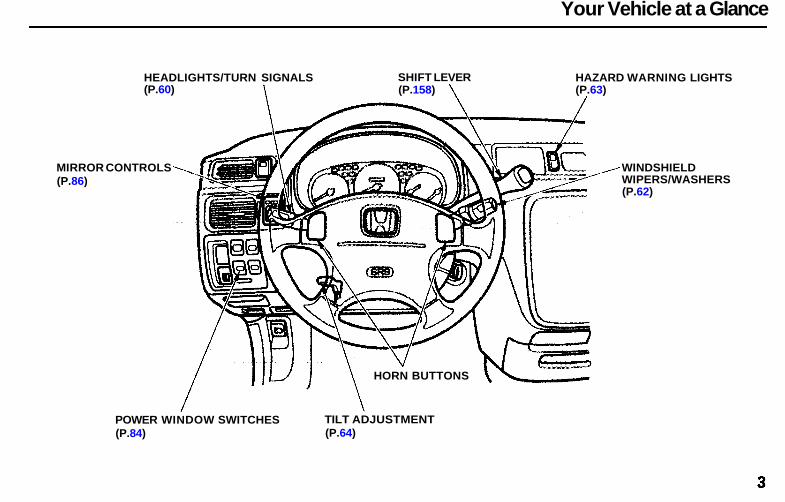
Your Vehicle at a Glance
HEADLIGHTS/TURN SIGNALS(P.60)
MIRROR CONTROLS(P.86)
SHIFT LEVER
POWER WINDOW SWITCHES(P.84)
TILT ADJUSTMENT(P.64)
HAZARD WARNING LIGHTS(P.63)
WINDSHIELDWIPERS/WASHERS(P.62)
(P.158)
HORN BUTTONS

Driver and Passenger Safety
This section gives you importantinformation about how to protectyourself and your passengers. Itshows you how to use seat beltsproperly. It explains your Supple-mental Restraint System. And it tellsyou how to properly restrain infantsand children in your vehicle.
Important Safety Precautions.......... 6Your Vehicle's Safety Features........ 7
Seat Belts........................................ 8Airbags............................................ 9Seats & Seat-Backs...................... 10
Head Restraints........................... 10Door Locks................................... 10Pre-Drive Safety Checklist......... 11
Protecting Adults............................. 121. Close and Lock the Doors...... 122. Adjust the Front Seats............ 123. Adjust the Seat-Backs............. 134. Adjust the Head Restraints.... 145. Fasten and Position the Seat
Belts...................................... 156. Adjust the Steering Wheel..... 187. Maintain a Proper Sitting
Position................................. 18Advice for Pregnant Women...... 19Additional Safety Precautions.... 19
Protecting Children......................... 21All Children Must Be
Restrained................................ 21Children Should Sit in the Back
Seat............................................ 22The Passenger's Airbag Poses
Serious Risks to Children....... 22If You Must Drive with Several
Children.................................... 24If a Child Requires Close
Attention................................... 24
Additional Safety Precautions.... 24General Guidelines for Using
Child Seats................................ 25Protecting Infants........................ 29Protecting Small Children.......... 33Protecting Larger Children........ 37Using Child Seats with
Tethers...................................... 40Additional Information About Your
Seat Belts.................................. 42Seat Belt System Components... 42Lap/Shoulder Belt....................... 42Lap Belt......................................... 43Seat Belt Maintenance................ 43
Additional Information About YourSRS............................................ 45
SRS Components......................... 45How Your Airbags Work............ 45How the Automatic Seat Belt
Tensioners Work..................... 47How the SRS Indicator Light
Works........................................ 47SRS Service................................... 48Additional Safety Precautions.... 48
Carbon Monoxide Hazard.............. 49Safety Labels.................................... 50
Driver and Passenger Safety

Important Safety Precautions
You'll find many safetyrecommendations throughout thissection, and throughout this manual.The recommendations on this pageare the ones we consider to be themost important
Always Wear Your Seat BeltA seat belt is your best protection inall types of collisions. Airbagssupplement seat belts, but airbagsare designed to inflate only in amoderate to severe frontal collision.So even though your vehicle isequipped with airbags, make sureyou and your passengers alwayswear your seat belts, and wear themproperly. (See page 15.)
Restrain All ChildrenChildren are safest when they areproperly restrained in the back seat,not the front seat. A child who is toosmall for a seat belt must be properlyrestrained in a child safety seat. (Seepage 21.)
Be Aware of Airbag HazardsWhile airbags can save lives, theycan cause serious or fatal injuries tooccupants who sit too close to them,or are not properly restrained.Infants, young children, and shortadults are at the greatest risk. Besure to follow all instructions andwarnings in this manual. (See page
7.)
Don't Drink and DriveAlcohol and driving don't mix. Evenone drink can reduce your ability torespond to changing conditions, andyour reaction time gets worse withevery additional drink. So don't drinkand drive, and don't let your friendsdrink and drive, either.
Control Your SpeedExcessive speed is a major factor incrash injuries and deaths. Generally,the higher the speed the greater therisk, but serious accidents can alsooccur at lower speeds. Never drivefaster than is safe for currentconditions, regardless of themaximum speed posted.
Keep Your Vehicle in SafeConditionHaving a tire blowout or amechanical failure can be extremelyhazardous. To reduce the possibilityof such problems, check your tirepressures and condition frequently,and perform all regularly scheduledmaintenance. (See page 188.)
Driver and Passenger Safety

Your Vehicle's Safety Features
(1) SaftyCarge(2) Crush Zones(3) Seats & Seat-Backs(4) Head Restraints(5) Collapsible Steering Column(6) Seat Belts(7) Airbags(8) Seat Belt Tensioners(9) Door Locks
Your vehicle is equipped with manyfeatures that work together toprotect you and your passengersduring a crash.Some safety features do not requireany action on your part. Theseinclude a strong steel frameworkthat forms a safety cage around thepassenger compartment; front andrear crush zones that are designed tocrumple and absorb energy during acrash; a collapsible steering column;and seat belt tensioners thatautomatically tighten the front seatbelts in the event of a crash.
These safety features are designedto reduce the severity of injuries in acrash. However, you and yourpassengers can't take full advantageof these safety features unless youremain sitting in a proper positionand always wear your seat beltsproperly. In fact, some safetyfeatures can contribute to injuries ifthey are not used properly.
Driver and Passenger Safety
Your Vehicle's Safety Features
Seat BeltsFor your safety, and the safety ofyour passengers, your vehicle isequipped with seat belts in all seatingpositions.
Your seat belt system alsoincludes a light on the
instrument panel to remind you andyour passengers to fasten your seatbelts.
Why Wear Seat BeltsSeat belts are the single mosteffective safety device for adults andlarger children. (Infants and smallerchildren must be properly restrainedin child seats.)
Not wearing a seat belt properlyincreases the chance of seriousinjury or death in a crash, eventhough your vehicle has airbags.
In addition, most states and allCanadian provinces require you towear seat belts.
Keep you connected to the vehicleso you can take advantage of thevehicle's built-in safety features.
Help protect you in almost everytype of crash, including side andrear impacts and rollovers. (Yourairbag can only be helpful in a
moderate to severe frontalcollision.)
Help keep you from being thrownagainst the inside of the vehicleand against other occupants.
Keep you from being thrown outof the vehicle.
Help keep you in a good positionshould the airbags ever deploy. Agood position reduces the risk ofinjury from an inflating airbag, andallows you to get the bestadvantage from the airbag.
Of course, seat belts cannotcompletely protect you in everycrash. But in most cases, seat beltscan reduce your risk of seriousinjury.
What you should do: Always wearyour seat belt, and make sure youwear it properly.
Driver and Passenger Safety
Not wearing a seat belt properlyincreases the chance of seriousinjury or death in a crash, evenif you have airbags.
Be sure you and yourpassengers always wear seatbelts and wear them properly.

Your Vehicle's Safety Features
Airbags
Your vehicle has a SupplementalRestraint System (SRS) with frontalairbags to help protect the driver anda front seat passenger.
This system also includesan indicator light on the
instrument panel to alert you to apossible problem with the system.
The most important things you needto know about your airbags are:
Airbags do not replace seat belts.The seat belts are the occupants'primary protection in all types ofcollisions. The airbags supplementthe seat belts by providing extraprotection for the head and chestof each front seat occupant in amoderate to severe frontalcollision.
Airbags offer no protection in sideimpacts, rear impacts, rollovers,or minor collisions. Airbags aredesigned to deploy only during amoderate to severe frontalcollision.
Airbags can pose serious hazards.To do their job, airbags mustinflate with tremendous force andspeed. So while airbags save lives,they can cause serious injuries toadults and larger children who are
not wearing seat belts, are notwearing them properly, are sittingtoo close to the airbag, or are notsitting in a proper position. Infantsand small children are at an evengreater risk of injury or death.
What you should do: Always wearyour seat belt properly, and situpright and as far back as possiblefrom the steering wheel ordashboard.
Driver and Passenger Safety
SRS

Your Vehicle's Safety Features
Seats & Seat-BacksYour vehicle's seats are designed tokeep you in a comfortable, uprightposition so you can take fulladvantage of the protection offeredby seat belts and the energyabsorbing materials in the seats.
How you adjust your seats and seat-backs can also affect your safety. Forexample, sitting too close to thesteering wheel or dashboardincreases the risk of you or yourpassenger being injured by strikingthe inside of the vehicle, or by aninflating airbag.
Reclining a seat-back too far reducesthe seat belt's effectiveness andincreases the chance that the seat'soccupant will slide under the seatbelt in a crash and be seriouslyinjured.
What you should do: Move the frontseats as far back as possible, andkeep adjustable seat-backs in anupright position whenever thevehicle is moving.
Head RestraintsHead restraints can help protect youfrom whiplash and other injuries. Formaximum protection, the back ofyour head should rest against thecenter of the head restraint.
Door LocksKeeping your doors locked reducesthe chance of being thrown out ofthe vehicle during a crash. It alsohelps prevent occupants fromaccidentally opening a door andfalling out, and outsiders fromunexpectedly opening your doors.
Driver and Passenger Safety

Your Vehicle's Safety Features
Pre-Drive Safety ChecklistTo make sure you and yourpassengers get the maximumprotection from your vehicle's safetyfeatures, check the following eachtime before you drive away:
All adults, and children who haveoutgrown child safety seats, arewearing their seat belts andwearing them properly (see page15 ).
Any infant or small child isproperly restrained in a child seatin the back seat (see page 21).
Front seat occupants are sittingupright and as far back as possiblefrom the steering wheel anddashboard (see page 12 ).
Seat-backs are upright (see page13 ).
Head restraints are properlyadjusted (see page 14).
All doors and the tailgate areclosed and locked (see page 12).
All cargo is properly stored orsecured (see page 148).
The rest of this section gives moredetailed information about how youcan maximize your safety.
Remember, however, that no safelysystem can prevent all injuries ordeaths that can occur in severecrashes, even when seat belts areproperly worn and the airbags deploy.
Driver and Passenger Safety

Protecting Adults
IntroductionThe following pages provideinstructions on how to properlyprotect the driver and other adultoccupants.
These instructions also apply tochildren who have outgrown childseats and are large enough to wearlap/shoulder belts. (See page 37 forimportant additional guidelines onhow to properly protect largerchildren.)
1. Close and Lock the DoorsAfter everyone has entered thevehicle, be sure the doors andtailgate are closed and locked.
Your vehicle has a tailgateopen indicator light on the
instrument panel to indicate whenthe tailgate is not tightly closed.
For safety, locking the doors reducesthe chance that a passenger,especially a child, will open a doorwhile the vehicle is moving andaccidentally fall out. It also reducesthe chance of someone being thrownout of the vehicle during a crash.
For security, locked doors canprevent an outsider fromunexpectedly opening a door whenyou come to a stop.
See page 70 for how to lock thedoors.
2.Adjust the Front Seats
Any driver who sits too close to thesteering wheel is at risk of beingseriously injured or killed by strikingthe steering wheel, or from beingstruck by an inflating airbag during acrash.
Driver and Passenger Safety

Protecting Adults
To reduce the chance of injury, wearyour seat belt properly, sit uprightwith your back against the seat, andmove the seat as far back as possiblefrom the steering wheel while stillmaintaining full control of thevehicle. Also make sure your frontseat passenger moves the seat as farto the rear as possible.
Most shorter drivers can get farenough away from the steeringwheel and still reach the pedals.However, if you are concerned aboutsitting too close, we recommend thatyou investigate whether some typeof adaptive equipment may help.
Once your seat is adjusted correctly,rock it back and forth to make surethe seat is locked in position.
See page 77 for how to adjust thefront seats.
3.Adjust the Seat-BacksAdjust the driver's seat-back to acomfortable, upright position,leaving ample space between yourchest and the airbag cover in thecenter of the steering wheel. If yousit too close to the steering wheel,you could be injured if the airbaginflates.
A front passenger should also adjustthe seat-back to an upright position,but as far from the dashboard aspossible. A passenger who sits tooclose to the dashboard could beinjured if the airbag inflates.
CONTINUED
Driver and Passenger Safety
Sitting too close to an airbagcan result in serious injury ordeath if the airbags inflate.
Always sit as far back from theairbags as possible.

Protecting Adults
Reclining a seat-back so that theshoulder part of the belt no longerrests against the occupant's chestreduces the protective capability ofthe belt. It also increases the chanceof sliding under the belt in a crashand being seriously injured. Thefarther a seat-back is reclined, thegreater the risk of injury.
See page 78 for how to adjust seat-backs.
4.Adjust the Head Restraints
Before driving, make sure everyonewith an adjustable head restraint hasproperly positioned the headrestraint. The restraint should bepositioned so the back of theoccupant's head rests against thecenter of the restraint. A tallerperson should adjust the restraint ashigh as possible.
Properly adjusted head restraintswill help protect occupants fromwhiplash and other crash injuries.
See page 79 for how to adjust thehead restraints.
Driver and Passenger Safety
Reclining the seat-back too farcan result in serious injury ordeath in a crash.
Adjust the seat-back to anupright position and sit wellback in the seat.
Improperly positioning headrestraints reduces theireffectiveness and you can beseriously injured in a crash.
Make sure head restraints arein place and positioned properlybefore driving.

Protecting Adults
5.Fasten and Position the SeatBelts
Using a Lap/Shoulder BeltInsert the latch plate into the buckle,then tug on the belt to make sure thebelt is securely latched. Also checkthat the belt is not twisted, because atwisted belt can cause seriousinjuries in a crash.
Position the lap part of the belt aslow as possible across your hips,then pull up on the shoulder part ofthe belt so the lap part fits snugly.This lets your strong pelvic bonestake the force of a crash and reducesthe chance of internal injuries.
If necessary, pull up on the belt againto remove any slack from theshoulder part, then check that thebelt rests across the center of yourchest and over your shoulder. Thisspreads the forces of a crash overthe strongest bones in your upperbody.
CONTINUED
Driver and Passenger Safety
Improperly positioning the seatbelts can cause serious injuryor death in a crash.
Make sure all seat belts areproperly positioned beforedriving.

Protecting Adults
If the seat belt touches or crossesyour neck, or if it crosses your arminstead of your shoulder, you need toadjust the seat belt anchor height.
To adjust the height of a front seatbelt anchor, press the release buttonand slide the anchor up or down asneeded (it has four positions).
Never place the shoulder portion of alap/shoulder belt under your arm orbehind your back. This could causevery serious injuries in a crash.
Using the Lap Belt
Insert the latch plate into the bucklemarked CENTER.
If the belt is too short, hold the latchplate at a right angle and pull on theplate to extend the belt. Then insertthe latch plate into the buckle, andtug on the belt to make sure the beltis securely latched.
Driver and Passenger Safety

Protecting Adults
Position the belt as low as possibleacross your hips. This lets yourstrong pelvic bones take the force ofa crash and reduces the chance ofinternal injuries.
Pull on the loose end of the belt for asnug but comfortable fit.
If a Seat Belt Doesn't Work ProperlyIf a seat belt does not seem to workas it should, it may not protect theoccupant in a crash. No one shouldsit in a seat with an inoperative seatbelt. Anyone using a seat belt that isnot working properly can beseriously injured or killed. Have yourHonda dealer check the belt as soonas possible.
See page 42 for additionalinformation about your seat beltsystem and how to take care of yourbelts.
Driver and Passenger Safety

Protecting Adults
6.Adjust the Steering Wheel
Adjust the steering wheel, if needed,so that the wheel points toward yourchest, not toward your face.
Pointing the steering wheel towardyour face decreases the protectivecapability of the driver's airbag.
See page 64 for how to adjust thesteering wheel.
7.Maintain a Proper SittingPosition
After all occupants have adjustedtheir seats and put on seat belts, it isvery important that they continue tosit upright, well back in their seats,with their feet on the floor, until thevehicle is parked and the engine isoff.
Sitting improperly can increase thechance of injury during a crash. Forexample, if an occupant slouches,lies down, turns sideways, sitsforward, leans forward or sideways,or puts one or both feet up, thechance of injury during a crash isgreatly increased.
In addition, an occupant who is out ofposition in the front seat can beseriously or fatally injured bystriking interior parts of the vehicle,or by being struck by an inflatingairbag.
Remember, to get the bestprotection from your vehicle'sairbags and other safety features,you must sit properly and wear yourseat belt properly.
Driver and Passenger Safety
Sitting improperly or out ofposition can result in seriousinjury or death in a crash.
Always sit upright, well back inthe seat, with your feet on thefloor.

Protecting Adults
Advice for Pregnant Women
Because protecting the mother is thebest way to protect her unborn child,a pregnant woman should alwayswear a seat belt whenever she drivesor rides in a vehicle.
We recommend that pregnantwomen use a lap/shoulder beltwhenever possible. Remember tokeep the lap portion of the belt aslow as possible across your hips.
Pregnant women should also situpright and as far back as possiblefrom the steering wheel ordashboard. This will reduce the riskof injuries to both the mother andher unborn child that can be causedby a crash or an inflating airbag.
Each time you have a check-up, askyour doctor if it's okay for you todrive.
Additional Safety PrecautionsNever let passengers ride in thecargo area or on top of a folded-down back seat. All passengersmust sit in locked, upright seatsand be properly restrained by seatbelts.
Passengers should not stand up orchange seats while the vehicle ismoving. A passenger who is notwearing a seat belt during a crashor emergency stop can be thrownagainst the inside of the vehicle,
against other occupants, or out ofthe vehicle.
Two people should never use thesame seat belt. If they do, theycould be very seriously injured in acrash.
Do not put any accessories on seatbelts. Devices intended to improveoccupant comfort or reposition theshoulder part of a seat belt, canseverely compromise theprotective capability of the seatbelt and increase the chance ofserious injury in a crash.
CONTINUED
Driver and Passenger Safety

Protecting Adults
Do not place hard or sharp objectsbetween yourself and an airbag.Carrying hard or sharp objects onyour lap, or driving with a pipe orother sharp object in your mouth,can result in injuries if yourairbags inflate.
Keep your hands and arms awayfrom the airbag covers. If yourhands or arms are close to the SRScovers in the center of thesteering wheel and on top of thedashboard, they could be injured ifthe airbags inflate.
Driver and Passenger Safety
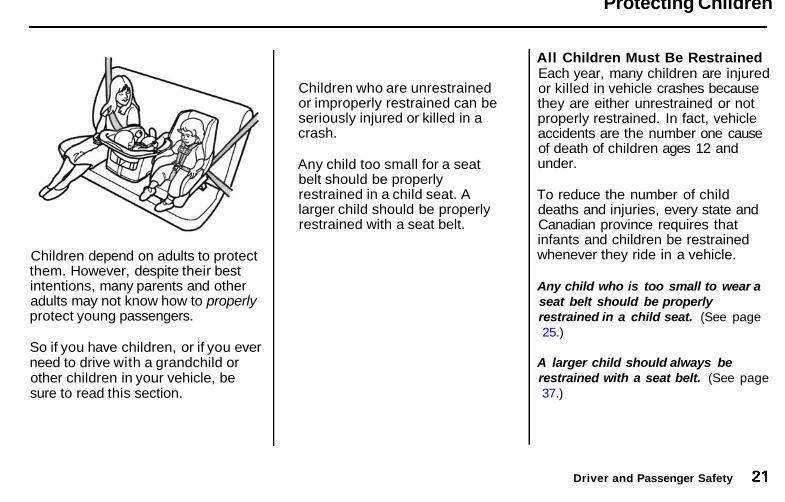
Protecting Children
Children depend on adults to protectthem. However, despite their bestintentions, many parents and otheradults may not know how to properlyprotect young passengers.
So if you have children, or if you everneed to drive with a grandchild orother children in your vehicle, besure to read this section.
All Children Must Be RestrainedEach year, many children are injuredor killed in vehicle crashes becausethey are either unrestrained or notproperly restrained. In fact, vehicleaccidents are the number one causeof death of children ages 12 andunder.
To reduce the number of childdeaths and injuries, every state andCanadian province requires thatinfants and children be restrainedwhenever they ride in a vehicle.
Any child who is too small to wear aseat belt should be properlyrestrained in a child seat. (See page25.)
A larger child should always berestrained with a seat belt. (See page37.)
Driver and Passenger Safety
Children who are unrestrainedor improperly restrained can beseriously injured or killed in acrash.
Any child too small for a seatbelt should be properlyrestrained in a child seat. Alarger child should be properlyrestrained with a seat belt.

Protecting Children
Children Should Sit in the BackSeatAccording to accident statistics,children of all ages and sizes aresafer when they are restrained in theback seat, not the front seat. TheNational Highway Traffic SafetyAdministration and TransportCanada recommend that all childrenages 12 and under be properlyrestrained in the back seat.
In the back seat, children are lesslikely to be injured by striking hardinterior parts during a collision orhard braking. Also, children cannotbe injured by an inflating airbagwhen they ride in the back.
The Passenger's Airbag PosesSerious Risks to ChildrenAirbags have been designed to helpprotect adults in a moderate tosevere frontal collision. To do this,the passenger's airbag is quite large,and it inflates with tremendousspeed.
InfantsNever put a rear-facing child seat inthe front seat of a vehicle equippedwith a passenger's airbag. If theairbag inflates, it can hit the back ofthe child seat with enough force tokill or very seriously injure an infant.
Small ChildrenPlacing a forward-facing child seat inthe front seat of a vehicle equippedwith a passenger's airbag can behazardous. If the vehicle seat is toofar forward, or the child's head isthrown forward during a collision, aninflating airbag can strike the childwith enough force to kill or veryseriously injure a small child.
Larger ChildrenChildren who have outgrown childseats are also at risk of being injuredor killed by an inflating passenger'sairbag. Whenever possible, largerchildren should sit in the back seat,properly restrained with a seat belt.(See page 37 for importantinformation about protecting largerchildren.)
Driver and Passenger Safety

Protecting Children
U.S. ModelsTo remind you of the passenger'sairbag hazards, and that childrenmust be properly restrained in aback seat, your vehicle has warninglabels on the dashboard and on thedriver's and front passenger's visors.Please read and follow theinstructions on these labels.
Canadian ModelsTo remind you of the airbag hazards,your vehicle has warning labels onthe driver's and front passenger'svisors. Please read and follow theinstructions on these labels.
Driver and Passenger Safety
CAUTIONTO AVOID SERIOUS INJURY:FOR MAXIMUM SAFETY PROTECTION INALL TYPES OF CRASHES, YOU MUSTALWAYS WEAR YOUR SAFETY BELT.DO NOT INSTALL REARWARD-FACINGCHILD SEATS IN ANY FRONTPASSENGER SEAT POSITION.DO NOT SIT OR LEAN UNNECESSARILYCLOSE TO THE AIR BAG.DO NOT PLACE ANY OBJECTS OVER THEAIR BAG OR BETWEEN THE AIR BAGAND YOURSELF.SEE THE OWNER'S MANUAL FOR FURTHERINFORMATION AND EXPLANATIONS.
PRECAUTIONS:POUR EVITER DES BLESSURES GRAVES:POUR PROFITER D'UNE PROTECTIOONMAXIMALE LORS D'UNE COLLISION BOUCLEZTOUJOURS VOTRE C EINTURE DE SECURITE.NINSTALLEZ JAMAIS UN SIEGE POURENFANTS FAISANT FACE A L'ARRIERE SURLE SIEGE DU PASSAGER AVANT.NE VOUS APPUYEZ PAS ET NE VOUS ASSOYEZPAS PRES DU COUSSIN GONFLABLE.NE DEPOSEZ AUCUN OBJET SUR LE COUSSINGONFLABLE OU ENTRE LE COUSSINGONFLABLE ET VOUS.LISEZ LE GUIDE UTILISATEUR POUR DEPULS AMPLES RENSEIGNEMENTS.

Protecting Children
If You Must Drive with SeveralChildrenYour vehicle has three seatingpositions in the back seat wherechildren can be properly restrained.
If you ever have to carry more thanthree children in your vehicle:
Place the largest child in the frontseat, provided the child is largeenough to wear a seat beltproperly (see page 37).
Move the vehicle seat as far to therear as possible (see page 12).
Have the child sit upright and wellback in the seat (see page 18).
Make sure the seat belt is properlypositioned and secured (see page15).
If a Child Requires CloseAttentionMany parents say they prefer to putan infant or small child in the frontpassenger seat so they can watch thechild, or because the child requiresattention.
Placing a child in the front seatexposes the child to hazards fromthe airbag, and paying closeattention to a child distracts thedriver from the important tasks ofdriving, placing both of you at risk.
If a child requires physical attentionor frequent visual contact, westrongly recommend that anotheradult ride with the child in the backseat. The back seat is far safer for achild than the front.
Additional Safety PrecautionsUse childproof door locks toprevent children from opening thedoors. Using this feature willprevent children from opening thedoors and accidentally falling out(see page 75).
Use the mam power windowswitch to prevent children fromopening the rear windows. Usingthis feature will prevent childrenfrom playing with the windows,which could expose them tohazards or distract the driver (seepage 84).
Driver and Passenger Safety

Protecting Children
Do not leave children alone in yourvehicle. Leaving children withoutadult supervision is illegal in moststates and provinces, and can bevery hazardous. For example,infants and small children left in avehicle on a hot day can the fromheatstroke. And children left alonewith the key in the ignition canaccidentally set the vehicle inmotion, possibly injuringthemselves or others.
General Guidelines for UsingChild SeatsThe following pages give generalguidelines for selecting and installingchild seats for infants and smallchildren.
Selecting a Child SeatTo provide proper protection, a childseat should meet threerequirements:
1.The child seat should meet safetystandards. The child seat shouldmeet Federal Motor VehicleSafety Standard 213 (FMVSS 213)or Canadian Motor Vehicle SafetyStandard 213 (CMVSS 213). Lookfor the manufacturer's statementof compliance on the box and seat.
2. The child seat should be of theproper type and size to fit the child.
Infants: Children up to about oneyear old should be restrained in arear-facing, reclining child seat. Onlya rear-facing seat provides theproper support to protect an infant'shead, neck, and back. See page29 for additional information onprotecting infants.
CONTINUED
Driver and Passenger Safety

Protecting Children
Small Children: A child who is toolarge for a rear-facing child seat, andwho can sit up without support,should be restrained in a forward-facing child seat. See page 33 foradditional information on protectingsmall children.
3. The child seat should fit thevehicle seating position (orpositions) where it will be used.
Due to variations in the design ofchild seats, vehicle seats, and seatbelts, all child seats will not fit allvehicle seating positions.
However, Honda is confident thatone or more child seat models can fitand be properly installed in allrecommended seating positions inyour vehicle.
Before purchasing a child seat, werecommend that parents test thechild seat in the specific vehicleseating position (or positions) wherethey intend to use the seat. If apreviously purchased child seat doesnot fit, you may need to buy adifferent one that will fit.
Driver and Passenger Safety

Protecting Children
Placing a Child SeatThis page briefly summarizesHonda's recommendations on whereto place rear-facing and forward-facing child seats in your vehicle.
Front Passenger's SeatInfants: Never in the front seat, due
to the passenger's airbag hazard.
Small children: Not recommended,due to the passenger's airbaghazard. If a small child must ridein front, move the vehicle seat tothe rear-most position and securea front-facing child seat with theseat belt (see page 34).
Back SeatInfants: Recommended positions.
Secure a rear-facing child seatwith the seat belt (see page 30).
Small children: Recommendedpositions. Secure a front-facingchild seat with the seat belt (seepage 34).
Driver and Passenger Safety
Airbags Pose SeriousRisks to Children
The passenger's airbag inflateswith enough force to kill orseriously injure an infant in arear-facing child seat.
A small child in a forward-facingchild seat is also at risk. If thevehicle seat is too far forward,or the child's head is thrownforward during a collision, aninflating airbag can kill orseriously injure the child.
If a small child must ride in thefront, follow the instructionsprovided.
CONTINUED

Protecting Children
Installing a Child SeatAfter selecting a proper child seat,and a good position to install the seat,there are three main steps ininstalling the seat:
1. Secure the child seat to the vehiclewith a seat belt. All child seatsmust be secured to the vehiclewith the lap belt or the lap part ofa lap/shoulder belt. A child whoseseat is not properly secured to thevehicle can be endangered in acrash. See pages 30 and 32 forinstructions on how to secure childseats in this vehicle.
2. Make sure the child seat is firmlysecured. After installing a childseat, push and pull the seatforward and from side to side toverify that it is secure.
To provide security during normaldriving maneuvers as well as duringa collision, we recommend thatparents secure a child seat as firmlyas possible.
However, a child seat does not needto be "rock solid." In some vehiclesor seating positions, it may bedifficult to install a child seat so thatit does not move at all. Some side-to-side or back-and-forth movement canbe expected and should not reducethe child seat's effectiveness.
If the child seat is not secure, tryinstalling it in a different seatingposition, or use a different style ofchild seat that can be firmly securedin the desired seating position.
3. Secure the child in the child seat.Make sure the child is properlystrapped in the child seataccording to the child seat maker'sinstructions. A child who is notproperly secured in a child seatcan be thrown out of the seat in acrash and seriously injured.
Storing a Child SeatWhen you are not using a child seat,either remove it and store it in a safeplace, or make sure it is properlysecured. An unsecured child seat canbe thrown around the vehicle duringa crash or sudden stop and injuresomeone.
Driver and Passenger Safety

Protecting Children
Protecting Infants
Child Seat TypeOnly a rear-facing child seat providesproper support for a baby's head,neck, and back. Infants up to aboutone year of age must be restrained ina rear-facing child seat.
Two types of seats may be used: aseat designed exclusively for infants,or a convertible seat used in the rear-facing, reclining mode.
We recommend that an infant berestrained in a rear-facing child seatuntil the infant reaches the seatmaker's weight or height limit and isable to sit up without support.
Rear-Facing Child Seat PlacementIn this vehicle, a rear-facing childseat can be placed in any seatingposition in the back, but not in thefront seat.
Never put a rear-facing child seat inthe front seat. If the passenger'sairbag inflates, it can hit the back ofthe child seat with enough force tokill or seriously injure an infant. If aninfant must be closely watched, werecommend that another adult sit inthe back seat with the baby.
Do not put a rear-facing child seat ina forward-facing position. If placedfacing forward, an infant could bevery seriously injured during afrontal collision.
CONTINUED
Driver and Passenger Safety
Placing a rear-facing child seatin the front seat can result inserious injury or death if theairbags inflate.
Always place a rear-facing childseat in the back seat, not thefront.

Protecting Children
Installing a Rear-Facing Child Seatwith a Lap/Shoulder BeltThe lap/shoulder belts in the outerback seats have a lockingmechanism that must be activated tosecure a child seat.
The following pages provideinstructions and tips on how tosecure a rear-facing child seat withthis type of seat belt.
See page 32 for how to secure a rear-facing child seat in the center backseat with the lap belt.
For tips on installing a rear-facingchild seat with either type of seatbelt, see page 32.
1. With the child seat in the desiredback seating position, route thebelt through the child seataccording to the seat maker'sinstructions, then insert the latchplate into the buckle.
Driver and Passenger Safety

Protecting Children
2. To activate the lockable retractor,slowly pull the shoulder part of thebelt all the way out until it stops,then let the belt feed back into theretractor (you might hear aclicking noise as the belt retracts).
3. After the belt has retracted, tug onit. If the belt is locked, you will notbe able to pull it out. If you can pullthe belt out, it is not locked andyou will need to repeat these steps.
4. After confirming that the belt islocked, grab the shoulder part ofthe belt near the buckle and pullup to remove any slack from thelap part of the belt. Remember, ifthe lap part of the belt is not tight,the child seat will not be secure.To remove slack, it may help toput weight on the child seat, orpush on the back of the seat, whilepulling up on the belt.
5. Push and pull the child seatforward and from side to side toverify that it is secure enough tostay upright during normal drivingmaneuvers. If the child seat is notsecure, unlatch the belt, allow it toretract fully, then repeat thesesteps.
To deactivate the lockingmechanism and remove a child seat,unlatch the buckle, unroute the seatbelt, and let the belt fully retract.
Driver and Passenger Safety
CONTINUED

Protecting Children
Installing a Rear-Facing Child Seatwith the Lap Belt
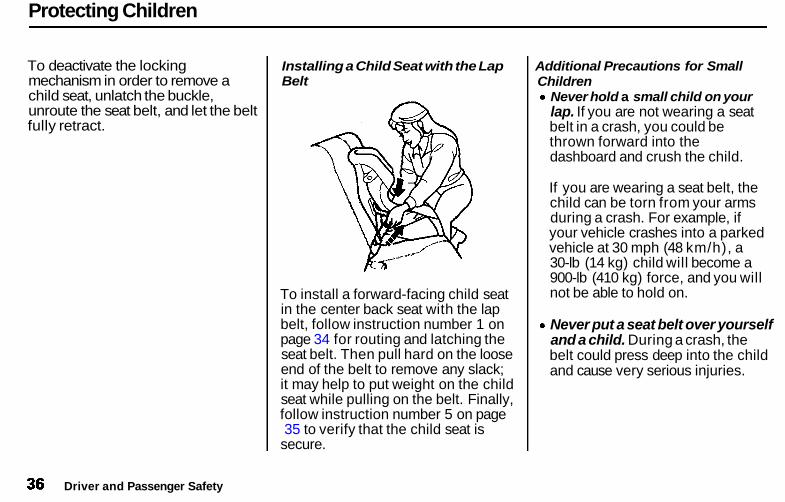
To install a rear-facing child seat inthe center back seat with the lap belt,follow instruction number 1 on page30 for routing and latching the seatbelt. Then pull hard on the loose endof the belt to remove any slack (itmay help to put weight on the childseat while pulling on the belt).Finally, follow instruction number 5on page 31 to verify that the childseat is secure.
Rear-Facing Child Seat InstallationTips
For proper protection, an infant mustride in a reclined, or semi-reclinedposition. To determine the properreclining angle, check with the baby'sdoctor or follow the seat maker'srecommendations.
To achieve the desired recliningangle, it may help to put a rolled uptowel under the toe of the child seat,as shown.
When properly installed, a rear-facing child seat may prevent thedriver or a front-seat passenger frommoving the seat as far back asrecommended (see page 12). Or itmay prevent them from locking theseat-back in the desired uprightposition (see page 13).
In either case, we recommend thatyou place the child seat directlybehind the front passenger seat,move the front seat as far forward asneeded, and leave it unoccupied. Oryou may wish to get a smaller childseat that allows you to safely carry afront passenger.
Driver and Passenger Safety

Protecting Children
Additional Precautions for InfantsNever hold an infant on your lap,If you are not wearing a seat beltin a crash, you could be thrownforward into the dashboard andcrush the infant.
If you are wearing a seat belt, theinfant can be torn from your arms.For example, if your vehiclecrashes into a parked vehicle at 30mph (48 km/h), a 20-lb (9 kg)infant will become a 600-lb (275kg) force, and you will not be ableto hold on.
Never put a seat belt over yourselfand an infant. During a crash, thebelt could press deep into theinfant and cause very seriousinjuries.
Protecting Small Children
Child Seat TypeA child who can sit up withoutsupport, and who fits within the childseat maker's weight and heightlimits, should be restrained in aforward-facing, upright child seat.
Of the different seats available, werecommend those that have a five-point harness system as shown.
We also recommend that a smallchild stay in the child seat as long aspossible, until the child reaches theweight or height limit for the seat.
Child Seat PlacementIn this vehicle, the best place toinstall a forward-facing child seat isin one of the seating positions in theback seat.
Placing a forward-facing child seat inthe front seat of a vehicle equippedwith a passenger's airbag can behazardous. If the vehicle seat is toofar forward, or the child's head isthrown forward during a collision, aninflating passenger's airbag canstrike the child with enough force tocause very serious or fatal injuries. Ifa small child must be closelywatched, we recommend thatanother adult sit in the back seatwith the child.
Driver and Passenger Safety
CONTINUED

Protecting Children
If it is necessary to put a forward-facing child seat in the front, movethe vehicle seat as far to the rear aspossible, be sure the child seat isfirmly secured to the vehicle, andthat the child is properly strapped inthe seat.
Installing a Child Seat with a Lap/Shoulder BeltThe lap/shoulder belts in the outerback and front passenger seatingpositions have a locking mechanismthat must be activated to secure achild seat.
The following pages provideinstructions on how to secure aforward-facing child seat with thistype of seat belt.
See page 36 for how to secure aforward-facing child seat in thecenter back seat with the lap belt.
1. With the child seat in the desired,back, seating position, route thebelt through the child seataccording to the seat maker'sinstructions, then insert the latchplate into the buckle.
Driver and Passenger Safety
Improperly placing a forward-facing child seat in the frontseat can result in serious injuryor death if the airbags inflate.
If you must place a forward-facing child seat in front, movethe vehicle seat as far back aspossible and properly restrainthe child.

Protecting Children
2. To activate the lockable retractor,slowly pull the shoulder part of thebelt all the way out until it stops,then let the belt feed back into theretractor (you might hear aclicking noise as the belt retracts).
3. After the belt has retracted, tug onit. If the belt is locked, you will notbe able to pull it out. If you can pullthe belt out, it is not locked andyou will need to repeat these steps.
4. After confirming that the belt islocked, grab the shoulder part ofthe belt near the buckle and pullup to remove any slack from thelap part of the belt. Remember, ifthe lap part of the belt is not tight,the child seat will not be secure. Itmay help to put weight on thechild seat, or push on the back ofthe seat, while pulling up on thebelt.
5. Push and pull the child seatforward and from side to side toverify that it is secure enough tostay upright during normal drivingmaneuvers. If the child seat is notsecure, unlatch the belt, allow it toretract fully, then repeat thesesteps.
CONTINUED
Driver and Passenger Safety
Protecting Children
To deactivate the lockingmechanism in order to remove achild seat, unlatch the buckle,unroute the seat belt, and let the beltfully retract.
Installing a Child Seat with the LapBelt
To install a forward-facing child seatin the center back seat with the lapbelt, follow instruction number 1 onpage 34 for routing and latching theseat belt. Then pull hard on the looseend of the belt to remove any slack;it may help to put weight on the childseat while pulling on the belt. Finally,follow instruction number 5 on page35 to verify that the child seat issecure.
Additional Precautions for SmallChildren
Never hold a small child on yourlap. If you are not wearing a seatbelt in a crash, you could bethrown forward into thedashboard and crush the child.
If you are wearing a seat belt, thechild can be torn from your armsduring a crash. For example, ifyour vehicle crashes into a parkedvehicle at 30 mph (48 km/h), a30-lb (14 kg) child will become a900-lb (410 kg) force, and you willnot be able to hold on.
Never put a seat belt over yourselfand a child. During a crash, thebelt could press deep into the childand cause very serious injuries.
Driver and Passenger Safety

Protecting Children
Protecting Larger ChildrenWhen a child reaches therecommended weight or height limitfor a forward-facing child seat, thechild should sit in one of the outerback seats and wear a lap/shoulderbelt. A lap/shoulder belt providesbetter protection than a lap belt.
If a child is too short for the shoulderpart of the belt to properly fit, werecommend that the child use abooster seat until they are tallenough to use the seat belt without abooster.
The following pages giveinstructions on how to check properseat belt fit, what kind of boosterseat to use if one is needed, andimportant precautions for childrenwho must sit in the front seat.
Checking Seat Belt FitTo determine if a lap/shoulder beltproperly fits a child, have the childput on the seat belt. Follow theinstructions on page 15 . Then checkhow the belt fits.
CONTINUED
Driver and Passenger Safety
Allowing a larger child to sitimproperly in the front seat canresult in injury or death if theairbags inflate.
If a larger child must sit in front,make sure the child moves theseat as far back as possibleand wears the seat belt properly.

Protecting Children
If the shoulder part of the belt restsover the child's collarbone andagainst the center of the chest, asshown, the child is large enough towear the seat belt.
However, if the belt touches orcrosses the child's neck, the childneeds to use a booster seat.
Do not let a child wear a seat beltacross the neck. This could result inserious neck injuries during a crash.
Do not let a child put the shoulderpart of a seat belt behind the back orunder the arm. This could causevery serious injuries during a crash.It also increases the chance that thechild will slide under the belt in acrash and be injured.
Do not put any accessories on a seatbelt. Devices intended to improveoccupant comfort or reposition theshoulder part of a seat belt, severelycompromise the protective capabilityof the seat belt and increase thechance of serious injury in a crash.
Two children should never use thesame seat belt. If they do, they couldbe very seriously injured in a crash.
Using a Booster Seat
If a child needs a booster seat, werecommend choosing a style thatallows the child to use the lap/shoulder belt directly, without ashield, as shown.
Whichever style you select, followthe booster seat maker's instructions.
Driver and Passenger Safety

Protecting Children
A child may continue using a boosterseat until the tops of the ears areeven with the top of the seat-back. Achild of this height should be tallenough to use the lap/shoulder beltwithout a booster.
When Can a Larger Child Sit in FrontThe National Highway Traffic SafetyAdministration and TransportCanada recommend that all childrenages 12 and under be properlyrestrained in a back seat.
The back seat is the safest place fora child of any age or size.
In addition, the passenger's airbagposes serious risks to children. If theseat is too far forward, or the child'shead is thrown forward during acollision, or the child is unrestrainedor out of position, an inflating airbagcan kill or seriously injure the child.
Of course, children vary widely. Andwhile age may be one indicator ofwhen a child can safely ride in thefront, there are other importantfactors you should consider.
Physical SizePhysically, a child must be largeenough for the lap/shoulder belt toproperly fit over the hips, chest, andshoulder (see pages 15 and 37). Ifthe seat belt does not fit properly,the child should not sit in the front.
MaturityTo safely ride in front, a child mustbe able to follow the rules, includingsitting properly and wearing the seatbelt properly throughout a ride.
CONTINUED
Driver and Passenger Safety
Protecting Children
If you decide that a child can safelyride up front, be sure to:
Carefully read the owner's manualand make sure you understand allseat belt instructions and all safetyinformation.
Move the vehicle seat to the rear-most position.
Have the child sit up straight, backagainst the seat, and feet on ornear the floor.
Check that the child's seat belt isproperly positioned and secured.
Supervise the child. Even maturechildren sometimes need to bereminded to fasten the seat beltsor sit properly.
Using Child Seats with Tethers
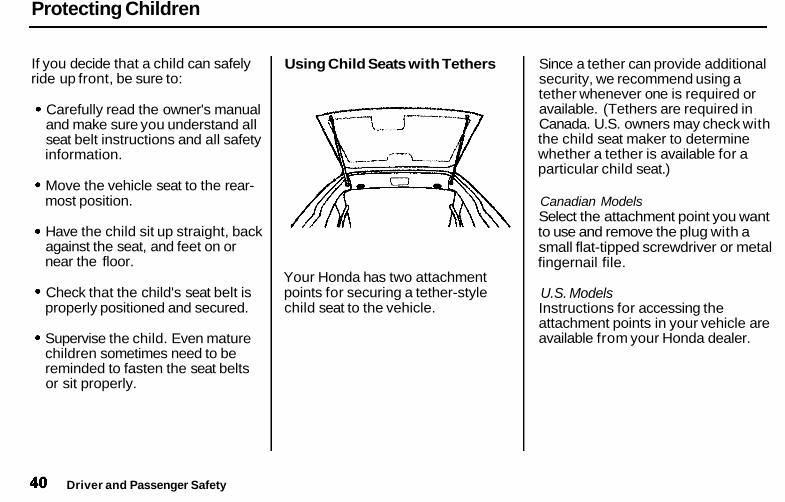
Your Honda has two attachmentpoints for securing a tether-stylechild seat to the vehicle.
Since a tether can provide additionalsecurity, we recommend using atether whenever one is required oravailable. (Tethers are required inCanada. U.S. owners may check withthe child seat maker to determinewhether a tether is available for aparticular child seat.)
Canadian ModelsSelect the attachment point you wantto use and remove the plug with asmall flat-tipped screwdriver or metalfingernail file.
U.S. ModelsInstructions for accessing theattachment points in your vehicle areavailable from your Honda dealer.
Driver and Passenger Safety

Protecting Children
Driver and Passenger Safety
Install the anchor plate andmounting hardware. The hardware isavailable for purchase from yourHonda dealer (part number 82410-SE3-C01). For Canadian models, thehardware is supplied with the vehicle.
All ModelsWhen installing tether hardware,make sure the toothed washer is onthe bottom of the bolt. Tighten thebolt to:16 lbf.ft (22 N.m, 2.2 kgf.m)
If a torque wrench was not used, seeyour Honda dealer as soon aspossible to verify proper installation.
To attach the tether to the child seat,follow the child seat maker'sinstructions.
If you are not sure how to install thetether, or you need mountinghardware, contact your Honda dealer.

Additional Information About Your Seat Belts
Seat Belt System ComponentsYour seat belt system includes lap/shoulder belts in the front seats andthe outer back seats, and a lap belt inthe center back seat.
The seat belt system alsoincludes a light on the
instrument panel to remind you andyour passengers to fasten your belts.If the driver's seat belt is notfastened before the ignition is turnedON (II), the light will come on and abeeper will also sound. The beeperwill stop after a few seconds, but thelight will stay on until the driver'sseat belt is fastened.
Lap/Shoulder Belt
This seat belt has a single belt thatgoes over your shoulder, across yourchest and across your hips.To fasten the belt, insert the latchplate into the buckle, then tug on thebelt to make sure the buckle islatched.To unlock the belt, push the redPRESS button on the buckle.Guide the belt across your body tothe door pillar. After exiting thevehicle, be sure the belt is out of the
way and will not get closed in thedoor.
All lap/shoulder belts have anemergency locking retractor.In normal driving, the retractor letsyou move freely in your seat while itkeeps some tension on the belt.During a collision or sudden stop,the retractor automatically locks thebelt to help restrain your body.
All the lap/shoulder belts except thedriver's have an additional lockingmechanism that must be activated tosecure a child seat. (See pages30 and 34 for instructions on how tosecure child seats with this type ofseat belt.)
If the shoulder part of the belt ispulled all the way out, the lockingmechanism will activate. The beltwill retract, but it will not allow thepassenger to move freely.
Driver and Passenger Safety

Additional Information About Your Seat Belts
To deactivate the lockingmechanism, unlatch the buckle andlet the seat belt fully retract. Torefasten the belt, pull it out only asfar as needed.
See page 15 for instructions on howto wear the lap/shoulder beltproperly.
Lap BeltThe lap belt has one manually-adjusted belt that fits across the hips.
To fasten the belt, insert the latchplate into the buckle markedCENTER, then tug on the belt tomake sure the buckle is latched.
To unlock the belt, push the redPRESS button.
See page 16 for how to lengthen thelap belt, and how to properly positionthe belt.
Seat Belt MaintenanceFor safety, you should check thecondition of your seat belts regularly.
Pull each belt out fully and look forfrays, cuts, burns, and wear. Checkthat the latches work smoothly andthat the lap/shoulder belts retracteasily. Any belt not in good conditionor not working properly will notprovide good protection and shouldbe replaced as soon as possible.
U.S. ModelsHonda provides a lifetime warrantyon seat belts. Honda will repair orreplace any seat belt component thatfails to function properly duringnormal use. Please see your HondaWarranty Information booklet fordetails.
CONTINUED
Driver and Passenger Safety
Additional Information About Your Seat Belts
If a seat belt is worn during a crash,you should have your dealer inspectthe belt, and replace it if necessary.A belt that has been worn during acrash may not provide the same levelof protection in a subsequent crash.The dealer should also inspect theanchors for damage and replacethem if needed.
For information on how to clean yourseat belts, see page 246.
Driver and Passenger Safety
Not checking or maintainingseat belts can result in seriousinjury or death if the seat beltsdo not work properly whenneeded.
Check your seat belts regularlyand have any problemcorrected as soon as possible.

Additional Information About Your SRS
SRS ComponentsYour Supplemental Restraint System(SRS) includes:
Two front airbags. The driver'sairbag is stored in the center ofthe steering wheel; the frontpassenger's airbag is stored in thedashboard. Both are marked "SRSAIRBAG."
Automatic seat belt tensionersthat tighten the front seat beltsduring a moderate to severefrontal collision.
Sensors that can detect amoderate to severe frontalcollision.
A sophisticated electronic systemthat continually monitors thesensors, control unit, the airbagactivators, and all related wiringwhen the ignition is ON (II).
An indicator light on theinstrument panel that alerts you toa possible problem with thesystem (see page 47 ).
Emergency backup power in caseyour vehicle's electrical system isdisconnected in a crash.
How Your Airbags Work
If you ever have a moderate tosevere frontal collision, the sensorswill detect rapid deceleration andsignal the control unit to instantlyinflate the airbags and activate theautomatic seat belt tensioners.
CONTINUED
Driver and Passenger Safety

Additional Information About Your SRS
During a crash, your seat belt helpsrestrain your lower body and torso,while the tensioner tightens andlocks the seat belt to help keep youin place. Your airbag provides acushion to help restrain and protectyour head and chest.
Since both airbags use the samesensors, both airbags normallyinflate at the same time. However, itis possible for only one airbag toinflate.
This can occur when the severity ofa collision is at the margin, orthreshold, that determines whetheror not the airbags will deploy. Insuch cases, the seat belt will providesufficient protection, and thesupplemental protection offered bythe airbag would be minimal.
After inflating, the airbagsimmediately deflate, so they won'tinterfere with the driver's visibility,or the ability to steer or operateother controls.
The total time for inflation anddeflation is approximately one-tenthof a second, so fast that mostoccupants are not aware that theairbags deployed until they see themlying in their laps.
After a crash, you may see whatlooks like smoke. This is actuallypowder from the airbag's surface.Although the powder is not harmful,people with respiratory problemsmay experience some temporarydiscomfort. If this occurs, get out ofthe car as soon as it is safe to do so.
U.S. OwnersFor additional information on howyour airbags work, see the booklettitled SRS: What You Need to KnowAbout Airbags that came with yourowner's manual.
Canadian OwnersFor additional information on howyour airbags work, ask your dealerfor a copy of the booklet titled SRS:What You Need to Know About Airbags.
Driver and Passenger Safety
Additional Information About Your SRS
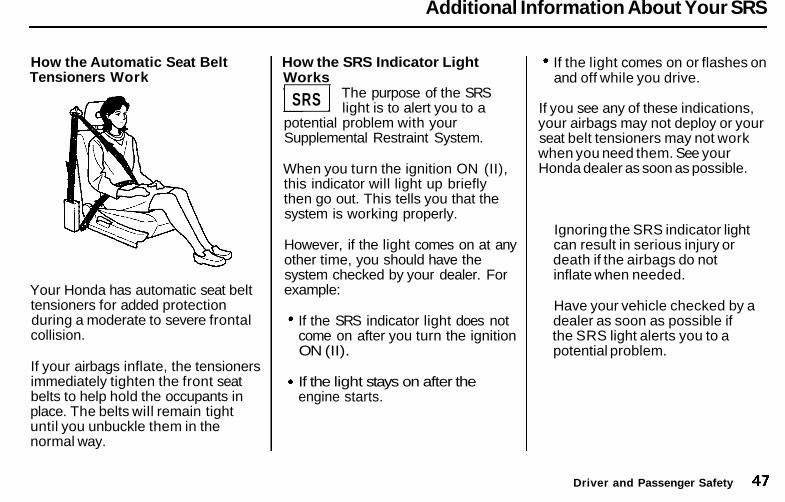
How the Automatic Seat BeltTensioners Work
Your Honda has automatic seat belttensioners for added protectionduring a moderate to severe frontalcollision.
If your airbags inflate, the tensionersimmediately tighten the front seatbelts to help hold the occupants inplace. The belts will remain tightuntil you unbuckle them in thenormal way.
How the SRS Indicator LightWorks
The purpose of the SRSlight is to alert you to a
potential problem with yourSupplemental Restraint System.
When you turn the ignition ON (II),this indicator will light up brieflythen go out. This tells you that thesystem is working properly.
However, if the light comes on at anyother time, you should have thesystem checked by your dealer. Forexample:
If the SRS indicator light does notcome on after you turn the ignitionON (II).
If the light stays on after theengine starts.
If the light comes on or flashes onand off while you drive.
If you see any of these indications,your airbags may not deploy or yourseat belt tensioners may not workwhen you need them. See yourHonda dealer as soon as possible.
Driver and Passenger Safety
SRS
Ignoring the SRS indicator lightcan result in serious injury ordeath if the airbags do notinflate when needed.
Have your vehicle checked by adealer as soon as possible ifthe SRS light alerts you to apotential problem.

Additional Information About Your SRS
SRS ServiceYour Supplemental Restraint Systemis virtually maintenance-free, andthere are no parts you can safelyservice. However, you must haveyour vehicle serviced if:
Your airbags ever inflate. Theairbags, seat belt tensioners, andcontrol unit must be replaced. Donot try to remove or replace theairbags yourself.This must be done by a Hondadealer or a knowledgeable bodyshop.
The SRS indicator light alerts youto a problem. Take your vehicle toan authorized Honda dealer assoon as possible. If you ignore thisindication, the airbags might notinflate when you need them.
Additional Safety PrecautionsDo not attempt to deactivate yourairbags. Together, airbags, seatbelt tensioners and seat beltsprovide the best protection in amoderate to severe frontalcollision.
Do not tamper with SRScomponents or wiring for anyreason. Tampering could causethe airbags to deploy, possiblycausing very serious injury.
See page 147 for further informationand precautions relating to your SRS.
Driver and Passenger Safety

Carbon Monoxide Hazard
Your vehicle's exhaust containscarbon monoxide gas. You shouldhave no problem with carbonmonoxide entering the vehicle innormal driving if you maintain yourvehicle properly.
Have the exhaust system inspectedfor leaks whenever:
The vehicle is raised for an oilchange.You notice a change in the soundof the exhaust.The vehicle was in an accidentthat may have damaged the under-side.
High levels of carbon monoxide cancollect rapidly in enclosed areas,such as a garage. Do not run theengine with the garage door closed.Even with the door open, run theengine only long enough to move thevehicle out of the garage.
With the tailgate open, air flow canpull exhaust gas into your vehicle'sinterior and create a hazardouscondition. If you must drive with thetailgate open, open all the windowsand set the heating and coolingsystem as shown below.
If you must sit in your parked vehicle,even in an unconfined area, with theengine running, adjust the heatingand cooling system as follows:
1. Select the Fresh Air mode.2. Select the mode.3. Turn the fan on high speed.4. Set the temperature control to a
comfortable setting.
Driver and Passenger Safety
Carbon monoxide gas is toxic.Breathing it can causeunconsciousness and even killyou.
Avoid any enclosed areas oractivities that expose you tocarbon monoxide.

Safety Labels
These labels are in the locationsshown. They warn you of potentialhazards that could cause seriousinjury. Read these labels carefully.
If a label comes off or becomes hardto read, contact your Honda dealerfor a replacement.
Driver and Passenger Safety
HOODU.S. models
DASH BOARDU.S. models only
SUN VISORU.S. models
Canadian models
SUN VISORU.S. models
RADIATOR CAP
Canadian models

Instruments and Controls
This section gives information aboutthe controls and displays thatcontribute to the daily operation ofyour Honda. All the essentialcontrols are within easy reach.
Control Locations............................ 52Indicator Lights................................ 53Gauges.............................................. 56
Speedometer................................ 56Tachometer.................................. 56Odometer...................................... 56Trip Meter.................................... 56Fuel Gauge................................... 57Temperature Gauge.................... 57Maintenance Required
Indicator.................................... 58Controls Near the Steering
Wheel........................................ 59Headlights.................................... 60
Daytime Running Lights............. 60Instrument Panel Brightness..... 61Turn Signals................................. 61Windshield Wipers...................... 62Windshield Washers................... 62Rear Window Wiper and
Washer...................................... 63Hazard Warning........................... 63Rear Window Defogger.............. 63Steering Wheel Adjustment....... 64
Steering Wheel Controls................ 66Cruise Control.............................. 66
Keys and Locks................................ 69Keys............................................... 69Ignition Switch............................. 69Door Locks................................... 70Power Door Locks....................... 71Remote Transmitter.................... 72Childproof Door Locks............... 75Tailgate......................................... 75Glove Box..................................... 77
Seats.................................................. 77Front Seat Adjustments.............. 77Driver's Seat Height
Adjustment............................... 78Head Restraints........................... 79
Rear Seat-back Adjustment........ 80Rear Seat Armrest....................... 80Reclining the Front and
Rear Seat-backs....................... 81Folding Rear Seat........................ 82
Power Windows............................... 84Mirrors.............................................. 85
Adjusting the Power Mirrors..... 86Parking Brake.................................. 86Digital Clock..................................... 87Center Table..................................... 87Beverage Holder.............................. 88Built-in Table.................................... 89Center Pocket.................................. 91Storage Box...................................... 91Cargo Floor Pockets........................ 92Accessory Power Socket................ 92Tailgate Pocket................................ 93Cargo Hooks..................................... 93Ashtrays............................................ 94Interior Lights.................................. 94
Ceiling Light................................. 94Spotlights...................................... 95Cargo Area Light......................... 95Ignition Switch Light................... 95
Instruments and Controls

Control Locations
Instruments and Controls
POWER WINDOWSWITCHES(P.84)
AUDIO SYSTEM(P. 106)
MIRROR CONTROLS(P.86)
TAILGATERELEASE(P.75)
HOOD RELEASEHANDLE(P.142)
HEATING/COOLING CONTROL(P.98)
FUEL FILL DOOR RELEASE(P.141)

Indicator Lights
The instrument panel has manyindicators to give you importantinformation about your vehicle.
* The U.S. instrument panel isshown. Differences for Canadianmodels are noted in the text.
MALFUNCTIONINDICATOR LAMP
PARKING BRAKE AND BRAKESYSTEM INDICATOR*
Instruments and Controls
HIGH BEAM INDICATOR
CHARGING SYSTEMINDICATOR
TAILGATE-OPEN INDICATOR
SEAT BELTREMINDER LIGHT
LOW OILPRESSUREINDICATOR
SUPPLEMENTALRESTRAINT SYSTEMINDICATOR
CRUISE CONTROLINDICATOR
ANTI-LOCK BRAKESYSTEM INDICATOR*
LOW FUELINDICATOR

Indicator Lights
Low Oil PressureIndicator
The engine can be severely damagedif this light flashes or stays on whenthe engine is running. For completeinformation, see page 264 .
Charging SystemIndicator
If this light comes on when theengine is running, the battery is notbeing charged. For completeinformation, see page 265 .
Malfunction IndicatorLamp
See page 266 .
Parking Brake andBrake SystemIndicator
This light has two functions:
1. It lights as a reminder that youhave not released the parkingbrake. Driving with the parkingbrake applied can damage thebrakes and tires, and cause theAnti-lock brake system to turn off(see page 167 ).
2. If it remains lit after you releasethe parking brake while the engineis running, or comes on whiledriving, it can indicate a problemin the brake system. For completeinformation, see page 267.
Supplemental RestraintSystem Indicator
This indicator lights when you turnthe ignition switch ON (II). If itcomes on at any other time, itindicates a problem in thesupplemental restraint system. Forcomplete information, see page 47.
Seat Belt Reminder Light
This indicator lights when you turnthe ignition switch ON (II). It is areminder to you and your passengersto protect yourselves by fasteningthe seat belts. A beeper also soundsif you have not fastened your seatbelt.
If you do not fasten your seat belt,the beeper will stop after a fewseconds but the light stays on untilyou do. Both the light and the beeperstay off if you fasten your seat beltbefore turning on the ignition.
Instruments and Controls
U.S. Canada
BRAKESRS

Indicator Lights
Anti-lock BrakeSystem (ABS)Indicator
Only on models equipped with ABS (seepage 165)This light normally comes on whenyou turn the ignition switch ON (II)and goes off after the engine starts.If it comes on at any other time,there is a problem in the ABS. If thishappens, take the vehicle to yourdealer to have it checked. With thelight on, your vehicle still has normalbraking ability but no anti-lock.
Low Fuel Indicator
This light comes on as a reminderthat you must refuel soon.
High Beam Indicator
This light comes on with the highbeam headlights. See page 60 forinformation on the headlightcontrols.
On Canadian models, this indicatorcomes on with reduced brightnesswhen the Daytime Running Lights(DRL) are on (see page 60).
Turn Signal and Hazard WarningIndicatorsThe left or right turn signal lightblinks when you signal a lane changeor turn. If the light does not blink orblinks rapidly, it usually means oneof the turn signal bulbs is burned out(see page 233). Replace the bulb assoon as possible, since other driverscannot see that you are signalling.
When you turn on the HazardWarning switch, both turn signallights blink. All turn signals on theoutside of the vehicle should flash.
Instruments and Controls
Cruise Control Indicator
This lights when you set the cruisecontrol. See page 66 for informationon operating the cruise control.
Tailgate-open Indicator
This light comes on if the tailgate isnot closed tightly.
U.S. Canada
ABS
CRUISECONTROL

Gauges
SpeedometerU.S.ModelsThis shows your speed in miles perhour (mph). The smaller innernumbers are the speed in kilometersper hour (km/h).
Canadian ModelsThis shows your speed in kilometersper hour (km/h). The smaller innernumbers are the speed in miles perhour (mph).
TachometerThe tachometer shows the enginespeed in revolutions per minute(rpm). To protect the engine fromdamage, never drive with thetachometer needle in the red zone.
OdometerThe odometer shows the total dis-tance your vehicle has been driven.It measures miles in U.S. models andkilometers in Canadian models.It is illegal under U.S. federal law andCanadian provincial regulations todisconnect, reset, or alter theodometer with the intent to changethe number of miles or kilometersindicated.
Trip MeterThis meter shows the number ofmiles (U.S.) or kilometers (Canada)driven since you last reset it. Toreset it, push the trip meter resetbutton.
Instruments and Controls
TACHOMETER TRIP METER
MAINTENANCEREQUIRED INDICATOR
TRIP METERRESET BUTTON
TEMPERATUREGAUGE
ODOMETER
SPEEDOMETER FUEL GAUGE

Gauges
TACHOMETER FUEL GAUGE
ODOMETER TRIP METERRESET BUTTON
TEMPERATUREGAUGE
Fuel GaugeThis shows how much fuel you have.It is most accurate when the vehicleis on level ground. It may showslightly more or less than the actualamount when you are driving oncurvy or hilly roads.
The gauge stays at the same fuellevel reading after you turn off theignition. When you add fuel, thegauge slowly changes to the newreading after you turn the ignitionswitch back ON (II).
Temperature GaugeThis shows the temperature of theengine's coolant. During normaloperation, the pointer should risefrom the bottom white mark to aboutthe middle of the gauge. In severedriving conditions, such as very hotweather or a long period of uphilldriving, the pointer may rise to theupper white zone. If it reaches thered (Hot) mark, pull safely to theside of the road. Turn to page 262 forinstructions and precautions onchecking the engine's coolingsystem.
Instruments and Controls
TRIP METER SPEEDOMETER

Gauges
Maintenance Required Indicator
SLOT
INDICATOR
This indicator reminds you that it isnearing 7,500 miles (12,000 km)since the last scheduled maintenance.Refer to the Maintenance Schedulesfor Normal and Severe DrivingConditions on pages 188—192.
When the distance driven since thelast scheduled maintenance nears7,500 miles (12,000 km), theindicator will turn yellow. If youexceed 7,500 miles (12,000 km), theindicator will turn red.
Your dealer will reset the indicatorwhen he performs the scheduledmaintenance. If someone elseperforms the maintenance, reset theindicator by inserting your key in theslot beside the indicator.
Instruments and Controls

Controls Near the Steering Wheel
The two levers on the steeringcolumn contain controls for drivingfeatures you use most often. The leftlever controls the turn signals,headlights, and high beams. Theright lever controls the windshieldwashers and wipers.
The hazard warning switch is on thedashboard between the center airvents.
The controls near the left air ventare for the power windows andpower mirrors.
The tilt adjustment lever on theunderside of the steering columnallows you to tilt the steering wheel.
WINDSHIELDWIPERS/WASHERS(P.62)
POWER WINDOW SWITCHES(P.84)
TILT ADJUSTMENT(P.64)
Instruments and Controls
HEADLIGHTS/TURN SIGNALS(P.60)
MIRROR CONTROLS(P.86)
SHIFT LEVER(P.158)
HORN BUTTONS
HAZARD WARNING LIGHTS(P.63)

Controls Near the Steering Wheel
Headlights
The rotating switch on the left levercontrols the lights. Turning thisswitch to the position turnson the parking lights, taillights,instrument panel lights, side-markerlights, and rear license plate lights.Turning the switch to theposition turns on the headlights.
If you leave the lights on with theignition switch in ACCESSORY (I)or LOCK (0), you will hear areminder beeper when you open thedriver's door.
To change between low beams andhigh beams, pull the turn signal leveruntil you hear a click, then let go.The blue high beam indicator willlight (see page 55 ).
To flash the high beams, pull theturn signal lever back lightly, thenrelease it. The high beams will comeon and go off.
The high beams will stay on for aslong as you hold the lever back, nomatter what position the headlightswitch is in.
Daytime Running Lights(Canadian Models)With the headlight switch off, thehigh beam headlights come on withreduced brightness when you turnthe ignition switch to ON (II) andrelease the parking brake. Theyremain on until you turn the ignitionoff, even if you set the parking brake.
The headlights revert to normaloperation when you turn them onwith the switch.
Instruments and Controls

Controls Near the Steering Wheel
Instrument Panel Brightness
The dial on the dashboard to the leftof the instrument panel controls thebrightness of the instrument panellights. Turn the dial to adjust thebrightness.
Turn Signals
Signal a turn or lane change with thislever. Push down on the lever tosignal a left turn, and up to signal aright turn. If you push it up or downall the way, the turn signal continuesto blink even when you release thelever. It shuts off automatically asyou complete the turn.
To signal a lane change, push lightlyon the turn signal lever in the properdirection and hold it. The lever willreturn to the center position as soonas you release it.
Instruments and Controls
TURN SIGNAL LEVER

Controls Near the Steering Wheel
Windshield Wipers
The right lever controls the wind-shield wipers and washers. Therotary switch at the end of the leverhas three positions:
INT: intermittent: low speed: high speed
In intermittent, the wipers operateevery few seconds. In low speed andhigh speed, the wipers run continu-ously.
To operate the wipers in mist mode,push the control lever down. Thewipers run at high speed until yourelease the lever. This gives you aquick way to clear the windshield.
Windshield Washers
To clean the windshield, pull back onthe wiper control lever. The washersspray until you release the lever.
The wipers run at low speed whileyou're pulling the lever, thencomplete one more sweep of thewindshield after you release it.
Instruments and Controls

Controls Near the Steering Wheel
Rear Window Wiper and Washer
The rear window wiper switch islocated next to the windshield wiperswitch.
To activate the rear windshield wiper,turn the switch "ON". The wiperoperates intermittently. If you wishto use the wiper and washer, turnand hold the switch one position upfrom "ON". To use the washer only,turn and hold the switch one positiondown from "OFF".
Push the red button between thecenter air vents to turn on the hazardwarning lights (four-way flashers).This causes all four outside turnsignals and both indicators in theinstrument panel to flash. Use thehazard warning lights if you need topark in a dangerous area near heavytraffic, or if your vehicle is disabled.
Rear Window Defogger
The rear window defogger will clearfog, frost, and thin ice from thewindow. Push the defogger button toturn it on and off. The light in thebutton lights to show the defogger ison. If you do not turn it off, thedefogger will shut itself off afterabout 25 minutes. It also shuts offwhen you turn off the ignition. Youhave to turn it on again when yourestart the vehicle.
Instruments and Controls
CONTINUED
Hazard Warning

Controls Near the Steering Wheel
Make sure the rear window is clearand you have good visibility beforestarting to drive.
The defogger wires on the inside ofthe rear window can be accidentallydamaged. When cleaning the glass,always wipe side to side.
Steering Wheel AdjustmentSee page 18 for important safetyinformation about how to properlyposition the steering wheel.Make any steering wheel adjustmentbefore you start driving.
Instruments and Controls
Adjusting the steering wheelposition while driving maycause you to lose control of thevehicle and be seriously injuredin a crash.
Adjust the steering wheel onlywhen the vehicle is stopped.

Controls Near the Steering Wheel
To adjust the steering wheel upwardor downward:
1. Push the lever under the steeringcolumn all the way down.
2. Move the steering wheel to thedesired position, making sure thewheel points toward your chest,not toward your face. Make sureyou can see the instrument panelgauges and the indicator lights.
3. Push the lever up to lock thesteering wheel in that position.
4. Make sure you have securelylocked the steering wheel in placeby trying to move it up and down.
Instruments and Controls

Steering Wheel Controls
Cruise ControlCruise control allows you to maintaina set speed above 25 mph (40 km/h)without keeping your foot on theaccelerator pedal. It should be usedfor cruising on straight, openhighways. It is not recommended forconditions such as city driving,winding roads, slippery roads, heavyrain, or bad weather. You shouldhave full control of the vehicle underthose conditions.
The cruise control, as it operates,moves the accelerator pedal. You candamage your vehicle's acceleratormechanism by resting your foot underthe pedal and blocking the movement.
Using the Cruise Control
1. Push in the Cruise Control MasterSwitch to the left of the steeringcolumn. The indicator in theswitch will light.
2. Accelerate to the desired cruisingspeed above 25 mph (40 km/h).
Instruments and Controls
Improper use of the cruisecontrol can lead to a crash.
Use the cruise control onlywhen traveling on openhighways in good weather.
NOTICE

Steering Wheel Controls
cruise control. To resume the setspeed, press the RESUME/accelbutton. The CRUISE CONTROLlight on the instrument panelcomes on.
When climbing a steep hill, theautomatic transmission maydownshift to hold the set speed.
Changing the Set SpeedYou can increase the set cruisingspeed in any of these ways:
Press and hold the RESUME/accel button. The car will acceler-ate. When you reach the desiredcruising speed, release the button.
Push on the accelerator pedal. Ac-celerate to the desired cruisingspeed and press the SET/decelbutton.
To increase your speed in verysmall amounts, tap the RESUME/
accel button repeatedly. Each timeyou do this, your vehicle will speedup about 1 mph (1.6 km/h).
You can decrease the set cruisingspeed in any of these ways:
Press and hold the SET/decelbutton. The vehicle will decelerate.Release the button when youreach the desired speed.
To slow down in very smallamounts, tap the SET/decelbutton repeatedly. Each time youdo this, your vehicle will slowdown about 1 mph (1.6 km/h).
Tap the brake pedal lightly withyour foot. The CRUISECONTROL light on the instru-ment panel will go out. When thevehicle slows to the desired speed,press the SET/decel button. Thevehicle will then maintain thedesired speed. CONTINUED
Instruments and Controls
3. Press the SET/decel button on thesteering wheel. The CRUISECONTROL light on theinstrument panel comes on toshow the system is now activated.
The cruise control may not holdthe set speed when you are goingup and down hills. If your speedincreases going down a hill, usethe brakes to slow down to thedesired speed. This will cancel the
RESUME/accel
SET/decel

Steeling Wheel Controls
Even with the cruise control turnedon, you can still use the acceleratorpedal to speed up for passing. Aftercompleting the pass, take your footoff the accelerator pedal. The vehiclewill return to the set cruising speed.
Resting your foot on the brake pedalwill cause the cruise control tocancel.
Cancelling the Cruise ControlYou can cancel the cruise control inany of these ways:
Tap the brake pedal.
Press the SET/decel and RE-SUME/accel buttons at the sametime.
Press the Cruise Control MasterSwitch.
When you tap the brake or clutchpedal, or press the SET and RE-SUME buttons at the same time, theCRUISE CONTROL light on theinstrument panel will go out and thevehicle will begin to slow down. Youcan use the accelerator pedal in thenormal way.
The system remembers thepreviously-set cruising speed. Toreturn to that speed, accelerate toabove 25 mph (40 km/h) and press
the RESUME/accel button until theCRUISE CONTROL light comes on.The vehicle will accelerate to thesame cruising speed as before.
Pressing the Cruise Control MasterSwitch turns the system completelyoff and erases the previous cruisingspeed from memory. To use thesystem again, refer to Using theCruise Control
Instruments and Controls

Keys and Locks
Keys
VALET KEY
Your vehicle comes with two masterkeys and a valet key.The master key fits all the locks onyour vehicle:
IgnitionDoorsGlove boxTailgate
The valet key works only in theignition and the door locks. You cankeep the glove box locked when youleave your vehicle and valet key at aparking facility.
You should have received a keynumber plate with your set of keys.You will need this key number if youever have to get a lost key replaced.Keep the plate stored in a safe place.
When replacing keys, use onlyHonda-approved key blanks.
Remote TransmitterSome models also come with tworemote transmitters; see page 72 foran explanation of their operation.
Ignition Switch
The ignition switch is on the rightside of the steering column. It hasfour positions:
LOCK (0)ACCESSORY (I)ON (II)START (III)
CONTINUED
Instruments and Controls
NUMBERPLATE
MASTER KEYS
KEY

Keys and Locks
LOCK (0) — You can insert orremove the key only in this position.To switch from ACCESSORY toLOCK, you must push the key inslightly as you turn it. If your vehiclehas an automatic transmission, itmust also be in Park. The anti-theftlock will lock the steering columnwhen you remove the key.If the front wheels are turned, theanti-theft lock may sometimes makeit difficult to turn the key fromLOCK to ACCESSORY. Firmly turnthe steering wheel to the left or tothe right as you turn the key.
ACCESSORY (I) — In this position,you can operate the audio systemand the accessory power socket.
ON (II) — This is the normal keyposition when driving. All featuresand accessories on the vehicle areusable. Several of the lights on theinstrument panel come on as a testwhen you turn the ignition switchfrom ACCESSORY to ON.
START (I I I ) — Use this positiononly to start the engine. The switchreturns to ON (II) when you let go ofthe key.
You will hear a reminder beeper ifyou leave the key in the ignitionswitch in the LOCK (0) orACCESSORY (I) position and openthe driver's door. Remove the key toturn off the beeper.
Door Locks
Each door has a lock tab on the top.Push the tab down to lock the doorand pull it up to unlock.
To lock any passenger's door whengetting out of the vehicle, push thelock tab down and close the door. Tolock the driver's door, pull theoutside door handle and push thelock tab down. Release the handle,then close the door.
Instruments and Controls
LOCK TAB
Removing the key from theignition switch while drivinglocks the steering. This cancause you to lose control.
Remove the key from theignition switch only whenparked.

Keys and Locks
The front doors can be locked andunlocked from the outside with thekey.
Power Door Locks
MASTER DOOR LOCK SWITCH
The master door lock switch allowscontrol of all door locks from thedriver's door. Push the switch downto lock all doors, and up to unlockthem.
All doors lock when you push downthe lock tab on the driver's door, orlock the driver's door from theoutside with the key. Only the driver'sdoor unlocks when you use the keyor lock tab. To unlock the passen-gers' doors, use the master door lockswitch or the lock tab on each door.
Instruments and Controls

Keys and Locks
UNLOCKBUTTON
LOCKBUTTON
TAILGATERELEASEBUTTON
PANICBUTTON
On EX modelYou can lock and unlock your vehiclewith the remote transmitter. Whenyou push the LOCK button, all doorslock.
When you push the UNLOCK buttononce, only the driver's door unlocks.The remaining doors unlock whenyou push the button a second time.
The ceiling light (if the ceiling lightswitch is in the center position) willcome on when you press theUNLOCK button. If you do not openany of the doors, the light will go outin about 30 seconds and the doorswill automatically relock. If yourelock the doors with the remotetransmitter before 30 seconds haveelapsed, the light will go offimmediately.
You cannot lock or unlock the doorswith the remote transmitter if anydoor is not fully closed or the key isin the ignition switch.
To open the tailgate, push and holdthe TAILGATE RELEASE buttonfor approximately one second.
Horn OperationThe horn will sound when you pushthe LOCK button twice within fiveseconds after first push.
Instruments and Controls
Remote Transmitter
LED

Keys and Locks
Panic ModePanic mode allows you to remotelyactivate your vehicle's securitysystem to attract attention. Whenactivated, the horn will sound forabout 30 seconds. To activate panicmode, press and hold the PANICbutton for about one second.
To cancel Panic mode before 30seconds, press any button on theremote transmitter. You can alsoturn the ignition switch to ON (II).
Panic mode will not activate if thekey is in the ignition switch.
Replacing the BatteryWhen the remote transmitter'sbattery begins to get weak, it maytake several pushes on the button tolock or unlock the doors, and theLED will get dim. Replace thebattery as soon as possible.
Battery type: CR2025
To replace the battery, remove theround cover on the back of the trans-mitter by turning it counterclockwisewith a coin.
CONTINUED
Instruments and Controls
Open
Close
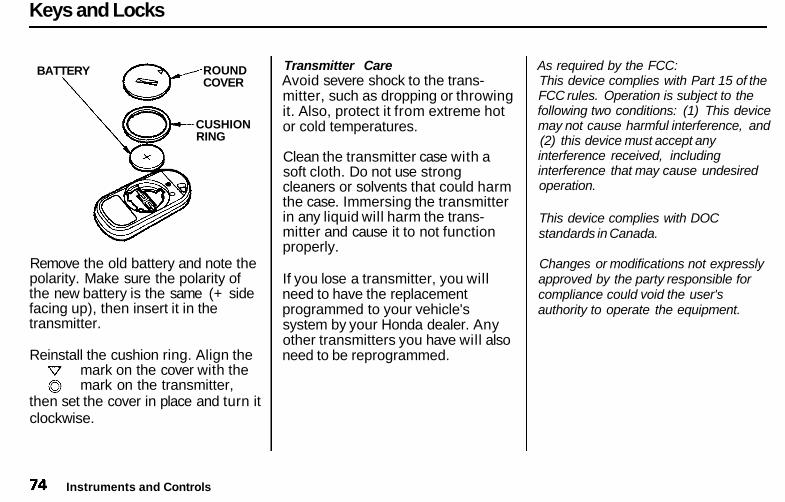
Keys and Locks
BATTERY ROUNDCOVER
CUSHIONRING
Remove the old battery and note thepolarity. Make sure the polarity ofthe new battery is the same (+ sidefacing up), then insert it in thetransmitter.
Reinstall the cushion ring. Align themark on the cover with themark on the transmitter,
then set the cover in place and turn itclockwise.
Transmitter CareAvoid severe shock to the trans-mitter, such as dropping or throwingit. Also, protect it from extreme hotor cold temperatures.
Clean the transmitter case with asoft cloth. Do not use strongcleaners or solvents that could harmthe case. Immersing the transmitterin any liquid will harm the trans-mitter and cause it to not functionproperly.
If you lose a transmitter, you willneed to have the replacementprogrammed to your vehicle'ssystem by your Honda dealer. Anyother transmitters you have will alsoneed to be reprogrammed.
As required by the FCC:This device complies with Part 15 of theFCC rules. Operation is subject to thefollowing two conditions: (1) This devicemay not cause harmful interference, and(2) this device must accept anyinterference received, includinginterference that may cause undesiredoperation.
This device complies with DOCstandards in Canada.
Changes or modifications not expresslyapproved by the party responsible forcompliance could void the user'sauthority to operate the equipment.
Instruments and Controls

Keys and Locks
Childproof Door Locks
The childproof door locks aredesigned to prevent children seatedin the rear from accidentally openingthe rear doors. Each rear door has alock lever near the edge. With thelever in the LOCK position, the doorcannot be opened from the insideregardless of the position of the locktab. To open the door, pull the locktab up and use the outside doorhandle.
Tailgate
1. You can open the tailgate in twoways:
Use the ignition key to open thetailgate lock.
CONTINUED
Instruments and Controls
TAILGATE UNLOCK BUTTON
Push the tailgate unlock buttonon the dashboard under the leftair vent
KEY
LEVER
LOCK

Keys and Locks
HATCH GLASS
2. The hatch glass will pop upslightly.
3. Lift up the hatch glass fully.
HANDLE
DOOR
4. Pull the handle on the door andpull the door open.
To close the tailgate, always closethe lower door first. Then, lower thehatch glass and press on it until itlatches.Make sure the door and the hatchglass are locked securely beforedriving.
STOP
To keep the tailgate door open on anincline, use the stop in the tool kit.The tool kit is in the right cargo floorpocket. Put the stop on the supportstrut as shown.
Instruments and Controls

Keys and Locks, Seats
Open the glove box by pulling thebottom of the handle. Close it with afirm push. Lock or unlock the glovebox with the master key.
Front Seat AdjustmentsSee pages 12 — 14 for important safetyinformation and warnings about how toproperly position seats and seat-backs,
Make all seat adjustments beforeyou start driving.
CONTINUED
Instruments and Controls
Glove Box
An open glove box can causeserious injury to your passengerin a crash, even if thepassenger is wearing the seatbelt.
Always keep the glove boxclosed while driving.

Seats
To adjust the seat forward andbackward, pull up on the lever underthe seat cushion's front edge. Movethe seat to the desired position andrelease the lever. Try to move theseat to make sure it is locked inposition.
To change the angle of the seat-back,pull up on the lever on the outside ofthe seat bottom. Move the seat-backto the desired position and releasethe lever. Let the seat-back latch inthe new position.
Driver's Seat Height Adjustment
The height of your driver's seat isadjustable. Turn the front dial on theoutside of the seat cushion to raisethe front of the seat bottom and turnthe rear dial to raise the rear.
Make all seat adjustments beforeyou start driving.
Instruments and Controls

Seats
Head RestraintsSee page 14 for important safetyinformation and a warning about how toproperly position the head restraints.The head restraints help protect youand your passengers from whiplashand other injuries. They are mosteffective when you adjust them sothe back of the occupant's head restsagainst the center of the restraint. Ataller person should adjust therestraint as high as possible.
The head restraints adjust for height.You need both hands to adjust therestraint. Do not attempt to adjust itwhile driving. To raise it, pull upward.To lower the restraint, push therelease button sideways and pushthe restraint down.
To remove a head restraint forcleaning or repair, pull it up as far asit will go. Push the release buttonand pull the restraint out of the seat-back.
Instruments and Controls
RELEASE BUTTON

Seats
Rear Seat-back AdjustmentSee pages 12 — 14 for important safetyinformation and warnings about how toproperly position seats and seat-backs.
The angle of the rear seat-backs canbe adjusted separately. To changethe angle of the seat-back, pull up onthe knob on the top of the seat-back.Move the seat-back to the desiredposition, then release the knob.Make sure the seat-back latches inthe new position.
Rear Seat Armrest
The rear seat armrest is located atthe center of the rear seat. Pivot itdown to use it.
Instruments and Controls
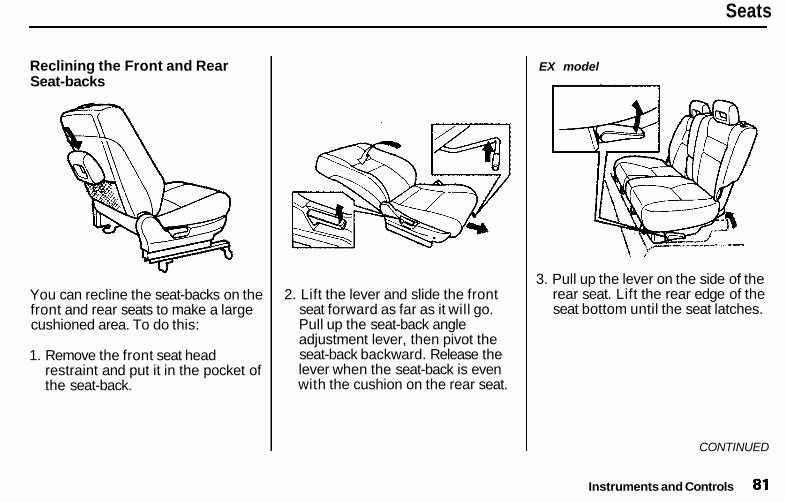
Seats
Reclining the Front and RearSeat-backs
You can recline the seat-backs on thefront and rear seats to make a largecushioned area. To do this:
1. Remove the front seat headrestraint and put it in the pocket ofthe seat-back.
2. Lift the lever and slide the frontseat forward as far as it will go.Pull up the seat-back angleadjustment lever, then pivot theseat-back backward. Release thelever when the seat-back is evenwith the cushion on the rear seat.
EX model
3. Pull up the lever on the side of therear seat. Lift the rear edge of theseat bottom until the seat latches.
CONTINUED
Instruments and Controls

Seats
4. Pull up on the knob on top of theseat-back and pivot the rear seat-back backward. Release the knobwhen the seat-back is reclined asfar as it will go.
Reverse this procedure to return theseats to their upright positions.Make sure you install the headrestraints, and that the seats arelocked securely in place beforedriving.
Folding Rear Seat
The left and right halves of the rearseat can be folded up separately tocreate more cargo space.
1. Store the latch plate for the centerlap belt by rolling up the belt andpushing it into the seat pocket.
Instruments and Controls

Seats
2. Pull the strap to release the seatbottom. Pivot the seat bottomforward.
3. Remove the head restraint andpull up on the knob on the top ofthe seat-back. Pivot the seat-backforward.
Put the head restraint behind theseat bottom as shown.Pass the fastening strap in throughthe hole of head restraint and fastenit with the Velcro strap.
Reverse this procedure to return theseat to the upright position. Makesure that the seat is locked securelybefore driving.
Instruments and Controls
CONTINUED
STRAP

Seats, Power Windows
Make sure any items stored in thecargo area are secured. Loose itemscan fly forward and cause injury ifyou have to brake hard.
Power WindowsYour vehicle's windows are electri-cally-powered. Turn the ignitionswitch to ON (II) to raise or lowerany window.
Each door has a switch that controlsits window. To open the window,push the switch down and hold it.Release the switch when you wantthe window to stop. Close thewindow by pushing the switch upand holding it.
There is a master power windowcontrol panel on the dashboard. Toopen any of the passengers' windows,push down on the appropriate switchand hold it down until the windowreaches the desired position. Toclose the window, push up on thewindow switch. Release the switchwhen the window gets to the positionyou want.
Instruments and Controls
DRIVER'S WINDOW SWITCH
MAIN SWITCH

Power Windows, Mirrors
The master control panel also con-tains these extra features:
AUTO — To open the driver'swindow fully, push the windowswitch firmly down and release it.The window automatically goes allthe way down. To stop the windowfrom going all the way down, pushthe window switch up briefly.To open the driver's window onlypartially, push the window switchdown lightly and hold it. The windowwill stop as soon as you release theswitch.
The AUTO function only works tolower the driver's window. To raisethe window, you must push thewindow switch up and hold it untilthe window reaches the desiredposition.
The MAIN switch controls power tothe passengers' windows. With thisswitch off, the passengers' windowscannot be raised or lowered. TheMAIN switch does not affect thedriver's window. Keep the MAINswitch off when you have children inthe vehicle so they do not injurethemselves by operating thewindows unintentionally.
Mirrors
Keep the inside and outside mirrorsclean and adjusted for best visibility.Be sure to adjust the mirrors beforeyou start driving.
The inside mirror has day and nightpositions. The night position reducesglare from headlights behind you.Flip the tab on the bottom edge ofthe mirror to select the day or nightposition.
Instruments and Controls
Closing a power window on achild's hands or fingers cancause serious injury.
Make sure your children areaway from the windows beforeclosing them.
TAB
CONTINUED

Mirrors, Parking Brake
Adjusting the Power Mirrors
Adjust the outside mirrors with theadjustment switch on the left side ofthe dashboard:
1. Turn the ignition switch ON (II).
2. Move the selector switch to L(driver's side) or R (passenger'sside).
3. Push the appropriate edge of theadjustment switch to move themirror right, left, up or down.
4. When you finish, move theselector switch to the center (off)position. This turns off theadjustment switch so you can'tmove a mirror out of position byaccidentally bumping the switch.
Parking Brake
To apply the parking brake, pull thelever up fully. To release it, pull upslightly, push the button, and lowerthe lever. The parking brake light onthe instrument panel should go outwhen the parking brake is fullyreleased (see page 54).
Driving the vehicle with the parkingbrake applied can damage the rearbrakes and axles.
Instruments and Controls
NOTICE
SELECTOR SWITCH ADJUSTMENT SWITCHPARKING BRAKE LEVER

Digital Clock, Center Table
Digital Clock
The digital clock displays the timewith the ignition switch ON (II).To set the clock:
1. Turn the ignition switch ON (II) todisplay the time.
2. Press and hold the H button untilthe hour advances to the desiredhour.
3. Press and hold the M button untilthe numbers advance to thedesired minutes.
You can use the RESET button toquickly set the time to the nearesthour. If the displayed time is beforethe half hour, pressing RESETbutton sets the clock back to theprevious hour. If the displayed timeis after the half hour, pressing theRESET button sets the clock for-ward to the beginning of the nexthour.
For example:1:06 would RESET to 1:00.1:52 would RESET to 2:00.
Center Table
To use the center table, pull up theoutside edge of the table until itlatches. To store it, pull the lever andlower the table.
CONTINUED
Instruments and Controls
H M R (RESET)

Center Table, Beverage Holder
Sitting on or getting under the table,or putting heavy objects on the table,may damage or deform it.
Do not put any items on the tablewhile driving. They may fall down orfly around when you go aroundcorners or brake hard.
Beverage Holder
Automatic Transmission model onlyTo use the beverage holder, pull onthe front. Push the holder all the wayin to close it.
The center table also has a beverageholder.
Instruments and Controls

Beverage Holder, Built-in Table
There is another beverage holder oneach rear door for the rear seatpassengers. Pivot it down to use it.
Be careful when you are using thebeverage holder. A spilled liquid thatis very hot can scald you or yourpassengers. Liquid can also spillfrom the rear seat beverage holderswhen you close the rear doors.
Spilled liquids can also damage theupholstery, carpeting, and electricalcomponents in the interior.
Built-in Table
The cargo area floor can be takenout and used as a table.
CONTINUED
Instruments and Controls

Built-in Table
HANDLE
To remove the table, pull up thecarpet. Lift and pull on the handle toslide the table out.
Unfold the legs. Lock them in placeby pushing on the middle of thelocking arms. Make sure all four arelocked.
To fold the legs, pull on the middleof each locking arm.
Instruments and Controls

Built-in Table, Center Pocket, Storage Box
Put the projections on the table intothe holes in the cargo area floor.
Using the Built-in TableBe sure to lock the legs of thetable.Do not stand on the table.Do not put a weight of over 44 Ibs(20 kg) on the table.Hot items such as pots, pans, orkettles should not be placeddirectly on the table.
Center Pocket
Automatic Transmission model onlyOpen the center pocket by pushingthe handle down. Close it with a firmpush.
Storage Box
A storage box is located under thefront passenger's seat. To use it, pullupward slightly on the front centeredge of the box to disengage thelocking tabs then pull forward toslide the box out.
Instruments and Controls

Cargo Floor Pockets, Accessory Power Socket
Cargo Floor Pockets
You can store small items in thepockets located on both sides of thecargo area.
Accessory Power Socket
There are two accessory powersockets: one in the dashboard by thefront ashtray and the other on theleft side of the cargo area.
To use the accessory power socket,pull down the cover. The ignitionswitch must be in ACCESSORY (I)or ON (II).
These sockets are intended to supplypower for 12 volt DC accessoriesthat are rated 120 watts or less (10amps).
They will not power an automotivetype cigarette lighter element.
Instruments and Controls

Tailgate Pocket, Cargo Hooks
Tailgate Pocket
To use the tailgate pocket, turn theknobs and remove the lid. Itemsstored in this pocket can be securedby the belts inside the pocket.
Cargo Hooks
The hooks on the floor of the cargoarea enable you to tie down itemsstored in the back. Make sure allstored items are secured beforedriving.
The hook on the tailgate door pivots,allowing items to be stored indifferent ways. Make sure any itemsput on this hook weigh less than 6.5Ibs (3 kg), or you could damage thehook.
Do not open or close the tailgatedoor with cargo on this hook.
Instruments and Controls
HOOKS

Ashtray, Interior Lights
Ashtray
Open the front ashtray by pulling onthe bottom edge. Push it in to close it.To remove the ashtray for emptying,push down on the metal plate inside,then pull the ashtray out completely.
Use the ashtray only for cigarettes,cigars, and other smoking materials.To prevent a possible fire and damageto your vehicle, don't put paper orother things that can burn in theashtray.
Ceiling Light
The ceiling light has a three-positionswitch. In the OFF position, the lightdoes not come on. In the centerposition, the ceiling light comes onwhen you open any door. In the ONposition, the ceiling light stays oncontinuously.
Instruments and Controls
NOTICE
ON
DOOR ACTIVATED
ASHTRAY
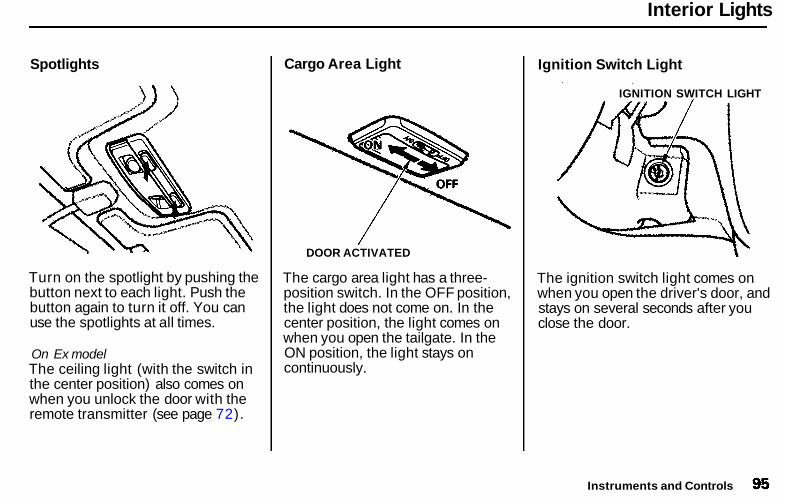
Interior Lights
Spotlights
Turn on the spotlight by pushing thebutton next to each light. Push thebutton again to turn it off. You canuse the spotlights at all times.
On Ex modelThe ceiling light (with the switch inthe center position) also comes onwhen you unlock the door with theremote transmitter (see page 72).
Cargo Area Light
DOOR ACTIVATED
The cargo area light has a three-position switch. In the OFF position,the light does not come on. In thecenter position, the light comes onwhen you open the tailgate. In theON position, the light stays oncontinuously.
Ignition Switch Light
The ignition switch light comes onwhen you open the driver's door, andstays on several seconds after youclose the door.
Instruments and Controls
IGNITION SWITCH LIGHT

Comfort and Convenience Features
The heating and air conditioningsystems in your Honda provide acomfortable driving environment inall weather conditions.
The standard audio system hasmany features. This section de-scribes those features and how touse them. (If you selected anoptional audio system, refer to theoperating instructions that camewith it.)
Heating and Cooling........................ 98What Each Control Does............ 98How to Use the System............. 100To Turn Everything Off........... 105
Audio System................................. 106Audio System
AM/FM/Cassette StereoAudio System (LX Model).... 107
Operating the Radio.................. 108Adjusting the Sound.................. 111Audio System Lighting............. 112Operating the Cassette
Player...................................... 112Operating the Optional CD
Player/Changer..................... 115CD Changer Error
Indications.............................. 118
Audio SystemAM/FM/CD Audio System
(EX Model)............................. 119Operating the Radio.................. 120Adjusting the Sound.................. 124Audio System Lighting............. 125Radio Frequencies..................... 125Radio Reception......................... 125Operating the CD Player.......... 127Operating the CD Changer...... 129Protecting Compact Discs........ 130CD Player Error Indications..... 131CD Changer Error
Indications.............................. 132Operating the Cassette
Player...................................... 133Tape Search Functions............. 134Caring for the Cassette
Player...................................... 136Theft Protection........................ 137
Comfort and Convenience Features

Heating and Cooling
Proper use of the Heating andCooling system can make theinterior dry and comfortable, andkeep the windows clear for bestvisibility.
What Each Control Does
Fan Control DialTurning this dial clockwise increasesthe fan's speed, which increases airflow.
Temperature Control DialTurning this dial clockwise increasesthe temperature of the air flow.
Air Conditioning (A/C) ButtonThis button turns the air condi-tioning ON and OFF. The indicatorin the button lights when the A/C ison.
MODE CONTROL DIAL
Recirculation ButtonThis button controls the source ofthe air going into the system. Whenthe indicator in this button is lit, airfrom the vehicle's interior is sentthrough the system again (Recircula-tion mode). When the indicator is off,air is brought in from outside thevehicle (Fresh Air mode).
Comfort and Convenience Features
FAN CONTROL DIAL TEMPERATURE CONTROL DIAL
AIRCONDITIONINGSWITCH
RECIRCULATIONBUTTON

Heating and Cooling
Mode Control DialUse the MODE control dial to selectthe vents the air flows from.
Air flows from the centerand corner vents in the dashboard.
Air flow is divided betweenthe vents in the dashboard and thefloor vents.
Air flows from the floorvents.
Air flow is divided betweenthe floor vents and the defrostervents at the base of the windshield.
Air flows from the defrostervents at the base of the windshield.
When you select the systemautomatically switches to Fresh Airmode and turns on the A/C.
Comfort and Convenience Features
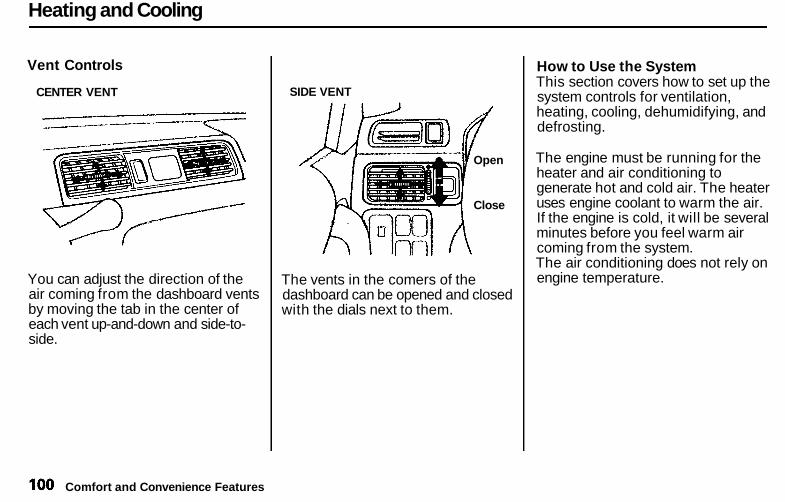
Heating and Cooling
Vent Controls
You can adjust the direction of theair coming from the dashboard ventsby moving the tab in the center ofeach vent up-and-down and side-to-side.
SIDE VENT
The vents in the comers of thedashboard can be opened and closedwith the dials next to them.
How to Use the SystemThis section covers how to set up thesystem controls for ventilation,heating, cooling, dehumidifying, anddefrosting.
The engine must be running for theheater and air conditioning togenerate hot and cold air. The heateruses engine coolant to warm the air.If the engine is cold, it will be severalminutes before you feel warm aircoming from the system.The air conditioning does not rely onengine temperature.
Comfort and Convenience Features
Open
Close
CENTER VENT

Heating and Cooling
It is best to leave the system in FreshAir mode under almost all conditions.Keeping the system in Recirculationmode, particularly with the A/C off,can cause the windows to fog up.Switch to Recirculation mode whenyou are driving through smoky ordusty conditions, then switch back toFresh Air mode when the conditionclears.
The outside air intakes for theheating and cooling system are atthe base of the windshield. Keepthese clear of leaves and otherdebris.
VentilationThe flow-through ventilation systemdraws in outside air, circulates itthrough the interior, then exhausts itthrough vents near the rear window.
1. Turn the temperature control dialall the way to the left.Make sure the A/C is off.
2. Select and Fresh Air mode.3. Set the fan to the desired speed.
CONTINUED
Comfort and Convenience Features
AIR CONDITIONING SWITCH
MODE CONTROLDIAL
FAN CONTROL DIAL TEMPERATURECONTROL DIAL

Heating and Cooling
To Cool with A/C1. Turn on the A/C by pressing the
button. The light in the buttonshould come on when a fan speedis selected.
2. Make sure the temperaturecontrol dial is all the way to the left.
3. Select4. If the outside air is humid, select
Recirculation mode. If the outsideair is dry, select Fresh Air mode.Set the fan to the desired speed.
If the interior is very warm frombeing parked in the sun, you can coolit down more rapidly by setting upthe controls this way:
1. Start the engine.2. Turn on the A/C by pressing the
button. Make sure the tempera-ture control dial is all the way tothe left.
3. Set the fan to maximum speed.4. Open the windows partially. Select
and Recirculation mode.
MODE CONTROL DIAL
FAN CONTROL DIAL TEMPERATURE CONTROL DIAL
When the interior has cooled downto a more comfortable temperature,close the windows and set thecontrols as described for normalcooling.
Air conditioning places an extra loadon the engine. Watch the enginecoolant temperature gauge (see page57) when driving in stop-and-go
traffic or climbing a long, steep hill.If it moves near the red zone, turnoff the A/C until the gauge readsnormally.
Comfort and Convenience Features
RECIRCULATIONBUTTON
AIRCONDITIONINGSWITCH
REARDEFOGGERSWITCH

Heating and Cooling
To HeatTo warm the interior:
1. Start the engine.2. Select and Fresh Air mode.3. Set the fan to the desired speed.4. Adjust the warmth of the air with
the temperature control dial.
To Heat and Dehumidify with AirConditioningAir conditioning, as it cools, removesmoisture from the air. When used incombination with the heater, itmakes the interior warm and dry.
1. Switch the fan on.2. Turn on the air conditioning.3. Select and Fresh Air mode.4. Adjust the temperature control
dial so the mixture of heated andcooled air feels comfortable.
This setting is suitable for all drivingconditions whenever the outsidetemperature is above 32°F (0°C).
To Defog and DefrostTo remove fog from the inside of thewindows:
1. Switch the fan on.2. Select
When you select thesystem automatically switches toFresh Air mode and turns on theA/C.
3. Adjust the temperature controldial so the air flow from thedefroster vents feels warm.
4. Turn on the rear window defoggerto help clear the rear window.When you switch to another modefrom the A/C stays on.Press the A/C button to turn it off.
CONTINUED
Comfort and Convenience Features
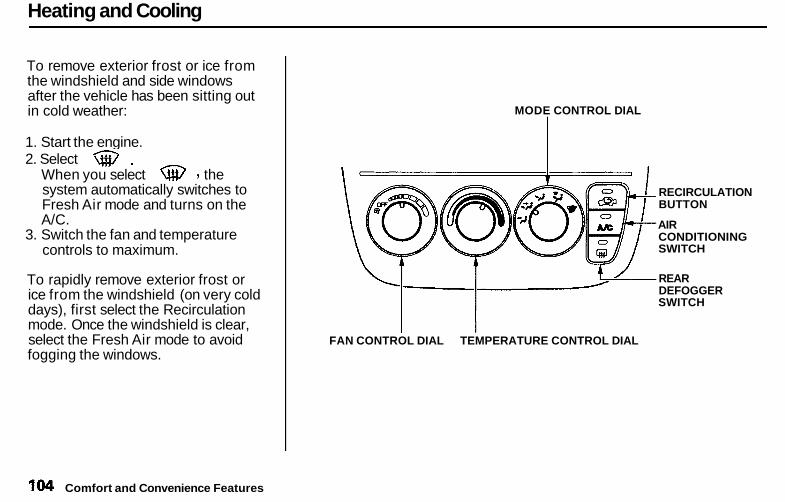
Heating and Cooling
To remove exterior frost or ice fromthe windshield and side windowsafter the vehicle has been sitting outin cold weather:
1. Start the engine.2. Select
When you select thesystem automatically switches toFresh Air mode and turns on theA/C.
3. Switch the fan and temperaturecontrols to maximum.
To rapidly remove exterior frost orice from the windshield (on very colddays), first select the Recirculationmode. Once the windshield is clear,select the Fresh Air mode to avoidfogging the windows.
MODE CONTROL DIAL
Comfort and Convenience Features
FAN CONTROL DIAL TEMPERATURE CONTROL DIAL
REARDEFOGGERSWITCH
AIRCONDITIONINGSWITCH
RECIRCULATIONBUTTON
Heating and Cooling
These settings direct all the air flowto the defroster vents at the base ofthe windshield and the side windowdefroster vents. The air flow will getwarmer and clear the windows fasteras the engine warms up. You canclose the side vents with the dialbeside each vent. This will sendmore warm air to the windshielddefroster vents.
For safety, make sure you have aclear view through all the windowsbefore driving away.
To Turn Everything OffTo shut off the system temporarily,turn the fan speed and temperaturecontrol dials all the way to the left.
You should shut the systemcompletely off only for the first fewminutes of driving in cold weather,until the engine coolant warms upenough to operate the heater. Keepthe fan on at all other times so staleair does not build up in the interior.
Comfort and Convenience Features

Audio System
Your vehicle should have one of theaudio systems described in thissection. Read the appropriate pagesin this section for operation of theaudio systems installed in yourvehicle.
pages 107 to 118 for LX Modelpages 119 to 134 for EX Model
Also, read page 114 or 136 for how totake care of your cassette player.
If your vehicle has a different audiosystem from these two types, readthe radio manufacturer's manual thatcame with your vehicle for itsoperation.
LX Model
EX Model
Comfort and Convenience Features

Audio System
AM/FM/Cassette Stereo AudioSystemOn LX modelYour Honda's audio system providesclear reception on both AM and FMbands, while the preset buttons allowyou to easily select your favoritestations.
The cassette system features DolbyB* noise reduction, automaticsensing of chromium-dioxide (CrO2)tape, and autoreverse for continuousplay.
* Dolby noise reduction manufactured underlicense from Dolby Laboratories Licensing Corpo-ration. "DOLBY" and the double-D symbol
are trademarks of Dolby LaboratoriesLicensing Corporation.
Comfort and Convenience Features

Audio System
Operating the RadioThe ignition switch must be inACCESSORY (I) or ON (II) tooperate the audio system. Turn thesystem on by pushing the PWR/VOL knob.
Adjust the volume by turning thePWR/VOL knob.
The band and frequency that theradio was last tuned to is displayed.To change bands, press the AM/FMbutton. On the FM band, ST will bedisplayed if the station is broadcast-ing in stereo. Stereo reproduction onAM is not available.
You can use any of four methods tofind radio stations on the selectedband: TUNE, SEEK, SCAN or thePreset buttons.
TUNE — Use the TUNE bar to tunethe radio to a desired frequency.Press the upper part ( ) to tuneto a higher frequency, or the lowerpart ( ) to tune to a lowerfrequency. The frequency numberswill start to change rapidly. Releasethe bar when the display reaches thedesired frequency. To change thefrequency in small increments, pressand release the TUNE bar quickly.
SEEK — The SEEK functionsearches the band for a station witha strong signal. To activate it, pushthe SEEK switch up or down, thenrelease it. Depending on which wayyou push the switch, the systemscans upward or downward from thecurrent frequency. It stops when itfinds a station with a strong signal.
Comfort and Convenience Features

Audio System
SCAN — The SCAN functionsamples all the stations with strongsignals on the selected band. Toactivate it, press the SCAN button,then release it. The system will scanup the band for a station with astrong signal. When the system is inthe SCAN mode, SCN shows in thedisplay. When it finds one, it will stopand play that station forapproximately five seconds. If you donothing, the system will then scanfor the next strong station and playthat for five seconds. When it plays astation that you want to continuelistening to, press the SCAN buttonagain.
CONTINUED
Comfort and Convenience Features
AM/FMBUTTON
SCAN BUTTON SCN INDICATOR
PWR/VOLKNOB
SEEK SWITCH TUNE BAR
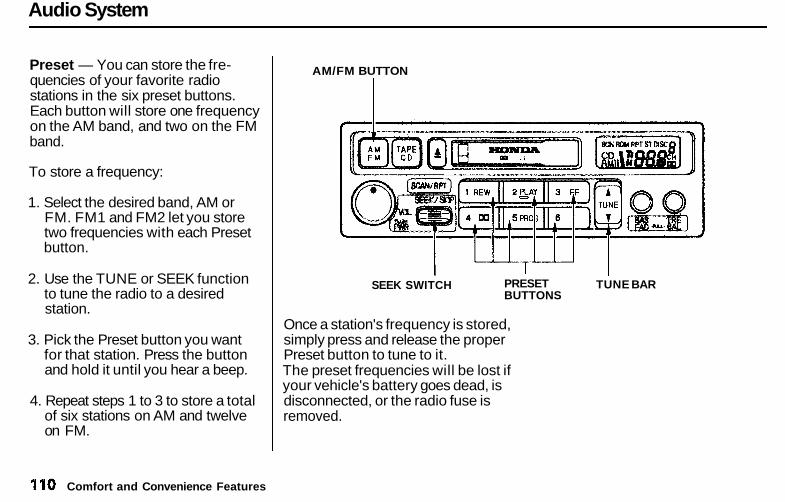
Audio System
Preset — You can store the fre-quencies of your favorite radiostations in the six preset buttons.Each button will store one frequencyon the AM band, and two on the FMband.
To store a frequency:
1. Select the desired band, AM orFM. FM1 and FM2 let you storetwo frequencies with each Presetbutton.
2. Use the TUNE or SEEK functionto tune the radio to a desiredstation.
3. Pick the Preset button you wantfor that station. Press the buttonand hold it until you hear a beep.
4. Repeat steps 1 to 3 to store a totalof six stations on AM and twelveon FM.
Once a station's frequency is stored,simply press and release the properPreset button to tune to it.The preset frequencies will be lost ifyour vehicle's battery goes dead, isdisconnected, or the radio fuse isremoved.
Comfort and Convenience Features
AM/FM BUTTON
SEEK SWITCH PRESETBUTTONS
TUNE BAR

Audio System
Adjusting the SoundBalance/Fader — These twocontrols adjust the strength of thesound coming from each speaker.The Balance control adjusts the side-to-side strength, while the Fadercontrol adjusts the front-to-backstrength.
To adjust the fader, push on theBASS/FADER control knob to get itto pop out. Pull it out slightly farther,and adjust the front-to-back sound toyour liking. Push the knob back inwhen you are done so you cannotchange the setting by accidentallybumping it
To adjust the balance, push on theTREBLE/BALANCE control knobto get it to pop out. Pull it out slightlyfarther, and adjust the side-to-sidesound to your liking. Push the knobback in when you are done so youcannot change the setting byaccidentally bumping it.
Treble/Bass — Use these controlsto adjust the tone to your liking.
To adjust the Treble level, push onthe TREBLE/BALANCE controlknob to get it to pop out. Withoutpulling it out farther, turn the knobto adjust the treble level. Push theknob back in when you are done soyou cannot change the setting byaccidentally bumping it.
To adjust the Bass level, push on theBASS/FADER control knob to get itto pop out. Without pulling it outfarther, turn the knob to adjust thebass level. Push the knob back inwhen you are done so you cannotchange the setting by accidentallybumping it.
Radio Frequencies and ReceptionFor information, See page 125.
Comfort and Convenience Features
BASS/FADERCONTROL
TREBLE/BALANCECONTROL

Audio System
AM/FM/CD Audio SystemOn EX modelYour Honda's audio system providesclear reception on both AM and FMbands, while the preset buttons allowyou to easily select your favoritestations.
The anti-theft feature will disable thesystem if it is disconnected from thevehicle's battery. To get the systemworking again, you must enter acode number (see page 137 ).
Comfort and Convenience Features

Audio System
Operating the RadioThe ignition switch must be inACCESSORY (I) or ON (ID tooperate the audio system. Turn thesystem on by pushing the PWR/VOL knob. Adjust the volume byturning the same knob.
The band and frequency that theradio was last tuned to is displayed.To change bands, press the A M / F Mbutton. On the FM band, ST will bedisplayed if the station is broadcast-ing in stereo. Stereo reproduction onAM is not available.
You can use any of four methods tofind radio stations on the selectedband: TUNE, SEEK, SCAN or thePreset buttons.
TUNE — Use the TUNE bar to tunethe radio to a desired frequency.Press the side of the bar to tuneto a higher frequency, and the
side to tune to a lowerfrequency. The frequency numberswill start to change rapidly. Releasethe bar when the display reaches thedesired frequency. To change thefrequency in small increments, pressand release the TUNE bar quickly.
SEEK — The SEEK functionsearches the band for a station witha strong signal. To activate it, pressthe SEEK bar on either the or
side, then release it.Depending on which side you press,the system scans upward or down-ward from the current frequency. Itstops when it finds a station with astrong signal.
Comfort and Convenience Features
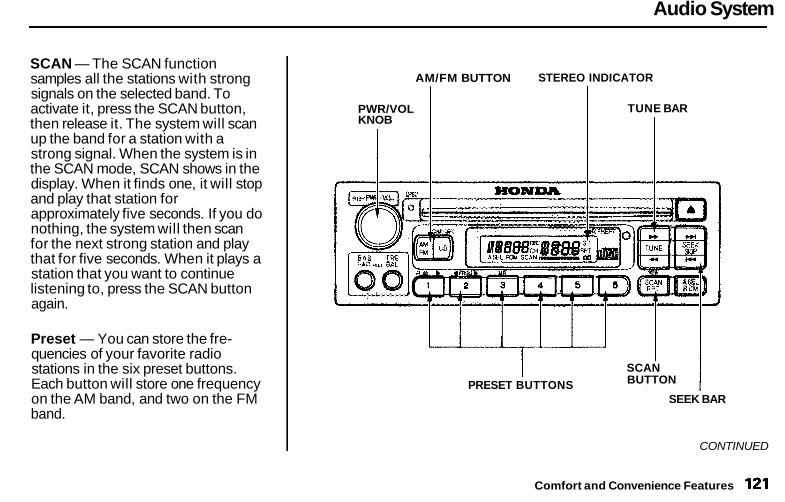
Audio System
SCAN — The SCAN functionsamples all the stations with strongsignals on the selected band. Toactivate it, press the SCAN button,then release it. The system will scanup the band for a station with astrong signal. When the system is inthe SCAN mode, SCAN shows in thedisplay. When it finds one, it will stopand play that station forapproximately five seconds. If you donothing, the system will then scanfor the next strong station and playthat for five seconds. When it plays astation that you want to continuelistening to, press the SCAN buttonagain.
Preset — You can store the fre-quencies of your favorite radiostations in the six preset buttons.Each button will store one frequencyon the AM band, and two on the FMband.
AM/FM BUTTON
PWR/VOLKNOB
STEREO INDICATOR
PRESET BUTTONSSEEK BAR
CONTINUED
Comfort and Convenience Features
TUNE BAR
SCANBUTTON

Audio System
To store a frequency:
1. Select the desired band, AM orFM. FM1 and FM2 let you storetwo frequencies with each Presetbutton.
2. Use the TUNE or SEEK functionto tune the radio to a desiredstation.
3. Pick the Preset button you wantfor that station. Press the buttonand hold it until you hear a beep.
4. Repeat steps 1 to 3 to store a totalof six stations on AM and twelveon FM.
Once a station's frequency is stored,simply press and release the properPreset button to tune to it.The preset frequencies will be lost ifyour vehicle's battery goes dead, isdisconnected, or the radio fuse isremoved.
AM/FM BUTTON
PRESET BUTTONS
Comfort and Convenience Features
SEEK BAR
TUNE BAR

Audio System
AUTO SELECT — If you aretraveling far from home and can nolonger receive the stations youpreset, you can use the Auto Selectfeature to find stations in the localarea.
To activate Auto Select, press theA. SEL button. A. SEL will flash inthe display, and the system will gointo scan mode for several seconds.It automatically scans both bands,looking for stations with strongsignals; It stores the frequencies ofsix AM stations and twelve FMstations in the preset buttons. Youcan then use the preset buttons toselect those stations.
If you are in a remote area, AutoSelect may not find six strong AMstations or twelve strong FM stations.If this happens, you will see a "0"displayed when you press any presetbutton that does not have a stationstored.
TUNE BAR
AUTO SELECT INDICATOR SCAN BUTTON
If you do not like the stations AutoSelect has stored, you can storeother frequencies in the presetbuttons. Use the TUNE, SEEK, orSCAN function to find the desiredfrequencies, then store them in theselected preset buttons as describedpreviously.
Auto Select does not erase thefrequencies that you preset pre-viously. When you return home, turnoff Auto Select by pressing theA. SEL button. The preset buttonswill then select the frequencies youoriginally set.
Comfort and Convenience Features
A. SEL BUTTON
SEEK BAR
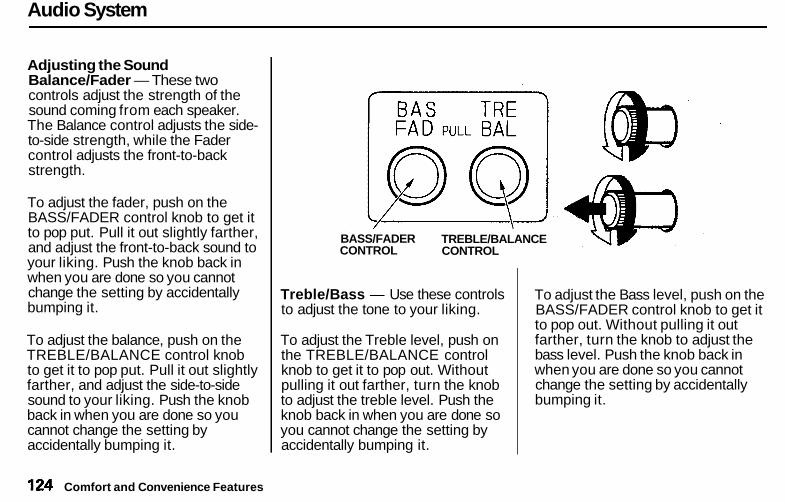
Audio System
Adjusting the SoundBalance/Fader — These twocontrols adjust the strength of thesound coming from each speaker.The Balance control adjusts the side-to-side strength, while the Fadercontrol adjusts the front-to-backstrength.
To adjust the fader, push on theBASS/FADER control knob to get itto pop put. Pull it out slightly farther,and adjust the front-to-back sound toyour liking. Push the knob back inwhen you are done so you cannotchange the setting by accidentallybumping it.
To adjust the balance, push on theTREBLE/BALANCE control knobto get it to pop put. Pull it out slightlyfarther, and adjust the side-to-sidesound to your liking. Push the knobback in when you are done so youcannot change the setting byaccidentally bumping it.
Treble/Bass — Use these controlsto adjust the tone to your liking.
To adjust the Treble level, push onthe TREBLE/BALANCE controlknob to get it to pop out. Withoutpulling it out farther, turn the knobto adjust the treble level. Push theknob back in when you are done soyou cannot change the setting byaccidentally bumping it.
To adjust the Bass level, push on theBASS/FADER control knob to get itto pop out. Without pulling it outfarther, turn the knob to adjust thebass level. Push the knob back inwhen you are done so you cannotchange the setting by accidentallybumping it.
Comfort and Convenience Features
BASS/FADERCONTROL
TREBLE/BALANCECONTROL

Audio System
Audio System LightingYou can use the instrument panelbrightness control knob to adjust theillumination of the audio system (seepage 61 ). The audio systemilluminates when the parking lightsare on, even if the radio is turned off.
Radio FrequenciesYour Honda's radio can receive thecomplete AM and FM bands.Those bands cover these frequen-cies:
AM band:530 to 1,710 kilohertzFM band:87.7 to 107.9 megahertz
Radio stations on the AM band areassigned frequencies at least tenkilohertz apart (530, 540, 550).Stations on the FM band areassigned frequencies at least 0.2megahertz apart (87.9, 88.1, 88.3).
Stations must use these exactfrequencies. It is fairly common forstations to round-off the frequency intheir advertising, so your radio coulddisplay a frequency of 100.9 eventhough the announcer may identifythe station as "FM101."
Radio ReceptionHow well your Honda's radioreceives stations is dependent onmany factors, such as the distancefrom the station's transmitter,nearby large objects, and atmos-pheric conditions.
A radio station's signal gets weakeras you get farther away from itstransmitter. If you are listening to anAM station, you will notice the soundvolume becoming weaker, and thestation drifting in and out. If you arelistening to an FM station, you willsee the stereo indicator flickering offand on as the signal weakens.Eventually, the stereo indicator will
go off and the sound will fadecompletely as you get out of range ofthe station's signal.
Driving very near the transmitter ofa station that is broadcasting on afrequency close to the frequency ofthe station you are listening to canalso affect your radio's reception.You may temporarily hear bothstations, or hear only the station youare close to.
Comfort and Convenience Features
CONTINUED

Audio System
Radio signals, especially on the FMband, are deflected by large objectssuch as buildings and hills. Yourradio then receives both the directsignal from the station's transmitter,and the deflected signal. This causesthe sound to distort or flutter. This isa main cause of poor radio receptionin city driving.
Radio reception can be affected byatmospheric conditions such asthunderstorms, high humidity, andeven sunspots. You may be able toreceive a distant radio station oneday and not receive it the next daybecause of a change in conditions.
Electrical interference from passingvehicles and stationary sources cancause temporary reception problems.
As required by the FCC:Changes or modifications not expresslyapproved by the party responsible forcompliance could void the user'sauthority to operate the equipment.
Comfort and Convenience Features

Audio System
Operating the CD PlayerYou operate the CD player with thesame controls used for the radio.
With the ignition switch inACCESSORY (I) or ON (II), insertthe disc into the CD slot. Push thedisc in halfway, the drive will pull itin the rest of the way and begin toplay. The number of the track that isplaying is shown in the display.
You can also play 3-inch (8-cm) discswithout using an adapter ring. In allcases, play only standard round discs.Odd-shaped CDs may jam in thedrive or cause other problems.
When the system reaches the end ofthe disc, it will return to the begin-ning and play that disc again.
TUNE BAR
EJECT BUTTON
CD BUTTON
CONTINUED
Comfort and Convenience Features
AM/FM BUTTON CD SLOT
SEEK/SKIPBAR
A.SEL/RDM BUTTON
RPT BUTTON

Audio System
You can switch to the radio while aCD is playing by pressing the A M /FM button. Press the CD button toreturn to playing the CD. The CDwill begin playing where it left off.
If you turn the system off while a CDis playing, either with the PWR/VOLknob or by turning off the ignition,the disc will stay in the drive. Whenyou turn the system back on, the CDwill begin playing where it left off.
Press the eject button to remove thedisc from the drive.
If you eject the disc, but do notremove it from the slot, the systemwill automatically reload the discafter 15 seconds and put the CDplayer in pause mode. To beginplaying the disc, press the CD button.
You can use the TUNE and SEEK/SKIP bars while a disc is playing toselect passages and change tracks.
To move rapidly within a track, pressand hold the TUNE bar. Press the
side to move forward. You willsee CUE in the display. Press the
side to move backward. Youwill see REW displayed. Release thebar when the system reaches thepoint you want.
Each time you press the side ofthe SEEK/SKIP bar, the systemskips forward to the beginning of thenext track. Press the side toskip backward to the beginning ofthe current track. Press it again toskip to the beginning of the previoustrack.
REPEAT — To activate the Repeatfeature, press and release the RPTbutton. You will see RPT in thedisplay. The system continuouslyreplays the current track. Press theRPT button again to turn it off.
RANDOM PLAY — This feature,when activated, plays the tracks onthe CD in random order, rather thanin the order they are recorded on theCD. To activate Random Play, pressand release the A. SEL/RDM button.You will see RDM in the display. Thesystem will then select and playtracks randomly. This continuesuntil you deactivate Random Play bypressing A. SEL/RDM again.
If the system is in Repeat mode, youmust turn it off by pressing the RPTbutton before selecting Random Play.
Comfort and Convenience Features

Audio System
Operating the CD Changer(Optional)A Compact Disc changer is availablefor your vehicle. It holds up to sixdiscs, providing several hours ofcontinuous entertainment. Youoperate this CD changer with thesame controls used for the in-dashCD player.
Load the desired CDs in themagazine and load the magazine inthe changer according to theinstructions that came with the unit.Play only standard round discs. Odd-shaped CDs may jam in the drive orcause other problems.
To select the CD changer, press theCD button. The disc and tracknumbers will be displayed.
To select a different disc, press theappropriate preset button (1—6). Ifyou select an empty slot in themagazine, the changer will, afterfinding that slot empty, try to loadthe CD in the next slot. Thiscontinues until it finds a CD to loadand play.
If you load a CD in the in-dash playerwhile the changer is playing a CD,the system will stop the changer andbegin playing the in-dash CD. Toselect the changer again, press theCD button. Play will begin where itleft off. Use the CD button to switchbetween the player and the changer.
If you eject the in-dash CD while it isplaying, the system will automaticallyswitch to the CD changer and beginplay where it left off. If there are noCDs in the changer, the display willflash. You will have to select anothermode (AM or FM) with the button.
When you switch back to CD mode,the system selects the same unit (in-dash or changer) that was playingwhen you switched out of CD mode.
To use the SKIP, REPEAT, andRANDOM functions, refer to the in-dash player operating instructions.
Comfort and Convenience Features

Audio System
Protecting Compact Discs
Handle a CD by its edges; nevertouch either surface. Contaminationfrom fingerprints, liquids, felt-tippens, and labels can cause the CD tonot play properly, or possibly jam inthe drive.
When a CD is not being played, storeit in its case to protect it from dustand other contamination. To preventwarpage, keep CDs out of directsunlight and extreme heat.
To clean a disc, use a clean soft cloth.Wipe across the disc from the centerto the outside edge.
A new CD may be rough on theinner and outer edges. The smallplastic pieces causing this roughnesscan flake off and fall on the re-cording surface of the disc, causingskipping or other problems. Removethese pieces by rubbing the innerand outer edges with the side of apencil or pen.
Never try to insert foreign objects inthe CD player or the magazine.
Comfort and Convenience Features

Audio System
CD Player Error IndicationsIf you see an error indication in thedisplay while operating the CDplayer, find the cause in the chart tothe right. If you cannot clear theerror indication, take the vehicle toyour Honda dealer.
Comfort and Convenience Features

Audio System
CD Changer Error IndicationsIf you see an error indication in thedisplay while operating the CDchanger, find the cause in the chartto the right. If you cannot clear theerror indication, take the vehicle toyour Honda dealer.
Comfort and Convenience Features

Audio System
Operating the Cassette Player(Optional)The cassette system features DolbyB* noise reduction, automaticsensing of chromium-dioxide (CrO2)tape, and autoreverse for continuousplay.
Make sure the tape opening on thecassette is facing to the right, theninsert the cassette most of the wayinto the slot. The system will pull itin the rest of the way, and begin toplay.
* Dolby noise reduction manufactured underlicense from Dolby Laboratories Licensing Corpo-ration. "DOLBY" and the double-D symbol
are trademarks of Dolby LaboratoriesLicensing Corporation.
CONTINUED
Comfort and Convenience Features
PWR/VOLKNOB
AM/FMBUTTON
CDBUTTON
TAPE DIRECTION INDICATOR
TUNE BAR
SEEK/SKIP BAR
NRBUTTON
REPEAT BUTTONPROGBUTTON
PLAYBUTTON
Audio System
The tape direction indicator will lightto show you which side of thecassette is playing. The indicatesthe side you inserted facing upwardis now playing. If you want to playthe other side, press the PROGbutton.
Dolby B noise reduction turns onwhen you insert a cassette. If thetape was not recorded with Dolby Bnoise reduction, turn it off bypressing the NR button.Dolby remains off until you turn it onby pressing the button again.
When the system reaches the end ofthe tape, it will automatically reversedirection and play the other side. Ifyou want to remove the cassettefrom the drive, press the EJECTbutton on the cassette player.
If you turn the system off while atape is playing, either with the PWR/VOL knob or by turning off theignition, the cassette will remain inthe drive. When you turn the systemback on, the cassette player will be inpause mode. To begin playing, pressthe PLAY button.
To switch to the radio or CD playerwhile a tape is playing, press theAM/FM, or CD button. To changeback to the cassette player, push theCD button.
Tape Search FunctionsWith a cassette playing, you can usethe FF, REW, SKIP, or REPEATfunction to find a desired program.
FF/REW — Fast Forward andRewind move the tape rapidly. Pressand release the side of theTUNE bar to fast forward the tape,or the side to rewind. You willsee FF or REW flashing in thedisplay. To stop fast forward orrewind, press either side of theTUNE bar or the PLAY button. If thesystem reaches the end of the tapewhile in fast forward or rewind, itautomatically stops that function,reverses direction, and begins to play.
Comfort and Convenience Features
Audio System
SKIP — The skip function allowsyou to find the beginning of a songor passage. To activate SKIP, pressthe SEEK/SKIP bar. Press the
side to advance to thebeginning of the next song orpassage, or the side to return tothe beginning of the current song orpassage. FF or REW will flash in thedisplay as the tape moves. When thesystem reaches the beginning of thenext song or passage (FF), or thebeginning of the current one (REW),it goes back to PLAY mode.
REPEAT — The Repeat functioncontinuously replays the currentsong or passage. Press the RPTbutton to activate it; you will see RPTdisplayed as a reminder. When thesystem reaches the end of the songor passage currently playing, it willautomatically go into rewind. Whenit senses the beginning of the samesong or passage, the system returnsto PLAY mode. It will continue torepeat this same program until youdeactivate REPEAT by pressing thebutton again.
The SKIP and REPEAT functionsuse silent periods on the tape to findthe end of a song or passage. Thesefeatures may not work to yoursatisfaction if there is almost no gapbetween selections, a high noiselevel between selections, or a silentperiod in the middle of selection.
Comfort and Convenience Features

Audio System
Caring for the Cassette PlayerThe cassette player picks up dirt andoxides from the tape. This contami-nation builds up over time andcauses the sound quality to degrade.To prevent this, you should clean theplayer after every 30 hours of use.Your dealer has a cleaning kitavailable.
If you do not clean the cassetteplayer regularly, it may eventuallybecome impossible to remove thecontamination with a normalcleaning kit.
Use 100-minute or shorter cassettes.Cassettes longer than that usethinner tape that may break or jamthe drive.
Look at the cassette before youinsert it. If the tape is loose, tightenit by turning a hub with a pencil oryour finger.If the label is peeling off, remove itfrom the cassette or it could causethe cassette to jam in the player.Never try to insert a warped ordamaged cassette in the player.
When they are not in use, storecassettes in their cases to protectthem from dust and moisture. Neverplace cassettes where they will beexposed to direct sunlight, high heat,or high humidity. If a cassette isexposed to extreme heat or cold, letit reach a moderate temperaturebefore inserting it in the player.
Never try to insert foreign objectsinto the cassette player.
If you see the error indication(LX model)/
(EX model) on the display, press theEJECT button and remove thecassette from the unit. Make surethe tape is not damaged. If thecassette will not eject or the errorindication stays on after the cassetteejects, take the vehicle to yourHonda dealer.
On LX modelIf a problem develops in the connec-tion between the cassette player andthe radio, you will see inthe display. Take the vehicle to yourHonda dealer.
Comfort and Convenience Features

Audio System
Theft ProtectionOn EX modelYour vehicle's audio system willdisable itself if it is disconnectedfrom electrical power for any reason.To make it work again, the usermust enter a specific five-digit codein the Preset buttons. Because thereare hundreds of numbercombinations possible from fivedigits, making the system workwithout knowing the exact code isnearly impossible.
You should have received a card thatlists your audio system's codenumber and serial number. It is bestto store this card in a safe place athome. In addition, you should writethe audio system's serial number inthis Owner's Manual. If you shouldhappen to lose the card, you mustobtain the code number from yourHonda dealer. To do this, you willneed the system's serial number.
If your vehicle's battery is discon-nected or goes dead, or the radiofuse is removed, the audio systemwill disable itself. If this happens,you will see in thefrequency display the next time youturn on the system. Use the Presetbuttons to enter the five-digit code. Ifit is entered correctly, the radio willstart playing.
If you make a mistake entering thecode, do not start over or try tocorrect your mistake. Complete thefive-digit sequence, then enter thecorrect code. You have ten tries toenter the correct code. If you areunsuccessful in ten attempts, youmust then leave the system on forone hour before trying again.
You will have to store your favoritestations in the Preset buttons afterthe system begins working. Youroriginal settings were lost whenpower was disconnected.
Comfort and Convenience Features

Before Driving
Before you begin driving your Honda,you should know what gasoline touse, and how to check the levels ofimportant fluids. You also need toknow how to properly store luggageor packages. The information in thissection will help you. If you plan toadd any accessories to your vehicle,please read the information in thissection first.
Break-in Period.............................. 140Gasoline.......................................... 140Service Station Procedures.......... 141
Filling the Fuel Tank................. 141Opening the Hood..................... 142
Oil Check................................ 143Engine Coolant Check.......... 144
Fuel Economy................................ 145Vehicle Condition...................... 145Driving Habits............................ 145
Accessories and Modifications.... 146Carrying Cargo.............................. 148
Before Driving

Break-in Period, Gasoline
Break-in PeriodHelp assure your vehicle's futurereliability and performance by payingextra attention to how you driveduring the first 600 miles (1,000 km).During this period:
Avoid full-throttle starts and rapidacceleration.
Avoid hard braking. New brakesneed to be broken-in by moderateuse for the first 200 miles (300km).
You should follow these same re -commendations with an overhauledor exchanged engine, or when thebrakes are relined.
GasolineYour Honda is designed to operateon unleaded gasoline with a pumpoctane number of 86 or higher. Useof a lower octane gasoline can causea persistent, heavy metallic rappingnoise in the engine that can lead tomechanical damage.
We recommend gasolines containingdetergent additives that help preventfuel system and engine deposits.
Using gasoline containing lead willdamage your vehicle's emissionscontrols. This contributes to airpollution.
In Canada, some gasolines containan octane-enhancing additive calledMMT. If you use such gasolines,your emission control systemperformance may deteriorate andthe Malfunction Indicator Lamp onyour instrument panel may turn on.If this happens, contact yourauthorized Honda dealer for service.
Before Driving

Service Station Procedures
Filling the Fuel Tank
1. Because the fuel fill cap is on thedriver's side of the vehicle, parkwith that side closest to theservice station pumps.
2. Open the fuel fill door by pullingon the handle at the outside of thedriver's seat.
FUEL FILL CAP
3. Remove the fuel fill cap slowly.You may hear a hissing sound aspressure inside the tank escapes.
4. Stop filling the tank after the fuelpump automatically clicks off. Donot try to "top off" the tank, leavesome room for the fuel to expandwith temperature changes.
5. Screw the fuel fil l cap back on,tighten it until it clicks at leastthree times. If you do not properlytighten the cap, the MalfunctionIndicator Lamp may come on (seepage 266).
6. Push the fuel fil l door closed untilit latches.
Before Driving
Gasoline is highly flammableand explosive. You can beburned or seriously injuredwhen handling fuel.
Stop the engine and keepheat, sparks, and flame away.Handle fuel only outdoors.Wipe up spills immediately.
Pull

Service Station Procedures
Opening the Hood
HOOD RELEASE HANDLE
1. Shift to Park or Neutral and setthe parking brake. Pull the hoodrelease handle located under thelower left corner of the dashboard.The hood will pop up slightly.
LATCH
2. Standing in front of the vehicle,put your fingers under the frontedge of the hood to the right ofcenter. Slide your hand to the leftuntil you feel the hood latchhandle. Push this handle up until itreleases the hood. Lift the hood.
If you can open the hood withoutlifting the hood latch handle, or thehood latch handle moves stiffly ordoes not spring back as before, themechanism should be cleaned andlubricated (see page 213).
Before Driving

Service Station Procedures
SUPPORT ROD
3. Pull the support rod out of its clipand insert the end into the hole onthe front of the hood around thecenter.
To close the hood, lift it up slightly toremove the support rod from thehole. Put the support rod back intoits holding clip. Lower the hood toabout a foot (30 cm) above thefender, then let it drop.After closing the hood, make sure itis securely latched.
Oil Check
Check the engine oil level every timeyou fill the vehicle with fuel. Wait afew minutes after turning the engineoff before you check the oil.
1. Remove the dipstick (orangehandle).
2. Wipe the dipstick with a cleancloth or paper towel.
CONTINUED
Before Driving
DIPSTICK

Service Station Procedures
3. Insert it all the way back in its tube.
UPPER MARK
4. Remove the dipstick again andcheck the level. It should bebetween the upper and lowermarks.
If it is near or below the lower mark,see Adding Oil on page 197.
Look at the coolant level in theradiator reserve tank. Make sure it isbetween the MAX and MIN lines. Ifit is below the MIN line, see AddingEngine Coolant on page 201 forinformation on adding the propercoolant.
Refer to Owner MaintenanceChecks on page 195 for informationon checking other items in yourHonda.
Before Driving
Engine Coolant Check
RESERVE TANK
MAX
MIN
LOWER MARK

Fuel Economy
The condition of your vehicle andyour driving habits are the two mostimportant things that affect the fuelmileage you get.
Vehicle ConditionAlways maintain your vehicle accord-ing to the maintenance schedule.This will keep it in top operatingcondition.
An important part of that mainte-nance is the Owner MaintenanceChecks (see page 195 ). Forexample, an underinflated tirecauses more "rolling resistance,"which uses fuel. It also wears outfaster, so check the tire pressure atleast monthly.
In winter, the build-up of snow onyour vehicle's underside adds weightand rolling resistance. Frequentcleaning helps your fuel mileage andreduces the chance of corrosion.
Driving HabitsYou can improve fuel economy bydriving moderately. Rapid acceler-ation, abrupt cornering, and hardbraking use more fuel.
Always drive in the highest gear thatallows the engine to run and acceler-ate smoothly.
Depending on traffic conditions, tryto maintain a constant speed. Everytime you slow down and speed up,your vehicle uses extra fuel. Use thecruise control, when appropriate, toincrease fuel economy.
A cold engine uses more fuel than awarm engine. It is not necessary to"warm-up" a cold engine by letting itidle for a long time. You can driveaway in about a minute, no matterhow cold it is outside. The enginewill warm up faster, and you getbetter fuel economy. To cut down onthe number of "cold starts," try tocombine several short trips into one.
The air conditioning puts an extraload on the engine which makes ituse more fuel. Turn off the A/C tocut down on air conditioning use.Use the flow-through ventilationwhen the outside air temperature ismoderate.
Before Driving

Accessories and Modifications
Modifying your vehicle, or installingsome non-Honda accessories, canmake your vehicle unsafe. Beforeyou make any modifications or addany accessories, be sure to read thefollowing information.
AccessoriesYour dealer has Genuine Hondaaccessories that allow you topersonalize your vehicle. Theseaccessories have been designed andapproved for your vehicle, and arecovered by warranty.
Non-Honda accessories are usuallydesigned for universal applications.Although aftermarket accessoriesmay fit on your vehicle, they may notmeet factory specifications, andcould adversely affect your vehicle'shandling and stability. (See"Modifications" on the page 147 foradditional information.)
When properly installed, cellularphones, alarms, two-way radios, andlow-powered audio systems shouldnot interfere with your vehicle'scomputer-controlled systems, suchas the SRS and anti-lock brakesystem.
However, if electronic accessoriesare improperly installed, or exceedyour vehicle's electrical systemcapacity, they can interfere with the
operation of your vehicle, or evencause the airbags to deploy.
Before installing any accessory:
Make sure the accessory does notobscure any lights, or interferewith proper vehicle operation orperformance.
Be sure electronic accessories donot overload electrical circuits(see page 268 ).
Have the installer contact yourHonda dealer for assistance beforeinstalling any electronic accessory.
If possible, have your dealer inspectthe final installation.
Before Driving
Improper accessories ormodifications can affect yourvehicle's handling, stability andperformance, and cause acrash in which you can be hurtor killed.
Follow all instructions in thisowner's manual regardingaccessories and modifications.

Accessories and Modifications
ModificationsDo not remove any originalequipment or modify your vehicle inany way that would alter its design oroperation. This could make yourvehicle unsafe and illegal to drive.
For example, do not make anymodifications that would change theride height of your vehicle, or installwheels and tires with a differentoverall diameter.
Such modifications can adverselyaffect handling, and interfere withthe operation of the vehicle's anti-lock brakes and other systems.
In addition, any modifications thatdecrease ground clearance increasethe chance of undercarriage partsstriking a curb, speed bump, or otherraised object, which could causeyour airbags to deploy.
Do not modify your steering wheelor any other part of yourSupplemental Restraint System.Modifications could make thesystem ineffective.
Additional Safety PrecautionDo not attach or place objects on theairbag covers. Any object attached toor placed on the covers marked "SRSAIRBAG," in the center of thesteering wheel and on top of thedashboard, could interfere with theproper operation of the airbags. Or,if the airbags inflate, the objectscould be propelled inside the vehicleand hurt someone.
Before Driving

Carrying Cargo
TAILGATEPOCKET
CARGO FLOOR POCKET SEAT UNDER-BOX
CARGO AREA CENTER POCKET GLOVE BOX
Your vehicle has several convenientstorage areas so you can stow cargosafely.
The glove box, and the pockets inthe front doors and seat-backs, aredesigned for small, lightweight items.The cargo area is intended for larger,heavier items. In addition, the backseat can be folded down to allow youto carry more cargo or longer items.
However, carrying too much cargo,or improperly storing it, can affectyour vehicle's handling, stability andoperation and make it unsafe. Beforecarrying any type of cargo, be sure toread the following pages.
Before Driving
DOOR POCKET

Carrying Cargo
Load LimitThe maximum load for your vehicleis 850 lbs (395 kg).
This figure includes the total weightof all occupants, cargo, accessories,and the tongue weight if you aretowing a trailer.
To figure out how much cargo youcan carry:
Add up the weight of all occupants.
If you are towing a trailer, add thetongue weight to the numberabove.
Subtract the total from 850 Ibs(395 kg).
The final number is the total weightof cargo you can carry.
Carrying Items in the PassengerCompartment
Store or secure all items that couldbe thrown around and hurtsomeone during a crash.
Be sure items placed on the floorbehind the front seats cannot rollunder the seats and interfere withthe driver's ability to operate thepedals, or with the properoperation of the seats.
Keep the glove box closed whiledriving. If the lid is open, apassenger could injure their kneesduring a crash or sudden stop.
Before Driving
Overloading or improperloading can affect handling andstability and cause a crash inwhich you can be hurt or killed.
Follow all load limits and otherloading guidelines in thismanual.
Carrying Cargo
Carrying Cargo in the Cargo Areaor on a Roof Rack
Distribute cargo evenly on thefloor of the cargo area, placing theheaviest items on the bottom andas far forward as possible. Tiedown items that could be thrownabout the vehicle during a crash orsudden stop.
If you carry large items thatprevent you from closing thetailgate, exhaust gas can enter thepassenger area. To avoid thepossibility of carbon monoxidepoisoning, follow the instructionson page 49 .
If you can carry any items on aroof rack, be sure the total weightof the rack and the items does notexceed the maximum allowableweight. Please contact your Hondadealer for further information.
Before Driving

Driving
This section gives you tips onstarting the engine under variousconditions, and how to operate the5-speed manual and automatictransmissions. It also includesimportant information on parkingyour vehicle, the braking system,and facts you need if you are plan-ning to tow a trailer or drive off-highway.
Driving Guidelines......................... 152Preparing to Drive......................... 153Starting the Engine........................ 154
Starting in Cold Weatherat High Altitude..................... 155
5-speed Manual Transmission..... 156Recommended Shift Points...... 157Maximum Allowable Speeds.... 157
Automatic Transmission............... 158Shift Lever Position Indicator.. 158Shift Lever Positions................. 158Maximum Allowable Speeds.... 161Shift Lock Release..................... 162
Parking............................................ 163The Braking System...................... 164
Brake Wear Indicators.............. 164Brake System Design................ 165Anti-lock Brakes........................ 165
Important SafetyReminders.......................... 166
ABS Indicator......................... 167Driving in Bad Weather................ 168Towing a Trailer............................ 170Towing Your Vehicle Behind a
Motorhome................................. 176
Off-Highway Guidelines............... 177General Information.................. 177Important Safety
Precautions............................. 178Driving Tips................................ 179
Driving

Driving Guidelines
Your CR-V has higher groundclearance than a passenger vehicledesigned only for use on pavement.Higher ground clearance has manyadvantages for off-highway driving.It allows you to travel over bumpsand unpaved roads. It also providesgood visibility so you can anticipateproblems earlier.
These advantages come at some cost.Because your vehicle is taller andrides higher off the ground, it has ahigh center of gravity. This meansthat your vehicle can tip or roll overif you make abrupt turns.
To prevent rollover or loss of control:
Take corners at slower speedsthan you would with a passengervehicle.
Avoid sharp turns and abruptmaneuvers whenever possible.
Do not modify your vehicle in anyway that would raise the center ofgravity.
Do not carry heavy cargo on theroof.
Four-wheel Drive ModelsYour CR-V is equipped with a uniquefour-wheel drive (4WD) system.Normally, power is delivered only tothe front wheels. When the systemsenses a loss of front-wheel traction,it automatically transfers somepower to the rear wheels. This givesyou better traction and mobility.
While this system can provideincreased traction on slipperysurfaces, you still need to exercisethe same care when accelerating,steering, and braking that you wouldin a two-wheel drive vehicle.
See page 177 for additional guidelinesfor driving off-highway.
Driving

Preparing to Drive
You should do the following checksand adjustments every day beforeyou drive your vehicle.
1. Make sure all windows, mirrors,and outside lights are clean andunobstructed. Remove frost, snow,or ice.
2. Check that the hood and tailgateare fully closed.
3. Visually check the tires. If a tirelooks low, use a gauge to check itspressure.
4. Check that any items you may becarrying with you inside are storedproperly or fastened downsecurely.
5. Check the adjustment of the seat(see page 77 ).
6. Check the adjustment of theinside and outside mirrors (seepage 85 ).
7. Check the adjustment of thesteering wheel (see page 64 ).
8. Make sure the doors are securelyclosed and locked.
9. Fasten your seat belt. Check thatyour passengers have fastenedtheir seat belts (see page 15 ).
10.Turn the ignition switch ON (II).Check the indicator lights in theinstrument panel.
11.Start the engine (see page 154 ).
12.Check the gauges and indicatorlights in the instrument panel (seepage 53 ).
Driving

Starting the Engine
1. Apply the parking brake.
2. In cold weather, turn off allelectrical accessories to reducethe drain on the battery.
3. Manual Transmission:Push the clutch pedal down all theway. START (III) does notfunction unless the clutch pedal isdepressed.
Automatic Transmission:Make sure the shift lever is inPark. Press on the brake pedal.
4. Without touching the acceleratorpedal, turn the ignition key to theSTART (III) position. If the enginedoes not start right away, do nothold the key in START (III) formore than 15 seconds at a time.Pause for at least 10 secondsbefore trying again.
5. If the engine does not start within15 seconds, or starts but stallsright away, repeat step 4 with theaccelerator pedal pressed half-waydown. If the engine starts, releasepressure on the accelerator pedalso the engine does not race.
6. If the engine still does not start,press the accelerator pedal all theway down and hold it there whilestarting in order to clear flooding.As before, keep the ignition key inthe START (III) position for nomore than 15 seconds. Return tostep 5 if the engine does not start.If it starts, lift your foot off theaccelerator pedal so the enginedoes not race.
Driving

Starting the Engine
Starting in Cold Weather at HighAltitude (Above 8,000 feet/2,400 meters)An engine is harder to start in coldweather. The thinner air found athigh altitude above 8,000 feet (2,400meters) adds to the problem.Use the following procedure:
1. Turn off all electrical accessoriesto reduce the drain on the battery.
2. Push the accelerator pedal half-way to the floor and hold it therewhile starting the engine. Do nothold the ignition key in START(III) for more than 15 seconds.When the engine starts, releasethe accelerator pedal gradually asthe engine speeds up and smoothsout.
3. If the engine fails to start in step 2,push the accelerator pedal to thefloor and hold it there while youtry to start the engine for no morethan 15 seconds. If the enginedoes not start, return to step 2.
Driving

5-speed Manual Transmission
The manual transmission is syn-chronized in all forward gears forsmooth operation. It has a lockout soyou cannot shift directly from Fifthto Reverse. When shifting up ordown, make sure you push the clutchpedal down all the way, shift to thenext gear, and let the pedal upgradually. When you are not shifting,do not rest your foot on the clutchpedal. This can cause your clutch towear out faster.
Come to a full stop before you shiftinto Reverse. You can damage thetransmission by trying to shift intoReverse with the vehicle moving.Push down the clutch pedal, andpause for a few seconds beforeshifting into Reverse, or shift intoone of the forward gears for amoment. This stops the gears sothey won't "grind."
When slowing down, you can getextra braking from the engine byshifting to a lower gear. This extrabraking can help you maintain a safespeed and prevent your brakes fromoverheating while going down asteep hill. Before downshifting,make sure engine speed will not gointo the tachometer's red zone in thelower gear. Refer to the MaximumAllowable Speeds chart.
Driving
Rapid slowing or speeding-upcan cause loss of control onslippery surfaces. If you crash,you can be injured.
Use extra care when driving onslippery surfaces.

5-speed Manual Transmission
Recommended Shift PointsDrive in the highest gear that letsthe engine run and acceleratesmoothly. This will give you the bestfuel economy and effective emis-sions control. The following shiftpoints are recommended:
Maximum Allowable SpeedsThe speeds in this table are themaximum allowable speeds in eachgear. If you exceed these speeds, theengine speed will enter into thetachometer's red zone. If this occurs,you may feel the engine cut in andout. This is caused by a limiter in theengine's computer controls. Theengine will run normally when youreduce the RPM below the red zone.
Before downshifting, make sure thevehicle will not exceed the maximumallowable speed in the chart in thelower gear to avoid engine damage.
Driving

Automatic Transmission
Your Honda's transmission has fourforward speeds, and is electronicallycontrolled for smoother shifting. Italso has a "lock-up" torque converterfor better fuel economy. You mayfeel what seems like another shiftwhen the converter locks.
Shift Lever Position Indicator
This indicator on the instrumentpanel shows which position the shiftlever is in.The "D" indicator comes on for afew seconds when you turn theignition switch ON (II). If it flasheswhile driving (in any shift position),it indicates a possible problem in thetransmission. Avoid rapid accelera-tion and have the transmissionchecked by an authorized Hondadealer as soon as possible.
Shift Lever Positions
The shift lever has six positions. Itmust be in Park or Neutral to startthe engine. When you are stopped inD, 2,1, N or R, press firmly on thebrake pedal, and keep your foot offthe accelerator pedal.
Driving
SHIFT LEVER

Automatic Transmission
Park (P) — This position mechani-cally locks the transmission. UsePark whenever you are turning off orstarting the engine. To shift out ofPark, you must press on the brakepedal and have your foot off theaccelerator pedal. Pull the shift levertowards you, then move it out ofPark.
If you have done all of the above andstill cannot move the lever out ofPark, see Shift Lock Release on page162.
You must also pull the shift levertowards you to shift into Park. Toavoid transmission damage, come toa complete stop before shifting intoPark. The shift lever must be in Parkbefore you can remove the key fromthe ignition switch.
CONTINUED
Driving

Automatic Transmission
Reverse (R) — To shift to Reversefrom Park, see the explanation underPark. To shift to Reverse fromNeutral, come to a complete stop andthen shift. Pull the shift levertowards you before shifting intoReverse from Neutral.
Neutral (N) — Use Neutral if youneed to restart a stalled engine, or ifit is necessary to stop briefly withthe engine idling. Shift to Park posi-tion if you need to leave the vehiclefor any reason. Press on the brake pe-dal when you are moving the shiftlever from Neutral to another gear.
Drive (D) — Use this position foryour normal driving. The transmis-sion automatically selects a suitablegear for your speed and acceleration.You may notice the transmissionshifting up at higher speeds whenthe engine is cold. This helps theengine warm up faster.
For faster acceleration, you can getthe transmission to automaticallydownshift by pushing the acceleratorpedal to the floor. The transmissionwill shift down one or two gears,depending on your speed.
Over-Drive (O/D) Mode
The Over-Drive (O/D) is onwhenever you turn the ignition ON(II). You can turn it off by pressingthe O/D switch on the edge of theshift lever. The O/D OFF indicatoron the instrument panel next to theshift lever position indicator willcome on.
Driving
Automatic Transmission
When the Over-Drive is off thetransmission selects only the firstthree gears, but not the fourth. Turnthe O/D off to provide enginebraking when going down a steep hill.You can also avoid the transmissionfrom cycling between third andfourth gears in stop-and-go driving.
Second (2) — To shift to Second,pull the shift lever towards you, thenshift to the lower gear. This positionlocks the transmission in secondgear. It does not downshift to firstgear when you come to a stop.Second gives you more power whenclimbing, and increased enginebraking when going down steep hills.Use second gear when starting outon a slippery surface or in deep snow.It will help reduce wheelspin.
First (1) — To shift from Second toFirst, pull the shift lever towards you,then shift to the lower gear. With thelever in this position, the transmis-sion locks in First gear. By upshift-ing and downshifting through 1,2, D,you can operate this transmissionmuch like a manual transmissionwithout a clutch pedal.
Maximum Allowable SpeedsThe speeds in this table are themaximum allowable speeds in eachposition. If you exceed these speeds,the engine speed will enter into thetachometer's red zone. If this occurs,you will feel the engine cut in andout. This is caused by a limiter in theengine's computer controls. Theengine will run normally when youreduce the RPM below the red zone.
Before downshifting, make sure thevehicle will not exceed the maximumallowable speed in the chart in thelower gear to avoid engine damage.
*:When O/D is off.
Driving

Automatic Transmission
Shift Lock ReleaseThis allows you to move the shiftlever out of Park if the normalmethod of pushing on the brakepedal and pulling the shift lever doesnot work.
1. Set the Parking brake.
2. Remove the key from the ignitionswitch.
3. Place a cloth on the edge of theshift lock release slot coverlocated on the steering column.Remove the cover by carefullyprying on the edge with a smallflat-tipped screwdriver (notincluded in the tool kit).
4. Insert the key in the Shift LockRelease slot on the steeringcolumn.
5. Push down on the key while youpull the shift lever towards youand move it out of Park to Neutral.
6. Remove the key from the shiftlock release slot, then reinstall thecover.Depress the brake pedal andrestart the engine.
If you need to use the Shift LockRelease, it means your vehicle isdeveloping a problem. Have thevehicle checked by your Hondadealer.
Driving
SHIFT LOCK RELEASE SLOT

Parking
Always use the parking brake whenyou park your vehicle. The indicatoron the instrument panel shows thatthe parking brake is not fullyreleased; it does not indicate that theparking brake is firmly set Makesure the parking brake is set firmlyor your vehicle may roll if it isparked on an incline.
If your vehicle has an automatictransmission, set the parking brakebefore you put the transmission inPark. This keeps the vehicle frommoving and putting pressure on theparking mechanism in thetransmission — making it easier tomove the shift lever put of Parkwhen you want to drive away.
If the vehicle is facing uphill, turnthe front wheels away from the curb.If you have a manual transmission,put it in first gear.
If the vehicle is facing downhill, turnthe front wheels toward the curb. Ifyou have a manual transmission, putit in reverse gear.
Make sure the parking brake is fullyreleased before driving away.Driving with the parking brakepartially set can overheat or damagethe rear brakes.
Parking TipsMake sure the windows are closed.
Turn off the lights.
Place any packages, valuables, etc.,in the cargo area or take themwith you.
Lock the doors.
Never park over dry leaves, tallgrass, or other flammablematerials. The three way catalyticconverter gets very hot, and couldcause these materials to catch onfire.
Driving

The Braking System
Your Honda is equipped with frontdisc brakes. The brakes on the rearwheels are drum. The brakingsystem is power-assisted to reducethe effort needed on the brake pedal.
Put your foot on the brake pedal onlywhen you intend to brake. Restingyour foot on the pedal keeps thebrakes applied lightly, causing themto build up heat. Heat build-up canreduce how well your brakes work. Italso keeps your brake lights on allthe time, confusing drivers behindyou.
Constant application of the brakeswhen going down a long hill buildsup heat and reduces their effective-ness. Use the engine to assist thebrakes by downshifting to a lowergear and taking your foot off theaccelerator pedal.
Check your brakes after drivingthrough deep water. Apply thebrakes moderately to see if they feelnormal. If not, apply them gently andfrequently until they do. Since alonger distance is needed to stopwith wet brakes, be extra cautiousand alert in your driving.
Brake Wear IndicatorsThe front disc brakes on all vehicleshave audible brake wear indicators.
When the brake pads need replacing,you will hear a distinctive metallic"screeching" sound when you applythe brakes. If you do not have thebrake pads replaced, they will beginscreeching all the time.
Your brakes may sometimes squealor squeak when you apply themlightly. Do not confuse this with thebrake wear indicators. They make avery audible "screeching."
Driving

The Braking System
Brake System DesignThe hydraulic system that operatesthe brakes has two separate circuits.Each circuit works diagonally acrossthe vehicle (the left-front brake isconnected with the right-rear brake,etc.). If one circuit should develop aproblem, you will still have brakingat two wheels.
Anti-lock BrakesU.S. EX, and Canadian LX and EXmodelsABS helps to prevent the wheelsfrom locking up and skidding duringhard braking, allowing you to retainsteering control.
When the front tires skid, you losesteering control; the vehiclecontinues straight ahead eventhough you turn the steering wheel.The ABS helps to prevent lock-upand helps you retain steering controlby pumping the brakes rapidly; muchfaster than a person can do it.
CONTINUED
Front
Driving

The Braking System
You should never pump thebrake pedal, this defeats thepurpose of the ABS. Let the ABSwork for you by always keeping firm,steady pressure on the brake pedalas you steer away from the hazard.This is sometimes referred to as"stomp and steer."
You will feel a pulsation in the brakepedal when the ABS activates, andyou may hear some noise. This isnormal, it is the ABS rapidlypumping the brakes.
Activation varies with the amount oftraction your tires have. On drypavement, you will need to press onthe brake pedal very hard before youactivate the ABS. However, you mayfeel the ABS activate immediately ifyou are trying to stop on snow or ice.
Important Safety RemindersABS does not reduce the time ordistance it takes to stop thevehicle, it only helps with steeringcontrol during braking. You shouldalways maintain a safe followingdistance from other vehicles.
ABS will not prevent a skid thatresults from changing directionabruptly, such as trying to take acorner too fast or making a suddenlane change. Always drive at a safe,prudent speed for the road andweather conditions.
ABS cannot prevent a loss ofstability. Always steer moderatelywhen you are braking hard. Severeor sharp steering wheel movementcan still cause your vehicle to veerinto oncoming traffic or off the road.
A vehicle with ABS may require alonger distance to stop on loose oruneven surfaces, such as gravel orsnow, than a vehicle without anti-lock. Slow down and allow a greaterdistance between vehicles underthose conditions.
Driving

The Braking System
ABS Indicator
The ABS is self-checking. It alsochecks itself whenever you use thebrakes.
If anything goes wrong, the ABSindicator on the instrument panelcomes on (see page 55 ). This meansthe anti-lock function of the brakingsystem has shut down. The brakesstill work like a conventional systemwithout anti-lock, providing normalstopping ability. You should have thedealer inspect your vehicle as soonas possible.
Driving
ABS INDICATOR*
*U.S. indicator shown
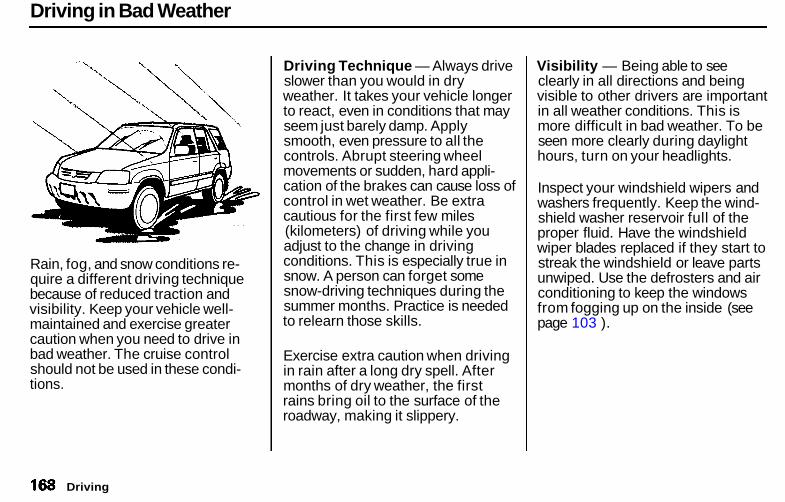
Driving in Bad Weather
Rain, fog, and snow conditions re-quire a different driving techniquebecause of reduced traction andvisibility. Keep your vehicle well-maintained and exercise greatercaution when you need to drive inbad weather. The cruise controlshould not be used in these condi-tions.
Driving Technique — Always driveslower than you would in dryweather. It takes your vehicle longerto react, even in conditions that mayseem just barely damp. Applysmooth, even pressure to all thecontrols. Abrupt steering wheelmovements or sudden, hard appli-cation of the brakes can cause loss ofcontrol in wet weather. Be extracautious for the first few miles(kilometers) of driving while youadjust to the change in drivingconditions. This is especially true insnow. A person can forget somesnow-driving techniques during thesummer months. Practice is neededto relearn those skills.
Exercise extra caution when drivingin rain after a long dry spell. Aftermonths of dry weather, the firstrains bring oil to the surface of theroadway, making it slippery.
Visibility — Being able to seeclearly in all directions and beingvisible to other drivers are importantin all weather conditions. This ismore difficult in bad weather. To beseen more clearly during daylighthours, turn on your headlights.
Inspect your windshield wipers andwashers frequently. Keep the wind-shield washer reservoir full of theproper fluid. Have the windshieldwiper blades replaced if they start tostreak the windshield or leave partsunwiped. Use the defrosters and airconditioning to keep the windowsfrom fogging up on the inside (seepage 103 ).
Driving

Driving in Bad Weather
Traction — Check your tiresfrequently for wear and properpressure. Both are important inpreventing "hydroplaning" (loss oftraction on a wet surface). In thewinter, mount snow tires on all fourwheels for the best handling.
Watch road conditions carefully,they can change from moment tomoment. Wet leaves can be as slip-pery as ice. "Clear" roads can havepatches of ice. Driving conditionscan be very hazardous when theoutside temperature is near freezing.The road surface can becomecovered with areas of water puddlesmixed with areas of ice, so yourtraction can change without warning.
Be careful when downshifting. Iftraction is low, you can lock up thedrive wheels for a moment and causea skid.
Be very cautious when passing, orbeing passed by other vehicles. Thespray from large vehicles reducesyour visibility, and the wind buffetingcan cause you to lose control.
Driving

Towing a Trailer
Your Honda is designed primarily tocarry passengers and their cargo.You can use it to tow a trailer if youcarefully observe some general rules.
The total weight of the trailer andeverything loaded in it must notexceed 1,000 Ibs (450 kg).
The "tongue load" should neverexceed 110 Ibs (50 kg). This is theamount of weight the trailer putson the hitch when it is fully-loaded.As a rule of thumb, the tongueload should be 10 percent of thetotal trailer package. For example,if the trailer and its load weigh 500Ibs (225 kg), the tongue loadshould be 50 Ibs (22.5 kg). Adjustthe trailer's cargo to change thetongue load. Start by puttingapproximately 60 percent of thecargo toward the front and 40percent toward the rear. Neverload the trailer so the back isheavier than the front. This takesweight off your vehicle's rear axleand reduces traction.
The combined weight of thevehicle, all passengers and theirluggage, and tongue load must notexceed the Gross Vehicle WeightRating. The GVWR is printed onthe Certification label attached tothe driver's doorjamb (see page276 ).
The combined weight of thevehicle, all passengers and theirluggage, and tongue load alsomust not exceed the Gross AxleWeight Rating. The GAWR is alsoshown on the Certification label. Ittells you the maximum load for thefront and rear axles. It is possiblethat your towing package does notexceed the GVWR but doesexceed the GAWR. Impropertrailer loading, and/or too muchluggage in the cargo area canoverload the rear axle. Redis-tribute the load and check the axleweights again.
Driving

Towing a Trailer
The best way to confirm that yourtotal towing package is within thesespecifications is to get it weighed.Load the vehicle and trailer as younormally would while towing, andtake them to a public scale. Havethem check the total weight and theweight at each axle, then comparethe weights to the specifications.
Trailer HitchesThe trailer hitch must be the propersize and construction for yourvehicle and the trailer you intend totow. Consult with an expert beforeyou purchase a trailer hitch, andhave it installed by a qualifiedmechanic.
The hitch should bolt to theunderbody of the vehicle, anddistribute the load over a wide area.Never use a hitch that mounts onlyto the rear bumper. The bumper isnot designed to handle that type ofload.
A trailer hitch that is not adequate forthe size of the trailer, or a hitch that isimproperly installed, can cause damageto the underside of your vehicle.
Driving
NOTICE
Improperly loading your vehicleand trailer can seriously affectits steering and brakingperformance, causing a crashin which you can be seriouslyinjured.
Check the loading of yourvehicle and trailer carefullybefore starting to drive.

Towing a Trailer
MirrorsMany states and provinces have lawsrequiring special outside mirrorswhen you are towing a trailer. Checkthe laws in your area. You may wantto install mirrors, even if they are notrequired. Hook up the trailer and seehow much it obscures your ability tosee behind you with the standardmirrors. If you cannot see directlybehind you, or have a large blindspot next to the trailer or the vehicle,you should install mirrors intendedfor towing.
Connecting the TrailerMost trailers that have a grossweight of 1,000 Ibs (450 kg) do nothave their own braking system. Ifyou are thinking of getting a trailerthat does have brakes, make surethey are electrically-operated. Thereare no provisions in your vehicle totap into its hydraulic braking system.Any attempt to attach the trailer'sbrakes to your vehicle's hydraulicsystem, no matter how successful itmay seem, will lower brakingeffectiveness and create a potentialhazard.
Always use a safety chain whentowing a trailer. Connect the safetychain securely at both ends. Makesure the chain crosses under thetongue so it will catch the trailer if itbecomes unhitched. Leave enoughslack in the chain so it can't bind in asharp turn. Do not let it drag on theground.
Driving

Towing a Trailer
Your vehicle has a trailer lightingconnector in the cargo area by theleft speaker. Refer to the drawingabove for the wiring color code andpurpose of each connector pin.
The connector and pins that matewith this connector are available atyour Honda dealer.
Since the lighting and wiring can bedifferent for various brands oftrailers, have a technician who isfamiliar with your trailer modify itslighting plug. A converter may berequired between the vehicle andtrailer for the lights to workcorrectly.
Before Starting OutAs you are preparing to tow yourtrailer, do the following:
Measure the trailer's tongue load.You can do this with a bathroomscale.
Verify that the hitch and safetychain are securely fastened.
Check the condition and airpressure of all tires on the trailerand your vehicle. Low tirepressure can seriously affect thehandling. Also check the spare tire.
With everything loaded and thetrailer connected, check that therear of the vehicle is not sagging.If so, redistribute the load in thevehicle.
Check that all lights on the vehicleand trailer are working properly.
Driving
Trailer Light
GROUND(BLACK)
BACK-UP LIGHT(GREEN/BLACK)
LEFT TURN SIGNAL(GREEN/RED)
BRAKE LIGHT(GREEN/WHITE)
TAILLIGHT(RED/GREEN)
RIGHT TURN SIGNAL(GREEN/YELLOW)

Towing a Trailer
Towing SafetyYour vehicle will not stop as quicklywith a trailer in tow. Leave extradistance between your vehicle andother vehicles. Avoid braking orturning suddenly. This could causethe trailer to jackknife or possiblyturn over.
Keep in mind that your total vehicleis now much longer. Leave moreroom when making turns. The trailertracks a smaller arc than the vehicleand can hit or run over somethingthat the vehicle misses. Whenpassing another vehicle, make surethe trailer is clear before changinglanes.
The vehicle/trailer combination ismore affected by crosswinds andbuffeting. When being passed by alarge vehicle, keep a constant speedand steer straight ahead. If there istoo much wind buffeting, slow downto get out of the other vehicle's airturbulence.
Towing a trailer puts an extra loadon your vehicle. You should haveyour vehicle serviced according tothe "Maintenance Schedule undersevere driving conditions" on page190.
This extra load is magnified whenyou are driving in hilly terrain.Watch the temperature gaugeclosely when climbing hills. If it getsnear the hot area, turn off the airconditioning (if it is on). If this doesnot reduce the heat, it may benecessary to pull to the side of theroad and wait for the engine to cool.If the automatic transmission shiftsfrequently between 3rd and 4thgears, turn off the over drive bypushing the switch (see page 160 ).This will help prevent thetransmission from overheating. Helpkeep the brakes from overheating byshifting to a lower gear when goingdownhill.
If you have to stop while going uphill,do not hold the vehicle in place bypressing on the accelerator. This cancause the automatic transmission tooverheat. Use the parking brake orfootbrake.
Driving
Towing a Trailer
Driving
When parking your vehicle andtrailer, especially on a hill, be sure tofollow all the normal precautions.Turn your front wheels into the curb,set the parking brake firmly, and putthe transmission in 1st or Reverse(manual transmission) or Park (auto-matic transmission). In addition,place wheel chocks at each of thetrailer's tires.
Backing up with a trailer is difficultand takes practice. Drive slowly,make small movements with thesteering wheel, and have someonestand outside to guide you. Grip thesteering wheel on the bottom (ratherthan the usual position near the top).Move your hand to the left to get thetrailer to move to the left, and rightto move the trailer right.

Towing Your Vehicle Behind a Motorhome
Towing Your Vehicle Behind aMotorhomeYour CR-V can be towed behind amotorhome at legal highway speeds.The vehicle must be "flat towed"with all four wheels on the ground.
When purchasing a tow bar or towdolly, make sure you select areputable manufacturer and installer.Follow the manufacturer'sattachment instructions carefully.
After attaching the tow bar to yourmotorhome, do the following toprepare your CR-V for "flat towing":
5-speed Manual TransmissionMake sure the transmission is fullof fluid (see page 208 ).
Release the parking brake.
Shift the transmission to Neutral.
Leave the key in the ignitionswitch and the ignition switch inACCESSORY (I) so the steeringwheel does not lock. Make surethe radio and any items pluggedinto the accessory power socketsare turned off so you do not rundown the battery.
Automatic TransmissionMake sure the transmission is fullof fluid (see page 207 ).
Release the parking brake.
Start the engine.
Press on the brake pedal. Shift toD, then to N.
Turn off the engine. Leave the keyin the ignition switch.
Leave the ignition switch inACCESSORY (I) so the steeringwheel does not lock. Make surethe radio and any items pluggedinto the accessory power socketsare turned off so you do not rundown the battery.
Improper towing preparation willdamage the transmission. Follow theabove procedure exactly. If you cannotshift the transmission or start theengine, your vehicle must betransported on a flat-bed or trailer.
Driving
The steering system can be damaged ifthe steering wheel is locked. Leave theignition switch in Accessory (I), andmake sure the steering wheel turnsfreely before you begin towing.
NOTICE
NOTICE

Off-Highway Guidelines
General InformationYour CR-V has been designedprimarily for use on pavement. Butits higher ground clearance allowsyou to occasionally travel on unpavedroads, to campgrounds, picnic sites,and similar locations. It is notdesigned for trailblazing, mountainclimbing, or other challenging off-road activities.
If you decide to drive on unpavedroads, you will find that it requiressomewhat different driving skills.Your CR-V will also handlesomewhat differently than it does onpavement. So be sure to read thisowner's manual, pay special attentionto the precautions and tips in thissection, and get acquainted withyour vehicle before you leave thepavement.
Driving

Off-Highway Guidelines
Important Safety PrecautionsRemember that your CR-V hashigher ground clearance and ahigher center of gravity thanpassenger vehicles designed for useonly on pavement. This means yourvehicle can more easily tip or rollover if you make abrupt turns ordrive on slopes. To avoid loss ofcontrol or rollover, be sure to followall recommendations andprecautions on page 152 and in thissection.
Seat belts are just as important off-highway as on pavement. Whereveryou drive, make sure you and yourpassengers always wear seat belts. Ifchildren or infants are along for theride, see that they are properlysecured.
On many unpaved roads, you won'tfind lane markers, traffic signals, orsigns to warn you of possible troubleahead. It's up to you to continuallyassess the situation and drive withinlimits.
The route presents limits (someroads are too steep and bumpy forexample). You have limits (in drivingskills and comfort). And your vehiclealso has limits (traction, stability, andpower, for instance).
Driving off-highway can behazardous if you fail to recognizelimits and take proper precautions.For example, you can have anaccident or rollover duringmaneuvers such as turning, drivingon hills, or over large obstacles.
Be sure to store cargo properly, anddo not exceed your CR-V's cargo ortrailer load limits (see pages 149 and170 ).
Driving
Improperly operating thisvehicle on or off-pavement cancause an accident or rollover inwhich you and your passengerscould be seriously injured orkilled.
Follow all instructions andguidelines in the owner'smanual.Keep your speed low anddon't drive faster thanconditions permit.

Off-Highway Guidelines
Driving TipsThe following pages contain practicaltips on basic off-highway operation.
Check Out Your VehicleDriving off-highway can be hard on avehicle. Before you leave thepavement, be sure all scheduledmaintenance and service has beendone, and that you have inspectedyour vehicle. Pay special attention tothe condition of the tires, and use agauge to check the tire pressures.
After you return to the pavement,carefully inspect your vehicle tomake sure there is no damage thatcould make driving it unsafe. Checkthe tires for damage and for properpressure.
Controlling SpeedOff-highway, the general rule is tokeep your speed low. Of course,you'll need enough speed to keepmoving forward. But at higherspeeds, you have less time to assessconditions and make good decisions.There's also a greater chance ofsliding if you brake or turn tooquickly on wet soil, gravel, or ice. Inany situation, never go faster thanconditions allow.
Accelerating and BrakingFor better traction on all surfaces,accelerate slowly and gradually buildup speed. If you try to start too faston wet soil, mud, snow, or ice, youmight not have enough traction toget underway. You may even digyourself into a hole.
Generally, the best off-pavementbraking technique is to gentlydepress the brake pedal, thenincrease pressure as more braking isneeded. Avoid hard braking. Keep inmind that you will usually need moretime and distance to brake to a stopon unpaved surfaces.
Test your brakes from time to timeto make sure they are operatingproperly. This will also give you afeel for how much traction you haveon a given surface.
Driving

Off-Highway Guidelines
TurningOff-highway, the basic turningtechnique is to drive at low speedand gradually adjust the amount ofsteering to suit the surface.
You should have no problem makingsharp turns at low speed on levelground. But never make an abruptturn at higher speeds, on or offpavement. With a higher center ofgravity, your vehicle can more easilytip or roll over.
Driving on SlopesBefore driving up or down a hill, stopand assess the situation. If you can'tclearly see all road conditions (goodtraction, no bumps, holes or otherobstacles, a safe way out, etc.) walkthe slope before you drive on it. Ifyou have any doubt about whetheryou can safely drive on the slope,don't do it Find another route.
If you are driving up a hill and findthat you cannot continue (because ofthe steepness, a large obstacle, etc.),do not try to turn around. Your vehiclecould roll over. Slowly back down thehill, following the same route youtook up the hill.
Avoiding ObstaclesBumps, holes, rocks, and otherobstacles can be hazardous. Debrisin the road can damage yoursuspension or other components.Even small rocks can cut your tires.
More important, because yourvehicle has a high center of gravity,driving over a large obstacle, orallowing a wheel to drop into a deephole, can cause your vehicle to tip orroll over.
Drive slow enough to observeobstacles ahead and maneuveraround them. If you can't avoid aserious obstacle, turn around andlook for a better route.
Driving

Off-Highway Guidelines
If You Encounter WaterAvoid driving through deep water. Ifyou encounter water in your route (asmall stream or large puddle, forexample), evaluate it carefully beforegoing ahead. Make sure it is shallow,flowing slowly, and has firm groundunderneath. If you are not sure ofthe depth or the ground, turn aroundand find another route.
Driving through deep water can alsodamage your vehicle. The water canget into the transmission anddifferential, diluting the lubricantand causing an eventual failure. Itcan also wash the grease out of thewheel bearings.
If You Get StuckAvoid driving on soft sand, deep mud,or other surfaces where you couldget stuck. If you do happen to getstuck because of inclement weather
or other conditions, choose a safeand appropriate course of action.
You should never use a jack to trygetting unstuck. A jack only workson firm, level ground. Also, yourvehicle could easily slip off the jackand hurt you or someone else.
4-Wheel Drive VehiclesIf you spin the wheels excessivelytrying to get unstuck, you mayoverheat the components of the4-wheel drive system. If this happens,the 4-wheel drive system shuts offand only the front wheels receivepower. If this happens, stop andallow everything to cool down. The4-wheel drive system will work againafter its temperature drops.
If you slip the clutch for a long timewhile trying to get unstuck, you mayoverheat and damage it.
Driving

Maintenance
This section explains why it isimportant to keep your vehicle wellmaintained and to follow basicmaintenance safety precautions.
This section also includesMaintenance Schedules for normaldriving and severe driving conditions,a Maintenance Record, and instruc-tions for simple maintenance tasksyou may want to take care ofyourself.
If you have the skills and tools to per-form more complex maintenancetasks on your Honda, you may wantto purchase the Service Manual. Seepage 295 for information on how toobtain a copy, or see your Hondadealer.
Maintenance Safety....................... 184Important Safety Precautions.. 185
Maintenance Schedule.................. 186
Required Maintenance Record.... 193Owner Maintenance Checks........ 195Fluid Locations............................... 196Engine Oil....................................... 197
Adding Oil................................... 197Recommended Oil..................... 197Synthetic Oil............................... 198Additives..................................... 198Changing the Oil and Filter...... 199
Cooling System.............................. 201Adding Engine Coolant............. 201Replacing Engine Coolant........ 203
Windshield Washers..................... 206Transmission Fluid........................ 207
Automatic Transmission........... 2075-speed Manual
Transmission.......................... 208Rear Differential Fluid.................. 209Brake and Clutch Fluid................. 210
Brake System............................. 210Clutch System............................ 211
Power Steering............................... 211Air Cleaner Element...................... 212Hood Latch..................................... 213Spark Plugs..................................... 213
Replacement............................... 213
Specifications............................. 214Battery............................................ 215Wiper Blades.................................. 217Air Conditioning System............... 219Air Conditioning Filter.................. 220Drive Belts...................................... 220Timing Belt..................................... 221Tires................................................ 221
Inflation....................................... 221Recommended Tire
Pressures for NormalDriving............................ 222
Inspection................................... 223Maintenance............................... 223Tire Rotation.............................. 224Replacing Tires and Wheels.... 225Wheels and Tires....................... 226Winter Driving........................... 226
Snow Tires.............................. 226Tire Chains............................. 227
Lights.............................................. 228Headlight Aiming...................... 230Replacing Bulbs......................... 232
Storing Your Vehicle..................... 239
Maintenance

Maintenance Safety
Regularly maintaining your vehicle isthe best way to protect yourinvestment. Proper maintenance isessential to your safety and thesafety of your passengers. It will alsoreward you with more economical,trouble-free driving and help reduceair pollution.
This section includes instructions forsimple maintenance tasks, such aschecking and adding oil. Any serviceitems not detailed in this sectionshould be performed by a Hondatechnician or other qualifiedmechanic.
Some of the most important safetyprecautions are given here. However,we cannot warn you of everyconceivable hazard that can arise inperforming maintenance. Only youcan decide whether or not youshould perform a given task.
Maintenance
Improperly maintaining thisvehicle or failing to correct aproblem before driving cancause a crash in which you canbe seriously hurt or killed.
Always follow the inspectionand maintenancerecommendations andschedules in this owner'smanual.
Failure to properly followmaintenance instructions andprecautions can cause you tobe seriously hurt or killed.
Always follow the proceduresand precautions in this owner'smanual.

Maintenance Safety
Important Safety PrecautionsBefore you begin any maintenance,make sure your vehicle is parked onlevel ground and that the parkingbrake is set. Also, be sure the engineis off. This will help to eliminateseveral potential hazards:
Carbon monoxide poisoningfrom engine exhaust. Be surethere is adequate ventilationwhenever you operate the engine.
Burns from hot parts. Let theengine and exhaust system coolbefore touching any parts.
Injury from moving parts. Donot run the engine unless in-structed to do so.
Read the instructions before youbegin, and make sure you have thetools and skills required.
To reduce the possibility of fire orexplosion, be careful when workingaround gasoline or batteries. Use acommercially available degreaser orparts cleaner, not gasoline, to cleanparts. Keep cigarettes, sparks, andflames away from the battery and allfuel-related parts.
You should wear eye protection andprotective clothing when workingnear the battery or when usingcompressed air.
Maintenance

Maintenance Schedule
The Maintenance Schedule specifieshow often you should have yourvehicle serviced and what thingsneed attention. It is essential thatyou have your vehicle serviced asscheduled to retain its high level ofsafety, dependability, and emissionscontrol performance.
The services and time or distanceintervals shown in the maintenanceschedule assume you will use yourvehicle as normal transportation forpassengers and their possessions.You should also follow theserecommendations:
Avoid exceeding your vehicle'sload limit. This puts excess stresson the engine, brakes, and manyother parts of your vehicle. Theload limit is shown on the label onthe driver's doorjamb.
Operate your vehicle onreasonable roads within the legalspeed limit.
Drive your vehicle regularly over adistance of several miles(kilometers).
Always use unleaded gasoline withthe proper octane rating (see page140 ).
Which Schedule to Follow:Service your vehicle according to thetime and mileage periods on one ofthe Maintenance Schedules on thefollowing pages. Select the schedulefor "Severe Conditions" if most ofyour driving is done under one ormore of the conditions listed on thatpage. Otherwise, follow the schedulefor "Normal Conditions."
Maintenance

Maintenance Schedule
Your authorized Honda dealerknows your vehicle best and canprovide competent, efficient service.However, service at a dealer is notmandatory to keep your warrantiesin effect. Maintenance may be doneby any qualified service facility orperson who is skilled in this type ofautomotive service. Keep all thereceipts as proof of completion, andhave the person who does the workfill out the Maintenance Record.Check your warranty booklet formore information.
We recommend the use of GenuineHonda parts and fluids whenever youhave maintenance done. These aremanufactured to the same high-quality standards as the originalcomponents, so you can be confidentof their performance and durability.
U.S. Vehicles:Maintenance, replacement orrepair of emissions controldevices and systems may be doneby any automotive repairestablishment or individual usingparts that are "certified" to EPAstandards.
According to state and federalregulations, failure to performmaintenance on the items markedwith # will not void your emissionswarranties. However, Hondarecommends that all maintenanceservices be performed at therecommended time or mileageperiod to ensure long-term reliability.
Maintenance

Maintenance Schedule (Normal Conditions)
U.S. OwnersFollow the Normal ConditionsMaintenance Schedule if thesevere driving conditionsspecified in the SevereConditions MaintenanceSchedule do not apply.
NOTE: If you onlyOCCASIONALLY drive under a"severe" condition, you shouldfollow the Normal ConditionsMaintenance Schedule.
Canadian OwnersFollow the MaintenanceSchedule for Severe Conditions.# : See information on maintenance and
emissions warranty, last column, page
187.
*1 : See Timing Belt on page 221 to
determine need for replacement.
Maintenance

Maintenence Schedule for Normal Conditions (listed by distance/time)
Service at the indicated distance or time, whichever comes first. Do the items in A, B, C as required for each distance/time interval Follow thisschedule if the severe driving conditions described in the Severe Conditions Schedule on the next page do not apply.Canadian owners: Follow the schedule for Severe Conditions.
Maintenance
page 224
#: See information on maintenance and emissions warranty, lastcolumn, page 187.
* 1: See Timing Belt on page 221 to determine need for replacement

Maintenance Schedule (Severe Conditions)
# : See information on maintenance and emissions warranty, last column, page 187.
* 1: Refer to page 221 for replacement information under special driving conditions.
* 2: Refer to page 220 for replacement information under special driving conditions.
U.S. OwnersFollow the Severe ConditionsMaintenance Schedule if youdrive your vehicle MAINLYunder one or more of thefollowing conditions:
Driving less than 5 miles (8 km) pertrip or, in freezing temperatures,driving less than 10 miles (16 km) pertrip.Driving in extremely hot (over 90°F/32°C) conditions.Extensive idling or long periods ofstop-and-go driving.Trailer towing, driving with a roof topcarrier, or driving in mountainousconditions.Driving on muddy, dusty, or de-iced
roads.
Canadian OwnersFollow the MaintenanceSchedule for Severe Conditions.
Maintenance

Maintenance Schedule for Severe Conditions (listed by distance/time)
Use this schedule if your vehicle is MAINLY driven in any of the following Severe Conditions; otherwise use the Normal Schedule. Service at theindicated distance or time, whichever comes first. Do the items in A, B, C, D as required for each distance/time.Severe Conditions:
Driving less than 5 miles (8 km) per trip or, in freezing temperatures, driving less than 10 miles (16 km) per trip.Driving in extremely hot (over 90°F/32°C) conditions.Extensive idling or long periods of stop-and-go driving.Trailer towing, driving with a rooftop carrier, or driving in mountainous conditions.Driving on muddy, dusty, or de-iced roads.
CONTINUED
page 224
Maintenance

Maintenance Schedule for Severe Conditions (listed by distance/time)
# : See information on maintenance and emissions warranty, lastcolumn, page 187.
* 1: See Timing Belt on page 221 to determine need for replacement.* 2 : See Air Conditioning Filter on page 220 for replacement
information under special conditions.
Maintenance

Required Maintenance Record (for Normal and Severe Schedules)
You or the servicing dealer can record all completed maintenance here, whether you follow the schedule for normal conditions (page 188) or severeconditions (page 190). Keep the receipts for all work done on your vehicle.
CONTINUED
Maintenance

Required Maintenance Record (for Normal and Severe Schedules)
Maintenance
Owner Maintenance Checks
You should check the followingitems at the specified intervals. Ifyou are unsure of how to performany check, turn to the page given.
Engine oil level — Check everytime you fill the fuel tank. Seepage 143.
Engine coolant level — Check theradiator reserve tank every timeyou fill the fuel tank. See page 144.
Windshield washer fluid — Checkthe level in the reservoir monthly.If weather conditions cause you touse the washers frequently, checkthe reservoir each time you stopfor fuel. See page 206.
Automatic transmission — Checkthe fluid level monthly. See page207.
Brakes and clutch — Check thefluid level monthly. See page 210.
Tires — Check the tire pressuremonthly. Examine the tread forwear and foreign objects. See page221.
Lights — Check the operation ofthe headlights, parking lights,taillights, high-mount brake light,turn signals, brake lights, andlicense plate lights monthly. Seepage 228.
Maintenance

Fluid Locations
ENGINE OILFILL CAP
AUTOMATICTRANSMISSIONFLUID DIPSTICK(Yellow loop)
COOLANTRESERVOIR
BRAKE FLUID(Gray cap)
CLUTCH FLUID(5-speed ManualTransmission only)(Gray cap)
WASHER FLUID(Blue cap)
POWER STEERINGFLUID (Red cap)
Maintenance
ENGINE OIL DIPSTICK(Orange loop)

Engine Oil
Adding Oil
To add oil, unscrew and remove theengine oil fi l l cap on top of the valvecover. Pour in the oil, and install theengine oil fill cap. Tighten it securely.Wait a few minutes and recheck theoil level. Do not fill above the uppermark; you could damage the engine.
Recommended OilOil is a major contributor to yourengine's performance and longevity.Always use a premium-grade deter-gent oil.
You can determine an oil's SAEviscosity and Service Classificationfrom the API Service label on the oilcontainer.
A fuel-efficient oil is recommendedfor your Honda. This is shown on theAPI Service label by the words"Energy Conserving." This oil isformulated to help your engine useless fuel.
The API Service label also tells youthe service classification of the oil.Always use an oil that is labeled "APIService SJ." This service rating mayinclude other classifications, such asCD. These additional classificationsare not a problem, as long as thelabel also carries the SJ classification.
API SERVICE LABEL
CONTINUED
Maintenance
ENGINE OIL FILL CAP

Engine Oil
The oil container may also displaythe API Certification seal. Make sureit says "For Gasoline Engines."
API CERTIFICATION MARK
The SAE numbers tell you the oil'sviscosity or weight. Select the oil foryour vehicle according to this chart.
Ambient Temperature
An oil with a viscosity of 5W-30 ispreferred for improved fuel economyand year-round protection in yourHonda. You may use a 10W-30 oil ifthe temperature in your area nevergoes below 20°F(—7°C).
Synthetic OilYou may use a synthetic motor oil ifit meets the same requirementsgiven for conventional motor oil:energy conserving, a serviceclassification of SJ, and the properweight as shown on the chart. Whenusing synthetic oil, you must followthe oil and filter change intervalsgiven in the maintenance schedule.
AdditivesYour Honda does not need any oiladditives. Purchasing additives forthe engine or transmission will notincrease your vehicle's performanceor longevity. It only increases thecost of operating your vehicle.
Maintenance

Engine Oil
Changing the Oil and FilterAlways change the oil and filteraccording to the time and distance(miles/kilometers) recommenda-tions in the maintenance schedule.The oil and filter collect contami-nants that can damage your engine ifthey are not removed regularly.
Changing the oil and filter requiresspecial tools and access fromunderneath the vehicle. The vehicleshould be raised on a service station-type hydraulic lift for this service.Unless you have the knowledge andproper equipment, you should havethis maintenance done by a skilledmechanic.
1. Run the engine until it reachesnormal operating temperature,then shut it off.
2. Open the hood and remove theengine oil fill cap. Remove the oildrain bolt and washer from thebottom of the engine. Drain the oilinto an appropriate container.
3. Remove the oil filter and let theremaining oil drain. A specialwrench (available from yourHonda dealer) is required toremove the filter.
4. Install a new oil filter according toinstructions that come with it.
CONTINUED
Maintenance
OIL DRAIN BOLT WASHER
OIL FILTER

Engine Oil
5. Put a new washer on the drain bolt,then reinstall the drain bolt.Tighten it to:
6. Refill the engine with the recom-mended oil.Engine oil change capacity(including filter):
4.0 US qt (3.8 ,3.3 Imp qt)
7. Install the engine oil fill cap. Startthe engine. The oil pressureindicator light should go out withinfive seconds. If it does not, turn offthe engine and reinspect yourwork.
8. Let the engine run for severalminutes and check the drain boltand oil filter for leaks.
9. Turn off the engine, let it sit forseveral minutes, then check the oillevel. If necessary, add oil to bringthe level to the upper mark on thedipstick.
Improper disposal of engine oil can beharmful to the environment. If youchange your own oil, please dispose ofthe used oil properly. Put it in a sealedcontainer and take it to a recyclingcenter. Do not discard it in a trash binor dump it on the ground.
Maintenance
NOTICE

Cooling System
Adding Engine Coolant
If the coolant level in the reservetank is at or below the MIN line, addcoolant to bring it up to the MAX line.Inspect the cooling system for leaks.This coolant should always be amixture of 50 percent antifreeze and50 percent water. Never add straightantifreeze or plain water.
Always use Genuine HondaAntifreeze/Coolant. If it is notavailable, you may use anothermajor-brand non-silicate coolant as atemporary replacement. Make sure itis a high-quality coolantrecommended for aluminum engines.However, continued use of any non-Honda coolant can result incorrosion, causing the coolingsystem to malfunction or fail. Havethe cooling system flushed andrefilled with Honda antifreeze/coolant as soon as possible.
If the reserve tank is completelyempty, you should also check thecoolant level in the radiator.
1. Make sure the engine and radiatorare cool.
CONTINUED
Maintenance
RESERVE TANK
Removing the radiator capwhile the engine is hot cancause the coolant to spray out,seriously scalding you.
Always let the engine andradiator cool down beforeremoving the radiator cap.

Cooling System
2. Turn the radiator cap counter-clockwise, without pressing downon it, until it stops. This relievesany pressure remaining in thecooling system.
3. Remove the radiator cap bypushing down and turningcounterclockwise.
4. The coolant level should be up tothe base of the filler neck. Addcoolant if it is low.
5. Put the radiator cap back on.Tighten it fully.
6. Pour coolant into the reserve tank.Fill it to halfway between the MAXand MIN marks. Put the cap backon the reserve tank.
Do not add any rust inhibitors orother additives to your vehicle'scooling system. They may not becompatible with the coolant orengine components.
Maintenance
RADIATOR CAP RESERVE TANK

Cooling System
Replacing Engine CoolantThe cooling system should becompletely drained and refilled withnew coolant according to the timeand distance recommendations inthe maintenance schedule. Only useGenuine Honda Antifreeze/Coolant.
Draining the coolant requires accessto the underside of the vehicle.Unless you have the tools andknowledge, you should have thismaintenance done by a skilledmechanic. 1. Turn the ignition ON (II). Turn
the heater temperature controldial fully clockwise. Turn theignition off.
2. Open the hood. Make sure theengine and radiator are cool to thetouch.
3. Remove the radiator cap.
4. Loosen the drain plug on thebottom of the radiator. Thecoolant will drain through thesplash guard. Remove the drainbolt and washer from the engineblock.
CONTINUED
Maintenance
DRAIN BOLT
DRAIN PLUG

Cooling System
5. Remove the reserve tank from itsholder by pulling it straight up.Drain the coolant, then put thetank back in its holder.
6. When the coolant stops draining,tighten the drain plug at thebottom of the radiator.Apply non-hardening sealant to thedrain bolt threads, put a newwasher on the drain bolt, andreinstall the bolt in the engineblock. Tighten it securely.Tightening torque:61 lbf.ft (83 N.m , 8.5 kgf.m)
7. Mix the recommended antifreezewith an equal amount of purifiedor distilled water in a cleancontainer. The cooling systemcapacity is:Automatic Transmission:1.03 US gal (3.9 , 0.86 Imp gal)
Manual Transmission:1.06 US gal (4.0 ,0.88 Imp gal)
8. Pour coolant into the radiator upto the base of the filler neck.
Maintenance
RESERVE TANK CAP
HOLDER RESERVE TANK Fill up to here
FILLER NECK

Cooling System
9. Start the engine and let it run forabout 30 seconds. Then turn offthe engine.
10.Check the level in the radiator,add coolant if needed.
11.Fill the reserve tank to the MAXmark. Install the reserve tank cap.
12.Install the radiator cap, andtighten it to the first stop.
13.Start the engine and let it run untilthe radiator fan comes on twotimes. Then stop the engine.
14.Remove the radiator cap.
15.Pour coolant into the radiator upto the base of the filler neck andinto the reserve tank up to theMAX mark.
16.Start the engine and hold it at1,500 rpm until the radiator fancomes on. Turn off the engine.Check the coolant level in theradiator and add coolant if needed.
17.Install the radiator cap, andtighten it fully.
18.If necessary, fill the reserve tankto the MAX mark. Install thereserve tank cap.
Maintenance
RESERVE TANK

Windshield Washers
Check the level in the windshieldwasher reservoir at least monthlyduring normal usage. In bad weather,when you use the washers often,check the level every time you stopfor fuel.
The windshield washer reservoir islocated behind the driver's sideheadlight. Check the reservoir's fluidlevel by removing the cap andlooking at the level gauge attachedto the cap.
Fill the reservoir with a good-qualitywindshield washer fluid. Thisincreases the cleaning capability andprevents freezing in cold weather.
Do not use engine antifreeze or avinegar/water solution in thewindshield washer reservoir.
Antifreeze can damage your vehicle'spaint, while a vinegar/water solutioncan damage the windshield washerpump.
Use only commercially-availablewindshield washer fluid.
Maintenance
LEVEL GAUGE NOTICE

Transmission Fluid
Automatic Transmission
Check the fluid level with the engineat normal operating temperature.
1. Park the vehicle on level ground.Shut off the engine.
2. Remove the dipstick (yellow loop)from the transmission and wipe itwith a clean cloth.
UPPER MARK
3. Insert the dipstick all the way intothe transmission.
4. Remove the dipstick and checkthe fluid level. It should bebetween the upper and lowermarks.
5. If the level is below the lowermark, add fluid into the filler holeto bring it to the upper mark.Always use Honda PremiumFormula Automatic TransmissionFluid (ATF). If it is not available,you may use a DEXRON® I I Iautomatic transmission fluid as atemporary replacement. However,continued use can affect shiftquality. Have the transmissiondrained and refilled with HondaATF as soon as it is convenient.
6. Insert the dipstick all the way backinto the transmission securely asshown in the illustration.
The transmission should be drainedand refilled with new fluid accordingto the time and distance recommen-dations in the maintenance schedule.
Maintenance
DIPSTICK
LOWER MARK

Transmission Fluid
Check the fluid level with thetransmission at normal operatingtemperature and the vehicle sittingon level ground. Remove thetransmission filler bolt and carefullyfeel inside the bolt hole with yourfinger. The fluid level should be upto the edge of the bolt hole. If it isnot, add Genuine Honda ManualTransmission Fluid (MTF) until itstarts to run out of the hole. Reinstallthe filler bolt and tighten it securely.
If Honda MTF is not available, youmay use an API service SG, SH or SJgrade motor oil with a viscosity ofSAE 10W-30 or 10W-40 as atemporary replacement. An SGgrade is preferred, but an SH or SJgrade may be used if SG is notavailable. However, motor oil doesnot contain the proper additives andcontinued use can cause stiffershifting. Replace as soon asconvenient.
The transmission should be drainedand refilled with new fluid accordingto the time and distance recommen-dations in the maintenance schedule.
Maintenance
5-speed Manual Transmission
Correct level FILLER BOLT

Rear Differential Fluid
(4WD models only)
FILLER BOLT
Check the fluid level with the reardifferential at normal operatingtemperature and the vehicle sittingon level ground. Remove thedifferential fluid filler bolt andwasher and carefully feel inside thebolt hole with your finger. The fluidlevel should be up to the edge of thebolt hole. If it is not, slowly addGenuine Honda CVT Fluid until itstarts to run out of the hole. Reinstallthe filler bolt and tighten it securely.
If CVT Fluid is not available, youmay use Honda Premium FormulaAutomatic Transmission Fluid(ATF) or a quality DEXRON® I I IATF as a temporary replacement.However, continued use can causenoise, vibration and performanceproblems. Have the differentialdrained and refilled with Honda CVTFluid as soon as it is convenient.
The rear differential should bedrained and refilled with new fluidaccording to the time and distancerecommendations in the mainte-nance schedule.
Maintenance
Correctlevel

Brake and Clutch Fluid
Check the fluid level in the reser-voirs monthly. There are up to tworeservoirs, depending on the model.They are:
Brake fluid reservoir (all models)Clutch fluid reservoir(manual transmission only)
The brake fluid should be replacedaccording to the time and distancerecommendations in the mainte-nance schedule.
Always use Genuine Honda DOT 3brake fluid. If it is not available, youshould use only DOT 3 or DOT 4fluid, from a sealed container, as atemporary replacement. However,the use of any non-Honda brake fluidcan cause corrosion and decreasethe life of the system. Have thebrake system flushed and refilledwith Honda DOT 3 brake fluid assoon as possible.
Brake fluid marked DOT 5 is notcompatible with your vehicle'sbraking system and can causeextensive damage.
Brake System
MAX
The fluid level should be betweenthe MIN and MAX marks on the sideof the reservoir. If the level is at orbelow the MIN mark, your brakesystem needs attention. Have thebrake system inspected for leaks orworn brake pads.
Maintenance
MIN

Brake and Clutch Fluid, Power Steering
Clutch System
MIN MAX
The fluid should be between theMIN and MAX marks on the side ofthe reservoir. If it is not, add brakefluid to bring it up to that level. Usethe same fluid specified for thebrake system.
Low fluid level can indicate a leak inthe clutch system. Have this systeminspected as soon as possible.
Power Steering
UPPER LEVEL
LOWER LEVEL
Check the level when the engine iscold. Look at the side of thereservoir. The fluid should bebetween the UPPER LEVEL andLOWER LEVEL. If it is below theLOWER LEVEL, add power steeringfluid to the UPPER LEVEL.
Always use Genuine Honda PowerSteering Fluid. If it is not available,you may use another power steeringfluid as an emergency replacementHowever, continued use can causeincreased wear and poor steering incold weather. Have the powersteering system flushed and refilledwith Honda PSF as soon as possible.
A low power steering fluid level canindicate a leak in the system. Checkthe fluid level frequently and havethe system inspected as soon aspossible.
Turning the steering wheel to full leftor right lock and holding it there candamage the power steering pump.
Maintenance
NOTICE

Air Cleaner Element
The air cleaner element should bereplaced according to the time anddistance recommendations in themaintenance schedule.
Replacement
CLIPS
The air cleaner element is inside theair cleaner housing on the right sideof the engine compartment.
To replace it:
1. Unsnap the two clips and removethe air cleaner housing cover.
AIR CLEANERELEMENT
2. Remove the old air cleanerelement.Carefully clean the inside of theair cleaner housing with a damprag.
3. Place the new air cleaner elementin the air cleaner housing.
4. Align the tabs and reinstall the aircleaner housing cover, snap thetwo clips back into place.
Maintenance

Hood Latch, Spark Plugs
Hood Latch
Clean the hood latch assembly with amild cleaner, then lubricate it with amultipurpose grease. Lubricate allthe moving parts, including the pivot.Follow the time and distancerecommendations in theMaintenance Schedule. If you arenot sure how to clean and grease thelatch, contact your Honda dealer.
Spark PlugsThe spark plugs in your car shouldbe replaced according to the timeand distance recommendations inthe maintenance schedule.
Replacement
SPARK PLUG CAP
1. Clean up any dirt and oil aroundthe spark plug caps.
2. Remove the spark plug cap bypulling it straight out.
3. Remove the spark plug witha five-eighths inch (16 mm) sparkplug socket.
CONTINUED
Maintenance

Spark Plugs
4. Put the new spark plug into thesocket; then screw it into the hole.Screw it in by hand so you do notcrossthread it.
5. Torque the spark plug. (If you donot have a torque wrench, tightenthe spark plug two-thirds of a turnafter it contacts the cylinder head.)Tightening torque:13 lbf.ft (18 N.m,1.8kgf.m)
Tighten the spark plugs carefully. Asparkplug that is too loose canoverheat and damage the engine.Overtightening can cause damage tothe threads in the cylinder head.
6. Install the spark plug cap.
7. Repeat this procedure for theother three spark plugs.
Specifications:
NGK:DENSO:
ZFR6F-11KJ20CR-L11
Spark Plug Gap:0.043 in (1.1 mm
Maintenance
NOTICE

Battery
Check the condition of your vehicle'sbattery monthly. You should checkthe color of the test indicator window,and for corrosion on the terminals.
TEST INDICATOR WINDOW
Check the battery condition bylooking at the test indicator windowon the battery.The label on the battery explains thetest indicator's colors.
Check the battery terminals forcorrosion (a white or yellowishpowder). To remove it, cover theterminals with a solution of bakingsoda and water. It will bubble up andturn brown. When this stops, wash itoff with plain water. Dry off thebattery with a cloth or paper towel.Coat the terminals with grease tohelp prevent future corrosion.
CONTINUED
Maintenance

Battery
If the terminals are severely cor-roded, clean them with baking sodaand water. Then use a wrench toloosen and remove the cables fromthe terminals. Always disconnect thenegative (—) cable first and recon-nect it last. Clean the battery termi-nals with a terminal cleaning tool orwire brush. Reconnect and tightenthe cables, then coat the terminalswith grease.
If you need to connect the battery toa charger, disconnect both cables toprevent damage to the vehicle'selectrical system.
On EX modelIf your vehicle's battery isdisconnected or goes dead, the audiosystem will disable itself. The nexttime you turn on the radio you willsee " Code " in the frequencydisplay. Use the Preset buttons toenter the five-digit code (see page137).
Charging the battery with the cablesconnected can seriously damage yourvehicle's electronic controls. Detachthe battery cables before connectingthe battery to a charger.
Maintenance
The battery gives off explosivehydrogen gas during normaloperation.
A spark or flame can cause thebattery to explode with enoughforce to kill or seriously hurt you.
Wear protective clothing and aface shield, or have a skilledmechanic do the batterymaintenance.
NOTICE

Wiper Blades
Check the condition of the wiperblades at least every six months.Look for signs of cracking in therubber, or areas that are gettinghard. Replace the blades if you findthese signs, or they leave streaksand unwiped areas when used.
To replace the blade:
1. Raise the wiper arm off thewindshield.
2. Disconnect the blade assemblyfrom the wiper arm by pushing inthe lock tab. Hold it in while youpush the blade assembly towardthe base of the arm.
CONTINUED
Maintenance
WIPER ARMS
LOCK TAB

Wiper Blades
3. Remove the blade from its holderby grasping the tabbed end of theblade. Pull firmly until the tabscome out of the holder.
4. Examine the new wiper blades. Ifthey have no plastic or metal rein-forcement along the back edge,remove the metal reinforcementstrips from the old wiper blade andinstall them in the slots along theedge of the new blade.
5. Slide the new wiper blade into theholder until the tabs lock.
6. Slide the wiper blade assemblyonto the wiper arm. Make sure itlocks in place.
7. Lower the wiper arm down againstthe windshield.
Maintenance
BLADE BLADE
REINFORCEMENT

Air Conditioning System
Your vehicle's air conditioning is asealed system. Any major mainte-nance, such as recharging, should bedone by a qualified mechanic. Youcan do a couple of things to makesure the air conditioning worksefficiently.
Periodically check the engine'sradiator and air conditioningcondenser for leaves, insects, anddirt stuck to the front surface. Theseblock the air flow and reduce coolingefficiency. Use a light spray from ahose or a soft brush to remove them.
The condenser and radiator fins bendeasily. Only use a low-pressure sprayor soft-bristle brush to clean them.
AIR CONDITIONING CONDENSER
Run the air conditioning at least oncea week during the cold weathermonths. Run it for at least tenminutes while you are driving at asteady speed with the engine atnormal operating temperature. Thiscirculates the lubricating oil con-tained in the refrigerant.
If the air conditioning does not get ascold as before, have your dealercheck the system. Recharge thesystem with Refrigerant HFC-134a(R-134a). (See Specifications on page279 .)
Whenever you have the air conditioningsystem serviced, make sure the servicefacility uses a refrigerant recyclingsystem. This system captures therefrigerant for reuse. Releasingrefrigerant into the atmosphere candamage the environment.
Maintenance
NOTICE
NOTICE

Air Conditioning Filter, Drive Belts
Air Conditioning FilterThe air conditioning filter removespollen and dust that is brought infrom the outside through the heatingand cooling system.
This filter should be replaced every30,000 miles (48,000 km) undernormal conditions. It should bereplaced every 15,000 miles (24,000km) if you drive primarily in urbanareas that have high concentrationsof soot in the air from industry anddiesel-powered vehicles. Replace itmore often if air flow from theheating and cooling system becomesless than usual. Have the airconditioning filter replaced by yourHonda dealer.
Drive Belts
Check the condition of the threedrive belts. Examine the edges ofeach belt for cracks or fraying.Check the tension of each belt bypushing on it with your thumbmidway between the pulleys.
The belts should have the following"play" or deflection.
Alternator belt:0.33 — 0.45 in (8.5 — 11.5 mm)Compressor belt:0.30 — 0.41 in (7.5 — 10.5 mm)Power steering belt:0.43 — 0.57 in (11.0 —14.5 mm)
If you see signs of wear or looseness,have your dealer adjust or replacethe belts.
Maintenance
POWER STEERING BELT
COMPRESSORBELT ALTERNATOR BELT

Timing Belt, Tires
Timing BeltThe timing belt should normally bereplaced at the intervals shown inthe maintenance schedule.
Replace the belt at 60,000 miles (U.S.)or 100,000 km (Canada) if you regu-larly drive your vehicle in one ormore of these conditions:
In very high temperatures(over 110°F,43°C).In very low temperatures(under — 20°F, — 29°C).
TiresTo safely operate your vehicle, yourtires must be the proper type andsize, in good condition with adequatetread, and correctly inflated. Thefollowing pages give more detailedinformation on how and when tocheck air pressure, how to inspectyour tires for damage and wear, andwhat to do when your tires need tobe replaced.
InflationKeeping the tires properly inflatedprovides the best combination ofhandling, tread Me and ridingcomfort. Underinflated tires wearunevenly, adversely affect handlingand fuel economy, and are morelikely to fail from being overheated.Overinflated tires can make yourvehicle ride more harshly, are moreprone to damage from road hazards,and wear unevenly.
We recommend that you visuallycheck your tires every day. If youthink a tire might be low, check itimmediately with a tire gauge.
CONTINUED
Maintenance
Using tires that are excessivelyworn or improperly inflated cancause a crash in which you canbe seriously hurt or killed.
Follow all instructions in thisowner's manual regarding tireinflation and maintenance.

Tires
Use a gauge to measure the airpressure at least once a month. Eventires that are in good condition maylose one to two psi (10 to 20 kPa, 0.1to 0.2 kgf/cm2) per month.Remember to check the spare tire atthe same time you check all theother tires.
Check the pressure in the tires whenthey are cold. This means the vehiclehas been parked for at least threehours. If you have to drive thevehicle before checking the tirepressure, the tires can still beconsidered "cold" if you drive lessthan 1 mile (1.6 km).
If you check the pressure when thetires are hot (the vehicle has beendriven several miles), you will seereadings 4 to 6 psi (30 to 40 kPa, 0.3to 0.4 kgf/cm2) higher than the coldreading. This is normal. Do not letair out to match the specified coldpressure. The tire will beunderinflated.
You should get your own tirepressure gauge and use it wheneveryou check your tire pressures. Thiswill make it easier for you to tell if apressure loss is due to a tire problemand not due to a variation betweengauges.
Recommended Tire Pressures forNormal DrivingThe following chart shows therecommended cold tire pressures formost normal driving conditions andspeeds. Tire pressures for highspeed driving are the same as fornormal driving.
These pressures are also given onthe tire information label on thedriver's doorjamb.
Tubeless tires have some ability toself-seal if they are punctured.However, because leakage is oftenvery slow, you should look closelyfor punctures if a tire starts losingpressure.
Maintenance

Tires
InspectionEvery time you check inflation, youshould also examine the tires fordamage, foreign objects, and wear.
You should look for:
Bumps or bulges in the tread orside of the tire. Replace the tire ifyou find either of these conditions.
Cuts, splits, or cracks in the sideof the tire. Replace the tire if youcan see fabric or cord.
Excessive tread wear.
Your vehicle's tires have wear indica-tors molded into the tread. When thetread wears down to that point, youwill see a 1/2 inch (12.7 mm) wideband running across the tread. Thisshows there is less than 1/16 inch(1.6 mm) of tread left on the tire. Atire that is this worn gives very littletraction on wet roads. You shouldreplace the tire if you can see thetread wear indicator in three or moreplaces around the tire.
MaintenanceIn addition to proper inflation,correct wheel alignment helps todecrease tire wear. If you find a tireis worn unevenly, have your dealercheck the wheel alignment.
The tires were properly balanced bythe factory. They may need to berebalanced at some time before theyare worn out. Have your dealercheck the tires if you feel a consis-tent vibration while driving. A tireshould always be rebalanced if it isremoved from the wheel for repair.
CONTINUED
Maintenance
INDICATOR LOCATION MARKS
TREAD WEAR INDICATORS

Tires
Make sure the installer balances thewheels when you have new tiresinstalled. This increases ridingcomfort and tire life. Your vehicle'soriginal tires were dynamic or "spin"balanced at the factory. For bestresults, have the installer perform adynamic balance.
(Only on vehicles equipped withaluminum wheels)Improper wheel weights can damageyour vehicle's aluminum wheels. Useonly Genuine Honda wheel weights forbalancing.
Tire Rotation
To help increase tire life anddistribute wear more evenly, youshould have the tires rotated every7,500 miles (12,000 km). Move thetires to the positions shown in thechart each time they are rotated.
When shopping for replacementtires, you may find that some tiresare "directional." This means theyare designed to rotate only in onedirection. If you use directional tires,they should be rotated only front-to-back.
Maintenance
FrontFront
(For Non-directionalTires and Wheels)
(For DirectionalTires and Wheels)
NOTICE

Tires
Replacing Tires and WheelsThe tires that came with yourvehicle were selected to match theperformance capabilities of thevehicle while providing the bestcombination of handling, ridecomfort, and long life. You shouldreplace them with radial tires of thesame size, load range, speed rating,and maximum cold tire pressurerating (as shown on the tire'ssidewall). Mixing radial and bias-plytires on your vehicle can reduce itsbraking ability, traction, and steeringaccuracy.
It is best to replace all four tires atthe same time. If that is not possibleor necessary, then replace the twofront tires or the two rear tires as apair. Replacing just one tire canseriously affect your vehicle's han-dling.
The ABS works by comparing thespeed of the wheels. When replacingtires, use the same size originallysupplied with the vehicle. Tire sizeand construction can affect wheelspeed and may cause the system towork inconsistently.
If you ever need to replace a wheel,make sure the wheel's specificationsmatch those of the original wheelthat came on your vehicle. Re-placement wheels are available atyour Honda dealer.
Maintenance
Installing improper tires on yourvehicle can affect handling andstability. This can cause a crashin which you can be seriouslyhurt or killed.
Always use the size and type oftires recommended in thisowner's manual.

Tires
Wheels and Tires
Wheels:15 x 6JJ
Tires:205/70R1595S
See Tire Information on page 280 foradditional information about tire andwheel size designations. See page281 for information about DOT TireQuality Grading.
Winter DrivingTires that are marked "M+S" or"All Season" on the sidewall have anall-weather tread design. Theyshould be suitable for most winterdriving conditions. Tires withoutthese markings are designed foroptimum traction in dry conditions.They may not provide adequateperformance in winter driving.For the best performance in snowyor icy conditions, you should installsnow tires or tire chains. They maybe required by local laws undercertain conditions.
Snow TiresIf you mount snow tires on yourHonda, make sure they are radialtires of the same size and load rangeas the original tires. Mount snowtires on all four wheels to balanceyour vehicle's handling in all weatherconditions. Keep in mind the tractionprovided by snow tires on dry roadsmay not be as high as your vehicle'soriginal equipment tires. You shoulddrive cautiously even when the roadsare clear. Check with the tire dealerfor maximum speed recommenda-tions.
Maintenance
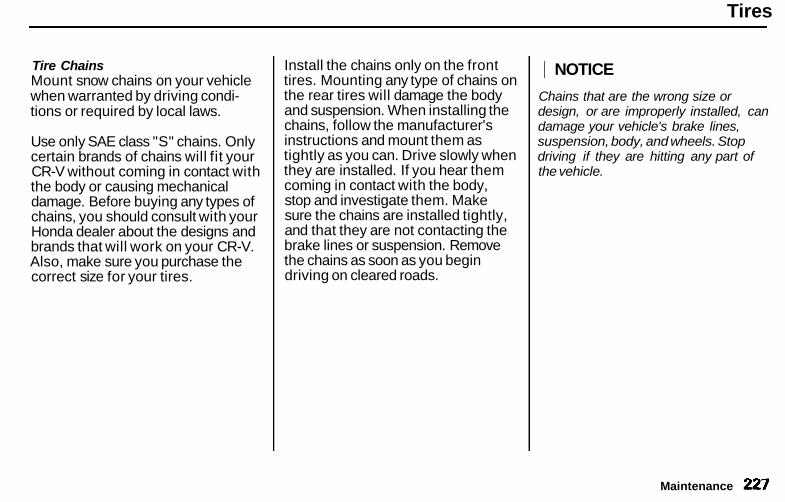
Tires
Tire ChainsMount snow chains on your vehiclewhen warranted by driving condi-tions or required by local laws.
Use only SAE class "S" chains. Onlycertain brands of chains will fit yourCR-V without coming in contact withthe body or causing mechanicaldamage. Before buying any types ofchains, you should consult with yourHonda dealer about the designs andbrands that will work on your CR-V.Also, make sure you purchase thecorrect size for your tires.
Install the chains only on the fronttires. Mounting any type of chains onthe rear tires will damage the bodyand suspension. When installing thechains, follow the manufacturer'sinstructions and mount them astightly as you can. Drive slowly whenthey are installed. If you hear themcoming in contact with the body,stop and investigate them. Makesure the chains are installed tightly,and that they are not contacting thebrake lines or suspension. Removethe chains as soon as you begindriving on cleared roads.
Chains that are the wrong size ordesign, or are improperly installed, candamage your vehicle's brake lines,suspension, body, and wheels. Stopdriving if they are hitting any part ofthe vehicle.
Maintenance
NOTICE

Lights
Check the operation of your vehicle'sexterior lights at least once a month.A burned out bulb can create anunsafe condition by reducing yourvehicle's visibility and the ability tosignal your intentions to otherdrivers.
FRONT PARKING LIGHT
HEADLIGHT TURN SIGNAL/SIDE MARKER LIGHTS
Maintenance

Lights
HIGH-MOUNT BRAKE LIGHT TURN SIGNAL LIGHT STOP/TAILLIGHTSCheck the following:
Headlights (low and high beam)Parking lightsTafflightsBrake lightsHigh-mount brake lightTurn signalsBack-up lightsHazard light functionLicense plate lightSide marker lightsDaytime running lights(Canadian models)
If you find any bulbs are burned out,replace them as soon as possible.Refer to the chart on page 279 todetermine what type of replacementbulb is needed.
Maintenance
LICENSE PLATE LIGHT BACK-UP LIGHT SIDE MARKER LIGHT

Lights
Headlight AimingThe headlights were properly aimedwhen your vehicle was new. Youshould check their aim if youregularly carry heavy items in thetrunk. Each headlight assembly hashorizontal and vertical adjustmentindicators. These are set to their "0"positions after the headlights areaimed at the factory.
To check these settings:
1. Make sure the fuel tank is full.Park the vehicle on level ground.
2. The driver or someone whoweighs the same should be sittingin the driver's seat for all checksand adjustments.Load your vehicle with the itemsyou normally carry.
HORIZONTAL ANGLE GAUGE
3. Open the hood.
4. Pull the inner fender off (see page233).
5. Check the horizontal angle gauge.The line on the adjustment screwindicator should line up with the"0" mark on the gauge.
Maintenance

Lights
6. Check the vertical angle gauge.The bubble should be centeredunderneath the longest scribemark on the gauge.
HORIZONTAL ADJUSTMENT
7. If either indicator is not alignedwith its "0" mark as described, anadjustment can be made using aPhillips-head screwdriver torealign it with the "0" mark. Pleaserefer to the illustrations.
VERTICAL ADJUSTMENT
8. If you cannot get an indicator toalign, have your Honda dealerinspect the vehicle for bodydamage or suspension problems.
Maintenance
VERTICAL ANGLE GAUGE

Lights
Replacing a Headlight BulbYour vehicle has halogen headlightbulbs, one on each side. Whenreplacing a bulb, handle it by its steelbase and protect the glass fromcontact with your skin or hardobjects. If you touch the glass, cleanit with denatured alcohol and a cleancloth.
Halogen headlight bulbs get very hotwhen lit. Oil, perspiration, or a scratchon the glass can cause the bulb tooverheat and shatter.
1. Open the hood.
2. Remove the electrical connectorfrom the bulb by squeezing theconnector on both sides to unlockthe tab. Pull the connector straightoff.
3. Remove the rubber weather sealby pulling on the tab.
Maintenance
NOTICE

Lights
4. Unclip the end of the hold-downwire from its slot. Pivot it out ofthe way and remove the bulb.
5. Insert the new bulb into the hole,making sure the tabs are in theirslots. Pivot the hold-down wireback in place and clip the end intothe slot.
6. Install the rubber seal over theback of the headlight assembly.Make sure it is right side up; it ismarked "TOP."
7. Push the electrical connector ontothe new bulb.Turn on the headlights to test thenew bulb.
Replacing the Front Side Marker/Turn Signal and Parking LightBulb1. If you are changing the bulb on
the driver's side, start the engine,turn the steering wheel all the wayto the right, and turn off theengine. If you are changing thebulb on the passenger's side, turnthe steering wheel to the left.
2. Use a flat-tip screwdriver toremove the fastener from theinner fender.
CONTINUED
Maintenance
FASTENER

Lights
3. Pull the inner fender cover back.
4. Remove the socket from theheadlight assembly by turning itone-quarter turn counterclockwise.
5. To remove the turn signal/sidemarker bulb, push it in slightly andturn it counterclockwise. Toremove the parking light bulb, pullit straight out of its socket.
6. Install the new bulb in the socket.
7. Insert the socket back into theheadlight assembly. Turn itclockwise to lock it in place.
8. Test the lights to make sure thenew bulb is working.
9. Put the inner fender cover in place.Install the fastener and push onthe center until it locks (the centeris flush with the head).
Replacing Rear Bulbs
1. Open the tailgate. Remove thethree screws and remove the rearlight assembly from the rear pillar.
2. Determine which of the threebulbs is burned out: stop/taillight,turn signal light or back-up light.
Maintenance

Lights
3. Remove the socket by turning itone-quarter turn counterclockwise.
4. Remove the bulb from the socketby pulling it straight out.
5. Install the new bulb in the socket.
6. Reinstall the socket. Turn it clock-wise until it locks.
7. Test the lights to make sure thenew bulb is working.
8. Reinstall the rear light assemblyinto the rear pillar. Reinstall thethree screws and tighten themsecurely.
Replacing a Rear License Bulb
1. Remove the cover by carefullyprying on the edge of the cover inthe middle with a small flat-tipscrewdriver.
2. Remove the socket from the lightassembly by turning it one-quarterturn counterclockwise.
CONTINUED
Maintenance

Lights
3. Pull the bulb straight out of itssocket. Push the new bulb in untilit bottoms in the socket.
4. Turn on the parking lights andcheck that the new bulb isworking.
5. Reinstall the socket. Snap thecover back in place.
Replacing a Rear Side MarkerLight Bulb
1. The rear side marker lightassembly is behind the rear wheel.You can reach the light assemblyfrom the rear wheel housing.
2. Remove the outer three screwsholding the mudguard and pivotthe mudguard out of the way.
3. Remove the socket from the rearside marker assembly by turning itone-quarter turn counterclockwise.
4. Pull the bulb straight out of itssocket.
Maintenance

Lights
5. Install the new bulb in the socket.
6. Insert the socket back into therear side marker light assembly.Turn it clockwise to lock it in place.
7. Test the lights to make sure thenew bulb is working.
8. Put the mudguard back in placeand secure it with the threescrews.
Replacing a High-mount BrakeLight Bulb
1. Remove the light assembly coverby pushing the tabs on both sidesand pulling the cover down.
2. Remove the socket from the lightassembly by turning it one-quarterturn counterclockwise.
3. Pull the bulb straight out of itssocket.Push the new bulb straight intothe socket until it bottoms.
4. Test the lights to make sure thenew bulb is working.
5. Put the socket back into the lightassembly and turn it clockwise tolock it in place.
6. Put the cover back onto the lightassembly. Push it up until it locksin place.
Maintenance

Lights
Replacing Ceiling/Cargo AreaLights and Spotlight BulbsThe ceiling light, cargo area lightand spotlight come apart the sameway. They do not all use the samebulb.
CEILING/CARGO AREA LIGHT
1. Remove the lens by carefullyprying on the edge of the lens witha fingernail file or a small flat-tipscrewdriver. Do not pry on theedge of the housing around thelens.
SPOTLIGHT
2. Remove the bulb by pulling itstraight out of its metal tabs.
3. Push the new bulb into the metaltabs. Snap the lens back in place.
Maintenance

Storing Your Vehicle
If you need to park your vehicle foran extended period (more than onemonth), there are several things youshould do to prepare it for storage.Proper preparation helps preventdeterioration and makes it easier toget your vehicle back on the road. Ifpossible, store your vehicle indoors.
Fill the fuel tank.
Change the engine oil and filter(see page 199).
Wash and dry the exteriorcompletely.
Clean the interior. Make sure thecarpeting, floor mats, etc. arecompletely dry.
Leave the parking brake off. Putthe transmission in Reverse (5-speed manual) or Park(automatic).
Block the rear wheels.
If the vehicle is to be stored for alonger period, it should besupported on jackstands so thetires are off the ground.
Leave one window open slightly (ifthe vehicle is being storedindoors).
Disconnect the battery.
Support the front and rear wiperblade arms with a folded towel orrag so they do not touch thewindshield.
To minimize sticking, apply asilicone spray lubricant to all doorand tailgate seals. Also, apply avehicle body wax to the paintedsurfaces that mate with the doorand tailgate seals.
Cover the vehicle with a"breathable" cover, one madefrom a porous material such ascotton. Nonporous materials, suchas plastic sheeting, trap moisture,which can damage the paint.
If possible, run the engine for awhile periodically (preferably oncea month).
If you store your vehicle for 12months or longer, have your Hondadealer perform the inspections calledfor in the 24 months/30,000 miles(48,000 km) maintenance schedule(Normal Conditions) as soon as youtake it out of storage (see page 188).The replacements called for in themaintenance schedule are notneeded unless the vehicle hasactually reached that time or mileage.
Maintenance
Appearance Care
Regular cleaning and polishing ofyour Honda helps to keep it "new"looking. This section gives you hintson how to clean your vehicle andpreserve its appearance: the paint,brightwork, wheels and interior. Alsoincluded are several things you cando to help prevent corrosion.
Exterior Care.................................. 242Washing...................................... 242Waxing........................................ 243Aluminum Wheels..................... 243Paint Touch-up........................... 244
Interior Care................................... 245Carpeting.................................... 245Fabric.......................................... 245Vinyl............................................ 245Seat Belts.................................... 246Windows..................................... 246Air Fresheners........................... 246
Corrosion Protection..................... 247Body Repairs.................................. 248
Appearance Care

Exterior Care
WashingFrequent washing helps preserveyour vehicle's beauty. Dirt and gritcan scratch the paint, while tree sapand bird droppings can permanentlyruin the finish.
Wash your vehicle in a shady area,not in direct sunlight. If the vehicle isparked in the sun, move it into theshade and let the exterior cool downbefore you start.
Only use the solvents and cleanersrecommended in this Owner'sManual.
Chemical solvents and strong cleanerscan damage the paint, metal, andplastic on your vehicle.
Rinse the vehicle thoroughly withcool water to remove loose dirt.
Fill a bucket with cool water. Mixin a mild detergent, such asdishwashing liquid or a productmade especially for car washing.
Wash the vehicle using the waterand detergent solution and a soft-bristle brush, sponge, or soft cloth.Start at the top and work your waydown. Rinse frequently.
Check the body for road tar, treesap, etc. Remove these stains withtar remover or turpentine. Rinse itoff immediately so it does notharm the finish. Remember to re-wax these areas, even if the rest ofthe vehicle does not need waxing.
When you have washed and rinsedthe whole exterior, dry it with achamois or soft towel. Letting itair-dry will cause dulling and waterspots.
As you dry the vehicle, inspect it forchips and scratches that could allowcorrosion to start. Repair them withtouch-up paint (see page 244).
Appearance Care
NOTICE

Exterior Care
WaxingAlways wash and dry the wholevehicle before waxing it. You shouldwax your vehicle, including the metaltrim, whenever water sits on thesurface in large patches. It shouldform into beads or droplets afterwaxing.
You should use a quality liquid orpaste wax. Apply it according to theinstructions on the container. Ingeneral, there are two types ofproducts:
Waxes — A wax coats the finish andprotects it from damage by exposureto sunlight, air pollution, etc. Youshould use a wax on your Hondawhen it is new.
Polishes — Polishes and cleaner/waxes can restore the shine to paintthat has oxidized and lost some of itsshine. They normally contain mildabrasives and solvents that removethe top layer of the finish. Youshould use a polish on your Honda ifthe finish does not have its originalshine after using a wax.
Cleaning tar, insects, etc. withremovers also takes off the wax.Remember to re-wax those areas,even if the rest of the vehicle doesnot need waxing.
Aluminum WheelsOn some modelsClean your Honda's aluminum alloywheels as you do the rest of theexterior. Wash them with the samesolution, and rinse them thoroughly.
The wheels have a protective clear-coat that keeps the aluminum fromcorroding and tarnishing. Usingharsh chemicals, including somecommercial wheel cleaners, or stiffbrushes can damage this clear-coat.Only use a mild detergent and softbrush or sponge to clean the wheels.
Appearance Care

Exterior Care
Paint Touch-upYour dealer has touch-up paint tomatch your vehicle's color. The colorcode is printed on a sticker on thedriver's doorjamb. Take this code toyour dealer so you are sure to getthe correct color.
Inspect your vehicle frequently forchips or scratches in the paint.Repair them right away to preventcorrosion of the metal underneath.Use the touch-up paint only on smallchips and scratches. More extensivepaint damage should be repaired bya professional.
Appearance Care

Interior Care
CarpetingVacuum the carpeting frequently toremove dirt. Ground-in dirt will makethe carpet wear out faster.Periodically shampoo the carpet tokeep it looking new. Use one of thefoam-type carpet cleaners on themarket. Follow the instructions thatcome with the cleaner, applying itwith a sponge or soft brush. Keepthe carpeting as dry as possible bynot adding water to the foam.
FabricVacuum dirt and dust out of thematerial frequently. For generalcleaning, use a solution of mild soapand lukewarm water, letting it air dry.To clean off stubborn spots, use acommercially-available fabric cleaner.Test it on a hidden area of the fabricfirst, to make sure it does not bleachor stain the fabric. Follow theinstructions that come with thecleaner.
VinylRemove dirt and dust with a vacuumcleaner. Wipe the vinyl with a softcloth dampened in a solution of mildsoap and water. Use the samesolution with a soft-bristle brush onmore difficult spots. You can also usecommercially-available spray orfoam-type vinyl cleaners.
Appearance Care

Interior Care
If your seat belts get dirty, you canuse a soft brash with a mixture ofmild soap and warm water to cleanthem. Do not use bleach, dye, orcleaning solvents. They can weakenthe belt material. Let the belts air-dry before you use the vehicle.
Dirt build-up in the loops of the seatbelt anchors can cause the belts toretract slowly. Wipe the insides ofthe loops with a clean clothdampened in mild soap and warmwater or isopropyl alcohol.
WindowsClean the windows, inside and out,with a commercially-available glasscleaner. You can also use a mixtureof one part white vinegar to ten partswater. This will remove the haze thatbuilds up on the inside of thewindows. Use a soft cloth or papertowels to clean all glass and clearplastic surfaces.
The rear window defogger wires arebonded to the inside of the glass.Wiping vigorously up-and-down candislodge and break the defogger wires.When cleaning the rear window, usegentle pressure and wipe side-to-side.
Air FreshenersIf you want to use an air freshener/deodorizer in the interior of yourvehicle, it is best to use a solid type.Some liquid air fresheners containchemicals that may cause parts ofthe interior trim and fabric to crackor discolor.
If you use a liquid air freshener,make sure you fasten it securely so itdoes not spill as you drive.
Appearance Care
NOTICESeat Belts
LOOP

Corrosion Protection
Two factors normally contribute tocausing corrosion in your vehicle:
1. Moisture trapped in body cavities.Dirt and road salt that collects inhollows on the underside of thevehicle stays damp, promotingcorrosion in that area.
2. Removal of paint and protectivecoatings from the exterior andunderside of the vehicle.
Many corrosion-preventive measuresare built into your Honda. You canhelp keep your vehicle fromcorroding by performing somesimple periodic maintenance:
Repair chips and scratches in thepaint as soon as you discover them.
Inspect and clean out the drainholes in the bottom of the doorsand body.
Check the floor coverings fordampness. Carpeting and floormats may remain damp for a longtime, especially in winter. Thisdampness can eventually causethe floor panels to corrode.
Use a high-pressure spray to cleanthe underside of your vehicle. Thisis especially important in areasthat use road salt in winter. It isalso a good idea in humid climatesand areas subject to salt air.Vehicles equipped with ABS havea sensor and wiring at each wheel.Be careful not to damage them.
Have the corrosion-preventivecoatings on the underside of yourvehicle inspected and repairedperiodically.
Appearance Care

Body Repairs
Body repairs can affect your vehicle'sresistance to corrosion. If yourvehicle needs repairs after a collision,pay close attention to the parts usedin the repair and the quality of thework.
Make sure the repair facility usesGenuine Honda replacement bodyparts. Some companies make sheetmetal pieces that seem to duplicatethe original Honda body parts, butare actually inferior in fit, finish, andcorrosion resistance. Once installed,they do not give the same high-quality appearance.
When reporting your collision to theinsurance company, tell them youwant Genuine Honda parts used inthe repair. Although most insurersrecognize the quality of originalparts, some may try to specify thatthe repairs be done with otheravailable parts. You should investi-gate this before any repairs havebegun.
Take your vehicle to your authorizedHonda dealer for inspection after therepairs are completed. Your dealercan make sure that quality materialswere used, and that corrosion-preventive coatings were applied toall repaired and replaced parts.
Appearance Care

Taking Care of the Unexpected
This section covers the more-common problems that motoristsexperience with their vehicles. Itgives you information about how tosafely evaluate the problem and whatto do to correct it. If the problem hasstranded you on the side of the road,you may be able to get going again.If not, you will also find instructionson getting your vehicle towed.
Changing a Flat Tire..................... 250If Your Engine Won't Start........... 258
Nothing Happens or the StarterMotor Operates VerySlowly...................................... 258
The Starter OperatesNormally................................. 259
Jump Starting................................. 260If Your Engine Overheats............. 262Low Oil Pressure Indicator.......... 264Charging System Indicator........... 265Malfunction Indicator Lamp........ 266Brake System Indicator................ 267Fuses............................................... 268
Checking and Replacing........... 269Towing............................................ 273
Taking Care of the Unexpected

Changing a Flat Tire
If you have a flat tire while driving,stop in a safe place to change it.Stopping in traffic or on the shoulderof a busy road is dangerous. Driveslowly along the shoulder until youget to an exit or an area to stop thatis far away from the traffic lanes.
1. Park the vehicle on firm, level andnon-slippery ground away fromtraffic. Put the transmission inPark (automatic) or Reverse(manual). Apply the parking brake.
2. Turn on the hazard warning lightsand turn the ignition switch toLOCK (0). Have all thepassengers get out of the vehiclewhile you change the tire.
3. Pull up the cargo area carpet andopen the cargo area floor. To keepthe cargo area floor out of the way,attach the hook to the tailgate sillas shown.
4. The tool kit is in the right cargofloor pocket. Open the cover andtake out the tool kit.
Taking Care of the Unexpected
The vehicle can easily roll offthe jack, seriously injuringanyone underneath.
Follow the directions forchanging a tire exactly, andnever get under the vehiclewhen it is supported only by thejack.
TOOL KIT
SPARE TIREJACK
HOOK

Changing a Flat Tire
5. The jack is under the cargostorage bin. Remove each of thefour clips holding the bin bypulling straight up on the ring.Remove the bin.
To keep the tailgate door open onan incline, use the stop in the toolkit.The tool kit is in the right cargofloor pocket. Put the stop on thesupport strut as shown.
6. Turn the jack's end bracketcounterclockwise to loosen it, thenremove the jack by lifting itstraight up.
7. Zip the cover open.
CONTINUED
Taking Care of the Unexpected
CLIPS
STOP

Changing a Flat Tire
8. Pull out the cover's two lower flaps.Don't pull the top of the cover, oryou will tear it.
9. Pull the upper flaps out bygradually working your hands upthe sides of the cover.
10.Remove the cover.
11.Peel off the spare tire cover fromthe back of the spare tire andremove the cover. Do not forciblypull off the cover or you maydamage it.
12.Pull off the center spacer. Usingthe wheel wrench, remove thefour wheel nuts. Remove the sparetire from the holder.
13.Loosen the five wheel nuts 1/2turn with the wheel wrench.
Taking Care of the Unexpected
CENTER SPACER
WHEEL NUTS

Changing a Flat Tire
14.Locate the jacking point nearestthe tire you need to change. It ispointed to by an arrow molded intothe underside of the body. Placethe jack under the jacking point.Turn the end bracket clockwiseuntil the top of the jack contactsthe jacking point. Make sure thejacking point tab is resting in thejack notch.
15.Use the extension and wheelwrench as shown to raise thevehicle until the flat tire is off theground.
16.Remove the wheel nuts and flattire. Temporarily place the flat tireon the ground with the outsidesurface of the wheel facing up.You could scratch the wheel if youput it face down.
CONTINUED
Taking Care of the Unexpected
JACKING POINT
EXTENSION
WHEEL WRENCH

Changing a Flat Tire
17.Before mounting the spare tire,wipe any dirt off the mountingsurface of the wheel and hub witha clean cloth. Wipe the hubcarefully, it may be hot fromdriving.
18.Put on the spare tire. Put thewheel nuts back on finger-tight,then tighten them in a crisscrosspattern with the wheel wrenchuntil the wheel is firmly againstthe hub. Do not try to tightenthem fully.
19.Lower the vehicle to the groundand remove the jack.
Taking Care of the Unexpected
BRAKE HUB
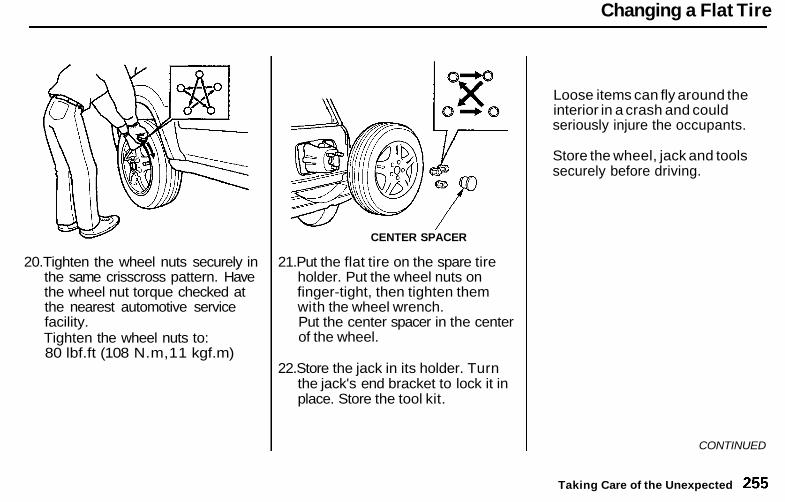
Changing a Flat Tire
20.Tighten the wheel nuts securely inthe same crisscross pattern. Havethe wheel nut torque checked atthe nearest automotive servicefacility.Tighten the wheel nuts to:80 lbf.ft (108 N.m,11 kgf.m)
21.Put the flat tire on the spare tireholder. Put the wheel nuts onfinger-tight, then tighten themwith the wheel wrench.Put the center spacer in the centerof the wheel.
22.Store the jack in its holder. Turnthe jack's end bracket to lock it inplace. Store the tool kit.
CONTINUED
Taking Care of the Unexpected
Loose items can fly around theinterior in a crash and couldseriously injure the occupants.
Store the wheel, jack and toolssecurely before driving.
CENTER SPACER

Changing a Flat Tire
23.Hold the cover at the 10 o'clockand 2 o'clock positions, then placethe top of it over the spare tire,making sure the top slit on theback of the cover is vertical.
Make sure the cover is at roomtemperature before you install it. If it'stoo cold, it won't fit easily over the tire.
24.Step back to check the alignmentof the logo. If needed, move thecover left or right until the logo isstraight.
25.Starting at the top of the tire,position the outside seam of thecover slightly over the outsideedge of the tire. Pull the cover on,a little at a time, and alternate sideto side along the tire until youreach the bottom.
Taking Care of the Unexpected
OUTSIDE SEAMTOP SLIT
NOTICE

Changing a Flat Tire
UPPER FLAP
SLIT
SPARE TIRE BRACKET
26.Pull the bottom of the cover overthe tire, and make sure the twoslits on the lower flaps of the coverare horizontal and the two upperflaps touch the spare tire bracket.
27.If needed, readjust the cover tosmooth out any wrinkles.
28.Zip the cover closed. 29.Replace the cargo storage bin.Secure it with the four clips. Pusheach clip down securely, and pivotthe ring down flat.
30.Unhook the cargo area floor andlower it. Replace the cargo areacarpet.
Taking Care of the Unexpected

If Your Engine Won't Start
Diagnosing why your engine won'tstart falls into two areas, dependingon what you hear when you turn thekey to START (III):
You hear nothing, or almostnothing. The engine's startermotor does not operate at all, oroperates very slowly.
You can hear the starter motoroperating normally, or the startermotor sounds like it is spinningfaster than normal, but the enginedoes not start up and run.
Nothing Happens or the StarterMotor Operates Very SlowlyWhen you turn the ignition switch toSTART (III), you do not hear thenormal noise of the engine trying tostart. You may hear a clicking soundor series of clicks, or nothing at all.Check these things:
Check the transmission interlock.If you have a manual transmission,the clutch pedal must be pushedall the way to the floor or thestarter will not operate. With anautomatic transmission, it must bein Park or Neutral.
Turn the ignition switch to ON (II).Turn on the headlights and checktheir brightness. If the headlightsare very dim or don't light at all,the battery is discharged. SeeJump Starting on page 260.
Turn the ignition switch to START(III). If the headlights do not dim,check the condition of the fuses. Ifthe fuses are OK, there is proba-bly something wrong with theelectrical circuit for the ignitionswitch or starter motor. You willneed a qualified technician todetermine the problem. (SeeTowing on page 273.)
Taking Care of the Unexpected

If Your Engine Won't Start
If the headlights dim noticeably orgo out when you try to start theengine, either the battery is dis-charged or the connections arecorroded. Check the condition of thebattery and terminal connections(see page 215). You can then tryjump starting the vehicle from abooster battery (see page 260).
The Starter Operates NormallyIn this case, the starter motor'sspeed sounds normal, or even fasterthan normal, when you turn theignition switch to START (III), butthe engine does not run.
Are you using the proper startingprocedure? Refer to Starting theEngine on page 154.
Do you have fuel? Turn theignition switch to ON (II) for aminute and watch the fuel gauge.The low fuel level warning lightmay not be working, so you werenot reminded to fil l the tank.
There may be an electricalproblem, such as no power to thefuel pump. Check all the fuses(see page 269).
If you find nothing wrong, you willneed a qualified technician to findthe problem. See Towing on page273 .
Taking Care of the Unexpected

Jump Starting
If your vehicle's battery has rundown, you may be able to start theengine by using a booster battery.Although this seems like a simpleprocedure, you should take severalprecautions.
You cannot start a Honda with anautomatic transmission by pushingor pulling it.
To jump start your vehicle, followthese directions closely:
1. Open the hood and check thephysical condition of the battery(see page 215). In very coldweather, check the condition ofthe electrolyte. If it seems slushyor like ice, do not try jump startinguntil it thaws.
If a battery sits in extreme cold, theelectrolyte inside can freeze.Attempting to jump start with a frozenbattery can cause it to rupture.
2. Turn off all the electrical acces-sories: heater, A/C, stereo system,lights, etc.
Put the transmission in Neutral orPark and set the parking brake.
Taking Care of the Unexpected
A battery can explode if you donot follow the correct procedure,seriously injuring anyonenearby.
Keep all sparks, open flames,and smoking materials awayfrom the battery.
NOTICE

Jump Starting
3. Connect one jumper cable to thepositive (+ ) terminal on thebooster battery. Connect the otherend to the positive (+ ) terminalon your Honda's battery.
4. Connect the second jumper cableto the negative (—) terminal onthe booster battery. Connect theother end to the ground wire onthe right side of the engine asshown. Do not connect this jumpercable to any other part of theengine.
5. If the booster battery is in anothervehicle, have an assistant startthat vehicle and run it at a fast idle.
6. Start your vehicle. If the startermotor still operates slowly, checkthe jumper cable connections tomake sure they have good metal-to-metal contact.
7. Once your vehicle is running,disconnect the negative cable fromyour vehicle, then from thebooster battery. Disconnect thepositive cable from your vehicle,then the booster battery.
Taking Care of the Unexpected
BOOSTER BATTERY

If Your Engine Overheats
The pointer of your vehicle'stemperature gauge should stay inthe midrange under most conditions.It may go higher if you are driving upa long steep hill on a very hot day. Ifit climbs to the red mark, you shoulddetermine the reason.
Driving with the temperature gaugepointer at the red mark can causeserious damage to your engine.
Your vehicle can overheat for severalreasons, such as lack of coolant or amechanical problem. The onlyindication may be the temperaturegauge climbing to or above the redmark. Or you may see steam orspray coming from under the hood.In either case, you should takeimmediate action.
1. Safely pull to the side of the road.Put the transmission in Neutral orPark and set the parking brake.Turn off the heating and coolingsystem and all other accessories.Turn on the hazard warningindicators.
2. If you see steam and/or spraycoming from under the hood, turnoff the engine.
3. If you do not see steam or spray,leave the engine running andwatch the temperature gauge. Ifthe high heat is due to overloading(climbing a long, steep hill on ahot day with the A/C running, forexample), the engine should startto cool down almost immediately.If it does, wait until the tempera-ture gauge comes down to the mid-point then continue driving.
4. If the temperature gauge stays atthe red mark, turn off the engine.
5. Wait until you see no more signsof steam or spray, then open thehood.
Taking Care of the Unexpected
NOTICE
Steam and spray from anoverheated engine canseriously scald you.
Do not open the hood if steamis coming out.

If Your Engine Overheats
6. Look for any obvious coolant leaks,such as a split radiator hose.Everything is still extremely hot,so use caution. If you find a leak, itmust be repaired before youcontinue driving (see Towing onpage 273).
7. If you don't find an obvious leak,check the coolant level in theradiator reserve tank (see page144). If the level is below the
MIN mark, add coolant to halfwaybetween the MIN and MAX marks.
8. If there was no coolant in thereserve tank, you may also have toadd coolant to the radiator. Let theengine cool down until the pointerreaches the middle of the tempera-ture gauge, or lower, before check-ing the radiator.
9. Using gloves or a large heavycloth, turn the radiator capcounterclockwise, without pushingdown, to the first stop. Thisreleases any remaining pressure inthe cooling system. After thepressure releases, push down onthe cap and turn it until it comesoff.
10. Start the engine and set thetemperature control dial tomaximum. Add coolant to theradiator up to the base of the fillerneck. If you do not have theproper coolant mixture available,you can add plain water.Remember to have the coolingsystem drained and refilled withthe proper mixture as soon as youcan.
11.Put the radiator cap back ontightly. Run the engine and watchthe temperature gauge. If it goesback to the red mark, the engineneeds repair. (See Towing onpage 273.)
12.If the temperature stays normal,check the coolant level in theradiator reserve tank. If it hasgone down, add coolant to theMAX mark. Put the cap back ontightly.
Taking Care of the Unexpected
Removing the radiator capwhile the engine is hot cancause the coolant to spray out,seriously scalding you.
Always let the engine andradiator cool down beforeremoving the radiator cap.

Low Oil Pressure Indicator
This indicator should light when theignition switch is ON (II), and go outafter the engine starts. It shouldnever come on when the engine ispinning. If it starts flashing, itindicates that the oil pressuredropped very low for a moment, thenrecovered. If the indicator stays onwith the engine running, it showsthat the engine has lost oil pressureand serious engine damage ispossible. In either case, you shouldtake immediate action.
Running the engine with low oilpressure can cause serious mechanicaldamage almost immediately. Turn offthe engine as soon as you can safely getthe vehicle stopped.
1. Safely pull off the road and shutoff the engine. Turn on the hazardwarning indicators.
2. Let the vehicle sit for a minute.Open the hood and check the oillevel (see page 143). Although oillevel and oil pressure are notdirectly connected, an engine thatis very low on oil can lose pressureduring cornering and other drivingmaneuvers.
3. If necessary, add oil to bring thelevel back to the full mark on thedipstick (see page 197).
4. Start the engine and watch the oilpressure indicator. If the lightdoes not go out within ten seconds,turn off the engine. There is amechanical problem that needs tobe repaired before you cancontinue driving. (See Towing onpage 273.)
Taking Care of the Unexpected
LOW OIL PRESSURE INDICATOR NOTICE

Charging System Indicator
This indicator should come on whenthe ignition switch is ON (II), and goout after the engine starts. If itcomes on brightly when the engineis running, it indicates that thecharging system has stoppedcharging the battery.
Immediately turn off all electricalaccessories: radio, heater, A/C, reardefogger, cruise control, etc. Try notto use other electrically-operatedcontrols such as the power windows.Keep the engine running and takeextra care not to stall it. Starting theengine will discharge the batteryrapidly.
By eliminating as much of theelectrical load as possible, you candrive several miles (kilometers)before the battery is too dischargedto keep the engine running. Drive toa service station or garage whereyou can get technical assistance.
Taking Care of the Unexpected
CHARGING SYSTEM INDICATOR

Malfunction Indicator Lamp
MALFUNCTION INDICATOR LAMP
This indicator comes on for a fewseconds when you turn the ignitionswitch ON (II). If it comes on at anyother time, it indicates one of theengine's emissions control systemsmay have a problem. Even thoughyou may feel no difference in yourvehicle's performance, it can reduceyour fuel economy and cause yourvehicle to put out excessiveemissions. Continued operation maycause serious damage.
If you have recently refueled yourvehicle, the cause of this indicatorcoming on could be a loose ormissing fuel fill cap. Check the capand tighten it until it clicks at leastthree times. Replace the fuel fi l l capif it is missing. Tightening the capwill not make the indicator turn offimmediately.
If the indicator remains on past threedriving trips, or the fuel cap was notloose or missing, have the vehiclechecked by the dealer as soon aspossible. Drive moderately until thedealer has inspected the problem.Avoid full-throttle acceleration anddriving at high speed.
You should also have the dealerinspect your vehicle if this indicatorcomes on repeatedly, even though itmay turn off as you continue driving.
If you keep driving with themalfunction indicator lamp on, you candamage your vehicle's emissionscontrols and engine. Those repairs maynot be covered by your vehicle'swarranties.
Taking Care of the Unexpected
NOTICE

Brake System Indicator
The Brake System indicator lightshould normally come on only whenthe parking brake is not fullyreleased.
If it comes on at any other time, itindicates a problem with the vehicle'sbrake system. In most cases, theproblem is a low fluid level in thebrake fluid reservoir. Press lightly onthe brake pedal to see if it feelsnormal. If it does, check the brakefluid level the next time you stop at aservice station (see page 210). If thefluid level is low, take the vehicle toyour dealer and have the brakesystem inspected for leaks or wornbrake pads.
However, if the brake pedal does notfeel normal, you should takeimmediate action. Because of thebrake system's dual-circuit design, aproblem in one part of the systemwill still give you braking at twowheels. You will feel the brake pedalgo down much farther before thevehicle begins to slow down, and youwill have to press harder on thepedal. The distance needed to stopwill be much longer.
Slow down by shifting to a lowergear, and pull to the side of the roadwhen it is safe. Because of thelonger distance needed to stop, it ishazardous to drive the vehicle. Youshould have it towed, and repaired assoon as possible. (See Towing onpage 273.)
If you must drive the vehicle a shortdistance in this condition, driveslowly and cautiously.
Taking Care of the Unexpected
BRAKE SYSTEM INDICATOR*
*U.S. indicator shown

Fuses
UNDER-HOOD TAB
All the electrical circuits in yourvehicle have fuses to protect themfrom a short circuit or overload.These fuses are located in two orthree fuse boxes.
The under-hood fuse box is locatedin the engine compartment. To openit, push the tab as shown.
INTERIOR
The interior fuse box is underneaththe dashboard on the driver's side.Remove the fuse box lid by swingingthe lid down and pulling it straightout of its hinges.
ABS FUSE BOX
Vehicles equipped with ABS have athird fuse box for the ABS. It is inthe engine compartment on thepassenger's side.
Taking Care of the Unexpected

Fuses
Checking and Replacing FusesIf something electrical in yourvehicle stops working, the first thingyou should check for is a blown fuse.Determine from the chart on pages271 and 272, or the diagram on the
fuse box lid, which fuse or fusescontrol that component. Check thosefuses first, but check all the fusesbefore deciding that a blown fuse isnot the cause. Replace any blownfuses and check the component'soperation.
1. Turn the ignition switch to LOCK(0). Make sure the headlights andall other accessories are off.
2. Remove the cover from the fusebox.
BLOWN
3. Check each of the large fuses inthe under-hood fuse box bylooking through the top at the wireinside. Removing these fusesrequires a Phillips-head screw-driver.
FUSE PULLER
4. Check the smaller fuses in theunder-hood fuse box and all thefuses in the interior fuse box bypulling out each fuse with the fusepuller provided in the door of theinterior fuse box.
CONTINUED
Taking Care of the Unexpected

Fuses
BLOWN
5. Look for a burned wire inside thefuse. If it is burned, replace it withone of the spare fuses of the samerating or lower.
If you cannot drive the vehiclewithout fixing the problem, and youdo not have a spare fuse, take a fuseof the same rating or a lower ratingfrom one of the other circuits. Makesure you can do without that circuittemporarily (such as the accessorypower socket or radio).If you replace the blown fuse with aspare fuse that has a lower rating, itmight blow out again. This does notindicate anything wrong. Replace thefuse with one of the correct rating assoon as you can.
Replacing a fuse with one that has ahigher rating greatly increases thechances of damaging the electricalsystem. If you do not have a replace-ment fuse with the proper rating for thecircuit, install one with a lower rating.
6. If the replacement fuse of thesame rating blows in a short time,there is probably a seriouselectrical problem in your vehicle.Leave the blown fuse in thatcircuit and have your vehiclechecked by a qualified mechanic.
On EX modelIf the radio fuse is removed, theaudio system will disable itself. Thenext time you turn on the radio youwill see "Code" in the frequencydisplay. Use the Preset buttons toenter the five-digit code (see page137).
Taking Care of the Unexpected
NOTICE

Fuses
INTERIOR FUSE BOX
CONTINUED
Taking Care of the Unexpected
* : Canadian model

Fuses
UNDER-HOOD FUSE BOX
ABS FUSE BOX (For some types)
Taking Care of the Unexpected

Towing
If your vehicle needs to be towed,call a professional towing service or,if you belong to one, an organizationthat provides roadside assistance.Never tow your vehicle behindanother vehicle with just a rope orchain. It is very dangerous.
Emergency TowingThere are three popular methods oftowing a vehicle:
Flat-bed Equipment — The operatorloads your vehicle on the back of atruck. This is the only way totransport your vehicle. Any othermethod of towing will damage thedrive system. When you contact thetowing agency, inform them that aflat-bed is required.
Towing a 4WD CR-V with only twotires on the ground will damage partsof the 4WD system. It should betransported on a flat-bed truck ortrailer.
Wheel Lift Equipment — The towtruck uses two pivoting arms that gounder the tires (front or rear) and liftthem off the ground. The other twotires remain on the ground.Never tow your vehicle withwheel lift equipment.
Sling-type Equipment — The towtruck uses metal cables with hookson the ends. These hooks go aroundparts of the frame or suspension andcables lift that end of the vehicle offthe ground. Your vehicle'ssuspension and body can beseriously damaged. This method oftowing your CR-V is unacceptable.
Improper towing preparation willdamage the transmission. Follow theabove procedure exactly. If you cannotshift the transmission or start theengine (automatic transmission), yourvehicle must be transported on a flat-bed.
Refer to Towing Your VehicleBehind a Motorhome on page176 for non-emergency towing
information.
Taking Care of the Unexpected
NOTICE NOTICE

Technical Information
The diagrams in this section giveyou the dimensions and capacities ofyour Honda, and the locations of theidentification numbers. The expla-nations of several electronic andmechanical systems on your Hondaare for the more technically-orientedowner.
Identification Numbers................. 276Specifications................................. 278Tire Information............................ 280
Tire Size Designation................ 280Wheel Size Designation............ 280Tire Speed Ratings.................... 280DOT Tire Quality Grading....... 281
Treadwear.............................. 281Traction.................................. 281Temperature.......................... 282
Oxygenated Fuels.......................... 283Driving in Foreign Countries....... 284Emissions Controls........................ 285
The Clean Air Act...................... 285Crankcase Emissions Control
System..................................... 285Evaporative Emissions Control
System..................................... 285Exhaust Emissions Controls.... 286
PGM-FI System..................... 286Ignition Timing Control
System................................. 286Three Way Catalytic
Converter............................ 286Replacement Parts..................... 286
Three Way Catalytic Converter... 287
Technical Information

Identification Numbers
Your vehicle has several identifyingnumbers located in various places.
The Vehicle Identification Number(VIN) is the 17-digit number yourHonda dealer uses to register yourvehicle for warranty purposes. It isalso necessary for licensing andinsuring your vehicle. The easiestplace to find the VIN is on a platefastened to the top of the dashboard.You can see it by looking throughthe windshield on the driver's side. Itis also on the Certification label at-tached to the driver's doorjamb, andis stamped on the engine com-partment bulkhead. The VIN is alsoprovided in bar code on theCertification label.
VEHICLE IDENTIFICATION NUMBER
CERTIFICATION LABEL
Technical Information

Identification Numbers
The Engine Number is stamped intothe engine block.
The Transmission Number is on alabel on top of the transmission.
TRANSMISSION NUMBER
ENGINE NUMBER
Technical Information

Specifications
* 1 : Including the coolant in the reserve tank and that remaining in theengine.Reserve tank capacity:0.16 US gal (0.6 ,0.13 Imp gal)
* 2 : Excluding the oil remaining in the engine.
Technical Information
page 214.

Specifications
Technical Information
page 272
page 271

Tire Information
Tire Size DesignationA tire's sidewall is marked with a tiresize designation. You will need thisinformation when selecting replace-ment tires for your vehicle. Thefollowing explains what the lettersand numbers in the tire sizedesignation mean.
(Example tire size designation)205/70R15 95S
205 — Tire width in millimeters.
70 — Aspect ratio. The tire's sectionheight as a percentage of its width.
R — Tire construction code (Radial).
15 — Rim diameter in inches.
95 — Load Index, a numerical codeassociated with the maximum loadthe tire can carry.
S — Speed Symbol. See the speedrating chart in this section foradditional information.
Wheel Size DesignationWheels are also marked withimportant information that you needif you ever have to replace one. Thefollowing explains what the lettersand numbers in the wheel sizedesignation mean.
(Example wheel size designation)15 x 6 JJ
15 — Rim diameter in inches.
6 — Rim width in inches.
JJ — Rim contour designation.
Tire Speed RatingsThe chart below shows many of thedifferent speed ratings currentlybeing used for passenger vehicletires. The speed symbol is part of thetire size designation on the sidewallof the tire. This symbol correspondsto that tire's designed maximum safeoperating speed.
Technical Information

Tire Information
DOT Tire Quality Grading(U.S. Vehicles)The tires on your car meet all U.S.Federal Safety Requirements. Al ltires are also graded for treadwear,traction, and temperature perform-ance according to Department ofTransportation (DOT) standards.The following explains thesegradings.
Uniform Tire Quality GradingQuality grades can be found whereapplicable on the tire sidewallbetween the tread shoulder and themaximum section width. Forexample:
Treadwear 200Traction AATemperature A
TreadwearThe treadwear grade is a compara-tive rating based on the wear rate ofthe tire when tested under controlledconditions on a specified governmenttest course. For example, a tiregraded 150 would wear one and onehalf (1-1/2) times as well on thegovernment course as a tire graded100. The relative performance oftires depends upon the actual condi-tions of their use, however, and maydepart significantly from the normdue to variations in driving habits,service practices, and differences inroad characteristics and climate.
TractionThe traction grades, from highest tolowest, are AA, A, B, and C. Thosegrades represent the tire's ability tostop on wet pavement as measuredunder controlled conditions onspecified government test surfacesof asphalt and concrete. A tiremarked C may have poor tractionperformance.
Warning: The traction gradeassigned to this tire is based onstraight-ahead braking traction tests,and does not include acceleration,cornering, hydroplaning, or peaktraction characteristics.
CONTINUED
Technical Information

Tire Information
TemperatureThe temperature grades are A (thehighest), B, and C, representing thelire's resistance to the generation ofheat and its ability to dissipate heatwhen tested under controlledconditions on a specified indoorlaboratory test wheel. Sustained hightemperature can cause the materialof the tire to degenerate and reducetire life, and excessive temperaturecan lead to sudden tire failure. Thegrade C corresponds to a level ofperformance which all passengervehicle tires must meet under theFederal Motor Vehicle SafetyStandard No. 109. Grades B and Arepresent higher levels ofperformance on the laboratory testwheel than the minimum required bylaw.
Warning: The temperature grade forthis tire is established for a tire thatis properly inflated and not over-loaded. Excessive speed, underinfla-tion, or excessive loading eitherseparately or in combination, cancause heat build-up and possible tirefailure.
Technical Information

Oxygenated Fuels
Some conventional gasolines arebeing blended with alcohol or anether compound. These gasolinesare collectively referred to asoxygenated fuels. To meet clean airstandards, some areas of the UnitedStates and Canada use oxygenatedfuels to help reduce emissions.
If you use an oxygenated fuel, besure it is unleaded and meets theminimum octane rating requirement.
Before using an oxygenated fuel, tryto confirm the fuel's contents. Somestates/provinces require thisinformation to be posted on thepump.
The following are the U.S. EPA andCanadian CGSB approvedpercentages of oxygenates:
ETHANOL (ethyl or grain alcohol)You may use gasoline containing upto 10 percent ethanol by volume.Gasoline containing ethanol may bemarketed under the name "Gasohol."
MTBE (Methyl Tertiary ButylEther)You may use gasoline containing upto 15 percent MTBE by volume.
METHANOL (methyl or woodalcohol)You may use gasoline containing upto 5 percent methanol by volume aslong as it also contains cosolventsand corrosion inhibitors to protectthe fuel system. Gasoline containingmore than 5 percent methanol byvolume may cause starting and/orperformance problems. It may alsodamage metal, rubber and plastic
parts of your fuel system.
If you notice any undesirableoperating symptoms, try anotherservice station or switch to anotherbrand of gasoline.
Fuel system damage or performanceproblems resulting from the use ofan oxygenated fuel containing morethan the percentages of oxygenatesgiven above are not covered underwarranty.
Technical Information

Driving in Foreign Countries
If you are planning to take yourHonda outside the U.S. or Canada,contact the tourist bureaus in theareas you will be traveling in to findout about the availability of unleadedgasoline with the proper octanerating.
If unleaded gasoline is not available,be aware that using leaded gasolinein your Honda will affect perfor-mance and fuel mileage, and damageits emissions controls. It will nolonger comply with U.S. andCanadian emissions regulations, andwill be illegal to operate in NorthAmerica. To bring your vehicle backinto compliance will require the re-placement of several components,such as the oxygen sensors and thethree way catalytic converter. Thesereplacements are not covered underwarranty.
Technical Information
Emissions Controls
The burning of gasoline in yourvehicle's engine produces several by-products. Some of these are carbonmonoxide (CO), oxides of nitrogen(NOx) and hydrocarbons (HC).Gasoline evaporating from the tankalso produces hydrocarbons. Con-trolling the production of NOx, CO,and HC is important to the environ-ment. Under certain conditions ofsunlight and climate, NOx and HCreact to form photochemical "smog."Carbon monoxide does not contri-bute to smog creation, but it is apoisonous gas.
The Clean Air ActThe United States Clean Air Act*sets standards for automobileemissions. It also requires thatautomobile manufacturers explain toowners how their emissions controlswork and what to do to maintainthem. This section summarizes howthe emissions controls work.Scheduled maintenance is on page188.
* In Canada, Honda vehicles complywith the Canadian Motor VehicleSafety Standards (CMVSS) forEmissions valid at the time they aremanufactured.
Crankcase Emissions ControlSystemYour vehicle has a PositiveCrankcase Ventilation System. Thiskeeps gasses that build up in theengine's crankcase from going intothe atmosphere. The Positive Crank-case Ventilation valve routes themfrom the crankcase back to theintake manifold. They are thendrawn into the engine and burned.
Evaporative Emissions ControlSystemAs gasoline evaporates in the fueltank, an evaporative emissionscontrol canister filled with charcoaladsorbs the vapor. It is stored in thiscanister while the engine is off. Afterthe engine is started and warmed up,the vapor is drawn into the engineand burned during driving.
Technical Information

Emissions Controls
Exhaust Emissions ControlsThe exhaust emissions controlsinclude three systems: PGM-FI,Ignition Timing Control and ThreeWay Catalytic Converter. Thesethree systems work together tocontrol the engine's combustion andminimize the amount of HC, CO, andNOx that comes out the tailpipe. Theexhaust emissions control systemsare separate from the crankcase andevaporative emissions controlsystems.
PGM-FI SystemThe PGM-FI System uses sequentialmultiport fuel injection.It has three subsystems: Air Intake,Engine Control, and Fuel Control.The Engine Control Module (ECM)or the Powertrain Control Module(PCM) uses various sensors todetermine how much air is goinginto the engine. It then controls howmuch fuel to inject under all operat-ing conditions.
Ignition Timing Control SystemThis system constantly adjusts theignition timing, reducing the amountof HC, CO and NOx produced.
Three Way Catalytic ConverterThe three way catalytic converter isin the exhaust system. Throughchemical reactions, it converts HC,CO, and NOx in the engine's exhaustto carbon dioxide (CO2), dinitrogen(N2), and water vapor.
Replacement PartsThe emissions control systems aredesigned and certified to work to-gether in reducing emissions tolevels that comply with the Clean AirAct. To make sure the emissionsremain low, you should use only newGenuine Honda replacement parts ortheir equivalent for repairs. Usinglower quality parts may increase theemissions from your vehicle.
The emissions control systems arecovered by warranties separate fromthe rest of your vehicle. Read yourwarranty manual for more informa-tion.
Technical Information

Three Way Catalytic Converter
The three way catalytic convertercontains precious metals that serveas catalysts, promoting chemicalreactions to convert the exhaustgasses without affecting the metals.The catalytic converter is referred toas a three-way catalyst, since it actson HC, CO, and NOx. A replacementunit must be an original Honda partor its equivalent.
The three way catalytic convertermust operate at a high temperaturefor the chemical reactions to takeplace. It can set on fire any com-bustible materials that come near it.Park your vehicle away from highgrass, dry leaves, or other flamma-bles.
A defective three way catalyticconverter contributes to air pollution,and can impair your engine's per-formance. Follow these guidelines toprotect your vehicle's three waycatalytic converter.
Always use unleaded gasoline.Even a small amount of leadedgasoline can contaminate thecatalyst metals, making the threeway catalytic converter ineffective.
Keep the engine tuned-up.
Have your vehicle diagnosed andrepaired if it is misfiring, back-firing, stalling, or otherwise notrunning properly.
Technical Information
THREE WAY CATALYTIC CONVERTER

Warranty and Customer Relations
Customer RelationsInformation................................. 290
U.S. Zone Office Map.................... 291Canada Zone Office Map.............. 292Warranty Coverages..................... 293Reporting Safety Defects
(U.S. Vehicles)........................... 294Authorized Manuals...................... 295
Warranty and Customer Relations

Customer Relations Information
Honda dealership personnel aretrained professionals. They shouldbe able to answer all your questions.If you encounter a problem that yourdealership does not solve to yoursatisfaction, please discuss it withthe dealership's management. TheService Manager or GeneralManager can help. Almost allproblems are solved in this way.
If you are dissatisfied with thedecision made by the dealership'smanagement, contact your HondaCustomer Relations Zone Office.Refer to the U.S. and Canadian ZoneOffice maps on the following pages.
When you call or write, please giveus this information:
Vehicle Identification Number(see page 276)Name and address of the dealerwho services your vehicleDate of purchaseMileage on your vehicleYour name, address, and tele-phone numberA detailed description of theproblemName of the dealer who sold thevehicle to you
Warranty and Customer Relations

U.S. Zone Office Map
The addresses and telephone numbers are subject to change. If you cannotreach your Zone office, ask your Honda dealer for the current information.
Western ZoneP.O. Box 2260
700 Van Ness AvenueTorrance, California90509-2260(310) 781-4565
Northwestern ZoneP.O. Box 20186
12439 N.E. Airport WayPortland, Oregon 97230(503) 256-0943(also includes Alaska andHawaii)
South Central Zone4529 Royal Lane
Irving, Texas 75063(972) 929-5481
Central Zone101 South Stanfield Road
Troy, Ohio 45373(937) 332-6250
Northeastern ZoneP.O. Box 337
Eastgate Industrial Park115 Gaither DriveMoorestown, New Jersey 08057(609) 235-5533
Includes: NYC Metro area andFairfield County, CT area
Mid-Atlantic Zone902 Wind River Ln., Suite 200
Gaithersburg, Maryland 20878(301) 990-2020
Southeastern Zone1500 Morrison Parkway
Alpharetta, Georgia 30004(770) 442-2045
North Central Zone601 Campus Drive, Suite A-9
Arlington Heights, Illinois 60004(847) 870-5600
New England Zone555 Old County Road
Windsor Locks, Connecticut 06096(860) 623-3310See Zone 5 for:NYC Metro area andFairfield County, CT area
West Central Zone1600 South Abilene Street, Suite D
Aurora, Colorado 80012(303) 696-3935
Puerto Rico and U.S. V.I.Bella International
P.O. Box 190816San Juan, PR 00919-0816(787) 250-4318
Warranty and Customer Relations

Canada Zone Office Map
Western ZoneHonda Canada Inc.13240 Worster CourtRichmond, B.C.V6V 2B8(604) 278-7121
Central ZoneHonda Canada Inc.715 Milner AvenueScarborough, ONM1B 2K8(416) 299-3400
Quebec ZoneHonda Canada Inc.1750 rue EiffelBoucherville, QuebecJ4B 7W1(450) 655-6161
Atlantic ZoneHonda Canada Inc.51 Raddall AvenueSuite 1Dartmouth, NSB3B 1L4(902) 468-4416
Warranty and Customer Relations

Warranty Coverages
U.S. OwnersYour new Honda is covered by thesewarranties:
New Vehicle Limited Warranty —covers your new vehicle, except forthe battery, emissions controlsystems and accessories, againstdefects in materials andworkmanship.
Emissions Control Systems DefectsWarranty and EmissionsPerformance Warranty — these twowarranties cover your vehicle's emis-sions control systems. Time, mileage,and coverage are conditional. Pleaseread the warranty manual for exactinformation.
Original Equipment Battery LimitedWarranty — this warranty gives upto 100 percent credit toward areplacement battery.
Seat Belt Limited Warranty — a seatbelt that fails to function properly iscovered for the useful life of thevehicle.
Rust Perforation Limited Warranty— all exterior body panels arecovered for rust-through from theinside for the specified time periodwith no mileage limit.
Accessory Limited Warranty —Genuine Honda Accessories arecovered under this warranty. Timeand mileage limits depend on thetype of accessory and other factors.Please read your warranty manualfor details.
Replacement Parts LimitedWarranty — covers all GenuineHonda replacement parts againstdefects in materials and workman-ship.
Replacement Battery LimitedWarranty — provides proratedcoverage for a replacement batterypurchased from a Honda dealer.
Replacement Muffler LifetimeLimited Warranty — providescoverage for as long as the pur-chaser of the muffler owns thevehicle.
Restrictions and exclusions apply toall these warranties. Please read the1999 Honda Warranty Informationbooklet that came with your vehiclefor precise information on warrantycoverages. Your Honda's originaltires are covered by theirmanufacturer. Tire warranty infor-mation is in a separate booklet.
Canadian OwnersPlease refer to the 1999 WarrantyManual that came with your vehicle.
Warranty and Customer Relations

Reporting Safety Defects (U.S. Vehicles)
If you believe that your vehicle has adefect which could cause a crash orcould cause injury or death, youshould immediately inform theNational Highway Traffic SafetyAdministration (NHTSA) in additionto notifying American Honda MotorCo., Inc.
If NHTSA receives similar com-plaints, it may open an investigation,and if it finds that a safety defectexists in a group of vehicles, it mayorder a recall and remedy campaign.However, NHTSA cannot becomeinvolved in individual problemsbetween you, your dealer, orAmerican Honda Motor Co., Inc.
To contact NHTSA, you may eithercall the Auto Safety Hotline toll-freeat 1-800424-9393 (or 366-0123 inWashington D.C. area) or write to:NHTSA, U.S. Department ofTransportation, Washington,D.C. 20590. You can also obtainother information about motorvehicle safety from the Hotline.
Warranty and Customer Relations

Authorized Manuals
Purchasing Factory Authorized Manuals(U.S. only)The following publications covering the operation andservicing of your vehicle can be obtained from HelmIncorporated, either by filling out the attached form or,for credit card holders, calling the toll-free phone numberon the form. For manuals prior to the year shown below,contact Helm Incorporated, P.O. Box 07280, Detroit,Michigan 48207, or call 1-800-782-4356.
Valid only for sales within the U.S. Canadian owners shouldcontact their authorized Honda dealer.
By completing this form you can order the materials desired. You canpay by check or money order, or charge to your credit card. Mail toHelm Incorporated at the address shown on the back of the order form.
61S1002
61S1002EL
61S1030
31S10620
HON-R

Authorized Manuals
These Publications cannot be returned for credit without receiving advance authorization within 14days of delivery. On returns, a restocking fee may be applied against the original order.
P.O. BOX 07280 DETROIT, MICHIGAN 48207 1-800-782-4356
Service Manual:This manual covers maintenance and recommendedprocedures for repair to engine and chassis components.It is written for the Journeyman mechanic, but is simpleenough for most mechanically-inclined owners to under-stand.
Electrical Troubleshooting Manual:This manual complements the Service Manual byproviding in-depth troubleshooting information for eachelectrical circuit in your vehicle.
Body Repair Manual:This manual describes the procedures involved in thereplacement of damaged body parts.
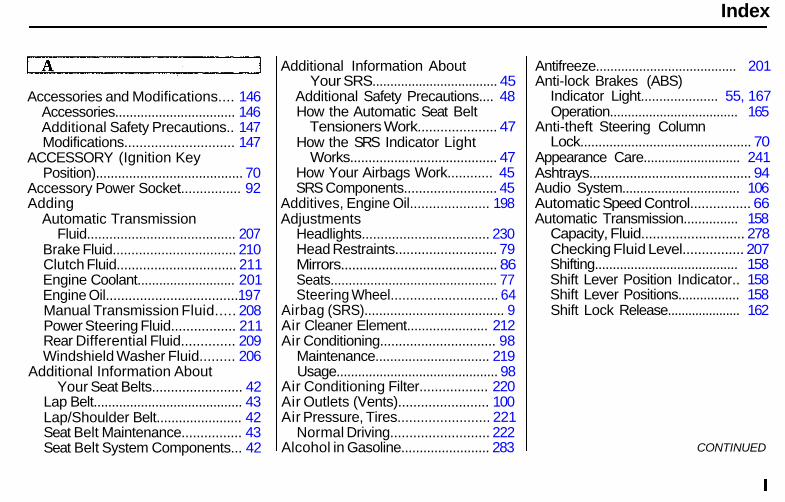
Index
Accessories and Modifications.... 146Accessories................................. 146Additional Safety Precautions.. 147Modifications............................. 147
ACCESSORY (Ignition KeyPosition)........................................ 70
Accessory Power Socket................ 92Adding
Automatic TransmissionFluid........................................ 207
Brake Fluid................................. 210Clutch Fluid................................ 211Engine Coolant........................... 201Engine Oil................................... 197Manual Transmission Fluid..... 208Power Steering Fluid................. 211Rear Differential Fluid.............. 209Windshield Washer Fluid......... 206
Additional Information AboutYour Seat Belts........................ 42
Lap Belt......................................... 43Lap/Shoulder Belt....................... 42Seat Belt Maintenance................ 43Seat Belt System Components... 42
Additional Information AboutYour SRS................................... 45
Additional Safety Precautions.... 48How the Automatic Seat Belt
Tensioners Work..................... 47How the SRS Indicator Light
Works........................................ 47How Your Airbags Work............ 45SRS Components......................... 45
Additives, Engine Oil..................... 198Adjustments
Headlights.................................. 230Head Restraints........................... 79Mirrors.......................................... 86Seats.............................................. 77Steering Wheel............................ 64
Airbag (SRS)...................................... 9Air Cleaner Element...................... 212Air Conditioning............................... 98
Maintenance............................... 219Usage............................................. 98
Air Conditioning Filter.................. 220Air Outlets (Vents)........................ 100Air Pressure, Tires........................ 221
Normal Driving.......................... 222Alcohol in Gasoline........................ 283
Antifreeze....................................... 201Anti-lock Brakes (ABS)
Indicator Light..................... 55, 167Operation.................................... 165
Anti-theft Steering ColumnLock............................................... 70
Appearance Care........................... 241Ashtrays............................................ 94Audio System................................. 106Automatic Speed Control................ 66Automatic Transmission............... 158
Capacity, Fluid........................... 278Checking Fluid Level................ 207Shifting........................................ 158Shift Lever Position Indicator.. 158Shift Lever Positions................. 158Shift Lock Release..................... 162
CONTINUED

Index
BatteryCharging System
Indicator............................ 54, 265Jump Starting............................. 260Maintenance............................... 215Specifications............................. 279
Before Driving............................... 139Belts, Seat........................................... 8Beverage Holder.............................. 88Body Repair.................................... 248Brakes
Anti-lock System (ABS)............ 165Break-in, New Linings.............. 140Fluid............................................ 210Light, Burned-out...................... 234Parking.......................................... 86System Indicator.................. 54, 267Wear Indicators......................... 164
Brakes, ABSOperation.................................... 165System Indicator.................. 55, 167
Braking System.............................. 164Break-in, New Car......................... 140Brightness Control, Instruments... 61
Brights, Headlights......................... 60Built-in Table.................................... 89Bulb Replacement
Back-up Lights........................... 234Brake Lights............................... 234Cargo Area Light....................... 238Ceiling Light............................... 238Front Parking Lights................. 233Front Side Marker Lights......... 233Headlights.................................. 232High-mount Brake Light.......... 237Interior Light.............................. 238License Plate Lights.................. 235Rear Side Marker Lights.......... 236Specifications............................. 279Spotlight...................................... 238Turn Signal Lights..................... 233
Bulbs, Halogen............................... 232
Cables, Jump Starting With.......... 260Capacities Chart............................. 278Carbon Monoxide Hazard.............. 49Cargo Area Light............................. 95Cargo Floor Pockets........................ 92
Cargo Hooks..................................... 93Carrying Cargo.............................. 148Cassette Player
Care............................................. 136Operation........................... 112, 133
CAUTION, Explanation of............... iiCD Changer........................... 115, 129CD Player............................... 115, 127Center Pocket.................................. 91Center Table..................................... 87Certification Label......................... 276Chains............................................. 227Change Oil
How to......................................... 199When to....................................... 188
Changing a Flat Tire..................... 250Changing Engine Coolant............. 203Charging System Indicator.... 54, 265Checking
Automatic TransmissionFluid........................................ 207
Battery Condition...................... 215Brake Fluid................................. 210Clutch Fluid................................ 211Drive Belts.................................. 220Engine Coolant........................... 144

Index
Engine Oil................................... 143Fuses........................................... 269Manual Transmission Fluid..... 208Power Steering Fluid................. 211Rear Differential Fluid.............. 209
Checklist, Before Driving............. 153Childproof Door Locks................... 75Child Safety...................................... 21Cleaner, Air.................................... 212Cleaning
Aluminum Wheels..................... 243Carpeting.................................... 245Exterior....................................... 242Fabric.......................................... 245Interior........................................ 245Seat Belts.................................... 246Vinyl............................................ 245Windows..................................... 246
Clock, Setting the............................ 87Clutch Fluid.................................... 211CO in the Exhaust......................... 285Cold Weather, Starting in............. 155Consumer Information*................ 289Controls, Instruments and.............. 51Coolant
Adding......................................... 201
Checking..................................... 144Proper Solution.......................... 201Replacing.................................... 203Temperature Gauge.................... 57
Corrosion Protection..................... 247Crankcase Emission Control
System......................................... 285Cruise Control Operation............... 66Customer Relations Office........... 290
DANGER, Explanation of................. iiDashboard........................................ 52Daytime Running Lights................. 60Dead Battery, What to Do............ 260Defects, Reporting Safety............. 294Defog and Defrost......................... 103Defogger, Rear Window................. 63Defrosting the Windows............... 103DEXRON® I I I Automatic
Transmission Fluid.................... 207Dimensions..................................... 278Dimming the Headlights................ 60Dipstick
Automatic Transmission........... 207
Engine Oil................................... 143Directional Signals........................... 61Disabled, Towing Your Car If...... 273Disc Brake Wear Indicators......... 164Disposal of Used Oil...................... 200Doors
Locking and Unlocking............... 70Power Door Locks....................... 71
DOT Tire Quality Grading........... 281Downshifting, 5-speed Manual
Transmission.............................. 156Drive Belts...................................... 220Driving............................................ 151
Economy..................................... 145In Bad Weather.......................... 168In Foreign Countries................. 284
Driving Guidelines......................... 152
CONTINUED

Index
Economy, Fuel............................... 145Emergencies on the Road............. 249
Battery, Jump Starting.............. 260Brake System Indicator............ 267Changing a Flat Tire................. 250Charging System Indicator...... 265Checking the Fuses................... 269Low Oil Pressure Indicator...... 264Malfunction Indicator Lamp.... 266Overheated Engine................... 262
Emergency Brake............................ 86Emergency Flashers....................... 63Emission Controls......................... 285Engine
Coolant Temperature Gauge..... 57Malfunction Indicator
Lamp................................. 54, 266Oil Pressure Indicator......... 54, 264Oil, What Kind to Use............... 197Overheating................................ 262Specifications............................. 278
Ethanol in Gasoline....................... 283Evaporative Emission Controls.... 285Exhaust Fumes................................ 49
Expectant Mothers, Use of SeatBelts by......................................... 19
Exterior, Cleaning the................... 242
Fabric, Cleaning............................. 245Fan, Interior...................................... 98Features, Comfort and
Convenience................................. 97Filling the Fuel Tank..................... 141Filters
Air................................................ 212Air Conditioning........................ 219Oil................................................ 199
5-speed Manual TransmissionChecking Fluid Level................ 208Shifting the................................. 156
Flashers, Hazard Warning.............. 63Flat Tire, Changing a.................... 250Fluids
Automatic Transmission........... 207Brake........................................... 210Clutch.......................................... 211Manual Transmission............... 208Power Steering........................... 211
Rear Differential........................ 209Windshield Washer................... 206
FM Stereo RadioReception.................................... 125
Folding Rear Seat............................ 82Foreign Countries, Driving in...... 284Four-way Flashers........................... 63Front End, Towing by
Emergency Wrecker................. 273Fuel.................................................. 140
Fill Door and Cap....................... 141Gauge............................................ 57Octane Requirement................. 140Oxygenated................................ 283Reserve Indicator......................... 55Tank, Filling the......................... 141
Fuses, Checking the...................... 269
Gas Mileage, Improving................ 145Gasohol........................................... 283Gasoline.......................................... 140
Fuel Reserve Indicator................ 55Gauge............................................ 57Octane Requirement................. 140

Index
Tank, Filling the......................... 141Gas Station Procedures................. 141Gauges
Engine Coolant Temperature.... 57Fuel................................................ 57
Gearshift Lever PositionsAutomatic Transmission........... 1585-speed Manual
Transmission.......................... 157Glass Cleaning............................... 246Glove Box......................................... 77
Halogen Headlight Bulbs.............. 232Hazard Warning Flashers............... 63Headlights
Aiming......................................... 230Daytime Running Lights............. 60High Beam Indicator................... 55High Beams, Turning on............ 60Low Beams, Turning on............. 60Reminder Beeper......................... 60Replacing Halogen Bulbs......... 232Turning on.................................... 60
Head Restraints............................... 79
Heating and Cooling........................ 98High Altitude, Starting at.............. 155High-Low Beam Switch.................. 60High-mount Brake Light............... 237Hood Latch..................................... 213Hood, Opening the........................ 142Horn................................................... 59Hot Coolant, Warning about........ 201Hydraulic Clutch............................ 211Hydroplaning.................................. 169
Identification Number, Vehicle.... 276If Your Car Has to be Towed....... 273Ignition
Keys............................................... 69Switch............................................ 69Timing Control System............. 286
Important Safety Precautions.......... 6Indicator Lights, Instrument
Panel.............................................. 53Infant Restraint................................ 29Inflation, Proper Tire.................... 221
High Speed Driving................... 222Normal Driving.......................... 222
Inside Mirror.................................... 85Inspection, Tire.............................. 223Instrument Panel............................. 53Instrument Panel Brightness......... 61Interior Cleaning............................ 245Interior Light.................................... 94Introduction......................................... i
Jacking up the Vehicle.................. 253Jack, Tire........................................ 250Jump Starting................................. 260
Keys................................................... 69
Label, Certification........................ 276Lane Change, Signaling.................. 61Lap Belt............................................. 43Lap/Shoulder Belts......................... 42Leaking of Exhaust into Car.......... 49
CONTINUED

Index
LightsBulb Replacement..................... 232Indicator........................................ 53Parking.......................................... 60Turn Signal................................... 61
LOCK (Ignition Key Position)....... 70Locks
Anti-theft Steering Column........ 70Fuel Fill Door............................. 141Glove Box..................................... 77Power Door.................................. 71Tailgate......................................... 75
Low Coolant Level......................... 144Low Fuel Indicator.......................... 55Low Oil Pressure Indicator... 54, 264Lubricant Specifications Chart.... 278
Manual Transmission.................... 156Manual Transmission Fluid......... 208Maximum Allowable Shift
Speeds................................ 157, 161Meters, Gauges................................ 56Methanol in Gasoline.................... 283Mirrors, Adjusting........................... 86
Octane Requirement, Gasoline.... 140Odometer.......................................... 56Odometer, Trip................................ 56Off-Highway Guidelines............... 177Oil
Change, How to......................... 199Change, When to....................... 188Checking Engine....................... 143
Pressure Indicator.............. 54, 264Selecting Proper Viscosity
Chart....................................... 198ON (Ignition Key Position)............ 70Opening the Hood......................... 142Opening the Tailgate....................... 75Operation in Foreign Countries... 284Outside Mirrors............................... 86Over-Drive...................................... 160Overheating, Engine..................... 262
Paint Touch-up............................... 244Panel Brightness Control............... 61Park Gear Position......................... 159Parking............................................ 163Parking Brake.................................. 86Parking Lights.................................. 60Parking Over Things that Burn... 287PGM-FI System.............................. 286Polishing and Waxing................... 243Power
Door Locks................................... 71Mirrors.......................................... 86Steering....................................... 211
Maintenance................................... 183Owner Maintenance Checks.... 195Record..................................193 -194Required Indicator....................... 58Safety........................................... 184Schedule.............................. 188-192
Malfunction Indicator Lamp. 54, 266
Neutral Gear Position.................... 160New Vehicle Break-in................... 140Normal Shift Speeds...................... 157NOTICE, Explanation of................... iiNumbers, Identification................ 276

Index
Windows....................................... 84Pre-Drive Safety Checklist............. 11Pregnancy, Using Seat Belts.......... 19Protecting Adults............................. 12
Additional Safety Precautions.... 19Advice for Pregnant Women...... 19
Protecting Children......................... 21Protecting Infants........................ 29Protecting Larger Children........ 37Protecting Small Children.......... 33Using Child Seats with
Tethers...................................... 40
Radiator Overheating.................... 262Radio/Cassette Sound System.... 107Rear Differential Fluid.................. 209Rear End Towing........................... 273Rear Lights, Bulb Replacement... 234Rear Seat, Folding........................... 82Rear View Mirror............................. 85Rear Window Defogger.................. 63Rear Window Wiper and Washer.. 63Reclining the Seat Backs................ 81Recommended Shift Speeds........ 157
Reminder Lights.............................. 53Remote Transmitter........................ 72Replacement Information
Air Cleaner Element.................. 212Air Conditioning Filter.............. 220Coolant........................................ 203Engine Oil and Filter................. 199Fuses........................................... 269Light Bulbs................................. 232Schedule..................................... 186Spark Plugs................................. 213Timing Belt................................. 221Tires............................................ 225Wiper Blades.............................. 217
Replacing Seat Belts After aCrash............................................. 43
Reserve Tank, Engine Coolant.... 144Restraint, Child................................ 21Reverse Gear Position................... 160Rotation, Tire................................. 224
Safety Belts......................................... 8Safety Defects, Reporting*.......... 294Safety Checklist, Pre-Drive............ 11
Safety Features.................................. 7Airbags............................................ 8Door Locks................................... 11Head Restraints........................... 10Seat Belts........................................ 8Seats & Seat-Backs...................... 10
Safety Labels, Location of.............. 50Safety Messages................................ iiSeat Belt, Additional Information.. 42
Lap Belt......................................... 43Lap/Shoulder Belt....................... 42Seat Belt Maintenance................ 43Seat Belt System Components... 42
Seat Belts............................................ 8Advice for Pregnant Women...... 19Child Seat Anchor Plate.............. 41Cleaning...................................... 246Frayed or Torn............................. 43Maintenance................................. 43Reminder Light and
Beeper.................................42, 54Replacement................................. 43System Components.................... 42Tether Attachment Points.......... 40
CONTINUED
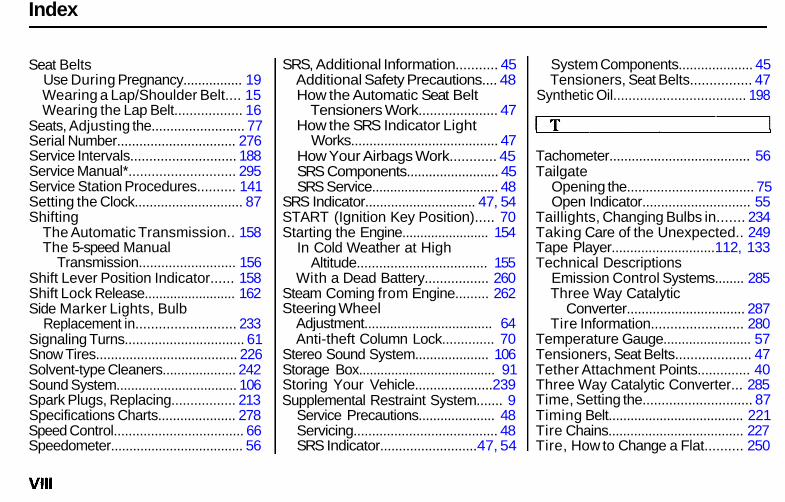
Index
Seat BeltsUse During Pregnancy................ 19Wearing a Lap/Shoulder Belt.... 15Wearing the Lap Belt.................. 16
Seats, Adjusting the......................... 77Serial Number................................ 276Service Intervals............................ 188Service Manual*............................ 295Service Station Procedures.......... 141Setting the Clock............................. 87Shifting
The Automatic Transmission.. 158The 5-speed Manual
Transmission.......................... 156Shift Lever Position Indicator...... 158Shift Lock Release......................... 162Side Marker Lights, Bulb
Replacement in.......................... 233Signaling Turns................................ 61Snow Tires...................................... 226Solvent-type Cleaners.................... 242Sound System................................. 106Spark Plugs, Replacing................. 213Specifications Charts..................... 278Speed Control................................... 66Speedometer.................................... 56
SRS, Additional Information........... 45Additional Safety Precautions.... 48How the Automatic Seat Belt
Tensioners Work..................... 47How the SRS Indicator Light
Works........................................ 47How Your Airbags Work............ 45SRS Components......................... 45SRS Service................................... 48
SRS Indicator.............................. 47, 54START (Ignition Key Position)..... 70Starting the Engine........................ 154
In Cold Weather at HighAltitude................................... 155
With a Dead Battery................. 260Steam Coming from Engine......... 262Steering Wheel
Adjustment................................... 64Anti-theft Column Lock.............. 70
Stereo Sound System.................... 106Storage Box...................................... 91Storing Your Vehicle.....................239Supplemental Restraint System....... 9
Service Precautions..................... 48Servicing....................................... 48SRS Indicator..........................47, 54
System Components.................... 45Tensioners, Seat Belts................ 47
Synthetic Oil................................... 198
Tachometer...................................... 56Tailgate
Opening the.................................. 75Open Indicator............................. 55
Taillights, Changing Bulbs in....... 234Taking Care of the Unexpected.. 249Tape Player............................112, 133Technical Descriptions
Emission Control Systems........ 285Three Way Catalytic
Converter................................ 287Tire Information........................ 280
Temperature Gauge........................ 57Tensioners, Seat Belts.................... 47Tether Attachment Points.............. 40Three Way Catalytic Converter... 285Time, Setting the............................. 87Timing Belt..................................... 221Tire Chains..................................... 227Tire, How to Change a Flat.......... 250

Index
Tires................................................ 221Air Pressure............................... 221Checking Wear.......................... 223DOT Tire Quality Grading...... 281Inflation....................................... 221Inspection................................... 223Maintenance............................... 223Replacing.................................... 225Rotating....................................... 224Snow............................................ 226Specifications............................. 279Technical Information.............. 280
Technical Information................... 275Emission Controls..................... 285Identification Numbers............. 276Specifications............................. 278Three Way Catalytic
Converter................................ 287Tire Information........................ 280
Tools,Tire Changing.................... 250Torn Seat Belts................................ 43Towing
A Trailer...................................... 170Behind a Motorhome................ 176Emergency Wrecker................. 273
TransmissionChecking Fluid Level,
Automatic............................... 207Checking Fluid Level,
Manual.................................... 208Fluid Selection................... 207, 208Identification Number............... 276Shifting the Automatic.............. 158Shifting the Manual................... 156
Treadwear...................................... 281Trip Meter........................................ 56Turn Signals..................................... 61
Underside, Cleaning...................... 247Unexpected, Taking Care
of the........................................... 249Uniform Tire Quality Grading..... 281Unleaded Gasoline......................... 140Upholstery Cleaning...................... 245Used Oil, How to Dispose of........ 200
Vehicle Capacity Load.................. 149
Warning BeepersHeadlights on............................... 60Key in Ignition.............................. 70Seat Belts...................................... 54
WARNING, Explanation of.............. iiWarning Labels, Location of.......... 50Warranty Coverages*................... 293Washer, Windshield
Checking the Fluid Level......... 206Operation...................................... 62
Washing.......................................... 242Waxing and Polishing................... 243
CONTINUED
Vehicle Dimensions....................... 278Vehicle Identification Number..... 276Vehicle Storage.............................. 239Ventilation...................................... 101VIN.................................................. 276Vinyl Cleaning................................ 245Viscosity, Oil................................... 198

Index
WheelsAdjusting the Steering................ 64Alignment and Balance............. 223Wrench....................................... 252
WindowsCleaning...................................... 246Operating the Power................... 84Rear, Defogger............................ 63
WindshieldCleaning........................................ 62Defroster.................................... 103
Wipers, WindshieldChanging Blades........................ 217Operation...................................... 62
Worn Tires..................................... 223Wrecker, Emergency Towing...... 273
*: U.S. and Canada only

Service Information Summary
Gasoline:Unleaded gasoline, pump octanenumber of 86 or higher.
Fuel Tank Capacity:15.3 US gal (58 l, 12.8 Imp gal)
Recommended Engine Oil:API Service SJ "EnergyConserving" oil, SAE 5W-30viscosity (see page 197 ).
Oil change capacity (includingfilter):
4.0 US qt (3.8 l, 3.3 Imp qt)
Automatic Transmission Fluid:Honda Premium FormulaAutomatic Transmission Fluidpreferred, or a DEXRON® III ATFas a temporary replacement (seepage 207 ).
5-speed Manual TransmissionFluid:Honda Manual TransmissionFluid preferred, or an API serviceSG, SH or SJ, SAE 10W-30 or10W-40 motor oil as a temporaryreplacement (see page 208 ).
Capacity (including differential):1.8 US qt (1.7 l, 1.5 lmp qt)
Rear Differential Fluid:Honda CVT Fluid preferred, or aDEXRON® III ATF as temporaryreplacement (see page 209 ).
Capacity:1.1 US qt (1.0 l, 0.9 Imp qt)
Power Steering Fluid:Genuine Honda Power SteeringFluid preferred, or another brandof power steering fluid as atemporary replacement. Do notuse ATF (see page 211 ).
Brake Fluid:Genuine Honda DOT 3 Brake Fluidpreferred, or a DOT 3 or DOT 4brake fluid as a temporaryreplacement (see page 210 ).
Tire Pressure (measured cold):Front/Rear:
26 psi (180 kPa, 1.8 kgf/cm2)