1read.pudn.com/.../ebook/975012/appnote_usbtors232.doc · web viewusb to rs232 converter - eeprom...
TRANSCRIPT

AVR309 USB to UART protocol converter
Features• USB protocol implemented in firmware• Supports Low Speed USB (1.5Mbit/s) in accordance with USB2.0• Implementation runs on very small AVR devices, from 2kBytes and up• Few external components required- One resistor for USB low speed detection- Voltage divider/regulator, with filtering• Implemented functions:- Direct I/O pin control- USB to RS232 converter- EEPROM scratch register• User can easily implement own functions as e.g.:- USB to TWI control- USB A/D and D/A converter• Vendor customizable device identification name (visible from PC side)• Full PC side support with source code and documentation- MS Windows USB drivers- DLL library functions- Demo application in Delphi• Examples for developers on how to communicate with device through DLL(Delphi, C++, Visual Basic)
IntroductionThe USB interface has become extremely
popular, especially for the end use due to its simplicity for end user applications (Plug and Play without restart). For developers, however, USB implementation into their devices has been more complicated when compared to e.g. RS232. In addition there is need of software support on PC side: device drivers. Because of this, RS232 based communication is still very popular among device manufacturers. This interface is well-established and has good operating system support, but recently the physcal RS232 port has been removed from the standard PC interface, giving ground to USB ports.
Implementation of USB into external devices is at present time solved in two ways:
a) Using microcontrollers with hardware-implemented USB interface. It is necessary to know how USB works and write firmware into microcontroller accordingly. Additionally, it is necessary to create a driver on the computer side (as long as the operating system does not include standard USB classes). The disadvantage (and this is the main disadvantage for small vendors and amateurs) is the lack of availability of this kind of microcontrollers and their high price compared to simple "RS232" microcontrollers.
b) Second option is to use some universal converter between USB and another interface. This other interface will usually be RS232, 8-bit data bus, or TWI bus. In this case there is no need for special firmware, it isn’t even necessary to know how USB works, and no driver writing is necessary as the converter vendor will offer one driver for the whole solution. The disadvantage is the higher price of the complete system, and the greater dimensions of the complete product.
The solution presented in this document is a USB implementation into a low-cost microcontroller through emulation of the USB protocol in the microcontroller firmware. The main challenge for this design was obtaining sufficient speed. The USB bus is quite fast: LowSpeed - 1.5Mbit/s, FullSpeed - 12Mbit/s, HighSpeed - 480Mbit/s. The maximum speed of a normal microcontroller is limited: AT89C2051 - 2MIPS = 24MHz/(12cycl/inst.), PIC16F84 - 5MIPS = 20MHz/(4cycl/inst.), AT90S23x3 - 10MIPS = 10MHz/(1cycl/inst.). There are higher-perfomance microcontrolers around, but they tend to have poor availability and high cost, as well as being larger in size. For the reasons described, AT90S1200/AT90S23x3 represent the least expensive solution which is still able to meet the hard speed requirements of LowSpeed USB. The solution is not recommended for higher USB speeds.

Theory of OperationExtensive details regarding physical USB
communication can be found at the website www.usb.org. This documentation is very complex and difficult for beginners (ca. 650 pages).A very good and simple explanation for beginners can be found in the document USB in a Nutshell. Making Sense of the USB Standard written by Craig Peacock ([email protected]). This document can be found at http://www.beyondlogic.org or here: usb-in-a-nutshell.pdf This document is recommended reading for understanding how USB works (only 30 pages).
In this document the explanation is limited to the scope of understanding the device firmware. The USB physical interface consists of 4 wires: 2 for powering the external device (VCC and GND), and 2 signal wires (DATA+ and DATA-). The power wires give approximately 5 volts and max. 500mA. We can supply our device from Vcc and GND. The signal wires named DATA+ and DATA- handle the communication between host (computer) and device. Signals on these wires are bi-directional. Voltage levels are differential: when DATA+ is at high level, DATA- is at low level, but there are some cases when DATA+ and DATA- are at the same level (EOP – end of packet, idle state).
Figure 1. Low Speed Driver Signal Waveforms
Therefore, in our firmware driven USB implementation we must be able to sense or drive both those signals.
Figure 2. Packet Transaction Voltage Levels
According to the USB standard the signal wires must be driven high between 3.0-3.6V, while the Vcc supported by the USB host is 4.4 - 5.25V. So if the microcontroller is powered directly from the USB lines, then the data lines must pass through a level converter to compensate for the different voltage levels. Another solution is to regulate the Vcc supported by the host down to 3.3V, and run the microcontroller at that voltage level.
USB device connection and disconnection is detected based on the impedance sensed on the USB line. For LowSpeed USB devices (our case) a 1.5kohm pull-up resistor between DATA- signal and VCC is necessary (for FullSpeed devices, this resistor is connected to DATA+).
Figure 3. Low Speed Device Cable and Resistor Connections
Based on this pull-up, the host computer will detect that some new device is connected to USB line.
After the host detects a new device it can start communicating with it in accordance with the physical USB protocol. The USB protocol, unlike UART, is based on synchronous data transfer. Synchronization of transmitter and receiver is necessary to carry out the communication. Because of this, the transmitter will transmit a small header (sync pattern) preceding the actual data. This header is a square wave (101010), succeed by two zeros after which the actual data is transmitted.
Figure 4. Sync Pattern

In order to maintain synchronization, USB demands that this sync pattern is transmitted every millisecond in the case of full speed devices, or that both signal lines are pulled to zero in the case of low speed devices. In hardware-implemented USB receivers, this synchronization is ensured by a digital PLL (phase locked loop). In our implementation, we must synchronize data sampling time with the sync pattern, then wait for two zeros, and start receiving data.
Data reception on USB must satisfy that receiver and transmitter are in sync at all times, therefore it is not permitted to send a stream of continuous zeros or ones on the data lines. The USB protocol ensures synchronization by bit stuffing. This means that, after 6 continuous ones or zeros on the data lines, one single change (one bit) is inserted. As signal on USB lines are NRZI coded, this means that one zero bit is inserted into the logical data stream after 6 contiguous logical ones.
Figure 5. NRZI Data Encoding
Figure 6. Bit Stuffing
Notification of end of data transfer is made by and EOP (end-of-packet) part. EOP consists of 2 zeros on both data lines (both physical DATA+ and DATA- are at low voltage level). EOP is succeeded by a short time of idle state (min 2 periods of data rate). After this, the next transaction can be performed.
Figure 7. EOP Width Timing
Data between sync pattern and EOP is NRZI coded communication between USB device and host. The data stream is composed by packets consisting of several fields: Sync field (sync pattern), PacketID (PID), Address field (ADDR), Endpoint field (ENDP), Data, and Cyclic redundancy check field (CRC). Usage of these fields in different types of data transfer is explained well in []. USB describes four types of transfer: Control Transfer, Interrupt Transfer, Isochronous Transfer, and Bulk Transfer. Each of these transfers is dedicated for different device requirements, and their explanations can be found in [].
Our device is using Control transfer. This transfer mode is dedicated for device settings, but can also be used for general purposes. Implementation of Control transfer must exist on every USB device, as this mode is used for configuration when the device is connected (obtaining information from device, setting device address, etc.). A description of the Control transfer and its contents can be found in [] and []. Each Control transfer consists of several stages: Setup stage, Data stage and Status stage.
Data is in USB transferred in packets, with several bytes each. The packet size is determined by each device, but is limited by specification. For LowSpeed devices, packet size is limited to 8 bytes. This 8 bytes long packed + beginning and ending field must be received into the device buffer in one USB transfer. In hardware-based USB receivers, the various parts of the transfer are automatically decoded, and the device is notified only when the entire message has been assigned for the particular device. In a firmware implementation, the USB message must be decoded by firmware after the entire message has been received into the buffer. This gives us the requirements and limitations: The device must have a buffer for storing the whole USB message length, another buffer for USB transmitting (prepared data to transmit), and administration overhead with message decoding and checking. Additionally, of course, the firmware is required to perform fast and precise synchronous speed reception (from physical pins to buffer) and transmission (from buffer to pins). All these capabilities are limited by microcontroller resources (speed and program/data memory capacity), so the firmware must be carefully optimized. In some cases the microcontroller computation power is very close to the minimum requirements and therefore all firmware must be written in assembly.

Hardware Implementation
A schematic diagram of microcontroller connection to USB bus is shown in Figure 8
and Figure 9. These schematics were made for the specific purpose as USB to RS232 converter. There were also implemented specific functions as direct pin control and EPROM read/write.
GND
VCC
R11k5
+
C210u
XT112MHz
1234
XC1USB-A
RST1
PD0/RXD2
PD1/TXD3
XTAL24
XTAL15
PD2/INT06
PD3/INT17
PD4/T08
PD5/T19
GND10
VCC 20
ICP/PD6 11AN2/PB0 12AN1/PB1 13PB2 14OC1/PB3 15PB4 16MOSI/PB5 17MISO/PB6 18SCK/PB7 19
IC1AT90S2313-10 / ATtiny2313
DATA+DATA-
GND
VCC
C1100n
GND
GND
GNDD0
D1D2
D3D4D5D6D7
TxDRxD
RS232 TTL
V+
VCC IN 1
GN
D2
OUT3
IC2LE35
3.5V regulatorC3100n
GND
GND
Figure 8. USB interface with ATtiny2313 (as USB to RS232 converter with 32 byte FIFO + 8-bit I/O control + 128 bytes EEPROM)

GND
XT112MHz
TxDRxD PC6/RST1
PD0/RXD2
PD1/TXD3
XTAL2/TOSC2/PB710 XTAL1/TOSC1/PB69
PD2/INT04
PD3/INT15
PD4/T0/XCK6
PD5/T111
GND8
AVCC 20
PD6/AIN012
PD7/AIN113
PB0/ICP14 PB1/OC1A 15PB2/SS/OCIB 16PB3/MOSI/OC2 17PB4/MISO 18PB5/SCK 19
AREF 21GND 22PC0/ADC0 23PC1/ADC1 24PC2/ADC2 25PC3/ADC3 26PC4/ADC4/SDA 27PC5/ADC5/SCL 28
VCC7
IC1ATmega8
R11k5
+
C210u
1234
XC1USB-A
DATA+DATA-
GND
V+
GND
GND
VCC
VCC
C1100n
GND
VCCVCCGND
RS232 TTL
Dd3Dd4
Dd5Dd6Dd7 Db2
Db3Db4Db5
Dc0Dc1Dc2Dc3Dc4Dc5Dc6/RST
IN 1
GN
D2
OUT3
IC2LE35
3.5V regulatorC3100n
GND
GND
Figure 9. USB interface with ATmega8 (as USB to RS232 converter with 800 byte FIFO + EEPROM + I/O control + EEPROM)

The USB data lines, DATA- and DATA+, are connected to pins PB0 and PB1 on the AVR. This connection cannot be changed because the firmware makes use of one AVR finesse for fast signal reception: The bit signal captured from the data lines is right shifted from LSB (PB0) to carry and then to the reception register, which collects the bits from the data lines. PB1 is used as input signal because on 8-pin AT90S2323 this pin can be used as external interrupt INT0 (no additional connection to INT0 is necessary – the 8-pin version of the AVR is the smallest pin count available). On other AVRs, an external connection from DATA+ to the INT0 pin is necessary if we want to ensure no firmware changes between different AVR microcontrollers.
For proper USB device connection and signaling, the AVR acting as low speed USB device must have a 1.5kohm pull-up resistor on DATA-.
The other components only provide functions for proper operation of the microcontroller: Crystal as clock source, and capacitors for power supply filtering.
This small component count is sufficient to obtain a functional USB device, which can communicate with a computer through the USB interface. This is a very simple and cheap solution. Some additional components can be added to extend the device functions. If we want to receive an IR signal, we can add the TSOP1738 infrared sensor. If we want to use the device as an USB to RS232 converter, we should add the MAX232 TTL to RS232 level converter. If we want to control LED diodes or display, we connect them to I/O pins directly or through resistors.
Software ImplementationAll USB protocol reception and decoding is
performed at the firmware level. The firmware first receives a stream of USB bits in one USB packet into the internal buffer. Start of reception is based on the external interrupt INT0, which takes care of the sync pattern. During reception, only the end of packet signal is checked (EOP detection only). This is due to the extreme speed of the USB data transfer. After a successful reception, the firmware will decode the data packets and analyze them. At first it checks if the packet is intended for this device according to its address. The address is transferred in every USB transaction and therefore the device will know if the next transferred data are dedicated to it. USB address decoding must be done very quickly, because the device must answer with an ACK handshake packet to the USB host if it
recognizes a valid USB packet with the given USB address. Therefore this is a critical part of the USB answer.
After the reception of this bitstream, we obtain an NRZI coded array of bits with bitstuffing in the input buffer. In the decoding process we first remove the bitstuffing and then the NRZI coding. All these changes are made in a second buffer (copy of the reception buffer), so a new packet can be received while the first one is being decoded. At this point, decoding speed is not so important, because the device can delay the answer, but when the hosts asks for an answer during decoding, the device must answer immediately with NAK so that the host will understand it is not ready yet. Because of this, the firmware must be able to receive packets from the host during decoding, decode whether the transaction is intended for the device, and then send NAK packet if there is some decoding in progress. The host will then ask again. The firmware also decodes the main USB transaction and performs the requested action (for example, send char to RS232 line and wait for transmission complete), and prepares the corresponding answer. During this process the device is interrupted by some packets from the host, usually IN packets to obtain answer from the device. To these IN packets, the device must answer with NAK handshake packets. When the answer is ready and the device has performed the required action, the answer must go through CRC field addition and then NRZI coding and bitstuffing before being transmitted as an array of bits. Now, when the host requests an answer, we can transmit this bitstream to the data lines according to the USB specification (from sync pattern to EOP).
Firmware descriptionIn the following we describe the main parts
of the firmware. The firmware is divided into blocks: interrupt routines, decoding routines (NRZI decoding, bitstuffing removal/addition, …), USB reception, USB transmission, requested action decoding, and performing requested custom actions.
User can add his own functions to the firmware. Some examples on how to make customer-specific functions can be found in the firmware code, and user can write new device extensions according to the existing built-in functions. For example TWI support can be added according to the built-in function for direct pin control.
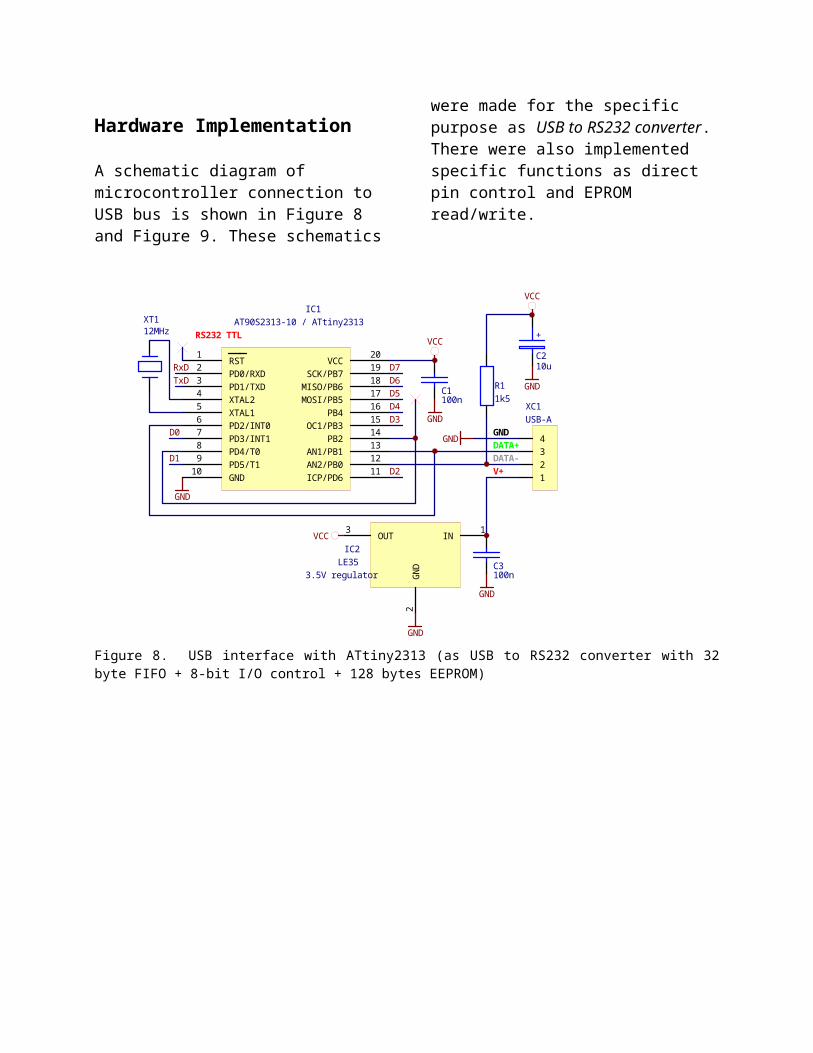
Figure 10. Flowchart of receiving routine“EXT_INT0” Interrupt
Service Routine
2
INT0 raising edge
Edge detection
Wait for end of SOP(2 bits at same level)
Sampling time to middle of bitInit USB data bits receiving
Sample DATA+, DATA- to PB0, PB1
Shift PB0 carryShiftbuffer carry
PB0=PB1=0 ?
Shiftbuffer full?
Store Shiftbuffer to input buffer
Received bytes < 3 ?
1
2
End of INT0 interrupt
Packet type detection
USB address detection (if no Data packet)
Send answer (if answer prepared in out buffer) or NACK (answer in progress)
Set state according received type of packet
Is my USB address?
1
2
Is it an INpacked?
Is Setup data packed?
Send ACK packet (accepting setup data packet).Copy receiving buffer to input buffer.Set flag for new request in input buffer.
Finish INT0 interrupt:Clear pending INT0Restore registers
2

The external interrupt 0 is active all the time while the firmware is running. This routine initiates the reception of USB serial data (an alternative name would be “USB reception”). An external interrupt occurs on a rising edge on the INT0 pin (a rising edge marks the beginning of the sync pattern of a USB packet see Figure 4). This activates the USB reception routine.
First, data sampling must be synchronized to the middle of the bit width. This is done according to the sync pattern (which is a square wave signal). Because bit duration is only 8 cycles of the XTAL clocks and interrupt occurrence can be delayed (+/- 4 cycles), edge synchronization in sync pattern must be carefully performed. End of sync pattern and begin of data bits are detected according to the last dual low level bits in sync packet (see Figure 4).
After this, data sampling is started. Sampling is performed in the middle of the bit. Because data rate is 1.5Mbit/s (1.5MHz) and the microcontroller speed is 12MHz, we have only 8 cycles
for data bit sampling, storing it into the buffer byte, shift the buffer byte, checking if the whole byte has been received, storing this byte into SRAM, and checking for EOP. This is perhaps the most crucial part of the firmware; everything must be done synchronously with exact timing. When a whole USB packet has been received, packet decoding must be performed. First, we must quickly determine the packet type (SETUP, IN, OUT, DATA) and received USB address. This fast decoding must be performed inside the interrupt service routine because an answer is required very quickly after receiving the USB packet (the device must answer with an ACK handshake packet when a packet with the device address has been received, and with NAK when the packet is for the device, but when no answer is currently ready).
At the end of the reception routine (after ACK/NAK handshake packet has been sent) the sampled data buffer must be copied into another buffer on which the decoding will be performed.
This is in order to free the reception buffer to receive a new packet.
During reception the packet type is decoded and the corresponding flag value is set. This flag is tested in the main program loop, and according to its value the appropriate action will be taken and the corresponding answer will be prepared with no regard to microcontroller speed requirements.
The INT0 must be allowed to keep its very fast invocation time in all firmware routines, so no interrupt disabling is allowed and during other interrupts’ execution (for example serial line receive interrupt) INT0 must be enabled. Fast reception in the INT0 interrupt routine is very important, and it is necessary to optimize the firmware for speed and exact timing. One important issue is register backup optimization in interrupt routines.
Main program loop
The main program loop is very simple. It is only required to check the action flag: what to do when some received data are
present. In addition it checks whether the USB interface is reset (both data lines are at low level for a long time) and, if it is, reinitializes the device. When there is something to do (action flag active), the corresponding action is called: decoding NRZI in packet, bitstuffing removal and preparation of the requested answer in the transmit buffer (with bitstuffing and NRZI coding). Then one flag is activated to signal that the answer is prepared for sending. Physical output buffer transmission to the USB lines is performed in the reception routine as answer to the IN packet.
Short description of used firmware subroutines
In the following, the firmware subroutines and their purposes are described briefly.
Reset:Initialization of
the AVR microcontroller resources: stack, serial lines, USB buffers, interrupts...
Main:Main program
loop. Checks the action flag value and, if flag is set,

performs the required action. Additionally, this routine checks for USB reset on data lines and reinitializes the USB microcontroller interface if this is the case.
Int0Handler:The interrupt
service routine for the INT0 external interrupt. Main reception/transmission engine; emulation from USB data lines. Storing data to buffer, decision of USB packet owners (USB address), packet recognition, sending answer to USB host. Basically the heart of the USB engine.
MyNewUSBAddress:
Called from INT0 reception routine if there is a request present to change the USB address. The address is changed and its coded NRZI equivalent for fastest address decoding during USB packet reception is prepared.
FinishReceiving:
Copies coded raw data from USB reception packet to decoding packet (for NRZI and bitstuffing decoding).
USB reset: Initializes USB
interface to default values (as the state after power on).
SendPreparedUSBAnswer:
Sends prepared output buffer contents to USB lines. NRZI coding and bitstuffing is performed during transmission. Packet is ended with EOP.
ToggleDATAPID:
Toggles DATAPID packet identifier (PID) between DATA0 and DATA1 PID. This toggling is necessary during transmission as per the USB specification.
ComposeZeroDATA1PIDAnswer:
Composes zero answer for transmission. Zero answer contains no data and is used in some cases as answer when no additional data is available on device.
InitACKBufffer:Initializes buffer
in RAM with ACK data (ACK handshake packet). This buffer is frequently sent as answer so it is always kept ready in memory.
SendACK:Transmits ACK
packet to USB lines. InitNAKBufffer:
Initializes buffer in RAM with NAK data (NAK handshake packet). This buffer is frequently sent as answer so it is always kept ready in memory.
SendNAK:Transmits NAK
packet to USB lines.ComposeSTAL
L:Initializes buffer
in RAM with STALL data (STALL handshake packet). This buffer is frequently sent as answer so it is always kept ready in memory.
DecodeNRZI:Performs NRZI
decoding. Data from USB lines in buffer is NRZI coded. This routine removes the NRZI coding from the data.
BitStuff:Removes/adds
bitstuffing in received USB data. Bitstuffing is added by host hardware according to the USB specification to ensure synchronization in data sampling. This routine produces received data without bitstuffing or data to transmit with bitstuffing.
ShiftInsertBuffer:
Auxiliary routine for use when performing bitstuffing addition. Adds one bit to output data buffer and thus increases the buffer length. The remainder of the buffer is shifted out.
ShiftDeleteBuffer:
Auxiliary routine for use when performing bitstuffing removal.
Removes one bit to output data buffer and thus decreases the buffer length. The remainder of the buffer is shifted in.
MirrorInBufferBytes:
Exchanges but order in byte because data is received from USB lines to buffer in reverse order (LSB/MSB).
CheckCRCIn:Performs CRC
(cyclic redundancy check) on received data packet. CRC is added to USB packet to detect data corruption.
AddCRCOut:Adds CRC field
into output data packet. CRC is calculated according to the USB specification from given USB fields.
CheckCRC:Auxiliary routine
used in CRC checking and addition.
LoadDescriptorFromROM:
Loads data from ROM to USB output buffer (as USB answer).
LoadDescriptorFromROMZeroInsert:
Loads data from ROM to USB output buffer (as USB answer) but every even byte is added as zero. This is used when a string descriptor in UNICODE format is

requested (ROM saving).
LoadDescriptorFromSRAM:
Loads data from RAM to USB output buffer (as USB answer).
LoadDescriptorFromEEPROM:
Loads data from data EEPROM to USB output buffer (as USB answer).
LoadXXXDescriptor:
Performs selection for answer source location: ROM, RAM or EEPROM.
PrepareUSBOutAnswer:
Prepares USB answer to output buffer according to request by USB host, and performs the requested action. Adds bitstuffing to answer.
PrepareUSBAnswer:
Main routine for performing the required action and preparing the corresponding answer. The routine will first determine which action to perform – discover function number from received input data packet – and then perform the requested function. Function parameters are located in input data packet.
Routine is divided into two big parts:
- standard requests
- vendor specific requests
Standard requests are necessary and are described in USB specification (SET_ADDRESS, GET_DESCRIPTOR, …).
Vendor specific requests are requests that can obtain vendor specific data (in Control USB transfer). Control IN USB transfer is used for this AVR device to communicate with host. Developers can add into this part their own functions and in this manner extend device versatility. The various documented built-in functions in the source code can be used as templates on how to add custom functions.
Standard USB functions (Standard Requests):
ComposeGET_STATUS:
ComposeCLEAR_FEATURE:
ComposeSET_FEATURE:
ComposeSET_ADDRESS:
ComposeGET_DESCRIPTOR:
ComposeSET_DESCRIPTOR:
ComposeGET_CONFIGURATION:
ComposeSET_CONFIGURATION;
ComposeGET_INTERFACE;
ComposeSET_INTERFACE:
ComposeSYNCH_FRAME;
Vendor USB functions (Vendor requests):
DoSetInfraBufferEmpty:
DoGetInfraCode:
DoSetDataPortDirection:
DoGetDataPortDirection:
DoSetOutDataPort:
DoGetOutDataPort:
DoGetInDataPort:
DoEEPROMRead:
DoEEPROMWrite:
DoRS232Send:DoRS232Read:DoSetRS232Ba
ud:DoGetRS232B
aud:DoGetRS232B
uffer:DoSetRS232Da
taBits:DoGetRS232D
ataBits:DoSetRS232Pa
rity:DoGetRS232Pa
rity:DoSetRS232St
opBits:DoGetRS232St
opBits:
Data structures (USB descriptors and strings):
DeviceDescriptor:
ConfigDescriptor:
LangIDStringDescriptor:
VendorStringDescriptor:
DevNameStringDescriptor:
Format of input message from USB host
As stated above, our USB device uses USB Control Transfer. This type of transfer uses a data format defined in the USB specification described in usb-in-a-nutshell.pdf [] on page 13 (Control Transfers). In this document the details and explanations on how control transfer works, and therefore how our device communicates with the USB host, can be found. The AVR device is using control IN endpoint. A nice example of data communication can be found on page 15 of []. Communication between host and AVR device is done according to this example.
In addition to the actual control transfer, the format of the DATA0/1 field in the transfer should be discussed. Control transfer defines in its setup stage a standard request, which is 8 bytes long. Its format is

described on page 26 of [] (The Setup Packet). There is table with a description of the meaning of every byte. The following is important for our purpose:
Standard setup packet used for detection and configuration of device after power on. This packet uses the Standard Type request in the bmRequestType
field (bits D6-D5 = 0). All next fields’ (bRequest, wValue, wIndex, wLength) meanings can be found in the USB specification. Their explanation can be found on pages 27-30 in [] (Standard Requests).
Every setup packet has eight bytes, used as described in the following table.
Offset Field Size Value Description
bmRequestType 1 Bit-map Characteristics of request
D7 Data xfer direction0 = Host to device1 = Device to host
D6..5 Type0 = Standard1 = Class2 = Vendor3 = Reserved
D4..0 Recipient0 = Device1 = Interface2 = Endpoint3 = Other4..31 = Reserved
bRequest 1 Value Specific request
wValue 2 Value Word-sized field that varies according to request
wIndex 2 Index or Offset
Word sized field that varies according to request - typically used to pass an index or offset
wLength 2 Count Number of bytes to transfer if there is a data phase
Table 1 : Standard setup packet fields (control transfer)
bRequest wValue wIndex wLength Data
CLEAR_FEATURE Feature ZeroInterface
Zero None
Selector Endpoint
Zero Zero One Configuration Value
Descriptor Type and Descriptor
Index
Zero or Language
ID
Descriptor Length
Descriptor
Zero Interface One Alternate Interface
Zero Zero Interface Endpoint
Two Device, Interface, or
Endpoint Status
Device Address
Zero Zero None
Configuration Value
Zero Zero None
Descriptor Type and Descriptor
Index
Zero or Language
ID
Descriptor Length
Descriptor
Feature Selector
ZeroInterfaceEndpoint
Zero None
Alternate Setting
Interface Zero None
Zero Endpoint Two Frame Number
Table 2: Standard device requests
bRequest(function number)
wValue(param1)
wIndex(param2)
wLength Data
1 None None 1 Status
2 None None 1 Status
3 DDRB
DDRC
DDRD
usedports
1 Status
4 None None 3 DDRB
DDRC

DDRD
FNCNumberDoSetOutDataPort 5 PORTB
PORTC
PORTD
usedports
1 Status
FNCNumberDoGetOutDataPort 6 None None 3 PORTB
PORTC
PORTD
FNCNumberDoGetInDataPort 7 None None 3 PINB
PINC
PIND
FNCNumberDoEEPROMRead 8 Address None Length EEPROM bytes
FNCNumberDoEEPROMWrite 9 Address EEPROM value
1 Status
FNCNumberDoRS232Send 10 RS232 byte value
None 1 Status
FNCNumberDoRS232Read 11 None None 2 Status
FNCNumberDoSetRS232Baud 12 Baudrate Lo
Baudrate Hi
1 Status
FNCNumberDoGetRS232Baud 13 None None 2 Baudrate
FNCNumberDoGetRS232Buffer 14 None None Length RS232 bytes from FIFO
FNCNumberDoSetRS232DataBits 15 Databits value
None 1 Status
FNCNumberDoGetRS232DataBits 16 None None 1 Databits value
FNCNumberDoSetRS232Parity 17 Parity value
None 1 Status
FNCNumberDoGetRS232Parity 18 None None 1 Parity value
FNCNumberDoSetRS232StopBits 19 Stopbits value
None 1 Status
FNCNumberDoGetRS232StopBits 20 None None 1 Stopbits
value
Table 3: Vendor device requests used in firmware as functions calls
Note: FNCNumberXXX values are defined in DLL.

Control Transfer is used for user communication, implemented as custom functions in the firmware, as well. The Vendor Type request in the bmRequestType field (bits D6-D5 = 2) is used. In this case all succeeding fields (bRequest, wValue, wIndex) can be modified according to the programmer’s purposes. In our implementation, bRequest field is used for function number and the next fields are used for function parameters. The first parameter is in the wValue slot, the second at the wIndex location.
An example from the implementation is EEPROM writing. bRequest = 9 is chosen as function number. The wValue field is used for EEPROM address, and the value to write (EEPROM data) is in the wIndex field. According to this, we obtain the following function: EEPROMWrite(Address, Value).
If more user functions are required, it is enough to add function numbers and the body of the required function into the firmware. The technique can be extracted from the built-in function in the firmware (see source code).
USB host also communicates with device with IN control transfers. Host sends an 8-byte IN data packet to the device in the format defined above (function number and parameters), and the device then answers with requested data. The length of the answered data is firmware limited in some cases up to 255 bytes, but the main limitation is on the device driver side on the host computer. Now this driver supports 8-byte length answers (in Vendor Type requests.
Firmware customizationUsers (developers of device) can add into
firmware new functions and extend device properties.
In firmware are prepared 3 examples how to add user functions: DoUserFunctionX (X=0,1,2). According these examples can be added similar extended functions. Functions content depends only on device requirements.
In firmware can be customized also all device names – as device appears in computer side. This names is located in firmware as strings and can be changed to any string. But these names are recommended to change together with USB PID (product ID) and VID (vendor ID) for correct recognition in system.
VID together with PID must be unique for given device type. Therefore is recommended that if device functionality is changed then is modified PID and/or VID. Vendor ID depends
from vendor of USB device and must be assigned from USB organization (see more information on [1]). Every vendor has its own ID and therefore this value cannot be changed to any unassigned value. But product ID depends only from vendor choice and purpose of PID is to recognize different devices from the same vendor. This application note is setup with VID 0x03EB and PID 0x21FF which is Atmel’s VID. Do not use this VID in your target system.
PC software
In order to communicate with the device we need some software support on the PC side. This software is divided into 3 levels:
1) Device driver: Used for low-level communication with the device and for installation into operating system (Windows98/ME/NT/XP).
2) DLL library: Used for encapsulation of device functions and communication with device driver. DLL simplifies the device function access from user applications., It includes some device and operating system related functions (threads, buffers, etc.).
3) User application: Makes user interface for friendly communication between user and device. Uses function calls from DLL library only.
Device driver and installation files
The first time we connect the USB device to the computer USB port, the operating system will detect the device and request driver files. This is called device installation. For the installation process it is necessary not only to make the device driver, but also an installation script in which the installation steps are described.
The device driver for the device described in this document is made with Windows2000 DDK (Driver Development Kit). The development of the USB driver is based on one of the included examples in the DDK – IsoUsb. This driver was modified for our purpose – AVR USB device communication. In the original source code, parts have been extended/added about the IOCTL communications, because our device communicates with the computer through these IOCTL calls. To reduce the driver code size, unused parts have been removed (read and write routines). The name of the driver is “AVR309.sys” and it works as sender of

commands to the USB device (Control IN transfers). The driver will work on all 32-bit Windows versions except Win95.
An installation script written in an INF file is used during device installation. In this INF file the various installation steps are described. The file “AVR309.inf” was created in the notepad text editor. This file is requested by the operating system during installation. During the installation process, the driver file is copied into the system and the required system changes are made. The INF file ensures installation of the DLL library to the system search path for easy reach from various applications.
Three files are necessary for device installation: INF file “AVR309.inf”, driver “AVR309.sys”, and DLL library “AVR309.dll”.
DLL libraryThe DLL library communicates with the
device driver and all device functions are implemented in this library. This way, programming of end-user applications is simplified. The DLL library ensures exclusive access to the device (serializes device access), contains system buffer for RS232 data reception, and creates a single system thread for device RS232 data buffer reading.
Serialization in DLL ensures that only one application/thread will communicate with the device at any given time. This is necessary because of the possibility of mixing question and answer from various applications at the same time.
System buffer for RS232 data reception ensures that the data received from the device’s RS232 line is stored into one buffer that is common to all applications. This way, data received by the device will be sent to all applications. There is no danger that an application will receive incomplete data because some other application has read some of the data before.
Only one system thread exists for all applications, and will periodically request device for RS232 data. The thread will then store received data into the system buffer. Only one system buffer solution ensures small CPU usage (in comparison to every application having their own thread) and simplifies storing data into the system buffer.
All device functions are defined in the DLL library, and they are exported in a user-friendly form: not as function number and parameters, but as tidy function names with parameters. Some functions are more complex internally, as the function for RS232 buffer data read. This
way, developers of end-user applications can rapidly write application using only the DLL interface. There is no need to study the low-level device functions, as the DLL library separates the application programmer level from the hardware level.
All functions exported from DLL are described bellow. The declaration is written for the 3 mostly used programming languages: Borland Delphi, C++ (Borland or Microsoft) and Visual Basic. A more detailed description of these functions can be found in the included help file AVR309_DLL_help.htm.
End user applicationThe end-user application will only use
functions from the DLL library to communicate with the device. Its main purpose is to make a user-friendly GUI (graphical user interface).
Application programmers use the DLL library to write their own applications. An example can be found in the published project where all the source code is available. Many applications can be written using this example as starting point, and in several programming languages (Delphi, C++, Visual Basic).
There is included an example of an end user application called “AVR309demo.exe”. This software is only meant as an example on how to use the functions from the DLL library. The source code can be used as a template for other applications.

UART speed error discussionMicrocontroller uses 12MHz clock because
the USB sampling. But using this clock value has disadvantage that baudrate speed generating contains small error for the standard baudrates. But high value of clock minimizes this error. Maximum error that can be accepted in baudrate generation is cca 4%: because maximum error is half bit duration (0.5) and the maximum packet time is 12bits = 1start bit + 8data bits + 1parity bit + 2stop bits. Then the error is: 0.5/12*100% = 4.1%.
Function in DLL automatically checks this error and set baudrate to microcontroller only if the error is bellow 4% (and returns error in case of unsupported baudrate).
In the next table is summarized the error of standard baudrates in case of use 12MHz clock.
Standard baudrates
Baudrate in AVR
Error [%]
600 602 +0.331200 1204 +0.332400 2408 +0.334800 4808 +0.179600 9616 +0.17
19200 19230 +0.1628800 28846 +0.1638400 38462 +0.1657600 57692 +0.16
115200 115384 +0.16Table 4: AVR UART baudrate errors (12MHz
clock)

Function prototype in "AVR309.dll" library:
Delphi:constAVR309DLL= 'AVR309.dll';//return values from AVR309DLL functions:NO_ERROR = 0;DEVICE_NOT_PRESENT = 1;NO_DATA_AVAILABLE = 2;INVALID_BAUDRATE = 3;OVERRUN_ERROR = 4;INVALID_DATABITS = 5;INVALID_PARITY = 6;INVALID_STOPBITS = 7;
function DoGetInfraCode(var TimeCodeDiagram:array of byte; var DiagramLength:integer):integer; stdcall external AVR309DLL name 'DoGetInfraCode';function DoSetDataPortDirection(DirectionByte:byte):integer; stdcall external AVR309DLL name 'DoSetDataPortDirection';function DoGetDataPortDirection(var DataDirectionByte:byte):integer; stdcall external AVR309DLL name 'DoGetDataPortDirection';function DoSetOutDataPort(DataOutByte:byte):integer; stdcall external AVR309DLL name 'DoSetOutDataPort';function DoGetOutDataPort(var DataOutByte:byte):integer; stdcall external AVR309DLL name 'DoGetOutDataPort';function DoGetInDataPort(var DataInByte:byte):integer; stdcall external AVR309DLL name 'DoGetInDataPort';function DoSetDataPortDirections(DirectionByteB, DirectionByteC, DirectionByteD, UsedPorts:byte):integer; stdcall external AVR309DLL name 'DoSetDataPortDirections';function DoGetDataPortDirectio ns (var DataDirectionByteB, DirectionByteC, DirectionByteD, UsedPorts:byte):integer; stdcall external AVR309DLL name 'DoGetDataPortDirections';function DoSetOutDataPorts(DataOutByteB, DataOutByteC, DataOutByteD, UsedPorts:byte):integer; stdcall external AVR309DLL name 'DoSetOutDataPorts';function DoGetOutDataPorts(var DataOutByteB, DataOutByteC, DataOutByteD, UsedPorts:byte):integer; stdcall external AVR309DLL name 'DoGetOutDataPorts';function DoGetInDataPorts(var DataInByteB, DataInByteC, DataInByteD, UsedPorts:byte):integer; stdcall external AVR309DLL name 'DoGetInDataPorts';
function DoEEPROMRead(Address:word; var DataInByte:byte):integer; stdcall external AVR309DLL name 'DoEEPROMRead';function DoEEPROMWrite(Address:word; DataOutByte:byte):integer; stdcall external AVR309DLL name 'DoEEPROMWrite';function DoRS232Send(DataOutByte:byte):integer; stdcall external AVR309DLL name 'DoRS232Send';function DoRS232Read(var DataInByte:byte):integer; stdcall external AVR309DLL name 'DoRS232Read';function DoSetRS232Baud(BaudRate:integer):integer; stdcall external AVR309DLL name 'DoSetRS232Baud';function DoGetRS232Baud(var BaudRate:integer):integer; stdcall external AVR309DLL name 'DoGetRS232Baud';function DoGetRS232Buffer(var RS232Buffer:array of byte; var RS232BufferLength:integer):integer; stdcall external AVR309DLL name 'DoGetRS232Buffer';function DoRS232BufferSend(var RS232Buffer:array of byte; var RS232BufferLength:integer):integer; stdcall external AVR309DLL name 'DoRS232BufferSend';function DoSetRS232DataBits(DataBits:byte):integer; stdcall external AVR309DLL name 'DoSetRS232DataBits';function DoGetRS232DataBits(var DataBits:byte):integer; stdcall external AVR309DLL name 'DoGetRS232DataBits';function DoSetRS232Parity(Parity:byte):integer; stdcall external AVR309DLL name 'DoSetRS232Parity';function DoGetRS232Parity(var Parity:byte):integer; stdcall external AVR309DLL name 'DoGetRS232Parity';function DoSetRS232StopBits(StopBits:byte):integer; stdcall external AVR309DLL name 'DoSetRS232StopBits';function DoGetRS232StopBits(var StopBits:byte):integer; stdcall external AVR309DLL name 'DoGetRS232StopBits';
C++ Builder / Microsoft Visual C++:#ifdef __cplusplusextern "C" {#endif
#define AVR309DLL "AVR309.dll";//return values from AVR309DLL functions:#define NO_ERROR 0;#define DEVICE_NOT_PRESENT 1;#define NO_DATA_AVAILABLE 2;#define INVALID_BAUDRATE 3;#define OVERRUN_ERROR 4;#define INVALID_DATABITS 5;#define INVALID_PARITY 6;#define INVALID_STOPBITS 7;
int __stdcall DoGetInfraCode(uchar * TimeCodeDiagram, int DummyInt, int * DiagramLength);int __stdcall DoSetDataPortDirection(uchar DirectionByte);int __stdcall DoGetDataPortDirection(uchar * DataDirectionByte);int __stdcall DoSetOutDataPort(uchar DataOutByte);int __stdcall DoGetOutDataPort(uchar * DataOutByte);int __stdcall DoGetInDataPort(uchar * DataInByte);int __stdcall DoSetDataPortDirections(uchar DirectionByteB, uchar DirectionByte, uchar DirectionByte, uchar UsedPorts);int __stdcall DoGetDataPortDirections(uchar * DataDirectionByteB, uchar * DataDirectionByteC, uchar * DataDirectionByteD, uchar * UsedPorts);int __stdcall DoSetOutDataPorts(uchar DataOutByteB, uchar DataOutByteC, uchar DataOutByteD, uchar UsedPorts);int __stdcall DoGetOutDataPorts(uchar * DataOutByteB, uchar * DataOutByteC, uchar * DataOutByteD, uchar * UsedPorts);int __stdcall DoGetInDataPorts(uchar * DataInByteB, uchar * DataInByteC, uchar * DataInByteD, uchar * UsedPorts);int __stdcall DoEEPROMRead(ushort Address, uchar * DataInByte);int __stdcall DoEEPROMWrite(ushort Address, uchar DataOutByte);int __stdcall DoRS232Send(uchar DataOutByte);int __stdcall DoRS232Read(uchar * DataInByte);int __stdcall DoSetRS232Baud(int BaudRate);int __stdcall DoGetRS232Baud(int * BaudRate);int __stdcall DoGetRS232Buffer(uchar * RS232Buffer, int DummyInt, int * RS232BufferLength);int __stdcall DoRS232BufferSend(uchar * RS232Buffer, int DummyInt, int * RS232BufferLength);

int __stdcall DoSetRS232DataBits(uchar DataBits);int __stdcall DoGetRS232DataBits(uchar * DataBits);int __stdcall DoSetRS232Parity(uchar Parity);int __stdcall DoGetRS232Parity(uchar * Parity);int __stdcall DoSetRS232StopBits(uchar StopBits);int __stdcall DoGetRS232StopBits(uchar * StopBits);
#ifdef __cplusplus}#endif
Visual Basic:Public Const AVR309DLL="AVR309.dll";'return values from AVR309DLL functions:Public Const NO_ERROR = 0;Public Const DEVICE_NOT_PRESENT = 1;Public Const NO_DATA_AVAILABLE = 2;Public Const INVALID_BAUDRATE = 3;Public Const OVERRUN_ERROR = 4;Public Const INVALID_DATABITS = 5;Public Const INVALID_PARITY = 6;Public Const INVALID_STOPBITS = 7;Public Declare Function DoGetInfraCode Lib "AVR309.dll" (ByRef TimeCodeDiagram As Any, ByVal DummyInt As Long, ByRef DiagramLength As Long) As LongPublic Declare Function DoSetDataPortDirection Lib "AVR309.dll" (ByVal DirectionByte As Byte) As LongPublic Declare Function DoGetDataPortDirection Lib "AVR309.dll" (ByRef DataDirectionByte As Byte) As LongPublic Declare Function DoSetOutDataPort Lib "AVR309.dll" (ByVal DataOutByte As Byte) As LongPublic Declare Function DoGetOutDataPort Lib "AVR309.dll" (ByRef DataOutByte As Byte) As LongPublic Declare Function DoGetInDataPort Lib "AVR309.dll" (ByRef DataInByte As Byte) As LongPublic Declare Function DoSetDataPortDirections Lib "AVR309.dll" (ByVal DirectionByteB As Byte, ByVal DirectionByteC As Byte, ByVal DirectionByteD As Byte, ByVal UsedPorts As Byte) As LongPublic Declare Function DoGetDataPortDirections Lib "AVR309.dll" (ByRef DataDirectionByteB As Byte, ByRef DataDirectionByteC As Byte, ByRef DataDirectionByteD As Byte, ByRef UsedPorts As Byte) As LongPublic Declare Function DoSetOutDataPorts Lib "AVR309.dll" (ByVal DataOutByteB As Byte, ByVal DataOutByteC As Byte, ByVal DataOutByteD As Byte, ByVal UsedPorts As Byte) As LongPublic Declare Function DoGetOutDataPorts Lib "AVR309.dll" (ByRef DataOutByteB As Byte, ByRef DataOutByteC As Byte, ByRef DataOutByteD As Byte, ByRef UsedPorts As Byte) As LongPublic Declare Function DoGetInDataPorts Lib "AVR309.dll" (ByRef DataInByteB As Byte, ByRef DataInByteC As Byte, ByRef DataInByteD As Byte, ByRef UsedPorts As Byte) As LongPublic Declare Function DoEEPROMRead Lib "AVR309.dll" (ByVal Address As Word, ByRef DataInByte As Byte) As LongPublic Declare Function DoEEPROMWrite Lib "AVR309.dll" (ByVal Address As Word, ByVal DataOutByte As Byte) As LongPublic Declare Function DoRS232Send Lib "AVR309.dll" (ByVal DataOutByte As Byte) As LongPublic Declare Function DoRS232Read Lib "AVR309.dll" (ByRef DataInByte As Byte) As LongPublic Declare Function DoSetRS232Baud Lib "AVR309.dll" (ByVal BaudRate As Long) As LongPublic Declare Function DoGetRS232Baud Lib "AVR309.dll" (ByRef BaudRate As Long) As LongPublic Declare Function DoGetRS232Buffer Lib "AVR309.dll" (ByRef RS232Buffer As Any, ByVal DummyInt As Long, ByRef RS232BufferLength As Long) As LongPublic Declare Function DoRS232BufferSend Lib "AVR309.dll" (ByRef RS232Buffer As Any, ByVal DummyInt As Long, ByRef RS232BufferLength As Long) As LongPublic Declare Function DoSetRS232DataBits Lib "AVR309.dll" (DataBits As Byte) As LongPublic Declare Function DoGetRS232DataBits Lib "AVR309.dll" (ByRef DataBits As Byte) As LongPublic Declare Function DoSetRS232Parity Lib "AVR309.dll" (Parity As Byte) As LongPublic Declare Function DoGetRS232Parity Lib "AVR309.dll" (ByRef Parity As Byte) As LongPublic Declare Function DoSetRS232StopBits Lib "AVR309.dll" (StopBits As Byte) As LongPublic Declare Function DoGetRS232StopBits Lib "AVR309.dll" (ByRef StopBits As Byte) As Long


Appendix A: Source code of firmware for ATmega8 AVRSource code of firmware for ATmega8 and ATtiny2313/AT90S2313 AVR microcontroller was written in AVR Studio 4.
Source code is in text file USBtoRS232.asm or in syntax highlighted form file USBtoRS232asm.pdf.
Appendix B: AVR309.dll interfaceLibrary AVR309.dll was written in Delphi3, so its source code is based on Object Pascal language. Interfaces (Delphi,
C/C++ and Visual Basic.) to the DLL library (exported functions) “AVR309.dll” are described in file AVR309_DLL_help.htm.
Appendix C: DLL library AVR309.dll source codeWhole source code of AVR309.dll library written in Delphi3 can be found in file AVR309.dpr (Delphi3 project).
Appendix D: End user application example - AVR309USBdemo.exe (with source code)
The example of using DLL library from end user application is software AVR309USBdemo.exe. Whole source codes as Delphi3 project of this example application: AVR309USBdemo.dpr.

Used documentation and resources
http://www.cesko.host.sk - authors web pages and various projects
USB related resources:[] http://www.usb.org - USB specification and another USB related resources[] usb-in-a-nutshell.pdf from http://www.beyondlogic.org/usbnutshell/usb-in-a-nutshell.pdf - very
good and simple document how USB works[] http://www.beyondlogic.org - USB related resources[] enumeration.pdf - exact pictures how USB enumeration works[] http://mes.loyola.edu/faculty/phs/usb1.html [] http://www.mcu.cz - USB section (in Czech/Slovak language)[] crcdes.pdf – implementation CRC in USB[] USBspec1-1.pdf – USB 1.1 specification[] usb_20.pdf – USB 2.0 specification
AVR related resources:
[] http://www.atmel.com - AVR 8-bit microcontrollers family[] doc0839.pdf – AT90S2313 datasheet (URL http://www.atmel.com/atmel/acrobat/doc0839.pdf )[] doc2486.pdf – ATmega8 datasheet[] avr910.pdf – AVR ISP programming[] http://www.avrfreaks.com - a lot of AVR resources and information[] AVR Studio 4 – debugging tool for the AVR family (from http://www.atmel.com)[] Simple LPT ISP programmer (http://www.hw.cz/products/lpt_isp_prog/index.html)
Driver related resources:
[] http://www.beyondlogic.org - USB related resources about USB drivers[] http://www.cypress.com - fully documented USB driver (for USB thermometer)[] http://www.jungo.com - WinDriver and KernetDriver – easy to use USB drivers[] http://microsoft.com Microsoft Windows DDK – Driver Development Kit – tools for drivers writing
Author:Ing. Igor [email protected]