2 dear customer,
TRANSCRIPT

Bathroom
Product care

2
For Customer Service and Aftersales assistance, please contact Roca Head Office on 01530 830080
Dear Customer,
Thank you for choosing Roca, we hope you will be very happy with your purchase. Roca, synonymous with design and quality, takes great care with the manufacture of its products.
This leaflet has been designed to help in all aspects of after care throughout our product range.
The guidance on the following pages will ensure that our product remains functional for years to come.
Product care recommendations
Vitreous china 3
Solid surface 4
Seat hinges 4
Electrical components 5
Brassware and chrome fittings 5
Acrylic products 6 (including baths, shower trays, plastic seats and plastic bath panels)
Cast iron and steel baths 6
Furniture 7
Concealed cisterns 7
Close-Coupled Toilets
Identifying your cistern fittings type 8
General close-coupled toilet maintenance 10
Push Button Removal
Type 1 11
Types 2, 3 and 4 12
Maintenance Procedure OUTLET Valve
Type 1 11
Types 2, 3 and 4 13
Maintenance Procedure INLET Valve
Type 1 14
Type 2 15
Type 3 16
Type 4 17
Concealed Cisterns
Product overview and identification 18
Maintenance 19
Close-coupled toilet identification 20
Warranty information 21
Contact details 21
Contents

3
Product and spare parts information can be found on the Roca website at www.uk.roca.com
3 Clean regularly with warm soapy water or mild detergent (to stop the build up of dirt and limescale), rinse with cold water, dry and polish with a dry soft cloth.
3 A cream or liquid cleaner can also be used.
3 Occasional use of mild bathroom lime scale removers is acceptable if used in accordance with manufacturer’s instructions, rinsing off immediately with plenty of cold water.
3 Use of bleach in the toilet bowl is acceptable.
3 Bathroom surface cleaner can be used to remove metal marks and minor blemishes.
3 In hard water areas we strongly recommend that inhibitors or water softeners are fitted to the system to help prevent limescale attack.
3 Do ensure that in hard water areas periodic checks are made to the diaphragm washer, located on the bottom of the drop valve in the cistern.
7 Do not put bleach products (e.g. bleach blocks or tablets) in the actual cistern as this can damage the internal fittings and will invalidate the warranty on the internal parts.
7 Do not put strong cleaners or bleach in the products to stand overnight.
7 Do not mix different cleaners in the WC as they can cause a chemical reaction and give off poisonous gas.
Do Don’t
Vitreous China is a material used to manufacture toilets and basins which is hard-wearing and long lasting when looked after correctly.
Vitreous China

4
For Customer Service and Aftersales assistance, please contact Roca Head Office on 01530 830080
3 Clean regularly with warm soapy water or mild detergent (to stop the build up of dirt and limescale), rinse with cold water, dry and polish with a dry soft cloth.
3 A cream or liquid cleaner can also be used together with a white / colourless non-scratch sponge scourer to clean the surface.
3 Occasional use of mild bathroom lime scale removers is acceptable if used in accordance with manufacturer’s instructions, rinsing off immediately with plenty of cold water.
3 Bathroom surface cleaner can be used to remove metal marks and minor blemishes.
7 Do not mix different cleaners as they can cause a chemical reaction and give off poisonous gas.
Do Don’t
Surfex® is a material created by the combination of minerals and resins which are extremely durable. This compound enables us a freedom of design, not possible before, to create curves, straight lines and very defined angles with no joints.
Solid Surface
3 Clean with warm soapy water or mild detergent.
3 Rinse thoroughly and dry with a soft cloth.
7 Do not force the operation of a soft-close seat.
7 Do not clean with abrasive materials or products containing bleach.
Do Don’t
Seat Hinges

5
Product and spare parts information can be found on the Roca website at www.uk.roca.com
3 Ensure that electrical components are fitted by a qualified electrician.
3 Use a dry cloth to clean.
7 Do not clean electrical products while they are switched on.
Do Don’t
Electrical Components
3 Clean immediately after use to to stop build up of dirt and limescale.
3 Clean with warm soapy water or mild detergent, rinse immediately and dry with a soft cloth.
7 Do not use products such as paint stripper, nail varnish remover, household bleach, perfume, after-shave and strong disinfectants, as chrome is vulnerable to acid attack. These may have a varying effect on the surface from black spots or streaks, which can’t be removed, to pitting of the surface.
7 Do not scratch the finish as this can be a cause for corrosion.
7 Do not clean with abrasive materials or products containing bleach.
Do Don’t
Brassware and Chrome Fittings

6
For Customer Service and Aftersales assistance, please contact Roca Head Office on 01530 830080
3 Clean immediately after use to to stop the build up of dirt and limescale.
3 Use warm soapy water or mild detergent and rinse down with cold water, wiping down with any soft dry cloth.
3 The occasional use of limescale removers is acceptable following manufacturers instructions rinsing off with cold water immediately after use.
3 Use T-Cut and a soft cloth to fix minor surface marks (acrylic baths only)
7 Do not use household chemicals or abrasive products such as hair dye, nail varnish remover, paint strippers, strong disinfectants, aftershave and household bleach.
7 Do not allow soaps, shampoos etc to pool for any length of time as some may permanently discolour the acrylic.
7 Do not have lit cigarettes or candle flames near acrylic as it can burn and melt.
Do Don’t
Acrylic ProductsIncluding baths, shower trays, plastic seats and plastic bath panels
3 Clean immediately after use to stop the build up of dirt and limescale.
3 Use warm soapy water or mild detergent followed by rinsing and if desired drying with a soft dry cloth and this will be sufficient.
3 Use a steel bath repair kit should any damage be caused to the bath. Contact Roca for details.
3 The use of cream cleaner can be used if there is a build up of limescale.
7 Do not use bleach or abrasive products when cleaning.
7 Do not use bathroom limescale remover, mousse or any acidic or alkali cleaner, unless it has been specifically recommended in the manufacturers instructions as suitable for these type of products.
7 Do not use steel wool or steel soap pads as these can leave rust spots.
Don’t
Cast-Iron and Steel Baths
Do

7
Product and spare parts information can be found on the Roca website at www.uk.roca.com
3 Clean furniture with a soft, clean and damp cloth, warm soapy water and a mild detergent.
3 Any stainless steel parts should be cleaned with a soft, lint-free cloth and non-abrasive stainless steel cleaner. Spray directly on to the cloth and wipe clean.
3 Ensure the bathroom is well ventilated and protected from prolonged direct sunlight to ensure the quality and appearence of the furniture is maintained.
7 Do not use abrasive cleaners or sharp objects when cleaning.
7 Do not leave chemicals such as hair dye, nail-varnish remover or perfume on surfaces.
7 Do not overload drawer units as this can damage the drawer runners.
7 Do not leave water on the surface of the furniture or inside the drawers. Any lying water must be wiped away immediately with a soft cloth.
Do Don’t
Furniture
3 Clean the operating panel with a soft, clean and damp cloth, warm soapy water or mild detergent and always wipe dry with a soft cloth.
3 In hard water areas we strongly recommend that inhibitors or water softeners are fitted to the system during installation to help prevent limescale attack.
7 Do not put bleach products (e.g. bleach blocks or tablets) in the actual cistern as this can damage the internal fittings and will invalidate the warranty on the internal parts.
7 Do not clean the operating panel with abrasive materials or products containing bleach.
Do Don’t
Concealed Cisterns

8
For Customer Service and Aftersales assistance, please contact Roca Head Office on 01530 830080
Type 1 fittings Type 2 fittings
To identify which cistern fittings you have installed, please refer to the
images below.
Close-Coupled Toilets - Identifying Cistern Fittings
A A
B B
Type 1 instructions also app yl for brass
threaded version.

9
Product and spare parts information can be found on the Roca website at www.uk.roca.com
Type 3 fittings Type 4 fittings
KEY:
A
B
A A
B B
Inlet valve
Outlet valve (also known as drop valve, flush valve or central column unit)
10
For Customer Service and Aftersales assistance, please contact Roca Head Office on 01530 830080
If water runs into your toilet bowl for longer than five minutes after flushing please refer to the cistern maintenance procedure or read the following for further details:
• The float height on the inlet valve may have moved causing water to internally overflow into the pan (contact an installer).
• There could be a build up of limescale or debris on the diaphragm washer (at the base of the central column unit/drop valve). See cistern maintenance procedure for step by step instructions on how to change the diaphragm washer. As a temporary measure the original washer can be cleaned, reversed and refitted whilst awaiting a replacement washer.
• Cleaning products such as bleach blocks may have been used which have chemically attacked the component part(s) meaning they must be replaced.
• The black cross headed screw which holds the push button in place for some models (see cistern maintenance) may have been over-tightened, therefore distorting the valve mechanism and preventing it from sealing (this point is applicable to Type 1 fittings only).
Close-Coupled Toilet Maintenance

11
Product and spare parts information can be found on the Roca website at www.uk.roca.com
1 2
3 4 5
iia ragi n
eret
por
sher
1
WhiteDiaphragmcompressionwasherbayonet
Support
washer
1. Turn off the water supp yl to the cistern and 10. Using the clear Neoprene (or g y re rubber)
flush. diaphragm washer as a grip, twist the
white compression bayonet (see picture 2) 2. Close toilet seat and lid.
and pull the washer, bayonet and support
washer away from the rest of the valve. 3. Press and hold down the small button.
11. Inspect the clear Neoprene (or grey rubber) 4. Lift out the large button.diaphragm washer. Clean or replace as
5. Remove the small button. necessary.
6. Use a cross-headed screwdriver to remove 12. Refitting the valve is reversal of removal the black plastic retaining screw. taking care to locate the four tabs of the
valve body into the four notches of the valve 7. Lift out the button body.seat (pictures 3, 4 and 5).
8. The cistern lid can now be removed.13. Re-fitting the button is reversal of removal
9. Expose the valve seal (diaphragm washer) taking care to replace the buttons on the by gripp gin the valve below the blue correct sides. reduced flush float and turn the valve anti-
14. Ensure that the screw which holds the push clockwise to unlock (picture 1).button in place is not over-tightened.
Type 1 Fittings How to remove the Push Button and Maintenance Procedure

12
For Customer Service and Aftersales assistance, please contact Roca Head Office on 01530 830080
1. Lift the cistern lid upwards from the cistern.
2. Turn the cistern lid upside down to reveal the push button securing nut.
3. Unscrew the securing nut to remove the push button from the cistern lid.
(also known as
drop valve or central
column unit)
Push buttons
White nut
Push button rods
- Inlet valve- Outlet valve
Type 2, 3 and 4 Fittings How to remove the Push Button
13
Product and spare parts information can be found on the Roca website at www.uk.roca.com
12345
Face AFULL
FLUSH
FLUSHOPERATION
SHORTFLUSH
SHORTFLUSH
FULLFLUSH
12345
Face AFULL
FLUSH
FLUSHOPERATION
SHORTFLUSH
SHORTFLUSH
FULLFLUSH
Grey Paddle Blue Paddle
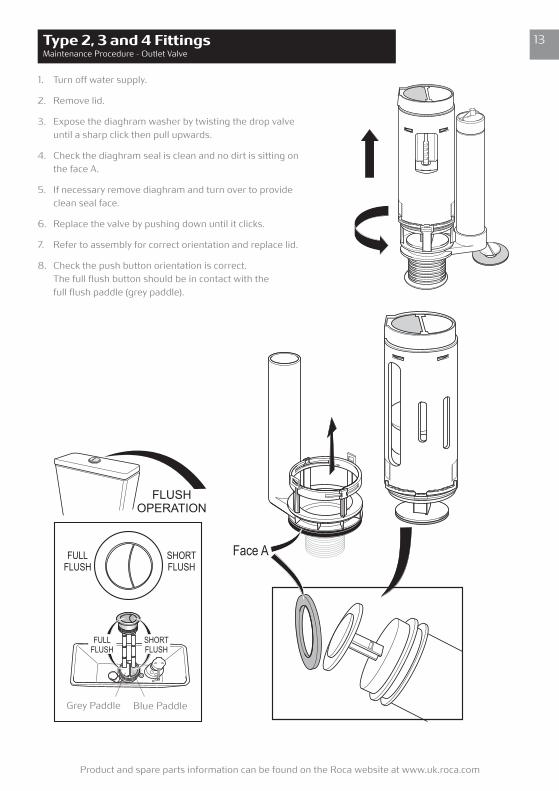
1. Turn off water supply.
2. Remove lid.
3. Expose the diaghram washer by twisting the drop valve until a sharp click then pull upwards.
4. Check the diaghram seal is clean and no dirt is sitting on the face A.
5. If necessary remove diaghram and turn over to provide clean seal face.
6. Replace the valve by pushing down until it clicks.
7. Refer to assembly for correct orientation and replace lid.
8. Check the push button orientation is correct. The full flush button should be in contact with the full flush paddle (grey paddle).
Type 2, 3 and 4 Fittings Maintenance Procedure - Outlet Valve

14
For Customer Service and Aftersales assistance, please contact Roca Head Office on 01530 830080
Type 1 Fittings Maintenance Procedure - Inlet Valve
2a
1. Accessing and removing the diaphragm washer on the Roca A3I Inlet valve
Filter inside the inlet valve thread can be easily removed with a pair of long nose pliers clean with a soft brush to remove any deposits, rinse with warm water and refit as required.
2b
2c
2d
2e
2f
2. Accessing and removing the diaphragm washer on the Roca A3I Inlet valve
2a Hold the blue retaining nut on the top of the valve and turn in an upward direction to release lock.
2b Holding the white cover arm pull in an outward direction and twist 90 degrees to remove.
2c Access to black circular diaphragm washer can now be gained.
2d To remove the diaphragm washer use a pair of long nose pliers. To clean use warm water.
2e Return the component housing back to the main stem ensuring the cut out in the white plastic connector aligns with the grey nodule to accept it on the stem body. Push into position, past the black ‘o’ ring seal and fix blue retaining nut, this time to lock in to position, twist in a downward direction.
2f IMPORTANT – When assembling the components back together, ensure that the ‘Y’ shaped clip that fits on to the threaded Float height adjusting rod is securely fastened. Failure to do so will prevent the valve from shutting off
15
Product and spare parts information can be found on the Roca website at www.uk.roca.com
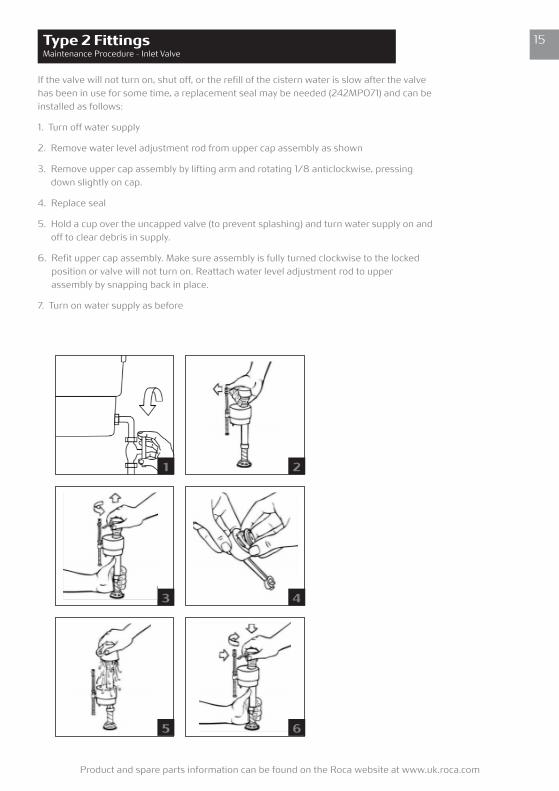
Type 2 Fittings Maintenance Procedure - Inlet Valve
If the valve will not turn on, shut off, or the refill of the cistern water is slow after the valve has been in use for some time, a replacement seal may be needed (242MP071) and can be installed as follows:
1. Turn off water supply
2. Remove water level adjustment rod from upper cap assembly as shown
3. Remove upper cap assembly by lifting arm and rotating 1/8 anticlockwise, pressing down slightly on cap.
4. Replace seal
5. Hold a cup over the uncapped valve (to prevent splashing) and turn water supply on and off to clear debris in supply.
6. Refit upper cap assembly. Make sure assembly is fully turned clockwise to the locked position or valve will not turn on. Reattach water level adjustment rod to upper assembly by snapping back in place.
7. Turn on water supply as before
1 2
3 4
5 6

16
For Customer Service and Aftersales assistance, please contact Roca Head Office on 01530 830080
The Type 3 valve is fitted with a filter which may need cleaning occasionally to ensure optimum water flow is
maintained:
1. Turn off water supp yl to the valve
2. Lift off cistern lid
3. Unscrew front nut and remove arm and pressure chamber cover. Remove diaphragm. Remove the filter
extractor key from the overhead discharge nozzle assembly. Insert the key through the centre of the
support ring and seat. Pull key – the support ring, seat and filter will become free from the main body.
Remove filter from seat and wash in clean water removing any debris that has been caught. Generally clean
the inside of the valve body with clean water.
4. Reassemble I reverse order ensuring that the filter is pushed fully home in the seat. Make sure the
monitoring pin in the diaphragm is free to move. Refit the pressure chamber assembly making sure the
locating lug is positioned in the mating slot in the main body. Slide front nut over arm on to the main body
and hand tighten. If the arm is removed for any reason, when refitting make sure that the small black seal is
securely in place and that both location pegs are snapped into position.
5. Turn on the water supp yl and ensure the valve operates correctly.
6. Resect the float height to the required water level.
7. Carry out final installation checklist:
i Check all moving components operate freely and that the inlet valve shuts off correctly.
ii Check all connections are tightened correctly
iii Check carefully for leaks
iv If overflowing or poor filling occurs:
Check float and arm move up and down freely and that water level is correct
Check filter is free from debris
Check restrictor has been fitted as detailed above
l
l
l
Type 3 Fittings Maintenance Procedure - Inlet Valve
Overhead Discharge Nozzle AssembleyFilter Extractor Key
FilterDiaphragm Assembley
‘O’ Ring
Seat Pressure Chamber Cover
Front NutMain Body
Support Seal
RingArm
Monitoring
PinFiller Tube
Threaded Stem
Base Thread
Rubber Washer
BodyBack Nut
Flow Restrictor
Diaphragm Assembley
FloatNote: Remove factory
fitted flow restrictor
if inlet pressure is
below 25psi (1.5 Bar
or 50ft head)
17
Product and spare parts information can be found on the Roca website at www.uk.roca.com
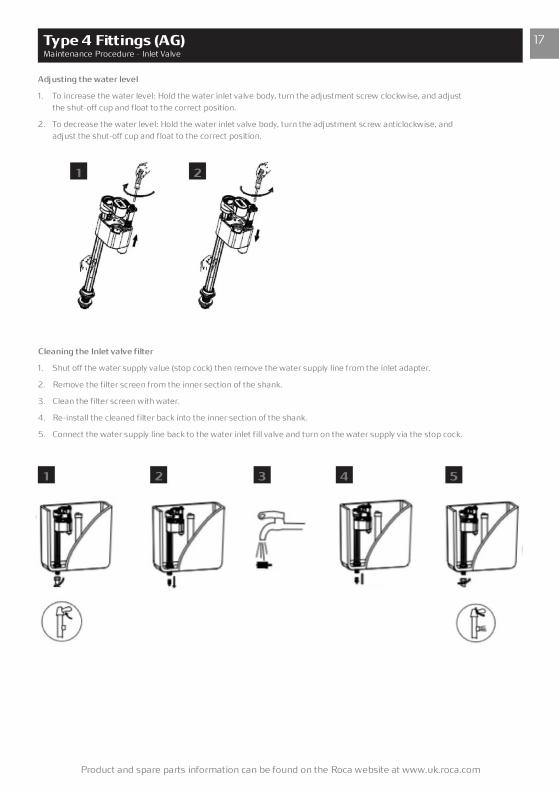
Type 4 Fittings (AG) Maintenance Procedure - Inlet Valve
Adjusting the water level
Cleaning the Inlet valve filter
1. To increase the water level: Hold the water inlet valve body, turn the adjustment screw clockwise, and adjust
the shut-off cup and float to the correct position.
2. To decrease the water level: Hold the water inlet valve body, turn the adjustment screw anticlockwise, and
adjust the shut-off cup and float to the correct position.
1. Shut off the water supply value (stop cock) then remove the water supply line from the inlet adapter.
2. Remove the filter screen from the inner section of the shank.
3. Clean the filter screen with water.
4. Re-install the cleaned filter back into the inner section of the shank.
5. Connect the water supp yl line back to the water inlet fill valve and turn on the water supp yl via the stop cock.
1 2
1 2 3 4 5

18
For Customer Service and Aftersales assistance, please contact Roca Head Office on 01530 830080
PL1 PL2 PL3
PL4 PL5 PL6
PL7 PL10
EP1 EP2
What is a concealed cistern and how is it installed?
How to identify what installation system or concealed cistern you have installed
Floor standing Wall-hung WC Back-to-wall WC
• An alternative solution to a standard vitreous china cistern,
a concealed cistern, is a rigid plastic cistern installed
behind the wall, which is compatible with wall-hung and
floor standing (ba -ck to-wall) toilets.
• If a wall-hung toilet is installed, the installation system
(containing the concealed cistern) will feature a metal
frame which fixes to the floor and/wall to securely support
the toilet.
• If a floor standing back-to-wall toilet is installed, the concealed cistern
would typically be without a frame and mounted directly onto the wall as no
support for the toilet is required.
• The concealed cistern flushes the toilet via the operating panel which is
the only visible component on the outside of the wall. One of the following
operating panel designs will be installed:
• Firstly identify what type of toilet pan is installed, is the pan wall-hung or floor-standing (back-to-wall).
• Secondly, measure the distance between the floor and the operating panel to see whether you have a
standard or low height frame (Low height will be around 820mm from the floor).
• This information will be required in the event of any spare parts being required (for further details on spare
parts please visit www.uk.roca.com)
Concealed Cisterns

19
Product and spare pa ts i ormation can be found on the Roca website at www.uk.roca.comr nf
What internal parts are included within a concealed cistern?
Parts included within a concealed cistern
Operating panel
fixing components
Operating panel
fitted to the wall
Inlet valve
Outlet valve
(also referred to as a
drop valve or central
column unit)
Concealed Cisterns – Maintenance and Identification
How can the concealed cistern be maintained?
Maintenance of the internal fittings can be accessed by removing the operating panel located on
the wall (or countertop for some models where the button can be top mounted) howeve , r
where they will find a dedicated subsection for
maintenance videos, including several for the concealed cisterns and frames.
• Identical to vitreous china cisterns, an inlet valve and outlet valve are included within
the concealed cistern which flush the cistern when operated via the push buttons on the
operating panel.
for full
video maintenance instructions, please refer your plumber to our professional YouTube
channel at www.youtube.com/RocaPro
It is recommended that a qualified tradesman performs maintenance
on the concealed cisterns and frames when required.
20
For Customer Service and Aftersales assistance, please contact Roca Head Office on 01530 830080
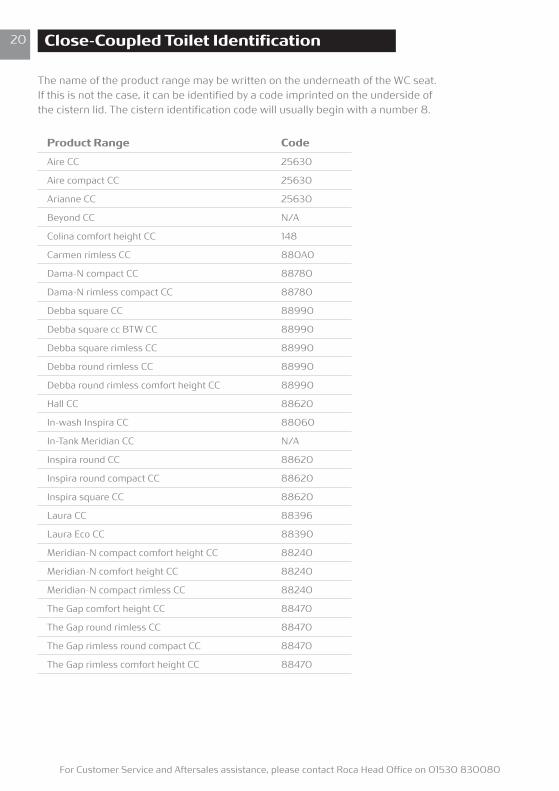
The name of the product range may be written on the underneath of the WC seat. If this is not the case, it can be identified by a code imprinted on the underside of the cistern lid. The cistern identification code will usually begin with a number 8.
Close-Coupled Toilet Identification
Product Range Code
Aire CC 25630
Aire compact CC 25630
Arianne CC 25630
Beyond CC N/A
Colina comfort height CC 148
Carmen rimless CC 880A0
Dama-N compact CC 88780
Dama-N rimless compact CC 88780
Debba square CC 88990
Debba square cc BTW CC 88990
Debba square rimless CC 88990
Debba round rimless CC 88990
Debba round rimless comfort height CC 88990
Hall CC 88620
In-wash Inspira CC 88060
In-Tank Meridian CC N/A
Inspira round CC 88620
Inspira round compact CC 88620
Inspira square CC 88620
Laura CC 88396
Laura Eco CC 88390
Meridian-N compact comfort height CC 88240
Meridian-N comfort height CC 88240
Meridian-N compact rimless CC 88240
The Gap comfort height CC 88470
The Gap round rimless CC 88470
The Gap rimless round compact CC 88470
The Gap rimless comfort height CC 88470

21
Product and spare parts information can be found on the Roca website at www.uk.roca.com
Bath Panels 2 years
Furniture and Mirrored Cabinets 2 years
Smart toilets (electrical components only) 2 years
Mirrors, Lights and Accessories 2 years
Operating panels 2 years
Seats and Covers 2 years
Touchless valve 2 years
Whirlpool spas 2 years
Cistern Internals and Wastes 1 year
Acrylic, Steel and Cast Iron Baths 25 years
Ceramics 25 years
Brassware and Showers 10 years (lifetime guarantee on ceramic cartridge)
Enclosures and Screens 10 years
Installation Systems Frame 10 years
Concealed Cisterns 5 years (excluding cistern internals)
Smart shower 5 years
Solid surface 5 years
Roca UK
Interlink Way West Bardon Hill Coalville Leicestershire LE67 1LD
Telephone: +44 1530 830080Email: [email protected]: www.uk.roca.com
For Customer Service and Aftersales assistance, please contact Roca UK.
Contact Details
Roca Ltd warrants that all Goods purchased after 1st September 2008 will be free from manufacturing defects for the following periods:
Warranty
Roca Ireland
Unit 628A Jordanstown Avenue Greenogue Industrial Estate Rathcoole County Dublin D24 C8PY Ireland
Telephone: + 353 1 401 9340
For the latest and full terms and conditions relating to warranties, please see the back of our latest Price List, which is available to download from our website: www.uk.roca.com

Roca Ltd.Interlink Way West Bardon Hill Coalville Leicestershire LE67 1LDTel: +44 1530 830080 www.uk.roca.com V3 M
ay 2
021
Roca IrelandUnit 628A Jordanstown Avenue Greenogue Industrial Estate Rathcoole, County Dublin D24 C8PY IrelandTel: + 353 1 401 9340