2 manual creation of an oracle 9i database
DESCRIPTION
oracleTRANSCRIPT

Copyright 2003 AIRCOM International Ltd
All rights reserved. No part of this work, which is protected by copyright, may
be reproduced in any form or by any means - graphic, electronic or mechanical,
including photocopying, recording, taping or storage in an information retrieval
system – without the written permission of the copyright owner.
Manual Creation of an Oracle 9i DB
Product Support Group
AIRCOM MEA

Manual Creation of an Oracle 9i DB Page 1
COMMERCIAL-IN-CONFIDENCE
Contents CONTENTS..................................................................................................................................1
1 INTRODUCTION................................................................................................................2
2 CREATING AN ORACLE DATABASE...........................................................................2
3 CREATING A LISTENER .................................................................................................8
4 CREATING A SERVICE..................................................................................................12

Manual Creation of an Oracle 9i DB Page 2
COMMERCIAL-IN-CONFIDENCE
1 INTRODUCTION This document describes the process of creating an Oracle 9i database, creating a listener for that database, creating a Local Net Service connection to that database.
2 CREATING AN ORACLE DATABASE • Go to START / PROGRAMS / ORACLE / ORACLE – ORAHOME92 /
CONFIGURATION AND MIGRATION TOOLS / DATABASE CONFIGURATION ASSISTANT – Next
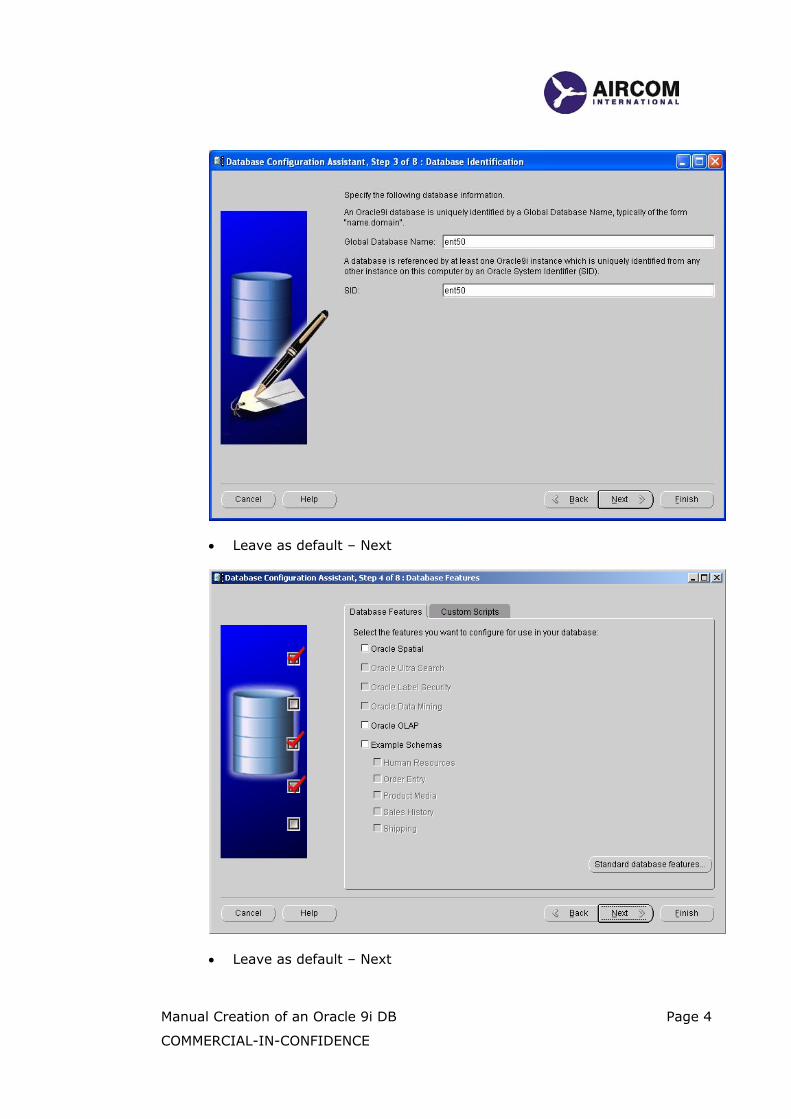
• Leave as default – Next

Manual Creation of an Oracle 9i DB Page 3
COMMERCIAL-IN-CONFIDENCE
• AIRCOM Production Autoextents (leave as it is) – Next
• Give the database a name of ENT50 – Next
Manual Creation of an Oracle 9i DB Page 4
COMMERCIAL-IN-CONFIDENCE
• Leave as default – Next
• Leave as default – Next

Manual Creation of an Oracle 9i DB Page 5
COMMERCIAL-IN-CONFIDENCE
• Leave as default – Next
• Leave as default – Next

Manual Creation of an Oracle 9i DB Page 6
COMMERCIAL-IN-CONFIDENCE
• Finish -> OK.

Manual Creation of an Oracle 9i DB Page 7
COMMERCIAL-IN-CONFIDENCE
• After the database has been created a window appears asking the user to enter passwords. Please enter sys, sys, system, system in this order. Now click Exit.

Manual Creation of an Oracle 9i DB Page 8
COMMERCIAL-IN-CONFIDENCE
3 CREATING A LISTENER Go to START / PROGRAMS / ORACLE / ORACLE - ORAHOME92 / CONFIGURATION AND MIGRATION TOOLS / NET CONFIGURATION ASSISTANT
• Select Listener configuration – Next

Manual Creation of an Oracle 9i DB Page 9
COMMERCIAL-IN-CONFIDENCE
• Select Add – Next
• Leave as default – Next

Manual Creation of an Oracle 9i DB Page 10
COMMERCIAL-IN-CONFIDENCE
• Ensure that Selected Protocol is TCP – Next
• Leave as default – Next

Manual Creation of an Oracle 9i DB Page 11
COMMERCIAL-IN-CONFIDENCE
• Select No – Next
• Listener Configuration Complete

Manual Creation of an Oracle 9i DB Page 12
COMMERCIAL-IN-CONFIDENCE
4 CREATING A SERVICE Please note that a listener must have already been created at this stage. Go to START / PROGRAMS / ORACLE / ORACLE - ORAHOME92 / CONFIGURATION AND MIGRATION TOOLS / NET CONFIGURATION ASSISTANT
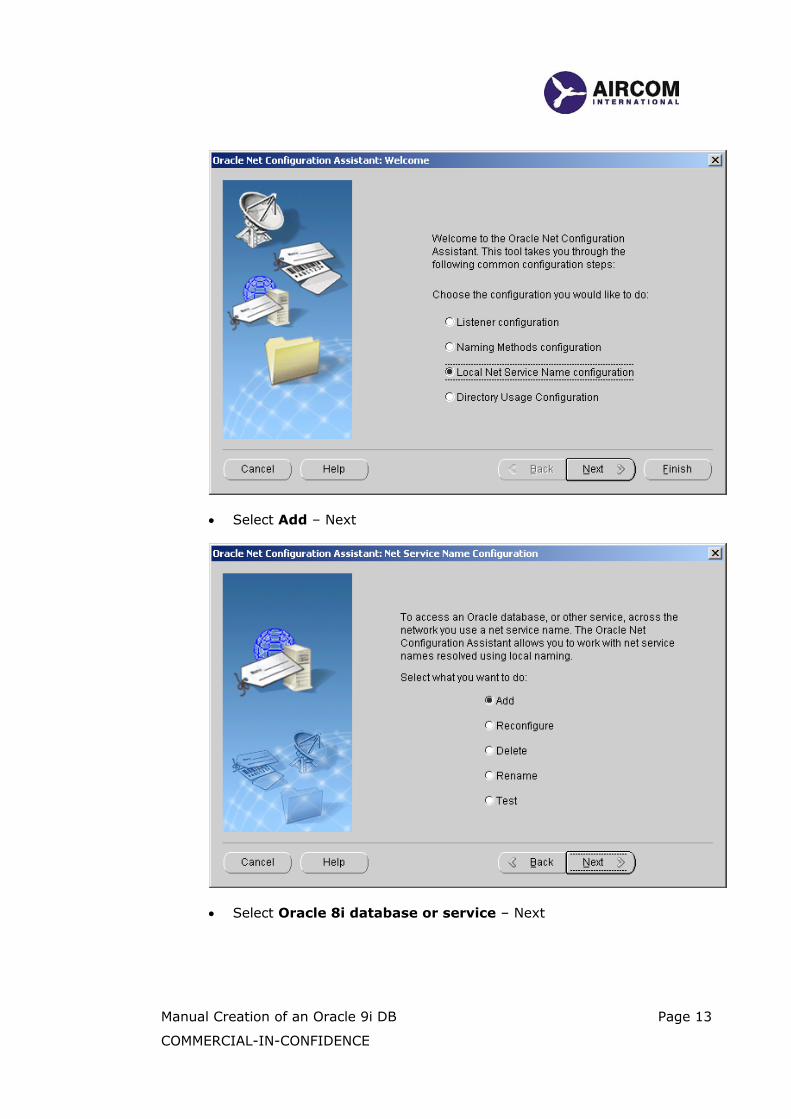
• Select Local Net Service Name Configuration – Next
Manual Creation of an Oracle 9i DB Page 13
COMMERCIAL-IN-CONFIDENCE
• Select Add – Next
• Select Oracle 8i database or service – Next

Manual Creation of an Oracle 9i DB Page 14
COMMERCIAL-IN-CONFIDENCE
• Enter the service name, which was the name for the database in Para 2 above.
• Select TCP – Next

Manual Creation of an Oracle 9i DB Page 15
COMMERCIAL-IN-CONFIDENCE
• Enter the Hostname of the machine that the database is stored on. – Next (To get the hostname go to the cmd prompt and type hostname and enter)
• Select Yes, perform a test – Next

Manual Creation of an Oracle 9i DB Page 16
COMMERCIAL-IN-CONFIDENCE
• It is normal to get an error message at first. Please Select Change Login – re-enter username as system, re-enter password as system and test again and it should succeed this time.
• Click on Next

Manual Creation of an Oracle 9i DB Page 17
COMMERCIAL-IN-CONFIDENCE
• Click on Next
• Leave as default – Next

Manual Creation of an Oracle 9i DB Page 18
COMMERCIAL-IN-CONFIDENCE
• Finish

Manual Creation of an Oracle 9i DB Page 19
COMMERCIAL-IN-CONFIDENCE