2008 mercedes c class mesh grille carid
TRANSCRIPT

8/8/2019 2008 Mercedes c Class Mesh Grille Carid
http://slidepdf.com/reader/full/2008-mercedes-c-class-mesh-grille-carid 1/4
1
1. IMPORTANT: Apply masking tape to all paintedsurfaces of the front bumper cover around the
grille openings to protect the paint from damage.2. Remove the factory front license plate bracket if equipped.
2
IMPORTANT: PLEASE RETAIN THIS INSTRUCTION MANUAL FOR FUTURE REFERENCECopyright © 2009 by E&G
Classics, Inc.All right reserved. The repro-duction or utilization of thiswork in any form or any elec-tronic, mechanical, or othermeans, no known or hereaf -ter invented, including xerog-
raphy, photocopy ing, and re-cording, and in any informa-tion storage retrieval systemis forbidden without writtenpermission of owners.
Notes to the Technician:
E&G is proud to present this package toyou and reminds you that for technical in-formation, contact Lynn Eash or Lee Clary at 410-381-4900. Do not attempt instal-lation any E&G product without first read-
ing the detailed instructions. E&G Classicswill not warrant damaged parts or vehicledue to altered installation instructions.
2008-09 Mercedes
C-Class “Ultimate”
Mesh Grille
C 18 G9P
Important information before you begin:
This E&G grille installation kit includes grille holelocation template(s) to drill mounting holes inthe vehicle.
Before marking or drilling any holes into thevehicle, you MUST verify that the template(s)provided in this kit match the mounting pinlocations on the grille(s).

8/8/2019 2008 Mercedes c Class Mesh Grille Carid
http://slidepdf.com/reader/full/2008-mercedes-c-class-mesh-grille-carid 2/4
2 Copyright 2009 by E&G Classics, Inc.
6. You will need to unclip the cable and hose fromthe back of the bracket attached to the radiatorsupport cover at the center.
8. Remove the 10mm hex head bolts (one each side)retaining the upper outer portions of the factory grille.
7. To remove the radiator support panel cover, youmust push back and pull up to release the back edge (A) and then push down and pull forward onthe front edge (B) where shown, each side. Oncethe panel unclips, remove it from the vehicle.
6
8
B
5. You will need to unclip the cable from the back of the bracket attached to the radiator support coverat both ends.
5
3. Open the hood and remove the air intake tubesattached to the radiator support panel cover by unclipping them at both ends.
3
4. In the center of the radiator support panel, turnthe plastic fastener 1/4 turn to release.
4
A
8/8/2019 2008 Mercedes c Class Mesh Grille Carid
http://slidepdf.com/reader/full/2008-mercedes-c-class-mesh-grille-carid 3/4
3 Copyright 2009 by E&G Classics, Inc.
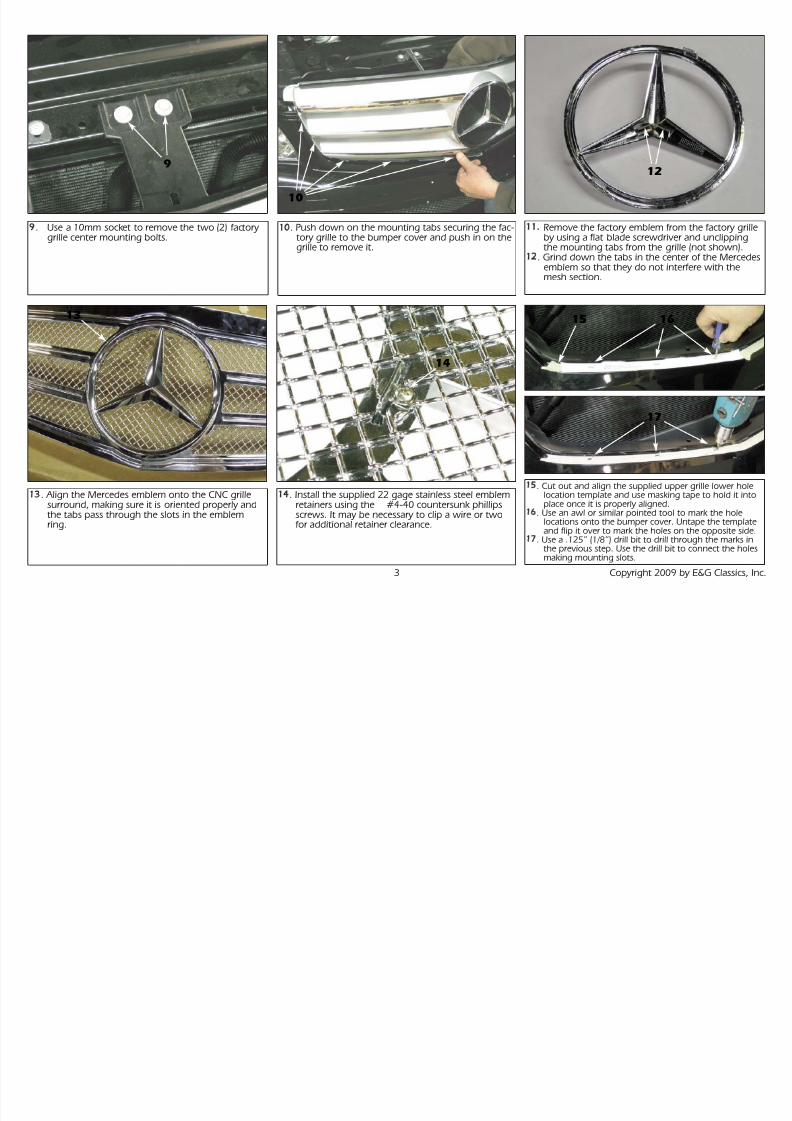
13. Align the Mercedes emblem onto the CNC grillesurround, making sure it is oriented properly andthe tabs pass through the slots in the emblemring.
13
11. Remove the factory emblem from the factory grilleby using a flat blade screwdriver and unclippingthe mounting tabs from the grille (not shown).
12. Grind down the tabs in the center of the Mercedesemblem so that they do not interfere with themesh section.
12
15. Cut out and align the supplied upper grille lower holelocation template and use masking tape to hold it intoplace once it is properly aligned.
16. Use an awl or similar pointed tool to mark the holelocations onto the bumper cover. Untape the template
and flip it over to mark the holes on the opposite side.17. Use a .125” (1/8”) drill bit to drill through the marks inthe previous step. Use the drill bit to connect the holesmaking mounting slots.
15
14. Install the supplied 22 gage stainless steel emblemretainers using the #4-40 countersunk phillipsscrews. It may be necessary to clip a wire or twofor additional retainer clearance.
14
9. Use a 10mm socket to remove the two (2) factory grille center mounting bolts.
10. Push down on the mounting tabs securing the fac-tory grille to the bumper cover and push in on thegrille to remove it.
10
9
17
16

8/8/2019 2008 Mercedes c Class Mesh Grille Carid
http://slidepdf.com/reader/full/2008-mercedes-c-class-mesh-grille-carid 4/4
4 Copyright 2009 by E&G Classics, Inc.
24. Reinstall the radiator support panel cover and theair intake tubes removed in Steps 3 through 7.
24
WARRANTY INFORMATION:
E&G Classics, Inc. warrants its chrome parts and products to be free from defects in ma te-rial, workmanship or finish for Forty-Eight (48) months from the date of shipment by E&G. Thiswarranty is limited to the repair or replacement, at E&G Classics option, of the defective part orproduct.
To obtain performance under this warranty you must:
1.) Present your E&G unit to an authorized distributor in your area with proof of purchase.2.) If no distributor is available, contact E&G Classics (address below) for authorization to return
unit.3.) Returns - All unauthorized returns will be refused. Merchandise approved by E&G for return
must have been purchased within the Forty-Eight (48) months. All returns require anauthorization number obtained from E&G and the actual return must be accompanied by the written authorization form filled out completely. All merchandise must be inspectedupon receipt and shortages reported within 48 hours. All merchandise must be in a resalable condition. Merchandise must be packed carefully in the original packing. If originalunit.