2010 nissan-datsun versa l4-1.6l (hr16de)€¦ · 2010 nissan-datsun versa l4-1.6l (hr16de) vehicle...
TRANSCRIPT
2010 Nissan-Datsun Versa L4-1.6L (HR16DE)
Vehicle » Engine, Cooling and Exhaust » Engine » Timing Chain » Service and Repair » Removal And
Installation
TIMING CHAIN
Removal and Installation
CAUTION:
The rotation direction indicated in the text indicates all directions seen from the engine front.
REMOVAL
1. Remove front wheel (RH). See: Maintenance\Wheels and Tires\Service and Repair\Adjustment.
2. Remove front fender protector (RH). See: Body and Frame\Fender\Front Fender\Front Fender
Liner\Service and Repair\Removal And Installation.
3. Drain engine oil. See: Engine Oil\Service and Repair\Draining.
CAUTION:
Perform this step when engine is cold.
4. Remove the following parts.
• Intake manifold: See: Intake Manifold\Service and Repair\Exploded View.
• Drive belt: See: Drive Belt\Service and Repair\Removal and Replacement.
• Water pump pulley: See: Water Pump\Service and Repair\Removal and Replacement\Exploded
View.
• Ground cable (RH)
5. Support the bottom surface of engine using a transmission jack, and then remove the engine mounting
bracket and insulator (RH). See: Service and Repair\Removal and Replacement\Exploded View.
6. Remove rocker cover. See: Powertrain Management\Ignition System\Ignition Coil\Service and
Repair\Exploded View.
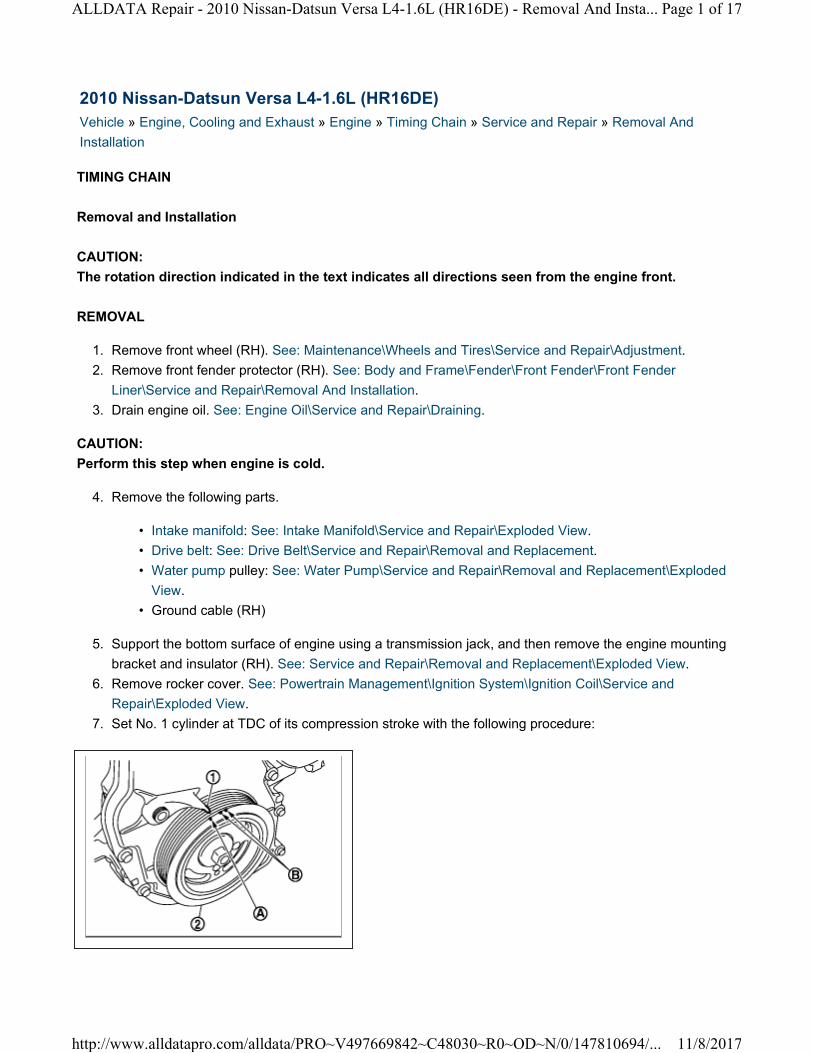
7. Set No. 1 cylinder at TDC of its compression stroke with the following procedure:
Page 1 of 17ALLDATA Repair - 2010 Nissan-Datsun Versa L4-1.6L (HR16DE) - Removal And Insta...
11/8/2017http://www.alldatapro.com/alldata/PRO~V497669842~C48030~R0~OD~N/0/147810694/...

a. Rotate crankshaft pulley (2) clockwise and align TDC mark
(without paint mark) (A) to timing indicator (1) on front cover.
B : White paint mark (Not use for service)
b. Make sure the matching marks on each camshaft sprocket are positioned as shown.
• If not, rotate crankshaft pulley one more turn to align matching marks to the positions.
8. Remove crankshaft pulley with the following procedure:
Page 2 of 17ALLDATA Repair - 2010 Nissan-Datsun Versa L4-1.6L (HR16DE) - Removal And Insta...
11/8/2017http://www.alldatapro.com/alldata/PRO~V497669842~C48030~R0~OD~N/0/147810694/...
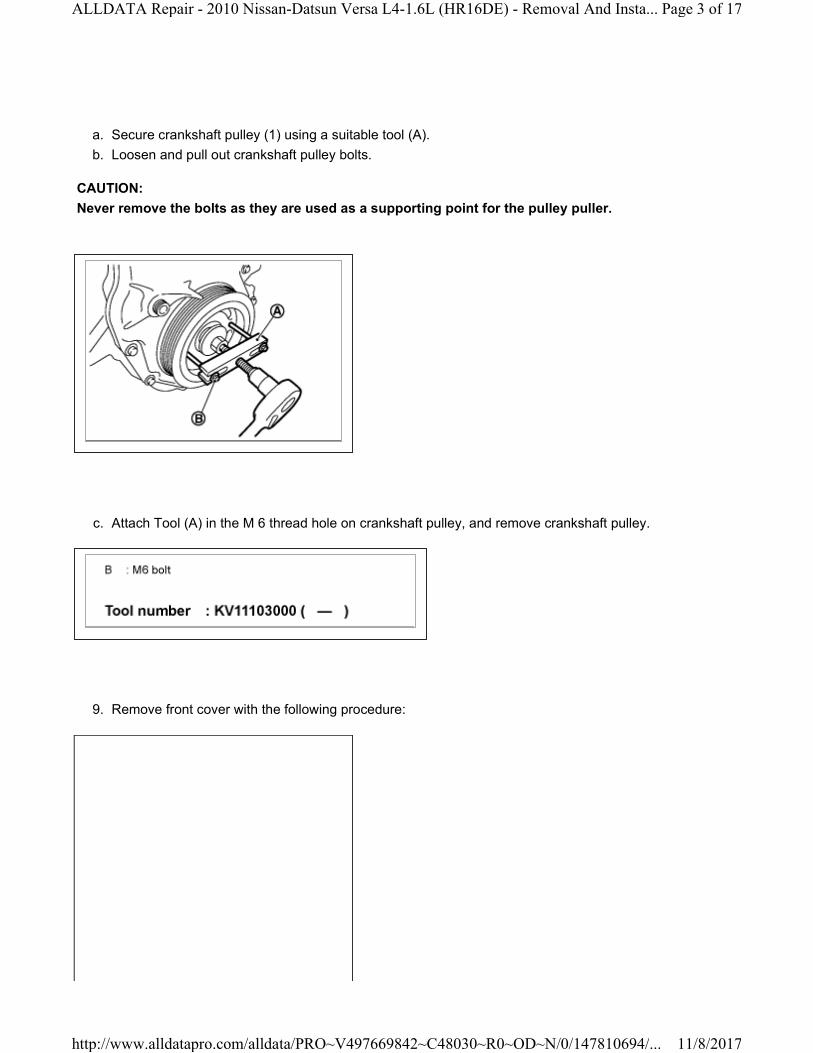
a. Secure crankshaft pulley (1) using a suitable tool (A).
b. Loosen and pull out crankshaft pulley bolts.
CAUTION:
Never remove the bolts as they are used as a supporting point for the pulley puller.
c. Attach Tool (A) in the M 6 thread hole on crankshaft pulley, and remove crankshaft pulley.
9. Remove front cover with the following procedure:
Page 3 of 17ALLDATA Repair - 2010 Nissan-Datsun Versa L4-1.6L (HR16DE) - Removal And Insta...
11/8/2017http://www.alldatapro.com/alldata/PRO~V497669842~C48030~R0~OD~N/0/147810694/...
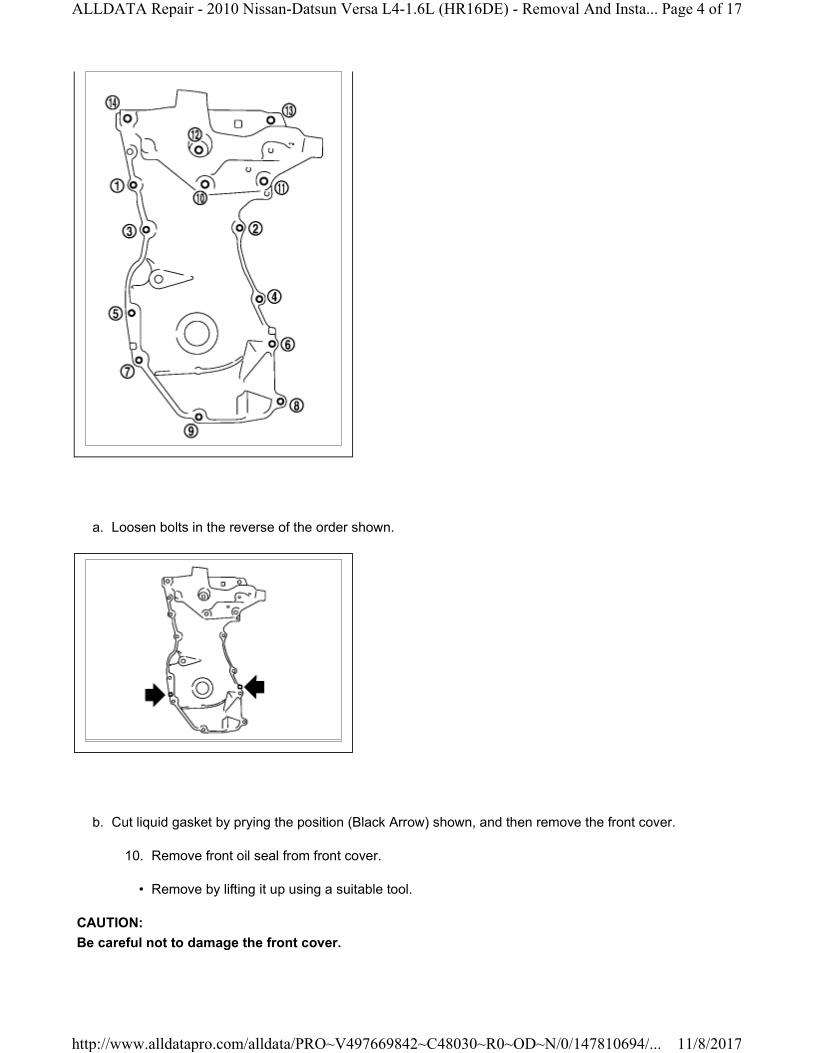
a. Loosen bolts in the reverse of the order shown.
b. Cut liquid gasket by prying the position (Black Arrow) shown, and then remove the front cover.
10. Remove front oil seal from front cover.
• Remove by lifting it up using a suitable tool.
CAUTION:
Be careful not to damage the front cover.
Page 4 of 17ALLDATA Repair - 2010 Nissan-Datsun Versa L4-1.6L (HR16DE) - Removal And Insta...
11/8/2017http://www.alldatapro.com/alldata/PRO~V497669842~C48030~R0~OD~N/0/147810694/...

11. Remove chain tensioner (1) with the following procedure.
a. Fully push down the chain tensioner lever (A), and then push the plunger (C) into the inside
of tensioner.
• The tab (B) is released by fully pushing the lever down. As a result, the plunger can be moved.
b. Pull up the lever to align its hole position with the body hole position.
• When the lever hole is aligned with the body hole position, the plunger is fixed.
• When the protrusion parts of the plunger ratchet and the tab face each other, both hole positions
are not aligned. At that time, correctly engage them and align these hole positions by slightly
moving the plunger.
c. Insert the stopper pin (D) into the body hole through the lever hole, and then fix the lever at
the upper position.
• The example that a hexagonal wrench for 2.5 mm (0.098 in) is used as shown.
d. Remove chain tensioner.
Page 5 of 17ALLDATA Repair - 2010 Nissan-Datsun Versa L4-1.6L (HR16DE) - Removal And Insta...
11/8/2017http://www.alldatapro.com/alldata/PRO~V497669842~C48030~R0~OD~N/0/147810694/...

12. Remove the timing chain tension guide (2) and the timing chain slack guide (1).
13. Remove the timing chain (2).
• Pull the looseness of timing chain toward the camshaft sprocket (EXH) (1), and then remove the
timing chain (2) and start the removal from camshaft sprocket (EXH) (1) side.
CAUTION:
Never rotate crankshaft or camshaft while timing chain is removed. It causes interference between valve
and piston.
14. Remove the crankshaft sprocket and the oil pump drive related parts with the following procedure.
a. Remove chain tensioner (1).
• Pull out from the shaft (B) and spring fixing holes (A).
Page 6 of 17ALLDATA Repair - 2010 Nissan-Datsun Versa L4-1.6L (HR16DE) - Removal And Insta...
11/8/2017http://www.alldatapro.com/alldata/PRO~V497669842~C48030~R0~OD~N/0/147810694/...
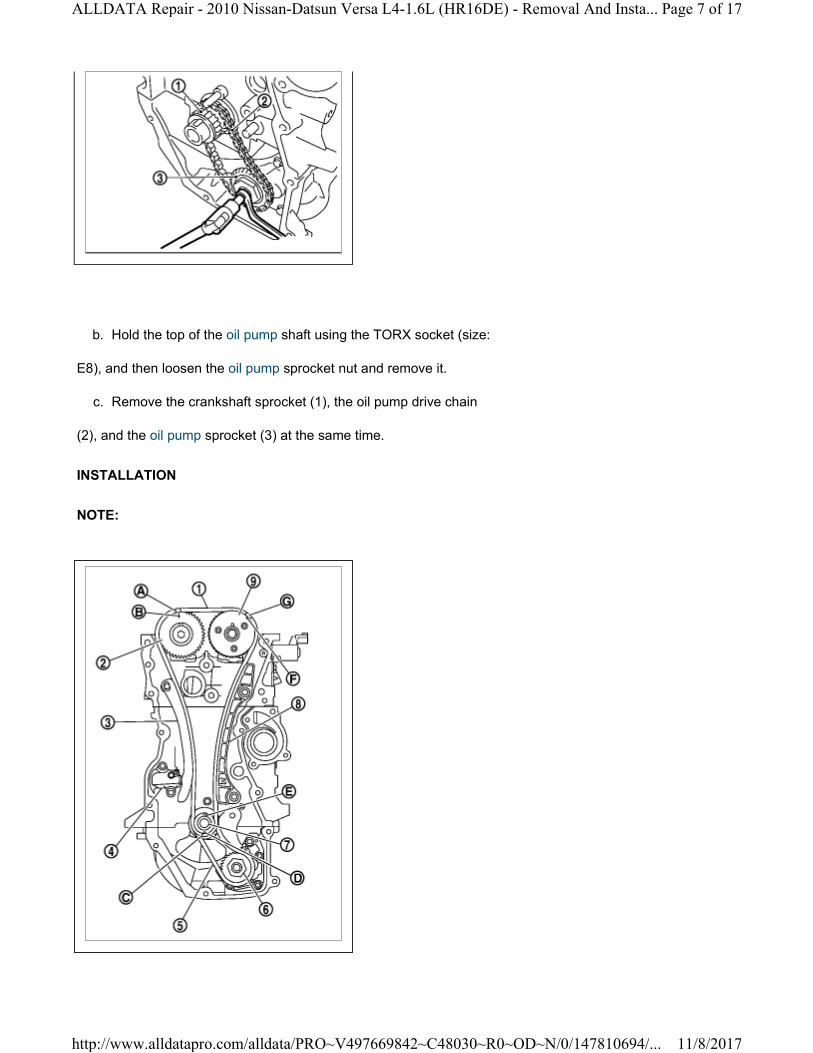
b. Hold the top of the oil pump shaft using the TORX socket (size:
E8), and then loosen the oil pump sprocket nut and remove it.
c. Remove the crankshaft sprocket (1), the oil pump drive chain
(2), and the oil pump sprocket (3) at the same time.
INSTALLATION
NOTE:
Page 7 of 17ALLDATA Repair - 2010 Nissan-Datsun Versa L4-1.6L (HR16DE) - Removal And Insta...
11/8/2017http://www.alldatapro.com/alldata/PRO~V497669842~C48030~R0~OD~N/0/147810694/...
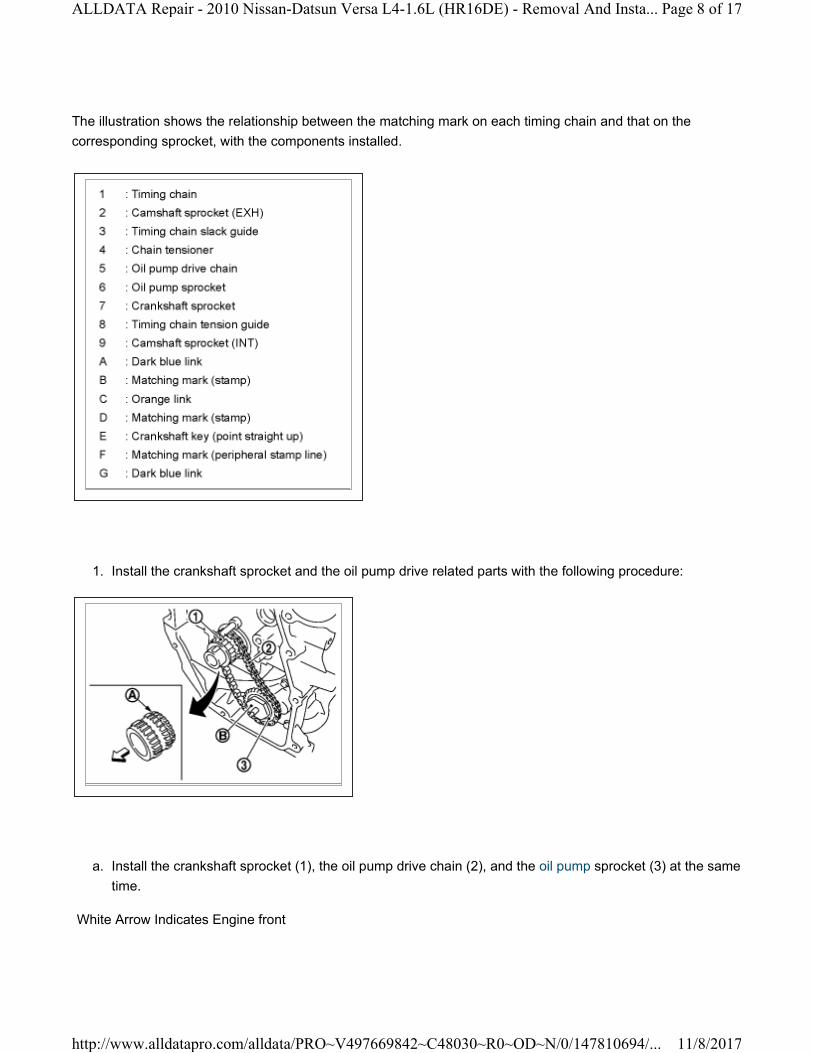
The illustration shows the relationship between the matching mark on each timing chain and that on the
corresponding sprocket, with the components installed.
1. Install the crankshaft sprocket and the oil pump drive related parts with the following procedure:
a. Install the crankshaft sprocket (1), the oil pump drive chain (2), and the oil pump sprocket (3) at the same
time.
White Arrow Indicates Engine front
Page 8 of 17ALLDATA Repair - 2010 Nissan-Datsun Versa L4-1.6L (HR16DE) - Removal And Insta...
11/8/2017http://www.alldatapro.com/alldata/PRO~V497669842~C48030~R0~OD~N/0/147810694/...

• Install the crankshaft sprocket (1) so that its invalid gear area (A) is towards the back of the engine.
• Install the oil pump sprocket (3) so that its hexagonal surface faces (B) the front of engine.
NOTE:
There is no matching mark in the oil pump drive related parts.
b. Hold the top of the oil pump shaft using the TORX socket (size:
E8), and then tighten the oil pump sprocket nuts.
Page 9 of 17ALLDATA Repair - 2010 Nissan-Datsun Versa L4-1.6L (HR16DE) - Removal And Insta...
11/8/2017http://www.alldatapro.com/alldata/PRO~V497669842~C48030~R0~OD~N/0/147810694/...
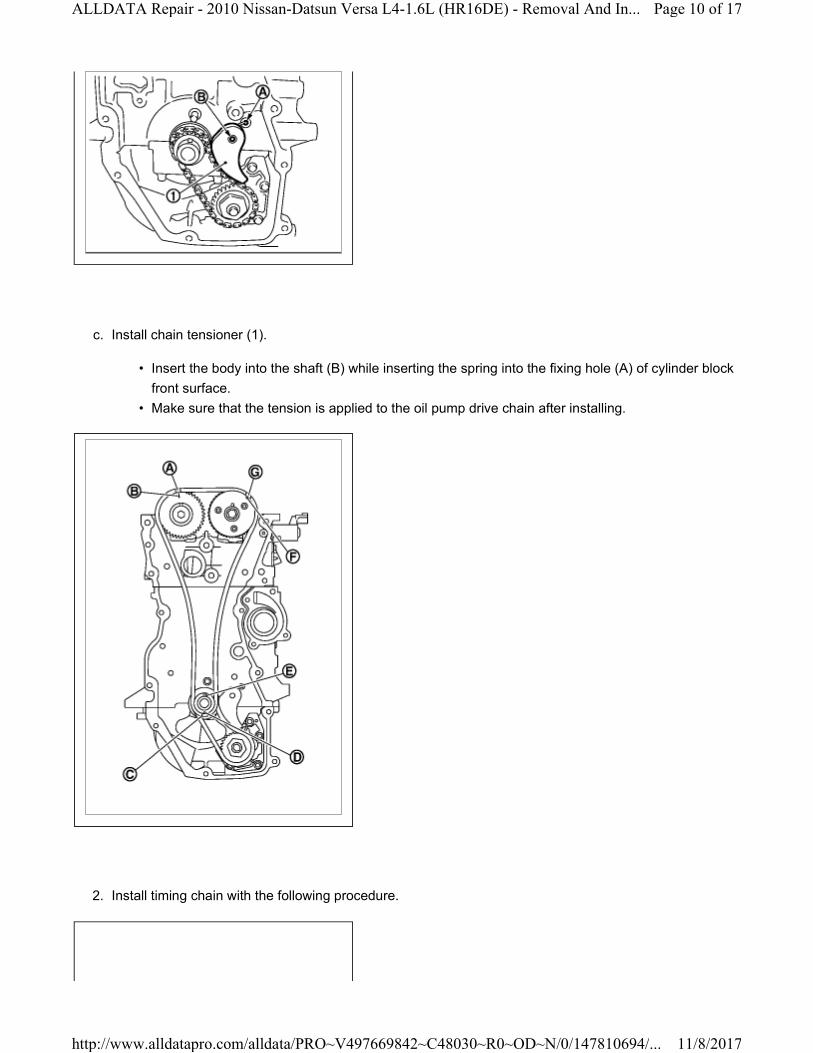
c. Install chain tensioner (1).
• Insert the body into the shaft (B) while inserting the spring into the fixing hole (A) of cylinder block
front surface.
• Make sure that the tension is applied to the oil pump drive chain after installing.
2. Install timing chain with the following procedure.
Page 10 of 17ALLDATA Repair - 2010 Nissan-Datsun Versa L4-1.6L (HR16DE) - Removal And In...
11/8/2017http://www.alldatapro.com/alldata/PRO~V497669842~C48030~R0~OD~N/0/147810694/...
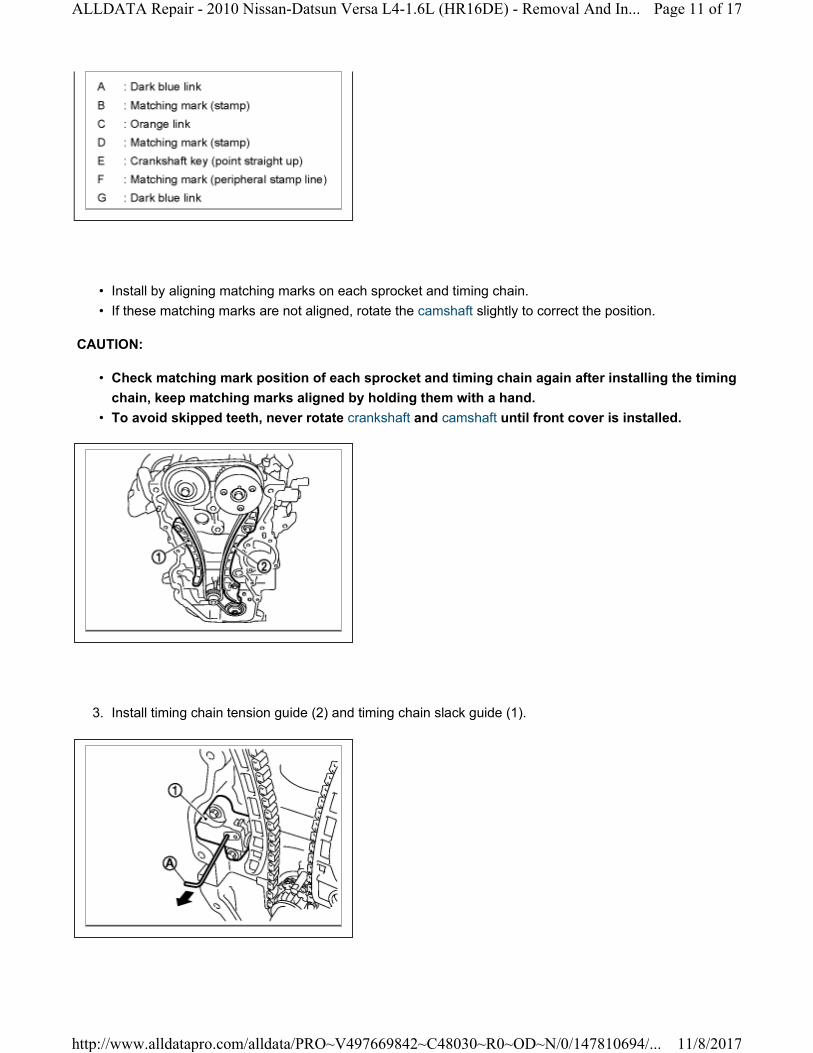
• Install by aligning matching marks on each sprocket and timing chain.
• If these matching marks are not aligned, rotate the camshaft slightly to correct the position.
CAUTION:
• Check matching mark position of each sprocket and timing chain again after installing the timing
chain, keep matching marks aligned by holding them with a hand.
• To avoid skipped teeth, never rotate crankshaft and camshaft until front cover is installed.
3. Install timing chain tension guide (2) and timing chain slack guide (1).
Page 11 of 17ALLDATA Repair - 2010 Nissan-Datsun Versa L4-1.6L (HR16DE) - Removal And In...
11/8/2017http://www.alldatapro.com/alldata/PRO~V497669842~C48030~R0~OD~N/0/147810694/...
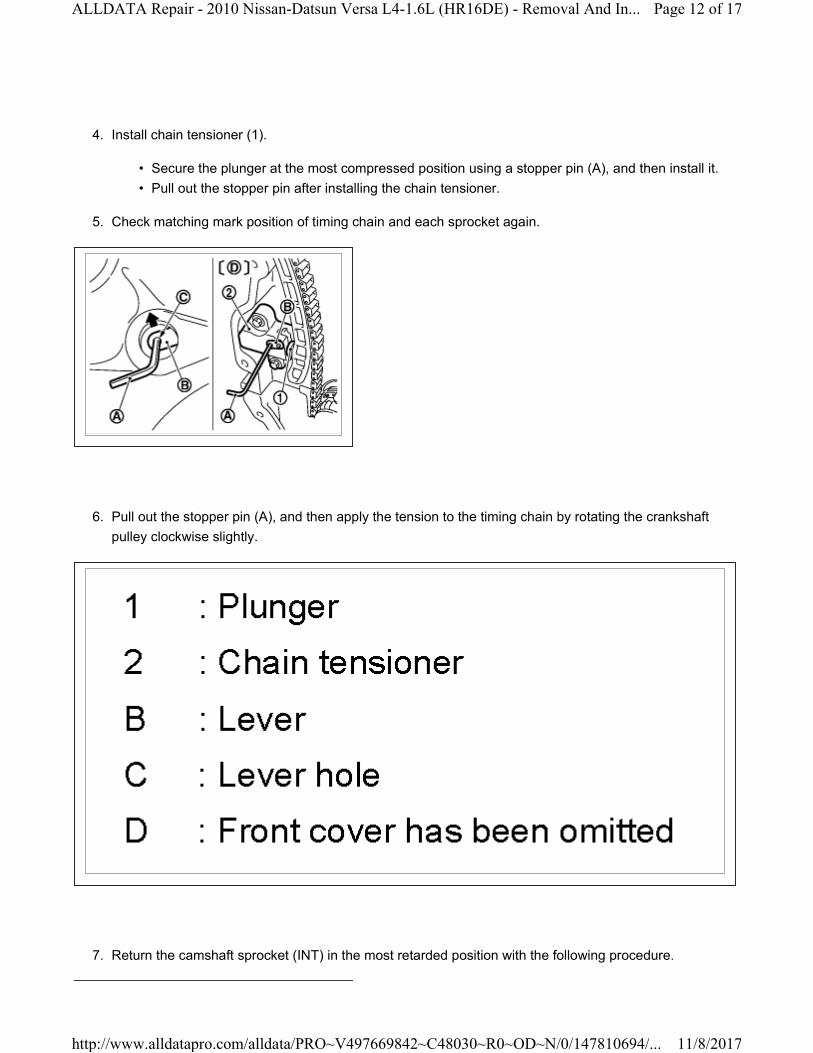
4. Install chain tensioner (1).
• Secure the plunger at the most compressed position using a stopper pin (A), and then install it.
• Pull out the stopper pin after installing the chain tensioner.
5. Check matching mark position of timing chain and each sprocket again.
6. Pull out the stopper pin (A), and then apply the tension to the timing chain by rotating the crankshaft
pulley clockwise slightly.
7. Return the camshaft sprocket (INT) in the most retarded position with the following procedure.
Page 12 of 17ALLDATA Repair - 2010 Nissan-Datsun Versa L4-1.6L (HR16DE) - Removal And In...
11/8/2017http://www.alldatapro.com/alldata/PRO~V497669842~C48030~R0~OD~N/0/147810694/...

a. Remove the stopper pin (A) from the camshaft sprocket (INT).
B : Tape
b. Turn the crankshaft slowly clockwise and return the camshaft sprocket (INT) to the most retarded angle
position.
• When first turning the crankshaft the camshaft sprocket (INT) will turn. Once it is turned more, and the
vane (camshaft) also turns, then it has reached the most retarded angle position.
• The most retarded angle position can be checked by seeing if the stopper pin groove (A) is shifted
clockwise.
Page 13 of 17ALLDATA Repair - 2010 Nissan-Datsun Versa L4-1.6L (HR16DE) - Removal And In...
11/8/2017http://www.alldatapro.com/alldata/PRO~V497669842~C48030~R0~OD~N/0/147810694/...
• After spinning the crankshaft slightly in the counterclockwise direction, you can make sure the lock pin
has joined by seeing if the vane (camshaft) and the sprocket move together.
8. Install the front oil seal to the front cover. See: Front Crankshaft Seal\Service and Repair
9. Install front cover with the following procedure:
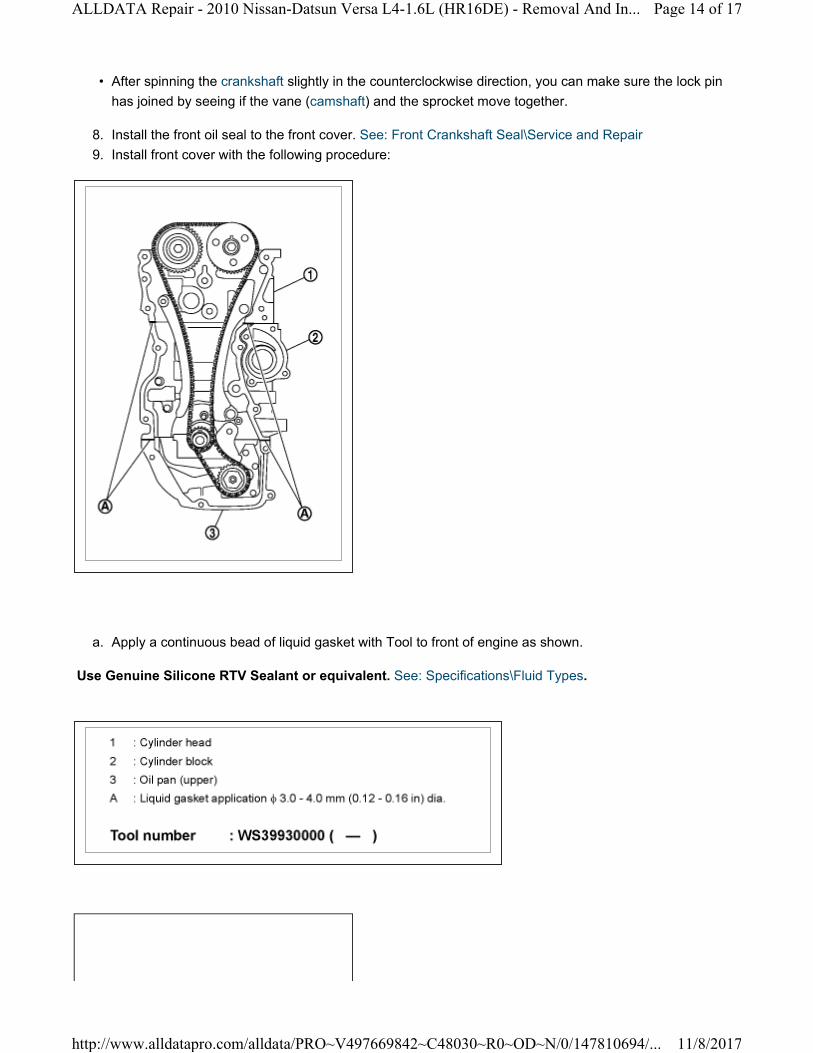
a. Apply a continuous bead of liquid gasket with Tool to front of engine as shown.
Use Genuine Silicone RTV Sealant or equivalent. See: Specifications\Fluid Types.
Page 14 of 17ALLDATA Repair - 2010 Nissan-Datsun Versa L4-1.6L (HR16DE) - Removal And In...
11/8/2017http://www.alldatapro.com/alldata/PRO~V497669842~C48030~R0~OD~N/0/147810694/...
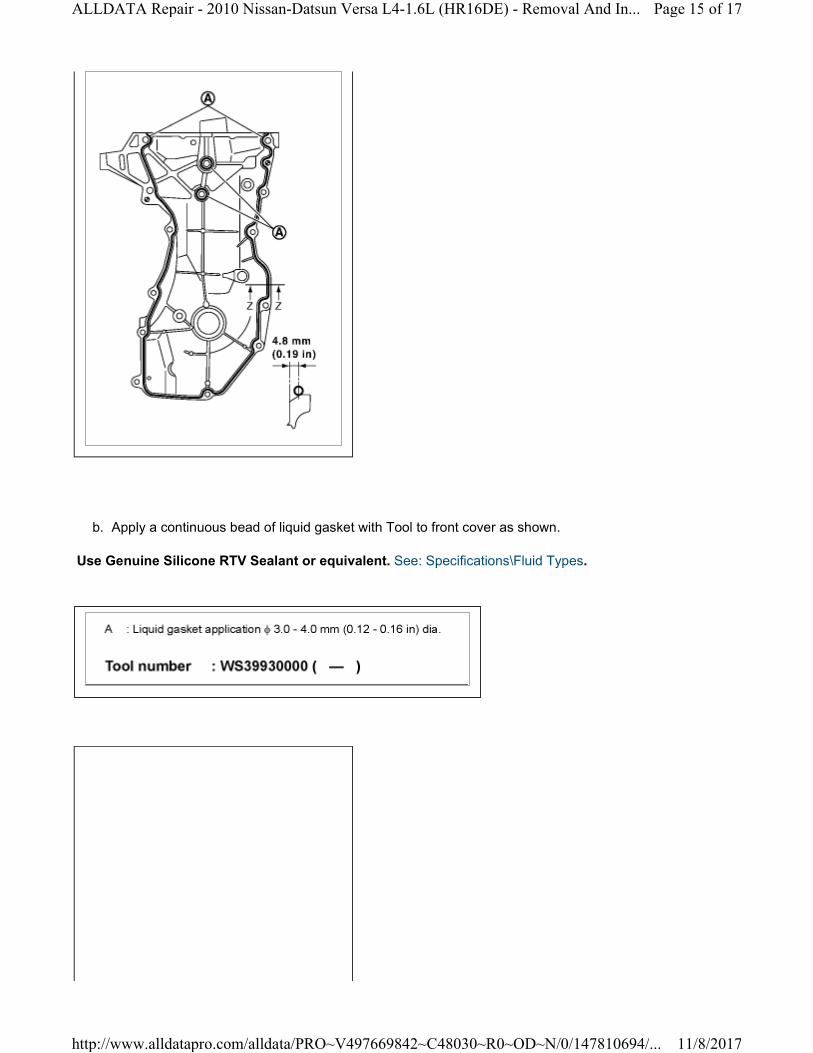
b. Apply a continuous bead of liquid gasket with Tool to front cover as shown.
Use Genuine Silicone RTV Sealant or equivalent. See: Specifications\Fluid Types.
Page 15 of 17ALLDATA Repair - 2010 Nissan-Datsun Versa L4-1.6L (HR16DE) - Removal And In...
11/8/2017http://www.alldatapro.com/alldata/PRO~V497669842~C48030~R0~OD~N/0/147810694/...
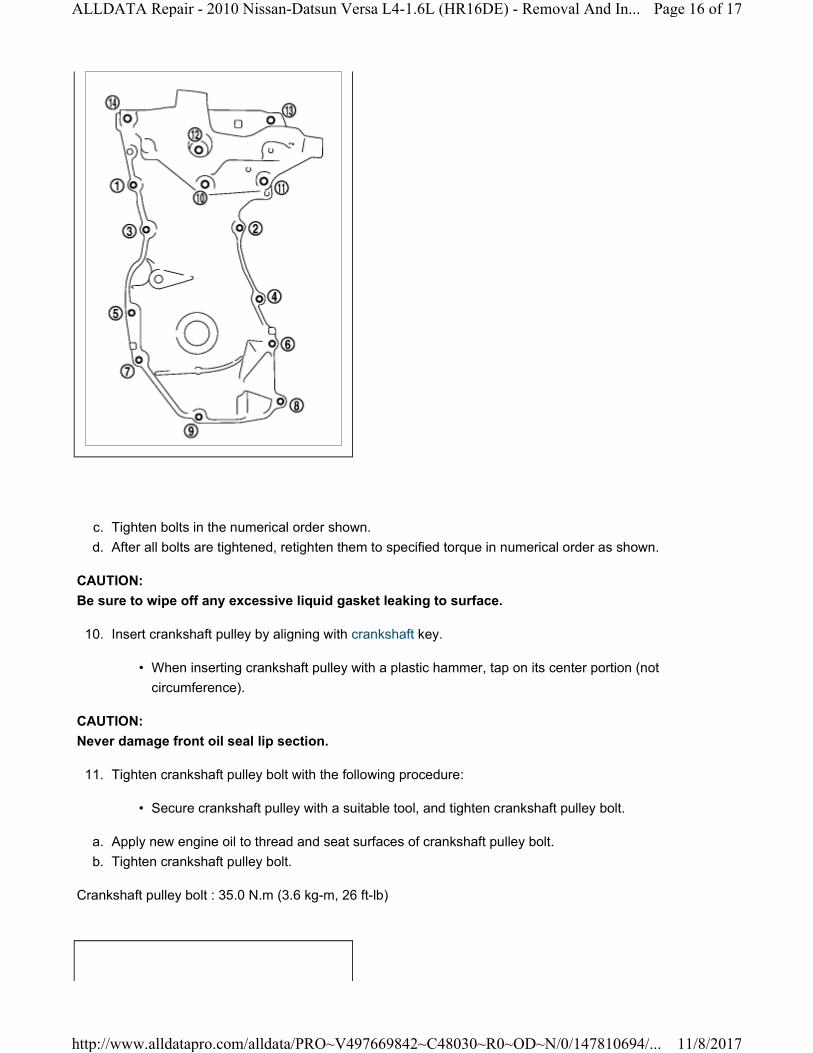
c. Tighten bolts in the numerical order shown.
d. After all bolts are tightened, retighten them to specified torque in numerical order as shown.
CAUTION:
Be sure to wipe off any excessive liquid gasket leaking to surface.
10. Insert crankshaft pulley by aligning with crankshaft key.
• When inserting crankshaft pulley with a plastic hammer, tap on its center portion (not
circumference).
CAUTION:
Never damage front oil seal lip section.
11. Tighten crankshaft pulley bolt with the following procedure:
• Secure crankshaft pulley with a suitable tool, and tighten crankshaft pulley bolt.
a. Apply new engine oil to thread and seat surfaces of crankshaft pulley bolt.
b. Tighten crankshaft pulley bolt.
Crankshaft pulley bolt : 35.0 N.m (3.6 kg-m, 26 ft-lb)
Page 16 of 17ALLDATA Repair - 2010 Nissan-Datsun Versa L4-1.6L (HR16DE) - Removal And In...
11/8/2017http://www.alldatapro.com/alldata/PRO~V497669842~C48030~R0~OD~N/0/147810694/...
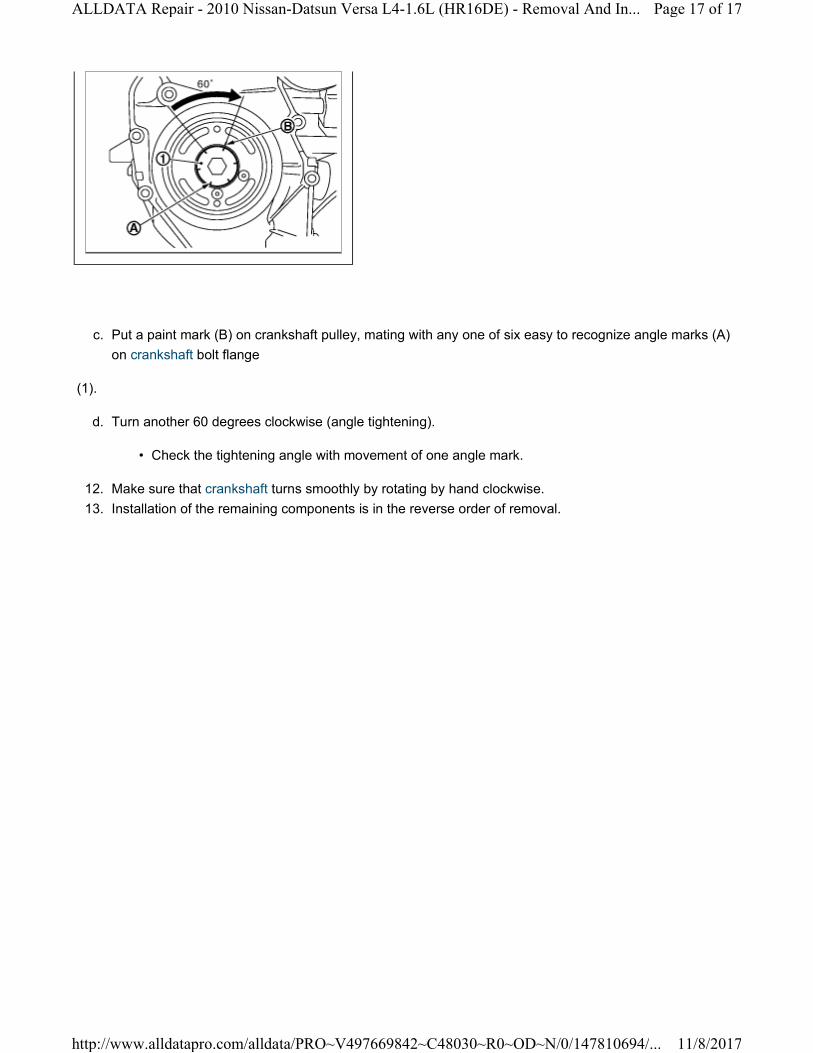
c. Put a paint mark (B) on crankshaft pulley, mating with any one of six easy to recognize angle marks (A)
on crankshaft bolt flange
(1).
d. Turn another 60 degrees clockwise (angle tightening).
• Check the tightening angle with movement of one angle mark.
12. Make sure that crankshaft turns smoothly by rotating by hand clockwise.
13. Installation of the remaining components is in the reverse order of removal.
Page 17 of 17ALLDATA Repair - 2010 Nissan-Datsun Versa L4-1.6L (HR16DE) - Removal And In...
11/8/2017http://www.alldatapro.com/alldata/PRO~V497669842~C48030~R0~OD~N/0/147810694/...