20101021 nj rain garden manual - maine.gov the rutgers cooperative extension water resources program...
TRANSCRIPT

RAIN GARDEN MANUAL OF NEW JERSEY


Introduction
Forward
06
14
32
42
48
Contents
Planning Your Rain Garden
Installing Your Rain Garden
Maintaining Your Rain Garden
Conclusion
Appendix

PROJECT TEAM
Rutgers Cooperative ExtensionWater Resources Program
Christopher C. Obropta, Ph.D., P.E.
Jeremiah D. Bergstrom, LLA, ASLA
Amy C. Boyajian
Caitrín S. Higgins, LEED AP
Native Plant Society of New Jersey
Kathleen V. Salisbury
William E. Young, MS, RLA, PWS
Special thanks to all of our partners throughout New Jersey who have contributed photographs and images to help make this Manual a success for the Rain Garden State!
www.water.rutgers.edu www.npsnj.org
Cooperating Agencies: Rutgers, The State University of New Jersey, U.S. Department of Agriculture, and County Boards of Chosen Freeholders. Rutgers Cooperative Extension, a unit of the Rutgers New Jersey Agricultural Experiment Station, is an equal opportunity program provider and employer.
This material is based upon work supported in part by the Cooperative State Research, Education, and Extension Service, U.S. Department of Agriculture, under Agreement No. 2008-51130-19504. Any opinions, findings, conclusions, or recommendations expressed in this publication are those of the author(s) and do not necessarily reflect the view of the U.S. Department of Agriculture.
Front cover photo courtesy of Pat Eisemann

Welcome!
The Rutgers Cooperative Extension Water Resources Program and the Native Plant Society of New Jersey are excited to share this Rain Garden Manual with you. Rain gardens are an easy way for everyone in New Jersey to help protect our State’s precious water resources and add to the health and diversity of our native habitats and landscapes. These shallow landscaped depressions are able to intercept, treat, and infiltrate stormwater at its source (your yard and home) helping to protect the quality of our lakes, rivers, and streams and recharge our groundwater. Every drop of water kept out of our storm drains reduces flooding, mitigates pollution, and improves base flow in our waterways.
We look forward to introducing you to the beautiful native plants that can be used in rain gardens. These many trees, shrubs, wildflowers and grasses adapted to our State provide both aesthetics and function in your landscape.
This manual is intended to give you the step-by-step procedure you need to create a beautiful and sustainable rain garden landscape. Rain gardens are something everyone can do. This manual will walk you through the fears or reservations you might have and will give you encouragement, as well as the tools and answers you need to create and sustain a rain garden on your property. Remember, a rain garden is one of the best and easiest things you can do to protect and conserve New Jersey’s natural resources.
Image Courtesy of Thomas Muse
Christopher C. Obropta, Ph.D., P.E. Rutgers Cooperative Extension Water Resources Program
Kathleen V. SalisburyNative Plant Society of New Jersey

Wheaton Arts and Cultural CenterMillville, Cumberland County, NJ

CHAPTER 1 Key Points:
• Impervious surfaces prevent groundwater infi ltration and enable stormwater runoff and nonpoint source pollutants to enter waterways.
• A rain garden is a landscaped, shallow depression that captures, fi lters, and infi ltrates stormwater at the source before it becomes runoff.
• A rain garden should reduce runoff, recharge groundwater, and use native plants.
• Native plants control erosion by stabilizing soils and increase infi ltration, leading to an overall improvement of water quality.
• Installing a rain garden is a simple way to save money and energy, while also preserving New Jersey’s natural resources.
page 7

Rain Garden Manual of New Jersey
8 3 KEY POINTS:
A Rain Garden should:
• Reduce Runoff
• Recharge Groundwater
• Use Native Plants
IntroductionWhy a Rain Garden?Rain that falls to the earth evaporates into the atmosphere, is used by plants, or infi ltrates down through the soil into the groundwater. The remainder of the rainfall fl ows across the land surface into gutters, drains, streams, rivers, and lakes as stormwater runoff. As the rain moves over the land surface, it washes off pollutants and carries these contaminants to local waterways. The pollution that is carried by stormwater runoff to our waterways is called nonpoint source pollution (see “Nonpoint Source Pollution” information on page 10). Stormwater runoff that carries nonpoint source pollution to our waterways is the major reason many of our streams, rivers, estuaries, ponds and lakes are not meeting water quality standards and are considered impaired. In fact, nonpoint source pollution in stormwater runoff causes up to 60% of our existing water pollution problems, making it the largest source of pollution in our New Jersey waters (NJDEP, Bureau of Nonpoint
Pollution Control, Division of Water Quality).
Rain gardens are a simple, cost-effective tool homeowners, municipalities, and schools can use to reduce stormwater runoff, improve groundwater recharge, and trap nonpoint source pollutants before they reach our waterways.
Holy Nativity Lutheran ChurchWenonah, NJ

9
Runoff from driveways & roads carrying nonpoint source pollution
Storm sewer pipe discharging to stream or river
Image Courtesy of the City of Maplewood, MN
CAPTURE A rain garden catches runoff and holds standing water for no more than 24 hours
Downspout discharging roof runoff to yard or rain garden
Root “sponge” zone
Rain garden plants filtering runoff
FILTERIn the soil, microbes break down pollutants and nutrients washed in by the rain
INFILTRATEDeep-rooted plants loosen the soil, creating a sponge zone. Water soaks in and groundwater aquifers are recharged

Rain Garden Manual of New Jersey
10
Natural landscapes, including wetlands, meadows, and forests, consist of native plant communities adapted to specifi c climate, soil, and hydrologic conditions. The roots of these plants help to make the land very porous so that the soil quickly infi ltrates rain that falls to the land surface.
What is a rain garden?A rain garden is a landscaped, shallow depression that captures, fi lters, and infi ltrates stormwater runoff. The rain garden removes nonpoint source pollutants from stormwater runoff while recharging groundwater. A rain garden has two main goals. The fi rst goal is to serve as a functional system to capture, fi lter, and infi ltrate stormwater runoff at the source, and the second goal is to be an aesthetically pleasing garden. Rain gardens are an important tool for communities and neighborhoods to create diverse, attractive landscapes while protecting the health of the natural environment.
Stormwater and YouDevelopment activities throughout New Jersey are rapidly covering the land with impervious surfaces like roadways, driveways, and rooftops. These impervious surfaces increase the amount of stormwater runoff and nonpoint source pollut-ants carried to nearby waterways. These areas also prevent water from infi ltrating into the ground, thereby depriving groundwater aquifers of the water they need to remain stable. Approximately half of the water we use in New Jersey comes from groundwater aquifers. Additionally, groundwater provides many of New Jersey’s streams with “basefl ow”. During the long periods between rainfall, groundwater seeps into our streams, keeping them fl owing and sustaining aquatic life. This basefl ow provided by the groundwater to the stream is critical in keeping streams healthy and viable.
In addition to the impervious surfaces associated with developed communities, many of the soils in these areas are disturbed and compacted during the development process. Even though turf grass is often covering these compacted soils, the infi ltration capacity of these areas is greatly decreased. Compaction reduces the amount of rain that can infi ltrate through soils and increases stormwater runoff by two to ten times from that of natural (undeveloped) landscapes.
NONPOINT SOURCE POLLUTION:“Nonpoint source pollution” is also called “people pollution.” It is the pollution that comes from our everyday lives. It is the fertilizers that wash off our farms and lawns. It is the pet waste that washes into our streams. It is the sediment (or soil) that erodes from our lands into our local waterways. It is the oil and grease that comes from our parking lots. Finally, it is the pollutants such as nitrogen, phosphorus, and heavy metals that settle out of our atmosphere onto our roads and rooftops. When it rains, the stormwater runoff carries nonpoint source pollution and may ultimately wash it to our waterways.
As the image on the left illustrates, stormwater runoff picks up oil and grease from the parking lot, fl ows through a curb cut, and into a rain garden. The rain garden acts as a sponge to trap the nonpoint source pollutants, preventing them from reaching the nearby lake.
oil + grease visible in runoff

11
Rain gardens can be readily implemented throughout our communities to begin the process of re-establishing the natural processes of the land. Rain gardens:
• capture stormwater runoff reducing erosion and sedimentation and the amount of water that fl ows to our streams and waterways during rain storms,
• protect water quality by fi ltering out and breaking down pollutants,
• infi ltrate runoff and thereby recharge groundwater supplies and provide basefl ow to nearby streams and waterways,
• provide the opportunity to establish native plant communities to promote biodiversity and habitat for benefi cial wildlife, and
• integrate necessary soil improvements and native plants adapted to periodic wet and dry periods mimicking our New Jersey natural landscape.
While the Environmental Protection Agency (EPA) defi nes stormwater runoff as the number one threat to water quality in our lakes and streams, rain gardens are one of the quickest and easiest methods everyone can use to reduce runoff and help protect our water resources. Beyond the aesthetic and ecological benefi ts, rain gardens encourage environmental stewardship and community pride. In addition, using native plant materials in rain gardens is an important way to promote biodiversity and preserve native species in our developed communities. When used throughout a community, rain gardens can also provide signifi cant economic benefi ts by lowering costs for local government and businesses to maintain and upgrade traditional stormwater infrastructure pipes and management basins.
How does a rain garden differ from any other garden?To a certain extent, a traditional landscaped bed or fl ower garden can provide functions similar to a rain garden. But, to provide all the benefi ts of a rain garden including capturing,
A Rain Garden can be...
a wet meadow
a butterfly habitat
a parking island a perennial garden
trees and shrubsalong a sidewalk
Photo courtesy of Bill Young
fi ltering, and infi ltrating stormwater runoff, a shallow basin must be dug and planted slightly below-grade to store water.
Ideally, a rain garden is planted with a variety of grasses, wildfl owers, and woody plants that are adapted to the soil, precipitation, climate, and other specifi c site conditions. Using native plants with deeper root systems facilitates infi ltration and also sustains the landscape through periods of drought that sometimes occur in our New Jersey summers.
Native plants provide a multitude of benefi ts to both the local ecosystem and the homeowner. For local wildlife, native plants supply food and habitat. In addition, most native plant species produce long root systems. For example, a non-native turf grass, such as Kentucky bluegrass, has roots that typically reach only six to eight inches in depth, while the roots of a native grass like big bluestem will extend to nine feet deep. Not only do these longer root systems help stabilize soils by controlling erosion, they also increase infi ltration to lessen the impacts of fl oods and droughts, leading to an overall improvement in water quality. Once established, native plants require very little maintenance, as they typically do not require irrigation or the application of pesticides or fertilizers.
Rain Garden Manual of New Jersey
12
Burlington County 1. Rutgers Cooperative Extension of Burlington County
Cape May County 2. Rutgers Cooperative Extension of Cape May County
Cumberland County 3. Wheaton Arts and Cultural Center
Essex County 4. Essex County Environmental Center
Gloucester County 5. Holy Nativity Lutheran Church
6. Greenwich Township Library
7. Atkinson Park
8. Hurffville Elementary School
Hunterdon County 9. Marion F. Clawson Memorial Park
Mercer County10. Mercer County Community College
11. Delaware River Basin Commission
Middlesex County12. Rutgers Cooperative Extension of Middlesex County (EARTH Center)
Monmouth County13. Rutgers Cooperative Extension of Monmouth County (Agriculture Building)
Morris County14. Washington Township Library
15. Leonard Park
16. Parsippany-Troy Hills Town Hall
Union County17. Fanwood Memorial Library
18. Hanson House/ Hanson Park Conservancy Reeves-Reed Arboretum
Where can you see a rain garden in New Jersey?Many rain gardens have been installed throughout New Jersey. Below are several locations where great examples of rain gardens can be found. Before beginning the process of planning and installing your rain garden, visit one located near you.
For more information on demonstration rain gardens near you, visit www.water.rutgers.edu
1
4
58
1013
129
14
11
15
16
18
17
7
6
2
3

13SAVE MONEY + SAVE ENERGY:
Planting a rain garden can save you money on your energy bill:
• Carefully situated plants, particularly deciduous trees located on the southern and western sides of your house, can reduce your energy bill by up to 25% for a typical household.
• Planting deciduous trees along the southern and western sides of your house contributes to a cooler house in the summer, while still allowing for the sun to shine in the windows in the winter.
• Trees, shrubs, or vines provide shade and act as windbreaks.
• Summer air temperatures can be three to six degrees cooler in tree-shaded neighborhoods.
How do you build a rain garden?
The design of a rain garden involves understanding several interrelated principles including:
• the hydrologic cycle or water cycle,
• nonpoint source pollution,
• natural resource conservation,
• wildlife habitat,
• nutrient cycles,
• soil chemistry,
• horticulture,
• landscape architecture,
• design,
• ecology, and more.
While these many principles may sound complicated, this manual provides the information you need and the simple step-by-step instructions that will allow you to enjoy creating your own rain garden to protect the water resources of New Jersey and enhance your landscape.
Sumner Elementary SchoolCamden, NJ
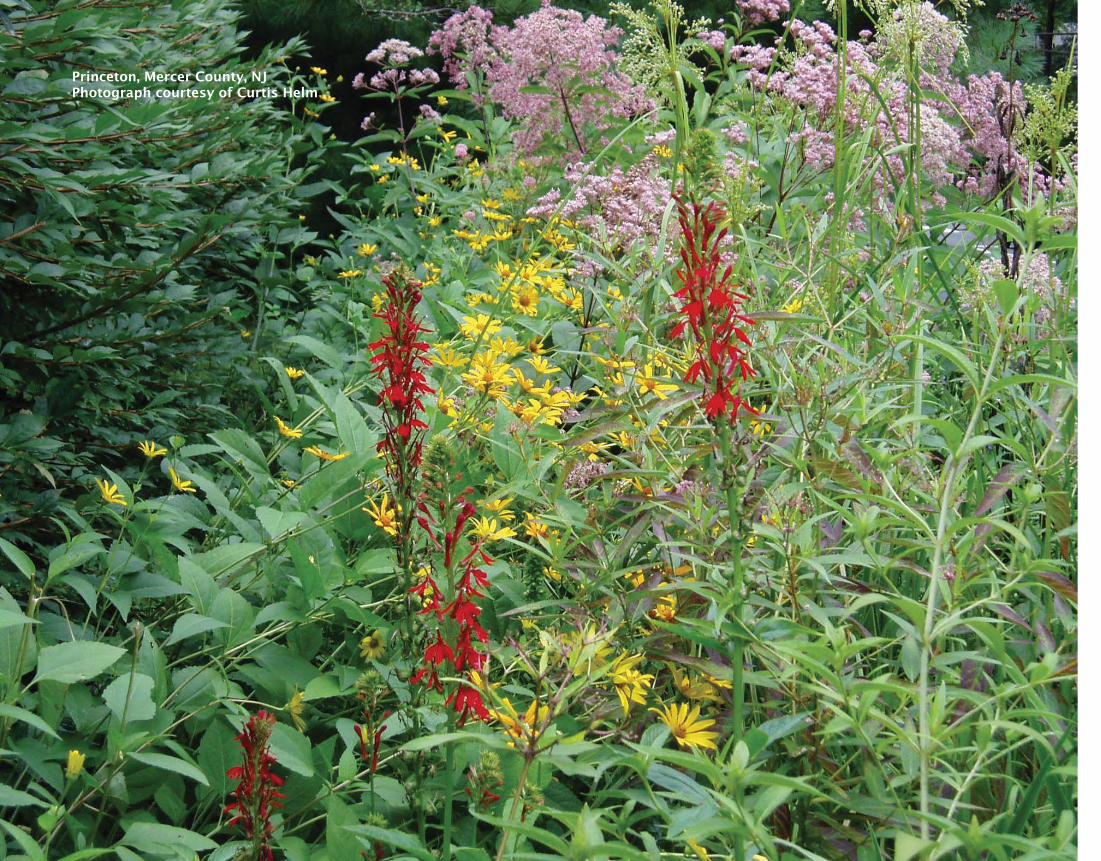
Princeton, Mercer County, NJPhotograph courtesy of Curtis Helm

CHAPTER 2
Key Points:
• Disconnect impervious surfaces. Place a rain garden between two impervious surfaces to control and slow down stormwater before it becomes runoff.
• The size of a rain garden is dependent upon the amount of runoff entering the rain garden (determined by drainage area).
• The depth of the rain garden is dependent upon the soil texture of the site.
• Good soil infiltration is important. Adding coarse sand to the rain garden’s soil will improve infiltration rates.
• Clayey soils, in particular, need coarse sand and compost amendments.
• Select appropriate native plant species based upon the zones of the rain garden. Plants that prefer wet conditions belong in the base of the rain garden, plants that tolerate wet and dry conditions equally belong on the slope, and plants that prefer dry conditions belong on the buffer of the rain garden.
page 15

Rain Garden Manual of New Jersey
16
How to BeginGoals & Strategies
Setting goals and strategies will help guide you through the process of building a rain garden. In addition to the obvious goal of designing and building a rain garden, another key consideration should be to better manage stormwater runoff. Installing a rain garden may also fulfi ll other goals such as to reduce irrigation of the lawn and landscape. The strategy of this goal could then be to plant only native plants in the rain garden. Other methods of achieving goals for a rain garden project may include: catching 50% of runoff in the rain garden, or using captured water in rain barrels to water plants in the rain garden.
Budget
It is important to consider costs prior to beginning a rain garden project. If you construct the rain garden yourself, without hiring a landscaper, a residential rain garden can typically average between $3 to $5 per square foot to install, depending on soil conditions, the desired plant species, and the size and density of plants used. For projects incorporat-ing curbing, storm drains, or underdrains, the cost of the rain garden will increase. It is recommended that you reach out to a landscape professional for support in the design and construc-tion of these more complex projects. Generally, the cost of plants will be the majority of the total cost of the project. Refer to pages 60-66 of the Appendix for a list of recommended plants and concept sketches. Call a local nursery to determine costs of plant materials.
Village SchoolHolmdel, NJ

17
Before you design your rain garden, remember to:
• Research site specific information such as the location of utilities, wetlands, fire lanes, future building plans, etc.
• Survey the grounds to identify possible rain garden sites including areas with downspouts, gutters, soil erosion or locations where water ponds and puddles during/after storms.
• Do you need a permit? Not typically, but if you are in doubt, it is best to contact your county and municipal offices.
• Pay attention to drainage problem areas. It may help to take pictures.
FIRST THINGS FIRST!
Site SelectionLocating Your Rain Garden
The fi rst step is to identify an appropriate location on your property for constructing the rain garden. Consideration must be given to where the water will enter, how it will fi ll up the rain garden, and where it will fl ow out. Remember that you will want to control how the rain garden overfl ows during a large storm. Where will the water go when it overfl ows? Consider the impact of this potential overfl ow, and try to minimize it by directing the overfl ow towards grassy areas, wooded areas, or existing storm drains. Make sure that the rain garden will neither drain towards your foundation, nor towards the neigh-boring property. DRIPLINE ZONE
There are several important things to consider when selecting the site of a rain garden:
1. For a building with a basement, the rain garden should be located at least ten feet from the building. This will prevent water from seeping into the building’s basement. For a building with no basement, the rain garden can be placed two feet away from the building.
2. Do not place the rain garden within 25 feet of a septic system, and make sure that the rain garden is placed upslope of any leach fi eld.
3. Do not situate the rain garden in soggy places where water already ponds. Instead, capture the water before it collects in these locations.
4. Avoid seasonably-high water tables within two feet of the rain garden depth. For real time data regarding the water table in your area, refer to the U.S. Geological Survey website (www.nj.usgs.gov/publications and from there, go to the link www.waterdata.usgs.gov). While this data provides a general idea of the water table, keep in mind that the water table fl uctuates seasonally depending upon rainfall amounts.
5. Consider fl at areas of the yard fi rst. This will make digging out the rain garden much easier.
6. To prevent disrupting large tree roots, refrain from posi-tioning the rain garden within the dripline of large trees. The dripline of a tree is the ring around the tree canopy on the ground surface that receives most of the rainwater from the tree canopy. Most of the tree’s roots are located within this zone, as indicated in the illustration above, right.
7. Provide adequate space for the rain garden. A typical rain garden for most homes ranges from approximately 100 to 300 square feet in area. Evidence of erosion: This
photograph shows that, during a rainstorm, water flows down the impervious sidewalk and carves a gully through the ground surface as it flows downhill. A rain garden situated here could contain the water and improve infiltration.

Rain Garden Manual of New Jersey
18
Do not locate a rain garden:
Next to trees. Soils near trees tend to have the best drainage, and should not be disturbed.
Near heavily used pedestrian areas. Foot traffic will cause soil compaction, which will decrease infiltration rates and disturb plant growth.
On top of buried utility lines, septic tank leach fields, water supply wells.
Over the buffer strip between the street and the sidewalk. This area usually holds multiple buried utility lines.
Within ten feet from your house if you have a basement foundation.
On the uphill side of a retaining wall if it is a structural feature (and not merely decorative) and was not specifically designed with a drainage system.
Beneath trees. Disturbing tree root systems (the tree’s dripline) will cause stress, particularly to oak trees. If you cannot avoid doing this, do not disturb more than 10% of a tree’s root system.
Over areas of shallow bedrock or shallow groundwater (three feet below ground surface or less). Shallow bedrock will hinder infiltration and plant growth, and shallow groundwater may cause permanent flooding in the rain garden. Also, shallow conditions may pollute the groundwater as the rain garden may not have enough time to filter pollutants before they infiltrate into the soil.
PLACES TO AVOID:
Call Before You Dig
It is critical that work not damage underground water, gas, and electrical services. Contact New Jersey’s “One Call” system at 1-800-272-1000 or 811 for a free markout of underground gas, water, sewer, cable, telephone, and electric utility lines before any outdoor construction or digging. Making this call before you dig will help prevent property damage and potential injuries. Call at least three full working days, but not more than ten days, prior to the planned installation date. Mention that you are going to be installing a garden that may have a depth of one foot (or more, if you are installing an under-drain). Utility company representatives will come to your site and mark the locations of utilities with spray paint, so you can be certain of avoiding them. Before their visit, make sure that you mark out the general location of the proposed rain garden with white spray paint or white fl ags (you can purchase these at a local hardware store). The representatives should inspect a larger area of the yard, not just the specifi c boundary of the rain garden. This will provide more fl exibility for the location of the rain garden. Do not place the rain garden within fi ve feet horizontally and one foot vertically from any utilities.
Understanding Your Property
A rain garden could probably fi t in several different areas on your property. To fi nd the most suitable location, it is essential to understand how rainwater fl ows through your yard. Walk around your property either during or soon after a large rainstorm. You will notice that on pervious areas of your property such as the lawn, a stone driveway, or a garden bed, the ground absorbs much, if not all, of the rain. On the other hand, take a look at the hard surfaces, such as a rooftop, a driveway, a road, or a compacted lawn area. The water does not soak into these impervious surfaces; instead, it runs off and fl ows downhill, looking for a place with a more porous surface in which to infi ltrate. Positioning a rain garden so that the stormwater runoff fl ows from an impervious surface towards and into the rain garden can alleviate most fl ooding and erosion issues commonly found on small properties.
LOCATE YOUR UTILITY LINES!
Call BEFORE You Dig!
NJ One Call1-800-272-1000
The different colors of the markout flags represent specific utilities.
ELECTRIC GAS, OIL, STEAM
COMMUNICATIONS, CATV
WATER
SEWER

19Roof
Road
In addition to establishing the source of the water, it is important to determine where the runoff travels to once it leaves your property. Look for signs such as erosion, patches of dead grass, and areas of sediment accumulation to identify the preferred fl ow path of stormwater runoff.
Rain gardens are commonly placed at least ten feet from the end of a downspout so that the runoff fl ows off of the rooftop, down the downspout, and into the rain garden. Similarly, rain gardens can be positioned to collect runoff from roads, driveways, or parking lots. In either scenario, the rain garden helps control and slow down runoff before it enters the nearby stream, lake, or detention basin.
PLACE A RAIN GARDEN BETWEEN TWO IMPERVIOUS SURFACES
REDUCE THE AMOUNT OF RUNOFF ENTERING
STORM SEWERS

Rain Garden Manual of New Jersey
20
Drainage Area Calculation
Now that you have determined the appropriate site within your yard for the rain garden, you will need to determine the necessary size of the rain garden. To calculate this, identify the area of impervious surface that will drain into the rain garden. More than likely, this surface is either a rooftop or a paved surface such as a road, driveway, or parking lot. The size of this impervious surface area will help determine the size (square footage) of your rain garden.
Things to Consider
To ensure that the location of the rain garden is most appropriate, ask the following questions:
1. Does the house have rooftop gutters and downspouts that can be associated with a rain garden?
IF YES:
• Does the house have gutters that catch the roof runoff and direct this water to downspouts?
• Do these downspouts discharge onto the ground?
• Are these downspouts directly connected to the underground storm sewer?
2. If a connection cannot be made to the rooftop, examine the existing stormwater infrastructure.
• Is there a curb and/or gutter connected to the road, driveway, or parking lot?
• Are there any nearby catch basins or storm sewers? If yes, look into the catch basins. What direction does the pipe fl ow?
• Are there any existing swales and/or ditches?
• Are there any existing detention or retention basins?
3. What is the topography of the yard? (fl at or sloped)
IF FLAT:
• A rain garden is best situated on a fl at portion of the yard. This will make digging out the rain garden much easier.
IF SLOPED:
• A rain garden should not be placed on a slope of more than 12% because it may require a retaining wall or high berm to be able to hold the runoff entering the rain garden.
REMEMBER:
SURFACE AREA EQUALS LENGTH MULTIPLIED BY
WIDTH!
SA = L x W
In this example, the total impervious surface area consists of two roofs with the same width but different lengths. Hockman FarmWinchester, VA
ROOF 1
WIDTHLENGTH 1
LENGTH 2LENGTH 2
ROOF 2
Surface Area = (L1 x W) + (L2 x W)
= (15′ x 20′) + (10′ x 20′) = (300′) + (200′) = 500 ft²
DRAINAGE AREA

21
Drainage Area: The Rooftop Scenario
To begin, the rooftop scenario is the easiest method for deter-mining the drainage area, as it is a simple calculation of the volume of water that discharges from the impervious surface of the roof, into the gutter, and carried to the ground by a downspout.
Using a measuring tape, measure the area of the roof by measuring the length and width along the foundation of the building where the building meets the ground. If there are two different roof surfaces draining into the same downspout, add their areas together to get the total surface area. Refer to the image on the previous page for an example calculation. If a single rooftop has more than one downspout, and the rain garden will only connect to one of those downspouts, you will need to fi gure out the roof top area draining to just the one downspout. To do this, take the total surface area of the rooftop and divide it by the total number of downspouts.
If the building has no gutters or downspouts, you can install a shallow ditch lined with stones along the roof dripline to convey the water into the rain garden.
If the downspout connects with underground pipes directly to the storm sewer system, try to disconnect the downspout before the pipe goes underground. Divert the water to the rain garden using a PVC pipe and fi ttings and/or a corrugated plastic pipe.
Drainage Area: The Road, Driveway, or Parking Lot Scenario
The road, driveway, or parking lot scenario is a bit more diffi cult to calculate, as the drainage area may be more diffi cult to defi ne. It is best to go outside after a rain event, observe the direction of the runoff, and measure the surface area of the impervious surface that is fl owing into the rain garden. Sediment accumulation along curbs provides evidence of the direction of water fl ow; if there is no curb, look for dead grass patches and erosion. Remember that roads, parking lots, and driveways are often pitched to convey water to one side, or both sides (in this case, look for a slight ridge in the center).
If there is no curb between the impervious surface and the location of the rain garden, it is best to leave a grass buffer (at least two feet wide) between the road and the rain garden. To help direct the runoff into the rain garden, a notch (approxi-mately one foot wide) lined with stone can also be cut into this buffer area. The stone will help to slow the fl ow of water.
If there is a curb between the impervious surface and the location of the rain garden, a curb cut is needed. This will allow the water to fl ow into the rain garden.
The image on the far left shows the approximate drainage area for a roof with more than one downspout. The two images in the center and near right depict both before and after the disconnection of the downspout from underground pipes.
Lions Lake ParkVoorhees, NJ
A curb cut and a stone buffer provides the inlet for runoff to enter the rain garden from the adjacent roadway.
Summit Middle SchoolSummit, NJ
DRAINAGE AREA
BEFORE AFTER
Make observations after a rainstorm to determine the direction of the runoff and the drainage area of the rain garden.
Rain Garden Manual of New Jersey
22
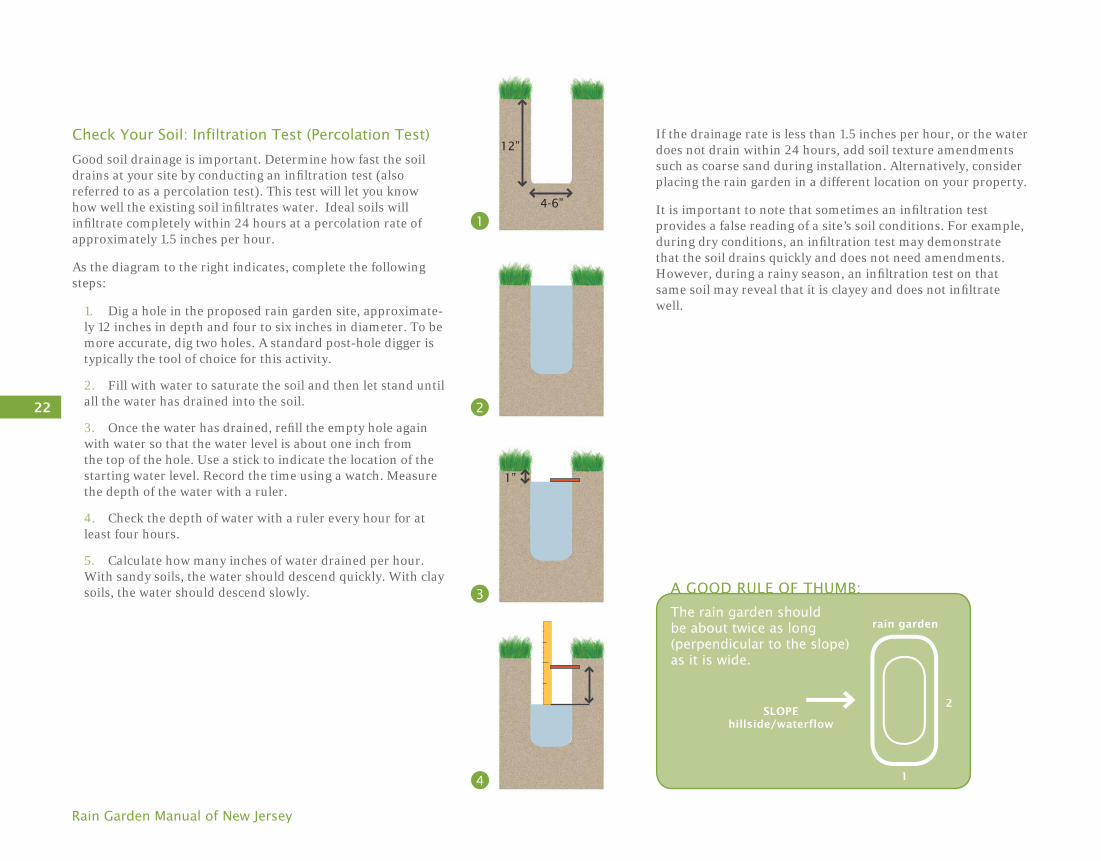
Check Your Soil: Infiltration Test (Percolation Test)
Good soil drainage is important. Determine how fast the soil drains at your site by conducting an infi ltration test (also referred to as a percolation test). This test will let you know how well the existing soil infi ltrates water. Ideal soils will infi ltrate completely within 24 hours at a percolation rate of approximately 1.5 inches per hour.
As the diagram to the right indicates, complete the following steps:
1. Dig a hole in the proposed rain garden site, approximate-ly 12 inches in depth and four to six inches in diameter. To be more accurate, dig two holes. A standard post-hole digger is typically the tool of choice for this activity.
2. Fill with water to saturate the soil and then let stand until all the water has drained into the soil.
3. Once the water has drained, refi ll the empty hole again with water so that the water level is about one inch from the top of the hole. Use a stick to indicate the location of the starting water level. Record the time using a watch. Measure the depth of the water with a ruler.
4. Check the depth of water with a ruler every hour for at least four hours.
5. Calculate how many inches of water drained per hour. With sandy soils, the water should descend quickly. With clay soils, the water should descend slowly.
If the drainage rate is less than 1.5 inches per hour, or the water does not drain within 24 hours, add soil texture amendments such as coarse sand during installation. Alternatively, consider placing the rain garden in a different location on your property.
It is important to note that sometimes an infi ltration test provides a false reading of a site’s soil conditions. For example, during dry conditions, an infi ltration test may demonstrate that the soil drains quickly and does not need amendments. However, during a rainy season, an infi ltration test on that same soil may reveal that it is clayey and does not infi ltrate well.
4-6”
12”
1”
1
2
3
4
The rain garden should be about twice as long (perpendicular to the slope) as it is wide.
A GOOD RULE OF THUMB:
SLOPEhillside/waterflow
1
rain garden
2

23
Check Your Soil: Soil Test
While the infi ltration test will give an initial evaluation of the site’s soil conditions, a soil sample that you collect and submit to Rutgers Cooperative Extension (RCE) Soil Testing Laboratory will provide the most accurate reading of the soil (refer to page 59 in the Appendix of this Manual for contact information and a sample soil test analysis). The standard soil fertility test, which includes both a nutrient and pH analysis and recommendations, costs approximately $20. A soil texture test/mechanical analysis (sand, silt, clay percentage) is $30. You can purchase a soil test kit from your local RCE County Offi ce. At the potential rain garden site, take approximately ten random soil samples near the location that you would like for your future rain garden. When taking your soil sample, remember to take about ten soil cores randomly at depths of 3, 6, 9, and 12 inches. Combine all of these into one composite sample. Send the soil sample and the order form to the RCE Soil Testing Laboratory. The results usually take about two weeks and will recommend any amendments needed for the soil based on the nutrient and pH analyses. The results of the soil texture test will help in calculating if coarse sand, topsoil, and/or compost are needed for the rain garden.
Insert the trowel or spade to a depth of 3, 6, 9, or 12 inches, remove some soil and set it aside.
Insert the trowel again ½ inchfrom the fi rst cut and just as deep. Collect a thin slice of soil, and place it in a clean bucket.
Repeat this procedure about tentimes, and combine all ofof these soil cores into onecomposite sample.
It is very likely that your soils will be highly compacted and will not drain well. To compensate for this, you may need to use a special soil mix within the rain garden. An ideal soil mix for a rain garden is 85 to 95% sands with no more than 25% of the sands as fi ne or very fi ne sands; no more than 15% silt and 2 to 5% clay content. The entire mix shall be amended with 3 to 7% organics (NJBMP Manual, 2009, page 9.1-4). You may be able to use the existing soil, but if it is not in good condition, you may have to spend money on new soil and/or amendments such as lime, gypsum, and specifi c nutrients.
As illustrated in the image on the left, in addition to the recommended soil amendments, it may be helpful to add sand wicks to a rain garden site with clay soils. To do this, dig out holes, preferably 1 foot deep if possible, and fi ll in with pockets of coarse sand. This will increase the infi ltration capacity of the rain garden.
Trailside Nature Center Mountainside, NJ
Sand WicksSand Wicks
A rain garden is not a garden permanently filled with water!
REMEMBER: REMEMBER:

Rain Garden Manual of New Jersey
24
wet moderatemoderate dry dry
BASE
Inlet
Outlet
BUFFER SLOPE
TYPICAL DEPTH
3-8”
MOISTURE LEVELS

25
Determining the Depth of the Rain Garden
The depth of the rain garden is dependent upon the soil texture found at the potential location for the rain garden. The depth of a rain garden usually ranges from three to eight inches. Typically, a rain garden with sandy soil should be eight inches deep, and a rain garden with silty soil (in between sandy and clayey) should be six inches deep. A rain garden with clay soil should be three inches deep. As mentioned on pages 22-23, clay soils do not infi ltrate well and need soil amendments. Rain gardens in clay soils should have an increased surface area (square footage), as well as a decreased depth. For a further explanation on rain garden depths, refer to the diagram on the right.
Determining the Size of the Rain Garden
The size of the rain garden is dependent upon the amount of runoff entering the rain garden. Using the drainage area calcu-lated on pages 20-21 and the existing soil texture of the rain garden, refer to the Rain Garden Sizing Table (below, right) to determine the necessary square footage of your rain garden. For example, a drainage area of 750 square feet with clay soils would need a rain garden with an area of 350 square feet. If you do not have the adequate space for the size of the rain garden that the Sizing Table recommends, build it as close to the recommended size, and then account for more overfl ow. A rain garden is sized to handle New Jersey’s Water Quality Design Storm of 1.25 inches of rain over two hours.
Based on New Jersey’s Water Quality Design Storm
Drainage Area
500 ft² 200 ft² 100 ft² 75 ft² 750 ft² 350 ft² 150 ft² 112 ft²1,000 ft² 400 ft² 200 ft² 149 ft²1,500 ft² 600 ft² 300 ft² 224 ft²2,000 ft² 800 ft² 400 ft² 299 ft²
Size of 3″ Deep Rain GardenCLAY SOIL∗
Size of 6″ Deep Rain GardenSILTY SOIL
Size of 8″ Deep Rain GardenSANDY SOIL
9”6”
3”
The depth of a rain garden (usually in inches) refers to the open space of the rain garden’s base. A rain garden with amendments needs to be dug deeper than a rain garden without amendments to accommodate for the sand and compost. As the above diagrams depict, the rain garden with soil amendments has a depth of three inches, while the rain garden without amendments has a depth of six inches, despite the fact that both rain gardens were both originally dug down to a depth of nine inches. The three inch layer of amendments (one cubic yard) accounts for the difference.
MULCH
BASE (Shallow Depression)
9”
3”
3”
3”
BASE(Shallow Depression)
MULCH
COARSE SAND + COMPOST MIXTURE
NATIVE SOIL
NATIVE SOIL
3” DEEP RAIN GARDEN - SOIL AMENDMENTS
6” DEEP RAIN GARDEN - NO SOIL AMENDMENTS
Rain Garden Depth
Rain Garden Sizing Table
∗SOIL TEXTURE AMENDMENTS NEEDED

Rain Garden Manual of New Jersey
26
Determining Soil Amendments of the Rain Garden
The existing soil conditions found at the site of your rain garden will determine whether or not soil amendments are necessary. There are two different types of amendments that you may need to add: soil texture amendments and soil quality amendments. Soil texture amendments will increase the rain garden’s ability to retain water, and soil quality amendments will improve the rain garden’s growing conditions for plants. See page 35 in the next Chapter for more information regarding the installation of soil amendments.
Soil Texture Amendments
Soil texture amendments improve the soil’s ability to infi ltrate water. Remember that sandy soils have the fastest infi ltration; clayey soils have the slowest. The ideal soil texture for a rain garden is a sandy loam soil, as it retains nutrients and water, while still allowing for adequate infi ltration.
The results of the infi ltration test will determine if the soil needs soil texture amendments. As indicated on page 22, if your infi ltration test resulted in more than 1.5 inches of infi ltration per hour, amendments are not necessary. Conversely, if your infi ltration test resulted in less than 1.5 inches of infi ltration per hour, you should add soil texture amendments to the soil, as your soil is likely compacted or poorly drained. Coarse sand is typically used as a soil texture amendment, with a loamy topsoil, purchased at a local garden shop, mixed into it. Generally, it is recommended to add one cubic yard (a combination of sand and compost) of amendments for every 100 square feet of rain garden, which translates to a three inch layer of amendments.
Soil Quality Amendments
Soil quality amendments improve the soil’s nutrient capacity, which results in improved growing conditions for plants. Adding soil quality amendments can be appropriate for any soil type based upon the soil test result recommendations from the Rutgers Cooperative Extension Soil Testing Laboratory. Common soil quality amendments include: gypsum, lime, fertilizer, or other organic matter.
REMEMBER:
Soil texture amendments improve the rain garden’s infiltration rate.
Soil quality amendments improve the rain garden’s growing conditions for plants. mulch
river rocksriver rocks
compost
coarse sand
27
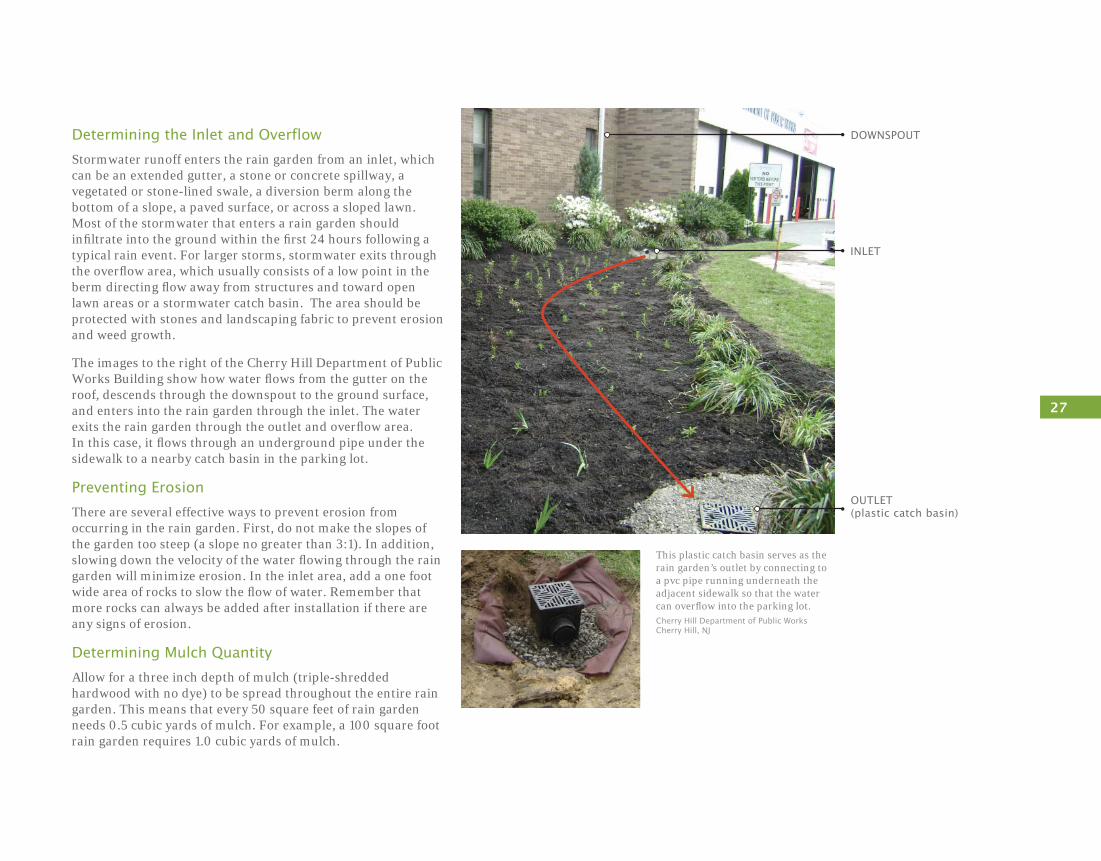
Determining the Inlet and Overflow
Stormwater runoff enters the rain garden from an inlet, which can be an extended gutter, a stone or concrete spillway, a vegetated or stone-lined swale, a diversion berm along the bottom of a slope, a paved surface, or across a sloped lawn. Most of the stormwater that enters a rain garden should infi ltrate into the ground within the fi rst 24 hours following a typical rain event. For larger storms, stormwater exits through the overfl ow area, which usually consists of a low point in the berm directing fl ow away from structures and toward open lawn areas or a stormwater catch basin. The area should be protected with stones and landscaping fabric to prevent erosion and weed growth.
The images to the right of the Cherry Hill Department of Public Works Building show how water fl ows from the gutter on the roof, descends through the downspout to the ground surface, and enters into the rain garden through the inlet. The water exits the rain garden through the outlet and overfl ow area. In this case, it fl ows through an underground pipe under the sidewalk to a nearby catch basin in the parking lot.
Preventing Erosion
There are several effective ways to prevent erosion from occurring in the rain garden. First, do not make the slopes of the garden too steep (a slope no greater than 3:1). In addition, slowing down the velocity of the water fl owing through the rain garden will minimize erosion. In the inlet area, add a one foot wide area of rocks to slow the fl ow of water. Remember that more rocks can always be added after installation if there are any signs of erosion.
Determining Mulch Quantity
Allow for a three inch depth of mulch (triple-shredded hardwood with no dye) to be spread throughout the entire rain garden. This means that every 50 square feet of rain garden needs 0.5 cubic yards of mulch. For example, a 100 square foot rain garden requires 1.0 cubic yards of mulch.
DOWNSPOUT
OUTLET(plastic catch basin)
This plastic catch basin serves as the rain garden’s outlet by connecting to a pvc pipe running underneath the adjacent sidewalk so that the water can overfl ow into the parking lot.Cherry Hill Department of Public Works Cherry Hill, NJ
INLET

Rain Garden Manual of New Jersey
28
BUFFERThe buffer, or outer edge, of the rain garden slows down the flow of water, filters out sediment, and provides absorption of the pollutants in stormwater runoff. Plants located in this area of the rain garden tolerate and thrive in dry soil.
ORGANIC MATTERBelow the base is the organic matter, such as compost and a 3� layer of triple shredded hardwood mulch. The mulch acts as a filter and provides a home to microorganisms that break down pollutants.
SLOPE The slope of the rain garden pitches downward and connects the buffer of the rain garden to the base. It creates a holding area to store runoff awaiting treatment and infiltration. Plants situated in this area should tolerate both wet and dry soils equally.
BASEThe bottom area is the flat, deepest visible area of the rain garden and is planted with plant species that prefer wet soil. The base should be level so that the maximum amount of water can be filtered and infiltrated. It is very important that this area drains within 24 hours to avoid problems with stagnant water that can become a mosquito breeding habitat.
BERM The berm is a constructed mound, or bank of earth, that acts as a barrier to control, slowdown, and contain the stormwater in the rain garden. The berm can be vegetated and/or mulched.
PLANTING SOIL LAYERThis layer is usually native soil. It is best to conduct a soil test of the area checking the nutrient levels and pH to ensure adequate plant growth.
INLET The inlet is the location where stormwater enters the rain garden. Stones are often used to slow down the water flow and prevent erosion.
OVERFLOWThe overflow (outlet) area serves as a way for stormwater to exit the rain garden during larger rain events. An overflow notch can be used as a way to direct the stormwater exiting the rain garden to a particular area surrounding the rain garden.
SAND BED If drainage is a problem, a sand bed may be necessary to improve drainage. Adding a layer of coarse sand (also known as bank run sand or concrete sand) will increase air space and promote infiltration. It is important that sand used in the rain garden is not play box sand or mason sand as these fine sands are not coarse enough to improve soil infiltration and may impede drainage.
Parts of a Rain Garden

29
Rain Garden DesignShaping Your Rain Garden
Go outside to the location of your rain garden. Using a garden hose or rope, outline the desired shape of your rain garden on the ground. This will provide you with the most fl exibility to adjust the shape, but spray paint or stakes will also work.
Although many rain gardens are in the shape of a circle or a kidney bean, your rain garden can take on whatever shape you prefer. Sketching may help you develop a layout with which you are comfortable.
Selecting Plants for Your Rain Garden
The success of your rain garden depends on selecting the right plants for the right place. Observe your rain garden site and record pertinent information such as hours of sun, refl ec-tions off of adjacent buildings and excessive wind. These conditions may contribute to unusual ‘microclimates’ due to increased heat or exposure, and it is necessary to choose plants accordingly.
Plant your rain garden with plants adapted for your specifi c site. Whether in the sun or shade, rain gardens can be planted with shrubs and accentuated by fl owers that are beautiful and low maintenance – as long as you select the plants that love the given conditions. Native plants, or plants that are indigenous to this climate or region, can thrive without a lot of care, extra water, fertilizer, or pesticides.
In particular, use native hardy perennial species with well-established root systems that survive in both dry and wet conditions. These plants do not require substantial fertilization, absorb water more effi ciently than turf-style grasses, and are much easier to maintain than exotic species.
Butterfly Milkweed
Indiangrass
Goldenrod
Joe-pye Weed
Sweet Pepperbush
Switchgrass
Purple Coneflower
New England Aster
Butterfly Habitat Rain Garden: Planting Plan
May June July August September October
WETLAND INDICATOR STATUS:
For standardized information on plant species, check this out:
www.plants.usda.gov
In addition to plant characteristics such as bloom time, sun and soil requirements, and flower color, this website provides the U.S. Fish and Wildlife Service wetland indicator status for each plant species. Page 31 of this Manual includes a sectional study of plant moisture tolerances.
Rain Garden Manual of New Jersey
30
Select species based upon the following qualities:
• Plant size
• Seasonal interest
• Moisture tolerances
• Sun preferences
• Plant aggressiveness
• Salt tolerance
• Habitat creation.
Using the planting plans included in this manual as inspira-tion, create a sketch of your rain garden design. Refer to pages 60-66 of the Appendix in this Manual for suggested planting plans and native plant lists. Refer to pages 54-57 for sources of native plant material.
Your planting layout should directly correspond with the layout of the buffer, slope, and base of your rain garden. The plant list on page 60 of this Manual lists appropriate plants for each rain garden zone. In particular, plants that like wet conditions belong within the base. Refer to the following page (page 31) for information regarding planting guidelines based upon the U.S. Fish and Wildlife wetland indicator status.
Plant spacing depends upon the future mature size and the growth rate of the plant species you select for your rain garden. Nurseries carry various sized containers. Although more expensive, larger plants may bloom faster; they are also more likely to experience transplant shock. Plugs, which are a small, economical option, may be available, particularly for grasses.
Plants that grow and spread quickly will need to be planted farther apart. Follow the spacing guidelines specifi c to each species. This will aid you in determining how many plants you need to fi ll your rain garden.
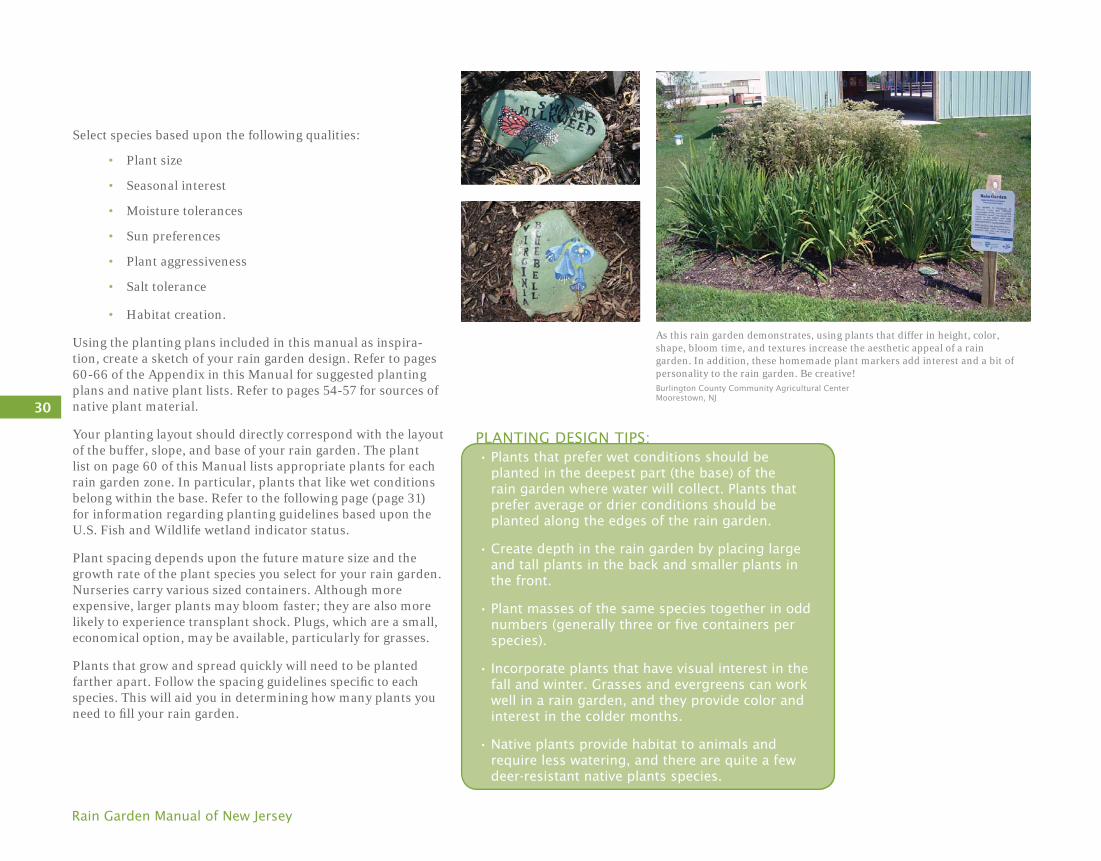
PLANTING DESIGN TIPS: • Plants that prefer wet conditions should be
planted in the deepest part (the base) of the rain garden where water will collect. Plants that prefer average or drier conditions should be planted along the edges of the rain garden.
• Create depth in the rain garden by placing large and tall plants in the back and smaller plants in the front.
• Plant masses of the same species together in odd numbers (generally three or five containers per species).
• Incorporate plants that have visual interest in the fall and winter. Grasses and evergreens can work well in a rain garden, and they provide color and interest in the colder months.
• Native plants provide habitat to animals and require less watering, and there are quite a few deer-resistant native plants species.
As this rain garden demonstrates, using plants that differ in height, color, shape, bloom time, and textures increase the aesthetic appeal of a rain garden. In addition, these homemade plant markers add interest and a bit of personality to the rain garden. Be creative!Burlington County Community Agricultural Center Moorestown, NJ

31
Wetland Indicator Status
Overflow
Ponding Depth
Cinnamon Fern
Winterberry
Broomsedge
Red Maple
Spicebush
Black Gum
Hackberry
River Bulrush
Duck Potato
Bayonet Rush
Pickerelweed
Softstem Bulrush
Olney’s Threesquare
Marsh Mallow
Soft Rush
Common Threesquare
Sweetflag
Blueflag Iris
Buttonbush
Swamp Milkweed
Green Bulrush
Arrow Arum
Silky Dogwood
Northern Arrowwood
Sweet Pepperbush
Elderberry
Highbush Blueberry
Inkberry
Narrow-Leaved Cattail
Hardstem Bulrush
Spatterdock
Fragrant Water Lily
Soft Rush
Prairie Cordgrass
Woolgrass
Grass-leaved Goldenrod
Steeplebush
Tussock Sedge
Alder Species
UPL FACU FAC FACW OBL
Wetland Status
OBL >99%, plants always found in standing water or wet soil
FACW 67-99%, plants usually found in wet to moist soil
FAC 34-66%, plants occurring in both wetlands and moist upland soil
FACU 1-33%, plants sometimes occur in wetlands and tolerate moist to dry soil
UPL 0%, plants that almost never occur in wetlands and tolerate dry soil
DRY
RAIN GARDEN BUFFER
RAIN GARDEN SLOPE
RAIN GARDEN BASE
WET
Generalized Planting Guideline for Ponds + Wetlands Typical Planting ZonesThis diagram illustrates typical planting zones for ponds and wetlands in New Jersey. Use a plant’s wetland indicator status as a guide to where it should be planted in a rain garden.
For more information: www.plants.usda.gov

Belmar Community Rain GardenBelmar, Monmouth County, NJ

CHAPTER 3
Key Points:
• Before installing the rain garden, it is essential to contact New Jersey’s “One Call” system to get a free markout of underground utilities.
• Avoid compacting the soil of the rain garden during the installation phase.
• Planting native plants will not only be easier to maintain, but they also provide food and habitat for native animal populations.
page 33

Rain Garden Manual of New Jersey
34
Installing your Rain GardenGetting StartedYou have completed the necessary steps of planning and designing - now it is time to install your rain garden!
Before you begin the installation process, there are several important things to consider. First, it is most effective to start the actual construction of the rain garden in the spring when the abundant rains will allow for best plant establishment and easier digging. A summer or autumn start will also work, but the plants may need more watering until they become established.
Go outside to the site or your rain garden. Referring to your sketches and notes from Chapter 2, use a garden hose, rope, or spray paint to layout the shape of the rain garden. Make sure that the placement of the rain garden does not confl ict with any of the utility markouts including underground gas, water, sewer, cable, telephone, and electric.
INSTALLATION STEPS: 1. Remove existing grass
2. Excavate to desired elevation and grade
3. Add soil amendments
4. Prepare berm (if necessary)
5. Prepare overflow
6. Level the base (lowest area)
7. Plant native species
8. Apply mulch
9. Water plants
DO NOT FORGET!
NJ One Call
Village SchoolHolmdel, NJ

35
Remove Existing GrassRemoving the existing grass can be done by digging with a shovel, renting a sod-cutter from a local hardware store, or hiring a landscape professional to do the work with a backhoe. Refer to www.water.rutgers.edu for a listing of landscape professionals trained in rain garden installations. Although a bit more costly, using a landscape professional may be advanta-geous, particularly if your rain garden is large and deep. The backhoe that a licensed operator uses will not only remove the grass, but it will easily dig deep into the ground. Regardless of the removal method, take out large chunks of grass with roots intact. This sod can be reused on the rain garden’s berm or on other patches of the yard lacking grass.
Excavate to Desired Depth and SlopeUsing either a shovel or a backhoe, excavate the area to the desired depth. Remember that the soil infi ltration test deter-mines the appropriate depth of the rain garden. At this point, the hole that you dug should appear wide and fl at. Now, consider how the edges of the rain garden meet the existing grade. Ideally, edges should maintain a gentle slope, perhaps a 3:1 slope or fl atter. This means that if the rain garden has a depth of eight inches, the sides will slope down gradually for 24 inches, or three times the depth.
Add Soil Amendments
You have already determined whether or not your rain garden needs soil texture amendments and/or soil quality amend-ments (refer to page 26 in the previous chapter), so now it is time to add these necessary amendments.
Adding soil texture amendments consists of adding coarse sand and compost (loamy topsoil) to loosen up the soil and improve the drainage. First remove about four to six inches of the native soil (or even up to eight inches with heavy clay soils) from the base, or the deepest part, and set it aside temporarily. Use a rototiller to break up the soil that remains within the base. If you do not have a rototiller available, use shovels and rakes instead. Add about an inch of loamy topsoil and coarse sand at a time to the base of the rain garden, combining it with a small amount of the extra soil that you removed previously. Use the rototiller to work this soil mixture into the rain garden’s soil; repeat these steps several times until you have added about two to three inches of loamy topsoil and coarse sand. Once you have built the soil of the base back up to the desired depth, level the base by raking and grading it. Refer to the diagram on page 25 for more information. You may have excess native soil material that can either be used for the berm or for a different area of your yard.
For the soil quality amendments, refer to the recommendations from the RCE Soil Testing Laboratory. The soil test results will specify the exact amendments needed, the proper quantity of these amendments, and the installation process.
TOOLS + MATERIALS NEEDED:
• Rakes and shovels
• Rototiller
• Wheelbarrow
• Triple-shredded hardwood mulch
• Plants
• Soil amendments, if necessary: fertilizer, pH adjustments (lime), coarse sand (bank run)
• Optional: decorative stone, signage, seating, pipe extensions, pavers for path
• Work crew (friends, neighbors, and family)
ReBuilder’s Source, Sustainable South BronxBronx, New York City, NY

Rain Garden Manual of New Jersey
36
Prepare the Overfl owOnce you have built the berm, you can prepare the overfl ow drainage area, which is a notch, or lowpoint, in the berm. This typically consists of river stone and landscape fabric and will serve as a way for stormwater to exit the rain garden during heavy rain events. First, to reduce weed growth, line the area with landscape fabric. Spread river stone out over the fabric, at a depth of three to six inches. The stone placed at this outlet point will slow the water, reducing erosion. Make sure that the overfl ow directs the fl ow of water away from structures and towards vegetated areas or a stormwater catch basin.
Level the BaseBefore planting any plants, it is important to carefully level the base of the rain garden to prevent ponding in any one area. As the image above indicates, to check for level use two stakes, mason string, a string level, and a ruler or meter stick. Tie the string tightly between the two stakes, using the string level to ensure the string is level. Use the ruler to measure from the level mason string to the ground surface to ensure that the base is level. Repeat this process several times, ensuring an even surface throughout the entire base of the rain garden. If the base is not level, use a shovel and rake to correct it.
Prepare the BermNext, you may need to create a berm for the rain garden. As the diagram below illustrates, a berm is the mound of soil found along the rain garden’s downhill side which acts as a barrier to control and contain stormwater during heavy rain storms. It is important to note that a berm may not be necessary if the rain garden is located on a level area in your yard. Use the soil that you shoveled out of the base to build the berm. Plant grasses, particularly native species, on the berm to help fi lter and slow down the fl ow of water leaving the rain garden.
uphill stake
string
lawn surface
downhill stake
Before Digging
berm
original lawn surface
base of rain gardenAfter Digging
Building the Berm

37
In addition, prior to planting, you may want to check the infi l-tration rate of the rain garden. This can also be conducted after planting, but it is much easier to modify and rework the soil without plants in the ground. Use a garden hose to soak and fi ll a small area of the rain garden. After the area has been soaked, fi ll with approximately two inches of water. Examine the area to make sure that it drains within an hour. If the garden drains adequately, install the plants as soon as possible. Wet soils will help the plants adjust easier to their new surroundings. In contrast, if it does not drain well, mix coarse sand into rain garden soils before planting to improve drainage. For more information, refer to the image of sand wicks on page 23.
Install the Plants You are now ready to plant. First, look at any sketches or planting plans you developed during the design/planning phase. Mark out the location of each plant, making sure to maintain the recommended distances between each plant. Using a rope to outline the planting scheme may help.
Avoid compacting the soil during planting. To do this, minimize the amount that people walk through the garden during planting. If the rain garden is large, put a temporary pathway of mulch down where you expect to walk. Remove the mulch before you plant.
Protect plants from extreme sun and wind exposure. Keep them cool and moist prior to planting.
Dig a planting hole that is both deep and wide enough to let the roots hang vertically to the bottom of the hole. Keep in mind that the depth should be approximately the same as the plant’s original container. Refer to the image on the top right.
Watch out for root-bound plants. Take the plant out of its container and observe for overgrown roots wrapped around the outside of the rootball. The roots of root-bound plants will continue to grow in a circle, confi ned to the shape of its original container. To ensure that the plant grows freely in the ground, make several vertical cuts down the sides of the rootball, and pull the roots apart. Refer to image on bottom left.
Place the plant so that the surface of the ground is slightly below the base of the plant. The rootball should be entirely enveloped by soil.
To reduce the number of air pockets around the roots, backfi ll the hole and water the plants.
Apply the MulchOnce the plants are in the ground, apply mulch. Along with maintaining moisture and coolness, the layer of mulch will thwart weed growth. Add approximately two to three inches cover, making sure to leave about an inch of space surround-ing the plant stems. When spreading the mulch, use the empty plant containers to protect small plants. Triple shredded hardwood mulch with no dye is preferred for rain gardens.
Water the PlantsLastly, do not forget to water the plants! Plants should be watered immediately after planting and twice a week, unless it rains, until well established. Establishment usually occurs after the fi rst year, when the plants will only need water during hot, dry spells. Using soaker hoses, at least for the fi rst year, will make it much easier for you to maintain your rain garden.
The following pages contain photographs documenting each of these steps of building a rain garden. This specifi c rain garden installation occurred at the Gloucester County 4-H Fairgrounds in March 2008 as part of the Rain Garden Training for Professional Landscapers, funded by a United States Department of Agriculture (USDA) National Institute for Food and Agriculture (NIFA) National Water Program grant (www.usawaterquality.org).

Rain Garden Manual of New Jersey
38
Remove existing grass with either a shovel or machinery. If using machinery, the heavy weight of the machinery can compact the soil. Be sure to only run the machinery along the edge of the rain garden, not directly on top of it.
Dig the rain garden to its appropriate depth based upon the soil infiltration test.
Delineate the rain garden, using either spray paint, a rope, or a garden hose.

39
Shape the rain garden bed. Create a berm and an overflow area (outlet) for the water.
Level the base (lowest area) of the rain garden to prevent ponding. Use a ruler, two stakes, and something level to check for an even surface. If the base is not level, use a rake and shovel to smooth it out.
Add soil amendments if necessary. Use a rototiller or shovel to combine amendments with existing soil. Loosen and prepare the soil.

Rain Garden Manual of New Jersey
40
Use empty plant containers to protect small plants. Apply two to three inches of mulch throughout the rain garden.
Water plants, either by installing a soaker hose or watering manually.
Before planting, place each plant in the desired locations. Dig a hole of equal depth, but slightly wider, to the size of the container. Take the plant out of the container, loosen the roots, and plant.

41
At time of installation
First growing season
Second growing season
Photos courtesy of: United States Department of Agriculture and Madeline Flahive DiNardo

Pinelands NurseryColumbus, Burlington County, NJPhotograph courtesy of Don Knezik

CHAPTER 4
Key Points:
• Rain gardens are low maintenance gardens, not no maintenance gardens!
• Rain gardens should be inspected during the growing season, at the end of the growing season, after large storm events, and during weather extremes.
• The maintenance of a rain garden consists of tasks to be completed on a weekly basis and other tasks as they are needed seasonally.
page 43

Rain Garden Manual of New Jersey
44
Maintaining Your Rain GardenInitial Things to ConsiderA rain garden will not require as much care as a lawn area but will need some maintenance to ensure long-term success. Weekly maintenance tasks include watering and weeding, while tasks such as mulching, pruning, mowing, re-planting, and soil testing can occur less frequently on an annual basis.
REMEMBER TO: Take pictures before,
during, and after installation!
Town of Ulster Municipal BuildingUlster, NY

45
Weekly MaintenanceWateringWater plants regularly, particularly during dry periods of the fi rst growing season. Of course, the amount of water you provide will vary depending upon the plant species selected, but most plants require about an inch of water per week during the fi rst growing season. Root systems will develop and become more substantial, so that after the fi rst growing season, you will only have to water during severe dry periods.
Keep in mind that young, small plants are most vulnerable to stress. Be cautious that they do not get too dry or too wet. If you expect large amounts of rain soon after the rain garden’s instal-lation, cut an indentation in the berm. This notch will prevent the water in the rain garden from getting too deep and over-saturating the young plants. To be most effective, make sure that this indentation is cut lower than the overfl ow notch. You can fi ll in the indentation after a few months, once the plants have grown a bit larger, so that the rain garden will collect and contain more water.
WeedingDuring the fi rst few years, you will, more than likely, need to weed often during the growing season. You will need to weed less and less as the plants grow and surpass the weeds, so that by the third year you should only be weeding several times a year. Watch out for the most aggressive, invasive weed species.
Common Invasive Plants (from left to right)
Multiflora RoseChinese WisteriaJapanese HoneysucklePurple Loosestrife
Japanese StiltgrassThistleAsiatic BittersweetGarlic Mustard
Rain Garden Manual of New Jersey
46
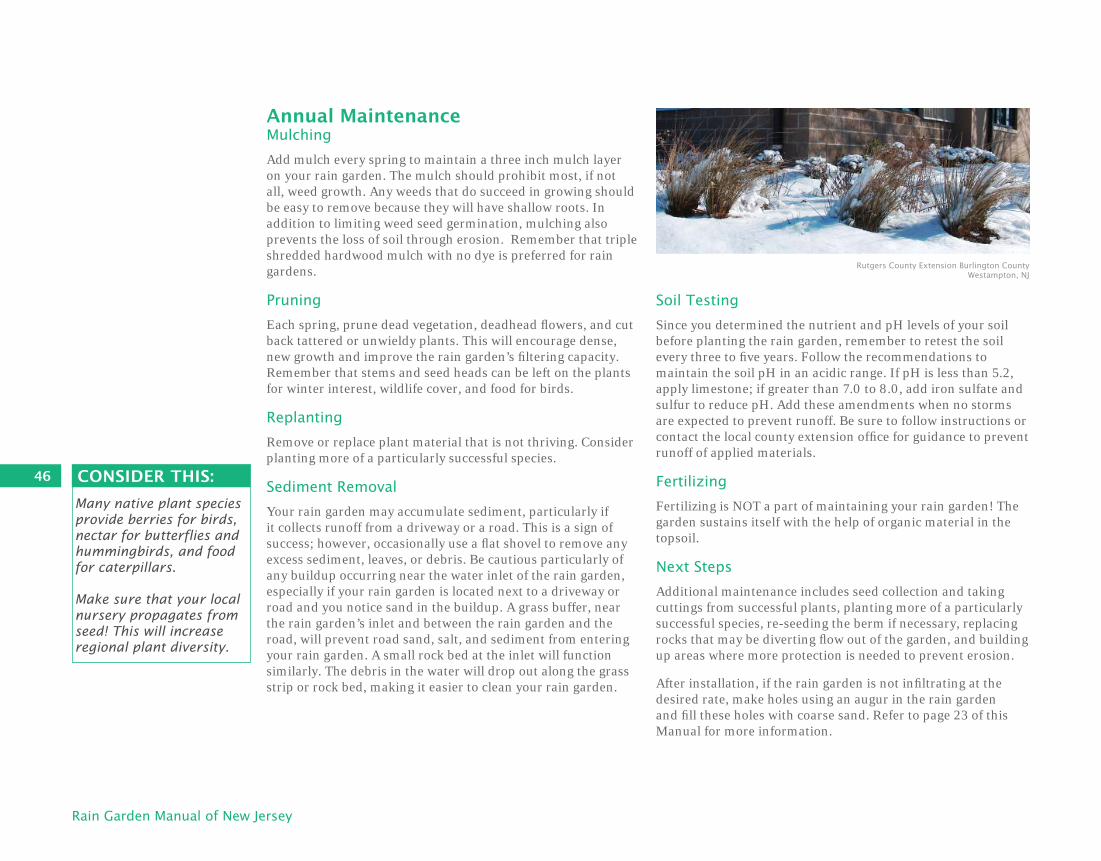
Annual MaintenanceMulchingAdd mulch every spring to maintain a three inch mulch layer on your rain garden. The mulch should prohibit most, if not all, weed growth. Any weeds that do succeed in growing should be easy to remove because they will have shallow roots. In addition to limiting weed seed germination, mulching also prevents the loss of soil through erosion. Remember that triple shredded hardwood mulch with no dye is preferred for rain gardens.
Pruning Each spring, prune dead vegetation, deadhead fl owers, and cut back tattered or unwieldy plants. This will encourage dense, new growth and improve the rain garden’s fi ltering capacity. Remember that stems and seed heads can be left on the plants for winter interest, wildlife cover, and food for birds.
ReplantingRemove or replace plant material that is not thriving. Consider planting more of a particularly successful species.
Sediment RemovalYour rain garden may accumulate sediment, particularly if it collects runoff from a driveway or a road. This is a sign of success; however, occasionally use a fl at shovel to remove any excess sediment, leaves, or debris. Be cautious particularly of any buildup occurring near the water inlet of the rain garden, especially if your rain garden is located next to a driveway or road and you notice sand in the buildup. A grass buffer, near the rain garden’s inlet and between the rain garden and the road, will prevent road sand, salt, and sediment from entering your rain garden. A small rock bed at the inlet will function similarly. The debris in the water will drop out along the grass strip or rock bed, making it easier to clean your rain garden.
Rutgers County Extension Burlington County Westampton, NJ
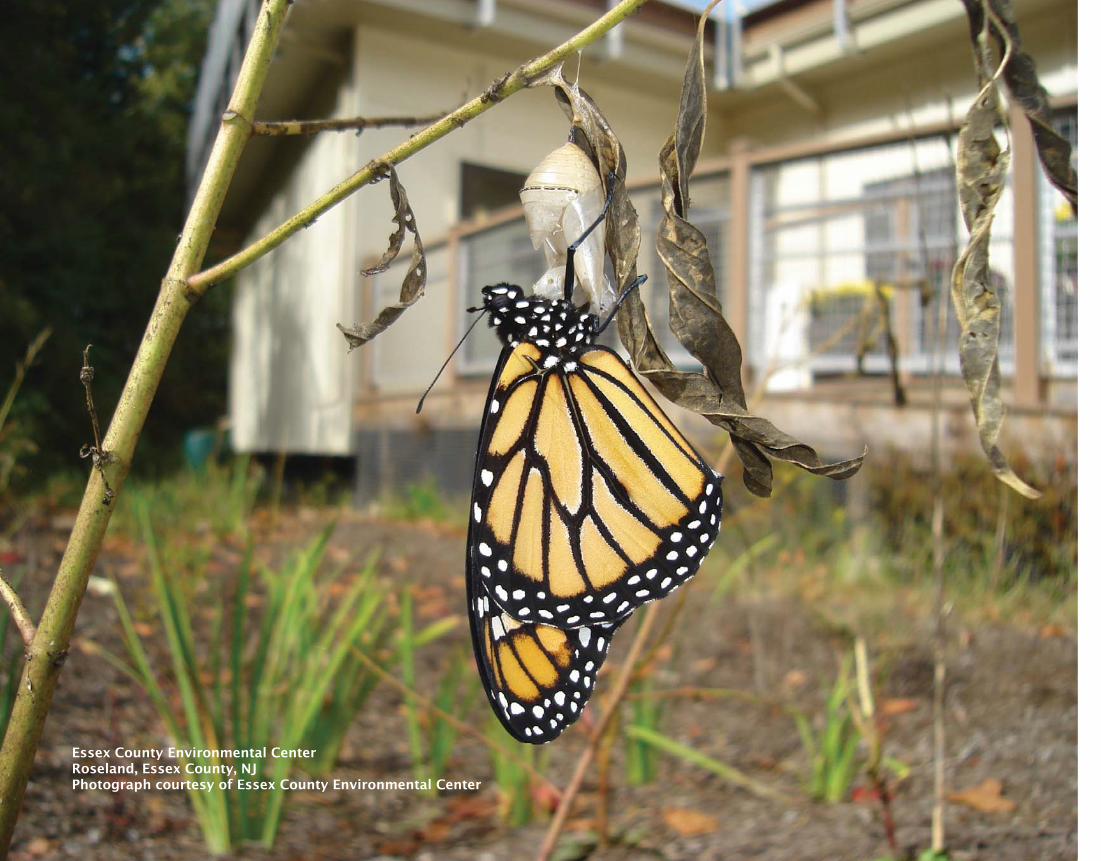
Many native plant species provide berries for birds, nectar for butterflies and hummingbirds, and food for caterpillars.
Make sure that your local nursery propagates from seed! This will increase regional plant diversity.
CONSIDER THIS:
Soil TestingSince you determined the nutrient and pH levels of your soil before planting the rain garden, remember to retest the soil every three to fi ve years. Follow the recommendations to maintain the soil pH in an acidic range. If pH is less than 5.2, apply limestone; if greater than 7.0 to 8.0, add iron sulfate and sulfur to reduce pH. Add these amendments when no storms are expected to prevent runoff. Be sure to follow instructions or contact the local county extension offi ce for guidance to prevent runoff of applied materials.
FertilizingFertilizing is NOT a part of maintaining your rain garden! The garden sustains itself with the help of organic material in the topsoil.
Next Steps Additional maintenance includes seed collection and taking cuttings from successful plants, planting more of a particularly successful species, re-seeding the berm if necessary, replacing rocks that may be diverting fl ow out of the garden, and building up areas where more protection is needed to prevent erosion.
After installation, if the rain garden is not infi ltrating at the desired rate, make holes using an augur in the rain garden and fi ll these holes with coarse sand. Refer to page 23 of this Manual for more information.

47
Essex County Environmental Center Roseland, NJ
Springfield Township Municipal Annex Building Springfield, NJ
Before & After Annual Maintenance
A Rain Garden Over Time
At time of installation First growing season Second growing season Third growing season Fourth growing season
Essex County Environmental CenterRoseland, Essex County, NJPhotograph courtesy of Essex County Environmental Center

CHAPTER 5
Key Points:
• Not only does a rain garden provide an aesthetic addition to the landscape, but it also creates a functioning system that improves water quality.
• Once you have installed a rain garden at your house, you can move on to other sustainable elements such as a rain barrel, pervious pavement, or a green roof. The sky is the limit!
page 49

Rain Garden Manual of New Jersey
50
Senior Resource CenterPrinceton, NJ
Photos courtesy of Curtis Helm
Taking it a Step FurtherEnjoy Your Rain Garden!Congratulations on installing your rain garden! You did it! Pat yourself on the back (and maybe get a back massage, too).
Not only did you add a beautiful landscaping feature to your yard, but you also created an area that will be fully functional at fi ltering nonpoint source pollution from stormwater runoff, the largest source of pollution in New Jersey waters (NJDEP, Bureau of Nonpoint Pollution Control, Division of Water Quality brochure). Another source of pollution in New Jersey’s waters is sediment, which can make New Jersey’s waters turbid, or cloudy, and can clog the gills of fi sh and aquatic invertebrates. Surprisingly, temperature can also be consid-ered a pollutant in New Jersey’s waters. You might not think of it, but runoff that goes over hot, impervious surfaces, like rooftops and roads, is dumped into New Jersey’s waterways and, in turn, raises the temperature. A rain garden can help solve all of these sources of pollution!
Additionally, the rain garden will accent your landscape, attract benefi cial wildlife, promote biodiversity, and, most impor-tantly, be used as a tool to educate others about the importance of managing stormwater runoff and controlling nonpoint source pollution. As an added bonus, the rain garden will not only fi lter out nonpoint source pollution, but also recharge groundwater. Replenishing groundwater is essential, since approximately 50% of New Jersey’s drinking water comes from aquifers that store groundwater. Unfortunately, New Jersey’s aquifers are drying up due to human use, so replenishment of groundwater is crucial. And a rain garden does just that – it fi lters and infi ltrates runoff into groundwater that then returns

51
IT ALL ADDS UP!In New Jersey, 90% of rainfall events are less than 1.25 inches, with approximately 44 total inches of rain per year. Therefore, your rain garden will treat and recharge 3.3 feet of water per year!
0.9 x 44 inches = 40 inches/year (or 3.3 feet)
If the rain garden receives runoff from 1,000 square feet, the total volume treated and recharged is 25,000 gallons of water per year.
1,000 square feet x 3.3 feet = 3,300 cubic feet/year (or 25,000 gallons)
So, if you build 40 rain gardens in your community, you will treat and recharge 1,000,000 gallons of water per year!
Village SchoolHolmdel, NJ
as cool water to New Jersey’s waterways and aquifers. Cool water in the waterways not only benefi ts wildlife, particu-larly fi sh, but also keeps the waterways’ base-fl ow higher and peak-fl ow lower, meaning better habitat for wildlife and less fl ooding.
It is essential for people to realize that what we do on the land affects the waterways, and that all of the little actions you take to prevent nonpoint source pollution on the land can help our water – that includes installing rain gardens! The installation of your rain garden should give you the confi dence to go out and try other things to improve our environment. How about trying rain barrels, cisterns, tree planting, water conservation fi xtures (faucets, toilets, showerheads, etc.), low maintenance grasses, integrated pest management (IPM), community gardening, and/or solar panels? If you install a rain barrel, for example, you use less tap water for your garden, reducing your water bill. All of these environmental practices will save you money, while protecting New Jersey’s environment at the same time.
Let’s change New Jersey from The Garden State to The Rain Garden State!

Baker Elementary SchoolMoorestown, Burlington County, NJ

Regional Native Plant Nurseries 54-57Website References 58Soil Testing 59Rain Garden Plant Lists 60-63Rain Garden Design Samples 64-66
page

54
Regional Native Plant Nurseries(R)=Retail (W)=Wholesale
NEW JERSEY
A Wild Bird Oasis (R)741 Stokes RoadMedford, NJ 08055PH: 609-654-6777www.awildbirdoasis.com
Arrowwood Nursery (R&W)870 W. Malaga Road, Route 659Williamstown, NJ 08094PH: 856-697-6045
Cicconi Farms (R&W)1005 Farmingdale RoadJackson, NJ 08527PH: 732-363-1420EMAIL: [email protected]
Fairweather Gardens (R)$ 2.00 Catalog (Mail order only)PO Box 330Greenwich, NJ 08323PH: 856-451-6261www.fairweathergardens.com
Fernbrook Nursery, Inc. (W)150 Georgetown Road, Route 545PO Box 228Bordentown, NJ 08505PH: 609-298-8282www.fernbrookfarms.com
Mapleton Nurseries (W)140 Mapleton RoadKingston, NJ 08528PH: 609-430-0366www.mapletonnurseries.com
New Moon Nursery (W)975 Barretts Run RoadBridgeton, NJ 08302PH: 888-998-1951EMAIL: [email protected]
Ocean Wholesale Nursery (W)705 Wright DeBow RoadJackson, NJPH: 732-833-7000EMAIL: [email protected]
Pinelands Nursery (W)323 Island RoadColumbus, NJ 08022PH: 609-291-9486EMAIL: [email protected]
Pleasant Run Nursery, Inc (W)Heidi, Richard, & Louise93 Ellisdale RoadPO Box 247Allentown, NJ 08501PH: 609-259-8585www.pleasantrunnursery.com
Princeton Nurseries (W)PO Box 1854 Polhemustown RoadAllentown, NJ 08501PH: 609-259-7671TOLL FREE 1-800-916-1776EMAIL: [email protected]
Rare Find Nursery, Inc (R&W)957 Patterson RoadJackson, NJ 08527PH: 732-833-0613EMAIL: info@rarefi ndnursery.comwww.rarefi ndnursery.com
Timber Creek Native Plant Nursery (R&W)200 Peskin RoadFarmingdale, NJ 07727PH: 732-928-0600FAX: 732-928-0660
Toadshade Wildflower Farm (R)53 Everittstown RoadFrenchtown, NJ 08825PH: 908-996-7500EMAIL: [email protected]
Tuckahoe Nurseries, Inc. (W)PO Box 576Tuckahoe, NJ 08250PH: 609-861-0533EMAIL: [email protected]

55
PENNSYLVANIA
Appalacian Nurseries (W)1724 Clay Hill RoadChambersburg, PA 17202PH: 717-597-0066EMAIL: [email protected]
Aquascapes Unlimited (W)PO Box 364Pipersville, PA 18947PH: 215-766-8151www.aquascapesunlimited.com
Better Forest Tree Seeds (W)13872 Alan Seeger RoadPetersburg, PA 16669PH: 814-667-3666EMAIL: [email protected]
Bowmans Hill Wildflower Preserve (R) PO Box 685 (No mail orders)New Hope, PA 18938PH: 215-862-2924EMAIL: [email protected]
Carino Nurseries (R&W) Route 403 N., P.O. Box 538Indiana, PA 15701PH: 724-463-3350EMAIL: [email protected]
Edge of the Woods Native Plant Nursery (R) 2415 Route 100Orefi eld, PA 18069PH: 610-395-2570EMAIL: [email protected]
Ernst Conservation Seeds (W)9006 Mercer PikeMeadville, PA 16335TOLL FREE: 1-800-873-3321www.ernstseed.com
Flickingers’ Nursery (W)P.O. Box 245Sagamore, PA 16250TOLL FREE: 1-800-368-7381FAX: 724-783-6528www.fl icknursery.com
Go Native Tree Farm (R&W)2310 Chestnut View DriveLancaster, PA 17603PH: 717-406-5267FAX: 717-399-0195EMAIL: [email protected]
Heirloom Seeds (R)287 E. Finley DriveWest Finley PA 15377PH: 724-663-5356EMAIL: mail@ heirloomseeds.comwww.heirloomseeds.com
Meadowood Nursery (R&W)24 Meadowood DriveKirkwood, PA 17536-9647PH: 717-529-3160EMAIL: [email protected]

56
Pikes Peak Nurseries (W)8289 Route 422 Highway EastPenn Run, PA 15765PH: 724-463-7747EMAIL: [email protected]
Pine Grove Nursery (W)152 Pine Grove Nursery RoadClearfi eld, PA 16830PH: 814-765-2363EMAIL: [email protected]
Primrose Path (R&W)921 Scottsdale-Dawson RoadScottdale, PA 15683PH: 724-887-6756FAX: 724-887-3077www.theprimrosepath.com
Redbud Native Plant Nursery (R&W)1214 N. Middletown RoadGlen Mills, PA 19342PH: 610 358-4300FAX: 610 358-3330redbudnativeplantnursery.com
Surgarbush Nursery (R)4272 Morgantown RoadMohnton, PA 19540PH: 610-856-0998Email: [email protected]
Sylva Native Nursery (W)3815 Roser RoadGlen Rock, PA 17327PH: 717-227-0486FAX: 717-227-0484EMAIL: [email protected]
Yellow Springs Farm Native Plant Nursery (R&W)1165 Yellow Springs RoadChester Springs, PA 19425PH: 610-827-2014Email: [email protected]
Wetland Supply Company (W)194 Goodview DriveApollo, PA 15613PH: 724-727-3772FAX: 724-727-3778EMAIL: [email protected]
Mid Atlantic Natives (R&W)12506 Susquehanna Trail SouthNew Freedom, PA 17349PH: 717-227-0924EMAIL: [email protected]
Natural Landscapes Nursery (W)354 North Jennersville RoadWest Grove, PA 19390PH: 610-869-3788EMAIL: [email protected] www.naturallandscapesnursery.com
North Creek Nurseries (W)388 North Creek RoadLandenberg, PA 19350PH: 610-255-0100EMAIL: [email protected]
Musser Forests, Inc (R&W)1880 Route 119 Highway North, P.O. Box 340Indiana, PA 15701PH: 724-465-5685EMAIL: [email protected]
Northeast Natives & Perennials (R)1716 E. Sawmill RoadQuakertown, PA 18951PH: 215-901-5552EMAIL: [email protected]
Octoraro Native Plant (W)6126 Street RoadHummelstown, PA 17036PH: 717-566-9875EMAIL: [email protected] Fanwood Memorial Library
Fanwood, NJ
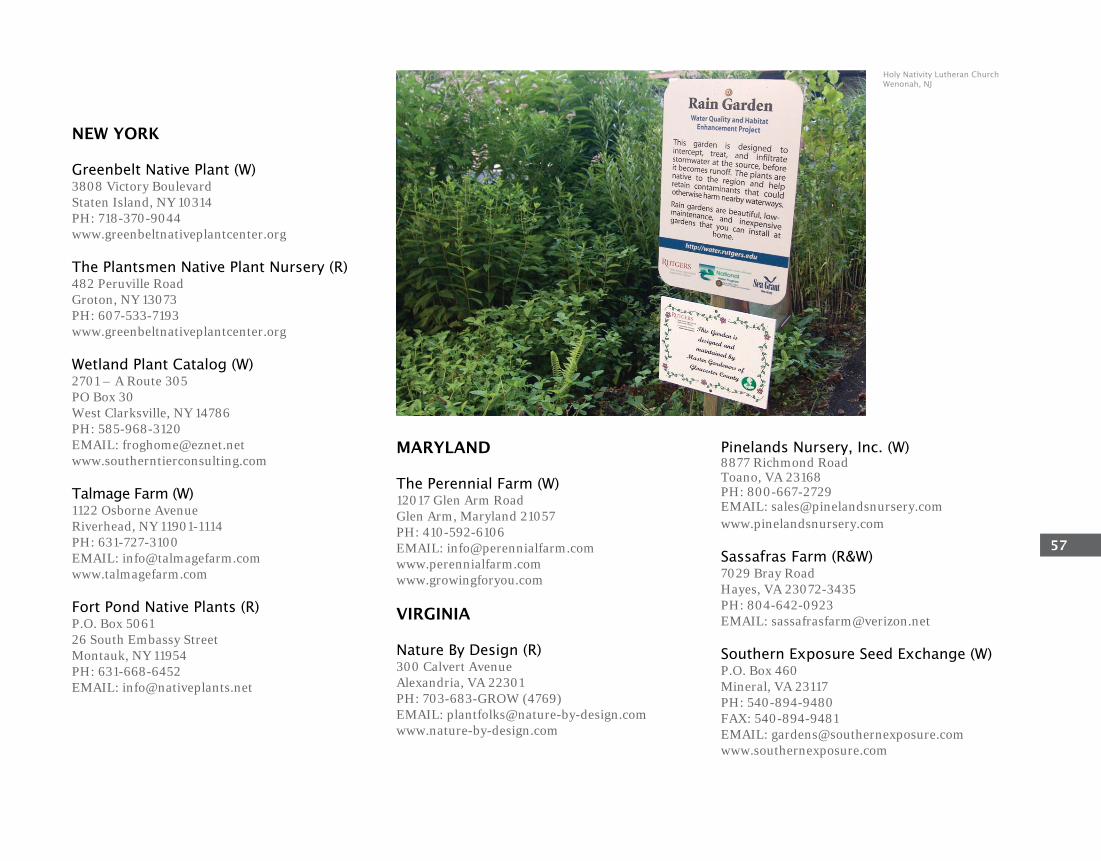
57
NEW YORK
Greenbelt Native Plant (W)3808 Victory BoulevardStaten Island, NY 10314PH: 718-370-9044www.greenbeltnativeplantcenter.org
The Plantsmen Native Plant Nursery (R)482 Peruville RoadGroton, NY 13073PH: 607-533-7193www.greenbeltnativeplantcenter.org
Wetland Plant Catalog (W)2701 – A Route 305PO Box 30West Clarksville, NY 14786PH: 585-968-3120EMAIL: [email protected]
Talmage Farm (W)1122 Osborne AvenueRiverhead, NY 11901-1114PH: 631-727-3100EMAIL: [email protected]
Fort Pond Native Plants (R)P.O. Box 506126 South Embassy StreetMontauk, NY 11954PH: 631-668-6452EMAIL: [email protected]
MARYLAND
The Perennial Farm (W)12017 Glen Arm RoadGlen Arm, Maryland 21057PH: 410-592-6106EMAIL: [email protected]
VIRGINIA
Nature By Design (R)300 Calvert AvenueAlexandria, VA 22301PH: 703-683-GROW (4769)EMAIL: [email protected]
Pinelands Nursery, Inc. (W)8877 Richmond RoadToano, VA 23168PH: 800-667-2729EMAIL: [email protected]
Sassafras Farm (R&W)7029 Bray RoadHayes, VA 23072-3435PH: 804-642-0923EMAIL: [email protected]
Southern Exposure Seed Exchange (W)P.O. Box 460Mineral, VA 23117 PH: 540-894-9480FAX: 540-894-9481EMAIL: [email protected]
Holy Nativity Lutheran ChurchWenonah, NJ

58
Website References
RAIN GARDEN WEBSITES
University of Wisconsin-Extension, Rain Garden Publications www.clean-water.uwex.edu/pubs/home.htm#rain
Rain Gardens: A how-to manual for homeowners www.clean-water.uwex.edu/pubs/pdf/home.rgmanual.pdf
Rain Gardens A household way to improve water quality in your community www.clean-water.uwex.edu/pubs/pdf/home.gardens.pdf
Rain Gardens of West Michigan-Home www.raingardens.org/index.php
Montgomery County Maryland, Rainscapes resource page www.montgomerycountymd.gov/deptmpl.asp?url=/Content/DEP/ Rainscapes/home.asp#garden
Southeastern Oakland County Resource Recovery Authority Healthy Lawns and Gardens Program www.socwa.org/lawn_and_garden.htm
Maplewood Minnesota Rainwater Gardens Site www.ci.maplewood.mn.us (search site for “rain water garden”)
Wisconsin Natural Resources Magazine www.dnr.wi.gov/wnrmag/html/supps/2003/feb03/run.htm
Montgomery County Government Services in Maryland www.montgomerycountymd.gov/deptmpl.asp?url=/Content/DEP/ Rainscapes/home.asp
LOW IMPACT & CONSERVATION WEB SITES
Impact Development Center’s sizing tool explained: www.lid-stormwater.net/bio_sizing.htm
Low Impact Development Center, Sustainable School Projects Website www.lowimpactdevelopment.org/school/index.html
Prince George’s County Maryland www.goprincegeorgescounty.com (Search for Bioretention)
Rutgers Cooperative Extension: Restoring NJ Riparian Forest Buffers www.njaes.rutgers.edu/njriparianforestbuffers/
Rain Bird Games, Trivia and Water Conservation Activities www.rainbird.com/iuow/community/crossword.htm (Teaching Tool with Answers)
Cauldwell Youth Garden, Sustainable South BronxBronx, New York City, NY
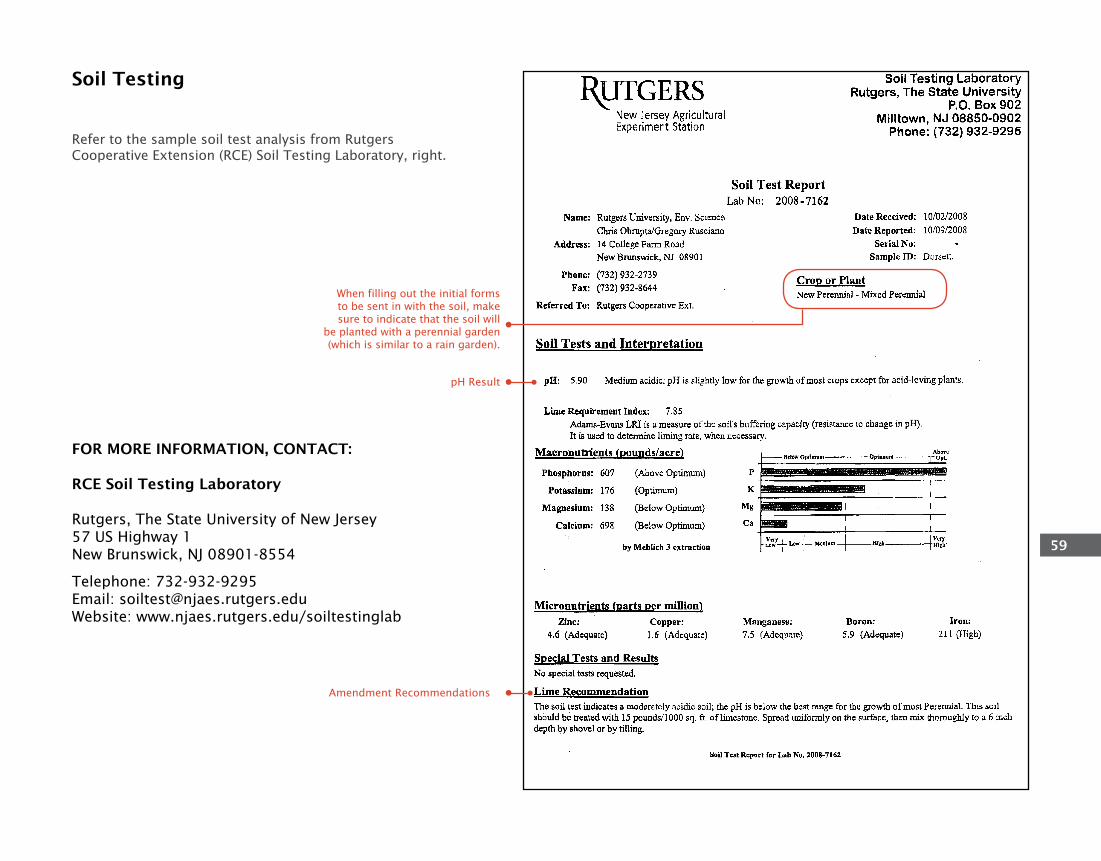
59
Soil Testing
FOR MORE INFORMATION, CONTACT:
RCE Soil Testing Laboratory
Rutgers, The State University of New Jersey57 US Highway 1New Brunswick, NJ 08901-8554
Telephone: 732-932-9295Email: [email protected]: www.njaes.rutgers.edu/soiltestinglab
pH Result
When filling out the initial forms to be sent in with the soil, make sure to indicate that the soil will
be planted with a perennial garden (which is similar to a rain garden).
Amendment Recommendations
Refer to the sample soil test analysis from Rutgers Cooperative Extension (RCE) Soil Testing Laboratory, right.

60
WILDFLOWERS AND FERNS
BASE
• Blue Lobelia (Lobelia siphilitica)
• Blueflag Iris (Iris virginica shrevei)
• Boneset (Eupatorium maculatum)
• Cardinal Flower (Lobelia cardinalis)
• Seaside Goldenrod (Solidago sempervirens)
• Marsh Marigold (Calthus palustris)
• Monkey Flower (Mimilus ringens)
• Rose-mallow (Hibiscus moscheutos)
• Royal Fern (Osmunda regalis)
• Swamp Milkweed (Asclepias incarnata)
• Turtlehead (Chelone glabra)
SLOPE
• Blazing Star (Liatris spicata)
• Cinnamon Fern (Osmunda cinnamomea)
• Columbine (Aquilegia spp.)
• Coreopsis (Coreopsis)
• Ironweed (Vernonia noveboracensis)
• Joe-pye Weed (Eupatorium spp.)
• New England Aster (Aster novae-angliae)
• New York Aster (Aster novi-belgii)
• Sensitive Fern (Onoclea Sensibilis)
BUFFER
• Black-eyed Susan (Rudbeckia laciniata)
• Butterfly Weed (Milkweed) (Asclepias tuberosa)
• Purple Coneflower (Echinacea purpurea)
• Wild Indigo (Baptista tinctoria)
• Wild Bergamont (Monarda didyma)
GRASSES AND GROUNDCOVERS
BASE
• Bluejoint Grass (Calamagrostis canadensis)
• Sedges (Carex spp.)
• Fowl Mannagrass (Glyceria striata)
• Soft Rush (Juncus effusus)
SLOPE
• Big Bluestem (Andropogon gerardii)
• Switchgrass (Panicum virgatum)
• Virginia Wild-rye (Elymus virginicus)
• Wood Grass (Sorghastrum nutans)
BUFFER
• Bearberry (Arctostaphylos uva-ursi)
• Broomsedge (Andropogon spp.)
• Indiangrass (Sorghastrum nutans)
• Little Bluestem (Schizachyrium scoparium)
• Panic Grass (Panicum virgatum)
• Switchgrass (Panicum virgatum)
• Deer Tongue (Dichanthelium clandestinum)
TREES AND SHRUBS
BASE
• Buttonbush (Cephalanthus occidentalis)
• Cranberrybush Viburnum (Viburnum trilobum)
• Green Ash (Fraxinus pennsylvanica)
• River Birch (Betula nigra)
• Silky Dogwood (Cornus amomum)
• Swamp White Oak (Quercus bicolor)
SLOPE
• Green Ash (Fraxinus pennsylvanica)
• Red Maple (Acer rubrum)
• Red-twig Dogwood (Cornus sericea)
• River Birch (Betula nigra)
• Serviceberry (Amelanchier canadensis)
• Sweetpepperbush (Clethera alnifolia)
• Sweetbay Magnolia (Magnolia virginiana)
• Winterberry Holly (Ilex verticillata)
BUFFER
• American Holly (Ilex opaca)
• Arrowwood Viburnum (Viburnum dentatum)
• Bayberry (Myrica pensylvanica)
• Hackberry (Celtis occidentalis)
• Lowbush Blueberry (Vaccinium angustifolium)
• Red Bud (Cercis canadensis)
• Red Oak (Quercus falcata)
• White Oak (Quercus alba)
• Witchhazel (Hamamelis virginiana)
Rain Garden Plant Lists
PLANTS BY RAIN GARDEN ZONE
BASE
BUFFER
SLOPE
DRY
WET

61
PLANTS FOR WIND BREAKS + SCREENS
Trees
• American Holly (Ilex opaca)
• Arborvitae
• Balsam Fir (Abies balsamea)
• Eastern Red Cedar (Juniperus virginiana)
• White Fir (Abies concolor)
• White Pine (Pinus strobus)
PLANTS FOR DRY SOILS
Trees
• American Hornbeam (Carpinus caroliniana)
• Eastern Red Cedar (Juniperus virginiana)
• Hackberry (Celtis occidentalis)
• Honeylocust (Gleditsia triacanthos)
• Northern Red Oak (Quercus rubra)
• Shagbark Hickory (Carya ovata)
• Washington Hawthorn
(Crataegus phaenopyrum)
• White Ash (Fraxinus americana)
• White Oak (Quercus alba)
Shrubs
• Bayberry (Myrica pensylvanica)
• Bush Cinquefoil (Potentilla fruticosa)
• Jerseytea (Ceanothus americanus)
• St. Johns Wort (Hypericum perforatum)
Perennials
• Bearberry (Arctostaphylos uva-ursi)
• Butterfly Milkweed (Asclepias tuberosa)
PLANTS FOR WET LOCATIONS
Trees
• Black Gum (Nyssa sylvatica)
• Black Willow (Salix nigra)
• Green Ash (Fraxinus pennsylvanica)
• Red Maple (Acer rubrum)
• River Birch (Betula nigra)
• Serviceberry (Amelanchier canadensis)
• Swamp White Oak (Quercus bicolor)
• Sweetgum (Liquidambar styraciflua)
• Sycamore (Platanus occidentalis)
Shrubs
• American Cranberry Bush
(Viburnum trilobum)
• Arrowwood Viburnum (Viburnum dentatum)
• Inkberry (Ilex glabra)
• Red Chokeberry (Aronia arbutifolia)
• Redosier Dogwood (Cornus sericea)
• Silky Dogwood (Cornus amomum)
• Spicebush (Lindera benzoin)
• Summersweet (Clethra alnifolia)
• Winterberry (Ilex verticillata)
Grasses
• Blue Lobelia (Lobelia siphilitica)
• Blueflag Iris (Iris virginica shrevei)
• Cardinal Flower (Lobelia cardinalis)
• New England Aster (Aster novae-angliae)
• New York Aster (Aster novi-belgii)
• Swamp Milkweed (Asclepias incarnata)
• Wild Bergamont (Monarda didyma)
PLANTS FOR SHADY LOCATIONS
Trees
• American Holly (Ilex opaca)
• American Hornbeam (Carpinus caroliniana)
• Eastern Hemlock (Tsuga canadensis)
• Eastern Redbud (Cercis canadensis)
• Flowering Dogwood (Cornus florida)
• Serviceberry (Amelanchier canadensis)
• Sugar Maple (Acer saccharum)
Grasses
• Arrowwood Viburnum (Viburnum dentatum)
• Inkberry (Ilex glabra)
• Spicebush (Lindera benzoin)
• Summersweet (Clethra alnifolia)
• Witchhazel (Hamamelis virginiana)
Perennials
• American Columbine (Aquilegia canadensis)
• Bleeding Hearts (Dicentra spectabilis)
• Cinnamon Fern (Osmunda cinnamomea)
• Royal Fern (Osmunda regalis)
• Sensitive Fern (Onoclea Sensibilis)
• Solomon’s Seal (Polygonatum commutatum)
• Woodland Phlox (Phlox divaricata)
Rain Garden Plant Lists

62
PLANTS FOR WILDLIFE HABITAT
Trees
• American Holly (Ilex opaca)
• Eastern Red Cedar (Juniperus virginiana)
• Hackberry (Celtis occidentalis)
• Serviceberry (Amelanchier canadensis)
• Wild Cherry (Prunus avium)
Shrubs
• Arrowwood Viburnum (Viburnum dentatum)
• Bayberry (Myrica pensylvanica)
• Black Haw Viburnum (Viburnum prunifolium)
• Redosier Dogwood (Cornus sericea)
• Spicebush (Lindera benzoin)
• Winterberry (Ilex verticillata)
Perennials
• Boneset (Eupatorium perfoliatum)
• Heath Aster (Aster ericoides)
• Ironweed (Vernonia noveboracensis)
Grasses
• Big Bluestem (Andropogon gerardii)
• Indiangrass (Sorghastrum nutans)
• Little Bluestem (Schizachyrium scoparium)
• Switchgrass (Panicum virgatum)
Hanson House Rain GardenCranford, NJ
Rain Garden Plant Lists
PLANTS THAT DEER PREFER TO EAT (USE WITH CAUTION)
Trees
• Balsam Fir (Abies balsamea)
• Cornelian Dogwood (Cornus cornaceae)
• Eastern Redbud (Cercis canadensis)
• Fraser Fir (Abies fraseri)
• Hemlock (Conium spp.)
• Rhododendron (Rhododendron ericaceae)
Shrubs
• Azalea (Rhododendron ericaceae)
Perennials
• Clematis (Clematis ranunculaceae)
• Cransbill geranium (Geranium sanguineum)
• Crocus (Crocus iridaceae)
• Daylily (Hemerocallis hemerocallidaceae)
• Echinacea (Echinacea spp.)
• English Ivy (Hedera helix)
• Hollyhock (Alcea)
• Hosta (Hosta agavaceae)
• Impatiens (Impatiens balsaminaceae)
• Lily (Lilium)
• Meadow rue (Thalictrum aquilegifolium)
• Pansy (Viola spp.)
• Peony (Paeonia spp.)
• Phlox (Phlox spp.)
• Sedum (Sedum spp.)
• Sunflower (Helianthus annuus)
• Trillium (Trillium melanthiaceae)
• Wood Hyacinth (Hyacinthoides hispanica)

63
PLANTS THAT ARE DEER TOLERANT/RESISTANT
Trees
• Ash (Fraxinus)
• Bayberry (Myrica pensylvanica)
• Beech (Fagus)
• Birch (Betula spp.)
• Carolina allspice (Calycanthus floridus)
• Fetterbush (Leucothoe fontanesiana)
• Great St. John’s wort (Hypericum perforatum)
• Honeylocust (Gleditsia triacanthos)
• Hornbeam (Carpinus caroliniana)
• Leatherwood (Dirca palustris)
• Magnolia (Magnolia spp.)
• Maple spp. (Acer)
• Oak (Quercus spp.)
• Serviceberry (Amelanchier canadensis)
• Shrubby St. John’s wort (Hypericum prolificum)
• Sourgum (Nyssa sylvatica)
• Spicebush (Lindera benzoin)
• Summersweet (Clethra alnifolia)
• Sweetgum (Liquidambar styraciflua)
• Trumpet Honeysuckle (Lonicera sempervirens)
• Viburnum spp. (Viburnum)
• Witchhazel (Hamamelis virginiana)
Perennials
• Aromatic Aster (Aster oblongifolius)
• Baneberry (Actaea spp.)
• Beardtongue (Penstemon barbatus)
• Black Cohosh (Actaea racemosa)
• Black-eyed Susan (Rudbeckia laciniata)
• Blue False Indigo (Baptista australis)
• Bluestar (Amsonia)
• Blue Vervain (Verbena hastata)
• Blue Wood Phlox (Phlox divaricata)
• Blueflag Iris (Iris virginica shrevei)
• Butterflyweed Milkweed (Asclepias tuberosa)
• Creeping Phlox (Phlox stolonifera)
• Culver’s-root (Veronicastrum virginicum)
• Dense Blazing Star (Liatris spicata)
• Flowering Spurge (Euphorbia corollata)
• Fringed Bleeding-heart (Dicentra eximia)
• Giant Purple Hyssop (Agastache scrophulariifolia)
• Goat’s Beard (Aruncus dioicis)
• Goldenrod spp. (Solidago)
• Great Blue Lobelia (Lobelia siphilitica)
• Helen’s flower (Helenium autumnale)
• Jack-in-the-Pulpit (Arisaema triphyllum)
• Jacob’s Ladder (Polemonium caeruleum)
• Mayapple (Podophyllum spp.)
• Monkey Flower (Mimilus ringens)
• Monkshood (Aconitum spp.)
• Mountainmint (Pycnanthemum spp.)
• New England Aster (Aster novae-angliae)
• Obedient Plant (Physostegia spp.)
• Rose Coreopsis (Coreopsis rosea)
• Skullcap (Scutellaria spp.)
• Skunk-cabbage (Symplocarpus foetidus)
• Small Agrimony (Agrimonia microcarpa)
• Swamp Rose-mallow (Hibiscus moscheutos palustris)
• Tickseed (Coreopsis spp.)
• Twin-Leaf (Jeffersonia diphylla)
• Virgin’s bower (Clematis virginiana)
• Wild Bergamont (Monarda fistulosa)
• Wild Columbine (Aquilegia canadensis)
• Wild Ginger (Asarum canadense)
• Wild Onion/Leek (Allium canadense)
• Wood Geranium (Geranium maculatum)
Grasses
• Big Bluestem (Andropogon gerardii)
• Switchgrass (Panicum virgatum)
Rain Garden Plant Lists
Note: There is no such thing as a plant that is absolutely deer resistant - deer will eat anything if they are hungry enough! This list merely reflects the plants that deer tend to avoid.
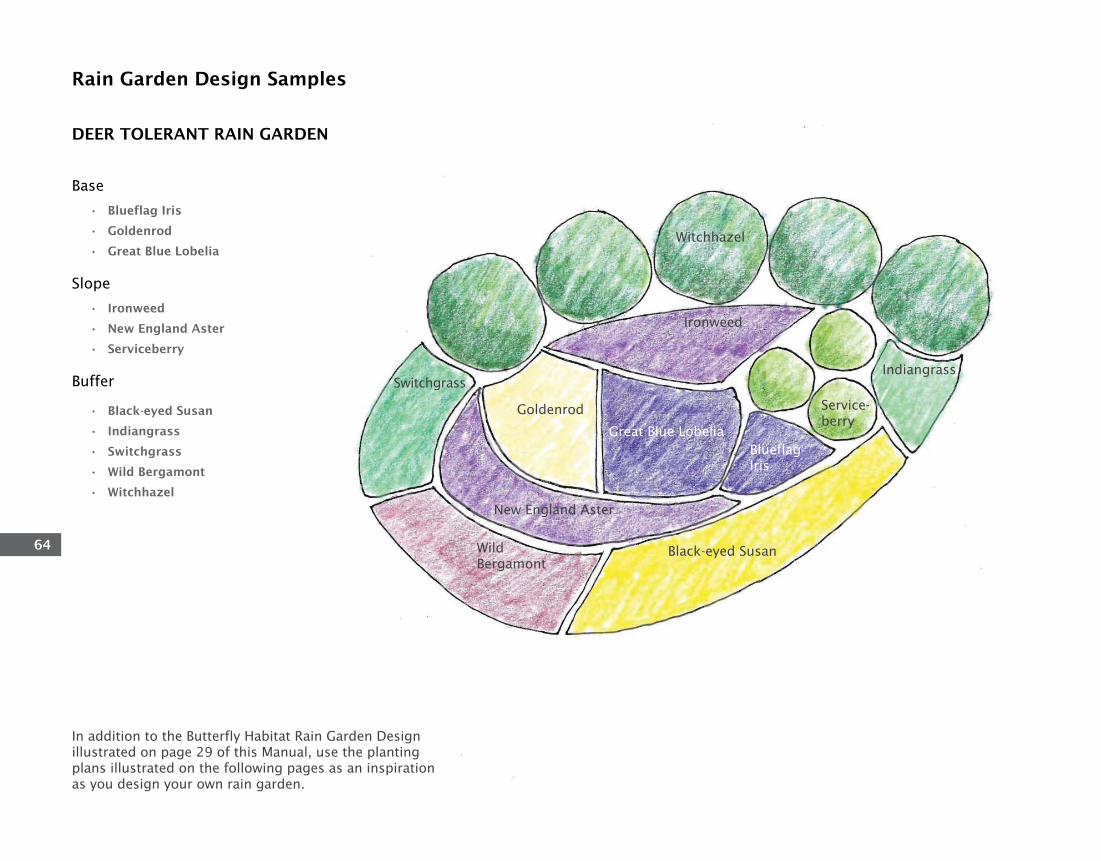
64
DEER TOLERANT RAIN GARDEN
Base
• Blueflag Iris
• Goldenrod
• Great Blue Lobelia
Slope
• Ironweed
• New England Aster
• Serviceberry
Buffer
• Black-eyed Susan
• Indiangrass
• Switchgrass
• Wild Bergamont
• Witchhazel
Wild Bergamont
Witchhazel
Ironweed
Goldenrod
Great Blue LobeliaBlueflag Iris
New England Aster
Switchgrass
Black-eyed Susan
Indiangrass
Service-berry
In addition to the Butterfly Habitat Rain Garden Design illustrated on page 29 of this Manual, use the planting plans illustrated on the following pages as an inspiration as you design your own rain garden.
Rain Garden Design Samples
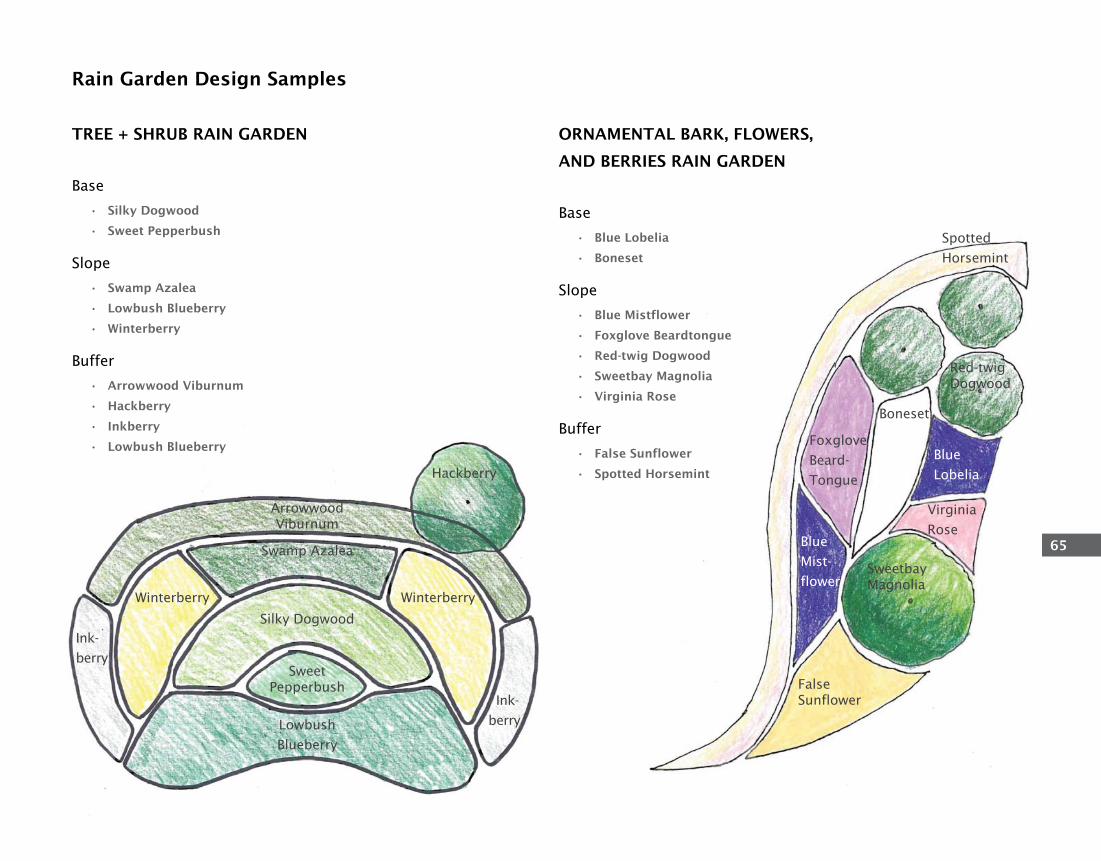
65
TREE + SHRUB RAIN GARDEN
Base
• Silky Dogwood
• Sweet Pepperbush
Slope
• Swamp Azalea
• Lowbush Blueberry
• Winterberry
Buffer
• Arrowwood Viburnum
• Hackberry
• Inkberry
• Lowbush Blueberry
Hackberry
Arrowwood Viburnum
Swamp Azalea
Winterberry
Silky Dogwood
Sweet Pepperbush
Winterberry
Lowbush
Blueberry
Ink-
berry
Ink-
berry
Rain Garden Design Samples
ORNAMENTAL BARK, FLOWERS,
AND BERRIES RAIN GARDEN
Base
• Blue Lobelia
• Boneset
Slope
• Blue Mistflower
• Foxglove Beardtongue
• Red-twig Dogwood
• Sweetbay Magnolia
• Virginia Rose
Buffer
• False Sunflower
• Spotted Horsemint
Red-twig Dogwood
Sweetbay Magnolia
Boneset
Foxglove
Beard-
Tongue
False Sunflower
Virginia
Rose
Spotted
Horsemint
Blue
Lobelia
Blue
Mist-
flower

66
DRY, SANDY SOIL RAIN GARDEN
Base
• Seaside Goldenrod
Slope
• Black-eyed Susan
• Columbine
• Yellow Wild Indigo
Buffer
• Bayberry
• Indiangrass
• Lowbush Blueberry
• Little Bluestem
• Bearberry
Seaside Goldenrod
Black-eyed Susan Columbine
Yellow Wild Indigo
Indiangrass
Witchhazel
Bayberry
Bearberry Lowbush
Blueberry
Rain Garden Design Samples
SUN/PART-SUN RAIN GARDEN
Base
• Blue Lobelia
• Cardinal Flower
Slope
• Boneset
• Joe-pye Weed
• New England Aster
• Wild Bergamot
• Virginia Rose
Buffer
• Common Milkweed
• Indiangrass
• Ironweed
• Little Bluestem
• Oak-leaf hydrangea
• Eastern Red Bud
Ironweed Oak-leaf Hydrangea
Cardinal
Flower
New England Aster
Blue LobeliaJoe-pye Weed
Common Milkweed Little Bluestem
Wild Bergamot
Boneset
Eastern
Red Bud
Indian-
grass

67
Native Plants of New Jersey (from left to right)
Lady’s SlipperWhite Pine
Sweet Gum
Mountain LaurelAmerican Beech
Giant’s Soloman SealStrawberry Bush
Toad TrilliumCulver’s RootSneezewood
Bloodroot
Turk’s Cap LilyCulver’s RootBlue CohoshChokeberry
Photos courtesy of Native Plant Society of New Jersey
