2015–16 secure browser installation manual - caaspp · updated february 2016. prepared by...
TRANSCRIPT

Updated February 2016.
Prepared by Educational Testing Service ®
Secure Browser Installation Manual
C A L I F O R N I AAssessment of Student Performance and Progress
2015–16 AdministrationSmarter Balanced Summative Assessments English Language Arts/Literacy, Mathematics
Smarter Balanced Interim Assessments English Language Arts/Literacy, Mathematics
California Alternate Assessments English Language Arts, Mathematics

CAASPP System
– ii –
Table of Contents Section I. Introduction to the Secure Browser Installation Manual .......................................................... 1 What’s New in 2015–16 ..........................................................................................................................................................1 Intended Audience .................................................................................................................................................................1 System Requirements ...........................................................................................................................................................2 Document Conventions .........................................................................................................................................................2 Manual Content ......................................................................................................................................................................2 Other Resources ....................................................................................................................................................................3
Section II. Overview of Secure Browsers ..................................................................................................... 4 About the Secure Browser ....................................................................................................................................................4
Close External User Applications .........................................................................................................................................4 Turn Off Background Jobs ...................................................................................................................................................4 Testing on Computers with Dual Monitors ...........................................................................................................................4
Forbidden Application Detection..........................................................................................................................................5 Secure Browser Error Messages ..........................................................................................................................................5
Secure Browser Not Detected .............................................................................................................................................5 Unable to Establish a Connection with the Test Delivery System ........................................................................................5
Section III. Installing the Secure Browser on Desktops and Laptops ........................................................ 6 Installing the Secure Browser on Windows ........................................................................................................................6
Installing the Secure Browser on an Individual Computer ....................................................................................................6 Sharing the Secure Browser over a Network .......................................................................................................................8 Copying the Secure Browser Installation Directory to Testing Computers ...........................................................................9 Installing the Secure Browser for Use with an NComputing Terminal ..................................................................................9 Installing the Secure Browser on a Terminal Server or Windows Server ........................................................................... 10 Installing the Secure Browser Without Administrator Rights .............................................................................................. 10 Uninstalling the Secure Browser on Windows ................................................................................................................... 11
Installing the Secure Browser on Mac OS X ...................................................................................................................... 11 Installing the Secure Browser on an Apple Computer Running Mac OS X 10.6 through 10.11 ......................................... 11 Installing Secure Browser 6.5 for Mac OSX 10.5 ............................................................................................................... 13 Uninstalling the Secure Browser on OS X ......................................................................................................................... 13
Installing the Secure Browser on Linux ............................................................................................................................. 14 Installing the Secure Browser on 32- or 64-Bit Distributions .............................................................................................. 14 Uninstalling the Secure Browser on Linux ......................................................................................................................... 15
Disabling and Enabling Auto Update ................................................................................................................................. 15 Understanding Auto Update ............................................................................................................................................... 15 Disabling Auto Update ....................................................................................................................................................... 16 Enabling Auto Update ........................................................................................................................................................ 17
Section IV. Installing the Secure Browser on Mobile Devices ...................................................................18 Installing the Secure Browser on iOS ................................................................................................................................ 18 Installing AIRSecureTest on Android ................................................................................................................................. 20
Downloading and Installing the Android AIRSecureTest Mobile Secure Browser .............................................................. 20 Chrome OS AIRSecureTest Kiosk App .............................................................................................................................. 22
Installing the AIRSecureTest Kiosk App on Standalone Chromebooks ............................................................................. 22 Installing the AIRSecureTest Kiosk App on Managed Chromebooks ................................................................................ 23 Opening the AIRSecureTest Kiosk App and Selecting the Assessment Program ............................................................. 24
Installing the Secure Browser on Windows Mobile Devices ............................................................................................ 24 Section V. Proxy Settings for Desktop Secure Browsers .........................................................................25 Specifying a Proxy Server to Use with the Secure Browser ............................................................................................ 25 Modifying Desktop Shortcuts to Include Proxy Settings ................................................................................................. 26
Modifying Desktop Shortcuts on Microsoft Windows ......................................................................................................... 26 Modifying Desktop Shortcuts on Mac OS X ....................................................................................................................... 26
Appendix A. Creating Group Policy Objects ..................................................................................................27 Appendix B. Resetting Secure Browser Profiles ...........................................................................................29 Resetting Secure Browser Profiles on Windows .............................................................................................................. 29 Resetting Secure Browser Profiles on OS X 10.6 or Later ............................................................................................... 29 Resetting Secure Browser Profiles on Linux .................................................................................................................... 30
Appendix C. User Support................................................................................................................................31 California Technical Assistance Center for LEA CAASPP Coordinators ....................................................................... 31

CAASPP System
– iii –
List of Tables Table 1. Key symbols and document conventions ...................................................................................................................2 Table 2. Commands for installing 32-bit compatibility libraries ............................................................................................... 14 Table 3. Specifying proxy settings using a shortcut or the command line ............................................................................... 25
List of Figures Figure 1. Unable to Establish Connection alert message .........................................................................................................5 Figure 2. [Download Browser] button .......................................................................................................................................6 Figure 3. [CASecureBrowser] shortcut icon .............................................................................................................................7 Figure 4. [Download Browser] button .......................................................................................................................................7 Figure 5. [CASecureBrowser] shortcut icon .............................................................................................................................8 Figure 6. [CASecureBrowser] shortcut icon .............................................................................................................................8 Figure 7. [Download Browser] button ..................................................................................................................................... 11 Figure 8. Contents of the CASecureBrowser-OSX.dmg folder ............................................................................................... 12 Figure 9. Security & Privacy screen for Mac OS X 10.11 ....................................................................................................... 12 Figure 10. [Download Browser] button ................................................................................................................................... 13 Figure 11. [CASecureBrowser6.5] shortcut icon .................................................................................................................... 13 Figure 12. [Download Browser] button ................................................................................................................................... 14 Figure 13. [CASecureBrowser] shortcut icon ......................................................................................................................... 14 Figure 14. [Download on the App Store] button ..................................................................................................................... 18 Figure 15. AIRSecureTest App Store download Web page ................................................................................................... 18 Figure 16. [AirSecureTest] icon, iOS ...................................................................................................................................... 19 Figure 17. Select the state from the Launchpad ..................................................................................................................... 19 Figure 18. Select the assessment from the Launchpad ......................................................................................................... 19 Figure 19. [Get it on Google play] button ................................................................................................................................ 20 Figure 20. AIRSecureTest Goggle Play download Web page ................................................................................................ 20 Figure 21. [AIRSecure Test] icon, Android ............................................................................................................................. 21 Figure 22. Select the state from the Launchpad ..................................................................................................................... 21 Figure 23. Select the assessment from the Launchpad ......................................................................................................... 21 Figure 24. Select the state from the Launchpad ..................................................................................................................... 24 Figure 25. Select the assessment from the Launchpad ......................................................................................................... 24 Figure 26. The Local Group Policy Editor ............................................................................................................................... 27 Figure 27. The Logon Properties dialog box .......................................................................................................................... 27 Figure 28. The Add a Script dialog box .................................................................................................................................. 28 Figure 29. Cleaning secure browser on OS X 10.6 or later .................................................................................................... 30
Acronyms and Initialisms Used in the Secure Browser Installation Manual
CAAs California Alternate Assessments
CAASPP California Assessment of Student Performance and Progress
CalTAC California Technical Assistance Center
IT information technology
LEA local educational agency
SSID Statewide Student Identifier


Introduction to the Secure Browser Installation Manual | What’s New in 2015–16
February 2016 2015–16 CAASPP Secure Browser Installation Manual 1 Customization Copyright © 2016 by the California Department of Education
Section I. Introduction to the Secure Browser Installation Manual
The secure browser is a type of browser used for taking online assessments. The secure browser prevents students from accessing other computer or Internet applications and from copying test information. It also occupies the entire computer screen.
What’s New in 2015–16
Feature Change
Administration of the California Alternate Assessments (CAAs) Online Assessments requires secure browser
In addition to being used to take the Smarter Balanced Online Summative and Interim Assessments, the secure browser must also be used to take the CAA operational tests.
System requirements as a separate manual
System requirements have been moved from the Secure Browser Installation Manual to a separate manual, the System Requirements Manual, which will be posted to the California Assessment of Student Performance and Progress (CAASPP) Instructions and Manuals Web page at http://www.caaspp.org/administration/instructions/.
Updated secure browsers The secure browser for all platforms except for Mac OSX 10.5 has been updated to version 8.x. Please note the following about the updated secure browsers:
Secure browsers do not require uninstallation.
Secure browsers now have auto update capability.
Icons for version 8.x of the secure browser no longer include version numbers on them (except for the secure browser for Mac OSX 10.5, which is still version 10.5).
The secure browser for Mac OSX 10.5 is version 6.5; it does not require updating for the 2015–16 CAASPP administration.
Supported operating systems The list of supported operating systems, included in the System Requirements Manual, has been updated.
Updated functionality for the current secure browser
The secure browser no longer requires separate installation of the Active X controls to ensure secure browser security. (Does not apply to version 6.5.)
Auto update The secure browser now has auto update capability.
Intended Audience This installation guide is intended for the following audiences:
Technology coordinators familiar with downloading installation packages from the Internet or from a network location and installing software onto desktop or laptop computers running Windows, Mac OS X, or Linux operating systems, or Chromebook, iPad, or Android devices.
Network administrators familiar with mapping or mounting network drives, and creating and running scripts at the user and host level.
If you install and run the secure browser from an NComputing server, you should be familiar with operating that software and related hardware.

Introduction to the Secure Browser Installation Manual | System Requirements
2 2015–16 CAASPP Secure Browser Installation Manual February 2016 Customization Copyright © 2016 by the California Department of Education
System Requirements For the secure browser to work correctly, the device on which you install it must have a supported operating system. For a list of supported operating systems, see the System Requirements for Online Testing available from the CAASPP Instructions and Manuals Web page at http://www.caaspp.org/administration/instructions/.
Document Conventions Table 1 lists key symbols and typographical conventions used in this manual.
Table 1. Key symbols and document conventions
Element Description
Warning: This symbol accompanies important information regarding actions that may cause fatal errors.
Alert: This symbol accompanies important information regarding a task that may cause minor errors.
Note: This symbol accompanies additional information that may be of interest.
Tip: This symbol accompanies useful information on how to perform a task.
filename Monospaced text indicates a directory, filename, or something you enter in a field.
[text] Bold text in brackets is used to indicate a link or button that is selectable.
Manual Content This manual is organized as follows:
Section I, Introduction to the Secure Browser Installation Manual (this section), describes this guide.
Section II, Overview of Secure Browsers, provides an overview of secure browsers and how they are used with online assessments.
Section III, Installing the Secure Browser on Desktops and Laptops, includes instructions for installing the secure browser onto supported Windows, Mac, and Linux platforms.
Section IV, Installing the Secure Browser on Mobile Devices, includes instructions for installing the mobile secure browser onto supported iOS, Android, and Chrome OS platforms.
Section V, Proxy Settings for Desktop Secure Browsers, provides commands for specifying proxy servers that the secure browser should use.
Appendix A, Creating Group Policy Objects, describes how to create scripts that launch when a user logs into a Windows computer.
Appendix B, Resetting Secure Browser Profiles, provides instructions for resetting secure browser profiles.
Appendix C, User Support, provides Help Desk information.

Introduction to the Secure Browser Installation Manual | Other Resources
February 2016 2015–16 CAASPP Secure Browser Installation Manual 3 Customization Copyright © 2016 by the California Department of Education
Other Resources These resources, as well as test administration manuals and user guides for testing within the CAASPP System, are available on the CAASPP Instructions and Manuals Web page at http://www.caaspp.org/administration/instructions/.
For information about supported operating systems and Web browsers, see the System Requirements for Online Testing at http://www.caaspp.org/rsc/pdfs/CAASPP.system-requirements-manual.2016.pdf.
For information about securing a computer before a test session, see the Test Administrator User Guide at http://www.caaspp.org/rsc/pdfs/CAASPP.ta-reference-guide.2016.pdf.
For information about network and Internet requirements, general peripheral and software requirements, and configuring text-to-speech settings, see the Technical Specifications Manual for Online Testing at http://www.caaspp.org/rsc/pdfs/CAASPP.tech-specs-manual.2016.pdf.
For information about supported hardware and software for Braille testing as well as information about configuring Job Access with Speech®, see the Braille Requirements and Testing Manual at http://www.caaspp.org/rsc/pdfs/CAASPP.braille-requirements.2016.pdf.

Overview of Secure Browsers | About the Secure Browser
4 2015–16 CAASPP Secure Browser Installation Manual February 2016 Customization Copyright © 2016 by the California Department of Education
Section II. Overview of Secure Browsers The information in this section provides an overview of secure browsers and their use with online assessments. This section includes the following topics:
About the Secure Browser
Forbidden Application Detection
Secure Browser Error Messages
About the Secure Browser All devices that students will use to access online assessments must have a secure browser installed on that device. The secure browser prevents students from accessing other computer or Internet applications or copying test information. All devices that will be used for testing must have the correct secure browser installed.
This manual contains instructions for downloading and installing the secure browsers. Your local educational agency (LEA) or school information technology (IT) staff should ensure that the secure browser has been installed correctly on all computers and devices that will be used for student testing.
While the secure browser is an integral component of test security, test administrators and test examiners perform an equally important role in preserving test integrity. Test administrators and test examiners should be aware of the following requirements and employ the necessary precautions while administering online assessments:
Close External User Applications
Prior to administering the online assessments, all nonrequired applications on computers and devices should be closed. After closing these applications, the secure browser can be launched.
The secure browser will not work if the device detects that a forbidden application is running. For more information, see the Forbidden Application Detection section.
Turn Off Background Jobs
Ensure and verify that all background jobs, such as virus scans or software updates, are scheduled outside of testing windows. For example, if your testing takes place between 8 a.m. and 3 p.m., schedule background jobs (e.g., attendance and payroll jobs) outside of these hours.
Testing on Computers with Dual Monitors
Systems that use a dual monitor setup typically display an application on one monitor screen while another application is accessible on the other screen. This typical dual monitor setup is not allowed for Smarter Balanced assessments.
However, in extremely rare circumstances, a test administrator is administering a test via read-aloud and wants to have a duplicate screen to view exactly what the student is viewing for ease of reading aloud. In these rare cases where a dual monitor is allowed, Smarter Balanced requires that the monitors must be set up to “mirror” each other. School technology coordinators can assist test administrators in setting up the two monitors to ensure they mirror each other rather than operate as independent monitors.
In these cases, all security procedures must be followed and the test administered in a secure environment to prevent others from hearing the questions or viewing the student or test administrator screens.
Overview of Secure Browsers | Forbidden Application Detection
February 2016 2015–16 CAASPP Secure Browser Installation Manual 5 Customization Copyright © 2016 by the California Department of Education
Forbidden Application Detection This feature automatically detects certain applications that are prohibited from running on a computer while the secure browser is open. The secure browser checks the applications currently running on a computer when it is launched. If a forbidden application is detected, the student is denied entry and receives a message indicating the open application. Similarly, if a forbidden application launches while the student is already logged on to an assessment—for example, if a scheduled task or background job begins (i.e., anti-virus scans)—the student is automatically logged off and a message is displayed.
Warning: Forbidden Applications and Testing
If a forbidden application is launched in the background while the student is testing, the student will be automatically logged off and a message displayed. This typically occurs when a process such as a Web browser (e.g., Internet Explorer) or an antivirus program is triggered in the background in order for a software auto update to occur. It is recommended to check all software auto updates and ensure that they are scheduled to occur outside of planned testing hours.
Before administering tests, LEA technology coordinators, test administrators, and test examiners should take proper measures to ensure that forbidden applications are not running on student devices.
Secure Browser Error Messages
Secure Browser Not Detected
The test delivery system automatically detects whether a device is using the secure browser to access the online assessments.
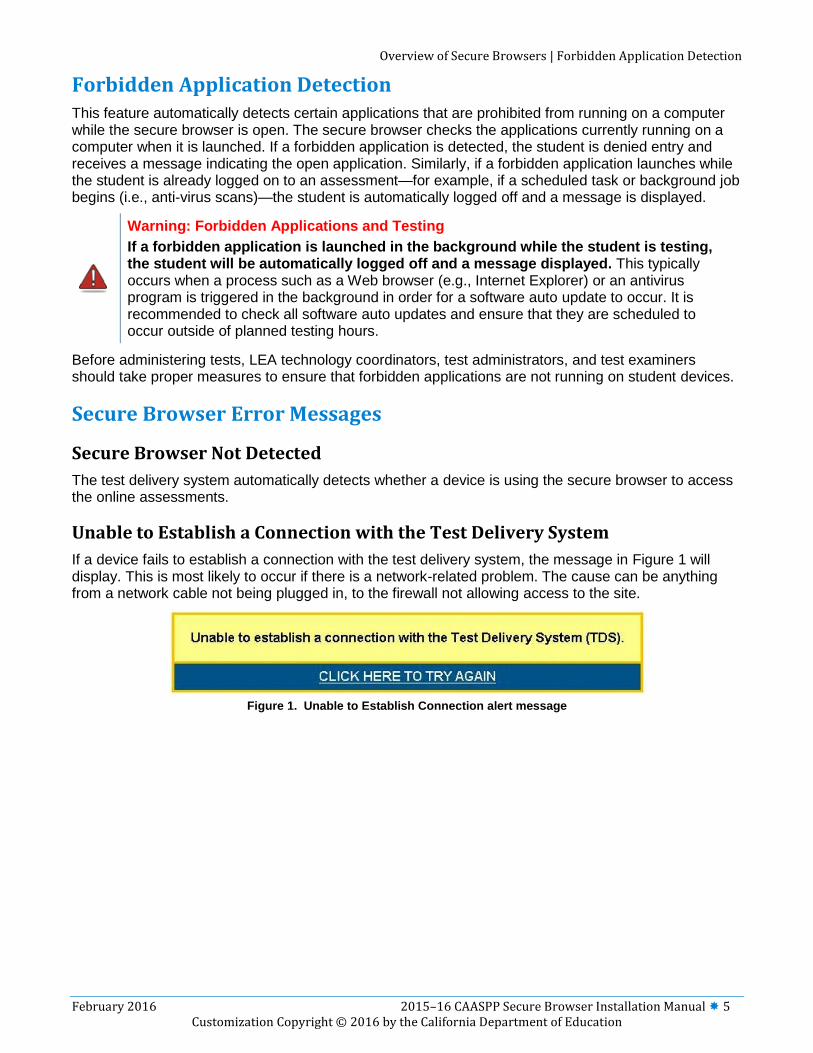
Unable to Establish a Connection with the Test Delivery System
If a device fails to establish a connection with the test delivery system, the message in Figure 1 will display. This is most likely to occur if there is a network-related problem. The cause can be anything from a network cable not being plugged in, to the firewall not allowing access to the site.
Figure 1. Unable to Establish Connection alert message

Installing the Secure Browser on Desktops and Laptops | Installing the Secure Browser on Windows
6 2015–16 CAASPP Secure Browser Installation Manual February 2016 Customization Copyright © 2016 by the California Department of Education
Section III. Installing the Secure Browser on Desktops and Laptops
This section contains installation instructions for Windows and Macintosh systems under a variety of deployment scenarios.
Installing the Secure Browser on Windows This section provides instructions for installing the secure browser on computers running on Windows XP, Vista, 7, 8.0, 8.1, and 10. (The secure browser does not run on other versions of Windows.)
The instructions in this section assume devices are running a 64-bit version of Windows and that the
secure browser will be installed to C:\Program Files (x86)\. If you are running a 32-bit version of
Windows, adjust the installation path to C:\Program Files\.
Installing the Secure Browser on an Individual Computer
This section contains instructions for installing the secure browser on individual computers.
Installing the Secure Browser via Windows
In this scenario, a user with administrator rights installs the secure browser using standard Windows. (If you do not have administrator rights, refer to the section Installing the Secure Browser Without Administrator Rights.)
1. If you installed a previous version of the secure browser in a location other than a default
location—C:\Program Files (x86)\CASecureBrowser\ (64 bit) or C:\Program Files)\
CASecureBrowser\ (32 bit)—manually uninstall the secure browser. (If you installed in the default
location, the installation package automatically removes it.) See the instructions in the section Uninstalling the Secure Browser on Windows.
2. Navigate to the California Assessment of Student Performance and Progress (CAASPP) Secure Browsers Web page by going to http://www.caaspp.org/ and selecting the [Secure Browsers] button.
3. Scroll down the CAASPP Secure Browsers Web page to the “Download Secure Browsers” section.
4. Select the [Windows] tab and then select the [Download Browser] button (shown as highlighted in Figure 2). A dialog box opens.
5. Take one of the following steps; this step may vary depending on the Web browser you are using:
a. If presented with a choice to run or save the file, select [Run]. This opens the Secure Browser Setup wizard.
b. If presented only with the option to save, save the file to a convenient location. After saving
the file, double-click the installation file CASecureBrowser-Win.msi to open the setup
wizard.
6. Follow the instructions in the setup wizard. When prompted for setup type, select [Install].
Figure 2. [Download Browser] button

Installing the Secure Browser on Desktops and Laptops | Installing the Secure Browser on Windows
February 2016 2015–16 CAASPP Secure Browser Installation Manual 7 Customization Copyright © 2016 by the California Department of Education
7. Select [Finish] to exit the setup wizard. The following items are installed:
The secure browser to the default location C:\Program Files (x86)\CASecureBrowser\
(64 bit) or C:\Program Files)\CASecureBrowser\ (32 bit)
A shortcut CASecureBrowser to the desktop (shown in
Figure 3).
8. Optional: Apply proxy settings by taking the following steps:
a. Right-click the [CASecureBrowser] shortcut icon on the desktop and select “Properties.”
b. Under the [Shortcut] tab, in the Target field, modify the command to specify the proxy. See Table 3 for available forms of this command.
c. Select [OK] to close the Properties dialog box.
For more information about proxy settings, see Section V, Proxy Settings for Desktop Secure Browsers.
9. Optional: Disable auto update by following the procedure in the section Disabling Auto Update.
10. Run the secure browser by double-clicking the [CASecureBrowser] shortcut icon on the desktop (shown in Figure 3). The secure browser opens displaying the student logon screen. The secure browser fills the entire screen and hides the task bar.
11. To exit the secure browser, select [CLOSE SECURE BROWSER] in the upper-right corner of the screen.
Installing the Secure Browser via the Command Line
In this scenario, a user with administrator rights installs the secure browser from the command line. If you do not have administrator rights, refer to the section Installing the Secure Browser Without Administrator Rights.
1. If you installed a previous version of the secure browser in a location other than C:\Program
Files (x86)\ (64 bit) or C:\Program Files\ (32 bit), manually uninstall the secure browser. (If
you installed in C:\Program Files (x86)\, the installation package automatically removes it.)
See the instructions in the section Uninstalling the Secure Browser on Windows.
2. Navigate to the CAASPP Secure Browsers Web page by going to http://www.caaspp.org/ and selecting the [Secure Browsers] button.
3. Scroll down the CAASPP Secure Browsers Web page to the “Download Secure Browsers” section.
4. Select the [Windows] tab and then select the [Download Browser] button (shown as highlighted in Figure 4). A dialog box opens.
5. Save the file on the computer (this step may vary depending on the Web browser you are using):
a. If presented with a choice to run or save the file, select [Save] and save the file to a convenient location.
b. If presented only with the option to save, save the file to a convenient location.
6. Note the full path and filename of the downloaded file, such
as c:\temp\CASecureBrowser-Win.msi.
7. Open a command prompt.
8. Run the command msiexec /I <Source> [/quiet] [INSTALLDIR=<Target>]
Figure 3. [CASecureBrowser]
shortcut icon
Figure 4. [Download Browser] button

Installing the Secure Browser on Desktops and Laptops | Installing the Secure Browser on Windows
8 2015–16 CAASPP Secure Browser Installation Manual February 2016 Customization Copyright © 2016 by the California Department of Education
<Source> Path to the installation file, such as C:\temp\CASecureBrowser-Win.msi
<Target> Path to the location where you want to install the
secure browser. If absent, installs to the directory described in step 10; the installation program creates the directory if it does not exist
/I Perform an install
[/quiet] Quiet mode, no interaction
For example, the command
msiexec /I c:\temp\CASecureBrowser-Win.msi /quiet
INSTALLDIR=C:\AssessmentTesting\BrowserInstallDirectory
installs the secure browser from the installation package at C:\temp\
CASecureBrowser-Win.msi into the directory
C:\AssessmentTesting\BrowserInstallDirectory using quiet mode.
9. Follow the instructions in the Setup Wizard. When prompted for setup type, select [Install].
10. Select [Finish] to exit the Setup Wizard. The following items are installed:
The secure browser to the default location C:\Program Files (x86)\CASecureBrowser\
(64 bit) or C:\Program Files\CASecureBrowser\ (32 bit).
A shortcut CASecureBrowser to the desktop.
11. Optional: Disable auto update by following the procedure in the section Disabling Auto Update.
12. Run the secure browser by double-clicking the [CASecureBrowser] shortcut icon on the desktop (shown in Figure 5). The secure browser opens, displaying the student logon screen. The secure browser fills the entire screen and hides the task bar.
13. To exit the secure browser, select [CLOSE SECURE BROWSER] in the upper-right corner of the screen.
Sharing the Secure Browser over a Network
In this scenario, you install the secure browser on a server’s shared drive, and you also create a shortcut to the secure browser’s executable on each testing computer’s desktop. This assumes that all testing computers have access to the shared drive.
1. On the remote computer from where the students run the secure browser, install the secure browser following the directions in the section Installing the Secure Browser on an Individual Computer.
2. On each testing device, sign in and take the following steps:
a. Copy the desktop shortcut CASecureBrowser from the remote device to the directory
C:\Users\Public\Public Desktop.
b. Run the secure browser by double-clicking the [CASecureBrowser] shortcut icon on the desktop (shown in Figure 6). The secure browser opens, displaying the student logon screen. The secure browser fills the entire screen and hides the task bar.
c. To exit the secure browser, select [CLOSE SECURE BROWSER] in the upper-right corner of the screen.
Figure 5. [CASecureBrowser]
shortcut icon
Figure 6. [CASecureBrowser]
shortcut icon
Installing the Secure Browser on Desktops and Laptops | Installing the Secure Browser on Windows
February 2016 2015–16 CAASPP Secure Browser Installation Manual 9 Customization Copyright © 2016 by the California Department of Education
Copying the Secure Browser Installation Directory to Testing Computers
In this scenario, a network administrator installs the secure browser on one machine and copies the entire installation directory to testing computers.
1. On the machine from where you will copy the installation directory, install the secure browser following the directions in the section Installing the Secure Browser on an Individual Computer.
Note the path of the installation directory, such as C:\Program Files (x86)\CASecureBrowser.
2. Identify the directory on the local testing computers to which you will copy the secure browser file (it should be the same directory on all computers). For example, you may want to copy the
directory to c:\AssesssmentTesting\. Ensure you select a directory in which the students can
run executables.
3. On each local testing computer, do the following:
a. Copy the installation directory used in step 1 from the remote machine to the directory you
selected in step 1. For example, if the target directory is c:\AssesssmentTesting\, you are
creating a new folder c:\AssesssmentTesting\CASecureBrowser.
b. Copy the shortcut c:\AssesssmentTesting\CASecureBrowser\CASecureBrowser.exe –
Shortcut.lnk to the desktop.
c. Run the secure browser by double-clicking the CASecureBrowser shortcut on the desktop.
The secure browser opens, displaying the student logon screen. The secure browser fills the entire screen and hides the task bar.
d. To exit the secure browser, select [CLOSE SECURE BROWSER] in the upper-right corner of the screen.
Installing the Secure Browser for Use with an NComputing Terminal
In this scenario, a network administrator installs the secure browser on a Windows server accessed through an NComputing terminal. Prior to testing day, the testing coordinator connects consoles to the NComputing terminal, logs on from each to the Windows server, and starts the secure browser so it is ready for the students.
This procedure assumes that you already have a working NComputing topology with consoles able to reach the Windows server.
For a listing of supported terminals and servers for this scenario, see System Requirements for Online Testing, available on the CAASPP Instructions and Manuals Web page at http://www.caaspp.org/administration/instructions/.
1. Log on to the machine running the Windows server.
2. Install the secure browser following the directions in the section Installing the Secure Browser on an Individual Computer.
3. Open Notepad and type the following command (no line breaks):
"C:\Program Files (x86)\CASecureBrowser\CASecureBrowser.exe" -CreateProfile
%SESSIONNAME%
If you used a different installation path on the Windows server, use that in the previous command.
4. Save the file to the desktop as logon.bat.
5. Create a group policy object that runs the file logon.bat each time a user logs on. For details,
see Appendix A, Creating Group Policy Objects.

Installing the Secure Browser on Desktops and Laptops | Installing the Secure Browser on Windows
10 2015–16 CAASPP Secure Browser Installation Manual February 2016 Customization Copyright © 2016 by the California Department of Education
6. On each NComputing console, create a new [CASecureBrowser] desktop shortcut by taking the following steps. This subprocess is necessary because the default shortcut created by the installation program has an incorrect target.
a. Connect to the NComputing terminal.
b. Log on to the Windows server with administrator privileges.
c. Delete the secure browser’s shortcut currently appearing on the desktop.
d. Navigate to the secure browser’s installation directory, usually C:\Program Files (x86)\
CASecureBrowser\.
e. Right-click the file CASecureBrowser.exe and select Send To > Desktop (create shortcut).
f. On the desktop, right-click the new shortcut and select Properties. The Shortcut Properties dialog box appears.
g. Under the [Shortcut] tab, in the Target field, type the following command:
"C:\Program Files(X86)\CASecureBrowser\CASecureBrowser.exe" -P%SESSIONNAME%
If you used a different installation path on the Windows server, use that in the previous command.
h. Select [OK] to close the Properties dialog box.
7. Verify the installation by double-clicking the shortcut to start the secure browser.
Installing the Secure Browser on a Terminal Server or Windows Server
In this scenario, a network administrator installs the secure browser on a server—either a terminal server or a Windows server. Testing machines then connect to the server’s desktop and run the secure browser remotely. This scenario is supported on Windows server 2003 and 2008.
Warning: Testing Quality With Servers
Launching a secure browser from a terminal or Windows server typically does not create a secure test environment because students can use their local machines to search for answers. Therefore, this installation scenario is not recommended for testing.
Local educational agency (LEA) CAASPP coordinators should contact the California Technical Assistance Center (CalTAC) for instructions and technical support before the secure browser is installed using this scenario.
Installing the Secure Browser Without Administrator Rights
In this scenario, you copy the secure browser from one machine where it is installed onto another machine on which you do not have administrator rights.
1. Log on to a device on which the secure browser is installed.
2. Copy the entire folder where the secure browser was installed (usually C:\Program Files
(x86)\CASecureBrowser) to a removable drive or shared network location.
3. Copy the entire directory from the shared location or removable drive to any directory on the target computer.
4. In the folder where you copied the secure browser, right-click CASecureBrowser.exe and select
Send To > Desktop (create shortcut).
5. Double-click the desktop shortcut to run the secure browser.

Installing the Secure Browser on Desktops and Laptops | Installing the Secure Browser on Mac OS X
February 2016 2015–16 CAASPP Secure Browser Installation Manual 11 Customization Copyright © 2016 by the California Department of Education
Uninstalling the Secure Browser on Windows
The following sections describe how to uninstall the secure browser from Windows or from the command line.
Uninstalling via the User Interface
The following instructions may vary depending on your version of Windows.
1. Navigate to Settings > System > Apps & features (Windows 10) or Control Panel > Add or Remove Programs or Uninstall a Program (previous versions of Windows).
2. Select the secure browser program CASecureBrowser and select [Remove] or [Uninstall].
3. Follow the instructions in the uninstall wizard.
Uninstalling via the Command Line
1. Open a command prompt.
2. Run the command msiexec /X <Source> /quiet
<Source> Path to the executable file, such as C:\MSI\CASecureBrowser.exe.
/X Perform an uninstall.
[/quiet] Quiet mode, no interaction.
For example, the command
msiexec /X C:\AssessmentTesting\
CASecureBrowser.exe /quiet
uninstalls the secure browser installed at C:\AssessmentTesting\ using quiet
mode.
Installing the Secure Browser on Mac OS X This section provides instructions for installing the secure browsers on Macintosh desktop or laptop computers only; it does not apply to Apple mobile devices such as the iPad.
Installing the Secure Browser on an Apple Computer Running Mac OS X 10.6 through 10.11
In this scenario, a user installs the secure browser on Apple desktop and laptop computers running Mac OS X 10.6 through 10.11. (If you are installing the secure browser on Mac OS X 10.5 with an Intel processor, see the procedure in the section Installing Secure Browser 6.5.) The steps in this procedure may vary depending on your version of Mac OS X and your Web browser.
1. Remove any previous version of the secure browser by dragging its folder to the Trash.
2. Navigate to the CAASPP Secure Browsers Web page by going to http://www.caaspp.org/ and selecting the [Secure Browsers] button.
3. Scroll down the CAASPP Secure Browsers Web page to the “Download Secure Browsers” section.
4. Select the [Mac OS X 10.6–10.11] tab and then select the [Download Browser] button (shown as highlighted in Figure 7). A dialog box opens.
5. If you are prompted for a download location, select your Downloads folder.
6. Open Downloads from the Dock, and then select CASecureBrowser-OSX.dmg to display its
contents.
Figure 7. [Download Browser] button

Installing the Secure Browser on Desktops and Laptops | Installing the Secure Browser on Mac OS X
12 2015–16 CAASPP Secure Browser Installation Manual February 2016 Customization Copyright © 2016 by the California Department of Education
Figure 8. Contents of the CASecureBrowser-OSX.dmg folder
7. If you are running Mac OS X 10.11, follow these additional steps to temporarily allow installation from any source. Otherwise, proceed to step 8.
a. Open System Preferences (Apple > System Preferences).
b. Select the [Security and Privacy] icon.
Figure 9. Security & Privacy screen for Mac OS X 10.11
c. In the [General] tab, select the lock in the bottom-left corner of the screen (indicated in Figure 9) and then type your password to enable changes.
d. In the “Allow apps downloaded from” section, first note which radio button is highlighted, and then select the Anywhere radio button (also indicated in Figure 9).
e. Select [Allow From Anywhere] in the confirmation message.
8. Drag the CASecureBrowser icon to the folder. This installs the secure browser into Applications.
9. For Mac OS 10.6 through 10.11, disable Mission Control/Spaces. Instructions for disabling Spaces are in the Technical Specifications Manual for Online Testing, available on the CAASPP Instructions and Manuals Web page at http://www.caaspp.org/administration/instructions/.
10. Optional: Disable auto update by following the procedure in the section Disabling Auto Update.

Installing the Secure Browser on Desktops and Laptops | Installing the Secure Browser on Mac OS X
February 2016 2015–16 CAASPP Secure Browser Installation Manual 13 Customization Copyright © 2016 by the California Department of Education
11. In Finder, navigate to Go > Applications, and then double-click CASecureBrowser to launch the
secure browser. (You must launch the secure browser to complete the installation.) The secure browser opens displaying the student logon screen. The secure browser fills the entire screen and hides the Dock.
Alert: The secure browser disables Exposé (hot corner) settings if they are set, and the settings remain disabled after the secure browser is closed.
12. To exit the secure browser, select [CLOSE SECURE BROWSER] in the upper-right corner of the screen.
13. To create a desktop shortcut, from the Applications folder, drag CASecureBrowser to the
desktop.
14. Mac OS X 10.11 only: Restore security settings by reversing the process in step 7 and resetting the “Allow apps downloaded from” setting to what it had been previously.
Installing Secure Browser 6.5 for Mac OSX 10.5
In this scenario, you install the secure browser on Apple desktop or laptop computers running Mac OSX 10.5 with an Intel processor. (If you are installing the secure browser on Mac OS X 10.6 or later, see the procedure in the section Installing the Secure Browser on an Apple Computer Running Mac OSX 10.6 through 10.11.)
1. Remove any previous version of the secure browser by dragging its folder to the Trash. You can skip this step if the computer currently has version 6.5 of the secure browser installed.
2. Navigate to the CAASPP Secure Browsers Web page by going to http://www.caaspp.org/ and selecting the [Secure Browsers] button.
3. Scroll down the CAASPP Secure Browsers Web page to the “Download Secure Browsers” section.
4. Select the [Mac OS X 10.5 (Intel)] tab and then select the [Download Browser] button (shown as highlighted in Figure 10). A dialog box opens.
5. If you are prompted for a download location, select your Downloads folder.
6. Open Downloads from the Dock, and select CASecureBrowser6.5-OSX.dmg to display its
contents.
7. Drag the [CASecureBrowser6.5] icon to the desktop.
8. Double-click the [CASecureBrowser6.5] shortcut icon (shown in Figure 11) on the desktop to launch the secure browser. (You must launch the secure browser to complete the installation.) The secure browser opens displaying the student logon screen. The secure browser fills the entire screen and hides the dock.
The secure browser disables Exposé (hot corner) settings if they are set, and the settings remain disabled after the secure browser is closed.
9. To exit the secure browser, select [Close] in the upper-right corner of the screen.
Uninstalling the Secure Browser on OS X
To uninstall an OS X secure browser, drag its folder to the Trash.
Figure 10. [Download Browser] button
Figure 11. [CASecureBrowser6.5]
shortcut icon

Installing the Secure Browser on Desktops and Laptops | Installing the Secure Browser on Linux
14 2015–16 CAASPP Secure Browser Installation Manual February 2016 Customization Copyright © 2016 by the California Department of Education
Installing the Secure Browser on Linux This section provides instructions for installing the secure browser on computers running a supported Linux distribution. For more information about Linux requirements, refer to the Technical Specifications Manual for Online Testing, available on the CAASPP Instructions and Manuals Web page at http://www.caaspp.org/administration/instructions/.
Installing the Secure Browser on 32- or 64-Bit Distributions
The instructions in this section are for installing the Linux secure browser onto 32 or 64-bit versions of Linux systems. These instructions may vary for your individual Linux distribution.
1. Uninstall any previous versions of the secure browser by deleting the directory containing it.
2. If you are installing Linux secure browser version 8.0 or earlier, use Table 2 as a guide to install the 32-bit compatibility libraries for your distribution. If your distribution does not appear in Table 2, consult its documentation for 32-bit compatibility.
3. Navigate to the CAASPP Secure Browsers Web page by going to http://www.caaspp.org/ and selecting the [Secure Browsers] button.
4. Scroll down the CAASPP Secure Browsers Web page to the “Download Secure Browsers” section.
5. Select the [Linux] tab and then select the [Download Browser] button (shown as highlighted in Figure 12).
6. Save the file to the desktop.
7. Right-click the downloaded file CASecureBrowser-
Linux.tar.bz2, and select [Extract Here] to expand the
file. This creates the CASecureBrowser folder on the desktop.
8. In a file manager, open the CASecureBrowser folder.
9. Right-click the file install-icon.sh and select [Open]. At the next dialog box, select [Run in Terminal]. The installation program runs and creates a [CASecureBrowser] icon on the desktop (shown in Figure 13).
10. Optional: Disable auto update by following the procedure in the section Disabling Auto Update.
11. If text-to-speech testing is performed on this computer, reboot it.
12. From the desktop, double-click the [CASecureBrowser] icon to launch the secure browser. The student logon screen appears. The secure browser fills the entire screen and hides any panels or launchers.
13. To exit the secure browser, select [CLOSE SECURE BROWSER] in the upper-right corner of the screen.
Table 2 lists the commands for installing 32-bit compatibility libraries for popular Linux distributions.
Table 2. Commands for installing 32-bit compatibility libraries
Distribution Command
Fedora 19–22 sudo yum install glibc.i686 nspr.i686 gtk2.i686
xulrunner.i686
openSUSE 13.1 zypper install glibc-32bit
Red Hat Enterprise Linux 6.5 sudo yum install xulrunner.i686 libgtk-x11-
2.0.50.0 libxcom.so glibc.i686
Figure 12. [Download Browser]
button
Figure 13.
[CASecureBrowser] shortcut icon

Installing the Secure Browser on Desktops and Laptops | Disabling and Enabling Auto Update
February 2016 2015–16 CAASPP Secure Browser Installation Manual 15 Customization Copyright © 2016 by the California Department of Education
Distribution Command
Ubuntu (LTS) 12.04, 14.04 sudo apt-get install libgtk2.0.0:i386
libstdc++6:i386 libasound2:i386 libasound2-
plugins:i386 libdbus-glib-1-2:i386 libXt6:i386 libreadline6:i386
Uninstalling the Secure Browser on Linux
To uninstall a secure browser, delete the directory containing it.
Disabling and Enabling Auto Update Starting with the version of the secure browser used for 2015–16 summative testing (and with the exception of version 6.5 for Mac OS 10.5), the secure browser automatically checks for and installs updates if the test delivery system is configured to support auto update.
Note: While it is recommended that your devices permit the secure browser to auto update, you can disable this feature on a per-secure browser level. For more information on how to disable this auto update feature can be found in the Disabling Auto Update section.
Understanding Auto Update
Updates to the secure browser are published as necessary, usually to provide enhancements, increase compatibility with operating systems, or resolve identified security issues. Starting with version 8 (the version available for online testing in 2015–16), the secure browser can automatically install these updates, similar to a Web browser.
Alert: Auto update is not available for version 6.5 of the secure browser on Mac OS 10.5.
The secure browser checks for updates under the following conditions:
The secure browser is running and its logon page is visible. If the secure browser is closed, or if a student is taking a test, it does not check for updates.
No other application is running on the computer. If another application is running, the secure browser does not check for updates.
The computer checks for updates during the night, generally between midnight and 6 a.m. The secure browser does not check for updates outside of these times.
If all of the previous conditions are satisfied, the following will occur:
1. The secure browser checks for an update.
2. If an update is available, the secure browser asks if you want to download and install it. You have an opportunity to respond to the prompt; if you do not respond during that time, the secure browser proceeds with downloading and installing the update.
3. A progress bar indicates installation progress.
4. After installation, the secure browser restarts.
On days when you want to check for an update, keep the computer on and ensure the secure browser is open to the logon page. Release dates will be announced on the CAASPP System Status Alerts Web page at http://www.caaspp.org/system-status/alert.html; you may want to keep the secure browser running on release dates.

Installing the Secure Browser on Desktops and Laptops | Disabling and Enabling Auto Update
16 2015–16 CAASPP Secure Browser Installation Manual February 2016 Customization Copyright © 2016 by the California Department of Education
If the secure browser is not running the night an auto update is published, it continues checking on subsequent nights until the update can be installed. Some updates are optional and others are required.
Notes:
If an update is required, you will be informed of the time by which the update must be installed. If a required update is not installed during that time, students will not be able to log on and test using the secure browser.
The auto update feature is not available if the secure browser is installed in a nonstandard location such as on a network drive or on a computer that uses a thin-client configuration.
Auto update is available starting with version 8 of the secure browser. If you have an earlier version, you must manually install version 8 or a later version to take advantage of auto update. You can download the installation files for the secure browser from the CAASPP Secure Browsers Web page by going to http://www.caaspp.org/ and selecting the [Secure Browsers] button.
Auto update is enabled by default when you install the secure browser. To disable auto update, follow the procedure in the next section, Disabling Auto Update.
Disabling Auto Update
To disable auto update:
1. Close the secure browser.
2. In a text editor, create a file with a single line containing the word OFF—all upper case. Ensure
this is the first and only line in the file.
3. Save the file with the name AUTOUPDATE.txt (upper-case filename, lower-case extension) in the
secure browser’s installation directory:
Windows (64 bit): C:\Program Files (x86)\CASecureBrowser\
Windows (32 bit): C:\Program Files\CASecureBrowser\
OS X: /Applications/CASecureBrowser.app/Contents/MacOS/
Linux: ~/Desktop/CASecureBrowser/
4. Start the secure browser.
Tip: Disabling auto update on multiple computers
With appropriate network permissions, you can push the file AUTOUPDATE.txt to
the directory in step 3 on other computers running the secure browser. Be sure to restart the secure browser on each target machine.

Installing the Secure Browser on Desktops and Laptops | Disabling and Enabling Auto Update
February 2016 2015–16 CAASPP Secure Browser Installation Manual 17 Customization Copyright © 2016 by the California Department of Education
Enabling Auto Update
You can resume the secure browser’s auto update feature if the test delivery system is configured to support auto update.
To enable auto update:
1. Navigate to the file where the secure browser is installed.
Windows (64 bit): C:\Program Files (x86)\CASecureBrowser\
Windows (32 bit): C:\Program Files\CASecureBrowser\
OS X: /Applications/CASecureBrowser.app/Contents/MacOS/
Linux: ~/Desktop/CASecureBrowser/
2. Delete the file AUTOUPDATE.txt.

Installing the Secure Browser on Mobile Devices | Installing the Secure Browser on iOS
18 2015–16 CAASPP Secure Browser Installation Manual February 2016 Customization Copyright © 2016 by the California Department of Education
Section IV. Installing the Secure Browser on Mobile Devices
This section contains information about installing AIRSecureTest, the secure browser app for iOS, Android, and Chrome OS. For information about configuring supported tablets and Chromebooks to work with the secure browser, refer to the Technical Specifications Manual for Online Testing, available on the CAASPP Instructions and Manuals Web page at http://www.caaspp.org/administration/instructions/.
Installing the Secure Browser on iOS This section contains instructions for downloading and installing AIRSecureTest and selecting your state and assessment program. The process for installing the secure browser is the same as for any other iOS application.
1. On your iPad, navigate to the California Assessment of Student Performance and Progress (CAASPP) Secure Browser Web page by going to http://www.caaspp.org/ and selecting the [Secure Browsers] button.
2. Scroll down the CAASPP Secure Browsers Web page to the “Download Secure Browsers” section.
3. Select the [iOS] tab.
4. Select [Download on the App Store] button, shown as highlighted in Figure 14.
(You can also search for AIRSecureTest in
the App Store to find the secure browser app.)
Figure 14. [Download on the App Store] button
5. The AIRSecureTest download Web page, shown in Figure 15, opens.
Figure 15. AIRSecureTest App Store download
Web page

Installing the Secure Browser on Mobile Devices | Installing the Secure Browser on iOS
February 2016 2015–16 CAASPP Secure Browser Installation Manual 19 Customization Copyright © 2016 by the California Department of Education
6. Tap the [Download] cloud [ ] icon, circled in Figure 15. The iPad downloads and installs the secure browser, and the button changes to [Open]. (Note that you must be signed in to the App Store to download AIRSecureTest.)
7. After installation, an [AIRSecureTest] icon like the one shown in Figure 16 appears on the iPad’s home screen.
Figure 16. [AirSecureTest] icon, iOS
8. Tap [Open]. The first time you open AIRSecureTest, the Launchpad screen appears. The Launchpad establishes the state and test administration for your students.
9. In the Please Select Your State drop-down list (shown in Figure 17), select California.
Figure 17. Select the state from the Launchpad
10. In the Choose Your Assessment Program drop-down list (shown in Figure 18), select California Assessment of Student Performance and Progress.
11. Tap [OK]. The student logon page opens. The secure browser is now ready for students to use.
The Launchpad screen appears only once. The student logon page appears the next time the secure browser is launched.
Figure 18. Select the assessment from the Launchpad

Installing the Secure Browser on Mobile Devices | Installing AIRSecureTest on Android
20 2015–16 CAASPP Secure Browser Installation Manual February 2016 Customization Copyright © 2016 by the California Department of Education
Installing AIRSecureTest on Android You can download AIRSecureTest from the Secure Browsers Web page or from the Google Play store. The process for installing the secure browser is the same as for any other Android application.
This section contains instructions for downloading and installing AIRSecureTest and selecting your state and assessment program.
Downloading and Installing the Android AIRSecureTest Mobile Secure Browser
1. On your Android tablet, navigate to the CAASPP Secure Browser Web page by going to http://www.caaspp.org/ and selecting the [Secure Browsers] button.
2. Scroll down the CAASPP Secure Browsers Web page to the “Download Secure Browsers” section.
3. Tap the [Android] tab.
4. Tap [Get it on Google play], shown as highlighted in Figure 19. (You can also
search for AIRSecureTest in the Google
Play store to find the secure browser app.) The AIRSecureTest download page appears.
Figure 19. [Get it on Google play] button
5. The AIRSecureTest download Web page appears (Figure 20).
Figure 20. AIRSecureTest Goggle Play download
Web page
6. Tap [Install] and then tap [Accept]. The tablet downloads and installs the secure browser. (Note that you must be signed in to Google Play to download AIRSecureTest.)

Installing the Secure Browser on Mobile Devices | Installing AIRSecureTest on Android
February 2016 2015–16 CAASPP Secure Browser Installation Manual 21 Customization Copyright © 2016 by the California Department of Education
7. After installation, an [AIRSecureTest] icon like the one shown in Figure 21 appears on the tablet’s home page.
Figure 21. [AIRSecure Test] icon, Android
8. Tap [Open]. The first time you open AIRSecureTest, the Launchpad screen appears. The Launchpad establishes the state and test administration for your students.
9. In the Please Select Your State drop-down list (shown in Figure 22), select California.
Figure 22. Select the state from the Launchpad
10. In the Choose Your Assessment Program drop-down list (shown in Figure 23), select California Assessment of Student Performance and Progress.
11. Tap [OK]. The student logon page appears. The secure browser is now ready for students to use.
The Launchpad screen appears only once. The student logon page appears the next time the secure browser is launched.
Figure 23. Select the assessment from the Launchpad
Alert: Android Secure Browser Keyboard:
If the secure browser keyboard has not been selected via device settings on Android tablets, it will need to be selected upon opening the AIRSecureTest app.
For more information about the Android secure browser keyboard, including instructions for enabling it, refer to the Technical Specifications Manual for Online Testing, available on the CAASPP Instructions and Manuals Web page at http://www.caaspp.org/administration/instructions/.

Installing the Secure Browser on Mobile Devices | Chrome OS AIRSecureTest Kiosk App
22 2015–16 CAASPP Secure Browser Installation Manual February 2016 Customization Copyright © 2016 by the California Department of Education
Chrome OS AIRSecureTest Kiosk App This section contains instructions for installing AIRSecureTest, the secure browser app for Chrome OS, as a kiosk application.
Installing the AIRSecureTest Kiosk App on Standalone Chromebooks
These instructions are for installing the AIRSecureTest secure browser on standalone Chromebook devices.
Warning: This procedure erases all data on the Chromebook. Be sure to back up any data you want to keep before you begin.
1. Obtain the following from your network administrator:
The wireless network to which the Chromebook connects. This typically includes the network’s service set identifier (SSID), password, and other access credentials.
An e-mail address and password for logging on to Gmail.
2. Power off and then power on your Chromebook.
3. If the OS verification is Off message appears, take the following steps; otherwise, skip to
step 4.
a. Press the [Spacebar]. In the confirmation screen, press [Enter]. The Chromebook reboots.
a. In the Welcome screen, select your language, keyboard, and the wireless network information you acquired from the network administrator, and then select [Continue].
b. In the Google Chrome OS Terms screen, select [Accept].
4. When the Sign in screen appears, wipe data from the Chromebook by taking the following steps:
a. Press [Esc] +[ ] + [Power]. The screen displays a yellow exclamation point (!).
b. Press [Ctrl] + [D] to begin developer mode and then press [Enter]. The screen displays a red exclamation point (!).
c. Press [Ctrl] + [D]. The Chromebook indicates it is transitioning to developer mode. The transition takes approximately 10 minutes, after which the Chromebook reboots.
d. After the Chromebook reboots, the OS verification is Off message appears. Press the
[Spacebar] and then press [Enter]. The Chromebook reboots and the Welcome screen appears.
5. In the Welcome screen, select your language, keyboard, and a network, and then select [Continue].
6. In the Google Chrome OS Terms screen, select [Accept] and continue. The Sign in screen appears.
7. In the Sign in screen, press [Ctrl] + [Alt] + [K]. The Automatic Kiosk Mode screen appears with a yellow exclamation point (!).
8. Select [Enable] and then select [OK]. The Sign in screen appears.
9. In the Sign in screen, enter your e-mail address and password, and then select [Sign in].
10. Set your Chromebook preferences as desired.
11. When the desktop opens, select the [Chrome] icon [ ] to open Chrome.
12. In the URL bar, enter chrome://extensions. The Extensions screen appears.

Installing the Secure Browser on Mobile Devices | Chrome OS AIRSecureTest Kiosk App
February 2016 2015–16 CAASPP Secure Browser Installation Manual 23 Customization Copyright © 2016 by the California Department of Education
13. Mark the checkbox for Developer Mode.
14. Select [Manage kiosk applications] located at the top of the screen. The Manage Kiosk Applications screen appears.
15. Take the following steps in the Manage Kiosk Applications screen:
a. Enter the following into the Add kiosk application field: ondcgjblmdblfnmdeoeebaemlckomedj
b. Select [Add]. The AIRSecureTest application appears in the Manage Kiosk Applications list.
c. Select [Done]. You will return to the Extensions screen.
16. Select your icon in the lower-right corner and select [Sign Out].
17. Back at the desktop, select [Apps] at the bottom of the screen and then select [AIRSecureTest]. The secure browser launches.
18. If you receive the following error message, then the secure browser is not configured to run in kiosk mode.
The AIRSecureTest application requires kiosk mode to be enabled.
You need to re-install the app in kiosk mode by following the procedure in this section.
19. Configure the test administration by following the procedure in the section Opening the AIRSecureTest Kiosk App and Selecting the Assessment Program.
Installing the AIRSecureTest Kiosk App on Managed Chromebooks
These instructions are for installing the AIRSecureTest secure browser on domain-managed Chromebook devices. The steps in this procedure assume that your Chromebooks are already managed through the admin console.
Alert: AIRSecureTest is not compatible with public sessions.
1. As the Chromebook administrator, log on to your admin console (https://admin.google.com).
2. Navigate to Device management > Chrome management > Device settings.
3. On the Device settings page, scroll down to the “Kiosk Settings” section.
4. Set “Single App Kiosk” to “Allow Single App Kiosk.”
5. Select [Manage Kiosk Applications]. The Kiosk Apps window appears.
6. Add the AIRSecureTest app by taking the following steps:
a. Select [Chrome Web Store].
b. In the search box, enter AIRSecureTest and press [Enter]. The AIRSecureTest app appears.
c. Select [Add]. The app appears in the “Total to install” section.
d. Select [Save]. The AIRSecureTest application appears on all managed Chromebook devices.

Installing the Secure Browser on Mobile Devices | Installing the Secure Browser on Windows Mobile Devices
24 2015–16 CAASPP Secure Browser Installation Manual February 2016 Customization Copyright © 2016 by the California Department of Education
Opening the AIRSecureTest Kiosk App and Selecting the Assessment Program
The first time you open the AIRSecureTest kiosk app, a Launchpad appears. The Launchpad establishes the state and test administration for your students.
1. In the Please Select Your State dropdown list (shown in Figure 24), select California.
Figure 24. Select the state from the Launchpad
2. In the Choose Your Assessment Program drop-down list (shown in Figure 25), the option California Assessment of Student Performance and Progress should already be selected.
3. Tap or select [OK]. The student logon page appears. The secure browser is now ready for students to use.
The Launchpad screen appears only once. The student logon page appears the next time the secure browser is launched.
Figure 25. Select the assessment from the Launchpad
Installing the Secure Browser on Windows Mobile Devices The procedure for installing the secure browser on Windows mobile devices is the same for installing it on desktops. See the section Installing the Secure Browser via Windows for details.

Proxy Settings for Desktop Secure Browsers | Specifying a Proxy Server to Use with the Secure Browser
February 2016 2015–16 CAASPP Secure Browser Installation Manual 25 Customization Copyright © 2016 by the California Department of Education
Section V. Proxy Settings for Desktop Secure Browsers
This section describes the commands for passing proxy settings to the secure browser, as well as how to implement those commands on the desktop computer.
Specifying a Proxy Server to Use with the Secure Browser By default, the secure browser attempts to detect the settings for your network’s Web proxy server. You can optionally force the secure browser to use specific proxy settings by passing them through the command line. Table 3 lists the form of the command for different settings and operating systems. To execute these commands from the command line, change to the directory containing the secure browser’s executable file.
Table 3. Specifying proxy settings using a shortcut or the command line
Description System Command
Run the secure browser without any proxy
Windows CASecureBrowser.exe -proxy 0
Mac 10.5 (Intel) arch -i386 ./CASecureBrowser6.5 -proxy 0
Mac 10.6–10.11 ./CASecureBrowser.sh -proxy 0
Linux ./CASecureBrowser -proxy 0
Set the proxy for HTTP requests only
Windows CASecureBrowser.exe -proxy 1:http:foo.com:80
Mac 10.5 (Intel) arch -i386 ./CASecureBrowser6.5 -proxy
1:http:foo.com:80
Mac 10.6–10.11 ./CASecureBrowser -proxy 1:http:foo.com:80
Linux ./CASecureBrowser.sh -proxy 1:http:foo.com:80
Set the proxy for all protocols to mimic the “Use this proxy server for all protocols” of Firefox
Windows CASecureBrowser.exe -proxy 1:*:foo.com:80
Mac 10.5 (Intel) arch -i386 ./CASecureBrowser6.5 -proxy
1:*:foo.com:80
Mac 10.6–10.11 ./CASecureBrowser -proxy 1:*:foo.com:80
Linux ./CASecureBrowser.sh -proxy 1:*:foo.com:80
Specify the URL of the PAC file
Windows CASecureBrowser.exe -proxy 2:proxy.com
Mac 10.5 (Intel) arch -i386 ./CASecureBrowser6.5 -proxy
2:proxy.com
Mac 10.6–10.11 ./CASecureBrowser -proxy 2:proxy.com
Linux ./CASecureBrowser.sh -proxy 2:proxy.com
Autodetect proxy settings
Windows CASecureBrowser.exe -proxy 4
Mac 10.5 (Intel) arch -i386 ./CASecureBrowser6.5 -proxy 4
Mac 10.6–10.11 ./CASecureBrowser -proxy 4
Linux ./CASecureBrowser.sh -proxy 4
Use the system proxy setting (default)
Windows CASecureBrowser.exe -proxy 5
Mac 10.5 (Intel) arch -i386 ./CASecureBrowser6.5 -proxy 5
Mac 10.6–10.11 ./CASecureBrowser -proxy 5
Linux ./CASecureBrowser.sh -proxy 5

Creating Group Policy Objects
26 2015–16 CAASPP Secure Browser Installation Manual February 2016 Customization Copyright © 2016 by the California Department of Education
Modifying Desktop Shortcuts to Include Proxy Settings This section provides guidelines for passing a proxy setting to the secure browser. All commands in this section are examples only and assume that you have a shortcut for the secure browser on your desktop.
Modifying Desktop Shortcuts on Microsoft Windows
1. Right-click the desktop shortcut for the secure browser, and select Properties from the shortcut menu.
1. Select the [Shortcut] tab.
2. If the Target field is disabled, do the following (otherwise skip to step 3):
a. Close the Properties dialog box and delete the desktop shortcut for the secure browser.
b. Create a new desktop shortcut. In Windows Explorer, navigate to C:\Program Files
(x86)\ (64 bit) or C:\Program Files)\CASecureBrowser\ (32 bit). Right-click the file
CASecureBrowser.exe and select Send To > Desktop (create shortcut).
c. Right-click the desktop shortcut for the secure browser and select Properties.
d. Select the [Shortcut] tab.
3. In the Target field, modify the command as specified in Table 3. For example:
"C:\Program Files (x86)\CASecureBrowser\CASecureBrowser.exe" -proxy
1:http:foo.com:80
4. Select [OK].
Modifying Desktop Shortcuts on Mac OS X
1. In Finder, navigate to Applications > Utilities, and then open Terminal.
2. Change to the desktop directory.
cd ~/Desktop
3. Create a file securebrowser.command on the desktop using a text editor such as pico.
pico securebrowser.command.
4. Copy or type the following the lines:
#!/bin/sh
/Applications/CASecureBrowser.app/Contents/MacOS/./ CASecureBrowser -proxy
1:http:foo.com:80 &
5. Be sure to specify the complete path to the secure browser and the desired proxy option. Ensure
the command ends with an ampersand (&).Save the file and exit the editor by pressing [Ctrl] +
[O], [Enter], and then [Ctrl] + [X].
6. Apply execute permission to the file. In Terminal, type
chmod a+x securebrowser.command
7. Close Terminal.
8. Select the securebrowser.command icon on the desktop. The secure browser opens with the
proxy setting you configured.

Creating Group Policy Objects
February 2016 2015–16 CAASPP Secure Browser Installation Manual 27 Customization Copyright © 2016 by the California Department of Education
Appendix A. Creating Group Policy Objects Many of the procedures in the section Installing the Secure Browser on Windows refer to creating a group policy object. These are objects that Windows executes upon certain events. The following procedure explains how to create a group policy object that runs a script when a user logs on. The
script itself is saved in a file called logon.bat.
Tip: For additional information about creating group policy objects, see “Assign user logon scripts” at http://technet.microsoft.com/en-us/library/cc781361%28v=ws.10%29.aspx.
1. In the task bar (Windows 10), or in Start > Run (previous versions of Windows), enter
gpedit.msc. The Local Group Policy Editor appears.
Figure 26. The Local Group Policy Editor
2. Expand Local Computer Policy > User Configuration > Windows Settings > Scripts (Logon/Logoff). This is indicated in Figure 26.
3. Select [Logon] and then select [Properties]. The Logon Properties dialog box appears.
Figure 27. The Logon Properties dialog box

Creating Group Policy Objects
28 2015–16 CAASPP Secure Browser Installation Manual February 2016 Customization Copyright © 2016 by the California Department of Education
4. Select [Add] (indicated in Figure 27). The Add a Script dialog box appears.
Figure 28. The Add a Script dialog box
5. Select [Browse…] (indicated in Figure 28) and navigate to the logon.bat you want to run.
6. Select [OK] (also indicated in Figure 28) to return to the Logon Properties dialog box.
7. Select [OK] to return to the Local Group Policy Editor.
8. Close the Local Group Policy Editor.
Resetting Secure Browser Profiles
February 2016 2015–16 CAASPP Secure Browser Installation Manual 29 Customization Copyright © 2016 by the California Department of Education
Appendix B. Resetting Secure Browser Profiles If you have been advised to reset the secure browser profile by the California Technical Assistance Center (CalTAC), use the instructions in this section.
Resetting Secure Browser Profiles on Windows
Resetting profiles for 64-bit versions of Windows
1. Log on as the user who installed the secure browser and close any open secure browsers.
2. Delete the contents of the following folders:
C:\Users\username\AppData\Local\AIR\
C:\Users\username\AppData\Roaming\AIR\
where username is the Windows user account where the secure browser is installed. (Keep the
AIR\ directories, just delete their contents.)
3. Start the secure browser.
Resetting profiles for 32-bit versions of Windows
1. Log on as the user who installed the secure browser and close any open secure browsers.
2. Delete the contents of the following folders:
C:\Documents and Settings\username\Local Settings\Application Data\AIR\
C:\Documents and Settings\username\Application Data\AIR\
where username is the Windows user account where the secure browser is installed. (Keep the
AIR\ directories, just delete their contents.)
3. Start the secure browser.
Resetting Secure Browser Profiles on OS X 10.6 or Later 1. Log on as the user who installed the secure browser and close any open secure browsers.
2. Start the Finder.
3. While pressing [Option], select Go > Library. The contents of the Library folder appear (shown
in Figure 29).
4. Open the Application Support folder.
5. Delete the folder containing the secure browser.
6. Delete the Mozilla folder.
7. Restart the secure browser.

Resetting Secure Browser Profiles
30 2015–16 CAASPP Secure Browser Installation Manual February 2016 Customization Copyright © 2016 by the California Department of Education
Figure 29. Cleaning secure browser on OS X 10.6 or later
Resetting Secure Browser Profiles on Linux 1. Log on as the user who installed the secure browser and close any open secure browsers.
2. Open a terminal and delete the contents of the following folders:
/home/username/.air
/home/username/.mozilla
where username is the user account where the secure browser is installed. (Keep the .air/
and .mozilla/ directories, just delete their contents.)
3. Restart the secure browser.

User Support
February 2016 2015–16 CAASPP Secure Browser Installation Manual 31 Customization Copyright © 2016 by the California Department of Education
Appendix C. User Support Local educational agency (LEA) California Assessment of Student Performance and Progress (CAASPP) coordinators should first contact your LEA technology coordinator or system administrator prior to contacting the California Technical Assistance Center (CalTAC).
Technology coordinators and CAASPP test site coordinators should contact their LEA CAASPP coordinators for assistance.
California Technical Assistance Center for LEA CAASPP Coordinators If you must contact CalTAC, you will be asked to provide as much detail as possible about the issue(s) you encountered.
CalTAC
Hours: 7 a.m. to 5 p.m., Monday–Friday
Toll-Free Phone Support: 800-955-2954
E-mail Support: [email protected]
Web site: http://www.caaspp.org
Always include the following information:
Test administrator or test examiner name and IT/network contact person and contact information
Statewide Student Identifier(s) of affected students
Results ID for the affected student tests
Operating system and secure browser version information
Any error messages and codes that appeared, if applicable
Information about your network configuration:
– Secure browser installation (to individual devices or network)
– Wired or wireless Internet network setup
Warning: Never provide any other student information, as doing so may violate Family Educational Rights and Privacy Act policies.