30357070a 11/1/2018 11:52 am - schema st4 pdf engine - layout by victor mahler density ... ·...
TRANSCRIPT

Density Kitfor Precision Balances XPR, XSR, XPE, XP, XS
Refe
renc
e M
anua
l
30357070A 11/1/2018 11:52 AM - Schema ST4 PDF engine - Layout by Victor Mahler

This Reference Manual provides information to handle the instrument in a safe and efficient manner.Personnel must have carefully read and understood this manual before performing any tasks.
Additional languages available online
u www.mt.com/Density-Kit-precision-RM
3Density Kit

1 IntroductionThank you for choosing a METTLER TOLEDO density kit.
The density kit allows you to determine the density of solids and liquids. The kit is compatible with XPR, XSR,XPE, XP, XS precision balances 0.1 mg and 1 mg.
Purpose of this documentThis document explains how to work with the density kit. It provides the procedure for performing a density deter-mination manually as well as instructions on the density determination software. If you need information onoperating your balance, please refer to the "Reference Manual (RM)" of your balance.
Finding more informationu www.mt.com/lab-accessories
u www.mt.com/library
Conventions and symbolsKey and/or button designations and display texts are shown in graphic or bold text, e.g., , Edit.
Refers to an external document.
Elements of instructions§ Prerequisites
1 Steps2 ...
ð Intermediate resultsð Results
Introduction4 Density Kit
2 Safety InformationOnly use the accessory according to this "Reference Manual" and the "Reference Manual" of the main instrument.If you do not use the accessory according to both documents or if it is modified, the safety of the main instrumentmay be impaired and Mettler-Toledo GmbH assumes no liability.
2.1 Definition of signal warning symbolsSafety notes are marked with signal words and warning symbols. These show safety issues and warnings.Ignoring the safety notes may lead to personal injury, damage to the instrument, malfunctions and false results.
Signal wordsNOTICE A hazardous situation with low risk, resulting in damage to the instrument, other material
damage, malfunctions and erroneous results, or loss of data.
Warning symbolsNotice
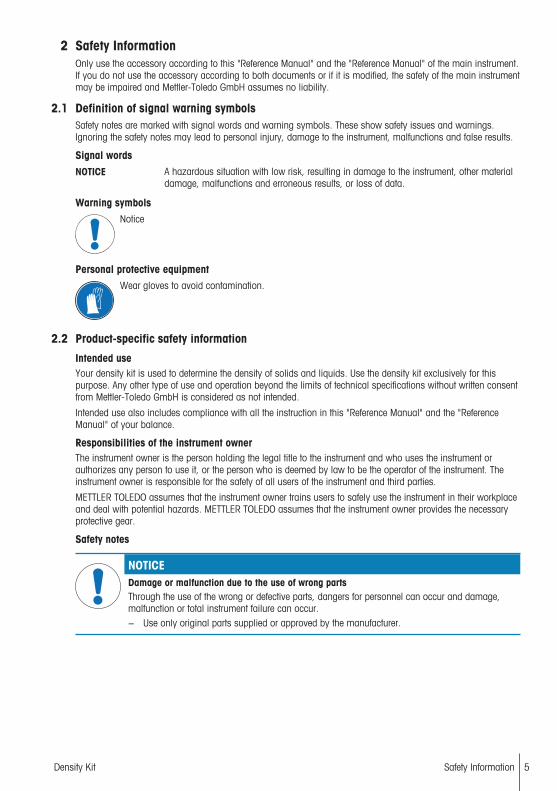
Personal protective equipmentWear gloves to avoid contamination.
2.2 Product-specific safety information
Intended useYour density kit is used to determine the density of solids and liquids. Use the density kit exclusively for thispurpose. Any other type of use and operation beyond the limits of technical specifications without written consentfrom Mettler-Toledo GmbH is considered as not intended.
Intended use also includes compliance with all the instruction in this "Reference Manual" and the "ReferenceManual" of your balance.
Responsibilities of the instrument ownerThe instrument owner is the person holding the legal title to the instrument and who uses the instrument orauthorizes any person to use it, or the person who is deemed by law to be the operator of the instrument. Theinstrument owner is responsible for the safety of all users of the instrument and third parties.
METTLER TOLEDO assumes that the instrument owner trains users to safely use the instrument in their workplaceand deal with potential hazards. METTLER TOLEDO assumes that the instrument owner provides the necessaryprotective gear.
Safety notes
NOTICEDamage or malfunction due to the use of wrong partsThrough the use of the wrong or defective parts, dangers for personnel can occur and damage,malfunction or total instrument failure can occur.− Use only original parts supplied or approved by the manufacturer.
Safety Information 5Density Kit
3 Installation and putting into operation
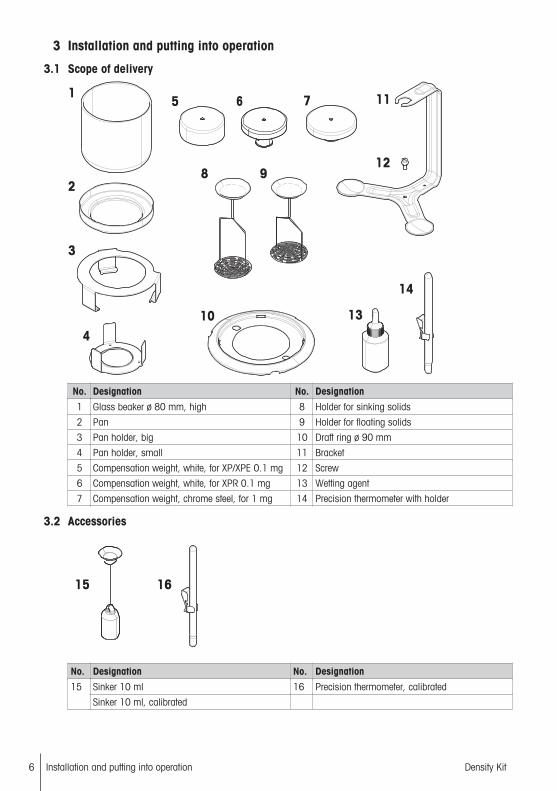
3.1 Scope of delivery
11
22
33
44
55 66 77
88 99
1010
1111
1212
1313
1414
No. Designation No. Designation
1 Glass beaker ø 80 mm, high 8 Holder for sinking solids
2 Pan 9 Holder for floating solids
3 Pan holder, big 10 Draft ring ø 90 mm
4 Pan holder, small 11 Bracket
5 Compensation weight, white, for XP/XPE 0.1 mg 12 Screw
6 Compensation weight, white, for XPR 0.1 mg 13 Wetting agent
7 Compensation weight, chrome steel, for 1 mg 14 Precision thermometer with holder
3.2 Accessories
1515 1616
No. Designation No. Designation
15 Sinker 10 ml 16 Precision thermometer, calibrated
Sinker 10 ml, calibrated
Installation and putting into operation6 Density Kit
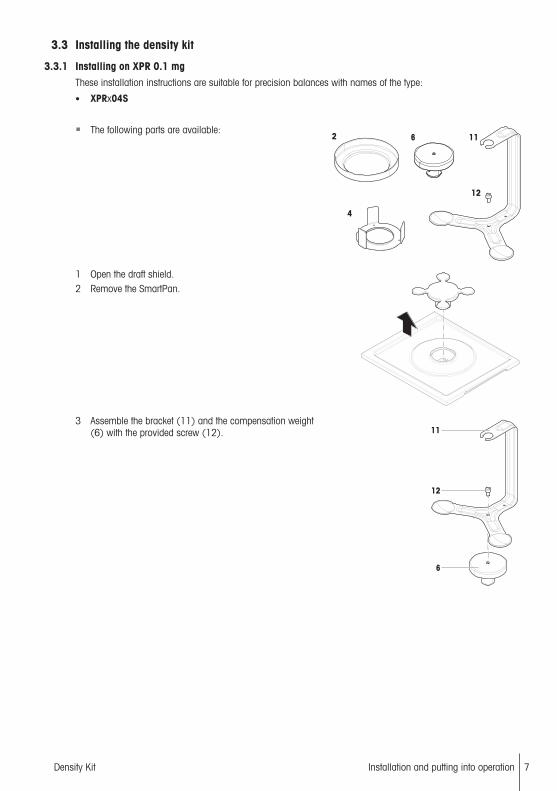
3.3 Installing the density kit
3.3.1 Installing on XPR 0.1 mgThese installation instructions are suitable for precision balances with names of the type:
• XPRx04S
22
44
66 1111
1212
§ The following parts are available:
1 Open the draft shield.2 Remove the SmartPan.
66
1111
1212
3 Assemble the bracket (11) and the compensation weight(6) with the provided screw (12).
Installation and putting into operation 7Density Kit

44
22
4 Place the pan holder (4) on the drip tray plate.5 Install the compensation weight and bracket on the
weighing cell.6 Place the pan (2) on top of the pan holder (4). The pan
should not touch the bracket nor the screw.ð To operate the density kit, refer to the section "Operation".
Installation and putting into operation8 Density Kit
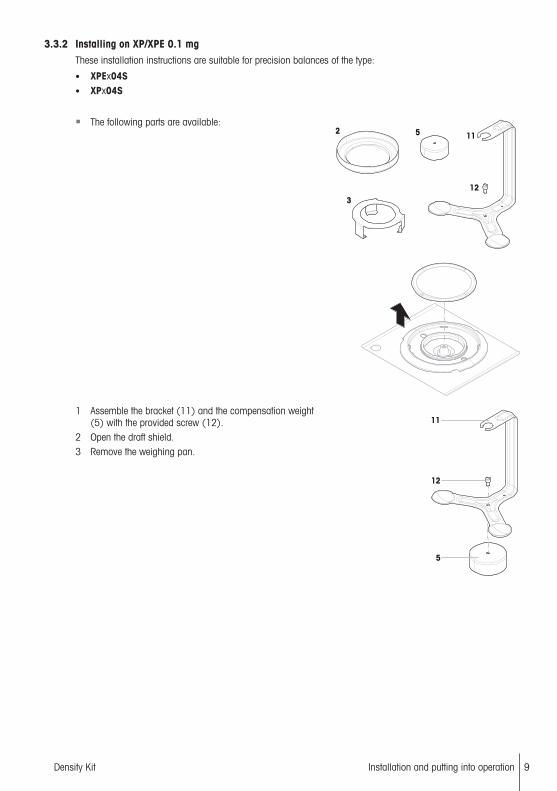
3.3.2 Installing on XP/XPE 0.1 mgThese installation instructions are suitable for precision balances of the type:
• XPEx04S• XPx04S
221111
1212
33
55
§ The following parts are available:
1111
1212
55
1 Assemble the bracket (11) and the compensation weight(5) with the provided screw (12).
2 Open the draft shield.3 Remove the weighing pan.
Installation and putting into operation 9Density Kit
22
33
1010
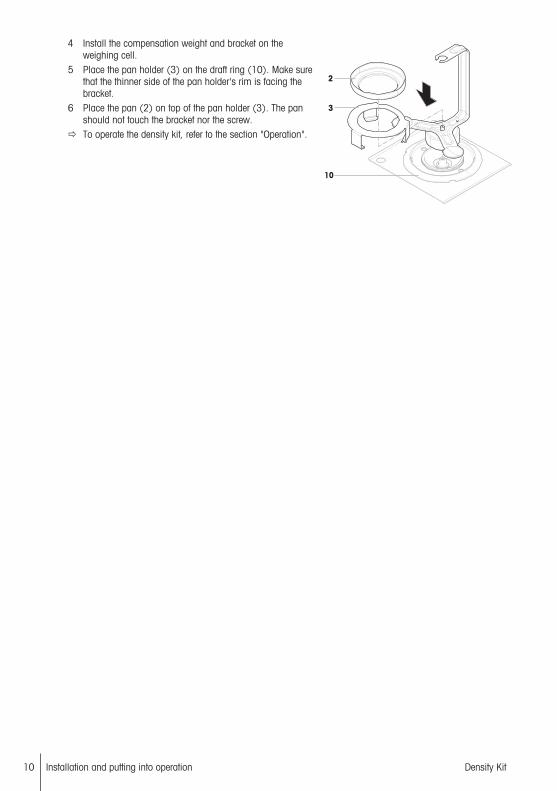
4 Install the compensation weight and bracket on theweighing cell.
5 Place the pan holder (3) on the draft ring (10). Make surethat the thinner side of the pan holder's rim is facing thebracket.
6 Place the pan (2) on top of the pan holder (3). The panshould not touch the bracket nor the screw.
ð To operate the density kit, refer to the section "Operation".
Installation and putting into operation10 Density Kit

3.3.3 Installing on XSR/XPR/XS/XPE 1 mg with SmartPanThese installation instructions are suitable for precision balances with names of the type:
• XSRxx03S and XSRxx03SN• XPRxx03S and XPRxx03SN• XPExx03S and XPExx03SN with SmartPan• XSxx03S and XSxx03SN with SmartPan, from SNR B543000000 on
22
44
1111
1212
77§ The following parts are available:
1 Open the draft shield, if applicable.2 Remove the SmartPan and weighing pan (if applicable).
1111
1212
77
3 Assemble the bracket (11) and the compensation weight(7) with the provided screw (12).
Installation and putting into operation 11Density Kit

44
22
4 Place the pan holder (4) on the drip tray plate.5 Install the compensation weight and bracket on the
weighing cell.6 Place the pan (2) on top of the pan holder (4). The pan
should not touch the bracket nor the screw.ð To operate the density kit, refer to the section "Operation".
Installation and putting into operation12 Density Kit

3.3.4 Installing on XP/XPE/XS 1 mg with standard panThese installation instructions are suitable for precision balances with names of the type:
• XPxx03S• XPExx03S• XSxx03S with traditional pan, up to SNR B542999999
22
1111
1212
33
1010
77
§ The following parts are available:
1 Open the draft shield, if applicable.2 Remove the weighing pan and support pan.
1111
1212
77
3 Assemble the bracket (11) and the compensation weight(7) with the provided screw (12).
Installation and putting into operation 13Density Kit

22
33
1010
4 Place the draft ring (10) on the balance plate, aligning theholes of the draft ring with the pins of the balance plate.
5 Install the compensation weight and bracket on theweighing cell.
6 Place the pan holder (3) on the draft ring (10). Make surethat the thinner side of the pan holder's rim is facing thebracket.
7 Place the pan (2) on top of the pan holder (3). The panshould not touch the bracket nor the screw.
ð To operate the density kit, refer to the section "Operation".
Installation and putting into operation14 Density Kit

4 OperationThis section provides theoretical and practical information about how to determine the density of solids andliquids using the density kit. It also includes recommendations to improve the results' accuracy and precision.Depending on your balance model and software version, the main operation steps and necessary calculationsmight be implemented in the balance software; follow the instructions from the wizard for support.
For full information, always consult and download the Reference Manual (RM).
4.1 Principle of density determinationThe density ρ is the quotient of the mass m and the volume V.
The international system of units specifies kg/m3 as the unit ofdensity. However, the unit g/cm3 is better suited to laboratorypurposes.
Density determinations are frequently performed by Archimedes'principle, which is also used with this density kit. Archimedes'principle states that a body immersed partially or fully in fluidexperiences a buoyant force acting upwards on it. Themagnitude of this force is equivalent to the weight of the fluiddisplaced by the body.
The procedure for the density determination by Archimedes'principle depends on whether the density of solids or liquids hasto be determined.
Density:
=
V
mρ
4.1.1 Density determination of solids
The density of a solid is determined with the aid of a liquid whosedensity ρ0 is known. Water or ethanol are frequently usually usedas auxiliary liquids. The solid is weighed in air (A) and then in theauxiliary liquid (B). The density ρ can be calculated from the twoweighing results.
Density:
(ρ0 - ρ
L)+ ρ
L ρ =
A-B
A
Volume:
V =ρ
0 - ρ
L
A-Bα
Legend
A Weight of sample in air
B Weight of sample in the auxiliary liquid
ρ Density of sample
ρ0 Density of auxiliary liquid
ρL Density of air (0.0012 g/cm3)
α Balance correction factor (0.99985). It takes air buoyancy of the adjustment weight(s) into account.
Operation 15Density Kit
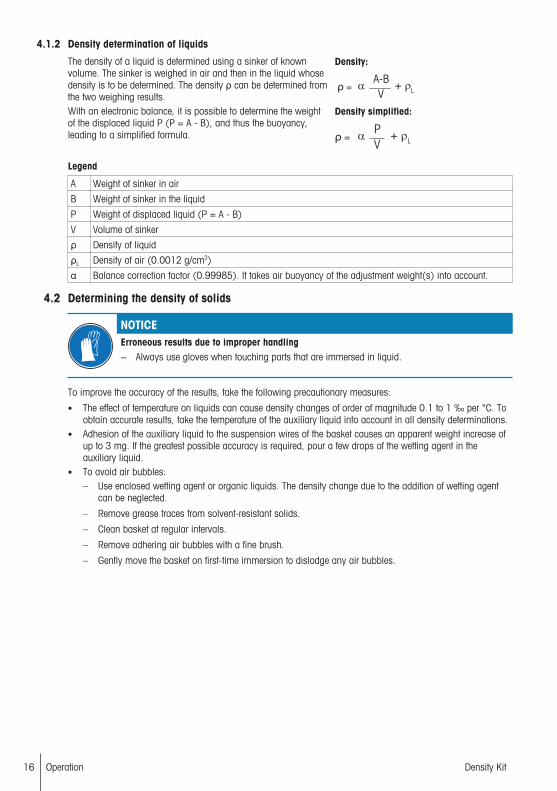
4.1.2 Density determination of liquids
The density of a liquid is determined using a sinker of knownvolume. The sinker is weighed in air and then in the liquid whosedensity is to be determined. The density ρ can be determined fromthe two weighing results.
Density:
ρ = + ρLV
A-Bα
With an electronic balance, it is possible to determine the weightof the displaced liquid P (P = A - B), and thus the buoyancy,leading to a simplified formula.
Density simplified:
ρ = + ρLV
Pα
Legend
A Weight of sinker in air
B Weight of sinker in the liquid
P Weight of displaced liquid (P = A - B)
V Volume of sinker
ρ Density of liquid
ρL Density of air (0.0012 g/cm3)
α Balance correction factor (0.99985). It takes air buoyancy of the adjustment weight(s) into account.
4.2 Determining the density of solids
NOTICEErroneous results due to improper handling− Always use gloves when touching parts that are immersed in liquid.
To improve the accuracy of the results, take the following precautionary measures:
• The effect of temperature on liquids can cause density changes of order of magnitude 0.1 to 1 ‰ per °C. Toobtain accurate results, take the temperature of the auxiliary liquid into account in all density determinations.
• Adhesion of the auxiliary liquid to the suspension wires of the basket causes an apparent weight increase ofup to 3 mg. If the greatest possible accuracy is required, pour a few drops of the wetting agent in theauxiliary liquid.
• To avoid air bubbles:– Use enclosed wetting agent or organic liquids. The density change due to the addition of wetting agent
can be neglected.
– Remove grease traces from solvent-resistant solids.
– Clean basket at regular intervals.
– Remove adhering air bubbles with a fine brush.
– Gently move the basket on first-time immersion to dislodge any air bubbles.
Operation16 Density Kit

Preparing the density kit§ The draft shield doors are closed (if applicable).
22
33
11
44
55
1 Tap to zero the balance.2 Open the draft shield.3 Attach the supplied thermometer (1) to the beaker (2) and
place the beaker on the pan (3).4 Fill the beaker with the auxiliary liquid. Add enough liquid
to ensure that the solid is covered by at least 1 cm of liquidafter immersion.
5 Hang the holder (4) for floating or sinking solids on thebracket (5). Make sure that no air bubbles adhere to theimmersed part of the holder. Remove air bubbles by eithermoving the holder or by using a fine brush.
66
6 For floating solids: If the buoyancy of the solid is greaterthan the weight of the holder, the holder must be weightedby placing an additional weight (6) on the top weighingpan of the holder. This additional weight must remain ontop of the weighing pan during the entire procedure.
7 Close the draft shield.8 Tap to tare the balance.
Operation 17Density Kit
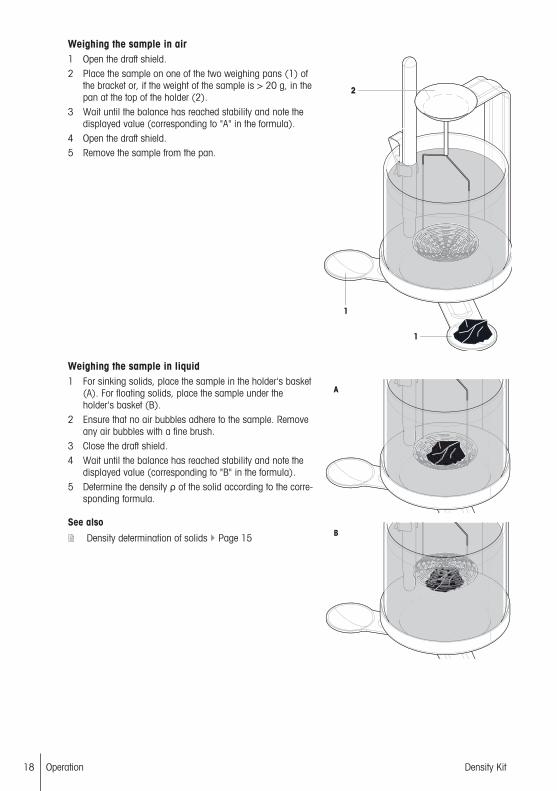
Weighing the sample in air
11
22
11
1 Open the draft shield.2 Place the sample on one of the two weighing pans (1) of
the bracket or, if the weight of the sample is > 20 g, in thepan at the top of the holder (2).
3 Wait until the balance has reached stability and note thedisplayed value (corresponding to "A" in the formula).
4 Open the draft shield.5 Remove the sample from the pan.
Weighing the sample in liquid
B
AA1 For sinking solids, place the sample in the holder's basket
(A). For floating solids, place the sample under theholder's basket (B).
2 Ensure that no air bubbles adhere to the sample. Removeany air bubbles with a fine brush.
3 Close the draft shield.4 Wait until the balance has reached stability and note the
displayed value (corresponding to "B" in the formula).5 Determine the density ρ of the solid according to the corre-
sponding formula.
See also
2 Density determination of solids } Page 15
Operation18 Density Kit
4.3 Determining the density of liquids
NOTICEErroneous results due to improper handling− Always use gloves when touching parts that are immersed in liquid.
To avoid air bubbles, take the following precautionary measures:
• Use enclosed wetting agent or organic liquids. The density change due to the addition of wetting agent canbe neglected.
• Remove grease traces from solvent-resistant solids.• Clean sinker at regular intervals.• Gently move sinker on first-time immersion to dislodge any air bubbles.• Remove adhering air bubbles with a fine brush.
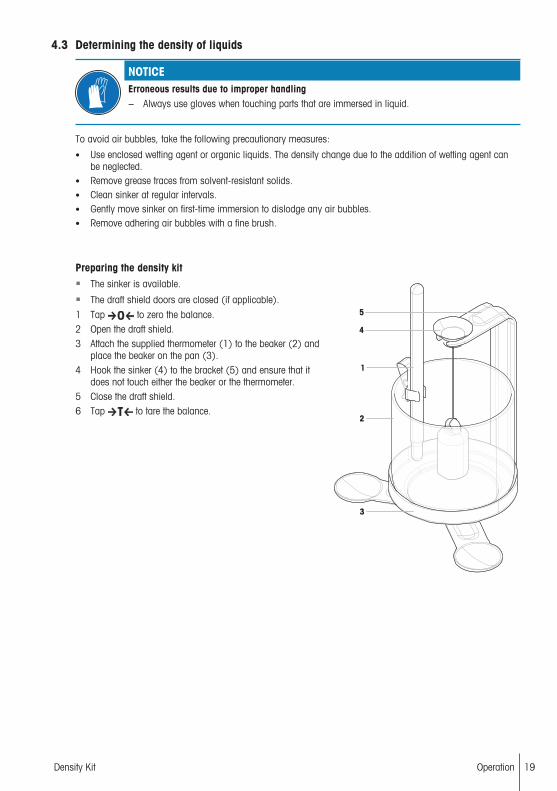
Preparing the density kit
22
33
11
44
55
§ The sinker is available.
§ The draft shield doors are closed (if applicable).
1 Tap to zero the balance.2 Open the draft shield.3 Attach the supplied thermometer (1) to the beaker (2) and
place the beaker on the pan (3).4 Hook the sinker (4) to the bracket (5) and ensure that it
does not touch either the beaker or the thermometer.5 Close the draft shield.6 Tap to tare the balance.
Operation 19Density Kit
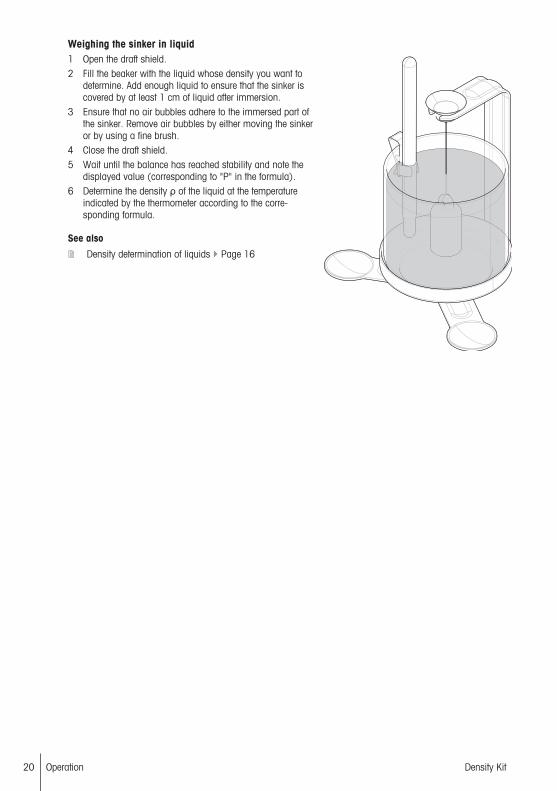
Weighing the sinker in liquid1 Open the draft shield.2 Fill the beaker with the liquid whose density you want to
determine. Add enough liquid to ensure that the sinker iscovered by at least 1 cm of liquid after immersion.
3 Ensure that no air bubbles adhere to the immersed part ofthe sinker. Remove air bubbles by either moving the sinkeror by using a fine brush.
4 Close the draft shield.5 Wait until the balance has reached stability and note the
displayed value (corresponding to "P" in the formula).6 Determine the density ρ of the liquid at the temperature
indicated by the thermometer according to the corre-sponding formula.
See also
2 Density determination of liquids } Page 16
Operation20 Density Kit

5 Technical Data
5.1 WiresWire of holder Wire of sinker 10 ml
Material Stainless steel PlatinumDiameter 0.6 mm 0.2 mm
5.2 Sinker 10 ml• The nominal volume of the sinker is 10.00 cm3 with a tolerance of ±0.5 %.• The calibrated volume of the sinker is available in the calibration certificate (measurement uncertainty of
±0.05 %).• Using the nominal volume of the sinker, i.e., 10.00 cm3, for the density determination of water at a
temperature of 20 °C leads to a maximum error of ±0.5 %, i.e., ±0.005 g/cm3.• Using the calibrated volume of the sinker for the density calculation contributes to the uncertainty of the
density value by ±0.05 %.• When the sinker is immersed under 10 mm of liquid, the additional immersed volume of wire is 0.001 cm3.
5.3 Density of distilled waterT/ °C 0 0.1 0.2 0.3 0.4 0.5 0.6 0.7 0.8 0.9
10 0.99970 0.99969 0.99968 0.99967 0.99966 0.99965 0.99964 0.99963 0.99962 0.99961
11 0.99960 0.99959 0.99958 0.99957 0.99956 0.99955 0.99954 0.99953 0.99952 0.99951
12 0.99950 0.99949 0.99947 0.99946 0.99945 0.99944 0.99943 0.99941 0.99940 0.99939
13 0.99938 0.99936 0.99935 0.99934 0.99933 0.99931 0.99930 0.99929 0.99927 0.99926
14 0.99924 0.99923 0.99922 0.99920 0.99919 0.99917 0.99916 0.99914 0.99913 0.99911
15 0.99910 0.99908 0.99907 0.99905 0.99904 0.99902 0.99901 0.99899 0.99897 0.99896
16 0.99894 0.99893 0.99891 0.99889 0.99888 0.99886 0.99884 0.99883 0.99881 0.99879
17 0.99877 0.99876 0.99874 0.99872 0.99870 0.99869 0.99867 0.99865 0.99863 0.99861
18 0.99859 0.99858 0.99856 0.99854 0.99852 0.99850 0.99848 0.99846 0.99844 0.99842
19 0.99840 0.99838 0.99836 0.99835 0.99833 0.99831 0.99828 0.99826 0.99824 0.99822
20 0.99820 0.99818 0.99816 0.99814 0.99812 0.99810 0.99808 0.99806 0.99803 0.99801
21 0.99799 0.99797 0.99795 0.99793 0.99790 0.99788 0.99786 0.99784 0.99781 0.99779
22 0.99777 0.99775 0.99772 0.99770 0.99768 0.99765 0.99763 0.99761 0.99758 0.99756
23 0.99754 0.99751 0.99749 0.99747 0.99744 0.99742 0.99739 0.99737 0.99734 0.99732
24 0.99730 0.99727 0.99725 0.99722 0.99720 0.99717 0.99715 0.99712 0.99709 0.99707
25 0.99704 0.99702 0.99699 0.99697 0.99694 0.99691 0.99689 0.99686 0.99684 0.99681
26 0.99678 0.99676 0.99673 0.99670 0.99667 0.99665 0.99662 0.99659 0.99657 0.99654
27 0.99651 0.99648 0.99646 0.99643 0.99640 0.99637 0.99634 0.99632 0.99629 0.99626
28 0.99623 0.99620 0.99617 0.99615 0.99612 0.99609 0.99606 0.99603 0.99600 0.99597
29 0.99594 0.99591 0.99588 0.99585 0.99582 0.99579 0.99577 0.99574 0.99571 0.99568
30 0.99564 0.99561 0.99558 0.99555 0.99552 0.99549 0.99546 0.99543 0.99540 0.99537
ISO 15212-1:1998 Oscillation-type density meters – Part 1: Laboratory instruments
Technical Data 21Density Kit

6 Spare Parts and Accessories11
22
33 4455
66
7788, 99 1010, 1111
Order no. Designation Remarks
1 11142289 Glass beaker ø 80 mm, high –
2 238164 Pan –
3 238175 Holder for sinking solids –
4 238173 Holder for floating solids –
5 11132682 Compensation weight, white, for XP/XPE0.1 mg
–
6 11131531 Draft ring ø 90 mm –
7 72409 Wetting agent –
8 210260 Sinker 10 ml –
9 210672 Sinker 10 ml, calibrated –
10 238767 Precision thermometer with holder –
11 11132685 Precision thermometer, calibrated –
Spare Parts and Accessories22 Density Kit


Mettler-Toledo GmbHIm Langacher 448606 Greifensee, Switzerlandwww.mt.com/contact
Subject to technical changes.© Mettler-Toledo GmbH 11/201830357070A en
For more informationwww.mt.com/lab-accessories
30357070
30357070A 11/1/2018 11:52 AM - Schema ST4 PDF engine - Layout by Victor Mahler