331-354 chrysler hemi - vintage air354 chrysler hemi compressor/alternator bracket kit (151007)...
TRANSCRIPT

331-354 Chrysler Hemi Compressor/Alternator Bracket Kit
(151007)
Fits:331 Hemi (1955)354 Hemi (1956)
18865 Goll St. San Antonio, TX 78266 Phone: 210-654-7171
Fax: 210-654-3113www.vintageair.com
903408 REV B 03/24/16, PG 1 OF 9

2 903408 REV B 03/24/16, PG 2 OF 9
www.vintageair.comTM
Bracket Systems
Table of ContentsCover................................................................................................................................Table of Contents..............................................................................................................Packing List/Parts Disclaimer.............................................................................................Engine Compartment Disassembly, Mounting Bracket Assembly Installation....................Compressor Installation...................................................................................................Alternator Installation......................................................................................................Alternator Rear Mounting Bracket Installation.................................................................Crankshaft Pulley Installation, Belt Routing, Compressor Warnings.................................Packing List......................................................................................................................
1 2 3 4 5 6 7 8 9
NOTE: To install this kit, the following additional parts are required:
Compressor — 04807-VUAAlternator — 042916

3 903408 REV B 03/24/16, PG 3 OF 9
www.vintageair.comTM
Bracket Systems
No. Qty. Part No. Description
1.2.3.4.
Bracket Assembly, Compressor/AlternatorBracket, Alternator, RearPulley, Crankshaft, CoatedHardware Kit, Compressor/Alternator
1111
151008151009733109191031
354 Chrysler HemiCompressor/Alternator Bracket Kit (151007)
Packing List:
1
NOTE: Images may not depict actual parts and quantities. Refer to packing list for actual parts and quantities.
2
43
** Before beginning installation, open all packages and check contents of shipment. Please report any shortages directly to Vintage Air within 15 days. After 15 days, Vintage Air will not be responsible for missing or damaged items.

4 903408 REV B 03/24/16, PG 4 OF 9
www.vintageair.comTM
Bracket Systems
Remove all belts.
Remove generator and mounting bracket.
Remove engine cooling fan (retain hardware).
Remove crankshaft pulley and install new crankshaft pulley (Vintage Air Part #733109) with OEM hardware.
Remove upper and lower driver side cylinder head water pump mounting bolts.
Remove lower most driver side engine block water pump mounting bolt.
Engine Compartment Disassembly
1.
2.
3.
4.
5.
6.
Perform the Following:
NOTE: Before starting the installation, check the function of the vehicle (horn, lights, etc.) for properoperation, and study the instructions, illustrations, & diagrams.
Mounting Bracket Assembly Installation1. Install compressor/alternator mounting bracket assembly onto engine using appropriate hardware as shown below.
NOTE: Before tightening bolts, assemble all brackets loosely to engine. This will ensure proper alignment of all brackets.
Driver Side Cylinder HeadUpper Water Pump
Mounting Hole
Driver Side Cylinder HeadLower Water Pump
Mounting Hole
Driver Side Engine BlockLower Water Pump
Mounting Hole
.990 LengthSteel Spacer
3/8-16 x 4 ¾”Bolt
3/8-16 x 3 ¾”Hex Bolt
3/8-16 x 5 ¼”Hex Bolt
Compressor/AlternatorBracket Assembly
151008
3/8” Lock Washer
3/8” Lock Washer

5 903408 REV B 03/24/16, PG 5 OF 9
www.vintageair.comTM
Bracket Systems
NOTE: Before tightening bolts, assemble all brackets loosely to engine. This will ensure proper alignment of all brackets.
Compressor Installation1. Install compressor onto compressor/alternator mounting bracket assembly using appropriate hardware as shown below.
Compressor/AlternatorBracket Assembly
151008
Compressor/AlternatorBracket Assembly
151008
3/8-16 x 1 ½”Hex Bolt
3/8-16 x 1 ½”Hex Bolt
.063 LengthSpacer
.063 LengthSpacer
.063 LengthSpacer
.063 LengthSpacer
(2) 3/8” Flat Washers
(2) 3/8” Flat Washers
.125 LengthSteel Spacer
.125 LengthSteel Spacer
.990 LengthSteel Spacer
.990 LengthSteel Spacer
3/8-16 x 2 ½”Hex Bolt
3/8-16 x 2 ½”Hex Bolt
Compressor
Compressor
(2) 3/8” Locknut
(2) 3/8” Locknut

6 903408 REV B 03/24/16, PG 6 OF 9
www.vintageair.comTM
Bracket Systems
NOTE: Before tightening bolts, assemble all brackets loosely to engine. This will ensure proper alignment of all brackets.
Alternator Installation1. Using appropriate hardware, install alternator onto compressor/alternator mounting bracket assembly as shown below.
Compressor/AlternatorBracket Assembly
151008
Compressor/AlternatorBracket Assembly
151008
3/8-16 x 3 ¼”Hex Bolt
35 mm LengthHex Bolt
.063 LengthSpacer
.063 LengthSpacer
.400 LengthSteel Spacer
.400 LengthSteel Spacer
5/16” Flat Washer
3/8” Locknut
Alternator

7 903408 REV B 03/24/16, PG 7 OF 9
www.vintageair.comTM
Bracket Systems
NOTE: Before tightening bolts, assemble all brackets loosely to engine. This will ensure proper alignment of all brackets.
AlternatorRear Mounting Bracket Installation
1. Using appropriate hardware, install alternator rear mounting bracket onto alternator as shown below.
Alternator
3/8” LengthSteel Spacer
5/16” Flat Washer
25 mm LengthHex Bolt
.990 LengthSteel Spacer
This Mounting Provision Ison the Back Side of the
Water Pump at the Thermostat
Alternator RearMounting Bracket
151009
Alternator RearMounting Bracket
151009
3/8” Flat Washer
3/8-16 x 1 ¾”Hex Bolt
NOTE: Due to various intake manifold configurations and water neck designs, some grinding in this area may be required in order to attain sufficient clearance.
8 903408 REV B 03/24/16, PG 8 OF 9
www.vintageair.comTM
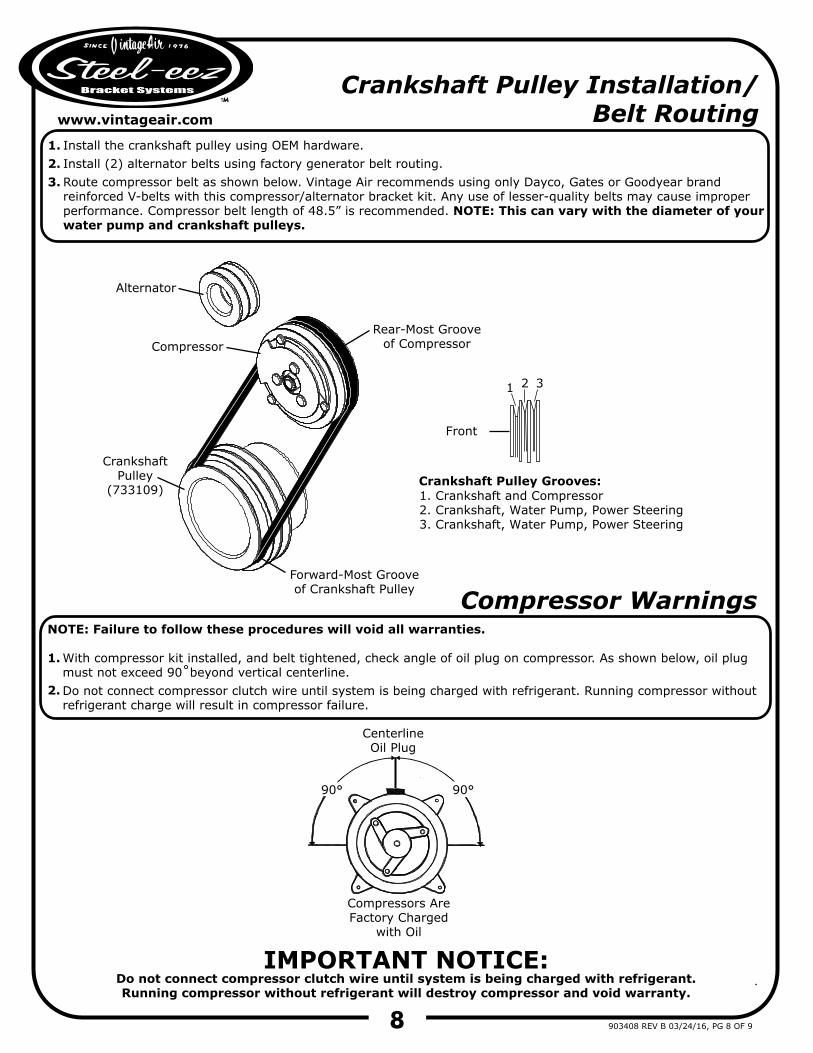
Bracket Systems Crankshaft Pulley Installation/Belt Routing
1.2.3.
Install the crankshaft pulley using OEM hardware.Install (2) alternator belts using factory generator belt routing.Route compressor belt as shown below. Vintage Air recommends using only Dayco, Gates or Goodyear brandreinforced V-belts with this compressor/alternator bracket kit. Any use of lesser-quality belts may cause improperperformance. Compressor belt length of 48.5” is recommended. NOTE: This can vary with the diameter of yourwater pump and crankshaft pulleys.
Alternator
CompressorRear-Most Groove
of Compressor
Forward-Most Grooveof Crankshaft Pulley
CrankshaftPulley
(733109)Crankshaft Pulley Grooves:
Front
1. Crankshaft and Compressor2. Crankshaft, Water Pump, Power Steering3. Crankshaft, Water Pump, Power Steering
1 2 3
Compressor WarningsNOTE: Failure to follow these procedures will void all warranties.
1.
2.
With compressor kit installed, and belt tightened, check angle of oil plug on compressor. As shown below, oil plug must not exceed 90˚beyond vertical centerline.Do not connect compressor clutch wire until system is being charged with refrigerant. Running compressor without refrigerant charge will result in compressor failure.
CenterlineOil Plug
IMPORTANT NOTICE:Do not connect compressor clutch wire until system is being charged with refrigerant.Running compressor without refrigerant will destroy compressor and void warranty.
Compressors AreFactory Charged
with Oil
90° 90°


903408 REV B 03/24/16, PG 9 OF 9
www.vintageair.comTM
Bracket Systems
1 2
43
No. Qty. Part No. Description
1.2.3.4.
Checked By:Packed By:
Date:
Bracket Assembly, Compressor/AlternatorBracket, Alternator, RearPulley, Crankshaft, CoatedHardware Kit, Compressor/Alternator
1111
151008151009733109191031
354 Chrysler HemiCompressor/Alternator Bracket Kit (151007)
Packing List:
NOTE: Images may not depict actual parts and quantities. Refer to packing list for actual parts and quantities.