36ft floor plans
TRANSCRIPT
Dome Deck Methods Erecting the dome on a pre-existing deck can be problematic. Please contact us if you plan to do so. Also contact us if your dome has a pre-hung door placement that may require modifications to the deck outline. Our shelter domes are designed with a hem that connects to the side of a raised deck, below the floor level. We suggest the following options for building decks to interface with our shelter dome hem:
1. Portable “Pie Piece” or “Star” Method The portable “Pie Piece” (16’, 20’, and 24’) and “Star” (30’ and 36’) methods allow the deck to be disassembled in sections and moved easily. You can take it apart, load it up and move it all in a day’s work. It costs a little more than the joist method and is more complex to build.
2. Stationary Joist Method This method requires less time and materials to build than the portable methods. We recommend a joist deck for people that don’t expect to move their dome. You can make this method semi-portable by using screws instead of nails.
3. Perimeter Boards We recommend this method for domes with earthen floors. The perimeter board will anchor your dome and keep the fabric off the ground. You can also use the perimeter board as a mold to lay tiles or pour concrete. Concrete floors can be painted beautifully. Coat the concrete with marine varnish for easy cleaning. If perimeter boards are used as forms for concrete, we recommend using pressure-treated, rot-resistant wood, and leaving the boards in place to receive the shelter hem. 16-penny, galvanized nails started into the inside of the perimeter boards will secure the boards to the slab.
36 ft. Dome Floor – Star Method
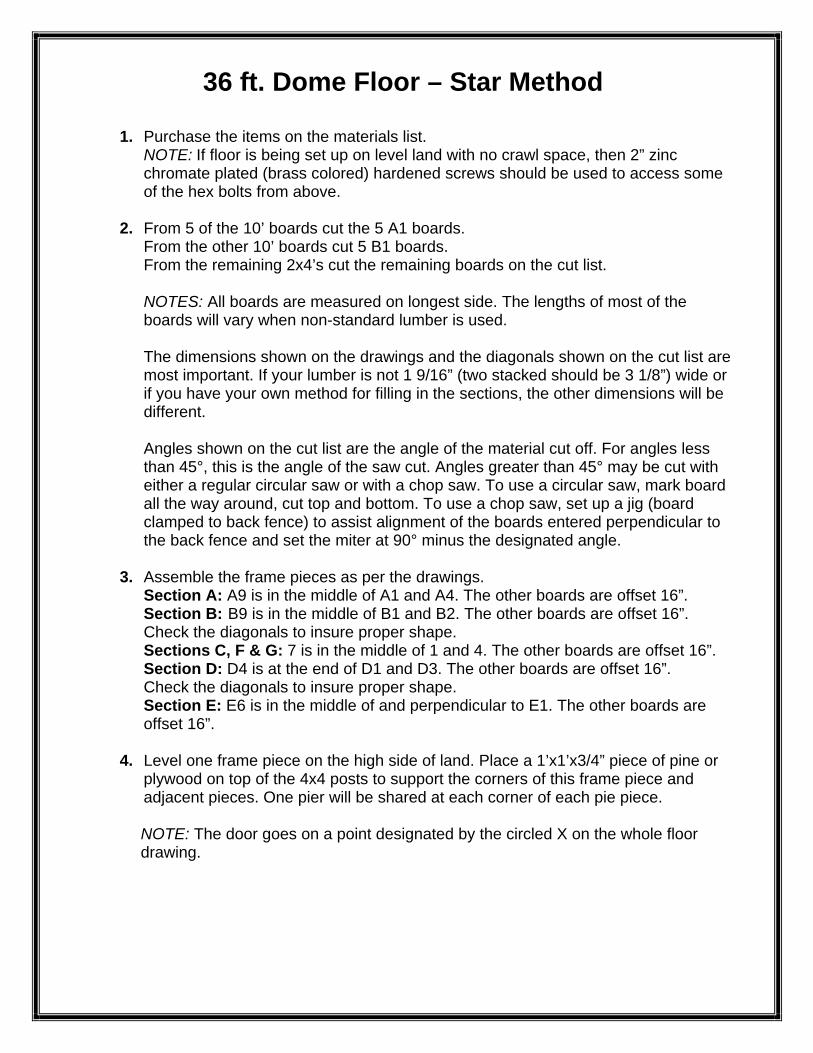
1. Purchase the items on the materials list. NOTE: If floor is being set up on level land with no crawl space, then 2” zinc chromate plated (brass colored) hardened screws should be used to access some of the hex bolts from above.
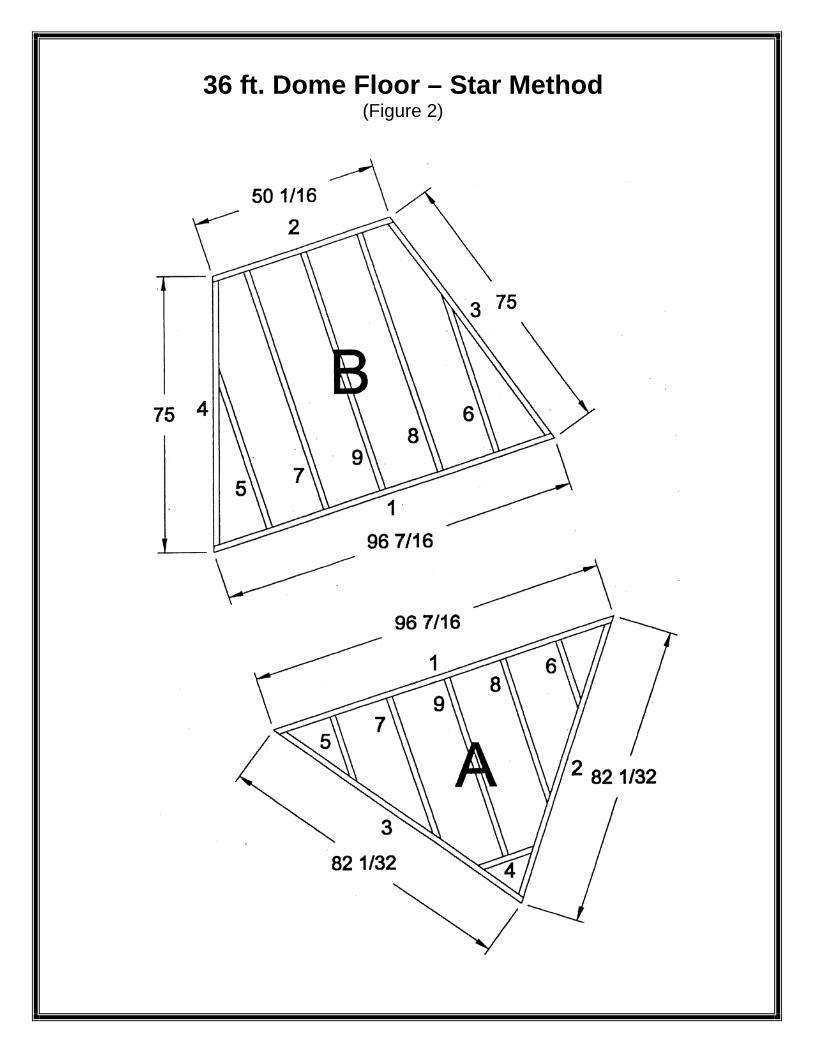
2. From 5 of the 10’ boards cut the 5 A1 boards. From the other 10’ boards cut 5 B1 boards. From the remaining 2x4’s cut the remaining boards on the cut list. NOTES: All boards are measured on longest side. The lengths of most of the boards will vary when non-standard lumber is used. The dimensions shown on the drawings and the diagonals shown on the cut list are most important. If your lumber is not 1 9/16” (two stacked should be 3 1/8”) wide or if you have your own method for filling in the sections, the other dimensions will be different. Angles shown on the cut list are the angle of the material cut off. For angles less than 45°, this is the angle of the saw cut. Angles greater than 45° may be cut with either a regular circular saw or with a chop saw. To use a circular saw, mark board all the way around, cut top and bottom. To use a chop saw, set up a jig (board clamped to back fence) to assist alignment of the boards entered perpendicular to the back fence and set the miter at 90° minus the designated angle.
3. Assemble the frame pieces as per the drawings.
Section A: A9 is in the middle of A1 and A4. The other boards are offset 16”. Section B: B9 is in the middle of B1 and B2. The other boards are offset 16”. Check the diagonals to insure proper shape. Sections C, F & G: 7 is in the middle of 1 and 4. The other boards are offset 16”. Section D: D4 is at the end of D1 and D3. The other boards are offset 16”. Check the diagonals to insure proper shape. Section E: E6 is in the middle of and perpendicular to E1. The other boards are offset 16”.
4. Level one frame piece on the high side of land. Place a 1’x1’x3/4” piece of pine or plywood on top of the 4x4 posts to support the corners of this frame piece and adjacent pieces. One pier will be shared at each corner of each pie piece.
NOTE: The door goes on a point designated by the circled X on the whole floor drawing.

36 Foot Dome Floor - Star Method
Frame Cut List
Length Angle 1 Angle 2 Length Angle 1 Angle 2 Section A, quantity = 5 Section D, quantity = 10
A1 96 7/16 36 36 D1 68 3/32 0 13 A2 78 7/16 36 18 D2 72 21/32 13 0 A3 80 3/32 36 18 D3 53 1/4 0 12.5 A4 16 36 36 D4 59 11/16 12.5 0 A5 19 5/32 0 54 D5 63 1/4 0 12.5 A6 19 5/32 0 54 D6 66 13/16 0 12.5 A7 41 3/16 0 54 D7 70 3/8 0 12.5 A8 41 3/16 0 54 Diagonal 92 9/16 A9 51 1/8 0 0 Diagonal 90 5/32
Section B, quantity = 5 Section E, quantity = 10 B1 96 7/16 18 18 E1 53 13/32 14.5 14.5 B2 51 3/32 18 18 E2 71 25/32 14.5 50.5 B3 71 23/32 18 18 E3 79 9/32 14.5 50.5 B4 71 23/32 18 18 E4 19 21/32 0 65 B5 45 11/16 0 72 E5 35 3/4 0 75.5 B6 45 11/16 0 72 E6 53 7/8 0 65 B7 68 7/32 0 0 Section F, quantity = 10 B8 68 7/32 0 0 F1 68 3/32 27 27 B9 68 7/32 0 0 F2 71 5/16 27 36
Diagonal 102 1/4 F3 73 1/4 27 36 Section C, quantity = 5 F4 16 27 27
C1 50 1/16 18 18 F5 31 15/16 0 63 C2 76 23/32 18 54 F6 31 15/16 0 63 C3 79 3/8 18 4 F7 46 1/8 0 0 C4 16 18 18 Section G, quantity = 5 C5 23 19/32 0 72 G1 56 1/2 27 27 C6 23 19/32 0 72 G2 58 13/16 27 36 C7 45 13/16 0 0 G3 60 3/4 27 36
G4 16 27 27 Material List G5 20 23/32 0 63
Qty. Item G6 20 23/32 0 63 10 2" x 4" x 10' fir G7 34 31/32 0 0
210 2" x 4" x 8' fir 1 50# box of 16d galvanized box nails 46 Pier blocks A/R 4" x 4" cedar, redwood or pressure treated fir 140 5/16" x 3-1/2" long hex bolts 140 5/16" hex nuts 280 5/16" flat washers
1000+ Square feet of suitable decking A/R Fasteners for decking 5 Gallons exterior varnish
All lengths are shown for the long side of the board and assume standard width (1-9/16") lumber. Angles shown are the angle of the material cut off. For angles less than 45°, this is the angle of the saw settings
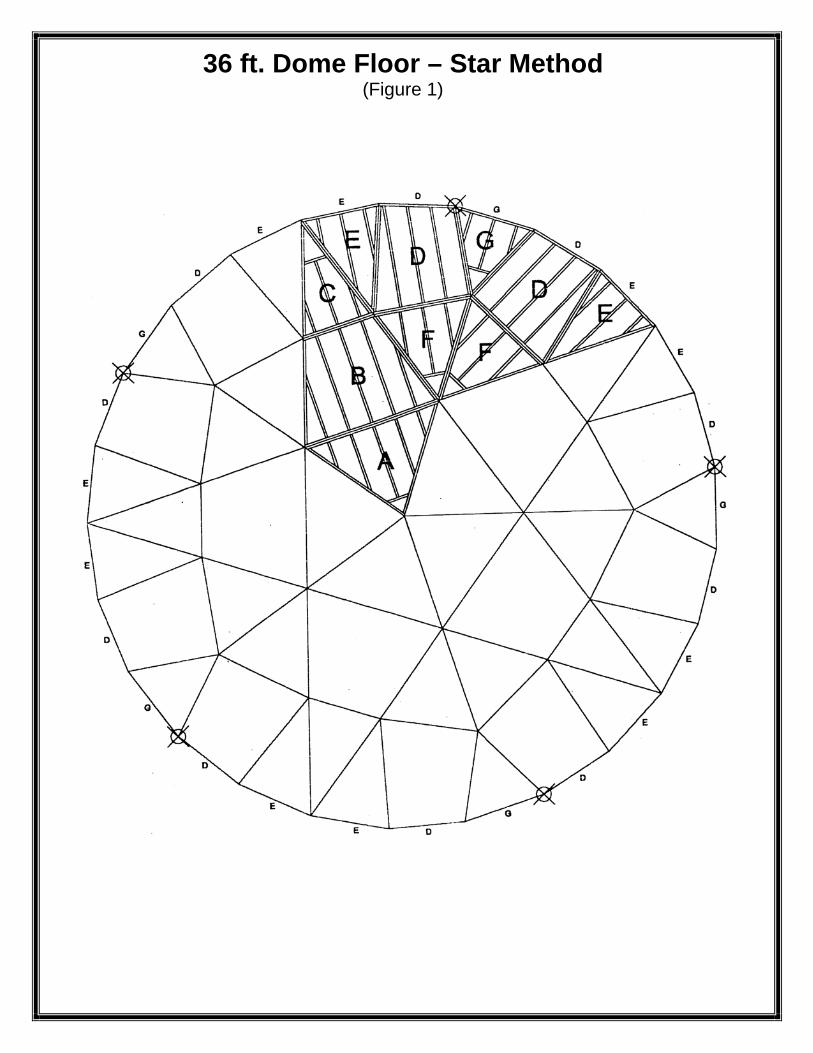
36 ft. Dome Floor – Star Method (Figure 1)
36 ft. Dome Floor – Star Method
(Figure 2)

36 ft. Dome Floor – Star Method
(Figure 3)

36 ft. Dome Floor – Star Method
(Figure 4)
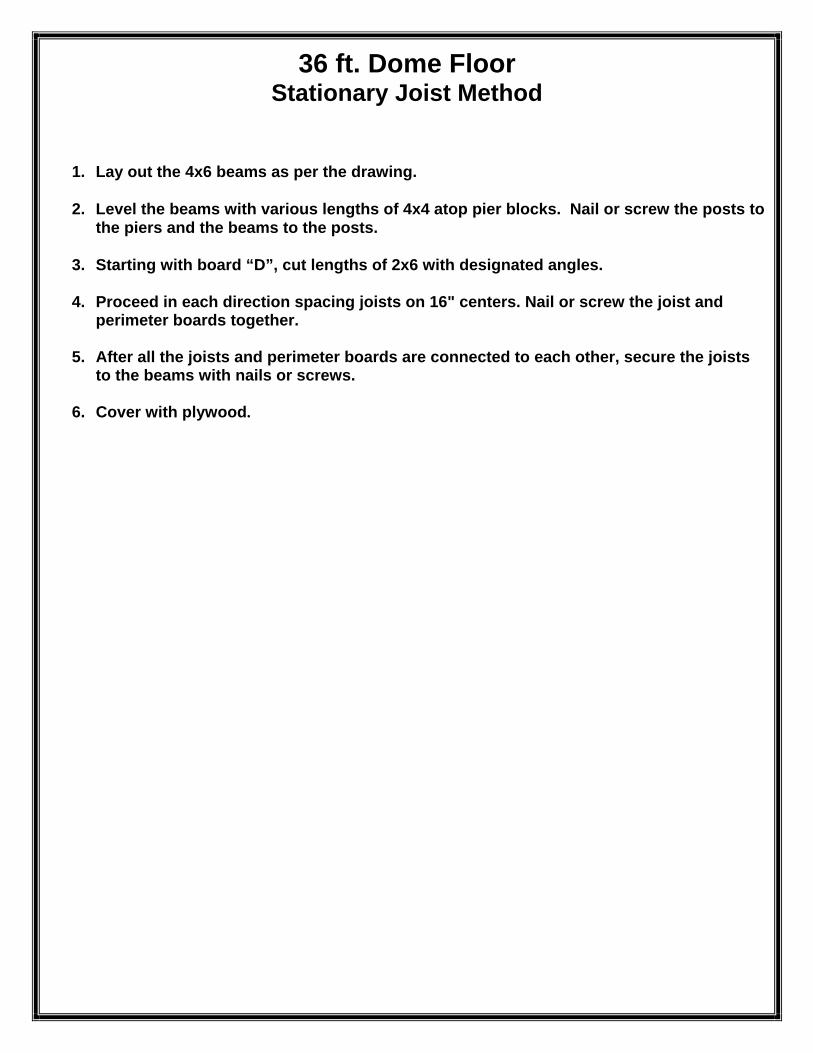
36 ft. Dome Floor Stationary Joist Method
1. Lay out the 4x6 beams as per the drawing.
2. Level the beams with various lengths of 4x4 atop pier blocks. Nail or screw the posts to the piers and the beams to the posts.
3. Starting with board “D”, cut lengths of 2x6 with designated angles.
4. Proceed in each direction spacing joists on 16" centers. Nail or screw the joist and
perimeter boards together.
5. After all the joists and perimeter boards are connected to each other, secure the joists to the beams with nails or screws.
6. Cover with plywood.

36ft. Dome Floor Joist Method
Material List
Qty. Item 42 Wood-topped pier blocks
A/R* 4” x 4” 7 4” x 6” x 20ft. 3 4” x 6” x 16ft. 2 4” x 6” x 10ft. 5 2” x 6” x 12ft. 18 2” x 6” x 16ft. 29 2” x 6” x 20ft. 13 2” x 6” x 10ft.
50# 16d galvanized box nails 50# 8d galvanized nails 36 ¾” plywood
*As Required
All 2” x 6” Boards
Qty. Board Letter Cut From Length Angle
10 D 5 – 10’ 53 1/16” 7.2° 10 E 5 – 10’ 53 9/16” 7.2° 1 F 1 – 20’ 240” 0° 5 G 3 – 10’ 56 11/16” 7.2° 2 H 2 – 16’ 147 3/4” 65° & 72° 2 I 2 – 20’ 216 7/16” 65° & 72° 2 J 2 – 12’ 130” 51° 2 K 2 – 16’ 149 1/2” 51° 2 L 2 – 16’ 163” 36° 2 M 2 – 16’ 174 5/8” 36° 2 N 2 – 16’ 186 1/4” 36° 2 O 2 – 20’ 193” 21° 2 P 2 – 20’ 199 1/4” 21° 2 Q 2 – 20’ 205 1/2” 21° 2 R 2 – 20’ 208 1/8” 7° 2 S 2 – 20’ 210 1/8” 7° 2 T 2 – 20’ 212 1/8” 7° 1 FF 1 – 12’ 126 7/16” 0° 2 JJ 2 – 12’ 131 5/8” 57° 2 KK 2 – 16’ 148 5/16” 43° 2 LL 2 – 16’ 163 5/16” 43° 2 MM 2 – 16’ 175 13/16” 29° 2 NN 2 – 16’ 184 5/8” 29° 2 OO 2 – 20’ 193 7/16” 29° 2 PP 2 – 20’ 199 15/16” 15° 2 QQ 2 – 20’ 204 1/8” 15° 2 RR 2 – 20’ 208 5/16” 15° 4 SS 4 – 20’ 211 3/16” 0°

--
/
~--\.
I ,
n
n
U
U
U
U
\I
\
A
,/'
\
,/'
-60-1 \
<
\
I-'
'
n
n
n
n
U
A
U
U
U
U '
I
B
\, 2
4
T \
-- n
n
n
n
n\
I
, U
A
U
U
U
C
,
i U
U
\I
1
24
\
I I
1- 5
8 -1
--
n
4 P
L
I 3681i
rn
U
I
A U
+
I
U
U
U'
C
7#
16
Y
CE
NT
ER
P
OIN
T
I
\ 2
5
56
-1- 7
2 -1
n
n
6 P
L
6 P
L
1 I
\ n
n
n
U
U
I U
\
C
U
A
U
u/
i
I
\, (-51-1-
74
-1 \
n 4
PL
6
PL
,//
n
n
U
I
I
B
U
U
A
U
/
\
,/'
k5
4-
1
6 P
L
,/'
n
n /
PIE
RS
&
B
EA
MS
u
A
u
JOIS
T
PE
RIM
ET
ER
S
HO
WN
IN
P
HA
NT
OM
\..
_/-
1
- ~
~
-


Cob Floors For Domes *Use in conjunction with our wooden perimeter plans
General Info. Cob is a natural building material made from clay, sand, straw and water. Cob is an inexpensive alternative to wood or cement. Cob floors have an earthy and organic feel and can often be made from materials already available. Siting and designing a cob floor: Choose a site for a cob floor at the top of a small rise or ridge where water will flow away from your dome. If your ground is sloped, you might consider having a multi-leveled floor. A multi-leveled floor can help define different areas, by stepping or gently sloping the cob-floor cold air can be directed, like water, to the lowest point. In some climates it is possible to use this method for cold storage, even instead of a refrigerator. Yet you should plan for your finished floor to be at least two inches above the ground. Temperature: The temperature in the ground below the frost line is the same as the average yearly air temperature. This temperature is constant throughout the year. If this is a comfortable temperature, you can build your cob floor directly on the ground, and your floor will stay approximately the same temperature as the average air temperature. If the ground temperature is really cold, you may need to insulate underneath and around the edge of the floor. This will reduce the time it takes for heat from the sun or wood stove to reflect back into your space. You can get information from your local builders and building department about the optimum thickness of your cob floor and how deep the insulation should be. (Pretend its concrete as they probably wont understand cob yet.) Passive solar: By facing your bay window to the south/southeast, you can optimize your floor’s ability to gather heat from the sun in the winter. Cob floors have plenty of thermal mass and can effectively store this energy. Cob can also be used to make benches and wood stoves, which will increase thermal mass generated by your living space. Radiant floor heating systems: Running hot water through pipes that are buried in the floor makes radiant floor heating systems. The water can be heated with a modified wood stove or a conventional water heat. This system is compatible with earthen and wood floors. If you choose this method, plan for the cob to be thick enough to cover the hot water pipes. You can find detailed information about radiant floor heating on the Internet.
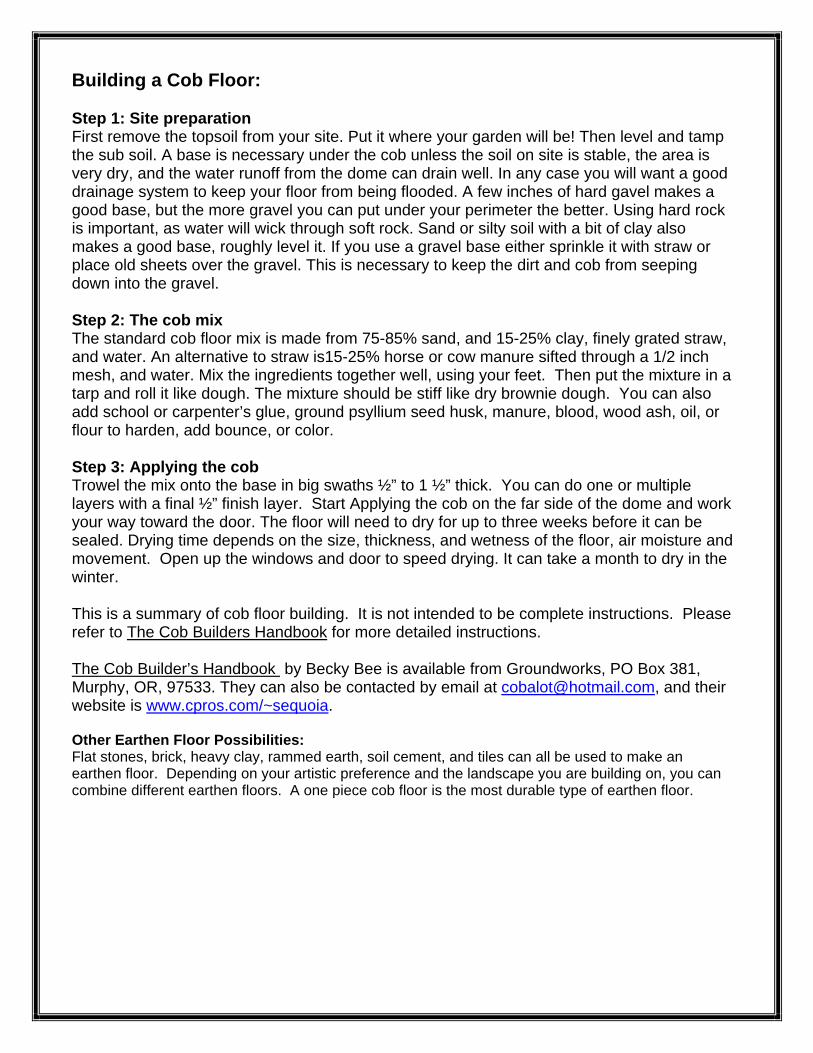
Building a Cob Floor: Step 1: Site preparation First remove the topsoil from your site. Put it where your garden will be! Then level and tamp the sub soil. A base is necessary under the cob unless the soil on site is stable, the area is very dry, and the water runoff from the dome can drain well. In any case you will want a good drainage system to keep your floor from being flooded. A few inches of hard gavel makes a good base, but the more gravel you can put under your perimeter the better. Using hard rock is important, as water will wick through soft rock. Sand or silty soil with a bit of clay also makes a good base, roughly level it. If you use a gravel base either sprinkle it with straw or place old sheets over the gravel. This is necessary to keep the dirt and cob from seeping down into the gravel. Step 2: The cob mix The standard cob floor mix is made from 75-85% sand, and 15-25% clay, finely grated straw, and water. An alternative to straw is15-25% horse or cow manure sifted through a 1/2 inch mesh, and water. Mix the ingredients together well, using your feet. Then put the mixture in a tarp and roll it like dough. The mixture should be stiff like dry brownie dough. You can also add school or carpenter’s glue, ground psyllium seed husk, manure, blood, wood ash, oil, or flour to harden, add bounce, or color. Step 3: Applying the cob Trowel the mix onto the base in big swaths ½” to 1 ½” thick. You can do one or multiple layers with a final ½” finish layer. Start Applying the cob on the far side of the dome and work your way toward the door. The floor will need to dry for up to three weeks before it can be sealed. Drying time depends on the size, thickness, and wetness of the floor, air moisture and movement. Open up the windows and door to speed drying. It can take a month to dry in the winter. This is a summary of cob floor building. It is not intended to be complete instructions. Please refer to The Cob Builders Handbook for more detailed instructions. The Cob Builder’s Handbook by Becky Bee is available from Groundworks, PO Box 381, Murphy, OR, 97533. They can also be contacted by email at [email protected], and their website is www.cpros.com/~sequoia. Other Earthen Floor Possibilities: Flat stones, brick, heavy clay, rammed earth, soil cement, and tiles can all be used to make an earthen floor. Depending on your artistic preference and the landscape you are building on, you can combine different earthen floors. A one piece cob floor is the most durable type of earthen floor.