4-h driving manual (pnw 229) - cooperative extension
TRANSCRIPT

4-H Driving Manual
PNW 229A Pacific Northwest Extension PublicationOregon State University • Washington State University • University of Idaho

2 4-H Driving Manual, PNW 229
The 4-H Driving Manual was developed and written by the Pacific Northwest (PNW) 4-H Driving Publication Committee. The team was led by Erika Thiel, 4-H program coordinator, University of Idaho. Oregon members are Roberta Lundeberg, program coordinator, 4-H youth development, Oregon State University; and Connie Mobley, Peggy Ashford, and Rennie Squier. Washington members are Jerry Newman, Extension 4-H youth development specialist; Jennifer Leach, Extension 4-H youth county faculty and interim 4-H state equine specialist, Washington State University; and Pat Pehling, Washington State 4-H Equine Advisory Committee. Committee member from Idaho is Carrie Stark, 4-H youth development specialist, University of Idaho.
This manual was adapted from 4-H Horse and Pony Driving Manual (PNW 229) and Harness Driving Manual and Rules for Washington State (EM4881).For corrections or changes to this publication, contact:
Idaho University of Idaho, 4-H Youth DevelopmentP.O. Box 443015, Continuing Education Building, 206,
Moscow, ID 83844-3015Phone 208/885-2156; Fax 208/885-4637
Oregon Oregon State University, 4-H Youth Development State
Office105 Ballard Extension Hall, Corvallis, OR 97331-3608Phone 541/737-2421; Fax 541/737-1332
Washington Washington State University, 4-H Youth Development,
Equine Advisory CommitteeHulbert Hall #323, P.O. Box 646236, Pullman, WA 99164-
6236Phone 509/335-2800; Fax 509/335-2808
Approved changes are forwarded to the Pacific Northwest (PNW) 4-H Horse Management Team for review and final decision.
Use this 4-H Driving Manual as you learn how to train your animal, fit the harness properly, and drive your animal safely. The manual outlines one of several accepted ways of training. See “For More Information” (page 27) for other publications that can help you continue to expand your knowledge.
4-H members can use the 4-H Driving Manual to train any equine to drive. For simplicity’s sake, the manual uses the word “horse” to stand for all equines.
Words that appear in the text in small caps are found in the Glossary.
Introduction
Publication ordersOregon State University Extension Servicehttp://extension.oregonstate.eduFax 541-737-0817Phone 541-737-2513
University of Idaho Extensionhttp://info.ag.uidaho.eduFax 208-885-4648Phone 208-885-7982
Washington State University Extensionhttp://pubs.wsu.eduFax 509-335-3006Toll-free 1-800-723-1763
Driving is a valuable training option for light horses, draft horses, ponies, donkeys, mules, or miniature horses. For example, when a 4-H member grows too large to ride a pony, he or she can learn to drive it. A full-size young horse can be driven before it’s physically ready for riding, which shortens training time and gives it experience. A mature riding horse’s value increases if it can also pull a cart.
For driving, you need a vehicle and harness. Vehicles and harnesses are available in several price ranges through tack stores or catalogs. The driver, horse, vehicle, and harness together are referred to as the turnout.

4-H Driving Manual, PNW 229 3
ContentsI. Turnout . . . . . . . . . . . . . . . . . . . . . . . . . . . . . . . . . . . . . . . . 4
A. Attire . . . . . . . . . . . . . . . . . . . . . . . . . . . . . . . . . . . . . . . . . 4B. Vehicle . . . . . . . . . . . . . . . . . . . . . . . . . . . . . . . . . . . . . . . 4C. Harness . . . . . . . . . . . . . . . . . . . . . . . . . . . . . . . . . . . . . . . 5D. Bridle parts and adjustments . . . . . . . . . . . . . . . . . . . . . . . 8E. Bits . . . . . . . . . . . . . . . . . . . . . . . . . . . . . . . . . . . . . . . . . . 9F. Collars . . . . . . . . . . . . . . . . . . . . . . . . . . . . . . . . . . . . . . . 11G. Whip . . . . . . . . . . . . . . . . . . . . . . . . . . . . . . . . . . . . . . . . 11H. Headers . . . . . . . . . . . . . . . . . . . . . . . . . . . . . . . . . . . . . . 11
II. Training . . . . . . . . . . . . . . . . . . . . . . . . . . . . . . . . . . . . . . 12A. Longe line and sacking out . . . . . . . . . . . . . . . . . . . . . . . 12B. Preparation for harnessing . . . . . . . . . . . . . . . . . . . . . . . 12C. Harnessing . . . . . . . . . . . . . . . . . . . . . . . . . . . . . . . . . . . 12D. Bridling . . . . . . . . . . . . . . . . . . . . . . . . . . . . . . . . . . . . . . 13E. Ground driving . . . . . . . . . . . . . . . . . . . . . . . . . . . . . . . . 13F. Training poles . . . . . . . . . . . . . . . . . . . . . . . . . . . . . . . . . 15G. Connecting the cart . . . . . . . . . . . . . . . . . . . . . . . . . . . . . 16H. Mounting the cart . . . . . . . . . . . . . . . . . . . . . . . . . . . . . . 17I. Training with the cart . . . . . . . . . . . . . . . . . . . . . . . . . . . . 17J. Unhitching/Unharnessing . . . . . . . . . . . . . . . . . . . . . . . . 18
III. Reinsmanship . . . . . . . . . . . . . . . . . . . . . . . . . . . . . . . . . . 19A. Driver position . . . . . . . . . . . . . . . . . . . . . . . . . . . . . . . . 19B. Holding the reins . . . . . . . . . . . . . . . . . . . . . . . . . . . . . . . 19C. Using the whip . . . . . . . . . . . . . . . . . . . . . . . . . . . . . . . . . 20
IV. Driving Safety . . . . . . . . . . . . . . . . . . . . . . . . . . . . . . . . . 21
V. Gaits . . . . . . . . . . . . . . . . . . . . . . . . . . . . . . . . . . . . . . . . 22
VI. Driving Classes . . . . . . . . . . . . . . . . . . . . . . . . . . . . . . . . 23A. Reinsmanship . . . . . . . . . . . . . . . . . . . . . . . . . . . . . . . . . 23B. Precision driving . . . . . . . . . . . . . . . . . . . . . . . . . . . . . . . 23C. Pleasure driving . . . . . . . . . . . . . . . . . . . . . . . . . . . . . . . 23D. Additional driving opportunities . . . . . . . . . . . . . . . . . . . 23
VII. Glossary . . . . . . . . . . . . . . . . . . . . . . . . . . . . . . . . . . . . 25
VIII. For More Information . . . . . . . . . . . . . . . . . . . . . . . . . . . 27

4 4-H Driving Manual, PNW 229
Entries may be penalized or disqualified for deviation from listed appointments.
A. AttireApproved headgear, riding boots or leather shoes,
gloves (color optional, but brown is traditional), and whip are required. Riding attire is acceptable. For more information on competition attire, please refer to the 4-H Horse Contest Guide (PNW 574).
B. VehicleA single animal hitched to an appropriate
two- or four-wheeled vehicle is allowed. Racing sulkies or roadster bikes are prohibited. In general, a horse should not be asked to pull more than its own weight, though this may vary with
I. Turnout
Two-wheeled, basket-type pleasure cart
Meadowbrook cart—the seats fold up and out to allow entrance from the back.
breed, conformation, and attitude. To determine the total load the animal is being asked to pull, combine the weight of the vehicle, the driver, and any passengers. Be aware, and do not stress your animal.
The vehicle must have a securely fastened footrest or basket, minimum 10 inches front to back (to help the driver maintain balance). For shorter children, you may need to attach another block securely as a foot brace. Smaller children may be bounced off if they cannot brace their feet. The basket must be built so the driver’s feet cannot get stuck.
ShaftsWhen choosing a vehicle, check the condition
of the shafts, their length, and the space between them. Shafts should be equipped with singletree
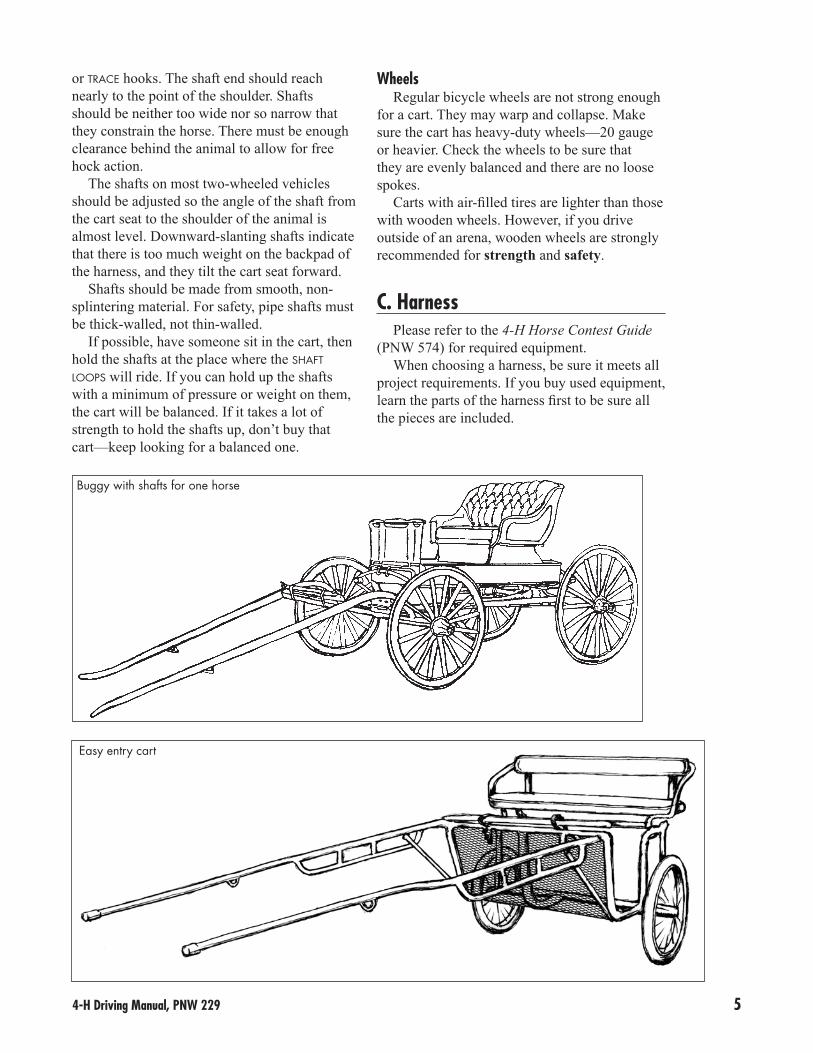
4-H Driving Manual, PNW 229 5
or trace hooks. The shaft end should reach nearly to the point of the shoulder. Shafts should be neither too wide nor so narrow that they constrain the horse. There must be enough clearance behind the animal to allow for free hock action.
The shafts on most two-wheeled vehicles should be adjusted so the angle of the shaft from the cart seat to the shoulder of the animal is almost level. Downward-slanting shafts indicate that there is too much weight on the backpad of the harness, and they tilt the cart seat forward.
Shafts should be made from smooth, non-splintering material. For safety, pipe shafts must be thick-walled, not thin-walled.
If possible, have someone sit in the cart, then hold the shafts at the place where the shaft loops will ride. If you can hold up the shafts with a minimum of pressure or weight on them, the cart will be balanced. If it takes a lot of strength to hold the shafts up, don’t buy that cart—keep looking for a balanced one.
Buggy with shafts for one horse
WheelsRegular bicycle wheels are not strong enough
for a cart. They may warp and collapse. Make sure the cart has heavy-duty wheels—20 gauge or heavier. Check the wheels to be sure that they are evenly balanced and there are no loose spokes.
Carts with air-filled tires are lighter than those with wooden wheels. However, if you drive outside of an arena, wooden wheels are strongly recommended for strength and safety.
C. HarnessPlease refer to the 4-H Horse Contest Guide
(PNW 574) for required equipment.When choosing a harness, be sure it meets all
project requirements. If you buy used equipment, learn the parts of the harness first to be sure all the pieces are included.
Easy entry cart
6 4-H Driving Manual, PNW 229
Harness construction and careHarnesses are constructed of several different
materials. The most common and traditional is leather. Modern synthetic harnesses are very well constructed and commonly used for combined driving. Nylon web harnesses tend to stretch and need constant readjustment; they are not recommended.
A quality leather harness is double-stitched on most parts. Make sure the leather is pliable and has sound stitching; if it’s dry or cracked, it will break. Check all points of stress, especially the bellyband, trace holes, and crupper. Don’t use twine or wire in place of leather straps, as it may be difficult to release an animal in an emergency.
You’ll need to clean a leather harness regularly, especially parts that get wet with sweat. Refer to the section on “Cleaning Tack” in The 4-H Horse Project (PNW 587).
Harnesses come in different sizes and styles. Choose the proper size for a horse or pony according to its height and breed type. Saddle makers can make minor alterations on a harness
to fit a particular animal. The harness must fit properly for comfort and good performance.
The harness should also be appropriate for the type of vehicle.
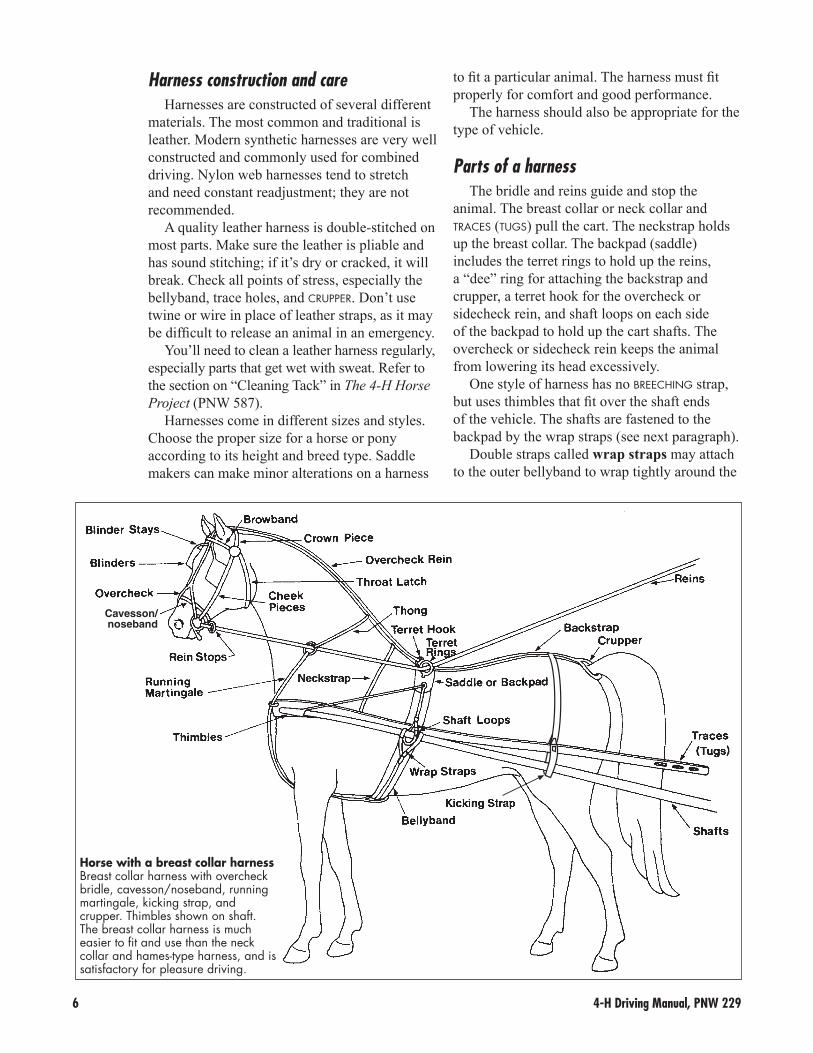
Parts of a harnessThe bridle and reins guide and stop the
animal. The breast collar or neck collar and traces (tugs) pull the cart. The neckstrap holds up the breast collar. The backpad (saddle) includes the terret rings to hold up the reins, a “dee” ring for attaching the backstrap and crupper, a terret hook for the overcheck or sidecheck rein, and shaft loops on each side of the backpad to hold up the cart shafts. The overcheck or sidecheck rein keeps the animal from lowering its head excessively.
One style of harness has no breeching strap, but uses thimbles that fit over the shaft ends of the vehicle. The shafts are fastened to the backpad by the wrap straps (see next paragraph).
Double straps called wrap straps may attach to the outer bellyband to wrap tightly around the
Horse with a breast collar harness Breast collar harness with overcheck bridle, cavesson/noseband, running martingale, kicking strap, and crupper. Thimbles shown on shaft. The breast collar harness is much easier to fit and use than the neck collar and hames-type harness, and is satisfactory for pleasure driving.
Cavesson/noseband

4-H Driving Manual, PNW 229 7
shafts. They keep the shafts from rising when the driver is mounting, and help hold back the cart when the breeching or thimbles are not used. The bellyband holds the backpad in place. The backstrap connects the backpad and crupper and supports the hip strap, breeching, and holdback straps on a breeching-type harness.
Use of either the breeching strap or thimbles is required as a safety measure.
The kicking strap is optional. It’s a strong piece of leather or other strap material with a buckle on each side to form an adjustable loop that wraps around the shafts. It goes through a keeper on the backstrap ahead of the crupper and prevents the animal from kicking or bucking. Adjust it so your fist fits under the strap on the animal’s back.
Breeching-type harnessThis type of driving harness includes a breeching
strap that goes around the hindquarters of the horse or pony. It stops the vehicle and holds it back when traveling downhill or when backing. A heavier vehicle or one driven cross-country requires a breeching-type harness.
Running martingaleA running martingale may be used only on the
driving snaffle rein for added safety and control. A horse with its nose up cannot be controlled—the running martingale prevents a horse from carrying its head too high. Adjust the martingale so that it doesn’t apply pressure when the head is in the proper position, but it exerts a downward force only if the horse raises its head. The martingale also allows the driver to put tremendous force on the bars of the mouth if necessary.
The running martingale is used only on a snaffle bit or a driving curb bit with the reins set to a snaffle position. The overcheck or sidecheck rein prevents the animal’s head from lowering. The action of the overcheck or sidecheck rein and the running martingale together give the driver the most control.
Be sure the martingale cannot catch on the shaft ends or slide over rein buckles. Add stops to the reins, or tie a leather thong or strap from ring to ring over the animal’s neck.
Collar and hames harness with sidecheck bridle and breeching
Cavesson/noseband

8 4-H Driving Manual, PNW 229
D. Bridle parts and adjustmentsWhile there are different styles of bridles used
in driving, the following parts should be included for 4-H.• Blinders—Do not drive an animal that is
hitched to a vehicle unless it is wearing blinders. Square or round blinders focus the animal’s attention on where it’s going and keep it from being distracted. If the animal sees the action of the cart wheels, it may become frightened. Blinders should be well cupped to give ample eye clearance.
• Blinder stays—Should turn the blinders out enough to provide adequate vision and be stiff enough to maintain position. The buckle in front of the crown piece and between the ears sets the distance of the blinders from the eyes. Let it down to open the blinders wider or tighten to bring the blinders closer to the head.
• Cheekstraps—Adjust so they center the blinder on the eyes, but don’t become slack when a cheekpiece or bearing rein is tightened. Adjust to hold the bit in the correct position.
• Browband—May be plain, embellished with metal to match the metal harness parts, or have colored leather to match the cavesson or saddle/backpad. Each end of the browband usually has a rosette of plain or decorated metal discs or of leather or silk to match the vehicle upholstery.
• Cavesson (noseband)—Snug, but not tight (allow one to two fingers of slack). A cavesson allows for greater adjustment and may match the browband. The cavesson may attach to or pass over or under the cheekpieces of the bridle (use over the cheekpieces to prevent the cheekpieces from popping away from the face if the reins are used strongly). A cavesson is required.
• Throatlatch—Functionally snug, yet comfortable when the horse’s head is collected. Should allow room for several fingers at the bottom.
• Face drop (optional)—A purely decorative piece of leather attached to the center buckle of the crown piece to hang straight down below the browband.
• Overcheck and sidecheck reins—Overcheck and sidecheck reins keep the animal from lowering its head. Either is optional.
The overcheck rein is the most common. The strap runs from the snaffle ring of the driving bit, or from the overcheck bit, up the face, between the ears, and down the crest of the neck to the backpad, attaching to the terret hook.
The sidecheck rein is one continuous strap and is less severe. It runs from the snaffle ring of the driving bit or overcheck bit through a sidecheck rein loop that hangs off each side of
the crownpiece of the bridle, attaches to the terret hook, through the opposite rein loop, and down to the snaffle ring on the off side of the animal.
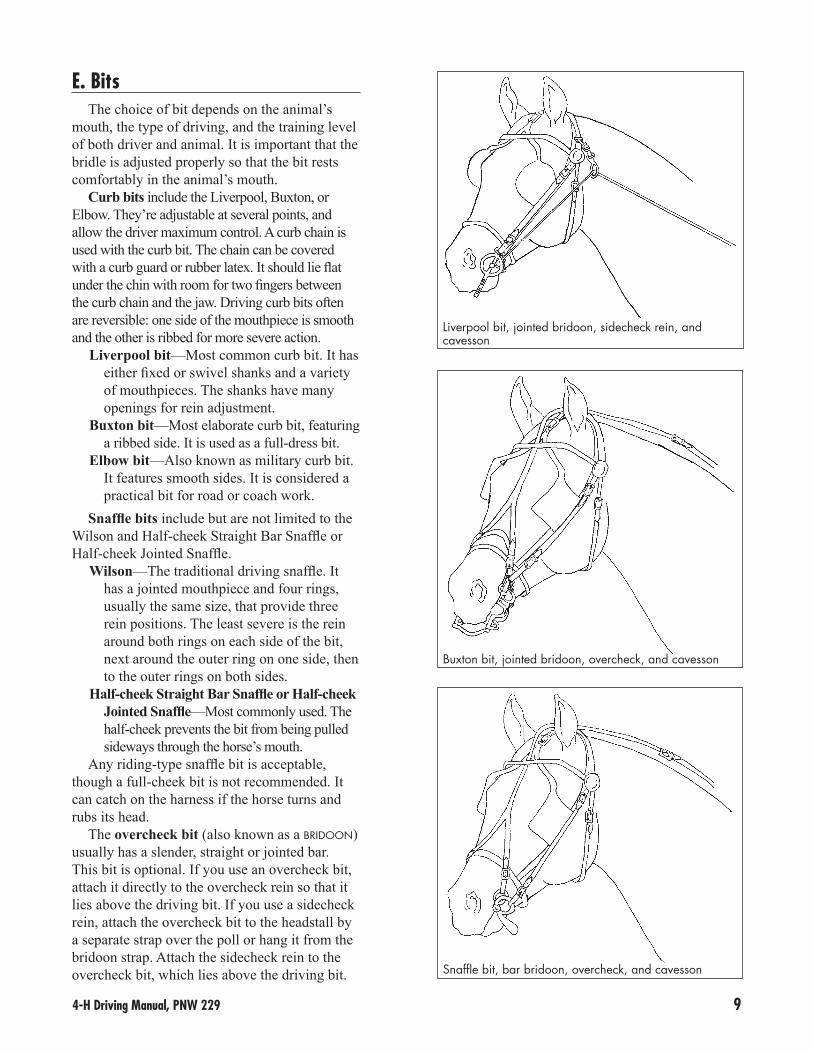
Head with bridle, cavesson, and overcheck
Parts of the driving bridle 1. Blinder 2. Blinder stay adjustment 3. Overcheck rein adjustment 4. Browband 5. Blinder adjustment 6. Throatlatch 7. Cheekpiece 8. Cavesson/noseband 9. Bit adjustment10. Driving snaffle11. Overcheck rein12. Crown piece
4-H Driving Manual, PNW 229 9
E. Bits The choice of bit depends on the animal’s
mouth, the type of driving, and the training level of both driver and animal. It is important that the bridle is adjusted properly so that the bit rests comfortably in the animal’s mouth.
Curb bits include the Liverpool, Buxton, or Elbow. They’re adjustable at several points, and allow the driver maximum control. A curb chain is used with the curb bit. The chain can be covered with a curb guard or rubber latex. It should lie flat under the chin with room for two fingers between the curb chain and the jaw. Driving curb bits often are reversible: one side of the mouthpiece is smooth and the other is ribbed for more severe action.
Liverpool bit—Most common curb bit. It has either fixed or swivel shanks and a variety of mouthpieces. The shanks have many openings for rein adjustment.
Buxton bit—Most elaborate curb bit, featuring a ribbed side. It is used as a full-dress bit.
Elbow bit—Also known as military curb bit. It features smooth sides. It is considered a practical bit for road or coach work.
Snaffle bits include but are not limited to the Wilson and Half-cheek Straight Bar Snaffle or Half-cheek Jointed Snaffle.
Wilson—The traditional driving snaffle. It has a jointed mouthpiece and four rings, usually the same size, that provide three rein positions. The least severe is the rein around both rings on each side of the bit, next around the outer ring on one side, then to the outer rings on both sides.
Half-cheek Straight Bar Snaffle or Half-cheek Jointed Snaffle—Most commonly used. The half-cheek prevents the bit from being pulled sideways through the horse’s mouth.
Any riding-type snaffle bit is acceptable, though a full-cheek bit is not recommended. It can catch on the harness if the horse turns and rubs its head.
The overcheck bit (also known as a bridoon) usually has a slender, straight or jointed bar. This bit is optional. If you use an overcheck bit, attach it directly to the overcheck rein so that it lies above the driving bit. If you use a sidecheck rein, attach the overcheck bit to the headstall by a separate strap over the poll or hang it from the bridoon strap. Attach the sidecheck rein to the overcheck bit, which lies above the driving bit. Snaffle bit, bar bridoon, overcheck, and cavesson
Buxton bit, jointed bridoon, overcheck, and cavesson
Liverpool bit, jointed bridoon, sidecheck rein, and cavesson

10 4-H Driving Manual, PNW 229
This bit works on the bars of the upper jaw and must be adjusted high enough so it won’t interfere with the driving bit’s action. When the driving bit has a jointed mouthpiece, the overcheck bit has a straight bar mouth. When the driving bit has a straight, ported, or mullen mouth, the overcheck bit has a jointed mouthpiece.
Elbow or military curb bit, smooth side
Liverpool bit showing possible rein positions
Buxton curb bit, ribbed side
Wilson snaffle bit with jointed mouthpiece
Leather or rubber bit guards
Half-cheek snaffle bit with jointed mouthpiece
Half-cheek snaffle bit with solid mullen (half-moon) mouthpiece
Loose ring snaffle bit with jointed mouthpiece
Half-cheek, twisted-wire snaffle bit. Not allowed in 4-H.
Jointed and bar overcheck bits (bridoons)

4-H Driving Manual, PNW 229 11
F. Collars
BreastThe breast collar must be above the point of
the shoulder and below the windpipe where the neck meets the chest. It’s adjusted by the neck strap, which hangs over the neck in front of the withers.
NeckThe neck collar provides padding and support
for the hames and tugs which are attached to it. Proper fit and condition of the collar is critical to the horse’s well-being and ability to work. A well-crafted collar has no value if it doesn’t fit. A poorly constructed or dilapidated collar may fit perfectly and not work properly. If a collar is too wide, too narrow, too short, or too long, it will cause the horse discomfort.
Fitting a neck collar properly can be a complex task and is not a job for a beginner. 4-H members may wish to seek more help in choosing a neck collar. See “For More Information” (page 27), for other resources.
Equally important is the correct position of the hames so that the point of draft (the point at which the tug attaches to the hame) is where it should be. The hames must be the proper length so that the curvature conforms to the groove (hame seat groove) of the collar. The hames should center near the widest point of the collar (draft), and the collar draft should be just above the point of the animal’s shoulder (see illustration on page 7).
G. WhipWhen driving, a whip is required. Either a
driving whip or a buggy whip is suitable. A longeing-type whip (with a long lash) is not permitted, as it may become tangled in the equipment.
The type of whip you use depends on the style of driving and your turnout. The traditional driving whip has a shorter handle and a lash of 20 to 30 inches to reach the shoulder of the animal. A driving whip is commonly used in pleasure, reinsmanship, precision driving, and cones courses. A buggy whip has a short lash and reaches only to the saddlepad. It is most often used in pleasure and reinsmanship.
See also “Using the whip,” page 20.
H. HeadersA header is a knowledgeable adult or
intermediate or senior 4-H member who assists the driver as requested by the judge or ring steward during 4-H driving classes, particularly when standing in line. Headers should be appropriately attired in boots or hard-soled shoes, long pants, and a shirt with long sleeves. Headers who are 4-H members are required to wear a helmet.
The header should be positioned directly in front of the horse and about an arm’s length away. Normally, standing in this position is considered dangerous when handling horses, but because the driving horse is wearing blinders, the header must stand where the horse can see her or him. The header should not touch the horse unless it is necessary for safety. If it is necessary to hold the horse, the header places a hand on the rein on each side of the bit.

12 4-H Driving Manual, PNW 229
II. TrainingC. Harnessing
Be patient. Do not become discouraged, and do not rush or eliminate any steps.
Before harnessing, the animal must obey the command “Whoa” and/or “Stand.” Let the horse inspect (smell) the harness. Standing on the near side of the horse, place the backpad assembly (complete with bellyband, wrapstraps, backstrap, and crupper) about 4 inches or one hand-width behind the withers. Adjust the backstrap (turnback strap) so that the crupper hangs about 1/2 inch below the dock. Buckle the bellyband loosely. You will need to tighten it later, but buckling it now keeps it from falling off and frightening the animal if it slips.
If the harness has a sewn crupper with no buckles, proceed as follows: Let the crupper hang down on top of the tail, then reach through the crupper and grasp the tail near the end of the tailbone and pull the long hair through. Slide the crupper the rest of the way up while holding up the tail. Carefully pull all the hair through the crupper before slowly letting down the tail.
With a buckled crupper, unbuckle one side, lift the tail, slip the unbuckled crupper around the tailbone, slowly let down the tail, and rebuckle the crupper. Smooth the tail hair away from the bare part on the underside of the tailbone. Remember, this is a very sensitive area. Do not let go of the tail until it’s completely down and the horse is relaxed. If you were to drop the tail onto the crupper the first time, the colt could become very frightened, clamp its tail, and bolt forward.
After the crupper is in place, adjust the bellyband to the backpad far enough back so that it won’t interfere with the elbow at a trot. Tighten this after the animal relaxes, remembering that the bellyband should be snug but not as tight as a regular saddle cinch. The harness must be adjusted for the horse’s complete comfort.
If there are wrap straps on the bellyband, buckle them into the shaft loops to keep them out of the way—you won’t need them at this training level. When the horse is relaxed and willing to stand, lead it around to help it adapt to the harness. Be prepared for a reaction to the feel of the crupper, breeching, or girth.
Before driving training starts, the animal must lead well; longe both directions willingly; know the voice commands “Walk,” “Trot,” “Whoa,” and “Stand”; and obey completely. Once you have your horse longeing calmly both ways of the circle, changing gaits on command, and accustomed to carrying a bit in its mouth, you are ready to begin harness training.
A. Longe line and sacking outMake sure your horse or other animal has
been thoroughly sacked out from both sides, using a big towel or saddle blanket. Being careful not to entangle it, accustom the horse to ropes or straps under the belly and around the legs. You can accustom your horse to the shafts by using a stiff pole or broom handle and applying pressure carefully to its sides.
This is the time to introduce your horse to the whip. Rub the whip all over the body, then move away and wave it. Accustom the horse to having a whip lie on its sides and back without being startled.
B. Preparation for harnessingWhen harnessing for the first time, be sure to
have a knowledgeable assistant. Have the horse tied safely in familiar surroundings. The harness should be the only thing new to the horse its first time.
To accustom your horse to a crupper, begin by lifting the tail gently and holding it up for a few seconds. Increase the height and length of time until the animal relaxes when the tail is gently lifted. Be gentle with this procedure, and take your time—you don’t want your horse to be “crupper shy” later. Scratching the horse by the tailhead sometimes helps to relax it, and it will readily lift its tail on its own.
Make your first few harnessing tries in a place your horse is comfortable, such as its grooming area. Once you have familiarized the horse to the harness, establish a routine for harnessing and don’t vary from it.

4-H Driving Manual, PNW 229 13
After making a couple rounds of the longe circle or walking out, check the crupper and strap adjustment. Readjust the crupper strap length so you have about an inch of clearance between the tail and the crupper. Too tight a crupper could cause irritation and can cut and scar the horse, especially if any tail hairs are left under the crupper.
The correct position of the breeching on the horse’s body is half way between the point of buttocks and the top of the gaskin, roughly level with the bottom of the flank. Buckle the holdback straps to keep them out of the way.
Longe your animal at a walk, then trot in both directions using a regular halter or longeing cavesson (if the animal isn’t accustomed to the bit), until it has accepted the harness and is relaxed.
D. Bridling
BitBe sure your horse is accustomed to wearing
an acceptable driving bit in its mouth. Adjust the bit as carefully as you would a riding bit. Some horses get their tongue over the bit; this is a difficult habit to break once it’s learned. A properly adjusted cavesson can help prevent this problem.
A snaffle is the best training bit to start with. Lengthen or shorten the driving bridle cheekpieces with the buckles near the bit so the bit just slightly wrinkles the corners of the mouth. Be sure the snaffle arches over the tongue.
BlindersUse blinders whenever the horse is hitched to
a vehicle. (Blinders can be added at a later stage of ground training, if preferred.)
Center the blinders over the eyes. The buckles on the cheekpieces above the blinders adjust the blinder height. Adjust blinder height before you adjust the bit in the mouth. The blinder stays should turn the blinders out enough to give the horse adequate vision. The buckle above the crown piece and between the ears sets the distance of the blinders from the animal’s eyes. Let it down to open the blinders wider, or tighten it to close them tighter to the head.
The throatlatch should allow room for several fingers at the bottom. Do not fasten the overcheck yet.
E. Ground drivingGround driving is the most important phase in
driving training. The animal must be completely manageable and able to do all the maneuvers before being hitched to the cart. This may take several weeks or longer. The important thing to remember is take each step slowly, being sure the horse is accepting and obeying commands and is relaxed.
Place a halter over the bridle to help control the animal without abusing its mouth. The overcheck or sidecheck rein can be tucked into the throatlatch of the bridle to keep it from flapping. Do not tighten the overcheck or sidecheck until ground driving has progressed and the horse is comfortable and relaxed.
For safety, ground driving is best done in an arena or corral. It’s helpful to have an adult assistant at the head of the animal when starting ground driving in harness. Teach the horse to start quietly with the voice command “Get up” or “Walk on.” If necessary, give a cluck or tap with a whip instead of slapping the lines to encourage the horse to move forward. Be careful not to jerk the lines.
Begin ground driving on the longe circle that your animal already knows. Lead the animal out, watching carefully for reactions to noise caused by something the animal can’t see. Since driving reins are too short to give you enough space behind the horse’s heels, use two longe lines or light ropes about 25 feet long (do not fasten the lines together when ground driving). As soon as the animal is calm, attach the lines to the bit or halter rings. Run the lines through the shaft loops to help keep them in place for ground driving.
Follow at least one length behind the horse’s flank, but stay inside the circle. Work the horse
Horse
Lines DriverGround driving position
14 4-H Driving Manual, PNW 229
on the lines until it is calm. Hold the lines high enough to prevent the animal stepping over them yet low enough to control the hindquarters.
Work on straight lines, circles, and halting and standing quietly on a loose rein. Ground drive until the horse is relaxed and responsive. Gradually increase the difficulty of the maneuvers until the horse is doing figure eights, serpentines, and circles. The horse should be going forward freely before working on the back. Keep training sessions short, and end on a positive note.
TurnsBe sure to wear driving gloves and to hold
the reins in the proper manner (see “Holding the reins,” page 19). Walking in the longe circle position, drive the horse around the circle and gradually apply more pressure on the outside rein to bring the horse into a wider and wider circle until it is using the whole ring. Begin to guide the horse into wider turns (this will be awkward at this stage). The important thing is that the horse responds to the pulling of the rein and makes the turn.
Hands are extremely important! Your hands should be relaxed, gentle, firm, and positive. One hand must give as much as the other takes. The reins should form a straight line from the ring terret to the elbow. (See “Driver position,” page 19.)
Work both ways of the arena, and soon the horse will respond easily to rein pressure and turns will smooth out. When reversing direction on the diagonal, perform smooth crossovers, adjusting your reins as you cross behind the horse. This requires even pressure on the reins, careful footwork, and working your hands independently from your body.
Stay in close (maintain a safe distance) to your horse around corners. The outside rein is the most important in all maneuvers. The inside rein determines the turn, but the outside rein dictates the size of the turn and the direction.
When teaching the trot, keep your hands steady to avoid bumping the horse’s mouth. Remember to stay safe, and pay attention to your footwork and the ground you are running on.
HaltsHarness horses must learn to stand for long
stretches of time. Your safety can depend on your horse’s ability to stand quietly. Intersperse turns, circles, and straight lines with halts. At the beginning, ask only for short halts of 10 or 20 seconds. As the horse’s training improves, ask for longer halts. When the horse is standing, relax the reins so there is no contact with its mouth. If the horse attempts to move off, tell it “Whoa” with a slight pull on the reins, and then relax the reins again. Relaxing the reins is the horse’s reward to stand.
Verbal commandsAlways be consistent with verbal commands.
The word you use should be specific to one maneuver only. Use “Whoa” only for a full stop. To slow down, say “Easy” or “Steady.”
To accomplish the “Whoa,” stop walking, and let the horse come up to your hands. Do not pull or jerk the reins, just set your hands and the horse will stop squarely and with a good head position. As soon as the horse responds, release the rein pressure. Never drop or set your reins down unless you have a groom or header holding the horse.
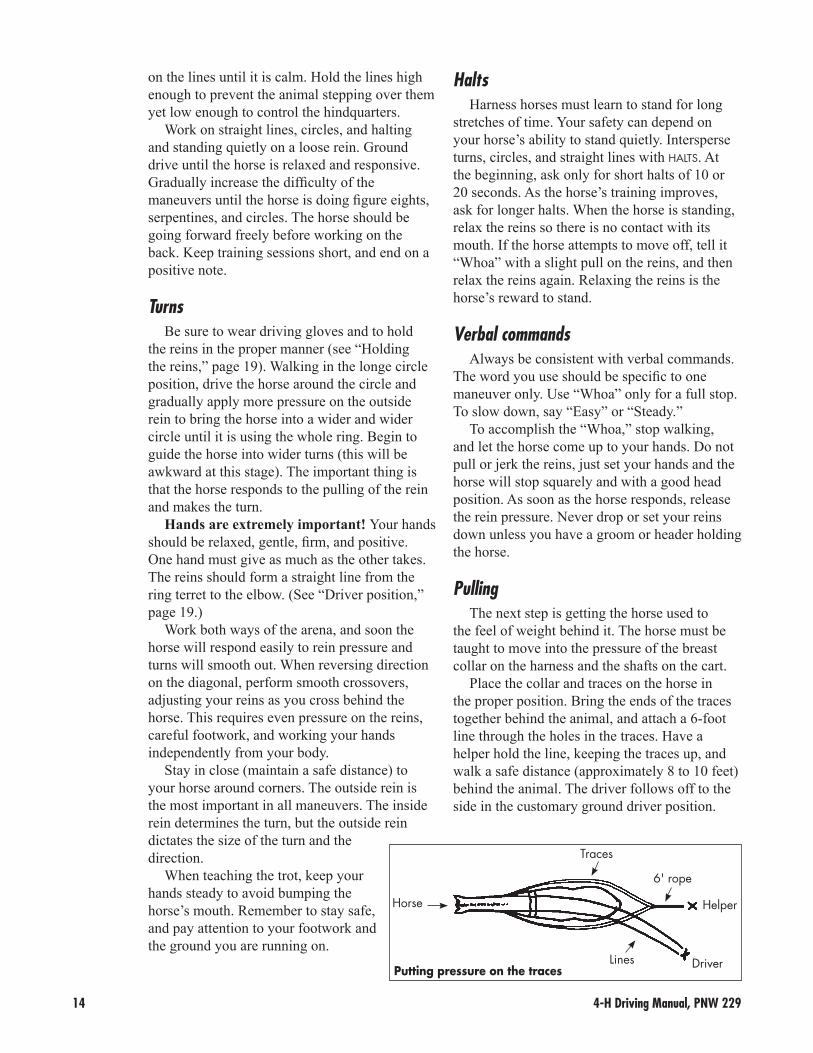
PullingThe next step is getting the horse used to
the feel of weight behind it. The horse must be taught to move into the pressure of the breast collar on the harness and the shafts on the cart.
Place the collar and traces on the horse in the proper position. Bring the ends of the traces together behind the animal, and attach a 6-foot line through the holes in the traces. Have a helper hold the line, keeping the traces up, and walk a safe distance (approximately 8 to 10 feet) behind the animal. The driver follows off to the side in the customary ground driver position.
Horse
Lines Driver
Helper
6' rope
Traces
Putting pressure on the traces

4-H Driving Manual, PNW 229 15
The helper gradually puts pressure on the traces by holding back, then releasing for a few seconds, and repeating. This gives the horse its first experience with pulling. The animal probably will hesitate or stop, but keep it going! Have the helper continue pulling on the traces for short distances with a complete release between pulls to relax the animal and as a reward. The feel of the traces on the flanks also prepares the horse for the feel of the shafts.
F. Training poles
Making polesA travois-like device made of two poles
joined together introduces the horse to dragging an object with shafts without risking damage to a vehicle.
Cut poles of green wood just before building the travois. Green poles are more resilient and will give instead of break if an accident occurs. Be sure you do not use seasoned older poles—they can break, splinter, and leave a sharp point, badly injuring an animal.
The poles should be about 3 inches in diameter, free of knots or thick bark, as straight as possible, and 10 to 12 feet long, depending on the size of the animal. Ponies may need a 9-foot pole. A thicker end at the back gives the poles more weight and stability.
Lay the two poles on the ground in a wedge shape, about 22 inches apart at the narrow end of the wedge. Measure 6 feet 3 inches back from the tips, and bolt on a 2- by 6-inch plank across the poles (they should be about 40 inches apart at this spot). Put in an eye bolt on either side of this plank. The traces attach here, so these bolts must be strong.
It is important to place the crossbar approximately 6 feet back for stability, rigidity, and better balance. This position allows the poles to touch the horse’s flank about the same way as a cart would. It also helps prevent the horse from getting its hind legs over the poles.
Taper the front 18 inches of the poles (at least) for a smooth entry into the shaft loops. Be sure the poles are smooth all along their length where they may make contact with the horse.
If wood is not available, you can make poles of black 2-inch ABS pipe, 10 feet long, joined by a coupler to a 1-foot piece of 1½-inch ABS pipe. This allows the shaft loops to slide on easily, and the coupler works as a “stop” for them. You can increase the poles’ strength by putting a 2-inch wooden dowel inside the 10-foot length of pipe. For the crossbar, use a light piece of ½-inch plywood about 8 inches wide and 4 feet long.
Introduction to the polesTo get the horse used to the shafts, bring
the poles into the ring and drag them past your horse, around it, and behind it. This accustoms the horse to the noises it will hear. Have your helper lift the poles up and down near the horse and drag them to and from the horse until the horse is relaxed with this movement. Be sure to do this on both sides of the horse. Once the horse is relaxed with this procedure, the next day you can begin hitching to the poles.
Hitching to the poles Position your horse to allow the longest,
straightest stretch possible before having to turn. This gives your horse time to adjust to the sensation of pulling before it feels the poles touch its sides on a turn.
Have your helper attach a lead rope to the halter and lead the horse into position directly in front of the poles. Have the helper stand by the horse’s head. Bring the poles up over the top of the horse’s croup, then down and through the shaft loops. Never bring the shafts up from the ground. Slide the pole ends through the shaft loops and attach the traces.
About 40" Eye bolts for traces
6'
20" to 28"
10' to 12'
Horse-size training poles
16 4-H Driving Manual, PNW 229
The shaft tips should not extend beyond the horse’s shoulder. If they do, they will poke the horse when it is turning, which can lead to bad habits. Do not use the wrap straps at this time.
Maintaining the same driver position as for ground training, ask the horse to walk on, allowing yourself plenty of room to make large turns so the poles won’t bump the horse. Never walk between the poles. Your helper should remain at the head until the horse is relaxed pulling the poles—but, the helper is there for safety only, and the driver should be directing the horse.
During this step, the driver’s hands are extremely important. You must be sensitive to the horse’s actions and be able to correct a horse’s movements the instant they happen. Your hands must constantly be giving and taking with slight squeezes of pressure on the reins to accomplish smooth turns.
Always stand to one side of the horse, not directly behind it. If the horse is moving in a circle, stand on the inside bend of the horse. As the horse relaxes, the helper can step back out of the horse’s line of sight, still keeping contact with the safety line. Once again, be sure you do an equal amount of work each direction of the ring, and keep the horse relaxed. These sessions should last only about 15 minutes.
As training progresses, work on doing figure eights, serpentines, and tight circles until the horse is relaxed and accepts the poles’ touch. Remember to work on halts and standing. It could take from a few days to weeks before you can progress to the next step.
Be careful taking the horse out of the poles. Have the horse stand while the helper holds it. Undo the traces, tie them up, and remove the shaft loops. The helper can lead the horse off while you support the poles, or you can lift the poles up and back, just the reverse of putting them on the horse.
When the horse can drive in poles easily, perform circles and figure eights, halt and stand quietly, and pivot, then it is ready to move on to the next stage: connecting the cart.
G. Connecting the cartBring out the cart and let the horse investigate
it. Have someone pull the cart around so the horse can see and hear it. Ground-drive the horse a little ahead of the cart, and then pass the horse with the cart. Repeat these two maneuvers until the horse ignores the cart.
For safety, be sure you and your animal are in a confined area when you first hitch to the cart. Once again, start the horse on the long end of the arena. Exchange the driving lines for reins. Run the reins through the terret rings, through the martingale rings (if used), and to the bit. Have a second helper on the offside to help connect the cart. (It’s helpful at this point to have three people working together.) Hold the reins off the ground away from the animal’s and driver’s feet, keeping the reins in hand.
While an adult helper holds the horse, pull the cart into position. Always bring the cart to the horse. Do not back the animal into the shafts, as this may startle it. Always alert the animal before approaching with the cart. Some drivers say “Cart coming” when hitching and “Cart away” when unhitching. This also notifies your helpers of the intended action.
Approach with lifted shafts, then gently lower them on each side. The shafts must go through the shaft loops. Untie the traces, then run them under the shaft loops and through the trace keepers on the shafts, and fasten them to the trace hooks or singletree on the cart.
The singletree pivots at its center to allow free movement of the shoulder. The singletree must have either a trace holder or a thong to keep the trace from working off the end. The singletree also has loops around it approximately halfway between the center and ends on each side. These are attached to the cart to restrict the singletree’s movement on the cart. Whether the vehicle is equipped with a singletree or trace hooks, the traces must be attached at the same length on each side. The holes used depend on the length of the traces, the size of the animal, and the type of cart.
Traces must be the appropriate length for the animal. If you have to wrap the traces around the shafts, then the traces are too long and are a safety hazard.
4-H Driving Manual, PNW 229 17
The horse must have enough room to extend its legs without hitting the cart while trotting, but not so much that it is out of the shafts. The tips of the shafts should come no further forward than the point of the shoulder. If they are too far forward, turning is difficult and the reins can easily become caught. If they are too far back, they will catch behind the shoulder.
Figure-eight the wrap strap around the shafts and shaft loops on both sides to hold them firmly. When using a breeching harness, attach the holdback straps around the shaft through the holdback strap fitting or footman’s loop (a metal eye on the underside of the shaft, on most carts). When using a harness with thimbles instead of breeching, run the shafts through the shaft loops and into the thimbles. Adjust the thimbles and
traces so that when the animal moves forward, the thimbles remain under tension and do not drop off the ends of the shafts. The thimbles will move the cart backward when the animal is asked to back.
When using a kicking strap, pass it over the horse’s rump, just ahead of the crupper. If it’s too far back or too far forward, it won’t serve its purpose. Adjust it loosely around the shaft on each side, letting the tug ride through the wrap of the kicking strap. Every novice driver should use a kicking strap while he/she learns to drive. Inexperienced drivers can easily confuse even a schooled horse and possibly cause a kick. (See the illustration on page 6.)
Driving a four-wheeled vehicle requires a horse with a higher degree of training and a driver with a higher level of knowledge and experience. Buggy shafts are independent of the buggy, in contrast to a cart’s shafts which are directly connected and supported. There is no weight on the shafts of a four-wheeled vehicle. Backing in a four-wheeled vehicle is not easy—leave this task for calm and more advanced horses.
H. Mounting the cartWhile holding the reins, the driver should
walk on the same side of the cart as the assistant, and as far back as possible to avoid interference with the assistant.
Ground drive with the assistant’s safety line attached until the horse is relaxed. Never ground drive a horse hitched to a cart without a safety line attached. This is a good time to do a safety check to make sure the harness is adjusted properly and the cart is working correctly.
If the horse is relaxed and all looks well, come to a halt and mount the cart. The additional weight presses the shafts on the shaft loops and backpad: be alert for a reaction from your horse. When driving alone, sit in the center to balance the load.
I. Training with the cartWith the assistant holding the safety line,
drive around slowly the first few times. Once the horse has relaxed and is turning safely, the assistant can unhook the safety line. The first and second lessons should only be performed at the walk. Practice only the figures performed during pole training. Gradually go to the slow trot for short periods, working on smooth downward transitions and control. When the horse can trot freely, practice all the figures learned in the poles.
At the trot, there may be a definite jogging motion of the cart that might startle the horse at first. In case of a runaway, use the hands in a strong seesaw movement to stop the animal. Do NOT use a steady pull. Solid walls or corners can be useful for stopping runaways. Be in command all the time, at any speed, and reinforce voice commands. Once again, steady and sensitive hands are important.
Do not take passengers until the animal is under control at all times. The driver always sits to the right of the passenger. Advise riders to hold on and not to touch the wheels. Warn them before starting or when changing speed or direction. Passengers always mount last and dismount first for safety.
Step 1: Double back traces
Step 2: Tie overhand knot

18 4-H Driving Manual, PNW 229
BackingAfter your horse is going well and is
comfortable, teach it to back. On the ground, standing in front of your
horse, grasp a rein in each hand, pull backwards, step towards the horse, and say “Back.” Use the pull-and-release system. If the horse is comfortable with this step, practice backing your horse while ground driving (due to the pole construction, you can’t back when in the travois). Ask for one step at a time. Gradually, add more back steps until the horse moves back and forward at ease.
Never slap the reins on the horse to go forward. Use the whip for reinforcement to move forward if the horse does not respond to voice commands.
When the horse backs comfortably from the ground, you can begin practicing in the cart. Be sure to practice in the center of the arena and not along a wall. Do not overdo asking the horse to back, and only ask for a few back steps at a time.
CirclesWhen performing circles, be sure the horse is
bending its head into the turns and not tipping its nose to the outside. This is a common fault and should not be allowed to continue. Sensitive hands used properly with give and take around corners should help correct this condition.
Practice reversing the ring from opposite ends at the walk and trot. Remember the rule: “When meeting another vehicle head on, keep to the right.”
Outside the arenaWhen the horse is comfortable, relaxed, and
working well, you can move out of the arena and introduce the horse to different ground surfaces. Working on gravel for the first time might cause a reaction from your horse, so be prepared to keep the horse calm. Start with a quiet road, out of the way of traffic, until your horse becomes accustomed to the new surroundings. Be alert at all times for potential hazards such as barking dogs, rocks, puddles, things blowing, or vehicles. The change of scenery can be beneficial to your horse if it is a rewarding and fun experience.
J. Unhitching/UnharnessingIt’s a good idea to have two helpers for
unhitching and unharnessing.Once the horse and cart are stopped, a helper
should immediately detach the overcheck or side-rein from the terret hook and then stand at the head of the horse as the driver dismounts from the vehicle, still holding the reins. Once the driver is on the ground, the other helper (if you have one) moves to the offside of the vehicle to help unhitch the cart and begin unharnessing.
In unison, the second helper and driver unhitch the horse from the vehicle. Disconnect the cart from the horse with the driver still holding the reins. Remember, never remove the bridle from a driving horse while it is hitched to the cart. With the reins in your left hand, move the cart up and back, away from the horse, then lead or drive the horse forward. Lift the cart up and away from the horse with a statement of purpose, such as “Cart away.”
To remove the harness, reverse the order of harnessing: undo kicking straps, hold-back straps, thimbles, wrap straps, traces/tugs, and crupper/backpad. When unbuckling the belly band, be careful to remove the crupper with the same precision you used when harnessing. Hold the crupper with your left hand, slowly lift the tail with your right, and slide the crupper carefully off the horse’s tail until it passes the tail bone. Helpers and driver should call out the harness parts as they remove them, so each is aware of what the other is doing. Tie up the traces, wrap straps, and hold-back straps so that nothing will drag if the horse is led away.
Place the halter around the horse’s neck, and remove the reins from the bit. Remove the bridle, and halter the horse. As a reward, cool the horse off and give it a thorough rub-down, paying particular attention to any harness sweat marks.
4-H Driving Manual, PNW 229 19
III. ReinsmanshipA. Driver position
The driver’s position is secure but not stiff. Sit up straight and look forward between the horse’s ears, with arms slightly extended, and elbows slightly bent and close to your body. This position allows you to respond quickly with maximum strength.
The correct position of your arms when driving is important both for control and appearance. The reins should form a straight line from the terret ring to your elbow. (This may not be possible when driving a very tall or short animal.) When you pull on the reins, pull back towards your hip keeping a straight line, rather than raising and lowering your hands. Maintain a firm but light contact for smoother transitions. Keep your wrists loose and flexible. Your hands need to work independently from your body, never bouncing up, down, or sideways.
Adjust the seat of the cart so that you sit with your knees comfortably bent and one foot slightly ahead of the other, with feet just far enough apart to stay balanced.
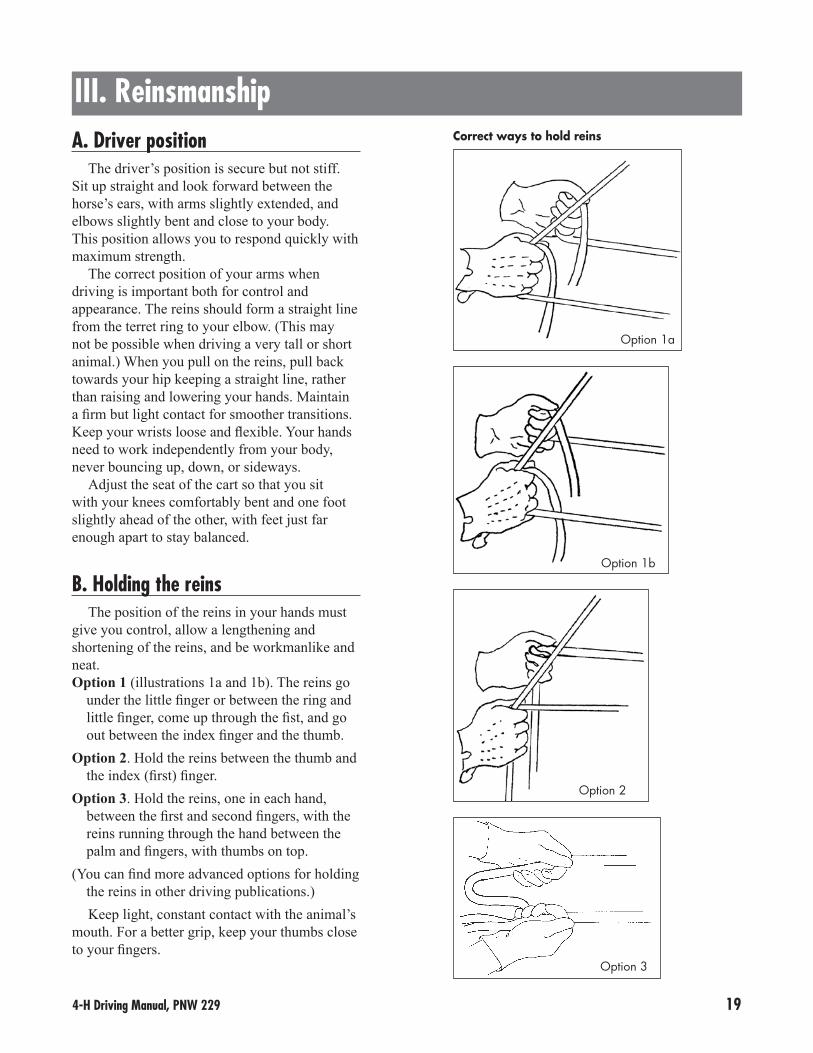
B. Holding the reinsThe position of the reins in your hands must
give you control, allow a lengthening and shortening of the reins, and be workmanlike and neat. Option 1 (illustrations 1a and 1b). The reins go
under the little finger or between the ring and little finger, come up through the fist, and go out between the index finger and the thumb.
Option 2. Hold the reins between the thumb and the index (first) finger.
Option 3. Hold the reins, one in each hand, between the first and second fingers, with the reins running through the hand between the palm and fingers, with thumbs on top.
(You can find more advanced options for holding the reins in other driving publications.)Keep light, constant contact with the animal’s
mouth. For a better grip, keep your thumbs close to your fingers.
Correct ways to hold reins
Option 2
Option 1b
Option 3
Option 1a

20 4-H Driving Manual, PNW 229
Hold your hands the width of your body or slightly closer together than your elbows. The bight of the reins should be held with the little finger of the right hand (see illustration below), or the driver may sit on the bight. A small loop of shoestring may be attached to the buckle of the reins for this purpose.
The reins must be buckled or sewn together. Joined reins are safer than unconnected reins. With properly-held joined reins, the driver will still have control of the horse should one hand drop off a rein. The reins should be long enough so that they won’t be yanked out of the driver’s hands if the horse stumbles or pulls.
When shortening the reins, it is important to maintain constant and steady contact on both reins the whole time. To shorten your grip, transfer the left rein to the right hand over the index finger, where it is gripped by the thumb and palm. Insert your left second finger between these reins, slide up the required amount and grip both reins firmly. Release the reins from the right hand, and with that hand pick up the right rein immediately in front of the left hand. While performing this action, you keep complete control at all times.
To lengthen the reins, simply loosen your grip, and allow the reins to slide through your fingers until the desired length is achieved.
C. Using the whipCarry your driving
whip in your right hand, resting it on your forefinger while holding it lightly in the palm of your hand with your other three fingers. The tip is just off the vertical to the left. Hold the whip where it balances comfortably, preferably towards the end of the stock.
Use the whip effectively but sparingly. Never misuse the driving whip. When you use the whip for reinforcement, lightly touch the horse just behind the shoulder. Never hit the horse on the croup, as this might cause bucking.
A properly-used whip greatly improves a driver’s performance. If you use the whip with a soft stroking motion, not a hard pop or snap, the animal will respond to it as if being squeezed by a rider’s leg. It helps the horse to move forward, or you can use it on the horse’s side to help it get by a frightening object. Use the whip for moving the horse over or to help keep its shoulder up during a turn.
Use the whip also for safety when driving, to prevent a horse from backing up into a dangerous situation or to distract a frightened horse and avoid a runaway incident. Ideally, the trained animal will “Whoa” on command, thus allowing the driver time to analyze the situation and get the horse to move out of trouble with a minimum of whip use.
Both pleasure and show-ring drivers should always hold the whip (do not leave it in the whip socket of the vehicle). In an emergency, the need for a whip can happen in an instant, and any delay may result in an accident.
Holding the whip, viewed from above
Increased control

4-H Driving Manual, PNW 229 21
IV. Driving SafetySafety is foremost in driving, either in
the show ring or in the country. The hazards mentioned here are to remind you how dangerous driving can be. If you establish safe driving techniques, then as you become more experienced, you can instinctively avoid accidents.• Pay special attention if your horse is
swishing its tail. If the driving reins get caught underneath its tail, the horse will be frightened, immediately clamp down its tail, tuck under its hindquarters, and jump forward or move erratically. If the tail comes down on the reins, immediately give the voice command “Whoa” without pulling back on the reins. Lean forward carefully, lift the tail from the hindquarters, and free the rein. If your horse is a tail swisher, hold the reins a little wider or higher when the horse is swishing its tail and then resume the normal rein position when the tail is quiet. If your horse is a constant tail swisher, it can be helpful to braid or knot its tail. Make sure there isn’t some other source of discomfort, such as the crupper being adjusted too short.
• Harness or vehicle breakage is always a potential hazard. Frequent inspections and proper care are important for you and your horse’s safety. If a harness or vehicle breaks, how serious the accident is depends on what part has broken.
• Be able to stop your horse with only the voice command “Whoa.” In a crisis, how willingly your horse listens and responds to voice commands can make a difference in whether there is an accident and how serious it is.
• Always check the vehicle’s tire pressure for a smoother ride for both driver and horse. Double check the axles and nuts every time you get in the cart. A wheel wrench and tire pump should always be close by. A loose tire could be a disaster!
• A checkrein that comes off can disturb a horse that relies on the checkrein for its head position and support. Check the leather piece on a routine basis, making sure that the leather retainer and terret hook are working properly.
• Always bridle the horse before hitching to the vehicle, and attach the reins immediately. Remember, the bridle and blinders keep the horse from seeing behind. The bridle is the last part of the harness to be removed. Never remove a horse’s bridle before taking the cart off the horse.
• Always have someone hold the horse while you attach the cart. If you must hitch alone, keep the reins in one hand while you control the shafts with the other.
• A runaway horse with a vehicle attached is a potential weapon. The horse will run faster and faster, bucking and kicking to get away from the danger behind. It is very difficult to control a runaway, and you must approach with caution. The shafts of the cart can seriously injure a person and the horse. You can avoid a runaway situation with careful handling, proper harnessing, and safe driving practices. A solid wall or corner can help stop a runaway horse.
• In case of a runaway, all other drivers must move off the rail to the center of the ring and stay in their vehicles. Most frightened horses tend to run the rail, looking for a way out.
• When driving, always keep a safe distance from other vehicles, especially passing and lining up at the completion of a class. If your horse misbehaves while standing, leave plenty of room behind and to the side of you when lining up.
• Never leave a hitched horse unattended.• Never tie a horse by the driving bridle. If
necessary, slip a halter over the driving bridle and tie to the halter ring.

22 4-H Driving Manual, PNW 229
V. GaitsGaited horses may use their respective
intermediate gait instead of a trot.
WalkThe walk should be flat-footed, calm, even,
but energetic, with a determined pace.
Slow trot/jogThe slow trot/jog should be slow and
on the bit, with impulsion, while showing submission to the bit and a steady cadence.
Working trotThe working trot is a forward moving, free,
and straight gait, with a taut but light rein.
Strong trotThe strong trot is also called trot on or
extended trot. This gait shows an increase in pace and length of stride while remaining well-balanced.

4-H Driving Manual, PNW 229 23
VI. Driving Classes Please refer to the 4-H Horse Contest Guide
(PNW 574) for all class rules.
A. ReinsmanshipThis class is designed to test the driver’s
knowledge of driving techniques and his or her ability to put that knowledge to use to present a proficient performance. Patterns are required.
Reinsmanship is judged as an equitation class based on hands, seat, correct driving technique, and proper harnessing and hitching. Driver should be able to change gaits quickly, smoothly, and unobtrusively while always maintaining contact and demonstrating correct driving techniques.
B. Precision drivingPrecision driving tests the skill of the driver,
the obedience and handiness of the animal, and the accuracy with which the course is driven.
C. Pleasure drivingThe pleasure driving horse should have the
same general qualities as the pleasure saddle horse. Special emphasis is placed on the quality of the gaits, manners, and the pleasurability of the ride for the driver. The horse should be in balance with a head and neck carriage typical of its breed or type, should be light-mouthed, and have a free way of moving. Erratic movements are highly undesirable. Hesitation or breaking stride will be penalized.
D. Additional driving opportunitiesIn addition to your 4-H driving classes, you
may compete in rail classes at various open, breed, or American Driving Society shows. Make sure you familiarize yourself with the rules of whatever organization is sponsoring a particular show. Following are descriptions of some of these other types of driving events you may compete in.
Cones coursesCones courses are designed to test the ability
of both the horse and driver to execute precision movements.
Pairs of traffic cones are placed at a distance 8 to 20 inches wider than the wheel track in a prescribed course. It may include obstacles such as “L,” serpentine, or “U.” Time allowed is determined. Each set of cones (gates) and/or obstacle is numbered consecutively. A ball is placed on top of each cone.
A penalty of 5 seconds is added to the final time for each ball or obstacle dislodged. A penalty of 0.5 seconds is assessed for each second over the posted time. Placings then are determined on low total time plus penalty points.
There are several variations on cones courses. You can find more information from the American Driving Society (http://www.americandrivingsociety.org).
Timed competitionPairs of traffic cones are placed at a distance 8 to
20 inches wider than the wheel track in a prescribed course. It may include obstacles such as “L,” serpentine, or “U.” Each set of cones (gate) and/or obstacle must be numbered consecutively with red cones on the right, white cones on the left. A ball is placed on top of each cone.
A penalty of 5 seconds is added to the final time for each ball or obstacle dislodged. A penalty of 0.5 seconds can be assessed for each second over the posted time. Placings then are determined on low total time plus penalty points. Or, if you prefer, you could elect not to do a timed course, but simply count the fewest balls or obstacles dislodged, with the winner having the lowest score.
Courses will be posted 2 hours before classes, and all drivers are allowed to walk the course, without horses, before competing.
Height—at least 12"
Tennis ball
Traffic cone
Measure from closest points

24 4-H Driving Manual, PNW 229
Cones driving—double jeopardyIn this event, there are two drivers in the
vehicle. After passing the starting line, the first driver drives through the prescribed course with the usual penalties. After the first driver passes through the finish gate, he/she gives the reins to the second driver, who then must drive the course in reverse order. Usually, 8 to 10 pairs of gates are used, but there may be more if space allows. The fastest time wins, with 5 penalty seconds added for knocking down or dislodging any obstacle or gate.
Cones driving—progressiveThis is driven at a trot, with a set time over a
course of six numbered gates that are adjusted to the following clearances:
#1—20 inches #4—8 inches#2—16 inches #5—4 inches#3—12 inches #6—2 inchesTime is calculated at 200 meters (about 660
feet) per minute. After passing the starting line, the driver shall proceed through each gate in order and may repeat through the course again and again until time expires or a gate is dislodged. Time will be stopped when a gate is dislodged; the suggested value for each gate completed is 2 points.
High-point cones courseA fun cones course is one with each obstacle
having a point value. You may choose which obstacles to do, and the highest score wins. An obstacle may be gone through twice, but not in succession, and there is a time limit (generally 2 minutes). Obstacles with high point values are considered the hardest to do, but the event often is won by someone who carefully plans which ones he or she can do the easiest within the time limit.
If an obstacle is disturbed so that it has to be repositioned, it may not be tried again. (Exception: those that are designed to be knocked down.) If the obstacle is incorrectly driven but not disturbed, it may be attempted again.
Obstacles often used are: • Serpentine, 10 points• Mail box, 20 points (take out and replace
newspaper)• Parallel rails, 30 points• A “U,” 40 points
• Bridge, 50 points• Snail course, 60 points• Back up, touch, and knock off rail, 70 pointsNo points are given for an incorrectly driven
obstacle. Ties are decided by a drive-off.
Driven dressageThe object of dressage is the harmonious
development of the physique and ability of the horse. Ridden and driven dressage apply similar techniques to do this. There are moves done in ridden dressage that cannot be done hitched, but the fundamentals are the same. A horse’s training is demonstrated by performing dressage “tests” which become progressively more difficult.
To become a good dressage rider/driver requires tremendous effort. If you’re already learning ridden dressage, apply the same techniques to the driving horse. Books that can help you with driven dressage are listed in the “For More Information” section. Again, the American Driving Society website (http://www.americandrivingsociety.org) is also helpful.
Combined drivingCombined driving is equivalent to 3-day
eventing under saddle. Drivers compete in three different sections of competition over a 2- or 3-day event.
On the first day, competitors perform a driven dressage test and—if the event is 2 days—compete in a cones course. On the second day, drivers compete in the marathon phase, which is driven at prescribed speeds and gaits over distance and includes obstacles which must be negotiated. In a 3-day event, the cones course is held on the third day. Scores are combined from the three phases to determine the winner.
Competitive trail drivingCompetitive trail driving is similar to
competitive trail riding. Drivers compete over a set trail over hills and through woods and are judged on their ability to navigate the natural hazards presented, their ability to “pace” their horse to a set rate of speed, and the condition of the horse.
4-H Driving Manual, PNW 229 25
VII. Glossarygig—Fancy two-wheeled vehicle, esp. Europe
and England.
halt—Complete, square stop without abruptness or veering. Horse should stand attentive, motionless, and straight, with weight evenly distributed over all four legs, and prepared to move off at the slightest indication from the driver.
hame—Either of the two rigid pieces along the sides of a horse’s collar, to which the traces are attached.
hame seat groove—The outside groove of the collar, where the two hames lay.
hazards—Part of the marathon portion of a Combined Driving Event, usually consisting of natural hazards that could be found on a driving trip.
header—One who stands at the head of the horse, specifically during an arena lineup.
impulsion—Increase in the energy and power of the horse’s push-off from the ground.
lengthening of the stride—Increasing the distance covered by the horse in each stride, without a change in rhythm.
marathon—Cross-country portion of a combined driving event.
Meadowbrook cart—Wooden, high-wheeled cart with hinged seats for easy entry.
point of draft—The 90-degree angle of tug to hame to point of shoulder. The load comes in contact with the animal’s shoulder at this point.
reinback—Backward motion in which the legs are raised and set down simultaneously in diagonal pairs, with hind legs remaining well in line. The horse must move backward in an unhurried manner with head flexed and straight, pushing the vehicle back in a straight line.
shaft loops—Sturdy loops attached to the saddle of the harness which support the shafts of the vehicle.
back—See reinback.
bearing rein—The rein with contact to the driving bit, not the overcheck bit.
bight—A slack part, a loop; or, excess reins.
blinders/blinkers—Bridle part that blocks the horse’s view to the side and rear.
breeching/britchen—The part of a harness that passes around the rump of a driving animal to act as a brake when stopping the vehicle.
bridoon/bradoon—Overcheck/sidecheck bit; a small bit with a jointed or unjointed mouthpiece, used with the overcheck or sidecheck rein.
buggy—Four-wheeled vehicle, esp. U.S.A.
cart—Two-wheeled vehicle, wooden or metal.
cavesson—Noseband to help keep the horse’s mouth closed.
close the back—Move forward willingly the same distance backed.
combined driving event—Outdoor competition consisting of three parts: Dressage, Marathon, and Cones. Takes place over a 2- or 3-day period. Similar to 3-day eventing.
crupper—Leather loop passing under the horse’s tail and fastened to the backstrap of the harness to keep the harness in place.
draft—Widest point of the collar. See also width of draft.
dressage—A French word meaning “training” or “schooling.” Dressage involves the use of hands, seat or weight, and legs in varying degrees to guide the horse through a set of maneuvers that are natural to the horse. Dressage teaches a horse to be obedient, willing, supple, and highly responsive to the wishes of the rider.
extended trot—Lengthened stride, covering more ground while remaining on the bit with light contact. Greater impulsion from hindquarters.
fine harness—Light harness with no breeching, often used in show rings.
26 4-H Driving Manual, PNW 229
singletree—Pivoting horizontal crossbar on the vehicle to which the harness traces are attached. Also known as a wiffletree.
slow trot/jog—The slow trot/jog should be regular and cadenced with energy. The steps should be shorter than in the working trot. This is not a Western Pleasure jog trot. There should be steady contact on the reins, but the horse should not have to be held strongly.
strong trot—Increase in pace and length of stride while remaining well balanced. Light contact should be maintained.
sulky—Light, two-wheeled racing cart for one person. Also called a bike.
traces—Heavy straps that attach to the breast collar or hames and to the vehicle.
transition—Change from one gait to another.
travois—Two poles attached to the animal with free ends dragging on the ground, and a platform for carrying the load. Originally used by American Plains Indians. Used in ground training to accustom the horse to the pull of a vehicle.
tugs—See shaft loops
turnout—Driver, horse, harness, and vehicle fitted for a show.
vehicle—Includes but is not limited to a cart, wagon, sulky, or gig. May be two- or four-wheeled.
wagon—Four-wheeled, heavy vehicle for hauling freight.
walk—The walk is a regular four-beat gait. The walk should be forward, energetic, and marching without being sluggish or hurried.
width of draft—The distance around the widest part of one side of the collar.
working trot—The working trot should also be regular and cadenced. It should have a longer stride and greater energy than the slow trot. The working trot should be ground-covering, energetic, and forward, with good contact on the reins.
4-H Driving Manual, PNW 229 27
VIII. For More InformationPublications
You can order many of these publications from your local tack shop or bookstore, or they may be available at your local library.Breaking and Training the Driving Horse by
Doris Ganton. 1985. Wilshire Book Co., Hollywood, CA. ISBN 0-87980-272-3.
Breaking a Horse to Harness by Sallie Walrond. 2000. J.A. Allen & Co., Ltd., London. ISBN-13: 9780851318233
Driving Questions Answered by Sallie Walrond. 1995. Half Halt Press, Boonsboro, MD. ISBN 1-872082-80-7.
Driving a Harness Horse by Sallie Walrond. 1990. J.A. Allen & Co., Ltd., London. ISBN 0-85131-551-8.
Harnessing Up by Anne Norris and Caroline Douglas. 2000. J.A. Allen & Co., Ltd., London. ISBN 0-85131-657-3.
Starting to Drive by Sallie Walrond. 1994. Kenilworth Press, Ltd., United Kingdom ISBN 1-872082-47-5.
AssociationsAmerican Driving Society (ADS)
PO Box 278 Cross Plains, WI 53528 htttp://www.americandrivingsociety.org
United States Equestrian Federation, Inc. (U.S. Equestrian) 4047 Iron Works Parkway Lexington, KY 40511 http://www.usef.org
Carriage Association of America 3915 Jay Trump Road Lexington, KY 40511 http://www.caaonline.com
© 2009 Oregon State University
Pacific Northwest Extension publications are produced cooperatively by the three Pacific Northwest Land-Grant universities: Oregon State University, Washington State University, and the University of Idaho. Similar crops, climate, and topography create a natural geographic unit that crosses state lines. Since 1949, the PNW program has published more than 600 titles, preventing duplication of effort, broadening the availability of faculty specialists, and substantially reducing costs for the participating states.
Published and distributed in furtherance of the Acts of Congress of May 8 and June 30, 1914, by the Oregon State University Extension Service, Washington State University Extension, University of Idaho Cooperative Extension System, and the U.S. Department of Agriculture cooperating.
The three participating Extension Services offer educational programs, activities, and materials--without regard to race, color, religion, sex, sexual orientation, national origin, age, marital status, disability, and disabled veteran or Vietnam-era veteran status--as required by Title VI of the Civil Rights Act of 1964, Title IX of the Education Amendments of 1972, and Section 504 of the Rehabilitation Act of 1973. The Oregon State University Extension Service, Washington State University Extension, and University of Idaho Extension are Equal Opportunity Employers. Revised September 2009. Replaces EM4881 (Washington).