4h/n indoor gardening and plant selection
TRANSCRIPT
Indoor Gardening
4h/n Artificial Lighting, Terrariums, Hanging Baskets, and Plant Selection
UNITED STATES DEPARTMENT OF AGRICULTURE
HOME AND GARDEN BULLETIN NUMBER 220
PREPARED BY AGRICULTURAL RESEARCH SERVICE
"^^/fFÍ
CONTENTS
Personal plants 3 Types of indoor gardens 4
Planter box 6 Lighting systems 8
Selecting a location 22 Stocking the garden 22
Plant guide 23 Plant designations 24 Setting the plants 24
Care of the garden 33 Training plants 33
Conditioned plants 34 General care 37
Watering 37 Fertilizing 40
Special gardening 40 Terrariums 40 Hanging baskets 43 Plants for the beginner 45 Other care 46
Other uses 46 Air layering 47
This pubUcation supersedes Home and Garden Bulletin No. 187, "Indoor Gardens With Con- trolled Lighting", issued May 1971.
Washington, D.C. Issued February 1978
For sale by the Superintendent of Documents, U.S. Government Printing Office Washington, D.C. 20402
Stock No. 001-O00-03758-7

INDOOR GARDENING
Artificial Lighting, Terrariums, Hanging Baskets, and Plant Selection
Prepared by Henry M. Cathey, ARS Research Horticulturist» and Lowell E. Campbell, ARS Agricultural Engineer^
PERSONAL PLANTS
You can grow and display many kinds of decorative house plants in your home by using an indoor garden. People are realizing that house plants—displayed in planters equipped primarily with fluorescent lamps—are an attractive asset and a constantly changing decoration for any space in the home. Much of this popularity has been due to the pro- duction, distribution, and varieties of house plants that have been made available to the consumer.
Most house plants are grown com- mercially under a protective covering in artificial growing media and fed
1 Florist and Nursery Crops Laboratory, Plant Genetics and Germplasm Institute, Belt- sville Agricultural Research Center, Beltsville, Md. 20705.
^Agricultural Equipment Laboratory, Envi- ronmental Quality Institute, Beltsville Agricul- tural Research Center, Beltsville, Md. 20705.
regularly with fertilizers. Care is taken to see that plant diseases and insect pests are controlled. A major aim of the plant industry is to- broaden the range of plants—their foliage and their flowering—which can be grown successfully. They have worked to develop easy-to-under- stand care instructions for handling the plants and to encourage the installation of lighting facilities suit- able for showing, acclimatizing, and growing them.
This accomplishment is made pos- sible by cooperation between many specialists. Florists must work with engineers and lighting designers to build the facilities for highlighting and maintaining the plants. Interior designers and architects must mix plants aesthetically with other fur- nishings. Growers and indoor gar- deners must select both the plants and the watering techniques to insure the continued success of the plants.
TYPES OF INDOOR GARDENS
Most house plants require light to survive in indoor locations. If natural light in the living space is unsufficient to help maintain the plants then arti- ficial light must be used.
To grow plants satisfactorily in an indoor garden one must remember to—
• Water the plants thoroughly, but only often enough to prevent wilting.
• Fertilize the plants every 2 to 4 weeks while they are actively growing.
• Illuminate the plants with fluo- rescent lamps 12 to 16 hours daily.
Fluorescent lamps have allowed house plants to thrive in indoor gar- dens—plants that barely existed indoors before the development of such light sources. These lamps have many benefits: they give uniform illu- mination and emit a minimum amount of heat into the air, they are available in a variety of shapes and sizes, and they give the proper envi- ronment for propagation of plants by root cuttings, air layering, or seed- lings. Whether the location has some daylight, or little or no daylight, fluo- rescent lamps provide the proper illu- mination. (For details see p. 8.)
To determine whether adequate light exists in a location, it is neces- sary to use a light meter especially designed for measuring artificial lighting. For this, and other light measurement details, see p. 18.
Plans for II types of indoor gar- dens are shown in this bulletin. Anyone who can use woodworking tools should be able to construct an indoor garden by following these gen- eral plans.
• PLAN A is for a garden about 4
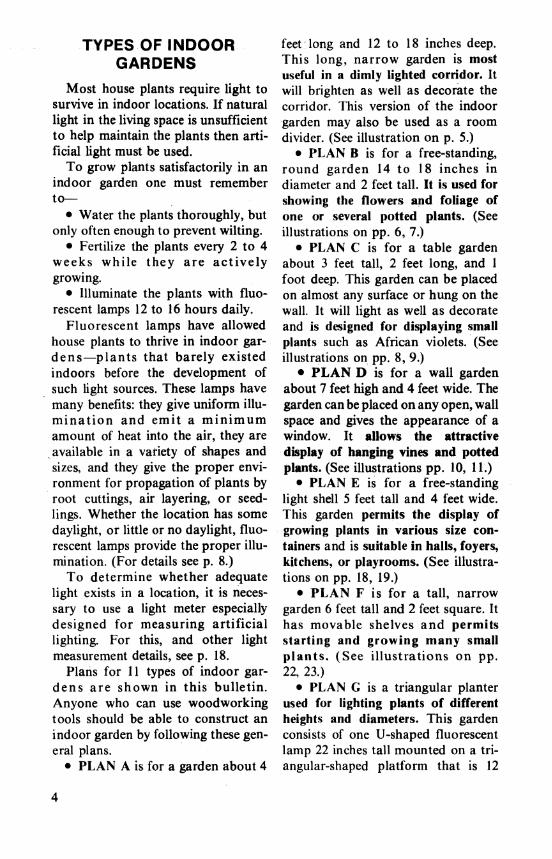
feet long and 12 to 18 inches deep. This long, narrow garden is most useful in a dimly lighted corridor. It will brighten as well as decorate the corridor. This version of the indoor garden may also be used as a room divider. (See illustration on p. 5.)
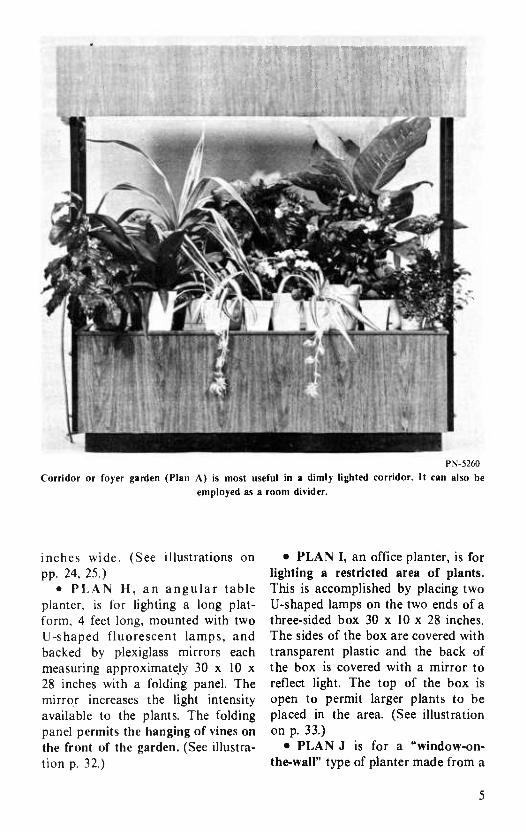
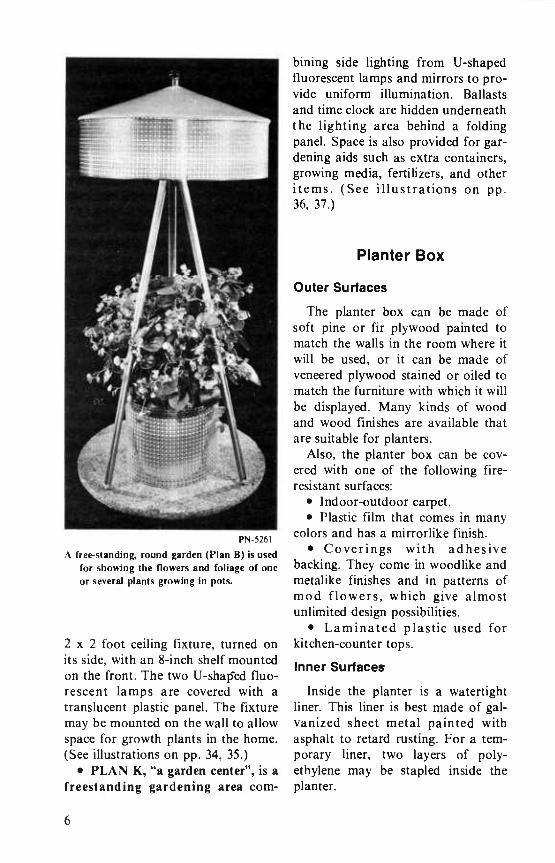
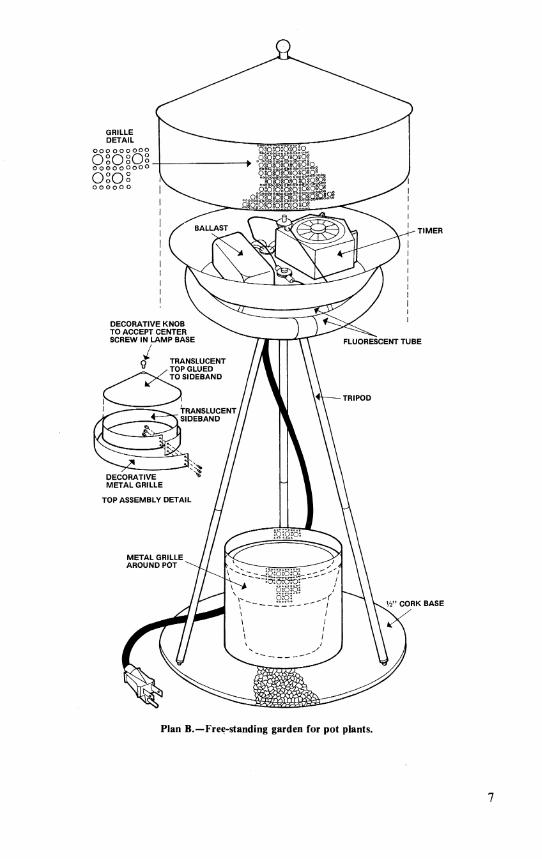
• PLAN B is for a free-standing, round garden 14 to 18 inches in diameter and 2 feet tall. It is used for showing the flowers and foliage of one or several potted plants. (See illustrations on pp. 6, 7.)
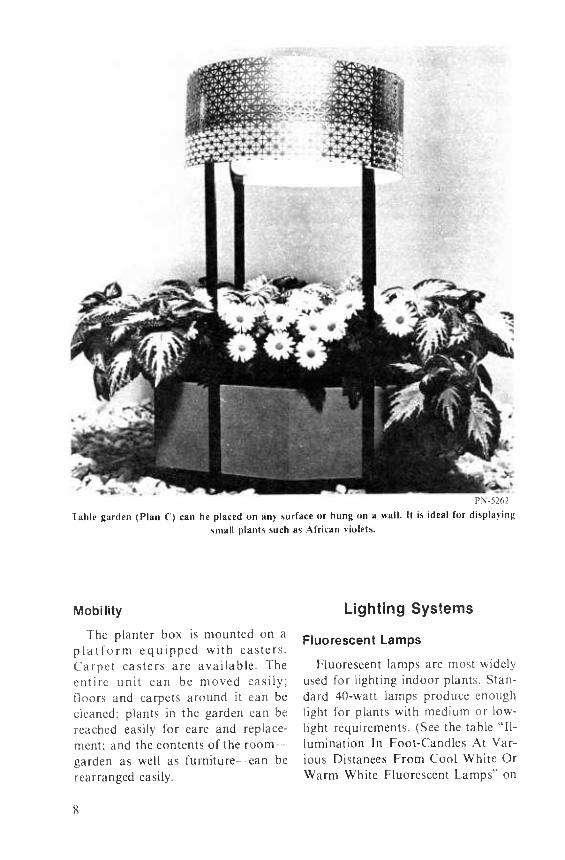
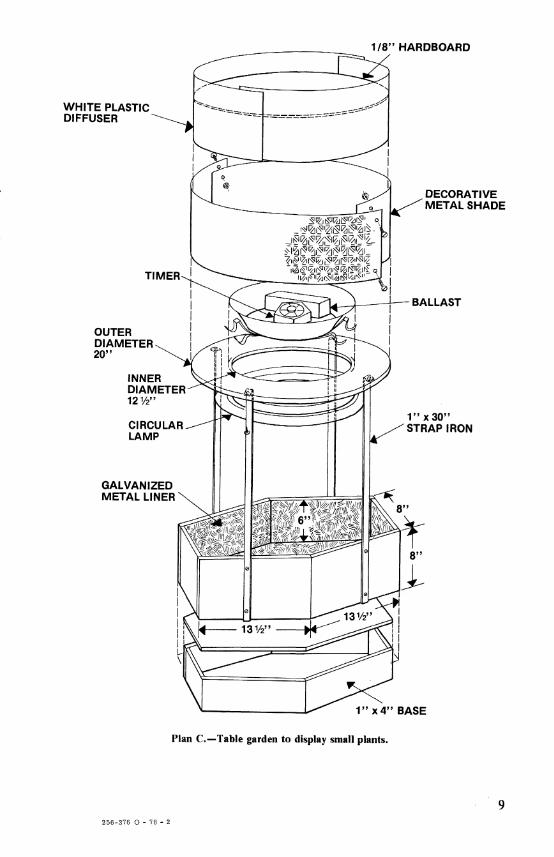
• PLAN C is for a table garden about 3 feet tall, 2 feet long, and 1 foot deep. This garden can be placed on almost any surface or hung on the wall. It will light as well as decorate and is designed for displaying small plants such as African violets. (See illustrations on pp. 8, 9.)
• PLAN D is for a wall garden about 7 feet high and 4 feet wide. The garden can be placed on any open, wall space and gives the appearance of a window. It allows the attractive display of hanging vines and potted plants. (See illustrations pp. 10, 11.)
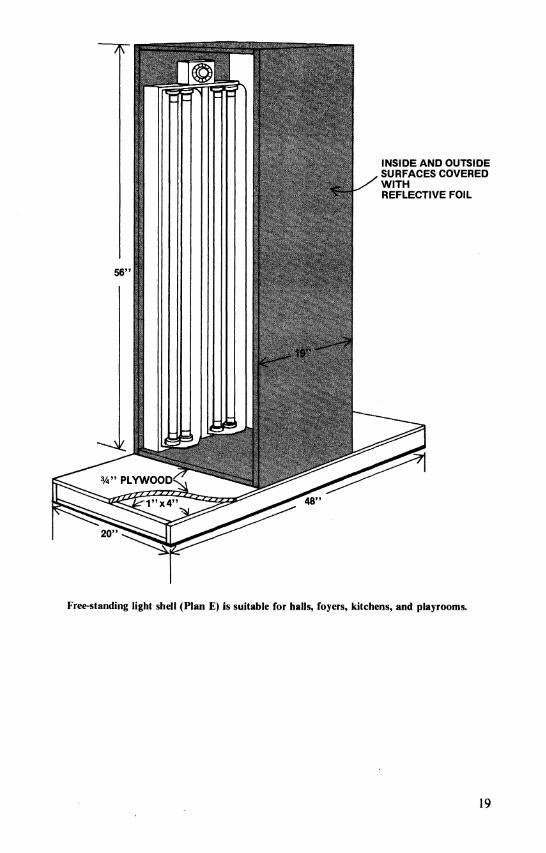
• PLAN E is for a free-standing light shell 5 feet tall and 4 feet wide. This garden permits the display of growing plants in various size con- tainers and is suitable in halls, foyers, kitchens, or playrooms. (See illustra- tions on pp. 18, 19.)
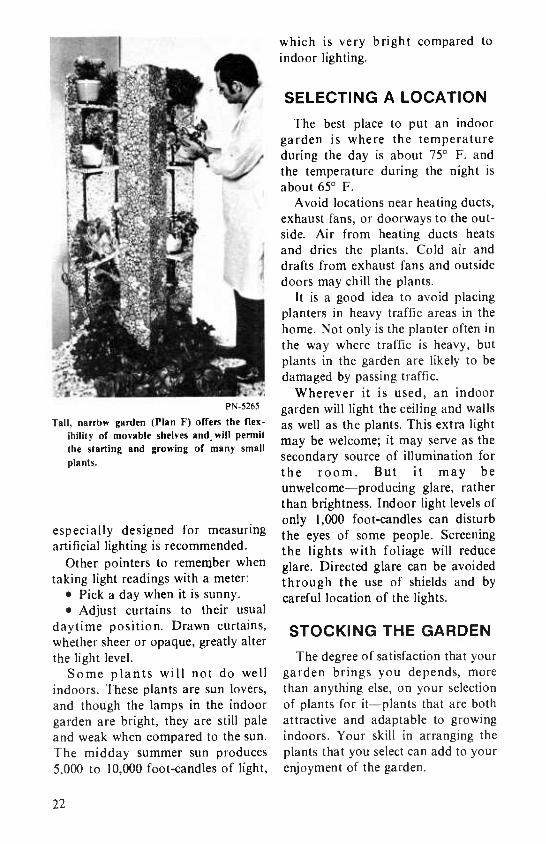
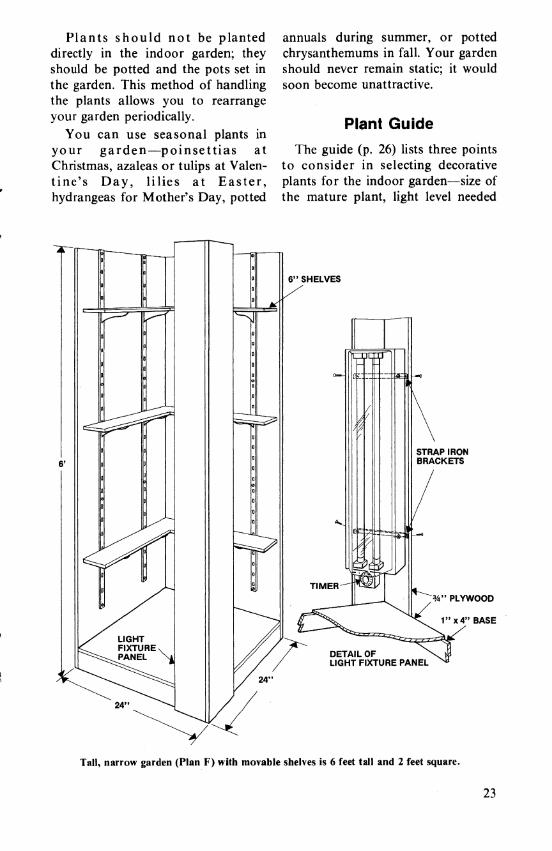
• PLAN F is for a tall, narrow garden 6 feet tall and 2 feet square. It has movable shelves and permits starting and growing many small plants. (See illustrations on pp. 22, 23.)
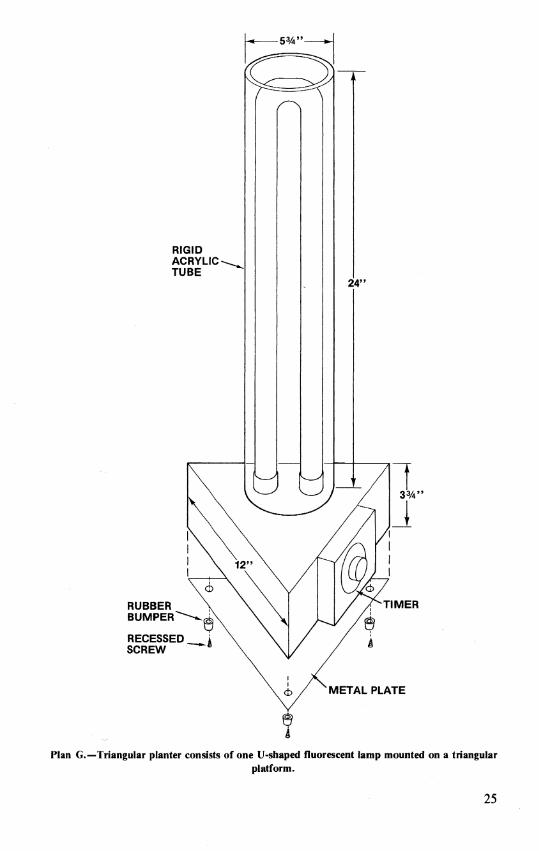
• PLAN G is a triangular planter used for lighting plants of different heights and diameters. This garden consists of one U-shaped fluorescent lamp 22 inches tall mounted on a tri- angular-shaped platform that is 12
PN-5260 Corridor or foyer garden (Plan A) is most useful in a dimly lighted corridor. It can also be
employed as a room divider.
inches wide. (See illustrations on pp. 24, 25.)
• PLAN H, an angular table planter, is for lighting a long plat- form, 4 feet long, mounted with two U-shaped fluorescent lamps, and backed by plexiglass mirrors each measuring approximately 30 x 10 x 28 inches with a folding panel. The mirror increases the light intensity available to the plants. The folding panel permits the hanging of vines on the front of the garden. (See illustra- tion p. 32.)
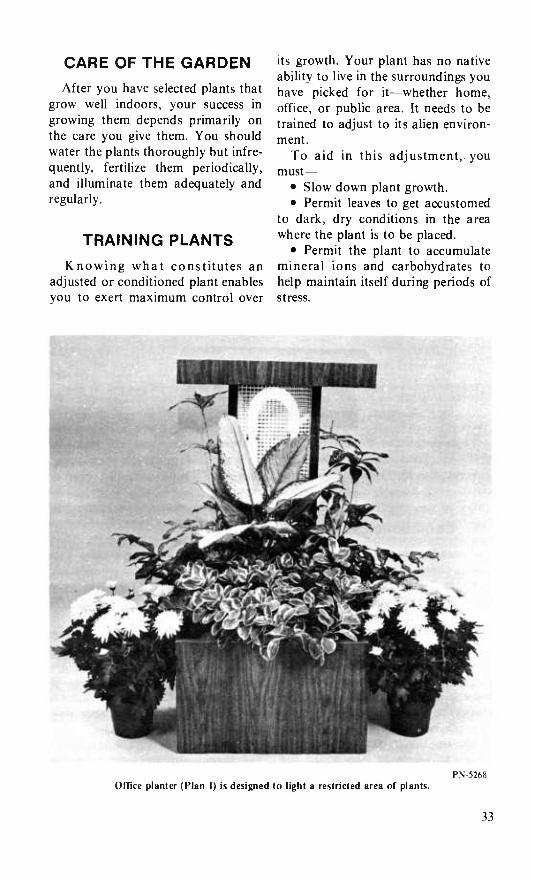
• PLAN I, an office planter, is for lighting a restricted area of plants. This is accomplished by placing two U-shaped lamps on the two ends of a three-sided box 30 x 10 x 28 inches. The sides of the box are covered with transparent plastic and the back of the box is covered with a mirror to reflect light. The top of the box is open to permit larger plants to be placed in the area. (See illustration on p. 33.)
• PLAN J is for a "window-on- the-wall" type of planter made from a
PN-5261
A free-standing, round garden (Plan B) is used for showing the flowers and foliage of one or several plants growing in pots.
2x2 foot ceiling fixture, turned on its side, with an 8-inch shelf mounted on the front. The two U-shajfed fluo- rescent lamps are covered with a translucent plastic panel. The fixture may be mounted on the wall to allow space for growth plants in the home. (See illustrations on pp. 34, 35.)
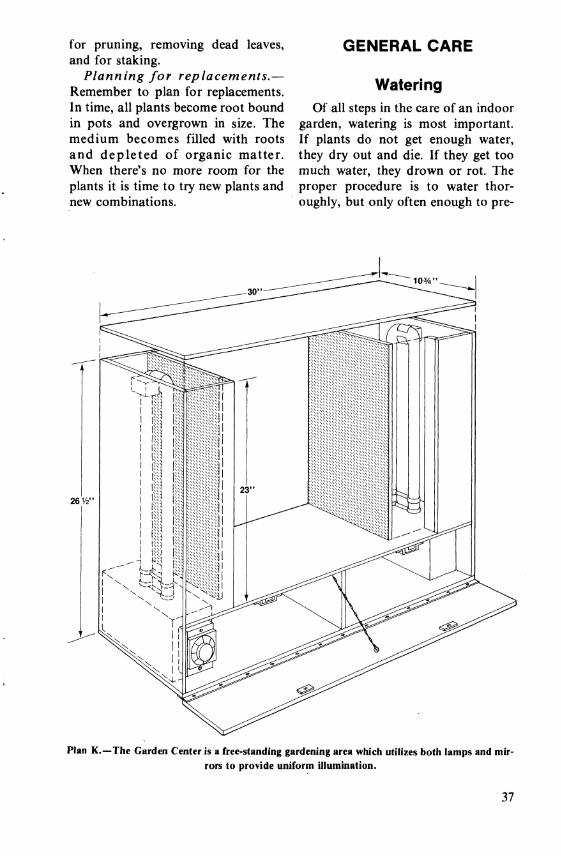
• PLAN K, "a garden center", is a freestanding gardening area com-
bining side lighting from U-shaped fluorescent lamps and mirrors to pro- vide uniform illumination. Ballasts and time clock are hidden underneath the lighting area behind a folding panel. Space is also provided for gar- dening aids such as extra containers, growing media, fertilizers, and other items. (See illustrations on pp. 36, 37.)
Planter Box
Outer Surfaces
The planter box can be made of soft pine or fir plywood painted to match the walls in the room where it will be used, or it can be made of veneered plywood stained or oiled to match the furniture with which it will be displayed. Many kinds of wood and wood finishes are available that are suitable for planters.
Also, the planter box can be cov- ered with one of the following fire- resistant surfaces:
• indoor-outdoor carpet. • Plastic film that comes in many
colors and has a mirrorlike finish. • Coverings with adhesive
backing. They come in woodlike and metal ike finishes and in patterns of mod flowers, which give almost unlimited design possibilities.
• Laminated plastic used for kitchen-counter tops.
Inner Surfaces
Inside the planter is a watertight liner. This liner is best made of gal- vanized sheet metal painted with asphalt to retard rusting. For a tem- porary liner, two layers of poly- ethylene may be stapled inside the planter.
GRILLE DETAIL
oo o o o o ooo 0S0§08. ooooooooo
osos 3§Q?Og080g080|_
DECORATIVE KNOB TO ACCEPT CENTER SCREW IN LAMP BASE
J. TRANSLUCENT ^ TOP GLUED
TO SIDEBAND
TRANSLUCENT/ V SIDEBAND
FLUORESCENT TUBE
a DECORATIVE "*» METAL GRILLE
TOP ASSEMBLY DETAIL
METAL GRILLE / / AROUND POT """^-v// k^^^. \\
W < /1
1 /
\ / \ / \ 1
\ \ 1
Plan B.—Free-standing garden for pot plants.
PN-5262
lablc (¡arden (Plan C ) can be placed on any surface or hung on a wall. 11 Is ¡deal for displaying small plants such as African violets.
Mobility
The planter box is mounted on a platform equipped with casters. Carpet casters are available. The entire unit can be moved easily; lloors and carpets around it can be cleaned; plants in the garden can be reached easily for care and replace- ment; and the contents of the room— garden as well as furniture—can be rearranged easily.
Lighting Systems
Fluorescent Lamps
Fluorescent lamps are most widely used for lighting indoor plants. Stan- dard 40-watt lamps produce enough light for plants with medium or low- light requirements. (See the table "Il- lumination In Foot-Candles At Var- ious Distances From Cool White Or Warm White Fluorescent Lamps" on
8
1/8" HARDBOARD
WHITE PLASTIC DIFFUSER
TIMER
OUTER DIAMETER 20"
INNER DIAMETER' 12 V2"
CIRCULAR. LAMP
GALVANIZED METAL LINER
DECORATIVE METAL SHADE
BALLAST
1"x30" STRAP IRON
BASE
Plan C—Table garden to display small plants.
256-376 O - 78 - 2
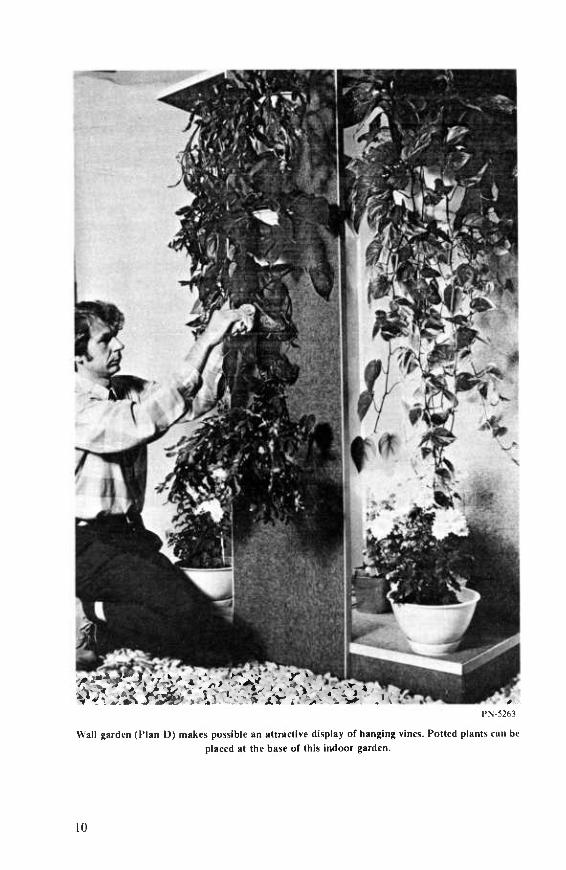
PN-5263
Wall garden (Plan D) makes possible an attractive display of hanging vines. Potted plants can be
placed at the base of this indoor garden.
10
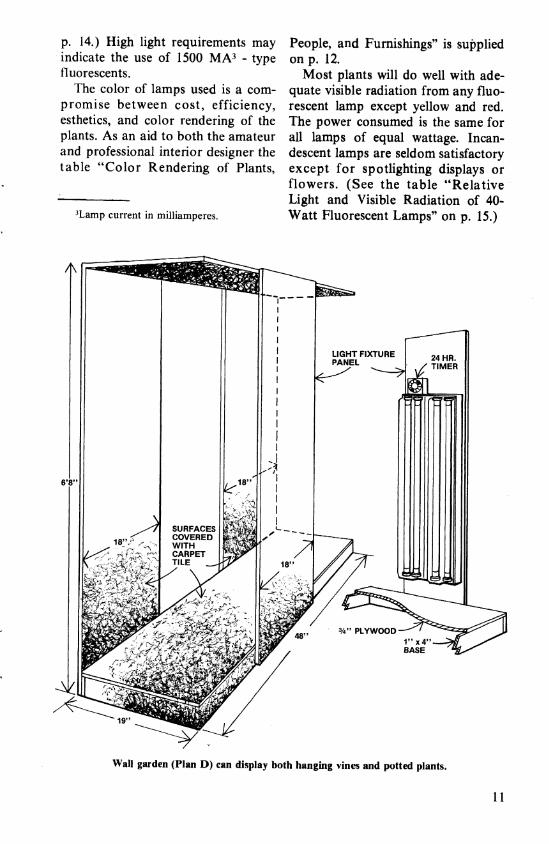
p. 14,) High light requirements may indicate the use of 1500 MA^ - type fluorescents.
The color of lamps used is a com- promise between cost, efficiency, esthetics, and color rendering of the plants. As an aid to both the amateur and professional interior designer the table "Color Rendering of Plants,
^Lamp current in milliamperes.
People, and Furnishings" is supplied on p. 12.
Most plants will do well with ade- quate visible radiation from any fluo- rescent lamp except yellow and red. The power consumed is the same for all lamps of equal wattage. Incan- descent lamps are seldom satisfactory except for spotlighting displays or flowers. (See the table "Relative Light and Visible Radiation of 40- Watt Fluorescent Lamps" on p. 15.)
Wall garden (Plan D) can display both hanging vines and potted plants.
11
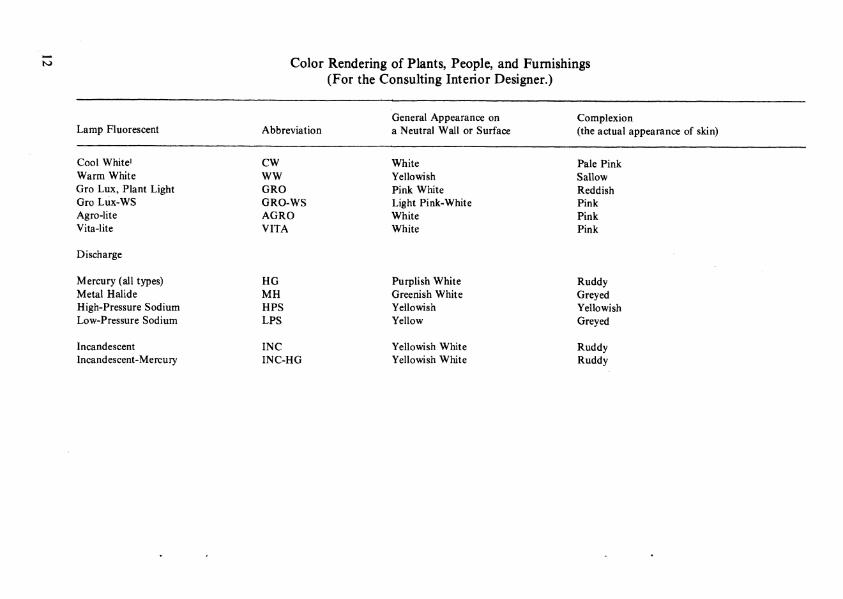
Color Rendering of Plants, People, and Furnishings (For the Consulting Interior Designer.)
General Appearance on Complexion Lamp Fluorescent Abbreviation a Neutral Wall or Surface (the actual appearance of skin)
Cool White' CW White Pale Pink Warm White WW Yellowish Sallow Gro Lux, Plant Light GRO Pink White Reddish Gro Lux-WS GRO-WS Light Pink-White Pink Agro-lite AGRO White Pink Vita-lite VITA White Pink
Discharge
Mercury (all types) HG Purplish White Ruddy Metal Halide MH Greenish White Greyed High-Pressure Sodium HPS Yellowish Yellowish Low-pressure Sodium LPS Yellow Greyed
Incandescent INC Yellowish White Ruddy Incandescent-Mercury INC-HG Yellowish White Ruddy
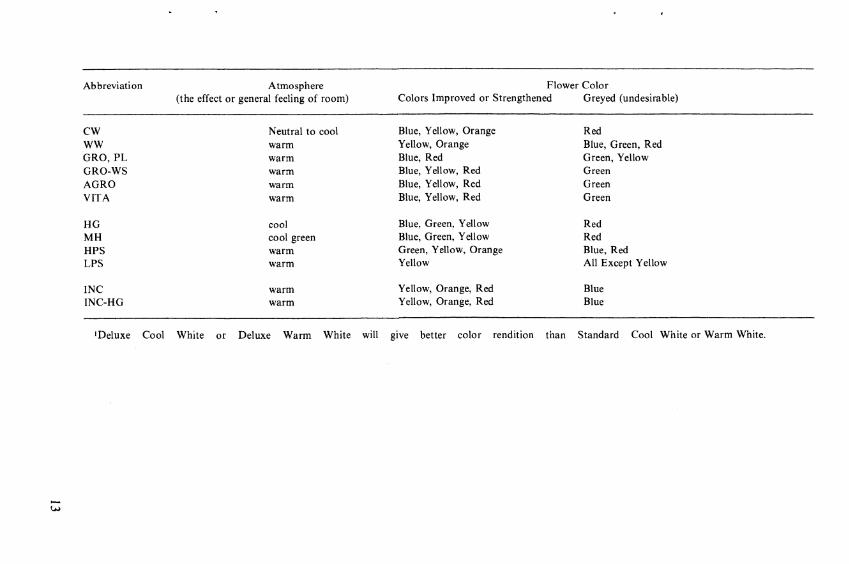
Abbreviation Atmosphere (the effect or general feeling of room)
Flower Color Colors Improved or Strengthened Greyed (undesirable)
CW ww GRO, PL GRO-WS AGRO VITA
HG MH HPS LPS
INC INC-HG
Neutral to cool Blue, Yellow, Orange Red warm Yellow, Orange Blue, Green, Red warm Blue, Red Green, Yellow warm Blue, Yellow, Red Green warm Blue, Yellow, Red Green warm Blue, Yellow, Red Green
cool Blue, Green, Yellow Red cool green Blue, Green, Yellow Red warm Green, Yellow, Orange Blue, Red warm Yellow All Except Yellow
warm Yellow, Orange, Red Blue warm Yellow, Orange, Red Blue
'Deluxe Cool White or Deluxe Warm White will give better color rendition than Standard Cool White or Warm White.
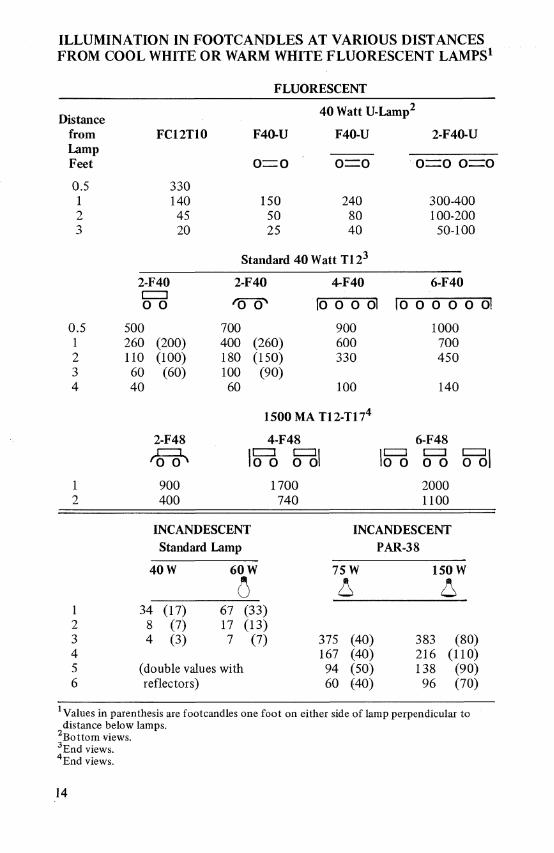
ILLUMINATION IN FOOTCANDLES AT VARIOUS DISTANCES FROM COOL WHITE OR WARM WHITE FLUORESCENT LAMPS^
FLUORESCENT
Distance 40 Watt U- Lamp 2
from FC12T10 F40-U F40-U 2-F40-U Lamp
o_o Feet Orro O 0 0 O
0.5 330 1 140 150 240 300-400 2 45 50 80 100-200 3 20 25 40 50-100
Standard 40 Watt Tl 2^
2-F40 1 1 0 0
2-F40
'0 0^
4-F40 6-F40
10 0 0 01 10 0 0 0 0 01
0.5 500 700 900 1000 1 2 3 4
260 (200) 110 (100) 60 (60) 40
400 (260) 180 (150) 100 (90) 60
600 330
100
700 450
140
1500MAT12-TI7'*
2-F48 I 1
4-F48 1 1 1 1 O O O O
1 1 0 0
6-F48 1 1 1 r
'0 0^ 0 0 0 O
1 900 1700 2000 2 400 740 1100
INCANDESCENT INCANDESCENT Standard Lamp
40W 60W
1 PAR-38
75 W
A 150 W
1 2 3 4 5 6
34 (17) 67 (33) 8 (7) 17 (13) 4 (3) 7 (7)
(double values with reflectors)
375 (40) 167 (40) 94 (50) 60 (40)
383 (80) 216 (110) 138 (90) 96 (70)
Values in parenthesis are footcandles one foot on either side of lamp perpendicular to distance below lamps. Bottom views. End views. End views.
14

RELATIVE LIGHT AND VISIBLE RADIATION OUTPUT OF 40-WATT LAMPS
40-Watt Lamp type Fluorescent Percent Lumens
Percent Visible Radiation
Cool White Warm White Plant Growth Wide Spectrum - Color Rendering Index (CRI) 90 or above
100 100 100 100 32 to 60 70 to 80 60 to 70 75 to 85
Fluorescent tubes should be replaced periodically when they are significantly dimmer than new lamps. For standard lamps (400-450 MA) this will be 1 or 2 years when oper- ated 15 hours a day. For 1500 MA lamps replacement each year is rec- ommended.
Some lamps will become dimmer in less time while other lamps may last longer. Keep extra lamps on hand for replacement. Remember that a fixture for two lamps will not operate with only one lamp. Stagger lamp replacement over a period of several weeks to avoid abrupt changes in light level. For the first 4 or 5 days new lamps may be up to one-fifth brighter than they will be subsequently.
It is important to know the dif- ferent ways that plants respond to the variety of lamps that may be employed. (See table "Lamps And Plant Response" on p. 16 for this information.)
Light Conversion
It is important to use equal energy when converting from one light source to another. Living spaces are lit with natural available light and
with many different kinds of lamps. Fluorescent and incandescent lamps are the types most frequently used. Each lamp has a different visible spectrum. To convert from one lamp source to another, use the table "Ap- propriate Foot-Candles For Equal Radiant Energy" on p. 20.
Lighting Fixtures
Standard fluorescent lighting fix- tures or luminaires are most easily utilized. Strip or channel fixtures or general lighting fixtures can be used as shown in the plans. Four-foot lamps, or the U-lamp (slightly less than 2 feet overall in length) are easy to employ.
Electrical connections require a three-prong plug both for safety and positive operation of the lamps. Ungrounded fixtures or lamps without grounded metal reflectors may not operate reliably. Especially noisy fixtures may require ballast replacement.
Components, available at electrical supply stores, can be wired when standard fixtures are not convenient. (Always have qualified persons install the wiring and make sure the wiring meets the local and National Elec-
15
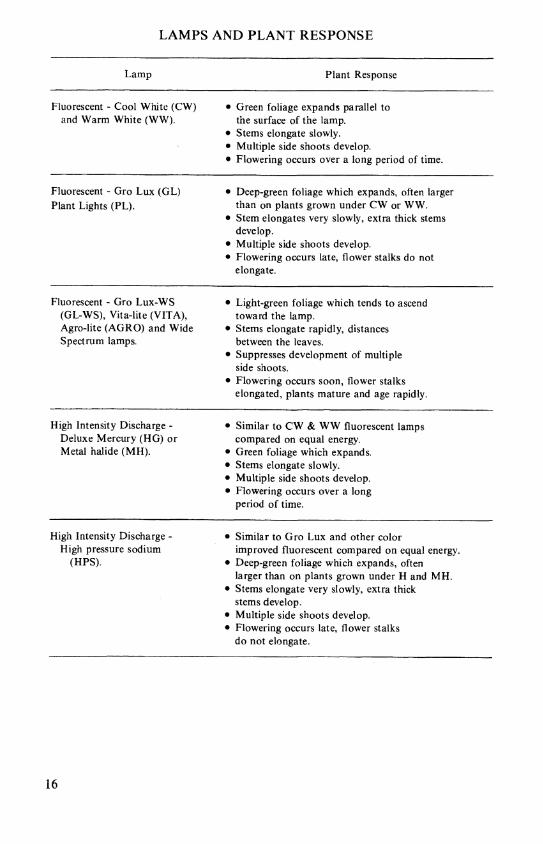
LAMPS AND PLANT RESPONSE
Lamp Plant Response
Fluorescent - Cool White (CW) and Warm White (WW).
Green foliage expands parallel to the surface of the lamp. Stems elongate slowly. Multiple side shoots develop. Flowering occurs over a long period of time.
Fluorescent - Gro Lux (GL) Plant Lights (PL).
Deep-green foliage which expands, often larger than on plants grown under CW or WW. Stem elongates very slowly, extra thick stems develop. Multiple side shoots develop. Flowering occurs late, flower stalks do not elongate.
Fluorescent - Gro Lux-WS (GL-WS), Vita-lite (VITA), Agro-lite (AGRO) and Wide Spectrum lamps.
Light-green foliage which tends to ascend toward the lamp. Stems elongate rapidly, distances between the leaves. Suppresses development of multiple side shoots. Flowering occurs soon, flower stalks elongated, plants mature and age rapidly.
High Intensity Discharge - Deluxe Mercury (HG) or Metal halide (MH).
Similar to CW & WW fluorescent lamps compared on equal energy. Green foliage which expands. Stems elongate slowly. Multiple side shoots develop. Flowering occurs over a long period of time.
High Intensity Discharge - High pressure sodium
(HPS).
Similar to Gro Lux and other color improved fluorescent compared on equal energy. Deep-green foliage which expands, often larger than on plants grown under H and MH. Stems elongate very slowly, extra thick stems develop. Multiple side shoots develop. Flowering occurs late, flower stalks do not elongate.
i6

LAMPS AND PLANT RESPONSE
Lamp
High Intensity Discharge - Low Pressure Sodium (LPS)
Incandescent (INC) and Incandescent-Mercury (INC-HG)
Plant Response
• Extra deep-green foliage, bigger and thicker than on plants grown under other light sources.
• Stem elongation is slowed, very thick stems develop.
• Multiple side shoots develop even on secondary shoots.
• Flowering occurs, flower stalks do not elongate.
Exceptions: Saintpaulias, lettuce, and Impatiens must have supplemental sunlight or incandescent to insure development of chlorophyll and reduction of stem elongation.
• Paling of foliage, thinner and longer than on plants grown under light sources.
• Stem elongation is excessive, eventually become spindly and easily breaks.
• Side shoot development is suppressed, plants expand only in height.
• Flowering occurs rapidly, the plants mature and senescence takes place.
Exceptions: Rosette and thick-leaved plants such as Sansevieria may maintain themselves for many months. The new leaves which eventually develop will elongate and will not have the typical characteristics of the species.
trical Code.) The components neces- sary are—
• Lampholders. Two are required for each lamp. (U-tubes require spe- cial lampholders available at elec- trical supply stores.)
• Ballast. This is a built-in power regulator.
• Wire, Insulated, heat-resistant type.
• Metal enclosure. This will house the ballast and the wiring to the lampholders.
Automatic Timers
Plants need light for 8 to 12 hours a day. Use an automatic timer to con- trol the length of illumination. Do not depend on your memory to turn on the lamps at the proper time.
An automatic timer is available at hardware and electrical stores. The timer can be set to turn the lamps on and off at any time. For 16 hours of light, you can set it to turn on at 6 a.m. and off at 10 p.m.
17 256-376 O - 78 -
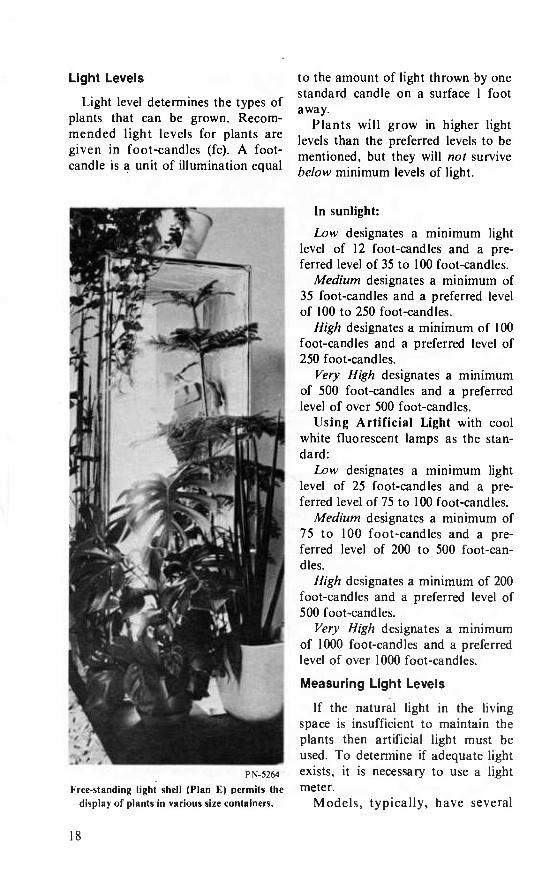
Light Levels
Light level determines the types of plants that can be grown. Recom- mended light levels for plants are given in foot-candles (fc). A foot- candle is a unit of illumination equal
to the amount of light thrown by one standard candle on a surface 1 foot away.
Plants will grow in higher light levels than the preferred levels to be mentioned, but they will not survive below minimum levels of light.
PN-5264
Free-standing light shell (Plan E) permits the display of plants in various size containers.
In sunlight:
Low designates a minimum light level of 12 foot-candles and a pre- ferred level of 35 to 100 foot-candles.
Medium designates a minimum of 35 foot-candles and a preferred level of 100 to 250 foot-candles.
High designates a minimum of 100 foot-candles and a preferred level of 250 foot-candles.
Very High designates a minimum of 500 foot-candles and a preferred level of over 500 foot-candles.
Using Artificial Light with cool white fluorescent lamps as the stan- dard:
Low designates a minimum light level of 25 foot-candles and a pre- ferred level of 75 to 100 foot-candles.
Medium designates a minimum of 75 to 100 foot-candles and a pre- ferred level of 200 to 500 foot-can- dles.
High designates a minimum of 200 foot-candles and a preferred level of 500 foot-candles.
Very High designates a minimum of 1000 foot-candles and a preferred level of over 1000 foot-candles.
Measuring Light Levels
If the natural light in the living space is insufficient to maintain the plants then artificial light must be used. To determine if adequate light exists, it is necessary to use a light meter.
Models, typically, have several
18
56" --•; 'v- -V *-v
i^^'.
INSIDE AND OUTSIDE SURFACES COVERED WITH REFLECTIVE FOIL
Free-standing light shell (Plan £) is suitable for halls, foyers, kitchens, and playrooms.
19
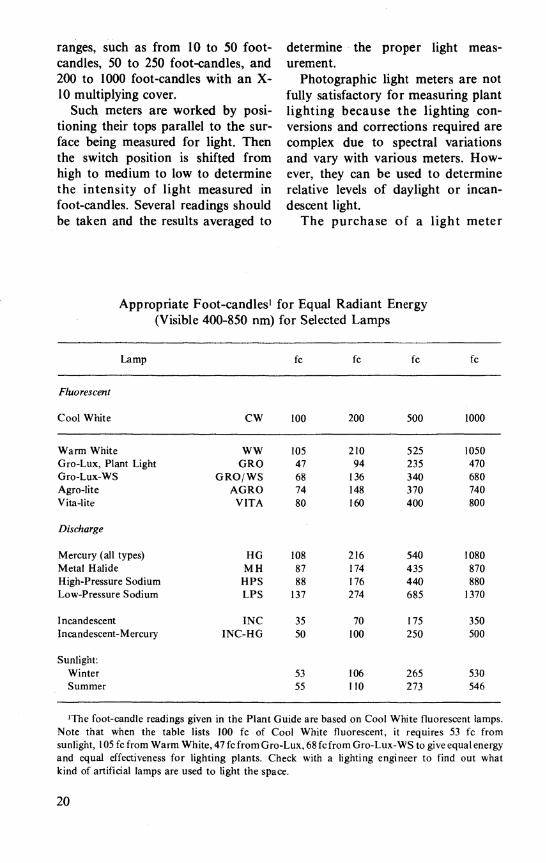
ranges, such as from 10 to 50 foot- determine the proper light meas- candles, 50 to 250 foot-candles, and urement. 200 to 1000 foot-candles with an X- Photographic light meters are not 10 multiplying cover. fully satisfactory for measuring plant
Such meters are worked by posi- lighting because the lighting con- tioning their tops parallel to the sur- versions and corrections required are face being measured for light. Then complex due to spectral variations the switch position is shifted from and vary with various meters. How- high to medium to low to determine ever, they can be used to determine the intensity of light measured in relative levels of daylight or incan- foot-candles. Several readings should descent light, be taken and the results averaged to The purchase of a light meter
Appropriate Foot-candles' for Equal Radiant Energy (Visible 400-850 nm) for Selected Lamps
Lamp fc fc fc fc
Fluorescent
Cool White CW 100 200 500 1000
Warm White ww 105 210 525 1050 Gro-Lux, Plant Light GRO 47 94 235 470 Gro-Lux-WS GRO/WS 68 136 340 680 Agro-lite AGRO 74 148 370 740 Vita-lite VITA 80 160 400 800
Discharge
Mercury (all types) HG 108 216 540 1080 Metal Halide MH 87 174 435 870 High-Pressure Sodium HPS 88 176 440 880 Low-Pressure Sodium LPS 137 274 685 1370
Incandescent INC 35 70 175 350 Incandescent-Mercury INC-HG 50 100 250 500
Sunlight: Winter 53 106 265 530 Summer 55 110 273 546
'Tne foot-candle readings given in the Plant Guide are based on Cool White fluorescent lamps. Note that when the table lists 100 fc of Cool White fluorescent, it requires 53 fc from sunlight, 105 fc from Warm White, 47 fc from Gro-Lux, 68 fcfrom Gro-Lux-WS to give equal energy and equal effectiveness for lighting plants. Check with a lighting engineer to find out what kind of artificial lamps are used to light the space.
20
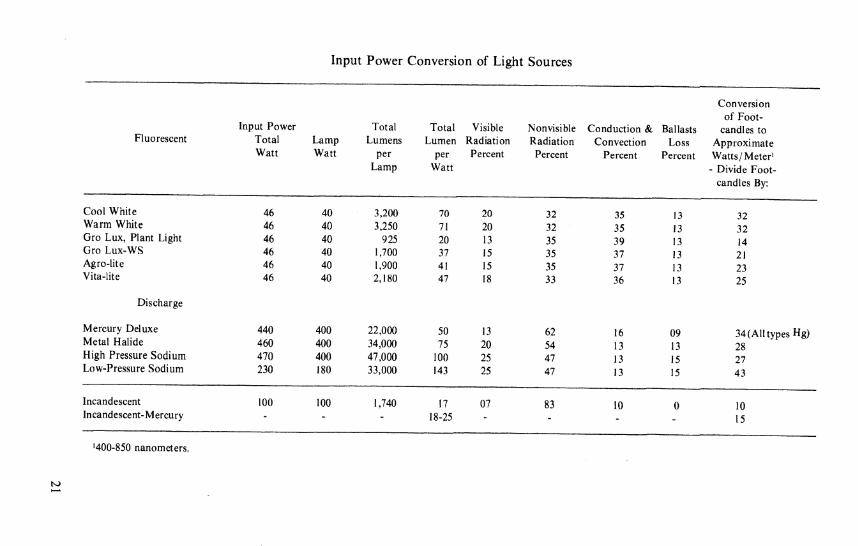
Input Power Conversion of Light Sources
Conversion of Foot-
Input Power Total Total Visible Nonvisible Conduction & Ballasts candles to Fluorescent Total Lamp Lumens Lumen Radiation Radiation Convection Loss Approximate
Watt Watt per Lamp
per Watt
Percent Percent Percent Percent Watts/Meter' - Divide Foot-
candles By:
Cool White 46 40 3,200 70 20 32 35 13 32 Warm White 46 40 3,250 71 20 32 35 13 32 Gro Lux, Plant Light 46 40 925 20 13 35 39 13 14 Gro Lux-WS 46 40 1,700 37 15 35 37 13 21 Agro-lite 46 40 1,900 41 15 35 37 13 23 Vita-lite 46 40 2,180 47 18 33 36 13 25
Discharge
Mercury Deluxe 440 400 22,000 50 13 62 16 09 34 (All types Hg) Metal Halide 460 400 34,000 75 20 54 13 13 28 High Pressure Sodium 470 400 47,000 100 25 47 13 15 27 Low-Pressure Sodium 230 180 33,000 143 25 47 13 15 43
Incandescent 100 100 1,740 17 07 83 10 0 10 Incandescent-Mercury - - - 18-25 - - 15
'400-850 nanometers.
PN-5265
Tall, narrow garden (Plan F) offers the flex- ibility of movable shelves and will permit the starting and growing of many small plants.
especially designed for measuring artificial lighting is recommended.
Other pointers to remenjber when taking light readings with a meter:
• Pick a day when it is sunny. • Adjust curtains to their usual
daytime position. Drawn curtains, whether sheer or opaque, greatly alter the light level.
Some plants will not do well indoors. These plants are sun lovers, and though the lamps in the indoor garden are bright, they are still pale and weak when compared to the sun. The midday summer sun produces 5,000 to 10,000 foot-candles of light.
which is very bright compared to indoor lighting.
SELECTING A LOCATION
The best place to put an indoor garden is where the temperature during the day is about 75° F. and the temperature during the night is about 65° F.
Avoid locations near heating ducts, exhaust fans, or doorways to the out- side. Air from heating ducts heats and dries the plants. Cold air and drafts from exhaust fans and outside doors may chill the plants.
It is a good idea to avoid placing planters in heavy traffic areas in the home. Not only is the planter often in the way where traffic is heavy, but plants in the garden are likely to be damaged by passing traffic.
Wherever it is used, an indoor garden will light the ceiling and walls as well as the plants. This extra light may be welcome; it may serve as the secondary source of illumination for the room. But it may be unwelcome—producing glare, rather than brightness. Indoor light levels of only 1,000 foot-candles can disturb the eyes of some people. Screening the lights with foliage will reduce glare. Directed glare can be avoided through the use of shields and by careful location of the lights.
STOCKING THE GARDEN
The degree of satisfaction that your garden brings you depends, more than anything else, on your selection of plants for it—plants that are both attractive and adaptable to growing indoors. Your skill in arranging the plants that you select can add to your enjoyment of the garden.
22
Plants should not be planted directly in the indoor garden; they should be potted and the pots set in the garden. This method of handling the plants allows you to rearrange your garden periodically.
You can use seasonal plants in your garden—poinsettias at Christmas, azaleas or tulips at Valen- tine's Day, lilies at Easter, hydrangeas for Mother's Day, potted
annuals during summer, or potted chrysanthemums in fall. Your garden should never remain static; it would soon become unattractive.
Plant Guide The guide (p. 26) lists three points
to consider in selecting decorative plants for the indoor garden—size of the mature plant, light level needed
" PLYWOOD
1"x4" BASE
Tall, narrow garden (Plan F) with movable shelves is 6 feet tall and 2 feet square.
23
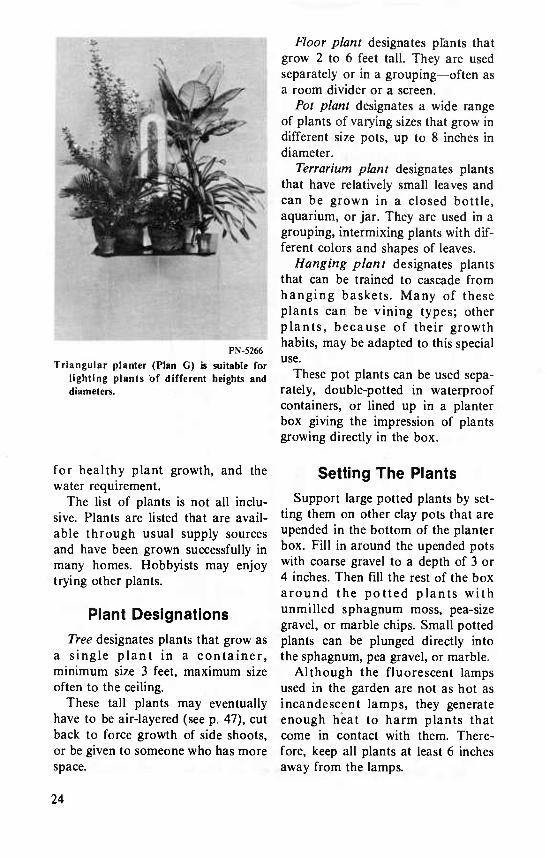
Triangular pi lighting pi diameters.
PN-5266
anter (Plan G) is suitable for ants of different heights and
Floor plant designates prants that grow 2 to 6 feet tall. They are used separately or in a grouping—often as a room divider or a screen.
Pot plant designates a wide range of plants of varying sizes that grow in different size pots, up to 8 inches in diameter.
Terrarium plant designates plants that have relatively small leaves and can be grown in a closed bottle, aquarium, or jar. They are used in a grouping, intermixing plants with dif- ferent colors and shapes of leaves.
Hanging plant designates plants that can be trained to cascade from hanging baskets. Many of these plants can be vining types; other plants, because of their growth habits, may be adapted to this special use.
These pot plants can be used sepa- rately, double-potted in waterproof containers, or lined up in a planter box giving the impression of plants growing directly in the box.
for healthy plant growth, and the water requirement.
The list of plants is not all inclu- sive. Plants are listed that are avail- able through usual supply sources and have been grown successfully in many homes. Hobbyists may enjoy trying other plants.
Plant Designations
Tree designates plants that grow as a single plant in a container, minimum size 3 feet, maximum size often to the ceiling.
These tall plants may eventually have to be air-layered (see p. 47), cut back to force growth of side shoots, or be given to someone who has more space.
Setting The Plants
Support large potted plants by set- ting them on other clay pots that are upended in the bottom of the planter box. Fill in around the upended pots with coarse gravel to a depth of 3 or 4 inches. Then fill the rest of the box around the potted plants with unmilled sphagnum moss, pea-size gravel, or marble chips. Small potted plants can be plunged directly into the sphagnum, pea gravel, or marble.
Although the fluorescent lamps used in the garden are not as hot as incandescent lamps, they generate enough heat to harm plants that come in contact with them. There- fore, keep all plants at least 6 inches away from the lamps.
24
RIGID ACRYLIC^ TUBE
RUBBER BUMPER
RECESSED SCREW
24»'
33/4"
TIMER
METAL PLATE
Plan G.—Triangular planter consists of one U-shaped fluorescent lamp mounted on a triangular platform.
25
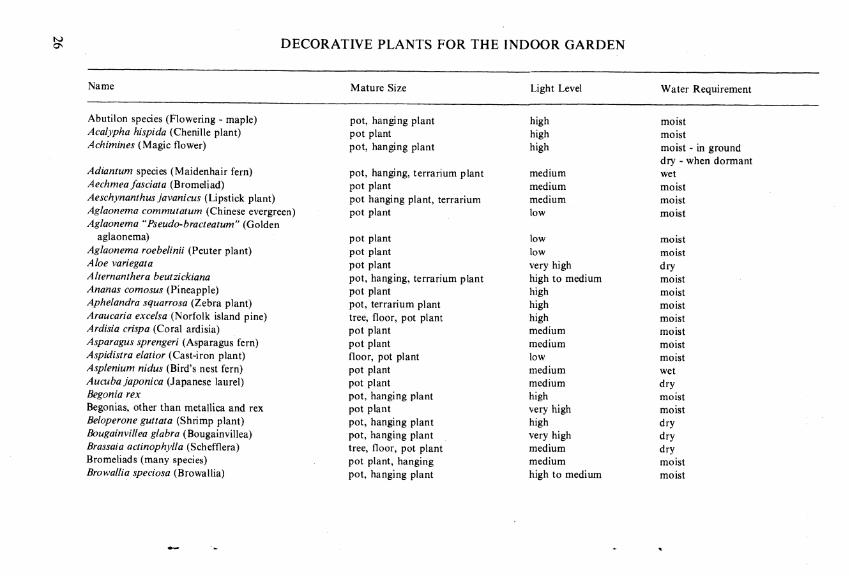
to ON DECORATIVE PLANTS FOR THE INDOOR GARDEN
Name Mature Size Light Level Water Requirement
Abutilón species (Flowering - maple) Acalypha hispida (Chenille plant) Achimines (Magic flower)
Adiantum species (Maidenhair fern) Aechmea fasciata (Bromeliad) Aeschynanthus javanicus (Lipstick plant) Aglaonema commutatum (Chinese evergreen) Aglaonerfia "Pseudo-bracteatum" (Golden
aglaonema) Aglaonema roebelinii (Peuter plant) Aloe variegata Alternant her a beutzickiana Ananas comosus (Pineapple) Aphelandra squarrosa (Zebra plant) Araucaria excelsa (Norfolk island pine) Ardisia crispa (Coral ardisia) Asparagus sprengeri (Asparagus fern) Aspidistra elatior (Cast-iron plant) Asplenium nidus (Bird's nest fern) Aucuba japónica (Japanese laurel) Begonia rex Begonias, other than metallica and rex Beloperone guttat a (Shrimp plant) Bougainvillea glabra (Bougainvillea) Brassaia actinophylla (Schefflera) Bromeliad s (many species) Browallia speciosa (Browallia)
pot, hanging plant high moist pot plant high moist pot, hanging plant high moist - in ground
dry - when dormant pot, hanging, terrarium plant medium wet pot plant medium moist pot hanging plant, terrarium medium moist pot plant low moist
pot plant low moist pot plant low moist pot plant very high dry pot, hanging, terrarium plant high to medium moist pot plant high moist pot, terrarium plant high moist tree, floor, pot plant high moist pot plant medium moist pot plant medium moist floor, pot plant low moist pot plant medium wet pot plant medium dry pot, hanging plant high moist pot plant very high moist pot, hanging plant high dry pot, hanging plant very high dry tree, floor, pot plant medium dry pot plant, hanging medium moist pot, hanging plant high to medium moist
Caladium (Fancy-leaved caladium) Calathea species (Calathea) Campanula isophlla (Star-of-Bethlehem) Capsicum annum (Christmas pepper) Chamaedorea elegens (Neanthe bella palm) Chamaedorea erumpens (Bamboo palm) Chamaeropsis humilis (European fan palm) Chlorophytum (Spider plant) Chrysanthemum morifolium (Chrysanthemum) Cissus antárctica (Kangaroo vine) Cissus rhombifolia (Grape ivy) Citrus mitis (Calamondin) Clerodendrum thomsonae (Bleeding-heart vine) Ciivia (Kaffir-lily) Codiaeum Coffea arabica (Arabian coffee tree) Coleus Columnea species (Columnea) Cordyline terminalis (Hawaiian ti plant) Crassula Crossandra infundibuliformis Cryptanthus species (Dwarf bromeliad) Cyclamen species (persicum or other species) Cyperus alternifolius Cyrtomium falcatum (Japanese holly fern) Davallis fejeensis (Figi rabbit's-foot fern) Dieffenbachia amoena (Dumb cane) Dieffenbachia "Exotica" (Dumb cane) Dizygotheca elegantissima (Spider aralia) Dracaena deremensis (Green dracaena) Dracaena deremensis "WarneckeV
(White striped dracaena)
pot plant high moist-dry (dormant) pot plant rpedium moist pot, hanging plant high moist pot, hanging plant high moist floor, pot plant low moist tree, floor, pot plant low moist tree, floor plant high moist pot, hanging, terrarium plant medium moist pot plant very high moist pot, hanging, terrarium plant high moist pot plant medium dry pot plant high dry pot, hanging plant high to medium moist pot plant medium dry pot plant very high dry tree plant medium moist pot, hanging plant very high wet pot, hanging, terrarium plant medium moist tree, floor, pot plant medium moist pot plant very high dry pot plant medium moist pot, terrarium plant medium dry pot plant high moist-dry (dormant) Umbrella plant medium wet pot plant medium to low moist pot, hanging plant low moist floor, pot plant medium dry pot, terrarium plant medium dry floor, pot plant high moist floor, pot plant medium wet
pot plant medium dry
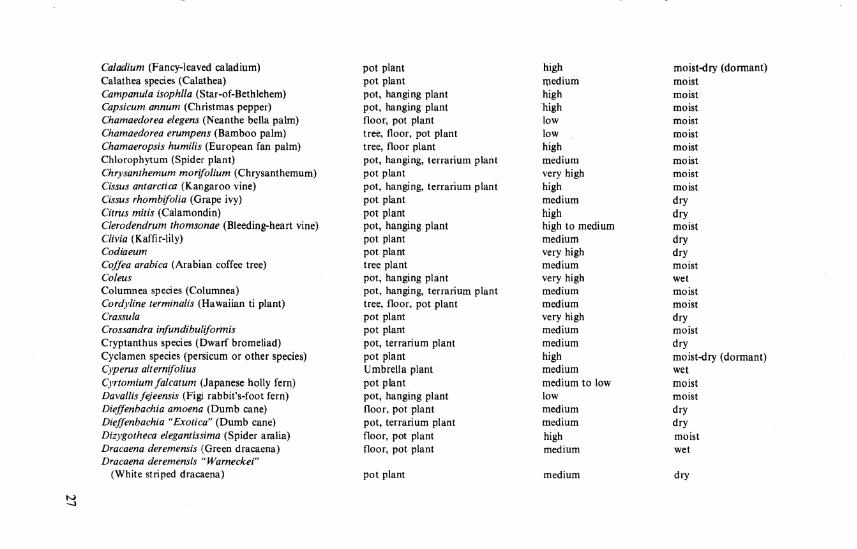
00 DECORATIVE PLANTS FOR THE INDOOR GARDEN
Name Mature Size
Dracaena fragrans massangeana (Com plant) Dracaena godsefflana (Gold-dust dracaena) Dracaena marginata (Dragon tree) Epiphyllum hybrids (Orchid cactus)
Episcia (Flame-violet) Eriobotyra japónica (Japanese loquat) Euphorbia mili (splenders) (Crown-of-thoms) Euphorbia pulcherrima (Poinsettia) Exacum affine Fatsia japónica (Japanese aralia) Ficus benjamina exotica (Weeping java fig) Ficus elástica "Decora" (Rubber plant) Ficus lyraîa (Fiddle leaf fig) Ficus philippinensis (Philippine fig) Ficus repens var. pumila (Creeping fig) Ficus retusa nitida (India laurel) Fittonia vers chaffeltii Fuchsia Gardenia jasminoides (Gardenis) Gynura aurantiaca (Velvet plant) Gynura Sarmentosa (Velvet plant) Haemanthus coccineus (Blood lily)
Haworthia species (Haworthia) Helxine soleirolii (Baby's-tears) Hibiscus rosa-sinensis (Rose-of-China) Howeia forsteriana (Kentia palm) Hoya carnosa (Wax plant)
Light Level Water Requirement
floor, pot plant low wet pot plant, terrarium plant medium wet tree, floor plant medium wet pot, hanging plant high moist-in growth
dry-over winter pot, hanging, terrarium plant medium moist tree high moist pot plant high dry pot plant very high dry pot, hanging plant medium moist floor, pot plant medium moist tree medium moist tree, floor, pot plant medium moist tree, floor plant medium moist tree, floor plant medium moist pot, hanging plant medium to low moist tree medium moist pot, terrarium plant medium moist pot, hanging plant very high moist pot plant very high moist pot, hanging, terrarium plant medium moist pot, hanging, terrarium plant medium moist pot plant very high moist-during growth
dry-when dormant pot, terrarium plant medium dry pot, terrarium plant medium moist pot plant very high moist tree, floor plant low moist pot, hanging plant medium dry
Impatiens Jacobinia obtusior (Plume flower) Kalanchoe species Lantana cámara (Trailing lantana) Lantana montevidensis (Trailing lantana) Ligustrum lucidum (Wax leaf privet) Maranta leuconeura (Prayer plant) Mimosa púdica (Sensitive plant) Monstera deliciosa (Ceriman or Mexican
Breadfruit) Naomarica northiana (Apostle plant) Neoregelia spectabilis (Fingernail plant) Nephrolepsis exalata bostoniensis
(Boston fern) Nerium oleander (Oleander) Nertera depressa granadensis (Bead plant) Orchids (many species) Pandanus veitchii (Screw-pine) Passiflora species (Passion-flower) Pathenocissus benryana (Ampélopsis) Pelargonium species (Geranium) Pellionia daveauana (Trailing watermelon-
begonia) Peperomia caperata (Emerald ripple) Petunia hybrida (Cascade type) Philodendron hybrids (Self-heading
philodendron) Philodendron oxycardium Common
philodendron) Phoenix roebelenii (Dwarf date palm) Pilea micorphylla (Artillery plant) Pittosporum tobira (Mock orange) Plectranthus australis (Swedish-ivy)
pot, hanging, terrarium plant very high moist pot plant medium moist pot, hanging plant high dry pot, hanging plant high dry pot, hanging plant high dry tree, floor plant ' medium dry pot, hanging, terrarium plant medium moist pot, hanging plant high moist
pot plant low moist pot plant medium wet pot plant medium moist
pot, hanging, terrarium plant medium moist floor, pot plant high dry pot, terrarium plant high moist pot, hanging plant very high moist/dry floor, pot plant medium dry pot, hanging plant very high moist pot, hanging plant medium moist pot, hanging plant very high dry
pot, hanging, terrarium plant medium moist pot, hanging, terrarium plant low dry pot, hanging plant very high moist
floor, pot plant medium moist
pot, hanging plant low dry floor, pot plant medium wet pot, hanging plant medium moist floor, pot plant high dry pot, hanging terrarium plant medium moist
o DECORATIVE PLANTS FOR THE INDOOR GARDEN
Name
Pleomele reflexa (Green pleomele) Podocarpus macrophylla Maki (Podocarpus) Polyscias guilfoylei (Parsley aralia) Priumla malacoides (Fairy primrose) Primula obconica (German primrose) Punka granatum var. nana Rhapis excelsa (Lady palm) Rhipsalidopsis gaertneri (Easter cactus)
Rohdea japónica (Japanese rohdea) Rosa chinensis var. minima (Miniature rose) Saintpaulia species (African violets) Salvia splendens (Scarlet sage) Saxífraga stolonifera var. tricolor
(Variegated strawberry-geranium) Schlumbergea bridgesii (Christmas cactus)
Selaginella lepidophylla (Resurrection plant)
Senecio cruentus (Cineraria) Senecio mikanioides (German ivy) Setcreasea purpurea (Purple heart) Sinningia species (Gloxinia) Solanum pseudo-capsicum (Jerusalem cherry) Spathiphyllum "Mauna Loa" (White flag) Streptocarpus species (Cape-primrose) Sygonium podophyllum (Nephthytis)
Mature Size Light Level Water Requirement
floor plant medium wet tree, floor, pot plant high moist floor, pot plant medium moist pot plant high moist pot plant high moist pot plant high moist tree, floor plant medium wet pot, hanging plant high moist-in growth
dry-over winter pot plant medium moist pot plant very high wet pot, hanging plant very high moist pot plant very high moist
pot, hanging, terrarium plant very high dry pot, hanging plant high moist-in growth
dry-over winter
pot, terranium plant medium to low moist pot plant high moist pot, hanging, terrarium plant medium moist pot, hanging, terrarium plant medium dry pot, hanging plant very high wet pot, hanging plant high dry pot plant medium dry pot plant high moist pot, hanging, terrarium plant low moist

Tagetes species (Marigold) Tolmiea memzieäi (Piggy-back plant) Tradescantia species (Wandering Jew) Vinca major var. variegata (Periwinkle) Zanîedeschia species (Calla-lily)
Zebrina species (Wandering Jew) Zygocactus truncatus (Thanksgiving cactus)
pot plant very high moist pot, hanging plant high moist pot, hanging, terrarium plant medium dry pot, hanging plant high moist pot plant high wet-in growth
dry-when dormant pot, hanging, terrarium plant medium moist pot, hanging plant high moist-in growth
dry-over winter

PN-5267 Angular table planter (Plan H) permits the lighting of a long platform displaying many plants.
EDGES OF PLASTIC HINGE MATERIAL
Plan H.—Angular table planter mounts two U-shaped fluorescent lamps and is backed by plexi- glass mirrors.
32
CARE OF THE GARDEN
After you have selected plants that grow well indoors, your success in growing them depends primarily on the care you give them. You should water the plants thoroughly but infre- quently, fertilize them periodically, and illuminate them adequately and regularly.
TRAINING PLANTS
Knowing what constitutes an adjusted or conditioned plant enables you to exert maximum control over
its growth. Your plant has no native ability to live in the surroundings you have picked for it—whether home, office, or public area. It needs to be trained to adjust to its alien environ- ment.
To aid in this adjustment, you must—
• Slow down plant growth. • Permit leaves to get accustomed
to dark, dry conditions in the area where the plant is to be placed.
• Permit the plant to accumulate mineral ions and carbohydrates to help maintain itself during periods of stress.
Office planter (Plan I) is designed to light a restricted area of plants. PN-5268
33
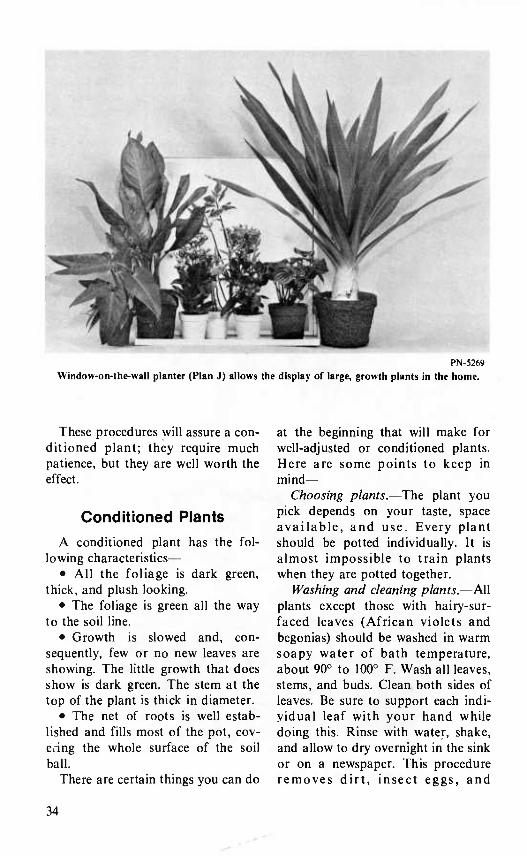
PN-5269 Window-on-the-wall planter (Plan J) allows the display of large, growth plants in the home.
These procedures will assure a con- ditioned plant; they require much patience, but they are well worth the effect.
Conditioned Plants
A conditioned plant has the fol- lowing characteristics—
• All the foliage is dark green, thick, and plush looking.
• The foliage is green all the way to the soil line.
• Growth is slowed and, con- sequently, few or no new leaves are showing. The little growth that does show is dark green. The stem at the top of the plant is thick in diameter.
• The net of roots is well estab- lished and fills most of the pot, cov- ering the whole surface of the soil ball.
There are certain things you can do
at the beginning that will make for well-adjusted or conditioned plants. Here are some points to keep in mind—
Choosing plants.—The plant you pick depends on your taste, space available, and use. Every plant should be potted individually. It is almost impossible to train plants when they are potted together.
Washing and cleaning plants.—All plants except those with hairy-sur- faced leaves (African violets and begonias) should be washed in warm soapy water of bath temperature, about 90° to 100° F. Wash all leaves, stems, and buds. Clean both sides of leaves. Be sure to support each indi- vidual leaf with your hand while doing this. Rinse with water, shake, and allow to dry overnight in the sink or on a newspaper. This procedure removes dirt, insect eggs, and
34

insecticides. Repeat at frequent inter- vals to bring out the natural shine of the foliage.
Locating training area.—Pick a spot with bright light, but avoid places where direct sunlight shines on the leaves. Keep plants away from drafts, heating ducts, or open doors. Place them on a waterproof area; this may be a wooden frame covered with polyethylene which is then covered with a layer of coarse gravel or sand.
Or use colorful inexpensive plastic trays, tubs, pans, and basins. Take care not to scar the underside of these containers—it ruins the water- proofing.
Buying fertilizer.—Since plants need at least 12 elements for growth, buy a complete fertilizer. The label should list the major ingredients: nitrogen, potassium and phosphorus, and a mixture of trace elements.
Some gardeners prefer a hquid fer-
PLASTIC DIFFUSER
Plan J.—Window-on-the-wall planter is made from a ceiling fixture turned on its side. Its fluo- rescent lamps are covered with a translucent plastic panel.
35
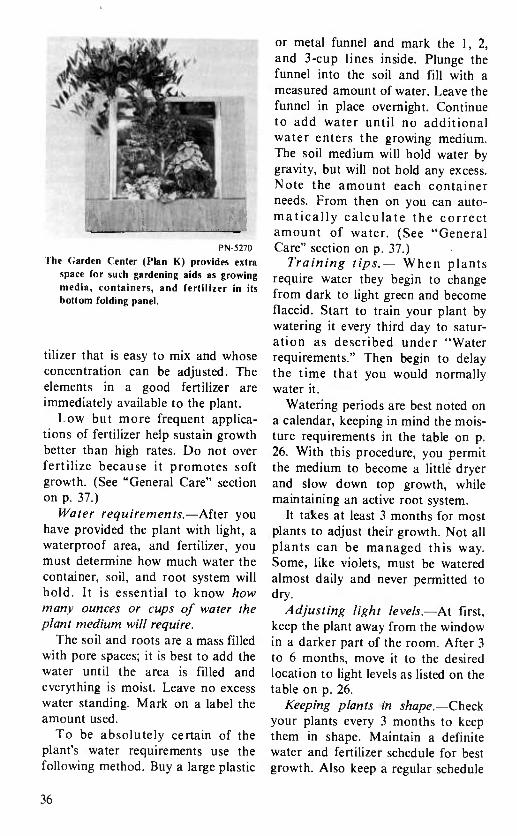
PN-5270 The Garden Center (Plan K) provides extra
space for such gardening aids as growing media, containers, and fertilizer in its bottom folding panel.
tilizer that is easy to mix and whose concentration can be adjusted. The elements in a good fertilizer are immediately available to the plant.
Low but more frequent applica- tions of fertilizer help sustain growth better than high rates. Do not over fertilize because it promotes soft growth. (See "General Care" section on p. 37.)
Water requirements.—After you have provided the plant with light, a waterproof area, and fertilizer, you must determine how much water the container, soil, and root system will hold. It is essential to know how many ounces or cups of water the plant medium will require.
The soil and roots are a mass filled with pore spaces; it is best to add the water until the area is filled and everything is moist. Leave no excess water standing. Mark on a label the amount used.
To be absolutely certain of the plant's water requirements use the following method. Buy a large plastic
or metal funnel and mark the 1, 2, and 3-cup lines inside. Plunge the funnel into the soil and fill with a measured amount of water. Leave the funnel in place overnight. Continue to add water until no additional water enters the growing medium. The soil medium will hold water by gravity, but will not hold any excess. Note the amount each container needs. From then on you can auto- matically calculate the correct amount of water. (See "General Care" section on p. 37.)
Training tips.— When plants require water they begin to change from dark to light green and become flaccid. Start to train your plant by watering it every third day to satur- ation as described under "Water requirements." Then begin to delay the time that you would normally water it.
Watering periods are best noted on a calendar, keeping in mind the mois- ture requirements in the table on p. 26. With this procedure, you permit the medium to become a little dryer and slow down top growth, while maintaining an active root system.
It takes at least 3 months for most plants to adjust their growth. Not all plants can be managed this way. Some, like violets, must be watered almost daily and never permitted to dry.
Adjusting light levels.—At first, keep the plant away from the window in a darker part of the room. After 3 to 6 months, move it to the desired location to light levels as listed on the table on p. 26.
Keeping plants in shape.—Check your plants every 3 months to keep them in shape. Maintain a definite water and fertilizer schedule for best growth. Also keep a regular schedule
36
for pruning, removing dead leaves, and for staking.
Planning for replacements.— Remember to plan for replacements. In time, all plants become root bound in pots and overgrown in size. The medium becomes filled with roots and depleted of organic matter. When there's no more room for the plants it is time to try new plants and new combinations.
GENERAL CARE
Watering Of all steps in the care of an indoor
garden, watering is most important. If plants do not get enough water, they dry out and die. If they get too much water, they drown or rot. The proper procedure is to water thor- oughly, but only often enough to pre-
plan K,—The Garden Center is a free-standing gardening area which utilizes both lamps and mir- rors to provide uniform illumination.
37
OPTIONAL FAN
120 VAC
U-TUBES OR STD. 40 W
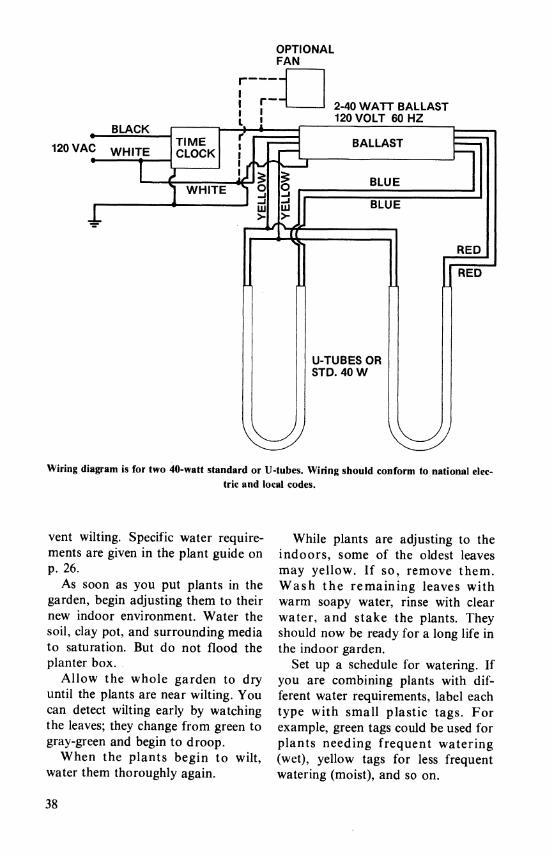
Wiring diagram is for two 40-watt standard or U-tubes. Wiring should conform to national elec- tric and local codes.
vent wilting. Specific water require- ments are given in the plant guide on p. 26.
As soon as you put plants in the garden, begin adjusting them to their new indoor environment. Water the soil, clay pot, and surrounding media to saturation. But do not flood the planter box.
Allow the whole garden to dry until the plants are near wilting. You can detect wilting early by watching the leaves; they change from green to gray-green and begin to droop.
When the plants begin to wilt, water them thoroughly again.
While plants are adjusting to the indoors, some of the oldest leaves may yellow. If so, remove them. Wash the remaining leaves with warm soapy water, rinse with clear water, and stake the plants. They should now be ready for a long life in the indoor garden.
Set up a schedule for watering. If you are combining plants with dif- ferent water requirements, label each type with small plastic tags. For example, green tags could be used for plants needing frequent watering (wet), yellow tags for less frequent watering (moist), and so on.
38
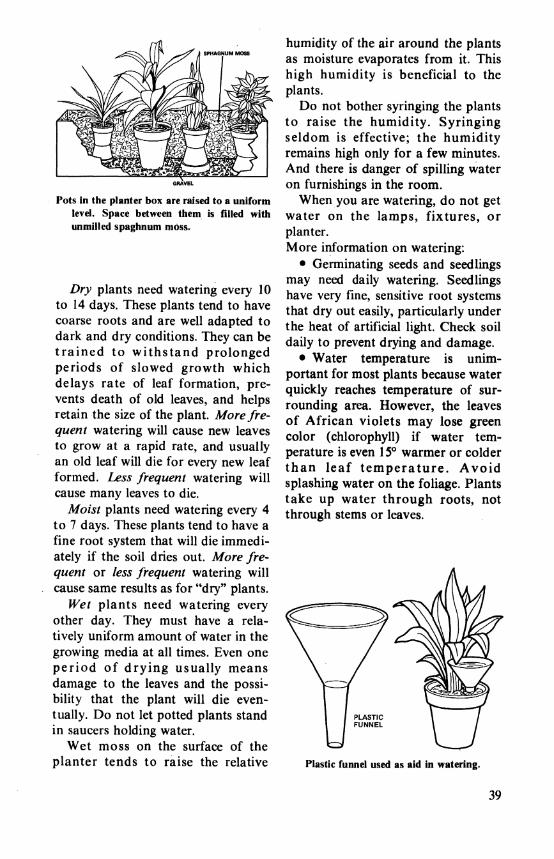
SPHAGNUM MOSS
Pots in the planter box are raised to a uniform level. Space between them is fîlled with unmilled spaghnum moss.
Dry plants need watering every 10 to 14 days. These plants tend to have coarse roots and are well adapted to dark and dry conditions. They can be trained to withstand prolonged periods of slowed growth which delays rate of leaf formation, pre- vents death of old leaves, and helps retain the size of the plant. More fre- quent watering will cause new leaves to grow at a rapid rate, and usually an old leaf will die for every new leaf formed. Less frequent watering will cause many leaves to die.
Moist plants need watering every 4 to 7 days. These plants tend to have a fine root system that will die immedi- ately if the soil dries out. More fre- quent or less frequent watering will cause same results as for "dry" plants.
Wet plants need watering every other day. They must have a rela- tively uniform amount of water in the growing media at all times. Even one period of drying usually means damage to the leaves and the possi- bility that the plant will die even- tually. Do not let potted plants stand in saucers holding water.
Wet moss on the surface of the planter tends to raise the relative
humidity of the air around the plants as moisture evaporates from it. This high humidity is beneficial to the plants.
Do not bother syringing the plants to raise the humidity. Syringing seldom is effective; the humidity remains high only for a few minutes. And there is danger of spilling water on furnishings in the room.
When you are watering, do not get water on the lamps, fixtures, or planter. More information on watering:
• Germinating seeds and seedlings may need daily watering. Seedlings have very fine, sensitive root systems that dry out easily, particularly under the heat of artificial light. Check soil daily to prevent drying and damage.
• Water temperature is unim- portant for most plants because water quickly reaches temperature of sur- rounding area. However, the leaves of African violets may lose green color (chlorophyll) if water tem- perature is even 15** warmer or colder than leaf temperature. Avoid splashing water on the foliage. Plants take up water through roots, not through stems or leaves.
Plastic funnel used as aid in watering.
39
• You can use drinking water directly from the faucet for most plants, but some plants (such as ferns and African violets) are sensitive to the chlorine in the water. For these, allow water to stand overnight before using; chlorine escapes into the atmo- sphere while the water is standing.
• If water is unacceptable to a person when judged by taste, color, and smell it will not be acceptable to plants.
• Do not reuse water drained from plants. This water does not have the oxygen that plants need and it may contain disease organisms and unused salts that will damage plant roots.
Fertilizing Water and fertilize plants at the
same time to insure proper uptake of nutrients and distribution throughout the growing media. Usually adding fertilizer every third or fourth time (every 2 to 4 weeks) you water is suf- ficient to maintain good growth.
Use a water-soluble fertilizer at the strength recommended on the label. Fertilize only when plants are actively growing. "
Even when you use soluble fertil- izers, you may notice an accumu- lation of fertilizer on the surface of the soil; it will be a white, crusty deposit. This deposit should be removed, along with a Httle of the surface soil, and replaced with new soil.
SPECIAL GARDENING
Terrariums Select plants which are compatible
as to growing media, light, and mois- ture needs. Clean all foliage and
scrub surfaces with vegetable brush to remove dust, disease, and insect debris. Healthy plants must be chosen if the terrarium is to thrive.
The container chosen for the ter- rarium must be both clear and water- proof. One can use candy jars, aquar- iums, condiment or beverage jars, or bottles of any size. Wash the con- tainer and remove all labels and traces of the previous contents. Allow them to dry completely before begin- ning the terrarium. Remember that all things that go into the construc- tion of a terrarium should be dry. Leave all items out to dry at least overnight; this will make assembly of the terrarium much easier and permit quick cleanup at the end.
The following items will be neces- sary to create a terrarium: (1) a con- tainer, (2) coarse sphagnum moss for bottom layer, (3) pasteurized potting mix, (4) cuttings and rooted plants, (5) a long stick of pencil diameter to handle plants, and (6) a wash bottle.
When all material has been assem- bled, do the following—
• Put a thin layer of moss on the bottom of the bottle. Firm with a stick to make a slanting base. The depth of the layer depends on bottle size; 1/2 to 3/4-inch is usually deep enough for most bottles.
• Put at least 1/2 to 3/4-inch of potting mix over the coarse moss. Use stick to level and firm up the structure of the potting mix.
• Select plants and try to blend their shape, foliage color, and height. Carefully remove most of the potting mix from the plants. Trim all roots 2 to 3 inches and remove all diseased or damaged foliage or branches.
• Group the plants outside the bottle first to decide on arrangement.
40
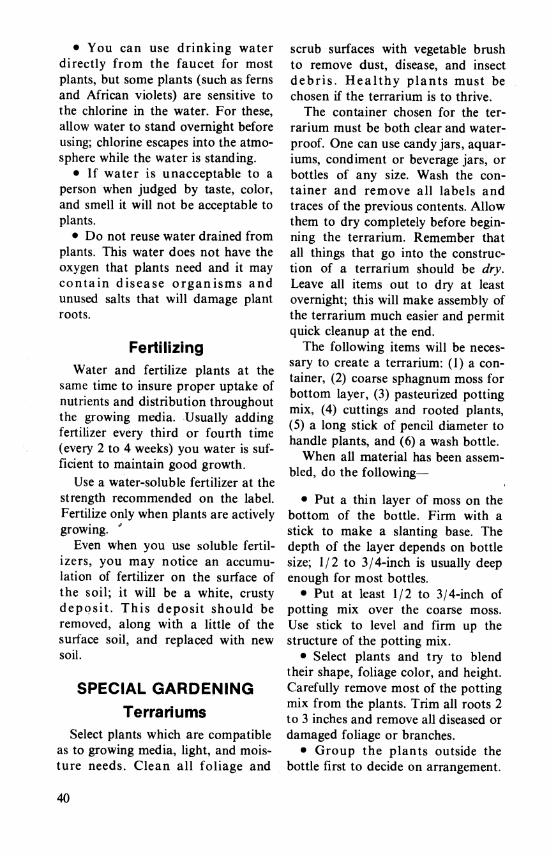
PN-5274
Containers of many different shapes and sizes can be used for terrariums.
Use stick to guide each plant into the bottle.
• Fan out the roots on the potting mix and shift dry potting mix over them; firm them into place with the stick. Tap and shake the bottle to force the growing media to shift down between the foliage. Starting at the back of the terrarium, add one plant at a time, firming all plants and media into place with the stick.
• Move the foliage and branches around to face in one direction with the stick. Working slowly, use stick to slide pieces of ground moss or painted gravel into place to cover the bottom of the bottle. Make sure all surfaces are still dry—it should be easy to move, place, and clean up inside of the terrarium.
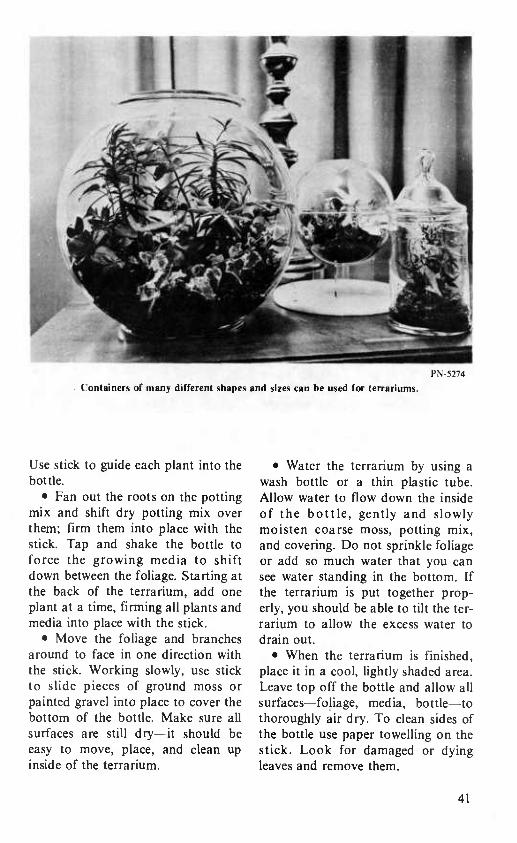
• Water the terrarium by using a wash bottle or a thin plastic tube. Allow water to flow down the inside of the bottle, gently and slowly moisten coarse moss, potting mix, and covering. Do not sprinkle foliage or add so much water that you can see water standing in the bottom. If the terrarium is put together prop- erly, you should be able to tilt the ter- rarium to allow the excess water to drain out.
• When the terrarium is finished, place it in a cool, lightly shaded area. Leave top off the bottle and allow all surfaces—foliage, media, bottle—to thoroughly air dry. To clean sides of the bottle use paper towelling on the stick. Look for damaged or dying leaves and remove them.
41
PN-5273 Terrarium plants should be carefully watered using a wash bottle or a thin plastic tube. Never
water to the point where it will stand at the bottom.
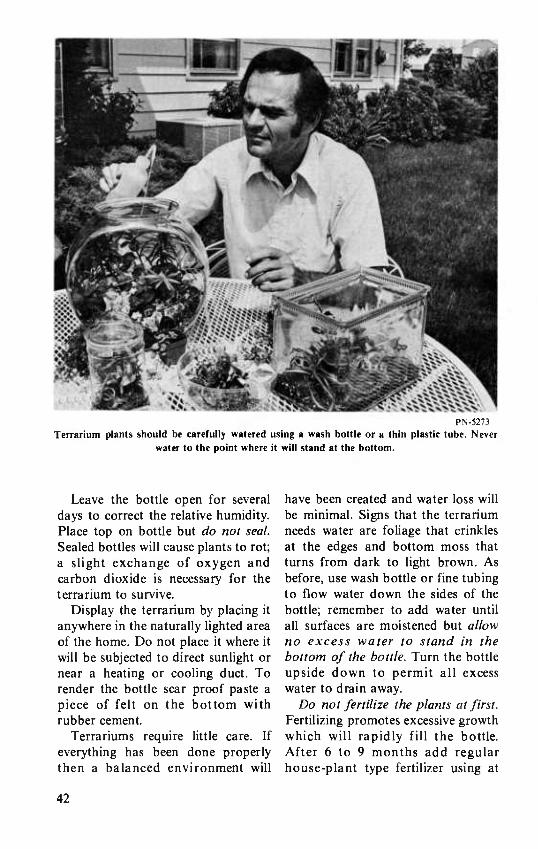
Leave the bottle open for several days to correct the relative humidity. Place top on bottle but do not seal. Sealed bottles will cause plants to rot; a slight exchange of oxygen and carbon dioxide is necessary for the terrarium to survive.
Display the terrarium by placing it anywhere in the naturally lighted area of the home. Do not place it where it will be subjected to direct sunlight or near a heating or cooling duct. To render the bottle scar proof paste a piece of felt on the bottom with rubber cement.
Terrariums require little care. If everything has been done properly then a balanced environment will
have been created and water loss will be minimal. Signs that the terrarium needs water are foliage that crinkles at the edges and bottom moss that turns from dark to light brown. As before, use wash bottle or fine tubing to flow water down the sides of the bottle; remember to add water until all surfaces are moistened but allow no excess water to stand in the bottom of the bottle. Turn the bottle upside down to permit all excess water to drain away.
Do not fertilize the plants at first. Fertilizing promotes excessive growth which will rapidly fill the bottle. After 6 to 9 months add regular house-plant type fertilizer using at
42
least one-quarter of the concentration recommended for ordinary house plants.
Eventually, plants will overgrow the space alloted them. When this occurs, chemically prune the tips of the plants by touching the growing point with a swab dipped in rubbing alcohol. Only the tips will die after this treatment and side branches will develop.
One should expect no more than a useful life of 1 year for plants in a ter- rarium. Poor plants should be dis- carded after this period and the remaining plants used again in another terrarium.
Plants that make good natural groupings in terrariums are cacti and succulents, native understory plants, and small-leave house plants. Do not mix types because they have different media, water, and light level require- ments. Easy-to-handle plants are: Be- gonia, Birds-nest fern, Boxwood, Calathea, Chamaedorea palm, Chlo- rophytum (Spider plant), Euonymus (Creeper), Fittonia, Gynura (Velvet plant), Hederá (English ivy), Hemi- graphis, Maidenhair fern, Maranta (Prayer plant), Peperomias, Pilea (Aluminum plant), Scindapsus (Devil's ivy), Tradescantia, and Ze- brina.
Hanging Baskets
The highest levels of light found in most rooms occur near or at the top of the windows. Hanging baskets permit indoor gardeners to utilize this light to grow the wide range of plants listed in the plant guide on p. 26.
To grow plants in hanging baskets take the following steps.—
Container.—Use any type of con- tainer that will hold at least 2 quarts
of growing media by volume. Con- tainers with less volume tend to dry out rapidly. Containers can be metal framed and lined with moss. Use bleach bottles that are available com- mercially, gallon-sized milk con- tainers, or redwood containers.
Be sure to provide drainage holes in the container. Use a nail to drive holes that are three-eighths of an inch in diameter, spaced 3 inches apart near the bottom of the container. Tie a cord or hemp bag around the con- tainer to make it into a hanging basket.
Hanging baskets are also available with self-adhering saucers. Thus, one can grow and water plants anywhere while preventing water drippings on furnishings.
Growing media.—Bagged growing media is available in most variety and garden stores. These usually contain fertilizers in slow-release form.
To make your own general-pur- pose mix use the following formula: To 2 parts of sandy loam soil add 1 part coarse sphagnum peat moss and 1 part coarse aggregate (vermiculite, perlite, or washed cinders). To each bushel of mix add 4 ounces of pul- verized dolomitic Umestone, 4 ounces of 20 percent superphosphate, and 2 ounces of 5-10-5 fertilizer. Mix thor- oughly and add just enough water to crumble the media in large masses; do not add so much water the media becomes soggy.
Drainage.—Line the bottom 2 inches of the container with coarse aggregate. Shield the drainage holes with coffee filters to hold the growing media in place until the new root system meshes into a solid mass. Pack the aggregate loosely to leave air pockets that will permit easy drainage of water out of the con-
43
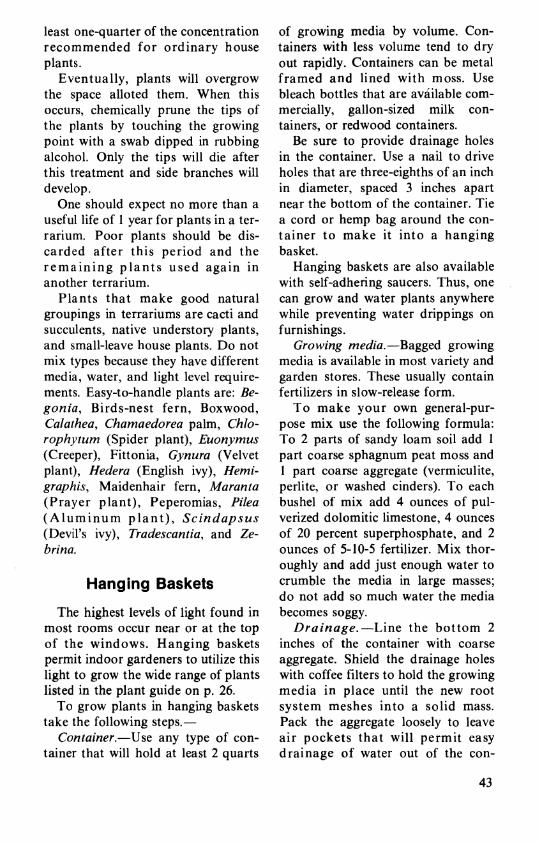
PN-5272 Containers for indoor gardening are as varied
as the plants that may be grown in them.
tainer. Cover the top of the aggregate with a half-inch layer of aggregate that has been finely crushed; this will prevent the growing media from plugging up the drainage holes.
Fertilizer.—Fill container to within 1 inch of the top with water-moist- ened growing media. Mix in 1 table- spoon of a coated, slow-release 14-14- 14 fertilizer per 6-inch container. The volume of a 6-inch container is equal to 2 quarts of mix. This concen- tration of fertilizer should last for about 3 months; plan to add a second tablespoon on the surface about 2-1/ 2 months after planting. Continue to fertilize at regular intervals throughout the life of the plant.
Planting.—Hold the potted plant on its side with one hand protecting the plant. Tap the plant gently until the soil ball and plant falls out. Remove the network of roots on bottom of soil ball. Dig a hole in which the soil ball fits perfectly. The growing media of the soil ball and of
the new container should be on the same level. Firm the soil ball and growing media to insure a good flow of water and the knitting of the root system.
Location.—Plants, like petunias, that require at least 6 hours daily of direct sunlight should be placed in areas where they will be shaded for part of the day. They can be placed near a porch, in a window, or close to the entrance of your home. (Petunias grown in too much shade develop long, poorly-branched shoots with few if any flowers; petunias are adapted to bright, sunny situations where they develop stout, highly- branched shoots with abundant flow- ering and fruiting.)
Watering.—When you water the plant, continue to add water until all areas of the growing media are thor- oughly moistened and excess water begins to drip from the drainage holes. This volume of water will be adequate if sufficient air space above the growing media and the top of the container has been provided. Note how much water has been added and apply the same volume next time.
Acclimatization.—To promote abundant flowering and to prolong the flowering time, the plant must be acclimatized or "trained to survive" in its location. This is accomplished by watering frequency and controlled fertilizer levels. Examine the plant when freshly planted and do not water until the leaves change from dark to pale green, and have a wilting appearance.
When watering the growing media keep water off the leaves. Do not water again until the plant shows signs of wilting; this treatment slows growth and will help the plant survive sudden changes in the environment.
44

Grooming.—To preserve the appearance of the plant pick off yel- lowing or damaged leaves and flowers. As the plant develops, remove some branches to prevent crowding and to promote the devel- opment of new flowering shoots. To expose all sides of the plant to the environment, turn the container at weekly intervals. This will help the symmetrical development of the plant and will balance out the effects of the different exposures.
Plants For The Beginner The Peperomia obtusifolia (or pep-
eromia plant) is a good plant for a beginner to experiment with, and is available in either a solid green or in various green and white com- binations.
This plant requires minimum care and can be trained to go into a cab- inet, a dark comer in a hallway, or into a hanging waterproof basket. However, it will die rapidly if over- watered and overfertilized. It must be trained. The peperomia is from trop-
ical South and Central America. Its fleshy leaves are about 4 inches long and 2-1/2 inches wide. It branches rapidly and its stems fall over the sur- face of the container.
Another plant that is interesting to experiment with is the Spathiphyllum "Mauna Loa.'' This plant, originally from Columbia, has long, green, lance-shaped foliage that forms spathes (large, leaf-like parts enclosing a flower cluster) that are 2- 1/2 inches long. The spadix (the fleshy spike of tiny flowers often enclosed in a spathe) is greenish- yellow to white. The plant is aesthetic to look at and throws interesting shadows around it giving the impres- sion of wide-open spaces. The plant must be kept moist at all times to sur- vive.
The Ficus retusa nitida, small-leaf rubber tree from the Indian and Malayan tropics, can be easily han- dled by the novice. It can be trained to any form by pruning. It has dark- green foliage 2 to 4 inches long, and is available on the market as a 6-foot tree in poodle, screen, or fan forms.
A Dozen Recommended Plants For Beginners
Name of plant Light level water requirement
Aechmea fasdata (Bromeliad) medium Aglaonema roebelinii (Pewter plant) low Brassaia actinophylla (Schefflera) medium Chamaedorea elegans (Neanthe bella palm) low Diejfenbachia amoena (Dumb cane) medium Dracaena fragrans (Com plant) low Fatsia japónica (Japanese aralia) medium Ficus elástica 'Decora' (Rubber plant) medium Hoya carnosa (Wax plant) medium Maranta leuconeura (Prayer plant) medium Nephrolepis exalta bostoniensis (Boston fern) medium Podocarpus macrophyllus 'Maki' (Podocarpus) high
moist moist dry moist dry wet moist moist dry moist moist moist
45
Unless trained, it rapidly loses its leaves. It should be watered about once a week.
Other Care
About once a week, turn each of the pots in the planter. This encour- ages even development of the plants and keeps them from rooting into the sphagnum moss through the drain hole of the pot.
It plants get old, sick, or oversize, take them out of the planter and replace them with new, healthy, mod- erate-size plants.
If you are having insect problems in your indoor garden follow the instructions in Home and Garden Bulletin No. 67, "Insects and Related Pests of House Plants." Single copies of this publication—prepared by the Agricultural Research Service—can
While you're away
Many house plants die while the owner is away from home on a vaca- tion or business trip. If you cannot get someone to care for your plants, cover the plants with a polyethylene sheet and tie it to the pot or box to prevent loss of moisture. Reduce the lighting to 8 hours a day.
If you have time before leaving, you can train the plants to get along with a little water. If not, just give them a good drink, using the funnel method, before you leave.
Plants usually can get along satis- factorily by themselves for about 2 weeks. If you must be away for more than 2 weeks, you can expect to lose some of your plants, particularly flowering plants.
Trade names are used in this publica- tion solely to provide specific infor- mation. Mention of a trade name does not constitute a guarantee of the product by the U.S. Department of Agriculture nor does it imply an endorsement by the Department over comparable products that are not named.
be obtained free from your County Extension Agent or by writing to the Office of Governmental and Public Affairs, U.S. Department of Agriculture, Washington, D.C. 20250. Send your request on a postcard. Be sure to include your ZIP Code.
OTHER USES
In addition to using your indoor garden for growing conventional house plants, you can use it for dis- playing plant collections such as mosses, ivies, orchids, or bonsai (dwarf plants). If you use the garden for orchids, surround it with a clear plastic-sheet material to hold in mois- ture and keep the humidity high.
Or you may want to display potted plants from the florist—plants that you intend to discard after their flowers pass. Because many of their needs are met by the garden, these potted plants last considerably longer there then they would on a table or window sill. Actually, the plants may continue to grow in the garden.
If you intend to use your garden exclusively for display of florist plants, you might have a metal pan made to fit over the floor of the planter. The pan should be 3 or 4 inches deep and painted to match the planter.
46

Fill the pan with pea gravel or marble chips and set the plants in the gravel-filled pan. When you water the plants, let some of the water drain into the pan; evaporation from the gravel or marble chips will increase the humidity of the air around the plants.
AIR LAYERING
If you wish to propagate plants, you can try air layering for plants that have stiff or woody stems and eventually grow too tall to be attrac- tive.
Do it this way. Attach the stem securely to a stake. Make an upward cut into the stem, separating the bark by inserting a small stick. Cover the cut area with a ball of moist, but not soggy, sphagnum moss. Then cover the moss with polyethylene film and tape it at each end to reduce water loss.
Continue to grow the mother plant in the usual way. When you can see the roots in the moss, cut the rooted top off the mother plant and pot the rooting.
Allow the mother plant to continue growing; new lateral branches often
Steps in air layering.
develop down the stem. You can air layer the same mother plant many times as new lateral shoots develop.
MORE INFORMATION Single copies of this publication
and Home and Garden Bulletin No. 82, "Selecting and Growing House Plants," may be obtained free from your County Extension Agent or by writing to the Office of Governmental and Public Affairs, U.S. Department of Agriculture, Washington, D.C. 20250. Send your request on a postcard. Please include your ZIP code and your return address.
47 U. S. GOVERNMENT PRINTING OFFICE : 1978 O - 256-376

U. s. DEPARTMENT OF AGRICULTURE AGRICULTURAL RESEARCH SERVICE
HYATTSVILLE, MARYLAND 20782
OFFICIAL BUSINESS PENALTY FOR PRIVATE USE, $300
POSTAGE AND FEES PAID U. S. DEPARTMENT OF
AGRICULTURE AGB 101
Department publications contain public infor- mation. They are not copyrighted and can be reproduced in whole or in part with or without credit.