5 petal punch roses
TRANSCRIPT

8/2/2019 5 Petal Punch Roses
http://slidepdf.com/reader/full/5-petal-punch-roses 1/3
A great time for you and your friends and a place to make new friendships!
D e n i s e W i l l e r t o n
4 1 4 L e a h A v e n u e
N a r o l , M B R 1 C 0 A 4 H T T P : / /
C H E Z M O I C R E AT I O N S .B LO G S P O T .C O M
Although I’ve seen rose tutorials elsewhere ~ I can never
remember where I found them...so here goes ~ my version ~
I hope you enjoy creating these roses as much as I do!What you will need to create these roses ~
• 5 Petal Flower Punch
• Piece of scrap Card Stock ~ I used Pretty In Pink for this one
• Melon Mambo Ink Pad and sponge
• Paper Snipe
• Tombow Glue
• Skewer for rolling edges
1. Punch three flowers using your Petal Punch
1. 2. Sponge edges using a contrasting ink pad
2.
3. Snip flowers as shown above
3. 4. Roll edges using a skewer, reopen slightly
once done. I left one unopened to show the roll
4.
5
4
3
2
1
Roll back
8/2/2019 5 Petal Punch Roses
http://slidepdf.com/reader/full/5-petal-punch-roses 2/3
Denise Willerton www.chezmoicreations.blogspot.com [email protected]
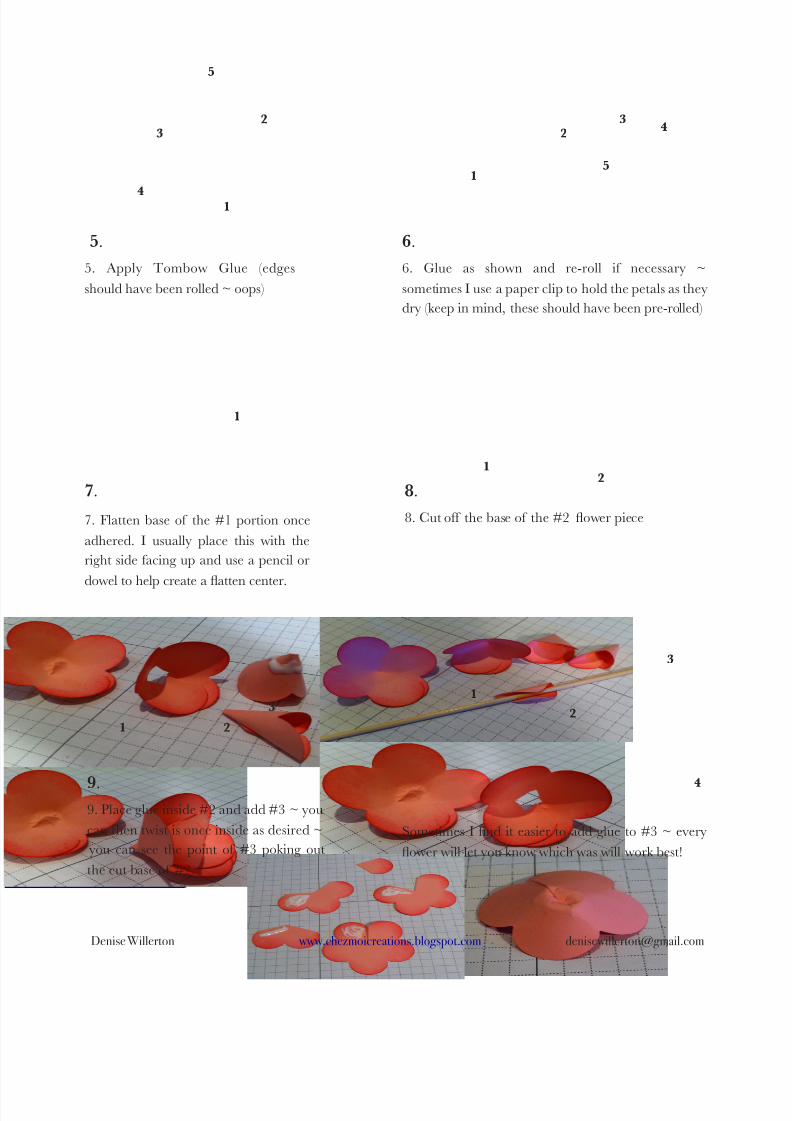
5. Apply Tombow Glue (edges
should have been rolled ~ oops)
5.
6. Glue as shown and re-roll if necessary ~
sometimes I use a paper clip to hold the petals as they
dry (keep in mind, these should have been pre-rolled)
6.
7. Flatten base of the #1 portion once
adhered. I usually place this with the
right side facing up and use a pencil or
dowel to help create a flatten center.
7.
8. Cut off the base of the #2 flower piece
8.
1
2
3
4
5
51
2
34
1
12
1 2
3
9. Place glue inside #2 and add #3 ~ you
can then twist is once inside as desired ~
you can see the point of #3 poking out
the cut base of #2.
9.
1
2
3
4
Sometimes I find it easier to add glue to #3 ~ every
flower will let you know which was will work best!

8/2/2019 5 Petal Punch Roses
http://slidepdf.com/reader/full/5-petal-punch-roses 3/3
Denise Willerton www.chezmoicreations.blogspot.com [email protected]
11. Re-roll the tiny portion of # 5 if necessary. Be sure t
you roll this piece into the center on the sides and the
petal to the outside. Cut the tip until it fits nicely inside the
# 2-3-4 portion. Apply a small dab of glue and hold unt
holds, you will be creating a small tube shape with the top
the petal flowing back as per picture #4.
11.
1
2
3
4
5
10. Snip the base of #4 until it fits nicely inside
# 2-3, turning and placing as desired ~ you will
definitely see as you turn the pieces which way look
the nicest.
10.
1
23
4
12. The 2-3-4-5 pieces are now all tucked in together.
You can see the point of the #3 peeking out ~ this
will be cut off as per picture #13.
12.
1
1
13. Apply glue into the flatten part of #1 ~ the other
portion should fit nicely in here, if not trim the
bottom a smidge until you like the fit.
13.
14. You’re done! Add a Rhinestone if you’d like ~ re-sponge if y
like ~ if you want to mist the flower a bit to re-roll the edg
the point you may. Be sure you don’t over mist your flowercause it to fall apart!
I hope you enjoyed this little tutorial! Have a great day an
don’t forget to smell the roses!14.