500-598v1.2 sol operating instructions - orderman · 4|21 general information this description...
TRANSCRIPT
Operating Instructions for Orderman Sol & Sol+

© 2010 by
Orderman GmbH Bachstrasse 59,
5023 Salzburg – Austria
www.orderman.com
Errors and misprints excepted.
Duplication, reproduction or distribution, even in part, is prohibited without the written consent of Orderman GmbH.
P3. 500-598 V1.2 Orderman assumes no liability for injuries or losses resulting from the use of these
instructions. Orderman assumes no liability for losses or claims by third parties resulting from
the use of Orderman devices. The contents of these instructions are subject to changes, which can be
implemented without prior notice. These instructions do not constitute part of a contract. Trademark: All brands and product names are trademarks or registered
trademarks of the accordant companies.

3|21
Contents
CONTENTS ................................................................................................................... 3 GENERAL INFORMATION........................................................................................... 4 1. SAFETY INFORMATION ................................................................................. 4 1.1. Explanation of symbols..................................................................................... 4 1.2. General safety information................................................................................ 5 1.3. Safety information for battery pack................................................................... 5 1.4. Maintenance ..................................................................................................... 5 2. DELIVERY VOLUME ....................................................................................... 6 ORDERMAN SOL ......................................................................................................... 7 3. OVERVIEW OF ORDERMAN SOL.................................................................. 7 4. CHARGING THE BATTERY PACK................................................................. 7 5. OPERATION (SETUP) ..................................................................................... 9 The status bar ................................................................................................................ 9 5.1. Status bar Get more ......................................................................................... 9 5.2. Message status bar ........................................................................................ 11 5.3. Connection status bar..................................................................................... 12 5.4. Battery status bar............................................................................................ 12 ORDERMAN SOL+ ..................................................................................................... 14 1. CONNECT BELT PRINTER........................................................................... 14 2. BELT PRINTER TEST ................................................................................... 15 3. ORDERCARD TEST ...................................................................................... 16 ACCESSORIES........................................................................................................... 17 1. CHARGING STATION ................................................................................... 17 2. SERVICE STATION ....................................................................................... 17 2.1. Startup ............................................................................................................ 18 2.2. System Displays in the Service Station .......................................................... 19 TECHNICAL DATA ..................................................................................................... 20 3. SOL & SOL+ .................................................................................................. 20 4. CHARGING STATION ................................................................................... 20 5. SERVICE STATION ....................................................................................... 21

4|21
General Information
This description applies to Orderman Sol and Sol+ devices. The functions of both products are fundamentally identical and are described below using Orderman Sol as an example. Orderman Sol+ has the following additional functions: Ordercard interface and Bluetooth interface for belt printer synchronization and optional magnetic strip reader function. These features are described under the section on Orderman Sol+. Please note that (as of July 2010) the dual battery charger is not yet available. Once this product becomes available, we will update this document and post it on the Orderman homepage for download.
1. Safety information
1.1. Explanation of symbols
Safety information is indicated in the text by a warning triangle and a grey background.
Signal words indicate the degree of danger that will result, unless actions to reduce damage are taken.
Caution indicates that minor property damage may result.
Warning indicates that minor bodily injury or major property damage may result.
Danger indicates that serious bodily injury may result. In particularly serious incidents, loss of life may result.
Notes are indicated in the text by the adjoining icon. They are set off by horizontal lines above and below the text. Notes provide important information about incidents that involve no risk to persons or equipment.

5|21
1.2. General safety information
Caution:
Orderman Sol does not contain any parts to be serviced by the user and therefore must not be opened. If opened, the warranty is rendered null and void.
Do not expose the unit to extreme weather conditions such as rain, hail, strong sunlight or snow. In case of damage, the unit must be examined by customer service for possible faults.
Use only the Orderman Touch Pen for pen operation with Orderman Sol. Pencils, ballpoint pens or other pointed objects will damage the device's touch screen.
The device could suffer damage from a heavy mechanical load such as twisting or falling from an excessive height or onto sharp objects.
Warning:
Do not, under any circumstances, short-circuit the charging contacts of the handheld device.
Orderman Sol+ is equipped with a Bluetooth interface for wireless communication. Never use the handheld device in environments where Bluetooth could cause interference (airplanes, hospitals, etc.).
1.3. Safety information for battery pack
Warning:
Only use the battery model included with the delivery.
Do not subject the battery to extreme heat. Never short-circuit the contacts since there is an explosion hazard.
Charging temperature 0-40° C
1.4. Maintenance
To clean the housing of the unit, use a soft cloth moistened in a mild solution of cleaning agent and water.
Do not use compressed air to clean the unit or its components.
Never use turpentine, thinners or other volatile agents to clean the unit; do not use compressed air to remove dust.
Make sure that you do not scratch the touch screen surface.
Make sure that you keep the charging contacts clean.

6|21
2. Delivery volume
1. Orderman Sol and Sol+
2. Two Orderman touch pens
3. Battery pack
4. Charging station or service station
5. 5 V power supply unit

7|21
Orderman Sol
3. Overview of Orderman Sol
1. On/Off button
2. Status bar
3. Display / touch screen
4. Battery compartment with safety cord fastener
5. Battery lock
6. Charging contacts / Ethernet port
4. Charging the battery pack This section describes the steps for charging the battery pack. A fully charged battery pack can be used for up to 18 hours, depending on the setting of the automatic power-off time and display settings.
Fully charge the battery before using the device (until a solid green light appears). To charge units quickly you can also use the dual charger (optional). When the battery is very low, the battery status indicator flashes red. To restart the device, you may need to recharge the battery for 20 minutes.

8|21
Insert the battery in the backside of the unit.
Insert the unit in the charging station or service station; the unit will turn on.
The charging icon in the status bar shows the battery level.
The following battery states are available:
White solid light - Battery OK
Green solid light – Battery full (in charging station / service station) Green flashing light – Battery is charging (in charging station / service station)
Orange solid light – Battery low ~20% remaining
Orange flashing light – Battery very low ~10% remaining
Red solid light – Battery defective Red flashing light – Battery too weak for boot procedure

9|21
5. Operation (Setup) Settings are always confirmed with a green checkmark. Use Cancel to exit setup mode.
Cancel
Ok Confirm
The status bar
The status bar is located at the top of the touch screen and consists of four icons.
Get more Message Connection Battery
Access Setup
Retrieve and create messages
Status of connection
Status of the battery
The status bar is used to quickly and clearly display the system states. You can also touch the different icons to call up additional information.
5.1. Status bar Get more
Touch the Get more icon to go to the device setup screen. The setup screen contains settings and test options for Orderman Sol. Service personnel can call up the Get more menu at any time. This menu allows you to set the display brightness, backlight timeout, etc. You can also test the touch screen in this menu. It is not possible to change installation-relevant settings such as the radio channel and IP address.

10|21
Get More (Setup)
White solid light – Setup OK
Start screen for setup (Connect Belt Printer displayed only on Sol+)
Configuration (Settings)
Display configuration (Display Settings)
To configure the settings, touch the dot on the scale and drag it to the desired position. The violet bar in the scale indicates the factory default.

11|21
The Display Settings menu item enables you to configure the following settings:
Brightness Timeout (seconds): Enables you to set the number of seconds before the display brightness is dimmed. A shorter timeout period saves battery power when the device is in operation.
Power Off (seconds): Enables you to set the number of seconds before the display switches off, if device is unused. A shorter timeout period saves battery power when the device is in operation.
Brightness at minimal ambient light (%): Enables you to set the display brightness.
Logging
Use Logging On/Off to enable/disable the unit's logging function.
Set Mark
Use Set Marker to set a marker on the unit.
Test
The Test menu item enables you to test the LEDs in the status bar, the display, the touch screen, and the tilt sensor to ensure proper function; it also allows you to run a ping test.
Ping tests only work if the device is in the service station and LAN connectivity is established.
On Sol+ you can test the belt printer – and Ordercard functionality.
About
This item displays information about the unit's hardware and software, as well as its serial number.
(Connect Belt Printer) Sol+ only
5.2. Message status bar
The Message icon provides access to internal messaging systems and allows you to create and read messages.

12|21
The function is application-specific. Two different states are supported:
White solid light – No new messages received
Yellow flashing light – Unread messages in mailbox
5.3. Connection status bar
The connection icon provides information about the status of the radio connection and the configured channel. See also the illustrations in the following table:
White solid light - Radio connection OK
Red flashing light – The unit does not detect a base station.
Blue flashing light – Host does not accept data
Violet flashing light – License expired
In addition, the connection icon shows the state of the unit in the service station. See also Service Station under AccessoriesSystem Displays in the Service Station Use Connections LED Information to call up a legend with all the different formats for displaying connection status.
5.4. Battery status bar
The battery icon provides information about the state of the battery. Depending on the icon, the state can be determined. Touch the icon to display the battery power available as a graphic and a percentage amount. Use

13|21
Battery LED Information to call up a legend with all the different formats for displaying battery power. The following states are available:
White solid light – Battery OK
Green solid light – Battery full (in charging station / service station) Green flashing light – Battery is charging (in charging station / service station)
Orange solid light – Battery low ~20% remaining
Orange flashing light – Battery very low ~10% remaining
Red solid light – Battery defective Red flashing light – Battery too weak for boot procedure

14|21
Orderman Sol+
1. Connect belt printer To connect the belt printer to Sol+, open the Get more menu and select Connect belt printer
Get more menu Connect Belt Printer
Belt printer "On"
Hold the belt printer to the upper left of Sol+ as shown in the figure
When the Get more icon lights up blue for two seconds, the belt printer is connected to Sol+

15|21
Sol+ is now establishing the connection to the belt printer
Once the belt printer is detected, the Get more LED lights up blue for two minutes. In addition, a test page is printed. This test page includes:
Figure 1 (if available)
Successfully connected to: <Sol serial no.>
Figure 2 (if available)
The display shows the serial number of the Sol+ unit
Select OK to confirm active connection
Select Cancel to end the connection
2. Belt printer Test
To launch the belt printer test, open the Get more menu and select Test belt printer Test.
Click on this test to check the device connection in advance and subsequently print the test page. Printing the test page on the belt printer enables you to check the device's functionality.
This test page includes: Figure 1 (if available) Successfully connected to: <Sol serial no.> Figure 2 (if available)
Select Ok or Cancel to return to the test menu.
Belt Printer Test
16|21
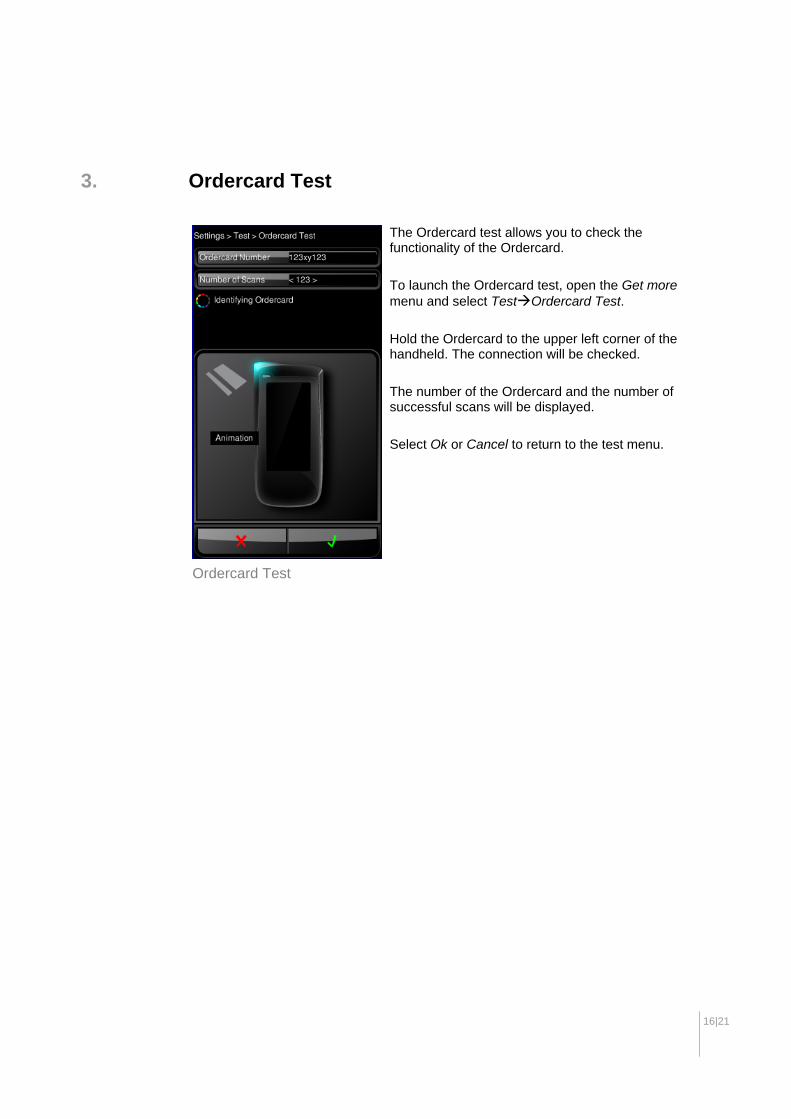
3. Ordercard Test
The Ordercard test allows you to check the functionality of the Ordercard.
To launch the Ordercard test, open the Get more menu and select TestOrdercard Test.
Hold the Ordercard to the upper left corner of the handheld. The connection will be checked.
The number of the Ordercard and the number of successful scans will be displayed.
Select Ok or Cancel to return to the test menu.
Ordercard Test

17|21
Accessories
1. Charging station
Connect the charging station as described above. Output of the power supply 5V.
When Orderman Sol or Sol+ is placed in the charging station the unit switches on. The current battery status will be displayed. After some 5 seconds, the display will switch to energy-saving mode. The battery display in the status bar will continue to show the battery level.
Touch the display to reactivate the display.
When the device is removed from the charging station the unit switches off again. Press the on/off button to turn on the unit again.
It takes approximately six hours to recharge Orderman Sol or Sol+ units in the charging station. Warning: Charging temperature 0-40° C
2. Service station Alongside its charging function (such as charging station, approx. six hours), the service station provides an IP-based Ethernet connection to an Orderman Sol or Sol+. The Ethernet cable is not included in the delivery volume. The service station is required to update firmware. We recommend a service station to be used with every Orderman Sol installation. It enables users to export large data packages (e.g. log files) and import new resources.

18|21
In addition, it supports IP-based remote service for handhelds.
2.1. Startup
Connect the service station as described above. Output of the power supply 5V.
When Orderman Sol or Sol+ is placed in the service station the unit switches on. The current battery status will be displayed. After some 5 seconds, the display will switch to energy-saving mode. The battery display in the status bar will continue to show the battery level.
Touch the display to reactivate the display.
When the device is removed from the service station the unit switches off again. Press the on/off button to turn on the unit again.
It takes approximately six hours to recharge Orderman Sol or Sol+ units in the service station. Warning: Charging temperature 0-40° C

19|21
2.2. System Displays in the Service Station
The connection icon in the status bar provides information about the status of the Ethernet connection. See also the illustrations in the following table:
Orange flashing light – Unit is contacting the service station properly; network module detected
Orange solid light – Ethernet cable is connected properly with service station; network link
Green solid light – IP found, Sol is now ready for use in the service station
Green flashing light – Hermes traffic (display illuminated)

20|21
Technical data
3. Sol & Sol+ Frequency bandwidth: 433.150 MHz – 434.650 MHz
Data transmission: Bi-directional in 433 MHz bandwidth
Transmitting power: less than 10 mW
Range: in building up to 50 m, in open areas up to 300 m
Coverage area: up to approx. 7800 m²
Battery (lithium ion technology); 3.6 V, 1940 mAh
Leak tightness: IP64 dust/splash resistant
Dimensions: 177mm x 84mm x 25mm (LxWxH)
Ports: Integrated Bluetooth cl. II ,V2.0 (Sol+ only); Ethernet 10/100Mb/s via service station
Ordercard reader (Sol+ only)
Micro SD slot for memory card
Magnetic strip reader (Sol+ option)
RFID with ISO standard (Sol+ option)
Operating time: up to 18 hours
Charging time: with charging station or service station approx. 6 hrs. with dual battery charger approx. 1 hr.
Weight incl. battery: 258g Sol; 268g Sol+
Operating temperature: -5°C to +50°C (storage temperature: -10°C to +60°C)
Charging temperature: 0° C to +40°C
No. of pixel errors allowed on display:
Continuously lit pixel: Max. no. allowed = 0
Continuously black pixel: Max. no. allowed <= 5
4. Charging station Supply voltage: 5 V power supply –1A
Power supply unit:
Input voltage 100V to 240V, 50-60Hz
21|21
Max. power consumption 150mA
Dimensions: 90 x 60 x 102 mm
Operating time: The charging station is designed for continuous operation.
Charging time: approx. 6 hours
Weight: 215g
Operating temperature: 0° C to +40°C
Storage temperature: -20°C to +60°C
5. Service station Supply voltage: 5 V power supply –1A
Power supply unit:
Input voltage 100V to 240V, 50-60Hz
Max. power consumption 150mA
Dimensions: 110 x 169 x 120 mm
Operating time: The service station is designed for continuous operation.
Charging time: approx. 6 hours
Weight: 392.5g
Operating temperature: 0° C to +40°C
Storage temperature: -20°C to +60°C
Ethernet cable is not included in delivery volume.