54119858 anthony carey the pain free program
TRANSCRIPT

THE
PAIN-FREEPROGRAM
A Proven Method to Relieve Back, Neck, Shoulder, and Joint Pain
ANTHONY CAREY, M.A., CSCS, CES
John Wiley & Sons, Inc.
ffirs.qxd 7/14/05 11:03 AM Page iii

ffirs.qxd 7/14/05 11:03 AM Page ii
Advance Praise for The Pain-Free Program
“For decades orthopedists and neurosurgeons told me I’d simply have to put upwith my bad back. Anthony Carey told me otherwise. I’ve been living pain freeever since.”
—Parvez Mahmood, M.D., F.A.C.S.
“We all have the capacity to make positive changes to how our body functionsand feels. Anthony’s book will walk you through the simple steps of seeingwhere help is needed and what you can do about it. It’s your body—and, for themost part—you are in charge.”
—Morrissey, Multiplatinum recording artist and former lead singer of the Smiths
“Years of triathlon training and countless international airline flights take a tollon your body in their own unique way. The philosophy that Anthony Careypromotes and practices can erase years of misuse.”
—Jeff Jacobs, President of Global Development for Qualcomm
“The Pain-Free Program is a practical, safe, and effective approach for anyone totake control of their pain. This is a must-have book for those that want to keepcontrol of their health, enhance their life, and live actively.”
—Tom Campanaro, CEO/President of EFI Sports Medicine and Total Gym
“With this book, Anthony Carey is breaking new ground in presenting ways tohelp us all lead healthier lives.”
—David Meggyesy, Western Director of the N.F.L. Players Association
“As a longtime dance and fitness advocate, I have always understood the impor-tance of proper body alignment and body mechanics. Anthony Carey explainsthese concepts in depth and provides easy-to-follow exercises to maintain,regain, or prevent loss of physical mobility. I have sent many friends and associ-ates to Anthony, and the result has been lots of happy, pain-free bodies.”
—Judi Sheppard Missett, Jazzercise Founder and CEO
“Read this book and open your eyes to a world of possibilities and hope for help-ing your aches and pains.”
—Greg Nelson, Cofounder and Board of Directors of Bregg Orthopedics
“The Pain-Free Program is not just an exercise regime, but a lifestyle that willfree its followers from many physical disabilities and chronic pain. AnthonyCarey’s simple, yet eloquent book is the key to a pain free life. I am walkingproof of that.”
—Peter Kovacs, Former President and CEO of Nutrasweet
ffirs.qxd 7/14/05 11:03 AM Page i

ffirs.qxd 7/14/05 11:03 AM Page ii

THE
PAIN-FREEPROGRAM
A Proven Method to Relieve Back, Neck, Shoulder, and Joint Pain
ANTHONY CAREY, M.A., CSCS, CES
John Wiley & Sons, Inc.
ffirs.qxd 7/14/05 11:03 AM Page iii

This book is printed on acid-free paper.
Copyright © 2005 by Anthony Carey, Inc. All rights reserved
Published by John Wiley & Sons, Inc., Hoboken, New JerseyPublished simultaneously in Canada
Design and composition by Navta Associates, Inc.
No part of this publication may be reproduced, stored in a retrieval system, or transmitted in any form or by anymeans, electronic, mechanical, photocopying, recording, scanning, or otherwise, except as permitted under Sec-tion 107 or 108 of the 1976 United States Copyright Act, without either the prior written permission of thePublisher, or authorization through payment of the appropriate per-copy fee to the Copyright Clearance Cen-ter, 222 Rosewood Drive, Danvers, MA 01923, (978) 750-8400, fax (978) 646-8600, or on the web atwww.copyright.com. Requests to the Publisher for permission should be addressed to the Permissions Department,John Wiley & Sons, Inc., 111 River Street, Hoboken, NJ 07030, (201) 748-6011, fax (201) 748-6008, or onlineat http://www.wiley.com/go/permissions.
Limit of Liability/Disclaimer of Warranty: While the publisher and the author have used their best efforts inpreparing this book, they make no representations or warranties with respect to the accuracy or completenessof the contents of this book and specifically disclaim any implied warranties of merchantability or fitness for aparticular purpose. No warranty may be created or extended by sales representatives or written sales materials.The advice and strategies contained herein may not be suitable for your situation. You should consult with a pro-fessional where appropriate. Neither the publisher nor the author shall be liable for any loss of profit or any othercommercial damages, including but not limited to special, incidental, consequential, or other damages.
For general information about our other products and services, please contact our Customer Care Departmentwithin the United States at (800) 762-2974, outside the United States at (317) 572-3993 or fax (317) 572-4002.
Wiley also publishes its books in a variety of electronic formats. Some content that appears in print may not beavailable in electronic books. For more information about Wiley products, visit our web site at www.wiley.com.
Library of Congress Cataloging-in-Publication Data:
Carey, Anthony.The Pain-Free Program : a proven method to relieve back, neck,
shoulder, and joint pain / Anthony Carey.p. cm.
ISBN-13 978-0-471-68720-7 (paper: alk. paper)ISBN-10 0-471-68720-0 (paper: alk. paper)
1. Chronic pain—Exercise therapy. I. Title.RB127.C375 2005616'.0472—dc22
2005001258
Printed in the United States of America
10 9 8 7 6 5 4 3 2 1
ffirs.qxd 7/14/05 11:03 AM Page iv

To Champagne, my wife and my soul mate. If everyone could experience the kind of happiness
and love that you bring to my life, the world would be a much better place.
ffirs.qxd 7/14/05 11:03 AM Page v

ffirs.qxd 7/14/05 11:03 AM Page vi

vii
Acknowledgments ix
Introduction 1
Part One: How Our Body Talks to Us
1 The Path to Pain 7
2 A New Perspective 18
3 Picture Perfect 27
4 Breakdown of the Mechanical Miracle—You! 38
5 The Physical Laws of Our Bodies 49
6 Function First, Everything Else Follows 58
7 Form Follows Function 68
Part Two: Regaining Control
8 Form 1 Exercises 93
9 Form 2 Exercises 118
10 Form 3 Exercises 143
11 Form 4 Exercises 168
12 Form 5 Exercises 192
13 Form 6 Exercises 216
14 The “Graduate” Program 241
Index 251
Contents
ftoc.qxd 7/14/05 11:09 AM Page vii

ftoc.qxd 7/14/05 11:09 AM Page viii

ix
First, I would like to thank the thousands of clients who have come throughthe doors of our office and trusted me in their time of need. I have learnedsomething from each and every one of you. I am continually inspired by yourcourage, dedication, and willingness to take responsibility for your own well-being. I am a better practitioner and a better person thanks to you.
My parents, Patricia and Patrick Carey, have always been there for me withlove, support, and encouragement throughout my life. The values and theethics they raised me with have given me the necessary tools to see this proj-ect through. One of the most rewarding things in my life is to see them proudof their children.
I would also like to thank my business partner, Aaron Brooks. We came tothe business as friends and will someday leave the business, still as friends.Aaron’s skills as a practitioner and his integrity as a business partner have beenessential to the success of our business.
I will also like to thank the members of my Mastermind Group, HaroldFox, Dennis Santopietro, and Fracka Future. Their support, motivation, anddrive are an ongoing source of personal and professional growth. They haveseen me along the way through the entire process.
My friend and colleague Devon Kidd volunteered her time to help me byposing for some of the exercise photos. Devon’s mission is to help others(www.mentorfitness.org). Tina Luu’s talent through the lens and photo edit-ing skills were a tremendous contribution to the appearance of the book. Ze Valagao’s unbelievable artistic ability and understanding of the human bodybrought the Categories of the bodies to life for me. My editor Teryn Johnson’spatience with me through the process and her critical eye for editing havemade this book something we can all be proud of. Many thanks to all of you.
Acknowledgments
flast.qxd 7/14/05 11:11 AM Page ix

flast.qxd 7/14/05 11:11 AM Page x

If you are in pain, all you can think about is relief. For more than twelveyears, I’ve worked with people just like you who have endured months,years, even decades of pain that ruled their lives. Well, I’m here to tell you
that it doesn’t have to be that way. In this book, I’ve combined all of myknowledge and experience into one pain-free program that truly works. I prom-ise that once you finish this book, not only will you have the tools you needto get rid of pain for good, you’ll also possess the knowledge to keep your bodyhealthy and functional for the rest of your life.
As far as health-care concerns go, cardiovascular issues such as heart dis-ease and high blood pressure get most of the media’s attention. While it’s truethat cardiovascular disease affects the quantity of your life, musculoskeletalproblems affect the quality of your life. When you’re in pain, you’re not reallyliving—rather, you’ve turned your entire focus toward managing your dis-comfort. Because of the pain, you’re less likely to do any exercise, which canlead to those cardiovascular problems we hear so much about. In short, paincan be at the center of a vicious cycle that can undermine your happiness andyour health.
If you understand that your pain is the product of many physical andenvironmental factors that preceded it, you can develop a strategy for change.I hope to provide a sensible guide to everyday events that are roadblocks to
Introduction
1
cintro.qxd 7/14/05 11:13 AM Page 1

healing. We’ll look at the body, beginning with “what” hurts, to understand-ing “why” it hurts. Some core concepts of my program are the interdependencyof all the body’s parts and the realization that a pain in one area of your bodycan result from other things going wrong far removed from that site of pain.
There is never a “one-size-fits-all” approach to addressing the body’s achesand pains. The more individually designed an exercise program is, the moreeffective it will be. Books, handouts, and videos that show a group of exercisesfor a specific ailment deny the uniqueness of each person’s body. If you and yoursignificant other both suffer from lower-back pain, you each suffer for differ-ent reasons because your bodies are different. So, why would you do the sameexercises? This book not only addresses the individuality of your physical structure, it will also let you further personalize the program by relating yourexercises to the activities you do most often. If you focus on teaching the bodyto function correctly and stop beating itself up, you’ll be rewarded with a reduc-tion in pain.
Chronic pain has far-reaching implications for our society, even for indi-viduals who are not in pain. Pain costs money. Pain causes lost workdays. Painreduces productivity. Reduced productivity results in higher costs, which areeventually passed on to you—the consumer. These financial implicationsshould matter to everyone because they affect all of us.
Function First opened its doors in 1994, empowering people to controltheir lives by helping them function pain-free. Our program has benefited peo-ple who felt hopeless because we looked beyond the symptoms that everyoneelse was chasing. Since then, we’ve had the good fortune of helping peoplefrom all over the United States, South America, and Europe. The FunctionFirst philosophy works because when the body is given the right stimuli(exercises), it will function and heal the way it was designed to.
If you suffer from chronic back, neck, or shoulder pain, this book will helpyou find lasting relief. You’ll learn to assess and treat the underlying causes ofyour pain. Part one describes the way our bodies work. Don’t skip that sectionbecause you need to understand the Function First philosophy to obtain max-imum benefit. Unless you read anatomy textbooks in your spare time, you’llalso appreciate the explanations of your muscles and how they function.
Part two will help you apply the Function First philosophy to your uniquesituation and will start you on the path toward pain relief. Find your body typeand your occupation type, then go to the exercises that correspond to these.How you use your body every day makes a big difference in the type of exer-cises that you need to correct your pain.
2 THE PA IN -FREE PROGRAM
cintro.qxd 7/14/05 11:13 AM Page 2

If people come into our program and don’t do their homework, they’refired. I can’t help you if you aren’t willing to do your part. So, as you read thisbook, keep in mind that at the end of the day, you need to put this advice intopractice.
The goal of this book is not to dismiss the medical system, but to open youup to the possibility that the route you have always taken may not be the bestone. If nothing else, that route is certainly not the only one. There are manyways to help yourself and your body.
Addressing the alignment of the body’s structure and its relationship tohow you move is based on fundamental principles of physics and the humananatomy. The relationship between posture and pain is well documented in sci-entific literature. By not trying to “fix” anyone’s symptoms and by addressingalignment and movement, we provide the body with an opportunity to restoreand heal itself.
To the millions who suffer from chronic back, neck, and shoulder pain, youcan exercise the Function First way to relief in the comfort of your own home.This book will give you the essential tools and instructions to determine whichCategory you best fit into and what exercise program suits your lifestyle. Theclear explanations and their accompanying illustrations will allow you to exer-cise at home without the need for expensive equipment or help from aprofessional. You can work at your own pace and allow your body to be yourguide. You’ll be in charge.
Before we get to those exercises, however, I feel that it’s essential for youto thoroughly understand the human body—how it functions and how all ofits parts work together. Then, it will be easy for you to see how a problem inone part of the body can relate to many other factors.
When I work privately with clients, I initially educate them about theFunction First philosophy and how the process can change their lives. This isan absolute “must” before I even begin an assessment on someone. Your mindmust be open to a new paradigm for achieving long-term health, and you mustbe able to relate that paradigm to your individual circumstances. You will beincredibly empowered by understanding the reasoning behind these exercises.If you read this book from start to finish, you’ll learn that
• It’s best to address the cause of pain and physical limitations, not thepain or the limitation itself.
• The body should be treated as a highly integrated structure—not as aseries of unrelated parts.
I N TRODUCT ION 3
cintro.qxd 7/14/05 11:13 AM Page 3

• You can provide an optimal healing environment by removing daily“micro” injuries to your body.
• The Function First philosophy has a positive effect on spinal disordersand back pain, various joint pains, cumulative trauma disorders,headaches, and similar challenges.
• By addressing the cause, you are also preventing a reoccurrence of thesame pain.
• It’s possible to transfer the responsibility of an individual’s health backto that person if you provide him or her with the tools for self-help.
You don’t have to be an athlete to benefit from the Function Firstapproach. With this program, everyone wins:
• the aging person
• the injured worker
• the accident victim
• athletes of all levels
• pain sufferers everywhere
People who win the biggest are those who can now overcome obstaclesthat they never knew existed. Please use these ideas and tools to take controlof your own well-being for the rest of your life.
4 THE PA IN -FREE PROGRAM
cintro.qxd 7/14/05 11:13 AM Page 4

Part One
How Our BodyTalks to Us
c01.qxd 7/14/05 11:15 AM Page 5

c01.qxd 7/14/05 11:15 AM Page 6
If you are reading this book, you are probably among the thousands offrustrated, angry people who are looking for help with their physicalchallenges and pain. According to the American Academy of Orthopedic
Surgeons, for thirty-five million Americans—that’s one in every seven—theirmovement is restricted by a musculoskeletal disorder, such as a broken bone,myofascial pain, arthritis, or a sports trauma. Pain sufferers are everywhere, fromall walks of life and all ethnic backgrounds, socioeconomic levels, and ages. Thecommon thread connecting these individuals is pain, either chronic (typicallydefined as pain that lasts longer than three months) or acute (pain that has moreof a rapid onset to levels that often motivate a person to seek intervention).
Perhaps the pain you have is new. Maybe it’s one more pain in a long listof pains that has prompted you to finally take action. Or maybe it’s chronicpain that never went away or has disappeared, only to come back again. Thesescenarios often develop when chronic pain is improperly addressed over time.When this happens, the damage exceeds the body’s level of tolerance, and thepain becomes acute. If intervention does not occur, disability or loss of func-tion may result.
Maybe it’s a pain that you’re tired of treating with medication. The med-ication may not be helping any more, or perhaps its side effects have createdtheir own problems. It could be a pain that you know is getting worse or willget worse if you don’t do something about it.
1
The Path to Pain
7
c01.qxd 7/14/05 11:15 AM Page 7

You might not even experience “pain” per se, but you do have a muscular-related physical limitation that interferes with your daily activities, by causingdifficulty in rising from a chair and sitting down, getting in and out of the car,or climbing up and down stairs. You might think that as long as you avoid aspecific movement, you won’t have any pain. Of course, little by little, you startadding to the list of activities to avoid until, finally, your life is restricted to afew, limited things you can do without pain.
Even a very active person can have similar problems. A small muscu-loskeletal imbalance or weakness can significantly limit an active individual’sability to perform at an optimum level. It can even result in your changing afavorite mode of exercise due to pain. No matter how hard you train or mod-ify your technique, you can’t seem to rise above the plateau. For example, atthe third mile in a run your knee begins to hurt, or you can’t play golf anymorebecause you will be laid up the next day with back pain. For the more elite ath-lete, an inability to cut, jump, balance, or accelerate as well with one side ofthe body greatly affects performance.
Peter, an up-and-coming triathlete, came to see me because he was unableto log the training miles from biking and running that he needed to improve hiscompetition times. Sure, he could run ten miles and feel okay or bike thirty milesand feel pretty good, but as soon as he crossed those thresholds, his body beganto break down, and the pain in his hip forced him to stop. Peter could swim with-out a problem, but that was only one third of what a triathlete needs to do. Atthe ten-mile run and the thirty-mile bike, Peter’s body could no longer toleratethe stress that his training put on it. His mechanical deficiencies became mag-nified, and pain reared its ugly head. So, running or biking was not the problem;it was the way Peter ran and biked. The program we designed for him reeducatedhis body to move the way it was supposed to move, without the mechanical stressthat it was so accustomed to. Peter is now competing at a level he never thoughtpossible, and without pain. He is a winning example of how body mechanicsmust first be viewed from a macro level. Although he’s a competitive athlete,Peter still had to begin with the fundamentals just like everyone else. If he hadn’tstarted with the basics, his body would have resorted to its old familiar ways.
The Path to PainTo help you understand what caused your present condition, I’d like to take youthrough what I term the “Path to Pain.” Everyone’s path is unique, but there is
8 THE PA IN -FREE PROGRAM
c01.qxd 7/14/05 11:15 AM Page 8
a sequence of events that’s common to individuals whom I see in private prac-tice. It isn’t unique to the people who come to Function First; it happens toalmost everyone. It’s a series of events that, when traced back, often leads us tothe underlying cause of an individual’s pain. As you read, you’ll begin to under-stand how this applies to you, and more than likely, to many people you know.You will not discover something extraordinary and unique; instead, you and your“healing team” (doctors, therapists, chiropractors, etc.) will begin to placeemphasis on long-term rehabilitation and the prevention of future occurrencesby looking beyond each symptom and seeking the underlying mechanical trigger.
In my opinion, the Path to Pain begins with muscle imbalance issues. Amuscle imbalance is a discrepancy in length and strength between two oppos-ing muscle groups. That is, muscles that oppose each other (pull in oppositedirections) need to maintain a mutually beneficial relationship. They shouldhave corresponding lengths and strengths that allow a joint to move equallyand within its normal range of motion. A predictable pattern occurs with thesemuscle imbalances based on how our neurological system works. It’s a dirty lit-tle trick that our bodies play on us. You see, when a muscle gets tight, it beginsto demand more attention from our command center, the central nervous sys-tem (CNS). The tight muscle thus receives more of the information from theCNS, until it deprives the opposing muscle of its fair share of the information.This is equivalent to adding fuel to the fire. The shorter, tighter muscle con-tinues to get even shorter and tighter. The opposing muscle now becomes longand weak as a result. Therefore, the situation perpetuates itself, if you do notrecognize and act upon it. Ultimately, these muscle imbalances will result inaltered or inappropriate movement patterns, which are precursors to manytypes of musculoskeletal injuries.
Muscle imbalances can be caused by many different things. The most eas-ily recognized are those associated with habitual postures. For many people, thepicture of a slouching teenager may come to mind. When left unaddressed,these postures become more ingrained in people’s physical characteristics.Other examples of habitual postures are a tendency to always stand on one legor to regularly shrug the shoulders in response to cold, fear, or tension. Womenwho were teenagers and young adults in the 1950s and 1960s were taught totuck their buttocks under when they stood. Over time, this affects the positionof the pelvis and the lower back. Habitual postures can also develop from psy-chological influences. Certain observable postures are often associated withdepression and fatigue, others with stress and fear. A person who consistentlyexperiences these emotions may reinforce these undesirable postures.
THE PATH TO PA IN 9
c01.qxd 7/14/05 11:15 AM Page 9

Another major cause of muscle imbalances is the work environment. If youdo a lot of any one thing, your body will get stronger and more efficient at themechanics it takes to complete that task. This can lead to tighter and strongermuscles associated with accomplishing that movement. This is true whetheryou use a computer or run a jackhammer every day. If you sit all day with yourhands in front of you, certain muscles will likely develop tightness, while theirantagonist muscles will develop weakness. The same principle applies if youalways hold a particular work tool the same way or have to assume a specificstance on a regular basis (e.g., as a grocery checker).
Past injuries and surgeries can also cause muscle imbalances. Trauma to thebody, be it from an accident or surgery, creates a response within the tissue.This includes the skin, the fascia, the blood vessels, the ligaments, the mus-cles, and the nerves. But we all knew this, right? You’ve experienced this if youfell and skinned your knee or your buttocks became bruised from a needle. Forthe sake of our discussion, however, the importance of this response to the tis-sue is how it affects the way we move. If there is a lack of movement in onepart of the body, be it a muscle or a joint, the body will make up for it some-where else. Let’s say that you strained the hamstring muscle in the back of yourleft thigh. Strains come in different degrees of severity—from just a few tornmuscle fibers to a complete tear, in which one side of the entire muscle is sep-arated from the other side. So, let’s say that your strain was pretty bad, and theskin above the muscle became discolored and bruised (this is due to bleedingof the damaged muscle fibers). As that tear heals, one part of the process is thatthe body places scar tissue in and over the region of the tear(s). Scar tissue doesnot have the same elastic properties that muscle has. This means that a mus-cle full of scar tissue does not lengthen or stretch the way a healthy one does.If left to heal on its own, that injured hamstring muscle will have less flexibilityat the hip and the knee joints that it helps to move. The result is that eventhough the bruising has disappeared, the damage remains and can continue toimpact the rest of your body.
Another way to develop muscle imbalances is through improper physicaltraining—for example, how individuals work out in the gym, the way athletestrain, and how a “weekend warrior” participates in his or her sport. The maindifference between improper physical training and stressful activity in thework environment is the intensity of the former versus the duration of thelatter. Work-related imbalances are often caused by repeating certain tasksand movements over a prolonged period of time. During physical training,muscle imbalances tend to develop as a result of overloading the muscles
10 THE PA IN -FREE PROGRAM
c01.qxd 7/14/05 11:15 AM Page 10

improperly—for example, a young man who spends most of his time in thegym training what I call the “mirror muscles.” These are muscles that he seesin the mirror—the chest, the biceps, and the abdominals. Since he doesn’t seethe opposing muscles on the back side of his body, he doesn’t give them thesame attention. Although he may do this only two or three times a week, heis adding resistance to the body in the form of the weights he lifts. Therefore,he is making himself dysfunctionally stronger; although his toned muscles maylook good, they in fact cause an overall negative impact on the body.
Another good example is a middle-aged woman who is an avid golfer. Sheloves to walk the course for exercise and never uses a cart. She may play onlya few times a week or every two weeks, but because golf is a one-sided sport,she tends to develop detrimental muscle imbalances on one side of her body.Although she isn’t working against resistance a way the weight lifter is, she hashad to develop her body’s muscular force to generate speed in the club to hitthe ball. No matter how good a golfer she is, she would do this at least one hun-dred times each round, if her actual strokes plus practice swings were added up.In this example, it is the repetition of a single, one-sided movement that resultsin the stress.
Another type of improper physical training that can negatively impact thebody is walking or running asymmetrically. Your movements should be sym-metrical, from left to right. Now, many professionals in my field would probablybe quick to point out that very few, if any, humans are perfectly symmetricalin their gait. Yet when the trained eye can observe asymmetries without theuse of high-tech recording equipment, it’s obvious that damage is being doneto your body with every step. Asymmetries in your gait reveal the effects ofyour postural misalignments and muscle imbalances. Walking is your posturein motion. Take a look at an older pair of your running or walking shoes andsee whether the wear patterns are the same on both soles. If you see exagger-ated wear on the inner sole or the outer heel, you may have a problem with anasymmetrical gait. This is just one way to see firsthand the uneven wear andtear to your body. In addition, notice whether you form calluses regularly onone area of a foot that you don’t form on the other foot.
The last few contributing factors to muscle imbalances are those that youhave very little control over. One such type consists of congenital factors. Youare born with them—for instance, having one leg slightly longer than theother. This is a “true” leg-length discrepancy. I say “true,” because many peo-ple have imbalances that make one leg appear longer than the other when itreally is not. True leg-length discrepancy is one in which a bone or several
THE PATH TO PA IN 11
c01.qxd 7/14/05 11:15 AM Page 11

bones are longer in one leg than in the other. This can create compensatorychanges all throughout the body, as the individual adjusts to the uneven base.
Scoliosis can also (though not always) be a congenital musculoskeletalissue. Scoliosis refers to a lateral curvature of the spine. This is seen when thespine is viewed from the back. Muscles on either side of the spine that should
be of the same length are instead drastically different fromone side to the other. Scoliosis is also found with a leg-length discrepancy, as a way for the body to compensate forthe sideways tilting of the pelvis.
Other muscle imbalances develop indirectly as a resultof neurological or neuromuscular disease. Examples of thesewould be imbalances due to stroke, Parkinson’s disease, orfibromyalgia.
I’d like to make a very important point about congeni-tal and disease-related imbalances: just because anindividual wasn’t directly responsible for the developmentof these imbalances doesn’t mean that he or she is helplessto change them. To do this, we must stop the downward spi-ral by steering the body off the path of least resistance thatit has traveled for so many years. We can accomplish this byworking on getting the body as close as possible to an idealalignment, using the exercises outlined in this book.
For example, let’s look at the illustration of a woman inher early twenties who has congenital scoliosis (see figure1). She believed that because she was born with it, shecould do nothing about it and would just have to live withit. But by allowing the body to take the path of least resist-ance and giving in to the muscular forces acting on thescoliosis, the curves get worse and worse. In figure 2, we cansee the same woman at fifty years of age. Although the cur-vature of her spin has deteriorated over the years, it isn’ttoo late to begin the Function First program. Theimprovement in quality of life that one can experience byreversing the path of least resistance is worth every repeti-tion of every last set of exercises.
How do you know whether you have muscle imbal-ances? A very effective way is to observe your static, relaxedposture. This, in itself, is not that easy for someone with an
12 THE PA IN -FREE PROGRAM
Figure 1Woman in her early
twenties with scoliosis
c01.qxd 7/14/05 11:15 AM Page 12

untrained eye, but in chapter 9 I’ll provide you with exam-ples of some of the more common postural faults that weregularly see. You can compare your stance with theseexamples in the mirror or let someone else inspect your pos-ture and match your body to the closest example given.
The Story of BrianLet us consider my client, Brian, who had a job loading andunloading furniture. He hurt his back because of muscularweakness throughout his core (hips, pelvis, and torso).Brian essentially stressed the muscles and the ligaments inhis lower back because he wasn’t strong enough to protecthis spine against the outside force created by the weight ofa piece of furniture. Brian’s visit to the worker’s compen-sation doctor resulted in orders to take two weeks off work,while using muscle relaxants and anti-inflammatories.
Returning for a follow-up visit two weeks later, Brianhad only slightly improved symptomatically. The doctorthen ordered an MRI (magnetic resonance imaging), adiagnostic tool that would determine whether any damagehad occurred. It took about ten days to get an appointmentand receive the MRI results. The MRI showed that Brianhad a damaged disc between the vertebrae (bones) in hislower back. Depending on the extent of the damage andthe philosophy and the ethics of the doctor, Brian’s treat-ment could have gone several different ways.
A conservative-minded doctor would have sent Brianto physical therapy. Of course, at this point, he had alreadylived with the injury for twenty-four days, and it mighteven be longer before he could get physical therapy approved by his worker’scompensation provider, as well as an appointment with a physical therapist.Valuable time would be lost. The longer Brian waited, the more deconditionedhis body would become. The longer his pain lasted, the more likely his bodywould learn new coping strategies—compensations and apprehensions—tohandle the pain.
Another doctor might have referred Brian to a spine specialist for further
THE PATH TO PA IN 13
Figure 2Fifty-year-old woman
with scoliosis
c01.qxd 7/14/05 11:15 AM Page 13

evaluation. Again, more time would pass between the time of injury and proac-tive intervention. The spine specialist would have two options: refer Brian tophysical therapy or do surgery. This is where the question of ethics and phi-losophy comes in. Would the spine specialist do surgery because that’s what hedoes best? Or would he first refer Brian to a physical therapist to see whethera more conservative form of treatment might produce the desired results?
Unfortunately for Brian, he had a doctor who didn’t just perform surgery;he did a spinal fusion. This involves the use of a metal “cage” to help fuse twovertebrae of the lower back together. It was not surprising to me that Brianactually felt worse after the surgery. First of all, the fusion did nothing toaddress the underlying cause of the injury. Second, Brian had essentially beenlying around for longer than ninety days since the injury and had become ter-ribly deconditioned.
Brian had not worked for over a year when he finally came to our Func-tion First office. Even after the surgery, he was still in a great deal of pain andwas extremely limited in the activities he could physically accomplish. Fortu-nately for Brian, we looked at his entire body, its condition, and what heneeded to do in order to live a normal life again.
Brian started out with exercises similar to those in this book and slowlylearned to use his body again the way it should be used. Instead of focusing on“what” hurt, we addressed the “why.” Brian had many musculoskeletal issuesthat had been present before the back injury, and layers of compensation hadoccurred on top of the injury.
Our approach to Brian went beyond prescribing the standard “back” exer-cises. At this point, these exercises were actually too aggressive for Brian. Hisbody needed an opportunity to start over. Instead of letting standard protocolsguide Brian’s exercise program, we let his body tell us what it could and couldnot do. Reproducing the pain or working “through” the pain is not part of ourphilosophy. The exercises that Brian received addressed muscle imbalancesthroughout his body and the associated movement patterns they produced. AsBrian’s alignment and movement patterns accepted consistent prompts fromthe exercises, his function improved and his pain diminished. With FunctionFirst’s whole-body approach, we built a foundation for Brian to work from.Soon he was earning a living again and had renewed confidence in his body.
Brian’s story illustrates the major shift that we need in current treatmentmodels for musculoskeletal disorders. One concept that’s beginning to shakethings up is the idea of the “industrial athlete.” This concept merges the phi-losophy of sports medicine with that of the workplace. The field of sports
14 THE PA IN -FREE PROGRAM
c01.qxd 7/14/05 11:15 AM Page 14

medicine has always stressed preventative screenings and active rehabilitation,with a return to activity as soon as safely possible. Preseason physicals identifyrisk factors for potential musculoskeletal injuries. Tightness and weakness ofspecific muscle groups are identified and addressed with exercise, to decreasethe risk of injury.
If an athlete gets injured, therapy and intervention begin the day of theinjury. The athlete doesn’t make this choice; the coach does. The athleteshows up every day in the training room just as he or she would to practice. If,for example, the athlete has an ankle injury, in conjunction with ankle reha-bilitation the athlete would continue with normal upper-body workouts.Instead of running, the athlete would use an upper-body aerobic device to helpmaintain cardiovascular fitness. Team meetings are also mandatory, so that theathlete will remain invested in the team’s goals and progress.
The need for this type of philosophy in the workplace seems obvious to me.Imagine screening workers for muscle imbalances if their job responsibilitiesrequire loading and unloading trucks. Or doing a postural screening of onehundred people at an accounting firm who sit at a computer for eight to tenhours a day.
This proactive approach would have two potential benefits. The first wouldbe an obvious opportunity to reduce the number of injuries and their associ-ated costs. The second would signify a company’s position on work-relatedinjuries. If a worker gets hurt on the job, it’s not an automatic pass for severaldays off work. With a physician’s clearance, the worker will be back on the job,contributing to the company in any capacity that he or she can.
But how about using this model with the general public as well? The cur-rent model in both industry and the private sector typically involves a visit tothe doctor. This visit might be an appointment or an unscheduled visit to theemergency room or urgent care. The doctor will diagnose the condition, pro-vide work or life modifications (e.g., no heavy lifting, stay off that knee, etc.),and then perhaps prescribe medications. This appointment is typically fol-lowed up by a reevaluation seven to fourteen days later. Could you imagine theteam doctor for a professional or an Olympic sports team telling the team’s ath-lete to go home and come back in a week for a checkup? That doctor wouldbe out of a job before the athlete left his office.
In the sports medicine model, the procedure would involve immediate(that day or the next) intervention by a physical therapist, an athletic trainer,or an exercise physiologist, following the guidelines provided by the treatingphysician. But to really break new ground in the intervention model, the
THE PATH TO PA IN 15
c01.qxd 7/14/05 11:15 AM Page 15

evaluation and the intervention would look beyond the site of injury. This isthe core concept that I profess throughout the book: intervention should affectall factors relating to the injury, both cause and effect.
Brian’s is not the everyday case, but he is also not an exception. If Brianhad been a professional athlete, he would not have been treated the way hewas. Brian waited from 14 days to 24 days to 90 days before any outside inter-ventions other than medications were used. Even if surgery were the onlyoption, an athlete would be doing everything he or she could to go into andcome out of that surgery as strong as possible.
The Whole-Body ApproachA study published by the National Academy of Sciences on MusculoskeletalDisorders and the Workplace concluded, “Musculoskeletal disorders should beapproached in the context of the whole person rather than focusing on bodyregions in isolation.” This means that back, neck, and shoulder pain andinjuries should be traced to their underlying causes, and health-care workersshould examine a patient’s whole body and the way that person uses his or herbody. They should not look only at the injured spot.
Brian’s case is not unique in the worker’s compensation arena either. Thisscenario is also prevalent in private insurance, especially with health mainte-nance organizations (HMOs). Injured people have to make their way throughmany “gatekeepers” before they end up in a place where help other than med-ication is given.
Let’s consider another client whom we’ll call Pat. Pat was a successful, self-employed computer graphics consultant who worked out of her home. Beingself-employed, Pat did not have worker’s compensation insurance, but she did have private health insurance. She spent six or more hours every dayworking on the computer. Pat was a forty-five-year-old female who hadobservable postural faults. Her personal physician diagnosed her with ten-dinitis of the right wrist and elbow, associated with repetitive keying on thecomputer. Pat’s treatment plan consisted of work modifications, a prescriptionfor anti-inflammatories, icing, and a wrist brace to wear at night to keep herwrist straight.
This is not an uncommon treatment plan. My doctor friends tell me thatit’s an excellent way to treat the inflammation associated with Pat’s condition.I do question, however, the logic behind the plan, since this was Pat’s third
16 THE PA IN -FREE PROGRAM
c01.qxd 7/14/05 11:15 AM Page 16

visit in a year with the same complaint. Yes, they were treating the inflamma-tion, but they had not addressed the underlying reason for her recurring injury.
When Pat finally arrived at our office, it was plain to see how the mechan-ics of her upper body had been altered, due to the right side of her pelvis beinghigh and her right shoulder sloping lower than the left one. Her right shoul-der was unable to function the way it should have because it was so out ofplace; thus, she passed that responsibility on to the elbow. The elbow, doingits own work plus the work of the shoulder, was unable to provide any supportfor the wrist. The muscles of the wrist exceeded their work capacity. With that,the soft tissue in the area was altered, and the end result for Pat was tendini-tis in the wrist. For Pat, it surfaced in the wrist, but for someone else—say, atennis player—the pain could have been in the shoulder or the elbow.
Pat’s injury would have become a continuous cycle if no one had lookedbeyond her wrist. Even if they had looked as far as her elbow, they would stillhave missed the bigger contributing factors. Pat might have ended up chang-ing her line of work or deciding to have surgery. Surgery would have onlyaccomplished the same objectives that her other prior treatments had: theytemporarily masked the pain and did not address the cause.
Only the Proactive Need ApplyPat and Brian were motivated people. They wanted to get better and theysought the resources to do so. As I’ll say again and again, the benefits that you’llexperience from your discipline and commitment will be your reward. Yourefforts will result in a reduction of pain and improved function and quality oflife. Your body didn’t reach this point overnight, so it isn’t realistic to expectan improvement overnight. Therefore, if you promise yourself to do your exer-cises and be committed, you can expect the benefits that accompany thisprogram.
Now that you’ve taken the initiative to free yourself from pain, you mustalso realize that, pain or no pain, the way you’ve used your body for many yearsis a major reason why you’re having problems now. To counteract your habit-ual movements, we have to give your body an opportunity to feel the correctway of using its muscles. The best way to do this is with exercises that teachus the basics all over again, so that we can build a solid foundation. These arenot weight-lifting or aerobic exercises. They are motor-learning exercises. Andas subtle as they may appear, their influence on your body will be profound.
THE PATH TO PA IN 17
c01.qxd 7/14/05 11:15 AM Page 17

18
2
A New Perspective
To grasp the origin of your pain, I feel that it’s essential to have a basicunderstanding of the musculoskeletal system. For starters, the muscu-loskeletal system consists of muscles, bones, tendons, ligaments, and
cartilage. And they are just that, a “system.” They are all anatomically con-nected and functionally related. The muscles move the bones. The bones actas levers to allow the muscles to increase the amount of output or work thatthey are capable of. Tendons are the links between bones and muscles. Theyblend out of the end of a muscle and attach the muscle to the bone. Ligamentsare like tendons, except that they attach bone to bone, instead of muscle tobone, to keep our skeleton connected. Ligaments don’t have the same abilityto stretch and recoil that a muscle has. So when they become overstretched,as with a sprained ankle, their length never returns to normal.
Associated with and intimately related to these structures is our internalcomputer system—the central nervous system (CNS). The CNS is the softwarethat drives the hardware (muscles). Every good thing that the body does, likesinking the perfect putt, is dependent on the CNS coordinating all the involvedmuscles, producing the right amount of force, directing that force in the rightdirection, and then slowing down the force enough to control the follow-through. The CNS is also responsible for a lot of the bad things we do. If you’reslouching as you read this, it’s because the CNS isn’t telling yourmusculoskeletal system that slouching creates long-term damage to the spine
c02.qxd 7/14/05 11:18 AM Page 18
and the muscles around it. The CNS is also responsible for developing new waysto move the body when the old way or the right way no longer gets the jobdone. This is compensation. And with the body being so incredibly adept atcompensating, we may never realize the consequences until symptoms develop.
As the previous descriptions illustrate, every part of the body truly doesdepend on the others. Focusing on where pain emerges will address only onesmall piece of the puzzle.
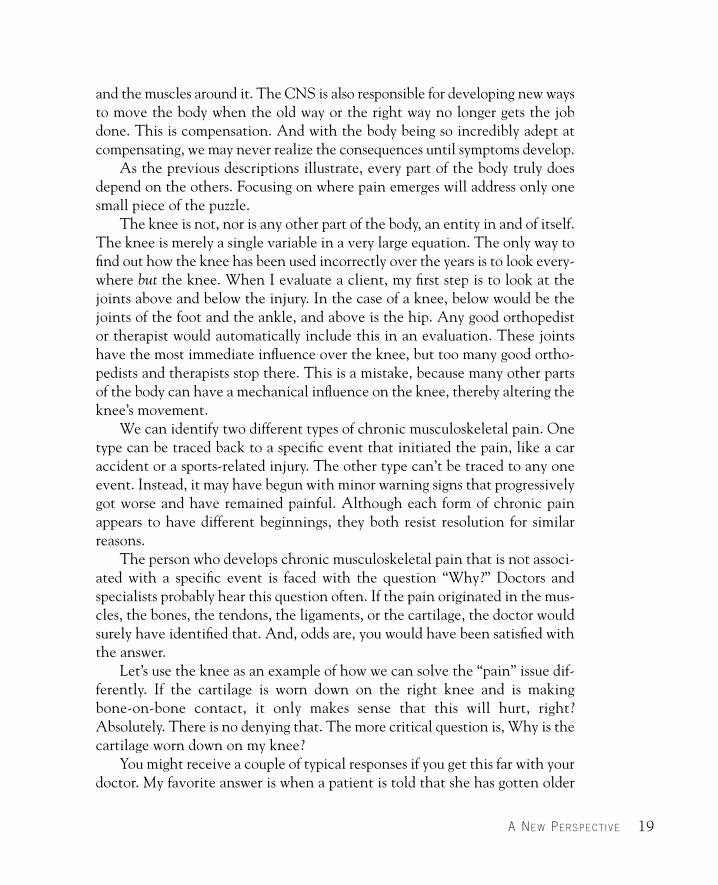
The knee is not, nor is any other part of the body, an entity in and of itself.The knee is merely a single variable in a very large equation. The only way tofind out how the knee has been used incorrectly over the years is to look every-where but the knee. When I evaluate a client, my first step is to look at thejoints above and below the injury. In the case of a knee, below would be thejoints of the foot and the ankle, and above is the hip. Any good orthopedistor therapist would automatically include this in an evaluation. These jointshave the most immediate influence over the knee, but too many good ortho-pedists and therapists stop there. This is a mistake, because many other partsof the body can have a mechanical influence on the knee, thereby altering theknee’s movement.
We can identify two different types of chronic musculoskeletal pain. Onetype can be traced back to a specific event that initiated the pain, like a caraccident or a sports-related injury. The other type can’t be traced to any oneevent. Instead, it may have begun with minor warning signs that progressivelygot worse and have remained painful. Although each form of chronic painappears to have different beginnings, they both resist resolution for similarreasons.
The person who develops chronic musculoskeletal pain that is not associ-ated with a specific event is faced with the question “Why?” Doctors andspecialists probably hear this question often. If the pain originated in the mus-cles, the bones, the tendons, the ligaments, or the cartilage, the doctor wouldsurely have identified that. And, odds are, you would have been satisfied withthe answer.
Let’s use the knee as an example of how we can solve the “pain” issue dif-ferently. If the cartilage is worn down on the right knee and is makingbone-on-bone contact, it only makes sense that this will hurt, right?Absolutely. There is no denying that. The more critical question is, Why is thecartilage worn down on my knee?
You might receive a couple of typical responses if you get this far with yourdoctor. My favorite answer is when a patient is told that she has gotten older
A NEW PERSPECT I VE 19
c02.qxd 7/14/05 11:18 AM Page 19

20 THE PA IN -FREE PROGRAM
and that wear and tear have worn away the cartilage. Of course, this responsedoesn’t explain why all of the other joints in the body feel fine and thereforemust have missed a few birthdays to avoid aging at the same rate as the painfulknee.
The other popular answer is that you haven’t used your knee correctly overthe years, which has accelerated the degenerative process. This answer beginsto shed a glimmer of light on your body’s mechanics. If you’ve gotten this farby asking “Why?” you’ve done better than most people. But if you continue toask questions (e.g., “Why haven’t I used my right knee correctly over theyears?”), the chances of your getting a satisfactory answer significantly decrease.You may not receive a good answer because you’re seeing a “specialist.” Thisspecialist may know the knee so thoroughly that he or she can perform surgeryblindfolded. Perhaps the specialist’s manual testing of the knee can predictwhat an MRI will report nine out of ten times. Yet that level of skill pertain-ing to one body part can cloud one’s vision about the role that the rest of thebody plays in the knee’s mechanics. Therefore, the specialist cannot provideyou with an answer if other parts of your body contributed to your knee’sdegeneration.
The Body’s InterrelatednessLet’s take a closer look at how the rest of the body might influence the rightknee that we’ve used as an illustration. If we observe the patient standing,instead of just lying or sitting on the examination table, we can see that theleft side of the patient’s pelvis is higher than the right side. And with the pelvissloping to the right, the upper body now sits over the right leg more than overthe left leg. In other words, because the left side of the pelvis is high, a greaterpercentage of body weight is over the right leg as compared to the left. Evenwith knee pain, the patient continues to put more weight on the painful side.Why? Because that’s the way this woman has walked for a very long time. Infact, she has walked that way for so long, it has worn down the cartilage on theright knee, causing bone-on-bone contact. So the right knee does appear tohave aged faster than the left knee, but only because the right knee has beendoing its share of the work plus part of the left knee’s!
The same evaluation techniques can be applied to any part of the body.Remember, we’re talking about a person who has chronic pain that cannot bedirectly associated with any specific event or accident. The all-important point
c02.qxd 7/14/05 11:18 AM Page 20

here is that this person developed chronic pain due to prolonged muscu-loskeletal dysfunction. The body was used inappropriately for a very long time.
Some examples of this type of dysfunction are easily recognized, once you open your eyes to other possibilities that contribute to your problems.Many of the people I help every year are amazed when they realize how inter-connected the body is. Their most frequent response is, “This makes a lot ofsense.”
Our Self-Healing BodiesThe human organism has an amazing capacity for self-healing. Given theproper environment, our body’s restoration system can heal torn ligaments,damaged nerves, broken bones, strained muscles, and so on. The best envi-ronment for recovery is that in which any stress similar to that which createdthe damage is removed. Would you lie out in the sun waiting for a bad sunburnto heal? No, you’d stay out of the sun so that the skin could heal and not getworse.
Interestingly, though, even in an improper, less-than-ideal environment,the body can still heal itself. But, typically, with this type of healing, properfunction is compromised in the previously damaged area. For instance, imag-ine how a tibia (shin bone) would heal if it were never set and put in a cast.The bones would heal in the position they took as a result of the break. Theleg would not only look abnormal, but it would never work the same way again.This is an extreme example of how the healing process can be less than opti-mal if it is not guided and nurtured. We will later see many other examples thatare much less obvious, yet their consequences are equally detrimental.
The Need to Take ResponsibilityI want to restate the ultimate insight that I hope you gain from this book: youhave an important role in properly guiding and nurturing the healing process.We can all help this process long before we feel pain, before the doctor tellsus that we require surgery, before we need medication, or before we make anappointment with a chiropractor.
If you are already in pain, don’t worry. It’s not too late. You see, we all aredoing continuous damage to our bodies at some level, just by performing our
A NEW PERSPECT I VE 21
c02.qxd 7/14/05 11:18 AM Page 21

daily activities. And the body needs to recover and heal from that damage, nomatter how microscopic the damage might be.
I damaged my body today by running four miles up and down hills.Because I have good running mechanics, the damage I did to my muscle tis-sue was actually a good type of stress. With an appropriate recovery, whichincludes stretching, rehydrating, proper nutrition, and rest, I will be strongerfrom today’s workout.
Now, if a sedentary person who hasn’t run in five years does the same work-out I did today and then “recovers” by coming home and flopping on the couchwith a couple of cold beers, the result will be quite different. Although thisindividual’s soreness will dissipate after three or four days, the effects of thedamage will not. He may no longer be aware of the damage because the ini-tial soreness will be gone, but another page will have been added to thisperson’s physical history book.
As you read this book, you are a representation of all your physical expe-riences to date. You may have had your ups and downs, but every page that waswritten in your personal history book tells part of the story that led to whereyou are today physically. The good news is that you have an opportunity towrite a happy ending.
It would be wonderful if we could just jump right to the “happy ending.”But, as they often say in the social sciences, if we don’t learn from our past mis-takes, we’re doomed to repeat them. So, we must look at the many physicalissues and core beliefs that have proved detrimental to our health, well-being,and overall function.
The Role of Your DoctorLet’s begin with your doctor. Your doctor is there for you, but your doctor is notyou. No doctor knows your body better than you do. When you go to the doc-tor with a complaint about your body, your doctor examines you, runs tests ifnecessary, and then applies a diagnosis to your problem. This diagnosis is basedon what the doctor sees, feels with his hands, and sometimes hears. Your doc-tor may also come to a conclusion that’s based on answers you give him totargeted questions. But your doctor can never experience what you experience.The pain, the limitations, and the inconveniences are all unique to you.There may be similarities between you and others who have like conditions, butnever will their experiences be identical to yours. Therefore, this well-educated,
22 THE PA IN -FREE PROGRAM
c02.qxd 7/14/05 11:18 AM Page 22

well-meaning individual is much more limitedin how he can affect your circle of influencethan you realize. Nevertheless, his influence isstill an important part of your route to recovery.
As figure 3 illustrates, we have immediatepower over certain aspects of our health. Thereare some that we cannot control and yet oth-ers over which we have limited control. Thegraphic is based on the concepts of StephenCovey’s Circle of Influence in his book The 7Habits of Highly Effective People. As you can see,the farther away you are from “You,” the lessinfluence or control you have. And the closeryou get to “You,” the more control you have.Things that we have the most control overshould be where we spend the greatest amountof time and energy.
Once the doctor has made a diagnosis,there are four main options. He can send you to some form of therapy, prescribemedication for pain and/or inflammation, perform surgery, or do a combinationof these. Once this decision has been made, the role of the doctor becomesmore of an evaluator. He evaluates the impact of the intervention he pre-scribed and determines whether to continue, modify, stop, or apply one of theother three available options. The doctor’s role becomes smaller and smallerafter an accurate diagnosis has been made.
Sometimes the doctor’s evaluation and your personal assessment ofprogress may not match, the case usually being that the doctor feels you haveprogressed or improved more than you think you have. This difference in opin-ion brings us to a critical crossroads in your history book, because if you haven’timproved as much as the doctor thinks you have or should have and you’re stillstruggling with pain, then there must be a reason. Possible reasons that mightrun through your mind are that the doctor made the wrong diagnosis, the pre-scribed drugs weren’t effective, or the therapist didn’t “make me well.”
Perhaps it’s to your advantage, as an individual seeking an improvedquality of life, to consider other possibilities—possibilities outside the con-temporary “menu” of options that most people adhere to. Medications top thelist on this contemporary treatment menu. Just look at the profit margins of thepharmaceutical companies in this country. If medication is part of your daily
A NEW PERSPECT I VE 23
Figure 3Illustration derived from the Circle of Influence,
from The 7 Habits of Highly EffectivePeople, by Stephen Covey
Exe
rcise
-Nutrition-Attitude
Doc
tors
-The
ra
pists-Other Health-careP
roviders
Insu
ranc
e
Providers-Employers-Work Environment
c02.qxd 7/14/05 11:18 AM Page 23

regimen for coping with musculoskeletal pain, I strongly believe that it doesn’thave to be.
Medications are nothing more than an adjunct to your path to a pain-freelife. They are not the foundation, and they certainly aren’t the ultimate answerto your problems. There isn’t a single medication on earth that, by itself,relieves pain, stops inflammation, fights infections, and so on. The only waythat medications can work is by helping your other bodily systems to do theirjobs more effectively.
Am I telling you to flush all of your medications down the toilet right now?No. But I will give you hope and the necessary tools so that one day you shouldbe able to do just that. This hope should inspire you to formulate a plan to getoff your anti-inflammatories and pain killers. Of course, I’m going to add,“Check with your doctor first.” But keep in mind that pain pills and anti-inflammatories are not life-and-death drugs, the same as, say, blood pressuremedication might be. So getting off these drugs is as much your decision, if notmore so, as it is your doctor’s.
Falling in the same category on the menu as medication are braces andsplints. Braces and splints do one of two things: (1) provide support and/or stability for a weak body part, or (2) seek to influence a positional change ina specific body part. Basically, you’re asking the brace or the splint to do a jobthat you should be able to do yourself. And that’s okay if your body needs help,especially if your ligaments lack full function and can’t hold one bone toanother. The brace or the splint is a means to an end, which substitutes forthe deficient ligament(s). If an area is weak or unstable, you strengthen it andchallenge it to increase its stability. If a body part needs to be influenced (i.e.,muscle lengthening or modified movements), you make proactive changes byusing your own central nervous system to create the change. By relying onyour own body, you make these changes permanent and part of how your bodyfunctions.
Suppose that you go bicycling for the first time in months. You wake up thenext day with incredibly sore muscles in your legs. Do you take out a pair ofcrutches? Of course not, because you know that your body will overcome this.It is minor damage to the tissue, due to an excess of “good stress.” Essentially,the same phenomenon is happening to your bad back, your tendonitis, or yoursore knee, except that these were created by an accumulation of bad stress to your body over time, which you essentially ignored until the pain began.Therefore, your recovery may have never occured because the bad stresscontinued to accumulate.
24 THE PA IN -FREE PROGRAM
c02.qxd 7/14/05 11:18 AM Page 24

Taking ChargeBefore you can implement any of the ideas and the exercises in this book, youhave to put a whistle around your neck and take over the position of headcoach. I use the term coach purposely because I feel that you need to look atyour body and your path to freedom from pain as a team dynamic.
Your team is made up of your feet, knees, hips, back, shoulders, neck, andhead. Essentially, your team consists of every part of your functioning body.
As the head coach, you need to surround yourself with a support staff of tal-ented individuals who complement one another. These are the assistantcoaches, the practitioners you choose to help prepare your team for the biggame—in this case, your treatment and recovery. They are your doctors, ther-apists, chiropractors, acupuncturists, and so on.
Keep in mind that they are still only your assistant coaches. For example,a football team is made up of many different positions (running backs, linemen,wide receivers, etc.). Each position has a coach who knows that part of thegame better than the head coach does. But the head coach is still key becausehe has to understand how all of the different positions work together to pro-duce the best results for the team. Does that mean you have to go out and geta degree in anatomy? No, but you do need to manage the various members ofyour team and determine what’s best for you.
The point is, none of your doctors or therapists know your body better thanyou do—so you must become an informed consumer. Putting all of your faithin one practitioner is like putting all of your savings into one stock on WallStreet. If things go well, there’s nothing to worry about. But as soon as some-thing goes wrong, your options are severely limited.
To grasp my point, look at the following table. How many squares do yousee?
A NEW PERSPECT I VE 25
c02.qxd 7/14/05 11:18 AM Page 25
Did you say 8, 16, or 24? You may be surprised to hear that all of these areincorrect. There are actually 30 squares, including the one big square thatencompasses the smaller squares.
The difference between the person who sees 16 squares and someone whosees 30 illustrates the difference between a person who never consults anyoneexcept the family doctor and someone who plays an active role in his or herown well-being. Seeing only 16 squares and stopping there means that youwere content with what was immediately obvious to you. A man wakes up inthe morning, and his shoulder pinches and hurts. He attributes it to too muchpainting the day before. He takes some ibuprofen for the pain. Folks, this is notwhat I mean by playing an active role in your health—and going to your doc-tor for the same pain pills isn’t any better.
Uniquely YouThe body is a highly integrated unit. We are much more than the sum of ourparts. In general, we all start out as infants with the same equipment. Certainindividuals are given more of an opportunity to challenge themselves than oth-ers are, because their body parts are not up to “factory specifications.” Otherswere born with fully functioning parts that later were affected by accidents ortraumas. Unfortunately, most people aren’t aware of the need to stimulate thedifferent systems of the body to keep it running optimally.
As a result, there are innumerable variations between people in the func-tioning of their musculoskeletal systems. Even with these variations, we stillmust have a “gold standard,” or a “blueprint,” that we strive for. Of course, noteveryone will be able to achieve the gold standard, but the closer we come tothat standard, the more functional our bodies will be. And with improvedfunction come improved health and well-being.
26 THE PA IN -FREE PROGRAM
c02.qxd 7/14/05 11:18 AM Page 26

Have you ever noticed that the anatomical charts hanging in yourdoctor’s office or displayed in textbooks all look alike? That’s howwe’re supposed to look. It is the gold standard, the
most mechanically effective and physiologically efficient stand-ing position or posture. One of the best criteria for evaluating thebody as a whole is to consider the standing posture. When weevaluate an individual’s relaxed, natural posture, we gain insightinto how that person’s body functions as a whole—not how oneor two specific parts function, but how the interdependent partsinteract within the entire mechanism. Postural alignment is thebasis of our movement patterns. If the basis of our movementbegins from a less-than-optimal position, then movement itselfwill likely be less than optimal. Optimal standing posture, the“blueprint,” has many benefits for our bodies. First of all, itenables us to neutralize the downward pull that gravity con-stantly exerts on our bodies. If all of the building blocks thatmake up our bodies were stacked on top of each other the waywe were designed, gravity couldn’t create pulls and torques onour tissue. To illustrate this, note the stress that is placed on yourlower back when you bend at the waist to a 45-degree angle, ver-sus what you feel when you stand up straight (figure 4). Granted,
3
Picture Perfect
27
Figure 4Bending to a 45-degree angle
c03.qxd 7/14/05 11:20 AM Page 27

this is an exaggerated example and is merely used to demonstratethe effect. Now imagine being asked to walk around for ten min-utes while bent at the waist to a 45-degree angle. This same effecthappens on a daily basis. It’s not as dramatic, but it does consis-tently occur. So, instead of feeling stress in your lower back for afew seconds as you bend over to 45 degrees, your body becomesaccustomed to lower-grade, omnipresent, almost background stress.And just because you don’t feel it every day, that doesn’t mean thedamaging stress has gone away. Your body is still performing actsthat will contribute to long-term damage.
Look at figure 5. A plumb line is used as a reference point. Theplumb line will always hang in the direction that gravity pulls.The plumb line is placed between the subject’s feet to divide hisbase of support in half. In our blueprint (figure 6), notice how allof the body’s critical weight-bearing joints are directly lined upover each other. Notice that the pelvis, the platform on which theupper body sits, is level. Notice how the spine sits directly in thecenter of the body and is straight when viewed from the front orthe back. If the spine were to continue on down to the floor, itwould land dead center between the two feet. The head sits on topof the spine and is therefore centered perfectly on the body. Theshoulders are of equal height, and the arms hang the same distancefrom the body on either side, with the palms facing in. The onlyadditional area to note is the shoulder blades in the back. Theinside borders of the shoulder blades should run parallel to thespine.
Now look at figures 7 and 8. Our blueprint, when viewed fromthe side, also shows the proper positioning of those weight-bearingjoints stacked on top of each other. See how the plumb line runsfrom the ankle up through all of the body’s weight-bearing joints.The placement of the shoulders and the head are also directly inline. Take note of the soft “S” curve that’s present in the spine.Having the right amount of inward and outward curves in the spinekeeps the upper body positioned properly over the lower body andkeeps the head sitting directly over the shoulders.
Proper postural alignment allows for our joints’ contacting sur-faces to line up exactly as they should. All of our joints have oneside that matches the other, enabling them to move together.
28 THE PA IN -FREE PROGRAM
Figure 6Blueprint front view
Figure 5Plumb line front view
c03.qxd 7/14/05 11:20 AM Page 28

Some examples would be the ball and socket that make up yourhip and shoulder joints or the hinge design of your knee andelbow joints. When the proper relationship between the two sidesis maintained, the joint can move freely through its designedrange of motion (ROM). If the muscle or the connective tissue onone side of the joint pulls more than do those on the other side,which can be caused by muscle imbalances, the proper relation-ship of the two sides is not maintained. Instead, the range ofmotion in one direction becomes greater, and the range of motionin the other direction decreases. Should this happen, your joint(s)lose normal movement, which prompts the body to figure outanother way to perform a task. Unfortunately, the “other” way istypically detrimental to the health of our muscles and joints.Proper joint alignment also reduces the joints’ susceptibility towear and tear, because each entire joint is being used the way inwhich it was designed. Therefore, isolated portions of each joint’ssurface don’t absorb the brunt of the work, and stress is better dis-tributed throughout these areas. Just as a car’s tire that makes fullcontact with the road lasts much longer than does a misalignedtire, the joint that is properly lined up will remain functional andpain-free longer than a misaligned joint will.
What Your Posture Tells You about Your BodyThere is an important distinction to make between standing orstatic posture and what it means to be functional and pain-free.Standing posture is a “snapshot” of how the many components ofyour musculoskeletal system work together. Static posture is areflection of four very important elements of the neuromuscu-loskeletal system (your nerves, muscles, and bones):
1. muscle balance
2. kinesthetic sense
3. neuromuscular coordination
4. mechanical efficiency
P ICTURE PERFECT 29
Figure 7Blueprint side view
Figure 8Plumb line side view
c03.qxd 7/14/05 11:20 AM Page 29

Each of these is interdependent and is essential to good musculoskeletal func-tion, optimal health, and pain-free living.
1. Muscle balance. Every muscle in your body exists for a reason. There are no“extras” or accidental misplacements. Each muscle is responsible for specificmovements, and each muscle has a counterpart called an antagonist. For everybicep, there is a tricep. In other words, if there is a muscle or muscles that bendthe elbow, then there is also a muscle or muscles that straighten the elbow. Inproper postural alignment, opposing muscle groups have a mutually respectfularrangement. They maintain an equal degree of pull on either side of a joint,and they share essential information from the nervous system. This allows thejoint to move with equal efficiency and freedom in every direction that it isdesigned to move. The opposite is true if muscles on one side of the joint aredominant. Those muscles would be shorter and tighter. A short, tight musclewill demand more information from the nervous system. This, in turn, inhibitsthe antagonistic muscle(s) on the other side of the joint. An inhibited mus-cle will eventually become longer and weaker to allow for the needs of theshorter and tighter muscle. For example, if the muscles of the chest areworked all the time and they become short and tight, they’ll inhibit the mus-cles between the shoulder blades. This pulls the joint that those muscles actupon out of alignment, causing the shoulders to round forward. As mentionedearlier, this will lead to abnormal movement patterns and excessive wear andtear on various structures in the body.
2. Kinesthetic sense. This term means our innate spatial awareness of our bod-ies, movements without the use of visual aids. Kinesthetic sense, or kinesthesia,applies to the location and the rate of the movement. For example, if I standwith my eyes closed and raise my right arm straight out to the side, then bendmy elbow to 90 degrees, I still know exactly where my hand is in space. I knowthis from the change in length and the tension of certain muscles in my arm.Therefore, a person with good kinesthetic sense should be aware when the pos-ture of his or her body is improperly aligned. The converse to this is a person whohas bad postural alignment and is unaware of it. This person has poor kinestheticsense. Nothing more clearly illustrates this than when our clients first see pic-tures of themselves standing behind a plumb line with a background grid.Although they may look at themselves every day in the mirror, they never viewtheir bodies from this perspective. Once they see the deviations from the “blue-print,” they are stunned. Many cannot believe that they hold their bodies so outof alignment on a daily basis. The pictures clearly show that a shoulder is much
30 THE PA IN -FREE PROGRAM
c03.qxd 7/14/05 11:20 AM Page 30

lower, the body has shifted to one side, or the head is tilted. Yet these people,who have looked at themselves in the mirror every day of their lives, have neverseen their misalignment until shown the images from this perspective.
One way to test your kinesthetic awareness is to close your eyes and try totouch the tips of your index fingers together in front of your face. If you touchtip to tip, you have pretty good kinesthetic sense. If you’d like to make the testa little harder, try the same thing by touching your fingertips behind your headand see how you do.
3. Neuromuscular coordination. In clinical terms, neuromuscular coordinationapplies to the relationship between the input and the output. The input is theinformation that your body gathers about the position of your parts in spacerelative to one another, the location of your center of gravity, and your envi-ronment. Your body has several different types of information gatherers. Theyare in your muscles, your joints, the skin, your inner ear, and your eyes. Withfaulty alignment, these information gatherers become “biased” toward inap-propriate positioning of your body segments related to postural misalignment.In other words, over time your body sets a new baseline for what is “normal.”Right or wrong, this becomes your standard. The output in most cases will beeither movement or the need to stabilize yourself, as you would do on a rock-ing boat. It will be the result of how you process the input. That meanscoordinating certain muscles to work as the prime movers, other muscles toassist, others to neutralize, and others to turn off and do nothing. All of this ispossible only if the input is accurate and the muscles and the joints are capa-ble of doing what is requested of them. Friends of mine who are computerexperts have a saying, “Garbage in equals garbage out,” meaning that you canask your processor (your central nervous system) to work only with what yougive it. Have you ever seen someone walking along and not notice a step down?An individual who doesn’t see changes in the environment is unable to antic-ipate changes in his or her support base. The person’s only chance to react isafter the body senses an increase in distance from the foot to the ground.Someone with good neuromuscular coordination will recover from this suddendisturbance very easily, perhaps with a little stumble. This person’s neuro-muscular system will have signaled the muscles throughout the body torespond to the sudden change and restore an upright position. The opposite istrue for someone with poor neuromuscular coordination, who won’t be able torespond quickly and effectively enough to prevent a fall or a possible injury. Aninteresting point about neuromuscular coordination is that it improves when
P ICTURE PERFECT 31
c03.qxd 7/14/05 11:20 AM Page 31

it’s challenged. If you spend your day in a chair and your evenings sitting infront of the television, your body becomes less efficient at responding to yourneeds. This has serious consequences for someone who doesn’t take action torecover from an injury, because the predisposition toward reinjury grows evengreater.
4. Mechanical efficiency. As mentioned earlier, postural alignment is the basisfor movement patterns. You cannot have optimal movement if your alignmentis faulty. The same mechanical laws that apply to any piece of machinery alsoapply to the human body. Imagine a Mercedes-Benz, the pride of German engi-neering. Now, imagine that we take that Mercedes apart, piece by piece. Thenwe put it back together but don’t remember where all of the parts go. They allend up somewhere, but not exactly where they’re supposed to be. Do you thinkthis Mercedes-Benz will still be an engineering marvel? Not likely. And suchis the case with movements that we perform when they originate from a dys-functional foundation. This applies as much to the way you use a keyboard asit does to how you run up a flight of stairs.
These four elements of the neuromusculoskeletal system must functionproperly in order for you to avoid damaging stress to your body. And if theydon’t, your posture will reveal what has gone wrong.
If static posture provides us with an overall “snapshot” of the body’s levelof function, then a person’s gait gives us a moving picture. Human gait, or one’sway of walking, is really posture in motion. By observing the way a personwalks, we can often confirm many of the things we see in static posture. Yet,a person’s gait can sometimes reveal additional problems that were hiddenwhen he or she stood still.
Have you ever noticed that from a distance, you can often identify some-one you know by the way that person walks? The characteristics that we noteabout certain people are a reflection of the mechanical strategies that they useto walk. Just as with static posture, we can define “normal” gait. As the bodydeviates from its normal gait, the likelihood of increased stress and strain onthe soft tissue and the bony structures is greater. There are too many combi-nations of possible deviations to count, but I’m sure you’re aware of the moreobvious and common ones. For instance, some people are rounded forward intheir upper backs with their heads forward. Others display the “duck walk,” inwhich one or both feet turn out. There is also a type of walk associated withrunway models, in which the hips swivel from side to side. Even these few, sim-ple examples are evidence of an improper gait pattern.
32 THE PA IN -FREE PROGRAM
c03.qxd 7/14/05 11:20 AM Page 32

You might say to yourself, “I’ve walked this way or stood this way all of mylife, long before I started having problems.” Or, “Of course, I stand or walk thisway; this is what pain has done to me.” In both cases, your observations areright, and in both cases, your body is wrong. What this means is that whetheryour structural misalignment and gait problems are a cause or an effect, it mat-ters much less than you might think. The reality is that your body is doingsomething wrong on a day-to-day basis that is detrimental to your health andquality of life. So, whether it’s a cause or an effect is secondary to the fact thatit’s now an existing part of how you move and function.
How Some Problems Might StartLet’s look in more detail at some major contributing causes to deviations in ourstructure. Most people are affected by more than one cause, and several of thecauses can often develop as a result of the others. The major causes of struc-tural deviations are (1) past injuries and/or surgeries, (2) congenitalconditions, (3) improper physical conditioning, (4) work environments, (5)habitual postures, and (6) muscular dysfunctions/disease.
We’ll use the issue of past injuries or surgeries to illustrate a point. Thereprobably isn’t a person on earth who hasn’t had some minor bodily injury atone time or another during his or her life. Especially as children and during ourdevelopmental teen years, we experience countless minor strains, sprains,bumps, and bruises. We also get weekend warrior–type injuries, in which a guyor a gal who doesn’t move all week tries to play as hard as possible on the week-end. The weekend warrior often participates only on the weekend because theindividual needs the rest of the week to recover. Most of these injuries mayhurt enough for the person to self-medicate, but they aren’t severe enough toprompt a trip to the doctor.
In addition to these minor pains, many people experience more significantinjuries, due to accidents or traumas, that require appropriate treatment byqualified health-care professionals. The ultimate intervention by a health pro-fessional would be surgery. Remember, all of your physical experiences to datedefine who you are from a musculoskeletal standpoint. Therefore, all of theseincidents were and are capable of influencing how your body works now.
The first issue with either an injury or a surgery is the actual damage that’sdone to the tissue in the immediate vicinity of the injury. Whenever there is
P ICTURE PERFECT 33
c03.qxd 7/14/05 11:20 AM Page 33

an insult to soft tissue (a sprain, a strain, inflammation, an incision, a contu-sion, etc.), a disruption occurs in the normal characteristics of that tissue. Itneeds to be repaired. The body can usually do this on its own, over time, unlessthere is a complete tear. If that’s the case, surgery is typically required to reat-tach the two ends. The severity of the damage, of course, determines howmuch change will occur. There is a distinct difference in the damage associ-ated with a surgery that neatly cuts through several layers of muscle and thatwhich occurs with a minor muscle strain. If we’re talking about damaged mus-cle, the particular area of damage doesn’t completely return to pre-injury status.As part of the healing process, the body lays down connective tissue in the areathat is supposed to have muscle tissue. However, connective tissue doesn’t havethe same stretch and recoil properties as muscle tissue. The result is a musclethat isn’t 100 percent repaired. How close one can get to 100 percent is directlyrelated to the steps that are taken after the injury. If we’re talking about liga-ments, they never had the stretch and the recoil properties of a muscle in thefirst place. They’re like a piece of stretched gum—it doesn’t snap back but staysstretched. This isn’t a good situation, considering that the primary responsi-bility of a ligament is to connect a bone from one side of a joint to a bone onthe other side of the joint. The ligament helps guide the movement of thejoint, which is created by the muscle contraction. So, if your ligaments arestretched, you have a loose, floppy joint. Then you have to rely solely on yourbackup stabilizers for that joint: the muscles.
What I’ve just described can very easily be associated with specific eventsin one’s life—events such as falls in the playground, injuries during a sportingevent, car accidents, and so on. But many of these traumas also happen everyday, and we just don’t realize it. They are background-type, low-level insultsto the tissue, which can be referred to as chronic, low-grade sprains or strains.This type of injury can happen as you hunch over your computer for eighthours a day. It can happen due to the way you walk or even how you stand inline at the grocery store. It’s a cumulative effect that prompts the body torespond the same way that it does to a more definitive event, like sprainingyour ankle. The body’s response is to begin laying down connective tissue tohelp protect the injured area, which results in stiffness in the muscles and thejoints; this, in turn, leads to a restricted range of motion in the joints. Theseeffects just happen more slowly and over a longer period of time.
What’s really dangerous about this type of low-grade sprain or strain is thatit sneaks up on you. No specific event has brought it on, so you don’t remem-ber when it arrived. And once it arrives, you don’t really know it’s there. As the
34 THE PA IN -FREE PROGRAM
c03.qxd 7/14/05 11:20 AM Page 34

condition progressively starts to break down your body, you simultaneouslybegin to build a tolerance to it. It’s like living near the freeway and eventuallynever hearing the cars anymore. This background problem can often be directlyassociated with other ailments that you might seek help for, but because youdon’t know the problem exists and the symptom is somewhere else, you cannotmake a connection between the background noise and the symptom. Many ofmy clients are heavy computer users because of the role that computers play inour society. I can often look at them and see where the shoulder muscles willbe very tight and tender. When I ask my client whether their shoulders are sore,they say, “No.” Yet, if I use my thumb to put a little pressure in that area, theyjump out of their chairs. My thumb is kind of like an occasional police siren thatreminds them that they do live near the freeway.
This background insult to the tissue is created by the force of gravity act-ing on a misaligned body. Remember, when proper postural alignment ismaintained, the body is very effective at neutralizing the downward pull ofgravity. The opposite is true if we aren’t properly aligned, and this will bereflected in activities that we perform both statically (like sitting) and dynam-ically (like walking or dancing).
Like a Pebble Dropped in a LakeNow let’s take an in-depth look at the ripple effect of an injury to your body.Consider that when you have an injury, new or old, the body does what it cando to avoid pain. Minor adjustments, when looked at individually and for anisolated period of time, don’t seem like a big deal. Yet something as commonas a sprained ankle, if not rehabilitated properly, can lead to changes through-out your body. Intuitively, the body limps to avoid placing too much weight onthe injured body part. As you do this for a few weeks, your body begins to learnthis new way of walking. As a result, changes occur in the muscles that act onthe knee, the hip, and the trunk. Another example may be a problem with therotator cuff of the shoulder. If certain movements produce pain, such asreaching overhead, you’ll avoid them. But if you need to get that arm over-head, you may compensate by “hiking” the shoulder toward the ear. Afterrepeating this movement for several weeks, you wouldn’t even be aware thatyou’re shrugging the shoulder. That’s because you’ve taught your shoulder anew incorrect way of operating, through repetition.
Vladimir Janda, M.D., an expert in the area of muscle balance, calls this
P ICTURE PERFECT 35
c03.qxd 7/14/05 11:20 AM Page 35

phenomenon sensory motor amnesia. Your body forgets how to move properly.In our context, properly means functionally. Your body has replaced the oldmovement pattern of raising your arm by the ball-and-socket joint with theadded movement of hiking up your shoulder blade. Even after your surfaceinjury heals in the rotator cuff, your body will keep part of the movement thatit learned while in pain. Is there a problem with this? Absolutely, because thisnewly learned movement actually predisposes the same shoulder to a reinjury.In addition, it can create an entire series of new problems that relate to thenew dysfunction. For example, the muscles that hike up the shoulder will con-tinue to get stronger and will compensate for other muscles. Potential problemscould arise in the neck, the elbow, and the wrist on the same side of the body.This illustrates precisely how the pages of the history book that make up yourphysical experiences are written.
I’m sure that most of this sounds foreign to you. You have always movedalong just fine, going about your workday or exercise program. This is the bodythat has gotten you through all the years of growing up, earning a living, andso on, and now I’m telling you that you’re doing it all wrong! How could youhave gotten this far if you were, in fact, doing everything wrong?
We can never test drive another human body. We cannot step outside ofour own musculoskeletal systems and into another to experience how it feelsto do something differently. We assume that we’re doing it correctly becausewe have only one point of reference—our own bodies. Unless you are a high-level, competitive athlete, you probably haven’t paid much attention to themechanics of the way you move. You don’t think about these things untilsomething hurts.
Quite simply, our bodies are smarter than we are. Our bodies will get fromPoint A to Point B the best way they know how. And if for some reason thatbest way doesn’t work because of a tight muscle, an injury, a bruise, inflam-mation, or a thousand other scenarios, the body will figure out another way toget there. Compensation is the name of the game, and the human body is aworld champion at it.
There are broad ends of the spectrum with respect to how much change isneeded to do the things that we do. At one end of the spectrum may be anindividual who was affected by polio as a child. Poor muscular development hasdisrupted the ability to walk properly. Now grown up, the person has figuredout a way to move from one place to another. At the other end of the spec-trum is someone walking barefoot on sharp gravel. The individual will have toalter his or her walk to avoid distributing body weight over small areas on the
36 THE PA IN -FREE PROGRAM
c03.qxd 7/14/05 11:20 AM Page 36

bottoms of the feet. You have probably done this yourself. Similar situationshappen when the weather gets warmer and people go barefoot for the first timethat season. The bottoms of the feet are soft from a winter of wearing shoes.When we walk on the hard, rough asphalt for the first time, we don’t stop andthink, “I’d better walk flat-footed so that I don’t scrape the bottoms of my feet.”Instead, our brains get new information from the bottoms of our feet telling usthat we’re no longer walking on Berber carpeting. We automatically, withoutthinking, bend slightly at the knees and the hips so that our feet flatten to bet-ter distribute the pressure from the ground over the soles of the feet.
Altering your movements once or twice, as described earlier, won’t influ-ence your body to move differently. But if it’s done repeatedly over a longperiod of time, as in the aftermath of an injury, your body will be changed. Theend result of all these little adaptations and changes is that your body willdevelop a new strategy to accomplish certain tasks. Whether or not the newstrategy is functionally correct is another story. As we repeatedly carry out anaction, it becomes “normal” for us. Unfortunately, normal in this case is notin the best interest of our long-term health. We establish a baseline from whichwe work, and like a carpenter whose first baseline measurement is off, it’sinevitable that the rest of the project will be detrimentally affected.
P ICTURE PERFECT 37
c03.qxd 7/14/05 11:20 AM Page 37

38
4
Breakdown of theMechanical Miracle—You!
If we are the product of all our physical experiences to date, I’d like you totake a moment to think back over the years to the major and the minorinjuries your body has sustained. Try to remember as many as you can,
because they all play a role in who you are today. Do you recall that sprainedankle during high school cheerleading or that deep-thigh bruise from a pickupfootball game back in college? They all had some effect on your body. Remem-ber, we are all affected by both large and small injuries, so don’t forget theingrown toenail that hampered you for two weeks back in 1988.
If you are and were very physically active in sports or because of your occu-pation, you have a greater probability of experiencing more insults to yourworking machinery than does someone who leads a more sedentary life. Majorinjuries that require a prolonged recovery process will obviously have a greaterimpact on your body than a bump or bruise would. For instance, reconstruc-tion of the anterior cruciate ligament (ACL) in your knee can take twelve ormore weeks to rehabilitate. During that twelve-week period of using crutchesand limping, your body learns a new motor program for movement. That is, thebody has to learn to walk during this time, taking into consideration that onelink in the chain from foot to hip is both unstable and lacking a full range ofmotion. In addition, it’s also very painful to put weight on the leg, and the bodydoesn’t like pain—so you avoid it. This also contributes to alterations in theway you walk, in an effort to avoid the pain.
c04.qxd 7/14/05 11:22 AM Page 38

On the positive side, if the rehabilitation and the follow-up for an injurylike this are ideal, then the long-term implications are lessened. That’s a big“if,” however, because standard physical therapy protocols for a repaired ACLtend to focus predominantly on the knee. In some cases, the ankle below andthe hip above the injured knee may be included in the rehabilitation process.Rarely is anything ever done to address the changes that the muscles of thetorso must make to compensate for the problems of one of its locomotor appa-ratuses (a fancy way of saying “leg”). Nor does it address the increased demandthat the other leg had to assume as a result of a prolonged period of asymmet-rical (one-sided) weight bearing.
An interesting observation to note is the difference between the rehabil-itation and the recovery of a professional athlete versus that of an ordinaryperson. One of the most noticeable differences is the recovery time. Often pro-fessional and even college athletes can return to full competition in one-halfor one-third the amount of time that you or I might take just to stop walkingwith a limp. How do they do this? Well, for starters, they are in excellent phys-ical condition prior to the injury. Their bodies are therefore better prepared tohandle the demands of aggressive rehabilitation. Aggressive rehabilitation is thekey phrase here. Aggressive refers to both the amount and the intensity of reha-bilitation. An athlete who injures his or her back, for example, should returnto action with a back that is stronger and more flexible than it was before theinjury. Professional athletes, as well as their employers, have a monetary inter-est in their recovery and ability to get “back on the job.” Money is definitelya motivator, but so is the fact that these individuals are achievers, and they feedoff their successes.
Thus the injured athlete has a new, temporary, full-time job: fixing his orher body. It isn’t unusual for professional athletes who are recovering frominjuries to spend three, four, or five hours in the training room and the weightroom every day! They are doing everything possible to maximize their bodies’healing potential—and they are doing the work. Certain things may be doneto them by trainers and medical staff, who also provide guidance, but they mustwork on themselves extensively. Compare this kind of rehabilitation schedule(and its recovery time) to that of the injured individuals who might spendthree hours a week rehabilitating themselves. The monetary incentives maynot be the same, but the desired outcome is. Both professional athletes and injured workers want pain-free bodies that allow them to do both theirjobs and all of the other things in life they enjoy. Therefore, an important ques-tion to ask yourself is, “How much time do I spend working on myself?” Please
BREAKDOWN OF THE MECHAN ICAL M IRACLE—YOU ! 39
c04.qxd 7/14/05 11:22 AM Page 39

keep in mind that I refer to physically addressing the biological you, not toarguing with insurance company representatives, scheduling office visits, sit-ting in the waiting room, or any of those necessities. Unfortunately, these tasksare often huge time vacuums, but they still don’t count toward the concretetime you must spend working on yourself. The time that you work on yourselfis far more important than anything a “customer service” representative couldever do for you.
Having read up to this point, you may have started to revise your overallperspective on your physical situation. If so, that’s great. Breaking throughinertia is the first step. If you still aren’t buying into the views I’ve presentedthus far, please continue reading. For thirteen years, I’ve used this approach tohelp people who had no hope, so I know that this program can help youachieve freedom from pain.
Tina’s StoryIf you’re a chronic pain sufferer, whether or not your pain is related to trauma,consider the possibility that biomechanical issues existing prior to any accidentmay be impeding the healing process. I think it’s safe to say that your bodydidn’t get into its present condition overnight.
Such was the case with Tina, a twenty-nine-year-old professional chef. Tinawas the unfortunate driver of a car that was blindsided in an intersection byanother car running a red light. The accident left her with pain on the side ofher neck and down into her shoulder blade, like a “knitting needle” being stuckin her back. Prior to seeing me, Tina spent a year and a half receiving care fromseveral chiropractors, as well as physical therapy and massage treatments.According to her, she was about 30 percent improved, but she still had a lot ofpain and had a hard time working. After evaluating Tina, I pointed out to herseveral misalignments of her shoulders and pelvis and explained how they con-tributed to her pain. Interestingly, Tina responded by saying that she had beenlike that long before the car accident. She even brought in pictures from eightyears earlier, when she was in college. She was right, she had been misalignedin terms of her posture, but the goal of her exercise program was to correct thatanyway, because the postural imbalances wouldn’t allow her to heal properly.Within four weeks, Tina was another 30 percent better, and in nine weeks, shewas at 90 percent improvement. Today Tina is pain-free, and if she continueswith her exercise program, she’ll remain so long into the future.
40 THE PA IN -FREE PROGRAM
c04.qxd 7/14/05 11:22 AM Page 40

The Unholy TrinityI’d like to outline a series of events that happens to many individuals who cur-rently suffer from chronic musculoskeletal pain. They are what I consider thethree preliminary steps to developing long-term musculoskeletal issues—anunholy trinity, if you will. As you read, think back and see whether they applyto the process you’ve experienced.
The first is denial. Whether you crashed on your motorcycle or developedshoulder pain while working on the computer, you deny to yourself the seri-ousness and the relevance of the injury. Of course, you’re aware that you’reinjured, especially if you crashed on a motorcycle. You may even be intellec-tually aware that you’ll be faced with a recovery period, but unless you’ve everhad a prior injury that required similar attention, you may be oblivious to whatyou’re in store for. When I use the term denial, I mean that you deny the seri-ousness of the injury and the level of effort that will be necessary on your partto effectively recover. So often, people equate this new injury with much lessserious ones they’ve experienced in the past, saying that it’s “no big deal,” orthat it will clear itself up in a few days or a week. Pop a few ibuprofen and takeit easy for a couple of days, and things will resolve themselves, right? Wrong.Even with something more serious like a motorcycle accident, just because theswelling has decreased or the stitches have been removed doesn’t mean thatthe healing process is complete. Many times, when individuals now must dealwith chronic conditions resulting from earlier injuries, they’ll look back to theinitial injuries and realize that they hadn’t accepted the gravity of the situa-tion—a classic case of “If I knew then what I know now . . .”
Denial can cost you the opportunity to begin some of the most importantinterventions in your recovery process. If you have a clear idea of what’s goingon in your body, with the help of your physician or another qualified health-care professional, you can map out a plan and know your responsibilities. Thisis important because, after an injury, you’re working within a window of timewhere the body changes as a result of the injury. This is when you can influ-ence the healing process, in order to recover to the best of your ability.
The second part of the unholy trinity is pain avoidance. Yes, I have alreadymentioned this earlier in one context. I said that the body doesn’t like pain anddoes whatever possible to avoid it, but if standing for ten minutes in churchcauses back pain, the answer is not to avoid standing (or church). Avoidingsomething if it hurts might apply to thumping yourself on the head with a ham-mer, but it doesn’t cover natural movements that the body should be able to
BREAKDOWN OF THE MECHAN ICAL M IRACLE—YOU ! 41
c04.qxd 7/14/05 11:22 AM Page 41

perform. By avoiding the pain without identifying its cause, you set yourself upfor additional problems down the road.
I often see people with lower-back problems who avoid activities like gar-dening or sitting for more than fifteen minutes because it aggravates their backpain. Or computer users who develop upper-extremity injuries associated withoveruse. They will either dramatically reduce their time on the computer ormanipulate their workstations temporarily to change the stress on their bod-ies. The reality is that they are just avoiding the pain instead of confrontingit and taking the necessary steps to create an optimal recovery environmentfor their bodies. Eventually, any movements or activities that are similar tothose that initially caused the discomfort will produce the same painful result.It’s usually at this point that people decide to do something about their pain,but valuable intervention time had been lost.
The third part of the trinity is shortsightedness. I often see this situationwith people who have already attempted some type of intervention or reha-bilitation prior to consulting me. It usually occurs when people have stoppedeither physical therapy or chiropractic care because their insurance no longercovers it or else they have been discharged. Limitations on any kind of care byyour insurance plan should never dictate the end of your rehabilitation process.Your insurance plan has no correlation with how your body heals. What hap-pens quite often is that people discontinue any rehabilitation once theirinsurance no longer pays for it. It’s quite possible that these individuals are stilla long way from 100 percent recovery. Instead, they may be only 50 to 60 per-cent recovered, so they resume their normal lives within the restricted levelof functioning that the 50 to 60 percent recovery allows. This is unfortunate,because an injury that could have been adequately rehabilitated within weeks,if everything were done as it should have been, may now take months or evenyears. It’s crucial that you see the rehabilitation through to the end and do allof your homework. Don’t rely on someone else to do the work for you. Othersdon’t have the same investment in your health that you have. They don’t haveto climb into your skin and do what you do or feel what you feel.
When Are You Done?When is the end of your rehabilitation? That’s a great question. Perhaps a bet-ter question to ask, though, is when does your formal rehabilitation end? Yourformal rehabilitation would be that dictated by a qualified professional, based
42 THE PA IN -FREE PROGRAM
c04.qxd 7/14/05 11:22 AM Page 42

on outcome objectives. You will have general time lines to follow, based onyour injury and your body’s capacity to heal. Now, your informal rehabilitationis another story. To me, that never ends. It’s an ongoing process to fight backagainst the things that beat us down day after day.
I mentioned that you might get discharged from rehabilitation based onyour insurance coverage. That is, your insurance might pay for only nine vis-its, even if your doctor wants you to go for eighteen visits. Another possibledischarge scenario is when the practitioner who is treating you makes the deci-sion. This means that either the practitioner feels he or she can do no morefor you with direct intervention or, in the practitioner’s opinion, you haveplateaued in your improvement. Keep in mind that when a practitioner statesthat you’ve “plateaued,” this simply applies to the treatment that this indi-vidual has provided for you. It doesn’t mean that you cannot improve withother forms of treatment or with a consistent home program. It’s perfectlyacceptable and not uncommon for practitioners (at least, ethical ones) to dis-continue your treatment because they feel that their skills and approach nolonger benefit you. A perfect example is with chiropractic care. A chiroprac-tor who only adjusts his or her patients and doesn’t utilize any complementarystretching and strengthening programs will ultimately need the patient to dosome other type of proactive work. The same can be true for a physical thera-pist who specializes in soft-tissue work or myofascial release, which, withoutcomplementary exercise, would have a diminishing likelihood of helping youto progress. Once again, the ball is in your court to determine what your bodyultimately needs to get better.
Self-TestsBy examining the concrete examples I have used, you might see where you’rehaving problems. However, you can also take a few simple tests to feel someof the more common movement faults that are often associated with muscleimbalances. These pertain to muscles that are tight, muscles that are weak, andmuscle groups that cannot work together to coordinate proper movements.
The first is the stork stance, which highlights muscle weakness and bal-ance. For this test, it’s best to stand in front of a full-length mirror. Lift one footoff the ground so that your thigh is almost, but not quite, parallel to the floor.Your knee should be bent, with your foot almost behind you (figure 9). As youdo this, you will watch yourself in the mirror to see what your body does. It
BREAKDOWN OF THE MECHAN ICAL M IRACLE—YOU ! 43
c04.qxd 7/14/05 11:22 AM Page 43

might be a good idea to try this before you read on. If youknow what your body is supposed to do, then you mightconsciously or unconsciously make corrections. For somepeople, just standing on one foot will be a challengingtask. If you are unable to balance for more than three tofive seconds, then practice balancing first. Don’t look atyourself in the mirror until you can balance on one footfor at least five seconds.
One way that your body might respond to this posi-tion is by allowing your torso to bend sideways towardthe stance leg (the leg on which you support yourself).Or, your pelvis on the side of your stance leg might tiltup, while the opposite side drops. As this happens, yourtorso might bend to the side as well. You should also lookat your pelvis to see if one side rotates toward the mirroras the other side rotates away. The final thing you canwatch is your knee on the stance leg. Check to seewhether your kneecap turns inward as you support your-self on that leg. After you have done this on one leg,repeat it on your other leg. It’s very possible that you’llget different results on the other leg. Also note whetherone leg feels more stable than the other.
If one or more of these movements occur, it’s a reflec-tion of weakness and lengthening of some of theimportant stabilizing muscles around your outer hip andpelvis. These muscles keep the pelvis in line, from side toside, when we walk, run, or go up and down stairs. We
use these muscles any time we place extra weight or all of our weight on onefoot at a time, as we do when walking. In addition, there should be no notice-able difference between the right and the left legs. Remember, we are abilateral piece of machinery.
So, what should happen if your body does what it is supposed to do? First,your pelvis should remain level and your torso should stay straight up anddown. In other words, you should be able to just shift your weight from twobases of support (your feet) to one base of support without any major move-ments in your pelvis, hips, and upper body. Therefore, your pelvis should not turn toward the mirror, nor should your knee face anywhere exceptstraight ahead.
44 THE PA IN -FREE PROGRAM
Figure 9Stork stance
c04.qxd 7/14/05 11:22 AM Page 44

Our next self-test involves the wall stance. Stand withyour back to the wall and your heels 2 or 3 inches from thewall (3 inches away at most). Allow your arms to hang atyour sides. Now stand so that your head, shoulders, and but-tocks all touch the wall. You will have to bring your shoulderblades toward each other to be able to get your shouldersback (figure 10).
In general, this will feel very strange and awkward formany of you. Essentially, to achieve this position, you mustengage all of the extensor muscles that run up and down yourspine from your pelvis to the base of your skull. Whether youcan attain this position and how you do so is the insight yougain from this test.
One of the first things you might notice is that yourweight is forward, on the balls of the feet. As a result, youmight feel your calf muscles working harder than normal topress you back toward the wall. For some people, getting theirheads on the wall is the most challenging task. When theupper back is rounded as part of one’s posture, the head mustgo forward to balance the weight that’s shifted behind theankles. Assume this position long enough, and you won’thave strength in the upper-back muscles to extend(straighten) it enough to allow the head to come all the wayback. Some people may be able to get their heads on the wallbut only by tipping them back. In other words, they wouldhave to look up at the ceiling to get their heads to touch the wall. When thehead touches the wall in this manner or doesn’t touch it at all, this reveals adefinite weakness in the very important muscles of the upper back.
For people who can get their heads and upper backs on the wall, there stillmay be concerns. Another technique used—and, yes, it’s a compensation—isto exaggerate the arch in the lower back to get the shoulders and the upperback on the wall. This technique is often resorted to by people who alreadyhave a great deal of arch in their lower backs and whose abdominal strengthis weak relative to their hip flexor strength and tightness. For these individu-als to achieve this position, their buttocks will touch the wall but no other partof their backs will touch until their shoulder blades do. The concave arch inthe back therefore extends all the way up to the shoulder blade region of theupper back (figure 11).
BREAKDOWN OF THE MECHAN ICAL M IRACLE—YOU ! 45
Figure 10Wall stance
c04.qxd 7/14/05 11:22 AM Page 45

If you aren’t sure whether you compensated by arch-ing your lower back, we have a little addition to this test.It will help to reveal whether you have the necessarystrength in your abdominals to keep your lower back neu-tral under this kind of demand.
The next step is to fold your arms in front of you.This may make your shoulders come forward a little, butyou still need to keep the shoulder blades on the wall.From this position, try to press your lower back flatagainst the wall. As you do this, you cannot allow yourhead or shoulders to come off the wall or allow yourknees to bend. Many people will find this very challeng-ing. If you cannot do this, you have weakness in theabdominal and the gluteal muscles.
Next we can try the cat and dog. The cat and dog,sometimes called the cat and camel, is a yoga exercise, butI use it as an evaluation tool to see how well a person canintegrate movements of the hip, the pelvis, the spine, theshoulder girdle, and the head. The shoulder girdle refersto the shoulder blade, the upper arm bone, and the col-lar bone. This is the most complex of our self-testsbecause it integrates so many different areas of the body.
You begin this movement on your hands and knees.Your hips should be directly over your knees, and your shoulders should bedirectly over your wrists. Your hands are shoulder-width apart, and the fingersshould point straight ahead. Your knees are hip-width apart. It’s essential thatyou keep your elbows straight during this entire movement. I’ll explain themovement in stages, beginning at the head. However, the exercise should bedone as one continuous movement and not be broken up into stages.
First, look up toward the ceiling with your head and exhale. As you do this,allow the shoulder blades to collapse together and the upper back to flatten.The stomach area, or midsection, should be completely relaxed, sagging towardthe floor. This will allow the lower back to sway. The buttocks should then besticking up in the air. The final movement for the “dog” should look like figure12. From here, you will reverse directions. Tuck your chin toward your chest andinhale. Raise your upper back up like a “mad cat.” As you do this, the shoulderblades should separate. Use your abdominal muscles to tuck your pelvis under,and this will round out the lower back as well. The final movement for the “cat”
46 THE PA IN -FREE PROGRAM
Figure 11Wall stance with arched back
c04.qxd 7/14/05 11:22 AM Page 46

should look like figure 13. Following this, reverse directions again back to the“dog,” where your head is up and your back is swayed.
Many things could potentially be done incorrectly with this movement.Again, let’s start with the head. Are you able to coordinate the movement ofyour head with the rest of your body, or do you find your head going in theopposite direction from the rest of you? Are you looking down when your backis swayed or are your eyes looking up as you round your back? How about yourelbows? Remember, the elbows should be straight during the exercise, in boththe cat and the dog position. It is extremely challenging for people to keeptheir elbows straight when they allow the shoulder blades to come together asthe upper back flattens. And it’s very important that you are able to relax com-pletely between the shoulder blades and allow them to drop all the waytogether. This won’t happen if you don’t effectively allow the upper back to set-tle completely into extension. Next, when you move between the twodirections, you should be able to keep your hips over your knees from the sideview. In other words, when your head is up and your back is swayed, you
BREAKDOWN OF THE MECHAN ICAL M IRACLE—YOU ! 47
Figure 12Dog
c04.qxd 7/14/05 11:22 AM Page 47
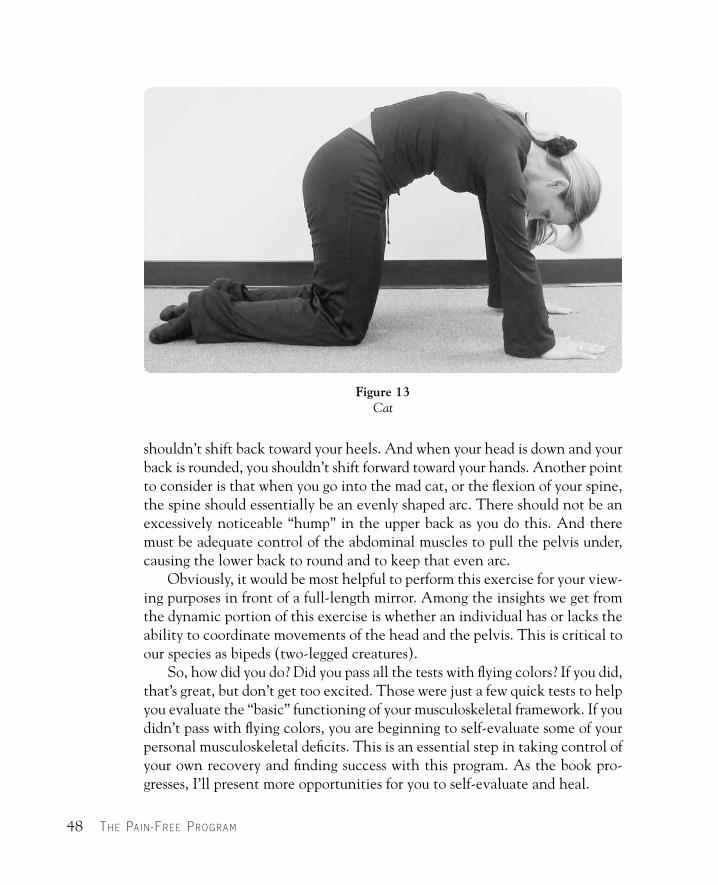
shouldn’t shift back toward your heels. And when your head is down and yourback is rounded, you shouldn’t shift forward toward your hands. Another pointto consider is that when you go into the mad cat, or the flexion of your spine,the spine should essentially be an evenly shaped arc. There should not be anexcessively noticeable “hump” in the upper back as you do this. And theremust be adequate control of the abdominal muscles to pull the pelvis under,causing the lower back to round and to keep that even arc.
Obviously, it would be most helpful to perform this exercise for your view-ing purposes in front of a full-length mirror. Among the insights we get fromthe dynamic portion of this exercise is whether an individual has or lacks theability to coordinate movements of the head and the pelvis. This is critical toour species as bipeds (two-legged creatures).
So, how did you do? Did you pass all the tests with flying colors? If you did,that’s great, but don’t get too excited. Those were just a few quick tests to helpyou evaluate the “basic” functioning of your musculoskeletal framework. If youdidn’t pass with flying colors, you are beginning to self-evaluate some of yourpersonal musculoskeletal deficits. This is an essential step in taking control ofyour own recovery and finding success with this program. As the book pro-gresses, I’ll present more opportunities for you to self-evaluate and heal.
48 THE PA IN -FREE PROGRAM
Figure 13Cat
c04.qxd 7/14/05 11:22 AM Page 48

R egardless of the pain or the type of job or incident that is associatedwith the pain, certain irrefutable physical laws affect our bodies. Forinstance, there are laws that apply to how muscles are arranged and
how joints are designed to work. Certain laws also guide how our bodies gatherinformation from the environment, how we use that information, and how ourbodies respond to good and bad stress. Breaking the law has repercussions—the aches and the pains that this book addresses. The only way to avoidbreaking the law is to first know the law.
Death and taxes are not the only things guaranteed in life. Gravity is rightthere with them. Gravity, the force that we associate with the apple fallingfrom the tree and hitting Sir Isaac Newton on the head, is both our friend andour foe.
How important is gravity? As an individual in pain, consider this: If youlived in the water or on the moon, you probably wouldn’t have many muscu-loskeletal problems. In both of these places, the force of gravity is reduced toan insignificant degree. That equates to less stress on the bones, the joints, thetendons, and the ligaments. The other side of the coin is that without gravity,our bones would weaken and our bodies’ key information gatherers regardingmovement, called proprioceptors (we’ll discuss these in more detail later),become much less effective.
Most of us won’t travel to space any time soon; however, similar effects can
5
The Physical Laws of Our Bodies
49
c05.qxd 7/14/05 11:24 AM Page 49

be seen with prolonged disuse of the musculoskeletal system. An obviousexample would be someone who requires bed rest for one or more weeks. Thisperson would not be able to adequately challenge his or her musculoskeletalsystem even with the movements of daily living. Yet a much less obvious exam-ple is probably applicable to many of you: the lack of stimulation that our“antigravity” muscles receive when we go from the bed to the car, to the desk,to the car, to the stationary bicycle, to the car, to the recliner, and then finallyback to bed. These “antigravity” muscles, such as the spinal erectors or thegluteals, are a key part of the body’s infrastructure. It is mandatory for anupright species that these muscles do their job. Unless we’re lying down or sit-ting supported, we have to resist the gravitational pull of earth on our bodiesto remain erect. This requires work by our muscles, which is precisely the rea-son we cannot sleep standing up the way that some four-legged animals can.As with any other unused or unchallenged muscles, the antigravity musclesweaken and atrophy. If they do weaken, we are haunted by that “C” wordagain—compensation. Other muscles may try to do the best they can to helpout, but the outcome will never be the same. Once again, the compensationwill lead to changes in the way our joints line up and how and when our mus-cles pull, as well as which muscles pull. Each of these factors predisposes us toinjury and creates a potential barrier to proper healing.
If you exercise regularly, you may think that you are appropriately chal-lenging your body with the workouts you do. A common misconception of thelayperson who works out and, unfortunately, even of some fitness profession-als is that as long as you’re doing something, you’re helping yourself. This is notnecessarily true regarding strength training. First, if you weight train and doonly a few exercises, you could be adding to or creating muscle-imbalanceissues. Second, if you never vary your workout or the exercises that you do, youwill again be adding to or creating muscle imbalances. When Dennis, a forty-six-year-old client, first came to see me, he was so proud of the consistency of his workouts. Three times a week for two years, Dennis did the same weight-training exercises. I had to break the news to him that this workout hadstopped benefiting him a long time ago.
Finally, if most or all of the exercises you do involve machines and sittingor lying fully supported at all times, you’re never challenging your deeper sta-bilizing muscles, called your core. Thankfully, recent trends in fitness have begunto address this aspect of health. But a word of caution for you and your fitnesstrainer: for someone who has muscle imbalances and structural-alignmentissues, doing core exercise training can reinforce compensation patterns.
50 THE PA IN -FREE PROGRAM
c05.qxd 7/14/05 11:24 AM Page 50

Core BeliefsA helpful way to convey the concept of our muscular arrangement is with the“ski suit analogy.” In cold-weather skiing, you always dress in layers. You startwith a light, thin T-shirt against the skin. Then you add a turtleneck over that.Next you may add a sweater to cover the turtleneck. And finally, you put onyour thickest layer, your ski jacket. Your muscles are layered in a similar way.Your body has very small, intricate muscles that lie deep within you, called“core” muscles. The outer jacket might be the most expensive, most techno-logically advanced layer of clothing, but it still cannot do the job of the T-shirt.Like the thin T-shirt beneath all the other layers of clothing, the core musclescan’t be seen, but they will be heard if they’re not properly conditioned.
Your core is made up of the region around your hips, pelvis, and trunk.Most areas of the arms, the legs, the hands, and the feet are one and two lay-ers deep. However, most people who exercise are exercising only the ski jacket.That is, they’re exercising only the bigger, most superficial muscles that every-one sees. They essentially exercise for aesthetic reasons. Exercising this way isnot wrong, but it is incomplete. When dealing with musculoskeletal pain,injuries, and rehabilitation, function must take priority over aesthetics.
The pelvis, more than any other structure in the body, has the greatestmechanical influence over the rest of the body. If the pelvis is off in its pitchfrom front to back, if it lists to one side or rotates left to right or right to left,it can alter the positioning of other parts of the body that are above and belowit. This alteration can reach as far down as the feet and as far up as the headand the neck. The strongest and the largest sections of connective tissue in thebody attach to the pelvis at the lower back, the abdominals, and the outer hips.And don’t forget, this is where our center of gravity is located.
For someone challenged with a repetitive stress injury of the wrist or a kneeproblem, a question that might arise is, “What has the core got to do with myproblem?” This is a good question, because there seems to be a more obviousrelationship with back pain or hip pain when we discuss the core. The coreequates to our center. All movements emanate from the core. For instance, ifyou are handwriting a letter at your desk for twenty minutes, you may experi-ence “writer’s cramp.” This is when the small muscles in your hand becomeoverworked. These working muscles are anchored on the wrist. Muscles thatcross over the elbow joint dictate the position of the wrist. Muscles that crossover the shoulder joint control the elbow joint’s position. And the muscles thatcross over the shoulder joint are anchored to our core.
THE PHYS ICAL LAWS OF OUR BOD I ES 51
c05.qxd 7/14/05 11:24 AM Page 51
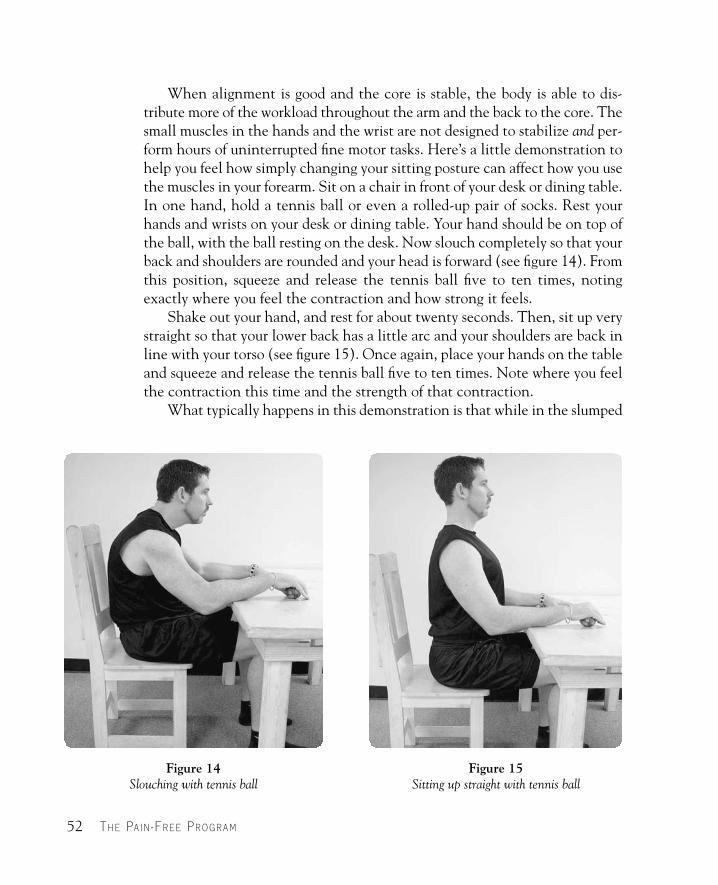
When alignment is good and the core is stable, the body is able to dis-tribute more of the workload throughout the arm and the back to the core. Thesmall muscles in the hands and the wrist are not designed to stabilize and per-form hours of uninterrupted fine motor tasks. Here’s a little demonstration tohelp you feel how simply changing your sitting posture can affect how you usethe muscles in your forearm. Sit on a chair in front of your desk or dining table.In one hand, hold a tennis ball or even a rolled-up pair of socks. Rest yourhands and wrists on your desk or dining table. Your hand should be on top ofthe ball, with the ball resting on the desk. Now slouch completely so that yourback and shoulders are rounded and your head is forward (see figure 14). Fromthis position, squeeze and release the tennis ball five to ten times, notingexactly where you feel the contraction and how strong it feels.
Shake out your hand, and rest for about twenty seconds. Then, sit up verystraight so that your lower back has a little arc and your shoulders are back inline with your torso (see figure 15). Once again, place your hands on the tableand squeeze and release the tennis ball five to ten times. Note where you feelthe contraction this time and the strength of that contraction.
What typically happens in this demonstration is that while in the slumped
52 THE PA IN -FREE PROGRAM
Figure 14Slouching with tennis ball
Figure 15Sitting up straight with tennis ball
c05.qxd 7/14/05 11:24 AM Page 52

posture, you’ll feel the contraction in a specific, concentrated region, usuallyin the forearm muscles facing the desk. The contraction feels strong in thatregion. With a more upright posture, you typically feel the contraction over abroader area, and the contraction is more diffuse. This is a demonstration ofthe body distributing the workload more efficiently. The advantage to doingthis is to allow the small, intricate muscles of the hands and the wrists tooccupy themselves with fine motor tasks, for which they are well equipped. It’swhen they’re asked to pull double duty, to perform fine motor tasks and stabi-lize the involved body segment, that they become overworked. A constantlyoverworked muscle is not a happy muscle. If this overstress occurs repeatedly,the muscles’ properties will actually begin to change. Metabolic by-products,which are the waste products produced by the muscles, gather within the mus-cle. Also, certain parts of the muscle become more like scar tissue (think beefjerky) and less like the smooth, soft fibers they should be. This creates a mus-cle that no longer functions the way it was designed to, negatively affecting thejoints and the nerves in and around it.
Collecting the DataAs mentioned earlier, your proprioceptors (those sensitive structures in themuscles and the joints) are information gatherers that bring crucial data toyour brain. Proprioceptors are one of three types of feedback mechanisms thatyour body has. The other two are part of the amazing radar system in your head:your eyes and your inner ear. The proprioceptors can be found in the muscles,the tendons, the joints, and the skin. They are sensitive to conditions like mus-cular tension and changes of length in muscles, as well as changes in jointposition, pressure, and temperature.
Your vision is extremely important because it allows you to choose exter-nal points of reference. With your eyes, you constantly reference yourrelationship with the environment. Using your vision also allows you to findand focus on a fixed point when your balance has been disrupted.
All of your feedback mechanisms (your proprioceptors, eyes, and inner ear)may fool you into thinking that everything is okay with how your body is mov-ing. This is because you have no point of reference other than yourself. If yourfeedback mechanisms don’t feel as if anything unusual is going on, they’ll con-tinue to supply you with the same bad information that your body has adaptedto. Often, what feels “right” is very wrong for the body.
THE PHYS ICAL LAWS OF OUR BOD I ES 53
c05.qxd 7/14/05 11:24 AM Page 53
The Villains We Don’t Think AboutWhen providing pain solutions for my clients, I often encounter a series of “vil-lains” they blame for their complaints. Age is a popular evildoer, as is theindividual’s employer for bad working conditions, or the other driver whocaused the accident that led to the injury, but let’s look at some possible vil-lains you might not have considered. As you read this book, consider theposition your body is in right now. My guess is that you’re either sitting downor lying down. If you’re sitting, where are your hands? In front of you holdingthe book, right? Now take notice of where your head and shoulders are. Yourhead is down, with your shoulders rounded forward, along with your upperback. If you’re lying down on your back and reading, how many pillows do youhave behind you, pushing your head forward? And when your head is forward,think about what that does. It also causes your upper back to round forward,doesn’t it? And your head and upper back cannot round forward without yourshoulders doing the same. Do you remember when you were a kid and you stud-ied or read lying on your stomach? You could rest on your elbows and read infront of you. Is that kind of movement of your hips and lower back a distantmemory? It shouldn’t be.
Let’s go back to the sitting position. How many other things do you do sit-ting with your hands in front of you? You eat, drive, type, sew, cook, and write,just to name a few. Think about how many appliances in your life have madethings “easier” for you by requiring less physical work on your part. The remotecontrol for the television, the electric can opener, the dishwasher, power locksand windows on the car, automatic garage door openers, and on, and on, andon. Who are these innovations reducing the workload for? They’re making surethat the guy who spends seven and a half hours of an eight-hour day in a chairin front of a computer or in a car seat doesn’t have to move too much! Thepoint is that as technology advances and our lifestyles become less physical, wemust find a way to activate the muscles that are no longer used in the activi-ties of daily life. We must introduce stimuli to our bodies that will counter thenegative effects that our technologically advanced world places upon us. Welive in a tunnel in regard to our physical movement. That tunnel is dictatedby the lifestyles we have created for ourselves. We spend countless hours athome and at work, moving within a fraction of the range of motion that ourbodies are capable of. We use the minimal amount of muscle activity that isavailable to us, and most of that activity comes from the larger, prime movingmuscles. This means that the very important, deep stabilizing muscles are left
54 THE PA IN -FREE PROGRAM
c05.qxd 7/14/05 11:24 AM Page 54

unused. As the saying goes, use it or lose it. This lesson is learned the hard wayif we injure ourselves taking groceries out of the car or while rushing across thestreet to beat traffic. We have stepped out of the tunnel that we’ve created,woefully unprepared. And when we leave this tunnel of daily living to “exer-cise,” we step right in to another tunnel dictated by modern weight-trainingmachines, cardiovascular-training machines, or 250 days a year of the sameactivity (tennis, golf, running, etc.).
Some of you might use your bodies all day long; in that case, the seven anda half hours of sitting doesn’t apply to you. However, you must also considerthe variety or lack thereof that your work requires. Just because you’re mov-ing every day doesn’t mean that you’re moving correctly. Most people whomove frequently at work repeat a lot of the same movements, based on theirjob requirements. Therefore, a lot of movements may be performed, but manyare the same movements. This leads to increased strength and efficiency inthese movements, but often at the cost of their opposing movements. We mustconsider the “quality” of the movement versus the “quantity.” So, if you movea lot each day, but have little variety in your movements, you’re in the sametunnel as someone who gets on the stair machine every time she works out ora golfer who plays three to four times a week. We will get further into this con-cept of “quality” movement in the next chapter.
Aaron, the guy who sits for seven and a half hours a day, might argue thathe leaves work and goes to the gym for ninety minutes every day. Then I wouldhave to pose a similar question to him. “How much variety does your workoutregime provide for your body?” He may benefit his cardiovascular system withaerobic exercise, but he may also do more overall damage to his muscu-loskeletal function with resistance (weight) training and not even know it. Ifyou add a resistance (weights or gravity) regimen to an existing dysfunction inyour musculoskeletal system, then you’re reinforcing that dysfunction ordeveloping additional compensatory dysfunctions. For example, let’s say thatone of your shoulders is lower than the other, and you’re using a machine inwhich you press a weight over your head to work your shoulder muscles (oftencalled a military press). The lever arm on the machine that you’re pressing iseven. Thus, the machine’s designer has assumed that whoever uses it will haveeven shoulders. But, as we know, this isn’t the case with you, so you have toput your hands on a lever that’s even on both sides. The only way to do this isto compensate with the lower shoulder to make it even with the other shoul-der. You do this by elevating or “shrugging” your lower shoulder. But when youdo this, you engage a completely different muscle group that shouldn’t be
THE PHYS ICAL LAWS OF OUR BOD I ES 55
c05.qxd 7/14/05 11:24 AM Page 55

involved in this movement. At the same time, there will even be slightchanges at the angles of your wrist, elbow, and shoulder joints as a result.Therefore, each and every time you perform this exercise, you reinforce thecompensation that your body must make so that your hands are even on themachine handles. Your body adapts to the machine at the expense of com-promised body mechanics.
Ultimately, the villain is not the other guy; it is the lifestyle you create tosave time, reduce costs, and be more efficient. It’s the equivalent of taking awild animal that runs free, hunts for food, climbs, avoids its enemies, and soon, and locking it up in a zoo. In this life of confined movements, with lim-ited energy expended for basic survival, an animal will pace the cage, bite thebars, and try to escape. The animal knows that this is not where it belongs orhow it should live. But humans in industrialized nations don’t display this sen-sible kind of behavior. We are all too content to opt for convenience andcomfort, never realizing their negative impact on our health.
The “Healing Deficit”Since our bodies are organic, the traumas we experience that don’t kill usshould heal. And for the chronic pain sufferer, the cuts, the bruises, the frac-tures, the sprains, and the strains do heal, but the pain doesn’t go away. Now,it’s not the cuts, the bruises, and so on, that are responsible for the pain.Instead, pain results from how these injuries have affected the body’s mobil-ity. A contributing factor to this pain relates to how the body was used priorto the accident or the trauma. Whatever the individual did wrong with his orher body before the accident could be interfering with the healing processweeks, months, and even years later. We stress this critical concept to manyof our clients; most people have never considered it as a possibility.
Here’s an example that I like to use in my clinic. For argument’s sake, let’ssay that your job involves sitting at a desk. Now, imagine that you have a badbruise on your knee. Your job requires that you get up and down from yourchair twenty or thirty times a day. And every time you sit back down in yourchair, you bang that bruised knee on your desk. The bruise will take a lot longerto heal in this scenario than it would if you just left it alone and allowed thebody to heal itself. The same thing happens to people with neck, or shoulder,back, or hip problems that surface as a result of an accident. They aggravatetheir injuries every day, just on a much subtler level—but it happens more
56 THE PA IN -FREE PROGRAM
c05.qxd 7/14/05 11:24 AM Page 56

consistently, based on the ways they use their bodies. How people sit, stand,get up from the table, take a shower, get out of the car, and so on, doesn’t seemto be a big deal, yet it can constantly impede the healing process. The cumu-lative effect of repetitive, improperly performed movements never gives thebody a window of opportunity to adequately apply its healing capacities. I callthis being in a state of “healing deficit”: your body never reaches a point whereit is no longer acting self-destructively. And if you think that bed rest or stay-ing off your feet is the answer, think again. First of all, you have probablyalready tried this, and it didn’t work. But more important, even if you start tofeel better and begin to climb out of the healing deficit, without changing yourimproperly performed movements, you’ll lose any progress you’ve made. Even-tually, you’ll be right back to the same point of the healing deficit. A simpleanalogy to clarify this would be someone with severe feline allergies. Let’s saythis person has spent a few hours in a room with several cats. This is a form ofanimal test that I approve of because no one gets hurt. Our subject will obvi-ously have a strong allergic reaction to the cats. Once that reaction is present,it isn’t likely to go away as long as the person is in the same room as the cats.Take the person out of the room, and within a few hours, he or she is back tonormal, having recovered from the allergic reaction. Put the individual backinto the same room with the cats, and the process is repeated. Take the per-son out of the room again, and allow him or her to recover. Bed rest is theequivalent of removing someone from the room to recover but then returningthe person to the same cat-filled room.
THE PHYS ICAL LAWS OF OUR BOD I ES 57
c05.qxd 7/14/05 11:24 AM Page 57

58
6
Function First, EverythingElse Follows
As I’ve mentioned, one of my key philosophies is to focus on the func-tion of the individual’s body, rather than attempting to treat or fixwhat hurts. The terms function, functional, and functional exercise
have recently become commonplace in the health and fitness industries. Theterms have been part of the physical therapy arena for at least ten years, butoften without any clear agreement on exactly what they mean.
Most professionals will say that these terms are generally used to describe exercises or movements that relate to “real-world” situations or are “transferable,” in that their benefits can be transferred to activities of life or sports. An exercise such as squatting is considered functional becauseit mimics movements that are used in getting up from and sitting down in a chair. The purpose of doing these types of exercises is to increase muscular strength and endurance for real-world activities. In the rehabilitationsetting, functional exercises typically focus on the skills required for normalmovement and independent living. For example, a person with knee surgeryhas to learn to walk properly again after years of having pain in the knee.Walking properly would include the position the foot must be in when the heelhits the ground and how the body weight must pass over the leg with therepaired knee. This cannot be achieved by rehabilitation that is done lying orsitting down.
In the athletic arena, functional exercises are more apt to apply to
c06.qxd 7/14/05 11:26 AM Page 58

sport-specific skills. They also seek to strengthen and balance some of our moreprimal movement patterns that are foundations for sport-specific skills. Anexample of this type of exercise might be the lunge, which emphasizes inde-pendent balance requirements for both legs, while strengthening the legs in afunctional movement. Athletes are often in scenarios while competing thatrequire them to rapidly accelerate or change directions, using one leg to initi-ate the movement.
As part of the message of this book, we want to think in broader terms,using a higher set of standards, when we consider function. What do I meanby this? Well, if we return to the knee patient who must learn to walk prop-erly again, “function” applies to the leg being rehabilitated. Typically, thiswould be the joints above and below the injured joint: the hip and the ankleof the injured leg. But true function should include the entire body, regardlessof a specific area of injury. For a person to be functional, he or she must scorehigh in the areas previously mentioned (in chapter 3) as assessable in thestanding posture: muscle balance, mechanical efficiency, neuromuscular coor-dination, and kinesthetic awareness. If the individual scores high in theseareas, then the body will move the way it was designed to move: efficiently,effectively, and with no undue stress on its parts. Moving functionally allowsus to live more comfortable and productive lives.
Truly functional exercises employ more than one area or one joint in thebody, even if certain parts of the body are used primarily for stabilization, whileothers perform most of the movement. On the other side of the coin are non-functional and dysfunctional exercises. Nonfunctional exercises often serve nopurpose other than aesthetics and building muscle mass. Dysfunctional exer-cises promote dysfunctional movements and are potentially harmful. They canplace inappropriate stress on the tendons, the bones, and the ligaments of thebody. Such stresses leave these structures subject to breakdown and, ultimately,to injury. Common sense and an increased number of fitness professionals helpto prevent most people from performing dysfunctional movements. Interest-ingly, however, when certain individuals do nonfunctional exercises, thesebecome dysfunctional exercises. This scenario repeatedly occurs in health clubsand gyms across the globe. People believe they are lifting weights and doingresistance exercises for their health, but instead they end up injuring them-selves. Most of the time, people aren’t aware that they’re hurting themselvesby the way they perform exercises because the injuries don’t occur acutely.Instead, their progressive onset can coincide with many other events in theindividuals’ lives.
FUNCT ION F I RST, EVERYTH ING ELSE FOLLOWS 59
c06.qxd 7/14/05 11:26 AM Page 59

Dysfunctional ExerciseLet’s look at a very popular and common exercise, the bench press. This is anonfunctional exercise that, for many people, is also a dysfunctional exercise. It’snonfunctional because the lifter is lying flat on his or her back to perform theexercise. Lying flat on your back is the most stable position you can be in.Therefore, the lifter has no real need to call upon any of the central stabiliz-ing muscles to perform the lift. A major portion of the stabilization is providedby the effect of gravity on the lifter’s body. Gravity holds the lifter’s body to thebench that he or she is lying on. Then, if we look at the lift itself, it’s a move-ment against resistance that no one is ever required to do in daily life. Even aperson who does physical labor all day long wouldn’t be in a position where hewas lying on his back and pushing away repeatedly. The closest thing to a real-world application for this movement is the offensive lineman in football whoputs his hands out in front of him to push away the oncoming defensive lineman. But even this technique cannot be accomplished without the offen-sive lineman planting his feet on the ground and having a strong base to pushfrom. And if you think that because you use a sitting bench-press machine,you’re doing a functional exercise, you’re incorrect. It’s essentially the samemovement with just another fulcrum added. You are still stabilized by themachine.
This exercise becomes dysfunctional for an individual who already hasstrong and tight (short) muscles in the front chest and the shoulder musclesand is weak in the opposing muscles of the upper back and the shoulder bladeregion. This imbalance causes the shoulder blades to move away from the spinein the back, which, in turn, causes the shoulder’s ball-and-socket joint to rotatedown and in, leaving the entire shoulder girdle complex in a dysfunctionalposition. The dynamics of this joint have changed, causing the lifter to placecontinual stress on the tendons and the ligaments of the shoulder every timehe or she does the bench-press exercise. This individual will usually end upwith bouts of rotator cuff ailments, various shoulder/neck problems, or all ofthese. Depending on other structural issues (e.g., pelvic alignment), the symp-toms may switch from one shoulder to the other. The usual course ofself-treatment is to take time off from the exercise, swallow some ibuprofen,and/or use dumbbells that restrict the movement less. This certainly is not away to solve the problem long term. In reality, the most basic intervention forthis person would be to stretch out all of the anterior chest and shoulder mus-cles (pectorals major and minor, deltoids, latissimus dorsi, and biceps) and
60 THE PA IN -FREE PROGRAM
c06.qxd 7/14/05 11:26 AM Page 60

strengthen the muscles in the upper back (rhomboids, middle trapezius, exten-sor muscles of the thoracic back, and rotator cuff) to help place the shouldersin a more functional position.
Most of the exercises that people do in the gym are perfect examples ofnonfunctional exercises. Another very familiar exercise is the leg-extensionmachine, which has a sitting bench and back support. The bench is highenough that your feet are off the ground, and a pad rests across the front of yourankles. From this position, you straighten your knee(s), lifting the pad that’sacross the ankles. This pad is connected to some type of resistance which israised and lowered by your using the quadriceps (the front thigh muscles).Again, where in your day as a mom, a dad, a garbage man, or a computer pro-grammer will you perform this motion? The closest movement I can identifywith this exercise is the kicking motion of soccer players—and a kickingmotion still requires synergistic movements at the hip and the ankle that theleg extension doesn’t address.
The bench press and the leg extension are examples of many exercises thatthe fitness industry has adopted from the body-building community. The ori-gin of these two exercises and others like them came from the need tooverload and isolate specific muscles or muscle groups for the purpose of mus-cle hypertrophy or muscle growth. Other examples of similar exercises are thehamstring curl, the bicep curl, calf raises, and the tricep extension. Essentially,a nonfunctional exercise is any exercise that isolates a specific muscle or mus-cle group in a way that cannot be applied to life, work, rehabilitation, or sport.Does that mean we should do away with these exercises? I don’t believe so. Theuse of these exercises has to be tied to the specific goals of the exerciser. If mus-cle hypertrophy is one of your goals, nonfunctional resistance exercises andmachines can be a valuable part of your arsenal, but only one part of your arse-nal. All of these exercises used on their own, without any stabilizationtraining, muscle balancing, and three-dimensional movements, will leave youwith significant structural weakness and problems with muscle coordination.Unfortunately, that is what happens to most exercisers. As a matter of fact,what many equipment manufacturers tout as a selling point has long-termdetrimental effects for the user. The fact that a machine “supports your lowerback” or keeps you completely stable deters from your ability to use those exactmuscles when you are out of the gym and living your life. The only way toimprove your physical being is by challenging it. Sitting on a recumbent sta-tionary bike for twenty minutes may challenge your cardiovascular system andwork your legs, but it does nothing to assist you with weaknesses around the
FUNCT ION F I RST, EVERYTH ING ELSE FOLLOWS 61
c06.qxd 7/14/05 11:26 AM Page 61
mechanical center of your body. Nor does it allow your hip joints to movethrough a normal range of motion while you ride the bike. The “challenge” toyour body should be relative to your current level of conditioning and func-tion. Remember, there is never a one-size-fits-all exercise program. If you goto a gym and are given one of the “orientation” personal training sessions, bevery careful. Typically, these are just a quick way to show you how to use a fewmachines so that you don’t walk aimlessly around the gym. Unless the trainerhas taken your health history and done some type of musculoskeletal assess-ment, you’re getting the same orientation as everyone else in yourdemographic. If you really want to do things right and not waste time whendoing resistance training, take a few training sessions to at least get you started.Research the qualifications of the staff, chat with various members to see ifthere is a personality match, and, most of all, clarify your goals and what youneed from them.
Machines are not all bad, though. In their defense, machines are an excel-lent learning tool for the beginning exerciser. When a novice exerciser gets ona weight-training machine, he or she has fewer things to worry about when per-forming the movement than with free weights. This allows the novice to learnthe new movement without expending physical and mental energy to stabilizethe body while the primary movement is performed. The machine also guidesthe user through the movement to ensure that the appropriate muscles arebeing worked. Machines offer creative ways to manipulate the force of gravityand thereby challenge certain muscle groups with more variety than is possi-ble with free weights, which purely oppose gravity.
Functional ExercisesSo, what are some of the specific advantages of a functional exercise, and whyis it important to you? First, let’s reiterate that functional exercises and move-ments have real-world applications or are transferable to real-world tasks. Ourreal world involves movement in three-dimensional space. Real-world appli-cations may be activities of daily living, work, or athletics. And for eachperson, they are different. Why? Because a new grandfather who wants to getstronger to lift his grandson, a college baseball player training in the off-season, and a forty-year-old mother recovering from a car accident will all wishto achieve different levels of function. In addition, each of these individualswill have strengths and weaknesses relative to his or her past physical history,
62 THE PA IN -FREE PROGRAM
c06.qxd 7/14/05 11:26 AM Page 62

and these strengths and weaknesses should be evaluated. If you’re working witha personal trainer (or you plan to work with one), and the trainer has put youon a resistance-training program, ask how he or she decided which exercisesto give you. The usual response will be that the trainer gave you a “well-rounded” or “balanced” workout to challenge every major muscle group. Butif you challenge each muscle group equally in a “well-rounded” or “balanced”workout, then you are getting stronger, but you’re maintaining the same muscle-imbalance ratios that you started with. This is why it’s essential for yourtrainer to evaluate your posture prior to designing your exercise program. Apostural evaluation can provide all the necessary information in a very usableand practical way within the gym or health-club setting.
The same argument applies to generic home exercises that are most oftengiven by physical therapists and chiropractors. What good is doing backextensions on a machine or even on the floor if your body is not aligned first?If one hip is higher than the other and the muscles on that side of your backare shorter, aren’t you just strengthening your back in the same dysfunctionalposition? The parts of your body that you wish to strengthen must first be in afunctional position before you strengthen them. Again, this information is eas-ily identified in the standing postural evaluation. For the health-care provideror the fitness professional whom you might work with, the information iden-tified in the postural evaluation, combined with an appropriate knowledge ofkinesiology and biomechanics, can readily predict what your body will dounder dynamic conditions (i.e., movement).
So, where do you begin to gain function? For starters, becoming morefunctional is something that you, and only you, can do for yourself. Ofcourse, it helps to get guidance from a knowledgeable professional, but theactual changes to your neuromuscular system occur from what you do and notfrom what someone else does to you. As mentioned earlier, the benefits ofmanual intervention performed by others on your body can be an integral partof the process, but without you driving the ship, long-term changes will notoccur. Without these changes, you probably won’t achieve the level of phys-ical capability and the quality of life that you desire. If methods of passiveintervention (medication, chiropractic, body work, acupuncture, etc.) are theonly tools in your toolbox, there’s no better time than right now to proactivelychange your body.
The next chapter will help you become a more functional person. You’llfind exercises to perform that are based on who you are and what you do. Thedevelopment of all the exercise programs was guided by specific principles from
FUNCT ION F I RST, EVERYTH ING ELSE FOLLOWS 63
c06.qxd 7/14/05 11:26 AM Page 63

the Function First philosophy. These principles have been discussed through-out this book. You will select an exercise program based on yourself-evaluation. It’s okay to get help from someone else, but remember, you arethe head coach of your team.
The exercises you’ll perform are the building blocks for more advanced andchallenging exercises. This is a necessary part of the reeducation of your body.You’ve heard the saying “You must walk before you run.” Well, I like to takethings back a step further than that. You must crawl before you walk. The exer-cises, first and foremost, will influence the segments of your body relative toone another. In other words, if we return to the blueprint of the human bodyin the standing position (figures 6 and 7), we can see that in order to achieveoptimal alignment, the various segments of the body must sit in their appro-priate places. If they don’t, there is an alteration of body alignment, followedby an alteration of body mechanics that produces stress and the breakdown ofaffected areas. Where muscle tightness is present, this will increase; wherethere are inhibited and dormant muscles, those muscles will get weaker.Please note that figures 6 and 7 are not my interpretation of how the bodyshould be aligned when standing. They are identical to any charts on the wallof a doctor’s office or in an anatomy text, and that’s because this is exactly howwe should look when we stand.
If you seek to influence the alignment of your body segments in the direc-tion of the blueprint, you must accept one very basic assumption: that thestrategies your body uses for most of your fundamental movements and staticpostures are incorrect. The basis for this assumption is rooted in the principlethat the alignment blueprint is the foundation for all of your movement pat-terns. And if your alignment isn’t optimal, it will be very difficult for yourmovements to be optimal and pain-free. This, of course, brings us back to com-pensation. We don’t want compensation, so the way we avoid it is by breakingthe exercises down to a level where it’s almost impossible for your body to com-pensate. This also happens to be a perfect level to begin the reeducationprocess for your muscles.
In the text “Motor Control: Issues and Trends” (1976), S. W. Keele, anexpert in motor learning, developed an excellent example of how your bodyacquires new motor skills. In the case of most adults and people reading thisbook, it may be more appropriate to say motor re-learning. I have adapted hisanalogy so that you can easily associate it with your own experiences. If youlook at the following chart, you can see how the act of driving a car with a stick shift can be represented at different stages of skill acquisition. Each
64 THE PA IN -FREE PROGRAM
c06.qxd 7/14/05 11:26 AM Page 64

movement has to happen, and they have to happen in this order for the driverto achieve the desired outcome of changing gears and moving the car. In thisdiagram you can see the heading for each action that’s necessary to completethe shifting of gears (Accelerator Up, Clutch Down, etc.). If you try to movethe shifter without pressing down on the clutch, you will damage the trans-mission. And if you try to put down the clutch without easing off the gas, theengine will rev too fast, overtaxing parts of your engine.
Down the left-hand side of the chart, you’ll see the three progressions ofpractice. I’d like you to take a pencil and do something right now. If you don’twant to write in your book (or if it’s not your book), get a piece of scrap paperand write the numbers 1 through 7 in three rows. Label them just as they arein the book with the three types of practice (Early, Middle, and Late). You canreference your book for the headings over numbers 1 through 7 so that youdon’t have to write them all out.
Take your pencil and begin with the row labeled “Early Practice.” Draw acircle around each of the seven numbers in that row. Next, go to the rowlabeled “Middle Practice” and draw one circle that includes the numbers 1 and2. Next, draw another circle that includes the numbers 3, 4, and 5. Then, drawone more circle that includes 6 and 7. Finally, go to the row labeled “Late Prac-tice” and draw one circle that includes all of the numbers from 1 through 7.
GEAR SHIFT ANALOGY
ACCEL- SHIFT SHIFT SHIFT ACCEL-ERATOR CLUTCH LEVER LEVER LEVER CLUTCH ERATOR
UP DOWN FORWARD TO RIGHT FORWARD UP DOWN
Early Practice 1 2 3 4 5 6 7
Middle Practice 1 2 3 4 5 6 7
Late Practice 1 2 3 4 5 6 7
The purpose of circling each number in the “Early Practice” is that eachone represents an individual task that must be learned for the driver to shiftgears. In other words, each number is an entity in and of itself to the begin-ner. The driver cannot learn to drive the car until he or she is clear about whateach step requires and how to perform it. That’s why the steps must be con-sidered individual components and be circled individually. Once the driver hasmastered steps 1 through 7 in the “Early Practice” stage, he or she moves on
FUNCT ION F I RST, EVERYTH ING ELSE FOLLOWS 65
c06.qxd 7/14/05 11:26 AM Page 65

to “Middle Practice.” In “Middle Practice,” we have circled the numbers inthree groups. This is when our student begins “chunking” steps that must coin-cide with one another. Steps 1 and 2 are together because the driver can movethe clutch and the accelerator at the same time. Steps 3, 4, and 5 are togetherbecause they all involve movement of the stick shift from the start position toplacing it in gear. And, finally, 6 and 7 go together because they consist of flip-flopping the position of the clutch and the accelerator to begin moving thevehicle.
In “Late Practice,” all of the steps are within one circle. This denotes asequential series of movements that is represented within our nervous systemas one piece of the pie of driving a car. With all of this practice, our driver isnow probably shifting while she talks on her cell phone; drinks her doubledecaf, no-whip, sugar-free latté; and changes the radio station all at the sametime. Imagine how complicated all of our movements would be if we never gotout of the “Early Practice” stage of learning. Or, a more compelling questionis, “What would happen if you didn’t master each component in ‘Early Prac-tice’ but then moved on to ‘Middle Practice’?” You might be doing some of thesteps correctly or all of them partly correctly, but not all of them completelycorrectly. And if no one is there to instruct you and give you feedback, you’dassume that you were doing everything right, even if you weren’t. Therefore,you’d think that you were ready to move on to “Late Practice.” So, you wouldthen do everything sequentially and without having to think about the steps,but you have carried mistakes from “Early Practice” all the way through to theend of what you assume is a mastered task. Is this beginning to sound like itmight apply toward your body as well? I hope so. Remember when I talkedabout the “baseline” the body sets for itself as normal? It is normal based on thebody’s own frame of reference and nothing else. The same holds true for ourgear-shift analogy, unless feedback is provided by someone who has the properexperience and skill in driving a gear shift.
So, you may wonder, how do I teach this old dog new tricks? You do it byreturning to the basic steps, the “Early Practice,” so that you can provide yourbody with the appropriate stimuli for change. This is the beauty of the exer-cises in the next chapter. They will do just that.
The learning process can also be viewed in three phases. The first is the“cognitive” phase. This is the mental side of learning. During this phase, youwill process the instructions or your options on how to perform a specificmovement-related task. It may involve some visualization as well. Everythingin the cognitive phase is done on an intellectual level, just as absorbing the
66 THE PA IN -FREE PROGRAM
c06.qxd 7/14/05 11:26 AM Page 66

information in these initial chapters has been. This is a very important firststep, because if you aren’t clear about your objective and what it takes toachieve it, you probably won’t perform the movement correctly.
The second phase of learning is the “associative” phase. In this phase, theindividual begins to learn a new movement task by associating it with one ofthe existing central motor programs in the motor system’s database. For exam-ple, think about someone on ice skates for the first time. You’ve seen it. Theperson moves about as fast as rush hour traffic on the Los Angeles freeway. He or she merely shuffles and slides across the ice. This is not skating. Instead,the individual is trying to walk on ice wearing thin-bladed, unfamiliar shoes.The act of ice skating is similar to, but not the same as, walking, but becausewalking is one of our fundamental movement patterns, a novice reverts to it.
Another example might be a baseball player who decides to take up golf.When he first swings a golf club, it almost inevitably looks like a ballplayerswinging at a low pitch. He may step toward the ball, instead of keeping hisfeet still as he swings and may allow his front elbow to bend too much duringthe back swing. There are definite similarities in the two swings, particularlywith the rotation of the torso and the use of the arms, so it would be natural,then, for a baseball-player-turned-golfer to associate some of the baseball tech-niques with the new skill of swinging a golf club.
The third phase is the “autonomic” phase of learning, where the move-ment task becomes automatic. When a movement becomes automatic, thereis essentially no need for cognitive processing. When the ice hockey playersteps onto the ice and must get the puck, his first thoughts are not “Push outand away with the left foot, then out and away with the right foot.” Instead,he anticipates where the puck will end up because the skating aspect of hisgame is automatic, or second nature. The accomplished golfer doesn’t gothrough all of the steps her coach gave her during the swing itself. Each move-ment has been integrated enough so that the smooth swing is automatic.
Clearly, the importance of going through every step of these learningprocesses is for you to understand how your body works. Armed with this kindof information, you now understand the relevance of doing the more basicexercises that I suggest, regardless of your current strength or fitness levels. Inour clinic, a professional athlete may be on the floor next to a sixty-five-year-old grandmother who really never exercised much in her life, and they are bothdoing similar exercises. Everyone must function first.
FUNCT ION F I RST, EVERYTH ING ELSE FOLLOWS 67
c06.qxd 7/14/05 11:26 AM Page 67

68
7
Form Follows Function
Iwill now help you choose the best possible exercises for your specific struc-tural characteristics and your unique station in life. Your station in liferefers to the types of physical activities and movements that you perform
most frequently during an ordinary day. For most of you, that will have somecorrelation with your occupation, but even if you don’t work, you’ll be able toidentify with one of the six Forms that I’ll outline in this chapter.
Unlike other books and videos that feature a one-size-fits-all program forback pain, one for neck pain, another for rotator cuff injuries, and so on, thisbook will provide tools that are much more specific to you. I call the differentclassifications Forms because of the well-known scientific premise that formfollows function. What you’ll observe in yourself and others is a reflection ofthe improper use, or function, of the musculoskeletal system.
The first thing you’ll need to do is evaluate your structure. I want to keepthis process easy, so the evaluation will focus on major postural distortions.Because there are many different possible combinations with the humanbody, you may not fit perfectly into one of the Forms I provide. Just choose theForm that best resembles yours. You can evaluate yourself alone with a mirror,or you can have photos taken of yourself from head to toe. Someone could alsoassist you. It’s best to be dressed in as little as possible, to avoid any interfer-ence from the way clothing fits or hangs. You will want to do the evaluation
c07.qxd 7/14/05 11:29 AM Page 68

barefoot. New shoes and insoles have a way of altering your stance, and oldshoes can magnify existing problems.
If you use a partner or photos, please consider making a plumb line. It’s verysimple to do and can also provide an excellent reference point while you con-duct your evaluation. It’s nothing more than a weight hanging from a string.You can even use a fishing weight tied to some string (don’t use fishing linebecause it will be too hard to see). An actual plumb bob from a hardware storedoesn’t cost more than a few dollars. The plumb line will represent the gravityline that is referenced in our blueprint. Hang the plumb line from the top of adoorjamb or the ceiling. The weight or the plumb bob at the bottom shouldhang about half an inch to an inch from the floor. Be sure that you’re standingon a level floor, regardless of which way you choose to do the evaluation.
With some of the Forms we’ll look at, the most important characteristicswill relate to the side view of the body. With other Forms, the front or the backview will be the most important. And in some instances, you’ll have the frontview of one Form and the side view of another. Therefore, I don’t want you toassume that you are one Form and immediately go to those exercises. Be sureto evaluate yourself from the front and the sides if you are alone. Evaluate fromthe front, the back, and the sides if you’re using a partner. Don’t worry, I’llexplain later how to proceed if a partner is helping you.
There is also a “pecking order,” if you will, when one observes postural align-ment problems. Certain issues must be addressed before others because they havea greater overall disruption to normal movement patterns. What this means isthat you may have to do the exercises for one Form for a few weeks and thenmove on to another Form, based on your combined alignment findings. You canfind additional photo samples of the Forms at www.movementbydesign.com.
I’ll present some of the more common ailments associated with each par-ticular musculoskeletal Form. Of course, no alignment issue is guaranteed tohave any of these symptoms, but the associated biomechanical compensationsmake these particular ailments easier to manifest in the body.
The Forms
Form 1This Form’s primary deviation is identified when the person is viewed from theside. If we refer back to our blueprint, the gravity line runs from the ankle bone
FORM FOLLOWS FUNCT ION 69
c07.qxd 7/14/05 11:29 AM Page 69

through the knee; then through the hip, the lower back, and the shoulder; andfinally ending behind the ear. Our Form 1 example shows a significant dis-placement of the hip joint ahead of the ankle, the knee, and the shoulderjoints (see figure 16). The front of the body has a “bowing” appearance fromthe toes to the neck. This creates a need for the head to protrude forward tobalance out the body. The weight of the head counters the weight of the upper
body, which is going backward. The upper body must go backwardto counter the shift of body weight forward around the hips. Withthe hips forward like this, very often the knees will hyperextend.Here is a perfect example of the human body’s need to balance itscenter of gravity (COG) over its base of support, the feet. In otherwords, if you have a zig, you must have a zag. The COG is balanced,but the body is contorted to do so. Therefore, balancing the COGover the base of support does not necessarily correlate with func-tional alignment (although they can).
Whenever the upper back rounds, the shoulder blades moveaway from the spine and the chest compresses. This causes the balland socket of the shoulder joint to round inwardly. If the head wereto follow the upper spine at this point, the person would fall back-ward, thus the need for the head to move forward.
This postural alignment is reflective of an individual who lacksstructural strength through the body’s central core. Essentially,this person is simply resting on the ligaments in the front of thehips. The individual uses very little muscular strength to maintaintheir alignment. Although this particular scenario requires lessenergy expenditure than optimal alignment does, the tradeoff bio-mechanically isn’t worth it. The stresses placed on the body are toomuch and will ultimately lead to the tissue damage and pain thatwere discussed at length in earlier chapters. Optimal alignment dis-plays the most advantageous distribution of work from muscularcontractions, coupled with the built-in stability of the shapes of thejoints and the passive tension created by tendons and ligaments.Form 1 places entirely too much responsibility on the passive ten-sion of tendons and ligaments.
Major areas of stress for the Form 1 person will be the neck andthe upper back, the lower back, and the knees. Muscularly, this per-son will have poor development of the buttocks muscles (gluteusmaximus) and weakness in the hip flexor muscles. The muscles of
70 THE PA IN -FREE PROGRAM
Figure 16Form 1
c07.qxd 7/14/05 11:29 AM Page 70

the upper chest and the shoulders will be tight. The muscles in the back of theneck will also be tight. The muscles in the middle back will be lengthened andweak. Often, the person with the Form 1 alignment also has well-developedmuscles on the back of the thighs (hamstrings) to compensate for the buttocksmuscles.
Although a major characteristic of the Form 1 person is weakness throughthe body’s core, it doesn’t necessarily mean that this person issedentary. While some sedentary people are representative ofthis Form, I also find plenty of active and athletic people.
Even though the Form 1 individual’s hips are out in front whenthe person is standing, the structural weakness associated with thiscreates just the opposite effect when he or she sits. This personlacks the strength to maintain good alignment in the sitting posi-tion. While sitting, the Form 1 individual has a tendency to sitmore on the lower part of the buttocks and the upper thighs. Thiscauses the curve in the lower back to reverse directions, pushingthe head and the shoulders even farther forward. For the Form 1person who does detailed work with the hands, such as with com-puters or assembly, there is a high risk of upper-extremity,repetitive stress–type injuries, due to the change in dynamics ofthe shoulder girdle. This places greater overall stress on the soft tis-sue (muscles, tendons, and ligaments) of the upper body.
The reasonably active Form 1 person may often end up withproblems away from the core of the body, due to the lack of corestability. This might include ankle, knee, and hip problems orshoulder and elbow problems for tennis or volleyball players andweight lifters. Lower-back pain may also be an issue when the per-son sits or stands too long. Changing position from sitting tostanding can often provide temporary relief.
Form 2Form 2 is also best identified by using the side view (figure 17). Ifwe begin the observation at the feet, we can see that the angle ofthe ankle is changed due to the slight bend or flexion in the knee.This person often has flattened arches and stands with most of thebody weight on the heels. From the side view, the overall flexionof the spine is also apparent. Instead of the spine presenting a
FORM FOLLOWS FUNCT ION 71
Figure 17Form 2
c07.qxd 7/14/05 11:29 AM Page 71

nice, soft “S” curve, as it does in the blueprint, it has more of a “C” shape. Thisis highly correlated with the pelvis tipping backward. The landmarks on theback of the pelvis are lower than the landmarks on the front of the pelvis. Ifwe imagined the pelvis as a bowl, when it is neutral the contents of the bowlwill rest undisturbed. In Form 2, the contents of the bowl are spilling towardthe back of the body. As the pelvis tips backward, the curve in the lower backis flattened. Although our gravity line runs closer to the hip joint in Form 2than it did in Form 1, the head still protrudes forward. Again, the weight ofthe head is attempting to offset the body weight behind the gravity line.
Flexion begets flexion. If the lower spine is in flexion, the upper spine willfollow the lower spine’s lead and flex more. As we saw in Form 1, flexion of theupper spine again causes the shoulder blades to move away from their homeclose to the spine, rounding the shoulders forward.
This postural alignment is also a reflection of noticeable muscle weak-nesses, along with the imbalances. The muscles that rotate the pelvisposteriorly, or backward, are stiffer and/or stronger than the muscles that rotatethe pelvis anteriorly, or forward. The abdominals, the gluteals, and the ham-strings rotate the pelvis posteriorly. The hip flexor muscles and the musclesthat extend the lower back rotate the pelvis anteriorly. This person will alsobe very weak in the muscles that extend the upper back, which is evident inthe rounding (and, therefore, the prolonged lengthening) of these muscles.
Common ailments associated with this kind of postural alignment includesacroiliac joint (SI) pain, sciatica, bunions, plantar faciitis, upper-back andneck pain, temporomandibular joint (TMJ) problems, headaches, and repeti-tive motion injuries of the arms, the wrists, and the hands. The Form 2individual may also regularly complain of excessive fatigue and weakness.
Form 3Form 3 is the first Form that we’ll evaluate from the front view. We can, how-ever, also use the side view with Form 3 to confirm the pelvic tilt here. If youuse the plumb line for the front view, remember that the plumb bob or theweight should always be centered between the feet. Don’t try to line it up withyour nose or your belly button. These parts of your body can move around asyou stand, but the feet stay fixed once you put them where you want.
If we begin at the feet again, you’ll see that the feet turn out at a 30-degree,or more, angle (figure 18). The feet should either be straight ahead or slightlytoed out to about 10 degrees when in a functional position. Turning the feet
72 THE PA IN -FREE PROGRAM
c07.qxd 7/14/05 11:29 AM Page 72

out often reflects a rotation occurring at the hips and has very little to do withthe feet. The feet just indicate what’s happening higher up the chain. If youtravel up from the feet to the knees, you’ll see that the knees also point out-ward. Imagine that the fronts of your kneecaps are headlights on a car. If thatcar were traveling down the road, the headlights would shine off toward thesides of the road and not straight down the road in the direction the car is trav-eling. This outward rotation of both the feet and the knees comes fromtightness in the muscles that rotate the hip out and weakness of muscles thatrotate the hip in.
When we look at the front view of the arms in Form 3, we see that boththe shoulders and the forearms rotate inwardly, or pronate. This is evident by the fact that we can see most of, or allof, the backs of this person’s hands. Theshoulders being rotated in on the Form 3individual are different from the roundedshoulders in Forms 1 and 2. In Form 3,the upper back doesn’t round, and theshoulder blades don’t necessarily moveaway from the spine, as they do in Forms1 and 2. Instead, the ball of the upper armbone (humerus) turns inward within thesocket of the shoulder blade (scapula).
Next, look at the Form 3 individualfrom the side view to confirm the front-to-back rotation, or “pitch,” of the pelvis.The Form 3 person has an anterior or for-ward tilt to the pelvis (figure 19). Thispelvis rotation places the major landmarkson the back of the pelvis higher than thelandmarks on the front of the pelvis. If weagain use the analogy of the pelvis as abowl, the bowl would be spilling its con-tents toward the front of the body. This isoften reflected by a protruding abdominalarea and/or prominent buttocks.
The anterior rotation of the pelviscorrelates with tightness in the hip flex-or muscles and the lower back muscles.
FORM FOLLOWS FUNCT ION 73
Figure 18Form 3
Figure 19Form 3 side view
c07.qxd 7/14/05 11:29 AM Page 73

Weakness in the antagonist, or opposing, muscles to the hip flexor muscles isalso present. The antagonists include the gluteals (buttocks), the hamstrings,and the abdominals.
Common ailments associated with this kind of postural alignment includelower-back pain, spondylosis and spondylolesthesis, hip joint pain, groinstrains, tight hamstrings, and rotator cuff problems. Form 3 individuals oftenrefer to themselves as being “tight” and lacking overall flexibility.
Form 4Once again, we’ll view this individual from the front. TheForm 4 person has characteristics that typically develop aftera year or more of a dysfunction or during an acute spasm inthe lower back. Interestingly, we don’t often see this Formclinically until weeks or months after the initial event thataffected the body, but that doesn’t mean that it can’t happenduring that time period. So, if you identify with the charac-teristics of Form 4, then follow the appropriate exercisesregardless of any time frame you associate with it.
As with the other Forms, let’s start at the feet and workour way up. The Form 4 individual usually has only one footrotated out more than the other (figure 20). The same kneeand hip of the outwardly rotated leg will also rotate out. Oneleg may, in effect, appear turned out relative to the otherone. The height of the pelvis on this same side will be higherthan on the other side, so the pelvis slopes away from theside of the outwardly rotated leg.
One way to see this alignment is to put your hands on topof your hip bones, as if you were standing with your hands onyour hips. You should notice that one side is higher than theother. Another clue is when you look at the skin folds thatmake up your waistline. On the high hip side, you’ll see ahigher crease along your side in the area of the waist.
Continuing up the body, we’ll stay with the same sidethat has presented all of the structural issues thus far. Theshoulder on this side has dropped or is lower than on theother side. This can be determined by viewing the heightsof the shoulders as you look in the mirror. In addition, there
74 THE PA IN -FREE PROGRAM
Figure 20Form 4
c07.qxd 7/14/05 11:29 AM Page 74

appears to be more “space” between the lower shoulder and the neck that isnot evident on the normal shoulder. Men with this problem often have to gettheir suits tailored to cover up this discrepancy. The sleeve lengths will haveto be adjusted, and sometimes padding will be placed in the area of the lowershoulder to make the shoulders appear even.
The appearance of more “space” between the neck and the shoulder is aresult of the shoulder being lower and the head leaning away from this shoul-der. The tilting of the head makes sense if we refer back to our earlierdiscussion of the head acting as our radar system. The mechanisms in our earsand eyes seek to keep the body upright. If the head followed the dropped shoul-der, it would end up resting on an angle. We would then view our worlddiagonally, and our brains don’t process that well. Therefore, the head seeks tocounter the dropped shoulder and center the body by bringing itself backtoward the middle and away from the side that’s leaning.
The body of the Form 4 person appears to be compressed on the side of thehigh hip and the lower shoulder, and that’s essentially what’s happening. Themuscles have tightened, drawing the top and the bottom halves together. The muscles in the lower back and the buttocks that influence the hip jointhave also tightened, causing the hip to rotate out.
This happens to someone who has a higher hip over a period of time becausethe body adapts to this posture. In contrast, a person whose pelvis is elevated onone side for a short period of time will often have a high shoulder on the sameside as the high hip, as the body initially leans away from the higher hip.
With a back spasm, the pull will be so strong and abrupt the body has todrop the shoulder and lean the head away. Remember, the spasm is quite oftenthe body’s protective mechanism to prevent further injury, so an individualwith a back spasm will unconsciously give in to the spasm to avoid increasedpain and perhaps greater injury.
Muscularly, Form 4 has one-sided tightness of the lower-back muscles onthe side of the high hip, as well as of the deep hip flexor muscle (iliopsoas).Muscles of the shoulder girdle will be stretched out and weak. Muscles on theside of the neck opposite the low shoulder may also be tight.
Form 4 is almost always associated with some form of lower-back pain. Inaddition, there is sometimes neck pain and pain that runs into the shoulderblade. The hip on the high side may also become arthritic and degenerative.If this posture has been assumed for many years, the Form 4 individual mighthave countless other symptoms, due to the havoc the posture wreaks on normalmovement.
FORM FOLLOWS FUNCT ION 75
c07.qxd 7/14/05 11:29 AM Page 75
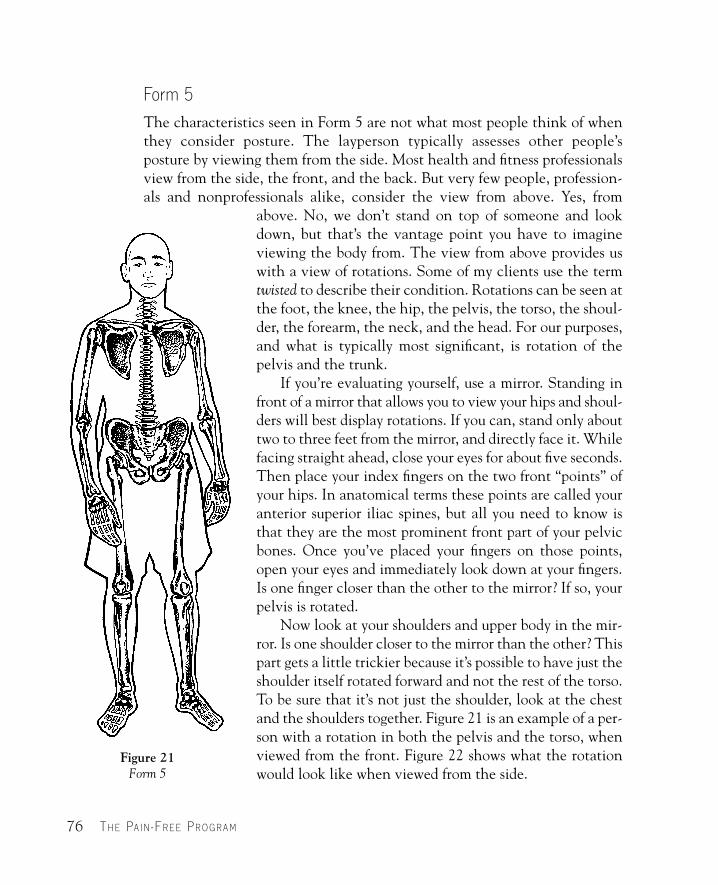
Form 5The characteristics seen in Form 5 are not what most people think of whenthey consider posture. The layperson typically assesses other people’s posture by viewing them from the side. Most health and fitness professionalsview from the side, the front, and the back. But very few people, profession-als and nonprofessionals alike, consider the view from above. Yes, from
above. No, we don’t stand on top of someone and lookdown, but that’s the vantage point you have to imagineviewing the body from. The view from above provides uswith a view of rotations. Some of my clients use the termtwisted to describe their condition. Rotations can be seen atthe foot, the knee, the hip, the pelvis, the torso, the shoul-der, the forearm, the neck, and the head. For our purposes,and what is typically most significant, is rotation of thepelvis and the trunk.
If you’re evaluating yourself, use a mirror. Standing infront of a mirror that allows you to view your hips and shoul-ders will best display rotations. If you can, stand only abouttwo to three feet from the mirror, and directly face it. Whilefacing straight ahead, close your eyes for about five seconds.Then place your index fingers on the two front “points” ofyour hips. In anatomical terms these points are called youranterior superior iliac spines, but all you need to know isthat they are the most prominent front part of your pelvicbones. Once you’ve placed your fingers on those points,open your eyes and immediately look down at your fingers.Is one finger closer than the other to the mirror? If so, yourpelvis is rotated.
Now look at your shoulders and upper body in the mir-ror. Is one shoulder closer to the mirror than the other? Thispart gets a little trickier because it’s possible to have just theshoulder itself rotated forward and not the rest of the torso.To be sure that it’s not just the shoulder, look at the chestand the shoulders together. Figure 21 is an example of a per-son with a rotation in both the pelvis and the torso, whenviewed from the front. Figure 22 shows what the rotationwould look like when viewed from the side.
76 THE PA IN -FREE PROGRAM
Figure 21Form 5
c07.qxd 7/14/05 11:29 AM Page 76

One other area on your body to check is your knees from the side view. Ifyou stand with one knee bent even slightly more than the other is, this couldbe a factor. Typically, the side of the body with the bent knee will be the sidethat rotates forward. If this is the case, you’ll still have to address the learnedrotational component of your pelvis and torso, because if you weren’t aware ofstanding with one knee bent, then you’ve probably been standing that way fora long time. And straightening your knee alone won’t remove theadapted rotations in your pelvis and torso.
It’s possible to have only the pelvis or the torso rotated for-ward. It’s also very common to have both the shoulder and thepelvis rotated at the same time. The problem with any of thesethree scenarios is that the eyes are looking ahead, making thebody feel straight even though it is twisted. A safe assumption isthat somewhere between the feet and the eyes, the body hastwisted itself in one direction and then corrected back toward theother direction to keep the eyes pointing straight ahead.
Form 5 is one of the most detrimental Forms to the body. Arotated body conflicts more with our fundamental movementsthan do the other Forms. Consider the basic act of walking.Walking essentially occurs in a straight and forward plane ofmovement. Certain minor rotations occur at different parts of thebody, but the overall movement is described as linear. Think ofthe stress placed on your body if your eyes and your feet directyour body straight to the north, but your pelvis and torso facenorthwest.
In addition, there is your body’s need to rotate during dailyand recreational activities. Consider a motion like getting out ofa car. You certainly have to turn your body to do that. It requiresa rotation of your hips and your upper body so that they can lineup with your legs to lift you out of the car. Perhaps you’re think-ing that if you’re already rotated, getting out of the car should beeasier! And if you’re rotated in the direction that you turn to getout of the car, you’re correct. What happens to your body,though, when you get back into the car? Your body is biasedtoward movement in one direction. Therefore, you have to moveyour muscles and bones from a mechanically disadvantaged posi-tion to get back into the car. This requires more work andproduces greater overall stress on the joints and the soft tissue.
FORM FOLLOWS FUNCT ION 77
Figure 22Form 5 rotation
c07.qxd 7/14/05 11:29 AM Page 77

A golfer might be the most obvious example of how damaging this Formis to the body. The golf swing is preceded by a back swing. If the golfer’s bodyis biased in the direction of the golf swing, she will never be able to achieve afull back swing. She will then be limited in how far and how accurately she canhit the ball because the back swing must provide the necessary “coiling” of themuscles used in the swing. Another golfer’s body might be biased in the direc-tion of the back swing. This golfer may be able to get the club head way backbefore the swing, but he can’t get his hips around to turn properly into theswing. This golfer probably slices the ball a lot because he can’t get the clubhead around in time to transfer his weight and get the club’s face directly onthe ball.
Form 5 is caused by imbalances of the muscles that run from the hips to theneck. Very often it results from a one-sided involvement of the muscles thatrotate the hips and the torso. It is likely to involve the oblique abdominals andperhaps one side of the erector muscles that run up and down the spine. Thisone-sidedness can be due to the body avoiding pain now or at some time in thepast or can result from a repetitive pattern of working, as with a dentist whoalways sits on the same side of his patients and turns the same way while work-ing on them. As with the other Forms, the individual probably wasn’t awarethat his or her body was “twisted.” Once again, the body has set a baseline forwhat it perceives as normal.
The Form 5 person is more susceptible to hip joint pain and degenerationbecause the ball and socket don’t line up properly, due to the rotated pelvis.Form 5 is also prone to lower-back pain and neck pain. The neck pain is oftenone-sided, due to the body’s correction for the twisting below.
Form 6We return to a side view evaluation for Form 6. When describing Form 6 tomy clientele, I like to use the term zig zag. This Form is a clear case of an indi-vidual shifting one segment of the body in response to a shift in another. Inorder to keep the body balanced over the feet (and to avoid toppling over), thisis a necessary adjustment. It usually begins with the pelvis and works its wayup the spine to the head. At first glance, Form 6 can be confused with Form1. Both of these Forms have issues related to the pelvis and correspondingchanges in the curvature of the thoracic (upper) back.
If you recall in Form 1, as we viewed it from the side, the pelvis was dis-placed in front of our plumb line. The axis of the hip joint didn’t line up with
78 THE PA IN -FREE PROGRAM
c07.qxd 7/14/05 11:29 AM Page 78

the plumb line. As a result, the upper back swayed backward to offset the for-ward movement of the pelvis. In Form 6, the rationale is the same, but thereasons are different.
As you view Form 6 from the side, begin at the feet, as we do with all ofthe other Forms (see figure 23). As we move up the body from the feet, theplumb line intersects the weight-bearing joints of the lower body(ankle, knee, and hip) reasonably well. So, unlike Form 1, wherethe hip joint was out in front of the line, in Form 6 the line runsthrough or almost through the hip joint. In Form 6, the crux of theproblem lies with the forward tilt of the pelvis. If you remember ouranalogy in Form 3 of the pelvis as a bowl, we can apply that here.As with Form 3, the pelvis is pitched forward, or the bowl isspilling its contents on this person’s toes. The critical identifyinglandmarks on the back of the pelvis are much higher than are thelandmarks on the front. In Form 3, this was associated with a pro-truding abdomen and high, prominent buttocks. In Form 6, therestill will be a protruding abdomen, but the buttocks won’t benearly as prominent.
As we continue toward the head, you’ll see that a significantamount of middle and upper torso is behind the line. This is theupper body’s “zag” to the pelvic area’s “zig.” To again clarify the dif-ference between Form 1 and Form 6, in the latter the angles of thecurves in the lower back and the upper back are much more acute.By comparison, the curves in Form 1 are elongated and drawn out.
With this abrupt angle change in the upper back, the shouldersmust round forward to bring the weight of the arms back in frontof the gravity line. The head must also come forward to assist theperson in re-centering the body over the feet. This is also the onlyway the person can reorientate his or her eyes with the horizon. Ifthe individual didn’t make this correction, the head would sitbehind the shoulders, and the person would be staring at the skywhile walking.
The characteristics of Form 6 often rear their ugly heads in ado-lescence. They may be found in taller children, who try not to standout among their peers or in large-breasted teenage girls whoattempt to hide their size. Left uncorrected, the abrupt curves we’veidentified in Form 6 will worsen with age. To all of you parents outthere, the longer that any postural distortion is left unaddressed, the
FORM FOLLOWS FUNCT ION 79
Figure 23Form 6
c07.qxd 7/14/05 11:29 AM Page 79

more the rest of the body tissue adapts to these distortions. With this goes anincreased opportunity for pain to develop. The longer the postural faults arepresent, the more time and effort are required to correct it. Yelling at littleJohnny to “Stand up straight” or telling young Suzy to “Hold your shouldersback” is never enough. In fact, it’s only a drop in the bucket toward what needsto be done. Remember, for your own sake and the sake of your children, thatour postural alignment is based on mechanics and reflexes. We can think,“Stand up straight,” and we’ll do it while we think about it, but as soon as ourattention is drawn elsewhere, our bodies will return to the position they areaccustomed to and are strong enough to maintain. I bring up this point aboutchildren with Form 6 because, in my experience, it seems to be most prevalentwith adolescents. Yet the argument is the same for any of the Forms listed inthis book. If your son or daughter is experiencing aches and pains, posturalfaults are probably the main reason.
Form 6 results from weakness in the abdominal and the gluteal muscles.The hip flexors are the antagonists to these muscles. The hip flexors will betight and stiff, as will the lower-back muscles. In addition, the deeper musclesof the upper back will be lengthened and weak. The more superficial musclesbetween the shoulder blades will also be lengthened and weak. The antagonistmuscles that are used to pull the shoulders forward are the chest and the biceps.
Middle-aged adults and older people who have had these structural issuesfor a long time will be prone to developing degeneration between the verte-bral joints of the spine. This is due to a “wedging” that occurs between thefront bodies of the vertebrae because of the sharp curves in the vertebral col-umn. Therefore, lower- and upper-back pain is highly correlated with Form 6.Neck pain often occurs as well, due to the head position. Upper-extremity,repetitive-motion injuries are also common, as the dynamics of the upper bodychange due to the dysfunctional shoulder and head position.
Lifestyle and Occupation ClassificationsDetermining which of the six major Forms most resembles your posture is justthe beginning. I want to help you take your self-diagnosis a step further andget even more specific. Instead of doing exercises merely to improve yourlooks, I want your exercises to also relate to what you do. If you are like mostpeople, your occupation, your station in life, or even your former occupation,if retired, occupies half of your waking hours. You need some defense. And,
80 THE PA IN -FREE PROGRAM
c07.qxd 7/14/05 11:29 AM Page 80

as the sports analysts often say, the best defense is a good offense. I want youto go on the offensive with your exercise program. Provide your body withwhat it needs to neutralize the effects of your daily environment. Read the fol-lowing descriptions of the occupations and the lifestyle categories. Fewpeople will fit 100 percent of the time into a classification, but find the onethat best describes how you spend most of your time. If it is split 50-50, thenmaybe you’ll do two exercise programs on alternate days. Read on to find outwhere you fit best.
Category 1: Physical WorkersIf you fall into this category, you couldn’t do your job if your body broke down.Your body must physically respond to the tasks at hand. These can include lift-ing, carrying, loading, digging, climbing, bending, crawling, and the like.Physical strength and endurance are required to perform your job. Some exam-ples of physical workers include
Labor/construction
Hospital orderlies
Warehouse workers
Delivery personnel
Landscapers
Category 2: Dexterity WorkersA dexterity worker must do a lot of fine motor skills with the hands. If you hadyour hand or wrist in a cast, it would be almost impossible for you to performyour job. The motions that you do are often very similar and repetitive. Inorder to perform these fine motor skills with your hands, the rest of your bodyis typically held in a static position while your eyes observe what you do. Someexamples of dexterity workers include
Computer users
Laboratory workers
Assemblers
Dental hygienists
Hairdressers
FORM FOLLOWS FUNCT ION 81
c07.qxd 7/14/05 11:29 AM Page 81

Category 3: MultitaskersIf you don’t fall into Category 1 or 2, you’ll fall into the multitasking category.Your job or lifestyle may require many different tasks throughout the day, someof which include Categories 1 and 2. It will also probably involve getting intoand out of the car, working in several or many different environments, andoccasionally assuming awkward postures. Some examples of multitaskersinclude
Stay-at-home moms/dads
Postal workers
Restaurant/hospitality workers
Outside sales
Retail sales
At this point, you have two methods of identifying yourself for the purposeof choosing the right functional exercise program. You may even have threebecause through your postural evaluation, you realized that you have the char-acteristics of more than one of the Forms presented. That’s okay because as wemove on to the next chapter, the exercises for all the Forms and the Categorieswill be laid out for you, along with ample instructions.
Now that you’ve identified where you are in the world of Function First,it’s time to take action. I hope that you performed a careful, thorough evalu-ation and even sought some help. Your intervention (the exercises) will beonly as good as your evaluation. Remember, the exercises are designed toaddress specific structural imbalances. Apply the wrong exercises to your body,and you aren’t likely to get any value from them. Worse yet, they might evenadd to your dysfunction. So, if you’re not sure whether you did a good job withyour evaluation, here’s a chance to go back and double-check your initial view.
On my Web site are additional photos of individuals who represent exam-ples of the 6 Forms (www.movementbydesign.com). In addition, the sitecontains other information to help you maximize your experience with theexercises and the advice in this book.
Once you’re completely confident that you’ve identified the Form(s) thatmost resembles your structure, pair that up with the Category that bestdescribes the bulk of your daily activities. Then, simply cross-reference theexercise program listed for that combination. For example, if you are Form 3and Category 2, you’ll use Exercise Program 3.2.
If you’ve identified yourself as fitting the description for more than one
82 THE PA IN -FREE PROGRAM
c07.qxd 7/14/05 11:29 AM Page 82

Form, there’s a progression to follow. This is because you must address certaindeviations before others, based on the body’s response to these specific devia-tions. The only two Forms that you can combine with any of the others areForm 4 and Form 5. Forms 1, 2, 3, and 6 cannot be combined with one another.
The rules for combining are as follows:
1. Form 5 is always the first Form that must be addressed. Exercises for Form5 must be completed daily for ten to fourteen days before you move on to theexercises for the other involved Form(s). For example, if you identified your-self with the characteristics of Form 5 and Form 1, you must do the exercisesassigned to Form 5 for ten to fourteen days before you move on to the exercisesfor Form 1.
2. Form 4 is always the first one addressed except when combined with Form5. If you pair Forms 4 and 5 together or with another Form, Form 5 is alwaysthe first exercise program, as stated in Rule 1. The exercises for Form 4 are donefor ten to fourteen days. The exercises for any other Forms will then follow thecompleted series for Form 4. If Form 4 is combined with either Forms 1, 2, 3,or 6, the exercises for Form 4 are done first for ten to fourteen days. Those exer-cises are then followed by the assigned exercises for the other Form.
The exercises are placed in an order that’s critical to their success. Essen-tially, one exercise prepares the body for the next. I’m of the opinion that allexercise regimens should follow a logical sequence. This aspect of designingexercise programs is often overlooked by most fitness professionals and thera-pists. What good is it to have the seven numbers that make up someone’sphone number if they aren’t in the order that will cause that person’s phoneto ring? A logical progression is as applicable for a gym workout as it is for anycorrective or therapeutic exercise program. Have you ever gone to the gym andstructured your workout around which machines or weights were available? Ifyou did, it was just to get the exercise done and not waste time. It wasn’t tomaximize the benefit of your workout, right? Or have you ever been given ahandout by a therapist or a doctor with multiple exercises on it, after that indi-vidual had just circled a few of them? Are you supposed to do the exercises inthe order they occur on the sheet? If so, the assumption is that the sheet wasdesigned with a logical progression in mind. On the other hand, maybe thesheet was designed by grouping the exercises according to their level of diffi-culty or according to the apparatus (e. g., physioballs or tubing) involved. Fromthe sheets our clients have brought to us, I can’t decipher any particularmethod to the madness, other than the types of apparatus used.
FORM FOLLOWS FUNCT ION 83
c07.qxd 7/14/05 11:29 AM Page 83

Every kind of exercise has three components it: (1) biomechanical, (2)physiological, and (3) neurological. This is as true for running as it is for yourfirst stretch to the ceiling when you get out of bed in the morning. The anal-ogy of an automobile can be helpful here. The biomechanical or themechanical component, as it relates to a car, would be the movement of thecar itself. This applies to the weight of the car’s body over the chassis, how the wheels turn, or how the shocks absorb bumps. The physiological compo-nent would be the engine, the fuel that runs the engine, and the oil that keepsthe parts running smoothly. The neurological component would be the elec-trical components and, in today’s cars, the microcomputers. These componentssend signals to all of the other parts to make things happen. How effective isa brand-new car if you don’t have the key to turn on the ignition?
I emphasize these points because the exercises you’ll do may appear quiteremedial at first glance. This could not be further from the truth. Nearly everyexercise has many more things occurring within it than may be apparent to theuntrained eye. A great deal of thought has gone into each exercise and how itrelates to the Form it addresses and the lifestyle that goes with it. Take fulladvantage of the sequencing of these exercises and resist the temptation tojump around in the sequence. Many people in our clinic ask if they can do allof the lying-down exercises together, all of the wall exercises together, all ofthe standing exercises together, and so forth, and so on. The answer is “no.”That would disrupt the sequence. It also reduces the opportunity for you toassess the impact of each exercise as you transition from one position to thenext. Life is about movement, so enjoy the process.
This brings me to another important point. While working with my clien-tele, I often ask them, “Where do you feel this?” during an exercise. All toooften, their response is, “It doesn’t hurt anywhere.” Well, that’s not really whatI’m asking. What I want is a full-body self-assessment of muscle work, stretch,relaxation, pain, and so on. But instead, what I gain from this kind of responseis two insights: the first, and probably the more important, is that any inven-tory this client has ever taken on his body relates to the level of pain. He hasno connection with his body other than whether it hurts or how much it hurts.Remember our discussion about proprioception (body awareness)? This gen-tleman has none. He tunes out his connection to his body to avoid interpretingmore pain. The second insight relates to his past experience with any therapyhe has undertaken. He assumes that pain is a major part of the therapeuticprocess and that he should expect it. I beg to differ.
You should not expect pain when doing these exercises. Remember, the
84 THE PA IN -FREE PROGRAM
c07.qxd 7/14/05 11:29 AM Page 84

ultimate goal of improving your functional alignment is to provide your bodywith an optimal environment in which to heal. By doing so, you remove thenegative stimulus or stimuli that create a pain response in your body on a reg-ular basis. If this is clearly the goal, then reproducing your pain would becontrary to that. Let me reemphasize that: these exercises should not reproduceyour pain. If an exercise does reproduce your pain, you will have to eliminateit or modify it if you can.
Let me also be clear that there’s a distinction between reproducing yourpain and experiencing discomfort from doing exercises that you’ve never donebefore. We’re all familiar with the muscle soreness that occurs from stressing(exercising) a muscle we haven’t stressed in a long time. This may occur, evenwith exercises that look simple. You may also stretch some tight muscles thathaven’t had their length disturbed in some time. A good rule of thumb to fol-low is that a stretch should never be so aggressive or intense that it’s painful.Stretching a muscle to this extent will be counterproductive. You’ll elicit abuilt-in defense mechanism that will cause the muscle to recoil immediatelywhen you release the stretch. Even worse, the recoil is likely to shorten themuscle more than it was prior to the aggressive stretch. Mild discomfort is okay,but never painful stretching.
You will also do exercises that require you to contract and shorten musclesas part of the strengthening element of your program. These exercises requireyou to use only 50 to 60 percent of what your perceived maximum would be.One of the biggest mistakes people make with exercises designed to reeducatethe body is to push or pull too hard. When you’re trying to influence your neu-romuscular system, harder is not better. As a matter of fact, it can becounterproductive. The best way to influence this system is through more sub-tle movements, rather than by exerting the effort that most people whoexercise are familiar with. Remember, these aren’t exercises for rippled abdom-inals or bulging biceps. Instead, they will influence the way the body’s partscooperate with one another.
There are two main reasons why you shouldn’t work too hard (more than50 to 60 percent). The first is to avoid using the same old strategies that yourbody has always used to produce any movement that’s similar to the exerciseat hand. For example, if you’re doing an exercise with your arms and your ten-dency is to shrug your shoulders to stabilize yourself, that’s what you’ll do.Stabilizing yourself this way is inappropriate, but you’re unable to recognizethis error because you’re concentrating more on the outcome of the exercisethan on how to do it. In other words, you’re thinking, “My arm has to go from
FORM FOLLOWS FUNCT ION 85
c07.qxd 7/14/05 11:29 AM Page 85

here to there this many times, come hell or high water.” We must back off fromthat all-out effort and think about how the arm got from here to there, not thatthe arm did manage to do so. This emphasizes the route the body uses, versus the final destination. And in the initial phases of the motor-learning process,the route is much more important.
The second critical reason is that when we push or pull too hard, we actu-ally recruit the wrong muscle fibers to use. Not all of the fibers in your musclesare the same, and muscles will have different ratios of the varying muscle-fibertypes. To avoid a physiology lesson here, let’s look at how this applies to yourgoals in simple terms. If you push and pull too hard, you end up using the big,major muscles that are mostly responsible for gross motor movements. Grossmotor movements are actions like walking, getting out of a chair, or lifting abag of groceries. The body creates momentum with these muscles, but that isn’tthe purpose of the exercises. Because every muscle in the body has a specificfunction, we want to make sure that the muscle groups you target with theseexercises give the “wake up call” to those hibernating muscles.
Resting between sets of exercises is also required. This isn’t the same typeof rest that you might need between sets of weight-lifting exercises. It’s muchshorter and for a completely different reason. A person rests in between setsof weight-lifting exercises to allow certain chemical changes to occur withinthe muscle. This recovery period prepares you for the next set. The FunctionFirst exercises don’t require that kind of recovery. The rest period betweenyour exercises has more to do with your being able to recognize what a mus-cle feels like when it’s turned “on” and when it’s turned “off.” For example, ifan exercise requires 3 sets of 15 repetitions (3 x 15), and you’re working at 50to 60 percent of what your perceived maximum would be, you might not feelas if you’re working that hard. So you decide that you’ll do 45 continuous rep-etitions, instead of breaking it up into 3 sets. If you do this, you’ll end upholding the muscle in a continuous state of tension, even though you may feelas if you have released it in between your efforts. You may have reduced ten-sion relative to the effort required, but you won’t be able to reproduce the stateof relaxation that the muscle would have in an inactive state. It’s extremelyimportant for your body to be able to recognize this difference. You don’t wantmuscle tension to be background noise. If a muscle is tense for any number ofreasons, we want you to be able to recognize this, so that you can take stepsto intervene. You don’t want to ignore it until you become used to it, and it becomes another page in another chapter of that history book that makesup you.
86 THE PA IN -FREE PROGRAM
c07.qxd 7/14/05 11:29 AM Page 86

The next section of the book contains exercises for your Form and Cate-gory. It will be helpful if you prepare your exercise environment before youbegin. You don’t want to have to run for a pillow or move a coffee table or doanything like that while you’re in the middle of exercising. Remember, it’s bestthat you be “present” while doing your program. This means being consciousof what your body does and feels. Let your mind observe and experience theexercises along with your body to heighten the sensory experience. This willmake your exercises that much more beneficial. Being glued to every wordOprah says while you do these exercises is less beneficial. Also, please remem-ber to do the exercises in the order that they appear.
People often ask, “When is the best time of the day to do the exercises?”Priority number one is that you find any time, as long as you do them every day.If you have a choice, early in the day is recommended. Doing the exercises inthe morning will allow you to integrate into your daily activities the structuraland the neurological changes that the exercises stimulate. It also provides aline of defense against the daily activities that probably contribute to the over-load of negative stimuli your body regularly receives. The exception to thiswould be if the exercises allowed you to sleep better at night and to make bet-ter use of that rejuvenation and healing time for your body.
At the end of all the Form and Category programs is the Graduate Pro-gram. You may advance to this program once you feel that you’ve correctedyour Form through the associated exercise program. The Graduate Program isa more advanced routine that requires greater overall strength and neuromus-cular coordination. Don’t move on to the Graduate Program if you’re stillexperiencing significant symptoms.
General Comments about the Exercises before You BeginIt is recommended that almost everyone should precede his or her exercise programwith the 90-90 Neutral Back position. This position can be very comfortable forsymptoms that are directly or indirectly related to the spine. It is more pro-ductive and beneficial for your body than simply lying down on your back withyour legs straight or bent. The 90-90 name comes from the angle that must bepresent at the knee joints and at the hip joints. Stated another way, the upperleg must be perpendicular to the floor and the lower leg must be parallel to the
FORM FOLLOWS FUNCT ION 87
c07.qxd 7/14/05 11:29 AM Page 87

floor. This position allows the muscles of the hips, the lower back, the upperback, the neck, and the shoulders to relax. When the muscles relax, it allowsyou to begin the exercises with a more neutral body position. In other words,it removes (albeit temporarily) the biases your body brings to the exercise ses-sion. For instance, if you do your exercises first thing in the morning aftersleeping in a contorted position for eight hours, you’ll bring some of that con-tortion into your exercise program if you don’t neutralize things first. Or, if youdo your exercises in the evening after a hard day and then a stressful ride homein traffic, the 90-90 Neutral Back will help you let go of that added muscle ten-sion before you begin your exercise program.
The formal description of the 90-90 Neutral Back is as follows:
90 -90 NEUTRAL BACKLie on your back with your legs draped over a chair or an ottoman. The heightof the chair should allow your knees and hips to be bent to 90 degrees. Allowyour arms to lie out to your sides on the floor, with the palms facing the ceil-ing. The arms should be placed about shoulder level. Relax in this position andallow the back muscles to relax.
88 THE PA IN -FREE PROGRAM
c07.qxd 7/14/05 11:29 AM Page 88

Recommended Durat ionApproximately 3 to 10 minutes, or as needed to allow the body to relax.
Mod i f i cat ionPlace a small rolled-up towel under your neck for comfort. If your head can-not lie flat on the floor, use a small pillow to support your head. Note: Thelong-term goal is to have your head on the floor without pain.
PurposeTo allow the muscles around the hips and the pelvis and along the spine torelax. This will let the body settle into a neutral, symmetrical position on thefloor. The position is also very effective for the temporary relief of many achesand pains associated with the hips, the pelvis, and the spine.
The sets and the repetitions given with each exercise are recommendations.They can be increased or decreased slightly, based on your present physicalconditioning. Remember, the purpose of this exercise program is not toexhaust the muscles but to remind them to do the job they were designed todo. So, if you feel overworked by a particular exercise, reduce the number ofrepetitions. Additional photos and views of the exercises can be found atwww.movementbydesign.com.
FORM FOLLOWS FUNCT ION 89
c07.qxd 7/14/05 11:29 AM Page 89

c07.qxd 7/14/05 11:29 AM Page 90

Part Two
Regaining Control
c08.qxd 7/14/05 11:32 AM Page 91

c08.qxd 7/14/05 11:32 AM Page 92

93
8
Form 1 Exercises
c08.qxd 7/14/05 11:32 AM Page 93

Lie on your back, with your legs draped over a chair or an ottoman. Place yourarms on the floor, at shoulder level. Bend the elbows to 90 degrees so that thewrists are directly over the elbows. Your hands are open, with the palms of thehands facing forward. From this position, gently press and release your elbowsinto the floor. This should cause your shoulder blades to come together. Do thiswithout shrugging your shoulders.
Recommended Sets and Repet i t i ons3 sets of 15 repetitions
Mod i f i cat ionsIf you feel this exercise in your neck, slightly lower your elbows toward yoursides, to avoid using the neck muscles.
PurposeTo activate the musclesbetween the shoulder bladesand the muscles of the mid-dle/upper back. This assistsin bringing the shouldersback to a more anatomicallycorrect position.
94 THE PA IN -FREE PROGRAM
P rogram 1.1Form 1 , Category 1 (Phys i ca l Work )
REVERSE BENCH PRESS IN 90 -90 NEUTRAL BACK
c08.qxd 7/14/05 11:32 AM Page 94

FORM 1 EXERC ISES 95
Lie on your back with your knees bent. Your feet should point straight ahead,and your feet, knees, and hips should be in a straight line. Your arms are outto the side on the floor with the palms facing up. Place a 6- to 8-inch ball orpillow between your knees. Gently, squeeze and release the pillow with yourknees. You should feel this in your inner thighs.
Recommended Sets and Repet i t i ons3 sets of 20 repetitions
Mod i f i cat ionsNone
PurposeTo activate the inner thigh muscles, which are important in pelvic stabiliza-tion. They also assist in the inward rotation of the thigh at the hip joint.
ADDUCTOR SQUEEZES SUP INE
c08.qxd 7/14/05 11:32 AM Page 95

Lie on your back with your knees bent. Your feet should point straight ahead,and your feet, knees, and hips should be in a straight line. Place a non-elasticbelt or strap around your thighs, just above the knees. Gently press out andrelease against the strap as if you were trying to separate your knees. You shouldfeel this in your outer thighs and buttocks.
Recommended Sets and Repet i t i ons3 sets of 20 repetitions
Mod i f i cat ionsBring your knees closer together before placing the strap around your thighsto help you feel the exercise in the right muscles.
PurposeTo activate the outer thigh mus-cles, which are important inpelvic stabilization. They alsoassist in the outward rotation ofthe thigh at the hip joint. Thisexercise may assist in the posi-tioning of your sacroiliac joint aswell. The exercise should be feltin the outer thighs/hips and thebuttocks.
ABDUCTOR PRESSES SUP INE
96 THE PA IN -FREE PROGRAM
c08.qxd 7/14/05 11:32 AM Page 96

FORM 1 EXERC ISES 97
Sit on a firm chair that allows you to have your knees and hips bent to 90degrees. Your feet should point straight ahead, and your feet, knees, and hipsshould be in a straight line. Place a non-elastic belt or strap around the thighs,just above the knees. Roll your pelvis forward, and sit tall on your “sit bones”under the buttocks. This should create an arch in your lower back. From thisposition, place a slight but constant pressure outward on the strap around yourlegs. While maintaining this sitting position and the pressure on the strap, liftand lower your heels off the floor. Do this by lifting from your top, upper-thighmuscles. Your calves will also be involved with this exercise, but we don’t wantthem doing all of the work.
Recommended Sets andRepet i t i ons3 sets of 15 repetitions
Mod i f i cat ionsNone
PurposeTo activate the hip flexor muscles, while keep-ing the proper alignment of your hips with thestrap. The sitting posture also helps to assist instrengthening and building endurance in thestabilizers of the spine. This exercise should befelt predominantly on the tops of the thighs andthe fronts of the hips.
HEEL L I FTS S I TT ING WITH STRAP
c08.qxd 7/14/05 11:32 AM Page 97

Lie on your back with your feet flat on a wall and your knees and hips bent toa 90-degree angle. Cross the left ankle over the right knee. As you do this, it’sextremely important that your hips stay square to the wall. The tendency is forthe pelvis to rotate away if the hips are tight. Using the muscles of your left hip(not your hand), gently press the left knee away from your body toward thewall. Remember to keep your hips square on the floor. Hold this position forthe desired amount of time. You should feel the stretch in the area of the leftbuttocks. Repeat with the opposite leg.
Recommended Durat ion1 to 2 minutes
Mod i f i cat ionsIf your hips are too tight andyou cannot keep your hipssquare to the wall, place yourfeet on the floor instead of onthe wall. Perform the stretch thesame as described previously.
PurposeTo assist in positioning the hipjoint by elongating the deepoutward rotators of the hip. Youshould feel this stretch in thebuttocks of the leg that has thecrossed ankle.
98 THE PA IN -FREE PROGRAM
HIP ROTATOR STRETCH
c08.qxd 7/14/05 11:32 AM Page 98

FORM 1 EXERC ISES 99
Kneel on some books or cushions that are approximately 10 inches high. Withyour knees still on the lift, drop forward so that your hands are on the floor.Place your hands directly under your shoulders with the elbows straight.Viewed from the side, the hip joint should be just slightly in front of the kneejoint. From this position, allow your stomach to relax and your back to sway.Also, allow your shoulder blades to collapse together while still keeping yourelbows straight. Your head hangs down, and your neck should be relaxed. Yourawareness should be in your upper and lower back.
Recommended Durat ion1 to 2 minutes
Mod i f i cat ionsThis exercise can be modified in three ways. The first would be to back yourhips up over your knees to relieve some of the pressure from the lower back.The second would be to do this exerciseon the floor, without elevating theknees. The third would be to rest onyour forearms with the elbows bent.Your elbows, instead of your hands,would then be directly under the shoul-ders.
PurposeTo allow the spine to passively relaxinto a position of extension (the oppo-site of sitting slouched).
SWAY-BACK POSE
c08.qxd 7/14/05 11:32 AM Page 99

Stand at the bottom of a stairwell or in a doorway with a platform compara-ble to the height of a single stair with the balls of your feet on the step. Yourfeet should be about 4 to 6 inches apart and pointing straight ahead. Place onehand on the nearest handrail, or stand in the middle and use both handrails ifpossible. Allow your heels to drop down. As you do this, it’s very importantthat you keep your body aligned straight up and down, if viewed from the side.Imagine a straight line extending from your ear to your shoulder to your hipto your knee to your ankle. Don’t bend forward at the waist, and don’t allowyour hips to move ahead of the rest of your body.
Recommended Durat ion2 to 3 minutes
Mod i f i cat ionsTo increase or decrease the amount ofstretch in your calves, put more or less ofyour foot on the step.
PurposeAlthough you’ll feel an obvious stretch inyour calves, this isn’t the primary purposeof the exercise. By keeping the bodyaligned perfectly as described, you areusing many of your postural muscles tomaintain and “learn” this position.
100 THE PA IN -FREE PROGRAM
HEEL DROP ON STA IRS
c08.qxd 7/14/05 11:32 AM Page 100

FORM 1 EXERC ISES 101
Stand about an arm’s length away from a pole, a banister, or two doorknobs.Grab hold at about waist level. Walk your feet in so that they are under yourhands. Your feet should point straight ahead and be in line with your knees andhips. From this position, squat down to 90 degrees at your knees and hips. Keepyour arms straight. Rotate your pelvis forward so that you are arching yourlower back and flattening your upper back. Stick your chest out. Keep your eyesfocused straight ahead and hold.
Recommended Durat ion30 seconds to 1 minute
Mod i f i cat ionsLimit the depth of the squat slightly ordecrease the time. Limiting the depthof the squat too much will decrease thevalue of the exercise considerably.
PurposeTo increase the static strength of thehip muscles and the spinal extensors.You should feel the thighs working, aswell as the extensor muscles in yourlower and upper back.
STAT IC SQUAT
c08.qxd 7/14/05 11:32 AM Page 101

Lie on your back, with your legs draped over a chair or an ottoman. Place yourarms on the floor, at shoulder level. Bend your elbows to 90 degrees so that yourwrists are directly over the elbows. Your hands are open, with the palms of thehands facing forward. From this position, gently press and release your elbowsinto the floor. This should cause your shoulder blades to come together. Do thiswithout shrugging your shoulders.
Recommended Sets and Repet i t i ons3 sets of 15 repetitions
Mod i f i cat ionsIf you feel this exercise in your neck, slightly lower your elbows toward yoursides, to avoid using the neck muscles.
PurposeTo activate the muscles between the shoulder blades and the muscles of themiddle/upper back. This assists in bringing the shoulders back to a moreanatomically correct position.
102 THE PA IN -FREE PROGRAM
REVERSE BENCH PRESS IN 90 -90 NEUTRAL BACK ( see page 94 )
P rogram 1.2Form 1 , Category 2 (Dexte r i t y Worker )
c08.qxd 7/14/05 11:32 AM Page 102

FORM 1 EXERC ISES 103
Lie on your back, with your legs draped over a chair or an ottoman. Rest yourarms on the floor at your sides. Keep your fingers, wrists, and elbows straight.The little-finger-side of the hand will be the only part of the hand to touch thefloor. Raise your arms along the floor, with your elbows straight up to shoulderlevel. At shoulder level, rotate your entire arm and hand back so that thethumb-side of the hand is touching the floor. From this position, bring yourhands along the floor and overhead, keeping the elbows straight. Reverse theprocess on the way down. Lower yourarms with the thumb-side on the flooruntil they’re shoulder level. Rotate yourarms forward so that the little-finger-sideof the hand is on the floor, then returnthem along your sides and repeat.
Recommended Sets andRepet i t i ons3 sets of 10 repetitions
Mod i f i cat ionsLimit how far overhead you go with yourhands if you have to bend your elbows.Alternately, you may continue the over-head movement until your palms touch aslong as your elbows remain straight.
PurposeFirst, to assist the body in recruiting the muscles that extend the upper back.In addition, to teach the body to coordinate the movement of the arm with theshoulder blade. You should feel the muscles of your shoulders and upper andmiddle back working. You may feel a stretch along your arms.
SNOW ANGELS IN 90 -90 NEUTRAL BACK
c08.qxd 7/14/05 11:32 AM Page 103

Lie on your back with your knees bent. Your feet should point straight ahead,and your feet, knees, and hips should be in a straight line. Place a non-elasticbelt or strap around your thighs, just above the knees. Maintain a slight, con-stant pressure on the strap. Maintaining this position, lift the heels of both feetoff the ground as high as you can. Keep the balls of your feet on the ground.Lower the heels back down, and raise the balls of your feet off the ground ashigh as you can while keeping the heels down. Rock back and forth, main-taining pressure on the strap.
Recommended Sets andRepet i t i ons3 sets of 15 repetitions
Mod i f i cat ionsNone
PurposeTo mimic the walking motion withyour foot, while activating the stabiliz-ers of your hip with the strap. Youshould feel this in the muscles of yourlower leg and your hips.
104 THE PA IN -FREE PROGRAM
ANKLE ROCKING WITH STRAP
c08.qxd 7/14/05 11:32 AM Page 104

FORM 1 EXERC ISES 105
Lie on your side in the fetal position, with your hips and knees bent to 90degrees. Your ankles, knees, hips, and shoulders should be stacked directly overone another. Place your bottom arm straight out on the floor at 90 degrees fromyour torso, and place the top hand on top of the bottom hand. From this posi-tion, rotate your top hand off your bottom hand towardthe floor behind you. It’s very important that you keepyour knees together as you rotate. Let the weight of yourtop arm pull your body around. It’s crucial to breathe,relax, and allow gravity to slowly bring your arm towardthe floor. Your head should be relaxed on the floor, andyour eyes should face the ceiling. After the desired time,slowly return to the starting position and repeat with theother side.
Recommended Durat ion1 to 2 minutes
Mod i f i cat ionsIf you have trouble keeping your kneestogether, reach down with your bottomhand to help hold your knees in place.
PurposeTo improve the spine’s ability to rotateindependently of the hips and the pelvis.You should feel a stretch across your chestand the top arm and a stretch along theside of your body and toward the lowerback.
UPPER SP INAL ROTAT ION
c08.qxd 7/14/05 11:32 AM Page 105

Start on your hands and knees with your hands directly under your shouldersand your knees directly under your hips. Your body should be square, like a box.Your weight should be evenly distributed between all four points of contact.Relax your feet so that the tops of the feet rest on the floor. From this position,smoothly round up your back, draw your belly button toward your spine, andtuck your pelvis under. Drop your head and bring your chin toward your chest.From here, reverse directions by allowing your stomach to drop and your backto sway. Your shoulder blades should drop together and your head looks up.Make it one fluid movement, rather than holding any one position. Exhale asyour head looks up, and inhale as your head looks down. It’s important to keepyour elbows straight as you perform the movement and to avoid rocking for-ward and backward at the hips and the shoulders.
Recommended Repet i t i ons15 repetitions
Mod i f i cat ionsYou can limit the range of motion in either or both directions if you feel anyrestrictions or discomfort during the exercise.
PurposeTo improve motion of the entire spine, in both flexion and extension. It alsoprovides a gentle stretch of the spinal flexors and extensors and helps withcoordination of movement of the head and the pelvis.
106 THE PA IN -FREE PROGRAM
CAT AND DOG ( see page 46 )
c08.qxd 7/14/05 11:32 AM Page 106

FORM 1 EXERC ISES 107
Lie on your back with your knees bent. Your feet should point straight aheadand line up with your knees and hips. Your arms are out to the sides, with thepalms facing the ceiling. From this position, lift one foot at a time 4 to 6 inchesoff the floor. Your foot should point straight ahead and remain directly in linewith the knee and hip as you lift. Your back will want to rise (arch) off the flooras you lift. Use your abdominals to keep your lower back flat on the floor as youlift. Complete the recommended repetitions with one leg, and then repeat withthe opposite leg. Alternate legs for each set.
Recommended Sets and Repet i t i ons3 sets of 15 repetitions
Mod i f i cat ionsIf you experience discomfort in your lower back when raising the leg, place arolled-up towel under your lower back for support.
PurposeTo reinforce proper tracking ofthe foot and the leg with the hip,as with walking. Also, to remindthe abdominals of their role instabilizing the pelvis while thehip flexor muscles are working.You should feel the work in yourupper thigh toward the hip andin the abdominals.
I SOLATED H IP F LEX ION SUP INE
c08.qxd 7/14/05 11:32 AM Page 107

Stand sideways to a wall. Place the palm of one hand against the wall at shoul-der level. The fingers should point toward the ceiling. Stand far enough awayso that your elbow is straight and your arm makes a 90-degree angle to thebody. Your body should be perpendicular to the wall. Avoid shrugging theshoulder of the arm on the wall. Hold this position for the desired time. It’simportant that you keep the elbow straight and you maintain the proper align-ment of your body. Switch sides and repeat.
Recommended Durat ion45 seconds to 1 minute
Mod i f i cat ionsNone
PurposeTo elongate the muscles andthe connective tissue that runthe distance from the fingertipsto the armpit. This will help toimprove shoulder and handposture. You should feel astretch in the upper part of theforearm and maybe the hand.
108 THE PA IN -FREE PROGRAM
S IDE FOREARM STRETCH
c08.qxd 7/14/05 11:32 AM Page 108

FORM 1 EXERC ISES 109
Stand with your back to a wall. Your heels should be about 2 to 4 inches fromthe wall. Keep your buttocks, shoulders, and head against the wall. From thisposition, stretch your arms out straight against the wall, with the backs of yourhands on the wall. Make your wingspan as long as possible. Your hands shouldbe approximately halfway between your waist and shoulders. Press and releasethe backs of your hands into the wall. As you press, don’t allow your buttocks,shoulders, or head to come off the wall. Avoid using your neck while pressing.Continue for the recommended number of repetitions.
Recommended Sets and Repet i t i ons3 sets of 10 repetitions
Mod i f i cat ionsIf you feel the work in your neck or there is dis-comfort in your shoulders, lower your armsslightly toward the level of your waist.
PurposeTo combine strengthening of the spinal extensorsand the muscles that bring the shoulder bladestogether. This is done by using the wall as a ref-erence for alignment. You should feel this in thebacks of the arms, in the upper back, andbetween the shoulder blades.
SCAPULAR WALL PRESSES
c08.qxd 7/14/05 11:32 AM Page 109

Lie on your back with your arms extended on the floor at shoulder level, palmsfacing upward. Keep the lower leg still as it rests on a chair or an ottoman.Rotate one foot at a time in a clockwise direction. With your toes, draw as biga circle as you can in the air to maximize the range of motion at the ankle. Afterthe desired repetitions, reverse directions by circling in a counterclockwisedirection. After completing both directions, point your foot straight away fromyou and then pull your foot straight back toward you for the recommended rep-etitions. Repeat with the other foot. It’s important to keep the lower leg still asyou move the foot to ensure that the movement occurs at the ankle.
Recommended Sets andRepet i t i ons1 set of 20 repetitions for all three movements
Mod i f i cat ionsDecrease the number of repetitions if 20 is ini-tially too challenging. Or, use alternate feet foreach movement to rest one ankle as you workthe other.
PurposeThe muscles at the foot and the ankle are critical for balance and will affectmovements at the knees and the hips. This exercise takes those joints through all of their available ranges of motion and strengthens the musclesthat are responsible. You should feel fatigue in the front and the sides of yourshin muscles.
110 THE PA IN -FREE PROGRAM
FOOT ROTAT IONS IN 90 -90 NEUTRAL BACK
Program 1.3Form 1 , Category 3 (Mu l t i t asker )
c08.qxd 7/14/05 11:32 AM Page 110

FORM 1 EXERC ISES 111
Lie on your back, with your legs draped over a chair or an ottoman. Place yourarms on the floor, at shoulder level. Bend your elbows to 90 degrees so that yourwrists are directly over the elbows. Your hands are open, with the palms of thehands facing forward. From this position, gently press and release your elbowsinto the floor. This should cause your shoulder blades to come together. Do thiswithout shrugging your shoulders.
Recommended Sets and Repet i t i ons3 sets of 15 repetitions
Mod i f i cat ionsIf you feel this exercise in your neck, slightly lower your elbows toward yoursides, to avoid using the neck muscles.
PurposeTo activate the muscles between the shoulder blades and the muscles of themiddle/upper back. This assists in bringing the shoulders back to a moreanatomically correct position.
REVERSE BENCH PRESS IN 90 -90 NEUTRAL BACK ( see page 94 )
c08.qxd 7/14/05 11:32 AM Page 111

Sit on the floor with your legs straight out in front of you. Sit as tall as you can. Cross your right foot over your left knee and place it flat on the flooralongside the left knee. Place your right hand on the floor behind you and closeto your right buttocks for support. Pull the toes of your foot toward you andkeep the left knee straight. Take your left elbow and place it across your bodyand against the outside of your right knee. As you remain sitting tall, rotateyour head and shoulders to the right, attempting to look over your rightshoulder. Hold this position for the desired length of time and breathe!Switch sides and repeat.
Recommended Durat ion30 seconds to 1 minute
Mod i f i cat ionNone
PurposeTo strengthen the spinal rotators,first on one side of the spine andthen on the other side. You shouldfeel a stretching along one side ofyour back and muscle contraction(shortening) along the other side ofyour back.
112 THE PA IN -FREE PROGRAM
S ITT ING SP INAL TWIST
c08.qxd 7/14/05 11:32 AM Page 112

FORM 1 EXERC ISES 113
Start on your hands and knees with your hands directly under your shouldersand your knees directly under your hips. Your body should be square, like a box.Your weight should be evenly distributed between all four points of contact.Relax your feet so that the tops of the feet rest on the floor. From this position,smoothly round up your back, draw your belly button toward your spine, andtuck your pelvis under. Drop your head and bring your chin toward your chest.From here, reverse directions by allowing your stomach to drop and your backto sway. Your shoulder blades should drop together and your head looks up.Make it one fluid movement, rather than holding any one position. Exhale asyour head looks up and inhale as your head looks down. It’s important to keepyour elbows straight as you perform the movement and to avoid rocking for-ward and backward at the hips and shoulders. You should feel a movement offlexion and extension through your spine.
Recommended Repet i t i ons15 repetitions
Mod i f i cat ionsYou can limit the range of motion in either or both directions if you feel anyrestrictions or discomfort during the exercise.
PurposeTo improve motion of the entire spine, in both flexion and extension. It alsoprovides a gentle stretch of the spinal flexors and extensors and helps withcoordinating movement of the head and the pelvis.
CAT AND DOG ( see page 46 )
c08.qxd 7/14/05 11:32 AM Page 113

Lie on your back on the floor next to a wall.Place your legs straight up the wall withyour feet, knees, and hips in line. Your bodyshould be perpendicular to the wall. Ideally,your buttocks will be touching the wall.With your legs straight, pull the tops of yourfeet and toes back toward you. Tighten yourfront thigh muscles to straighten the knees.The upper buttocks area and the lower backshould be resting firmly on the floor. Yourarms are relaxed out to the sides, with thepalms facing the ceiling. Hold this positionfor the recommended duration. You shouldfeel a stretch in your calves and the backs of
your thighs (hamstrings). Remember, a muscle stretch should not be so intensethat it is painful. If this is the case, see the following modification.
Recommended Durat ion1 to 11⁄2 minutes
Mod i f i cat ionMove your buttocks away from the wall enough to be able to tolerate thestretch or to allow your upper buttocks and lower back to rest on the floor.
PurposeTo symmetrically lengthen the posterior muscles of the legs without the influ-ence of the spinal muscles. Pulling the feet back and tightening the quadricepshelps to improve the efficiency of the stretch. You should feel the stretch inyour calves and the backs of your thighs (hamstrings).
114 THE PA IN -FREE PROGRAM
WALL HAMSTR ING STRETCH
c08.qxd 7/14/05 11:32 AM Page 114

FORM 1 EXERC ISES 115
Lie on your back on the floor next to a wall. Place your legs straight up the wallwith your feet about 18 inches apart. Your body should be perpendicular to thewall. Ideally, your buttocks will be touching the wall. With your legs straight,pull the tops of your feet and toes back toward you. Tighten the front thigh mus-cles to straighten the knees. Your upper buttocks area and lower back should beresting firmly on the floor. Your arms are relaxed out to the sides, with the palmsfacing the ceiling. From this position, rotate both of your entire legs (not justyour feet) toward each other. Then rotate them away from each other. Rotateonly as far as you can while keeping the front thigh musclestight. Think about the entire leg moving as if it were oneunit. Continue rotating back and forth in a continuoussmooth motion for the recommended repetitions.
Recommended Sets and Repet i t i ons3 sets of 10 repetitions
Mod i f i cat ionsMove your buttocks away from the wall enough to be ableto tolerate the stretch or to allow your upper buttocks andlower back to rest on the floor.
PurposeTo teach the body how to move the hip joints independ-ently of the pelvis. It also strengthens the muscles thatrotate the hip in and out. You should feel the movementoccurring from around the hip joints. You may feel a slightlydifferent stretch than you felt in the Wall HamstringStretch.
WALL HAMSTR ING STRETCH WITH FEMUR ROTAT IONS
c08.qxd 7/14/05 11:32 AM Page 115

Lie on your back with your knees bent. Your feet should point straight aheadand line up with your knees and hips. Your arms are out to the sides with thepalms facing the ceiling. From this position, lift one foot at a time 4 to 6 inchesoff the floor. Your foot should point straight ahead and remain directly in linewith the knee and the hip as you lift. Your back will want to rise (arch) off thefloor as you lift. Use your abdominals to keep your lower back flat on the flooras you lift. Complete the recommended repetitions with one leg, and thenrepeat with the opposite leg. Alternate legs for each set.
Recommended Sets and Repet i t i ons3 sets of 15 repetitions
Mod i f i cat ionsIf you experience discomfort in your lower back when raising the leg, place arolled-up towel under your lower back for support.
PurposeTo reinforce proper tracking of the foot and the leg with the hip, as with walk-ing. Also, to remind the abdominals of their role in stabilizing the pelvis whilethe hip flexor muscles are working. You should feel the work in your upperthigh toward the hip and in the abdominals.
116 THE PA IN -FREE PROGRAM
I SOLATED H IP F LEX ION SUP INE ( see page 107 )
c08.qxd 7/14/05 11:32 AM Page 116

FORM 1 EXERC ISES 117
Stand about an arm’s length away from a pole, a banister, or two doorknobs.Grab hold at about waist level. Walk your feet in so that they are under yourhands. Your feet should point straight ahead and be in line with your knees andhips. From this position, squat down to 90 degrees at your knees and hips. Keepyour arms straight. Rotate your pelvis forward so that you are arching yourlower back and flattening your upper back. Stick your chest out. Keep your eyesfocused straight ahead and hold.
Recommended Durat ion30 seconds to 1 minute
Mod i f i cat ionsLimit the depth of the squat slightly or decrease the time. Limiting the depthof the squat too much will decrease the value of the exercise considerably.
PurposeTo increase the static strength of the hip muscles and the spinal extensors. Youshould feel the thighs working, as well as the extensor muscles in your lowerand upper back.
STAT IC SQUAT ( see page 101 )
c08.qxd 7/14/05 11:32 AM Page 117

118
9
Form 2 Exercises
c09.qxd 7/14/05 11:37 AM Page 118

FORM 2 EXERC ISES 119
Stand in a doorjamb with one foot inside the doorjamb andone foot outside of it. Place the palms of your hands and yourforearms on the doorjamb so that your elbows are bent to 90degrees. The upper arms should be level with the shoulders.Tighten your abdominal muscles. Keep your chest high, andavoid shrugging your shoulders. Then lean your upper bodythrough the doorjamb until you feel the stretch in your chestarea. Hold this position for the recommended duration. Afteryour first hold, relax, then switch the front and the back footplacement and repeat.
Recommended Sets and Durat ion2 sets of 30 seconds
Mod i f i cat ionsSlightly vary the height of the elbow position to change theemphasis of the area stretched or to relieve any discomfort inthe shoulders.
PurposeTo lengthen the muscles of the chest and the front shoulders,which will help to “open” the chest area. The stretch shouldbe felt across your chest and front shoulders.
DOUBLE -ARM DOORWAY STRETCH
Program 2.1Form 2 , Category 1 (Phys i ca l Work )
c09.qxd 7/14/05 11:37 AM Page 119

Lie on the floor with the bottoms of your feet on a wall.Lie so that your knees and hips are bent to a 90-degreeangle. Your arms are out to the sides, with the palms fac-ing the ceiling. From this position, bring your kneestogether so that they touch, and then spread themapart as far as you can. It is a smooth and controlledmovement. The length of your foot must maintaincontact with the wall during the movement. It’s okay for you to roll to the outside edges of your feet. Keepyour feet and toes pointing straight to the ceilingthroughout the movement. Do not allow your heels tocome off the wall.
Recommended Sets and Repet i t i ons2 sets of 20 repetitions
Mod i f i cat ionsBringing your feet closer together will make it morechallenging to get your knees apart. Placing your feetfarther apart on the wall will make it more challengingto bring your knees together.
PurposeTo improve the ability of the hip to rotate in combina-tion with movement of the thigh toward the body andaway from the body. This movement is independent ofthe movement of the pelvis. You should feel this in yourinner and outer thighs.
120 THE PA IN -FREE PROGRAM
HIP ABDUCT ION/ADDUCT ION
c09.qxd 7/14/05 11:37 AM Page 120

FORM 2 EXERC ISES 121
Lie on your back with your feet flat on a wall and your knees and hips bent toa 90-degree angle. Cross the left ankle over the right knee. As you do this, it’sextremely important that your hips stay square to the wall. The tendency is forthe pelvis to rotate away if the hips are tight. Using the muscles of your left hip(not your hand), gently press the left knee away from your body toward thewall. Remember to keep your hips square on the floor. Hold this position forthe desired amount of time. You should feel the stretch in the area of the leftbuttocks. Repeat with the opposite leg.
Recommended Durat ion1 to 2 minutes
Mod i f i cat ionsIf your hips are too tight and you cannot keep them square to the wall, placeyour feet on the floor instead of on the wall. Perform the stretch the same asdescribed previously.
PurposeTo assist in positioning the hip joint by elongating the deep outward rotatorsof the hip. This stretch should be felt in the buttocks of the leg with the anklecrossed.
HIP ROTATOR STRETCH ( see page 98 )
c09.qxd 7/14/05 11:37 AM Page 121

Lie facedown on the floor. Place a small folded towel or a washcloth under yourforehead to keep your face off the floor. Lie with your arms straight out above
your head and your legs in line with your hips. From this posi-tion, you will attempt to lengthen your body on opposite sidesby reaching in a direct line with your body along the floor withone arm and in the opposite direction with the opposite leg.Hold this position for 5 seconds and relax. Repeat the move-ment with the other arm and leg. For each repetition, alternatethe sides that you are reaching with. While you reach, it’s veryimportant that you remain in contact with the floor. Don’t liftyour arms or your hips as you reach. Imagine that you are mov-ing on a sheet of ice. You should feel a stretch on the side of thelower back of the leg that is reaching, as well as muscular con-traction around your upper back and the shoulder of the armthat is reaching.
Recommended Repet i t i ons and Durat ionHold for 5 seconds for 10 repetitions on each side, alternatingsides on each repetition.
Mod i f i cat ionsIf you experience discomfort in your shoulder, reach on a slightangle away from the body, instead of in a direct line with thebody.
PurposeTo work the small, intrinsic muscles that stabilize the spine.This exercise also requires reciprocal movement of the upperand the lower body, similar to walking.
122 THE PA IN -FREE PROGRAM
OPPOSITE ARM AND LEG GL ID ING
c09.qxd 7/14/05 11:37 AM Page 122

FORM 2 EXERC ISES 123
Sit on a firm chair that allows you to have yourknees and hips bent to 90 degrees. Your feetshould point straight ahead, and your feet, knees,and hips should be in a straight line. Roll yourpelvis forward, and sit tall on your “sit bones”under the buttocks. This should create an arch inyour lower back. Place a 6- to 8-inch ball or pil-low between your knees. Allow your arms tohang relaxed at your sides. Gently squeeze andrelease the pillow with your knees. Do not losethe proper sitting position as you squeeze. Youshould feel muscles working in your inner thighsand lower back.
Recommended Sets andRepet i t i ons3 sets of 20 repetitions
Mod i f i cat ionsIf the sitting position is too challenging or painful, attempt the exercise lyingon your back with the knees bent.
PurposeTo activate the inner thigh muscles, which are important in pelvic stabiliza-tion. They also assist in the inward rotation of the thigh at the hip joint. Thisexercise strengthens the spinal stabilizers to maintain the sitting posture. Theexercise should be felt in the inner thighs/hips and the lower back.
ADDUCTOR SQUEEZES S I TT ING
c09.qxd 7/14/05 11:37 AM Page 123

Sit on a firm chair that allows you to have your knees and hips bent to 90degrees. Your feet should point straight ahead, and your feet, knees, and hipsshould be in a straight line. Roll your pelvis forward, and sit tall on your “sitbones” under the buttocks. This should create an arch in your lower back.Place a non-elastic belt or strap around your thighs, just above the knees. Gen-tly press out and release against the strap, as if you were trying to separate yourknees. Don’t lose the proper sitting position as you press out. You should feelthis in your outer thighs and buttocks.
Recommended Sets andRepet i t i ons3 sets of 20 repetitions
Mod i f i cat ionsBring your knees closer together before placingthe strap around the thighs to help you feel theexercise in the right muscles. If the sitting posi-tion is too challenging or painful for you,attempt the exercise lying on your back withyour knees bent.
PurposeTo activate the outer thigh muscles, which areimportant in pelvic stabilization. They alsoassist in the outward rotation of the thigh at thehip joint. This exercise strengthens the spinalstabilizers to maintain the sitting posture. Theexercise should be felt in the outer thighs/hips,the buttocks, and the lower back.
124 THE PA IN -FREE PROGRAM
ABDUCTOR PRESSES S I TT ING
c09.qxd 7/14/05 11:37 AM Page 124

FORM 2 EXERC ISES 125
Kneel on the floor. Place an approximately 6-inch pillow or ball between yourankles. Drop forward so that you are on your hands and knees. If viewed fromthe side, your hip joints should be slightly ahead of the knee joints and yourshoulders should be directly over the hands. Your fingers should point straightahead. Relax the abdominal muscles and allow your back to drop into a sway-back position. Keep your elbows straight. Allow your head to hang down.Gently squeeze and release the pillow between your ankles, using the innerankle bones and the inside borders of the feet. You should feel a contractionaround your hips and buttocks. Continue for the desired number of sets andrepetitions. When resting between sets, rest only from the squeezing; maintainthe sway-back position while you rest from the squeezing.
Recommended Sets andRepet i t i ons3 sets of 20 repetitions
Mod i f i cat ionsThis exercise can be modified in two ways.The first would be to back the hips up overthe knees to relieve some of the pressurefrom the lower back. The second would be to rest on the forearms with theelbows bent. The elbows, instead of the hands, would then be directly underthe shoulders.
PurposeTo strengthen the muscles of the hips while the lower back is in a position of passive extension. You should feel a contraction around your hips and thebuttocks.
SWAY-BACK ANKLE SQUEEZES
c09.qxd 7/14/05 11:37 AM Page 125

Stand facing a wall with your feet, knees, and hips all in alignment. Stand alittle more than an arm’s length away from the wall. Lean forward and reachout, placing the palms of your hands on the wall at approximately shoulderheight. Straighten your elbows. Kick your buttocks backward, and allow yourtorso to drop down between your arms. You should bend from the hip jointsand move your torso down between your arms as a unit. This should increasethe arch in your back. Tighten your quadriceps (front thighs) and hold for thedesired length of time.
Recommended Durat ion1 minute
Mod i f i cat ionsPlace your hands higher up on the walland limit the distance you drop yourtorso down between your arms.
PurposeTo lengthen the muscles on the back sideof the leg, while shortening the musclesof the back. Your arms on the wall assistin keeping your back in extension whilethe backs of the thighs lengthen. Youshould feel the stretch in your hamstrings(back of the thighs) and calves. You mayalso feel a stretch alongside your torsoand a tightening in the upper back.
126 THE PA IN -FREE PROGRAM
TABLE TOP WALL STRETCH
c09.qxd 7/14/05 11:37 AM Page 126

FORM 2 EXERC ISES 127
Stand in a doorjamb with one foot inside the doorjamb and one foot outsideof it. Place the palms of your hands and your forearms on the doorjamb so thatyour elbows are bent to 90 degrees. The upper arms should be level with theshoulders. Tighten your abdominal muscles. Keep your chest high, and avoidshrugging your shoulders. Then lean your upper body through the doorjambuntil you feel the stretch in your chest area. Hold this position for the recom-mended duration. After your first hold, relax, then switch the front and theback foot placement and repeat.
Recommended Sets and Durat ion2 sets of 30 seconds
Mod i f i cat ionsSlightly vary the height of the elbow position to change the emphasis of thearea stretched or to relieve any discomfort in the shoulders.
PurposeTo lengthen the muscles of the chest and the front shoulders, which will helpto “open” the chest area. The stretch should be felt across your chest and frontshoulders.
DOUBLE -ARM DOORWAY STRETCH ( see page 119 )
P rogram 2.2Form 2 , Category 2 (Dexte r i t y Work )
c09.qxd 7/14/05 11:37 AM Page 127

Lie on your back on the floor. Bring the soles of your feet together, and as youdo this, allow your knees to fall out to the sides. Pull your feet toward yourgroin, making sure that your feet are centered in the middle of your body.Allow gravity to pull your knees toward the floor. Don’t try to push your kneesdown and don’t resist if they drop. The lower back doesn’t have to be flat onthe floor, and you shouldn’t feel pain in the back. Next, reach your armsstraight out above your chest. Clasp your hands together and keep the elbows
straight. From this position, bring your clasped hands over-head toward the floor behind you. Go only as far back as youcan while keeping your elbows straight. If your elbows bend,stop at that point and return to the start. Repeat the over-head movement, using a slow, controlled motion. Repeat forthe recommended sets and repetitions.
Recommended Sets and Repet i t i ons3 sets of 10 repetitions
Mod i f i cat ionsIf there is any discomfort or any limitation in the shoulderjoints, keep the movement of the arms in a pain-free range.
PurposeTo increase the extension in the lower- and the upper-backareas and improve the position of the shoulder joints in rela-tion to the upper back. You should feel a stretch in the inner
thigh muscles and an increase in the arch throughout your back as your handsdraw closer to the floor. You may also feel some muscular effort around theshoulder joints.
128 THE PA IN -FREE PROGRAM
FROG PULLOVERS
c09.qxd 7/14/05 11:37 AM Page 128

FORM 2 EXERC ISES 129
Stand with your back to a wall. Your heels should be about 2 to 4 inches fromthe wall. Keep your buttocks, shoulders, and head against the wall. From thisposition, stretch your arms out straight against the wall, with the backs of yourhands on the wall. Make your wingspan as long as possible. Your hands shouldbe approximately halfway between your waist and shoulders. Press and releasethe backs of your hands into the wall. As you press, don’t allow your buttocks,shoulders, or head to come off the wall. Avoid using your neck while pressing.Continue for the recommended number of repetitions.
Recommended Sets and Repet i t i ons3 sets of 10 repetitions
Mod i f i cat ionsIf you feel the work in your neck or there is discomfort in your shoulders, loweryour arms slightly toward the level of your waist.
PurposeTo combine strengthening of the spinal extensors and the muscles that bringthe shoulder blades together. This is done by using the wall as a reference pointfor alignment. You should feel this in the backs of the arms, in the upper back,and between the shoulder blades.
SCAPULAR WALL PRESSES ( see page 109 )
c09.qxd 7/14/05 11:37 AM Page 129

Kneel on the floor. Place an approximately 6-inch pillow or ball between yourankles. Drop forward so that you are on your hands and knees. If viewed fromthe side, your hip joints should be slightly ahead of the knee joints and yourshoulders should be directly over the hands. Your fingers should point straightahead. Relax the abdominal muscles and allow your back to drop into a sway-back position. Keep your elbows straight. Allow your head to hang down.Gently squeeze and release the pillow between your ankles, using the innerankle bones and the inside borders of the feet. You should feel a contractionaround your hips and buttocks. Continue for the desired number of sets andrepetitions. When resting between sets, rest only from the squeezing. Maintainthe sway-back position while you rest from the squeezing.
Recommended Sets and Repet i t i ons3 sets of 20 repetitions
Mod i f i cat ionsThis exercise can be modified in two ways. The first would be to back the hipsup over the knees to relieve some of the pressure from the lower back. The sec-ond would be to rest on the forearms with the elbows bent. The elbows, insteadof the hands, would then be directly under the shoulders.
PurposeTo strengthen the muscles of the hips while the lower back is in a position ofpassive extension. You should feel a contraction around your hips and buttocks.
130 THE PA IN -FREE PROGRAM
SWAY-BACK ANKLE SQUEEZES ( see page 125 )
c09.qxd 7/14/05 11:37 AM Page 130
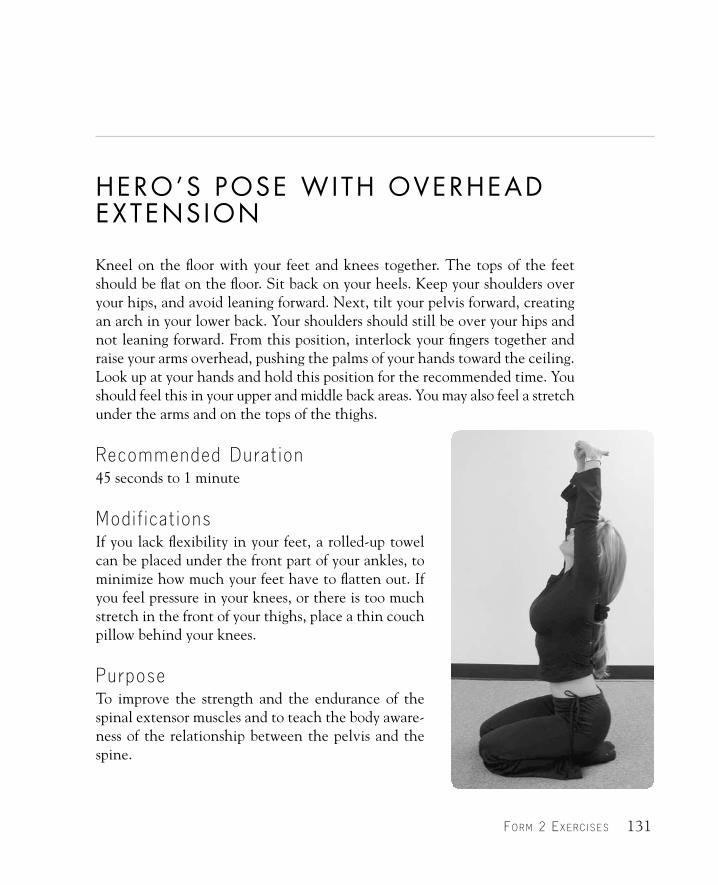
FORM 2 EXERC ISES 131
Kneel on the floor with your feet and knees together. The tops of the feetshould be flat on the floor. Sit back on your heels. Keep your shoulders overyour hips, and avoid leaning forward. Next, tilt your pelvis forward, creatingan arch in your lower back. Your shoulders should still be over your hips andnot leaning forward. From this position, interlock your fingers together andraise your arms overhead, pushing the palms of your hands toward the ceiling.Look up at your hands and hold this position for the recommended time. Youshould feel this in your upper and middle back areas. You may also feel a stretchunder the arms and on the tops of the thighs.
Recommended Durat ion45 seconds to 1 minute
Mod i f i cat ionsIf you lack flexibility in your feet, a rolled-up towelcan be placed under the front part of your ankles, tominimize how much your feet have to flatten out. Ifyou feel pressure in your knees, or there is too muchstretch in the front of your thighs, place a thin couchpillow behind your knees.
PurposeTo improve the strength and the endurance of thespinal extensor muscles and to teach the body aware-ness of the relationship between the pelvis and thespine.
HERO’S POSE WITH OVERHEAD EXTENS ION
c09.qxd 7/14/05 11:37 AM Page 131

Sit on a firm chair that allows you have your knees and hips bent to 90 degrees.Your feet should point straight ahead, and your feet, knees, and hips should bein a straight line. Roll your pelvis forward, and sit tall on your “sit bones” underthe buttocks. This should create an arch in your lower back. Place a non-elasticbelt or strap around your thighs, just above the knees. Gently press out andrelease against the strap, as if you were trying to separate your knees. Don’t losethe proper sitting position as you press out. You should feel this in your outerthighs and buttocks.
Recommended Sets and Repet i t i ons3 sets of 20 repetitions
Mod i f i cat ionsBring your knees closer together before placing the strap around your thighsto help you feel the exercise in the right muscles. If the sitting position is toochallenging or painful for you, attempt the exercise lying on your back withyour knees bent.
PurposeTo activate the outer thigh muscles, which are important in pelvic stabiliza-tion. They assist in the outward rotation of the thigh at the hip joint. Thisexercise strengthens the spinal stabilizers to maintain the sitting posture. Theexercise should be felt in the outer thighs/hips, the buttocks, and the lowerback.
132 THE PA IN -FREE PROGRAM
ABDUCTOR PRESSES S I TT ING ( see page 124 )
c09.qxd 7/14/05 11:37 AM Page 132

FORM 2 EXERC ISES 133
Sit on a firm chair that allows you to have your knees and hips bent to 90degrees. Your feet should point straight ahead, and your feet, knees, and hipsshould be in a straight line. Roll your pelvis forward, and sit tall on your “sitbones” under the buttocks. This should create an arch in your lower back. Holdyour arms straight out from the shoulders and parallel to the floor. Clasp yourfingers together. From this position, raise your arms overhead, keeping theelbows straight. Go overhead only as far as you can while keeping the elbowsstraight. Follow your hands with your eyes. Without pausing,return to the starting position, and repeat for the recom-mended sets and repetitions. You should feel the muscles ofthe upper and the lower back working during this exercise.
Recommended Sets and Repet i t i ons3 sets of 15 repetitions
Mod i f i cat ionsIf there is any discomfort or limitation in your shoulderjoints, keep the movement of the arms in a pain-free range.If you feel discomfort in your neck with the head movement,continue the exercise while keeping your eyes focused straightahead.
PurposeTo activate the spinal muscles, which improve shoulder posi-tion. Movement of the arms in this position improves therelationship of the shoulders and the upper back and helps torestore proper positioning of the shoulders. You should feelthe muscles of your upper and lower back and shouldersworking during this exercise.
PUL LOVERS S I TT ING
c09.qxd 7/14/05 11:37 AM Page 133

Stand facing a wall with your feet, knees, and hips all in alignment. Stand alittle more than an arm’s length away from the wall. Lean forward and reachout placing the palms of your hands on the wall at approximately shoulderheight. Straighten your elbows. Kick your buttocks backward and allow yourtorso to drop down between your arms. You should bend from the hip jointsand move your torso down between your arms as a unit. This should increasethe arch in your back. Tighten your quadriceps (front thighs) and hold for thedesired length of time.
Recommended Durat ion1 minute
Mod i f i cat ionsPlace your hands higher up on the wall and limit the distance you drop yourtorso down between your arms.
PurposeTo lengthen the muscles on the back side of the leg, while shortening the mus-cles of the back. Your arms on the wall assist in keeping your back in extensionwhile the backs of the thighs lengthen. You should feel the stretch in yourhamstrings (back of the thighs) and calves. You may also feel a stretch along-side your torso and a tightening in the upper back.
134 THE PA IN -FREE PROGRAM
TABLE TOP WALL STRETCH ( see page 126 )
c09.qxd 7/14/05 11:37 AM Page 134

FORM 2 EXERC ISES 135
Stand in a doorjamb with one foot inside the doorjamb and one foot outsideof it. Place the palms of your hands and your forearms on the doorjamb so thatyour elbows are bent to 90 degrees. The upper arms should be level with theshoulders. Tighten your abdominal muscles. Keep your chest high, and avoidshrugging your shoulders. Then lean your upper body through the doorjambuntil you feel the stretch in your chest area. Hold this position for the recom-mended duration. After your first hold, relax, then switch the front and theback foot placement and repeat.
Recommended Sets and Durat ion2 sets of 30 seconds
Mod i f i cat ionsSlightly vary the height of the elbow position to change the emphasis of thearea stretched or to relieve any discomfort in the shoulders.
PurposeTo lengthen the muscles of the chest and the front shoulders, which will helpto “open” the chest area. The stretch should be felt across your chest and frontshoulders.
DOUBLE -ARM DOORWAY STRETCH ( see page 119 )
P rogram 2.3Form 2 , Category 3 (Mu l t i t asker )
c09.qxd 7/14/05 11:37 AM Page 135

Lie on the floor with the bottoms of your feet on a wall. Lie so that your kneesand hips are bent to a 90-degree angle. Your arms are out to the sides, with thepalms facing the ceiling. From this position, bring your knees together so thatthey touch, and then spread them apart as far as you can. It is a smooth andcontrolled movement. The length of your foot must maintain contact with thewall during the movement. It’s okay for you to roll to the outside edges of yourfeet. Keep your feet and toes pointing straight to the ceiling throughout themovement. Don’t allow your heels to come off the wall.
Recommended Sets and Repet i t i ons2 sets of 20 repetitions
Mod i f i cat ionsBringing your feet closer together will make it more challenging to get yourknees apart. Placing your feet farther apart on the wall will make it more chal-lenging to bring your knees together.
PurposeTo improve the ability of the hip to rotate in combination with movement ofthe thigh toward the body and away from the body. This movement is inde-pendent of movement of the pelvis. You should feel this in your inner andouter thighs.
136 THE PA IN -FREE PROGRAM
HIP ABDUCT ION/ADDUCT ION ( see page 120 )
c09.qxd 7/14/05 11:37 AM Page 136

FORM 2 EXERC ISES 137
Lie on your back with your feet flat on a wall and your knees and hips bent toa 90-degree angle. Cross the left ankle over the right knee. As you do this, it’sextremely important that your hips stay square to the wall. The tendency is forthe pelvis to rotate away if the hips are tight. Using the muscles of your righthip (not your hand), gently press the right knee away from your body towardthe wall. Remember to keep your hips square on the floor. Hold this positionfor the desired amount of time. You should feel the stretch in the area of theright buttocks. Repeat with the opposite leg.
Recommended Durat ion1 to 2 minutes
Mod i f i cat ionsIf your hips are too tight and you cannot keep your hips square to the wall,place your feet on the floor instead of on the wall. Perform the stretch the sameas described previously.
PurposeTo assist in positioning the hip joint by elongating the deep outward rotatorsof the hip. This stretch should be felt in the buttocks of the leg with the anklecrossed.
HIP ROTATOR STRETCH ( see page 98 )
c09.qxd 7/14/05 11:37 AM Page 137

Lie facedown on the floor. Place a small folded towel or a washcloth under yourforehead to keep your face off the floor. Lie with your arms straight out aboveyour head and your legs in line with your hips. From this position, you willattempt to lengthen your body on opposite sides by reaching in a direct linewith your body along the floor with one arm and in the opposite direction withthe opposite leg. Hold this position for 5 seconds and relax. Repeat the move-ment with the other arm and leg. For each repetition, alternate the sides thatyou are reaching with. While you reach, it’s very important that you remainin contact with the floor. Don’t lift your arms or your hips as you reach. Imag-ine that you are moving on a sheet of ice. You should feel a stretch on the sideof the lower back of the leg that is reaching, as well as muscular contractionaround your upper back and the shoulder of the arm that is reaching.
Recommended Repet i t i ons and Durat ionHold for 5 seconds for 10 repetitions on each side, alternating sides on eachrepetition.
Mod i f i cat ionsIf you experience discomfort in your shoulder, reach on a slight angle awayfrom the body instead of in a direct line with the body.
PurposeTo work the small, intrinsic muscles that stabilize the spine. This exercise also requires reciprocal movement of the upper and the lower body, similar towalking.
138 THE PA IN -FREE PROGRAM
OPPOSITE ARM AND LEG GL ID ING ( see page 122 )
c09.qxd 7/14/05 11:37 AM Page 138

FORM 2 EXERC ISES 139
Lie on your back with your knees bent. Your feet should point straight aheadand line up with your knees and hips. Your arms are out to the sides, with thepalms facing the ceiling. From this position, lift one foot at a time 4 to 6 inchesoff the floor. Your foot should point straight ahead and remain directly in linewith the knee and the hip as you lift. Your back will want to rise (arch) off thefloor as you lift. Use your abdominals to keep your lower back flat on the flooras you lift. Complete the recommended repetitions with one leg, and thenrepeat with the opposite leg. Alternate legs for each set.
Recommended Sets and Repet i t i ons3 sets of 15 repetitions
Mod i f i cat ionsIf you experience discomfort in your lower back when raising the leg, place arolled-up towel under your lower back for support.
PurposeTo reinforce proper tracking of the foot and the leg with the hip, as with walk-ing. Also, to remind the abdominals of their role in stabilizing the pelvis whilethe hip flexor muscles are working. You should feel the work in your upperthigh toward the hip and in the abdominals.
I SOLATED H IP F LEX ION SUP INE ( see page 107 )
c09.qxd 7/14/05 11:37 AM Page 139

Kneel on the floor. Place an approximately 6-inch pillow or ball between yourankles. Drop forward so that you are on your hands and knees. If viewed fromthe side, your hip joints should be slightly ahead of the knee joints and yourshoulders should be directly over the hands. Your fingers should point straightahead. Relax the abdominal muscles and allow your back to drop into a sway-back position. Keep your elbows straight. Allow your head to hang down.Gently squeeze and release the pillow between your ankles, using the innerankle bones and the inside borders of the feet. You should feel a contractionaround your hips and buttocks. Continue for the desired number of sets andrepetitions. When resting between sets, rest only from the squeezing. Maintainthe sway-back position while you rest from the squeezing.
Recommended Sets and Repet i t i ons3 sets of 20 repetitions
Mod i f i cat ionsThis exercise can be modified in two ways. The first would be to back the hipsup over the knees to relieve some of the pressure from the lower back. The sec-ond would be to rest on the forearms with the elbows bent. The elbows, insteadof the hands, would then be directly under the shoulders.
PurposeTo strengthen the muscles of the hips while the lower back is in a position ofpassive extension.
140 THE PA IN -FREE PROGRAM
SWAY-BACK ANKLE SQUEEZES ( see page 125 )
c09.qxd 7/14/05 11:37 AM Page 140

FORM 2 EXERC ISES 141
Stand with your feet hip-width apart and pointing straightahead. Place your hands on your hips so that the thumbs areto the front over the hip bones and pointing down. The restof your fingers should be resting on the upper buttocks andpointing toward the floor. Try to squeeze your elbows togetherand hold. Tighten your front thigh muscles. Keeping an archin your lower back, bend forward and hinge from the hipjoints. Bend only as far forward as you can without losing thearch in your lower back. Shift the weight toward the balls ofyour feet, and focus your eyes straight ahead. Hold for the rec-ommended duration. You should feel a stretch in your calvesand hamstrings. You may also feel the muscular effort in yourlower back.
Recommended Durat ion45 seconds to 1 minute
Mod i f i cat ionsInstead of placing your hands on your lower back, stand infront of a dining table or a desk and place your hands on that.Use your upper body to control how far you bend forward. Itis still critical that you maintain the arch in your lower backand hinge from the hip as you lean forward.
PurposeTo lengthen the hamstring and calf muscles against gravity,while stabilizing the lumbar spine with the spinal extensormuscles.
STANDING H IP H INGE
c09.qxd 7/14/05 11:37 AM Page 141

Start on your hands and knees with your hands directly under your shouldersand your knees directly under your hips. Your body should be square, like a box.Your weight should be evenly distributed between all four points of contact.Relax your feet so that the tops of the feet rest on the floor. From this position,smoothly round up your back, draw your belly button toward your spine, andtuck your pelvis under. Drop your head and bring your chin toward your chest.From here, reverse directions by allowing your stomach to drop and your backto sway. Your shoulder blades should drop together and your head looks up.Make it one fluid movement, rather than holding any one position. Exhale asyour head looks up, and inhale as your head looks down. It’s important to keepyour elbows straight as you perform the movement and to avoid rocking for-ward and backward at the hips and the shoulders. You should feel a movementof flexion and extension through your spine.
Recommended Repet i t i ons15 repetitions
Mod i f i cat ionsYou can limit the range of motion in either or both directions if you feel anyrestrictions or discomfort during the exercise.
PurposeTo improve motion of the entire spine in both flexion and extension. It alsoprovides a gentle stretch of the spinal flexors and extensors and helps withcoordinating movement of the head and the pelvis.
142 THE PA IN -FREE PROGRAM
CAT AND DOG ( see page 46 )
c09.qxd 7/14/05 11:37 AM Page 142

143
10
Form 3 Exercises
c10.qxd 7/14/05 11:40 AM Page 143

Lie on your back, with your legs draped over a chair or an ottoman. Place a 6-inch ball or a firm pillow between your knees. Your knees should be elevatedand in line with your hips. Relax your arms out to the sides, with the palms fac-ing the ceiling. Gently squeeze and release the pillow with your knees. Don’tallow your lower back to arch off the floor as you squeeze.
Recommended Sets and Repet i t i ons3 sets of 15 repetitions
Mod i f i cat ionsNone
PurposeTo activate the inner thigh muscles and assist in relaxing the lower back andthe buttocks muscles. You should feel this exercise in your inner thighs.
144 THE PA IN -FREE PROGRAM
P rogram 3.1Form 3 , Category 1 (Phys i ca l Work )
ADDUCTOR SQUEEZES IN THE 90 -90 NEUTRAL BACK
c10.qxd 7/14/05 11:40 AM Page 144

FORM 3 EXERC ISES 145
Start on your hands and knees with your hands directly under your shouldersand your knees directly under your hips. Your body should be square, like a box.Your weight should be evenly distributed between all four points of contact.Relax your feet so that the tops of the feet rest on the floor. Allow gravity topull your belly slightly toward the floor. We are trying to achieve a “neutral”spine, which means just a slight arch in the lower back. From this position,draw your belly button to your spine as if you were hollowing out your abdom-inal area. To use the appropriate muscles for this, you cannot move your spineor hips as you draw in. They should remain still. Once you have drawn all theway in, hold the contraction. You should feel the work toward the lower, innerpart of the abdominals. You may even feel it in the deep pelvic floor muscles.
Recommended Durat ion and Repet i t i onsHold for 3 seconds for 10 repetitions. Increase the hold time as you get morecomfortable with the exercise.
Mod i f i cat ionsLie on your back with your knees bent if you areunable to recruit the proper muscles in this exerciseor are unable to perform the exercise without mov-ing your hips and spine. Instead, draw your bellybutton to the floor, again without moving your hips.
PurposeTo assist the body in using the deepest abdominaland “core” muscles for spinal stabilization. Thesemuscles are underused in many people, who insteadsubstitute with the more superficial abdominals.
TVA DRAW ON ALL FOURS
c10.qxd 7/14/05 11:40 AM Page 145

Lie on your back with your feet flat on a wall and the knees and hips bent toa 90-degree angle. Cross the left ankle over the right knee. As you do this, it’sextremely important that your hips stay square to the wall. The tendency is forthe pelvis to rotate away if the hips are tight. Using the muscles of your left hip(not your hand), gently press the left knee away from the body toward the wall.Remember to keep the hips square on the floor. Hold this position for yourdesired amount of time. You should feel the stretch in the area of your rightbuttocks. Repeat with the opposite leg.
Recommended Durat ion1 to 2 minutes
Mod i f i cat ionsIf your hips are too tight and you cannot keep your hips square to the wall,place your feet on the floor instead of on the wall. Perform the stretch the sameas described previously.
PurposeTo assist in positioning the hip joint by elongating the deep outward rotatorsof the hip. This stretch should be felt in the buttocks of the leg with the anklecrossed.
146 THE PA IN -FREE PROGRAM
HIP ROTATOR STRETCH ( see page 98 )
c10.qxd 7/14/05 11:40 AM Page 146

FORM 3 EXERC ISES 147
Lie on your stomach with your hands on the floor and your chin resting on yourhands. Grab hold of a 6- to 8-inch ball or pillow with your ankles. Bend yourknees to 90 degrees, holding onto the ball. The 90-degree angle at the kneesis a very important part of this exercise. From this position, gently squeeze andrelease the ball with your inner ankle bones and theinside borders of your feet. Don’t squeeze with only theheels.
Recommended Sets and Repet i t i ons3 sets of 20 repetitions
Mod i f i cat ionsIf you don’t feel the contraction in your buttocks,spread your knees apart slightly until you do feel thework in the buttocks area. If you feel pressure or painin your lower back with your knees bent, perform theexercise with your legs straight on the floor.
PurposeTo activate the buttocks muscles and thedeep muscles under the buttocks. Thisimproves the relationship of these mus-cles to the lower back and helps with hipalignment. The contraction should befelt in your buttocks area.
ANKLE SQUEEZES PRONE
c10.qxd 7/14/05 11:40 AM Page 147

Lie in a doorway with your outside thigh against the doorjamb and your legsstraight. Lift your inside leg straight up and cross it over your body, placing the
heel on the doorjamb. Keep the kneecap of theinside leg pointing straight off the doorjamb. Pullthe foot and the toes of the leg on the doorjambback toward you, and tighten the front thighmuscles. Your arms are out to the side, at chestlevel, with the palms facing the ceiling.
Recommended Durat ion45 seconds to 1 minute
Mod i f i cat ionsYou can move your body closer to the doorjambor farther away from the doorjamb depending onyour flexibility. Moving closer to the doorjambwill increase the stretch, and moving away fromthe doorjamb will decrease the stretch.
PurposeTo lengthen the hamstrings and the outer hipmuscles independently of the lower back. Youshould feel the stretch of this exercise in yourcalf, hamstring, and buttock of the leg that’s upand across the doorjamb.
148 THE PA IN -FREE PROGRAM
I SOLATED HAMSTR ING STRETCH WITH CROSSOVER
c10.qxd 7/14/05 11:40 AM Page 148

FORM 3 EXERC ISES 149
Lie on your back with your knees bent. Your feet, knees, and hips are in line,and your feet are pointing straight ahead. Your arms are out to the sides, withthe palms facing the ceiling. Draw your belly button down to the floor andtighten all of your abdominal muscles to flatten your lower back entirely to thefloor. While holding this position, lift one foot off the floor so that the lowerleg from the knee down is parallel to the floor. The hip and the knee shouldbe bent. Slowly straighten out this leg as you keep the lower leg parallel to thefloor. Straighten the leg only as far as you can while keeping your lower backflat to the floor. When you feel your lower back arch off the floor, bring the legback to the start and repeat. After the recommended repetitions for the firstset, switch legs and repeat with the other leg.
Recommended Sets and Repet i t i ons3 sets of 5 repetitions
Mod i f i cat ionsIf you are not able to keep your lower back flat on thefloor at all as you begin to straighten your leg, then keepyour feet on the floor. Maintain the required engage-ment of the abdominal muscles. Instead of lifting onefoot, slide the heel away from your body, allowing yourhip and knee to extend. Only slide the heel as far as youcan while maintaining your flat back on the floor.Return to the start and repeat.
PurposeTo improve control of the abdominals and help themcontribute to stabilizing the lower back and the pelvis.You should predominantly feel this exercise in the abdominal area.
LEG EXTENS IONS SUP INE
c10.qxd 7/14/05 11:40 AM Page 149

Begin with one knee on the floor. Keep both legs in line with the hips. The footof the front leg should be slightly in front of the knee of the same leg. The footof the back leg should be directly in line with the knee of the back leg. Place
your hands on top of the thigh of the front leg, andkeep your torso straight up and down. Tighten yourabdominals and slightly tilt your pelvis backward,decreasing the arch in your lower back. Once youhave done this, lunge slightly forward, bringing thefront knee over the front ankle. Once in this posi-tion, lift the arm on the kneeling side of the body upand over the head for a side stretch. Keep yourabdominals tight the entire time. Hold for the rec-ommended duration, then repeat on the other side.
Recommended Durat ion1 minute
Mod i f i cat ionsIf you are challenged with balance during this exercise, kneelnext to a chair and place one hand on the chair to help youmaintain your balance. Getting a proper stretch with this exer-cise is more important than the balance component. If your kneeis uncomfortable, place a thin, flat pillow under it during theexercise.
PurposeTo lengthen the hip flexor muscles, which have a significantinfluence on the lower back. You should feel a stretch in thethigh and the groin of the back leg.
150 THE PA IN -FREE PROGRAM
KNEEL ING H IP F LEXOR STRETCH
c10.qxd 7/14/05 11:40 AM Page 150

FORM 3 EXERC ISES 151
Kneel upright on the floor with your knees directly under your hips. The topsof your feet are flat on the floor. Place a 6- to 8-inch ball or pillow between yourankles. Allow your arms to hang at your sides. Gently squeeze and release theball with your inner ankle bones and the inside borders of your feet. Don’tsqueeze with only the heels. The contraction should be felt in your buttocksarea.
Recommended Sets and Repet i t i ons3 sets of 20 repetitions
Mod i f i cat ionsIf you don’t feel the contraction in the buttocks,spread your knees apart slightly until you do feelthe work in the buttocks area. If you are chal-lenged by holding yourself in this position, kneelin front of a chair and support yourself with theseat of the chair. Try to progress from using thechair for balance to balancing on your own.
PurposeTo activate the gluteal muscles and help them tokeep the pelvis in a neutral and upright balance.
ANKLE SQUEEZES KNEEL ING
c10.qxd 7/14/05 11:40 AM Page 151

Lie on your back, with your legs draped over a chair or an ottoman. Place a 6-inch ball or a firm pillow between your knees. Your knees should be in line withyour hips. Relax your arms out to the sides with the palms facing the ceiling.Gently, squeeze and release the pillow with your knees. Don’t allow your lowerback to arch off the floor as you squeeze.
Recommended Sets and Repet i t i ons3 sets of 15 repetitions
Mod i f i cat ionsNone
PurposeTo activate the inner thigh muscles and assist in relaxing the lower back andthe buttocks muscles. You should feel this exercise in your inner thighs.
152 THE PA IN -FREE PROGRAM
ADDUCTOR SQUEEZES IN THE 90 -90 NEUTRAL BACK ( see page 144 )
P rogram 3.2Form 3 , Category 2 (Dexte r i t y Work )
c10.qxd 7/14/05 11:40 AM Page 152

FORM 3 EXERC ISES 153
Start on your hands and knees with your hands directly under your shouldersand your knees directly under your hips. Your body should be square, like a box.Your weight should be evenly distributed between all four points of contact.Relax your feet so that the tops of the feet rest on the floor. Allow gravity topull your belly slightly toward the floor. We are trying to achieve a “neutral”spine, which means just a slight arch in the lower back. From this position,draw your belly button to your spine as if you were hollowing out your abdom-inal area. To use the appropriate muscles for this, you cannot move your spineor hips as you draw in. They should remain still. Once you have drawn all theway in, hold the contraction. You should feel the work toward the lower, innerpart of the abdominals. You may even feel it in the deep pelvic floor muscles.
Recommended Durat ion and Repet i t i onsHold for 3 seconds for 10 repetitions. Increase the hold time as you get morecomfortable with the exercise.
Mod i f i cat ionsLie on your back with your knees bent if you are unable to recruit the propermuscles in this exercise or are unable to perform the exercise without movingyour hips and spine. Instead, draw your belly button to the floor, again with-out moving your hips.
PurposeTo assist the body in using the deepest abdominal and “core” muscles for spinalstabilization. These muscles are underused in many people, who instead sub-stitute with the more superficial abdominals.
TVA DRAW ON ALL FOURS ( see page 145 )
c10.qxd 7/14/05 11:40 AM Page 153
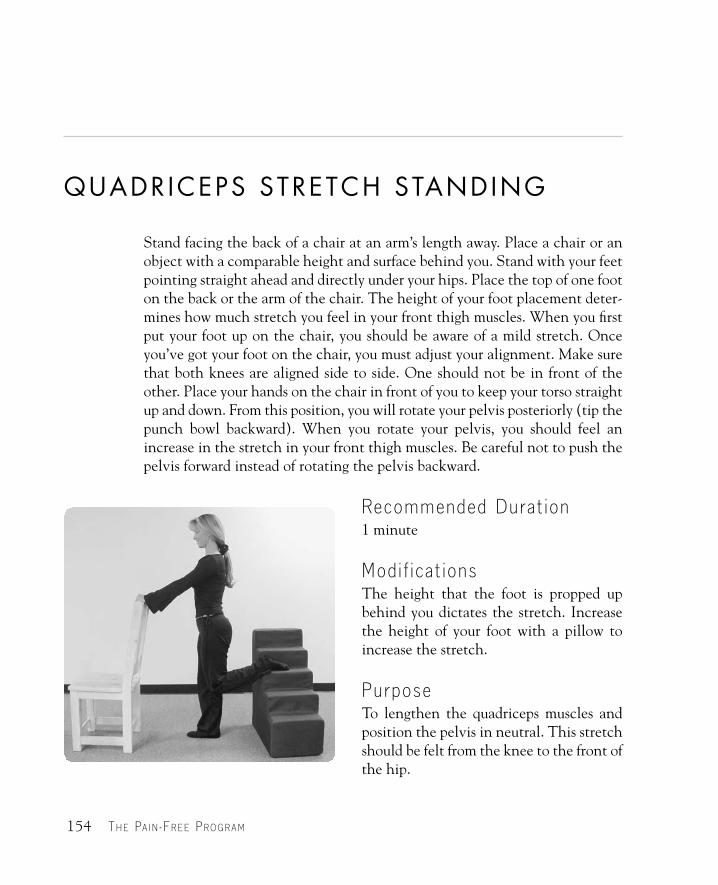
Stand facing the back of a chair at an arm’s length away. Place a chair or anobject with a comparable height and surface behind you. Stand with your feetpointing straight ahead and directly under your hips. Place the top of one footon the back or the arm of the chair. The height of your foot placement deter-mines how much stretch you feel in your front thigh muscles. When you firstput your foot up on the chair, you should be aware of a mild stretch. Onceyou’ve got your foot on the chair, you must adjust your alignment. Make surethat both knees are aligned side to side. One should not be in front of theother. Place your hands on the chair in front of you to keep your torso straightup and down. From this position, you will rotate your pelvis posteriorly (tip thepunch bowl backward). When you rotate your pelvis, you should feel anincrease in the stretch in your front thigh muscles. Be careful not to push thepelvis forward instead of rotating the pelvis backward.
Recommended Durat ion1 minute
Mod i f i cat ionsThe height that the foot is propped upbehind you dictates the stretch. Increasethe height of your foot with a pillow toincrease the stretch.
PurposeTo lengthen the quadriceps muscles andposition the pelvis in neutral. This stretchshould be felt from the knee to the front ofthe hip.
154 THE PA IN -FREE PROGRAM
QUADRICEPS STRETCH STANDING
c10.qxd 7/14/05 11:40 AM Page 154

FORM 3 EXERC ISES 155
Stand sideways to a wall. Place the palm of one hand against the wall at shoul-der level. The fingers should point toward the ceiling. Stand far enough awayso that your elbow is straight and your arm makes a 90-degree angle to thebody. Your body should be perpendicular to the wall. Avoid shrugging theshoulder of the arm on the wall. Hold this position for the desired amount oftime. It’s important that you keep the elbow straight and you maintain theproper alignment of your body. Switch sides and repeat.
Recommended Durat ion45 seconds to 1 minute
Mod i f i cat ionsNone
PurposeTo elongate the muscles and the connective tissue that run the distance fromthe fingertips to the armpit. This will help to improve shoulder and hand pos-ture. You should feel a stretch in the upper part of the forearm and maybe thehand.
S IDE FOREARM STRETCH ( see page 108 )
c10.qxd 7/14/05 11:40 AM Page 155

Kneel in front of a chair or a couch. Bend forward and place one hand on thefloor under your shoulder and the other forearm on the chair. The elbow of thearm on the chair should be straight, with the thumb pointing to the ceiling.Tighten your abdominals so that your lower back is not arching toward thefloor. Bend the elbow of the arm on the floor to allow your torso to start drop-ping toward the floor. As your torso drops, keep it level and don’t rotate to oneside or the other. This can be adjusted by the degree that you bend the arm onthe floor. You should feel a stretch in the area under the arm and along the sidetorso of the arm on the chair. Hold for the recommended duration, and repeatwith the other arm.
Recommended Durat ion30 seconds
Mod i f i cat ionsIf you are unable to hold yourself with one hand on the chair, place both fore-arms on the chair. This may decrease the stretch along the sides of your torso,
but will increase the extensionthat occurs in your upper back.
PurposeTo lengthen the muscles fromunder the arm that attach alongthe lower back and the pelvis.You should feel the stretch underyour arm and along the side ofyour body.
156 THE PA IN -FREE PROGRAM
ONE-ARM TABLE TOP STRETCH KNEEL ING
c10.qxd 7/14/05 11:40 AM Page 156

FORM 3 EXERC ISES 157
Begin with one knee on the floor. Keep both legs in line with the hips. The footof the front leg should be slightly in front of the knee of the same leg. The footof the back leg should be directly in line with the knee of the back leg. Placeyour hands on top of the thigh of the front leg and keep your torso straight upand down. Tighten your abdominals and slightly tilt your pelvis backward,decreasing the arch in your lower back. Once you have done this, lunge slightlyforward, bringing the front knee over the front ankle. Once in this position,lift the arm on the kneeling side of the body up and over the head for a sidestretch. Keep your abdominals tight the entire time. Hold for the recom-mended duration, then repeat on the other side.
Recommended Durat ion1 minute
Mod i f i cat ionsIf you are challenged with balance during this exercise, kneel next to a chairand place one hand on the chair to help you maintain your balance. Gettinga proper stretch with this exercise is more important than the balance com-ponent. If your knee is uncomfortable, place a thin, flat pillow under it duringthe exercise.
PurposeTo lengthen the hip flexor muscles, which have a significant influence on thelower back. You should feel a stretch in the thigh and the groin of the back leg.
KNEEL ING H IP F LEXOR STRETCH ( see page 150 )
c10.qxd 7/14/05 11:40 AM Page 157
Lie on your stomach with your hands on the floor and your chin resting on yourhands. Grab hold of a 6- to 8-inch ball or pillow with your ankles. Bend yourknees to 90 degrees, holding onto the ball. The 90-degree angle at the kneesis a very important part of this exercise. From this position, gently squeeze andrelease the ball with your inner ankle bones and the inside borders of your feet.Don’t squeeze with only the heels.
Recommended Sets and Repet i t i ons3 sets of 20 repetitions
Mod i f i cat ionsIf you don’t feel the contraction in your buttocks, spread your knees apartslightly until you do feel the work in the buttocks area. If you feel pressure orpain in your lower back with your knees bent, perform the exercise with yourlegs straight on the floor.
PurposeTo activate the buttocks muscles and the deep muscles under the buttocks.This improves the relationship of these muscles with the lower back and helpswith hip alignment. The contraction should be felt in your buttocks area.
158 THE PA IN -FREE PROGRAM
ANKLE SQUEEZES PRONE ( see page 147 )
c10.qxd 7/14/05 11:40 AM Page 158

FORM 3 EXERC ISES 159
Stand leaning against a wall. Your feet should point straight ahead, directly inline with your hips. Walk your feet out away from the wall. As you walk yourfeet away, begin sliding your buttocks down the wall. Walk your feet away farenough to allow you to bend your knees close to a 90-degree angle. Press yourlower back flat into the wall, and keep the weight on your heels. From this posi-tion, get your upper back and head against the wall.Then place your elbows at shoulder level on the wall.Bend your elbows to 90 degrees, and try to get yourupper arms, forearms, wrists, and hands all to touchthe wall. Don’t allow your lower back to come off thewall. Keep your lower back flat on the wall by usingyour abdominals. Hold this position for the recom-mended duration After you finish, immediately walkaround the room for 20 to 30 seconds to allow theblood to recirculate through your body.
Recommended Durat ion30 seconds to 2 minutes, depending on strength
Mod i f i cat ionsYou can modify how far you drop your buttocks downthe wall. The arms may also be kept below shoulderlevel, with the hands resting on the thighs, palms-up.
PurposesTo strengthen the thigh muscles and to get the back completely flat on thewall, in order to disengage the lower back muscles. This exercise should be feltin the front thigh muscles.
WALL S I T WITH SHOULDER ROTAT ION
c10.qxd 7/14/05 11:40 AM Page 159

Lie on your back, with your legs draped over a chair or an ottoman. Place a 6-inch ball or a firm pillow between your knees. Your knees should be in line withyour hips. Relax your arms out to the sides, with the palms facing the ceiling.Gently squeeze and release the pillow with your knees. Don’t allow your lowerback to arch off the floor as you squeeze.
Recommended Sets and Repet i t i ons3 sets of 15 repetitions
Mod i f i cat ionsNone
PurposeTo activate the inner thigh muscles and assist in relaxing the lower back andthe buttocks muscles. You should feel this exercise in your inner thighs.
160 THE PA IN -FREE PROGRAM
ADDUCTOR SQUEEZES IN THE 90 -90 NEUTRAL BACK ( see page 144 )
P rogram 3.3Form 3 , Category 3 (Mu l t i t asker )
c10.qxd 7/14/05 11:40 AM Page 160

FORM 3 EXERC ISES 161
Start on your hands and knees with your hands directly under your shouldersand your knees directly under your hips. Your body should be square, like a box.Your weight should be evenly distributed between all four points of contact.Relax your feet so that the tops of the feet rest on the floor. Allow gravity topull your belly slightly toward the floor. We are trying to achieve a “neutral”spine, which means just a slight arch in the lower back. From this position,draw your belly button to your spine as if you were hollowing out your abdom-inal area. To use the appropriate muscles for this, you cannot move your spineor hips as you draw in. They should remain still. Once you have drawn all theway in, hold the contraction. You should feel the work toward the lower, innerpart of the abdominals. You may even feel it in the deep pelvic floor muscles.
Recommended Durat ion and Repet i t i onsHold for 3 seconds for 10 repetitions. Increase the hold time as you get morecomfortable with the exercise.
Mod i f i cat ionsLie on your back with your knees bent if you are unable to recruit the propermuscles in this exercise or are unable to perform the exercise without movingyour hips and spine. Instead, draw your belly button to the floor, again with-out moving your hips.
PurposeTo assist the body in using the deepest abdominal and “core” muscles for spinalstabilization. These muscles are underused in many people, who instead sub-stitute with the more superficial abdominals.
TVA DRAW ON ALL FOURS ( see page 145 )
c10.qxd 7/14/05 11:40 AM Page 161
Kneel in front of a chair or a couch. Bend forward and place one hand on thefloor under your shoulder and the other forearm on the chair. The elbow of thearm on the chair should be straight, with the thumb pointing to the ceiling.Tighten your abdominals so that your lower back is not arching toward thefloor. Bend the elbow of the arm on the floor to allow your torso to start drop-ping toward the floor. As your torso drops, keep it level and don’t rotate to oneside or the other. This can be adjusted by the degree that you bend the arm onthe floor. You should feel a stretch in the area under the arm and along the sidetorso of the arm on the chair. Hold for the recommended duration, and repeatwith the other arm.
Recommended Durat ion30 seconds
Mod i f i cat ionsIf you are unable to hold yourself with one hand on the chair, place both fore-arms on the chair. This may decrease the stretch along the sides of your torso,but it will increase the extension that occurs in your upper back.
PurposeTo lengthen the muscles from under the arm that attach along the lower backand the pelvis. You should feel the stretch under your arm and along the sideof your body.
162 THE PA IN -FREE PROGRAM
ONE-ARM TABLE TOP STRETCH KNEEL ING ( see page 156 )
c10.qxd 7/14/05 11:40 AM Page 162

FORM 3 EXERC ISES 163
Lie on your back on the floor next to a wall. Place your legs straight up the wallwith your feet, knees, and hips in line. Your body should be perpendicular tothe wall. Ideally, your buttocks will be touching the wall. With your legsstraight, pull the tops of your feet and toes back toward you. Tighten your frontthigh muscles to straighten the knees. The upper buttocks area and the lowerback should be resting firmly on the floor. Your arms are relaxed out to thesides, with the palms facing the ceiling. Hold this position for the recom-mended duration. You should feel a stretch in your calves and the backs of yourthighs (hamstrings). Remember, a muscle stretch should not be so intense thatit is painful. If this is the case, see the following modification.
Recommended Durat ion1 to 11⁄2 minutes
Mod i f i cat ionMove your buttocks away from the wall enough to be able to tolerate thestretch or to allow your upper buttocks and lower back to rest on the floor.
PurposeTo symmetrically lengthen the posterior muscles of the legs without the influ-ence of the spinal muscles. Pulling the feet back and tightening the quadricepshelps to improve the efficiency of the stretch. You should feel the stretch inyour calves and the backs of your thighs (hamstrings).
WALL HAMSTR ING STRETCH ( see page 114 )
c10.qxd 7/14/05 11:40 AM Page 163

Lie on your back on the floor next to a wall. Place your legs straight up the wallwith your feet about 18 inches apart. Your body should be perpendicular to thewall. Ideally, your buttocks will be touching the wall. With your legs straight,pull the tops of your feet and toes back toward you. Tighten the front thighmuscles to straighten the knees. Your upper buttocks area and lower backshould be resting firmly on the floor. Your arms are relaxed out to the sides,with the palms facing the ceiling. From this position, rotate both of your entirelegs (not just your feet) toward each other. Then rotate them away from each other. Rotate only as far as you can while keeping the front thigh mus-cles tight. Think about the entire leg moving as if it were one unit. Continuerotating back and forth in a continuous smooth motion for the recommendedrepetitions.
Recommended Sets and Repet i t i ons3 sets of 10 repetitions
Mod i f i cat ionsMove your buttocks away from the wall enough to be able to tolerate thestretch or to allow your upper buttocks and lower back to rest on the floor.
PurposeTo teach the body how to move the hip joints independently of the pelvis. Italso strengthens the muscles that rotate the hip in and out. You should feel themovement occurring from around the hip joints. You may feel a slightly dif-ferent stretch than you felt in the Wall Hamstring Stretch.
164 THE PA IN -FREE PROGRAM
WALL HAMSTR ING STRETCH WITHFEMUR ROTAT IONS ( see page 115 )
c10.qxd 7/14/05 11:40 AM Page 164

FORM 3 EXERC ISES 165
Begin with one knee on the floor. Keep both legs in line with the hips. The footof the front leg should be slightly in front of the knee of the same leg. The footof the back leg should be directly in line with the knee of the back leg. Placeyour hands on top of the thigh of the front leg, and keep your torso straight upand down. Tighten your abdominals and slightly tilt your pelvis backward,decreasing the arch in your lower back. Once you have done this, lunge slightlyforward, bringing the front knee over the front ankle. Once in this position,lift the arm on the kneeling side of the body up and over the head for a sidestretch. Keep your abdominals tight the entire time. Hold for the recom-mended duration, then repeat on the other side.
Recommended Durat ion1 minute
Mod i f i cat ionsIf you are challenged with balance during this exercise, kneel next to a chairand place one hand on the chair to help you maintain your balance. Gettinga proper stretch with this exercise is more important than the balance com-ponent. If your knee is uncomfortable, place a thin, flat pillow under it duringthe exercise.
PurposeTo lengthen the hip flexor muscles, which have a significant influence on thelower back. You should feel a stretch in the thigh and the groin of the back leg.
KNEEL ING H IP F LEXOR STRETCH ( see page 150 )
c10.qxd 7/14/05 11:40 AM Page 165

Lie on your back with your knees bent. Your feet, knees, and hips are in line,and your feet are pointing straight ahead. Place your arms out to the sides ofyour body with the lower arms parallel to your head and the palms facing theceiling. Draw your belly button down to the floor, and tighten all of yourabdominal muscles to flatten your lower back entirely to the floor. This servesas the reference point for the position of your pelvis in this exercise. Holdingthis abdominal position and the tilt to the pelvis that it creates, lift your but-tocks off the floor. Your feet and shoulders stay on the ground, while you liftonly the buttocks. Keep your knees in line with your hips as you lift, and don’tallow them to spread apart. Lift only as high as you can while maintaining thisneutral position in your lower back. If you feel your lower back arching, loweryour buttocks back toward the floor until you can keep your lower back neu-tral. Hold for the recommended duration.
Recommended Sets and Durat ion2 sets for 30 seconds each
Mod i f i cat ionsIf you are unable to hold for the recommendedtime, lower your buttocks to the floor and regainthe neutral position, then rise back up and hold.
PurposeThis exercise is designed to strengthen the musclesthat will assist in bringing your pelvis to a neutralposition. You should feel the work in your abdom-inals, buttocks, and hamstrings (backs of thethighs).
166 THE PA IN -FREE PROGRAM
SHOULDER BR IDGE WITH ABDOMINALS
c10.qxd 7/14/05 11:40 AM Page 166

FORM 3 EXERC ISES 167
Stand leaning against a wall. Your feet should point straight ahead, directly inline with your hips. Walk your feet out away from the wall. As you walk yourfeet away, begin sliding your buttocks down the wall. Walk your feet away farenough to allow you to bend your knees close to a 90-degree angle. Press yourlower back flat into the wall, and keep the weight on your heels. From this posi-tion, get your upper back and head against the wall. Then place your elbowsat shoulder level on the wall. Bend your elbows to 90 degrees, and try to getyour upper arms, forearms, wrists, and hands all to touch the wall. Don’t allowyour lower back to come off the wall. Keep your lower back flat on the wall byusing your abdominals. Hold this position for the recommended duration. Afteryou finish, immediately walk around the room for 20 to 30 seconds to allow theblood to recirculate through your body.
Recommended Durat ion30 seconds to 2 minutes, depending on strength
Mod i f i cat ionsYou can modify how far you drop your buttocks down the wall. The arms may also be kept below shoulder level, with the hands resting on the thighs,palms-up.
PurposesTo strengthen the thigh muscles and to get the back completely flat on thewall, in order to disengage the lower back muscles. This exercise should be feltin the front thigh muscles.
WALL S I T WITH SHOULDER ROTAT ION ( see page 159 )
c10.qxd 7/14/05 11:40 AM Page 167

168
11
Form 4 Exercises
c11.qxd 7/14/05 11:42 AM Page 168

FORM 4 EXERC ISES 169
Lie on your back, with your legs draped over a chair or an ottoman. Place a 6-inch ball or a firm pillow between your knees. Your knees should be elevatedand in line with your hips. Relax your arms out to the sides, with the palms fac-ing the ceiling. Gently squeeze and release the pillow with your knees. Don’tallow your lower back to arch off the floor as you squeeze.
Recommended Sets and Repet i t i ons3 sets of 15 repetitions
Mod i f i cat ionsNone
PurposeTo activate the inner thigh muscles and assist in relaxing the lower back andthe buttocks muscles. You should feel this exercise in your inner thighs.
ADDUCTOR SQUEEZES IN THE 90 -90 NEUTRAL BACK ( see page 144 )
P rogram 4.1Form 4 , Category 1 (Phys i ca l Work )
c11.qxd 7/14/05 11:42 AM Page 169

While lying on your back with your lower legs elevated on a chair or a com-parable object, slightly point the toes of each foot away from you. One leg ata time, gently press the heel and the back of the calf downward, as if you weretrying to bring your heel toward your buttocks. Release and repeat with theopposite leg, alternating each repetition. You should feel this exercise in thecalf and the hamstring of the leg that is working. You should also feel a subtlemovement of your pelvis on the floor as you press.
Recommended Sets and Repet i t i ons3 sets of 10 repetitions with each leg
Mod i f i cat ionsNone
PurposeTo use the leverage of the mus-cles pushing into the chair tohelp neutralize the pelvis onthe floor.
170 THE PA IN -FREE PROGRAM
ONE- LEGGED HAMSTR ING CURLS IN THE 90 -90 NEUTRAL BACK
c11.qxd 7/14/05 11:42 AM Page 170

FORM 4 EXERC ISES 171
Lie on your stomach with your hands on the floor and your chin resting on yourhands. Grab hold of a 6- to 8-inch ball or pillow with your ankles. Bend yourknees to 90 degrees, holding onto the ball. The 90-degree angle at the kneesis a very important part of this exercise. From this position, gently squeeze andrelease the ball with your inner ankle bones and the inside borders of your feet.Don’t squeeze with only the heels.
Recommended Sets and Repet i t i ons3 sets of 20 repetitions
Mod i f i cat ionsIf you don’t feel the contraction in your buttocks, spread your knees apartslightly until you do feel the work in the buttocks area. If you feel pressure orpain in your lower back with your knees bent, perform the exercise with yourlegs straight on the floor.
PurposeTo activate the buttocks muscles and the deep muscles under the buttocks.This improves the relationship of these muscles with the lower back and helpswith hip alignment. The contraction should be felt in your buttocks area.
The next three exercises are done in a sequence. This means that you gothrough one set of each of the three exercises completely. Then you return tothe first exercise and repeat all three exercises a second time. Finally, returnto the first exercise and repeat all three for a third time.
ANKLE SQUEEZES PRONE ( see page 147 )
c11.qxd 7/14/05 11:42 AM Page 171

Lie on your back with your knees bent. Your feet should point straight aheadand your feet, knees, and hips should be in a straight line. Your arms are outto the sides on the floor, with the palms facing up. Place a 6- to 8-inch ball orpillow between your knees. Gently squeeze and release the pillow with yourknees. You should feel this in your inner thighs.
Recommended Sets and Repet i t i ons3 sets of 20 repetitions
Mod i f i cat ionsNone
PurposeTo activate the inner thigh muscles, which are important in pelvic stabiliza-tion. They also assist in the inward rotation of the thigh at the hip joint.
172 THE PA IN -FREE PROGRAM
ADDUCTOR SQUEEZES SUP INE ( see page 95 )
c11.qxd 7/14/05 11:42 AM Page 172

FORM 4 EXERC ISES 173
Lie on your back with your knees bent. Your feet should point straight ahead,and your feet, knees, and hips should be in a straight line. Place a non-elasticbelt or strap around your thighs, just above the knees. Gently press out andrelease against the strap as if you were trying to separate your knees. You shouldfeel this in your outer thighs and buttocks.
Recommended Sets and Repet i t i ons3 sets of 20 repetitions
Mod i f i cat ionsBring your knees closer together before placing the strap around your thighsto help you feel the exercise in the right muscles.
PurposeTo activate the outer thigh muscles, which are important in pelvic stabiliza-tion. They also assist in the outward rotation of the thigh at the hip joint. Inaddition, this exercise may assist in the positioning of your sacroiliac joint. Theexercise should be felt in the outer thighs/hips and the buttocks.
ABDUCTOR PRESSES SUP INE ( see page 96 )
c11.qxd 7/14/05 11:42 AM Page 173

Lie on your back on the floor. Bring the soles of your feet together, and as youdo this, allow your knees to fall out to the sides. Pull your feet toward yourgroin, making sure that your feet are centered in the middle of your body.Allow gravity to pull your knees toward the floor. Don’t try to push your kneesdown, and don’t resist if they drop. Your lower back doesn’t have to be flat onthe floor, and you shouldn’t feel pain in your back.
Recommended Durat ion1 minute
Mod i f i cat ionsThe degree to which you pull your feet in toward your groin will affect thestretch. The closer your feet are to your groin, the greater the stretch.
PurposeTo lengthen the inner thigh muscles and use their pull to position the pelvisin a symmetrical position. You should feel the stretch in the inner thighs, andyour lower back will arch slightly off the floor.
174 THE PA IN -FREE PROGRAM
FROG
c11.qxd 7/14/05 11:42 AM Page 174
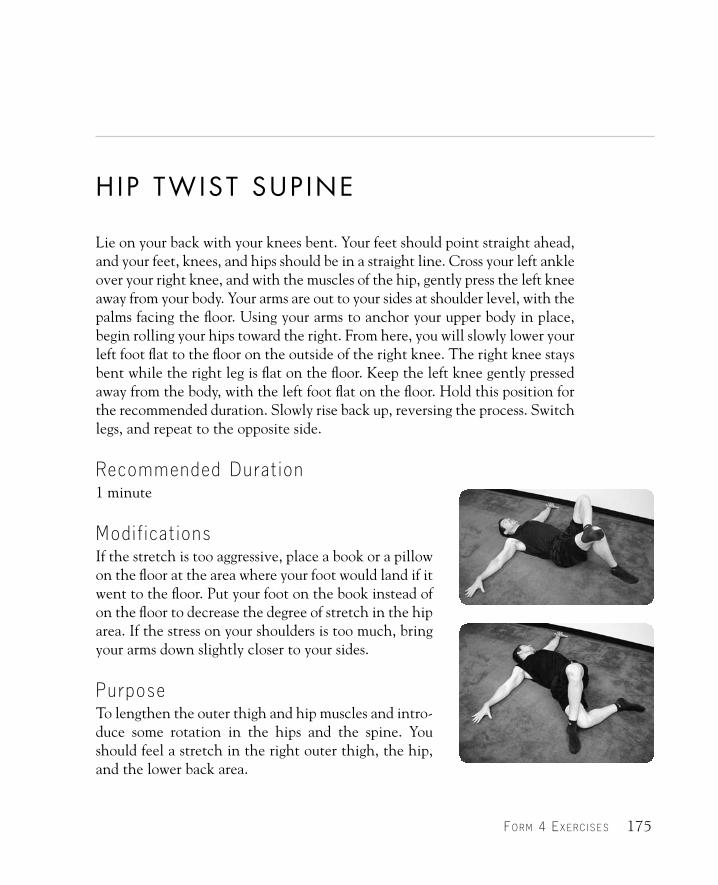
FORM 4 EXERC ISES 175
Lie on your back with your knees bent. Your feet should point straight ahead,and your feet, knees, and hips should be in a straight line. Cross your left ankleover your right knee, and with the muscles of the hip, gently press the left kneeaway from your body. Your arms are out to your sides at shoulder level, with thepalms facing the floor. Using your arms to anchor your upper body in place,begin rolling your hips toward the right. From here, you will slowly lower yourleft foot flat to the floor on the outside of the right knee. The right knee staysbent while the right leg is flat on the floor. Keep the left knee gently pressedaway from the body, with the left foot flat on the floor. Hold this position forthe recommended duration. Slowly rise back up, reversing the process. Switchlegs, and repeat to the opposite side.
Recommended Durat ion1 minute
Mod i f i cat ionsIf the stretch is too aggressive, place a book or a pillowon the floor at the area where your foot would land if itwent to the floor. Put your foot on the book instead ofon the floor to decrease the degree of stretch in the hiparea. If the stress on your shoulders is too much, bringyour arms down slightly closer to your sides.
PurposeTo lengthen the outer thigh and hip muscles and intro-duce some rotation in the hips and the spine. Youshould feel a stretch in the right outer thigh, the hip,and the lower back area.
HIP TWIST SUP INE
c11.qxd 7/14/05 11:42 AM Page 175

Start on your hands and knees with your hands directly under your shouldersand your knees directly under your hips. Your body should be square, like a box.Your weight should be evenly distributed between all four points of contact.Relax your feet so that the tops of the feet rest on the floor. From this position,smoothly round up your back, draw your belly button toward your spine, andtuck your pelvis under. Drop your head and bring your chin toward your chest.From here, reverse directions by allowing your stomach to drop and your backto sway. Your shoulder blades should drop together and your head looks up.Make it one fluid movement rather than holding any one position. Exhale asyour head looks up, and inhale as your head looks down. It’s important to keepyour elbows straight as you perform the movement and to avoid rocking for-ward and backward at the hips and the shoulders.
Recommended Repet i t i ons15 repetitions
Mod i f i cat ionsYou can limit the range of motion in either or both directions if you feel anyrestrictions or discomfort during the exercise.
PurposeTo improve motion of the entire spine, in both flexion and extension. It alsoprovides a gentle stretch of the spinal flexors and extensors and helps withcoordinating movement of the head and the pelvis.
176 THE PA IN -FREE PROGRAM
CAT AND DOG ( see page 46 )
c11.qxd 7/14/05 11:42 AM Page 176

FORM 4 EXERC ISES 177
Lie on your back, with your legs draped over a chair or an ottoman. Place a 6-inch ball or a firm pillow between your knees. Your knees should be elevatedand in line with your hips. Relax your arms out to the sides, with the palms fac-ing the ceiling. Gently squeeze and release the pillow with your knees. Don’tallow your lower back to arch off the floor as you squeeze.
Recommended Sets and Repet i t i ons3 sets of 15 repetitions
Mod i f i cat ionsNone
PurposeTo activate the inner thigh muscles and assist in relaxing the lower back andthe buttocks muscles. You should feel this exercise in your inner thighs.
ADDUCTOR SQUEEZES IN THE 90 -90 NEUTRAL BACK ( see page 144 )
P rogram 4.2Form 4 , Category 2 (Dexte r i t y Work )
c11.qxd 7/14/05 11:42 AM Page 177

Lie on your stomach with your hands on the floor and your chin resting on yourhands. Grab hold of a 6- to 8-inch ball or pillow with your ankles. Bend yourknees to 90 degrees, holding onto the ball. The 90-degree angle at the kneesis a very important part of this exercise. From this position, gently squeeze andrelease the ball with your inner ankle bones and the inside borders of your feet.Don’t squeeze with only the heels.
Recommended Sets and Repet i t i ons3 sets of 20 repetitions
Mod i f i cat ionsIf you don’t feel the contraction in your buttocks, spread your knees apartslightly until you do feel the work in the buttocks area. If you feel pressure orpain in your lower back with your knees bent, perform the exercise with yourlegs straight on the floor.
PurposeTo activate the buttocks muscles and the deep muscles under the buttocks.This improves the relationship of these muscles with the lower back and helpswith hip alignment. The contraction should be felt in your buttocks area.
178 THE PA IN -FREE PROGRAM
ANKLE SQUEEZES PRONE ( see page 147 )
c11.qxd 7/14/05 11:42 AM Page 178
FORM 4 EXERC ISES 179
Lie on your back on the floor next to a wall. Place your legs straight up the wallwith your feet, knees, and hips in line. Your body should be perpendicular tothe wall. Ideally, your buttocks will be touching the wall. With your legsstraight, pull the tops of your feet and toes back toward you. Tighten your frontthigh muscles to straighten the knees. The upper buttocks area and the lowerback should be resting firmly on the floor. Your arms are relaxed out to the sideswith the palms facing the ceiling. Hold this position for the recommendedduration. You should feel a stretch in your calves and the backs of your thighs(hamstrings). Remember, a muscle stretch should not be so intense that it ispainful. If this is the case, see the following modification.
Recommended Durat ion1 to 11⁄2 minutes
Mod i f i cat ionMove your buttocks away from the wall enough to be able to tolerate thestretch or to allow your upper buttocks and lower back to rest on the floor.
PurposeTo symmetrically lengthen the posterior muscles of the legs without the influ-ence of the spinal muscles. Pulling the feet back and tightening the quadricepshelps to improve the efficiency of the stretch. You should feel the stretch inyour calves and the backs of your thighs (hamstrings).
WALL HAMSTR ING STRETCH ( see page 114 )
c11.qxd 7/14/05 11:42 AM Page 179

Lie on your back on the floor next to a wall. Place your legs straight up thewall with your feet about 18 inches apart. Your body should be perpendicularto the wall. Ideally, your buttocks will be touching the wall. With your legsstraight, pull the tops of your feet and toes back toward you. Tighten the frontthigh muscles to straighten the knees. Your upper buttocks area and lowerback should be resting firmly on the floor. Your arms are relaxed out to thesides, with the palms facing the ceiling. From this position, rotate both of yourentire legs (not just your feet) toward each other. Then rotate them away fromeach other. Rotate only as far as you can while keeping the front thigh mus-cles tight. Think about the entire leg moving as if it were one unit. Continuerotating back and forth in a continuous smooth motion for the recommendedrepetitions.
Recommended Sets and Repet i t i ons3 sets of 10 repetitions
Mod i f i cat ionsMove your buttocks away from the wall enough to be able to tolerate thestretch or to allow your upper buttocks and lower back to rest on the floor.
PurposeTo teach the body how to move the hip joints independently of the pelvis. Italso strengthens the muscles that rotate the hip in and out. You should feel themovement occurring from around the hip joints. You may feel a slightly dif-ferent stretch than you felt in the Wall Hamstring Stretch.
180 THE PA IN -FREE PROGRAM
WALL HAMSTR ING STRETCH WITHFEMUR ROTAT IONS ( see page 115 )
c11.qxd 7/14/05 11:42 AM Page 180

FORM 4 EXERC ISES 181
Lie face down on the floor. Place a small folded towel or a washcloth underyour forehead to keep your face off the floor. Lie with your arms straight outabove your head and your legs in line with your hips. From this position, youwill attempt to lengthen your body on opposite sides by reaching in a directline with your body along the floor with one arm and in the opposite directionwith the opposite leg. Hold this position for 5 seconds and relax. Repeat themovement with the other arm and leg. For each repetition, alternate the sidesthat you are reaching with. While you reach, it’s very important that youremain in contact with the floor. Don’t lift your arms or your hips as you reach.Imagine that you are moving on a sheet of ice. You should feel a stretch on theside of the lower back of the leg that is reaching, as well as muscular contrac-tion around your upper back and the shoulder of the arm that is reaching.
Recommended Repet i t i ons and Durat ionHold for 5 seconds for 10 repetitions on each side, alternating sides on eachrepetition.
Mod i f i cat ionsIf you experience discomfort in your shoulder, reach on a slight angle awayfrom the body, instead of in a direct line with the body.
PurposeTo work the small, intrinsic muscles that stabilize the spine. This exercise also requires reciprocal movement of the upper and the lower body, similar towalking.
OPPOSITE ARM AND LEG GL ID ING ( see page 122 )
c11.qxd 7/14/05 11:42 AM Page 181

Begin with one knee on the floor. Keep both legs in line with the hips. The footof the front leg should be slightly in front of the knee of the same leg. The footof the back leg should be directly in line with the knee of the back leg. Placeyour hands on top of the thigh of the front leg, and keep your torso straight upand down. Tighten your abdominals and slightly tilt your pelvis backward,decreasing the arch in your lower back. Once you have done this, lunge slightlyforward, bringing the front knee over the front ankle. Once in this position,lift the arm on the kneeling side of the body up and over the head for a sidestretch. Keep your abdominals tight the entire time. Hold for the recom-mended duration, then repeat on the other side.
Recommended Durat ion1 minute
Mod i f i cat ionsIf you are challenged with balance during this exercise, kneel next to a chairand place one hand on the chair to help you maintain your balance. Gettinga proper stretch with this exercise is more important than the balance com-ponent. If your knee is uncomfortable, place a thin, flat pillow under it duringthe exercise.
PurposeTo lengthen the hip flexor muscles, which have a significant influence on thelower back. You should feel a stretch in the thigh and the groin of the back leg.
182 THE PA IN -FREE PROGRAM
KNEEL ING H IP F LEXOR STRETCH ( see page 150 )
c11.qxd 7/14/05 11:42 AM Page 182

FORM 4 EXERC ISES 183
Stand facing a wall with your feet, knees, and hips all in alignment. Stand alittle more than an arm’s length away from the wall. Lean forward and reachout, placing the palms of your hands on the wall at approximately shoulderheight. Straighten your elbows. Kick your buttocks backward, and allow yourtorso to drop down between your arms. You should bend from the hip jointsand move your torso down between your arms as a unit. This should increasethe arch in your back. Tighten your quadriceps (front thighs), and hold for thedesired length of time.
Recommended Durat ion1 minute
Mod i f i cat ionsPlace your hands higher up on the wall and limit the distance you drop yourtorso down between your arms.
PurposeTo lengthen the muscles on the back side of the leg while shortening the mus-cles of the back. Your arms on the wall assist in keeping your back in extensionwhile the backs of your thighs lengthen. You should feel the stretch in yourhamstrings (back of the thighs) and calves. You may also feel a stretch along-side your torso and a tightening in the upper back.
TABLE TOP WALL STRETCH ( see page 126 )
c11.qxd 7/14/05 11:42 AM Page 183

Lie on your back, with your legs draped over a chair or an ottoman. Place a 6-inch ball or a firm pillow between your knees. Your knees should be elevatedand in line with your hips. Relax your arms out to the sides, with the palms fac-ing the ceiling. Gently squeeze and release the pillow with your knees. Don’tallow your lower back to arch off the floor as you squeeze.
Recommended Sets and Repet i t i ons3 sets of 15 repetitions
Mod i f i cat ionsNone
PurposeTo activate the inner thigh muscles and assist in relaxing the lower back andthe buttocks muscles. You should feel this exercise in your inner thighs.
184 THE PA IN -FREE PROGRAM
ADDUCTOR SQUEEZES IN THE 90 -90 NEUTRAL BACK ( see page 144 )
P rogram 4 .3Form 4 , Category 3 (Mu l t i t asker )
c11.qxd 7/14/05 11:42 AM Page 184

FORM 4 EXERC ISES 185
Lie on your stomach with your hands on the floor and your chin resting on yourhands. Grab hold of a 6- to 8-inch ball or pillow with your ankles. Bend yourknees to 90 degrees, holding on to the ball. The 90-degree angle at the kneesis a very important part of this exercise. From this position, gently squeeze andrelease the ball with your inner ankle bones and the inside borders of your feet.Don’t squeeze with only the heels.
Recommended Sets and Repet i t i ons3 sets of 20 repetitions
Mod i f i cat ionsIf you don’t feel the contraction in the buttocks, spread your knees apartslightly until you do feel the work in the buttocks area. If you feel pressure orpain in your lower back with your knees bent, perform the exercise with yourlegs straight on the floor.
PurposeTo activate the buttocks muscles and the deep muscles under the buttocks.This improves the relationship of these muscles with the lower back and helpswith hip alignment. The contraction should be felt in your buttocks area.
ANKLE SQUEEZES PRONE ( see page 147 )
c11.qxd 7/14/05 11:42 AM Page 185

Lie on your stomach with your hands on the floor and your chin resting on yourhands. Walk your feet apart as far as you can, spreading the legs as far apart aspossible. From here, bend your knees and place the soles of your feet together.Be sure to line up your feet evenly, with the balls of the feet and the heels ofboth feet touching each other. Next, gently press and release the soles of thefeet into one another. Make certain to press equally with both the heels andthe balls of the feet.
Recommended Sets and Repet i t i ons3 sets of 20 repetitions
Mod i f i cat ionsNone
PurposeTo strengthen the outward rotator muscles ofthe hips and the buttocks. You should feelthis exercise in your upper, inner thighs andbuttocks.
186 THE PA IN -FREE PROGRAM
ACT IVE FROG PRONE
c11.qxd 7/14/05 11:42 AM Page 186

FORM 4 EXERC ISES 187
Kneel on the floor. Place an approximately 6-inch pillow or ball between yourankles. Drop forward so that you are on your hands and knees. If viewed fromthe side, your hip joints should be slightly ahead of the knee joints and yourshoulders should be directly over the hands. Your fingers should point straightahead. Relax your abdominal muscles, and allow your back to drop into a sway-back position. Keep your elbows straight. Allow your head to hang down.Gently squeeze and release the pillow between your ankles, using the innerankle bones and the inside borders of the feet. You should feel a contractionaround your hips and buttocks. Continue for the desired number of sets andrepetitions. When resting between sets, rest only from the squeezing; maintainthe sway-back position while you rest from the squeezing.
Recommended Sets and Repet i t i ons3 sets of 20 repetitions
Mod i f i cat ionsThis exercise can be modified in two ways. The first would be to back the hipsup over the knees to relieve some of the pressure from the lower back. The sec-ond would be to rest on the forearms with the elbows bent. The elbows, insteadof the hands, would then be directly under the shoulders.
PurposeTo strengthen the muscles of the hips while the lower back is in a position ofpassive extension. You should feel a contraction around the hips and the but-tocks.
SWAY-BACK ANKLE SQUEEZES ( see page 125 )
c11.qxd 7/14/05 11:42 AM Page 187

Lie face down on the floor. Place a small folded towel or a washcloth underyour forehead to keep your face off the floor. Lie with your arms straight outabove your head and your legs in line with your hips. From this position, youwill attempt to lengthen your body on opposite sides by reaching in a directline with your body along the floor with one arm and in the opposite directionwith the opposite leg. Hold this position for 5 seconds and relax. Repeat themovement with the other arm and leg. For each repetition, alternate the sidesthat you are reaching with. While you reach, it’s very important that youremain in contact with the floor. Don’t lift your arms or your hips as you reach.Imagine that you are moving on a sheet of ice. You should feel a stretch on theside of the lower back of the leg that is reaching, as well as muscular contrac-tion around your upper back and the shoulder of the arm that is reaching.
Recommended Repet i t i ons and Durat ionHold for 5 seconds for 10 repetitions on each side, alternating sides on eachrepetition.
Mod i f i cat ionsIf you experience discomfort in your shoulder, reach on a slight angle awayfrom the body, instead of in a direct line with the body.
PurposeTo work the small, intrinsic muscles that stabilize the spine. This exercise also requires reciprocal movement of the upper and the lower body, similar towalking.
188 THE PA IN -FREE PROGRAM
OPPOSITE ARM AND LEG GL ID ING ( see page 122 )
c11.qxd 7/14/05 11:42 AM Page 188

FORM 4 EXERC ISES 189
Lie on your back with your knees bent. Your feet should point straight ahead,and your feet, knees, and hips should be in a straight line. Cross your left ankleover your right knee, and with the muscles of the hip, gently press the left kneeaway from your body. Your arms are out to your sides at shoulder level, with thepalms facing the floor. Using your arms to anchor your upper body in place,begin rolling your hips toward the right. From here, you will slowly lower yourleft foot flat to the floor on the outside of the right knee. The right knee staysbent while the right leg is flat on the floor. Keep the left knee gently pressedaway from your body, with the left foot flat on the floor. Hold this position forthe recommended duration. Slowly rise back up, reversing the process. Switchlegs, and repeat to the opposite side.
Recommended Durat ion1 minute
Mod i f i cat ionsIf the stretch is too aggressive, place a book or a pillow on the floor at the areawhere your foot would land if it went to the floor. Place your foot on the bookinstead of on the floor to decrease the degree of stretch in the hip area. If thestress on your shoulders is too much, bring your arms down slightly closer toyour sides.
PurposeTo lengthen the outer thigh and hip muscles and introduce some rotation inthe hips and the spine. You should feel a stretch in the right outer thigh, thehip, and the lower back area.
HIP TWIST SUP INE ( see page 175 )
c11.qxd 7/14/05 11:42 AM Page 189
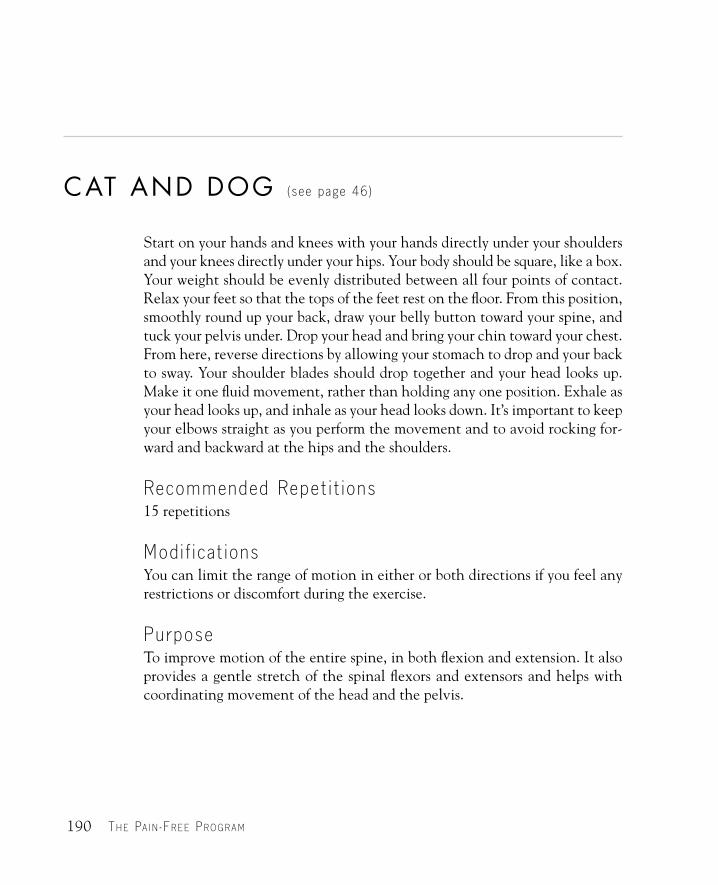
Start on your hands and knees with your hands directly under your shouldersand your knees directly under your hips. Your body should be square, like a box.Your weight should be evenly distributed between all four points of contact.Relax your feet so that the tops of the feet rest on the floor. From this position,smoothly round up your back, draw your belly button toward your spine, andtuck your pelvis under. Drop your head and bring your chin toward your chest.From here, reverse directions by allowing your stomach to drop and your backto sway. Your shoulder blades should drop together and your head looks up.Make it one fluid movement, rather than holding any one position. Exhale asyour head looks up, and inhale as your head looks down. It’s important to keepyour elbows straight as you perform the movement and to avoid rocking for-ward and backward at the hips and the shoulders.
Recommended Repet i t i ons15 repetitions
Mod i f i cat ionsYou can limit the range of motion in either or both directions if you feel anyrestrictions or discomfort during the exercise.
PurposeTo improve motion of the entire spine, in both flexion and extension. It alsoprovides a gentle stretch of the spinal flexors and extensors and helps withcoordinating movement of the head and the pelvis.
190 THE PA IN -FREE PROGRAM
CAT AND DOG ( see page 46 )
c11.qxd 7/14/05 11:42 AM Page 190

FORM 4 EXERC ISES 191
Lie on your back on the floor next to a wall. Place your legs straight up thewall with your feet about 18 inches apart. Your body should be perpendicularto the wall. Ideally, your buttocks will be touching the wall. With your legsstraight, pull the tops of your feet and toes back toward you. Tighten the frontthigh muscles to straighten the knees. Your upper buttocks area and lowerback should be resting firmly on the floor. Your arms are relaxed out to thesides, with the palms facing the ceiling. From this position, rotate both of yourentire legs (not just your feet) toward each other. Then rotate them away fromeach other. Rotate only as far as you can while keeping the front thigh mus-cles tight. Think about the entire leg moving as if it were one unit. Continuerotating back and forth in a continuous smooth motion for the recommendedrepetitions.
Recommended Sets and Repet i t i ons3 sets of 10 repetitions
Mod i f i cat ionsMove your buttocks away from the wall enough to be able to tolerate thestretch or to allow your upper buttocks and lower back to rest on the floor.
PurposeTo teach the body how to move the hip joints independently of the pelvis. Italso strengthens the muscles that rotate the hip in and out. You should feel themovement occurring from around the hip joints. You may feel a slightly dif-ferent stretch than you felt in the Wall Hamstring Stretch.
WALL HAMSTR ING STRETCH WITHFEMUR ROTAT IONS ( see page 115 )
c11.qxd 7/14/05 11:42 AM Page 191

192
12
Form 5 Exercises
c12.qxd 7/14/05 11:45 AM Page 192

FORM 5 EXERC ISES 193
Lie on your back, with your legs draped over a chair or an ottoman. Reach yourarms straight out above your chest. Clasp your hands together and keep theelbows straight. From this position, bring your clasped hands overhead towardthe floor behind you. Go only as far back as you can while keeping your elbowsstraight. If your elbows bend, stop at that point and return to the start. Repeatthe overhead movement, using a slow, controlled motion. You should feel anincrease in the arch throughout your back asyour hands draw closer to the floor. Youmay also feel some muscular effort aroundthe shoulder joints. Repeat for the recom-mended sets and repetitions.
Recommended Sets andRepet i t i ons3 sets of 10 repetitions
Mod i f i cat ionsIf there is any discomfort or limitation inthe shoulder joints, keep the movement ofthe arms in a pain-free range.
PurposeTo focus the effort on the muscles of theupper spine and improve the position of theshoulder joints in relation to the upper backwithout the assistance of the lower back.
PUL LOVERS IN THE 90 -90 NEUTRAL BACK POS IT ION
Program 5.1Form 5 , Category 1 (Phys i ca l Work )
c12.qxd 7/14/05 11:45 AM Page 193

In this exercise, your knees are slightly closer together than your hips and ankles.Lie on your back, with your legs draped over a chair or an ottoman. Place a non-elastic belt or strap around your thighs, just above the knees, and elevate yourlower legs. Gently press out and release against the strap, as if you were tryingto separate your knees. You should feel this in your outer thighs and buttocks.
Recommended Sets and Repet i t i ons3 sets of 15 repetitions
Mod i f i cat ionsBring your knees closer together or farther apart to help you feel the exercisein the right muscles.
PurposeTo activate the outer thigh mus-cles without using the lower backmuscles. The outer thigh musclesare important in pelvic stabiliza-tion and the outward rotation ofthe thigh at the hip joint. Thisexercise may also assist in thepositioning of your sacroiliacjoint. The exercise should be feltin the outer thighs/hips and thebuttocks.
194 THE PA IN -FREE PROGRAM
ABDUCTOR PRESSES IN THE 90 -90NEUTRAL BACK POS IT ION
c12.qxd 7/14/05 11:45 AM Page 194

FORM 5 EXERC ISES 195
Lie on your back on the floor. Bring the soles of your feet together, and as youdo this, allow your knees to fall out to the sides. Pull your feet toward yourgroin, making sure that your feet are centered in the middle of your body.Allow gravity to pull your knees toward the floor. Don’t try to push your kneesdown and don’t resist if they drop. Your lower back doesn’t have to be flat onthe floor, and you shouldn’t feel pain in your back.
Recommended Durat ion1 minute
Mod i f i cat ionsThe degree to which you pull your feet in toward your groin will affect thestretch. The closer your feet are to your groin, the greater the stretch.
PurposeTo lengthen the inner thigh muscles and use their pull to position the pelvisin a symmetrical position. You should feel the stretch in the inner thighs, andyour lower back will arch slightly off the floor.
FROG ( see page 174 )
c12.qxd 7/14/05 11:45 AM Page 195
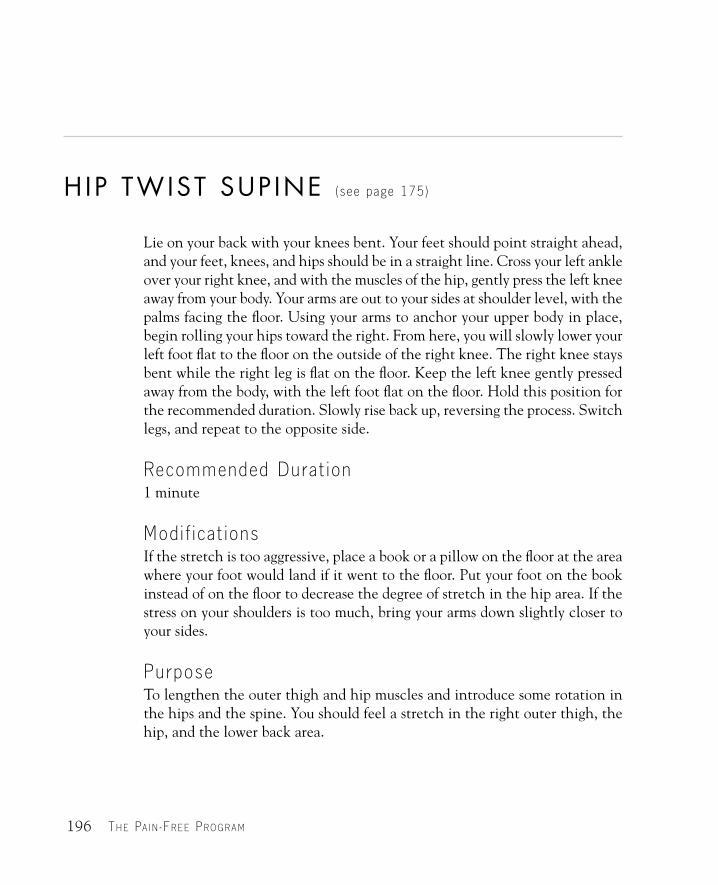
Lie on your back with your knees bent. Your feet should point straight ahead,and your feet, knees, and hips should be in a straight line. Cross your left ankleover your right knee, and with the muscles of the hip, gently press the left kneeaway from your body. Your arms are out to your sides at shoulder level, with thepalms facing the floor. Using your arms to anchor your upper body in place,begin rolling your hips toward the right. From here, you will slowly lower yourleft foot flat to the floor on the outside of the right knee. The right knee staysbent while the right leg is flat on the floor. Keep the left knee gently pressedaway from the body, with the left foot flat on the floor. Hold this position forthe recommended duration. Slowly rise back up, reversing the process. Switchlegs, and repeat to the opposite side.
Recommended Durat ion1 minute
Mod i f i cat ionsIf the stretch is too aggressive, place a book or a pillow on the floor at the areawhere your foot would land if it went to the floor. Put your foot on the bookinstead of on the floor to decrease the degree of stretch in the hip area. If thestress on your shoulders is too much, bring your arms down slightly closer toyour sides.
PurposeTo lengthen the outer thigh and hip muscles and introduce some rotation inthe hips and the spine. You should feel a stretch in the right outer thigh, thehip, and the lower back area.
196 THE PA IN -FREE PROGRAM
HIP TWIST SUP INE ( see page 175 )
c12.qxd 7/14/05 11:45 AM Page 196

FORM 5 EXERC ISES 197
Start on your hands and knees with your hands directly under your shouldersand your knees directly under your hips. Your body should be square, like a box.Your weight should be evenly distributed between all four points of contact.Relax your feet so that the tops of the feet rest on the floor. From this position,smoothly round up your back, draw your belly button toward your spine, andtuck your pelvis under. Drop your head and bring your chin toward your chest.From here, reverse directions by allowing your stomach to drop and your backto sway. Your shoulder blades should drop together and your head looks up.Make it one fluid movement, rather than holding any one position. Exhale asyour head looks up, and inhale as your head looks down. It’s important to keepyour elbows straight as you perform the movement and to avoid rocking for-ward and backward at the hips and the shoulders.
Recommended Repet i t i ons15 repetitions
Mod i f i cat ionsYou can limit the range of motion in either or both directions if you feel anyrestrictions or discomfort during the exercise.
PurposeTo improve motion of the entire spine, in both flexion and extension. It alsoprovides a gentle stretch of the spinal flexors and extensors and helps withcoordinating movement of the head and the pelvis.
CAT AND DOG ( see page 46 )
c12.qxd 7/14/05 11:45 AM Page 197

Stand facing a wall with your feet, knees, and hips all in alignment. Stand alittle more than an arm’s length away from the wall. Lean forward and reachout, placing the palms of your hands on the wall at approximately shoulderheight. Straighten your elbows. Kick your buttocks backward, and allow yourtorso to drop down between your arms. You should bend from the hip jointsand move your torso down between your arms as a unit. This should increasethe arch in your back. Tighten your quadriceps (front thighs) and hold for thedesired length of time.
Recommended Durat ion1 minute
Mod i f i cat ionsPlace your hands higher up on the wall and limit the distance you drop yourtorso down between your arms.
PurposeTo lengthen the muscles on the back side of the leg, while shortening the mus-cles of the back. Your arms on the wall assist in keeping your back in extensionwhile the backs of the thighs lengthen. You should feel the stretch in yourhamstrings (back of the thighs) and calves. You may also feel a stretch along-side your torso and a tightening in the upper back.
198 THE PA IN -FREE PROGRAM
TABLE TOP WALL STRETCH ( see page 126 )
c12.qxd 7/14/05 11:45 AM Page 198

FORM 5 EXERC ISES 199
Stand at the bottom of a stairwell or in a doorway with a platform compara-ble to the height of a single stair, with the balls of your feet on the step. Yourfeet should be about 4 to 6 inches apart and pointing straight ahead. Place onehand on the nearest handrail, or stand in the middle and use both handrails ifpossible. Allow your heels to drop down. As you do this, it’s very importantthat you keep your body aligned straight up and down, if viewed from the side.Imagine a straight line extending from your ear to your shoulder to your hipto your knee to your ankle. Don’t bend forward at the waist, and don’t allowyour hips to move ahead of the rest of your body.
Recommended Durat ion2 to 3 minutes
Mod i f i cat ionsTo increase or decrease the amount of stretch in your calves, get more or lessof your foot on the step.
PurposeAlthough you’ll feel an obvious stretch in your calves, this isn’t the primarypurpose of the exercise. By keeping the body aligned perfectly, as described, youare using many of your postural muscles to maintain and “learn” this position.
HEEL DROP ON STA IRS ( see page 100 )
c12.qxd 7/14/05 11:45 AM Page 199

Lie on your back, with your legs draped over a chair or an ottoman. Rest yourarms on the floor at your sides. Keep your fingers, wrists, and elbows straight.The little-finger-side of the hand will be the only part of the hand to touch thefloor. Raise your arms along the floor, with your elbows straight up to shoulderlevel. At shoulder level, rotate your entire arm and hand back so that thethumb-side of the hand is touching the floor. From this position, bring yourhands along the floor and overhead, keeping your elbows straight. Reverse theprocess on the way down. Lower your arms with the thumb-side on the flooruntil they’re shoulder level. Rotate your arms forward so that the little-finger-side of the hand is on the floor, then return them along your sides and repeat.
Recommended Sets and Repet i t i ons3 sets of 10 repetitions
Mod i f i cat ionsLimit how far overhead you go with your hands if you have to bend yourelbows. Alternately, you may continue the overhead movement until yourpalms touching as long as your elbows remain straight.
PurposeFirst, to assist the body in recruiting the muscles that extend the upper back.In addition, to teach the body to coordinate the movement of the arm with theshoulder blade. You should feel the muscles of your shoulders and upper andmiddle back working. You may feel a stretch along your arms.
200 THE PA IN -FREE PROGRAM
SNOW ANGELS IN 90 -90 NEUTRAL BACK ( see page 103 )
P rogram 5.2Form 5 , Category 2 (Dexte r i t y Work )
c12.qxd 7/14/05 11:45 AM Page 200

FORM 5 EXERC ISES 201
Stand in a doorjamb with one foot inside the doorjamb and one foot outsideof it. Place the palms of your hands and your forearms on the doorjamb so thatyour elbows are bent to 90 degrees. The upper arms should be level with theshoulders. Tighten your abdominal muscles. Keep your chest high, and avoidshrugging your shoulders. Then lean your upper body through the doorjambuntil you feel the stretch in your chest area. Hold this position for the recom-mended duration. After your first hold, relax, then switch the front and theback foot placement and repeat.
Recommended Sets and Durat ion2 sets of 30 seconds
Mod i f i cat ionsSlightly vary the height of the elbow position to change the emphasis of thearea stretched or to relieve any discomfort in the shoulders.
PurposeTo lengthen the muscles of the chest and the front shoulders, which will helpto “open” the chest area. The stretch should be felt across your chest and frontshoulders.
DOUBLE -ARM DOORWAY STRETCH ( see page 119 )
c12.qxd 7/14/05 11:45 AM Page 201

Lie on your side in the fetal position, with your hips and knees bent to 90degrees. Your ankles, knees, hips, and shoulders should be stacked directly overone another. Place your bottom arm straight out on the floor at 90 degrees fromyour torso, and place the top hand on top of the bottom hand. From this posi-tion, rotate your top hand off your bottom hand toward the floor behind you.It’s very important that you keep your knees together as you rotate. Let theweight of your top arm pull your body around. It’s crucial to breathe, relax, andallow gravity to slowly bring your arm toward the floor. Your head should berelaxed on the floor, and your eyes should face the ceiling. After the desiredtime, slowly return to the starting position and repeat with the other side.
Recommended Durat ion1 to 2 minutes
Mod i f i cat ionsIf you have trouble keeping your knees together, reach down with your bottomhand to help hold your knees in place.
PurposeTo improve the spine’s ability to rotate independently of the hips and thepelvis. You should feel a stretch across your chest and the top arm and a stretchalong the side of your body and toward the lower back.
202 THE PA IN -FREE PROGRAM
UPPER SP INAL ROTAT ION ( see page 105 )
c12.qxd 7/14/05 11:45 AM Page 202

FORM 5 EXERC ISES 203
Start on your hands and knees with your hands directly under your shouldersand your knees directly under your hips. Your body should be square, like a box.Your weight should be evenly distributed between all four points of contact.Relax your feet so that the tops of the feet rest on the floor. From this position,smoothly round up your back, draw your belly button toward your spine, andtuck your pelvis under. Drop your head and bring your chin toward your chest.From here, reverse directions by allowing your stomach to drop and your backto sway. Your shoulder blades should drop together and your head looks up.Make it one fluid movement, rather than holding any one position. Exhale asyour head looks up, and inhale as your head looks down. It’s important to keepyour elbows straight as you perform the movement and to avoid rocking for-ward and backward at the hips and shoulders.
Recommended Repet i t i ons15 repetitions
Mod i f i cat ionsYou can limit the range of motion in either or both directions if you feel anyrestrictions or discomfort during the exercise.
PurposeTo improve motion of the entire spine, in both flexion and extension. It alsoprovides a gentle stretch of the spinal flexors and extensors and helps withcoordinating movement of the head and the pelvis.
CAT AND DOG ( see page 46 )
c12.qxd 7/14/05 11:45 AM Page 203

Stand facing a wall with your feet, knees, and hips all in alignment. Stand alittle more than an arm’s length away from the wall. Lean forward and reachout, placing the palms of your hands on the wall at approximately shoulderheight. Straighten your elbows. Kick your buttocks backward, and allow yourtorso to drop down between your arms. You should bend from the hip jointsand move your torso down between your arms as a unit. This should increasethe arch in your back. Tighten your quadriceps (front thighs), and hold for thedesired length of time.
Recommended Durat ion1 minute
Mod i f i cat ionsPlace your hands higher up on the wall and limit the distance you drop yourtorso down between your arms.
PurposeTo lengthen the muscles on the back side of the leg while shortening the mus-cles of the back. Your arms on the wall assist in keeping your back in extensionwhile the backs of the thighs lengthen. You should feel the stretch in yourhamstrings (back of the thighs) and calves. You may also feel a stretch along-side your torso and a tightening in the upper back.
204 THE PA IN -FREE PROGRAM
TABLE TOP WALL STRETCH ( see page 126 )
c12.qxd 7/14/05 11:45 AM Page 204

FORM 5 EXERC ISES 205
Sit on the floor with your knees bent and your feet flat on the floor. Place yourhands behind you for support with the fingers pointing away from your body.Your elbows should be straight. Roll your hips forward with help from yourarms to create an arch in your lower back. Lift your chest up and out, using yourupper/middle back muscles. Allow your head to drop back as if you were star-ing at the ceiling. Try to relax your head back as far as it will go. Avoidshrugging your shoulders up around your ears. You may feel a “bunching” in theback of your neck. This is okay. You should not feel pain. Hold this positionfor the recommended duration.
Recommended Sets and Durat ion2 sets of 30 seconds
Mod i f i cat ionsIf your neck is painful, continue withthe proper positioning of your upperand lower back. Move your head into apain-free area, and focus your eyestoward the ceiling.
PurposeTo strengthen the muscles of the mid-dle back and lengthen the muscles onthe front of the neck. You should feelthe muscular effort in your middleback, lifting your chest up and out, anda stretch on the front of your neck.
S ITT ING THORACIC AND CERV ICAL EXTENS ION
c12.qxd 7/14/05 11:45 AM Page 205

Begin with one knee on the floor. Keep both legs in line with the hips. The footof the front leg should be slightly in front of the knee of the same leg. The footof the back leg should be directly in line with the knee of the back leg. Placeyour hands on top of the thigh of the front leg, and keep your torso straight upand down. Tighten your abdominals and slightly tilt your pelvis backward,decreasing the arch in your lower back. Once you have done this, lunge slightlyforward, bringing the front knee over the front ankle. Once in this position,lift the arm of the kneeling side of the body up and over the head for a sidestretch. Keep your abdominals tight the entire time. Hold for the recom-mended duration, then repeat on the other side.
Recommended Durat ion1 minute
Mod i f i cat ionsIf you are challenged with balance during this exercise, kneel next to a chairand place one hand on the chair to help you maintain your balance. Gettinga proper stretch with this exercise is more important than the balance com-ponent. If your knee is uncomfortable, place a thin, flat pillow under it duringthe exercise.
PurposeTo lengthen the hip flexor muscles, which have a significant influence on thelower back. You should feel a stretch in the thigh and the groin of the back leg.
206 THE PA IN -FREE PROGRAM
KNEEL ING H IP F LEXOR STRETCH ( see page 150 )
c12.qxd 7/14/05 11:45 AM Page 206

FORM 5 EXERC ISES 207
Lie on your back on the floor next to a wall. Place your legs straight up the wallwith your feet, knees, and hips in line. Your body should be perpendicular tothe wall. Ideally, your buttocks will be touching the wall. With your legsstraight, pull the tops of your feet and toes back toward you. Tighten your frontthigh muscles to straighten the knees. The upper buttocks area and the lowerback should be resting firmly on the floor. Your arms are relaxed out to thesides, with the palms facing the ceiling. Hold this position for the recom-mended duration. You should feel a stretch in your calves and the backs of yourthighs (hamstrings). Pulling the feet back and tightening the quadricepshelps to improve the efficiency of the stretch. Remember, a muscle stretchshould not be so intense that it is painful. If this is the case, see the followingmodification.
Recommended Durat ion1 minute to 11⁄2 minutes
Mod i f i cat ionMove your buttocks away from the wall enough to be able to tolerate thestretch or to allow your upper buttocks and lower back to rest on the floor.
PurposeTo symmetrically lengthen the posterior muscles of the legs without the influ-ence of the spinal muscles.
WALL HAMSTR ING STRETCH ( see page 114 )
c12.qxd 7/14/05 11:45 AM Page 207

Lie on your back, with your legs draped over a chair or an ottoman. Reach yourarms straight out above your chest. Clasp your hands together and keep theelbows straight. From this position, bring your clasped hands overhead towardthe floor behind you. Go only as far back as you can while keeping your elbowsstraight. If your elbows bend, stop at that point and return to the start. Repeatthe overhead movement, using a slow, controlled motion. You should feel anincrease in the arch throughout your back as your hands draw closer to thefloor. You may also feel some muscular effort around the shoulder joints. Repeatfor the recommended sets and repetitions.
Recommended Sets and Repet i t i ons3 sets of 10 repetitions
Mod i f i cat ionsIf there is any discomfort or limitation in the shoulder joints, keep the move-ment of the arms in a pain-free range.
PurposeTo focus the effort on the muscles of the upper spine and improve the positionof the shoulder joints in relation to the upper back without the assistance ofthe lower back.
208 THE PA IN -FREE PROGRAM
PUL LOVERS IN THE 90 -90 NEUTRALBACK POS IT ION ( see page 193 )
P rogram 5.3Form 5 , Category 3 (Mu l t i t asker )
c12.qxd 7/14/05 11:45 AM Page 208

FORM 5 EXERC ISES 209
Lie on your back with your knees bent. Your feet should point straight ahead,and your feet, knees, and hips should be in a straight line. Place a 6- to 8-inchpillow or block between your ankles. Put a non-elastic belt or strap around yourthighs, just above the knees. Your arms are out to the sides, with the palms fac-ing the ceiling. Gently press out and release against the strap as if you weretrying to separate your knees. At the same time, press in against the pillow as ifyou were trying to slide your feet together. Release and repeat for the recom-mended sets and repetitions. Be careful not to turn the bottoms of your feetonto the pillow as you push or to lift the heels off the ground as you push. Youshould feel this in your inner and outer thighs and buttocks.
Recommended Setsand Repet i t i ons3 sets of 10 repetitions
Mod i f i cat ionsNone
PurposeTo help reposition the hip jointby strengthening the musclesaround it.
I SO ABDUCT ION ADDUCT ION SUP INE
c12.qxd 7/14/05 11:45 AM Page 209

Lie on your back with your knees bent. Your feet should point straight ahead,and your feet, knees, and hips should be in a straight line. Place a 6- to 8-inchpillow or block between your knees. Place a non-elastic belt or strap aroundyour ankles. Your arms are out to the sides, with the palms facing the ceiling.Gently press on the pillow with your knees. At the same time, press out againstthe strap as if you were trying to slide your feet apart. You should feel this inyour inner and outer thighs and buttocks. Release and repeat for the recom-mended sets and repetitions.
Recommended Setsand Repet i t i ons3 sets of 10 repetitions
Mod i f i cat ionsNone
PurposeTo help reposition the hip jointby strengthening the musclesaround it.
210 THE PA IN -FREE PROGRAM
I SO ADDUCT ION ABDUCT ION SUP INE
c12.qxd 7/14/05 11:45 AM Page 210

FORM 5 EXERC ISES 211
Lie on your back with your knees bent. Your feet should point straight ahead,and your feet, knees, and hips should be in a straight line. Cross your left ankleover your right knee, and with the muscles of the hip, gently press the left kneeaway from your body. Your arms are out to your sides at shoulder level, with thepalms facing the floor. Using your arms to anchor your upper body in place,begin rolling your hips toward the right. From here, you will slowly lower theleft foot flat to the floor on the outside of the right knee. The right knee staysbent, while the right leg is flat on the floor. Keep the left knee gently pressedaway from your body, with the left foot flat on the floor. Hold this position forthe recommended duration. Slowly rise back up, reversing the process. Switchlegs, and repeat to the opposite side.
Recommended Durat ion1 minute
Mod i f i cat ionsIf the stretch is too aggressive, place a book or a pillow on the floor at the areawhere your foot would land if it went to the floor. Put your foot on the bookinstead of on the floor to decrease the degree of stretch in the hip area. If thestress on your shoulders is too much, bring your arms down slightly closer toyour sides.
PurposeTo lengthen the outer thigh and hip muscles and introduce some rotation inthe hips and the spine. You should feel a stretch in the right outer thigh, thehip, and the lower back area.
HIP TWIST SUP INE ( see page 175 )
c12.qxd 7/14/05 11:45 AM Page 211

Start on your hands and knees with your hands directly under your shouldersand your knees directly under your hips. Your body should be square, like a box.Your weight should be evenly distributed between all four points of contact.Relax your feet so that the tops of the feet rest on the floor. From this position,smoothly round up your back, draw your belly button toward your spine, andtuck your pelvis under. Drop your head and bring your chin toward your chest.From here, reverse directions by allowing your stomach to drop and your backto sway. Your shoulder blades should drop together and your head looks up.Make it one fluid movement, rather than holding any one position. Exhale asyour head looks up, and inhale as your head looks down. It’s important to keepyour elbows straight as you perform the movement and to avoid rocking for-ward and backward at the hips and the shoulders.
Recommended Repet i t i ons15 repetitions
Mod i f i cat ionsYou can limit the range of motion in either or both directions if you feel anyrestrictions or discomfort during the exercise.
PurposeTo improve motion of the entire spine, in both flexion and extension. It alsoprovides a gentle stretch of the spinal flexors and extensors and helps withcoordinating movement of the head and the pelvis.
212 THE PA IN -FREE PROGRAM
CAT AND DOG ( see page 46 )
c12.qxd 7/14/05 11:45 AM Page 212

FORM 5 EXERC ISES 213
Lie on your back with your knees bent. Your feet should point straight aheadand your feet, knees, and hips should be in a straight line. Slightly lift the frontof your feet and toes off the floor. Keep the pressure down and toward you withyour heels into the floor. This should make you engage the muscles on thebacks of your thighs (hamstrings). Flatten your lower back into the floor, usingyour abdominal muscles. Interlock your fingers behind your head, and focus onthe ceiling above you. Rise up, using your abdominals, until your shoulderblades lift off the floor. Exhale on your way up, and inhale on the way backdown. Remember to keep the pressure on the floor with your heels so that youfeel the backs of your thighs working. Lower and repeat for the recommendedsets and repetitions.
Recommended Sets andRepet i t i ons3 sets of 10 repetitions
Mod i f i cat ionsIf the exercise is too challenging with yourhands behind your head, place your handson your thighs. Reach for the tops of yourknees by lifting your shoulder blades off theground.
PurposeTo teach your body to work and strengthenyour abdominal muscles without using yourhip flexor muscles. You should feel this inboth your upper and lower abdominal areas.
ABDOMINAL CRUNCHES WITH HEELS
c12.qxd 7/14/05 11:45 AM Page 213

While standing, spread your legs apart until you feel a very slight stretch inyour inner thigh muscles. Your feet should be pointing straight ahead. Yourknees should be in a “soft extension,” which means that they should be straightbut not locked. From this position, squeeze and release the buttocks muscles.Focus on isolating the buttocks muscles and not using the quadriceps (thighs)or the abdominals. It can be helpful during this exercise to place your handson your buttocks while you squeeze. The tactile information from your handscan help you to recruit the right muscles.
Recommended Sets and Repet i t i ons3 sets of 20 repetitions
Mod i f i cat ionsIf you have difficulty engaging your buttocks musclesat first, try turning your feet out until you can feelthat you are using the right muscles. Once you havedone that, return your feet to pointing straightahead.
PurposeTo teach your body to recruit the very importantgluteal muscles while standing, without using theinner thigh or the hamstring muscles. You shouldfeel the entire buttocks muscles contract when yousqueeze and not just the small, deep muscles of theanus.
214 THE PA IN -FREE PROGRAM
SPREAD -FOOT GLUTEAL CONTRACT IONS
c12.qxd 7/14/05 11:45 AM Page 214

FORM 5 EXERC ISES 215
Stand with your feet hip-width apart and pointing straight ahead. Place yourhands on your hips so that the thumbs are to the front over the hip bones andpointing down. The rest of your fingers should be resting on the upper buttocksand pointing toward the floor. Try to squeeze your elbows together and hold.Tighten your front thigh muscles. Keeping an arch in the lower back, bend for-ward and hinge from the hip joints. Bend only as far forward as you can withoutlosing the arch in your lower back. Shift the weight toward the balls of yourfeet, and focus your eyes straight ahead. Hold for the recommended duration.You should feel a stretch in your calves and hamstrings. You may also feel themuscular effort in your lower back.
Recommended Durat ion45 seconds to 1 minute
Mod i f i cat ionsInstead of placing your hands on your lower back, stand in front of a diningtable or a desk and place your hands on that. Use your upper body to controlhow far you bend forward. It’s still critical that you maintain the arch in yourlower back and hinge from the hip as you lean forward.
PurposeTo lengthen the hamstring and the calf muscles against gravity, whilestabilizing the lumbar spine with the spinal extensor muscles.
STANDING H IP H INGE ( see page 141 )
c12.qxd 7/14/05 11:45 AM Page 215

216
13
Form 6 Exercises
c13.qxd 7/14/05 11:48 AM Page 216

FORM 6 EXERC ISES 217
Lie on your back, with your legs draped over a chair or an ottoman. Place yourarms on the floor, at shoulder level. Bend your elbows to 90 degrees so that yourwrists are directly over the elbows. Your hands are open, with the palms of your hands facing forward. From this position, gently press and release yourelbows into the floor. This should cause your shoulder blades to come together.Do this without shrugging your shoulders.
Recommended Sets and Repet i t i ons3 sets of 15 repetitions
Mod i f i cat ionsIf you feel this exercise in your neck, slightly lower your elbows toward yoursides, to avoid using the neck muscles.
PurposeTo activate the muscles between the shoulder blades and the muscles of themiddle/upper back. This assists in bringing the shoulders back to a moreanatomically correct position.
REVERSE BENCH PRESS IN 90 -90 NEUTRAL BACK ( see page 94 )
P rogram 6.1Form 6 , Category 1 (Phys i ca l Work )
c13.qxd 7/14/05 11:48 AM Page 217

Place a 6- to 10-inch stack of pillows or books on the floor about 8 inches fromthe top of your head. Lie on your back, with your legs draped over a chair oran ottoman. Reach your arms straight out above your chest. Clasp your handstogether and keep the elbows straight. From this position, bring your claspedhands overhead toward the floor behind you until your hands reach the stackof books. Be sure that the height of the books allows you to keep your elbowsstraight when your hands are on top. If you cannot keep your elbows straight,add more books until you can. With your hands resting on the book stack, gen-tly press and release your clasped hands into the stack as if you were trying tocontinue moving toward the floor, but the books are in the way. You should feelyour shoulder blades move together and an increase in the arch throughoutyour back as you press. You may also feel some muscular effort around yourshoulder joints. Repeat for the recommended sets and repetitions.
Recommended Sets and Repet i t i ons3 sets of 10 repetitions
Mod i f i cat ionsIf there is any discomfort or limitation inthe shoulder joints, raise the height ofthe book stack until you can press pain-free with your elbows straight.
PurposeTo strengthen the muscles of your upperback and shoulders by using your arms tohelp your body recruit the muscles of yourupper back.
218 THE PA IN -FREE PROGRAM
PUL LOVER PRESSES IN THE 90 -90 NEUTRAL BACK POS IT ION
c13.qxd 7/14/05 11:48 AM Page 218

FORM 6 EXERC ISES 219
Start on your hands and knees with your hands directly under your shouldersand your knees directly under your hips. Your body should be square, like a box.Your weight should be evenly distributed between all four points of contact.Relax your feet so that the tops of the feet rest on the floor. Allow gravity topull your belly slightly toward the floor. We are trying to achieve a “neutral”spine, which means just a slight arch in the lower back. From this position,draw your belly button to your spine as if you were hollowing out your abdom-inal area. To use the appropriate muscles for this, you cannot move your spineor hips as you draw in. They should remain still. Once you have drawn all theway in, hold the contraction. You should feel the work toward the lower, innerpart of the abdominals. You may even feel it in the deep pelvic floor muscles.
Recommended Durat ion and Repet i t i onsHold for 3 seconds for 10 repetitions. Increase the hold time as you get morecomfortable with the exercise.
Mod i f i cat ionsLie on your back with your knees bent if you are unable to recruit the propermuscles in this exercise or are unable to perform the exercise without movingyour hips and spine. Instead, draw your belly button to the floor, again with-out moving your hips.
PurposeTo assist the body in using the deepest abdominal and “core” muscles for spinalstabilization. These muscles are underused in many people, who instead sub-stitute with the more superficial abdominals.
TVA DRAW ON ALL FOURS ( see page 145 )
c13.qxd 7/14/05 11:48 AM Page 219

Stand facing the back of a chair at an arm’s length away. Place a chair or anobject with a comparable height and surface behind you. Stand with your feetpointing straight ahead and your feet directly under your hips. Place the topof one foot on the back or the arm of the chair. The height of your foot place-ment determines how much stretch you feel in your front thigh muscles. Whenyou first put your foot up on the chair, you should be aware of a mild stretch.Once you’ve got your foot on the chair, you must adjust your alignment. Makesure that both knees are aligned side to side. One should not be in front of theother. Place your hands on the chair in front of you to keep your torso straightup and down. From this position, you will rotate your pelvis posteriorly (tip thepunch bowl backward). When you rotate your pelvis, you should feel anincrease in the stretch in your front thigh muscles. Be careful not to push thepelvis forward instead of rotating the pelvis backward.
Recommended Durat ion1 minute
Mod i f i cat ionsThe height that the foot is propped up behind you dictates the stretch.Increase the height of your foot with a pillow to increase the stretch.
PurposeTo lengthen the quadriceps muscles and position the pelvis in neutral. Thisstretch should be felt from the knee to the front of the hip.
220 THE PA IN -FREE PROGRAM
QUADRICEPS STRETCH STANDING ( see page 154 )
c13.qxd 7/14/05 11:48 AM Page 220

FORM 6 EXERC ISES 221
Sit on the edge of a countertop or a table. The surface should be high enoughso that your feet don’t touch the ground. Lie all the way back on the table,while keeping your knees bent to 90 degrees. Your buttocks should be close tothe edge of the table. Bring one knee to your chest, and place one hand behindthat knee and the other hand on top of the knee. Allow the other leg to dropstraight down off the table. The muscle tension on the leg hanging down willcause your back to arch. Use your abdominals to keep your lower back flat onthe table. Hold for the recommended duration. Switch legs, and repeat withthe other side.
Recommended Durat ion1 to 11⁄2 minutes
Mod i f i cat ionsIf the stretch is too great in the frontgroin and thigh, or if you are unable tokeep your lower back flat on the table,move slightly up on the table so thatmore of the thigh that is level withyour torso is supported.
PurposeTo passively lengthen the hip flexormuscles and strengthen control of theabdominal muscles on the pelvis. Youshould feel a stretch in the front thighand the groin of the leg hanging down.
HIP F LEXOR STRETCH ON TABLE
c13.qxd 7/14/05 11:48 AM Page 221

Lie on your back with your feet flat on a wall and your knees and hips bent toa 90-degree angle. Cross the left ankle over the right knee. As you do this, it’sextremely important that your hips stay square to the wall. The tendency is forthe pelvis to rotate away if the hips are tight. Using the muscles of your righthip (not your hand), gently press the right knee away from your body towardthe wall. Remember to keep your hips square on the floor. Hold this positionfor the desired amount of time. You should feel the stretch in the area of theright buttocks. Repeat with the opposite leg.
Recommended Durat ion1 to 2 minutes
Mod i f i cat ionsIf your hips are too tight and you cannot keep your hips square to the wall,place your feet on the floor instead of on the wall. Perform the stretch the sameas described previously.
PurposeTo assist in positioning the hip joint by elongating the deep outward rotatorsof the hip. This stretch should be felt in the buttocks of the leg with the anklecrossed.
222 THE PA IN -FREE PROGRAM
HIP ROTATOR STRETCH ( see page 98 )
c13.qxd 7/14/05 11:48 AM Page 222

FORM 6 EXERC ISES 223
Prepare two 8-inch stacks of booksor very firm pillows. Place themend to end. Sit on the floor withyour back to the end of one stack.Your buttocks should be about 12inches from the books. Keep yourknees bent. Lie back onto the stackso that the closest edge to you linesup just below your shoulder blades.The first stack of books should support your upper back, and thesecond stack should support your head. Your arms are out to the sides at shoul-der level, with the palms facing the ceiling. Try to relax and settle into thisposition for the recommended duration.
Recommended Durat ion2 to 3 minutes
Mod i f i cat ionsIf your head is unable to reach the second stack that should support it, slightlyincrease the height of that stack. However, you don’t want the stack so highthat it pushes your head forward.
PurposeThis position will help to passively improve the extension in your upper backand will decrease the rounding. You should feel an “opening” of the chest andthe front of the shoulders. You may feel a little pressure in your middle back.
THORACIC BLOCK WITH HEAD SUPPORTED
c13.qxd 7/14/05 11:48 AM Page 223

Stand leaning against a wall. Your feet should point straight ahead, directly inline with your hips. Walk your feet out away from the wall. As you walk yourfeet away, begin sliding your buttocks down the wall. Walk your feet away farenough to allow you to bend your knees close to a 90-degree angle. Press yourlower back flat into the wall, and keep the weight on your heels. From this posi-tion, get your upper back and head against the wall. Then place your elbowsat shoulder level on the wall. Bend your elbows to 90 degrees, and try to getyour upper arms, forearms, wrists, and hands all to touch the wall. Don’t allowyour lower back to come off the wall. Keep your lower back flat on the wall byusing your abdominals. Hold this position for the recommended duration. Afteryou finish, immediately walk around the room for 20 to 30 seconds to allow theblood to recirculate through your body.
Recommended Durat ion30 seconds to 2 minutes, depending on strength
Mod i f i cat ionsYou can modify how far you drop your buttocks down the wall. The arms may also be kept below shoulder level with the hands resting on the thighs,palms-up.
PurposeTo strengthen the thigh muscles and to get your back completely flat on thewall, in order to disengage the lower back muscles. Placing the arms on the wallstrengthens the muscles of the upper back and the shoulders and causes theabdominals to work harder. This exercise should be felt in the front thigh mus-cles, the upper back, and the abdominals.
224 THE PA IN -FREE PROGRAM
WALL S I T WITH SHOULDER ROTAT ION ( see page 159 )
c13.qxd 7/14/05 11:48 AM Page 224

FORM 6 EXERC ISES 225
Lie on your back, with your legs draped over a chair or an ottoman. Place yourarms on the floor, at shoulder level. Bend your elbows to 90 degrees so that yourwrists are directly over the elbows. Your hands are open, with the palms of thehands facing forward. From this position, gently press and release your elbowsinto the floor. This should cause your shoulder blades to come together. Do thiswithout shrugging your shoulders.
Recommended Sets and Repet i t i ons3 sets of 15 repetitions
Mod i f i cat ionsIf you feel this exercise in your neck, slightly lower your elbows toward yoursides, to avoid using the neck muscles.
PurposeTo activate the muscles between the shoulder blades and the muscles of themiddle/upper back. This assists in bringing the shoulders back to a moreanatomically correct position.
REVERSE BENCH PRESS IN 90 -90 NEUTRAL BACK ( see page 94 )
P rogram 6.2Form 6 , Category 2 (Dexte r i t y Work )
c13.qxd 7/14/05 11:48 AM Page 225

Place a 6- to 10-inch stack of pillows or books on the floor about 8 inches fromthe top of your head. Lie on your back, with your legs draped over a chair oran ottoman. Reach your arms straight out above your chest. Clasp your handstogether and keep the elbows straight. From this position, bring your claspedhands overhead toward the floor behind you until your hands reach the stackof books. Be sure that the height of the books allows you to keep your elbowsstraight when your hands are on top. If you cannot keep your elbows straight,add more books until you can. With your hands resting on the book stack, gen-tly press and release your clasped hands into the stack as if you were trying tocontinue moving toward the floor, but the books are in the way. You should feelyour shoulder blades move together and an increase in the arch throughoutyour back as you press. You may also feel some muscular effort around yourshoulder joints. Repeat for the recommended sets and repetitions.
Recommended Sets and Repet i t i ons3 sets of 10 repetitions
Mod i f i cat ionsIf there is any discomfort or limitation in the shoulder joints, raise the heightof the book stack until you can press pain-free with your elbows straight.
PurposeTo strengthen the muscles of your upper back and shoulders by using your armsto help your body recruit the muscles of your upper back.
226 THE PA IN -FREE PROGRAM
PUL LOVER PRESSES IN THE 90 -90 NEUTRAL BACK POS IT ION ( see page 218 )
c13.qxd 7/14/05 11:48 AM Page 226

FORM 6 EXERC ISES 227
Stand in a doorjamb with one foot inside the doorjamb and one foot outsideof it. Place the palms of your hands and your forearms on the doorjamb so thatyour elbows are bent to 90 degrees. The upper arms should be level with theshoulders. Tighten your abdominal muscles. Keep your chest high and avoidshrugging your shoulders. Then lean your upper body through the doorjambuntil you feel the stretch in your chest area. Hold this position for the recom-mended duration. After your first hold, relax; then switch the front and theback foot placement and repeat.
Recommended Sets and Durat ion2 sets of 30 seconds
Mod i f i cat ionsSlightly vary the height of the elbow position to change the emphasis of thearea stretched or to relieve any discomfort in the shoulders.
PurposeTo lengthen the muscles of the chest and the front shoulders, which will helpto “open” the chest area. The stretch should be felt across your chest and frontshoulders.
DOUBLE -ARM DOORWAY STRETCH ( see page 119 )
c13.qxd 7/14/05 11:48 AM Page 227

Kneel in front of a chair or a couch. Bend forward and place one hand on theground under your shoulder and the other forearm on the chair. The elbow ofthe arm on the chair should be straight with the thumb pointing to the ceil-ing. Tighten your abdominals so that your lower back is not arching toward thefloor. Bend the elbow of the arm on the floor to allow your torso to start drop-ping toward the floor. As your torso drops, keep it level and don’t rotate to oneside or the other. This can be adjusted by the degree that you bend the arm onthe floor. You should feel a stretch in the area under the arm and along the sidetorso of the arm on the chair. Hold for the recommended duration, and repeatwith the other arm.
Recommended Durat ion30 seconds
Mod i f i cat ionsIf you’re unable to hold yourself with one hand on the chair, place both fore-arms on the chair. This may decrease the stretch along the sides of your torso,but it will increase the extension that occurs in your upper back.
PurposeTo lengthen the muscles from under the arm that attach along the lower backand the pelvis. You should feel the stretch under your arm and along the sideof your body.
228 THE PA IN -FREE PROGRAM
ONE-ARM TABLE TOP STRETCH KNEEL ING ( see page 156 )
c13.qxd 7/14/05 11:48 AM Page 228

FORM 6 EXERC ISES 229
Begin with one knee on the floor. Keep both legs in line with the hips. The footof the front leg should be slightly in front of the knee of the same leg. The footof the back leg should be directly in line with the knee of the back leg. Placeyour hands on top of the thigh of the front leg, and keep your torso straight upand down. Tighten your abdominals and slightly tilt your pelvis backward,decreasing the arch in your lower back. Once you have done this, lunge slightlyforward, bringing the front knee over the front ankle. Once in this position,lift the arm on the kneeling side of the body up and over the head for a sidestretch. Keep your abdominals tight the entire time. Hold for the recom-mended duration, then repeat on the other side.
Recommended Durat ion1 minute
Mod i f i cat ionsIf you are challenged with balance during this exercise, kneel next to a chairand place one hand on the chair to help you maintain your balance. Gettinga proper stretch with this exercise is more important than the balance com-ponent. If your knee is uncomfortable, place a thin, flat pillow under it duringthe exercise.
PurposeTo lengthen the hip flexor muscles, which have a significant influence on thelower back. You should feel a stretch in the thigh and the groin of the back leg.
KNEEL ING H IP F LEXOR STRETCH ( see page 150 )
c13.qxd 7/14/05 11:48 AM Page 229
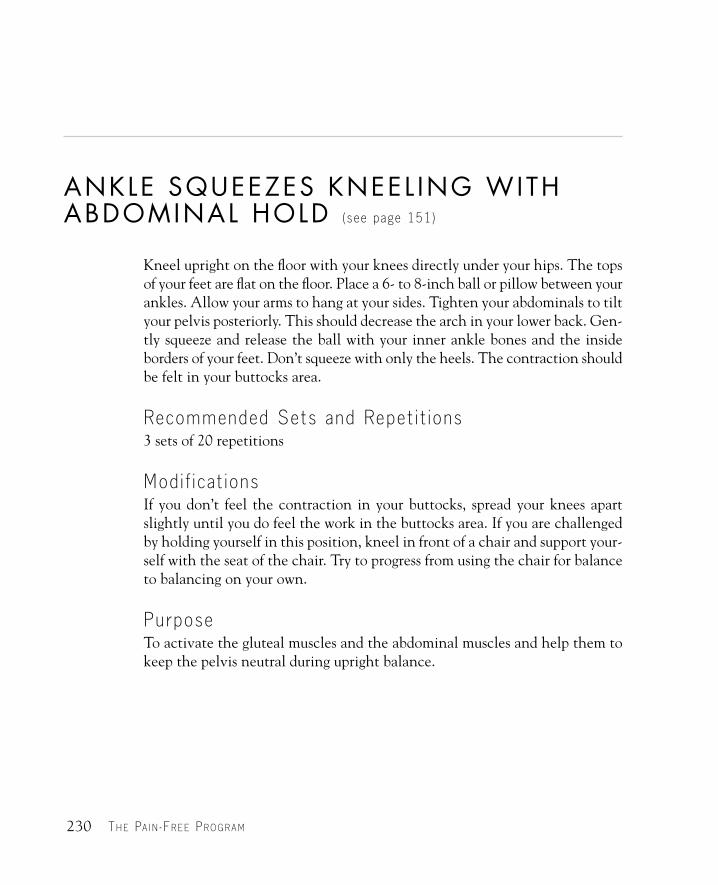
Kneel upright on the floor with your knees directly under your hips. The topsof your feet are flat on the floor. Place a 6- to 8-inch ball or pillow between yourankles. Allow your arms to hang at your sides. Tighten your abdominals to tiltyour pelvis posteriorly. This should decrease the arch in your lower back. Gen-tly squeeze and release the ball with your inner ankle bones and the insideborders of your feet. Don’t squeeze with only the heels. The contraction shouldbe felt in your buttocks area.
Recommended Sets and Repet i t i ons3 sets of 20 repetitions
Mod i f i cat ionsIf you don’t feel the contraction in your buttocks, spread your knees apartslightly until you do feel the work in the buttocks area. If you are challengedby holding yourself in this position, kneel in front of a chair and support your-self with the seat of the chair. Try to progress from using the chair for balanceto balancing on your own.
PurposeTo activate the gluteal muscles and the abdominal muscles and help them tokeep the pelvis neutral during upright balance.
230 THE PA IN -FREE PROGRAM
ANKLE SQUEEZES KNEEL ING WITHABDOMINAL HOLD ( see page 151 )
c13.qxd 7/14/05 11:48 AM Page 230

FORM 6 EXERC ISES 231
Lie on your back on the floor next to a wall. Place your legs straight up the wallwith your feet, knees, and hips in line. Your body should be perpendicular tothe wall. Ideally, your buttocks will be touching the wall. With your legsstraight, pull the tops of your feet and toes back toward you. Tighten your frontthigh muscles to straighten the knees. The upper buttocks area and the lowerback should be resting firmly on the floor. Your arms are relaxed out to thesides, with the palms facing the ceiling. Hold this position for the recom-mended duration. You should feel a stretch in your calves and the backs of yourthighs (hamstrings). Remember, a muscle stretch should not be so intense thatit is painful. If this is the case, see the following modification.
Recommended Durat ion1 to 11⁄2 minutes
Mod i f i cat ionMove your buttocks away from the wall enough to be able to tolerate thestretch or to allow your upper buttocks and lower back to rest on the floor.
PurposeTo symmetrically lengthen the posterior muscles of the legs without the influ-ence of the spinal muscles. Pulling the feet back and tightening the quadricepshelps to improve the efficiency of the stretch. You should feel the stretch inyour calves and the backs of your thighs (hamstrings).
WALL HAMSTR ING STRETCH ( see page 114 )
c13.qxd 7/14/05 11:48 AM Page 231

Stand leaning against a wall. Your feet should point straight ahead, directly inline with your hips. Walk your feet out away from the wall. As you do this,begin sliding your buttocks down the wall. Walk your feet away far enough toallow you to bend your knees close to a 90-degree angle. Press your lower backflat into the wall and keep the weight on your heels. From this position, getyour upper back and head against the wall. Then place your elbows at shoul-der level on the wall. Bend your elbows to 90 degrees, and try to get your upperarms, forearms, wrists, and hands all to touch the wall. Don’t allow your lowerback to come off the wall. Keep your lower back flat on the wall by using yourabdominals. Hold this position for the recommended duration. After youfinish, immediately walk around the room for 20 to 30 seconds to allow theblood to recirculate through your body.
Recommended Durat ion30 seconds to 2 minutes, depending on strength
Mod i f i cat ionsYou can modify how far you drop your buttocks down the wall. The arms may also be kept below shoulder level with the hands resting on the thighs,palms-up.
PurposeTo strengthen the thigh muscles and to get your back completely flat on thewall, in order to disengage the lower back muscles. Placing your arms on thewall strengthens the muscles of the upper back and the shoulders and causesthe abdominals to work harder. This exercise should be felt in the front thighmuscles, the upper back and the abdominals.
232 THE PA IN -FREE PROGRAM
WALL S I T WITH SHOULDER ROTAT ION ( see page 159 )
c13.qxd 7/14/05 11:48 AM Page 232

FORM 6 EXERC ISES 233
Lie on your back, with your legs draped over a chair or an ottoman. Place yourarms on the floor, at shoulder level. Bend your elbows to 90 degrees so that thewrists are directly over the elbows. Your hands are open, with the palms of thehands facing forward. From this position, gently press and release your elbowsinto the floor. This should cause your shoulder blades to come together. Do thiswithout shrugging your shoulders.
Recommended Sets and Repet i t i ons3 sets of 15 repetitions
Mod i f i cat ionsIf you feel this exercise in your neck, slightly lower your elbows toward yoursides, to avoid using the neck muscles.
PurposeTo activate the muscles between the shoulder blades and the muscles of themiddle/upper back. This assists in bringing the shoulders back to a moreanatomically correct position.
REVERSE BENCH PRESS IN 90 -90 NEUTRAL BACK ( see page 94 )
P rogram 6.3Form 6 , Category 3 (Mu l t i t asker )
c13.qxd 7/14/05 11:48 AM Page 233

Place a 6- to 10-inch stack of pillows or books on the floor about 8 inches fromthe top of your head. Lie on your back, with your legs draped over a chair oran ottoman. Reach your arms straight out above your chest. Clasp your handstogether, and keep the elbows straight. From this position, bring your claspedhands overhead toward the floor behind you until your hands reach the stackof books. Be sure that the height of the books allows you to keep your elbowsstraight when your hands are on top. If you cannot keep your elbows straight,add more books until you can. With your hands resting on the book stack, gen-tly press and release your clasped hands into the stack as if you were trying tocontinue moving toward the floor, but the books are in the way. You should feelyour shoulder blades move together and an increase in the arch throughoutyour back as you press. You may also feel some muscular effort around yourshoulder joints. Repeat for the recommended sets and repetitions.
Recommended Sets and Repet i t i ons3 sets of 10 repetitions
Mod i f i cat ionsIf there is any discomfort or limitation in the shoulder joints, raise the heightof the book stack until you can press pain-free with your elbows straight.
PurposeTo strengthen the muscles of your upper back and shoulders by using your armsto help your body recruit the muscles of your upper back.
234 THE PA IN -FREE PROGRAM
PUL LOVER PRESSES IN THE 90 -90 NEUTRAL BACK POS IT ION ( see page 218 )
c13.qxd 7/14/05 11:48 AM Page 234

FORM 6 EXERC ISES 235
Lie on your side in the fetal position, with your hips and knees bent to 90degrees. Your ankles, knees, hips, and shoulders should be stacked directly overone another. Place your bottom arm straight out on the floor at 90 degrees fromyour torso, and place the top hand on top of the bottom hand. From this posi-tion, rotate your top hand off your bottom hand toward the floor behind you.It’s very important that you keep your knees together as you rotate. Let theweight of your top arm pull your body around. It’s crucial to breathe, relax, andallow gravity to slowly bring your arm toward the floor. Your head should berelaxed on the floor, and your eyes should face the ceiling. After the desiredtime, slowly return to the starting position and repeat with the other side.
Recommended Durat ion1 to 2 minutes
Mod i f i cat ionsIf you have trouble keeping your knees together, reach down with your bottomhand to help hold your knees in place.
PurposeTo improve the spine’s ability to rotate independently of the hips and thepelvis. You should feel a stretch across your chest and the top arm and a stretchalong the side of your body and toward the lower back.
UPPER SP INAL ROTAT ION ( see page 105 )
c13.qxd 7/14/05 11:48 AM Page 235

Start on your hands and knees with your hands directly under your shouldersand your knees directly under your hips. Your body should be square, like a box.Your weight should be evenly distributed between all four points of contact.Relax your feet so that the tops of the feet rest on the floor. From this position,smoothly round up your back, draw your belly button toward your spine, andtuck your pelvis under. Drop your head and bring your chin toward your chest.From here, reverse directions by allowing your stomach to drop and your backto sway. Your shoulder blades should drop together and your head looks up.Make it one fluid movement, rather than holding any one position. Exhale asyour head looks up, and inhale as your head looks down. It’s important to keepyour elbows straight as you perform the movement and to avoid rocking for-ward and backward at the hips and shoulders.
Recommended Repet i t i ons15 repetitions
Mod i f i cat ionsYou can limit the range of motion in either or both directions if you feel anyrestrictions or discomfort during the exercise.
PurposeTo improve motion of the entire spine, in both flexion and extension. It alsoprovides a gentle stretch of the spinal flexors and extensors and helps withcoordination of movement of the head and the pelvis.
236 THE PA IN -FREE PROGRAM
CAT AND DOG ( see page 46 )
c13.qxd 7/14/05 11:48 AM Page 236

FORM 6 EXERC ISES 237
Begin with one knee on the floor. Keep both legs in line with the hips. The footof the front leg should be slightly in front of the knee of the same leg. The footof the back leg should be directly in line with the knee of the back leg. Placeyour hands on top of the thigh of the front leg, and keep your torso straight upand down. Tighten your abdominals and slightly tilt your pelvis backward,decreasing the arch in your lower back. Once you have done this, lunge slightlyforward, bringing the front knee over the front ankle. Once in this position,lift the arm on the kneeling side of the body up and over the head for a sidestretch. Keep your abdominals tight the entire time. Hold for the recom-mended duration, then repeat on the other side.
Recommended Durat ion1 minute
Mod i f i cat ionsIf you are challenged with balance during this exercise, kneel next to a chairand place one hand on the chair to help you maintain your balance. Gettinga proper stretch with this exercise is more important than the balance com-ponent. If your knee is uncomfortable, place a thin, flat pillow under it duringthe exercise.
PurposeTo lengthen the hip flexor muscles, which have a significant influence on thelower back. You should feel a stretch in the thigh and the groin of the back leg.
KNEEL ING H IP F LEXOR STRETCH ( see page 150 )
c13.qxd 7/14/05 11:48 AM Page 237

Lie on your stomach with your hands on the floor and your chin resting on yourhands. Grab hold of a 6- to 8-inch ball or pillow with your ankles. Bend yourknees to 90 degrees, holding onto the ball. The 90-degree angle at the kneesis a very important part of this exercise. From this position, gently squeeze andrelease the ball with your inner ankle bones and the inside borders of your feet.Don’t squeeze with only the heels.
Recommended Sets and Repet i t i ons3 sets of 20 repetitions
Mod i f i cat ionsIf you don’t feel the contraction in your buttocks, spread your knees apartslightly until you do feel the work in the buttocks area. If you feel pressure orpain in your lower back with your knees bent, perform the exercise with yourlegs straight on the floor.
PurposeTo activate the buttocks muscles and the deep muscles under the buttocks.This improves the relationship of these muscles to the lower back and helpswith hip alignment. The contraction should be felt in your buttocks area.
238 THE PA IN -FREE PROGRAM
ANKLE SQUEEZES PRONE ( see page 147 )
c13.qxd 7/14/05 11:48 AM Page 238

FORM 6 EXERC ISES 239
Prepare two 8-inch stacks of books or very firm pillows. Place them end to end.Sit on the floor with your back to the end of one stack. Your buttocks shouldbe about 12 inches from the books. Keep your knees bent. Lie back on thestack so that the closest edge to you lines up just below your shoulder blades.The first stack of books should support your upper back, and the second stackshould support your head. Your arms are out to the sides at shoulder level, withthe palms facing the ceiling. Try to relax and settle into this position for therecommended duration.
Recommended Durat ion2 to 3 minutes
Mod i f i cat ionsIf your head is unable to reach the second stack that should support it, slightlyincrease the height of that stack. However, you don’t want the stack so highthat it pushes your head forward.
PurposeThis position will help to passively improve the extension in your upper backand decrease the rounding. You should feel an “opening” of the chest and thefront of the shoulders. You may feel a little pressure in your middle back.
THORACIC BLOCK WITH HEAD SUPPORTED ( see page 223 )
c13.qxd 7/14/05 11:48 AM Page 239

Lie on your back with your knees bent. Your feet, knees, and hips are in line,and your feet are pointing straight ahead. Place your arms out to the sides ofyour body, with the lower arms parallel to your head and the palms facing theceiling. Draw your belly button down to the floor, and tighten all of yourabdominal muscles to flatten your lower back entirely to the floor. This servesas the reference point for the position of your pelvis in this exercise. Holdingthis abdominal position and the tilt to the pelvis that it creates, lift your but-tocks off the floor. Your feet and shoulders stay on the ground, while you liftonly the buttocks. Keep your knees in line with your hips as you lift, and don’tallow them to spread apart. Lift only as high as you can while maintaining thisneutral position in your lower back. If you feel your lower back arching, loweryour buttocks back toward the floor until you can keep your lower back neu-tral. Hold for the recommended duration.
Recommended Sets and Durat ion2 sets for 30 seconds each
Mod i f i cat ionsIf you are unable to hold for the recommended time, lower your buttocks to thefloor and regain the neutral position, then rise back up and hold.
PurposeThis exercise is designed to strengthen the muscles that will assist in bringingyour pelvis to a neutral position. You should feel the work in your abdominals,buttocks, and hamstrings (backs of the thighs).
240 THE PA IN -FREE PROGRAM
SHOULDER BR IDGE WITH ABDOMINALS ( see page 166 )
c13.qxd 7/14/05 11:48 AM Page 240

241
14
The “Graduate” Program
A s stated earlier, the Graduate Program is moreadvanced and requires greater overall muscularstrength and coordination. The ability to do these
exercises correctly and to be sure that you are not compensat-ing is dependent on your mastery of the exercises in yourpersonal Form and Category. Don’t proceed with these exer-cises if you’re still experiencing significant symptoms. If you’vemade it to the Graduate Program, congratulations! You’vemade major progress toward taking control of your health,improving your function, and providing a healing environmentfor your body to operate in.
c14.qxd 7/14/05 11:50 AM Page 241

Lie on your back with your knees bent. Your feet, knees, and hips are in line,and your feet are pointing straight ahead. Place a 6- to 8-inch pillow or ballbetween the knees. Put your arms out to the sides of your body, with the palmsfacing the floor. Lift your feet off the floor so that your knees and hips are bent
to 90 degrees. In a controlled motion,rotate your legs approximately halfway tothe floor on one side of your body. Reversedirections, and bring your legs halfway tothe floor on the other side of your body.Keep your upper body anchored in placeon the floor with your arms. Be sure tokeep the knee and the hip joint angle at90 degrees as you move.
Recommended Sets andRepet i t i ons2 sets of 15 repetitions to each side
Mod i f i cat ionsNone
PurposeStrengthening the oblique abdominals asthey lengthen to help control gravita-tional forces. You should feel this exercisein the lower abdominals and along thesides of your torso.
242 THE PA IN -FREE PROGRAM
HIP ROTAT IONS SUP INE
c14.qxd 7/14/05 11:50 AM Page 242

THE “GRADUATE ” PROGRAM 243
Lie facedown on the floor with one arm straight out on the floor overhead andin line with the body. Keep this arm perfectly straight, and rotate the thumbtoward the ceiling by rotating the entire arm from the shoulder. The other armis relaxed at the side. Draw your belly button toward the spine to hollow yourabdominal area, which will help stabilize your body. From this position, lift thearm extended overhead off the floor while keeping the elbow straight. Afterthe desired repetitions, move the same arm to a 45-degree angle from your bodyand continue to rotate out from the shoulder. Lift and lower from the floorhere, while keeping the elbow straight. Finally, move your arm to a 90-degreeangle from your body and continue to rotate out from the shoulder. Onceagain, lift and lower the arm from the floor, keeping the elbow straight.
Recommended Sets andRepet i t i ons2 sets of 10 repetitions with each arm
Mod i f i cat ionsDon’t focus on how high your arm is liftedfrom the ground. Even if you aren’t able tolift the arm, your body will still be strength-ening the correct muscles.
PurposeTo strengthen the muscles of the upper backand the shoulders and to improve theirworking relationship. You should feel this inthe shoulder that you’re lifting and in themuscles of the upper back.
S INGLE -ARM SHOULDER F LEX ION
c14.qxd 7/14/05 11:50 AM Page 243

This is the same exercise as the Hip Rotator Stretch, but it’s done without thehelp of a wall to support your leg. Lie on your back with your feet flat on theground and your knees and hips bent. Cross the left ankle over the right knee.Using only the muscles of the hip, lift your right leg off the floor so that thehip and the knee are bent to a 90-degree angle. Using the muscles of your lefthip (not your hand), gently press the left knee away from your body. Remem-ber to keep your hips square on the floor. Hold this position for the desiredamount of time. Repeat with the opposite leg.
Recommended Durat ion1 minute per leg
Mod i f i cat ionsThe only modification at this level would be to decrease the time of theexercise.
PurposeTo assist in positioning the hip joint by elongating the deep outward rotatorsof the hip. It also strengthens the hip flexor of the leg supporting the crossedleg. You should feel this stretch in the buttocks of the leg that has the crossedankle. You may also feel the effort in your abdominals and the front thigh mus-cles of the support leg.
244 THE PA IN -FREE PROGRAM
HIP ROTATOR STRETCH (UNASS ISTED) ( see page 98 )
c14.qxd 7/14/05 11:50 AM Page 244

THE “GRADUATE ” PROGRAM 245
Stand with your feet pointing straight ahead. Shift yourweight to one leg, and balance on that foot. Using the bal-ance leg, lower your body down in a squat. Make sure thatyour knee tracks directly in line with your first and secondtoe as you squat down. Don’t allow the knee to rotate or shifttoward the other leg. If this happens, limit the depth of thesquat. Try to stay balanced on one foot the entire time bynot putting your other foot down on the floor. Repeat, andthen alternate sets with other leg.
Recommended Sets and Repet i t i ons3 sets of 5 repetitions per leg
Mod i f i cat ionsIf balance is a problem, limit the depth of the squat to a levelwhere you can stay stable.
PurposeAddresses balance and strength of the important links fromthe foot and the ankle to the knee, and then to the hip andthe lower back. You should feel the work predominantly inthe thigh muscles but may also feel it in the shin and calfmuscles.
S INGLE - LEG SQUATS
c14.qxd 7/14/05 11:50 AM Page 245

Sit on a firm chair that allows you to have your kneesand hips bent to 90 degrees. Sit toward the front of thechair as if it didn’t have a backrest. Your feet shouldpoint straight ahead, and your feet, knees, and hipsshould be in a straight line. Roll your pelvis forward,and sit tall on your “sit bones” under the buttocks. Thisshould create an arch in your lower back. Place a 6- to8-inch ball or pillow between your knees. Interlock yourfingers behind your head, and hold the elbows back.Without moving your feet on the floor, rise up to astanding position. Keep your feet and knees in align-ment at all times. Stand all the way until your knees arestraight. Maintaining the arch in your lower back andwithout moving your feet, sit back down on the chair.Continue for the recommended sets and repetitions.
Recommended Sets and Repet i t i ons3 sets of 10 repetitions
Mod i f i cat ionsA chair that allows you to sit with your knees and hipsat an angle that’s greater than 90 degrees will make theexercise less challenging.
PurposeTo strengthen the muscles of the hips and the pelvis, aswell as of the upper back. You should feel this in yourthighs and buttocks.
246 THE PA IN -FREE PROGRAM
S ITT ING TO STANDING
c14.qxd 7/14/05 11:50 AM Page 246

THE “GRADUATE ” PROGRAM 247
Lie on your stomach, resting on your elbows and forearms. Your elbows shouldbe directly under the shoulders. Your hands should be in fists. Your feet are inline with your hips. Lifting from the forearms and the hips, raise your body up,keeping your body in line from shoulder to ankle. Relax completely betweenthe shoulder blades and allow them to collapse together so that your upperback is not rounded. Keep the front thigh muscles tight. Don’t let your hipsdrop to the floor. Keep the abdominals engaged to limit the lower back fromarching. Keep your eyes focused straight ahead. Hold for the desired time andrelax. Repeat the process for the recommended sets and repetitions.
Recommended Sets and Durat ion2 sets of 1-minute holds
Mod i f i cat ionsCan be done with the knees still on the floor.
PurposeTo strengthen the core stabilizers of the body.
COBRA UP
c14.qxd 7/14/05 11:50 AM Page 247

Begin with one foot on a chair with the knee bent. The otherfoot is behind you, with the foot slightly toed in and the backleg straight. Tighten your abdominals, and slightly tilt yourpelvis backward. Once you have done this, move your pelvisslightly toward the front foot. You should feel a slight stretchin the groin of your back leg. From this position, there will bethree separate movements of the upper body and arms. Keepyour abdominals tight the entire time.
1. Hold both arms straight out in front of your chest. Fromhere, raise both arms straight overhead together, thenbring them back to the starting position and repeat.
2. Hold both arms straight out in front of your chest. Turnyour arms and upper body away from your back leg. Turnyour head so that it follows the same motions as your armsand torso. Return to the start and repeat.
3. Hold the arm on thesame side as the back legstraight up in the air.Place the other hand onthe front knee. Keepingthe overhead arm in linewith your torso, slightlyside-bend your bodytoward the side of thefront leg. Return to thestart and repeat.
248 THE PA IN -FREE PROGRAM
3D H IP F LEXOR STRETCH
c14.qxd 7/14/05 11:50 AM Page 248

THE “GRADUATE ” PROGRAM 249
Recommended Sets and Repet i t i ons1 set of 10 repetitions
Mod i f i cat ionIn movement 2, you can keep your head and eyes still so that they aren’t mov-ing with your arms and torso. This will assist with balance.
PurposeTo elongate the hip flexor muscles by moving the upper attachment of themuscle away from the lower attachment, using the arms and the trunk. Youshould feel a stretch in the thigh and the groin of the back leg, as well as higherand deeper, possibly under the ribs.
c14.qxd 7/14/05 11:50 AM Page 249

Start on your hands and knees with your hands directly under your shouldersand your knees directly under your hips. Your body should be square, like a box.Your weight should be evenly distributed between all four points of contact.Curl your toes under and raise your body up so that you are now on your handsand feet. Make sure your hands don’t move back toward the feet. Push yourhips up and back, trying to “pike” your body like a diver. Once you get yourhips in the right position, tighten the quadriceps as you gently lower your heels
to the floor. Don’t lower your heels to the floorif it causes you to round your back. Check tomake sure your feet are parallel and hip-widthapart.
Recommended Durat ion1 minute
Mod i f i cat ionNone at this level
PurposeTo lengthen the muscles of the posterioraspect of the legs, while working the musclesof the upper body to create the stretch. Youshould feel the stretch in your calves and ham-strings. You should also feel that your upperbody is continually working to maintain theproper position.
250 THE PA IN -FREE PROGRAM
DOWNWARD DOG
c14.qxd 7/14/05 11:50 AM Page 250

251
Abdominal Crunches withHeels, 213
Abductor Presses in the 90-90Neutral Back Position, 194
Abductor Presses Sitting, 132Abductor Presses Supine, 96, 173accidents, 54
biomechanical issues existingprior to, 39–40, 56
Active Frog Prone, 186acupuncture, 63acute pain, defined, 7Adductor Presses Sitting, 124Adductor Squeezes in the 90-90
Neutral Back, 144, 152, 160,169, 177, 184
Adductor Squeezes Sitting, 123Adductor Squeezes Supine, 95,
172aggressive rehabilitation, 39aging, musculoskeletal disorders
attributed to, 19–20, 54alignment of the body, 3, 27–29,
35standing posture. See standing
postureAmerican Academy of Ortho-
pedic Surgeons, 7anatomical charts, 27Ankle Rocking with Strap, 104Ankle Squeezes Kneeling, 151Ankle Squeezes Kneeling with
Abdominal Hold, 230Ankle Squeezes Prone, 158,
171, 178, 185, 238
Ankles Squeezes Prone, 147anterior cruciate ligament
(ACL), reconstruction of,38–39
“antigravity” muscles, 50anti-inflammatory medicines, 24associative phase of the learning
process, 67asymmetrical walking or run-
ning, 11autonomic phase of the learning
process, 67
bed rest, 50, 57bench press, 60, 61bicep curl, 61biomechanical component of
exercise, 84braces, 24
calf raises, 61Cat and Dog, 46–48, 106, 113,
142, 176, 190, 197, 203,212, 236
categories of occupations andlifestyles, 80–82
determining correct exerciseprogram and, 82–83
central nervous system (CNS),18–19
muscle imbalances and, 9chiropractic care, 43, 63chronic pain
defined, 7financial implications of, 2
Circle of Influence, 23Cobra Up, 247cognitive phase of the learning
process, 66–67compensation, 36–37, 50, 64computer use, muscle pain and
heavy, 35, 42congenital factors as cause of
muscle imbalances, 11–12,33
core exercise training, 50core muscles, 50–53Covey, Stephen, 23
depression, habitual posturesand, 9
Dexterity Workers category, 81doctors, 13–14
role of your, 22–24taking charge of your treat-
ment, 25–26Double-Arm Doorway Stretch,
119, 127, 135, 201, 227Downward Dog, 250“duck walk,” 32dysfunctional exercises, 59,
60–62
evaluation of your standing posture, 68–81
determining correct exerciseprogram and, 82–83
Form 1, 69–71Form 2, 71–72Form 3, 72–74
Index
bindex.qxd 7/14/05 11:53 AM Page 251

252
evaluation of your standing posture (continued)
Form 4, 74–75Form 5, 76–78Form 6, 78–80“pecking order” for, 69preliminary matters, 68–69
exercisebiomechanical component
of, 84misconceptions about, 50musculoskeletal imbalances or
weaknesses affecting, 8neurological component of, 84personalized program of, 62physiological component of,
84exercises, the
components of, 84discomfort from, 85environment for, 86Form 1 exercises, 93–117Form 2 exercises, 118–142Form 3 exercises, 143–167Form 4 exercises, 168–191Form 5 exercises, 192–215Form 6 exercises, 216–240general comments before
beginning, 87–88“Graduate” Program, 87,
241–250identifying Form(s) for. See
evaluation of your standingposture
identifying lifestyle and occu-pation category for, 80–82
pain, experiencing, 84–85resting between sets, 86sequencing of, 83, 84time of day for, 86working too hard, 85–86
eyes, 53
fatigue, habitual postures and, 9
fear, habitual postures and, 9fibromyalgia, 12financial implications of
chronic pain, 2Foot Rotations in 90-90 Neutral
Back, 110Form 1, 69–71
exercises, 93–117Form 2, 71–72
exercises, 118–142Form 3, 72–74
exercises, 143–167Form 4, 74–75
exercises, 168–191Form 5, 76–78
exercises, 192–215Form 6, 78–80
exercises, 216–240Frog, 174, 195Frog Pullovers, 128functional exercises, 58–59,
62–67personalized, 62–63real-world applications of, 62
Function First program, historyof, 2
gaitasymmetries in your, 11problems revealed by, 32–33
“Graduate” Program, 87,241–250
gravity, 35, 49–50, 60gross motor movements, 86
hamstring curl, 61healing, 56–57
body’s capacity for self-, 21, 34“deficit,” 57taking responsibility for, 21–22
Heel Drop on Stairs, 100, 199Heel Lifts Sitting with Strap, 97Hero’s Pose with Overhead
Extension, 131
Hip Abduction/Adduction,120, 136
Hip Flexor Stretch on Table,221
Hip Rotations Supine, 242Hip Rotator Stretch, 98, 121,
137, 146, 222Hip Rotator Stretch
(Unassisted), 244Hip Twist Supine, 175, 189,
196, 211
individualized needs, 2, 25–26,62–63
“industrial athlete,” 14–15injuries, past, 38
muscle imbalances caused by,10, 33–35
ripple effect of, 35–37inner ear, 53insurance coverage, rehabilita-
tion process and, 40, 41, 43
interrelatedness of parts of thebody, 2, 16–17, 20–21
ISO Abduction AdductionSupine, 209
ISO Adduction AbductionSupine, 210
Isolated Hamstring Stretch withCrossover, 148
Isolated Hip Flexion Supine,107, 116, 139
Janda, Vladimir, 35–36joints
proper alignment of, 29range of motion (ROM), 29
Keele, S. W., 64kinesthetic sense, 30–31Kneeling Hip Flexor Stretch,
150, 157, 165, 182, 206,229, 237
bindex.qxd 7/14/05 11:53 AM Page 252

253
leg-extension machine, 61Leg Extensions Supine, 149leg-length discrepancy, 11–12lifestyle, muscle use and,
54–56lifestyle and occupation classifi-
cations, 80–82determining correct exercise
program and, 82–83ligaments, 18, 34
mechanical efficiency, standingposture and, 32
medication to treat pain, 7,23–24, 63
side effects of, 7“mirror muscles,” 11“Motor Control: Issues and
Trends,” 64motor skills, phases in acquiring
new, 64–67movement
alignment of the body and, 3restricted by musculoskeletal
disorder, 7MRI (magnetic resonance
imaging), 13Multitaskers category, 82muscle balance, standing pos-
ture and, 30muscle imbalances, 9–13, 29
asymmetrical walking or run-ning and, 11
central nervous system and, 9congenital factors, 11–12, 33defined, 9improper physical training
leading to, 10–11, 33movement patterns and, 9neurological or neuromuscular
disease and, 12, 33past injuries or surgeries and,
10, 33–35postures and, 9
as precursors of musculoskele-tal injuries, 9
weight training and, 50work environment and, 10,
13–16musculoskeletal disorders
National Academy of Sci-ences study on, 16
physical limitations imposedby, 7, 8
resulting from a specific event,19
statistics on, 7without a single traceable
cause, 19, 34–35musculoskeletal system, 18
prolonged disuse of, 50self-tests to evaluate your. See
self-tests
National Academy of Sciences,16
neurological component ofexercise, 84
neurological disorders, muscleimbalances caused by, 12, 33
neuromuscular coordination,31–32
neuromuscular disorders, mus-cular imbalances caused by,12
90-90 Neutral Back, 88–89preceding exercise program
with, 87–88nonfunctional exercises, 59, 60,
61
occupation and lifestyle classifi-cations, 80–82
determining correct exerciseprogram and, 82–83
One-Arm Table Top StretchKneeling, 156, 162, 228
One-Legged Hamstring Curls in the 90-90 Neutral Back,170
one-sided sports, 11Opposite Arm and Leg Gliding,
122, 138, 181, 188
pain killers, 24Parkinson’s disease, 12Path to Pain, 8–13pelvis, 51personalizing your exercise pro-
grams, 2, 62–73personal trainers, 63physical laws of our bodies,
49–57physical therapy, 13, 15, 39physical training, muscle imbal-
ances caused by improper,10–11, 33
Physical Workers category, 81physicians. See doctorsphysiological component of
exercise, 84plumb line, 69postural evaluation. See evalua-
tion of your standing postureposture(s)
habitual, 9muscle imbalances and habit-
ual, 9postural alignment, 27–29relationship of pain and, 3standing. See standing posture
proactive approach, 15, 17professional athletes
aggressive rehabilitation for,39–40
sports medicine. See sportsmedicine
proprioceptors, 53, 84Pullover Presses in the 90-90
Neutral Back Position, 218,226, 234
bindex.qxd 7/14/05 11:53 AM Page 253

254
Pullovers in the 90-90 NeutralBack Position, 193, 208
Pullovers Sitting, 133
Quadriceps Stretch Standing,154, 220
range of motion (ROM) ofjoints, 29
reeducation of your body, 64rehabilitation process, 38–39
end of formal, 42–43informal, 43insurance coverage and, 40,
41, 43of professional athlete versus
ordinary person, 39–40responsibility for healing
process, taking, 21–22Reverse Bench Press in 90-90
Neutral Back, 94, 102, 111,217, 225, 233
rotator cuff problem, 35running, asymmetrical, 11
Scapular Wall Presses, 109, 129scar tissue, 10scoliosis, 12self-tests, 43–48
cat and dog, 46–48stork stance, 43–44wall stance, 45–46
sensory motor amnesia, 367 Habits of Highly Effective Peo-
ple (Covey), 23Shoulder Bridge with Abdomi-
nals, 166, 240Side Forearm Stretch, 108,
155Single-Arm Shoulder Flexion,
243Single-Arm Squats, 245Sitting and Standing, 246Sitting Spinal Twist, 112
Sitting Thoracic and CervicalExtension, 205
slouching, 9, 52–53Snow Angels in 90-90 Neutral
Back, 103, 200spinal erectors, 50spinal fusion, 14splints, 24sports medicine, 14–16sprained ankle, 35Spread-Foot Gluteal Contrac-
tions, 214Standing Hip Hinge, 141, 215standing posture
bending at 45-degree angle,27–28
blueprint front view, 28blueprint side view, 29evaluation of. See evaluation
of your standing posturekinesthetic sense and, 30–31mechanical efficiency and, 32muscle balance and, 30neuromuscular coordination
and, 31–32optimal, 27plumb line front view, 28plumb line side view, 29proper postural alignment,
28–29, 35static posture. See standing pos-
tureStatic Squat, 101, 117stork stance, 43–44strains, 10strength training
misconceptions about, 50, 59posture evaluation prior to
starting, 63stress
“good,” 24habitual postures and, 9
surgery, 33–34back, 14
muscle imbalances caused bypast, 10, 33
rehabilitation after, 38–40Sway-Back Ankle Squeezes,
125, 130, 140, 187Sway-Back Pose, 99
Table Top Wall Stretch, 126,134, 183, 198, 204
tendons, 18Thoracic Block with Head Sup-
ported, 223, 2393D Hip Flexor Stretch,
248–249tricep extension, 61TVA Draw on All Fours, 145,
153, 161, 219
Upper Spinal Rotation, 105,202, 235
“villains” blamed for pain, 54visualization, 66
walking, asymmetrical, 11Wall Hamstring Stretch, 114,
163, 179, 207, 231Wall Hamstring Stretch with
Femur Rotations, 115, 164,180, 191
Wall Sit with Shoulder Rota-tion, 159, 167, 224, 232
wall stance, 45–46weekend warrior, 33weight training
misconceptions about, 50, 59posture evaluation prior to, 63
whole-body approach, 16–17work environment. See also
occupation and lifestyleclassifications
muscle imbalances caused by,10, 13–16, 33, 54
“writer’s cramp,” 51–53
bindex.qxd 7/14/05 11:53 AM Page 254