5x8 grill gazebo with lights - searsdownload.sears.com/docs/spin_prod_786726312.pdf · 5x8 grill...
TRANSCRIPT

1
5X8 Grill Gazebo With Lights
Date of purchase: _____/ _____/ _____
Product Code: D71 M83832
KSN Code: 01494393-0
UPC Code: 749241311079

2
SAFETY INFORMATIONPlease read and understand this entire manual before attempting to assemble, operate orinstall the product. If any parts is missing or damaged, do not attempt to assemble the product.
Two to four people are needed for assembly.In order to avoid damage to the shelter and its components, use appropriate tools.Check all screws on a regular basis to maintain the solidity of the structure.Keep instructions and parts list for further use.Estimated Assembly Time: Approx. 5 hoursTools required for Assembly (not included): Ladder, 5 ft. (at least 5 ft. during assembly).
CAUTIONDo not leave outside during high winds, heavy rains or snow. The mosquito nets must be removed for winter storage.Do not attach gazebo to wood or concrete deck or patio.
WARRANTY1 year limited warranty.Limited warranty applicable on parts only. Warranty extends solely to the original purchaser, whomust offer the original sales receipt for record.
EXCLUDEDDamages due to vandalism, abuse and wrong use of the product is not covered by the warranty.Damages due to extreme weather conditions such as thunderstorm and windstorm.
MAINTENANCEIf this shelter needs repairs, DO NOT RETURN THE PRODUCT TO SEARS.In case of a defective part of if a problem occurs while using this Product, please contact Bond Vastat 1-800-961-9838, 9AM ~ 5PM, Pacific Time Zone, Monday - Friday. Or email us: [email protected].

3
G
H
I
LM
R
ABF
E
B
C
DA
J
NS
K
P
O Q
TU
U V UU
T

A Post A 1
B Post B 1
C
D
E 4
F 4
G Fence 1
H Support plate 4
I Table top 2
J Decorative plate
K Straight crossbar
2
L Bend crossbar
2
M
1
Post C
Post D
1
1
Base cap
Base flange
Bend crossbar 1
Item Description IllustrationQty
4
Parts list

1
1
Right long crossbar
Right roof tube 2
Roof panel 1 2
4
Roof panel 3 1
2
2
1
N
O
P
Q
R
S
T
U
V
W
X
Y
Z
Bend crossbar
Bend crossbar
2
Left long crossbar 2
Left roof tube 2
Roof panel 2
1
Connect wire 1
Connect wire 2
Connect wire 3
AC adapter
5
Item Description Qty Illustration

Plastic cap
Washer 1
46
AB
32
AC
AD
AE
AA
BB
CC
DD
EE
Screw M6 x 13mm
Screw M6 x 65mm
Screw M6 x 35mm
Screw M6 x 20mm
FF
Screw M6 x 42mm 4
4
12
32
Hex wrench 1
16Stake
4
12
Washer 2
6
Hardware Kit
Item Description Qty Illustration
Item Description Qty Illustration

A 1
B 1
C 1
1D
A
E
F
AA AA
A
E
F
7
ON/OFF SWITCH
1. Insert base cap (E) into post 1 (A), then using screw (AA) secure base flange (F) on the bottom of post (A), slide down base cap (E) as figure shown.Repeat for remaining post (B), post (C) and post (D).

L
M
1
1J
1
LM J
M LAA
1
1
MJ
L
AA AAM
J
L
M JL
2
2
8
1. Insert decorative plate (J) into bend crossbar (M), then insert bend crossbar (M) into bend crossbar (L) and secure with screw (AA). 2. Align the boring hole at decorative plate (J) to screw hole at bend crossbar (M) and bend crossbar (L), then secure them with two screw (AA).

1
J
AA
1
1
AA AA
J
J
2
2
1
1
N
O
NO
O
O
O
N
N
N
J
J
NO
9
Power plug Power plug
1. Insert decorative plate (J) into bend crossbar (O), then insert bend crossbar (O) into bend crossbar (N) and secure them with screw (AA).2. Align the boring hole at decorative plate (J) to screw hole at ben crossbar (O) and bend crossbar (N), secure them with two screw (AA).
H
I
4
2
H
HI
I
H
1
1
BB
AD
2
2
H
I
AD BB
10
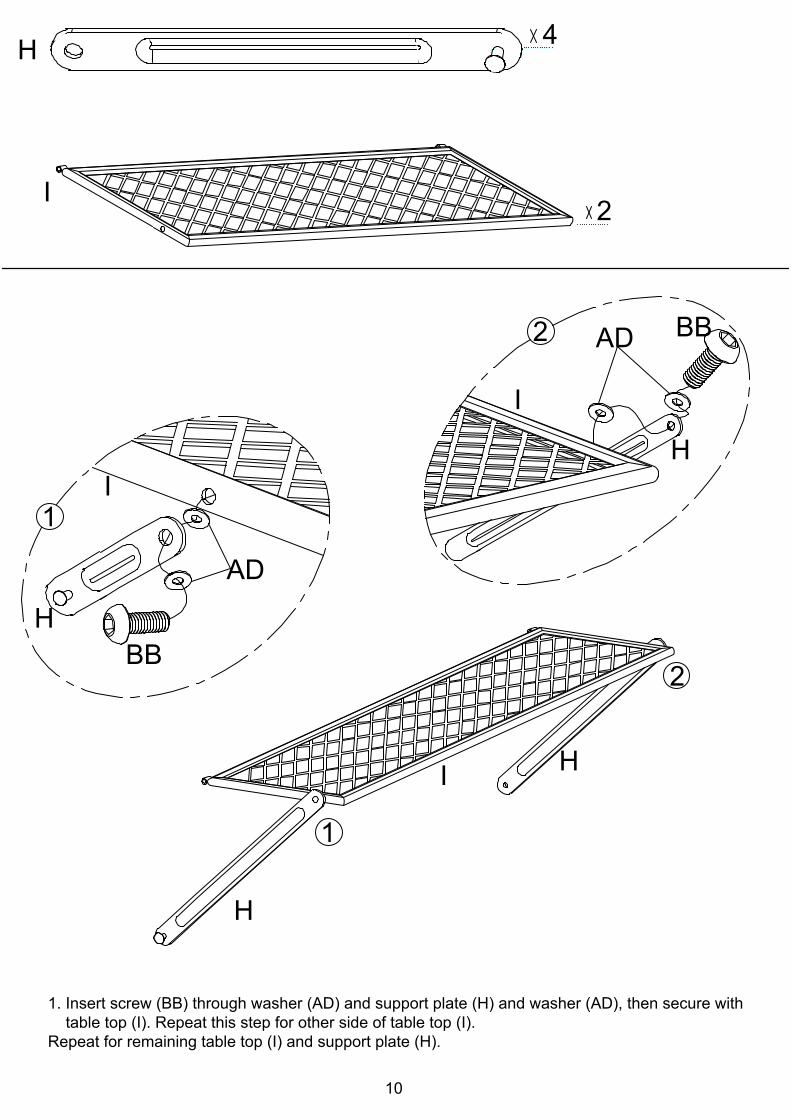
1. Insert screw (BB) through washer (AD) and support plate (H) and washer (AD), then secure with table top (I). Repeat this step for other side of table top (I).Repeat for remaining table top (I) and support plate (H).

G
K
1
1
G
K
A
B
AG
A
I
CC
ADAC
DD
DD
BEE
EEK
11
2
2
2
22
1
3
3
3
4H
I
4
HA
11
1. Insert screw (CC) through washer (AD) and table top hole into plastic washer (AC), then secure with post (A) as figure 1 shown. Then repeat this step for secure other side of table top (I) with post (B). Then insert support plate (H) into the post (A) and post (B) as figure 4 shown.2. Connect fence (G) with post (A) and post (B) by using screw (DD) as figure 2 shown.3. Insert screw (EE) through straight crossbar (K) secure with post (B) as figure 3 shown, then repeat this step for other side of straight crossbar (K) and post (A).

K1
C
D
D
I
CC
ADAC
HD
C
EE
EEK
H
K
2
2
11
3
3
21
3
12
1. Insert screw (CC) through washer (AD) and table top hole into plastic washer (AC), then secure with post (D) as figure 1 shown. Then repeat this step for secure other side of table top (I) with post (C). Then insert support plate (H) into the post (C) and post (D) as figure 4 shown.2. Insert screw (EE) through straight crossbar (K) secure with post (C) as figure 3 shown, then repeat this step for other side of straight crossbar (K) and post (D).
I

A
B
C
D
DD
DDA
LM
NO
O
13
1. Insert screw (DD) through bend crossbar set (O, N) into post (A), then secure them by using hex wrench (FF). Repeat this step for other side of bend crossbar (O, N) and post (D).Then repeat this step for bend crossbar set (L, M), post (B) and post (C).

Y2
AD
NOK
K
K
AO
N
K
D
Y
14
B
C
1. Insert 1 of connect wire (Y) into post (A), straight crossbar (K) and bend crossbar (O) as figure shown.2. Insert 1 of connect wire (Y) into post (D), straight crossbar (K) and bend crossbar (N) as figure shown.

K
B
C
W 2
K
K
BM
W
15
1. Insert 1 of connect wire (W) into post (B), and straight crossbar (K) as figure shown.Repeat for another connect wire (W).

1X
NO
NO
X
16
1. Insert connect wire (X) into bend crossbar set (O, N) as figure shown.

P 2
Q 2
PQ
P
P Q
P
K
K
K
1
1
1
2
2
2
2
2
EE
17
1. Insert left long crossbar (Q) into right long crossbar (P), then insert screw (EE) through straight crossbar (K) secure with right crossbar (P), repeat for other side left long crossbar (Q).Repeat for remaining left long crossbar (Q) and right long corssbar (P).

R
S
1
1
2
22
22
1
2
2
K
K
K
S RS
EE
EE
SS
R
18
1. Insert left roof tube (S) into right roof tube (R), then insert screw (EE) through left roof tube (S) secure with straight crossbar (K), and insert screw (EE) through right roof tube (R) secure with straight crossbar (K).Repeat for remaining left roof tube (S) and right roof tube (R).

T 2
P
Q
Q P
K
T
T
TAE
K
AA
19
1. Connect the roof panel (T) to roof frame by using washer (AE) and screw (AA) as figure shown.Repeat for remaining roof panel (T).

U4
UU
UU
P Q
AE
U
AA
20
1. Fix place roof panel 2 (U) onto roof frame and secure by using screw (AA) and washer (AE) as figure shown.Repeat for remaing roof panel 2 (U).

V 1
V
AE
V
AA
21
1. Fix place roof panel 3 (V) onto roof frame and secure by using screw (AA) and washer (AE) as figure shown.

AB
16
E
F
AB AB
22
1. Raise base cap (E) and secure stakes (AB) through base flange (F) into the ground.2. Remove all gazebo assembly stickers.

1Z
1
2
ZA 1
Z
3
3
關開源電
23
Power outlet
1. Please make sure to connect all cables securely. Plug power cable into power outlet.

See our extensive assortment of outdoor living productson-line at www.sears.com and www.kmart.com
Made in / Hecho en CHINADistributed by Sears, Roebuck and Co., Hoffman Estates, IL 60179
sears.com
For questions or comments about product:Email: [email protected] or Call toll-free: 1-800-961-9838
Please refer to part numbers when reordering
24