6 laplace transformation - school of mechanical …data.mecheng.adelaide.edu.au/robotics/ · web...
TRANSCRIPT

rtmc9s12-TargetA Simulink target for real-time control using
Freescale 9S12 microcontrollers
Compiler suite: Metrowerks CodeWarrior
Manual: V 2.1 Frank Wörnle, August 2007

rtmc9s12-Target A Simulink Real-Time Target for 9S12 microcontrollers
Contents
1 Introduction and Background.......................................................................................4
1.1 Introduction..............................................................................................................4
1.2 Background..............................................................................................................6
2 The Simulink real-time target rtmc9s12-Target.............................................................8
2.1 Installation...............................................................................................................82.1.1 Installing rtmc9s12-Target................................................................................82.1.2 System heap space.............................................................................................82.1.3 Migrating models from R13.1 to R14................................................................8
2.2 The rtmc9s12-Target block set..................................................................................92.2.1 User Communication blocks (obsolete)............................................................102.2.2 FreePort communication blocks.......................................................................102.2.3 A/D Converter unit (ADC)..............................................................................122.2.4 Pulse-Width Modulation unit (PWM)..............................................................132.2.5 Servo Motor Pulse-Width Modulation unit (PWM)..........................................142.2.6 Digital input....................................................................................................152.2.7 Digital output..................................................................................................162.2.8 D/A Converter unit (DAC)..............................................................................172.2.9 On-board D/A Converter unit (On-board DAC)...............................................18
2.3 Code generation options.........................................................................................19
3 Building a simple model – A mini tutorial...................................................................25
4 The example models.....................................................................................................39
4.1 AD_9S12.mdl..........................................................................................................39
4.2 ADC_DAC.mdl.......................................................................................................404.2.1 External DAC on the I2C bus (UofA protective circuit board)..........................404.2.2 On-board DAC on the Dragon-12 (Rev-E, SPI)...............................................40
4.3 DigINPort.mdl........................................................................................................41
4.4 DigOUTPort.mdl....................................................................................................42
4.5 Pulse-Width Modulation (PWM).............................................................................42
4.6 Pulse-Width Modulation (PWM) with FreePort communications.............................43
4.7 FreePort communications.......................................................................................464.7.1 Simple download of data to the target..............................................................464.7.2 Simple upload of data from the target..............................................................474.7.3 Simultaneous upload and download of data between host and target................494.7.4 Download of unformatted data to the target.....................................................514.7.5 Upload and download of data via both ports SCI0 and SCI1............................52
4.8 Wireless communications........................................................................................544.8.1 RFComm Server.............................................................................................544.8.2 RFComm Client..............................................................................................594.8.3 Other RFComms models.................................................................................62
4.9 Fuzzy control..........................................................................................................65
FW-08-07 1

rtmc9s12-Target A Simulink Real-Time Target for 9S12 microcontrollers
4.10 Timer blocks...........................................................................................................694.10.1 Output Compare mode (OC)............................................................................694.10.2 Input Capture mode (IC)..................................................................................71
4.11 Toggle a pin of PORTB...........................................................................................724.11.1 Toggling a pin of PORTB in External Mode....................................................724.11.1 Toggling a pin of PORTB in standalone mode.................................................73
4.13 Simple sonar range finder.......................................................................................73
4.13 Miscellaneous sample models..................................................................................754.13.1 The F14 simulation.........................................................................................754.13.2 A rudimentary robot control............................................................................754.13.3 Band-limited white noise generator..................................................................774.13.4 Generation of a chirp signal (frequency wobbling)...........................................78
Appendix..............................................................................................................................79
Appendix A – Possible things to do…................................................................................81
FW-08-07 2

rtmc9s12-Target A Simulink Real-Time Target for 9S12 microcontrollers
FW-08-07 3

rtmc9s12-Target A Simulink Real-Time Target for 9S12 microcontrollers
1 Introduction and Background
1.1 Introduction
rtm9S12-Target is a MATLAB/Simulink toolbox for real-time control using Freescale 9S12 microcontrollers. The toolbox turns regular Simulink models (block diagrams) into real-time executable code. In addition to the normal Simulink blocks, a number of special function blocks are provided, giving high-level access to most hardware units of the microcontroller. The controller can thus be programmed without the need for low-level coding in C/C++ or assembler. The usually very time-consuming testing and debugging of these programs can therefore be reduced to a minimum.
At the moment rtmc9s12-Target provides access to all 16 channels of the two A/D converter units (ATD0, ATD1), the majority of the general purpose digital I/O lines (GPIO), the eight 8-bit channels of the PWM unit (four channels in 16-bit operation), the 8 channels of the timer unit in output compare mode (OC, signal generation) as well as in input capture mode (IC, event detection, time measurements), and both serial port interfaces (SCI0, SCI1, line speed up to 115.2 kBit/s).
In addition, there are blocks for serially loaded D/A converters (connected to the SPI and/or the I2C bus of the chip), ultrasonic range finder modules (e.g. Devantech SRF04) as well as blocks for wireless communications with other microcontrollers or a host computer. The latter have been written for the Nordic nRF24L01 radio frequency transceiver (2.4 GHz). This chip is the heart of a small inexpensive communications module distributed by SparkFun Electronics (MiRF v2, less than US$20, range: 80 m at 250 kBit/s (http://www.sparkfun.com/commerce/product_info.php?products_id=705). Additional hardware units can easily be integrated using user-supplied s-functions or Target Language Code script files (tlc).
The target platform (microcontroller) can communicate with a host machine (personal computer, PC) through a serial connection (RS-232, null-modem). This allows real-time process data to be monitored and control parameters to be tuned on-the-fly. The host-to-target communication has been based on Simulink’s External Mode interface, thereby fully integrating rtmc9s12-Target into the Simulink environment. This makes it possible to simulate a model on the host (normal mode) before building real-time executable code to be run on the target platform (external mode). No changes have to be made to the block diagram when switching from normal mode to external mode.
A useful extension of the External Mode interface has been devised to provide a set of upload and download channels for the (optional) exchange of user data telegrams between host and target. This feature gives the microcontroller access to resources on the host, e.g. PC based data-acquisition cards, vision systems, data bases, etc. Using the host as a simple information server, the microcontroller is given access to an extremely wide range of applications.
rtmc9s12-Target is based on a similar toolbox for Infineon C167 microcontrollers (www.mecheng.adelaide.edu.au/robotics/WWW_Devs/c167Web/RTC167-Target.htm). This predecessor toolbox had been written for a small single-board computer featuring the Infineon C167CR-LM microcontroller, 256 kBytes of external Flash ROM and 256 kBytes of external RAM (Phytec phyCORE-167, www.phytec.com). With its relatively large memory, the phyCORE-167 allowed for much larger communications buffers than what could be achieved on the Freescale MC9S12DP256, where everything has to fit into the 12 kByte of internal RAM. A
FW-08-07 4

rtmc9s12-Target A Simulink Real-Time Target for 9S12 microcontrollers
second advantage of the C167 over the 9S12 is its vastly more versatile timing unit (5 independently programmable timers) and a priority based interrupt system (64 priority levels – there are none on the 9S12). These differences cause the host-target communication system of rtmc9s12-Target to be slightly less robust than that of its predecessor. Nevertheless, rtmc9s12-Target has been found to perform reasonably well in most applications. A large number of sample programs have been included with this toolbox to assist new users with the first few experiments.
At present, rtmc9s12-Target can be run on Wytec MiniDragon+ boards as well as Wytec Dragon-12 and/or Dragon-12 Plus boards (www.evbplus.com). The executable code is generated from a regular MATLAB/Simulink (V7.4, R2007a) model using Metowerks’ CodeWarrior (V3.0 or later, www.metrowerks.com). Adaptations to other 9S12 based development boards should be straight forward.
The author believes in the usefulness of free software. rtmc9s12-Target is thus released under the terms of the GNU Public License Agreement (GPL). The spirit of free software incorporates the users' freedom to run, copy, distribute, study, change and improve the software. Commercial developments based on rtmc9s12-Target are permitted within the limits of the GPL. For further details please visit the GNU website or refer to: www.gnu.org/philosophy/free-sw.html.
FW-08-07 5

rtmc9s12-Target A Simulink Real-Time Target for 9S12 microcontrollers
1.2 Background
The idea for the development of an easy-to-use real-time target for a microcontroller was born during the writing and delivery of a number of laboratory sessions for a graduate level Control Engineering class, held at Glasgow Caledonian University (Scotland) between 1999 and 2001. It became apparent that students often find it difficult to make the link between the theoretic concepts taught in class and practical real world applications. To address this problem, a number of microcontroller based design exercises were introduced.
Working in small groups of 2 to 4 students, the participants were asked to develop a microcontroller based mobile robot which could for instance follow a reflecting track on the ground or be navigated using a vision based control system. Each group was handed a simple frame for a differential drive mobile robot, including a 2-channel H-bridge motor driver circuit and a breadboard area for additional circuitry such as photo detectors or sonar range finders. Figure 1-1 shows a similar robot developed by the School of Mechanical Engineering, University of Adelaide (Australia).
Figure 1-1 Front-wheel driven mobile robot (University of Adelaide, robotics group)
The students generally liked this exercise because of its integral nature, combining many aspects from a variety of areas: control engineering, programming, electronics, communications and project management. However, it soon became apparent that the 5 laboratory sessions (2h per session) were insufficient to bring the exercise to a successful and satisfying conclusion. Judging the situation from a Control Engineering point of view, too much time was “wasted” with tedious programming tasks and the inevitable debugging of the developed programs. To remedy this problem the MATLAB toolbox RTC167-Target was written, giving high-level access to all essential features of the controller using a customised set of Simulink S-Function blocks. This completely eliminated the process of having to convert a control algorithm – often given in form of a block diagram – into a C-language program for the microcontroller. Using the toolbox, no time needs to be wasted with familiarizing oneself with a new software development environment (compiler, debugger) or microcontroller specific details such as hardware registers, memory models, startup files, etc. By reducing this development time, the focus of the exercise can be shifted from low-level development to system-level control engineering. This opens the door to realistic real-
FW-08-07 6

rtmc9s12-Target A Simulink Real-Time Target for 9S12 microcontrollers
world control applications, e.g. robot control using machine vision, process control experiments, intelligent system of multiple autonomous mobile robots, etc.
The heart of the robots used in Glasgow was a Phytec phyCORE-167 single-board computer. This platform, while reasonably powerful, had one major drawback: Access to the controller signals was only possibly through connectors with a very small footprint (Molex). This made it rather difficult for the university workshop to build interface boards for different applications. It was therefore decided to redevelop the toolbox for Freescale 9S12 microcontrollers. The latter, while probably less powerful than the C167, is a widely used microcontroller for which the marked offers a large number of development boards. In addition, most compilers for the C167 were found to be rather expensive. Metrowerks’ CodeWarrior, on the other hand, is a relatively easy to use compiler package offered at a reasonably small price (as little as US$99 per seat for educational institutions).
Like all other Real-Time Workshop (RTW) targets, rtmc9s12-Target generates code from a Simulink model (block diagram). The build process initially turns the block diagram into a series of ANSI-C source code files. These files are then cross-compiled and linked to a single MC9S12 executable. Once downloaded into the FLASH-ROM of the microcontroller, the code can be controlled using the graphical user interface of Simulink. The build process is fully automated and can be customised through the Real-Time Workshop options panel. The generation of timing signals and other status information can be configured. The options panel also allows the setting of the serial communication parameters (host COM port, baudrate).
The present version of rtmc9s12-Target makes use of Metrowerks’ CodeWarrior Integrated Development Environment (www.metrowerks.com). A free evaluation version of this compiler is available on the Metrowerks web page. This ‘special HC12’ edition is sufficient to build small models (up to 12 kByte of executable code, up to 32 source code files). For more demanding designs the full version of the compiler is required. Inexpensive licenses are available to educational institutions. The current version of rtmc9s12-Target has been developed and tested on MATLAB 7.4 (R2007a).
The remainder of this document presents a detailed description of the installation and use of rtmc9s12-Target. At The University of Adelaide we use Wytec Dragon-12 and MiniDragon+ development boards (www.wytec.com). A number of currently known problems and recommendations for future extensions are listed in Appendix A.
It is hoped that this contribution will be helpful to many users in education, science and research. Any comments and feedback on possible flaws within the code of rtmc9s12-Target are welcome and should be directed to:
Frank Wornle ([email protected])
The University of AdelaideSchool of Mechanical Engineering
August 2007
FW-08-07 7

rtmc9s12-Target A Simulink Real-Time Target for 9S12 microcontrollers
2 The Simulink real-time target rtmc9s12-Target
2.1 Installation
2.1.1 Installing rtmc9s12-Target
The installation of rtmc9s12-Target is simple: Extract the contents of the archive file rtmc9S12_CW_R14.zip to a folder of your choice and run the set-up (setup.m) script. The latter can be found in the main folder of the toolbox and needs to be run from the MATLAB (V7.4, R2007a) command line.
Unlike with previous versions of this toolbox, it is no longer necessary to specify the location of the cross compiler (CodeWarrior). Similarly, it is no longer required to store all model files in one and the same work directory. Models can now be compiled from any accessible location. This modification has been introduced to allow students to keep their work on their thumb drives and/or network drives.
The setup script adds the following two folders to the MATLAB search path variable:
<RTMC9S12_TARGET_ROOT>\bin<RTMC9S12_TARGET_ROOT>\mc
In addition, the setup script modifies a number of XML files which define the template CodeWarrior projects used to build the models under a variety of code generation options. Moving the toolbox from one machine to another requires the setup script to be run again to adjust these template project files to the new environment.
2.1.2 System heap space
With previous releases of this toolbox it was necessary to increase the amount of heap space allowed for by CodeWarrior. This is no longer required, as the present version of rtmc9s12-Target uses static memory allocation, thus not making any use of the heap space of the system.
2.1.3 Migrating models from R13.1 to R14
Models which have been generated for and used with the previous release of the toolbox (for MATLAB 6.5.1 / R13.1) can be converted to the current release using the update9s12models script. At the MATLAB command prompt type
>> update9S12models(<myModel.mdl>)
This converts model myModel.mdl to the new style. Replacing the call-up parameter by the name of a folder converts all models found in this folder.
FW-08-07 8

rtmc9s12-Target A Simulink Real-Time Target for 9S12 microcontrollers
2.2 The rtmc9s12-Target block set
Upon successful installation of rtmc9s12-Target, the Simulink library browser should include a new entry called Real-Time mc9s12 Toolbox. rtmc9s12-Target contributes 14 new blocks (Figure 2-1): A to D converter, Digital input, Digital output, D to A converter, On-board D to A converter (Dragon-12, Rev-E), Pulse-Width Modulation (PWM), Servo-motor PWM, FreePortComms_RX, FreePortComms_TX, RF communications client, RF communications Server, Sonar range finder, Timer and a Fuzzy controller block.
Figure 2-1 The blocks of rtmc9s12-Target
Application examples of all blocks of the toolbox can be found in the examples directory of the toolbox. Wherever a system includes communication blocks (e.g. Freeport Send/Receive or RF Communication Client/Server), the system comprises of a target model (<example_name>.mdl) as well as a host model (<example_name>_PC.mdl). See chapter 4 for details about the provided examples.
FW-08-07 9

rtmc9s12-Target A Simulink Real-Time Target for 9S12 microcontrollers
2.2.1 User Communication blocks (obsolete)
Previous releases of this toolbox included a pair of User Communication blocks: Receive user data and Send user data. These blocks provided a mechanism for simple communication between a target model (running on the microcontroller) and a separate host model (running on the PC).
The user communication blocks had been integrated into the External Mode communication protocol. User communication blocks therefore only worked in conjunction with the External Mode interface. An advantage of this approach was that the second Serial Communications Interface (SCI) of the microcontroller remained unused and could therefore be used otherwise. A disadvantage was that the sending of user telegrams led to a reduction in bandwidth available to the exchange of log data and/or parameter records between host and target.
With the present release of rtmc9s12-Target, the User Communication interface has been discontinued and can thus no longer be used. Use the FreePort communication blocks instead (see chapter 2.2.2).
2.2.2 FreePort communication blocks
Some applications need simple and reliable communications between several microcontroller platforms or between a microcontroller and host based applications other than MATLAB.
This need is catered for by the FreePort communication blocks of the toolbox. These blocks allow the transmission/reception of short formatted messages through either of the Serial Communication Interfaces of the 9S12 (SCI0 / SCI1), unless it is used for External Mode communications. The parameters of the FreePort communication blocks are: Sample time, Communication port, Baudrate, Channel number, Number of elements and Data type. A tick box allows the transmission of raw data values (Figure 2-2).
FW-08-07 10

rtmc9s12-Target A Simulink Real-Time Target for 9S12 microcontrollers
Figure 2-2 Parameters of the block FreePortComms_TX
The sample time specifies the rate at which the block is updated by the timing ISR (target sided block) or by Simulink (host sided block). Short sample times reduce the bandwidth which is available for the monitoring of process data and other FreePort data channels.
The channel number can range from 0 to 9. It is used to identify corresponding transmit (txd) and receive (rxd) blocks on the host and on the target. To increase the currently available number of 10 user channels the source code macro MAX_FREEPORT_CHANNELS should be redefined and all related code sections need to be re-compiled (e.g. the S-Functions freePortComms_rxd and freePortComms_txd).
The parameter Number of elements defines the width of the block input (transmission) and of the block output (reception). Together with the parameter data type the number of elements defines the size of the communication buffers. Each buffer is currently limited to a maximum size of 100 bytes.
The communication port defines whether a block is used as host block (COM1 – COM4) or as target block (SC0 and SCI1). The build process performs a check for inadequate port settings such as the use of the same SCI port for both External Mode communications as well as FreePort communications. At the writing of this document, baudrates ranging from 300 bps to 115200 bps are supported.
Ticking the box labeled ‘block sends raw data’ causes the underlying S-Function to send unformatted (raw) data telegrams. In this case, only the selected number of data bytes (uint8) is transmitted. No additional overhead such as the channel number, the data type byte, etc. are sent. This is useful when interfacing the microcontroller to
FW-08-07 11

rtmc9s12-Target A Simulink Real-Time Target for 9S12 microcontrollers
intelligent sensors which provide measurements and other information in form of a stream of serial data bytes. Selecting the raw data tick box causes the block mask to change to the reduced format shown in Figure 2-3.
Figure 2-3 Raw data mode – reduced parameter set
2.2.3 A/D Converter unit (ADC)
The A/D converter unit of the MC9S12 can be accessed using the target block ADC Input. This block has five parameters: The ADC unit of the microcontroller (ATD0, ATD1), the range of channels to be converted (0 – 7), the resolution of the ADC (8-bit, 10-bit), the output format (raw data, normalized to [0 ... 1], normalized to [0 ... 5]) and the sample time at which the block is to be updated. Figure 2-4 shows the parameter requester of the ADC Input block.
FW-08-07 12

rtmc9s12-Target A Simulink Real-Time Target for 9S12 microcontrollers
Figure 2-4 Parameters of the block ADC Input
2.2.4 Pulse-Width Modulation unit (PWM)
Pulse width modulated (PWM) signals can be generated using the Pulse-Width Modulation block. The current version of rtmc9s12-Target offers 4 to 8 PWM channels, depending on the resolution of each individual channel. The unit can be configured for up to 4 16-bit PWM channels or up to 8 8-bit channels. Block inputs can be signed numbers. The sign information is removed and presented on a programmable sign pin. The block mask allows the following parameters to be set (Figure 2-5): Sample time, Resolution, PWM period, Pulse pin, Sign port, Sign pin, Saturation input level and an optional monitoring output.
The sample time defines the rate at which the block is updated. The PWM period is the period of the created PWM signal. This parameter is limited by the maximum period of the PWM timer (179 seconds).
Pulse pin, Sign port and Sign pin allow the output pins to be chosen on which display the PWM signal should be displayed. The pulse port is fixed (PTP). The sign bit is ‘high’ (+ 5 V) for negative signals and ‘low’ (0 V) for positive inputs.
The Saturation input level defines the magnitude of the block input signal beyond which the PWM output signal has a duty cycle of 100%.
Note that channels 0, 1, 4 and 5 run of PWM clock source A, whereas channels 2, 3, 6 and 7 run of PWM clock source B. This means that the achievable resolution within each group depends on how similar the individual periods are. It is commonly a bad idea to define both very slow and very fast PWM channels within the same group. See chapter 4 for an example of a multi-channel PWM model
FW-08-07 13

rtmc9s12-Target A Simulink Real-Time Target for 9S12 microcontrollers
Figure 2-5 Parameters of the block Pulse width modulation
An optional block output can be displayed by ticking the Signal monitoring check box. This allows the current state of the PWM output signal to be uploaded to the host. Please note that this feature is only useful when the block sample time is much shorter than the PWM period.
2.2.5 Servo Motor Pulse-Width Modulation unit (PWM)
Servo motors are driven by Pulse-Width Modulated (PWM) signals with a very short duty cycle (typically 2% - 12%). These signals can be generated using the Servo Motor Pulse-Width Modulation block. The current version of rtmc9s12-Target offers 4 to 8 PWM channels, depending on the resolution of each individual channel. The unit can be configured for up to 4 16-bit PWM channels or up to 8 8-bit channels. Block inputs need to be unsigned numbers. The block mask allows the following parameters to be set (Figure 2-6): Sample time, Resolution, PWM period, Pulse pin, Minimum Pulse Width, Maximum Pulse Width and Saturation input level.
The sample time defines the rate at which the block is updated. The PWM period is the period of the generated PWM signal. This parameter is limited by the maximum period of the PWM timer (179 seconds).
Minimum and maximum pulse widths define the limits of the servo motor. Typical values range from 0.5 ms to 2.5 ms. A duty cycle of 0% will produce pulses with the
FW-08-07 14

rtmc9s12-Target A Simulink Real-Time Target for 9S12 microcontrollers
minimum pulse width; a duty cycle of 100% will generate pulses with the maximum pulse width.
The pulse pin defines on which pin of port PTP the PWM signal should be displayed.
The Saturation input level defines the magnitude of the block input signal beyond which the PWM output signal has a duty cycle of 100%.
Figure 2-6 Parameters of the block Servo Motor Pulse-Width Modulation
2.2.6 Digital input
All available digital inputs of the MC9S12 can be accessed using the block Digital input. The block allows specification of Port, Pin number as well as the block sample time (Figure 2-7). The available ports are PORTA, PORTB, PTH, PTJ, PTM, PTP, PTS and PTT. For each of these ports, one or more pins (0 – 7) can be selected.
The mask of block Digital Input is adjusted to the number of pins that has been chosen. Example: specifying pins ‘2 4 5 7’ yields a Digital Input port with 4 block outputs. The top-most block output corresponds to pin ‘2’ and the bottom-most output is pin ‘7’.
FW-08-07 15

rtmc9s12-Target A Simulink Real-Time Target for 9S12 microcontrollers
Figure 2-7 Parameters of the block Digital input
2.2.7 Digital output
Digital outputs can be programmed using the block Digital output. In analogy to the corresponding input block (section 2.2.6) this block also allows specification of Port, Pin number and Sample time (Figure 2-8). In addition to these block parameters, a lower and an upper block input signal threshold can be specified: On-threshold (Von) and Off-Threshold (Voff), respectively. These two levels are used to decide when the block output should become ‘high’ (above Von) or low (below Voff). Setting Von > Voff allows the programming of a hysteresis.
FW-08-07 16

rtmc9s12-Target A Simulink Real-Time Target for 9S12 microcontrollers
Figure 2-8 Parameters of the block Digital output
2.2.8 D/A Converter unit (DAC)
Analogue output signals can be generated using two external D/A converters (DAC0, DAC1) connected to the I2C bus of the controller. Two serially loaded Analog Devices D/A converters (AD5311) have been included on the protective circuit board we use in our laboratory. They are loaded through the I2C bus interface of the MC9S12 and output DC voltages between 0 and 5 volts. The block parameters are Sample time, DAC channel and Saturation level (Figure 2-9). The latter is used to define the correspondence between block input signal level and the full-scale output of the DAC.
FW-08-07 17

rtmc9s12-Target A Simulink Real-Time Target for 9S12 microcontrollers
Figure 2-9 Parameters of the block D to A converter
2.2.9 On-board D/A Converter unit (On-board DAC)
Revision E of the Dragon-12 board now comes with a pair of D/A converters connected to the SPI interface of the controller. These serially loaded DACs can be accessed using the On-board DAC blocks of the toolbox. Note that the inclusion of the On-board DACs in a model causes the exclusion of RF Communication blocks, as the latter also use the SPI.
The block parameters are Sample time, DAC channel and Saturation level. The latter is used to define the correspondence between block input signal level and the full-scale output of the DAC. The parameter mask of the On-board DAC is identical to that of the I2C DAC (see Figure 2-9).
FW-08-07 18

rtmc9s12-Target A Simulink Real-Time Target for 9S12 microcontrollers
2.3 Code generation options
Real-Time Workshop (RTW) allows a number of options to be specified during the code generation for a particular target platform. All RTW options can set through the menu ToolsReal-Time WorkshopOptions… . Figure 2-10 shows the target configuration page of rtmc9s12-Target.
Figure 2-10 Target configuration page of rtmc9s12-Target
The three target specific options pages (mc9s12 code generation) become accessible after the system target file ‘mc9s12.tlc’ has been selected using the System target file browser (Figure 2-11).
Figure 2-11 System target file browser: mc9s12.tlc
FW-08-07 19

rtmc9s12-Target A Simulink Real-Time Target for 9S12 microcontrollers
Figure 2-12 Configuration Parameters for rtmc9s12-Target
The first of the three target specific option pages is shown in Figure 2-12. It allows the Target platform to be chosen. Five different targets are supported at present: Dragon-12 (this also works with the new Dragon-12 Plus boards), MiniDragon+, UofA Mobile Robot (a MiniDragon+ based mobile robot system used at the University of Adelaide, similar to the MiniDragon+ target but with the default communication ports set as for the Dragon-12 target), C128-based and C32-based targets. The latter have been provided to allow the toolbox to be used with inexpensive targets such as Wytec’s Dragon-Fly. At the writing of this document, neither of these two targets has been fully tested.
Option Memory model defines the memory layout of the generated runtime code. Two settings are currently available: Flash_flat and Flash_banked. Most small control applications can make use of the efficient Flash_flat model. Memory model Flash_banked should only be used for applications with very large code requirements and/or large sets of in-lined parameters. The Flash_flat memory model assumes a 16-bit linear address space (0 – 64 kByte). RAM is located from 0x1000 – 0x3FFF (12 kByte); ROM exists in two blocks, one from 0x4000 – 0x7FFF (16 kByte), the second from 0xC000 – 0xD7FF (6 kByte). Note that the upper ROM block has been limited to the first 6 kByte. This is only necessary when working with ROM resident system programs in the protected area of Flash. The boards in our laboratory have been pre-loaded with a self-test program. For further details about the protected Flash of the 9S12 see:
www.mecheng.adelaide.edu.au/robotics/WWW_Devs/Dragon12/Dragon12.htm.
Model Flash_banked produces target executables which use the memory banking mechanism of the 9S12 to expand the address space beyond the 16-bit limit of 64 kByte. The memory window resides at addresses 0x8000 – 0xBFFF. The MC9S12
FW-08-07 20

rtmc9s12-Target A Simulink Real-Time Target for 9S12 microcontrollers
can be instructed to present any of 16 memory pages (16 kByte each -> 16 x 16 kByte = 256 kByte, this applies to the MC9S12DP_256_B/C) in this memory window. Setting the Memory map parameter to Flash_banked instructs the compiler to build code that makes use of this memory swapping mechanism.
Note:
The memory model Flash_banked should only be used if absolutely necessary. It seems that, at the writing of this document, the generated code does not run as reliably as when using the Flash_flat memory model. Support for the banked memory model has never been tested properly. External Mode communications between host and target appear to get stuck too easily for reliable operation.
The Compile, Download and Run checkbox is selected by default. This option enables a all-in-one build process, which also downloads the generated binary code to the target where it is started. The compiler (CodeWarrior) as well as the debugger (Hiware, used to download the code) are closed automatically at the end of the build process.
The External Mode checkbox enables or disables the background communication interface for process data logging and on-the-fly parameter tuning. The External Mode interface is very useful during the design phase of a controller. However, once all parameter values have been found it is often more appropriate to run the target in standalone mode (release version). The code-size can be reduced significantly, when the External Mode option is deselected.
All other options on this page are only used when the External Mode checkbox is ticked. Most of these options have to do with the memory management of the External Mode interface. They commonly do not have to be modified by the user. The checkbox use static memory allocation should always be selected. It includes a customized memory manager, thus substituting the heap space based dynamic memory management routines malloc, calloc and free.
Once static memory management is used, the maximum available amount of memory can be specified in option External Mode – available memory (byte). This memory pool is the base container for all communication related buffers, e.g. the target reception buffer, the target transmission buffer and the upload/download FIFO buffers.
On the Dragon-12 the current ‘emptiness’ of the target based transmission buffer can be displayed on the 7-segment display. A value of ‘9’ denotes a completely empty upload buffer. As the buffer fills, the displayed values decrease until they reach ‘0’. A full buffer is represented by ‘-‘. The buffer can fill temporarily when the host is busy, e.g. when the user opens a menu in Simulink while the model is running. Once this blockage is removed, the current contents of the buffer are uploaded to the host and normal operation resumes. The display jumps back to ‘9’.
Additional state variables of the External Mode communication system can be displayed on the pins of port T (PTT). At the University of Adelaide we use a protective circuit board on which the state of port T is visualized using LEDs. The display of the External Mode communication state is only useful for developers and fault finding. Consequently, this option is deselected by default.
The remaining few options define the communication line speed in bits per second, the host sided communication port (COM1 – COM4) and the target sided
FW-08-07 21

rtmc9s12-Target A Simulink Real-Time Target for 9S12 microcontrollers
communications port (SCI0 or SCI1). Option Auto-update status bar clock can be selected to enable the display of the current simulation time in the status bar of the model. The option is deselected by default, as this information is also visible in each of the scope blocks and the additional traffic on the serial communication line can thus be avoided. It seems that the target runs more smoothly without the clock.
Note:
The FreePort communication blocks are independent of the External Mode interface. They can be used to upload/download short message telegrams (currently limited to 100 bytes) from/to the target. When used in parallel to the External Mode communication system, FreePort communications may appear somewhat sluggish. This is because these telegrams can only be sent once every sample step. The External Mode interface on the other hand uses the entire available idle time between subsequent sample steps for upload/download. Further details about FreePort communication can be found in chapter 2.2.2.
Figure 2-13 Configuration Parameters for rtmc9s12-Target
The second page of target specific options (Figure 2-13) controls the display of timing signals on a configurable port/pin of the microcontroller. Access to low-level timing information is generally helpful during the setting-up of a new control algorithm. The exact duration of the control cycle is displayed on the chosen I/O pin from where it can be monitored using an oscilloscope. In addition to this so-called cycle time, the controller also displays the activity on the serial reception line RxD. This information has proved to come in handy during the debugging of new communication modules. To disable the display of timing signals, deselect the check box Timing signals.
FW-08-07 22

rtmc9s12-Target A Simulink Real-Time Target for 9S12 microcontrollers
Figure 2-14 shows how the timing signals can be measured using a scope probe. A typical trace of both timing signals as well as the activity on the serial reception line is shown in Figure 2-15.
Figure 2-14 Accessing the timing signals on the Dragon-12
Figure 2-15 Cycle time (top) and serial reception RxD (bottom)
In addition to the timing signals, the second option page also allows definition of the target behaviour following a reset (run directly or wait for external mode connection). Furthermore, the main timing engine can be configured to run of the Real-Time
FW-08-07 23

rtmc9s12-Target A Simulink Real-Time Target for 9S12 microcontrollers
Interrupt (RTI) or of timer channel TC7. The latter commonly achieves a slightly more accurate match between the specified and the actually achieved sample rate. However, in some cases it might be advantageous to keep the timer unit free. In this case the RTI offers an independent time base. In the majority of cases the choice of clock source (RTI / TC7) does not really matter.
Figure 2-16 shows the third page of target specific options. This page allows options to be set for a variety of aspects of the generated code as well as the build process. The rebuilding of the static libraries of the MATLAB blocks can be enforced. Other options control the use of the on-board LCD display of the Dragon-12. The default setting is ‘on’ for the Dragon-12 and ‘off’ for MiniDragon+ based targets, as the latter does not feature an LCD display. Option ‘RT logging information (debug) on SCI0’ should only be used by developers. A number of settings allow the display of target debugging messages on the commonly vacant Serial Communication Interface SCI0 (Dragon-12). Selecting the MiniDragon+ board (not the UofA Mobile Robot) automatically deselects this option, as the MiniDragon+ commonly uses SCI0 to communicate with MATLAB.
Figure 2-16 Category: mc9S12 code generation options (cont.)
FW-08-07 24

rtmc9s12-Target A Simulink Real-Time Target for 9S12 microcontrollers
3 Building a simple model – A mini tutorial
The following example gives an outline of the build process of a simple target model with FreePort communication.
Let us begin by creating a new Simulink model. From the main menu of MATLAB create a new Simulink model (FileNewModel) and save this empty model as test.mdl.
Open the library browser. Upon successful installation, you should find a new toolbox entry called Real-Time mc9S12 Toolbox. Click on the ‘+’ next to this entry to expand its contents (Figure 3-1).
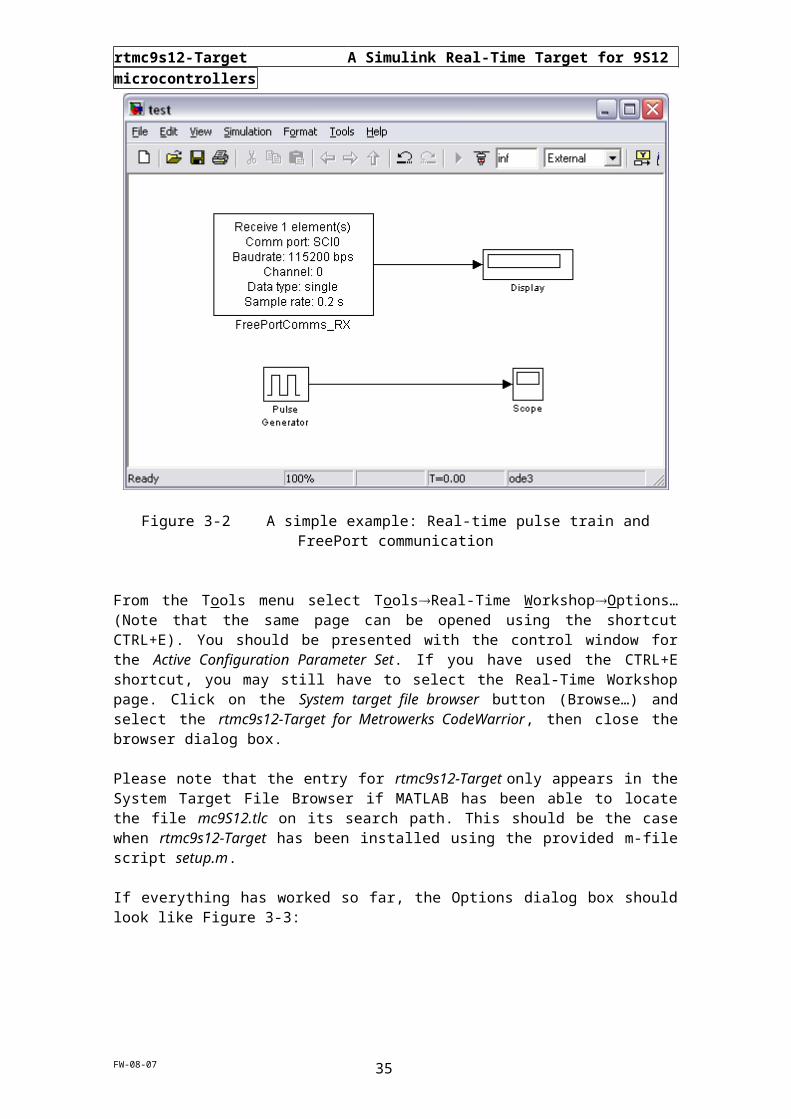
Drag the block FreePortComms_RX to the (still empty) model window test. From the sources category of the main library (SimulinkSources) select the block Pulse Generator and place it in your model. Similarly, from the sinks category (SimulinkSinks) choose a Scope block as well as a Display block. Link the output of the Pulse Generator to the input of the Scope block and the output of the FreePortComms_RX block to the input of the Display block. Your model should look as shown in Figure 3-2.
Double-click on the Pulse Generator block to display its parameters. The default settings are a period of 2 seconds, a duty cycle of 50%, amplitude of 1 unit and the start-time 0. Close the parameter control window without making any changes.
Open the FreePortComms_RX parameter page by double-clicking the corresponding block icon. The default parameters are a sample time of 0.1 seconds (100 ms), SCI0, 115.2 kBit/s, channel number 0, 2 bytes (UINT8) to be received and block output is double. Change the sample time to 0.2 seconds, the FreePort communication interface to SCI1, the number of elements to 1 and set the signal data type to SINGLE; then close the dialog box.
FW-08-07 25

rtmc9s12-Target A Simulink Real-Time Target for 9S12 microcontrollers
Figure 3-1 The Simulink library browser – Real-Time mc9S12 Toolbox
FW-08-07 26

rtmc9s12-Target A Simulink Real-Time Target for 9S12 microcontrollers
Figure 3-2 A simple example: Real-time pulse train and FreePort communication
From the Tools menu select ToolsReal-Time WorkshopOptions… (Note that the same page can be opened using the shortcut CTRL+E). You should be presented with the control window for the Active Configuration Parameter Set. If you have used the CTRL+E shortcut, you may still have to select the Real-Time Workshop page. Click on the System target file browser button (Browse…) and select the rtmc9s12-Target for Metrowerks CodeWarrior, then close the browser dialog box.
Please note that the entry for rtmc9s12-Target only appears in the System Target File Browser if MATLAB has been able to locate the file mc9S12.tlc on its search path. This should be the case when rtmc9s12-Target has been installed using the provided m-file script setup.m.
If everything has worked so far, the Options dialog box should look like Figure 3-3:
FW-08-07 27

rtmc9s12-Target A Simulink Real-Time Target for 9S12 microcontrollers
Figure 3-3 Options dialog box – Real-Time Workshop
Now select the first of the three mc9s12 code generation options pages (Figure 2-12). Ensure that the External mode check box is selected and that the communication parameters have been set to 115200 bps and the COM port you are using on your host machine. It may be required to deselect and then re-select the External Mode option to make Simulink switch to External Mode. The label ‘Normal’ shown in the toolbar of the model (see Figure 3-2) should have changed to ‘External’.
On the second target specific options page deselect the Timing signals check box as well as the Run upon reset check box. Configure the target to use RTI as the main timing engine.
Besides these code generation options we also have to choose an appropriate base sample rate for our model. Click on the Solver entry on the left-hand side of the Configuration Parameter dialog box and change the solver type from Variable step to Fixed step. Select a step size of 5 ms (0.005). This defines the base sample rate at which we intend to run the target program. Care should be taken when choosing this value: Too small a base sample-time might lead to problems as the model has not enough time to execute before the next sample-time hit occurs (ISR overrun, error 1). Sample-times of less than 1 ms are not recommended.
Change the parameter Mode from its default value Auto to Single-Tasking. This option instructs Real-Time Workshop to build code for a single-tasking environment. Please note that our target model has to perform two jobs, namely the generation of the pulse train (continuous-time) and the checking for new user data every 200 ms (discrete-time). Real-Time Workshop can service these two jobs from within the base sample rate task (single-tasking) or as two individual tasks (multi-tasking). Please note, however, that the latter approach only works in conjunction with a real-time kernel with a multi-threaded task scheduler. rtmc9s12-Target currently doesn't support this option.
FW-08-07 28

rtmc9s12-Target A Simulink Real-Time Target for 9S12 microcontrollers
Set the stop time to ‘inf’ to force the target to run forever (or at least until the power is cut). In External Mode, the target program can be stopped by the user trough the External Mode Control Panel. The completed Solver page should appear as shown in Figure 3-4.
Figure 3-4 Simulation parameters: Fixed step size solver
Close the dialog box using the push button OK and save your model file. When run on the target platform (e. g. the Dragon-12), this simple test program will generate a periodic square wave signal with a 2 seconds period and a duty cycle of 50%. FreePort telegrams can be downloaded at a maximum rate of 5 Hz (200 ms) and will be displayed on the Display block of the block diagram.
However, before the target can receive any FreePort telegrams we first have to design a corresponding host model. A host model is only required when the target model includes any of the FreePort communication blocks. (Note that the host-based communication partner can also be an m-file).
Create a new model and save it as test_PC.mdl. From the mc9S12 library we need the user communication block FreePortComms_TX. From the Sources category of the Simulink library (SimulinkSources) select the block Constant and place it in your host model. Open the Math category of the Simulink library (SimulinkMath) and find the block Slider gain. Drag this block to the host block diagram and connect all three blocks as shown in Figure 3-5.
Open the block FreePortComms_TX and choose to all parameters to match those of the reception side, i. e. channel 0, 1 element of type single. The sample time can be set to 0 seconds (continuous); this ensures that the host transmits new user data as soon as it decides to update this block. However, when used on the host, the parameter Sample time is often rather meaningless.
FW-08-07 29

rtmc9s12-Target A Simulink Real-Time Target for 9S12 microcontrollers
To ensure that the host model runs forever, open the simulation parameters menu (SimulationSimulation Parameters…) and change the Stop time to inf.
Figure 3-5 Simple test program: Host model
We are now ready to compile the target model and run it on the target hardware. Re-open the target model (test.mdl) and select the menus ToolsReal-Time WorkshopBuild Model; this initiates the build process of the block diagram. Alternatively, the shortcut CTRL+B can be used.
Notice:
When running rtmc9s12-Target for the first time, the toolbox might generate a library of all real-time modules supplied by The MathWorks (<MATLAB_ROOT>\rtw\c\libsrc). This may take a few moments. Once compiled, the real-time library is copied to <rtmc9S12_TARGET_ROOT>\rtwlib. Subsequent build processes do not require the library to be rebuilt. In the current release of the toolbox, the precompiled version of this library is already included. This allows the evaluation version of Metrowerks CodeWarrior (HC12 special license) to be used with the toolbox. Previous versions required the full version of CodeWarrior, mostly because the 32 files limitation of the evaluation version made it impossible to compile the library (presently 265 files).
During the build process the CodeWarrior IDE should open up and the generated source code should get compiled (Figure 3-6). The two warnings indicating the conversion from floating-point numbers to unsigned integers can safely be ignored.
FW-08-07 30

rtmc9s12-Target A Simulink Real-Time Target for 9S12 microcontrollers
Figure 3-6 MATLAB generates a fully functional CodeWarrior project
The fully linked binary code is then downloaded into the FLASH-ROM of the target using the Hiware debugger (Figure 3-7). Upon completion of this download, the code is started and both Hiware as well as the CodeWarrior IDE are closed.
Figure 3-7 Automatic download to the target using the Hiware debugger
FW-08-07 31

rtmc9s12-Target A Simulink Real-Time Target for 9S12 microcontrollers
Note that, in our laboratory at the University of Adelaide, we use Dragon-12 development boards on which we have installed Motorola’s serial monitor (see: www.mecheng.adelaide.edu.au/robotics/WWW_Devs/Dragon12/Dragon12.htm). This allows CodeWarrior to download the code into the Flash ROM of the 9S12 using its debugger.
Note that the generated CodeWarrior project can be re-opened, if the code needs to be inspected and/or manual changes are to be made. Should the automatic download not be desired, de-select the option Compile, Download and Run on the first of the three target specific options pages and recompile. This causes the automatic process to halt after the CodeWarrior project has been built.
Once the target code is running, the LCD display of the Dragon-12 should show the model name (‘test’) and indicate that the host has not yet connected.
The External Mode communication interface of rtmc9s12-Target is monitoring the serial line, waiting for commands such as Connect and Disconnect, Start and Stop, etc. These commands can be sent to the target using the External Control panel. From the Tools menu choose the item External Mode Control Panel… (Figure 3-8).
Figure 3-8 External Mode Control Panel
Real-Time Workshop assumes a real-time target to be an autonomous unit to which a user has to connect before any further interaction can take place. Click on the push button Connect to initiate the communication between RTW and the target model code. Once connected, the LCD display should indicate that the trigger is now armed. Start the real-time code using the push button Start real-time code. The LCD display should switch to running. Open the Scope block to display the uploaded signal of the Pulse Generator block. Note that the scope axis is at its default setting of 10 seconds.
FW-08-07 32

rtmc9s12-Target A Simulink Real-Time Target for 9S12 microcontrollers
To change this, first stop the real-time code by clicking on the Stop real-time code button of the External Mode Control Panel. This is not really required as scope display changes can be made while the target code is running.
Note that, once the target code has been stopped, RTW also disconnects from the target. Click on the parameters push button of the scope window (second button from the left, see Figure 3-9).
Figure 3-9 Changing the scope display settings
The appearing dialog box allows the scope settings to be customised (Figure 3-10). Replace the automatically chosen Time range by a fixed value of, say, 5 seconds. Close the dialog box using the OK push button. The modified scope settings can be saved using the push button Save current axis settings (6th button from the left within the toolbar of the scope window).
Figure 3-10 Adjusting the scope settings
FW-08-07 33

rtmc9s12-Target A Simulink Real-Time Target for 9S12 microcontrollers
Re-launch the real-time code (Connect then Start real-time code). The scope block should now display the trace of the pulse train as produced by the pulse generator. The display block should display a value of 0. Upon starting the host model test_PC.mdl the display block should change to the value which is sent by the host. Open the slider gain block and change this value. The target should immediately update to the new value.
Figure 3-11 Adjusted scope settings
As expected, the graph of the square wave signal has a period of 2 seconds (Figure 3-11). It is worth noting that we are currently bombarding the host with a lot of unnecessary data – to represent the 2 second square wave, an upload rate of, say, 10 to 20 times a second would have been sufficient. At the moment, the target uploads a new time stamp and data value every 5 ms, i. e. 200 times a second! Noting that, with the overhead introduced by the External Mode protocol (32 bytes per point), this results in a data flow rate of 6,400 byte per second. Seen that the serial transmission of a single byte requires the sending of a 10-bit word (start bit, 8 data bits, stop bit, no parity), this means that we are working with a data rate of at least 64 kBit per second – this is more than half the available bandwidth (115200 bps). Every additional data packet such as response packets to the download of a new parameter set, e.g. a new slider gain value, will have to be transmitted in-between. It is therefore advisable, to reduce the log data upload rate to the minimum required for a particular application. In our case, the displaying of a 2 seconds square wave signal does not require an upload of more than 20 values per period.
To reduce the volume of log data use the Zero-Order Hold (ZOH) block. These blocks achieve a down-sampling from a high rate to a lower rate. From the Simulink library category Discrete drag a ZOH into the target model block diagram. Insert this block into the signal path between Pulse Generator and Scope block. Open the ZOH and choose an upload rate of 20 values per seconds (sample time: 0.05 seconds). Figure 3-12 shows the modified target block diagram.
FW-08-07 34
rtmc9s12-Target A Simulink Real-Time Target for 9S12 microcontrollers
Figure 3-12 Modified target block diagram: Reduced upload rate
In addition to the reduced upload rate we can also slim line the target code by eliminating the unnecessary continuous-time solver algorithm: Our block diagram does not include any dynamic blocks which would require numeric integration. Therefore, there is no need to include an ordinary differential equation (ODE) solver algorithm. We can thus choose the solver setting ‘discrete (no continuous-time states)’. This is done on the Solver page of the Configuration Parameters dialog (CTRL+E, see Figure 3-13).
Save the block diagram and re-build the target code (CTRL+B). Once downloaded to the target, the executable is automatically started. Connect to the target and run the model code. The scope block should still display a symmetric pulse train with a period of 2 seconds and a 50% duty cycle. However, the upload rate has been reduced by a factor 10. Upload rate considerations are very important when more than one signal are to be monitored and/or when working with large parameter sets which frequently need to be downloaded to the target.
FW-08-07 35

rtmc9s12-Target A Simulink Real-Time Target for 9S12 microcontrollers
Figure 3-13 No continuous-time states, no ODE solver required
Note that you may have to change the Scope trigger point to match the chosen time axis range. Stop the model execution – Simulink automatically disconnects from the target. Change the scope setting back to 10 seconds and reconnect to the target. Running the target code should cause a square wave to be plotted up to only half the width of the scope (5 seconds) before the horizontal trigger is reached.
This can be explained as follows: At the chosen sample rate of 0.005 seconds it takes 2000 samples to reach 10 seconds. However, the default setting for the trigger is after 1000 data points. In our case, this mark is reached ever 5 seconds.
From the External Mode Control panel (Figure 3-8) choose Signal & Triggering. Set the Trigger Duration to 2000 (Figure 3-14). Close this window and restart the target code. Note that this does not require the code to be rebuilt, as the modification only affects the host-based scope display.
With the new trigger setting, the trace is plotted up to 10 seconds before the trigger point is reached.
FW-08-07 36

rtmc9s12-Target A Simulink Real-Time Target for 9S12 microcontrollers
Figure 3-14 Configuring the Upload signal trigger
Note that most controller parameters can be changed while the controller is running (on-the-fly parameter tuning). As an example, change the amplitude of the Pulse Generator block. The Scope block should immediately reflect the requested change. Figure 3-15 shows a jump from an amplitude value of ‘1’ to the new amplitude ‘2’, then ‘3’, then back to ‘1’.
Figure 3-15 On-the-fly parameter tuning: Changing the amplitude
FW-08-07 37

rtmc9s12-Target A Simulink Real-Time Target for 9S12 microcontrollers
Another way to control the data logging process is the push button Cancel trigger on the External Mode Control Panel. Hitting this button stops all upload of log data; the label of the Cancel trigger push button changes to Arm trigger (Figure 3-16). Notice that the controller continues to execute the real-time code and host and target remain connected. The effect of Cancel trigger is best compared to that of a pause button. To resume data logging click on Arm trigger. Furthermore, it is possible to disconnect from the target while keeping it running. This is useful when an experiment runs for a long time and does not require permanent supervision. Once disconnected, the host computer can be switched off and back on without disturbing the currently running program on the microcontroller. To resume control simply reconnect.
Figure 3-16 Cancel trigger and Arm trigger
Remarks:
(1) As it can never be guaranteed that the serial link between host and target remains active all the time, a host driven flow control has been implemented. Typically, problems can occur when a user decides to launch a new application, to move or resize a window, to open a menu, etc. Any of these events can interrupt the regular upload of log data for an unspecified duration. rtmc9s12-Target takes care of this uncertainty by timeout counters and the acknowledgement of each data packet. The target thus stops sending log data when the host is busy; regular operation resumes as soon as Simulink continues to operate normally.
(2) The Cancel/Arm trigger button as well as the disconnecting from a running target have been found to be a bit flaky. Their use is therefore discouraged.
FW-08-07 38

rtmc9s12-Target A Simulink Real-Time Target for 9S12 microcontrollers
4 The example models
A set of sample models has been included to facilitate familiarisation with this toolbox. They can all be found in the examples directory.
4.1 AD_9S12.mdl
The model AD_9S12.mdl implements a 3-channel A/D Conversion with real-time data logging. A/D channels 2, 3 and 4 are read and converted every 2 ms. Data upload is performed every 20 ms. As can be seen from the status bar (Figure 4-1), the model has been configured to use an ODE solver (ODE1, Euler method). Note that this is not really necessary here, as the model does not feature any continuous states.
Figure 4-1 Sample model: AD_9S12.mdl
FW-08-07 39

rtmc9s12-Target A Simulink Real-Time Target for 9S12 microcontrollers
4.2 ADC_DAC.mdl
4.2.1 External DAC on the I2C bus (UofA protective circuit board)
Model ADC_DAC.mdl reads ADC channel 2 (100 times per second) and multiplies the converted value with a sine wave. The output of this operation is then sent to the D/A Converter on the protective circuit board (I2C bus, DAC channel 0). A saturation block ensures that the DAC input values remain within the valid range (0 … 5). Note that this model does not use any data upload blocks. The External Mode could therefore be switched off to reduce the size of the target executable to approximately 1/3 of its current size.
Figure 4-2 Sample model: ADC_DAC.mdl
4.2.2 On-board DAC on the Dragon-12 (Rev-E, SPI)
Model Onboard_DAC_Dragon12_RevE.mdl (Figure 4-3) sends a value to channel 0 of the on-board DAC on the Dragon-12 board (Rev-E and later). This D/A converter is connected to the Serial Peripheral Interface (SPI).
FW-08-07 40

rtmc9s12-Target A Simulink Real-Time Target for 9S12 microcontrollers
Figure 4-3 Sample model: Onboard_DAC_Dragon12RevE.mdl
4.3 DigINPort.mdl
The model DigINPort.mdl allows monitoring of the state of digital input lines 0, 1 and 2 of port PTH. The upload of log data is performed every 20 ms.
Figure 4-4 Sample model: DigINPort.mdl
FW-08-07 41

rtmc9s12-Target A Simulink Real-Time Target for 9S12 microcontrollers
4.4 DigOUTPort.mdl
The model DigOUTPort.mdl allows the control of digital output lines. Here, pins 2 and 6 of port PTT can be controlled using a slider gain. Gain parameter download is performed ‘continuously’ (sample time 0), whereas the upload (Display) has been limited to 10 times per second. Notice that the outputs switch ‘high’ when the slider gain exceeds the On-Threshold (Von = 3.5); the are switched to ‘low’ when the slider gain is set to values below the Off-Threshold (Voff = 2). Both thresholds can be set via the block parameter dialog box.
Figure 4-5 Sample model: DigOUTPort.mdl
4.5 Pulse-Width Modulation (PWM)
Model PWM.mdl produces a host driven pulse width modulated signal with a period of 100 ms. In conjunction with a suitable amplifier (e.g. a H-bridge amplifier, stepper motor driver), the PWM module can be used to implement a large variety of drive systems (DC motors, servo motors, stepper motors, etc.). Forward / reverse information is derived from the polarity of the block input signal and can be accessed on the configured sign pin. The example uses PORTB, pin 1 to display the sign information. Port PTP is connected to the PWM unit of the microcontroller. Each channel has been assigned a pin of port PTP: Channel 0 corresponds to PTP.0, channel 1 is PTP.1 and so on. A cascaded 16-bit PWM channel ties up two 8-bit units. The generated pulse train can then be read from the ‘upper’ of the two associated pins, i. e. PTP.1 for cascaded unit ‘0 & 1’, PTP.3 for cascaded unit ‘2 & 3’, etc. Block inputs above the Saturation level (here: 5) are clipped and result in a 100% duty cycle. The optional block output has been enabled (Signal monitoring). However, it should be noted that this feature is only useful when the block sample time is much shorter than the PWM period – here we work with a sample time of 10 ms and a pulse
FW-08-07 42

rtmc9s12-Target A Simulink Real-Time Target for 9S12 microcontrollers
period of 100 ms. This means that the resolution of the monitored PWM signal is not too high.
Figure 4-6 Sample model: PWM.mdl
4.6 Pulse-Width Modulation (PWM) with FreePort communications
Model PWM2.mdl (Figure 4-7) and the corresponding host model PWM2_PC.mdl (Figure 4-8) demonstrate how easy it is to set up a remote-controlled robot control system.
The target model (PWM2.mdl) has two PWM output channels (16-bit resolution, pulse pins PTP.1 and PTP.3). For demonstration purposes, the PWM period has been set to a rather long interval of 0.5 s. Background monitoring is performed at a rate of 10 times per second. The duty cycle of both channels is controlled by a signal which is sent from the host through a FreePort download block (FreePortComms_RX). The host-sided end of this communication channel is a ‘FreePortComms_TX’ block in a second, independent Simulink model (PWM2_PC.mdl). The latter runs on the host in normal simulation mode. Changing the values of either of the slider gains initiates a download through the associated FreePort communication channel. The host sided model can be started / stopped / modified at all times. It is truly independent of the target model.
FW-08-07 43

rtmc9s12-Target A Simulink Real-Time Target for 9S12 microcontrollers
Figure 4-7 Sample model: PWM2.mdl
Figure 4-8 Host-end of the user communication: PWM2_pc.mdl
FW-08-07 44

rtmc9s12-Target A Simulink Real-Time Target for 9S12 microcontrollers
The use of the optional monitoring output of the Pulse width modulation block is shown in Figure 4-9. Note that Figure 4-9 also shows the state of sign bit – this feature has not been implemented on the 9S12. The monitoring output can be enabled or disabled using a check-box in the block parameter page (Figure 4-10).
Figure 4-9 Pulse width modulation: monitoring the generated PWM signals
FW-08-07 45

rtmc9s12-Target A Simulink Real-Time Target for 9S12 microcontrollers
Figure 4-10 Block parameter page: Pulse width modulation
FW-08-07 46

rtmc9s12-Target A Simulink Real-Time Target for 9S12 microcontrollers
4.7 FreePort communications
4.7.1 Simple download of data to the target
The target model FreePortComm_RX_simple.mdl and the corresponding host model FreePortComm_TX_simple.mdl demonstrate the use of the FreePort communication blocks for data download from the host to the target. The FreePort communication interface does not rely on the External Mode and can therefore be used with small standalone programs as well as in parallel with optional External Mode communications via the other port. The sample target model receives 5 values on its SCI0 port and feeds these values to an output block for PTH. The latter block has been configured to switch a line high whenever the incoming signal exceeds 3.5. A port line is switched low when the input falls below 2. Port SCI0 is the free communication port on the Dragon-12 when using External Mode. Without External Mode communications, both ports are free. The display shown in Figure 4-11 only shows the incoming data when using External Mode communications.
Figure 4-11 Sample model: FreePortComm_RX_simple.mdl (target)
Figure 4-12 is the corresponding host sided block diagram. Note that, instead of using a host-sided Simulink model, the command freePortSend could have been used. This is often more convenient, especially when the data to be sent is produced by an m-file.
FW-08-07 47

rtmc9s12-Target A Simulink Real-Time Target for 9S12 microcontrollers
Command freePortSend has the following syntax:
freePortSend(1, 115200, 0, 5, 2, [ 1 2 3 4 5 ])
This sends data via COM1, at 115200 bps using channel 0. The number of elements to be sent is 5 and they are of type 2 (uint8; 0 = single, 1 = int8, 2 = uint8, 3 = int16, 4 = uint16, 5 = int32, 6 = uint32, 7 = boolean); the data values are then numbers 1 – 5. For an example of how to use command freePortSend see the test m-file script freeport_test.m.
Figure 4-12 Sample model: FreePortComm_TX_simple.mdl (host)
4.7.2 Simple upload of data from the target
The target model FreePortComm_TX_simple2.mdl and the corresponding host model FreePortComm_RX_simple2.mdl demonstrate the use of the FreePort communication blocks for data upload from the target to the host. The target model reads the dip switches connected to port H (PTH) and uploads this information (‘0’ or ‘1’) to the host. The optional (target sided) display block is only serviced when running in External Mode (Figure 4-13).
Figure 4-14 shows the corresponding host model. Note that, instead of using a host-sided Simulink model, the command freePortReceive could have been used. This is often more convenient, especially when the received data is to be processed further by an m-file.
Command freePortReceive has the following syntax:
[myData, numElementsReceived] = freePortReceive(1, 115200, 0, 5, 2, 1)
This attempts to receive data via COM1, at 115200 bps using channel 0. The number of elements to be received is 5 and they are of type 2 (uint8; 0 = single, 1 = int8, 2 = uint8, 3 = int16, 4 = uint16, 5 = int32, 6 = uint32, 7 = boolean). A blocking call is made to freePortReceive (last call-up parameter, 1 = blocking, 0 = non-blocking), i. e. the command only returns, once some data has been received – if the received data is
FW-08-07 48

rtmc9s12-Target A Simulink Real-Time Target for 9S12 microcontrollers
not destined for the chosen channel (here: ‘0’), both return parameters are ‘0’; when the received data is destined for the chosen channel, numElementsReceived should match the expected number of elements (here: ‘5’) and myData are the received data values. The latter are of the expected type (here: ‘single’). For examples of how to use command freePortReceive see the test m-file scripts freeport_test2.m, freeport_test3.m and freeport_test4.m.
Figure 4-13 Sample model: FreePortComm_RX_simple2.mdl (target)
Figure 4-14 Sample model: FreePortComm_TX_simple2.mdl (target)
FW-08-07 49

rtmc9s12-Target A Simulink Real-Time Target for 9S12 microcontrollers
FW-08-07 50

rtmc9s12-Target A Simulink Real-Time Target for 9S12 microcontrollers
4.7.3 Simultaneous upload and download of data between host and target
The target model FreePortComm_RXTX.mdl and the corresponding host model FreePortComm_TXRX.mdl demonstrate the simultaneous upload and download between host and target using the FreePort communication blocks. Figure 4-15 is the target-sided model, whereas Figure 4-16 shows the host-sided equivalent.
Figure 4-15 Sample model: FreePortComm_RXTX.mdl (target)
FW-08-07 51

rtmc9s12-Target A Simulink Real-Time Target for 9S12 microcontrollers
Figure 4-16 Sample model: FreePortComm_TXRX.mdl (host)
Note:
When using simultaneous upload and download it is important to start the host model first, then the target model. This is because the S-Function underlying the host sided FreePortComms_RX block flushes the reception buffer when it is started. If the target model is already running by the time the host model is started, it can happen that this flushing of the buffer on the host leads to the discarding of valid data bytes. As the FreePort system does not (yet) implement a proper host-target synchronization mechanism, it can happen that the data packet contents are misinterpreted. In this case, the FreePortComms_RX block is likely to emit garbage. Note that this particularity only happens with host models which include both FreePort receive as well as FreePort send blocks.
FW-08-07 52

rtmc9s12-Target A Simulink Real-Time Target for 9S12 microcontrollers
4.7.4 Download of unformatted data to the target
The target model FreePortComm_RX_simple3.mdl and the corresponding host model FreePortComm_TX_simple3.mdl demonstrate the download of raw data from the host to the target using the FreePort communication blocks. Figure 4-17 is the target-sided model, whereas Figure 4-18 shows the host-sided equivalent.
A similar pair of block diagrams can be designed for the upload of raw data from the target (microcontroller) to the host.
Figure 4-17 Sample model: FreePortComm_RX_simple3.mdl (target)
Figure 4-18 Sample model: FreePortComm_TX_simple3.mdl (host)
FW-08-07 53

rtmc9s12-Target A Simulink Real-Time Target for 9S12 microcontrollers
4.7.5 Upload and download of data via both ports SCI0 and SCI1
The target model FreePortComm_RXTX_noExt.mdl and the corresponding host model FreePortComm_TXRX_noExt.mdl demonstrate the download of data from the host to the target using the link from COM2 to SCI1 while simultaneously using the link from SCI0 to COM1 for data upload. Figure 4-19 is the target-sided model, whereas Figure 4-20 shows the host-sided equivalent. Notice that this requires the External Mode interface to be disabled (no background monitoring).
Figure 4-19 Sample model: FreePortComm_RXTX_noExt.mdl (target)
FW-08-07 54

rtmc9s12-Target A Simulink Real-Time Target for 9S12 microcontrollers
Figure 4-20 Sample model: FreePortComm_TXRX_noExt.mdl (host)
Remarks:
(1) When using simultaneous upload and download it is important to start the host model first, then the target model. This is because the S-Function underlying the host sided FreePortComms_RX block flushes the reception buffer when it is started. If the target model is already running by the time the host model is started, it can happen that this flushing of the buffer on the host leads to the discarding of valid data bytes. As the FreePort system does not (yet) implement a proper host-target synchronization mechanism, it can happen that the data packet contents are misinterpreted. In this case, the FreePortComms_RX block is likely to emit garbage. Note that this particularity only happens with host models which include both FreePort receive as well as FreePort send blocks.
(2) Using FreePort in parallel to the External Mode interface seems to require the target to be run out of ROM (target reset required – strange, but seems to be the case) to prevent the on-chip serial monitor from interfering with the FreePort interface SCI0.
(3) The FreePort communication blocks have been designed to cover a maximum number of situations. They can be used for serial communication between 2 hosts (e.g. COM1 on host A to COM1 on host B), COM1 to COM2 on one and the same host (loop-back operation), between a host and a target or between two different targets (e.g. microcontroller A to microcontroller B).
FW-08-07 55

rtmc9s12-Target A Simulink Real-Time Target for 9S12 microcontrollers
4.8 Wireless communications
4.8.1 RFComm Server
The models RFComm_server_[MODELNAME].mdl are a number of simple test models which can be used to experiment with the radio-frequency (RF) wireless communication blocks of the toolbox. This latest addition to the toolbox provides a simple interface for wireless communications using Nordic nRF24L01 radio modules (2.4 GHz, maximum data throughput: 2 MBit/s). These powerful little communication modules have been integrated in the easy to use transceiver circuits MiRF v2 (distributed by SparkFun, less than US$20, 2006). In our laboratory, we use these transceiver chips on our mobile robots (Figure 4-21).
Figure 4-21 RF modules on the mobile robots used at The University of Adelaide
The software interface to the MiRF v2 modules, written by one of our students (Stephen Craig) in support of a final year project (design of an autonomous paraglider) has been integrated in a series of blocks for the toolbox. The structure of these blocks resembles that of the FreePort communication blocks. At present the toolbox supports one radio module per microcontroller. The built-in transmission layer of these modules allows for bidirectional communications, i. e. each module can be used to transmit as well as receive using one of 128 separate RF channels. Set-up as a transmitter, the RF Server block can transmit data to up to 5 clients. Figure 4-22 shows the sample model RFComm_server_TX_freePort0_5x2_formatted_noExt.mdl. This model sets up two server transmit (TX) blocks using logical channels ‘0’ and ‘1’. Per client, up to 10 of these logical channels can be chosen. These channels resemble the channel number of the FreePort block. It is thus possible to use one and the same RF channel (0 … 127) for up to 10 separate logical channels.
FW-08-07 56

rtmc9s12-Target A Simulink Real-Time Target for 9S12 microcontrollers
Figure 4-22 Sample model RFComm_server_TX_freePort0_5x2_formatted_noExt
Note that the underlying code currently limits the maximum number of bytes to be sent in any RF transmission to 32. This has implications on how much data can be sent through a RFComms block at anyone time. Using the formatted data transmission of the RFComms blocks, each telegram has a size of
4 + number_of_elements x element_size bytes.
In this equation, the number_of_elements defines the width of the block input, whereas the element_size is given by the width of each data type.
The following data types are supported:
type width single 4uint8 1int8 1uint16 3int16 3int32 4int32 4boolean 1
This means that it should be possible to send up to 7 single precision numbers per transmission, or 28 individual data bytes.
FW-08-07 57

rtmc9s12-Target A Simulink Real-Time Target for 9S12 microcontrollers
The above model (Figure 4-22) runs on a MiniDragon+ board. The first of the 5 elements received on FreePort channel ‘0’ (serial communication interface SCI0) is used to select one of two displays on 7-segment display of the board (connected to port H). All 5 elements – here: uint8 – are sent via the wireless link to client number ‘1’ using logical channel ‘0’. Note that this channel number has nothing to do with the one used by the corresponding FreePort block.
The second FreePort channel (‘1’), also connected to serial port SCI0, receives 7 bytes (uint8) and sends them to the same client via the wireless link. Logical channel ‘1’ is used for this transmission. Again, this channel number has nothing to do with the corresponding FreePort channel. The radio module acts as server of the RF communication network. RF channel ‘12’ is used and the server and client addresses have been set to 0xe7e7e7e7 and 0xc2c2c2c2c2, respectively. Note that the model runs in ‘normal mode’ (as opposed to ‘External mode’); once compiled, it is not controlled by MATLAB anymore.
The data which is sent to this model through serial communication interface SCI0 is generated by a small m-file script which sends data through the COM1 serial port of the host computer (rfComms_server_TX_freePort0_5x2_test_formatted.m). A set of 5 bytes (uint8, data type: ‘2’) is sent using user channel ‘0’, followed by a set of 7 bytes on user channel ‘1’:
% test program, 'RFComm_server_TX_freePort0_5x2_formatted_noExt.mdl'
i = 0;while(1) myData1 = i*[1 2 3 4 5] myData2 = i*[1 2 3 4 5 6 7] disp(['sending [' num2str(myData1) ']']); freePortSend(1, 115200, 0, 5, 2, myData1) disp(['sending [' num2str(myData2) ']']); freePortSend(1, 115200, 1, 7, 2, myData2) i = i + 1; if(i == 2) i = 0; end pauseend
disp('never reached')
Figure 4-23 shows the block parameters of the rfComms_Server block in transmit (TX) mode. Note the similarity of this block and the FreePort block. The only parameters which distinguish this block from the FreePort block are the radio frequency channel (RF channel, 0 … 127), the server address (hexadecimal, 4 bytes), the client address (hexadecimal, 4 bytes) and the number of clients to be serviced (1 – 5).
FW-08-07 58

rtmc9s12-Target A Simulink Real-Time Target for 9S12 microcontrollers
Figure 4-23 Block parameters of block rfComms_Server
The Server and client addresses can be chosen feely – they simply have to match on all communication partners (server, clients). Using more than one set of RF modules in the same area requires each communication network to be run on a different RF channel. This is for instance important when multiple mobile robot experiments are to be run simultaneously within the same laboratory. Assigning a different RF channel to each group allows for up to 128 parallel communication networks – more than enough for most applications of this toolbox. Figure 4-24 shows an example of a multi-robot configuration we used during experiments in our laboratory. The two robots on the right-hand side of the image are transmitters on channel ‘12’ and ‘13’, respectively. The robot in the middle is client #1 of the channel ‘13’ network, whereas the outer robots are clients #1 to #5 of the channel ’12’ network.
FW-08-07 59

rtmc9s12-Target A Simulink Real-Time Target for 9S12 microcontrollers
Figure 4-24 Multi-robot experiment
Figure 4-25 shows the client model which could be used to form the receiving end of this model: RFComm_client_RX_freePort0_5x2_formatted_noExt. It has a very similar structure to that of the above model. The first element of the 5 bytes received on logical channel ‘0’ is filtered out and controls the 7-segment display on the MiniDragon+ board. In addition, the data is sent through serial communication interface SCI1 to a model running on the host. The latter is shown in Figure 4-26.
Note that, like the FreePort communication blocks, the rfComms blocks can be configured to send and receive unformatted data streams. In this case, all incoming bytes (up to 32) are sent without adding a telegram header (number of bytes, channel number, data type).
FW-08-07 60

rtmc9s12-Target A Simulink Real-Time Target for 9S12 microcontrollers
Figure 4-25 Sample model RFComm_client_RX_freePort0_5x2_formatted_noExt
Figure 4-26 Host model for RFComm_client_RX_freePort0_5x2_formatted_noExt
4.8.2 RFComm Client
The models RFComm_client_[MODELNAME].mdl are simple test models which can be used to experiment with the radio-frequency (RF) wireless communication blocks of the toolbox. The block parameters of the client blocks are very similar to those of the server blocks (Figure 4-27). The client number now specifies which client this block belongs to.
FW-08-07 61

rtmc9s12-Target A Simulink Real-Time Target for 9S12 microcontrollers
Figure 4-27 Block parameters of block rfComms_Client
The nRF24L01 is very versatile. Many more configurations are possible. One module could for instance be configured to act as a central base station, receiving data through up to 6 separate data pipes. This might be of interest in applications in which a number of sensors need to be connected to a central hub. Figure 4-28 shows the star configuration with a primary receiver and 6 transmitting nodes.
The same network topology can be used to transmit data to up to 5 different clients. Figure 4-29 shows an example, RFComm_server_TX_counter_5clients_noExt.mdl, which services 5 clients simultaneously. In this example, the same information is relayed to all 5 clients and the data transmission via the radio link is not formatted. The model also runs in ‘normal’ mode (‘noExt’).
The corresponding client models are RFComm_client_RX_PTH_client1.mdl to RFComm_client_RX_PTH_client5.mdl (Figure 4-30). A formatted version exists as well. It is important to match the transmission parameters on both ends of a RF link. This includes the channel number, number of elements, data type for formatted transmissions and consists of the number of bytes to be sent/received for unformatted transmissions.
FW-08-07 62

rtmc9s12-Target A Simulink Real-Time Target for 9S12 microcontrollers
Figure 4-28 Using the nRF24L01 in star configuration
Figure 4-29 Sample model RFComm_server_TX_counter_5clients_noExt
FW-08-07 63

rtmc9s12-Target A Simulink Real-Time Target for 9S12 microcontrollers
Figure 4-30 Sample model RFComm_client_RX_PTH_client1.mdl
4.8.3 Other RFComms models
The remaining RFComm_server and RFComm_client models should make it easy to experiment with the radio modules. The names of these models give an indication of what a model is trying to achieve. For example, server model RFComm_server_TX_counter_formatted_noExt.mdl (Figure 4-31) implements a simple counter (0 to 3) which controls the on-board 7-segment display of the MiniDragon+ board. Data values are transmitted to a single client using formatted data telegrams (logical channel ‘0’, ‘1’ element of type ‘uint8’). The model runs in ‘normal’ mode (no ‘External mode’).
FW-08-07 64

rtmc9s12-Target A Simulink Real-Time Target for 9S12 microcontrollers
Figure 4-31 Sample model RFComm_server_TX_counter_formatted_noExt.mdl
Whenever a sample model receives data from the host, the name includes ‘freeport’. An example is RFComm_server_RXTX_formatted_noExt.mdl, with client model RFComm_client_RXTX_formatted_noExt.mdl. Figure 4-32 shows the server end of affairs. This model receives 5 elements of type ‘uint8’ from serial port SCI0 and sends them via the RF link to the client (formatted transmission).
Figure 4-32 Sample model RFComm_server_RXTX_formatted_noExt.mdl
FW-08-07 65

rtmc9s12-Target A Simulink Real-Time Target for 9S12 microcontrollers
Figure 4-33 shows the client side of this model. The model receives the 5 bytes on logical channel ‘0’ and loops them back using logical channel ‘1’. The first element of the received data is used to control the 7-segment display of the receiving MiniDragon+ board (displaying either ‘0’ or ‘1’). The server model receives the returned data and also displays either ‘0’ or ‘1’, depending on the first element of the 5 incoming bytes. This sample model thus demonstrates that both the server as well as the client can be used to send and receive at the same time.
Figure 4-33 Sample model RFComm_client_RXTX_formatted_noExt.mdl
When experimenting with the remaining RF sample models, try to find matching server and client models and run them according to what is implied by their file name (‘External mode’, ‘normal mode’, etc.). Note that some models have associated m-file scripts which send data to the corresponding FreePort blocks.
The underlying code is fairly robust, taking care of temporary loss of transmission (receiver out of range), resending of erroneous data packages, etc. The RF interface thus provides an inexpensive, yet reliable means of communication between microcontrollers. Using antennas we have managed to achieve a total range of around 80 meters.
FW-08-07 66

rtmc9s12-Target A Simulink Real-Time Target for 9S12 microcontrollers
4.9 Fuzzy control
The 9S12 microcontroller has an interesting feature: It supports evaluation of simple fuzzy inference systems (FIS). As this has been implemented as a hardware feature of the microcontroller core, the resulting fuzzy controller is generally very fast.
The toolbox provides a fuzzy control block which can be configured as a 1 to 3 input, 1 output Mamdani FIS. In our undergraduate laboratories we use the free MATLAB fuzzy toolbox FlouLib, (www.listic.univ-savoie.fr/modules.php?name=Content&pa=show&acronym=FlouLib) developed at the Université de Savoie, Chambéry Annecy (France) – Laboratoire d’Informatique, Systèmes, Traitement de l’Information et de la Connaissance (LISTIC). This toolbox provides a number of Simulink S-Function blocks for fuzzy logic systems using Mamdani FIS as well as Takagi-Sugeno FIS. The membership functions used during fuzzification and defuzzification can be defined using simple text files. The same holds for the rule base. Figure 4-34 shows an example of a simple Proportional-Derivative (PD) fuzzy controller for an inverted pendulum experiment. As this controller sits in the feedback branch of the control loop, the inputs have been placed on the right-hand side, whereas the outputs are on the left.
Figure 4-34 Inverted pendulum control using FlouLib blocks
Fuzzification of the inputs (position error 1,err and rate of change of the position error d1,err/dt) can be achieved using a simple text file, which is as call-up parameter in the SymbFuz block. In the case of the inverted pendulum example, three linguistic terms are used: N1 (negative position errors), Z (zero-ish position errors) and P1 (positive position errors). The input membership functions (MSF) can be defined as follows:
3N1 -1 -1 -1 0Z -1 0 0 1P1 0 1 1 1
FW-08-07 67

rtmc9s12-Target A Simulink Real-Time Target for 9S12 microcontrollers
Note that the input scaling gains g1 – g4 have been chosen to arrive at an effective universe of discourse of 1. The output membership functions are defined in a similar way. In the inverted pendulum example we have chosen a total of 5 output MSFs (N2, N1, Z, P1 and P2). The effective universe of discourse is mapped onto the normalized range from -1 to 1. An output scaling gain (go) ensures that the required signal levels are achieved.
5N2 -1.5 -1 -1 -0.5N1 -1 -0.5 -0.5 0Z -0.5 0 0 0.5P1 0 0.5 0.5 1P2 0.5 1 1 1.5
Finally, the rule base is specified in form of another text file. With 2 inputs (PD) and 5 output membership functions, the following rule base can be specified:
2 5N1 N1 N2N1 Z N1N1 P1 Z Z N1 N1 Z Z Z Z P1 P1P1 N1 ZP1 Z P1P1 P1 P2
The shown example produces a linear control surface. The fuzzy controller therefore emulates a linear PD controller.
Once a FlouLib simulation works satisfactorily, the fuzzy controller files (definition of the input and output MSFs, rule base) can directly be used with the fuzzy block of rtmc9s12-Target. Simply enter the filenames in the corresponding edit boxes of the block parameter window (Figure 4-35).
FW-08-07 68

rtmc9s12-Target A Simulink Real-Time Target for 9S12 microcontrollers
Figure 4-35 Using FlouLib definition files with the rtmc9s12-Target fuzzy block
The toolbox uses the settings found in the input, output and rule base files to generate a customized assembler code fuzzy engine. This source code file is then added to the list of files to be compiled into the target. To the user, all of this is fully transparent. Simply specify the required definition files and compile the model. Figure 4-36 shows a sample model which can be used to validate the correct operation of a fuzzy controller.
The fuzzy block allows for interesting lab exercises. In our laboratory we ran a small mobile robot exercise in which the students were asked to design a fuzzy controlled automatic parking system for a small mobile robot. Using a simple MATLAB based robot simulator, the students developed code to process frames from a camera / simulated stream of camera images to detect position and orientation of the robot. This information was then sent to the robots using the wireless RF links. On the robot, the current distance to the target was worked out, as well as the misalignment of the current orientation vector and a vector from the current location of the robot to the target. These two inputs were then fed to a fuzzy controller in charge of steering the robot around the workspace. The latter had been tuned using the simulator. As the simulator uses the very same algorithms and controller settings as the real application, the commonly big step from simulation to application was rather straight forward. Figure 4-37 shows the simulator used in conjunction with this exercise.
FW-08-07 69

rtmc9s12-Target A Simulink Real-Time Target for 9S12 microcontrollers
Figure 4-36 Testing a fuzzy controller on the target
Figure 4-37 Robot control exercise using an rtmc9s12-Target fuzzy controller
FW-08-07 70

rtmc9s12-Target A Simulink Real-Time Target for 9S12 microcontrollers
4.10 Timer blocks
The latest addition to the toolbox is a set of timer blocks. Each of the 8 timer channels can be configured in Output Compare mode (OC, signal generation) or Input Capture mode (IC, time measurements).
4.10.1 Output Compare mode (OC)
In the past, signal generation had to be performed either using the PWM unit or through General Purpose Input/Output pins (GPIO). The former is suitable when the rate of the output signals needs to be much higher than the update rate of the model, e.g. when driving small DC motors with signals in the kHz region while running the model at as little as 100 ms (10 Hz). However, when the period / duty cycle of the PWM needs to be adjustable with 16-bit resolution, only 4 separate channels can be configured.
Using GPIO pins, on the other hand does not impose any limitation on the achievable resolution. However, a GPIO pin can only be set/reset once every simulation cycle. The maximum achievable rate on GPIO outputs is therefore limited by the base sample period of the model (recommended minimum: 1 ms). This approach is thus only useful when the overall rate of the output signal is rather low (Hz region).
The timer unit provides a good solution to the above dilemma. Each of its 8 channels can be configured for signal production with rates up to 10 MHz (100 ns – faster rates are possible, but not recommended). The nominal resolution of each channel is 16-bit. However, as the timer unit has a single central clock generator, the actual resolution of each individual timer channel is limited by the dynamic range of all channels, i. e. by the ratio of fastest sample rate to slowest sample rate. To understand this, recall that the slowest rate determines the prescale value of the timer unit – the maximum period is achieved when counting at the chosen rate (f timer) from 0 to 216 -1 = 65535. This defines the smallest achievable time step (timer ‘tick’) to 1/f timer. Faster channels have shorter periods (we now count up to values less than 65535), yet their period is still determined by the overall timer tick (1/f timer). This can lead to a rather poor accuracy of the programmed period, e.g. when trying to program a 100 ns period with a smallest step of around 5 s (5000 ns).
Furthermore, the block input of the timer in OC mode defines the percentage of the full period as specified in the block parameters. A block input of ‘1’ causes the timer to produce a square wave signal with twice the requested period on the associated output pin (always port ‘T’ – for ‘Timer’). Note that the factor ‘2’ is due to the fact that the associated interrupt service routine (ISR) simply toggles the output pin: Every time the timer reaches the requested period value, the output pin reverses its current state (0 1, 1 0). Decreasing the block input signal level from 1 (100% of the requested period) to values below 1 makes the produced signal become faster, as the effective period is now a fraction of the full-scale value. Block input signals below the threshold given by the resolution switch the associated output to inactive (0 V). This can be used to enable / disable a timer channel (only using ‘0’ = off and ‘1’ = on as block inputs) or to modulate the frequency of the associated channel (values between 0 and 1). Sample model Timer_OC_2.mdl (Figure 4-38) gives an example of a simple frequency modulation (FM) system.
FW-08-07 71

rtmc9s12-Target A Simulink Real-Time Target for 9S12 microcontrollers
Figure 4-38 Frequency Modulation (FM) square wave signal (500 Hz 10 MHz)
Note that the limitations of the shared central clock generator (see above) also limit the resolution of a modulated timer channel – just imagine the situation where the slowest channel demands an overall resolution of approximately 5 s; modulating a signal with a maximum period of 20 s now only allows for 4 discrete steps…
Figure 4-39 shows the block parameters of the timer block in Output Capture mode.
Figure 4-39 Block parameters, timer block in OC mode
The timer blocks can be used to produce simple driver models for stepper motor driver circuits who might require a pulse sequence and a direction signal as inputs. On our mobile robots we are using pairs of stepper motors driven by dedicated stepper motor
FW-08-07 72

rtmc9s12-Target A Simulink Real-Time Target for 9S12 microcontrollers
driver circuit board. The command input to this board is a square wave signals whose frequency defines how fast the stepper motor sequence is cycled through. The timer blocks in OC mode are ideally suited to provide the required command signals.
4.10.2 Input Capture mode (IC)
The biggest benefit from adding timer blocks to the toolbox is that it is now possible to perform simple measurements of durations between events. At present, the timer block in Input Capture (IC) mode measures the length of the time interval between any two subsequent rising edges on the associated input pin. This value is then scaled to seconds and presented at the block output. All resolution issues introduced above apply to the Input Capture mode as well.
Figure 4-40 shows the sample model Timer.mdl which features timer blocks in both Output Compare as well as Input Capture mode. Note that only one of the blocks shows a resolution term. The other blocks derive their resolution from the block with the longest period. In this case, this is the Input Capture block (channel 3, requested period: 0.3 seconds). The specified period of an Input Capture block defines the longest time interval between the two events (rising edges). Exceeding this period might lead to unpredictable results.
Using the timer in IC mode should make it a relatively straight-forward task to interface to echo-pulse sensors such as sonar range finders or optical motor shaft encoders.
Figure 4-40 Sample model Timer.mdl – Output Compare and Input Capture
FW-08-07 73

rtmc9s12-Target A Simulink Real-Time Target for 9S12 microcontrollers
Figure 4-41 shows the block parameters of the timer block in Input Capture mode.
Figure 4-41 Block parameters, timer block in IC mode
4.11 Toggle a pin of PORTB
4.11.1 Toggling a pin of PORTB in External Mode
The model TogPort.mdl is a simple test model which can be used to toggle an I/O pin of the microcontroller. The model uses a digital square wave block to produce an on/off sequence on PORTB pin 0. On the Dragon-12 development board, this pin is associated with one of the on-board LEDs. The model should therefore make this LED flash with a period of 1 second (0.5 s on, 0.5 s off). Both frequency as well as duty cycle of this pulse sequence can be changed on-the-fly (external mode).
FW-08-07 74

rtmc9s12-Target A Simulink Real-Time Target for 9S12 microcontrollers
Figure 4-42 Sample model: TogPort.mdl
4.11.1 Toggling a pin of PORTB in standalone mode
The model TogPortNoCom.mdl is a simple test model which runs as standalone program, i. e. without the use of the External Mode communication interface. Consequently, the generated executable is much smaller than is the case for all other sample models (approx. 4 kByte instead of the typically 17 - 20 kByte). Following the successful download of this program and a subsequent reset of the target hardware, the program is automatically launched and runs until the power is switched off.
4.13 Simple sonar range finder
A basic interface block has been provided for the Devantec SRF04 sonar range finder (Figure 4-43).
FW-08-07 75

rtmc9s12-Target A Simulink Real-Time Target for 9S12 microcontrollers
Figure 4-43 Sonar range finder (Devantec SRF04)
The block interface is very simple, only requiring specification of the ports and pins used for the triggering of the pulse generator (output) as well as for the echo received line (input). Figure 4-44 shows the block diagram of sample model Sonar.mdl.
Figure 4-44 Sample model Sonar servicing a Devantec SRF04 sonar range finder
FW-08-07 76

rtmc9s12-Target A Simulink Real-Time Target for 9S12 microcontrollers
4.13 Miscellaneous sample models
As a proof of concept a number of the original MathWorks demo files have been built with rtmc9s12-Target and tested on the Dragon-12 development board.
4.13.1 The F14 simulation
The model f14.mdl is a direct copy of the original Simulink demonstration file. This example has been included to validate the correct operation of rtmc9s12-Target with models of a slightly elevated complexity. The model runs at a base sample rate of 50 Hz (sample time: 20 ms) with an upload of log data every 100 ms.
Figure 4-45 Sample model: f14.mdl
4.13.2 A rudimentary robot control
The target model robot.mdl together with its corresponding host model robot_pc.mdl provide a very basic remote control for a mobile robot. The target model receives direction commands using user data channel 0. The two values are multiplied by a common factor (speed) which is sent to the robot using user channel 1. Many more sophisticated robot control systems can be devised. The pair of models has simply been included to provide a simple starting point for further experiments. In our laboratory, we supply the robot with information about its own position, thus allowing it to react to what it sees. Co-ordinates and information about its orientation are supplied from a suitably programmed video grabber unit and sent to the robot using two separate user channels. Many more applications can be thought of (and put together in minutes), including the communication between various mobile robots.
FW-08-07 77

rtmc9s12-Target A Simulink Real-Time Target for 9S12 microcontrollers
This opens the door to applications using artificial intelligence and the co-ordinated collaboration of otherwise autonomous units.
Figure 4-46 Sample model: Robot.mdl (target)
FW-08-07 78

rtmc9s12-Target A Simulink Real-Time Target for 9S12 microcontrollers
Figure 4-47 Sample model: Robot_pc.mdl (host)
4.13.3 Band-limited white noise generator
The target model BLNoiseTest.mdl is a simple test model to ensure the correct operation of the automatically generated real-time libraries. This example generates band-limited white noise in form of pulses which are monitored at a rate of 20 Hz.
Figure 4-48 Sample model: BLNoiseTest.mdl
FW-08-07 79

rtmc9s12-Target A Simulink Real-Time Target for 9S12 microcontrollers
4.13.4 Generation of a chirp signal (frequency wobbling)
The target model ChirpTest.mdl is a simple test model to ensure the correct operation of the automatically generated real-time libraries. This example generates a sinusoidal oscillation with slowly increasing frequency. The frequency is wobbled from 0.1 Hz to 1 Hz over a sweep time of 60 seconds.
Figure 4-49 Sample model: ChirpTest.mdl
FW-08-07 80

rtmc9s12-Target A Simulink Real-Time Target for 9S12 microcontrollers
Appendix
FW-08-07 81

rtmc9s12-Target A Simulink Real-Time Target for 9S12 microcontrollers
FW-08-07 82

rtmc9s12-Target A Simulink Real-Time Target for 9S12 microcontrollers
Appendix A – Possible things to do…
The following list of things to do is by far not complete. At this stage (August 2007) it is unlikely that any of it will ever be addressed by myself…
(1) Enabling communication using the CAN bus.
(2) Host-to-host communication using a backbone network (e. g. Ethernet, etc.)
FW-08-07 83